
Instruction Book
CC2 67 T
Condenser Tumble Dryer
®
English
Nederlands
Français
Português
Italiano
40003874Eng.qxd 20/09/2005 18:57 Page 1
Introduction . . . . . . . . . . . . . . . . . . . . . . . . . . . . . . . . . . . . . . . . . . . . . . . 3
Delivery information . . . . . . . . . . . . . . . . . . . . . . . . . . . . . . . . . . . . . . . . . . . . . 3
Unpacking the Product . . . . . . . . . . . . . . . . . . . . . . . . . . . . . . . . . . . 3
Safety reminders . . . . . . . . . . . . . . . . . . . . . . . . . . . . . . . . . . . . . . . . . . 4
Installation . . . . . . . . . . . . . . . . . . . . . . . . . . . . . . . . . . . . . . . . . . . . . . . . . . . . . 4
Use . . . . . . . . . . . . . . . . . . . . . . . . . . . . . . . . . . . . . . . . . . . . . . . . . . . . . . . . . . . 4
The Laundry . . . . . . . . . . . . . . . . . . . . . . . . . . . . . . . . . . . . . . . . . . . . . . . . . . . . 4
Environmental Issues . . . . . . . . . . . . . . . . . . . . . . . . . . . . . . . . . . . . . . . . . . . . . 5
GIAS Service . . . . . . . . . . . . . . . . . . . . . . . . . . . . . . . . . . . . . . . . . . . . . . . . . . . . 5
Installation. . . . . . . . . . . . . . . . . . . . . . . . . . . . . . . . . . . . . . . . . . . . . . . . . 6
Electrical requirements . . . . . . . . . . . . . . . . . . . . . . . . . . . . . . . . . . . . . . . . . . . 6
Adjusting the feet . . . . . . . . . . . . . . . . . . . . . . . . . . . . . . . . . . . . . . . . . . . . . . . 6
Ventilation . . . . . . . . . . . . . . . . . . . . . . . . . . . . . . . . . . . . . . . . . . . . . . . . . 7
Preparing the load . . . . . . . . . . . . . . . . . . . . . . . . . . . . . . . . . . . . . . . . 8
Clothes preparation . . . . . . . . . . . . . . . . . . . . . . . . . . . . . . . . . . . . . . . . . . . . . . 8
Sorting the load. . . . . . . . . . . . . . . . . . . . . . . . . . . . . . . . . . . . . . . . . . . . . . . . . 9
Drying advice. . . . . . . . . . . . . . . . . . . . . . . . . . . . . . . . . . . . . . . . . . . . . 10
Do not tumble dry . . . . . . . . . . . . . . . . . . . . . . . . . . . . . . . . . . . . . . . . . . . . . . 10
Energy saving. . . . . . . . . . . . . . . . . . . . . . . . . . . . . . . . . . . . . . . . . . . . . . . . . . 10
Drying guide . . . . . . . . . . . . . . . . . . . . . . . . . . . . . . . . . . . . . . . . . . . . . . . . . . 10
Controls and indicators . . . . . . . . . . . . . . . . . . . . . . . . . . . . . . . . . 11
Door and Filter . . . . . . . . . . . . . . . . . . . . . . . . . . . . . . . . . . . . . . . . . . . 12
Opening the door . . . . . . . . . . . . . . . . . . . . . . . . . . . . . . . . . . . . . . . . . . . . . . 12
Filter. . . . . . . . . . . . . . . . . . . . . . . . . . . . . . . . . . . . . . . . . . . . . . . . . . . . . . . . . 12
Filter care indicator . . . . . . . . . . . . . . . . . . . . . . . . . . . . . . . . . . . . . . . . . . . . . 12
Water container . . . . . . . . . . . . . . . . . . . . . . . . . . . . . . . . . . . . . . . . . . 13
To remove the container . . . . . . . . . . . . . . . . . . . . . . . . . . . . . . . . . . . . . . . . . 13
Condenser . . . . . . . . . . . . . . . . . . . . . . . . . . . . . . . . . . . . . . . . . . . . . . . . 14
To remove the condenser . . . . . . . . . . . . . . . . . . . . . . . . . . . . . . . . . . . . . . . . 14
Selecting the Programme . . . . . . . . . . . . . . . . . . . . . . . . . . . . . . . 14
Operation . . . . . . . . . . . . . . . . . . . . . . . . . . . . . . . . . . . . . . . . . . . . . . . . . 16
Cancelling and resetting the programme . . . . . . . . . . . . . . . . . . . . . . . . . . . . 16
Start Delay . . . . . . . . . . . . . . . . . . . . . . . . . . . . . . . . . . . . . . . . . . . . . . . . . . . . 16
Cleaning and Routine Maintenance. . . . . . . . . . . . . . . . . . . . 17
Cleaning the dryer . . . . . . . . . . . . . . . . . . . . . . . . . . . . . . . . . . . . . . . . . . . . . . 17
Technical specifications . . . . . . . . . . . . . . . . . . . . . . . . . . . . . . . . . . . . . . . . . . 17
Troubleshooting. . . . . . . . . . . . . . . . . . . . . . . . . . . . . . . . . . . . . . . . . . 18
Customer Service. . . . . . . . . . . . . . . . . . . . . . . . . . . . . . . . . . . . . . . . . 19
Spares. . . . . . . . . . . . . . . . . . . . . . . . . . . . . . . . . . . . . . . . . . . . . . . . . . . . . . . . 19
GIAS Service . . . . . . . . . . . . . . . . . . . . . . . . . . . . . . . . . . . . . . . . . . . . . . . . . . . 19
2
English . . . . . . . . . . . . . . . . . 2
Nederlands . . . . . . . . . . . . . 20
Français . . . . . . . . . . . . . . . . 38
Português . . . . . . . . . . . . . . 56
Italiano . . . . . . . . . . . . . . . . 74
. . . . . . . . . . . . . . . 92
40003874Eng.qxd 20/09/2005 18:57 Page 2

Introduction
Please read and follow these instructions
carefully and operate the machine accordingly.
This booklet provides important guidelines for
safe use, installation, maintenance and some
useful advice for best results when using your
machine.
Keep all documentation in a safe place for future
reference or for any future owners
Delivery information
Please check that the following items are
delivered with the appliance:
● Instruction manual
● Guarantee card
● Energy label
Remove the machine from its packaging close to
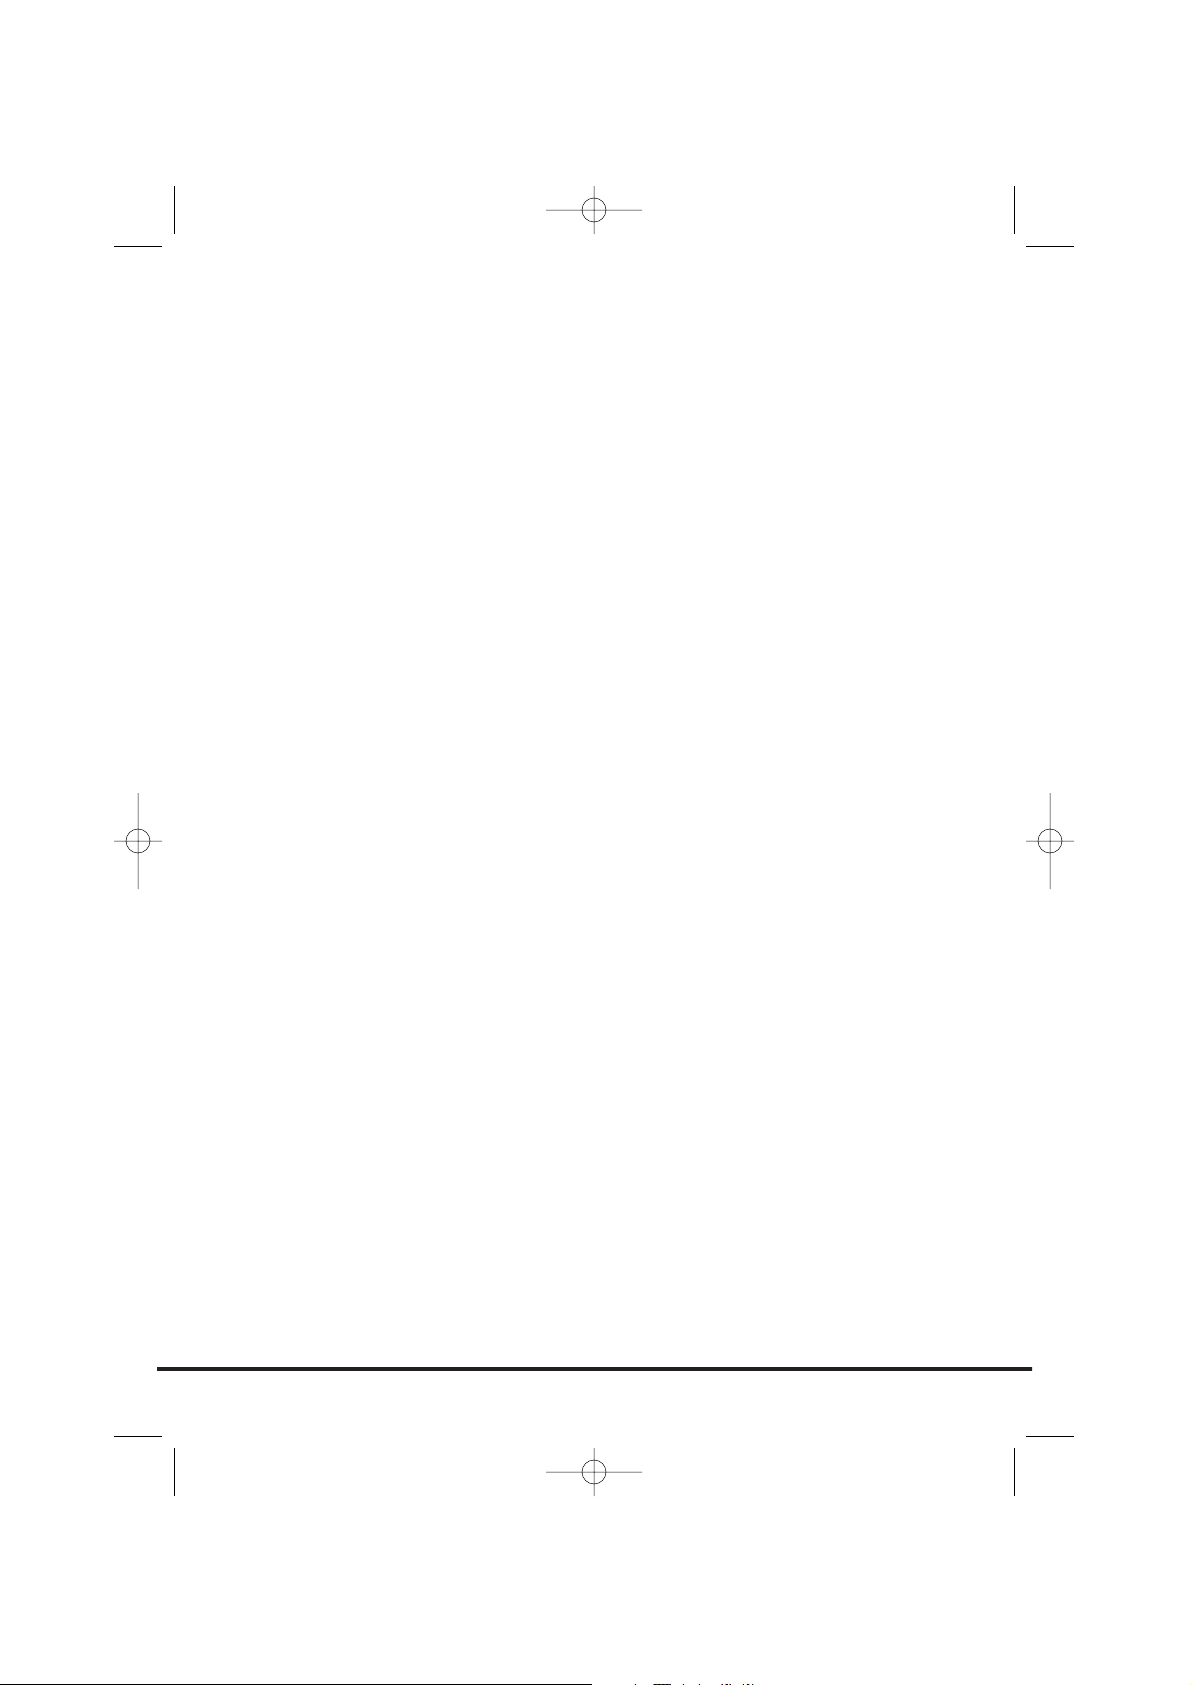
the final location of the machine.
1. Cut carefully around the base of the
packaging and up one corner.
2. Remove the polythene sleeve and lift the
dryer off the polystyrene base.
3
Check that no
damage has
occurred to the
machine during
transit. If it has,
call for service by
GIAS.
Failure to comply
with the above
can compromise
the safety of the
appliance. You
may be charged
for a service call
if a problem with
your machine is
caused by
misuse.
Unpacking the product
Dispose of the packaging safely. Make
sure it is out of the reach of children,
it is a potential source of danger.
40003874Eng.qxd 20/09/2005 18:57 Page 3
Safety reminders
Installation
● Check that the product has no visible signs of damage before use. If
damaged do not use and please call GIAS Service.
● Do not use adapters, multiple connectors and/or extensions.
● This machine should not be installed in a bathroom or shower room.
● Never install the dryer against curtains and be sure to prevent items from
falling or collecting behind the dryer.
Use
● WARNING Misuse of a tumble dryer may create a fire hazard.
● This machine is solely for domestic use, i.e. to dry household textiles and
garments.
● This machine should only be used for its intended purpose as described in
this manual. Ensure that the instructions for installation and use are fully
understood before operating the appliance.
● Do not touch the appliance when hands or feet are damp or wet.
● Do not lean on the door when loading the machine or use the door to
lift or move the machine.
● Do not allow children to play with the machine or its controls.
● WARNING Do not use the product if the fluff filter is not in position or is
damaged; fluff could be ignited.
● WARNING Where the hot surface symbol is located the temperature
rise during operation of the tumble dryer may be in excess of 60 degrees C.
● Remove the plug from the electricity supply. Always remove the plug
before cleaning the appliance.
● Do not continue to use this machine if it appears to be faulty.
● Lint and fluff must not be allowed to collect on the floor around the
outside of the machine.
● The drum inside may be very hot. Always allow the dryer to complete the
cool down period before removing the laundry.
The Laundry
● WARNING Do not tumble dry fabrics treated with dry cleaning fluids.
● WARNING Foam rubber materials can, under certain circumstances, when
heated become ignited by spontaneous combustion. Foam plastic, foam
rubber and rubber-like material are not suitable for tumble drying.
Articles made from these materials MUST NOT be placed in the dryer.
● Always refer to the laundry care labels for directions on suitability for
drying.
● Clothes should be spin dried or thoroughly wrung before they are put
into the tumble dryer. Clothes that are dripping wet should NOT be put
into the dryer.
4
40003874Eng.qxd 15/12/2005 15:49 Page 4

● Lighters and matches must not be left in pockets and NEVER use
flammable liquids near the machine.
● Glass fibre curtains should NEVER be put in this machine. Skin irritation
may occur if other garments are contaminated with the glass fibres.
● Garments treated or contaminated with flammable cleaning sprays or
liquids such as petrol, cooking oil or aerosol sprays MUST NOT be put in
this machine.
Environmental Issues
● All packaging materials used are environmentally-friendly and recyclable.
Please help dispose of the packaging via environmentally-friendly means.
Your local council will be able to give you details of current means of
disposal.
● To ensure safety when disposing of an old tumble dryer disconnect the
mains plug from the socket, cut the mains power cable and destroy this
together with the plug. To prevent children shutting themselves in the
machine break the door hinges or the door lock.
GIAS Service
● To ensure the continued safe and efficient operation of this appliance we
recommend that any servicing or repairs are only carried out by an
authorised GIAS Service engineer.
European directive 2002/96/EC
This appliance is marked according to the European directive 2002/96/EC on
Waste Electrical and Electronic Equipment (WEEE).
By ensuring this product is disposed of correctly, you
will help prevent potential negative consequences for
the environment and human health, which could
otherwise be caused by inappropriate waste handling
of this product.
The symbol on the product indicates that this product
may not be treated as household waste. Instead it shall
be handed over to the applicable collection point for
the recycling of electrical and electronic equipment
Disposal must be carried out in accordance with local
environmental regulations for waste disposal.
For more detailed information about treatment,
recovery and recycling of this product, please contact
your local city office, your household waste disposal
service or the shop where you purchased the product.
5
If the appliance is not running properly or breaks down,
switch it off and disconnect the plug from the socket.
Consult GIAS Service for possible repair.
40003874Eng.qxd 15/12/2005 15:50 Page 5
Electrical requirements
Tumble dryers are supplied to operate at a
voltage of 230V, 50 Hz single phase. Check that
the supply circuit is rated to at least 16A.
Electricity can be extremely dangerous.
This appliance must be earthed.
The socket outlet and the plug on the appliance
must be of the same type.
Do not use multiple adapters and/or extension
leads.
The plug should be accessible for disconnection
after the appliance has been installed.
The wires in the mains lead are coloured in
accordance with the following codes:
Blue NEUTRAL
Brown LIVE
Green and Yellow EARTH
CE Appliance complies with European Directive
89/336/EEC, 73/23/EEC and subsequent amendments.
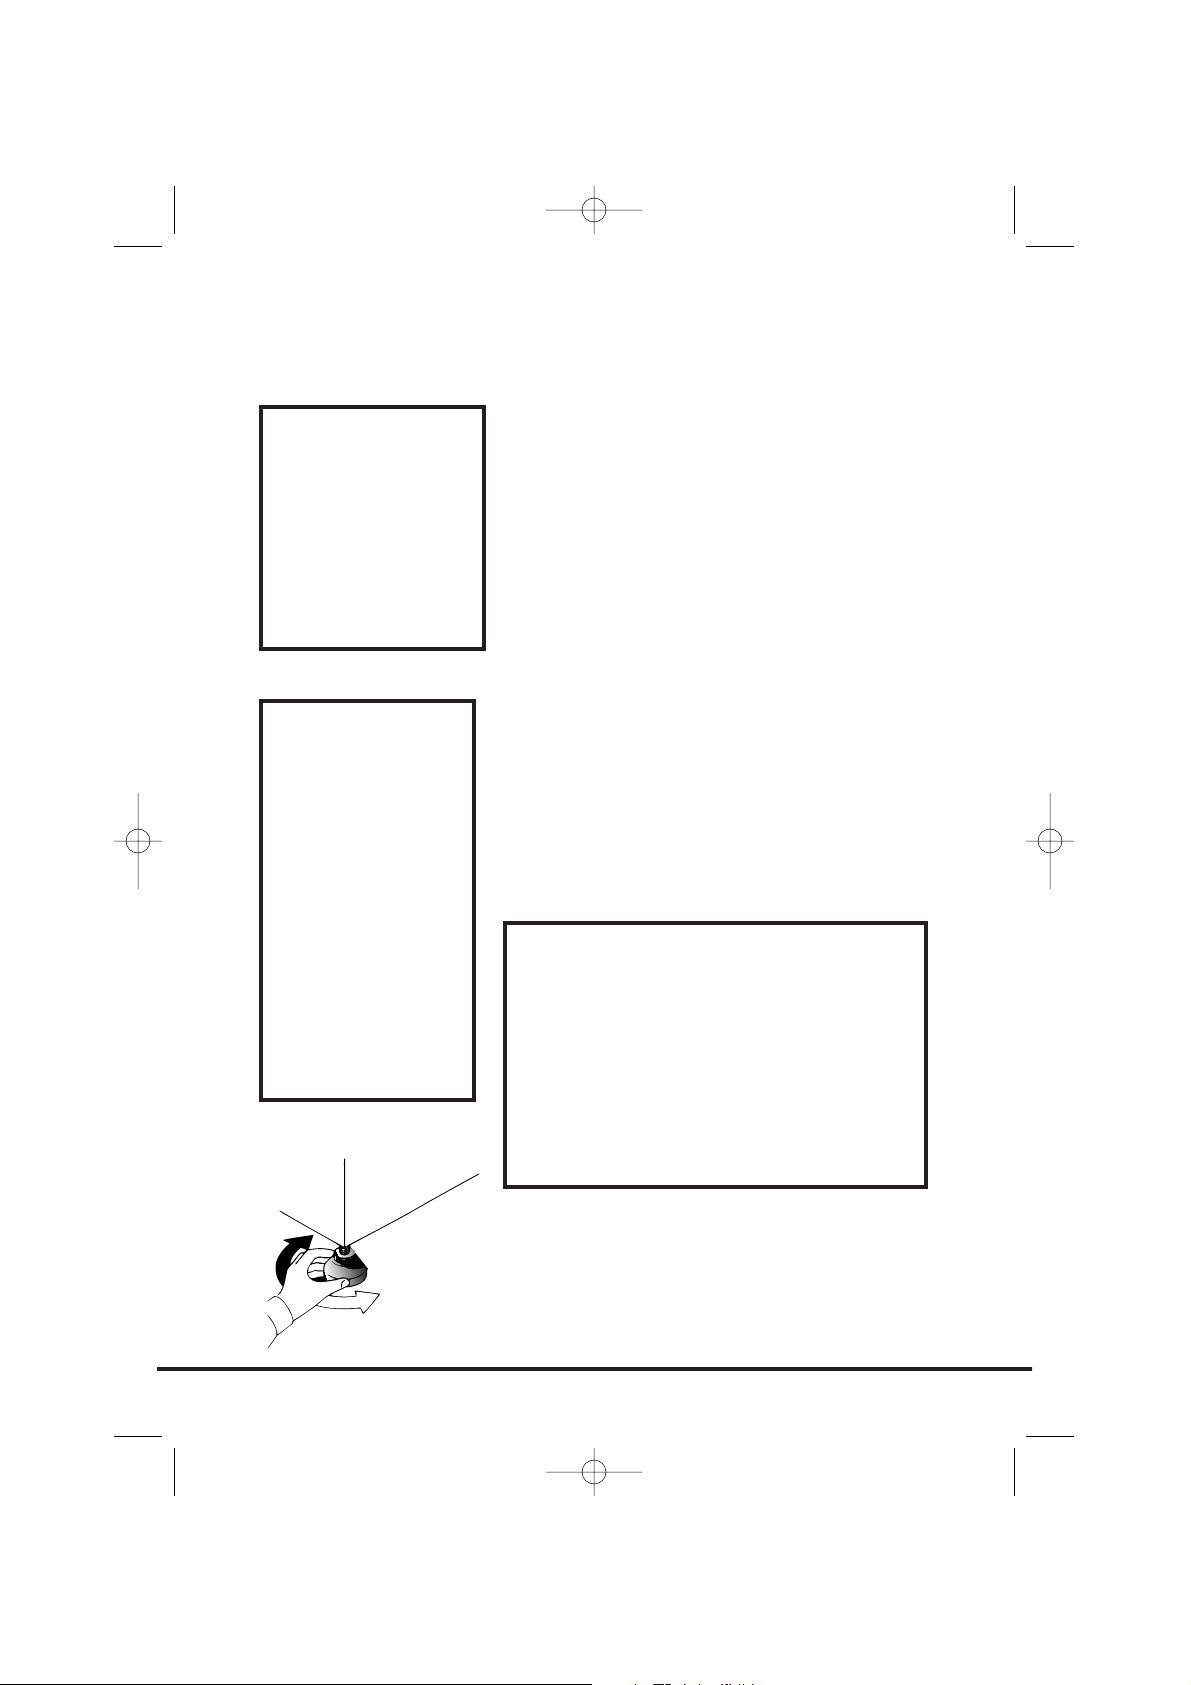
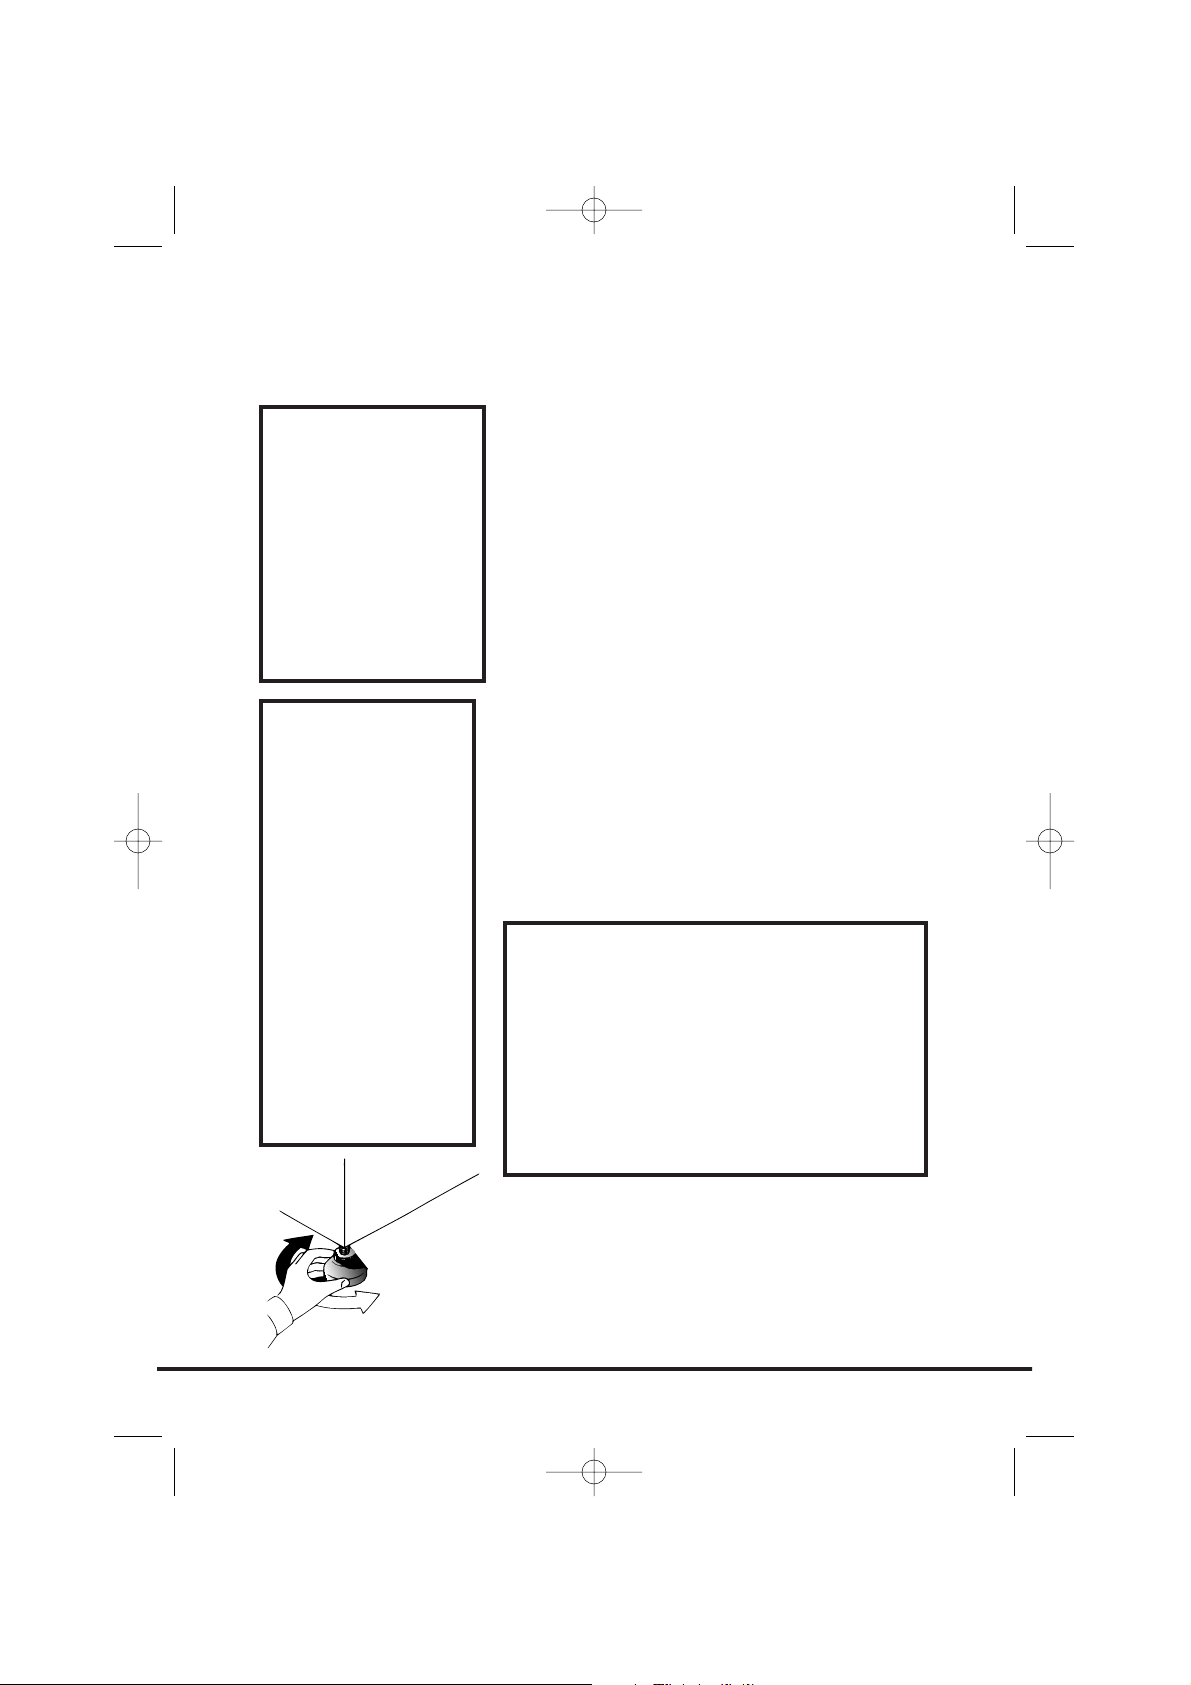
Adjusting the feet
Once the machine is in place the feet should be
adjusted to ensure that the machine is level.
Adjust the four feet to ensure the machine is firm
and level.
6
You may be
charged for a
service call if a
problem with
your machine is
caused by
incorrect
installation.
If the mains cord
on this
appliance is
damaged, it
must be
replaced by a
special cord
which is ONLY
obtainable from
the spares
service. It must
be installed by a
competent
person.
Installation
Do not plug the machine in and
switch it on at the mains until the
installation is completed.
For your safety, this dryer must be
correctly installed.
If there is any doubt about
installation, call GIAS Service for
advice.
40003874Eng.qxd 20/09/2005 18:57 Page 6
Adequate ventilation must be provided in the
room where the tumble dryer is located to
prevent gases from appliances burning other
fuels, including open fires, being drawn into the
room during operation of the tumble dryer.
● Exhaust air must not be discharged into a
flue which is used for exhausting fumes
from appliances burning gas or other fuels.
● Check regularly that the air flowing through
the dryer is not restricted.
● Check the fluff filter after use, and clean, if
necessary.
● The inlet and outlets should be kept free
from obstructions. To ensure adequate
ventilation the space between the bottom
of the machine and the floor must not be
obstructed. There should be a gap of at
least 12mm between the machine and any
obstructions.
● Prevent items from falling or collecting
behind the dryer as these may obstruct the
air inlet and outlet.
● NEVER install the dryer up against curtains.
7
Ventilation
AIR OUTLETS
AIR OUTLETS IN THE BASE
AIR INLET VENTS
40003874Eng.qxd 20/09/2005 18:57 Page 7

Before using the tumble dryer for the first time:
● Please read this instruction book thoroughly.
● Remove all items packed inside drum.
● Wipe the inside of the drum and door with
a damp cloth to remove any dust which may
have settled in transit.
Clothes preparation
Make sure that the laundry you are going to dry
is suitable for drying in a tumble dryer, as shown
by the care symbols on each item.
Check that all fastenings are closed and that
pockets are empty. Turn the articles inside out.
Place clothes loosely in the drum to make sure
that they don't get tangled.
Maximum drying weight
● Cottons Max. 7.5 kg
● Synthetics Max. 3.5 kg
8
Preparing the load
Do not overload
the drum, large
items when wet
can exceed the
maximum
admissible
clothes load
(for example:
sleeping bags,
duvets).
40003874Eng.qxd 20/09/2005 18:57 Page 8
Sort the load as follows:
● By care symbols
These can be found on the collar or inside
seam:
Suitable for tumble drying.
Tumble drying at high temperature.
Tumble drying at low temperature only.
Do not tumble dry.
If the item does not have a care label it
must be assumed that it is not suitable
for tumble drying.
● By amount and thickness
Whenever the load is bigger than the dryer
capacity, separate clothes according to
thickness (e.g. towels from thin underwear).
● By type of fabric
Cottons/linen: Towels, cotton jersey, bed and
table linen.
Synthetics: Blouses, shirts, overalls, etc.
made of polyester or polyamid, as well as
for cotton/synthetic mixes.
● By drying level
Sort into: iron dry, cupboard dry, etc. For
delicate articles press the button to
select low drying temperature.
9
40003874Eng.qxd 20/09/2005 18:57 Page 9
Do not tumble dry:
Woollens, silk, delicate fabrics, nylon stockings,
delicate embroidery, fabrics with metallic
decorations, garments with PVC or leather
trimmings, training shoes, bulky items such as
sleeping bags, etc.
Energy saving
Only put into the tumble dryer laundry which has
been thoroughly wrung or spin-dried. The drier
the laundry the shorter the drying time thus
saving electricity.
ALWAYS
● Try to dry the maximum weight of laundry,
this will save time and electricity.
● Check that the filter is clean before every
drying cycle.
NEVER
● Exceed the maximum weight, this will waste
time and electricity.
● Put dripping wet items into the tumble
dryer, this may damage the appliance.
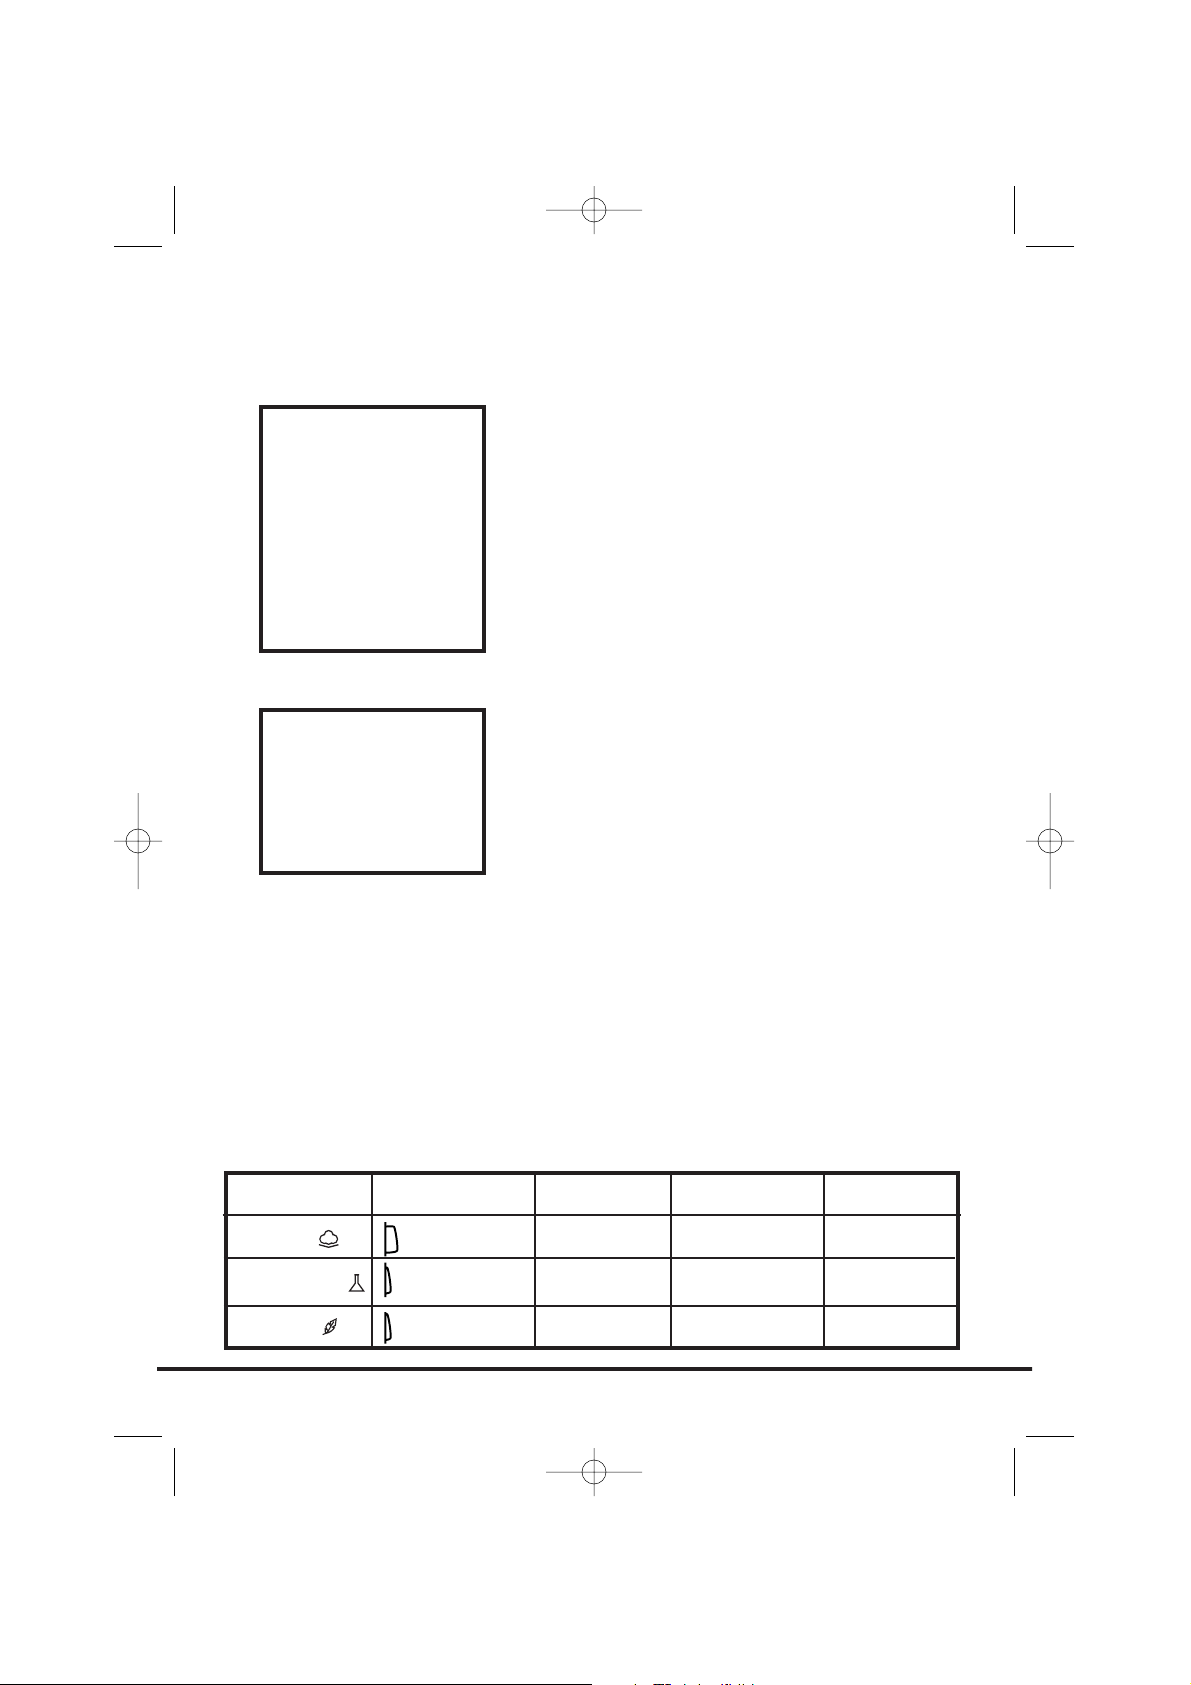
Drying guide
The table shows approximate drying times,
depending on the type of fabric and dampness of
the clothes.
10
Drying advice
IMPORTANT: Do
not dry articles
which have been
treated with a
dry cleaning fluid
or rubber clothes
(danger of fire or
explosion).
During the last
15 minutes the
load is always
tumbled in cool
air.
Fabric
COTTON
SYNTHETICS
ACRYLIC
HEAT SETTING
HIGH
LOW
LOW
HEAVY LOAD
140-165 min
–
–
MEDIUM LOAD
70-80 min
70-80 min
50-65 min
LIGHT LOAD
50-65 min
40-55 min
30-40 min
40003874Eng.qxd 20/09/2005 18:57 Page 10
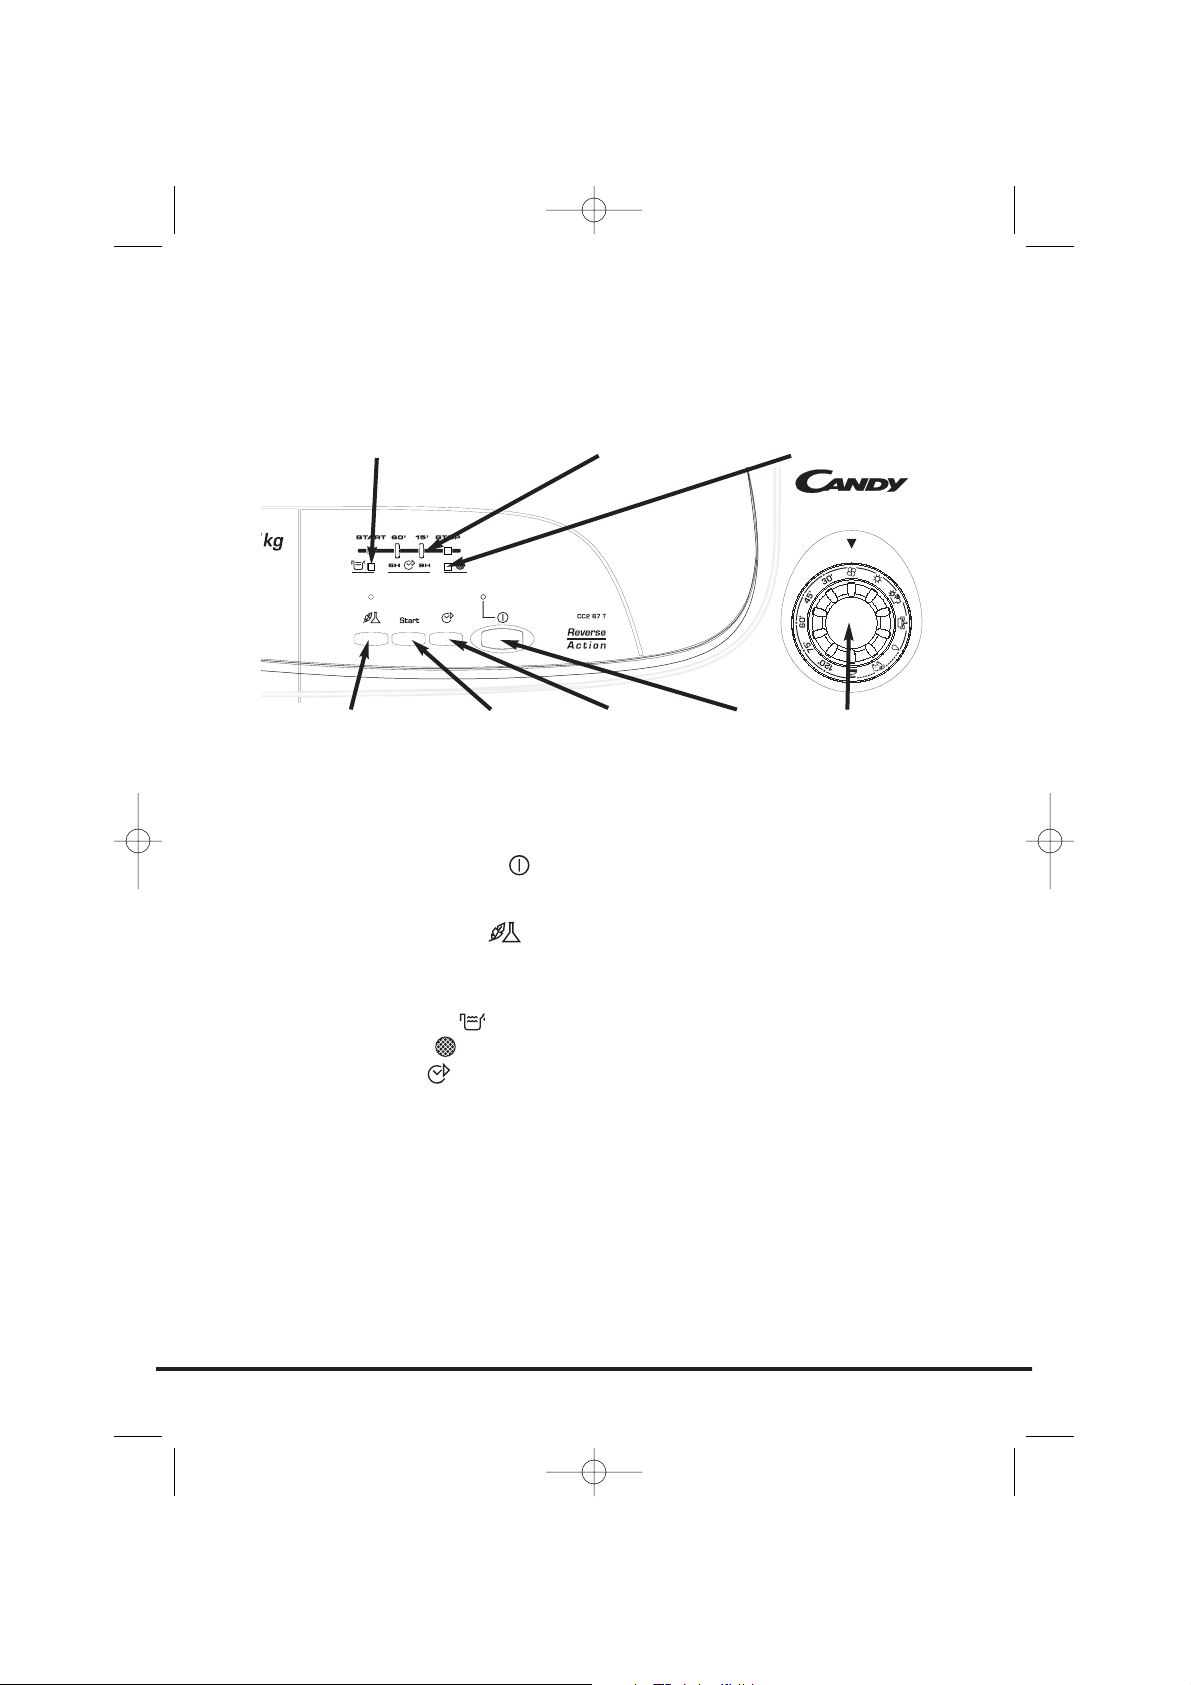
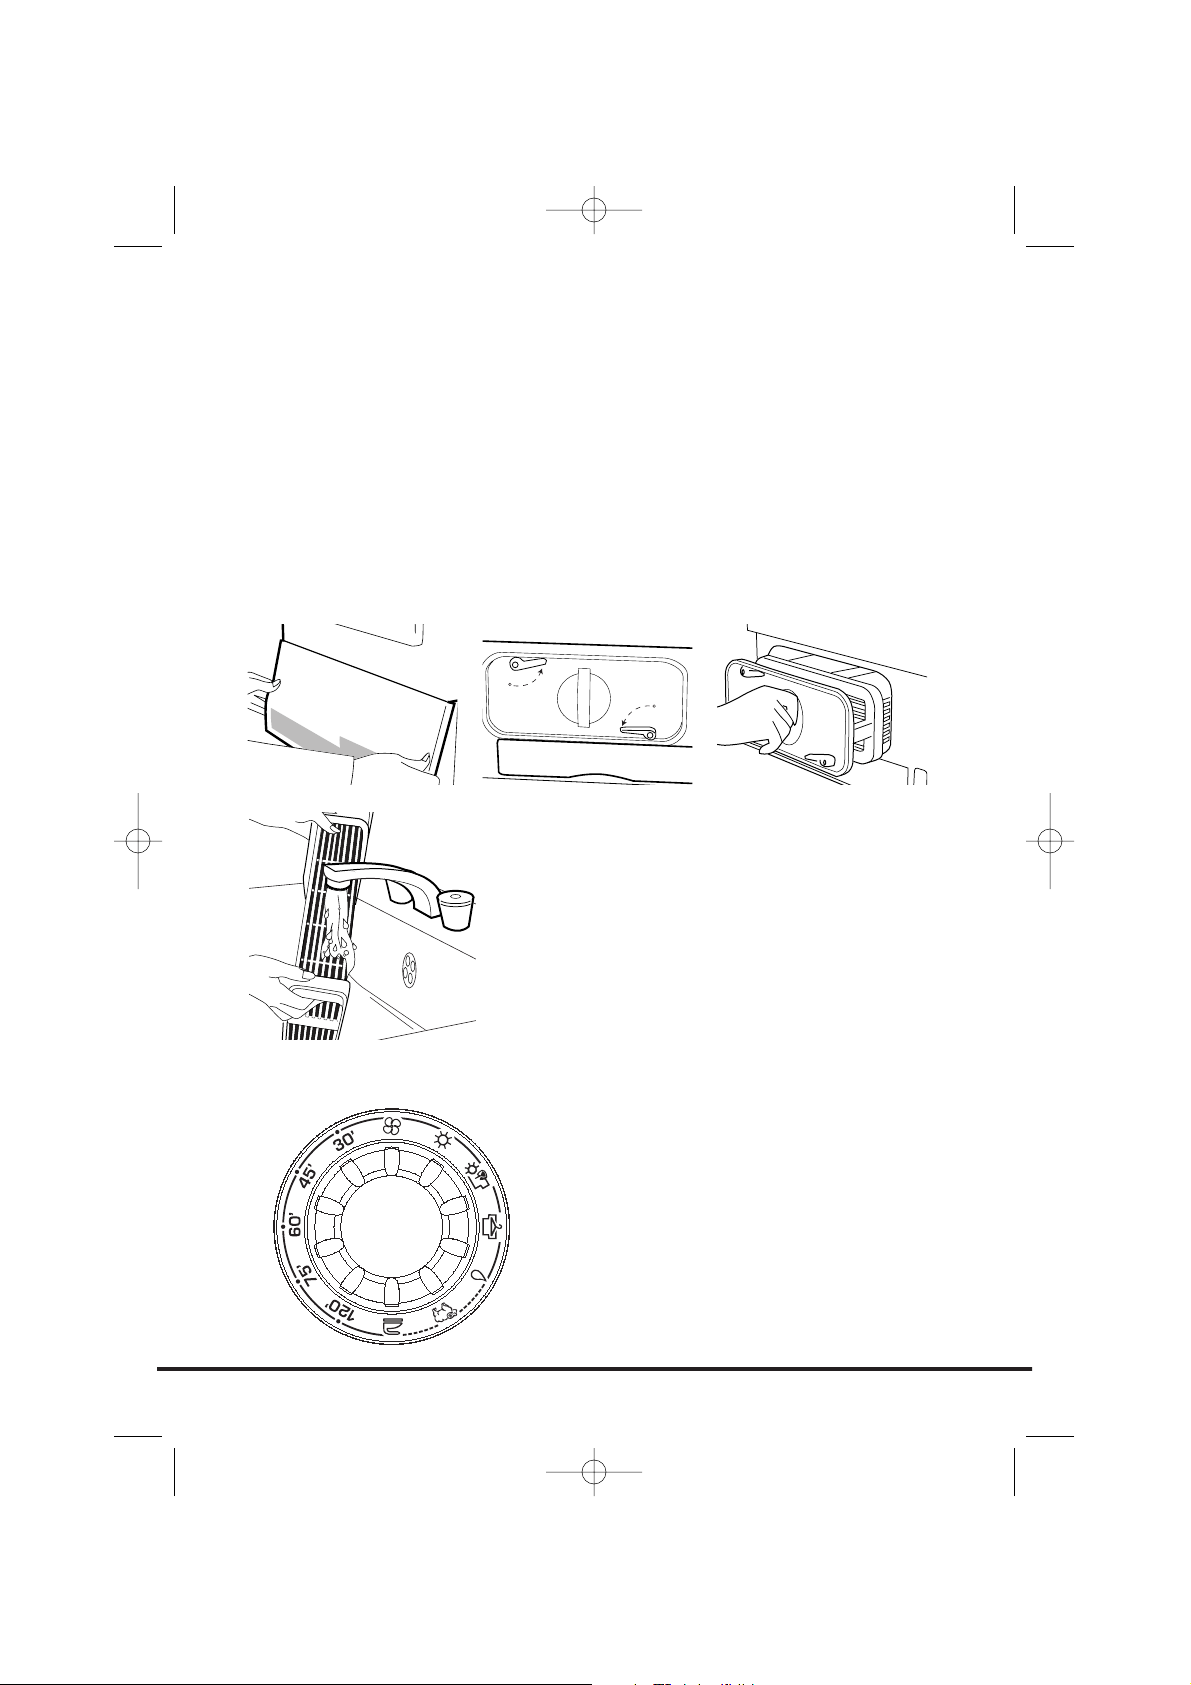
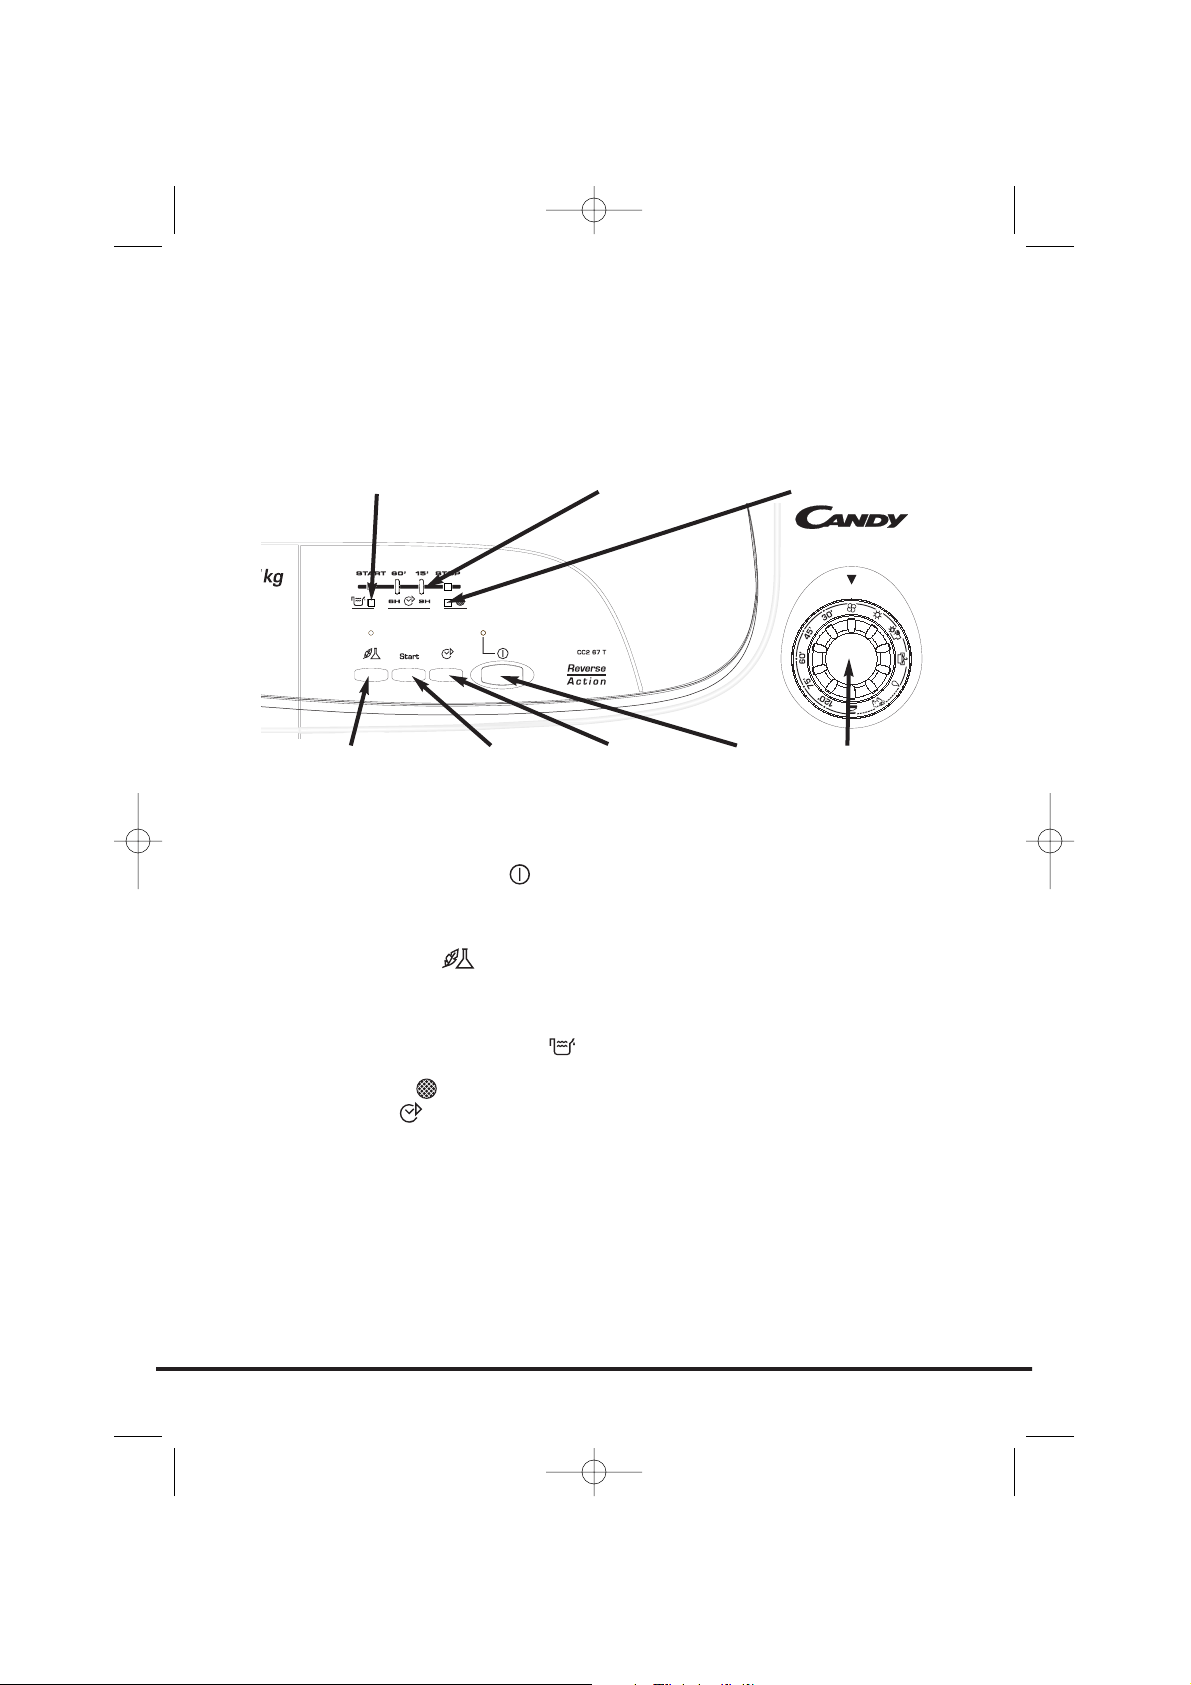
Control panel and indicator lights
Programme Selector – Select the required programme
On/Off button and indicator – Press to switch on, the indicator will light
Start – Press Start to commence the selected drying programme. Press for 5
seconds to cancel/reset the programme
Acrylics/Synthetics button – Press to reduce the heat level for delicate
items, the indicator above the button will light up. To change the heat setting
the programme must be reset
Low Heat – Indicator light ON High Heat – Indicator light OFF
Empty Water indicator – lights when the water container is full
Filter Care indicator – lights when the filter needs cleaning
Start Delay button – Allows the user to delay the start of the drying cycle
(see details of operation page 16)
COUNTDOWN Display
START – When the dryer is switched On the START indicator will flash, when
the programme starts the START indicator will light up
60' – Indicator lights when there is less than 60 minutes left until completion
of the programme
15' - Indicator lights when there is less than 15 minutes left until completion
of the programme. At this stage of the drying cycle the machine enters the
Cool Down phase
STOP - Indicator lights when the programme is finished.
6h - 6 hour start delay (light flashes when in operation)
9h - 9 hour start delay (light flashes when in operation)
11
Controls and indicators
ACRYLICS/
SYNTHETICS
BUTTON
ON/OFF
BUTTON
FILTER CARE INDICATOR
EMPTY WATER INDICATOR
PROGRAMME
SELECTOR
START
BUTTON
START DELAY
BUTTON
COUNTDOWN
DISPLAY
40003874Eng.qxd 20/09/2005 18:57 Page 11

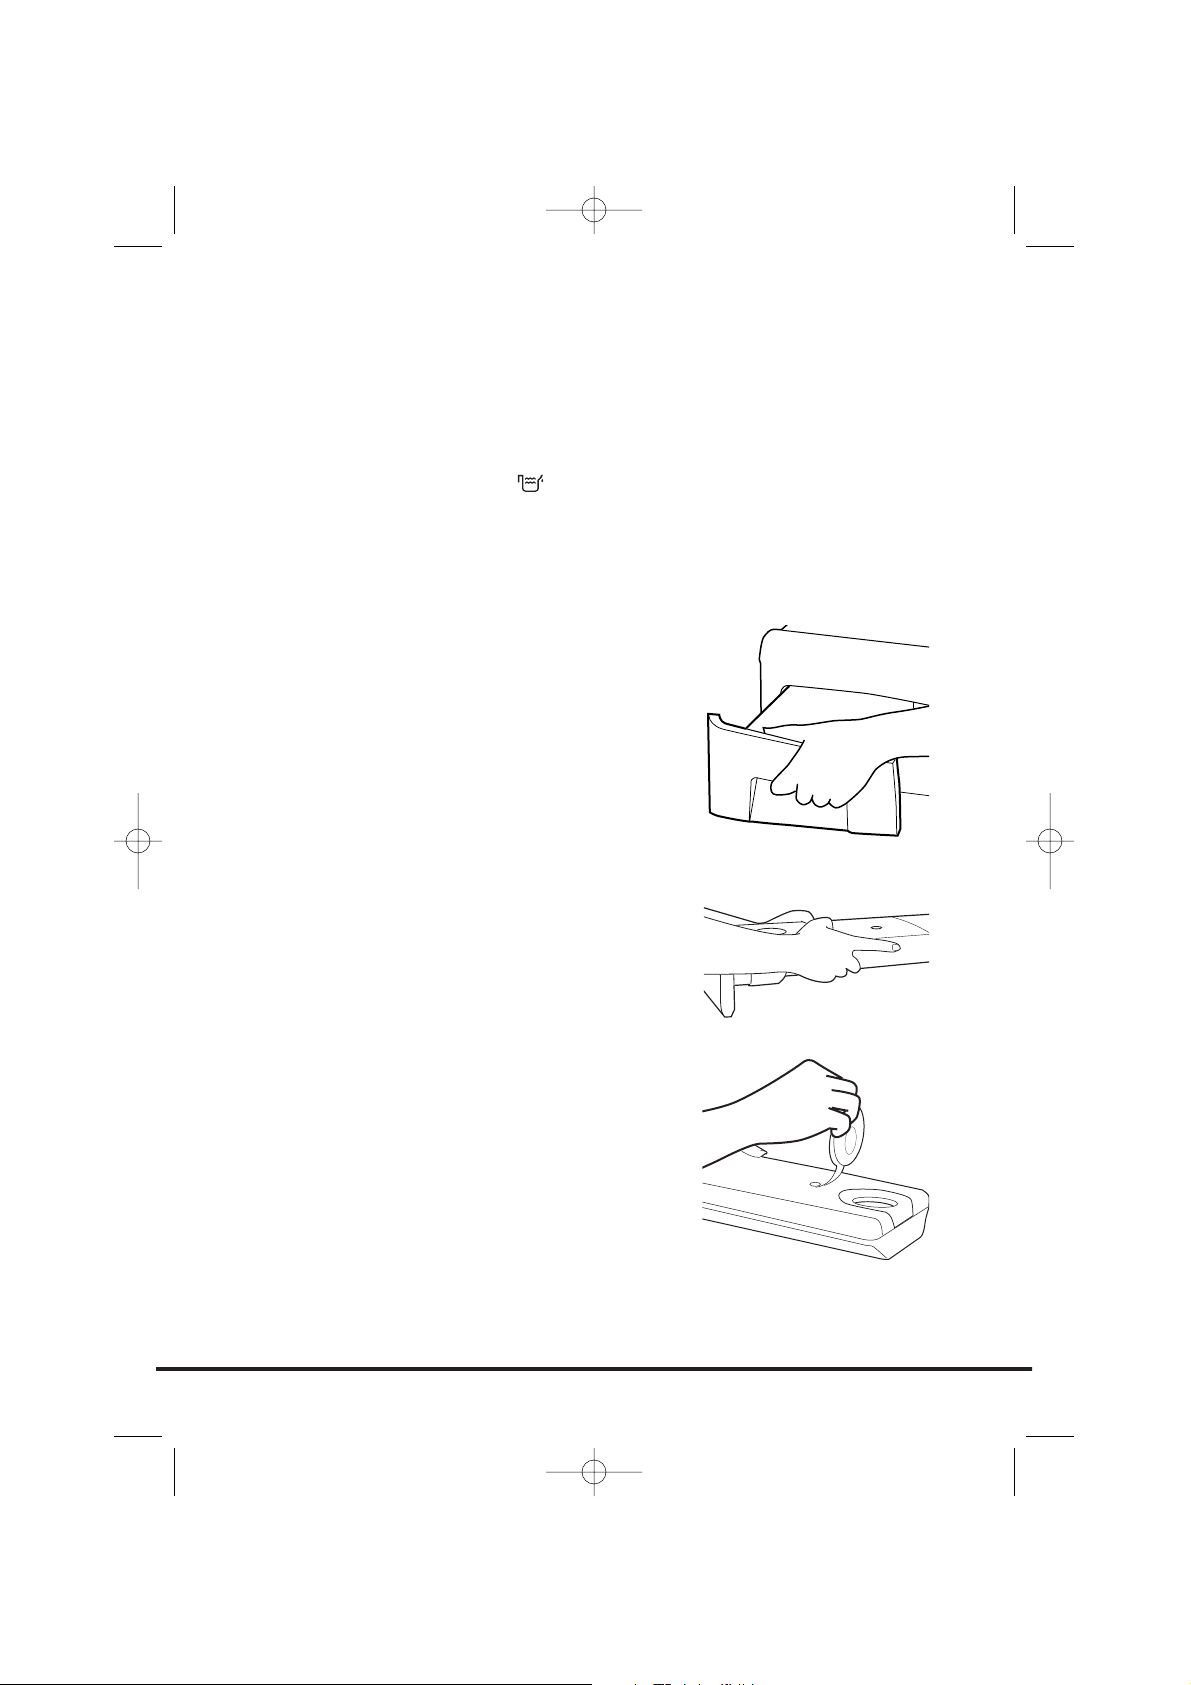
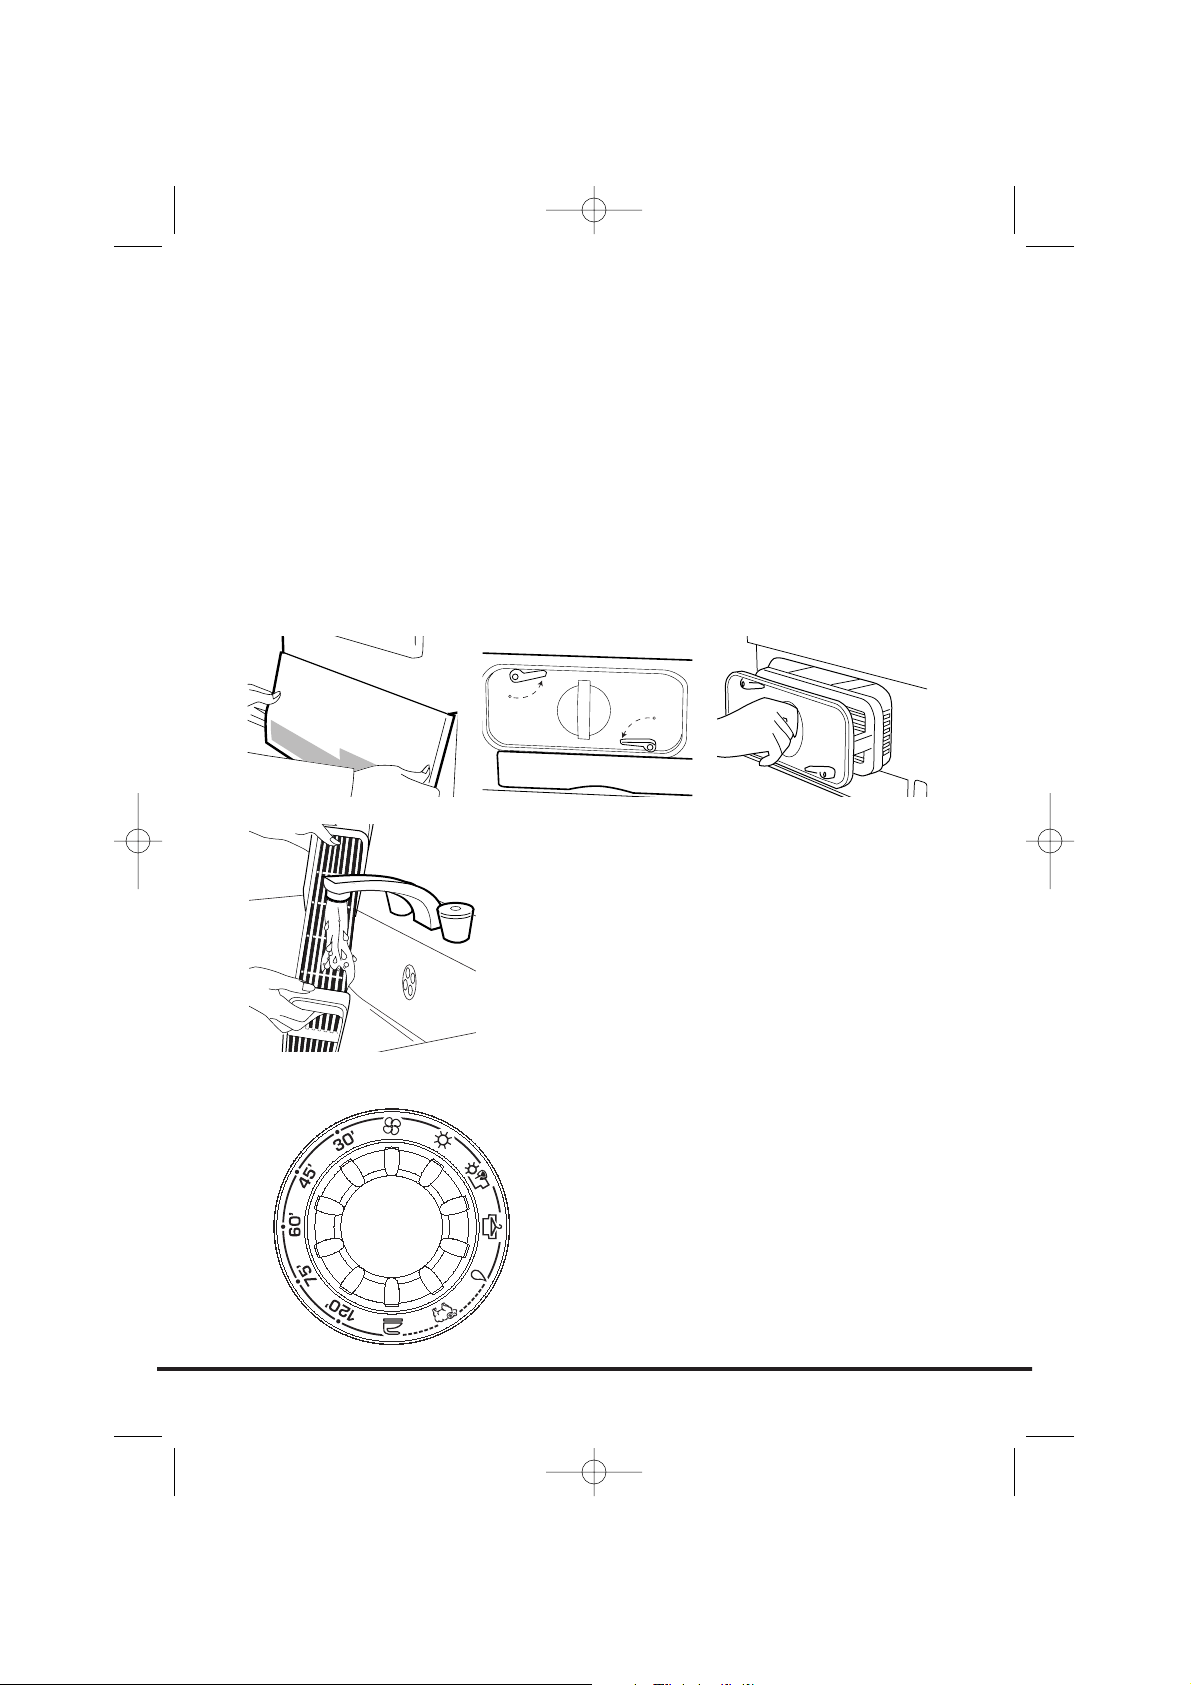
Opening the door
Pull on handle to open the door.
To restart the dryer, close the door and press
Start.
Filter
IMPORTANT: To maintain the efficiency of the
dryer check that the fluff filter is clean before
each drying cycle.
1. Pull the filter upwards.
2. Open filter as shown.
3. Gently remove lint using a soft brush or
your fingertips.
4. Snap the filter together and push back into
place.
Filter Care Indicator
lights when the filter needs cleaning.
If the laundry is not drying check that the filter is
not clogged.
12
Door and Filter
WARNING!
When the tumble dryer is in use the
drum and door may be VERY HOT.
40003874Eng.qxd 20/09/2005 18:57 Page 12
The water removed from the laundry during the
drying cycle is collected in a container at the
bottom of the dryer.
When the container is full the indicator on the
control panel will light, and the container MUST
be emptied. However, we recommend that the
container is emptied after each drying cycle.
NOTE: Very little water will collect during the
first few cycles of a new machine as an internal
reservoir is filled first.
To remove the container
1. Gently pull out the tray until it is completely
removed. Support the tray with both hands.
When it is full the water container will
weigh about 4kg.
2. Open the lid located on the top of the
container and empty the water out. Refit
the lid and slide the water container back
into position. PUSH FIRMLY INTO PLACE.
NOTE: If you have the option of drainage near
the dryer it is possible to use the discharge kit to
provide a permanent drain for the water
collected by the dryer. This will remove the need
to empty the water tray. All the information for
assembly of the kit is contained in the kit
envelope.
13
Water Container
40003874Eng.qxd 20/09/2005 18:57 Page 13
Important: Always switch off and remove the plug from the electricity supply
before cleaning the condenser.
To maintain the efficiency of the dryer regularly check that the condenser is clean.
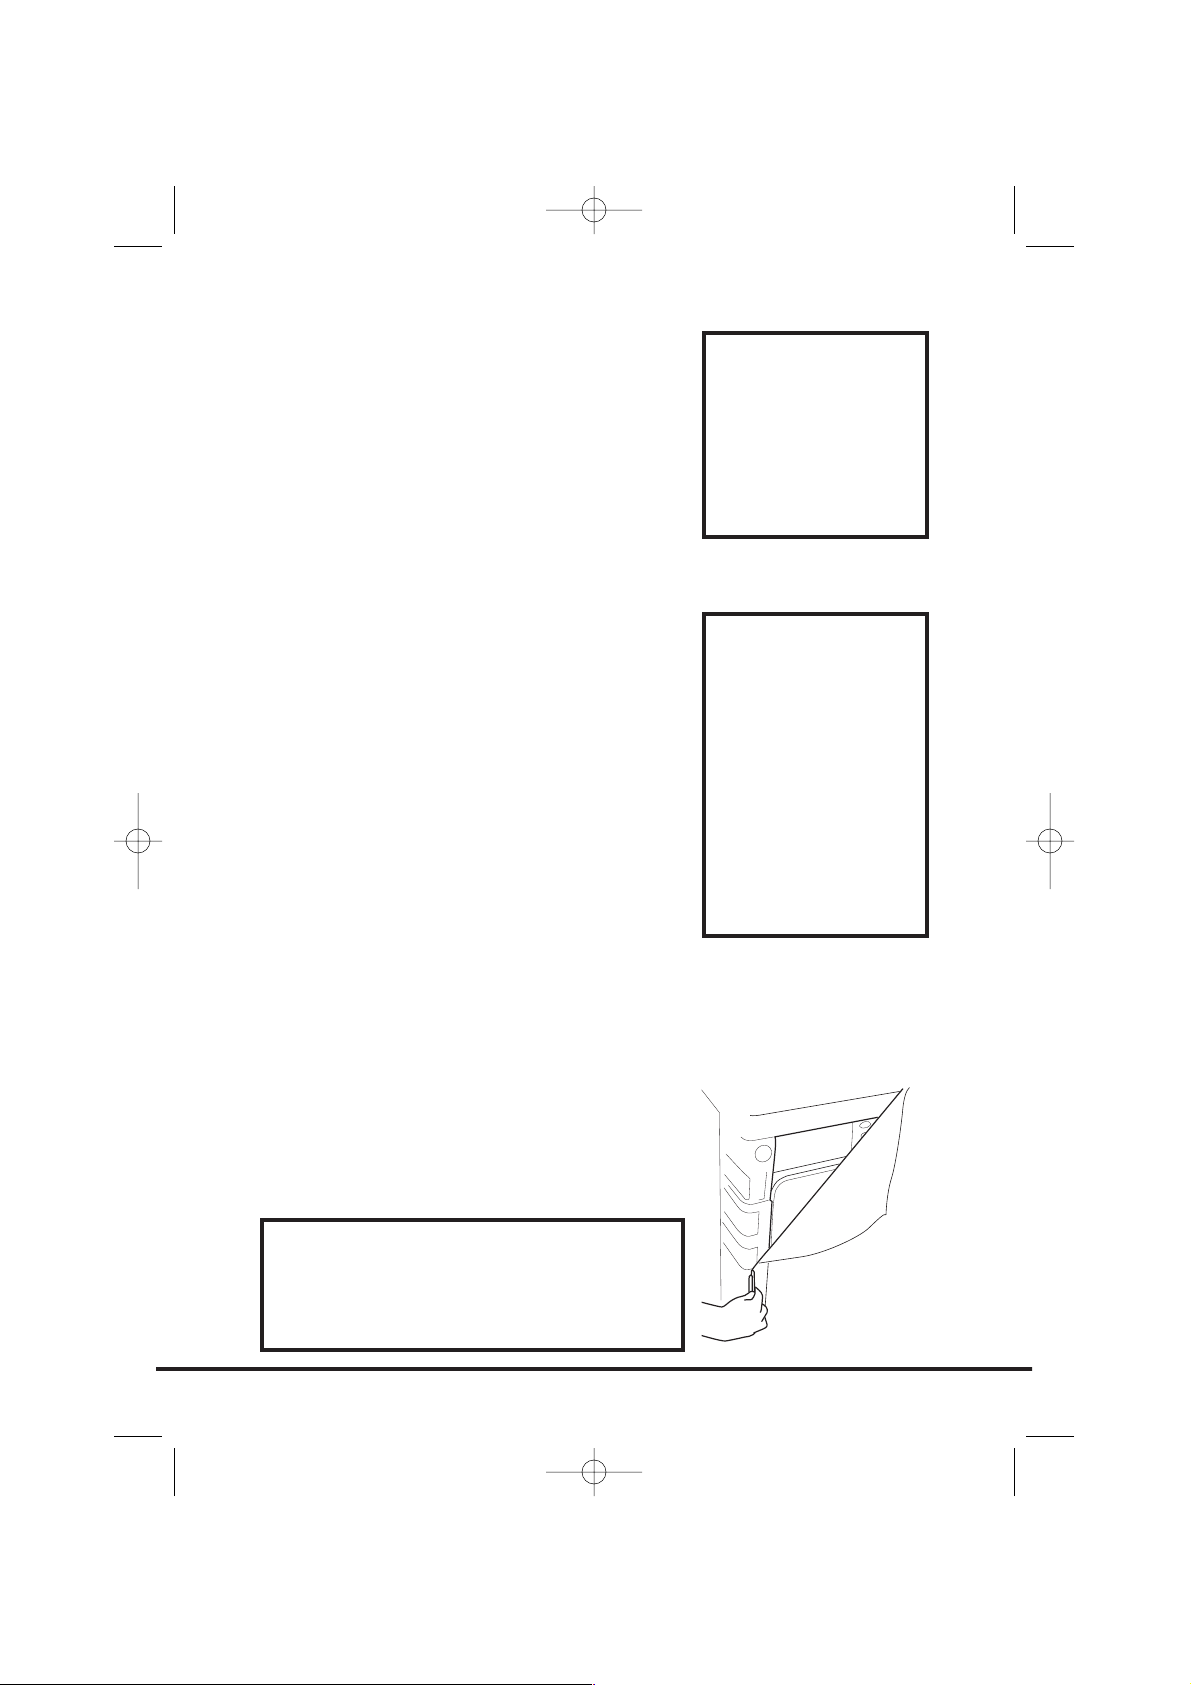
To remove the condenser
1. Gently pull the bottom of the kickplate so that it unclips from the dryer. The
top section can then be unhinged allowing the kickplate to be completely
removed.
2. Turn the two locking levers anti-clockwise and pull out the condenser.
3. Pull out the condenser unit.
4. Gently remove any dust or fluff with a cloth,
then wash the unit by holding it under a
running tap turning it so that water flows
between the plates, to remove any dust or fluff.
5. Refit the condenser ensuring it is in the correct
way (as indicated by the arrow) and pushed
firmly into place. Lock the two levers by turning
them clockwise.
6. Refit the kickplate.
The Sensor Dry machine gives many options for
drying the laundry to suit all circumstances.
Note: The sensor may not detect a small load of
small articles. For small loads and separate items
or pre-dried fabrics with low moisture content,
use the timed programmes. Set the programme
between 30 and 75 minutes depending on the
14
Condenser
Selecting the
Programme
40003874Eng.qxd 20/09/2005 18:57 Page 14

load size and dryness required, and select high or low heat depending upon
the fabric type.
If the sensor does not detect the item the dryer will only operate for 10
minutes before going into cooldown.
If the load is too large or too wet to tumble dry the dryer will automatically
go into cooldown after 185 minutes.
The table below lists the programmes and the function of each programme.
15
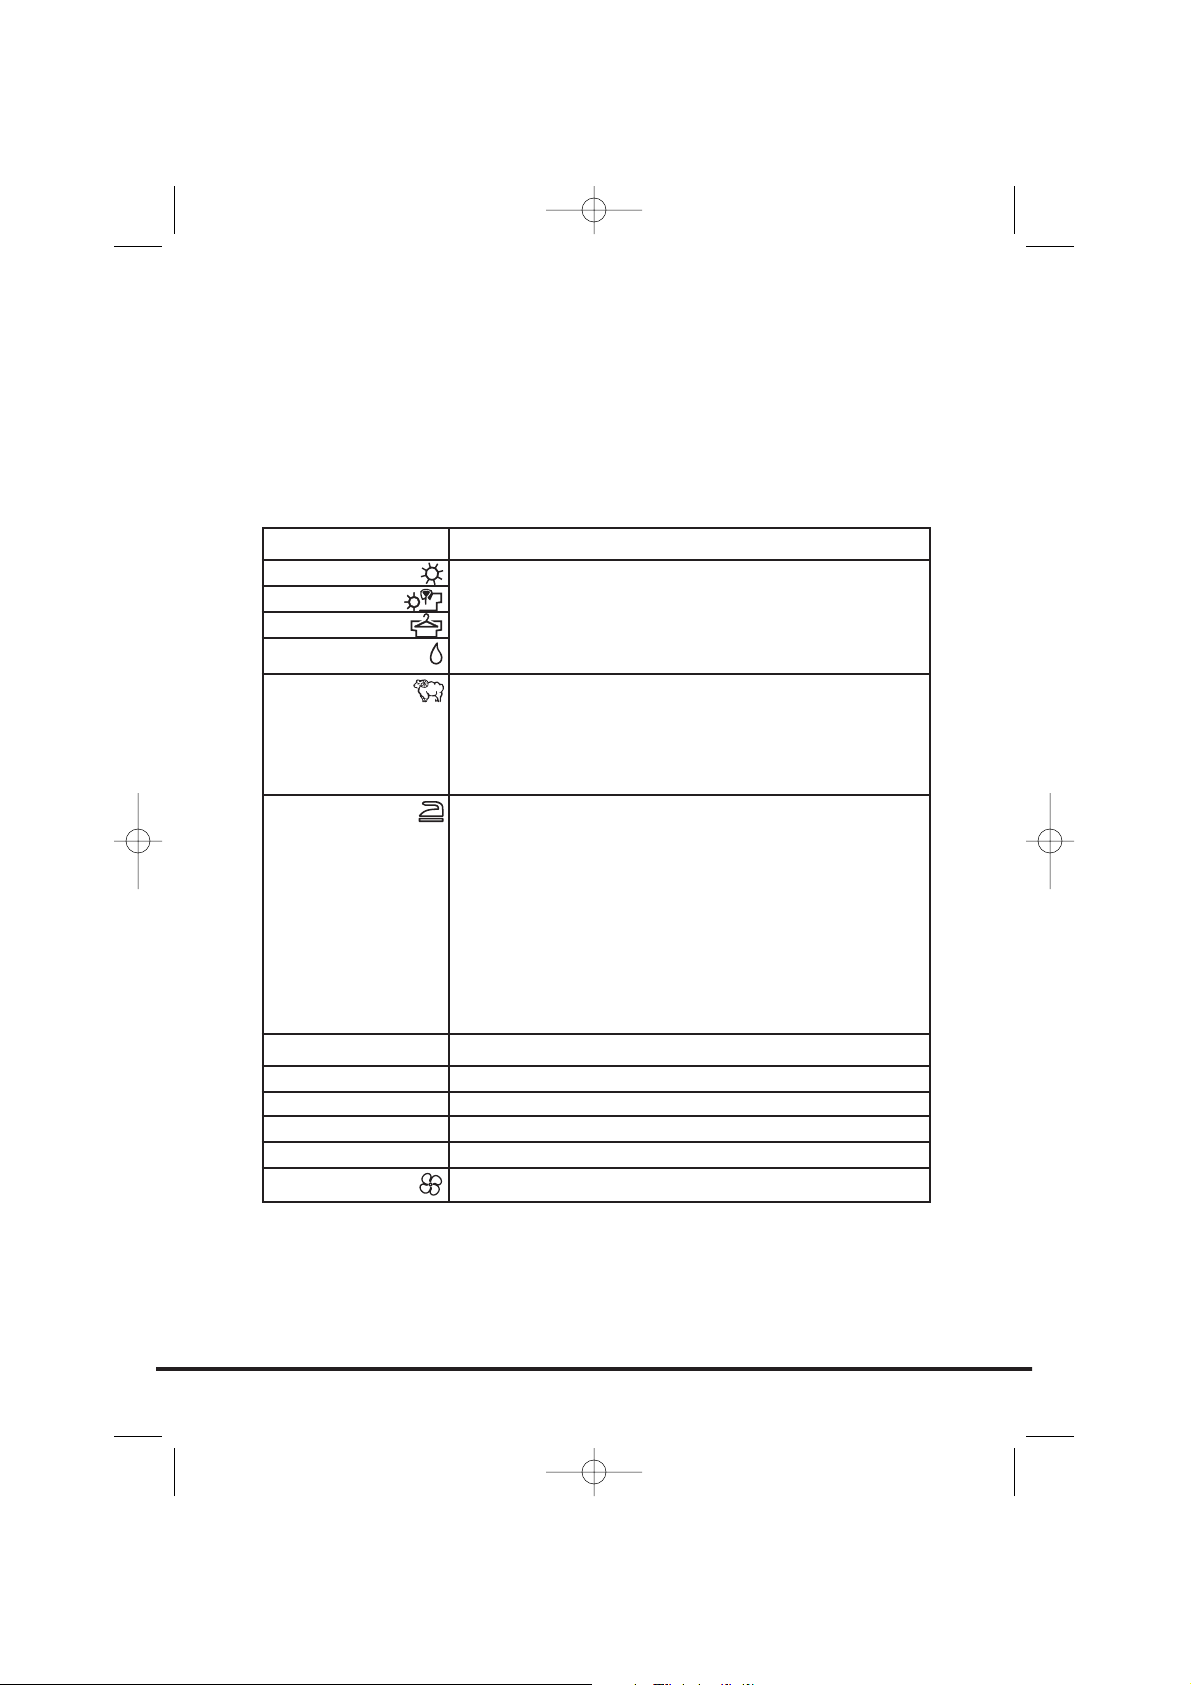
Programme
Bone Dry
Extra Dry
Cupboard Dry
Iron Dry
Wool
Fast Iron
120'
75'
60'
45'
30'
Refresh
Description
Select the degree of dryness that you require.
This ranges from Bone Dry for bath towels and
bathrobes, through Cupboard Dry for items that will be
put away without ironing, to the programme that
leaves the laundry suitable for ironing.
A gentle programme specially created to get woollens
softer after air-drying.
This delicate warm air cycle, lasting 12 minutes, can
also be used to get woollens 'refreshed' after being
stored in the wardrobe.
The Fast Iron programme provides a conditioning and
anticrease function. The dryer will heat the load for 9
minutes followed by a 3 minute cool down period and
is especially good for garments which may have been
left for some time prior to ironing, in a linen basket for
example. Garments may also become stiffened when
dried outside on a washing line or inside on radiators.
The Fast Iron process relaxes the creases in the fabric
making ironing quicker and easier.
120 minutes of drying
75 minutes of drying
60 minutes of drying
45 minutes of drying
30 minutes of drying
Tumbling of laundry in cool air for 30 minutes.
40003874Eng.qxd 20/09/2005 18:57 Page 15
1. Open the door and load the drum with laundry. Ensure that garments do
not hinder closure of the door.
2. Gently close the door pushing it slowly until you hear the door 'click'
shut.
3. Press the button to switch on the dryer. The indicator will light up and
the START indicator will flash.
4. Turn the Programme Selector dial to select the required drying program
(see Programme Guide).
5. If drying synthetics, acrylics or delicate items, press the button to
reduce the heat level.
The light above the push button will light up when the machine is in low
heat setting. To deselect this status when the drying cycle has started it is
necessary to reset the machine.
6. Press the Start button. The dryer will start automatically and the START
indicator will be continuously lit.
7. The display will show the drying progress in terms of time remaining.
8. If the door is opened during the programme to check the laundry, it is
necessary to press Start to recommence drying after the door has been
closed.
9. When the 15' indicator is lit the machine will enter the cool down phase,
the clothes will be tumbled in cool air allowing the load to cool down.
10. When the programme is complete the STOP indicator will light.
Cancelling and resetting the
programme
To cancel a programme press the Start button for 5 seconds. The machine will
indicate that it has been reset by the START indicator flashing. It is possible to
change the programme within the first 10 minutes without using the cancel
and reset function.
Start Delay
The function allows the user to delay the start of the drying cycle by 6 or 9
hours.
When the function is first selected the display will show a delay of 6 hours, a
subsequent press of the button will increase the delay to 9 hours.
To commence the programme press Start and the appliance will complete the
16
Operation
40003874Eng.qxd 20/09/2005 18:57 Page 16
drying cycle at the end of this time. The 6 or 9
hour indicator light will flash to indicate that the
start delay is in progress.
Cleaning the dryer
● Clean the filter and empty the water
container after every drying cycle.
● Regularly clean the condenser.
● After each period of use, wipe the inside of
the drum and leave the door open for a
while to allow circulation of air to dry it.
● Wipe the outside of the machine and the
door with a soft cloth.
● DO NOT use abrasive pads or cleaning
agents.
● To prevent the door sticking or the build up
of fluff periodically clean the inner door and
gasket with a damp cloth.
Technical specifications
Drum capacity 115 litres
Maximum load 7.5 kg
Height 85cm
Width 60cm
Depth 60cm
Energy Label Band C
17
IMPORTANT
Always switch
off and remove
the plug from
the electricity
supply before
cleaning this
appliance.
For electrical data
refer to the
rating label on
the front of the
dryer cabinet
(with the door
open).
Cleaning and Routine
Maintenance
WARNING!
The drum, door
and load may be
very hot.
40003874Eng.qxd 20/09/2005 18:57 Page 17
What might be the cause of...
Defects you can remedy yourself
Before calling GIAS Service for technical advice please run through the
following checklist. A charge will be made if the machine is found to be
working or has been installed incorrectly or used incorrectly. If the problem
persists after completing the recommended checks, please call GIAS Service,
they may be able to assist you over the telephone.
Drying time is too long/clothes are not dry enough…
● Have you selected the correct drying time/programme?
● Were the clothes too wet? Were the clothes thoroughly wrung or spin-
dried?
● Does the filter need cleaning?
● Does the condenser need cleaning?
● Is the dryer overloaded?
● Are the inlets, outlets and base of the dryer free from obstructions?
● Has the option been selected from a previous cycle?
The dryer does not operate…
● Is there a working electricity supply to the dryer? Check using another
appliance such as a table lamp.
● Is the plug properly connected to the mains supply?
● Is there a power failure?
● Has the fuse blown?
● Is the door fully closed?
● Is the dryer switched on, both at the mains supply and at the machine?
● Has the drying time or the programme been selected?
● Has the machine been switched on again after opening the door?
● Has the dryer stopped operating because the water tray is full and needs
emptying?
The dryer is noisy…
● Switch off the dryer and contact GIAS Service for advice.
The Filter Care Indicator is on…
● Does the filter need cleaning?
● Does the condenser need cleaning?
Empty Water Indicator is on…
● Does the water container need emptying?
18
Troubleshooting
40003874Eng.qxd 20/09/2005 18:57 Page 18

Should there still be a problem with your dryer
after completing all the recommended checks,
please call GIAS Service for advice. They may be
able to assist you over the telephone or arrange
for a suitable appointment for an engineer to call
under the terms of your guarantee. However, a
charge may be made if any of the following
applies to your machine:
● Is found to be in working order.
● Has not been installed in accordance with
the installation instructions.
● Has been used incorrectly.
Spares
Always use genuine spares, available direct from
GIAS Service.
GIAS Service
For service and repairs call your local GIAS
Service engineer.
The manufacturer declines all responsibility in the
event of any printing mistakes in this booklet.
The manufacturer also reserves the right to make
appropriate modifications to its products without
changing the essential characteristics.
19
Customer Service
40003874Eng.qxd 20/09/2005 18:57 Page 19
Inleiding. . . . . . . . . . . . . . . . . . . . . . . . . . . . . . . . . . . . . . . . . . . . . . . . . . . 21
Afleveringsinformatie . . . . . . . . . . . . . . . . . . . . . . . . . . . . . . . . . . . . . . . . . . . 21
Uitpakken van het product . . . . . . . . . . . . . . . . . . . . . . . . . . . . . 21
Veiligheidsaanwijzingen . . . . . . . . . . . . . . . . . . . . . . . . . . . . . . . . 22
Installatie . . . . . . . . . . . . . . . . . . . . . . . . . . . . . . . . . . . . . . . . . . . . . . . . . . . . . 22
Gebruik . . . . . . . . . . . . . . . . . . . . . . . . . . . . . . . . . . . . . . . . . . . . . . . . . . . . . . 22
De was . . . . . . . . . . . . . . . . . . . . . . . . . . . . . . . . . . . . . . . . . . . . . . . . . . . . . . . 22
Het milieu . . . . . . . . . . . . . . . . . . . . . . . . . . . . . . . . . . . . . . . . . . . . . . . . . . . . 23
GIAS-Service . . . . . . . . . . . . . . . . . . . . . . . . . . . . . . . . . . . . . . . . . . . . . . . . . . . 23
Installatie . . . . . . . . . . . . . . . . . . . . . . . . . . . . . . . . . . . . . . . . . . . . . . . . . 24
Elektrische vereisten . . . . . . . . . . . . . . . . . . . . . . . . . . . . . . . . . . . . . . . . . . . . 24
De voeten verstellen . . . . . . . . . . . . . . . . . . . . . . . . . . . . . . . . . . . . . . . . . . . . 24
Ventilatie. . . . . . . . . . . . . . . . . . . . . . . . . . . . . . . . . . . . . . . . . . . . . . . . . . 25
De lading voorbereiden . . . . . . . . . . . . . . . . . . . . . . . . . . . . . . . . . 26
Voorbereiding van de kleren . . . . . . . . . . . . . . . . . . . . . . . . . . . . . . . . . . . . . . 26
Sorteren van het wasgoed. . . . . . . . . . . . . . . . . . . . . . . . . . . . . . . . . . . . . . . . 27
Droogadvies . . . . . . . . . . . . . . . . . . . . . . . . . . . . . . . . . . . . . . . . . . . . . . 28
Niet in de droogtrommel doen . . . . . . . . . . . . . . . . . . . . . . . . . . . . . . . . . . . . 28
Energie besparen . . . . . . . . . . . . . . . . . . . . . . . . . . . . . . . . . . . . . . . . . . . . . . . 28
Richtlijnen voor het drogen . . . . . . . . . . . . . . . . . . . . . . . . . . . . . . . . . . . . . . 28
Bediening & indicatielampjes . . . . . . . . . . . . . . . . . . . . . . . . . . . 29
Deur en filter . . . . . . . . . . . . . . . . . . . . . . . . . . . . . . . . . . . . . . . . . . . . . 30
De deur openen. . . . . . . . . . . . . . . . . . . . . . . . . . . . . . . . . . . . . . . . . . . . . . . . 30
Filter. . . . . . . . . . . . . . . . . . . . . . . . . . . . . . . . . . . . . . . . . . . . . . . . . . . . . . . . . 30
Filter Schoonmaken Indicatielampje . . . . . . . . . . . . . . . . . . . . . . . . . . . . . . . . 30
Watercontainer. . . . . . . . . . . . . . . . . . . . . . . . . . . . . . . . . . . . . . . . . . . 31
Om het reservoir te verwijderen . . . . . . . . . . . . . . . . . . . . . . . . . . . . . . . . . . . 31
Condensator . . . . . . . . . . . . . . . . . . . . . . . . . . . . . . . . . . . . . . . . . . . . . . 32
De condensator verwijderen . . . . . . . . . . . . . . . . . . . . . . . . . . . . . . . . . . . . . . 32
Het programma kiezen . . . . . . . . . . . . . . . . . . . . . . . . . . . . . . . . . . 32
Bediening . . . . . . . . . . . . . . . . . . . . . . . . . . . . . . . . . . . . . . . . . . . . . . . . . 34
Het programma annuleren en resetten. . . . . . . . . . . . . . . . . . . . . . . . . . . . . . 34
Start uitstel functie . . . . . . . . . . . . . . . . . . . . . . . . . . . . . . . . . . . . . . . . . . . . . 34
Schoonmaken en Onderhoudsbeurten . . . . . . . . . . . . . . . . 35
Schoonmaken van de droger. . . . . . . . . . . . . . . . . . . . . . . . . . . . . . . . . . . . . . 35
Technische specificaties . . . . . . . . . . . . . . . . . . . . . . . . . . . . . . . . . . . . . . . . . . 35
Problemen oplossen . . . . . . . . . . . . . . . . . . . . . . . . . . . . . . . . . . . . . 36
Klantenservice. . . . . . . . . . . . . . . . . . . . . . . . . . . . . . . . . . . . . . . . . . . . 37
Reserveonderdelen . . . . . . . . . . . . . . . . . . . . . . . . . . . . . . . . . . . . . . . . . . . . . 37
GIAS-Service . . . . . . . . . . . . . . . . . . . . . . . . . . . . . . . . . . . . . . . . . . . . . . . . . . . 37
20
40003874Dut.qxd 20/09/2005 15:57 Page 20
Inleiding
Lees deze instructies zorgvuldig door en gebruik deze
machine op basis van deze aanwijzingen. Dit boekje
geeft u naast belangrijke richtlijnen voor het veilige
gebruik de veilige installatie en het veilige onderhoud
van de machine ook enkele nuttige tips over hoe u de
beste resultaten bekomt wanneer u met deze machine
wast.
Bewaar alle documentatie op een veilige plek zodat u
of de toekomstige eigenaars van de machine ze in de
toekomst opnieuw kunnen raadplegen
Afleveringsinformatie
Controleer dat de volgende items samen met de
wasmachine werden geleverd:
● Handleiding
● Garantiekaart
● Energiekeurmerk
Verwijder de machine uit de verpakking op de plek
waar u de machine wilt plaatsen.
1. Snij voorzichtig rond de voet van de verpakking
en langs een hoek omhoog.
2. Verwijder de hoes van polyethyleen en til de
droger van de polystyrene voet.
21
Controleer of de
machine schade
heeft opgelopen
tijdens het vervoer.
Indien dit het geval
is, neem dan contact
op met GIAS.
Als u de
bovenstaande
aanwijzingen niet
opvolgt, kan de
veiligheid van de
machine niet worden
gegarandeerd. Indien
het probleem met
uw machine wordt
veroorzaakt door
misbruik, kunnen de
kosten van de
onderhoudsbeurt aan
u worden
doorberekend.
Uitpakken van het product
Gooi de verpakking veilig weg. Zorg dat de
verpakking buiten bereik van kinderen blijft,
het vormt een potentieel gevaar.
40003874Dut.qxd 20/09/2005 15:57 Page 21
Veiligheidsaanwijzingen
Installatie
● Controleer het apparaat op zichtbare beschadigingen vooraleer u het gebruikt.
Gebruik het niet als het beschadigd is maar neem contact op met GIAS-Service.
● Gebruik geen adapters, meervoudige stekkers en/of verlengsnoeren.
● Dit apparaat mag niet worden geïnstalleerd in een badkamer of douchekamer.
● Installeer de droger nooit tegen gordijnen aan en zorg ervoor dat er geen
artikelen achter de droger kunnen vallen en zich daar kunnen ophopen.
Gebruik
● WAARSCHUWING Misbruik van een droogtrommel kan brand veroorzaken.
● Deze machine is alleen voor huishoudelijk gebruik, m.a.w. voor het drogen van
huishoudelijk textiel en kleding.
● Dit apparaat mag uitsluitend gebruikt worden voor het doel waarvoor het
vervaardigd is, zoals dat in deze handleiding beschreven wordt. Verzeker u ervan
dat u de instructies voor de installatie en het gebruik volledig begrijpt voordat u
de machine gebruikt.
● Raak de machine niet aan als uw handen of voeten nat of vochtig zijn.
● Leun niet tegen de deur als u de machine laadt en gebruik de deur niet om de
machine op te tillen of te verplaatsen.
● Sta niet toe dat kinderen met de machine of de bediening ervan spelen.
● WAARSCHUWING Gebruik het apparaat niet als de pluizenfilter niet geplaatst of
beschadigd is; pluis kan ontbranden.
● WAARSCHUWING Op de plaats van het symbool voor warm oppervlak kan de
temperatuur tijdens het drogen tot meer dan 60 graden C stijgen.
● Haal de stekker uit het stopcontact. Haal altijd de stekker uit het stopcontact
voordat u de machine schoonmaakt.
● Blijf deze machine niet gebruiken als ze een gebrek lijkt te hebben.
● Pluizen of dons mogen zich niet op de grond rondom de buitenkant van de
machine ophopen.
● De trommel kan vanbinnen erg heet worden. Wacht altijd met het uithalen van
het wasgoed tot de afkoelingsperiode van de droger voorbij is.
De was
● WAARSCHUWING Geen stoffen in de droogtrommel doen die met chemische
reinigingsvloeistoffen zijn behandeld.
● WAARSCHUWING Materialen uit schuimrubber kunnen onder bepaalde
omstandigheden, wanneer ze verhit worden, spontaan ontbranden. Schuimplastic,
schuimrubber en rubberachtige materialen zijn niet geschikt om in de
droogtrommel gedroogd te worden. Artikelen die van deze materialen gemaakt
zijn MOGEN NIET in de droger gestopt worden.
● Bekijk altijd de wasvoorschriften op het wasgoed om te controleren of u het in de
droger mag drogen.
● Kleren moeten gecentrifugeerd of grondig uitgewrongen worden, voordat zij in
de droogtrommel gestopt worden. Druipnatte kleren mogen NIET in de droger
22
40003874Dut.qxd 15/12/2005 15:57 Page 22

gestopt worden.
● Aanstekers en lucifers mogen niet in zakken blijven zitten en gebruik NOOIT
ontvlambare vloeistoffen in de buurt van het apparaat.
● Glasvezelgordijnen mogen NOOIT in dit apparaat worden gestopt. Er kunnen zich
huidirritaties voordoen als andere kledingstukken met de glasvezels in aanraking
geweest zijn.
● Kledingstukken die behandeld of vervuild zijn met brandbare
schoonmaakmiddelen of producten zoals benzine, bakolie of aërosols, MOGEN
NIET in deze machine gedroogd worden.
Het milieu
● Alle verpakkingsmaterialen zijn milieuvriendelijk en recycleerbaar. Doe de
verpakkingsmaterialen op een milieuvriendelijke manier van de hand. Uw
gemeente kan u informeren over de beste manier om deze materialen weg te
ruimen.
● Wanneer u een oude wasmachine van de hand doet, moet u voor alle veiligheid
de stekker uit het stopcontact halen, het stroomsnoer afknippen en dit samen met
de stekker vernietigen. Om te voorkomen dat kinderen zichzelf in de machine
opsluiten, breekt u de scharnieren of het slot van de deur.
GIAS-Service
● Om te zorgen voor een continue veilige en efficiënte werking van dit apparaat,
bevelen wij aan dat servicing of reparaties alleen worden uitgevoerd door een
bevoegde GIAS onderhoudsmonteur.
Europese richtlijn 2002/96/EC
Dit apparaat voldoet aan de Europese richtlijnen 2002/96/EC voor elektrische en
elektronische afval.
Door dit apparaat correct te verwijderen, helpt u het
potentiële negatieve gevolg voor de omgeving en menselijke
gezondheid te voorkomen, welke anders door onjuiste
verwijdering zou kunnen worden veroorzaakt.
Het symbool op het product duidt aan dat dit product niet
behandeld zal worden als huishuidelijk afval. In plaats
daarvan zal het apparaat naar het verzamelpunt voor de
recycling van elektrische en elektronische uitrusting gaan.
De verwijdering moet in overeenstemming met plaatselijke
milieuvoorschriften voor afvalverwerking uitgevoerd worden.
Voor meer gedetailleerde informatie over de verwijderingvan
dit product, neemt u contact op met uw gemeenlijke
reinigingsdienst of de dealer waar u het apparaat heeft
gekocht.
23
Als de machine niet correct functioneert of kapot gaat, schakel
het dan uit en haal de stekker uit het stopcontact. Wendt u tot
GIAS-Service voor reparaties.
40003874Dut.qxd 15/12/2005 15:58 Page 23
Elektrische vereisten
Drogers worden geleverd om te kunnen werken op een
voltage van 230V, 50 Hz monophase. Controleer of het
voedingscircuit ten minste 16A bedraagt.
Elektriciteit kan erg gevaarlijk zijn.
Deze machine moet geaard zijn.
Het stopcontact en de stekker van de machine moeten
van hetzelfde soort zijn.
Gebruik geen meervoudige adapters en/of
verlengsnoeren.
Nadat het apparaat is geïnstalleerd, moet de stekker
bereikbaar blijven om uit het stopcontact te halen.
De draden in het stroomsnoer hebben de volgende
kleuren:
Blauw NEUTRAAL
Bruin ONDER STROOM
Groen en Geel AARDVERBINDING
CE apparaat voldoet aan de Europese richtlijn
89/336/EEC, 73/23/EEC en volgende aanvullingen.
De voeten verstellen
Als de machine is geplaatst, moeten de voeten worden
versteld zodat de machine waterpas staat.
Verstel de vier voeten zodat de machine stevig en
waterpas staat.
24
Indien het
probleem met uw
machine wordt
veroorzaakt door
een verkeerde
installatie, kunnen
de kosten van de
onderhoudsbeurt
aan u worden
doorberekend.
Als de
stroomkabel van
het toestel
beschadigd is, dan
moet hij
vervangen
worden door een
speciaal snoer dat
ALLEEN bij de
dienst
Reserveondelen
van Hoover
verkrijgbaar is. De
kabel moet door
een bekwaam
persoon worden
geïnstalleerd.
Installatie
Sluit de machine niet aan en start deze
niet voordat de installatie is voltooid.
Voor uw veiligheid moet deze droger
op de juiste manier worden
geïnstalleerd.
Als er ook maar enige twijfel bestaat
over de installatie, bel dan de GIAS-
Service voor advies.
40003874Dut.qxd 20/09/2005 15:57 Page 24

Er moet voldoende ventilatie zijn in de kamer waar de
droger staat om te voorkomen dat de dat gassen van
andere apparaten die brandstof verbranden, waaronder
een open haard, de kamer in worden gezogen als de
droger wordt gebruikt.
● Afzuiglucht mag niet in een via een afvoer
waarlangs uitlaatstoffen van mechanismen die gas
of andere brandstoffen verbranden, worden
afgevoerd.
● Controleer regelmatig dat de lucht die door de
droger stroomt, niet geblokkeerd wordt.
● Controleer na gebruik de pluizenfilter en maak
die indien nodig schoon.
● De aanvoeren en afvoeren moeten vrij gehouden
worden van obstructies. Om te zorgen voor
voldoende ventilatie moet de ruimte tussen de
onderkant van de machine en de vloer vrij blijven.
Er moet een opening van ten minste 12 mm zijn
tussen de machine en enig obstakel.
● Voorkom dat artikelen achter de droger vallen of
zich daar ophopen omdat deze de luchtaanvoer
en afvoer kunnen belemmeren.
● Installeer de droger NOOIT tegen gordijnen aan.
25
Ventilatie
LUCHTUITVOER
LUCHTUITVOER AAN DE ONDERKANT
GATEN VOOR
LUCHTAANVOER
40003874Dut.qxd 20/09/2005 15:57 Page 25

Alvorens de droogtrommel voor de eerste keer te
gebruiken:
● Lees deze handleiding a.u.b. aandachtig door.
● Verwijder alle artikelen die in de trommel zijn
gepakt.
● Veeg de binnenkant van de trommel en de deur
met een vochtige doek af om alle stof te
verwijderen dat zich tijdens het vervoer kan
hebben verzameld.
Voorbereiding van de
kleren
Zorg ervoor dat het wasgoed dat u wilt drogen,
geschikt is voor het drogen in een droogtrommel, zoals
wordt aangegeven door de wasvoorschriften op ieder
artikel.
Controleer dat alle sluitingen dicht zijn en dat de
zakken leeg zijn. Keer de kleren binnenstebuiten. Leg
de kleren losjes in de trommel om ervoor te zorgen dat
ze niet in elkaar verward raken.
Maximaal te drogen
gewicht
● Katoen Max. 7,5 kg
● Synthetische stoffen Max. 3,5 kg
26
Het wasgoed voorbereiden
Overlaadt de
trommel niet.
Grote stukken
kunnen wanneer
ze nat zijn de
maximaal
toegelaten
waslading
overschrijden
(bijvoorbeeld:
slaapzakken,
donsdekens).
40003874Dut.qxd 20/09/2005 15:57 Page 26

Sorteer het wasgoed als
volgt:
● Op wasvoorschrift
Deze vindt u in de kraag of in de binnennaad:
Kan in de droogtrommel gedroogd worden.
Drogen in de droogtrommel op hoge
temperatuur.
Drogen in de droogtrommel alleen op lage
temperatuur.
Niet in de droogtrommel drogen.
Als de stof geen wasvoorschrift heeft, kunt u
er van uitgaan dat het niet geschikt is voor
de droogtrommel.
● Op hoeveelheid en dikte
Altijd wanneer de hoeveelheid wasgoed groter is
dan de capaciteit van de droger, sorteer de kleren
op dikte (b.v. handdoeken apart van dun
ondergoed).
● Op type stof
Katoen/linnen: Handdoeken, jersey katoen, bed-
en tafellinnen.
Synthetische stoffen: Blouses, overhemden,
overalls, enz. gemaakt van polyester of
polyamide, evenals voor gemengd
katoen/synthetisch.
● Op de temperatuur van het drogen
Sorteer op: strijkdroog, kastdroog, enz. Voor fijn
goed druk op de -knop om een lage
droogtemperatuur in te stellen.
27
40003874Dut.qxd 20/09/2005 15:57 Page 27
Niet in de droogtrommel
drogen:
Wol, zijde, fijn goed, nylon kousen, fijn borduurwerk,
stoffen met metalen versieringen, kledingstukken met
pvc of leren randen, trainingsschoenen, artikelen met
een groot volume zoals slaapzakken, enz.
Energiebesparing
Stop alleen wasgoed in de droogtrommel dat grondig is
uitgewrongen of gecentrifugeerd. Hoe droger het
wasgoed, hoe korter de droogtijd waardoor elektriciteit
wordt bespaard.
ALTIJD
● Probeer altijd om het maximale gewicht aan
wasgoed te drogen, zo bespaart u tijd en
elektriciteit.
● Controleer altijd voor iedere droogcyclus of de
filter schoon is.
NOOIT
● Stop nooit meer dan het maximale gewicht in de
droger, dit is verspilling van tijd en elektriciteit.
● Stop nooit druipnat wasgoed in de
droogtrommel, dit kan het apparaat beschadigen.
Richtlijnen voor het
drogen
De tabel toont de gemiddelde droogtijden, afhankelijk
van het soort stof en de vochtigheid van de kleren.
28
Droogadvies
BELANGRIJK: Stop
geen artikelen in
de droogtrommel,
die zijn behandeld
met een chemische
reinigingsvloeistof
en ook geen
rubber kleren
(gevaar voor brand
of explosie).
Gedurende de
laatste 15 minuten
draait de was altijd
in koude lucht.
Weefsel
KATOEN
SYNTHETISCH
ACRYL
WARMTESTAND
HOOG
LAAG
LAAG
GROTE LADING
140-165 Min
–
–
MEDIUM LADING
70-80 Min
70-80 Min
50-65 Min
KLEINE LADING
50-65 Min
40-55 Min
30-40 Min
40003874Dut.qxd 20/09/2005 15:57 Page 28
Bedieningspaneel en indicatielampjes
Programmakeuzetoets – Kies het gewenste programma
Aan/Uit knop en indicatielampje – Indrukken om aan te zetten, het indicatielampje
zal gaan branden
Start – Indrukken om het gekozen droogprogramma te starten. 5 seconden indrukken
om het programma te annuleren/resetten
Acryl/Synthetisch-knop – Indrukken om de temperatuur te verlagen voor het
drogen van fijn goed. Het indicatielampje boven de knop zal gaan branden. Om de
temperatuurinstelling te veranderen moet het programma gereset worden
Lage Temperatuur - Indicatielampje AAN Hoge temperatuur - Indicatielampje UIT
Indicatielampje Watercontainer Legen – Brandt wanneer de watercontainerlade vol
is
Filtercontrolelampje – Brandt wanneer de filter schoongemaakt moet worden.
Start Uitstel-knop – Hiermee kan de gebruiker de start van de droogcyclus uitstellen
(lees voor gebruik de beschrijving op pagina 34)
Aftelscherm COUNTDOWN
START – Wanneer de droger AAN wordt gezet, knippert het START-indicatielampje.
Wanneer het programma start, gaat het START-indicatielampje branden
60' – Indicatielampje brandt wanneer het programma binnen 60 minuten afgelopen is
15' – Indicatielampje brandt wanneer het programma binnen 15 minuten afgelopen is.
Op dit punt van de droogcyclus begint de Afkoelingsfase
STOP – Indicatielampje brandt wanneer het programma is afgelopen.
6h – 6 uur start uitstel (licht knippert waneer het ingeschakeld is)
9h – 9 uur start uitstel (licht knippert wanneer het ingeschakeld is)
29
Bedieningsknoppen en
indicatielampjes
ACRYL/SYNTHETISCH-
KNOP
AAN/UIT-
KNOP
FILTER SCHOONMAKEN
INDICATIELAMPJE
WATERCONTAINER LEGEN
INDICATIELAMPJE
PROGRAMMA-
KEUZETOETS
STARTKNOP
START UITSTEL-
KNOP
AFTELSCHERM
40003874Dut.qxd 20/09/2005 15:57 Page 29

De deur openen
Trek aan de hendel om de deur te openen.
Om de droger opnieuw te starten, doet u de deur dicht
en drukt u op Start.
Filter
BELANGRIJK: Controleer, om ervoor te zorgen dat de
droger efficiënt blijft werken, voor iedere droogcyclus
of de pluizenfilter schoon is.
1. Trek de filter omhoog.
2. Open de filter zoals getoond wordt.
3. Haal de pluizen met een zacht borsteltje of met
uw vingertoppen voorzichtig weg.
4. Klik de filter samen en duw hem terug op zijn
plaats.
Filter Schoonmaken
Indicatielampje
brandt wanneer het filter schoongemaakt moet
worden.
Als het wasgoed niet droog wordt, controleer dan of
de filter verstopt is.
30
Deur en filter
WAARSCHUWING!
Wanneer de droger in gebruik is,
kunnen de trommel en de deur ERG
WARM worden.
40003874Dut.qxd 20/09/2005 15:57 Page 30

Het water dat tijdens de droogcyclus uit de was wordt
verwijderd, wordt verzameld in een reservoir onderaan
de droogmachine.
Wanneer de container vol is zal het indicatielampje
op het regelpaneel gaan branden en MOET de
container worden geleegd. Maar, we raden aan dat de
container na iedere droogcyclus wordt geleegd.
OPMERKING: Tijdens de eerste cycli van een nieuwe
machine wordt er weinig water verzameld in het
reservoir omdat eerst het interne reservoir wordt
gevuld.
Om het reservoir te
verwijderen
1. Trek de lade voorzichtig naar buiten tot het
helemaal is verwijderd. Ondersteun de lade met
twee handen. Wanneer de watercontainer vol is,
zal deze ongeveer 4kg wegen.
2. Maak het deksel open dat bovenop de container
zit en gooi het water weg. Sluit het deksel en
schuif het waterreservoir weer op zijn plaats.
DRUK GOED OP ZIJN PLAATS.
OPMERKING: Wanneer u een afvoermogelijkheid bij de
droger heeft, kunt u de afvoerset gebruiken waarmee
een permanente afvoer ontstaat voor het door de
droger verzamelde water. Hierdoor hoeft de waterlade
niet meer geleegd te worden. U vindt alle informatie
over de montage van de set in de verpakking van de
set.
31
Watercontainer
40003874Dut.qxd 20/09/2005 15:57 Page 31
Belangrijk: Zet het apparaat altijd uit en trek de stekker uit het stopcontact alvorens u de
condensator schoonmaakt.
Controleer regelmatig of de condensator schoon is om de efficiëntie van de droger te
handhaven.
De condensator verwijderen
1. Trek voorzichtig aan de onderkant van de schopplaat zodat ze van de droger los
komt. U kunt vervolgens de scharnieren aan de bovenkant losmaken en de
schopplaat volledig verwijderen.
2. Draai de twee sluithendels tegen de klok in en haal de condensator uit de machine.
3. Haal de condens-unit uit de machine.
4. Haal voorzichtig alle stof of pluizen met een doek
weg, was de unit daarna door hem onder een
stromende kraan te houden en hem zo te draaien dat
er water tussen de platen stroomt, waardoor alle stof
of pluizen verwijderd worden.
5. Plaats de condensator opnieuw. Zorg ervoor dat u
hem in de juiste richting plaatst (volgens de pijl) en
druk hem stevig aan. Draai de twee hendels weer
met de klok mee aan.
6. Breng de schopplaat weer op haar plaats.
De Sensor Wasdroger biedt veel opties voor het
drogen van wasgoed onder alle omstandigheden.
Opmerking: De sensor zal misschien een kleine lading
artikelen niet ontdekken. Gebruik imerprogramma’s
voor kleine ladingen en aparte artikelen of
voorgedroogde stoffen met een laag vochtgehalte.
Stel het programma tussen 30 en 75 minuten
32
Condensator
Het programma
kiezen
40003874Dut.qxd 20/09/2005 15:57 Page 32
afhankelijk van de grootte van de lading en de vereiste droogte en slecteer een hoge of
lage temperatuur afhankelijk van het soort stof.
Als de sensor het artikel niet waarneemt, zal de droger slechts 10 minuten draaien,
waarna het op afkoelen overgaat.
Als de lading te groot of te nat is om te drogen, zal de droger na 185 minuten
automatisch op afkoelen overgaan.
In de onderstaande tabel staan de programma’s en functie van ieder programma
vermeld.
33
Programma
Kurkdroog
Extra droog
Kastdroog
Strijkdroog
Wol
Snel Strijken
120'
75'
60'
45'
30'
Opfrissen
Beschrijving
Kies de droogtegraad die u wenst.
Dit varieert van Kurkdroog voor handdoeken en badjassen,
naar Kastdroog voor artikelen die zonder strijken opgeborgen
worden, tot het programma dat het wasgoed strijkklaar
maakt.
Een voorzichtig programma dat speciaal is gemaakt om
wolwas zachter te maken na luchtdroging.
Deze fijne warme luchtcyclus van 12 minuten kan ook worden
gebruikt voor het ‘opfrissen’ van wolwas dat in de klerenkast
is opgeborgen.
Het programma Snel Strijken heeft een verzorgings- en
kreukherstellende functie. De droger zal gedurende
9 minuten het wasgoed verwarmen, gevolgd door een
afkoelingsperiode van 3 minuten. Dit is vooral handig voor
kledingstukken die misschien enige tijd voorafgaande aan het
strijken zijn blijven liggen, b.v. in een wasmand. Het is
eveneens mogelijk dat er kledingstukken stijf zijn geworden
toen ze buiten aan de waslijn of binnen op een radiator
droogden. De Snel Strijken-behandeling maakt de kreuken in
de stof zachter wat het strijken sneller en gemakkelijker
maakt.
120 minuten drogen
75 minuten drogen
60 minuten drogen
45 minuten drogen
30 minuten drogen
Was 30 minuten in koude lucht draaien.
40003874Dut.qxd 20/09/2005 15:57 Page 33
1. Doe de deur open en laad de trommel met wasgoed. Zorg ervoor dat de
kledingstukken het sluiten van de deur niet belemmeren.
2. Doe de deur voorzichtig dicht waarbij u haar langzaam aandrukt tot u ze hoort
‘dichtklikken’.
3. Druk op de knop om de droger aan te zetten. Het indicatielampje gaat
branden en het START-indicatielampje gaat knipperen.
4. Draai de Programmakeuzeschakelaar om het gewenste droogprogramma te
kiezen (zie Programmaoverzicht).
5. Indien u synthetische, acryl of fijne artikelen droogt, drukt u op de knop om
de temperatuur te verlagen.
Het lampje boven de drukknop brandt wanneer een lage temperatuur is ingesteld.
Om de keuze ongedaan te maken na het starten van de droogcyclus, moet de
machine gereset worden
6. Druk op de Start-knop. De droger start automatisch en het START-indicatielampje
brandt ononderbroken.
7. Het display toont de voortgang door de resterende tijd de tonen.
8. Indien de deur tijdens het programma wordt geopend om de was te controleren,
drukt u op Start om het drogen opnieuw te starten na het sluiten van de deur.
9. Wanneer het 15' indicatielampje brandt, gaat de afkoelingsfase in.De kleding
draaien in koude lucht zodat de lading af kan koelen.
10. Wanneer het programma afgelopen is, gaat het STOP-indicatielampje branden.
Het programma annuleren en resetten
Druk 5 seconden op de Start-knop om een programma te annuleren. Het knipperen van
het START-indicatielampje geeft aan dat de machine is gereset. Het is mogelijk om
tijdens de eerste 10 minuten het programma te veranderen zonder de annuleer en reset
functie te gebruiken.
Start Uitstel
Met de functie kan de gebruiker de start van de
droogcyclus 6 of 9 uur uitstellen.
Wanneer de functie is gekozen, toont het
bedieningspaneel een uitstel van 6 uur. De volgende
druk op de knop zal het uitstel verlengen tot 9 uur.
Druk op Start om het programma te starten en het
apparaat zal de droogcyclus na het verstrijken van die
tijd uitvoeren. Het 6 of 9 uur indicatielampje knippert
om aan te geven dat Start Uitstel is ingeschakeld.
34
WAARSCHUWING!
De trommel, de
deur en het
wasgoed kunnen
erg warm zijn.
Bediening
40003874Dut.qxd 20/09/2005 15:57 Page 34
Schoonmaken van de
droger
● Maak het filter schoon en leeg het waterreservoir
na iedere droogcyclus.
● Maak de condensator regelmatig schoon.
● Veeg na iedere gebruiksperiode de binnenkant
van de trommel af en laat de deur een poosje
open zodat ze kan drogen door de circulatie van
de lucht.
● Veeg de buitenkant van de machine en de deur af
met een zachte doek.
● GEEN schuursponsjes of schoonmaakmiddelen
gebruiken.
● Om te voorkomen dat de deur plakt of pluis zich
ophoopt, moet u de binnendeur regelmatig
schoonmaken met een natte doek.
Technische specificaties
Trommelcapaciteit 115 liter
Maximale lading 7,5 kg
Hoogte 85 cm
Breedte 60 cm
Diepte 60 cm
Energieniveaugroep C
35
BELANGRIJK
Voor u dit
apparaat
schoonmaakt,
moet u het altijd
uitschakelen en de
stekker uit het
stopcontact halen.
De elektrische
gegevens vindt u
op het kwalificatie-
etiket op de
voorkant van de
droger (met de
deur open).
Schoonmaken en
Onderhoudsbeurten
40003874Dut.qxd 20/09/2005 15:57 Page 35
Wat zou de reden kunnen zijn voor...
Defecten die u zelf kunt oplossen
Voordat u de GIAS-Service voor technisch advies belt, kunt u de volgende controlelijst
afgaan. Er zullen kosten worden aangerekend als blijkt dat de machine werkt of dat de
machine niet juist werd geïnstalleerd of gebruikt. Als het probleem zich na de
aanbevolen controles nog steeds voordoet, belt u GIAS-Service, zodat zij u telefonisch
kunnen helpen.
De droogtijd is te lang/kleren zijn niet droog
genoeg…
● Hebt u de juiste droogtijd/het juiste programma gekozen?
● Waren de kleren te nat? Waren de kleren grondig uitgewrongen of
gecentrifugeerd?
● Moet het filter schoongemaakt worden?
● Moet de condensator schoongemaakt worden?
● Is de droger te vol geladen?
● Worden de aan- en afvoeren en het onderstuk van de droger niet geblokkeerd?
● Is de -knop geselecteerd voor een voorgaande cyclus?
De droger werkt niet…
● Staat er spanning op het elektriciteitssnoer van de droger? Controleer dit door het
met een ander apparaat te gebruiken, zoals een tafellamp.
● Is de stekker op de juiste manier verbonden met de netspanning?
● Is de stroom uitgevallen?
● Is de zekering doorgeslagen?
● Is de deur helemaal dicht?
● Staat de droger aan, zowel bij de netspanning als bij de machine?
● Is de droogtijd of het programma ingesteld?
● Is de machine opnieuw ingeschakeld nadat de deur open is geweest?
● Is de droger gestopt omdat het waterreservoir vol is en geleegd moet worden?
De droger maakt herrie…
● Schaker de droger uit en neem contact op met GIAS-Service voor advies.
Het indicatielampje Filter schoonmaken staat aan…
● Moet het filter schoongemaakt worden?
● Moet de condensator schoongemaakt worden?
Indicatielampje Watercontainer Legen brandt…
● Moet het waterreservoir geleegd worden?
36
Problemen oplossen
40003874Dut.qxd 20/09/2005 15:57 Page 36

Als er nog steeds een probleem mocht zijn met uw
droger nadat u alle aanbevolen controles hebt
uitgevoerd, bel dan a.u.b. de GIAS-Service voor advies.
Zij kunnen u misschien aan de telefoon helpen of
volgens de bepalingen van de garantie een afspraak
maken met een technicus die u komt opzoeken. Er
kunnen evenwel kosten in rekening worden gebracht
als een van de volgende punten op uw machine van
toepassing is:
● De machine blijkt goed te werken
● Ze is niet geïnstalleerd volgens de
installatievoorschriften.
● Ze is op een onjuiste manier gebruikt.
Reserveonderdelen
Gebruik altijd originele reserveonderdelen. Deze zijn
direct beschikbaar via GIAS-Service.
GIAS-Service
Voor onderhoud en reparaties belt u met uw locale
GIAS onderhoudsmonteur.
De fabrikant aanvaardt geen verantwoordelijkheid voor
drukfouten in dit boekje. De fabrikant behoudt ook het
recht voor om de producten waar nodig aan te passen
zonder de hoofdkenmerken te veranderen.
37
Klantenservice
40003874Dut.qxd 20/09/2005 15:57 Page 37

Introduction . . . . . . . . . . . . . . . . . . . . . . . . . . . . . . . . . . . . . . . . . . . . . . 39
Informations sur la livraison . . . . . . . . . . . . . . . . . . . . . . . . . . . . . . . . . . . . . . 39
Déballage du produit . . . . . . . . . . . . . . . . . . . . . . . . . . . . . . . . . . . . 39
Rappels de sécurité . . . . . . . . . . . . . . . . . . . . . . . . . . . . . . . . . . . . . . 40
Installation . . . . . . . . . . . . . . . . . . . . . . . . . . . . . . . . . . . . . . . . . . . . . . . . . . . . 40
Utilisation. . . . . . . . . . . . . . . . . . . . . . . . . . . . . . . . . . . . . . . . . . . . . . . . . . . . . 40
Le linge . . . . . . . . . . . . . . . . . . . . . . . . . . . . . . . . . . . . . . . . . . . . . . . . . . . . . . 40
Protection de l’environnement . . . . . . . . . . . . . . . . . . . . . . . . . . . . . . . . . . . . 41
Service GIAS . . . . . . . . . . . . . . . . . . . . . . . . . . . . . . . . . . . . . . . . . . . . . . . . . . . 41
Installation. . . . . . . . . . . . . . . . . . . . . . . . . . . . . . . . . . . . . . . . . . . . . . . . 42
Besoins électriques. . . . . . . . . . . . . . . . . . . . . . . . . . . . . . . . . . . . . . . . . . . . . . 42
Ajustement des pieds. . . . . . . . . . . . . . . . . . . . . . . . . . . . . . . . . . . . . . . . . . . . 42
Ventilation . . . . . . . . . . . . . . . . . . . . . . . . . . . . . . . . . . . . . . . . . . . . . . . . 43
Préparation de la charge . . . . . . . . . . . . . . . . . . . . . . . . . . . . . . . . 44
Préparation des vêtements . . . . . . . . . . . . . . . . . . . . . . . . . . . . . . . . . . . . . . . 44
Tri de la charge . . . . . . . . . . . . . . . . . . . . . . . . . . . . . . . . . . . . . . . . . . . . . . . . 45
Conseils de séchage. . . . . . . . . . . . . . . . . . . . . . . . . . . . . . . . . . . . . . 46
Ne séchez pas en machine . . . . . . . . . . . . . . . . . . . . . . . . . . . . . . . . . . . . . . . . 46
Économies d’énergie . . . . . . . . . . . . . . . . . . . . . . . . . . . . . . . . . . . . . . . . . . . . 46
Guide de séchage. . . . . . . . . . . . . . . . . . . . . . . . . . . . . . . . . . . . . . . . . . . . . . . 46
Commandes et indicateurs . . . . . . . . . . . . . . . . . . . . . . . . . . . . . 47
Porte et filtre . . . . . . . . . . . . . . . . . . . . . . . . . . . . . . . . . . . . . . . . . . . . . 48
Ouverture de la porte . . . . . . . . . . . . . . . . . . . . . . . . . . . . . . . . . . . . . . . . . . . 48
Filtre. . . . . . . . . . . . . . . . . . . . . . . . . . . . . . . . . . . . . . . . . . . . . . . . . . . . . . . . . 48
Indicateur Entretien Filtre . . . . . . . . . . . . . . . . . . . . . . . . . . . . . . . . . . . . . . . . 48
Réservoir d’eau. . . . . . . . . . . . . . . . . . . . . . . . . . . . . . . . . . . . . . . . . . . 49
Pour retirer le réservoir . . . . . . . . . . . . . . . . . . . . . . . . . . . . . . . . . . . . . . . . . . 49
Condenseur . . . . . . . . . . . . . . . . . . . . . . . . . . . . . . . . . . . . . . . . . . . . . . . 50
Pour retirer le condenseur . . . . . . . . . . . . . . . . . . . . . . . . . . . . . . . . . . . . . . . . 50
Sélection du programme . . . . . . . . . . . . . . . . . . . . . . . . . . . . . . . . 50
Fonctionnement . . . . . . . . . . . . . . . . . . . . . . . . . . . . . . . . . . . . . . . . . 52
Annulation et réinitialisation du programme . . . . . . . . . . . . . . . . . . . . . . . . . 52
Départ Différé . . . . . . . . . . . . . . . . . . . . . . . . . . . . . . . . . . . . . . . . . . . . . . . . . 52
Nettoyage et Entretien de Routine . . . . . . . . . . . . . . . . . . . . 53
Nettoyage du sèche-linge . . . . . . . . . . . . . . . . . . . . . . . . . . . . . . . . . . . . . . . . 53
Spécifications techniques. . . . . . . . . . . . . . . . . . . . . . . . . . . . . . . . . . . . . . . . . 53
Dépistage de pannes . . . . . . . . . . . . . . . . . . . . . . . . . . . . . . . . . . . . 54
Service clientèle . . . . . . . . . . . . . . . . . . . . . . . . . . . . . . . . . . . . . . . . . . 55
Pièces de rechange. . . . . . . . . . . . . . . . . . . . . . . . . . . . . . . . . . . . . . . . . . . . . . 55
Service GIAS . . . . . . . . . . . . . . . . . . . . . . . . . . . . . . . . . . . . . . . . . . . . . . . . . . . 55
38
40003874Fre.qxd 20/09/2005 17:19 Page 38
Introduction
Veuillez lire et suivre ces instructions avec soin et
utiliser la machine en conséquence. Ce livret contient
des instructions importantes sur la sécurité d’utilisation,
l’installation et l’entretien de la machine, ainsi que des
conseils utiles pour obtenir les meilleurs résultats
possibles lors de son utilisation.
Conservez toute la documentation dans un endroit sûr
pour pouvoir vous y reporter à une date ultérieure ou la
transmettre aux prochains propriétaires
Informations sur la
livraison
Vérifiez que les articles suivants ont bien été livrés avec
l’appareil :
● Manuel d’utilisation
● Carte de garantie
● Étiquette d’énergie
Retirez la machine de l’emballage, à proximité de son
emplacement définitif.
1. Coupez délicatement autour de la base de
l’emballage en remontant vers l’angle supérieur.
2. Retirer le manchon en polyéthylène et sortez le
sèche-linge de la base en polystyrène.
39
Vérifiez que la
machine ne s’est
pas détériorée en
transit. Si c’est le
cas, contactez GIAS
pour une opération
de dépannage.
Le non-respect de
ces instructions
peut compromettre
la sécurité de votre
appareil. Un appel
de service peut
vous être facturé si
la défaillance de
votre appareil est
causée par une
mauvaise
utilisation.
Déballage du produit
Mettez l’emballage au rebut en toute
sécurité. Conservez hors de portée des
enfants car il représente une source de
danger potentielle.
40003874Fre.qxd 20/09/2005 17:19 Page 39

Rappels de sécurité
Installation
● Vérifiez que la machine ne présente aucun signe visible de détérioration avant de
l’utiliser. En cas de détérioration, assurez-vous de ne pas l’utiliser et de contacter le
service GIAS.
● N’utilisez pas d’adaptateurs, de multi-prises et/ou de rallonges.
● Cette machine ne doit pas être installée dans une salle de bain ou de douche.
● Veillez à ne pas installer le sèche-linge contre des rideaux et assurez-vous que rien
ne pourra tomber ou s’accumuler derrière le sèche-linge.
Utilisation
● ATTENTION La mauvaise utilisation d’un sèche-linge risque de causer un d’incendie.
● Cette machine est conçue uniquement pour usage domestique, à savoir pour
sécher le linge domestique et les vêtements.
● Cette machine ne doit être utilisée que pour l’emploi auquel elle est destinée et
qui est décrit dans ce manuel. Assurez-vous d’avoir bien compris les instructions
d’installation et d’utilisation avant de faire fonctionner la machine.
● Ne touchez pas la machine si vous avez les mains ou les pieds mouillés ou humides.
● Ne vous appuyez pas sur la porte lorsque vous chargez la machine et n’utilisez pas
la porte pour soulever ou déplacer la machine.
● Ne laissez pas des enfants jouer avec la machine ou avec ses commandes.
● ATTENTION N’utilisez pas cette machine si le filtre à peluches n’est pas en place ou
s’il est endommagé ; les peluches risquent en effet de s’allumer.
● ATTENTION L’augmentation de température pendant le fonctionnement du sèche-
linge peut être supérieure à 60°C là où se trouve le symbole de surface chaude.
● Débranchez du courant de secteur. Retirez toujours la prise avant de nettoyer la
machine.
● Cessez d’utiliser la machine si elle semble défectueuse.
● Veillez à ce que les peluches ne puissent pas s’accumuler sur le sol, à l’extérieur de
la machine.
● Il se peut que l’intérieur du tambour soit très chaud. Veillez à ce que le sèche-linge
termine son cycle de refroidissement avant d’en sortir le linge.
Le linge
● ATTENTION NE séchez PAS les tissus qui ont été traités avec des liquides de
nettoyage à sec.
● ATTENTION Quand elles sont chauffées, les mousses alvéolaires peuvent dans
certains cas brûler par combustion spontanée. Les articles en plastique alvéolaire,
en caoutchouc alvéolaire et en caoutchouc ne conviennent pas au séchage en
machine. Les articles fabriqués à partir de ces matériaux NE DOIVENT PAS être
placés dans le sèche-linge.
● Reportez-vous toujours aux étiquettes d’entretien du linge pour vérifier le mode
de séchage recommandé.
● Les vêtements doivent être essorés en machine ou à la main avant d’être placés
dans le sèche-linge. Les vêtements qui dégoulinent NE DOIVENT PAS être mis dans
40
40003874Fre.qxd 15/12/2005 16:02 Page 40

le sèche-linge.
● Enlevez les briquets et les allumettes des poches et veillez à ne JAMAIS utiliser de
liquides inflammables à proximité de la machine.
● Les rideaux en fibres de verre ne doivent JAMAIS être placés dans cette machine.
La contamination d’autres vêtements par les fibres de verre peut entraîner des
irritations de la peau.
● Les vêtements traités ou contaminés par des produits de nettoyage ou des liquides
inflammables, comme le pétrole, l’huile de cuisson ou les aérosols NE DOIVENT
PAS être placés dans la machine.
Protection de l’environnement
● Tous les matériaux de conditionnement utilisés sont écologiques et recyclables.
Veuillez les éliminer de manière écologique. Votre municipalité pourra vous
donner le détail exact des méthodes d’élimination en vigueur.
● Pour assurer la sécurité lors de l’élimination d’un vieux sèche-linge, veuillez
débrancher la fiche du courant de secteur, couper le câble d’alimentation et le
détruire avec la fiche. Pour empêcher que les enfants ne s’enferment dans la
machine, cassez les charnières de la porte ou son dispositif de verrouillage.
Service GIAS
● Pour veiller au fonctionnement efficace et sans risque de cet appareil, nous vous
recommandons de faire exclusivement appel à un technicien GIAS agréé pour son
entretien ou sa réparation éventuelle.
Directive européenne 2002/96/CE
Cet appareil est commercialisé en accord avec la directive européenne 2002/96/CE sur les
déchets des équipements électriques et électroniques (DEEE).
En vous assurant que ce produit est correctement recyclé,
vous participez à la prévention des conséquences négatives
sur l’environnement et la santé publique qui pourrait être
causé par une mise au rebut inappropriée de ce produit.
Le symbole sur ce produit indique qu’il ne doit pas être traité
comme un déchet ménager. Il doit être rapporté jusqu’à un
point de recyclage des déchets électriques et électroniques.
La collecte de ce produit doit se faire en accord avec les
réglementations environnementales concernant la mise au
rebut de ce type de déchets.
Pour plus d’information au sujet du traitement, de la collecte
et du recyclage de ce produit, merci de contacter votre mairie,
votre centre de traitement des déchets ou le magasin où vous
avez acheté ce produit.
41
Si l’appareil ne fonctionne pas correctement ou s’il tombe en
panne, mettez-le à l’arrêt et débranchez-le du courant de secteur.
Consultez le service GIAS pour prévoir une éventuelle réparation.
40003874Fre.qxd 15/12/2005 16:03 Page 41

Besoins électriques
Les sèche-linges sont prévues pour une tension
monophasée de 230 V, 50 Hz. Vérifiez que la tension
nominale du circuit d’alimentation est réglée sur 16 A
minimum.
L’électricité peut être extrêmement dangereuse.
Cet appareil doit être mis à la terre.
La prise de courant et la fiche de la machine doivent
être du même type.
N’utilisez pas de multi-prises et/ou de rallonges.
La fiche doit être accessible pour débrancher l’appareil
une fois qu’il a été installé.
Les fils du câble de secteur sont colorés en fonction des
codes suivants :
Bleu NEUTRE
Marron SOUS TENSION
Vert et jaune TERRE
La machine est conforme aux directives européennes
89/336/EEC, 73/23/EEC et à leurs modifications ultérieures.
Ajustement des pieds
Lorsque la machine est en place, les pieds doivent être
ajustés pour mettre la machine de niveau.
Ajustez les quatre pieds pour stabiliser la machine et la
mettre de niveau.
42
Un appel de
service peut vous
être facturé si la
défaillance de
votre appareil est
causée par une
installation
incorrecte.
Si le cordon
électrique de cet
appareil est
endommagé, il
doit être remplacé
par un cordon
spécial qui est
UNIQUEMENT
disponible auprès
du service des
pièces de
rechange. Il doit
être installé par
une personne
compétente.
Installation
Ne branchez pas l’appareil et ne mettez
pas en marche l’interrupteur de secteur
tant que l’installation n’est pas
terminée.
Par mesure de sécurité, veillez à
installer ce sèche-linge correctement.
En cas de doute concernant son
installation, veuillez demander conseil à
GIAS Service.
40003874Fre.qxd 20/09/2005 17:19 Page 42

La pièce où se trouve le sèche-linge doit avoir une
ventilation adéquate de manière à ce que les gaz des
appareils qui brûlent d’autres combustibles, y compris
les cheminées, ne soient pas attirés dans la pièce
pendant que le sèche-linge est en marche.
● L’air d’échappement ne doit pas être évacué par
un conduit qui est également utilisé pour évacuer
les fumées d’échappement d’appareils qui brûlent
du gaz ou d’autres combustibles.
● Vérifiez régulièrement que l’air peut circuler
librement autour du sèche-linge.
● Vérifiez le filtre à peluches après usage, et
nettoyez-le le cas échéant.
● Les entrées et sorties doivent être libres
d’obstructions. Pour veiller à une ventilation
adéquate, l’espace entre le bas de la machine et
le sol ne doit pas être obstrué. Il doit y avoir un
espace d’au moins 12 mm entre la machine et
d’éventuelles obstructions.
● Veillez à ce que rien ne puisse tomber ou
s’accumuler entre les côtés et l’arrière du sèche-
linge, afin de ne pas obstruer l’entrée et la sortie
d’air.
● N’installez JAMAIS le sèche-linge contre des
rideaux.
43
Ventilation
PRISES D’AIR
PRISES D’AIR DANS LA BASE
ENTREES D’AIR
40003874Fre.qxd 20/09/2005 17:19 Page 43
Avant d’utiliser le sèche-linge pour la première fois :
● Veuillez lire ce manuel d’instruction en détail.
● Retirez tous les articles qui se trouvent à
l’intérieur du tambour.
● Essuyez l’intérieur du tambour et de la porte avec
un chiffon humide pour éliminer la poussière
éventuelle qui aurait pu s’y infiltrer en transit.
Préparation des
vêtements
Vérifiez sur les étiquettes comportant les symboles
d’entretien que le linge que vous souhaitez sécher
convient au séchage en machine.
Vérifiez que toutes les fermetures sont fermées et que
les poches sont vides. Mettez les articles à l’envers.
Placez les vêtements en vrac dans le tambour en veillant
à ce qu’ils ne s’emmêlent pas les uns avec les autres.
Poids de séchage
maximum
● Coton, 7,5 kg maxi
● Synthétiques, 3,5 kg maxi
44
Préparation de la charge
Ne surchargez pas
le tambour ;
lorsqu’ils sont
mouillés, les
grands articles
peuvent dépasser
le poids de
maximum
admissible
(ex : sacs de
couchage,
couettes).
40003874Fre.qxd 20/09/2005 17:19 Page 44

Triez la charge comme
suit :
● Par symbole de soin d’entretien
Vous les trouverez sur le col ou la couture
intérieure :
Convient pour séchage en machine.
Séchage à haute température.
Séchage à basse température uniquement.
Ne séchez pas en machine.
Si le vêtement ne comporte aucune étiquette
de conseils de lavage, considérez qu’il ne
convient pas pour le séchage en machine.
● Par quantité et épaisseur
Lorsque la charge est plus importante que la
capacité du sèche-linge, séparez les vêtements
selon leur épaisseur (ex : les serviettes des sous-
vêtements fins).
● Par type de tissu
Coton/toile de lin : Serviettes, jersey en coton,
linge de lit ou de table.
Synthétiques : Chemisiers, chemises, blouses etc.
en polyester ou polyamide, ainsi que pour les
mélanges de coton/synthétique.
● Par degré de séchage
Triez selon : sec pour repassage, sec pour
rangement, etc. Pour les articles délicats, appuyez
sur le bouton pour sélectionner une
température de séchage basse.
45
40003874Fre.qxd 20/09/2005 17:19 Page 45
Ne séchez pas en
machine :
Les lainages, la soie, les tissus délicats, les bas de nylon,
les broderies délicates, les tissus ayant des décorations
métalliques, les vêtements avec des bordures en PVC ou
en cuir, les chaussures de sport, les articles volumineux
comme les sacs de couchage, etc.
Économies d’énergie
Ne mettez que du linge essoré en machine ou à la main
dans le sèche-linge. Plus le linge est sec, plus le temps
de séchage sera court, ce qui économisera de l’énergie.
TOUJOURS
● Essayez de sécher le poids de linge maximum,
pour économiser du temps et de l’électricité.
● Vérifiez que le filtre est propre avant chaque cycle
de séchage.
JAMAIS
● Ne dépassez pas le poids maximum pour ne pas
gaspiller du temps ou de l’électricité.
● Ne mettez pas d’articles dégoulinant d’eau dans
le sèche-linge pour ne pas endommager
l’appareil.
Guide de séchage
Ce tableau indique les temps de séchage approximatifs,
selon le type de tissu et le degré d’humidité des
vêtements.
46
Conseils de séchage
IMPORTANT : Ne
séchez pas les
articles qui ont été
traités avec un
liquide de
nettoyage à sec ou
les vêtements en
caoutchouc (risque
d’incendie ou
d’explosion).
Pendant les 15
dernières minutes,
la charge est
toujours séchée
dans de l’air froid.
Tissus
COTON
SYNTHÉTIQUES
ACRYLIQUE
PUISSANCE DE SÉCHAGE
HAUT
BAS
BAS
PLEINE CHARGE
140-165 min
–
–
1/2 CHARGE
70-80 min
70-80 min
50-65 min
PETITE CHARGE
50-65 min
40-55 min
30-40 min
40003874Fre.qxd 20/09/2005 17:19 Page 46
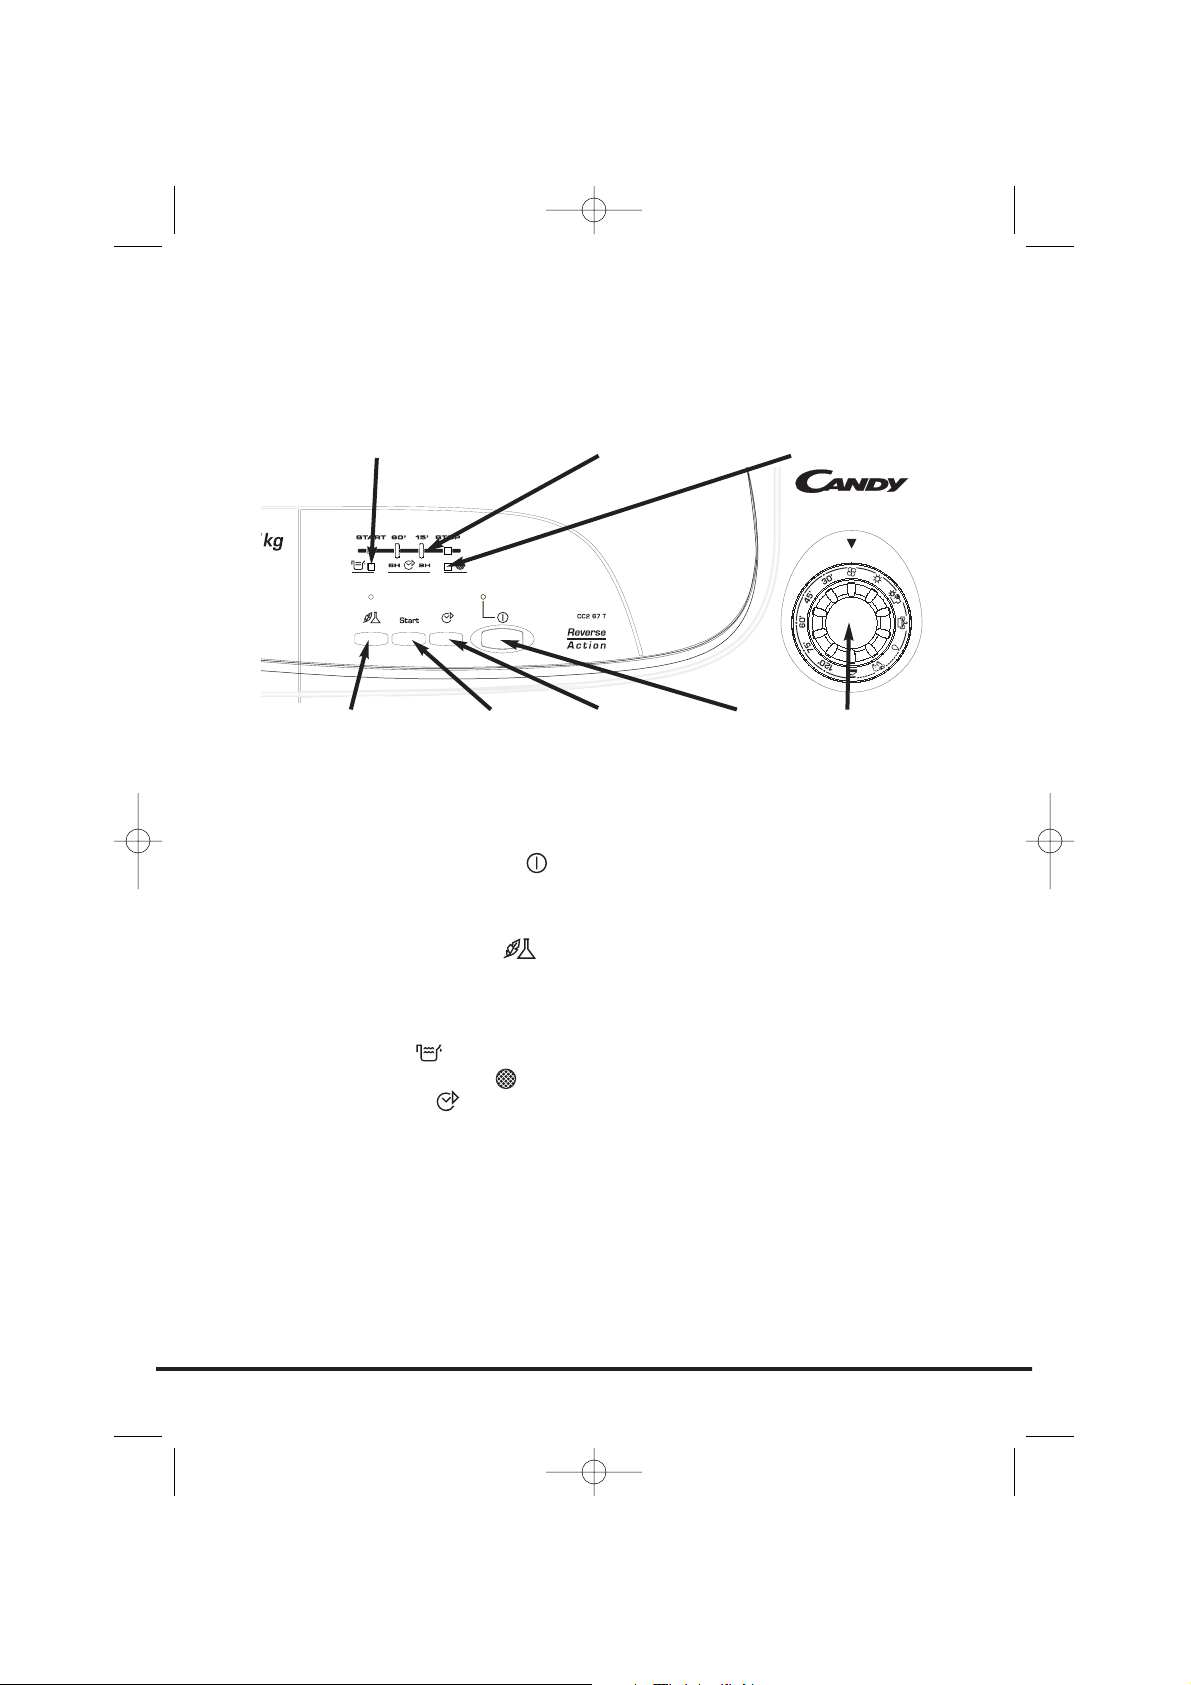
Panneau de commande et témoins indicateurs
Sélecteur de programmes – sélectionnez le programme requis
Bouton et indicateur Marche/Arrêt – appuyez pour mettre en marche ; l’indicateur
s’allume
Start – appuyez sur Start (Marche) pour lancer le programme de séchage sélectionné.
Appuyez pendant 5 secondes pour annuler/réinitialiser le programme.
Bouton acryliques/synthétiques – appuyez pour réduire la température pour les
articles délicats ; l’indicateur situé au-dessus du bouton s’allume. Pour modifier le
réglage de la température, le programme doit être réinitialisé.
Basse température - témoin lumineux ALLUME
Haute température - témoin lumineux ETEINT
Indicateur Vider eau – s’allume lorsque le réservoir d’eau est plein
Indicateur d’entretien du filtre – s’allume lorsqu’il est nécessaire de nettoyer le filtre.
Bouton Départ Différé – permet à l’utilisateur de différer le démarrage du cycle de
séchage (voir les détails de fonctionnement en page 52)
Afficheur COUNTDOWN
START – le témoin de START clignote lorsque le sèche-linge est en marche, et est allumé
lorsque le programme débute.
60' – le témoin s’allume lorsqu’il reste moins de 60 minutes avant la fin du programme.
15' – le témoin s’allume lorsqu’il reste moins de 15 minutes avant la fin du programme.
A ce stade du cycle de séchage, la machine se met en mode Refroidissement.
STOP – ce témoin s’allume lorsque le programme est terminé.
6h – temporisation de 6 heures (le témoin clignote lorsque cette fonction est activée).
9h – temporisation de 9 heures ((le témoin clignote lorsque cette fonction est activée)
47
Commandes et indicateurs
BOUTON SECHAGE
DELICAT
BOUTON
MARCHE/ARRET
INDICATEUR ENTRETIEN FILTRE
INDICATEUR RÉSERVOIR PLEIN
SELECTEUR DE
PROGRAMMES
BOUTON
START
(MARCHE)
BOUTON
DEPART
DIFFERE
AFFICHEUR
COUNTDOWN
40003874Fre.qxd 20/09/2005 17:19 Page 47

Ouverture de la porte
Tirez sur la poignée pour ouvrir la porte.
Pour remettre le sèche-linge en marche, fermez la porte
et appuyez Start.
Filtre
IMPORTANT : Pour assurer l’efficacité du sèche-linge,
vérifiez que le filtre à peluches est propre avant chaque
cycle de séchage.
1. Tirez le filtre vers le haut.
2. Ouvrez le filtre, comme illustré.
3. Retirez doucement les peluches à l’aide d’une
brosse douce ou du bout des doigts.
4. Réenclenchez le filtre et poussez-le en place.
Indicateur Entretien
Filtre
s’allume lorsqu’il faut nettoyer le filtre.
Si le linge ne sèche pas, vérifiez que le filtre n’est pas
colmaté.
48
Porte et filtre
ATTENTION !
Lorsque le seche-linge est en cours
d’utilisation, il se peut que le tambour
et la porte soient TRES CHAUDS.
40003874Fre.qxd 20/09/2005 17:19 Page 48
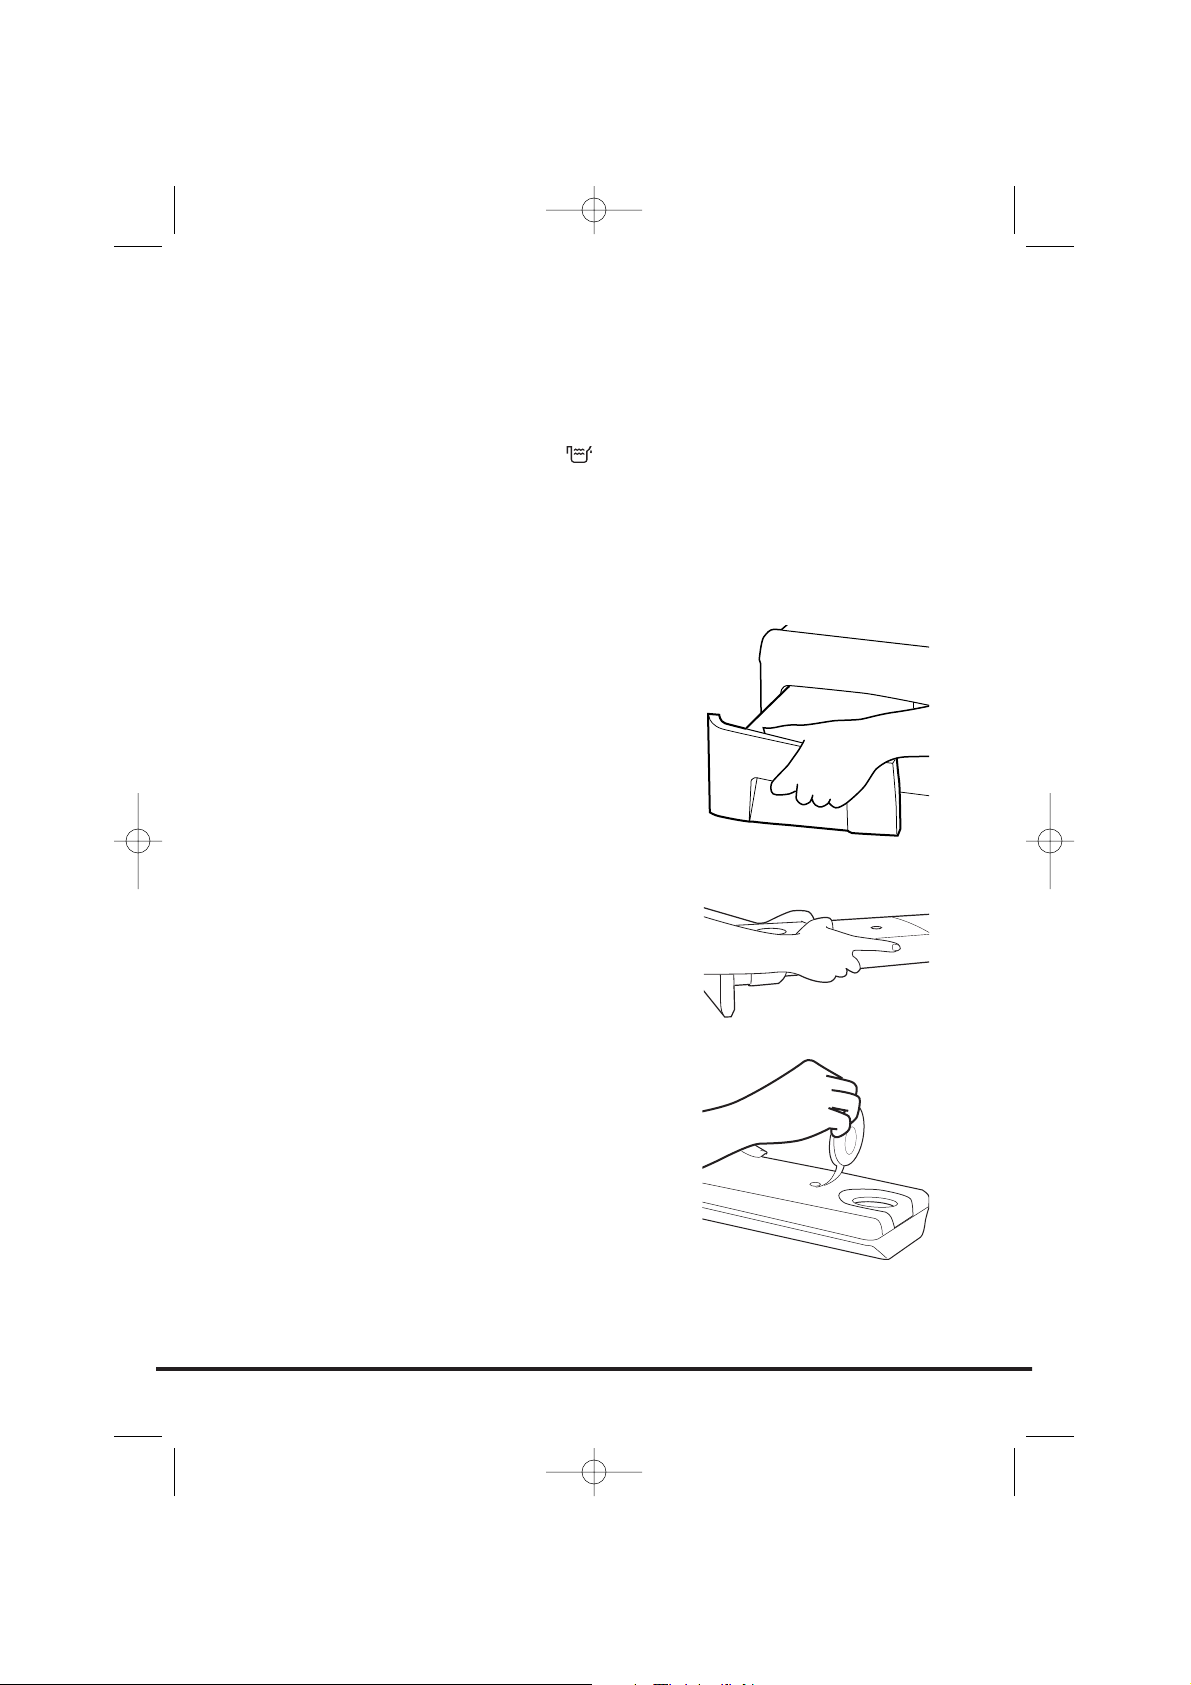
L’eau récupérée du linge pendant le cycle de séchage
est recueillie dans un bac situé en bas du sèche-linge.
Quand le réservoir est plein, l’indicateur s’allume
sur le panneau de commande et le réservoir DOIT
ABSOLUMENT être vidé. Cependant, nous
recommandons de vider le réservoir après chaque cycle
de séchage.
NOTE : Il n’y a que très peu d’eau qui est récupéré
pendant les premiers cycles d’une nouvelle machine, car
le réservoir intérieur est rempli en premier.
Pour retirer le réservoir
1. Tirez doucement le réservoir jusqu’à l’extraire
complètement. Tenez-le fermement à deux mains.
Lorsque le réservoir est plein, il pèse environ 4 kg.
2. Ouvrez le couvercle situé sur le dessus du réservoir
et videz l’eau. Refermez le couvercle et glissez le
bac de récupération de l’eau dans sa position.
POUSSEZ-LE FERMEMENT EN PLACE.
NOTE : Si vous disposez d’une bouche d’évacuation
proche du sèche-linge, il est possible d’installer le kit
d’évacuation de façon permanente pour vidanger l’eau
accumulée dans le sèche-linge. Il n’y aura ainsi plus
besoin de vider le réservoir d’eau. Toutes les
informations d’assemblage du kit sont fournies avec
celui-ci.
49
Réservoir d’eau
40003874Fre.qxd 20/09/2005 17:19 Page 49
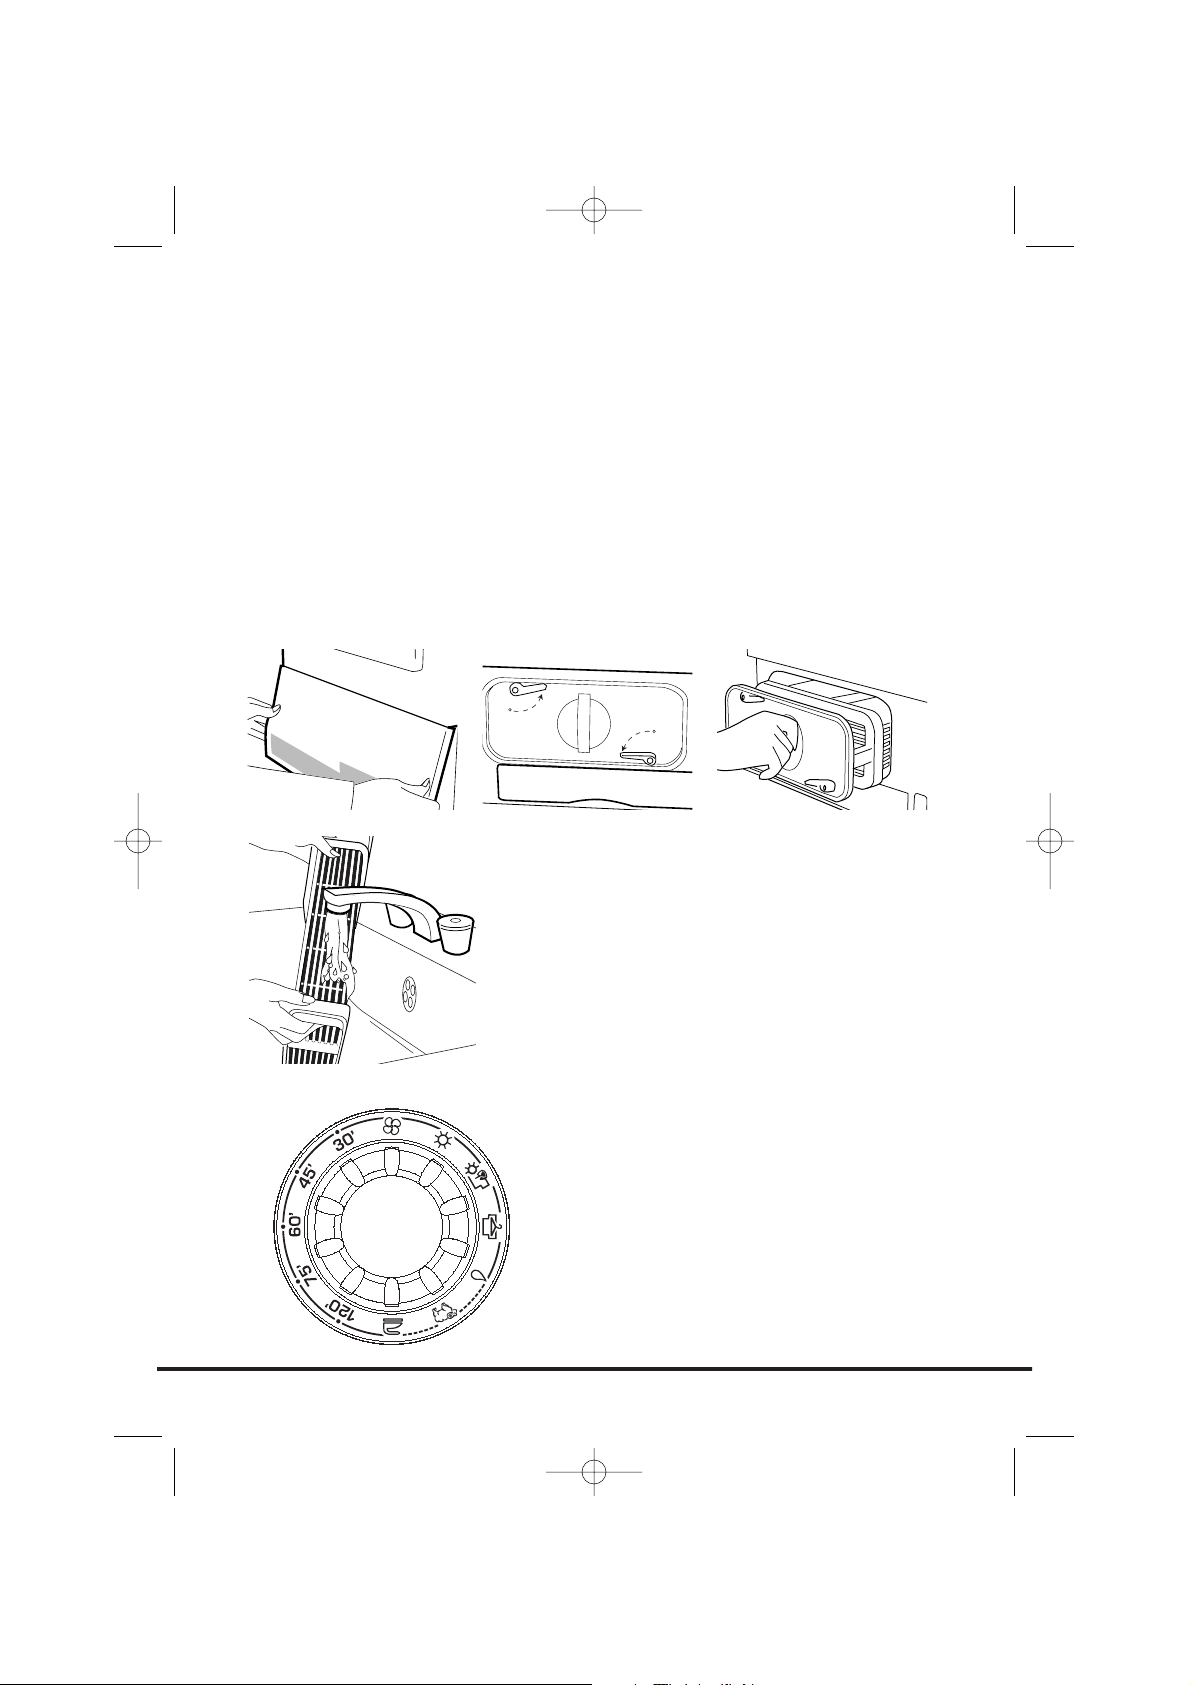
Important : Coupez toujours le courant et débranchez la prise avant de nettoyer le
condenseur.
Pour maintenir l’efficacité du sèche-linge, vérifiez régulièrement la propreté du condenseur.
Pour retirer le condenseur
1. Tirez doucement le bas de la plaque de protection pour la décrocher du sèche-linge.
La section supérieure peut être ôtée de ses charnières pour permettre le retrait total
de la plaque de protection.
2. Tournez les deux leviers de blocage dans le sens contraire des aiguilles d’une montre
et retirez le condenseur.
3. Tirez l’ensemble du condenseur vers l’extérieur.
4. Retirez doucement la poussière ou les peluches avec
un chiffon, puis lavez-le en le tenant sous un robinet
d’eau pour que l’eau coule entre les plaques afin
d’enlever la poussière ou les peluches éventuelles.
5. Remettez correctement le condenseur en place (en
suivant la flèche) en le poussant fermement. Bloquez
les deux leviers en position en les tournant dans le
sens des aiguilles d’une montre.
6. Remettez la plaque de protection en place.
La machine Sensor Dry propose diverses options de
séchage du linge répondant à tous les besoins.
Note : Il se peut que le capteur ne détecte pas les
petites charges de petits articles. Pour les petites
charges et les articles individuels ou les tissus pré-
séchés ayant une faible teneur en humidité, utilisez les
programmes à durée déterminée. Réglez le
50
Condenseur
Sélection du
programme
40003874Fre.qxd 20/09/2005 17:19 Page 50
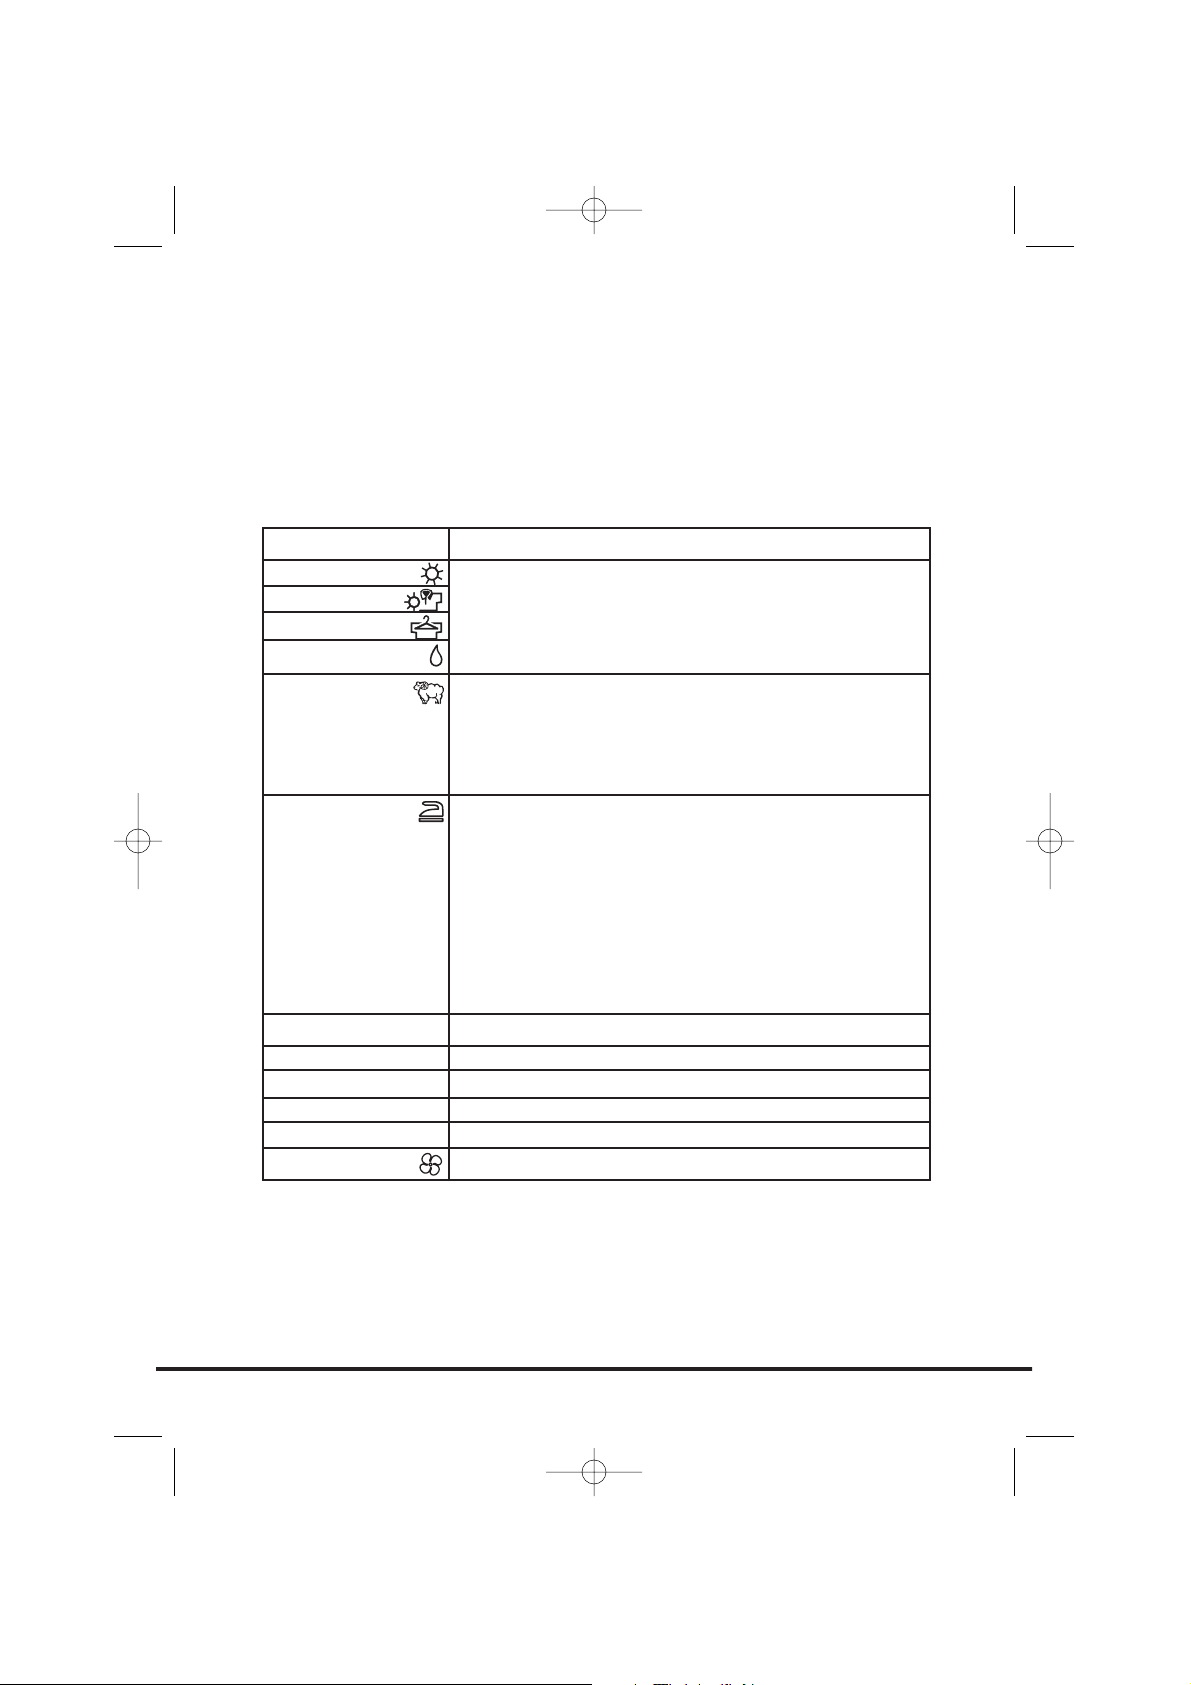
programme entre 30 et 75 minutes selon la taille de la charge et le degré de séchage
voulu, et sélectionnez une température haute ou basse selon le type de tissu.
Si le capteur ne détecte pas l’article, le sèche-linge ne fonctionnera que pendant 10
minutes avant de se mettre en mode refroidissement.
Si la charge est trop importante ou trop mouillée, le sèche-linge se met
automatiquement en mode refroidissement après 185 minutes.
Le tableau ci-après répertorie les programmes et leurs fonctions correspondantes.
51
Programme
Complètement sec
Extra Sec
Sec
Prêt à Repasser
Laine
Repassage rapide
120'
75'
60'
45'
30'
Défroissage
Description
Sélectionnez le degré de séchage souhaité.
Celui-ci s’étend de Complètement sec pour le linge de bain et
les peignoirs, à Sec pour les articles qui seront rangés sans être
repassés, et comprend également le programme séchant le
linge qui sera repassé.
Un programme délicat spécialement créé pour rendre les
lainages plus doux après le séchage à l’air.
Ce cycle délicat à l’air chaud, d’une durée de 12 minutes,
permet aussi de “rafraîchir” les lainages rangés depuis un
certain temps dans votre armoire.
Le programme Repassage rapide comporte une fonction
assouplissant et antifroissement. Le sèche-linge chauffera la
charge pendant 9 minutes et le refroidira ensuite pendant
3 minutes, ce qui est particulièrement utile pour les vêtements
qui ont été laissés pendant un certain temps avant le
repassage, dans le sac à linge par exemple. Les vêtements
peuvent également raidir lorsqu’ils sont séchés en plein air sur
une corde à linge ou à l’intérieur sur des radiateurs. Le
processus de Repassage rapide détend les froissements du
tissu pour rendre le repassage plus rapide et plus facile.
120 minutes de séchage
75 minutes de séchage
60 minutes de séchage
45 minutes de séchage
30 minutes de séchage
Séchage de linge dans de l’air froid pendant 30 minutes.
40003874Fre.qxd 20/09/2005 17:19 Page 51
1. Ouvrez la porte et chargez le sèche-linge de linge. Vérifiez qu’aucun vêtement
n’entrave la fermeture de la porte.
2. Fermez doucement la porte en la poussant lentement jusqu’à ce que vous
entendiez un déclic.
3. Appuyez sur le bouton pour mettre le sèche-linge en marche. Le témoin
s’allume et le témoin de START clignote.
4. Tournez le sélecteur de programme pour choisir le programme de séchage requis
(consultez le guide de programmation).
5. Pour sécher des articles délicats, synthétiques ou en acrylique, appuyez sur le
bouton pour diminuer la température.
Le témoin lumineux situé au-dessus du bouton s’allume lorsque la machine est en
mode basse température. Pour désactiver ce mode lorsque le cycle de séchage a
commencé, la machine doit être réinitialisée.
6. Appuyez sur le bouton Start (Marche). Le sèche-linge démarre automatiquement
et l’indicateur START reste allumé de façon continue.
7. L’afficheur indique le l’avancement du séchage en termes de temps restant.
8. Si vous ouvrez la porte pendant le cycle de séchage pour vérifier le linge, il est
nécessaire d’appuyer sur Start (Marche) pour recommencer le séchage une fois la
porte refermée.
9. Lorsque l’indicateur 15' s’allume, la machine se met en mode refroidissement et les
articles sont séchés dans de l’air froid.
10. Lorsque le programme est terminé, le témoin STOP s’allume.
Annulation et réinitialisation du
programme
Pour annuler un programme, appuyez sur le bouton Start (Marche) pendant
5 secondes. L’indicateur START clignote, signifiant que la machine a été réinitialisée. Il
est possible de modifier le programme dans les 10 minutes suivant le démarrage sans
utiliser la fonction d’annulation et de réinitialisation.
Départ Différé
La fonction permet à l’utilisateur de programmer le
démarrage du cycle de séchage dans un délai de 6 à
9 heures.
Lorsque cette fonction est sélectionnée pour la première
fois, l’afficheur indique un délai de 6 heures. Il convient
d’appuyer une nouvelle fois sur le bouton pour
repousser le délai à 9 heures.
Pour lancer le programme, appuyez sur Start (Marche).
Le cycle de séchage débutera à l’issue de ce délai.
52
ATTENTION !
Il est possible que
le tambour, la
porte et la charge
soient très chauds.
Fonctionnement
40003874Fre.qxd 20/09/2005 17:19 Page 52
Le témoin lumineux de 6 ou 9 heures clignote alors
pour indiquer que la temporisation est activée.
Nettoyage du sèche-
linge
● Nettoyez le filtre et videz le réservoir d’eau après
chaque cycle de séchage.
● Nettoyez le condenseur à intervalles réguliers.
● Après chaque période d’utilisation, essuyez
l’intérieur du tambour et laissez la porte ouverte
pendant un moment pour qu’il puisse sécher
grâce à la circulation d’air.
● Essuyez l’extérieur de la machine et la porte avec
un chiffon doux.
● N’utilisez PAS de tampons ou d’agents de
nettoyage abrasifs.
● Pour empêcher que la porte n’adhère ou que les
peluches ne s’accumulent, nettoyez régulièrement
la surface intérieure et le joint de la porte avec un
chiffon humide.
Spécifications
techniques
Capacité du tambour 115 litres
Charge maximale 7,5 kg
Hauteur 85 cm
Largeur 60 cm
Profondeur 60 cm
Étiquette d’énergie C
53
IMPORTANT
Coupez toujours le
courant et
débranchez la fiche
de l’alimentation
électrique avant de
nettoyer cet
appareil.
Pour les données
électriques,
veuillez consulter
l’étiquette des
valeurs nominales
qui se trouve à
l’avant de l’armoire
du sèche-linge
(avec la porte
ouverte).
Nettoyage et entretien de
routine
40003874Fre.qxd 20/09/2005 17:19 Page 53
Qu’est-ce qui peut être à l’origine de...
Défauts que vous pouvez rectifier vous-même
Avant d’appeler le service GIAS pour obtenir des conseils, veuillez suivre la liste des
vérifications ci-dessous. L’intervention sera facturée si la machine fonctionne
correctement ou si elle a été installée ou utilisée de manière incorrecte. Si le problème
persiste alors que vous avez terminé les vérifications recommandées, veuillez appeler le
service GIAS qui pourra peut-être vous aider par téléphone.
La période de séchage est trop longue/les vêtements
ne sont pas suffisamment secs…
● Avez-vous sélectionné le temps de séchage/le programme qui convient ?
● Les vêtements étaient-ils trop mouillés ? Les vêtements avaient-ils été
adéquatement essorés en machine ou à la main ?
● Le filtre doit-il être nettoyé ?
● Faut-il nettoyer le condenseur ?
● Le sèche-linge est-il surchargé ?
● Les entrées, sorties et la base du sèche-linge sont-elles libres d’obstructions ?
● Avez-vous sélectionné le bouton au cours d’un cycle précédent ?
Le sèche-linge ne fonctionne pas…
● Le sèche-linge est-il branché sur une alimentation électrique adéquate ? Vérifiez à
l’aide d’un autre appareil, par exemple une lampe de chevet.
● La fiche est-elle bien branchée sur l’alimentation de secteur ?
● Y a-t-il une panne de courant ?
● Le fusible a-t-il sauté ?
● La porte est-elle bien fermée ?
● Le sèche-linge est-il en position de marche, au niveau du courant de secteur et de
la machine ?
● La période de séchage ou le programme a-t-il été sélectionné ?
● La machine a-t-elle été remise en marche après l’ouverture de la porte ?
● Le sèche-linge s’est-il arrêté parce que le réservoir d’eau est plein et qu’il faut le
vider ?
Le sèche-linge est bruyant…
● Arrêtez le sèche-linge et contactez le service GIAS pour obtenir des conseils.
L’indicateur Entretien Filtre est allumé.
● Le filtre doit-il être nettoyé ?
● Faut-il nettoyer le condenseur ?
Indicateur Réservoir Plein est en marche…
● Le réservoir d’eau doit-il être vidé ?
54
Dépistage de pannes
40003874Fre.qxd 20/09/2005 17:19 Page 54

En cas de problème après avoir effectué toutes les
inspections recommandées, veuillez contacter le Service.
Il pourra vous aider par téléphone ou organiser la visite
d’un technicien, en vertu des conditions de votre
garantie. Cependant, vous serez facturé dans l’un des
cas suivants :
● Si la machine est en bon état de marche.
● Si la machine n’a pas été installée conformément
aux instructions d’installation.
● Si la machine a été utilisée incorrectement.
Pièces de rechange
Utilisez toujours des pièces de rechange de Hoover,
disponibles auprès du service GIAS.
Service GIAS
Pour les entretiens et les réparations, contactez votre
technicien local du service GIAS.
Le constructeur décline toute responsabilité en cas
d’erreurs d’impression dans le présent document. Le
constructeur se réserve le droit d’apporter les
modifications nécessaires à ses produits sans en changer
les caractéristiques de base.
55
Service clientèle
40003874Fre.qxd 20/09/2005 17:19 Page 55

Introdução . . . . . . . . . . . . . . . . . . . . . . . . . . . . . . . . . . . . . . . . . . . . . . . . 57
Informações de entrega. . . . . . . . . . . . . . . . . . . . . . . . . . . . . . . . . . . . . . . . . . 57
Desembalar o produto . . . . . . . . . . . . . . . . . . . . . . . . . . . . . . . . . . 57
Segurança. . . . . . . . . . . . . . . . . . . . . . . . . . . . . . . . . . . . . . . . . . . . . . . . . 58
Instalação . . . . . . . . . . . . . . . . . . . . . . . . . . . . . . . . . . . . . . . . . . . . . . . . . . . . . 58
Utilização . . . . . . . . . . . . . . . . . . . . . . . . . . . . . . . . . . . . . . . . . . . . . . . . . . . . . 58
Lavandaria . . . . . . . . . . . . . . . . . . . . . . . . . . . . . . . . . . . . . . . . . . . . . . . . . . . . 58
Ambiente . . . . . . . . . . . . . . . . . . . . . . . . . . . . . . . . . . . . . . . . . . . . . . . . . . . . . 59
Assistência GIAS . . . . . . . . . . . . . . . . . . . . . . . . . . . . . . . . . . . . . . . . . . . . . . . . 59
Instalação . . . . . . . . . . . . . . . . . . . . . . . . . . . . . . . . . . . . . . . . . . . . . . . . . 60
Requisitos eléctricos. . . . . . . . . . . . . . . . . . . . . . . . . . . . . . . . . . . . . . . . . . . . . 60
Ajustar os pés. . . . . . . . . . . . . . . . . . . . . . . . . . . . . . . . . . . . . . . . . . . . . . . . . . 60
Ventilação. . . . . . . . . . . . . . . . . . . . . . . . . . . . . . . . . . . . . . . . . . . . . . . . . 61
Preparação da carga . . . . . . . . . . . . . . . . . . . . . . . . . . . . . . . . . . . . . 62
Preparação da roupa . . . . . . . . . . . . . . . . . . . . . . . . . . . . . . . . . . . . . . . . . . . . 62
Separação da carga . . . . . . . . . . . . . . . . . . . . . . . . . . . . . . . . . . . . . . . . . . . . . 63
Conselhos para a secagem . . . . . . . . . . . . . . . . . . . . . . . . . . . . . . 64
Não pôr na máquina de secar . . . . . . . . . . . . . . . . . . . . . . . . . . . . . . . . . . . . . 64
Economia de energia . . . . . . . . . . . . . . . . . . . . . . . . . . . . . . . . . . . . . . . . . . . . 64
Guia de secagem . . . . . . . . . . . . . . . . . . . . . . . . . . . . . . . . . . . . . . . . . . . . . . . 64
Comandos e indicadores . . . . . . . . . . . . . . . . . . . . . . . . . . . . . . . . 65
Porta e filtro . . . . . . . . . . . . . . . . . . . . . . . . . . . . . . . . . . . . . . . . . . . . . . 66
Abrir a porta . . . . . . . . . . . . . . . . . . . . . . . . . . . . . . . . . . . . . . . . . . . . . . . . . . 66
Filtro. . . . . . . . . . . . . . . . . . . . . . . . . . . . . . . . . . . . . . . . . . . . . . . . . . . . . . . . . 66
Indicador de estado do filtro. . . . . . . . . . . . . . . . . . . . . . . . . . . . . . . . . . . . . . 66
Recipiente da água . . . . . . . . . . . . . . . . . . . . . . . . . . . . . . . . . . . . . . 67
Para retirar o recipiente. . . . . . . . . . . . . . . . . . . . . . . . . . . . . . . . . . . . . . . . . . 67
Condensador . . . . . . . . . . . . . . . . . . . . . . . . . . . . . . . . . . . . . . . . . . . . . 68
Para retirar o condensador . . . . . . . . . . . . . . . . . . . . . . . . . . . . . . . . . . . . . . . 68
Selecção do programa . . . . . . . . . . . . . . . . . . . . . . . . . . . . . . . . . . . 68
Funcionamento. . . . . . . . . . . . . . . . . . . . . . . . . . . . . . . . . . . . . . . . . . . 70
Cancelar e repor o programa. . . . . . . . . . . . . . . . . . . . . . . . . . . . . . . . . . . . . . 70
Início retardado . . . . . . . . . . . . . . . . . . . . . . . . . . . . . . . . . . . . . . . . . . . . . . . . 70
Limpeza e manutenção de rotina . . . . . . . . . . . . . . . . . . . . . . 71
Limpeza da máquina . . . . . . . . . . . . . . . . . . . . . . . . . . . . . . . . . . . . . . . . . . . . 71
Especificações técnicas . . . . . . . . . . . . . . . . . . . . . . . . . . . . . . . . . . . . . . . . . . . 71
Resolução de problemas . . . . . . . . . . . . . . . . . . . . . . . . . . . . . . . . 72
Assistência a clientes . . . . . . . . . . . . . . . . . . . . . . . . . . . . . . . . . . . . 73
Peças sobressalentes. . . . . . . . . . . . . . . . . . . . . . . . . . . . . . . . . . . . . . . . . . . . . 73
Assistência GIAS . . . . . . . . . . . . . . . . . . . . . . . . . . . . . . . . . . . . . . . . . . . . . . . . 73
56
40003874Port.qxd 20/09/2005 18:05 Page 56
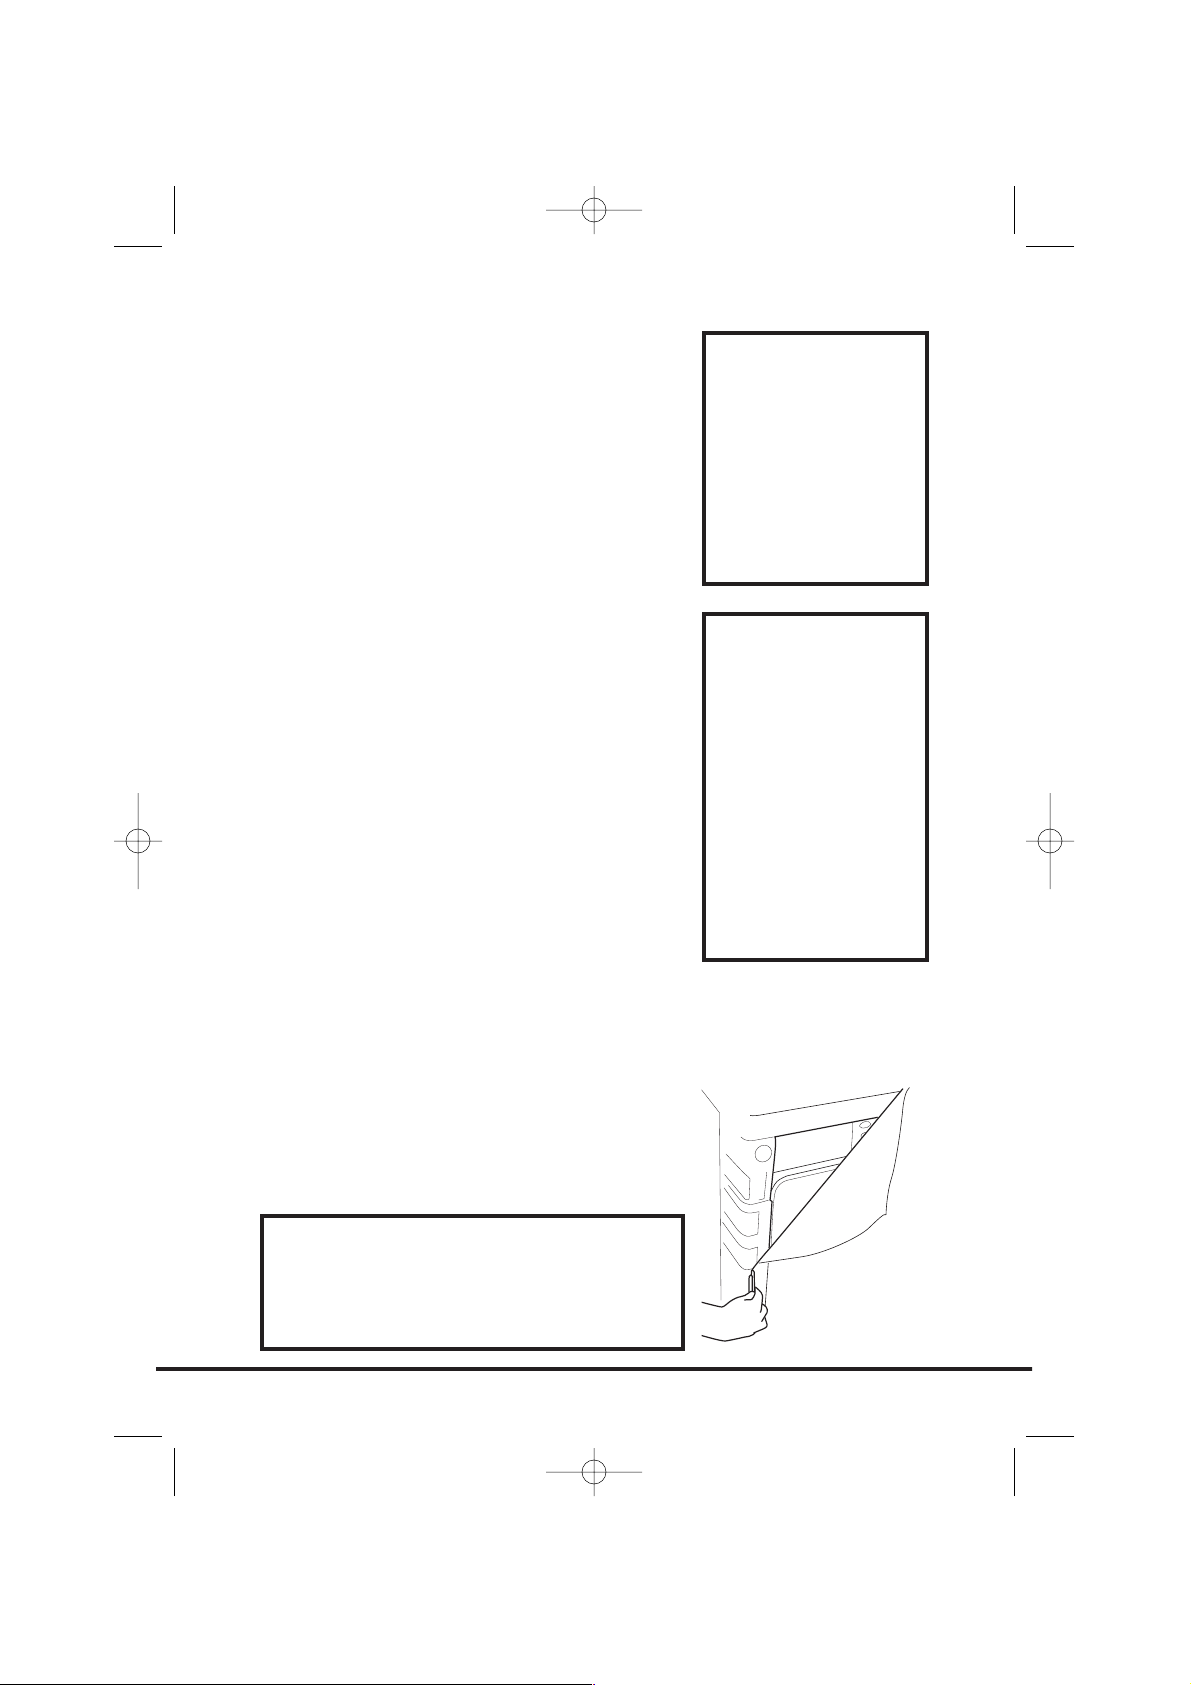
Introdução
Por favor leia e siga estas instruções cuidadosamente
antes de pôr a máquina a funcionar. Este manual
fornece-lhe instruções importantes para proceder em
segurança à utilização, instalação e manutenção, assim
como conselhos úteis para obter melhores resultados
da utilização da máquina.
Guarde todos os documentos num lugar seguro para
referência futura ou para ceder aos eventuais futuros
proprietários
Informações de entrega
Verifique se os seguintes artigos estão incluídos na
máquina:
● Manual de instruções
● Cartão de garantia
● Etiqueta de energia
Retire a máquina da embalagem próximo do local final
de instalação da máquina.
1. Corte cuidadosamente em redor da base da
embalagem e ascendentemente num canto.
2. Retire a protecção de politeno e erga a máquina
de secar acima da base de poliestereno.
57
Verifique se a
máquina não
sofreu qualquer
tipo de dano
durante o
transporte. Caso
contrário, solicite a
assistência da
GIAS.
A inobservância do
exposto
anteriormente
pode pôr em causa
a segurança da
máquina. Pode ser-
lhe cobrada uma
visita da
assistência se o
problema da
máquina se dever
a uma utilização
indevida.
Desembalar o produto
Descarte-se da embalagem em segurança.
Certifique-se de que está fora do alcance
de crianças, pois trata-se de uma fonte
potencial de perigo.
40003874Port.qxd 20/09/2005 18:05 Page 57
Segurança
Instalação
● Verifique se o produto não tem quaisquer sinais visíveis de danos antes da
utilização. Se estiver danificado, não o utilize e contacte a Assistência GIAS.
● Não utilize adaptadores, vários conectores e/ou extensões.
● Esta máquina não deve ser instalada numa casa de banho.
● Nunca instale a máquina junto a cortinas e tenha o cuidado de evitar a queda ou
acumulação de objectos atrás da mesma.
Utilização
● ATENÇÃO A má utilização de uma máquina de secar pode criar risco de incêndio.
● Esta máquina destina-se apenas a uso doméstico, ou seja, para secar têxteis e
vestuário domésticos.
● Esta máquina deve apenas ser utilizada para os fins para os quais foi concebida,
conforme descrito neste manual. Certifique-se de que compreende perfeitamente
as instruções de instalação e utilização antes de colocar a máquina em
funcionamento.
● Não toque na máquina com as mãos ou pés húmidos ou molhados.
● Não se apoie na porta ao carregar a máquina ou utilize a porta para erguer ou
mover a máquina.
● Não permita que as crianças brinquem com a máquina ou os respectivos controlos.
● ATENÇÃO Não utilize o produto se o filtro de cotão não estiver bem posicionado
ou se estiver danificado; o cotão é inflamável.
● ATENÇÃO O aumento de temperatura durante o funcionamento da máquina de
secar pode exceder os 60 graus C, onde exista o símbolo de superfície quente .
● Retire a ficha da tomada de corrente eléctrica. Faça o mesmo antes de limpar a
máquina.
● Não insista em utilizar a máquina, se lhe parecer que existe qualquer avaria.
● Não deixe que se acumulem partículas de fibras e cotão em torno da máquina.
● O interior do tambor pode estar muito quente. Antes de retirar a roupa, deixe
sempre a máquina de secar completar o período de arrefecimento.
Lavandaria
● ATENÇÃO Não pôr na máquina de secar roupa tecidos tratados com produtos de
limpeza a seco.
● ATENÇÃO Os materiais de borracha esponjosa podem, em certas circunstâncias, ser
inflamáveis por combustão espontânea quando aquecidos. Plástico esponjoso,
borracha esponjosa e materiais à base de borracha, não são apropriados para
secagem em máquina. Os artigos em cuja composição entrem estes materiais NÃO
PODEM ser colocados na máquina.
● Consulte sempre as indicações das etiquetas de lavagem e secagem.
● A roupa deve ser centrifugada ou bem torcida antes de ser colocada na máquina
de secar. NÃO deve pôr na máquina roupa ensopada e a pingar.
● Não deixe isqueiros e fósforos nos bolsos e NUNCA utilize líquidos inflamáveis
58
40003874Port.qxd 15/12/2005 16:05 Page 58

perto da máquina.
● NUNCA deverá utilizar-se esta máquina para secar cortinas de fibra de vidro. Se
outras roupas forem contaminadas com estas fibras, podem provocar irritações na
pele.
● As peças tratadas ou contaminadas com aerossóis ou líquidos de limpeza
inflamáveis, tais como petróleo, óleo de cozinha ou aerossóis NÃO PODEM ser
colocadas nesta máquina.
Ambiente
● Todos os materiais de embalagem utilizados não são hostis ao ambiente e são
recicláveis. Ajude, desfazendo-se das embalagens por meios não hostis ao
ambiente. As autoridades locais estarão em condições de o informar sobre os
meios actuais de recolha de lixo.
● Para garantir as condições de segurança, quando se desfizer de uma máquina de
secar velha, retire a ficha eléctrica da tomada de corrente, corte o cabo de
alimentação e destrua ambos. Para evitar a eventualidade de alguma criança ficar
fechada dentro da máquina, parta as dobradiças ou o fecho da porta.
Assistência GIAS
● Para assegurar continuadamente as operações seguras e eficientes desta máquina,
recomendamos que os serviços de manutenção ou reparação sejam executados
apenas por um técnico autorizado da GIAS.
Directiva Europeia 2002/96/CE
Este electrodoméstico está marcado de acordo com o disposto na directiva europeia
2002/96/CE relativa aos resíduos de equipamentos eléctricos e electrónicos (REEE).
Ao assegurar que este produto seja correctamente eliminado, estará a prevenir
eventuais consequências negativas para o ambiente e para
a saúde, que, de outra forma, poderiam resultar de um
tratamento incorrecto deste produto, quando eliminado.
O símbolo patente neste produto indica que ele não pode
ser tratado como lixo doméstico. Em vez disso, deve ser
entregue no centro de recolha apropriado, para reciclagem
do equipamento eléctrico e electrónico.
A eliminação deste produto deve ser levada a cabo de
acordo com os regulamentos localmente aplicáveis à
eliminação e ao tratamento de lixo e resíduos.
Para obter informações mais detalhadas sobre o
tratamento, a recuperação e a reciclagem deste produto,
agradecemos que entre em contacto com a entidade
municipal competente, com o serviço de eliminação de lixos
e resíduos ou com o estabelecimento comercial onde
adquiriu o produto.
59
Se o electrodoméstico não estiver a funcionar devidamente,
desligue-o e desconecte a ficha da tomada. Consulte a Assistência
GIAS para uma possível reparação.
40003874Port.qxd 15/12/2005 16:06 Page 59

Requisitos eléctricos
As máquinas de lavar são concebidas para funcionarem
com uma corrente monofásica de 230 volts e 50 Hz.
Verifique se o circuito de corrente está classificado a,
pelo menos, 16 A.
A electricidade pode ser extremamente perigosa.
Esta máquina deve estar ligada à terra.
A tomada de corrente e a ficha da máquina devem ser
do mesmo tipo.
Não utilize vários adaptadores e/ou extensões.
A ficha deve ficar acessível para se poder desligar a
máquina após a sua instalação.
Os fios do cabo de alimentação têm cores diferentes de
acordo com os seguintes códigos:
Azul NEUTRO
Castanho FASE
Verde e amarelo TERRA
Esta máquina está conforme à Directiva Europeia
89/336/EEC, 73/23/EEC e emendas subsequentes.
Ajustar os pés
Depois de a máquina estar devidamente posicionada, os
pés devem ser ajustados para assegurar que a máquina
está nivelada.
Ajuste os quatro pés para assegurar que a máquina está
firme e nivelada.
60
Pode ser-lhe
cobrada uma visita
da assistência se o
problema da
máquina se dever
a uma instalação
incorrecta.
Se o cabo de
alimentação da
máquina se
danificar, deve ser
substituído por
um cabo especial
APENAS
disponível no
serviço de peças
sobressalentes.
Tem de ser
instalado por uma
pessoa
competente.
Instalação
Não conecte a máquina nem a ligue até
que a instalação esteja concluída.
Para sua segurança, a máquina deve ser
correctamente instalada.
Se tiver alguma dúvida sobre a
instalação, aconselhe-se com a
Assistência GIAS.
40003874Port.qxd 20/09/2005 18:05 Page 60

Deve existir uma ventilação adequada na divisão onde
está situada a máquina de secar para evitar que os gases
dos electrodomésticos que queimem outros
combustíveis, incluindo chamas vivas, sejam atraídos
para a divisão durante o funcionamento da máquina de
secar.
● O ar de exaustão não pode ser eliminado pelo
tubo de chaminé que é utilizado para os fumos de
exaustão de electrodomésticos que queimem gás
ou outros combustíveis.
● Verifique regularmente se nada está a limitar o
fluxo de ar na máquina.
● Verifique a eventual presença de cotão após a
utilização e limpe, se necessário.
● As entradas e saídas devem manter-se livres de
quaisquer obstruções. Para uma ventilação
adequada, o espaço entre a base da máquina e o
chão deverá estar desobstruído. Deve existir uma
abertura de pelo menos 12 mm entre a máquina e
quaisquer obstruções.
● Evite que caiam e se acumulem objectos atrás e
ao lado da máquina, uma vez que podem obstruir
a entrada e saída de ar.
● NUNCA instale a máquina junto a cortinas.
61
Ventilação
SAÍDAS DE AR
SAÍDAS DE AR NA BASE
ABERTURAS DE
ENTRADA DE AR
40003874Port.qxd 20/09/2005 18:05 Page 61
Antes de utilizar a máquina de secar roupa pela
primeira vez:
● Leia com atenção este livro de instruções.
● Retire tudo o que estiver no tambor.
● Limpe o interior do tambor e a porta com um
pano húmido para remover o pó que possa ter-se
instalado durante o transporte.
Preparação da roupa
Certifique-se de que a roupa que vai secar é apropriada
para secagem por máquina de secar, conforme indicado
nos símbolos das etiquetas, representativos dos cuidados
a ter com cada um dos artigos.
Certifique-se de que todos os fechos estão fechados e os
bolsos vazios. Vire os artigos do avesso. Coloque a roupa
livremente no tambor de modo a não se emaranhar.
Peso máximo de
secagem
● Algodões Máx. 7,5 kg
● Sintéticos Máx. 3,5 kg
62
Preparação da carga
Não sobrecarregue
o tambor, os
artigos de grandes
dimensões podem
exceder a carga
máxima admissível
de roupa quando
molhados
(por exemplo:
sacos-cama,
edredões).
40003874Port.qxd 20/09/2005 18:05 Page 62

Separe a carga como se
segue:
● Por símbolos de cuidados de secagem
Podem ser encontrados no colarinho ou na
costura interna:
Pode ser seco em máquina de secar.
Secagem a alta temperatura.
Secagem apenas a baixa temperatura.
Não pôr na máquina de secar roupa.
Se o artigo não possuir uma etiqueta de
cuidados, deve assumir-se que não se adequa
à máquina de secar.
● Por quantidade e volume
Sempre que a carga for superior à capacidade da
máquina, separe a roupa de acordo com o volume
(por exemplo, toalhas e roupa interior).
● Por tipo de tecido
Algodões/linho: Toalhas, camisolas de algodão,
lençóis e toalhas de mesa.
Sintéticos: Blusas, camisas, fatos-macacos, etc., de
poliéster ou poliamida, assim como misturas de
algodão/fibras sintéticas.
● Por grau de secagem
Separe por: secagem para engomar, secagem para
guardar, etc. Para artigos delicados prima o botão
para seleccionar uma temperatura de
secagem baixa.
63
40003874Port.qxd 20/09/2005 18:05 Page 63
Não pôr na máquina de
secar:
Lãs, sedas, tecidos delicados, meias de nylon, bordados
delicados, tecidos com decoração metálica, vestuário
com guarnições de PVC ou couro, ténis, artigos
volumosos, tais como sacos-cama, etc.
Economia de energia
Ponha somente na máquina de secar roupa as peças que
tenham sido bem torcidas ou centrifugadas. Quanto
mais seca estiver a roupa, menor será o tempo de
secagem, resultando numa economia de electricidade.
SEMPRE
● Tente secar o peso máximo de roupa, o que
origina economia de tempo e de electricidade.
● Verifique se o filtro está limpo antes de cada ciclo
de secagem.
NUNCA
● Exceda o peso máximo recomendado, o que
provocará desperdício de tempo e de
electricidade.
● Ponha na máquina artigos ensopados e a pingar,
o que pode danificar a máquina.
Guia de secagem
A tabela mostra os tempos aproximados de secagem,
dependendo do tipo de tecido e do grau de humidade
da roupa.
64
Conselhos para a secagem
IMPORTANTE: Não
seque artigos
tratados com um
produto de
limpeza a seco ou
vestuário de
borracha (perigo
de incêndio ou de
explosão).
Durante os últimos
15 minutos, a
roupa é sempre
seca com ar frio.
Tecido
ALGODÃO
TECIDOS DE FIBRAS
SINTÉTICAS
ACRÍLICO
REGULAR O CALOR
ALTO
BAIXO
BAIXO
CARGA PESADA
140-165 min.
–
–
CARGA MÉDIA
70-80 min.
70-80 min.
50-65 min.
CARGA LEVE
50-65 min.
40-55 min.
30-40 min.
40003874Port.qxd 20/09/2005 18:05 Page 64

Painel de controlo e luzes indicadoras
Selector de programas – Seleccione o programa necessário
Tecla e indicador On/Off – Prima para ligar, o indicador ilumina-se.
Start (Iniciar) – Prima Start para começar o programa de secagem seleccionado. Prima
durante 5 segundos para cancelar/repor o programa
Botão Acrílicos/Sintéticos – Prima para reduzir o nível de calor para peças
delicadas, o indicador sobre o botão acende-se. Para alterar a definição de calor, o
programa tem de ser reposto
Pouco calor – Luz indicadora ON Muito calor – Luz indicadora OFF
Indicador esvaziar água – Acende-se quando o recipiente da água estiver cheio
Indicador de estado do filtro – Acende-se quando o filtro precisa de ser limpo.
Botão início retardado – Permite ao utilizador retardar o início do ciclo de secagem
(consulte os detalhes de funcionamento na página 70)
Visor da Contagem decrescente
START (INICIAR) – Quando a máquina de secar está ligada, o indicador START fica
intermitente, quando o programa tem início o indicador START acende-se
60' – O indicador acende-se quando faltam menos de 60 minutos para a conclusão do
programa
15' – O indicador acende-se quando faltam menos de 15 minutos para a conclusão do
programa. Nesta fase do ciclo de secagem, a máquina entra na fase de Arrefecimento
STOP (PARAR) - O indicador acende-se quando o programa termina.
6h - Início retardado por 6 horas (a luz fica intermitente quando está em
funcionamento)
9h - Início retardado por 9 horas (a luz fica intermitente quando está em
funcionamento)
65
Controlos e indicadores
BOTÃO
ACRÍLICOS/SINTÉTICOS
TECLA ON/OFF
(ACTIVADO/
DESACTIVADO)
INDICADOR DO
ESTADO DO FILTRO
INDICADOR ESVAZIAR ÁGUA
SELECTOR DE
PROGRAMAS
BOTÃO
START
(INÍCIO)
BOTÃO INÍCIO
RETARDADO
VISOR DA CONTAGEM
DECRESCENTE
40003874Port.qxd 20/09/2005 18:05 Page 65
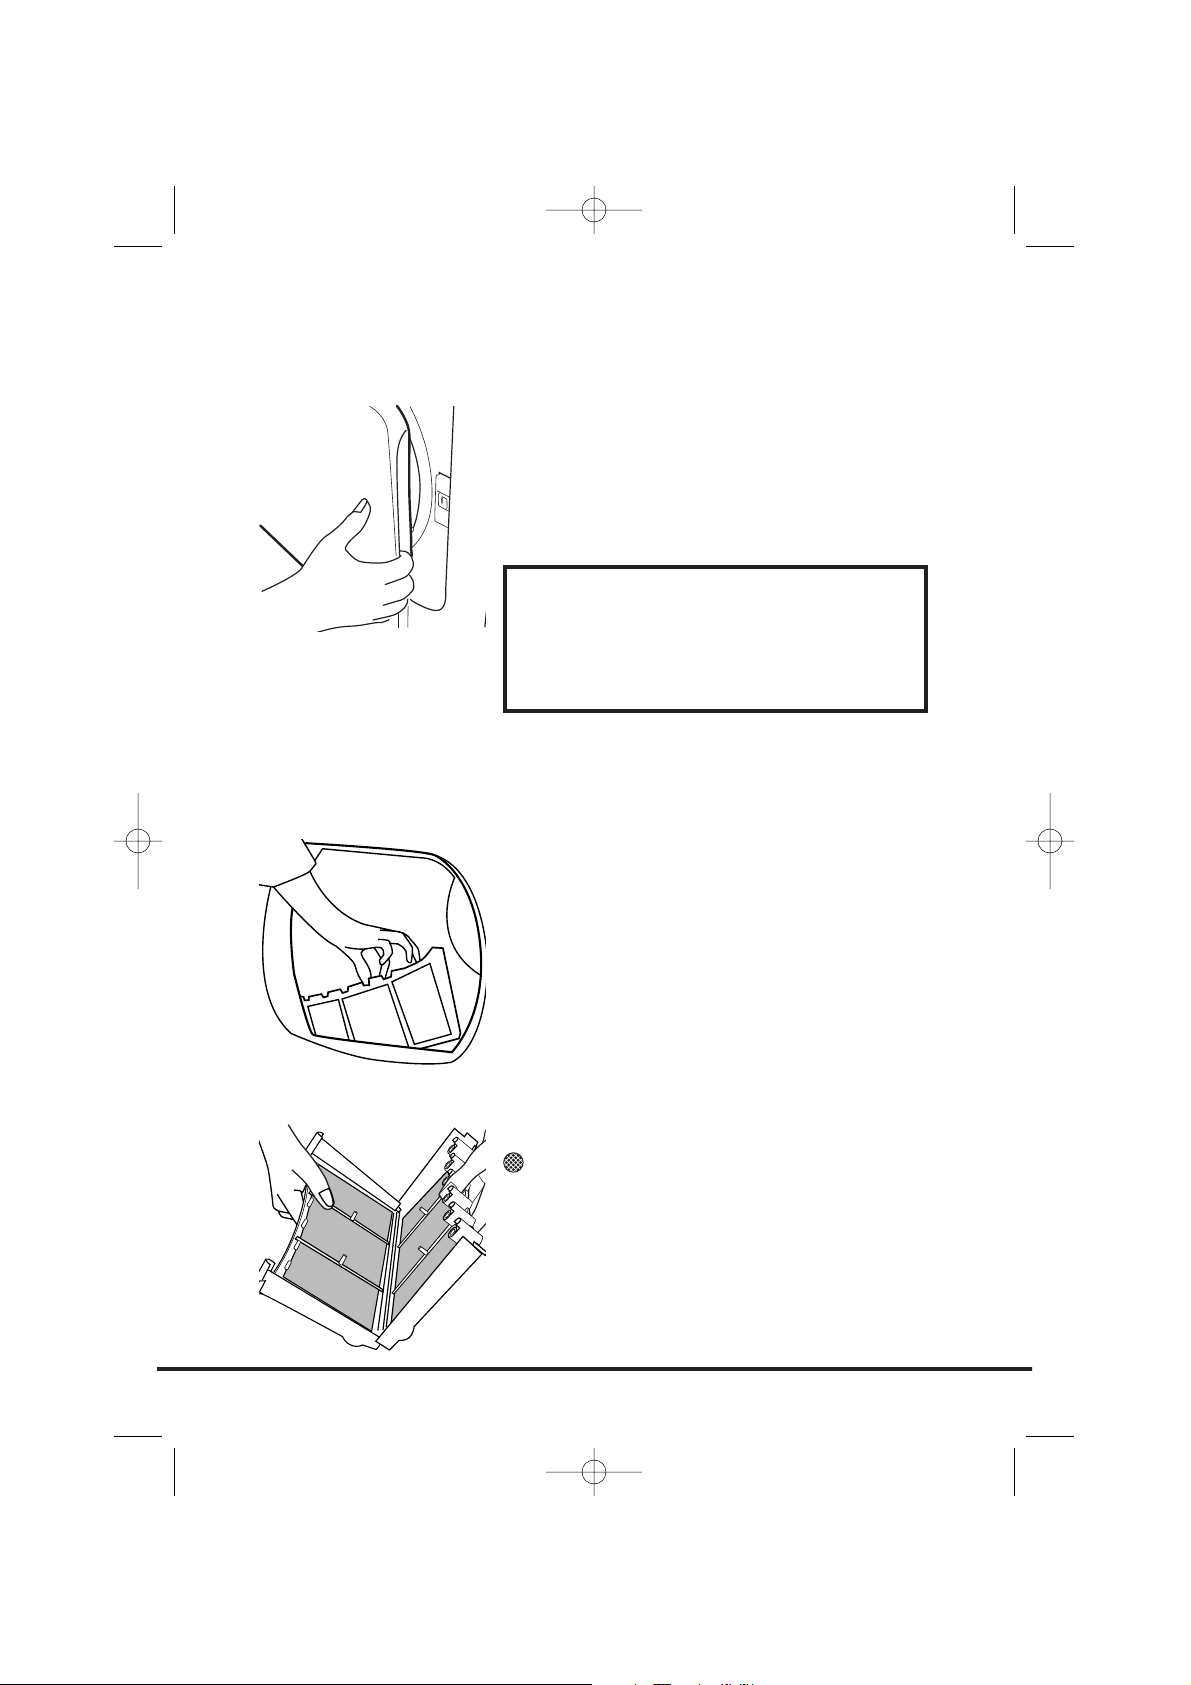
Abrir a porta
Puxe o manípulo para abrir a porta.
Para reiniciar a máquina de secar, feche a porta e prima
Start.
Filtro
IMPORTANTE: Para manter a eficiência da máquina,
verifique se o filtro do cotão está limpo antes de cada
ciclo de secagem.
1. Puxe o filtro para cima.
2. Abra o filtro como ilustrado.
3. Retire com cuidado os resíduos de tecido,
utilizando uma escova macia ou a ponta dos
dedos.
4. Junte e feche entre si as duas metades do filtro e
volte a montá-lo no seu lugar.
Indicador de Controlo do
Estado do Filtro
acende quando o filtro necessitar de limpeza.
Se a roupa não estiver a secar, verifique se o filtro não
está obstruído.
66
Porta e filtro
ATENÇÃO!
Quando a máquina de secar roupa
estiver a ser utilizada, o tambor e a
porta podem estar MUITO QUENTES.
40003874Port.qxd 20/09/2005 18:05 Page 66

A água removida da roupa durante o ciclo de secagem,
é recolhida num recipiente instalado no fundo da
máquina de secar.
Quando o recipiente estiver cheio, o indicador no
painel de controlo ilumina-se e TEM DE esvaziar o
recipiente. No entanto, recomenda-se esvaziar o
recipiente após cada ciclo de secagem.
Nota: Durante os primeiros ciclos de uma máquina, a
quantidade de água recolhida é muito pouca, pois um
reservatório interno é enchido primeiro.
Para retirar o recipiente
1. Puxe suavemente o recipiente até que saia por
completo. Segure o recipiente com ambas as
mãos. Quando cheio, o recipiente da água pesa
aproximadamente 4 kg.
2. Solte a tampa localizada na parte superior do
recipiente e retire a água. Coloque a tampa de
novo e faça deslizar o recipiente da água de volta
à posição inicial. PRESSIONE COM FIRMEZA ATÉ
FICAR NO LOCAL DEVIDO.
NOTA: Se tiver a opção de drenagem próximo da
máquina de secar, é possível utilizar o kit de descarga
para proporcionar uma drenagem permanente da água
recolhida pelo secador. Assim, deixa de precisar de
esvaziar o recipiente da água. Todas as informações de
montagem do kit estão contidas na embalagem do kit.
67
Recipiente da água
40003874Port.qxd 20/09/2005 18:05 Page 67

IMPORTANTE: Antes de limpar o condensador, desligue sempre a máquina e retire a ficha
da tomada de corrente eléctrica.
Para manter a eficiência da máquina, verifique regularmente se o condensador está limpo.
Para retirar o condensador
1. Puxe cuidadosamente a parte inferior do encosto de modo a desprender-se da
máquina. A secção superior pode então desarticular-se, permitindo a remoção
completa do encosto.
2. Rode as duas alavancas de fixação no sentido inverso ao dos ponteiros de um relógio
e tire o condensador.
3. Tire a unidade do condensador.
4. Limpe cuidadosamente quaisquer poeiras ou cotão
com um pano, lavando de seguida a unidade debaixo
de uma torneira, virando-a de modo a que água flua
entre as armaduras para remover eventuais poeiras e
cotão.
5. Reinstale o condensador, assegurando que fica
encaixado firmemente na posição devida (tal como é
indicado pela seta). Fixe as duas alavancas, rodando-
as no sentido dos ponteiros de um relógio.
6. Reinstale o encosto.
A máquina de secar com sensor proporciona muitas
opções para a secagem da roupa de acordo com todas
as circunstâncias.
Nota: O sensor pode não detectar uma carga pequena
constituída por artigos pequenos. Para cargas
pequenas e artigos separados ou tecidos pré-secos com
68
Condensador
Selecção do
programa
40003874Port.qxd 20/09/2005 18:05 Page 68

índice de humidade baixo, utilize os programas temporizados. Regule o programa entre
30 e 75 minutos, dependendo do tamanho e nível de secagem de carga requeridos,
seleccionando temperatura alta ou baixa consoante o tipo de tecido.
Se o sensor não detectar a peça, a máquina operará somente durante 10 minutos antes
de entrar na fase de arrefecimento.
Se a carga for muito volumosa ou estiver demasiado encharcada para secagem de
máquina, esta entrará automaticamente na fase de arrefecimento após 185 minutos.
A tabela seguinte lista os programas e a função de cada programa.
69
Programa
Secagem completa
Secagem extra
Secagem para
guardar
Secagem para
engomar
Lã
Engomar rápido
120'
75'
60'
45'
30'
Refrescar
Descrição
Seleccione o grau de secagem necessário.
Vai desde Inteiramente seco para toalhas e roupões de banho,
passando por Secagem para arrumação para artigos que vão
ser guardados sem serem passados a ferro, até aos programas
que deixam a roupa pronta a ser passada.
Um programa suave criado especialmente para deixar as lãs
mais suaves após a secagem ao ar livre.
Este delicado ciclo de ar quente, que dura 12 minutos,
também pode ser utilizado para ‘refrescar’ as lãs após serem
guardadas no roupeiro.
O programa Engomar rápido proporciona uma função de
amaciador e anti-vincos. A máquina aquecerá a carga durante
9 minutos, seguidos de um período de arrefecimento de
3 minutos, sendo especialmente vantajoso para roupas que
possam ter sido deixadas por um tempo considerável antes de
serem passadas a ferro, por exemplo, num cesto de roupa.
A roupa pode também ficar endurecida quando seca no
exterior, num estendal, ou no interior junto a aquecedores.
O processo Engomar rápido suaviza os vincos do tecido,
facilitando a acção de passar a ferro e tornando-a mais rápida.
120 minutos de secagem
75 minutos de secagem
60 minutos de secagem
45 minutos de secagem
30 minutos de secagem
Centrifugação da roupa em ar fresco durante 30 minutos.
40003874Port.qxd 20/09/2005 18:05 Page 69
1. Abra a porta e coloque a roupa no tambor. Assegure-se de que a roupa não
entrava o fecho da porta.
2. Feche a porta com cuidado, empurrando-a lentamente até ouvir um clique.
3. Prima a tecla para ligar a máquina. O indicador acende-se e o indicador START
fica intermitente.
4. Rode o selector de programa para seleccionar o programa de secagem adequado
(consulte o Guia de programas).
5. Se secar sintéticos, acrílicos ou artigos delicados, prima o botão para reduzir
o nível de calor.
A luz sobre o botão de pressão acende-se quando a máquina está na definição de
pouco calor. Para anular a selecção deste estado depois de o ciclo de secagem ter
começado, é necessário repor a máquina.
6. Prima a tecla Start. A máquina começa a funcionar automaticamente e o indicador
START acende-se continuamente.
7. O visor apresenta o progresso da secagem em termos de tempo restante.
8. Se a porta for aberta durante o programa para verificar a roupa, é necessário
premir Start para recomeçar a secagem depois de a porta ter sido fechada.
9. Quando o indicador de 15' estiver aceso, a máquina entra na fase de
arrefecimento, as roupas são centrifugadas com ar frio o que permite à roupa
arrefecer.
10. Quando o programa terminar, o indicador STOP acende-se.
Cancelar e repor o programa
Para cancelar um programa, prima o botão Start durante 5 segundos. A máquina indica
que foi reposta pelo indicador START intermitente. É possível alterar o programa nos
primeiros 10 minutos sem utilizar a função de cancelamento ou reposição.
Início retardado
A função permite ao utilizador atrasar o início do
ciclo de secagem em 6 ou 9 horas.
Ao seleccionar a função, o visor apresenta um atraso de
6 horas, uma pressão subsequente do botão aumenta o
atraso para 9 horas.
Para começar o programa, prima Start e a máquina
conclui o ciclo de secagem no final deste tempo. A luz
indicadora de 6 ou 9 horas fica intermitente para
indicar que o início retardado está em progresso.
70
ATENÇÃO!
O tambor, a porta
e a carga podem
estar muito
quentes.
Funcionamento
40003874Port.qxd 20/09/2005 18:05 Page 70
Limpeza da máquina
● Após cada ciclo de secagem, limpe o filtro e
esvazie o recipiente da água.
● Limpe o condensador com regularidade.
● Após cada utilização, limpe o interior do tambor e
deixe a porta aberta por alguns instantes, de
modo a permitir que a circulação do ar o seque.
● Limpe o exterior da máquina e a porta com um
pano macio.
● NÃO usar produtos ou discos de limpeza
abrasivos.
● Para evitar que a porta se cole ou a acumulação
de cotão, limpe periodicamente a porta interior e
a junta com um pano húmido.
Especificações técnicas
Capacidade do tambor 115 litros
Carga máxima 7,5 kg
Altura 85 cm
Largura 60 cm
Profundidade 60 cm
Faixa da Etiqueta de Energia C
71
IMPORTANTE
Desligue sempre a
máquina e retire a
ficha da tomada de
corrente antes de
limpá-la.
Quanto a dados
eléctricos, consulte
a etiqueta na
frente da máquina
(com a porta
aberta).
Limpeza e manutenção de
rotina
40003874Port.qxd 20/09/2005 18:05 Page 71
Qual poderá ser a causa de...
Anomalias que você mesmo pode remediar
Antes de contactar a Assistência GIAS para aconselhamento técnico, passe rapidamente
pela seguinte lista de verificação. Se chamar um técnico e este verificar que a máquina
está a funcionar normalmente, foi mal instalada ou usada incorrectamente, ser-lhe-á
cobrada uma quantia consoante o caso. Se o problema persistir após ter completado as
verificações recomendadas, ligue para a Assistência GIAS, eles poderão eventualmente
resolver o problema pelo telefone.
O tempo de secagem é demasiado longo/as roupas
não estão suficientemente secas…
● Seleccionou o tempo/programa de secagem correctos?
● A roupa estava demasiado ensopada? As roupas foram bem torcidas ou
centrifugadas?
● O filtro necessita de limpeza?
● O condensador necessita de limpeza?
● A máquina está com excesso de roupa?
● As entradas, saídas e a base da máquina estão desobstruídas?
● A opção foi seleccionada num ciclo anterior?
A máquina não funciona…
● Existe energia eléctrica para alimentar a máquina? Verifique utilizando outro
aparelho eléctrico, por exemplo, um candeeiro.
● A ficha está correctamente ligada à corrente eléctrica?
● Houve algum corte de corrente?
● O fusível fundiu-se?
● A porta está bem fechada?
● A máquina está ligada à corrente, quer através da tecla ‘ON’, quer através do cabo
de alimentação?
● O tempo de secagem ou o programa foram seleccionados?
● A máquina foi ligada de novo após ter aberto a porta?
● A máquina deixou de funcionar devido ao tabuleiro da água estar cheio e precisar
de ser esvaziado?
A máquina de secar faz muito ruído…
● Desligue a máquina de secar e contacte a Assistência GIAS para obter ajuda.
O indicador de estado do filtro está aceso…
● O filtro necessita de limpeza?
● O condensador necessita de limpeza?
O Indicador de Esvaziar Água está aceso…
● O recipiente da água necessita de ser esvaziado?
72
Resolução de problemas
40003874Port.qxd 20/09/2005 18:05 Page 72
Se após todas as verificações recomendadas, ainda
subsistir qualquer problema com a máquina, ligue por
favor para o Serviço de Assistência GIAS para
aconselhamento. Podem conseguir ajudá-lo pelo
telefone ou combinar consigo a intervenção adequada
de um técnico, nos termos da garantia. No entanto,
pode ser debitado nas seguintes situações:
● A máquina está em bom estado de
funcionamento.
● Não foi instalada de acordo com as instruções de
instalação.
● Foi utilizada incorrectamente.
Peças sobressalentes
Utilize sempre peças sobressalentes genuínas,
disponíveis directamente da Assistência GIAS.
Assistência GIAS
Para obter assistência e reparações, contacte o
engenheiro local da Assistência GIAS.
O fabricante declina toda e qualquer responsabilidade
pela eventual ocorrência de erros de impressão contidos
no manual. O fabricante reserva-se também o direito de
fazer as modificações apropriadas aos seus produtos
sem alterar as características essenciais.
73
Serviço de clientes
40003874Port.qxd 20/09/2005 18:05 Page 73

Introduzione. . . . . . . . . . . . . . . . . . . . . . . . . . . . . . . . . . . . . . . . . . . . . . 75
Informazioni sulla consegna . . . . . . . . . . . . . . . . . . . . . . . . . . . . . . . . . . . . . . 75
Estrazione del prodotto dall’imballaggio. . . . . . . . . . . . . . 75
Consigli di sicurezza . . . . . . . . . . . . . . . . . . . . . . . . . . . . . . . . . . . . . 76
Installazione. . . . . . . . . . . . . . . . . . . . . . . . . . . . . . . . . . . . . . . . . . . . . . . . . . . 76
Utilizzo. . . . . . . . . . . . . . . . . . . . . . . . . . . . . . . . . . . . . . . . . . . . . . . . . . . . . . . 76
La biancheria . . . . . . . . . . . . . . . . . . . . . . . . . . . . . . . . . . . . . . . . . . . . . . . . . . 76
Tutela dell’ambiente . . . . . . . . . . . . . . . . . . . . . . . . . . . . . . . . . . . . . . . . . . . . 77
Servizio GIAS . . . . . . . . . . . . . . . . . . . . . . . . . . . . . . . . . . . . . . . . . . . . . . . . . . 77
Installazione . . . . . . . . . . . . . . . . . . . . . . . . . . . . . . . . . . . . . . . . . . . . . . 78
Requisiti elettrici . . . . . . . . . . . . . . . . . . . . . . . . . . . . . . . . . . . . . . . . . . . . . . . 78
Regolazione dei piedini . . . . . . . . . . . . . . . . . . . . . . . . . . . . . . . . . . . . . . . . . 78
Ventilazione . . . . . . . . . . . . . . . . . . . . . . . . . . . . . . . . . . . . . . . . . . . . . . 79
Preparazione della biancheria . . . . . . . . . . . . . . . . . . . . . . . . . 80
Preparazione dei capi . . . . . . . . . . . . . . . . . . . . . . . . . . . . . . . . . . . . . . . . . . . 80
Selezione della biancheria . . . . . . . . . . . . . . . . . . . . . . . . . . . . . . . . . . . . . . . . 81
Consigli per l’asciugatura . . . . . . . . . . . . . . . . . . . . . . . . . . . . . . . 82
Evitare di asciugare . . . . . . . . . . . . . . . . . . . . . . . . . . . . . . . . . . . . . . . . . . . . . 82
Risparmio energia . . . . . . . . . . . . . . . . . . . . . . . . . . . . . . . . . . . . . . . . . . . . . . 82
Guida ad una corretta asciugatura . . . . . . . . . . . . . . . . . . . . . . . . . . . . . . . . . 82
Comandi e spie di segnalazione . . . . . . . . . . . . . . . . . . . . . . . 83
Portellone e filtro . . . . . . . . . . . . . . . . . . . . . . . . . . . . . . . . . . . . . . . . 84
Apertura del portellone. . . . . . . . . . . . . . . . . . . . . . . . . . . . . . . . . . . . . . . . . . 84
Filtro. . . . . . . . . . . . . . . . . . . . . . . . . . . . . . . . . . . . . . . . . . . . . . . . . . . . . . . . . 84
Spia di pulizia filtro . . . . . . . . . . . . . . . . . . . . . . . . . . . . . . . . . . . . . . . . . . . . . 84
Vaschetta dell’acqua . . . . . . . . . . . . . . . . . . . . . . . . . . . . . . . . . . . . . 85
Per togliere la vaschetta . . . . . . . . . . . . . . . . . . . . . . . . . . . . . . . . . . . . . . . . . 85
Condensatore . . . . . . . . . . . . . . . . . . . . . . . . . . . . . . . . . . . . . . . . . . . . 86
Per togliere il condensatore. . . . . . . . . . . . . . . . . . . . . . . . . . . . . . . . . . . . . . . 86
Selezione del programma . . . . . . . . . . . . . . . . . . . . . . . . . . . . . . . 86
Funzionamento. . . . . . . . . . . . . . . . . . . . . . . . . . . . . . . . . . . . . . . . . . . 88
Annullamento e azzeramento del programma . . . . . . . . . . . . . . . . . . . . . . . . 88
Partenza ritardata . . . . . . . . . . . . . . . . . . . . . . . . . . . . . . . . . . . . . . . . . . . . . . 88
Pulizia e manutenzione ordinaria . . . . . . . . . . . . . . . . . . . . . . 89
Pulizia dell’asciugatrice . . . . . . . . . . . . . . . . . . . . . . . . . . . . . . . . . . . . . . . . . . 89
Specifiche tecniche. . . . . . . . . . . . . . . . . . . . . . . . . . . . . . . . . . . . . . . . . . . . . . 89
Ricerca guasti. . . . . . . . . . . . . . . . . . . . . . . . . . . . . . . . . . . . . . . . . . . . . 90
Servizio assistenza clienti . . . . . . . . . . . . . . . . . . . . . . . . . . . . . . . 91
Ricambi . . . . . . . . . . . . . . . . . . . . . . . . . . . . . . . . . . . . . . . . . . . . . . . . . . . . . . 91
Servizio GIAS . . . . . . . . . . . . . . . . . . . . . . . . . . . . . . . . . . . . . . . . . . . . . . . . . . 91
74
40003874Ita.qxd 20/09/2005 18:54 Page 74
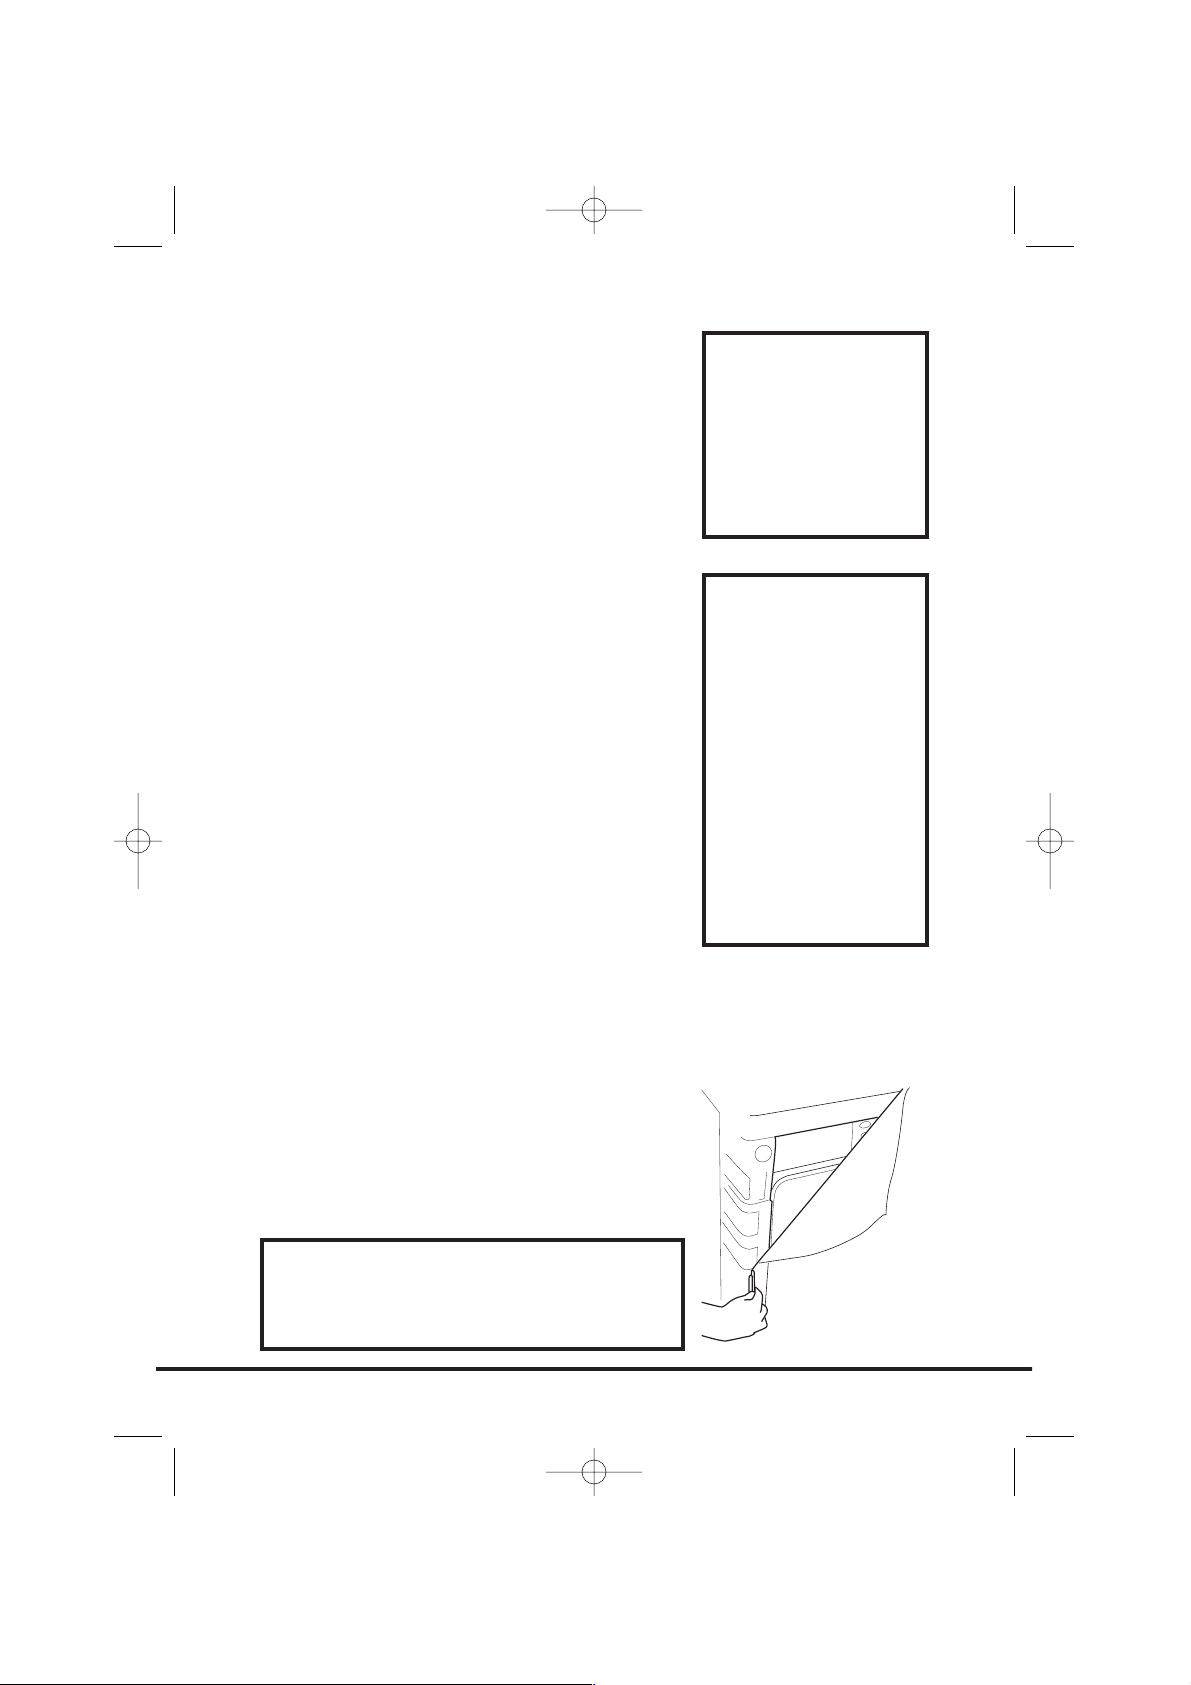
Introduzione
Leggere attentamente le istruzioni e utilizzare la
macchina di conseguenza. Questo opuscolo fornisce
importanti linee guida per una manutenzione, un uso e
un’installazione sicuri. Esso contiene inoltre utili
consigli che consentiranno di sfruttare al meglio le
potenzialità di questa macchina.
Conservare la documentazione in un luogo sicuro per
eventuali riferimenti o per futuri proprietari
Informazioni sulla
consegna
Controllare che al momento della consegna la macchina
sia dotata dei seguenti componenti:
● Libretto di istruzioni
● Certificato di garanzia
● Etichetta efficienza energetica
Estrarre la macchina dall’imballaggio vicino al punto
previsto per l’installazione.
1. Con cautela, eseguire un taglio lungo il perimetro
della base dell’imballaggio e un altro verso l’alto,
in corrispondenza di un angolo.
2. Togliere la fascia in politene e sollevare
l’asciugatrice togliendola dalla base di polistirolo.
75
Verificare che
durante il trasporto
la macchina non
abbia subito danni.
In caso contrario,
rivolgersi al Centro
Assistenza GIAS.
La mancata
osservanza di tale
procedura potrebbe
compromettere la
sicurezza
dell’apparecchio. La
chiamata può essere
soggetta a
pagamento se le
cause di
malfunzionamento
della macchina sono
attribuibili a un uso
improprio.
Estrazione del prodotto
dall’imballaggio
Smaltire l’imballaggio in maniera sicura.
Accertarsi che sia fuori dalla portata dei
bambini, in quanto fonte potenziale di rischio.
40003874Ita.qxd 20/09/2005 18:54 Page 75
Consigli di sicurezza
Installazione
● Prima dell’uso, controllare che il prodotto non presenti segni visibili di danni. Non
usare in caso di danni e contattare il Servizio Assistenza GIAS.
● Non utilizzare adattatori, connettori multipli e/o prolunghe.
● Non installare la macchina in bagno.
● Non installare l’asciugatrice vicino ai tendaggi e rimuovere tempestivamente
eventuali oggetti caduti dietro la macchina.
Utilizzo
● ATTENZIONE L’uso improprio dell’asciugatrice può provocare rischio di incendio.
● Questa macchina è prevista unicamente per uso domestico, ovvero per
l’asciugatura di capi e indumenti per la casa.
● La macchina qui descritta deve essere utilizzata esclusivamente per lo scopo al
quale è destinata secondo quanto illustrato nel presente libretto. Prima di attivare
la macchina, accertarsi di avere letto attentamente e compreso le istruzioni d’uso e
di installazione.
● Non toccare l’asciugatrice con mani o piedi umidi o bagnati.
● Non appoggiarsi al portellone per caricare la macchina; non utilizzare il portellone
per sollevare o spostare la macchina.
● Non consentire ai bambini di giocare con la macchina o con i suoi comandi.
● ATTENZIONE Non utilizzare il prodotto se il filtro antifilacce non è correttamente
posizionato o risulta danneggiato; il filtro non è ignifugo.
● ATTENZIONE Se è esposto il simbolo indicante il riscaldamento della superficie,
quando l’asciugatrice è in funzione la temperatura può essere superiore a
60 gradi C.
● Staccare la spina dalla presa elettrica. Prima di pulire la macchina, staccare sempre
la spina.
● Se si presume che la macchina sia guasta, non continuare ad usarla.
● Non accumulare cascami e filacce sul pavimento attorno alla macchina.
● Dopo il ciclo di asciugatura, l’interno del cestello può essere molto caldo. Prima di
estrarre la biancheria è pertanto opportuno lasciar raffreddare completamente la
macchina.
La biancheria
● ATTENZIONE Evitare di asciugare articoli trattati con prodotti di pulizia a secco.
● ATTENZIONE In determinate circostanze, i materiali in gomma possono essere
soggetti ad autocombustione se riscaldati. I materiali in plastica, in gomma e
similgomma non sono adatti ad essere asciugati meccanicamente. EVITARE
ASSOLUTAMENTE di asciugare articoli in questi materiali.
● Leggere attentamente le etichette con le istruzioni di lavaggio per conoscere le
caratteristiche dell’asciugatura idonea.
● Gli indumenti devono essere introdotti nell’asciugatrice solo dopo essere stati
opportunamente centrifugati in lavatrice o strizzati a mano. EVITARE di caricare
nel cestello indumenti ancora gocciolanti.
76
40003874Ita.qxd 15/12/2005 16:11 Page 76
● Controllare accuratamente che nelle tasche degli indumenti da asciugare non
siano presenti accendini o fiammiferi ed EVITARE assolutamente l’uso di prodotti
infiammabili in prossimità della macchina.
● EVITARE ASSOLUTAMENTE di asciugare tende in fibra di vetro. La contaminazione
dei capi con le fibre di vetro può infatti dar luogo a fenomeni d’irritazione
cutanea.
● NON introdurre nella macchina indumenti trattati o contaminati con spray o
liquidi detergenti infiammabili, come benzina, olio da cucina o spray con aerosol.
Tutela dell’ambiente
● Tutti i materiali utilizzati per l’imballaggio sono ecologici e riciclabili. Smaltite
l’imballaggio con metodi ecologici. Presso il comune di residenza si potranno
reperire ulteriori informazioni sui metodi di smaltimento.
● Per garantire la sicurezza al momento dello smaltimento di una asciugatrice,
scollegare la spina dell’alimentazione dalla presa, tagliare il cavo
dell’alimentazione di rete e distruggerlo insieme alla spina. Per evitare che i
bambini possano rimanere intrappolati all’interno della lavatrice, rompere i cardini
o la chiusura dell’oblò.
Servizio GIAS
● Ai fini della durata e del buon funzionamento della macchina, per gli eventuali
interventi di assistenza o riparazione consigliamo di rivolgersi esclusivamente al
servizio assistenza autorizzato GIAS.
Direttiva Europea 2002/96/CE
Questo elettrodomestico è marcato conformemente alla Direttiva Europea 2002/96/CE
sui rifiuti da apparecchiature elettriche ed elettroniche (WEEE).
Assicurandovi che questo prodotto sia smaltito correttamente, aiuterete ad evitare
possibili conseguenze negative all'ambiente e alla salute delle
persone, che potrebbero verificarsi a causa d'un errato
trattamento di questo prodotto giunto a fine vita.
Il simbolo sul prodotto indica che questo apparecchio non
può essere trattato come un normale rifiuto domestico; dovrà
invece essere consegnato al punto più vicino di raccolta per il
riciclo delle apparecchiature elettriche ed elettroniche.
Lo smaltimento deve essere effettuato in accordo con le
regole ambientali vigenti per lo smaltimento dei rifiuti.
Per informazioni più dettagliate sul trattamento, recupero e
riciclo di questo prodotto, per favore contattare l'ufficio
pubblico di competenza (del dipartimento ecologia e
ambiente), o il vostro servizio di raccolta rifiuti a domicilio, o
il negozio dove avete acquistato il prodotto.
77
Nel caso in cui la macchina non funzioni correttamente o sia fuori
uso, spegnere e staccare la spina dalla presa. Per la riparazione,
rivolgersi al Centro Assistenza GIAS.
40003874Ita.qxd 15/12/2005 16:12 Page 77
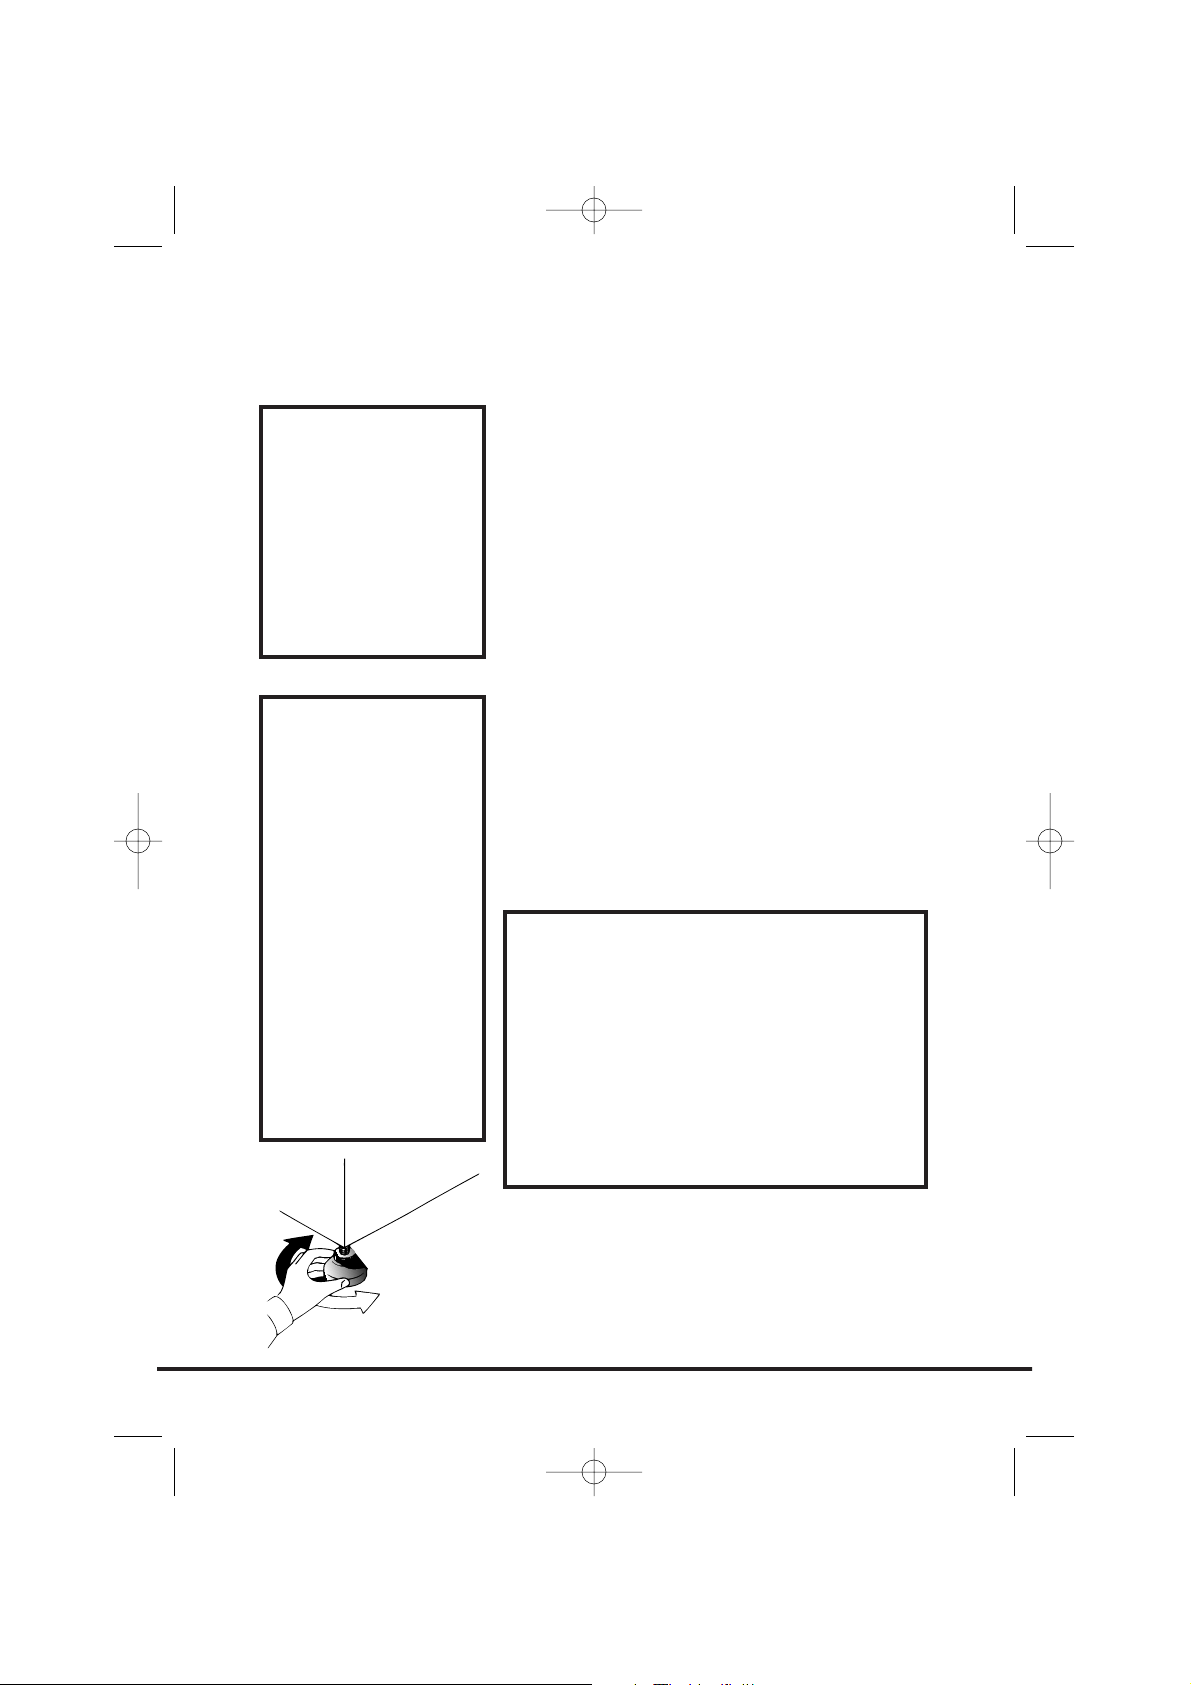
Requisiti elettrici
Le asciugatrici sono state progettate per funzionare ad
una tensione di 230-240V, 50 Hz monofase. Controllare
che il circuito dell’alimentazione sia idoneo per valori di
corrente di almeno 16A.
L’elettricità può essere estremamente pericolosa.
L’apparecchio deve essere opportunamente collegato a
terra.
La presa e la spina dell’apparecchio devono essere dello
stesso tipo.
Non utilizzare adattatori multipli e/o prolunghe.
Una volta completata l’installazione, la spina deve
risultare accessibile e facilmente scollegabile.
I fili dell’impianto elettrico sono contrassegnati con i
seguenti colori:
Blu NEUTRO
Marrone SOTTO TENSIONE
Verde e giallo TERRA
L’apparecchio con marchio CE è conforme alle direttive
europee 89/336/CEE, 73/23/CEE e successive modifiche.
Regolazione dei piedini
Una volta posizionata la macchina, si dovrebbe
procedere alla regolazione dei piedini, per garantire
una perfetta messa in bolla.
Regolare i quattro piedini per garantire che la macchina
sia stabile e in bolla.
78
La chiamata può
essere soggetta a
pagamento, se le
cause di
malfunzionamento
della macchina
sono attribuibili a
un’installazione
non corretta.
Nel caso risulti
danneggiato, il
cavo di
alimentazione
dell’apparecchio
dev’essere
prontamente
sostituito con
apposito cavo
reperibile
ESCLUSIVAMENTE
presso il servizio di
ricambi.
L’installazione deve
essere effettuata
da persone
competenti.
Installazione
Non inserire la spina nella presa e non
accendere la macchina finché
l’installazione non sarà stata
completata.
Ai fini della sicurezza personale è
essenziale che l’asciugatrice venga
installata correttamente.
In caso di dubbi sull’installazione,
rivolgersi al Servizio Assistenza GIAS.
40003874Ita.qxd 20/09/2005 18:54 Page 78

Accertarsi che nel locale scelto per l’installazione vi sia
un ricambio d’aria sufficiente, onde evitare che i gas
provenienti da apparecchiature funzionanti con altri
combustibili, comprese fiamme libere, siano aspirati nel
locale dove l’asciugatrice è in funzione.
● Non scaricare l’aria nella canna fumaria utilizzata
per lo scarico di fumi provenienti da attrezzature
funzionanti a gas o altri combustibili.
● Controllare periodicamente che attorno
all’asciugatrice vi sia una buona circolazione
d’aria, senza impedimenti di sorta.
● Dopo l’uso ispezionare il filtro antifilacce e, se
necessario, pulirlo.
● Verificare costantemente che presa e sfiati non
siano ostruiti. Per assicurare un’idonea
ventilazione è essenziale che lo spazio tra il fondo
macchina e il pavimento non sia ostruito. Tra la
macchina ed eventuali ostacoli si dovrebbe
lasciare uno spazio di almeno 12mm.
● Rimuovere tempestivamente eventuali oggetti
caduti dietro/sotto la macchina in quanto
potrebbero ostruire le prese e gli sfiati dell’aria.
● EVITARE ASSOLUTAMENTE d’installare la
macchina contro tendaggi.
79
Ventilazione
SFIATI ARIA
SFIATI ARIA NELLA BASE
PRESE ARIA
40003874Ita.qxd 20/09/2005 18:54 Page 79
Prima di utilizzare l’asciugatrice per la prima volta:
● Leggere attentamente il presente libretto
d’istruzioni.
● Togliere tutti gli articoli presenti all’interno del
cestello.
● Pulire l’interno del cestello e il portellone con un
panno umido in modo da eliminare l’eventuale
polvere depositata durante il trasporto.
Preparazione dei capi
Verificare che la biancheria da asciugare sia idonea per
l’asciugatura meccanica, come indicato dai simboli
sull’etichetta di lavaggio dei vari articoli.
Controllare che le chiusure siano chiuse e le tasche
vuote. Girare i capi con il rovescio all’esterno. Introdurre
i capi nel cestello uno ad uno, in modo che non si
aggroviglino.
Peso massimo di
asciugatura
● Capi in cotone Max. 7,5 kg
● Capi sintetici Max. 3,5 kg
80
Preparazione della
biancheria
Non sovraccaricare
il cestello, in
quanto i capi
ingombranti, a
caldo, possono
superare il carico
massimo
consentito.
(per esempio sacchi
a pelo e piumoni)
40003874Ita.qxd 20/09/2005 18:54 Page 80
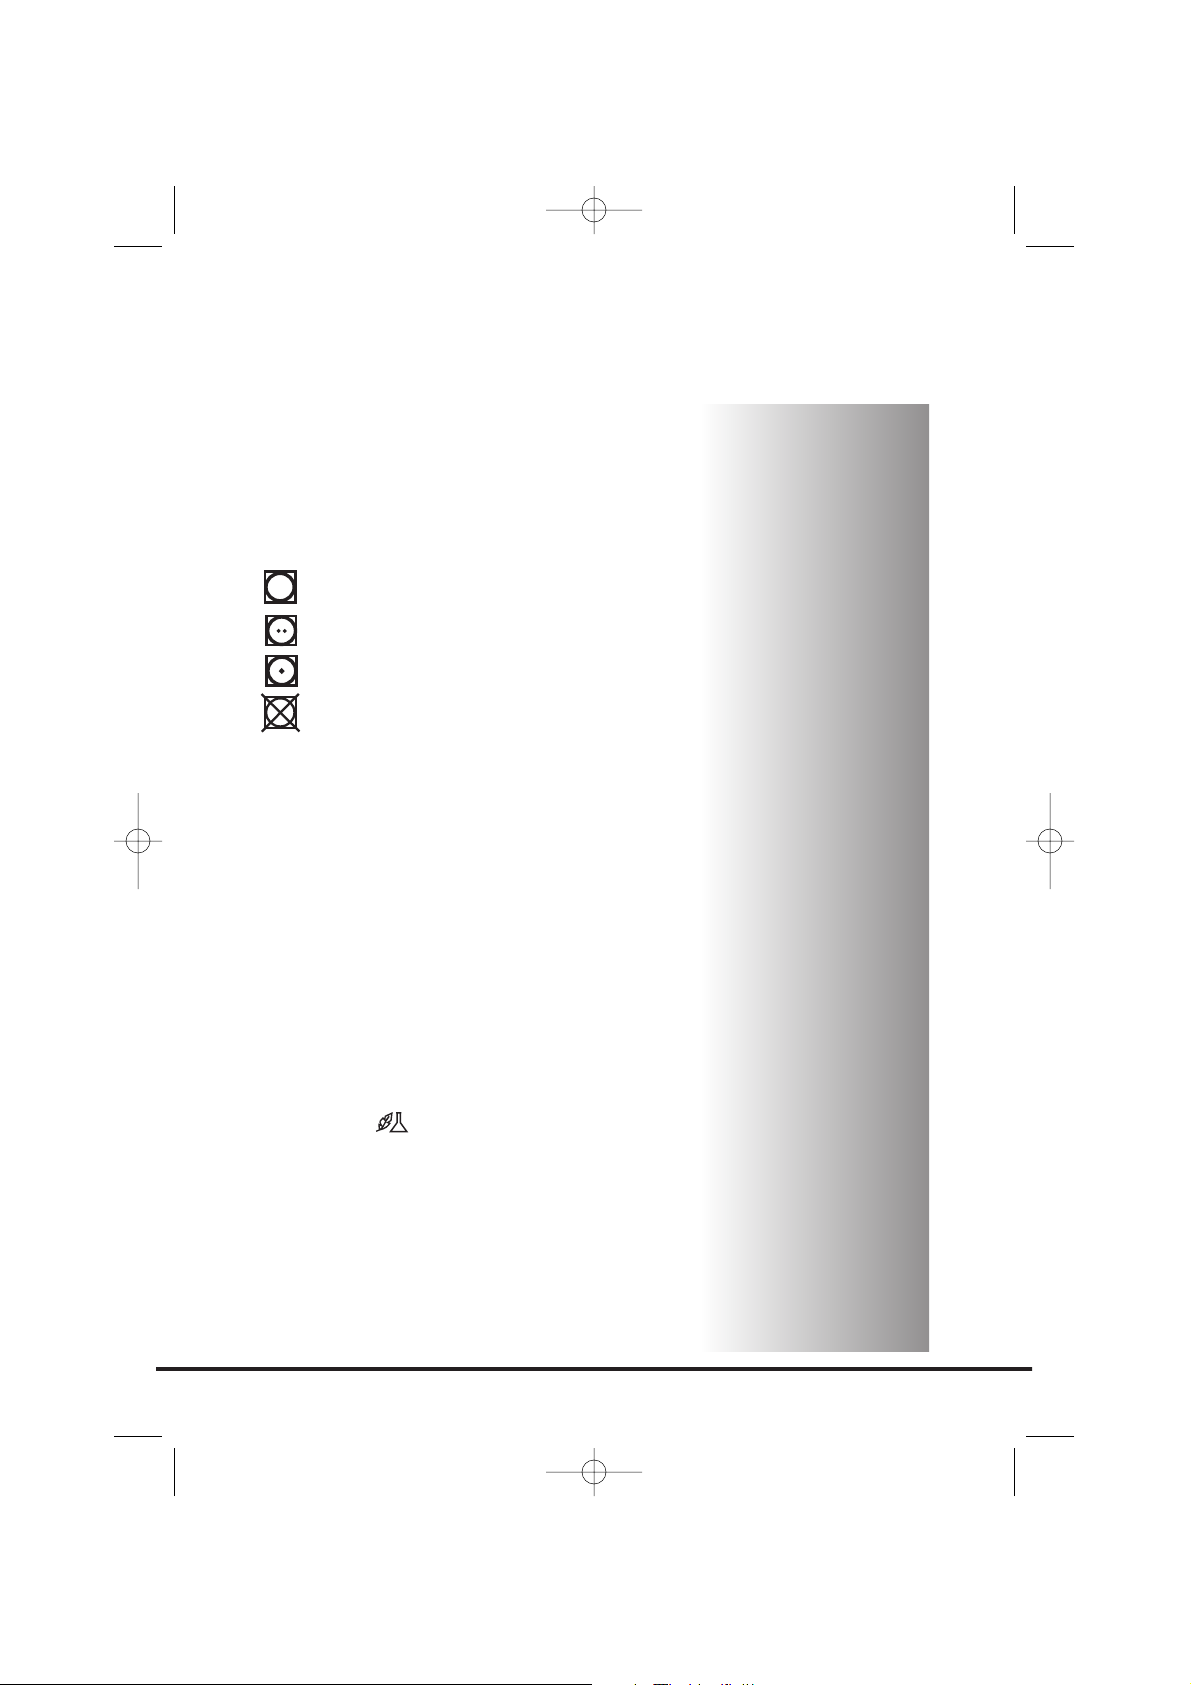
Selezionare la biancheria
nel modo seguente:
● In base ai simboli delle etichette di lavaggio
Le etichette di lavaggio sono apposte sul collo o
sulle cuciture interne:
Articolo idoneo per l’asciugatura meccanica.
Asciugatura ad alta temperatura.
Solo asciugatura a bassa temperatura.
Articolo non idoneo all’asciugatura
meccanica.
Se il capo è sprovvisto di etichetta di
lavaggio, si deve presumere che non sia
idoneo all’asciugatura meccanica.
● In base al quantitativo ed alla pesantezza
Se il carico è superiore alla capacità della
macchina, separare i capi in base alla pesantezza
(p. es., separare gli asciugamani dalla biancheria
leggera).
● In base al tipo di tessuto
Articoli di cotone/lino: Asciugamani, jersey di
cotone, biancheria da tavola/letto.
Articoli sintetici: Camicette, camicie, tute ecc. in
poliestere o poliammide e misti cotone/sintetici.
● In base al grado di asciugatura
Selezionare tra: capi asciutti da stirare, capi pronti
da riporre ecc. Per i capi delicati premere il
pulsante , impostando una temperatura di
asciugatura ridotta.
81
40003874Ita.qxd 20/09/2005 18:54 Page 81
Evitare di asciugare:
Articoli di lana, seta, tessuti delicati, calze di nylon,
ricami delicati, tessuti con decorazioni metalliche,
indumenti con guarnizioni in PVC o in pelle, scarpe da
ginnastica, articoli pesanti come sacchi a pelo ecc.
Risparmio energia
Introdurre nell’asciugatrice solo biancheria
accuratamente strizzata a mano o centrifugata a
macchina. Quanto più asciutta è la biancheria, tanto più
rapido è il tempo richiesto per l’asciugatura, con
conseguente risparmio di consumo elettrico.
COSA FARE SEMPRE
● Cercare sempre di far lavorare la macchina a
pieno carico di biancheria: si risparmia tempo ed
elettricità.
● Prima di ogni ciclo di asciugatura verificare
SEMPRE che il filtro sia pulito.
COSA NON FARE MAI
● Non superare mai il peso massimo: si perde tempo
e si consuma più elettricità.
● Evitare di caricare capi ancora gocciolanti: si
rischia di rovinare la macchina.
Guida ad una corretta
asciugatura
In tabella sono riportati i tempi di asciugatura indicativi
in funzione del tipo di tessuto e del grado di umidità
dei capi.
82
Consigli per l’asciugatura
IMPORTANTE:
Evitare di asciugare
articoli
preventivamente
trattati con
prodotti di pulizia
a secco o capi in
gomma (pericolo
d’incendio o
esplosione).
Nel corso degli
ultimi 15 minuti, il
carico viene
sempre asciugato
con aria fredda.
Tessuto
COTONE
SINTETICI
ACRILICI
SELEZIONE TEMPERATURA
ELEVATA
BASSA
BASSA
CARICO PESANTE
140-165 min
–
–
CARICO MEDIO
70-80 min
70-80 min
50-65 min
CARICO LEGGERO
50-65 min
40-55 min
30-40 min
40003874Ita.qxd 20/09/2005 18:54 Page 82

Pannello di comando e spie luminose
Selettore dei programmi – Consente di selezionare il programma desiderato
Tasto e spia On/Off – Premere questi tasti per attivarli, la spia si illumina.
Tasto Start (Avvio) – Per dare inizio al programma di asciugatura selezionato, premere il
tasto Start. Per annullare/azzerare il programma, tenere premuto per 5 secondi
Tasto Acrilici/Sintetici – Premere questo tasto per ridurre la temperatura nel caso di
capi delicati. Si accenderà la spia sopra il relativo tasto. Per modificare la regolazione
della temperatura, occorre azzerare il programma
Bassa temperatura – Spia ACCESA Alta temperatura – Spia SPENTA
Spia Elimina Acqua – si accende quando la vaschetta dell’acqua è piena
La spia di segnalazione pulizia filtro – Si accende quando il filtro deve essere pulito.
Tasto Partenza ritardata – Consente all’utente di ritardare la partenza del ciclo di
asciugatura (si vedano i dettagli sul funzionamento a pagina 88)
Display COUNTDOWN (Tempo residuo)
START – Quando si attiva l’asciugatrice, la spia START lampeggia; quando parte il
programma, la spia START si accende
La spia 60' si accende quando mancano meno di 60 minuti al completamento del
programma
La spia 15' si accende quando mancano meno di 15 minuti al completamento del
programma In questa fase del ciclo di asciugatura, la macchina entra nella fase di
Raffreddamento
La spia STOP – si accende quando viene completato il programma.
6h – partenza ritardata di 6 ore (quando entra in funzione la spia lampeggia)
9h – partenza ritardata di 9 ore (quando entra in funzione la spia lampeggia)
83
PULSANTE
ACRILICI/SINTETICI
IL PULSANTE
ON/OFF
SPIA DI PULIZIA FILTRO
SPIA ELIMINA ACQUA
SELETTORE DEI
PROGRAMMI
PULSANTE
AVVIO
PULSANTE
PARTENZA
RITARDATA
DISPLAY TEMPO
RESIDUO
Comandi e spie di
segnalazione
40003874Ita.qxd 20/09/2005 18:54 Page 83

Apertura del portellone
Tirare la maniglia per aprire lo sportello.
Per avviare la macchina, richiudere il portellone e
premere il tasto Start (Avvio).
Filtro
IMPORTANTE: Ai fini della massima efficacia della
macchina, prima di ogni ciclo di asciugatura è essenziale
verificare la pulizia del filtro antifilacce.
1. Tirare il filtro verso l’alto.
2. Aprire il filtro come illustrato.
3. Rimuovere delicatamente le filacce con la punta
delle dita o aiutandosi con uno spazzolino
morbido.
4. Richiudere il filtro e reinserirlo in sede.
Spia di pulizia filtro
si accende segnalando la necessità di pulire il filtro.
Se la biancheria non si asciuga verificare che il filtro
non sia intasato.
84
Portellone e filtro
AVVERTENZA!
Si ricorda che quando la macchina è in
funzione il cestello e il portellone
possono essere MOLTO CALDI.
40003874Ita.qxd 20/09/2005 18:54 Page 84
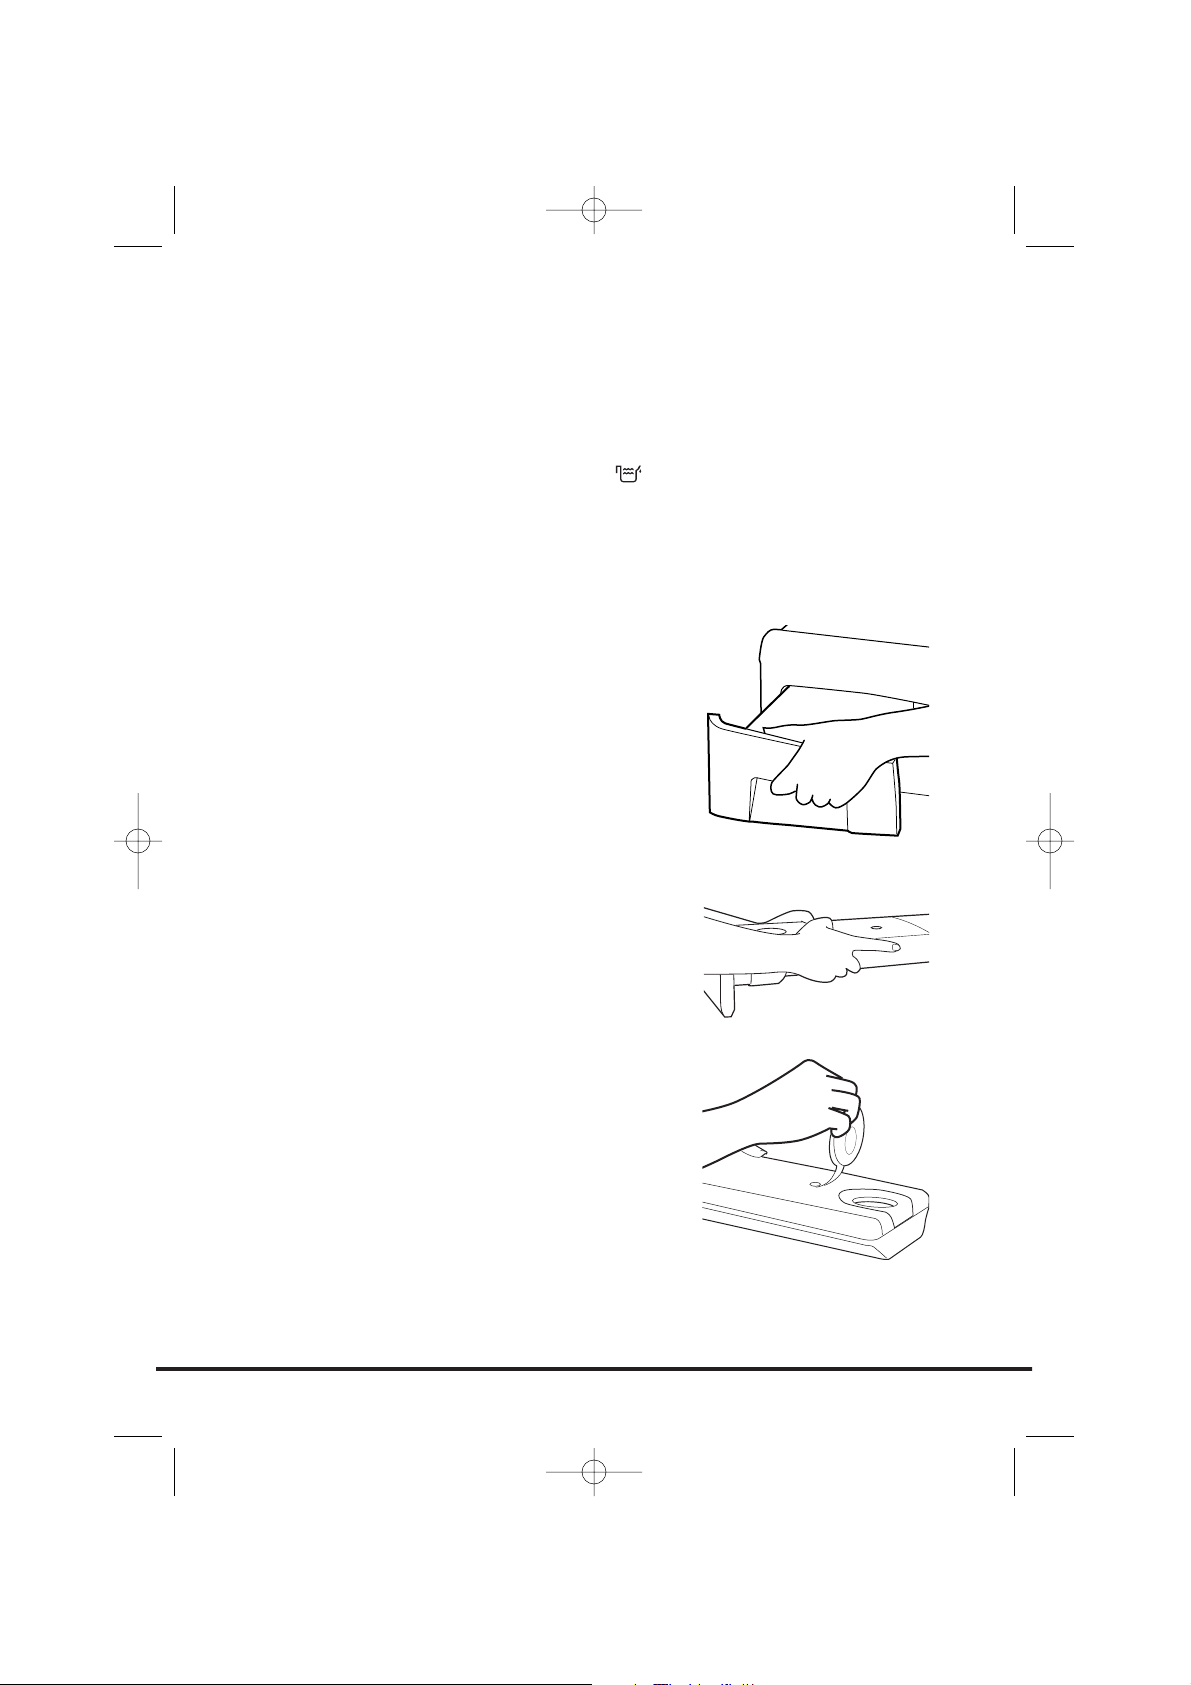
L’acqua eliminata dalla biancheria durante il ciclo di
asciugatura viene raccolta in una vaschetta posta in
fondo alla macchina.
Quando la vaschetta è piena si accende la spia sul
pannello dei comandi, segnalando che si DEVE vuotare
la vaschetta. Tuttavia, si consiglia di svuotare la
vaschetta dopo ogni ciclo di asciugatura.
NOTA: Nei primi cicli, quando la macchina è nuova, si
raccoglie poca acqua in quanto si riempie prima il
serbatoio interno.
Per togliere la vaschetta
1. Estrarre con delicatezza la vaschetta, finché non
viene completamente rimossa. Sostenere la
vaschetta con entrambe le mani. Da piena, la
vaschetta dell’acqua pesa circa 4 kg.
2. Aprire il coperchio sulla vaschetta e svuotare
l’acqua. Rimontare il coperchio e reinserire la
vaschetta in sede. SPINGERE CON DECISIONE IN
SEDE.
NOTA: se c’è uno scarico vicino all’asciugatrice, si può
usare l’apposito kit per far scaricare costantemente
l’acqua raccolta dalla macchina. Così facendo si eviterà
di svuotare la vaschetta dell’acqua. Tutte le informazioni
per il montaggio sono all’interno della confezione del
kit di scarico.
85
Vaschetta dell’acqua
40003874Ita.qxd 20/09/2005 18:54 Page 85

IMPORTANTE: Prima di procedere alla pulizia del condensatore, disattivare sempre
l’apparecchio e staccare la spina dalla presa elettrica.
Ai fini delle prestazione dell’apparecchio, è opportuno verificare regolarmente lo stato di
pulizia del condensatore.
Per togliere il condensatore
1. Tirare delicatamente la parte inferiore dello zoccolo, che si sgancia dalla macchina. A
questo punto si può sbloccare la parte superiore ed estrarre completamente lo
zoccolo.
2. Agire sulle due leve di bloccaggio in senso antiorario e estrarre il condensatore.
3. Estrarre il modulo condensatore.
4. Servendosi di un panno, eliminare delicatamente
polvere e filacce, poi lavare il modulo tenendolo sotto
l’acqua corrente e facendolo girare in modo che
l’acqua circoli tra le piastre fino a perfetta
eliminazione delle impurità.
5. Rimontare il condensatore rispettando il verso giusto
(come indicato dalla freccia) e accertandosi che sia
perfettamente inserito in sede. Bloccare le due leve
ruotandole in senso orario.
6. Rimontare lo zoccolo.
La macchina, dotata di sensore di asciugatura, offre
opzioni di asciugatura in grado di rispondere alle più
svariate esigenze.
Nota: Il sensore potrebbe non essere in grado di
individuare un carico ridotto di articoli di piccole
dimensioni. Per carichi ridotti e articoli separati o per
86
Condensatore
Selezione del
programma
40003874Ita.qxd 20/09/2005 18:54 Page 86
tessuti pre-asciugati leggermente umidi, selezionare i programmi a tempo. Impostare il
tempo del programma tra 30 e 75 minuti in base alla quantità del carico e al grado di
asciugatura richiesto. Successivamente, selezionare la temperatura alta o bassa in base al
tipo di tessuto.
Se il sensore non rileva la presenza del capo, l’asciugatrice funziona solo per 10 minuti,
prima di passare alla fase di raffreddamento.
Se il carico è troppo abbondante o troppo bagnato per essere asciugato, l’asciugatrice
passa automaticamente alla fase di raffreddamento dopo 185 minuti.
Nella tabella che segue viene riportato un elenco dei programmi con la relativa
funzione.
87
Programma
Capi completamente
asciutti
Capi extra asciutti
Capi asciutti da
riporre
Capi asciutti
da stirare
Lana
Stiro Facile
120'
75'
60'
45'
30'
Rinfresca
Descrizione
Selezionare il grado di asciugatura desiderato.
Le possibilità disponibili comprendono l’opzione Capi
completamente asciutti, ideale per asciugamani e accappatoi,
l’opzione Capi asciutti da riporre, per capi che non è
necessario stirare, e il programma che lascia la biancheria
pronta per la stiratura.
Un programma delicato creato appositamente per ottenere
capi in lana più soffici dopo l’asciugatura ad aria.
Questo ciclo delicato con aria calda, della durata di 12 minuti,
si può utilizzare anche per “rinfrescare” i capi in lana dopo
averli tenuti in guardaroba.
Il programma Stiro facile assicura una funzione di trattamento
antipiega. La macchina effettua un ciclo di riscaldamento della
biancheria per 9 minuti, seguito da 3 minuti di
raffreddamento. Si tratta di una funzione particolarmente
utile quando si prevede di riporre la biancheria (ad esempio,
nel cesto della biancheria) per un certo periodo di tempo
prima della stiratura. I capi possono ‘seccarsi’ eccessivamente
anche quando vengono fatti asciugare all’aperto sul filo o
vengono posti su radiatori. Il ciclo di Stiro facile attenua le
pieghe sul tessuto rendendo più facile e più rapida la
stiratura.
120 minuti di asciugatura
75 minuti di asciugatura
60 minuti di asciugatura
45 minuti di asciugatura
30 minuti di asciugatura
Asciugatura della biancheria con aria fredda per 30 minuti.
40003874Ita.qxd 20/09/2005 18:54 Page 87
1. Aprire il portellone e caricare la biancheria nel cestello. Verificare che i capi non
impediscano la chiusura del portellone.
2. Chiudere delicatamente il portellone spingendolo lentamente fino ad avvertirne lo
scatto di chiusura.
3. Premere il tasto per attivare l’asciugatrice. La spia si accenderà e inizierà a
lampeggiare la spia START.
4. Ruotare il selettore dei programmi selezionando il programma di asciugatura
desiderato (si veda Guida ai programmi).
5. Per ridurre il grado di calore con capi delicati, sintetici o acrilici, premere il tasto
.
La spia sopra il tasto si accende quando è impostata la funzione bassa
temperatura. Per annullare la selezione di questa funzione quando il ciclo di
asciugatura è partito, è necessario azzerare la macchina.
6. Premere il pulsante di Start (Avvio). L’asciugatrice partirà automaticamente e la
spia START resterà accesa.
7. Sul display comparirà lo stato di avanzamento dell’asciugatura, ossia il tempo
restante prima della fine del programma.
8. Se si apre il portellone per controllare la biancheria mentre il programma è in
funzione, per riattivare l’operazione di asciugatura è necessario chiudere il
portellone e premere nuovamente il tasto Start.
9. Quando si accende la spia 15', la macchina entra nella fase di raffreddamento. In
questa fase, i capi vengono asciugati con aria fredda e il carico può così
raffreddarsi.
10. Una volta completato il programma, si accenderà la spia STOP.
Annullamento e azzeramento del
programma
Per annullare un programma, tenere premuto il tasto Start per 5 secondi. A questo
punto si vedrà lampeggiare la spia di START, a segnalare l’avvenuto azzeramento del
programma. Modificando il programma entro il primi 10 minuti, si può evitare di usare
la funzione di annullamento e azzeramento.
Partenza ritardata
La funzione consente all’utente di ritardare la
partenza del ciclo di asciugatura di 6 o 9 ore.
Agendo la prima volta sul tasto di questa funzione,
comparirà sul display un ritardo di 6 ore. Premendo di
nuovo il tasto, si passerà a un ritardo di 9 ore.
Per far partire il programma, premere il tasto Start.
Trascorso il tempo di ritardo impostato, la macchina
88
AVVERTENZA!
Il cestello, il
portellone e il
carico possono
essere molto caldi.
Funzionamento
40003874Ita.qxd 20/09/2005 18:54 Page 88
completerà il ciclo di asciugatura. Lampeggerà la spia
delle 6 ore o delle 9 ore, per indicare che è in funzione
la partenza ritardata.
Pulizia dell’asciugatrice
● Si consiglia di pulire il filtro e di svuotare la
vaschetta dell’acqua dopo ogni ciclo di
asciugatura.
● Pulire regolarmente il condensatore.
● Dopo l’uso, pulire l’interno del cestello e lasciare
aperto il portellone per un certo periodo di
tempo in modo che circoli aria e si asciughi.
● Pulire l’esterno della macchina e il portellone con
un panno morbido.
● NON usare spugnette abrasive né prodotti di
pulizia.
● Per evitare che il portellone resti ‘incollato’ o che
si accumulino filacce, pulire regolarmente il
portellone interno e le guarnizioni con un panno
umido.
Specifiche tecniche
Capacità del cestello 115 litri
Carico massimo 7,5 kg
Altezza 85 cm
Larghezza 60 cm
Profondità 60 cm
Efficienza Energetica C
89
IMPORTANTE
Prima di procedere
alla pulizia,
disattivare sempre
la macchina e
staccare la spina
dalla presa a muro.
Per i dati elettrici
vedere la targhetta
dei dati posta sul
davanti del mobile
della macchina
(con portellone
aperto).
Pulizia e manutenzione
ordinaria
40003874Ita.qxd 20/09/2005 18:54 Page 89

Quale può essere la causa...
Problemi che può risolvere l’utente
Prima di rivolgersi al Centro Assistenza GIAS, consultare la seguente checklist. La
chiamata verrà addebitata all’utente nel caso in cui risulti che la macchina funziona o è
stata installata o utilizzata in maniera errata. Se il problema persiste anche dopo aver
eseguito i controlli consigliati, rivolgersi al servizio di assistenza GIAS che sarà a
disposizione per suggerire eventuali soluzioni per telefono.
Tempo di asciugatura eccessivamente lungo/capi non
sufficientemente asciutti…
● Il programma/tempo di asciugatura selezionato è corretto?
● I capi sono stati introdotti eccessivamente bagnati? Si è provveduto a strizzare o
centrifugare adeguatamente i capi prima d’introdurli nella macchina?
● Si deve pulire il filtro?
● Si deve pulire il condensatore?
● L’asciugatrice è stata caricata eccessivamente?
● Vi sono ostruzioni a livello delle prese, degli sfiati e della base dell’asciugatrice?
● Il tasto è stato selezionato da un ciclo precedente?
L’asciugatrice non funziona…
● L’alimentazione elettrica cui è collegata la macchina è attiva? Controllare
provando con un altro apparecchio (ad esempio, lampada da tavolo).
● La spina di alimentazione è stata collegata correttamente all’alimentazione
elettrica?
● Manca la corrente?
● Fusibile bruciato?
● Il portellone è stato chiuso perfettamente?
● La macchina è stata opportunamente attivata (sia collegata all’alimentazione sia
attivata localmente)?
● È stato selezionato il tempo o il programma di asciugatura?
● La macchina è stata riattivata dopo aver aperto il portellone?
● La macchina ha smesso di funzionare perché la vaschetta dell’acqua è piena e deve
essere svuotata?
L’asciugatrice fa molto rumore…
● Spegnere l’asciugatrice e rivolgersi al Servizio Assistenza GIAS.
La spia di segnalazione Pulizia filtro è accesa…
● Si deve pulire il filtro?
● Si deve pulire il condensatore?
Spia Elimina Acqua accesa…
● Si deve svuotare la vaschetta dell’acqua?
90
Ricerca guasti
40003874Ita.qxd 20/09/2005 18:54 Page 90

Se il problema persiste anche dopo aver effettuato tutti
i controlli consigliati, rivolgersi al Servizio Assistenza
GIAS. Sarà a disposizione per suggerire eventuali
soluzioni per telefono o per fissare la visita del tecnico
in base alle condizioni di garanzia. Si ricorda che
l’intervento del tecnico può essere soggetto a
pagamento nel caso la macchina:
● risulti perfettamente funzionante.
● non sia stata installata secondo quanto indicato
nelle istruzioni d’installazione.
● sia stata utilizzata in modo improprio.
Ricambi
Utilizzare sempre ricambi originali, disponibili
direttamente presso il Servizio Assistenza GIAS.
Servizio GIAS
Per assistenza e riparazioni, rivolgersi al tecnico del
Servizio Assistenza GIAS più vicino.
Il produttore declina ogni responsabilità in caso di
eventuali errori di stampa nel presente opuscolo. Il
produttore si riserva il diritto di apportare le necessarie
modifiche ai propri prodotti senza modificarne le
caratteristiche essenziali.
91
Servizio assistenza clienti
40003874Ita.qxd 20/09/2005 18:54 Page 91

. . . . . . . . . . . . . . . . . . . . . . . . . . . . . . . . . . . . . . . . . . . . . . . . . 93
. . . . . . . . . . . . . . . . . . . . . . . . . . . . . . . . . . . . . . . . . 93
. . . . . . . . . . . . . . . . . . . . . . . . 93
. . . . . . . . . . . . . . . . . . . . . . . . . . . . . . . 94
. . . . . . . . . . . . . . . . . . . . . . . . . . . . . . . . . . . . . . . . . . . . . . . . . . . 94
. . . . . . . . . . . . . . . . . . . . . . . . . . . . . . . . . . . . . . . . . . . . . . . . . . . . . . . . 94
. . . . . . . . . . . . . . . . . . . . . . . . . . . . . . . . . . . . . . . . . . . . . . . 94
. . . . . . . . . . . . . . . . . . . . . . . . . . . . . . . . . . . . . . . . . . . 95
GIAS . . . . . . . . . . . . . . . . . . . . . . . . . . . . . . . . . . . . . . . . . . . . . . . . 95
. . . . . . . . . . . . . . . . . . . . . . . . . . . . . . . . . . . . . . . . . . . . . 96
. . . . . . . . . . . . . . . . . . . . . . . . . . . . . . . . . . . . . . . . . . . . 96
. . . . . . . . . . . . . . . . . . . . . . . . . . . . . . . . . . . . . . . . . . . . . 96
. . . . . . . . . . . . . . . . . . . . . . . . . . . . . . . . . . . . . . . . . . . . . . . 97
. . . . . . . . . . . . . . . . . . . . 98
. . . . . . . . . . . . . . . . . . . . . . . . . . . . . . . . . . . . . . . . . . . . 98
. . . . . . . . . . . . . . . . . . . . . . . . . . . . . . . . . . . . 99
. . . . . . . . . . . . . . . . . . . . . . . . . . . . . . . . 100
. . . . . . . . . . . . . . . . . . . . . . . . . . . . . . . . . . . . 100
E . . . . . . . . . . . . . . . . . . . . . . . . . . . . . . . . . . . . . . . . . . 100
. . . . . . . . . . . . . . . . . . . . . . . . . . . . . . . . . . . . . . . . . . . . 100
. . . . . . . . . 101
. . . . . . . . . . . . . . . . . . . . . . . . . . . . . . . . . . . . . . . . 102
. . . . . . . . . . . . . . . . . . . . . . . . . . . . . . . . . . . . . . . . . . . . . 102
. . . . . . . . . . . . . . . . . . . . . . . . . . . . . . . . . . . . . . . . . . . . . . . . . . . . . . . 102
. . . . . . . . . . . . . . . . . . . . . . . . . . . . . . 102
. . . . . . . . . . . . . . . . . . . . . . . . . . . . . . . . . . . . . . . . . . . . 103
. . . . . . . . . . . . . . . . . . . . . . . . . . . . . . . . . . . . . . . 103
. . . . . . . . . . . . . . . . . . . . . . . . . . . . . . . . . . . . . . . . . . . 104
. . . . . . . . . . . . . . . . . . . . . . . . . . . . . . . . . . 104
. . . . . . . . . . . . . . . . . . . . . . . . . . . 104
. . . . . . . . . . . . . . . . . . . . . . . . . . . . . . . . . . . . . . . . . . . . . . . 106
. . . . . . . . . . . . . . . . . . . . . . . . 106
. . . . . . . . . . . . . . . . . . . . . . . . . . . . . . . . . . . . . . . . . . . 106
. . . . . . . . . . . . . . . . . . 107
. . . . . . . . . . . . . . . . . . . . . . . . . . . . . . . . . . . . . 107
. . . . . . . . . . . . . . . . . . . . . . . . . . . . . . . . . . . . . . . . . . 107
. . . . . . . . . . . . . . . . . . . . . . . . . . 108
. . . . . . . . . . . . . . . . . . . . 109
. . . . . . . . . . . . . . . . . . . . . . . . . . . . . . . . . . . . . . . . . . . . . . . . . . 109
GIAS . . . . . . . . . . . . . . . . . . . . . . . . . . . . . . . . . . . . . . . . . . . . . . . 109
92
40003874Greek.qxd 21/09/2005 10:27 Page 92
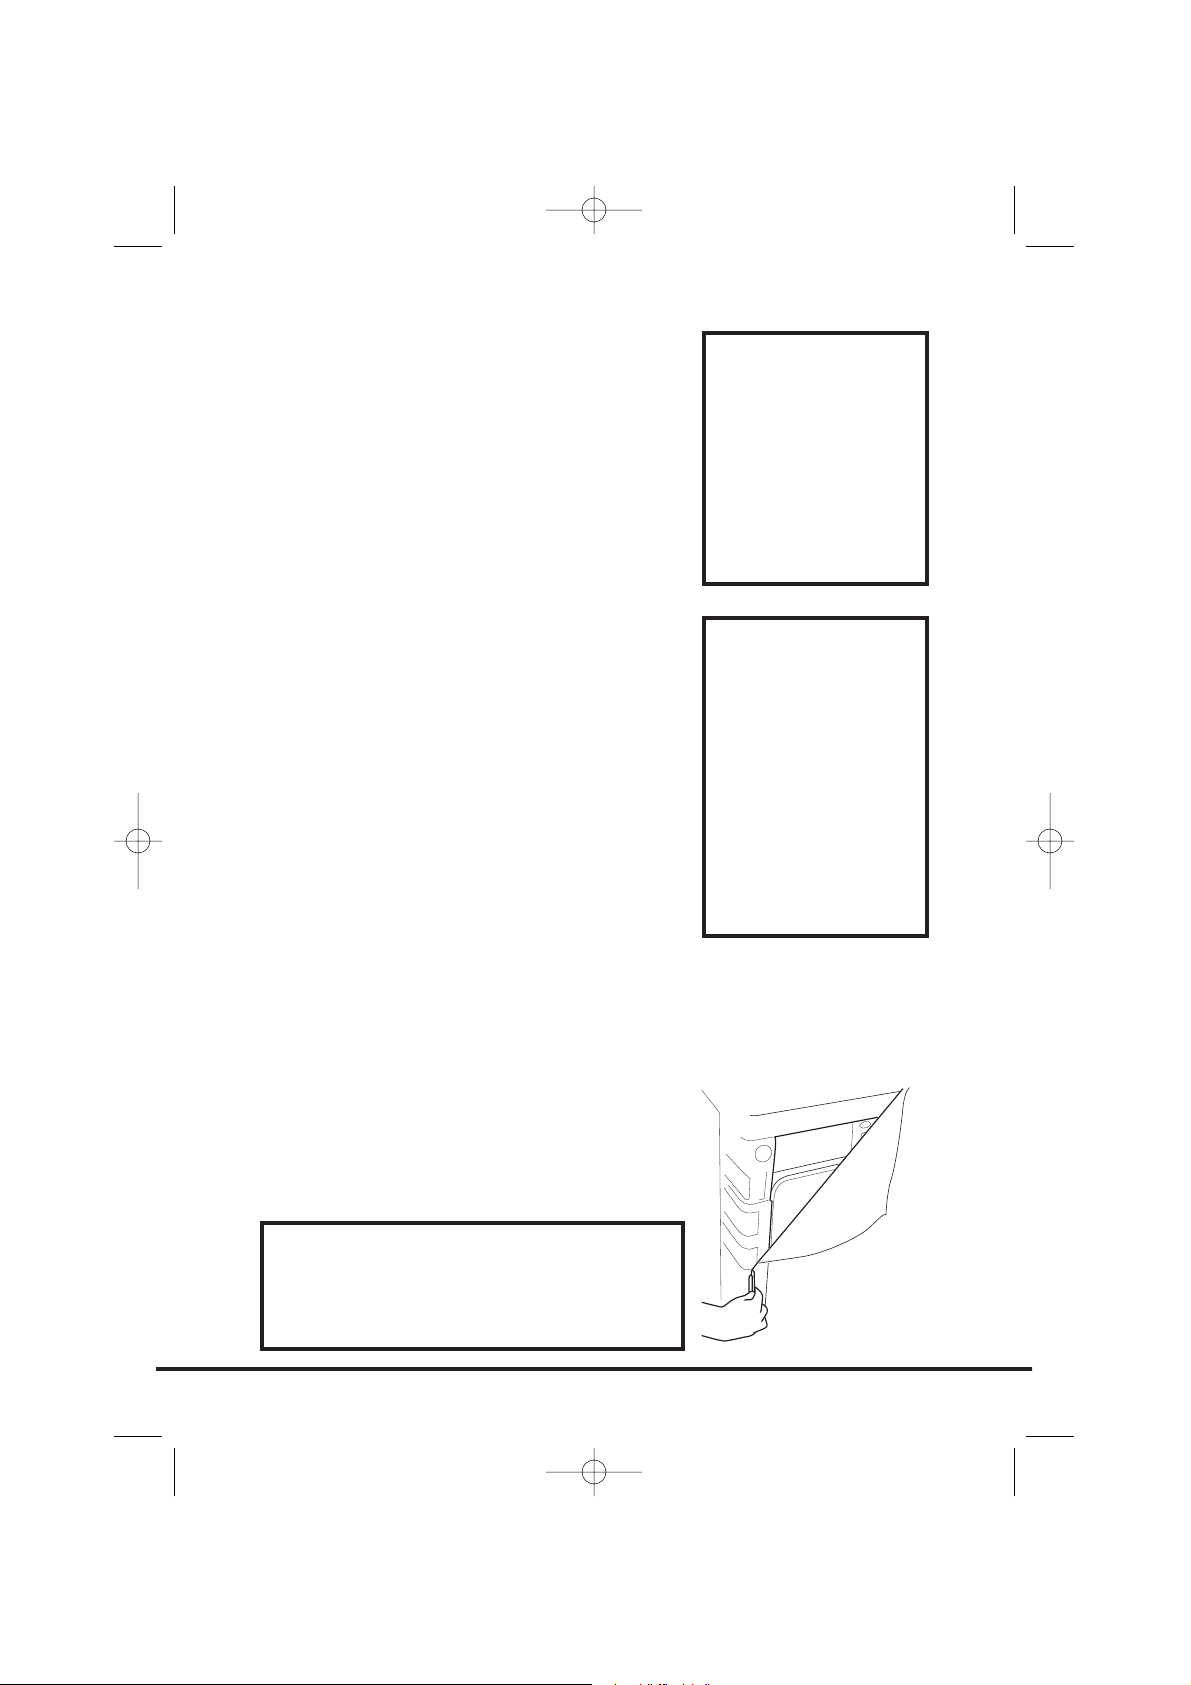
.
,
,
.
:
●
●
●
.
1.
.
2.
.
93
.
,
GIAS.
.
,
.
.
,
.
40003874Greek.qxd 21/09/2005 10:27 Page 93
● , .
, GIAS.
● , / .
● .
●
.
●
.
● ,
.
●
, .
,
.
● .
●
.
● .
●
. .
● ,
, 60 C.
● .
.
● .
●
.
● .
.
●
.
● ,
, . ,
.
.
●
.
●
.
.
94
40003874Greek.qxd 15/12/2005 16:08 Page 94

●
.
●
. ,
.
●
, ,
.
●
.
.
.
● ,
,
.
,
.
GIAS
●
GIAS.
! " 2002/96EC
2002/96EC (WEEE).
,
,
.
.
.
.
, ,
,
.
95
,
!" # $ %# !
&. ' $# # GIAS ( .
40003874Greek.qxd 15/12/2005 16:09 Page 95
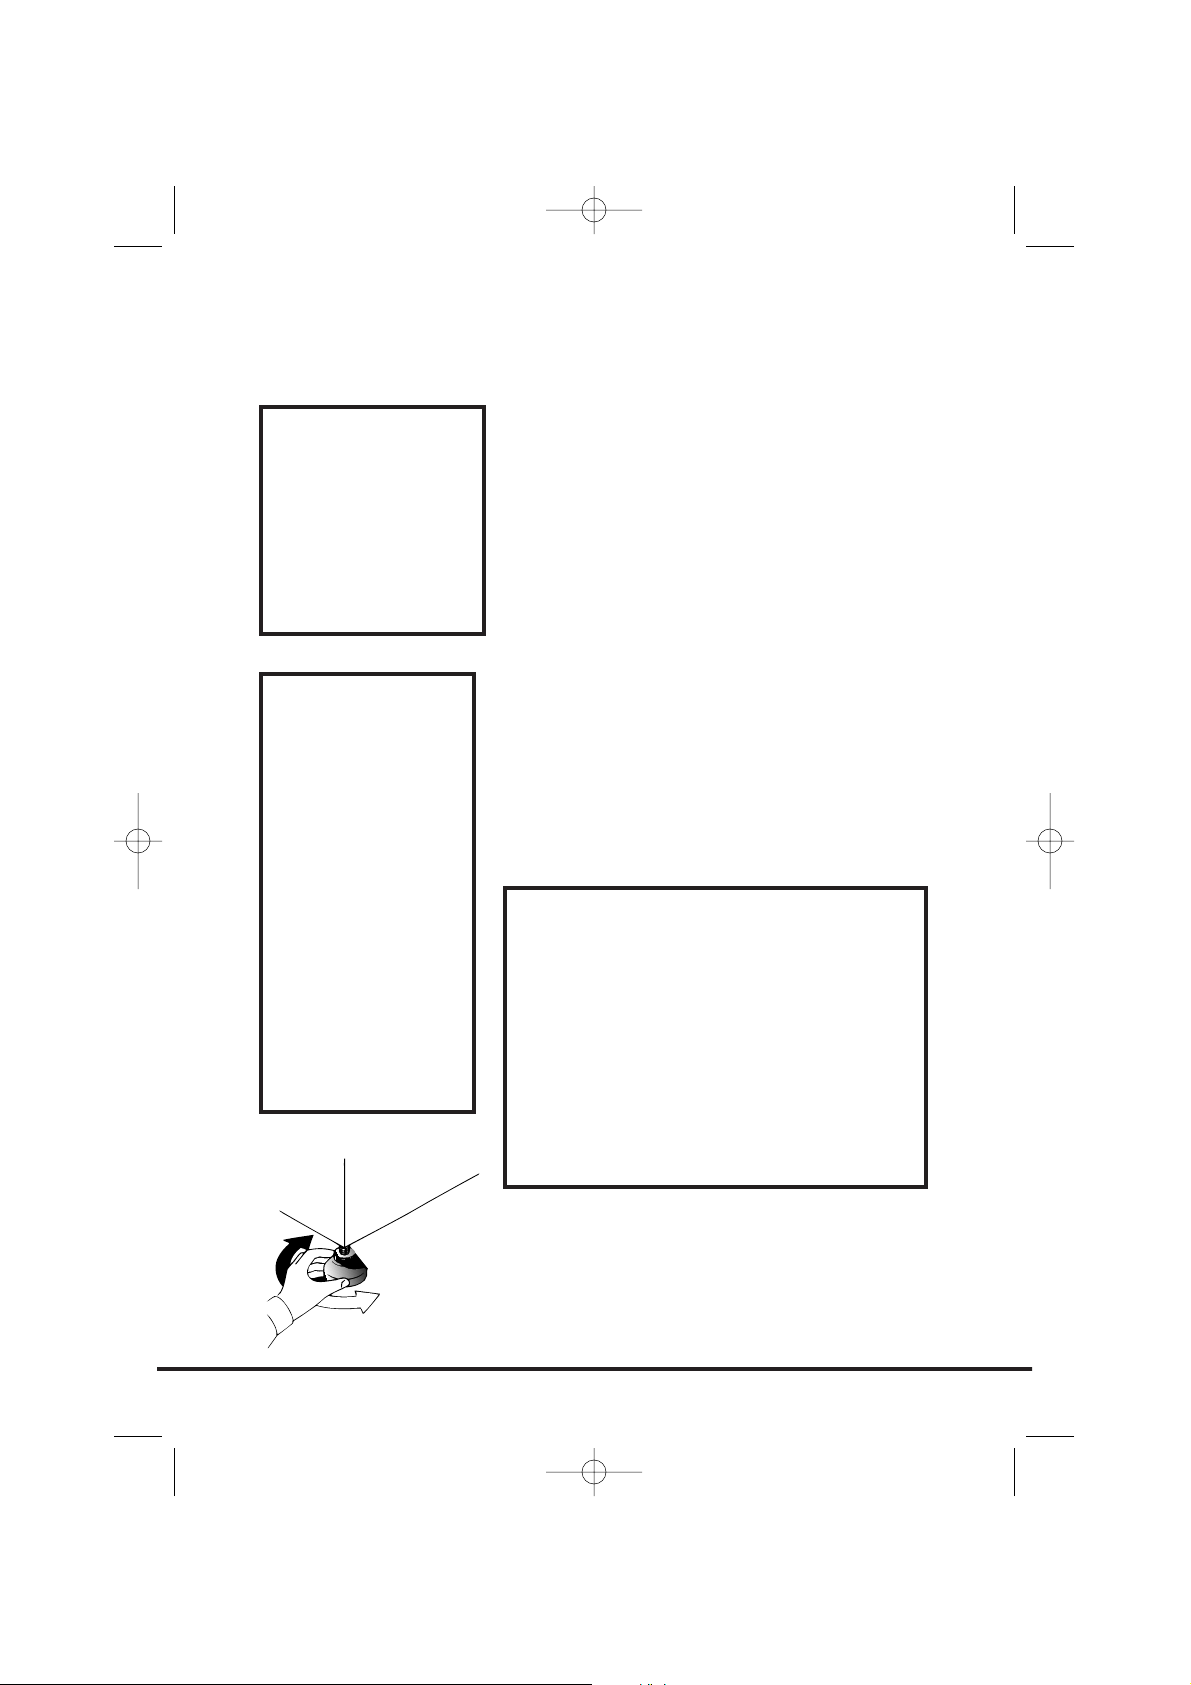
230 V, 50 Hz.
16 A .
.
.
.
/
.
.
:
CE 89/336/,
73/23/ .
,
.
,
.
96
,
.
,
,
.
.
.
,
.
,
GIAS
.
40003874Greek.qxd 21/09/2005 10:27 Page 96

,
,
,
.
●
.
●
:
●
, .
● .
,
.
12 mm
.
●
,
.
●
.
97
40003874Greek.qxd 21/09/2005 10:27 Page 97
:
●
.
●
.
●
.
,
.
, ..
.
. ,
.
● . 7.5
● . 3.5
98
,
( :
,
).
40003874Greek.qxd 21/09/2005 10:27 Page 98

:
●
:
.
.
.
.
,
.
●
,
(..
).
●
/: ,
.
: , , ..
,
/.
●
: ,
..
.
99
40003874Greek.qxd 21/09/2005 10:27 Page 99
:
, , , ,
, ,
PVC , ,
..
E
.
.
●
.
.
● ,
.
● .
.
●
,
.
O
,
.
100
:
(
).
15 ,
.
HIGH ()
LOW ()
LOW ()
140-165
–
–
70-80
70-80
50-65
50-65
40-55
30-40
40003874Greek.qxd 21/09/2005 10:27 Page 100
–
emeqcopogrgy/apemeqcopogrgy –
,
(Start) – Start
5 /
/ –
, .
,
-
-
–
–
–
(. 106)
START – , START ()
, START
60' – 60
15' - 15
,
STOP -
6h - 6 ( )
9h - 9 ( )
101
/
/
(Start)
40003874Greek.qxd 21/09/2005 10:27 Page 101

.
,
Start.
:
,
.
1. .
2. .
3.
.
4.
.
.
,
.
102
!
,
.
40003874Greek.qxd 21/09/2005 10:27 Page 102

.
,
. ,
.
:
,
.
1.
.
. ,
4 .
2.
.
. .
:
,
.
.
.
103
40003874Greek.qxd 21/09/2005 10:27 Page 103
:
.
,
.
1. ,
. ,
.
2.
.
3. .
4.
,
,
.
5. ,
(
)
. ,
.
6. .
Sensor Dry
.
:
.
104
40003874Greek.qxd 21/09/2005 10:27 Page 104
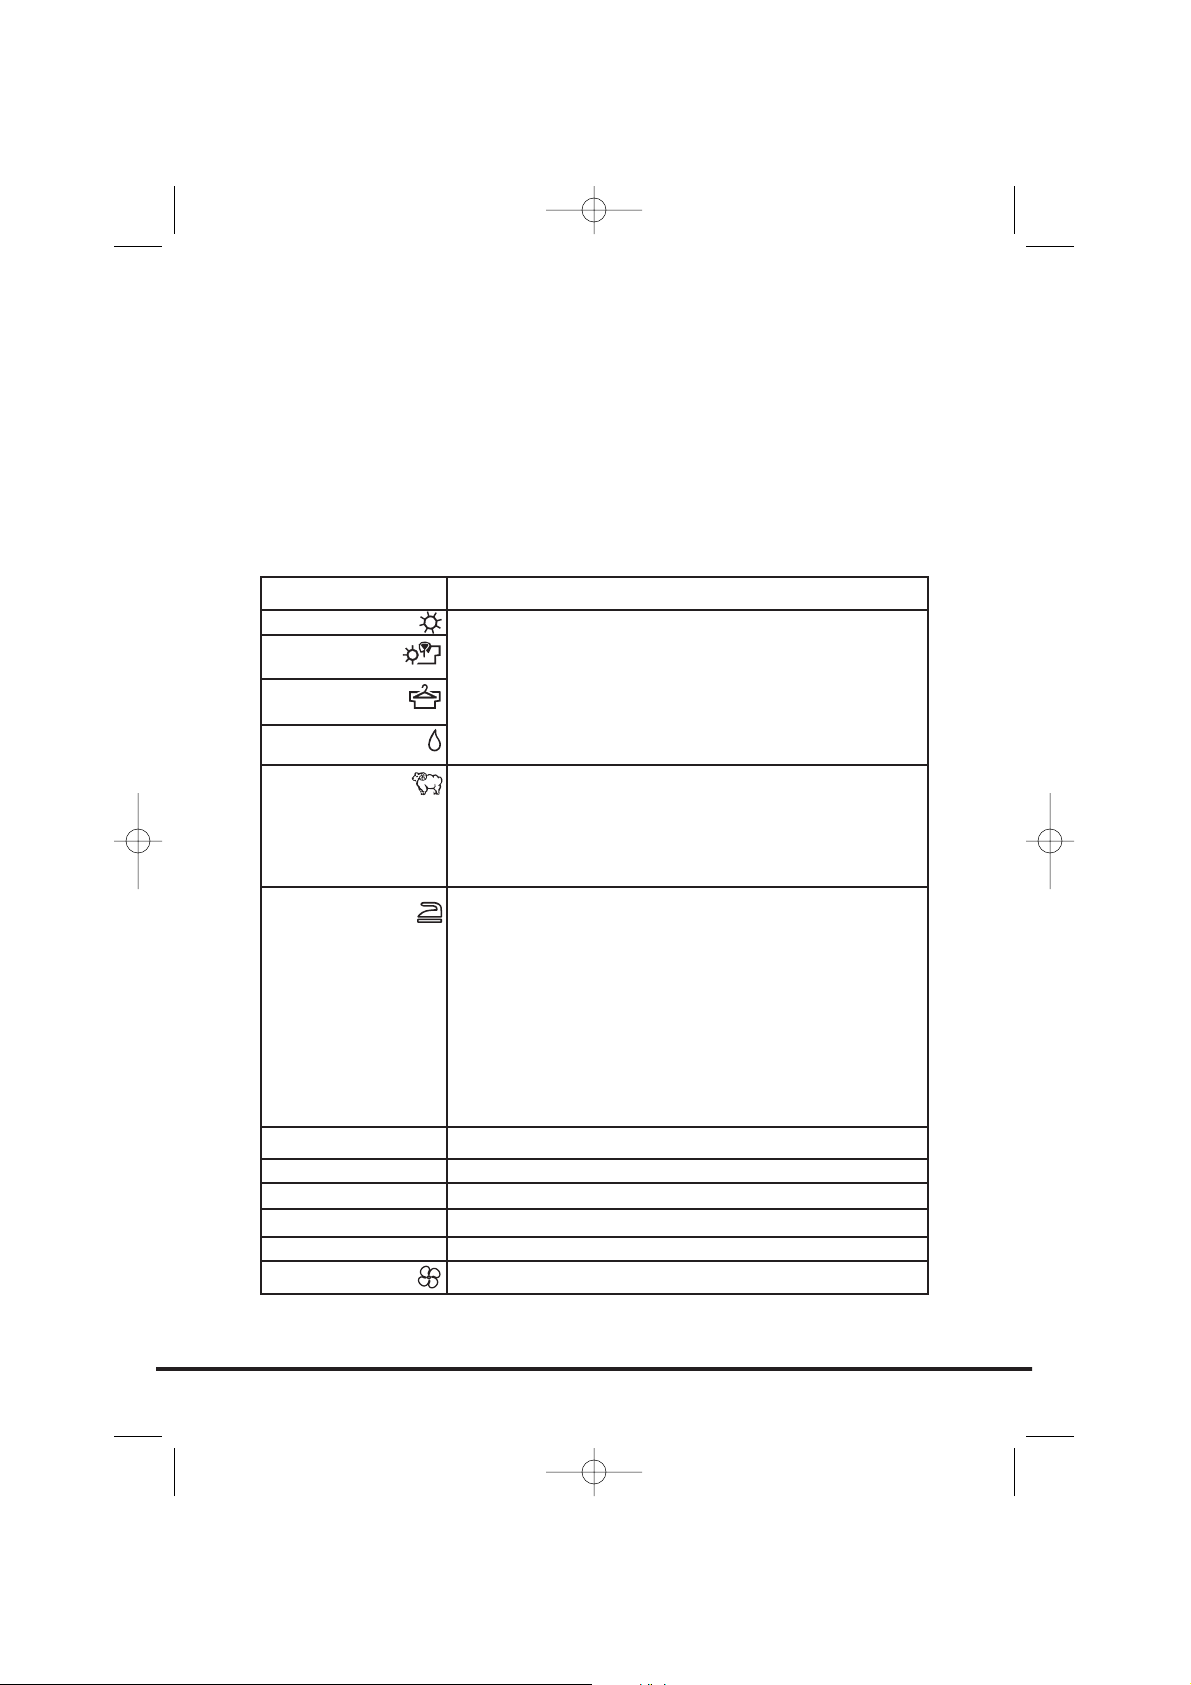
, .
30 75 ,
,
.
, 10 ,
.
,
185 .
.
105
120'
75'
60'
45'
30'
.
“ ”
, “ ”
,
.
.
, 12 ,
.
“ ”
.
9 3 ,
,
.. .
.
“ ” ,
.
120
75
60
45
30
30 .
40003874Greek.qxd 21/09/2005 10:27 Page 105
1. .
.
2. , ‘’
.
3. .
START .
4.
(. ).
5. , ,
.
.
,
.
6. Start.
START .
7.
.
8.
, Start
.
9. 15' ,
, .
10. , STOP .
, Start
5 .
START.
10
.
6 9 .
,
106
!
,
.
40003874Greek.qxd 21/09/2005 10:27 Page 106
6
9 .
, Start
. 6 9
,
.
●
.
● .
● ,
,
.
●
.
●
.
●
,
.
115
7,5 kg
85 cm
60 cm
60 cm
C
107
.
(
).
40003874Greek.qxd 21/09/2005 10:27 Page 107

...
GIAS ,
.
, .
, GIAS,
.
/
...
● / ;
● ; ;
● ;
● o ;
● ;
● , ;
● ;
…
● ;
, .
● ;
● ;
● ‘’ ;
● ;
●
;
● ;
● ;
●
;
…
● GIAS
.
…
● ;
● o ;
…
● ;
108
40003874Greek.qxd 21/09/2005 10:27 Page 108
,
GIAS .
. ,
,
:
● .
●
.
● .
,
GIAS.
GIAS
GIAS.
.
,
.
109
40003874Greek.qxd 21/09/2005 10:27 Page 109


40003874
40003874Eng.qxd 20/09/2005 18:57 Page 20

