nuwavenow.com
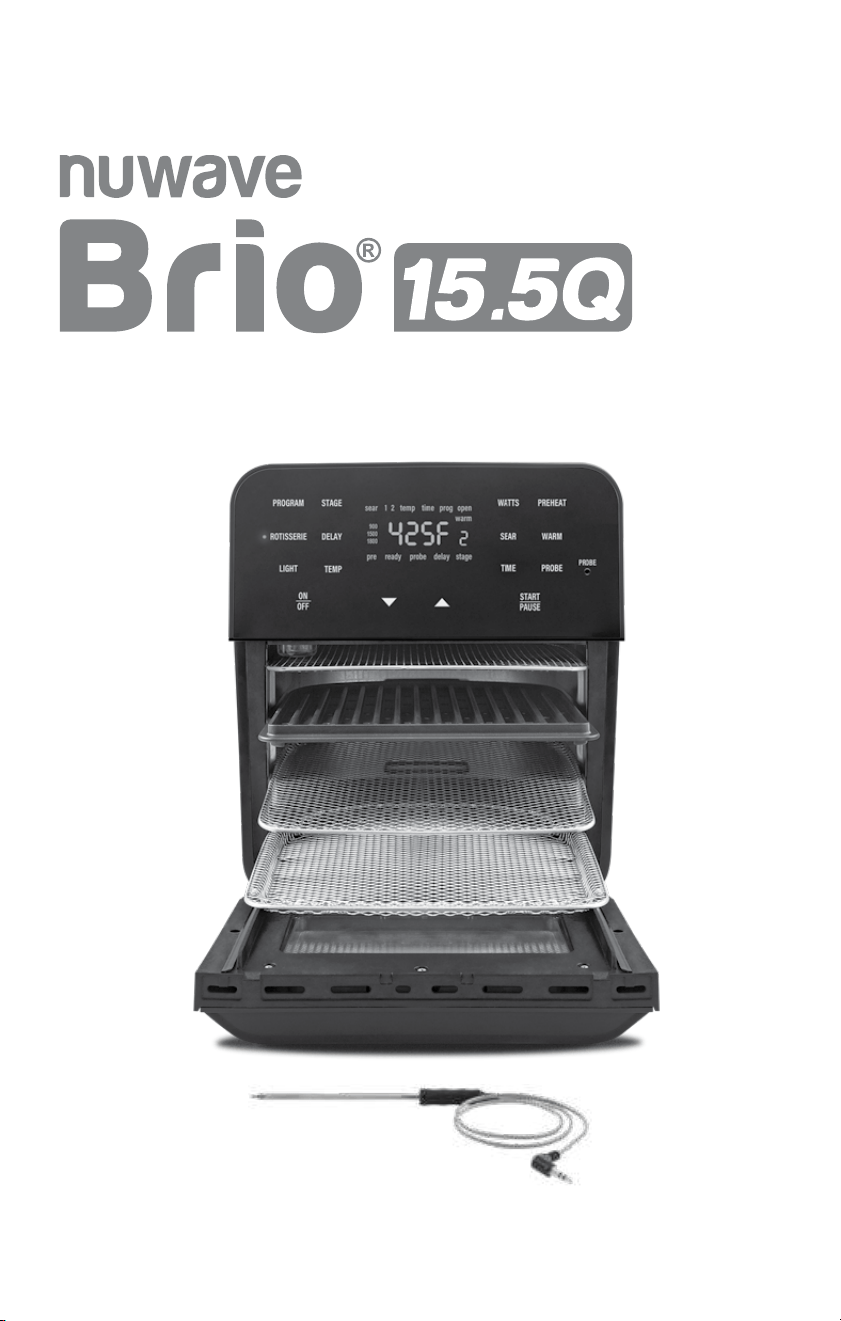
OWNER’S MANUAL
Air Fryer/Grill/Rotisserie Oven
Open your mobile app store
(App Store, Google Play).
Search for "QR code readers."
Simply download the QR code reader to your phone,
open it, scan the code and you are ready to go.
NOTE: You may need to open your downloaded QR
code reader each time you want to scan a QR code.
nuwavenow.com
2 3
nuwavenow.com
2 3
REGISTER
NOW!
3
for an additional
months
warranty!
As a special thank-you for registering your NuWave
Brio, you’ll automatically receive an additional 3 months
added to your limited manufacturer’s warranty!*
All you have to do is follow these simple steps.
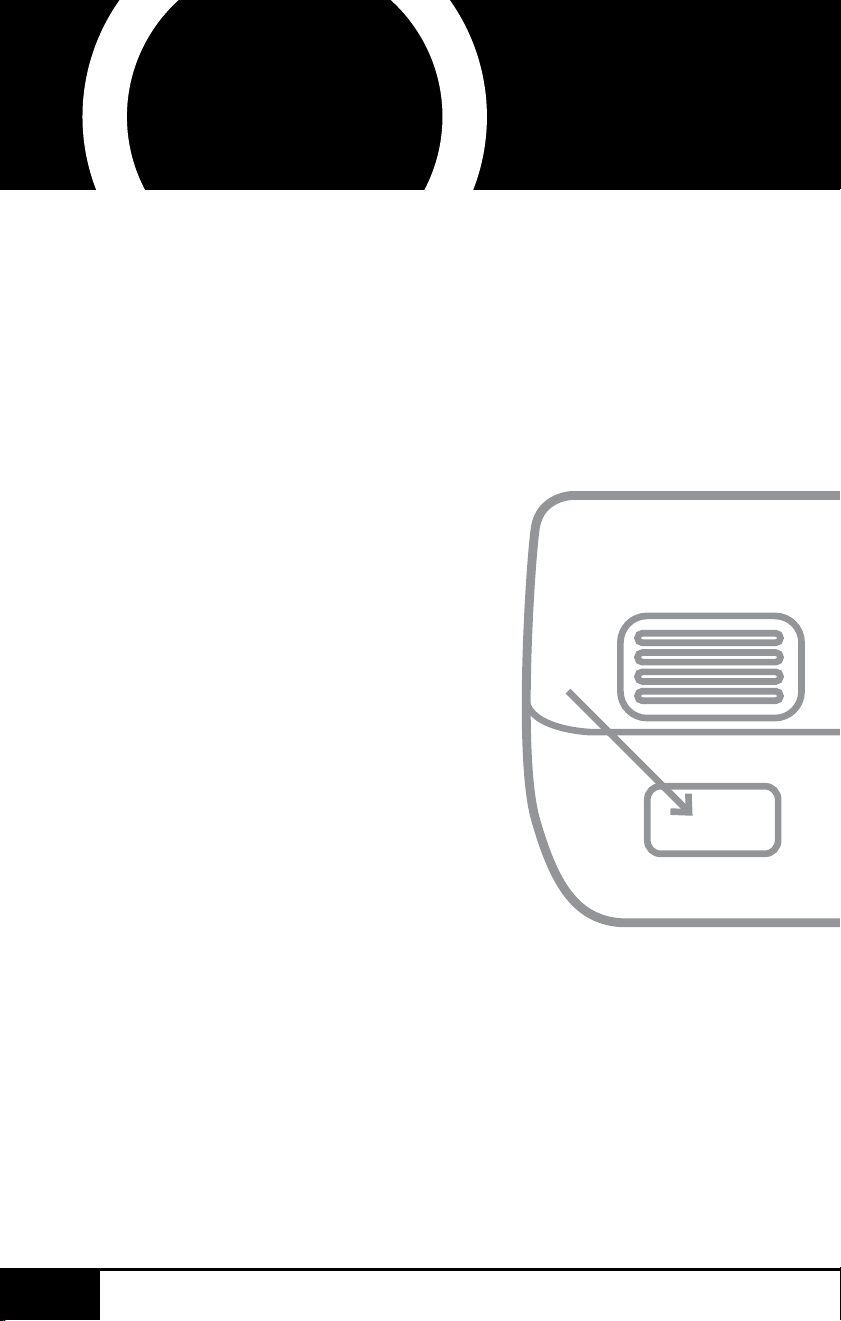
Using your smartphone or
smart device, scan the QR code
located on the unit label on the
back of the Brio.
You will be directed to NuWave’s
product registration page with
your Brio’s unique serial number
automatically entered in the
appropriate eld.
NOTE: If you do not have a
web-enabled smart device,
simply visit nuwavenow.com/QR
and manually enter in your Brio’s
serial number.
Fill out the remaining information
and complete the optional survey.
Once you submit your
information, you will receive
a conrmation email containing
your extended warranty details.
1
2
3
4
*Register your product within 1 year of date of purchase for
a free 3-month extension of your limited warranty.
1
2
3
DOWNLOAD THE QR CODE
APP TO YOUR MOBILE DEVICE
QR code readers

Open your mobile app store
(App Store, Google Play).
Search for "QR code readers."
Simply download the QR code reader to your phone,
open it, scan the code and you are ready to go.
NOTE: You may need to open your downloaded QR
code reader each time you want to scan a QR code.
nuwavenow.com
2 3
nuwavenow.com
2 3
REGISTER
NOW!
3
for an additional
months
warranty!
As a special thank-you for registering your NuWave
Brio, you’ll automatically receive an additional 3 months
added to your limited manufacturer’s warranty!*
All you have to do is follow these simple steps.
Using your smartphone or
smart device, scan the QR code
located on the unit label on the
back of the Brio.
You will be directed to NuWave’s
product registration page with
your Brio’s unique serial number
automatically entered in the
appropriate eld.
NOTE: If you do not have a
web-enabled smart device,
simply visit nuwavenow.com/QR
and manually enter in your Brio’s
serial number.
Fill out the remaining information
and complete the optional survey.
Once you submit your
information, you will receive
a conrmation email containing
your extended warranty details.
1
2
3
4
*Register your product within 1 year of date of purchase for
a free 3-month extension of your limited warranty.
1
2
3
DOWNLOAD THE QR CODE
APP TO YOUR MOBILE DEVICE
QR code readers
table of contents
nuwavenow.com
4 5
ENGLISH
nuwavenow.com
TABLE OF CONTENTS
4 5
OWNER’S MANUAL
Important Safeguards ....................................................... 5-8
Parts & Accessories .......................................................... 8-9
Assembly Guide ............................................................ 10-13
Quick Start .................................................................... 14-15
Instructions.................................................................... 16-29
Cleaning & Maintenance ................................................ 30-31
Troubleshoot Guide ........................................................ 32-33
Limited Warranty ............................................................ 34-37
Spanish............................................................................ 38-79
Replaceable Parts........................................................... 80-83
IMPORTANT SAFEGUARDS
HOUSEHOLD USE ONLY • READ ALL INSTRUCTIONS BEFORE USE
WARNING: When using the
Brio, basic safety precautions
should always be followed:
1. Do not touch hot surfaces.
Use handles.
2. To protect against electrical
shock, do not immerse the
cord, plugs, or the Brio in
water or other liquids.
3. Do not operate the Brio
with a damaged cord or
plug or after the appliance
malfunctions or has been
damaged in any manner.
Return the appliance to the
nearest authorized service
facility for examination,
repair, or adjustment.
4. Close supervision is
necessary when any
appliance is used near
children. This appliance
is not intended for use
by persons (including
children) with reduced
physical, sensory or mental
capabilities, or who lack
experience and knowledge,
unless they have been given
supervision or instruction
concerning the use of the
appliance by a person
responsible for their safety.
5. The use of accessories
that are not intended to be
used with the Brio is not
recommended. Doing so
may damage the Brio and
can cause accidents.
6. NOT INTENDED FOR
OUTDOOR USE. FOR
HOUSEHOLD USE ONLY.
7. Do not let the cord hang
over the edge of any
table or counter, or touch
hot surfaces, including a
stovetop.
8. Do not place on or near a
hot gas or electric burner
or on a heated oven or on
a stovetop.
9. While air-frying, hot steam
is released from the air
outlet vent. Keep hands
and face away from the
steam and from the air
outlet vent. Also, be careful
of hot steam and air when
removing accessories.
10. Never put the Brio
against the wall or other
appliances. There should
be at least 3 inches of free
space for the back, sides,
and top of the Brio.
11. Do not place objects on
top of the Brio.
12. Unplug the Brio from the
wall outlet when it’s not in
use and before cleaning.
Allow the Brio to cool
before cleaning, putting on
or taking off parts.
13. Oversized foods or metal
utensils must not be
inserted in the Brio, as they
may increase the risk of a
re or electric shock.
14. A re may occur if the Brio
is covered by, or touching,
ammable materials
including curtains,
draperies, walls, etc., when
in operation.
www.nuwavenow.com

nuwavenow.com
7
ENGLISH
nuwavenow.com
IMPORTANT SAFEGUARDS
HOUSEHOLD USE ONLY • READ ALL INSTRUCTIONS BEFORE USE
7
important safeguards
66
Electrical Information
A short power-supply cord is
provided to reduce the risk
of becoming entangled in, or
tripping over, a longer cord.
Longer detachable power-
supply cords or extension
cords are available and may
be used if care is exercised
in their use. If a longer
detachable power-supply
cord or extension cord is
used:
1. The marked electrical
rating of the extension
cord should be at least
as great as the electrical
rating of the appliance.
2. The longer cord should be
arranged so that it will not
drape over any countertop
or tabletop where it could
be pulled or tripped over
unintentionally. The Brio
should be operated on a
separate electrical outlet
from other operating
appliances due to wattage
limitations. The appliance
has a polarized plug (one
blade is wider than the
other). To reduce the risk
of electric shock, this
plug is intended to fit into
a polarized outlet only
one way. If the plug does
not fit fully into the outlet,
reverse the plug. If it still
does not fit, contact a
qualified electrician. Do
not attempt to modify the
plug in any way.
3. If the appliance is of the
grounded type, the cord
set or extension cord
should be a grounding-
type 3-wire cord.
SEE ASSEMBLY GUIDE
BEFORE USE
SAVE THESE INSTRUCTIONS
Read and understand the entire
manual before using the Brio.
DO NOT USE THE BRIO FOR
ANYTHING OTHER THAN ITS
INTENDED USE
Note: Put the Brio on a surface
that is horizontal, even, and
stable. This appliance is intended
for normal household use. It
is not intended to be used in
environments such as staff
kitchens/cafeterias in shops,
ofces, farms, or other work
environments, nor is it intended
to be used by guests in hotels,
motels, bed and breakfasts, and
non-residential environments.
NOTICE: THE FAILURE
TO FOLLOW ANY OF THE
IMPORTANT SAFEGUARDS,
ADDITIONAL SAFEGUARDS, OR
THE INSTRUCTIONS FOR SAFE
USE IS A MISUSE OF YOUR
BRIO THAT CAN VOID YOUR
WARRANTY AND CREATE A
RISK OF SERIOUS INJURY.
ADDITIONAL SAFEGUARDS
1. Do not place the Brio close to
ammable materials, heating
units, or wet environments.
2. Do not place cooking pans
larger than 8x8 inches (2
quarts) in the Brio. Do not
replace any parts with other
containers.
15. Do not clean the Brio with
metal scouring pads. Pieces
can break off the pad and
touch electrical parts,
increasing the risk of electric
shock.
16. Use extreme caution when
using containers constructed
of material that can burn or
melt.
17. Do not store anything other
than the manufacturer’s
recommended accessories in
the Brio when it is in use.
18. Do not place any of the
following materials in the Brio:
paper, cardboard, plastic,
or any other ammable
materials.
19. Do not cover any part of the
Brio with aluminum foil. This
will cause overheating.
20. Use extreme caution when
removing accessories or
when disposing of oil or hot
grease.
21. Use extreme caution when
moving the Brio, especially if
it contains hot oil or other hot
liquids.
22. To disconnect, turn the Brio
OFF, then remove the plug
from the wall outlet.
23. Always remove the plug by
the head, not the cord.
24. Press ON/OFF to turn the
Brio off.
25. Keep the User Manual handy
for future reference.
WARNING
If any mechanical problems
arise, immediately unplug
and contact Customer
Service Department.
1-877-689-2838
help@nuwavenow.com
3. It is normal for some smoke
to escape the Brio when
using it for the rst time.
4. If a lot of smoke is
escaping from the air vent
during operation, unplug
the Brio immediately and
contact Customer Service.*
5. Extreme caution must be
exercised when operating
the Brio or any other
appliance.
6. Do not move the Brio while
in operation. Only after
the Brio has completely
cooled should moving be
attempted. Always wait for
the Brio to cool down prior
to handling it.
7. Discard the protective
plastic covering the power
plug before use.
8. The Brio is not intended
to be operated by means
of an external timer or
separate remote-control
system.
9. Do not disassemble
the Brio or replace
any parts without prior
written consent from the
manufacturer.
10. Do not use metal utensils
with the Tray, Racks, Grill/
Griddle Plate as this can
damage the surface.
11. Make sure the Brio is
always clean prior to
cooking.
*Customer Service
Department:
1-877-689-2838
help@nuwavenow.com

nuwavenow.com
7
ENGLISH
nuwavenow.com
IMPORTANT SAFEGUARDS
HOUSEHOLD USE ONLY • READ ALL INSTRUCTIONS BEFORE USE
7
important safeguards
66
Electrical Information
A short power-supply cord is
provided to reduce the risk
of becoming entangled in, or
tripping over, a longer cord.
Longer detachable power-
supply cords or extension
cords are available and may
be used if care is exercised
in their use. If a longer
detachable power-supply
cord or extension cord is
used:
1. The marked electrical
rating of the extension
cord should be at least
as great as the electrical
rating of the appliance.
2. The longer cord should be
arranged so that it will not
drape over any countertop
or tabletop where it could
be pulled or tripped over
unintentionally. The Brio
should be operated on a
separate electrical outlet
from other operating
appliances due to wattage
limitations. The appliance
has a polarized plug (one
blade is wider than the
other). To reduce the risk
of electric shock, this
plug is intended to fit into
a polarized outlet only
one way. If the plug does
not fit fully into the outlet,
reverse the plug. If it still
does not fit, contact a
qualified electrician. Do
not attempt to modify the
plug in any way.
3. If the appliance is of the
grounded type, the cord
set or extension cord
should be a grounding-
type 3-wire cord.
SEE ASSEMBLY GUIDE
BEFORE USE
SAVE THESE INSTRUCTIONS
Read and understand the entire
manual before using the Brio.
DO NOT USE THE BRIO FOR
ANYTHING OTHER THAN ITS
INTENDED USE
Note: Put the Brio on a surface
that is horizontal, even, and
stable. This appliance is intended
for normal household use. It
is not intended to be used in
environments such as staff
kitchens/cafeterias in shops,
ofces, farms, or other work
environments, nor is it intended
to be used by guests in hotels,
motels, bed and breakfasts, and
non-residential environments.
NOTICE: THE FAILURE
TO FOLLOW ANY OF THE
IMPORTANT SAFEGUARDS,
ADDITIONAL SAFEGUARDS, OR
THE INSTRUCTIONS FOR SAFE
USE IS A MISUSE OF YOUR
BRIO THAT CAN VOID YOUR
WARRANTY AND CREATE A
RISK OF SERIOUS INJURY.
ADDITIONAL SAFEGUARDS
1. Do not place the Brio close to
ammable materials, heating
units, or wet environments.
2. Do not place cooking pans
larger than 8x8 inches (2
quarts) in the Brio. Do not
replace any parts with other
containers.
15. Do not clean the Brio with
metal scouring pads. Pieces
can break off the pad and
touch electrical parts,
increasing the risk of electric
shock.
16. Use extreme caution when
using containers constructed
of material that can burn or
melt.
17. Do not store anything other
than the manufacturer’s
recommended accessories in
the Brio when it is in use.
18. Do not place any of the
following materials in the Brio:
paper, cardboard, plastic,
or any other ammable
materials.
19. Do not cover any part of the
Brio with aluminum foil. This
will cause overheating.
20. Use extreme caution when
removing accessories or
when disposing of oil or hot
grease.
21. Use extreme caution when
moving the Brio, especially if
it contains hot oil or other hot
liquids.
22. To disconnect, turn the Brio
OFF, then remove the plug
from the wall outlet.
23. Always remove the plug by
the head, not the cord.
24. Press ON/OFF to turn the
Brio off.
25. Keep the User Manual handy
for future reference.
WARNING
If any mechanical problems
arise, immediately unplug
and contact Customer
Service Department.
1-877-689-2838
help@nuwavenow.com
3. It is normal for some smoke
to escape the Brio when
using it for the rst time.
4. If a lot of smoke is
escaping from the air vent
during operation, unplug
the Brio immediately and
contact Customer Service.*
5. Extreme caution must be
exercised when operating
the Brio or any other
appliance.
6. Do not move the Brio while
in operation. Only after
the Brio has completely
cooled should moving be
attempted. Always wait for
the Brio to cool down prior
to handling it.
7. Discard the protective
plastic covering the power
plug before use.
8. The Brio is not intended
to be operated by means
of an external timer or
separate remote-control
system.
9. Do not disassemble
the Brio or replace
any parts without prior
written consent from the
manufacturer.
10. Do not use metal utensils
with the Tray, Racks, Grill/
Griddle Plate as this can
damage the surface.
11. Make sure the Brio is
always clean prior to
cooking.
*Customer Service
Department:
1-877-689-2838
help@nuwavenow.com

important safeguards
nuwavenow.com
8 9
ENGLISH
nuwavenow.com
IMPORTANT SAFEGUARDS
HOUSEHOLD USE ONLY • READ ALL INSTRUCTIONS BEFORE USE
8 98
PARTS &
ACCESSORIES
3
2
5
4
1800
1500
900
1
(2x)
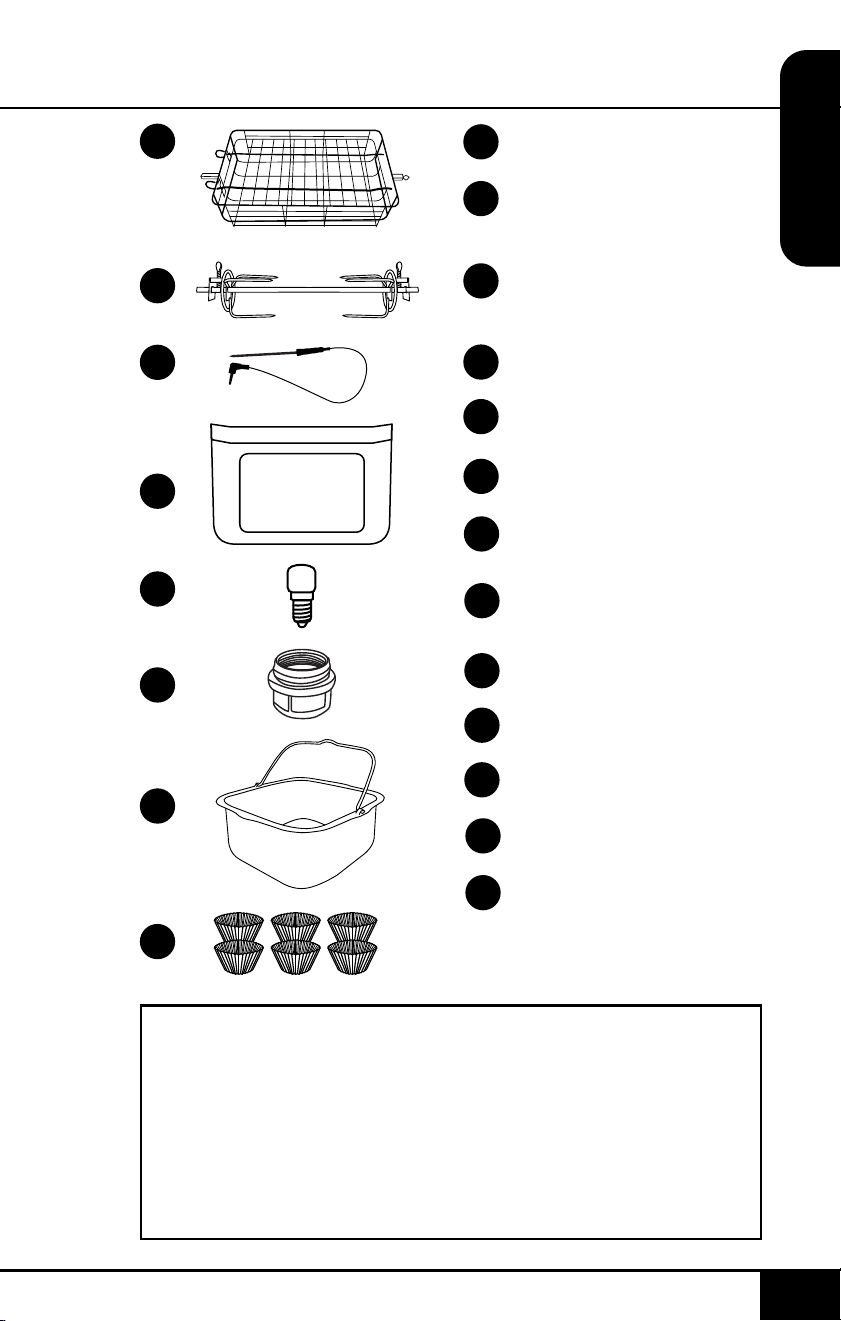
Power Base
Part #: 38005
Chrome Mesh
Rack
Part #: 38202
Chrome Mesh
Trays (2x)
Part #: 38203
Drip Tray
Part #: 38204
Grill/Griddle Plate
Part #: BRI14-A8
Rotisserie Basket
Part #: BRI14-A12
Rotisserie Skewer
Part #: BRI14-A13
Digital Temperature
Probe
Part #: 38207
Door
Part #: 38208
Light Bulb
Part #: 38209
Light Bulb Cover
Part #: 38211
Non-Stick Baking Pan
Part #: 37212
Silicone Cupcake
Liners (6x)
Part #: 22113
1
2
3
4
5
6
7
8
9
10
11
12
13
6
7
8
To order replaceable parts, head over to the Replaceable Parts
section and then NuWaveNow.com.
CAUTION
• Always put the ingredients
to be cooked in the Tray
or on the Racks, or Grill/
Griddle Plate to prevent
direct contact with the
heating components.
• Do not cover the air inlet
and outlet openings while
the appliance is operating.
• Do not pour oil into the
Tray, Racks, Grill/Griddle
Plate, Rotisserie Basket, or
on the Rotisserie Skewer,
as this may create a re
hazard.
• Never touch the insides of
the appliance while
it is operating.
9
10
11
12
13
(6x)
Please note: The accessories shown above make up the complete
collection of available Brio accessories. Not all listed accessories
are included with all purchases. If there is an accessory listed above
that was not included with your order, or if you misplaced any of
your Brio parts or accessories, contact NuWave Customer Service
to place an order – subject to availability.
NuWave Customer Service can be reached by calling
1-877-689-2838 or emailing help@nuwavenow.com Monday-Friday
7:30 am-4:30 pm CST.
important safeguards
nuwavenow.com
8 9
ENGLISH
nuwavenow.com
IMPORTANT SAFEGUARDS
HOUSEHOLD USE ONLY • READ ALL INSTRUCTIONS BEFORE USE
8 98
PARTS &
ACCESSORIES
3
2
5
4
1800
1500
900
1
(2x)
Power Base
Part #: 38005
Chrome Mesh
Rack
Part #: 38202
Chrome Mesh
Trays (2x)
Part #: 38203
Drip Tray
Part #: 38204
Grill/Griddle Plate
Part #: BRI14-A8
Rotisserie Basket
Part #: BRI14-A12
Rotisserie Skewer
Part #: BRI14-A13
Digital Temperature
Probe
Part #: 38207
Door
Part #: 38208
Light Bulb
Part #: 38209
Light Bulb Cover
Part #: 38211
Non-Stick Baking Pan
Part #: 37212
Silicone Cupcake
Liners (6x)
Part #: 22113
1
2
3
4
5
6
7
8
9
10
11
12
13
6
7
8
To order replaceable parts, head over to the Replaceable Parts
section and then NuWaveNow.com.
CAUTION
• Always put the ingredients
to be cooked in the Tray
or on the Racks, or Grill/
Griddle Plate to prevent
direct contact with the
heating components.
• Do not cover the air inlet
and outlet openings while
the appliance is operating.
• Do not pour oil into the
Tray, Racks, Grill/Griddle
Plate, Rotisserie Basket, or
on the Rotisserie Skewer,
as this may create a re
hazard.
• Never touch the insides of
the appliance while
it is operating.
9
10
11
12
13
(6x)
Please note: The accessories shown above make up the complete
collection of available Brio accessories. Not all listed accessories
are included with all purchases. If there is an accessory listed above
that was not included with your order, or if you misplaced any of
your Brio parts or accessories, contact NuWave Customer Service
to place an order – subject to availability.
NuWave Customer Service can be reached by calling
1-877-689-2838 or emailing help@nuwavenow.com Monday-Friday
7:30 am-4:30 pm CST.
assembly guide
nuwavenow.com
10 11
ENGLISH
nuwavenow.com
ASSEMBLY GUIDE
10 11
Notes:
• For better results, use kitchen
twine around the chicken or
other meats.
• Always check that there is
sufcient space above and
below your food so it can rotate
freely without obstruction.
• When using the Rotisserie
Skewer, place the Drip Tray
on the bottom.
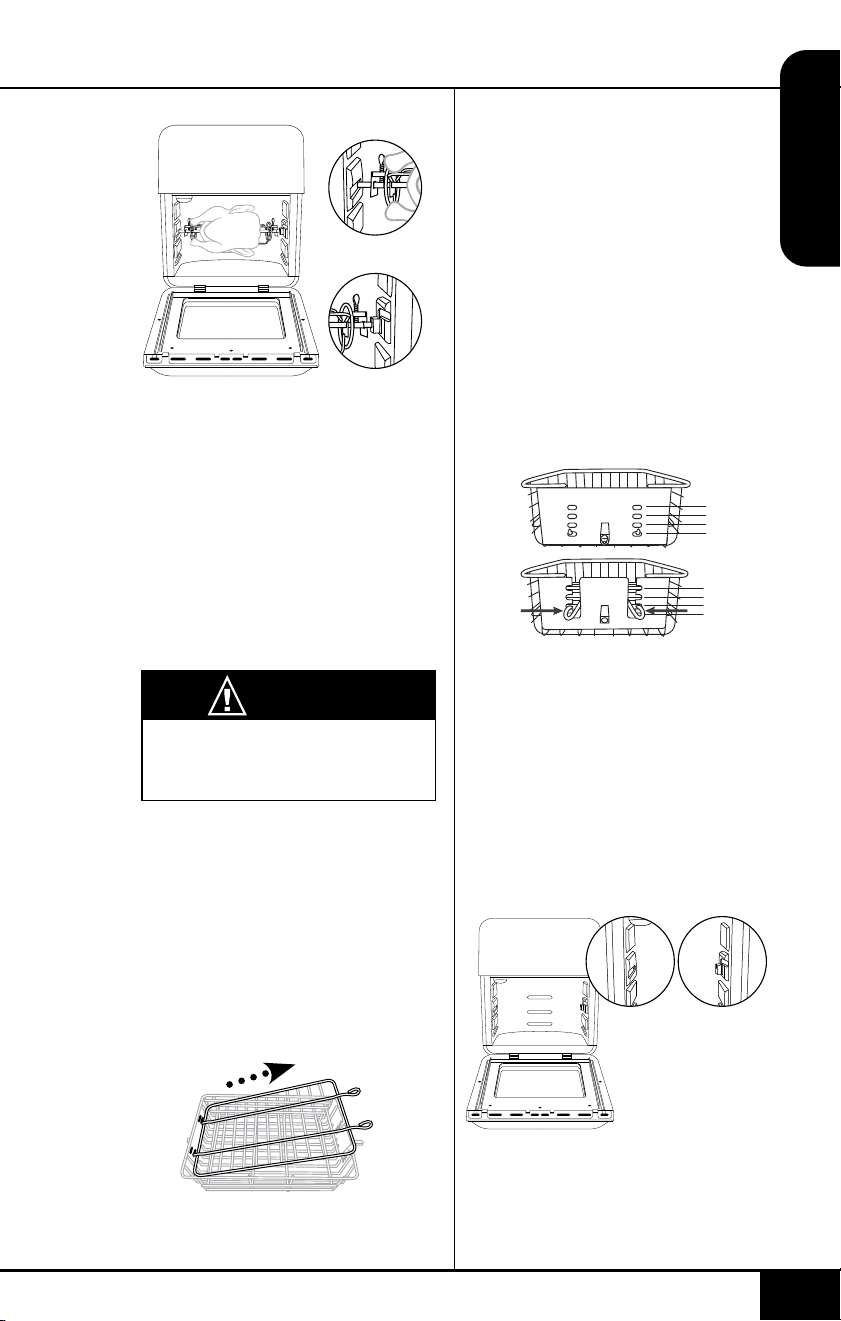
3. Adjust the top lid to t over
your food: Place ends of the
top lid into slots. Squeeze
the prongs on the outside
of the top lid and slide them
down into position, lined up
and opposite the slots on
the other side.
• Position of prongs should
be lined up and opposite
of slot holes on other side.
• Make sure the top lid lies
at oover the food and
that it ts snugly.
4. After securing your food in
the Basket take the Basket
and slide it in between
Position 2 and Position
3 inside the Brio. The
rectangular end without
grooves should be on the
left. Keep the right side
slightly tilted upward while
sliding it in.
Rotisserie Basket Assembly
To use the Rotisserie Basket with
the Brio, follow the steps and
illustrations below:
1. Remove the top lid from the
Rotisserie Basket: Squeeze
the prongs on the outside of
the top lid toward the middle
and lift up. Remove the other
end from the holes.
2. Place your food in the
Basket.
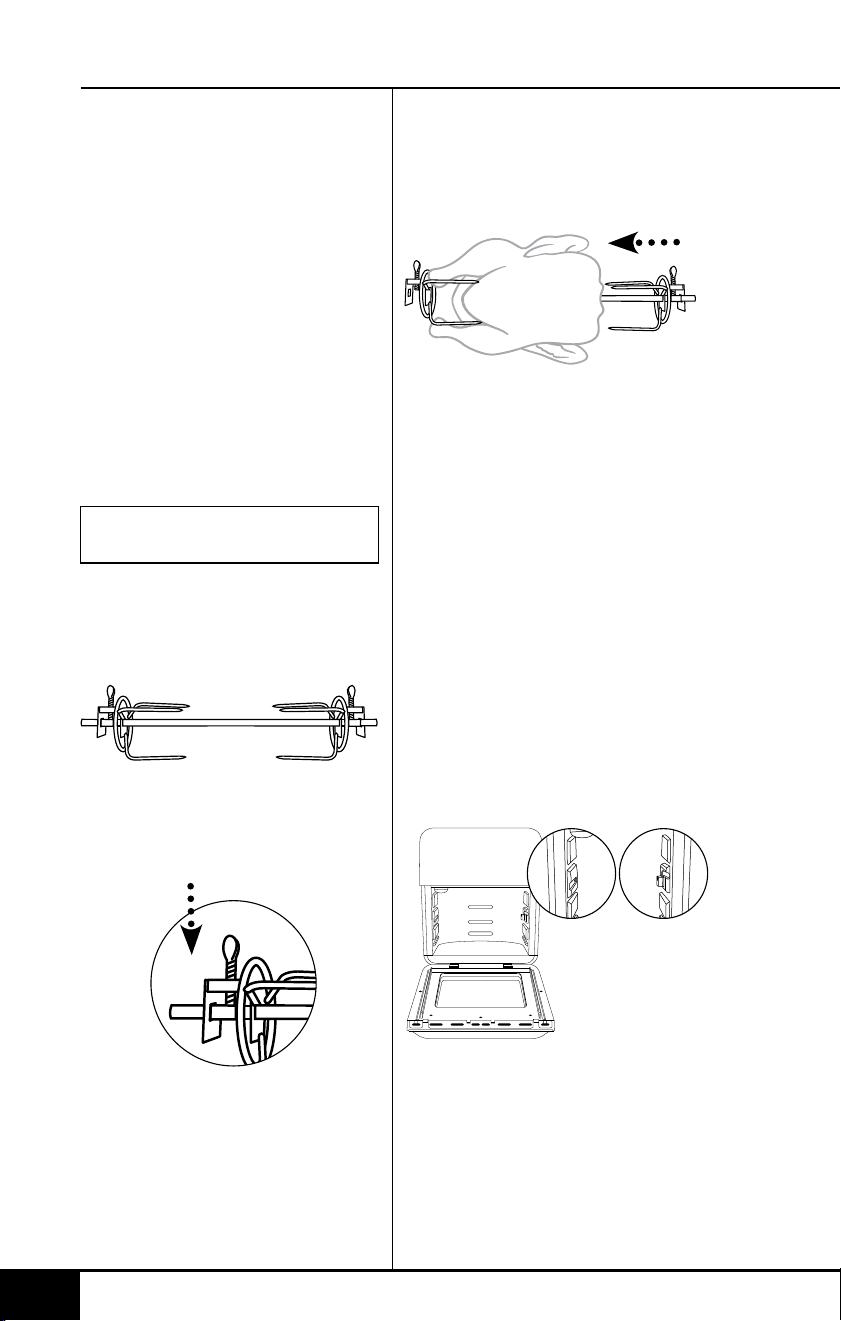
3. Place the second Rotisserie
Skewer fork onto the other
end of the Skewer and
push the fork forward until it
pierces the end of the meat.
Tighten the screw of the
fork. If necessary, loosen
screw and move the rst fork
forward until it pierces the
other end of the meat then
retighten. Make sure both
screws are tight and in place.
4. After securing the food on
the Rotisserie Skewer slide
it between Position 2 and
Position 3 inside the Brio.
The rectangular end of the
spit should be on the left.
Keep the right side slightly
tilted upward while sliding in.
5. Bring down the right side
of the spit into the Shaft
Bracket, then insert the left
spit (bar) of the Skewer into
the Shaft Support Hole in
the inner wall.
Rotisserie Skewer Assembly
To assemble the Rotisserie
Skewer with poultry and other
meats, follow the steps below:
1. Screw one Rotisserie
Skewer fork onto the end
of the Skewer with the
rectangular end.
2. Push the Skewer through the
center of the meat until the
Skewer emerges from the
other side.
4
3
2
1
4
3
2
1
CAUTION
Rotisserie Skewer parts will be
hot during and after use. Use
oven gloves when handling.
USE THE DRIP TRAY AT
ALL TIMES.
Left Right
Screw
Left
Right
Left Right
Before Use
1. Remove all the packaging
materials.
2. Remove the glue and labels
on the appliance.
3. Clean all parts thoroughly
with hot water, a nonabrasive
sponge, and mild dish
detergent, or in the
dishwasher, top rack only.
4. Wipe the insides and outside
of the Brio with a wet cloth.
Do not immerse the Brio in
water. Dry thoroughly.
assembly guide
nuwavenow.com
10 11
ENGLISH
nuwavenow.com
ASSEMBLY GUIDE
10 11
Notes:
• For better results, use kitchen
twine around the chicken or
other meats.
• Always check that there is
sufcient space above and
below your food so it can rotate
freely without obstruction.
• When using the Rotisserie
Skewer, place the Drip Tray
on the bottom.
3. Adjust the top lid to t over
your food: Place ends of the
top lid into slots. Squeeze
the prongs on the outside
of the top lid and slide them
down into position, lined up
and opposite the slots on
the other side.
• Position of prongs should
be lined up and opposite
of slot holes on other side.
• Make sure the top lid lies
at oover the food and
that it ts snugly.
4. After securing your food in
the Basket take the Basket
and slide it in between
Position 2 and Position
3 inside the Brio. The
rectangular end without
grooves should be on the
left. Keep the right side
slightly tilted upward while
sliding it in.
Rotisserie Basket Assembly
To use the Rotisserie Basket with
the Brio, follow the steps and
illustrations below:
1. Remove the top lid from the
Rotisserie Basket: Squeeze
the prongs on the outside of
the top lid toward the middle
and lift up. Remove the other
end from the holes.
2. Place your food in the
Basket.
3. Place the second Rotisserie
Skewer fork onto the other
end of the Skewer and
push the fork forward until it
pierces the end of the meat.
Tighten the screw of the
fork. If necessary, loosen
screw and move the rst fork
forward until it pierces the
other end of the meat then
retighten. Make sure both
screws are tight and in place.
4. After securing the food on
the Rotisserie Skewer slide
it between Position 2 and
Position 3 inside the Brio.
The rectangular end of the
spit should be on the left.
Keep the right side slightly
tilted upward while sliding in.
5. Bring down the right side
of the spit into the Shaft
Bracket, then insert the left
spit (bar) of the Skewer into
the Shaft Support Hole in
the inner wall.
Rotisserie Skewer Assembly
To assemble the Rotisserie
Skewer with poultry and other
meats, follow the steps below:
1. Screw one Rotisserie
Skewer fork onto the end
of the Skewer with the
rectangular end.
2. Push the Skewer through the
center of the meat until the
Skewer emerges from the
other side.
4
3
2
1
4
3
2
1
CAUTION
Rotisserie Skewer parts will be
hot during and after use. Use
oven gloves when handling.
USE THE DRIP TRAY AT
ALL TIMES.
Left Right
Screw
Left
Right
Left Right
Before Use
1. Remove all the packaging
materials.
2. Remove the glue and labels
on the appliance.
3. Clean all parts thoroughly
with hot water, a nonabrasive
sponge, and mild dish
detergent, or in the
dishwasher, top rack only.
4. Wipe the insides and outside
of the Brio with a wet cloth.
Do not immerse the Brio in
water. Dry thoroughly.
assembly guide
nuwavenow.com
12 13
ENGLISH
nuwavenow.com
ASSEMBLY GUIDE
12 13
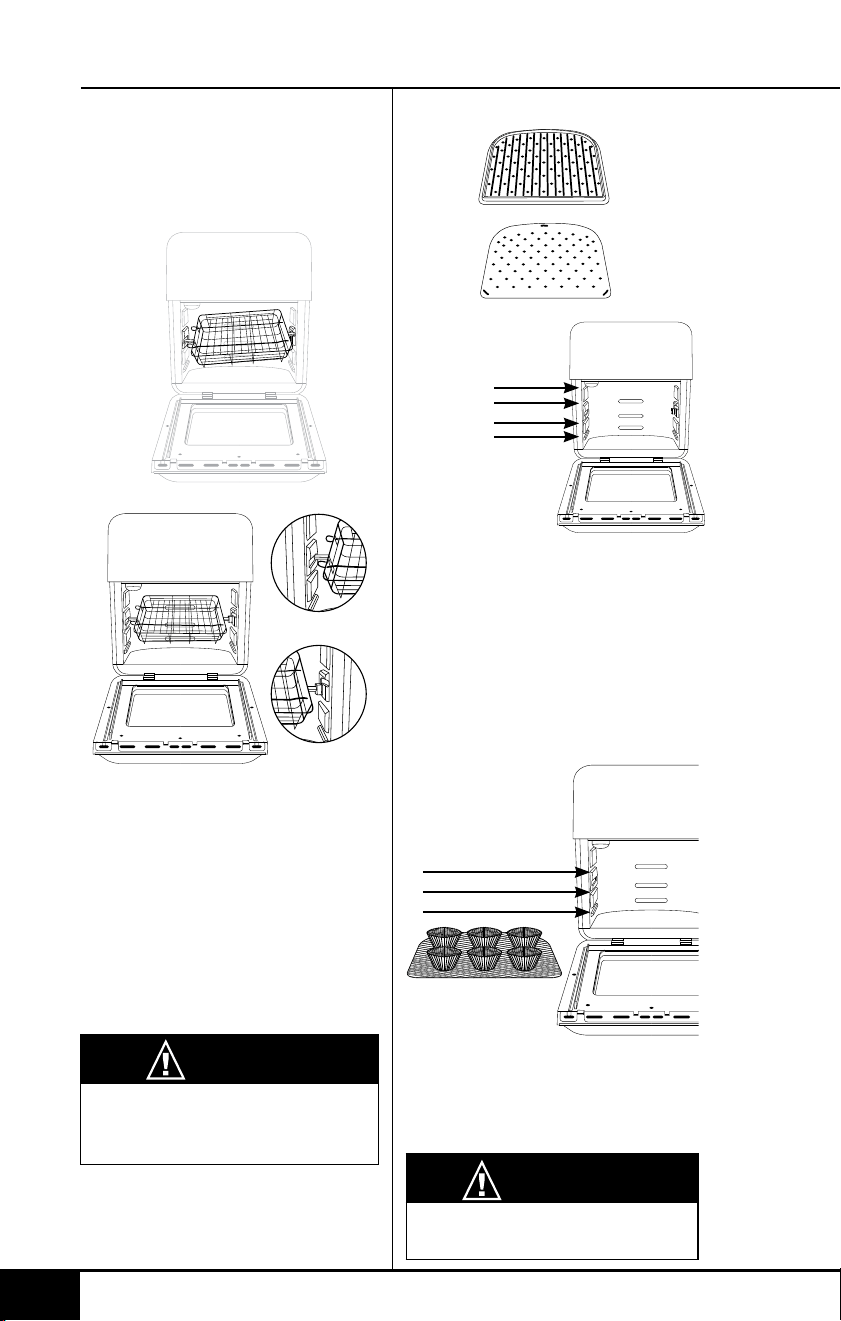
5. Bring down the right side of
the bar and place it into the
bracket, then insert the left
side of the bar into the hole
in the inner wall.
Notes:
• Always check that there
is sufcient space above
and below the basket so
it can rotate freely without
obstruction.
• When using the Rotisserie
Basket, place the Drip Tray on
the bottom.
Left
Right
CAUTION
Rotisserie Basket parts will be
hot during and after use. Use
oven gloves.
CAUTION
Accessories and contents will
be HOT. Use oven gloves.
Grill/Griddle Plate Assembly
4
3
2
1
Position:
Griddle
Grill
The Grill/Griddle Plate can be
used in Positions 1-3. For crispier
results it’s recommended to use
Position 3.
Position 4 is primarily used for
dehydrating foods using the
Mesh Rack.
Silicone Cupcake Liners
3
2
1
Position:
When using the Silicone
Cupcake Liners with the Mesh
Rack, Positions 1-3 may be
used.
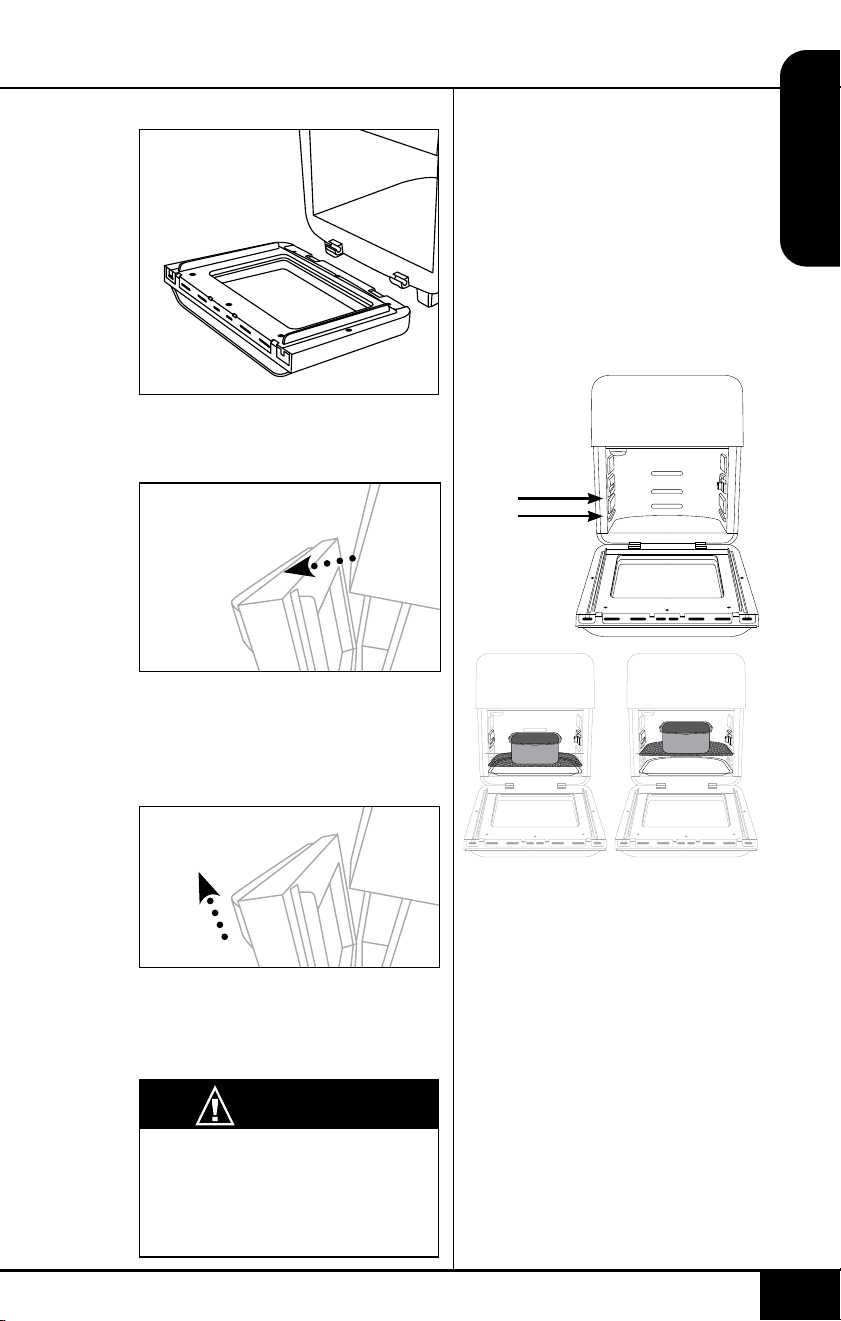
To Remove the Brio Door
1. Make sure your Brio has
completely cooled. Open the
Door 1-inch (25mm).
2. Holding the Door handle
securely, lift up the right side
of the Door rst from the
hinge and then the left side
to remove.
3. Slide the Door back into the
hinge slots and press down.
Open and close Door to
ensure it’s secure.
CAUTION
If you have trouble removing
the Door, do not force it. The
Door is at the wrong angle.
Close it fully and then open it 1
inch and try again.
Open 1 inch.
lift up
Non-Stick Baking Pan
With the Mesh Rack in either
Position 1 or 2, place the
Baking Pan on top of the Rack.
• You can also place the
Pan on the very bottom
without a Rack.
• The pan holds up to 2
quarts (1.9 liters).
2
1
Position:
assembly guide
nuwavenow.com
12 13
ENGLISH
nuwavenow.com
ASSEMBLY GUIDE
12 13
5. Bring down the right side of
the bar and place it into the
bracket, then insert the left
side of the bar into the hole
in the inner wall.
Notes:
• Always check that there
is sufcient space above
and below the basket so
it can rotate freely without
obstruction.
• When using the Rotisserie
Basket, place the Drip Tray on
the bottom.
Left
Right
CAUTION
Rotisserie Basket parts will be
hot during and after use. Use
oven gloves.
CAUTION
Accessories and contents will
be HOT. Use oven gloves.
Grill/Griddle Plate Assembly
4
3
2
1
Position:
Griddle
Grill
The Grill/Griddle Plate can be
used in Positions 1-3. For crispier
results it’s recommended to use
Position 3.
Position 4 is primarily used for
dehydrating foods using the
Mesh Rack.
Silicone Cupcake Liners
3
2
1
Position:
When using the Silicone
Cupcake Liners with the Mesh
Rack, Positions 1-3 may be
used.
To Remove the Brio Door
1. Make sure your Brio has
completely cooled. Open the
Door 1-inch (25mm).
2. Holding the Door handle
securely, lift up the right side
of the Door rst from the
hinge and then the left side
to remove.
3. Slide the Door back into the
hinge slots and press down.
Open and close Door to
ensure it’s secure.
CAUTION
If you have trouble removing
the Door, do not force it. The
Door is at the wrong angle.
Close it fully and then open it 1
inch and try again.
Open 1 inch.
lift up
Non-Stick Baking Pan
With the Mesh Rack in either
Position 1 or 2, place the
Baking Pan on top of the Rack.
• You can also place the
Pan on the very bottom
without a Rack.
• The pan holds up to 2
quarts (1.9 liters).
2
1
Position:

quick start
nuwavenow.com
14 15
ENGLISH
nuwavenow.com
QUICK START
14 15
1800
1500
900
ON/OFF
Press ON/OFF to turn the Brio ON and OFF, and to stop the cooking
process.
START/PAUSE
Select a cooking function, press START/PAUSE to begin cooking.
WARM
Press and hold down WARM for 1 second to activate the
independent Warm function.
PREHEAT
Press PREHEAT. The temp and time is adjustable using the Up
and Down Arrow keys. To begin, press START/PAUSE. Once it has
reached the set temperature, the Brio will beep and a 5-minute
countdown will begin. Place your food into the Brio. The Brio will
begin to cook automatically when closed.
TIME
Use Up and Down Arrow keys to adjust the cooking temperature and
time before and during the cooking process.
• Days/Hours: To switch the timer to Days and Hours, press
PROGRAM and TIME. To go back to Hours and Minutes, press
PROGRAM and TIME again.
• TIME format:
You can change the Time format to display minutes
and seconds (ex 10:59, 10 minutes and 59 seconds). Press and
hold TIME for 1 second, if you press it again it will go back to the
default setting.
• Month/Day: Press STAGE and TIME to change the format to
months and days.
• Setting the clock: Press PREHEAT and TIME at the same time.
The display with show “12:00” and “:” will flash. Use the Up and
Down Arrows to set the time.
Note: To adjust the default time, press TIME then press and hold START/
PAUSE for 1 second and adjust. This will be the new default time.
TEMP
To adjust the cooking temperatures, press TEMP and adjust with the
Up and Down Arrows. You can do this before and during the cooking
process.
• To convert from Fahrenheit to Celsius, press TEMP for1 second.
Do the same to change again.
Note: To change the temperature to Celsius, press TEMP and hold it
for 1 second. Repeat this to return to Fahrenheit.
Insert line break adjust the default temperature, press and hold
START/PAUSE for 1 second and adjust. This will be the new default
temperature.
SEAR
Press SEAR. If preferred, adjust the Sear temperature and time.
Press START/PAUSE to begin. To mute/unmute the beep from the
Brio, press and hold SEAR and STAGE for 1 second.
PROBE
Plug the Probe into the jack. Press PROBE and set Probe target
internal temperature for food using the Up or Down Arrows. Insert the
other end of the Probe into your food. Press START/PAUSE to begin
cooking.
ROTISSERIE
After placing food on Skewer, in Basket and into the Brio, press
ROTISSERIE. Use the Up or Down Arrows to adjust the temp and
time. Press START/PAUSE to automatically turn the spit and begin
cooking.
PROGRAM
Press PROGRAM and press the Up or Down Arrows to choose
preset items (1-100) to cook. Press the Up or Down Arrows when
in each cooking function to adjust temps and times. Press START/
PAUSE to begin the chosen program.
DELAY
Set your temp and time. Press DELAY and press the Up or Down
Arrows to adjust the Delay time. Adjustable up to 24 hours. After
setting the cooking function and Delay time, press START/PAUSE.
Press DELAY at any time to cancel the Delay function.
STAGE
To add a cooking stage, press STAGE once and adjust the
Temperature and Time by pressing the Up or Down Arrows.
WATTS
Controls the power consumption of your Brio. The default wattage
on the Brio is 1800W. The lower wattage settings will consume less
energy, ideal if your home is not equipped for 1800 watts. Press
WATTS to adjust from 1800W to 900W to 1500W.

instructions
nuwavenow.com
16 17
ENGLISH
nuwavenow.com
INSTRUCTIONS
16 17
Note: Preset temperatures
and times may need minor
adjustments to best suit your
culinary needs.
CAUTION: This appliance
cooks using hot air. DO NOT
ll the Baking Pan with oil.
Operation:
1. Place the Brio on a level,
even, and stable heat-
resistant surface.
2. Plug the Brio into a standard
wall socket.
Note: Do not cover or block the
vents located on the top and
back of the Brio. Doing so can
prevent proper ventilation and
will adversely affect the cooking
results.
Fahrenheit to Celsius
1. Press and hold TEMP for 1
second. The Brio will display
the temperature settings in
degrees Celsius (C).
2. Press and hold TEMP for 1
second again to switch back
to degrees Fahrenheit (F).
• You will not be able to
switch between F and C
while the Brio is cooking.
This can only be done
during the setup.
1800
1500
900
177C
Switch from Hours : Minutes to
Minutes : Seconds
By default, the Brio displays all
times in hours and minutes. You
can change this format to minutes
and seconds.
1. Press and hold TIME for 1
second. The Brio will display
the time format in minutes
and seconds.
2. Press and hold TIME for 1
second again to return the
time display format to hours
and minutes.
• You will not be able to
switch between time
formats while the Brio is
cooking. This can only be
done during the setup.
1800
1500
900
0 1:00
hours minutes
1800
1500
900
60:00
minutes seconds
Probe Temp Guide
Meats Temp. Rare
Med
Rare
Med
Med
Well
Well Time Min.
Chicken, breast
Turkey, breast
Duck, breast
360F/
182C
165F/
74C*
6 - 8 per lb (13 - 18kg)
7 - 9 per lb (15 - 20kg)
5 - 7 per lb (11- 15kg)
Chicken, whole
Turkey, whole
Duck, whole
360F/
182C
165F/
74C*
8 - 10 per lb (18 - 22kg)
11 - 13 per lb (24 - 29kg)
10 - 13 per lb (22 - 29kg)
Chicken, thigh
Turkey, thigh
Duck, thigh
360F/
182C
165F/
74C*
14 - 16 per lb (31 - 35kg)
14 - 16 per lb (31 - 35kg)
9 - 11 per lb (20 - 24kg)
Steak 1" (25mm)
thick
350F/
177C
125F/
52C
135F/
57C
145F/
63C*
150F/
66C*
160F/
71C*
3 - 8
Burgers ½ lb
(227g)
350F/
177C
125F/
52C
135F/
57C
145F/
63C*
155F/
68C*
160F/
71C*
5 - 7
Roast Beef
(bone-in)
Roast Beef
(boneless)
325F/
163C
125F/
52C
135F/
57C
145F/
63C*
150F/
66C*
160F/
71C*
15 - 20 per lb (33 - 44kg)
10 - 15 per lb (22 - 33kg)
Lamb (bone-in)
Lamb (boneless)
325F/
163C
125F/
52C
135F/
57C
145F/
63C*
150F/
66C*
160F/
71C*
15 - 20 per lb (33 - 44kg)
10 - 15 per lb (22 - 33kg)
Pork (bone-in)
Pork (boneless)
350F/
177C
145F/
63C*
150F/
66C*
160F/
71C*
15 - 20 per lb (33 - 44kg)
10 - 15 per lb (22 - 33kg)
Salmon,
Tuna, Halibut,
Swordfish
145F/
63C*
150F/
66C*
160F/
71C*
2 - 3
Fish Steaks 1"
(25mm) thick
350F/
177C
145F/
63C*
150F/
66C*
160F/
71C*
5 - 7
Sausage
360F/
182C
160F/
71C*
4 - 5
Note: Times may vary. Consuming raw or undercooked meats, poultry, or seafood may
increase your risk of food borne illness. *To reduce the risk, cook your food to USDA-safe
temperatures.

instructions
nuwavenow.com
18 19
ENGLISH
nuwavenow.com
INSTRUCTIONS
18 19
Getting Started
Press the Up or Down arrows
to adjust the temperature and
time.
1. Press ON/OFF to turn your
Brio on and off.
2. To adjust the cooking time,
press TIME.
• The default cooking time
is 15 minutes.
3. Press START/PAUSE to
begin cooking. The (:) will
ash, indicating your Brio is
now cooking.
• To pause cooking, press
START/PAUSE. The (:) will
no longer ash, indicating
the Brio is now paused.
• To resume cooking
(unpause) press START/
PAUSE once again.
Note: Opening the door will
pause cooking, closing the door
will resume cooking. The light will
turn on automatically when the
door is open.
4. Once the Brio nishes
cooking, “End” will be
displayed and the Brio will
beep three times.
• To mute/unmute the beep
from the Brio, press and
hold down SEAR and
STAGE for 1 second.
1800
350F
LIGHT
Press LIGHT once to turn the
light on. Press again to turn it off.
To change the light bulb in
the oven, see Light Bulb
Replacement under
“Cleaning and Maintenance.”
WATTS
The default wattage of the Brio is
1800 watts.
1. To change the wattage,
press WATTS once. “900”
will illuminate, indicating the
Brio is now set to 900 watts.
2. Press WATTS again and
“1500” will illuminate. The
Brio is now set to 1500 watts.
3. Press WATTS once more
and “1800” will illuminate,
indicating the Brio is now set
to the default of 1800 watts.
Note: If the wattage is changed
from 1800W to either 900W or
1500W and the Brio is unplugged,
the Brio will remember the last
wattage setting when plugged
back in and turned on.
DELAY
The Delay function is used to
delay your cooking start time.
Press the Up or Down arrows
to adjust the temperature and
time.
1. Press ON/OFF.
2. Press DELAY.
1800
0 1 00
:
3. The Delay time can be
adjusted up to 24 hours
(24:00).
• During the Delay period,
the (:) will ash, indicating
the delay time countdown
has started.
4. To stop the Delay function at
any time, press DELAY. The
Brio will end the delay cycle
and move on to the next
cooking function.
• After the Delay time has
elapsed, the Brio will
automatically move on to
the next cooking function.
5. Once the Brio nishes
cooking your food, “End” will
be displayed and the Brio
will beep three times.
TEMP
Press the Up or Down arrows
to adjust the temperature and
time.
1. Press TEMP to see or adjust
your cooking temperature.
2. Press START/PAUSE to
begin cooking at the set
temperature.
TIME
1800
350F
1800
00 15
:
Press the Up or Down arrows
to adjust the temperature
and time.
1. Press TIME to see or adjust
the cooking time.
2. Press START/PAUSE to
begin cooking at the set
time.
Notes: The following are the
Brio’s temperature and time
ranges:
• 60F~275F (16C~135C):
00:00-99:59 (0 minutes to 99
minutes, 59 seconds).
• 280F~ 345F (138C~174C):
00:00-24:00 (0 minutes to 24
hours).
• 350F~400F (177C~204C):
00:00-01:00 (1 hour).
• Stage 1 default: 350F (177C),
00:15.
• Stages 2-5 default: 350F
(177C), 00:00.
• 405F~425F (207C~218C):
00:00-00:15 (15 minutes).
STAGE
Stage cooking is used to
cook your foods at different
temperatures and times
throughout the cooking process.
Up to 5 cooking stages can
be set. Delay, Preheat, Sear
1, Sear 2, and Warm are
NOT considered stages in the
cooking process.
1800
35 0F 2

instructions
nuwavenow.com
18 19
ENGLISH
nuwavenow.com
INSTRUCTIONS
18 19
Getting Started
Press the Up or Down arrows
to adjust the temperature and
time.
1. Press ON/OFF to turn your
Brio on and off.
2. To adjust the cooking time,
press TIME.
• The default cooking time
is 15 minutes.
3. Press START/PAUSE to
begin cooking. The (:) will
ash, indicating your Brio is
now cooking.
• To pause cooking, press
START/PAUSE. The (:) will
no longer ash, indicating
the Brio is now paused.
• To resume cooking
(unpause) press START/
PAUSE once again.
Note: Opening the door will
pause cooking, closing the door
will resume cooking. The light will
turn on automatically when the
door is open.
4. Once the Brio nishes
cooking, “End” will be
displayed and the Brio will
beep three times.
• To mute/unmute the beep
from the Brio, press and
hold down SEAR and
STAGE for 1 second.
1800
35 0F
LIGHT
Press LIGHT once to turn the
light on. Press again to turn it off.
To change the light bulb in
the oven, see Light Bulb
Replacement under
“Cleaning and Maintenance.”
WATTS
The default wattage of the Brio is
1800 watts.
1. To change the wattage,
press WATTS once. “900”
will illuminate, indicating the
Brio is now set to 900 watts.
2. Press WATTS again and
“1500” will illuminate. The
Brio is now set to 1500 watts.
3. Press WATTS once more
and “1800” will illuminate,
indicating the Brio is now set
to the default of 1800 watts.
Note: If the wattage is changed
from 1800W to either 900W or
1500W and the Brio is unplugged,
the Brio will remember the last
wattage setting when plugged
back in and turned on.
DELAY
The Delay function is used to
delay your cooking start time.
Press the Up or Down arrows
to adjust the temperature and
time.
1. Press ON/OFF.
2. Press DELAY.
1800
0 1 00
:
3. The Delay time can be
adjusted up to 24 hours
(24:00).
• During the Delay period,
the (:) will ash, indicating
the delay time countdown
has started.
4. To stop the Delay function at
any time, press DELAY. The
Brio will end the delay cycle
and move on to the next
cooking function.
• After the Delay time has
elapsed, the Brio will
automatically move on to
the next cooking function.
5. Once the Brio nishes
cooking your food, “End” will
be displayed and the Brio
will beep three times.
TEMP
Press the Up or Down arrows
to adjust the temperature and
time.
1. Press TEMP to see or adjust
your cooking temperature.
2. Press START/PAUSE to
begin cooking at the set
temperature.
TIME
1800
35 0F
1800
00 15
:
Press the Up or Down arrows
to adjust the temperature
and time.
1. Press TIME to see or adjust
the cooking time.
2. Press START/PAUSE to
begin cooking at the set
time.
Notes: The following are the
Brio’s temperature and time
ranges:
• 60F~275F (16C~135C):
00:00-99:59 (0 minutes to 99
minutes, 59 seconds).
• 280F~ 345F (138C~174C):
00:00-24:00 (0 minutes to 24
hours).
• 350F~400F (177C~204C):
00:00-01:00 (1 hour).
• Stage 1 default: 350F (177C),
00:15.
• Stages 2-5 default: 350F
(177C), 00:00.
• 405F~425F (207C~218C):
00:00-00:15 (15 minutes).
STAGE
Stage cooking is used to
cook your foods at different
temperatures and times
throughout the cooking process.
Up to 5 cooking stages can
be set. Delay, Preheat, Sear
1, Sear 2, and Warm are
NOT considered stages in the
cooking process.
1800
35 0F 2

instructions
nuwavenow.com
20 21
ENGLISH
nuwavenow.com
INSTRUCTIONS
20 21
Press the Up or Down arrows
to adjust the temperature
and time.
1. Stage 1: Press ON/OFF.
• The default temperature
and time for Stage 1
cooking is 350F (177C)
for 15 min.
2. Press TIME and adjust the
cooking time, if needed.
3. Stage 2: To add additional
stages, press STAGE once.
4. Press TIME and adjust the
cooking time, if needed.
• For only two stages of
cooking, leave the time
at 00:00 for stages 3-5
and those stages will be
skipped.
5. Press START/PAUSE to
begin cooking. The Brio will
cook your food at the set
temperature and time for
each stage.
• When the Brio has
nished cooking, “End”
will be displayed and the
Brio will beep three times.
6. To set additional stages
with cooking settings,
repeat the steps above. The
number above stage will
change each time STAGE is
pressed.
• After the temperature and
time is set for Stage 5, if
STAGE is pressed again,
will go back to Stage 1.
Notes:
• The display will only indicate
the stage cooking number
when two or more stages are
used. Display will not show
stage cooking number if only
one stage of cooking is used.
• During cooking, press
STAGE to see and adjust the
upcoming cooking stages.
• Stage 1 default: 350F (177C),
00:15. Stages 2-5 default:
350F (177C), 00:00.
• If no time is set for stages 2-5
those stages will be skipped
in the cooking cycle.
PREHEAT
The Preheat function ensures
your Brio reaches the desired
temperature before cooking
begins. Preheat is perfect for
foods that require a crispier
nish such as frozen appetizers,
French fries, or chicken wings.
Max 425F (218C).
Press the Up or Down arrows
to adjust the temperature and
time.
1. Press ON/OFF.
2. Press PREHEAT.
• The Brio will always
preheat to the cooking
temperature of the next
cooking cycle.
3. Press START/PAUSE. The
Brio will begin preheating to
the set temperature.
1800
35 0F
• During preheat the
cooking temperature can
be adjusted.
4. Once the Brio reaches
the preheat temperature,
the Brio will beep once
and begin a 5-minute
countdown.
• The Brio will maintain
the preheat temperature
during the 5-minute
countdown.
• Cooking temperature
and time can be adjusted
during the 5-minute
countdown.
• If no action is taken during
the 5-minute countdown,
the Brio will automatically
go into standby mode.
5. Place your food into the Brio
and close the door. The Brio
will begin cooking at the set
temperature and time.
6. When the Brio is nished
cooking “End” will be
displayed and the Brio will
beep three times.
Note: Press PREHEAT to cancel
the Preheat function at any time.
When Preheat is canceled, the
Brio will automatically go on to
the next step in the cooking cycle.
AUTO PREHEAT
1. Press PROGRAM and
PREHEAT at the same time
to turn on Auto Preheat.
• Auto Preheat will
automatically preheat the
Brio to the set cooking
temperature.
• After it has reached the
set cooking temperature,
the Brio will go into a
5-minute countdown
just like the manual
PREHEAT function.
• After the countdown, the
Brio will cook at the set
cooking temperature and
cooking time.
To turn off Auto Preheat, press
PROGRAM and PREHEAT at the
same time.
SEAR
Sear 1 will always be directly
BEFORE regular stage cooking.
Sear 2 will always be directly
AFTER regular stage cooking.
SEAR 1
The default Sear 1 temperature
is 425F (218C) and the default
Sear 1 time is 5 min. (00:05).
1. Press ON/OFF.
2. Press SEAR once.
• Adjust the temperature
for Sear 1. 425F (218C)
is the maximum searing
temperature.
3. Press TIME.
• Adjust the time for Sear
1. The Sear time can be
adjusted up to 15 min.
(00:15).
1800
42 5F

instructions
nuwavenow.com
22 23
ENGLISH
nuwavenow.com
INSTRUCTIONS
22 23
4. Press START/PAUSE to
begin cooking.
5. Once Sear 1 is complete,
the Brio will beep once and
automatically go into regular
stage cooking.
• When the Brio is nished
cooking your food, “End”
will be displayed and the
Brio will beep three times.
SEAR 1 2
Sear 1 2 is used to sear before
and after regular stage cooking.
1. Press ON/OFF. Adjust
your cooking temperature
and time for regular stage
cooking.
2. Press SEAR twice. Press
START/PAUSE. The Brio will
sear at 425F (218C) for 5
min (sear 1), go into regular
stage cooking, and then sear
again at 425F (218C) for 5
min. (sear 2).
3. To set a different
temperature and time for
Sear 1 and 2, press SEAR
once and adjust the Sear 1
temperature and time. Press
SEAR again. Adjust the
Sear 2 temperature and
time.
4. Press START/PAUSE to
begin cooking.
1800
42 5F
• Once the Sear 1 cycle
is complete, the Brio
will beep once and
automatically go into
regular stage cooking.
• Once the stage cooking
cycle is complete, the
Brio will beep once and
automatically go into
Sear 2 cooking.
5. When the Brio has nished
cooking your food, “End” will
be displayed and the Brio
will beep three times.
Example Sear your food at
425F (218C) for 3 min. (Sear 1),
cook it at 350F (177C) (default)
for 15 min. (default), and then
sear it again at 380F (193C) for
5 min. (Sear 2): Press ON/OFF.
The default setting for the regular
cooking temperature and time
will be displayed. Press SEAR
once. “425F” (“218C”) (default)
will be displayed. Press TIME.
Press the Up or Down arrows to
adjust the searing time to 00:03.
Press SEAR again. Press the
Up or Down arrows to adjust the
searing temperature to 380F
(193C). Press TIME. The “00:05”
default time will be displayed.
Press START/PAUSE.
SEAR 2
The default 2 temperature and
time are 425F (218C) and 5
minutes (00:05).
1800
42 5F
1. Press ON/OFF. Adjust
cooking temperature and time
for regular (stage 1) cooking.
2. Press SEAR three times.
• 425F (218C) is the
maximum searing
temperature.
• Press TIME. Adjust the
sear 2 (searing) time up to
5 min. (00:05).
3. Press START/PAUSE to
begin cooking.
• Once regular stage
cooking cycle is complete,
the Brio will beep once
and automatically go into
Sear 2 cooking.
• When the Brio is nished
cooking your food, End
will be displayed and the
Brio will beep three times.
Using SEAR as Independent
Function
1. Press SEAR and hold for 1
second.
• The Brio will begin to
sear at 425F (218C) for 5
minutes.
• Temperatures and Times
can be adjusted at any
time.
2. SEAR will ash.
3. Once the SEAR time end the
Brio will display “End”.
WARM
Warm can be used as an
independent function to heat
up your food. Default is 140F
(60C) for 1 hour.
Press and hold down WARM
for 1 second. The Brio will
automatically begin the WARM
function.
• When the warming time is
over, “End” will be displayed
and the Brio will beep three
times.
• To adjust the time or
temperature, press either
TIME or TEMP and the Up or
Down arrows.
Using Warm After Cooking
Ends to Keep Your Food Warm
1. Press and hold WARM for
1 second. Press the Up or
Down arrows to adjust the
warming temperature.
2. Press TIME. Press the Up
or Down arrows to adjust
the warming time.
3. Press START/PAUSE to
start cooking. The Brio
will cook the regular stage
cooking cycle then will
go into Warm at the set
temperature and time.
Notes:
• The Warm temperature can
be adjusted up to 200F (93C).
1800
0 1 00
:

instructions
nuwavenow.com
24 25
ENGLISH
nuwavenow.com
INSTRUCTIONS
24 25
• Warm can be set immediately
after adjusting the regular
cooking times and
temperatures, before the Brio
cooks your food.
• To cancel the Warm function
at any time, press WARM.
The Warm function will end
and “warm” will no longer be
displayed.
• Warm can be used with the
Program function option as
well. Press PROGRAM and
then press WARM and adjust
warming temperature and time
.
PROGRAM
The Program function handles
Memory Entry, the storage
of frequently used cooking
sequences, and Memory
Recall, the retrieval of cooking
sequences for recipes.
Memory Recall
1. Press PROGRAM. Press the
Up or Down arrows to
choose the program number
to recall.
• Numbers 1-100 are
preset programs.
• Numbers 101-150
are your own unique
programs (recipes).
1800
1
1800
1 0 1
2. Once your program number
is chosen, press START/
PAUSE to begin cooking.
Temperature and time can
be adjusted, if desired.
The Brio will cook at the
programmed temperatures
and times.
Notes:
• Refer to the 100 Presets in
the Quick Start Guide for
preprogrammed recipes
1-100.
• Preset temperatures and
times for program recipes
1-100 can be adjusted.
However, these adjusted
temps and times will not be
saved when that program is
recalled once again.
Storing Recipes Before
Cooking
1. Press ON/OFF. Enter your
cooking functions including
temperatures and times for
your recipe.
2. Press and hold PROGRAM
for 1 second. Press the Up
and Down Arrows to choose
the number to which you will
save your program (101-150
only).
3. Press and hold PROGRAM
for 1 second again to store
and save the program
to the chosen program
number.
• The programmed
recipe is now stored
and available for future
recall.
4. Press START/PAUSE to
begin cooking your set
program (recipe).
Storing Recipes During Cooking
1. Press ON/OFF. Enter your
cooking functions, including
the temperatures and times
for your recipe.
2. Press START/PAUSE to
begin cooking.
3. While cooking, press and
hold PROGRAM for 1
second. Press the Up or
Down Arr
ows to choose the
program number to which
you will save your program
(101-150 only).
4. Press and hold PROGRAM
for 1 second again to store
and save your program
to y
our chosen program
number.
• The Program (recipe) is
now stored and available
for future recall.
• The Brio will continue to
cook the recipe you just
programmed and stored.
Storing Recipes After Cooking
has Completed
1. Press ON/OFF. Enter your
cooking functions, including
the temperatures and times
for your recipe.
2. Press START/PAUSE to
begin cooking.
3. When the cooking is nished
and “End” is displayed,
press and hold PROGRAM
for 1 second. Press the Up
or Down arrows to choose
the progr
am number to
save your program (101-
150 only).
4. Press and hold PROGRAM
for 1 second again to store
and save the program
to th
e chosen program
number.
• The program (recipe) is
now stored and available
for future recall.
Viewing the Current Program
Number During Cooking
1. While the Brio is cooking,
press and hold down
PROGRAM for 1 second.
The current program
number will be displayed.
2. Release PROGRAM to
see the previous screen.
Viewing the Program Cooking
Functions
You can view the cooking
functions associated with a
program before or during the
cooking process.
View Before Cooking
1. Press PROGRAM. Locate
the program number you
want to review by pressing
the Up or Down arrows.
2. Once the program number
is displayed, press STAGE
to review each phase
(function) of the cooking
program.
• Adjustments to
temperatures and times
for each function can be
made at this time.

instructions
nuwavenow.com
26 27
ENGLISH
nuwavenow.com
INSTRUCTIONS
26 27
View During Cooking
1. Press STAGE to review
each phase (function) of the
program.
2. Continue to press STAGE
to scroll through each
programmed function.
• Adjustments to
temperatures and times
can be made for each
function at this time.
Editing and Modifying a Saved
Program
Edit Before Cooking
1. Press PROGRAM. Locate
the program number you
want to edit by pressing the
Up or Down arrows.
2. Once your chosen program
number is displayed, press
STAGE until the function to
edit is displayed.
• Adjust the Temperature
and time.
3. Once all your edits are
made, press PROGRAM.
4. Press the Up or Down
arrows to locate the program
number to which you will
save the edits. Press and
hold PROGRAM for 1
second again to save and
store your edits.
Edit During Cooking
1. When the Brio is cooking,
press STAGE. Press the Up
or Down arrows to select the
cooking function to edit.
2. Press TIME. Press the Up
and Down arrows to adjust
the cooking time.
• If there are additional
cooking functions you
want to edit, press
STAGE until the function
to edit is reached.
• The Brio will continue
cooking your food
with the adjusted
temperatures and
times for each function.
Functions that have
already ended in the
cooking cycle cannot be
edited.
3. Once all your edits are
made, press and hold
PROGRAM for 1 second.
4. Use the Up or Down arrows
to locate the program
number to which you will
save the edits. Press and
hold PROGRAM for 1
second again to save and
store your edits.
5. When the Brio has nished
cooking, “End” will be
displayed followed by
“SAVE”, and the Brio will
beep.
Notes:
• If any recipe is saved into a
program (memory slot) that
you’ve already lled, the new
recipe with set temperatures
and times will override the
previous program recipe (101-
150 only).
• Preset temperatures and times
for program recipes 1-100
can be adjusted. Adjusted
temperatures and times
will not be saved when that
program number (1-100) is
recalled that again.
PROBE
The digital temperature Probe is
used to show an accurate internal
temperature of your food.
1. Place the Probe plug into
the jack. Set the cooking
functions, temperatures, and
times with stages as desired.
2. Press PROBE. The current
Probe temperature reading
will be displayed.
3. Press and hold down PROBE
for 1 second to set the target
Probe temperature.
• Press the Up or Down
arrows to set the target
internal temperature for
your food. The internal
temperature can be set up
to 212F (100C).
4. Insert the pointed end of the
Probe into the side of the
food. Place your food into the
Brio.
1800
1 6 5F
5. Press START/PAUSE. The
current Probe temperature
will be displayed.
6. To see the current cooking
temperature, press TEMP.
To change the cooking
temperature, press the Up
or Down arrows to adjust.
7. Press PROBE to go back
and see the current internal
temperature reading.
• To see the target Probe
temperature, press
and hold PROBE for 2
sec. The target internal
temperature can still be
adjusted by pressing the
Up or Down arrows.
8. The Brio will cook until the
set internal temperature on
the Probe is reached. When
the target temperature
is reached, “End” will be
displayed and the Brio will
beep three times.
Example: Always cook chicken
to an internal temperature of
165F (74C):
Set the Probe target temperature
to 165F (74C). When the
internal temperature of chicken
reaches 165F (74C), the Brio will
automatically turn off or go into
Warm function (if WARM was
chosen).
Note: The Rotisserie function
will not work with the Probe. If
the Probe is connected to the
Brio, Rotisserie will be disabled
and the Brio will beep three
times.

instructions
nuwavenow.com
28 29
ENGLISH
nuwavenow.com
INSTRUCTIONS
28 29
Slow-Cook
Slow-cook roasts, chicken, or
any other food items.
1. Press and hold PROBE for
1 second. The display will
show “165F” (“74C”). Press
the Up or Down arrows
to set the target internal
temperature.
2. Press PROGRAM and
PROBE at the same time.
This will start the slow-
cooking process. “01:00” (1
hour) will be displayed. This
is the default cooking time.
3. Press the Up or Down
arrows to adjust the time.
4. Place the Probe in the food
and place the food in the
Brio.
5. Press START/PAUSE.
The Brio will begin
cooking and the current
Probe temperature will be
displayed.
1800
1 6 5F
1800
0 1 00
:
ROTISSERIE
1. Press ROTISSERIE.
The light next to
ROTISSERIE will illuminate.
2. Press TIME and adjust the
cooking time.
3. Press START/PAUSE
to begin cooking. The
Rotisserie Skewer (spit),
Basket, or Drum will begin
to turn.
4. When the Brio is nished
cooking your food, “End” will
be displayed and the Brio will
beep three times.
• See Rotisserie Skewer
Assembly, and Rotisserie
Basket Assembly under
“Assembly Guide” for
more information.
Notes:
• Always check that there
is sufcient space above
and below your food, so
it can rotate freely without
obstruction.
• When using the Rotisserie
Skewer, Basket, or Drum,
place the Drip Tray on the
bottom.
1800
35 0F
CAUTION
Accessories will be hot during
and after use. Use oven mitts.
• The Brio will cook for the
amount of time you set for
slow cooking.
• When the time runs out, the
display will show “End”.
Carryover Cooking
If you would like to do a high sear
at the end of cooking while using
the Probe, you can set the Brio to
begin the Sear function up to 30
degrees before the target probe
temperature is reached.
1. Set your cooking
temperature, and then
press and hold PROBE for
1 second to set the target
probe temperature.
2. Press SEAR and PROGRAM
at the same time. The
Display will show 10F (-12C).
• At this time you can press
the Up or Down arrows to
set the number of degrees
below the target probe
temperature you would like
the Probe to reach before
the Brio begins the nal
Sear function.
Example: The cooking
temperature is 375F (191C). The
target probe temperature is 135F
(57C). Begin the Sear function.
Cook at 15F (-9C) before target
probe temperature:
1. Press the Up or Down
arrows to set the cooking
temperature to 375F
(191C).
2. Press and hold PROBE for
1 second. The display will
show “160F” (“71C”). Press
the Up or Down arrows to set
the target probe temperature
to 135F (57C).
3. Press PROBE and
PROGRAM at the same
time. The display will show
“10F” (“-12C”). Press the Up
or Down arrows to set the
temperature to 15F (-9C).
4. Press START/PAUSE. The
Brio will begin cooking at
375F (191C) and the display
will show the current internal
temperature of the food.
• When the internal
temperature reaches
120F (49C), the Brio will
begin the Sear function
until the target probe
temperature is reached.
Once 135F (57C) is
reached, the Brio will
nish cooking and “End”
will be displayed.
LOCK
Lock is used to stop the function
of the Brio. While in Lock mode,
your Brio’s buttons will not
respond to any action until the
Brio is unlocked.
1. Press ON/OFF. Set the
cooking temperature.
2. To lock the Brio functions,
press PROGRAM and
STAGE at the same time.
The remaining cooking time
will be displayed.
• NO buttons will function
while the Brio is locked
except for LIGHT and
ON/OFF.
3. To unlock your Brio’s
functions, press PROGRAM
and STAGE at the same
time once again. The Brio
will unlock and “LOC” be
displayed.
• The ON/OFF button will
work during Lock function
if the Brio needs to be
turned off.

cleaning & maintenance
nuwavenow.com
30 31
ENGLISH
nuwavenow.com
CLEANING & MAINTENANCE
30 31
Hand-wash
Clean your Brio after every use or in between a number of large
batches. Do not use metal utensils or harsh abrasives when cleaning
as this can damage the coating.
1. Unplug the Brio and make sure it cools completely.
2. Use a damp cloth to wipe the outside of the appliance.
3. Clean the Mesh Tray, Mesh Racks, Drip Tray, Grill/Griddle Plate,
Rotisserie Basket, Rotisserie Skewer, Door, Silicone Cupcake
Liners, and Non-Stick Baking Pan with a nonabrasive sponge,
hot water, and mild detergent. Dry thoroughly.
4. To clean the Probe, wipe it with a damp cloth or paper towel.
Allow the Probe to dry.
Tip: If there is residual food or particles on the Tray, Racks, Grill/
Griddle Plate, Rotisserie Skewer, Basket, or Baking Pan, add some
hot water and let the item soak separately for about 10 minutes
for easier cleaning. Then, use a soft cleaning brush to remove any
lingering food. Dry the parts thoroughly.
Dishwasher
Bottom rack: Mesh Tray, Mesh Racks, Drip Tray, Grill/Griddle Plate.
Top rack: Rotisserie Basket, Rotisserie Skewer, Silicone Cupcake
Liners, and Baking Pan.
Note: Water can get inside the Door if washed in the dishwasher.
It is recommended you hand-wash the Door.
IMPORTANT - Do not immerse the Brio and door in water or
attempt to cycle them through the dishwasher. The outer surface
may be cleaned by carefully wiping it with a damp dishcloth
or sponge. Make sure the Brio has cooled completely prior to
cleaning.
Removing the Door for Cleaning
The Door on the Brio is removable for easier, more thorough cleaning,
including the glass. To remove the Door and clean all of the parts:
1. Make sure the Brio has completely cooled. Partially open the
Door (about 1 inch).
2. Holding the Door handle securely, lift up. Clean both sides with a
damp cloth or paper towel and dry the door thoroughly.
WARNING
In case of other problems, immediately unplug and
contact Customer Service Department.
1-877-689-2838 • help@nuwavenow.com
Light Bulb Replacement
Turn off and unplug the Brio. Ensure that the Brio, bulb cover, and the
bulb have cooled completely. Unscrew the light bulb cover and light
bulb.
Note: You can order the light bulb by calling Customer Service at
1-877-689-2838 or help@nuwavenow.com. Use part number 38209.
The light bulb can also be purchased at your local
hardware store. The Brio uses an oven incandescent
light bulb 25W - 120/125 Volt -T6 E14 screw.
Remove Door Glass for Cleaning
Storage
1. Unplug the Brio and let it cool
down completely.
2. Make sure that all the parts are
clean and dry.
3. Store in a cool dry place.
1 inch
Place the Door on a at surface.
Using a Phillips screwdriver,
remove all screws.
Lift up the inner portion.
Carefully lift up and remove the
glass from the center window.
Gently clean the glass with a
damp cloth or paper towel.
For tougher buildup, soak the
glass in water rst, or run it
under warm water. Dry the glass
thoroughly and return all the
screws before replacing the Door.
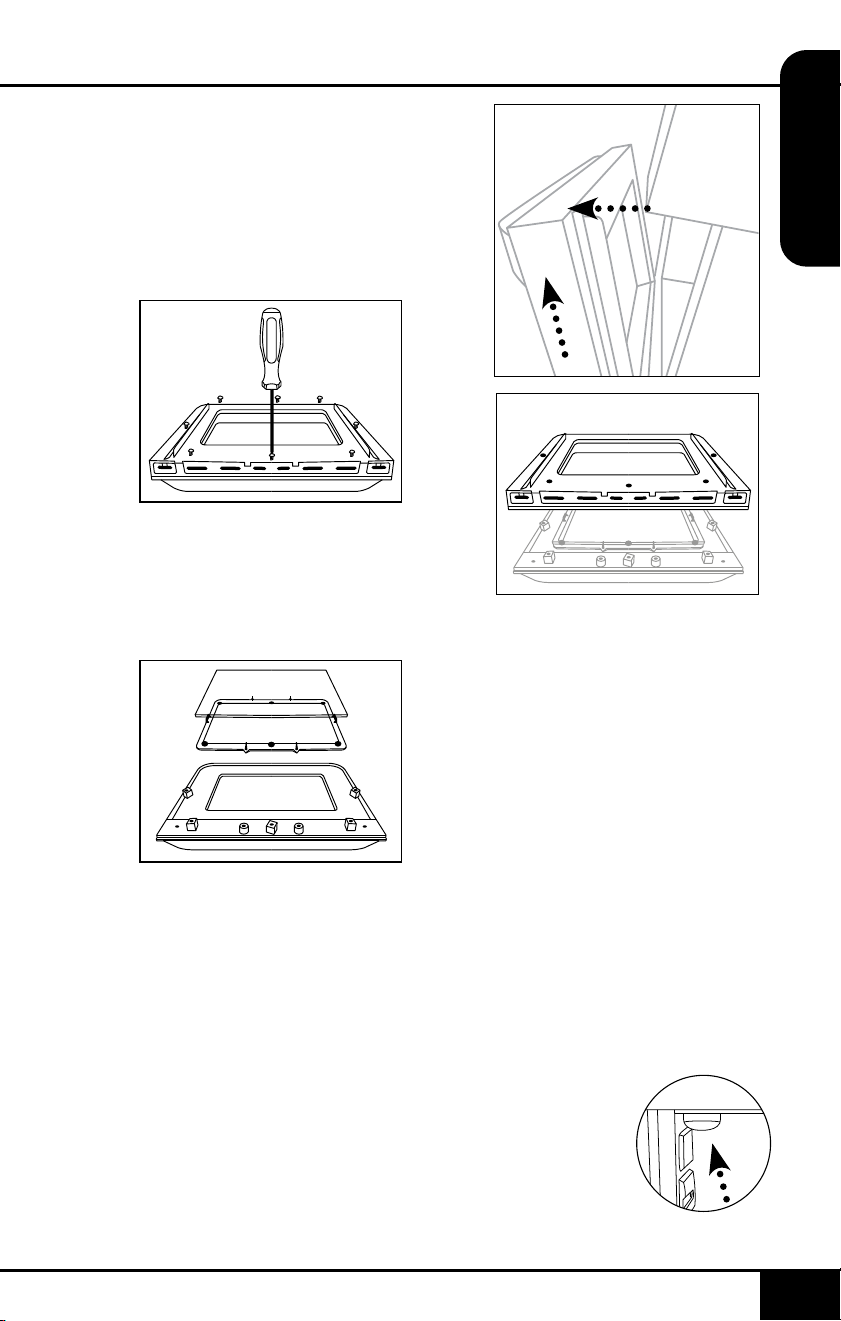

troubleshoot guide
nuwavenow.com
32 33
ENGLISH
nuwavenow.com
TROUBLESHOOT GUIDE
32 33
The Brio is not turning on or working.
1. The Brio is not plugged in.
2. Did not press ON/OFF button.
3. Insert the plug into an appropriate grounded power socket.
Press ON/OFF button.
The ingredients fried in the Brio are not completely cooked.
1. Too many ingredients were used.
2. The cooking temperature is too low.
3. The cooking time is too short.
4. Remove some ingredients from the Tray or Racks; smaller
batches air-fry more evenly. Cook at a higher temperature. Set
the Brio to air-fry for a longer time.
Fried snacks are not crispy when they come out of the Brio.
Use snacks designed to be baked in a traditional oven, or lightly
brush some olive oil onto the snacks beforehand for crispier results.
White smoke is coming out of the product.
1. You are frying greasy foods. The Trays or Racks contain
greasy residue from previous uses.
2. When preparing greasy ingredients in the air fryer, large
amounts of oil can smoke and inltrate the Brio. Oil can produce
white smoke and the Tray or Racks might become hotter than
usual. This will not affect the nal cooking result. White smoke
is caused by grease heating up in the Tray or Racks. Make sure
you clean Tray and Racks properly after use.
Fresh French fries are fried unevenly in the Brio.
1. You did not soak the potato sticks properly before air-frying them.
2. You did not use the right potato type or they were not fresh.
3. Soak potato sticks in a bowl of water for at least 30 minutes,
remove them, and dry them with paper towels. Use fresh
potatoes and make sure they stay rm during air-frying.
Fresh French fries are not crispy when they come out of the Brio.
1. The crispiness of the fries depends on the amount of oil and
water in the fries.
2. Make sure you dry the potato sticks properly before adding oil.
Cut the potato sticks smaller and dry them for a crispier result.
Add slightly more oil to the potatoes before placing them in the
Brio for crispier results.
If the Brio needs to be replaced or returned to the manufacturer,
contact Customer Service at: 1-877-689-2838 or help@
nuwavenow.com.
Error Message: Solution(s):
Prb1
The Probe is not connected to the Brio. Plug
the Probe into the Brio’s Probe Jack.
Prb2
The Probe target internal temperature is set
higher than set cooking temperature.
Prb3
A Probe short Circuit.
Contact Customer Service at 1-877-689-2838
or help@nuwavenow.com.
Prb4
The Probe sensor is not detecting any
temperature increase. Ensure the Probe is
inserted into the food and the food is in the
oven while cooking.
Prb5
The Rotisserie function was turned on with the
Probe connected. Unplug the Probe or cancel
the Rotisserie function.
Er1
The Temperature Sensor has overheated. Turn
the Brio off to cool. If the Brio is not working
after it cools down, contact Customer Service.
Err1
A Temperature Sensor short circuit.
Contact Customer Service at 1-877-689-2838
or help@nuwavenow.com.
Err2
The Temperature Sensor is open.
Contact Customer Service at 1-877-689-2838
or help@nuwavenow.com.

limited warranty
nuwavenow.com
34 35
ENGLISH
nuwavenow.com
LIMITED WARRANTY
34 35
MANUFACTURER’S OBLIGATION
The Manufacturer’s obligation under this Limited Warranty is
limited, to the extent allowable by law, to repairing or replacing any
part covered by this Limited Warranty which upon examination is
found to be defective under normal use. The Limited Warranty is
applicable only within the continental United States and only to the
original purchaser of the manufacturer’s authorized channels of
distribution. THE LIMITED WARRANTY MAY NOT BE ALTERED,
VARIED OR EXTENDED EXCEPT BY A WRITTEN INSTRUMENT
EXECUTED BY THE MANUFACTURER. THE REMEDY OF
REPAIR OR REPLACEMENT AS PROVIDED UNDER THIS
LIMITED WARRANTY IS EXCLUSIVE. IN NO EVENT SHALL THE
MANUFACTURER BE LIABLE FOR ANY CONSEQUENTIAL OR
INCIDENTAL DAMAGES TO ANY PERSON, WHETHER OR NOT
OCCASIONED BY NEGLIGENCE OF THE MANUFACTURER,
INCLUDING WITHOUT LIMITATION, DAMAGES FOR LOSS OF
USE, COSTS OF SUBSTITUTION, PROPERTY DAMAGE, OR
OTHER MONEY LOSS.
Some states do not allow the exclusion or limitation of incidental
or consequential damages, so the above limitation exclusions
may not apply. This Limited Warranty gives specic legal rights,
and there may also be other rights which vary from state to
state. EXCEPT AS OTHERWISE EXPRESSLY PROVIDED
ABOVE, THE MANUFACTURER MAKES NO WARRANTIES
EXPRESSED OR IMPLIED ARISING BY LAW OR OTHERWISE,
INCLUDING WITHOUT LIMITATION, THE IMPLIED WARRANTIES
OF MERCHANTABILITY AND FITNESS FOR A PARTICULAR
PURPOSE TO ANY OTHER PERSON. READ YOUR OWNER’S
MANUAL. IF YOU STILL HAVE ANY QUESTIONS ABOUT
OPERATION OR WARRANTY OF THE PRODUCT, PLEASE
CONTACT NUWAVE LLC.
DISPUTE RESOLUTION PROCEDURE. For disputes relating to use
of the website or use or purchase of a NuWave product or service
(collectively “Disputes”), you agree to first contact NuWave LLC
at (877) 689-2838 (phone), (847) 367-5486 (facsimile), or legal@
nuwavenow.com (email). If we cannot resolve your dispute informally,
any and all disputes shall be submitted to final and binding arbitration.
You may start the arbitration process by submitting in writing a
demand to the American Arbitration Association (“AAA”) and sending
a copy to NuWave. NuWave will pay all filing costs. A single arbitrator
of the AAA will conduct the arbitration in a location convenient to
you or by phone. The arbitrator’s award will be binding and may
be entered as a judgment in a court of competent jurisdiction. The
arbitration will be conducted in accordance with the provisions of
AAA’s Commercial Arbitration Rules and Mediation Procedures in
effect at the time of submission of your demand for arbitration. See
https://www.adr.org/sites/default/files/CommercialRules_Web.pdf.
The NuWave 15.5Q Brio
®
Air Fryer/Grill/Rotisserie Oven
THE MANUFACTURER WARRANTS
The Brio
®
, including the Chrome Mesh Trays, Chrome Mesh Rack,
Drip Tray, Light Bulb, Light Bulb Cover, Rotisserie Basket, Rotisserie
Skewer, Door, Non-Stick Baking Pan, Grill/Griddle Plate, Silicone
Cupcake Liners, and Digital Temperature Probe are to be free from
manufacturer defects.
All electrical components are warranted for 1 year from the date
of purchase, under normal household use, and when operated
in accordance with the Manufacturer’s written instructions. The
Manufacturer will provide the necessary parts and labor to repair
any part of the Brio
®
at NuWave LLC Service Department. After the
expiration of the warranty, the cost of the labor and parts will be the
responsibility of the owner.
THE WARRANTY DOES NOT COVER
The Limited Warranty is voided if repairs are made by an unauthorized
dealer or the serial number data plate is removed or defaced. Normal
deterioration of nish due to use or exposure is not covered by this
Warranty. This Limited Warranty does not cover failure, damages
or inadequate performance due to accident, acts of God (such as
lightning), uctuations in electric power, alterations, abuse, misuse,
misapplications, corrosive-type atmospheres, improper installation,
failure to operate in accordance with the Manufacturer’s written
instructions, abnormal use or commercial use. NuWave LLC reserves
the right to void the Limited Warranty, where allowable by law, for
products purchased from an unauthorized dealer.
TO OBTAIN SERVICE
The owner shall have the obligation and responsibility to: pay for all
services and parts not covered by the warranty; prepay the freight to
and from Service Department for any part or system returned under
this warranty; and carefully package the product using adequate
padding material to prevent damage in transit. The original container
is ideal for this purpose. Include in the package the owner’s name,
address, daytime telephone number, a detailed description of the
problem, and your “RGA number.” (Call 1-877-689-2838) or email
help@nuwavenow.com to obtain the RGA number (Return Goods
Authorization number). Provide the cooking system model & serial
number and proof of date of purchase (a copy of the receipt) when
making claims under this warranty.

LIMITED WARRANTY
limited warranty
3636
Except as may be required by law as determined by an arbitrator, no
party or arbitrator may disclose the existence, content, or results of
any arbitration hereunder without prior written consent of both parties.
A. WAIVER OF RIGHT TO SUE. By agreeing to arbitration you
understand that, to the maximum extent permitted by law, you are
agreeing to waive your right to file suit in any court, to a court hearing,
judge trial, and jury trial.
B. CLASS ACTION WAIVER. To the maximum extent permitted
by law you expressly agree to refrain from bringing or joining any
claims in any representative or class-wide capacity, including but not
limited to, bringing or joining any claims in any class action or class-
wide arbitration.
C. OPT OUT PROCEDURE. To opt out of arbitration you must
contact NuWave. To request to opt out of arbitration contact us at
legal@nuwavenow.com (email), NuWave LLC, 560 Bunker Ct.,
Vernon Hills, IL 60061, U.S.A., (847) 367-5486 (fax), or (877) 689-
2838 or (224) 206-3019 (phone). You will have thirty (30) days from
the date of product delivery to opt out of arbitration with respect
to any dispute arising out of or relating to use or purchase of any
NuWave product. If more than 30 days have passed you are not
eligible to opt out of arbitration and will have waived your right to
sue or participate in a class action with respect to the dispute arising
out of your purchase or use of a NuWave product. For any dispute
arising out of your use of NuWave’s website, you have thirty (30)
days from the date you provided information to the website to opt
out of arbitration. If more than 30 days have passed you are not
eligible to opt out of arbitration and you will have waived your right
to sue and participate in a class action with respect to the dispute
arising out of your use of NuWave’s website.
nuwavenow.com
37
nuwavenow.com
37
ENGLISH
D. SOME MATTERS ARE NOT SUBJECT TO ARBITRATION.
Notwithstanding the foregoing, the following shall not be subject
to arbitration and may be adjudicated only in the state and federal
courts of Illinois: (i) any dispute, controversy, or claim relating to
or contesting the validity of our intellectual property rights and
proprietary rights, including without limitation, patents, trademarks,
service marks, copyrights, or trade secrets; (ii) an action by a party
for temporary, preliminary, or permanent injunctive relief, whether
prohibitive or mandatory, or other provisional relief; or (iii) interactions
with governmental and regulatory authorities. You expressly agree
to refrain from bringing or joining any claims in any representative or
class-wide capacity, including but not limited to, bringing or joining any
claims in any class action or any class-wide arbitration.
READ YOUR OWNER’S MANUAL
If you still have any questions about operation or warranty of the
product, please contact NuWave LLC at: 1-877-689-2838 or email
help@nuwavenow.com.
EL MANUAL DEL
PROPIETARIO
Freidora de Aire/Parrilla/Horno asador
nuwavenow.com
38
nuwavenow.com
39
nuwavenow.com
39
Como agradecimiento especial por registrar su producto,
¡recibirá automáticamente 3 meses adicionales a su
garantía limitada del fabricante!*
Todo lo que tiene que hacer es seguir estos
simples pasos.
Usando su teléfono inteligente o
dispositivo inteligente, escanee el
código QR ubicado en la etiqueta
de su producto ubicada en la
parte posterior de el Brio.
Se le dirigirá a la página de
registro del producto NuWave
con el número de serie único
de su producto que se ingresa
automáticamente en el campo
correspondiente.
NOTA: Si no tiene un dispositivo
inteligente habilitado para
la web, simplemente visite
nuwavenow.com/QR e ingrese
manualmente el número de
serie de su producto.
Complete la información restante
y complete la encuesta opcional.
Una vez que envíe su
información, recibirá un correo
electrónico de conrmación
con los detalles de la garantía
extendida.
1
2
3
4
* Registre su producto dentro de 1 año a partir de la fecha
de compra para una extensión gratuita de 3 meses de
garantía limitada.
¡REGÍSTRESE
AHORA!
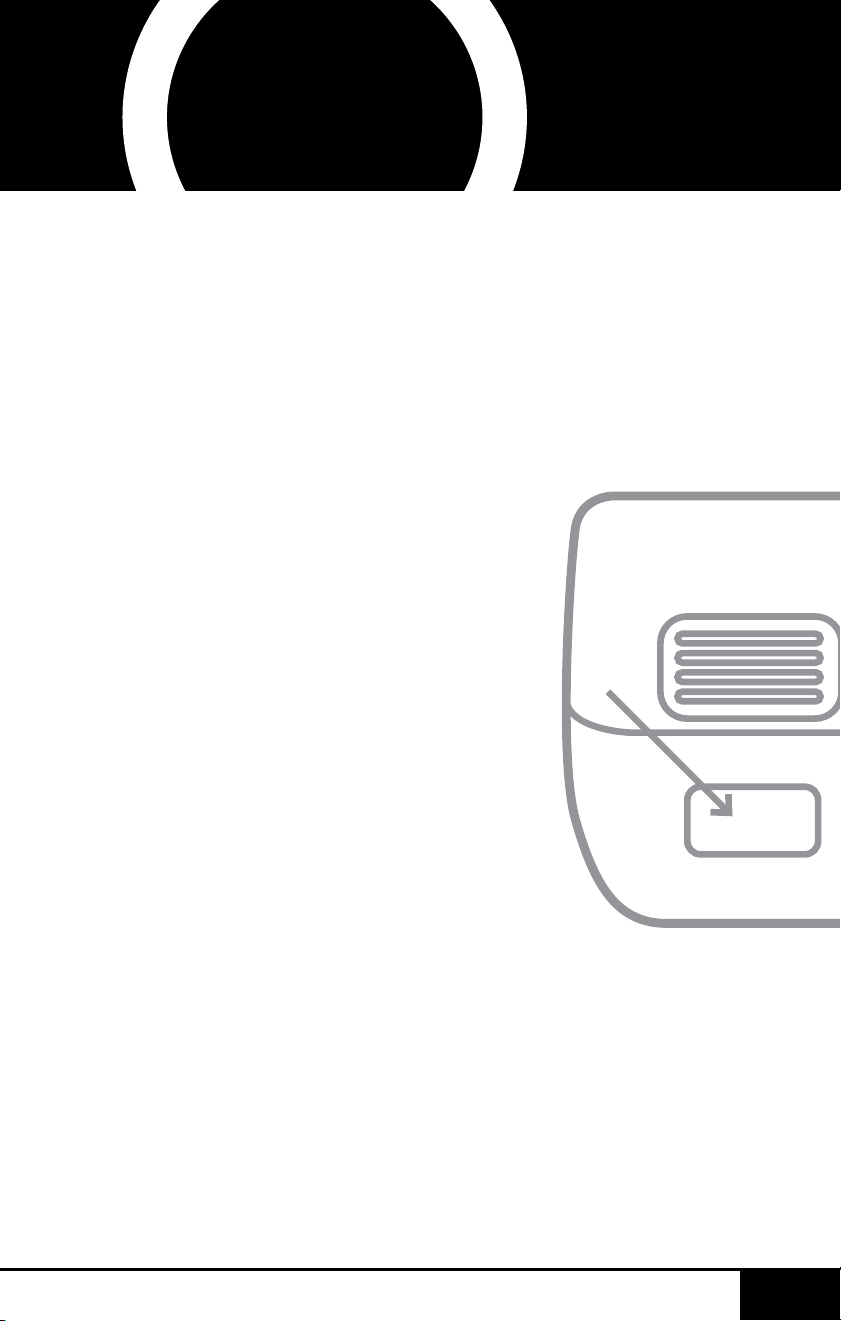

Abra su tienda de aplicaciones móviles (App Store,
Google Play).
Busque “lectores de códigos QR.”
Simplemente descargue el lector de códigos QR a
su teléfono, ábralo y escanee el código, ya está listo
para comenzar.
NOTA: Es posible que deba abrir el lector de código
QR descargado cada vez que desee escanear un
código QR.
40
40
1
2
3
DESCARGUE LA APLICACIÓN QR
CODE EN SU DISPOSITIVO MÓVIL
lectores de códigos QR
3
!para una garantía
adicional de
meses!
nuwavenow.com
41
nuwavenow.com
41
SPANISH
MEDIDAS DE SEGURIDAD IMPORTANTES
PARA USO DOMÉSTICO SOLAMENTE Y LEA TODAS LAS
INSTRUCCIONES ANTES DE USARLO
ADVERTENCIA: Al usar el
Brio, siempre se deben seguir
las precauciones básicas de
seguridad:
1. No toque las supercies
calientes. Utilice asas o
perillas.
2. Para protegerse contra
descargas eléctricas,
no sumerja el cable, los
enchufes ni el Brio en agua
u otros líquidos.
3. No utilice el Brio con un
cable o enchufe dañado o
después de que el aparato
no funcione correctamente
o se haya dañado de alguna
manera. Devuelva el aparato
al Centro de Servicio
Autorizado más cercano
para que lo examinen,
reparen o ajusten.
4. Es necesaria una estrecha
supervisión cuando se
utiliza cualquier aparato
cerca de niños. Este
dispositivo no está
diseñado para ser utilizado
por personas (incluidos
niños) con capacidades
físicas, sensoriales o
mentales reducidas, o
con falta de experiencia y
conocimiento, a menos que
hayan sido supervisados o
instruidos sobre el uso del
dispositivo por parte de una
persona responsable de
su seguridad.
5. No se recomienda el uso
de otros accesorios que
no estén diseñados para
usarse con la Brio. Hacerlo
puede dañar el Brio y causar
accidentes.
6. NO APTO PARA USO EN
EXTERIORES. SÓLO PARA
USO EN EL HOGAR.
7. No deje que el cable
cuelgue del borde de la
mesa o mostrador ni que
toque supercies calientes.
8. No coloque el Brio sobre
o cerca de un quemador
de gas o eléctrico, o en un
horno caliente.
9. Se debe tener mucho
cuidado al mover el Brio si
contiene aceite caliente u
otros líquidos calientes.
10. Para desconectar, apague el
Brio, luego retire el enchufe
del tomacorriente de pared.
11. Durante la fritura al aire, se
libera vapor caliente de la
salida de aire. Mantenga las
manos y la cara alejadas del
vapor y de la salida de aire.
Además, tenga cuidado con
el vapor caliente y el aire
cuando retire las Bandejas,
las Rejillas o la Base y
Trinche del Rostizador.
12. Nunca ponga el Brio contra
la pared u otros aparatos.
Debe haber al menos 3
pulgadas de espacio libre
para la parte posterior, los
lados izquierdo o derecho y
la parte superior
del Brio.
13. No coloque nada encima
del Brio.

medidas de seguridad importantes
nuwavenow.com
42 43
nuwavenow.com
MEDIDAS DE SEGURIDAD IMPORTANTES
PARA USO DOMÉSTICO SOLAMENTE Y LEA TODAS LAS
INSTRUCCIONES ANTES DE USARLO
42 43
SPANISH
14. Desenchufe el Brio del
tomacorriente cuando no
esté en uso y antes de
limpiarla. Permita que el Brio
se enfríe antes de limpiarlo,
ponerle o quitarle partes
15. No utilice el Brio para algo
para lo que no fue diseñado.
16. Los alimentos muy grandes
o utensilios de metal no
deben introducirse en el
Brio ya que pueden crear
un riesgo de incendio o
descarga eléctrica.
17. Un incendio puede ocurrir
si el Brio es cubierto o
tocado por materiales
amables, incluyendo
cortinas, paredes con tapiz
u otros así, mientras esté en
funcionamiento.
18. No lo limpie con bras
metálicas. La bra puede
soltar pedacitos que toquen
las partes eléctricas creando
un riesgo de incendio o
descarga eléctrica.
19. Debe tomarse extrema
precaución cuando utilice
contenedores que no sean
de metal o vidrio.
20. No guarde ningún material,
que no sean los accesorios
recomendados por el
fabricante, en el Brio cuando
no esté en funcionamiento.
21. No coloque ninguno de los
siguientes materiales en el
Brio: papel, carbón, plástico
u otros materiales amables.
22. No cubra la bandeja de
goteo con papel aluminio.
Eso podría hacer que el Brio
se sobrecaliente.
23. Tome extrema precaución
cuando retire la Bandeja de
Malla, la Rejilla de Malla o
la Base, Pincho de Asador
y el Trinche del Rostizador
o cuando deseche grasa
caliente.
24. Presione “ON/OFF” para
apagar el Brio.
25. Mantenga el manual a
la mano para futuras
referencias.
MEDIDAS DE SEGURIDAD
ADICIONALES
VEA EL QUICKSTART
BEFORE USE
Información Eléctrica
Se proporciona un cable de
suministro de energía corto
(o cable de suministro de
energía desmontable) para
reducir el riesgo resultante de
enredarse o tropezar con un
cable más largo. Los cables
de alimentación desmontables
más largos o los cables de
extensión están disponibles
y se pueden usar si se tiene
cuidado. Si se utiliza un cable
de alimentación o un cable de
extensión desmontable más
largo:
1. La calicación eléctrica
marcada del cable de
extensión debe ser al
menos tan grande como
la calicación eléctrica
del aparato.
2. El cable más largo
debe ser colocado de
modo que no cuelgue
de la encimera o de
la mesa, de donde se
podría tirar o tropezar
involuntariamente. El
Brio debe operarse
en una toma eléctrica
separada de otros
aparatos debido a las
limitaciones de vataje.
3. El aparato tiene un
enchufe polarizado (una
cuchilla es más ancha
que la otra). Para reducir
el riesgo de descarga
eléctrica, este enchufe
está diseñado para
encajar en una toma
de corriente polarizada
de una sola manera. Si
el enchufe no encaja
completamente en el
tomacorriente, invierta
el enchufe. Si aún no
encaja, comuníquese con
un electricista calicado.
No intente modicar
el enchufe de ninguna
manera. Si el aparato es
del tipo con conexión a
tierra, el juego de cables o
el cable de extensión debe
ser un cable de 3 hilos con
conexión a tierra.
GUARDE ESTAS
INSTRUCCIONES
Lea y comprenda todo el
manual antes de usar el Brio.
NO UTILICE EL BRIO PARA
OTRO USO QUE NO SEA PARA
EL QUE FUE DISEÑADA.
Nota: Coloque el Brio en una
supercie que sea horizontal,
uniforme y estable. Este
aparato está diseñado para
uso doméstico normal. No está
diseñado para ser utilizado en
entornos como el de personal
de cocinas/cafeterías de
tiendas, ocinas, granjas u otros
entornos de trabajo, ni está
diseñado para ser utilizado por
clientes en hoteles, moteles,
bed and breakfast y entornos no
residenciales.
AVISO: EL NO SEGUIR
CUALQUIERA DE LAS
MEDIDAS DE SEGURIDAD
IMPORTANTES, LAS
MEDIDAS DE SEGURIDAD
ADICIONALES O LAS
INSTRUCCIONES PARA UN
USO SEGURO ES UN ABUSO
DE SU BRIO QUE PUEDE
ANULAR SU GARANTÍA
Y CREAR EL RIESGO DE
LESIONES GRAVES.
ADVERTENCIA
En caso de otros
problemas, inmediatamente
desconecte y contacte al
Departamento de Servicio
al Cliente.
1-877-689-2838
help@nuwavenow.com

medidas de seguridad importantes
nuwavenow.com
44 45
nuwavenow.com
MEDIDAS DE SEGURIDAD IMPORTANTES
PARA USO DOMÉSTICO SOLAMENTE Y LEA TODAS LAS
INSTRUCCIONES ANTES DE USARLO
44 45
SPANISH
1. No coloque el Brio cerca
de materiales inamables,
unidades de calefacción o
ambientes húmedos.
2. No coloque ningún otro
tamaño de sartén para
cocinar que no sea
8x6x2 pulgadas hasta
8x8 pulgadas (2 cuartos
de galón) en el Brio. No
reemplace ninguna parte
con otros recipientes.
3. Es normal que algo de humo
escape del Brio cuando se
calienta por primera vez.
4. Si sale mucho humo del
respiradero de aire durante
la operación, desenchufe
el Brio de inmediato y
comuníquese con Servicio
al Cliente.*
5. Se debe tener mucho
cuidado al operar el Brio o
cualquier otro aparato.
6. No mueva el Brio mientras
esté en funcionamiento.
Solo después de que el
Brio se haya enfriado
completamente debe
intentarse el movimiento.
Siempre espere a que el
Brio se enfríe antes de
manipularlo.
7. Los niños deben ser
supervisados para
asegurarse de que no
jueguen con el Brio.
PRECAUCIÓN
• Siempre ponga los
ingredientes para freír
en la bandeja o en la
rejilla para evitar el
contacto directo con los
componentes de calor.
• No cubra las aberturas de
entrada y salida de aire
mientras el aparato esté
funcionando.
• No vierta aceite en las
bandejas, las rejillas,
la base y el trinche del
rostizador, ya que esto
puede provocar un
incendio.
• Nunca toque el interior
del aparato meintras esté
duncionando.
PARTES Y ACCESORIOS
3
2
5
4
1800
1500
900
1
(2x)
6
7
8
9
10
11
12
13
(6x)
PARTES Y
ACCESORIOS
Base de Poder
Part #: 38005
Bandejas de Malla
Part #: 38202
Rejilla de Mallas (2x)
Part #: 38203
Bandeja de Goteo
Part #: 38204
Parilla/Plancha
Part #: BRI14-A8
Jaula del Asador
Part #: BRI14-A12
Pincho de Asador
Part #: BRI14-A13
Sensor
Part #: 38207
Puerta
Part #: 38208
Bombilla
Part #: 38209
Cubierta de Bombilla
Part #: 38211
Sartén Antiadherente
Part #: 37212
Revestimientos de Silicona
para Cupcakes (6x)
Part #: 22113
1
2
3
4
6
7
8
9
10
11
12
13
5
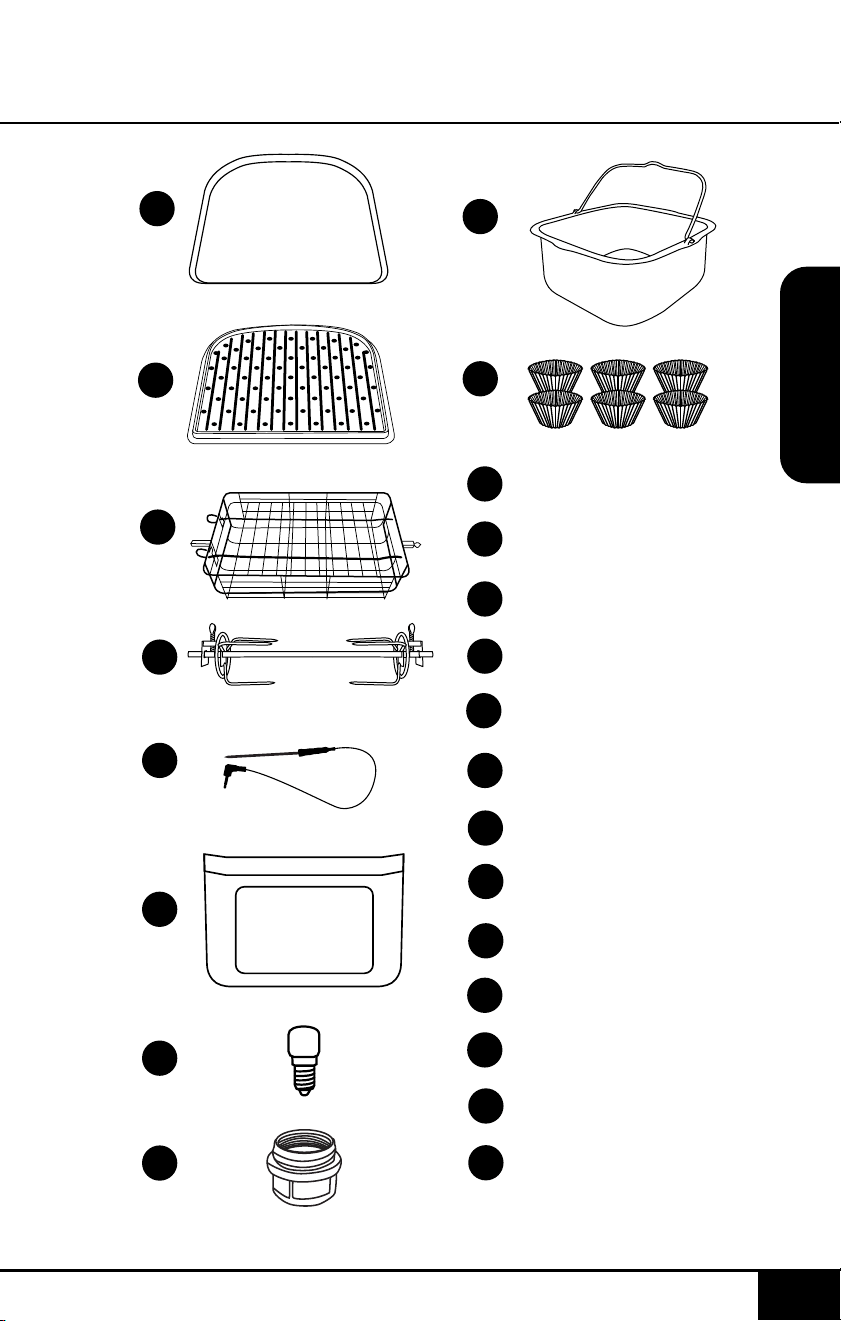
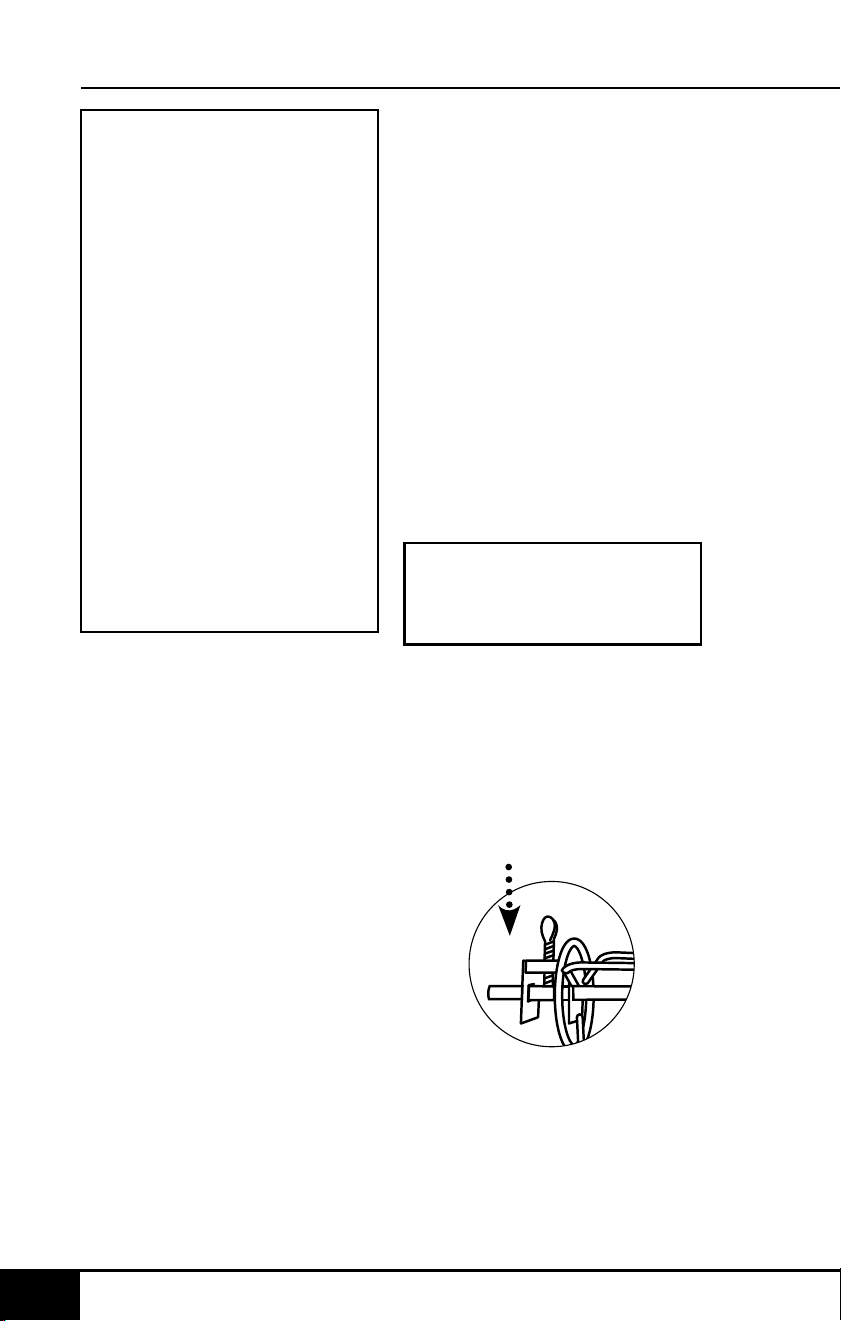
partes y accesorios
nuwavenow.com
46 47
SPANISH
nuwavenow.com
PARTES Y ACCESORIOS
46 47
GUÍA DE MONTAJE
Antes de Usar
1. Retire todos los materiales de
embalaje.
2. Retire el pegamento y las
etiquetas del aparato.
3. Limpie todas las piezas a
fondo con agua caliente,
una esponja no abrasiva
y detergente suave para
platos, o en el lavavajillas,
solo en la rejilla superior.
4. Limpie el interior y el exterior
del Brio con un paño húmedo.
No sumerja el Brio en agua.
Secar bien.
UTILICE LA
BANDEJA DE GOTEO
EN TODO MOMENTO.
Ensamblaje del Pincho de
Asador
Para ensamblar el asador de
asador con aves y otras carnes,
siga los pasos a continuación:
1. Atornille un Pincho en el
extremo del Pincho con el
extremo rectangular.
2. Empuje el Pincho a través
del centro de la carne hasta
que el Pincho atraviese la
comida por completo y salga
por el otro lado.
Tornillo
Nota: Los accesorios que se
muestran arriba constituyen
la colección completa de
accesorios Brio disponibles.
No todos los accesorios
enumerados están incluidos.
Si hay un accesorio en la lista
anterior que no se incluyó con
su pedido, o si perdió alguna
de las piezas o accesorios
de Brio, comuníquese con el
Servicio al cliente de NuWave
para realizar un pedido, sujeto
a disponibilidad.
Puede comunicarse con el
Servicio al Cliente de NuWave
llamando al 1-877-689-2838 o
enviando un correo electrónico
a help@nuwavenow.com de
lunes a viernes de 7:30 a.m. a
4:30 p.m. CST.
3. Coloque el segundo tenedor
del asador del asador en el
otro extremo del pincho y
empuje el tenedor hacia
adelante hasta que atraviese
el extremo de la carne.
Apriete el tornillo del Pincho. Si
es necesario, aoje el tornillo y
mueva el primer tenedor hacia
adelante hasta que atraviese el
otro extremo de la carne, luego
vuelva a apretar. Asegúrese
de que ambos tornillos estén
apretados y en su lugar.
4. Después de colocar la comida
en el Pincho del asador y
asegurarla, deslice entre la
Posición 2 y la Posición 3
dentro del Brio. El extremo
rectangular del asador debe
estar a la izquierda cuando
se desliza hacia adentro.
Mantenga el lado derecho
ligeramente inclinado hacia
arriba mientras se desliza
hacia adentro.
Izquierda Derecha
5. Baje el lado derecho
del asador al soporte
del eje, luego inserte el
asador izquierdo (barra)
del pincho en el orificio
(orificio de soporte del eje)
en la pared interior.
Notas:
• Para obtener mejores
resultados, use hilo de cocina
alrededor del pollo u otras
carnes.
• Siempre verique que haya
suciente espacio encima y
debajo de los alimentos para
que pueda girar libremente sin
obstrucciones.
• Cuando use la Brocheta
Rotisserie, coloque la Bandeja
de goteo en la parte inferior.
Izquierda
Derecha
PRECAUCIÓN
Las piezas del asador del
asador estarán calientes
durante y después del uso.
Use guantes para horno.
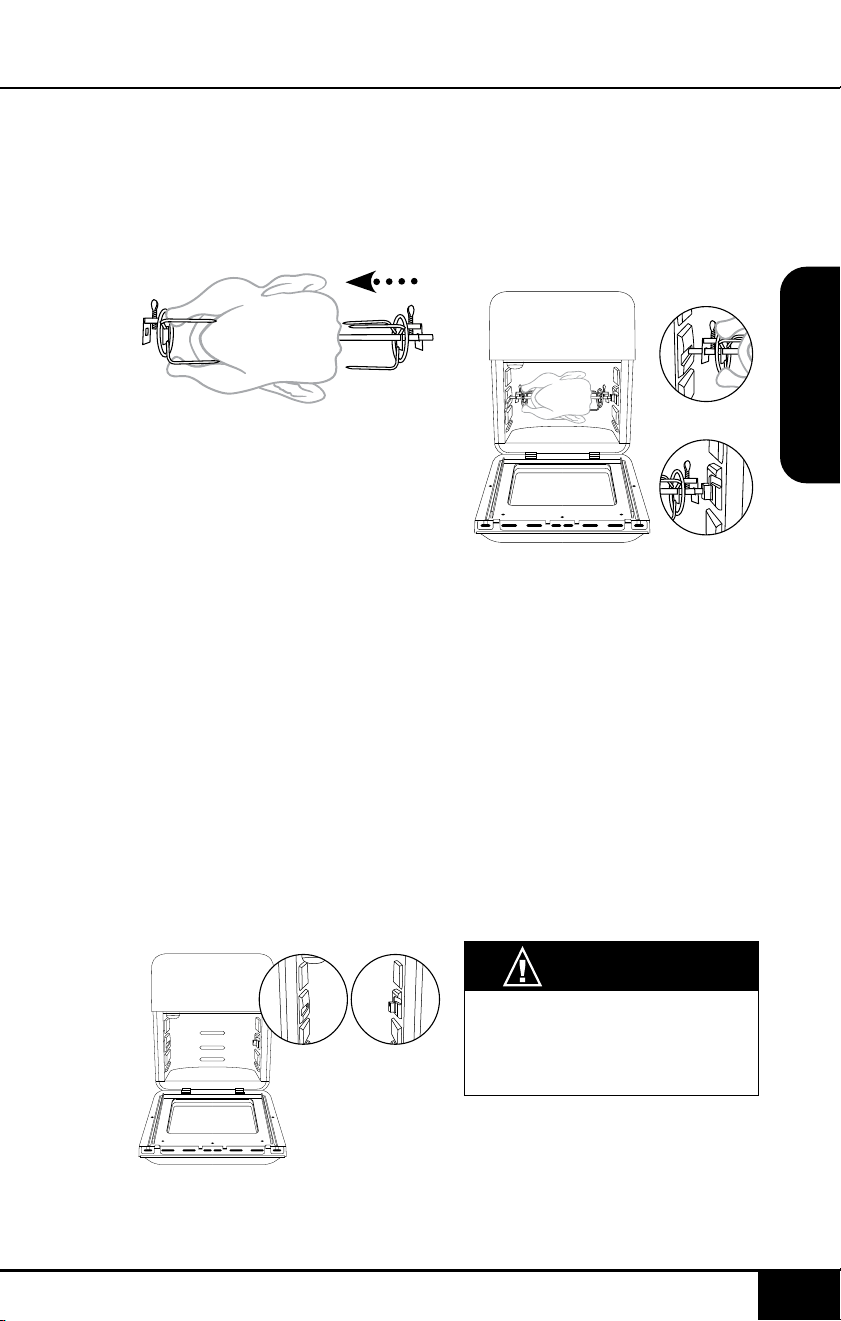
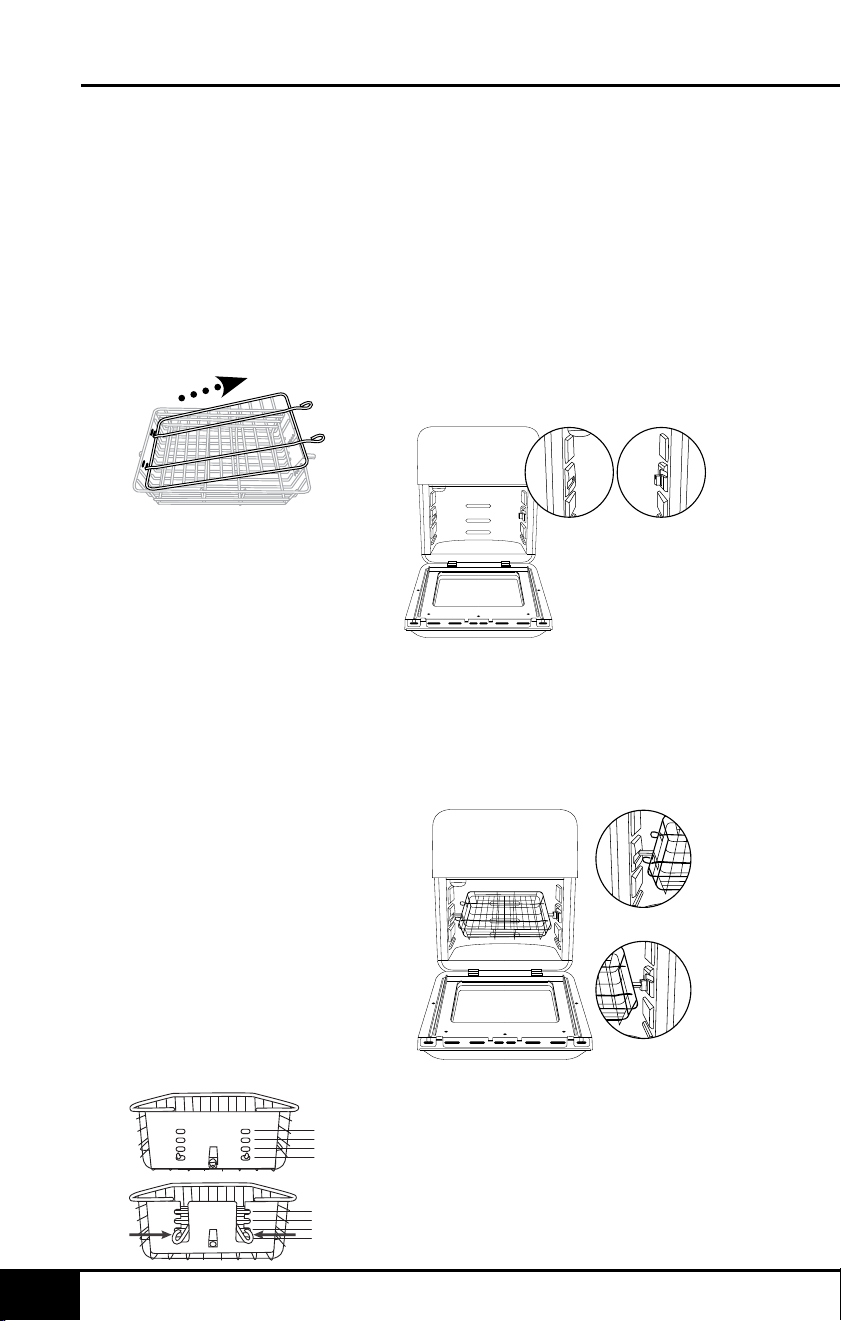
instrucciones
nuwavenow.com
48 49
SPANISH
nuwavenow.com
INSTRUCCIONES
48 49
Ensamblaje de la Jaula del
Asador
Para ensamblar la Jaula del
Asador en el Brio, siga los pasos
e ilustraciones a continuación:
1. Retire la tapa superior de
la Jaula: Apriete las puntas
en el exterior de la tapa
superior hacia el centro y
levántelas. Retire el otro
extremo de los agujeros.
2. Coloque la comida en la
Jaula.
3. Ajuste la tapa superior para
que se ajuste a la comida:
Coloque los extremos de la
tapa superior en las ranuras
por encima de donde
termina la parte superior
de la comida. Apriete las
puntas en el exterior de la
tapa superior y deslícelas
hacia abajo en su posición
y coloque las puntas en la
posición correcta.
• La posición de las puntas
debe estar alineada y
opuesta a los agujeros de
la ranura en el otro lado.
• Asegúrese de que la tapa
superior quede plana
sobre la comida y que
quede ajustada.
4
3
2
1
4
3
2
1
4. Después de colocar
la comida en la Jaula
y asegurarla, tome la
Jaula y deslícela entre la
posición 2 y la posición 3
dentro del Brio. El extremo
rectangular sin ranuras
debe estar a la izquierda.
Mantenga el lado derecho
ligeramente inclinado hacia
arriba mientras se desliza
hacia adentro.
5. Baje el lado derecho de
la barra de la Jaula al
soporte, luego inserte
la barra izquierda de la
Jaulaa en el oricio de la
pared interior.
Izquierda Derecha
Izquierda
Derecha
Notas:
• Siempre verique que haya
suciente espacio encima y
debajo de los alimentos para
que pueda girar libremente
sin obstrucciones.
• Cuando use la canasta
Rotisserie, coloque la bandeja
de goteo en la parte inferior.
PRECAUCIÓN
Las piezas de la cesta del
asador estarán calientes
durante y después del uso.
Use guantes para horno.
Montaje de la Parilla/Plancha
La Parrilla/Plancha se puede usar
en la posición 1-3. Para obtener
resultados más nítidos, se
recomienda usar la Posición 3.
La posición 4 se usa
principalmente para deshidratar
alimentos usando la Bandejas
de Malla.
4
3
2
1
Posición:
Plancha
Parilla
Revestimientos de Silicona
para Cupcakes
Coloque los pastelitos de
silicona en la Bandejas de Malla
en la posición 1, 2 o 3.
Para Quitar la Puerta
1. Asegúrese de que su
Brio se haya enfriado por
completo. Abra la puerta
hacia abajo parcialmente
(se abrió aproximadamente
1 pulgada/25mm).
3
2
1
Posición:
PRECAUCIÓN
Los accesorios y contenidos
estarán CALIENTES. Use
guantes para horno.
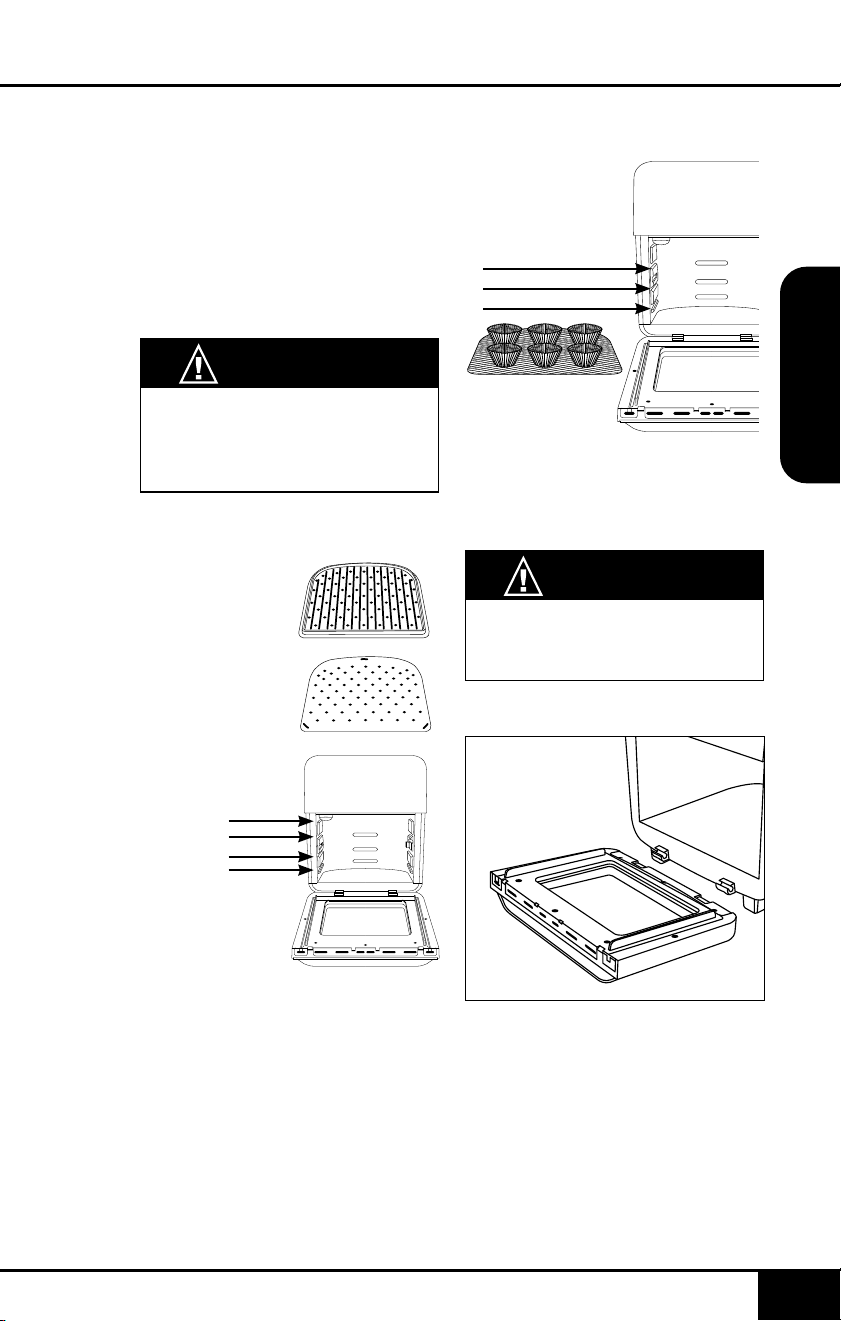
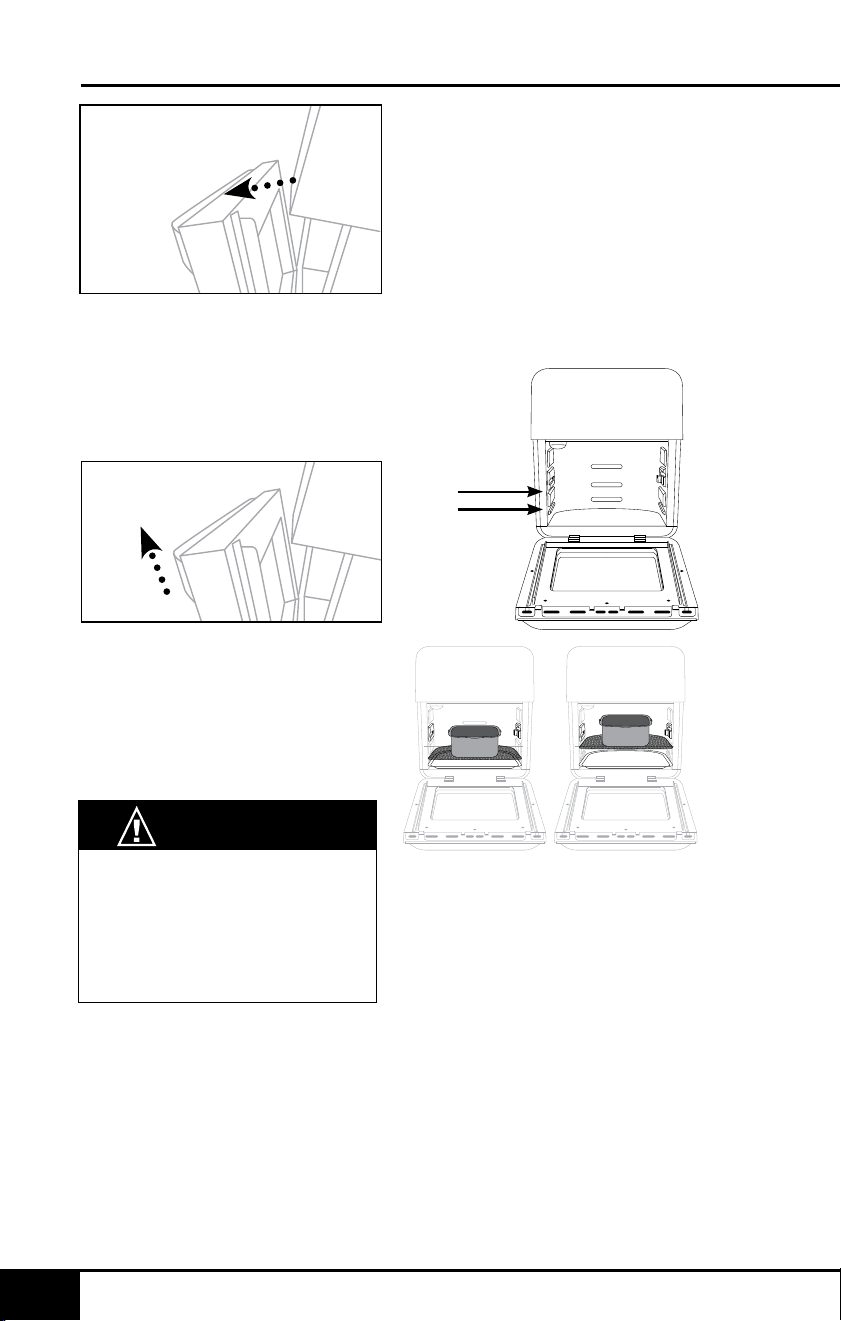
instrucciones
nuwavenow.com
50 51
SPANISH
nuwavenow.com
INSTRUCCIONES
50 51
2. Sosteniendo la manija de
la puerta de forma segura,
levante el lado derecho de la
puerta primero de la bisagra
y luego el lado izquierdo
para retirarlo.
3. Coloque la puerta
nuevamente en las ranuras
de las bisagras y presione
hacia abajo. Abra y cierre la
puerta para asegurarse de
que sea segura.
1 inch (25mm) halar
levantar
PRECAUCIÓN
Si tiene problemas para quitar
la puerta, no fuerce; la puerta
se está abriendo en el ángulo
equivocado. La puerta debe
abrirse 1 pulgada (25mm)
hacia abajo.
Sartén Antiadherente
Con la rejilla de malla en la
posición 1 o 2, coloque la
bandeja para hornear encima de
la rejilla.
• También puede colocar la
bandeja en la parte inferior
sin una rejilla.
• La sartén tiene capacidad
para 2 cuartos (litros).
Posición:
1800
1500
900
ON/OFF
Presione ON/OFF para apagar el Brio y detener el proceso de cocción.
• Para convertir de Fahrenheit a Celsius, presione TEMP por un
segundo. Haga lo mismo para volver a cambiar.
START/PAUSE
Seleccione una función de cocción, presione START/PAUSE para
comenzar a cocinar. Para silenciar/activar el pitido de el Brio, presione y
mantenga presionado START/PAUSE durante 1 segundo.
WARM
Mantenga presionado WARM durante 1 segundo, si lo usa de forma
independiente, el Brio comenzará automáticamente.
PREHEAT
Presione PREHEAT. La temperatura y el tiempo se pueden ajustar con
las echas hacia arriba y hacia abajo. Para comenzar, presione START/
PAUSE. Una vez que haya alcanzado la temperatura establecida, el
Brio emitirá un pitido y comenzará una cuenta regresiva de 5 minutos.
Coloque su comida en el Brio. El Brio comenzará automáticamente
cuando se cierre.
TIME
Le permite ajustar la temperatura y el tiempo antes y durante el proceso
de cocción.
• Días/Horas: Para cambiar el temporizador a Días y Horas presione
PROGRAM y TIME, para volver a Horas y Minutos presione
PROGRAM y TIME nuevamente.
• Formato de Tiempo: Puede cambiar el formato para mostrar
minutos y segundos (por ejemplo, 10:59, 10 minutos y 59 segundos).
Mantenga presionado TIME durante 1 segundo; si lo presiona
nuevamente, volverá a la conguración predeterminada.
• Mes/Día: Presione STAGE y TIME para cambiar el formato a meses
y días.
• Ajuste del reloj: presione PREHEAT y TIME al mismo tiempo. La
pantalla con el espectáculo “12:00” y “:” parpadeará. Use las echas
hacia arriba y hacia abajo para congurar la hora.
Nota: Para ajustar el tiempo predeterminado, presione TIME, luego
presione y mantenga presionado START/PAUSE durante 1 segundo y
ajuste. Esta será la nueva hora predeterminada.
INICIO RÁPIDO

instrucciones
nuwavenow.com
52 53
SPANISH
nuwavenow.com
INSTRUCCIONES
52 53
TEMP
Ajuste las temperaturas de cocción. Presione TEMP, ajuste con las
echas hacia arriba y hacia abajo, antes y durante el proceso de cocción.
Nota: Para ajustar la temperatura predeterminada, mantenga pulsado
START/PAUSE durante 1 segundo y ajuste. Esta será la nueva
temperatura predeterminada.
SEAR
Presione SEAR. Si lo preere, ajuste la temperatura y el tiempo de
búsqueda y presione START/PAUSE.
PROBE
Conecte el Sensor de el Brio. Presione PROBE y congure la
temperatura interna objetivo de el Sensor para alimentos con las
echas hacia arriba y hacia abajo. Inserte el otro extremo de el Sensor
en su comida. Presione START/PAUSE para comenzar a cocinar.
ROTISSERIE
Después de colocar la comida en Pincho, en la Jaula y en el Brio,
presione ROTISSERIE. Use las echas hacia arriba y hacia abajo para
ajustar la temperatura y el tiempo. Presione START/PAUSE para girar
automáticamente el asador y comenzar a cocinar.
PROGRAM
Presione PROGRAM y presione las echas hacia arriba o hacia abajo
para elegir elementos preestablecidos (1-100) para cocinar. Presione
las echas hacia arriba o hacia abajo cuando esté en cada función de
cocción para ajustar las temperaturas y los tiempos. Presione START/
PAUSE para comenzar el programa elegido.
DELAY
Establece tu temperatura y tiempo. Presione DELAY y presione las
echas hacia arriba o hacia abajo para ajustar el tiempo de retardo.
Ajustable hasta 24 horas. Después de congurar la función de cocción
y el tiempo de retardo, presione START/PAUSE. Presione DELAY en
cualquier momento para cancelar el retraso.
STAGE
Para agregar una etapa de cocción, presione ETAPA una vez y ajuste
presionando las echas hacia arriba o hacia abajo.
WATTS
Controla el consumo de energía de su Brio. La potencia predeterminada
en el Brio es 1800W. La menor potencia consumirá menos energía, ideal
si su hogar no tiene 1800 vatios. Presione WATTS para ajustar de 1800W
a 900W a 1500W.
Nota: Las temperaturas y
tiempos preestablecidos pueden
necesitar ajustes menores
para adaptarse mejor a los
resultados deseados.
PRECAUCIÓN: Este aparato
cocina con aire caliente. NO
llene la Sartén Antiadherente
con aceite.
Operación:
1. Coloque el Brio sobre una
superficie nivelada, estable y
resistente al calor.
2. Conecte el Brio a una toma de
corriente estándar. El enchufe
está incluido.
Nota: No cubra ni bloquee la
ventilación ubicada en la parte
superior o posterior del Brio.
Fahrenheit a Centígrado
1. Presione TEMP por un
segundo. El Brio mostrará la
conguración de temperatura
en grados Centígrado (C).
2. Presione TEMP por un
segundo
nuevamente para
volver a grados Fahrenheit
(F).
• No podrá cambiar entre
F y C mientras se cocina
el Brio. Esto solo se
puede hacer durante la
conguración.
1800
1500
900
177C
Cambiar de horas: minutos a
minutos: segundos
Por defecto, el Brio muestra
todos los tiempos en horas y
minutos. Puede cambiar este
formato a minutos y segundos.
1. Presione TIME por un
segungo. El Brio mostrará el
formato de hora en minutos
y segundos.
2. Presione TIME por un
segungo nuevamente para
regresar el formato de
visualización de la hora a
horas y minutos.
• No podrá cambiar entre
formatos de hora mientras
el Brio está cocinando.
Esto solo se puede hacer
durante la conguración.
1800
1500
900
0 1:00
horas minutos
1800
1500
900
60:00
minutos segundos
INICIO RÁPIDO

instrucciones
nuwavenow.com
54 55
SPANISH
nuwavenow.com
INSTRUCCIONES
54 55
Guía de Temperatura del Sensor
Carnes Temp. Poco
Tres
Cuartos
Medio Cocido
Bien
Cocido
Tiempo Minutos
Pechuga de pollo
Pechuga de pavo
Pechuga de pato
360F/
182C
165F/
74C*
6 - 8 per lb (13 - 18kg)
7 - 9 per lb (15 - 20kg)
5 - 7 per lb (11- 15kg)
Pollo entero
Turquía entera
Pato entero
360F/
182C
165F/
74C*
8 - 10 per lb (18 - 22kg)
11 - 13 per lb (24 - 29kg)
10 - 13 per lb (22 - 29kg)
Muslo de pollo
Pollo, Pavo, Muslo
Pato, muslo
360F/
182C
165F/
74C*
14 - 16 per lb (31 - 35kg)
14 - 16 per lb (31 - 35kg)
9 - 11 per lb (20 - 24kg)
Filete de 1” de
grosor (25mm)
350F/
177C
125F/
52C
135F/
57C
145F/
63C*
150F/
66C*
160F/
71C*
3 - 8
Hamburguesas ½
lb (227g)
350F/
177C
125F/
52C
135F/
57C
145F/
63C*
155F/
68C*
160F/
71C*
5 - 7
Rosbif (con
hueso)
Rosbif (sin hueso)
325F/
163C
125F/
52C
135F/
57C
145F/
63C*
150F/
66C*
160F/
71C*
15 - 20 per lb (33 - 44kg)
10 - 15 per lb (22 - 33kg)
Cordero (con
hueso)
Cordero
(deshuesado)
325F/
163C
125F/
52C
135F/
57C
145F/
63C*
150F/
66C*
160F/
71C*
15 - 20 per lb (33 - 44kg)
10 - 15 per lb (22 - 33kg)
Cerdo (con hueso)
Cerdo
(deshuesado)
350F/
177C
145F/
63C*
150F/
66C*
160F/
71C*
15 - 20 per lb (33 - 44kg)
10 - 15 per lb (22 - 33kg)
Salmón, Atún,
Halibut, Pez
Espada
145F/
63C*
150F/
66C*
160F/
71C*
2 - 3
Filetes de pescado
de 1” de espesor
(25mm)
350F/
177C
145F/
63C*
150F/
66C*
160F/
71C*
5 - 7
Chorizo
360F/
182C
160F/
71C*
4 - 5
Nota: Los tiempos pueden variar según la preferencia de cocción. El consumo de carnes, aves o
mariscos crudos o poco cocidos puede aumentar el riesgo de enfermedades transmitidas por los
alimentos. *Para reducir el riesgo, cocine sus alimentos a temperaturas seguras del USDA.
Empezando
1. Presione ON/OFF para
encender y apagar el Brio.
• La temperatura se puede
ajustar presionando las
echas hacia arriba o
hacia abajo.
2. Para ajustar el tiempo de
cocción, presione TIME.
• El tiempo se puede
ajustar presionando las
echas hacia arriba o
hacia abajo.
• El tiempo de cocción
predeterminado es de
15 minutos.
3. Presione START/PAUSE
para comenzar a cocinar.
El (:) parpadeará, indicando
que el Brio está ahora.
• Para hacer una pausa
en la cocción, presione
START/PAUSE. El (:) ya
no parpadeará, lo que
indica que el Brio está
ahora en pausa.
• Para reanudar la
cocción (sin pausa),
presione START/PAUSE
una vez más.
Nota: Al abrir la puerta, se
pausará la cocción, al cerrar
la puerta se reanudará la
cocción. La luz se encenderá
automáticamente cuando la puerta
esté abierta.
1800
35 0F
4. Una vez que el Brio termine
de cocinar, aparecerá End y
el Brio emitirá un pitido tres
veces.
• Para silenciar/activar
el pitido de el Brio,
mantenga presionado
SEAR y STAGE por 1
segundo.
LUZ
Presione LIGHT una vez para
encender la luz. Presione de
nuevo para apagarla. Para
cambiar la bombilla en el
horno, consulte “Limpieza y
Mantenimiento”.
WATTS
El vatiaje predeterminado del
Brio es 1800 vatios.
1. Para cambiar la potencia,
presione WATTS una vez.
900 se iluminará, lo que
indica que el Brio ahora está
congurado a 900 vatios.
2. Presione WATTS otra vez
y 1500 se iluminará. El Brio
ahora está congurado a
1500 vatios.
3. Presione WATTS una vez
más y se iluminará 1800,
lo que indica que el Brio
ahora está congurado en
el valor predeterminado de
1800 vatios.
Nota: Si se cambia la potencia
en vatios de 1800W a 900W
o 1500W y el Brio está
desenchufado, el Brio recordará
la última conguración de vatiaje
cuando se vuelva a conectar y se
encienda.

instrucciones
nuwavenow.com
56 57
SPANISH
nuwavenow.com
INSTRUCCIONES
56 57
DELAY
La función de Demora se utiliza
para retrasar el tiempo de inicio
de la cocción.
Presione las echas hacia
arriba o hacia abajo para
ajustar la temperatura y el
tiempo.
1. Presione ON/OFF.
2. Presione DELAY.
3. El tiempo de retraso se
puede ajustar hasta 24
horas (24:00).
• Durante la demora, (:)
parpadeará, indicando
que la cuenta regresiva
del tiempo de demora ha
comenzado.
4. Para detener la función
Delay en cualquier
momento, presione DELAY.
El Brio nalizará el ciclo
de demora y pasará a la
siguiente función de cocción.
• Una vez transcurrido el
tiempo de demora, el Brio
pasará automáticamente
a la siguiente función de
cocción.
5. Una vez que el Brio termine
de cocinar, se mostrará End
y el Brio emitirá un pitido tres
veces.
1800
0 1 00
:
TEMP
Presione las echas hacia
arriba o hacia abajo para
ajustar la temperatura y el
tiempo.
1. Presione TEMP para ver o
ajustar la temperatura de
cocción.
2. Presione START/PAUSE
para comenzar a cocinar a
la temperatura establecida.
TIME
Presione las echas hacia
arriba o hacia abajo para
ajustar la temperatura y el
tiempo.
1. Presione TIME para ver o
ajustar el tiempo de cocción.
2. Presione START/PAUSE
para comenzar a cocinar en
el tiempo establecido.
Notas: Los siguientes son
rangos de temperatura y tiempo:
• 60F~275F (16C~135C):
00:00-99:59 (0 minutos to 99
minutos, 59 seconds).
• 280F~ 345F (138C~174C):
00:00-24:00 (0 minutos to 24
horas).
1800
35 0F
1800
00 15
:
• 350F~400F (177C~204C):
00:00-01:00 (1 hora).
• Stage 1 defecto: 350F (177C),
00:15.
• Stages 2-5 defecto: 350F
(177C), 00:00.
• 405F~425F (207C~218C):
00:00-00:15 (15 minutos).
STAGE
La cocción por etapas se
utiliza para cocinar alimentos
a diferentes temperaturas
y tiempos durante todo el
proceso de cocción. Se pueden
congurar hasta 5 etapas de
cocción. Delay, Preheat, Sear 1,
Sear 2 y Warm no se consideran
etapas en el proceso de cocción.
1. Stage 1: Presione ON/OFF.
• La temperatura y el
tiempo predeterminados
para la cocción de la
Etapa 1 son 350F (177C)
durante 15 minutos
(350F/177C para 00:15).
2. Presione TIME.
3. Etapa 2: Para agregar etapas
adicionales, presione STAGE
una vez.
4. Presione TIME.
• Para solo dos etapas de
cocción, deje el tiempo
en 00:00 para las etapas
3-5 y esas etapas se
omitirán.
5. Presione START/PAUSE para
comenzar a cocinar. El Brio
cocinará con la temperatura y
los tiempos establecidos para
cada etapa.
• Cuando el Brio haya
terminado de cocinar, se
mostrará End y el Brio
emitirá un pitido tres
veces.
6. Para establecer etapas
adicionales con los ajustes
de cocción, repita los pasos
anteriores. El número sobre
stage cambiará cada vez
que se presione STAGE,
después de congurar la
temperatura y el tiempo.
• Después de congurar
la temperatura y el
tiempo para la Etapa 5,
si se presiona STAGE de
nuevo, el Brio volverá a la
Etapa 1.
Notas:
• La pantalla solo indicará
el número de cocción
de la etapa cuando se
utilicen dos o más etapas.
La pantalla no mostrará el
número de cocción de la
etapa si solo se utiliza una
etapa de la cocción.
• Durante la cocción,
presione STAGE para
ver y ajustar las próximas
etapas de cocción.
• Valor predeterminado
de la Etapa 1: 350F
(177C), 00:15. Etapas 2-5
predeterminadas: 350F
(177C), 00:00.
• Si no se establece un
tiempo para las etapas
2-5, esas etapas se
omitirán en el ciclo de
cocción.

instrucciones
nuwavenow.com
58 59
SPANISH
nuwavenow.com
INSTRUCCIONES
58 59
PREHEAT
La función de precalentamiento
garantiza que su Brio alcance
la temperatura deseada antes
de que comience la cocción. El
precalentamiento es perfecto
para alimentos que requieren
un acabado más crujiente,
como aperitivos congelados,
papas fritas o alitas de pollo.
Máx. 425F (218C).
Presione ON/OFF. Ajuste la
temperatura y el tiempo de
cocción presionando las
echas hacia arriba o hacia
abajo.
1. Presione PREHEAT.
2. Presione START/PAUSE
• El Brio siempre se
precalentará a la
temperatura de cocción
del próximo ciclo de
cocción.
3. Presione START/PAUSE.
El Brio comenzará
a precalentarse a la
temperatura establecida.
• Durante el
precalentamiento, la
temperatura de cocción se
puede ajustar.
4. Cuando el Brio alcanza
la temperatura de
precalentamiento, el
Brio emitirá un pitido y
comenzará una cuenta
regresiva de 5 minutos.
1800
35 0F
• El Brio mantendrá
la temperatura de
precalentamiento durante
la cuenta regresiva de 5
minutos.
• La temperatura y el
tiempo de cocción se
pueden ajustar durante
la cuenta regresiva de 5
minutos.
• Si no se realiza ninguna
acción dentro de la
cuenta regresiva de 5
minutos, el Brio pasará
automáticamente al modo
de espera.
5. Coloque los alimentos en
el Brio, cierre la puerta y
presione START/PAUSE. El
Brio comenzará a cocinar a
la temperatura y el tiempo
establecidos.
6. Cuando el Brio termine de
cocinar, se mostrará End en
la pantalla y el Brio emitirá
un pitido tres veces.
Nota: Presione Precalentar para
cancelar la función Precalentar
en cualquier momento. Cuando
se cancela el precalentamiento,
el Brio nalizará el ciclo de
precalentamiento y pasará
automáticamente al siguiente
ciclo de cocción.
PRECALENTAR AUTOMATICO
1. Presione PROGRAM
y PREHEAT al mismo
tiempo para activar
el precalentamiento
automático.
• El precalentamiento
automático precalentará
automáticamente el Brio a
la temperatura de cocción
establecida.
• Una vez que haya
alcanzado la temperatura
de cocción establecida,
Brio realizará una cuenta
regresiva de 5 minutos
al igual que la función
PREHEAT típica.
• Después de la cuenta
regresiva, el Brio
cocinará a la temperatura
y el tiempo de cocción
establecidos.
Para desactivar el
precalentamiento automático,
presione PROGRAM y
PREHEAT al mismo tiempo.
SEAR
El Sear 1 siempre estará
directamente ANTES de cocinar
en la etapa regular. Sear 2
siempre estará directamente
DESPUÉS de la cocción de la
etapa regular.
SEAR 1
La temperatura predeterminada
del ador 1 es 425F (218C) y el
tiempo predeterminado del ador
1 es 5 min. (00:05)
1800
42 5F
1. Presione ON/OFF.
2. Presione SEAR una vez.
• Ajuste la temperatura para
el ador 1. 425F (218C)
es la temperatura máxima
de abrasión.
3. Presione TIME.
• Ajuste el tiempo para
el ador 1. El tiempo se
puede ajustar hasta 15
minutos. (00:15).
4. Presione START/PAUSE
para comenzar a cocinar.
5. Una vez que se complete
el sear 1, el Brio emitirá
un pitido y pasará
automáticamente a la etapa
de cocción (regular).
• Cuando el Brio se termine
de cocinar, se mostrará
en la pantalla End y el
Brio emitirá un pitido tres
veces.
SEAR 1 y 2
Sear 1 y 2 se usa para sellar
antes y después de la etapa de
cocinar regular.
1. Presione ON/OFF. Ajuste la
temperatura de cocción y el
tiempo para la cocción en
etapa regular.
2. Presiona SEAR dos veces.
Presione START/PAUSE. El
Brio dorará a 425F (218C)
durante 5 minutos (sear 1),
1800
42 5F

instrucciones
nuwavenow.com
60 61
SPANISH
nuwavenow.com
INSTRUCCIONES
60 61
luego la etapa de cocción
regular, y depués sellará
nuevamente a 425F (218C)
durante 5 minutos. (Sear 2).
3. Para congurar una
temperatura y un tiempo
diferentes para Sear 1 y 2,
presione SEAR una vez y
ajuste la temperatura y el
tiempo de Sear 1. Presione
SEAR de nuevo. Ajuste la
temperatura y el tiempo de
Sear 2.
4. Presione START/PAUSE
para comenzar a cocinar.
• Una vez que se
complete el ciclo Sear 1,
el Brio emitirá un pitido
y automáticamente
entrará en la etapa de
cocción normal.
• Una vez que se complete
el ciclo de cocción por
etapas, el Brio emitirá
un pitido y pasará
automáticamente a la
cocción Sear 2.
5. Cuando el Brio termine de
cocinar, End se mostrará en
la pantalla y el Brio emitirá un
pitido tres veces.
Ejemplo: Sellar los alimentos
a 425F (218C) durante 3
min. (Sear 1), cocinar los
alimentos a 350F (177C)
(predeterminado) durante
15 min. (predeterminado), y
sellar nuevamente a 380F
(193C) durante 5 min. (Sear 2):
Presione ON/OFF. Se mostrará
el ajuste predeterminado para
la temperatura y el tiempo
SEAR 2
La temperatura y el tiempo
predeterminados de Sear 2 es
de 425F (218C) durante 5 min.
(00:05).
1. Presione ON/OFF. Ajuste la
temperatura y el tiempo de
cocción para una cocción
regular (etapa 1).
2. Presione SEAR tres veces.
• 425F (218C) es la
temperatura máxima de
abrasión.
• Presione TIEMPO.
Ajuste el tiempo del
ador 2 (abrasivo) hasta
5 min. (00:05).
3. Presione START/PAUSE
para comenzar a cocinar.
1800
42 5F
de cocción regulares. Pulse
SEAR una vez. Se mostrará
425F (218C) (predeterminado)
Presione TIME. Presione las
echas hacia arriba o hacia
abajo para ajustar el tiempo a
00:03. Pulse de nuevo SEAR.
Presione las echas hacia arriba
o hacia abajo para ajustar la
temperatura a 380F (193C).
Pulse TIME. Se mostrará 00:05
(predeterminado). Presione
START/PAUSE.
• Una vez que se complete
el ciclo de cocción de
la etapa regular, el Brio
emitirá un pitido y pasará
automáticamente a la
cocción Sear 2.
• Cuando el Brio termine
de cocinar, se mostrará
End en la pantalla y el
Brio emitirá un pitido tres
veces.
Usando SEAR como función
independiente
1. Presione SEAR y
manténgalo presionado
durante 1 segundo.
• El Brio comenzará a
dorarse a 425F (218C)
durante 5 minutos.
• Las temperaturas y
los tiempos se pueden
ajustar en cualquier
momento.
2. SEAR parpadeará.
3. Una vez que naliza el
tiempo SEAR, el Brio
mostrará “Fin”.
WARM
Calentar puede usarse como
una función independiente para
calentar su comida. El valor
predeterminado es 140F (60C)
durante 1 hora.
1800
0 1 00
:
Mantenga presionado WARM
durante 1 segundo. El Brio
comenzará automáticamente la
función WARM.
• Cuando nalice el tiempo de
calentamiento, se mostrará
End y el Brio emitirá un pitido
tres veces.
• Para ajustar el tiempo o la
temperatura, presione TIME
o TEMP y las echas hacia
arriba o hacia abajo.
El uso de Warm después de la
cocción termina para mantener
la comida caliente en el Brio.
1. Presione WARM por 1
segundo. Use las echas
hacia arriba o hacia abajo
para ajustar la temperatura
de calentamiento.
2. Presione TIME. Use las
echas hacia arriba o hacia
abajo para ajustar el tiempo
para mantener caliente.
3. Presione START/PAUSE
para comenzar a cocinar.
El Brio cocinará el ciclo de
cocción de la etapa regular
y luego entrará en Mantener
Caliente a la temperatura y
el tiempo establecidos.
Notas:
• La temperatura para WARM
se puede ajustar hasta 200F
(93C).
• Se puede congurar el calor
inmediatamente después
de ajustar los tiempos y
temperaturas de cocción
regulares, antes de que el
Brio cocine sus alimentos.

instrucciones
nuwavenow.com
62 63
SPANISH
nuwavenow.com
INSTRUCCIONES
62 63
• Para cancelar la función
WARM en cualquier
momento, presione WARM.
La función de calentamiento
nalizará y ya no se mostrará.
• WARM también se puede
usar con la opción de función
Program. Presione Programa
y luego presione CALENTAR
y ajuste la temperatura y el
tiempo de calentamiento.
PROGRAM
La función de programa
representa la entrada en la
memoria, el almacenamiento de
las secuencias de cocción de
uso frecuente y la recuperación
de la memoria, la recuperación
de las secuencias de cocció
para recetas.
Recuperacion de Memoria
1. Presione PROGRAM.
Presione las echas
hacia arriba o hacia abajo
para elegir el número
de programa que desea
recuperar.
• Los números 1-100
son programas
preestablecidos.
1800
1
• Los números 101-150 son
programas únicos
creados (recetas).
2. Una vez elegido el número
de programa, presione
START/PAUSE para
comenzar a cocinar. La
temperatura y el tiempo
se pueden ajustar, si se
desea. El Brio cocinará a
las temperaturas y tiempos
programados.
Notas:
• Consulte los Guía de Inicio
Rápido para Programar 100
Elementos del Menú para ver
las recetas preprogramadas
1-100.
• Se pueden ajustar las
temperaturas y tiempos
preestablecidos para las
recetas del programa 1-100.
Las temperaturas y tiempos
ajustados no se guardarán
cuando se vuelva a llamar un
número de programa (1-100).
Guardando la receta antes de
cocinar:
1. Presione ON/OFF. Entre en
las funciones de cocción
incluyendo temperaturas y
tiempos para la receta.
1800
1 0 1
2. Presione PROGRAM por
un segundo. Presione las
echas hacia arriba y hacia
abajo para elegir el número
para guardar la receta del
programa en (101-150
solamente).
3. Presione PROGRAM por
un segundo nuevamente
para almacenar y guardar
la receta del programa en
el número de programa
elegido.
• La receta del programa
ahora está almacenada
y disponible para su
posterior recuperación.
4. Presione START/PAUSE
para comenzar a cocinar
el programa establecido
(receta).
Almacenando la receta durante
la cocción:
1. Presione ON/OFF. Entra en
las funciones de cocción
incluyendo temperaturas y
tiempos para la receta.
2. Presione START/PAUSE
para comenzar a cocinar.
3. Durante la cocción,
presione PROGRAM por
un segundo. Presione las
echas hacia arriba o hacia
abajo para elegir el número
de programa para guardar
la receta del programa en
(101-150 solamente).
4. Presione PROGRAM por un
segundo nuevamente para
guardar y guardar la receta
del programa en el número
de programa elegido.
• El programa (receta)
ahora está almacenado
y disponible para su
posterior recuperación.
• El Brio continuará
cocinando la receta
recién programada y
almacenada.
Guardando la receta después
de que la cocción
haya terminado:
1. Presione ON/OFF. Entra en
las funciones de cocción
incluyendo temperaturas y
tiempos para la receta.
2. Presione START/PAUSE
para comenzar a cocinar.
3. Cuando haya terminado la
cocción y se muestre End,
presione PROGRAM por
un segundo. Presione las
echas hacia arriba y hacia
abajo para elegir el número
de programa para guardar
la receta del programa en
(101-150 solamente).
4. Presione PROGRAM por
un segundo nuevamente
para guardar la receta del
programa en el número de
programa elegido.
• El programa (receta)
ahora está almacenado
y disponible para su
posterior recuperación.

instrucciones
nuwavenow.com
64 65
SPANISH
nuwavenow.com
INSTRUCCIONES
64 65
Ver durante la cocción:
1. Presione STAGE para revisar
cada fase (función) de la
cocción.
2. Continúe presionando
STAGE para desplazarse
por cada función
programada para el número
de programa elegido.
• Se pueden hacer ajustes
a las temperaturas
y tiempos para cada
función en este
momento.
Edición y modicación de un
programa guardado:
Editar antes de cocinar:
1. Presione PROGRAM.
Localice el número de
programa para editar
presionando las echas
hacia arriba o hacia abajo.
2. Una vez que se muestra
el número de programa
elegido, presione STAGE
hasta que aparezca la
función para editar.
• Presione TEMP y ajuste
presionando las echas
hacia arriba y hacia
abajo. Presione TIME y
ajústelo presionando las
echas hacia arriba y
hacia abajo.
3. Una vez que se hayan
realizado todas las
ediciones, presione
PROGRAM.
4. Presione las echas
hacia arriba o hacia abajo
para ubicar el número de
programa para guardar
las ediciones. Presione
PROGRAM por un segundo
nuevamente para guardar
las ediciones.
Viendo la receta actual del
programa durante la cocción:
1. Mientras el Brio está
cocinando, mantenga
presionado PROGRAM
durante 1 segundo. Se
mostrará la receta actual
del programa de cocción.
2. Suelte PROGRAM para ver
la pantalla anterior.
Visualización de las funciones
de cocción del programa.
Se pueden ver las funciones
de cocción asociadas con un
programa antes o durante el
proceso de cocción.
Ver antes de cocinar:
1. Presione PROGRAM.
Localice el número de
programa para revisar
presionando las flechas
hacia arriba o
hacia abajo.
2. Una vez que se muestra
el número del programa,
presione STAGE para
revisar cada fase (función)
de la cocción.
• Los ajustes de
temperatura y tiempos
para cada función se
pueden hacer en este
momento.
Editar durante la cocción:
1. Cuando el Brio esté
cocinando, presione
ETAPA. Presione las
echas hacia arriba o hacia
abajo para seleccionar la
función de cocción para
editar.
2. Presione TIME. Presione las
echas hacia arriba y hacia
abajo para ajustar el tiempo
de cocción.
• Si hay funciones de
cocción adicionales para
editar, presione STAGE
nando las echas hacia
arriba y hacia abajo.
• El Brio continuará el
proceso de cocción
con las temperaturas
y tiempos ajustados
para cada función. Las
funciones que ya han
nalizado en el ciclo de
cocción no se pueden
editar.
3. Una vez que se hayan
realizado todas las
ediciones, presione
PROGRAM por un segundo.
4. Use las echas hacia arriba
o hacia abajo para ubicar
el número de programa
para guardar las ediciones.
Presione PROGRAM por un
segundo nuevamente para
guardar las ediciones.
5. Cuando el Brio haya
terminado de cocinar,
aparecerá “End” seguido de
“SAVE”, y el Brio emitirá un
pitido.
Notas:
• Si alguna receta se guarda
en un programa (ranura
de memoria) que ya está
lleno, la nueva receta con
temperaturas y tiempos
establecidos anulará la receta
del programa anterior (solo
101-150).
• Se pueden ajustar las
temperaturas y tiempos
preestablecidos para las
recetas del programa 1-100.
Las temperaturas y tiempos
ajustados no se guardarán
cuando se vuelva a llamar un
número de programa (1-100).
PROBE
El Sensor digital de temperatura
se utiliza para mostrar una
temperatura interna precisa de
los alimentos.
1. Coloque el extremo del
sensor (conector) en el Brio
Brio (conector). Ajuste las
funciones de cocción y las
temperaturas y tiempos con
las etapas que desee.
2. Presione PROBE.
3. Mantenga presionado
PROBE durante 1 segundo
para establecer la
temperature deseada del
sensor.
1800
1 6 5F

instrucciones
nuwavenow.com
66 67
SPANISH
nuwavenow.com
INSTRUCCIONES
66 67
• Presione las echas hacia
arriba y hacia abajo para
establecer la temperatura
interna deseada que
alcancen los alimentos.
La temperatura interna
se puede congurar en
el Sensor hasta 212F
(100C).
4. Inserte el otro extremo del
sensor en la comida. Coloque
los alimentos en el Brio.
5. Presione START/PAUSE.
6. Para ver la temperatura de
cocción actual, presione
TEMP. Para cambiar la
temperatura de cocción,
presione las echas hacia
arriba o hacia abajo para
ajustar, si lo desea.
7. Para retroceder y ver la
lectura de la temperatura
interna actual del sensor,
presione PROBE.
• Para ver la temperatura
objetivo del sensor,
mantenga presionado
PROBE durante 1
segundo. La temperatura
interna deseada aún
se puede ajustar
presionando las echas
hacia arriba o hacia
abajo.
8. El Brio cocinará hasta que
se alcance la temperatura
interna establecida en el
sensor. Cuando se alcance
la temperatura objetivo,
se mostrará End y el Brio
emitirá un pitido tres veces.
Ejemplo: Cuando cocine el
pollo a una temperatura interna
de 170F (77C), congure la
temperatura objetivo del sensor
en 170F (77C). Cuando la
temperatura interna del pollo
alcance los 170F (77C), el Brio
se apagará automáticamente
o entrará en la función de
Mantener Caliente, si se
seleccionó WARM (presionado).
Nota: La función del Rostizador
no funcionará con Probe. Si el
Sensor está conectada a el Brio,
el rostizador se desactivará y el
Brio emitirá un pitido tres veces.
ROTISSERIE
1. Presione ROTISSERIE. La
luz roja junto a ROTISSERIE
se iluminará. Presione
las echas hacia arriba o
hacia abajo para ajustar la
temperatura de cocción.
2. Presione TIME.
• Presione las echas
hacia arriba o hacia abajo
para ajustar el tiempo de
cocción.
1800
35 0F
Slow-Cook
Cocine a fuego lento asados,
pollo o cualquier otro alimento.
1. Mantenga presionado
PROBE durante 1 segundo.
La pantalla mostrará 165F
(74C). Presione hacia
arriba o hacia abajo para
establecer la temperatura
interna objetivo.
2. PresionePROGRAM y
PROBE al mismo tiempo.
Esto iniciará el proceso de
cocción lenta. Se mostrará
01:00 (1 hora). Este es el
tiempo de cocción
predeterminado.
1800
1 6 5F
1800
0 1 00
:
3. Presione START/PAUSE
para comenzar a cocinar.
El trinche del rostizador
(insertado) comenzará a
girar.
4. Cuando el Brio se termine
de cocinar, se mostrará
End en la pantalla y el Brio
emitirá un pitido tres veces.
Notas:
• Siempre verique que
haya espacio suciente
por encima y por debajo
de los alimentos para que
puedan girar libremente
sin obstrucciones.
• Cuando utilice un asador,
una cesta o un tambor,
coloque la bandeja de
goteo en la parte inferior.
3. Presione hacia arriba o hacia
abajo para ajustar la hora.
4. Coloque el Sensor en la
comida y coloque en el Brio.
5. Presione START/PAUSE. El
Brio comenzará a cocinar y
se mostrará la temperatura
actual de el Sensor.
• El Brio cocinará durante
el tiempo que establezca
para la cocción lenta.
• Cuando se acabe el
tiempo, la pantalla
mostrará “End”.

instrucciones
nuwavenow.com
68 69
SPANISH
nuwavenow.com
INSTRUCCIONES
68 69
Carryover Cooking
Si desea realizar una búsqueda
alta al nal de la cocción
mientras usa de el Sensor,
puede congurar el Brio para que
comience la función de búsqueda
hasta 30 grados antes de
alcanzar la temperatura objetivo
de el Sensor.
1. Establezca la temperatura
de cocción y luego presione
y sostenga PROBE durante
1 segundo para establecer
la temperatura objetivo de el
Sensor.
2. Presione SEAR y
PROGRAM al mismo
tiempo. La pantalla mostrará
10F (-12C).
• En este momento, puede
presionar hacia arriba
o hacia abajo para
establecer el número de
grados por debajo de la
temperatura objetivo de
el Sensor que desea que
alcance el Sensor antes
de que el Brio comience la
función de búsqueda nal.
Ejemplo: temperatura de cocción
375F (191C). La temperatura
objetivo de el Sensor es de 135F
(57C). Comience la función de
búsqueda. Cocine a 15F (-9C)
antes de la temperatura objetivo
de el Sensor:
1. Presione hacia arriba o
hacia abajo para congurar
la temperatura de cocción a
375F (191C).
2. Mantenga presionado
PROBE durante 1 segundo.
La pantalla mostrará 160F
(71C). Presione hacia arriba
o hacia abajo para congurar
la temperatura de el Sensor
objetivo a 135F (57C).
PRECAUCIÓN
Los accesorios estarán
calientes durante y después
del uso. Use guantes para
horno.
3. Presione PROBE y
PROGRAM al mismo
tiempo. La pantalla mostrará
10F. Presione hacia arriba o
hacia abajo para ajustar la
temperatura a 15F (-9C).
4. Presione START / PAUSE.
El Brio comenzará a cocinar
a 375F (191C) y la pantalla
mostrará la temperatura
interna actual de los
alimentos.
• Cuando la temperatura
interna lee 120F (49C),
el Brio comenzará a
cocinar en la función de
búsqueda hasta que se
alcance la temperatura
objetivo de el Sensor.
Una vez que se alcanza
135F (57C), el Brio
terminará de cocinar y se
mostrará “End”.
LOCK
El bloqueo se utiliza para detener
la función del Brio. Mientras
está en el modo de bloqueo,
los botones de su Brio no
responderán a ninguna acción
hasta que el Brio se desbloquee.
1. Presione ON/OFF. Ajuste la
temperatura de cocción.
2. Para bloquear las funciones
de el Brio, presione
PROGRAM y STAGE al
mismo tiempo. Se mostrará
el tiempo restante de
cocción.
• Los botones NO
funcionarán durante el
bloqueo, excepto LIGHT
y ON/OFF.
3. Para desbloquear las
funciones de su Brio,
presione PROGRAM y
STAGE al mismo tiempo
una vez más. El Brio se
desbloqueará y ya no se
mostrará “LOC”.
• El botón de ON/OFF
funcionará durante la
función de bloqueo si es
necesario apagar el Brio.

limpieza y mantenimiento
nuwavenow.com
70 71
SPANISH
nuwavenow.com
LIMPIEZA Y MANTENIMIENTO
70 71
Limpieza
Limpie el Brio después de cada uso o entre varios lotes grandes. No
utilice utensilios metálicos o abrasivos fuertes al limpiar, ya que esto
puede dañar el revestimiento.
1. Desenchufe el Brio y asegúrese de que se enfríe completamente.
2. Use un paño húmedo para limpiar el exterior del aparato.
3. Limpie las bandejas de malla, la rejilla de malla, la bandeja de
goteo y la base y trinche del rostizador con una esponja no
abrasiva, agua caliente y un detergente suave. Seque bien.
4. Para limpiar el sensor, limpie el extremo con un paño húmedo o papel.
Nota: Retire las bandejas, la rejilla, la base y el sensor. Colóquelos
sobre una supercie resistente al calor para ayudar a enfriar el
aparato más rápido.
Nota: Si usa el lavavajillas para las bandejas de malla, la rejilla
de malla, la bandeja de goteo y la base y trinche del rostizador, se
recomienda usar solo la rejilla superior. Lave el sensor a mano.
Consejo: Si hay comida residual en las bandejas o en la rejilla,
agregue un poco de agua caliente y deje que se remoje por separado
durante unos 10 minutos para facilitar la limpieza. Luego, use un
cepillo de limpieza suave para eliminar cualquier alimento persistente.
Seque bien.
Almacenamiento:
1. Desconecte el Brio y deje que se enfríe completamente.
2. Asegúrese de que todas las piezas estén limpias y secas.
3. Guarde en un lugar fresco y seco.
La puerta del 14 QT Brio es removible para una limpieza más
fácil y completa (solo lavado a mano). Para quitar la puerta:
1. Asegúrese de que el Brio se haya enfriado
completamente. Abrir la puerta hacia abajo parcialmente.
2. Sujetando rmemente la manija de la puerta, levante la
puerta de las ranuras en ambos lados. Evite que entre agua
por la ventana.
3. Después de limpiar, vuelva a colocar en las ranuras.
Abra y cierre la puerta para asegurarse de que esté bien
colocada antes de usarla.
Notas: Para limpiar el interior de la ventana, quite los tornillos
ubicados en el interior de la puerta con un destornillador Phillips.
IMPORTANTE - No sumerja el Brio en agua ni intente lavar
en el lavavajillas. La supercie exterior se puede limpiar
frotando cuidadosamente con un paño húmedo o una esponja.
Asegúrese de que el Brio se haya enfriado completamente
antes de limpiarla.
Reemplazo de la bombilla
Para reemplazar la bombilla, apague y desenchufe Brio. Asegurar
el Brio y la cubierta de la bombilla. Se han enfriado completamente.
Destornille la tapa de la bombilla y la bombilla. Reemplace la bombilla
y la tapa antes de volver a enchufarla y encenderla. Antes de retirar
la cubierta de la bombilla y la bombilla, deje que el Brio, incluidas las
partes y Interior, para enfriar completamente.
ADVERTENCIA
En caso de otros problemas, desenchúfelo
inmediatamente y comuníquese con el Departamento de
Servicio al Cliente.
1-877-689-2838 • help@nuwavenow.com

solución de problemas
nuwavenow.com
72 73
SPANISH
nuwavenow.com
SOLUCIÓN DE PROBLEMAS
72 73
Los bocadillos fritos no son crujientes cuando salen del Brio.
Use bocadillos diseñados para hornear en un horno tradicional,
o aplique un poco de aceite de oliva sobre ellos para obtener un
resultado más crujiente.
Sale humo blanco del producto.
1. Está friendo alimentos grasosos. Las bandejas o la rejilla
contienen residuos grasos de usos anteriores.
2. preparar ingredientes grasos en la freidora, se pueden
fumar grandes cantidades de aceite e inltrarse en el Brio.
El aceite puede producir humo blanco y las bandejas o la
rejilla pueden calentarse más de lo normal. Esto no afectará
el resultado nal de cocción. El humo blanco es causado por
el calentamiento de la grasa en las bandejas o en la rejilla.
Asegúrese de limpiar las bandejas y la rejilla correctamente
después del uso.
Las papas fritas se fríen de manera desigual en el Brio.
1. No empapó bien los palitos de papa antes de freírlos.
2. No usó el tipo de papa correcto o no estaban frescas.
3. Remoje los palitos de papa en un recipiente con agua
durante al menos 30 minutos, retírelos y séquelos con
toallas de papel. Use papas frescas y asegúrese de que
permanezcan rmes durante la fritura al aire.
Las papas fritas no son crujientes cuando salen del Brio.
1. El sabor crujiente de las papas fritas depende de la cantidad
de aceite y agua en las papas fritas.
2. Asegúrese de secar los bastones de papa correctamente
antes de agregar el aceite. Corte los palitos de papa más
pequeños y séquelos para obtener un resultado más
crujiente. Agregue un poco más de aceite en las papas
antes de colocarlas en Brio para obtener un resultado
más crujiente.
Si el Brio necesita ser reemplazada o devuelta al fabricante,
comuníquese con el Departamento de Servicio al Cliente al:
1-877-689-2838 or help@nuwavenow.com.
El Brio no enciende ni funciona.
1. Brio no está enchufado.
2. Presionó el botón “ON/OFF”.
3. Inserte el enchufe en una toma de corriente con conexión
a tierra adecuada. Presione el botón “ON/OFF” después de
seleccionar los ajustes.
Los ingredientes fritos en el Brio no están
completamente cocidos.
1. Se utilizaron demasiados ingredientes. La temperatura de
cocción es demasiado baja.
2. El tiempo de cocción es demasiado corto.
3. Retire algunos ingredientes de la Bandeja o Rejilla; Los lotes
más pequeños se fríen de manera más uniforme. Cocine
a una temperatura más alta. Ajuste el Brio para freír al aire
durante más tiempo.

solución de problemas
nuwavenow.com
74 75
SPANISH
nuwavenow.com
SOLUCIÓN DE PROBLEMAS
74 75
El NuWave Brio
®
15.5Q
EL FABRICANTE GARANTIZA
El Brio, incluyendo las Bandejas De Malla, la Rejilla De Malla, la
Bandeja De Goteo, la Bombilla, Cubierta De Bombilla, la Puerta y La
Base y Trinche Del Rostizadorson están libres de defectos
de fabricación.
Todos los componentes eléctricos tienen una garantía de 1
año a partir de la fecha de compra, en uso doméstico normal y
siempre y cuando se utilicen de acuerdo con las instrucciones
escritas del fabricante. El fabricante proporcionará las piezas y
la mano de obra necesarias para reparar cualquier parte del Brio
en el Departamento de Servicio de NuWave LLC. Después del
vencimiento de la garantía, el costo de la mano de obra y las piezas
será responsabilidad del propietario.
LA GARANTÍA NO CUBRE
La garantía limitada se anula si las reparaciones son realizadas
por un distribuidor no autorizado o si la placa de datos del número
de serie se retira o borra. Esta garantía no cubre el deterioro
normal del acabado debido al uso o la exposición. Esta garantía
limitada no cubre fallas, daños o un desempeño inadecuado
debido a un accidente, actos de Dios (como rayos), uctuaciones
en la energía eléctrica, alteraciones, abuso, mal uso, aplicaciones
incorrectas, atmósferas de tipo corrosivo, instalación incorrecta,
falta de funcionamiento de acuerdo con las instrucciones escritas
del fabricante, uso anormal o uso comercial. NuWave LLC se
reserva el derecho de anular la Garantía Limitada, según lo
permita la ley, para los productos adquiridos a través de un
distribuidor no autorizado.
OBTENER SERVICIO
El propietario tendrá la obligación y la responsabilidad de: pagar por
todos los servicios y piezas no cubiertos por la garantía; prepagar el
ete hacia y desde el Departamento de Servicio para cualquier parte
o sistema devuelto bajo esta garantía; y empacar cuidadosamente el
producto con material de relleno adecuado para evitar daños durante el
transporte. El envase original es ideal para este propósito. Incluya en el
paquete el nombre del propietario, la dirección, el número de teléfono
durante el día, una descripción detallada del problema y su “número
RGA”. (Llame al 1-877-689-2838) o envíe un correo electrónico a
help@nuwavenow.com para obtener el número RGA (Número de
autorización de devolución de mercancías). Proporcione el modelo
del sistema de cocción y el número de serie y el comprobante de la
fecha de compra (una copia del recibo) al realizar reclamaciones bajo
esta garantía.
GARANTÍA LIMITADA
Mensaje de
error:
Solución (s):
Prb1
El sensor no está conectado el Brio. Conecte
el Brio en una toma de
corriente apropiada.
Prb2
La temperatura interna objetivo del sensor se
ajustó más alta que la temperatura de
cocción establecida.
Prb3
Corto Circuito en el Sensor.
Comuníquese con el Departamento de
Servicio al Cliente al 1-877-689-2838 o
help@nuwavenow.com.
Prb4
El sensor no detecta aumento de temperatura.
Asegúrese de que el sensor esté insertado en
los alimentos y que estén en el horno durante
la cocción.
Prb5
Cuando el Rostizador se utiliza junto con el
Sensor. Desenchufe el Sensor o cancele la
función de Rostizador.
Er1
El sensor de temperatura NTC está
sobrecalentado. Apague el Brio para que se
enfríe. Si el Brio no funciona después de que
se enfríe, comuníquese con Servicio al Cliente.
Err1
El sensor de temperatura NTC tiene un corto
circuito. Comuníquese con el Departamento de
Servicio al Cliente al 1-877-689-2838 o help@
nuwavenow.com.
Err2
El sensor de temperatura NTC está abierto.
Comuníquese con el Departamento de Servicio al
Cliente al 1-877-689-2838 o
help@nuwavenow.com.

garantía limitada
nuwavenow.com
76 77
SPANISH
nuwavenow.com
GARANTÍA LIMITADA
76 77
OBLIGACIÓN DEL FABRICANTE
La obligación del fabricante en virtud de esta Garantía Limitada
se limita, en la medida en que lo permita la ley, a reparar o
reemplazar cualquier pieza cubierta por esta Garantía Limitada
que, al examinarla, se encuentre defectuosa en el uso normal.
La Garantía Limitada se aplica solo dentro de los Estados Unidos
continentales y solo al comprador original de los canales de
distribución autorizados por el fabricante. LA GARANTÍA LIMITADA
NO PUEDE SER ALTERADA, VARIADA O EXTENDIDA, EXCEPTO
POR UN INSTRUMENTO ESCRITO EJECUTADO POR EL
FABRICANTE. EL RECHAZO DE REPARACIÓN O REEMPLAZO
SEGÚN LO PROPORCIONADO POR ESTA GARANTÍA LIMITADA
ES EXCLUSIVO. EN NINGÚN CASO, EL FABRICANTE SERÁ
RESPONSABLE DE CUALQUIER DAÑO CONSECUENTE O
INCIDENTAL A CUALQUIER PERSONA, SEA O NO OCASIONADO
POR LA NEGLIGENCIA DEL FABRICANTE, INCLUIDOS, SIN
LIMITACIÓN, DAÑOS POR PÉRDIDA DE USO, COSTOS DE
SUSTITUCIÓN, DAÑO A LA PROPIEDAD U OTRA PÉRDIDA
DE DINERO.
Algunos estados no permiten la exclusión o limitación de daños
incidentales o consecuentes, por lo que es posible que no se
apliquen las exclusiones de limitación anteriores. Esta Garantía
Limitada otorga derechos legales especícos, y también puede
haber otros derechos que varían de estado a estado. EXCEPTO
OTRAS MANERAS QUE EXPRESAMENTE SE PROPORCIONAN
ANTERIORMENTE, EL FABRICANTE NO HACE GARANTÍAS
EXPRESAS O IMPLÍCITAS DE LA LEY O DE OTRA MANERA,
INCLUYENDO SIN LIMITACIONES, LAS GARANTÍAS IMPLÍCITAS
DE COMERCIALIZACIÓN Y EJERCICIO PARA UN PROPÓSITO
PARTICULAR A CUALQUIER OTRA PERSONA. LEA EL
MANUAL DEL USUARIO. SI TUVIERA ALGUNA DUDA SOBRE
EL FUNCIONAMIENTO O LA GARANTÍA DEL PRODUCTO,
CONTACTE A NUWAVE LLC.
PROCEDIMIENTO DE RESOLUCIÓN DE CONTROVERSIAS. Para
disputas relacionadas con el uso del sitio web o el uso o la compra
de un producto o servicio NuWave (colectivamente “Disputas”),
usted acepta comunicarse primero con NuWave LLC al (877) 689-
2838 (teléfono), (847) 367-5486 ( facsímil) o legal@nuwavenow.
com (correo electrónico). Si no podemos resolver su disputa de
manera informal, todas las disputas se someterán a un arbitraje nal
y vinculante. Puede comenzar el proceso de arbitraje enviando una
solicitud por escrito a la Asociación Americana de Arbitraje (“AAA”) y
enviando una copia a NuWave. NuWave pagará todos los costos de
presentación. Un solo árbitro de la AAA llevará a cabo el arbitraje en
un lugar conveniente para usted o por teléfono. El laudo del árbitro
será vinculante y podrá presentarse como un fallo en un tribunal de
jurisdicción competente. El arbitraje se llevará a cabo de conformidad
con las disposiciones de las Reglas de arbitraje comercial de AAA
y los Procedimientos de mediación vigentes en el momento de la
presentación de su solicitud de arbitraje. Ver https://www.adr.org/
sites/default/les/CommercialRules_Web.pdf. Salvo que lo exija la
ley según lo determine un árbitro, ninguna de las partes o el árbitro
puede revelar la existencia, el contenido o los resultados de cualquier
arbitraje a continuación sin el consentimiento previo por escrito
de ambas partes.
A. RENUNCIA DE DERECHO A DEMANDAR. Al aceptar el arbitraje,
comprende que, en la medida máxima permitida por la ley, acepta
renunciar a su derecho a presentar una demanda en cualquier
tribunal, a una audiencia judicial, un juicio con jueces y un juicio
con jurado.
B. RENUNCIA A LA ACCIÓN DE CLASE. En la medida máxima
permitida por la ley, usted acepta expresamente abstenerse de
presentar o unirse a cualquier reclamo en cualquier capacidad
representativa o de toda la clase, incluyendo, entre otros, presentar o
unir cualquier reclamo en cualquier acción de clase o arbitraje
de clase.
C. PROCEDIMIENTO DE SALIDA. Para optar por no participar en el
arbitraje, debe comunicarse con NuWave. Para solicitar la exclusión
voluntaria del arbitraje, contáctenos en legal@nuwavenow.com
(correo electrónico), NuWave LLC, 560 Bunker Ct., Vernon Hills,
IL 60061, EE. UU., (847) 367-5486 (fax) o (877) 689 -2838 o (224)
206-3019 (teléfono). Tendrá treinta (30) días a partir de la fecha
de entrega del producto para optar por el arbitraje con respecto a
cualquier disputa que surja o esté relacionada con el uso o la compra
de cualquier producto NuWave. Si han pasado más de 30 días,
no es elegible para optar por no participar en el arbitraje y habrá
renunciado a su derecho de demandar o participar en una demanda
colectiva con respecto a la disputa que surge de su compra o uso de
un producto NuWave. Para cualquier disputa que surja de su uso del
sitio web de NuWave, tiene treinta (30) días a partir de la fecha en
que proporcionó información al sitio web para optar por no participar
en el arbitraje. Si han pasado más de 30 días, no es elegible para
optar por no participar en el arbitraje y habrá renunciado a su derecho
de demandar y participar en una demanda colectiva con respecto a la
disputa que surge del uso del sitio web de NuWave.

garantía limitada
nuwavenow.com
78 79
SPANISH
nuwavenow.com
GARANTÍA LIMITADA
78 79
D. ALGUNOS ASUNTOS NO ESTÁN SUJETOS A ARBITRAJE.
Sin perjuicio de lo anterior, lo siguiente no estará sujeto a arbitraje
y podrá ser juzgado solo en los tribunales estatales y federales de
Illinois: (i) cualquier disputa, controversia o reclamo relacionado o que
impugne la validez de nuestros derechos de propiedad intelectual
y derechos de propiedad , incluidas, entre otras, patentes, marcas
comerciales, marcas de servicio, derechos de autor o secretos
comerciales; (ii) una acción de una parte para una medida cautelar
temporal, preliminar o permanente, ya sea prohibitiva u obligatoria,
u otra medida provisional; o (iii) interacciones con autoridades
gubernamentales y reguladoras. Usted acepta expresamente
abstenerse de presentar o unirse a cualquier reclamo en cualquier
capacidad representativa o de toda la clase, incluyendo, entre otros,
presentar o unir cualquier reclamo en cualquier acción de clase o
cualquier arbitraje de clase.
LEA EL MANUAL DE SU PROPIETARIO
Si aún tiene preguntas sobre el funcionamiento o la garantía del
producto, comuníquese con NuWave LLC al:
1-877-689-2838 o envíe un correo electrónico a
help@nuwavenow.com.
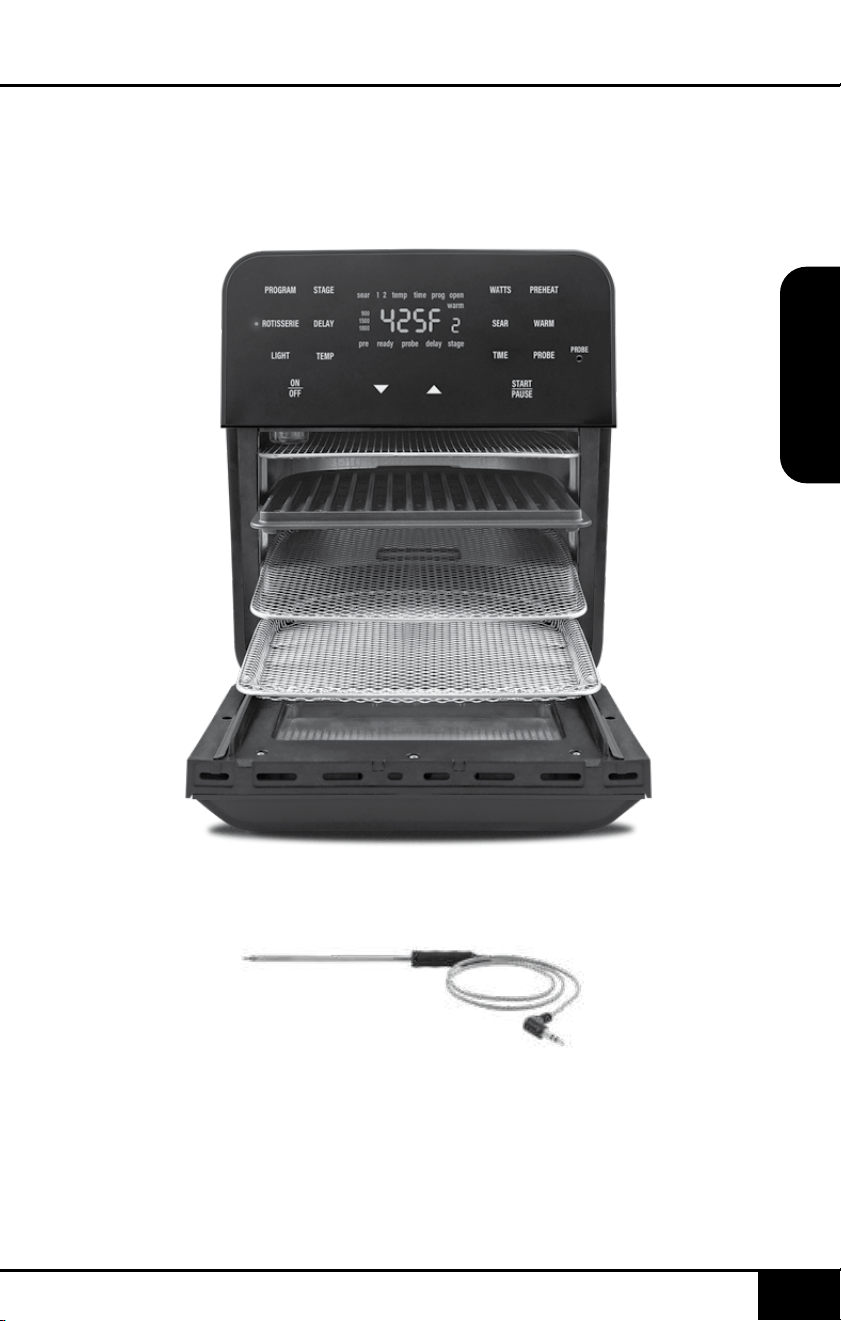
garantía limitada
nuwavenow.com
78 79
SPANISH
nuwavenow.com
GARANTÍA LIMITADA
78 79
D. ALGUNOS ASUNTOS NO ESTÁN SUJETOS A ARBITRAJE.
Sin perjuicio de lo anterior, lo siguiente no estará sujeto a arbitraje
y podrá ser juzgado solo en los tribunales estatales y federales de
Illinois: (i) cualquier disputa, controversia o reclamo relacionado o que
impugne la validez de nuestros derechos de propiedad intelectual
y derechos de propiedad , incluidas, entre otras, patentes, marcas
comerciales, marcas de servicio, derechos de autor o secretos
comerciales; (ii) una acción de una parte para una medida cautelar
temporal, preliminar o permanente, ya sea prohibitiva u obligatoria,
u otra medida provisional; o (iii) interacciones con autoridades
gubernamentales y reguladoras. Usted acepta expresamente
abstenerse de presentar o unirse a cualquier reclamo en cualquier
capacidad representativa o de toda la clase, incluyendo, entre otros,
presentar o unir cualquier reclamo en cualquier acción de clase o
cualquier arbitraje de clase.
LEA EL MANUAL DE SU PROPIETARIO
Si aún tiene preguntas sobre el funcionamiento o la garantía del
producto, comuníquese con NuWave LLC al:
1-877-689-2838 o envíe un correo electrónico a
help@nuwavenow.com.
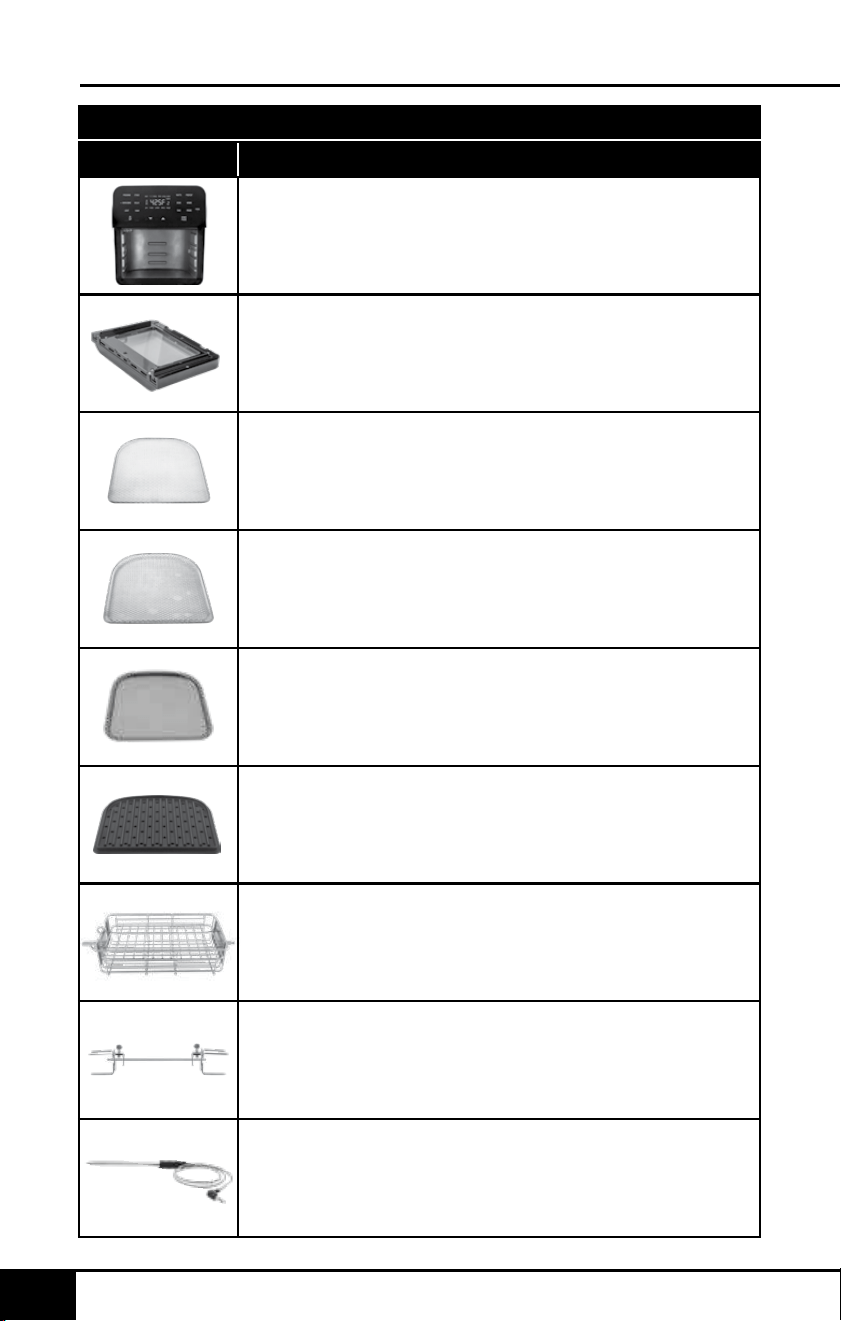
replaceable parts
nuwavenow.com
80 81
REPLACEABLE PARTS
nuwavenow.com
REPLACEABLE PARTS
80 81
Part Name Part Description Part No.
To order replaceable parts head over to NuWaveNow.comTo replace the entire unit use part number 38005.
Rotisserie Basket
Door
Rotisserie Skewer
(2) Chrome Mesh Trays
Chrome Mesh Rack
Drip Tray
Base
Grill/Griddle Plate
Digital Temperature Probe
38203
38202
BRI14-A12
38208
BRI14-A13
Used to place food on. Racks are
inserted into slots in oven.
Used to place food on. Tray is inserted
into slots in oven.
Used for rotisserie cooking. Includes
basket, spit, and forks.
Removable door opens and
closes appliance.
Used for rotisserie cooking. Includes
forks and spit.
38204
Used in bottom of oven for collecting
grease and oil from cooking.
Electrical base/housing of the Brio.
38005
Used as griddle or grill.
BRI14-A8
38207
Inserted into food. Measures internal
temperature of food.
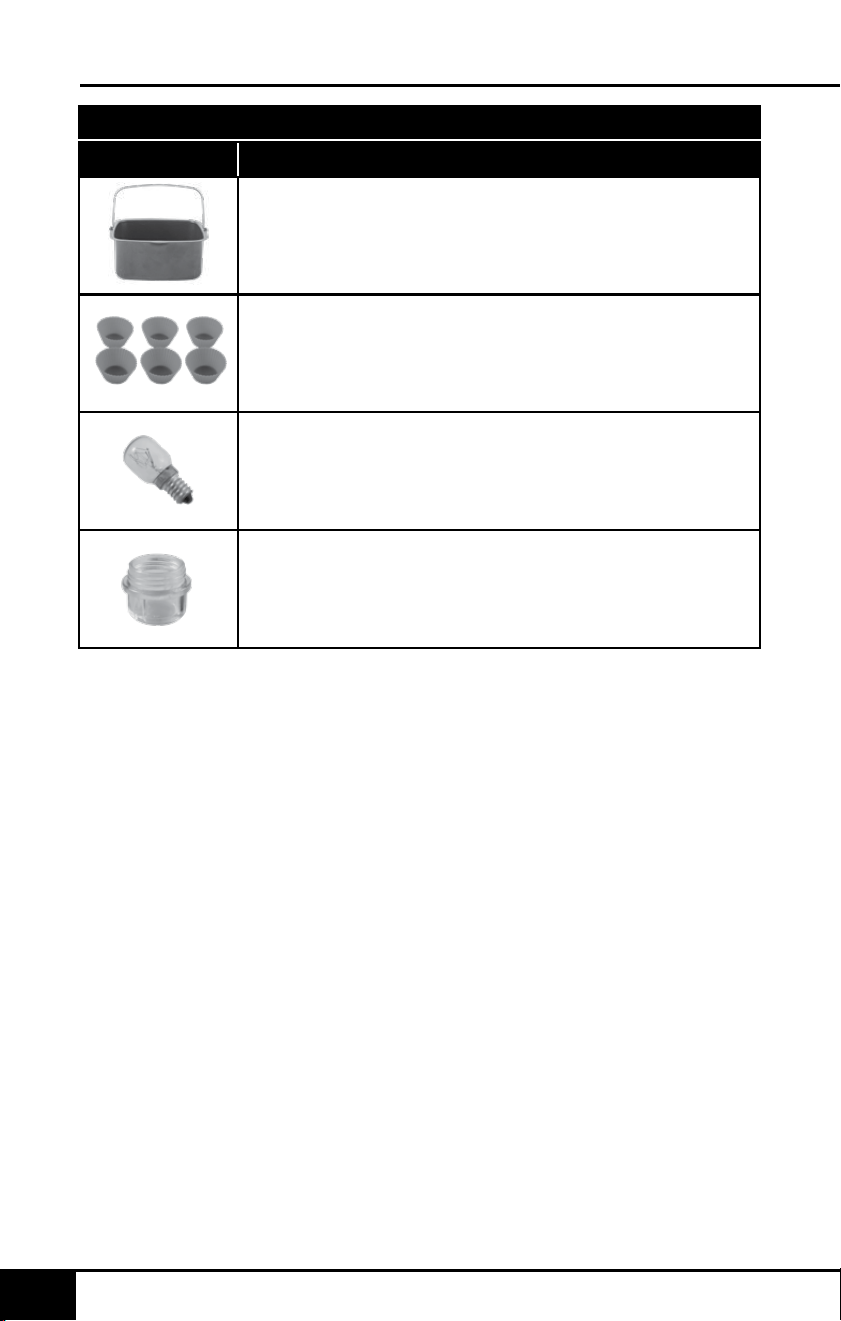
replaceable parts
nuwavenow.com
82 83
REPLACEABLE PARTS
nuwavenow.com
REPLACEABLE PARTS
82 83
Part Name Part Description Part No.
To order replaceable parts head over to NuWaveNow.comTo replace the entire unit use part number 38005.
Non-Stick Baking Pan
Light Bulb
Light Bulb Cover
Silicone Cupcake Liners
For baking and cooking pasta. Made
with non-stick coating.
37212
38209
38211
Used to light up food while cooking.
Oven incandescent light bulb,
25W - 120/125 Volt -T6 E14 screw, 300˚C.
Protective cover shields light bulb
from heat.
22113
Perfect for baking cakes, mufns,
breads, mousse, jams, chocolate,
pudding, and fruit pies, etc.
If you misplaced any of your Brio accessories or simply wish to add
to your Brio cooking experience, contact NuWave Customer Service
to order any of these parts and accessories – subject to availability.
NuWave Customer Service can be reached by calling
1-877-689-2838 or emailing help@nuwavenow.com Monday-Friday
7:30 am-4:30 pm CST.
Print No: BM38020
Rev. 03-OG
11-05-20
DJ01 CC01
FOR HOUSEHOLD USE ONLY
Model: 38001, 38004, 38005, 38011, 38015, 38020
120V, 60Hz, 1800 Watts
For patent information please go to:
www.nuwavenow.com/legal/patent
Designed & Developed in USA by:
NuWave LLC
560 bunker Ct.
Vernon Hills, IL 60061, U.S.A.
Customer Service:
1-877-689-2838 • help@nuwavenow.com
Made in China
©2020 NuWave LLC • All Rights Reserved.
nuwavenow.com