User Guide Mash Kettle
DELIVERY AND ASSEMBLY
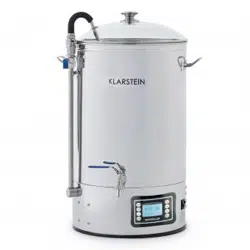
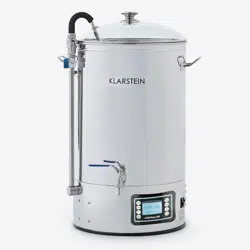
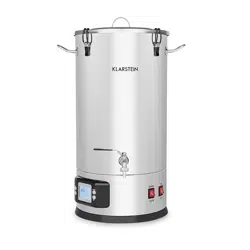
Structure of the system
With the vessel, almost all styles of beer can be brewed. To do this successfully, the system must be correctly set up. Make yourself familiar with the features of the system
Scope of delivery
The following parts are included in delivery:

- Boiler 30 liters
- Circulation line with ball valve, stainless steel
- 1/2“ stainless steel ball valve
- Digital programmable control
- 5 Glass lid
- Overflow tube
- Perforated strainer
- Malt pipe
- Switches
- Handle for the malt tube
- Curved pipe for circulation
- Filter
- Accessories
Assembly of the malt pipe
First, the perforated screens must be assembled. For this the following parts are needed:

A. Perforated sheet above
with 2 small holes
B. Perforated plate below
C. 2 handles
D. Short pipe
E. Long pipe
F. 2 sleeves with through
thread
G. Sleeve with thread
H. Nipple with external
thread
I. Cap
1. Slide the component H through the center of the component B and fasten it with component F.

2. Depending on the recipe and the quantity of output, it makes sense to construct the sieves with either the short (D) or long pipe (E).

3. Next, attach the handles (C) to the upper perforated strainer (B).

4. Then, screw component F onto the short or long pipe. In this example, it was screwed onto the long pipe.

5. Now screw down the upper perforated plate including the preassembled handles.

6. The assembled screens are now ready and can be inserted into the pipe. The combination should look like this. The malt pipe is now fully assembled and can be placed in the brewing kettle.

Assembly of the circulation pipe

- We recommend that you do not run the pump without water. The boiler must be filled with water before switching on the pump.
- We recommend using the pump during the mashing process.
- Before switching on the pump, make sure that the curved pipe (11) is mounted. Mount the curved pipe (11) by placing it on the circulation pipe (2). Check that the black gasket is installed and lock the curved pipe (11) by pushing the two handles down. If you want to use the glass lid (5) when mashing, you must put on the lid (5) before assembling the curved pipe (11). The curved pipe (11) should first be inserted through the hole in the lid (5).
- Set the flow rate on the circulation pipe with the blue valve for a correct circulation speed.
- The blue valve on the circulation pipe in horizontal position closes the ball valve. The blue valve on the circulation line in vertical position opens the ball valve.
- Do not run the pump while the wort is cooking.
- It is not recommended to use the pump to pump the wort after cooling, as there is no filter on the pump inlet. This can cause brewing deposits to enter the pump, which can block and damage the system.
Note: When the assembled malt tube is in the brewing kettle and everything is correctly connected, cleaning can begin.
Cleaning the system
Before the brewing machine is used to brew beer, it should be thoroughly cleaned. To this end, the items must be checked for contamination. If any exist, they must be removed with a suitable cleaning agent. After assembling the system, fill the system with about 20 liters of water and a suitable cleaning agent. This cleaning mixture should circulate at about 60 degrees for half an hour. Afterwards, the device including all lines must be rinsed with water. After this process, the brewing kettle can be used to brew beer.
DISPLAY AND SETTINGS

Manual Mode Setting
- Switch on the power switch, then press the MANUAL button.
- TEMP is for Temperature setting, POWER is for Wattage setting, TIMER is for session timing. All 3 of these must be set before machine will start. These can be set in any order.
- Press START button when all 3 settings have been made, and the manual session will start.
- he default boiling temperature is 100 °C in our program, the timer will not be triggered if temperature does not indicate 100°C. In this case, please put the cover on for 1-2 minutes (or see below) to achieve 100°C on the display.
- If the machine starts to boil, but shows a lower temp on the display, make the following adjustment to set the temp at 100°C and trigger the timer.
- Press „-“ and „+“ button together until the display shows the C1/F1 sign. Temperature correction range is from -10 °C to +10 °C.
- Press Manual/Pause button during heating, machine back to edit page. You can edit Temp/Power/Timer, then press Manual/button again to confirm and machine back to heating.
- Long press TEMP for 5 seconds, switch degree centigrade to Fahrenheit. This operation only can be proceeded when you switch on the machine before any setting.
Memory Function in Manual Mode
- Press MANUAL/PAUSE button in edit page for 5 seconds, and release it. You can record the last setting, There is ringing sound of bell for successful recording.
- Press START button after above operation, machine back to work, and carry out the input data.
- Press STOP button, machine stop working
- Long press AUTO/PAUSE button in BLANK PAGE as below (display shown current temperature only as below) for 5 seconds to restore factory settings, there’s a slower ringing for restoring successfully.

Auto Mode Setting
- Switch on the device, then press AUTO button.
- S1 will be shown on the top left corner, input the 3 settings - TEMP, TIMER and POWER. (as above)
- After you have set the 1st program, press AUTO button again then enter into 2nd program setting. 3rd to 6th programs are set as 1st and 2nd.
- When you have entered up to 9 steps as you require, press the START button to confirm the above step mashing settings.
- When you have entered up to 9 steps as you require, press the START button to confirm the above step. This program only support one boiling setting in each Recipe. You can adjust the boiling power during operation anytime. The step after boiling will be skipped if 9 steps is too much for you. This program only support one boiling setting in each Recipe. You can adjust the boiling power during operation anytime.
- When S1 temperature is reached, there’s reminder ringing, timer will not countdown unless you press auto button to confirm. It is ingredients filling reminder.
- The boiling reminder is same as above, when machine finish the step before boiling, there is reminder ringing, program will not enter boiling step unless you press AUTO button for confirmation. It is sparging reminder.
- PAUSE button will stop the element and timer working temporarily, and you can amend the data, afterward, press AUTO to continue.
- Press START button when auto mode is running, you can skip the step you do not need instantly.
- Setting hop reminder in boiling process, press - or + for countdown timer setting. Press TIMER button for 2nd, 3rd...9th setting. The countdown timer must be boiling leads time>1st >2nd>3rd...>9th. Press START button start to heat.
- Long pressing POWER and TIMER buttons for 5s in BLANK PAGE, operation enter to recipe selection. Press “-” or “+” to choose required recipe. Recipe storage is up to 9 programs. Press Start button to confirm the selected recipe, BLANK PAGE will be shown on display, then press AUTO/PAUSE button enter the chosen recipe edit page. You can press START button to run the picked up program instantly or press AUTO/PAUSE button to edit/check the program step by step
- If you press STOP button to skip all the step, machine stop working, and display shown END, bell ringing for 30s, press the STOP button again enter to BLANK PAGE.
Memory Function in Auto Mode
- After setting all the data you need in auto mode, press STOP button until BLANK PAGE. Please do not switch off the machine! Follow below step for recording.
- Press MANUAL button enter manual edit page, then long press MANUAL button for 5 seconds then release it. You can record the last manual and auto mode setting. There is ringing sound of bell for successful recording.
- Switch off/on the machine, then press AUTO button, the 1st step of last chosen program will be shown on the display.
- Press START button, machine start working.
- Our program not support batch storage. Each recording need to repeat above instruction.
BREWING PROCESS (EXAMPLE)
- Always Clean the machine before and after use.
- Assemble the Bazooka filter to the tap, and add the required quantity of water before switching on.
- Heat up the water to 66-68°C, then add the grain into grain basket and stir it gently.
- When the correct temperature is reached, start the circulation pump and regulate the flow as described in the next paragraph.

RECIPE SELECTION IN AUTO MODE

- The default time for the 1st pass is 60 minutes (depending on the recipe).
- The temperature for the 2nd pass is 78-80 ° C, the run time is 20 minutes (depending on the recipe).
- After mashing, carefully lift the grain basket by the handle and attach it to the rim of the kettle
- Sprinkle the basket with water to remove any sugar residue from the grain in the basket, and then drain the basket for another 10 minutes. Remove it afterwards
- Heat the appliance up to boiling temperature. The cooking time is 90 minutes (depending on the recipe).
- Add the remaining ingredients at the right time according to your recipe.
- Immerse the cooling coil 15 minutes before the end of the cooking process to sterilize it.
- After cooking, cool the mash to 20 ° C with the help of the cooling coil before filling it into a fermentation vessel via the drain tap on the front of the boiler.

TROUBLESHOOTING
| Problem |
Possible cause and suggested solution |
| Ingredients stuck in the pump |
Flush the pump by connecting a hose to the curve pipe. |
| Dismantle the pump to remove the ingredients. |
| Failing to reach 100 °C. |
Put cover on for 1 to 2 mins.
Do temperature correction.
|
| Temperature correction. |
Do temperature correction. Press „-“ and „+“ at the same time enter into C1 temperature correction setting. Setting range is from -10°C to +10°C (or -50 °F. to +50 °F, respectively). Press Temp button to confirm the setting and exist the temperature correction page |
| ERR-1 shown on display |
Temperature is lower than -20 °C, it is low temperature warning. Senor connector is loosen. Open the underneath and check the sensor. Re-connect it if loosen. |
| ERR-2 shown on display. |
Temperature is higher than 120 °C, it is overheat/boildry warning. Sensor is failure, please contact dealer for replacement. |