Loading ...
Loading ...
Loading ...

17
Operations
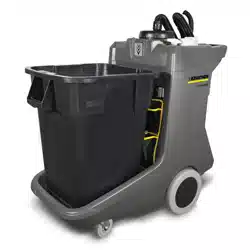
Equipment Set Up
Charging the Machine
Ensure that the machine has a fully charged battery
pack. Pull the coiled extension cord from its storage
box, plug the cord termination into a grounded wall
outlet.
When the machine is first plugged in, the control panel
battery status light will double-flash green. This
indicates that the battery charger is connected to
external power and is properly charging the batteries.
The charge cycle is complete when the battery status
indicator light is solid green.
NOTE: A full battery charge cycle will take
approximately 8 hours.
Test that the machine is charged. Turn the machine on
by pressing and releasing the power switch located on
the upper right of the control panel. Turn the machine
off during transport to the work location.
NOTE: If the machine has a full battery charge and
does not operate once the on/off switch is engaged it
will be necessary to call a qualified Service
Technician.
Vacuum Bags
FOR SAFETY: Turn off vacuum before changing
filter bags.
For easy vacuum bag replacement and optimum
vacuum system performance disposable paper vacuum
bags and a re-usable cloth bag liner are provided.
Install a suitable vacuum bag (disposable paper) and
clean vacuum bag liner (re-usable cloth) from the top of
the vacuum enclosure. There is also a second stage
filter at the bottom of the vacuum chamber.
1. Twist the vacuum enclosure cover counter-
clockwise and lift.
2. Remove and discard the full paper bag.
3. To minimize soil build-up, remove and shake out
the cloth bag each time the paper bag is replaced.
4. Place the new paper vacuum bag inside of the
cloth bag.
5. Check that the protective second-stage filter is
clean and properly placed at the bottom of the
vacuum chamber.
6. Check that the gasket at the base of the vacuum
cover is in place and free from defects.
7. Replace the vacuum cover. Turn clockwise to
tighten.
Vacuum Accessories
1. Examine the floor tool, vacuum hose and hose
cuffs at both ends to see that there are no obstruc-
tions.
2. Examine the full length of the vacuum hose to
ensure there are no cuts or gaps in the hose
material that would result in loss of airflow.
NOTE: Replace damaged hoses, cuffs or
accessories immediately.
3. Connect the vacuum hose cuff to its working
location in the center of the vacuum cover. Push
lightly to seat the cuff.
4. Connect the appropriate accessory or floor tool to
the working end of the vacuum hose and press
firmly into place.
5. Extend the telescoping wand to an appropriate
length, based on the cleaning tasks being
performed.
86405760 ECO! T11 Bp LINER
Loading ...
Loading ...
Loading ...