86405760-G 08/22/17
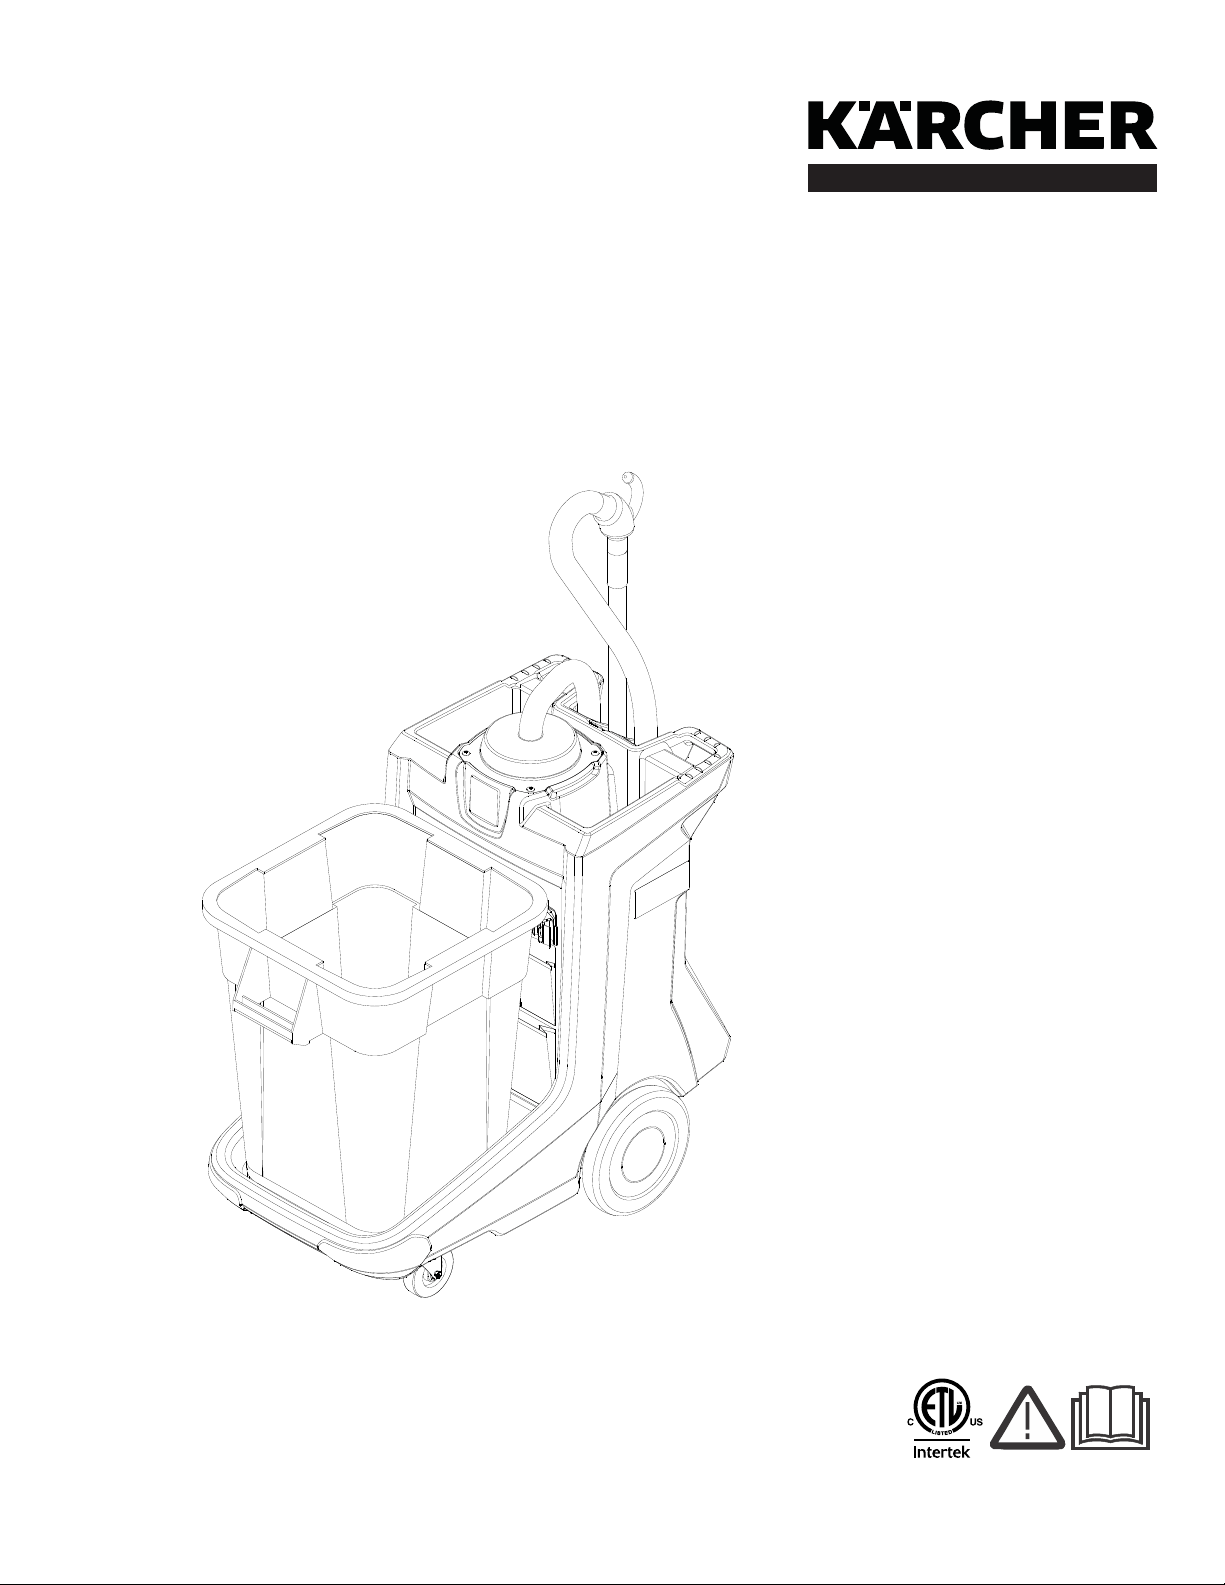
ECO! T11 Bp LINER
Cleaning Cart with Vacuum
Operating Instructions (ENG)
MODELS: 1.013-100.0
1.013-101.0
1.013-103.0
2
Warranty Registration
Thank you for purchasing a Kärcher North America product. Warranty registration is quick
and easy. Your registration will allow us to serve you better over the lifetime of the product.
To register your product go to :
http://warranty.karcherna.com/
For customer assistance:
1-800-444-7654
86405760 ECO! T11 Bp LINER
Machine Data Label
Overview
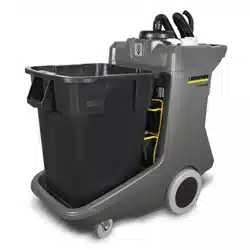
The ECO! T11 Bp Liner is a multi-functional cleaning machine intended for commercial use.

3
Table of Contents
Machine Data Label. . . . . . . . . . . . . . . . . . . . . . . . . .2
Overview . . . . . . . . . . . . . . . . . . . . . . . . . . . . . . . . . .2
Table of Contents . . . . . . . . . . . . . . . . . . . . . . . . . . .3
How To Use This Manual . . . . . . . . . . . . . . . . . . . . .4
Safety
IMPORTANT SAFETY INSTRUCTIONS . . . . . . . . .5
HAZARD INTENSITY LEVEL . . . . . . . . . . . . . . . . . .7
Safety Labels . . . . . . . . . . . . . . . . . . . . . . . . . . . . . .9
Grounding Instructions . . . . . . . . . . . . . . . . . . . . . .10
Operations
Technical Specifications . . . . . . . . . . . . . . . . . . . . .12
How the Machine Works . . . . . . . . . . . . . . . . . . . . .14
Components/Controls . . . . . . . . . . . . . . . . . . . . . . .15
Control Panel . . . . . . . . . . . . . . . . . . . . . . . . . . . . .16
Equipment Set Up. . . . . . . . . . . . . . . . . . . . . . . . . .17
Charging the Machine. . . . . . . . . . . . . . . . . . . . . . .17
Vacuum Bags . . . . . . . . . . . . . . . . . . . . . . . . . . . . .17
Vacuum Accessories . . . . . . . . . . . . . . . . . . . . . . .17
Maintenance
Daily Maintenance . . . . . . . . . . . . . . . . . . . . . . . . .18
Service Schedule . . . . . . . . . . . . . . . . . . . . . . . . . .20
Battery Maintenance . . . . . . . . . . . . . . . . . . . . . . . .22
Charging Batteries . . . . . . . . . . . . . . . . . . . . . . . . .24
Changing Batteries . . . . . . . . . . . . . . . . . . . . . . . . .27
Delta Q IC650 Charger Maintenance Instructions .27
Delta Q IC650 Charger Operating Instructions. . . .28
Charge Tracking Data. . . . . . . . . . . . . . . . . . . . . . .31
Suggested Spare Parts. . . . . . . . . . . . . . . . . . . . . .32
86405760 ECO! T11 Bp LINER
4
How To Use This Manual
This manual contains the following sections:
• How to Use This Manual
•Safety
• Operations
• Maintenance
The HOW TO USE THIS MANUAL section will tell you
how to find important information for ordering correct
repair parts.
Parts may be ordered from authorized dealers. When
placing an order for parts, the machine model and
machine serial number are important. Refer to the
MACHINE DATA box which is filled out during the
installation of your machine. The MACHINE DATA box
is located on the inside of the front cover of this manual.
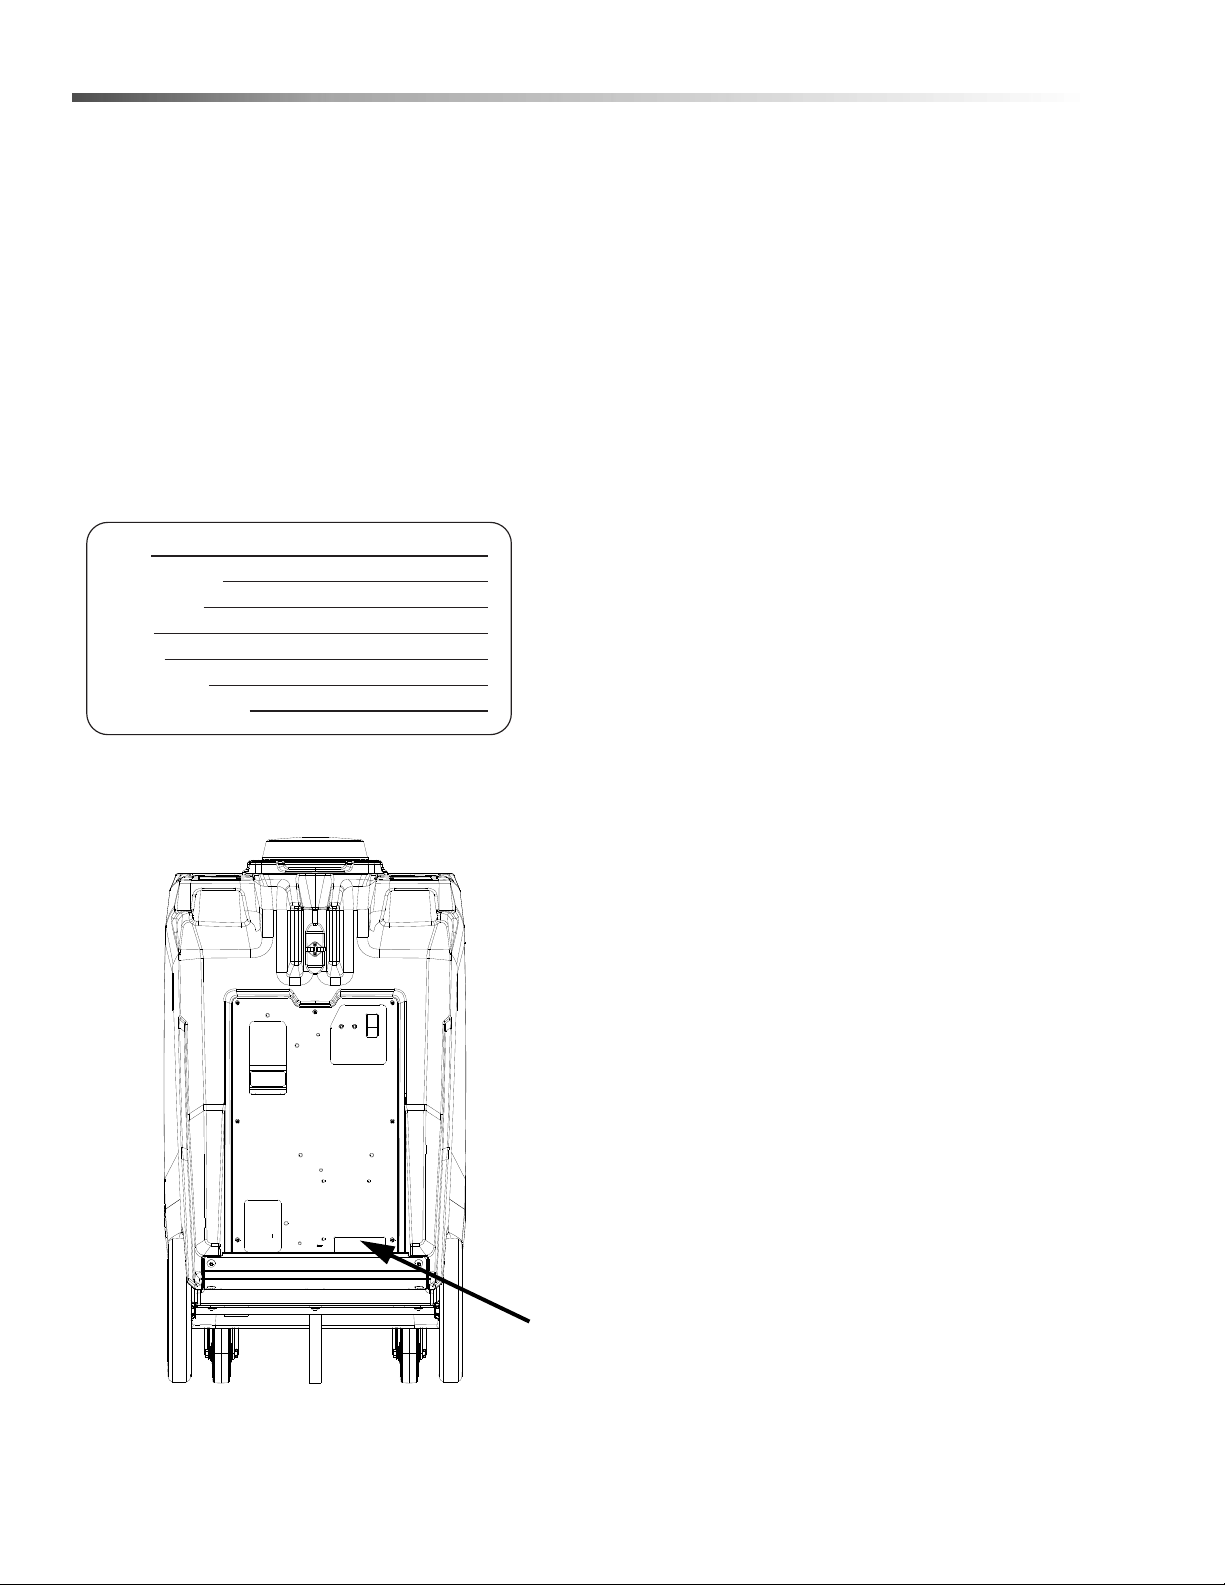
The model and serial number of your machine is
located on the back of the machine.
The SAFETY section contains important information
regarding hazardous or unsafe practices of the
machine. Levels of hazards are identified that could
result in product damage, personal injury, or severe
injury resulting in death.
The OPERATIONS section is to familiarize the operator
with the operation and function of the machine.
The MAINTENANCE section contains preventive
maintenance information to keep the machine and its
components in good working condition. They are listed
in this general order:
• Storage
• Maintenance
• Troubleshooting
NOTE: If a service or option kit is installed on your
machine, be sure to keep the KIT INSTRUCTIONS
which came with the kit. It contains replacement parts
numbers needed for ordering future parts.
NOTE: The manual part number is located on the
lower right corner of the front cover.
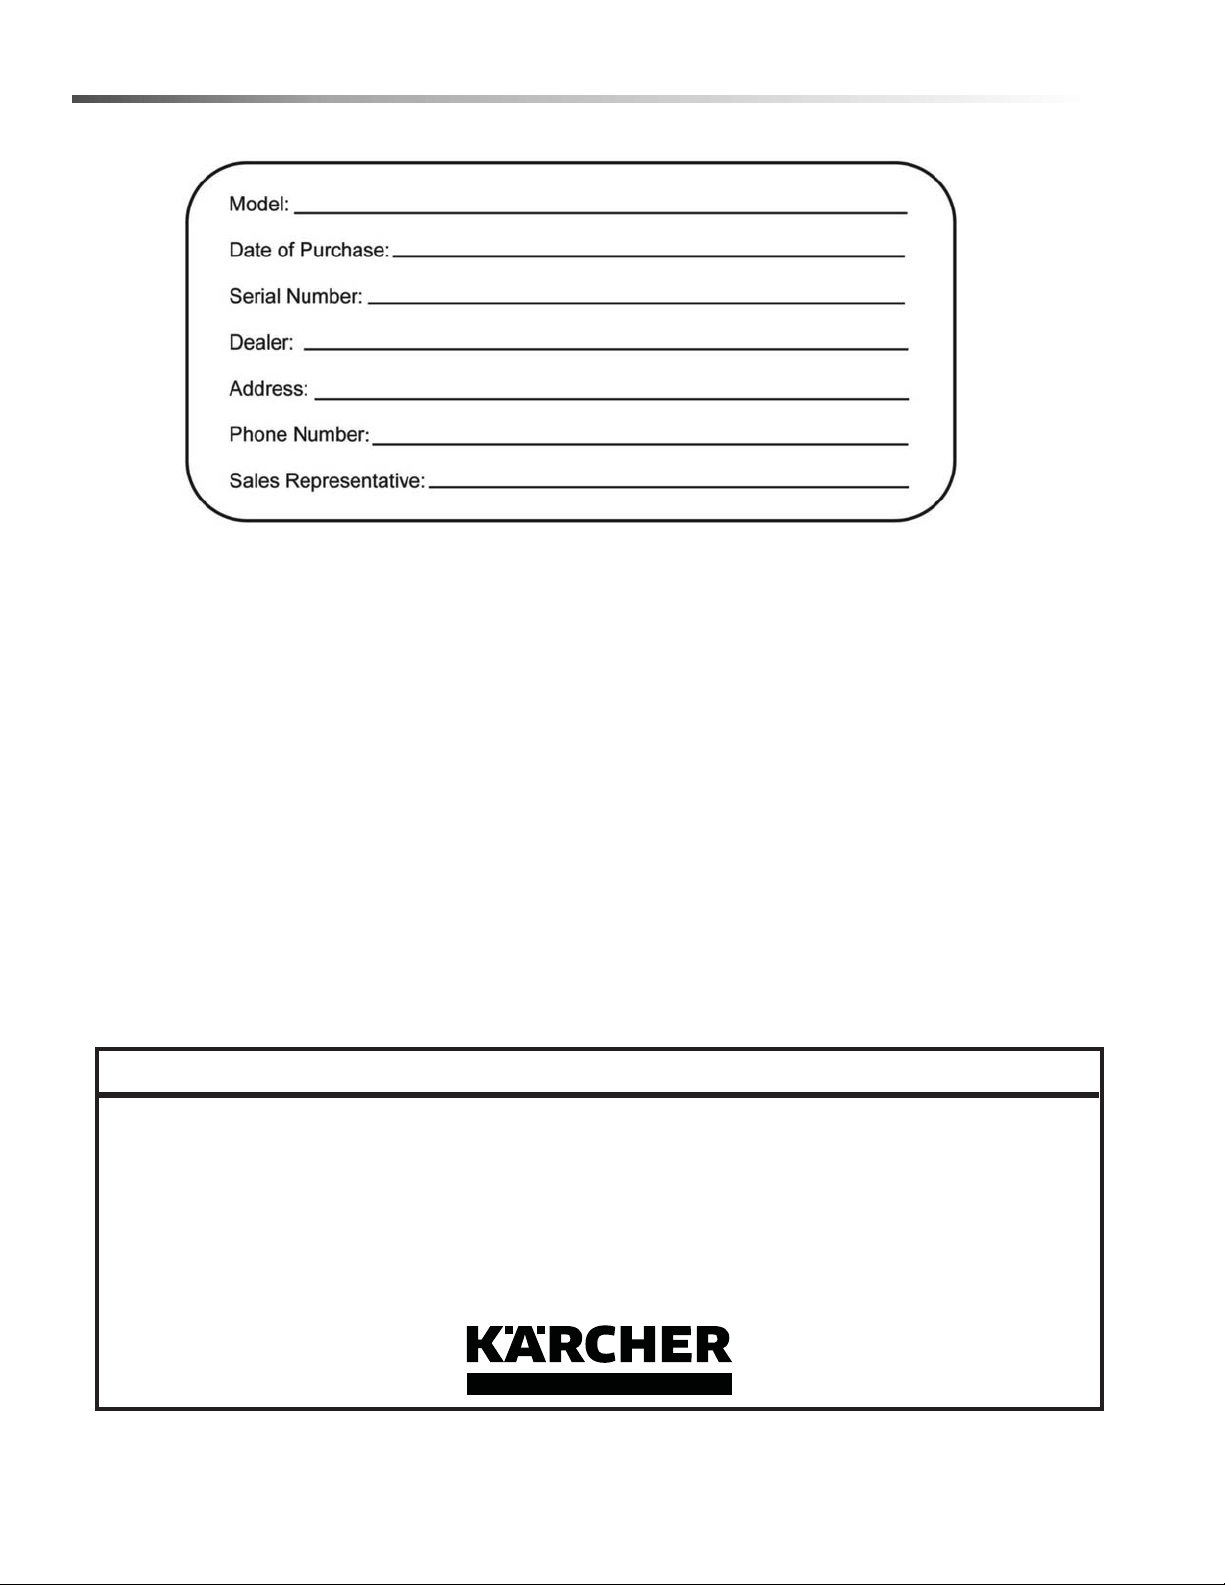
Model:
Date of Purchase:
Serial Number:
Dealer:
Address:
Phone Number:
Sales Representative:
86405760 ECO! T11 Bp LINER

5
Safety
IMPORTANT SAFETY INSTRUCTIONS
When using this machine, basic precaution
must always be followed, including the following:
READ ALL INSTRUCTIONS BEFORE USING THIS MACHINE.
To reduce the risk of fire, electric shock, or injury:
• Connect to a properly grounded outlet. See Grounding Instructions.
• Do not leave the machine unattended. Unplug machine from outlet when not in use and before
maintenance or service.
• Use only in enclosed areas. Do not use outdoors and do not leave it in the rain/snow.
• Use only indoors. This machine is for dry use only.
• Do not allow machine to be used as a toy. Close attention is necessary when used by or near children.
• Do not point vacuum nozzle at people.
• Use only as described in this manual. Use only manufacturer's recommended components and attach-
ments.
• Do not use damaged electrical cord or plug. Follow all instructions in this manual concerning grounding the
machine. If the machine is not working properly, has been dropped, damaged, left outdoors, or dropped into
water, return it to an authorized service center.
• Do not pull or carry machine by electrical cord, use as a handle, close a door on cord, or pull cord around
sharp edges or corners.
• Do not run machine over cord. Keep cord away from heated surfaces.
• Do not unplug machine by pulling on cord. To unplug, grasp the electrical plug, not the electrical cord.
• Do not handle the electrical plug or machine with wet hands.
• Do not operate the machine with any openings blocked. Keep openings free of debris that may reduce
airflow.
• Do not vacuum anything that is burning or smoking, such as cigarettes, matches, or hot ashes.
• This machine is not suitable for picking up health endangering dust.
• Turn off all controls before unplugging.
• Do not operate this machine near flammable fluids, dust or vapors.
• Maintenance and repairs must be done by qualified personnel.
• Use AGM or Gel Batteries Only. Use of other batteries may result in operator injury.
• Machine must be plugged in for charging.
• Keep hair, clothing, loose jewelery, fingers and all parts of body away from openings and moving parts.
• Do not use without dust bag and/or filter in place.
READ AND SAVE THESE
INSTRUCTIONS
86405760 ECO! T11 Bp LINER

6
Safety
CONSIGNES DE SÉCURITÉ
IMPORTANTES
Lors de l'utilisation de cette machine, des précautions de base
doivent toujours être prises, y compris les précautions suivantes :
LIRE TOUTES LES INSTRUCTIONS AVANT D'UTILISER CETTE MACHINE.
Pour réduire le risque d'incendie, d'électrocution ou de
blessure :
• Raccordez l'appareil à une prise adéquatement reliée à la terre. Voir les Consignes de mise à la terre.
• Ne laissez pas l'appareil sans surveillance lorsqu'il est branché. Débranchez l'appareil lorsqu'il n'est pas utilisé et avant
tout entretien.
• Utilisez-le exclusivement dans des endroits fermés. Ne l'utilisez pas en plein air et ne le laissez pas sous la pluie/neige.
• Utilisez-la uniquement à l’intérieur. Cette machine est conçue pour un usage à sec uniquement.
• Ne pas permettre aux enfants dejouer avec l'appareil. Durant la manoeuvre de la machine, prendre garde aux
personnes environnantes et notamment aux enfants.
• Ne pas diriger le pistolet vers les gens.
• Utilisez-le exclusivement de la manière décrite dans ce manuel. Utilisez exclusivement les composants et les fixations
recommandés par le fabricant.
• N'utilisez pas l'appareil si le cordon ou la fiche est endommagé(e). Observez toutes les consignes figurant dans ce
manuel au sujet de la mise à la terre de l'appareil. Si l'appareil ne fonctionne pas correctement, s'il est tombé par terre,
s'il est endommagé, s'il a été laissé dehors ou s'il a été plongé dans l'eau, veuillez le renvoyer à un centre d'entretien
agréé.
• Ne tirez pas sur le cordon, ne portez pas l'appareil par le cordon, n'utilisez pas le cordon comme poignée, ne fermez
pas une porte sur le cordon, ne tirez pas sur le cordon dans des angles ou des coins pointus.
• Ne faites pas passer l'appareil par-dessus le cordon. Maintenez le cordon à l'écart de surfaces chauffées..
• Ne débranchez pas l'appareil en tirant sur le cordon. Pour le débrancher, empoignez la fiche, non pas le cordon.
• Ne manipulez pas la fiche ou l'appareil les mains mouillées.
• Ne faites pas fonctionner l'appareil si des ouvertures sont bouchées. Dégagez des ouvertures tous débris susceptibles
d'entraver le passage de l'air.
• Ne pas ramasser quelque chose qui brûle ou fume, comme des cigarettes, des allumettes ou des cendres chaudes.
• Cet appareil n'est pas conçu pour aspirer des poussières dangereuses.
• Arrêtez toutes les commandes avant le débranchement.
• Ne faites pas fonctionner cet appareil à proximité de fluides, de poussières ou de vapeurs inflammables.
• Les travaux de maintenance et de réparation doivent absolument être effectués par du personnel qualifié.
• Utilisez uniquement des batteries Gel ou AGM. L’utilisation d’autres batteries peut blesser l’opérateur.
• La machine doit être branchée pour la recharge.
• Éloigner les cheveux, les vê-tements, les bijoux flottants, les doigts et toutes les parties du corps des ouvertures et des
pièces mobiles.
• Ne pas utiliser l’appareil si le filtre ou le sac à poussière n’est pas en place.
LIRE ET CONSERVER CES
INSTRUCTIONS
86405760 ECO! T11 Bp LINER

7
Safety
HAZARD INTENSITY LEVEL
The following symbols are used throughout this guide as indicated in their descriptions:
There are three levels of hazard intensity identified by signal words -WARNING and CAUTION and FOR SAFETY.
The level of hazard intensity is determined by the following definitions:
WARNING - Hazards or unsafe practices which COULD result in severe personal injury or death.
CAUTION - Hazards or unsafe practices which could result in minor personal injury or product or property damage.
FOR SAFETY: To Identify actions which must be followed for safe operation of equipment.
Report machine damage or faulty operation immediately. Do not use the machine if it is not in proper operating
condition. Following is information that signals some potentially dangerous conditions to the operator or the equip-
ment. Read this information carefully. Know when these conditions can exist. Locate all safety devices on the
machine. Please take the necessary steps to train the machine operating personnel.
FOR SAFETY:
DO NOT OPERATE MACHINE:
Unless Trained and Authorized.
Unless Operation Guide is Read and understood.
In Flammable or Explosive areas.
In areas with possible falling objects.
WHEN SERVICING MACHINE:
Avoid moving parts. Do not wear loose clothing; jackets, shirts, or sleeves when working on the machine. Use
approved replacement parts.
Batteries emit hydrogen gas. Explosion or fire can result. Keep sparks and open flame away. Keep sparks
and flames away from the batteries. Do not smoke around batteries.
Disconnect batteries before working on machine. Only qualified personnel should work inside machine.
Always wear eye protection and protective clothing when working on or near batteries. Avoid skin contact
with the acid contained in the batteries.
Never allow metal to lie across battery tops.
86405760 ECO! T11 Bp LINER

8
Safety
Les symboles ci-dessous sont utilisés à travers ce manuel comme illustré dans leurs descriptions :
DEGRÉS DE RISQUES EN CAS DE DANGER
Il existe trois degrés de risques identifiés par les termes signalétiques -AVERTISSEMENT et ATTENTION et POUR
VOTRE SÉCURITÉ. Le degré de risque est défini de la manière suivante:
AVERTISSEMENT - Dangers ou méthodes dangereuses qui POURRAIENT provoquer de graves blessures ou
entraîner la mort.
ATTENTION - Dangers ou méthodes dangereuses qui pourraient provoquer des blessures légères ou une détério-
ration du produit ou des biens immobiliers.
POUR VOTRE SÉCURITÉ: ce signe permet d'identifier les mesures de précaution à prendre pour assurer un bon
fonctionnement du matériel.
Rendre compte immédiatement d'une défaillance ou d'une détérioration de la machine. Ne pas utiliser la machine
si celle-ci ne fonctionne pas correctement. Lire soigneusement les informations ci-dessous signalant certains
dangers potentiels pour l'opérateur de la machine. L'opérateur doit être absolument au courant de ces dangers
potentiels. Localiser tous les dispositifs de sécurité sur la machine. Il est conseillé de prendre les mesures néces-
saires pour former le personnel opérateur.
POUR VOTRE SÉCURITÉ:
NE PAS MANOEUVRER LA MACHINE:
Lorsqu'on n'est pas expérimenté ou qualifié.
Lorsque le guide d'utilisation n'est pas été lu ou compris.
Dans des zones inflammables ou explosives.
Dans des zones où des objets peuvent tomber.
LORS DE L'ENTRETIEN DE LA MACHINE:
Éviter les parties amovibles. Ne pas porter de vêtements amples, tels que des vestes, des chemises ou des
vêtements avec manches lors de l'utilisation de la machine. Utiliser les pièces détachées Windsor homologuées.
Les batteries émettent le gaz d'hydrogène. L'explosion ou le feu peut résulter. Étincelles de subsistance et
flamme nue loin. Étincelles et flammes de subsistance loin des batteries. Ne fumez pas autour des
batteries.
Déconnecter les batteries avant de travailler sur la machine. La machine ne doit être confiée qu'à un
personnel qualifié. Porter systématiquement des lunettes et des vêtements de protection lors d'une inter-
vention sur les batteries ou aux alentours. Éviter tout contact de la peau avec l'acide contenu dans les
batteries.
Ne jamais placer d'objets métalliques sur le dessus des batteries.
86405760 ECO! T11 Bp LINER
9
Safety
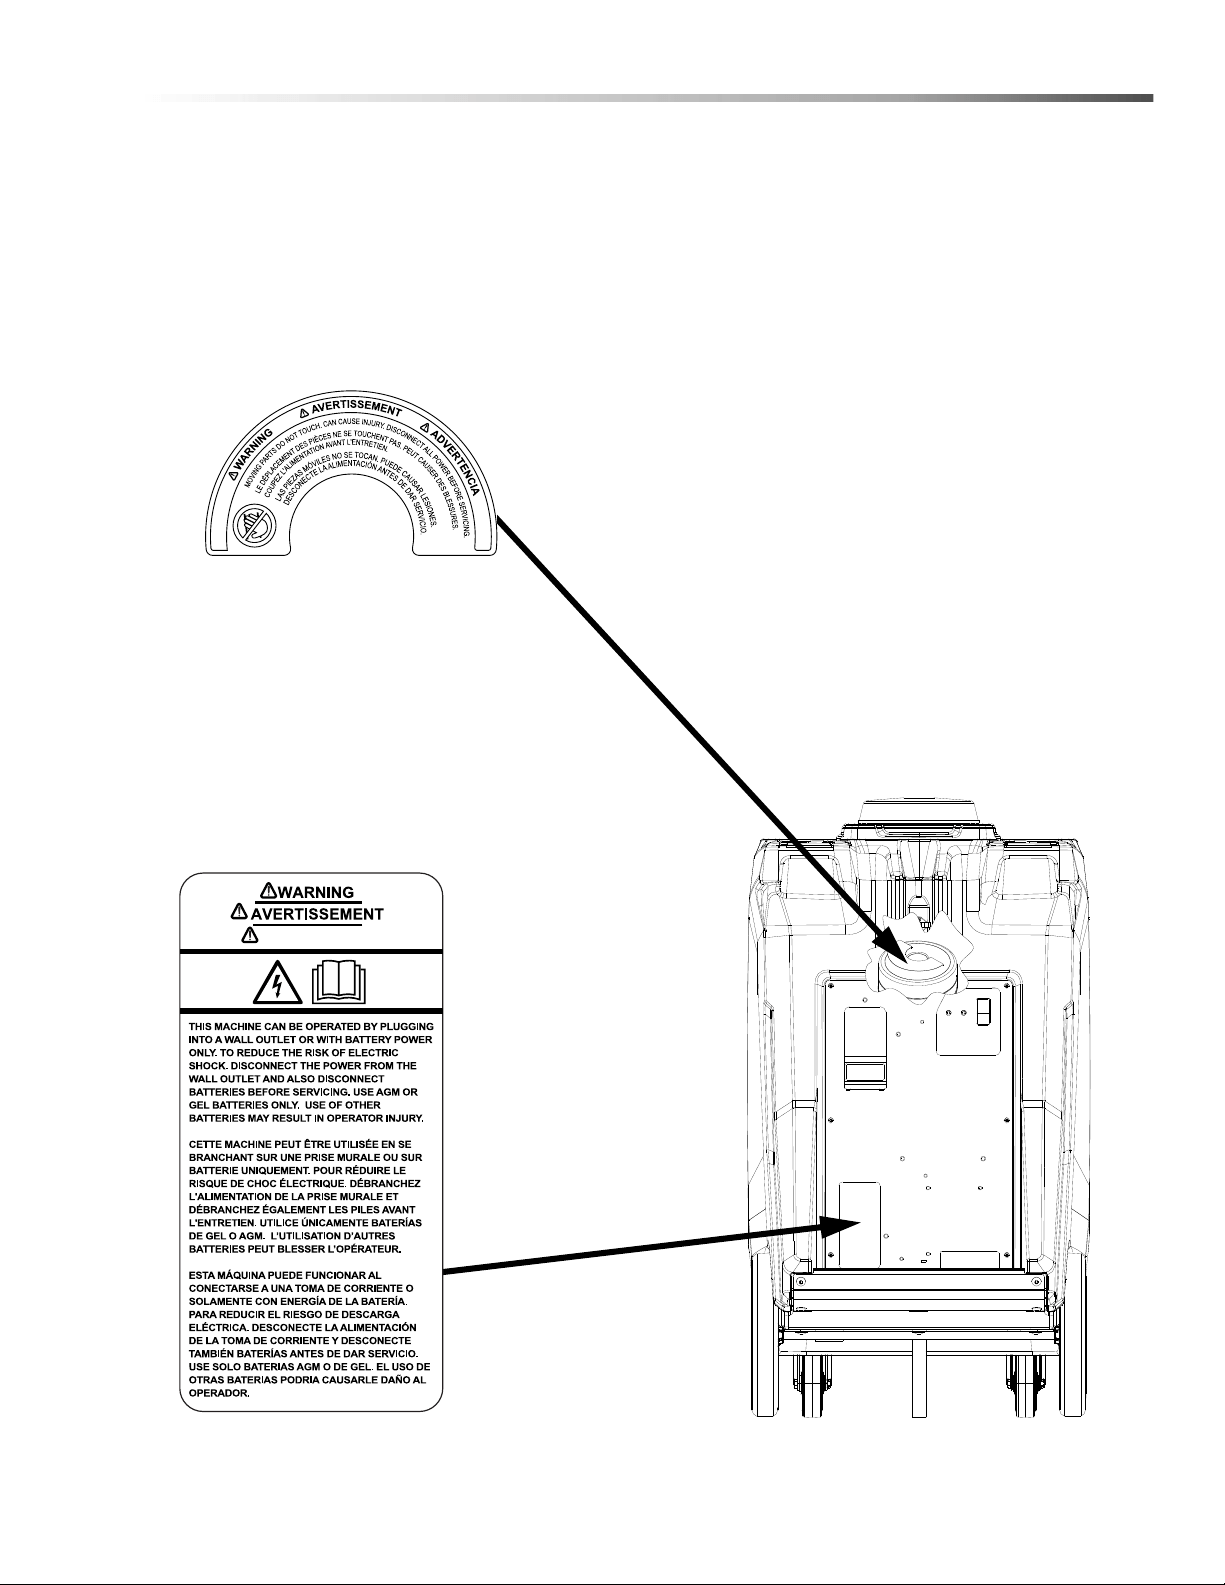
Safety Labels
NOTE: These drawings indicate the location of safety labels on the machine. If at any time the labels become
illegible, promptly replace them.
EMPLACEMENT DE L'ÉTIQUETTE DE SÉCURITÉ
REMARQUE : Ces dessins indiquent l'emplacement des étiquettes de sécurité sur la machine. Si, à tout moment,
les étiquettes deviennent illisibles, contactez votre représentant autorisé pour un remplacement rapid
ADVERTENCIA
8.641-103.0
LABEL, WARNING, VACUUM
8.640-248.0
LABEL, WARNING, ELEC SHOCK
86405760 ECO! T11 Bp LINER
10
Safety
Electrical
In the USA this machine operates on a standard 15
amp 115 volt A.C. power circuit. The amp, hertz, and
voltage are listed on the data label found on each
machine. Using voltages above or below those
indicated on the data label will cause serious damage
to the motor and electrical components.
Extension Cords
If an extension cord is used, the wire size must be at
least one size larger than the power cord on the
machine, and must be limited to 50 feet (15.5m) in
length.
Grounding Instructions
This appliance must be grounded. If it should malfunc-
tion or breakdown, grounding provides a path of least
resistance for electric current to reduce the risk of
electric shock. This appliance is equipped with a cord
having an equipment-grounding conductor and
grounding plug. The plug must be inserted into an
appropriate outlet that is properly installed and
grounded in accordance with all local codes and ordi-
nances.
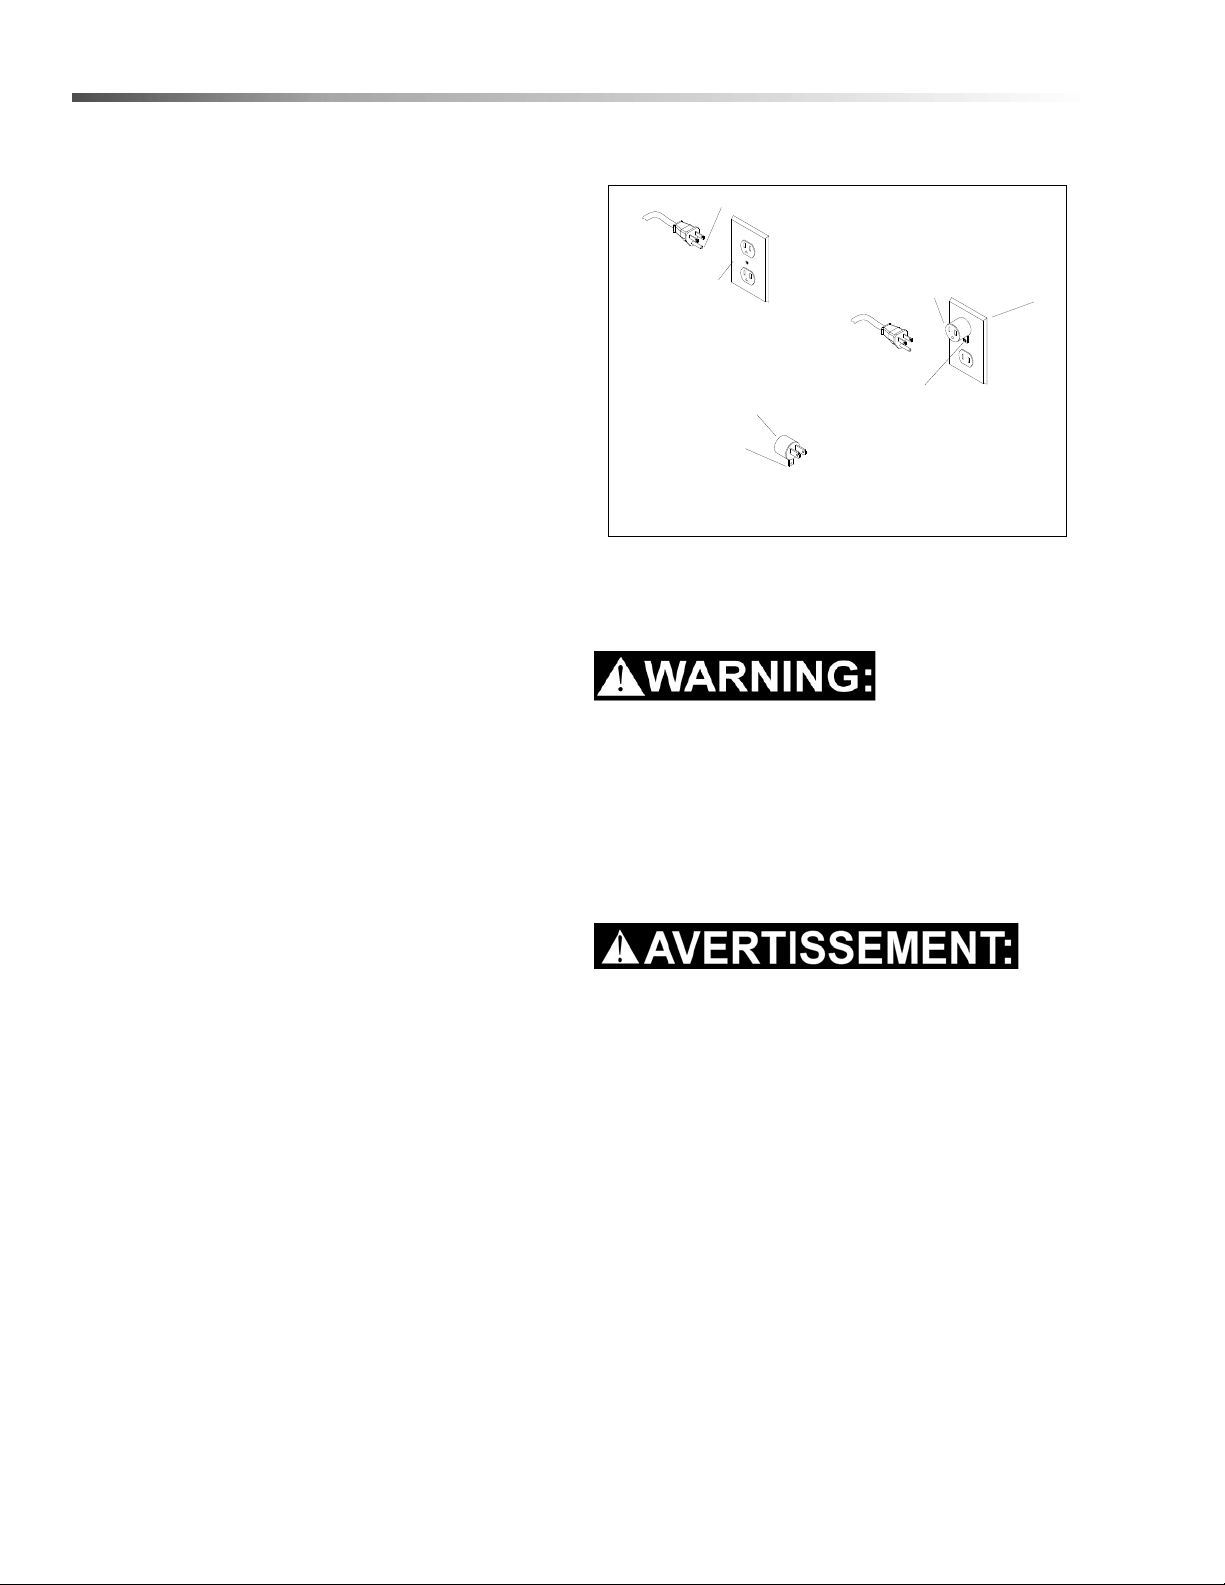
This appliance is for use on a nominal 120-volt circuit,
and has a grounded plug that looks like the plug illus-
trated in sketch A. A temporary adapter looks like
adapter illustrated in sketches B and C, may be used to
connect this plug to a 2-pole receptacle as shown in
sketch B if a properly grounded outlet is not available.
The temporary adapter should be used only until a
properly grounded outlet (sketch A) can be installed by
a qualified electrician. The green colored rigid ear, lug
or the like extending from the adapter must be
connected to a permanent ground such as a properly
grounded outlet box cover. Whenever the adapter is
used, it must be held in place by a metal screw
.
NOTE: In Canada, the use of a temporary adapter is
not permitted by the Canadian Electrical Code.
Improper connection of the equipment-grounding
conductor can result in a risk of electric shock.
Check with a qualified electrician or service person
if you are in doubt as to whether the outlet is
properly grounded. Do not modify the plug
provided with the appliance - if it will not fit the
outlet, have a proper outlet installed by a qualified
electrician.
Une connexion incorrecte du conducteur de mise à
la terre de l'équipement peut entraîner une électro-
cution. En cas de doute sur la mise à la terre de la
prise murale, vérifier, avec un électricien qualifié ou
un technicien d'entretien. Ne pas modifier la fiche
fournie avec l'appareil- Si elle ne correspond pas à
la prise murale, faire installer une prise appropriée
par un électricien qualifié.
USING AN ADAPTOR
GROUNDING CONNECTION
Note: Adaptors are not allowed in Canada.
Outlet
Tab for Grounding
Outlet Box
FIGURE C
Grounded
FIGURE A
Adaptor
Screw
FIGURE B
Adaptor
Metal Screw
Grounded
Grounding Pin
86405760 ECO! T11 Bp LINER

11
Notes
86405760 ECO! T11 Bp LINER

12
Operations
Technical Specifications
ITEM DIMENSION/CAPACITY
Electrical 115 VAC, Internally Powered with 36 VDC (3 - 12V Batteries)
Electric Vacuum Motor 36 VDC, 500W
Water Lift 65 Inches
Vacuum Bag Capacity 10 Qt
Air Flow 85 CFM
Power Cable 20ft (7.62m) 18 gauge
Wheels
Front (2) 5in Dia. (12.7cm) x 1.5
Rear (2) 12in Dia. (30.48cm) x 1.75
86405760 ECO! T11 Bp LINER
13
Operations
This appliance is not intended for use by persons (including children) with reduced physical, sensory or mental
capabilities, or lack of experience and knowledge, unless they have been given supervision or instruction
concerning use of the appliance by a person responsible for their safety. Children should be supervised to ensure
that they do not play with the appliance.
Cet appareil n'est pas prévu à l'usage des personnes (enfants y compris) avec des possibilités physiques, sensori-
elles ou mentales réduites, ou le manque d'expérience et de connaissance, à moins qu'ils aient été donnés la
surveillance ou l'instruction au sujet de l'utilisation de l'appareil par une personne chargée de leur sûreté. Des
enfants devraient être dirigés pour s'assurer qu'ils ne jouent pas avec l'appareil.
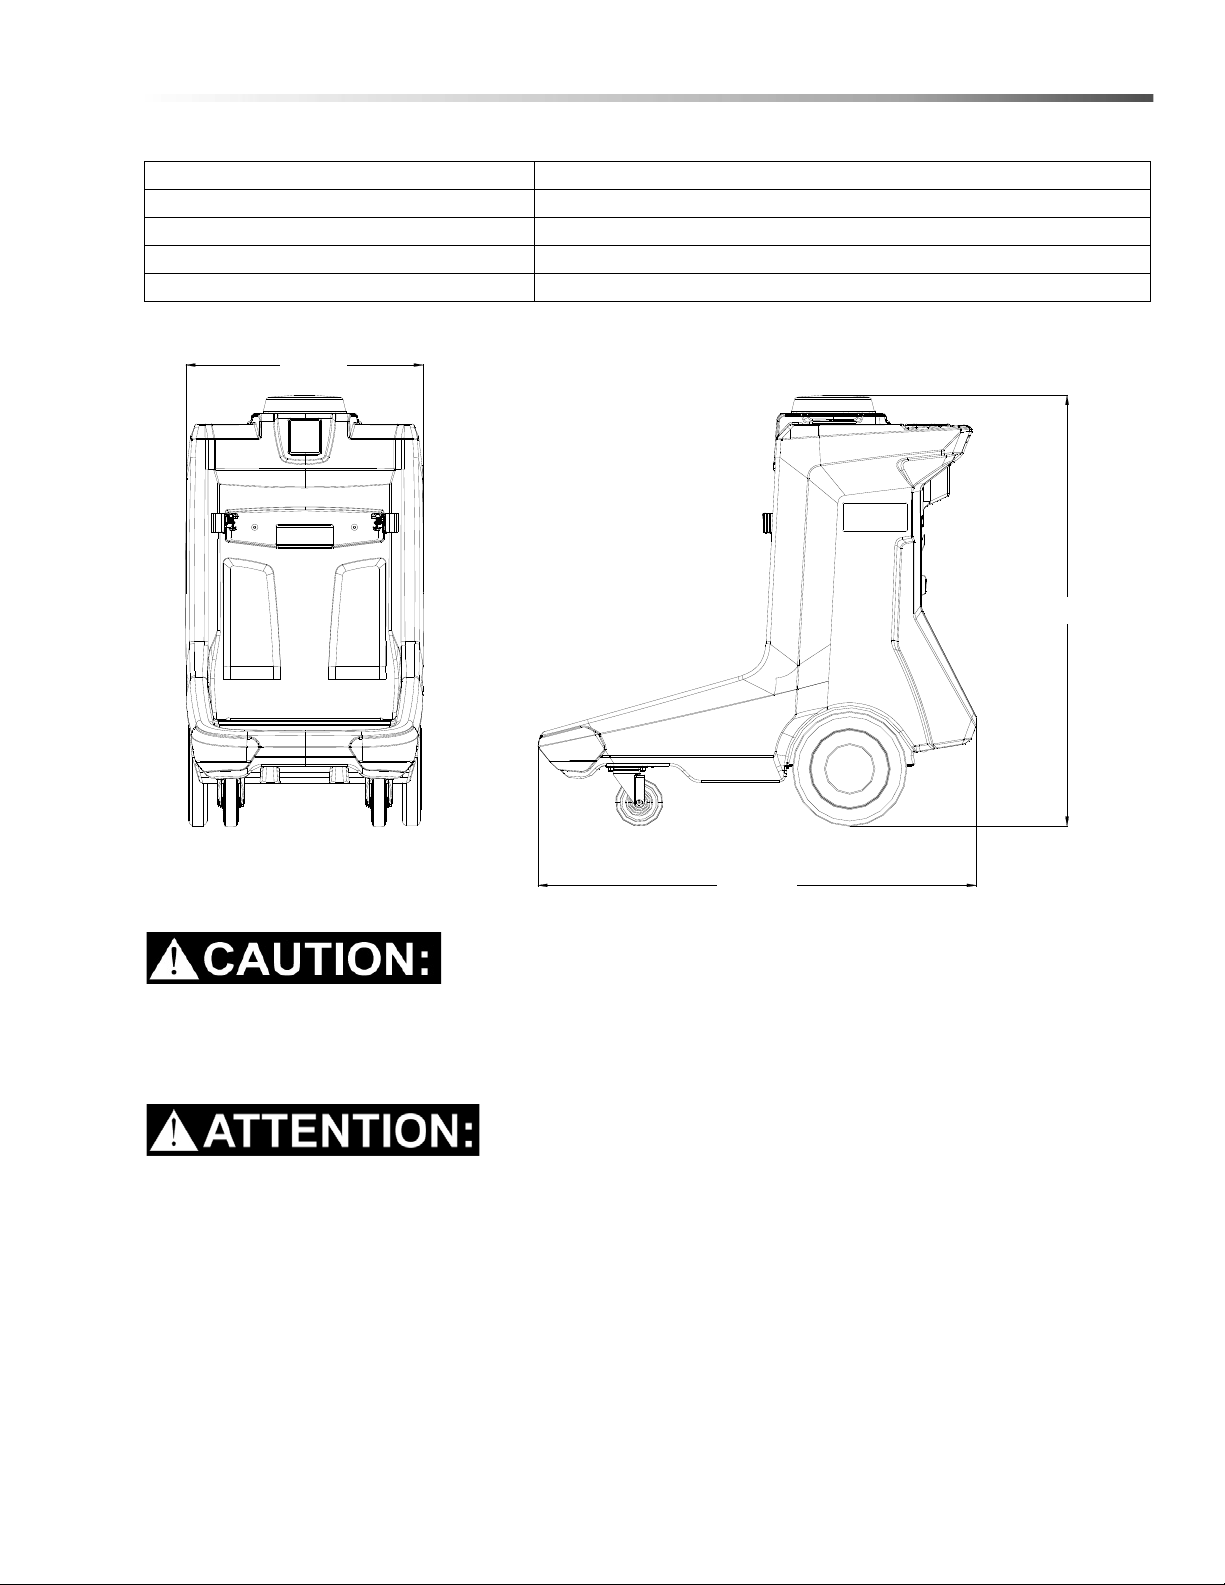
ITEM MEASURE
Weight 180 lbs (82kg) for 1.013-100.0 194 lbs (88 kg) for 1.013-101.0
Length 46 in (1168mm)
Height 43 in (1092mm
Width 25in (635mm)
Length
Height
Width
86405760 ECO! T11 Bp LINER

14
Operations
How the Machine Works
The ECO! T11 Bp Liner is a multi-functional cleaning
machine intended for commercial use. It can be used
as a mobile station that can be placed in a convenient
area to provide vacuum cleaning of floors and surfaces
with a variety of cleaning attachments. It also provides
garbage collection and convenient storage of utensils
and supplies for general surface cleaning.
The machine's primary systems are:
• High-efficiency vacuum with on-board 20 ft. 4:1
vacuum stretch hose
• Various vacuum accessory attachments
• A 40 Gal. trash container
• Various on-board handle, utensil, bottle and
supply storage locations.
86405760 ECO! T11 Bp LINER

15
Operations
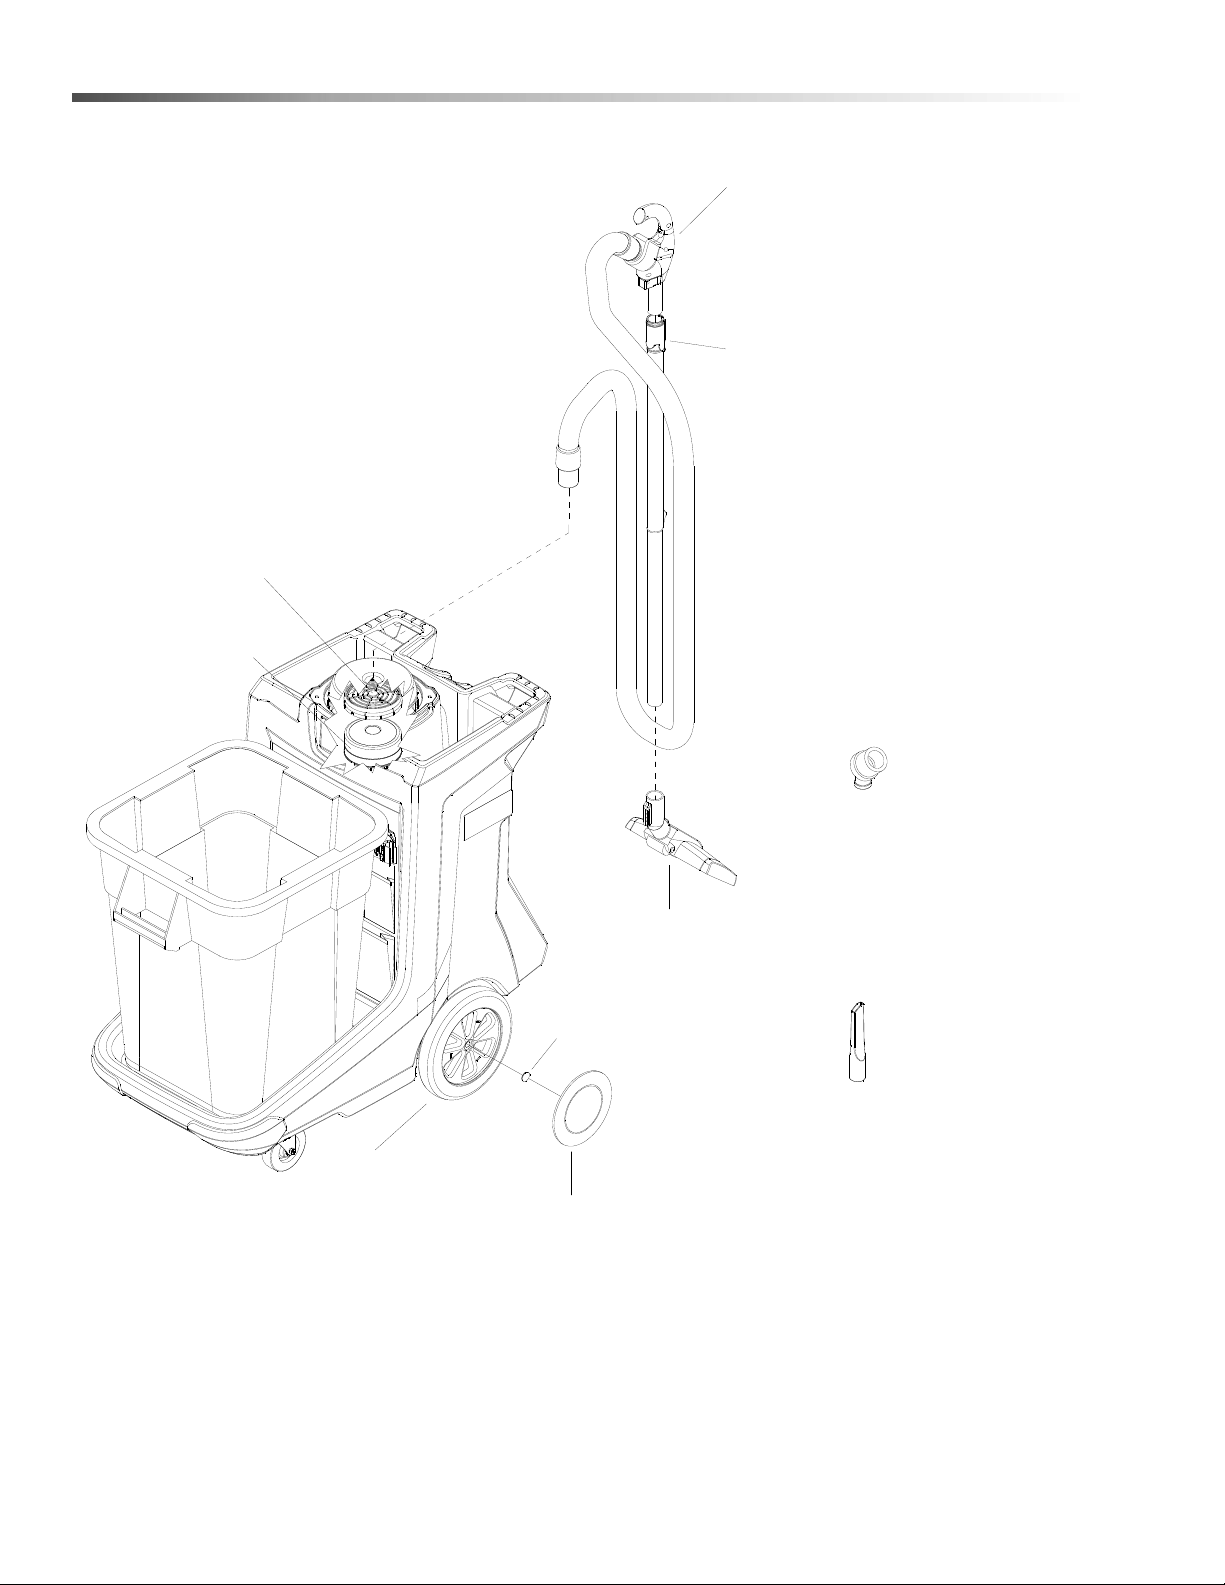
Components/Controls
1. Control Panel 7. On/Off Switch
2. Vacuum Chamber Lid 8. Battery Charger Cord
3. Trash Container 9. Battery Status Indicator LED
4. Vacuum Floor Tool 10. Bag Full Indicator LED
5. Telescoping Wand 11. Supply Storage (Optional)
6. Vacuum Handle
1
7
9
10
8
6
5
4
11
2
3
86405760 ECO! T11 Bp LINER
16
Operations
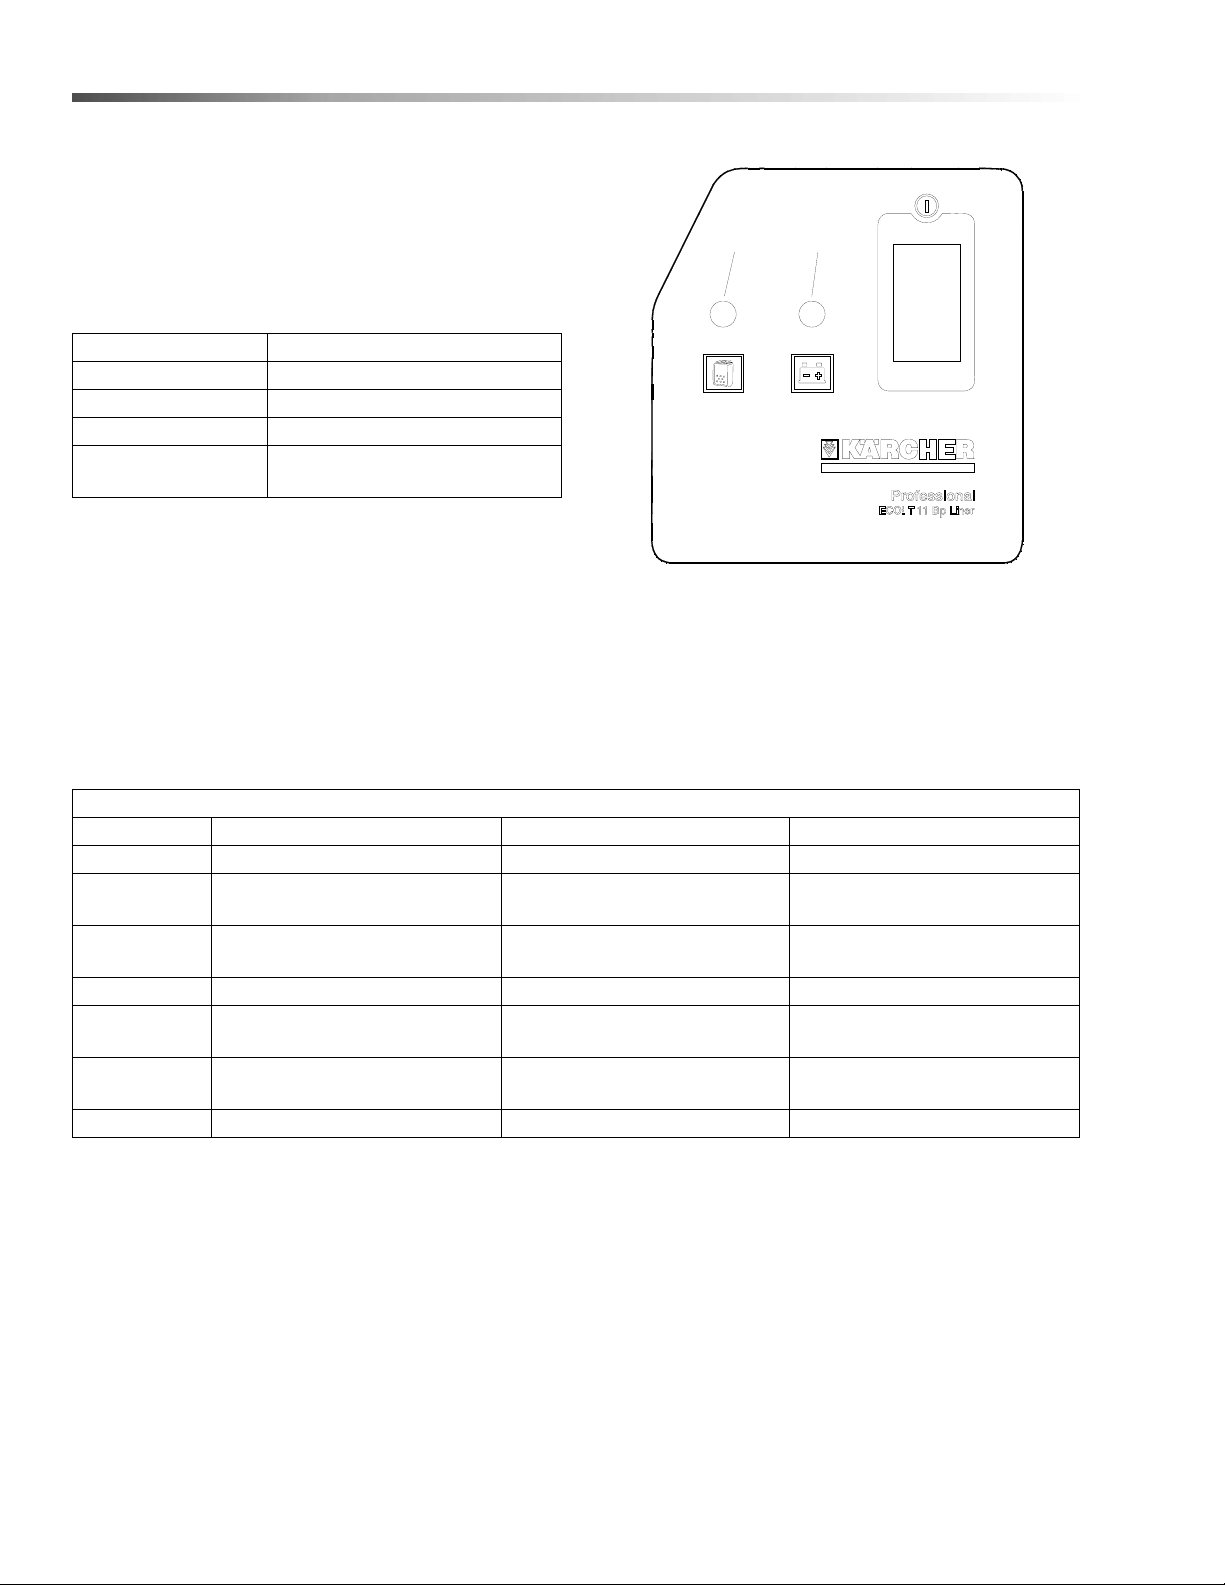
Control Panel
The on/off switch is located on the upper right side of
the control panel
There are two indicator lights on the control panel:
1. Bag Full Indicator LED:
2. Battery Indicator LED:
NOTE: If the battery is dead, the vacuum motor will
not turn on until the charger is plugged in. If the
operator tries to turn on the machine when the battery
is dead, without plugging in the charger, the light will
turn solid red for 10 seconds.
Vacuum Motor LED
Off Off
On Solid Green
Bag Almost Full Solid red.
Bag Full
Machine shuts down, stays
solid red for 10 seconds.
1
2
Battery Indicator LED Table
LED Vacuum Motor Charger Battery
Off Off Unplugged No Activity
Double Blink
Green
On or Off Plugged In Charging
Solid Green/
Off
Off Plugged In Charged
Solid Green On Unplugged >40% Charge
Slow Blinking
Green
On Unplugged
Between 30% and 40%
Charge
Fast Blinking
Green
On Unplugged
Between 20% and 30%
Charge
Solid Red On Unplugged Low Charge or Dead Battery
86405760 ECO! T11 Bp LINER

17
Operations
Equipment Set Up
Charging the Machine
Ensure that the machine has a fully charged battery
pack. Pull the coiled extension cord from its storage
box, plug the cord termination into a grounded wall
outlet.
When the machine is first plugged in, the control panel
battery status light will double-flash green. This
indicates that the battery charger is connected to
external power and is properly charging the batteries.
The charge cycle is complete when the battery status
indicator light is solid green.
NOTE: A full battery charge cycle will take
approximately 8 hours.
Test that the machine is charged. Turn the machine on
by pressing and releasing the power switch located on
the upper right of the control panel. Turn the machine
off during transport to the work location.
NOTE: If the machine has a full battery charge and
does not operate once the on/off switch is engaged it
will be necessary to call a qualified Service
Technician.
Vacuum Bags
FOR SAFETY: Turn off vacuum before changing
filter bags.
For easy vacuum bag replacement and optimum
vacuum system performance disposable paper vacuum
bags and a re-usable cloth bag liner are provided.
Install a suitable vacuum bag (disposable paper) and
clean vacuum bag liner (re-usable cloth) from the top of
the vacuum enclosure. There is also a second stage
filter at the bottom of the vacuum chamber.
1. Twist the vacuum enclosure cover counter-
clockwise and lift.
2. Remove and discard the full paper bag.
3. To minimize soil build-up, remove and shake out
the cloth bag each time the paper bag is replaced.
4. Place the new paper vacuum bag inside of the
cloth bag.
5. Check that the protective second-stage filter is
clean and properly placed at the bottom of the
vacuum chamber.
6. Check that the gasket at the base of the vacuum
cover is in place and free from defects.
7. Replace the vacuum cover. Turn clockwise to
tighten.
Vacuum Accessories
1. Examine the floor tool, vacuum hose and hose
cuffs at both ends to see that there are no obstruc-
tions.
2. Examine the full length of the vacuum hose to
ensure there are no cuts or gaps in the hose
material that would result in loss of airflow.
NOTE: Replace damaged hoses, cuffs or
accessories immediately.
3. Connect the vacuum hose cuff to its working
location in the center of the vacuum cover. Push
lightly to seat the cuff.
4. Connect the appropriate accessory or floor tool to
the working end of the vacuum hose and press
firmly into place.
5. Extend the telescoping wand to an appropriate
length, based on the cleaning tasks being
performed.
86405760 ECO! T11 Bp LINER

18
Maintenance
Daily Maintenance
Before making any repairs or adjustments to the
machine, disconnect the power cord from the
electrical source.
Retirez le cordon d'alimentation de la machine de la
source électrique avant de procéder à des répara-
tions ou des ajustements de la machine.
At the end of each working day
1. Turn cloth filter bag inside out and brush clean. Do
not use a wire brush. Cloth bags can be vacuumed
with another machine or washed occasionally in
warm water using a mild, water-based soap
without harming filtering capacity. Allow to dry
completely before using.
2. Wipe down exterior of machine.
3. Check round foam filter at bottom of vacuum
chamber and clean if necessary. For best results,
replace the filter every 6 months
4. Inspect hose for wear. Frayed or cracked hoses
should be replaced to avoid vacuum loss.
5. Inspect power cord for wear. To prevent electric
shock, immediately replace cords with frayed or
cracked insulation.
Periodically inspect all hoses, electrical cables and
connections on your machine. Frayed or cracked hoses
should be repaired or replaced to eliminate vacuum
pressure loss. The electrical cable must be well
insulated. If the cable insulation is broken or frayed,
repair or replace immediately. Don't take chances with
electrical fire or shock.
86405760 ECO! T11 Bp LINER
19
Maintenance
Troubleshooting
Battery Indicator LED Error Codes
Blink Code Error Condition
1 Vacuum Over Current Vacuum > 15A
2 Vacuum Under Current Vacuum < 8A
3 Charger Over Current, Vacuum On Charger > 19A
4 Charger Over Current, Vacuum Off Charger > 8A
5 Charger Under Current, Vacuum On Charger < 15A and Battery <39V
6 Bag Full Sensor Open Circuit
7 Bag Full Sensor Short Circuit
8 Stalled Vacuum Motor during Startup
9 Vacuum Motor Over Temp. Temp. >203°F (95°C)
10 Machine Over Temp. Temp. >167°F (75°C)
11 Charger Over Voltage, Vacuum On Charger >40V
12 Charger Over Voltage, Vacuum Off Charger >50V
PROBLEM. CAUSE SOLUTION
No power, vacuum
motor will not run
Dead batteries. Plug in cord to charge.
Circuit breaker tripped in building. Reset breaker.
Thermal protector tripped
Machine requires cool down and reset. To
prevent repeated tripping, clear all restric-
tions out of hose and tools, replace paper
filter bag. Clean cloth filter bag and internal
foam filter, clear all restrictions to the
exhaust air flow.
Faulty switch. Call for service.
Faulty power cord. Call for service.
Poor vacuum
performance
Debris plugging hose, wand or accessory
tool.
Remove debris.
Paper bag full. Replace bag.
Cloth bag plugged.
Remove from machine, turn inside out and
shake or brush clean.
Hosecuffs loose or hose cracked. Tighten cuffs or replace hose.
Cap loose on top of machine. Tighten cap.
Vacuum filter plugged.
Remove filter(s) and clean. Replace filter(s)
if needed.
Does not charge
with cord plugged in
Faulty charge system. Call for service.
86405760 ECO! T11 Bp LINER

20
Maintenance
Service Schedule
MAINTENANCE DAILY WEEKLY MONTHLY QUARTERLY
BI-
ANNUALLY
Check bag and replace if necessary *
Check hoses for wear, blockages, or
damage
*
Check major gaskets for leakage *
Check brush-should be clean with no lint or
strings attached
*
Store cord in pocket *
Check hoses for cracks or holes *
Check all cords and handles for damage or
cracks; replace as necessary
*
Inspect and replace all filters including
exhaust, intake, and microfilters
*
Check all gaskets for wear and leakage *
Check vacuum motor carbon brushes *
Check for arcing and pitting on any electrical
contacts; replace if found
*
Inspect and clean vacuum accessories;
check for dents and damage which would
detrimentally effect vacuum and brush
movement
*
Check overall performance of machine *
Replace foam vacuum filter *
Replace cloth bag *
86405760 ECO! T11 Bp LINER
21
Maintenance
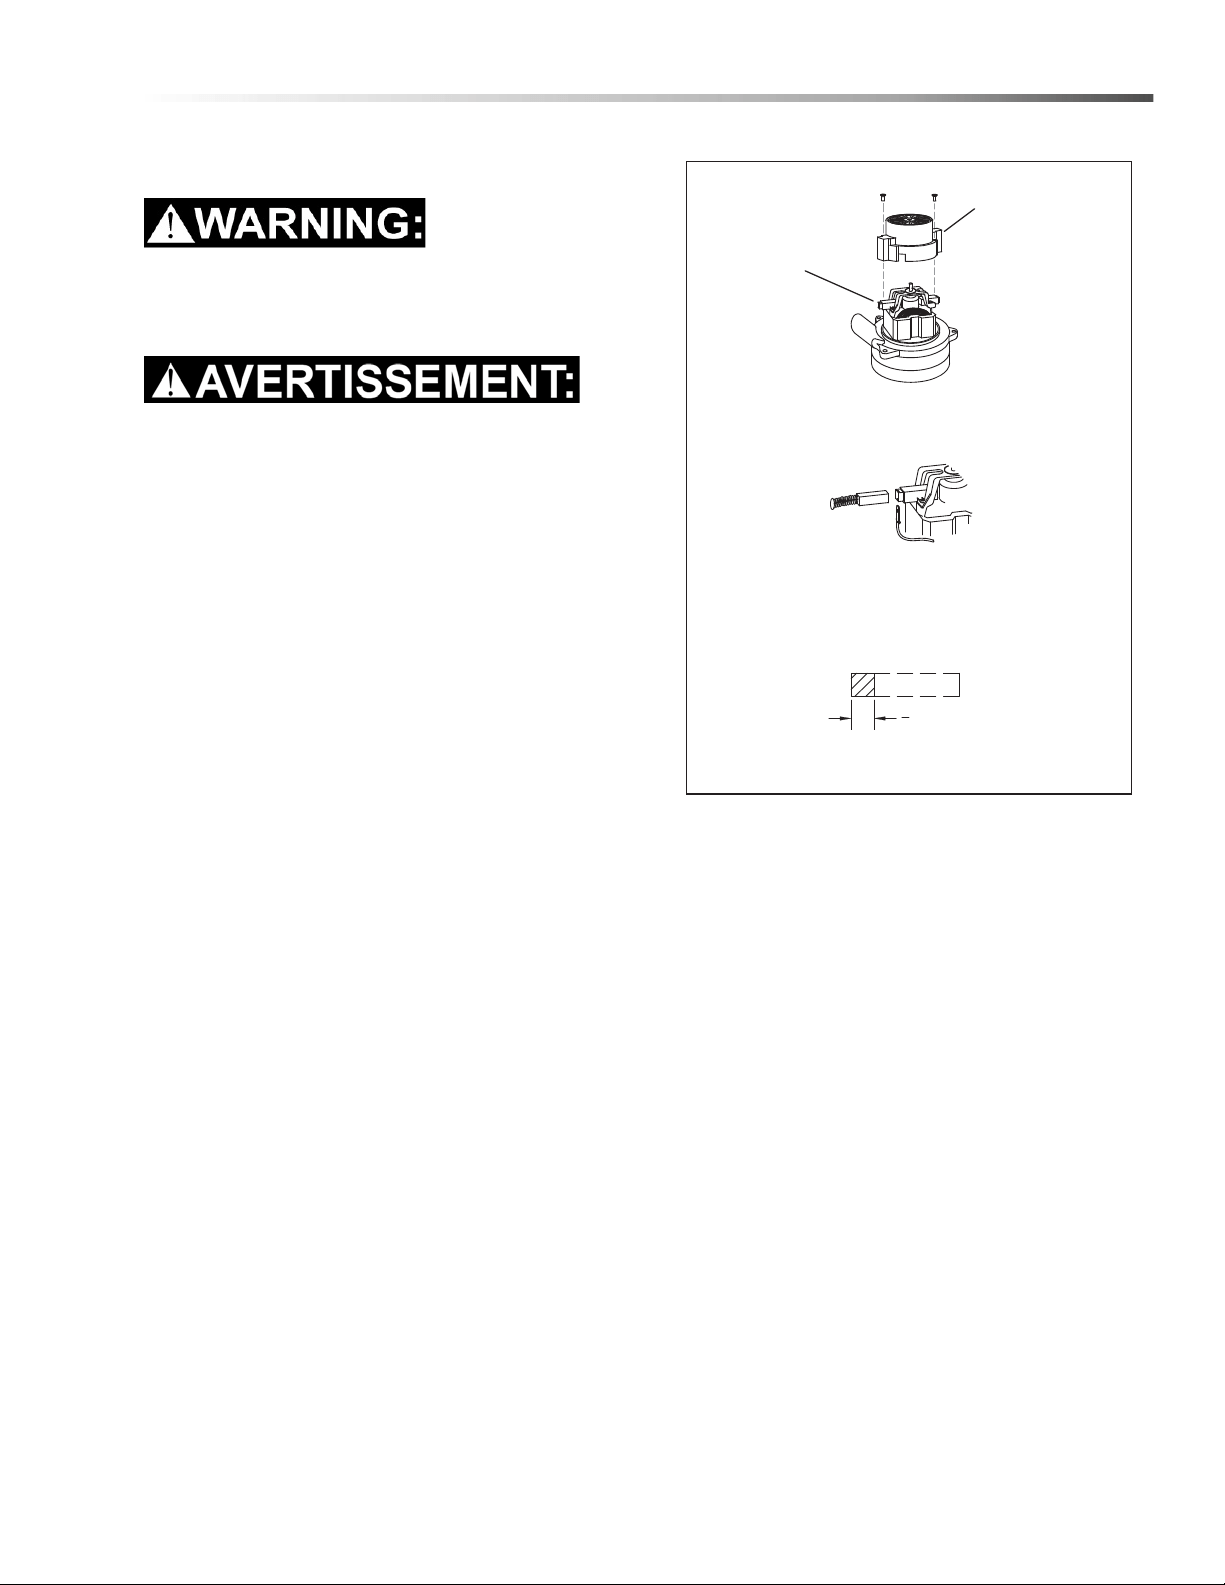
Vacuum Motor Replacement
Only qualified maintenance personnel are to
perform the following repairs.
Seul le personnel d'entretien qualifié peut effectuer
des réparations
1. Turn off vacuum and unplug machine
2. Remove the (4) screws that fasten the vacuum
housing to the cart.
3. Remove the (7) screws that fasten the back panel
to the cart and set the panel aside.
4. Disconnect the hose and electrical terminals from
the vacuum housing.
5. Lift the vacuum housing assembly from the cart.
6. Remove (1) screw that fastens the electrical
terminal to the outside of the vacuum housing.
7. Remove the (5) screws that fasten the exhaust
bracket to the vacuum housing.
8. Remove the (3) screws that hold the vacuum motor
to the vacuum housing.
9. Remove vacuum motor.
10. Remove (4) screws that fasten isolator assembly to
vacuum motor.
11. Remove (2) screws that fasten the electrical
terminals to the vacuum motor.
12. Reverse process to install vacuum motor.
Vacuum Motor Carbon Brushes Replacement
End Cap
Carbon
Brushes
If armature commutator is grooved, extremely pitted or not
concentric, the motor will need to be replaced or sent to a
qualified service center.
Important:
These brushes wear quicker as the length shortens
due to increased heat. Spring inside brush housing
will damage motor if brushes are allowed to wear
away completely.
Periodically check the length of the carbon brushes.
Replace both carbon brushes when either is less than
3/8" (9.5mm) long.
3
8
[9.5mm]
WARNING:
The ground wire
must be attached
for safe operation.
See wiring
diagram.
86405760 ECO! T11 Bp LINER
22
Maintenance
Use AGM or Gel Batteries Only. Use of other
batteries may result in operator injury.
Utilisez uniquement des batteries AGM ou Gel.
L’utilisation d’autres batteries peut blesser l’opéra-
teur.
Batteries
The batteries provide the power to operate the
machine. The batteries require regular maintenance to
keep them operating at peak efficiency.
The machine batteries will hold their charge for long
periods of time, but they can only be charged a certain
number of times. To get the greatest life from the
batteries, charge them when their charge level reaches
25% of a full charge.
Do not allow the batteries to remain in a discharged
condition for any length of time. Never expose a
discharged battery to temperatures below freezing.
Discharged batteries will freeze causing cracked
cases. Do not operate the machine if the batteries are
in poor condition or if they have a charge level below
25% (specific gravity below 1.155).
Keep all metallic objects off the top of the batteries, as
they may cause a short circuit. Replace worn or
damaged cables and terminals.
Not all batteries require maintenance. AGM and Gel
batteries are maintenance free. Do not attempt to
remove sealed caps from AGM or Gel batteries.
Warranty is void if caps are removed from AGM or
Gel battery.
L’entretien n’est pas nécessaire pour toutes les
batteries. Les batteries AGM et Gel ne nécessitent
pas d’entretien. N'essayez pas d'enlever les
bouchons scellés des batteries AGM ou Gel. La
garantie est annulée si les bouchons sont retirés
des batteries AGM ou Gel.
Battery Maintenance
Only qualified maintenance personnel are to
perform the following repairs.
Seul le personnel d'entretien qualifié peut effectuer
des réparations
When servicing machine, avoid contact with
battery acid.
Lors de l'entretien de la machine, évitez tout
contact avec l'acide de batterie.
Batteries emit hydrogen gas. Explosion or fire can
result. Keep sparks and open flame away. Keep
covers open when charging.
Les batteries émettent du gaz hydrogène. Une
explosion ou un incendie peut en résulter.
Maintenez les étincelles et les flammes nues à
l’écart. Gardez les carters ouverts lors du charge-
ment.
86405760 ECO! T11 Bp LINER

23
Maintenance
Use AGM or Gel Batteries Only. Use of other
batteries may result in operator injury.
Utilisez uniquement des batteries AGM ou Gel.
L’utilisation d’autres batteries peut blesser l’opéra-
teur.
Wear eye protection and protective clothing when
working with batteries.
Portez des lunettes de protection et des vêtements
de protection lorsque vous travaillez avec des
batteries.
Charge batteries in a well ventilated area.
Chargez les batteries dans un endroit bien ventilé.
Battery Maintenance (continued)
1. The batteries originally installed are sealed and do
not require electrolyte level monitoring.
2. When cleaning the batteries, use a solution of
baking soda and water. Do not allow the cleaning
fluid to enter the battery cells.
3. Ensure that all connections are tight and all
corrosion removed.
4. Every 4 to 6 months, remove the batteries from the
machine and clean the battery cases and battery
compartment.
86405760 ECO! T11 Bp LINER
24
Maintenance
Charging Batteries
Use AGM or Gel Batteries Only. Use of other
batteries may result in operator injury.
Utilisez uniquement des batteries AGM ou Gel.
L’utilisation d’autres batteries peut blesser l’opéra-
teur.
Only qualified maintenance personnel are to
perform the following repairs.
Seul le personnel d'entretien qualifié peut effectuer
des réparations
Not all batteries require maintenance. AGM and Gel
batteries are maintenance free. Do not attempt to
remove sealed caps from AGM or Gel batteries.
Warranty is void if caps are removed from AGM or
Gel battery.
L’entretien n’est pas nécessaire pour toutes les
batteries. Les batteries AGM et Gel ne nécessitent
pas d’entretien. N'essayez pas d'enlever les
bouchons scellés des batteries AGM ou Gel. La
garantie est annulée si les bouchons sont retirés
des batteries AGM ou Gel.
When servicing machine, avoid contact with
battery acid.
Lors de l'entretien de la machine, évitez tout
contact avec l'acide de batterie.
Batteries emit hydrogen gas. Explosion or fire can
result. Keep sparks and open flame away. Keep
covers open when charging.
Les batteries émettent du gaz hydrogène. Une
explosion ou un incendie peut en résulter.
Maintenez les étincelles et les flammes nues à
l’écart. Gardez les carters ouverts lors du charge-
ment.
Wear eye protection and protective clothing when
working with batteries.
Portez des lunettes de protection et des vêtements
de protection lorsque vous travaillez avec des
batteries.
Charge batteries in a well ventilated area.
Chargez les batteries dans un endroit bien ventilé.
86405760 ECO! T11 Bp LINER
25
Maintenance
Batteries emit hydrogen gas. Explosion or fire can
result. Keep sparks and open flame away. Keep
covers open when charging.
Les batteries émettent du gaz hydrogène. Une
explosion ou un incendie peut en résulter.
Maintenez les étincelles et les flammes nues à
l’écart. Gardez les carters ouverts lors du charge-
ment.
Charging Batteries (continued)
1. This machine includes an on-board charger.
2. The battery status indicator LED will display a color
and flashing patterns during machine usage. See
the Battery Indicator Table.
3. Connect the coiled cord to a grounded wall outlet
to start the charge cycle.
4. Allow the battery pack to progress through a full
charge cycle every day upon completion of a work
shift. At a minimum the battery pack should be
allowed to progress through a full charge cycle at
least once per week.
NOTE: A full battery charge cycle will take
approximately 8 hours.
NOTE: If the machine has a full battery charge and
does not operate once the on/off switch is engaged it
will be necessary to call a qualified Service
Technician.
Battery Indicator LED Table
LED Vacuum Motor Charger Battery
Off Off Unplugged No Activity
Double Blink
Green
On or Off Plugged In Charging
Solid Green/
Off
Off Plugged In Charged
Solid Green On Unplugged >40% Charge
Slow Blinking
Green
On Unplugged
Between 30% and 40%
Charge
Fast Blinking
Green
On Unplugged
Between 20% and 30%
Charge
Solid Red On Unplugged Low Charge or Dead Battery
86405760 ECO! T11 Bp LINER

26
Maintenance
Batteries
Use AGM or Gel Batteries Only. Use of other batteries may result in operator injury.
Utilisez uniquement des batteries AGM ou Gel. L’utilisation d’autres batteries peut blesser l’opérateur.
Only qualified maintenance personnel are to perform the following repairs.
Seul le personnel d'entretien qualifié peut effectuer des réparations.
Not all batteries require maintenance. AGM and Gel batteries are maintenance free. Do not attempt to
remove sealed caps from AGM or Gel batteries. Warranty is void if caps are removed from AGM or Gel
battery.
L’entretien n’est pas nécessaire pour toutes les batteries. Les batteries AGM et Gel ne nécessitent pas
d’entretien. N'essayez pas d'enlever les bouchons scellés des batteries AGM ou Gel. La garantie est
annulée si les bouchons sont retirés des batteries AGM ou Gel.
Only qualified maintenance personnel are to perform the following repairs.
Seul le personnel d'entretien qualifié peut effectuer des réparations
86405760 ECO! T11 Bp LINER

27
Maintenance
FOR SAFETY: Before leaving or servicing the
machine; stop on level surface and turn off
machine.
Changing Batteries
1. Open the control panel.
2. Disconnect battery pack from machine.
3. Use the proper size open end wrench to discon-
nect main ground wire first and secure cable
terminal away from batteries.
4. Disconnect main positive lead and secure cable
terminals away from batteries.
5. Remove bolt from Battery Strap.
6. Loosen both terminals on each jumper cable and
remove one at a time.
7. Prepare a suitable site to place the batteries.
Delta Q IC650 Charger Maintenance
Instructions
1. Do not expose charger to oil, dirt, mud or direct
heavy water spray when cleaning the vehicle or
machine.
2. The enclosure of the charger meets IP66, making it
dust-tight and protected against powerful water
jets. The AC inlet connection itself, when mated, is
rated to IP20, which is not protected against water.
Protect the AC connection if used in wet or dusty
environments.
3. If the detachable input power supply cord set is
damaged, replace with a cord that is appropriate
for your region:
- North America: UL or CSA listed / approved
detachable cord at least 1.8m in length (≥ 6 feet), 3
conductor, 16AWG minimum and rated SJT; termi-
nated in a grounding type IEC 60320 C14 plug
rated 250V, 13A minimum.
- All other regions: Safety approved detachable
cord, 3 conductor, 1.5mm² minimum, rated appro-
priately for industrial use. The cord set must be
terminated on one end with a grounding type input
connector appropriate for use in the country of
destination and, on the other end, an output
grounding type IEC 60320 C14 plug.
86405760 ECO! T11 Bp LINER
28
Maintenance
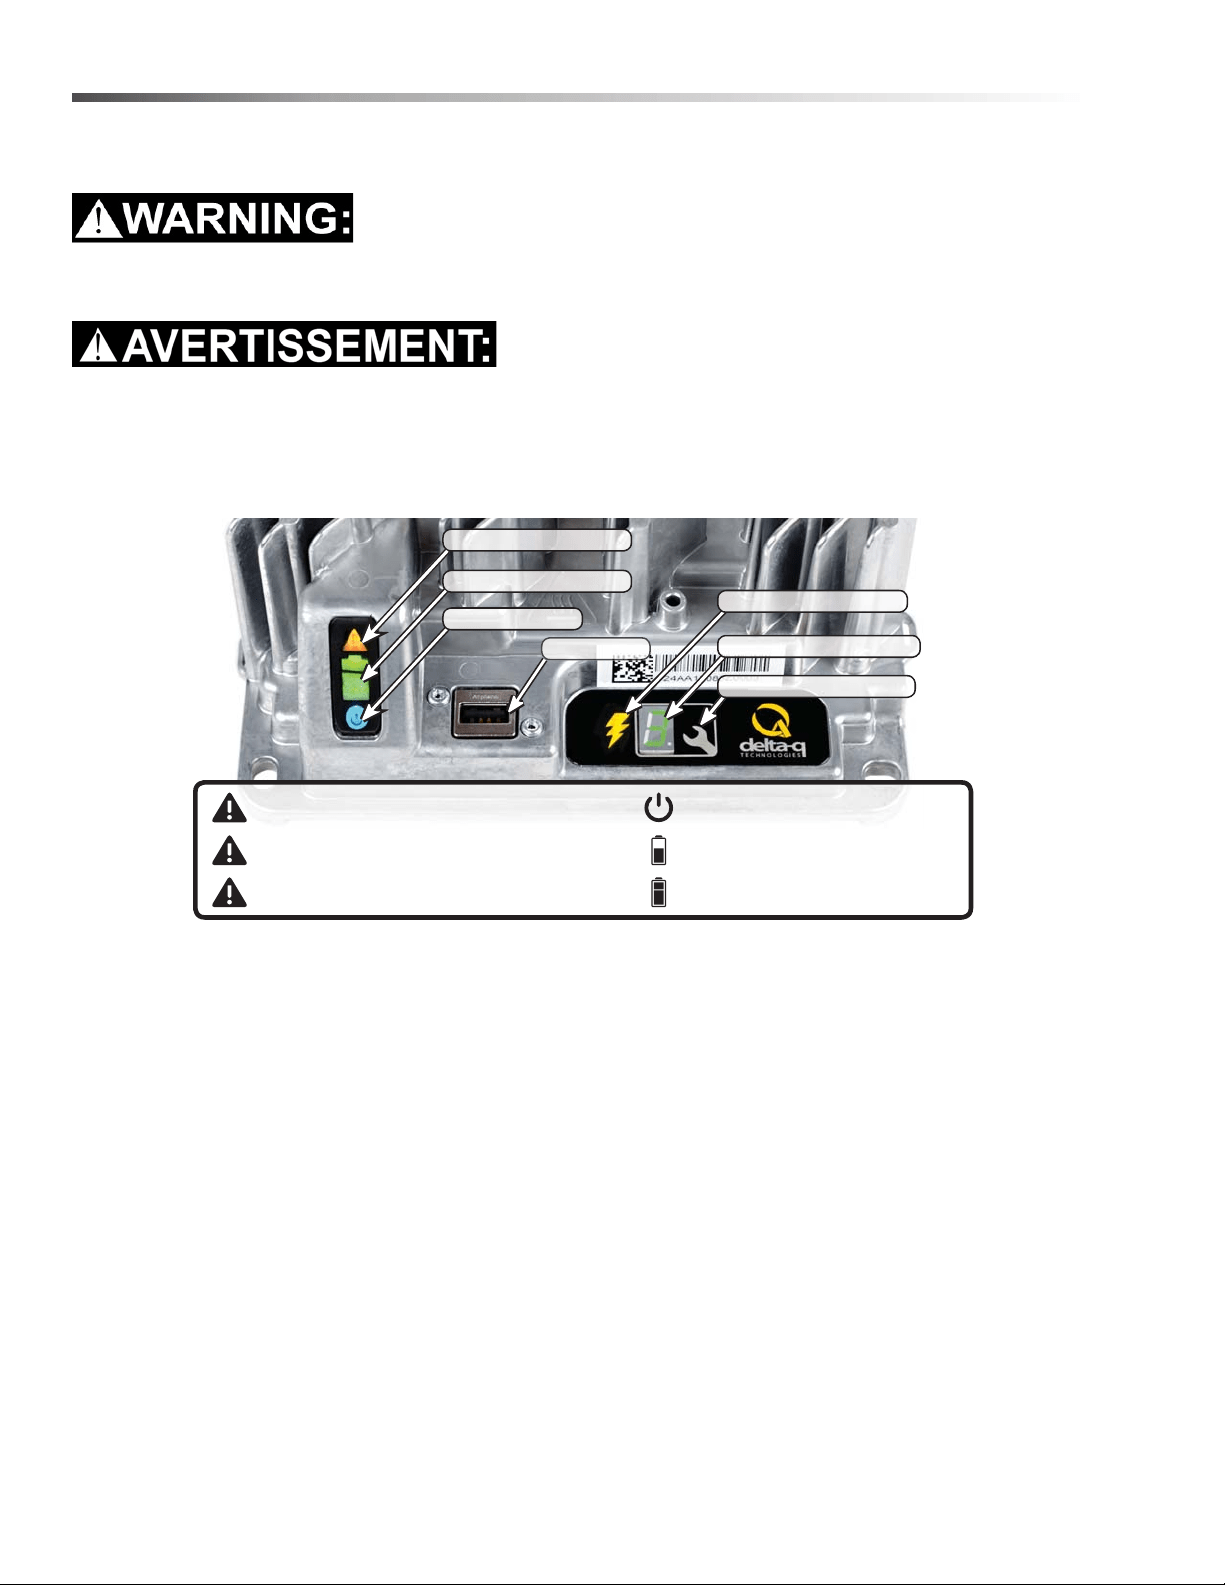
Delta Q IC650 Charger Operating Instructions
Only qualified maintenance personnel are to perform the following repairs.
Seul le personnel d'entretien qualifié peut effectuer des réparations
- The charger may become hot during charging. Use hand protection to safely handle the charger during
charging.
- Extension cords must be a 3-wire cord no longer than 30m (100') at 10 AWG or 7.5m (25') at 16 AWG, per UL
guideline
1. The USB Host Port allows data to be transferred to and from the charger using a standard USB flash drive,
including the downloading of charge tracking data and updating of the charger’s software and / or charge
profiles.
2. The Charging Output Indicator means that the charger output is active, and there is a potential risk of electric
shock.
3. The Charge Profile / Error Display shows one of four possible codes to indicate different conditions:
- ‘F’ codes meaning that an internal fault condition has caused charging to stop.
- ‘E’ codes meaning that an external error condition has caused charging to stop.
- ‘P’ code meaning that the charger programming mode is active.
- ‘USB’ code meaning that the USB interface is active, and the USB flash drive should not be removed.
The ‘E,’ ‘F’ and ‘P’ codes will appear, then are followed by three numbers and a period to indicate different
conditions (e.g. E-0-0-4). “See the Charger Fault Codes” or “Charger Error Codes” sections for details on
these conditions and their solutions.
4. The Select Charge Profile Button is used to select a charge profile from those stored on the charger. Up to 25
charge profiles can be stored. See the “Selecting A Charge Profile” section for instructions.
Fault / Error / USB Indicator
Battery Charging Indicator
AC Power Indicator
USB Host Port
1
Charging Output Indicator
2
3
4
Solid red = Charger fault
See display panel for details
Flashing amber = External error condition - caution
See display panel for details
Flashing green = USB port active
Solid green = Safe to remove USB ash drive
Flashing green = Low state of charge
Solid green = High state of charge
Flashing green = High state of charge
Solid green = charge completed
Solid blue = AC power available
Charge Prole/Error Display
Select Charge Prole Button
86405760 ECO! T11 Bp LINER

29
Maintenance
Selecting a Charge Profile
1. Disconnect AC input from the charger, or from the
wall outlet. Wait 30 seconds for the input relay to
open.
Figure 1:
Disconnect AC
input from the
charger.
2. While reconnecting AC input, press and hold
Select Charge Profile button. Hold the button until
Error Indicator is on and Battery Charging Indicator
starts flashing.
Figure 2:
Reconnect AC
input while
holding the
Select Charge
Profile Button.
3. Press and release the Select charger Profile
Button to advance through charging profiles loaded
on the charger. The selected charging profile will
be displayed up to three times (e.g. “P-0-1-1” for
Profile 11).*
Figure 3:
Press the
Select Charge
Profile Button
to advance
through the
charge
profiles. Hold
the button for
10 seconds to
confirm your
selection.
*Process will time out and profile will remain
unchanged if there is 15 seconds of inactivity, a profile
number is allowed to display three times, or if AC power
is cycled.
4. Once desired charging profile is displayed, press
and hold button for 10 seconds (see Figure 3) to
confirm selection and exit Profile Selection Mode.
5. Press the Select Charge Profile Button to check
that the desired profile is selected.
Use this table to record the charging profiles on
your charger.
Profile Logic
Profiles #42, 62 and 73 are programmed to automati-
cally restart a charge cycle after 14 days or 1.8V/cell
have been reached by the batteries if the charger
remains connected to AC power.
NOTE: Each profile is programmed to optimize the
life and performance of their corresponding battery,
contact the manufacturer before changing battery
charger profiles.
86405760 ECO! T11 Bp LINER
30
Maintenance
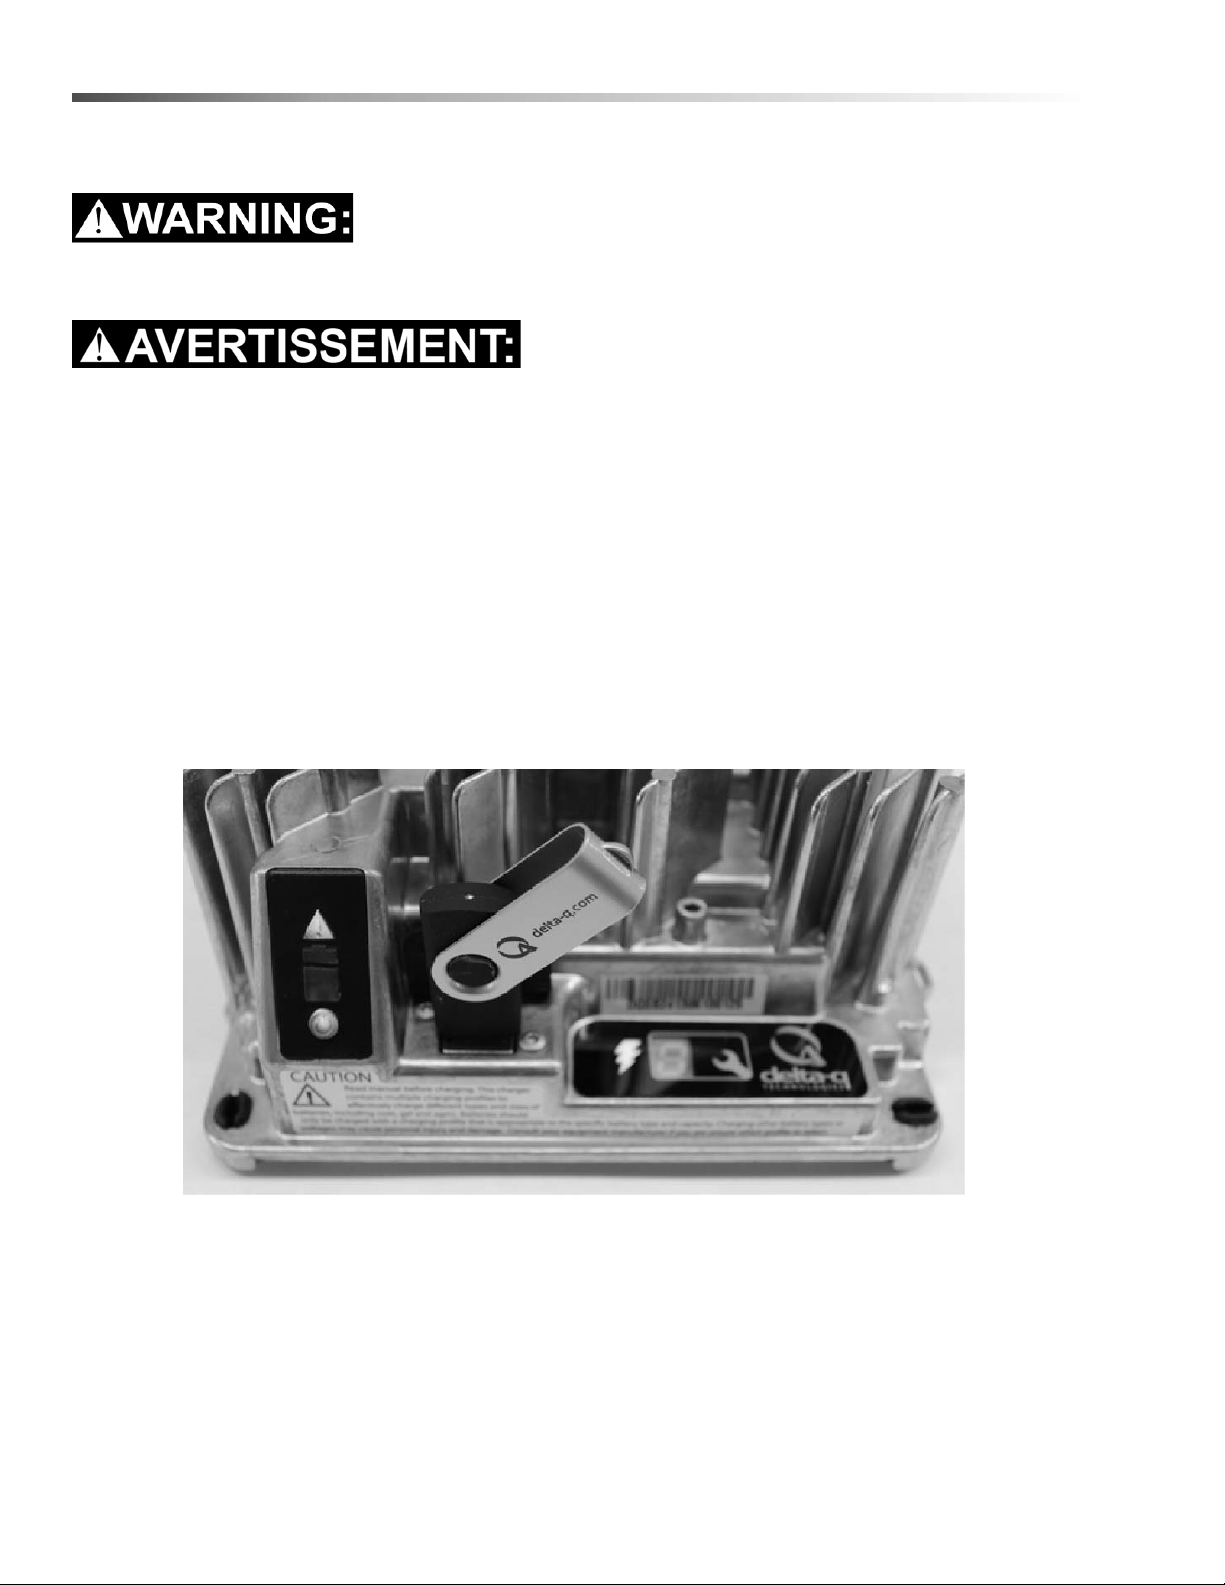
Configuring the IC650 Charger Using a USB Flash Drive
Only qualified maintenance personnel are to perform the following repairs.
Seul le personnel d'entretien qualifié peut effectuer des réparations
Using the Delta Q software, USB storage drives can be pre-programmed to certain charger configuration.
To use the USB port, follow these steps:
1. Insert the USB flash drive at any time, except during a charge cycle. Stop the charge cycle by removing AC
power or the DC connection to the batteries. The charger will power the USB port from the remaining AC
connection.
2. If there is enough disk space, the charger will write charge tracking data to the drive. The Fault/Error/USB
Indicator will flash green during reading and writing.
3. If the drive contains compatible configuration files, the charger will load them.
4. The IC650 Charger will briefly reset.
5. Remove the drive when the Fault/Error/USB Indicator is solid green.
Figure 4, Insert the USB flash drive to begin the reprogramming process. When complete, the Fault/Error/USB
Indicator will be solid green as shown.
Troubleshooting
If the alarm indicator flashes amber, note the error code and retry the update. If there is no response to inserting
the USB drive when the charger is being used off-board, check that AC power is available and connected. If the
charger is installed on-board, ensure that the charger either has AC power and / or batteries are connected.
86405760 ECO! T11 Bp LINER
31
Maintenance
Confirming a Software Update
After using a USB flash drive to update the charger firmware, the update can be confirmed by reviewing the .txt file
written to the flash drive by the charger. It will be located in the folder labelled ‘syslog’ (e.g.
F:\CHARGER\RESP\serialno\syslog\00000000.txt).
Open this file using a text editing program such as Notepad or Microsoft Word. If the update has been successful,
near the end of the text you will see a description resembling “SM Task: Successful upgrade at
Major[001].Minor[991].Build[000]variant[008].”
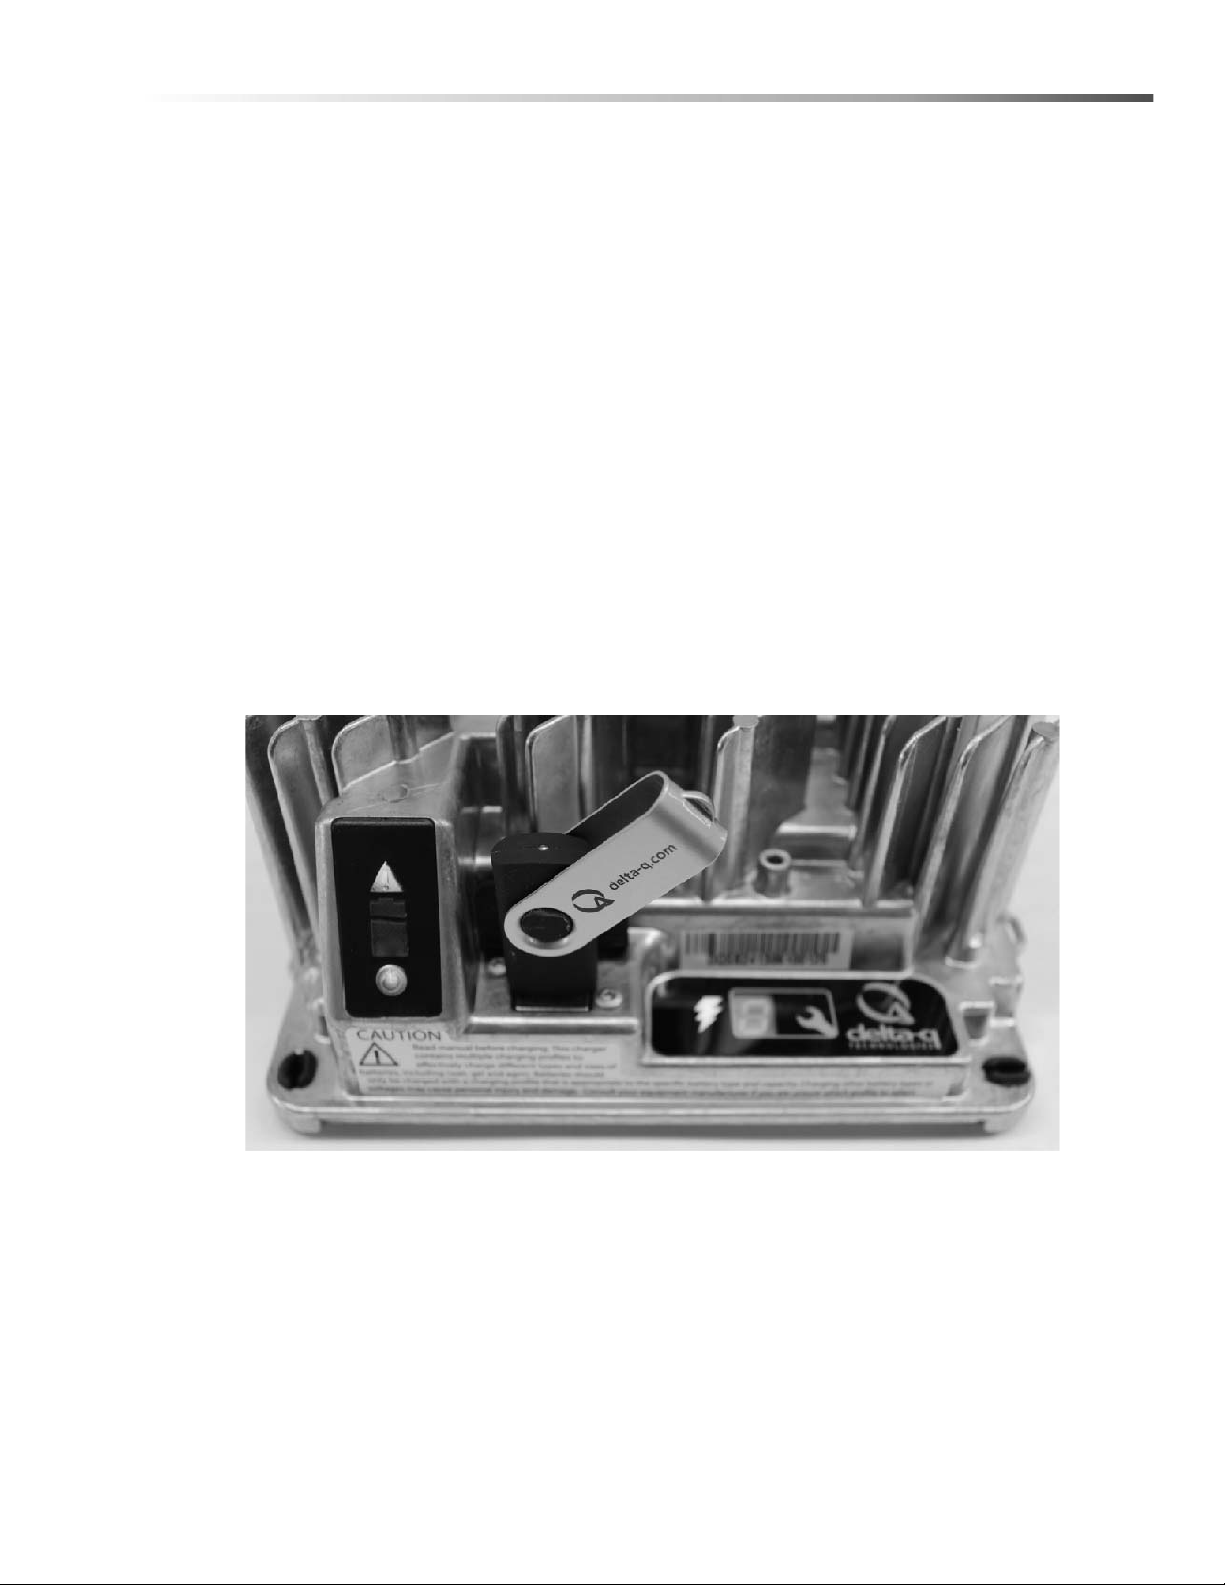
Charge Tracking Data
All IC650 Chargers record data such as amp hours returned, charge cycle completion or interruption, and the
charge profile being used. This data can be very useful in vehicle or machine diagnostics.
To retrieve this data, follow these steps:
1. After a charge cycle is complete, or the charger is disconnected from the battery pack, insert a USB flash drive
with at least 2MB of free space into the IC650 Charger’s USB hose port. The charger will automatically begin
to downlad the data, shown on the Fault/Error/USB Indicator with a flashing green light.
If you plan to download data from a large number of chargers, having more free space on your USB flash drive is
recommended. If you want to update the software on only some of your chargers, it is recommended that you use
separate USB flash drives for updating and downloading charge tracking data.
Figure 5, Insert the USB flash drive to begin the charge data download process. This step can be completed using
the same USB flash drive programmed to update the charger’s software. The process is completed when the USB
indicator is solid green, and no longer flashing.
2. The downloading process is complete when the Fault/Error/USB Indicator is solid green. The USB flash drive
can be removed from the charger.
86405760 ECO! T11 Bp LINER
32
Suggested Spare Parts
8.630-979.0
WHEEL
8.630-007.0
HUBCAP
6.907-410.0
FLOOR
ATTACHMENT
8.600-351.0
MOTOR FILTER
8.683-043.0
CARBON BRUSH FOR
24/36V C-MOTOR
8.640-204.0
WAND
8.640-361.0
HOSE ASSEMBLY
6.903-403.0
CREVICE NOZZLE
8.634-487.0
DUST BRUSH
8.619-885.0
REPLACEMENT PAPER BAGS
(PKG. OF 10)
NOT SHOWN
8.640-211.0
CLOTH VACUUM
BAG
NOT SHOWN
8.600-166.0
SHAFT HUBCAP
86405760 ECO! T11 Bp LINER

33
Notes
86405760 ECO! T11 Bp LINER


ECO! T11 BP LINER
Valid on 27.09.2018 Page 2 / 19
POS Description Quantity Unit
1 BATTERIES 1.000 ST
2 BODY 1.000 ST
3 CHARGER 1.000 ST
4 LABELS 1.000 ST
5 VACUUM 1.000 ST
6 WAND 1.000 ST
7 WHEELS 1.000 ST
8 TRASH ACCESSORIES 1.000 ST
100 ECO! CART SERIAL NUMBER 1.000 ST
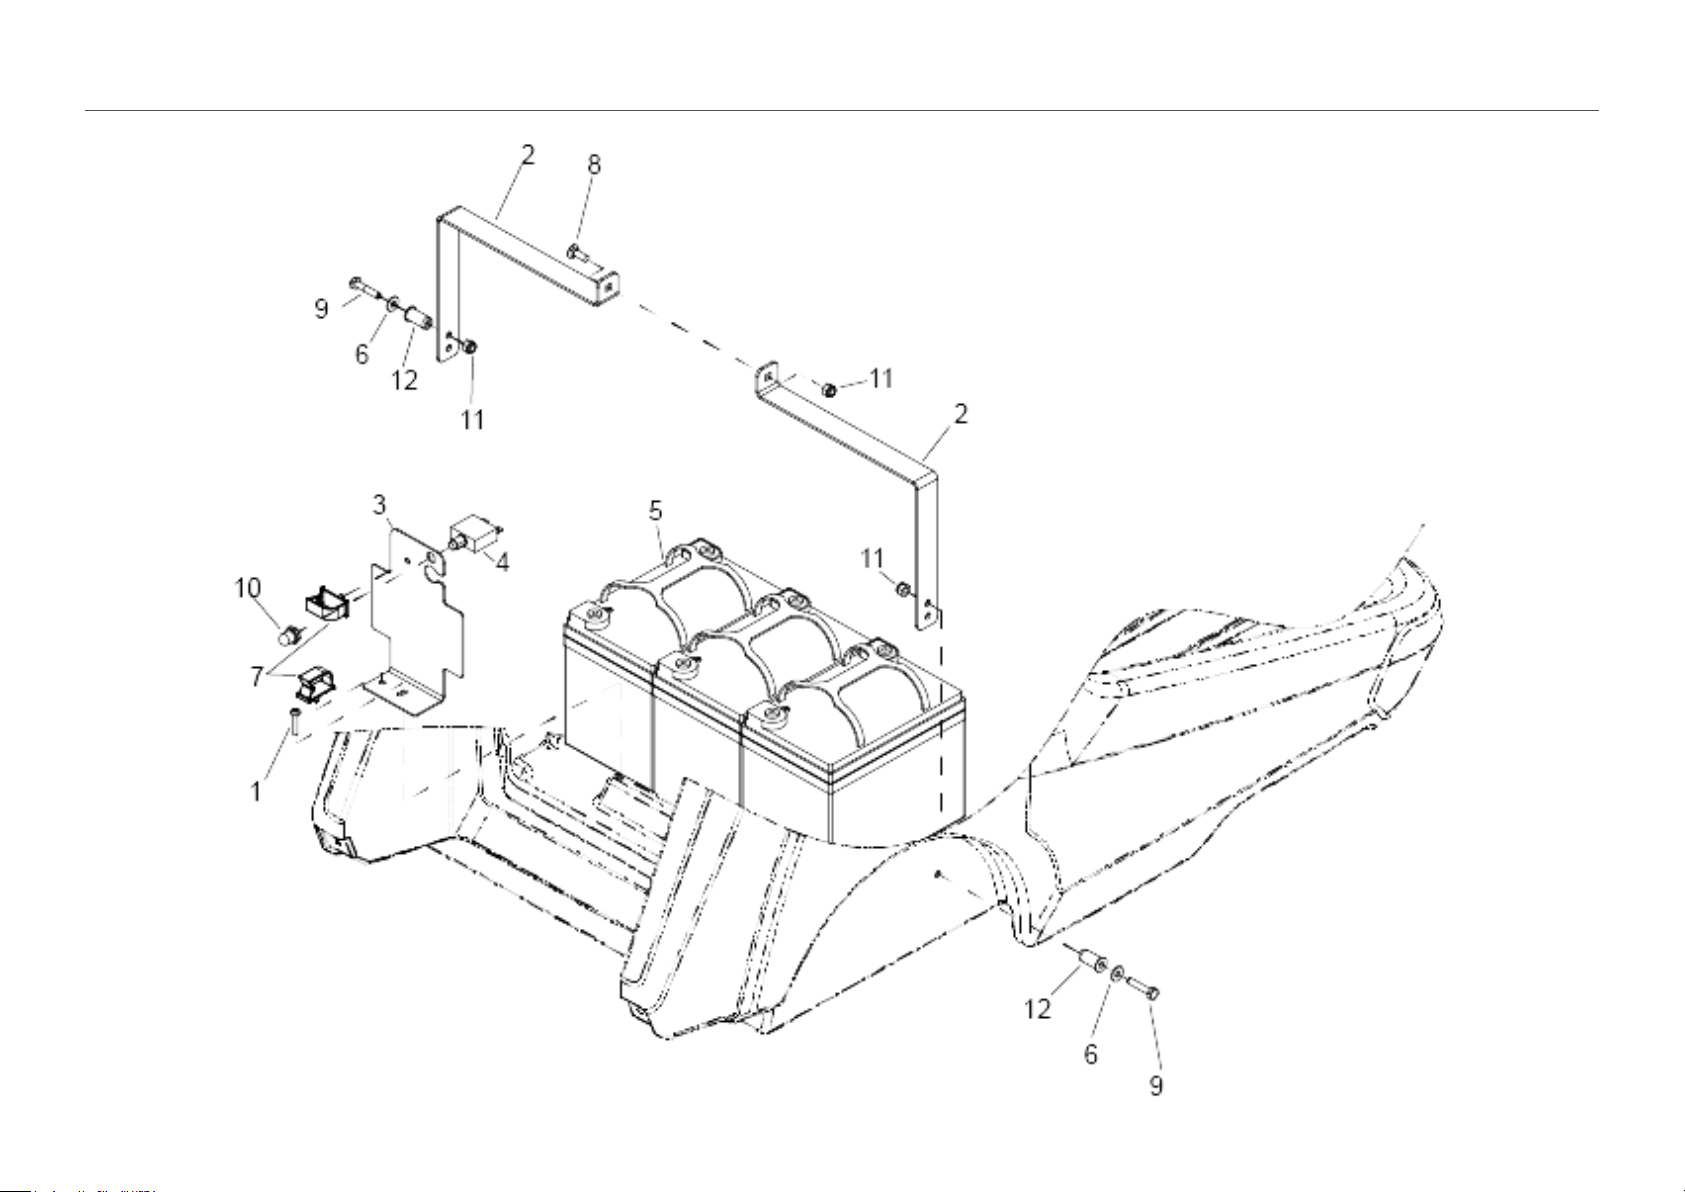
1 BATTERIES
Valid on 27.09.2018 Page 3 / 19

1 BATTERIES
Valid on 27.09.2018 Page 4 / 19
POS Article no. Description Quantity Unit
1 8.640-858.0 Screw 10-32 X 1 TPNHMS SS BLK ZNPLT 1.000 ST
2 8.640-395.0 Bracket battery strap 2.000 ST
3 8.640-240.0 Bracket battery harness 1.000 ST
4 8.640-214.0 BREAKER, 30A, 250VAC, 50VDC 1.000 ST
5 8.637-463.0 Battery 12V 33AH 3.000 ST
6 8.636-177.0 WASHER, 1/4 FLT SS 3.000 ST
7 8.636-152.0 CLIP, CABLE ENTRY 2.000 ST
8 8.627-695.0 SCREW, 1/4-20 X .75 CARR SS 1.000 ST
9 8.627-382.0 SCREW, 1/4-20 X 1.25 HHMS SS 2.000 ST
10 8.600-890.0 BOOT, SEAL-PUSH BUTTON 7/16-28 1.000 ST
11 8.600-581.0 NUT, 1/4-20 HEX NYLOCK SS 3.000 ST
12 8.600-562.0 NUT, 1/4-20 WELL 2.000 ST
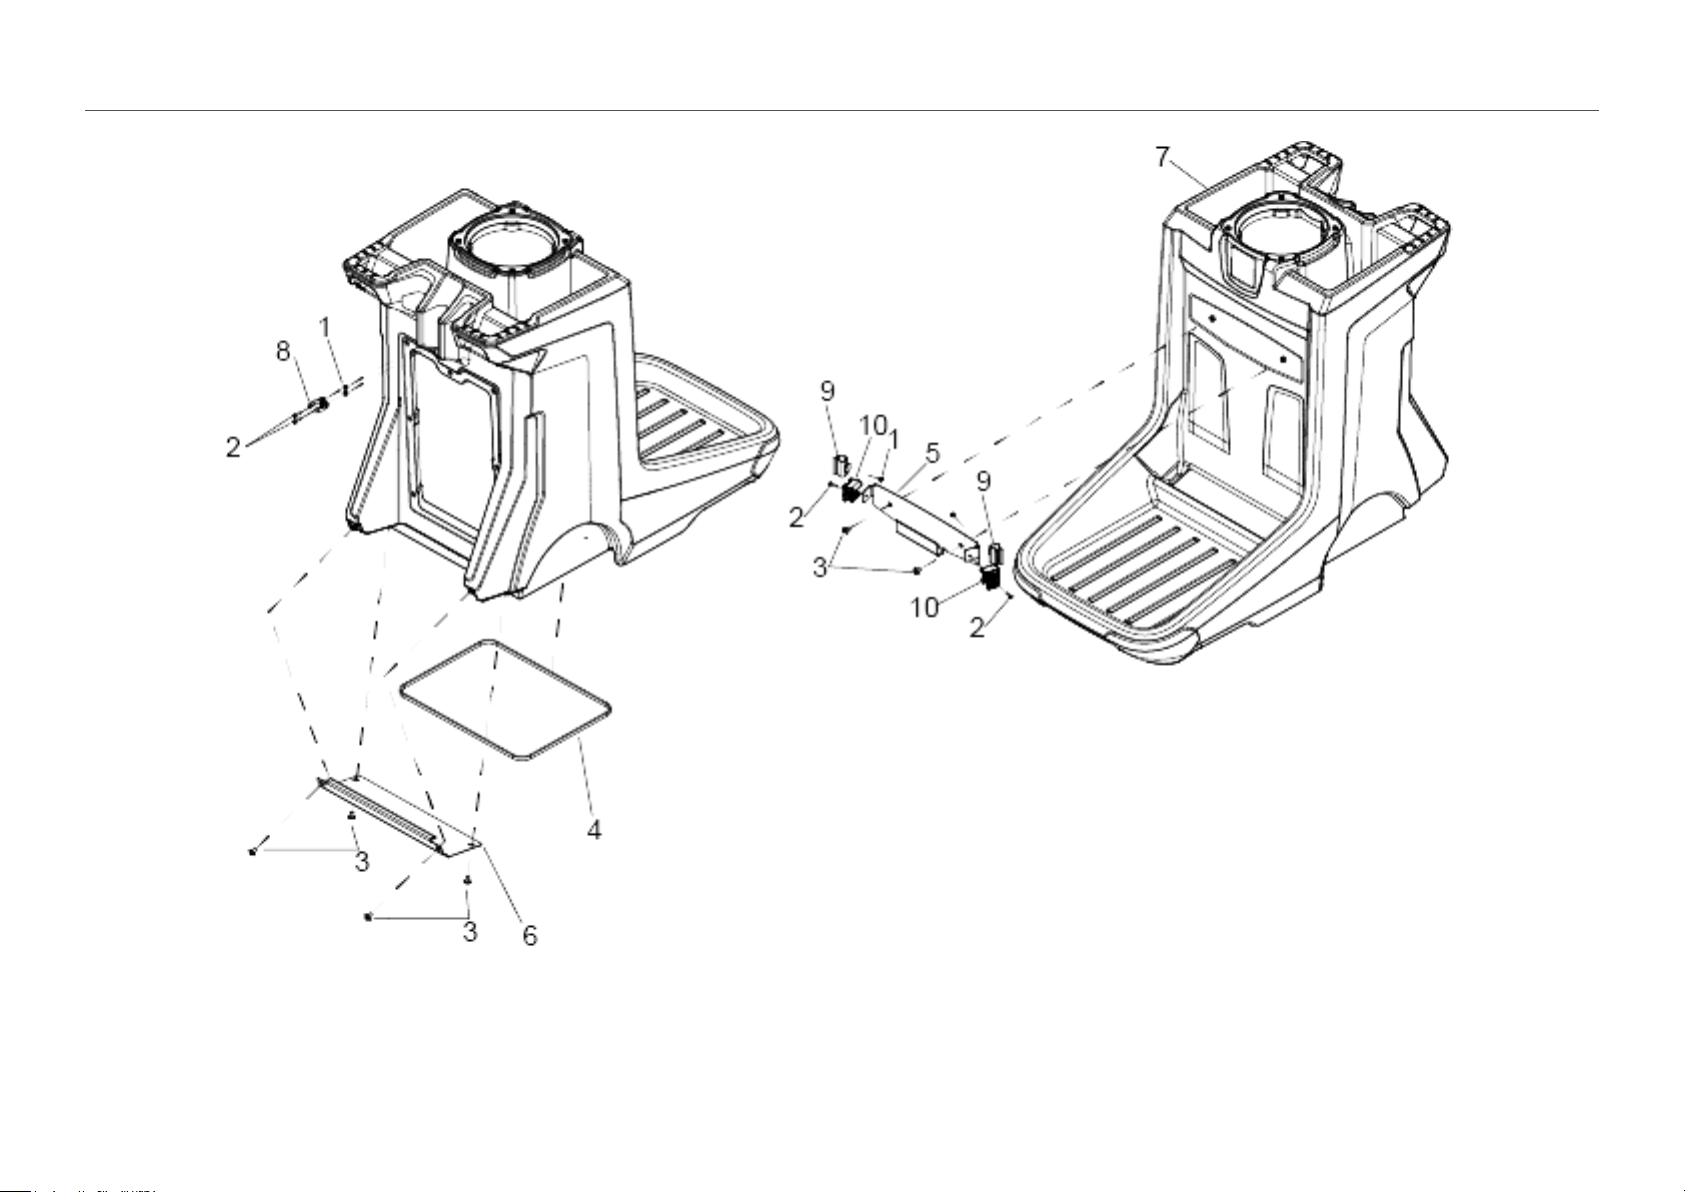
2 BODY
Valid on 27.09.2018 Page 5 / 19

2 BODY
Valid on 27.09.2018 Page 6 / 19
POS Article no. Description Quantity Unit
1 8.640-279.0 Nut 8-32 HEX NYLOCK ST BLKZINC 4.000 ST
2 8.640-278.0 Screw 8-32 X.75 TPNHMS SS BLK ZNPLT 4.000 ST
3 8.640-276.0 Screw 5/16-18 X 1/2 TTRHMS SS BLK ZNPLT 6.000 ST
4 8.640-186.0 GASKET, .188 x .37 x 61 1.000 ST
5 8.640-185.0 Bracket trash home base 1.000 ST
6 8.640-184.0 Bracket wand shelf 1.000 ST
7 8.640-164.0 CART, TRIMMED, GRY, T11BPB 1.000 ST
8 8.600-299.0 CLIP, C 1 1/2" PLASTIC 1.000 ST
9 6.980-078.0 Holder handhold grey 2.000 ST
10 5.035-488.0 Adapter Homebase 2.000 ST
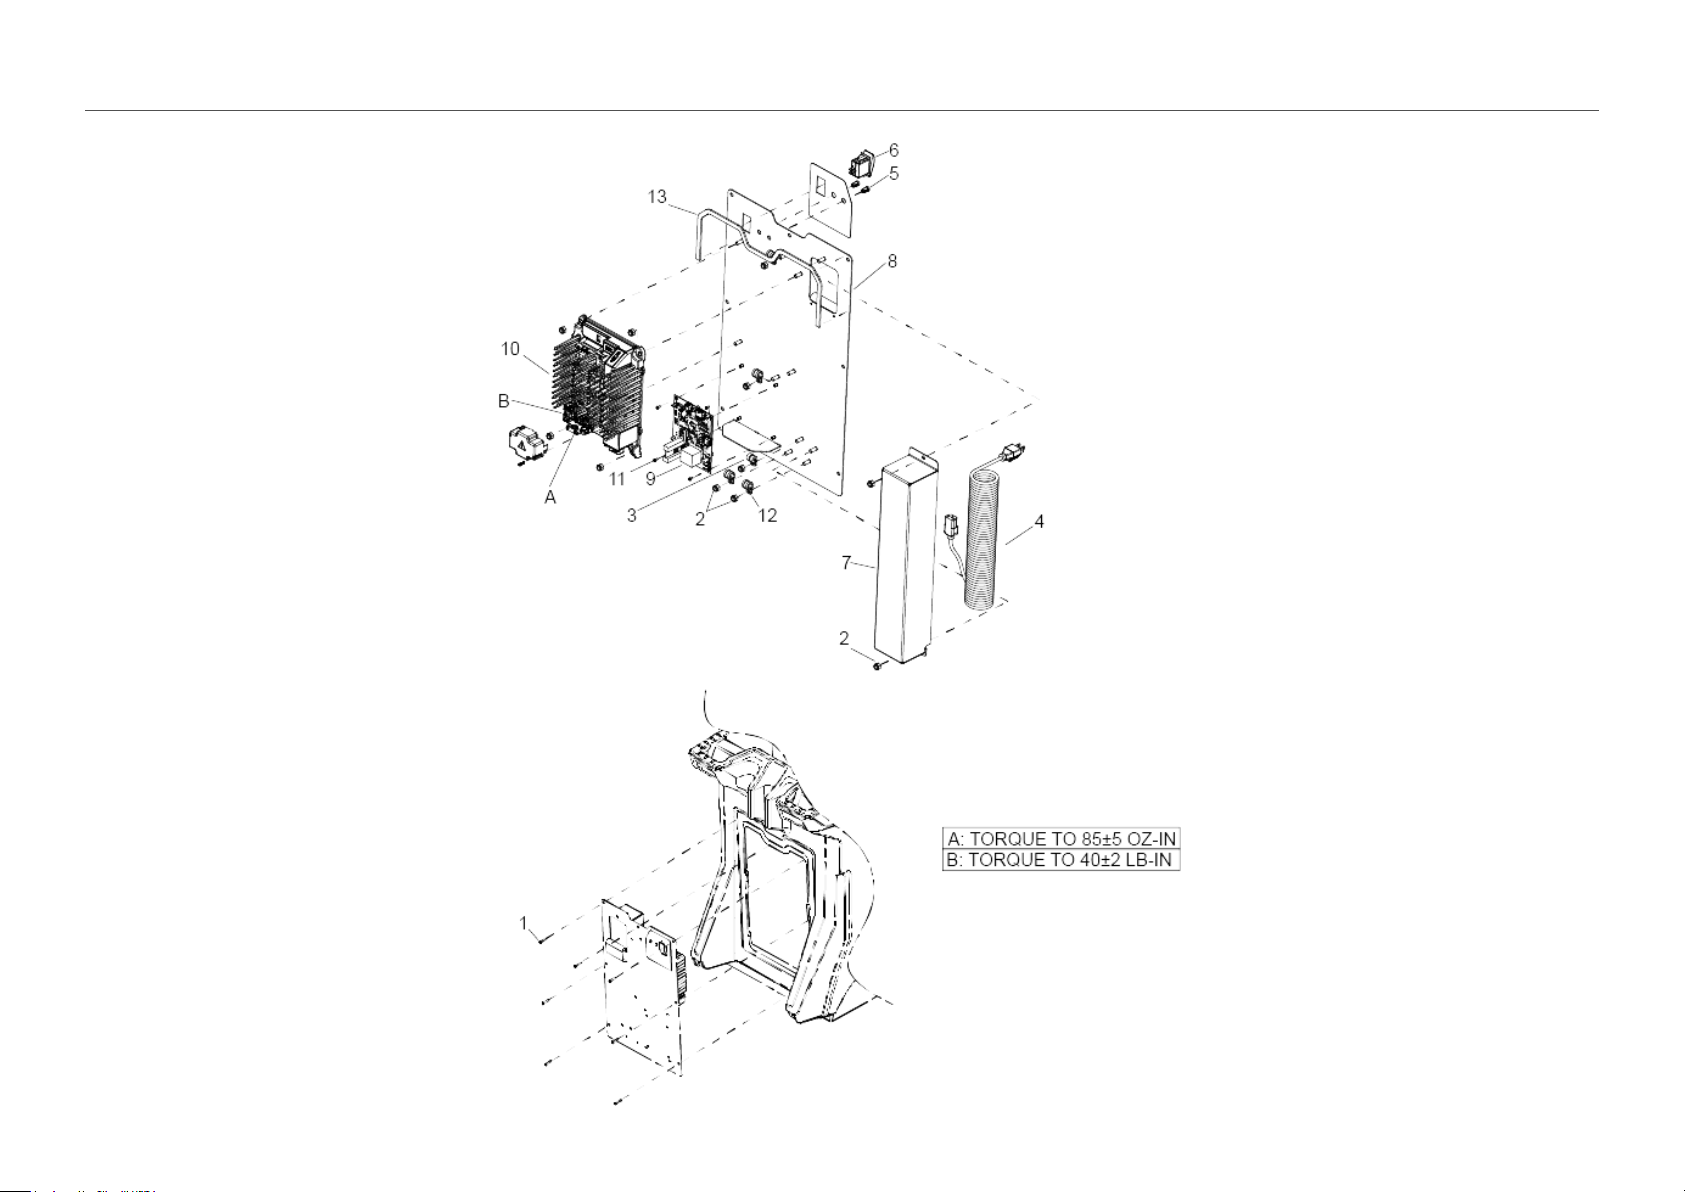
3 CHARGER
Valid on 27.09.2018 Page 7 / 19

3 CHARGER
Valid on 27.09.2018 Page 8 / 19
POS Article no. Description Quantity Unit
1 8.640-858.0 Screw 10-32 X 1 TPNHMS SS BLK ZNPLT 7.000 ST
2 8.600-581.0 NUT, 1/4-20 HEX NYLOCK SS 11.000 ST
3 8.640-222.0 Clamp 1/4 cushioned .265 MTG 1.000 ST
4 8.640-203.0 Cord set 18/3 SVEO coil 20 foot 1.000 ST
5 8.640-202.0 Bezel LED 2.000 ST
6 8.640-201.0 Switch SPST 2-POS MOM ROCKER 1.000 ST
7 8.640-193.0 Bracket cord housing 1.000 ST
8 8.640-191.0 Panel control T11BPB 1.000 ST
9 8.639-530.0 PCB ASSEMBLY, T11BPB 1.000 ST
10 8.638-816.0 CHRGR, 36V 18A IC650 OBC ALG 196 1.000 ST
10 8.637-201.0 CHRGR, 36V 18A IC650 OBC ALG 42 1.000 ST
11 8.627-457.0 SCREW, 4-40 X .25 PHPNHMS STL ZNPLT 4.000 ST
12 8.617-709.0 CLAMP, CABLE 1/2I.D. 1/4BLT 4.000 ST
13 8.623-790.0 GASKET, .125T X .37W X 23L 1.000 ST

4 LABELS
Valid on 27.09.2018 Page 9 / 19

4 LABELS
Valid on 27.09.2018 Page 10 / 19
POS Article no. Description Quantity Unit
1 8.640-275.0 Label battery cabling 1.000 ST
2 8.640-236.0 Label control panel T11BPB 1.000 ST
3 8.640-238.0 Label cord 1.000 ST
4 8.640-237.0 Label side 2.000 ST
5 8.633-500.0 Label AKW domed logo 1.000 ST
6 8.641-535.0 LABEL, CRI, BRONZE 1.000 ST
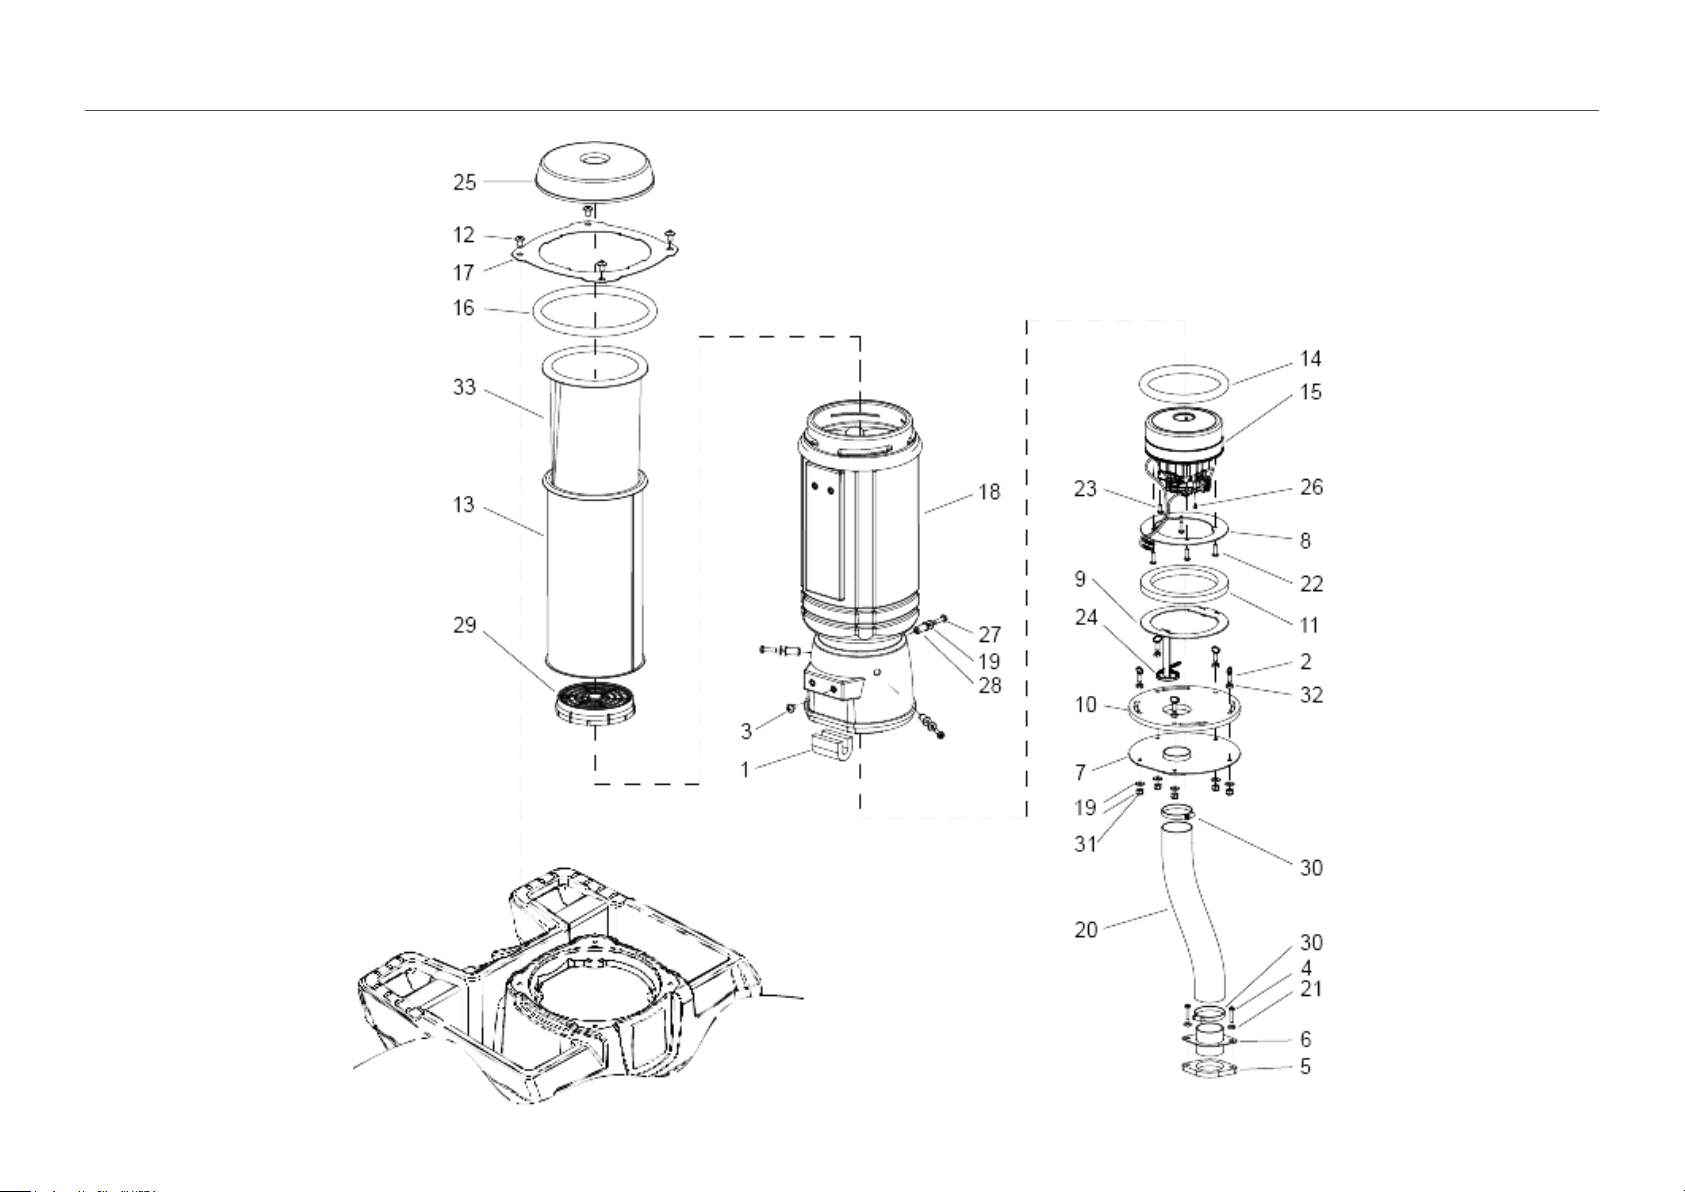
5 VACUUM
Valid on 27.09.2018 Page 11 / 19

5 VACUUM
Valid on 27.09.2018 Page 12 / 19
POS Article no. Description Quantity Unit
1 8.640-935.0 GASKET, HARNESS SEAL 1.000 ST
2 8.637-188.0 SCREW, 1/4-20 x .75 THUMB SS 5.000 ST
3 8.640-904.0 Screw M8-1.25 X 10 PHPNHMS SS 1.000 ST
4 8.640-858.0 Screw 10-32 X 1 TPNHMS SS BLK ZNPLT 2.000 ST
5 8.640-414.0 Gasket muffler bracket 1.000 ST
6 8.640-388.0 Bracket muffler hose 1.000 ST
7 8.640-374.0 BRKT, VAC EXHAUST, WELDMENT 1.000 ST
8 8.640-358.0 Bracket vac motor mount upper 1.000 ST
9 8.640-357.0 Bracket vac motor mount lower 1.000 ST
10 8.640-355.0 GASKET, MOTOR CAP 1.000 ST
11 8.640-354.0 GASKET, MOTOR ISOLATOR 1.000 ST
12 8.640-276.0 Screw 5/16-18 X 1/2 TTRHMS SS BLK ZNPLT 4.000 ST
13 8.640-211.0 Bag cloth vacuum 10 QT 1.000 ST
14 8.640-198.0 GASKET, VACUUM MOTOR 1.000 ST
15 8.641-303.0 Assembly vac motor 36VDC 2ST FT 1.000 ST
16 8.640-196.0 GASKET, BAG HOUSING MOUNT 1.000 ST
17 8.640-195.0 Plate bag housing mount 1.000 ST
18 8.638-841.0 Housing vacuum bag trimmed 1.000 ST
19 8.636-177.0 WASHER, 1/4 FLT SS 8.000 ST
20 8.628-118.0 HOSE, 2.0 VAC EXHAUST X 17" 1.000 ST
21 8.627-929.0 Washer #10 FLAT W/NEOPRENE 2.000 ST
22 8.627-629.0 SCREW, 10 X .75 PPNHMS HI LOW ST BLK ZN 4.000 ST
23 8.627-435.0 SCREW, 10-24 X .5 PHPNHTC 1.000 ST
24 8.626-492.0 CABLE TIE, 7" UL/CSA 1.000 ST
25 8.619-874.0 Cap black 1.000 ST
26 8.617-310.0 SCREW, M3 X 6 BTNHSCHCS SS ISO7380 1.000 ST
27 8.600-653.0 SCREW, 1/4-20 X 1 PHPNHMS SS 3.000 ST
28 8.600-562.0 NUT, 1/4-20 WELL 3.000 ST
29 8.600-351.0 FILTER VAC MOTOR 1.000 ST
30 8.600-238.0 Clamp 2.25" WORM GEAR 2.000 ST
31 8.600-581.0 NUT, 1/4-20 HEX NYLOCK SS 5.000 ST
32 8.627-093.0 NUT, 1/4-20 HEXTHIN SS 5.000 ST
33 8.619-885.0 FILTER BAG, VP10 PAPER **(PKG/10)** 1.000 PAK
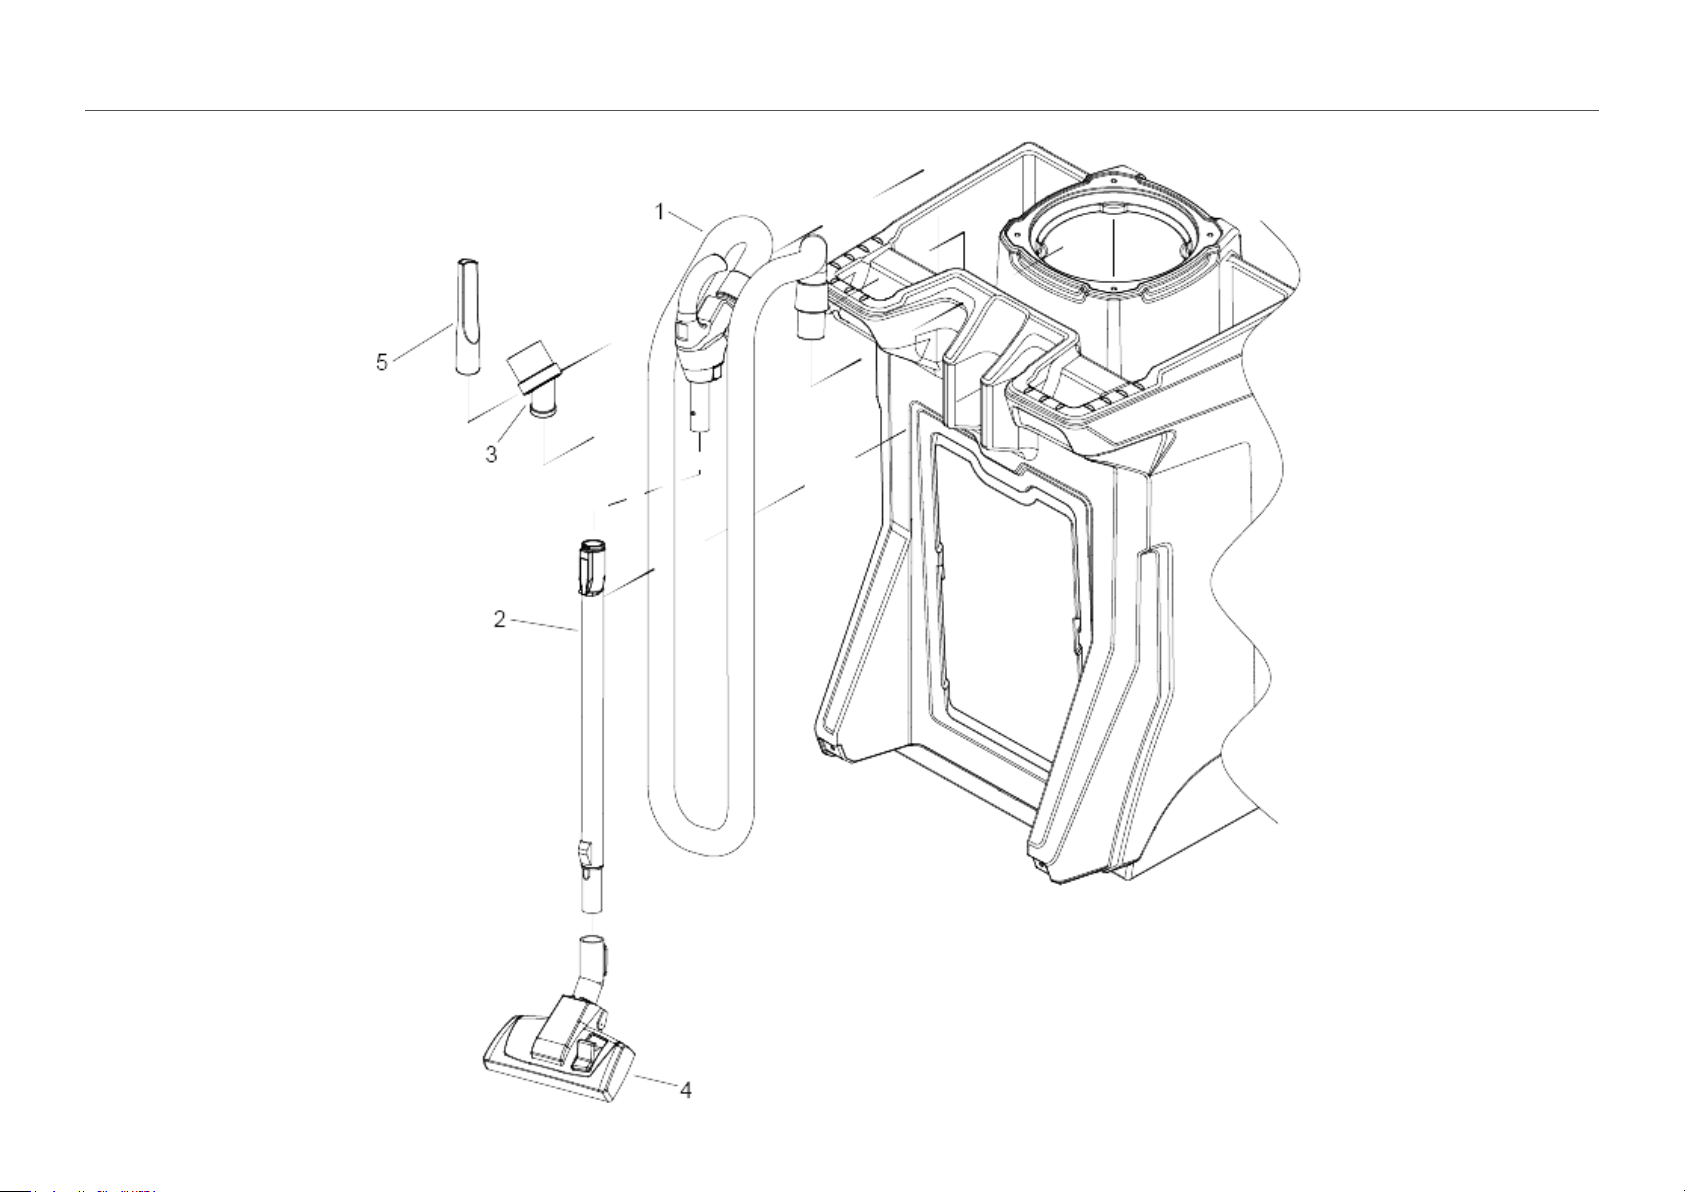
6 WAND
Valid on 27.09.2018 Page 13 / 19

6 WAND
Valid on 27.09.2018 Page 14 / 19
POS Article no. Description Quantity Unit
1 8.640-361.0 Assembly handle hose 20 FT 1.000 ST
2 8.640-204.0 WAND, TELESCOPIC, ALUM 1.000 ST
3 8.634-487.0 BRUSH, DUST 1.000 ST
4 6.907-410.0 Combination nozzle packaged basalt grey 1.000 ST
5 6.903-403.0 Crevice nozzle DN32 1.000 ST
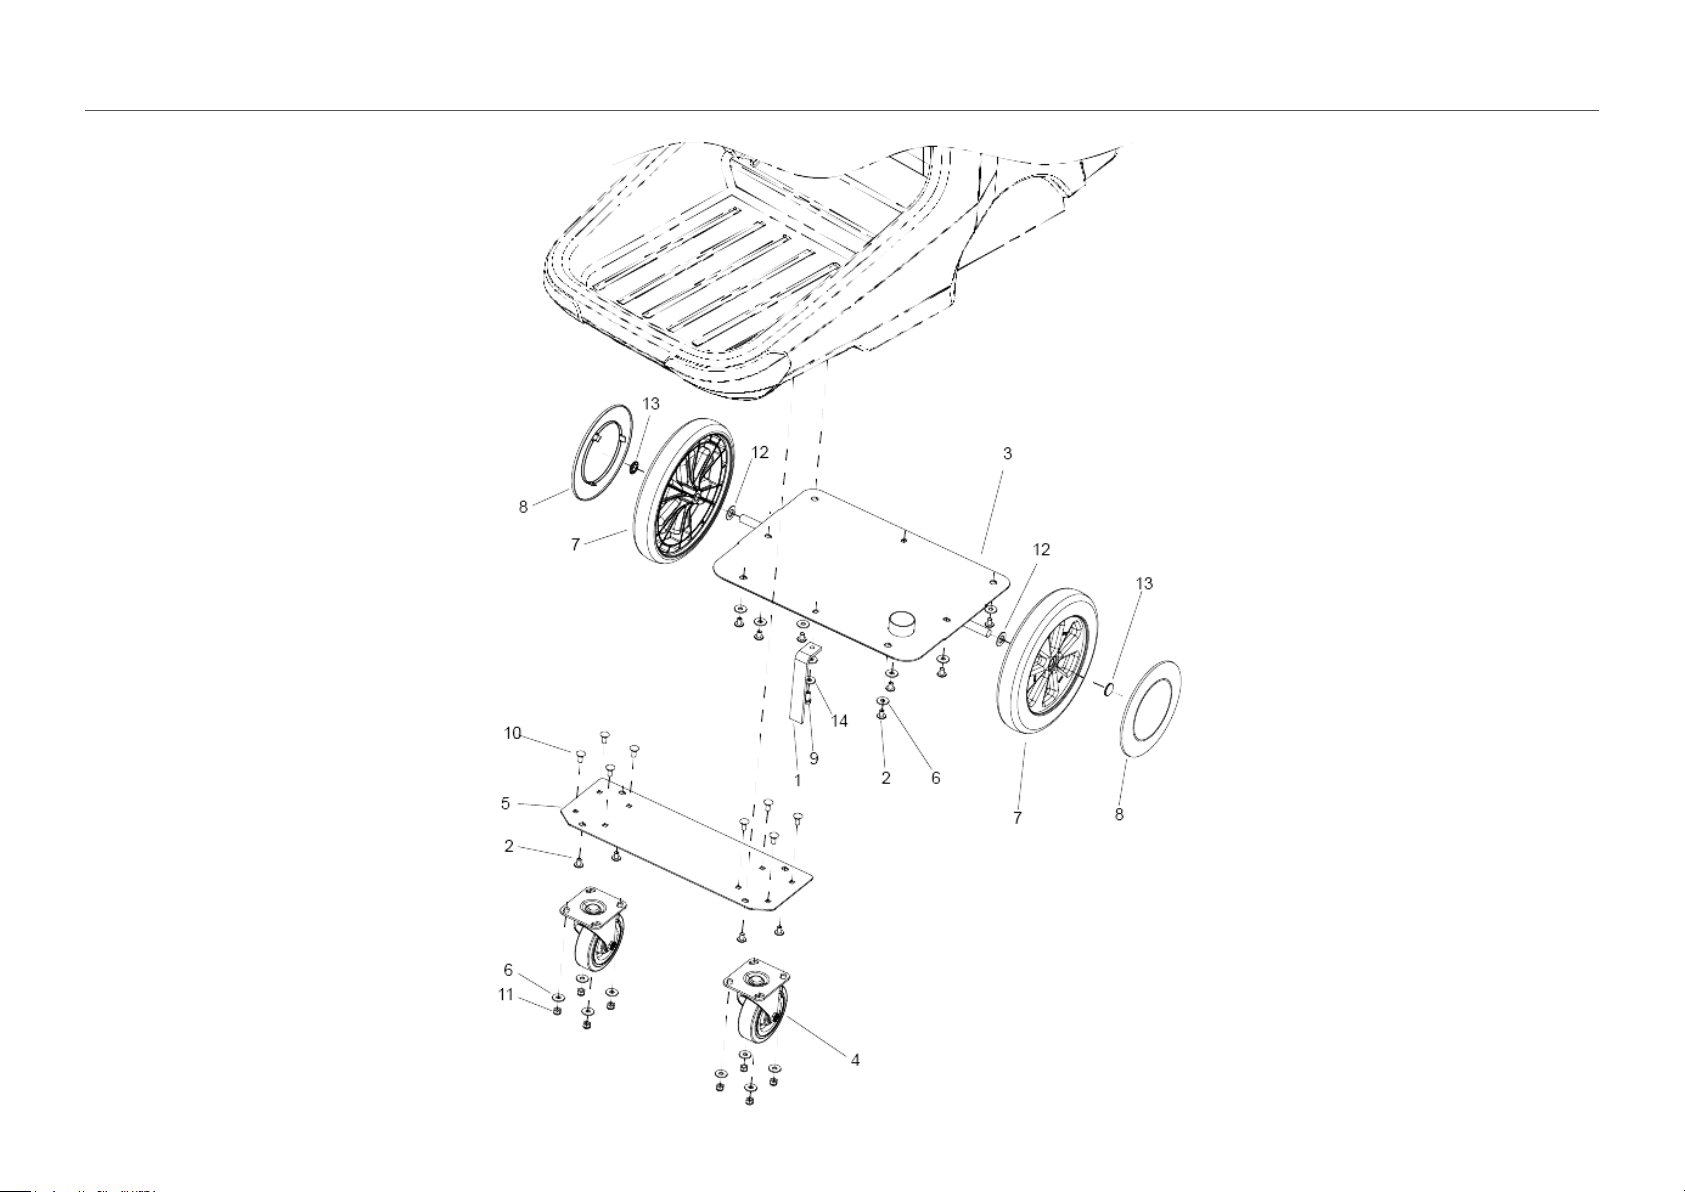
7 WHEELS
Valid on 27.09.2018 Page 15 / 19

7 WHEELS
Valid on 27.09.2018 Page 16 / 19
POS Article no. Description Quantity Unit
1 8.640-877.0 Strap static .25T X 1.12W X 8L 1.000 ST
2 8.640-276.0 Screw 5/16-18 X 1/2 TTRHMS SS BLK ZNPLT 11.000 ST
3 8.640-181.0 Bracket rear wheel mount 1.000 ST
4 8.640-180.0 CASTER, 5" DIA SWIVEL 2.000 ST
5 8.640-179.0 Plate caster mount 1.000 ST
7 8.630-979.0 Wheel 12" x 2.25" 2.000 ST
8 8.630-007.0 HUBCAP, 9.75" WHEEL, BLACK 2.000 ST
11 9.802-776.0 NUT, 5/16-18, ESNA 8.000 ST
12 8.601-073.0 WASHER, 5/8 X .64 X 1.188 SS 2.000 ST
13 8.600-166.0 HUBCAP, 5/8" SHAFT 2.000 ST
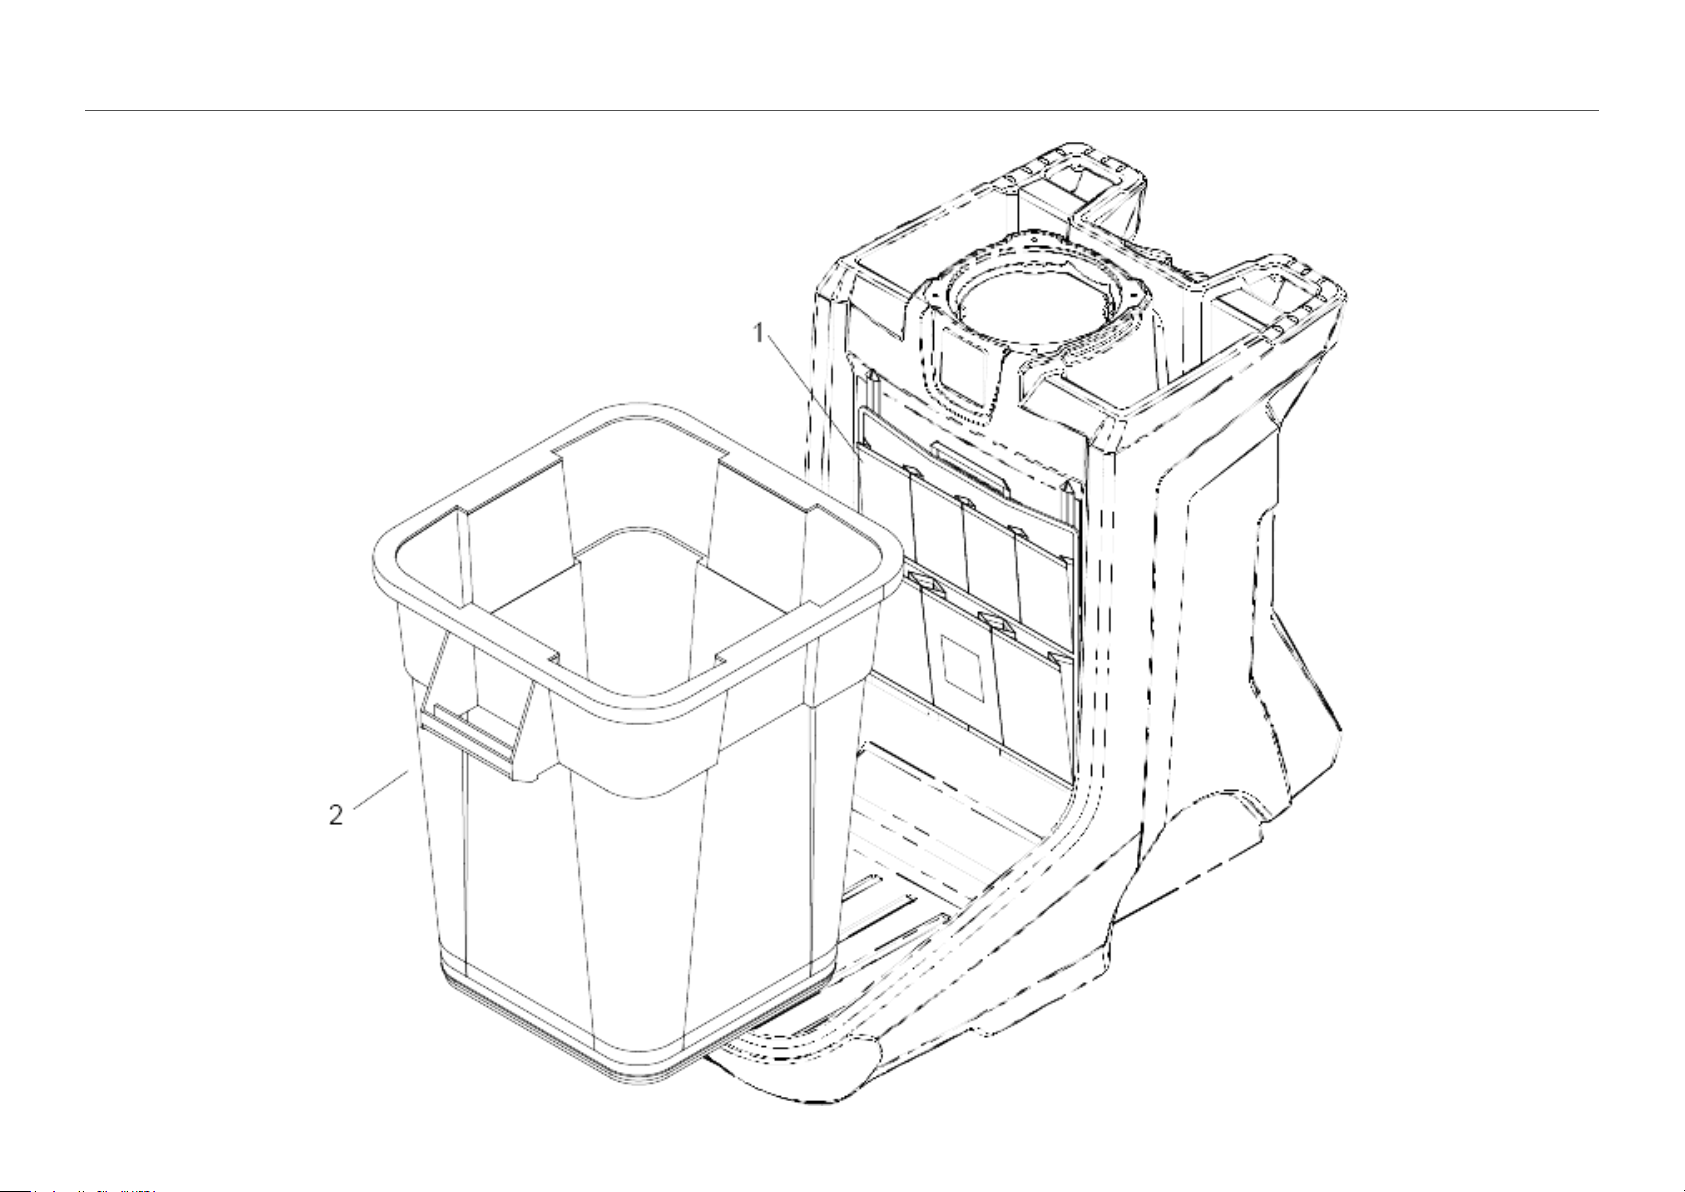
8 TRASH ACCESSORIES
Valid on 27.09.2018 Page 17 / 19

8 TRASH ACCESSORIES
Valid on 27.09.2018 Page 18 / 19
POS Description Quantity Unit
1 POUCH, CART SUPPLIES 1.000 ST
2 CAN, TRASH, 40 GAL, BLK 1.000 ST