nuwavenow.com
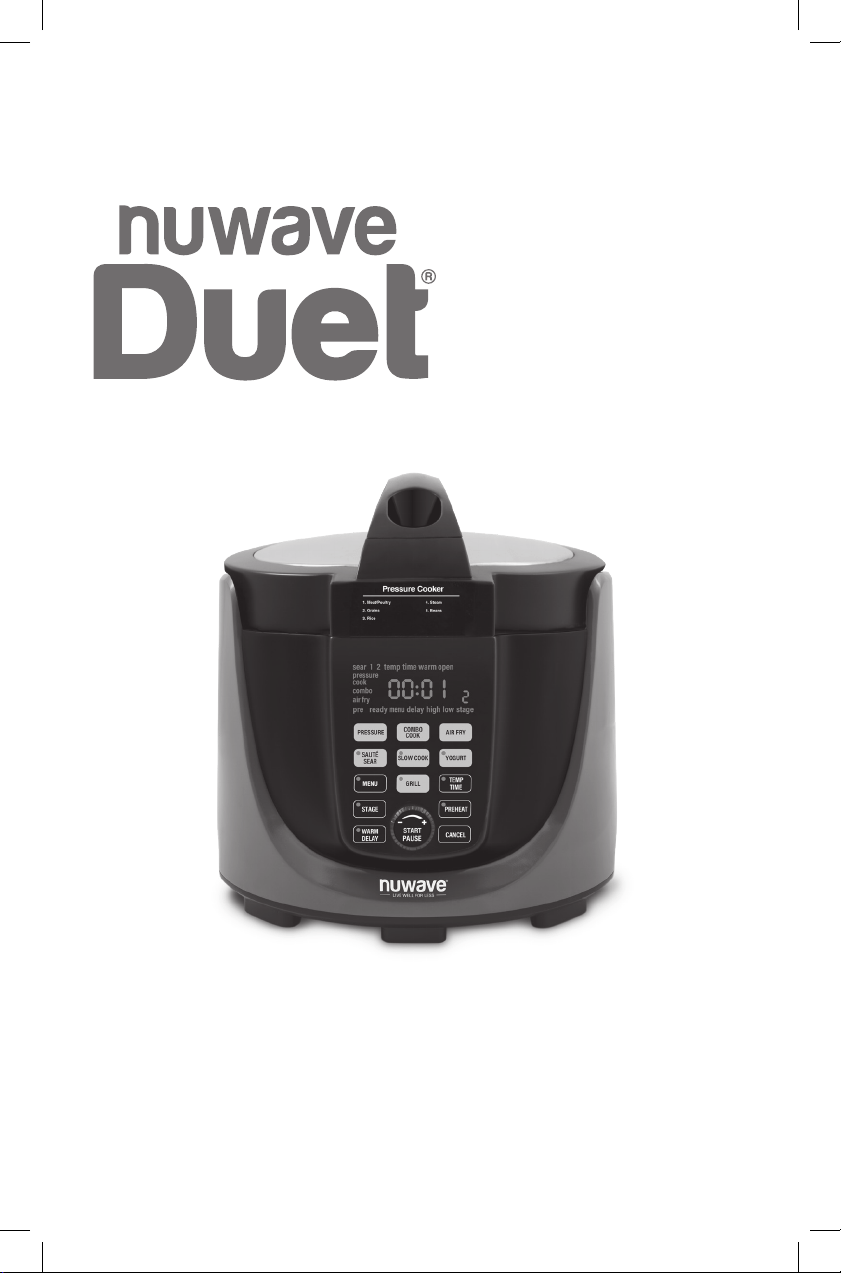
OWNER’S MANUAL
Pressure Air Fryer Grill
2
2
REGISTER
NOW!
As a special thank-you for registering your NuWave Duet,
you’ll automatically receive an additional 3 months added to
your limited manufacturer’s warranty!*
All you have to do is follow these simple steps.
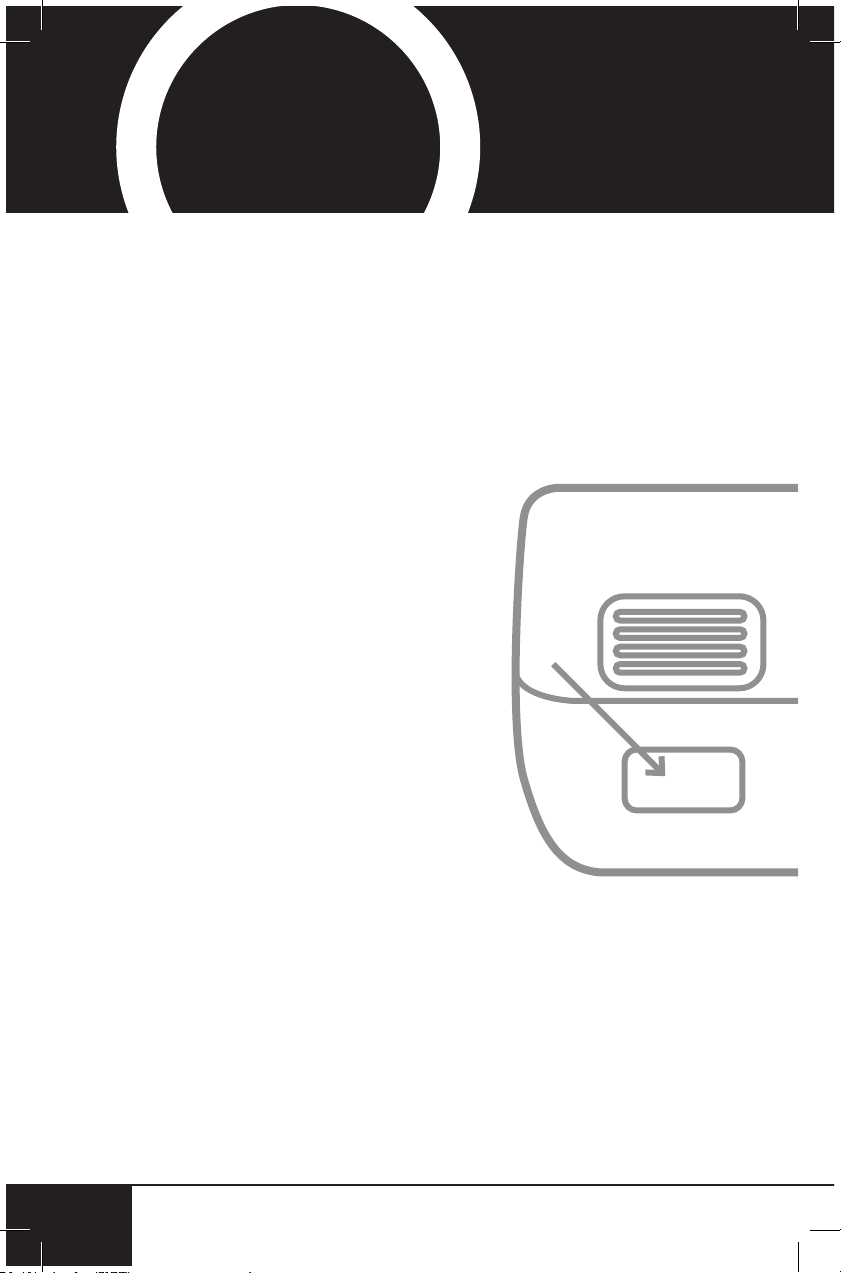
Using your smartphone or smart
device, scan the QR code located on
the back of the Duet.
You will be directed to NuWave’s
product registration page with
your Duet’s unique serial number
automatically entered in the
appropriate eld.
NOTE: If you do not have a web-
enabled smart device, simply visit
nuwavenow.com/QR and manually
enter in your Duet’s serial number.
Fill out the remaining information and
complete the optional survey.
Once you submit your information,
you will receive a conrmation email
containing your extended
warranty details.
1
2
3
4
*Register your product within 1 year of date of purchase for a free
3-month extension of your limited warranty.

Open your mobile app store
(App Store, Google Play).
Search for "QR code readers."
Simply download the QR code reader to your phone, open it,
scan the code and you are ready to go.
NOTE: You may need to open your downloaded QR code
reader each time you want to scan a QR code.
nuwavenow.com
3
nuwavenow.com
3
3
for an additional
months
warranty!
1
2
3
DOWNLOAD THE QR CODE
APP TO YOUR MOBILE DEVICE
QR code readers
table of contents
4
TABLE OF CONTENTS
4
OWNER’S MANUAL
Important Safeguards ............................................................... 5-8
Parts & Accessories......................................................................9
Accessory Instructions...........................................................10-11
Quick Start ............................................................................ 12-13
Pressure Cooking Instructions.............................................. 14-19
Air Frying Instructions ........................................................... 20-28
Combo Cooking Instructions ................................................ 29-30
Cleaning & Maintenance ........................................................ 31-34
Troubleshooting Guide .......................................................... 35-40
Limited Warranty .................................................................... 41-43
Spanish.................................................................................... 44-91
Replaceable Parts................................................................... 92-95
nuwavenow.com

nuwavenow.com
5
ENGLISH
nuwavenow.com
5
IMPORTANT SAFEGUARDS
HOUSEHOLD USE ONLY • READ ALL INSTRUCTIONS BEFORE USE
Operate only in accordance
with the intended use as
described in this manual. When
using electrical appliances,
basic safety precautions
should always be followed
including the following:
1. Read all instructions.
2. Ensure the appliance and
all parts are clean and dry
before each use.
3. Do not touch hot surfaces.
The appliance’s surfaces
may be hot during and
after use. Use handles as
directed to handle appliance.
4. Do not let the cord hang
over any edge or let the cord
touch hot surfaces.
5. Discard the protective plastic
covering the power plug
before use.
6. Do not immerse the cord,
plugs, or appliance in water
or other liquid.
7. Close supervision is
necessary when any
appliance is used near
children. This appliance
is not intended for use
by persons with reduced
physical, sensory or mental
capabilities, children,
or persons without of
experience or knowledge,
unless supervised or
instructed on the use
of the appliance by one
responsible for their safety.
8. Unplug the Duet when not
in use and before cleaning.
Allow to cool before
removing or replacing parts.
9. Do not operate if the
appliance or the appliance’s
cord malfunctions or has
been damaged in any way.
Return the appliance to the
nearest authorized service
facility for examination,
repair, or adjustment.
10. Use only on a clean, stable,
dry and level surface.
11. Do not use accessories
or attachments not
recommended by the
manufacturer.
12. Do not use outdoors. This
appliance is intended for
non-commercial, indoor
use only.
13. Do not place on or near a hot
surface, in a heated oven, or
on a stovetop.
14. Use caution when moving
any appliance after cooking.
NEVER move the appliance
while it is operating and/or
under pressure.

important safeguards
66
SEE CLEANING
& MAINTENANCE
BEFORE USE
ADDITIONAL SAFEGUARDS
1. DO NOT use the appliance
without the supplied
Stainless-steel Inner Pot
installed.
2. The Duet cooks under
pressure and releases
hot steam. READ ALL
instructions for the proper
use of this appliance to
avoid injury.
3. DO NOT cover the Pressure
Release Valve or Pressure
Indicator. Before each
use, ALWAYS check the
Pressure Release Valve and
the Pressure Indicator for
blockage or obstructions.
These should move freely
and should not be stuck in
one position. Foods that
expand (pasta, rice, grains,
beans, oatmeal, etc.) may
block these so clean the unit
thoroughly after each use.
4. Use caution when removing
the Stainless-steel Inner
Pot from the Duet, as the
pot may be heavy and hot.
Use protective gloves or
hot pads.
5. DO NOT use the Silicone
Gasket if it is torn or
damaged. Clean after each
use. ONLY NuWave LLC
Silicone Gaskets are to be
used in the operation of the
Duet.
1. DO NOT overll the Air Fry
Basket.
2. DO NOT cover the air intake
or outlet vents. This may
prevent the appliance from
performing correctly and
may damage the Duet.
3. It is not unusual for a small
amount of steam and/or
smoke to occasionally be
released from the air outlet
vent. Keep hands and face
away from the air outlet
vents to avoid injury.
4. Be cautious when removing
the Air Fryer Lid after use,
as the heating elements in
the Lid may be extremely
hot. Place the Air Fryer Lid
on the Lid Holder to avoid
damage to property. Refer to
Cleaning & Maintenance for
instructions.
5. The Air Fry Basket and
any accessories used may
be extremely hot during
and immediately after use.
ALWAYS use oven mitts
or hot pads when handling
these items.
6. This appliance is not
intended for deep-frying.
7. Ensure the appliance and
all parts are clean and dry
before each use.
8. Unplug the appliance when
not in use and ensure it
is completely cool before
cleaning.
IMPORTANT SAFEGUARDS

nuwavenow.com
7
ENGLISH
nuwavenow.com
7
6. DO NOT sear or saute
foods under pressure. The
pressure-cooking Saute/
Sear function is intended
to be used without the
PRESSURE Lid.
7. NEVER use the Slow
Cook or Warm functions
without food or liquid in the
Stainless-steel Inner Pot.
8. DO NOT overll. For beans,
rice, grains, dehydrated
foods and fruit: Max should
be ½ full; and ⅔ full for
soups, broths, or stocks.
9. NEVER pressurize the Duet
without liquid. The amount of
liquid needed is provided in
the recipes.
10. NEVER attempt to open
the PRESSURE Lid while
the appliance is in use
or pressurized. DO NOT
force the Lid open at any
time. Ensure ALL pressure
is released BEFORE
opening the PRESSURE
Lid by turning the Pressure
Release Valve to the
“OPEN” position.
11. Keep all body parts away
from the appliance while
releasing pressure. DO
NOT place any body
part over the Pressure
Release Valve or anywhere
steam may escape. When
opening the Lid (ONLY
after all pressure has been
released and the Pressure
Indicator has dropped), the
contents will still be hot and
opening the Lid will release
steam. Make sure to open
the PRESSURE Lid away
from yourself and others.

important safeguards
8
IMPORTANT SAFEGUARDS
HOUSEHOLD USE ONLY • READ ALL INSTRUCTIONS BEFORE USE
8
SAVE THESE INSTRUCTIONS
Read and understand the
entire manual before using
the Duet. This appliance has
a polarized plug (one blade
is wider than the other). To
reduce the risk of electric
shock, this plug is intended to
fit into a polarized outlet only
one way. If the plug does not
fit fully into the outlet, reverse
the plug. If it still does not fit,
contact a qualified electrician.
Do not attempt to modify the
plug in any way.
A. A short power-supply cord
(or detachable power-
supply cord) is provided
to reduce the risk of
becoming entangled
in, or tripping over, a
longer cord.
B. Longer detachable power-
supply cords or extension
cords are available and
may be used if care is
exercised in their use.
C. If a longer detachable
power-supply cord or
extension cord is used:
WARNING
In case of malfunction,
immediately unplug the
Duet and contact Customer
Service at: 1-877-689-2838
or
help@nuwavenow.com
1. The marked electrical
rating of the cord set or
extension cord should
be at least as great as
the electrical rating of
the appliance;
2. The cord should be
arranged so that it
will not drape over
any surface where it
can be pulled on by
children or tripped over
unintentionally.
3. If the appliance is of the
grounded type, the cord
set or extension cord
should be a grounding-
type 3-wire cord.
nuwavenow.com
9
ENGLISH
nuwavenow.com
9
3
2
6
5
4
1
7
8
9
10
11
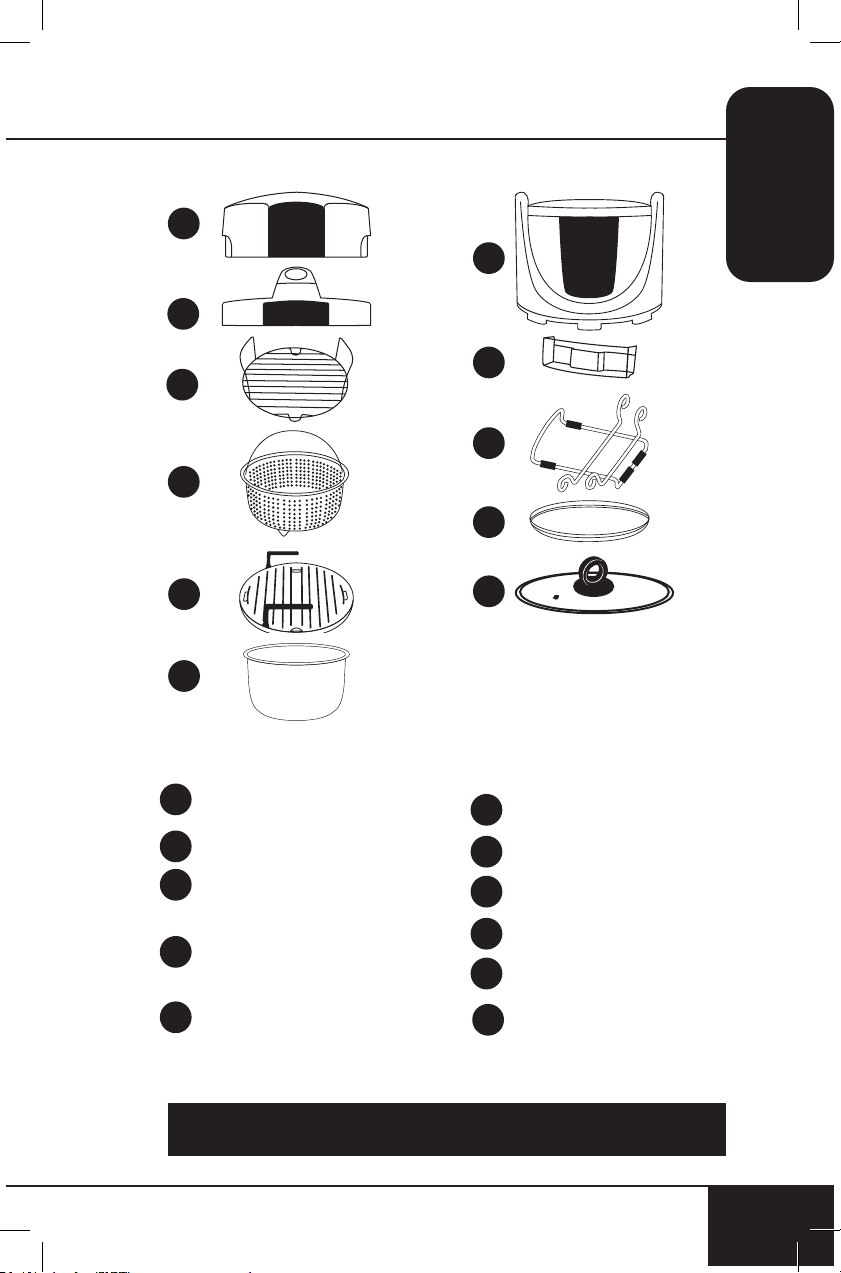
Air Fryer Lid
Part #: 34805
PRESSURE Lid
Part #: 34839
Multipurpose Reversible
Rack
Part #: 34834
Stainless-steel
Air Fry Basket
Part #: 34818
Grill/Griddle Plate
Part #: 34833
1
2
3
4
5
Stainless-steel Inner Pot
Part #: 34803
Duet
®
Base
Part #: DUE-A31
Water-Collection Tray
Part #: 34804
Lid Holder
Part #: 34815
Silicone Gasket
Part #: 34813
Slow Cook Lid
Part #: 34838
6
7
8
9
10
11
To order parts head over to Replaceable Parts section and
then NuWaveNow.com.
PARTS & ACCESSORIES
accessory instructions
1010
ACCESSORY INSTRUCTIONS
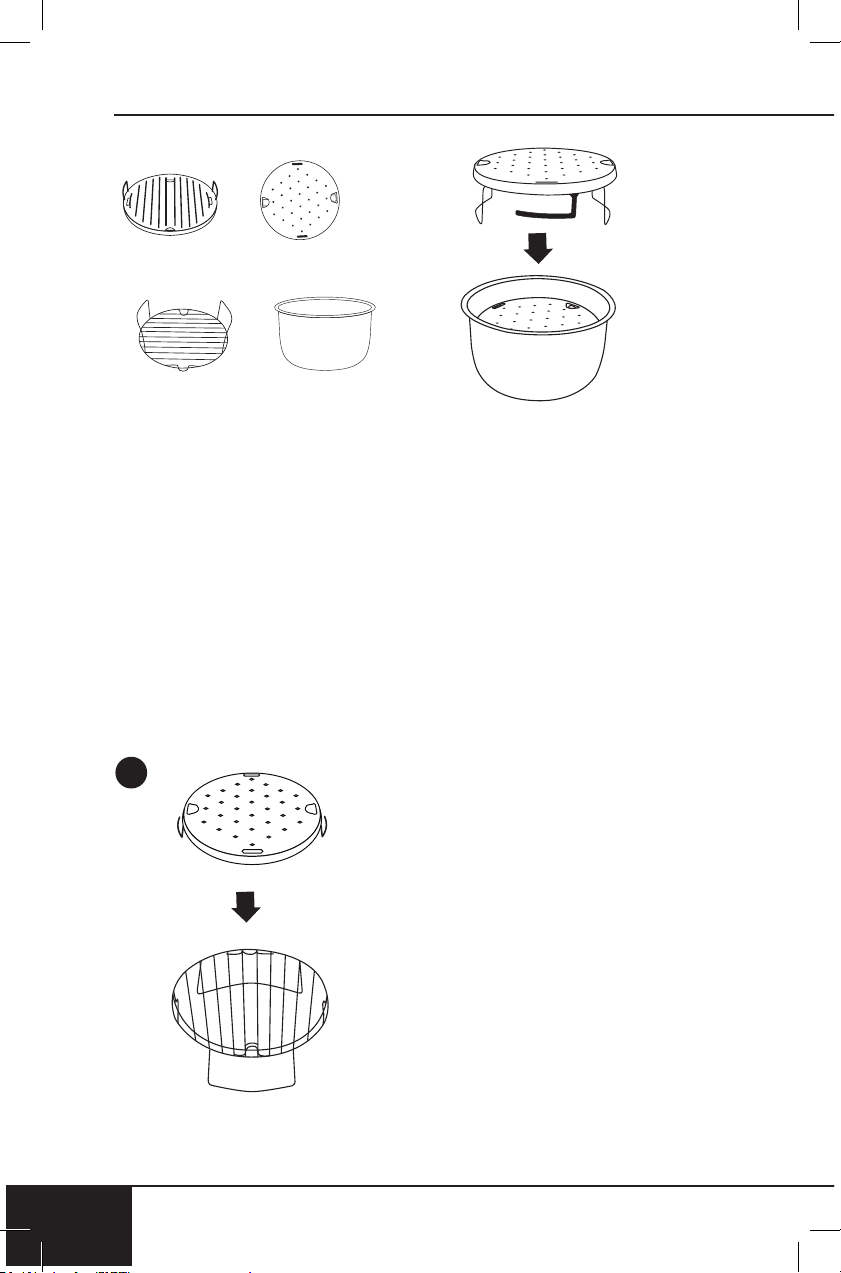
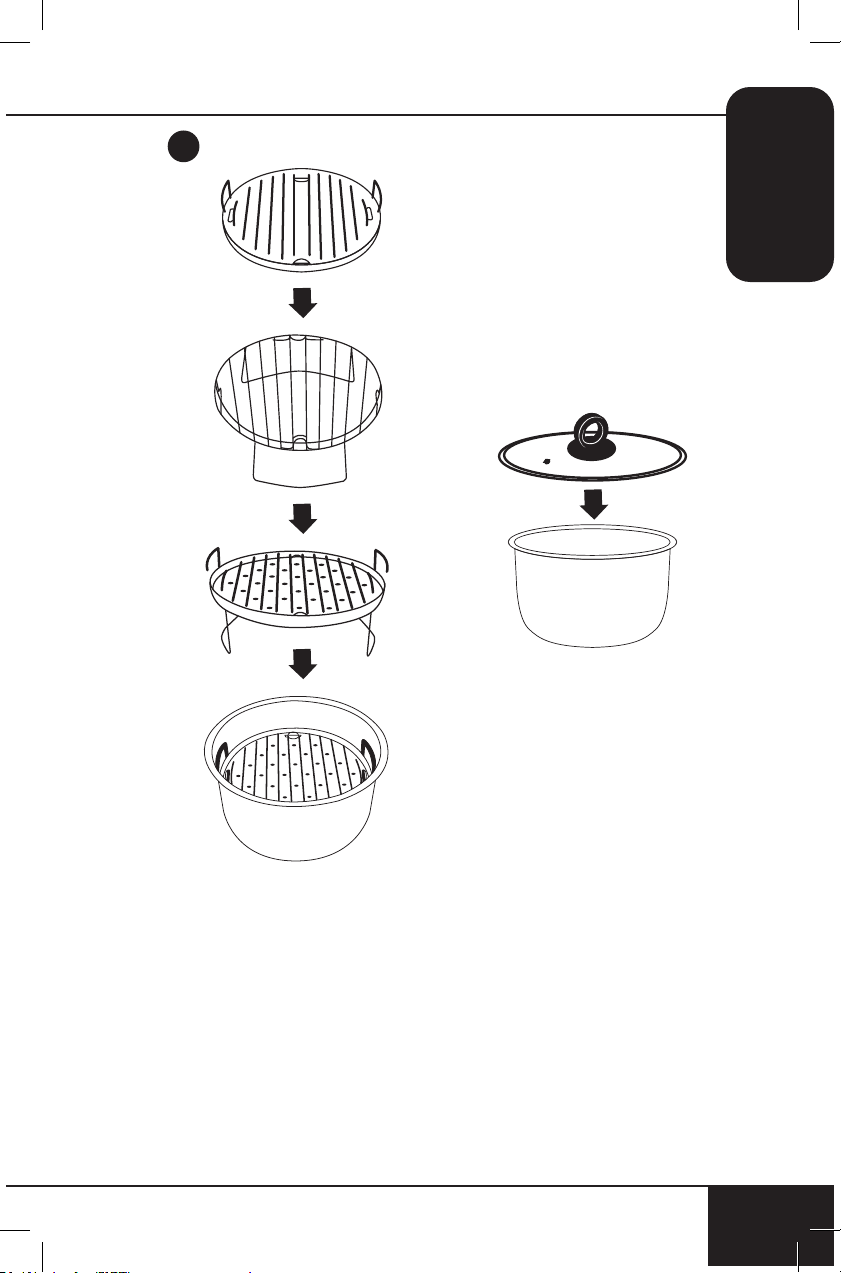
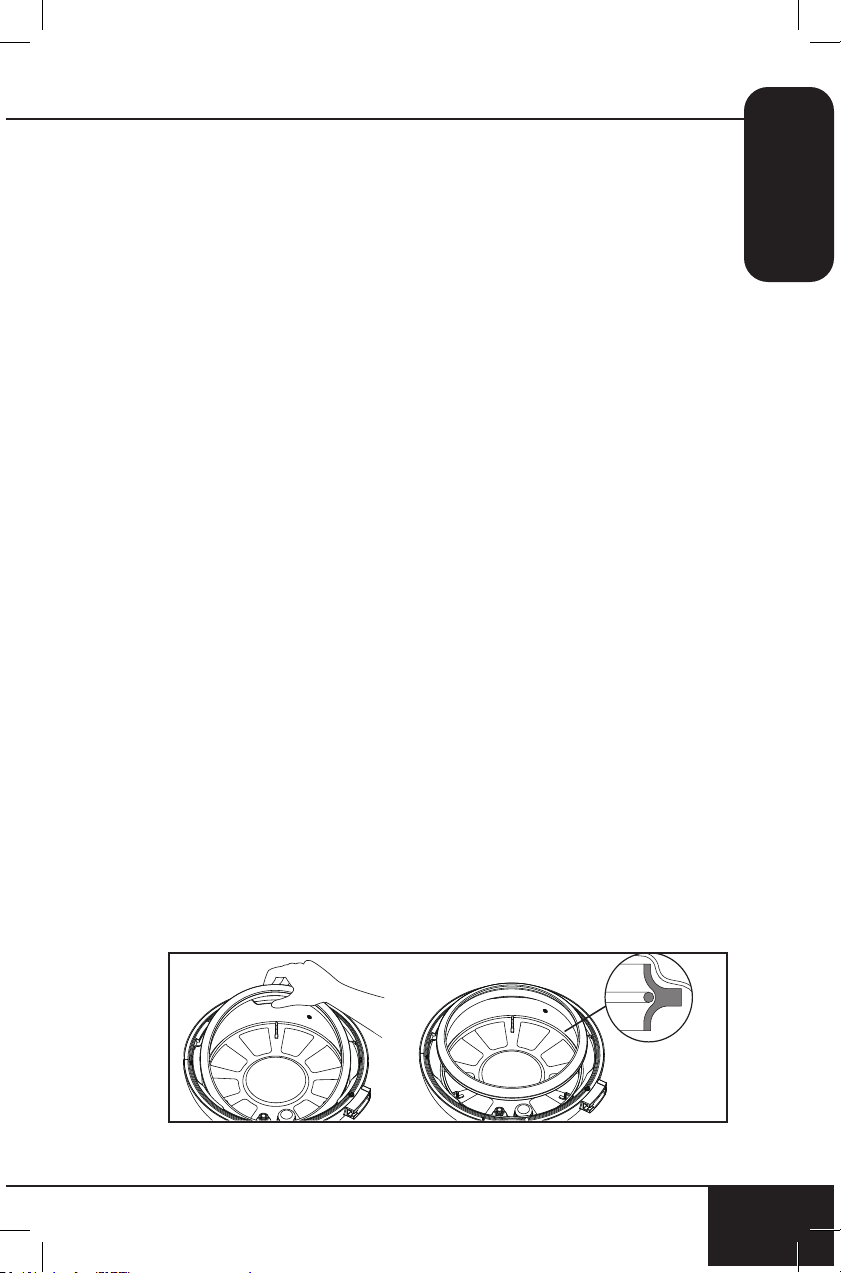
Using the Grill/Griddle Plate
The reversible Grill/Griddle Plate
for your Duet cooks a variety
of foods. Always preheat for 15
minutes before adding food.
When using the Grill/Griddle
Plate, line up the grates from the
Grill side with the bars from the
Multipurpose Reversible Rack,
insert the tabs from the Rack into
the slots in the Plate. Place these
into the Stainless-steel Inner Pot.
Note: When removing the Grill/
Griddle Plate, Grill-side up, use
the Black Silicone Mitts or oven
mitts to lift up the Plate by both
handles. The maximum height
allowed for any cut of meat is
2 in.
Stainless-steel
Inner Pot
(Top) (Bottom)
Grill/Griddle Plate
Multipurpose
Reversible Rack
1
nuwavenow.com
11
ENGLISH
nuwavenow.com
11
2
Slow Cook Lid
Place the Slow Cook Lid onto
the Stainless-steel Inner Pot
with the handle facing up.
The Slow Cook Lid should be
used with the Stainless-steel
Inner Pot at all times for slow-
cooking, sautéing, and keeping
food warm. The PRESSURE
function will not work with the
Slow Cook Lid.
quick start
12
QUICK START
12
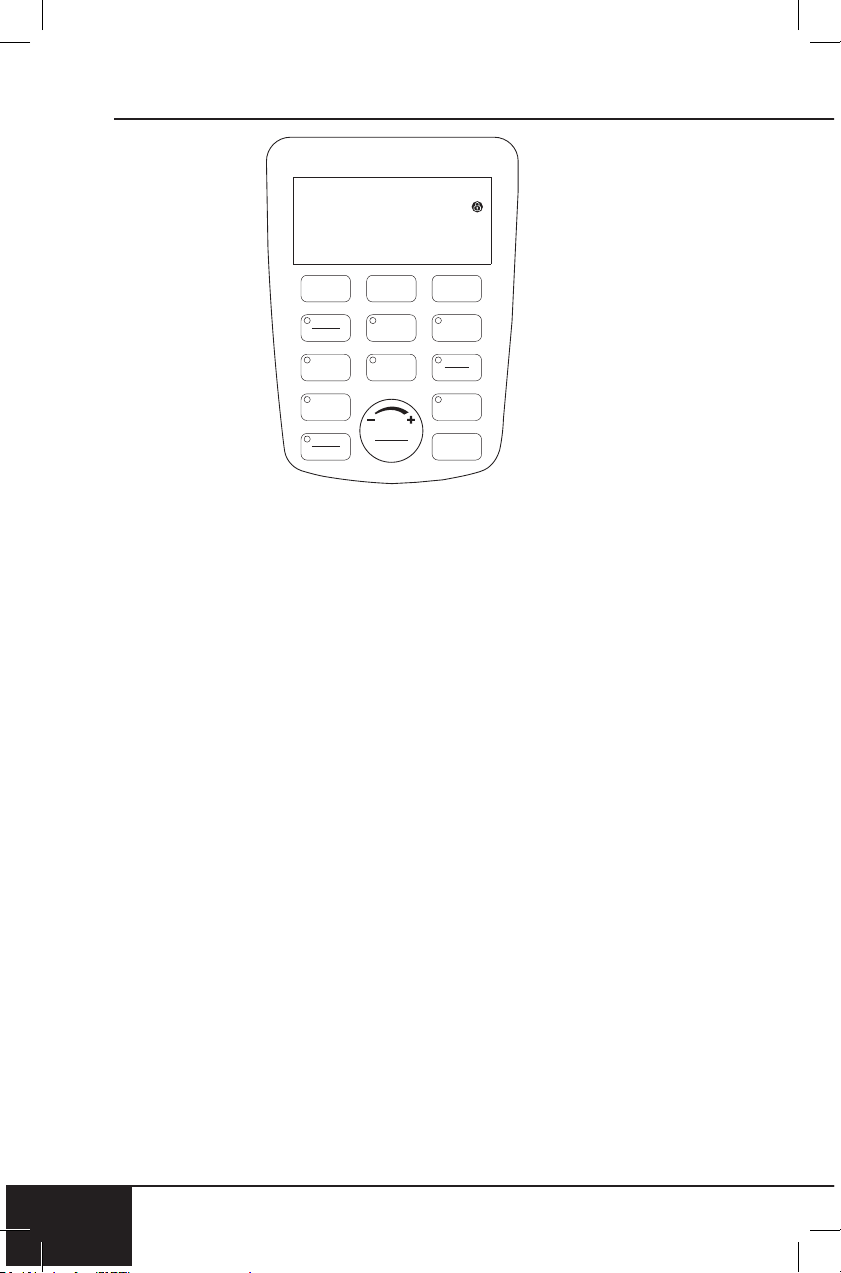
PRESSURE: Use PRESSURE to initiate the PRESSURE function.
Press and hold PRESSURE for 1 second to switch between HIGH
pressure and LOW pressure
Note: Sometimes the cooking process can create a seal between
the PRESSURE Lid and the Stainless-steel Inner Pot. To keep from
lifting the pot along with the Lid, gently shake the handle to separate
the Lid from the pot before opening. PRESSURE is disabled during
air-frying.
COMBO COOK: Use COMBO COOK to initiate the COMBO COOK
function.
AIR FRY: Use AIR FRY to initiate the AIR FRY function.
SAUTÉ/SEAR: For PRESSURE, temp and time default to 450F for
20 minutes. The time can be increased to 30 minutes. For AIR FRY,
temp and time default to 450F for 5 minutes. This is adjustable up to
15 minutes. SEAR is used to cook at a high temperature for a short
amount of time.
SLOW COOK: Temp default is 210F down to 185F. Time default is 5
hours, adjustable up to 10 hours.
GRILL: Default time is 5 minutes, adjustable up to 20 minutes. The
default temp is 400F (no adjustment) MENU: 11-30.
MENU: The Duet comes with 300 preprogrammed cooking recipes
along with an additional 150 memory slots to add your own unique
recipes. Use MENU to recall and save programmed recipes.
TEMP/TIME: Use TEMP/TIME to show the cooking temperature. Use
the START/PAUSE dial to adjust the temperature before or during
cooking.
• To switch from Fahrenheit to Celsius: Press SAUTE/SEAR +
TEMP/TIME. Repeat to change it back.

nuwavenow.com
13
ENGLISH
nuwavenow.com
13
• To change the default temperature and time: Press START/
PAUSE for 1 second.
• To change the time format: You can change the Time format
to display minutes and seconds (ex. 10:59, 10 minutes and 59
seconds). Press and hold TIME for 1 second, if you press it again
it will go back to the default setting.
Use TEMP/TIME to show the cooking time. Use the START/PAUSE
dial to adjust the time before or during cooking. The Duet can be set
to cook for up to 10 hours under low and high pressure.
STAGE: Is used to scroll through cooking functions while PRESSURE
cooking. During AIR FRY, use STAGE to set up to 5 different cooking
stages. Cooking temperatures and times can be adjusted for each
stage of cooking using TEMP/TIME and START/PAUSE.
PREHEAT: Use PREHEAT to heat the Duet to the correct
temperature before adding food. To cancel the preheat function,
press PREHEAT at any time.
Note: PREHEAT is disabled while in PRESSURE mode.
WARM/DELAY: Use WARM/DELAY to keep your food warm after
cooking or when keeping it warm for an extended amount of time.
Use the START/PAUSE dial to adjust the warming temperature and
warming time. Press WARM/DELAY to cancel the warm cycle.
Use DELAY to delay cooking for up to 24 hours. Use the START/
PAUSE dial to adjust the delay time.
YOGURT: Make homemade yogurt using the YOGURT function.
Follow the steps on COMBO COOK Instructions.
START/PAUSE: When the START/PAUSE dial is pressed, the Duet
starts or pauses cooking. The START/PAUSE dial is turned to adjust
cooking functions and cooking temperature and time, and to scroll
through Menu options.
Mute the beep sounds on the Duet by pressing and holding STAGE
and SEAR/SAUTÉ dial for 1 second. To unmute, simply press and hold
it again for 1 second. Pause is disabled while in PRESSURE mode .
Note: Ensure the Stainless-steel Inner Pot is in the Duet. Error code
"Pot" will appear if you press START/PAUSE and the Stainless-steel
Inner Pot is not in the Duet. Make sure the PRESSURE Lid is on and
locked into place. The “Lock” symbol will show on the display when
the Lid is in place.
CANCEL: Is used to clear out any functions that are set into the Duet
at any time.
SAFETY FEATURE: The Duet can be locked to prevent children from
accidently turning it on. While the Duet is plugged in, press MENU +
STAGE for 1 second. This will lock the control panel. Press MENU +
STAGE again to unlock the appliance.
pressure cooking instructions
14
PRESSURE COOKING INSTRUCTIONS
14
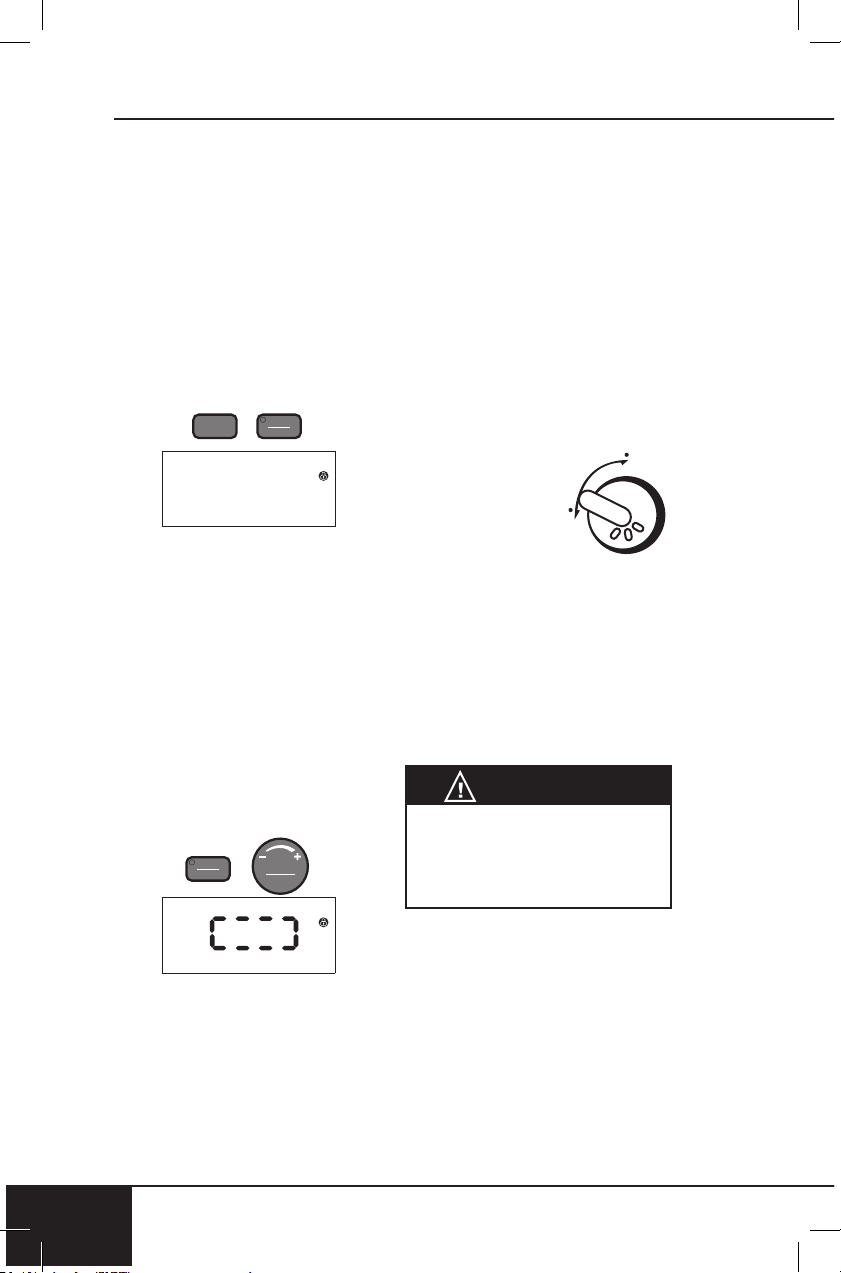
PRESSURE
1. Ensure the Stainless-steel
Inner Pot is in your Duet.
2. Plug the Duet in to turn it on.
3. Press PRESSURE.
• The lights will indicate the
cooking functions that are
available for use.
4. Press and hold PRESSURE
for 1 second to switch from
HIGH to LOW pressure.
5. Press TEMP/TIME, time
can be adjusted using the
START/PAUSE dial.
6. Turn the PRESSURE Lid
clockwise until it locks. The
“Lock” symbol will show on
the display when the Lid is
in place.
7. Turn the Pressure Release
Valve to the CLOSE position.
8. Press START/PAUSE to
begin cooking.
• The circulating box
indicates that the Duet is
preheating/pressurizing.
• Once the Duet reaches
the correct pressure,
the Duet will beep once,
the display will show
00:30
"PRESSURE", "high",
"00:30" (default time).
The colon (:) will ash,
indicating the Duet is
currently cooking and 30
minutes remain.
9. Once the Duet nishes
cooking, the display will
show "End" and the Duet will
beep 3 times.
Note:
To naturally release the pressure,
turn the Duet off and unplug.
The Duet will
slowly release
the pressure.
To release the
pressure quickly,
carefully turn
the Pressure
Release Valve to the OPEN
position until all steam/pressure
is released. Remember to
always turn the Pressure
Release Valve to the OPEN
position before opening the
PRESSURE Lid to ensure all
pressure is released.
CAUTION
Be very careful when releasing
pressure. A jet of hot steam
will release from the Pressure
Release Valve.
PRESSURE COOK LID
If the Pressure Cook Lid is
properly locked, the lock icon
on the display will appear. If the
Pressure Cook Lid is not properly
locked, then ''LID'' will show on
the display.
O
P
E
N
C
L
O
S
E

nuwavenow.com
15
ENGLISH
nuwavenow.com
15
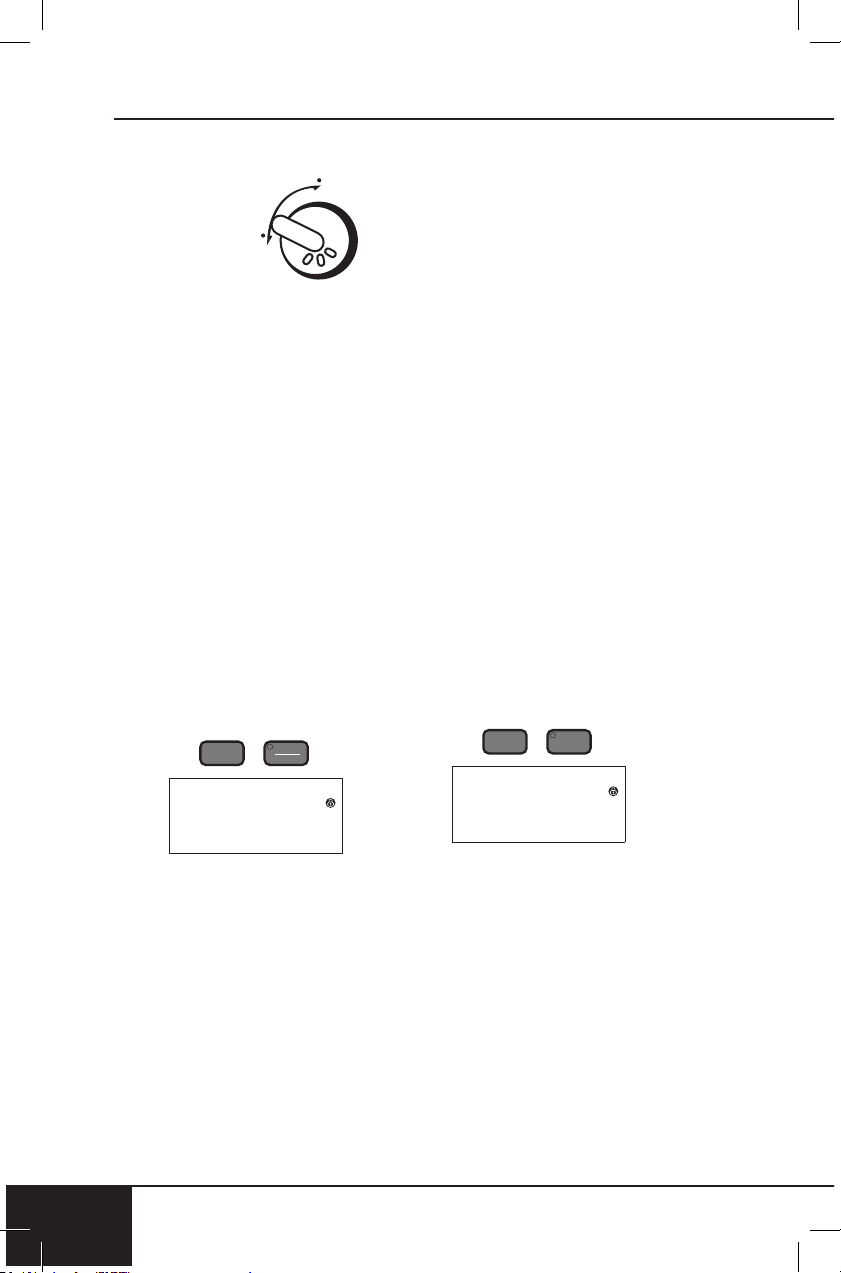
SAUTÉ/SEAR
When in PRESSURE mode, the
Duet will saute. When in AIR
FRY mode, it will sear.
1. Ensure the Stainless-steel
Inner Pot is in the Duet.
2. Press PRESSURE.
• The lights will show
which functions are
available for use.
3. Press SAUTÉ/SEAR to heat
the inner pot to sear meats,
sh, and vegetables before
pressure cooking.
4. Turn the START/PAUSE dial
to adjust the sauté time, up
to 00:30 (30 minutes).
5. Press TEMP/TIME to adjust
the sauté temperature. The
display will show "sear",
"temp", and "450F".
6. Turn the START/PAUSE dial
to adjust sear temperature
between 50F and 470F.
7. Press the START/PAUSE
dial to begin sautéing.
• Temperature and time can
be adjusted with START/
PAUSE and TEMP/TIME
during searing.
8. When nished, the display
will show "End".
Note: The SAUTÉ/SEAR
function should be used with the
Slow Cook Lid.
00:20
DELAY
1. Ensure the Stainless-steel
Inner Pot is in the Duet.
2. Press PRESSURE.
• The lights will show
which functions are
available for use.
3. Set your cooking time and
temperature.
4. Press and hold WARM/
DELAY for 1 second to delay
cooking for a designated
time period.
5. Turn the START/PAUSE dial
to adjust the delay time up to
24:00 (24 hours).
6. Press START/PAUSE
to begin the delay time
countdown. During the delay
time countdown, the colon
(:) will ash, indicating the
countdown has begun.
7. Delay time can be added or
reduced at any time by turning
the START/PAUSE dial.
8. Once the delay time
countdown has ended, the
Duet will automatically begin
to pressurize and go into
cooking cycle.
9. To cancel the Delay
function, press and hold
WARM/DELAY for 1
second. The Duet will move
into the next phase of
cooking.
10. Once the Duet nishes
cooking, the display will
show "End" and the Duet will
beep 3 times.
0 1:00
pressure cooking instructions
16
PRESSURE COOKING INSTRUCTIONS
16
Natural Pressure Release
Unplug the
Duet and allow
it to naturally
release the
pressure. To
quickly release
pressure, carefully turn the
Pressure Release Valve to the
OPEN position until all steam/
pressure is released. Remember
to always turn the Pressure
Release Valve to the OPEN
position before opening the
PRESSURE Lid to ensure that
all pressure is released.
SLOW COOK
For stews, soups, and much more.
Use this feature with the Slow
Cook Lid, do not use with the
PRESSURE Lid or AIR FRY Lid.
WARM
1. Press PRESSURE.
• The lights will show
which functions are
available for use.
2. Set your cooking time and
temperature.
3. Press WARM/DELAY to
engage the warm function
and keep your food warm
until you’re ready to serve.
4. Turn the START/PAUSE
dial to adjust the warming
time, up to 3:00 (3 hours).
5. Press START/PAUSE to
begin warming. To cancel,
press WARM/DELAY.
0 1:00
6. Press WARM/DELAY and
turn the START/PAUSE dial
to adjust the warming time
during cooking.
7. Press TEMP/TIME to see
how much cooking time
remains.
8. When the Duet nishes
cooking, the display will
show "End" and the Duet
will beep 3 times.
MENU (Presets)
Use MENU to retrieve 100
PRESSURE, 100 Air Fry, and
100 Combo Cook presets. It
will also let you store up 150 of
your own presets (50 for each
cooking function). See the back
of the Duet Recipe Book for the
entire list of presets.
Memory Recall
1. Press the PRESSURE.
• The lights will indicate
which functions are
available for use.
2. Press MENU to recall a
program from the Duet’s
Memory. The display will
show "PRESSURE", "menu",
and "1", which indicates
program number 1.
3. Turn the START/PAUSE
dial to the right (clockwise)
to count up in program
number and turn it to the left
(counterclockwise) to count
down in program number.
1
O
P
E
N
C
L
O
S
E

nuwavenow.com
17
ENGLISH
nuwavenow.com
17
4. Once you reach the program
number you want press
START/PAUSE.
5. The display will show the
default time setting for that
program as well as the
default pressure setting.
Note: PRESSURE adjusts
pressure, TEMP/TIME and the
START/PAUSE dial adjusts time.
6. Press START/PAUSE to
begin the cooking process.
7. Once the Duet nishes
cooking, the display will
show "End" and the Duet will
beep 3 times.
To Program Your Own Unique
Recipe Before Cooking
1. Press PRESSURE.
• The lights will show
which functions are
available for use.
2. Set your cooking functions
for either MENU, STAGE,
WARM/DELAY, SLOW
COOK, TEMP/TIME, or
SAUTÉ/SEAR.
3. Once the cooking functions
are programmed into the
Duet, press and hold MENU
for 1 second. The display
will show "menu" and "101".
4. Use the START/PAUSE dial
to scroll through the program
memory slots until you
reach the number to which
1
you would like to save the
program (101-150).
5. Once the desired program
number is reached, press
and hold MENU for 1
second again. The Duet will
beep once and the program
is saved for future recall.
To Program Your Own Unique
Recipe After Cooking
1. Press PRESSURE.
• The lights will show
which functions are
available for use.
2. Set your cooking functions
using SAUTÉ/SEAR,
PRESSURE, and WARM/
DELAY.
3. Once programmed into the
Duet, press START/PAUSE.
The Duet will begin the
cooking process.
4. When done, the Duet will
beep 3 times and the display
will show "End".
5. Press and hold MENU for 1
second, the display will show
"menu" and "101".
6. Use the START/PAUSE dial
to scroll through the program
memory slots numbers until
you reach the number to
which you would like to save
the program (101-150).
7. Once the desired program
number is reached, press
and hold MENU for 1
second again. The Duet
will beep once and the
program is saved and can
be recalled later.

pressure cooking instructions
18
PRESSURE COOKING INSTRUCTIONS
18
View Current Program During
Cooking
1. While cooking, press
and hold down MENU.
The display will show the
program number currently
running.
2. Release MENU to see the
previous screen on the
display.
Editing a Program
You can edit the programs you
create (101-150) before or during
the cooking process and save
any changes.
1. Edit Before Cooking:
• Press MENU and use the
START/PAUSE dial to nd
the program to edit.
• Once the program number
shows in the display, press
STAGE until you reach the
function you want to edit.
Use the START/PAUSE
dial to adjust temperatures
and times.
• To add a function, press
the function of choice
and use the START/
PAUSE dial to make your
adjustments.
• Once all edits are made,
press MENU. The display
will show "menu" and
"101".
• Use the START/PAUSE
dial to nd the program
number to which you wish
to save your edits.
• Press and hold MENU for
1 second again to save
and store the edits for
later recall.
2. Edit During Cooking:
• While cooking, press
STAGE until you reach the
function you want to edit.
Use the START/PAUSE
dial to adjust.
• To add a function, press
the function of choice
and use the START/
PAUSE dial to make your
adjustments.
• The Duet will continue the
cooking process with the
edits that you have made.
Note: Functions that have
already ended in the cooking
cycle cannot be edited or added
during cooking.
• When cooking has
nished, the Duet will
beep 3 times and the
display will show "End"
followed by "SAVE".
• Press MENU, the display
will show "menu" and
"101".
• Use the START/PAUSE
dial to nd the program
to which you wish to save
the edits.
• Press and hold MENU
for 1 second to save and
store the edits for later
recall.
Note: If any recipe is saved into
a program (memory slot) that is
already lled, the new recipe will
override the previous program
recipe (101-150 only). Preset
temperatures and times for
program recipes 1-100 can be
adjusted, but will not be saved
when the program number (1-
100) is recalled once again.

nuwavenow.com
19
ENGLISH
nuwavenow.com
19
CANCEL
Press CANCEL at any time to
end all operation of the Duet.
Once CANCEL is pressed the
display will show "--:--", which
indicates standby mode.
YOGURT Function:
1. Place milk in the Inner Pot.
2. Press YOGURT once (to
enter YOGURT MODE).
• “9:10” will display on the
LED screen (this is the
default time).
3. Press START/PAUSE.
• The LED display will
show “HEAT” and the
default temperature of
“275F”.
• Press TIME to display
the default 10–minute
heating time to let the
milk reach 180F.
Note: At 9 minutes, Duet beeps
continuously to alert you to check
that the temperature is 180F with
handheld thermometer.
If the milk temperature has not
reached 180F, add 2 minutes with
the START/PAUSE dial until it
does reach 180F.
• Once time ends, the Duet
will beep continuously
and the LED will display
“COOL”.
4. Duet will now go into Delay
mode for 1 hour.
5. Press START/PAUSE to
begin the Cool cycle.
• Once the hour has
passed, the Duet will
beep continuously.
• Check the milk with
handheld thermometer.
• When the milk has
cooled to 110F and “Add”
is on the LED display,
add the yogurt culture to
the milk.
Note: “Add” will display after the
1 – hour delay has run out.
• Place the glass lid on the
Duet.
6. Press START/PAUSE.
• The LED screen will
display “8:00” hours and
“115F”. Leave the Duet
undisturbed for 8 hours.
• Once the 8 hours have
passed, the incubation is
complete.
• The Duet will beep (2
short and 1 long) and the
LED display will show
“End.”
7. Press CANCEL and remove
your yogurt.
air frying instructions
20
AIR FRYING INSTRUCTIONS
20
Getting Started
SAUTÉ/SEAR, WARM/DELAY,
TEMP/TIME, MENU, PREHEAT,
and STAGE are available for use
when air-frying.
1. Plug the power cord into an
electrical outlet.
2. Press the AIR FRY.
• The lights will show which
functions are available for
use.
• If the Lid is removed,
"open" will also show in
the display.
Note: PRESSURE is disabled
during use of the air fryer.
3. Ensure the Air Fryer Lid
is on the Duet and press
START/PAUSE to begin
cooking.
• The display will show
"00:15" (15 minutes).
• The colon (:) will ash,
indicating the Duet is
currently cooking.
• Turn the START/PAUSE
dial to adjust the cooking
time, if desired.
• Press TEMP/TIME and
turn the START/PAUSE
dial to adjust the cooking
temperature, if desired.
4. To pause cooking, press
START/PAUSE or remove
the Air Fryer Lid.
• The colon (:) will no longer
ash. This indicates the
Duet is paused.
350F
• If the Air Fryer Lid is
removed to pause cooking,
the display will show "air
fry", "Lid", and "open".
5. To resume cooking, simply
return the Air Fryer Lid and
the colon (:) will begin to
ash, indicating the Duet has
resumed cooking.
6. Once the Duet nishes
cooking, the display will
show "End" and the Duet will
beep 3 times.
TEMP/TIME
1. Press TEMP/TIME whenever
you want to see or adjust the
cooking time temperature
and time by turning the
START/PAUSE dial. You can
make this adjustment before
or while cooking.
DELAY
Delay can be used with the Air
Fry function.
1. Press AIR FRY.
• The lights will show
which functions are
available for use.
• The display will show "air
fry", "temp", and "350F". If
the Lid is removed, "open"
will also show in the
display. Place the Lid on
the Duet and "open" will
no longer be lit.
Cooking time range
50F~275F
275F~345F
350F~400F
00:00 - 99:99
00:00 - 24:00
00:00 - 01:00
nuwavenow.com
21
ENGLISH
nuwavenow.com
21
2. Set your cooking functions,
as described in this manual.
3. Press and hold WARM/
DELAY for 1 second to delay
cooking for a designated
period of time. The display
will show "air fry", "delay",
"time", and "01:00" (1 hour).
4. Turn the START/PAUSE dial
to adjust the delay time up to
24:00 (24-hours).
5. Press START/PAUSE
to begin the delay time
countdown. During the Delay
time countdown, the colon
(:) will ash, indicating the
countdown has begun.
6. Delay time can be added
or reduced at any time by
turning the START/PAUSE
dial.
7. Once the delay time
countdown has ended, the
Duet will automatically go
into the cooking cycle.
8. To cancel the Delay function,
press and hold WARM/
DELAY for 1 second. If
operating, the Duet will
move into the next phase of
cooking.
STAGE
Stage cooking is used to cook
foods at different temperatures
and times throughout the cooking
process. Up to 5 stages of cooking
can be set up. DELAY, PREHEAT,
SEAR 1, SEAR 2, and WARM are
NOT considered stages. Stage 1
cooking is the default 350F for 15
minutes).
1. Plug the power cord into an
electrical outlet.
2. Press AIR FRY.
• The lights will show which
functions are available
for use. The display will
show "air fry", "temp", and
"350F". When you press
STAGE "stage" and "1"
will be displayed.
3. Adjust the cooking
temperature by turning the
START/PAUSE dial until the
desired cooking temperature
is reached.
4. Press TEMP/TIME and use
the START/PAUSE dial to
adjust Stage 1 cooking time.
5. To add an additional stage,
press STAGE once. The
display will show "stage",
and "2" (above stage). This
is Stage 2 cooking.
6. Adjust Stage 2 cooking
temperature by turning the
START/PAUSE dial until the
desired cooking temperature
is reached.
7. Press TIME, the display will
show "00:00", "time", "stage"
and "2" (above stage). Use
350F
1
Stage 1
350F
2
Stage 2

air frying instructions
22
AIR FRYING INSTRUCTIONS
22
the START/PAUSE dial to
adjust Stage 2 cooking time.
8. To set additional stage
cooking settings, repeat
steps 5-7.
• The number above stage
will change after you
press STAGE and set
temperature and time.
• After Stage 5, when
STAGE is pressed again
the Duet will go back to
Stage 1. The display will
show stage 1 set cooking
temperature, "temp",
"stage", and "1" (above
stage).
9. If you only want 2 stages
of cooking, leave the time
at 00:00 for stages 3-5 and
those stages will be skipped.
10. Press START/PAUSE to
begin cooking. The Duet will
cook with the set functions.
11. While cooking, press STAGE
to see and adjust the
upcoming cooking stages
and cooking functions (sear 1
& 2, preheat, and warm).
12. When the Duet nishes
cooking, the display will
show "End" and the Duet will
beep 3 times.
Notes:
• The display will only indicate the
stage cooking number when 2
or more stages are used.
• The display will not show
stage cooking if only one stage
of cooking is used.
• Stage 1 default: 350F, 00:15
• Stage 2-5 default: 350F, 00:00
• If no time is set for stages 2-5,
those stages will be skipped in
the cooking cycle.
GRILL
1. Press GRILL. The default
temperature and time is
450F for 10 minutes.
2. Press TEMP/TIME to adjust
the cooking temperature
and time.
3. Once set, press START/
PAUSE. The Duet
will preheat to a set
temperature of 450F.
4. Once it has reached the
preheat temperature, the
Duet will start a 5-minute
countdown. Insert your food,
and press START/PAUSE to
begin cooking.
PREHEAT
When air-frying use the Air
Fryer Lid.
1. Press AIR FRY.
• The lights will show
which functions are
available for use.
• The display will show "air
fry", "temp", and "350F".
If the Lid is removed,
"open" will also show in the
display. Place the Lid on
the Duet and "open" will no
longer be lit.
2. Set your cooking functions,
as described in this manual.
350F

nuwavenow.com
23
ENGLISH
nuwavenow.com
23
3. Press PREHEAT to engage
the preheat function. The
display will show "air fry",
the set cooking temperature,
"pre", and "temp".
• The Duet will ALWAYS
preheat to the cooking
temperature of the NEXT
cooking cycle.
4. Press START/PAUSE to
begin preheating. The Duet
will begin preheating to the
set temperature.
• The display will show
"air fry", the set cooking/
preheat temperature
(ashing), "pre", and
"temp".
• During preheat the
temperature can be
adjusted by turning the
START/PAUSE dial.
• The cooking time can also
be adjusted by pressing
TIME then adjusting by
turning the START/PAUSE
dial.
5. When the Duet reaches
the preheat temperature it
will go into a 5-minute hold.
The Duet will maintain the
preheat temperature during
this 5-minute hold.
• During the 5-minute hold
the display will show "5"
(ashing), "ready", and
"temp", and the Duet will
beep 3 times.
• The cooking temperature
can be adjusted by turning
the START/PAUSE dial
during the 5-minute hold.
• The cooking time can also
be adjusted by pressing
TIME then adjusting by
turning the START/PAUSE
dial.
• If no action is taken within
the 5-minute hold, the
Duet will automatically go
into standby mode.
6. Remove the Air Fryer Lid
and place your food into
the Duet. Replace the Air
Fryer Lid. The Duet will
begin cooking at the set
temperature and time.
7. The preheat cycle can be
canceled at any time by
pressing PREHEAT. The
Duet will end the preheat
cycle and automatically go
into the next cooking cycle.
8. When the Duet has nished
cooking, the display will
show "End" and the Duet
will beep 3 times.
AUTO PREHEAT
1. Press MENU and PREHEAT
at the same time to turn on
Auto Preheat.
• Auto Preheat will
automatically preheat the
Duet to the set cooking
temperature.
• After it has reached the
set cooking temperature,
the Duet will go into a
5-minute countdown just
like the typical PREHEAT
function.
• After the countdown, the
Duet will cook at the set
cooking temperature and
cooking time.
2. To turn off Auto Preheat press
MENU and PREHEAT at the
same time.

air frying instructions
24
AIR FRYING INSTRUCTIONS
24
SEAR
Sear 1 will always be directly
BEFORE regular stage cooking
and Sear 2 will always be directly
AFTER regular stage cooking.
Sear 1
Default sear 1 temperature is
450F and default sear 1 time is 5
minutes (00:05).
1. Press SEAR one (1) time.
The Sear 1 temperature can
be adjusted by turning the
START/PAUSE dial up to
450F.
• Press TEMP/TIME and
use the START/PAUSE
dial to adjust the sear
1 searing time up to 15
minutes (00:15).
2. Adjust your cooking
temperatures and times for
stage cooking.
3. Press START/PAUSE to
begin cooking. The display
will show "sear 1" (ashing),
time, and the set sear time
(00:05 default) with the colon
(:) ashing.
4. Once the Sear 1 cycle
is complete the Duet will
automatically go into regular
(stage) cooking.
5. When the Duet is nished
cooking the display will
show "End" and the Duet
will beep 3 times.
Sear 1 & 2
Sear 1 & 2 is used to sear before
and after regular stage cooking.
1. Adjust your cooking
temperatures and times for
stage cooking.
2. Press SEAR one time and
set your sear 1 temperature
and time. Default is 450F
for 5 minutes. Press SEAR
again. The display will show
"450F", "sear", "2" (ashing),
and "temp".
3. Adjust the sear 2
temperature and time.
Default is 450F for 5
minutes.
4. Press START/PAUSE to
begin cooking. The display
will show "sear 1" (ashing),
"2", "time", and the set "sear
1" time with the colon (:)
ashing.
5. Once the Sear 1 cycle is
complete the Duet will beep
once and will automatically
go into regular stage
cooking. The display will
show "sear 2", "time", and
the set regular (stage)
cooking time (00:15 default)
with the colon (:) ashing.
6. Once the stage cooking
cycle is complete the Duet
will beep once and will
automatically go into sear
2 cooking. The display will
show "sear 2" (ashing),
"time", and the set sear
time (00:05 default) with
the colon (:) ashing.
7. When the Duet is nished
cooking the display will
show "End" and the Duet
will beep 3 times.
Sear 2
Default Sear 2 temperature is
450F and default sear 2 time is 5
minutes (00:05).
1. Adjust your cooking
temperatures and times for
stage cooking.
2. Press SEAR 3 times. This
will engage the Sear 2
function.

nuwavenow.com
25
ENGLISH
nuwavenow.com
25
3. The display will show
"450F", "sear", "2" (ashing),
and "temp".
• Sear 2 searing
temperature can be
adjusted by turning the
START/PAUSE dial. 450F
is the maximum searing
temperature.
• Press TEMP/TIME and
turn the START/PAUSE
dial to adjust the sear
2 searing time up to 15
minutes (00:15).
4. Press the START/PAUSE
dial to begin cooking. The
display will show "sear 2",
"time", and the set regular
stage cooking time (00:15
default) with the colon (:)
ashing.
5. Once the stage cooking
cycle is complete the Duet
will automatically go into
sear 2 cooking. The display
will show "sear 2" (ashing),
"time", and the set sear
time (00:05 default) with the
colon (:) ashing.
6. When the Duet is nished
cooking the display will
show "End".
7. Press SEAR 4 times until
"sear", "1", and "2" are no
longer lit in the display to
clear the Sear function.
450F
WARM
1. Set cooking functions, as
described in this manual, to
your specications.
2. Press WARM/DELAY to
engage the warm function and
keep your food warm after
cooking until you’re ready to
serve.
3. The display will show "air
fry", "temp", "warm", and
"140F".
4. Turn START/PAUSE to
adjust the warm temperature
up to 200F.
5. Press TIME to adjust the
warming time.
6. The display will show "air
fry", "warm", "time", and
01:00 (1 hour).
7. Use the START/PAUSE dial
to adjust Warm time up to 3
hours (03:00).
8. Press START/PAUSE to
begin cooking.
9. To cancel the Warm function
at any time, simply press
WARM/DELAY.
10. To adjust the Warm setting
during cooking, press
STAGE until warm and
the set warm temperature
appear in the display.
11. To adjust the warm time
during cooking, press
TIME and use the START/
PAUSE dial to adjust.
140F

air frying instructions
26
AIR FRYING INSTRUCTIONS
26
12. To see the current function,
press STAGE until that
function is ashing in the
display.
13. When the Duet nishes
cooking it will automatically
go into Warm function.
14. When the Warm function
ends, the Duet will beep 3
times and the display will
show "End".
Warm Used as an Independent
Function: Warm can be used
independently as its own function
to keep food items warm.
1. Press and hold STAGE
and WARM/DELAY for 2
seconds. The Duet will
automatically begin to warm.
2. The display will show "air
fry", "temp", "warm", and
"140F".
3. Turn the START/PAUSE
dial to adjust the warm
temperature up to 200F.
4. Press TEMP/TIME to adjust
the warming time.
5. The display will show "air
fry", "warm", "time", and
"01:00" (1-hour).
6. Use the START/PAUSE
dialo adjust warm time up to
3 hours (03:00).
7. Once the warm function time
ends, the display will show
"End" and beep 3 times.
MENU
Gives you access to preset
cooking settings and allows
you to save and recall your own
frequently used cooking settings.
Memory Recall
1. Press MENU, the display
will show "air fry", "menu",
and "1".
• Use the START/PAUSE
dialto choose the desired
program number to recall.
• Numbers 1-100 are preset
programs.
• There is storage space for
an additional 50 recipes
of your own. This will be
covered in Program Your
Own Recipe below.
2. Once the program number
is chosen, press START/
PAUSE to begin cooking.
You can make temperature
and time adjustments if
desired.
3. The Duet will cook at the
programmed settings.
Program Your Own Recipe
Before Cooking:
1. Set cooking functions, as
described in this manual, to
your specications.
2. Press and hold MENU for 1
second, the display will show
"air fry", "menu", and "101".
3. Use the START/PAUSE
dial to choose the program
number to which you wish
to save the program (101-
150).
4. Once the program number
is chosen, press and hold
MENU for 1 second to store
and save the program. It is
now stored and available for
future recall.
1

nuwavenow.com
27
ENGLISH
nuwavenow.com
27
5. Press START/PAUSE to
begin cooking the program.
Program Your Own Recipe
During Cooking:
1. Set cooking functions, as
described in this manual, to
your specications.
2. Press START/PAUSE to
begin cooking.
3. During cooking, press and
hold MENU for 1 second.
The display will show "air fry",
"menu", and "101".
4. Use the START/PAUSE
dial to choose the program
number to which you wish to
save the program (101-150).
5. Once the program number
is chosen, press and hold
MENU for 1 second again to
store and save the program
to your chosen program
number. The program is
now stored and available for
future recall.
6. The Duet will continue
to cook the recipe
programmed.
Program Your Own Recipe
After cooking:
1. Set cooking functions, as
described in this manual, to
your specications.
2. Press START/PAUSE to
begin cooking.
3. When the cooking process
is nished, and the display
shows "End", press and hold
MENU for 1 second. The
display will show "air fry",
"menu", and "101".
10 1
4. Use the START/PAUSE dial
to choose the number to
which you wish to save the
program (101-150).
5. Once the program number
is chosen, press and hold
MENU for 1 second again to
store and save the program
to your chosen program
number. The program is
now stored and available for
future recall.
View Current Program During
Cooking: You can view the
currently cooking program
number.
1. During cooking, press and
hold MENU for 2 seconds.
2. The display will show the
currently running program.
3. Release MENU to see the
previous screen on the
display.
View Programmed Cooking
Functions: You can view all
cooking functions associated
with a program before or during
the cooking process.
1. View Before cooking:
• Press MENU and nd the
program number to review
using the START/PAUSE
dial.
• Once the program number
shows in the display,
press STAGE to review
each phase of cooking.
• Adjustments to
temperature and time can
be made for each function
at this time.
2. View During cooking:
• Press STAGE to review
each phase of cooking.
• Continue to press STAGE
to scroll through all
programmed functions for
that program number.

air frying instructions
28
AIR FRYING INSTRUCTIONS
28
• Adjustments to
temperature and time can
be made for each function
at this time.
• Editing a Program: You
can edit the programs you
create before or during the
cooking process and save
any changes.
1. Edit Before Cooking:
• Press MENU and nd the
program number to edit
using the START/PAUSE
dial.
• Once the program number
shows in the display,
press STAGE until the
function you would like to
edit shows in the display.
• Using TEMP/TIME and the
START/PAUSE dial, make
the edits to temperature
and time as desired.
• Once all edits are made,
press and hold MENU
for 1 second. The display
will show "air fry",
"menu", and "101".
• Use the START/PAUSE
dial to nd the program
number to which you wish
to save your edits.
• Press and hold MENU for
1 second again to save
and store the edits.
2. Edit During Cooking:
• While cooking, press
TEMP/TIME and use
the START/PAUSE dial
to adjust the cooking
temperature.
• Press TEMP/TIME and
use the START/PAUSE
dial to adjust the cooking
time.
• If there are more cooking
functions that you would
like to edit, press STAGE
until you reach the function
you would like to edit.
• Use the TEMP/TIME and
the START/PAUSE dial to
make edits.
• The Duet will continue the
cooking process with the
edits that you have made.
Note: Functions that have
already ended in the cooking
cycle cannot be adjusted.
• Once all edits are made,
press and hold MENU
for 1 second. The display
will show "air fry",
"menu", and "101".
• Use the START/PAUSE
dial to nd the program
number to which you wish
to save your edits.
• Press and hold MENU for
1 second again to save
and store the edits.
• When cooking has
nished, the Duet will
beep 3 times and the
display will show "End"
followed by "SAVE".
Note: If you save any recipe to
an already lled memory slot,
the new recipe will overwrite
the previous recipe. Any edits
to a preset program (1-100) can
only be saved and stored into
program numbers 101-150. You
cannot save and adjust preset
program to its original preset
program number.

nuwavenow.com
29
ENGLISH
nuwavenow.com
29
COMBO COOK
Combo cooking allows you to set
both PRESSURE and AIR FRY
settings at the beginning, instead
of programming in the middle of
cooking. PRESSURE, TEMP/
TIME, WARM/DELAY, SAUTÉ/
SEAR, STAGE, and MENU are
available for use with the Combo
Cook function.
1. Plug the power cord into
an electrical outlet.
2. Press COMBO COOK.
• The lights will show
which functions are
available for use.
The display will show
"COMBO COOK".
3. Set the PRESSURE settings.
4. Once PRESSURE settings
have been entered, press
COMBO COOK a second
time.
• The lights on GRILL,
SAUTÉ/SEAR, STAGE,
TEMP/TIME, MENU,
and WARM/DELAY will
light up, indicating those
functions are available
for use.
• The display will show "air
fry", "temp", and "350F".
5. Set the AIR FRY settings.
6. Press START/PAUSE when
all settings are entered
and the pressure-cooking
portion of your cooking is
ready to go. Make sure the
PRESSURE Lid is properly
00:30
in place. The Duet will rst
cook the PRESSURE part of
the recipe.
7. Allow the Duet to naturally
release the pressure. To
quick release pressure,
carefully turn the Pressure
Release Valve to the
“OPEN” position until all
steam/pressure is released.
Remember to always turn
the Pressure Release
Valve to the “OPEN”
position before opening
the PRESSURE Lid to
ensure all pressure is
released.
8. Replace the PRESSURE
Lid with the AIR FRYER Lid.
9. Press START/PAUSE to
begin the air- frying potion
of cooking.
10. When all cooking is
complete, the Duet will beep
3 times and the display will
show "End".
Note: The Program function
works the same as it does in both
the PRESSURE and AIR FRY
sections with one difference: In
order to activate the COMBO
COOK, you will need to press
COMBO COOK. This will
allow you access to the preset
programs for COMBO COOK,
and allow you to create and save
your own.
COMBO COOKING INSTRUCTIONS

cleaning & maintenance
30
CLEANING & MAINTENANCE
30
Before First Use:
1. Remove all the packaging materials.
2. Remove the glue and labels on the appliance.
3. Clean the Stainless-steel Inner Pot, Multipurpose Reversible
Rack, Stainless-steel Fry Basket, Grill/Griddle Plate, and Slow
Cook Lid thoroughly with hot water, a nonabrasive sponge, and
mild dish detergent, or in the dishwasher, top rack only. Wipe
the insides and outside of the Duet with a wet cloth. Do not
immerse the Duet in water. Dry thoroughly.
Note: This appliance also cooks using hot air. NEVER ll the Duet
with oil when air-frying.
Cleaning
ALWAYS unplug the Duet and allow it, and all parts to completely cool
down BEFORE cleaning. Clean the Duet after each use. Removing
parts from the Duet will allow the Duet to cool down faster.
IMPORTANT - Do not immerse the base or lids in water or
attempt to cycle them through a dishwasher. The outer surface
may be cleaned by wiping carefully with a damp dishcloth or
sponge. Make sure the Duet has cooled completely prior to
cleaning.
DO NOT USE HARSH ABRASIVES OR SCOURING PADS TO CLEAN
THE DUET OR ANY PARTS, as surface scratching may occur.
1. Unplug the Duet and allow it to cool.
2. Clean the Base, Lids, and
control panel of Duet with a
damp cloth or paper towel.
Dry thoroughly.
3. Clean the Stainless-steel Inner
Pot with warm or hot water and
mild detergent. Dry thoroughly
before returning it to the Duet.
For tougher cooked-on food
particles, soak the Pot in warm
water rst. Use a soft brush or
cloth to remove particles.
4. The PRESSURE Lid can be cleaned with water and mild
detergent soap. Dry thoroughly. DO NOT clean in the dishwasher.
5. The Food Blocking Cap is removable. Wash using water and mild
detergent. Return to the Duet when dry. The Duet will not operate
properly without this part installed.
nuwavenow.com
31
ENGLISH
nuwavenow.com
31
6. The Stainless-steel Air Fry Basket can be cleaned using water
and a soft cloth or paper towel, or in the dishwasher, top rack
only. For tougher particles, soak with hot water before cleaning
with a soft cloth.
7. Clean the AIR FRYER Lid by wiping the outside and insides
with a wet cloth or paper towel. Dry thoroughly. DO NOT clean
in the dishwasher.
8. Gently clean the Pressure Release Valve with a damp, soft cloth
or paper towel.
9. Clean the Multipurpose Stainless-steel Reversible Rack with hot
water and a nonabrasive sponge. For tough buildup, soak before
removing particles with a soft brush, cloth, or paper towels.
10. Clean the Slow Cook Lid with hot water and a nonabrasive
sponge. For tough buildup, soak before removing particles with
a soft brush, cloth, or paper towels. Dishwasher safe, bottom
rack only.
Note: Dry all parts gently with a clean, dry cloth or paper towel or air-
dry before returning them to the appliance.
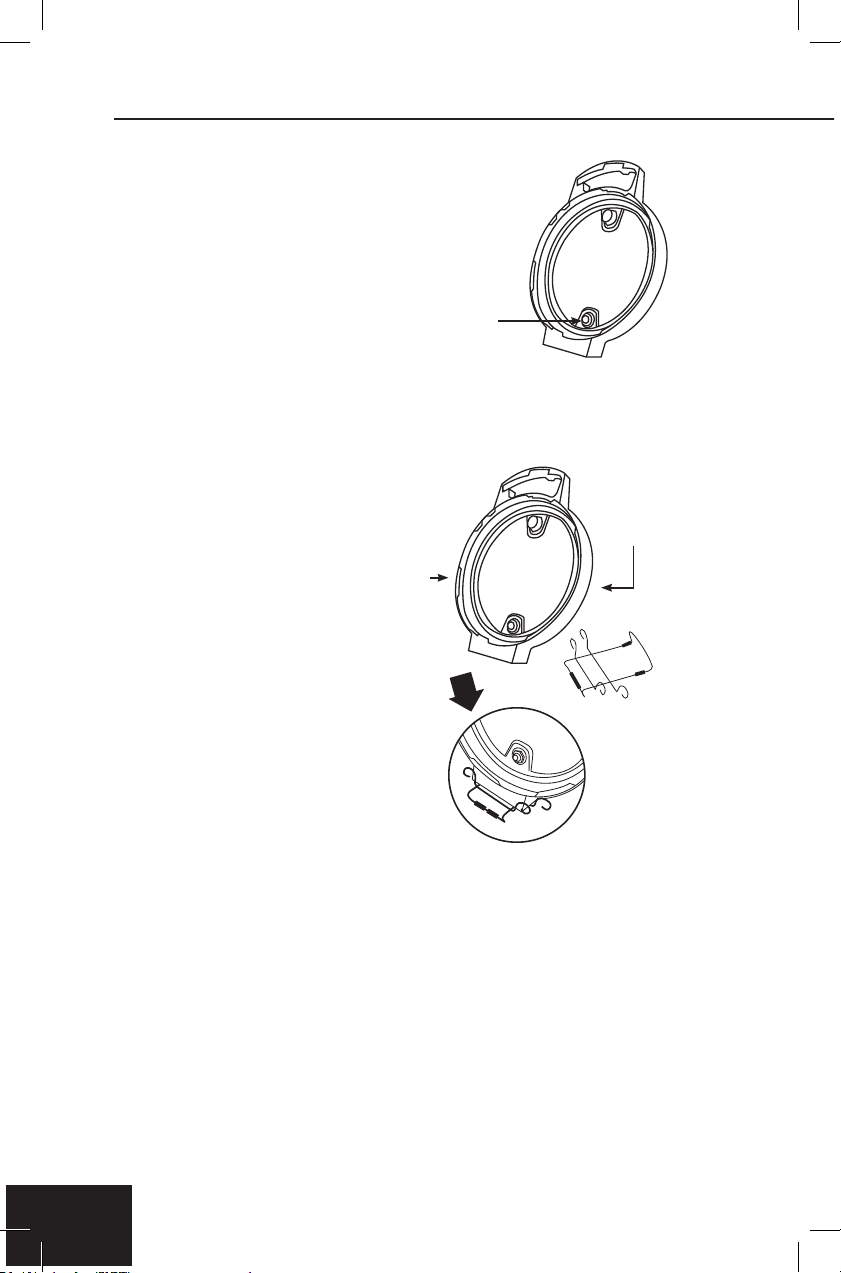
Cleaning and Removing the Silicone Gasket from the
PRESSURE Lid.
MAKE SURE THE SILICONE GASKET HAS NO CRACKS OR
IS IN ANY WAY DAMAGED. THE SILICONE GASKET MUST BE
INSTALLED IN THE LID FOR THE DUET PRESSURE FUNCTION
TO WORK.
Removing the Silicone Gasket
• With one hand holding the Lid down, gently pull the Silicone Gasket
up from the PRESSURE Lid.
Installing the Silicone Gasket
• Line up the Silicone Gasket on top of the metal ring.
• Gently push the Silicone Gasket, making sure you see the metal
ring is inside the Silicone Gasket’s groove. Continue pushing the
Silicone Gasket all around.
Note: Clean the Silicone Gasket under lightly running warm water.
Allow to air-dry.
cleaning & maintenance
32
CLEANING & MAINTENANCE
32
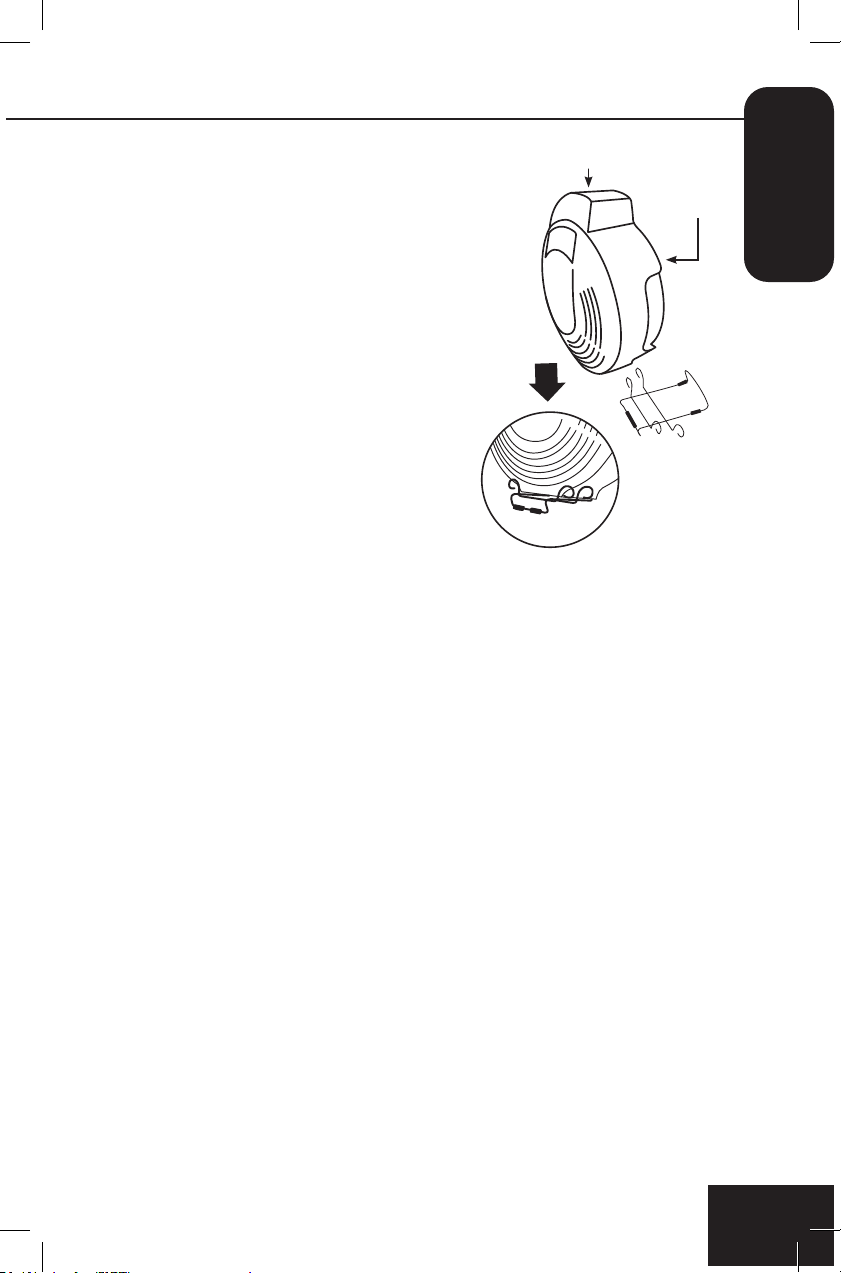
Lid Holder
Use the Lid Holder for both the
PRESSURE Lid and Air Fryer
Lid to keep from touching hot
surfaces and to allow the lids to
cool down.
1. After using the PRESSURE
function, ensure that all
steam/pressure has been
released prior to removing
the lid.
See Releasing Pressure on
page 15.
2. Remove the PRESSURE Lid
from the Duet and place the
bottom of the Lid on the two
lower horizontal bars with the
rim resting in between each.
The underside of the Lid will face out.
Back of Lid
Inside
of Lid
Lid Holder
Cleaning Pressure Indicator Valve
Remove the Silicone Valve Gasket underneath
the Lid covering the bottom of the Pressure
Indicator Valve. When removed, the Pressure
Indicator will be released. If needed, clean the
Pressure Indicator Valve and Silicone Valve
Gasket before replacing.
When clean and dry, place
Pressure Indicator Valve back
through its hole. Replace the
Silicone Valve Gasket over the bottom of the
Pressure Indicator Valve. Ensure that the t is
snug and that the Pressure Indicator is moving up and down freely.
Pressure
Indicator Valve
nuwavenow.com
33
ENGLISH
nuwavenow.com
33
After Air-Frying:
1. Remove the AIR FRYER Lid from the
DUET and place the bottom of the Lid
on the two lower horizontal bars with
the rim resting in between each. Allow
the Lid to lean against the curved bar
of Lid Holder.
2. Ensure the Lid is correctly in place and
secure on the Holder.
Caution: Lids will be HOT. Use Black
Silicone Mitts or oven mitts when placing
them on the Holder.
Back of Lid
Inside of Lid
Lid Holder
Cleaning the Grill/Griddle Plate
After removing it from the Duet and
allowing it to cool, wipe with a wet
cloth or paper towel or clean it in
the dishwasher, top rack only.
troubleshooting guide
34
TROUBLESHOOTING GUIDE
34
The Duet is taking a longer time to come up to
correct pressure.
1. Cooking times vary based on selected temperatures, the
current temperature of the Inner Pot, and temperature or
amount of ingredients used.
2. Make sure the Silicone Gasket in the Lid is properly in place
and ush against rim of Lid, all the way around.
3. Make sure the PRESSURE Lid is locked into place and the
Pressure Release Valve is in the “CLOSE” position. When the
Lid is properly locked, the “Lock” icon will appear in the display.
You are unsure if whether or not the Duet is pressurizing
inside the Inner Pot.
“PH” with the colon (:) will be ashing, indicating it is pressurizing.
The time is counting down noticeably slower
on the Duet.
The hours may have been set, and not the minutes on the Duet.
When the time is set, HH:MM will be displayed. The time will
increase/decrease 1-minute increments.
Steam is being released from the Pressure Release Valve
when pressurizing.
This is normal. When pressurizing, some steam will be released.
The PRESSURE Lid is NOT removing easily from the Duet.
As an added safety feature, the Duet will only open once all
pressure has been released. Allow the Duet to Natural Release
pressure and always Quick Release afterward to make sure all
pressure/steam is released: Turn the Pressure Released Valve to
the “OPEN” position. Once all pressure/steam is released turn the
PRESSURE Lid counterclockwise to open and lift it up away from
you.
The Pressure Release Valve is loose.
The Pressure Release Valve was designed to be loose for an
efcient, easier movement from the “CLOSE” position to the
“OPEN” position. The Valve was engineered this way to regulate
pressure and release small amounts of steam from the Duet when
pressure-cooking.
Note: ALWAYS turn the Pressure Release Valve to the “CLOSE”
position when pressure-cooking or, at rst, as part of the beginning
of the combo-cooking process. Make sure to turn the Pressure
Release Valve all the way to “OPEN” when performing a Quick
Release.
nuwavenow.com
35
ENGLISH
nuwavenow.com
35
The Duet is making a hissing sound and not building
up pressure.
1. Make sure you have turned the Pressure Release Switch to
the “CLOSE” position.
2. Silicone Gasket is not properly in place in the rim of the Lid.
Stop the cooking process, perform a Quick Release until all
steam/pressure is released, and unplug the Duet, and then
carefully remove the Lid. Allow both the Lid and Gasket to
cool. When the lid and gasket are cool, press the Silicone
Gasket down into the groove of the Lid, all the way around.
You should be able to slightly tug on the Gasket while
rotating. Refer to Cleaning and Removing the Silicone
Gasket from the PRESSURE Lid under Cleaning &
Maintenance.
How long does it take for the Duet to release pressure?
Natural Release can take 20 minutes or more depending on the
food and ingredients. For Quick Release, it can take 2 minutes or
more depending on the food and ingredients.
Error Code LID is displayed and the Duet is not cooking.
1. The wrong lid is being used for the chosen cooking function.
Place the correct lid on the Duet.
2. The Lid is not properly in place on the Duet. Make sure the Lid
is in place and the Lock icon is displayed.
3. If the correct lid is on the Duet and it is correctly in place (or
locked) and the LID error is still displayed, unplug the Duet and
contact Customer Service.
Error Code POT is displayed and the Duet is not cooking.
The Pot was not properly placed in the Duet. Make sure the Pot is
correctly placed in the Duet before cooking.
Error Code Er1 is displayed and the Duet is not cooking.
Cancel the cooking function and unplug the Duet to allow it to cool.
If the Duet is still not working after letting it cool and turning it on
again, contact Customer Service.
Error Code Er2 is displayed and the Duet is not cooking.
PRESSURE temperature is over 340F.
troubleshooting guide
36
TROUBLESHOOTING GUIDE
36
Error Code Er3 is displayed and the Duet is not cooking.
When pressurizing, the pressure is over 50kPa. Unplug the Duet
and allow it to completely cool. Plug it back and try again. If the
Duet is still not working, contact Customer Service.
Error Code Err1 is displayed and the Duet is not cooking.
Temperature Sensor Short Circuit. Contact Customer Service.
Error Code Err2 is displayed and the Duet is not cooking.
Temperature Sensor is open. Contact Customer Service.
Error Code Err5 is displayed and the Duet is not cooking.
The Duet has a faulty Pressure Sensor. Contact Customer Service.
Error Code Err6 is displayed and the Duet is not cooking.
The Duet has a faulty HIGH Pressure Sensor.
Contact Customer Service.
Error Code Err7 is displayed and the Duet is not cooking.
The Duet has a faulty LOW Pressure Sensor.
Contact Customer Service.
nuwavenow.com
37
ENGLISH
nuwavenow.com
37
The Duet is not turning on or working.
1. The Duet is not plugged in.
2. The Air Fry Basket is not in the Duet. The Stainless-steel
Inner Pot is not in the Duet. Insert the plug into an appropriate
grounded power socket. Place the Air Fry Basket into the Duet.
Place the Stainless-steel Inner Pot in the Duet before placing
Basket inside.
The ingredients fried in the Air Fry Basket are not completely
cooked.
1. Too many ingredients were used. The cooking temperature is
too low.
2. The cooking time is too short.
3. Remove some ingredients from the Air Fry Basket. Smaller
batches air-fry more evenly. Cook at a higher temperature. Set
the Duet to air-fry for a longer time.
Cannot place Air Fryer Lid on properly.
1. The Air Fry Basket is overlled. The Air Fry Basket is not
placed in the Stainless-steel Inner Pot correctly.
2. Do not ll the Air Fry Basket more than 4/5 full. Place the Air
Fry Basket in the Stainless-steel Inner Pot properly so the rim
of the Basket is completely inside the Inner Pot.
The food is fried unevenly.
1. Certain types of ingredients need to be shaken halfway through
the cooking time.
2. Ingredients that are on the top need to be shaken halfway
through the cooking time.
Fried snacks are not crispy when they come out
of the Duet.
1. You used a type of snack meant to be prepared in a traditional
deep fryer.
2. Use snacks designed to be baked in a traditional oven, or lightly
brush the snacks with some olive oil before placing them into the
Duet for crispier results.
troubleshooting guide
38
TROUBLESHOOTING GUIDE
38
White smoke is coming out of the product.
1. You are frying greasy foods. The Air Fry Basket and Stainless-
steel Inner Pot contains greasy residue from previous uses.
2. When preparing greasy ingredients in the Duet, large amounts
of oil can smoke and cover the Air Fry Basket or Stainless-steel
Inner Pot. Grease and oil will produce white smoke and the Air
Fry Basket or Stainless-steel Inner Pot might become hotter
than usual. This will not affect the nal cooking result. Make
sure you clean Air Fry Basket and Inner Pot properly after each
use.
French fries are fried unevenly in the Duet.
1. You did not soak the potato sticks properly before air-frying them.
2. You did not use the right potato type or they were not fresh.
3. Soak the potato sticks in a bowl of water for at least 30
minutes, remove them, and dry them with paper towels. Use
fresh potatoes and make sure they stay rm during air-frying.
French fries are not crispy when they come out of the Duet.
1. The crispiness of the fries depends on the amount of oil and
water in the fries.
2. Make sure you dry the potato sticks properly before adding
oil. Cut the potato sticks smaller and dry them for a crispier
result. Add slightly more oil on the potatoes before placing
them in the Duet for a crispier result.
If the Duet needs to be replaced or returned to the manufacturer,
please contact Customer Service at: 1-877-689-2838 or help@
nuwavenow.com.

nuwavenow.com
39
ENGLISH
nuwavenow.com
39

limited warranty
40
LIMITED WARRANTY
40
The NuWave Duet
®
Grill PRESSURE, Air Fryer & Grill
THE MANUFACTURER WARRANTS
The Duet, Air Fryer Lid, PRESSURE Lid, Slow Cook Lid, Multipurpose
Reversible Rack, Stainless-steel Air Fry Basket, Grill/Griddle Plate,
Stainless-steel Inner Pot, Water-Collection Tray, Lid Holder, and
Silicone Gasket are to be free from manufacturer defects.
All electrical components are warranted for 1 year from the date
of purchase, under normal household use, and when operated
in accordance with the Manufacturer’s written instructions. The
Manufacturer will provide the necessary parts and labor to repair
any part of the Duet at NuWave LLC Service Department. After the
expiration of the warranty, the cost of the labor and parts will be the
responsibility of the owner.
THE WARRANTY DOES NOT COVER
The Limited Warranty is voided if repairs are made by an unauthorized
dealer or the serial number data plate is removed or defaced. Normal
deterioration of nish due to use or exposure is not covered by this
Warranty. This Limited Warranty does not cover failure, damages
or inadequate performance due to accident, acts of God (such as
lightning), uctuations in electric power, alterations, abuse, misuse,
misapplications, corrosive-type atmospheres, improper installation,
failure to operate in accordance with the Manufacturer’s written
instructions, abnormal use or commercial use. NuWave LLC reserves
the right to void the Limited Warranty, where allowable by law, for
products purchased from an unauthorized dealer.
TO OBTAIN SERVICE
The owner shall have the obligation and responsibility to: pay for all
services and parts not covered by the warranty; prepay the freight to
and from Service Department for any part or system returned under
this warranty; and carefully package the product using adequate
padding material to prevent damage in transit. The original container
is ideal for this purpose. Include in the package the owner’s name,
address, daytime telephone number, a detailed description of the
problem, and your “RGA number.” (Call 1-877-689-2838) or email
help@nuwavenow.com to obtain the RGA number (Return Goods
Authorization number). Provide the cooking system model & serial
number and proof of date of purchase (a copy of the receipt) when
making claims under this warranty.
MANUFACTURER’S OBLIGATION
The Manufacturer’s obligation under this Limited Warranty is
limited, to the extent allowable by law, to repairing or replacing any
part covered by this Limited Warranty which upon examination is
found to be defective under normal use. The Limited Warranty is
applicable only within the continental United States and only to the
original purchaser of the manufacturer’s authorized channels of
distribution. THE LIMITED WARRANTY MAY NOT BE ALTERED,

nuwavenow.com
41
ENGLISH
nuwavenow.com
414141
VARIED OR EXTENDED EXCEPT BY A WRITTEN INSTRUMENT
EXECUTED BY THE MANUFACTURER. THE REMEDY OF
REPAIR OR REPLACEMENT AS PROVIDED UNDER THIS
LIMITED WARRANTY IS EXCLUSIVE. IN NO EVENT SHALL THE
MANUFACTURER BE LIABLE FOR ANY CONSEQUENTIAL OR
INCIDENTAL DAMAGES TO ANY PERSON, WHETHER OR NOT
OCCASIONED BY NEGLIGENCE OF THE MANUFACTURER,
INCLUDING WITHOUT LIMITATION, DAMAGES FOR LOSS OF
USE, COSTS OF SUBSTITUTION, PROPERTY DAMAGE, OR
OTHER MONEY LOSS.
Some states do not allow the exclusion or limitation of incidental
or consequential damages, so the above limitation exclusions
may not apply. This Limited Warranty gives specic legal rights,
and there may also be other rights which vary from state to state.
EXCEPT AS OTHERWISE EXPRESSLY PROVIDED ABOVE, THE
MANUFACTURER MAKES NO WARRANTIES EXPRESSED OR
IMPLIED ARISING BY LAW OR OTHERWISE, INCLUDING WITHOUT
LIMITATION, THE IMPLIED WARRANTIES OF MERCHANTABILITY
AND FITNESS FOR A PARTICULAR PURPOSE TO ANY OTHER
PERSON. READ YOUR OWNER’S MANUAL. IF YOU STILL HAVE
ANY QUESTIONS ABOUT OPERATION OR WARRANTY OF THE
PRODUCT, PLEASE CONTACT NUWAVE LLC.
DISPUTE RESOLUTION PROCEDURE. For disputes relating to use
of the website or use or purchase of a NuWave product or service
(collectively “Disputes”), you agree to rst contact NuWave LLC
at (877) 689-2838 (phone), (847) 367-5486 (facsimile), or legal@
nuwavenow.com (email). If we cannot resolve your dispute informally,
any and all disputes shall be submitted to nal and binding arbitration.
You may start the arbitration process by submitting in writing a
demand to the American Arbitration Association (“AAA”) and sending
a copy to NuWave. NuWave will pay all ling costs. A single arbitrator
of the AAA will conduct the arbitration in a location convenient to
you or by phone. The arbitrator’s award will be binding and may
be entered as a judgment in a court of competent jurisdiction. The
arbitration will be conducted in accordance with the provisions of
AAA’s Commercial Arbitration Rules and Mediation Procedures in
effect at the time of submission of your demand for arbitration. See
https://www.adr.org/sites/default/les/CommercialRules_Web.pdf.
Except as may be required by law as determined by an arbitrator, no
party or arbitrator may disclose the existence, content, or results of
any arbitration hereunder without prior written consent of both parties.
A. WAIVER OF RIGHT TO SUE. By agreeing to arbitration you
understand that, to the maximum extent permitted by law, you are
agreeing to waive your right to le suit in any court, to a court hearing,
judge trial, and jury trial.

limited warranty
42
LIMITED WARRANTY
42
B. CLASS ACTION WAIVER. To the maximum extent permitted
by law you expressly agree to refrain from bringing or joining any
claims in any representative or class-wide capacity, including but not
limited to, bringing or joining any claims in any class action or class-
wide arbitration.
C. OPT OUT PROCEDURE. To opt out of arbitration you must
contact NuWave. To request to opt out of arbitration contact us at
legal@nuwavenow.com (email), NuWave LLC, 560 Bunker Ct.,
Vernon Hills, IL 60061, U.S.A., (847) 367-5486 (fax), or (877) 689-
2838 or (224) 206-3019 (phone). You will have thirty (30) days from
the date of product delivery to opt out of arbitration with respect
to any dispute arising out of or relating to use or purchase of any
NuWave product. If more than 30 days have passed you are not
eligible to opt out of arbitration and will have waived your right to
sue or participate in a class action with respect to the dispute arising
out of your purchase or use of a NuWave product. For any dispute
arising out of your use of NuWave’s website, you have thirty (30)
days from the date you provided information to the website to opt
out of arbitration. If more than 30 days have passed you are not
eligible to opt out of arbitration and you will have waived your right
to sue and participate in a class action with respect to the dispute
arising out of your use of NuWave’s website.
D. SOME MATTERS ARE NOT SUBJECT TO ARBITRATION.
Notwithstanding the foregoing, the following shall not be subject
to arbitration and may be adjudicated only in the state and federal
courts of Illinois: (i) any dispute, controversy, or claim relating to
or contesting the validity of our intellectual property rights and
proprietary rights, including without limitation, patents, trademarks,
service marks, copyrights, or trade secrets; (ii) an action by a party
for temporary, preliminary, or permanent injunctive relief, whether
prohibitive or mandatory, or other provisional relief; or (iii) interactions
with governmental and regulatory authorities. You expressly agree
to refrain from bringing or joining any claims in any representative or
class-wide capacity, including but not limited to, bringing or joining any
claims in any class action or any class-wide arbitration.
READ YOUR OWNER’S MANUAL
If you still have any questions about operation or warranty of the
product, please contact NuWave LLC at: 1-877-689-2838 or email
help@nuwavenow.com.

nuwavenow.com
43
ENGLISH
nuwavenow.com
43
EL MANUAL DEL
PROPIETARIO
nuwavenow.com
Parrilla de Freidora de Aire a Presión
Pressure Air Fryer Grill
4444

Como agradecimiento especial por registrar su producto, ¡recibirá
automáticamente 3 meses adicionales a su garantía limitada del
fabricante!*
Todo lo que tiene que hacer es seguir estos simples pasos.
Usando su teléfono inteligente o
dispositivo inteligente, escanee el
código QR ubicado en la etiqueta
de su producto ubicada en la parte
posterior de la unidad.
Se le dirigirá a la página de registro
del producto NuWave con el número
de serie único de su producto que
se ingresa automáticamente en el
campo correspondiente.
NOTA: Si no tiene un dispositivo
inteligente habilitado para la web,
simplemente visite nuwavenow.
com/QR e ingrese manualmente el
número de serie de su producto.
Complete la información restante y
complete la encuesta opcional.
Una vez que envíe su información,
recibirá un correo electrónico de
conrmación con los detalles de la
garantía extendida.
1
2
3
4
* Registre su producto dentro de 1 año a partir de la fecha
de compra para una extensión gratuita de 3 meses de
garantía limitada.
¡REGÍSTRESE
AHORA!
nuwavenow.com
45
nuwavenow.com
45

Abra su tienda de aplicaciones móviles (App Store, Google
Play).
Busque “lectores de códigos QR”.
Simplemente descargue el lector de códigos QR a su
teléfono, ábralo y escanee el código, ya está listo para
comenzar.
NOTA: Es posible que deba abrir el lector de código QR
descargado cada vez que desee escanear un código QR.
46
1
2
3
DESCARGUE LA APLICACIÓN QR
CODE EN SU DISPOSITIVO MÓVIL
lectores de códigos QR
3
!para una garantía
adicional de
meses!

nuwavenow.com
47
nuwavenow.com
47
SPANISH
Opere sólo de acuerdo con
el uso previsto como se
describe en este manual.
Al usar aparatos eléctricos,
siempre se deben seguir
las precauciones básicas
de seguridad, incluidas las
siguientes:
1. Lee todas las instrucciones.
2. Asegúrese de que el aparato
y todas las piezas estén
limpias y secas antes de
cada uso.
3. No toque las supercies
calientes. Las supercies
del aparato pueden estar
calientes durante y después
del uso. Use los mangos
como se indica para manejar
el aparato.
4. No deje que el cable
cuelgue sobre ningún borde
ni permita que el cable toque
supercies calientes.
5. Deseche el plástico protector
que cubre el enchufe
electrico antes del uso.
6. No sumerja el cable, los
enchufes o el aparato en
agua u otros líquidos.
7. Es necesaria una estrecha
supervisión cuando se utiliza
cualquier aparato cerca de
niños. Este aparato no está
destinado a ser utilizado por
personas con incapacidades
físicas, sensoriales o
mentales reducidas, niños
o personas con falta de
experiencia o conocimiento,
a menos que un
responsable de su seguridad
supervise o instruya sobre el
MEDIDAS DE SEGURIDAD IMPORTANTES
SÓLO PARA USO DOMÉSTICO • LEA TODAS LAS INSTRUCCIONES
ANTES DE USAR
uso del aparato.
8. Desenchúfelo del
tomacorriente cuando
no esté en uso y antes
de limpiarlo. Deje que se
enfríe antes de retirar o
reemplazar las piezas.
9. No lo haga funcionar si el
aparato o el cable del mismo
funcionan mal o si han sido
dañados de alguna manera.
Devuelva el aparato al
centro de servicio autorizado
más cercano para que
lo examinen, reparen o
ajusten.
10. Utilícelo solo sobre una
supercie limpia, estable,
seca y nivelada.
11. No utilice accesorios
o aditamentos no
recomendados por el
fabricante.
12. No utilizar al aire libre. Este
aparato está diseñado
para uso domestico, no
comercial, solo en interiores.
13. No lo coloque sobre o cerca
de una supercie caliente o
en un horno caliente.
14. Tenga cuidado al mover un
aparato después de cocinar.
NUNCA mueva el aparato
mientras esté funcionando
y/o esté bajo presión.
15. Desenchufe el aparato
cuando no esté en uso
y deje que se enfríe por
completo antes de limpiar o
quitar/colocar piezas.

medidas de seguridad importantes
48
MEDIDAS DE SEGURIDAD IMPORTANTES
SÓLO PARA USO DOMÉSTICO • LEA TODAS LAS INSTRUCCIONES
ANTES DE USAR
48
MEDIDAS DE SEGURIDAD
ADICIONALES
1. NO llene demasiado la
canasta para freír con aire.
2. NO cubra las rejillas de
ventilación de entrada o
salida de aire. Esto puede
evitar que el aparato
funcione correctamente y
puede dañar el Duet.
3. No es inusual que una
pequeña cantidad de
vapor y / o humo salga
ocasionalmente de la salida
de aire. Mantenga las
manos y la cara alejadas
de las salidas de aire para
evitar lesiones.
4. Tenga cuidado al retirar la
tapa de la freidora de aire
después de su uso, ya que
los elementos calefactores
de la tapa pueden estar
extremadamente calientes.
Coloque la tapa de la
freidora de aire en el soporte
de la tapa para evitar daños
a la propiedad. Consulte
Limpieza y mantenimiento
para obtener instrucciones.
5. El Air Fry Basket y cualquier
accesorio utilizado pueden
estar extremadamente
calientes durante e
inmediatamente después
de su uso. SIEMPRE
use guantes de cocina
o almohadillas calientes
cuando manipule estos
artículos.
6. Este aparato no está
diseñado para freír.
7. Asegúrese de que el aparato
y todas las piezas estén
limpios y secos antes de
cada uso.
8. Si falta alguna pieza del
aparato o está dañado,
NO lo utilice. Para obtener
piezas de repuesto,
comuníquese con el Servicio
al cliente de NuWave LLC
para obtener piezas de
repuesto: 1-877-689-2838 o
help@nuwavenow.com.
GUARDE ESTAS
INSTRUCCIONES
Este aparato tiene un enchufe
polarizado (una cuchilla
es más ancha que la otra).
Para reducir el riesgo de
descarga eléctrica, este
enchufe está diseñado para
encajar en una toma de
corriente polarizada de una
sola manera. Si el enchufe
no encaja completamente en
el tomacorriente, invierta el
enchufe. Si aún no encaja,
comuníquese con un
electricista calicado. No
intente modicar el enchufe de
ninguna manera.
1. NO use el aparato sin la
Cacerola Interior de Acero
Inoxidable suministrada.
2. Esta unidad cocina bajo
presión y libera vapor
caliente. LEA TODAS las
instrucciones para el uso
adecuado de este aparato
para evitar lesiones.
3. NO cubra el Interruptor/
Válvula de Liberación de
Presión o el Indicador de
Presión. Antes de cada

nuwavenow.com
49
nuwavenow.com
49
SPANISH
uso, SIEMPRE verique
el Interruptor/Válvula de
Liberación de Presión o
el Indicador de Presión
por si tuvieran bloqueos u
obstrucciones. Estos deben
moverse libremente y no
deben estar atorados en una
posición. Los alimentos que
se expanden (pasta, arroz,
granos, frijoles, avena, etc.)
pueden bloquearlos, así que
límpielos bien después de
cada uso.
4. Tenga cuidado al retirar la
Cacerola Interior de Acero
Inoxidable de el Duet, ya
que puede ser pesada y
estar caliente. Use guantes
protectores para el calor.
5. NO coloque alimentos o
líquidos directamente en
el aparato sin la Cacerola
Interior de Acero Inoxidable.
6. NO use el Empaque de
Silicón si está rasgado o
dañado. Limpiar después
de cada uso. SOLO se
debe usar el Empaque de
Silicón de NuWave LLC para
el funcionamiento de esta
unidad.
7. NO selle los alimentos bajo
presión. La función Sear
de cocción a presión está
diseñada para usarse sin la
Tapa de la Olla de Presión.
8. NUNCA use las funciones
de Cocción Lenta o
Mantener Caliente sin
alimentos o líquidos en la
Cacerola Interior de Acero
Inoxidable.
9. No llene demasiado. Para
los frijoles, el arroz, los
granos, los alimentos
deshidratados y la cantidad
máxima de fruta deben estar
llenos a la mitad y ⅔ para
todo lo demás.
10. NUNCA cueza a presión
sin líquido. La cantidad
de líquido necesario se
proporciona en las recetas.
11. NUNCA intente abrir la
tapa de la Olla de Presión
mientras el aparato esté en
uso o generando presión.
NO force la tapa para
que se abra en ningún
momento. Asegúrese de que
TODA la presión se libere
ANTES de abrir la tapa de
la Olla de Presión girando
el Interruptor/Válvula de
Liberación de Presión a la
posición “OPEN”.
12. Mantenga todas las partes
del cuerpo alejadas del
aparato cuando esté
liberando presión. NO
coloque ninguna parte del
cuerpo sobre el Interruptor/
Válvula de Liberación de
Presión o en cualquier
lugar donde pueda escapar
el vapor. Al abrir la tapa
(SOLAMENTE después de
que se haya liberado toda
la presión y haya caído el
Indicador de Presión), el
contenido del aparato aún
estará caliente y al abrir
la tapa se liberará vapor.
Asegúrese de abrir la tapa
de la Olla de Presión lejos de
usted y de los demás.

medidas de seguridad importantes
50
MEDIDAS DE SEGURIDAD IMPORTANTES
SÓLO PARA USO DOMÉSTICO • LEA TODAS LAS INSTRUCCIONES
ANTES DE USAR
50
6. La Cesta para Freir con
Aire y cualquier accesorio
utilizado pueden estar
extremadamente calientes
durante e inmediatamente
después de su uso.
SIEMPRE use guantes
para horno o almohadillas
para el calor cuando
maneje estos artículos.
7. Este aparato no está
diseñado para freír.
8. Asegúrese de que el aparato
y todas las piezas estén
limpias y secas antes de
cada uso.
9. Desenchufe el aparato
cuando no esté en uso y
asegúrese de que esté
completamente frío antes
de limpiarlo.
10. Si falta alguna parte del
aparato o está dañada, NO
la utilice. Para piezas de
repuesto, comuníquese con
el departamento de Servicio
al Cliente de NuWave LLC
para obtener piezas de
repuesto: 1-877-689-2838 o
help@nuwavenow.com.
VEA LAS LIMPIEZA Y
MANTENIMIENTO ANTES
DE USAR GUARDE ESTAS
INSTRUCCIONES
Lea y comprenda todo el
manual antes de usar el
Duet. Este aparato tiene un
enchufe polarizado (una
cuchilla es más ancha que la
otra). Para reducir el riesgo
de descarga eléctrica, este
enchufe está diseñado para
encajar en una toma de
corriente polarizada de una
1. No utilice accesorios
o aditamentos no
recomendados por el
fabricante.
2. NO llene en exceso la Cesta
para Freir con Aire.
3. NO cubra las tomas de aire
o las salidas de ventilación.
Esto puede evitar que
el aparato funcione
correctamente y puede
dañar el Duet.
4. No es raro que una pequeña
cantidad de vapor y/o humo
salga ocasionalmente de la
salida de aire. Mantenga las
manos y la cara alejadas
de las salidas de aire para
evitar lesiones.
5. Al retirar la Tapa para Freir
con Aire, después de su uso,
los elementos calefactores
estarán contenidos dentro
de la tapa y puede estar
extremadamente caliente.
Coloque la Tapa para Freir
con Aire en el soporte de
la Tapa para Freir con
Aire para evitar daños
materiales. Consulte
Limpieza y Mantenimiento
para obtener instrucciones.
ADVERTENCIA
En caso de mal
funcionamiento,
inmediatamente y
comuníquese con el
Departamento de Servicio
al Cliente.
1-877-689-2838 • help@
nuwavenow.com
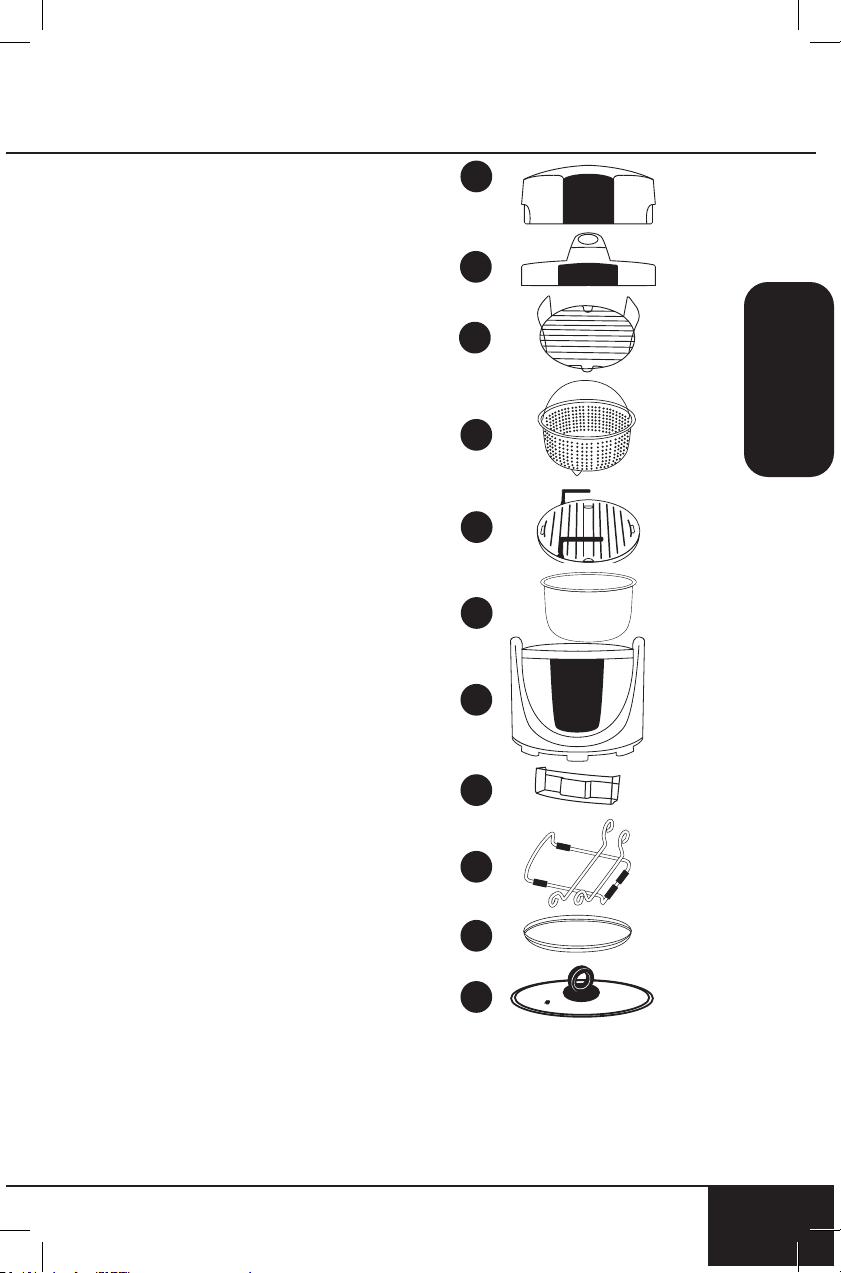
nuwavenow.com
51
nuwavenow.com
51
SPANISH
sola manera. Si el enchufe
no encaja completamente en
el tomacorriente, invierta el
enchufe. Si aún no encaja,
comuníquese con un
electricista calicado.
No intente modicar el
enchufe de ninguna manera.
A. Se proporciona un cable
electrico corto (o cable
electrico desmontable) para
reducir el riesgo resultante
de enredarse o tropezar con
un cable más largo.
B. Los cables electricos
desmontables más largos
o los cables de extensión
están disponibles y se
pueden usar si se tiene
cuidado en su uso.
C. Si se utiliza un cable de
electrico o un cable de
extensión desmontable
más largo:
1. La calicación eléctrica
marcada del juego
de cables o cable de
extensión debe ser al
menos tan grande como
la calicación eléctrica
del aparato;
2. El cordón debe estar
dispuesto de modo
que no cuelgue sobre
la supercie donde los
niños puedan tirar de
él o tropezar con él
involuntariamente.
3. Si el aparato es del
tipo conectado a tierra,
el juego de cables o
el cable de extensión
deben ser del tipo de
conexión a tierra. Cable
de 3 hilos.
PARTES Y ACCESORIOS
3
2
6
5
4
1
7
8
9
10
11
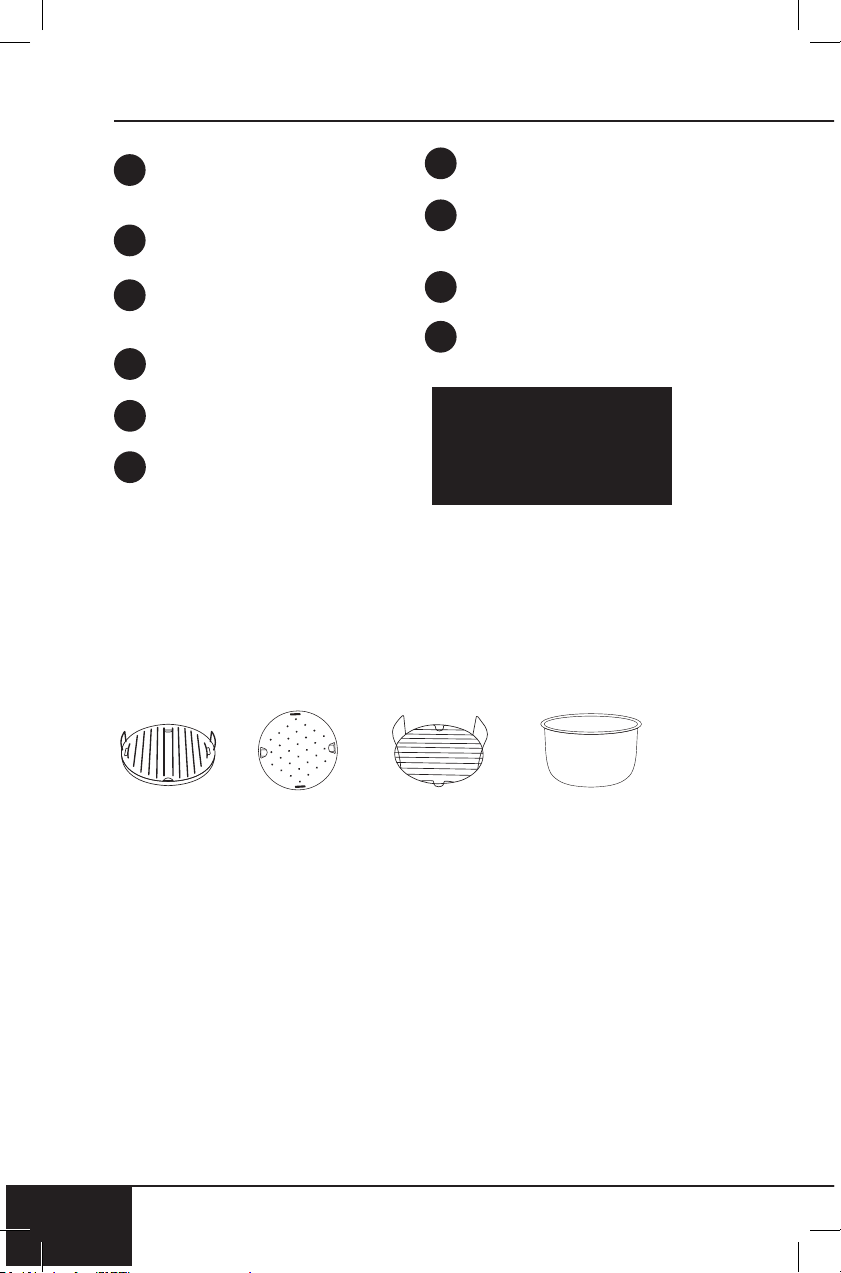
partes y accesorios
52
PARTES Y ACCESORIOS
52
Uso de la Parrilla/Plancha
La Parrilla/Placa Reversible de su Duet cocina una variedad
de alimentos. Precaliente siempre durante 15 minutos antes
de colocar alimentos.
Cuando use el lado de la Plancha, alinee las ranuras del lado
de la parrilla paralelas con las barras de la rejilla. Coloque
la parte superior e inserte las pestañas de la Rejilla en las
ranuras de la Plancha. Coloque en la Cacerola Interior.
Cacerola
Interior de Acero
Inoxidable
(Parte
Superior)
(Parte
Inferior)
Parrilla/Plancha Rejilla Reversible
Multiusos
ACCESORIO INSTRUCCIONES
Tapa para Freir
con Aire
Parte #: 34805
Tapa de la Olla de Presión
Parte #: 34839
Rejilla Reversible
Multiusos
Parte #: 34834
Cesta Freír con Aire
Parte #: 34818
Parrilla/Plancha
Parte #: 34833
Cacerola Interior de
Acero Inoxidable
Parte #: DUE-A31
1
2
3
4
5
7
Base del Duet
®
Parte #: 34806
Bandeja de Recolección
de Agua
Parte #: 34804
Soporte de la Tapa
Parte #: 34815
Empaque de Silicón
Parte #: 34813
8
9
10
11
Para ordenar repuestos
vaya a la sección de
Piezas de Repuesto y
luego a NuWaveNow.
com.
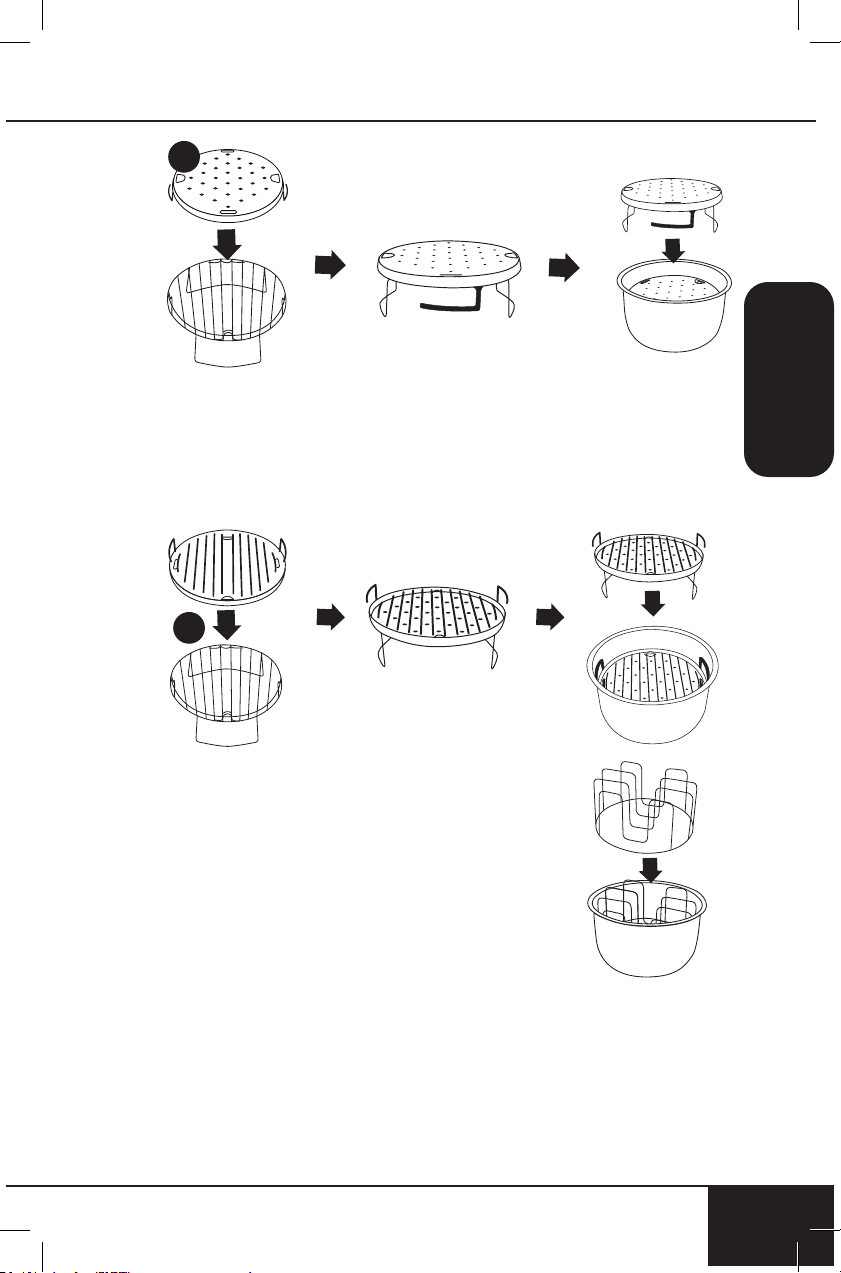
nuwavenow.com
53
SPANISH
nuwavenow.com
53
ACCESORIO INSTRUCCIONES
1
Notas: Al retirar con el lado de la Parrilla hacia
arriba, use los Guantes de Silicón Negros o guantes de
horno, levante sosteniendo ambas agarraderas. La altura
máxima permitida para cortes de carne es de 2 pulgadas.v
2
Uso de la Rejilla para Costillas
Coloque el costillar en Cacerola Interior de
Acero Inoxidable hacia arriba. Coloque las
costillas verticalmente en las ranuras, dejando
suciente espacio entre
cada una.
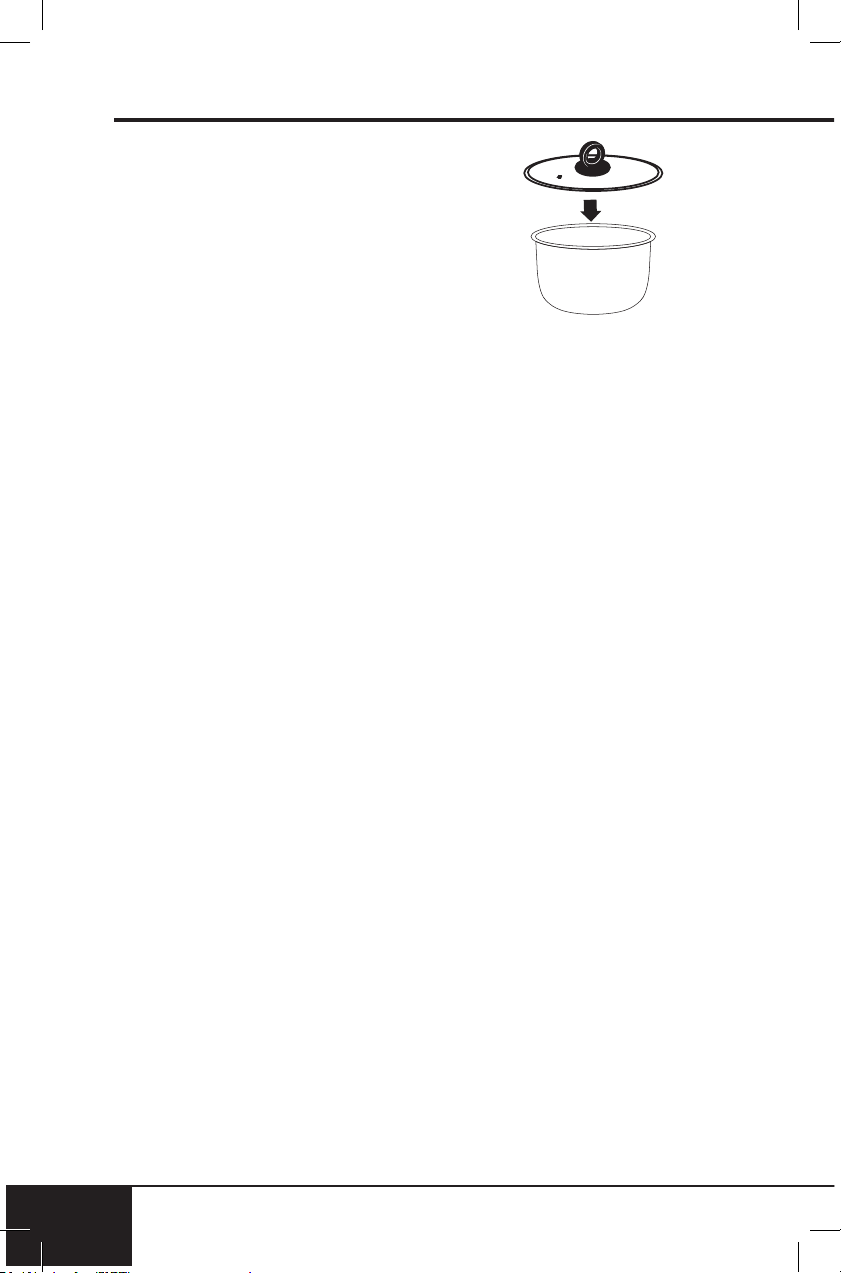
accesorio instrucciones
5454
ACCESORIO INSTRUCCIONES
Tapa de Cocción Lenta
Coloque la Tapa de Cocción Lenta en la
Cesta de Acero Inoxidable con el mango
hacia arriba. La Tapa de Cocción Lenta debe
usarse con la Cesta de Acero Inoxidable
asar a fuego lento y para mantener alimentos
calientes. PRESSURE no funcionará con la
Tapa de Cocción Lenta.
PRESSURE: Utilice el botón PRESSURE para iniciar la función de la
Olla de Presión. Mantenga pulsado PRESSURE durante 1 segundo
para cambiar entre HIGH (alta) presión y LOW (baja) presión.
Nota: A veces el proceso de cocción puede crear un sello entre la
Tapa de la Olla de Presión y la Cacerola de Acero Inoxidable. Para
evitar levantar la Cacerola junto con la Tapa, sacuda suavemente el
asa para separar la Tapa de la Cacerola antes de abrir.
COMBO COOK: Use el botón COMBO COOK para iniciar La función
de cocción en combo.
AIR FRY: Use el botón AIR FRY para iniciar la función de freir con aire.
SAUTÉ/SEAR: Para presión, la temperatura es por defecto 450F
el tiempo es de 20 minutos por defecto hasta 30 minutos y freír al
aire, la temperatura por defecto es de 450F el tiempo por defecto
es de 5 minutos hasta 15 minutos. SEAR se usa para cocinar a alta
temperatura durante un corto período de tiempo.
SLOW COOK: La temperatura predeterminada es 210F hasta 185 F,
5 horas por defecto hasta 10 horas.
GRILL: El tiempo predeterminado es de 5 minutos, ajustable hasta
20 minutos. La temperatura predeterminada es 400F (sin ajuste)
MENU: 11-30.
MENU: El Duet viene con 300 recetas preprogramadas de cocina
junto con 150 ranuras de memoria adicionales Para agregar sus
propias recetas únicas a su gusto. Utilice el botón MENU para
recuperar y guardar recetas programadas.
TIME/TEMP: Use TEMP/TIME para mostrar la temperatura de cocción.
Use el dial START/PAUSE para ajustar la temperatura antes o durante
la cocción.
• Para cambiar de Fahrenheit a Celsius: Presione el botón
SEAR + TEMP. Repita para cambiarlo de nuevo.
• Para cambiar la temperatura y el tiempo predeterminados:
Presione START/PAUSE durante 1 segundo.
• Para cambiar el formato de hora: Puede cambiar el formato
de hora para mostrar minutos y segundos (por ejemplo, 10:59,
GUIA DE INICIO RÁPIDO

nuwavenow.com
55
SPANISH
nuwavenow.com
55
GUIA DE INICIO RÁPIDO
10 minutos y 59 segundos). Mantenga presionado TEMP/TIME
durante 1 segundo, si lo presiona nuevamente, volverá a la
conguración predeterminada.
Use TEMP/TIME para mostrar el tiempo de cocción. Use el dial
START/PAUSE para ajustar el tiempo antes o durante la cocción.
El Duet se puede congurar hasta 10 horas a baja presión y 10
horas a alta presión.
STAGE: El botón STAGE se usa para desplazarse por las funciones
durante la cocción a presión. Durante AIR FRY, use el botón STAGE
para congurar hasta 5 etapas de cocción diferentes. Las temperaturas
y tiempos de cocción se pueden ajustar para cada uno etapa de
cocción con los botones TEMP/TIME y la perilla START/PAUSE.
PREHEAT: Use el botón PREHEAT para calentar el Duet con la
temperatura correcta antes de agregar los alimentos. Para cancelar
la función de precalentamiento, presione el botón PREHEAT en
cualquier momento.
Nota: El botón PREHEAT está desactivado durante la cocción a presión.
WARM/DELAY: Use WARM para mantener los alimentos calientes
después de cocinarlos o cuando los mantenga calientes durante
un período prolongado. Utilice el dial START/PAUSE para ajustar
la temperatura y el tiempo de calentamiento. Presione WARM para
cancelar el ciclo tibio.
Utilice DELAY para retrasar la cocción hasta 24 horas. Utilice el dial
STAR / PAUSE para ajustar el tiempo de retardo.
YOGURT: Hacer yogur casero casero con la función YOGURT. Siga
los pasos de las instrucciones de COMBO COOK.
START/PAUSE: Cuando se presiona el botón START/PAUSE, el
Duet comienza o hace una pausa en la cocción. La perilla de START/
PAUSE se gira para ajustar las funciones de cocción (TEMP/TIME) y
para desplazarse por las opciones del menú.
Silencie los pitidos en el Duet presionando y manteniendo presionado
el botón STAGE y SAUTÉ/SEAR por un segundo. Para activar el
sonido, pulse y mantenga presionado el botón de START/PAUSE por
un segundo.
Nota: Asegúrese de que la olla interior de acero inoxidable esté en
el dúo. El código de error "Pot" aparecerá si presiona START/PAUSE
y el potenciómetro interior de acero inoxidable no está en el dúo.
Asegúrese de que la tapa de PRESIÓN esté encendida y bloqueada
en su lugar. El símbolo de "bloqueo" aparecerá en la pantalla cuando
la tapa esté en su lugar.
CANCEL: Se utiliza para borrar cualquier función que se establezca
en Duet en cualquier momento.
FUNCIÓN DE SEGURIDAD: El Duet se puede bloquear para evitar
que los niños la enciendan accidentalmente. Mientras el Duet está
enchufado, presione MENU + STAGE durante 1 segundo. Esto
bloqueará el panel de control. Presione MENÚ + ETAPA nuevamente
para desbloquear el aparato.
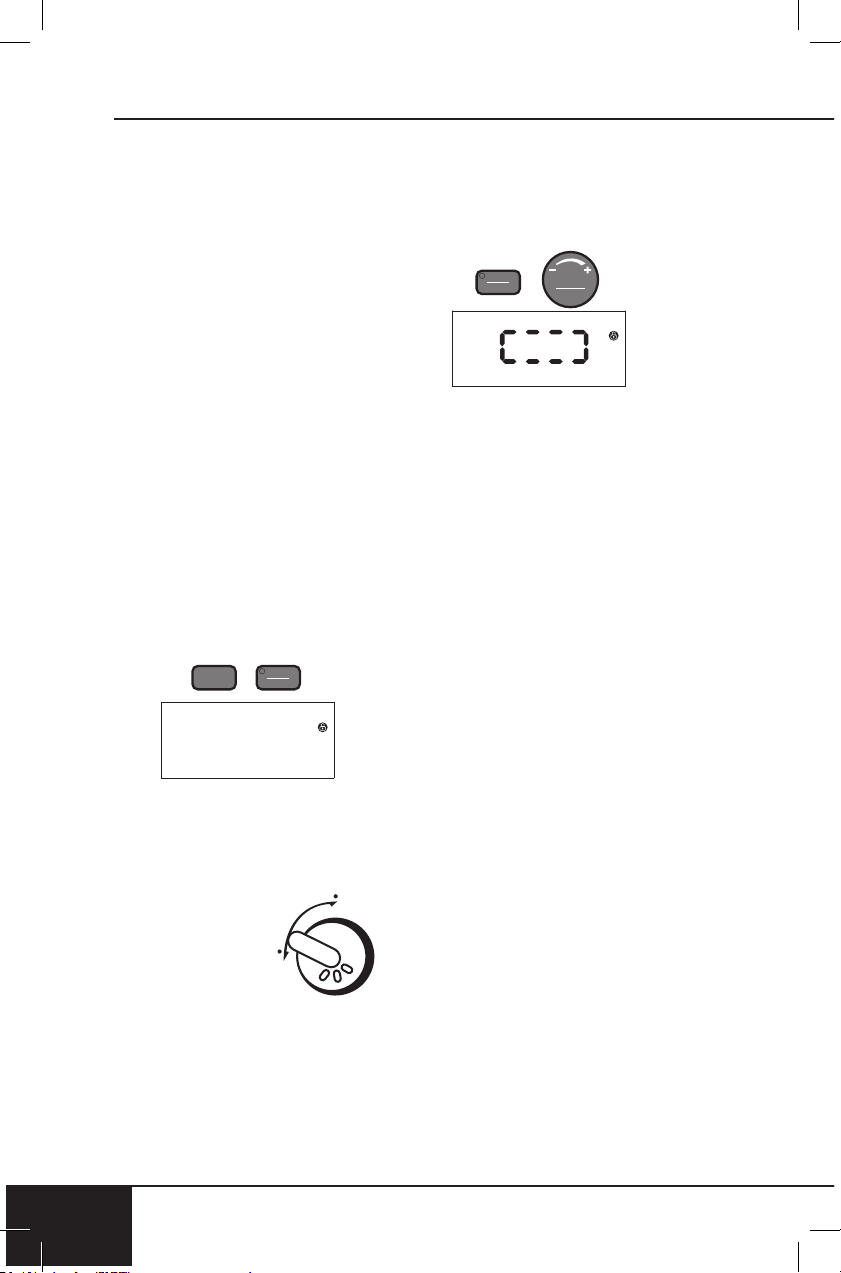
instrucciones de cocción a presión
56
INSTRUCCIONES DE COCCIÓN A PRESIÓN
56
COCINA A PRESION
1. Asegúrese de que la olla
interna de acero inoxidable
esté en el dúo.
2. Enchufe el cable electrico a
una toma de corriente.
3. Presione el botón
PRESSURE.
• Las luces estarán
encendidas 1-2 segundos
y luego se apagarán,
indicando que esas
funciones están disponibles
para su uso.
Nota: El Duet entrará en modo
de espera después de 5 minutos
si no hay interacción con el panel
de control. Simplemente presione
cualquier botón o gire la perilla de
START/PAUSE para “despertar”.
4. Presione PRESSURE por
un segungo para cambiar de
presión HIGH a LOW.
5. Presione TEMP/TIME, el
tiempo se puede ajustar
usando START / PAUSE.
6. Gire la tapa
de la olla
a presión
hacia la
derecha
hasta
que se
bloquee. El símbolo de "Lock"
aparecerá en la pantalla
cuando la tapa esté en su
lugar.
00:30
7. Gire el interruptor / válvula
de liberación de presión a la
posición CLOSE.
8. Presione START/PAUSE
para comenzar a cocinar.
• La caja de circulación
indica que el Duet
está precalentando /
presurizando.
• Una vez que el dúo llega
a la presión correcta, el
Duet emitirá un pitido,
la pantalla mostrará
la presión de cocción,
alta, "00:30" (tiempo
predeterminado). Los dos
puntos (:) parpadearán,
indicando que el Dueto se
está cocinando y quedan
30 minutos.
9. Una vez que Duet termina
de cocinar, la pantalla
mostrará "End" y el Duet
emitirá un pitido 3 veces.
Nota: Para la presión de
liberación natural, apague el
Duet y desenchúfelo. Permita
que el dúo libere naturalmente la
presión. Para liberar rápidamente
la presión, gire con cuidado el
interruptor / válvula de liberación
de presión a la posición OPEN
hasta que se libere todo el vapor
/ presión. Recuerde siempre
girar el interruptor / válvula
de liberación de presión a la
posición OPEN antes de abrir
la tapa de la olla de presión
para asegurarse de que se
O
P
E
N
C
L
O
S
E
nuwavenow.com
57
SPANISH
nuwavenow.com
57
libere toda la presión.
SAUTÉ/SEAR
1. Asegúrese de que la olla
interior de acero inoxidable
esté en el Duet.
2. Presione el botón
PRESSURE.
• Las luces estarán
encendidas indicando
que esas funciones están
disponibles para su uso.
3. Presione SAUTÉ / SEAR
para calentar el fondo de la
olla a PRESIÓN para dorar
carnes, pescados y verduras
antes de presionar.
4. Gire la perilla START/
PAUSE para ajustar el
tiempo de sellar, hasta las
00:30 (30 minutos).
5. Presione el botón TEMP/
TIME para ajustar la
temperatura de sellar.
La pantalla mostrará la
"pressure", "sear", "temp" y
"450F".
6. Gire la perilla START/
PAUSE para ajustar la
temperatura de sellar entre
50F y 470F.
PRECAUCIÓN
Tenga mucho cuidado al
liberar la presión. Un chorro
de vapor caliente saldrá
del interruptor/válvula de
liberación de presión.
00:20
7. Presione el botón START/
PAUSE para comenzar a
sellar.
• Tanto la temperatura
como el tiempo se pueden
ajustar con START/
PAUSE y TEMP/TIME
durante el chamuscado.
8. Cuando termine, la pantalla
mostrará "End".
Nota: La función SALTAR /
SEAR debe utilizarse con el Tapa
de cocción lenta.
DELAY
9. Asegúrese de que la olla
interna de acero inoxidable
esté en el dúo.
10. Presione el botón
PRESSURE.
• Las luces estarán
encendidas indicando
que esas funciones están
disponibles para su uso.
11. Congure las funciones de
cocción, como se describe
en este manual, para sus
especicaciones
12. Presione WARM/DELAY por
un segundo para retrasar
la cocción por períodos de
tiempo hasta de 24:00 (24
horas). La pantalla mostrará
"pressure", "delay", "time" y
"01:00" (1 hora).
13. Gire la perilla START/
PAUSE para ajustar el
tiempo de demora hasta las
24:00 (24 horas).
0 1:00

instrucciones de cocción a presión
58
INSTRUCCIONES DE COCCIÓN A PRESIÓN
58
14. Presione el botón START/
PAUSE para comenzar la
cuenta regresiva del tiempo
de demora. Durante la
cuenta atrás del tiempo de
retardo, parpadeará colon
(:), indicando que la cuenta
regresiva ha comenzado.
15. El tiempo de demora se
puede aumentar o reducir en
cualquier momento girando
la perilla START/PAUSE.
16. Una vez que la cuenta
regresiva del tiempo de
demora haya nalizado,
el Duet comenzará
automáticamente a
presurizar y entrar en el ciclo
de cocción.
17. Para cancelar la función de
demora, presione WARM/
DELAY pot un segundo. El
Duet pasará a la siguiente
fase de cocción.
18. Una vez que el Duet termine
de cocinar, la pantalla
mostrará "End" y el Duet
emitirá un pitido 3 veces.
Para una liberación natural de
presión
Apague el Duet y desenchúfela.
Permita que el Duet libere
naturalmente la presión. Para
liberar rápidamente la presión,
gire con cuidado el Interruptor/
Válvula de Liberación de Presión
a la posición “OPEN” hasta
que se libere todo el vapor/
presión. Recuerde siempre
girar el Interruptor/Válvula
de Liberación de Presión a la
posición OPEN antes de abrir
la tapa de la Olla de Presión
para asegurarse de que se
libere toda la presión.
WARM
1. Establezca las funciones de
cocción, como se describe
en este manual, según sus
especicaciones.
2. Presione el botón WARM/
DELAY (Mantener Caliente)
para activar la función de
calentamiento y mantener
sus alimentos calientes
después de cocinarlos hasta
que estén listos para servir.
3. La pantalla mostrará "air
fry", "temp", "warm" y
"140F".
4. Gire la perilla START/
PAUSE para ajustar
la temperatura de
calentamiento hasta 200F
(93C).
5. Presione el botón TEMP/
TIME para ajustar el tiempo
para mantener caliente.
6. La pantalla mostrará "air
fry", "warm", "time" y
"01:00" (1 hora).
7. Presione START/PAUSE
para comenzar a cocinar.
8. Para cancelar la función de
warm, simplemente presione
WARM/DELAY por un
segundo.
0 1:00

nuwavenow.com
59
SPANISH
nuwavenow.com
59
9. Para ajustar la conguración
de mantener caliente
durante la cocción, presione
el botón de STAGE
hasta que aparezca en la
pantalla la temperatura
de calentamiento y la
temperatura ajustada.
10. Para ajustar el tiempo de
calentamiento durante la
cocción, presione TEMP/
TIME y use la perilla START/
PAUSE para ajustar.
11. Para ver la función actual
en ejecución, presione el
botón de STAGE hasta que
esa función parpadee en la
pantalla.
12. Cuando el Duet termine
de cocinar, entrará
automáticamente en la
función de mantener
caliente.
13. Cuando nalice la función
Warm, el Duet emitirá un
pitido 3 veces y la pantalla
mostrará "End".
MENU (Presets)
El botón MENU representa
la entrada de la memoria del
programa (el almacenamiento
de las secuencias de cocción
utilizadas frecuentemente) y la
recuperación de la memoria del
programa (recuperación de las
secuencias de cocción).
Recuperacion de Memoria
1. Presione el botón
PRESSURE.
• Las luces estarán
encendidas indicando
que esas funciones están
disponibles para su uso.
2. Presione el botón MENU
para recuperar un programa
de la memoria del Duet.
La pantalla mostrará
"pressure", "menu" y "1".
El “1” indica el número de
programa 1.
3. Gire la perilla de START/
PAUSE hacia la derecha (en
el sentido de las agujas del
reloj) para contar el número
de programa y gírelo
hacia la izquierda (hacia
la izquierda) para hacer
una cuenta regresiva en el
número de programa.
4. Una vez que aparezca el
número del programa que
desee usar en la pantalla,
presione el botón START/
PAUSE.
1

instrucciones de cocción a presión
60
INSTRUCCIONES DE COCCIÓN A PRESIÓN
60
5. La pantalla mostrará la
conguración de tiempo
predeterminada para ese
programa, así como la
conguración de
presión predeterminada.
Nota: Ambos son ajustables
usando el botón PRESSURE para
ajustar la conguración de presión,
y el botón TEMP/TIME y la perilla
START/PAUSE para ajustar la
conguración del tiempo.
6. Presione el botón de
START/PAUSE para
comenzar el proceso de
cocción.
7. Una vez que el Duet termine
de cocinar, la pantalla
mostrará "End" y el Duet
emitirá un pitido 3 veces.
Para programar su propia
receta única antes de cocinar
1. Presione el botón
PRESSURE.
• Las luces estarán
encendidas indicando
que esas funciones están
disponibles para su uso.
2. Establezca sus parámetros
de cocción usando MENU,
STAGE, WARM/DELAY,
SLOW COOK, TEMP/TIME,
o SAUTÉ/SEAR.
3. Una vez que los parámetros
de cocción estén
programados en el Duet,
presione y mantenga el
botón MENU para una
1
segunda. La pantalla
mostrará "menu" y "101".
4. Use el dial de INICIO/
PAUSA para desplazarse
por los números de la ranura
de la memoria del programa
hasta que llegue al número
en el que desea guardar el
programa (101-150).
5. Una vez que se alcanza
el número de programa
deseado, presione y
mantenga el botón MENU
una segunda vez. El Duet
emitirá un pitido una vez y el
programa se guardará en la
memoria para su posterior
recuperación.
Para programar su propia
receta única después de
cocinar
1. Presiona el botón
PRESSURE.
• Las luces estarán
encendidas indicando
que esas funciones están
disponibles para su uso.
2. Ajuste sus funciones de
cocción usando SAUTÉ/
SEAR, PRESSURE, y
WARM/DELAY.
3. Una vez programada en
el Duet, presione el botón
START/PAUSE. El Duet
comenzará el proceso de
cocción.
4. Cuando termine, el Duet
emitirá un pitido 3 veces y la
pantalla mostrará "End".
5. Presione el botón MENU.
La pantalla mostrará "menu"
y "101".
6. Use la perilla START/PAUSE
para desplazarse por los
números de las ranuras de

nuwavenow.com
61
SPANISH
nuwavenow.com
61
memoria hasta que llegue
al número al que desea
guardar el programa
(101-150).
7. Una vez que llegue al
número de programa
deseado, presione y
mantegna Botón MENU una
segunda vez. El Duet pitará
una vez. Y el programa se
guardará en la memoria y
podrá ser recordado más
tarde.
Ver el programa actual durante
la cocción
1. Durante la cocción,
mantenga presionado el
botón MENU. La pantalla
mostrará el número de
programa actualmente
en ejecución.
2. Suelte el botón MENU para
ver la pantalla anterior en
el monitor.
Edición de un Programa
Puede editar los programas que
cree (101-150) antes o durante
el proceso de cocción y guardar
los cambios.
1. Editar antes de cocinar:
• Presione el botón
MENU y use la perilla
de START/PAUSE para
encontrar el número de
programa para editar.
• Una vez que el número
del programa aparezca
en la pantalla, presione el
botón STAGE hasta que
llegue a la función que
desea editar. Use la perilla
START/PAUSE para
ajustar las temperaturas y
los tiempos.
• Para agregar una función,
presione la función de
elección y use la perilla
START/PAUSE para
hacer sus ajustes.
• Una vez que se realicen
todas las ediciones,
presione el botón MENU.
La pantalla mostrará
"menu" y "101".
• Utilice la perilla START/
PAUSE para encontrar el
número de programa para
guardar sus ediciones.
• Presione y mantenga
el botón MENU para 1
segundo para guardar y
almacenar las ediciones
para recuperarlas
posteriormente.
2. Editar durante la cocción:
• Durante la cocción,
presione el botón STAGE
hasta que llegue a la
función que desea editar.
Use la perilla START/
PAUSE para ajustar.
• Para agregar una función,
presione la función de
elección y use la perilla
START/PAUSE para hacer
sus ajustes.
• El Duet continuará el
proceso de cocción con
las modicaciones que
haya realizado.
Notas: Las funciones que ya han
nalizado en el ciclo de cocción
no se pueden editar ni agregar
durante la cocción.
• Cuando la cocción haya
terminado, el Duet emitirá
un pitido 3 veces y la
pantalla mostrará "End"
seguido de "SAVE".
instrucciones de cocción a presión
62
INSTRUCCIONES DE COCCIÓN A PRESIÓN
62
• Presione y mangtenga
el botón MENU para una
segunda. La pantalla
mostrará "menu" y "101".
• Utilice la perilla de START/
PAUSE para encontrar el
número de programa para
guardar sus ediciones.
• Presione y mantenga
el botón MENU para 1
segundo para guardar y
almacenar las ediciones
para recuperarlas
posteriormente.
Nota: Si alguna receta se guarda
en un programa (ranura de
memoria) que ya está llena, la
nueva receta con temperaturas
y tiempos establecidos anulará
la receta del programa anterior
(solo 101-150). Temperaturas y
tiempos preestablecidos para las
recetas del programa. 1-100 se
puede ajustar. Las temperaturas
y tiempos ajustados no serán
guardado cuando un número de
programa (1-100) se recupera
una vez más.
CANCEL
Presione el botón CANCEL en
cualquier momento para cancelar
y terminar todas las operaciones
del Duet. Una vez que se
presiona CANCEL la pantalla
mostrará "--:--", este es el modo
de espera.
Inicio
Los botones SAUTÉ/SEAR,
WARM/DELAY,
TEMP/TIME, MENU, PREHEAT,
y STAGE están disponibles para
freír con aire.
1. Enchufe el cable
electrico a una toma de
corriente.
2. Presione el botón AIR FRY.
• Las luces estarán
encendidas indicando
que esas funciones están
disponibles para su uso.
• Si se quita la tapa,
también aparecerá abierto
en la pantalla.
350F
INSTRUCCIONES
PARA FREIR CON
AIRE
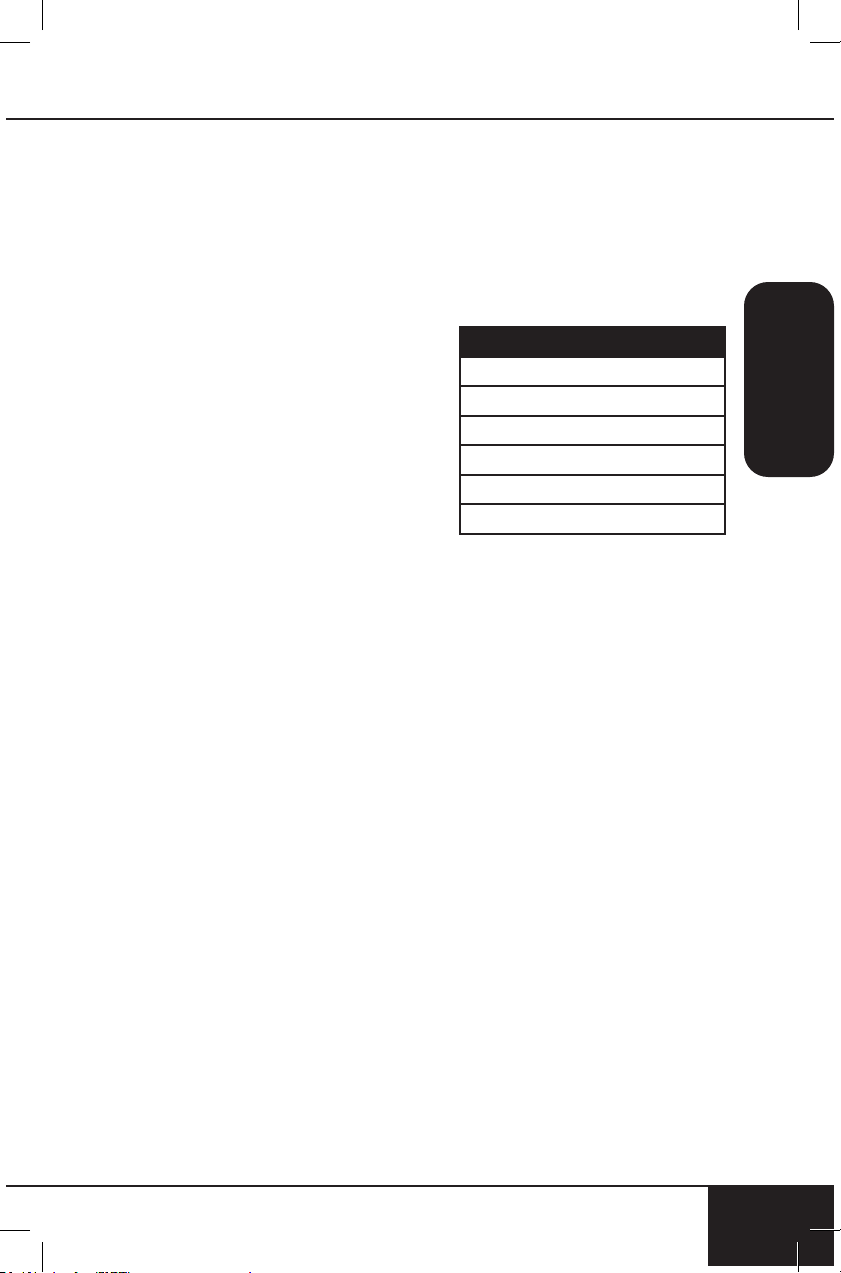
nuwavenow.com
63
SPANISH
nuwavenow.com
63
INSTRUCCIONES PARA FREIR CON AIRE
Nota: PRESSURE se desactiva
durante el uso de la freidora.
START/PAUSE
3. Asegúrese de que la tapa
de la freidora de aire esté en
el Duet y presione el botón
de START/PAUSE para
comenzar a cocinar.
• La pantalla mostrará "air
fry", "time" y "00:15" (15
minutos).
• El colon (:) parpadeará,
indicando que el Duet está
cocinando actualmente.
• Gire la perilla START/
PAUSE para ajustar el
tiempo de cocción, si lo
desea.
• Presione el botón TEMP/
TIME para ajustar la
temperatura de cocción, si
lo desea.
• Gire START/PAUSE para
ajustar la temperatura
de cocción.
4. Para hacer una pausa en la
cocción, presione el botón
START/PAUSE o retire la
tapa de la freidora de aire.
• El colon (:) ya no
parpadeará. Esto indica
que el Duet está en
pausa.
• Si se quita la tapa de la
freidora de aire para hacer
una pausa en la cocción,
la pantalla mostrará "air
fry", "Lid" y "open".
5. Para reanudar la cocción,
simplemente regrese la tapa
de la freidora de aire y colon
(:) comenzará a parpadear,
indicando que el Duet ha
reanudado la cocción.
6. Una vez que el Duet termine
de cocinar, la pantalla
mostrará "End" y el Duet
emitirá un pitido 3 veces.
TEMP/TIME
1. Presione TEMP/TIME en
cualquier momento que
desee ver o ajustar.
DELAY
La demora se puede utilizar con
la función Air Fry.
1. Presionando el botón AIR
FRY.
• Las luces estarán
encendidas 1-2
segundos y luego se
apagarán, indicando que
esas funciones están
disponibles para su uso.
• La pantalla mostrará "air
fry", "temp" y "350F". Si
la tapa se retira, open
también se mostrará en la
pantalla. Coloque la tapa
del Duet y open ya no
estará encendido.
2. Congure las funciones de
cocción, como se describe
en este manual, para sus
especicaciones.
Tiempo de cocción
60F~275F
275F~345F
350F~400F
00:00 - 99:99
00:00 - 24:00
00:00 - 01:00
instrucciones para freir con aire
64
INSTRUCCIONES PARA FREIR CON AIRE
64
cocción de la etapa 1 es la
predeterminada 350F por 15
minutos).
1. Enchufe el cable electrico
a una toma de corriente.
El Duet se encenderá y la
pantalla mostrará "--:--" .
2. Presiona el botón AIR FRY.
• Las luces estarán
encendidas indicando
que esas funciones están
disponibles para su uso.
La pantalla mostrará "air
fry", "temp" y "350F".
Cuando presione STAGE,
se mostrarán "stage" y "1".
3. Ajuste la temperatura de
cocción girando la perilla
START/PAUSE hasta que se
alcance la temperatura de
cocción deseada.
4. Presione el botón TEMP/
TIME y use la perilla START/
PAUSE para ajustar el
tiempo de cocción de la
Etapa 1.
5. Para agregar una etapa
adicional, presione el botón
STAGE una vez. La pantalla
mostrará "stage" y "2"
(encima del stage). Esta es
la etapa 2 de cocción.
350F
Stage 1
350F
2
Stage 2
3. Presione el botón WARM/
DELAY para retrasar la
cocción para un período de
tiempo hasta de 24:00 (24
horas). La pantalla mostrará
"air fry", "delay", "time" y
"01:00" (1 hora).
4. Gire la perilla START/
PAUSE para ajustar el
tiempo de demora hasta por
24:00 (24 horas).
5. Presione START/PAUSE
para comenzar la cuenta
regresiva del tiempo de
retardo. Durante la cuenta
regresiva del tiempo de
retardo, parpadeará colon
(:), indicando que la cuenta
regresiva ha comenzado.
6. El tiempo de retardo se
puede agregar o reducir en
cualquier momento girando
el dial START/PAUSE.
7. Una vez que la cuenta atrás
del tiempo de demora ha
nalizado, el Duet entrará
automáticamente en el ciclo
de cocción.
8. Para cancelar la función
de demora presione el
botón WARM/DELAY. Si
está funcionando, el Duet
pasará a la siguiente fase
de cocción.
STAGE
La cocción por etapas se
utiliza para cocinar alimentos
a diferentes temperaturas y
tiempos a lo largo del proceso
de cocción. Se pueden
congurar hasta 5 etapas de
cocción. DELAY, PREHEAT,
SEAR 1, SEAR 2 y WARM.
no se consideran etapas. La

nuwavenow.com
65
SPANISH
nuwavenow.com
65
6. Ajuste la temperatura de
cocción de la Etapa 2
girando la perilla START/
PAUSE hasta que se
alcance la temperatura de
cocción deseada.
7. Presione el botón TEMP/
TIME. La pantalla mostrará
"00:00", "time", "stage" y
"2" (stage superior). Use la
perilla START/PAUSE para
ajustar el tiempo de cocción
de la Etapa 2.
8. Para establecer ajustes
adicionales de cocción por
etapas, repita los pasos 5-7.
• El número de la etapa
anterior cambiará después
de presionar el botón
STAGE y congurar la
temperatura y el tiempo.
• Después de la Etapa
5, cuando se presione
nuevamente el botón
STAGE, el Duet regresará
a la Etapa 1. La pantalla
mostrará la temperatura
de cocción de la Etapa
1, temp, stage y 1 (por
encima de la etapa).
9. Si solo desea 2 etapas de
cocción, deje el tiempo en
00:00 para las etapas 3-5 y
esas etapas se omitirán.
10. Presione START/PAUSE
para comenzar a cocinar.
El Duet cocinará con las
funciones establecidas.
11. Durante la cocción, presione
el botón de STAGE para
ver y ajustar las próximas
etapas de cocción y las
funciones de cocción (sear 1
y 2, preheat y warm).
12. Cuando termine de cocinar,
la pantalla mostrará "End"
y el Duet emitirá un pitido 3
veces.
Notas:
• La pantalla solo indicará el
número de cocción de la etapa
cuando se utilicen 2 o más
etapas.
• La pantalla no mostrará la
cocción por etapas si solo se
utiliza una etapa de cocción.
• Etapa 1: 350F, 00:15
• Etapa 2-5 por defecto: 350F,
00:00
• Si no se establece un tiempo
para las etapas 2-5, esas
etapas se omitirán en el ciclo
de cocción.
GRILL
1. Presione GRILL, la
temperatura predeterminada
es 400F.
2. Presione TEMP/TIME para
ajustar la temperatura y el
tiempo de cocción.
3. Una vez congurado,
presione START/PAUSE. El
Duet se precalentará a una
temperatura establecida de
400F.
4. Una vez que haya
alcanzado la temperatura
de precalentamiento, el
Duet iniciará una cuenta
regresiva de 5 minutos.
Inserte su comida y espere
a que termine la cuenta
regresiva o presione
START/PAUSE para
comenzar a cocinar.

instrucciones para freir con aire
66
INSTRUCCIONES PARA FREIR CON AIRE
66
PREHEAT
Para freír con aire, utilice la tapa
de la freidora de aire.
1. Presiona el botón AIR FRY.
• Las luces estarán
encendidas 1-2
segundos y luego se
apagarán, indicando que
esas funciones están
disponibles para su uso.
• La pantalla mostrará "air
fry", "temp" y "350F". Si
se quita la tapa, también
se mostrará "open" en la
pantalla. Coloque la tapa
del Duet y "open" ya no
estará encendido.
2. Establezca las funciones de
cocción, como se describe
en este manual, según sus
especicaciones.
3. Presione el botón PREHEAT
para activar la función
de precalentamiento. La
pantalla mostrará "air fry",
la temperatura de cocción
elegida, "pre" y "temp".
• El Duet SIEMPRE
precalentará a la
temperatura de cocción
del SIGUIENTE ciclo de
cocción.
4. Presione START/
PAUSE para comenzar el
precalentamiento. El Duet
comenzará a precalentar a la
temperatura establecida.
• La pantalla mostrará "air
350F
fry", la temperatura de
cocción/precalentamiento
elegida, (intermitente),
"pre" y "temp".
• Durante el
precalentamiento, la
temperatura se puede
ajustar girando la perilla
START/PAUSE.
• El tiempo de cocción
también se puede ajustar
presionando el botón
TEMP/TIME y luego
girando la perilla START/
PAUSE.
5. Cuando el Duet alcance
la temperatura de
precalentamiento, entrará en
una retención de 5 minutos.
El Duet mantendrá la
temperatura, durante estos
5 minutos.
• Durante la espera
de 5 minutos, la
pantalla mostrará "5"
(parpadeando), "ready" y
"temp", y el Duet emitirá
un pitido 3 veces.
• La temperatura de
cocción se puede ajustar
girando la perilla START/
PAUSE durante los 5
minutos de espera.
• El tiempo de cocción
también se puede ajustar
presionando el botón
TEMP/TIME y luego
girando la perilla START/
PAUSE.
• Si no se realiza ninguna
acción dentro de la espera
de 5 minutos, el Duet
pasará automáticamente
al modo de espera.

nuwavenow.com
67
SPANISH
nuwavenow.com
67
6. Retire la tapa de la freidora
de aire y coloque su comida
en el Duet. Vuelva a colocar
la tapa de la freidora de aire.
El Duet comenzará a cocinar
a la temperatura y el tiempo
establecidos.
7. El ciclo de precalentamiento
se puede cancelar en
cualquier momento
presionando el botón
PREHEAT. El Duet nalizará
el ciclo de precalentamiento
y pasará automáticamente al
siguiente ciclo de cocción.
8. Cuando el Duet haya
terminado de cocinar, la
pantalla mostrará "End" y
el Duet emitirá un pitido 3
veces.
AUTO PREHEAT
1. Presione MENU y PREHEAT
al mismo tiempo para
activar el Precalentamiento
automático. Auto
Preheat precalentará
automáticamente el Duet a
la temperatura de cocción
establecida.
• Una vez que haya
alcanzado la temperatura
de cocción establecida, el
Duet entrará en una cuenta
regresiva de 5 minutos
como la función típica de
PREHEAT.
• Después de la cuenta
regresiva, el Duet cocinará
a la temperatura y el tiempo
de cocción establecidos.
2. Para apagar el
precalentamiento automático,
presione MENU y PREHEAT
al mismo tiempo.
SEAR
Sear 1 siempre estará
directamente ANTES de la
cocción en etapa regular y Sear
2 siempre será directamente
DESPUÉS de la cocción en
etapa regular.
Sear 1
La temperatura predeterminada
de sear 1 es de 450F y el tiempo
predeterminado de sear 1 es de
5 minutos (00:05).
1. Ajuste las temperaturas y los
tiempos de cocción para la
cocción por etapas.
2. Presione el botón SEAR1
una vez. Esto activará la
función Sear 1. La pantalla
mostrará "air fry", "450F",
"sear", "1" (intermitente) y
"temp".
• Presione el botón TEMP/
TIME y use la perilla
START/PAUSE para
ajustar el tiempo de
búsqueda de Sear 1 hasta
15 minutos (00:15).
3. Presione START/PAUSE
para comenzar a cocinar.
La pantalla mostrará "sear
1" (parpadeando), "time" y
el tiempo establecido (00:05
predeterminado) con el
colon (:) parpadeando.
4. Una vez que se complete el
ciclo Sear 1, el Duet pasará
automáticamente a la
cocción en etapa (regular).
5. Cuando el Duet haya
terminado de cocinar, la
pantalla mostrará "End" y
el Duet emitirá un pitido 3
veces.

instrucciones para freir con aire
68
INSTRUCCIONES PARA FREIR CON AIRE
68
Sear 1 & 2
Sear 1 & 2 se usa para sellar
antes y después de la cocción
regular.
1. Ajuste las temperaturas y los
tiempos de cocción para la
cocción por etapas.
2. Presione el botón SEAR
una vez y establezca la
temperatura y el tiempo de
Sear El valor predeterminado
es 450Fdurante 5 minutos.
Presione el botón SEAR
nuevamente. La pantalla
mostrará "450F", "sear", "1",
"2" (parpadeando) y "temp".
3. Ajuste la temperatura y el
tiempo de sear 2. El valor
predeterminado es 450F
durante 5 minutos.
4. Presione START/PAUSE
para comenzar a cocinar.
La pantalla mostrará "sear
1" (intermitente), "2", "time"
y el tiempo establecido
de "sear 1" con colon (:)
parpadeando.
5. Una vez que se complete
el ciclo Sear 1, el Duet
emitirá un pitido y pasará
automáticamente a la
etapa de cocción normal.
La pantalla mostrará "sear
2", "time" y el tiempo de
cocción establecido de
la etapa regular (00:15
predeterminado) con el
colon (:) parpadeando.
6. Una vez que se complete
el ciclo de cocción por
etapas, el Duet emitirá un
pitido y automáticamente
entrará en la cocción Sear
2. La pantalla mostrará
"sear 2" (parpadeando),
la hora y el tiempo de
marcación establecido
(00:05 predeterminado) con
el colon (:) parpadeando.
7. Cuando el Duet haya
terminado de cocinar, la
pantalla mostrará "End" y
el Duet emitirá un pitido 3
veces.
Sear 2
La temperatura predeterminada
de Sear 2 es 400°F y el tiempo
predeterminado de Sear 2 es de
5 minutos (00:05).
1. Ajuste las temperaturas y los
tiempos de cocción para la
cocción por etapas.
2. Presione el botón SEAR
3 veces. Esto activará la
función Sear 2.
3. La pantalla mostrará "450F",
"sear", "2" (parpadeando) y
"temp".
• La temperatura de sellar
de Sear 2 se puede
ajustar girando la perilla
START/PAUSE. 450F
(232C)es la temperatura
máxima de sellar.
• Presione el botón TEMP/
TIME y gire la perilla
START/PAUSE para
ajustar el tiempo de
sellar de Sear 2 hasta 5
minutos (00:05).
4. Presione START/PAUSE
para comenzar a cocinar.
La pantalla mostrará "sear
2", "time" y el tiempo
de cocción de la etapa
regular establecido (00:15
predeterminado) con el
colon (:) parpadeando.

nuwavenow.com
69
SPANISH
nuwavenow.com
69
5. Una vez que se complete
el ciclo de cocción por
etapas, el Duet entrará
automáticamente en
la cocción Sear 2. La
pantalla mostrará "sear 2"
(parpadeando), "time" y el
tiempo establecido (00:05
predeterminado) con el
colon (:) parpadeando.
6. Cuando el Duet haya
terminado de cocinar, la
pantalla mostrará "End".
7. Presione el botón SEAR
4 veces hasta que "sear",
"1", y "2" ya no estén
encendidos en la pantalla,
para borrar la función Sear.
WARM
1. Establezca las funciones de
cocción, como se describe
en este manual, según sus
especicaciones.
2. Presione el botón WARM
(Mantener Caliente) para
activar la función de
calentamiento y mantener
sus alimentos calientes
después de cocinarlos hasta
que estén listos para servir.
3. La pantalla mostrará "air
fry", "temp", "warm" y
"140F".
4. Gire la perilla START/
PAUSE para ajustar
la temperatura de
calentamiento hasta 200F.
140F
5. Presione el botón TEMP/
TIME para ajustar el tiempo
para mantener caliente.
6. La pantalla mostrará "air
fry", "warm", "time" y "01:00"
(1 hora).
7. Use la perilla START/PAUSE
para ajustar el tiempo para
mantener caliente hasta 3
horas (03:00).
8. Presione START/PAUSE
para comenzar a cocinar.
9. Para cancelar la función
de Mantener Caliente
en cualquier momento,
simplemente presione el
botón WARM.
10. Para ajustar la conguración
de mantener caliente
durante la cocción, presione
el botón de STAGE
hasta que aparezca en la
pantalla la temperatura
de calentamiento y la
temperatura ajustada.
11. Para ajustar el tiempo de
calentamiento durante la
cocción, presione TEMP/
TIME y use la perilla START/
PAUSE para ajustar.
12. Para ver la función actual
en ejecución, presione el
botón de STAGE hasta que
esa función parpadee en la
pantalla.
13. Cuando el Duet termine
de cocinar, entrará
automáticamente en la
función de mantener
caliente.
14. Cuando nalice la función
Warm, el Duet emitirá un
pitido 3 veces y la pantalla
mostrará "End".
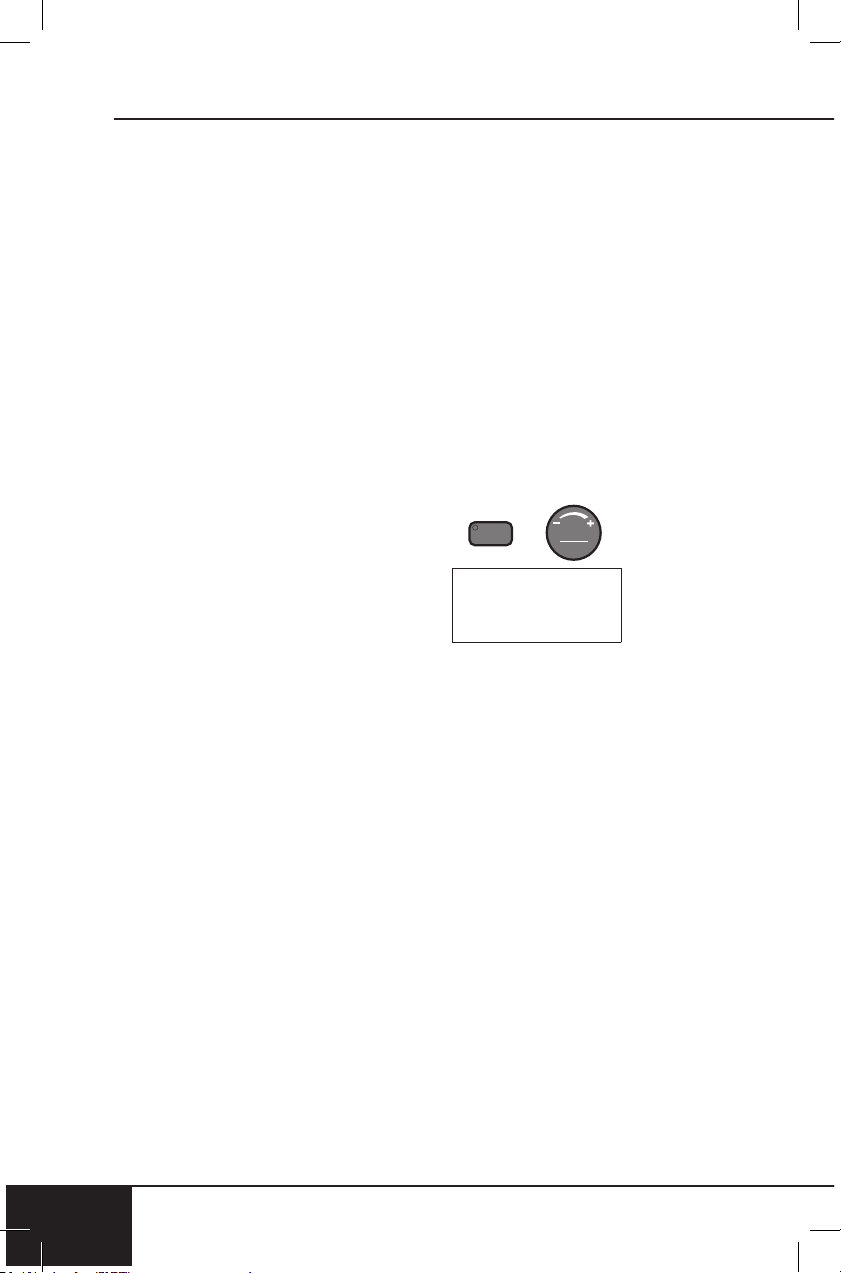
instrucciones para freir con aire
70
INSTRUCCIONES PARA FREIR CON AIRE
70
Mantener Caliente utilizado
como función independiente:
Mantener Caliente se puede
usar independientemente como
una función independiente para
mantener calientes los alimentos.
1. Mantenga presionado
STAGE y WARM/DELAY
durante 1 segundo. El Duet
comenzará a calentarse
automáticamente.
2. La pantalla mostrará "air
fry", "temp", "warm" y
"140F".
3. Gire la perilla START/
PAUSE para ajustar la
temperatura de Mantener
Caliente hasta 200F (93C).
4. Presione el botón TEMP/
TIME para ajustar el tiempo
de calentamiento.
5. La pantalla mostrará "air
fry", "warm", "time" y
"01:00" (1 hora).
6. Use la perilla START/PAUSE
para ajustar el tiempo para
mantener caliente hasta por
3 horas (03:00).
7. Una vez que nalice el
tiempo de la función de
warm, la pantalla mostrará
"End" con tres pitidos.
MENU
El botón MENU representa
la entrada de la memoria del
programa (el almacenamiento
de las secuencias de cocción
utilizadas frecuentemente) y la
recuperación de la memoria del
programa (recuperación de las
secuencias de cocción).
Recuperación de Memoria:
Presione el botón MENU. La
pantalla mostrará "air fry",
"menu" y "1".
1. Use la perilla START/PAUSE
para elegir el número
de programa que desea
recuperar.
• Los números 1-100
son programas
preestablecidos.
• Los números del 1 al
100 son programas
preestablecidos.
• Hay espacio de
almacenamiento para 50
recetas adicionales. Esto
se tratará en Programe
su propia receta a
continuación.
2. Una vez elegido el número
de programa, presione
START/PAUSE para
comenzar a cocinar.
Puede hacer ajustes de
temperatura y tiempo si lo
desea.
3. El Duet cocinará en los
ajustes programados.
4. Hay 100 programas
preestablecidos ya
programados en el Duet (#
1-100). Hay 50 ranuras de
memoria adicionales para
que guarde sus propias
recetas únicas (# 101-150).
Programe su propia receta
antes de cocinar:
1. Establezca las funciones de
cocción, como se describe
en este manual, según sus
especicaciones.
10 1
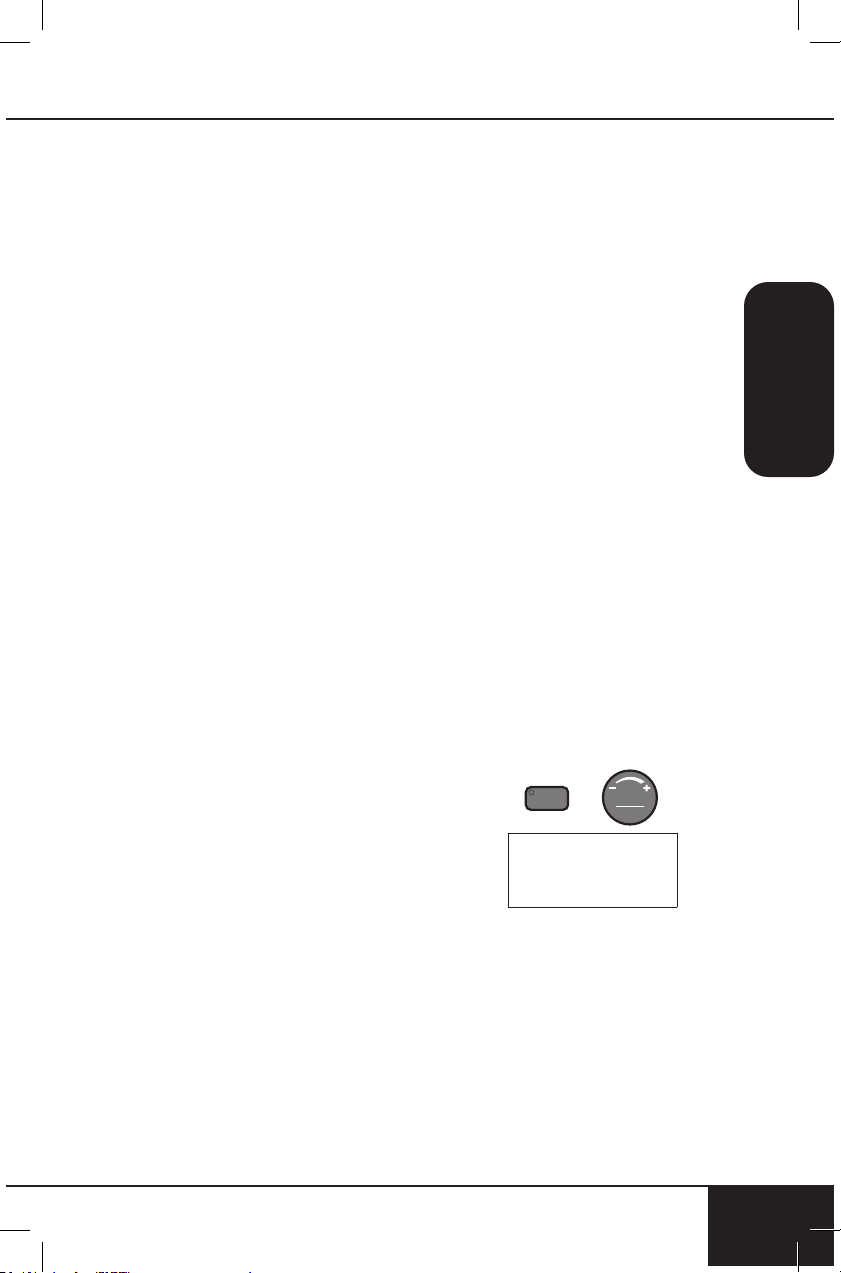
nuwavenow.com
71
SPANISH
nuwavenow.com
71
2. Presione y mantegna el
botón MENU para una
segunda. La pantalla
mostrará "air fry", "menu" y
"101".
3. Use la perilla START/PAUSE
para elegir el número de
programa deseado para
guardar el programa en
(101-150).
4. Una vez elegido el
número de programa,
presione y mantenga
el botón MENU para 1
segundo para almacenar
y guardar el programa en
el número de programa
elegido. El programa
ahora está almacenado y
disponible para su posterior
recuperación.
5. Presione START/PAUSE
para comenzar a cocinar el
programa.
Programe su propia receta
durante la cocción:
1. Establezca las funciones de
cocción, como se describe
en este manual, según sus
especicaciones.
2. Presione START/PAUSE
para comenzar a cocinar.
3. Durante la cocción,
presione y mantegna el
botón MENU para una
segunda. La pantalla
mostrará "air fry", "menu" y
"101".
4. Use la perilla START/PAUSE
para elegir el número de
programa deseado para
guardar el programa en
(101-150).
5. Una vez elegido el
número de programa,
presione y mantegna
el botón MENU para 1
segundo para almacenar
y guardar el programa en
el número de programa
elegido. El programa
ahora está almacenado y
disponible para su posterior
recuperación.
6. El Duet continuará
cocinando la receta
programada.
Programe su propia receta
después de cocinar:
1. Establezca las funciones de
cocción, como se describe
en este manual, según sus
especicaciones.
2. Presione START/PAUSE
para comenzar a cocinar.
3. Cuando el proceso de
cocción haya nalizado y la
pantalla muestrará "End",
presione y mantenga el
botón MENU para una
segunda. La pantalla
mostrará "air fry", "menu"
y "101".
4. Use la perilla START/PAUSE
para elegir el número de
programa deseado para
guardar el programa en
(101-150).
5. Una vez elegido el
número de programa,
presione y mentenga
el botón MENU para 1
segundo para almacenar
1

instrucciones para freir con aire
72
INSTRUCCIONES PARA FREIR CON AIRE
72
y guardar el programa en
el número de programa
elegido. El programa
ahora está almacenado y
disponible para su posterior
recuperación.
Ver el programa actual durante
la cocción: Puede ver el número
del programa de cocción actual.
1. Durante la cocción,
mantenga presionado el
botón MENU durante 2
segundos.
2. La pantalla mostrará el
programa actualmente en
ejecución.
3. Suelte el botón MENU para
ver la pantalla anterior en
la pantalla.
Ver funciones de cocción
programadas: Puede ver
todas las funciones de cocción
asociadas con un programa
antes o durante el proceso de
cocción.
1. Ver antes de cocinar:
• Presione el botón MENU
y busque el número de
programa para revisar
usando la perilla de
START/PAUSE.
• Una vez que el número
del programa aparezca
en la pantalla, presione el
botón STAGE para revisar
cada fase de la cocción.
• Se pueden realizar ajustes
de temperatura y tiempo
para cada función en este
momento.
2. Ver durante la cocción:
• Presione el botón STAGE
para revisar cada fase de
la cocción.
• Continúe presionando
el botón STAGE para
desplazarse por todas las
funciones programadas
para ese número
de programa.
• Se pueden realizar
ajustes de temperatura y
tiempo para cada función
en este momento.
• Edición de un programa:
puede editar los
programas creados
anteriormente o durante
el proceso de cocción y
guardar los cambios.
1. Editar antes de cocinar:
• Presione el botón MENU
y busque el número de
programa para editar
usando la perilla START/
PAUSE.
• Una vez que el número
del programa aparezca
en la pantalla, presione el
botón STAGE hasta que la
función que desea editar
aparezca en la pantalla.
• Usando TEMP/TIME y la
perilla START/PAUSE,
realice las ediciones a
temperatura y tiempo
como lo desee.
• Una vez que se realicen
todas las ediciones,
presione y mantenga el
botón MENU para una
segunda. La pantalla
mostrará "air fry", "menu"
y "101".
• Utilice la perilla START/
PAUSE para encontrar el
número de programa para
guardar sus ediciones.

nuwavenow.com
73
SPANISH
nuwavenow.com
73
• Presione y mantenga
el botón MENU para 1
segundo para salvar y
almacenar las ediciones.
2. Editar durante la cocción:
• Durante la cocción,
presione el botón TEMP/
TIME y use la perilla
START/PAUSE para
ajustar la temperatura de
cocción.
• Presione el botón TEMP/
TIME y use la perilla
START/PAUSE para
ajustar el tiempo de
cocción.
• Si hay más funciones de
cocción que desee editar,
presione el botón STAGE
hasta que llegue a la
función que desea editar.
• Use TEMP/TIME, y la
perilla START/PAUSE
para hacer ediciones.
• El Duet continuará el
proceso de cocción con
las modicaciones que
haya realizado.
Nota: Las funciones que ya
han nalizado en el ciclo de
cocción no se pueden ajustar.
• Una vez que se realicen
todas las ediciones, presione
y mantenga el botón MENU
para una segunda. La pantalla
mostrará "air fry", "menu" y
"101".
• Utilice la perilla START/
PAUSE para encontrar el
número de programa para
guardar sus ediciones.
• Presione y mantenga el
botón MENU para 1 segundo
para salvar y almacenar las
ediciones.
• Cuando la cocción haya
terminado, el Duet emitirá un
pitido 3 veces y la pantalla
mostrará "End" seguido de
"SAVE".
Nota: Si guarda cualquier receta
en una ranura de memoria ya
llena, la nueva receta anulará la
receta anterior. Cualquier edición
de un programa preestablecido
(1-100) solo se puede guardar
y almacenar en los números de
programa 101-150. No puede
guardar y ajustar el programa
predenido a su número de
programa predenido original.
INSTRUCCIONES DE
COMBO COOK
COMBO COOK le permite
congurar tanto la conguración
de PRESIÓN como la
conguración de la freidora
al principio en lugar de
programarla en medio de la
cocción. PRESSURE, TEMP/
TIME, WARM/DELAY, SAUTÉ/
SEAR, STAGE y MENU están
disponibles para usar con la
función de Combo Cook.
00:30

instrucciones de cocina combinada
74
INSTRUCCIONES DE COMBO COOK
74
7. Para la liberación natural de
presión, apague el Duet y
desenchúfela. Permita que
el Duet libere naturalmente
la presión. Para liberar
rápidamente la presión, gire
con cuidado el Interruptor/
Válvula de Liberación
de Presión a la posición
“OPEN” hasta que se libere
todo el vapor/presión.
Recuerde siempre girar
el Interruptor/Válvula de
Liberación de Presión a la
posición “OPEN” antes de
abrir la Tapa de la Olla de
Presión para asegurarse
de que se libere toda la
presión.
8. Vuelva a colocar la Tapa
de la Olla de Presión con la
Tapa de la Freidora de Aire.
9. Presione el botón START/
PAUSE nuevamente para
reanudar la parte de la
cocción para freir con aire.
10. Cuando se haya completado
toda la cocción, el Duet
emitirá un pitido 3 veces y la
pantalla mostrará End.
Nota: La función de Programa
funciona de la misma
manera que en las secciones
PRESSURE COOK y FREIR
CON AIRE con una diferencia:
para activar la COMBO
COOK, deberá presionar el
botón COMBO COOK. Esto
le permitirá acceder y guardar
programas preestablecidos para
COMBO COOK.
1. Enchufe el cable electrico
a una toma de corriente.
El dúo se encenderá y la
pantalla mostrará -: - .
2. Presione el botón COMBO
COOK.
• Las luces estarán
encendidas 1-2
segundos y luego se
apagarán, indicando que
esas funciones están
disponibles para su uso.
La pantalla mostrará la
presión de cocción.
3. Establezca los ajustes de la
Olla de Presión.
4. Una vez que se hayan
ingresado los ajustes de la
Olla de Presión, presione el
botón COMBO COOK por
segunda vez.
• Las luces de los botones
SAUT/SEAR, STAGE,
TEMP/TIME, MENU
y WARM/DELAY se
encenderán, indicando
que esas funciones están
disponibles para su uso.
• La pantalla mostrará air
fry, temp y 350F (177C).
5. Establezca la conguración
de la freidora de aire.
6. Pulse el botón START/
PAUSE cuando estén todos
los ajustes introducidos y la
porción de cocción a presión
de su cocina esté lista.
Asegúrese de que la Tapa
de la Olla de Presión esté
correctamente colocada.
El Duet primero cocinará la
parte de la receta de la Olla
de Presión.

nuwavenow.com
75
SPANISH
nuwavenow.com
75
Función YOGURT:
1. Coloque la leche en la olla
interior.
2. Presione YOGURT una vez
(para ingresar al MODO
YOGURT).
• Aparecerá "9:10" en la
pantalla LED (este es el
tiempo predeterminado).
3. Presione START/PAUSE.
• La pantalla LED mostrará
"HEAt" y la temperatura
predeterminada de
"275F".
• Presione TIME para
mostrar el tiempo
de calentamiento
predeterminado de 10
minutos para que la leche
alcance los 180F.
Nota: A los 9 minutos, Duet
emite un pitido continuo para
avisarle que verique que la
temperatura es de 180F con un
termómetro de mano.
Si la temperatura de la leche no
ha alcanzado los 180F), agregue
2 minutos con el dial START/
PAUSE hasta que alcance los
180F.
• Una vez que termina el
tiempo, el Duet emitirá un
pitido continuo y el LED
mostrará "CooL".
4. Duet ahora entrará en modo
Delay durante 1 hora.
5. Presione START/PAUSE
para comenzar el ciclo de
enfriamiento.
• Una vez que haya pasado
la hora, el Duet emitirá un
pitido continuo.
• Verique la leche con un
termómetro de mano.
• Cuando la leche se haya
enfriado a 110F (43C) y
"Add" esté en la pantalla
LED, agregue el cultivo de
yogur a la leche.
Nota: "Add" se mostrará
después de que se agote el
retraso de 1 hora.
• Coloque la tapa de vidrio
en el Duet.
6. Presione START/PAUSE.
• La pantalla LED mostrará
"8:00" horas y "115F".
Deje el Duet sin tocar
durante 8 horas.
• Una vez transcurridas las
8 horas, se completa la
incubación.
• El dueto emitirá un pitido
(2 cortos y 1 largo) y la
pantalla LED mostrará
"End".
7. Presione CANCEL y retire
su yogur.

limpieza y mantenimiento
76
LIMPIEZA Y MANTENIMIENTO
76
Antes del primer uso:
1. Retire todos los materiales de empaque.
2. Retire el pegamento y las etiquetas del aparato.
3. Limpie a fondo la Cacerola Interior de Acero Inoxidable, la Rejilla
Reversible Multiusos, Tapa de la Olla de Presión, Parrilla/Plancha,
y la Tapa de Cocción Lenta con una esponja no abrasiva y
detergente suave para platos, o solo en el lavavajillas, en la rejilla
superior. Limpie el interior y el exterior del Duet con un paño húmedo.
No sumerjal Duet en agua. Seque bien.
Nota: Este aparato también cocina con aire caliente. NO llene el Duet
con aceite cuando esté friendo con aire.
Limpieza
SIEMPRE apague, desenchufe y permita que el Duet y todas las partes
se enfríen completamente ANTES de limpiar. Limpie el Duet después de
cada uso. Al quitar las partes de el Duet, el Duet se enfriará más rápido.
IMPORTANTE: No sumerja la base ni las tapas en agua ni intente
colocarlas en el lavavajillas. El exterior de la supercie se puede
limpiar frotando cuidadosamente con un paño húmedo o una
esponja. Asegúrese de que el Duet se haya enfriado completamente
antes de la limpieza.
NO UTILICE ABRASIVOS O FIBRAS PARA LIMPIAR
EL DUET O CUALQUIER PIEZA, ya que puede rayar
las supercies.
1. Desconecte el Duet y deje enfriar.
2. Limpie la base, las tapas y el panel de control del Duet con un paño
húmedo o una toalla de papel. Seque bien.
3. Limpie la Olla Interna de Acero Inoxidable con agua tibia o caliente y
un detergente suave. Seque bien antes de regresarlo al Duet. Para
las partículas de comida más duras, moje primero la olla en agua
tibia. Use un cepillo suave o un paño para eliminar
las partículas.
4. La Tapa de la Olla de Presión se puede limpiar con agua y
detergente suave. Séquela bien. NO lave en el lavavajillas.
5. La tapa de bloqueo de alimentos es extraíble. Lave con agua y
detergente suave. Colóquelo de nuevo en el Duet cuando esté
seco. El Duet no funcionará correctamente sin esa pieza.

nuwavenow.com
77
SPANISH
nuwavenow.com
77
6. La Cesta de AceroInoxidable paraFreír con Aire se puede limpiar
con agua y un paño suave o una toalla de papel. O, lávela en
el lavaplatos, solo en la rejilla superior. Para partículas más
resistentes, remoje con agua
caliente antes de limpiar con un
paño suave.
7. Limpie la tapa de la freidora de
aire limpiando el exterior y el
interior con un paño húmedo o
una toalla de papel. Seque bien.
NO la coloque en el lavaplatos.
8. Limpie suavemente el
Interruptor/Válvula de Liberación
de Presión con un paño suave y húmedo o con una toalla de
papel.
9. Limpie la Rejilla Reversible Multiusos con agua caliente y una
esponja no abrasiva. Para una acumulación resistente, remoje
antes de eliminar partículas con un cepillo suave, un paño o toallas
de papel.
10. Limpie la tapa de cocción lenta con agua caliente y una esponja
no abrasiva. Para una acumulación difícil, remoje antes de
eliminar las partículas con un cepillo suave, un paño o toallas de
papel. Apto para lavavajillas, solo en la rejilla inferior.
Nota: Seque todas las piezas con suavidad con un paño limpio y
seco o con una toalla de papel o seque al aire antes de colocarlas de
nuevo en el aparato.
Limpieza y Extracción del Empaque de Silicón de la Tapa de la
Olla de Presión.
ASEGÚRESE DE QUE EL EMPAQUE DE SILICÓN NO TENGA
GRIETAS O ESTÉ DAÑADO. EL EMPAQUE DE SILICÓN DEBE
ESTAR INSTALADO EN LA TAPA PARA QUE LA FUNCIÓN DE
COCCIÓN A PRESIÓN DEL DUET OPERE.
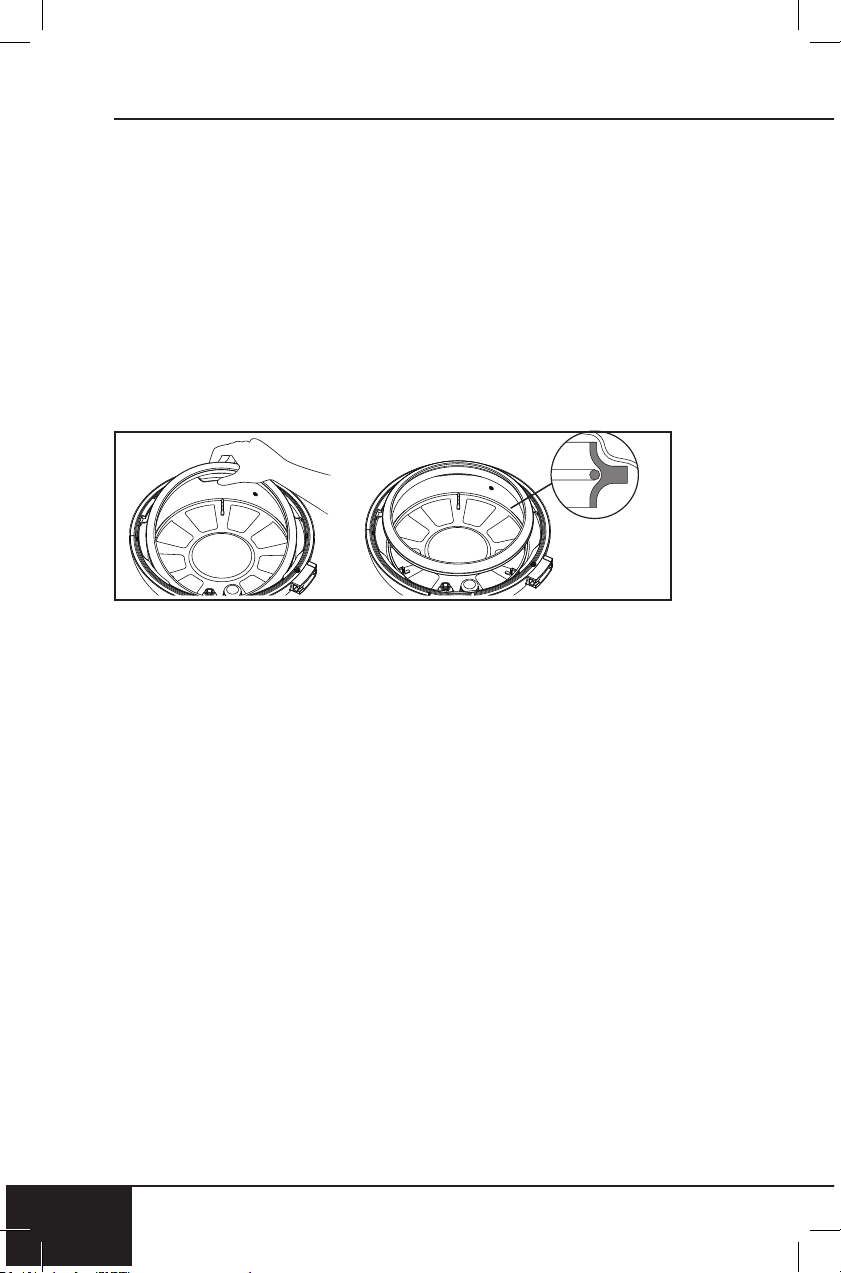
limpieza y mantenimiento
78
LIMPIEZA Y MANTENIMIENTO
78
Retirar el Empaque de Silicón
• Con una mano sosteniendo la tapa hacia abajo, jale suavemente de la
junta de silicona hacia arriba de la tapa de la Olla de Presión.
Colocar el Empaque de Silicón
• Alinee el empaque de silicón con la parte superior del anillo
de metal.
• Empuje suavemente el empaque de silicón, asegurándose de que
vea que el anillo de metal está dentro de la arboleda del empaque
de silicón. Continúe empujando el empaque de silicón alrededor.
Nota: Limpie el empaque de silicón con un poco de agua tibia. Deje
secar al aire.
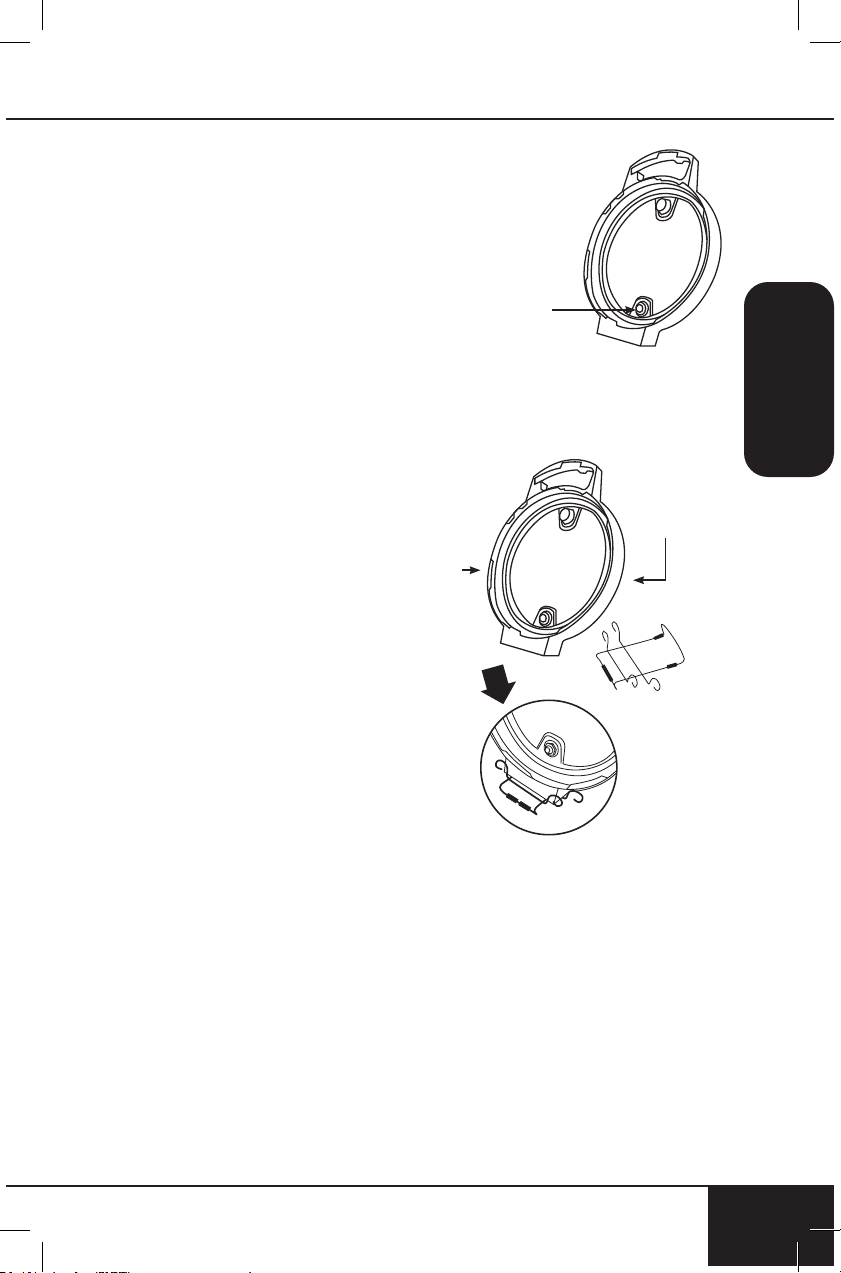
nuwavenow.com
79
SPANISH
nuwavenow.com
79
Sostenedor de la Tapa
Use el soporte de la tapa para
la tapa de la olla a presión y
la tapa de la freidora de aire
para evitar tocar supercies
calientes. Coloque en el
soporte de la tapa para enfriar
la tapa.
1. Después de usar la
función de olla a presión,
asegúrese de que se
haya liberado todo el
vapor / presión.
Vea Liberación de presión
en la página 58.
2. Retire la tapa de la olla
a presión del Duet y
coloque la parte inferior
de la tapa en dos barras horizontales inferiores con el borde
apoyado entre cada una. Debajo de la tapa se enfrentará.
Limpieza de Válvula Indicadora de Presión
Retire la junta de la válvula de silicona debajo de
la tapa que cubre la parte inferior de la válvula
indicadora de presión. Cuando se retira, se
liberará el indicador de presión. Si es necesario,
limpie la válvula indicadora de presión y la junta
de la válvula de silicona antes de reemplazarla.
Cuando esté limpio y seco, vuelva
a colocar la válvula indicadora
de presión a través de su oricio.
Vuelva a colocar la junta de la válvula de silicona
sobre la parte inferior de la válvula indicadora de presión. Asegúrese
de que el ajuste esté ajustado y que el indicador de presión se mueva
hacia arriba y hacia abajo libremente.
Válvula
Indicadora de
Presión
Tapa
Exterior
Tapa
Interior
Titular de la Tapa
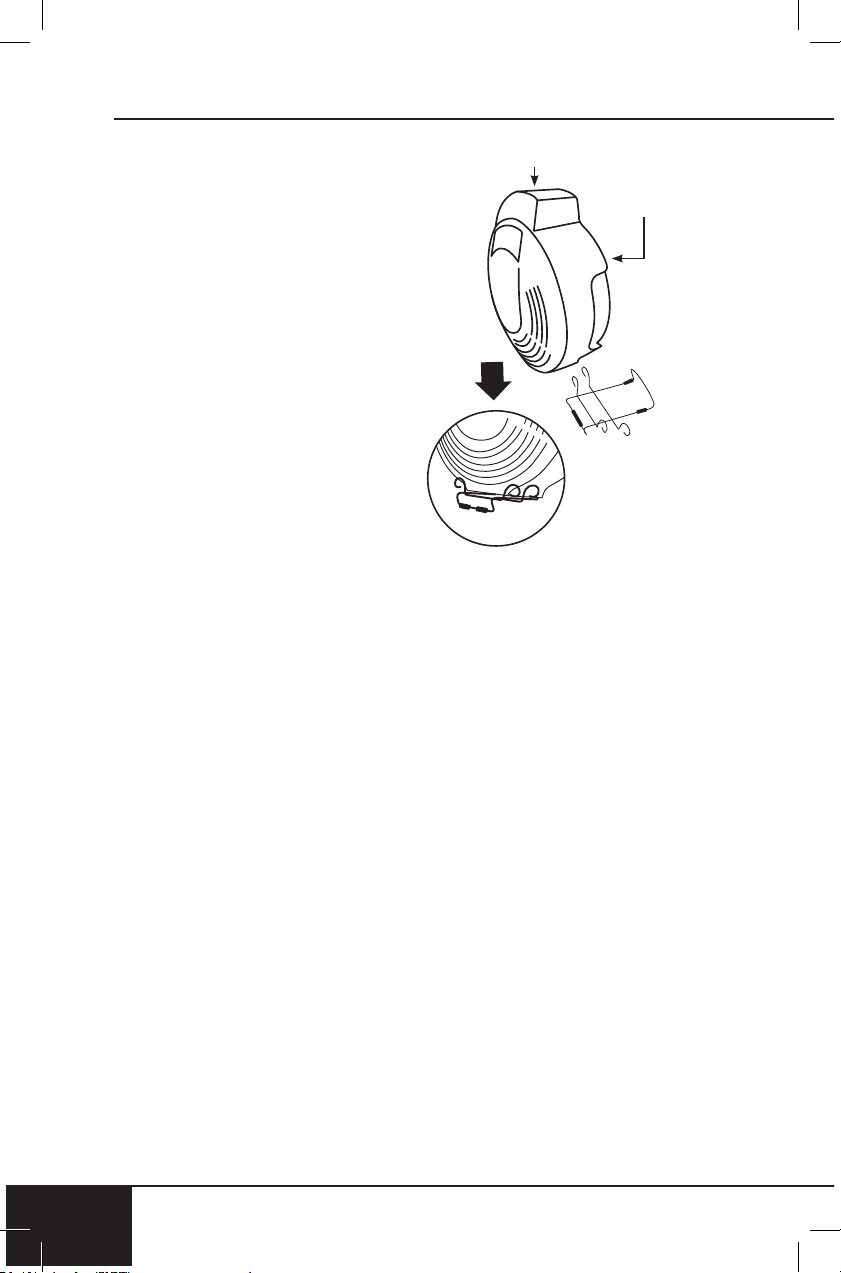
guía de resolución de problemas
8080
GUÍA DE RESOLUCIÓN DE PROBLEMAS
Después de Freír al Aire:
1. Retire la tapa de la freidora del Duet
y coloque la parte inferior de la tapa
en dos barras horizontales inferiores
con el borde apoyado entre cada una.
Permita que la tapa se apoye contra la
barra curva del soporte de la tapa.
2. Asegúrese de que la tapa esté
correctamente colocada y segura en el
soporte.
Precaución: las tapas estarán
CALIENTES. Use guantes de silicona
negros o guantes de horno al colocarlos
en el soporte.
Limpieza de la Parrilla / Placa de
Plancha
Después de retirar, dejar enfriar.
Limpie con un paño húmedo o
una toalla de papel o limpie en
el lavavajillas, solo en la rejilla
superior.
Tapa Exterior
Tapa Interior
Titular de
la Tapa

nuwavenow.com
81
SPANISH
nuwavenow.com
81
El Duet está tardando más tiempo en llegar a la presión correcta.
1. Los tiempos de cocción varían según las temperaturas
seleccionadas, la temperatura actual de la olla interna y la
temperatura o cantidad de ingredientes utilizados.
2. Asegúrese de que la junta de silicona en la tapa esté
correctamente colocada y que quede al ras contra el borde de
la tapa, alrededor de todo.
3. Asegúrese de que la tapa de la olla a presión esté bloqueada
en su lugar y que la válvula / el interruptor de liberación de
presión estén en la posición "CERRADA". Cuando la tapa
está correctamente bloqueada, aparecerá el icono "Bloquear"
en la pantalla.
No está seguro de si el Dueto está presurizando dentro de la
olla interna.
"PH" con los dos puntos (:) estará parpadeando, lo que indica que
está presurizando.
El tiempo es la cuenta regresiva notablemente más lento
en el dúo.
Las horas pueden haber sido establecidas, y no los minutos en el
Duet. Cuando se establece la hora, se mostrará HH: MM. El tiempo
aumentará / disminuirá los incrementos de 1 minuto.
Se está liberando vapor de la válvula de liberación de presión
cuando se cocina a presión.
Esto es normal. Cuando se cocina a presión, un poco de vapor
ser liberado.
La tapa de cocción a presión NO se quita fácilmente del dúo.
Como una característica de seguridad adicional, el Duet solo se
abrirá una vez que se haya liberado toda la presión. Deje que el
Dúo ejerza presión de Liberación Natural y siempre Liberación
Rápida después para asegurarse de que se libere toda la presión
/ vapor: Gire el Interruptor / Válvula de Presión Liberada a la
posición "ABIERTO". Una vez que se libere toda la presión /
vapor, gire la tapa de la olla a presión en sentido contrario a las
agujas del reloj para abrirla y levantarla.
GUÍA DE RESOLUCIÓN DE PROBLEMAS
guía de resolución de problemas
8282
GUÍA DE RESOLUCIÓN DE PROBLEMAS
El interruptor / válvula de liberación de presión está suelto.
El interruptor / válvula de liberación de presión fue diseñado
para ser suelto para un movimiento eciente y más fácil desde
la posición "CERRAR" a la posición "ABIERTO". El interruptor /
válvula se diseñó de esta manera en la tapa de la olla a presión
para regular la presión y liberar pequeñas cantidades de vapor del
Duet cuando se cocina a presión.
Nota: SIEMPRE gire el interruptor / válvula de liberación de presión
a la posición “CERRAR” cuando realice la cocción a presión o, al
principio, como parte del inicio del proceso de cocción combinada.
Asegúrese de girar el Interruptor / Válvula de liberación de presión
completamente a "ABIERTO" cuando realice una Liberación rápida.
El Duet hace un silbido y no acumula presión.
1. Asegúrese de haber girado el interruptor de liberación de
presión a la posición "CERRAR".
2. La junta de silicona no está colocada correctamente en el
borde de la tapa. Detenga el proceso de cocción, realice una
Liberación rápida hasta que se libere todo el vapor / presión,
apague y desenchufe el Duet y luego retire con cuidado la
tapa. Permita que la tapa y la junta se enfríen. Presione hacia
abajo la junta de silicona en la ranura de la tapa, alrededor
de todo. Debe poder tirar ligeramente de la junta mientras
gira. Consulte Limpieza y extracción de la junta de silicona de
la tapa de la olla a presión en Limpieza y mantenimiento.
¿Cuánto tiempo tarda el Dueto en liberar la presión?
La liberación natural puede tomar 20 minutos o más dependiendo
de los alimentos e ingredientes. Para el lanzamiento rápido, puede
tomar 2 minutos o más dependiendo de los alimentos y
los ingredientes.
Se visualiza el código de error LID y el Duet no está cocinando.
1. Se está utilizando la tapa incorrecta para la función de cocción
especíca. Coloque la tapa correcta en el dueto.
2. La tapa no está correctamente colocada en el dueto. Asegúrese
de que la tapa esté correctamente colocada. La tapa de la olla a
presión no está bien colocada y no está bloqueada. Asegúrese de
que la tapa esté en su lugar y se muestre el icono de bloqueo.
3. Si la tapa correcta está en el Duet y está correctamente colocada
(o bloqueada) y aún se muestra el LID de error, apáguelo,
desenchufe el Duet y comuníquese con el Servicio al Cliente.
Aparece el código de error POT y el Duet no está cocinando.
La olla no fue colocada o no está en el Duet correctamente. Coloque
la olla en el Duet antes de cocinar. Asegúrate de que la olla esté
colocada en Duet correctamente.
nuwavenow.com
83
SPANISH
nuwavenow.com
83
Se muestra el código de error Er1 y el Duet no está cocinando.
Apague el Duet y desenchúfela para enfriarla. Si aún no funciona
después de enfriar y se enciende, comuníquese con el Servicio
al Cliente.
Se muestra el código de error Er2 y el Duet no está cocinando.
Temperatura de cocción a presión sobre 340F.
Se muestra el código de error Er3 y el Duet no está cocinando.
Cuando cocine a presión, la presión es superior a 50 kPa. Apague
y deje que se enfríe completamente. Encienda de nuevo. Si aún no
funciona, póngase en contacto con el Servicio al Cliente.
Se muestra el código de error Err1 y el Duet no está cocinando.
Sensor de temperatura Cortocircuito. Contactar Servicio al Cliente.
Se muestra el código de error Err2 y el Duet no está cocinando.
El sensor de temperatura está abierto. Contactar Servicio al Cliente.
Se muestra el código de error Err5 y el Duet no está cocinando.
El Duet tiene un sensor de presión defectuoso. Contactar Servicio
al Cliente.
Se muestra el código de error Err6 y el Duet no está cocinando.
El Duet tiene un sensor de ALTA presión defectuoso. Contactar
Servicio al Cliente.
Se muestra el código de error Err7 y el Duet no está cocinando.
El Duet tiene un sensor de baja presión defectuoso. Contactar
Servicio al Cliente.
El Duet no se enciende ni funciona.
El Duet no está enchufado.
La Cesta Antiadherente para Freír no está en el Duet. La olla y el
difusor internos de acero inoxidable no están en el dueto. Inserte el
enchufe en una toma de corriente con conexión a tierra adecuada.
Coloque la Cesta Antiadherente para Freír en el Duet. Coloque la
Cacerola Interior de Acero Inoxidable en el Duet antes de colocar la
Cesta.
SOLUCIÓN DE PROBLEMAS DE AIR FRY
guía de resolución de problemas
8484
GUÍA DE RESOLUCIÓN DE PROBLEMAS
Los ingredientes fritos en la Cesta Antiadherente para Freír no
están completamente cocinados.
Se usaron demasiados ingredientes. La temperatura de cocción es
demasiado baja.
El tiempo de cocción es muy corto.
Retire algunos ingredientes de la Cesta Antiadherente para Freír;
lotes más pequeños se fríen al aire de manera más uniforme.
Cocine a una temperatura más alta. Configure el Duet para freír
durante más tiempo.
No se puede colocar la Tapa para Freír con Aire correctamente.
La Cesta Antiaderente para Freír se ha llenado en exceso. La
Cesta Antiaderente para Freír no se coloca correctamente en la
Cacerola Interior de Acero Inoxidable.
No llene la Cesta Antiaderente para Freír más de 4/5 por completo.
Coloque la Cesta Antiaderente para Freír en la Cacerola Interior de
Acero Inoxidable correctamente, de modo que el borde de la Cesta
quede completamente dentro de la Cacerola Interior.
La comida se fríe de manera desigual.
Ciertos tipos de ingredientes deben agitarse a la mitad del tiempo
de cocción.
Los ingredientes que están en la parte superior deben agitarse a la
mitad del tiempo de cocción.
Los bocadillos fritos no son crujientes cuando salen del Duet.
Usaste un tipo de refrigerio para preparar en una
freidora tradicional.
Use refrigerios diseñados para hornearse en un horno tradicional,
o aplique un poco de aceite de oliva sobre los refrigerios antes de
colocarlos en el Duet para obtener un resultado más crujiente.
El Duet no se enciende ni funciona.
El Duet no está enchufado.
La Cesta Antiadherente para Freír no está en el Duet. La olla y el
difusor internos de acero inoxidable no están en el dueto. Inserte el
enchufe en una toma de corriente con conexión a tierra adecuada.
Coloque la Cesta Antiadherente para Freír en el Duet. Coloque la
Cacerola Interior de Acero Inoxidable en el Duet antes de colocar la
Cesta.
nuwavenow.com
85
SPANISH
nuwavenow.com
85
Los ingredientes fritos en la Cesta Antiadherente para Freír no
están completamente cocinados.
Se usaron demasiados ingredientes. La temperatura de cocción es
demasiado baja.
El tiempo de cocción es muy corto.
Retire algunos ingredientes de la Cesta Antiadherente para Freír;
lotes más pequeños se fríen al aire de manera más uniforme.
Cocine a una temperatura más alta. Configure el Duet para freír
durante más tiempo.
No se puede colocar la Tapa para Freír con Aire correctamente.
La Cesta Antiaderente para Freír se ha llenado en exceso. La
Cesta Antiaderente para Freír no se coloca correctamente en la
Cacerola Interior de Acero Inoxidable.
No llene la Cesta Antiaderente para Freír más de 4/5 por completo.
Coloque la Cesta Antiaderente para Freír en la Cacerola Interior de
Acero Inoxidable correctamente, de modo que el borde de la Cesta
quede completamente dentro de la Cacerola Interior.
La comida se fríe de manera desigual.
Ciertos tipos de ingredientes deben agitarse a la mitad del tiempo
de cocción.
Los ingredientes que están en la parte superior deben agitarse a la
mitad del tiempo de cocción.
Los bocadillos fritos no son crujientes cuando salen del Duet.
Usaste un tipo de refrigerio para preparar en una
freidora tradicional.
Use refrigerios diseñados para hornearse en un horno tradicional,
o aplique un poco de aceite de oliva sobre los refrigerios antes de
colocarlos en el Duet para obtener un resultado más crujiente.
Sale humo blanco del producto.
Estás friendo alimentos grasosos. La Cesta Antiaderente para Freír
y Cacerola Interior de Acero Inoxidable contienen residuos grasos de
usos anteriores.
Al preparar ingredientes grasientos en el Duet, se pueden salir
grandes cantidades de humo de aceite e infiltrarse en la cesta de
freír o en la olla interior. El aceite producirá humo blanco y la cesta
de freír o la olla interior podrían calentarse más de lo normal. Esto no
afectará el resultado final de la cocción. El humo blanco es causado
por el calentamiento de la grasa en la cesta de freír con aire o en la
cacerola interior. Asegúrese de limpiar la cesta de freír y la cacerola
interior correctamente después de su uso.
guía de resolución de problemas
8686
GUÍA DE RESOLUCIÓN DE PROBLEMAS
El Duet muestra el código de error LID y no está cocinando.
1. Se está utilizando la tapa incorrecta para una función de cocción
especíca. Coloque la tapa correcta en el Duet.
2. La tapa no está colocada correctamente en el Duet. Asegúrese
de que la tapa esté correctamente en su lugar.
3. Si la tapa correcta está en el Duet y correctamente colocada
(o bloqueada) y aún se muestra la TAPA del error, APAGUE,
desenchufe el Duet y comuníquese con el Servicio al cliente.
El Duet muestra el código de error POT y no está cocinando.
La olla no se colocó o no está en el Duet correctamente. Coloque
la olla en el Duet antes de cocinar. Asegúrate de que la olla esté
colocada en el Duet correctamente.
El Duet muestra el código de error Er1 y no está cocinando.
Apague el Duet y desenchúfela para que se enfríe. Si aún no
funciona después de enfriar y encender, comuníquese con el
Servicio al cliente.
El Duet muestra el código de error Err1 y no está cocinando.
Sensor de temperatura Cortocircuito. Contactar Servicio al Cliente.
Las papas fritas se fríen de manera desigual en el Duet.
No remojaste los palitos de papa correctamente antes de freírlos
al aire.
No usaste el tipo correcto de papa o no eran frescas.
Remoje los palitos de papa en un recipiente con agua durante al
menos 30 minutos, retírelos y séquelos con toallas de papel. Use
papas frescas y asegúrese de que se mantengan firmes durante
la fritura.
Las papas fritas no son crujientes cuando salen del Duet.
El crujiente de las papas fritas depende de la cantidad de aceite y
agua en las papas fritas.
Asegúrese de secar los palitos de papa correctamente antes de
agregar aceite. Corte los palitos de papa más pequeños y séquelos
para obtener un resultado más crujiente. Agregue un poco más de
aceite a las papas antes de colocarlas en el Duet para obtener un
resultado más crujiente..
Si el Duet necesita ser reemplazada o devuelta al fabricante,
comuníquese con el Departamento de Servicio al Cliente al:
1-877-689-2838 o help@nuwavenow.com.

nuwavenow.com
87
SPANISH
nuwavenow.com
87
La NuWave Duet
®
EL FABRICANTE GARANTIZA
La Duet, Tapa para Freir con Aire, Tapa de la Olla de
Presión, Rejilla Reversible Multiusos, Cesta de Acero
Inoxidable para Freír con Aire, Parrilla/Plancha, Rejilla para
Costillas, Cacerola Interior de Acero Inoxidable, Bandeja
de Recolección de Agua, Soporte de la Tapa, Empaque
de Silicón, Guantes Negros de Silicón, y Tapa de Cocción
Lenta están libres de defectos de fabricación.
Todos los componentes eléctricos tienen una garantía de 1
año a partir de la fecha de compra, en uso doméstico normal y
siempre y cuando se utilicen de acuerdo con las instrucciones
escritas del fabricante. El fabricante proporcionará las piezas
y la mano de obra necesarias para reparar cualquier parte
del Duet en el Departamento de Servicio de NuWave LLC.
Después del vencimiento de la garantía, el costo de la mano
de obra y las piezas será responsabilidad del propietario.
LA GARANTÍA NO CUBRE
La garantía limitada se anula si las reparaciones son
realizadas por un distribuidor no autorizado o si la placa de
datos del número de serie se retira o borra. Esta garantía
no cubre el deterioro normal del acabado debido al uso o
la exposición. Esta garantía limitada no cubre fallas, daños
o un desempeño inadecuado debido a un accidente, actos
de Dios (como rayos), uctuaciones en la energía eléctrica,
alteraciones, abuso, mal uso, aplicaciones incorrectas,
atmósferas de tipo corrosivo, instalación incorrecta, falta de
funcionamiento de acuerdo con las instrucciones escritas del
fabricante, uso anormal o uso comercial. NuWave LLC se
reserva el derecho de anular la Garantía Limitada, según lo
permita la ley, para los productos adquiridos a través de un
distribuidor no autorizado.

garantía limitada
88
GARANTÍA LIMITADA
88
OBTENER SERVICIO
El propietario tendrá la obligación y la responsabilidad de:
pagar por todos los servicios y piezas no cubiertos por la
garantía; prepagar el ete hacia y desde el Departamento
de Servicio para cualquier parte o sistema devuelto bajo
esta garantía; y empacar cuidadosamente el producto con
materialde relleno adecuado para evitar daños durante el
transporte.El envase original es ideal para este propósito.
Incluya en el paquete el nombre del propietario, la dirección, el
número de teléfono durante el día, una descripción detallada
del problema y su “número RGA”. (Llame al 1-877-689-2838)
o envíe un correo electrónico a help@nuwavenow.com
para obtener el número RGA (Número de autorización de
devolución de mercancías). Proporcione el modelo del sistema
de cocción y el número de serie y el comprobante de la fecha
de compra (una copia del recibo) al realizar reclamaciones
bajo esta garantía.
OBLIGACIÓN DEL FABRICANTE
La obligación del fabricante en virtud de esta Garantía
Limitada se limita, en la medida en que lo permita la ley,
a reparar o reemplazar cualquier pieza cubierta por esta
Garantía Limitada que, al examinarla, se encuentre defectuosa
en el uso normal. La Garantía Limitada se aplica solo dentro
de los Estados Unidos continentales y solo al comprador
original de los canales de distribución
autorizados por el fabricante. LA GARANTÍA LIMITADA
NO PUEDE SER ALTERADA, VARIADA O EXTENDIDA,
EXCEPTO POR UN INSTRUMENTO ESCRITO EJECUTADO
POR EL FABRICANTE. EL RECHAZO DE REPARACIÓN
O REEMPLAZO SEGÚN LO PROPORCIONADO POR
ESTA GARANTÍA LIMITADA ES EXCLUSIVO. EN NINGÚN
CASO, EL FABRICANTE SERÁ RESPONSABLE DE
CUALQUIER DAÑO CONSECUENTE O INCIDENTAL A
CUALQUIER PERSONA, SEA O NO OCASIONADO POR
LA NEGLIGENCIA DEL FABRICANTE, INCLUIDOS, SIN
LIMITACIÓN, DAÑOS POR PÉRDIDA DE USO, COSTOS DE
SUSTITUCIÓN, DAÑO A LA PROPIEDAD U OTRA PÉRDIDA
DE DINERO.

nuwavenow.com
89
SPANISH
nuwavenow.com
89
Algunos estados no permiten la exclusión o limitación de
daños incidentales o consecuentes, por lo que es posible
que no se apliquen las exclusiones de limitación anteriores.
Esta Garantía Limitada otorga derechos legales especícos,
y también puede haber otros derechos que varían de
estado a estado. EXCEPTO OTRAS MANERAS QUE
EXPRESAMENTE SE PROPORCIONAN
ANTERIORMENTE, EL FABRICANTE NO HACE
GARANTÍAS EXPRESAS O IMPLÍCITAS DE LA LEY O
DE OTRA MANERA, INCLUYENDO SIN LIMITACIONES,
LAS GARANTÍAS IMPLÍCITAS DE COMERCIALIZACIÓN
Y EJERCICIO PARA UN PROPÓSITO PARTICULAR A
CUALQUIER OTRA PERSONA. LEA EL MANUAL DEL
USUARIO. SI TUVIERA ALGUNA DUDA SOBRE EL
FUNCIONAMIENTO O LA GARANTÍA DEL PRODUCTO,
CONTACTE A NUWAVE LLC.
PROCEDIMIENTO DE RESOLUCIÓN DE CONTROVERSIAS.
Para disputas relacionadas con el uso del sitio web o el uso o
la compra de un producto o servicio NuWave (colectivamente
“Disputas”), usted acepta comunicarse primero con NuWave
LLC al (877) 689-2838 (teléfono), (847) 367-5486 ( facsímil) o
legal@nuwavenow.com (correo electrónico). Si no podemos
resolver su disputa de manera informal, todas las disputas se
someterán a un arbitraje nal y vinculante. Puede comenzar
el proceso de arbitraje enviando una solicitud por escrito
a la Asociación Americana de Arbitraje (“AAA”) y enviando
una copia a NuWave. NuWave pagará todos los costos de
presentación. Un solo árbitro de la AAA llevará a cabo el
arbitraje en un lugar conveniente para usted o por teléfono.
El laudo del árbitro será vinculante y podrá presentarse como
un fallo en un tribunal de jurisdicción competente. El arbitraje
se llevará a cabo de conformidad con las disposiciones de las
Reglas de arbitraje comercial de AAA y los Procedimientos de
mediación vigentes en el momento de la presentación de su
solicitud de arbitraje. Ver https://www.adr.org/sites/default/les/
CommercialRules_Web.pdf. Salvo que lo exija la ley según lo
determine un árbitro, ninguna de las partes o el árbitro puede
revelar la existencia, el contenido o los resultados de cualquier
arbitraje a continuación sin el consentimiento previo por escrito
de ambas partes.

garantía limitada
90
GARANTÍA LIMITADA
90
A. RENUNCIA DE DERECHO A DEMANDAR. Al aceptar el
arbitraje, comprende que, en la medida máxima permitida
por la ley, acepta renunciar a su derecho a presentar una
demanda en cualquier tribunal, a una audiencia judicial, un
juicio con jueces y un juicio con jurado.
B. RENUNCIA A LA ACCIÓN DE CLASE. En la medida
máxima permitida por la ley, usted acepta expresamente
abstenerse de presentar o unirse a cualquier reclamo en
cualquier capacidad representativa o de toda la clase,
incluyendo, entre otros, presentar o unir cualquier reclamo en
cualquier acción de clase o arbitraje de clase.
C. PROCEDIMIENTO DE SALIDA. Para optar por no participar
en el arbitraje, debe comunicarse con NuWave. Para solicitar
la exclusión voluntaria del arbitraje, contáctenos en legal@
nuwavenow.com (correo electrónico), NuWave LLC, 560 Bunker
Ct., Vernon Hills, IL 60061, EE. UU., (847) 367-5486 (fax) o
(877) 689 -2838 o (224) 206-3019 (teléfono). Tendrá treinta
(30) días a partir de la fecha de entrega del producto para optar
por el arbitraje con respecto a cualquier disputa que surja o
esté relacionada con el uso o la compra de cualquier producto
NuWave. Si han pasado más de 30 días, no es elegible para
optar por no participar en el arbitraje y habrá renunciado a su
derecho de demandar o participar en una demanda colectiva
con respecto a la disputa que surge de su compra o uso de un
producto NuWave. Para cualquier disputa que surja de su uso
del sitio web de NuWave, tiene treinta (30) días a partir de la
fecha en que proporcionó información al sitio web para optar
por no participar en el arbitraje. Si han pasado más de 30 días,
no es elegible para optar por no participar en el arbitraje y habrá
renunciado a su derecho de demandar y participar en una
demanda colectiva con respecto a la disputa que surge del uso
del sitio web de NuWave.

nuwavenow.com
91
SPANISH
nuwavenow.com
91
D. ALGUNOS ASUNTOS NO ESTÁN SUJETOS A
ARBITRAJE. Sin perjuicio de lo anterior, lo siguiente no
estará sujeto a arbitraje y podrá ser juzgado solo en los
tribunales estatales y federales de Illinois: (i) cualquier
disputa, controversia o reclamo relacionado o que impugne
la validez de nuestros derechos de propiedad intelectual y
derechos de propiedad , incluidas, entre otras, patentes,
marcas comerciales, marcas de servicio, derechos de autor
o secretos comerciales; (ii) una acción de una parte para
una medida cautelar temporal, preliminar o permanente,
ya sea prohibitiva u obligatoria, u otra medida provisional;
o (iii) interacciones con autoridades gubernamentales
y reguladoras. Usted acepta expresamente abstenerse
de presentar o unirse a cualquier reclamo en cualquier
capacidad representativa o de toda la clase, incluyendo,
entre otros, presentar o unir cualquier reclamo en cualquier
acción de clase o cualquier arbitraje de clase.
LEA EL MANUAL DE SU PROPIETARIO
Si aún tiene preguntas sobre el funcionamiento o la garantía
del producto, comuníquese con NuWave LLC al:
1-877-689-2838 o envíe un correo electrónico a
help@nuwavenow.com.
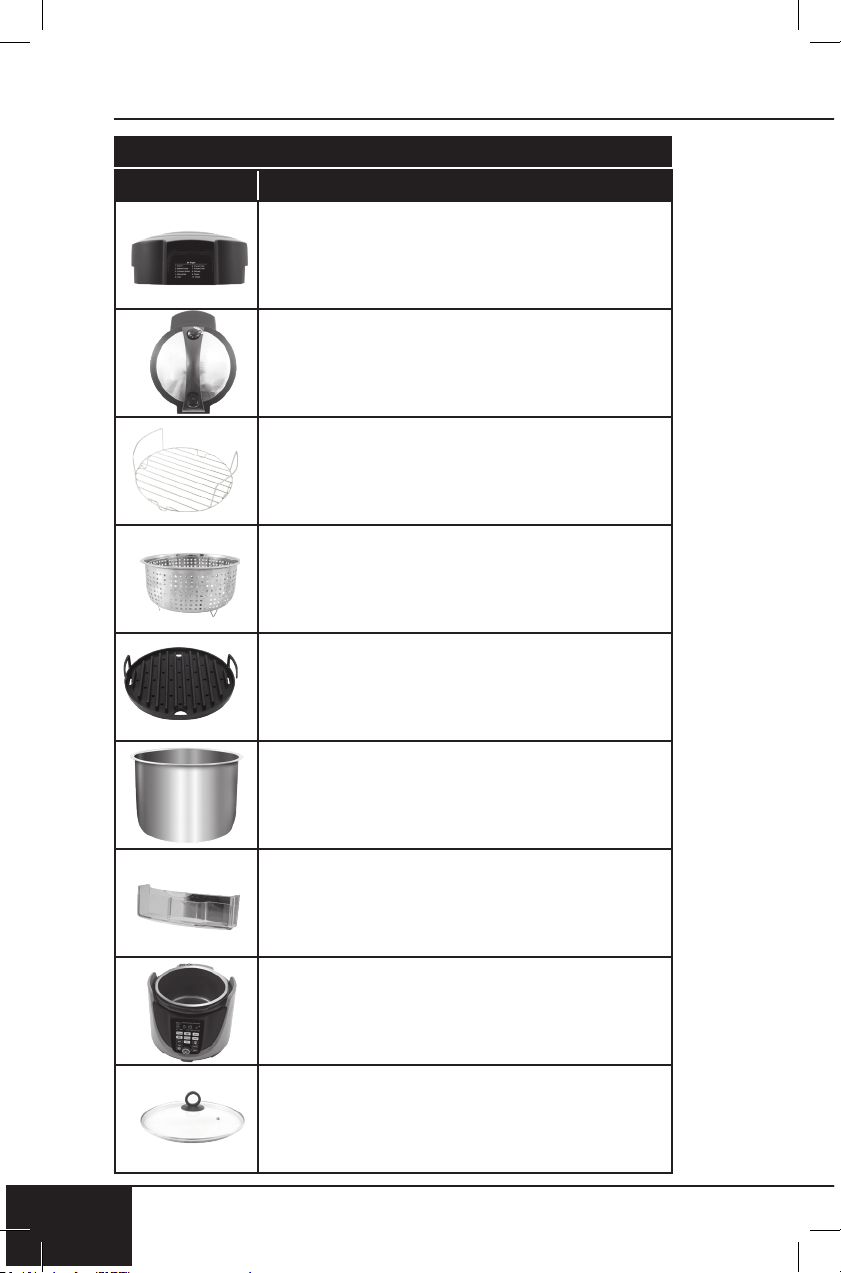
Part Name
Part Description Part No.
replaceable parts
92
REPLACEABLE PARTS
92
To order replaceable parts head over to NuWaveNow.com
Air Fryer Lid
PRESSURE Lid
Multipurpose Reversible Rack
Stainless-steel Air Fry Basket
Stainless-steel Inner Pot
Water-Collection Tray
Duet
®
Base
Grill/Griddle Plate
Slow Cook Lid

Part Name
Part Description Part No.
nuwavenow.com
93
REPLACEABLE PARTS
nuwavenow.com
93
34805
34839
34834
34818
34803
34804
DUE-A31
Used on top of Duet when air-frying foods.
Used on top of Duet when pressure-
cooking foods.
Provides high or low positioning of food items
in Duet, during pressure-cooking or air-frying.
Fits inside Stainless-steel Inner Pot.
Removable basket helps crisp up foods
when air-frying.
Used to place food items in when
PRESSURE. Includes ll lines for proper
measurement of food and liquids.
Removable tray on outside of Duet
collects excess liquid created by steam
when pressure-cooking. Allows easy
removal of water.
Contact Customer Service for more
information or repair: 1-877-689-2838 or
help@nuwavenow.com.
34833
Fits into the Multipurpose Reversible Rack.
Use as griddle or grill when ipped.
34838
Tempered Vented Glass Lid for slow-cooking
and keeping food warm.

replaceable parts
94
REPLACEABLE PARTS
94
Part Name Part Description Part No.
To order replaceable parts head over to NuWaveNow.com
Pressure Indicator Valve
Pressure Release Valve
Food Blocking Cap
Silicone Gasket
Start/Pause
Silicone Valve Gasket
Lid Holder
nuwavenow.com
95
REPLACEABLE PARTS
nuwavenow.com
95
Part Name Part Description Part No.
34809
34810
34811
34812
34813
34814
Located in the Lid, protrudes or lowers to
indicate pressure levels inside the Duet.
When up, pressure has built; when down,
there is not sufcient or no pressure.
Under the Lid, attaches the Pressure
Indicator Valve to the underneath of Lid.
Located on top of Lid, releases and
encloses pressure within the Duet.
Prevents food and debris from entering
PRESSURE components from underneath
the Lid.
Under the rim of the PRESSURE Lid.
Provides an airtight seal between the Lid
and Base when pressure-cooking.
On the control panel, adjusts temperature
and time, and all functions and begins
cooking process (button).
34815
Holds the Air Fryer Lid upright and off
of surfaces.
Print No: BM33851
Rev. 05-OG
12-10-20
PC01 DV01
FOR HOUSEHOLD USE ONLY
Model: 33851
Rev. 1
120V, 60Hz, 1500 Watts
For patent information please go to:
www.nuwavenow.com/legal/patent
Designed & Developed in USA by:
NuWave LLC
560 Bunker Ct.
Vernon Hills, IL 60061, U.S.A.
Customer Service:
1-877-689-2838 • help@nuwavenow.com
Made in China
©2020 NuWave LLC • All Rights Reserved.
nuwavenow.com