User manual Air Conditioner
Parts and Features
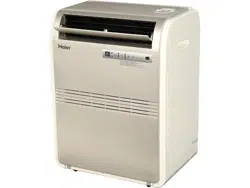
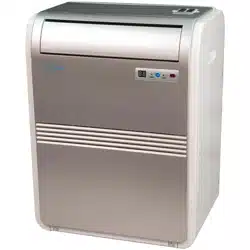
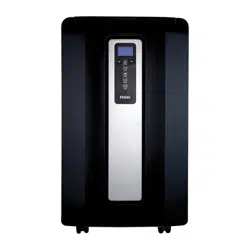
Front
-311458.png)
1. Control Panel
2. Air Outlet (To be opened manually)
3. Handle Hole
4. Caster
5. Air Filter
6. Air Outlet (Heat Exhaust)
7. Air Intake (Condenser)
8. Remote Control Storage Facility
9. Water Outlet Drain (Note : Please ensure if the water outlet drain is well installed before use.)
10. Power Supply Cord
-616620.png)
- TEST: WHEN THIS BUTTON IS PRESSED OR WHEN THERE IS A CURRENT LEAK, THE INDICATOR LIGHT WILL TURN OFF AND THE UNIT WILL NOT RUN.
- RESET: AFTER SOLVING THE PROBLEM, PLEASE PRESS THE BUTTON AND THE UNIT WILL START OPERATING.
Rear
-925438.png)
Note: Please manually open the air outlet (Item 2) to desired position.
Assembly and Installation
Accessories Include
-476382.png)
- Main window panel and extension panels - extends from 20" up to 46".................3 pieces
- Exhaust nozzle..................................1 piece
- Screws............................................8 pieces
- Exhaust hose....................................1 piece
- Cover.............................................1 piece
- Foam..............................................2 pieces
- Hose connector.................................1 piece
-524097.png)
-40935.png)
- Connect the 3 pieces of the window panels by sliding the 2 extension panels into the main window panel.
- Apply a foam strip to the end of each extension panel.
- Open the window and place the window panel assembly into the window. Adjust the extension panels to fit the width or height of the window as shown below (see figure A). Secure the extension panels using 4 blunt tip screws (see figure B-l). Secure the main window panel using 4 pointed screws (see figure B-2 and B-3).
- Expand the 2 ends of the exhaust hose. Connect the hose connector to one end of the exhaust hose by turning clockwise. Then insert the exhaust nozzle at the other end of the exhaust hose by turning clockwise (see figure C) to create the hose assembly.
- lnsert the hose connector end of the hose assembly into the rear of the unit and turn clockwise to secure (see figure D).
- lnsert the exhaust hose with nozzle end into the window panel(see figure E).
- Plug the power cord into the wall outlet and press the "Reset"button.
- Please allow 8" of space around the unit for proper air circulation.
- When removing the portable air conditioner for storage, the window panel may be left in place. Simply place the cover over the nozzle hole (see figure A).
-786272.png)
Operation
Control Panel
-217350.png)
Power Control -134204.png)
The power control turns the unit on and off.
Warning Light -638194.png)
Condensed water may accumulate in the unit. If the internal tank becomes full, the warning light will light up and the unit will not operate until the unit has been drained.
Mode Control
The Mode Control has three settings:
Cool • Dehumidify • Fan
The settings are adjusted with Mode Control button. A light will indicate which setting is currently being used.
Cooling Mode
When cool mode is selected, the indicator light turns blue. During the cooling mode the air is cooled and hot air is exhausted to the outside through the exhaust tube. Adjust fan speed and air temperature to suit your desired comfort level.
Note:The air exchange hoses must vent outside the room when using cool mode.
Dehumidify Mode
When dehumidify mode is selected, the indicator light turns yellow. Air is dehumidified as it passes through the unit, without being in full cooling mode. If room temperature is higher than 77 degree Fahrenheit, fan speed can be adjusted; otherwise fan speed is fixed to " Low ".
Note:If the unit is to be used as a dehumidifier, do not connect the exhaust hose let the warm air return to the room. Continuous drainage is then necessary.
Fan Mode
When fan mode is selected the indicator light will shine green. Air is circulated throughout the room with no cooling.
Note: unit does not need to be vented in Fan mode
Fan Speed Control
The Fan Speed Control has 3 settings: High, Medium, and low.
Timer
With machine in running mode, press timer button to Select number of hours you would like the unit to run in air conditioning mode until it automatically shuts off.
With machine in stand by mode, press timer button to Select number of hours until you would like the unit to automatically start running in air conditioning mode.
Timer / Temp set controls
- Used for adjusting the timer and thermostat.
- The default display is room temperature.
- In cooling mode, when “^” or "v" button is pressed, the set temperature is displayed and may be adjusted. After 15 seconds the display will revert back to room temperature. Temperature is only adjustable in cool mode. The time is adjustable between 1 ~24 hours.
Note: By pressing both Timer/ Temp set buttons at the same time, the display will toggle between Celsius and Fahrenheit.
After switching the air conditioner off, you must wait 3 minutes before switching it back on again.
Remote Control
-141187.png)
Power Control
The power control turns the unit on and off.
Mode Control
There are 3 models of Operations: "Cool" (When unit is cooling), "Dehumidify", and "Fan" (only Fan running). A mode Indicator light on the unit control panel shows the following colors: Blue for "Cool" mode; Orange for "Dehumidify", and Green for "Fan".
The unit will start in "Cool" mode with a Blue Indicator light. Once you press the "Mode" button on the remote, it will change to "Dehumidify" mode. Press the "Mode" button again to get "Fan" mode.
It goes back to the "Cool" mode once the "Mode" button is pressed again.
Note: When you press "Up" and "Down" buttons and there is no response, please press the "Mode" button until the unit indicator light is Blue ("Cool"), you can then adjust the temperature accordingly. •
During the cooling mode the air is cooled and hot air is exhausted to the outside air through the air exhaust hose. Adjust fan speed and temperature to suit your desired comfort level. Note: The air exchange hoses must vent outside the room when using Cool Mode.
Air is dehumidified as it passes through air conditioner, without being in full cooling mode. If room temperature is greater than 77°F, fan speed can be adjusted; otherwise fan speed is fixed to "low."
Air is circulating throughout the room with no cooling.
Note: Unit does not need to be vented in Fan Mode.
Fan Speed Control
The Fan Speed Control has 3 settings: High, Medium and Low.
Temp Set Controls
Press "Up" or "Down" to set temperature. The setting range is from 61°F to 89°F.
Note: When using Dehumidify or Fan Mode, temperature setting button is invalid.
Timer Setting Control
- When you use the timer setting button while the unit is operating, you can preset a time for the unit to turn off.
- When you use the timer setting button while the unit is on standby, you can present a time for the unit to turn on.
- If you press the "ON/OFF" button, the preset timer function will be cancelled.
- Timer setting range is 1 ~24 hours.
Care and Cleaning Guide
- Always unplug your air conditioner before cleaning.
- Air filter needs to be cleaned at least once a week for your unit to operate at optimum efficiency. Slide out the filter from the back by pulling on the tab. The filter may be washed or vacuumed. Remove the excess water from the filter by gently shaking the filter. This will remove dust and particles trapped in the filter. After cleaning, reinstall the filter. DO NOT use your air conditioner without the air filter in place.
- To clean the cabinet, DO NOT use harsh chemicals, abrasives, ammonia, chlorine, bleach, concentrated detergents, solvents or metal scouring pads. Some of these chemicals may dissolve, damage and/or discolor your air conditioner.
- Always use a soft cloth dampened with water or a mild soap and water solution to wipe the front of the cabinet. Wipe dry with a soft cloth.
Storage
- To store your air conditioner when not in use for a long period of time, drain condensed water using the drain pipe. Remove exhaust hose, clean the filters, cover with plastic bag and store.
Troubleshooting
If air conditioner does not operate:
- Check if unit is plugged in. The plug may have come loose.
- Press "Reset" button on the plug to resume operation.
- Check if the electrical wall receptacle is of proper voltage.
- Check if the circuit breaker needs to be reset or if the fuse needs to be replaced.
- Check if the unit is in "Off" mode.
- If the warning light is on, drain the water drain pipe by removing the plug.
Air conditioner is working but room is not cooling:
- Room may have appliances that produce heat. Use an exhaust fan to remove excess heat.
- Check exhaust hose for proper installation.
- Redirect the airflow. Remove any obstacles.
- All doors and windows need to be closed so that cool air does not escape the room.
- Air filter may be blocked or may need cleaning.
- Unit BTU may be too low for the required cooling area.
- On extremely hot & humid days, air conditioners may take a little longer to cool.
- Drain the water drain pipe by removing the plug.
- Unit may be in fan or dry mode. Put air conditioner in cool mode.
SAFETY PRECAUTIONS
WARNING; Following these basic precautions will reduce the risk of fire, electrical shock, injury or death when using your air conditioner,
- Air conditioner must be connected to proper electrical outlet with the correct electrical supply, (see table previous page)
- Proper grounding must be ensured to reduce the risk of shock and fire. DO NOT CUT OR REMOVE THE GROUNDING PRONG. If you do not have a three-prong electric receptacle outlet in the wall, have a certified electrician install the proper receptacle. The wall receptacle MUST be properly grounded.
- Do not operate air conditioner if power cord is frayed or otherwise damaged. Also avoid using it if there are cracks or abrasion damage along the length or plug connector or if the unit malfunctions or is damaged in any manner. Contact an authorized service for examination, repairs or adjustments.
- DO NOT USE AN ADAPTER OR AN EXTENSION CORD.
- Do not block airflow around the air conditioner. Also, the exhaust hose should be free of any obstructions.
- Always unplug the air conditioner before servicing it or moving it.
- Do not install or use the air conditioner in any area where the atmosphere contains combustible gases or where the atmosphere is oily or sulphurous. Avoid any chemicals coming in contact with your air conditioner.
- Do not place any object on the top of the unit.
- Never operate the air conditioner without the filters in place.
- Do not use the air conditioner near a bathtub, shower or wash basin.
Important Instructions
- Please keep this manual in a safe place.
- Do not use liquid or a spray to clean this product. Use a damp cloth.
- Do not place the product on an unstable surface or elevated place as it may fall and cause damage or injury.
- Never spill liquid on the control panel; it may cause electrical shock to the electronic parts inside and disable them or cause them to function improperly.
- Never try to dismantle the product by yourself. Unsupervised dismantling and incorrect reassembly of the inside of the back cover may damage the electrical circuit and affect its performance. When maintenance is required, please contact the local service center or local distributor.