
1Section Title
User Manual
Tovala Smart Oven Pro

2Table of Contents
Important Safety Instructions
Power Supply Cord Set Instructions
Setting up your Tovala Oven
In the box
Before first use of your oven/safeguards
How do I unpack and set up my oven?
Connecting your oven to WiFi
WiFi troubleshooting
What can I do with the Tovala App?
Cooking with your Tovala Oven
Oven Controls
Mode: Scan
How do I scan a QR code or barcode?
Mode: Bake
How do I preheat my oven?
Mode: Broil
Mode: Reheat
How long should I reheat my food?
Mode: Steam
How do I add water to my oven?
Mode: Toast
Which Toast Level should I use?
Temp
Time
Oven Rack Placement
Table of Contents
Start and Stop
Air Fry
Set custom cook cycles with Automated
Multi-Mode Cooking
What is Automated Multi-Mode Cooking?
Why should I use Automated
Multi-Mode Cooking?
How do I set my oven to Automated
Multi-Mode Cooking?
Chef’s Recipes
Cleaning and maintaining your Tovala Oven
How do I keep my oven clean?
Oven storage and water cleanliness
My oven’s light bulb is out. How do I change it?
Contacting Tovala Customer Support
Warranty
Warnings
3
4
5
5
6
7
10
10
11
12
12
13
13
14
14
15
16
17
18
19
19
20
21
21
22
22
23
24
25
25
26

43 Important Safety InstructionsImportant Safety Instructions
21. Do not store any materials other than the
manufacturer’s recommended accessories in this
oven when not in use.
22. Do not cover crumb tray or any part of the oven with
metal foil. This will cause overheating of the oven.
23. Always wear protective, insulated oven gloves when
inserting or removing items from the hot oven.
24. This appliance has a tempered, safety glass door.
The glass is stronger than ordinary glass and more
resistant to breakage. Tempered glass can still
break around the edges. Avoid scratching the door
surface or nicking the edges.
25. Do not use outdoors.
26. Do not use this appliance for other than its
intended use.
27. Do not immerse the oven into water.
28. This oven is for household use only.
• A short power-supply cord is provided to reduce the
risk resulting from becoming entangled in or tripping
over a longer cord.
• Longer detachable power-supply cords or extension
cords are available and may be used if care is
exercised in their use.
• If a longer detachable power-supply cord or extension
cord is used:
1. The marked electrical rating of the cord set or
extension cord should be at least as great as the
electrical rating of the appliance;
2. The cord should be arranged so that it will not
drape over the countertop or tabletop where
it can be pulled on by children or tripped over
unintentionally; and
3. The cord set or extension cord should be a
grounding-type 3-wire cord.
↑ Save these instructions.
Power Supply Cord Set
Instructions
When using your
Electric Oven
, basic safety
precautions should always be observed,
including the following:
1. Read all instructions.
2. Do not touch hot surfaces. Always use handles or
knobs.
3. Close supervision is necessary when any appliance
is used by or near children.
4. To protect against electric shock, do not immerse
cord, plug or any parts of the oven in water or any
other liquids.
5. Do not let cord hang over edge of table or counter,
or touch hot surfaces.
6. Do not operate an appliance with a damaged cord or
plug or after the appliance malfunctions or has been
damaged in any manner. Return the appliance to the
nearest authorized service facility for examination,
repair or adjustment.
7. The use of accessory attachments not
recommended by the appliance manufacturer may
cause hazard or injury.
8. Do not place on or near a hot gas or electric burner.
9. When operating the oven, keep at least three inches
of free space around the sides and back of the oven
and six inches of free space from the top of the oven
to allow for adequate air circulation.
10. Unplug from outlet when not in use and before
cleaning. Allow to cool before putting on or taking
off parts and before cleaning.
Important Safety Instructions
11. To disconnect, press the Stop button on the oven
control panel, then remove the plug. Always hold the
plug, and never pull the cord.
12. Extreme caution must be used when moving a drip
pan or sheet tray containing hot oil or other hot
liquids.
13. Do not cover any part of the oven with metal foil.
This may cause the oven to overheat.
14. Use extreme caution when removing the tray,
racks, basket, or disposing of hot grease or other
hot liquids.
15. Do not clean the inside of the oven with metal
scouring pads. Pieces can break off the pad and
touch electrical parts, creating a risk of electric
shock.
16. Oversized foods or metal utensils must not be
inserted in a toaster oven as they may create a fire
or an electric shock.
17. A fire may occur if the oven is covered or touching
flammable material, including the curtains,
draperies, walls, and the like, when in operation.
Do not store any item on top of the appliance when
in operation.
18. Extreme cautions should be exercised when using
cooking or baking containers constructed of
anything other than metal or ovenproof glass.
19. Be sure that nothing touches the top or bottom
elements of the oven.
20. Do not place any of the following materials in the
oven: cardboard, plastic, paper or anything similar.
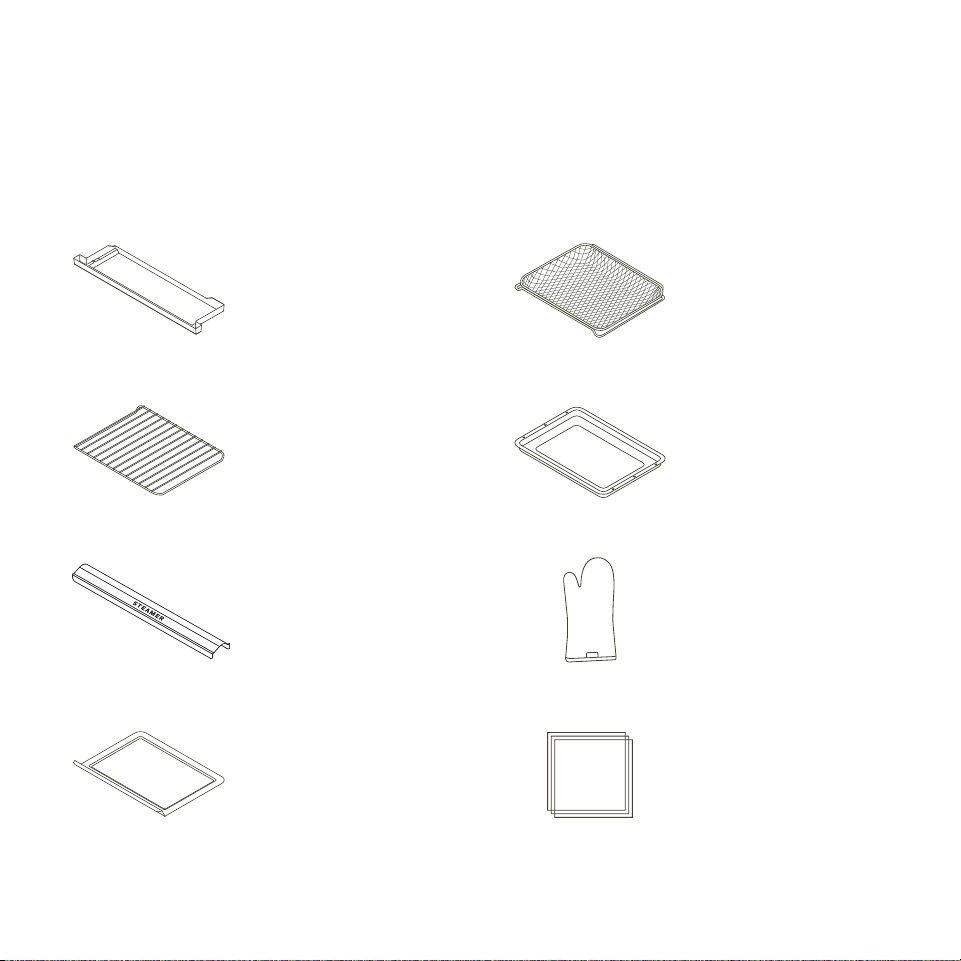
65 Setting up your Tovala OvenSetting up your Tovala Oven
Setting up your Tovala Oven
In the box
Before first use of your oven, you need
to know these important safeguards.
General usage safeguards
• Do not place paper, cardboard, plastic, or any
other materials not suitable for an oven inside this
appliance. Extreme caution should be used when
using a container made from anything other than
metal or glass.
• Your oven will become very hot during and after
cooking. Do not touch hot surfaces. Use only the
handles and buttons.
• Take care when opening your oven’s door, as cooking
causes superheated steam to be released from your
oven’s inner chamber.
• Do not put cooking utensils or cooking dishes on your
opened oven door.
• Do not operate your oven with sealed or airtight
containers inside.
• Do not place oversized foods, metal foil packages, or
utensils in your oven, as they may cause a risk of fire
or electric shock.
• Do not operate your oven if the power cord is
damaged in any way. Email Tovala Customer Support
at support@tovala.com or live chat with Customer
Support at tovala.com/contact.
• Do not let the power cord touch hot surrounding
surfaces.
• Do not try to to adjust or repair your oven yourself.
• Do not remove any screws from your oven for
cleaning or repairs.
• Do not insert any objects in the steam outlets or vents
on the sides of your oven.
• Do not place or use your oven anywhere water may
accidentally splash or come in contact with your oven.
• Do not place any items on top of your oven. A fire may
occur if your oven is covered or touching flammable
material, such as walls, cabinets, curtains, and the
like, when in operation. Do not hang any item on the
oven door handle.
• Do not use your oven outdoors.
• If you hear your oven’s fan running after cooking with
it, do not be alarmed. The fan will continue to run after
cooking until your oven has sufficiently cooled.
• Place your oven 1 to 3 inches from your countertop's
edge, or set back from your countertop's edge at least
8 inches to avoid damage when opening the door.
Cleaning safeguards
• Unplug your oven when not in use and before
cleaning. For cleaning guidelines, see page 22.
• During cleaning, make sure your oven is cool before
touching it or removing its parts.
• Make sure your oven is completely cooled before
emptying the drain tray of water.
Water reservoir safeguards
• Only put tap water in the water reservoir. During
regular use, do not put other liquids in the water
reservoir.
• If your oven is leaking water, do not operate it. Email
Tovala Customer Support at support@tovala.com
or live chat with Customer Support at tovala.com/
contact.
Oven Mitt
Steamer Cover
Crumb Tray
Recipe Cards
& User Manual
Drain Tray Air Fry Basket
Oven Rack
Sheet Tray
87
6 in
3 in
3 in
Lowest Rack Position
Setting up your Tovala OvenSetting up your Tovala Oven
Place your oven on a level and sturdy
surface near a dedicated GFCI outlet. Leave
open space between your oven and any
surface: 3 inches around the back and sides,
and 6 inches from the top.
Remove all plastic and packaging. Throw out
the silica packs found inside your oven.
Be sure to remove the plastic from the
crumb tray (found on the bottom of your
oven’s interior). Then, slide the crumb tray
back into place under the heating elements
and steamer.
01
02
03
04
05
06
07
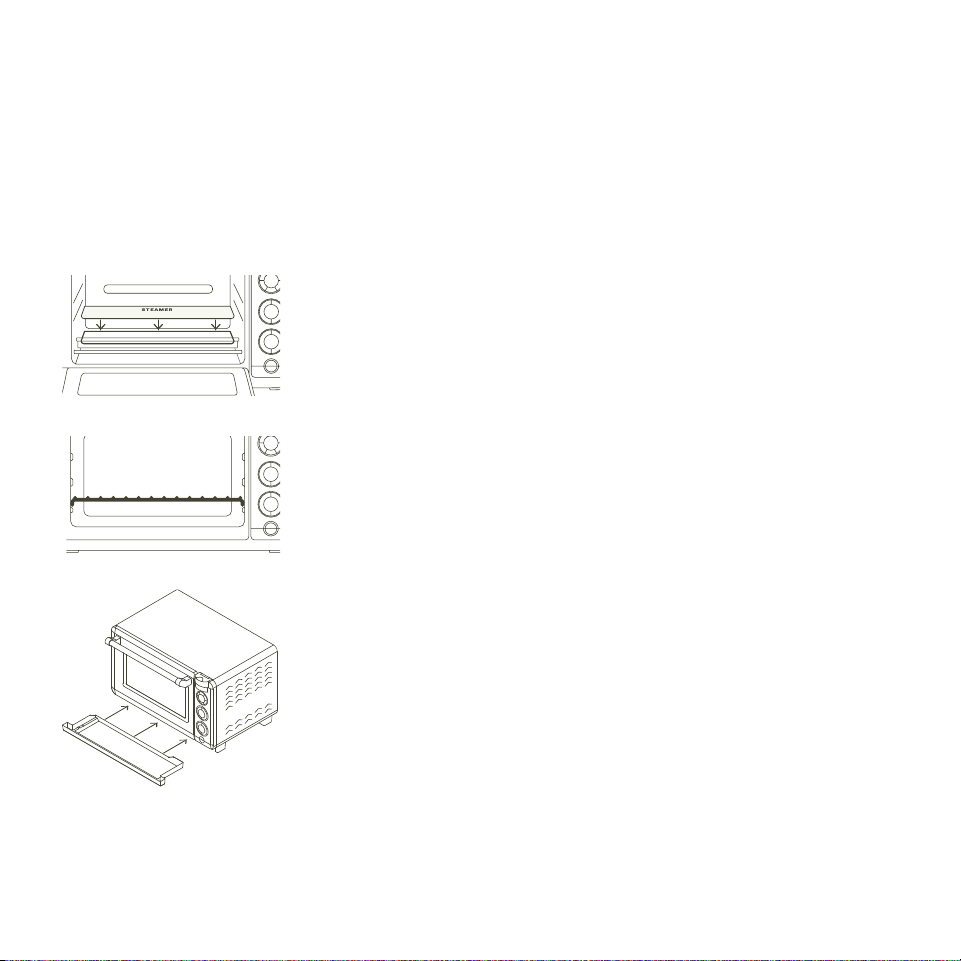
Place the steamer cover on top of the
steamer with the text "STEAMER" facing
you. The steamer is stainless steel and
located inside your oven toward the back wall.
Slide the oven rack into the lowest rack
position, curved edges facing down. Unless
otherwise stated, keep your rack in this
position.
Slide the drain tray underneath your oven
door. The drain tray collects any excess
water when your oven cooks with steam.
Plug your oven into a GFCI outlet. Be sure
that nothing else is plugged into that outlet.
Do not plug your oven into an extension cord
or power strip.
Follow these setup steps
How do I unpack and set up my Tovala Oven?
87
6 in
3 in
3 in
Lowest Rack Position
Setting up your Tovala OvenSetting up your Tovala Oven
Place your oven on a level and sturdy
surface near a dedicated GFCI outlet. Leave
open space between your oven and any
surface: 3 inches around the back and sides,
and 6 inches from the top.
Remove all plastic and packaging. Throw out
the silica packs found inside your oven.
Be sure to remove the plastic from the
crumb tray (found on the bottom of your
oven’s interior). Then, slide the crumb tray
back into place under the heating elements
and steamer.
01
02
03
04
05
06
07
Place the steamer cover on top of the
steamer with the text "STEAMER" facing
you. The steamer is stainless steel and
located inside your oven toward the back wall.
Slide the oven rack into the lowest rack
position, curved edges facing down. Unless
otherwise stated, keep your rack in this
position.
Slide the drain tray underneath your oven
door. The drain tray collects any excess
water when your oven cooks with steam.
Plug your oven into a GFCI outlet. Be sure
that nothing else is plugged into that outlet.
Do not plug your oven into an extension cord
or power strip.
Follow these setup steps
How do I unpack and set up my Tovala Oven?
109 Setting up your Tovala OvenSetting up your Tovala Oven
Having trouble connecting your oven to WiFi?
Check and try the following:
• Make sure the WiFi network you’re trying to connect to is working
properly. Connect your phone to the WiFi network you’re trying to
connect your oven to, then open up a webpage in your phone’s web
browser. If the webpage does not successfully load, there may be an
issue with the WiFi network itself.
• Make sure you selected your WiFi network and type in your WiFi
network’s password correctly. Typos happen to the best of us!
• Make sure the WiFi network you’re trying to connect your oven to is 2.4
GHz, NOT 5 GHz. Your oven cannot connect to 5 GHz networks and will
not be available to connect to them in the app.
• Don’t see your WiFi network but pretty sure it’s 2.4 GHz? Some
networks are hidden and won’t automatically display in the app. In
this case, carefully type in your WiFi network name and password to
connect.
• Your oven will display on the Temp display screen when it is not
connected to WiFi.
Still having trouble connecting your oven to WiFi?
Get answers to common setup questions at tovala.com/setup-help. You
can also email Tovala Customer Support at support@tovala.com or live
chat with Customer Support at tovala.com/contact.
Your oven requires WiFi to scan, cook Tovala Meals, and communicate with
the Tovala App. To connect your oven to WiFi:
• Download the Tovala App from the Apple App Store or Google Play Store
on a compatible phone.
› App Store is a service mark of Apple Inc., registered in the US and other
countries. Google Play is a trademark of Google LLC.
• Log in to your Tovala account or create an account.
• Go to the Settings tab of the app to connect to WiFi.
Connecting your
Tovala Oven to WiFi
WiFi troubleshooting
08
09
10
Pour 1 cup of tap water into the water
reservoir. When you start adding
water, the "Add Water" message will
disappear. Keep pouring until "Add
Water" flashes and your oven beeps.
Download the Tovala App and
connect your oven to WiFi in the
Settings tab. Without WiFi, your
oven won't be able to scan or
communicate with the app.
Before cooking anything, wash the
air fry basket and sheet tray with
warm, soapy water. Rinse and dry
thoroughly then place in the oven
with the sheet tray on the oven rack
and air fry basket in the middle
rack position. Set your oven to Bake
at 450°F for 20:00. During this
cleaning, you may detect smoke or
smell burning. This is normal during
your oven's first use.
You're all set.
Wondering what to make first? Try a
recipe card or any recipe in the app.
Warning: Do not place or use your oven
anywhere water may accidentally splash or
come in contact with it.
Do not place any items on top of your oven.
A fire may occur if your oven is covered or
touching flammable material, such as walls,
cabinets, curtains, and the like, when in
operation.

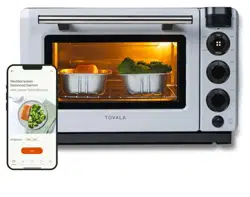
1211 Cooking with your Tovala OvenSetting up your Tovala Oven
Cooking with your
Tovala Oven
Oven Controls
You can operate your oven with its control panel
(pictured here). The control panel has 4 sections.
1. Select the Mode
2. Set a Temp
3. Set a Time (if not preheating)
4. Press Start
You can also set your oven from the Tovala App.
• Use Steam, Bake, and Broil modes separately.
• Or use them together for Automated Multi-Mode
Cooking. See page 21.
Set custom cook cycles with Automated Multi-Mode Cooking
• Your oven can steam, bake, and broil separately and in cook cycles that
switch between multiple of these cooking modes automatically.
• We utilize Automated Multi-Mode Cooking in our Toast and Reheat
modes, when cooking Tovala Meals, and in Chef’s Recipes (recipes
found in the Tovala App you make from scratch). For more on Automated
Multi-Mode Cooking, see page 21.
Cook from a library of Chef’s Recipes
• When you want to cook from scratch, make a Chef’s Recipe. Use the app
to follow our chef’s instructions and then cook these recipes perfectly
without the guesswork.
Order Tovala Meals
• When you don’t have time to cook, get Tovala Meals delivered to your
door. We do the prep work so they cook with the scan of a QR code!
Scan grocery store foods
• Scan hundreds of refrigerated and frozen grocery store foods.
No preheating required. See the Tovala App for more details.
What can I do with
the Tovala App?

1413 Cooking with your Tovala OvenCooking with your Tovala Oven
Mode
• Pressing this button activates your oven’s scanner.
Your oven uses this to scan QR codes/barcodes found
on Tovala Meals, recipe cards, and select scannable,
Tovala-compatible grocery store foods. Each unique
meal QR code communicates a cook cycle to your
oven, so it understands how to automatically switch
between cooking modes (a sequence of steaming,
baking, and/or broiling).
• How do I scan a QR code or barcode?
› Press this button to activate your oven’s scanner. A
red light will appear and indicate where to line up
the QR code or barcode.
› Hold the QR code or barcode you’re trying to scan
steady approximately 3 to 4 inches below the
scanner.
› When your oven successfully scans, it will beep and
display a cook time.
• Pressing this button selects your oven’s Bake mode.
This cooking mode uses convection baking, meaning
the convection fan evenly circulates heat for baking.
• Keep in mind that convection baking tends to cook
food faster than non-convection baking.
• Use Bake mode to air fry.
› Air frying is an application of your oven's convection
baking that takes advantage of the convection fan
evenly circulating heat within your oven. For more
information on how to air fry, see page 20.
•
• How do I preheat my oven?
› Set your desired Bake mode Temperature and press
Start. The message “Preheat Estimate” will appear in
the Time display and begin an estimated countdown
to when the Temperature you’ve set will be reached.
Your oven will beep accordingly when the desired
Temperature has been reached.
› Once your oven reaches the desired Temperature,
set a Time and press Start.
› Your oven will hold the desired Temperature for
10 minutes after preheat is complete and then
automatically shut off if you never set a Time or
press Start.
• How do I use my oven without preheating?
› Set a Time after setting a Temperature, then press
Start.
Scan
Bake
• Pressing this button selects your oven’s Broil mode,
which can be set to “Hi” broil or “Lo” broil. This
cooking mode uses radiant heat from your oven’s
broiler to brown the top of your food.
• Keep in mind that this Broil mode is powerful. When
using Broil, do not leave your oven unattended.
• Do not use Broil mode with the oven rack in the
highest rack position.
Food should never touch the
top heating element, as it could burn easily.
• Your oven does NOT need to preheat when using
Broil mode.
Simply set to “Hi” or “Lo”, set Time, and
press Start.
Broil
• Pressing this button selects your oven’s Reheat
mode, a cook cycle of steaming, baking, and broiling
calibrated to reheat food and return it to its original,
freshly cooked glory.
• Cookware for reheating: Only cookware marked
“oven safe” can be safely used in your oven. Do not
place paper, cardboard, plastic, or any other materials
not suitable for an oven inside this appliance. Extreme
caution should be used when using a container made
from anything other than metal or glass.
› Pro tip: When heating up messier foods like pastas
and stews, reuse a clean aluminum tray from a
Tovala Meal.
› For other foods, use the included sheet tray. Cover it
in aluminum foil for easy cleanup.
• How long should I reheat my food?
› See the Reheating Guidelines card included with
your oven, or check out the Support section of the
app.
Reheat

1615 Cooking with your Tovala OvenCooking with your Tovala Oven
• Pressing this button selects your oven’s Steam mode.
This cooking mode combines steam with convection
baking for dynamic wet heat that preserves the
moisture in food or adds moisture back into already-
cooked food.
• Your oven heats up the steamer (located toward the
rear of your oven's interior), then releases water from
the water reservoir into the steamer to create steam.
• Make sure the water reservoir is filled with water
before cooking with Steam mode. If there is not
enough water in your oven to produce steam, it will
let you know by displaying “Add Water” on the
Temp display.
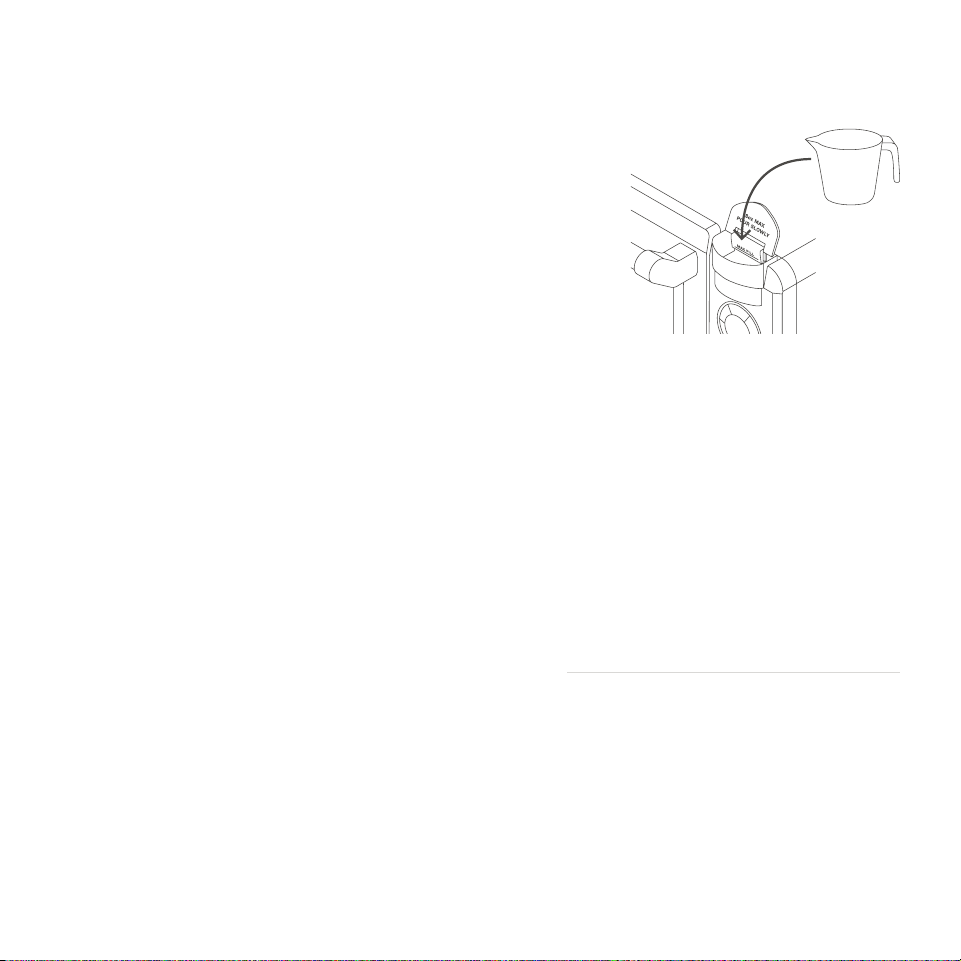
• How do I add water to my oven?
› Open the lid on the water reservoir and pour 1 cup
of tap water directly into it. When you start adding
water, the "Add Water" message will disappear from
your oven's display. Keep pouring until "Add Water"
flashes on the display and your oven beeps.
• How do I preheat my oven?
› Set your desired Steam mode Temperature and
press Start. The message “Preheat Estimate” will
appear in the Time display and begin an estimated
countdown to when the Temperature you’ve set will
be reached. Your oven will beep accordingly when
the desired Temperature has been reached.
› Once your oven reaches the desired Temperature,
set a Time and press Start.
• Pressing this selects your oven’s Toast mode, a cook
cycle of steaming, baking, and broiling calibrated to
toast bread really well—whether it’s freshly baked,
stale, or frozen.
• There are 5 Toast Levels to choose from, with 1 being
a very light toast and 5 being a very dark toast.
• If you’d like, adjust the oven rack’s position in your
oven to a higher level to adjust how your bread toasts.
• Which Toast Level should I use?
› See the Toasting Guidelines card included with your
oven, or check out the Support section of the app.
Toast
› Your oven will hold the desired Temperature for
10 minutes after preheat is complete and then
automatically shut off if you never set a Time or
press Start.
• How do I use my oven without preheating?
› Set a Time after setting a Temperature,
then press Start.
Steam

1615 Cooking with your Tovala OvenCooking with your Tovala Oven
• Pressing this button selects your oven’s Steam mode.
This cooking mode combines steam with convection
baking for dynamic wet heat that preserves the
moisture in food or adds moisture back into already-
cooked food.
• Your oven heats up the steamer (located toward the
rear of your oven's interior), then releases water from
the water reservoir into the steamer to create steam.
• Make sure the water reservoir is filled with water
before cooking with Steam mode. If there is not
enough water in your oven to produce steam, it will
let you know by displaying “Add Water” on the
Temp display.
• How do I add water to my oven?
› Open the lid on the water reservoir and pour 1 cup
of tap water directly into it. When you start adding
water, the "Add Water" message will disappear from
your oven's display. Keep pouring until "Add Water"
flashes on the display and your oven beeps.
• How do I preheat my oven?
› Set your desired Steam mode Temperature and
press Start. The message “Preheat Estimate” will
appear in the Time display and begin an estimated
countdown to when the Temperature you’ve set will
be reached. Your oven will beep accordingly when
the desired Temperature has been reached.
› Once your oven reaches the desired Temperature,
set a Time and press Start.
• Pressing this selects your oven’s Toast mode, a cook
cycle of steaming, baking, and broiling calibrated to
toast bread really well—whether it’s freshly baked,
stale, or frozen.
• There are 5 Toast Levels to choose from, with 1 being
a very light toast and 5 being a very dark toast.
• If you’d like, adjust the oven rack’s position in your
oven to a higher level to adjust how your bread toasts.
• Which Toast Level should I use?
› See the Toasting Guidelines card included with your
oven, or check out the Support section of the app.
Toast
› Your oven will hold the desired Temperature for
10 minutes after preheat is complete and then
automatically shut off if you never set a Time or
press Start.
• How do I use my oven without preheating?
› Set a Time after setting a Temperature,
then press Start.
Steam
1817 Cooking with your Tovala OvenCooking with your Tovala Oven
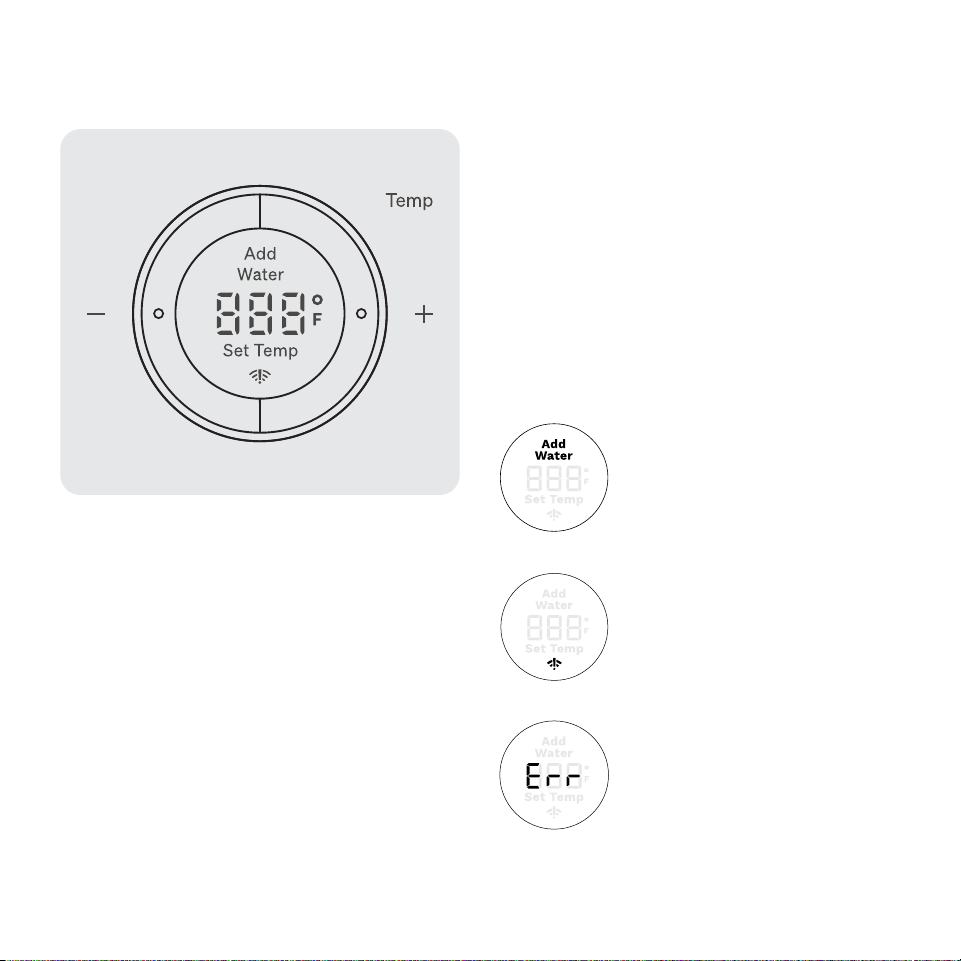
Temp
• After selecting Steam or Bake mode, set the
Temperature you’d like by adjusting up or down with
the “+” and “-” buttons.
• Broil mode can only be set to “Hi” or “Lo” —not a
specific temperature.
• Because Reheat mode is a cook cycle consisting
of Steam, Bake, and Broil, you do not need to set a
Temperature. You only need to set a Time.
• Select the Toast Level you’d like here. Level 1 is the
lightest toast, while Level 5 is the darkest toast.
“Add Water” - This displays when
your oven needs its water reservoir
filled with 1 cup of tap water.
This displays when your oven is
unable to perform a function.
If you see this message, please
email Tovala Customer Support
at support@tovala.com or live
chat with Customer Support at
tovala.com/contact.
This displays when your oven is not
connected to WiFi.
This screen also displays messages, including:
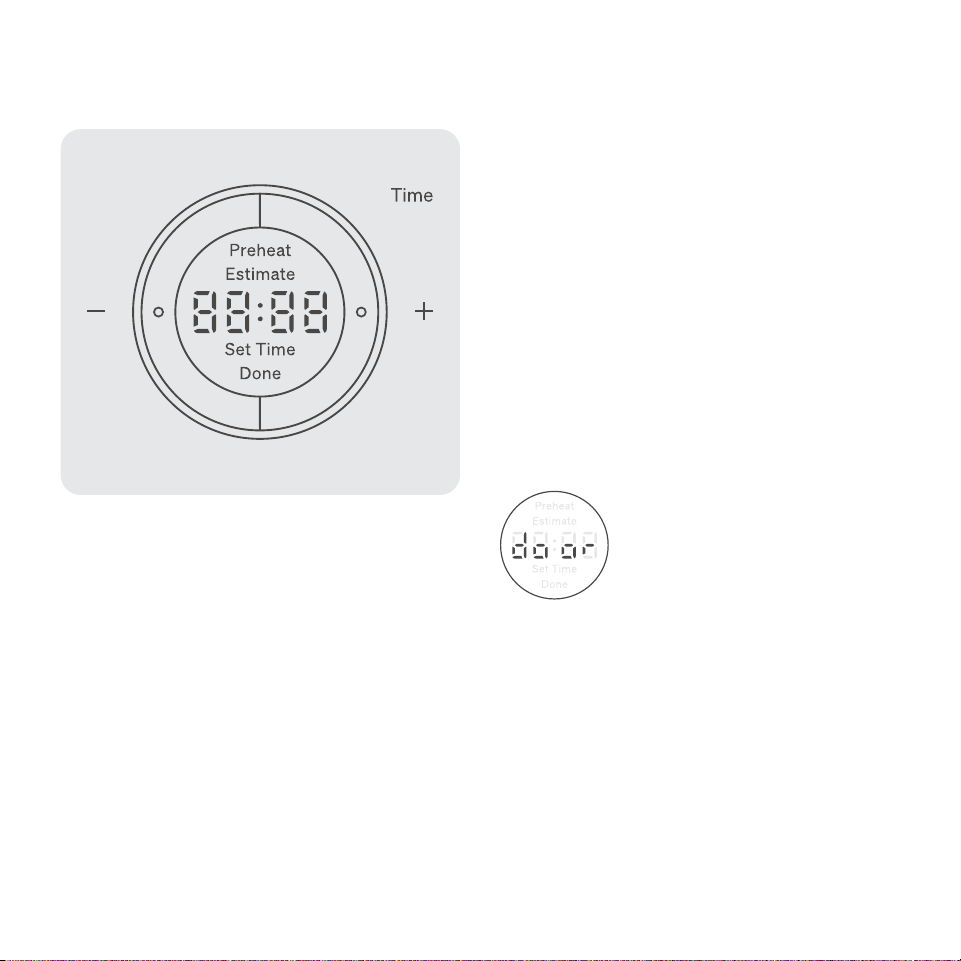
Time
• Finally, set the Time you’d like by adjusting up or down
with the “+” and “-” buttons. The display will prompt
you to “Set Time”.
• Pressing and holding the “+” and “-” buttons will
cause the Temperature to jump up or down in higher
increments.
• For safety reasons, Broil mode cannot be set for
longer than 15 minutes.
• Preheat Estimate message on display
› When you select a Temperature for Steam or Bake
mode, a Preheat Estimate will display. Learn more
about preheating on page 13.
This displays when your oven door is
not completely shut when trying to
perform a cooking function.
This screen also displays messages, including:
1817 Cooking with your Tovala OvenCooking with your Tovala Oven
Temp
• After selecting Steam or Bake mode, set the
Temperature you’d like by adjusting up or down with
the “+” and “-” buttons.
• Broil mode can only be set to “Hi” or “Lo” —not a
specific temperature.
• Because Reheat mode is a cook cycle consisting
of Steam, Bake, and Broil, you do not need to set a
Temperature. You only need to set a Time.
• Select the Toast Level you’d like here. Level 1 is the
lightest toast, while Level 5 is the darkest toast.
“Add Water” - This displays when
your oven needs its water reservoir
filled with 1 cup of tap water.
This displays when your oven is
unable to perform a function.
If you see this message, please
email Tovala Customer Support
at support@tovala.com or live
chat with Customer Support at
tovala.com/contact.
This displays when your oven is not
connected to WiFi.
This screen also displays messages, including:
Time
• Finally, set the Time you’d like by adjusting up or down
with the “+” and “-” buttons. The display will prompt
you to “Set Time”.
• Pressing and holding the “+” and “-” buttons will
cause the Temperature to jump up or down in higher
increments.
• For safety reasons, Broil mode cannot be set for
longer than 15 minutes.
• Preheat Estimate message on display
› When you select a Temperature for Steam or Bake
mode, a Preheat Estimate will display. Learn more
about preheating on page 13.
This displays when your oven door is
not completely shut when trying to
perform a cooking function.
This screen also displays messages, including:
2019 Cooking with your Tovala OvenCooking with your Tovala Oven
When setting your oven to cook, make sure your oven
rack is placed in the LOWEST rack position with the
curved edges facing down (see illustration). The crumb
tray should also be inserted into the bottom of your
oven's interior, and the drain tray should be in place
below the oven door.
• If using other rack positions, please do so with
caution. Make sure no food is touching the heating
elements, as the food could burn easily.
• If you cook anything on the highest rack level, please
be cautious and observant while cooking, as your
food is very close to the top heating element.
• Tovala Meals should always be cooked with the oven
rack in the lowest rack position.
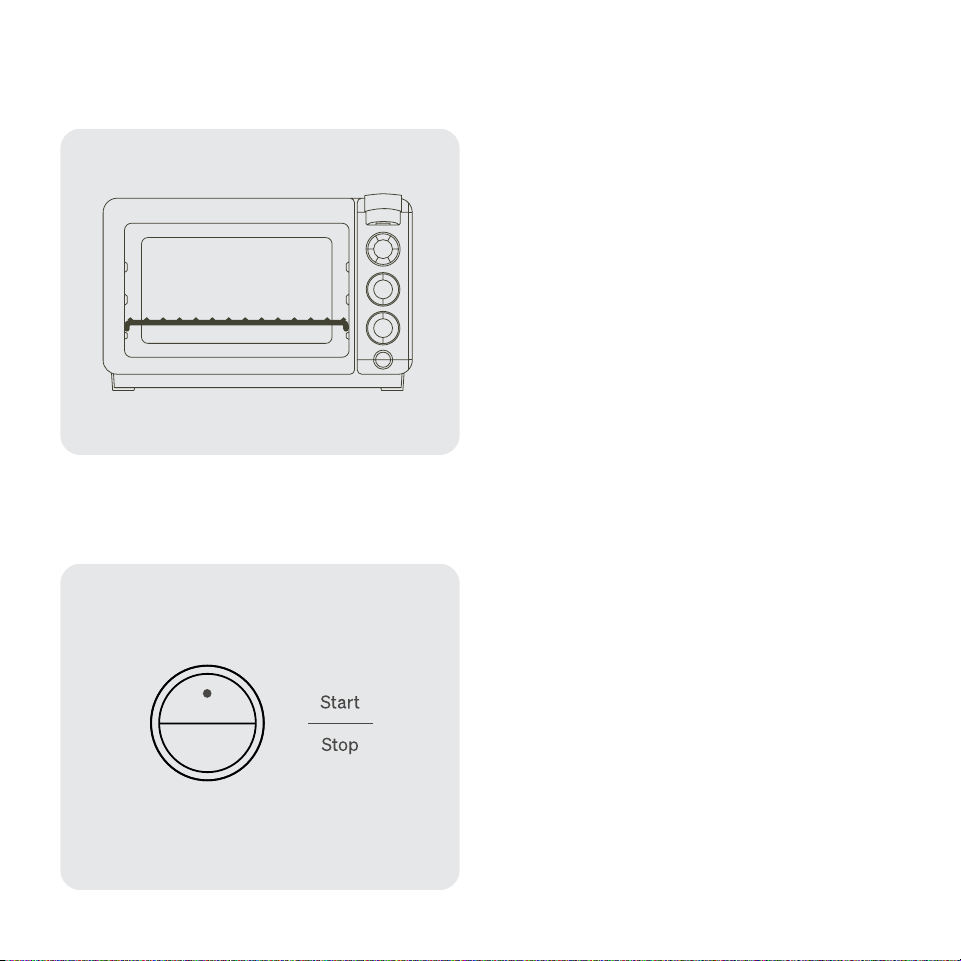
Start Button
• Pressing this button starts cooking for all cooking
modes.
Stop Button
• Pressing this button cancels any selection or current
cooking action your oven is performing and turns off
your oven.
• If you hear your oven’s fan running after stopping
cooking/turning off your oven, do not be alarmed. The
fan will continue to run after cooking until your oven
has sufficiently cooled.
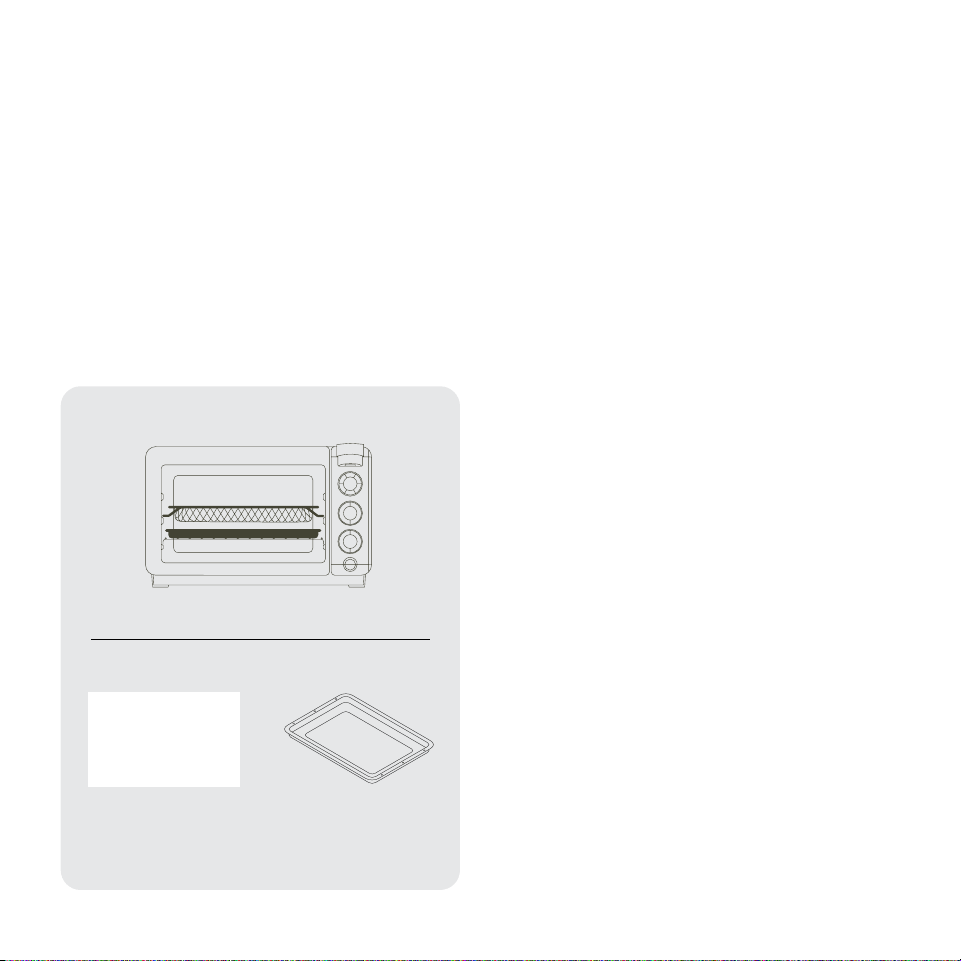
Oven Rack Placement Air Fry
Start and Stop
Lowest Rack Position
She et Tray
(Optional)
Air Fry Basket
• What you need (included with your oven):
› Air Fry Basket
› Sheet Tray (Optional)
Your oven's Bake mode can also be used to air fry.
Air frying is an application of your oven's convection
baking that takes advantage of the convection fan
evenly circulating heat within your oven.
When cooking select scannable, Tovala-compatible
grocery store foods, some may cook best in the air fry
basket to take advantage of your oven's ability to air fry.
See the Tovala App for more details.
To air fry in your oven, use the air fry basket.
1. Place food in the air fry basket. For best results, place
food in a single layer leaving space between pieces.
Then insert the air fry basket in the middle rack
position above the oven rack (see diagram).
› Do not overfill the air fry basket or food may not
cook correctly.
› (Optional) If you're air frying food that is likely to
drip, place the sheet tray on the oven rack under
the air fry basket for easy cleanup. Make sure the
oven rack is in the lowest rack position with the
curved edges facing down. If you're not using the
sheet tray, clean the crumb tray at the bottom of
your oven after air frying (see page 22).
› Do not line the bottom of your oven with metal foil
or any other material (even if it's deemed "oven
safe").
2. Press Bake on your oven, set your desired Temperature
and Time, then press Start. To preheat before air frying,
see page 13.
3. Remove food promptly when cooking is complete.
› Do not remove the air fry basket with bare,
unprotected hands. After cooking, the air fry
basket will be hot. Always use an oven mitt or
other heat protective device.
› If using the sheet tray, wait until tray is completely
cool before removing and cleaning it.
• Do you have any recommended cook times or
temperatures for air frying certain foods?
› See the Air Frying Guidelines card included with
your oven, or check out the Support section of
the app.
2019 Cooking with your Tovala OvenCooking with your Tovala Oven
When setting your oven to cook, make sure your oven
rack is placed in the LOWEST rack position with the
curved edges facing down (see illustration). The crumb
tray should also be inserted into the bottom of your
oven's interior, and the drain tray should be in place
below the oven door.
• If using other rack positions, please do so with
caution. Make sure no food is touching the heating
elements, as the food could burn easily.
• If you cook anything on the highest rack level, please
be cautious and observant while cooking, as your
food is very close to the top heating element.
• Tovala Meals should always be cooked with the oven
rack in the lowest rack position.
Start Button
• Pressing this button starts cooking for all cooking
modes.
Stop Button
• Pressing this button cancels any selection or current
cooking action your oven is performing and turns off
your oven.
• If you hear your oven’s fan running after stopping
cooking/turning off your oven, do not be alarmed. The
fan will continue to run after cooking until your oven
has sufficiently cooled.
Oven Rack Placement Air Fry
Start and Stop
Lowest Rack Position
She et Tray
(Optional)
Air Fry Basket
• What you need (included with your oven):
› Air Fry Basket
› Sheet Tray (Optional)
Your oven's Bake mode can also be used to air fry.
Air frying is an application of your oven's convection
baking that takes advantage of the convection fan
evenly circulating heat within your oven.
When cooking select scannable, Tovala-compatible
grocery store foods, some may cook best in the air fry
basket to take advantage of your oven's ability to air fry.
See the Tovala App for more details.
To air fry in your oven, use the air fry basket.
1. Place food in the air fry basket. For best results, place
food in a single layer leaving space between pieces.
Then insert the air fry basket in the middle rack
position above the oven rack (see diagram).
› Do not overfill the air fry basket or food may not
cook correctly.
› (Optional) If you're air frying food that is likely to
drip, place the sheet tray on the oven rack under
the air fry basket for easy cleanup. Make sure the
oven rack is in the lowest rack position with the
curved edges facing down. If you're not using the
sheet tray, clean the crumb tray at the bottom of
your oven after air frying (see page 22).
› Do not line the bottom of your oven with metal foil
or any other material (even if it's deemed "oven
safe").
2. Press Bake on your oven, set your desired Temperature
and Time, then press Start. To preheat before air frying,
see page 13.
3. Remove food promptly when cooking is complete.
› Do not remove the air fry basket with bare,
unprotected hands. After cooking, the air fry
basket will be hot. Always use an oven mitt or
other heat protective device.
› If using the sheet tray, wait until tray is completely
cool before removing and cleaning it.
• Do you have any recommended cook times or
temperatures for air frying certain foods?
› See the Air Frying Guidelines card included with
your oven, or check out the Support section of
the app.

2221 Cleaning and maintaining your Tovala OvenCooking with your Tovala Oven
• Cleaning the door
› The inside and outside of the door can be cleaned
with a soft, damp cloth. Dampen the cloth with a
solution of mild soap and water.
› DO NOT attempt to clean between the two layers
of glass within the door. The door’s screws are not
designed to be removed and reinserted.
› DO NOT use harsh, abrasive cleaners or scrapers to
clean the door’s glass, as this may lead to scratches
or other damage.
• Cleaning the crumb tray
› Remove the crumb tray and dispose of crumbs/food
particles into the trash.
› Then, wipe down the crumb tray with a soft, damp
cloth. We recommend using a solution of mild soap
and water to dampen. Hand-wash only. Dishwasher
use not recommended.
› When the crumb tray is completely dry, slide it into
the bottom of your oven. Cooking performance
could be altered if you cook without the crumb tray
present.
• Cleaning the Air Fry Basket
› Hand-wash only. NOT dishwasher safe. Wipe
down the air fry basket with a soft, damp cloth.
We recommend using a solution of mild soap and
water to dampen. You can also soak the basket in a
solution of warm, soapy water.
› DO NOT use harsh, abrasive cleaners or sharp
objects (such as knives or hard brushes) to clean
the basket.
Cleaning and maintaining
your Tovala Oven
How do I keep my oven clean?
• After every use, we recommend cleaning the interior
and exterior of your oven.
› DO NOT use oven cleaner to clean your oven. Oven
cleaner may degrade your oven's finishes.
› DO NOT clean your oven with metal scouring pads.
See cleaning instructions below for further details.
Before you start cleaning, make sure your oven is
unplugged and cooled completely and safe to touch. Use
the following instructions for more complete cleaning:
• Cleaning the exterior
› The outside body of your oven can be cleaned with a
soft, damp cloth. We recommend using a solution of
mild soap and water to dampen the cloth.
› Running several cook cycles without cleaning
your oven may result in permanent blemishes or
discoloration to the exterior.
• Cleaning the interior
› The interior walls of your oven can be cleaned with a
soft, damp cloth. We recommend using a solution of
mild soap and water to dampen the cloth.
› DO NOT use abrasive cleaners, metal scouring pads,
or metal utensils on your oven's interior walls. This will
damage the interior walls.
› Running several cook cycles without cleaning
your oven may result in permanent blemishes to
the interior.
Set custom cook
cycles with Automated
Multi-Mode Cooking
What is Automated Multi-Mode Cooking?
• It’s a sequence of any 3 Tovala cooking modes: Steam, Bake, and Broil.
You can set your oven to use some or all of these modes in any order,
for any time, and at any temperature (or Hi/Lo, in the case of Broil).
Each mode can also be repeated as many times as you like within
each cook cycle. Your oven will then automatically switch between the
cooking modes you’ve selected in a cook cycle.
• We utilize Automated Multi-Mode Cooking in our Toast and Reheat
modes, when cooking Tovala Meals, and in Chef’s Recipes (recipes
found in the Tovala App you make from scratch).
Why should I use Automated Multi-Mode Cooking?
• With your oven, you can achieve the exceptional results that normally
come from using multiple kitchen appliances. For example: a 3-step
cook cycle of steaming, baking, and broiling will ensure a chicken breast
is juicy and tender on the inside with a golden-brown exterior.
How do I set my oven to use Automated Multi-Mode Cooking?
• To set your oven to use Automated Multi-Mode Cooking, create a cook
cycle with the Tovala App’s oven controls.
Chef’s Recipes
When you want to cook from scratch, make a Chef’s Recipe. Use the app to
follow our chef’s instructions and then cook these recipes perfectly without
the guesswork.
What can I cook with Chef’s Recipes?
An assortment of proteins, vegetables, full meals, kids’ meals, appetizers,
and desserts. Check your app frequently for new additions.
We’ve included recipe cards with your oven, so you can get a taste of what
Chef’s Recipes have to offer. For our complete library of Chef’s Recipes, see
the Tovala App.

2423
• Cleaning the sheet tray
› Wipe down the sheet tray with a soft, damp cloth.
We recommend using a solution of mild soap and
water to dampen. Dishwasher safe.
• Cleaning the control panel
› The control panel should be wiped down with a soft
cloth lightly dampened with water. Wring out your
cloth before wiping down to ensure the cloth is not
excessively wet.
• Cleaning the drain tray (located in the front of your
oven underneath the door)
› Empty the drain tray after every use of your oven.
The drain tray can be cleaned with a soft, damp
cloth. Dampen the cloth with a solution of mild soap
and water.
• Oven storage and water cleanliness
› If you are planning on not using your oven for more
than 2 days, empty out your oven’s water reservoir
and refill upon next use. This ensures the water you
use in your oven is as fresh as possible.
• How to empty your oven of water
› Your oven's water reservoir is designed to drain
into the drain tray located in the front of your oven
underneath your oven door. Be sure to empty any
water from the drain tray both BEFORE and AFTER
emptying your oven of water.
1. Empty the drain tray of any water, then replace the
drain tray underneath your oven door.
2. Hold the Steam button down for 5 seconds to
DRAIN the water reservoir. The reservoir will drain
automatically and beep when empty.
Note: The oven can take up to 15 minutes to drain.
3. Empty any water from the drain tray after draining.
If the water reservoir is completely full, you may
need to empty your drain tray multiple times to
remove water. Be prepared to remove it, dispose
of water, and replace it multiple times as your
oven empties.
• Descaling your oven:
› If you use your oven once a day or less, we
recommend descaling your oven every 6 months. If
you use your oven more than twice a day, or live in
an area with hard water, we recommend conducting
this descaling procedure more frequently.
1. Make sure your oven is in a well-ventilated space,
free from any overhanging cabinets or other nearby
overhead obstructions. If needed, move it to a place
that is unobstructed overhead.
2. Empty the oven of water. (See above instructions.)
3. Fill the water reservoir with ½ cup of filtered water
and ½ cup of distilled white vinegar.
4. Set your oven to the following cook cycle, using the
Tovala App (Note: A strong vinegar smell will be
present throughout this cycle.):
5. 5 minutes of Bake at 400°F
6. 25 minutes of Steam at 400°F
7. Let your oven cool back down to room temperature.
8. Fill the water reservoir with 1 cup of tap water.
9. Wipe up any excess water in your oven with a
soft cloth.
10. Finally, run the same cook cycle as before:
11. 5 minutes of bake at 400°F
12. 25 minutes of steam at 400°F
13. Allow your oven to cool until it’s safe to touch,
then wipe up excess water inside your oven with
a soft cloth.
14. If any limescale is deposited into your oven’s interior
or drain tray, gently wipe it away with a soft cloth
dampened with vinegar.
• My oven’s light bulb is out. How do I change it?
› The oven light is on the right side of your oven.
If your oven light has died, it can be replaced.
Make sure your oven is off, unplugged, and cooled
before removing the glass cover and replacing
the light bulb. If you have any questions about
replacement light bulbs, email Tovala Customer
Support at support@tovala.com or live chat with
Customer Support at tovala.com/contact.
Cleaning and maintaining your Tovala OvenCleaning and maintaining your Tovala Oven

2625
Contacting Tovala Customer Support & Warranty
FCC Warnings
California Proposition
65 Warning
WARNING: Changes or modifications to this unit not expressly
approved by the party responsible for compliance could void
the user’s authority to operate the equipment.
NOTE: This equipment has been tested and found to comply
with the limits for a Class B digital device, pursuant to Part
15 of the FCC Rules. These limits are designed to provide
reasonable protection against harmful interference in a
residential installation. This equipment generates, uses, and
can radiate radio frequency energy and, if not installed and
used in accordance with the instructions, may cause harmful
interference to radio communications.
However, there is no guarantee that interference will not occur
in a particular installation. If this equipment does cause harmful
interference to radio or television reception, which can be
determined by turning the equipment off and on, the user is
encouraged to try to correct the interference by one or more of
the following measures:
• Reorient or relocate the receiving antenna.
• Increase the separation between the equipment and
receiver.
• Connect the equipment into an outlet on a circuit different
from that to which the receiver is connected.
• Consult the dealer or an experienced radio/TV technician
for help.
WARNING
This product contains chemicals known to the State of
California to cause cancer, birth defects, or other
reproductive harm.
Contacting Tovala
Customer Support
Have questions or confusion related to your oven?
Email Tovala Customer Support at [email protected] or
live chat with Customer Support at tovala.com/contact.
Warranty
Tovala warrants the first consumer purchaser that this
oven, when shipped in its original packaging and sold or
distributed in the United States by Tovala or an authorized
reseller, will be free from defective workmanship and
materials under normal home use for 1 year from the date
of the original purchase.
Tovala agrees that it will either repair the defect or replace
the defective oven with a new or refurbished equivalent
oven at no charge to the purchaser.
This limited warranty does not apply to any aesthetic
items of the oven, nonfunctional accessories, or the light
bulb. This limited warranty also does not apply to any oven
with an oven exterior that has been damaged or defaced,
and/or has been subjected to misuse, abnormal cleaning
or handling, or has been altered/modified.
To obtain warranty service, email Tovala Customer
Support at support@tovala.com or live chat with
Customer Support at tovala.com/contact.
Warnings

2625
Contacting Tovala Customer Support & Warranty
FCC Warnings
California Proposition
65 Warning
WARNING: Changes or modifications to this unit not expressly
approved by the party responsible for compliance could void
the user’s authority to operate the equipment.
NOTE: This equipment has been tested and found to comply
with the limits for a Class B digital device, pursuant to Part
15 of the FCC Rules. These limits are designed to provide
reasonable protection against harmful interference in a
residential installation. This equipment generates, uses, and
can radiate radio frequency energy and, if not installed and
used in accordance with the instructions, may cause harmful
interference to radio communications.
However, there is no guarantee that interference will not occur
in a particular installation. If this equipment does cause harmful
interference to radio or television reception, which can be
determined by turning the equipment off and on, the user is
encouraged to try to correct the interference by one or more of
the following measures:
• Reorient or relocate the receiving antenna.
• Increase the separation between the equipment and
receiver.
• Connect the equipment into an outlet on a circuit different
from that to which the receiver is connected.
• Consult the dealer or an experienced radio/TV technician
for help.
WARNING
This product contains chemicals known to the State of
California to cause cancer, birth defects, or other
reproductive harm.
Contacting Tovala
Customer Support
Have questions or confusion related to your oven?
Email Tovala Customer Support at support@tovala.com or
live chat with Customer Support at tovala.com/contact.
Warranty
Tovala warrants the first consumer purchaser that this
oven, when shipped in its original packaging and sold or
distributed in the United States by Tovala or an authorized
reseller, will be free from defective workmanship and
materials under normal home use for 1 year from the date
of the original purchase.
Tovala agrees that it will either repair the defect or replace
the defective oven with a new or refurbished equivalent
oven at no charge to the purchaser.
This limited warranty does not apply to any aesthetic
items of the oven, nonfunctional accessories, or the light
bulb. This limited warranty also does not apply to any oven
with an oven exterior that has been damaged or defaced,
and/or has been subjected to misuse, abnormal cleaning
or handling, or has been altered/modified.
To obtain warranty service, email Tovala Customer
Support at support@tovala.com or live chat with
Customer Support at tovala.com/contact.
Warnings

Tag us and show off. @tovalafood