OFF
ON
WARNING: SHOCK HAZARD.
May result in serious injury or death. Turn off
power at circuit breaker or fuse before installing.
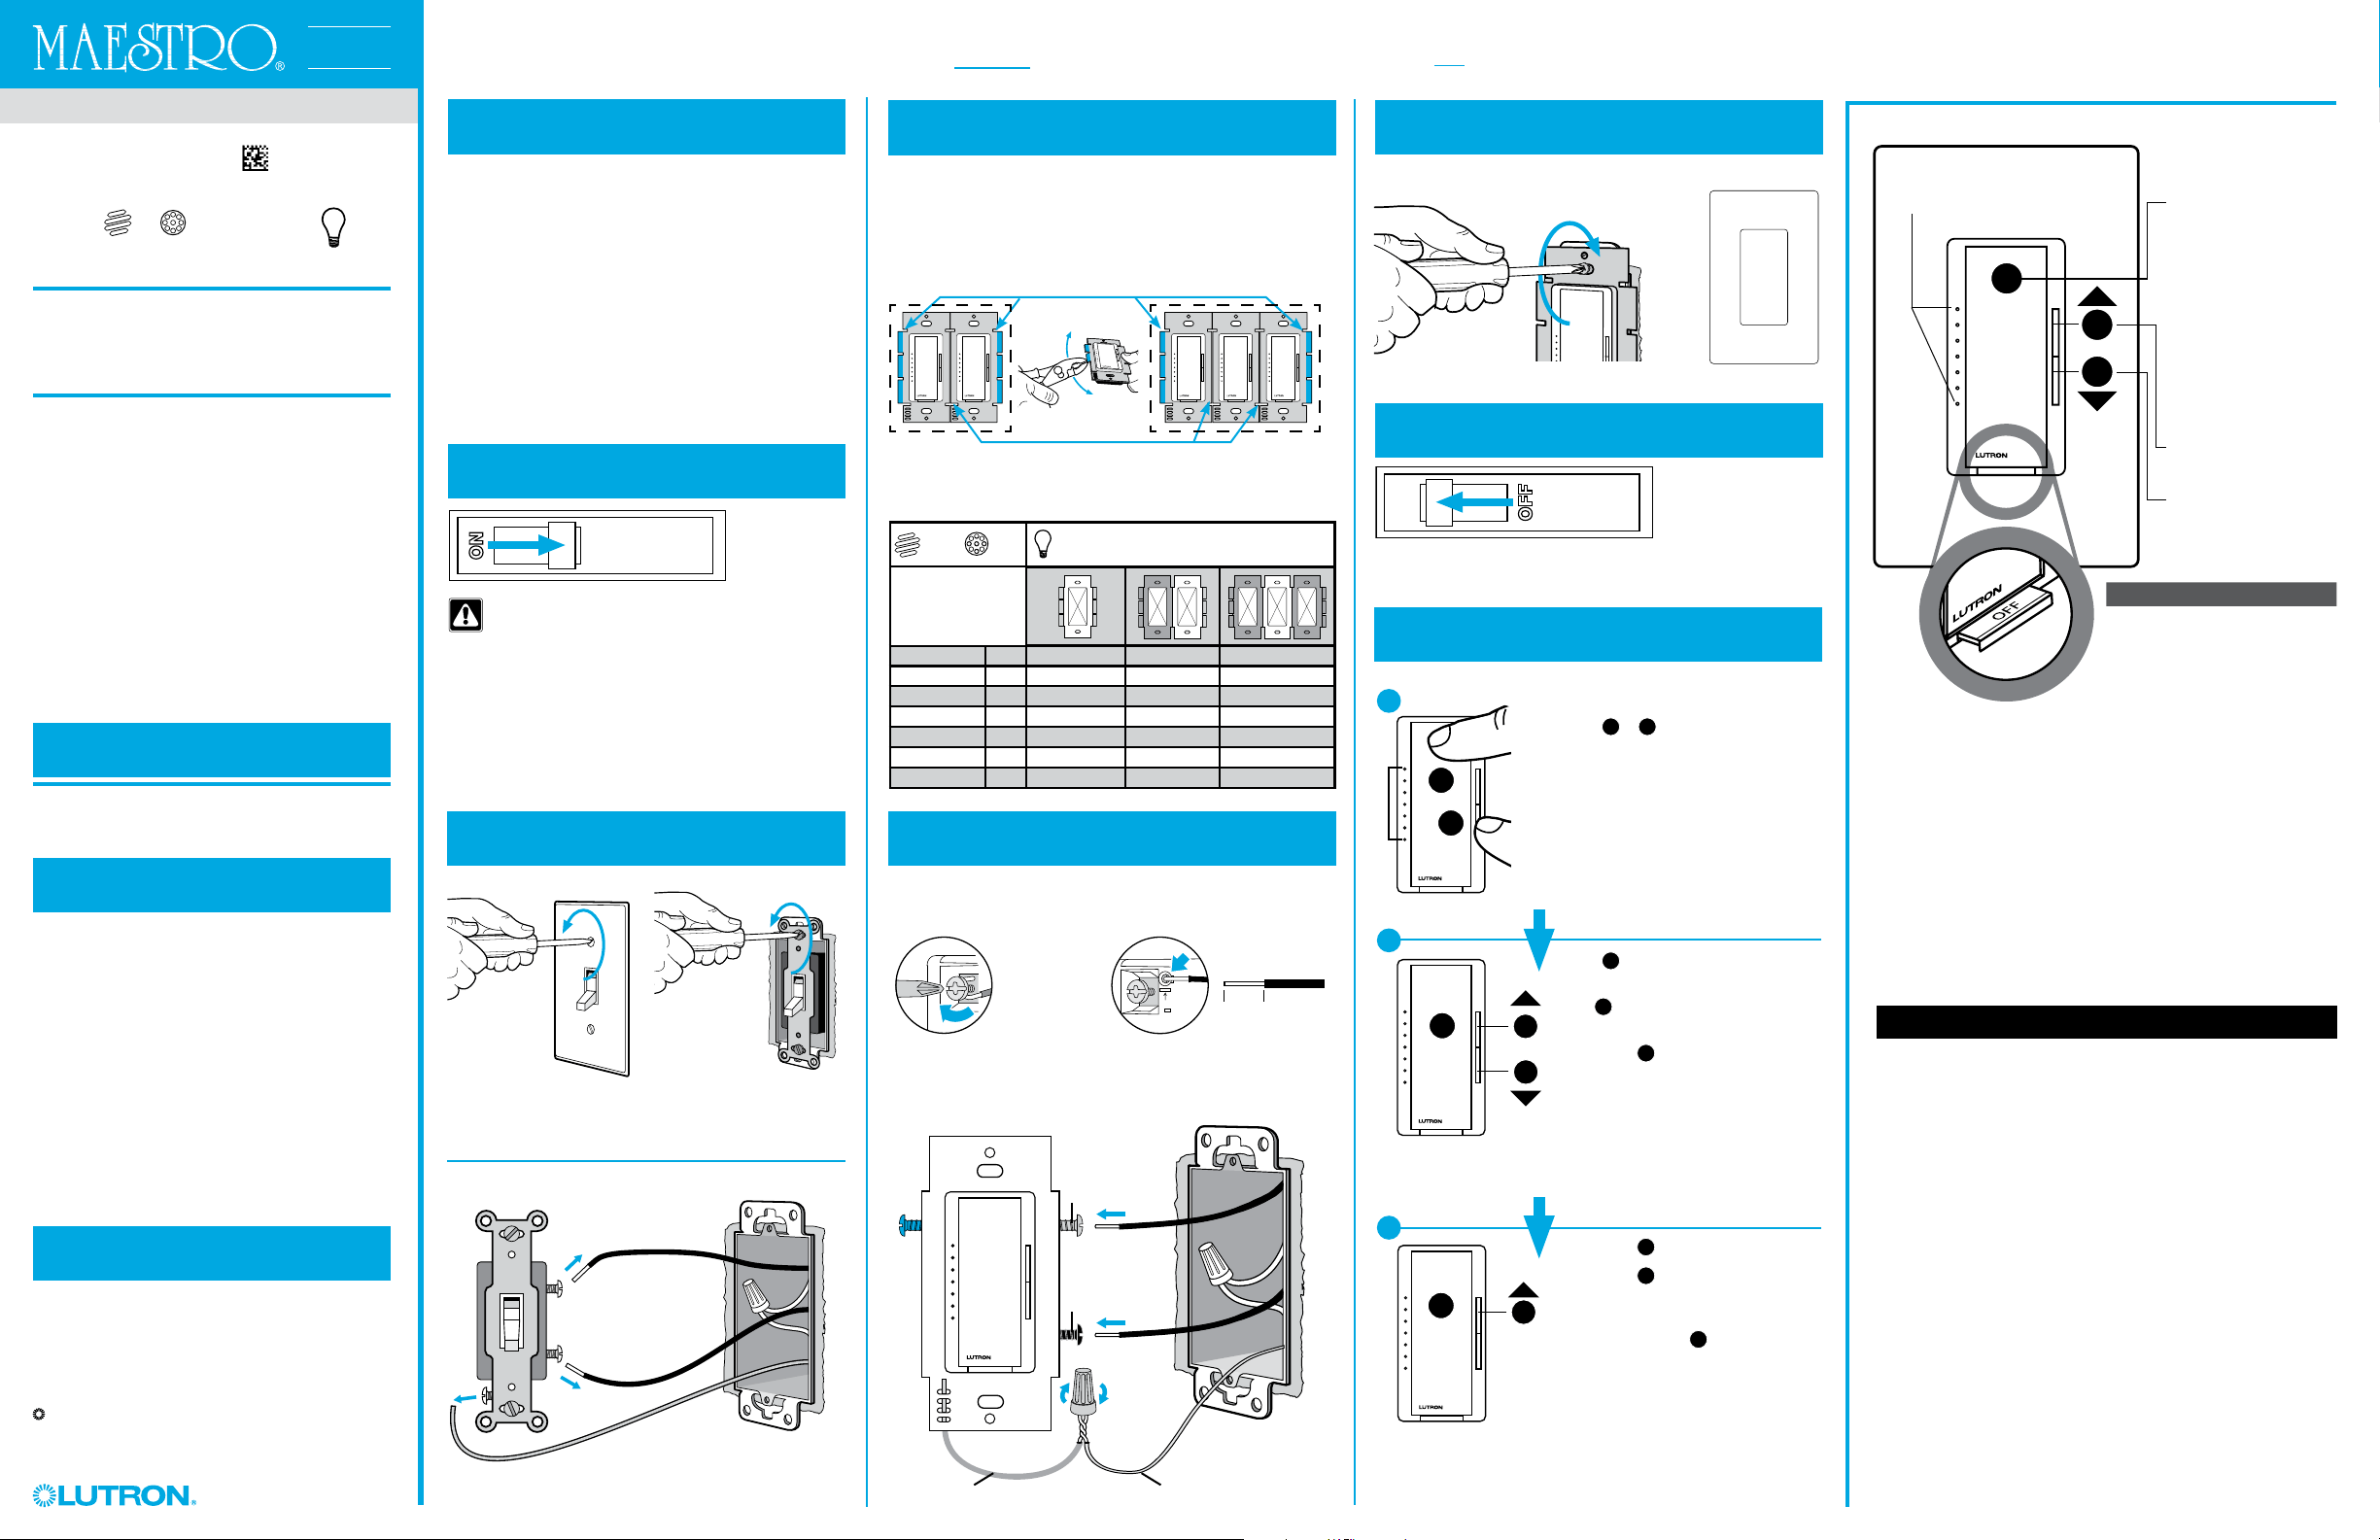
1
Determine wiring type
2
Turn power OFF at circuit breaker
5
Connect the new dimmer (MACL)
6
Mount dimmer using the provided screws
7
Turn power ON at circuit breaker
8
Adjust dimming range for CFLs and LEDs
3
Remove existing device
Disconnect wires.
For lights switched from one location
(For lights switched from two locations, see instructions on reverse)
Dimmer
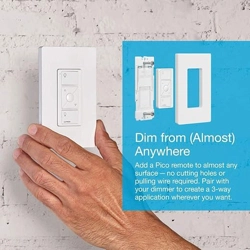
For the Compatible Bulb List...
Helpful videos...
Advanced programming & operation...
Additional wiring scenarios...
Replacing a dimmer with a dimmer...
or
If you have three or more switches
controlling a light...
Please visit: www.lutron.com/macl
If using CFL or LED bulbs,
they must be Lutron
®
compatible!
P/N 0301771 REV A
C
•
L®
4
Remove middle sections (if ganging devices)
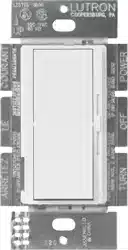
MACL-153M
120 V~ 60 Hz
LED
DEL
LFCA
CFL
AFC
150 W
CFL / LED
600 W
Incand. /Hal.
INC / HAL
U.S.A. | Canada | Caribbean
1.800.523.9466
Mexico
+1.888.235.2910
Others
+1.610.282.3800
Fax
+1.610.282.6311
Help
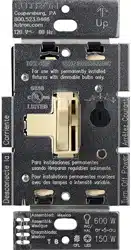
Ground wire (bare or green)
Brass screw
OPTIONAL FOR INCANDESCENT / HALOGEN
OPERATION
Black screw
Green wire
Limited Warranty:
www.lutron.com/TechnicalDocumentLibrary/
369-119_Wallbox_Warranty.pdf
©2013-2015 Lutron Electronics Co., Inc.
®
Lutron, Lutron, Claro, Satin Colors, Maestro, and C
•
L
are registered trademarks of Lutron Electronics Co., Inc.
Hold
T
&
L
until an indicator light
(IL) blinks on the MACL dimmer.
Or
L
T
R
Hold
L
until bottom indicator light (IL)
is reached.
Tap
R
until all bulbs in the room are
on and stable (no flickering).
Single tap
T
to save setting.
Single tap
T
to turn off bulbs.
Single tap
T
again.
If all bulbs do not turn on or are not
stable, repeat step 8a, and in step 8b
increase light with
R
.
R
T
Remove middle sections if mounting 2 or more devices side
by side. See Maximum Ratings chart below for the new
wattage limits.
NOTE: No derating is required when using only CFLs or LEDs.
For lights switched from two locations, see instructions on
the reverse side.
For lights switched from one location, proceed to Step 2
below.
Remove
Use 12 / 14 AWG Use 14 AWG
Keep
OR
1/2 in
(13 mm)
Raise lights
Tap to toggle lights
on / off.
Double-tap to turn
lights on to full
intensity.
Press & hold for
delayed fade-to-off.
Lower lights
F
A
S
S
T
M
•
F
A
S
S
T
M
•
F
A
S
S
T
M
•
F
A
S
S
T
M
•
F
A
S
S
T
M
•
F
A
S
S
T
M
•
T
R
L
Displays the current light level
Indicator Lights (IL)
FASSTM
MAXIMUM RATINGS FOR MIXED LOAD TYPES
INC / HAL
Incandescent / Halogen
0 W + 600 W 500 W 400 W
1 W – 25 W + 500 W 400 W 300 W
26 W – 50 W + 400 W 300 W 200 W
51 W – 75 W + 300 W 200 W 100 W
76 W – 100 W + 200 W 100 W 50 W
101 W – 125 W + 100 W 50 W 0 W
126 W – 150 W + 0 W 0 W 0 W
LED
DEL
LFCA
CFL
AFC
Pull tab out for bulb replacement.
T
L
&
IL
CFL
MACL
www.lutron.com/macl
www.lutron.com/macl
+
IMPORTANT
1. CAUTION: Use only with permanently installed fixtures with dimmable
screw-in compact fluorescent, dimmable screw-in LED, halogen, or
incandescent lamps. To avoid overheating and possible damage to other
equipment, do not use to control receptacles, motor-driven appliances, or
low-voltage transformer-supplied appliances.
2. Install in accordance with all national and local electrical codes.
3. When no “grounding means” exists in wallbox, the 2011 National
Electrical Code
® (NEC®) allows a control to be installed as a replacement
if 1) a nonmetallic, noncombustible faceplate is used with non-metallic
attachment screws or 2) the circuit is protected by a ground fault circuit
interrupter (GFCI). When installing a control according to these methods,
cap or remove green wire before screwing control into wallbox and use an
appropriate faceplate such as Claro
® or Satin Colors® series wallplates by
Lutron.
4. 3-way wiring must use only one Maestro
® C•L® Dimmer and a Maestro®
Companion Dimmer (MA-R, MA-RR, MSC-AD) or an existing switch. 4-way
wiring must use only one Maestro
® C•L® Dimmer and up to 9 Maestro®
Companion Dimmers (MA-R, MA-RR, MSC-AD).
5. For indoor use only between 32 °F and 104 °F (0 °C and 40 °C).
6. Maestro
® C•L® Dimmers may feel warm to the touch during normal
operation.
7. Maximum wire length between the Master Dimmer and the last
Companion Dimmer (MA-R, MA-RR, MSC-AD) is 150 ft (46 m).
8. Clean dimmers with a soft damp cloth only. Do not use any
chemical cleaners.
Fully wrap the wires around the screw and tighten (A), or strip
insulated wires to 1/2 in (13 mm) and insert into the push-in
terminals (B).
If your bulbs are flickering, buzzing or dropping out, your bulbs may
not be compatible. Please visit www.lutron.com/macl to check the
Compatible Bulb List.
A B
A
B
C

OFF
ON
WARNING: SHOCK HAZARD.
May result in serious injury or death. Turn off
power at circuit breaker or fuse before installing.
1
Turn power OFF at circuit breaker
6a
Connect the new MASTER dimmer (MACL) and re-wire OTHER EXISTING switch
6b
Connect the new MASTER dimmer (MACL) and a Maestro® COMPANION dimmer (MA-R, MA-RR, or MSC-AD)
7
Mount all devices using the provided screws
8
Turn power ON at circuit breaker
9
Program MASTER dimmer for use with existing switch
2
Remove (but do not disconnect) existing devices
3
Mark wire on the COMMON terminal
See Step 8 on reverse for details.
See Step 4 on reverse for details.
5
Remove middle sections (if ganging devices)
4
Disconnect wires
OR
On both existing devices, mark the wire (for example, using electrical tape) that
is connected to the screw that is a different color (typically black) than all the
others. This screw terminal may also be labeled “COMMON” or “COM”.
Does not include the ground screw.
Rear / side view of existing device
Ground wire (bare or green)
Ground wire
(bare or green)
Ground wire
(bare or green)
Blue screw
Black screw
Brass screw
Green wire
Green wire Green wire
Ground wire (bare or green)
Ground screw
Jumper wire
(included in box)
Different color screw
Remaining wire
Brass screwBlue screw
Black screw
Hold
T
&
R
until an indicator light (IL) blinks on
the MACL dimmer.
T R
&
Using
L
, select IL 1 when an existing switch is
being used.
IL4 is the default for a Maestro® Companion
Dimmer.
L
IL1
Single tap
T
to save setting.
T
Marked wire
Marked wire
10
Adjust dimming range for LEDs and CFLs
OPTIONAL FOR INCANDESCENT / HALOGEN
SKIP THIS STEP IF YOU ARE USING A MAESTRO
® COMPANION DIMMER
MACL
MA-R
For lights switched from two locations
Choose one of the two wiring scenarios shown below (6a or 6b):
+
You MUST perform Step 9 (at right) for dimmer to work correctly.
IL
Blue screw
Black screw
Brass screw
Marked wire Marked wire
MACL
COM
One to breaker and
one to light(s)
FOR ILLUSTRATION
PURPOSES ONLY
(DO NOT DISCONNECT)
(For lights switched from three or more locations, please visit www.lutron.com/macl)
Use 12 / 14 AWG Use 14 AWG
OR
1/2 in
(13 mm)
Fully wrap the wires around the screw and tighten (A), or strip insulated
wires to 1/2 in (13 mm) and insert into the push-in terminals (B).
A B
One to breaker and
one to light(s)
FOR ILLUSTRATION
PURPOSES ONLY
(DO NOT DISCONNECT)
B
C
A

OFF
ON
AVERTISSEMENT : RISQUE
D'ÉLECTROCUTION.
Peut causer des blessures graves ou la mort.
Coupez l'alimentation au niveau du disjoncteur du
fusible avant l'installation.
1
Déterminez le type de câblage
Determine el tipo de cableado
2
Couper l’alimentation au niveau du disjoncteur
Desconecte el suministro eléctrico en el
disyuntor
5
Raccordez le nouveau gradateur (MACL)
Conecte el nuevo atenuador (MACL)
6
Installez le gradateur avec les vis fournies
Monte el atenuador utilizando los tornillos
suministrados
7
Connectez l’alimentation au niveau du disjoncteur
CONECTE el suministro eléctrico en el disyuntor
8
Régler la plage de gradation pour les AFC et les DEL
Ajuste el rango de atenuación de los LFCA y los LED
3
Retirez l'appareil existant
Retire el dispositivo existente
Déconnectez les fils.
Desconecte los cables.
Pour la commutation des lumières depuis un emplacement
(Pour la commutation des lumières depuis deux emplacements, voir les instructions au verso)
Gradateur | Atenuador
Pour la liste des ampoules compatibles...
Vidéos utiles...
Programmation et utilisation avancée...
Scénarios de câblage supplémentaires...
Replacement d'un gradateur par un gradateur...
ou
Si vous disposez de trois interrupteurs ou plus
pour commander votre éclairage...
Veuillez consultez : www.lutron.com/macl
Si vous utilisez des
ampoules AFC ou
DEL, elles doivent être
compatibles avec les
produits Lutron® !
P/N 0301771 Rev. A
C
•
L®
4
Retirez les sections centrales (en cas d’encastrement des appareils)
Retire las secciones centrales (si se agruparan dispositivos)
MACL-153M
120 V~ 60 Hz
LED
DEL
LFCA
CFL
AFC
150 W
AFC / DEL
LFCA / LED
600 W
Incand. /Hal.
INC / HAL
É.-U., Canada, Caraïbes | E.U.A.,
Canadá, Caribe
1.800.523.9466
Mexique | México +1.888.235.2910
Autres | Otros países +1.610.282.3800
Fax +1.610.282.6311
Aide | Ayuda
Fil de terre (nu ou vert)
Cable de tierra
(desnudo o verde)
Vis en laiton
Tornillo de latón
OPTIONNEL POUR LES AMPOULES INCAND. / HALOGÈNES
OPCIONAL PARA INCANDESCENTE/HALÓGENA
FONCTIONNEMENT | OPERACIÓN
Vis noire
Tornillo negro
Fil vert
Cable verde
Garantie limitée :
www.lutron.com/TechnicalDocumentLibrary/
369-119_Wallbox_Warranty.pdf
Garantía limitada:
www.lutron.com/TechnicalDocumentLibrary/
369-119_Wallbox_Warranty.pdf
©2013-2015 Lutron Electronics Co., Inc.
®
, Lutron, Claro, Satin Colors, Maestro, et C
•
L sont des
marques déposées de Lutron Electronics Co., Inc.
®
, Lutron, Claro, Satin Colors, Maestro y C
•
L son marcas
comerciales registradas de Lutron Electronics Co., Inc.
Maintenez
T
et
L
enfoncés jusqu'à
ce qu'un indicateur lumineux (IL)
clignote sur le gradateur MACL.
Mantenga pulsados
T
y
L
hasta que
parpadee una luz indicadora (IL) en el
atenuador MACL.
Ou | O
L
T
R
Maintenez
L
enfoncé jusqu'à ce que
l'indicateur lumineux (IL) du bas s'illumine.
Appuyez
R
jusqu'à ce que toutes les
ampoules soit allumées et stables (sans
scintillement) dans la pièce.
Tapez une fois sur
T
pour enregistrer
le réglage.
Mantenga pulsado
L
hasta que se alcance
la luz indicadora (IL) inferior.
Toque
R
hasta que todas las bombillas de
la habitación estén encendidas y estables (sin
parpadeo).
Toque una vez
T
para guardar la configuración.
Tapez une fois sur
T
pour éteindre
les ampoules.
Tapez sur
T
une fois de plus.
Si toutes les ampoules ne s'allument
pas ou demeurent instables,
recommencez l'étape 8a et à l'étape
8b, augmentez la lumière avec
R
.
Toque una vez
T
para apagar las bombillas.
Toque una vez
T
de nuevo.
Si todas las bombillas no se encendieran o
no fueran estables, repita el paso 8a y en el
paso 8b aumente la luz con
R
.
R
T
Retirez les sections centrales en cas de montage de 2 appareils
ou plus côte-à-côte. Voir le tableau des Caractéristiques
Nominales pour les nouvelles limites de puissance.
REMARQUE : Aucun déclassement n’est nécessaire pour
l’utilisation de AFC ou de DEL seulement.
Si monta dos o más dispositivos lado a lado retire las secciones
centrales. Para obtener los nuevos límites de potencia consulte la tabla de
Especificaciones Máximas.
NOTA: Cuando sólo se utilizan LFCA o LED no se requiere una reducción
de la potencia.
Pour la commutation des lumières depuis deux
emplacements, voir les instructions au verso.
Pour la commutation des lumières depuis un emplacement,
continuez à l'étape 2 ci-dessous.
Para las luces conmutadas desde dos ubicaciones, consulte las
instrucciones al dorso.
Para las luces conmutadas desde una sola ubicación, continúe al
siguiente paso 2.
Retirez | Eliminar
Utilisez | Utilice
12 / 14 AWG
Utilisez | Utilice
14 AWG
Gardez | Mantener
OU
O
13 mm
(½ po/pulg)
Monter les lumières
Aumentar la intensidad de
las luces
Appuyez pour allumer /
éteindre les lumières.
Appuyez deux fois pour
allumer les lumières à
pleine intensité.
Appuyez et maintenez
enfoncé pour une
extinction progressive
différée
Toque para encender/apagar
las luces.
Toque dos veces para encender
las luces a su intensidad plena.
Pulse y mantenga pulsado para
obtener una atenuación con
demora hasta el apagado.
Baisser les lumières
Reducir la intensidad de
las luces
F
A
S
S
T
M
•
F
A
S
S
T
M
•
F
A
S
S
T
M
•
F
A
S
S
T
M
•
F
A
S
S
T
M
•
F
A
S
S
T
M
•
T
R
L
Affiche le niveau d'éclairage actuel
Exhibe el nivel corriente de luz
Indicateurs lumineux (IL)
Luces indicadoras (IL)
FASSTM
CARACTÉRISTIQUES NOMINALES POUR LES TYPES DE CHARGES MIXTES
ESPECIFICACIONES MÁXIMAS PARA TIPOS DE CARGA MIXTOS
INC / HAL
Incandéscentes / halogènes
Incandescente / halógena
0 W + 600 W 500 W 400 W
1 W – 25 W + 500 W 400 W 300 W
26 W – 50 W + 400 W 300 W 200 W
51 W – 75 W + 300 W 200 W 100 W
76 W – 100 W + 200 W 100 W 50 W
101 W – 125 W + 100 W 50 W 0 W
126 W – 150 W + 0 W 0 W 0 W
LED
DEL
LFCA
CFL
AFC
Tirez la languette pour changer
l’ampoule.
Para el reemplazo de la bombilla tire
de la lengüeta hacia afuera.
T
L
et | y
IL
MACL
www.lutron.com/macl
www.lutron.com/macl
+
IMPORTANT | IMPORTANTE
1. AVERTISSEMENT : À utiliser seulement pour des luminaires installés de
façon permanente avec des lampes fluorescentes compactes, des ampoules
DEL, halogènes, ou incandescentes variables vissables. Pour éviter toute
surchauffe et d'endommager d'autres équipements, n’utilisez pas ce produit
pour commander des prises, des appareils motorisés ou des appareils
alimentés par transformateur de basse tension.
2. Effectuez l'installation en conformité avec les codes électriques en vigueur.
3. En l'absence de «moyens de mise à la terre» existant dans le boîtier
d’encastrement, le National Electrical Code
® (NEC®) de 2011 autorise
l’installation d'une commande en remplacement si 1) une façade non
métallique et incombustible est utilisée avec des vis de fixation non
métalliques ou 2) le circuit est protégé par un disjoncteur différentiel de fuite
à la terre (DDFT). Lors de l’installation d’une commande selon l’une de ces
méthodes, capuchonnez ou retirez le fil vert avant de visser la commande
dans le boîtier d’encastrement et utilisez une plaque murale adéquate telle
que les plaques des séries Claro
® ou Satin Colors® de Lutron.
4. Le câblage va-et-vient ne doit utilisez qu'un gradateur Maestro
® C•L® et un
gradateur auxiliaire Maestro
® (MA-R, MA-RR, MSC-AD) ou un interrupteur
existant. Le câblage de permutateur ne doit utilisez qu'un gradateur Maestro
®
C•L
® et jusqu'à 9 gradateurs auxiliaires Maestro® (MA-R, MA-RR, MSC-AD).
5. Utilisation à l'intérieur seulement entre 0 °C et 40 °C (32 °F et 104 °F).
6. Les gradateurs Maestro
® C•L® peuvent être chauds au toucher en
fonctionnement normal.
7. La longueur totale maximale de câble entre le gradateur Master et le dernier
gradateur auxiliaire (MA-R, MA-RR, MSC-AD) est de 46 m (150 pi).
8. Ne nettoyez les gradateurs qu'avec un chiffon doux et humide.
Ne pas utiliser de nettoyants chimiques.
1. PRECAUCIÓN: Sólo utilizar con artefactos permanentemente instalados, con lámparas
de rosca fluorescentes compactas atenuables, LED de rosca atenuables, o lámparas
halógenas o incandescentes. Para evitar el sobrecalentamiento y posibles daños a
otros equipos, no utilizar para controlar receptáculos, artefactos accionados a motor o
aparatos provistos de transformador.
2. Instale de acuerdo con todos los códigos eléctricos locales y nacionales.
3. Cuando no existan “medios de conexión a tierra” en la caja de empotrar, el Código
Eléctrico Nacional 2011
® (NEC®) permite que un control sea instalado como reemplazo
si 1) se utiliza una placa frontal no metálica y no combustible con tornillos de fijación
no metálicos o 2) el circuito está protegido por un disyuntor de falla de tierra (GFCI).
Cuando instale un control de acuerdo con estos métodos, cubra o retire el cable verde
antes de atornillar el control a la caja de empotrar, y utilice una placa frontal adecuada
tal como las placas de pared de las series Claro
® o Satin Colors® de Lutron.
4. El cableado de tres vías sólo debe utilizar un atenuador Maestro
® C•L® y un atenuador
acompañante Maestro
® (MA-R, MA-RR, MSC-AD) o un interruptor existente. El
cableado de cuatro vías sólo debe utilizar un atenuador Maestro
® C•L® y hasta nueve
atenuadores acompañantes Maestro
® (MA-R, MA-RR, MSC-AD).
5. Sólo para uso bajo techo entre 0 °C y 40 °C (32 °F y 104 °F).
6. Los atenuadores Maestro
® C•L® pueden sentirse calientes al tacto durante su
operación normal.
7. La máxima longitud de cable entre el atenuador principal y el último atenuador
acompañante (MA-R, MA-RR, MSC-AD) es de 46 m (150 pies).
8. Sólo limpie los atenuadores con un paño suave y húmedo.
No utilice ningún limpiador químico.
Enroulez complètement le fil autour de la vis et serrez (A), ou
dénudez les fils isolés sur 13 mm (1/2 po) et insérez-les dans les
bornes enfichables (B).
Envuelva completamente los cables alrededor del tornillo y apriete (A),
o pele los cables aislados hasta 13 mm (1/2 pulg) e insértelos en los
terminales a presión (B).
Si vos ampoules scintillent, bourdonnent ou s'éteignent, il est possible que
vos ampoules ne sont pas compatibles. Veuillez consultez
www.lutron.com/macl pour vérifier la liste des ampoules compatibles.
Si sus bombillas parpadean, zumban o experimentan bajones, podrían no ser
compatibles. Para consultar la lista de bombillas compatibles visite www.lutron.com/macl
A B
¡Si se utilizan bombillas LFCA
o LED, deben ser compatibles
con Lutron
®!
Para obtener la lista de bombillas compatibles...
Videos útiles...
Programación y operación avanzadas...
Escenarios de cableado adicionales...
Reemplazando un atenuador con
otro atenuador...
o
Si usted tiene tres o más interruptores
controlando una luz...
Visite: www.lutron.com/macl
Para las luces conmutadas desde sólo una ubicación
(Para las luces conmutadas desde dos ubicaciones, consulte las instrucciones al dorso)
ADVERTENCIA: PELIGRO DE DESCARGA
ELÉCTRICA.
Podría ocasionar lesiones graves o la muerte. Antes
de instalar desconecte la alimentación eléctrica en
el disyuntor o el fusible.
AFC
LFCA
DEL
LED
A
B
C

OFF
ON
AVERTISSEMENT : RISQUE D'ÉLECTROCUTION.
Peut causer des blessures graves ou la mort. Coupez l'alimentation
au niveau du disjoncteur du fusible avant l'installation.
1
Couper l’alimentation au niveau du disjoncteur
Desconecte el suministro eléctrico en el disyuntor
6a
Raccordez le gradateur MASTER (MACL) et recâblez les AUTRES interrupteurs EXISTANTS
Raccordez le gradateur MASTER (MACL) et recâblez les AUTRES interrupteurs EXISTANTS
6b
Raccordez le nouveau gradateur MASTER (MACL) et le gradateur AUXILIAIRE Maestro
® (MA-R, MA-RR, ou MSC-AD)
Conecte el nuevo atenuador PRINCIPAL (MACL) y un atenuador ACOMPAÑANTE Maestro® (MA-R, MA-RR, o MSC-AD)
7
Installez tous les appareils avec les vis fournies
Monte todos los dispositivos utilizando los tornillos suministrados
8
Connectez l’alimentation au niveau du disjoncteur
CONECTE el suministro eléctrico en el disyuntor
9
Programmer le gradateur MASTER pour une utilisation
avec un interrupteur existant
Programe el atenuador PRINCIPAL para su uso con el interruptor existente
2
Retirez (mais ne déconnectez pas) les appareils existants
Retire (pero no desconecte) los dispositivos existentes
3
Marquez le fil sur la borne COMMUN
Marque el cable del terminal COMÚN
Voir l'étape 8 au verso pour plus de détails.
Para obtener detalles consulte el Paso 8 al dorso.
Voir l'étape 4 au verso pour plus de détails.
Para obtener detalles consulte el Paso 4 al dorso.
5
Retirez les sections centrales
(en cas d’encastrement des appareils)
Retire las secciones centrales (si se agruparan dispositivos)
4
Déconnectez les fils
Desconecte los cables
OU | O
Sur les deux appareils existants, marquez le fil (par exemple, avec du ruban
isolant) raccordé à la vis d’une couleur différente (noir en général) des autres.
Cette borne à vis peut également être étiquetée « COMMUN » ou « COM ».
Ne comprend pas la vis de terre.
En ambos dispositivos existentes marque el cable (por ejemplo, utilizando cinta aisladora)
que está conectado al tornillo que es de color diferente (generalmente negro) que todos
los demás. Este terminal atornillable puede también rotularse como “COMÚN” o “COM”.
No incluye el tornillo de puesta a tierra.
Vue arrière / latérale de l'appareil existant
Vista trasera/lateral del dispositivo existente
Fil de terre (nu ou vert)
Cable de tierra (desnudo o verde)
Fil de terre (nu ou vert)
Cable de tierra (desnudo o verde)
Fil de terre (nu ou vert)
Cable de tierra (desnudo o verde)
Vis bleue
Tornillo azul
Vis noire
Tornillo negro
Vis en laiton
Tornillo de latón
Fil vert
Cable verde
Fil vert
Cable verde
Fil vert
Cable verde
Fil de terre (nu ou vert)
Cable de tierra (desnudo o verde)
Vis de terre
Tornillo de tierra
Fil de pontage
(inclus dans la boîte)
Cable de puente
(incluido en la caja)
Vis de couleur différente
Tornillo de color diferente
Fil restant
Cable restante
Vis en laiton
Tornillo de latón
Vis bleue
Tornillo azul
Vis noire
Tornillo negro
Maintenez
T
et
R
enfoncés jusqu'à ce qu'un
indicateur lumineux (IL) clignote sur le gradateur
MACL.
Mantenga pulsados
T
y
R
hasta que parpadee una
luz indicadora (IL) en el atenuador MACL.
T R
Avec
L
, sélectionnez IL 1 lorsqu'un interrupteur
existant est utilisé.
IL4 est l'indicateur lumineux par défaut pour un
gradateur auxiliaire Maestro®.
Utilizando
L
, seleccione IL 1 cuando se esté
empleando un interruptor existente.
IL4 es la predeterminada para un atenuador
acompañante Maestro
®.
L
IL1
Tapez une fois sur
T
pour enregistrer le réglage.
Toque una vez
T
para guardar la configuración.
T
Fil étiqueté
Cable marcado
Fil étiqueté
Cable marcado
10
Régler la plage de gradation pour les DEL et les AFC
Ajuste el rango de atenuación de los LED y los LFCA
OPTIONNEL POUR LES AMPOULES INCANDÉSCENTES / HALOGÈNES
OPCIONAL PARA INCANDESCENTE/HALÓGENA
SAUTEZ CETTE ÉTAPE SI VOUS UTILISEZ UN GRADATEUR AIXILIAIRE MAESTRO®
OMITA ESTE PASO SI USTED ESTÁ UTILIZANDO UN ATENUADOR ACOMPAÑANTE MAESTRO®
MACL
MA-R
Pour la commutation des lumières depuis deux emplacements
Choisissez l'un des deux scénarios de câblage ci-dessous (6a ou 6b) :
Seleccione uno de los dos escenarios de cableado mostrados a continuación (6a o 6b):
+
Vous DEVEZ effectuer l'étape 9 (à droite) pour
que le gradateur fonctionne correctement.
IL
Vis bleue
Tornillo azul
Vis noire
Tornillo negro
Vis en laiton
Tornillo de latón
Fil étiqueté
Cable marcado
Fil étiqueté
Cable marcado
MACL
COM
(Pour la commutation des lumières depuis trois emplacements ou plus, veuillez consulter www.lutron.com/macl)
Enroulez complètement le fil autour de la vis et serrez (A), ou dénudez les fils
isolés sur 13 mm (1/2 po) et insérez-les dans les bornes enfichables (B).
Envuelva completamente los cables alrededor del tornillo y apriete (A), o pele los
cables aislados hasta 13 mm (1/2 pulg) e insértelos en los terminales a presión (B).
L'un vers le disjoncteur et
'autre vers la/les lumière(s)
À TITRE D'ILLUSTRATION
SEULEMENT
(NE PAS DÉCONNECTER)
Uno al disyuntor y uno a
las luces
SÓLO PARA PROPÓSITOS DE
ILUSTRACIÓN
(NO DESCONECTAR)
L'un vers le disjoncteur et
'autre vers la/les lumière(s)
À TITRE D'ILLUSTRATION
SEULEMENT
(NE PAS DÉCONNECTER)
Uno al disyuntor y uno a
las luces
SÓLO PARA PROPÓSITOS DE
ILUSTRACIÓN
(NO DESCONECTAR)
Para las luces conmutadas desde dos ubicaciones
(Para las luces conmutadas desde tres o más lugares, visite www.lutron.com/macl)
ADVERTENCIA: PELIGRO DE DESCARGA ELÉCTRICA.
Podría ocasionar lesiones graves o la muerte. Antes de instalar
desconecte la alimentación eléctrica en el disyuntor o el fusible.
Utilisez | Utilice
12 / 14 AWG
Utilisez | Utilice
14 AWG
OU
O
13 mm
(½ po/pulg)
Usted DEBE realizar el Paso 9 (a la derecha)
para que el atenuador funcione correctamente.
et
y
B
C
A