
EN

2
Index
Please read and follow these nstructons
c a r e f u l l y a n d o p e r a t e t h e m a c h n e
accordngly. Ths booklet provdes mportant
gudel nes f or saf e use , ns talla ton,
mantenance and some useful advce for best
results when using your machine.
Keep all documentation in a safe place for
future reference or for any future owners.
Please check that the followng tems are
delvered wth the applance:
● Instruction manual
● Guarantee card
● Energy label
By placng the mark on ths product,
we are confrmng complance to all relevant
European safety, health and envronmental
requrements whch are applcable n
legslaton for ths product.
Check that no damage has occurred to
the machine during transit. If it has, call for
service by GIAS. Failure to comply with the
above can compromise the safety of the
appliance. You may be charged for a service
call if a problem with your machine is caused
by misuse.
1. SAFETY REMINDERS
2. DRAIN HOSE KIT: FITTING
INSTRUCTIONS
3. PREPARING THE LOAD
4. CLEANING AND ROUTINE
MAINTENANCE
5. WATER CONTAINER
6. DOOR AND FILTER AND CONDENSER
7. CONTROLS AND INDICATORS
8. SELECTING THE PROGRAMME AND
SET THE FUNCTION
9. TROUBLESHOOTING CUSTOMER
SERVICE

1.
SAFETY REMINDERS
EN
Ths applance can be used by
chldren aged from 8 years and
above and persons wth
reduced physcal,sensory or
mental capabltes or lack of
experence and knowledge f
t h e y h a v e b e e n g v e n
supervson or nstructon
c o n c e r n n g u s e o f t h e
applance n a safe way and
u n d e r s ta n d t h e h a z a rd s
nvolved.Chldren shall not play
wth the applance. Cleanng and
user mantenance should not be
made by chldren wthout
supervson.Chldren of less than
3 years should be kept away
unless contnuously supervsed.
WARNING Misuse of a tumble
dryer may create a fire hazard.
Ths applances s ntended to be
used n household and smlar
applcatons such as:
Staff ktchen areas n shops,
offces and other workng
envronments;
By clents n hotels, motels and
o t h e r r e s d e n t a l t y p e
envronments;
B e d a n d b r e a k fa s t t y p e
A dfferent use of ths applance
from household envronment or
from typcal housekeepng
functons,as commercal use by
expert or traned users, s
excluded even n the above
applcatons.
If the applance s used n a
manner nconsstent wth
ths t may reduce the lfe of
the applance and may vod
the m a n u f a c t u r e r ’ s
warranty. Any damage to
the applance or other
damage or loss arsng
through use that s not
consstent wth domestc or
household use ( even f
located n a domestc or
household envronment)
shall not be accepted by the
manufacturer to the fullest
extent permtted by law.
This machine should only be
used for its intended purpose
as described in this manual.
Ensure that the nstructons
for nstallaton and use are
fully understood before
operatng the applance.
Do not touch the appliance
when hands or feet are damp
or wet.
Do not lean on the door when
loading the machine or use
the door to lift or move the
machne.
Do not allow children to play
with the machine or its
controls.
3
-
-
-
-
envronments.
Farm houses;
WARNING Do not use the
product if the fluff filter is not in
position or is damaged; fluff
could be gnted.
WARNING Where the hot
surface symbol is located
the temperature rise durng
operaton of the tumble dryer
may be n excess of 60
degrees C.
Remove the plug from the
electricity supply. Always
re mo ve t he p lu g bef or e
cleanng the applance.
Do not continue to use this
machine if it appears to be
faulty.
Lint and fluff must not be
allowed to collect on the floor
around the outside of the
machne.
The fnal part of a tumble dryer
cycle occurs wthout heat (cool
down cycle) to ensure that the
tems are left at a temperature
that ensures that the tems wll
not be damaged.
The tumble dryer s not to be
used f ndustral chemcals
have been used for cleanng.
WARNING: Never stop a
tumble dryer before the end of
the dryng cycle unless all
tems are quckly removed and
spread out so that the heat s
dsspated.
Maximum load drying weight :
see energy label.
Installaton
Do not use adapters, multiple
connectors and/or extensions.
Never install the dryer against
curtains and be sure to prevent
items from falling or collecting
behind the dryer.
The appliance must not be
installed behind a lockable
door, a sliding door or a door
with a hinge on the opposite
side to that of the tumble dryer.
4
●
●
●
●
●
●
●
●
●
●
●
●
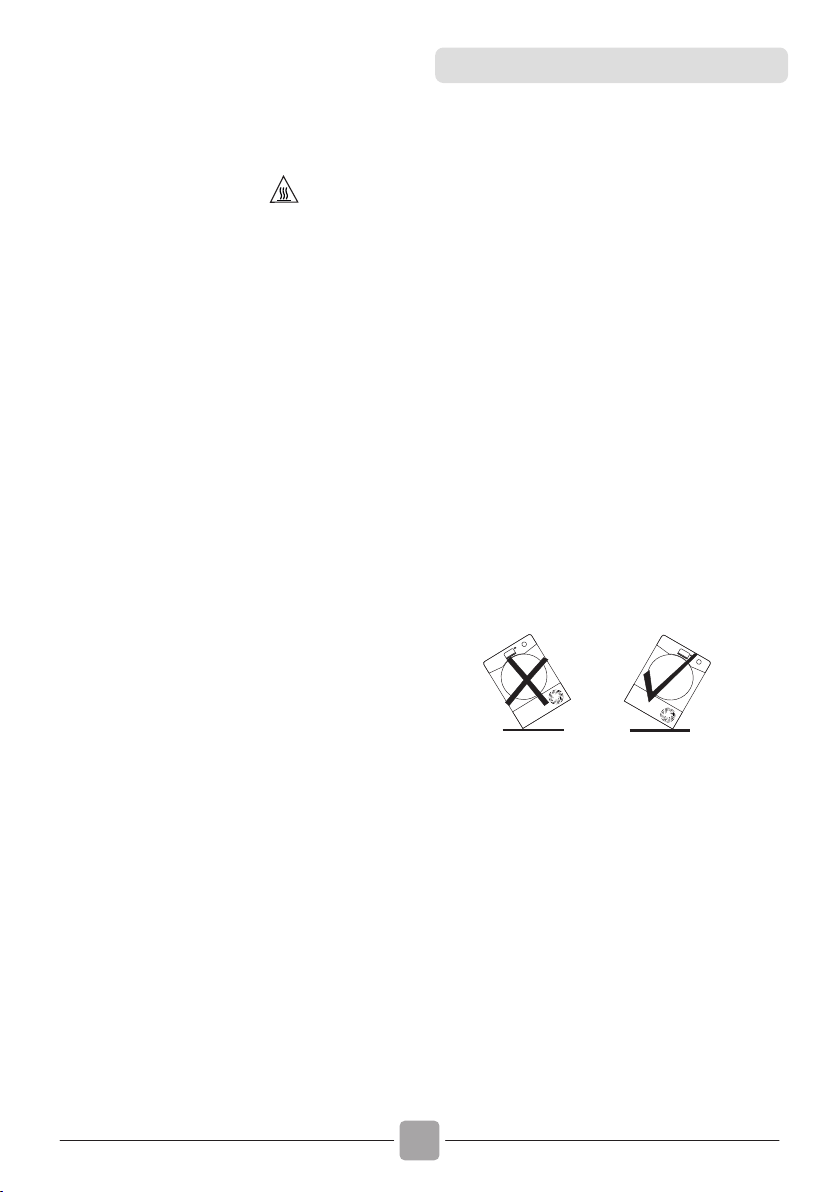
Important: Durng transport
ensure that the dryer s n an
uprght poston, f t's necessary
you can only flp n the sde shown;
Cauton: If the product s n
dfferent sde, wat at least 4 hours
before swtchng on so that the ol
c a n f l o w b a c k n t o t h e
compressor. Falure to do ths
could result n damage to the
compressor.

EN
5
Do not dry unwashed items in
the tumble dryer.
WARNING Do not tumble dry
f a b r i c s t r e a t e d w it h d r y
cleaning fluids.
WA R N I N G F o a m r u b b e r
materials can, under certain
circumstances, when heated
b e c o m e g n t e d b y
spontaneous combuston.
Items such as foam rubber
(latex foam), shower caps,
waterproof textles, rubber
backed artcles and clothes or
pllows ftted wth foam rubber
pads MUST NOT be dred n the
tumble dryer.
Always refer to the laundry care
l a b e l s f o r d i r e c t i o n s o n
suitability for drying.
Clothes should be spin dried or
thoroughly wrung before they
are put into the tumble dryer.
Clothes that are drppng wet
should not be put nto the dryer.
Lighters and matches must not
be left in pockets and NEVER
use flammable lquds near the
machne.
Glass fibre curtains should
NEVER be put in this machine.
Skin irritation may occur f other
garments are contamnated
wth the glass fbres.
Items that have been soiled
w i t h s u bs t a n ce s s uc h a s
cooking oil, acetone, alcohol,
The Laundry
pe t r o l , k e r o s e n e , s p o t
removers, turpentne, waxes
and wax removers should be
washed n hot water wth an
extra amount of detergent
before beng dred n the
tumble dryer.
Fabric softeners, or similar
products, should be used as
specified by the fabric
softener nstructons.
Ventlaton
Adequate ventlaton must
be provded n the room
where the tumble dryer s
located to prevent gases
from applances burnng
other fuels, ncludng open
fres, beng drawn nto the
room durng operaton of the
tumble dryer.
Installng the rear of the
applance close to a wall or
vertcal surface.
There should be a gap of at
least 12 mm between the
m a c h n e a n d a n y
obstrubtons.The nlet and
outlet should be kept clear of
ob s t r u c t o n . To e n s u r e
adequate ventlaton the
space between the bottom
of the machne and the floor
must not be obstructed.
Check regularly that the ar
flowng through the dryer s
not restrcted.
●
●
●
●
Do not nstall the product n a
low temperature room or n a
room where there s a rsk of frost
occurrng. At temperature around
freezng pont the product may
not be able to operate properly:
there s a rsk of damage f the
water s allowed to freeze n the
hydraulc crcut (valves, hoses,
pumps). For a better product
performance the ambent room
temperature must be between
5-3 5°C. Plea se n ot e t hat
operatng n cold condton
(between +2 and +5°C) mght
smply some water condensaton
6
Check frequently the fluff flter
a f t er u s e, a n d c le an , f
necessary.
Prevent tems from fallng or
collectng behnd the dryer as
these may obstruct the ar nlet
and outlet
NEVER nstall the dryer up
aganst curtans.
In cases where the dryer s
nstalled on top of a washng
machne, a sutable stackng kt
must be used accordng to the
follow confguraton.
Stackng kt Mod 35100019: for
mnmum washng machne
depth 49 cm
Stackng kt Mod 35900120: for
mnmum washng machne
depth 51 cm
The stackng kt shall be one of
that above, obtanable from our
spare servce.
The nstructons for nstallaton
and any fxng attachments, are
provded wth the stakng kt.
●
●
●
●
-
-
Ar Outlets n the Base
and water drops on the floor.
EN
Envronmental Issues
● All p a c k a ging m a t e r ials u s e d are
environmentally-friendly and recyclable.
Please help dispose of the packaging via
environmentally-friendly means. Your local
council will be able to give you details of
current means of disposal.
● To ensure safety when disposing of an old
tumble dryer disconnect the mains plug from
the socket, cut the mains power cable and
destroy this together with the plug. To prevent
children shutting themselves in the machine
break the door hinges or the door lock.
European Directive 2012/19/EU
Ths applance s marked accordng
to the European drectve 2012/19/EU
on Waste Electrcal and Electronc
Equpment (WEEE).
WEEE contans both pollutng substances (whch
can cause negatve consequences for the
envronment) and basc components (whch can
be re-used). It s mportant to have WEEE
subjected to specfc treatments, n order to remove
and dspose properly all pollutants, and recover
and recycle all materals.
Indvduals can play an mportant role n ensurng
that WEEE does not become an envronmental
ssue; t s essental to follow some basc rules:
- WEEE should not be treated as household
waste.
- WEEE should be handed over to the relevant
collecton ponts managed by the muncpalty or by
regstered companes. In many countres, for large
WEEE, home collecton could be present.
In many countres, when you buy a new applance,
the old one may be returned to the retaler who has
to collect t free of charge on a one-to-one bass, as
long as the equpment s of equvalent type and
has the same functons as the suppled equpment.
Electrcal Requrements
Tumble dryers are suppled to operate at a
of 220V, 60 Hz sngle phase.
Check that the supply crcut s rated to at least
6 A.
Electricity can be extremely dangerous.
This appliance must be earthed.
The socket outlet and the plug on the
appliance must be of the same type.
Do not use multiple adapters and/or
extension leads.
The plug should be accessible for
disconnection after the appliance has
been installed.
You may be charged for a service
call if a problem with your machine is
caused by incorrect installation.
If the mains cord on this appliance
is damaged, it must be replaced by a
special cord which is ONLY obtainable
from the spares service. It must be
installed by a competent person.
Do not plug the machine in and
switch it on at the mains until the
installation is completed.For your safety,
this dryer must be correctly installed. If
there is any doubt about installation, call
GIAS Service for advice.
GIAS Servce
● To ensure the continued safe and efficient
operation of this appliance we recommend that
any servicing or repairs are only carried out by
an authorised GIAS service engineer.
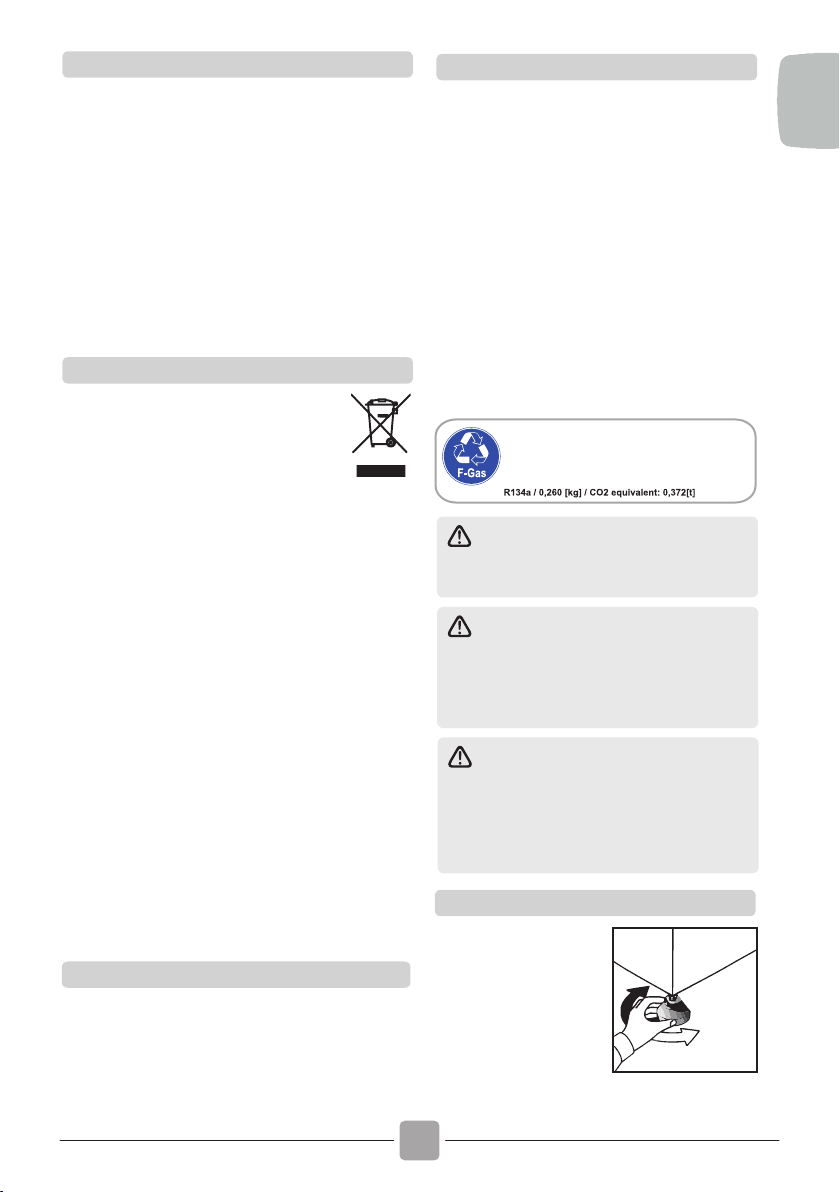
Adjustng the Feet
Once the machine is
in plac e the fee t
should be adjusted to
e n s u r e t h a t t h e
machine is level.
7
C o n t a n s f l u o r n a t e d
g r e e n h o u s e g a s e s .
Hermetcally sealed.
GWP1430
voltage
8
1
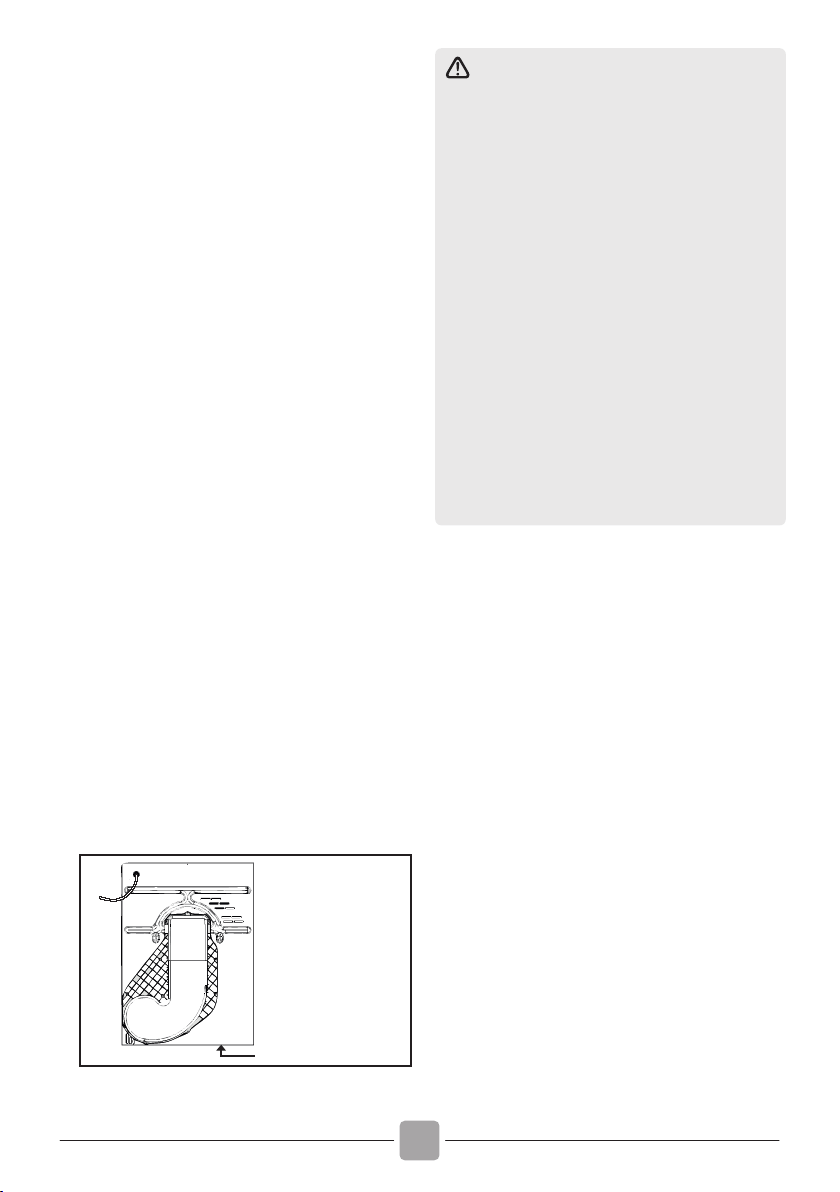
2.
DRAIN HOSE : FITTING
INSTRUCTIONS
To avod emptyng the water contaner after
each dryng cycle, the water can be dscharged
drectly to a waste water dran ppe (the same
dranage system as household snks). Water
Bye-Laws prohbt connecton to a surface
water dran. The waste water dran ppe should
be located adjacent to the tumble dryer.
The kt conssts of:1 hose and 1 tap.
WARNING! Switch off and remove the
tumble dryer plug from the electricity supply
before carrying out any work.
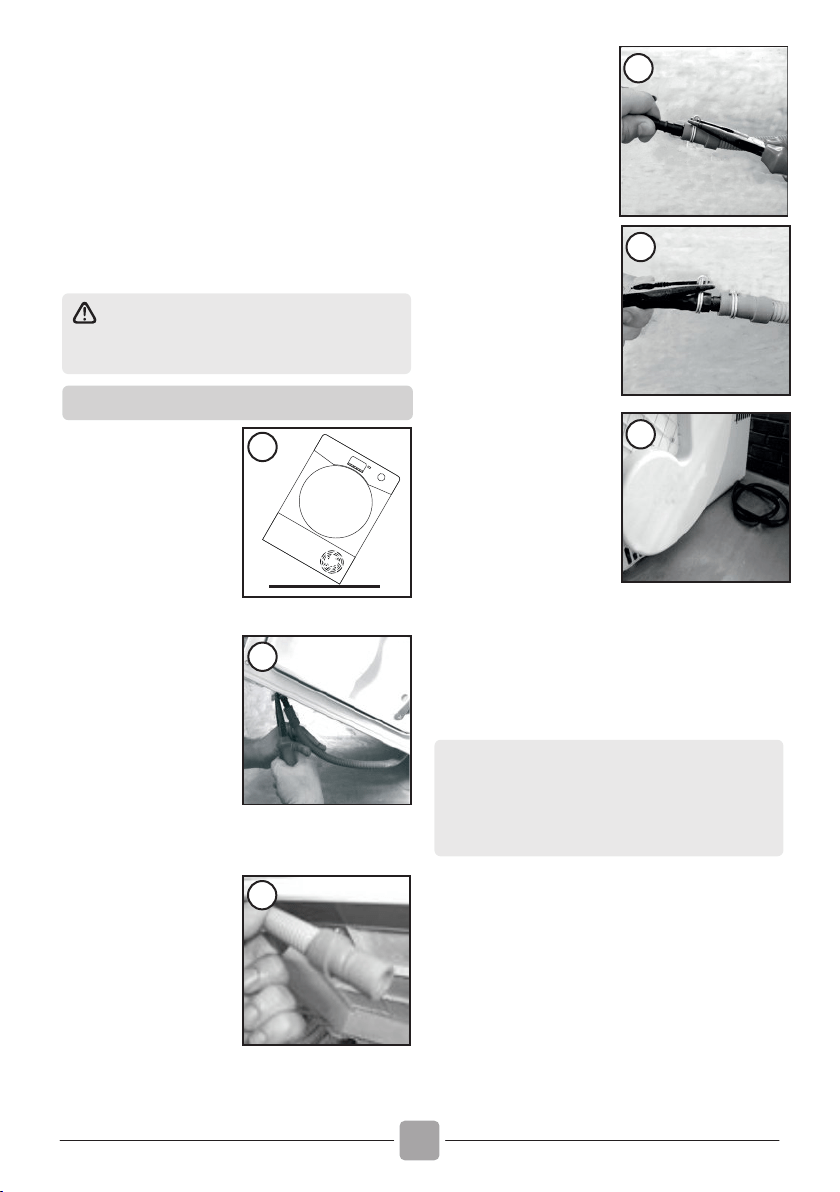
Fit the Hose as Follows:
1. Flp the machne
slowly to the rght
sde.
2. The waste water
ppe is situated at the
right-hand side of the
ma c h i n e ( s e e t h e
pcture). A grey hose
connects to the bridge
at the left hand sde of
the machne. Using
pliers, remove the
pipe retaining clip
from the bridge.
3. Pull the hose off the
bridge connection.
4. Attach the black
ho se from the kit,
(using the connector
a n d p i p e c l i p s
supplied), to the hose
re mo ve d f r o m th e
bridge connection.
5. Connect the new
drain hose to the waste
Water pipe.
6. Once the machne s
n place, check the
bottom to ensure that
the new hose does not
kink when pushing the
t u m b l e d r y e r i n t o
position.
Connect to the mains
electricity supply.
2
4
5
6
Cauton: If the product s n dfferent sde,
wat at least 4 hours before swtchng on so
that the ol can flow back nto the
compressor. Falure to do ths could result
n damage to the compressor.
3
EN
3.
PREPARING THE LOAD
Before usng the tumble dryer for the frst tme:
● Please read this instruction book thoroughly.
● Remove all items packed inside drum.
● Wipe the inside of the drum and door with a
damp cloth to remove any dust whch may have
settled n transt.
Make sure that the laundry you are going to
dry is suitable for drying in a tumble dryer, as
shown by the care symbols on each item.
Check that all fastenings are closed and that
pockets are empty. Turn the articles inside out.
Place clothes loosely in the drum to make sure
that they don't get tangled.
Clothes Preparaton
Do Not Tumble Dry:
Silk, nylon stockings, delicate embroidery,
fabrics with metallic decorations, garments
with PVC or leather trimmings.
IMPORTANT: Do not dry articles which
have been treated with a dry cleaning fluid or
rubber clothes (danger of fire or explosion).
During the last 15 minutes the load is always
tumbled in cool air.
Only put into the tumble dryer laundry which has
been thoroughly wrung or spin-dried. The drier
the laundry the shorter the drying time thus
saving electricity.
ALWAYS
● Check that the filter is clean before every
drying cycle.
NEVER
● Put dripping wet items into the tumble dryer,
this may damage the appliance.
Energy Savng
. .
.
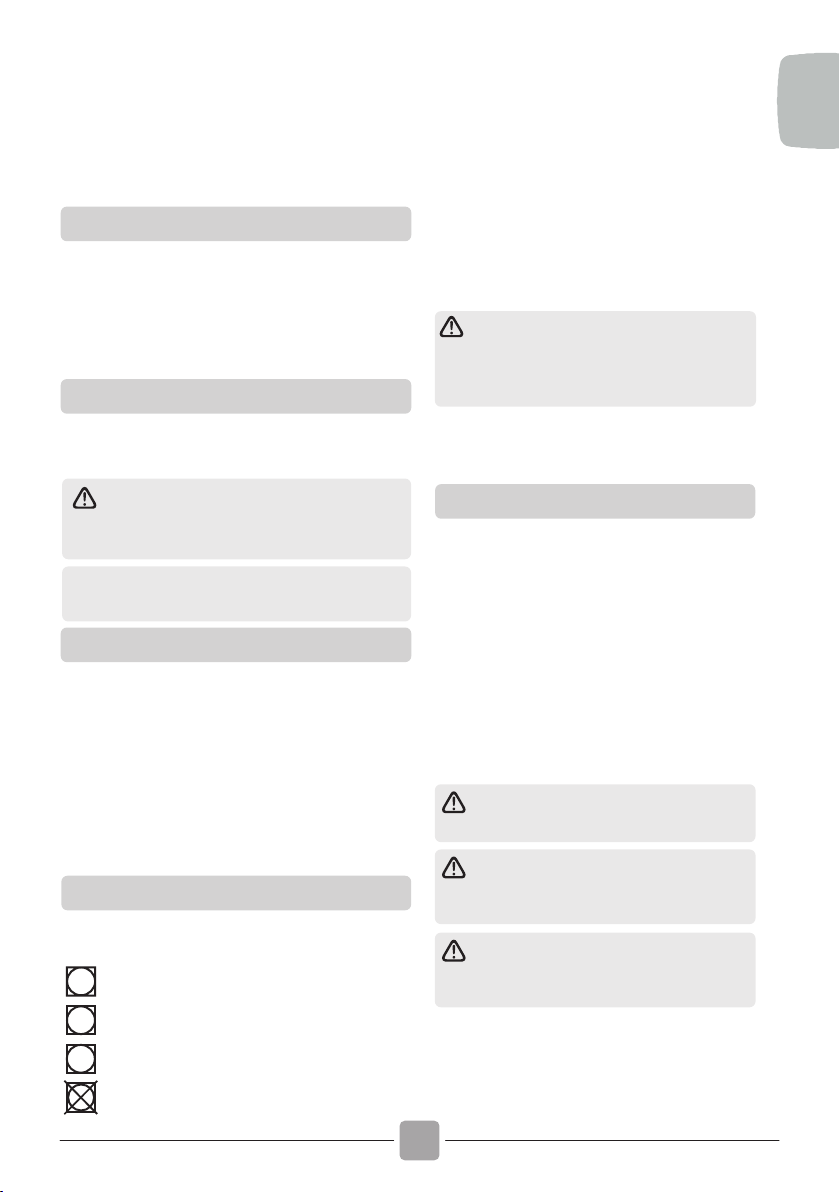
● By care symbols
These can be found on the collar or inside seam:
Suitable for tumble drying.
Tumble drying at high temperature.
Tumble drying at low temperature only.
Do not tumble dry.
Sort the Load as Follows
Do not overload the drum, large tems
w h e n w e t e x c e e d t h e m a x m u m
admssble clothes load (for example:
sleepng bags, duvets).
If the item does not have a care label it must
be assumed that it is not suitable for tumble
drying.
● By amount and thickness
Whenever the load is bigger than the dryer
capacity, separate clothes according to
thickness (e.g. towels from thin underwear).
● By type of fabric
Cottons/lnen: Towels, cotton jersey, bed
and table linen.
Synthetcs: Blouses, shirts, overalls, etc.
made of polyester or polyamid, as well as
for cotton/synthetic mixes.
4.
CLEANING AND ROUTINE
MAINTENANCE
WARNING! The Drum, door and load
may be very hot.
IMPORTANT Always switch off and
remove the plug from the electricity supply
before cleaning this appliance.
For electrical data refer to the rating
label on the front of the dryer cabinet (with
the door open).
Cleanng the Dryer
● Cl ean t he fi lter and e mpty the w ater
contaner after every dryng cycle.
● Regularly clean the condenser.
● After each period of use, wipe the inside
of the drum and leave the door open for a
whle to allow crculaton of ar to dry t.
● Wipe the outside of the machine and the
door wth a soft cloth.
● DO NOT use abrasive pads or cleaning
agents.
● To prevent the door sticking or the build
up of fluff clean the nner door and gasket
wth a damp cloth after every dryng cycle.
9
10
5.
WATER CONTAINER
The water removed from the laundry durng
the dryng cycle s collected n a contaner
nsde the door of the dryer. When the
contaner s full the ndcator on the
control panel wll lght, and the contaner
MUST be empted. However, we recommend
that the contaner s empted after each
dryng cycle.
NOTE: Very little water will collect during the
first few cycles of a new machine as an
internal reservoir is filled first.
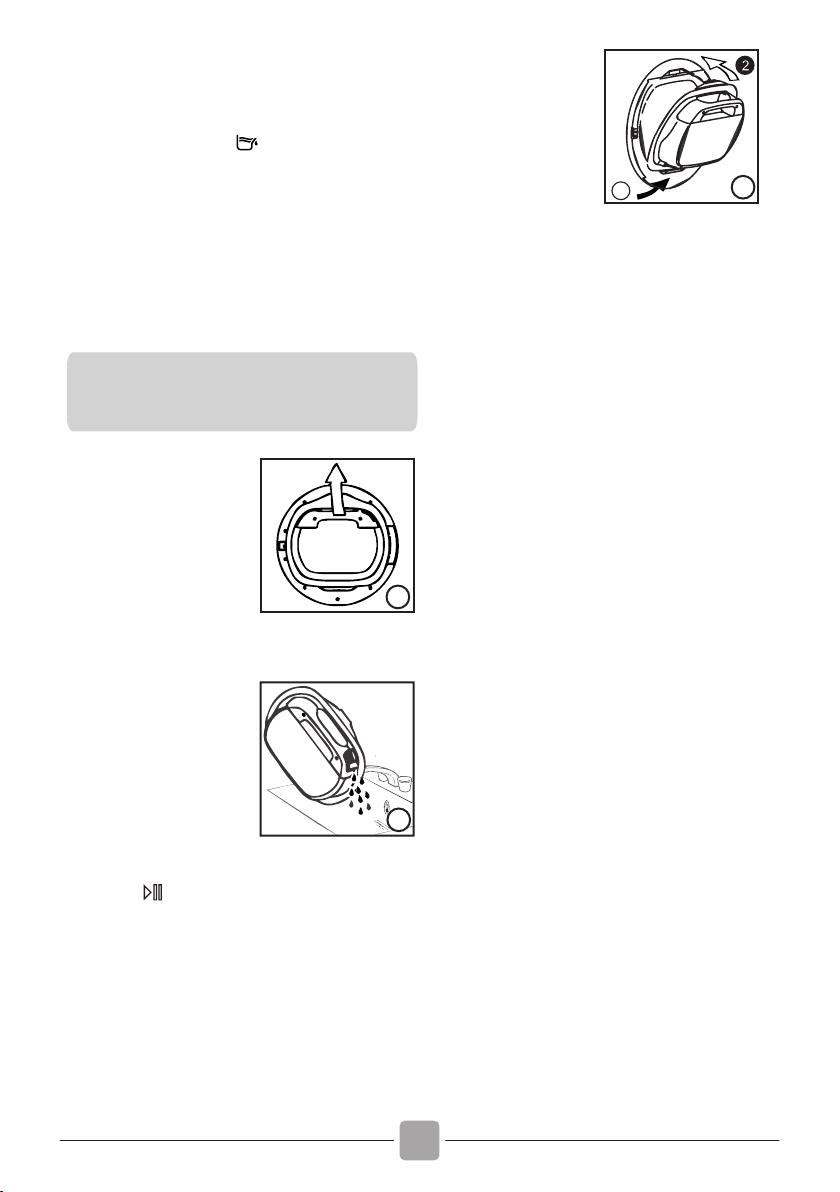
To remove the contaner
tank n door drawer
1. Gently pull out the
water contaner holdng
the handle. (A)
When t s full the
water contaner wll
wegh about 6 kg.
2. T l t t h e w a t e r
contaner to empty the
water out through the
spout. (B)
When empty, replace
the water contaner
back as shown; (C) first
insert the base of the
container into position
a s s h o w n ( 1 ) t h e n
gentle push the top into
position (2).
3. Press Button to
restart the cycle.
A
B
1
C
NOTE: If you have
the opton of dranage
near to the dryer you
c a n u s e t h e
d s c h a r g e k t t o
provde a permanent
dranage for the water
c o l l e c t e d n t h e
contaner of the dryer.
Ths means that you
don't have to empty
the water container.
6.
DOOR and FILTER
Pull on handle to open the door.
To restart the dryer, close the door and press
Start / Pause button.
WARNING! When the tumble dryer is in
use the drum and door may be VERY HOT.
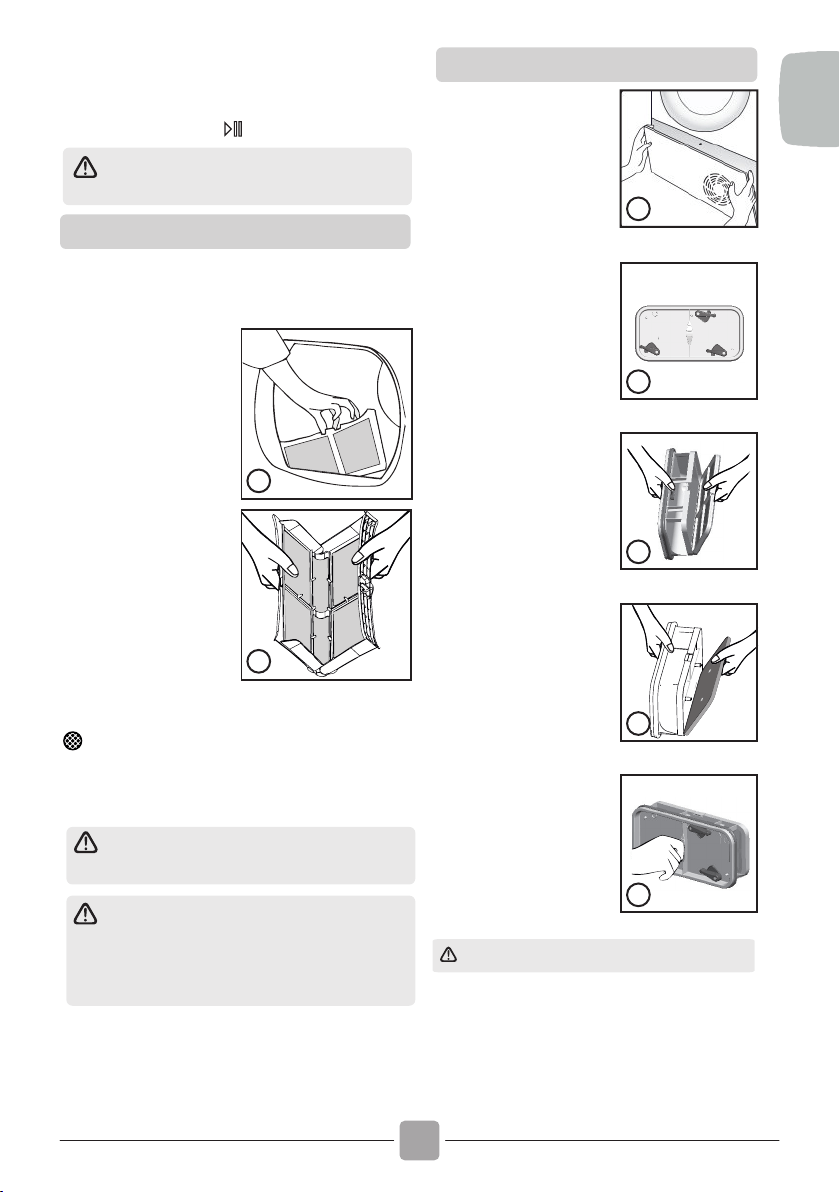
Flter
IMPORTANT: To mantan the effcency of
the dryer check that the fluff flter s clean
before each dryng cycle.
1. P u l l t h e f i l t e r
upwards.
2. Open filter as shown.
3. Gently remove lint
using a soft brush or
your fingertips.
4. S n a p t h e f i l t e r
together and push
back into place.
1
2
Flter Care Indcator
Lghts when the flter needs cleanng.
If the laundry is not drying check that the filter
is not clogged.
IF YOU CL E AN FILTE R UNDER
WATER, REMEMBER TO DRY IT.
WARNING! If you open the door mid
cycle, before the cool-down cycle has
completed,the handle may be hot. Please use
extreme caution when attempting to empty
the water reservoir during the cycle.
EN
11
To Clean the Condenser Flter
1. R e m o v e t h e
kickplate.
2. g
levers anti-clockwise
and pull out the front
cover.
3. Gently remove the
flter frame and clean
any dust or fluff with a
cloth from the flter. Do
not use water to clean
the flter.
4. Remove the sponge
gently from ts place
and then wash the
sponge by holding it
under a running tap
turning it so to remove
any dust or fluff.
5. Refit the front cover
ensuring it is in the
c o r r e c t w a y ( a s
indicated by the arrow)
and pushed firmly into
place.
levers by turning them
clockwise.
6. Refit the kickplate.
1
2
3
4
5
Clean the flters before every cycle
Turn the lockin
three
three the Lock
7.
CONTROLS AND
INDICATORS
12
A
1
7
6
5
4
3
2
8
B
D
C
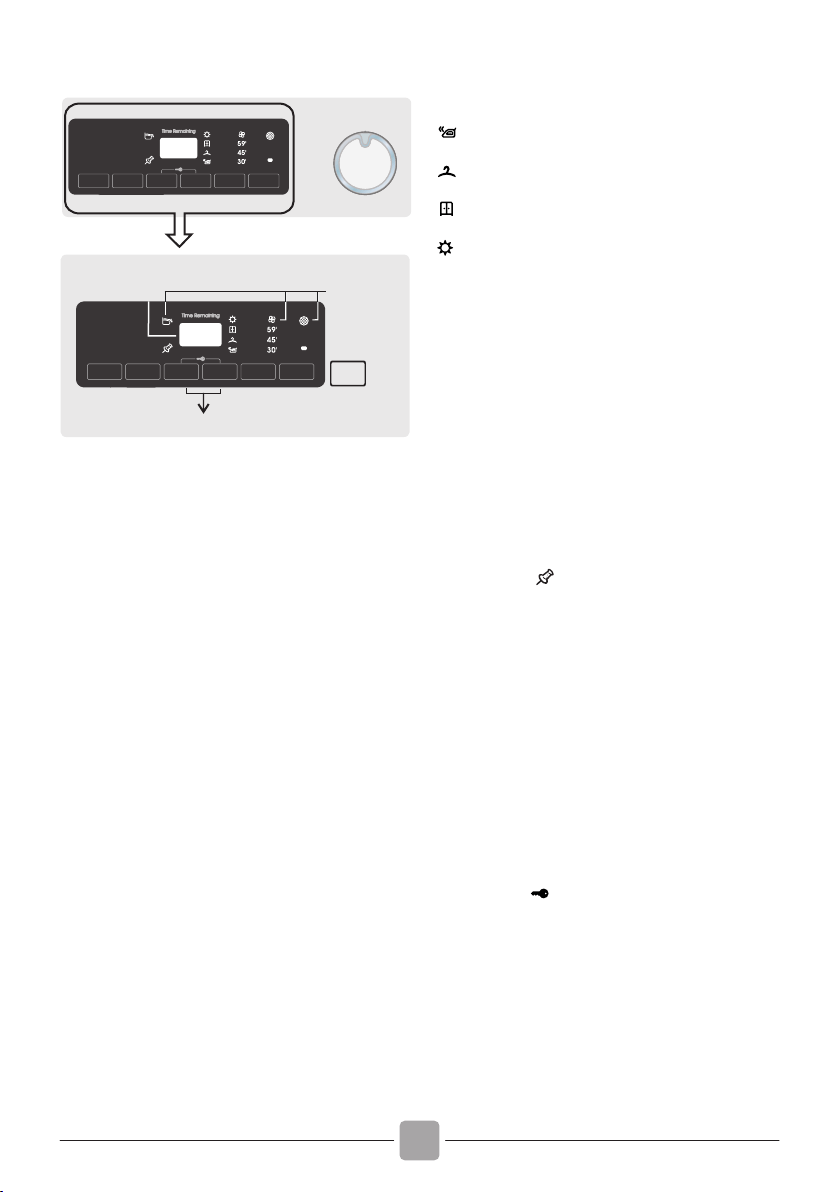
A-Programme Selector - Rotatng the knob
n both drectons t's possble to select the
desred dryng program. To cancel the
selectons or swtch off the dryer rotate the
knob on OFF.
B- Dsplay Dgt - The dsplay shows the
remanng tme for dryng, the postponed
tme n case of delayed start selecton and
other notfcatons settng.
C-Buttons -
1.Start/Pause Button - To start the selected
program and/or suspend t.
2. Super Easy Iron - Ths opton allows to
reduce folds and tangles, thanks to
alternatng movements of the drum durng
and after dryng and automatcally, settng
the ron dryng level (the dryng level settng
can be modfed after the opton selecton).
The opton can be set up to fve mnutes after
the start of the cycle and s actvated only on
automatc cycles.
3.Rapds Button - It's possble swtch an
automatc program to RAPID program, up to
3 mnutes after the start of the cycle. The
progressve pressure ncreases the tme (30-
45-59 mnutes).
After ths selecton to reset the automatc
functonng s necessary to swtch off
the dryer. In case of ncompatblty, all LEDs
flash quckly for 3 tmes.
4.Dryng Selecton Button
It allows to set the desred dryness level
edtable opton up to 5 mnutes after the
startng of the cycle:
- Ready to Iron : It leaves the garments
slghtly wet to facltate ronng.
- Dry Hanger : To get garment ready to be
hang.
- Dry wardrobe : For laundry that can be
drectly stored.
-Extra-dry : To get completely dry
garments, deal for full load.
Ths applances s equpped wth Dryng
Manager Functon. On automatc cycles,
each level of ntermedate dryng, pror to the
reachng the selected one, s ndcated by
flashng the lght ndcator correspondng to
the degree of dryng reached.all LEDs flash
quckly for 3 tmes.
5.Delay Start Button - It allows to delay the
start of the program from 1 to 24 hours n 1-
hour ntervals. The delay selected s shown
on the dsplay.
After pressng the START button the tme showed
decrease hour after hour.
Openng of the porthole wth delayed start set,
after re-closng the porthole, press start agan to
resume the countng.
6.Memo - Ths opton allows you to
store the optons set on a cycle.
STORAGE When the cycle s runnng push the
button "memory" for three seconds. The control
lght "memory" flashes for three tmes and stores
the set optons connected to the cycle selected n
the flange.
Recall: After the selecton of the cycle Push the
button "memory" for recall the stored optons
(not the cycle).
7.Tme cycle selecton - It's possble transform
a cycle from automatc to programmed, up to 3
mnutes after the start of the cycle.
The progressve pressure ncreases the tme n
10-mnute ntervals. After ths selecton to reset
the automatc functonng s necessary to
swtch off the dryer. In case of ncompatblty, all
LEDs flash quckly for 3 tmes.
8.Keylock - Ths functon allows to block
unwanted changes of the set optons on the
bezel , durng dryng phase.
Actvaton/ Inactvaton: Push 4 and 5 buttons
smultaneously for two seconds . The sgn
"LOC" appears on the dsplay. Unlockng the
opton, on the dsplay appears the sgn "Unl",
only once. In case of openng of 'porthole' wth
actvated key lock, the cycle stops but the lock
s kept: to restart the cycle, you must remove
the lock and restore Start. When the dryer s
off, the opton s automatcally nactvated.Key
lock can be modfed at any tme of the cycle.
dry
ng
dry
ng
The wool dryng cycle of ths
machne has been approved by
The Woolmark Company for the
dryng of machne washable
wool products provded that the
products are washed and dred
accordng to the nstructons on
the garment label and those
ssues by the manufacturer of ths machne M1530.
In UK, Ere, Hong Kong and Inda the Woolmark trade
mark s a Certfcaton trade mark.
Dryng Gude
The standard cycle COTTON DRY ( ) s the
most energy effcent and best suted for dryng
normal wet cotton laundry.
Technical Specifications
Drum capacty 115
Maxmum load See energy label
Heght 85 cm
Wdth 60 cm
Depth 60 cm
Energy class See energy label
D- Led
Water tank - It lghts up when t's necessary to
empty the condensate water tank.
Flter cleanng - It lghts up when the cleanng of
the flters s requested (the door and the lower flter.)
Coolng - It lghts up when the cycle s n the fnal
coolng phase.
13
EN
Max.capacty declared
Max.4 Kg
Maxmum Dryng Weght
Cottons
Synthetcs or Delcates
The real duraton of dryng cycle
depends by the startng humdty level of
the laundry due to spn speed, type and
amount of load, cleanlness of flters and
ambent temperature.
OPERATION
1. Open the door and load the drum
with laundry. Ensure that garments do
not hinder closure of the door.
2. Gently close the door pushing it
slowly until you hear the door 'click'
shut.
3. Turn the Programme Selector dial to
select the required drying programme
(see Programme Guide).
4. Press the button. The dryer will
start automatically and the indicator
above the button will be continuously
lit.
5. If the door is opened during the
programme to check the laundry, it is
necessary to press to recommence
drying after the door has been closed.
6. W h e n t h e c y c l e i s n e a r i n g
completion the machine will enter the
cool down phase, the clothes will be
tumbled in cool air allowing the load to
cool down.
7. Following the completion of the
cycle the drum will rotate intermittently
t o m i n i m i z e c r e a s i n g . T h i s w i l l
continue until the machine is switched
OFF or the door is opened.
Do not open the door durng the automatc
programs n order to obtan a proper dryng.
Automatc Ant crease
Ths opton automatcally actvates an ant-
creases movement of the drum, pre cycle n
case of actvaton of the delay and at the end
of dryng cycle for 6 hours. It s actvated
every 10 mnutes. To stop the movements
set the knob to OFF.
Useful when t's not possble to remove
mmedately the laundry.
Clean the flters before every cycle
ONLY FOR 10 KG CAPACITY TUMBLE
DRYER : CONNECT THE DRAIN HOSE FOR
RE C OV E RI N G C O ND E NSE R WAT ER
ACC OR DI NG TO IN ST RU CT IO N AT
CHAPTER 2

8.
SELECTING THE PROGRAMME AND SET THE FUNCTION
14
PROGRAM
PROGRAM DESCRIPTION
DRYING
TIME
(mn)
CAPACITY
(kg)
The rght cycle to dry cottons, sponges and towels.
Program Eco normatve (hang dry) dryng. The most effcent
program n energy consumpton. Sutable for cottons and lnens.
To dry all together dfferent knd of fabrcs as cotton ,lnen,
mx, synthetcs.
Specfc cycle dedcated to dry huge lnens sze lke curtans,
sheets and tableclothes. Thanks to a specfcs movement of the
drum the lnens wll be dry mnmazng tangles and folds.
The perfect cycle to remove bad smells from the lnens
smoothng creases.
Ths s a warm cycle that n only 12 mnutes helps to relax folds
and creases
Ths specfcs cycle has been conceved to dry shrts mnmzng
tangles and folds thanks specfc movements of the drum. It's
recommended to take out the lnens mmedately after dryng cycle.
To dry delcate and synthetc fabrcs that need an accurate
and specfc treatment.
Dedcated to dry unformly fabrcs lke jeans or denm. It's
recommended flp over the garments before dryng.
Dedcated to techncal garments for sport and ftness, dryng
gently wth specal care to avod shrnkng and deteroraton
of elastc fbers.
Woolen clothes: the program can be used to dry up to 1 kg of
laundry (around 3 jumpers). It s recommended to reverse all
clothes before dryng. Tmng can change due to dmensons
and thckness of load and to spnnng chosen durng
washng. At the end of the cycle, clothes are ready to be
worn, but f they are heaver, edges can be a bt wet: t s
suggested to dry them naturally. It s recommended to
unload clothes at the very end of the cycle. Attenton: feltng
process of wool s rreversble; please dry exclusvely clothes
wth symbol (symbol "ok tumble"); ths program s not
ndcated for acrylc clothes.
One specfcs cycle that dry and n the same tme helps to
reduce the man allergens as dustmtes, pet har, pollens and
resdual of powder detergents
Full
4
4
2.5
4
4
4
1
4
6
2.5
2.5
*
*
*
*
*
*
*
*
70’
*
*
* The real duraton of dryng cycle depends by the startng humdty level of the laundry due to spn speed, type
and amount of load, cleanlness of flters and ambent temperature.
A delcate and specfc cycle to dry dark or colour cotton or
syntethcs garments.
Full
WKH6PDUW7RXFK
Perfect
cycle
to
dry
duvets
and
revitalizing
the
smoothness of the
feathers.
This kind of cycle, thanks a special Rack, allows to dry 2 couples
of canvas shoes. It's raccommended take out the laces from the
shoes before drying them.
*
120’
220’
220’
4
*
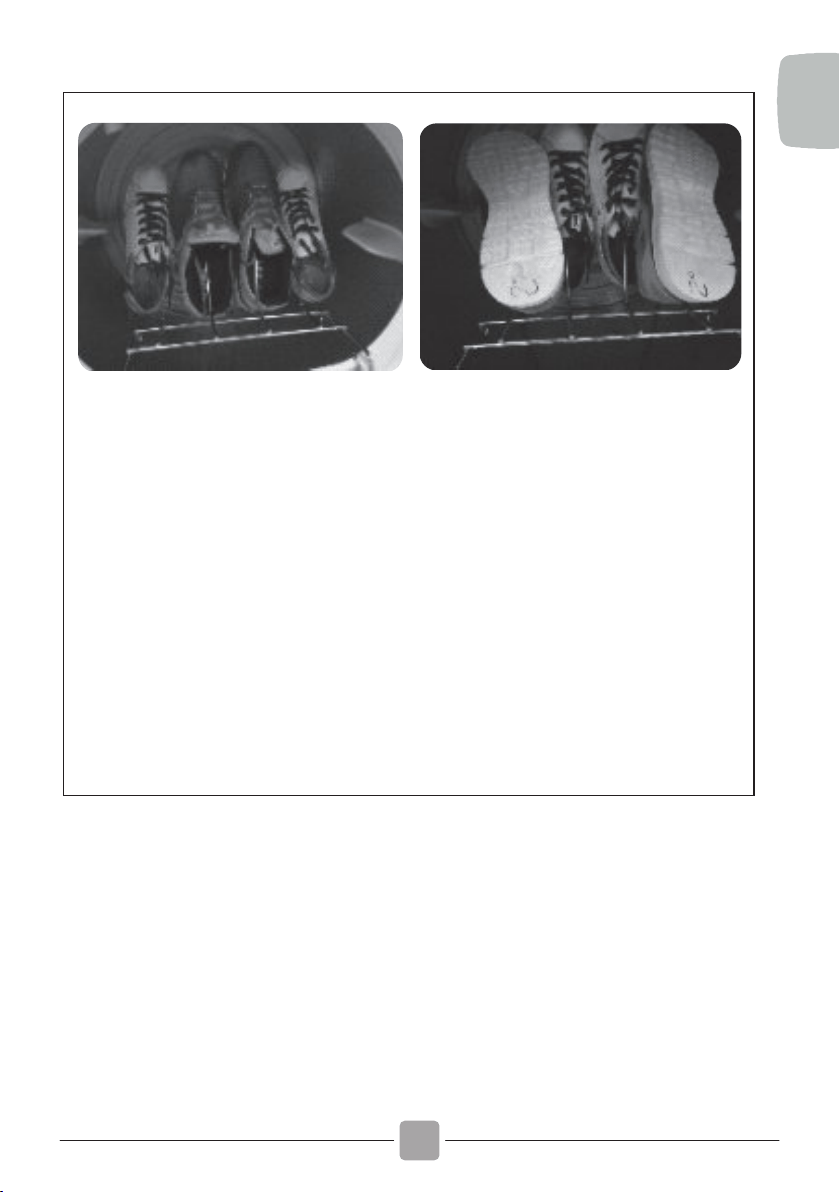
The shoes accessory supplied with the dryer, allows to dry up to 4
sneakers. You must remove the door filter replacing it with the rack.
Before inserting the shoes, remove any soles and place them in the
dryer.
Central hooks are also suitable for men's shoes, while side hooks are
more suitable for children's or women's shoes (EU 39- UK 5.5). It is
advisable to turn the drum around to check for no interference.
Alternatively you can position the two side shoes with the sole up.
RACK FOR SHOES AND TRAINERS
15
EN

16
9.
TROUBLESHOOTING
What Mght be the Cause of...
Defects you can remedy yourself
Before callng servce for techncal advce please
run through the followng checklst. A charge wll
be made f the machne s found to be workng or
has been nstalled ncorrectly or used ncorrectly.
If the problem perssts after completng the
recommended checks, please call Servce, they
may be able to assst you over the telephone.
Tme dsplay to end could change durng
dryng cycle. The tme to end s contnuously
checked durng the dryng cycle and the tme
s adjusted to gve the best estmaton tme.
The dsplayed tme may ncrease or decrease
durng the cycle and ths s normal.
Dryng tme s too long/clothes are not dry
enough…
● Have you selected the correct drying
time/programme?
● Were the clothes too wet? Were the clothes
thoroughly wrung or spindried?
● Does the filter need cleaning?
● Is the dryer overloaded?
The dryer does not operate…
● Is there a working electricity supply to the
dryer? Check using another appliance such as a
table lamp.
● Is the plug properly connected to the mains
supply?
● Is there a power failure?
● Has the fuse blown?
● Is the door fully closed?
● Is the dryer switched on, both at the mains
supply and at the machine?
● Has the drying time or the programme been
selected?
● Has the machine been switched on again after
opening the door?
The dryer s nosy…
● Switch off the dryer and contact GIAS
Service for advice.
The Indcator s on…
● Does the filter need cleaning?
The Indcator s on…
● Does the wat e r cont a iner ne e d
emptying?
CUSTOMER SERVICE
Should there stll be a problem wth your
d r y e r a f t e r c o m p l e t n g a l l t h e
recommended checks, please call
servce for advce.
They may be able to assst you over the
telephone or arrange for a sutable
appontment for an engneer to call under
the terms of your guarantee. However, a
charge may be made f any of the
followng apples to your machne:
● Is found to be in working order.
● Has not been installed in accordance
with the nstallaton nstructons.
● Has been used incorrectly.
Spares
Servce
Always use genuine spares, available
direct from service.
For service and repairs call your local
service engineer.
Th e m a nu f a c t u r e r dec l i ne s al l
responsibility in the event of any
printing mistakes in this booklet. The
manufacturer also reserves the right
to make appropriate modifications to
its products without changing the
essential characteristics.
EN


40012381
Time
Time
Whites
Whites
Cotton
Cotton
½
Whites
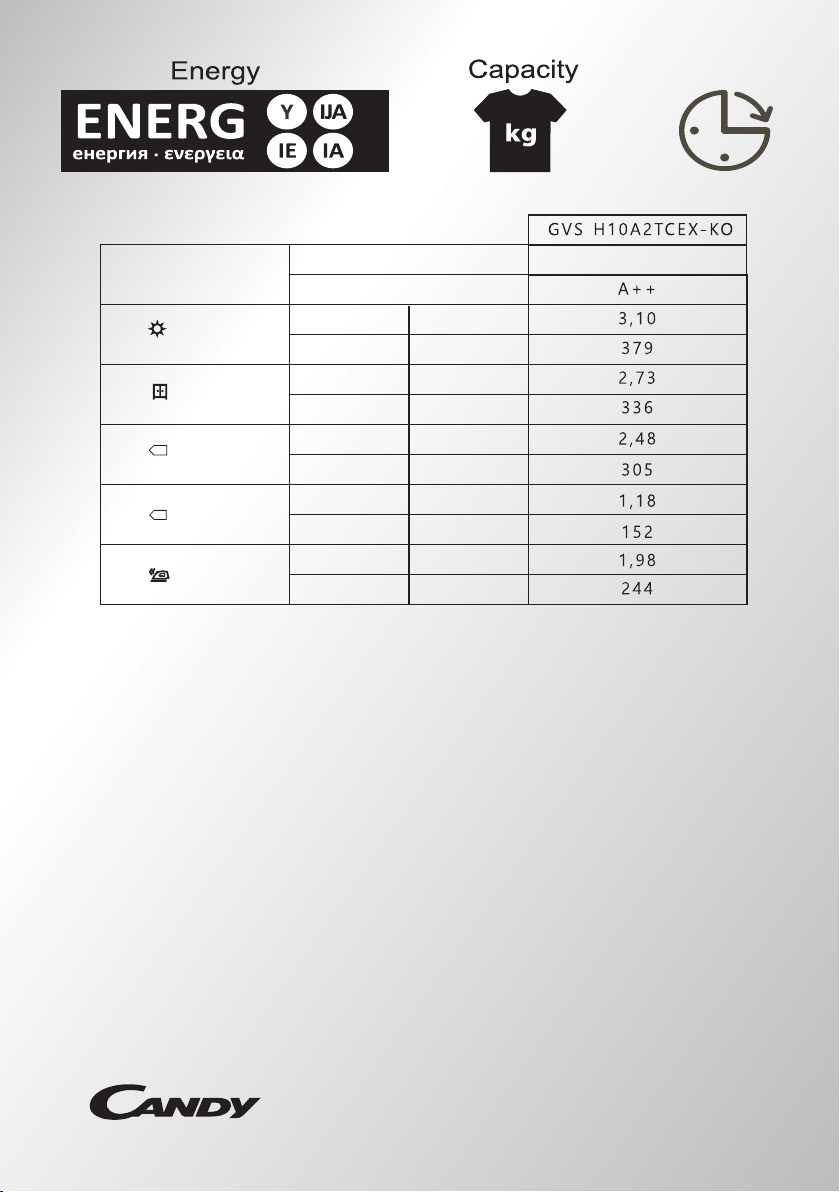
Energy kWh
Time Min.
Energy kWh
Time Min.
Energy kWh
Time Min.
Energy kWh
Time Min.
Energy kWh
Time Min.
Capacity (kg)
Class
10

