Hang your photo frame on the wall horizontally with nails or screws (not included).
2
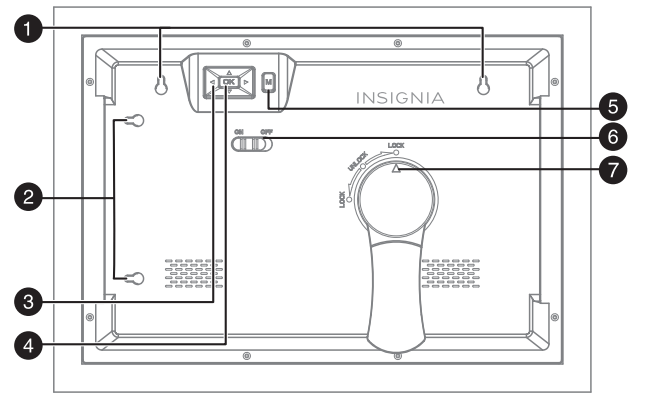
Portrait mounting holes
Hang your photo frame on the wall vertically with nails or screws (not included).
3
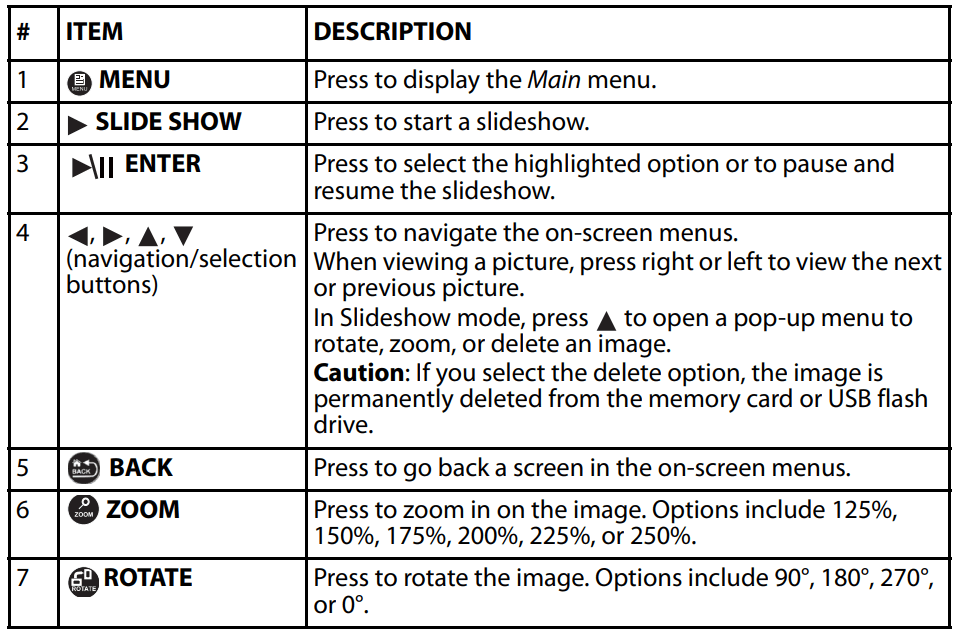
◄, ►, ▲,▼
(navigation) buttons
Press to navigate the on-screen menus.
When viewing a picture, press right or left to view the next or previous picture.
4
OK
Press to select the highlighted option or to pause and resume the slideshow.
5
M (menu)
Press to go to the main menu.
6
ON/OFF switch
Slide to turn your digital photo frame on or off.
7
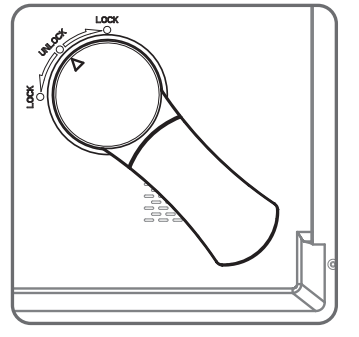
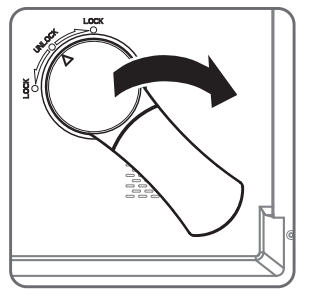
Stand lock
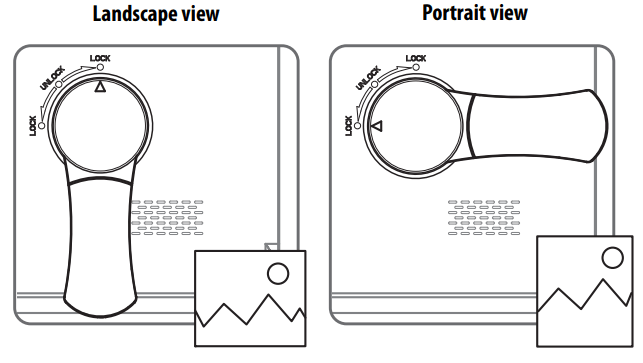
Turn the stand to LOCK to display in a landscape or portrait view.
Turn the stand to UNLOCK to remove the stand and hang your digital photo frame on the wall.
Side view
#
ITEM
DESCRIPTION
1
USB port
Plug a USB flash drive into this slot.
2
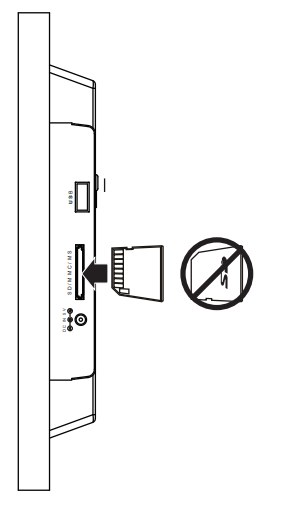
SD memory card slot
Plug a memory card into this slot. Your digital photo frame accepts:
SD™/SDHC™
MultiMediaCard™ (MMC)
Memory Stick™ (MS)
Memory Stick PRO™ (MS PRO).
3
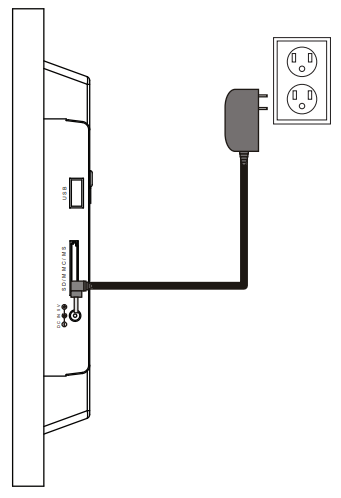
DC in jack
Plug the power adapter into this connector.
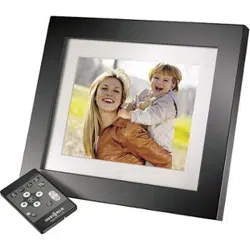
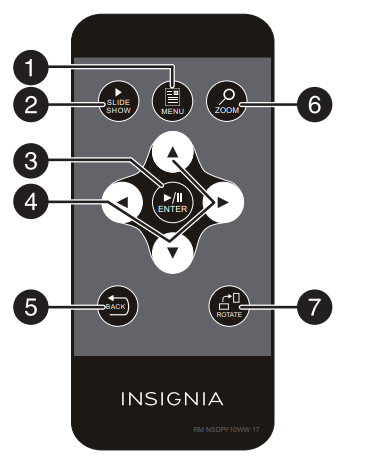
Remote control
Setting up your digital photo frame
Setting up the remote control
Remove the plastic tab that extends past the bottom edge of the remote control. This tab protects the battery. The remote control will not work until it is removed.
Setting up the photo frame
1. Lay the picture frame face-down.
2. Line up the arrow on the stand with the UNLOCK dot on the back of the photo frame, and insert the stand into the grooves.
3. Rotate the stand to LOCK the stand in a landscape or portrait view.
4. Plug the power adapter into the frame’s DC IN jack and into an power outlet.
5. Slide the ON/OFF switch to the ON position. The photo frame comes preloaded with pictures. You can turn on the photo frame and play back the preloaded demo pictures with no memory device inserted.
6. To play back your own pictures, insert a memory card or USB flash drive containing pictures into the corresponding slot on the photo frame. Make sure that the label on the memory card or USB flash drive faces the back of the photo frame.
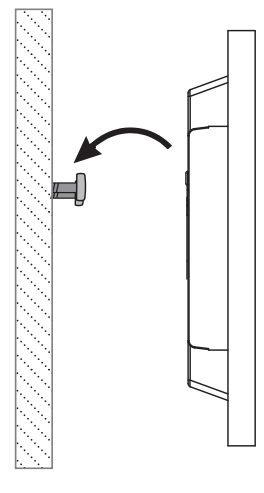
Hanging the photo frame
1. If the stand is attached, turn the stand to the UNLOCK dot and remove the stand.
2. Insert two nails (not included) into your wall, then align the photo frame’s mounting holes with the nails to hang your photo frame.
Using the digital photo frame menus
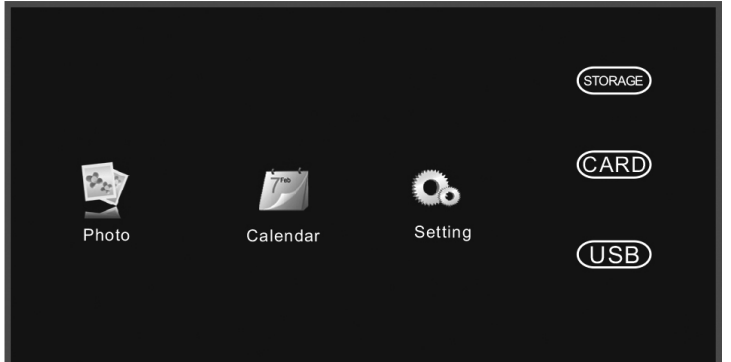
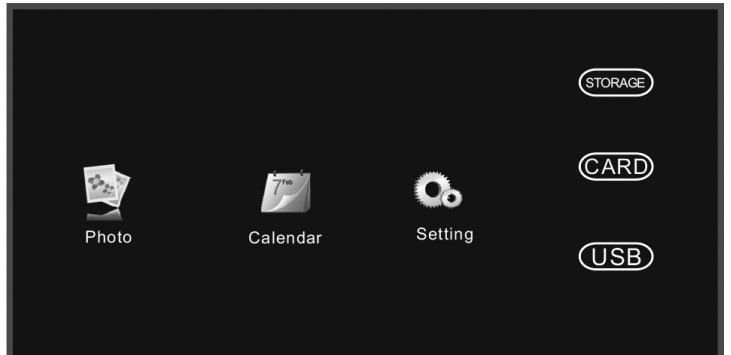
1. Slide the ON/OFF switch to turn the digital photo frame on. The menu opens. If a memory card or USB flash drive is inserted, a slideshow of the contents begins automatically.
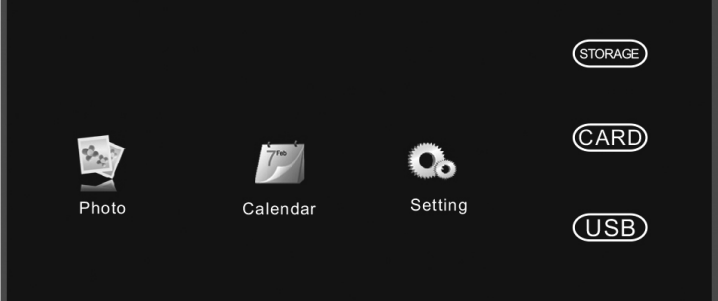
2. Press to highlight your selection, then press ENTER to confirm your selection. You can choose from the following options:
Photo: Starts the slideshow or displays thumbnails of the images on the media device. To change photo settings, see “Using the Photo Setup menu”
Calendar: Displays a calendar and clock. To change the calendar settings, see “Using the Calendar Setup menu”
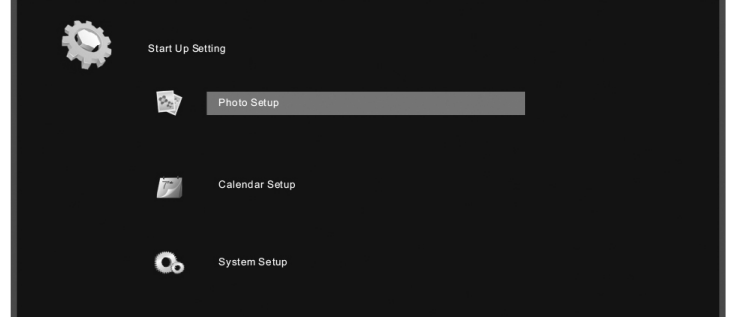
Setting: Opens the Start Up Setting menu.
STORAGE - View pre-loaded images stored in the internal memory of your digital photo frame.
CARD (SD/MMC/MS) - Access photos stored on a memory card.
USB - Access photos stored on a USB flash drive.
Using the Photo Setup menu
1. Slide the ON/OFF switch to turn the digital photo frame on. The menu opens.
2. Press to select Setting, then pressENTER. The Start Up Setting menu opens.
3. Press to highlight Photo Setup, then press ENTER. The Photo Setup menu opens.
4. Press to highlight your selection, then press ENTER to confirm your selection.
5. Press to change the settings, and press BACK to return to the Photo Setup menu:
Display Mode: Select the image Display Mode. Choose from Slideshow, Thumbnail, or Browse Mode.
Display Ratio: Select the image display size. Choose from Fit to Screen, Crop to Fill, or Full Screen.
Slideshow Duration: Select the duration of the slideshow. Choose from 5 sec, 15 sec, 30 sec, 60 sec, 5 min, or 15 min.
Slideshow Repeat: Select the way the photos are repeated. Choose Once or Repeat.
Slideshow Effect: Adjust the transition effect between each image in a slideshow. Choose from Random, S-curve, Partition, Erase, Blinds, Random lines, Grid, Gross, Zoom, Spiral, or Close.
Photo From: Select the memory source from which the photos are shown. Choose All Dir or Current Dir.
Photo Play Sequence: Select the order in which the photos are displayed. Choose Random or Sequence.
6. Press BACK repeatedly to leave the menus and return to photo Display Mode.
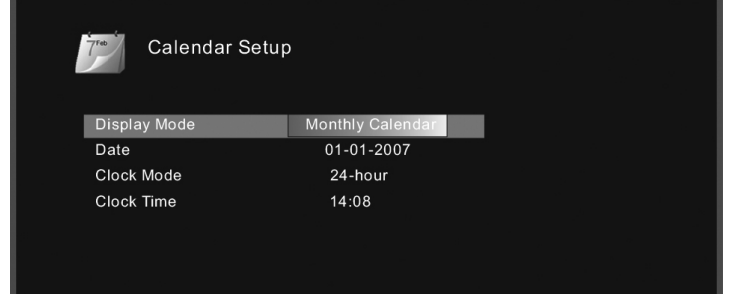
Using the Calendar Setup menu
1. Slide the ON/OFF switch to turn the digital photo frame on. The menu opens.
2. Press to select Setting, then press ENTER. The Start Up Setting menu opens.
3. Press to highlight Calendar Setup, then press ENTER. The Calendar Setup menu opens
4. Press to highlight your selection, then press ENTER to confirm your selection, or press BACK to return to the Setup menu:
Display Mode: Change the Calendar Display Mode. Choose from: Monthly, Calendar, and Clock.
Date: Press to change the month, then press to move to the day field. Press to change the day, then press to move to the year field. Press to change the year, then press ENTER when done. Press to select another menu option
Clock Mode: Change the Clock Mode. Choose 24-hour or 12-hour.
Clock Time: Press to change the hour, then press to move to the minute field. Press to change the minute, then press ENTER when done. Press to select another menu option.
5. Press BACK repeatedly to leave the menus and return to Photo Display Mode.
Using the System Setup menu
1. Slide the ON/OFF switch to turn the digital photo frame on. The menu opens
2. Press to select Setting, then press ENTER. The Start Up Setting menu opens.
3 Press to highlight System Setup, then press ENTER, or press MENU. The System Setup menu opens.
4. Press to highlight your selection, then press ENTER to confirm your selection or press BACK to return to the Setup menu:
Language: Select the on-screen display language. Choose from English, French, Spanish, or Portuguese.
Brightness: Adjust screen brightness (from 1~16).
Contrast: Adjust the screen contrast (from 1~16).
Saturation: Adjust the screen color saturation (from 1~16).
Auto Power On: Select if you want the photo frame to turn on at a specific time. Choose On or Off.
Auto Boot Time: Set the time you want the photo frame to turn on. Press to change the hour, then press to move to the minute field. Press to change the minute, then press ENTER when done. Press to select another menu option.
Auto Power Off: Select if you want the photo frame to turn off at a specific time. Choose On or Off.
Auto Shut Time: Set the time you want the photo frame to turn off. Press to change the hour, then press to move to the minute field. Press to change the minute, then press ENTER when done. Press to select another menu option.
Auto-Power Frequency: Select how often you want your photo frame to turn on and off automatically. Choose from: Everyday, Weekday, Weekend, or Once.
Reset default setting: Select to revert to the original factory settings.
Version: Press ENTER to display the software version number.
System upgrade: Select this option to upgrade the system software, if an upgrade is available. Check the Insignia website at www.insigniaproducts.com for available updates.
Playing a slideshow
Playing an instant slideshow from a memory card or USB device
Insert a memory card into the memory card slot or a USB flash drive into the USB port.A slideshow of pictures from the memory card or USB device automatically starts to play. This may take a few seconds, depending on the number of images on the card or flash drive.
Press ENTER to pause the slideshow. Press ENTER again to resume the slideshow.
To change slideshow settings, see “Using the Photo Setup menu”
Manually playing a slideshow
1. Insert a memory card or USB drive into one of the available memory slots or the USB port, or you can set up the slideshow to play from demo photos stored on the digital photo frame itself. The menu opens.
2. Press to select from the available options (memory card, USB flash drive, or onboard storage).
3. Press SLIDE SHOW. A slideshow begins that displays the pictures contained in the memory device you selected.
4. In Slideshow mode, press to open a pop-up menu to rotate, zoom, or delete an image.
5. To change slideshow settings, see “Using the Photo Setup menu”
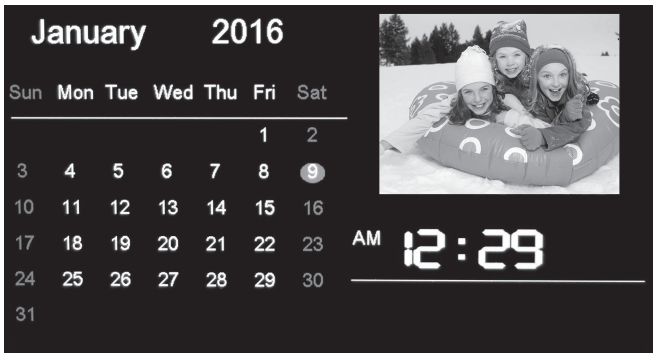
Using the Clock/Calendar view screen
1. Slide the ON/OFF switch to turn the digital photo frame on.
-OR
If viewing a slideshow, press MENU, then BACK. The main menu opens.
2 Pressto highlight Calendar, then press ENTER to display the calendar and clock.
3. Press BACK repeatedly to leave the OSD menus and return to Photo Display Mode.
Maintaining your digital photo frame
Cleaning your digital photo frame
Clean the outer surface of the digital photo frame with a clean, microfiber cleaning cloth.
Replacing the remote control battery
Squeeze the battery tray’s sides together and slide it out of the remote control.
Remove the old battery and insert the new 3V lithium battery (CR2025) into the battery tray. Match the polarity of the new battery with the plus sign (+) in the battery tray.
Slide the battery tray into the battery compartment until it clicks into place.
Notes:
Remove the battery when the charge is depleted.
If the remote control is not going to be used for an extended period of time, remove the battery
Troubleshooting
PROBLEM
POSSIBLE SOLUTION
The frame will not turn on.
The power adapter is not securely connected to the photo frame, or the power switch is not on. Check the power adapter connections, then switch the power on.
No photo files on the memory card.
The memory card may be incorrectly inserted. Make sure that the label on the card is facing the back of the digital photo frame. Do not force a memory card into the slot.
The photo file does not play.
The images on the card may be in an incompatible format. Make sure that there is at least one supported image file (JPEG) on the memory card.
A memory device is inserted in the frame, but you can’t view your pictures.
Make sure that the memory device is one of the supported formats and that the files on the device are JPEG image files.
Turn the digital photo frame off and make sure that the memory device is inserted all the way into the slot or port and is inserted correctly, then turn it back on. After a few seconds, you should see your first picture.
Try formatting the device in FAT32 format.
Caution: Formatting the device erases all files on the device. Back up the files on the device to your computer before attempting to format the device.
Some digital cameras save images in formats other than JPEG. Refer to your camera’s manual for details.
The frame displays some pictures slower than others.
Higher resolution pictures load more slowly. Try using lower resolution pictures or down-sampling (compressing or resizing) them. See your camera’s user guide for instructions on down-sampling your pictures
Photos are not facing the correct direction.
Press ROTATE until the photo is facing the correct direction. Repeat for each photo
The stand does not stay in place.
Rotate the stand until its indicator is aligned with the LOCK on the back of the photo frame.


 to highlight your selection, then press ENTER to confirm your selection. You can choose from the following options:
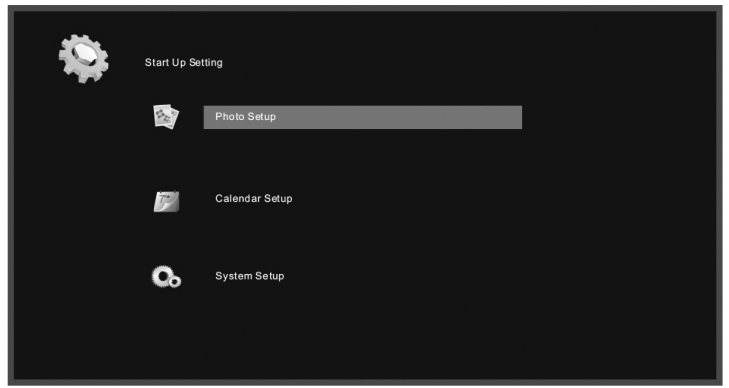
 to select Setting, then press
 ENTER. The Start Up Setting menu opens.
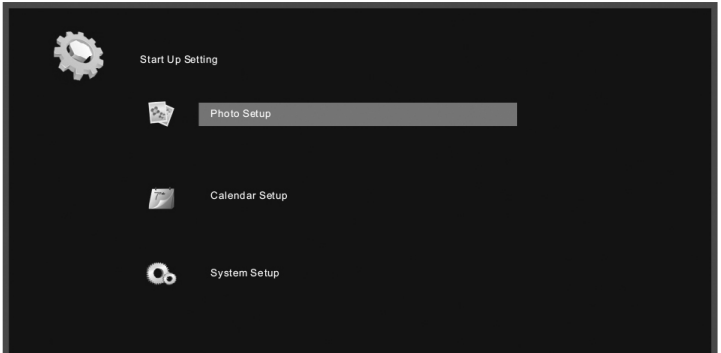
 to highlight Photo Setup, then press
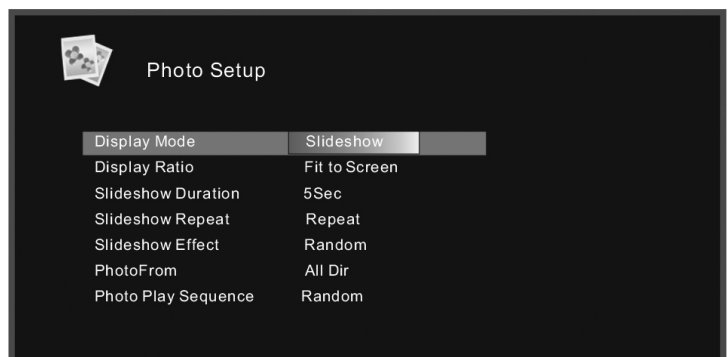
 to highlight your selection, then press
  to change the settings, and press
  BACK to return to the Photo Setup menu:
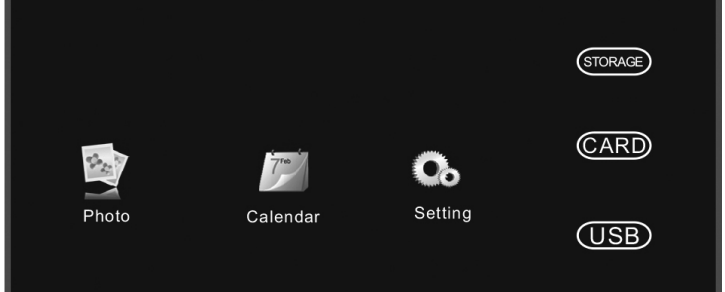
 to change the month, then press
  to move to the day field. Press
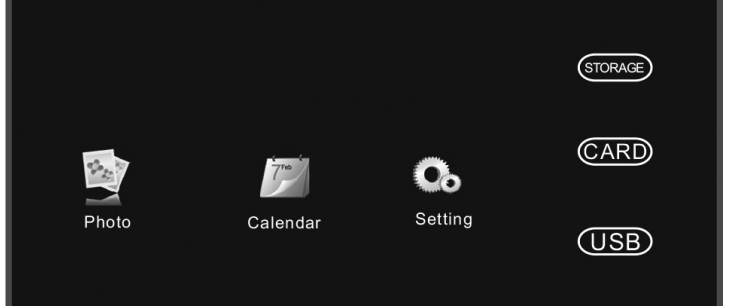

 MENU. The System Setup menu opens.
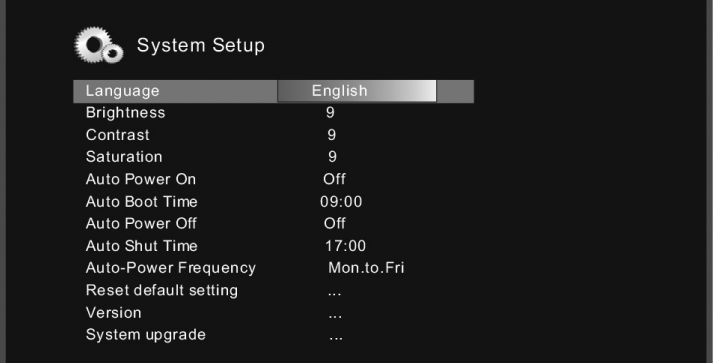
 to select from the available options (memory card, USB flash drive, or onboard storage).
 SLIDE SHOW. A slideshow begins that displays the pictures contained in the memory device you selected.
 to open a pop-up menu to rotate, zoom, or delete an image.
 BACK repeatedly to leave the OSD menus and return to Photo Display Mode.
 ROTATE until the photo is facing the correct direction. Repeat for each photo