Documents: Go to download!
User Manual
- User Manual - (English, French)
- Dimension Guide - (English)
- Warranty - (English)
- Installation Instructions - (English)
- Wiring Diagram - (English)
- PARTS AND FEATURES
- COOKTOP FEATURES
- USING YOUR COOKTOP
- CARE AND CLEANING
- TROUBLESHOOTING
Table of contents
COMMERCIAL-STYLE GAS COOKTOP Use & Care Guide
PARTS AND FEATURES
These instructions cover several different models. The cooktop you have purchased may have some or all of the items listed. The locations and appearances of the features shown here may not match those of your model.
COOKTOP
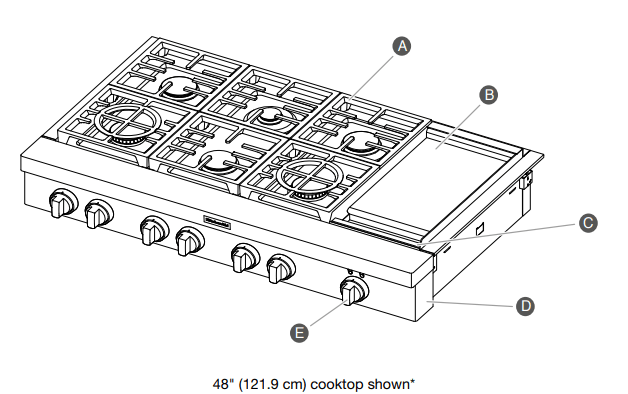
- Cooktop grate
- Electric griddle (on some models)
- Drip tray (on griddle models)
- Console panel
- Cooktop knobs
*Cooktop configuration may differ.
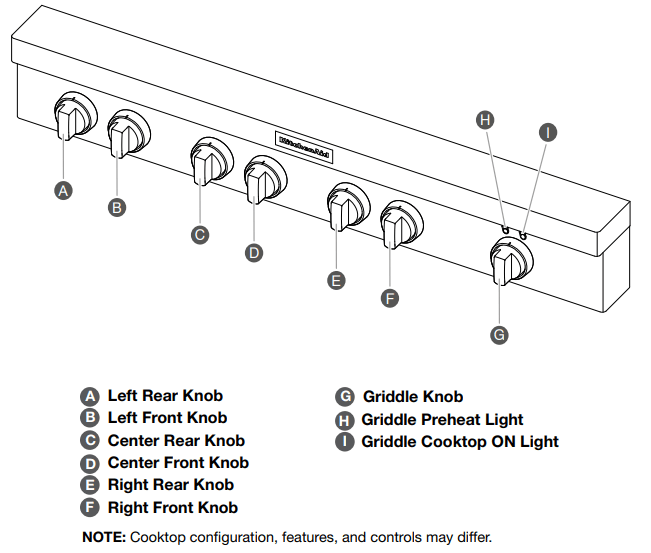
CONTROL KNOBS
The cooktop features are accessed through the cooktop knobs.
Cooktop Knobs 30" (76.2 CM)
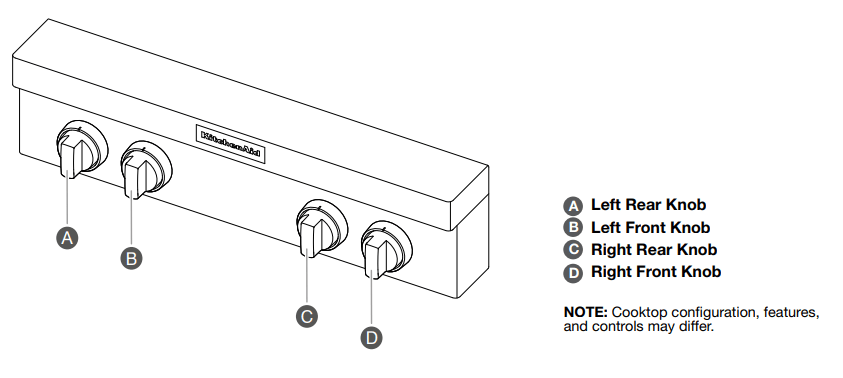
Cooktop Knobs 36" (91.4 CM)
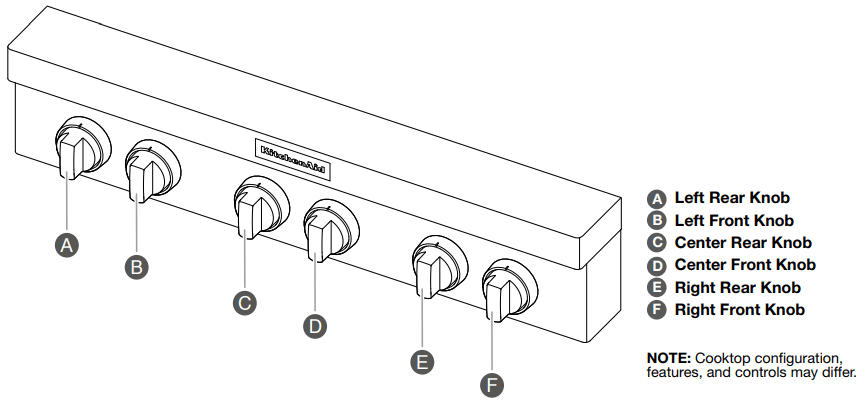
Cooktop Knobs and Indicator Lights 48" (121.9 CM)
COOKTOP FEATURES
BURNERS
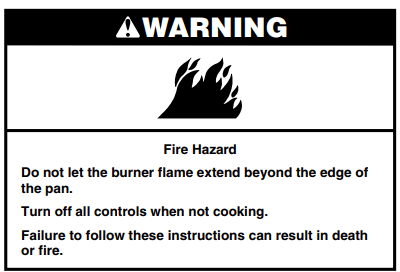
Igniting Burners:
- Electric igniters automatically light the surface burners when burner knobs are turned to
 .
. - Before setting a burner knob, place filled cookware on the grate. Do not operate a burner using empty cookware or without any cookware on the grate.
- Visually check that the burner has lit. If the burner does not ignite, listen for the clicking sound. If you do not hear the igniter click, turn off the burner. Check for a tripped circuit breaker or blown fuse. Check that the burner knob is pressed completely down on the valve shaft. If the spark igniter still does not operate, call a trained repair specialist.
- When the burner knob for the desired burner is turned to the
 position, the burner will click independent of the other burners.
REMEMBER: When cooktop is in use, the entire cooktop area may become hot.
Reignition Feature
During cooktop use, if one or more burners are extinguished due to external causes (such as a water spill, wind, or ventilation draft), the ignition system will turn on to reignite the flame. When the flame comes back on, the system will stop sparking. If the draft in the room is not removed, occasional sparking may continue. Sparking may also occasionally occur when using the low setting on a burner.
To Set a Burner: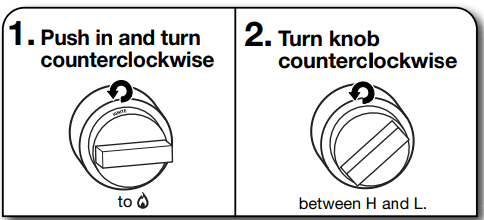
Turn knob counterclockwise further for Simmer H and Simmer L.
In Case of Power Failure
Hold a lit match near a burner and turn knob counterclockwise to H. After burner lights, turn knob to desired setting.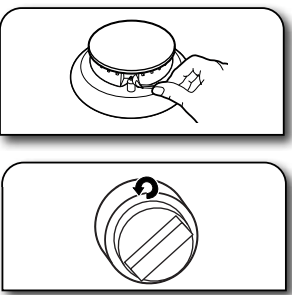
SEALED SURFACE BURNERS
Sealed surface burners are designed to minimize gaps and seams that can allow liquids and spills to get under the cooktop. This design makes cleanup quick and easy
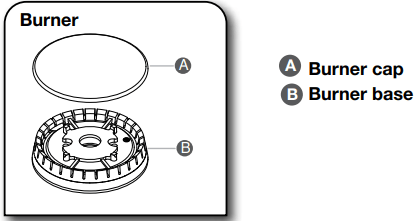
IMPORTANT: Do not obstruct the flow of combustion and ventilation air around the burner grate edges.
Burner cap: Always keep the burner cap in place when using a surface burner. A clean burner cap will help avoid poor ignition and uneven flames. Always clean the burner cap after a spillover, and routinely remove and clean the caps according to the “Care and Cleaning” section.
Gas opening: Gas must flow freely throughout the gas opening for the burner to light properly. Keep this area free of soil and do not allow spills, food, cleaning agents, or any other material to enter the gas opening. Keep spillovers out of the gas opening by always using a burner cap.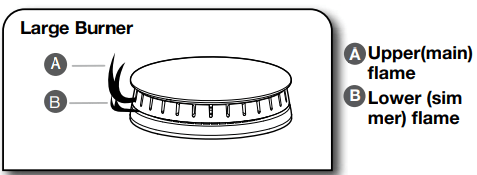
Burner Ports: Check burner flames occasionally for proper size and shape as shown above. A good flame is blue in color, not yellow. Keep this area free of soil and do not allow spills, food, cleaning agents, or any other material to enter the burner ports.
WOK RING GRATES
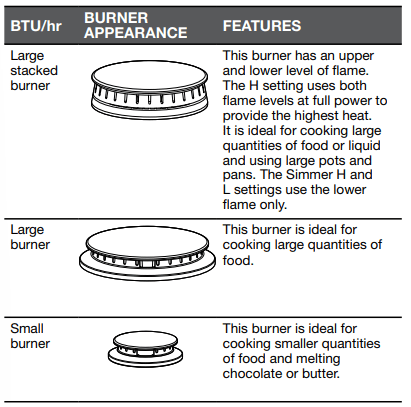
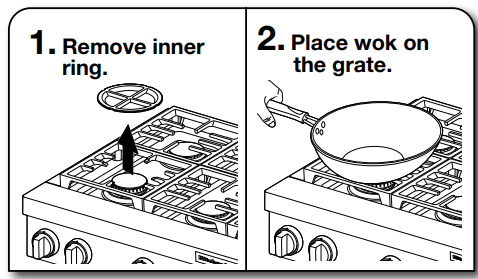
Some grates on the unit are designed for use with a wok. These grates can be used over the high power burners (LF or RF) or can be used for improved melting performance when used with the small, low power burners (RR or CR).
To use for wok cooking, place the grates with the removable ring over the LF or RF burner, remove the center ring and set it aside. A 14" (35.5 cm) or larger wok pan will rest in the opening of the grate for optimum cooking with your wok.
To use for improved melting performance, place the grates with the removable ring over the small, low power burner. Turn the center ring upside down and reposition it in the center of the grate so the pan will be farther away from the heat source.
To Use:
CHROME ELECTRIC GRIDDLE (on some models)
The chrome electric griddle provides the perfect cooking surface for grilled sandwiches, pancakes, eggs, burgers, sautéed vegetables, and many more family favorites. The attractive low-stick surface is designed to make cleanup easy.
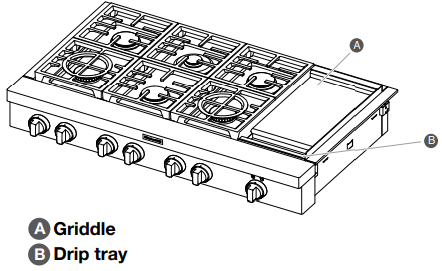
The chrome electric griddle system provides a convenient cooking surface.
- Be sure plastic film has been removed and wash with hot water before first use.
- To avoid scratching the griddle, do not place any pots or pans on the griddle. Use only heat-resistant plastic or wooden utensils.
- The griddle surface is ready to use and does not need to be seasoned.
- Pouring cold water on a hot griddle may warp the griddle, resulting in an uneven cooking surface.
To Use:
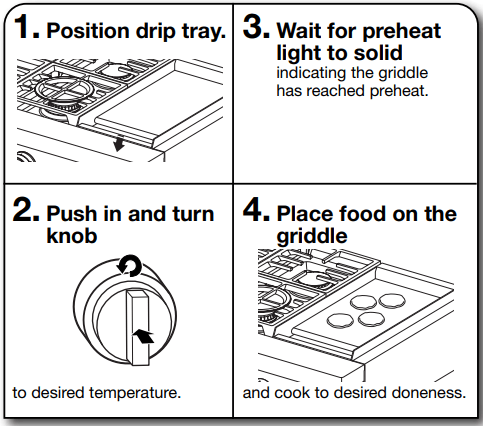
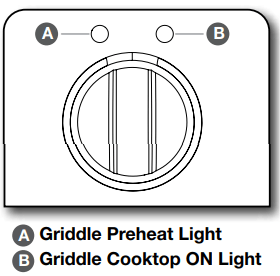
The right griddle indicator light shows that there is power applied to the griddle.
The left griddle indicator light blinks to show that the griddle is preheating. When preheat is complete, the left griddle indicator lights solid.
Cooking Chart
The settings and times are guidelines only and may need to be adjusted for individual tastes.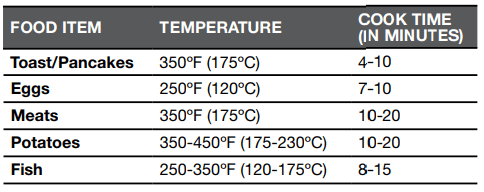
USING YOUR COOKTOP
LIGHT INDICATORS, BEHAVIORS AND CONTROLS
The indicator lights illuminate and blink to show the status of the unit.
| FUNCTION | USE AND LIGHT BEHAVIOR |
| Griddle Power Indicator Light (on 48" models only) | Solid Blue Light The griddle power indicator light illuminates blue when the griddle is powered on. |
| Griddle Preheat Light (on 48" models only) | Blinking Blue Light The griddle preheat light flashes blue while the griddle is preheating. Once preheat temperature has been reached, the indicator light turns solid blue. |
CARE AND CLEANING
COOKTOP SURFACE
IMPORTANT:
- Before cleaning, make sure all cooktop knobs are OFF and the oven and cooktop are cool. Do not use oven cleaners, bleach, or rust removers.
- Soap, water, and a soft cloth or sponge are suggested first. Affresh® Cooktop Cleaner or affresh® Cooktop Cleaning Wipes can also be used.
After Each Use:
1. Wipe off cooktop, grates, and caps.
2. Clean food spills.
To preserve the finish, clean food spills containing acids, such as vinegar and tomato, as soon as the entire appliance is cool
SEALED SURFACE BURNERS
1. Remove burner cap.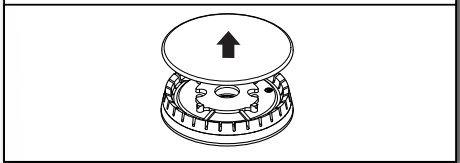
2. Clean gas opening with damp cloth.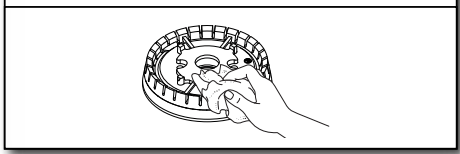
3. Clean clogged burner ports.
Use a straight pin. Do not enlarge or distort the port. Do not use a wooden toothpick. If the burner needs to be adjusted, contact a trained repair specialist.
4. Replace burner cap.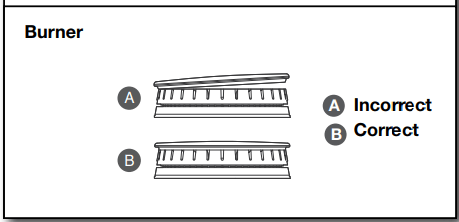
5. Turn on burner.
If the burner does not light, check cap alignment. If the burner still does not light, do not service the sealed burner yourself. Contact a trained repair specialist.
PORCELAIN-COATED GRATES AND CAPS
Use scrub and cleanser.
Clean with a nonabrasive nylon scrub pad and mildly abrasive cleanser.
Know Your Grates and Caps
- Food spills containing acids, such as vinegar and tomato, should be cleaned as soon as the cooktop, grates, and caps are cool. These spills may affect the finish.
- To avoid chipping, do not bang grates and caps against each other or hard surfaces such as cast iron cookware.
- Do not reassemble caps on burners while wet.
- Do not clean in the Self-Cleaning cycle.
- Grates and caps are dishwasher safe.
GRIDDLE
Tips:
- Prior to cleaning the griddle, make sure that all cooktop burners and oven controls have been turned off.
- For best results, clean the griddle shortly after removing the food.
Do Not Use:
- Soap
- Abrasive materials
- Cleaning materials, including stainless steel cleaner
After Each Use:
1. Turn knob to 300°F (149°C) to preheat.
Wait until preheat is complete before cleaning.
2. Pour water on soiled area.
Using a measuring cup, pour up to 1 cup (236.6 mL) tap water over the soiled area. Start at the back, allowing the water to run toward the drip tray in the front. Allow the water to bubble on the griddle for 3–4 seconds.
3. Scrape residue into drip tray.
Use a pad holder or wooden spoon with a non-abrasive pad or cloth. Use pressure on soiled areas. Repeat if needed for heavy soils.
4. Remove remaining residue.
Fold a damp towel and, with the pad holder or wooden spoon, go over the griddle to remove remaining residue.
5. Turn off griddle and let cool.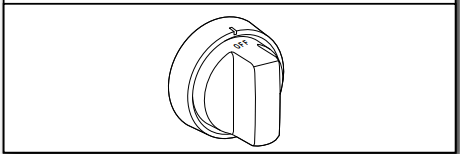
6. Wipe off griddle.
Once cool, wipe the griddle with a clean, damp terry cloth towel. Then buff with a microfiber cloth. If streaking, rainbowing, or ghosting occurs, use a mixture of 1 part white vinegar to 2 parts water on a towel to wipe the griddle.
7. Remove, empty, and clean drip tray.
Clean the drip tray with warm, soapy water. Wipe the area under the drip tray clean. Once dry, put the drip tray back in position.
COOKTOP CONTROLS
1. Remove knobs.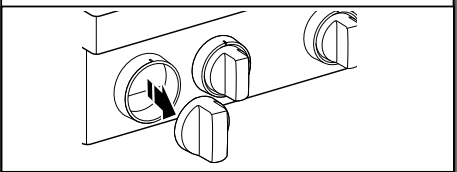
Pull the knobs straight away from the control panel to remove.
2. Clean with warm, soapy water.
Know Your Cooktop Controls
- To avoid damage to the cooktop controls, do not use steel wool, abrasive cleansers, or an oven cleaner.
- To avoid damage, do not soak knobs.
- When replacing knobs, make sure knobs are in the Off position.
- When replacing knobs after cleaning either the surface burner controls or the griddle module control, make sure the knobs are replaced to the correct location. See the “Knob Variations” section for reference.
STAINLESS STEEL EXTERIOR
Use cleaner or wipes.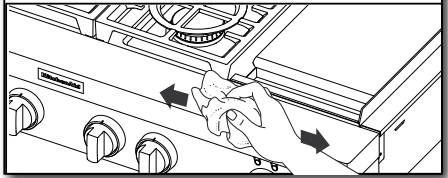
Use affresh® Stainless Steel Cleaning Spray, affresh® Stainless Steel Cleaning Mousse or affresh® Stainless Steel Cleaning Wipes (not included). Rub in direction of the grain to avoid possible damage to the steel surface.
Do Not Use:
- Soap-filled scouring pads
- Abrasive cleaners
- Cooktop polishing creme
- Steel-wool pads
- Gritty washcloths
- Abrasive paper towels
TROUBLESHOOTING
First try the solutions suggested here. If you need further assistance or more recommendations that may help you avoid a service call, refer to the "Warranty" or visit https://kitchenaid.com. In Canada, visit http://www.kitchenaid.ca.
| IF YOU EXPERIENCE | POSSIBLE CAUSES | SOLUTION |
| Nothing will operate. | A household fuse has blown or a circuit breaker has tripped. | Replace the fuse or reset the circuit breaker. If the problem continues, call an electrician. |
| Surface burners will not operate. | This is the first time the surface burners have been used. | Turn on any one of the surface burner knobs to release air from the gas lines |
| The control knob is not set correctly. | Push in knob before turning to a setting | |
| The burner ports are clogged. | Clean clogged burner ports with a straight pin. | |
| Surface burner flames are uneven, yellow, and/ or noisy | The burner ports are clogged. | Clean clogged burner ports with a straight pin. |
| The burner caps are not positioned properly. | Make sure cap is properly aligned with the burner | |
| Propane gas is being used. | The cooktop may have been converted improperly. Contact a trained repair specialist. | |
| Surface burner makes popping noises. | The burner is wet. | Let it dry |
| Burner sparks but does not light. | There is continuous sparking, but the burner does not light. | Make sure cap is properly aligned with burner. If sparking continues, discontinue use of the surface burner and contact a service technician |
| Excessive heat around cookware on cooktop. | The cookware is not the proper size. | Use cookware about the same size as the surface cooking area or surface burner. Cookware should not extend more than 1/2" (1.3 cm) outside the cooking area. |
| Cooktop cooking results not what expected. | The proper cookware is not being used. | Use medium-to-heavy cookware made of the material that cooks food the way you want. The best cookware should have a flat bottom, straight sides, and a well-fitting lid. |
| The control knob is not set to the proper heat level. | Set the Cooktop Control to H or L, depending upon the type of cooking you want to do. | |
| The cooktop is not level. | The cooktop must be level for the griddle to operate properly. See the Installation Instructions for leveling instructions. |
See other models: UXT4136ADS MER7662WW CVGX2423B NTW4630YQ GI6FARXXB
