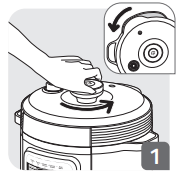
To open the lid, take hold of the lid knob, turn it anticlockwise – Fig. 1
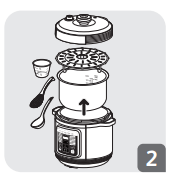
Remove all packaging materials from the inside of the appliance – Fig. 2
Clean the parts of the appliance thoroughly before using it for the first time.
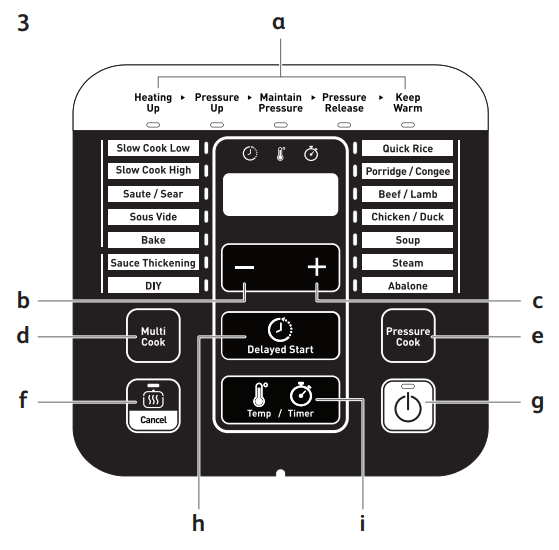
Dry off carefully.
Note: For more details, see “Cleaning and Maintenance” paragraph. Page 19.
PREPARATIONS BEFORE COOKING
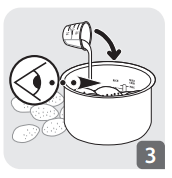
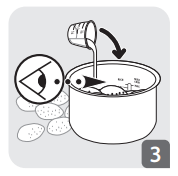
1. Open the lid and put ingredients in the pot, wipe the outside and bottom of the cooking pot dry. Place the cooking pot in the appliance – Fig. 3. Do not use your appliance without the cooking pot.
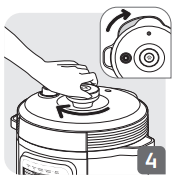
2. Turn the lid knob clockwise to lock the lid. When the appliance is charged, it will beep twice if the lid is locked and the appliance is charged – Fig. 4.
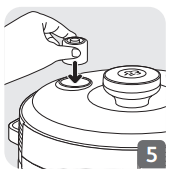
3. Position the pressure limit valve and take care that it clicks well into place – Fig. 5.
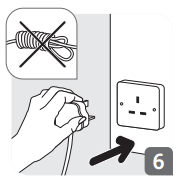
4. Unroll the power cord; connect it to the earthed socket – Fig. 6.
Note:
The level of foods and liquids should never exceed the max level marking on the cooking pot – Fig. 3.
Do not use the appliance to cook food (such as beans, noodle or dried food etc.) that expands during cooking. The food may get stuck in the float valve and cause damage to the appliance and stop the pressure from being released properly.
When cooking rice and other sticky ingredients, use nonstick inner pot to avoid stick.
After the cooking process is started, you can long press “Keep Warm/ Cancel” button to terminate the current program and the appliance goes to standby mode.
Note:
The preheat time of “Saute/Sear” may take up to 5 minutes.
To use “Sauce Thickening” and “Saute/Sear” program, you need to open lid and start the program.
DIY:
Thanks to this function, you are free of choice regarding the cooking time and temperature, but also the lid position.
Be aware that to use pressure cooking, there must be liquid in the cooking pot and the temperature must be higher than a certain temperature (between 100 to 120 degrees). Also the lid must be closed and locked. If you don’t respect all those conditions, the appliance will start cooking without pressure, at the selected temperature.
Note:
For Abalone program, you can press “+, -” button to shift between two kinds of setting.
GENERAL INFORMATION FOR COOKING UNDER PRESSURE
An EPC (electrical pressure cooker) is an electric pan with an hermetic lid and a special valve, that allows to cook the food under pressure, which saves cooking time and makes the stiff foods soft.
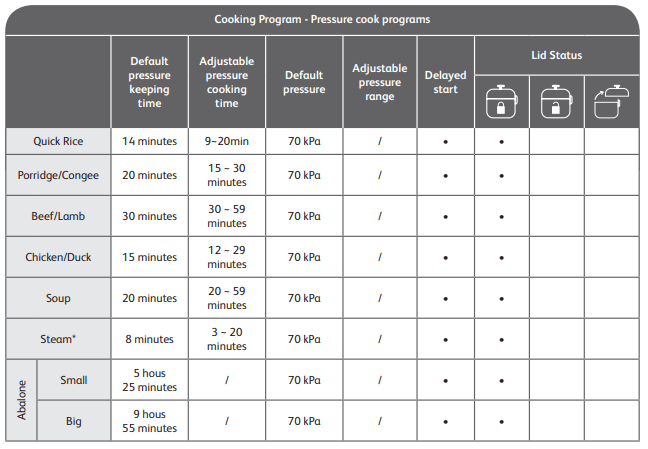
The following programs cook automatically under pressure: Quick Rice, Porridge/Congee, Beef/Lamb, Chicken/Duck, Soup, Steam, Abalone. For DIY function you will enter a cooking pressure state if you select at least 100°C, with the lid closed and locked.
Once you have selected your program, the time to reach the pressure will depend on the amount of food and liquids in the cooking pot. The lid must be closed and locked to reach a pressure state: as the appliance is hermetically closed, when the temperature increases, the liquid inside forms steam which raises the pressure in the pot (thus when preparing with pressure there should be always liquid inside the bowl).
Once pressure has built up in the appliance, the lock mechanism system is activated and then the lid will not be able to be opened during cooking (so all ingredients must be added at the beginning of cooking). Never attempt to open the lid during pressure cooking. When the pressure for cooking is reached, the appliance switches automatically to cooking phase, and the time previously set starts counting down.
When the food is cooked under pressure, after the cooking process the appliance will switch to keep warm state. The digital screen will indicate ‘’b’’.
When using the pressure cooker for the first few times, you may notice slight steam leakage from the lid. This is normal and will occur when pressure builds up. Some leakage from the pressure limit valve may also occur during cooking.
It is normal for a small amount of steam to escape during cooking (as the valve is a safety valve).
Opening the lid after pressure cooking
After cooking under pressure, steam will be released automatically, it will take from a few seconds to 10 minutes depending on the quantity of liquid inside.
To open the lid, take hold of the handle, turn it anticlockwise, and push the opening button -1-2. Unplug the power cord.
Note: Be careful of the hot steam coming out from the lid. Keep your face and hands away from the steam flow
1. Follow the steps in “Preparations before cooking”.
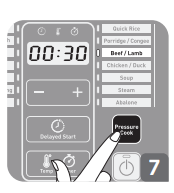
2. Press “Pressure Cook” to choose cooking programs. The chosen programs lights up, the default pressure cooking time is displayed on the screen – Fig. 7.
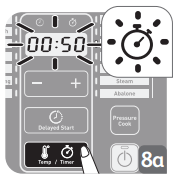
3. Press “Temp/Timer” button, the light of timer blinks – Fig. 8a.
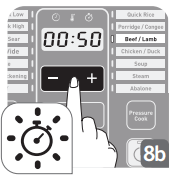
4. Press “+/-” to change the pressure cooking time – Fig. 8b.
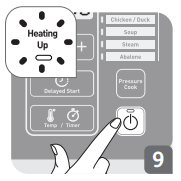
5. Press “Start” to start the cooking program. The appliance starts to heat up. The light of “Heating Up” lights up – Fig. 9. Once you have selected your program, the time to reach the pressure will depend on the amount of food and liquids in the cooking pot. The lid must be closed and locked to reach a pressure state: as the appliance is hermetically closed, when the temperature increases, the liquid inside forms steam which raises the pressure in the pot (thus when preparing with pressure there should be always liquid inside the bowl).
6. When the pressure for cooking is reached, the appliance switches automatically to the pressure cooking phase, and the time previously set starts to countdown.
7. When the pressure cooking time has elapsed, the appliance beeps.
8. When the pressure time has elapsed, “F” is displayed on the screen. The pressure release needs to be done manually :
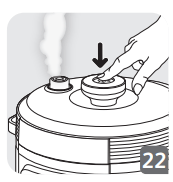
a Push the pressure release button to release the pressure – Fig. 22.
b Keep your hands away from the pressure limit valve when releasing steam.
c To remove lid, take hold of the lid knob, turn it anticlockwise and lift the lid.
d Unplug the power cord.
9. The appliance will jump to “Keep Warm” automatically when the appliance cools down and the pressure releases completely.
RICE COOKING
1. Pour the required quantity of rice into the cooking pot using the measuring cup provided. Then fill with cold water up to the corresponding “CUP” mark printed in the bowl.
Note: Always add the rice first otherwise you will have too much water.
2. For best results, we recommend using ordinary rice rather than “easy cook” type of rice which tend to give a stickier rice and may adhere to the housing. With other types of rice, such as brown or wild rice, the quantities of water need adjustment.
3. If you only want to cook 1 cup of white rice (serves 2 small or 1 large portion), use 1 measuring cup of white rice and then add one and a half measuring cup of water. With some types of rice it is normal for a little rice to stick on the housing when cooking 1 cup of rice.
4. If you only want to cook 2 cups of white rice (serves 4 small or 3 large portions), use 2 measuring cups of white rice and then add two measuring cups of water
5. The maximum quantity of water + rice should not exceed the highest mark inside the bowl. Depending on the type of rice, quantities of water may need adjustment.
COOKING GUIDE FOR RICE
Rice measurement in cups
Weight
Water measurement in the bowl (+ rice)
Serves
2
300 g
2 cup mark
2 - 4 pers
4
600 g
4 cup mark
4 - 8 pers
6
900 g
6 cup mark
6 - 12 pers.
8
1200 g
8 cup mark
8 - 16 pers
10
1500 g
10 cup mark
10 - 20 pers
12
1800 g
12 cup mark
12 - 22 pers
MULTI-COOK
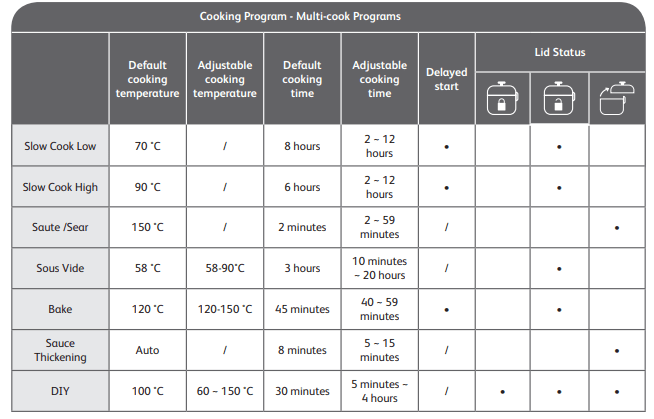
Slow Cook Low, Slow Cook High, Saute/Sear, Sous Vide, Bake, Sauce Thickening, DIY are Multi-Cook programs.
1. Follow the steps in “Preparations before cooking”
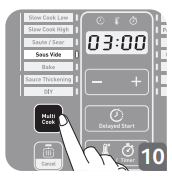
2. Press “Multi Cook” to choose cooking programs. The chosen programs lights up, the default cooking time is displayed on the screen – Fig. 10.
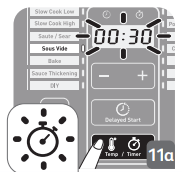
3. Press “Temp/Timer” button, the light of timer lights up – Fig. 11a.
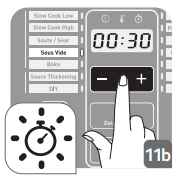
4. Press “+/-” to change the cooking time – Fig. 11b.
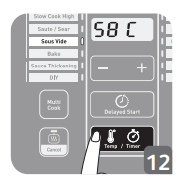
5. Press “Pressure/Temp” to change the cooking temperature. The default cooking temperature is displayed on the screen – Fig. 12.
6. Press “+/-” to change the cooking temperature – Fig. 13.
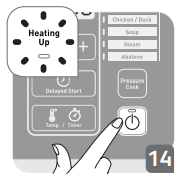
7. Press “Start” to start the cooking program. The appliance starts to heat up. The light of “Heating Up” lights up – Fig. 14.
8. When you use “Slow Cook Low”, “Slow Cook High”, “Sauce Thickening” and “DIY” programs, the time previously set starts to countdown from the beginning of program. When you use “Sous Vide”, “Bake” and “Sauté/Sear” program, the appliance starts to countdown when the temperature reaches the previously set parameter.
9. When the cooking time has elapsed, the appliance beeps and switches to “Keep Warm” mode automatically except “Saute/Sear”, “Sous Vide”, “DIY” and “Bake”. You can unlock and open the top lid.
Note:
Some programs’s cooking time or cooking temperature can’t be changed. Please see the detail in the Multi-cook Programs chart.
Sous Vide Cooking program
–The key for sous vide cooking is to create a vacuum seal. Vacuum sealing foods prevents evaporation and allows for the most efficient transfer energy from the water to the food. To do so, simply place your seasoned food in a plastic bag and squeeze out all the air and then seal the bag. Add water into the inner pot first and then submerge the food into water.
– If you set the cooking temperature under 60 degree, please don’t cook the food more than 6 hours.
DELAYED START
Delay start is not available only in “Saute/Sear”, “Sous Vide”, “Sauce Thickening” and “DIY”.
1. Follow the steps of pressure cook or multi-cook, choose the cooking program and time/temperature parameters you need.
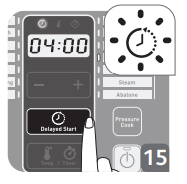
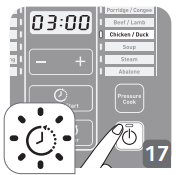
2. Press “Delayed Start” and the light of delayed start lights up – Fig. 15.
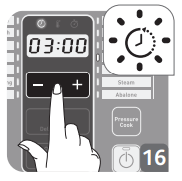
3. Press “+,-” to set time – Fig. 16.
4. Press “Start” to confirm the preset time. When preset time is elapsed, the appliance starts working in the selected cooking mode automatically – Fig. 17.
KEEP WARM
Keeping warm state
If pressing “Keep Warm/Cancel” key at standby mode, it enters keep warm function, the digital screen indicates “b”, and key button indicator lights. After 24 consecutive hours, this function will be cancelled automatically and it returns to the standby mode.
CLEANING AND MAINTENANCE
1. It is recommended to clean your appliance after each use. Before cleaning let your appliance cool down for at least 2 hours.
2. You can wash the “cooking pot” and accessories including steam cover in the dishwasher. Do not put the appliance into the dishwasher:
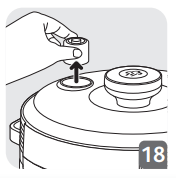
a. Remove the pressure limit valve to clean it, rinse it under water and dry – Fig. 18.
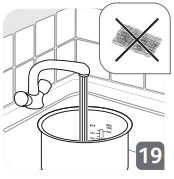
b. Remove the cooking pot from the appliance, rinse it and dry it off thoroughly. Do not use a scourer as this can damage the non stick coating in the pot – Fig. 19.
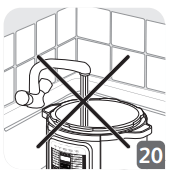
c. Do not immerse the appliance in water or pour water into it, clean the housing with a damp cloth – Fig. 20.
3. Taking care of the pot
a. To ensure the maintenance of pot quality, it is recommended not to cut food in it.
b. Use the plastic spoon provided or a wooden spoon and not a metal type so as to avoid damaging the pot surface
c. To avoid any risk of corrosion, do not pour vinegar into the pot.
4. Once all the components you just cleaned are perfectly dried, place them all in their original position.
5. Always use the cooking pot provided.
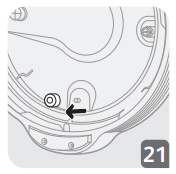
6. Make sure to clean the float valve after each use. You may not be able to open the lid or it can be dangerous if the float valve is very dirty and stuck – Fig. 21.
7. Press on the spring valve and remove the duct pressure limit valve cover to check they are functional and clean.
8. Do not pour water or food directly into the appliance. If you inadvertently immerse your appliance in water or spill water directly on the heating element (when the pot is not in place), take it to your service center for repair.
TECHNICAL TROUBLESHOOTING GUIDE
Problem
Possible reasons
Solutions
Unable to open lid
Unable to open because of pressure in the cooking pot.
Press and hold the pressure release button to remove the pressure inside the cooking pot.
Pressure in the pot is fully released but the float valve is stuck because it is too dirty, and therefore unable to fall.
a. Press and hold the pressure release button to remove the pressure inside the cooking pot. Then let the appliance cool down for at least 2 hours and then press the external part of the float valve – Fig. 23.
b. For next use, please clean and wipe the float valve.
Unable to close lid
Hot pot with steam inside.
Wait for the pot to be cool.
The sealing gasket was not properly installed.
Install the sealing gasket properly.
The float valve is stuck because it is too dirty, and therefore unable to fall.
a. Press the external part of the float valve (when the lid is cold) – Fig. 23.
b. For next use, please clean and wipe the float valve.
Direction at which lid was closed is incorrect.
Close lid in the correct direction according to the instruction manual.
Food is uncooked.
Rice :water ratio is incorrect
Use the required rice: water ratio
No electricity from the power grid.
Check the electric circuit
Steam leakage from lid
Sealing gasket is broken
Send to repair and maintenance department.
Residue in the sealing gasket.
Clean and remove the residue.
The sealing gasket was not properly installed.
Install the sealing gasket properly.
Intense release of pressure from pressure limit valve
Faulty pressure control resulted in release of pressure.
Send to repair and maintenance department
Pressure limit valve did not fall into place.
Carefully rotate/press the pressure limit valve to make it fall into place.
Continuous pressure release from float valve
Residue in the float valve
Clean and remove the residue.
Float valve is stuck.
Stop the appliance and wait for the appliance to cool down. Then clean and wipe the float valve, before restarting the cooking.
“E0” , “E1” displayed on digital screen
Send to repair and maintenance department.
“E2” displayed on digital screen
The lid is not in the position defined for the selected cooking mode.
Please refer to the cooking table to check the right position of the lid for the program you have selected.