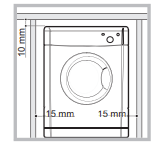
If you are going to install the appliance under a work counter be sure to leave a 10mm space between the top and any other objects on or above the machine and a 15mm space between the sides and any kitchen units or walls to ensure proper air circulation. The dryer must never be installed behind a lockable door, a sliding door or a door with a hinge on the opposite side to that of the dryer door. The appliance must be installed with the rear surface placed against a wall.
VENTILATION
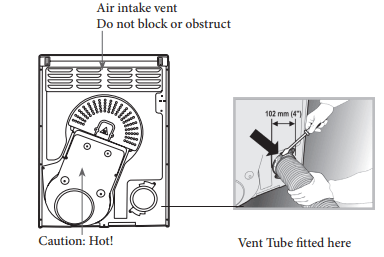
When the dryer is in use there has to be adequate ventilation to avoid the back flow of gases into the room from appliances burning other fuels, including open fires. The vent tube should not exceed 2.4 metres in length. The tube should be kept clear of the air intake vent and kinks or ‘U’ bends must be avoided as these will obstruct the tube and trap condensation.
VENTING
Wall mounting
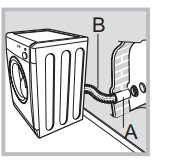
Keep the tube as short and as straight as possible to prevent condensation forming in the vent pipe. The duct in the wall should slope slightly downwards. Mounting The hole should be as low down as possible and the tube should be kept as short as possible. Depending on how often you use your tumble dryer, it is essential that areas A and B are checked periodically to remove lint or debris. Make sure that the ventilation hose, air inlet vents, and outlets are not obstructed or blocked
Venting
The end of the tube should be directed downwards, to prevent warm moist air from condensing in the room or dryer.
Do not discharge exhaust air into a flue which is used for exhaust fumes from other appliances that burn gas or other fuels.
Do not discharge exhaust air into an extraction system or any duct with an extractor fan. This will affect the way the thermal controls operate and can result in a fire hazard.
ELECTRICAL CONNECTIONS
The socket must be grounded. The power supply cord should be checked periodically. If the supply cord is damaged, it must be replaced by the manufacturer, its service agent or similarly qualified persons in order to avoid a hazar
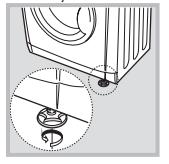
LEVELLING YOUR DRYER
The dryer must be installed level for correct operation. When you have installed your dryer in its final location check that it is first level side to side and then back to front.
If the dryer is not level use a wooden block to support it while adjusting the two front legs up or down until your dryer is level.
BEFORE YOU START USING YOUR DRYER
Once you have installed your dryer and before you use it clean the inside of the drum to remove any dust that could have accumulated during transport
ITEMS NOT SUITABLE FOR TUMBLE DRYING
Articles that contain rubber or rubber-like materials or plastic film, any flammable articles or objects that contain flammable substances.
Glass fibres.
Items which have been dry cleaned.
Large bulky items (quilts, sleeping bags, etc). These expand when drying and prevent airflow through the dryer.
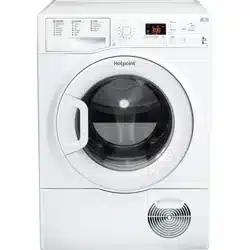
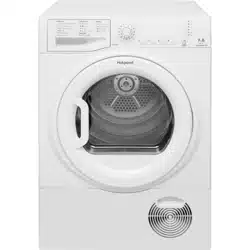
Dryer Description
Control panel
The HEAT button selects drying temperature.
OUT: LOW heat IN: HIGH heat.
The TIMER knob: the 0 position swithes off the dryer.
The TIMER knob sets the drying time: rotate it clockwise, NEVER COUNTER-CLOCKWISE, until the indictor is pointing to the drying time you want to select.
CHOOSING A PROGRAMME
Plug the dryer into the electrical socket.
Sort your laundry according to fabric type.
Open the door and make sure the filter is clean and in place.
Load the machine and make sure items are not in the way of the door seal. Close door.
Set the temperature with the HEAT button. High heat for Cotton and synthetics. Low heat for delicates and acrylics.
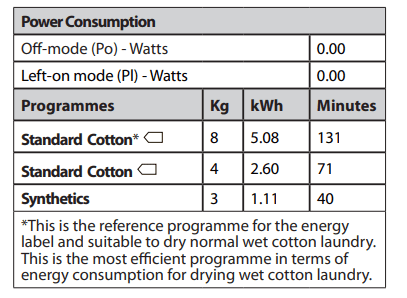
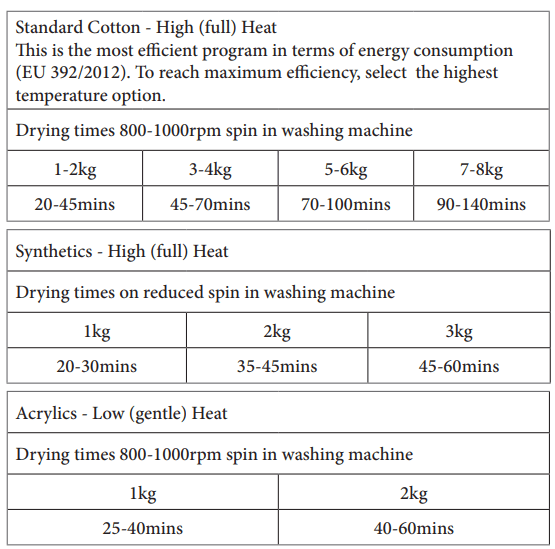
Select a drying time by rotating the TIMER knob clockwise. The tables below show APPROXIMATE drying times in minutes. Weights refer to dry garment weights.
Press the START button to begin. During the drying programme, you can check on your laundry and take out items that are dry while others continue drying. When you close the door again press the START button in order to resume drying.
About 10 minutes before the programme is completed it enters the final COOL TUMBLE phase (fabrics are cooled) which should always be allowed to complete.
Open the door, take the laundry out, clean the filter and replace it.
Unplug the dryer.
WASH CARE LABELS
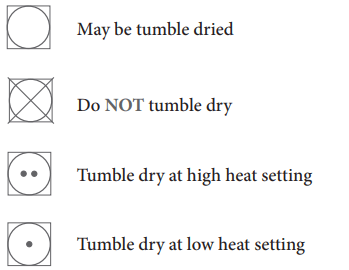
Look at the labels on your garments when tumble drying. The following symbols are the most common.
Cleaning the filter after each cycle
Clean the filter once drying is completed.
Step 1
Open the door of your dryer
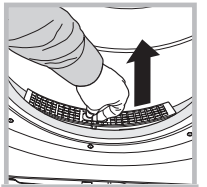
Step 2
Pull out the filter (using the two finger grips)
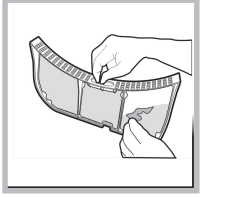
Step 3
Clean the fluff off the filter and replace it correctly.
Ensure that the filter is pushed fully home.
Step 4
Make sure the filter is pushed fully home NEVER run the dryer without the filter in position
Failure to clean the filter after EVERY drying cycle will affect the drying performance of your machine. It will take longer to dry and as a result will use more electricity during drying. At least every two or three months you MUST clean fluff build up around the filter housing and the vent tube.
Check the vent tube and any permanent venting fixture to make sure that there has been no accumulation of fluff or lint. Remove lint that collects around the filter and the outlet vents.
Troubleshooting
Before you call the service centre go through the following troubleshooting suggestions:
PROBLEM:
The dryer won’t start.
POSSIBLE CAUSES/SOLUTION:
The plug is not in the socket or making contact.
There has been a power failure.
The fuse has blown. Try to plug another appliance into the socket.
You are using an extension cord? Try to plug the dryer directly into the socket.
The timer knob has not been set properly.
The start button has not been pressed.
The start button was pressed with the door open. Make sure the door is closed before pressing the start button.