
E
English
User’s Guide
Follow these guidelines to avoid the risk of fire, burns, injury, electric
shocks, rupture, overheating, abnormal odours or smoke.
printer to prevent any damage or failure.
the power outlet.
is loose.
get wet, for example, by handling them with wet hands or spilling beverages on to
them.
batteries.
deformation or anything unusual while using or storing it.
possibility of generating heat.
Safety Precautions
WARNING
GETTING STARTED
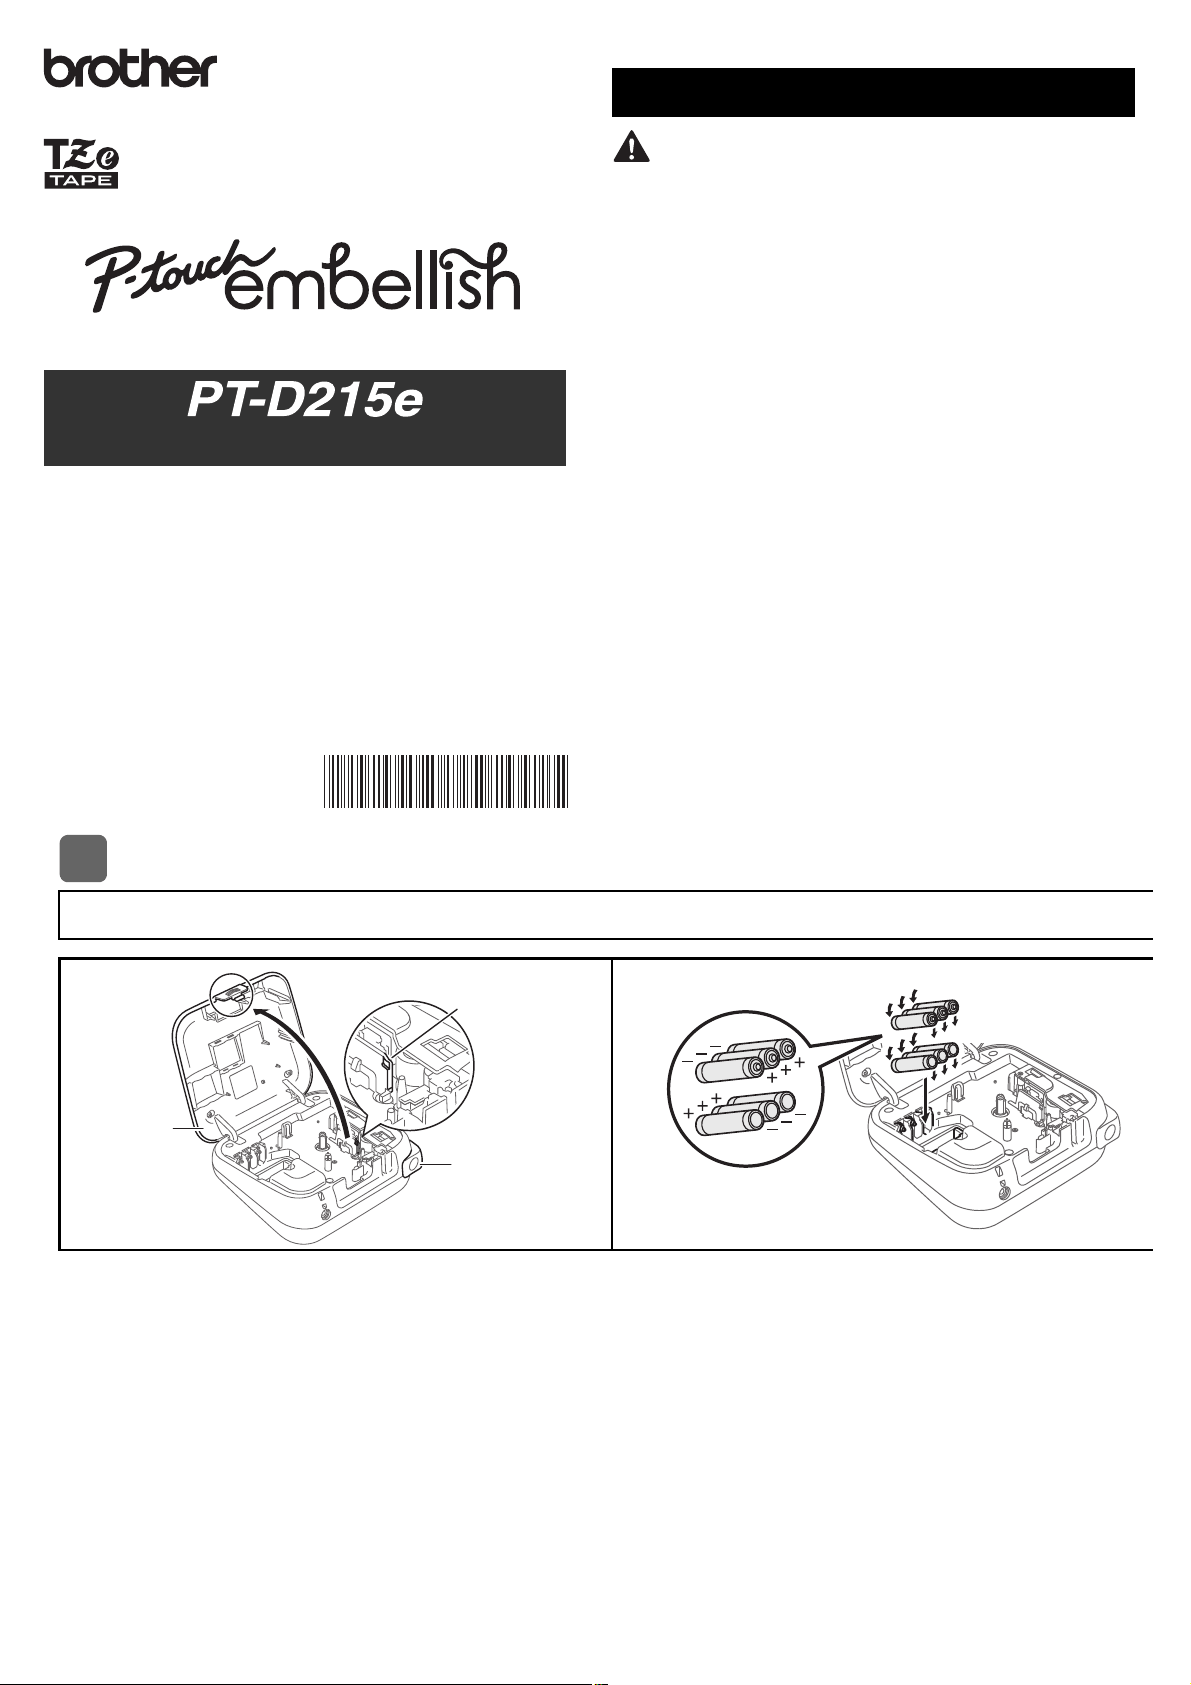
Installing Power Supply and Ribbon Cassette or Tape Cassette
With the LCD facing down, open the
Cassette Cover by pressing the grooved tab
and pushing in the direction of the arrow, as
illustrated.
When replacing batteries or tape
cassettes, make sure the power is
turned off.
This ribbon/tape printer requires six (6)
AAA alkaline batteries or six (6) fully-
charged Ni-MH batteries, not included.
1
1
Tape Cutter
Lever
Cassette
Cover
2
www.brother.com.
(QJOLVK
8VHU·V*XLGH

Follow these guidelines to avoid personal injury, liquid leakage,
burns or heat.
or different models. Do not insert a battery with its plus and minus ends reversed.
ribbon/tape printer.
that do not have the mark.
with your hands.
ribbon/tape printer.
printer, or if the battery expires.
General Precautions
CAUTION
Federal Communications Commission (FCC)
Compliance Notice (For USA Only)
of the following measures:
Important
Insert the Ribbon or Tape Cassette
following the drawing marked inside the
case. Gently press the Cassette into the
ribbon/tape printer until it clicks into
place.
marked .
or 12 mm.
be sure to remove the
Close the Cassette Cover and gently press
until it clicks into place.
NOTE
instead of using batteries:
1.
2.
When running a memory backup, we recommend
using both batteries AND the optional Power Adapter,
in the event that one or the other power method fails.
3
Toothed
Cutter
Edge
End of Tape
Tape Guide
Ribbon Cassette
or Tape Cassette
4
NOTE
return to the default item.
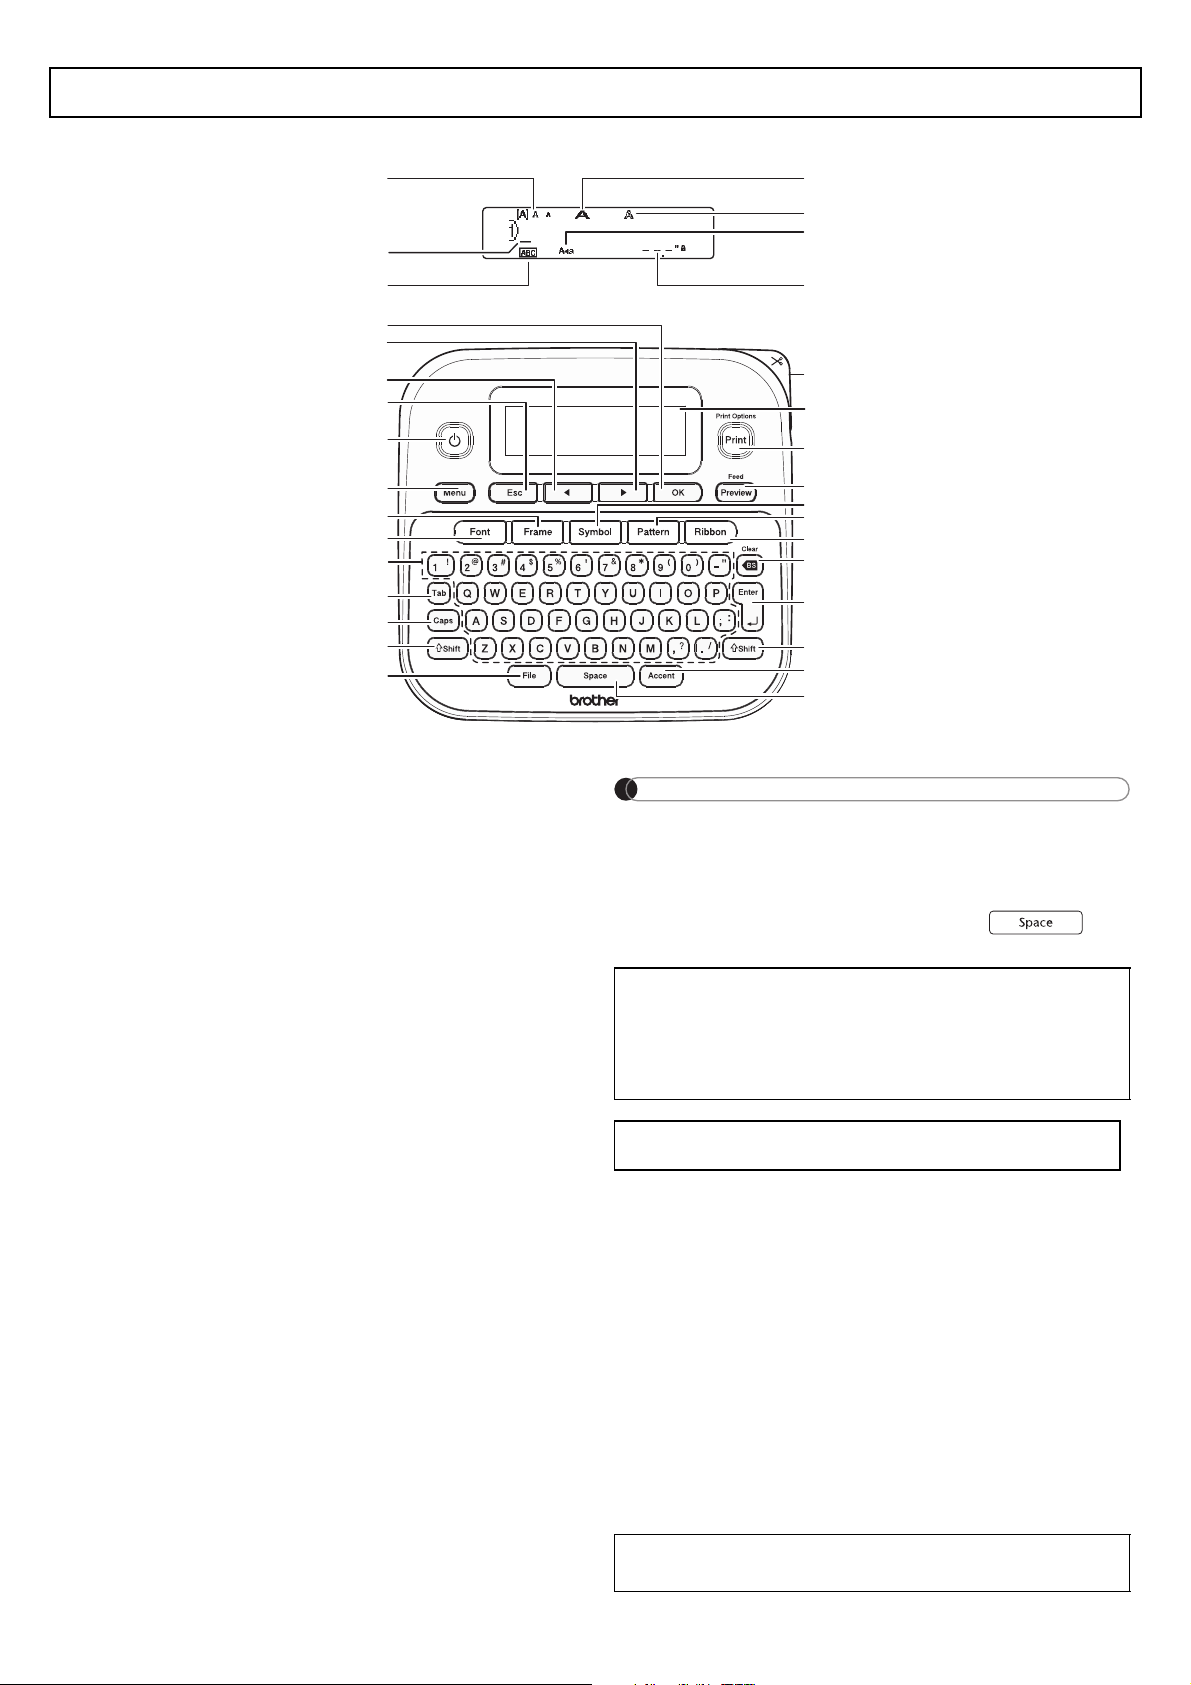
LCD and Keyboard
1.
2. Cursor
3. Underline / Frame
4.
5.
6. Caps
7. Ribbon/Tape Length
8. OK key
9. Cursor key : Right
10. Cursor key : Left
11.
12.
13. Menu key
14. Frame key
15. Font key
16.
17. Tab key
18. Caps key
19.
20. File key
21.
22. LCD
23.
24.
25.
26.
27. Ribbon key
28.
29. Enter key
30.
31.
preview of the ribbon/tape, and may differ from
tual length when printed.
Specifications
Dimensions:
(W x D x H)
Weight:
Power Supply:
Tape Cassette:
Ribbon Cassette:
0.47" (12mm)
Pattern Tape
Cassette:
0.47" (12mm)
1
Turn your machine on.
2
Set the language.
The default setting is [English].
3
Set the unit of measurement.
NOTE
turns off if no keys are
pressed within five minutes.
Accepted] appears for
brightness. The default setting is [
0
].
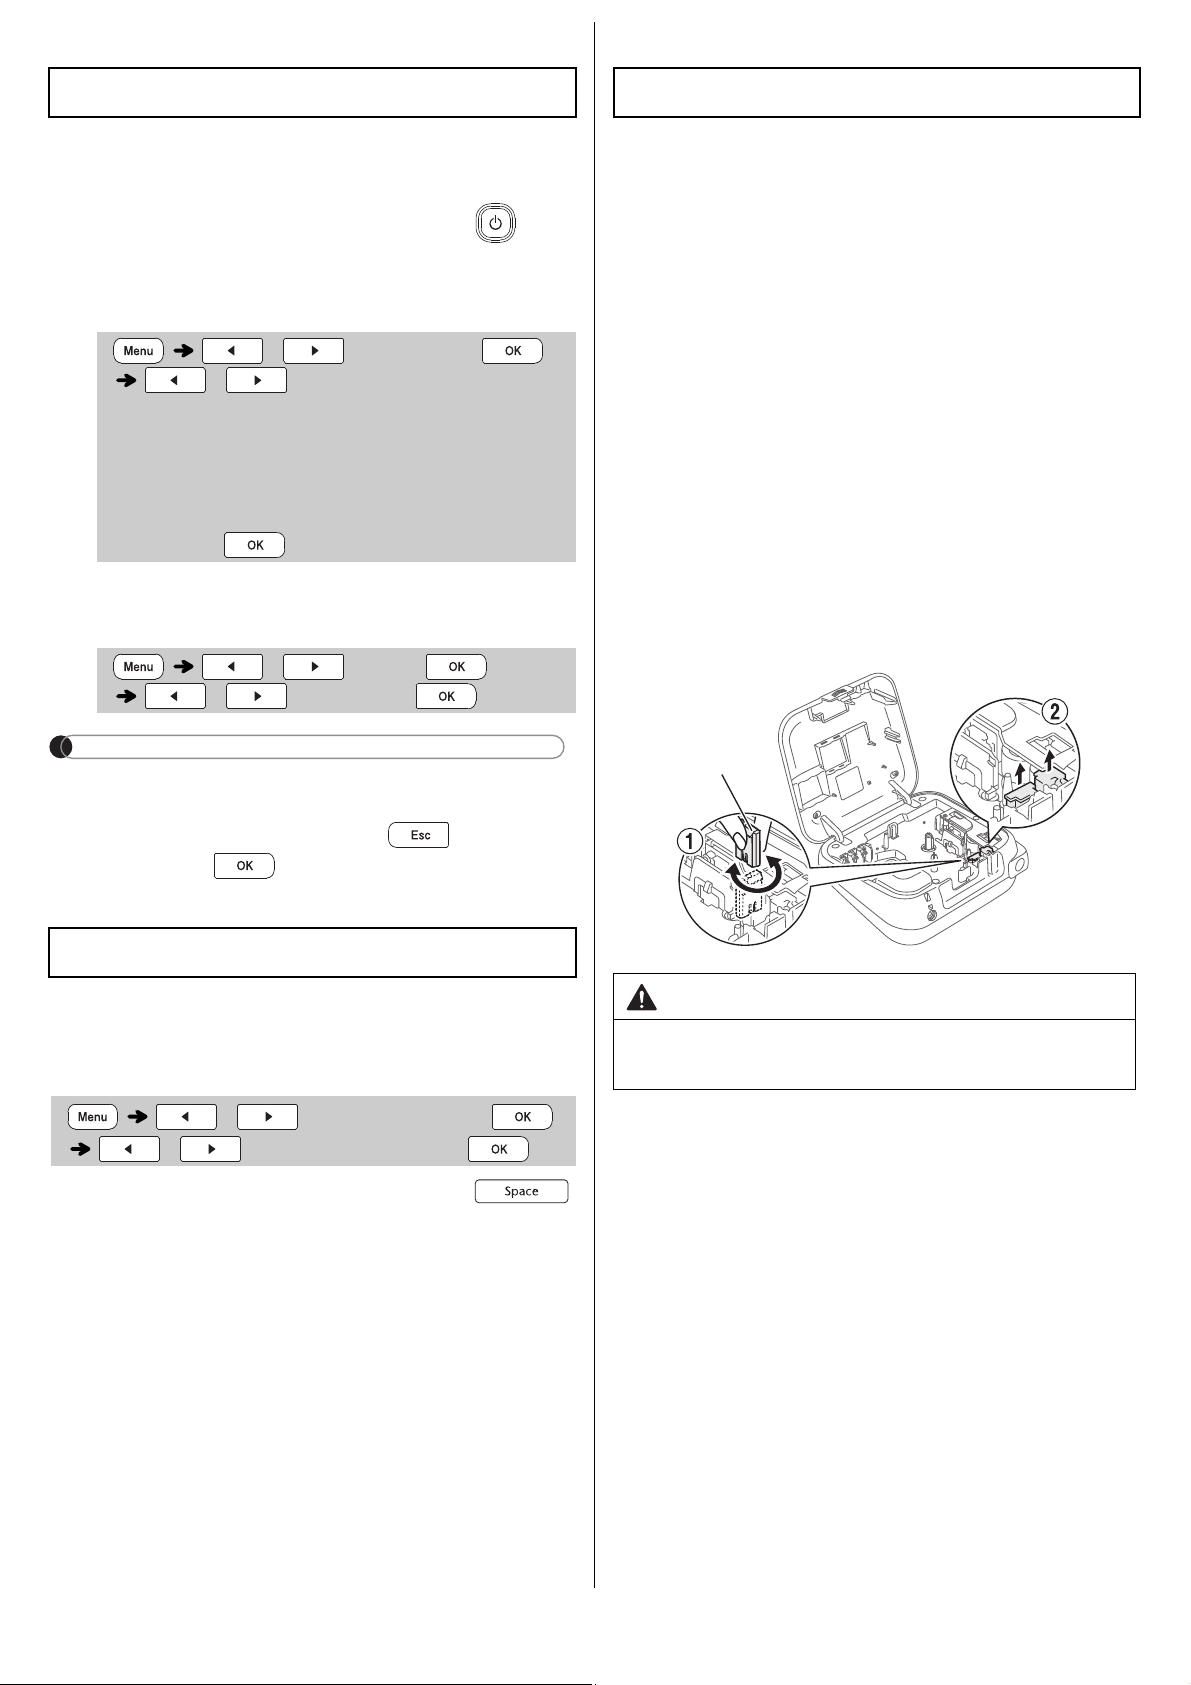
Cutter Unit.
X Replacing the Cutter Unit
1.
illustrated below
2
.
2.
Initial Settings
/ [Language]
/ [English / Español /
Français / Hrvatski / Italiano /
Magyar / Nederlands / Norsk / Polski /
Português / Portug. (BR) / Românã /
Slovenski / Slovenský / Suomi /
Svenska / Türkçe / eština / Dansk /
Deutsch] .
/ [Unit]
/ [inch / mm] .
Contrast
/ [LCD Contrast]
/ [-2 / -1 / 0 / +1 / +2]
Supplies and Accessories
Cassettes: Supplies and
Accessories Guide.
AC Adapter:
Cutter Unit:
WARNING
fingers.
Cutter
BASIC USAGE
Accepted] appears on the
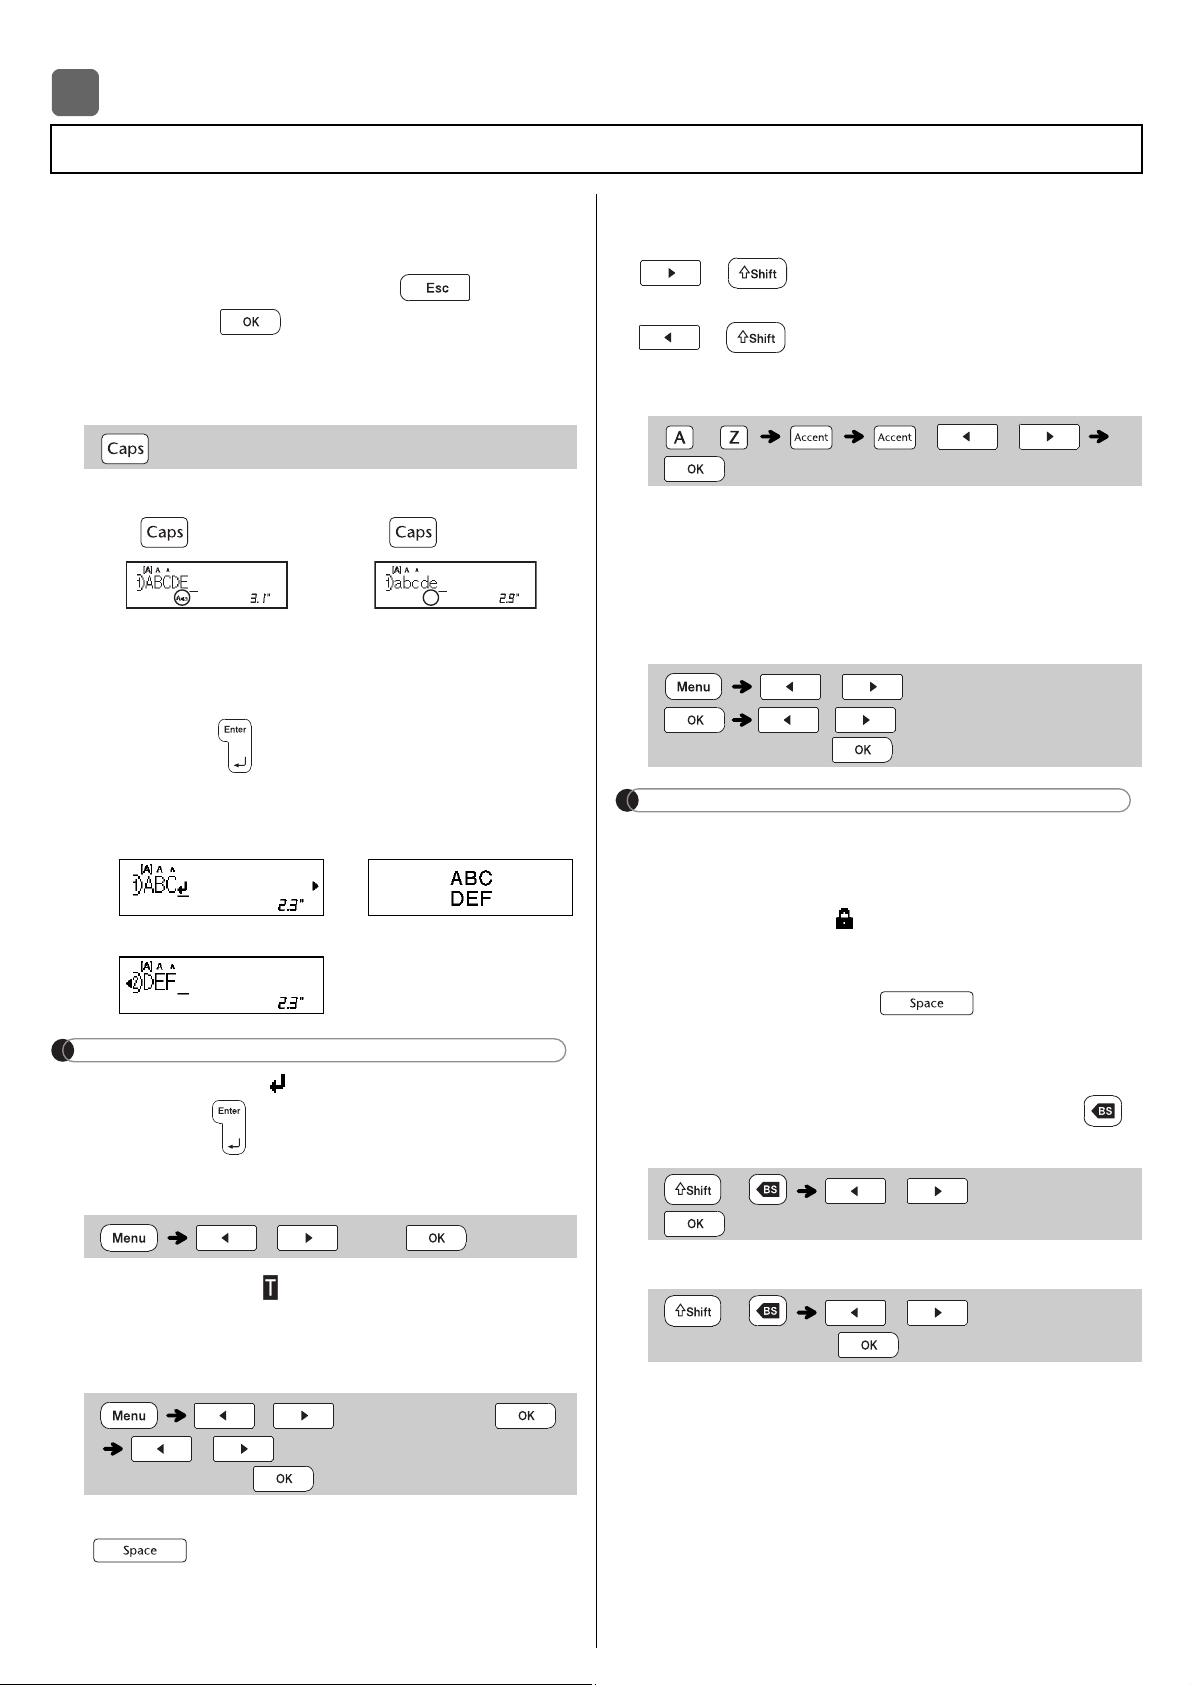
X Switching Upper Case / Lower Case
X Creating Two-Line Ribbons / Tapes
(12mm) tape for two-line printing.
NOTE
the Enter key .
X Entering Tabs
tab in the text.
X Changing Tab Length
lt tab length, press
.
your ribbon or tape size.
X Cursor Keys
To move to the end of your text:
+
To move to the beginning of your text:
+
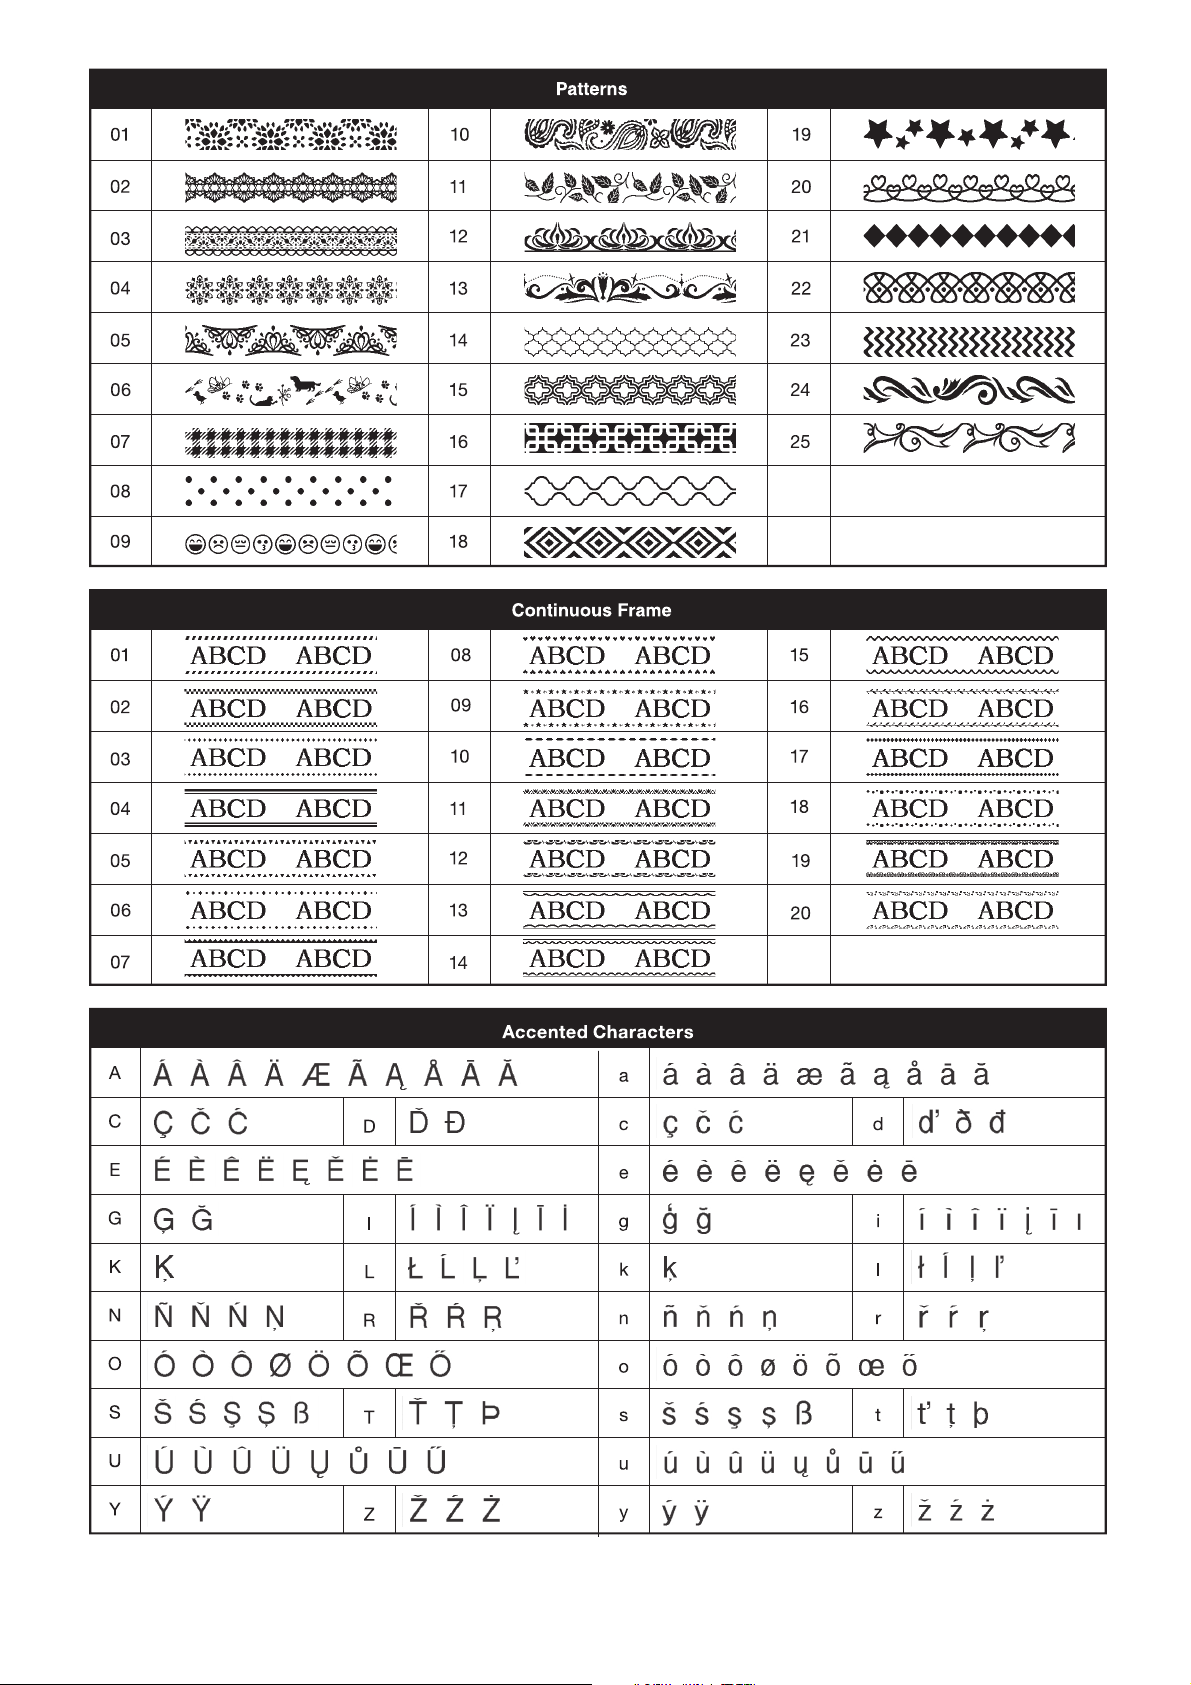
X Entering Accented Characters
Accented Characters table in this
guide.
X Changing Ribbon / Tape Length
NOTE
what is shown on the LCD.
on text length), press , and [Auto]
appears on the LCD.
X Clearing Text and Settings
To delete all text :
To delete all text and settings :
Entering Text
2
( ON)
( OFF)
Line 1 The image
Line 2
/ [Tab]
/ [Tab Length]
/ [Auto / 0.0"-4.0"
(0-100 mm)]
Caps Caps
- / /
/ [Label Length]
/ [Auto / 1.2"-39.0"
(30-999 mm)]
+ / [Text Only]
+ /
[Text&Format]
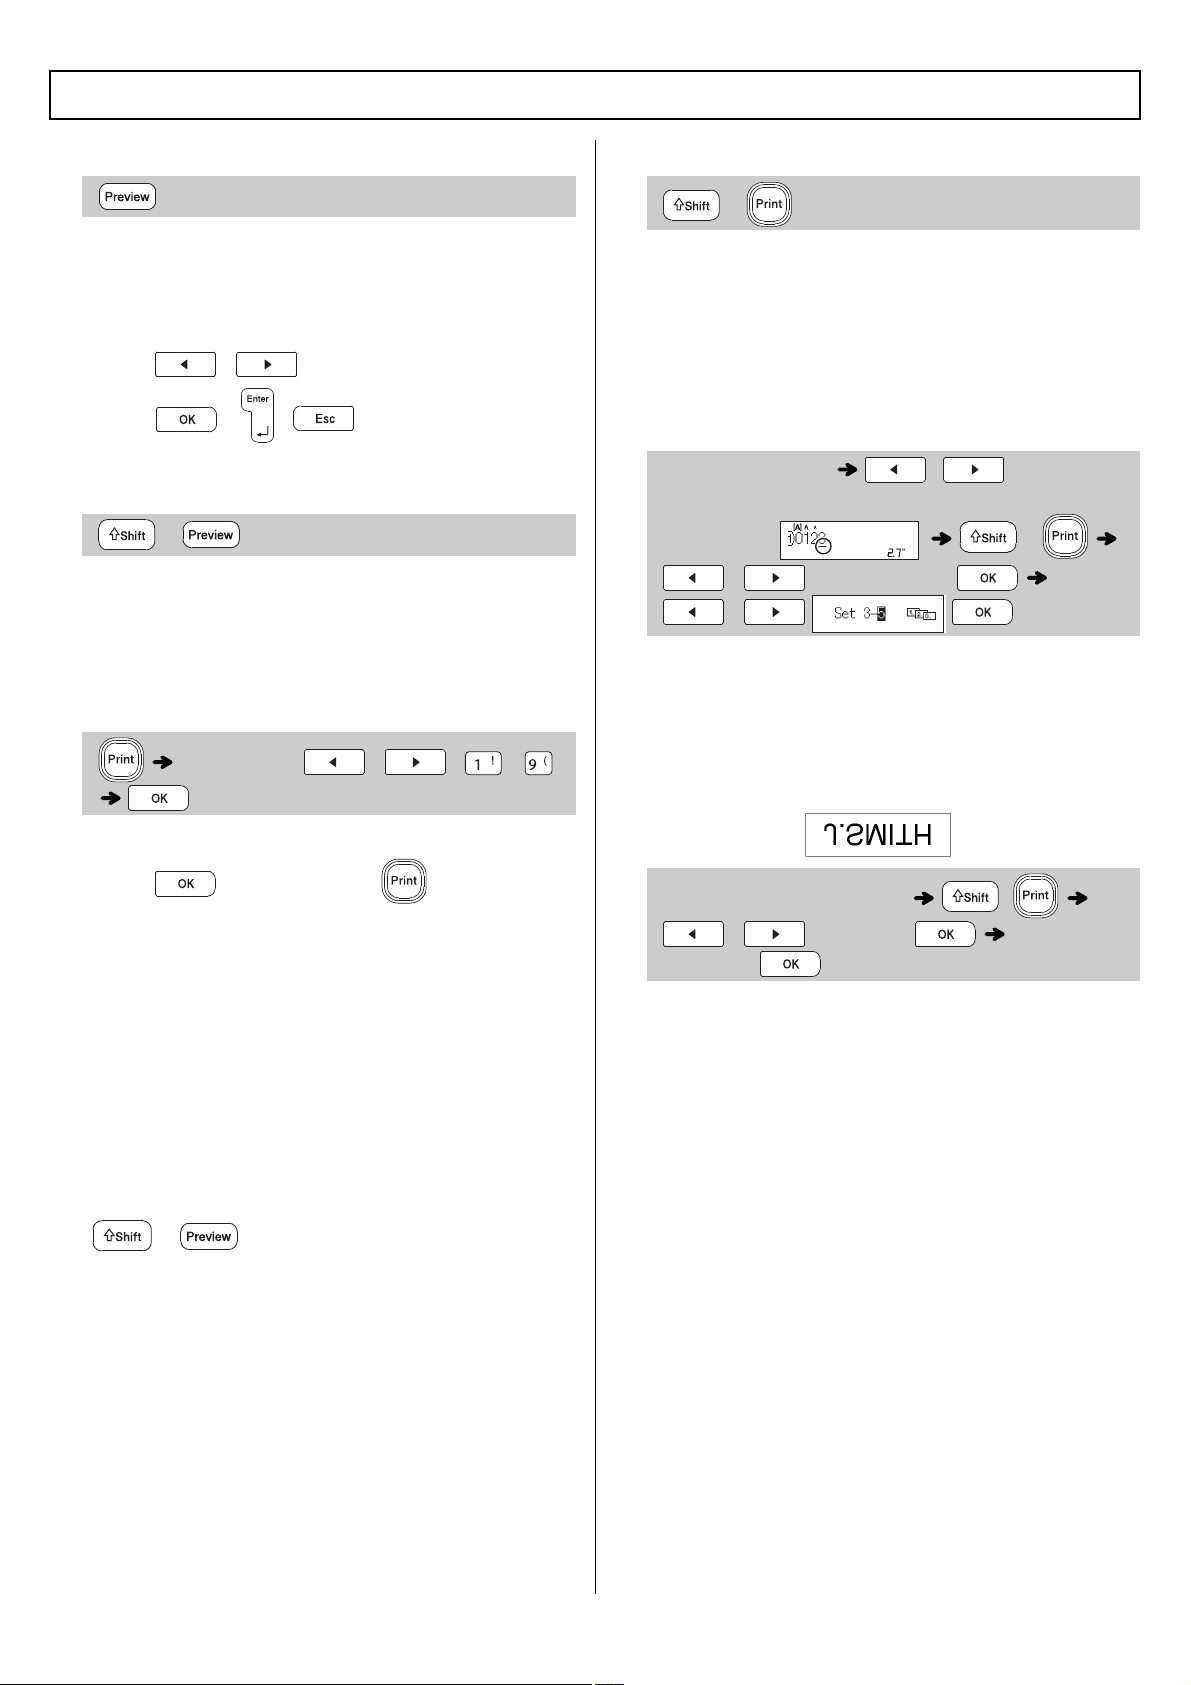
X Preview
one when printed.
press / to display the hidden text.
X Feeding (Tape Feed)
blank tape.
Tape Cassette.
X Printing
press after you press .
tape.
message [Please Wait] appears on the LCD.
To cut tape:
Tape Cutter Lever after the message [Please
Cut] appears.
To cut ribbon:
lengthwise (with the text
expose the inside edges that run down the
X Using Print Options
[
1XPEHULQJ
]
using auto-numbering. Use this feature to
Ex:
when setting the number.
[
0LUURU
]
Ex:
Printing Ribbons / Tapes
+
[Copies: ] / / -
+
(Enter numbers) / by moving
the cursor to the number you wish to
increment. +
/ [Numbering]
/
(Enter text or characters)
+
/ [Mirror] [Mirror
Print?]
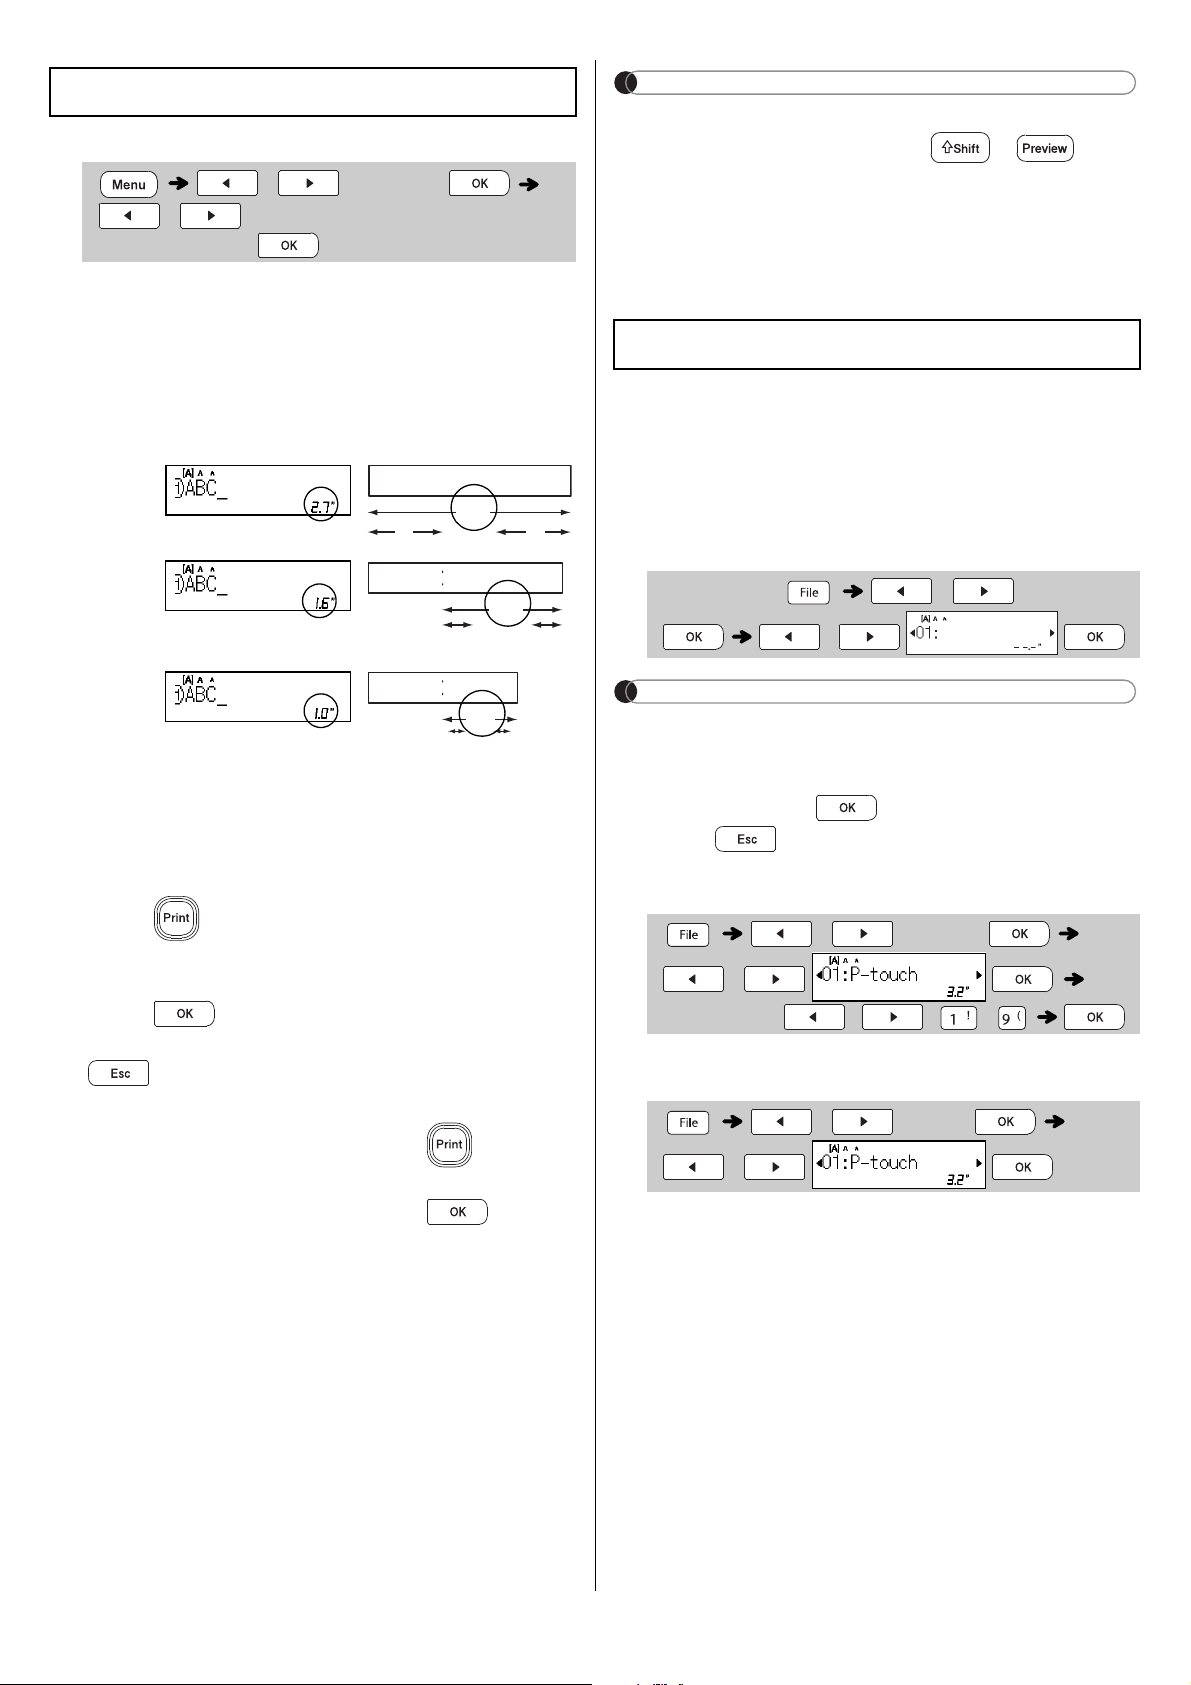
X Setting Margins
[
)XOO
] / [
+DOI
] / [
1DUURZ
]
before and after your text.
[
&KDLQ3ULQW
]
(ribbon/tape-saving option)
Use this option to print multiple different labels with
narrow margins. This option saves ribbon/tape.
1.
Enter your text.
2.
Copies] appears on the LCD.
3.
enter the number of
4.
5.
Feed OK?] appears on the LCD, press
6.
Clear the text, enter the text you want on the
next ribbon/tape, and then press .
7.
Feed
OK?] appears on the LCD, press .
NOTE
Chain Print
], feed the ribbon/
Cassette.
or overwrite stored files as needed.
X Saving a new file
NOTE
already assigned to another file, [
Overwrite OK?
]
appears on the LCD. To overwrite the previously-
press .
X Printing a saved file
X Opening a saved file
Printing Ribbons / Tapes (cont)
/ [Margin]
/ [Full / Half / Narrow /
Chain Print]
Full
Half
Narrow
2.7"
ABC
1" 1"
1.6"
ABC
0.47" 0.47"
1.0"
ABC
0.16"0.16"
Saving Ribbons / Tapes Files
(Enter text) / [Save]
/
/ [Print]
/
[Copies: ] / / -
/ [Open]
/
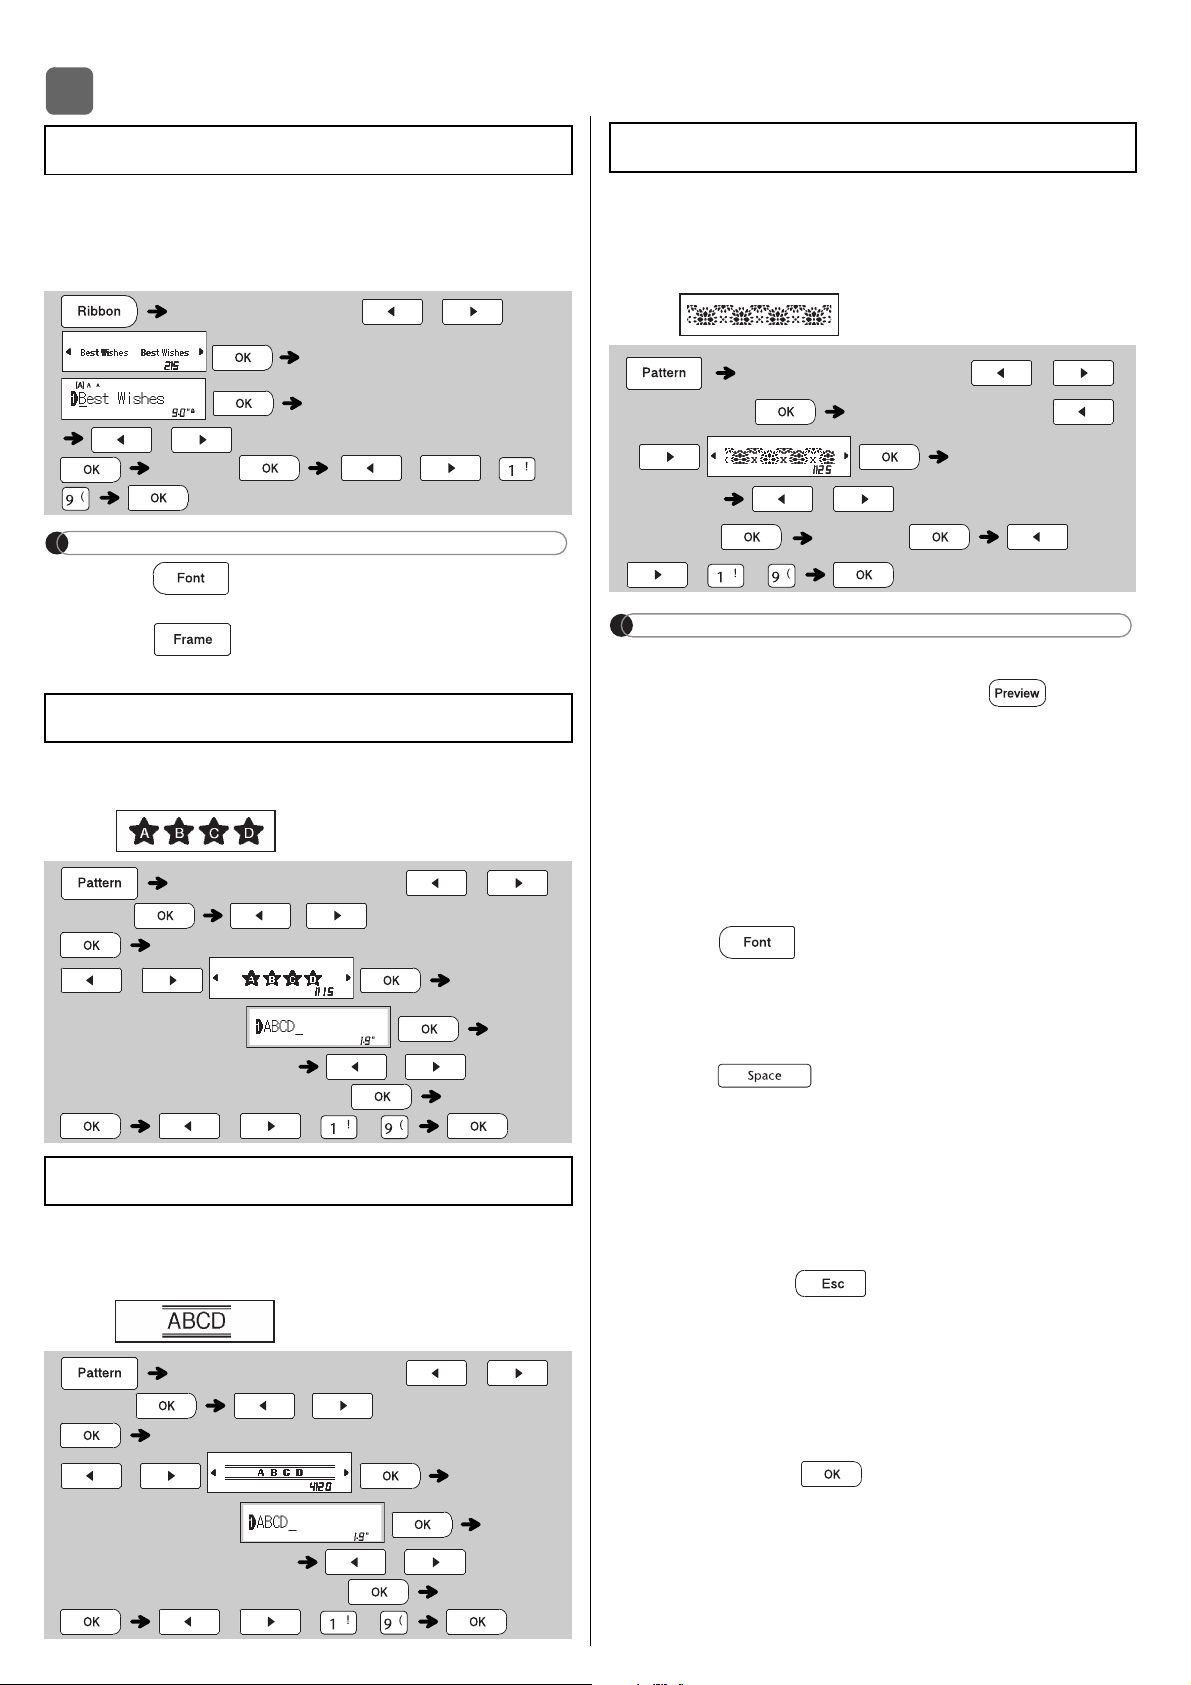
USING TEMPLATES
Use Text templates to repeat text without having
to retype it. Enter your own text or use the built-in
two-line Text templates. Refer to the Text
Samples table in this guide.
NOTE
, size, and style after
entering your text.
your text.
Use Initial Marks to add personality to your ribbons/
tapes. Refer to the
Initial Marks
table in this guide.
Ex.:
borders on ribbons/tapes. Refer to the
Continuous Frame table in this guide.
Ex.:
texture to your ribbons/
Patterns table
in this guide.
Ex.:
NOTE
X For Initial Marks and Continuous Frame
[
Print
] is displayed on the LCD.
default length (
[AUTO]
), the text prints
repeatedly within the length you set. If the text
depending on the length of your text.
style, also).
X For Patterns
([3.9"(100mm)]) for [
Label Length
].
X For All Templates
Print] appears on
the LCD.
Please Cut] appears
Text
[
Select Layout
] /
[
Input Text
] (Enter text)
[
Set Label Length
]
/ [
1.2"-39.0" (30-999mm)
]
[
Print
] / / -
Initial Marks
[Select Category] /
[Text]
/
[Initial mark]
[Select Layout]
/
[
Input
Text
] (Enter text)
[
Set Label Length
] / [
Auto
/
1.2"-39.0"(30-999mm)
] [
Print
]
/ / -
Continuous Frame
[Select Category] /
[Text]
/
[Continuous]
[Select Layout]
/
[
Input
Text
]
(Enter text)
[
Set Label Length
]
/
[
Auto
/
1.2"-39.0"(30-999mm)
]
[
Print
]
/ / -
3
Patterns
[
Select Category
] /
[
Patterns
] [
Select Design
]
/ [
Set Label
Length
] / [
1.2"-39.0" (30-
999mm)
]
[
Print
]
/
/ -
FORMATTING KEYS
1
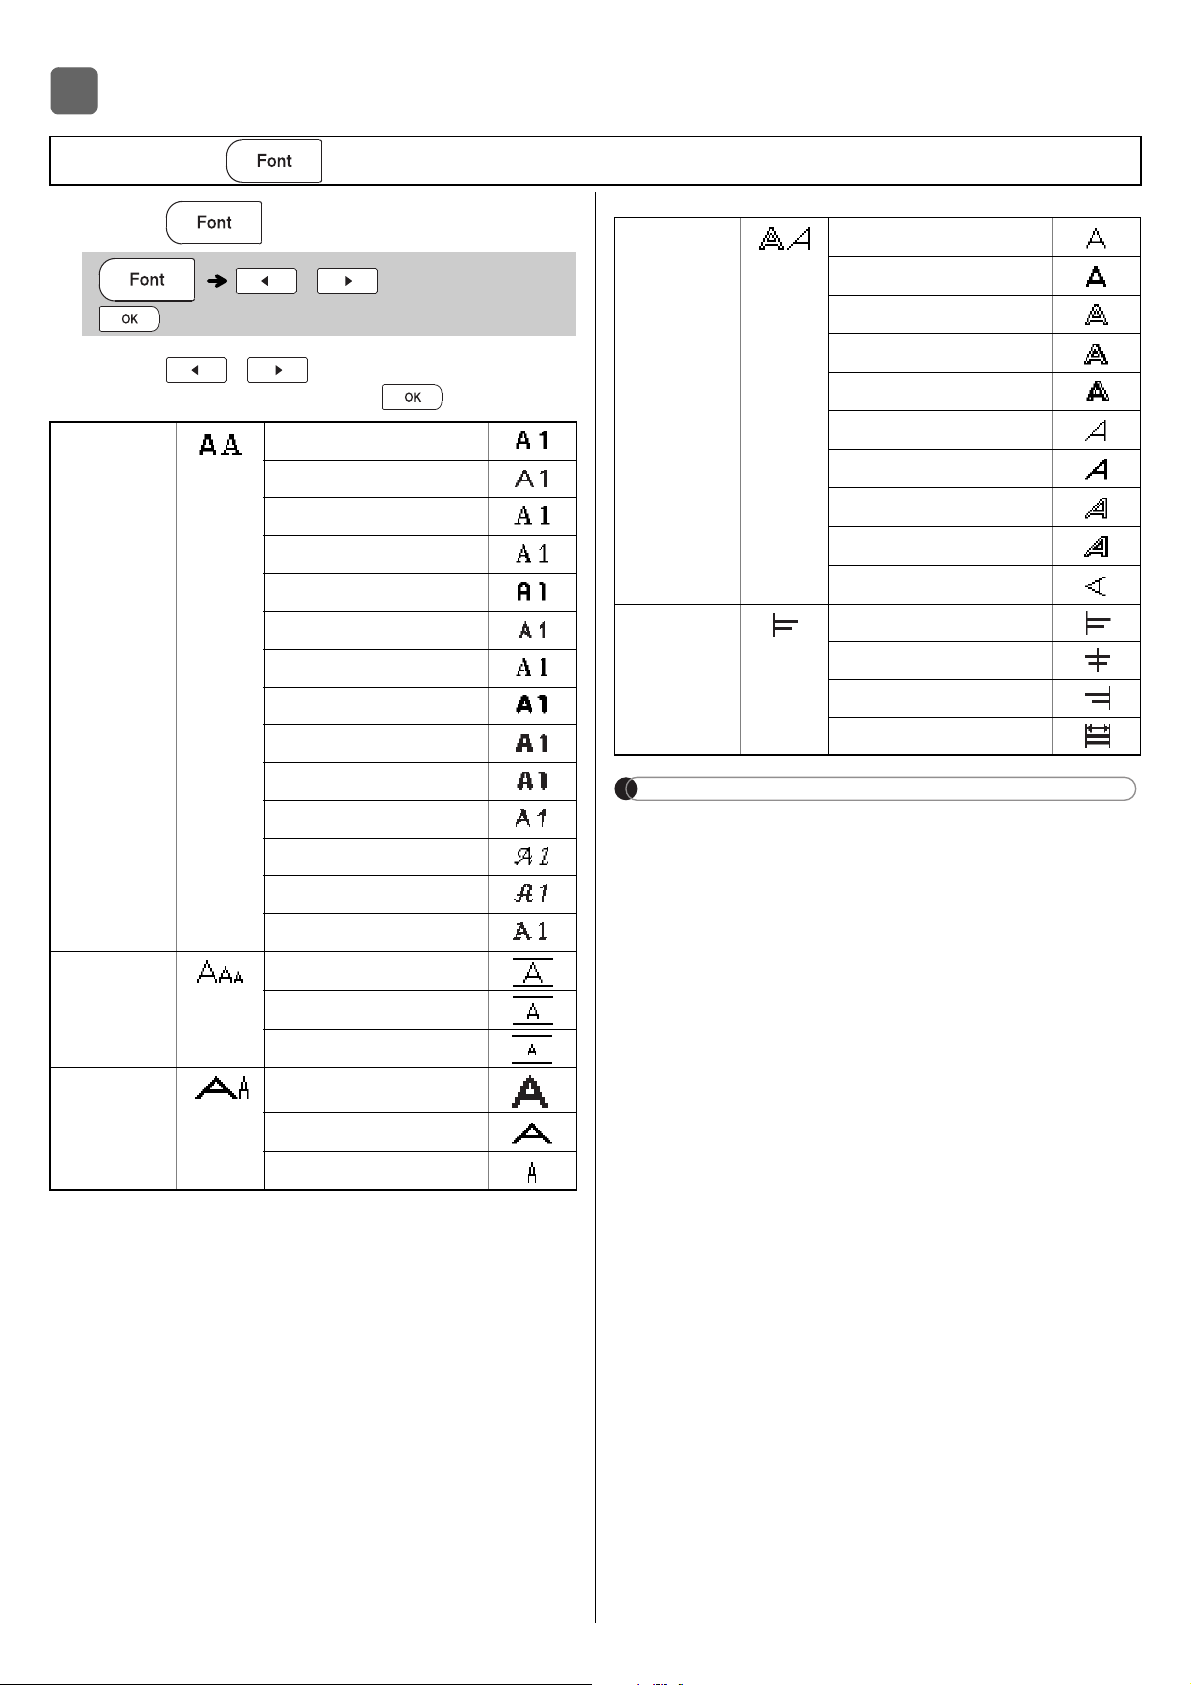
Press to change the font settings.
2
Press / to select the settings
you want, and then press .
Font Samples table illustrated in
this guide.
width, number of characters and number of
input lines. Once characters reach a minimum
size, the selected font will default to a custom
font which is based on the Helsinki style. This
ribbon and tapes.
4
Font Key
(Select an item)
Atlanta
Brussels
Belgium
Adams
Istanbul
Calgary
Berlin
Venezia
Medium
Width Normal
Bold
Outline
Italic
Vertical
Alignment Left
Center
Right
Justify
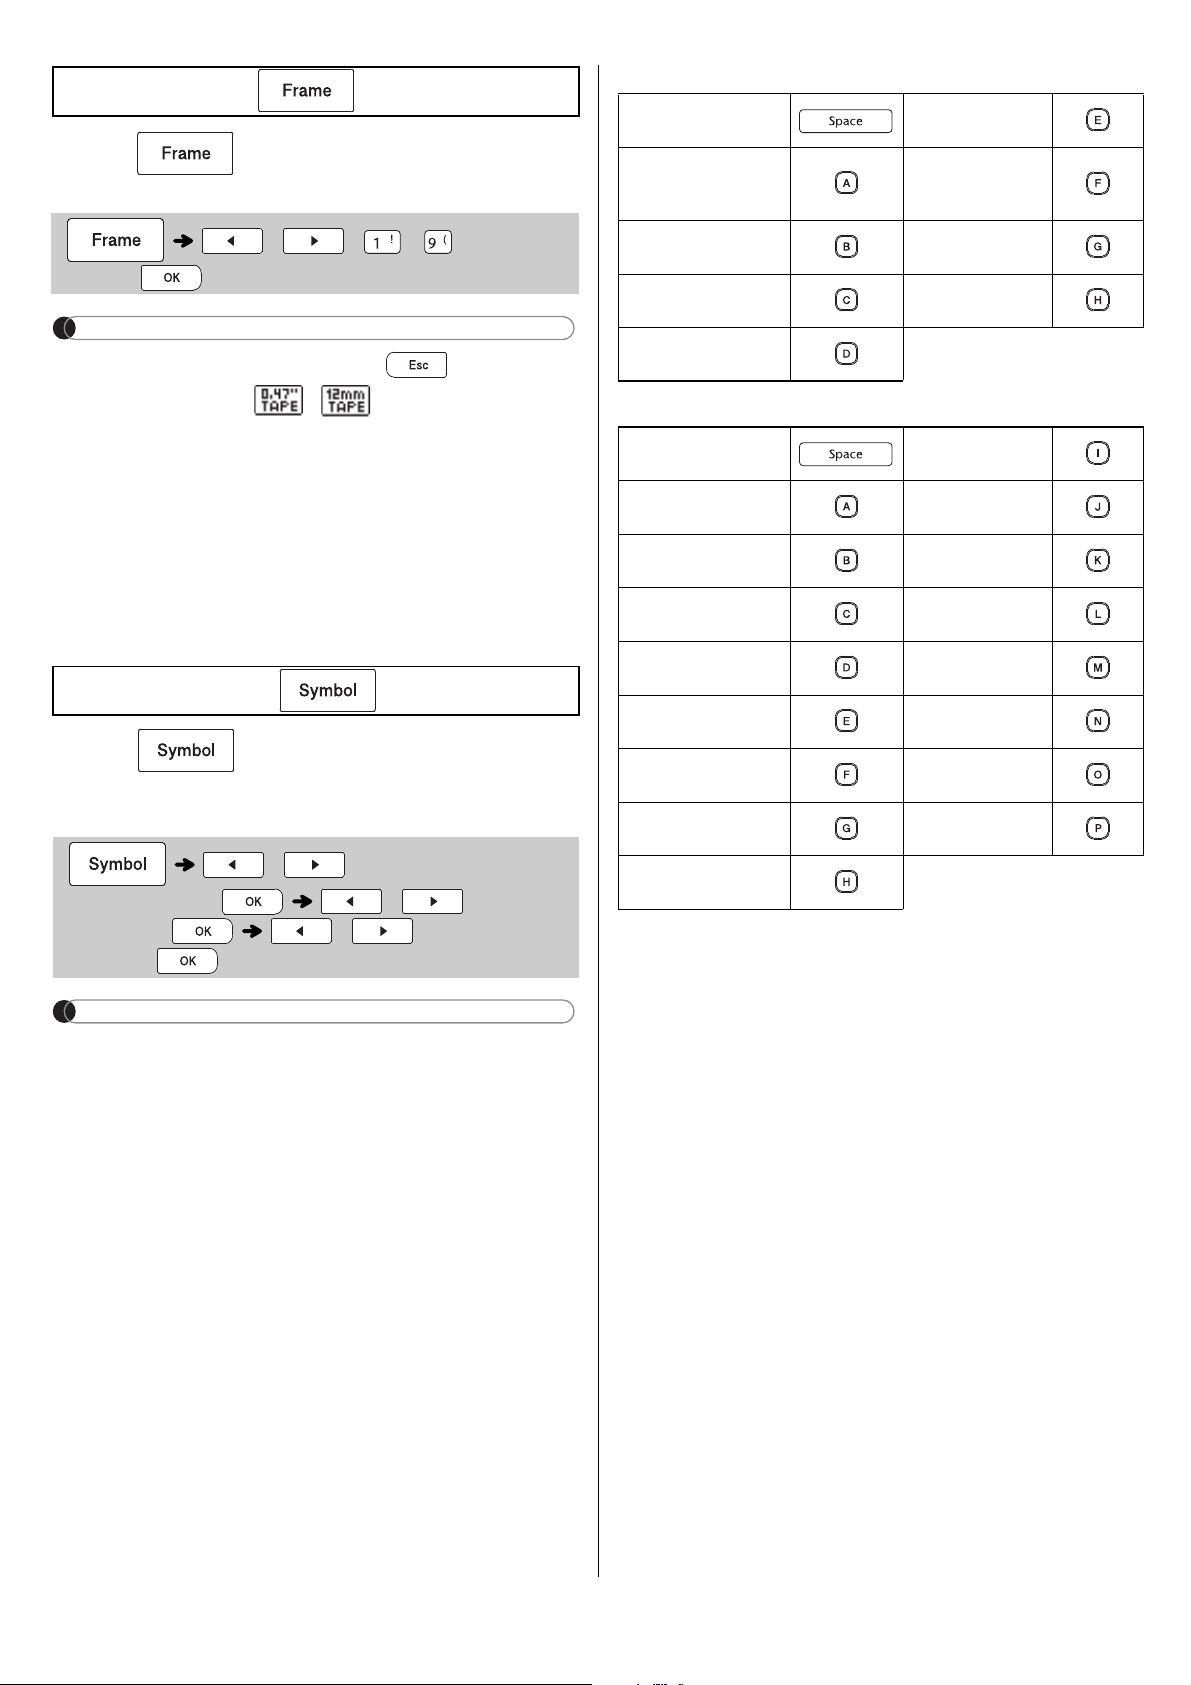
the
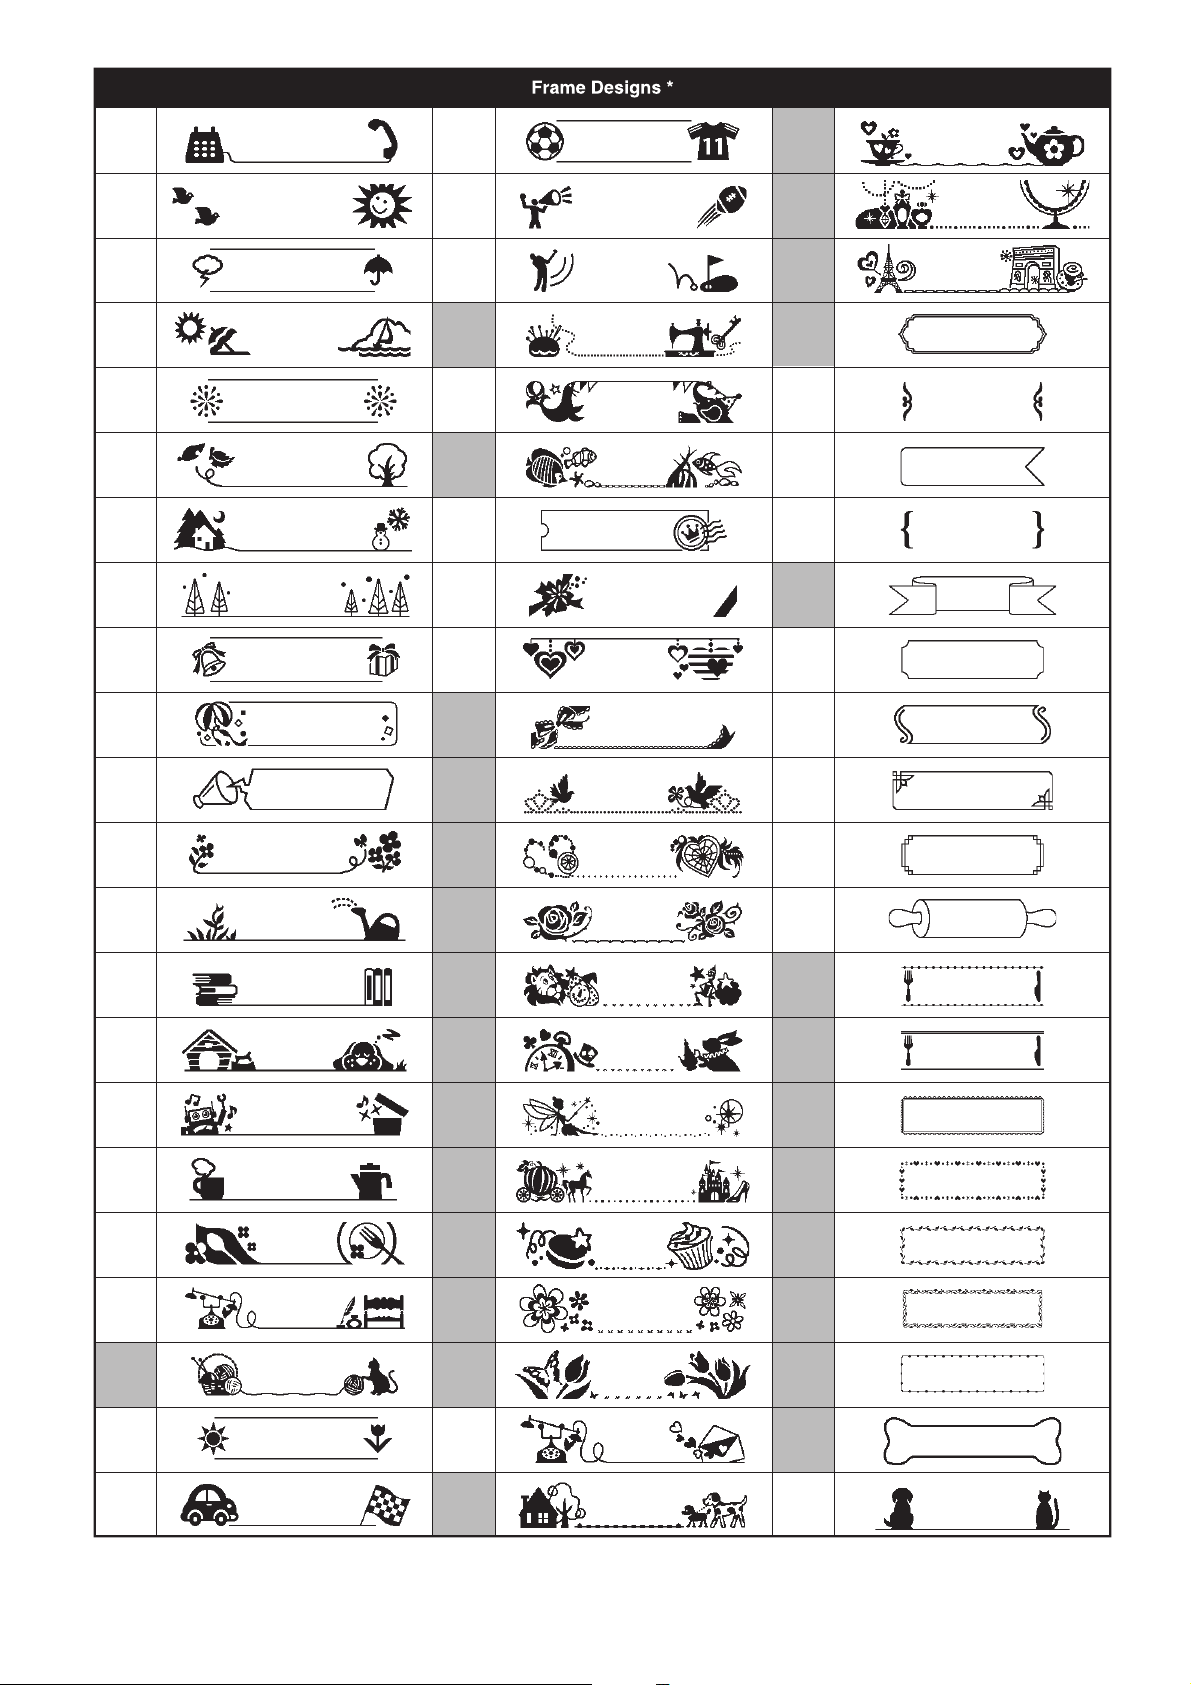
Frame Designs
table section in this guide.
right side of the LCD when selecting a frame, it
Refer to the Frame Designs table section in
this guide.
the
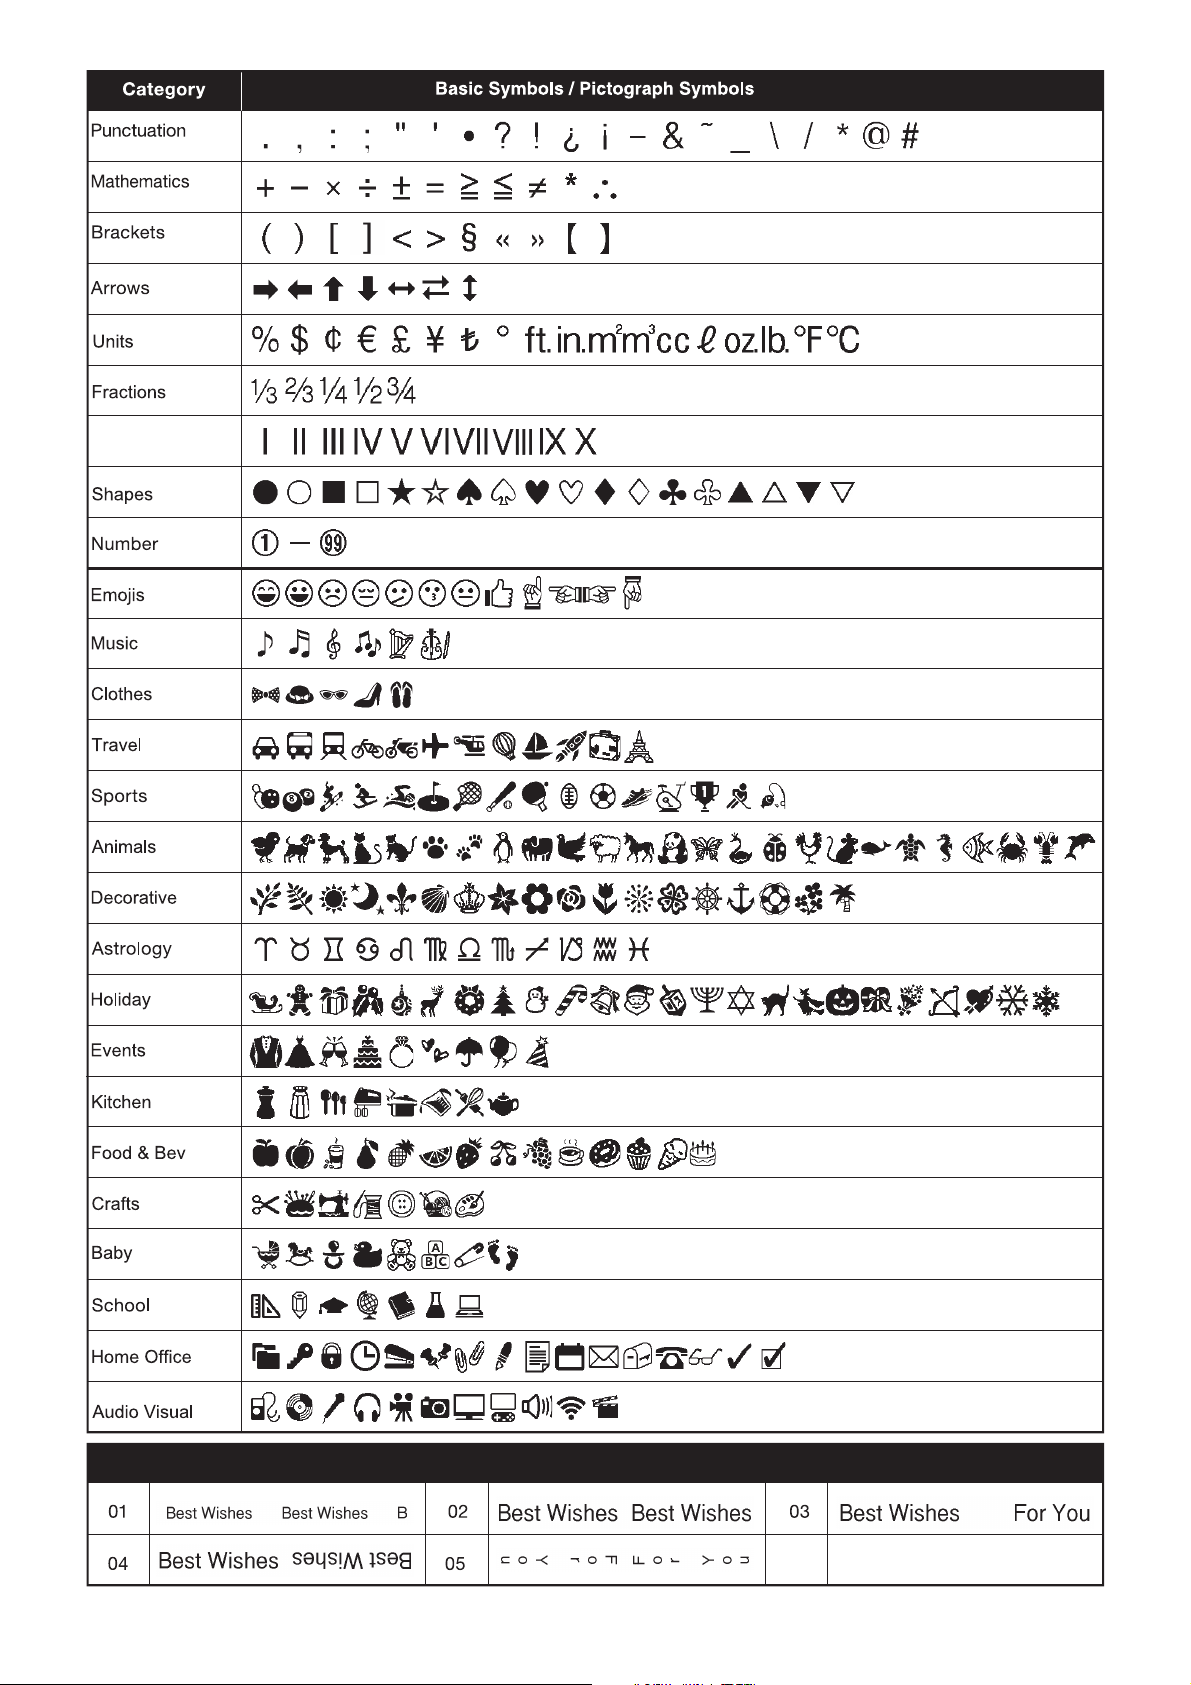
Basic Symbols
and
Pictograph Symbols
table sections in this guide.
used symbols are added to History.
category.
Helpful Hints,
Shortcuts.
X Basic
X Pictograph
Frame Key
(Select a
frame)
Symbol Key
HistoryBasic
Pictograph (Select
category)(Choose a
symbol)
Mathematics
Roman
Numerals
Arrows Number
Music Kitchen
Astrology Audio Visual
Holiday
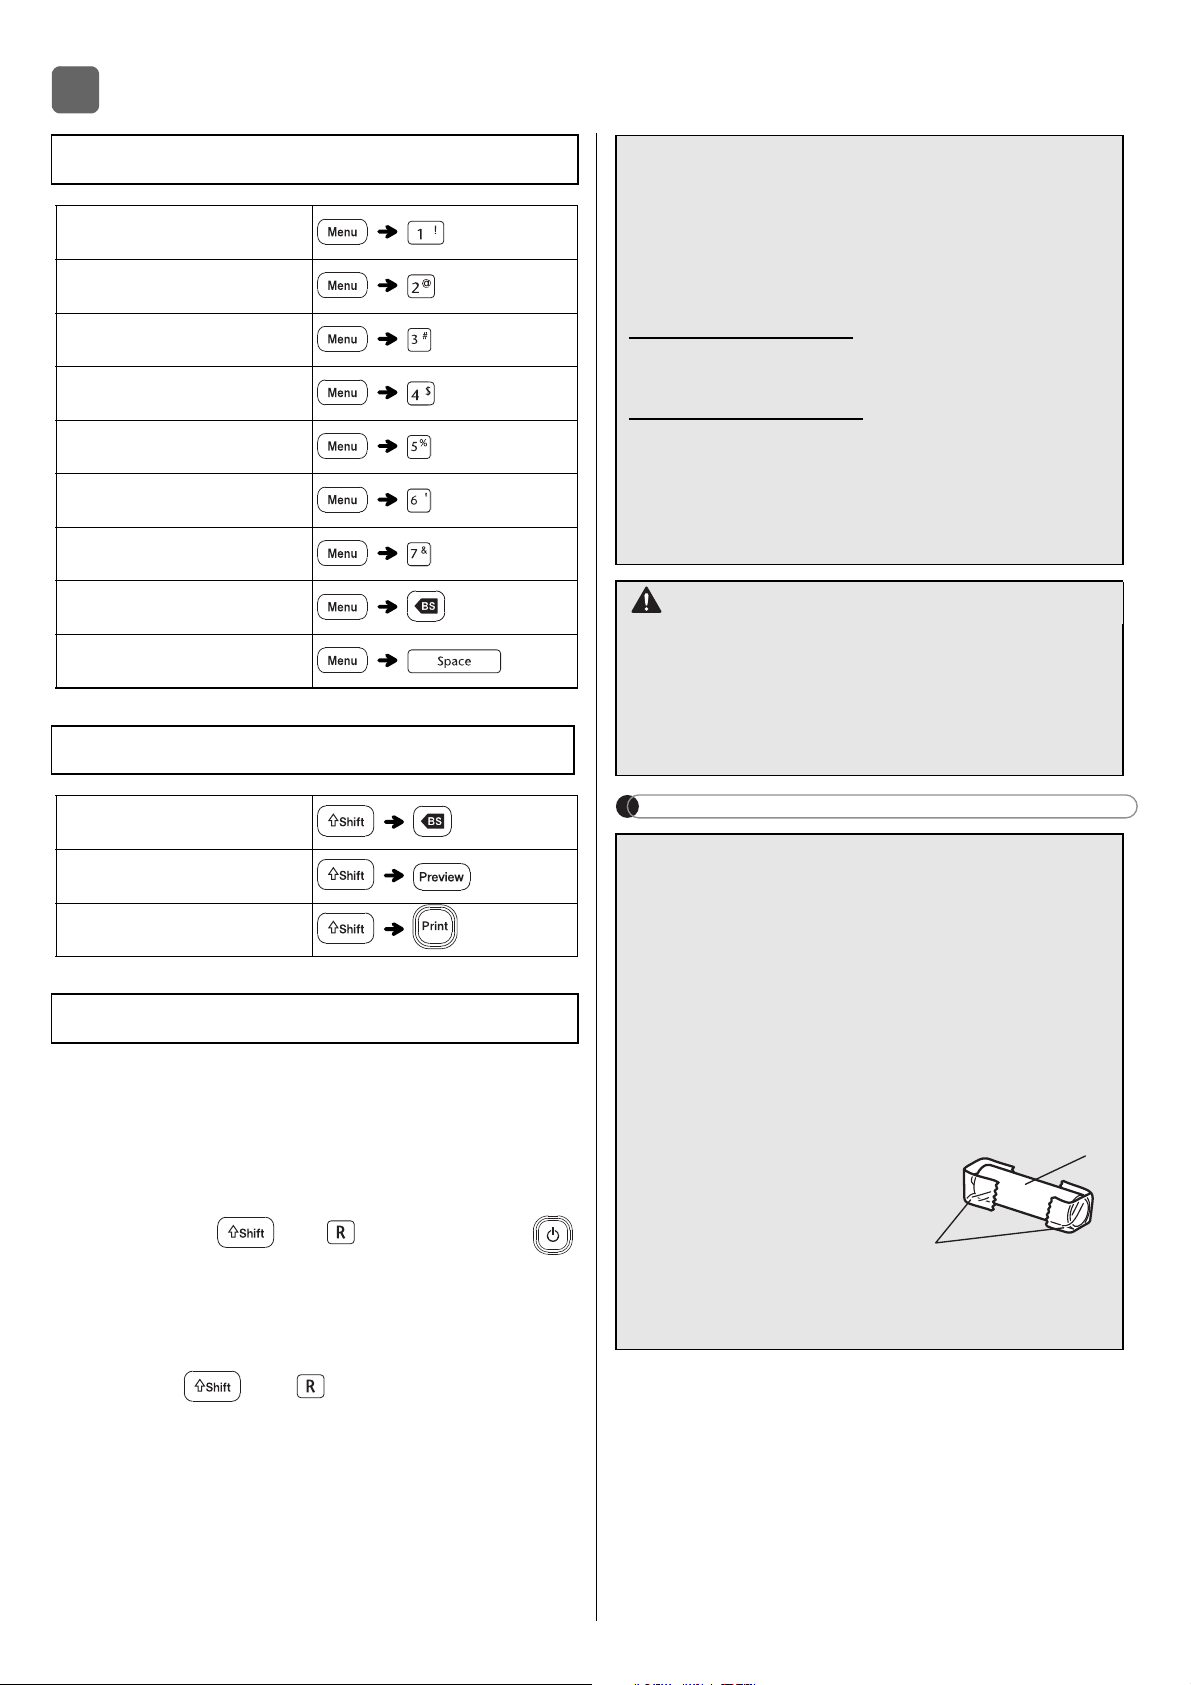
HELPFUL HINTS
stored files.
1
Turn off the P-touch ribbon/tape printer,
hold down and , and then press
to turn the P-touch ribbon/tape printer back
on.
2
First release the power button, and then
release and .
the internal memory reset.
Shortcuts
Tab
LCD Contrast
Margin
Tab Length
Clear
Language
Helpful Tips
Clear
Resetting the P-touch
5
online or call.
support.brother.com.
To order supplies and
www.brothermall.com
or call
CAUTION
you do not intend to
period of time.
collection point, not in the general waste
federal, state, and local regulations.
1. Cellophane tape
battery
Do not mix old and new batteries. Replace all
six batteries at the same time.
2
1
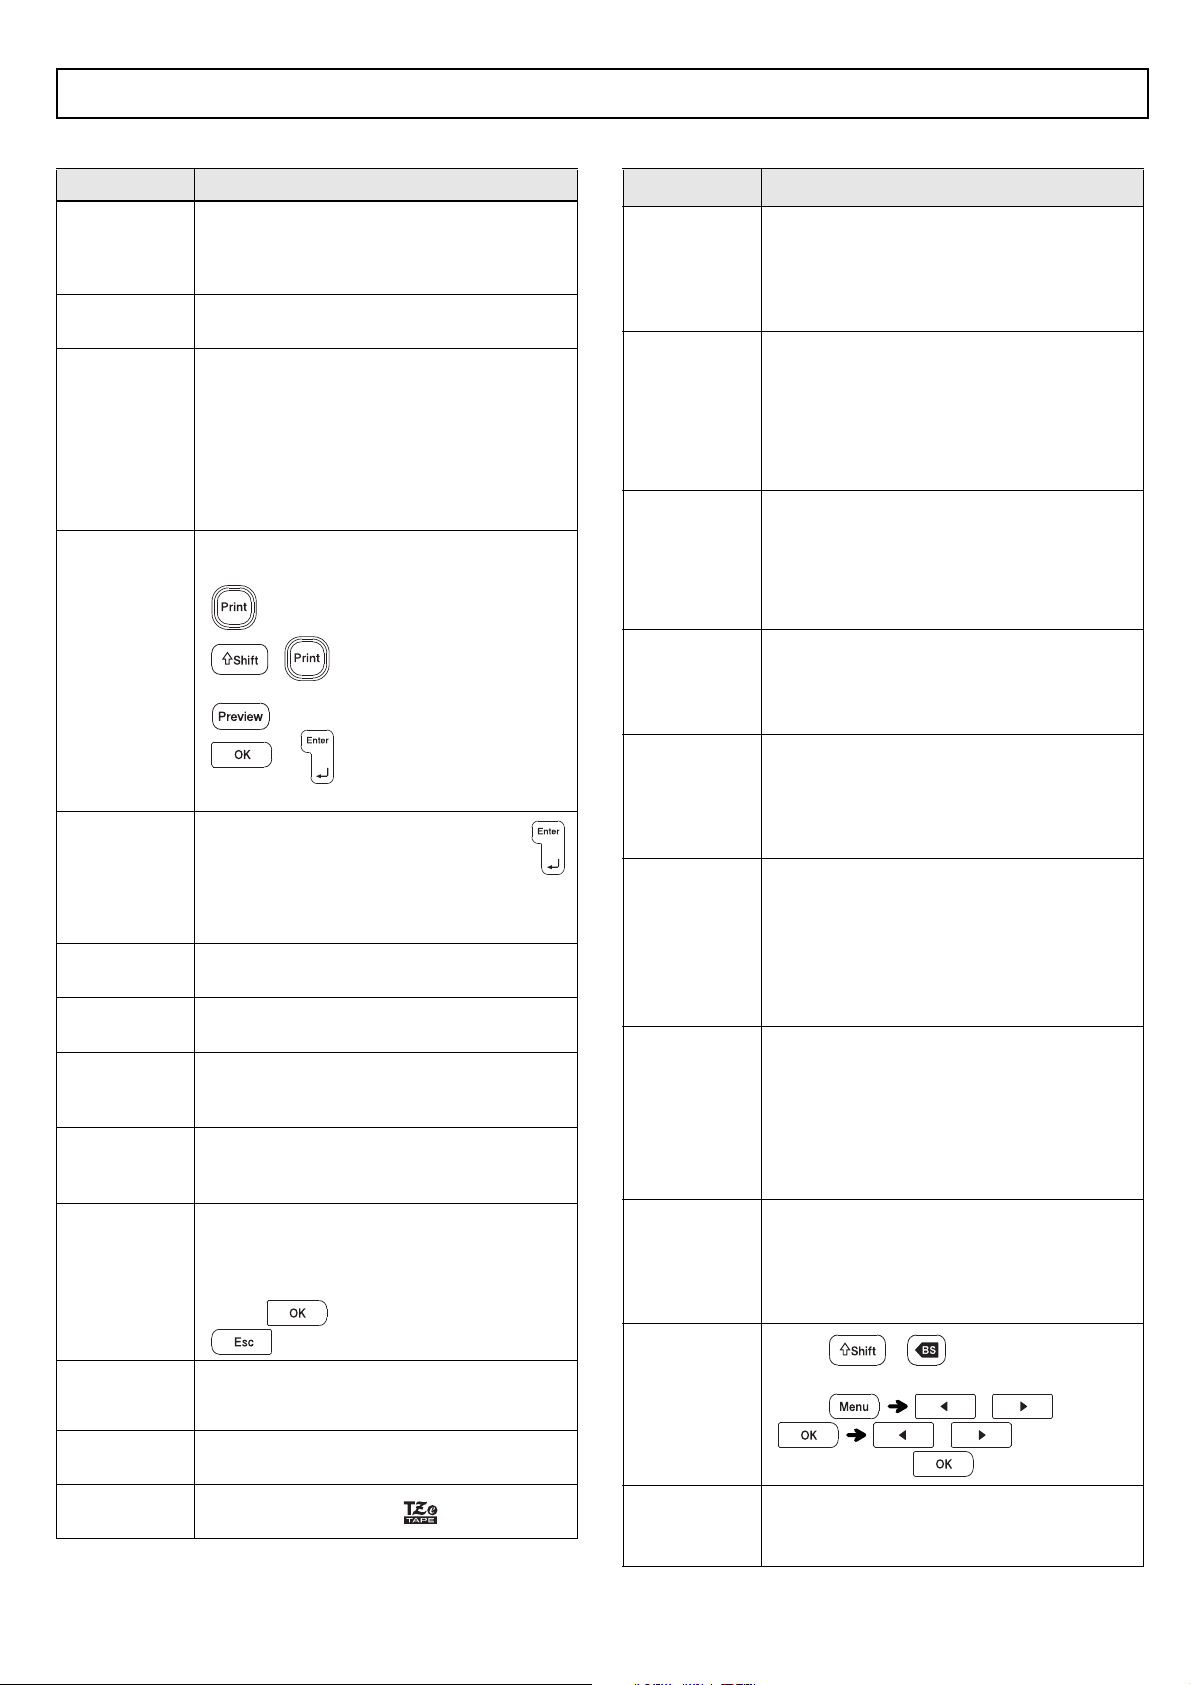
X Error messages X What to do when...
Troubleshooting
Message Cause / Remedy
Battery Low! The batteries are weak.
If using AAA alkaline batteries, replace them
with new ones.
If using Ni-MH batteries, charge them fully.
Battery
Empty!
The installed batteries are running low and
need to be replaced for continued operation.
Invalid!
selected [Numbering].
r was selected for
[Numbering].
s selected for [Tab
Length] or [Label Length].
tape length while using templates.
No Text
data stored in the memory.
entered.
was entered while using templates.
2 Line Limit!
1 Line Limit!
installed. Install a larger tape size.
No
Cassette!
There is no cassette installed.
Cutter
Pressed
middle of the printing process.
Text Full!
Change
Length
Auto
tape length.
No Frame OK?
ON, but a cassette narrower than
to cancel.
Feed OK? Chain
Print] is selected. Refer to the Setting
Margin section in this guide.
Insert
0.47"
cassette.
Use TZe
Tape!
Problem Solution
The display
stays blank
turned on the
machine.
inserted.
is correctly connected.
When the
printed out,
there is too
much margin
Setting Margin section in this
guide and select [Half] , [Narrow] or
[Chain
The machine
does not print,
or the printed
characters are
not formed
properly.
correctly.
The setting has
cleared on its
own.
display settings are cleared.
A blank
horizontal line
appears through
the printed
and-down motion.
The machine
has “locked up”
happens when a
key is pressed,
Resetting the P-Touch section
in this guide.
The power
turns off when
you try to print.
inserted.
he wrong AC Adapter is used. We
Adapter.
The tape does
not feed properly
or the tape gets
stuck inside the
machine.
the tape guides.
format settings
need to be
cleared to
create a new
[Text&Format].
Clear]
[Text&Format]
To change
language
setting.
Initial Settings section in this
guide.
Roman Numerals
Text Templates

01
02
03
04
05
06
07
08
09
10
11
12
13
14
15
16
17
18
19
20
21
22
23
24
25
26
27
28
29
30
Off
Note: Images are for illustrative purposes only.
* Not applicable Frame Designs with numbers highlighted in gray can be used ONLY with
0.47"(12mm) wide tape cassettes.
31
32
33
34
35
36
37
38
39
40
41
42
43
44
45
46
47
48
49
50
51
52
53
54
55
56
57
58
59
60
61
62
63
64
65
66
67
68
69
70
71
72
73
74
75
76
77
78
79
80
81
82
83
84
85
86
87
88
89
90
91
92
93
94
95
96