User manual Refrigerator
SETTING UP YOUR REFRIGERATOR
GETTING READY TO INSTALL THE REFRIGERATOR_
Congratulations on the purchase of your Samsung Refrigerator.
We hope you will enjoy the many state-of-the-art features and efficiencies that this new appliance has to offer.
- This refrigerator must be properly installed and located in accordance with the manual before it is used.
- Use this appliance only for its intended purpose as described in this instruction manual.
- We strongly recommend that any servicing be performed by a qualified individual.
- Please dispose of the packaging material for this product in an environmentally friendly manner.
Warning: • Pull the power plug out of the socket before changing the interior light of the refrigerator.
- Otherwise, there is a risk of electric shock.
Selecting the best location for the refrigerator
• Select a location without direct exposure to sunlight.
• Select a location with level (or nearly level) flooring.
• Select a location with enough space for the refrigerator doors to open easily.
• Allow sufficient space to install the refrigerator on a flat surface.
- If your refrigerator is not level, the internal cooling system may not work correctly.
- Overall space required in use.
Refer to drawing and dimension as below.
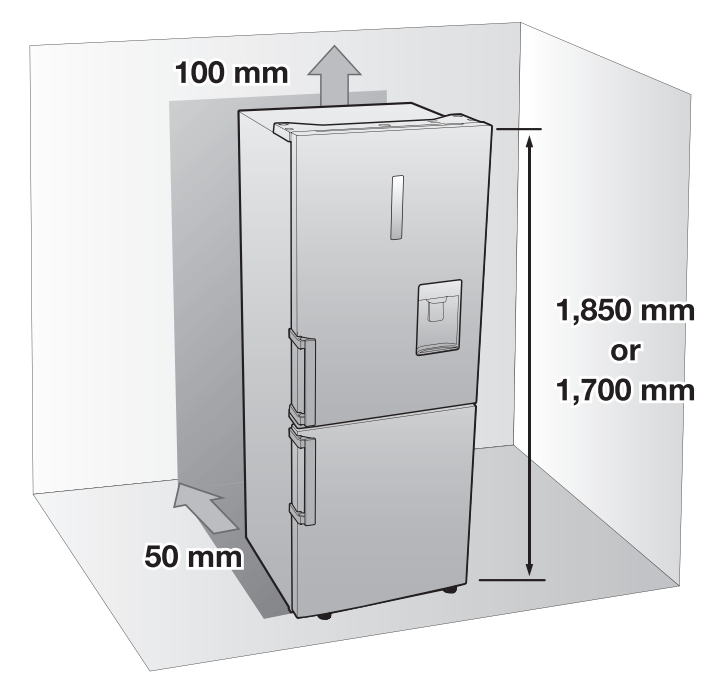
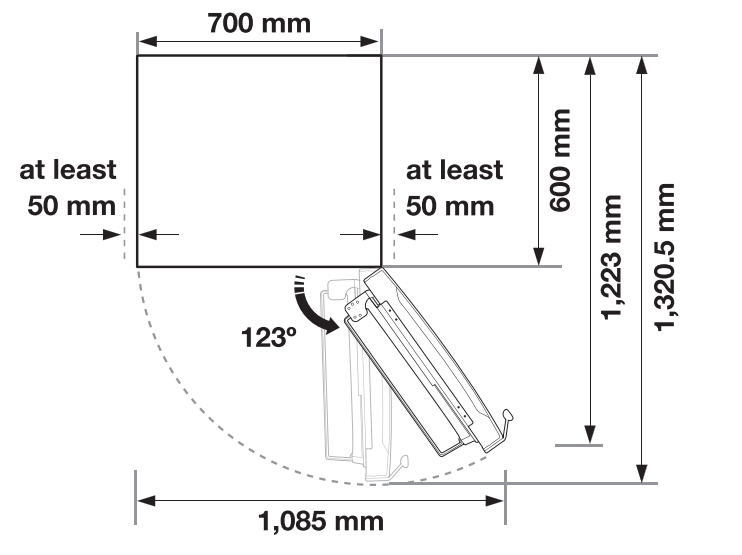
Note:
Allow sufficient space to the right, left, J back and top for air circulation.
This will help reduce power consumption and keep your energy bills lower.
• Do not install the refrigerator where the temperature will go below 10 °C.
• Please ensure that appliance can be moved freely in the event of maintenance & service.
Caution: When installing, servicing, or cleaning behind the refrigerator, be sure to pull the unit straight out and push back in straight after finishing. Also, make sure your floor supports the full-load refrigerator. Otherwise, it may cause floor damage.
Caution: Please tie up the extra length of the power cord at the back of the refrigerator so as not to be touched on the floor preventing the power cord from being crushed by the rollers upon relocation.
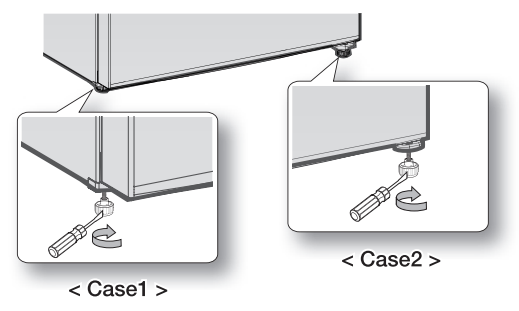
LEVELLING THE REFRIGERATOR
- If the front of the appliance is slightly higher than the rear, the door can be opened and closed more easily.
- Case 1) The appliance tilts down to the left.
- Turn the left adjusting leg in the direction of the arrow until the appliance is level.
- Case 2) The appliance tilts down to the right.
- Turn the right adjusting leg in the direction of the arrow until the appliance is level.
SETTING UP THE REFRIGERATOR
Now that you have your new refrigerator installed and in place, you are ready to set up and enjoy the full features and functions of the appliance.
By completing the following steps, your refrigerator should be fully operational.
If not, first check the power supply and electricity source or try the troubleshooting section at the back of this user guide.
If you have any further questions, contact your Samsung Electronics service center.
- Place the refrigerator in an appropriate location with reasonable clearance between the wall and the refrigerator.
- Refer to installation instructions in this manual.
- Once the refrigerator is plugged in, make sure the interior light comes on when you open the doors.
- Set the temperature control to the coldest temperature and wait for an hour.
- The freezer should get slightly chilled and the motor should run smoothly.
- After powering the refrigerator, it will take a few hours to reach the appropriate temperature. Once the refrigerator temperature is sufficiently cool, you can store food and drink in the refrigerator.
REVERSING THE DOOR (DEPENDING ON MODEL OPTION)
Before you reverse the refrigerator door, make sure to unplug the refrigerator. Samsung recommends that reversing of the door opening is only completed by Samsung approved Service providers. This will be on a chargeable basis and at the customers expense.
Note: Any damage caused while attempting to reverse the door opening is not covered under the appliance manufactures warranty. Any repairs requested due to this circumstance will be completed on a chargeable basis at the customers expense.
- Before attempting to reverse the refrigerator doors ensure that the refrigerator is disconnected from the main electricity supply and all food stuffs are emptied from inside the appliance.
- If the customer does not feel confident to follow instruction in the user manual, a Samsung qualified service engineer must be contacted to carry out this change.
- Do not plug in Refrigerator just after door reverse finished process and wait for at least one hour.
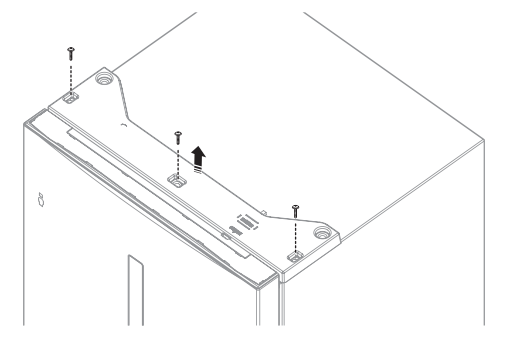
Required Tools
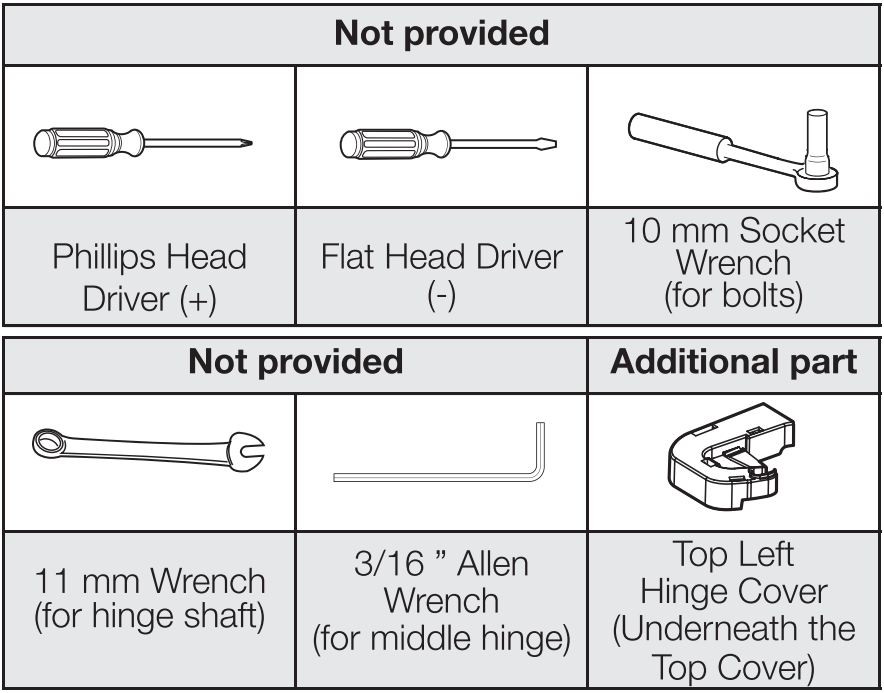
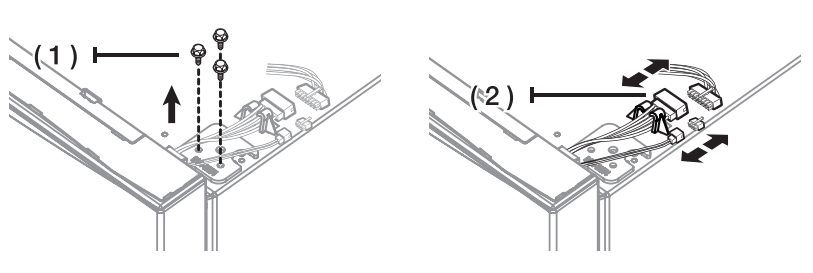
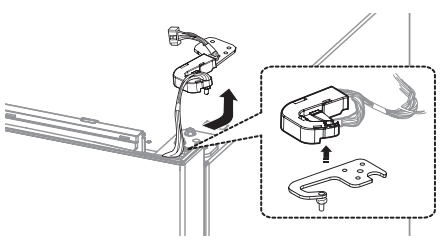
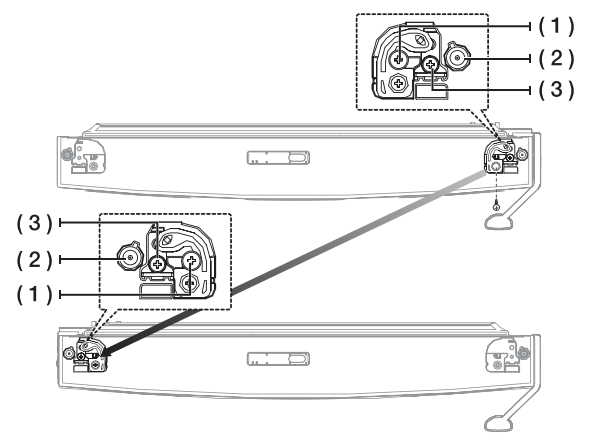
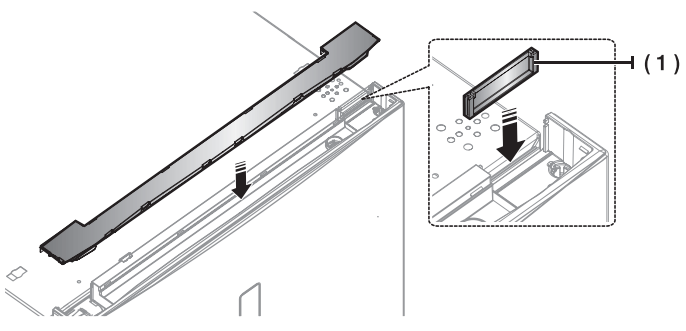
1. Remove the Hinge Cover and detach the sensor from the right Hinge Cover.
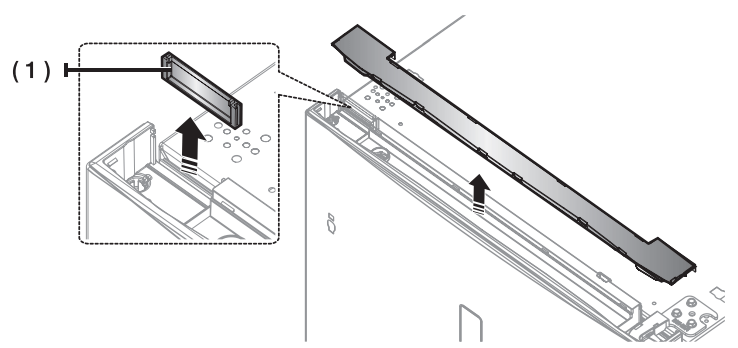
2. Remove bolts (1) and disconnect the wire (2).
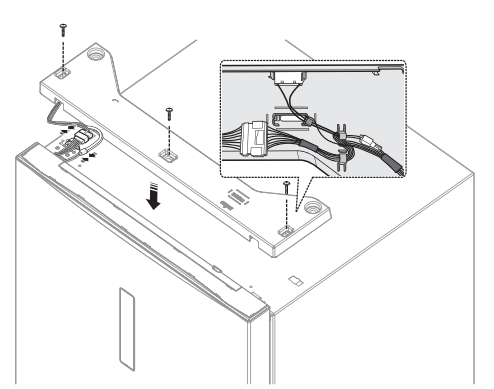
3. Remove Door Cover (1)
4. Remove the Hinge and detach Hinge Case from the hinge. Pull the wires out from the Hinge Case. (Door display type only)
5. Remove the fridge door from the Middle hinge by carefully lifting the door straight up.

Caution: The door is heavy, be careful not to injure yourself when removing the door.
6. Disassemble the Middle hinge.
7. Remove the freezer door from the Bottom hinge by carefully lifting the door straight up.
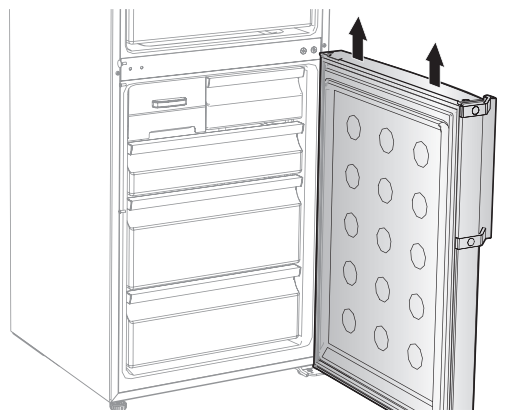
Caution: The door is heavy, be careful not to injure yourself when removing the door.
8. Lay the refrigerator carefully.
Switch the position of Bottom Hinge and Leg.
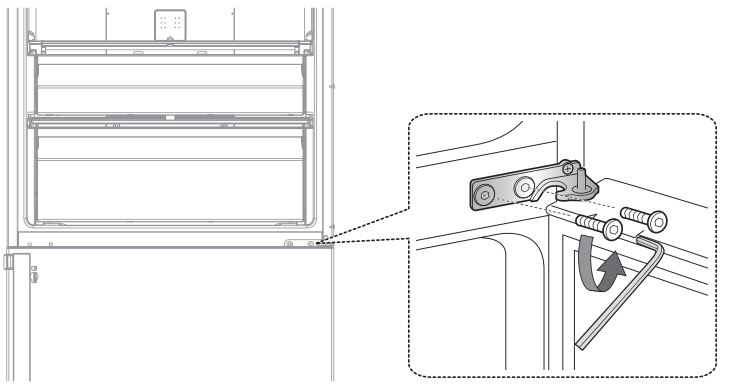
9. Remove the screw on the bottom right side of the fridge and freezer door.
Switch Door Stopper (1), Grommet (2) and Bracket (3) from the right to the left.
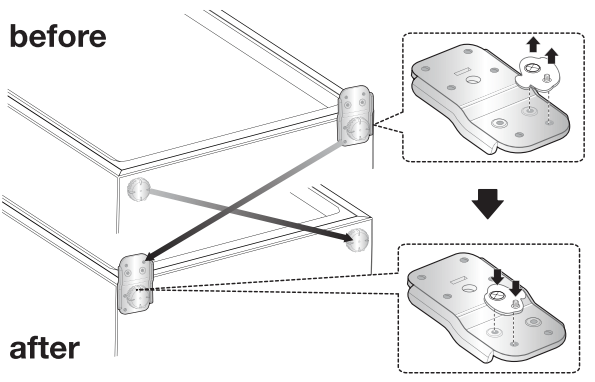
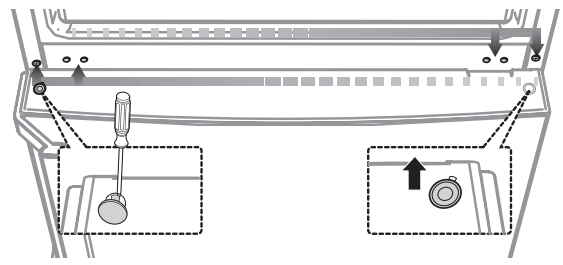
10. Switch the position of Grommet and Cap screws.
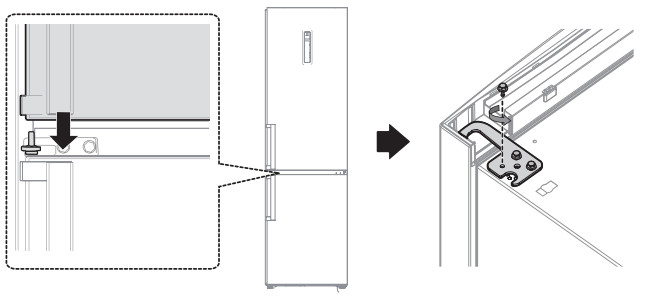
11. Carefully put the freezer door back on. Assemble the Middle hinge.

12. Switch the Wire door direction to opposite side on fridge door. (Door display type only)

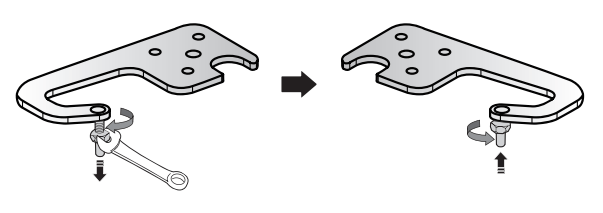
13. Use 11 mm wrench to separate the Top hinge shaft. Flip the Top hinge and reattach the Top hinge shaft.
14. Carefully put the Fridge door back on and assemble the hinge.
15. Change the Wire door direction to opposite side and assemble the door cover.
16. Connect wires (Door display type only) and Assemble the Hinge Cover.
Caution: Be careful not to damage on wires when reversing the door.
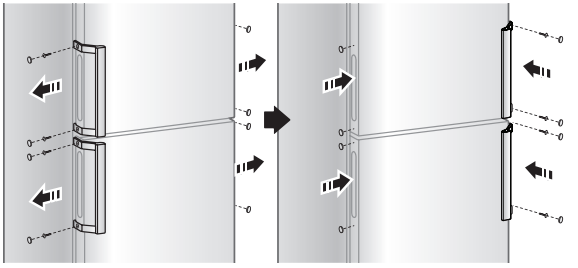
17. Switch the handles from the to left the right.
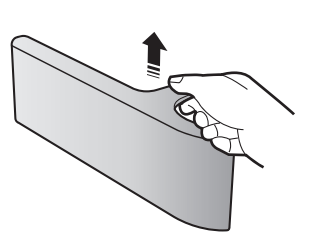
Caution: AWhen disassemble the Cover slider door, carefully open with both hands and pull it out. (Ez handle model only)
There is a risk of broken
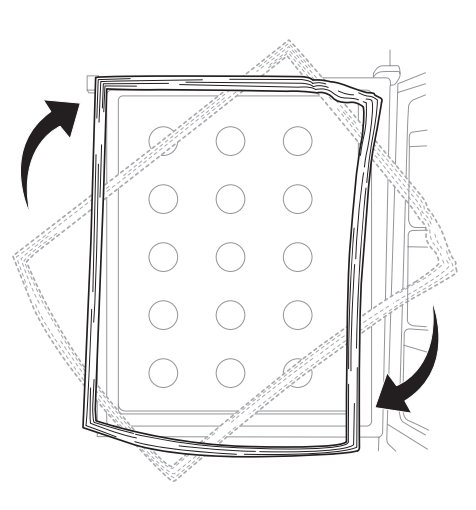
18. Detach the Fridge and the Freezer door gaskets and then attach them after rotating them 180°.
OPERATING YOUR REFRIGERATOR
USING THE CONTROL PANEL
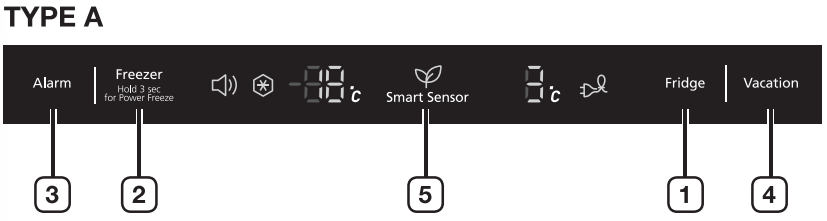
Note: Each time you press the J button, a short beep will sound.
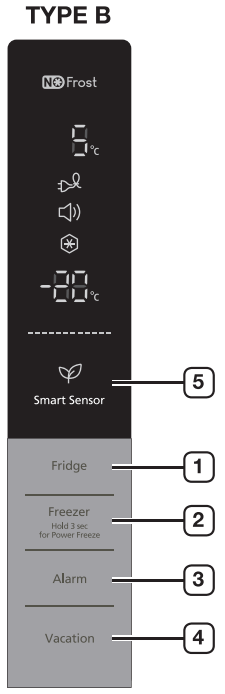
1. Fridge
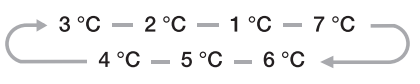
- Press the Fridge button to set the fridge to desired temperature from the range between 1 °C and 7 °C.
- Default set temperature is set on 3 °C and each time you press the Fridge button, temperature will change in following order and temperature indicator will display the desired temperature.
2. Freezer
- Press the Freezer button to set the freezer to desired temperature from the range between -15 °C and -23 °C.
- Default set temperature is set on -19 °C and each time you press the Freezer button, temperature will change in following order and temperature indicator will display the desired temperature.

Note:
- Fridge or Freezer temp indicator will blink when temperature in the fridge or freezer compartment goes up dramatically by storing warm food or frequent door opening.
- Fridge or Freezer temperature indicator will stop blinking when temperature in the fridge or freezer becomes normal.
- If temperature indicator does not stop blinking after several hours, please contact your service center.
- Press this button for 3 seconds to activate the Power Freeze function.
- Power Freeze indicator (
 ) will light up and the refrigerator will speed up the time to needed to freeze products in the freezer.
- This function will be activated for 50 hours and freezer indicator will display -23 °C.
- This function switches off automatically.
- When the Power Freeze process is completed, the Power freeze indicator switches off and the freezer switches back to the previous temperature setting. When you use this function, the energy consumption will increase.
- To deactivate this function, press the Freezer button for 3 seconds.
Note:
- If you need to freeze large amount of food 'F-J stuff, activate Power Freeze function 20 hours before.
3. Alarm
- Press this button to activate the Alarm function. Alarm indicator (
 ) will light up and the refrigerator will alert you with alarm sound if the refrigerator door is kept open for longer than 2 minutes.
- To deactivate the Alarm function, press this button.
4. Vacation
- Press the Vacation button to activate the Vacation function.
- Vacation indicator (
 ) will light up and the refrigerator will set the temperature to 15 °C to minimize the power consumption when you are going on a long vacation or business trip or you do not need to use the refrigerator.
- While Vacation function is activated, freezer compartment remains on.
- Vacation function will be automatically deactivated if you adjust fridge temperature while Vacation function is on.
- Make sure to remove foods in the fridge compartment before using Vacation function.
5. Smart Sensor
- This icon (
 ) will light up when the refrigerator is activated with the optimized energy efficiency. {TYPE B Only)
- Without additional controls, it keeps food freshness automatically by many sensors detecting the inner and outside temperature and minimizes energy consumption.
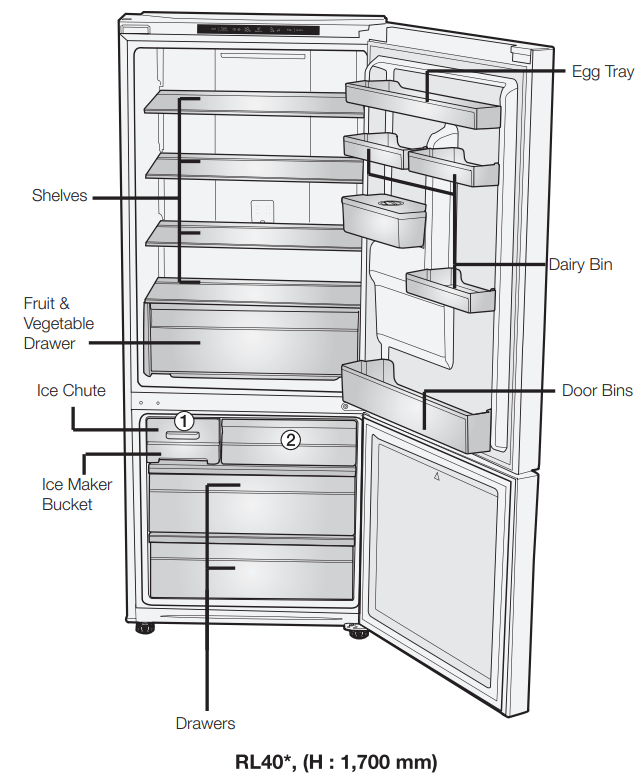
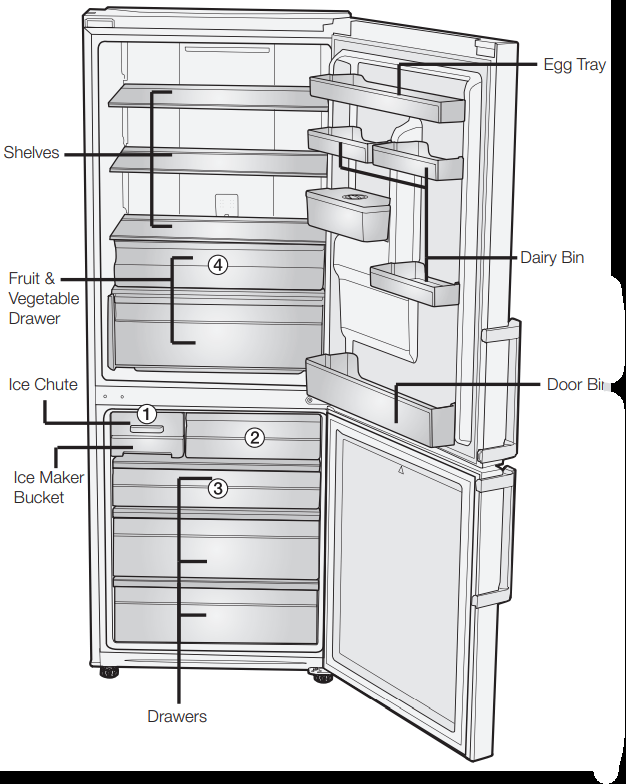
RL43*, (H: 1,850 mm)
Note:
- Some of the feature such as Water tank and Fresh Room (4) can be different and may not be available depending on the model.
- The fruits or the vegetables could get frozen in Fresh Room. (Optional)
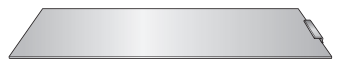
ADDITIONAL SHELF (OPTIONAL)
Note:
- To get more space in the freezer, you can remove Ice maker ( 1 ), mini drawer ( 2 ), and the top drawer ( 3 ) (RL43 model only), then place the additional shelf (Optional) right above the below drawer.
- It does not affect thermal and mechanical characteristics.
- A declared storage volume of the freezer compartment is calculated with these parts removed.
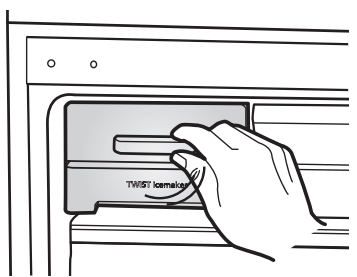
MAKING ICE
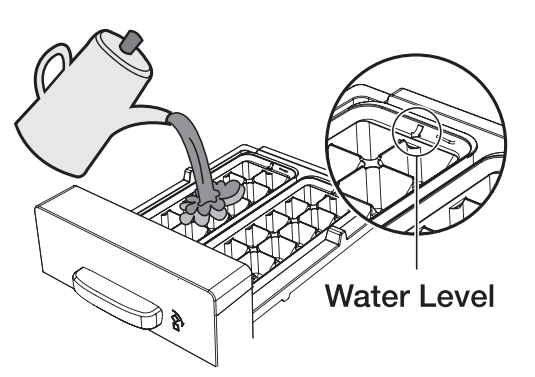
TWIST ICE MAKER
• Making Ice Cubes
Remove the ice cube tray by lifting up slightly and pulling it towards you.
Fill the tray with water up to the maximum water level marked on the rear of the tray.
Slide the tray back into the holder, taking care not to spill the water.
Wait until the ice cubes are formed.
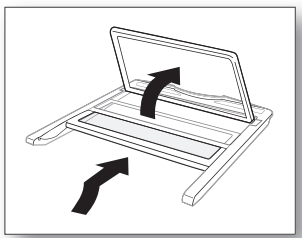
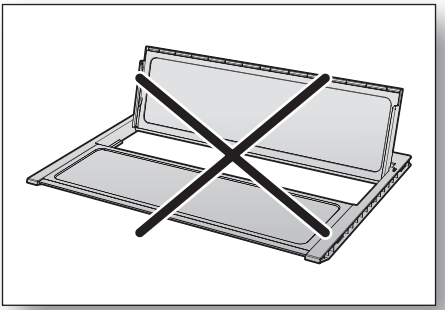
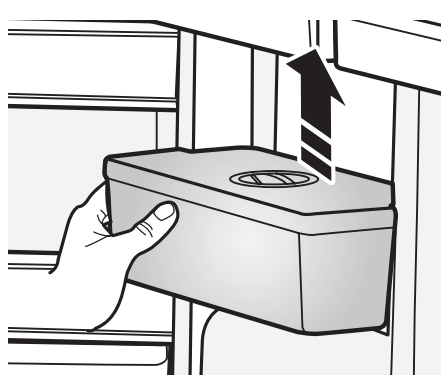
• Removing the Ice Cubes
Make sure that the ice cube storage bin is in place under the ice cube tray.
If not, slide it into place. Twist the lever firmly in the clockwise direction until the tray twists slightly.
Result: The ice cubes fall into the storage bin.
Remove the storage bin by:
- Lifting it slightly
- Pulling it towards you
USING THE FOLDABLE SHELF (OPTIONAL)
You can fold the foldable shelf if you need to accommodate taller containers or products on the shelf underneath.
- Slightly lift up the shelf an< slide it inward.
- Lift up the tucked shelf towards the rear wall.
- You can simply pull the folded shelf in reverse procedure to use the fully
Caution: Shelf can fall out, handle with care when using or cleaning the shelf.
When you fold the Foldable shelf, make enough space to lift up foldable shelf.
USING THE WATER DISPENSER (OPTIONAL)
With the water dispenser, you can obtain chilled water easily without opening the refrigerator door.
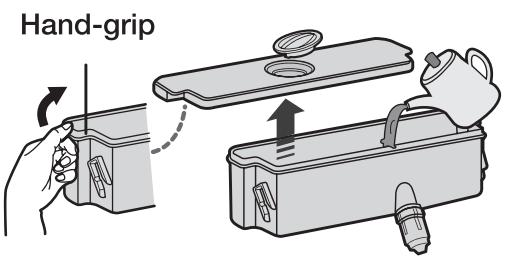
- Lift up and pull out the water tank.
- Flold the handgrips on both sides to lift out the water tank.
- Clean the inside of water tank before using it for the first time.
NOTE: For more space, empty the water off the water tank, remove the lid completely, place the water tank back and use it to store food. For water dispenser usage, do not put anything other than water in the water tank.
- Fill the water tank with water, ensuring that it is in a stable position, allowing for the extended water supply outlet.
- Fill with water up to 2.4 L. If it is filled higher than this, it may overflow when the lid is closed.
- It is impossible to fill the tank with water while it is positioned in the refrigerator.
- Method 1.
- Fill the water lifting the round lid in the arrow direction to open.
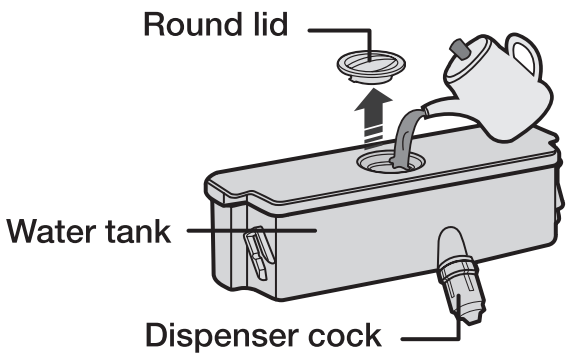
- Method 2.
- Please fill the water after holding and lifting the large lid to open it.
- Close the refrigerator door after fitting the water tank.
- Confirm that the dispenser cock is outside after closing the door.
Caution: Fix the water tank to the fridge door tightly. If not, water tank may not be operate correctly. Do not use the refrigerator without the water tank. If not, it may cause an efficiency problem.
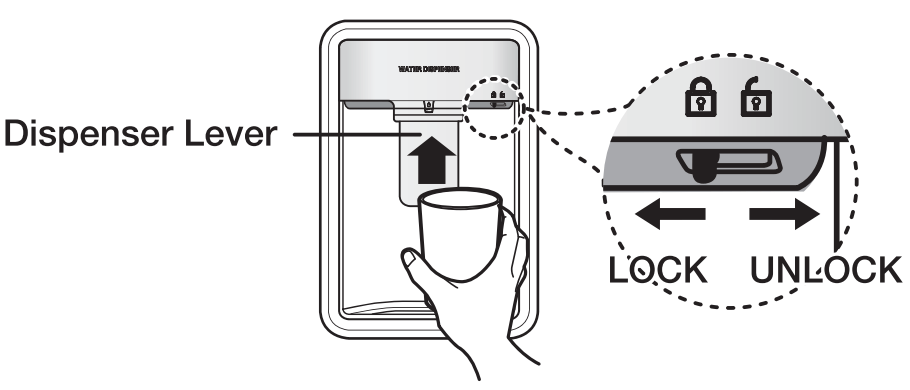
- Place a glass underneath the water outlet and push gently against the dispenser lever with your glass. Make sure the glass is in line with the dispenser to prevent the water from bouncing out.
Caution: Check that the locking device is set to “unlock”. Water can only be dispensed on this setting.
REMOVING THE INTERIOR PARTS
Shelves
Gently lift up the shelves with both hands and pull it toward you. (Glass shelf/ Foldable shell)
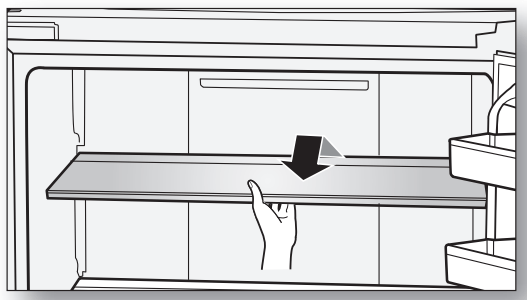
Caution: Do not put the shelves upside down or backwards.
There is a risk of falling.
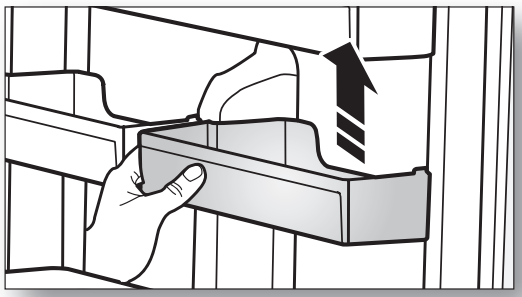
Door guards
Firmly grab the door guards with both hands and lift it up gently to remove the door guards.
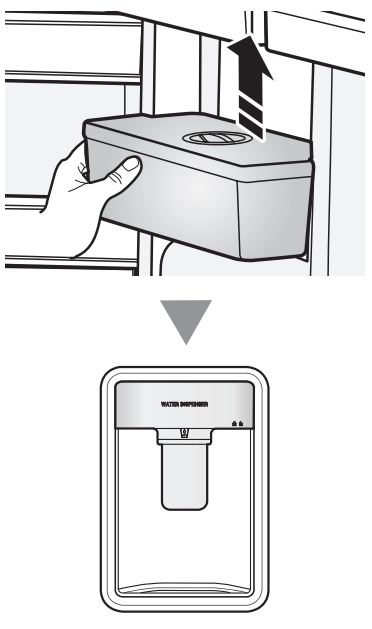
Water tank
Firmly grab the water tank with both hands and lift it up towards you gently to remove the water tanks.
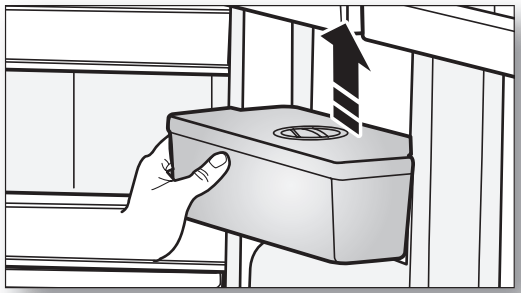
NOTE: Water tank may not be available J depending on the model.
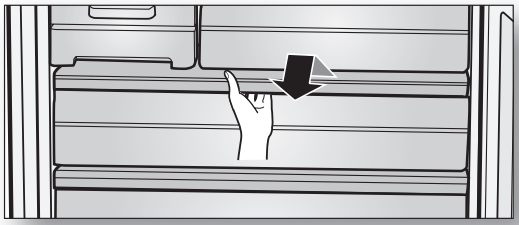
Drawers
Pull the drawers out fully then slightly lift it up to remove the drawers.
- If the drawers get stuck to door, remove drawer by lifting up after remove

Freezer Rail Drawer (Optional)
Lift up the Rail Drawer until take off from the hook then pull the drawer out.
- When put back the Rail Drawer, tuck the rail then to the original position.
Caution: Do not touch Steel Rail in the freezer caution with wet hands.
This may cause frostbite.
- Be careful when you touch the Steel Rail.
- This may cause a personal injury.
CLEANING THE REFRIGERATOR
Warning: Do not use Benzene, Thinner or Clorox™ for cleaning.
They may damage the surface of the appliance and can create a risk of fire.
Caution: Do not spray the refrigerator with water while it is plugged in, as it may cause an electric shock. Do not clean the refrigerator with benzene, thinner or car detergent for risk of fire.
REPLACING THE LED LAMP
When the interior or exterior LED lamp has gone out, do not disassemble the lamp cover and LED lamp by yourself.
NOTE: Please contact your service agents.
TROUBLESHOOTING
|
PROBLEM
|
SOLUTION
|
|
The appliance is not operating at all or the temperature is too high.
|
• Check if the power plug is correctly connected.
• Is the temperature control on the front panel correctly set?
• Does sun shine on the appliance or are there any heat sources nearby?
• Is the back of the appliance too close to the wall?
|
|
The food in the refrigerator is frozen.
|
• Is the temperature control on the front panel set to the coldest temperature?
• Is the surrounding temperature too low?
|
|
There are unusual noises.
|
• Check if the appliance is installed on a stable and even floor.
• Is the back of the appliance too close to the wall?
• Have any foreign objects fallen behind or under the appliance?
• Is the noise coming from the compressor in the appliance?
• A ticking sound occurs when the various accessories contract or expand.
|
|
The front corners and sides of the appliance are warm and condensation starts to form.
|
• Heat-proof pipes are installed in the front corners of the appliance to prevent condensation from forming.
When the surrounding temperature rises, this may not always be effective. However, this is not abnormal.
• In very humid weather, condensation may form on the outer surface of the appliance when the moisture in the air comes into contact with the cool surface of the appliance.
|
|
You can hear a liquid bubbling in the appliance.
|
• This is the refrigerant, which cools the inside of the appliance.
|
|
There is a bad smell inside the appliance.
|
• Is there any spoiled food inside of the refrigerator?
• Make sure that strong smelling food (for example, fish) is wrapped so that it is airtight.
• Clean out your refrigerator periodically and throw away any spoiled or suspect food.
|
|
There is a layer of frost on the appliances walls.
|
• Are the air outlet vents blocked by food stored inside the refrigerator?
• Space the food out as much as possible to improve ventilation.
• Is the door fully closed?
|
|
Condensation forms on the inside wall of the appliance and around vegetables.
|
• Food with a high water content is stored uncovered with a high humidity level or the door has been left open for a long time.
• Store the food with a cover or in sealed containers.
|