Loading ...
Loading ...
Loading ...
If
WELCOME
PRESS
CLEAR
AND
PRESS
CLOCK
isonthedisplay,rsttouchStop/Clear.
®
SHARP ELECTRONICS CORPORATION
100 Paragon Drive, Suite #100, Montvale, NJ 07645
Carousel
®
is a registered trademark of Sharp Corporation.
START
Touch On
1 3 0
START
Touch On
POWER
LEVEL
2 0
1
325F
COOKING
PRESS
START
TIME
ENTER
For more complete information and safety precautions, refer to the inside instructions.
Touch Minute Plus for one minute at
100% power or to add additional minutes.
MINUTE PLUS
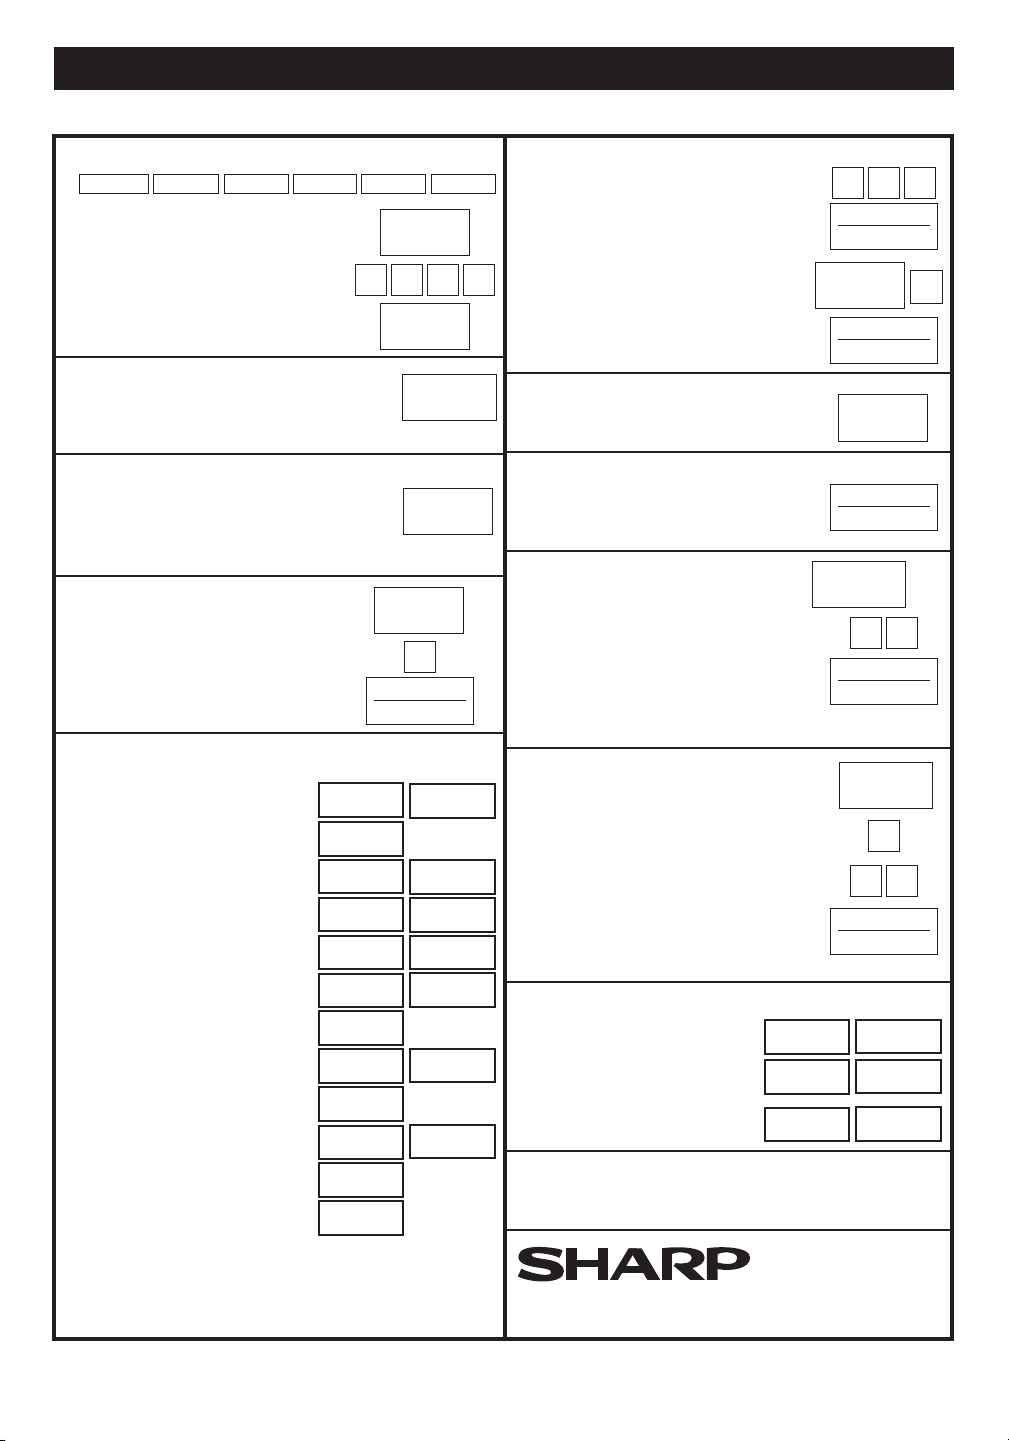
High Power Cooking
1. Enter cooking time by touching
numbers pads. (Ex: 1 min. 30 sec.)
2. Touch START/Touch On pad.
Variable Power Cooking
2. After Step 1 above, touch
Power Level and number 6 for
60% power.
3. Touch START/Touch On pad.
MANUAL OPERATION
Continuously touch START/Touch On
for 100% power cooking. Remove
ngerandovenwillstopinstantly.
TOUCH ON
1. Touch Defrost pad
(Ex: two times for a steak).
2. Enter weight by touching number pads.
(Ex: 2 and 0.)
3. Touch START/Touch On pad.
Defrost
2 5
START
Touch On
1. Touch Roast pad.
2. Select desired setting.
(Ex: Touch 1 for poultry.)
3. Touch number pads for weight or
quantity.
4. Touch START/Touch On pad.
See Bake, Roast and Broil Charts on
pages 23, 24 and 25.
Roast (Bake or Broil)
During defrosting, oven will stop.
Check food. See Defrost Chart on page 15.
Touch LOW MIX BAKE pad,
enter desired cooking time
and touch START/Touch On
pad. Follow information on the
display.
TO COOK WITH AUTOMATIC MIX
Your oven can be programmed to combine preheating
and automatic mix cooking operations. See page 22 for
information.
TO PREHEAT AND COOK WITH
CONVECTION
Touch Sensor Reheat once. The oven will
start automatically. Sensor Reheat can be
programmed with turntable on or off.
See Sensor Reheat Chart on page 17.
INSTANT SENSOR REHEAT
When the oven reaches the programmed temp., it will automa-
tically hold at the preheat temperature for 30 minutes and then
the display will change to the time of day.For more information
on convection cooking, see pages 21 and 22.
1. Touch Clock pad.
2. Enter correct time of day by
touching numbers in sequence.
(Ex: 12:30)
3. Touch Clock pad again.
1. Touch Sensor Cook pad.
2. Select desired Sensor Cook setting.
(Ex: 1)
3. Touch START/Touch On pad.
See Sensor Cook Chart, page 18.
SENSOR COOK
1. Touch Preheat pad.
SET CLOCK
Touch Sensor Popcorn pad. Touch once for
regular size and twice for a snack size. See
page 17.
INSTANT SENSOR POPCORN
2. Touch number pad for desired
temperature. (Ex: touch pad
6for350˚F.)
3. Touch Convec pad.
4. Touch number pad for
desired temperature.
(Ex: 5for325˚F.)
5. Enter cooking time by
touching number pads.
(Ex: 2000.)
6. Touch START/Touch On pad.
1 2 3 0
Clock
Sensor
Reheat
START
Touch On
Defrost
START
Touch On
Roast
TINSEB402WRRZ
AUTO-TOUCH
GUIDE
x 2
1
START
Touch On
PRESS
20.00
COOKING
ENTER
TEMP
SELECT
CONVEC
PRESS
OR
START
PRESS
350F
SELECT
PREHEAT
PREHEAT
TEMP
325F
TIME
START
Clock
Popcorn
Sensor
Cook
Minute
Plus
6