Use a Phillips screwdriver to attach Turbo Tool Holder.
Insert the pivoting brush into the extension wand.
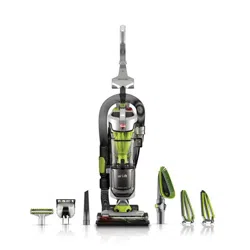
Store the tools* on the side of vacuum
*tools may vary per model
Using your Air Lift™ as an upright:
Push here to turn on and off.
Step here and pull the handle back to activate brushroll and begin vacuuming.
For optimal cleaning, keep the brushroll rotating for all surfaces. For delicate or highly polished floors, push here to switch off brushroll.
Set the handle upright to use the hose or to remove the canister. Brushroll will not spin in upright position.
It’s easiest to lift by the carry handle.
CAUTION Use extra care when cleaning on stairs. To avoid personal injury or damage, and to prevent the cleaner from falling, always place the vacuum at the bottom of stairs or on floor. Do not place vacuum on stairs or furniture, as it may result in injury or damage. When using tools, always ensure handle is in the upright position.
Using your Air Lift™ as a canister:
Grasp carry handle and press here to release canister.
Pivot canister back and lift off.
The canister is designed to be held by the carry handle.
To return canister, hold by the carry handle and align bottom of canister with docking tab on upright base. Pivot until canister clicks into place
WARNING Always turn off this appliance before connecting or disconnecting the Canister, hose or tools.
CAUTION Use extra care when cleaning on stairs. To avoid personal injury or damage, and to prevent the cleaner from falling, always place the vacuum at the bottom of stairs or on floor. Do not place vacuum on stairs or furniture, as it may result in injury or damage
Using your Air Lift™ hose, wand and accessories:
To use the hose in upright or canister mode, press the hose release button and pull out.
Attach tools to the hose end to clean stairs, upholstery and more.
Reinsert hose when you're done. Replace hose to its original position.
CORD STORAGE Wrap cord around hooks for convenient storage. Attach the plug end to the cord
WARNING
Always turn off this appliance before connecting or disconnecting hose, wand or tools.
WARNING
The hose contains electrical wires. Avoid picking up sharp objects. If hose appears damaged, cut, punctured or wires are exposed, unplug unit and discontinue use. Do not attempt to repair damaged hose, take to an authorized service center for repair (on select models only).
CAUTION
Use extra care when cleaning on stairs. To avoid personal injury or damage, and to prevent the cleaner from falling, always place the vacuum at the bottom of stairs or on floor. Do not place vacuum on stairs or furniture, as it may result in injury or damage. When using tools, always ensure handle is in upright position.
CAUTION
To avoid injury, particularly to face and head, keep hair, loose clothing, fingers and all parts of the body away from revolving brush of Motorized Hand Tool. Not to be used for grooming a pet.
Keep your Air Lift™ running properly: dirt cup:
Empty the dirt cup when it reaches the max fill line.
Press the dirt cup release button then pivot the dirt cup out.
Press the dirt cup empty button to release dirt. Snap the dirt cup closed.
Place the dirt cup back in, bottom first until it clicks into place.
WARNING
To reduce the risk of personal injury - Unplug before cleaning or servicing. Do not use vacuum without dirt cup or filters in place.
Keep your Air Lift™ running properly: rinsable filter:
Press the dirt cup release button and pivot cup out.
Push release button here to open filter cover.
Pull the silk ribbon on the back of filter over a trash can.
Rinse with water for two minutes until water runs clear.
Allow 24 hours for filter to dry completely.
Replace filter, bottom first until it clicks.
Place the dirt cup back in, bottom first until it clicks into place.
WARNING
To reduce the risk of personal injury-Unplug before cleaning or servicing. Do not use vacuum without dirt cup or filters in place.
NOTE:
When used and maintained properly, your Rinsable Filter should not need replacement within the warranty period.
If desired, additional filter is available. Ask for Hoover® Part No. 440008153.
IMPORTANT:
Allow filter to dry completely before replacing. Dry filter on edge so air circulates on both sides of filter. This may take up to 24 hours.
Keep your Air Lift™ running properly: filter made with HEPA media:
Press the dirt cup release button and pivot cup out.
Pull release tab to open filter cover and pivot forward to remove.
Press latches on side of filter to release. Tap out dirt and debris.
Replace filter into position until it clicks. Replace filter cover by placing bottom cover into slots and pivot forward until it clicks.
Place the dirt cup back in, bottom first until it clicks into place.
WARNING
To reduce the risk of personal injury-Unplug before cleaning or servicing. Do not use vacuum without dirt cup or filters in place.
IMPORTANT: DO NOT RINSE OR WASH THE HEPA FILTER CARTRIDGE
What HEPA Filter to Buy
When used and maintained properly, your Filter should not need replacement within the warranty period. If desired, additional filter is available.
Ask for Hoover® Part No. 440008154.
Keep your Air Lift™ running properly: cyclonic filter assembly:
Press the dirt cup release button and pivot cup out.
Twist counterclockwise and lift the filter assembly up out of the dirt cup.
Twist the filter lock plate counterclockwise to remove filter screen.
Use the Dusting or Upholstery Tool to clean off debris.
Twist filter lock plate clockwise to lock.
Reinsert the assembly into the dirt cup aligning the tabs. Twist clockwise to secure.
Replace dirt cup lid and place the dirt cup back in, bottom first until it clicks into place.
WARNING To reduce the risk of personal injury-Unp
Keep your Air Lift™ running properly: cleaning the brushroll
Flip vacuum over.
Remove the 6 screws with a Phillips screwdriver.
Rotate bottom plate off.
Pull out the brushroll and remove debris.
Slide belt over motor shaft with the lettering on the outside of the belt.
Slide other end of belt around end of brushroll.
With belt in place, slide brushroll into nozzle making sure that the brushroll end caps are in the correct orientation.
Replace the bottom plate and reinstall the 6 screws as shown.
CAUTION
To reduce the risk of injury from moving partsUnplug before servicing.
For additional maintenance required for belt or brushroll please contact a HOOVER® service provider at 1-800-944-9200.
Vacuum is equipped with an automatic brushroll shut-off in event of overload or jam. Check for obstructions in the brushroll area and remove any obstructions.
IMPORTANT:
Rotate brushroll manually to make sure the belt is properly installed.
LUBRICATION NOT REQUIRED
The motor and brushroll are equipped with bearings which contain sufficient lubrication for their lifetime. The addition of lubricant could cause damage. Do not add lubricant to motor or brushroll.
Any other servicing should be done by an authorized service representative. If appliance is not working as it should, has been dropped, damaged, left outdoors, or dropped into water, take it to a service center prior to continuing use.
Available Accessories
Included with select models.
Need Help?
WARNING
To reduce the risk of personal injury. Unplug vacuum before cleaning or servicing.
My Air Lift™ won't turn on.
Always be sure to plug it in firmly. A Thermal Protector may have been activated—unplug and let vacuum cool for 30 min. If this doesn’t work, there may be no voltage in the wall plug. Check fuse or breaker in home. If there is a blown fuse or tripped breaker, replace fuse or reset breaker in home.
My Air Lift™ isn’t picking up well.
Be sure to empty if the dirt cup is full. You may have a clogged filter. Your filter should be rinsed every 4-6 uses. First, push the dirt cup release button then push the filter door release button and remove the filter. Rinse with clear warm water for two minutes. Let it dry for 24 hours before reinstalling it.
If your filter was dirty...
You may also have a clog in the system. Remove canister and check hose for a clog. Lay the upright flat and check hose for a clog. If found, remove the clog.
My Air Lift™ picks up well on hard floors, but not on carpet.
When you’re vacuuming, look to see if the brushroll is spinning. You should hear it. If you don’t, press the brushroll on/off button.
If your brushroll is not turning on...
The Motor Protection Sensor may have been activated by an obstruction. Unplug and remove the obstruction. Wait a few minutes (usually about 2-5, but can take up to 30) for the unit to reset itself, plug in and turn on.
Any other servicing should be done by an authorized service representative.
If appliance is not working as it should, has been dropped, damaged, left outdoors, or dropped into water, take it to a service center prior to continuing use.