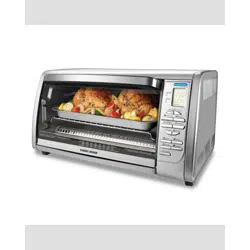
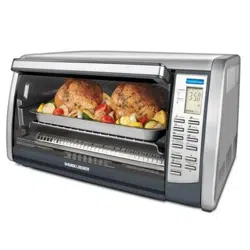
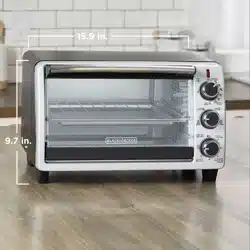
1. Slide out crumb tray (Part# TO3250-04) 2. Baking pan (Part# TO3250-05) 3. Slide rack (Part# TO3250-06) 4. 3 rack positions 5. Easy view glass door 6. Door handle 7. Digital Display 8. Convection + Bake 9. Toast 10. Broil 11. Bagel 12. Reheat 13. Pizza 14. Frozen Snacks 15. Temperature 16. Timer + Toast Shade 17. Start-Stop
HOW TO USE
This appliance is intended for household use only.
Getting Started
Remove all packing material, any stickers, and the plastic band around the power plug.
Remove and save literature.
Wash all removable parts as instructed in Care & Cleaning Section.
Select a location where this unit is to be used, allowing enough space from the back of the unit and wall to allow heat flow without damage to cabinets and walls.
Important information about your oven
This oven gets hot. When in use, always use oven mitts or potholders when touching any outer or inner surface of the oven.
When using the oven for the first time, you may notice smoke or a slight odor during the first few minutes. This is normal.
Be sure food or baking dish does not come within 11/2 inches (3.81cm) of the top heating elements.
Food should not extend beyond the edges of the baking pan/drip tray to avoid drippings from falling onto the heating elements.
The heating elements will cycle on and off to maintain even heat distribution.
After the cooking cycle is completed, the main display will stay illuminated for a short time if not unplugged.
Changing to and from Celsius and Fahrenheit
Press and hold the Up and Down temperature arrows ( ) simultaneously. The display will show either a °C for Celsius or °F for Fahrenheit
OPERATING YOUR OVEN
Plug into outlet.
Display light will illuminate and all function lights will light up momentarily.
When turned on, the oven will either default to factory settings or to the last setting used. (see Function Chart)
Choose the desired function and proceed with detailed function information below.
Convection Baking Function |
Display will blink until desired temperature setting is met. Timer will not start until the oven is preheated.
Press the Convection Baking function button ( ). The blue light will illuminate and flash.
The oven will either default to factory function settings or to the last setting used. (see Function Chart on page 10)
If needed, press the temperature buttons ( ) to select the desired temperature. Up arrow for a higher temperature, and down for a lower temperature.
If needed, press the timer buttons ( ) to select the desired time. Up arrow for a longer time period, and Down for a shorter time period. Select Stay On ( ) by pressing the Down arrow past Zero. The Stay On icon ( ) will show in the display panel.
Press the Start/Stop button (I/0) to begin heating the oven. Display will blink while oven is preheating.
Once it’s preheated there will be an audible beep and the display will stop blinking; Place the food in the oven on the middle or low rack position to begin baking. Note: Use a metal, oven-tempered glass, or ceramic baking dish.
If using the oven timer, there will be an audible beep once the baking cycle is complete and the oven will stop heating. If not using the timer, press the Start/ Stop Button (I/0) once cooking cycle is complete.
Unplug the appliance when not in use.
Broil Function |
Display will blink until desired temperature setting is met. Timer will not start until the oven is preheated.
Press the broil function button ( ). The blue light will illuminate and flash.
The oven will either default to factory function settings or to the last setting used. (see Function Chart on page 10)
If needed, press the temperature buttons ( ) to select the desired temperature.
If needed, press the time buttons ( ) to select the desired time. Up arrow for a longer time period, and Down for a shorter time period.
Press the Start/Stop button (I/0) to begin heating the oven. Display will blink while oven is preheating.
Once it’s preheated there will be an audible beep and the display will stop blinking; Place the food in the oven on the top rack position to begin broiling. Be sure food or baking dish does not come within 11/2 inches (3.81cm) of the top heating elements. Note: Place food directly on rack with baking pan in place.
There will be an audible beep once the broil cycle is complete and the oven will stop heating.
Unplug the appliance when not in use.
Toast Function |
No preheat needed for this function.
Press the Toast function button ( ). The blue light will illuminate and flash.
The oven will either default to factory function settings or to the last setting used. (see Function Chart on page 10)
If needed, press the time/toast shade buttons ( ) to select the desired shade. Up arrow for a darker shade, and Down for a lighter shade. Note: Shades 1-7 are available, 1 being the lightest and 7 being the darkest.
Place food directly on rack in the middle rack position and then press the Start/Stop button (I/0) to begin toasting.
There will be an audible beep once the toasting cycle is complete and the oven will stop heating.
Unplug the appliance when not in use.
Bagel Function |
No preheat needed for this function.
Press the Bagel function button ( ). The blue light will illuminate and flash.
The oven will either default to factory function settings or to the last setting used. (see Function Chart on page 10)
If needed, press the time/toast shade button ( ) to select the desired shade. Up arrow for a darker shade, and Down for a lighter shade. Note: Shades 1-7 are available, 1 being the lightest and 7 being the darkest.
Place food directly on rack in the middle rack position and press the Start/Stop button (I/0) to begin toasting.
There will be an audible beep once the toasting cycle is complete and the oven will stop heating.
Unplug the appliance when not in use.
Reheat Function |
No preheat needed for this function.
Press the Reheat function button ( ). The blue light will illuminate and flash.
The oven will either default to factory function settings or to the last setting used. (see Function Chart on page 10)
If needed, press the temperature button ( ) to select the desired temperature. Up arrow for a higher temperature, and Down for a lower temperature.
If needed, press the time buttons ( ) to select the desired time. Up arrow for a longer time period, and Down for a shorter time period. Select Stay On by pressing the Down arrow past Zero. The Stay On icon ( ) will show in the display panel.
Place food on middle or low rack and press the Start/Stop button (I/0) to begin reheating the food. Note: Use a metal, oven-tempered glass, or ceramic baking dish.
If using the oven timer, there will be an audible beep once the cycle is complete and the oven will stop heating. If not using the timer, press the Start/Stop Button (I/0) once cycle is complete.
Unplug the appliance when not in use.
Frozen Snacks |
Display will blink until desired temperature setting is met. Timer will not start until the oven is preheated.
Press the Frozen Snacks function button ( ). The blue light will illuminate and flash.
When turned on, the oven will either default to factory settings or to the last setting used. (see Function Chart on page 10)
If needed, press the temperature button ( ) to select the desired temperature. Up arrow for a higher temperature, and Down for a lower temperature.
If needed, press the time buttons ( ) to select the desired time. Up arrow for a longer time period, and Down for a shorter time period.
Press the Start/Stop button (I/0) to begin heating the oven. Display will blink while oven is preheating.
Once it’s preheated there will be an audible beep and the display will stop blinking; Place the food in the oven on the middle or low rack position to begin baking. Note: Use a metal, oven-tempered glass, or ceramic baking dish placed on the middle or low rack position.
There will be an audible beep once the frozen snack cycle is complete and the oven will stop heating.
Unplug appliance when not in use
Pizza |
Display will blink until desired temperature setting is met. Timer will not start until the oven is preheated.
Press the Pizza function button ( ). The blue light will illuminate and flash.
The oven will either default to factory function settings or to the last setting used. (see Function Chart on page 10)
If needed, press the temperature button ( ) to select the desired temperature. Up arrow for a higher temperature, and Down for a lower temperature.
If needed, press the time buttons ( ) to select the desired time. Up arrow for a longer time period, and Down for a shorter time period.
Press the Start/Stop button (I/0) to begin heating the oven. Display will blink while oven is preheating.
Once it’s preheated there will be an audible beep and the display will stop blinking. Place the food in the oven, directly on the rack, in the middle or low rack position to begin baking.
There will be an audible beep once the pizza cycle is complete and the oven will stop heating.
Unplug appliance when not in use.
CARE AND CLEANING
This product contains no user serviceable parts. Refer to service qualified service personnel.
Cleaning
Important: Before cleaning any part, be sure the oven is off, unplugged, and cool.
Clean the glass door with a sponge, soft cloth, or nylon pad and sudsy water. Do not use a spray cleaner.
Remove slide rack and bake pan; wash in soapy water. To remove stubborn spots, use a polyester or nylon pad.
Pull out crumb tray using the handle and dispose of crumbs. Wipe tray with a damp cloth and dry thoroughly before placing back into the oven.
Wipe the outside of the oven with a damp cloth or sponge. Dry thoroughly.
Do not attempt to clean the heating elements. Any food that comes into contact with the elements will burn off on its own.
Cooking Containers
Metal, ovenproof glass or ceramic bakeware can be used in your oven. Follow the manufacturer’s instructions. Be sure the top edge of the container is at least 11/2 inches (3.81cm) away from the upper heating elements
WARRANTY INFORMATION
For service, repair or any questions regarding your appliance, call the appropriate 800 number listed within this section. Please DO NOT return the product to the place of purchase. Also, please DO NOT mail product back to manufacturer, nor bring it to a service center. You may also want to consult the website listed on the cover of this manual.
Two-Year Limited Warranty
(Applies only in the United States and Canada)
What does it cover?
Any defect in material or workmanship provided; however, Applica’s liability will not exceed the purchase price of product.
For how long?
Two years from the date of original purchase with proof of purchase.
What will we do to help you?
Provide you with a reasonably similar replacement product that is either new or factory refurbished.
How do you get service?
Save your receipt as proof of date of sale.
Visit the online service website at www.prodprotect.com/applica, or call toll-free 1-800-231-9786, for general warranty service.
If you need parts or accessories, please call 1-800-738-0245.
What does your warranty not cover?
Damage from commercial use
Damage from misuse, abuse or neglect
Products that have been modified in any way
Products used or serviced outside the country of purchase
Glass parts and other accessory items that are packed with the unit
Shipping and handling costs associated with the replacement of the unit
Consequential or incidental damages (Please note, however, that some states do not allow the exclusion or limitation of consequential or incidental damages, so this limitation may not apply to you.)
How does state law relate to this warranty?
This warranty gives you specific legal rights. You may also have other rights that vary from state to state or province to province


 ) simultaneously. The display will show either a °C for Celsius or °F for Fahrenheit
 ) to select the desired temperature. Up arrow for a higher temperature, and down for a lower temperature.
 ) to select the desired time. Up arrow for a longer time period, and Down for a shorter time period. Select Stay On (
  ) by pressing the Down arrow past Zero. The Stay On icon (
 ) to select the desired temperature.
 ) to select the desired time. Up arrow for a longer time period, and Down for a shorter time period.
 ) to select the desired shade. Up arrow for a darker shade, and Down for a lighter shade. Note: Shades 1-7 are available, 1 being the lightest and 7 being the darkest.
 ) to select the desired shade. Up arrow for a darker shade, and Down for a lighter shade. Note: Shades 1-7 are available, 1 being the lightest and 7 being the darkest.
 ) to select the desired temperature. Up arrow for a higher temperature, and Down for a lower temperature.
 ) to select the desired time. Up arrow for a longer time period, and Down for a shorter time period. Select Stay On by pressing the Down arrow past Zero. The Stay On icon (
 ) will show in the display panel.
 ) to select the desired temperature. Up arrow for a higher temperature, and Down for a lower temperature.
 ) to select the desired time. Up arrow for a longer time period, and Down for a shorter time period.
 ) to select the desired temperature. Up arrow for a higher temperature, and Down for a lower temperature.
 ) to select the desired time. Up arrow for a longer time period, and Down for a shorter time period.