Owner's Guide Ovens
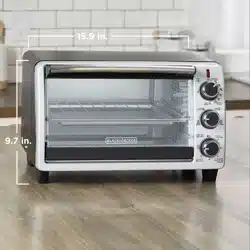
COUNTERTOP OVEN
Product may vary slightly from what is illustrated.
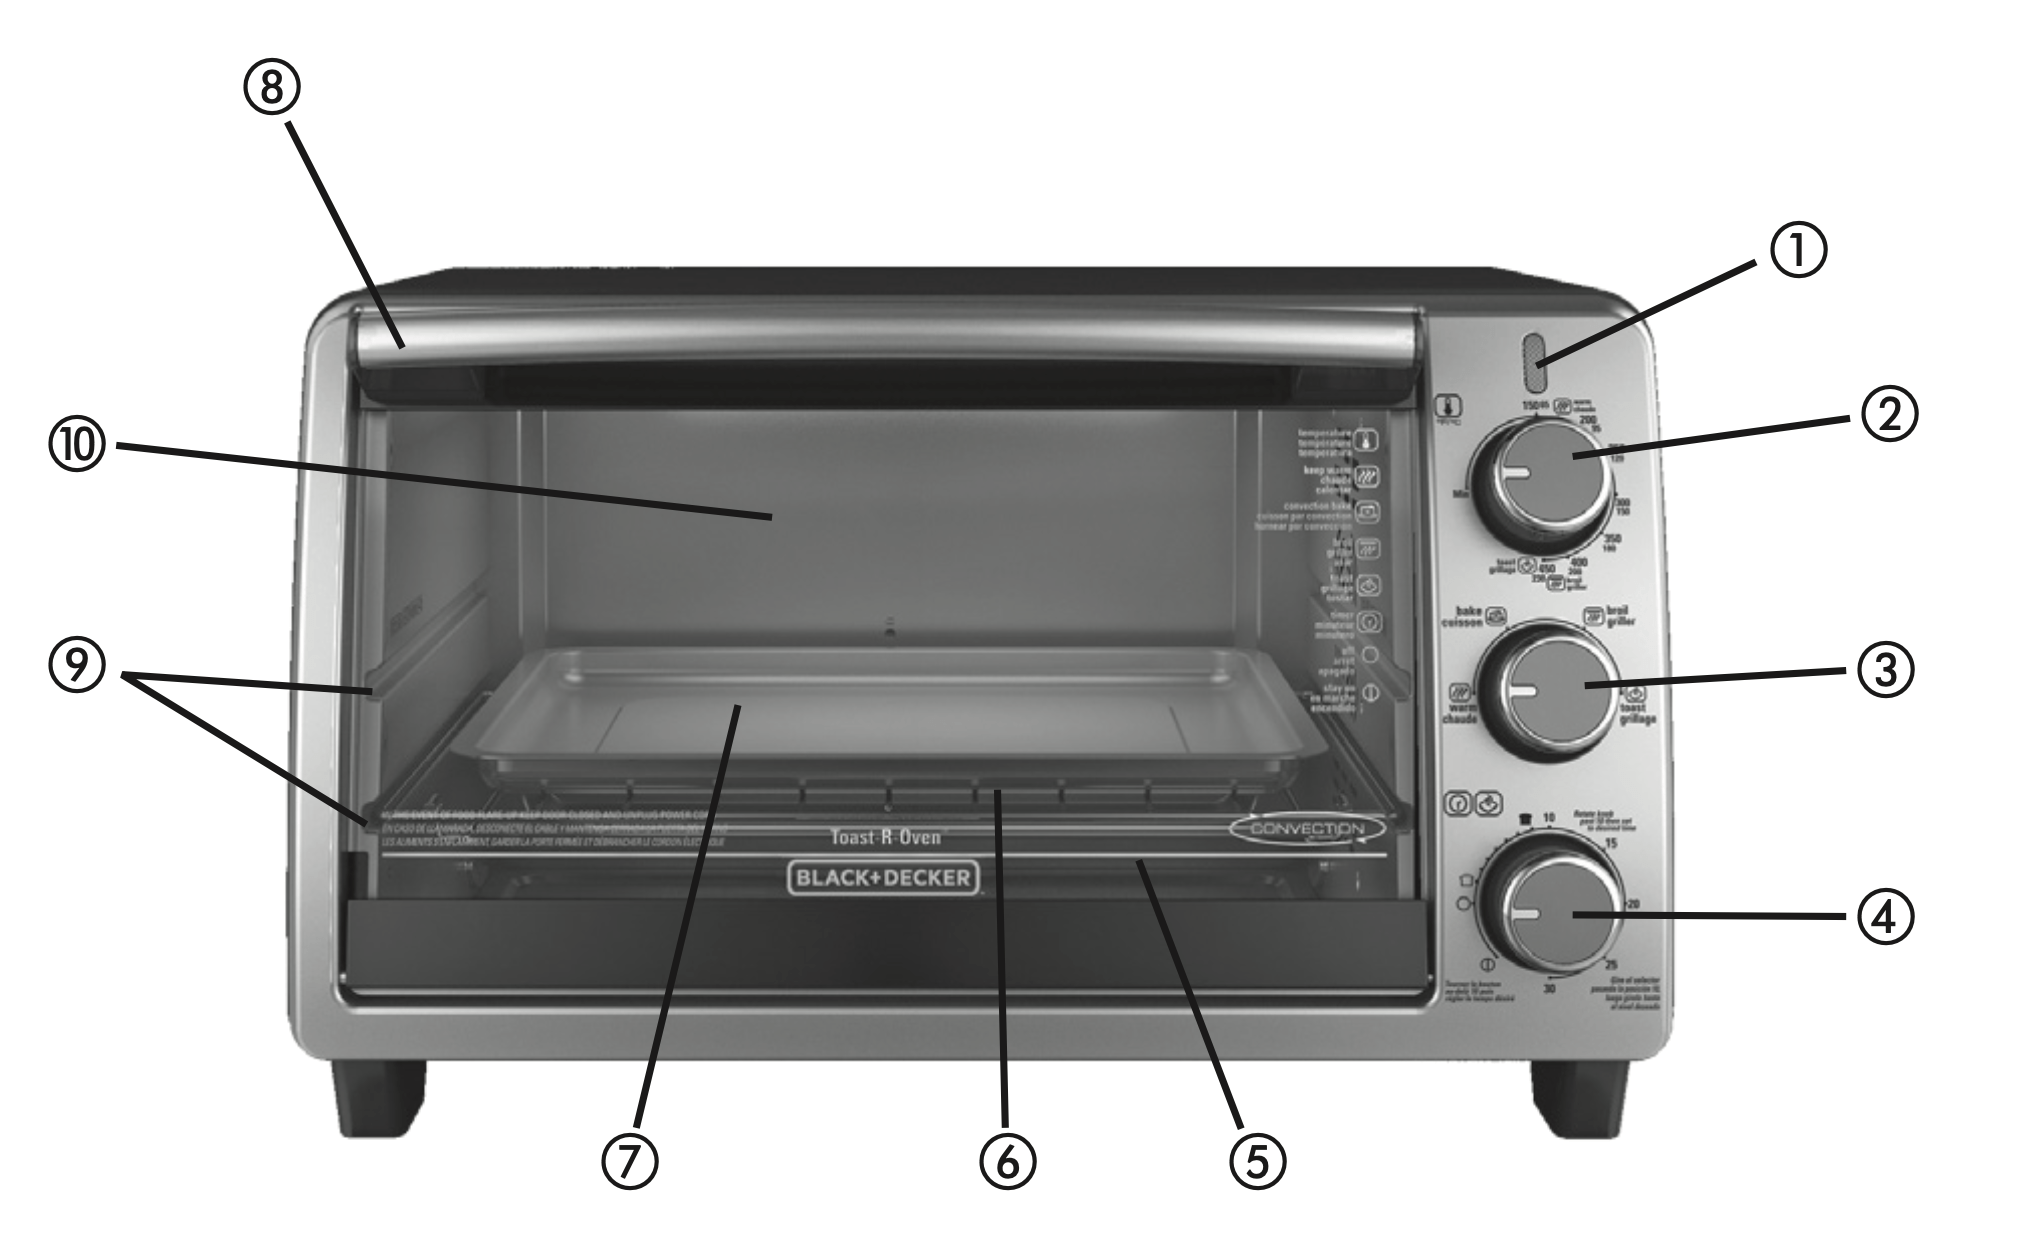
- Power indicator light
- † Temperature control knob (Part# TO1950-01)
- † Cooking FUNCTION selector knob (Part# TO1950-02)
- † 30-minute TIMER/TOAST shade selector knob (Part# TO1950-03)
- † Removable crumb tray (Part# TO1950-04)
- † Slide rack/broil rack (Part# TO1950-05)
- † Bake pan/drip tray (Part# TO1950-06)
- Door handle
- Rack slots
- Extra-deep curved interior
NOTE: † indicates consumer replaceable/removable parts
TAMPER-RESISTANT SCREW
Warning: This appliance is equipped with a tamper-resistant screw to prevent removal of the outer cover. To reduce the risk of fire or electric shock, do not attempt to remove the outer cover. There are no userserviceable parts inside. Repair should be done only by authorized service personnel.
ELECTRICAL CORD
- A short power cord is provided to reduce the risk resulting from becoming entangled in or tripping over a longer cord.
- Longer detachable power-supply cords or extension cords are available and may be used if care is exercised in their use.
- If a long detachable power-supply cord or extension cord is used,
- The marked electrical rating of the detachable power-supply cord or extension cord should be at least as great as the electrical rating of the appliance,
- The longer cord should be arranged so that it will not drape over the countertop or tabletop where it can be pulled on by children or tripped over unintentionally.
Note: If the power cord is damaged, it should be replaced by qualified personnel; in Latin America, by an authorized service center.
HOW TO USE
This product is for household use only.
CAUTION: THIS OVEN GETS HOT. WHEN IN USE, ALWAYS USE OVEN MITTS OR POT HOLDERS WHEN TOUCHING ANY OUTER OR INNER SURFACE OF THE OVEN.
GETTING STARTED
- Remove packing materials and any stickers.
- Remove and save literature.
- Please go to www.prodprotect.com/applica to register your warranty.
- Remove the slide rack and bake pan from oven. Wash in mildly soapy water, or in the dishwasher.
- Replace slide rack in oven.
- Select a location for the unit. Do not place unit under cabinets or too close to the wall to allow heat to flow without damaging counter space.
- Slide crumb tray onto oven cavity floor, angled edge facing oven door.
TOASTING
Important: The oven top and side surfaces get hot.
It is not necessary to preheat the oven for toasting.
- Set temperature control knob to toast position.
- Open oven door. Insert the slide rack into the top slot.
- Place the toast directly on the slide rack and close the door.
- Set the cooking FUNCTION selector knob to Toast.
- Turn toast timer knob past 10 and then turn back to desired toast shade. NOTE: For best results, select the medium setting for your first cycle, then adjust lighter or darker to suit your taste.
- The indicator light comes on and stays on during the toasting cycle.
- When toasting is done, the signal bell sounds, the oven automatically shuts off and the indicator light goes off.
- Open oven door and using oven mitt or pot holder, slide out rack to remove toast. Important: Always use an oven mitt or pot holder to remove food from the oven as the door and the slide rack will be hot.
Helpful Tip for Multiple Toasting Cycles
For best results, when making three or more consecutive batches of toast, allow a short cool down period between toasting cycles.
USEFUL TIPS
- You must turn off the TIMER/TOAST shade selector knob if you want to discontinue toasting.
- When making more toast immediately after one toasting cycle, set the toast shade selector to a slightly lighter setting.
BAKING
Convection uses a fan to circulate heat evenly for consistently better cooking. (TO1950SBD ONLY)
Important: The oven top and side surfaces get hot.
Note: For best results, when baking or cooking, always preheat the oven at least 10 minutes at the desired temperature setting.
- Open oven door. Insert the slide rack into the bottom slot.
- Set the temperature control knob to the desired temperature setting.
- Set the cooking FUNCTION selector knob to Bake.
Important: You must set the timer or select Stay On for the oven to function.
- Turn timer past 10 and then turn back or forward to desired baking time, including preheat time.
Tip: To set the timer to the Stay On setting if you want to control cooking time or need to cook your food longer than 30 minutes, turn the timer counterclockwise.
The indicator light comes on and stays on during cooking cycle.
The heating elements cycle on and off to maintain the temperature.
NOTE: Be sure the top edge of the food or container is at least 1½” (3.81 cm) away from the upper heating elements.
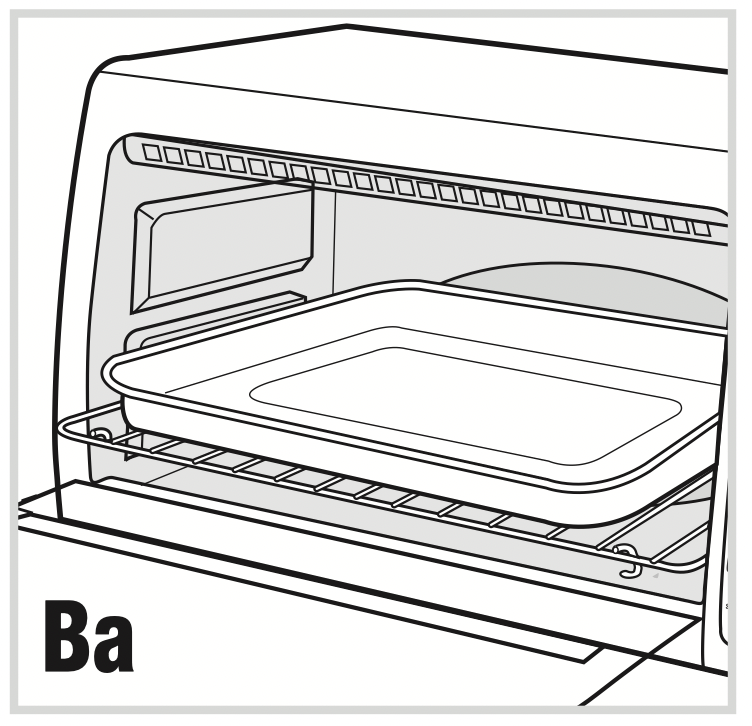
- You can cook your food two ways:
In the bake pan placed on the slide rack (Ba).
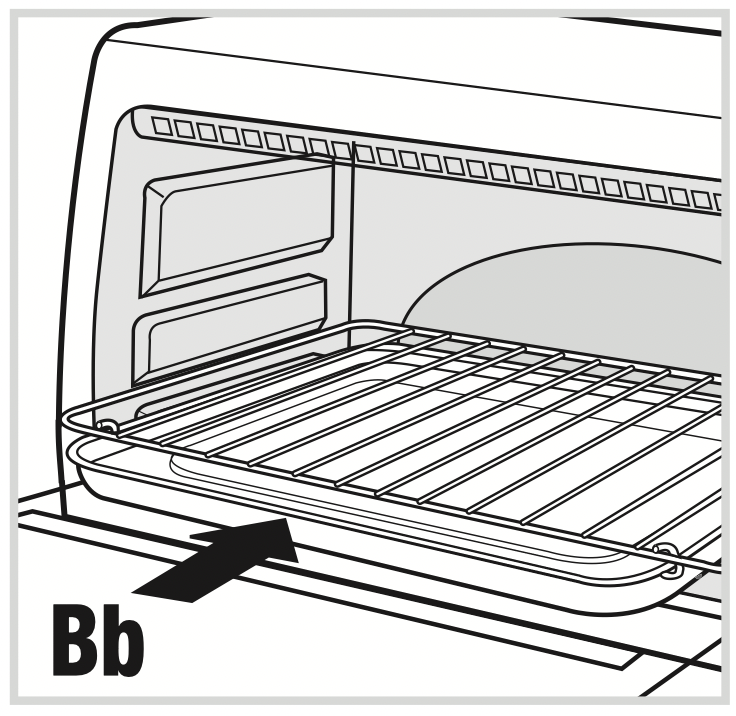
Directly on the slide rack using the bake pan as a drip tray, inserted in the rack support rails underneath the slide rack (Bb).
- Close oven door.
- Cook food according to recipe or package instructions and check at minimum time to see if it is done.
- Once cooking cycle is finished:
If the timer was on, the signal bell sounds, the indicator light goes off and the oven automatically turns off.
If the timer was not on, turn the TIMER/TOAST selector knob from the Stay On position to the OFF (O) position. The indicator light goes off.
- Open oven door and using oven mitt or pot holder, slide out rack to remove food.
Important: Always use an oven mitt or pot holder to remove food from the oven as the door and the slide rack will be hot. BROILING
Important: The oven top and side surfaces get hot.
NOTE: When broiling, preheat oven for 5 minutes.
- Set temperature control knob to 450 Broil position.
- Insert slide rack into upper slot. Set the cooking FUNCTION selector knob to Broil.
- Open oven door and use the bake pan as a drip tray. Insert it under the slide rack on the rack support rails (Bb).
Important: You must set the timer or select Stay On for the oven to function.
- Turn timer past 10 and then turn back or forward to desired broiling time. Select Stay On, if you want to control cooking time yourself.
- Place food on the slide rack.
NOTE: Be sure the top edge of the food or container is at least 1½” (3.81 cm) away from the upper heating elements.
Important: Food should not extend beyond the edges of the bake pan to avoid drippings from falling onto the heating elements.
- The first time you broil an item in this oven, cook according to recipe or package instructions and check at minimum time to see if it is done.
- When finished broiling: If the timer was on, the signal bell sounds, the indicator light goes off and the oven automatically turns off. If the timer was not on, turn the TIMER/TOAST selector knob from the Stay On position to the OFF (O) position. The indicator light goes off.
- Using an oven mitt or pot holder, slide out broiling rack together with bake pan to remove food.
Important: Always use an oven mitt or pot holder to remove food from the oven as the door and the slide rack will be hot.
KEEP WARM FUNCTION
- Set temperature control knob to Keep Warm position
- Set cooking FUNCTION selector knob to Keep Warm position.
- Turn timer past 10 and then turn back or forward and set to desired number of minutes or to Stay On position.
The indicator light comes on and stays on during cooking cycle.
The heating elements cycle on and off to maintain the temperature.
- Close oven door.
- Once finished:
If the timer was on, the signal bell sounds, the indicator light goes off and the oven automatically turns off.
If the timer was not on, turn the TIMER/TOAST selector knob from the Stay On position to the OFF (O) position. The indicator light goes off.
- Open oven door and using oven mitt or pot holder, slide out rack to remove food.
CARE AND CLEANING
This product contains no user serviceable parts.
CLEANING YOUR OVEN
Important: Before cleaning any part, be sure the oven is off, unplugged, and cool. Always dry parts thoroughly before using oven after cleaning.
- Clean the glass door with a sponge, soft cloth or nylon pad and mildly soapy water. Do not use a spray glass cleaner.
- To remove the slide rack, open the door, pull the rack forward and out. Wash the slide rack in mildly soapy water or in a dishwasher. To remove stubborn spots, use a polyester or nylon pad.
- Wash the bake pan in mildly soapy water. To minimize scratching, use a polyester or nylon pad.
CRUMB TRAY
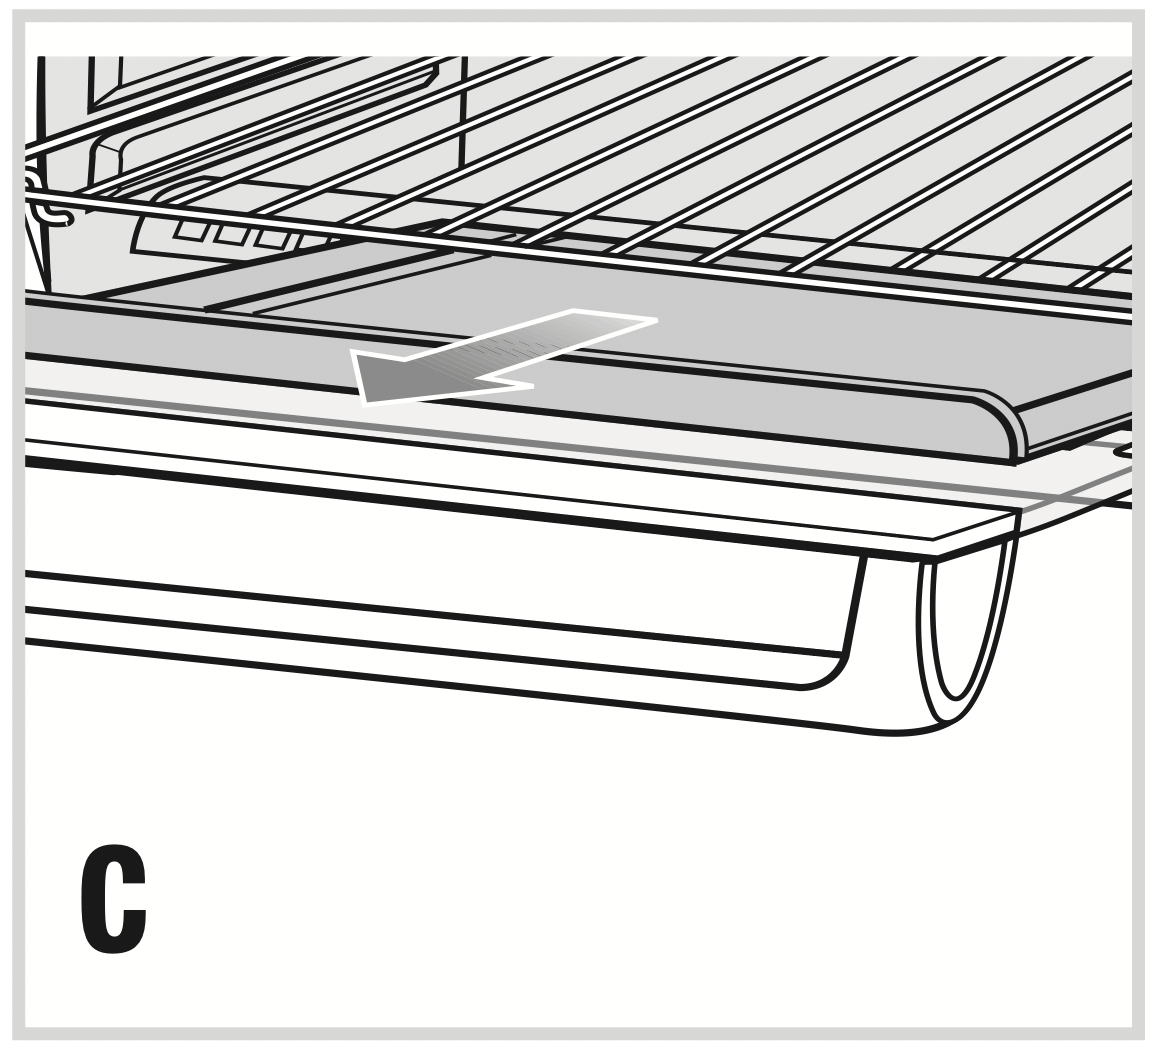
- Open oven door and pull out crumb tray (C).
- Dispose of crumbs and wipe the tray with a dampened cloth, or wash in mildly soapy water.
- Be sure to dry thoroughly before inserting the tray back into the oven.
EXTERIOR SURFACES
Important: The oven top surface gets hot, be sure the oven has cooled completely before cleaning.
Wipe the top and exterior walls with a damp cloth or sponge. Dry thoroughly.
COOKING CONTAINERS
Metal, ovenproof glass or ceramic bakeware without glass lids can be used in your oven. Follow manufacturer’s instructions. Be sure the top edge of the container is at least 1½” (3.81 cm) away from the upper heating elements.
NEED HELP?
For service, repair or any questions regarding your appliance, call the appropriate 800 number on cover of this sheet. Please DO NOT return the product to the place of purchase. Also, please DO NOT mail product back to manufacturer, nor bring it to a service center. You may also want to consult the website listed on the cover of this sheet.
IMPORTANT SAFEGUARDS.
When using electrical appliances, basic safety precautions should always be followed, including the following:
- Read all instructions.
- Do not touch hot surfaces. Use handles or knobs.
- To protect against electrical shock do not immerse cord, plugs or appliance in water or other liquids.
- Close supervision is necessary when any appliance is used by or near children.
- Unplug from outlet when not in use and before cleaning. Allow to cool before putting on or taking off parts.
- Do not operate any appliance with a damaged cord or plug, or after the appliance malfunctions or has been damaged in any manner. Return appliance to the nearest authorized service facility for examination, repair or adjustment. Or, call the appropriate toll-free number on the cover of this manual.
- The use of accessory attachments not recommended by the appliance manufacturer may cause injuries.
- Do not use outdoors.
- Do not let cord hang over edge of table or counter, or touch hot surfaces.
- Do not place on or near a hot gas or electric burner, or in a heated oven.
- Do not use appliance for other than intended use.
- Use extreme caution when removing tray or disposing of hot grease.
- To disconnect, turn the timer to “off” and then remove plug from wall outlet.
- Oversized foods or metal utensils must not be inserted in a toaster oven, as they may create a fire or risk of electric shock.
- A fire may occur if the toaster oven is covered or touching flammable material including curtains, draperies, walls and the like, when in operation.
- Do not store any item on top of the appliance.
- Do not clean with metal scouring pads. Pieces can break off the pad and touch electrical parts resulting in a risk of electric shock.
- Extreme caution should be exercised when using containers constructed of other than metal or glass.
- Do not store any material, other than manufacturer’s recommended accessories, in this oven when not in use.
- Do not place any of the following materials in the oven: paper, cardboard, plastic and the like.
- Do not cover crumb tray or any part of this oven with metal foil. This will cause overheating of the oven.
- This appliance is not intended for use by persons (including children) with limited physical, mental or sensitivity and lack of experience and knowledge prevents them from using the appliance safely without supervision or instruction.
- You must ensure supervision of children to avoid using the device as a toy.
- This appliance is not designed to operate via an external timer or remote control.