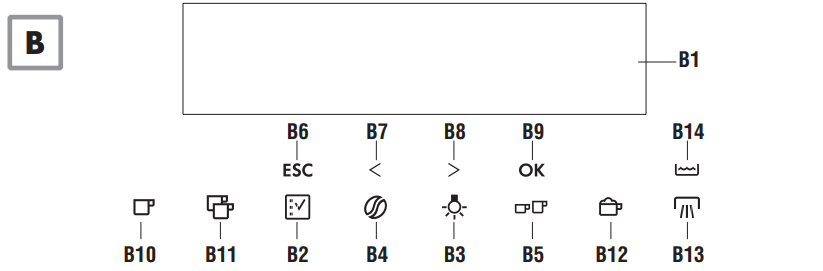
B1. Display: guides the user in using the appliance.
B2. icon to activate or deactivate menu parameter setting mode
B3. icon to turn lights A6 on and off
B4. icon to select the coffee taste
B5. icon to select the type of coffee (espresso, small cup,ll cup,
B6. ESC icon to exit the selected mode
B7-B8.icons to scroll forwards or backward through the menu and display the various modes
B9. OK icon to confirm the selected function
B10. icon to deliver a cup of coffee
B11. icon to deliver two cups of coffee
B12. icon to deliver cappuccino
B13. icon to deliver hot water
B14. “jug” icon to make a number of cups of coffee directly in the jug (provided)
Description of milk container and accessories
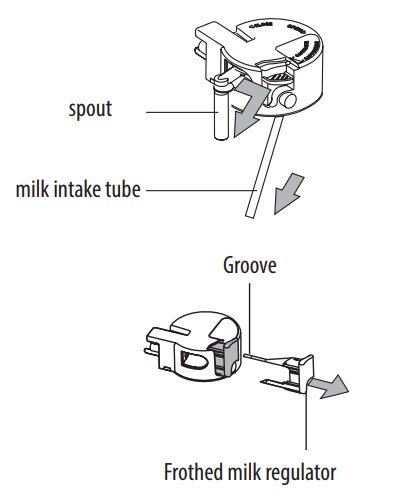
C1. Frothed milk regulator
C2. Milk container handle
C3. CLEAN button
C4. Milk intake tube
C5. Frothed milk spout
C6. Milk frother
C7. Hot water spout
C8. Cleaning brush
PRELIMINARY CHECKS
Controls after transport
After removing the packaging, make sure the product is complete and undamaged and that all accessories are present. Do not use the appliance if it is visibly damaged. Contact Customer Services.
Installing the appliance
Installation must be performed by a qualified professional in compliance with legislation in force in the country of installation (see Built-in installation).
The packing elements (plastic bags, polystyrene foam, etc.) should be kept out of reach of children.
Do not install the appliance in rooms where the temperature may drop to 0°C or lower
Customisethewater hardness as soon as possible following the instructions in the “Setting water hardness” section.
Connecting the appliance
Danger : Check that the mains power supply voltage corresponds to the value indicated on the rating plate on the bottom of the appliance.
Connect the appliance to an efficiently earthed and correctly installed socket with a minimum current rating of 10A only. If the power socket does not match the plug on the appliance, have the socket replaced with a suitable type by a qualified professional? To comply with safety directives, an omnipolar switch with a minimum contact distance of 3 mm must be installed. Do not use multiple sockets or extensions.
Important : Safety cutout devices must be included in the mains power supply in compliance with the installation regulations in the country concerned.
Disposing of the appliance
The appliance must not be disposed of with household waste, but taken to an authorized waste separation and recycling center.
USING THE APPLIANCE FOR THE FIRST TIME
• Coffee has been used to factory test the appliance and it is therefore completely normal for there to be traces of coffee in the mill.
• Customise water hardness as soon as possible following the instructions in the “Setting water hardness” section.
1. Connect the appliance to the main supply. Set the required language.
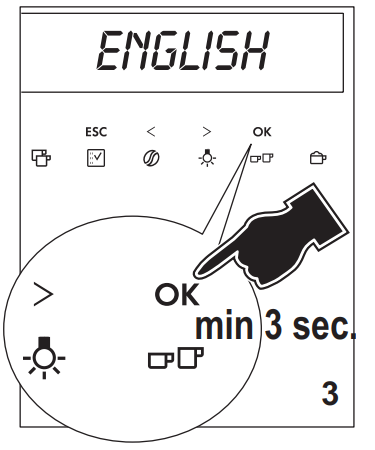
2. To set the language, use the icons (B7 and B8) to choose the required language (fig. 2). When the message “PRESS OK TO CHOOSE ENGLISH” is displayed, press the OK icon (B9) (fig. 3) for 3 seconds until “ENGLISH INSTALLED” is displayed. If you set the wrong language, follow the instructions in the “Setting the language” section. If your language is not available, select one from those displayed. The instructions refer to the English version. Then follow the instructions displayed:
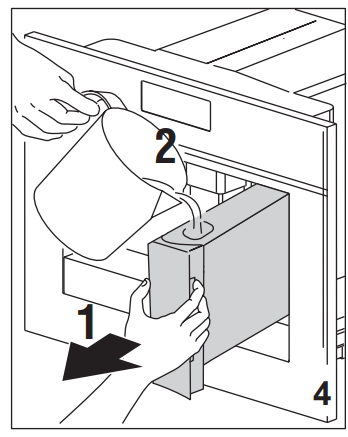
3. After 5 seconds, the appliance displays “FILL TANK”. Extract the water tank (fig. 4), rinse and fill with fresh water without exceeding the MAX line. Replace and push as far as it will go.
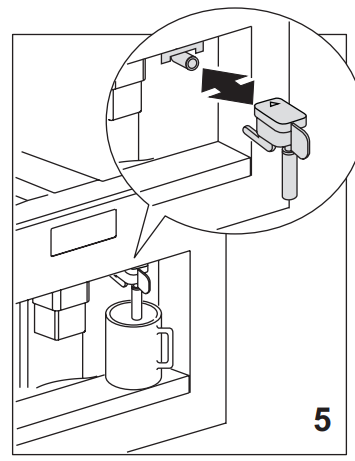
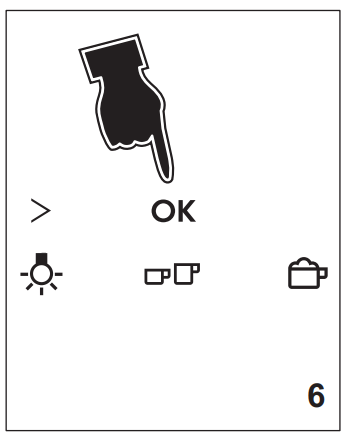
4. Place a cup under the hot water spout (fig. 5). (If the hot water spout is not inserted, the appliance displays “INSERT WATER SPOUT”. Attach it as shown in figure 5. The appliance displays: “HOT WATER PRESS OK” Press the OK icon (B9) (fig. 6) and after a few seconds a little water comes out of the spout.
5. The machine now displays “TURNING OFF... PLEASE WAIT” and goes off.
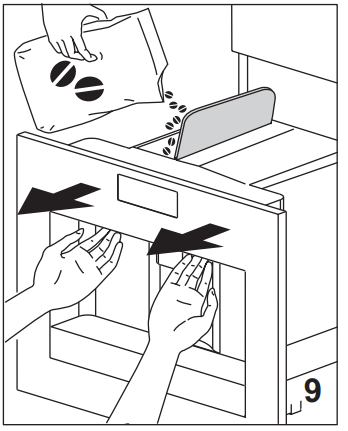
6. Extract the appliance by pulling it out using the handles (fig. 9). Open the lid and fill the container with coffee beans, then close the lid and push the appliance in. The coffee maker is now ready for normal use.
TURNING ON AND HEATING UP
Each time the appliance is turned on, it performs an automatic preheat and rinse cycle which cannot be interrupted. The appliance is ready for use only after completion of this cycle.
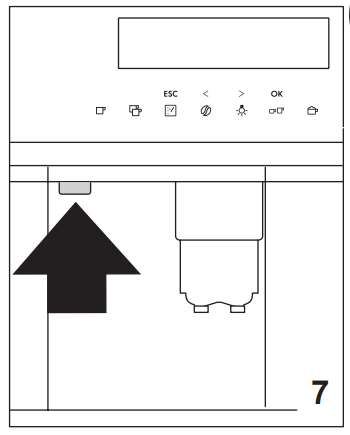
To turn the appliance on, press the ON/OFF/stand-by button (A7) (fig. 7). The message “HEATING UP... PLEASE WAIT” is displayed. When heating is complete, the message changes to “RINSING”; The appliance is at temperature when the message “MEDIUM CUP NORMAL TASTE” is displayed.
If no icon is pressed within about 2 minutes, the time (if set, see the “Setting the clock” section) is displayed. If the time has not been set, the appliance displays the last function set.
When any icon is pressed, “MEDIUM CUP NORMAL TASTE” is displayed again. The appliance is ready to make coffee again.
MAKING COFFEE USING COFFEE BEANS
1. The appliance is preset to make coffee with a normal taste. You can also choose coffee with an extra-mild, mild, strong or extra-strong taste. There is also a pre-ground coffee option. To choose the required taste, press the icon (B4) (fig. 10) a number of times. The required coffee taste is displayed.
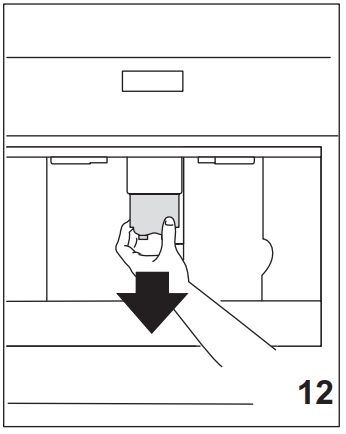
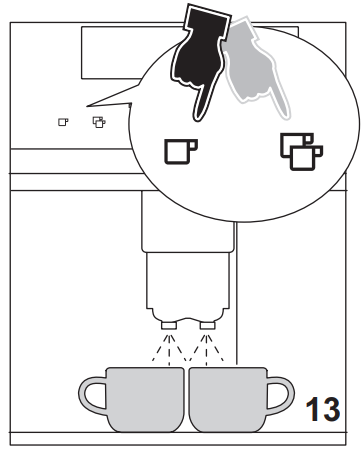
2. Place 1 cup under the spouts to make 1 coffee or 2 cups for 2 coffees (fig. 13). Lower the spouts as near as possible to the cup for a creamier coffee (fig. 12).
3. Press the (B5) icon (B5) (fig. 11) to select the type of coffee: espresso, small cup, medium cup, large cup, mug. Now press the (icon (B10) if you want to make a coffee and the icon (B11) (fig. 13) if you want to make 2 coffees. The appliance now grinds the beans and starts delivering the coffee into the cup. Once the set amount of coffee has been delivered, the machine stops delivery automatically and expels the exhausted waste coffee into the waste coffee container.
4. After a few seconds, the appliance is ready for use again.
5. To turn the appliance off, press the ON/OFF/stand-by button (A7) (fig. 7). (Before going off, the appliance performs an automatic rinse cycle. Take care to avoid scalds).
NOTE 1: If the coffee is delivered a drop at a time or not at all, see the “Adjusting the coffee mill” section.
NOTE 2: If the coffee is delivered too fast and the cream is not satisfactory, see the “Adjusting the coffee mill” section.
NOTE 3: Tips for a hotter coffee:
• Proceed as described in the section “Changing and setting menu parameters”, “Rinse” function.
• Unless preheated, do not use excessively thick cups as they will absorb too much heat.
• Preheat the cups by rinsing them with hot water.
NOTE 4: Coffee delivery can be interrupted at any moment by re-pressing the previously selected icon which remains lit during the operation.
NOTE 5: As soon as delivery is finished, to increase the quantity of coffee in the cup, just keep pressing the previously selected icon within 3 seconds after delivery has finished.
NOTE 6: When the appliance displays “FILL TANK”, fill the tank with water or the appliance will not deliver coffee. (It is normal for there to be a little water left in the tank).
NOTE 7: After about 14 single (or 7 double) coffees, the appliance displays “EMPTY WASTE COFFEE CONTAINER”.
Even if not full, the empty waste coffee container message is displayed 72 hours after the first coffee has been delivered. For the 72 hours to be calculated correctly, the machine must never be turned off with the main switch in the 0 position.
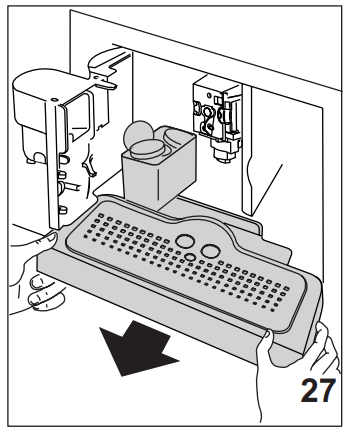
To clean, open the service door on the front of the appliance by pulling the spout (fig. 26), extract the drip tray (fig. 27) and clean.
When cleaning, always extract the drip tray completely.
NOTE 8: Never extract the water tank while the machine is delivering coffee.
If it is removed, it will not be possible to make the coffee and the appliance will display “GROUND TOO FINE ADJUST MILL AND PRESS OK” and then “FILL TANK”. Check the level of water in the tank and replace in the appliance.
To turn the appliance back on, insert the water spout if not already in place (fig. 5), then press the OK icon (B9). “HOT WATER PRESS OK” is displayed.
Press the OK icon (B9) within a few seconds and deliver water from the spout for about 30 seconds. When delivery stops, the basic modes are displayed again.
CHANGING THE QUANTITY OF COFFEE IN THE CUP
The appliance is set by default to automatically make the following types of coffee:
• espresso
• small cup
• medium cup
• large cup
• mug
To change the quantity, proceed as follows:
• Press the icon (B2) to enter the menu. Press the icons (B7) and (B8) (fig. 2) until “PROGRAM COFFEE” is displayed.
• Press the OK icon (B9).
• Select the type of coffee you want to change by pressing the icons (B7) and (B8).
• Press the OK icon (B9) to confirm the type of coffee you want to make.
• Usethe icons (B7) and (B8) to change the quantity of coffee. The progress bar shows the quantity of coffee selected.
• Press the OK icon (B9)again to confirm (or the icon (B6) to cancel the operation).
• Press theESC(B6) icon (B6) twicetoexit the menu.
The appliance is now reprogrammed with the new settings and is ready.
ADJUSTING THE COFFEE MILL
The coffee mill is preset in the factory and should not require adjusting. However, if after making the first few coffees you find that delivery is either too fast or too slow (a drop at a time), this can be corrected by adjusting the grinding adjustment knob (fig. 14).
Important! The grinding adjustment knob must only be turned when the coffee mill is in operation.
MAKING ESPRESSO COFFEE WITH PREGROUND COFFEE (INSTEAD OF BEANS)
• Press the (B4) icon (B4) (fig. 10) and select the pre-ground coffee function
• Extract the machine by pulling it outwards using the handles.
• Lift the central lid, place one measure of pre-ground coffee in the funnel, push the appliance in then proceed as described in the section “Making coffee using coffee beans”. N.B.: You can make just one coffee at a time by pressing the icon (B10).
• After using the machine with pre-ground coffee, to go back to making coffee using beans, deactivate the pre-ground coffee function by pressing the icon (B4).
NOTE 1: Never introduce pre-ground coffee when the machine is off or it could spread through the inside of the appliance.
NOTE 2: Never add more than 1 measure, otherwise the appliance will not make the coffee.
NOTE 3: Use the measure provided only.
NOTE 4: Introduce only pre-ground coffee for espresso coffee machines into the funnel.
NOTE 5: If more than one measure of pre-ground coffee is used and the funnel clogs, push the coffee down with a knife then remove and clean the brewing unit and machine as described in the “Cleaning the brewing unit” section.
DELIVERING HOT WATER
• Always make sure the appliance is ready.
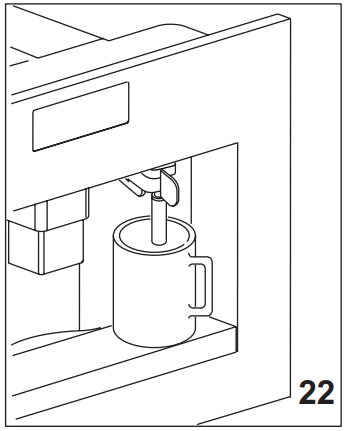
• Make sure the hot water spout is in place(fig.21). Position a container under the spout (fig. 22).
• Press the icon (B13) (fig. 23). The appliance displays: “HOT WATER PRESS OK”. Press the OK icon (B9) again and hot water is delivered from the water spout into the container underneath. (You should not deliver hot water for more than 2 minutes at a time). To interrupt, press the icon (B13) or the ESC icon (B6).
The appliance stops delivery once the set quantity is reached.
CHANGING THE QUANTITY OF HOT WATER
The machine is set by default to automatically delivery 200 ml of hot water.
To change these quantities, proceed as follows:
• Placeacontainerunderneath the water spout (fig.22).
• Press the (B2) to enter the menu or press the icons (B7) and (B8) (fig. 2) until “PROGRAM HOT WATER” is displayed.
• Press the OK icon (B9) toconfirm.
• Select the required quantity of water by pressing the icons (B7) and (B8). The progress bar shows the quantity of water selected.
• Press the OK icon (B9) to confirm (or the ESC icon (B6) to cancel the operation.
• Press the ESC(B6) icon (B6) twicetoexit the menu.
• Theapplianceis now reprogrammed with the new settings and is ready
MAKING A NUMBER OF CUPS OF COFFEE WITH THE JUG FUNCTION
Using this function you can automatically make a number of cups of coffee (4, 6) directly in the jug (A9) to keep the coffee hot.
• Turn the jug lid until the arrow lines up with the word OPEN and remove the lid. Rinse the jug and lid.
• Close the jug by turning the lid towards CLOSE until it is tightly closed and then place it under the coffee spout. Always position the jug with the handle facing to the right or left as shown in the figure.
The coffee spout (A13) must be fully raised to enable the jug to be inserted. “FILL BEAN CONT. AND WATER TANK, EMPTY WASTE CONT., PRESS OK” is displayed. Make sure the water tank is full, the bean container is full enough and the waste coffee container is completely empty.
• Press the OK icon (B9). The type of coffee selected, for example, “EXTRA-MILD JUG”, and the number of cups you want to make with the jug are displayed, for example, “JUG 4 CUPS”.
• Confirmbypressingthe icon (B14). The display shows a progress bar which indicates coffee making process. When the progress bar is complete, the appliance finishes the process and automatically goes back to the coffee jug function. If on the other hand, an incomplete progress bar is displayed, this means that the cycle has not been completed correctly. Remove the jug and check the message which appears on the display, consulting the section “DISPLAYED MESSAGES”.
• Removejugandleavethelidin theCLOSEposition to keep the coffee hot.
• Topour the coffee, and turn the lid anticlockwise until the arrow is lined up with the spout of the jug.
CHANGING JUG FUNCTION PARAMETERS
The jug program is factory-set with default values. These can be modified to suit your personal taste and saved. You can select 5 different types of coffee from extra-mild to extra-strong and, with the aid of a graphic bar, 10 quantities of coffee.
To make these adjustments, proceed as follows:
• Press the icon (B2) to enter the menu. Press the icons (B7) and (B8) until “PROGRAM JUG” is displayed.
• Press the OK icon (B9) and then the icons (B7) and (B8) until “JUG COFFEE TASTE” is displayed.
• Press the OK icon (B9).
• Press the icons (B7) and (B8) to select a different coffee taste from extra-mild to extra-strong.
• Confirm the required taste by pressing the OK icon (B9).
• To change the quantity of coffee, press the icons (B7) and (B8) until “JUG LEVEL” is displayed.
• Press the OK icon (B9) toconfirm.
• A bar representing the quantity of coffee delivered for each cup is displayed and can be made shorter or longer. A completely full bar corresponds to the maximum quantity of coffee per cup.
• When the bar indicates the quantity of coffee required, press the OK icon (B9) to confirm.
• Tochangethequantityof cups, press the icons (B7) and (B8) until “NR OF CUPS IN JUG” is displayed.
• Select the OK icon (B9) and then press the icons (B7) and (B8) to select the number of cups required (4, 6). “JUG 4 CUPS” or “JUG 6 CUPS” is displayed.
• Press the OK icon (B9) to confirm.
• Press the ESC(B6) icon (B6) toexit the programming menu.
CLEANING
Cleaning the coffee maker
Do not use solvents or abrasive detergents to clean the coffee maker. A soft damp cloth will suffice.
Never wash any of the components of the coffee maker in the dishwasher.
The following parts of the machine must be cleaned regularly:
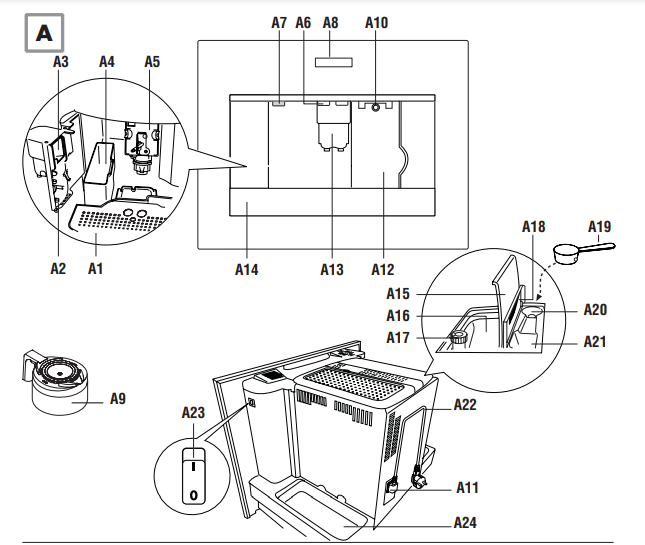
• Wastecoffeecontainer (A4).
• Driptray(A14).
• Water tank(A12).
• Coffeespouts (A13)
• Pre-groundcoffeefunnel (A21).
• nside of the machine, accessible after opening the service door (A2).
• Brewingunit (A5).
• Coffeejug(A9).
Cleaning the waste coffee container
When “EMPTY WASTE COFFEE CONTAINER” is displayed, the waste coffee container must be emptied and cleaned.
To clean:
• open the service door on the front of the appliance (fig.26), extract the drip tray (fig. 27), and clean.
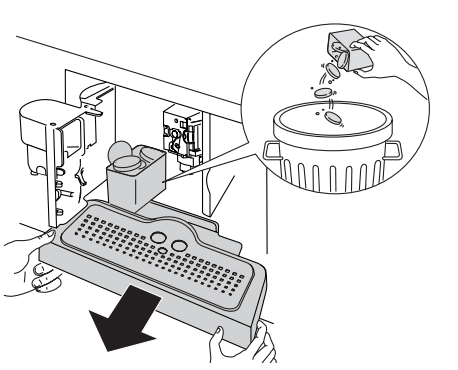
• Empty the waste coffee container and clean thoroughly to remove all residues left on the bottom. This can be done with the spatula on the brush (C8) provided.
Cleaning the drip tray
This could damage the machine.
The drip tray is fitted with a level indicator (red) showing the level of water it contains.
Before the indicator protrudes from the cup tray, the drip tray must be emptied and cleaned.
To remove the tray:
1. Open the service door (fig. 26).
2. Remove the drip tray and the waste coffee container (fig. 27).
3. Clean the drip tray and waste coffee container (A4).
4. Replace the drip tray and waste coffee container (A4).
5. Close the service door.
Cleaning the water tank
1. Clean the water tank (A12) regularly (about once a month) with a damp cloth and a little mild washing up liquid.
2. Remove all traces of washing up liquid.
Cleaning the spouts
1. Clean the nozzles periodically using a sponge.
2. Check regularly that the holes in the coffee spout are not blocked. If necessary, remove coffee deposits with a toothpick.
Cleaning the pre-ground coffee funnel
• Check regularly (about once a month) that the pre-ground coffee funnel is not blocked. If necessary, remove coffee deposits with the brush (C8) supplied.
Cleaning the inside of the coffee maker
1. Check regularly (about once a week) that the inside of the appliance is not dirty. If necessary, remove coffee deposits with the brush (C8) supplied and a sponge.
2. Remove the residues with a vacuum cleaner (fig. 30).
Cleaning the brewing unit
The brewing unit must be cleaned at least once a month.
1. Make sure the machine is correctly turned off (see “Turning the appliance off”).
2. Open the service door (fig. 26).
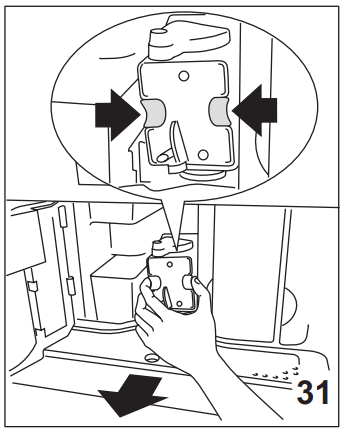
3. Remove the drip tray and waste coffee container (fig. 27);
4. Press the two red release buttons inwards and at the same time pull the brewing unit outwards (fig. 31).
5. Soak the brewing unit in water for about 5 minutes, then rinse. Use the brush (C8) to remove any coffee residues left in the unit.
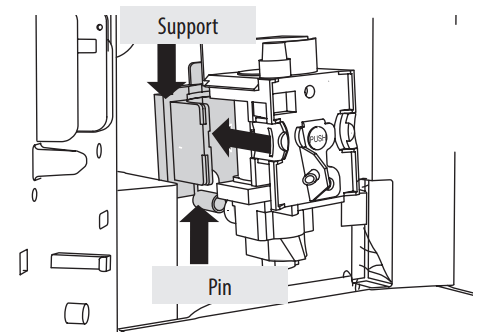
6. After cleaning, replace the brewing unit (A5) by sliding it onto the internal support and pin at the bottom, then push the PUSH symbol fully in until it clicks into place
7. Once inserted, make sure the two red buttons have snapped out.
8. Replace the drip tray and waste coffee container.
9. Close the service door.
Cleaning the milk container
If there is still milk in the container, do not leave it out of the refrigerator for longer than strictly necessary. Clean the container each time you prepare milk as described in Note 3 in the section “Making cappuccino”. All components can be washed in a dishwasher, placing them in the top basket of the dishwasher.
1. Turn the lid of the milk container clockwise then remove it.
2. Remove the milk spout and intake tube.
3. Remove the frothed milk regulator by pulling it outwards.
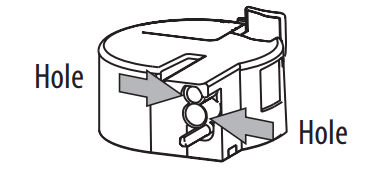
4. Wash all the components thoroughly with hot water and mild washing-up liquid. Make sure there are no milk residues left inside the holes and the groove on the fine end of the frothed milk regulator.
5. Check that the intake tube and spout are not clogged with milk residues.
6. Replace the frothed milk regulator, milk spout and intake tube.
7. Replace the milk container lid.
Cleaning the coffee jug
Clean the jug with a damp cloth and mild washing up liquid
CHANGING AND SETTING MENU PARAMETERS
When the appliance is ready, you can use the internal menu to modify the following parameters and functions:
• Choose language
• Rinsing
• Shut-off time
• Set clock
• Start time
• Auto-start
• Temperature
• Water hardness
• Program coffee
• Program cappuccino
• Program jug
• Program water
• Descale
• Reset to default
• Statistics
• Buzzer
• Contrast
Setting the language
To change the language on the display, proceed as follows:
• Press the icon (B2) to enter the menu. “CHOOSE LANGUAGE” is displayed.
• Press the OK icon (B9).
• Press the icons (B7) and (B8) until the required language is displayed.
• Press the OK icon (B9) toconfirm.
• Press theESC(B6) toexit the menu.
• Press the (B2) for at least 7 seconds until the appliance displays the various languages.
• Choose the required language as described in the section “Using the appliance for the first time”.
Rinsing
This function enables you to obtain hotter coffee.
Proceed as follows:
• When you turn the appliance on, if you want to make a small cup of coffee (less than 60 cc), preheat the cup by rinsing it with hot water.
• If on the other hand more than 2/3 minutes have passed since the last coffee was made, before requesting another coffee, you must preheat the brewing unit by first pressing the icon (B2) to enter the menu then the icons (B7) and (B8) to select the “RINSING” function. Press the OK icon (B9). “RINSING... PLEASE CONFIRM” is displayed. Press the OK icon (B9) again.
Deliver the water into the underlying drip tray or alternatively use this water to fill (and then empty) the cup to be used for the coffee to preheat it.
Changing the length of time the appliance remains on
The appliance is set by default to go off automatically 30 minutes after the last coffee has been made. To change this interval (max. 120 min), proceed as follows:
• Press the icon (B2) to enter the menu and then the icons (B7) and (B8) until “SHUT-OFF TIME” is displayed.
• Press the OK icon (B9) to confirm.
• Press the icons (B7) and (B8) to set the time after which the appliance will go off (after 1/2 hour, 1 hour, 2 hours).
• Press the OK icon (B9) to confirm.
• Press theESCicon (B6) toexit.
Setting the clock
• Press the icon (B2) to enter the menu and then the icons (B7) and (B8) until “SET CLOCK” is displayed.
• Press the OK icon (B9).
• Use the icons (B7) and (B8) to set the hour, then press the OK icon (B9) to confirm.
• Use the icons (B7) and (B8) to set the minutes, then press the OK icon (B9) to confirm.
• Press the ESC(B6) icon (B6) toexit the menu.
Setting auto-start time
This function programs the time the machine will come on automatically.
• Make sure the clock on the appliance has been set.
• Press the icon (B2) to enter the menu and then the icons (B7) and (B8) until “START TIME” is displayed.
• Press the OK icon (B9).
• Use the icons (B7) and (B8) to set the auto-start time, then press the OK icon (B9) to confirm.
• Use the icons (B7) and (B8) to set the minutes, then press the OK icon (B9) to confirm.
• Press the icons (B7) and (B8) to activate the auto-start function until “AUTO START” is displayed.
• “AUTO STARTPLEASECONFIRM” is displayed. PRESS THE OK ICON (B9). The symbol appears on the display.
• Press theESC(B6) icon (B6) toexit the menu.
• To disable auto-start, press the icon (B2), then the icons (B7) and (B8) until “AUTO START” is displayed. Press the OK icon (B9). “PLEASE CONFIRM” is displayed Press (B6) to disable, and the ESC symbol disappears .
Changing coffee temperature
To change the coffee temperature, proceed as follows:
• Press the icon (B2) to enter the menu and then the icons (B7) and (B8) until “TEMPERATURE” is displayed.
• Press the OK icon (B9).
• Press the icons (B7) and (B8) to select the required coffee temperature from low, medium, and high.
• Press the OK button (B9) to confirm the temperature selected.
• Press the ESC icon (B6) toexit the menu.
Setting water hardness
The operating period can be extended if required, making descaling less frequent by programming the machine on the basis of the real lime content in the water used.
Proceed as follows:
• remove the “Total HardnessTest” strip(attachedtopage2) from its packaging then dip it fully in the water for a few seconds, Then remove and wait about 30 seconds (until it changes color and forms red squares).
• turn the appliance on by pressing the ON/OFF/stand-by button (A7).
• Press the icon (B2) to enter the menu and then the icons (B7) and (B8) until “WATER HARDNESS” is displayed.
• Press the OK icon (B9).
• Press the icons (B7) and (B8) until the number coincides with the number of red squares on the test strip (for example, if there are 3 red squares on the test strip, select the message “WATER HARDNESS 3”
• Press the OK icon (B9) to confirm. The coffee maker is now programmed to provide the descale warning when actually necessary.
Programming coffee
For instructions on programming coffee, see the “CHANGING THE QUANTITY OF COFFEE IN THE CUP” section.
Programming cappuccino
For instructions on programming cappuccino, see the section “CHANGING THE QUANTITY OF MILK AND COFFEE FOR CAPPUCCINO”.
Programming the jug
For instructions on programming the jug, see the section “ CHANGING JUG FUNCTION PARAMETERS”.
Programming water
For instructions, see the “CHANGING THE QUANTITY OF HOT WATER” section.
Descaling
When “PLEASE DESCALE !” is displayed, the machine requires descaling.
Proceed as follows:
• make sure the machine is ready;
• Press the icon (B2) to enter the menu and then the icons (B7) and (B8) until “DESCALE” is displayed.
• Press the OK icon (B9). The message “ADD DESCALER PLEASE CONFIRM” is displayed.
• Empty the tank of water, pour the content of the descaler bottle into the tank respecting the instructions given on the descaler pack, then add water.. Position a container with a capacity of 2 liters under the hot water spout.
• Press the OK icon (B9). The descaler flows out of the hot water spout into the container below. The appliance displays: “DESCALING”.
• The descaling program automatically performs a series of deliveries and pauses.
• After about 30 minutes“DESCALE COMPLETE PLEASE CONFIRM” is displayed. • Press the OK icon (B9).“RINSING FILLTANK” is displayed.
• Empty the water tank, rinse it to eliminate descaler residues, then fill it with clean water.
• Replace the tank full of clean water. “RINSING PLEASE CONFIRM” is displayed again.
• Press the OK icon (B9)again. Hot water flows out of the spout into the container below and “RINSING” is displayed.
• Wait until “RINSING COMPLETE PLEASE CONFIRM” is displayed.
• Press the OK icon (B9). “DESCALE COMPLETE” is displayed, then “FILL TANK!”. Fill the tank again with clean water.
• The descaling program is now terminated and the appliance is ready to make coffee again.
NOTE: If descaling is interrupted before completion, the process must be begun again from the beginning.
Resetting default values (reset)
If you change the original values, the default values can be reset as follows:
• Press the icon (B2) to enter the menu and then the icons (B7) and (B8) until “RESET TO DEFAULT” is displayed.
• Press the OK icon (B9)and the appliance displays“RESET TO DEFAULT PLEASE CONFIRM”.
• press the OK button (B9) to reset the default values;
Statistics
This displays statistics relating to the machine. To display, proceed as follows:
• Press the icon (B2) to enter the menu and then the icons (B7)and(B8)until“STATISTICS” is displayed.
• Press the OK icon (B9).
• Press the icons (B7) and (B8) to verify:
• How many coffees and cappuccinos have been made.
• How manytimes the machine has been descaled.
• How many cappuccinos have been made;
• The total number of liters of water delivered.
• Press the ESC icon (B6) once to exit the function or twice to exit the menu.
Buzzer
This activates or deactivates the buzzer emitted by the machine each time an icon is pressed or an accessory is inserted/removed.
• Press the icon (B2) to enter the menu and then the icons (B7) and (B8) until “BUZZER” is displayed.
• Press the OK icon (B9). “BUZZER PLEASE CONFIRM” is displayed.
• PresstheESC(B6) icon (B6) todisableor the OK icon (B9) to enable the buzzer.
• Press the ESC(B6) icon (B6) toexit the menu.
Adjusting contrast
To increase or reduce the contrast of the display, proceed as follows:
• Press the icon (B2) to enter the menu and then the icons (B7) and (B8) until “CONTRAST” is displayed.
• Press the OK icon (B9).
• Press the icons (B7) and (B8) until the required display contrast is reached. The progressive bar indicates the level of contrast selected.
• Press the OK icon (B9) toconfirm.
• Press the ESC (B6) icon (B6) once to exit the function or twice to exit the menu.
TURNING THE APPLIANCE OFF
Each time the appliance is turned off, it performs an automatic rinse cycle which cannot be interrupted.
TECHNICAL SPECIFICATION
Voltage: 220-240 V~ 50/60 Hz max. 10A
Absorbed power: 1350 W
Pressure: 15 bars
Water tank capacity: 1.8 litres
Size LxHxD: 594x 455x411 mm
Weight: 23/24 kg
The appliance complies with the following EC directives:
• EC Regulation 1275/2008 for standby.
This appliance conforms to EC Regulation 1935/2004 on materials and articles intended to come into contact with food.
DISPLAYED MESSAGES
DISPLAYED MESSAGE
POSSIBLE CAUSE
REMEDY
FILL TANK!
The water tank is empty or positioned incorrectly
Fill the tank with water and/or insert it correctly, pushing it as far as it will go
GROUND TOO FINE ADJUST MILL AND alternating with PRESS OK
The grinding is too fine and the coffee is delivered too slowly.
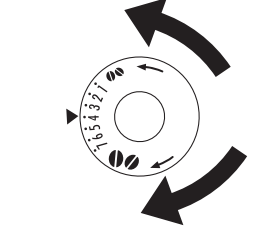
Turn the grinding adjustment knob one click clockwise towards “7”.
GROUND TOO FINE ADJUST MILL AND (alternating with) PRESS OK (then) FILL TANK
The tank has been removed during delivery.
Insert the tank and press the OK icon (B9). “HOT WATER PRESS OK” is displayed. Press the OK icon (B9) again. The appliance is once again ready for use.
EMPTY WASTE COFFEE CONTAINER
The waste coffee container (A4) is too full or more than 3 days have passed since you last made coffee (this guarantees correct hygiene of the machine).
Empty the waste coffee container and clean it, then replace it. Important: when removing the drip tray, the waste coffee container MUST be emptied, even if it is not completely full. If this is not done, when you make the next coffee, the waste coffee container may fill up more than expected and clog the machine.
INSERT WASTE COFFEE CONTAINER
After cleaning, the waste coffee container has not been replaced.
Open the service door and insert the waste coffee container.
INSERIRE CAFFÈ PRE-MACINATO
The “pre-ground coffee” function has been selected without placing any pre-ground coffee in the funnel. The funnel (A21) is blocked.
Extract the appliance and place pre-ground coffee in the funnel.
Empty the funnel with the help of a knife as described in the section “Cleaning the pre-ground coffee funnel”
PLEASE DESCALE!
The machine must be descaled.
The descaling procedure described in the “Descaling” section needs to be performed as soon as possible.
LESS COFFEE
Too much coffee has been used.
Select a milder taste or reduce the quantity of pre-ground coffee, then make the coffee again.
FILL BEAN CONTAINER
The coffee beans have run out
Fill bean container
INSERT BREWING UNIT
The brewing unit has not been replaced after cleaning.
Insert the brewing unit as described in the section “Cleaning the brewing unit”.
CLOSE DOOR
The service door is open
Close the service door.
GENERAL ALARM!
The inside of the appliance is very dirty
Clean the inside of the appliance thoroughly, as described in the section “Cleaning and maintenance”.
If the message is still displayed after cleaning, contact customer services.
TROUBLESHOOTING
PROBLEM
POSSIBLE CAUSE
REMEDY
The coffee is not hot
The cups were not preheated.
The brewing unit has cooled down because 2/3 minutes have elapsed since the last coffee was made.
The temperature set is too low.
Warm the cups by rinsing them with hot water.
Before making coffee, preheat the brewing unit by selecting the RINSING function in the menu.
Change the set temperature (see paragraph “Changing coffee temperature”).
The coffee is not creamy enough
The coffee is ground too coarsely.
Wrong type of coffee.
Turn the grinding adjustment knob one click anticlockwise towards “1” while the coffee mill is in operation (fig. 14).
Use a type of coffee for espresso coffee makers.
The coffee is delivered too slowly or a drop at a time.
The coffee is ground too finely.
Turn the grinding adjustment knob one click clockwise towards “7” while the coffee mill is in operation (fig. 14). Continue one click at a time until coffee delivery is satisfactory. The effect is only visible after delivering two coffees.
The coffee is delivered too quickly
The coffee is ground too coarsely
Turn the grinding adjustment knob one click anticlockwise towards “1” while the coffee mill is in operation (fig. 14). Avoid turning the grinding adjustment knob excessively otherwise when you select 2 cups, the coffee may be delivered a drop at a time. The effect is only visible after delivering two coffees.
Coffee does not come out of one of the spouts.
The spouts are blocked.
Clean the spouts with a toothpick.
The coffee does not come out of the spouts, but from around the service door (A2).
The holes in the spouts are clogged with dry coffee dust.
The coffee guide (A3) inside the service door is blocked and cannot swing.
If necessary, remove coffee deposits with a toothpick, sponge or stiff bristled kitchen brush.
Thoroughly clean the coffee guide (A3), particularly near the hinges
Water comes out of the spouts instead of coffee.
The pre-ground coffee may be blocked in the funnel (A21).
Clean the funnel (A27) with a wooden or plastic fork, and clean the inside of the machine.
The milk does not come out of the milk spout (C5).
The intake tube is not inserted or is inserted incorrectly.
Insert the intake tube (C4) in the rubber washer in the milk container lid (fig. 24).
The milk is not well-frothed.
The milk container lid is dirty.
The frothed milk regulator is not positioned correctly.
Clean the milk container lid as described in the section “Cleaning the milk container”.
Adjust following the instructions in the section “Making cappuccino”
The milk contains bubbles or squirts out of the milk spout.
The milk is not cold enough or is not semi-skimmed.
The frothed milk regulator is incorrectly adjusted. The milk container lid is dirty
You should ideally use skimmed or semi-skimmed milk at refrigerator temperature (about 5°C). If the result is still disappointing, try another brand of milk.
Move the frothed milk regulator slightly towards the word “CAFFELATTE” (see section “Making cappuccino”).
Clean the milk container lid as described in the section “Cleaning the milk container”
 icon to activate or deactivate menu parameter setting mode
 icon to turn lights A6 on and off
 icon to select the coffee taste
 icon to select the type of coffee (espresso, small cup,ll cup,
 icons to scroll forwards or backward through the menu and display the various modes
 icon to deliver a cup of coffee
 icon to deliver two cups of coffee
 icon to deliver cappuccino
 icon to deliver hot water
 “jug” icon to make a number of cups of coffee directly in the jug (provided)
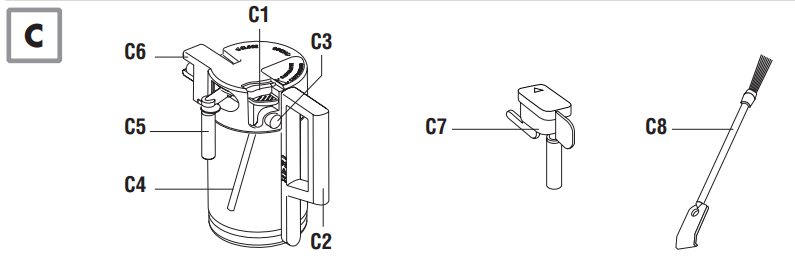
 icons (B7 and B8) to choose the required language (fig. 2). When the message “PRESS OK TO CHOOSE ENGLISH” is displayed, press the OK icon (B9) (fig. 3) for 3 seconds until “ENGLISH INSTALLED” is displayed. If you set the wrong language, follow the instructions in the “Setting the language” section. If your language is not available, select one from those displayed. The instructions refer to the English version. Then follow the instructions displayed:
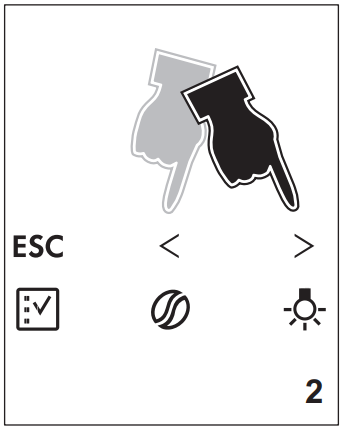
 (B4) (fig. 10) a number of times. The required coffee taste is displayed.
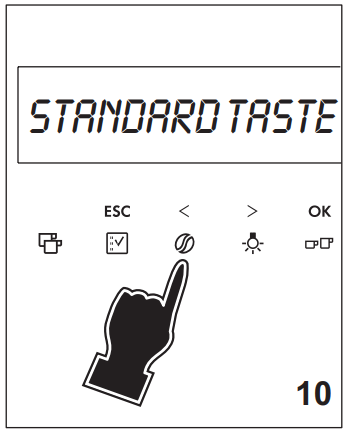
 (B5) icon (B5) (fig. 11) to select the type of coffee: espresso, small cup, medium cup, large cup, mug. Now press the
  (icon (B10) if you want to make a coffee and the
 icon (B11) (fig. 13) if you want to make 2 coffees. The appliance now grinds the beans and starts delivering the coffee into the cup. Once the set amount of coffee has been delivered, the machine stops delivery automatically and expels the exhausted waste coffee into the waste coffee container.
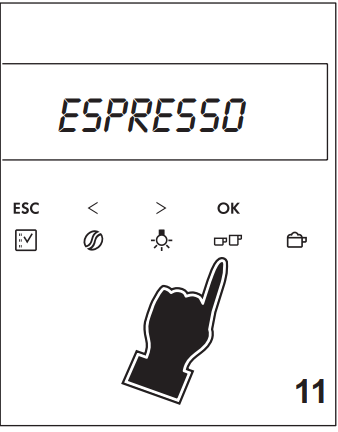

 icon (B2) to enter the menu. Press the
 icons (B7) and (B8) (fig. 2) until “PROGRAM COFFEE” is displayed.
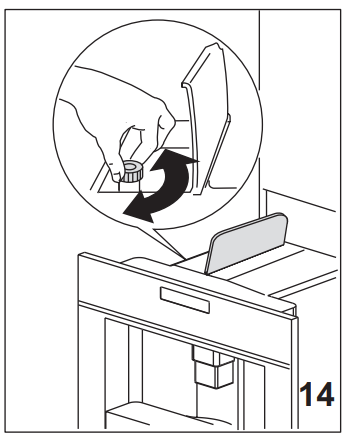
 (B4) icon (B4) (fig. 10) and select the pre-ground coffee function
 icon (B10).
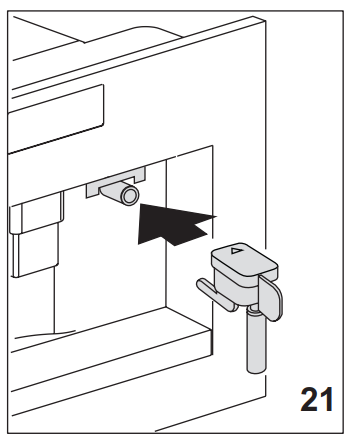
 icon (B13) (fig. 23). The appliance displays: “HOT WATER PRESS OK”. Press the OK icon (B9) again and hot water is delivered from the water spout into the container underneath. (You should not deliver hot water for more than 2 minutes at a time). To interrupt, press the
 (B2) to enter the menu or press the
  icons (B7) and (B8) (fig. 2) until “PROGRAM HOT WATER” is displayed.
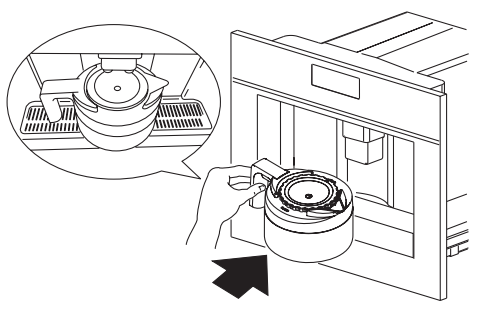
 icon (B2) to enter the menu. Press the icons
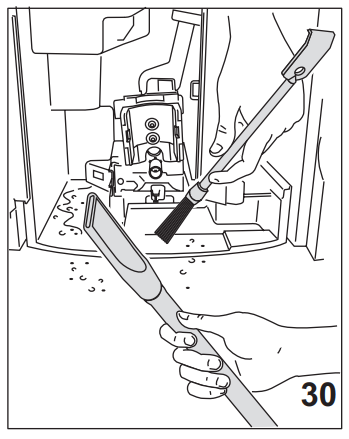

 icon (B2) to enter the menu. “CHOOSE LANGUAGE” is displayed.
 icons (B7) and (B8) until the required language is displayed.
 icon (B2) to enter the menu then the icons
 (B7) and (B8) to select the “RINSING” function. Press the OK icon (B9). “RINSING... PLEASE CONFIRM” is displayed. Press the OK icon (B9) again.
 symbol appears on the display.
 The appliance complies with the following EC directives:
 This appliance conforms to EC Regulation 1935/2004 on materials and articles intended to come into contact with food.