Loading ...
Loading ...
ENGLISH
|
3
1. Carefully remove the microscope and other
parts from the carton and set them on a
table, desk, or other flat surface.
2. Remove the plastic cover from the
microscope.
3. Plug the small cable from the AC adapter into
the socket on the back of the base
(see Figure 2).
4. Insert the plug you need (see note below) into the AC adapter and
then plug the adapter into the proper power source.
NOTE: The AC Adapter supplied with this microscope has an interchangeable plug
system that can work in the USA, UK, Europe, Australia, and many other parts of
the world.
You can easily change plugs for your particular power requirement:
A. You may have one of two different types of adapters. One is
shown in Figure 3A and another one is somewhat similar shown
in Figure 3B. Each has a different means of changing plugs.
B. For the Figure 3A type, push down on the small button labeled
“PUSH” and hold it down while at the same time holding the
prongs of the plug. Rotate it slightly counterclockwise and pull up
to remove it. Then release the “PUSH” button down.
Take the plug style that you want to use
and center it over the AC adapter and
rotate it until it falls into the opening.
Rotate it clockwise until you hear a click,
which lets you know the plug is installed
correctly.
C. For the Figure 3B type, pull the plug up
and away while holding the base of the AC
adapter. The plug will come off. Take the plug
style that you want to use and align the two
holes in the bottom of the plug with the two
pins in the AC adapter. Then, push the plug
into the AC adapter all the way.
Battery Operation — You can use your
microscope without AC power if you choose. This
gives you the freedom to operate the microscope
outdoors or indoors anywhere you please. You’ll
need 4 AA batteries (user supplied). Open the
battery door on the bottom of the microscope and
insert the batteries according to the battery polarity
shown in the battery compartment (Figure 4). After
the batteries are installed, close the battery door.
Battery life will typically be three hours.
SETTING UP YOUR MICROSCOPE
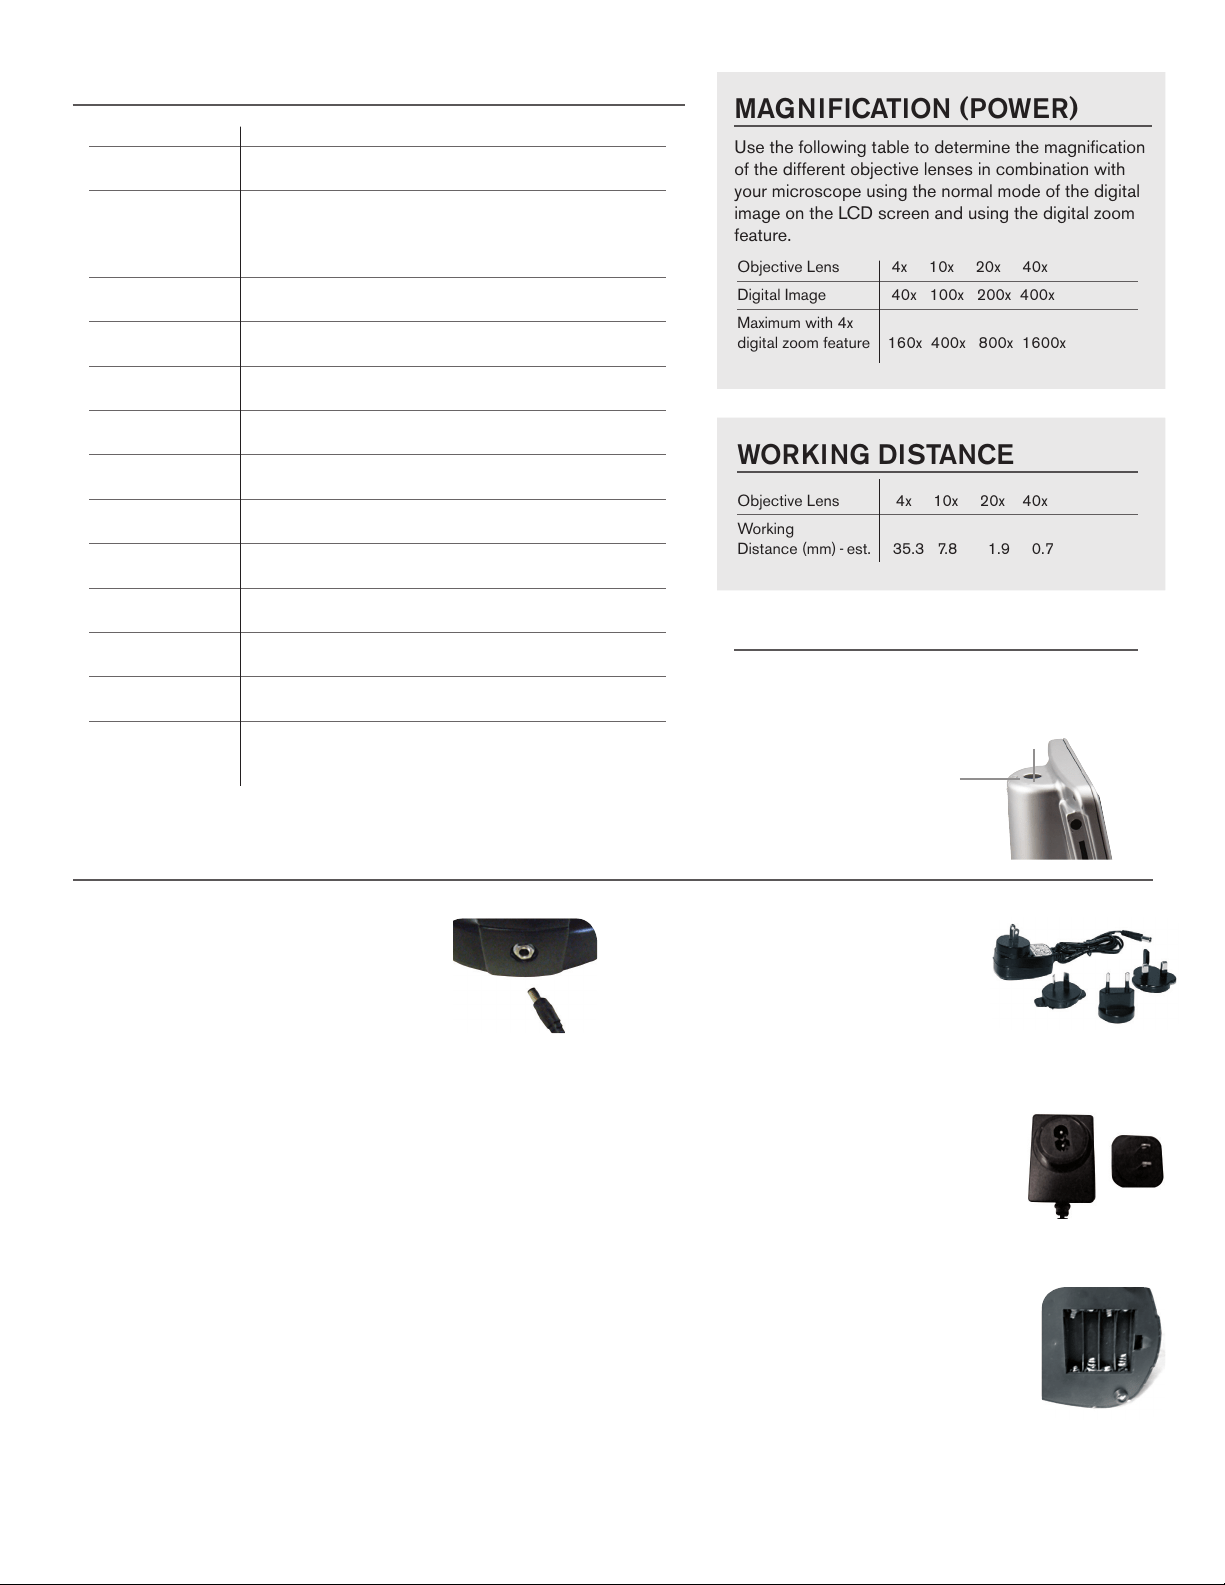
MAGNIFICATION (POWER)
Use the following table to determine the magnification
of the different objective lenses in combination with
your microscope using the normal mode of the digital
image on the LCD screen and using the digital zoom
feature.
SPECIFICATIONS
Stage Mechanical Stage 3.5 in x 3.5 in (88 mm x 88 mm)
Digital Camera 5 MP ½.5” CMOS; 10x Magnication in lieu of an eyepiece
LCD Monitor 4.3 inch (109 mm) with 4x Digital Zoom — High denition touch
digital TFT display
Resolution — 480 x 272 pixels
Focuser Dual — Coarse/Fine
Objectives Achromatic, glass type — 4x, 10x 20x, 40x
Memory 2 GB SD Card (approximately 550+ snapshots @ 5 MP
LCD Rotation 180° – 90° left / 90° right
Filter Wheel Red/Green/Blue/1 mm hole/3 mm hole/6 mm hole (default)
Nosepiece Quad with click stop
Illuminator Built-in electric — LED 6 Volt and 6 Watt
Condenser N.A. 0.65
AC Adapter Input Universal 100 to 240 Volt 50/60HZ
Batteries User supplied 4 AA — (optional - up to 3 hours usage)
Weight/Dimensions 67 oz/1.9 kg 7.0” (178 mm) x 5.5 in (140 mm) x 13.0 in (330 mm)
Fig 3A
Fig 4
Fig 3B
WORKING DISTANCE
Objective Lens 4x 10x 20x 40x
Working
Distance (mm) - est. 35.3 7.8 1.9 0.7
TOUCH PEN
You can keep the touch pen handy in
the receptable behind the Power ON/OFF button.
Objective Lens 4x 10x 20x 40x
Digital Image 40x 100x 200x 400x
Maximum with 4x
digital zoom feature 160x 400x 800x 1600x
Touch Pen
ON/OFF Button
Fig 2
Loading ...
Loading ...
Loading ...