MARK
1. INSTALLING THE BATTERY
Press battery door release in with your finger or a coin and lift up
to remove door.
Place brand new 9V alkaline battery into the compartment and
press into place.
Replace battery door and snap shut.
2. SELECTING THE MODE
Move selector switch to the desired mode: STUD SCAN for finding wood
or metal studs; METAL SCAN for locating metal; or AC SCAN for locating
hot AC wiring.
Move selector switch to the OFF position when not in use to prevent the
tool from accidentally powering on and wearing down the battery.
3. FINDING A STUD
Always scan for studs with the tool placed flat against the
wall. Move the mode switch to STUD SCAN, place the tool
against the wall, then press and hold the handle down.
Wait for beep to confirm calibration has completed
before moving tool.
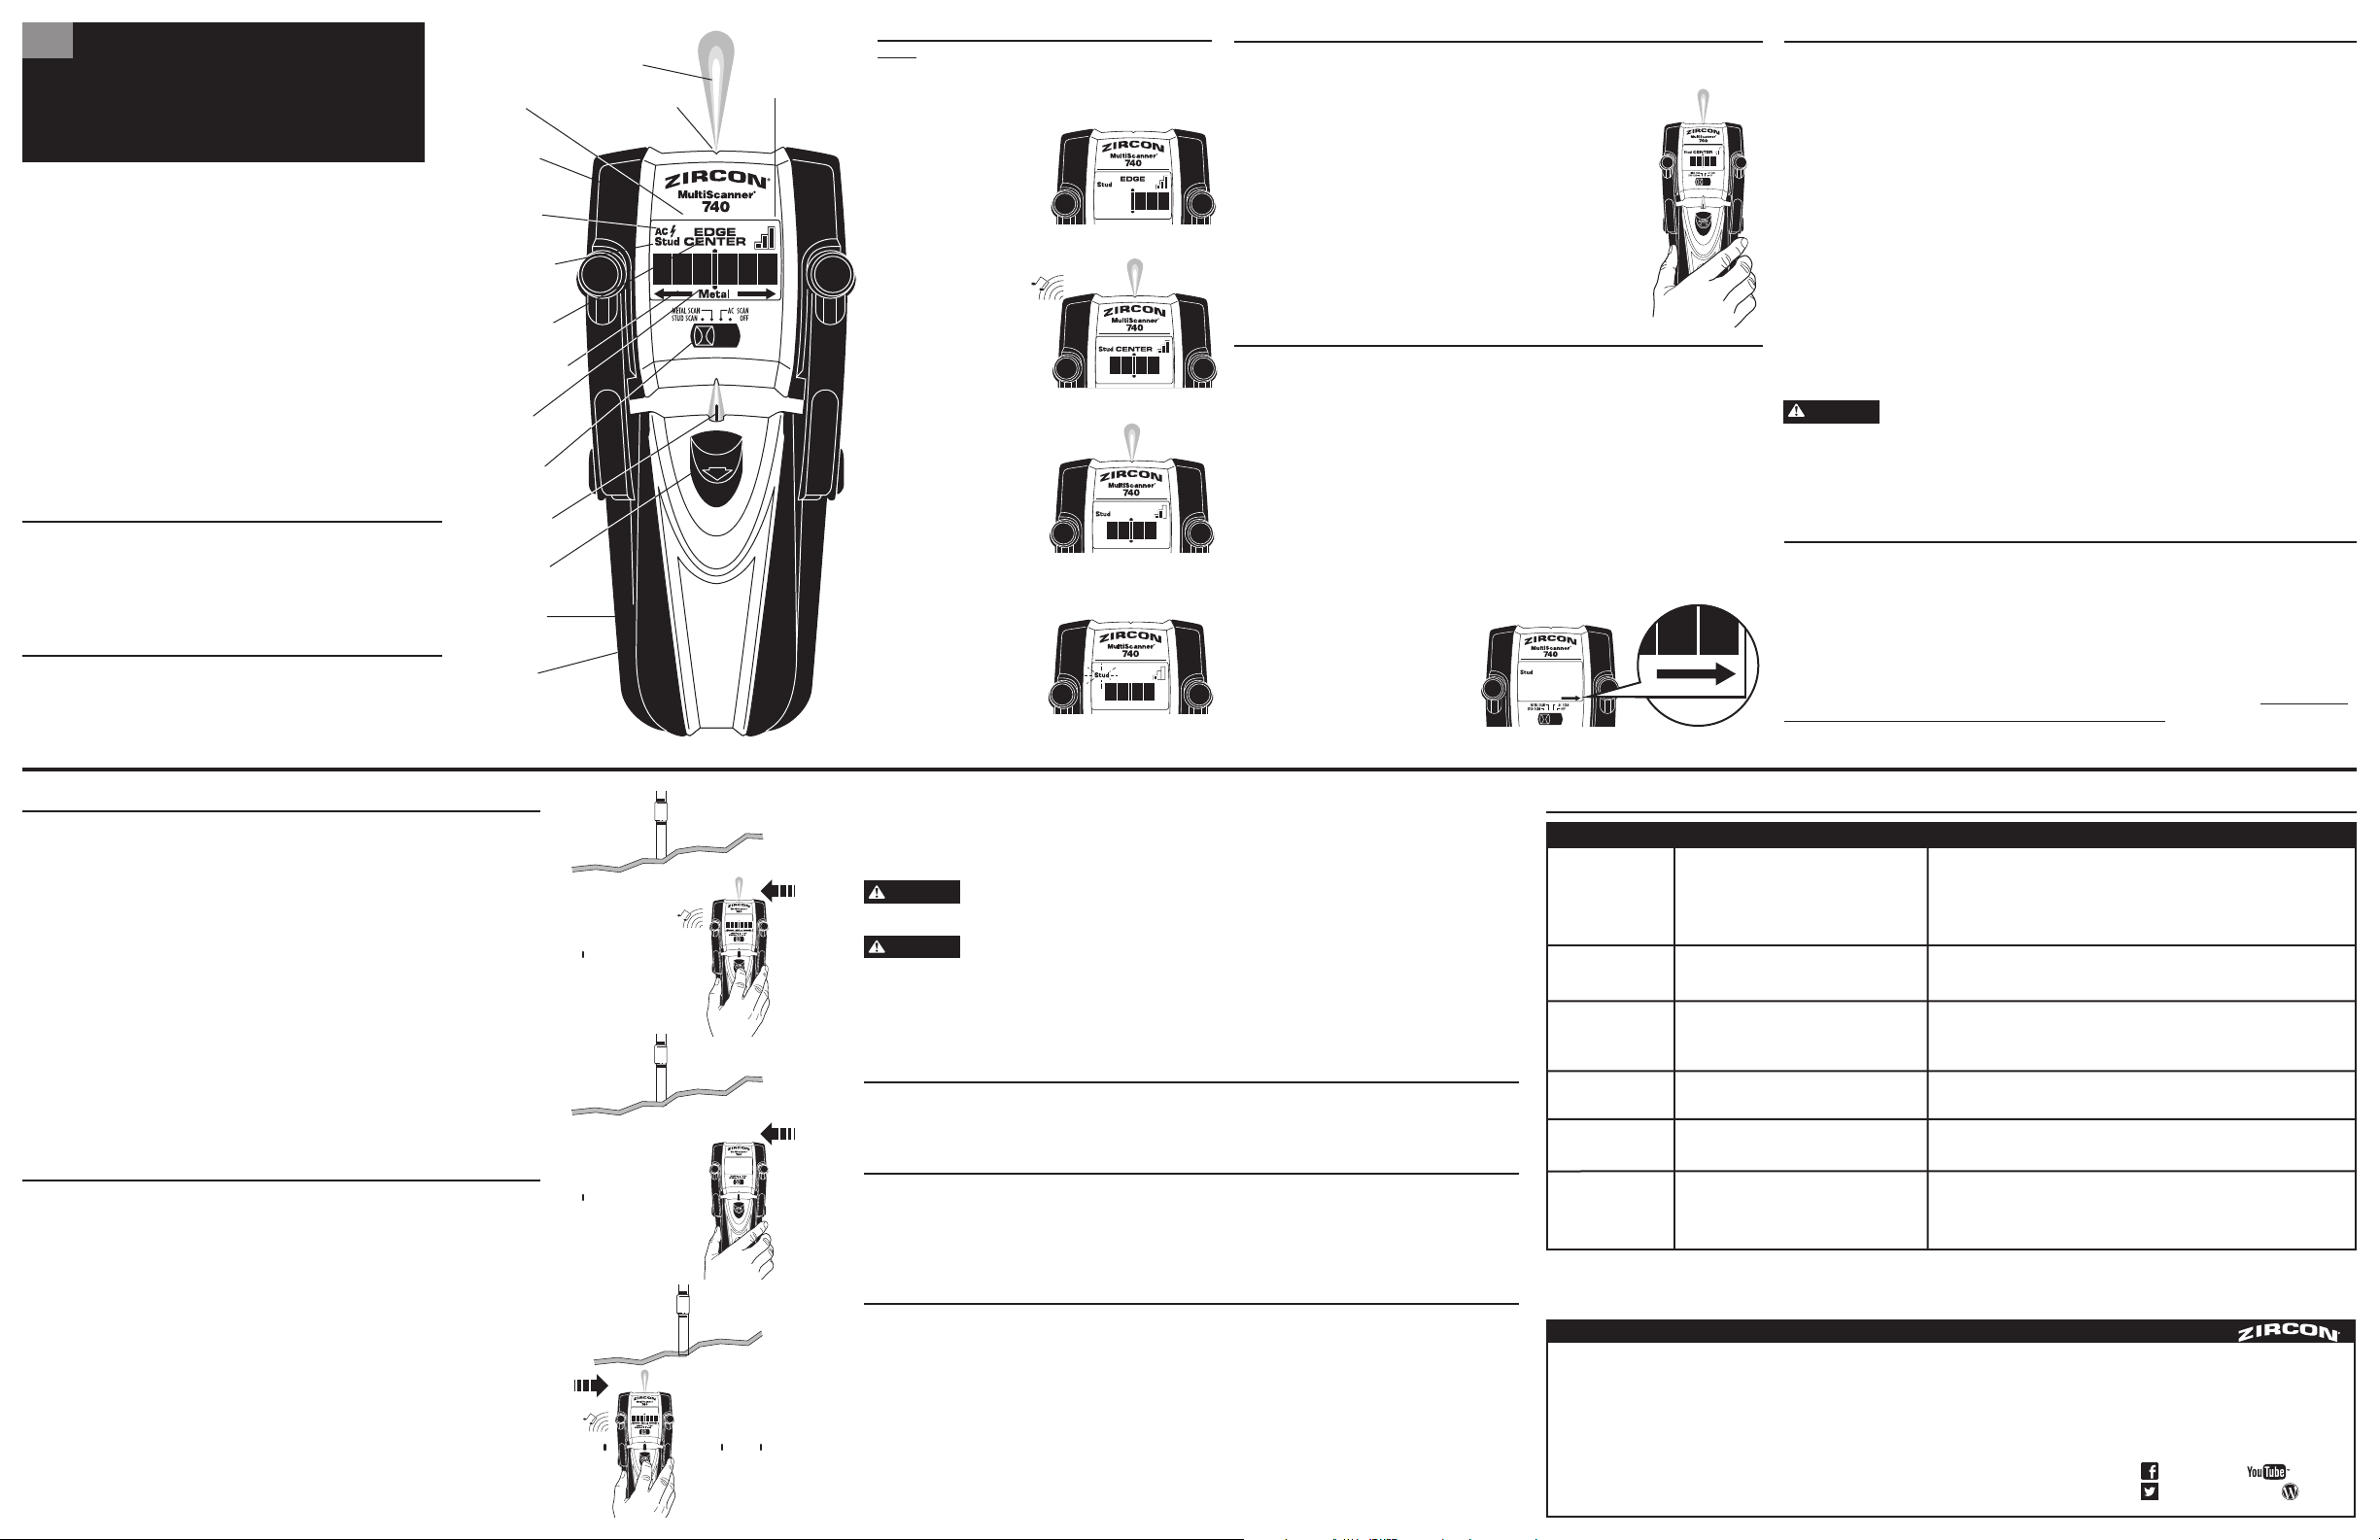
Slowly slide tool across
surface. EDGE display will
illuminate, indicating
location of the stud edge.
Continue sliding tool.
When the center of stud
is located with three bars
on the Signal Strength
Indicator, the buzzer will
sound, and the four middle
bars, CENTER display, and
SpotLite
®
Pointing System
will illuminate.
In cases of deeper studs
(or thicker walls), two bars
will show on the Signal
Strength Indicator and only
the SpotLite
®
Pointing
System and four middle
bars will illuminate. If you
still can’t locate a stud, try
the next step.
Quickly (within one second)
release and re-press the
handle down. The scanner
will enter the High
Sensitivity Mode and the
STUD SCAN Mode Indication
will flash continuously. The center of a very deep stud
will be indicated by the four middle bars illuminating.
4. OPERATING TIPS
For optimum scanning results, it is important to properly hold MultiScanner
®
740 and move
slowly when scanning. The following tips will ensure accurate scanning results:
• Grasp the handle with your thumb on one side and your fingers on
the other side. Make sure your fingertips are resting on or above the
running board and not touching the surface being scanned or the
scanning head of the tool.
• Hold the tool straight up and down, parallel to the studs, and do not
rotate the tool.
• Keep tool flat against the wall and do not rock or tilt the tool when
slowly sliding across the surface being scanned.
• Make sure your other hand (or any other part of your body) is not
touching the surface being scanned. This will interfere with the
tool’s performance.
5. CALIBRATING THE TOOL
MultiScanner
®
740 constantly monitors the subsurface environment 10 times per second
and automatically recalibrates, when needed, to successfully find the center of studs in
one step!
• Place MultiScanner
®
740 against the wall and press the handle until it lays flat against
the wall. Pressing the tool to lay flat against the wall will automatically power on the tool
via the internal On/Off switch.
• Once powered on, tool will automatically perform all calibrations. The LCD will display all
icons until calibration is complete. Upon completion of calibration, the SpotLite
®
and buzzer
will momentarily activate and the tool will begin continuous measurements. Continue to
press the tool flat against the wall and begin scanning.
Note: It is important to wait for calibration to complete (1–2 seconds) before moving
the tool.
• ACT
™
(Auto Correcting Technology)—During scanning, the tool will automatically recalibrate
itself when needed. This recalibration is
usually transparent and no indication is
made. If the tool is initially calibrated
near a stud and then moved away
(it will detect the density of the wall
decreasing), an arrow icon will be
illuminated, indicating the direction of
the missed stud.
Dual SpotLite
®
Pointing System
Stud Edge Groove
Backlit LCD
Mode Selector
Switch
Battery
(back of tool)
Stud Scan Mode
Indication
Stud Edge or
Center Indication
AC Mode &
WireWarning
®
Indication
Metal Mode
Indication
Auto Recalibration
Indication
Signal Strength
Indicator
Dual SpotLite
®
Erasable Marker
Button
Running Board
Metal Sensor
(back of unit)
The MultiScanner
®
740 features three scan modes:
• STUD SCAN: Locates the center and edges of
wood and metal studs up to 1½ in. (38 mm) deep
• METAL SCAN: Detects and locates ferrous
(magnetic) metal up to 3 in. (76 mm) deep and
non-ferrous (non-magnetic) metal up to 1½ in.
(38 mm) deep
• AC SCAN: Detects and locates live unshielded AC
wires up to 2 in. (51 mm) deep
WireWarning
®
Detection automatically detects and
alerts the user to live AC wires in STUD SCAN
and METAL SCAN modes.
arnoldingallsmoranvilleadvertising
Figure A
Figure B
Figure C
Visit www.zircon.com/support for the most current instructions.
ACT, CenterVision, MultiScanner, OneStep, SpotLite, StudSensor, WireWarning, and Zircon are registered trademarks or trademarks of Zircon Corporation.
Detects objects
besides studs in
STUD SCAN Mode.
Finds more targets
than there should be.
Area of voltage appears
much larger than actual
wire (AC only).
Difficulty detecting
metal.
Image of metal object
appears wider than
actual size.
Constant readings of
studs near windows
and doors.
You suspect electrical
wires, but do not
detect any.
• Electrical wiring and metal/plastic pipes may
be near or touching back surface of wall.
• Static charge may develop on drywall, spreading
voltage detection as much as 12 in. (305 mm)
laterally from each side of an actual electrical wire.
• Tool calibrated over metal object.
• Metal targets too deep or small.
• Metal has greater density than wood.
• Double and triple studs are usually found
around doors and windows. Solid headers are
above them.
• Wires are shielded by metal conduit, a braided
wire layer, or metallic wall covering.
• Wires deeper than 2 in. (51 mm) from surface
might not be detected.
• Wires may not be live.
• Scan the area in METAL and AC SCAN modes to determine if metal or
hot AC is present.
• Check for other studs equally spaced to either side 12, 16, or 24 in. (305, 406, or
610 mm) apart or the same stud at several places directly above or below the first.
Use CAUTION when nailing, sawing, or drilling in walls, floors, and ceilings
where these items may exist.
• To narrow detection, turn unit off and on again at the edge of where wire was first
detected and scan again.
• Place your free hand flat against wall near tool during the entire scan to drain static.
• The scanner may have been calibrated over a metal object, reducing sensitivity.
Try calibrating in another location.
• Scan in both horizontal and vertical directions. Metal sensitivity is increased when
metal object is parallel to sensor, located under Zircon logo.
• To reduce sensitivity, follow Step 7 and recalibrate MultiScanner
®
740 over either of
first two marks. (Metal mode only.)
• Detect outer edges so you know where to begin.
• Try METAL SCAN to see if you can find metal, wire, or metal conduit.
• Always turn off the power when working near electrical wires.
• Try turning on switches to outlet.
• Try plugging a lamp into outlet and turning on switch.
12. HELPFUL HINTS (See also number 4, OPERATING TIPS)
Situation Probable Cause Solution
EN
ZirconCorporation ZirconTV
ZirconTools
|
ZirconToolPro
ZirconTools
LIMITED 1 YEAR WARRANTY
Zircon Corporation, (“Zircon”) warrants this product to be free from defects in materials and workman-
ship for one year from the date of purchase. Any in-warranty defective product returned to Zircon*,
freight prepaid with proof of purchase date and $5.00 to cover postage and handling, will be repaired
or replaced at Zircon’s option. This warranty is limited to the electronic circuitry and original case of the
product and specifically excludes damage caused by abuse, unreasonable use or neglect. This warranty
is in lieu of all other warranties, express or implied, and no other representations or claims of any nature
shall bind or obligate Zircon. Any implied warranties applicable to this product are limited to the one year
period following its purchase. IN NO EVENT WILL ZIRCON BE LIABLE FOR ANY SPECIAL, INCIDENTAL OR
CONSEQUENTIAL DAMAGES RESULTING FROM POSSESSION, USE OR MALFUNCTION OF THIS PRODUCT.
In accordance with government regulations, you are advised that: (i) some states do not allow limitations
on how long an implied warranty lasts and/or the exclusion or limitation of incidental or consequential
damages, so the above limitations and/or exclusions may not apply to you, and further (ii) this warranty
gives you specific legal rights and you may also have other rights which vary from state to state.
Return product freight prepaid with proof of purchase date (dated sales receipt) and $5.00 to cover
postage and handling, to:
Zircon Corporation
*Attn: Returns Department
1580 Dell Avenue
Campbell, CA 95008-6992 USA
Be sure to include your name and return address. Out of warranty service and repair, where proof of
purchase is not provided, shall be returned with repairs charged C.O.D. Allow 4 to 6 weeks for delivery.
Customer Service, 1-800-245-9265 or 1-408-963-4550
Monday–Friday, 8:00 a.m. to 5:00 p.m. PST
www.zircon.com
© 2015 Zircon Corporation • P/N 67395 • Rev A 10/15
6. WORKING WITH DIFFERENT MATERIALS
Wallpaper: The MultiScanner
®
740 functions normally on walls covered with wallpaper or fabric,
unless the materials are metallic foil, contain metallic fibers, or are still wet after application.
Wallpaper may need to dry for several weeks after application.
Lath & plaster: Due to irregularities in plaster thickness, it is difficult for the MultiScanner
®
740
to locate studs in STUD SCAN mode. Change to METAL SCAN mode to locate nail heads holding
laths to stud. If plaster has metal mesh reinforcement, MultiScanner
®
740 will be unable to detect
through that material.
Textured walls or acoustic ceilings: When scanning a ceiling or wall with an uneven surface,
place thin cardboard on the surface to be scanned and scan over the cardboard. Calibrate with
cardboard in place.
Wood flooring, subflooring, or gypsum drywall over plywood sheathing: Use STUD SCAN mode
and move the tool slowly. The signal strength indicator may only display 1 or 2 bars when the tool
locates a stud through thick surfaces.
MultiScanner
®
740 cannot scan for wood studs and joists through concrete or carpeting and pad. In
problematic situations, try using METAL SCAN to locate nails or drywall screws that line up vertically
where a stud is positioned.
Note: Sensing depth and accuracy can vary due to moisture, content of materials, wall texture,
and paint. Indoor use only.
Do not rely exclusively on the detector to locate items behind the scanned
surface. Use other information sources to help locate items before
penetrating the surface. Such additional sources include construction plans, visible points
of entry of pipes and wiring into walls, such as in a basement, and in standard 16 and 24 in.
(41 and 61 cm) stud spacing practices.
7. SCANNING IN METAL MODE
Note: When scanning for metal studs, use STUD SCAN mode to quickly locate the center and edges of
wood or metal studs. Use METAL SCAN mode only to determine if studs are wood or metal. In METAL
SCAN mode, only metal drywall screws will be found in wood studs, while metal will be indicated
everywhere on a metal stud.
METAL SCAN mode has interactive calibration to adjust its sensitivity to metal which can be used
to find the precise location of metal objects in walls, floors, and ceilings. Maximum sensitivity is
ideal for quickly finding the approximate location of metal. However, the user can reduce sensitivity
by turning on the tool closer to metal. The reason for reducing sensitivity is because with less
sensitivity, the area where metal is indicated will be smaller. But in both cases, the metal target is
in the center of the area where the tool indicates metal is present.
WARNING
7. SCANNING IN METAL MODE (continued)
1. (Figure A) Press the tool flat against the wall and slowly slide the tool across the surface.
Mark the spot where the display bars peak. If it is a strong target, the SpotLite
®
Pointing
System will also shine a beam of light and a steady beep will sound. Continue in same
direction until display bars reduce. Reverse direction and mark the spot where the display
bars peak from the reversed direction. The midpoint of the two marks is the location of the
center of the metal object.
If the tool indicates metal over a large area, you can refine the scanning area to more
accurately locate the metal target.
2. (Figure B) To further pinpoint the location of the metal target, scan the area again.
Release the handle and then turn the tool back on, this time starting on the wall over
one of the previous marks. This will reset the tool to a lower sensitivity and make the
scan more precise.
3. (Figure C) Scan in both directions as in Step 1. The area indicated should
become smaller so you can more precisely identify the metal location.
This procedure can be repeated to narrow the field even further.
Note: Small targets or targets deep within the surface may only illuminate some
of the bars and not the center line or audio tone. In this case, use the highest
indication to determine the metal position.
8. SCANNING IN AC MODE
As with METAL SCAN Mode, AC SCAN Mode has interactive calibration and works in the
same manner.
1. (Figure A) Press the tool flat against the wall and slowly slide the tool across the surface.
Mark the point where you get the highest AC indication (the most bars on the screen). If it
is a strong target, the SpotLite
®
Pointing System will also shine a beam of light and a steady
beep will sound. Continue in same direction until display bars reduce. Reverse direction and
mark the spot where the display bars peak from the reversed direction. The midpoint of the
two marks is the location of the center of the live AC wiring.
If the tool indicates live electricity over a large area, you can refine the scanning area to
more accurately locate the live AC wiring by following steps 2 and 3 below.
2. (Figure B) To further pinpoint the location of the live AC wiring, scan the area again.
Release the handle and then turn the tool back on, this time starting on the wall over
one of the previous marks. This will reset the tool to a lower sensitivity and narrow the scan
area.
3. (Figure C) Scan in both directions as in Step 1. The area indicated should become
smaller so you can more precisely identify the location of live AC wires. This procedure
can be repeated to narrow the field even further.
Note: AC SCAN mode will only detect live (energized) AC wiring.
WireWarning
®
Detection
Zircon’s WireWarning
®
Detection feature works continuously in STUD, High Sensitivity, and METAL modes. When live
AC voltage is detected, the AC Alert warning icon will appear in the display. If scanning begins over a live AC wire,
the AC indicator will flash continuously.
Electrical field locators may not detect live AC wires if wires are more than 2 in. (51 mm)
from the scanned surface, in concrete, encased in conduit, present behind a plywood shear
wall or metallic wall covering, or if moisture is present in the environment or scanned surface.
DO NOT ASSUME THERE ARE NO LIVE ELECTRICAL WIRES IN THE WALL. DO NOT TAKE
ACTIONS THAT COULD BE DANGEROUS IF THE WALL CONTAINS A LIVE ELECTRICAL
WIRE. ALWAYS TURN OFF THE ELECTRICAL POWER, GAS, AND WATER SUPPLIES BEFORE PENETRATING
A SURFACE. FAILURE TO FOLLOW THESE INSTRUCTIONS MAY RESULT IN ELECTRIC SHOCK, FIRE, AND/OR
SERIOUS INJURY OR PROPERTY DAMAGE.
Always turn off power when working near electrical wires.
9. MARKING THE LOCATION
Once an object is located, you can mark the location by gently pulling down the MARK button with the tip of your
finger. Pulling back the MARK button will cause a pencil point to extend from the front of the handle, placing a short
erasable line on the wall.
10. CHANGING THE MARKER TIP
Pull and hold the MARK button to fully extend the marker tip. Grasp the marker and pull it off the marker post.
To install a new marker tip, pull and hold the MARK button to fully extend the marker post. Push the new marker
onto the marker post.
Note: MultiScanner
®
740 comes with three spare marker tips. These tips are stored in a compartment located behind
the battery. Additional marker tips can be ordered from Customer Service at 1-800-245-9265.
11. REMOVING OR REPLACING THE SCANNING HEAD
MultiScanner
®
740’s scanner head may be removed from the handle to facilitate cleaning or repair. Or the scanning
head may also become separated from the handle if accidentally dropped or twisted. Follow the directions below to
replace the scanning head:
To remove the head: Place the back of the head in the palm of one hand, and grasp the body of the unit in the
other hand. Slowly and gently lift and turn the body, removing one arm from the socket at a time.
To replace the head: Align the end of the arms over the sockets and gently snap them back into their
sockets, one arm at a time.
FCC Part 15 Class B Registration Warning
This device complies with Part 15 of FCC Rules. Operation is subject to the following two conditions: (1) this device may not
cause harmful interference, and (2) this device must accept any interference received, including interference that may cause
undesired operation.
WARNING
WARNING
MultiScanner
®
740
Multifunction
Wall Scanner
MARK
MultiScanner
®
740
™
Escáner de Pared de Multiples Funciones
Sistema de
Puntero Dual
SpotLite
®
Muesca para
bordes de vigas
Pantalla LCD con Luz
de Fondo
Interruptor de
Selección de Modo
Batería (parte posterior
de la herramienta)
Indicador de Modo
de Escaneo de
Postes
Indicador del
Borde o
Centro del Poste
Modo de AC
& Indicador
WireWarning
®
Indicador del Modo
Metal
Indicador de
Recalibración
Automática
Indicador
Potencia de
Señal
Dual SpotLite
®
Botón de Marcador
Borrable
Agarradera
Sensor de Metal (parte
posterior de la unidad)
ES
1. INSTALACIÓN DE BATERÍA
Presione el seguro de la tapa del compartimiento de la batería con su dedo o
con una moneda y levante la tapa para retirarla.
Coloque una batería de 9V en el compartimiento y presione hasta que quede
en su lugar.
Coloque nuevamente la tapa y presionela hasta que se cierre.
2. SELECCIÓN DE MODALIDAD
Mueva el interruptor de selección al modo: STUD SCAN (ESCANEO DE
POSTES) para localizar postes de madera o metal; METAL SCAN (ESCANEO DE
METAL) para localizar metal; o AC SCAN (ESCANEO DE CORRIENTE ALTERNA)
para localizar cables con AC.
Mueva el interruptor de selección a la posición de Apagado cuando no esté
utilizando la unidad, para evitar que la unidad se encienda involuntariamente
y se descargue la batería.
El MultiScanner
®
740 ofrece tres modalidades de escaneo:
• STUD SCAN: Ubica el centro y bordes de las vigas
de madera y metal hasta una profundidad de
1½ pulg (38 mm)
• ESCANEO DE METALES: Detecta y localiza metales
ferrosos (magnéticos) (tales como barra de refuerzo
de 1⁄2 pulgada) hasta 3 pulg. (76 mm) de profundidad
y metal no ferroso (no magnetico) hasta 1½ pulg.
(38 mm) de profundidad
• AC SCAN: Detecta y localiza los cables AC activos hasta
a una profundidad de 2 pulg. (51 mm)
La detección WireWarning
®
detecta automaticamente
y alerta sobre cables AC vivos en las modalidades de
STUD SCAN y METAL SCAN.
3. CÓMO LOCALIZAR UNA VIGA
Siempre comience con la herramienta colocado sobre la pared,
entonces presione el mango hacia abajo. Espere por el tono
que confirma que la calibración se ha completado antes de mover
la herramienta.
Lentamente deslice la herramienta
de un lado a otro de la superficie. Se
mostrará la palabra EDGE iluminada,
indicando la localización del borde
de una viga.
Continúe deslizando la
herramienta. Cuando se localice
el centro dela viga se muestran
tres barras en el Signal Strength
Indicator (Indicador de Fuerza
de la Señal), la bocina sonará,
y las cuatro barras centrales, la
pantalla CENTER y el SpotLite
®
se iluminarán.
En los casos con vigas más
profundas (o paredes más
gruesas) aparecerán dos barras
en el Signal Strength Indicator
(Indicador de Fuerza de la Señal)
y se iluminarán cuatro barras
centrales. Si todavía no puede
localizar una viga, pruebe el
próximo paso.
Rápidamente (en el lapso de
un segundo) suelte y vuelva
a presionar el mango hacia
abajo. El escáner pasará al High
Sensitivity Mode (Modo de
sensibilidad alta) y el Indicador
de Modo de Escaneo de Vigas
destellará continuamente. El centro de una viga muy profundo será
indicado por la iluminación de las cuatro barras centrales.
4. CONSEJOS DE FUNCIONAMIENTO
Para obtener mejores resultados del escaneo, es importante sostener adecuadamente
el MultiScanner
®
740 y moverlo lentamente al escanear. Las siguientes sugerencias
asegurarán resultados de escaneo adecuados:
• Sostenga el mango con su pulgar de un lado y sus dedos del otro.
Asegúrese que sus dedos descansen sobre o por encima de la
agarradera y que no toquen la superficie que se está escaneando o el
cabezal de escaneo de la unidad.
• Sostenga la unidad de manera rectilínea, paralela a postes y sin girarla.
• Mantenga la unid ad plana contra la pared y no mueva o incline
la unidad al deslizarla lentamente a lo largo de la superficie que
está escaneando.
• Asegúrese que su otra mano o cualquier otra parte de su cuerpo no
esté tocando la superficie que está escaneando. Esto podría interferir
con el rendimiento del producto.
5. CALIBRAR LA UNIDAD
El MultiScanner
®
740 monitorea constantemente el ambiente de la superficie interna 10 veces
por segundo y automáticamente se vuelve a calibrar, cuando se requiere, para encontrar el
centro de postes, ¡todo en un solo paso!
• Coloque el MultiScanner
®
740 contra la pared y presione el mango hasta que el escáner
esté totalmente plano contra la pared. Al presionar la unidad, encenderá automáticamente
la unidad a través del interruptor interno de encendido/apagado.
• Una vez encendida, la unidad realizará automáticamente todos las calibraciones.
La pantalla LCD mostrará todos los iconos hasta que termine la calibración.
Al terminar la calibración, se activarán momentáneamente las luces de SpotLite
®
y la
bocina, y la herramienta empezará a realizar mediciones continuas. Continúe presionando
la herramienta contra la pared y comience a escanear.
Nota: Es importante esperar a que finalice la calibración (1–2 segundos) antes de mover
la herramienta.
• ACT™ (la tecnología de auto corrección) Durante el escaneo, la herramienta se
auto-recalibrara automaticamente cuando sea necesario.
Esta ecalibración es normalmente
transparente y no se produce
indicacion alguna. Si un icono de
flecha se ilumina, el instrumento fue
calibrado cerca o sobre una viga y
luego alejado. La flecha indica la
dirección donde se encuentra la viga.
arnoldingallsmoranvilleadvertising
Figura A
Figura
B
Figura C
ACT, CenterVision, MultiScanner, SpotLite, WireWarning, y Zircon son marcas comerciales registradas o marcas comerciales de Zircon Corporation.
En el modo de STUD SCAN, detecta
otros objetos que no son postes.
Encuentra más objetivos de los
que debería haber.
El área de voltaje aparece más grande
que el cable real (únicamente CA).
Presenta dificultades al
detectar metales.
La imagen de objetos metálicos parece
más ancha que la medida real.
Lecturas constantes de vigas
cerca de las ventanas y puertas.
Sospecha que haya cables eléctricos
pero no detecta ninguno.
• El cable eléctrico y las tuberías de metal o plástico pueden estar cerca o
tocando la superficie de la pared.
• Puede desarrollarse una carga estática en la mampostería, esparciendo la
detección del voltaje hasta por 12 pulgadas (305 mm) a cada lado
del cable eléctrico en sí.
• Se calibró la unidad sobre el objeto metálico.
• El metal está ubicado muy profundo.
• El metal tiene una densidad mayor que la madera.
• Postes dobles y triples se encuentran generalmente alrededor de las puertas
y ventanas. Los canales transversales están sobre ellos.
• Postes pueden estar protegidos por conductos portacables o detrás de la
cubierta metálica de la pared.
• Cables a una profundidad mayor de 2 pulgadas (51 mm) de la superficie
pueden no ser detectables.
• Cables pueden no estar con corriente.
• Escanee el área en modos de escaneo de METAL y AC SCAN para determinar si hay metal o
cables eléctricos con corriente alterna.
• Verifique otros postes espaciados de la misma manera, de cualquier lado (12, 16 ó 24 pulg. de
distancia [305, 406 ó 610 mm]) o el mismo poste en varios lugares directamente sobre o
por debajo del primero.
Tenga PRECAUCIÓN al clavar, serruchar o taladrar en paredes, pisos y techos donde puedan
existir estos artículos.
• Para limitar la detección, apague y encienda nuevamente el escáner al borde del lugar
donde se detectó el cable la primera vez y escanee nuevamente.
• Coloque su mano libre plana contra la pared, cerca de la herramienta, durante todo el
escaneo para drenar la estática.
• El escáner puede haberse calibrado sobre un objeto de metal, reduciendo la sensibilidad.
Trate de calibrarlo en otro sitio.
• Escanea en ambas direcciones horizontal y vertical. La sensibilidad del Metal se incrementa
cuando el objeto de metal está paralelo al sensor, ubicado bajo el logo tipo de Zircon.
• Para reducir la sensibilidad, vuelva a calibrar el MultiScanner
®
740 sobre una de las dos
primeras marcas.
• Detecte bordes exteriores de modo que sepa dónde comenzar.
• Pruebe con el METAL SCAN (escaneo de metal) para ver si puede encontrar metal, cable o
conductos portacables metálicos.
• Siempre apague la unidad cuando esté trabajando cerca de cables eléctricos.
• Pruebe encender interruptores al tomacorriente.
• Pruebe conectando una lámpara al tomacorriente y encienda el interruptor.
12. CONSEJOS ÚTILES (Consulte también la Sección 4, CONSEJOS DE FUNCIONAMIENTO)
Situación Causa Probable Solucíon
GARANTÍA LIMITADA DE 1 AÑO
Zircon Corporation (“Zircon”) garantiza este producto como libre de defectos en materiales y mano de obra
por un año a partir de la fecha de compra. Cualquier producto defectuoso dentro de la garantía enviado a
Zircon* con el envio pagado, comprobante de fecha de compra y $5,00 para cubrir porte y manejo, se reparará
o reemplazará a opción de Zircon. Esta garantía se limita a los circuitos electrónicos y a la caja original del
producto y excluye específicamente los daños provocados por uso indebido, uso no razonable o descuido.
Esta garantía está en lugar de todas las demás garantías, expresas o implícitas, y ninguna otra declaración
o reclamación de cualquier naturaleza será obligatoria para Zircon. Cualquier garantía implícita aplicable
para este producto se limita al periodo de un año inmediato a su compra. EN NINGÚN CASO, ZIRCON SERÁ
RESPONSABLE DE NINGÚN DAÑO ESPECIAL, INCIDENTAL O RESULTANTE DE LA POSESIÓN, USO O MAL
FUNCIONAMIENTO DE ESTE PRODUCTO.
De conformidad con las reglamentaciones gubernamentales, se le notifica que: (i) en algunos estados no se
permiten limitaciones del tiempo de vigencia de una garantía implícita y/o de la exclusión o limitación de
daños incidentales o consecutivos; así que las limitaciones y/o exclusiones anteriores tal vez no se apliquen
para usted, y además, (ii) esta garantía le otorga derechos legales específicos y usted tal vez tenga otros
derechos que varían de estado en estado.
Devuelva el producto con envio pagado y comprobante de la fecha de compra (recibo de venta fechado) y
$5.00 para cubrir el porte y el manejo, a:
Zircon Corporation
*Attn: Returns Department
1580 Dell Avenue
Campbell, CA 95008-6992 USA
Asegúrese de incluir su nombre y dirección. El servicio y reparación fuera de garantía donde no se incluya
el comprobante de compra se regresará con cargos de reparación C.O.D. Permita de 4 a 6 semanas para la
entrega.
Atención al Cliente, 1-800-245-9265 o 1-408-963-4550
Lunes a viernes, 8:00 a.m. a 5:00 p.m. Hora estándar del Pacífico
www.zircon.com • [email protected]
© 2015 Zircon Corporation • P/N 67395 Rev A 10/15
Visite www.zircon.com/support para las instrucciones más actualizadas.
ZirconCorporation ZirconTV
ZirconTools
|
ZirconToolPro
ZirconTools
6. TRABAJAR CON DIFERENTES MATERIALES
Papel tapiz: El MultiScanner
®
740 funciona normalmente en paredes cubiertas con papel tapiz o
tela, a menos que los materiales tengan láminas metálicas, contengan fibras metalicas o esten aun
humedos luego de haber sido aplicados.
Es posible que el papel tapiz necesite varias semanas para
secar totalmente después de ser aplicado.
Listones o yeso: Debido a las irregularidades del espesor del yeso, es difícil que el MultiScanner
®
740 encuentre postes en el modo STUD SCAN (escaneo de postes). Cambie al modo METAL SCAN
para ubicar cabezas de clavos que sostienen listones a postes. Si el yeso tiene un refuerzo de malla
metálica, el MultiScanner
®
740 no podrá detectar nada a través de este material.
Paredes con textura o techos acústicos: Al escanear un techo o pared con una superficie poco
uniforme, coloque cartón delgado en la superficie que va a escanear y escanee sobre el cartón.
Calibre la unidad con el cartón sobre puesto.
Revestimiento para pisos de madera, contrapisos o mampostería de yeso sobre cubiertas de
madera contrachapada: Utilice el modo de STUD SCAN y mueva la unidad lentamente. El indicador
de potencia de señal puede mostrar únicamente 1 ó 2 barras cuando la unidad localiza un poste a
través de superficies gruesas.
MultiScanner
®
740 no puede escanear vigas de madera y vigas dentro del concreto o a traves de
alfombras y almohadillas. En situaciones problemáticas, intente utilizar el METAL SCAN (escaneo de
metal) para localizar clavos o tornillos de paneles de yeso que se alinean de forma vertical donde se
ha ubicado una viga.
Nota: La detección de la profundidad y la precisión pueden variar debido a la humedad, el contenido
de los materiales, la textura de la pared, y la pintura. Uso en Ineriores solamente.
No se confíe exclusivamente en el detector para localizar
elementos detrás de la superficie escaneada. Utilice otras fuentes
de información para ayudarse a localizar los artículos antes de atravesar la superficie. Estas
fuentes adicionales incluyen los planes de construcción, los puntos visibles de entrada de
los tubos y cables en las paredes, como en un sótano, y en separaciones estándar entre los
barrotes de 16 y 24 pulg. (41 y 61 cm).
7. ESCANEO EN MODALIDAD METAL SCAN
Nota: Cuando escanee en busca de vigas, utilice la modalidad STUD SCAN (o la modalidad
sensibilidad alta en paredes más gruesas) para ubicar rápidamente el centro y los bordes. Utilice
METAL SCAN para determinar si la lectura previa en STUD SCAN era una viga de madera, de metal,
o un tubo. En METAL SCAN, sólo se encontrarán los tornillos de metal o los clavos de los paneles de
yeso en las vigas de madera, mientras que el metal se indicará en cualquier parte de una viga de
metal o tubo.
METAL SCAN tiene una calibración interactiva que le permite ajustar la sensibilidad al metal y
utilizarlo para encontrar la ubicacion precisa de los objetos de metal en paredes, pisos, y techos.
La sensibilidad máxima es ideal para encontrar rápidamente la ubicación aproximada del metal.
Sin embargo, puede disminuir la sensibilidad activando la herramienta más cerca del metal.
Con menor sensibilidad, el área donde se indique el metal será más pequeña. Pero en ambos casos,
el objetivo metalico esta al centro del área donde la herramienta indica la presencia de metal.
7. ESCANEO EN MODALIDAD METAL SCAN (cont.)
1. (Figura A) Presione la herramienta de forma plana contra la pared y
lentamente deslice la herramienta por la superficie. Marque el punto donde
obtiene la indicacion mas alta de presencia de metal (donde hayan mas barras
en la pantalla). Si es un objetivo fuerte, el sistema de señalamiento SpotLite
®
tambien mostrara un rayo de luz y emitirá un sonido continuo. Continúe en la
misma dirección hasta que se disminuyan las barras en el visualizador. Invierta
la dirección y marque el punto donde las barras del visualizador dieron la lectura
pico en la dirección inversa. El punto medio entre las dos marcas es la ubicacion
del centro del objeto metalico.
Si la herramienta indica la presencia de metal en un área extensa, puede refinar el
área de escaneo para ubicar de forma mas precisa el objetivo metalico siguiendo
los pasos 3 y 4 que se indican a continuación.
2. (Figura B) Para determinar con mayor precision la ubicacion del objetivo
metalico, escanee el area nuevamente. Suelte el boton de encendido y active
nuevamente la herramienta, esta vez comenzando en la pared sobre una de
las marcas previas. Esto reiniciará la herramienta a una sensibilidad mas baja y
limitara el area de escaneo.
3. (Figura C) Para continuar disminuyendo la sensibilidad y refinando mas el area
de escaneo, repita el paso 2. Este procedimiento puede repetirse múltiples veces
para limitar el campo aun mas.
Nota: Si aparecen barras en la pantalla, hay metal presente. Los objetivos
pequeños o profundos dentro de la superficie podrán únicamente iluminar
algunas de las barras y no la línea central o el tono de audio. En este caso,
utilice la indicación más alta para determinar la posición del metal.
8. ESCANEO EN MODALIDAD AC SCAN
Como con la modalidad de escaneo de metales, la modalidad de escaneo AC tiene
calibracion interactiva y trabaja de la misma manera.
1. (Figura A) Mueva el interruptor de modalidad a la modalidad AC SCAN.
Presione la herramienta de forma plana contra la pared. Marque el punto donde
obtiene la lectura más alta de AC (donde hayan más barras en la pantalla). Si es
un objetivo fuerte, el sistema de señalamiento SpotLite
®
tambien mostrara un rayo
de luz y emitira un sonido continuo. Continúe en la misma dirección hasta que se
disminuyan las barras en el visualizador. Invierta la dirección y marque el punto
donde las barras del visualizador dieron la lectura pico en la dirección inversa.
El punto medio entre las dos marcas es la ubicación del centro del cableado
AC activo. Si la herramienta indica electricidad viva en un área extensa, puede
disminuir la sensibilidad de la herramienta para refinar el area de escaneo y
ubicar de forma más precisa en cableado vivo AC siguiendo los pasos 2 y 3 que se
indican a continuacion.
2. (Figura B) Para determinar con mayor precisión la ubicación del
cableado AC activo, escanee el area nuevamente. Suelte el boton
de encendido y active nuevamente la herramienta, esta vez
comenzando en la pared sobre una de las marcas previas.
Esto reiniciará la herramienta a una sensibilidad mas baja y limitara
el area de escaneo.
3. (Figura C) Escanee en ambas direcciones como en el paso 2.
El área indicada deberá ser más pequeña de modo que pueda
identificar de forma más precisa la ubicación de los cables AC activos.
Puede repetir este procedimiento para estrechar más aún el campo.
Nota: La modalidad AC SCAN sólo detectará el cableado AC activo
sin aislamiento.
Detección Wirewarning
®
Deteccion WireWarning
®
funciona continuamente en modalidades
de STUD, HIGH SENSITIVITY, y METAL. Cuando se detecta voltaje
de corriente alterna (AC), el icono de indicacion de deteccion
WireWarning
®
se encendera en la pantalla. Si el escaneo empieza
sobre un cable de AC vivo, el indicador de WireWarning
®
parpadeara
continuamente.
Los localizadores de campo eléctrico
no pueden detectar cables con
corriente AC, si la pared está húmeda, o si los cables están más
lejos de 2 pulg. (51 mm) de la superficie escaneada, dentro del
concreto, en un tubo, o detrás de un muro de madera o paredes
metálicas.
ADVERTENCIA NO ASUMA QUE NO
HAYA CABLES ELÉCTRICOS CON
CORRIENTE EN LA PARED. NO TOME MEDIDAS QUE PUEDAN SER
PELIGROSAS SI LA PARED CONTIENE UN CABLE ELÉCTRICO CON
CORRIENTE. SIEMPRE APAGUE LA ELECTRICIDAD Y DESCONECTE
GAS Y FUENTES DE AGUA ANTES DE ATRAVESAR UNA
SUPERFICIE. EL INCUMPLIMIENTO DE ESTAS INSTRUCCIONES
PODRíA PROVOCAR UNA DESCARGA ELÉCTRICA, FUEGO, Y/O
LESIONES GRAVES O DAÑOS A LA PROPIEDAD.
Siempre apague la electricidad cuando esté trabajando cerca de
cables eléctricos.
9. MARCAR LA UBICACIÓN
Una vez que se localice el objeto, puede marcar la ubicación
oprimiendo hacia abajo con suavidad el botón de MARK (marcar),
con la punta de su dedo. El oprimir hacia atrás el botón de MARK
hará que se extienda una punta de lápiz de la parte frontal del
mango, colocando una corta línea borrable en la pared.
10. CAMBIAR LA PUNTA DEL MARCADOR
Oprima y sostenga el botón de MARK para extender
completamente la punta del marcador. Sujete el marcador y
tirelo para sacarlo de la base del marcado. Para instalar una nueva
punta de marcador, oprima y sostenga el botón de MARK para
extender completamente la base del marcado. Empuje el nuevo
marcador en la base del marcador.
Nota: MultiScanner
®
740 viene con tres puntas de marcador de
repuesto. Estas puntas se guardan en un compartimiento que
se encuentra detrás de la batería. Se pueden solicitar puntas
adicionales llamando al departamento de servicio al cliente
al 1-800-245-9265.
11. RETIRAR O REEMPLAZAR EL CABEZAL
DE ESCANEO
Puede retirar por el mango el cabezal de escaneo del
MultiScanner
®
740 para facilitar su limpieza o reparación. O también
puede separar del mango el cabezal de escaneo si se cae o tuerce
por casualidad. Siga las instrucciones que aparecen a continuación
para reemplazar el cabezal de escaneo:
Para retirar el cabezal: Coloque la parte posterior del cabezal en
la palma de una mano y sostenga el cuerpo de la unidad en la otra
mano. Lenta y suavemente, levante y gire el cuerpo, sacando un
brazo del receptáculo a la vez.
Para reemplazar el cabezal: Alinee el extremo de brazos sobre
receptáculos y presione suavemente hasta que queden fijos en sus
receptáculos, un brazo a la vez.
Advertencia de Registro de la Parte 15 del FCC Clase B
Este aparato cumple con las reglas Parte 15 de la FCC. Su operación
esta sujeta a las siguientes dos condiciones: (1) este aparato no
puede causar interferencia dañina, y (2) este aparato debe aceptar
cualquier interferencia recibida, incluyendo la interferencia que pueda
causar la operación no deseada.
ADVERTENCIA
ADVERTENCIA
ADVERTENCIA