The appliance is heavy. Secure in position during transportation and installation. Due to the weight/dimensions of the appliance and to minimise the risk of injury and damage to the appliance at least two persons are necessary to set-up the appliance safely.
Installation location
Install the appliance in a dry, well ventilated room. The installation location should neither be exposed to direct sunlight nor near a heat source, e.g. a cooker, radiator, etc. If installation next to a heat source is unavoidable, use a suitable insulating plate or observe the following minimum distances to a heat source:
■ 3 cm to electric or gas cookers.
■ 30 cm to an oil or coal-fired cooker.
If installing the appliance next to another refrigerator or freezer, ensure a minimum lateral distance of 25 mm to prevent the formation of condensation. If a panel or cupboard is installed above the appliance, ensure that a gap of 30 mm is left so that the appliance can be pulled out of the recess if required. The air heated on the rear side of the appliance must be allowed to escape unhindered.
Subsurface
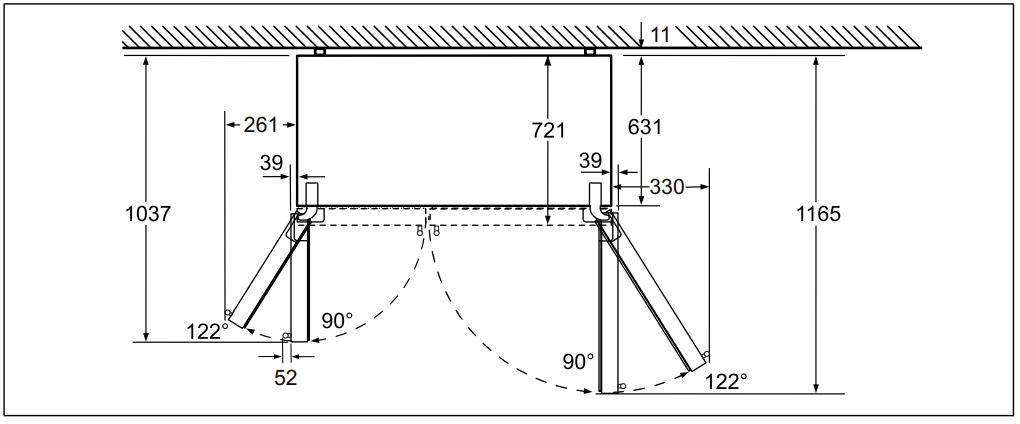
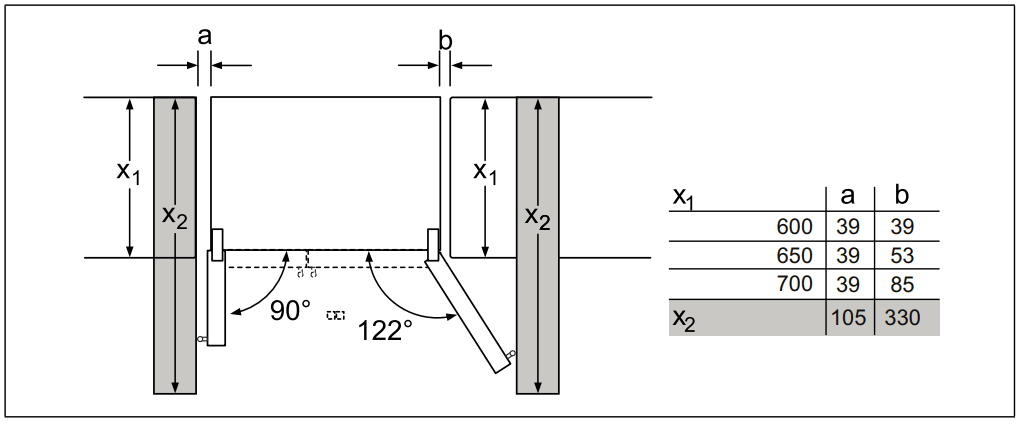
The appliance is very heavy. Design: 119 kg The floor of the installation location must not give way; if required, reinforce floor. To ensure that the doors can open all the way, observe lateral minimum distances when installing the appliance in a corner or recess (see chapter Installation dimensions). If the depth of the adjacent kitchen equipment is more than 60 cm, observe lateral minimum distances in order to utilise the full door opening angle (see chapter “Door opening angle“).
Observe ambient temperature and ventilation
Ambient temperature
The climate class can be found on the rating plate. The climate class indicates within which ambient temperatures the appliance can be operated. The rating plate is located in the refrigerator compartment at the right side.
Climate class
Permitted ambient temperature
SN
+10 °C to 32 °C
N
+16 °C to 32 °C
ST
+16 °C to 38 °C
T
+16 °C to 43 °C
Ventilation
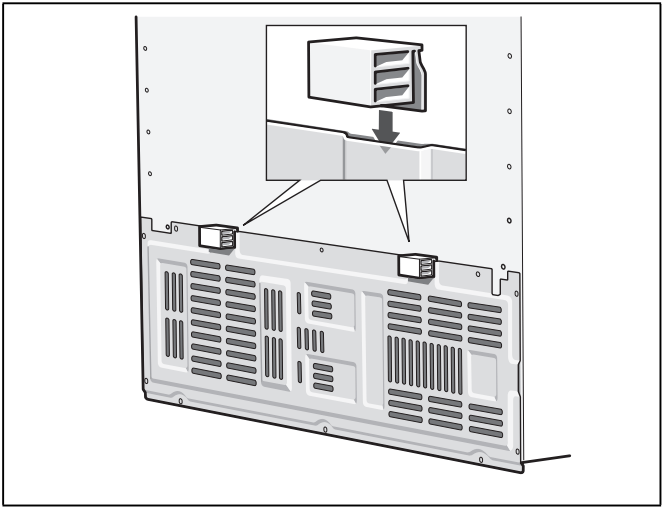
Never cover the ventilation openings on the rear of the appliance. Conduction of the heated air must not be obstructed. Otherwise, the refrigeration unit must work harder. This increases power consumption. Place the enclosed spacers in the designated holders on the back of the appliance. This ensures that there is a minimum distance between the appliance and the wall.
Installation dimensions
Door opening angle
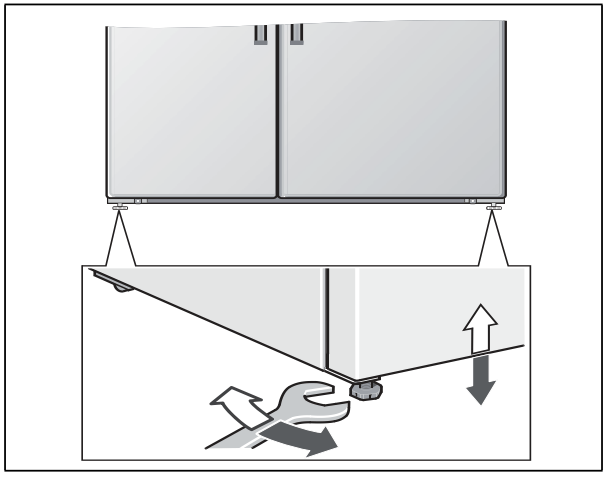
Aligning the appliance
To ensure that the appliance functions correctly, it must be set level with a spirit level. If the appliance is not level, water may flow out of the ice maker, ice cubes may be irregular or the doors may not close properly
Connecting the appliance
Have a technician install and connect the appliance according to the enclosed installation instructions. Do not remove the transportation protection devices from the shelves and storage compartments until the appliance has been installed. Always connect the water before the power. Apart from statutory national regulations, you should stick to the connection terms relating to the local electricity and water companies. After installing the appliance, wait at least 1 hour until the appliance starts up. During transportation the oil in the compressor may have flowed into the refrigeration system. Before switching on the appliance for the first time, clean the interior of the appliance (see chapter “Cleaning the appliance”).
Electrical connection
Risk of electric shock! If the length of the mains cable is inadequate, never use multiple sockets or extension leads. Instead, please contact Customer Service for alternatives. The appliance must be connected to a permanently installed socket. The socket must be near the appliance and also freely accessible following installation of the appliance. The appliance complies with protection class I. Connect the appliance to 220–240 V/50 Hz alternating current via a correctly installed socket with protective conductor. The socket must be protected by a 10 A to 16 A fuse or higher. For appliances operated in non-European countries, check whether the indicated voltage and current type match the values of your electricity supply. The rating plate is situated in the bottom right-hand side of the appliance. The mains cable may be replaced by a technician only.
Warning : Never connect the appliance to electronic energy saver plugs. Our appliances can be used with mains and sinecontrolled inverters. Mains-controlled inverters are used for photovoltaic systems which are connected directly to the national grid. Sine-controlled inverters must be used for isolated applications (e.g. on ships or in mountain lodges) which are not connected directly to the national grid.
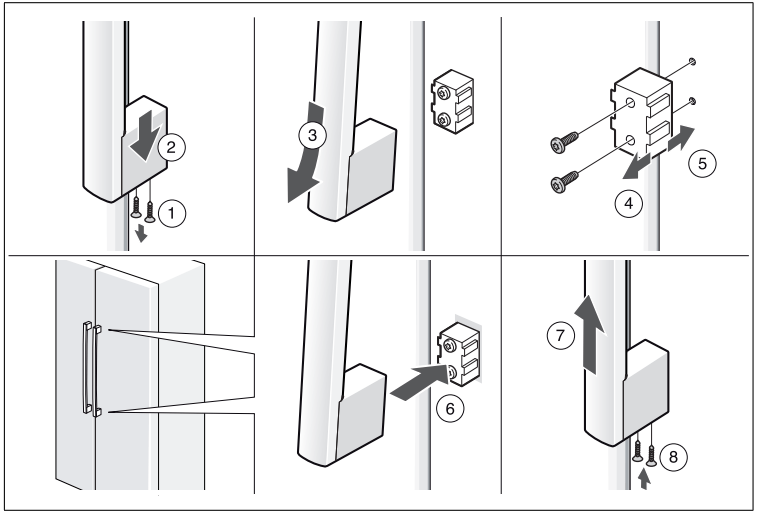
Removing appliance doors and handles
If the appliance will not fit through the house door, the appliance doors and handles can be unscrewed.
Using your freezer
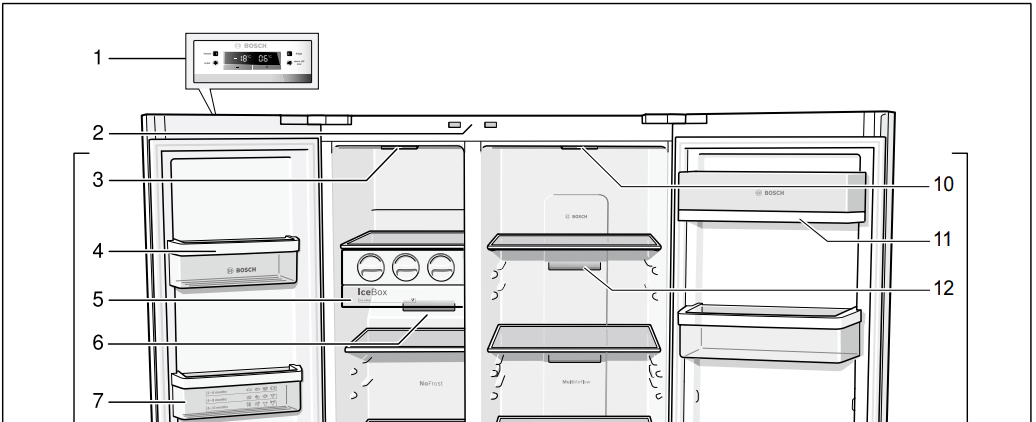
Getting to know your appliance
These operating instructions refer to several models. The diagrams may differ
* Not all models.
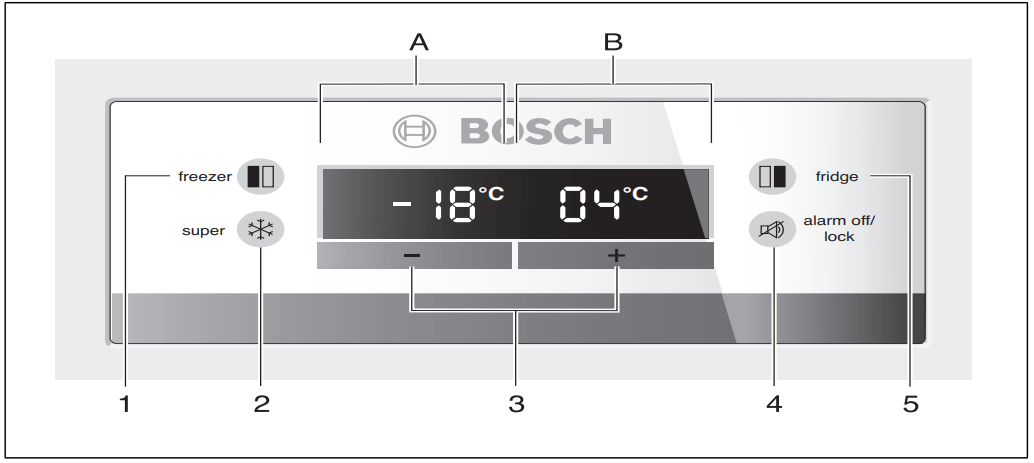
A. Freezer compartment
B. Refrigerator compartment
1. Control and display panel
2. Light switch for refrigerator and freezer compartments
3. Light, freezer compartment
4. Door shelf
5. Ice maker
6. Air outlet opening
7. Freezer calendar
8. Glass shelf in the freezer compartment
9. Frozen food container
10. Light, refrigerator compartment
11. Butter and cheese compartment
12. Air outlet opening
13. Door shelf
14. Glass shelf in the refrigerator compartment
15. Vegetable container with humidity control
16. Vegetable container
17. Height-adjustable feet
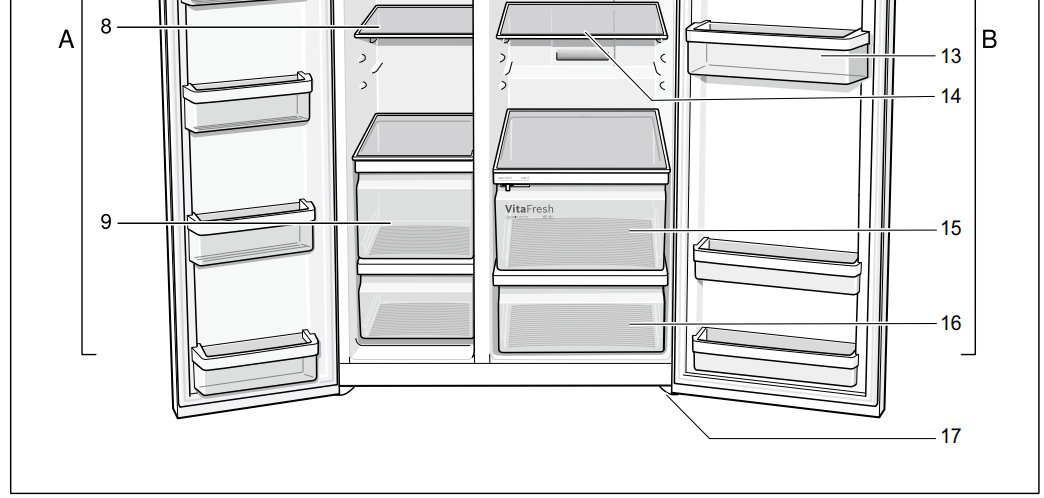
Control and display panel
The display panel and display panel on the door consists of a touch pad. Touch the keypad to actuate the corresponding function.
A. Freezer compartment display panel
B. Refrigerator compartment display panel
1. “freezer” button : To implement settings for the freezer compartment area, press button until “freezer” is lit on the freezer compartment display panel.
2. “super” button : For switching on the Super cooling (refrigerator compartment) function or Super freezing (freezer compartment) function. See chapter entitled “Super cooling” or “Super freezing”.
3. Setting buttons +/-: The buttons are used to set the temperatures of the refrigerator and freezer compartment.
4. “alarm off/lock” button : The button is used to
■ switch off the warning signal (see chapter “Alarm function”),
■ switch the button lock on and off.
To switch the button lock on and off, press button for 5 seconds. When the function is switched on, “lock” is indicated on the display panel.
5. “fridge” button : To implement settings for the refrigerator compartment area, press button until “fridge” is lit in the display panel.
Switching on the appliance
When connected, the appliance is switched on. A warning signal sounds. Press the “alarm off” button. The warning signal switches off. The preset temperatures are reached after several hours. Do not put any food in the appliance beforehand. The factory has recommended the following temperatures:
■ Freezer compartment: -18 °C
■ Refrigerator compartment: +4 °C
Setting the temperature
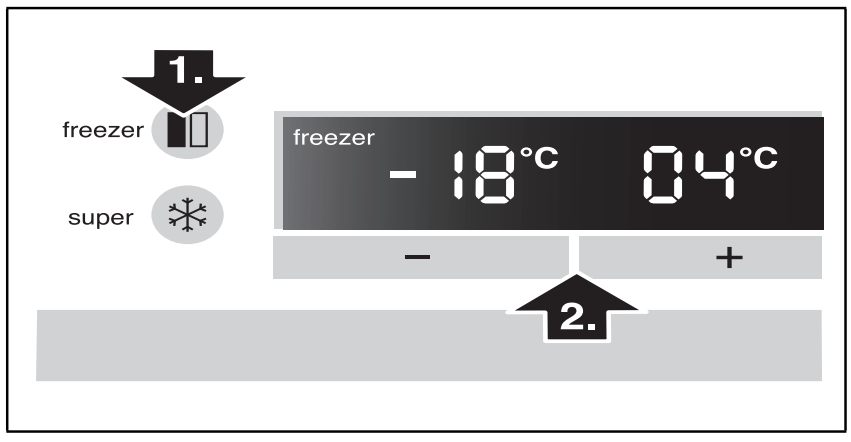
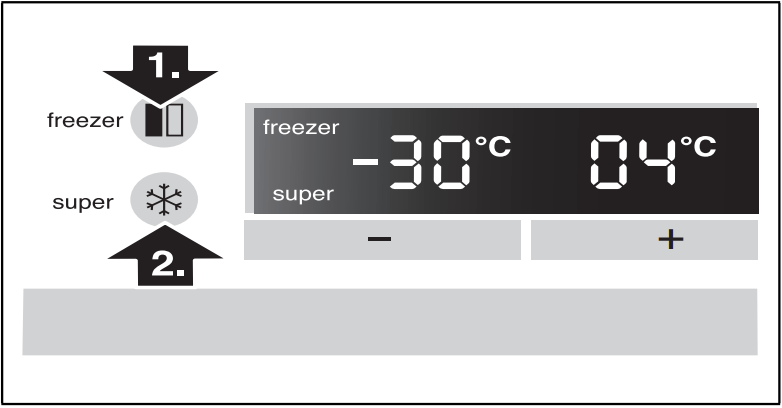
Freezer compartment
The freezer compartment can be set from -14 °C to -24 °C. We recommend a setting of -18 °C. The value last indicated is saved by the system.
1. Press the “freezer” button until “freezer” is lit on the freezer compartment display panel.
2. Set the temperature with the + (warmer) or - (cooler) setting buttons.
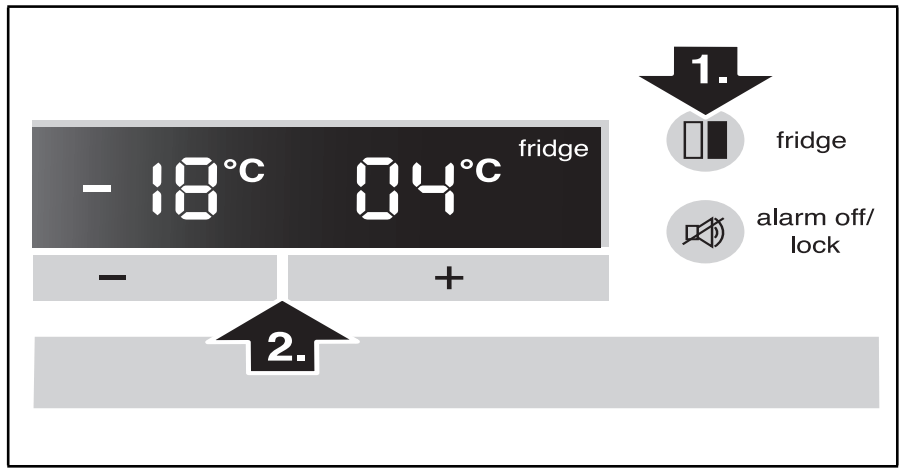
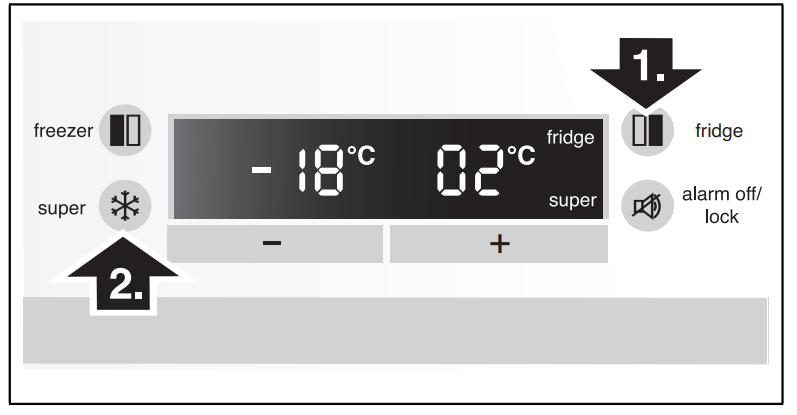
Refrigerator compartment
The refrigerator compartment can be set from +2 °C to +8 °C. The temperature can be set at 1 °C intervals. The value last indicated is saved by the system. We recommend a setting of +4 °C. Perishable food should not be stored above +4 °C.
1. Press the “fridge” button until “fridge” is lit on the refrigerator compartment display panel.
2. Set the temperature with the + (warmer) or - (cooler) setting buttons.
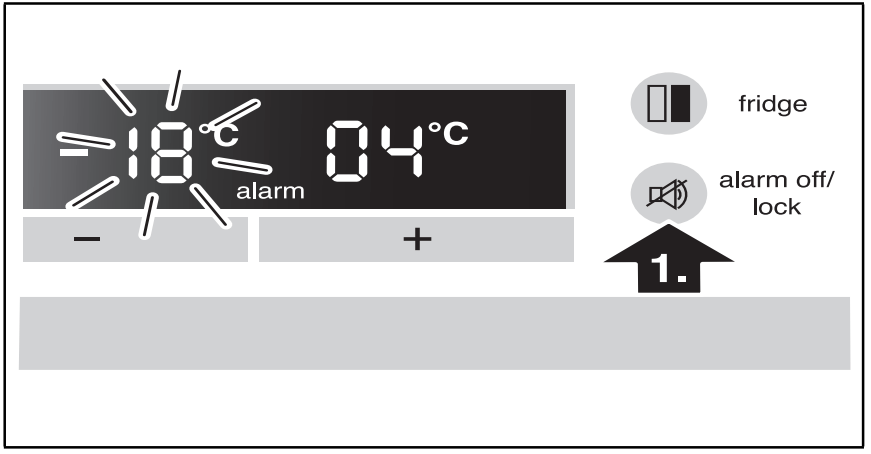
Alarm function
Press the “alarm off/lock” button to switch off the warning signal. In the following cases an alarm may be actuated:
Door opening alarm
If the appliance is left open for longer than one minute, the door alarm switches on. Close the door or press the Alarm button to switch the warning signal off again.
Temperature alarm
The temperature alarm switches on if the freezer and refrigerator compartment is too warm and the food is at risk of thawing. The acoustic and optical signals may be actuated without risk to the frozen food when:
■ The appliance is switched on.
■ Large quantities of fresh food are placed in the freezer.
Freezer compartment
The set temperature of the freezer compartment flashes and “alarm” is displayed on the display panel
The temperature display indicates for 10 seconds the warmest temperature which was reached in the freezer compartment. Then the set temperature is displayed again. The alarm display goes out as soon as the set temperature has been reached again.
Refrigerator compartment
“alarm” is indicated on the display panel.
Usable capacity
Information on the usable capacity can be found inside your appliance on the rating plate (see diagram at chapter “Customer service”).
Fully utilising the freezer volume
To place the maximum amount of food in the freezer, the top frozen food container can be taken out of the appliance. The food can then be placed directly on the shelves and stacked in the lower frozen food container.
Freezer compartment
Use the freezer compartment
■ To store deep-frozen food.
■ To make ice cubes.
■ To freeze food.
Note:
Ensure that the freezer compartment door has been closed properly. If the door is open, the frozen food will thaw. The freezer compartment will become covered in thick ice. Also: waste of energy due to high power consumption!
When the freezer compartment door is closed, a low pressure occurs, causing a sucking noise. Wait two to three minutes until the low pressure has adjusted itself.
We recommend leaving the ice cube container in the appliance. This ensures optimum temperature distribution in the freezer compartment.
Purchasing frozen food
■ Packaging must not be damaged.
■ Use by the “use by” date.
■ Temperature in the supermarket freezer must be -18 °C or lower.
■ If possible, transport deep-frozen food in an insulated bag and place quickly in the freezer compartment.
Max. freezing capacity
Information about the max. freezing capacity within 24 hours can be found on the rating plate (see diagram at chapter “Customer service”).
Freezing fresh food
Freeze fresh and undamaged food only. To retain the best possible nutritional value, flavour and colour, vegetables should be blanched before freezing. Aubergines, peppers, zucchini and asparagus do not require blanching. Literature on freezing and blanching can be found in bookshops.
Note : Keep food which is to be frozen away from food which is already frozen.
■ The following foods are suitable for freezing: Cakes and pastries, fish and seafood, meat, game, poultry, vegetables, fruit, herbs, eggs without shells, dairy products such as cheese, butter and quark, ready meals and leftovers such as soups, stews, cooked meat and fish, potato dishes, soufflés and desserts.
■ The following foods are not suitable for freezing: Types of vegetables, which are usually consumed raw, such as lettuce or radishes, eggs in shells, grapes, whole apples, pears and peaches, hardboiled eggs, yoghurt, soured milk, sour cream, crème fraîche and mayonnaise.
Packing frozen food
To prevent food from losing its flavour or drying out, place in airtight containers.
1. Place food in packaging.
2. Remove air.
3. Seal the wrapping.
4. Label packaging with contents and date of freezing.
Suitable packaging:
Cling wrap, tubular film made of polyethylene, aluminium foil, freezer containers. These products are available from specialist outlets.
Unsuitable packaging:
Wrapping paper, greaseproof paper, cellophane, bin liners and used shopping bags.
Items suitable for sealing packaged food:
Rubber bands, plastic clips, string, cold-resistant adhesive tape, etc. Bags and tubular film made of polyethylene (PE) can be sealed with a film heat sealer.
Shelf life of frozen food
Storage duration depends on the type of food. At a temperature of -18 °C:
■ Fish, sausage, ready meals and cakes and pastries: up to 6 months
■ Cheese, poultry and meat: up to 8 months
■ Vegetables and fruit: up to 12 months
Super freezing
Food should be frozen solid as quickly as possible in order to retain vitamins, nutritional value, appearance and flavour. Several hours before placing fresh food in the freezer compartment, switch on super freezing to prevent an unwanted temperature rise. As a rule, 4–6 hours is adequate. This appliance runs constantly and the freezer compartment drops to a very low temperature. If the max. freezing capacity is to be used, super freezing must be switched on for 24 hours before the fresh produce is placed in the freezer compartment. You can freeze smaller quantities of food (up to 2 kg) without fast freezing.
Note : When super freezing is switched on, increased operating noises may occur.
Switching on Super freezing
1. Press the “freezer” button until “freezer” is lit on the freezer compartment display panel.
2. Press “super” button. If super freezing is switched on, “super” is indicated on the display panel.
Switching off Super freezing
1. Press the “freezer” button until “freezer” is lit on the freezer compartment display panel.
2. Press “super” button. If Super freezing is switched off, the “super” display goes out on the display panel.
Thawing frozen food
Depending on the type and application, select one of the following options:
■ at room temperature
■ in the refrigerator
■ in an electric oven, with/without fan assisted hot-air
■ in the microwave
Refrigerator compartment
The refrigerator compartment is the ideal storage location for meat, sausage, fish, dairy products, eggs, ready meals and pastries.
Storing food
■ Store fresh, undamaged food. The quality and freshness will then be retained for longer.
■ In the case of ready-made products and bottled goods, observe the best-before date or use-by date specified by the manufacturer.
■ To retain aroma, colour and freshness, pack or cover food well before placing in the appliance. This will prevent the transfer of flavours and the discolouration of plastic parts in the refrigerator compartment.
■ Allow warm food and drinks to cool down before placing in the appliance.
Note the chill zones in the refrigerator compartment
The air circulation in the refrigerator compartment creates different chill zones:
■ Coldest zone is between the vegetable container and the glass shelf situated above.
Note : Store perishable food (e.g. fish, sausage, meat) in the coldest zone above the vegetable container.
■ Warmest zone is at the very top of the door.
Note : Store e.g. hard cheese and butter in the warmest zone. Cheese can then continue to release its flavor and the butter will still be easy to spread.
Vegetable container with humidity controller
To create the optimum storage climate for fruit and vegetables, you can set the air humidity in the vegetable container depending on the quantity stored:
■ smaller quantities of fruit and vegetables – high air humidity
■ large quantities of fruit and vegetables – low air humidity
Super cooling
Super cooling sets the refrigerator temperature to the coldest temperature setting for approx. 6 hours. Then the appliance automatically switches to the temperature set prior to super cooling mode. Switch on super cooling mode, e.g.
■ before placing large quantities of food in the refrigerator compartment.
■ for the fast cooling of drinks.
Note : When super cooling is switched on, increased operating noises may occur.
Switching on Super cooling
1. Press the “fridge” button until “fridge” is lit on the refrigerator compartment display panel.
2. Press “super” button. If super cooling is switched on, “super” is indicated on the display panel.
Switching off Super cooling
1. Press the “fridge” button until “fridge” is lit on the refrigerator compartment display panel.
2. Press “super” button. If super cooling is switched off, “super” goes out on the display panel
Operation
Features of the freezer compartment
(not all models)
Freezer calendar
To prevent the quality of the frozen food from deteriorating, do not exceed the storage duration.The storage period depends on the type of produce. The figures next to the symbols indicate the permitted storage period of the produce in months. In the case of commercially available frozen food observe the date of manufacture or use-by date
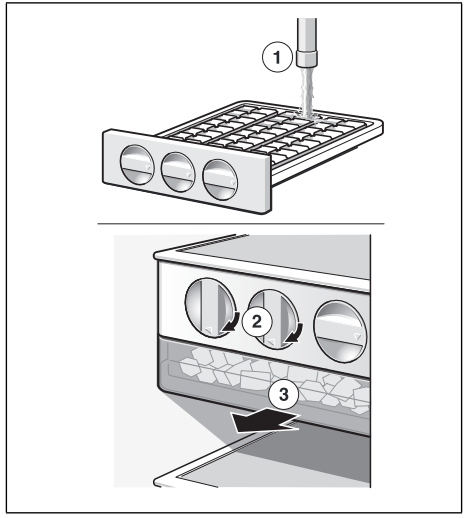
Ice maker
1. Remove the ice cube tray, fill ¾ full of drinking water and re-insert.
2. When the ice cubes are frozen, rotate the knobs on the ice cube trays several times to the right and release. The ice cubes loosen and fall into the storage container.
3. Remove ice cubes from the storage container.
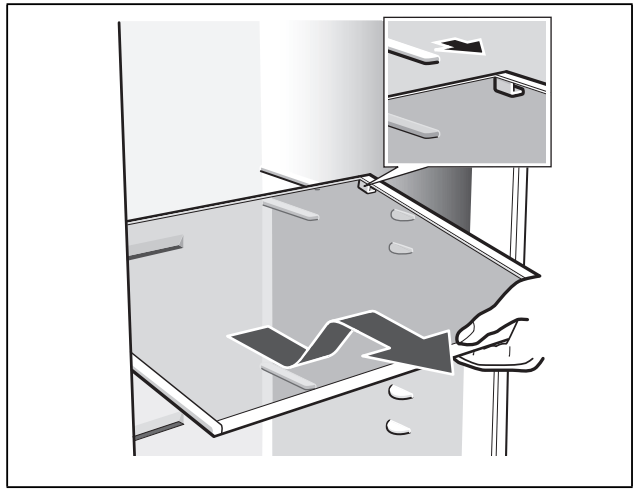
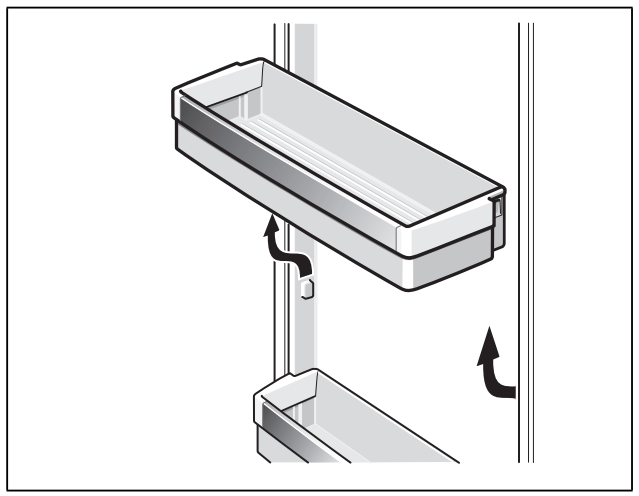
Variable interior design
You can vary the shelves inside the appliance and the door shelves as required.
■ Pull shelf forwards, lower and swing out to the side
■ Lift the door shelf and remove.
Switching off and disconnecting the appliance
Switching off the appliance
Pull out mains plug or switch off fuse. Refrigerating unit switches off.
Disconnecting the appliance
If you do not use the appliance for a prolonged period:
1. Take all food out of the appliance.
2. Pull out the mains plug or switch off the fuse.
3. Clean the appliance interior (see chapter “Cleaning the appliance”).
4. Leave the appliance doors open to prevent odours from forming
Defrosting
Freezer compartment
The fully automatic NoFrost system ensures that the freezer compartment remains free of ice. Defrosting is no longer required.
Refrigerator compartment
Defrosting is actuated automatically. The condensation runs through the drainage hole into an evaporation pan on the rear of the appliance.
Cleaning the appliance
Proceed as follows:
1. Before cleaning: Switch off the appliance.
2. Pull out mains plug or switch off fuse.
3. Take out the frozen food and store in a cool location. Place the ice pack (if enclosed) on the food.
4. Wait until the layer of frost has thawed.
5. Clean the appliance with a soft cloth, lukewarm water and a little pH neutral washing-up liquid. The rinsing water must not run into the light.
6. Wipe the door seal with clear water only and then wipe dry thoroughly.
7. After cleaning reconnect and switch the appliance back on.
8. Put the frozen food back into the appliance.
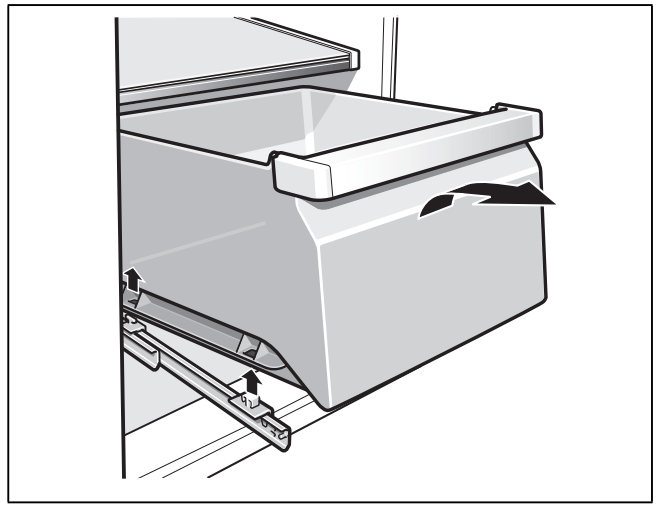
Interior fittings
To clean the equipment, all variable parts of the appliance can be taken out (see chapter Variable interior design).
Note : To take out and clean the containers, open the doors fully beyond 90°.
Removing the container
Pull out container all the way, lift to detach it from the holder and take out.
To insert the container, place on the telescopic rails and push into the appliance. Attach the container by pressing it down.
Light (LED)
Your appliance features a maintenance-free LED light. These lights may be repaired by customer service or authorised technicians only.
Tips for saving energy
■ Install the appliance in a dry, well ventilated room! The appliance should not be installed in direct sunlight or near a heat source (e.g. radiator, cooker). If required, use an insulating plate.
■ Do not block the ventilation openings in the appliance.
■ Allow warm food and drinks to cool down before placing in the appliance.
■ Thaw frozen food in the refrigerator compartment and use the low temperature of the frozen food to cool refrigerated food.
■ Open the appliance as briefly as possible.
■ Ensure that the freezer compartment door is always closed properly.
■ If available: Fit wall spacers to obtain the indicated energy rating of the appliance (see “Installing the appliance”, section “Ventilation”). A reduced wall gap will not restrict the function of the appliance. The energy rating may then increase slightly.
■ The arrangement of the fittings does not affect the energy rating of the appliance.
Operating noises
Quite normal noises
Droning
Motors are running (e.g. refrigerating units, fan).
Bubbling, humming or gurgling noises
Refrigerant is flowing through the tubing.
Clicking
Motor, switches or solenoid valves are switching on/off.
Preventing noises
The appliance is not level
Please align the appliance with a spirit level. Use the height-adjustable feet or place packing underneath them.
The appliance is not free-standing
Please move the appliance away from adjacent units or appliances.
Containers or storage areas wobble or stick
Please check the removable parts and re-insert them correctly if required.
Bottles or receptacles are touching each other
Move the bottles or receptacles slightly away from each other
Eliminating minor faults yourself
Fault
Possible cause
Remedial action
Temperature differs greatly from the set value
In some cases it is adequate to switch off the appliance for 5 minutes. If the temperature is too high wait a few hours and check whether the temperature has approached the set value. If the temperature is too low check the temperature again the next day.
Displays do not illuminate.
Power failure; the fuse has been switched off; the mains plug has not been inserted properly
Connect mains plug. Check whether the power is on, check the fuses.
Display indicates “E..”.
Electronics have detected a fault.
Call customer service.
Warning signal sounds and the temperature display on the freezer compartment flashes. The freezer compartment is too warm! Frozen food is at risk!
To switch off the warning signal, press the “alarm off/lock” button. The display stops flashing. The warmest temperature reached in the freezer compartment is indicated on the temperature display for 10 seconds.
Freezer compartment door is open.
Close the door.
Ventilation openings have been covered.
Remove obstacles.
Too much food was placed in the freezer at once.
Do not exceed max. freezing capacity
The light does not work.
Light switch is jammed.
Check whether the light switch can move
The light is defective.
(See chapter “Light”.)
Appliance has no refrigeration capacity. The light does not work. The display does not illuminate
Power failure.
Check whether the power is on.
The fuse has been switched off.
Check the fuse.
The mains plug has not been inserted properly
Check whether the mains plug is secure.
The refrigerating unit is switching on more frequently and for longer.
Appliance opened frequently
Do not open the appliance unnecessarily
The ventilation openings have been covered
Remove obstacles
Large quantities of fresh food are being frozen
Do not exceed max. freezing capacity.
Appliance self-test
Your appliance features an automatic self-test program which shows you sources of faults which may be repaired by customer service only
Starting the appliance self-test
1. Switch off the appliance and wait 5 minutes.
2. Switch the appliance on again.
3. Simultaneously press the setting buttons + and - for 5 seconds.
The self-test programme starts. If “E..” is indicated on the display panel, an error has occurred. If this fault is displayed, inform customer service. Ending the appliance self-test Simultaneously press the setting buttons + and - again for 5 seconds.
Ending the appliance self-test
Simultaneously press the setting buttons + and - again for 5 seconds.
Customer service
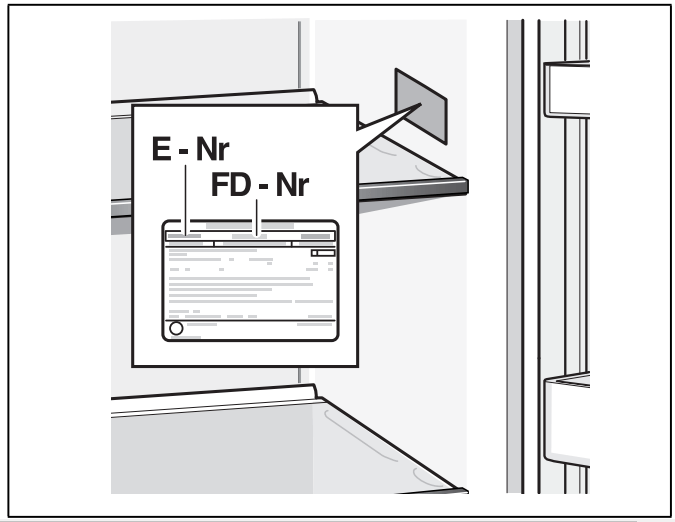
Your local customer service can be found in the telephone directory or in the customer-service index. Please provide customer service with the appliance product number (E-Nr.) and production number (FD-Nr.). These specifications can be found on the rating plate.
To prevent unnecessary call-outs, please assist customer service by quoting the product and production numbers. This will save you additional costs.
Refer to your owner's manual to learn how to change the water filter. We recommend changing the water filter every 6 months or when your appliance prompts you to.
#2 How do I clean the exterior of my refrigerator / freezer?
For normal stainless steel surfaces, use mild soapy water or a stainless steel cleaner with a soft cloth. Always wipe in the direction of the stainless steel grain when washing and drying. Dry thoroughly and use a stainless steel conditioner to condition the surface. Bosch Stainless Steel Cleaning Powder and Conditioner can be purchased in the Bosch Accessories Store. Warning: Some stainless steel cleaners are known to have negative effects on materials other than stainless steel. Do not use the Bosch Stainless Steel Cleaning Powder or Conditioner on control labels, markings, black stainless steel, or appliance interiors. For black stainless steel and non-stainless steel surfaces, simply wipe down the surface with mild soapy water and a soft cloth and dry. Make sure to always wipe in the direction of the grain.
#3 How do I clean the interior of my refrigerator / freezer?
Follow these step-by-step instructions: 1. Unplug the appliance or switch off the fuse. 2. Remove all the food and store it in a cool location. 3. Remove the storage compartments, drawers, or shelves. Clean these parts with warm, mild soapy water and a soft cloth. Wipe dry with a soft cloth. 4. Clean the interior of the appliance with warm, mild soapy water and a soft cloth. Make sure the soap does not get into the lights or run into the evaporation tray through the drain hole. Wipe dry with a soft cloth. 5. Wipe the door seal with water and a soft cloth. Then, thoroughly dry with a soft cloth.
#4 What cleaners can I use to clean my refrigerator / freezer?
You can use warm, mild soapy water and a soft cloth to clean your refrigerator / freezer. Do not use cleaners that are flammable, acidic, or chlorine-based. Abrasive cleaning pads or sponges should also be avoided since they may scratch the surface.
#5 Why is it important to change the water filter?
Changing your water filter every 6 months or when your appliance prompts you to will help ensure optimal filter performance so you can have fresh and clean tasting water.
#6 What type of cleaning cloth can I use to clean my appliance?
We recommend using an absorbent, soft cloth that leaves a streak-free finish. Visit the Bosch Accessories Store to purchase cleaning cloths suitable for cleaning your appliance.