By following the basic steps on these two pages you will be able to quickly check that your oven is operating correctly. Please pay particular attention to the guidelines on where to install your oven. When unpacking your oven make sure you remove all accessories and packing materials. Check to make sure that your oven has not been damaged during shipping.
1. Unpack your oven and place it on a flat level suface.
2. Place the oven on the level location of your choice with more than 85cm height but make sure there is at least 20 cm of space on the top and 20 cm at the rear & left & right for proper ventilation. The front of the oven should be at least 8 cm from the edge of the surface to prevent tipping.
An exhaust outlet is located on the bottom and side of the oven. Blocking the outlet can damage the oven.
If you use the microwave oven in an enclosed space or cupboard, The air flow for cooling the product could be worse. It may result in lower performance and reduced service life. If possible, please use the microwave oven in the counter top condition.
NOTE
• THIS OVEN SHOULD NOT BE USED FOR COMMERCIAL CATERING PURPOSES. DO NOT USE THIS OVEN IN A BUILT IN APPLICATION.
3. Plug your oven into a standard household socket. Make sure your oven is the only appliance connected to the socket. If your oven does not operate properly, unplug it from the electrical socket and then plug it back in.
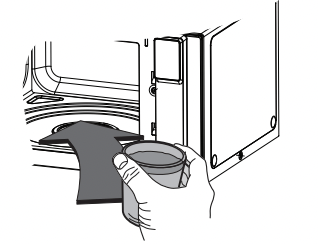
4. Open your oven door by pulling the door handle. Place the rotating ring inside the oven and place the glass tray on top.
5. Fill a microwave safe container with 300 ml (1/2 pint) of water. Place on the glass tray and close the oven door. If you have any doubts about what type of container to use please refer to Microwave-safe utensils.
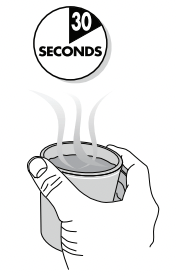
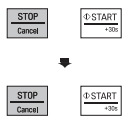
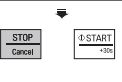
6. Press the STOP button, and press the START button one time to start 30 seconds of cooking time.
7. The DISPLAY will count down from 30 seconds. When it reaches 0 it will chime briefly. Open the oven door and test the temperature of the water. If your oven is operating the water should be warm. Be careful when removing the container as it may be hot. YOUR OVEN IS NOW INSTALLED
8. The contents of feeding bottles and baby food jars must be stirred or shaken and the temperature checked before consumption in order to avoid burns.
9. Button recognition may be hampered in the following circumstances:
• Only the outside area of the button is pressed.
• The button is pushed using a nail or the tip of the finger.
NOTE Do not use rubber gloves or disposable gloves. When wiping the touch control panel with a wet towel, remove moisture from the touch control panel when finished.
10. The setting of the cooking time should be shorter than common microwave ovens (700 W, 800 W) due to the relatively high output power of the product. Excessive heating with the product may cause moisture on the door.
CONTROL PANEL
Part
1 REHEAT
See page 14 "Reheat"
2 POPULAR MENU / SENSOR COOK
See page 15 "Popular Menu" / "Sensor Cook"
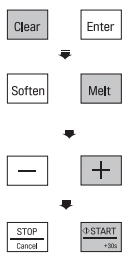
3 SOFTEN
See page 18 "Soften "
4 MELT
See page 19 "Melt"
5 PROOF
See page 20 "Proof”
6 KEEP WARM
See page 21 "Keep warm"
7 POWER
See page 13 "Timed Cooking"
8 INVERTER DEFROST
See page 22 "Inverter Defrost"
9 MORE / LESS
See page 12 "More / Less"
• Choose the cooking menu.
• Set cooking time and weight.
• While cooking with auto and manual function, you can increase or decrease the cooking time at any point by pressing the - or + keys, or sliding the slide touch key. See page 11 "Slide Touch Key" (except defrost mode).
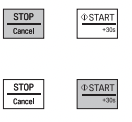
10 STOP / CLEAR
• Clears all functions and set entries except time of day.
11 START / ENTER
• Press this button to start cooking or resume cooking if the door was opened or the STOP button was pressed once.
• The quick start feature allows you to set
30 second intervals of HIGH power cooking with each touch of the quick start button.
DISPLAY ICON MEANINGS
Icon
Shows when the Microwave function is in operation.
Shows when the Auto Cook function is in operation.
Shows when the Inverter Defrost function is in operation.
Shows in the display when More/Less time can be set.
Shows when Cooking can be started by pressing the START button.
Shows when the Cooking power level should be set.
Shows when the food weight should be set.
SLIDE TOUCH KEY
By using the slide touch, you can adjust the cooking time or Defrost weight.
Example: Increase the cooking time, Touch and slowly slide from left to right.
1. Touch the ( - ) symbol of slide touch key with your finger.
2. To increase the time, slowly slid e your finger to the right.
Example: To Reduce cooking time, Touch and slowly slide from right to left.
1. Touch the ( + ) symbol of slide touch key with your finger.
2. To reduce the time, slowly slide your finger to the left.
NOTE
1. Time setting
• 0~3 minutes : Time setting will increase or decrease by 10 second increments.
• 3~20 minutes : Time setting will increase or decrease by 30 second increments.
• 20~90minutes : Time setting will increase or decrease by 1 minute increments.
• Operating microwave : Remaining time will increase or decrease by 10 second increments.
2. Defrost weight is set the same way as the cooking time. It will increase or decrease by 0.1kg.
THE RIGHT TOUCH
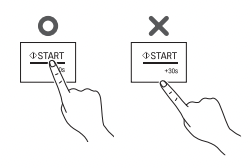
1. (-), (+) keys at both ends of Slide Touch Key can be used like the normal touch keys. By repeatedly touching the key once like the picture, you can set up the Cooking time or Defrost weight.
2. Place your finger in a centred position and sliding it along the centre of the slide scale.
THE WRONG TOUCH
If you touch the key as follows, the slide touch key may not be recognised.
1. Touching the outside of the slide touch key.
2. Touching the slide touch key using your finger nail or thumb.
3. Sliding the slide touch key too fast.
NOTE
• Don't use rubber gloves or disposable gloves when using the touch key or any other device or tool other than a finger.
• When wiping the touch control panel with a wet towel, dry off any remaining moisture from the touch control panel.
• If a (+), (-) button on the touch control panel is being pressed, and the setting no longer increases or decreases, then remove your finger and try again.
SETTING CLOCK
When your oven is plugged in for the first time or when power resumes after a power interruption, the numbers in the display reset to '12H'.
Example: To set 11:11
1. Close the Door. Press + once. '24H' will show in the display. (press + twice for 12 Hour mode) 2. Press START.
3. Press + eleven times until display shows '11:'
4. Press START.
5. Press + eleven times until display shows '11:11'
6. Press START.
You can also set the time by using the slide Touch Key after closing the door. At the begging of the power be provided,when you press the STOP button,you couldn’t use the clock mode.
QUICK START
The QUICK START feature allows you to set 30 seconds intervals of HIGH power cooking with each touch of the START button.
Example: Set 2 minutes of cooking on high power
1. Close the Door. Press STOP.
2. Select 2 minutes on high power.
Press the START button four times
The oven will start before you have finished the fourth press.
During QUICK START cooking, you can extend the cooking time up to 99 minutes 59 seconds by repeatedly pressing the START button.
MORE/LESS
By using the ( - ) or ( + ) key, manual cook settings can be adjusted to cook food for a longer or shorter time. Pressing ( + ) will increase10 seconds to the cooking time each time you press it. Pressing ( - ) will decrens 10 seconds of cooking time each time you press it. The max cooking time possible in the manual cook mode will be 99 min 59 seconds.
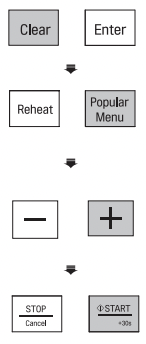
Example: To adjust the Reheat (ex. Dinner Plate 1 Serve) cooking time for a longer time, or for a shorter time
1. Open the Door. Press Clear.
2. Press Reheat three times. ‘3’ will show in the display.
3. Close the Door. Press START.
4. Slide ( + ) or ( - ) Remaining time will increase or decrease by 10 seconds.
ENERGY SAVING
Energy saving means to save energy by turning off the display. This feature only operates when the Microwave Oven is in standby and the display will go out.
NOTE
• When using clock mode,the displaywillremain on.
HOW TO USE
MANUAL COOKING (timed cooking)
This function allows you to cook food for a desired time. There are 10 power levels available. The example below shows how to set 90% power level for the desired time.
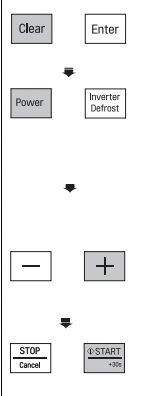
Example: To cook food on 90% Power for 5 minutes 30 seconds
When cooking is complete, a chime will sound. The word End shows in the display window. 'End' remains in the display and the chime will sound every minute until the door is opened, or any button is pressed.
NOTE If you do not select the power level, the oven will operate at power HIGH. To set HI-POWER cooking, skip step 2 above.
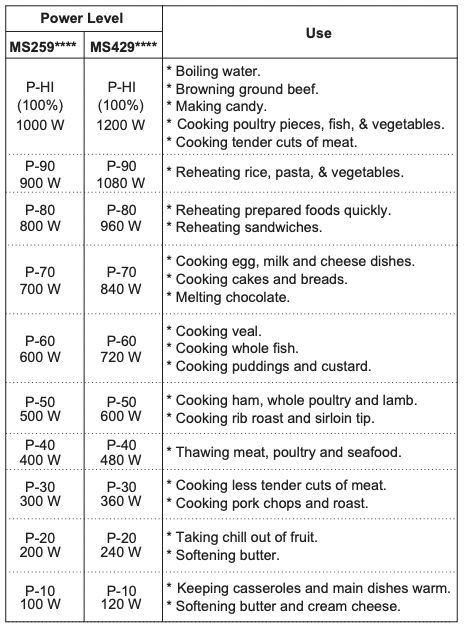
MICROWAVE POWER LEVELS
Your microwave oven is equipped with 10 power levels to give you maximum flexibility and control over cooking. The adjacent table will give you some idea of which foods are prepared at each of the various power levels.
The adjacent chart shows the power level settings for your oven.
MICROWAVE POWER LEVEL CHART
CHILD LOCK
This is a unique safety feature that prevents unwanted oven operations. Once the CHILD LOCK is set, no cooking can take place.
Example: To set the CHILD LOCK
1. Close the Door. Press STOP.
2. Press and hold STOP until 'Loc' appears in the display and a chime is heard.
If the time of day was already set, the time of day will appear on the display window after 1 seconds.
If the CHILD LOCK was already set and you touch another key pad, the word Loc shows in the display. You can cancel the CHILD LOCK according to below procedure.
Example: To cancel the CHILD LOCK
Press and hold STOP until 'Loc' disappears in the display.
After the CHILD LOCK is turned off, the oven will operate normally.
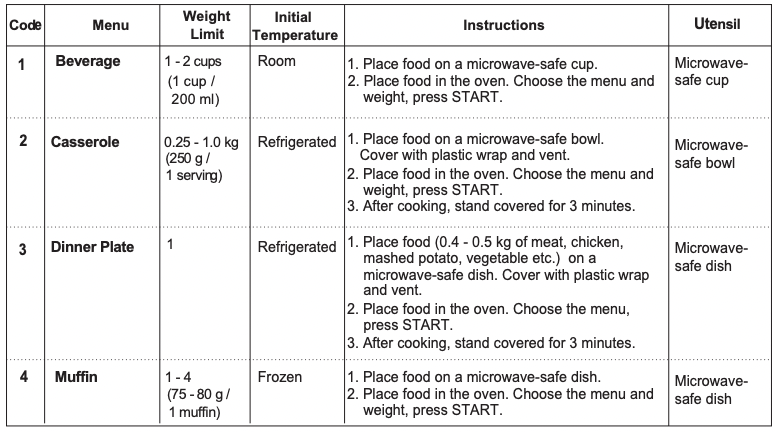
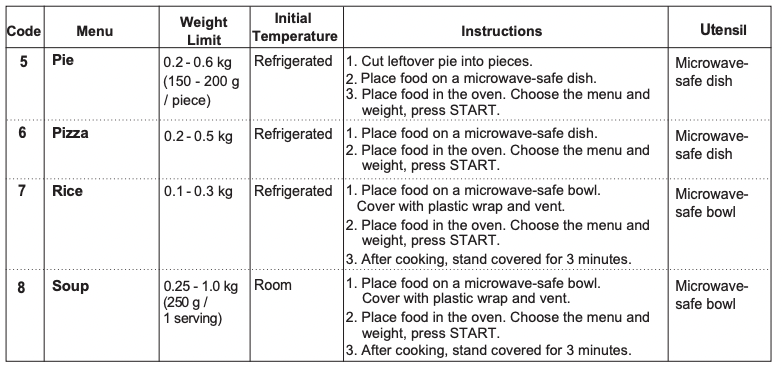
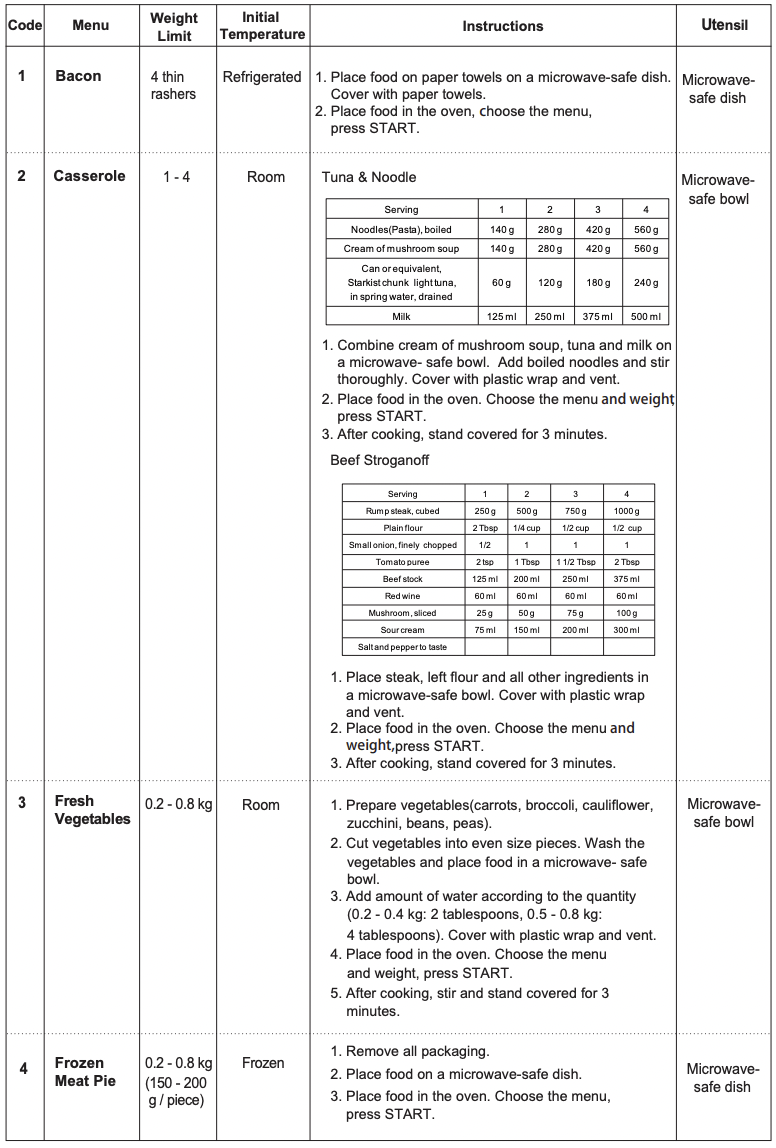
REHEAT
Your oven’s menu has been preprogrammed to automatically reheat food. Select one of the Reheat menus and then select the weight of the food. The microwave will then reheat the contents appropriately after the START button is pressed as in step 4 below.
Example: To reheat 0.2 kg Rice, simply follow the step below
1. Open the Door. Press Clear.
2. Press Reheat seven times. '7' will show in the display.
3. Press + until display shows '0.2 kg'.
4. Close the Door. Press START.
REHEAT MENU INSTRUCTIONS
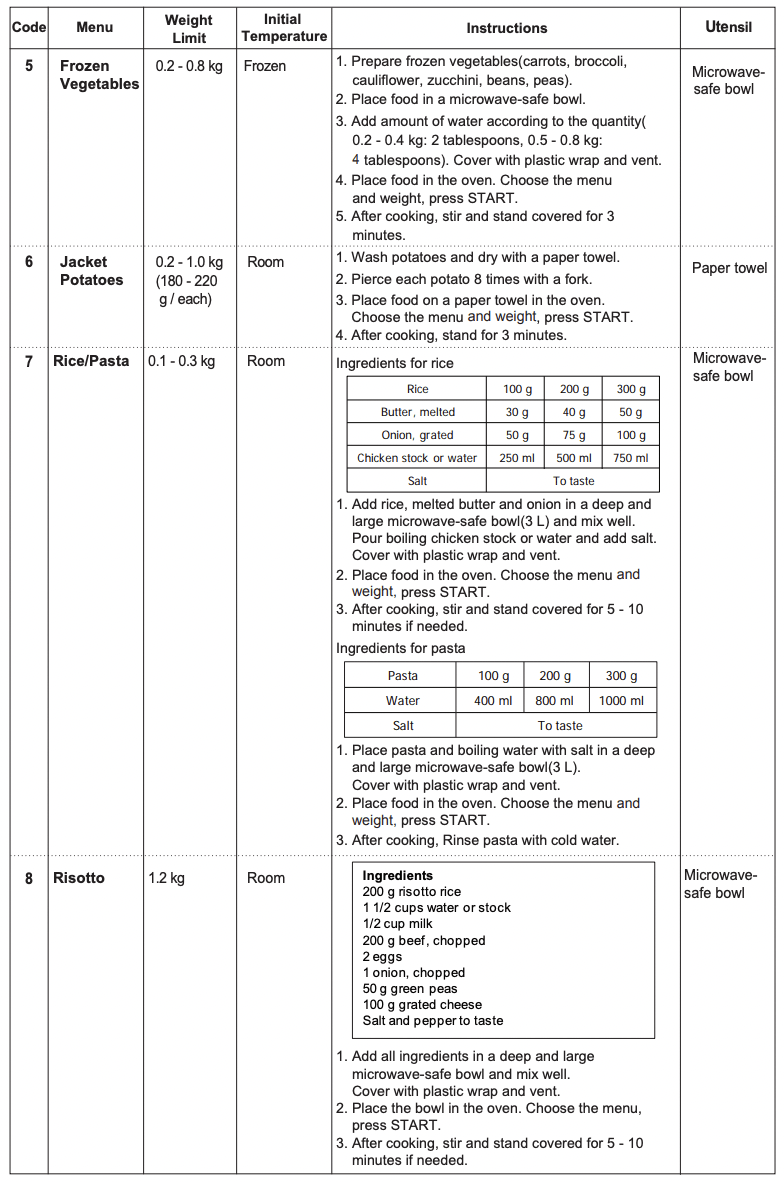
POPULAR MENU / SENSOR COOK
Your oven’s menu has been preprogrammed to automatically cook food. Select a Popular Menu and weight, or, select one of the Sensor Cook menus and then press START to allow the microwave to cook your selection. Then let your microwave oven cook your selections.
Example: To cook 0.4 kg Fresh Vegetable,simply follow the step below
1. Open the Door. Press Clear.
2. Press Popular Menu three times. '3' will show in the display.
3. Press + until display shows '0.4 kg'.
4. Close the Door. Press START.
POPULAR MENU / SENSOR COOK INSTRUCTIONS
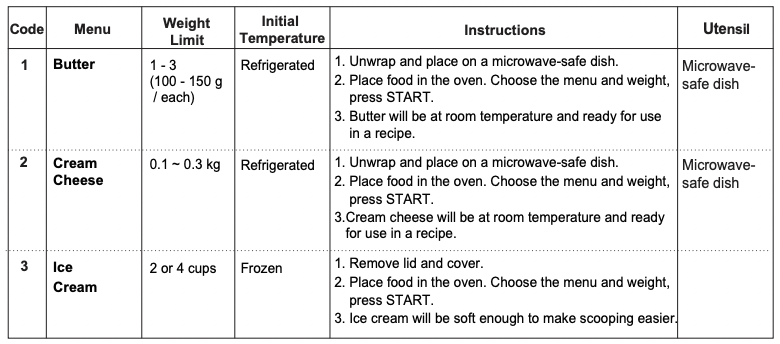
SOFTEN
The oven uses low power to soften foods (butter, cream cheese and ice cream) See the following table.
Example: To Soften 0.2 kg Cream Cheese.
1. Open the Door. Press Clear.
2. Press Soften twice. ‘2' will show in the display.
3. Press + until display shows ‘0.2 kg'.
4. Close the Door. Press START.
SOFTEN MENU INSTRUCTIONS
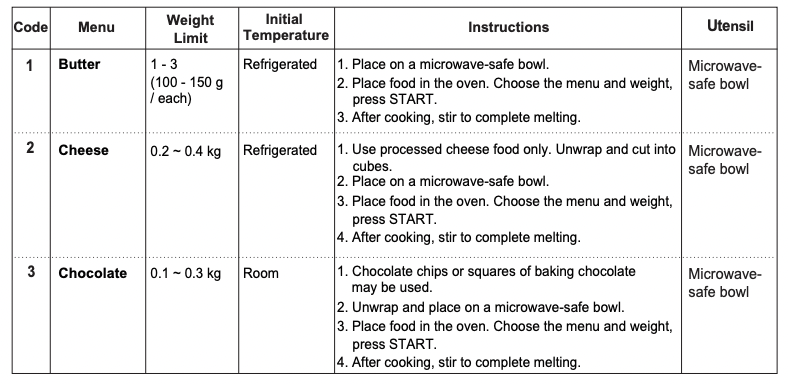
MELT
The oven uses low power to melt foods (butter, cheese and chocolate). See the following table.
Example: To Melt 0.2 kg Chocolate
1. Open the Door. Press Clear.
2. Press Melt three times. ‘3' will show in the display.
3. Press + until display shows ‘0.2 kg'.
4. Close the Door. Press START.
MELT MENU INSTRUCTIONS
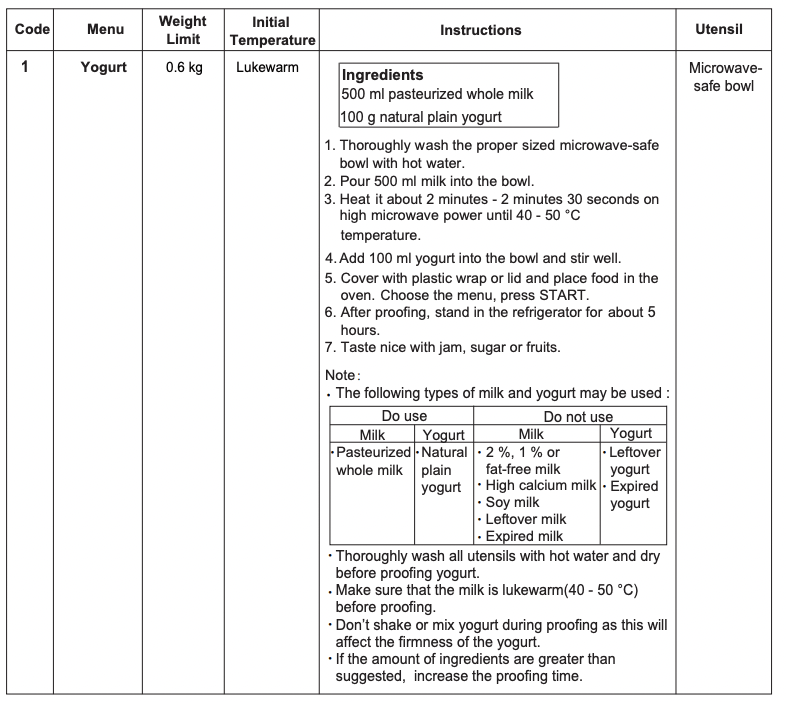
PROOF (fermenting)
This feature allows you to make Yogurt by pressing the Proof button.
To make 0.6 kg yogurt
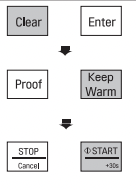
1. Open the Door. Press Clear.
2. Press Proof once. ‘1' will show in the display.
3. Close the Door. Press START. ‘5h00' will show in the display.
PROOF MENU INSTRUCTIONS
KEEP WARM
The Keep Warm function will keep hot food that has just been cooked at serving temperature. Use microwave-safe utensils.
Example: To keep food warm for 90 minutes
1. Open the Door. Press Clear.
2. Press Keep Warm once. ‘1’ will show in the display.
3. Close the Door. Press START. ‘1h30’ will show in the display.
Notes : Crisp foods (pastry, pies, turnovers, etc) should be uncovered during keep warm. Moist foods should be covered with plastic wrap or microwave-safe lid. The amount of keep warm food is suitable for 1-3 servings. It should also be noted that moist food will become dryer the longer it is Kept Warm.
INVERTER DEFROST
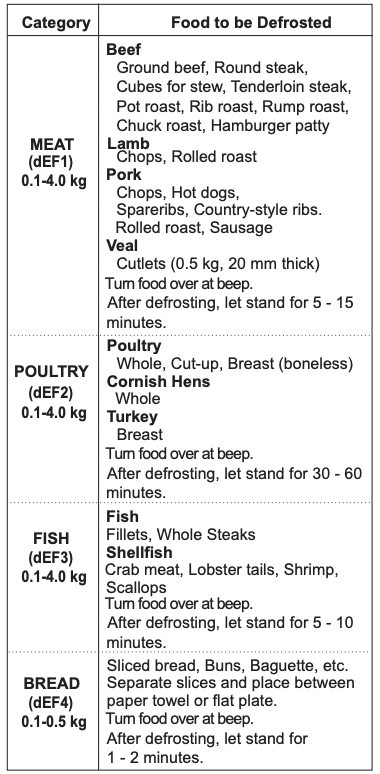
Four defrost sequences are preset in the oven. The INVERTER DEFROST feature provides you with the best defrosting method for frozen foods. The cooking guide will show you which defrost sequence is recommended for the food you are defrosting.
For added convenience, the INVERTER DEFROST includes a built-in beep alert that reminds you to check, turn over, separate, or rearrange to get the best defrost results. Four different defrosting leve is are provided.
(MEAT /POULTRY / FISH / BREAD)
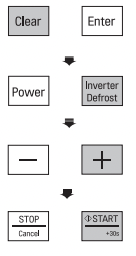
Example: To defrost 1.2 kg of meat
1. Open the Door. Press Clear and place 1.2kg of frozen meat inside the oven.
2. Press Inverter Defrost once. ‘dEF1' will show in the display.
3. Press + until display shows ‘1.2 kg’.
4. Close the Door. Press START.
NOTE:
When you press the START button, the display changes to the defrost time count down. The oven will beep once during the DEFROST cycle.
At the beep, open the door and remove any portions that have thawed and turn.
Return frozen portions to the oven and press START to resume the defrost cycle.
• Remove fish, shellfish, meat, and poultry from its original wrapping paper or plastic package. Otherwise, the wrap will hold steam and juice close to the foods, which can cause the outer surface of the foods to cook.
• Place foods in a shallow container or in a microwave roasting dish to catch the drippings.
• Food should still be somewhat icy in the center when removed from the oven.
• The length of defrosting time varies according to how solidly the food is frozen.
• The shape of the package affects how quickly food will defrost. Shallow packages will defrost more quickly than a deep block.
• Depending on the shape of the food can be defrosted more or less.
INVERTER DEFROST MENU INSTRUCTIONS
MICROWAVE-SAFE UTENSILS
Never use metal or metal trimmed utensils in using microwave function
Microwaves cannot penetrate metal. They will bounce off any metal object in the oven and cause arcing, an alarming phenomenon that resembles lightning. Most heat resistant non metallic cooking utensils are safe for use in your oven. However, some may contain materials that render them unsuitable as microwave cookware. If you have any doubts about a particular utensil, there's a simple way to find out if it can be used in the microwave.
Place the utensil in question next to a glass bowl filled with water in using microwave function. Microwave at power HIGH for 1 minute. If the water heats up but the utensil remains cool to the touch, the utensil is microwave-safe. However, if the water does not change temperature but the utensil becomes warm, microwaves are being absorbed by the utensil and it is not safe for use in using microwave function. You probably have many items on hand in your kitchen right now that can be used as cooking equipment in the microwave. Just read through the following checklist.
Dinner plates
Many kinds of dinnerware are microwave-safe. If in doubt consult the manufacturer's literature or perform the microwave test. Do not heat dinner plates that use any painted on decorative as they will arc if the paint has metallic content.
Glassware
Glassware that is heat-resistant is microwave-safe. This would include all brands of oven tempered glass cookware. However, do not use delicate glassware, such as tumblers or wine glasses, as these might shatter as the food warms.
Plastic storage containers
These can be used to hold foods that are to be quickly reheated. However, they should not be used to hold foods that will need considerable time in the oven as hot foods will eventually warp or melt plastic containers.
Paper
Paper plates and containers are convenient and safe to use in using microwave function, provided that the cooking time is short and foods to be cooked are low in fat and moisture. Paper towels are also very useful for wrapping foods and for lining baking trays in which greasy foods such as bacon are cooked. In general, avoid coloured paper products as the colour may run. Some recycled paper products may contain impurities which could cause arcing or fires when used in the microwave.
Plastic cooking bags
Provided they are made specially for cooking, cooking bags are microwave safe. However, be sure to make a slit in the bag so that steam can escape. Never use ordinary plastic bags for cooking in using microwave function, as they will melt and rupture.
Plastic microwave cookware
A variety of shapes and sizes of microwave cookware are available. For the most part, you can probably use items you already have on hand rather than investing in new kitchen equipment.
Pottery, stoneware and ceramic
Containers made of these materials are usually fine for use in using microwave function, but they should be tested to be sure.
CAUTION
• Some items with high lead or iron content are not suitable as cooking utensils.
* Utensils should be checked to ensure that they are suitable for use in the microwave.
FOOD CHARACTERISTICS & MICROWAVE COOKING
Keeping an eye on things
Always watch your food while it cooks. Your microwave function is equipped with a light that turns on automatically when the oven is in operation so that you can see inside and check the progress of your food. Directions given in recipes to elevate, stir, and the like should be thought of as the minimum steps recommended. If the food seems to be cooking unevenly, simply make the necessary adjustments you think appropriate to correct the problem.
Factors affecting microwave cooking times
Many factors affect cooking times. The temperature of ingredients used in a recipe makes a big difference in cooking times. For example, a cake made with ice-cold butter, milk, and eggs will take considerably longer to bake than one made with ingredients that are at room temperature. Some of the recipes, particularly those for bread, cake, and custards, recommend that food be removed from the oven when they are slightly undercooked.
This is not a mistake. When allowed to stand, usually covered, these foods will continue to cook outside of the oven as the heat trapped within the outer portions of the food gradually travels inward. If the food is left in the oven until it is cooked all the way through, the outer portions will become overcooked or even burnt. You will become increasingly skillful in estimating both cooking and standing times for various foods.
Density of food
Light, porous food such as cakes and breads cook more quickly than heavy, dense foods such as roasts and casseroles. You must take care when microwaving porous food so that the outer edges do not become dry and brittle.
Height of food
The upper portion of tall foods, particularly roasts, will cook more quickly than the lower portion.
Therefore, it is wise to turn tall food several during cooking.
Moisture content of food
Since the heat generated from microwaves causes moisture to evaporate, relatively dry food such as roasts and some vegetables should either be sprinkled with water prior to cooking or covered to retain moisture.
Bone and fat content of food
Bones conduct heat and fat cooks more quickly than meat. Care must be taken when cooking bony or fatty cuts of meat in order to prevent unevenly or overcooked meat.
Quantity of food
The number of microwaves in your oven remains constant regardless of how much food is being cooked.
Therefore, the more food you place in the oven, the longer the cooking time. Remember to decrease cooking times by at least one third when halving a recipe.
Shape of food
Microwaves penetrate only about 2 cm into food, the interior portion of thick foods are cooked as the heat generated on the outside travels inward. Only the outer edge of food is cooked by microwave energy; the rest is cooked by conduction.The worst possible shape for a food that is to be microwaved is a thick square.
The corners will burn long before the centre is even warm. Round thin foods and ring shaped foods cook most successfully in the microwave.
Covering
A cover traps heat and steam which causes food to cook more quickly. Use a lid or microwave cling film with a corner folded back to prevent splitting.
Browning
Meats and poultry that are cooked fifteen minutes or longer will brown lightly in their own fat. Foods that are cooked for a shorter period of time may be brushed with a browning sauce such as Worcestershire sauce, soy sauce or barbecue sauce to achieve an appetizing colour. Since relatively small amounts of browning sauces are added to food, the original flavour of the recipe is not altered.
Covering with greaseproof paper
It is a looser cover than a lid or cling film, the food may dry out slightly. But because it makes a looser cover than a lid or clingfilm, it allows the food to dry out slightly.
Arranging and spacing
Individual foods such as baked potatoes, small cakes and hors d'oeuvres will heat more evenly if placed in the oven an equal distance apart, preferably in a circular pattern. Never stack foods on top of one another.
Stirring
Stirring is one of the most important of all microwaving techniques. In conventional cooking, food is stirred for the purpose of blending. Microwaved food, however, is stirred in order to spread and redistribute heat.
Always stir from the outside towards the centre as the outside of the food heats first.
Turning over
Large, tall foods such as roasts and whole chickens should be turned so that the top and bottom will cook evenly. It is also a good idea to turn cut up chicken and chops.
Placing thicker portions facing outwards
Since microwaves are attracted to the outside portion of food, it makes sense to place thicker portions of meat, poultry and fish to the outer edge of the baking dish. This way, thicker portions will receive the most microwave energy and the food will cook evenly.
Shielding
Strips of aluminium foil (which block microwaves) can be placed over the corners or edges of square and rectangular foods to prevent those portions from overcooking. Never use too much foil and make sure the foil is secured to the dish or it may cause'arcing'in the oven especially if the foil passes too closely to the walls of the oven during rotation.
Elevating
Thick or dense foods can be elevated so that microwaves can be absorbed by the underside and centre of the foods.
Piercing
Foods enclosed in a shell, skin or membrane are likely to burst in the oven unless they are pierced prior to cooking. Such foods include yolks and whites of eggs, clams and oysters and whole vegetables and fruits.
Testing if cooked
Food cooks so quickly in a oven, it is necessary to test it frequently. Some foods are left in the microwave until completely cooked, but most foods, including meats and poultry, are removed from the oven while still slightly undercooked and allowed to finish cooking during standing time. The internal temperature of foods will rise between 50 F (30 C) and 150 F (8 ° C) during standing time.
Standing time
Foods are often allowed to stand for 3 to 10 minutes after being removed from the oven. Usually the foods are covered during standing time to retain heat unless they are supposed to be dry in texture (some cakes and biscuits, for example). Standing allows foods to finish cooking and also helps flavour blend and develop.
TO CLEAN YOUR OVEN
1 Keep the inside of the oven clean
Food spatters or spilled liquids stick to oven walls and between the seal and door surfaces. It is best to wipe up spillovers with a damp cloth right away. Crumbs and spillovers will absorb microwave energy and lengthen cooking times and may even damage the oven. Use a damp cloth to wipe out crumbs that fall between the door and the frame. It is important to keep this area clean to assure a tight seal. Remove greasy spatters with a soapy cloth then rinse and dry. Do not use harsh detergent or abrasive cleaners. The metal tray can be washed by hand or in the dishwasher.
2 Keep the outside of the oven clean
Disconnect the mains plug from the power outlet before cleaning the oven to eliminate the possibility of electric shock. Clean the outside of your oven with soap and water then with clean water and dry with a soft cloth or paper towel. To prevent damage to the operating parts inside the oven, the water should not be allowed to seep into the ventilation openings.To clean control panel, open the door to prevent the oven from accidentally starting, and wipe a damp cloth followed immediately by a dry cloth. Press STOP after cleaning.
3 If steam accumulates inside or around the outside of the oven door, wipe the panels with a soft cloth. Steam or condensation build up inside the door is normal if foods are heated for a long period on higher power levels. this is not a malfunction. the condensation will eventually evaporate. Try covering the food or vary the heating levels and time to reduce any condensation forming in the door, this may also occur when the oven is operated under high humidity conditions and in no way indicates a malfunction of the unit.
4 The door and door seals should be kept clean. Use only warm, soapy water, rinse then dry thoroughly. DO NOT USE ABRASIVE MATERIALS, SUCH AS CLEANING POWDERS OR STEEL AND PLASTIC PADS. Metal parts will be easier to maintain if wiped frequently with a damp cloth.
QUESTIONS & ANSWERS
FAQ
Answer
What's wrong when the oven light will not glow?
There may be several reasons why the oven light will not glow. Either the light bulb has blown or the electric circuit has failed.
Does microwave energy pass through the viewing screen in the door?
No.The holes, or ports, are made to allow light to pass; they do not let microwave energy through.
Why does the BEEP tone sound when a button on the control panel is touched?
The BEEP tone sounds to assure that the setting is being properly entered.
Will the microwave function be damaged if it operates empty?
Yes. Never run it empty.
Why do eggs sometimes pop?
When baking, frying, or poaching eggs, the yolk may pop due to steam build up inside the yolk membrane. To prevent this, simply pierce the yolk before cooking. Never microwave eggs in the shell.
Why is standing time recommended after microwave cooking is over?
After microwave cooking is finished, food keeps on cooking during standing time.This standing time finishes cooking evenly throughout the food. The amount of standing time depends on the density of the food.
Why doesn't my oven always cook as fast as the cooking guide says?
Check your cooking guide again to make sure you've followed directions correctly, and to see what might cause variations in cooking time. Cooking guide times and heat settings are suggestions, chosen to help prevent overcooking, the most common problem in getting used to this oven. Variations in the size, shape, weight and dimensions of the food require longer cooking time. Use your own judgment along with the cooking guide suggestions to test food conditions, just as you would do with a conventional cooker.
'Food' on the display.
Why doesn't the microwave oven work when 'Food' appears on the display?
When 'Food' appears on the display, the microwave will not operate as it assumes that no food has been placed inside. 'Food' in the display will also appear and the remaining time will be cancelled, if the door is opened and closed during cooking and the START button is not pressed within 5 minutes of doing so.
'Cool' appears on the display and the cooling fan continues to run after the cooking or heating time is over.
After cooking is complete, the fan may operate to cool the oven. The display will show 'Cool'. If you open the door or press once STOP before the cooking time is complete, the remaining cooking time will show on the display. This is not a malfunction.
When operating the microwave oven, If you use a product such as radio, TV, wireless LAN, Bluetooth, medical equipment, wireless equipment etc. Using the same frequency as the microwave oven, the product may receive interference from these products. This interference does not indicate a problem of the microwave or the product and is not a malfunction. Therefore, it is safe to use. However, medical equipment may receive interference as well, so use caution when using medical equipment near the product.
Not sure what you mean by 'kitchen timer'. The clock can be reset after the mains power has been switched off then on. The oven will operate for the amount of time you select via +/- or what it calculates for the cooking job on hand. I think it's not a good idea to operate microwave ovens empty.
#2 SMJ... is there an issue with required space around the microwave please, I dont have alot of space.
The manual says 10cm each side, 5cm behind and 15cm above. Hope this helps.
#3 What's wrong when the oven light will not glow?
There may be several reasons why the oven light will not glow. Either the light bulb has blown or the electric circuit has failed.
#4 Will the microwave function be damaged if it operates empty?
When baking, frying, or poaching eggs, the yolk may pop due to steam build up inside the yolk membrane. To prevent this, simply pierce the yolk before cooking. Never microwave eggs in the shell.