User manual Dryer
Installation Instructions
SAVE THESE INSTRUCTIONS
Introduction
Read these installation instructions completely and carefully before starting to install your new dryer. The information contained can save you time and effort and will help to ensure optimum performance of your new dryer. Be sure to observe all warnings and cautions.
WARNING
RISK OF FIRE, ELECTRIC SHOCK OR INJURY TO PERSONS
- To reduce the risk of fire, electric shock or injury to persons, read the Important Safety Instructions at the beginning of this manual before installing or operating this appliance.
- Clothes dryer installation must be performed by a qualified installer, according to these instructions and according to all local codes.
- In addition to the installation and safety information in this manual, the local water and electrical power suppliers (services) may have special requirements
CAUTION
- Dryer is heavy. Do not lift it by yourself, use additional help and care when lifting and positioning.
- If in doubt, have the appliance installed and connected by an authorized technican.
- Take care to not damage the appliance. Do not hold on to protruding parts (e.g. door) when lifting.
- Do not install the appliance outdoors or in an area exposed to freezing condtions.
- If freezing conditions exist where appliance is located all drain water must be removed from hoses, sumps, pumps, etc.
These installation instructions are intended for use by qualified installers. In addition to these instructions, the installation must comply with:
- for the United States - National Electrical Code, ANSI/ NFPA70 - and latest editions of the State and Municipal and/or local regulations.
- for Canada - Canadian Electrical Code C22.1 - and the latest editions of the Provincial, Municipal and/or local regulations.
Before installing the dryer
Unpacking the appliance
Check the dryer for transportation damage. Do not connect a dryer which is visibly damaged. If in doubt, contact your dealer.
Waste disposal
Disposal of Packaging Materials
After unpacking your new appliance dispose of the protective packaging materials in an environmentally friendly way. Ask your dealer or inquire with your local authority regarding currently acceptable means of disposal.
WARNINGS FOR CHILDREN
Do not let children play with packaging and associated parts to avoid risk of choking or suffocation.
Disposal of Your Old Appliance
Your old appliance can be recycled if it is no longer to be used. Prior to disposing of your old appliance observe the following precautions to reduce safety risks.
WARNING
TO AVOID RISK OF INJURY OR DEATH, DO THE FOLLOWING
- after unplugging the old appliance, remove the electric power cord and dispose of properly.
- remove the door or permanently disable the door lock to prevent children from being locked inside.
Parts provided with your dryer
Back side of the dryer
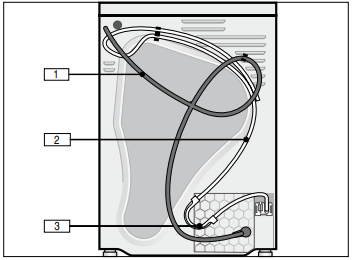
- power cord with plug
- drain hose connected to the dryer
- elbow to form the hose to fit the drain
Dryer drum contents
A literature pack and drain hose pack are shipped in the dryer drum. Be sure to remove these items before using the dryer.
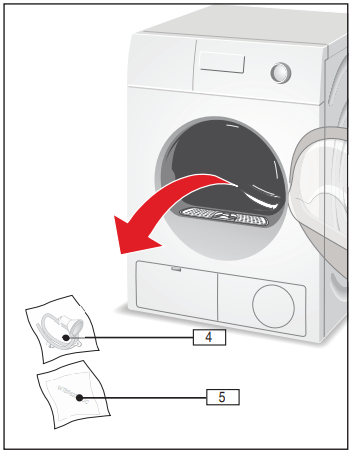
4. drain hose pack contents:
- (2) plastic ties for securing drain hose
- plastic connector
- summary of drain hose installation instructions
5. literature pack contents:
NOTICE: If any parts are missing please notify your dealer immediately
Accessories for your appliance
Pedestal
The dryer can be mounted on a special pedestal for easier loading and unloading.
Pedestal item number: WMZ 20500
Stacking kits
The dryer can be stacked on a Bosch washer of the same dimensions to save space.
Stacking kits without a shelf: WTZ20410
Stacking kits with a shelf: WTZ11400
Accessories can be purchased from customer service or your local dealer. ~ Customer service;
Installation - step by step
- Unpack the dryer.
- Remove all objects from the dryer drum.
- Check the dryer for visible damage.
- Position the dryer near the installation location.
- Disconnect the power cord and drain hose from their clips on the back of the dryer.
CAUTION Do not disconnect the drain hose from the sump/ pump connection at the bottom of the dryer.
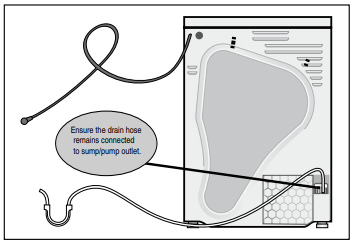
NOTICE: Do not reuse an old or different drain hose. Only use the drain hose included with the dryer.
6. Connect the outlet end of the drain hose to a standpipe or other drain inlet. Examples are shown below.
CAUTION
APPLIANCE DAMAGE COULD OCCUR IF DRAIN WATER FLOWS BACK INTO THE APPLIANCE
- In all drain conditions, scenarios, or connections you must ensure:
- The drain water from the hose is free flowing and not obstructed allowing adequate water flow.
- Drain opening is not sealed in any way and ventilated enough not to cause a back siphon.
- The end of the drain hose does not protrude into the pumped out or standing water.
- Be sure to follow all local codes and regulations in draining the condensate water to a suitable drain.
Examples of connections:
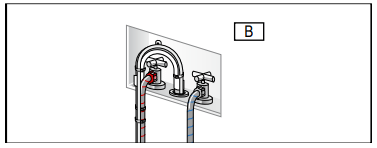
- Plumbing box or Standpipe connection: For most plumbing box installations (with adjacent washer) the plastic elbow supplied with the dryer will not be used and must be removed from the dryer drain hose.
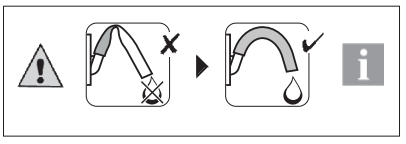
1. Fasten the dryer drain hose to the washer drain/elbow as shown in picture “A”. Secure with plastic ties supplied.
CAUTION Do not over tighten plastic ties pinching or causing a restriction in the drain hose.
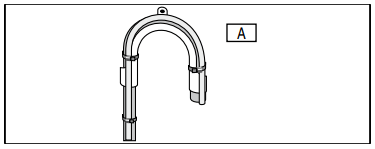
2. Place drain hose assembly into standpipe as shown in picture “B”.
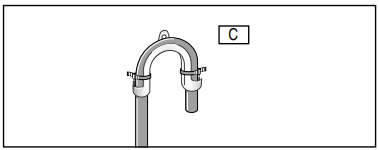
* Sink/Basin or Floor drain: If using the elbow supplied on the hose re-position elbow closer to the drain end of hose and fasten with the plastic ties as shown in picture “C”.
Secure hose and/or elbow as shown below. Basin “D” or floor “E”.
NOTICE: Examples shown are for reference only. Not all fittings, connectors, nuts, brackets, ties, etc. are supplied to accommodate every application.
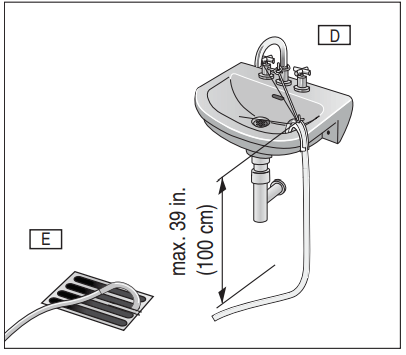
Maximum height of drain is 39 in. (100 cm).
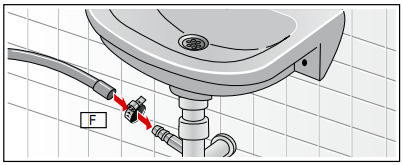
- Sink Drain Pipe:
- Attach and secure drain hose as shown below in picture “F”.
- Use a standard hose clamp available from your local hardware store.
NOTICES
- Examples shown are for reference only. Not all fittings, connectors, nuts, brackets, ties, etc. are supplied to accommodate every application.
- Ensure there are no kinks or crimps along the entire lenght of hose.
- If installed in an upper floor of a multi-story building, the dryer should be installed on a drained floor to prevent water damage to lower floors in the event of a leak.
Electrical Connections
Power Cord The attached power cord is a standard 4-wire dryer cord and is UL approved and listed in the USA and Canada. It meets the following requirements:
- 208-240 volt rated (minimum);
- 30 amps;
- Type SRDT or DRT (UL 2158A).
NOTICE: If your specific installation requires a 3-wire power cord follow the installation instructions for such in the next section of this manual.
ALL ELECTRICAL CONNECTIONS AND CIRCUITS
WARNING
ELECTRIC SHOCK
- Do not pull on the power cord to unplug the dryer.
- Protect the power cord from physical damage such as being twisted, kinked, pinched, or walked on for example.
- DO NOT use an extension cord or an adapter to connect the dryer to the power supply.
- Make sure:
- The power cord fits into the outlet/receptacle.
- The home’s internal power supply circuit wire size is sufficient and electrically grounded.
- The outlet/receptacle used to power the dryer must be connected to an individual 30 amps
- Branch Circuit.
- Do not cut, remove or bypass the grounding prong on the power cord end.
- Do not modify the plug provided. If the plug will not fit into the outlet/receptacle have it inspected by a qualified electrician.
- The power cord must only be replaced by a qualified technician or licensed electrician to help avoid a fire/electric shock hazard. Replacement power cords are available through our Customer Service department.
- Use only a UL listed 30 amps power cord.
- Do not reuse old power cord.
- Do not make a sharp bend or crimp wiring or conductors at connections.
- Use only a 4-wire/conductor power cord when the appliance is installed in a mobile home, recreational vehicle, in a new branch-circuit installations or where the local codes do not permit grounding through the neutral.
ELECTRIC SHOCK
To reduce the risk of electrical shock:
- Only pull out the main cable by the plug and never by the cable, as this could damage it.
- Never touch or hold the main plug with wet hands.
- Never unplug the main plug during operation.
ELECTRIC SHOCK
- Improper connection of the ground may result in electric shock. Have the appliance checked by a qualified technician or licensed electrician if you are in doubt as to whether the dryer has been properly grounded.
Grounding Instructions
This appliance must be electrically grounded. In the event of malfunction or breakdown, grounding will reduce the risk of electric shock by providing a path of least resistance for electric current.
This appliance is equipped with a cord that has an equipment grounding conductor and a grounding plug. The plug must be plugged into an appropriate outlet that is properly installed and grounded in accordance with all local codes and ordinances.
If a ground fault circuit breaker is used, ensure it has this symbol: 
This symbol guarantees compliance with all current regulations.
SAVE THESE INSTRUCTIONS
Connecting a 3-wire power supply cord
The power cord must meet the following requirements:
- 208-240 volt rated (minimum);
- 30 amps;
- Type SRDT or DRT (UL 2158A).
- Unplug the current power cord being used from the outlet/receptacle.
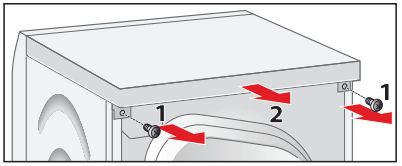
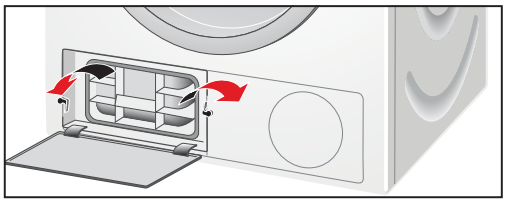
- To disconnect and/or reconnect a new power cord you must remove the top cover of the appliance as shown below.
- A.Remove the two T20 torx head screws.
- B.Push the top cover toward the rear of the appliance and lift up
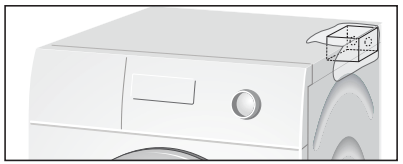
3. Open the connection box toward the rear of the appliance by removing the T20 torx head screw fastening the cover.
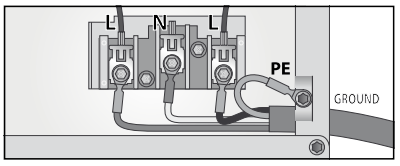
4. Remove the 4-wire power cord (as supplied):
A.Remove the 3 Philips screws (2 labeled L and one labeled N).
B.Remove the green grounding screw PE (T20 torx).
NOTICE: Be careful not to drop the screws into the dryer.
5. Loosen the strain relief clamp screw (Philips head) on rear of the connection box.
6. Pull the old power cord out of the connection box.
7. Install the new power cord back through the strain relief clamp.
NOTICE: Ensure the strain relief clamp has not been moved and its clamping screw(s) are outside the rear of the connection box.
8. Ensure the terminal ends are long enough and are formed (bent) so that no part of them (wires or terminal ends) come in contact with connection box enclosure.
NOTICE: Use only open-end spade lugs.
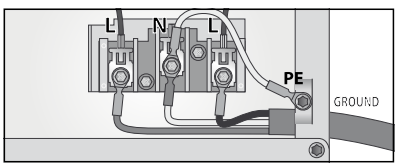
9. Ensure the terminal ends are long enough and are formed (bent) so they will align with the terminal block fastening locations (screw holes).
10.Reinstall the 2 terminal block screws (Philips head) at locations L as shown below.
11.If the ground wire shown below from N to PE is not part of the 3-wire cord assembly you have it must be obtained/purchased separately and it must be installed.
12.Install the last terminal block screw (Philips) and 1 grounding screw (T20 torx) at locations N and PE.
13.Tighten the strain relief screw ensuring the power cord cannot be pulled out of the connection box but not so tight as cut the power cord insulation.
14.Reinstall the connection box cover making sure all wires are routed so they do not touch any part of the enclosure and are secure.
15.Reinstall the appliance top cover as previously described in “2” point above.
Integrated electrical receptacle
This appliance is equipped with a 208/240V 15A receptacle for use ONLY with Bosch washer listed below.
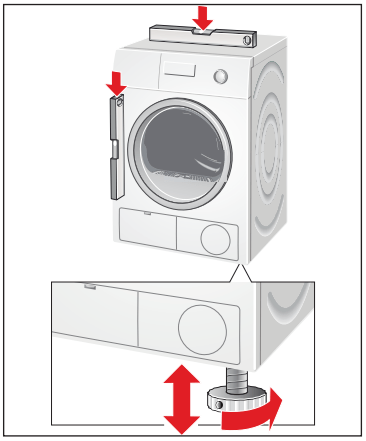
Leveling the dryer
Importance of leveling the dryer
It is important that your dryer is level and that all four dryer feet press with equal pressure against the floor. This will help assure the quietest, most vibration-free use of your dryer.
To adjust the dryer feet:
- Install the dryer on a level and solid surface, preferably in a corner of a room.
- If the floor is uneven (or not level) adjust the dryer feet as required to level the dryer. Do not place anything under the dryer feet to help level the dryer.
- Extend the dryer feet no more than is necessary. The more the feet are extended, the more vibration the dryer will experience. Start with the dryer feet turned all the way in and adjust each foot as necessary.
- Use a bubble level to check the top of the dryer to make sure it is level side to side and front to rear.
- Press down on each corner of the dryer top to make sure the dryer does not “wobble“. There should be no "give" or movement. All four dryer feet should press equally against the floor. This is just as important as the dryer being level to prevent vibration.
Check heating system
- Check that the drum is empty.
- Close the dryer door.
- Switch the dryer to Extra Dry and then press the Start/Pause button.
- After 3-5 minutes press the Start/Pause button and open the door.
- If the interior of the dryer feels warm, the dryer has been connected properly. Switch the dryer to Off.
- If the dryer does not work, switch the dryer to Off. Look in the Troubleshooting section of this user manual and find the fault.
Preparing to transport the dryer - step by step
- Rotate the program selector to Off.
- Pull out power supply plug.
- Place any accessories in the drum.
- Close the door and secure with adhesive tape.
- Screw the height-adjustable feet of the dryer into the housing to prevent them from being damaged during transportation.
Getting to know your appliance
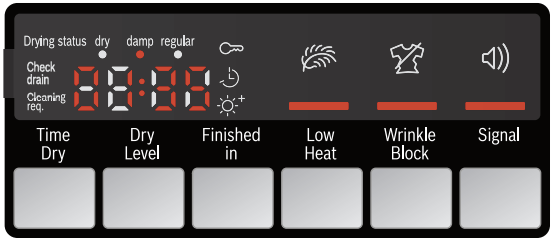
Control panel
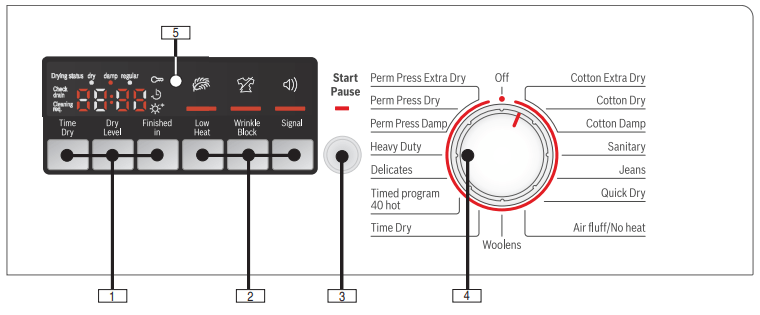
1 Time Dry, Dry Level, Finished in
- Changing the program settings. Indicator lamp lights up if the setting is active.
2 Low Heat, Wrinkle Block, Signal
- Additional option settings. Indicator lamp lights up if the setting is active.
3 Start/Pause
- starts or pauses the selected cycle;
- indicator lamp on (steady) - cycle running, can be paused;
- indicator lamp blinking - settings can be changed; cycle can be started; door is closed; childproof lock is active; cycle is in Pause mode.
4 Program Selector
- Selecting a program and switching on/off; turns in both directions.
5 Display area for settings and information.
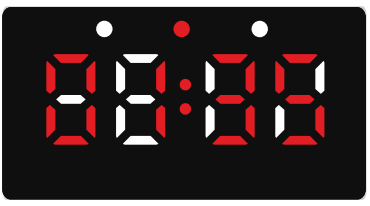
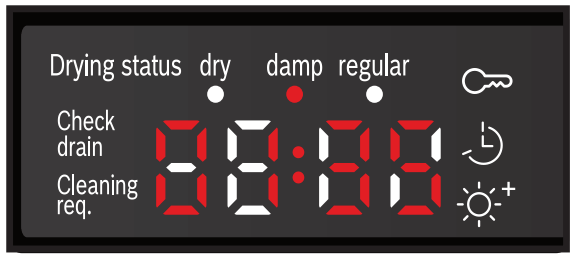
Display area
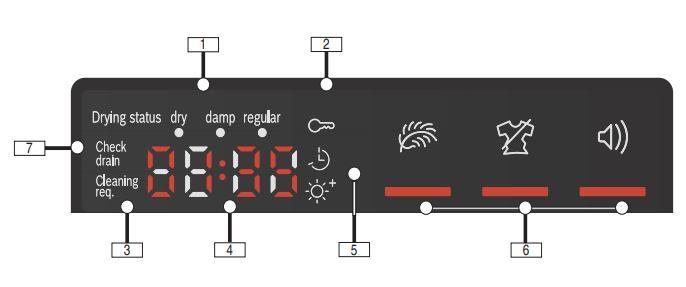
- Drying cycle status sequence
- Childproof lock indicator
- Cleaning required indicator
- 4 Digit Display:
- Finished in time adjustable in 1h (h=hour) steps to 24h
- program duration 3:00
- Time Dry
-199246.png) and Dry Level
and Dry Level -291946.png) indicators
indicators
- Indicator lamps for additional option settings: Low Heat, Wrinkle Block and Signal
- Check drain indicator
Laundry
Preparing the laundry
NOTICE: Damage to the appliance/fabrics
Foreign objects (e.g. coins, paper-clips, needles, nails) may damage the laundry or components in the dryer.
Therefore, note the following tips when preparing your laundry:
* Empty all pockets to ensure no loose debris (coins, keys, other hard objects and cigarette lighters) are placed in the dryer drum. The drum must be empty prior to drying
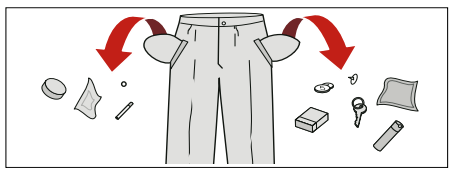
- Close any fasteners (such as zippers, hooks and eyelets) that could cause laundry to catch or become entangled. Button up covers. Tie cloth belts, apron strings, etc. together or use a laundry bag.
- Remove any foreign objects or non-washable parts.
- Always dry very small items (such as socks and handkerchiefs) and underwired bras together with large items of laundry or in a laundry bag.
Sorting the laundry
Check the care labels on each laundry item prior to drying. They provide valuable information as well as limitations about the temperature of drying process. Choose an appropriate drying cycle.
Do not dry the following textiles in the dryer:
- air-tight textiles (e.g. rubberized),
- delicate fabrics (silk, synthetic curtains),
- oil-stained laundry.
Drying tips
- To ensure a uniform drying result, sort the laundry according to fabric type and drying program.
- Do not over-dry easy-care laundry - risk of wrinkling! Allow laundry to finish drying in the air.
- Do not iron laundry immediately after drying. Place the laundry in a pile for a short while. Residual moisture will then be distributed uniformly.
- Knitted fabrics (e.g. T-shirts, jerseys) often shrink when tumble-dried for the first time. Do not use the Extra Dry program.
- Do not dry woolens in the dryer. They may, however, be refreshed by using the Woolens program.
- Starched laundry is not always suitable for dryer. Starch leaves behind a coating that reduces the drying effect.
- When washing laundry that is to be tumble-dried afterwards, use the correct amount of fabric softener as specified in the manufacturer’s instructions.
- For pre-dried, multi-layered fabrics or small, individual items of laundry, use the Time program. ~ Program selection table; Also suitable for subsequent drying.
Operating Instructions
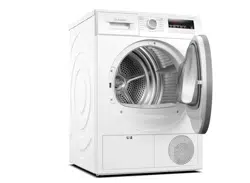
Your new dryer
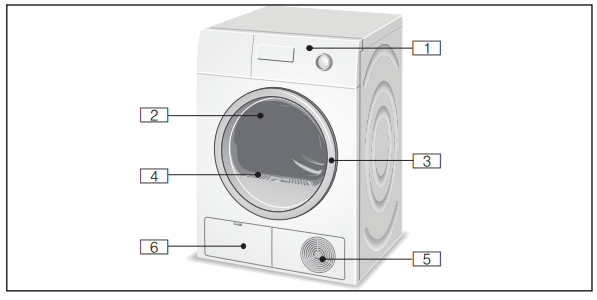
- Control panel, display area, program selector
- Drum with interior light (depending on model) The light up after the door is opened and after the program starts, and switches off automatically
- Open the door & Close the door

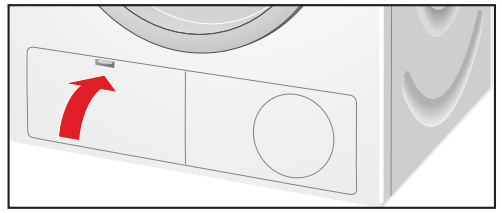
4. Lint filter
5 Air inlet
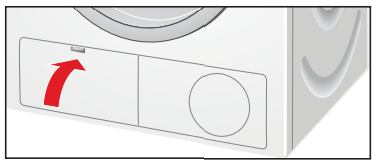
6 Open the maintenance flap
Heat exchanger
Close the maintenance flap
WARNING
BEFORE INSTALLING OR USING YOUR DRYER
- Read and follow all installation and operating instructions.
Check the machine. Never start a damaged machine! Contact your customer service! ~ Customer service;
Check to be sure your household electrical system voltage and the voltage specifications on the dryer rating plate correspond.
Check to be sure the dryer drain hose is installed properly.
Turning the dryer on and off
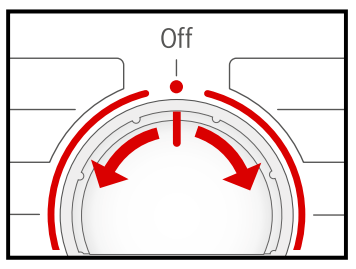
The rotating Program Selector turns the dryer on as drying cycle is selected and off when the selector is later turned to the vertical Off position.
Before using the dryer for the first time
- Read these operating instructions carefully.
- Check that the supply voltage corresponds with the voltage specifications on the rating plate on the dryer, see top rear side of the dryer and/or rating plate label inside of the dryer door.
- Remove all objects from the drum.
- Check the dryer for visible damage. If damage found contact your dealer.
- Wipe the inside of the drum with a damp cloth.
- Check heating system. ~ Check heating system;
- If the dryer does not work, switch the dryer to Off. Look in the Troubleshooting section of the operating instructions and find the fault. ~ Troubleshooting;
Temporary disconnection of the dryer
Operate your dryer only when you are at home. If you intend going on vacation or are not using your dryer for an extended period of time, you should:
- Turn off the circuit breaker.
- Pull out the power supply plug if possible.
- Clean the lint filter.
Using the program selector to choose a drying cycle
NOTICE: If you have activated the childproof lock, you must deactivate it before you can set a program.
Use the program selector to select the desired drying cycle. Turns in both directions. The machine is switched on.
In the display area, the cycle duration for the selected program appears.
Program selection
For optimum drying results your dryer offers several program groups and additional options. Select the required drying program from the program table according to the examples. ~ Program selection table;
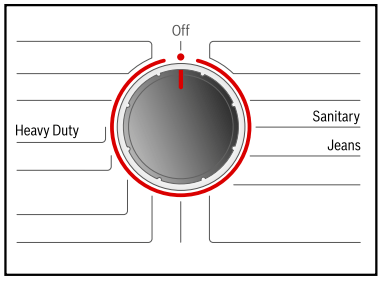
Automatic programs
There are automatic programs for different types of textiles (regular/cotton, permanent press).
The program sequence of automatic programs is controlled by sensors. The duration of the program depends on the measured degree of moisture in the laundry and on the selected degree of dryness (e.g. Cotton Dry or Cotton Extra Dry).
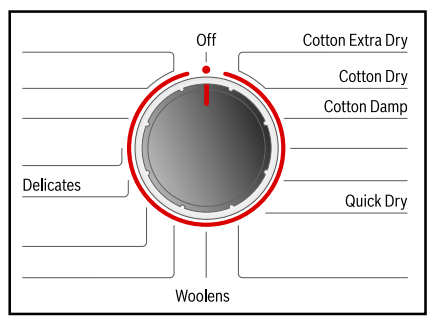
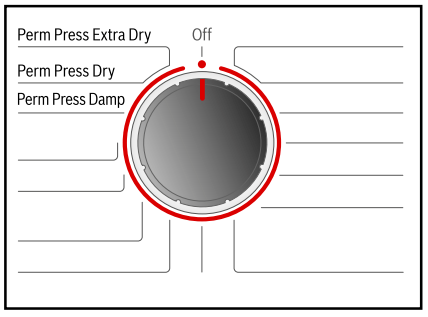
Special programs
The programs Sanitary, Jeans, Active Wear, AntiShrink, Super Quick 15 min, Towels, Mixed and Heavy Duty (depending on model) are made for special application cases. Details. ~ Program selection table;
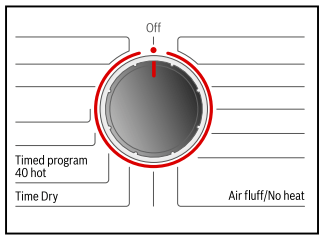
Time programs
Time programs run at specific temperatures. Suitable for prie-dried, multi-ply, delicate textiles or individual small items. Also for subsequent drying. ~ Program settings;
Selecting program settings and additional options
By selecting program settings and additional options, you can adjust the drying process still better to suit the items you are drying. The settings can be selected and deselected depending on the cycle progress.
The indicator lamps of the buttons light up if the setting is active.
For Time Dry, Finished in, Low Heat, Wrinkle Block and Signal the settings are not retained after the appliance is switched off.
~ Program settings;
~ Additional options;
For Dry Level the setting is retained after the appliance is switched off.
~ Dry Level;
Loading the laundry
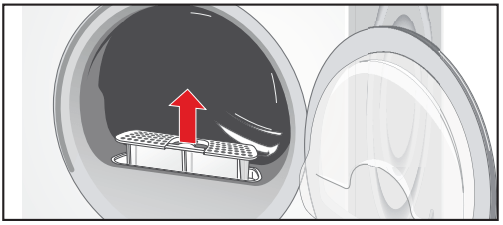
1. Check lint filter.
The filter should be cleaned after or before every drying process. Cleaning the filter reduces the drying time and saves energy. ~ Cleaning the lint filter;
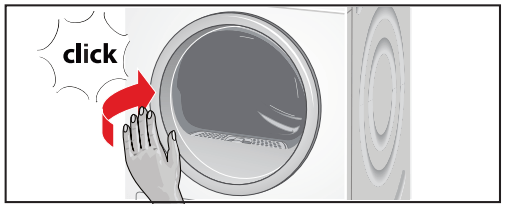
2. Load the laundry into the drum and close the door.
Tip: If the door has not been closed properly, the dryer will not start
Tips
After loading, close the door carefully so as not to trap any items between the door and the rubber seal. The door should close until a click is heard.
Foreign objects left in the drum may damage laundry. Before inserting any laundry, check to make sure no foreign objects are in the drum.
Recommended Load Size
Recommended maximum load size can be found in the program selection table in this manual. ~ Program selection table;
Load the laundry
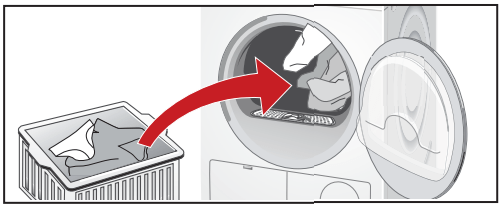
Place laundry in the empty drum. Put each piece of laundry into machine separately. For best results the laundry to be dried must be sorted according to type of laundry and desired degree of drying.
~ Program selection table;
~ Sorting the laundry;
~ Dry Level;
Starting the program
1. Rotate program selector to the desired program. Select the program which corresponds to the laundry in the dryer from Program selection table.
~ Program selection table;
The Start/Pause indicator light starts flashing.
2. Press the Start/Pause button. Indicator lamp lights up and the cycle starts.
During the cycle, the display area indicates the estimated remaining time and, after starting the drying cycle, the cycle duration and the symbols for the cycle progress are flashing. ~ Display area;
3. If required, select Low Heat by pressing the button. ~ Additional options;
4. If required, select Wrinkle Block by pressing the button. ~ Additional options;
Tip: The estimated remaining time will be updated.
Indicator of program sequence
The dryer uses an electronic control system. A moisture sensor continuously checks the moisture in the laundry. Drying ends automatically as soon as the selected degree of dryness has been reached. The drum continues to rotate at specific intervals for one hour to prevent creasing. The current state of the process and level reached during the program sequence is indicated by indicator lights (dry, damp, regular).
Cleaning and care
Cleaning the housing and control panel
Wipe the housing and fascia with a soft cloth and soapy water only.
Wipe the drum, door seal and inside of the door with a damp cloth only.
NOTICE: Do not clean with a water jet.
Remove detergent and cleaning agent residue immediately.
During drying, water may occassionally accumulate between the window and the seal. This does not affect the proper operation of your dryer.
Cleaning the lint filter
A dirty filter extends the drying time and increases energy consumption.
The filter should be cleaned before or after each drying process.
If the Cleaning req. indicator lights up during a drying program, clean the filter immediately.
Tip: The program interrupts automatically.
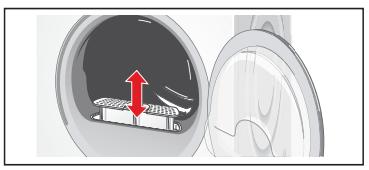
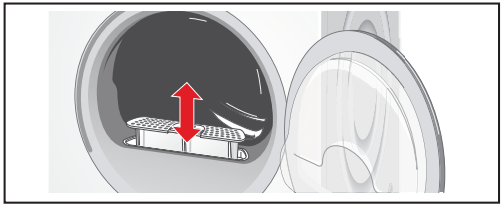
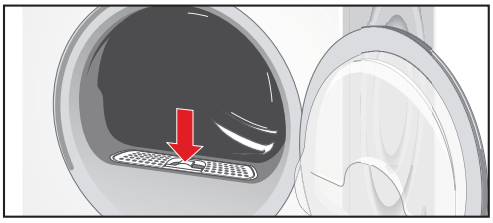
To clean the lint filter:
1. Switch off the dryer. Rotate the program selector to Off.
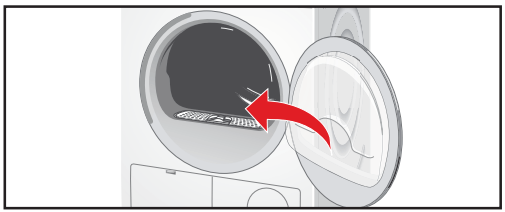
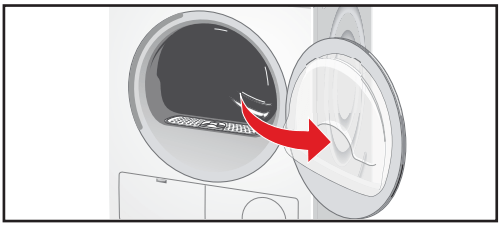
2. Open the door.

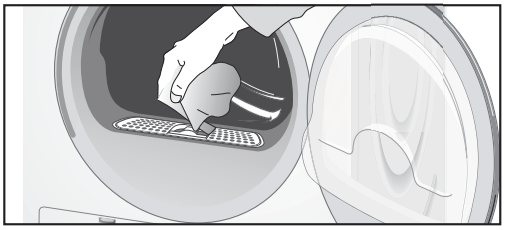
3. Pull out filter.
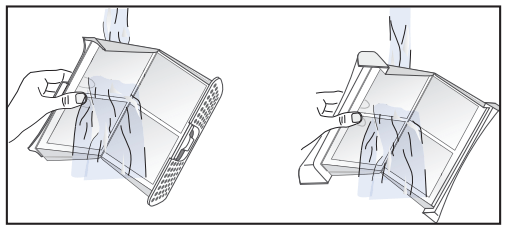
4. Open the filter.
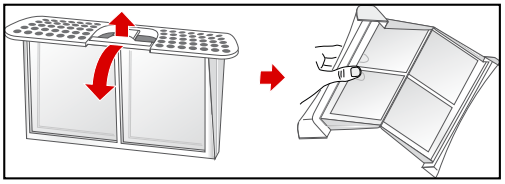
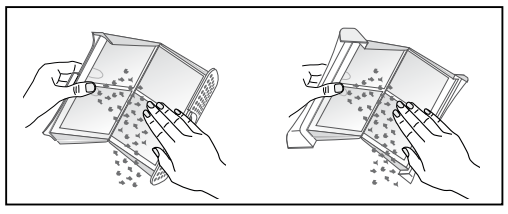
5. Remove fluff (run hand over filter).
6. Close the filter and re-insert it.
7. Close the door.
NOTICE: The filter should be rinsed once a year under warm running water. The filter must be dried thoroughly before being replaced.
Cleaning the heat exchanger
The heat exchanger requires periodic cleaning (recommended once per month under normal drying conditions). The frequency of cleaning depends on the amount and type loads being dried.
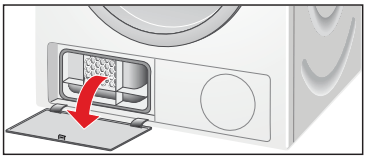
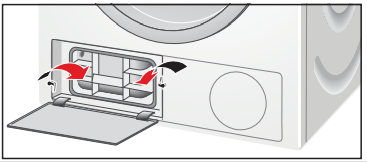
To clean the heat exchanger:
1. If the dryer is hot, run on Air fluff/No heat program to allow the dryer to cool down.
2. Residual water may escape, place an absorbent cloth under the maintanance flap.
3. Unlock the maintanance flap and open it completely.
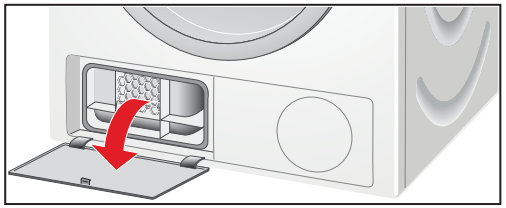
4. Turn both locking levers towards each other.
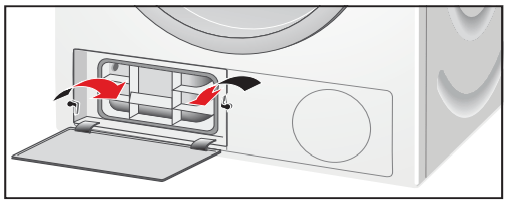
5. Pull out the heat exchanger cap.
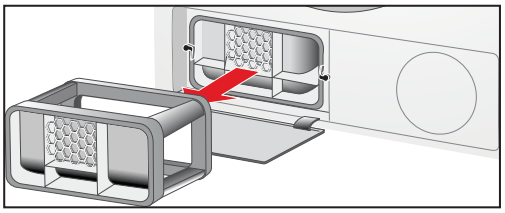
6. Remove the heat exchanger.
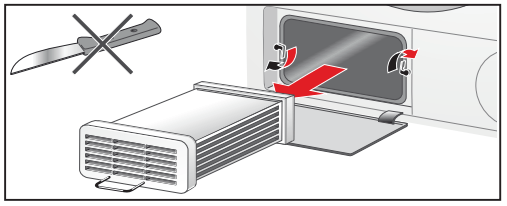
NOTICE: Do not damage the heat exchanger! Clean with warm water only. Do not use hard/sharp-edged objects!
7. Rinse the heat exchanger and the cap on all sides with a jet of water to completely remove all of the fluff.
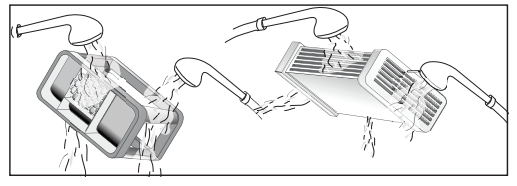
8. Remove any fluff from the seals on the dryer and heat exchanger.
9. Allow the cap and the heat exchanger to dry fully.
10. First insert the heat exchanger, then the cap.
11. Turn back both locking levers.
12. Close the maintanance flap until it locks into position.
13. Look in the Troubleshooting table also to reset the maintenance indication. ~ Troubleshooting;
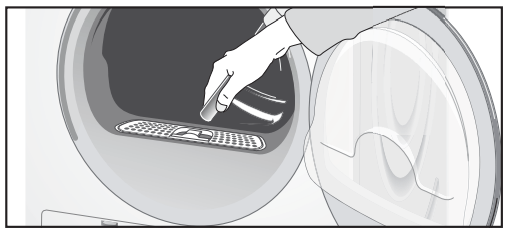
Cleaning the moisture sensors
Occasionally the moisture sensors have to be cleaned because a fine layer of transparent buildup is deposited on the sensors.
To clean the moisture sensors:
1. Open the door
2. The deposit on the sensors can easily be removed by wiping the sensors (the two bars next to the lint filter) with a cloth and a little white vinegar.
NOTICE: Use white vinegar only! Clean the moisture sensors once a month.
Cleaning the lint filter area
Over time, fluff from the drying process collects in the lint filter area.
This fluff can be easily removed using your vacuum cleaner, at least once a month.
Maintenance of drain hose
If Check drain indicator lights up, check the drain hose, it may be kinked or bent, and/or the drain hose connection conditions.
NOTICE: If Check drain indicator still lights up after the maintenance, you should contact customer service or your local dealer.
Troubleshooting
Introduction
NOTICE: Before doing maintenance work or trying to rectify a problem by yourself, rotate the program selector to Off.
The program will not continue running when the power supply has been restored. Desired program must be selected again and start button pressed.
Troubleshooting
If you encounter a problem, it often will merely be something minor. Before you call customer service, consider the suggestions and instructions below:
NOTICE: The troubleshooting items listed below can help you resolve minor issues with your dryer quickly and without the necessity of waiting for a service call.
Service calls for issues that could have been solved by using this table may not be covered under the warranty. Please rule out any of these issues before calling customer service.
Determing the Problem
Dryer does not start. Start/Pause indicator light does not illuminate.
- Main plug not inserted at all or not inserted correctly.
- Insert main plug correctly.
- A fuse of power supply is tripped.
- Start/Pause button not pressed.
- Press Start/Pause button.
- Door not closed properly.
- Check if laundry is caught in the door, address the issue. Close the door until a click is heard.
- Ambient temperature below 41°F/ 5°C.
- Increase room temperature. ~ Your dryer is intended for;
- Program not selected.
- Rotate the program selector to desired program. ~ Program selection table;
The display panel lighting and indicator lights go out, Start/Pause indicator light flashes
- Energy-saving mode is activated.
- Press any button to activate the lighting. ~ Environmentally friendly use of your dryer;
The display panel switches off.
- Sleep mode after setting the Finished in option is activated.
- Press any button to activate the lighting.
The Cleaning req. indicator light up.
- Lint filter dirty.
- Clean lint filter. ~ Cleaning the lint filter; Press the Start/Pause button to reset the displayed indication and then press Start/Pause button again to reset the appliance if necessary.
- Heat exchanger dirty.
- Clean heat exchanger. ~ Cleaning the heat exchanger; Press the Start/Pause button to reset the displayed indication and then press Start/Pause button again to reset the appliance if necessary
The Check drain indicator light up. Water has not drained completely
- Drain hose is blocked.
- Check drain hose. ~ Maintenance of drain hose; Check drain hose connection conditions.
- Drain hose is leaking: is not screwed on the tight at both ends, or rubber not placed in hose.
- Check the drain hose, be sure that it is on the dryer securely with the clamp in place; may need to replace the drain hose if leaking continues.
Water is leaking out.
- Dryer is not leveled.
- Level the dryer. ~ Leveling the dryer;
- The heat exchanger seal is dirty.
- Clean the heat exchanger seal. ~ Cleaning the heat exchanger;
Program terminates shortly after starting.
- Ambient temperature greater than 41°F/5°C.
- Laundry is not loaded.
- Load the laundry. ~ Loading the laundry;
- Load too small for selected program.
- Use time program. ~ Program selection table;
- Loaded laundry dry.
- Check the loaded laundry. If it is dry, open the door, remove laundry and turn program selector to Off.
The door opens by itself.
- The door not closed properly.
- Close the door until a click is heard.
Creasing.
- Laundry load exceeded. Unsuitable program selected.
- Do not exceed the maximum load for selected program. Remove items of laundry immediately after the end of the program, hang them up and pull into shape. Turn program selector to Off. ~ Program selection table;
Drying result is not satisfactory (laundry feels too damp).
- Warm laundry may feel damper than it really is.
- Remove items of laundry immediately after the end of the program and turn the program selector to Off.
- The selected program does not suit the load.
- Use another drying program or, in addition, select the time program. ~ Program selection table;
- Dryness level is not adjusted.
- Use Dry Level to adjust the dryness level. ~ Dry Level;
- Fine layer of limescale on the humidity sensors.
- Clean the moisture sensors. ~ Cleaning the moisture sensors;
- Program termination e.g. main power supply failure, door open or maximum drying time reached.
- See the problem(s) mentioned in this table.
- Laundry is too wet.
- Spin laundry at higher speed in the washing machine, before drying.
- Switch off the dryer and switch on again.
Drying time too long.
- Lint filter is dirty.
- Clean lint filter. ~ Cleaning the lint filter;
- Insufficient supply of air. Air inlet possibly blocked.
- Ensure that air can circulate. Do not obstruct the air inlet on the front of the dryer.
- Ambient temperature higher than 95°F/35°C.
Program does not start Finished in (remaining) time is displayed.
- Program ending time has been selected and activated.
- Drying cycle will begin at proper time to complete at the selected Finished in time.
Program does not start - symbol light up.
- Childproof look is activated.
- Deactivate Childproof look. ~ Childproof lock;
One or more indicator lights are flashing.
- int filter or/and heat exchanger is dirty.
- Clean lint filter or/and heat exchanger (see solution of the problem(s) in this table above).
- Installation conditions are not fine.
- Check the installation conditions. ~ Electrical Connections;
- Fault in program sequence or malfunction.
- Switch off the dryer, allow it to cool down, switch back on and restart the program.
Power failure.
Remove laundry from the dryer immediately and spread out. This allows the heat to dissipate. Be careful as the door, the drum and the laundry may be hot.