[PI00200(ALL)07/96]
thirty-two pica
chart:0050269-B
File:01wnpis.ex
Update:Thu Jul 18 10:53:43 1996

*
[PI00300(ALL)05/96]
thirty-six pica chart:
File:01wnpis.ex
Update:Thu Jul 18 10:53:43 1996

*
[PI01800(ALL)05/95]
Table of Contents
Introduction ..................... 1
Instrumentation .................... 7
Audio ........................41
Controls and Features .................81
Seating and Safety Restraints ............. 147
Starting ...................... 217
Driving ...................... 223
Roadside Emergencies ................ 247
Maintenance and Care ................ 279
Capacities and Specifications ............. 333
Reporting Safety Defects ............... 339
Customer Assistance ................ 341
Accessories ..................... 351
Quick Index .................... 357
Index........................ 367
Service Station Information ............. 388
File:01wnpis.ex
Update:Thu Jul 18 10:53:43 1996

1
Introduction
*
[II00200(ALL)01/96] Ford’s Commitment to You
*
[II00300(ALL)01/96]
At Ford Motor Company, excellence is the continuous
commitment to achieve the best result possible. It is dedication
to learning what you want, determination to develop the right
concept, and execution of that concept with care, precision, and
attention to detail. In short, excellence means being the standard
by which others are judged.
*
[II00400(ALL)01/96]
Our Guiding Principles
*
[II00500(ALL)01/96]
■ Quality comes first. For your satisfaction, the quality of our
products and services must be our number one priority.
*
[II00600(ALL)01/96]
■ You are the focus of everything we do. Our work must be
done with you in mind, providing better products and
services than our competition.
*
[II00700(ALL)01/96]
■ Continuous improvement is essential to our success. We
must strive for excellence in everything we do: in our
products — in their safety and value — and in our services,
our human relations, our competitiveness, and our
profitability.
*
[II00800(ALL)01/96]
■ Employee involvement is our way of life. We are a team.
We must treat one another with trust and respect.
*
[II00900(ALL)01/96]
■ Dealers and suppliers are our partners. We must maintain
mutually beneficial relationships with dealers, suppliers, and
our other business associates.
*
[II01000(ALL)01/96]
■ Integrity is never compromised. Our conduct worldwide
must be pursued in a manner that is socially responsible and
commands respect for its integrity and for its positive
contributions to society.
File:02wniis.ex
Update:Mon Jul 8 14:10:59 1996

2
*
[II01100(ALL)03/96] Things to Know About Using This Guide
*
[II01200(ALL)03/96]
Congratulations on the purchase of your new vehicle. This
guide has information about the equipment and the options for
your new vehicle. You may not have bought all of the options
available to you. If you do not know which information applies
to your vehicle, talk to your dealer.
*
[II01300(ALL)03/96]
This guide describes equipment and gives specifications for
equipment that was in effect when this guide was approved for
printing. Ford may discontinue models or change specifications
or design without any notice and without incurring obligation.
*
[II01400(ALL)03/96]
NOTES and WARNINGS
*
[II01500(ALL)02/96]
NOTES give you additional information about the subject
matter you are referencing.
*
[II01600(ALL)01/96]
WARNINGS remind you to be especially careful in those areas
where carelessness can cause damage to your vehicle or
personal injury to yourself, your passengers or other people.
Please read all WARNINGS carefully.
*
[II01700(ALL)01/96]
R WARNING
*
[II01800(ALL)01/96]
Finding Information in This Guide
*
[II01900(ALL)12/95]
After you have read this guide once, you will probably return
to it when you have a specific question or need additional
information. To help you find specific information quickly, you
can use the Quick Index or the Index.
*
[II02000(ALL)03/96]
The Quick Index at the end of the book provides a page
number following each item which indicates where detailed
information can be found.
File:02wniis.ex
Update:Mon Jul 8 14:10:59 1996

Introduction
3
*
[II02100(ALL)01/96]
To use the Index, turn to the back of the book and search in the
alphabetical listing for the word that best describes the
information you need. If the word you chose is not listed, think
of other related words and look them up. We have designed the
Index so that you can find information under a technical term.
%
*
[II02200(ALL)01/96]
Canadian Owners — French Version
*
[II02300(ALL)01/96]
French Owner Guides can be obtained from your dealer or by
writing to Ford Motor Company of Canada, Limited, Service
Publications, P.O. Box 1580, Station B, Mississauga, Ontario L4Y
4G3.
%
*
[II02400(ALL)05/96] Your Maintenance Schedule Booklet
*
[II02500(ALL)03/96]
The Maintenance Schedule booklet lists the services that are most
important for keeping your vehicle in good condition. A record
log is also provided to help you keep track of all services
performed.
%
*
[II02600(ALL)01/96] About the Warranties
*
[II02700(ALL)01/96]
Your vehicle is covered by three types of warranties: Basic
Vehicle Warranty, Extended Warranties on certain parts, and
Emissions Warranties.
%
*
[II02800(ALL)01/96]
Read your Warranty Information Booklet carefully to find out
about your vehicle’s warranties and your basic rights and
responsibilities.
*
[II02900(ALL)03/96]
If you lose your Warranty Information Booklet, you can get a new
one free of charge. Contact any Ford or Lincoln-Mercury dealer,
or refer to the addresses and phone numbers on the first page
of this Owner’s Guide.
File:02wniis.ex
Update:Mon Jul 8 14:10:59 1996

4
%
*
[II03000(ALL)05/96]
Ford Extended Service Plan
*
[II03100(ALL)05/96]
If you bought your vehicle in the U.S., you can buy a Ford
Extended Service Plan for your vehicle. This optional contract
provides service protection for a longer period of time than the
basic warranty that comes with your vehicle.
*
[II03200(ALL)05/96]
You do not have to buy this option when you buy your vehicle.
However, your option to purchase the Ford Extended Service
Plan runs out after 18 months or 18,000 miles. See your dealer
for more details about the Ford Extended Service Plan.
*
[II03300(ALL)05/96]
If you purchased a Canadian vehicle and did not take
advantage of the Ford Extended Service Plan at the time of
purchase, you may still be eligible. See your dealer for the
details.
%
*
[II03400(ALL)01/96] Breaking Your Vehicle In
*
[II03500(ALL)01/96]
Your new vehicle goes through an adjustment or break-in
period during the first 1,000 miles (1,600 km) that you drive it.
During the break-in period, you need to pay careful attention to
how you drive your vehicle.
%
*
[II03600(ALL)01/96]
■ Avoid sudden stops. Because your vehicle has new brake
linings, you should take these steps:
*
[II03700(ALL)01/96]
— Watch traffic carefully so that you can anticipate when to
stop.
*
[II03800(ALL)01/96]
— Begin braking well in advance.
*
[II03900(ALL)01/96]
— Apply the brakes gradually.
*
[II04000(ALL)01/96]
The break-in period for new brake linings lasts for 100 miles
(160 km) of city driving or 1,000 miles (1,600 km) of
highway driving.
File:02wniis.ex
Update:Mon Jul 8 14:10:59 1996

Introduction
5
*
[II04100(ALL)05/96]
■ Wheel lug nuts must be retightened to proper torque
specifications at 500 miles/800 km of new vehicle operation.
Proper torque specifications are provided in this guide. Also
retighten to proper torque specifications at 500 miles/800 km
after any wheel change or any other time the wheel lug nuts
have been loosened.
%
*
[II04200(ALL)03/96]
■ Use only the type of engine oil that Ford recommends. See
Engine oil recommendations in the Index. Do not use special
“break-in” oils.
*
[II04300(ALL)03/96]
Your vehicle is equipped with an Electronic Powertrain Control
Module that limits engine and/or vehicle speeds with a cut-out
mode to promote durability.
File:02wniis.ex
Update:Mon Jul 8 14:10:59 1996

7
Instrumentation
%
*
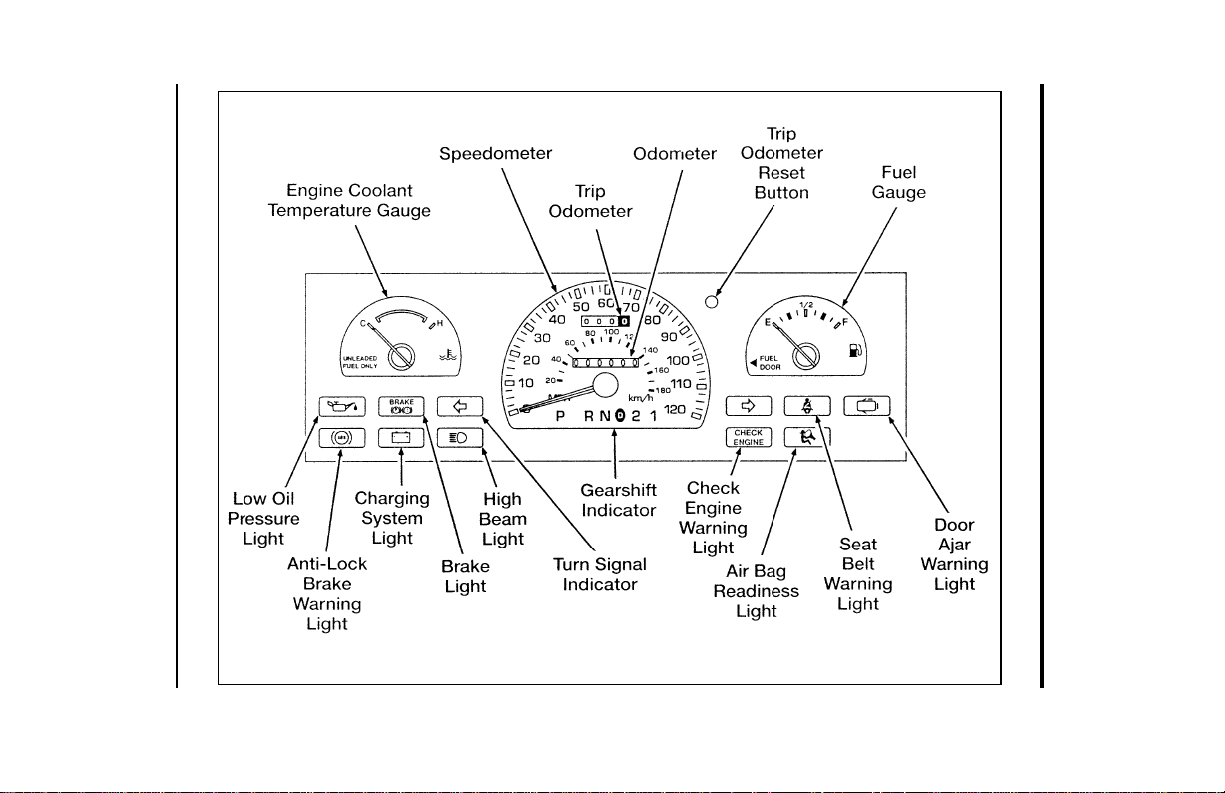
[IS00200(ALL)01/96]
The instrument panel (dashboard) on your vehicle is divided
into several different sections. The illustrations on the following
pages show the major parts of the instrument panel that are
described in this chapter. Some items shown may not be on all
vehicles.
*
[IS00300(ALL)05/96]
Your vehicle has one of the following clusters:
[IS00400(ALL)12/95]
■ Mechanical Cluster
[IS00500(ALL)12/95]
■ Mechanical Cluster with a tachometer
[IS00600(ALL)12/95]
■ Electronic Cluster
*
[IS00700(ALL)01/96]
If you are not sure which cluster your vehicle has, check the
diagrams on the following pages.
File:03wniss.ex
Update:Thu Jul 18 10:55:19 1996

8
[IS00800(ALL)01/96]
33-1/2 pica art:0050063-E
The instrument panel
File:03wniss.ex
Update:Thu Jul 18 10:55:19 1996
Instrumentation
9
[IS00900(ALL)12/95]
33-1/2 pica
art:0050230-C
Mechanical Cluster
File:03wniss.ex
Update:Thu Jul 18 10:55:19 1996
10
[IS01000(ALL)12/95]
33-1/2 pica art:0050127-F
The mechanical cluster with tachometer
File:03wniss.ex
Update:Thu Jul 18 10:55:19 1996
Instrumentation
11
%
*
[IS01300(ALL)01/96] The Mechanical Cluster
[IS01400(ALL)12/95]
The following warning lights and gauges are on the Mechanical
Cluster. All of these indicators alert you to the status of vehicle
systems or possible problems with your vehicle. Some of the
lights listed are optional. The following section explains each of
the indicators.
[IS02100(ALL)12/95] Warning and Indicator Lights
%
*
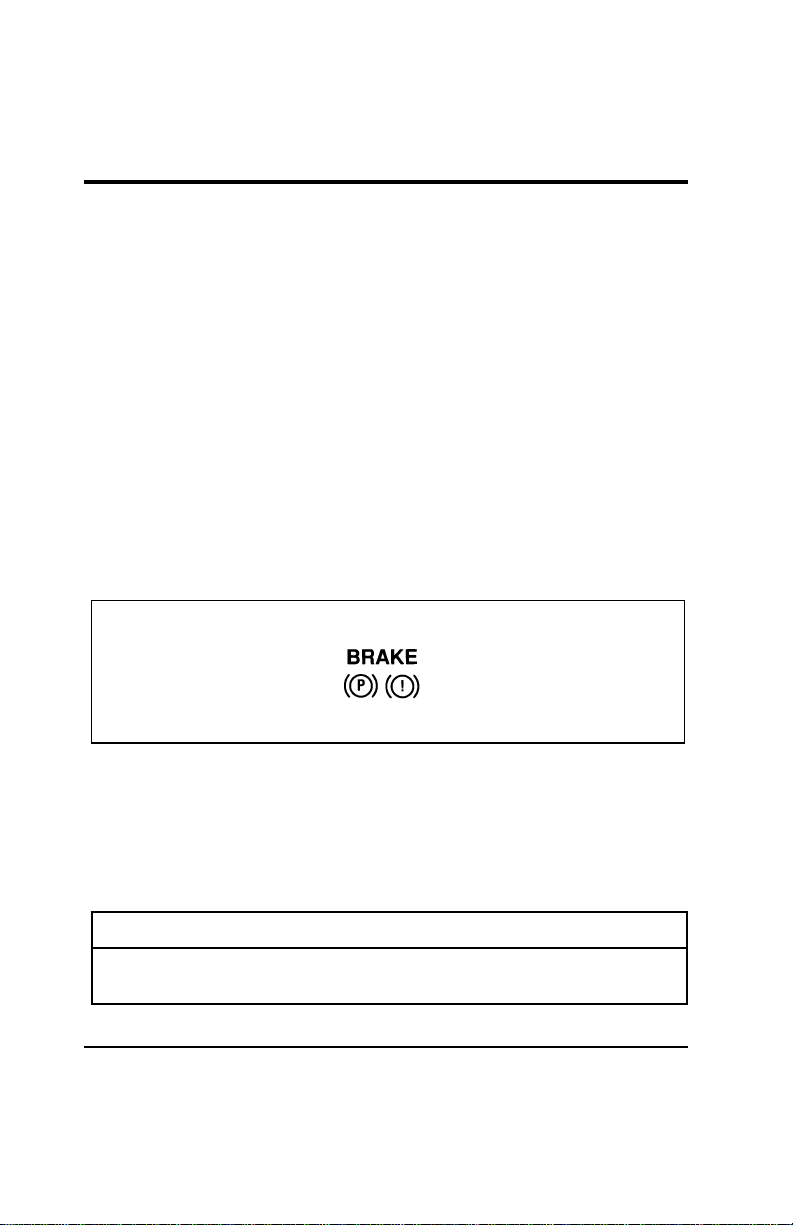
[IS02200(ALL)03/96]
Brake System Light
[IS02300(ALL)07/96]
The warning light for the brakes indicates two things — that
either the parking brake is on or not fully released, or that the
brake fluid level is low in the master cylinder reservoir. If the
fluid level is low, add fluid to the reservoir as defined under
the procedure in “Maintenance and Care.”
[IS02400(ALL)12/95]
6 pica art:0050144-B
The brake system light
[IS02500(ALL)07/96]
The BRAKE light normally comes on when you turn the
ignition key to the ON or START position to verify that the
indicator bulb is working. If the light stays on or comes on
when the engine is running and after you have released the
parking brake fully, check the brake fluid.
*
[IS02600(ALL)03/96]
R WARNING
The BRAKE light indicates that the brakes may not be
working properly. Have the brakes checked immediately.
File:03wniss.ex
Update:Thu Jul 18 10:55:19 1996
12
% [IS02700(ALL)12/95]
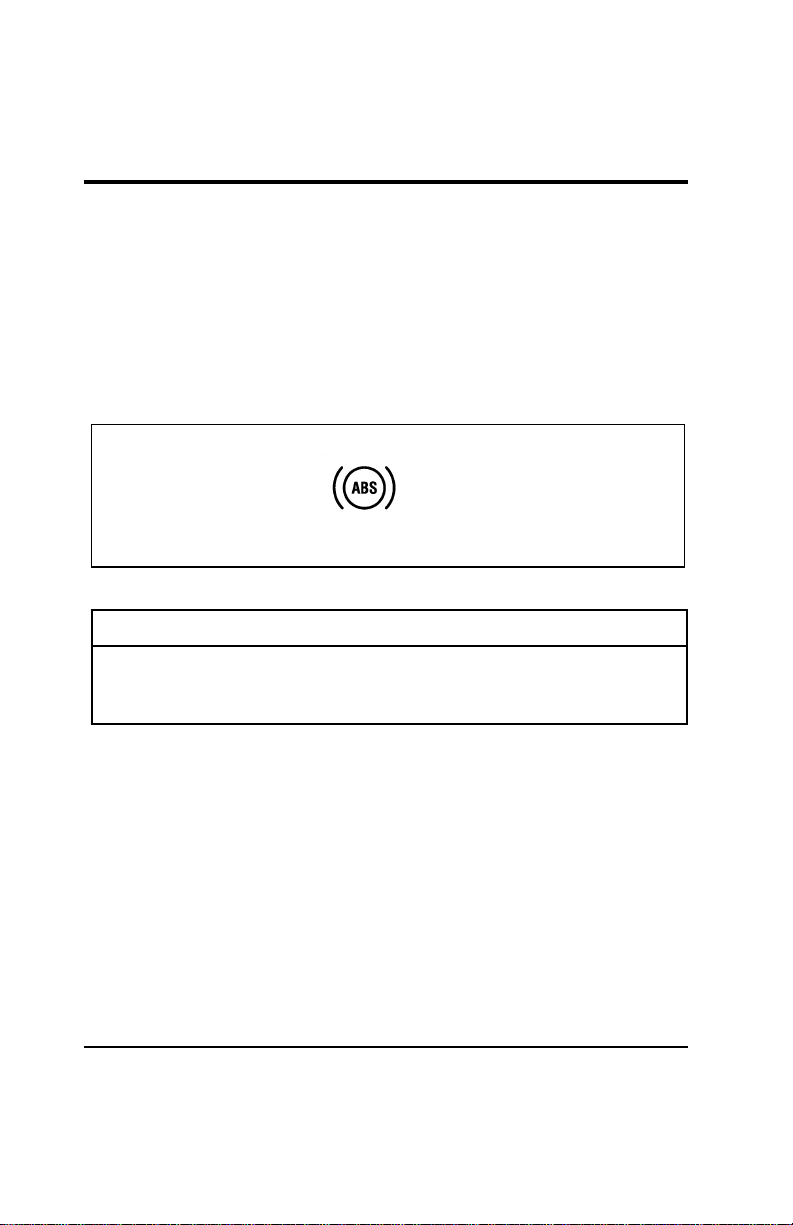
Anti-lock Brake System (ABS) Warning Light
*
[IS02800(ALL)01/96]
To check the anti-lock brake warning light, turn the ignition key
to the ON position. The ABS warning light should glow
momentarily.
*
[IS02900(ALL)01/96]
NOTE: If it does not glow at all or stays on for a long time,
have your vehicle’s electrical system checked
immediately.
[IS03000(ALL)12/95]
6 pica art:0050147-B
The anti-lock brake warning light
*
[IS03100(ALL)03/96]
R WARNING
If the anti-lock brake system warning light remains on or
comes on while driving, have the braking system checked
by a qualified service technician as soon as possible.
*
[IS03200(ALL)03/96]
NOTE: If a fault occurs in the anti-lock system, and the brake
warning light is not lit, the anti-lock system is
disabled but normal brake function remains
operational.
%
*
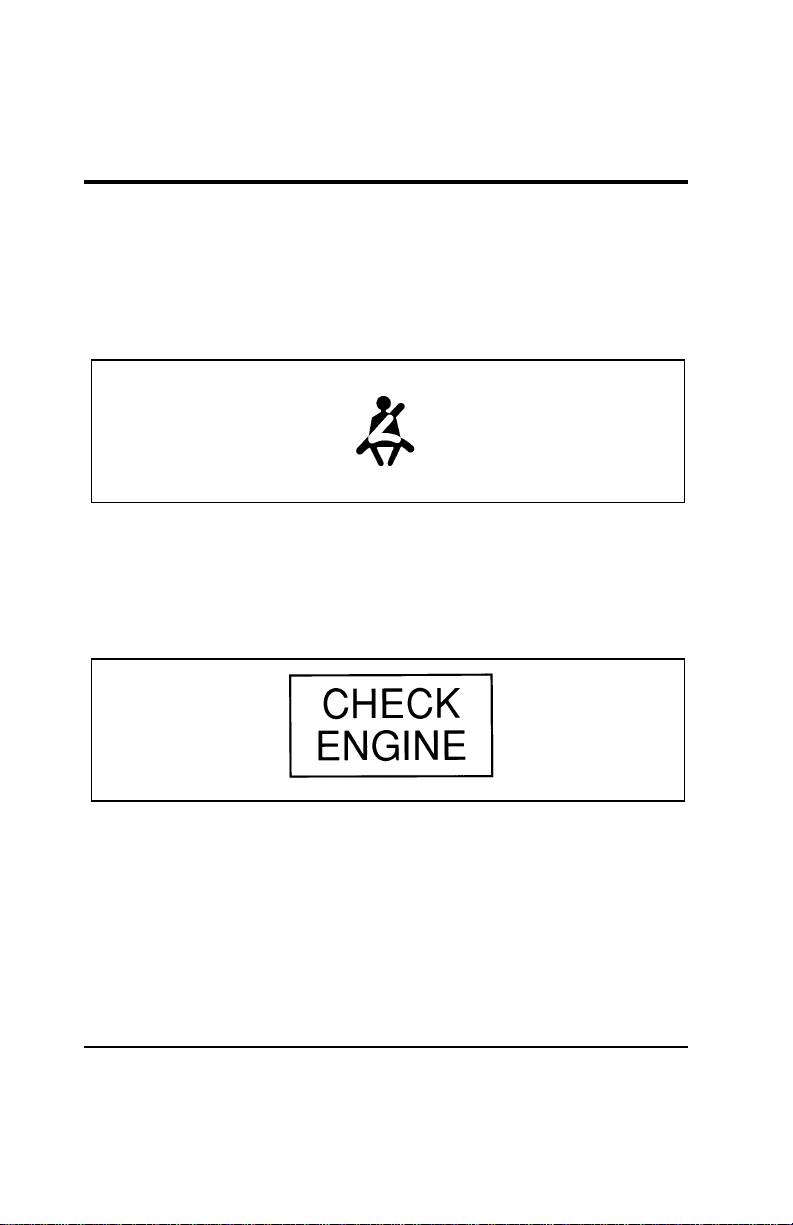
[IS03300(ALL)03/96]
Safety Belt Warning Light and Chime
*
[IS03400(ALL)03/96]
This warning light and chime remind you to fasten your safety
belt. The following conditions will take place:
[IS03500(ALL)12/95]
■ If the driver does not fasten the safety belt before the
ignition is turned to ON, the chime will sound for four (4) to
eight (8) seconds and the light will illuminate for one (1) to
two (2) minutes, or until the safety belt is fastened.
File:03wniss.ex
Update:Thu Jul 18 10:55:19 1996
Instrumentation
13
[IS03600(ALL)12/95]
■ If the driver fastens the safety belt before the ignition is
turned to ON, the chime will not sound and the light will
not illuminate.
[IS03700(ALL)12/95]
■ If the safety belt is buckled while the light is on and the
chime is sounding, both the light and the chime turn off.
[IS03800(ALL)12/95]
6 pica art:0050148-B
The safety belt warning light
%
*
[IS03900(ALL)03/96]
Check Engine Warning Light
%
*
[IS04000(ALL)05/96]
This light illuminates when the engine’s Emission Control
System requires service. It will also illuminate when the ignition
key is in the ON position and the engine is off.
[IS04100(ALL)12/95]
6 pica art:0050065-B
The check engine warning light
*
[IS04200(ALL)05/96]
Modifications or additions to the vehicle may cause incorrect
operation of the OBD II system. Additions such as burglar
alarms, cellular phones, and CB radios must be carefully
installed. Do not install these devices by tapping into or running
wires close to powertrain control system wires or components.
*
[IS04300(ALL)05/96]
The light comes on briefly when you turn the ignition key to
ON, but it should turn off when the engine starts. If the light
does not come on when you turn the ignition to ON or if it
File:03wniss.ex
Update:Thu Jul 18 10:55:19 1996

14
comes on and stays on when you are driving, have your vehicle
serviced as soon as possible. This indicates a possible problem
with one of the vehicle’s emission control systems. You do not
need to have your vehicle towed in.
[IS04400(ALL)05/96]
If the light turns on and off at one (1) second intervals while
you are driving the vehicle, it means that the engine is
misfiring. If this condition persists, damage could occur to the
engine or catalytic convertor. Have your vehicle serviced at the
first opportunity. You do not need to have your vehicle towed
in.
[IS04500(ALL)05/96]
If the light turns on and off on rare occasions while you are
driving, it means that a malfunction occurred and the condition
corrected itself.
*
[IS04600(ALL)05/96]
An example of a condition which corrects itself occurs when an
engine running out of fuel begins to misfire. In this case, the
Check Engine Warning Light may turn on and will then set a
Diagnostic Trouble Code indicating that the engine was
misfiring while the last of the fuel was being consumed. After
refueling, the Check Engine Warning Light will turn off after
the vehicle has completed three consecutive warm up cycles
without a misfire condition occurring. A warm up cycle consists
of engine start from a cold condition (engine at ambient
temperature) and running until the engine reaches normal
operating temperature.
[IS04700(ALL)05/96]
On the fourth engine start up, the Check Engine Warning Light
will turn off as soon as the engine begins to crank. It is not
necessary to have the engine serviced.
*
[IS04800(ALL)05/96]
Under certain conditions, the Service Engine Soon Light may
come on if the fuel cap is not properly installed. If the Service
Engine Soon Light comes on and you suspect that the fuel cap
is not properly installed, pull off the road as soon as it is safely
possible and turn off the engine. Remove and replace the cap,
making sure it is properly seated.
File:03wniss.ex
Update:Thu Jul 18 10:55:19 1996
Instrumentation
15
*
[IS04900(ALL)05/96]
After completing the three consecutive warm up cycles and on
the fourth engine start up, the Service Engine Soon Warning
Light should turn off. If the light does not go off after the
fourth engine re-start, have your vehicle serviced by your dealer
or a qualified technician.
%
*
[IS05000(ALL)01/96]
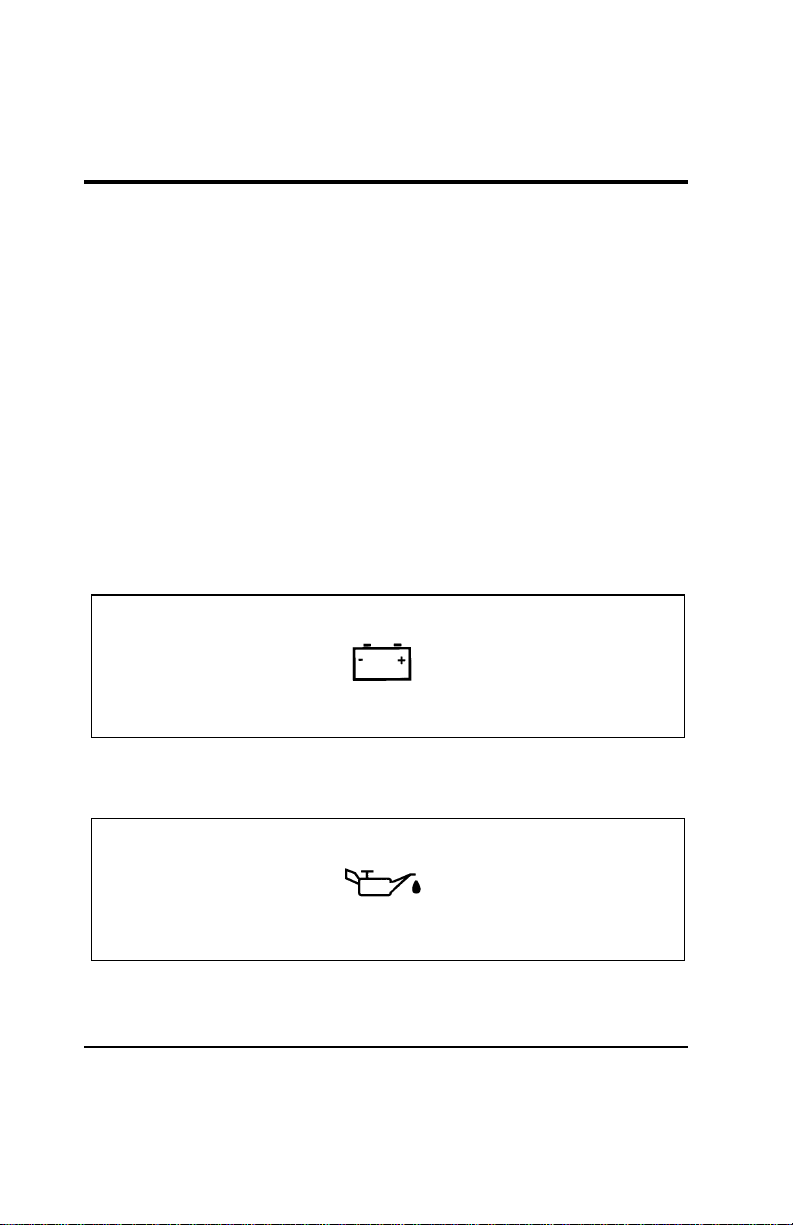
Charging System Light
[IS05100(ALL)07/96]
This light indicates that your battery is not being charged. The
light illuminates briefly during the display self-test every time
you turn your ignition key to the ON position. The light will go
off when the key is turned to the START position. The light
should stay off when the self-test is done if the engine is
running and the alternator is charging.
*
[IS05200(ALL)03/96]
If the light stays on or illuminates when the engine is running,
have the electrical system checked as soon as possible.
[IS05300(ALL)12/95]
6 pica art:0050149-B
The charging system light
% [IS05400(ALL)07/96]
Oil Pressure Light
[IS05500(ALL)12/95]
6 pica art:0050150-B
The oil pressure light
File:03wniss.ex
Update:Thu Jul 18 10:55:19 1996

16
[IS05600(ALL)12/95]
This light indicates the engine’s oil pressure, not the oil level.
However, if your engine’s oil level is low, it could affect the oil
pressure. The light should come on every time your ignition key
is turned to ON or START, and should go out when the engine
starts. If the light stays on or turns on while the engine is
running, you have lost oil pressure and continued operation will
cause severe engine damage.
*
[IS05700(ALL)07/96]
If you lose engine oil pressure:
*
[IS05800(ALL)07/96] 1. Pull off the road as soon as safely possible.
*
[IS05900(ALL)07/96] 2. Shut off the engine immediately. If you do not stop the
engine as soon as safely possible, severe engine damage
could result.
[IS06000(ALL)07/96] 3. Check the engine’s oil level. (See “Checking and Adding
Engine Oil” in the Maintenance and Care chapter of this
Owner Guide.) If you do not follow these instructions, you
or others could be injured. To ensure an accurate reading,
your vehicle should be on level ground.
[IS06100(ALL)07/96] 4. If the level is low, add only as much oil as necessary before
you start the engine again. Do not overfill. Do not operate
the engine if the light is on regardless of the oil level.
Contact your nearest dealer for further service.
%
*
[IS07000(ALL)01/96]
Door Ajar Warning Light
*
[IS07100(ALL)01/96]
If the ignition switch is in the ON position and any door or the
liftgate is not completely closed, the light will illuminate.
[IS07200(ALL)12/95]
If the light illuminates, safely stop the vehicle and check and
close all doors until the light turns off.
File:03wniss.ex
Update:Thu Jul 18 10:55:19 1996
Instrumentation
17
[IS07300(ALL)12/95]
6 pica art:0050151-B
The door ajar warning light
%
*
[IS07400(ALL)05/96]
Air Bag Readiness Light
[IS07500(ALL)12/95]
This light indicates that the Air Bag system is not functional
and needs to be serviced. The light illuminates for
approximately six seconds when the ignition is turned to the
ON position to verify that the indicator bulb is working. If the
light fails to illuminate, flashes continuously, or remains on,
have the air bag system serviced as soon as possible.
[IS07600(ALL)12/95]
6 pica art:0050153-B
The air bag readiness light
%
*
[IS07700(ALL)03/96]
Turn Signal Indicator Lights
[IS07800(ALL)07/96]
See “Turn Signals” in the Controls and Features chapter of this
Owner Guide.
[IS07900(ALL)12/95]
6 pica art:0050190-A
The turn signal indicator lights
File:03wniss.ex
Update:Thu Jul 18 10:55:19 1996
18
[IS08000(ALL)12/95]
If one or both of your turn signal indicators does not light up
or remains on continuously when you signal a turn, have the
turn signaling system serviced as soon as possible.
%
*
[IS08100(ALL)05/96]
High Beam Light
[IS08200(ALL)12/95]
This light comes on when the headlamps are turned to high
beam or when the high beams are flashed. If your vehicle is
equipped with Daytime Running Lights (Canadian vehicles
only) and the headlamps are on when the high beams are
flashed, the high beam indicator will not light.
[IS08300(ALL)12/95]
6 pica art:0050154-B
The high beam indicator light
% [IS08400(ALL)07/96]
Low Windshield Washer Fluid Level Warning
(Optional Chime with Light)
[IS08500(ALL)07/96]
This light indicates that the level of your washer fluid is low,
and you have to add more fluid. This light comes on briefly
after you turn your ignition key from the START to the ON
position. If the washer fluid is low, a one second chime will
sound and the light will remain on for 60 seconds. If the washer
fluid is not low, the light should turn off a few seconds after
the engine has started. The light and chime also come on if the
washer fluid is low when you use your windshield washers.
[IS08600(ALL)07/96]
The washer fluid is only checked when the engine is started or
the windshield washers are in operation. The light will not
come on if the fluid level becomes low while you are driving
unless you turn on the windshield washers.
File:03wniss.ex
Update:Thu Jul 18 10:55:19 1996
Instrumentation
19
[IS08700(ALL)07/96]
6 pica art:0050062-B
The low windshield washer indicator light
% [IS09200(ALL)07/96]
Low Fuel Indicator Light
[IS09300(ALL)12/95]
This light comes on when your fuel gauge indicates
approximately 1/16 of a tank. The ignition must be turned to
ON in order for this light to come on.
[IS09400(ALL)12/95]
6 pica art:0050189-A
The low fuel indicator light
*
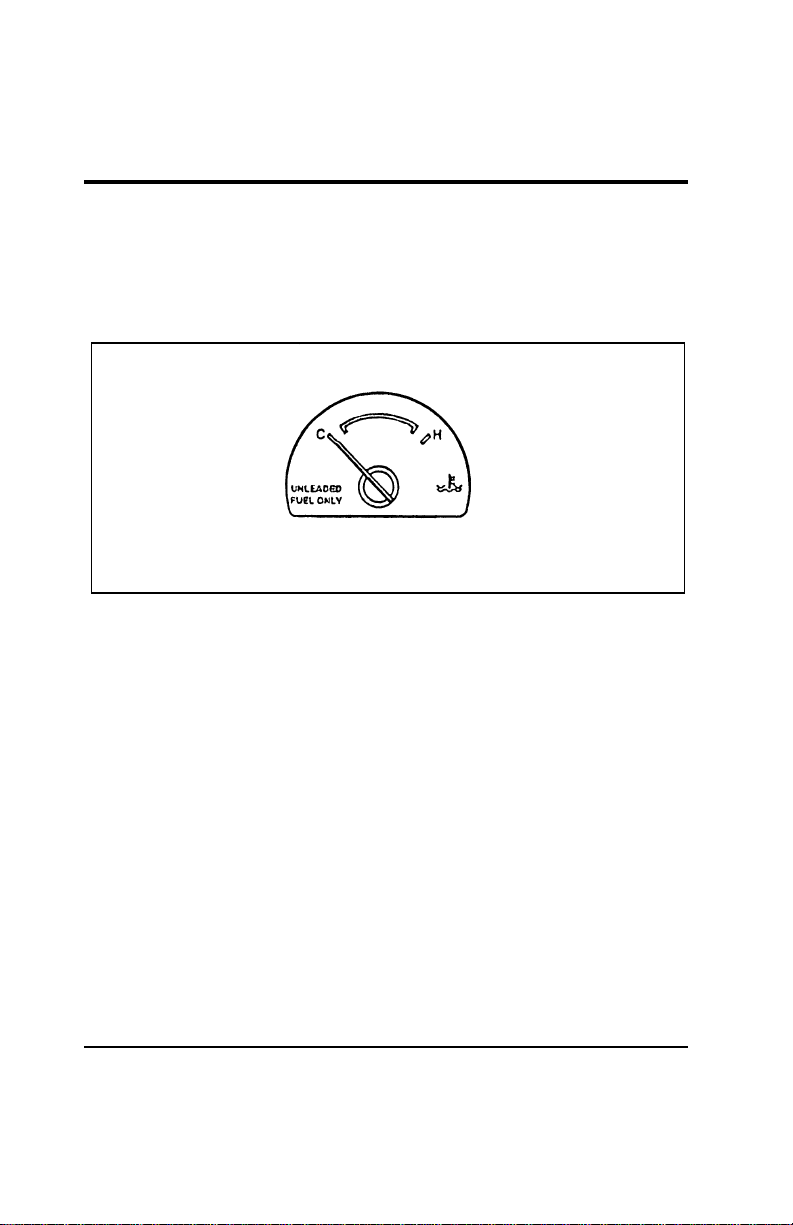
[IS10200(ALL)04/96] Gauges
%
*
[IS10400(ALL)07/96]
Fuel Gauge
[IS10500(ALL)12/95]
The fuel gauge displays approximately how much fuel is in the
fuel tank only when the ignition is ON. For proper fuel gauge
indication after adding fuel, the ignition should be in the OFF
position while the vehicle is being refueled.
[IS10600(ALL)12/95]
The fuel gauge indicator may also vary slightly when the
vehicle is in motion. With the ignition OFF, the fuel gauge
indicator may drift from the ignition ON position as well.
File:03wniss.ex
Update:Thu Jul 18 10:55:19 1996
20
[IS10700(ALL)12/95]
10-1/2 pica
art:0050235-A
Fuel gauge — base cluster
[IS10800(ALL)12/95]
10-1/2 pica
art:0050126-C
The engine coolant temperature and fuel gauge
File:03wniss.ex
Update:Thu Jul 18 10:55:19 1996
Instrumentation
21
%
*
[IS11400(ALL)07/96]
Engine Coolant Temperature Gauge
*
[IS11500(ALL)02/96]
This gauge indicates the temperature of the engine coolant, not
the coolant level. If the coolant is not at its proper level or
mixture, the gauge indication will not be accurate.
[IS11600(ALL)01/96]
10-1/2 pica
art:0050236-A
Engine coolant temperature gauge — base cluster
[IS11700(ALL)01/96]
The pointer moves from the C (cold) mark into the NORMAL
band as the engine coolant warms up. It is acceptable for the
pointer to fluctuate within the normal band under normal
driving conditions. Under certain driving conditions such as
heavy stop and go traffic, or driving up hills in hot weather, the
pointer may indicate at the top of the NORMAL band. This is
also acceptable.
*
[IS11800(ALL)04/96]
If, under any circumstances, the pointer moves above the
NORMAL band, the engine is overheating and continued
operation may cause engine damage.
*
[IS11900(ALL)07/96]
If your engine overheats:
*
[IS12000(ALL)07/96] 1. Pull off the road as soon as it is safely possible.
*
[IS12100(ALL)07/96] 2. Turn off the engine. If you do not stop the engine as soon as
safely possible, severe engine damage could result.
File:03wniss.ex
Update:Thu Jul 18 10:55:19 1996
22
*
[IS12200(ALL)07/96] 3. Let the engine cool. DO NOT REMOVE COOLANT
SYSTEM FILL CAP UNTIL THE ENGINE IS COOL.
[IS12300(ALL)07/96] 4. Check the coolant level following the instructions on
checking and adding coolant to your engine in this Owner
Guide. See engine coolant in the index. If you do not follow
these instructions, you or others could be injured.
*
[IS12400(ALL)07/96]
If the coolant continues to overheat, have the coolant system
serviced.
%
*
[IS13600(ALL)07/96]
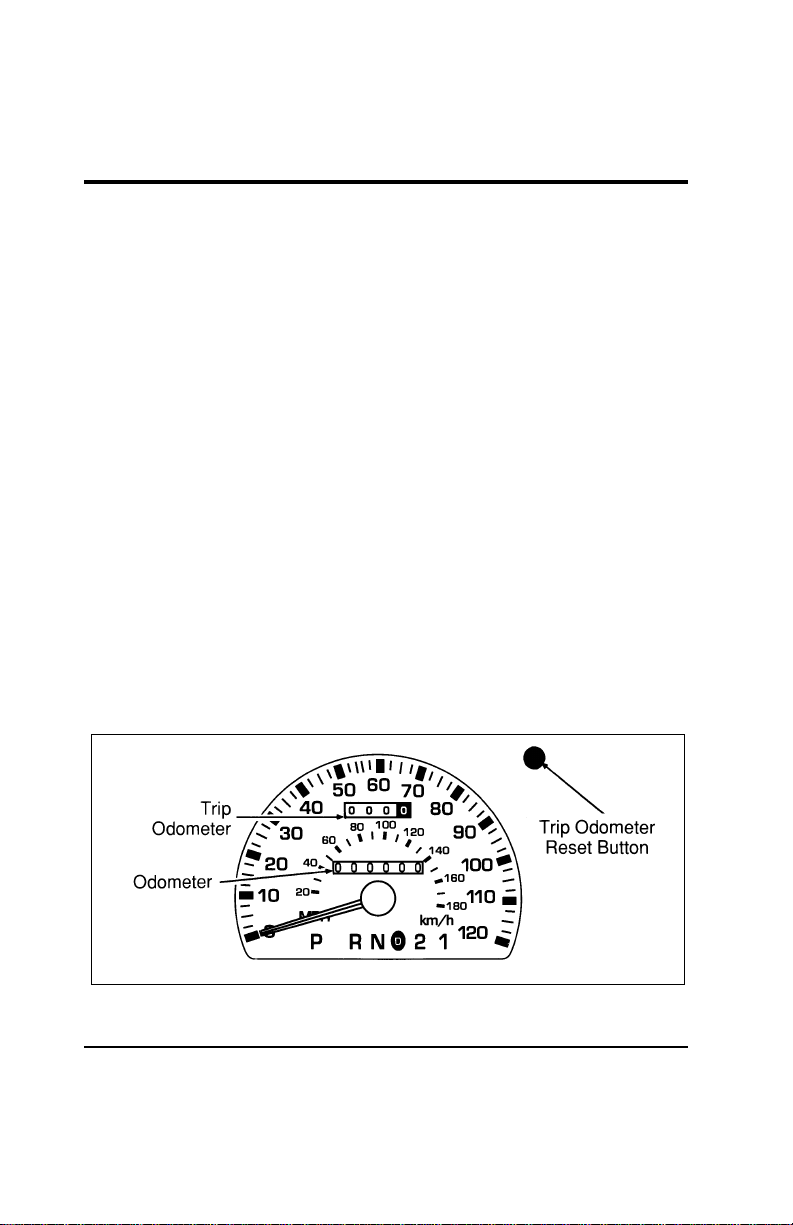
Speedometer
*
[IS13700(ALL)03/96]
The speedometer tells you how many miles (kilometers) per
hour your vehicle is moving.
%
*
[IS14200(ALL)07/96]
Odometer
*
[IS14300(ALL)01/96]
The odometer records the total distance the vehicle has been
driven.
%
*
[IS14700(ALL)01/96]
Trip Odometer
%
*
[IS14800(ALL)05/96]
The trip odometer records the distance of individual trips.
Before each trip, set the trip odometer to zero by pushing the
reset control.
[IS14900(ALL)01/96]
10-1/2 pica
art:0050155-C
The speedometer, odometer and trip odometer
File:03wniss.ex
Update:Thu Jul 18 10:55:19 1996
Instrumentation
23
% [IS15000(ALL)04/96]
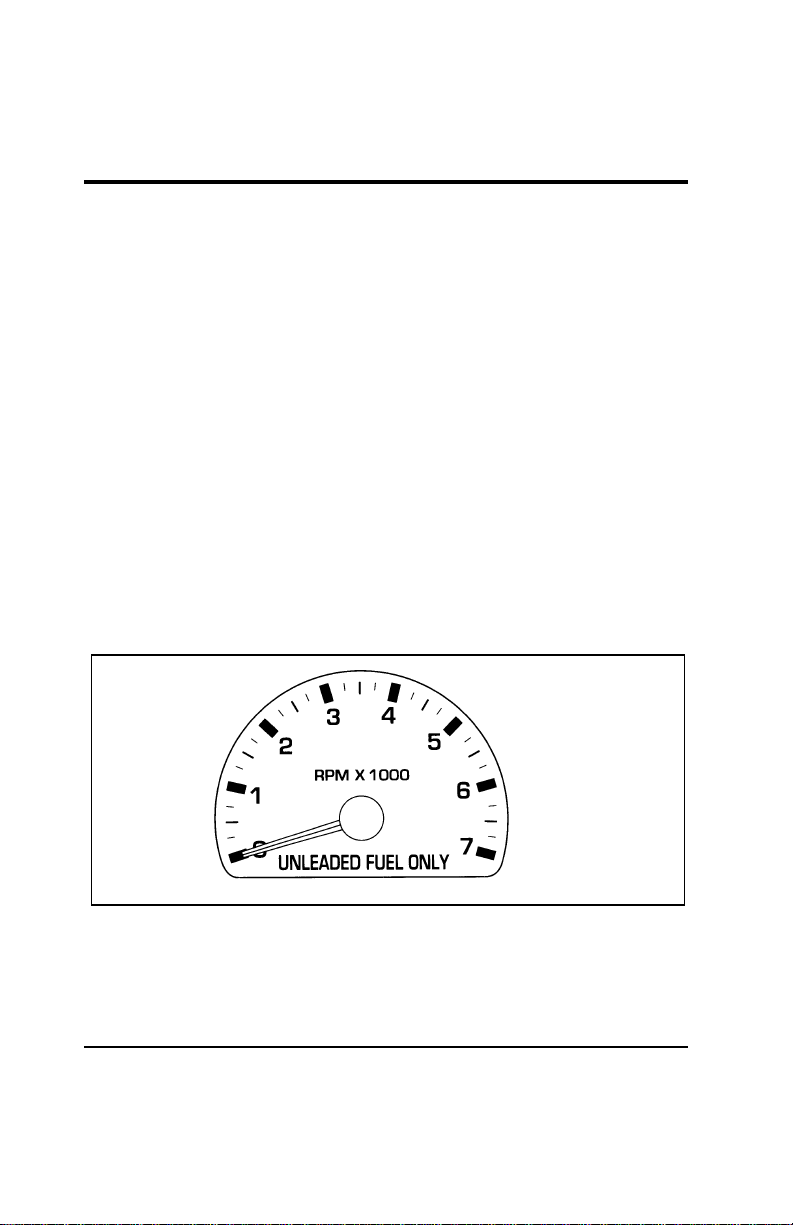
Tachometer (If equipped)
*
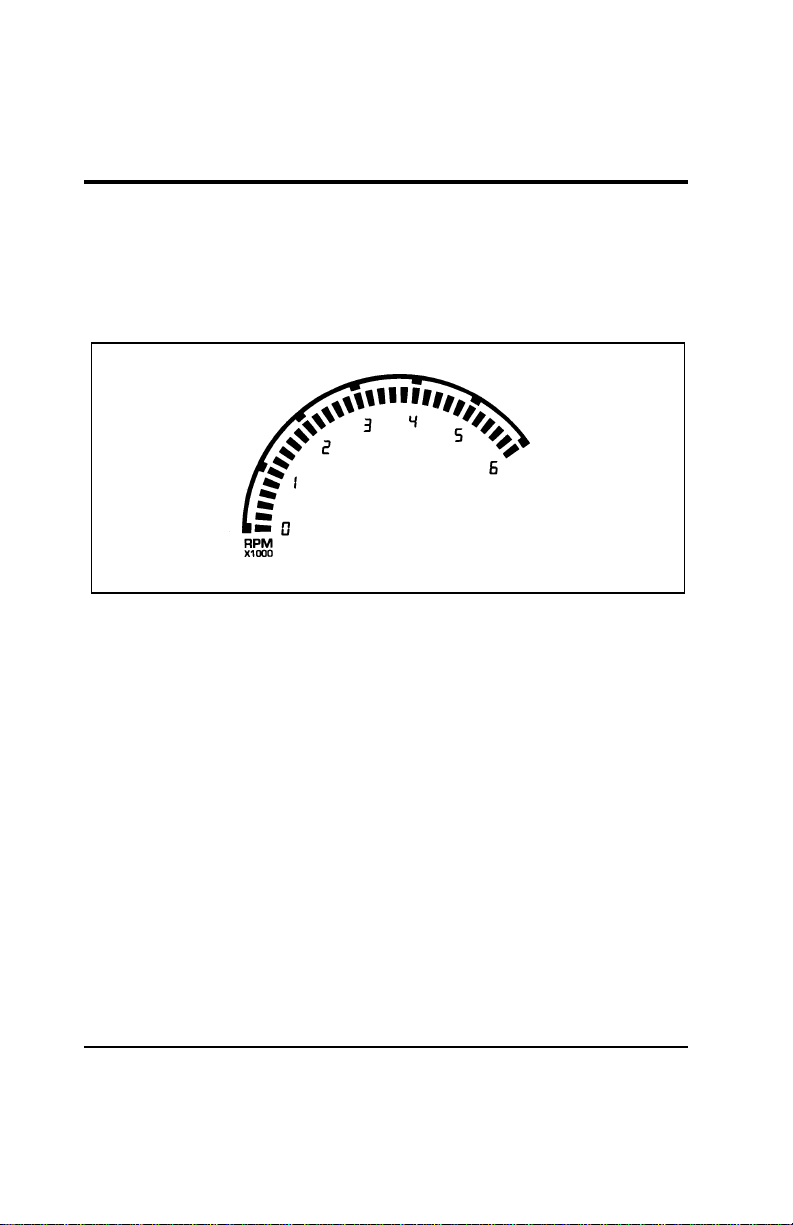
[IS15100(ALL)03/96]
The tachometer will show you the engine’s speed measured in
revolutions per minute (RPM).
*
[IS15200(ALL)03/96]
The tachometer may move slightly when the key is placed in
the ACC or ON position, with the engine off. This is normal
and does not affect the performance of the tachometer when the
engine is running.
[IS15300(ALL)01/96]
Some vehicles are equipped with an engine speed (RPM)
limiting device that is contained within the Electronic Engine
Control Module. The purpose of this device is to maintain peak
engine speed (RPM) below a specified limit. (Engine speed
limits may vary based on engine size.)
*
[IS15400(ALL)03/96]
If you are experiencing an “engine cut-out” condition at high
speeds, it may be the result of this limiting device. It is a
normal condition and can be avoided by reducing
vehicle/engine speed.
[IS15500(ALL)01/96]
10-1/2 pica
art:0050168-B
The tachometer
File:03wniss.ex
Update:Thu Jul 18 10:55:19 1996
24
[IS15501(ALL)07/96]
33-1/2 pica art:0050076-E
The electronic cluster
File:03wniss.ex
Update:Thu Jul 18 10:55:19 1996

Instrumentation
25
%
*
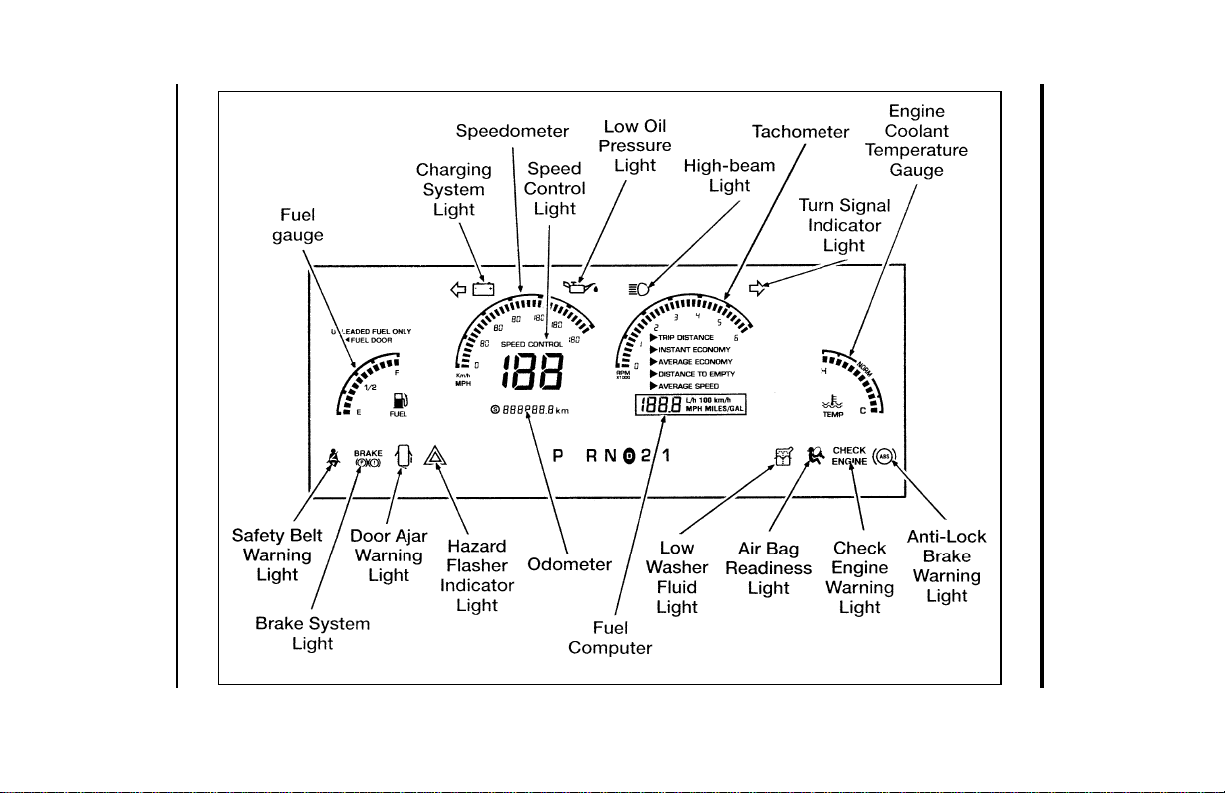
[IS15502(ALL)07/96] Electronic Cluster (If equipped)
[IS15503(ALL)07/96]
The Electronic Cluster works only when your ignition is in the
ON position. Each time you start your vehicle, the displays go
through a self-test by lighting up all segments for about one
second and then turning off all segments for about one second,
before displaying actual gauge readings. (The turn signal and
high beam indicators do not light during the self-test. The LOW
OIL light may remain on throughout the self-test and for several
seconds after normal readings are displayed.) This self-test
demonstrates that all of the display segments are working
properly.
[IS15505(ALL)07/96]
The electronic cluster has three major functions to provide you
with information about your vehicle’s operating status:
[IS15507(ALL)07/96]
■ Warning and Indicator Lights
[IS15509(ALL)07/96]
■ Electronic Gauges
[IS15511(ALL)07/96]
■ The Fuel Computer
[IS15513(ALL)07/96]
The electronic cluster uses the same warning and indicator
lights as the mechanical cluster. However, the electronic cluster
contains some additional warning and indicator lights as
described here.
% [IS15515(ALL)07/96]
Oil Pressure Light
[IS15517(ALL)07/96]
6 pica art:0050150-B
The oil pressure light
File:03wniss.ex
Update:Thu Jul 18 10:55:19 1996

26
[IS15519(ALL)07/96]
This light indicates the engine’s oil pressure, not the oil level.
However, if your engine’s oil level is low, it could affect the oil
pressure. The light will come on briefly during the display
self-test every time you turn your key to the ON position. The
light will go off when the key is turned to the START position.
The light should stay off when the self-test is done if the engine
is running with normal oil pressure. If the light comes on while
the engine is running, you have lost oil pressure and continued
operation will cause severe engine damage.
*
[IS15521(ALL)07/96]
If you lose engine oil pressure:
*
[IS15523(ALL)07/96] 1. Pull off the road as soon as safely possible.
*
[IS15525(ALL)07/96] 2. Shut off the engine immediately. If you do not stop the
engine as soon as safely possible, severe engine damage
could result.
[IS15527(ALL)07/96] 3. Check the engine’s oil level. (See “Checking and Adding
Engine Oil” in the Maintenance and Care chapter of this
Owner Guide.) If you do not follow these instructions, you
or others could be injured. To ensure an accurate reading,
your vehicle should be on level ground.
[IS15529(ALL)07/96] 4. If the level is low, add only as much oil as necessary before
you start the engine again. Do not overfill. Do not operate
the engine if the light is on regardless of the oil level.
Contact your nearest dealer for further service.
% [IS15531(ALL)07/96]
Low Windshield Washer Fluid Level Warning Light
[IS15533(ALL)07/96]
This light indicates that the level of your washer fluid is low,
and you have to add more fluid. This light comes on briefly
after you turn your ignition key from the START to the ON
position. If the washer fluid is low, a one second chime will
sound and the light will remain on for 60 seconds. If the washer
fluid is not low, the light should turn off a few seconds after
the engine has started. The light and chime also come on if the
washer fluid is low when you use your windshield washers.
File:03wniss.ex
Update:Thu Jul 18 10:55:19 1996
Instrumentation
27
[IS15535(ALL)07/96]
The washer fluid is only checked when the engine is started or
the windshield washers are in operation. The light will not
come on if the fluid level becomes low while you are driving
unless you turn on the windshield washers.
[IS15537(ALL)07/96]
6 pica art:0050062-B
The low windshield washer indicator light
[IS15539(ALL)07/96]
Speed Control Indicator
[IS15541(ALL)07/96]
A SPEED CONTROL light is displayed in the optional electronic
instrument cluster when the speed control system is engaged.
The display will turn off when the brake pedal is pressed or if
speed control is shut off.
*
[IS15543(ALL)07/96]
This display does not indicate any problems with the speed
control, but is simply a convenient way of knowing when it is
active.
[IS15545(ALL)07/96]
6 pica art:0050220-A
The speed control light
% [IS15547(ALL)07/96]
Hazard Flasher Indicator Light
[IS15549(ALL)07/96]
This light flashes when you turn on the hazard flashers. If your
ignition is ON, the turn signal indicator lights in the electronic
cluster will flash in time with the hazard flashers.
File:03wniss.ex
Update:Thu Jul 18 10:55:19 1996

28
[IS15551(ALL)07/96]
6 pica art:0050237-A
[IS15553(ALL)07/96] Electronic Gauges
%
*
[IS15555(ALL)07/96]
Fuel Gauge
[IS15556(ALL)07/96]
The fuel gauge displays approximately how much fuel you have
in the fuel tank. The number of bars illuminated in the display
indicates fuel level. Your ignition must be in the ON position to
read the fuel gauge. Read the fuel level at the top bar that is lit.
When only one bar on the gauge is lit, the fuel pump symbol
on the gauge will flash to warn you of a low fuel level
condition.
[IS15557(ALL)07/96]
If the fuel gauge displays only the top two bars and bottom two
bars, or if the Distance to Empty function in the fuel computer
displays CO or CS, you must have the fuel indication system
serviced.
[IS15558(ALL)07/96]
Turn your ignition to OFF while fueling to obtain an accurate
fuel gauge indication. If you do not turn your ignition off, the
fuel gauge will not display the new fuel level immediately, but
will slowly increase to the correct value.
File:03wniss.ex
Update:Thu Jul 18 10:55:19 1996
Instrumentation
29
[IS15559(ALL)07/96]
7-1/2 pica art:0050156-B
The fuel gauge
%
*
[IS15561(ALL)07/96]
Engine Coolant Temperature Gauge
[IS15563(ALL)07/96]
7-1/2 pica art:0050175-B
Engine coolant temperature gauge
[IS15565(ALL)07/96]
This gauge indicates the temperature of the engine’s coolant, not
the coolant level. If the coolant is not at its proper level or
mixture, the gauge indication will not be accurate. The gauge is
identified by a thermometer symbol, an “H” (hot), and a “C”
(cold). The “NORM” indicates the normal operating range. The
bars will move into the normal operating range as the engine
coolant warms up. It is acceptable for the bars to fluctuate
within the normal operating range under normal driving
conditions. Under certain driving conditions, such as heavy stop
and go traffic, or driving up hills in hot weather, the gauge may
indicate at the top of the NORMAL band. This is also
acceptable.
[IS15567(ALL)07/96]
If, under any circumstances, the bars move above the NORMAL
band, the temperature symbol will flash and a chime will sound
to alert the driver that the engine coolant is overheating and
continued operation may cause engine damage.
File:03wniss.ex
Update:Thu Jul 18 10:55:19 1996

30
*
[IS15569(ALL)07/96]
If your engine overheats:
*
[IS15571(ALL)07/96] 1. Pull off the road as soon as it is safely possible.
*
[IS15573(ALL)07/96] 2. Turn off the engine. If you do not stop the engine as soon as
safely possible, severe engine damage could result.
*
[IS15575(ALL)07/96] 3. Let the engine cool. DO NOT REMOVE COOLANT
SYSTEM FILL CAP UNTIL THE ENGINE IS COOL.
[IS15577(ALL)07/96] 4. Check the coolant level following the instructions on
checking and adding coolant to your engine in this Owner
Guide. See engine coolant in the index. If you do not follow
these instructions, you or others could be injured.
*
[IS15579(ALL)07/96]
If the coolant continues to overheat, have the coolant system
serviced.
[IS15581(ALL)07/96]
If the temperature gauge displays only the top two and bottom
two bars, the temperature indication system is indicating that it
requires servicing. Take the vehicle to a dealership for service as
soon as possible.
%
*
[IS15583(ALL)07/96]
Speedometer
[IS15585(ALL)07/96]
The electronic speedometer in the left center of the cluster has
two displays that indicate how fast your vehicle is moving in
miles or kilometers per hour. Press the fuel computer E/M
(English/Metric) button to switch between MPH and km/h. The
main digital speedometer indicates speed up to 120 MPH
(199 km/h). The secondary bar graph speedometer indicates
approximate speed up to 120 MPH in steps of 4 MPH
(180 km/h in steps of 6 km/h). The bar graph speedometer
shows your approximate speed relative to the full scale, and it
gives you a visual indication of how fast your speed is changing
when you accelerate or decelerate.
[IS15587(ALL)07/96]
Your vehicle may not actually be able to travel at the maximum
speeds indicated by the speedometer due to a speed limiter in
the Electronic Engine Control module. The purpose of the
File:03wniss.ex
Update:Thu Jul 18 10:55:19 1996

Instrumentation
31
limiter is to maintain vehicle speed below a specified limit to
ensure safe vehicle operation.
[IS15589(ALL)07/96]
10-1/2 pica
art:0050192-A
The speedometer and odometer
%
*
[IS15591(ALL)07/96]
Odometer
[IS15593(ALL)07/96]
The odometer displays the total number of miles or kilometers
your vehicle has been driven. Press the fuel computer E/M
(English/Metric) button to switch between miles and kilometers.
[IS15595(ALL)07/96]
If the electronic cluster is replaced and the mileage on the old
odometer is unknown, the replacement cluster will be set to
zero miles (kilometers), and the circle “S” symbol to the left of
the odometer will be lit to indicate that a service cluster has
been installed. A label showing the estimated mileage will then
be attached to the door pillar. If the actual mileage can be
verified, an authorized service center can program the correct
mileage into the replacement cluster, and the circled “S” will
not be lit.
[IS15597(ALL)07/96]
If the odometer displays the word “Error,” have your vehicle
serviced.
File:03wniss.ex
Update:Thu Jul 18 10:55:19 1996
32
%
*
[IS15599(ALL)07/96]
Tachometer
[IS15601(ALL)07/96]
The electronic bar graph tachometer in the right center of the
cluster displays the approximate engine speed in revolutions per
minute (RPM). Each bar on the display represents 200 RPM.
[IS15603(ALL)07/96]
10-1/2 pica
art:0050193-A
The tachometer
% [IS15900(ALL)01/96] Fuel Computer
[IS16000(ALL)01/96]
The Electronic Cluster Fuel Computer display is located under
the tachometer and consists of a menu and a digital display.
The fuel computer can display five different functions. They are:
[IS16100(ALL)01/96]
■ Trip distance
[IS16200(ALL)01/96]
■ Instantaneous fuel economy
[IS16300(ALL)01/96]
■ Average fuel economy
[IS16400(ALL)01/96]
■ Distance to empty
[IS16500(ALL)01/96]
■ Average speed
File:03wniss.ex
Update:Thu Jul 18 10:55:19 1996

Instrumentation
33
[IS16600(ALL)01/96]
Fuel Computer Buttons
[IS16700(ALL)01/96]
The fuel computer functions are controlled by the three buttons
located to the right of the electronic cluster:
[IS16800(ALL)01/96]
7-1/2 pica art:0050049-A
The fuel computer buttons
% [IS16900(ALL)01/96]
SELECT — The SELECT button lets you choose the function
displayed by the fuel computer. Each time you press the
SELECT button, the fuel computer points to the next choice on
the menu. After it reaches the last choice, it returns to the top
of the menu.
% [IS17000(ALL)01/96]
E/M — The E/M button lets you switch the fuel computer
functions and the speedometer and odometer displays between
English and metric units. The displays remain in the chosen
units until you switch them again, even after you turn off the
vehicle and restart it.
% [IS17100(ALL)01/96]
RESET — The RESET button lets you reset or initialize the fuel
computer function that is displayed. Only TRIP DISTANCE,
AVERAGE ECONOMY, and AVERAGE SPEED can be reset.
[IS17200(ALL)01/96]
Any time one of the fuel computer buttons is pressed, a short
chime will sound.
[IS17300(ALL)01/96]
The Fuel Computer Functions
[IS17400(ALL)01/96]
The complete fuel computer menu is displayed for about five
seconds after the cluster self-test (when the ignition is turned to
ON) and after the SELECT button is pressed. After five seconds,
only the selected function is displayed.
File:03wniss.ex
Update:Thu Jul 18 10:55:19 1996

34
% [IS17500(ALL)01/96]
TRIP DISTANCE
[IS17600(ALL)01/96]
Your trip distance is the distance you have traveled since the
last reset. To display your current trip distance, press the
SELECT button until the pointer is at TRIP DISTANCE. To reset
the trip distance to zero, press the RESET button while the
pointer is at TRIP DISTANCE. You may want to use this feature
to see how far you have traveled on a particular trip.
[IS17700(ALL)01/96]
If you do not reset your trip distance, the display will roll over
to zero when it passes 1999 miles or kilometers. If you switch
from miles to kilometers after you have passed 1242 miles
(1999 kilometers), you must add 2000 to the kilometers display
for actual distance traveled. The display will then roll over to
zero when it passes 1218 kilometers (3218 kilometers or 1999
miles traveled) whether you select English or metric units. If the
display is in metric units when you pass 1999 kilometers (1242
miles), both English and metric trip distances will roll over to
zero.
% [IS17800(ALL)01/96]
INSTANT ECONOMY
[IS17900(ALL)01/96]
Your instantaneous fuel economy is your vehicle’s fuel economy
over the last one second of driving. To display your
instantaneous fuel economy, press SELECT until the pointer is
at INSTANT ECONOMY. Your instantaneous fuel economy
changes with your driving conditions. Factors affecting fuel
economy include braking, acceleration, and road terrain. You
may want to use this feature to see how your driving habits
affect your fuel economy. INSTANT ECONOMY is not
resettable.
[IS18000(ALL)01/96]
Your instantaneous fuel economy can vary from 0 to 99 miles
per gallon or from 99 to 2 liters per 100 kilometers when your
vehicle is moving. When your vehicle is not moving, fuel
economy is displayed as 0 miles per gallon or as a number of
liters per hour. In the metric mode, instantaneous fuel economy
will display in liters per hour when your vehicle speed drops
below 5 km/h and will stay in liters per hour until your speed
exceeds 7 km/h.
File:03wniss.ex
Update:Thu Jul 18 10:55:19 1996

Instrumentation
35
% [IS18100(ALL)01/96]
AVERAGE ECONOMY
[IS18200(ALL)01/96]
Your average fuel economy is the average value of your fuel
economy since the last reset. To display your average fuel
economy, press SELECT until the pointer is at AVERAGE
ECONOMY. The fuel computer calculates average fuel economy
from the distance traveled and the fuel used (as reported by the
Electronic Engine Control module). Press the RESET button
when AVERAGE ECONOMY is selected to reset the average
fuel economy. You may want to use this feature to see how
your fuel economy changes each day or for each tank of fuel.
[IS18300(ALL)01/96]
If you calculate your fuel economy based on the odometer
distance traveled and the amount of fuel you pump into the
tank, your number may be different than the fuel computer
number for various reasons. Most likely, the top level of fuel
added may be different between fill-ups, causing an incorrect
estimate of the amount of fuel used.
% [IS18400(ALL)01/96]
DISTANCE TO EMPTY
[IS18500(ALL)01/96]
Your distance to empty is the approximate number of miles or
kilometers that you can drive before you run out of fuel. To
display your distance to empty, press SELECT until the pointer
is at DISTANCE TO EMPTY. The fuel computer calculates
distance to empty from the amount of fuel in the tank and an
internally determined fuel economy value, which is not the
same as the AVERAGE ECONOMY number. DISTANCE TO
EMPTY is not resettable. You may want to use this feature to
plan when your next fuel fill-up should be.
[IS18600(ALL)01/96]
Your distance to empty may change faster or slower than actual
distance traveled because your fuel economy varies with
changing driving conditions.
File:03wniss.ex
Update:Thu Jul 18 10:55:19 1996

36
[IS18700(ALL)01/96]
The fuel computer will automatically warn you when your
distance to empty is low. When your distance to empty reaches
50 miles (80 km), 25 miles (40 km) and 10 miles (20 km), the
fuel computer will automatically select DISTANCE TO EMPTY,
flash the number for five seconds, and sound a one second
chime.
[IS18800(ALL)01/96]
If the Distance to Empty function displays CO or CS, you must
have the fuel indication system serviced.
[IS18900(ALL)01/96]
Turn your ignition to OFF while fueling to obtain an accurate
distance to empty reading. If you do not turn your ignition off,
the fuel computer will not display the new distance to empty
immediately, but will slowly increase to the correct value.
[IS19000(ALL)01/96]
AVERAGE SPEED
[IS19100(ALL)01/96]
Your average speed is the average speed your vehicle has
traveled while the ignition was ON since the last reset. To
display your average speed, press SELECT until the pointer is at
AVERAGE SPEED. Press the RESET button when AVERAGE
SPEED is selected to reset the average speed. You may want to
use this feature to see what your average speed is during daily
driving or on a long trip.
File:03wniss.ex
Update:Thu Jul 18 10:55:19 1996
Instrumentation
37
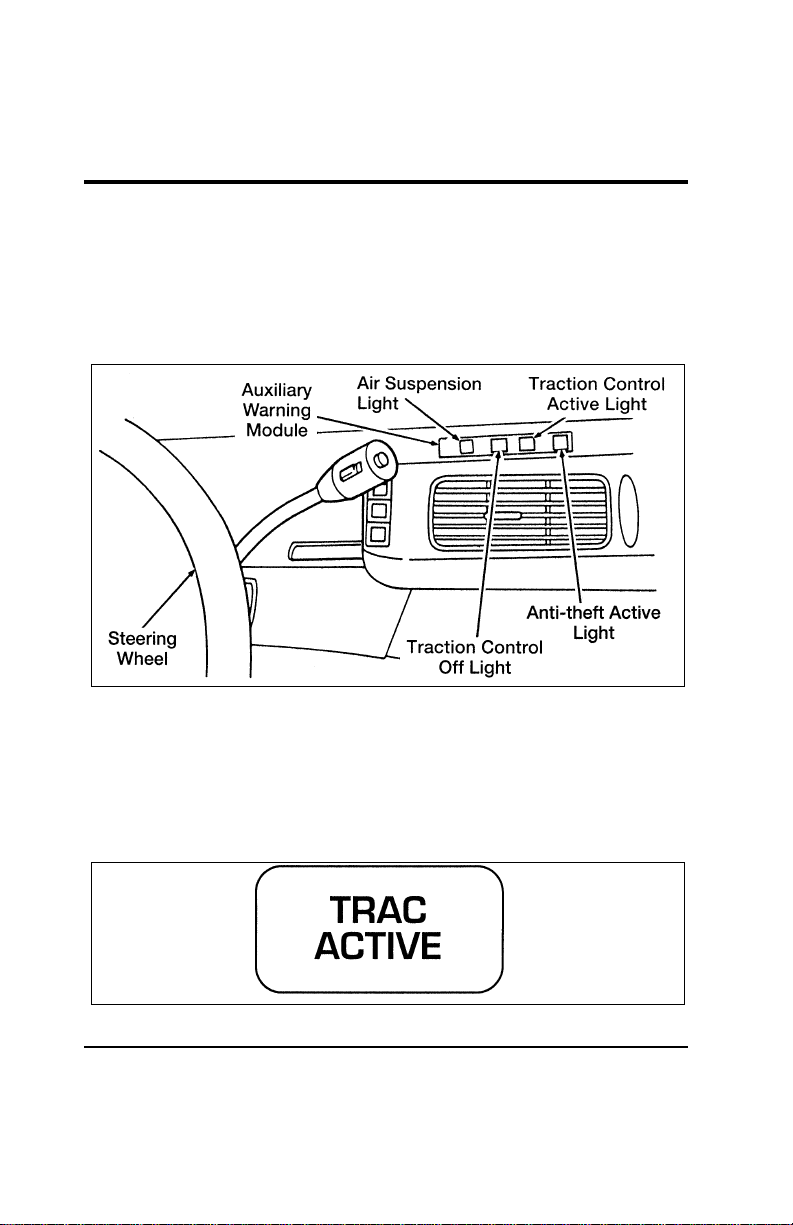
% [IS19200(ALL)01/96] Auxiliary Warning Module (If equipped)
[IS19300(ALL)01/96]
An additional bank of indicator and warning lights is located
above the driver’s side vent, just to the right of the steering
wheel. The light(s) located in this module are described and
illustrated below.
[IS19400(ALL)07/96]
13-1/2 pica
art:0050122-G
The auxiliary warning module
% [IS19500(ALL)01/96]
Traction Control Active Light
[IS19600(ALL)01/96]
This light comes on when the Traction Control system begins
applying and releasing the brakes and adjusting the engine
characteristics to limit a wheelspin condition. You may feel
some steering changes and hear some noise, but this is normal.
[IS19700(ALL)01/96]
one inch art:0050274-A
File:03wniss.ex
Update:Thu Jul 18 10:55:19 1996
38
[IS19800(ALL)01/96]
The Traction Control light will stay on for a minimum of four
seconds.
[IS19900(ALL)07/96]
Traction Control Off Light
[IS20000(ALL)01/96]
This light comes on when the Traction Control system is not
operating. In some conditions, you may want to turn Traction
Control off, such as when rocking your vehicle out of deep
snow or mud.
[IS20100(ALL)07/96]
one inch art:0050275-B
[IS20200(ALL)01/96]
Traction Control will automatically turn off to prevent the
brakes from overheating. The system will turn back on once the
brakes have cooled down.
[IS20300(ALL)01/96]
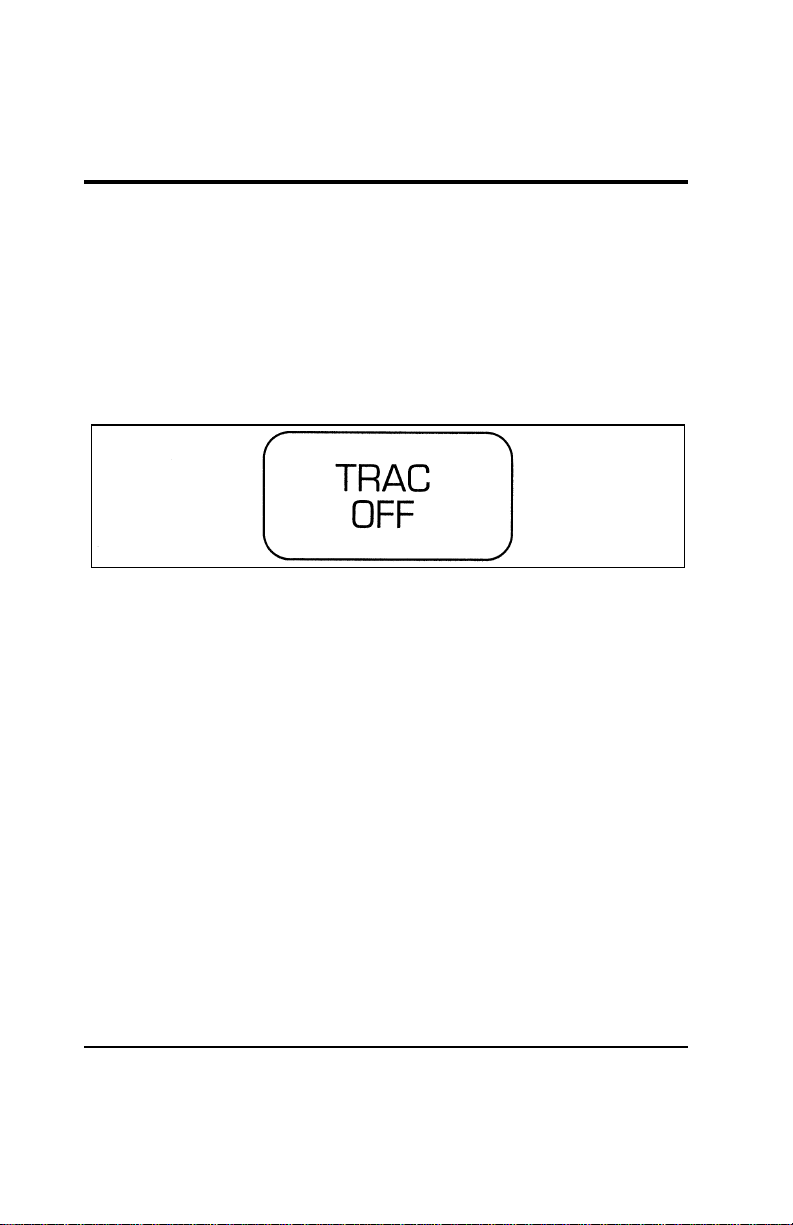
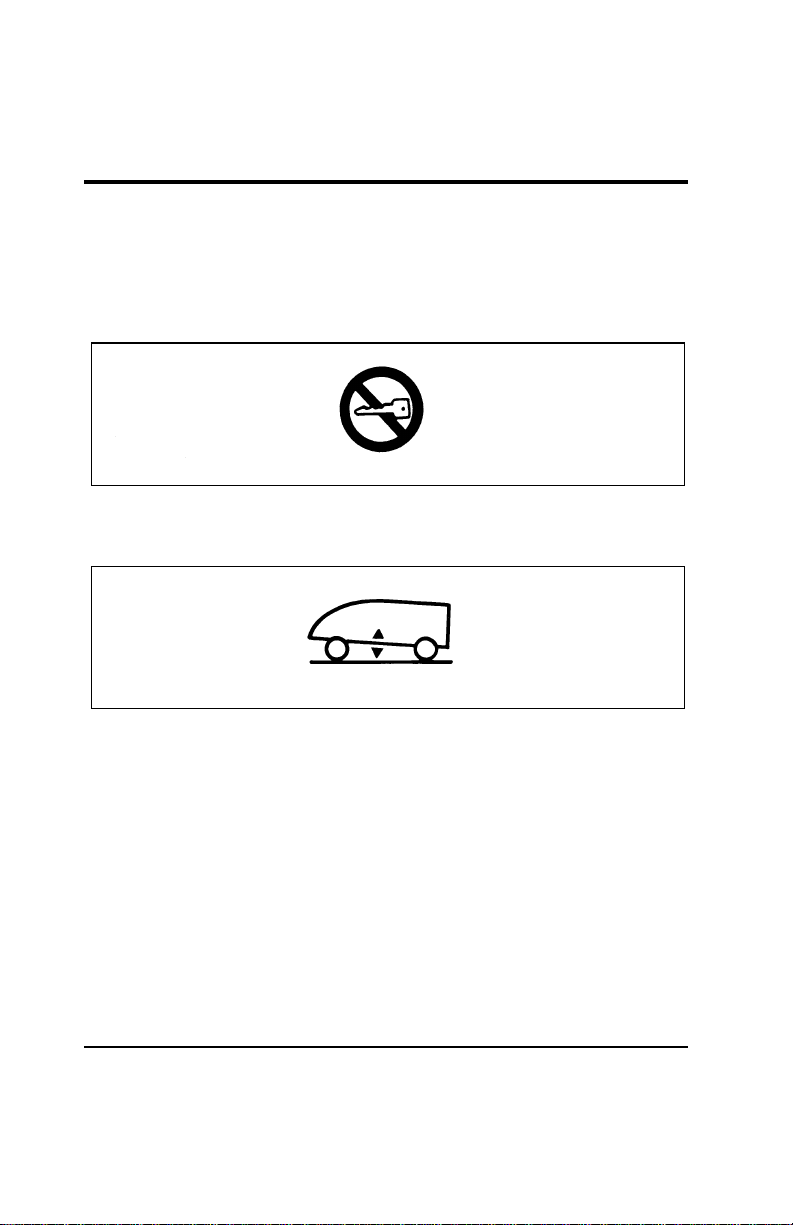
NOTE: If the TRAC OFF light is flashing repeatedly, it means
that there is a Traction Control system malfunction
and the system is inoperative. Contact your dealer for
service as soon as possible.
File:03wniss.ex
Update:Thu Jul 18 10:55:19 1996
Instrumentation
39
% [IS20400(ALL)01/96]
Anti-Theft Active Indicator Light
[IS20500(ALL)07/96]
This indicator is used in the optional Anti-Theft System. See
“Anti-Theft System” in the Controls and Features chapter of this
Owner Guide.
[IS20600(ALL)01/96]
6 pica art:0050123-B
The anti-theft active indicator light
[IS20700(ALL)01/96]
Air Suspension Warning Light
[IS20800(ALL)01/96]
6 pica art:0050227-A
The air suspension warning light
[IS20900(ALL)01/96]
The warning light for the Air Suspension indicates one of two
things:
[IS21000(ALL)01/96] 1. The service switch (located in the jack storage area) is in the
“off” position.
[IS21100(ALL)01/96] 2. A system malfunction has occurred electronically disabling
Air Suspension function.
[IS21200(ALL)01/96]
NOTE: If the switch is returned to or in the “ON” position
and the light does not go out after recycling the
ignition switch OFF/ON, the Air Suspension should
be checked by a qualified service technician.
File:03wniss.ex
Update:Thu Jul 18 10:55:19 1996
41
Electronic Sound Systems
[AS01100(ALL)04/95]
33-1/2 pica
art:0060674-B
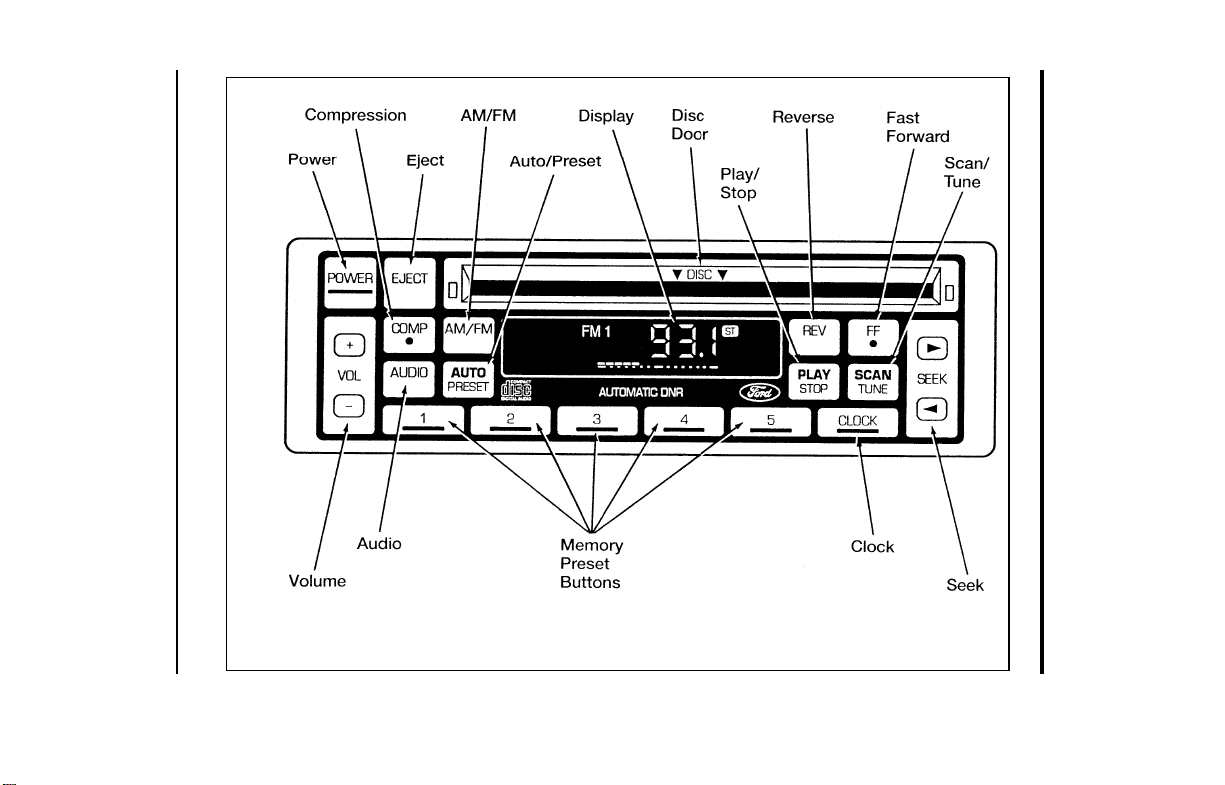
The Compact Disc Radio
File:04wnass.ex
Update:Mon Jul 8 14:13:42 1996

42
%
*
[AS01175(ALL)10/95] Compact Disc Radio
*
[AS01250(ALL)10/95]
The Compact Disc Radio combines the Electronic Stereo Radio
with the Ford Compact Disc Player.
*
[AS01300(ALL)08/95]
Using the Controls on Your New Radio/CD Player
*
[AS01400(ALL)04/92]
Most of the features of this unit work for both radio and CD
operation, depending on which mode the unit is in. Also, some
of the buttons control several different functions, so be sure to
read all of the operating instructions carefully.
*
[AS01500(ALL)03/96]
How to turn the radio on and off
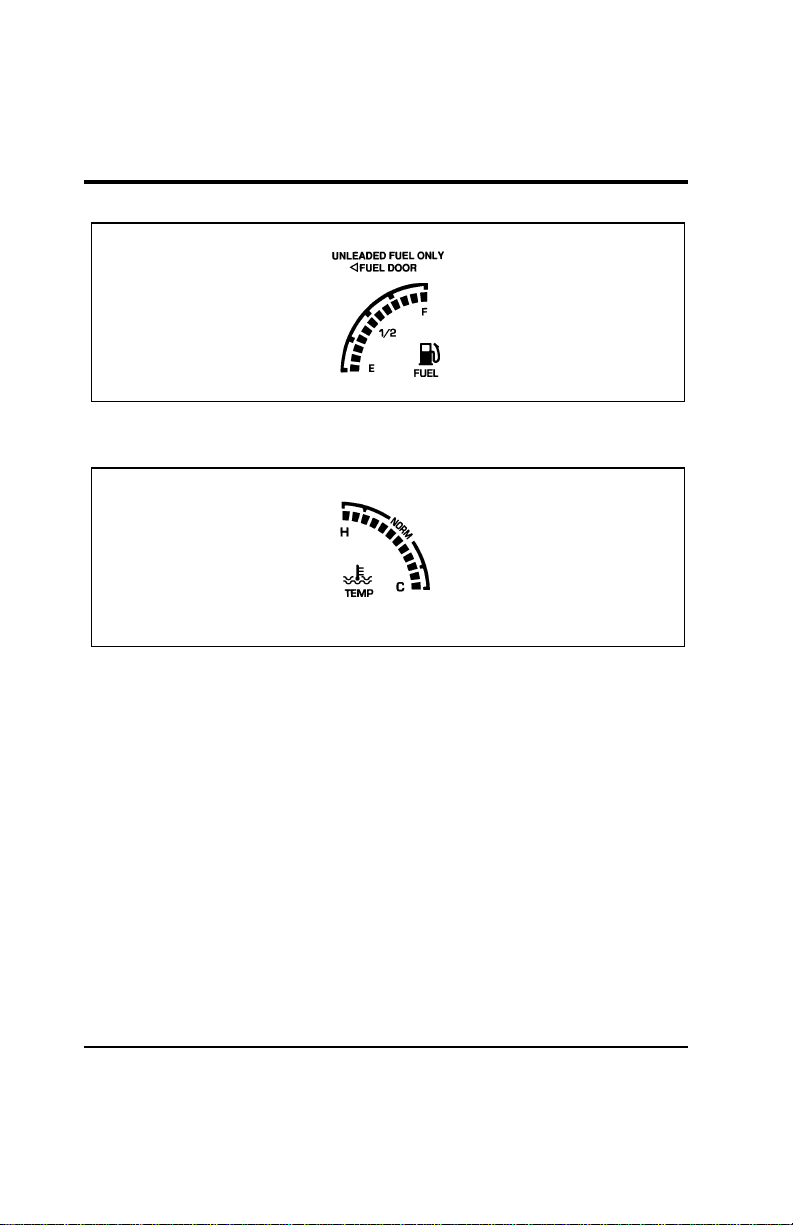
*
[AS01600(ALL)10/95]
Press the “POWER” button to turn the radio on. Press it again
to turn it off.
*
[AS01625(ALL)03/96]
How to adjust the volume
*
[AS01650(ALL)03/96]
Press the (R/S) side of the “VOL” button to increase/decrease
the volume. Bars illuminate in the display to show the relative
volume level.
*
[AS01675(ALL)02/96]
NOTE: If the volume level is set above a certain listening
level when the ignition switch is turned off, when the
ignition switch is turned back on, the volume will
come back to a “nominal” listening level. However, if
the radio power is turned off, the volume will remain
in the position it was set at when radio power was
switched off.
*
[AS01700(ALL)03/96]
Selecting the AM or FM frequency band
*
[AS01800(ALL)10/95]
Push the “AM/FM” button to select the desired frequency band.
When in the radio mode, pushing the button more than once
will alternate between AM, FM1 and FM2. These functions are
used with the station memory buttons described under How to
tune radio stations.
File:04wnass.ex
Update:Mon Jul 8 14:13:42 1996

Electronic Sound Systems
43
%
*
[AS01900(ALL)03/96]
How to tune radio stations
*
[AS02000(ALL)10/95]
There are four ways for you to tune in a particular station. You
can manually locate the station using the “SCAN/TUNE”
button, “SEEK” the station, “SCAN” to the station or select the
station by using the memory buttons, which you can set to any
desired frequency. These four methods are described below.
*
[AS02100(ALL)10/95]
■ Using the “SCAN/TUNE” button to manually tune
*
[AS02200(ALL)04/96]
You can change the frequency up or down one increment at
a time (FM changes in increments of 200kHz; AM changes in
increments of 10kHz) by first pressing the “SCAN/TUNE”
button twice (display shows “TUNE”), then — within
approximately five seconds —pressing and releasing either
the top
a
or bottom
b
half of the “SEEK” button. To
change frequencies quickly, press and hold down either the
top or bottom half of the “SEEK” button. While you are
manually tuning, the display will show a blinking “M”.
*
[AS02300(ALL)03/96]
Manual tuning adjusts your radio to any allowable broadcast
frequency, whether or not a station is present on that
frequency. (See All About Radio Frequencies in this section.)
*
[AS02400(ALL)04/96]
■ Using the “SEEK” function
*
[AS02500(ALL)04/96]
This feature on your radio allows you to automatically select
listenable stations up or down the frequency band. Press the
top
a
half of the “SEEK” button to select the next listenable
station up the frequency band. Press the bottom
b
half of
the button to select the next listenable station down the
frequency band. By pressing and holding the button,
listenable stations can be passed over to reach the desired
station.
File:04wnass.ex
Update:Mon Jul 8 14:13:42 1996

44
*
[AS02600(ALL)02/96]
■ Using the “SCAN/TUNE” button to scan radio stations
*
[AS02700(ALL)04/96]
Pressing the “SCAN/TUNE” button once enters the scan
mode (display will indicate “SCN”). Pushing the top
a
half
of the “SEEK” button will begin the scan mode up the
frequency band, stopping on each listenable station for
approximately five seconds. Pushing the bottom
b
half of
the “SEEK” button will begin the scan mode down the
frequency band, again stopping on each listenable station for
approximately five seconds.
*
[AS02800(ALL)03/96]
To stop the scan mode on the presently sampled station,
press the “SCAN/TUNE” button again.
*
[AS03000(ALL)03/96]
■ Setting the station MEMORY PRESET buttons
%
*
[AS03100(ALL)06/96]
Your radio is equipped with 5 station memory buttons.
These buttons can be used to select up to 5 preset AM
stations and 10 FM stations (5 in FM1 and 5 in FM2). Follow
the easy steps below to set these buttons to the desired
frequencies.
*
[AS03200(ALL)06/96] 1. Select a band, then select a frequency.
*
[AS03400(ALL)06/96] 2. Press one of the memory preset buttons and hold the button
until the sound returns. That station is now held in memory
on that button.
*
[AS03500(ALL)06/96] 3. Follow the two steps above for each station memory preset
button you want to set.
File:04wnass.ex
Update:Mon Jul 8 14:13:42 1996

Electronic Sound Systems
45
[AS03600(ALL)04/92]
Using the Automatic Memory Load and Automatic
Memory Store features
[AS03700(ALL)09/95]
NOTE: If no stations are in memory presets, you can activate
the feature by pressing and holding the “AUTO
PRESET” button for approximately three seconds.
Auto Memory Load sets all memory buttons in AM,
FM1 and FM2 sequentially by seeking out the first
five strong stations for the respective band and storing
them in memory buttons 1-5. (FM2 will store the
second set of strong stations from the FM band.)
*
[AS03800(ALL)05/96]
With Auto Memory Store, you can continually set strong
stations into your memory buttons without losing your existing
memory presets, which is especially helpful while traveling.
Your radio will automatically set your memory buttons to the
strong local stations so you don’t have to continually manually
tune to existing stations.
*
[AS03900(ALL)02/96]
Activate Auto Memory Store by pushing the “AUTO PRESET”
button once. Your radio will set the first five strong stations of
the band you are in (AM, FM1 or FM2) into the memory
buttons. The display will show “AUTO,” then run through the
frequencies, stopping momentarily on the stations being set into
the memory buttons. The radio is now in the “AUTO” mode
and the display will show “AUTO” each time a preset is
activated.
*
[AS04000(ALL)10/95]
NOTE: If there are fewer than five strong stations in the
frequency band, the remaining unfilled buttons will
store the last strong station detected on the band.
*
[AS04100(ALL)03/96]
After all stations have been filled, the radio will begin playing
the station stored on memory button 1.
File:04wnass.ex
Update:Mon Jul 8 14:13:42 1996

46
*
[AS04200(ALL)02/96]
To deactivate the Auto Memory Store mode and return to the
manually-set memory button stations (or those stations set using
Auto Memory Load), simply push the “AUTO PRESET” button.
Display will show “AUTO” then “OFF.” The next time Auto
Memory Store is activated on that band, the radio will store the
next set of five strong stations.
*
[AS04400(ALL)08/95]
Using the “AUDIO” button to adjust the tone balance
and speaker output
*
[AS04500(ALL)02/96]
■ Increasing or decreasing bass response
*
[AS04600(ALL)08/95]
Push the “AUDIO” button repeatedly until the display reads
“BASS.” Push the “+” side of the “VOL” button to increase
bass (more “lows”), and push the “-” side to decrease bass
(less “lows”).
*
[AS04700(ALL)02/96]
■ Increasing or decreasing treble response
*
[AS04800(ALL)08/95]
Push the “AUDIO” button repeatedly until the display reads
“TREB.” Push the “+” side of the “VOL” button to increase
treble (more “highs”), and push the “-” side to decrease
treble (less “highs”).
*
[AS05100(ALL)02/96]
■ Adjusting speaker balance
*
[AS05200(ALL)08/95]
Balance control allows you to adjust the sound distribution
between the right and left speakers. Push the “AUDIO”
button repeatedly until the display reads “BAL.” Push the
“+” side of the “VOL” button to shift the sound to the right
speakers, and push the “-” side to shift the sound to the left
speakers.
*
[AS05300(ALL)04/96]
■ Adjusting speaker fader
*
[AS05400(ALL)08/95]
Fade control allows you to adjust the sound distribution
between the front and rear speakers. Push the “AUDIO”
button repeatedly until the display reads “FADE.” Push the
“+” side of the “VOL” button to shift the sound to the front
speakers, and push the “-” side to shift the sound to the rear
speakers.
File:04wnass.ex
Update:Mon Jul 8 14:13:42 1996

Electronic Sound Systems
47
[AS05500(ALL)09/95]
NOTE: Illuminated bars in the display show relative levels of
bass and treble and positions of speaker balance and
fader functions for five seconds after adjustments are
made, then revert to volume level set.
%
*
[AS05600(ALL)08/95]
Clock operation
*
[AS05700(ALL)08/95]
When in the radio mode, push the “CLOCK” button to switch
from radio frequency to clock. Only the clock numerals will be
displayed in the clock mode — there is no A.M./P.M.
indication. When in the clock mode, the time will be displayed
until the button is pushed again. However, if you retune the
radio while it is in the clock mode, the new radio frequency
will be displayed for approximately ten seconds and then
change back to clock.
*
[AS05800(ALL)08/95]
When in the CD mode, push the “CLOCK” button to change
the display from elapsed time mode to track number mode to
clock mode. If the CD track selection is changed when you are
in the clock or elapsed time mode, the new track number will
be displayed for approximately ten seconds and then revert
back to the previous mode.
*
[AS05900(ALL)08/95]
To set the clock, simultaneously press the “CLOCK” button and
either the bottom (
b
) half of the “SEEK” button to set hours,
or the top (
a
) half of the “SEEK” button to set minutes.
[AS06000(ALL)04/96]
NOTE: The clock can be set with the radio and/or ignition on
or off.
%
*
[AS07000(ALL)10/95]
Using the Controls on Your New Compact Disc Player
*
[AS07100(ALL)03/96]
Your new Ford Compact Disc Player is capable of playing 12
cm or 8 cm discs, without an adapter. The player operates when
the power is on and a disc is inserted (label side up). Handle
the disc by its edge only. (Be sure to read and follow all of the
care and cleaning instructions under How To Take Care of and
Clean Your CD Player and Discs.)
File:04wnass.ex
Update:Mon Jul 8 14:13:42 1996

48
*
[AS07200(ALL)09/95]
NOTE: If after you insert a disc, the disc is ejected and
“ERROR” begins scrolling in the display, remove the
disc and reinsert it right side up (label side up).
*
[AS07300(ALL)08/95]
The digital display on your CD player will either show the
track (selection) number or the elapsed time. (The display mode
can be selected by pressing the “CLOCK” button.) Indicators for
play (
a
), stop (
X
) and compression on (“C”) are also in the
display. (These features are described later.)
*
[AS07400(ALL)10/95]
Once a disc is inserted, operation of the CD player will override
that of the radio.
*
[AS07500(ALL)09/95]
NOTE: The volume, bass, treble, balance and fader controls
on the radio are also used with the CD player. Refer
to earlier operating instructions on these controls.
*
[AS07600(ALL)04/96]
How to insert a disc and begin play
*
[AS07700(ALL)10/95]
Insert one disc, label side up into the disc opening. When
inserted, the disc automatically loads into the unit and play
starts at the beginning of the first track (selection).
*
[AS07800(ALL)04/96]
When the disc reaches the end, the disc player automatically
returns to the beginning of the disc and resumes playing.
[AS07900(ALL)04/96]
NOTE: Once a disc is inserted, the disc opening is secured to
prevent the accidental insertion of a second disc.
[AS08000(ALL)09/95]
NOTE: The CD player has heat protection circuitry to protect
the laser diode. If the temperature of the player
reaches 167˚F (75˚C), the heat detection circuit will
shut off the player and “TOO HOT” will scroll in the
display for five seconds (radio will resume playing).
When the temperature returns to normal operating
range, the CD player will again be operational.
File:04wnass.ex
Update:Mon Jul 8 14:13:42 1996

Electronic Sound Systems
49
*
[AS08100(ALL)10/95]
How to stop and restart the CD player
*
[AS08200(ALL)04/96]
When a disc is loaded, the unit automatically enters the play
mode and the play indicator
a
illuminates. To stop
temporarily, press the “PLAY/STOP” button or the “AM/FM”
button. The stop indicator
X
in the display illuminates and
operation returns to the radio mode. To resume CD play, press
the “PLAY/STOP” button once again.
*
[AS08300(ALL)10/95]
NOTE: If the ignition key is turned OFF during play and
then is set to the ON or ACCESSORY position, the
CD player will resume playing in the mode it was in
when ignition was turned off.
*
[AS08400(ALL)05/96]
How to fast forward or reverse your CD player
*
[AS08500(ALL)10/95]
To quickly search for a particular point in a selection, press the
“FF” button (to fast forward) or the “REV” button (to reverse).
While either button is pressed, the disc goes forward or
backward at two different speeds depending on how long the
button is held down. (Pressing either button for more than three
seconds will speed up the process.) Release the button at the
desired point (found by watching the elapsed playing time in
the display or by listening to the sound during fast forward or
reverse). When you have reached the beginning of track 1, the
CD player will begin playing.
*
[AS08600(ALL)10/95]
When you have reached the end of the disc by keeping the fast
forward button pressed, the display will show “END” and the
player will go into pause mode. Push the “PLAY/STOP” button
to begin playing the first track of the disc, press the “REV”
button to back up from the end of the disc, or use the “SEEK”
function to locate a desired track.
*
[AS08610(ALL)08/95]
Using the “SEEK” feature
[AS08620(ALL)10/94]
Press the top (
a
) of the “SEEK” button once to repeat the
current playing selection. Press the bottom (
b
) of the “SEEK”
button to advance to the next selection.
File:04wnass.ex
Update:Mon Jul 8 14:13:42 1996

50
[AS08630(ALL)10/94]
Pressing and holding the top (
a
) or bottom (
b
) of the “SEEK”
button will scroll backward and forward respectively through
the tracks.
*
[AS08700(ALL)10/95]
Using the “SCAN” function
*
[AS08800(ALL)08/95]
Press the “SCAN/TUNE” button to enter the scan mode. Once
in the scan mode, press the top (
a
) or bottom (
b
) half of the
“SEEK” button to scan forward or reverse, respectively. The CD
player will begin scanning the disc, stopping on each listenable
track for approximately eight seconds. This continues until you
press the “SCAN/TUNE” button a second time. While in the
scan mode, the display shows the current sampled track
number.
*
[AS08900(ALL)10/95]
Special features of your CD player
*
[AS09000(ALL)10/95]
■ Compression
*
[AS09100(ALL)10/95]
The compression feature will bring soft and loud passages
closer together for a more consistent listening level.
*
[AS09200(ALL)10/95]
To turn the compression on, press the “COMP” button.
When on, the compression indicator (“C”) will appear in the
display. Press the button again to turn off.
*
[AS09300(ALL)10/95]
■ Automatic Disc Storage
*
[AS09400(ALL)10/95]
If the disc is ejected from the CD player but is not removed
from the disc opening within approximately 10 seconds, the
player will automatically reload the disc for storage, unless
the disc is automatically ejected due to a “focus error” (disc
inserted upside down). In this case, the disc will not be
automatically reloaded.
File:04wnass.ex
Update:Mon Jul 8 14:13:42 1996

Electronic Sound Systems
51
*
[AS09500(ALL)04/96]
How to eject the disc
*
[AS09600(ALL)10/95]
Push the “EJECT” button to stop play, eject the disc and resume
radio operation of your audio system.
[AS09700(ALL)09/95]
NOTE: You can eject the disc while the radio power and/or
ignition is on or off.
%
*
[AS09710(ALL)08/95]
How To Take Care of and Clean Your CD Player and
Discs
*
[AS09720(ALL)08/95]
To ensure the continued performance of your Ford Compact
Disc Player, carefully read the following precautions:
*
[AS09730(ALL)04/96]
■ Always handle the disc by its edge. Never touch the playing
surface.
*
[AS09740(ALL)08/95]
■ Before playing, inspect the disc for any contamination. If
needed, clean the disc with an approved disc cleaner, such as
the DiscwasherH Compact Disc Cleaner or the Allsop 3H
Compact Disc Cleaner, by wiping from the center out to the
edges. Do not use a circular motion to clean.
*
[AS09750(ALL)06/96]
■ Do not clean discs with solvents such as benzine, thinner,
commercially available cleaners or antistatic spray intended
for analog records.
*
[AS09760(ALL)04/96]
■ Do not expose the disc to direct sunlight or heat sources
such as defroster and floor heating ducts. Do not leave any
discs in a parked car in direct sunlight where there may be a
considerable rise in temperature or damage may result.
*
[AS09765(ALL)04/96]
■ After playing, store the disc in its case.
*
[AS09770(ALL)04/96]
■ If a disc has already been inserted, do not try to insert
another disc. Doing so may damage the disc player.
*
[AS09780(ALL)04/96]
■ Do not insert anything other than a disc into the disc player.
File:04wnass.ex
Update:Mon Jul 8 14:13:42 1996

52
*
[AS09790(ALL)04/96]
NOTE: The use of optical instruments with this product will
increase eye hazard as the laser beam used in this
compact disc player is harmful to the eyes. Do not
attempt to disassemble the case. Refer servicing to
qualified personnel only.
*
[AS09800(ALL)08/95]
Common Operating Conditions of Your CD Player
*
[AS09810(ALL)04/96]
The following information is designed to help you recognize
typical situations that could be mistakenly interpreted as
mechanical malfunctions of the disc player.
*
[AS09820(ALL)04/96]
■ A disc is already loaded.
*
[AS09830(ALL)04/96]
■ The disc is inserted with the label surface downward.
*
[AS09840(ALL)04/96]
■ The disc is dusty or defective.
*
[AS09850(ALL)04/96]
■ The player’s internal temperature is above 167˚F (75˚C).
Allow the player to cool off before operating.
*
[AS09869(ALL)08/95]
■ Different manufacturers of compact discs may produce discs
with different dimensions or tolerances, some of which may
not be within industry standards or in accordance with the
CD format. Because of this, a new disc that is free of dust
and scratches could be defective and may not play on your
Ford Compact Disc Player.
*
[AS09870(ALL)04/96]
If play does not begin after the CD button is pushed:
*
[AS09880(ALL)04/96]
■ The radio is not on.
*
[AS09890(ALL)04/96]
■ The unit is in the stop mode.
*
[AS09900(ALL)04/96]
■ Moisture may have condensed on the lenses within the unit.
If this occurs, remove the disc and wait approximately an
hour until the moisture evaporates.
*
[AS09910(ALL)04/96]
If the sound skips:
*
[AS09920(ALL)04/96]
■ Badly scratched discs or extremely rough roads will cause
the sound to skip. Skipping will not damage the disc player
or scratch the discs.
File:04wnass.ex
Update:Mon Jul 8 14:13:42 1996
Electronic Sound Systems
53
[AS09925(ALL)04/95]
33-1/2 pica
art:0060675-B
High-Level Audio System
File:04wnass.ex
Update:Mon Jul 8 14:13:42 1996

54
%
*
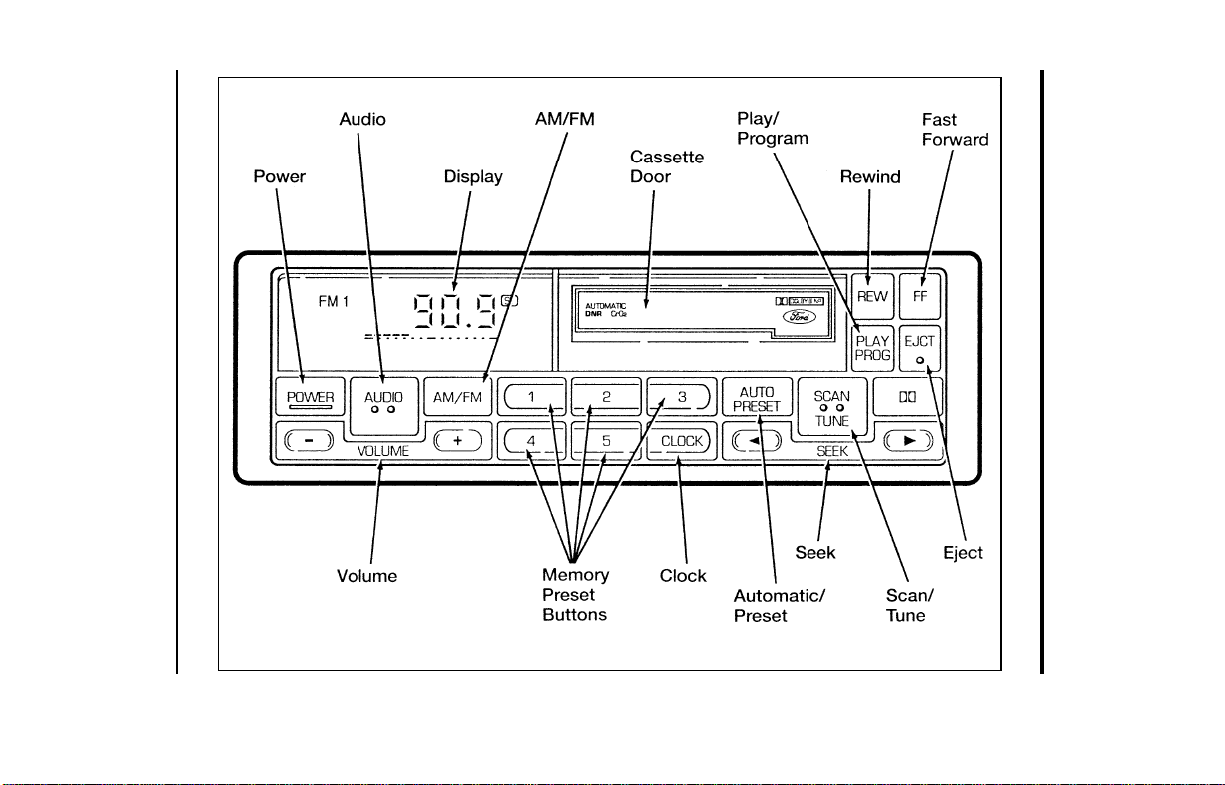
[AS09930(ALL)08/95] High-Level Audio System
[AS09940(ALL)07/91]
Ford’s High-Level Audio System delivers quality performance
for maximum listening enjoyment.
*
[AS09950(ALL)03/96]
Using the Controls on Your New Radio
*
[AS09960(ALL)03/96]
How to turn the radio on and off
*
[AS09970(ALL)10/95]
Press the “POWER” button to turn the radio on. Press it again
to turn it off.
*
[AS09990(ALL)03/96]
How to adjust the volume
*
[AS10000(ALL)03/96]
Press the (R/S) side of the “VOL” button to increase/decrease
the volume. Bars illuminate in the display to show the relative
volume level.
*
[AS10010(ALL)02/96]
NOTE: If the volume level is set above a certain listening
level when the ignition switch is turned off, when the
ignition switch is turned back on, the volume will
come back to a “nominal” listening level. However, if
the radio power is turned off, the volume will remain
in the position it was set at when radio power was
switched off.
*
[AS10020(ALL)03/96]
Selecting the AM or FM frequency band
*
[AS10030(ALL)08/95]
Push the “AM/FM” button to select the desired frequency band.
When in the radio mode, pushing the button more than once
will alternate between AM, FM1 and FM2. These functions are
used with the station memory buttons described under How to
Tune Radio Stations.
%
*
[AS10040(ALL)03/96]
How to tune radio stations
*
[AS10050(ALL)10/95]
There are four ways for you to tune in a particular station. You
can manually locate the station using the “SCAN/TUNE”
button, “SEEK” the station, “SCAN” to the station or select the
station by using the memory buttons, which you can set to any
desired frequency. These four methods are described below.
File:04wnass.ex
Update:Mon Jul 8 14:13:42 1996

Electronic Sound Systems
55
*
[AS10060(ALL)03/96]
■ Using the “TUNE” function
*
[AS10070(ALL)03/96]
You can change the frequency up or down one increment at
a time (FM changes in increments of 200 kHz; AM changes
in increments of 10 kHz) by first pressing the
“SCAN/TUNE” button twice (display shows “TUNE”), then
— within approximately five seconds —pressing and
releasing either the right
a
or left
b
side of the “SEEK”
button. To change frequencies quickly, press and hold down
either the right or left side of the “SEEK” button.
*
[AS10080(ALL)03/96]
Manual tuning adjusts your radio to any allowable broadcast
frequency, whether or not a station is present on that
frequency. (See All About Radio Frequencies in this section.)
*
[AS10090(ALL)04/96]
■ Using the “SEEK” function
[AS10100(ALL)07/96]
This feature on your radio allows you to automatically select
listenable stations up or down the frequency band. Press the
right
a
side of the “SEEK” button to select the next
listenable station up the frequency band. Press the left
b
side of the button to select the next listenable station down
the frequency band. By holding the button down, listenable
stations can be passed over to reach the desired station.
*
[AS10120(ALL)04/96]
■ Using the “SCAN” function
*
[AS10130(ALL)03/96]
Pressing the “SCAN/TUNE” button once enters the scan
mode (display will indicate “SCN”). Pushing the right
a
side of the “SEEK” button will begin the scan mode up the
frequency band, stopping on each listenable station for
approximately a five-second sampling. Pushing the left
b
side of the “SEEK” button will begin the scan mode down
the frequency band, again stopping on each listenable station
for approximately a five-second sampling.
*
[AS10150(ALL)03/96]
To stop the scan mode on the presently sampled station,
press the “SCAN/TUNE” button again.
File:04wnass.ex
Update:Mon Jul 8 14:13:42 1996

56
*
[AS10160(ALL)03/96]
■ Setting the station MEMORY PRESET buttons
*
[AS10170(ALL)02/96]
Your radio is equipped with 5 station memory buttons.
These buttons can be used to select up to 5 preset AM
stations and 10 preset FM stations (5 in FM1 and 5 in FM2).
*
[AS10180(ALL)08/95]
Follow the easy steps below to set these buttons to the desired
frequencies:
*
[AS10190(ALL)06/96] 1. Select a band, then select a frequency.
*
[AS10210(ALL)06/96] 2. Press one of the memory preset buttons and hold the button
until the sound returns. That station is now held in memory
on that button.
*
[AS10220(ALL)06/96] 3. Follow the two steps above for each station memory preset
button you want to set.
*
[AS10240(ALL)10/95]
■ Using the Automatic Memory Load feature
[AS10250(ALL)09/95]
NOTE: If no stations are in memory presets, you can activate
the feature by pressing and holding the “AUTO
PRESET” button for approximately three seconds.
Auto Memory Load sets all memory buttons in AM,
FM1 and FM2 sequentially by seeking out the first
five strong stations for the respective band and storing
them in memory buttons 1-5. (FM2 will store the
second set of strong stations from the FM band.)
*
[AS10260(ALL)05/96]
With Auto Memory Store, you can continually set strong
stations into your memory buttons without losing your existing
memory presets, which is especially helpful while traveling.
Your radio will automatically set your memory buttons to the
strong local stations so you don’t have to continually manually
tune to existing stations.
[AS10270(ALL)02/96]
Activate Auto Memory Store by pushing the “AUTO PRESET”
button once. Your radio will set the first five strong stations of
the band you are in (AM, FM1 or FM2) into the memory
buttons. The display will show “AUTO”, then run through the
File:04wnass.ex
Update:Mon Jul 8 14:13:42 1996

Electronic Sound Systems
57
frequencies, stopping momentarily on the stations being set into
the memory buttons. The radio is now in the “AUTO” mode for
the selected band and this display will show “AUTO” each time
a preset is activated.
*
[AS10280(ALL)10/95]
NOTE: If there are fewer than five strong stations in the
frequency band, the remaining unfilled buttons will
store the last strong station detected on the band.
*
[AS10290(ALL)03/96]
After all stations have been filled, the radio will begin playing
the station stored on memory button 1.
*
[AS10300(ALL)02/96]
To deactivate the Auto Memory Store mode and return to the
manually-set memory button stations (or those stations set using
Auto Memory Load), simply push the “AUTO PRESET” button.
Display will show “AUTO” then “OFF.” The next time Auto
Memory Store is activated on that band, the radio will store the
next set of five strong stations.
*
[AS10310(ALL)10/95]
Adjusting the tone balance and speaker output of your
radio
*
[AS10320(ALL)02/96]
■ Increasing or decreasing bass response
*
[AS10330(ALL)08/95]
Push the “AUDIO” button repeatedly until the display reads
“BASS.” Push the “+” side of the “VOL” button to increase
bass (more “lows”), and push the “-” side to decrease bass
(less “lows”).
*
[AS10340(ALL)02/96]
■ Increasing or decreasing treble response
*
[AS10350(ALL)08/95]
Push the “AUDIO” button repeatedly until the display reads
“TREB.” Push the “+” side of the “VOL” button to increase
treble (more “highs”), and push the “-” side to decrease
treble (less “highs”).
File:04wnass.ex
Update:Mon Jul 8 14:13:42 1996

58
*
[AS10360(ALL)02/96]
■ Adjusting speaker balance
*
[AS10370(ALL)08/95]
Balance control allows you to adjust the sound distribution
between the right and left speakers. Push the “AUDIO”
button repeatedly until the display reads “BAL.” Push the
“+” side of the “VOL” button to shift the sound to the right
speakers, and push the “-” side to shift the sound to the left
speakers.
*
[AS10380(ALL)04/96]
■ Adjusting speaker fader
*
[AS10390(ALL)08/95]
Fade control allows you to adjust the sound distribution
between the front and rear speakers. Push the “AUDIO”
button repeatedly until the display reads “FADE.” Push the
“+” side of the “VOL” button to shift the sound to the front
speakers, and push the “-” side to shift the sound to the rear
speakers.
[AS10400(ALL)09/95]
NOTE: Illuminated bars in the display show relative levels of
bass and treble and positions of speaker balance and
fader functions for five seconds after adjustments are
made, then revert to volume level set.
%
*
[AS10450(ALL)06/96]
Using the Controls of Your Cassette Tape Player
*
[AS10460(ALL)08/95]
How to insert a tape
*
[AS10470(ALL)08/95]
Your cassette tape player is equipped with power loading. Once
you insert a tape and push slightly (with the open edge to the
right), the loading mechanism draws the tape the rest of the
way in and play will begin after a momentary tape tightening
process. Display indicates “M” (for metal/CrO
2
) while tape is
playing.
*
[AS10500(ALL)08/95]
There are four ways to quickly locate a desired selection on the
tape. You can use the fast forward, rewind, “SEEK” or “SCAN”
function. Following are brief descriptions of each.
File:04wnass.ex
Update:Mon Jul 8 14:13:42 1996

Electronic Sound Systems
59
*
[AS10510(ALL)09/95]
■ Fast forwarding the tape
*
[AS10520(ALL)03/96]
To fast forward the tape, press the “FF” button. The radio
will automatically begin playing until fast forward is
manually stopped. At the end of the tape, the direction
automatically reverses and plays the other side of the tape.
*
[AS10530(ALL)08/95]
■ Rewinding the tape
*
[AS10540(ALL)08/95]
To rewind the tape, press the “REW” button.
[AS10550(ALL)12/93]
■ How to change the track of the tape being played
*
[AS10560(ALL)08/95]
The alternate track of the tape can be selected anytime by
pressing the “PLAY/PROG” button.
*
[AS10570(ALL)08/95]
■ Using the “SEEK” function with your cassette tape player
*
[AS10580(ALL)03/96]
While in the tape mode, push the right
a
side of the
“SEEK” button to seek forward to the next selection on the
tape. Push the left
b
side to seek the previous tape
selection.
*
[AS10590(ALL)09/95]
NOTE: If you want to restart a currently playing tape
selection, press the left (
b
) side of the “SEEK” button
after three seconds into the current selection.
*
[AS10595(ALL)03/96]
Whirling sprockets in the display l indicate the direction of
tape travel.
File:04wnass.ex
Update:Mon Jul 8 14:13:42 1996

60
*
[AS10600(ALL)08/95]
■ Using the “SCAN” function with your cassette tape player
*
[AS10700(ALL)03/96]
Press the “SCAN/TUNE” button to enter the scan mode
(display indicates “SCN”). Pushing the right
a
side of the
“SEEK” button will begin the forward scan mode on the tape
currently playing, stopping on each tape selection for
approximately an eight-second sampling.
*
[AS10800(ALL)03/96]
Pushing the left
b
side of the “SEEK” button will begin the
reverse scan mode, stopping on each previous tape selection
for approximately an eight-second sampling. While scanning,
the display indicates whirling sprockets plus an “S” m.
*
[AS10810(ALL)03/96]
To stop the scan mode on the presently sampled tape
selection, press the “SCAN/TUNE” button again.
*
[AS10820(ALL)08/95]
How to eject the tape
*
[AS10830(ALL)08/95]
To stop the tape and eject the cassette, press the “EJCT” button.
The radio will resume playing if the radio power is on. The
tape cartridge can be ejected with radio power (and/or ignition)
on or off.
*
[AS10840(ALL)08/95]
How to store the tape
*
[AS10850(ALL)08/95]
Press the “AM/FM” button to stop the tape player and resume
radio play. The cassette will be stored in the tape player and
the
X
symbol in the display will be lit until you push the
“PLAY PROG” button to resume tape play. Fast forward and
fast rewind can be used while the tape is in storage mode
without interrupting radio play.
*
[AS10860(ALL)02/96]
Using the DolbyH B noise reduction feature
[AS10870(ALL)07/93]
DolbyH is a Registered Trademark of Dolby Laboratories
Licensing Corp.
*
[AS10880(ALL)08/95]
Push the k button to activate. When on, the k symbol
above the button will be lit.
File:04wnass.ex
Update:Mon Jul 8 14:13:42 1996

Electronic Sound Systems
61
*
[AS10905(ALL)05/96]
Tips on Caring for the Cassette Player and Tapes
*
[AS10910(ALL)08/95]
In order to keep your cassette tape player performing the way it
was meant to, read and follow these simple precautions:
*
[AS10915(ALL)05/96]
■ Using a Ford or equivalent cassette cleaning cartridge to
clean the tape player head after 10-12 hours of play will help
maintain the best playback sound and proper tape operation.
*
[AS10920(ALL)08/95]
■ Only cassettes that are 90 minutes long or less should be
used. Tapes longer than 90 minutes are thinner and subject
to breakage or may jam the tape player mechanism.
*
[AS10925(ALL)08/95]
■ Protect cassettes from exposure to direct sunlight, high
humidity and extreme heat or cold. If they are exposed to
extreme conditions, allow them to reach a moderate
temperature before playing.
*
[AS10930(ALL)08/95]
■ If a tape is loose inside the cassette, tighten it before playing
by putting your finger or a pencil into one of the holes and
turning the hub until the tape is tight.
*
[AS10935(ALL)08/95]
■ Loose labels on cassette tapes can become lodged in the
mechanism. Remove any loose label material before inserting
a cassette.
*
[AS10940(ALL)08/95]
■ Do not leave a tape in the cassette tape player when not in
use. High heat in the vehicle can cause the cassette to warp.
*
[AS11010(ALL)08/95]
Tape error messages
*
[AS11020(ALL)08/95]
Your cassette tape player is equipped to diagnose certain
problems you may experience. Error codes are as follows:
*
[AS11030(ALL)08/95]
Error 0 — Communication error between the radio controller
and the tape controller. The cassette player will eject the tape.
Insert the tape again. If the same error code appears, turn the
ignition off, then back on again and insert the tape.
File:04wnass.ex
Update:Mon Jul 8 14:13:42 1996

62
*
[AS11040(ALL)08/95]
Error 1 — Possible problem cartridge. The cassette tape player
will eject the tape. Insert the tape again. If the same error code
appears in the display, try a different cartridge.
*
[AS11050(ALL)08/95]
Error 2 — Tape eject or load failure. Your cassette tape player
will go into the pause mode. Push “EJCT” to eject the tape. If
the tape doesn’t eject, refer the problem to qualified personnel
for service.
%
*
[AS11060(ALL)05/96]
Clock Operation
*
[AS11080(ALL)05/96]
How to view the clock mode
*
[AS11090(ALL)08/95]
Press the “CLOCK” button to alternate the frequency and time
in the display. In the clock mode, pressing any radio function
will automatically display the radio frequency for approximately
ten seconds before changing back to the clock mode.
*
[AS11100(ALL)05/96]
How to set the clock
[AS11120(ALL)12/93]
Press and hold in the “CLOCK” button, press the “SEEK”
button left (
b
) to advance the hours and right (
a
) to advance
the minutes.
*
[AS11130(ALL)05/96]
NOTE: The clock displays 12-hour time with no AM/PM
indications.
*
[AS11135(ALL)09/95]
NOTE: On the High-Level Audio System, the clock can be set
with the radio power on or off.
[AS12000(ALL)09/95]
NOTE: In order to maintain the performance of your cassette
stereo system, refer to “Tips on Caring for the
Cassette Player and Tapes” later in this chapter.
File:04wnass.ex
Update:Mon Jul 8 14:13:42 1996
Electronic Sound Systems
63
[AS12003(ALL)04/95] The Ford 10-CD Changer System
[AS12006(ALL)05/95]
The Ford 10-CD Changer is mounted in your center floor
console and holds 10 CDs, all controlled by using the buttons
on your High-Level Audio System.
[AS12012(ALL)05/95]
Center Floor Console Loading Instructions
[AS12015(ALL)05/95] 1. Open Compact Disc Changer center floor console unit by
sliding door to the right (Figure 1).
[AS12018(ALL)05/95]
7-1/2 pica art:0050265-A
[AS12021(ALL)04/95] 2. Push “EJECT” button to eject the disc “magazine” (holds 10
discs) (Figure 2).
[AS12024(ALL)05/95]
7-1/2 pica art:0050266-A
File:04wnass.ex
Update:Mon Jul 8 14:13:42 1996
64
*
[AS12027(ALL)04/95] 3. Load discs into disc magazine slots (numbered 1 through 10)
one at a time with labeled surfaces upward, starting with
bottom slot number 1 (Figure 3).
[AS12030(ALL)05/95]
10-1/2 pica
art:0050267-A
[AS12033(ALL)04/95] 4. Insert loaded disc magazine into chamber unit with the
arrow on top of the disc magazine pointing toward the
changer (Figure 4). Make sure magazine is fully inserted
into changer.
[AS12036(ALL)06/95]
7-1/2 pica art:0050268-A
*
[AS12039(ALL)09/95]
NOTE: To remove one or more compact disc(s) from the disc
magazine, push the corresponding lever(s) (numbered
1 to 10 on the side of the disc magazine) to the left.
Disc(s) will partially come out for easy removal.
File:04wnass.ex
Update:Mon Jul 8 14:13:42 1996

Electronic Sound Systems
65
*
[AS12045(ALL)01/95] 5. Close unit by sliding changer panel door to the left.
[AS12048(ALL)05/95]
The Compact Disc Changer center floor console unit is now
ready to play using the controls of your High-Level Audio
System.
*
[AS12051(ALL)04/95]
How to Operate the Ford 10-CD Changer Using the
Controls on the Radio
[AS12054(ALL)07/95]
If your vehicle is equipped with the Ford 10-CD Changer
System, you can operate it through the controls of your
High-Level Audio System.
*
[AS12057(ALL)05/95]
Several of the controls on the radio operate in the same manner
in CD mode as they do in radio or cassette mode: turning the
power on, volume control and adjusting the bass, treble, speaker
balance or fade.
*
[AS12060(ALL)02/95]
How to begin CD Changer play
*
[AS12063(ALL)09/95]
NOTE: Radio power must be on to operate the Compact Disc
Changer.
[AS12066(ALL)04/95]
Push the “PLAY PROG” button to begin CD play. (The radio
will revert to the CD mode when “PLAY PROG” button is
pushed and there is no cassette stored or playing in the cassette
deck.) The 10-CD Changer will automatically begin playing the
first track (selection) of the first disc loaded in the trunk unit.
The display will indicate “CD-##” for track number. Three
seconds after displaying “TR-##”, the display will indicate
“##-##” (CD number-Track number).
*
[AS12069(ALL)02/95]
How to change the disc being played
[AS12072(ALL)04/95]
When in the CD mode, you can change discs by pressing the
“FF” button (to select the next discs) or the “REW” button (to
select previous discs). Play willl begin on the first track of the
selected disc.
File:04wnass.ex
Update:Mon Jul 8 14:13:42 1996

66
*
[AS12075(ALL)04/95]
If either button is pressed and held, the CD Changer will
continue fast-forwarding or reversing through the discs in the
disc magazine. During these functions, the display will indicate
the disc number.
*
[AS12078(ALL)10/95]
How to change the track being played
*
[AS12081(ALL)02/96]
Press the right (
a
) side of the “SEEK” button to seek forward
to the next track of current disc. If the button is held and the
last track is reached, the disc changer will automatically begin
playing the last track of the current disc. After the last track has
been completed, the disc changer advances to the next disc and
begins play of track 1. The display indicates the track number
while seeking.
[AS12084(ALL)02/96]
Press the left (
b
) side of the “SEEK” button to seek in reverse
to the previous track on the current disc. If a selection has been
playing for three seconds or more and you press the left (
b
)
side of the “SEEK” button, the CD Changer will replay that
selection from the beginning.
*
[AS12087(ALL)04/95]
Operating the CD Compression feature
*
[AS12090(ALL)05/96]
The compression feature will bring soft and loud passages closer
together for a more consistent listening level.
[AS12093(ALL)04/95]
To turn the compression on, press the Dolby B noise reduction
k button. (While in the CD Changer mode, the Dolby button
controls the compression function.) When the compression
feature is activated, the display will indicate “C”.
*
[AS12096(ALL)06/96]
HowtostopCDplay
[AS12099(ALL)03/96]
While in the CD Changer mode, press the “EJCT” button to
stop CD play and resume radio play. Also, loading a cassette
into the cassette deck will stop CD play and begin cassette play.
File:04wnass.ex
Update:Mon Jul 8 14:13:42 1996
Electronic Sound Systems
67
*
[AS21050(ALL)08/95] Rear Seat Radio Controls
*
[AS21055(ALL)08/95]
Using the Rear Seat Radio Controls
[AS21060(ALL)12/93]
Rear seat radio controls are standard equipment on all models.
*
[AS21065(ALL)12/93]
The rear seat radio controls are located behind the driver on the
left hand side of the vehicle. These controls duplicate several
radio functions of the radio and allow the use of headphones in
the vehicle.
[AS21068(ALL)04/95]
7-1/2 pica art:0060676-B
Rear Seat Radio Controls
*
[AS21070(ALL)06/95]
How to turn the rear seat radio controls on and off
[AS21075(ALL)04/96]
Press memory preset buttons “1” and “3” simultaneously on the
face of your radio to turn the rear seat radio controls on. A
headphones symbol (j) will appear in the display when the
rear seat controls are on. Press “1” and “3” simultaneously
again to turn rear seat radio controls off.
*
[AS21080(ALL)03/96]
How to adjust the volume
*
[AS21085(ALL)12/93]
Press the right (+) side of the “VOLUME” rocker switch to
increase volume, and push the left (-) side to decrease the
volume of the rear speakers.
[AS21090(ALL)09/95]
NOTE: Rear seat control volume can be set no higher than
current radio setting unless speakers are turned off.
See note under How to turn speakers on and off.
File:04wnass.ex
Update:Mon Jul 8 14:13:42 1996

68
*
[AS21095(ALL)06/95]
Setting the AM or FM frequency band
*
[AS21100(ALL)06/95]
Push the “BAND” button to change the frequency band.
*
[AS21105(ALL)06/95]
Using the “MEMORY” button
*
[AS21110(ALL)06/95]
Push the “MEMORY” button to access the station you have set
into memory button 1 on the face of the radio. Successively
pushing this button will access, numerically, all stations set into
the Station Memory Preset buttons (1 through 5).
*
[AS21115(ALL)06/95]
How to turn the speakers on and off
*
[AS21120(ALL)06/95]
When the rear seat controls are on, push the “SPKRS ON-OFF”
button to turn all speakers off. Push again to turn all speakers
on.
[AS21125(ALL)04/96]
NOTE: Turning the ignition off, then on again will not turn
the speakers back on, if previously turned off by the
“SPKRS ON-OFF” button on the rear seat controls.
*
[AS21130(ALL)06/95]
Using the “SEEK” function
[AS21135(ALL)04/96]
Press the right (
a
) side of the “SEEK” rocker switch to seek to
the next radio station. Press the left (
b
) side of the “SEEK”
rocker switch to seek to the previous radio station.
*
[AS21140(ALL)09/95]
NOTE: When using the rear seat controls with a High-Level
Audio System, the “SEEK” function on the rear seat
controls will also function with cassettes, seeking the
next (“SEEK
a
”) or previous (“
b
SEEK”) selection
on the tape.
*
[AS21145(ALL)06/95]
Using headphones with the rear seat controls
*
[AS21150(ALL)10/95]
Two 3.5 mm headphone jacks have been provided on the rear
seat controls. Plug headphone(s) into the provided jack(s) to
operate headphones.
File:04wnass.ex
Update:Mon Jul 8 14:13:42 1996
Electronic Sound Systems
69
[AS21200(ALL)09/94]
33-1/2 pica
art:0060677-A
Electronic Stereo Radio
File:04wnass.ex
Update:Mon Jul 8 14:13:42 1996
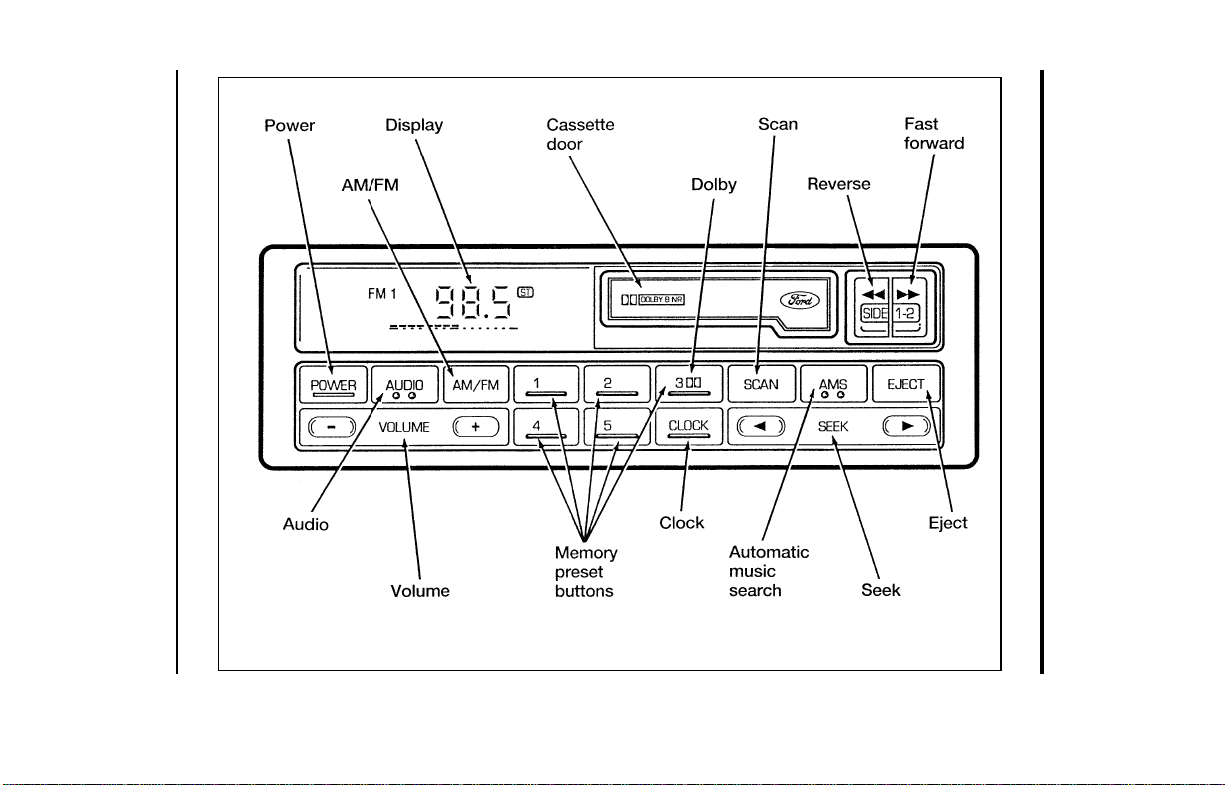
70
[AS21250(ALL)09/94]
33-1/2 pica
art:0060678-A
Electronic Stereo Radio with Cassette
File:04wnass.ex
Update:Mon Jul 8 14:13:42 1996

Electronic Sound Systems
71
%
*
[AS21300(ALL)09/95] Electronic Stereo and Stereo Cassette
Radios
*
[AS21400(ALL)03/96]
Using the Controls on Your New Radio
*
[AS21500(ALL)08/95]
How to turn the radio on and adjust the volume
*
[AS21701(ALL)10/95]
Press the “POWER” button to turn the radio on. Press it again
to turn it off.
*
[AS21950(ALL)02/96]
Press the right (+) side of the “VOLUME” button to increase the
volume. Press the left (s) side of the button to decrease the
volume. Illuminated bars in the display show the relative
volume level.
*
[AS21975(ALL)02/96]
NOTE: If the volume level is set above a certain listening
level when the ignition switch is turned off, when the
ignition switch is turned back on, the volume will
come back to a “nominal” listening level. However, if
the radio power is turned off, the volume will remain
in the position it was set at when radio power was
switched off.
*
[AS22100(ALL)03/96]
Selecting the AM or FM frequency band
*
[AS22225(ALL)02/96]
Push the “AM/FM” button to select the desired frequency band.
Pushing the button more than once will alternate between AM,
FM1 and FM2. These functions are used with the station
memory buttons described under How to tune radio stations.
*
[AS22300(ALL)02/96]
How to tune radio stations (Stereo Radio)
*
[AS22400(ALL)02/96]
There are three ways for you to tune in to a particular station.
You can manually locate the station by using the “TUNE”
button, “SEEK” the station or select the station by using the
memory preset buttons, which you can set to any desired
frequency.
File:04wnass.ex
Update:Mon Jul 8 14:13:42 1996

72
%
*
[AS22410(ALL)02/96]
How to tune radio stations (Stereo Cassette Radio)
*
[AS22420(ALL)06/96]
There are four ways for you to tune in to a particular station.
You can manually locate the station by using Automatic Music
Search (“AMS”), “SEEK” the station, “SCAN” to the station or
select the station by using the memory buttons, which you can
set to any desired frequency.
*
[AS22450(ALL)03/96]
■ Using the “TUNE” function
*
[AS22700(ALL)03/96]
Manual tuning adjusts your radio to any allowable broadcast
frequency, whether or not a station is present on that
frequency. (See All About Radio Frequencies in this section.)
*
[AS22730(ALL)02/96]
■ Using the “AMS” function to manually tune your radio
(Stereo Cassette Radio)
*
[AS22740(ALL)02/96]
You can change the frequency up or down one increment at
a time by first pressing the “AMS” button (display shows
“TUNE”) then within approximately five seconds pressing
and releasing either the right
a
or left
b
side of the
“SEEK” button. To change frequencies quickly, press and
hold down either the right or left side of the “SEEK” button.
*
[AS22750(ALL)03/96]
Manual tuning adjusts your radio to any allowable broadcast
frequency, whether or not a station is present on that
frequency. (See All About Radio Frequencies in this section.)
*
[AS22800(ALL)04/96]
■ Using the “SEEK” function
[AS22900(ALL)07/96]
This feature on your radio allows you to automatically select
listenable stations up or down the frequency band. Press the
right
a
side of the “SEEK” button to select the next
listenable station up the frequency band. Press the left
b
side of the button to select the next listenable station down
the frequency band. By holding the button down, listenable
stations can be passed over to reach the desired station.
File:04wnass.ex
Update:Mon Jul 8 14:13:42 1996

Electronic Sound Systems
73
*
[AS23160(ALL)02/96]
■ Using the “SCAN” function (Stereo Cassette Radio)
*
[AS23170(ALL)06/95]
Press the “SCAN” button to enter the scan mode. The radio
will begin scanning up the frequency band, stopping on each
listenable station for approximately a five-second sampling.
This continues until you press the “SCAN” button a second
time. The display flashes “AM” or “FM.”
*
[AS23200(ALL)03/96]
■ Setting the station MEMORY PRESET buttons
*
[AS23325(ALL)02/96]
Your radio is equipped with 5 station memory buttons.
These buttons can be used to select up to 5 preset AM
stations and 10 preset FM stations (5 in FM1 and 5 in FM2).
*
[AS23400(ALL)08/95]
Follow the easy steps below to set these buttons to the desired
frequencies:
*
[AS23500(ALL)06/96] 1. Select a band, then select a frequency.
*
[AS23700(ALL)06/96] 2. Press one of the memory preset buttons and hold the button
until the sound returns. That station is now held in memory
on that button.
*
[AS23800(ALL)06/96] 3. Follow the two steps above for each station memory preset
button you want to set.
*
[AS23900(ALL)03/96]
NOTE: If the vehicle’s battery is disconnected, the clock and
station memory preset buttons will need to be reset.
*
[AS24000(ALL)10/95]
Adjusting the tone balance and speaker output of your
radio
*
[AS24100(ALL)02/96]
■ Increasing or decreasing bass response
*
[AS24225(ALL)02/96]
Push the “AUDIO” button repeatedly until the display reads
“BASS.” Push the right (+) side of the “VOLUME” button to
increase bass (more “lows”), and push the left (s) side to
decrease bass (less “lows”).
File:04wnass.ex
Update:Mon Jul 8 14:13:42 1996

74
*
[AS24300(ALL)02/96]
■ Increasing or decreasing treble response
*
[AS24425(ALL)02/96]
Push the “AUDIO” button repeatedly until the display reads
“TREB.” Push the right (+) side of the “VOLUME” button to
increase the treble (more “highs”), and push the left (s) side
to decrease treble (less “highs”).
*
[AS24500(ALL)02/96]
Speaker features and operation
*
[AS24600(ALL)02/96]
■ Adjusting speaker balance
*
[AS24725(ALL)02/96]
Balance control allows you to adjust the sound distribution
between the right and left speakers. Push the “AUDIO”
button repeatedly until the display reads “BAL.” Push the
right (+) side of the “VOLUME” button to shift the sound to
the right speakers, and push the left (s) side to shift the
sound to the left speakers.
*
[AS24800(ALL)04/96]
■ Adjusting speaker fader
*
[AS24925(ALL)02/96]
Fade control allows you to adjust the sound distribution
between the front and rear speakers. Push the “AUDIO”
button repeatedly until the display reads “FADE.” Push the
right (+) side of the “VOLUME” button to shift the sound to
the front speakers, and push the left (s) side to shift the
sound to the rear speakers.
[AS24950(ALL)09/95]
NOTE: Illuminated bars in the display show relative levels of
bass and treble and positions of speaker balance and
fader functions for five seconds after adjustments are
made, then revert to volume level set.
File:04wnass.ex
Update:Mon Jul 8 14:13:42 1996

Electronic Sound Systems
75
%
*
[AS25000(ALL)06/96]
Using the Controls of Your Cassette Tape Player
*
[AS25500(ALL)08/95]
How to insert a tape
[AS25600(ALL)05/95]
Insert a cassette (with the open edge to the right) firmly into
the tape door opening, making sure the cassette is completely in
and “seated.”
*
[AS25700(ALL)12/95]
How to locate a desired track on the tape
[AS25800(ALL)09/95]
NOTE: The tape track number indicated in the display does
not necessarily correspond to the tape track or side
number on the cassette label. It is used only to
indicate when the tape mechanism reverses tracks.
[AS25896(ALL)12/93]
Using the Automatic Music Search (“AMS”) function with
cassette tape player (if your display shows numerals)
*
[AS25897(ALL)03/96]
Press and hold the “AMS” button (“AMS” will appear in the
display). Then, push the left
h
button to rewind to the
beginning of the current selection or press the right
g
button
to fast forward to the beginning of the next selection.
*
[AS25900(ALL)09/95]
■ Fast forwarding the tape
*
[AS26000(ALL)04/96]
Push the right
g
button to fast forward the tape.
*
[AS26100(ALL)08/95]
■ Rewinding the tape
*
[AS26200(ALL)04/96]
Push the left
h
button to rewind the tape.
[AS26300(ALL)12/93]
Using the Automatic Music Search (“AMS”) function with
cassette tape player (if your display shows arrows)
[AS26310(ALL)10/95]
Press and hold the “AMS” button. Then, push the
appropriate fast-wind button, depending upon the direction
of the tape travel arrow in the display. For example, if the
tape travel arrow is pointing to the left, push the right (
g
)
button to rewind to the beginning of the current selection. If
the tape travel arrow is pointing to the right, press the right
(
g
) button to fast forward to the beginning of the next
selection.
File:04wnass.ex
Update:Mon Jul 8 14:13:42 1996

76
[AS26500(ALL)12/93]
Fast forwarding the tape (if your display shows arrows)
*
[AS26650(ALL)03/96]
To fast forward the tape, press the fast-wind button with the
arrows pointing in the same direction as indicated in the
display. For example, if the tape travel arrow in the display
is pointing to the left, press the left
h
button to fast
forward the tape. To return to the play mode, press the
opposite fast-wind button momentarily, until fast forward
stops.
*
[AS26700(ALL)07/90]
■ Rewinding the tape (if your display shows arrows)
*
[AS26850(ALL)03/96]
To rewind the tape, press the fast-wind button with the
arrows pointing in the opposite direction as indicated in the
display. For example, if the tape travel arrow in the display
is pointing to the left, press the right
g
button to rewind
the tape. To return to the play mode, press the opposite
fast-wind button momentarily, until rewind stops.
*
[AS26900(ALL)08/95]
■ How to change the side of the tape being played
*
[AS27000(ALL)02/96]
The alternate track (other side) of the tape can be selected at
any time by pushing both fast-wind buttons
h
and
g
at the same time.
*
[AS27100(ALL)08/95]
How to eject the tape
*
[AS27250(ALL)04/96]
To stop the tape and eject the cassette, press the eject (i)
button. The radio will resume playing.
*
[AS27300(ALL)02/96]
Using the DolbyH B noise reduction feature
*
[AS27400(ALL)09/95]
NOTE: Noise reduction system manufactured under license
from Dolby Labs Licensing Corporation. “Dolby” and
double-D symbol are trademarks of Dolby
Laboratories Licensing Corporation.
*
[AS27550(ALL)05/95]
Push station memory button 3 to activate DolbyH B Noise
Reduction.
File:04wnass.ex
Update:Mon Jul 8 14:13:42 1996

Electronic Sound Systems
77
*
[AS27600(ALL)05/96]
Tips on Caring for the Cassette Player and Tapes
*
[AS27700(ALL)08/95]
In order to keep your cassette tape player performing the way it
was meant to, read and follow these simple precautions:
*
[AS27750(ALL)05/96]
■ Using a Ford or equivalent cassette cleaning cartridge to
clean the tape player head after 10-12 hours of play will help
maintain the best playback sound and proper tape operation.
*
[AS27800(ALL)08/95]
■ Only cassettes that are 90 minutes long or less should be
used. Tapes longer than 90 minutes are thinner and subject
to breakage or may jam the tape player mechanism.
*
[AS27900(ALL)08/95]
■ Protect cassettes from exposure to direct sunlight, high
humidity and extreme heat or cold. If they are exposed to
extreme conditions, allow them to reach a moderate
temperature before playing.
*
[AS28001(ALL)08/95]
■ If a tape is loose inside the cassette, tighten it before playing
by putting your finger or a pencil into one of the holes and
turning the hub until the tape is tight.
*
[AS28101(ALL)08/95]
■ Loose labels on cassette tapes can become lodged in the
mechanism. Remove any loose label material before inserting
a cassette.
*
[AS28200(ALL)08/95]
■ Do not leave a tape in the cassette tape player when not in
use. High heat in the vehicle can cause the cassette to warp.
%
*
[AS28400(ALL)05/96]
Clock Operation
*
[AS28500(ALL)05/96]
How to view the clock mode
*
[AS28650(ALL)08/95]
Press the “CLOCK” button to alternate the frequency and time
in the display. In the clock mode, pressing any radio function
will automatically display the radio frequency for approximately
ten seconds before changing back to the clock mode.
File:04wnass.ex
Update:Mon Jul 8 14:13:42 1996

78
*
[AS28800(ALL)05/96]
How to set the clock
*
[AS28900(ALL)05/96] 1. Turn the radio on.
*
[AS29025(ALL)04/96] 2. Press and hold in the “CLOCK” button. Press the “SEEK”
button left (
b
) to advance the hours and right (
a
)to
advance the minutes.
*
[AS29200(ALL)05/96]
NOTE: The clock displays 12-hour time with no AM/PM
indications.
*
[AS35200(ALL)04/96] Common Radio Reception Conditions
*
[AS35300(ALL)05/96]
Several conditions prevent FM reception from being completely
clear and noise-free, such as the following:
*
[AS35400(ALL)05/96] 1. Distance/Strength
*
[AS35500(ALL)05/96]
The strength of the FM signal is directly related to the distance
the signal must travel. The listenable range of an average FM
signal is approximately 25 miles (40 kilometers). Beyond this
distance, the radio is operating in a fringe area and the signal
becomes weaker.
*
[AS35600(ALL)05/96] 2. Terrain
*
[AS35700(ALL)05/96]
The terrain (hilly, mountainous, tall buildings) of the area over
which the signal travels may prevent the FM signal from being
noise-free.
*
[AS35900(ALL)05/96]
If there is a building or large structure between the antenna and
station, some of the signal “bends” around the building, but
certain spots receive almost no signal. Moving out of the
“shadow” of the structure will allow the station to return to
normal.
*
[AS36000(ALL)05/96]
When the radio waves are reflected off objects or structures, the
reflected signal cancels the normal signal, causing the antenna to
pick up noise and distortion. Cancellation effects are most
prominent in metropolitan areas, but also can become quite
severe in hilly terrain and depressed roadways.
File:04wnass.ex
Update:Mon Jul 8 14:13:42 1996

Electronic Sound Systems
79
*
[AS36100(ALL)05/96]
To minimize these conditions, a stereo/mono blend circuit has
been incorporated into this system. This feature automatically
switches a weak stereo signal to a clearer monaural signal,
which improves the quality of reception.
*
[AS36200(ALL)05/96]
Several sources of static are normal conditions on AM
frequencies. These can be caused by power lines, electric fences,
traffic lights and thunderstorms.
*
[AS36300(ALL)05/96]
Another reception phenomenon is Strong Signal Capture and
Overload. This can occur when listening to a weak station and
when passing another broadcast tower. The close station may
capture the more distant station, although the displayed
frequency does not change. While passing the tower, the station
may switch back and forth a few times before returning to the
original station.
*
[AS36400(ALL)05/96]
When several broadcast towers are present (common in
metropolitan areas), several stations may overload the receiver,
resulting in considerable station changing, mixing and
distortion.
*
[AS36500(ALL)05/96]
Automatic gain control circuitry for both AM and FM bands has
been incorporated into this system to reduce strong signal
capture and overload.
%
*
[AS36600(ALL)05/96] All About Radio Frequencies
*
[AS36700(ALL)05/96]
The Federal Communications Commission (FCC) and the
Canadian Radio Telecommunications Commission (CRTC)
establish the frequencies that AM and FM radio stations may
use for their broadcasts. The allowable frequencies are, AM: 530,
540...1600, 1610 kHz in 10 kHz steps; FM: 87.9, 88.1...107.7, 107.9
MHz in 0.2 MHz steps.
*
[AS36800(ALL)05/96]
Not all frequencies will be assigned to a given area. This radio
will tune to each of these frequencies using manual tune and no
fine tuning is necessary as radio stations may not use other
frequencies.
File:04wnass.ex
Update:Mon Jul 8 14:13:42 1996

80
*
[AS36900(ALL)05/96]
Some FM radio stations advertise a “rounded-off” frequency
which is not the frequency they actually broadcast on. For
example, a radio station that is assigned a frequency of 98.7
MHz may call itself “Radio 99” even though 99.0 MHz is not an
allowable FM broadcast frequency.
%
*
[AS37000(ALL)05/96] Important Warranty and Service Information
*
[AS37050(ALL)07/90]
■ Warranty
[AS37100(ALL)10/94]
Your sound system is warranted for three years/36,000 miles
(60,000 km). Consult your vehicle warranty booklet for further
information.
*
[AS37150(ALL)07/90]
■ Service
*
[AS37200(ALL)05/96]
At Ford, we stand behind our audio systems with a
comprehensive service and repair program. If anything should
go wrong with your Ford audio system, return to your dealer
for service. There is a nationwide network of qualified Ford
authorized repair centers to assist you.
File:04wnass.ex
Update:Mon Jul 8 14:13:42 1996

81
Controls and Features
*
[CF00200(ALL)01/96]
The instrument panel (dashboard) on your vehicle is divided
into several different sections. Illustrations are provided for the
major parts of the instrument panel that are explained in this
chapter. Some items shown may not be on all vehicles.
[CF00300(ALL)01/96]
The controls for the climate control systems, headlamps, dim
switch, rear window defogger, fog lamps, power rear quarter
windows, Traction Control, clock/radio and the rear window
washer and wiper are all on the instrument panel.
[CF00310(ALL)04/96]
Your vehicle is designed with innovative and state-of-the-art
features. Understanding how these features work can make
driving your vehicle more comfortable.
% [CF00400(ALL)01/96]
NOTE: Any cleaner or polish that increases the gloss (shine)
of the upper part of te instrument panel should be
avoided. The dull finish in this area us to help protect
the driver from undesirable windshield reflection.
%
*
[CF00500(ALL)01/96] Climate Control Systems
[CF00600(ALL)01/96]
Your vehicle is equipped with a control assembly designed to
handle either a combination A/C-Heater System or a
Heater-Only System. Main Heater-Only Systems are standard
equipment. Main and Rear Heater-Only Systems, Main
A/C-Heater Systems, and Main and Rear A/C-Heater Systems
are optional.
[CF00700(ALL)01/96]
If your vehicle has a rear system, the front control will be
equipped with a rear fan control knob plus another fan speed
control knob which is installed in the rear.
File:05wncfs.ex
Update:Wed Jul 31 15:55:37 1996
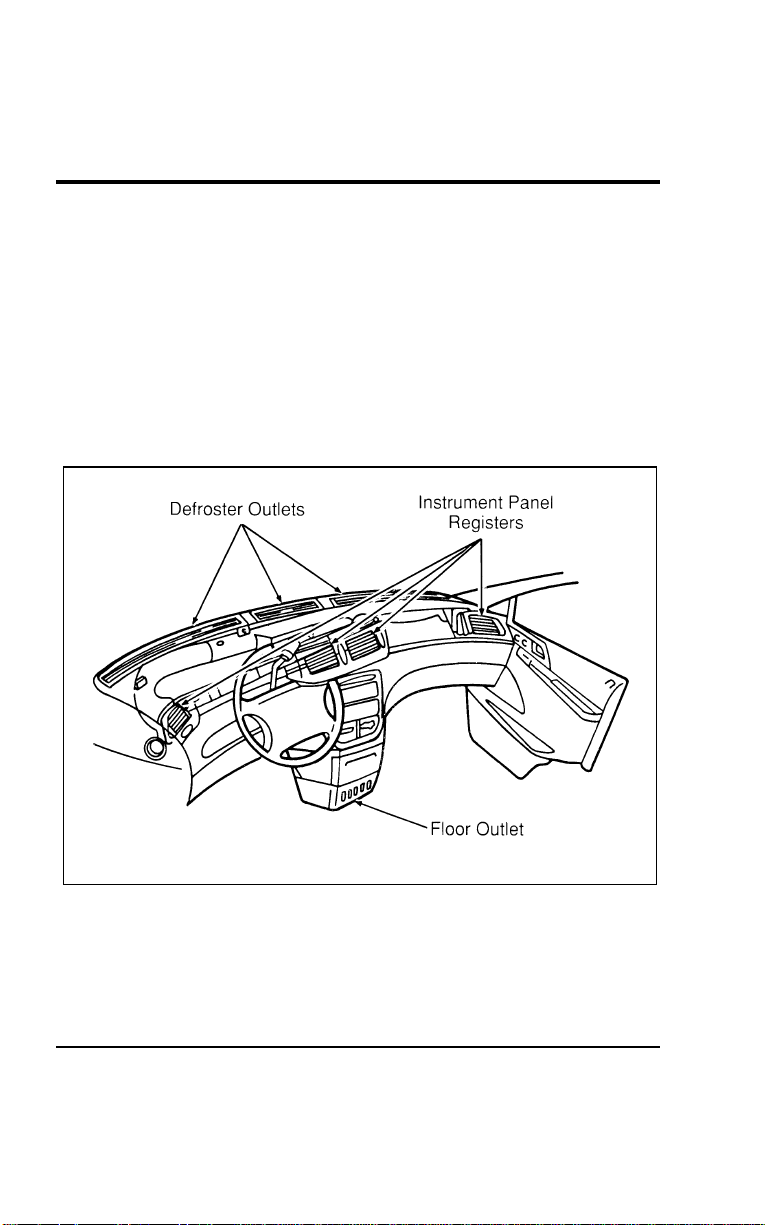
82
%
*
[CF00800(ALL)03/96]
Instrument Panel Registers
[CF00900(ALL)01/96]
There are four registers in the instrument panel. Each of these
registers contain a louver assembly which can be manually
adjusted to direct airflow UP, DOWN, LEFT and RIGHT. Each
register in the instrument panel also has a thumbwheel that
allows you to open or close each register. The defroster outlets
are located on the top of the instrument panel while the floor
outlet is located at the bottom of the center console. An
illustration of the register, defroster, and floor outlet locations
follows.
[CF01000(ALL)01/96]
17-1/2 pica
art:0050129-B
The climate control air outlet locations
File:05wncfs.ex
Update:Wed Jul 31 15:55:37 1996

Controls and Features
83
% [CF01100(ALL)01/96]
Air Conditioning (A/C) Controls — Main (Front) System
Only (Manual Air Conditioning)
[CF01200(ALL)01/96]
10-1/2 pica
art:0050130-C
The climate controls — main A/C
[CF01300(ALL)01/96]
The Fan Speed Knob controls the volume of air circulated in the
vehicle. There are four fan settings: Low, Medium Low, Medium
High, and High.
[CF01400(ALL)01/96]
NOTE: The fan will not operate when the Function Selector
Knob is in the m (OFF) position.
[CF01500(ALL)01/96]
The Temperature Control Knob may be adjusted from COOL air
in the blue range to WARM air in the red range.
[CF01600(ALL)01/96]
NOTE: Air temperature can be adjusted for the main climate
control system only. Air temperature from the
auxiliary heating/air conditioning system (if equipped)
cannot be adjusted. Rear passengers will receive either
FULL COOL or FULL WARM air based on the setting
of the Function Selector Knob.
[CF01700(ALL)01/96]
The Function Selector Knob controls air circulation and A/C
Compressor Operation.
File:05wncfs.ex
Update:Wed Jul 31 15:55:37 1996

84
[CF01800(ALL)01/96]
The air conditioning settings include MAX A/C, A/C and S
(Panel/Floor). However, heating capabilities are also provided in
these modes. Adjust the Temperature Control Knob as necessary
to receive cool (air-conditioned) or warm (heated) air when in
these modes.
[CF01900(ALL)01/96]
NOTE: The A/C compressor will only operate when outside
air temperatures are above approximately 45˚F (7˚C).
[CF02000(ALL)01/96]
The climate control system provides fresh outside air in all
function control settings except for MAX A/C and m (OFF).
Only recirculated interior air is available in MAX A/C.
[CF02100(ALL)01/96]
In MAX A/C, air from inside the passenger compartment is
recirculated continuously and the A/C compressor is engaged.
In this position, the system provides maximum cooling,
maximum dehumidifying, and greater fuel efficiency. It also has
a greater noise level because the sound of the air from the
blower motor is not muffled by a closed damper door as it
would be in all other functional settings.
[CF02200(ALL)01/96]
In A/C, outside air is drawn into the system and the A/C
compressor is engaged. The cooling process and the distribution
of cooled air is the same as that provided with MAX A/C.
Because outside air is drawn into the system, it will not have
the advantage of cooling already cooled air. It will have a lower
noise level because a closed damper door muffles the sound of
the air from the blower motor.
[CF02300(ALL)01/96]
In Q (PANEL), air is drawn from the outside and directed into
the passenger compartment through the instrument panel
registers. The temperature of the air can be varied by adjusting
the Temperature Control Knob. This mode is normally used as a
vent setting. The A/C compressor does not operate in this
mode, only heating capabilities are provided.
File:05wncfs.ex
Update:Wed Jul 31 15:55:37 1996

Controls and Features
85
[CF02400(ALL)01/96]
In m (OFF), air supply is shut off from all outlets and all
blower motor operation is stopped. Use this setting when
driving through an area where outside air is unpleasant or
dusty.
[CF02500(ALL)01/96]
R WARNING
Operating with the Function Selector Control in off or in
Max A/C for extended periods of time in cold weather
can result in fog buildup on interior glass surfaces.
[CF02600(ALL)01/96]
This fogging can make it difficult to see the road for safe
driving. Operating in the A/C, Q (PANEL), S
(PANEL/FLOOR), R (FLOOR), P (DEFROST/FLOOR) and
V (DEFROST) positions will help prevent fogging. Adjust the
temperature as necessary for comfort.
[CF02700(ALL)01/96]
In S (PANEL/FLOOR), approximately equal amounts of
airflow are directed to the instrument panel registers and the
floor outlets. This setting will engage the A/C compressor, thus
providing you with an additional A/C mode.
[CF02800(ALL)01/96]
In R (FLOOR), most of the system’s air supply is directed to
the floor outlets with a small amount going to the windshield
and side window demisters.
[CF02900(ALL)01/96]
In P (DEFROST/FLOOR), approximately equal amounts of air
are directed to the windshield and floor outlets with a small
amount to the side windows.
[CF03000(ALL)01/96]
NOTE: If outside air temperatures are above approximately
45˚F (7˚C), the P (DEFROST/FLOOR) and V
(DEFROST) positions will also automatically engage
the air-conditioning compressor in order to reduce the
humidity in the air and aid in clearing the inside
glass. Adjust the Temperature Control Knob as
necessary for comfort.
File:05wncfs.ex
Update:Wed Jul 31 15:55:37 1996
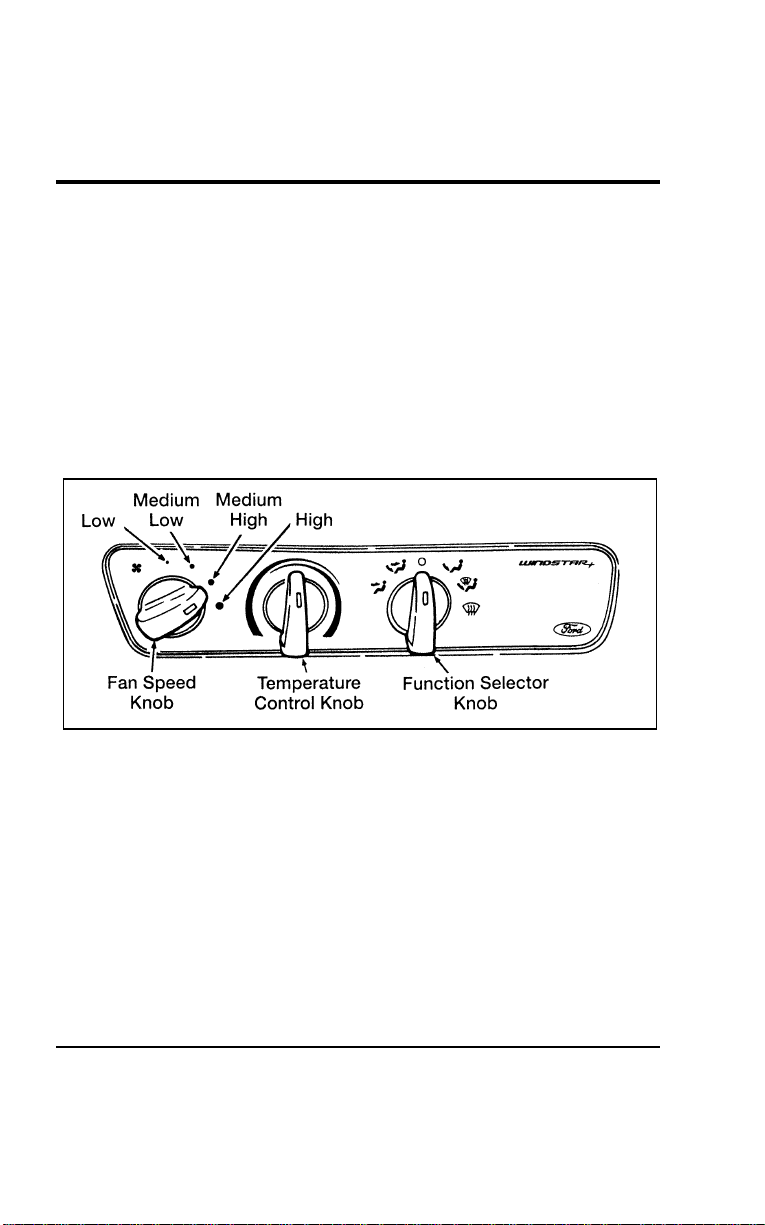
86
[CF03100(ALL)01/96]
In V (DEFROST), most of the air is directed through the
defrosters and onto the windshield. A small amount is diverted
to the floor.
*
[CF03200(ALL)01/96]
Heater Controls (Heater-Only Vehicles)
[CF03300(ALL)01/96]
The fan speed, temperature, and function controls are essentially
the same as the A/C controls described previously with the
exception that the control assembly has no function settings for
MAX A/C and A/C and no A/C compressor operation is
provided in any of the function settings. An illustration of the
control for a heater-only system follows.
[CF03400(ALL)01/96]
10-1/2 pica
art:0050238-C
Climate control panel — Heater-Only System
*
[CF03500(ALL)04/96]
Turning On the Heat
[CF03600(ALL)01/96]
Heat will not be available until the engine has been running for
sufficient time as indicated by the engine coolant temperature
gauge.
*
[CF03700(ALL)01/96]
To heat the inside of your vehicle:
[CF03800(ALL)01/96] 1. Turn the Function Selector Knob to R (FLOOR). Outside
air is drawn in and directed into the passenger compartment
through the floor outlets. Small quantities of air are also
directed to the defrost and side window demist outlets.
File:05wncfs.ex
Update:Wed Jul 31 15:55:37 1996

Controls and Features
87
[CF03900(ALL)01/96] 2. Turn the Temperature Control Knob toward the WARM
(red) area.
[CF04000(ALL)01/96] 3. Turn the Fan Speed Knob to the speed of your choice. When
your vehicle warms up, you may want to set the Fan Speed
Knob to a lower speed, or adjust the Temperature Control
Knob to a lower setting to maintain a comfortable
temperature.
*
[CF04100(ALL)01/96]
To defrost the windshield and side windows:
[CF04200(ALL)01/96]
■ Turn the Function Selector Knob to V (DEFROST), turn the
Temperature Control Knob to the WARM (red) area and turn
the Fan Speed Knob to the position of your choice.
*
[CF04300(ALL)01/96]
To heat and defrost at the same time:
[CF04400(ALL)01/96]
■ Turn the Function Selector Knob to P
(DEFROST/FLOOR),turn the Temperature Control Knob and
the Fan Speed Knob to provide the temperature and fan
speed you prefer.
[CF04500(ALL)01/96]
Do not place objects under the front seats unless your vehicle is
equipped with an under seat storage tray. Improperly stored
objects will interfere with the flow of air to the back seats.
[CF04600(ALL)01/96]
Remove any snow, ice, or leaves from the area below the
windshield on the outside of your vehicle. They could block the
air intake.
*
[CF04700(ALL)01/96]
Heating and Air Conditioning System
*
[CF04800(ALL)04/96]
Turning On the Heat
[CF04900(ALL)01/96]
You can heat the inside of your vehicle and defrost the
windshield using the Function Selector Knob located in the
control assembly in the instrument panel.
[CF05000(ALL)07/96]
The seven function selector modes are: MAX A/C, AC, Q
(PANEL), S (PANEL/FLOOR), R (FLOOR), P
(DEFROST/FLOOR), and V (DEFROST). If your vehicle is
equipped with a rear seat climate control system, the instrument
File:05wncfs.ex
Update:Wed Jul 31 15:55:37 1996
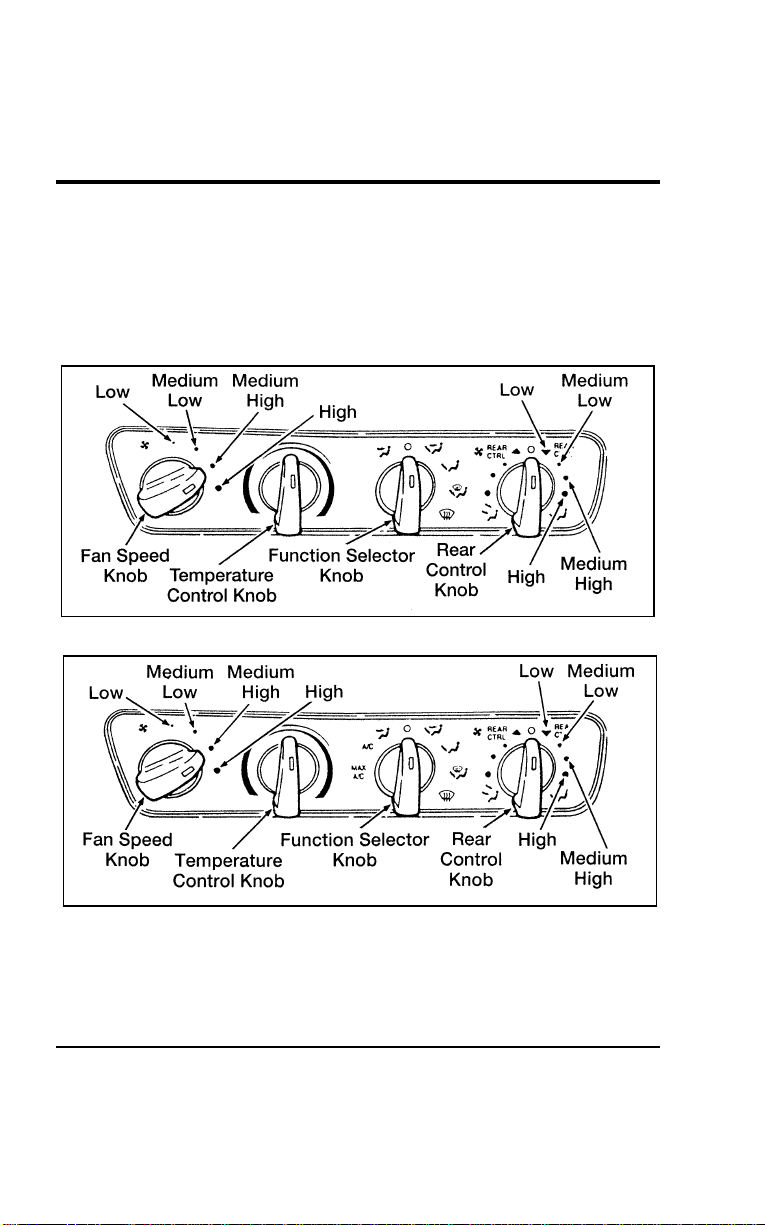
88
panel will also include a rear seat climate control knob. To turn
on the rear passenger compartment control system, select REAR
CTRL, and any fan speed. With the knob set to REAR CTRL,
rear seat passengers will have control of rear fan speed on the
rear seat climate control panel. The rear control knob will
control rear fan speed from the front control panel.
[CF05050(ALL)07/96]
10-1/2 pica art:005001-A
The climate controls — main and auxiliary system — Heater System only
[CF05100(ALL)07/96]
10-1/2 pica art:0050059-E
The climate controls — main and auxiliary system A/C — Heater System — if
equipped
File:05wncfs.ex
Update:Wed Jul 31 15:55:37 1996

Controls and Features
89
[CF05150(ALL)07/96]
The auxiliary system is controlled exclusively by the 9-position
switch. If the control is turned to the left, cool air will be
delivered at the beltline and overhead. If the control is turned
to the right, warm air will be delivered to the floor area. The
further left or right from the OFF position the control is turned,
the higher the fan speed.
[CF05200(ALL)01/96]
The standard heating system and the heating portion of the
heating and air conditioning system are essentially identical.
There is one exception, however; the air conditioning
compressor will automatically engage when the P
(DEFROST/FLOOR) or V (DEFROST) position is selected to
aid in defogging and defrosting the inside glass when the
outside temperature is above approximately 45˚F (7˚C). Refer to
the heating system operating instructions covered previously for
a more detailed explanation of heating system operation.
[CF05300(ALL)01/96]
Turning on the Air Conditioner
*
[CF05400(ALL)01/96]
To cool your vehicle quickly in warm weather:
[CF05500(ALL)01/96] 1. Turn the Function Selector Knob to MAX A/C.
[CF05600(ALL)01/96] 2. Turn the Temperature Control Knob to COOL.
[CF05700(ALL)01/96] 3. Turn the Fan Speed Knob to the position of your choice.
[CF05800(ALL)07/96] 4. If your vehicle is equipped with the rear passenger
compartment air conditioning unit, it will be on when the
front system is on MAX A/C, A/C or PANEL/FLOOR and
the rear climate control knob is set to REAR CTRL, and any
fan speed. Refer to the previous section for an explanation of
the heating system.
[CF05900(ALL)01/96] 5. Adjust your instrument panel registers.
[CF06000(ALL)01/96] 6. If the inside of your vehicle is very warm, you may want to
drive for a few minutes with the windows down and the air
conditioner on. This forces most of the hot, stale air out of
the vehicle and allows the air conditioner to cool the interior
more quickly.
File:05wncfs.ex
Update:Wed Jul 31 15:55:37 1996

90
*
[CF06100(ALL)01/96]
The air conditioner may be used to cool the outside air being
drawn into your vehicle, but using recirculated air is more
economical and cools your vehicle more quickly.
*
[CF06200(ALL)01/96]
Cooling your vehicle with outside air
*
[CF06300(ALL)01/96]
Cooling your vehicle with air conditioned outside air is quieter
but less economical than using recirculated air. It also has less
cooling capacity.
[CF06400(ALL)01/96]
To cool your vehicle with outside air:
[CF06500(ALL)01/96] 1. Turn the Function Selector Knob to the A/C or S
(PANEL/FLOOR).
[CF06600(ALL)01/96] 2. Turn the Temperature Control Knob to COOL.
[CF06700(ALL)01/96] 3. Turn the Fan Speed Knob to the position of your choice.
[CF06800(ALL)01/96] 4. Make sure that the registers in the instrument panel are open
and adjusted to the positions of your choice.
[CF06900(ALL)01/96]
During periods of high humidity, vapor may be emitted from
the air outlets when using the A/C with outside air. Correct
this by switching the Function Control Knob to MAX A/C.
*
[CF07000(ALL)01/96]
Improving fuel economy
[CF07100(ALL)01/96]
Whenever you turn on the air conditioning, your vehicle uses
more fuel because the air conditioning compressor is running.
To get better fuel economy while cooling your vehicle, do not
use the air conditioner on mild days. Instead, set the function
control knob to Q (PANEL) and turn the temperature control
knob to COOL.
*
[CF07200(ALL)01/96]
Operating tips
[CF07300(ALL)01/96]
To vary the temperature inside your vehicle, move the
Temperature Control Knob toward WARM (red) for warmer
temperatures and toward COOL (blue) for cooler temperatures.
The Temperature Control Knob setting determines the
temperature of the air being discharged from the system in all
operating modes (heating or A/C).
File:05wncfs.ex
Update:Wed Jul 31 15:55:37 1996

Controls and Features
91
[CF07400(ALL)01/96]
When stopped in traffic for long periods of time in hot weather,
place the automatic transaxle gearshift selector lever in Park (P)
or in Neutral (N). This aids in engine cooling and air
conditioner efficiency. (If the engine overheats, turn the
Function Selector Knob to Q (PANEL) and turn the
Temperature Control Knob to WARM.)
*
[CF07500(ALL)01/96]
When your vehicle’s engine is operated at full throttle, the air
conditioner compressor will automatically be turned off to allow
maximum engine power. This may occur during passing or
when climbing steep grades. The compressor will return to
normal operation within a few seconds after full throttle is no
longer needed.
[CF07600(ALL)01/96]
NOTE: The compressor will not operate when the outside
temperature is less than about 45˚F (7˚C).
% [CF07700(ALL)01/96] Rear Climate Control System (If equipped)
[CF07800(ALL)01/96]
If your vehicle is equipped with a rear climate control system,
the rear seat occupants can select their own personal fan speed
settings.
[CF07900(ALL)01/96]
The rear seat climate control system is controlled from the main
climate control system on the instrument panel. If the rear
passenger compartment climate control knob in the front climate
control panel is set in OFF, the fan in the rear seat climate
control system will also be off. If the knob is set in any of the
fan speed positions (Medium Low, Medium High, or High), air
will be discharged from the rear seat vents at the corresponding
speed. However, when the knob is set at REAR CTRL, rear seat
passengers can control their own fan speed.
File:05wncfs.ex
Update:Wed Jul 31 15:55:37 1996
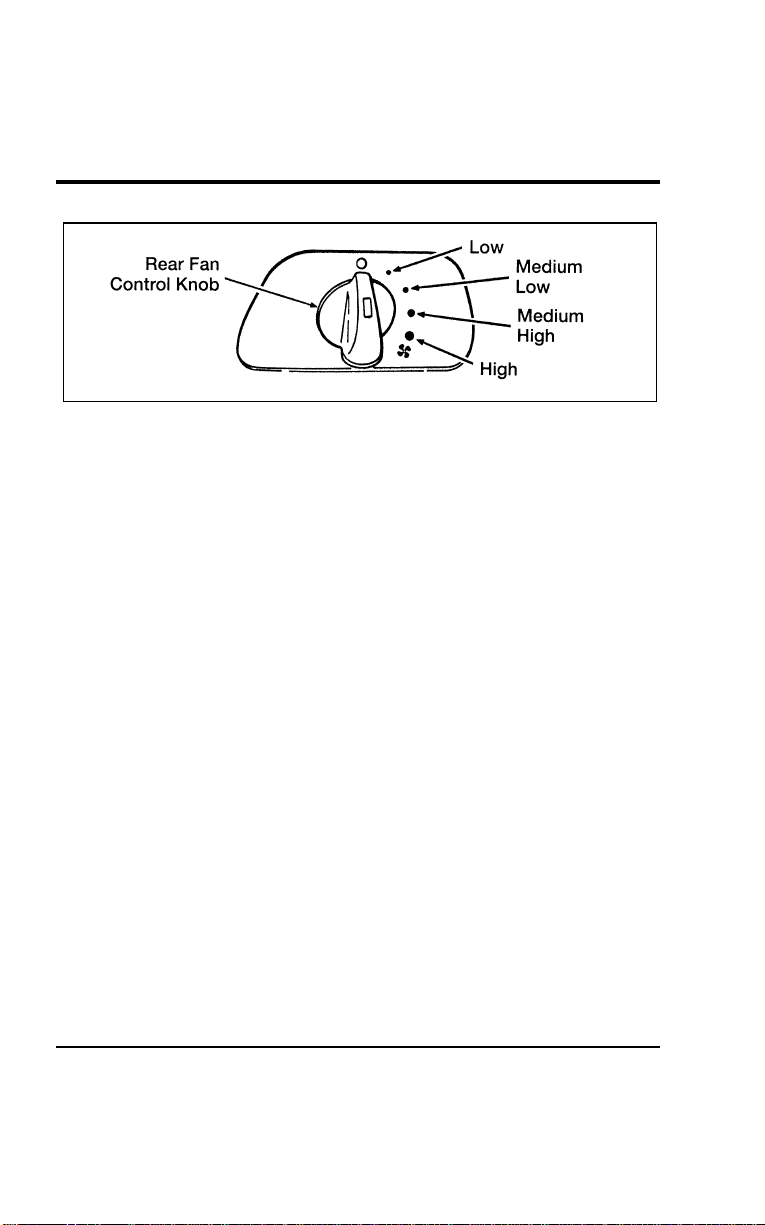
92
[CF08000(ALL)01/96]
7-1/2 pica art:0050048-D
Rear fan control knob
[CF08100(ALL)01/96]
The rear passenger compartment climate control panel has a Fan
Speed Knob which controls the speed (Low, Medium Low,
Medium High, or High) at which air is discharged from the
registers whenever the Rear Control Knob on the front panel
climate control panel is in REAR CTRL.
[CF08200(ALL)01/96]
Front passengers determine the temperature and location of the
airflow for rear passengers by setting the Function Selector
Knob in the front climate control panel in either a heat or A/C
mode.
[CF08300(ALL)01/96]
If an A/C mode is chosen, rear passengers will receive FULL
COOL (air-conditioned) air out of the side and upper rear
registers. If a heat mode or the Q (PANEL) mode is chosen,
rear passengers will receive FULL WARM (heated) air out of
the lower rear registers.
[CF08400(ALL)01/96]
Rear passengers do not have the ability to adjust the
temperature or select the location of the airflow from the
auxiliary climate control system. Rear passengers can adjust the
Rear Fan Speed Control Knob and air discharge (adjust
registers) for comfort.
[CF08500(ALL)01/96]
NOTE: For maximum heating and cooling for front seat
passengers, set the rear fan switch to the m (OFF)
position.
File:05wncfs.ex
Update:Wed Jul 31 15:55:37 1996

Controls and Features
93
*
[CF08600(ALL)01/96] Liftgate Window Features
%
*
[CF08700(ALL)01/96]
Rear Window Defogger (If equipped)
*
[CF08800(ALL)01/96]
The defogger for the rear liftgate window clears frost, fog, or
thin ice from both the inside and outside of the rear window.
The defogger operates with the ignition in the ON position.
[CF08900(ALL)01/96]
The control switch is located on the instrument panel to the
right of the steering column and below the climate control
system.
[CF09000(ALL)01/96]
10-1/2 pica
art:0050036-B
The rear defogger switch
*
[CF09100(ALL)03/96]
To defrost the rear window:
*
[CF09200(ALL)03/96] 1. Clear any snow or ice from the rear window.
*
[CF09300(ALL)03/96] 2. Get in your vehicle and start the engine.
[CF09400(ALL)01/96] 3. Press the rear defogger switch.
[CF09500(ALL)01/96]
The defogger turns off automatically after 10 minutes. If the
window is not clear, turn the defogger on again. It will
automatically shut off anytime the engine is turned off or if the
switch is depressed a second time.
File:05wncfs.ex
Update:Wed Jul 31 15:55:37 1996
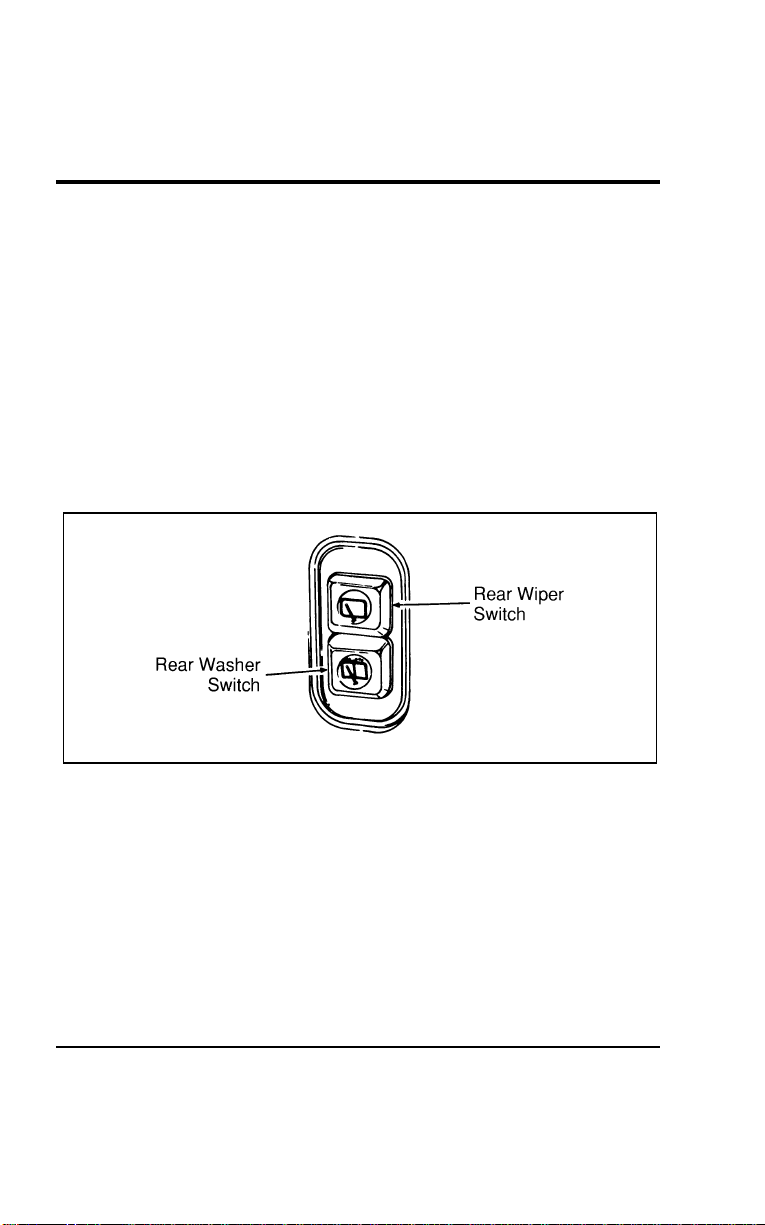
94
[CF09600(ALL)01/96]
NOTE: Operating the rear defogger will also turn on the
heated side view mirrors (if equipped).
*
[CF09700(ALL)01/96]
Never use sharp instruments or abrasive window cleaners to
clean the inside of your rear window. If you do, you may
damage the wires that are bonded to the inside of the rear
window, and cause damage to the rear window defogger.
% [CF09800(ALL)01/96]
Rear Wiper and Washer (If equipped)
[CF09900(ALL)01/96]
The controls for the rear wiper and washer can be found on the
instrument panel to the right of the instrument cluster below the
climate control system. The rear wiper and washer controls
operate with the ignition in the ACC or ON positions.
[CF10000(ALL)01/96]
10-1/2 pica
art:0050037-A
The rear wiper switches
[CF10100(ALL)01/96]
To turn on the rear wiper, press the rear wiper switch. The
wiper will operate until it is turned off. To turn off the rear
wiper, press the wiper switch a second time.
[CF10200(ALL)01/96]
To activate the rear washer, press the rear washer switch. Spray
will continue as long as the button is depressed. When you
activate the wash system, the wiper will also activate. The wiper
can be turned off by pressing the wiper switch a second time.
File:05wncfs.ex
Update:Wed Jul 31 15:55:37 1996

Controls and Features
95
*
[CF10300(ALL)01/96]
Do not activate the washer for longer than fifteen seconds
continuously. This could damage the washer pump system.
% [CF10700(ALL)01/96] Exterior Lamps
*
[CF10800(ALL)05/96]
To turn on the headlamps, parking lamps, marker lamps, tail
lamps, license plate lamps and instrument panel lamps, use the
headlamp knob, to the left of the instrument cluster.
*
[CF10900(ALL)05/96] 1. Turn the headlamp knob to the first position to turn on the
parking lamps, tail lamps, license plate lamps, marker lamps
and instrument panel lamps.
File:05wncfs.ex
Update:Wed Jul 31 15:55:37 1996
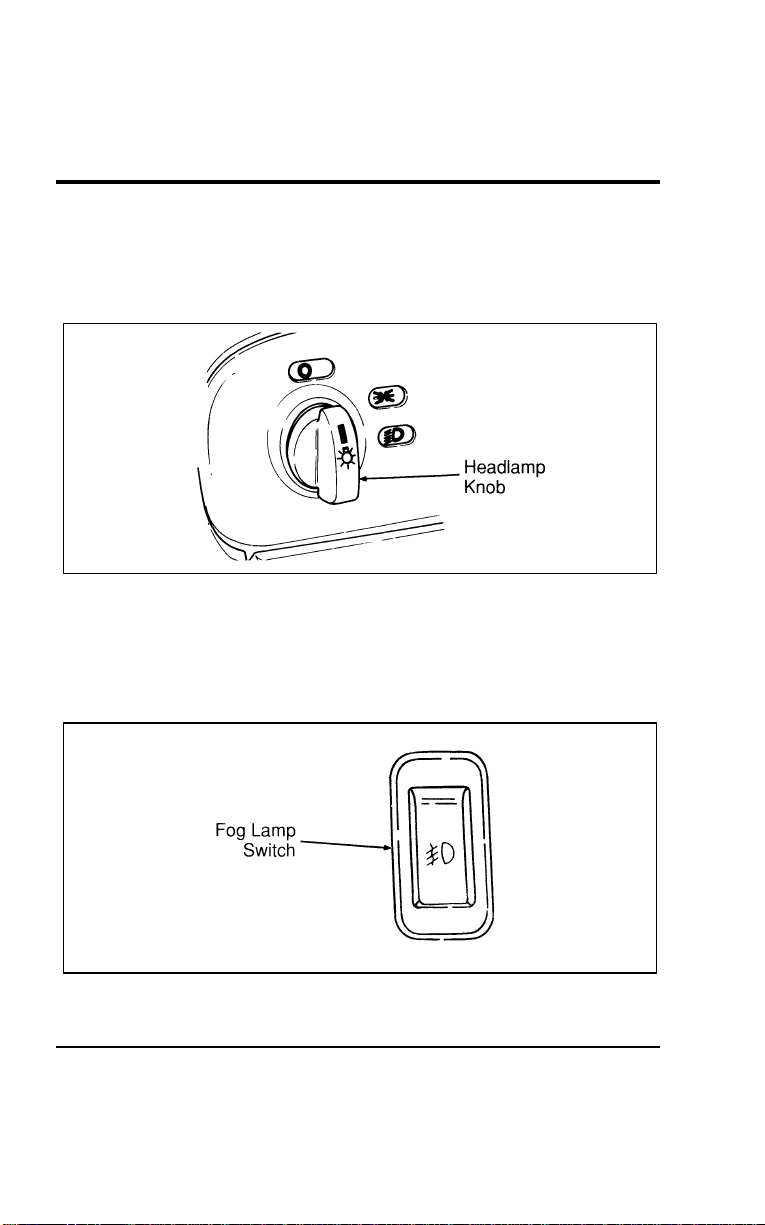
96
*
[CF11000(ALL)05/96] 2. Turn the headlamp knob to the second position to turn on
the headlamps in addition to the parking lamps, tail lamps,
license plate lamps, marker lamps and instrument panel
lamps.
[CF11100(ALL)01/96]
10-1/2 pica
art:0050040-A
The headlamp controls
%
*
[CF11200(ALL)05/96]
Fog Lamps (If equipped)
[CF11300(ALL)01/96]
The fog lamp switch is located on the center of the instrument
panel.
[CF11400(ALL)01/96]
10-1/2 pica
art:0050232-A
Fog lamp switch
File:05wncfs.ex
Update:Wed Jul 31 15:55:37 1996

Controls and Features
97
*
[CF11500(ALL)03/96]
The fog lamps act as a supplement to the low beam headlamps
under limited visibility conditions such as rain, snow, dust or
fog and operate only when the low beam headlamps are on.
*
[CF11600(ALL)03/96]
To maximize fog lamp bulb life, it is recommended that the fog
lamp switch be turned off after each use prior to turning off the
headlamps.
[CF11700(ALL)01/96]
■ To turn the fog lamps on, push the switch. An indicator light
will glow when the lamps are on.
*
[CF11800(ALL)03/96]
■ To turn off, push the switch again.
%
*
[CF11900(ALL)03/96]
“Headlamps On” Alert Chime
[CF12000(ALL)01/96]
The “headlamps on” alert chime acts as an indicator that you
have left the headlamps or parking lights on. This continuous
chime will activate when the following conditions are present:
[CF12100(ALL)01/96]
■ The headlamp and/or parking lamps are on
[CF12200(ALL)01/96]
■ There is no key in the ignition
[CF12300(ALL)01/96]
■ The driver’s door is ajar (open)
%
*
[CF12400(ALL)01/96]
Daytime Running Light (DRL) System
(Canadian vehicles only)
*
[CF12500(ALL)01/96]
The Daytime Running Light (DRL) system is designed to turn
the high beam headlamps on, with a reduced light output and
without illuminating the high beam indicator lamp in the
instrument panel. The DRL system operates when all of the
following conditions are met:
*
[CF12600(ALL)01/96]
■ the vehicle is “running”
*
[CF12700(ALL)02/96]
■ the vehicle has a fully released parking brake
*
[CF12800(ALL)01/96]
■ the headlamp system is in the OFF position
*
[CF12900(ALL)01/96]
NOTE: You may notice that the lights flicker when the engine
is turned on or off. This is a normal condition.
File:05wncfs.ex
Update:Wed Jul 31 15:55:37 1996
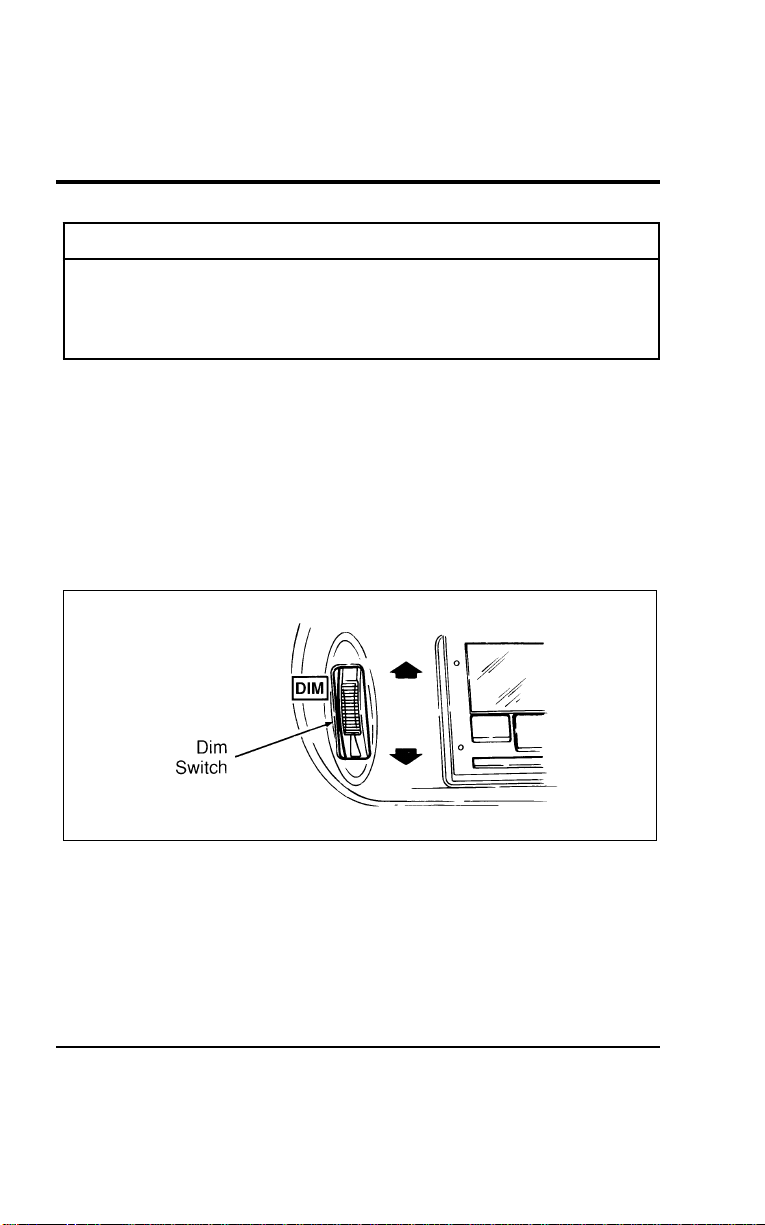
98
*
[CF13000(ALL)03/96]
R WARNING
The Daytime Running Light (DRL) system will not
illuminate the tail lamps and parking lamps. Turn on
your headlamps at dusk. Failure to do so may result in a
collision.
% [CF13100(ALL)01/96] Interior Lamps
%
*
[CF13200(ALL)01/96]
Lighting Up the Instrument Panel
[CF13300(ALL)01/96]
The instrument panel lights can be turned on by turning the
headlamp control knob to either the first or second position.
You can brighten or dim the instrument panel lights by rotating
the dim switch up or down to the desired brightness. The dim
switch is located to the right of the steering column next to the
radio.
[CF13400(ALL)01/96]
10-1/2 pica
art:0050041-B
The dim switch
File:05wncfs.ex
Update:Wed Jul 31 15:55:37 1996
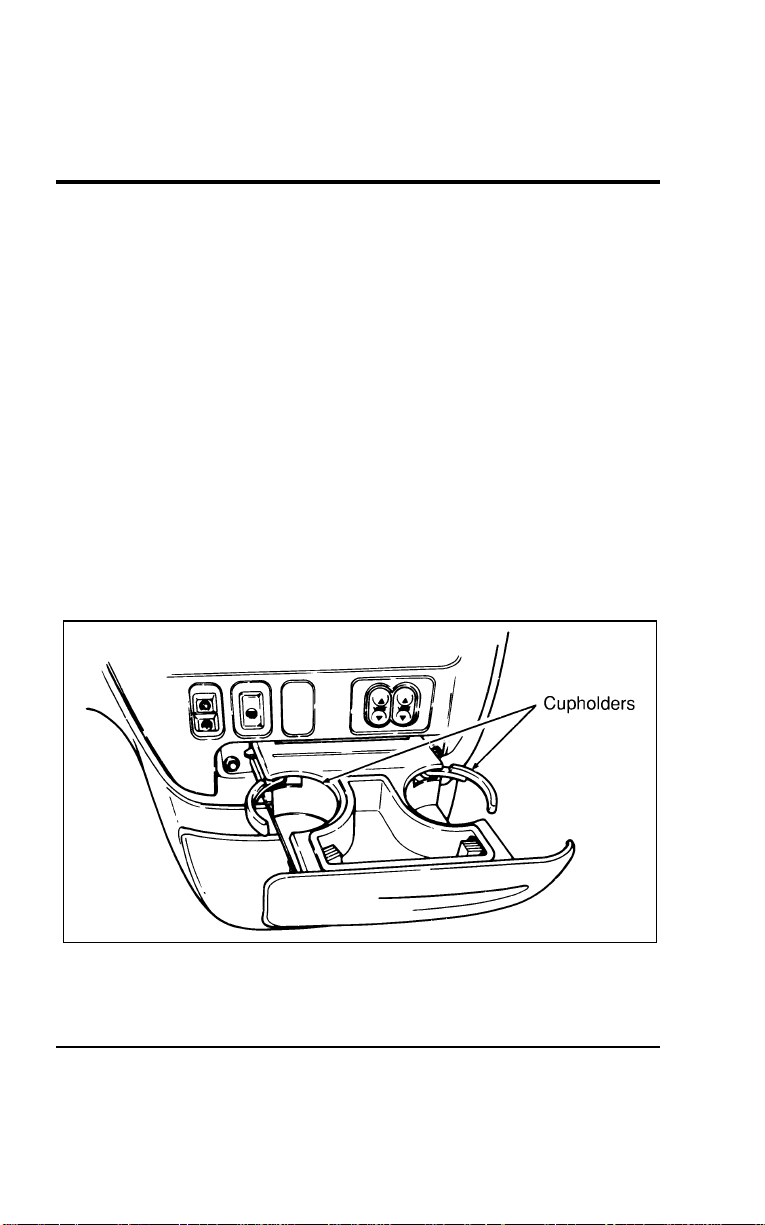
Controls and Features
99
*
[CF13500(ALL)01/96] Clock Controls on Electronic Radios
[CF13600(ALL)01/96]
The electronic radios have a built-in clock. For complete
operating instructions, refer to the Electronic Sound Systems
chapter of this Owner Guide.
%
*
[CF13700(ALL)03/96]
Radio Antenna
*
[CF13800(ALL)01/96]
The fixed radio antenna is mounted on the front fender on the
passenger’s side of the vehicle.
% [CF13900(ALL)01/96]
Cupholders
[CF14000(ALL)01/96]
The front seat cupholders are located with the ashtray. To access
the cupholders, pull open the ashtray drawer which is located
to the right of the steering column, above the compact disc and
cassette storage console.
[CF14100(ALL)01/96]
As you close the ashtray drawer, the cupholders will
automatically fold back into place.
[CF14200(ALL)01/96]
13-1/2 pica
art:0050010-A
The front seat cupholders
[CF14300(ALL)01/96]
Your vehicle also has rear seat cupholders built into the side
panels.
File:05wncfs.ex
Update:Wed Jul 31 15:55:37 1996
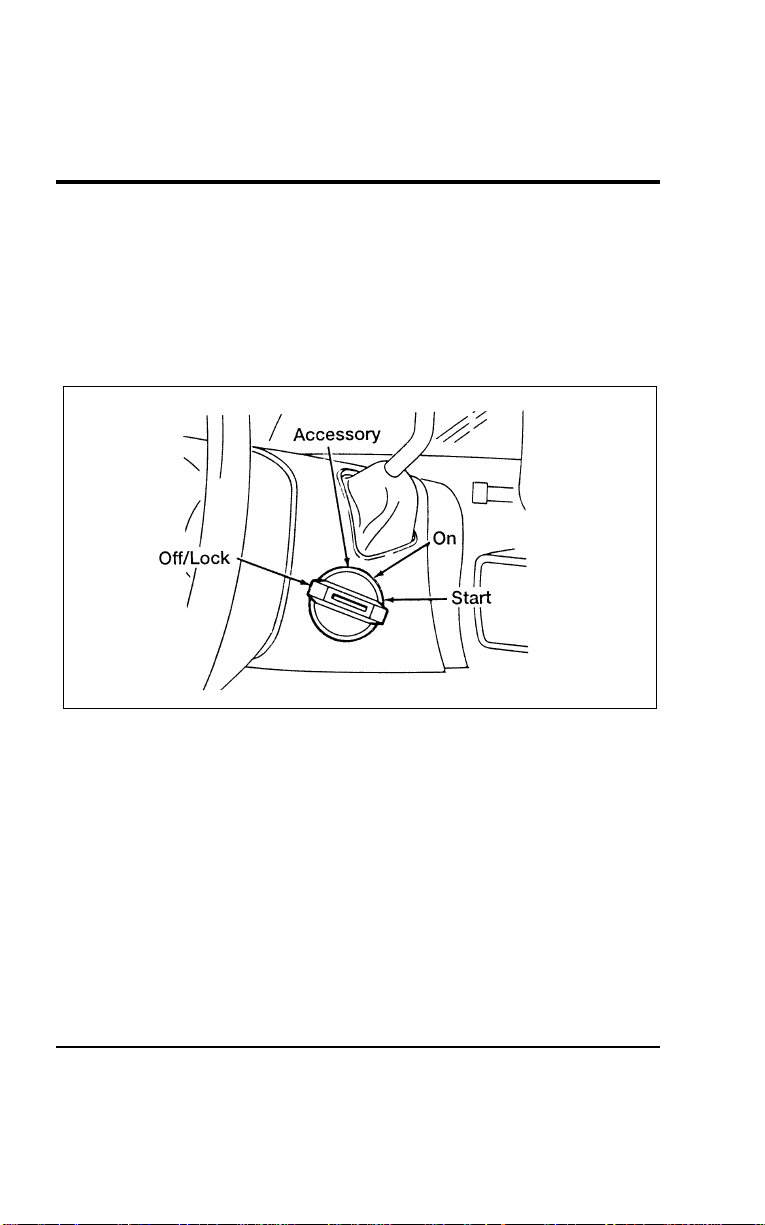
100
*
[CF14400(ALL)04/96]
NOTE: Do not place heavy objects in the cupholders.
*
[CF14500(ALL)05/96]
The controls on the steering column and wheel are designed to
give you easy access to the controls while you are driving.
*
[CF14600(ALL)01/96] Ignition
%
*
[CF14700(ALL)01/96]
Understanding the Positions of the Ignition
*
[CF14800(ALL)01/96]
13-1/2 pica
art:0040047-D
The ignition positions
% [CF14900(ALL)12/95]
ACCESSORY allows you to operate some of your vehicle’s
electrical accessories while the engine is not running. For
example, you can use ACCESSORY to turn on the radio or
windshield wipers without starting the engine.
[CF15000(ALL)12/95]
LOCK locks the steering wheel and the gearshift lever.
*
[CF15100(ALL)06/96]
OFF allows you to shut off the engine and all accessories
without locking the steering wheel, or the gearshift lever.
*
[CF15200(ALL)01/96]
ON allows you to test your vehicle’s warning lights to make
sure they work before you start the engine. The key returns to
the ON position once the engine is started and remains in this
position while the engine runs.
File:05wncfs.ex
Update:Wed Jul 31 15:55:37 1996

Controls and Features
101
[CF15300(ALL)12/95]
START cranks the engine. Release the key once the engine starts
so that you don’t damage the starter. The key should return to
the ON position when you release it. The START position also
allows you to test the brake warning light.
%
*
[CF15400(ALL)03/96]
Removing the Key From the Ignition
[CF15500(ALL)12/95]
LOCK is the only position that allows you to remove the key
from the ignition. The LOCK feature helps to protect your
vehicle from theft, because it also locks the steering wheel and
the gearshift lever when the key is removed.
%
*
[CF15600(ALL)01/96]
If your key is stuck in the LOCK position, and you are unable
to turn it, move your steering wheel left or right until the key
turns freely.
*
[CF15700(ALL)01/96]
To remove your key from the ignition:
*
[CF15800(ALL)01/96] 1. Put the gearshift lever in P (Park).
*
[CF15900(ALL)01/96] 2. Set the parking brake fully.
*
[CF16000(ALL)06/96] 3. Turn the ignition key to LOCK.
*
[CF16100(ALL)03/96] 4. Remove the key.
*
[CF16200(ALL)01/96]
R WARNING
When you leave your vehicle, place the gearshift lever in
P (Park). Set the parking brake fully, and shut off the
engine. Never park your vehicle in N (Neutral). If you do
not take these precautions, your vehicle may move
suddenly and injure someone.
*
[CF16300(ALL)05/96]
R WARNING
Do not leave children, unreliable adults, or pets
unattended in your vehicle.
File:05wncfs.ex
Update:Wed Jul 31 15:55:37 1996
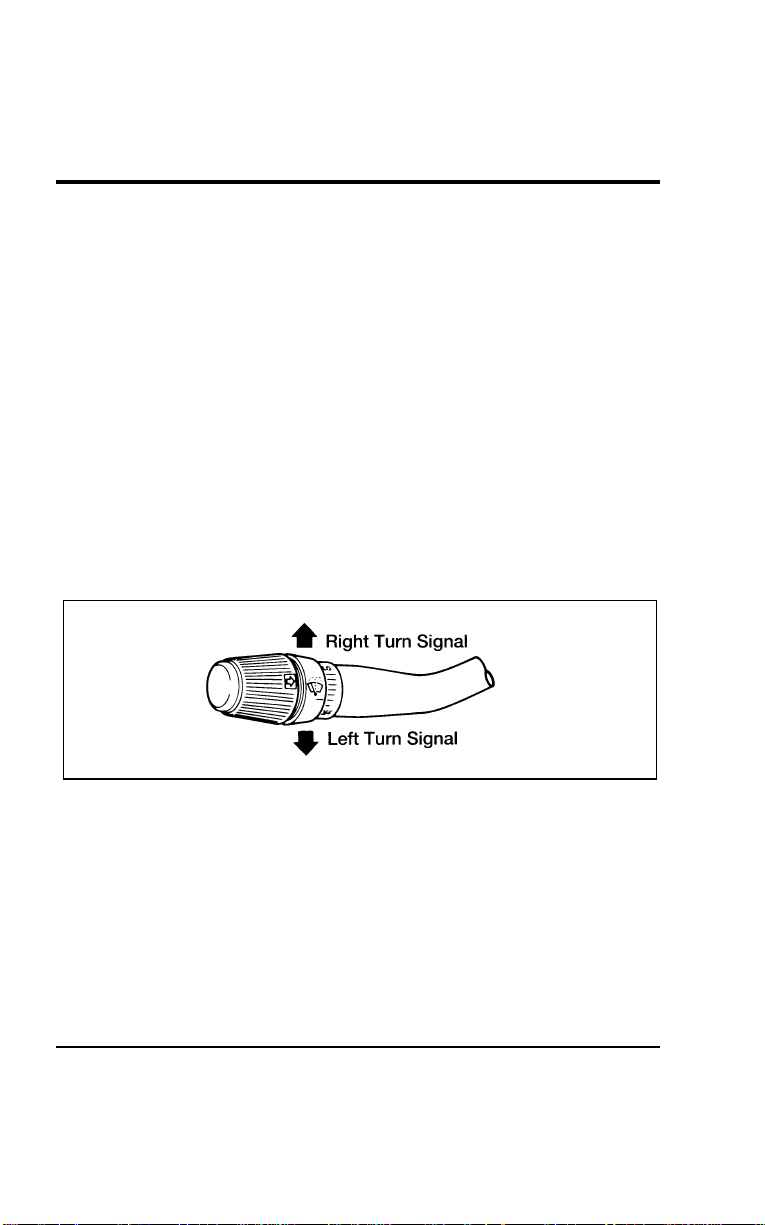
102
*
[CF16400(ALL)01/96] Turn Signal Lever
*
[CF16500(ALL)02/96]
You can use the turn signal lever on the left side of the steering
column to:
*
[CF16600(ALL)01/96]
■ operate the turn signals.
*
[CF16700(ALL)01/96]
■ turn the headlamps to high beam.
*
[CF16800(ALL)01/96]
■ flash the headlamps.
*
[CF16900(ALL)01/96]
■ turn the windshield wipers and washer on/off.
%
*
[CF17000(ALL)01/96]
Turn Signals
[CF17100(ALL)01/96]
To turn on the right turn signal, push the turn signal lever up.
The right-side arrow on the instrument panel will flash.
[CF17200(ALL)01/96]
To turn on the left turn signal, pull the turn signal lever down.
The left-side arrow on the instrument panel will flash.
*
[CF17300(ALL)01/96]
7-1/2 pica art:0040085-D
The turn signal lever
[CF17400(ALL)01/96]
Usually, the turn signals turn off automatically after you turn
your vehicle. If the turn signal continues to flash after you have
made the turn, pull the lever back to the neutral position.
[CF17500(ALL)01/96]
To indicate a lane change to the right, push the turn signal
lever up slightly (without latching) and hold it in position. To
indicate a lane change to the left, pull the turn signal lever
down slightly (without latching) and hold it in position. The
lever will return to the OFF position when you release it.
File:05wncfs.ex
Update:Wed Jul 31 15:55:37 1996
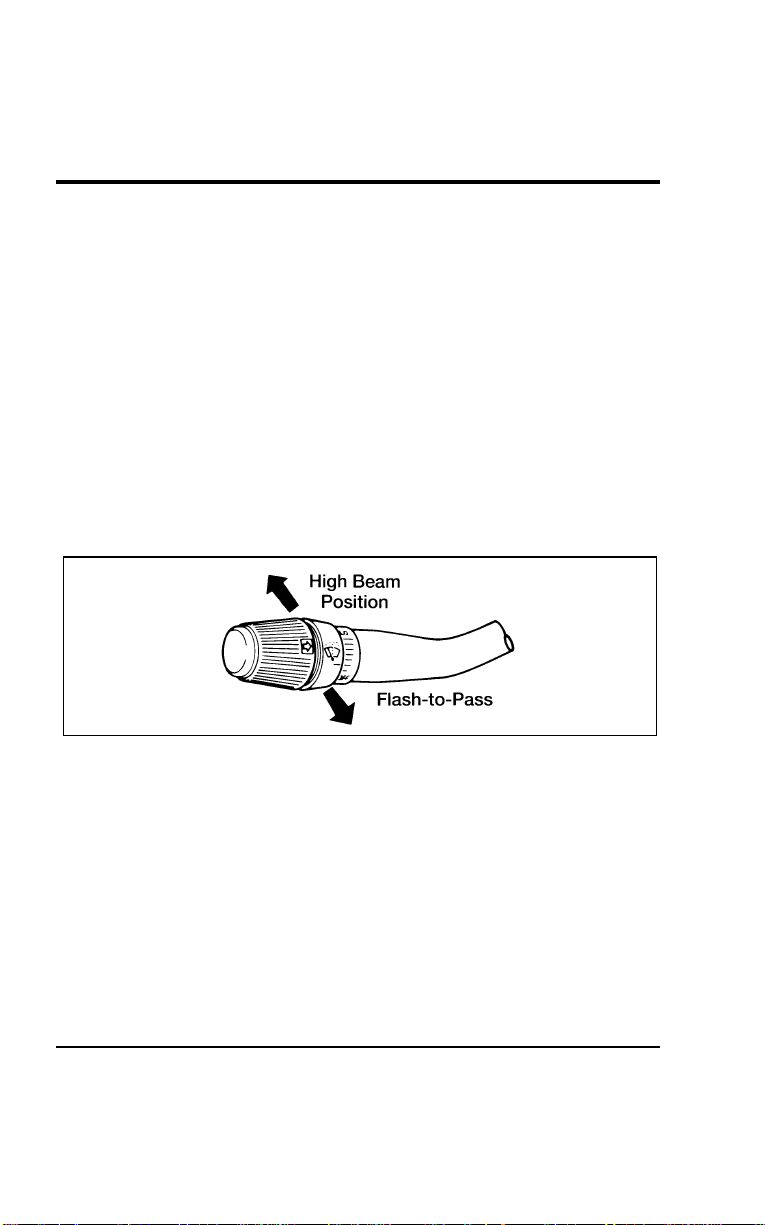
Controls and Features
103
*
[CF17600(ALL)01/96]
If the turn indicator light in the instrument panel does not
illuminate or remains on (does not flash) when you signal a
turn, the turn signaling system is malfunctioning. Have this
condition corrected as soon as possible, and use the accepted
hand signals until the turn signal system is repaired.
%
*
[CF17700(ALL)01/96]
High Beams
*
[CF17800(ALL)01/96]
To turn on the high beams, turn the headlamps on and push
the turn signal lever away from you until it latches. When the
high beams are on, the high beam indicator light on the
instrument panel is illuminated.
*
[CF17900(ALL)01/96]
To return to the low beam setting, pull the turn signal lever
toward you until it latches back into the neutral position. The
high beam indicator light turns off.
*
[CF18000(ALL)01/96]
7-1/2 pica art:0040086-D
High beam and flash-to-pass operation
%
*
[CF18100(ALL)01/96]
Flashing the Lights
*
[CF18200(ALL)01/96]
To flash the headlamps, pull the turn signal lever toward you
for a moment and then release it. The high beam headlamps
will flash whether the headlamps are on or off.
File:05wncfs.ex
Update:Wed Jul 31 15:55:37 1996
104
%
*
[CF18300(ALL)01/96] Windshield Wipers and Washer
%
*
[CF18400(ALL)06/96]
Variable Interval Wipers
[CF18500(ALL)01/96]
Your vehicle has wipers that operate at varying intervals. For
example, you can set the interval so they wipe less often in
light rain or more often in heavier rain. The wiper delays range
from about 1.5 to 20 seconds.
*
[CF18600(ALL)01/96]
10-1/2 pica art:0040087-E
Variable interval wiper control
*
[CF18700(ALL)01/96]
To set the interval wipers, rotate the knob at the end of the turn
signal lever to the most effective interval. The farther the knob
is from the OFF position, the faster the wipers move.
[CF18800(ALL)01/96]
Speed Dependent Wipers
[CF18900(ALL)01/96]
This feature compensates for the extra moisture that
accumulates on your windshield at higher speeds during rain.
At higher speeds, the Speed Dependent feature shortens the
delay between wipes when you use the variable interval wipers.
Delay will automatically adjust at speeds between 10 and
65 mph (16 and 105 km/h).
[CF19000(ALL)01/96]
The Speed Dependent feature comes disabled from the factory,
but can be activated at any time by using the following
procedure.
File:05wncfs.ex
Update:Wed Jul 31 15:55:37 1996

Controls and Features
105
[CF19100(ALL)01/96] 1. Make sure the two front doors are securely closed.
[CF19200(ALL)01/96] 2. Insert the key into the ignition and turn first to the ON
position (the gauges on the instrument panel will not
illuminate) and then back to the OFF position. Remove the
key and within 30 seconds:
[CF19300(ALL)01/96] 3. Press and hold the washer button on the end of the turn
signal lever.
[CF19400(ALL)01/96] 4. Within two seconds, put the key back in the ignition and
turn to the ON position.
[CF19500(ALL)01/96] 5. Hold the washer button down until a long (two second) tone
is heard. Release the button while the tone is active.
[CF19600(ALL)01/96] 6. After the long tone, a confirmation sequence will be heard.
One beep indicates the feature is inactive. Two beeps
indicates the feature is active.
[CF19700(ALL)01/96]
Repeat this procedure any time you want to cancel or reactivate
the Speed Dependent feature.
*
[CF19800(ALL)01/96]
Windshield Washer
[CF19900(ALL)01/96]
To clean the windshield, push in the washer button on the end
of the turn signal lever. For a constant spray, push and hold the
button. If the windshield wipers are off, one momentary push
results in one wipe and a longer push in three wipes and
activation of washer fluid. If the windshield wipers are in
interval mode a quick tap results in two wipe cycles and a
longer tap in three wipes and washer fluid activation.
*
[CF20000(ALL)01/96]
Do not try to clean the windshield when the washer fluid
container is empty and never activate the washers for more than
fifteen seconds continuously. This could damage the washer
pump system.
File:05wncfs.ex
Update:Wed Jul 31 15:55:37 1996
106
*
[CF20100(ALL)01/96]
R WARNING
Always warm up the windshield with the defroster
before you use the washer fluid. In freezing weather, the
washer solution may freeze on the windshield and
obscure your vision.
*
[CF20200(ALL)03/96]
For information about refilling the washer fluid or replacing
your windshield wiper blades, see Windshield washer fluid and
Wipers in the Index.
%
*
[CF20300(ALL)01/96] Gearshift Lever
[CF20400(ALL)01/96]
The gearshift lever on your vehicle is mounted on the steering
column. On the end of the gearshift lever is the Overdrive
On/Off button and the OVERDRIVE OFF lamp. For additional
information about the gearshift lever and the Overdrive On/Off
button, see the Driving chapter.
[CF20500(ALL)01/96]
13-1/2 pica
art:0050016-A
The gearshift lever
File:05wncfs.ex
Update:Wed Jul 31 15:55:37 1996
Controls and Features
107
*
[CF20600(ALL)05/96]
OVERDRIVE OFF Lamp
[CF20700(ALL)01/96]
This lamp indicates the operating range of the transaxle. This
lamp will illuminate when the Overdrive On/Off button is
depressed.
[CF20800(ALL)01/96]
6 pica art:0050187-C
OVERDRIVE OFF lamp location
[CF20900(ALL)01/96]
With the transaxle range selector in the Overdrive
j
range, the
OVERDRIVE OFF lamp will not be illuminated. The transaxle
will be allowed to upshift and downshift from 1st through 4th
gears. When the Overdrive on/off button is depressed, the
OVERDRIVE OFF lamp will illuminate. The transaxle will now
only upshift and downshift from 1st through 3rd gears. The
vehicle will always return to the overdrive operation mode
when the ignition is turned off and back on.
[CF21000(ALL)01/96]
If the lamp does not come on when the Overdrive ON/OFF
button is depressed or if the lamp flashes when you are driving,
have your vehicle serviced at the first opportunity. If this
condition persists, damage could occur to the transaxle.
File:05wncfs.ex
Update:Wed Jul 31 15:55:37 1996
108
%
*
[CF21200(ALL)05/96] Horn
[CF21300(ALL)01/96]
To sound the horn, press the center of the steering wheel. Check
the horn regularly to make sure it operates properly.
[CF21400(ALL)01/96]
13-1/2 pica
art:0050017-A
The horn pad
%
*
[CF21500(ALL)05/96] Hazard Flasher Switch
[CF21600(ALL)01/96]
The hazard flasher switch is located on top of the steering
column.
*
[CF21700(ALL)01/96]
To use the hazard flasher:
*
[CF21800(ALL)01/96] 1. Push the HAZARD switch; you will see the turn signal
arrows flash.
*
[CF21900(ALL)01/96] 2. To stop the hazard flashers, push the HAZARD switch again.
File:05wncfs.ex
Update:Wed Jul 31 15:55:37 1996
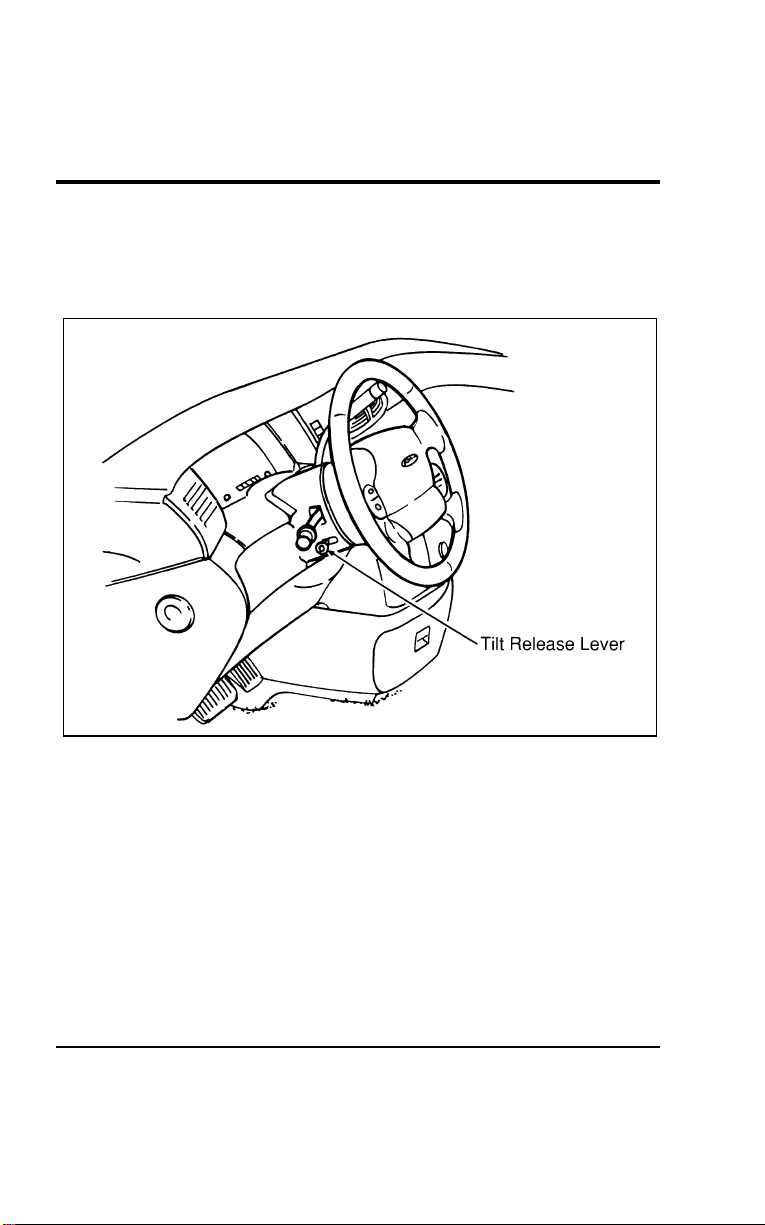
Controls and Features
109
%
*
[CF22000(ALL)05/96] Tilt Steering (If equipped)
[CF22100(ALL)01/96]
With the tilt steering option, you can move your steering wheel
up or down.
[CF22200(ALL)01/96]
17-1/2 pica
art:0050101-A
Tilt steering release lever location
[CF22300(ALL)04/96]
To change the position of the steering column:
[CF22400(ALL)04/96] 1. Make sure your vehicle is stopped.
[CF22500(ALL)04/96] 2. Pull the tilt release lever on the column toward you.
[CF22600(ALL)01/96] 3. Tilt the steering wheel up or down until you find the best
position for you.
[CF22700(ALL)04/96] 4. Release the lever to lock the wheel in place.
File:05wncfs.ex
Update:Wed Jul 31 15:55:37 1996

110
[CF22800(ALL)01/96]
Be sure the steering wheel is locked in place. It can only be
adjusted to specific positions. Do not adjust the steering wheel
while the vehicle is in motion.
%
*
[CF22900(ALL)03/96] Speed Control (If equipped)
*
[CF23000(ALL)05/96]
The speed of the vehicle cannot be automatically controlled until
the vehicle speed is at or above 30 mph (48 km/h).
[CF23100(ALL)01/96]
When driving in hilly terrain, at high elevations, or when
pulling a trailer, it may be desirable to drive in the Overdrive
Lockout mode. This can be done by depressing the O/D button
on the end of the gearshift lever. Driving in this mode helps
prevent excessive transaxle shifting and helps speed control to
maintain speed when going down steep hills.
*
[CF23200(ALL)05/96]
Use of radio transmitting equipment that is not Federal
Communications Commission (FCC) or in Canada the Canadian
Radio and Telecommunications Commission (CRTC) approved
may cause the speed control to malfunction. Therefore, use only
properly installed FCC (CRTC in Canada) approved radio
transmitting equipment in your vehicle.
*
[CF23300(ALL)09/95]
NOTE: Do not shift to N (Neutral) when using the speed
control. This will cause the engine to overspeed.
File:05wncfs.ex
Update:Wed Jul 31 15:55:37 1996
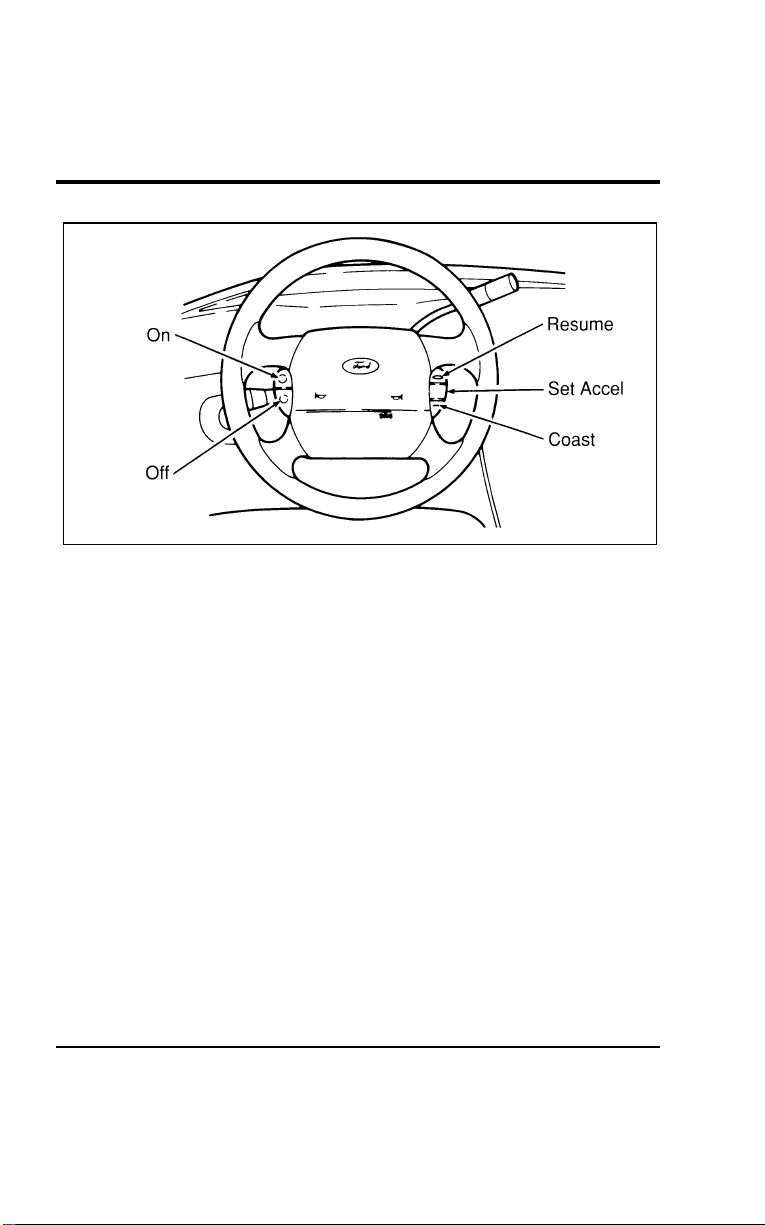
Controls and Features
111
[CF23400(ALL)01/96]
13-1/2 pica
art:0050018-A
The speed control switches on the steering wheel
*
[CF23500(ALL)05/96]
To set the speed control:
[CF23600(ALL)04/96] 1. Find the speed control switches on the steering wheel.
[CF23700(ALL)04/96] 2. Press and release the ON switch.
[CF23800(ALL)04/96] 3. Accelerate to the desired speed above 30 mph (50 km/h)
using the accelerator pedal.
*
[CF23900(ALL)01/96] 4. Make sure you are driving faster than 30 mph (50 km/h).
[CF24000(ALL)01/96] 5. Press SET ACCEL and release it immediately. This will set
your speed. If you keep this switch pressed, your speed will
continue to increase and will not be set at the desired speed.
[CF24100(ALL)01/96] 6. Take your foot off the accelerator pedal. Your vehicle will
maintain the speed you set.
*
[CF24200(ALL)05/96]
If you drive up or down a steep hill, your vehicle may
momentarily slow down or speed up, even though the speed
control is on. This is normal.
File:05wncfs.ex
Update:Wed Jul 31 15:55:37 1996

112
[CF24300(ALL)01/96]
NOTE: On a downhill grade, if your speed increases above
your set speed while driving in
j
(Overdrive) on a
downhill grade, you may want to downshift to Third
(3) gear to reduce vehicle speed. To do this, push the
Overdrive ON/OFF button on the end of the gearshift
lever. The OVERDRIVE OFF lamp will illuminate
when you press the switch.
[CF24400(ALL)01/96]
You may want to drive in 3 (Third) when driving in hilly
terrain, at high altitudes, or when pulling a trailer. This will
improve speed control performance.
[CF24500(ALL)04/96]
NOTE: When driving uphill, especially with a heavy load,
you may notice your speed decreasing even if you
have the speed control set. If the speed drops more
than 8 to 14 mph (13-23 km/h) it is normal for the
automatic speed control feature to be cancelled. You
may need to use the accelerator pedal to help your
vehicle maintain the selected speed when driving up
steep grades.
*
[CF24600(ALL)05/96]
R WARNING
Do not use the speed control in heavy traffic or on roads
that are winding, slippery, or unpaved.
[CF24700(ALL)01/96]
Accelerating With the Speed Control On
[CF24800(ALL)01/96]
If you want to speed up momentarily, or regain preset speed on
hills when the speed control is on, accelerate using the
accelerator pedal. Manually accelerating to a higher speed does
not interfere with the speed control. When you take your foot
off the accelerator, your vehicle returns to the set speed.
File:05wncfs.ex
Update:Wed Jul 31 15:55:37 1996

Controls and Features
113
%
*
[CF24900(ALL)05/96]
Resetting the Speed Control
*
[CF25000(ALL)03/96]
To reset the speed control to a lower speed, use one of the
following procedures:
*
[CF25100(ALL)03/96]
■ COAST — Press and hold the COAST switch. Release the
switch when the vehicle slows down to the desired speed.
*
[CF25200(ALL)03/96]
■ Lightly tap the brake pedal. When the vehicle attains the
desired speed, press the SET ACCEL switch and release it
immediately.
[CF25300(ALL)01/96]
■ TAP-DOWN — Press and then quickly release the COAST
switch. Each time you “tap” the switch, the set speed will
decrease by 1 mph (1.6 km/h). Multiple taps will cause the
set speed to decrease in increments of 1 mph (1.6 km/h).
For example, if the current set speed is 60 mph (97 km/h) 5
taps of the COAST switch will decrease the vehicle speed
and SET it at 55 mph (88 km/h).
*
[CF25400(ALL)03/96]
If vehicle speed is reduced below 30 mph (50 km/h) by any of
the above methods, then you must manually accelerate to a
speed over 30 mph (50 km/h) and reset the system.
*
[CF25500(ALL)03/96]
To reset the speed control to a higher speed, follow one of
these procedures:
*
[CF25600(ALL)03/96]
■ ACCEL — Press and hold the SET ACCEL switch. Release
the switch when the vehicle has accelerated to the desired
speed.
*
[CF25700(ALL)03/96]
■ Depress the accelerator pedal. When the vehicle attains the
desired speed, press the SET ACCEL switch and release it
immediately.
[CF25800(ALL)01/96]
■ TAP-UP — Press and then quickly release the SET ACCEL
switch. Each time you “tap” the switch, the set speed will
increase by 1 mph (1.6 km/h). Multiple taps will cause the
set speed to increase in increments of 1 mph (1.6 km/h). For
example, if the current set speed is 55 mph (88 km/h), five
taps of the SET ACCEL switch will increase the vehicle
speed and set it at 60 mph (97 km/h).
File:05wncfs.ex
Update:Wed Jul 31 15:55:37 1996

114
[CF25900(ALL)01/96]
To Cancel or Turn Off Speed Control
[CF26000(ALL)01/96]
The speed control can be cancelled at any time by depressing
the brake pedal slightly. After cancelling, you can return to the
speed you set by pressing the RESUME switch, or set a new
speed by pressing the SET ACCEL or COAST switch.
[CF26100(ALL)01/96]
Speed control can also be cancelled when you press the OFF
switch. The speed control system will remain off until you press
the ON switch and reset the speed control.
*
[CF26200(ALL)05/96]
In addition, the speed control is turned off each time you turn
the vehicle ignition off.
*
[CF26300(ALL)03/96]
Cancelling and Resuming a Set Speed
*
[CF26400(ALL)05/96]
If you press the brake pedal, the speed control is cancelled. You
can return to the speed you set by using the RSM switch, as
long as you did not press the OFF switch.
*
[CF26500(ALL)05/96]
To resume the speed you had before, you must be driving at
least 30 mph (50 km/h).
*
[CF26600(ALL)03/96]
Press and release the RESUME switch. Your vehicle gradually
returns to the previously set speed and then maintains it.
% [CF26700(ALL)01/96]
Speed Control Light (Electronic Cluster Only)
[CF26800(ALL)04/96]
This light comes on when you turn on the speed control system
and set the speed. The light will be on whenever the speed
control is set, even if you override the set speed by pressing the
accelerator pedal or by pressing the coast button. The light will
go off when the brakes are used or the speed control system is
turned off.
[CF26900(ALL)01/96]
This light comes on briefly during the display self-test every
time you turn your ignition key to the ON position. The light
will go off when the key is turned to the START position. The
light should stay off when the self-test is done.
File:05wncfs.ex
Update:Wed Jul 31 15:55:37 1996
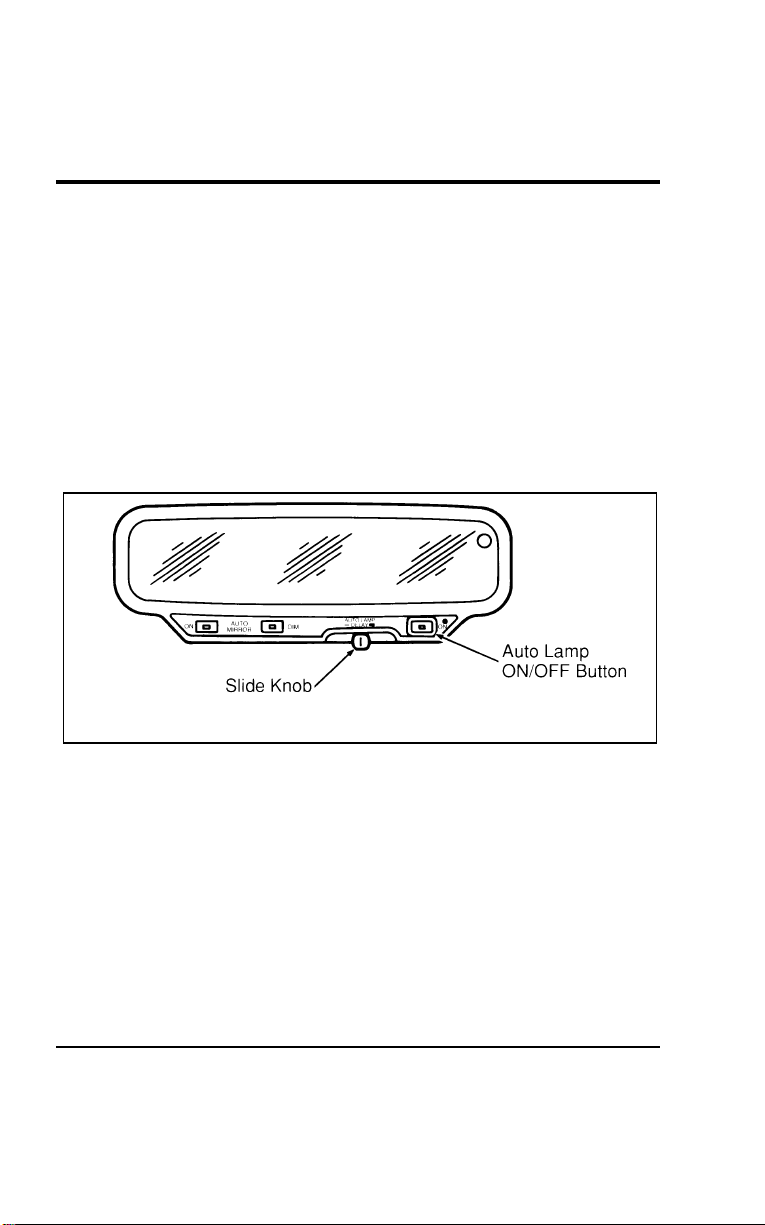
Controls and Features
115
[CF27000(ALL)01/96]
This light does not indicate any problems with the speed control
system, but is a convenience to tell you when the speed control
system is actively maintaining a set speed.
%
*
[CF27200(ALL)05/96]
Setting the Autolamp Delay System (If equipped)
*
[CF27300(ALL)01/96]
By using the autolamp, you can set the headlamps to:
*
[CF27400(ALL)01/96]
■ turn on the headlamps automatically at night
*
[CF27500(ALL)01/96]
■ turn off the headlamps automatically during daylight
[CF27600(ALL)01/96]
■ keep the headlamps on for up to three minutes after you
turn the key to OFF.
[CF27700(ALL)01/96]
10-1/2 pica
art:0050157-A
The autolamp system
[CF27800(ALL)01/96]
Setting the autolamp
[CF27900(ALL)01/96]
This feature allows the Autolamp circuit to be adjusted, to the
driver’s liking, for the headlamps to turn on for the amount of
ambient light. If the driver desires the headlamps to come on
earlier when the sky is brighter or later when the sky is darker,
then the following procedure should be performed to satisfy the
driver’s requirement.
File:05wncfs.ex
Update:Wed Jul 31 15:55:37 1996

116
[CF28000(ALL)01/96]
Move the Autolamp Delay slider knob to the far left position
with the vehicle in park and ignition in the RUN position. Then
press the mirror DIM and Autolamp ON switches
simultaneously. The Autolamp ON LED will flash, indicating it’s
into the special mode. Slowly slide the Autolamp Delay control
to the right until the DIM LED is on steadily. This indicates the
current setting for the early/late headlamp. (The factory setting
would fall in the middle of the control slide range.)
[CF28100(ALL)01/96]
If earlier activation of the headlamps is desired, slide the
Autolamp Delay slider knob to the left. The DIM LED will start
flashing, indicating that the setting is being changed. The further
left the control is moved the earlier the headlamps will come
on. Pressing the Autolamp button will enter the new setting and
return the mirror back to normal operation.
[CF28200(ALL)01/96]
If later activation of the headlamps is desired, slide the
Autolamp Delay slider knob to the right. The DIM LED will
start flashing, indicating that the setting is being changed. The
further right the control is moved, the later the headlamps will
come on. Pressing the Autolamp switch will enter the new
setting and return the mirror back to the normal operation.
[CF28300(ALL)04/96]
To turn the autolamp off, press the On/Off button. The
indicator light will turn off.
[CF28400(ALL)04/96]
To keep the lamps on after you leave your vehicle:
[CF28500(ALL)04/96]
■ Move the slider knob to the right. Once the slider knob is to
the right, it controls how long the lamps stay on.
[CF28600(ALL)04/96]
■ The further you move the slide knob toward the right, the
longer the headlamps stay on after you leave your vehicle.
Similarly, if you move the slide knob only slightly toward
the left, the headlamps stay on for only a moment after you
turn your vehicle off.
File:05wncfs.ex
Update:Wed Jul 31 15:55:37 1996
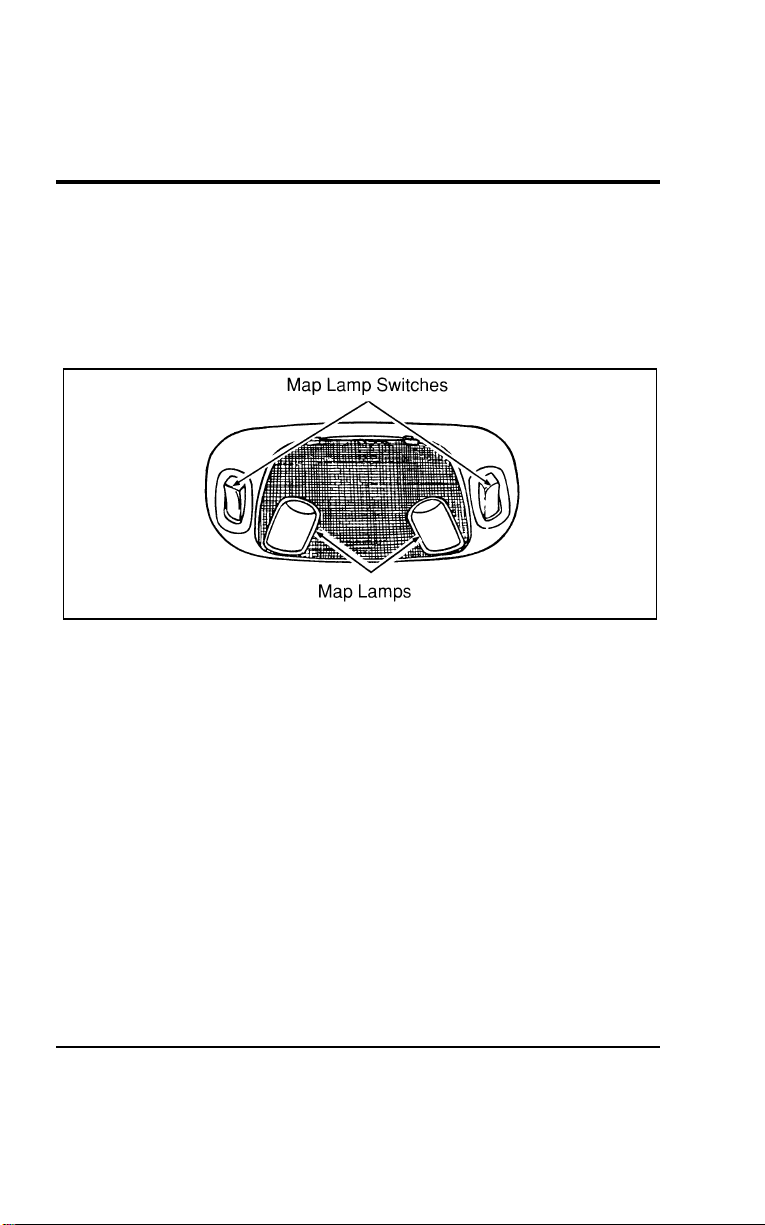
Controls and Features
117
% [CF28700(ALL)01/96]
Front Dome Lamp
[CF28800(ALL)01/96]
Front dome lamp, rear cargo and second row reading lamp may
be turned on and off using the dimmer switch.
[CF28900(ALL)01/96]
The front dome lamp is located overhead between the driver
and front passenger seats.
[CF29000(ALL)01/96]
10-1/2 pica
art:0050164-B
The front dome lamp and map lamps
% [CF30000(ALL)01/96]
Turning on the map lamps (If equipped)
[CF30100(ALL)01/96]
Your vehicle may have a map lamp for the passenger and one
for the driver. The map lamps and switches are located on the
front dome lamp.
[CF30200(ALL)01/96]
The rear cargo lamp is located overhead near the rear seating
positions.
File:05wncfs.ex
Update:Wed Jul 31 15:55:37 1996
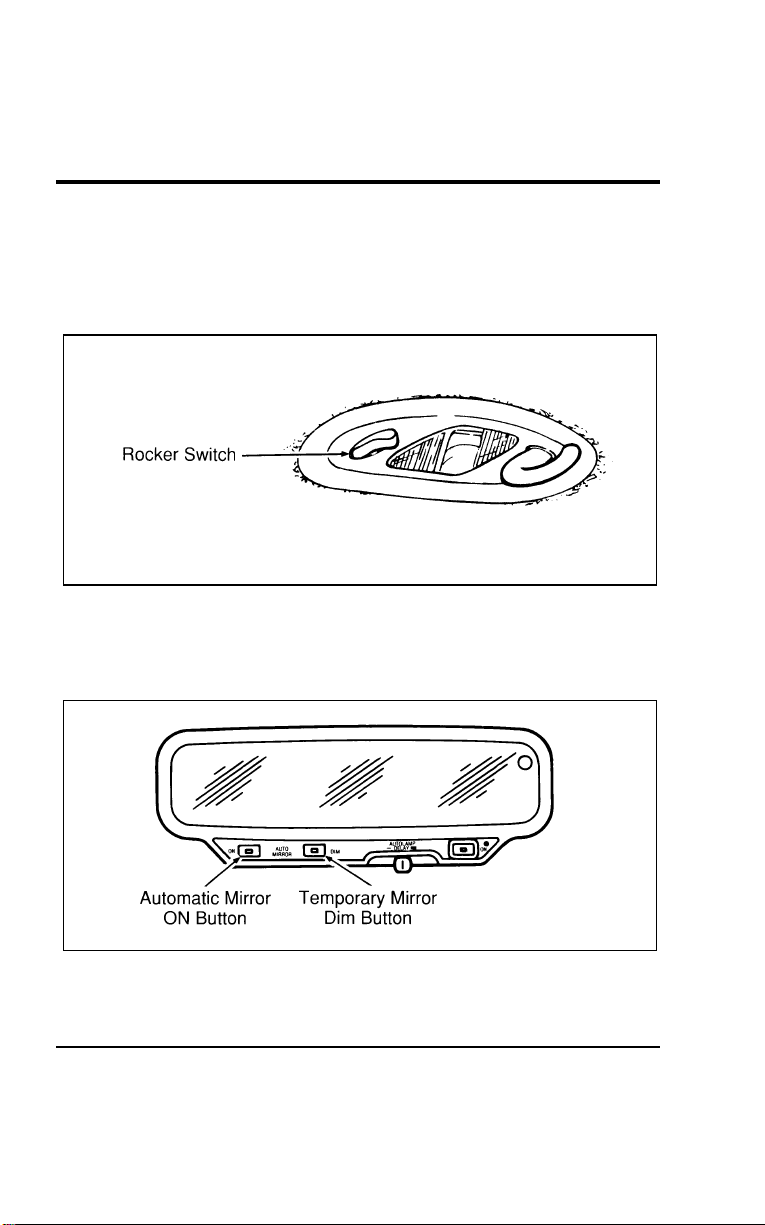
118
[CF30300(ALL)01/96]
Second Row Reading Lamp
[CF30400(ALL)01/96]
The second row reading lamp may be turned on by using the
rocker switch located on the lamp assembly or by using the
instrument panel dimmer switch.
[CF30500(ALL)01/96]
10-1/2 pica
art:0050233-A
Second row reading lamp
%
*
[CF30600(ALL)06/96]
Automatic Dimming Inside Rearview Mirror
(If equipped)
[CF30700(ALL)12/95]
10-1/2 pica
art:0050191-A
The automatic non-glare mirror
File:05wncfs.ex
Update:Wed Jul 31 15:55:37 1996

Controls and Features
119
*
[CF30800(ALL)05/96]
The electronic day/night mirror will change from the normal
state to the non-glare state when bright lights (glare) reach the
mirror. This mirror functions at night, and has a limited
function at dusk or dawn. From the non-glare state, the mirror
will return to the normal state after a short delay. The delay
starts when the glare goes away. The delay prevents excessive
changing of the mirror as traffic moves behind and around the
vehicle, or on rolling hills and curves.
*
[CF30900(ALL)05/96]
The electronic mirror measures the brightness of the light
coming in from the rear of the vehicle. It automatically makes a
correction in the glare state. The mirror may be turned off in
either the normal or non-glare position.
*
[CF31000(ALL)01/96]
There are two light sensors (photocells) in this mirror. The
sensor that detects rear glare is located inside a window in the
upper RH corner of the mirror. The second light sensor which
determines outside light level is located on the backside of the
mirror case.
*
[CF31100(ALL)05/96]
One important safety feature is that the mirror automatically
returns to the normal position whenever the vehicle is placed in
R (Reverse) (when the mirror is in the ON position). This
feature ensures a bright clear view in the mirror when backing
up.
[CF31200(ALL)04/96]
To turn on the automatic mirror, have the key in the ON
position and push the ON button once. The light in the center
of the button will light indicating the mirror is on. To turn the
mirror off push the ON button again.
[CF31300(ALL)04/96]
The mirror can be temporarily darkened, if wanted, by pushing
the Dim button. After releasing the button, the mirror will
return to the previous operation mode after a short delay.
File:05wncfs.ex
Update:Wed Jul 31 15:55:37 1996
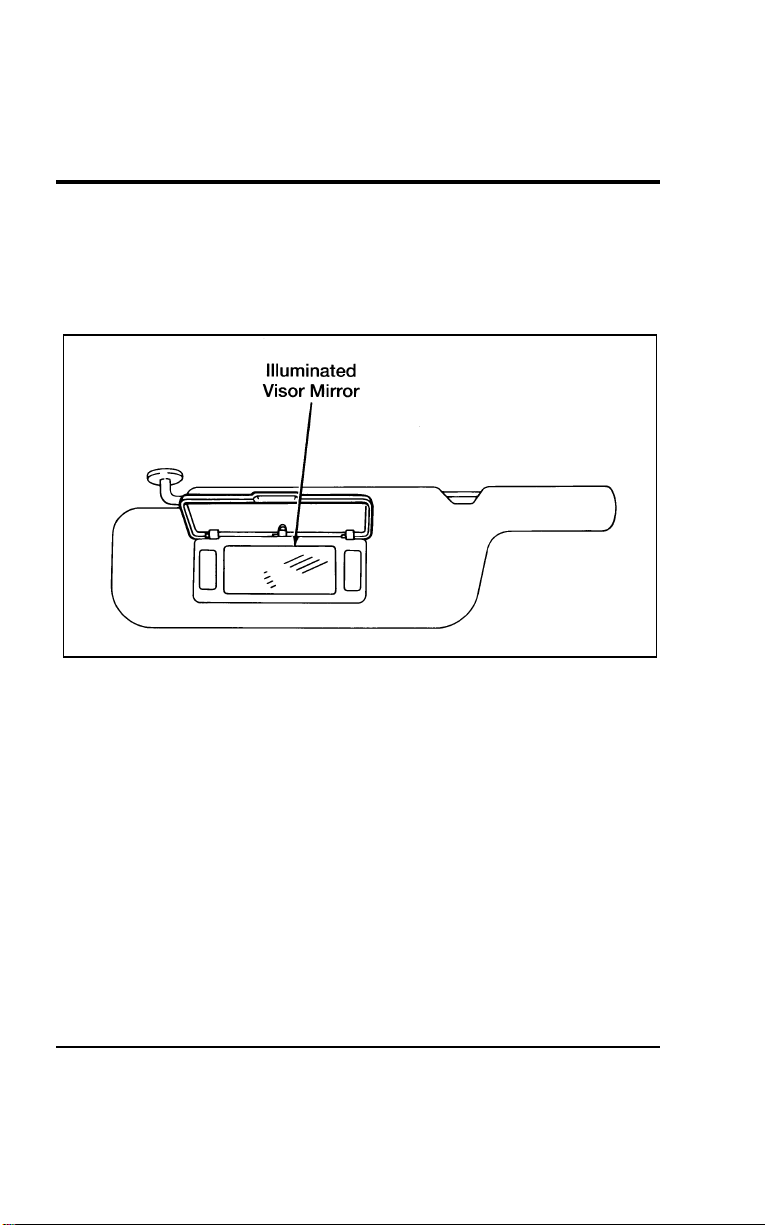
120
% [CF31400(ALL)12/95]
Illuminated Courtesy Mirror (If equipped)
[CF31500(ALL)12/95]
Your vehicle may have illuminated courtesy mirrors on the sun
visors. You can turn on the lighted mirrors by lifting the mirror
door cover.
[CF31600(ALL)12/95]
13-1/2 pica
art:0040111-B
The illuminated mirror on the sun visor
File:05wncfs.ex
Update:Wed Jul 31 15:55:37 1996
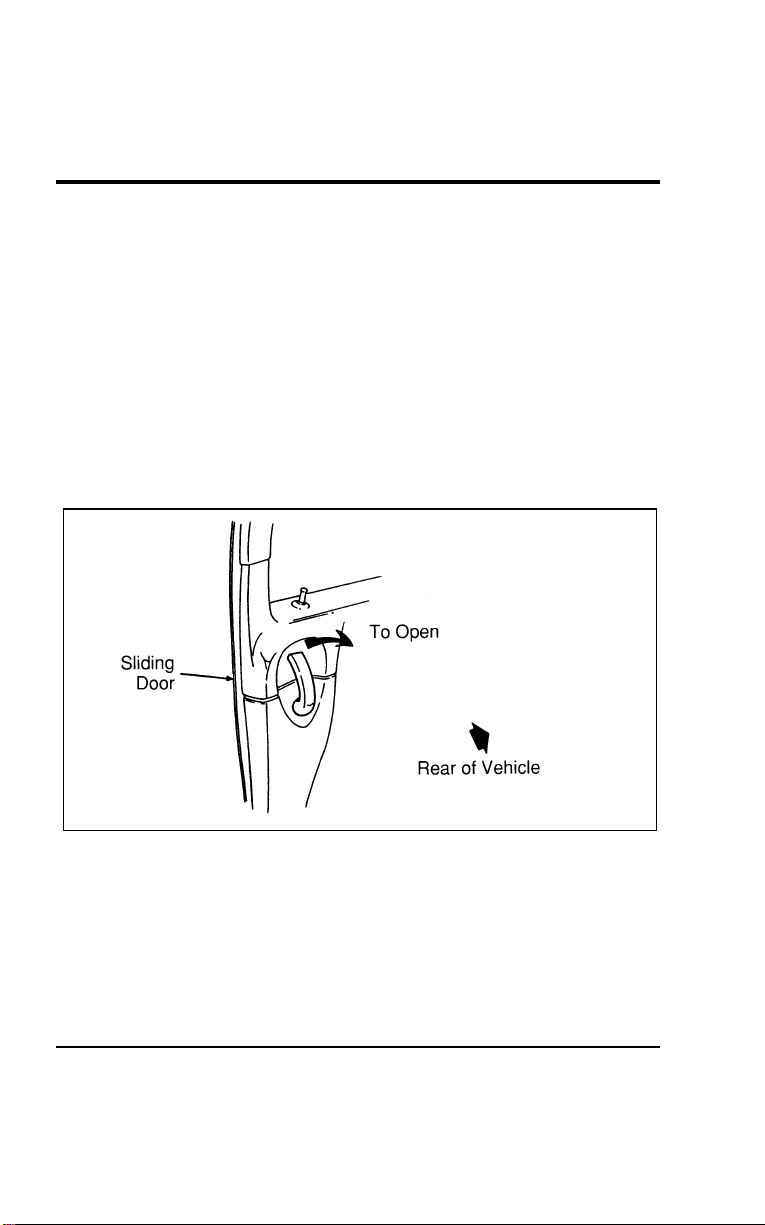
Controls and Features
121
%
*
[CF31700(ALL)02/96] Doors
*
[CF31800(ALL)01/96]
For information on the liftgate refer to the Liftgate section later
in this chapter.
*
[CF31900(ALL)01/96]
Sliding Door
*
[CF32000(ALL)01/96]
The sliding door allows rear seat passengers to enter and exit
easily.
[CF32100(ALL)01/96]
To open the sliding door from inside of the vehicle, pull the
handle toward the rear of the vehicle. The door will stay open if
you slide it all the way back until the detent at the bottom of
the door engages.
[CF32200(ALL)01/96]
13-1/2 pica
art:0050119-A
The inside sliding door handle
[CF32300(ALL)01/96]
To close the door, pull the handle toward the front of the
vehicle and slide the door. Be sure it is fully closed.
[CF32400(ALL)01/96]
To open the sliding door from outside the vehicle, unlock the
door then unlatch the sliding door by pulling the handle
straight out and sliding the door back.
File:05wncfs.ex
Update:Wed Jul 31 15:55:37 1996
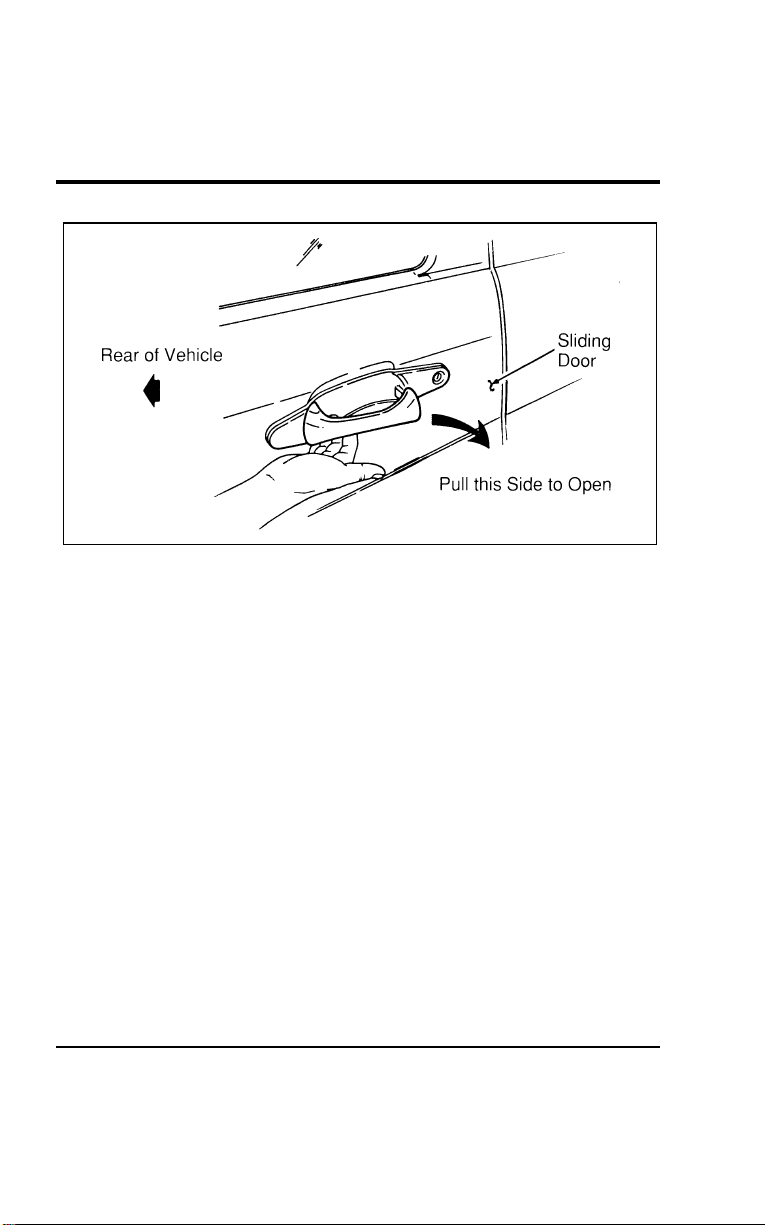
122
[CF32500(ALL)01/96]
13-1/2 pica
art:0050120-B
The outside sliding door handle
[CF32600(ALL)01/96]
Memory Lock
[CF32700(ALL)01/96]
If you lock your doors with the power lock switch or the
remote transmitter while the sliding door is open, the door will
automatically lock after it is closed.
%
*
[CF32800(ALL)01/96]
Childproof Lock for the Sliding Door
%
*
[CF32900(ALL)01/96]
Your vehicle has a childproof lock for the sliding door. If you
set the childproof lock, the sliding door cannot be opened from
inside the vehicle.
*
[CF33000(ALL)01/96]
This lock will keep children from opening the door from the
inside; the door can still be opened from the outside if the door
is unlocked.
File:05wncfs.ex
Update:Wed Jul 31 15:55:37 1996
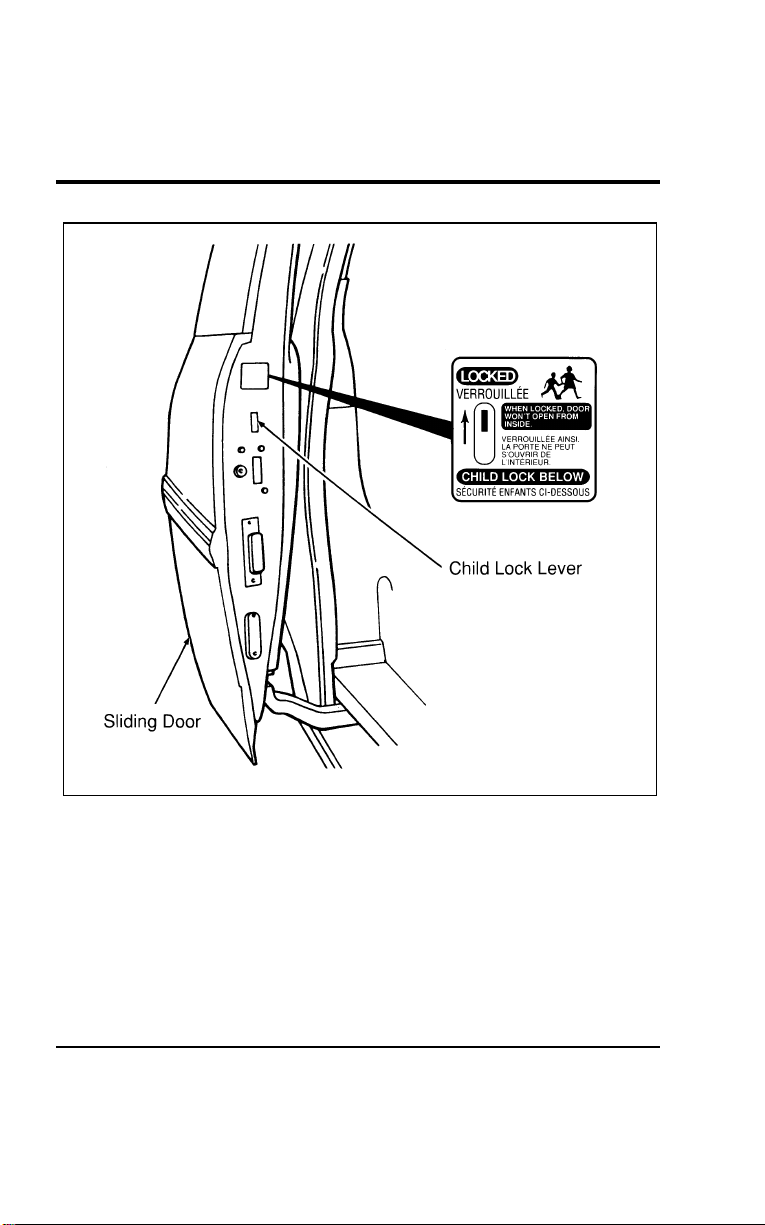
Controls and Features
123
[CF33100(ALL)01/96]
24 pica art:0050082-B
Childproof lock location
*
[CF33200(ALL)01/96]
To set the childproof lock:
*
[CF33300(ALL)01/96] 1. Open the sliding door.
[CF33400(ALL)01/96] 2. Find the childproof lock lever below the label.
[CF33500(ALL)01/96] 3. Push the lever to the up position.
File:05wncfs.ex
Update:Wed Jul 31 15:55:37 1996
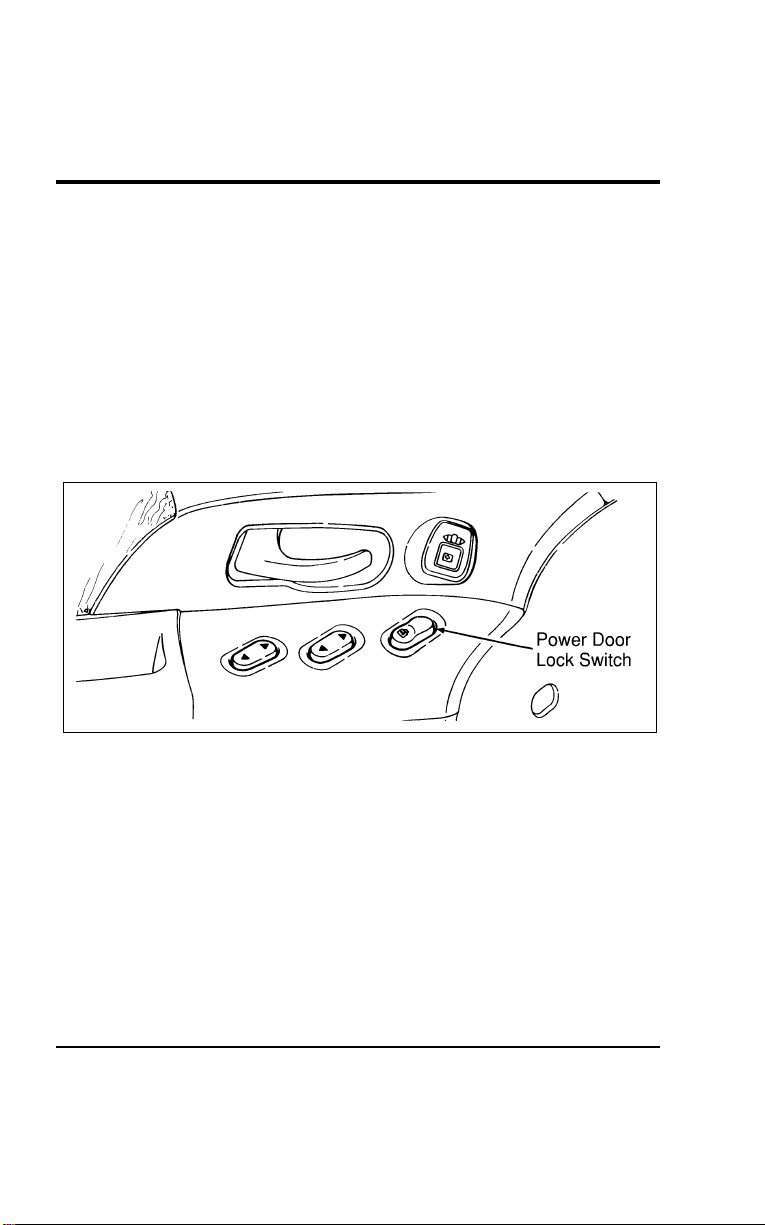
124
*
[CF33600(ALL)01/96]
To release the childproof lock:
*
[CF33700(ALL)01/96] 1. Open the sliding door from the outside.
[CF33800(ALL)01/96] 2. Push the lever to the down position.
%
*
[CF33900(ALL)01/96]
Power Door Locks (If equipped)
[CF34000(ALL)01/96]
The power door lock control switches are located in the panels
of the front doors. They control the locks on both front doors,
the sliding door and the liftgate. To lock all doors, push the
raised side of the switch. To unlock the doors, push the recessed
side of the switch.
[CF34100(ALL)01/96]
10-1/2 pica
art:0050029-A
The power door lock switch
[CF34200(ALL)01/96]
Door locks can also be operated from the power door lock
switch in the cargo area.
File:05wncfs.ex
Update:Wed Jul 31 15:55:37 1996
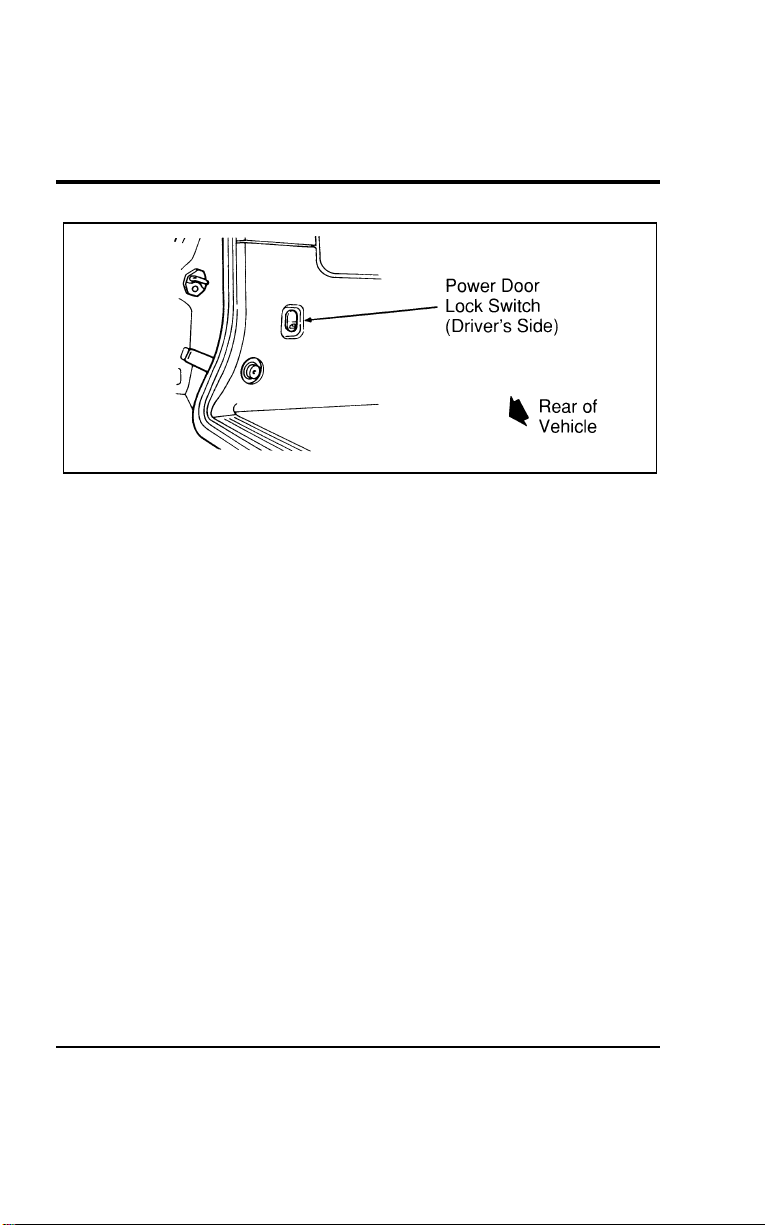
Controls and Features
125
[CF34300(ALL)01/96]
10-1/2 pica
art:0050186-A
The power door lock switch in the cargo area
*
[CF34400(ALL)01/96]
NOTE: If the sliding door is open when all doors are locked
with the power door lock switch, the sliding door
automatically locks when it is closed.
*
[CF34500(ALL)01/96]
You can manually lock and unlock the doors using the manual
door locks to override the power locks.
%
*
[CF34600(ALL)04/96] Windows
[CF34700(ALL)01/96]
Power Windows with Accessory Delay (If equipped)
[CF34800(ALL)01/96]
Both of the front doors have a power control that opens and
closes the window on that door. The driver’s door has master
controls that operate both front door windows. You must
initially place the ignition switch in the ON or ACC position to
use your power window controls. The Accessory Delay function
also allows the power windows to be operated for up to 30
seconds after the ignition key is removed or taken out of the
ON or ACC position. Accessory Delay will be cancelled,
however, if either of the front doors are opened.
[CF34900(ALL)01/96]
To open a window, press the recessed area of the switch. To
close it, press the raised area of the switch.
File:05wncfs.ex
Update:Wed Jul 31 15:55:37 1996
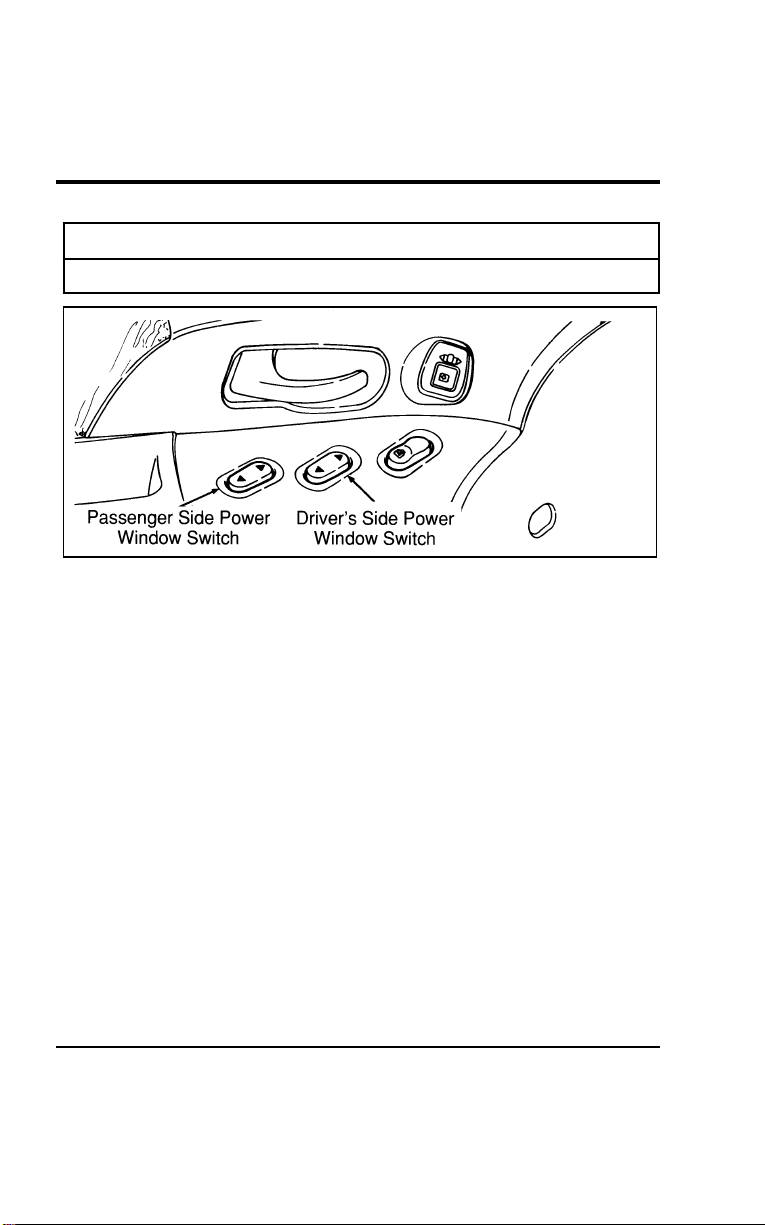
126
*
[CF35000(ALL)01/96]
R WARNING
Do not let children play with the power windows.
[CF35100(ALL)01/96]
10-1/2 pica
art:0050030-B
The power window switches
[CF35200(ALL)01/96]
One-Touch-Down Power Window (If equipped)
[CF35300(ALL)01/96]
The one-touch-down power window feature allows you to
completely open the driver’s window without holding down the
window switch. To open the window completely, tap quickly on
the lower half of the switch and release it. If the top of the
button is pressed firmly while the window is going down, the
window will stop at that position.
[CF35400(ALL)01/96]
To open the window only partially, press the lower half of the
switch lightly and hold it until the window has opened to the
desired position and then release the switch.
[CF35500(ALL)01/96]
To close the window you must hold the upper half of the
button until the window closes.
File:05wncfs.ex
Update:Wed Jul 31 15:55:37 1996

Controls and Features
127
[CF35600(ALL)01/96]
Cancelling and reactivating the one-touch-down feature
[CF35700(ALL)01/96]
The one-touch-down power window feature can be cancelled
and reactivated at any time using the following procedure:
[CF35800(ALL)01/96] 1. Make sure the two front doors are securely closed.
[CF35900(ALL)01/96] 2. Insert the key into the ignition and turn first to the ON
position and then back to the OFF position. Remove the key
and within 30 seconds:
[CF36000(ALL)01/96] 3. Press and hold the DOWN side of the driver’s side window
rocker switch.
[CF36100(ALL)01/96] 4. Within two seconds, put the key in the ignition.
[CF36200(ALL)01/96] 5. Hold the switch down until a long (two second) tone is
heard. Release the switch while the tone is active.
[CF36300(ALL)01/96] 6. After the long tone, a confirmation sequence will be heard.
One beep indicates the feature is inactive. Two beeps
indicates the feature is active.
[CF36400(ALL)01/96]
Repeat this procedure any time you want to cancel or reactivate
the one-touch-down power window feature.
*
[CF36500(ALL)01/96]
Manual Flip-Open Quarter Windows
[CF36600(ALL)01/96]
To open the flip-open quarter windows in the third row,
squeeze the upper and lower pads and pull the rear portion of
the latch toward you. Swing the latch forward and out, then
lock it into the open position by pushing rearward until you
hear a click. To close the windows, squeeze the upper and
lower pads and pull the handle inward. Release pads and push
the handle inward until you hear a click.
File:05wncfs.ex
Update:Wed Jul 31 15:55:37 1996
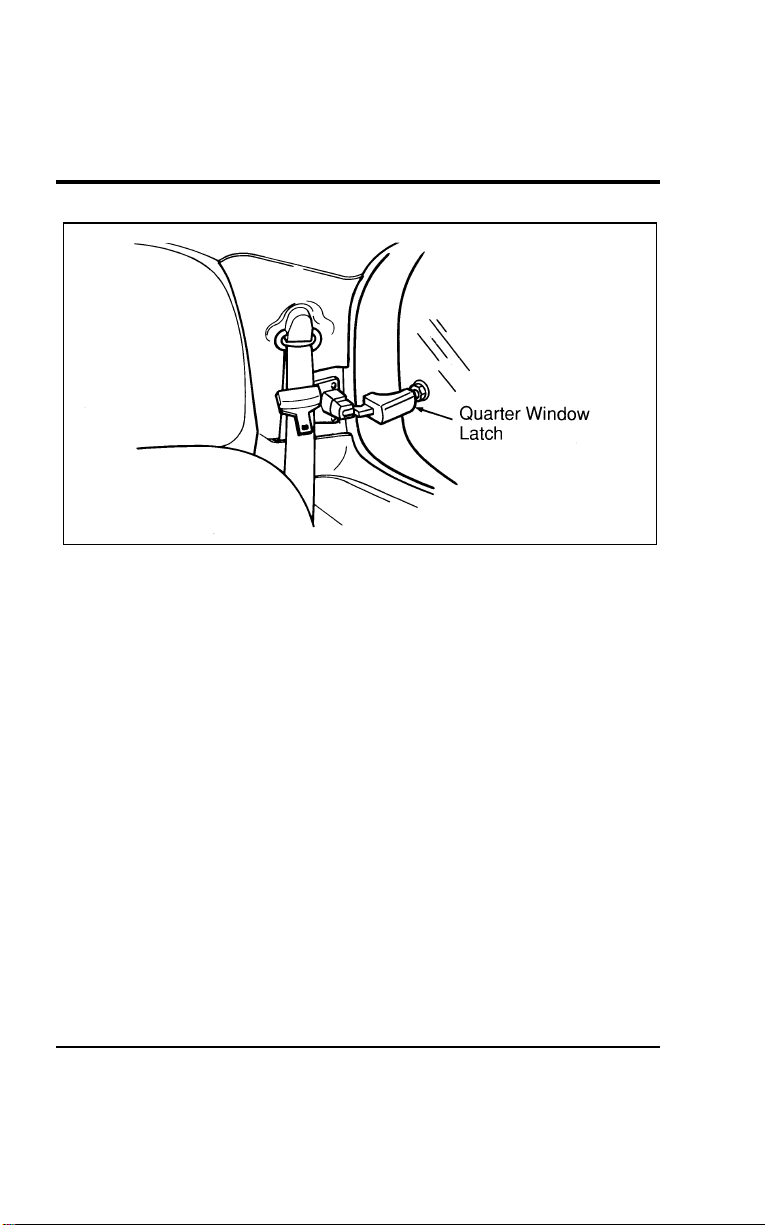
128
[CF36700(ALL)01/96]
13-1/2 pica
art:0050083-A
Manual flip-open quarter window latch location
*
[CF36800(ALL)01/96]
Power Quarter Windows (If equipped)
[CF36900(ALL)01/96]
The power rear quarter vent windows operate with the ignition
in the ON or ACC positions. The vent windows are controlled
by the right and left switches located in the center of the
instrument panel, just to the right of the rear defogger. Press the
indented side of the switch to open the windows; press the
raised side of the switch to close the windows.
File:05wncfs.ex
Update:Wed Jul 31 15:55:37 1996
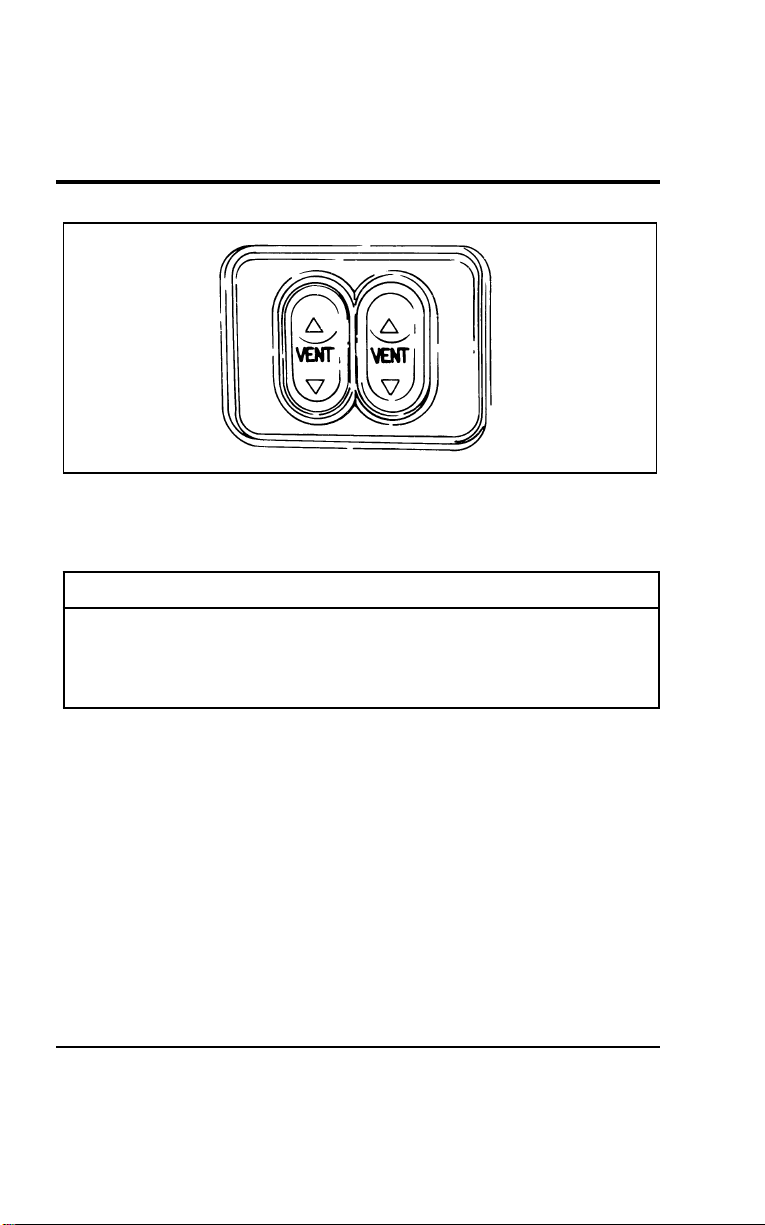
Controls and Features
129
[CF37000(ALL)01/96]
10-1/2 pica
art:0050034-A
The power quarter window switches
%
*
[CF37100(ALL)03/96] Mirrors
*
[CF37200(ALL)01/96]
R WARNING
Make sure you can see clearly through the rearview
mirror at all times. Do not block your vision. If you
cannot see through the mirror, it could result in a
collision, injuring yourself and others.
%
*
[CF37300(ALL)01/96]
Side View Mirrors
*
[CF37400(ALL)01/96]
Close your door and adjust the driver’s seat to the most
comfortable position before you adjust the side view mirrors.
[CF37500(ALL)12/95]
If you have manually adjusting side view mirrors, you can
adjust them in any direction by moving the mirror glass. The
mirror heads should be folded rearward to prevent damage
when using an automatic car wash.
*
[CF37600(ALL)01/96]
NOTE: Be careful. The convex side view mirror on the right
makes objects appear smaller and farther away than
they actually are. Use the inside rearview mirror (or
look behind you) to determine the actual size and
distance of objects that appear in the convex mirror.
File:05wncfs.ex
Update:Wed Jul 31 15:55:37 1996
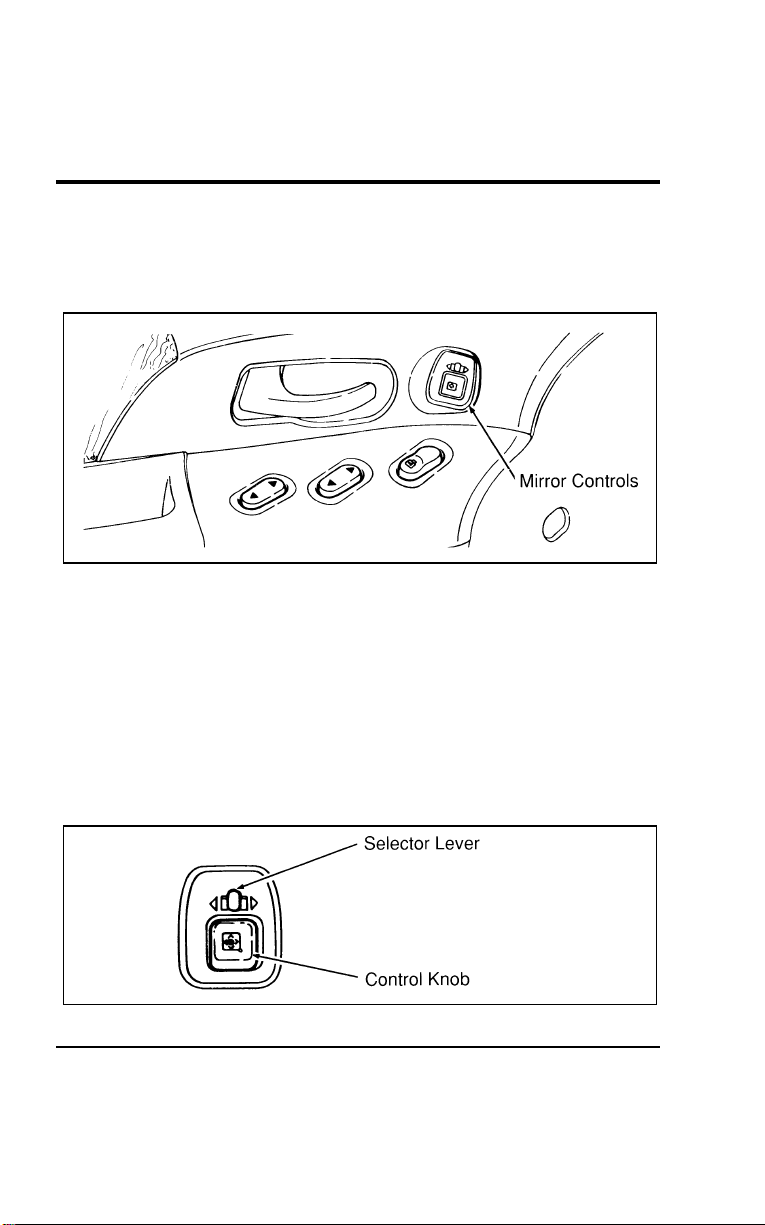
130
%
*
[CF37700(ALL)01/96]
Dual Electric Remote Controlled Mirrors (If equipped)
[CF37800(ALL)12/95]
If you have power side view mirrors, you can adjust them in
any direction by using the mirror controls on the door panel.
[CF37900(ALL)12/95]
10-1/2 pica
art:0050031-A
The electric mirror controls
*
[CF38000(ALL)05/96]
To adjust the remote controlled side mirrors:
[CF38100(ALL)12/95] 1. Select the right or left mirror by sliding the selector lever
towards the right arrow or the left arrow.
*
[CF38200(ALL)01/96] 2. Move the control knob in the direction you want to move
the mirror.
[CF38300(ALL)12/95] 3. Return the selector lever to the middle position to keep the
mirror in place.
[CF38400(ALL)12/95]
7-1/2 pica art:0050214-A
Operating the electric mirrors
File:05wncfs.ex
Update:Wed Jul 31 15:55:37 1996
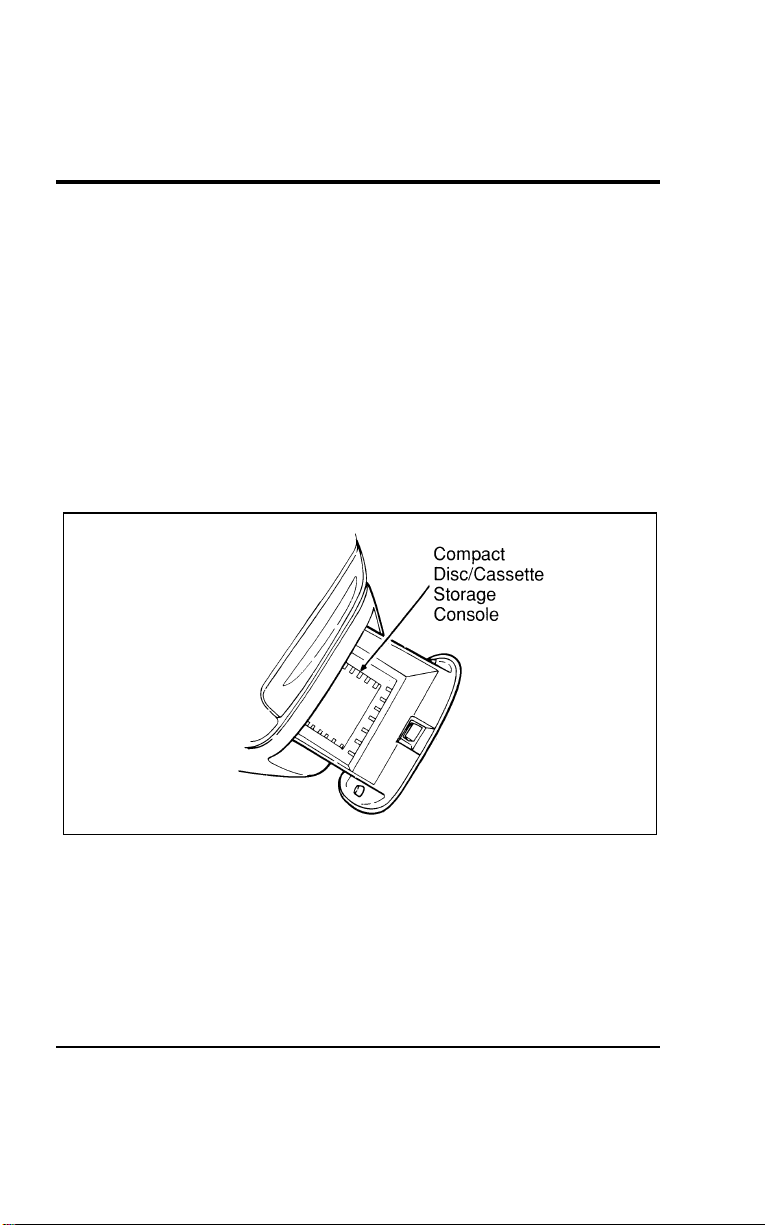
Controls and Features
131
% [CF38500(ALL)12/95]
Heated Side View Mirrors (If equipped)
[CF38600(ALL)12/95]
The heated side view mirrors are automatically activated
whenever you activate the rear defogger. The defogger in your
vehicle automatically shuts off after 10 minutes. If additional
defogging is necessary, reactivate the rear defogger.
[CF38700(ALL)01/96]
Compact Disc and Cassette Storage Console
(If equipped)
[CF38800(ALL)01/96]
A storage compartment is included below the radio for storage
of your discs or cassettes. There is also a compact disc and
cassette storage insert in the storage compartment located under
the front passenger seat (if equipped).
[CF38900(ALL)01/96]
13-1/2 pica
art:0050014-A
Compact disc/cassette storage
% [CF39000(ALL)01/96]
Console (If equipped)
[CF39100(ALL)01/96]
Your vehicle may have a full console. Console features are
detailed in the following illustration. To open the console lid,
lift up on the latch toward the rear of the console. If your
vehicle has the CD changer (a dealer installed option), this
console could also house the changer and conceal it from sight.
File:05wncfs.ex
Update:Wed Jul 31 15:55:37 1996
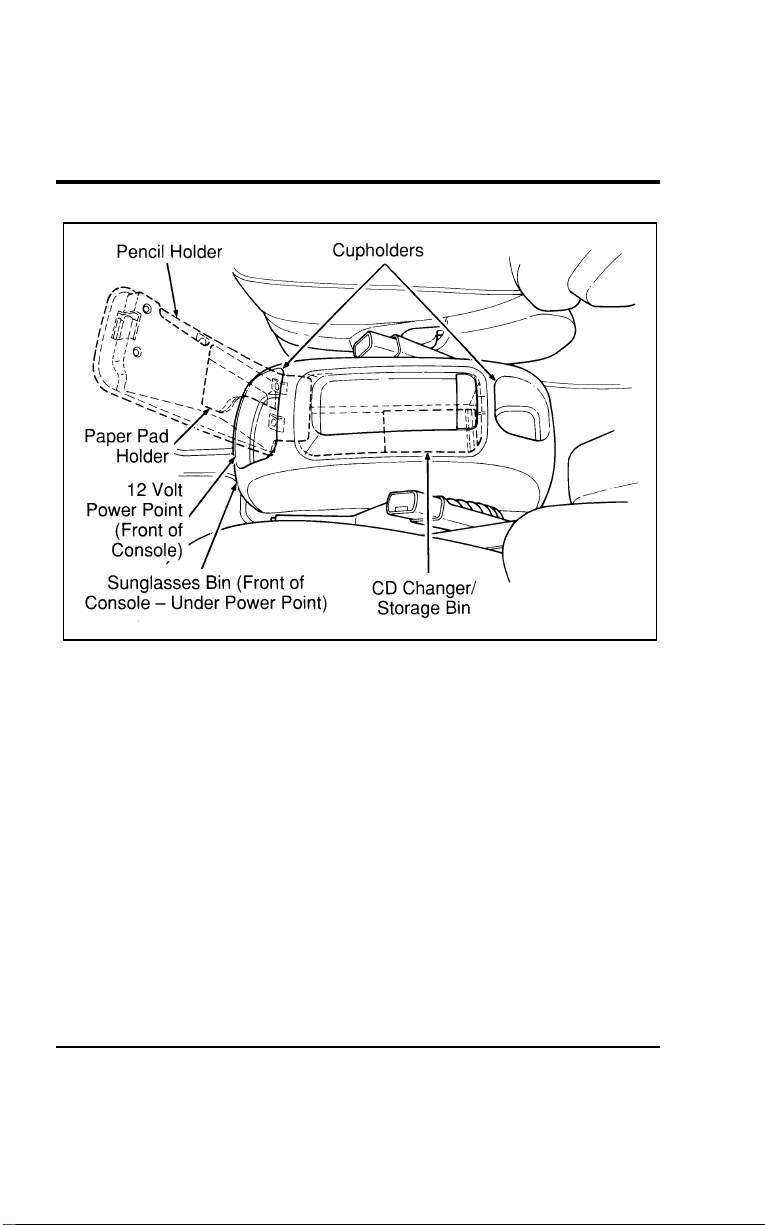
132
[CF39200(ALL)01/96]
17-1/2 pica
art:0050015-B
The full console
%
*
[CF39300(ALL)01/96] Liftgate
*
[CF39400(ALL)01/96]
Liftgate opening procedure
[CF39500(ALL)01/96] 1. To open the liftgate, insert the door key into the lock and
turn it clockwise. You can also unlock the latch (but not
release it) with the power door lock system.
*
[CF39600(ALL)01/96] 2. Reach under the license plate light shield and release the
liftgate latch by squeezing the paddle handle rearward.
[CF39700(ALL)01/96] 3. To make the gate swing up to the fully opened position, pull
back and upward on the latch paddle handle under or
behind the license plate shield.
File:05wncfs.ex
Update:Wed Jul 31 15:55:37 1996
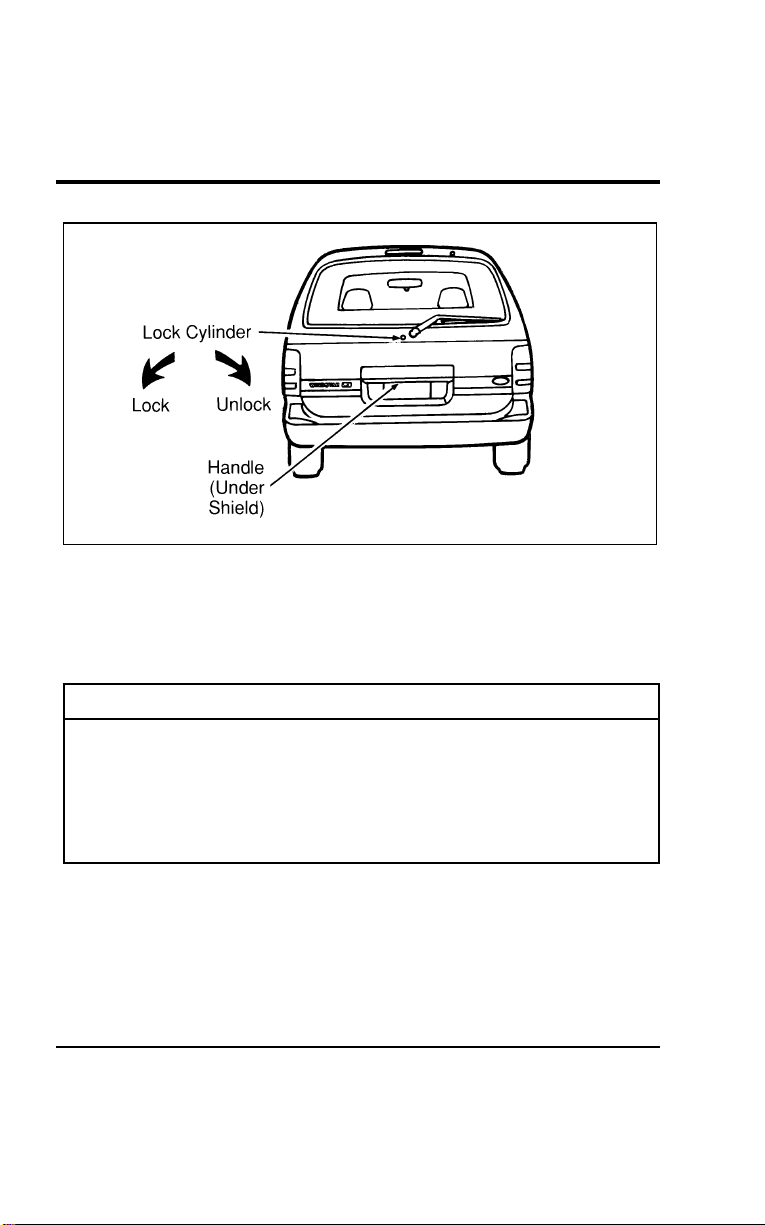
Controls and Features
133
[CF39800(ALL)01/96]
13-1/2 pica
art:0050108-B
Opening the liftgate
[CF39900(ALL)01/96]
Make certain that you close the liftgate door before driving your
vehicle. Possible damage may occur to the liftgate door lift
cylinders and attaching hardware if the liftgate door is not
closed prior to driving.
*
[CF40000(ALL)01/96]
R WARNING
Make sure that the liftgate door and/or window are
closed to prevent exhaust fumes from being drawn into
the vehicle. This will also prevent passengers and cargo
from falling out. If you must drive with the liftgate door
or window open, keep the vents open so outside air
comes into the vehicle.
File:05wncfs.ex
Update:Wed Jul 31 15:55:37 1996

134
*
[CF40100(ALL)01/96]
Liftgate closing procedure
*
[CF40200(ALL)01/96] 1. To make the liftgate swing downward, reach up and pull the
lower edge of the liftgate (or the loop handle on the inner
trim panel of vehicles with this option) and pull downward.
*
[CF40300(ALL)01/96] 2. When you have pulled down the liftgate enough so that you
can reach the license plate light shield, push the shield down
and forward to close the latch and liftgate. At this point, the
latch is not locked.
[CF40400(ALL)01/96] 3. You can lock the liftgate latch by pushing down the
night-lock button (located on the inside of the liftgate at the
bottom of the window) before you pull down and close the
liftgate. You can also lock the liftgate latch by inserting your
vehicle’s door key and turning it counterclockwise after you
have closed the liftgate, or by using the power door locks on
the front doors or the power lock switch in the cargo area.
*
[CF40500(ALL)01/96]
The liftgate area is only intended for cargo, not passengers. You
can open and close the liftgate from outside the vehicle. It
cannot be opened from inside the cargo area.
%
*
[CF40600(ALL)01/96] Cargo Net (If equipped)
*
[CF40700(ALL)01/96]
The cargo net is designed to hold your cargo upright between
the third row bench seat and the liftgate to prevent it from
moving around the cargo area.
*
[CF40800(ALL)01/96]
To install the cargo net:
*
[CF40900(ALL)01/96]
Attach the loops on the four corners of the net to the four
retainers on the cargo area rear quarter panels. Pull on the net
to be sure that it is fastened securely.
*
[CF41000(ALL)01/96]
R WARNING
Be sure to secure all four loops into the retainers. The
cargo restrained in the net must not exceed 50 lbs.
(22.5 kg) or the net may not stay secured.
File:05wncfs.ex
Update:Wed Jul 31 15:55:37 1996
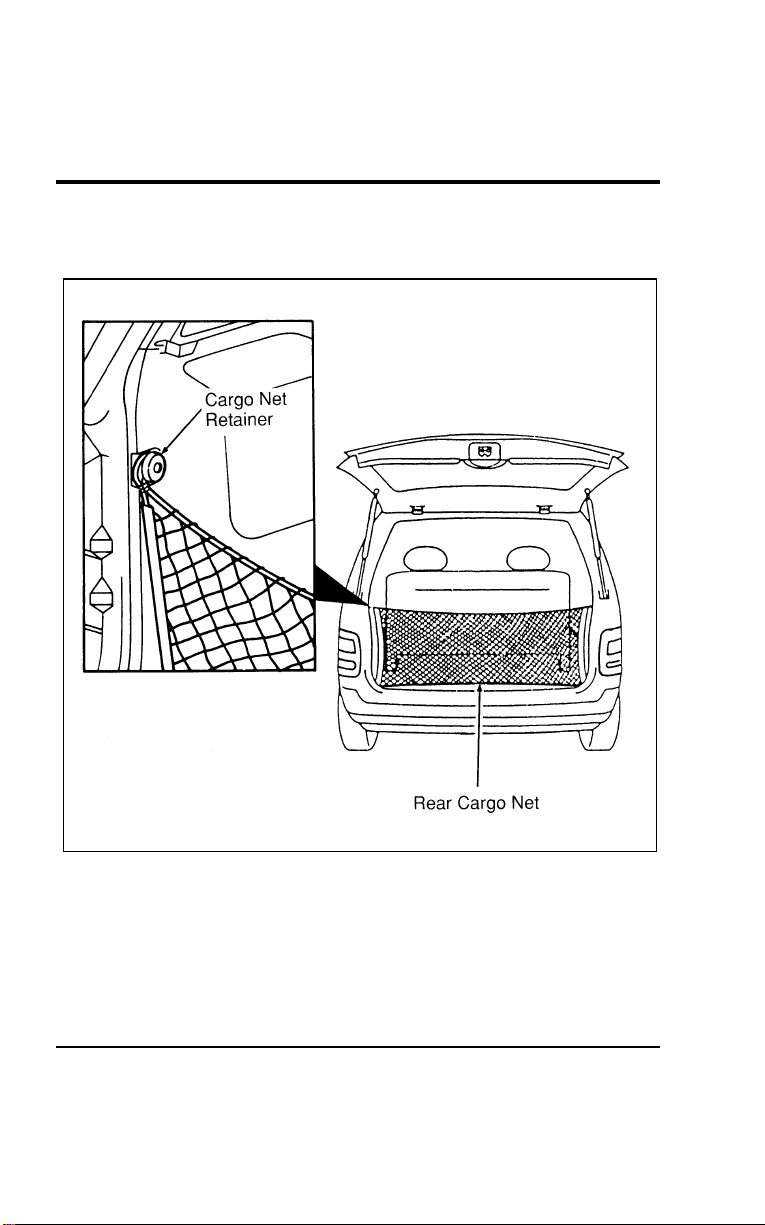
Controls and Features
135
*
[CF41100(ALL)01/96]
To remove the cargo net, remove the loops from the four
retainers.
[CF41200(ALL)12/95]
24 pica art:0050013-A
The rear cargo net
File:05wncfs.ex
Update:Wed Jul 31 15:55:37 1996
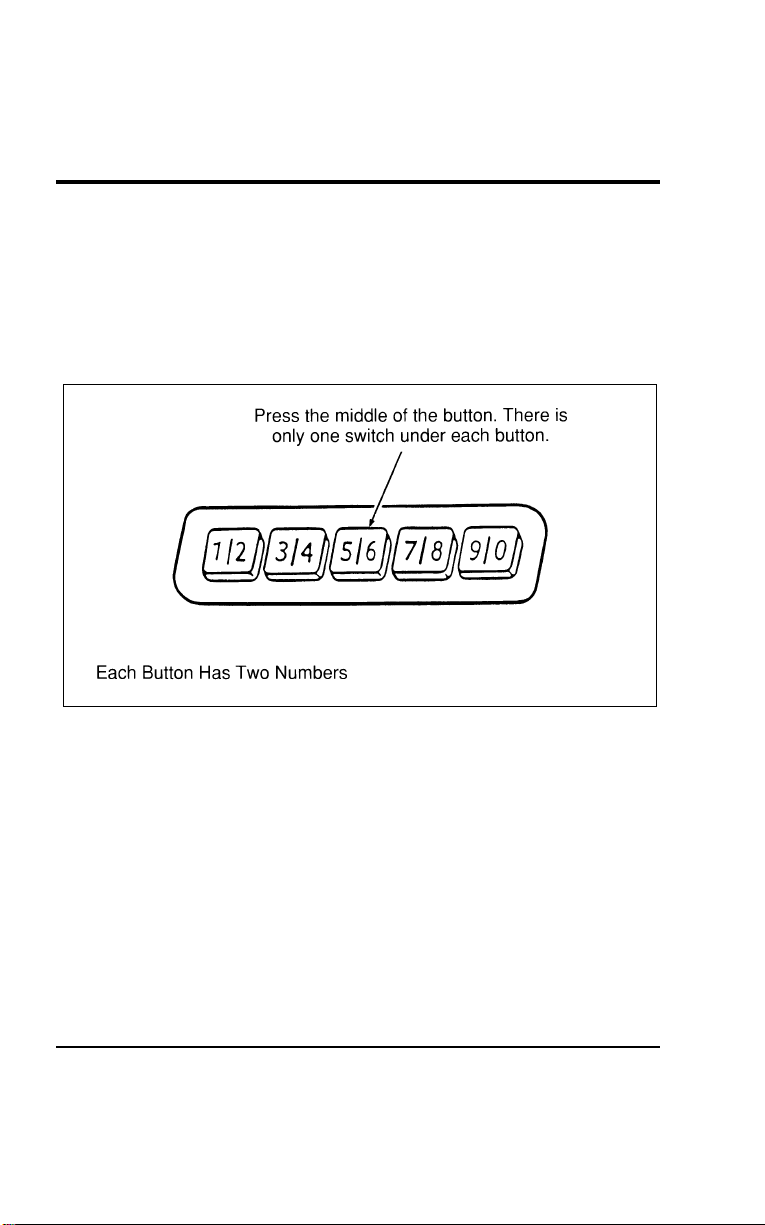
136
% [CF41300(ALL)07/96] Keyless Entry System (If equipped)
[CF41400(ALL)01/96]
If you have chosen the keyless entry system option for your
vehicle, you can lock or unlock the doors and liftgate without
using a key. The keypad is above the outside door handle on
the driver’s side. See also Remote Entry System which follows
this description.
[CF41500(ALL)01/96]
13-1/2 pica
art:0050107-A
The keyless entry system keypad
[CF41600(ALL)04/96]
When you bought your vehicle, you were given a computer
code that operates the system for your vehicle. For your
convenience, we have duplicated this code in two places.
*
[CF41700(ALL)05/96]
The code is:
*
[CF41800(ALL)05/96]
■ on your owner’s wallet card found in the glove compartment
[CF41900(ALL)04/96]
■ taped to the computer module
[CF42000(ALL)01/96]
When you use the keyless entry system, the illuminated entry
system turns on the interior lights for 25 seconds and the
buttons on the keypad light up for five seconds.
File:05wncfs.ex
Update:Wed Jul 31 15:55:37 1996

Controls and Features
137
[CF42100(ALL)04/96]
Do not push the keypad buttons with a key, ball-point pen,
pencil, or any other hard object since they could damage the
buttons.
[CF42200(ALL)07/96]
Using the Keyless Entry System
[CF42300(ALL)04/96]
To operate the Keyless Entry System, you must be familiar with
the “personal code” and the “permanent code.” The personal
code is a code number that you select that is easy for you to
remember. This is the number that you enter on the keypad to
unlock the door. The personal code can be changed as often as
you like.
[CF42400(ALL)01/96]
The permanent code is a number that is assigned to your
vehicle and can be used to program your personal code into the
system.
[CF42500(ALL)01/96]
For your convenience, one additional piece of tape with the
permanent code has been included in the glove box. Place this
additional piece of tape in a safe location where you can refer
to it when necessary. Do not put it in any location that is
accessible to unauthorized persons, since this would allow them
entrance to your vehicle.
% [CF42600(ALL)04/96]
Programming your Personal Code
[CF42700(ALL)01/96]
A personal code does not replace the permanent code that the
dealership gave you. The original dealer code will always work
in addition to your personal code.
*
[CF42800(ALL)05/96]
To program your own code:
*
[CF42900(ALL)05/96] 1. Select five digits for your personal code.
[CF43000(ALL)01/96] 2. Enter the permanent code.
[CF43100(ALL)01/96] 3. Within five seconds, press the 1/2 button.
[CF43200(ALL)01/96] 4. Within five seconds of pressing the 1/2 button, enter your
personal code. Press each digit within five seconds of the
previous digit.
File:05wncfs.ex
Update:Wed Jul 31 15:55:37 1996

138
[CF43300(ALL)01/96] 5. The keyless system registers this second code. To open your
vehicle, you can now use either code. The module
remembers only one personal code at a time. Entering a
second personal code will erase the first and replace it with
the new code.
[CF43400(ALL)01/96] 6. After you have entered your personal code, the driver’s door
will unlock.
*
[CF43500(ALL)05/96]
To erase your personal code:
*
[CF43600(ALL)05/96] 1. Enter the original permanent code.
[CF43700(ALL)01/96] 2. Press the 1/2 button within five seconds of step #1.
*
[CF43800(ALL)05/96] 3. Wait six seconds.
[CF43900(ALL)01/96] 4. The keyless entry system automatically erases your personal
code. The system will now only respond to the permanent
code.
*
[CF44000(ALL)05/96]
Do not set a code that presents the numbers in sequential order,
such as 1/2, 3/4, 5/6, 7/8, 9/0. Studies show that people who
idly press the buttons usually press a sequential pattern. Also,
do not select a code that uses the same button five times.
Thieves can easily figure out these types of codes.
% [CF44100(ALL)04/96]
Unlocking the Doors with the Keyless Entry System
[CF44200(ALL)01/96]
You must unlock the driver’s door before you unlock any of the
other doors. If you let more than five seconds pass between
pressing numbers, the system shuts down and you have to
enter the code again. The system has shut down if the keypad
light is out. If the keyless entry system does not work properly,
use the key or Remote Entry transmitter(s) to lock and unlock
the doors or liftgate until the system can be serviced.
[CF44300(ALL)01/96] 1. To unlock the driver’s door, enter the code. All codes have 5
numbers. After you press the fifth number, the driver’s door
unlocks.
File:05wncfs.ex
Update:Wed Jul 31 15:55:37 1996

Controls and Features
139
[CF44400(ALL)01/96] 2. To unlock the passenger’s door, sliding door and liftgate,
press 3/4 within five seconds of step #1, or re-enter the code
to open the driver’s door then press 3/4.
*
[CF44500(ALL)05/96]
Locking the Doors with the Keyless Entry System
*
[CF44600(ALL)01/96]
Along with unlocking your doors, you can use the keyless entry
system to lock the doors.
[CF44700(ALL)01/96]
To lock all of the doors at the same time, press the 7/8 and 9/0
buttons at the same time. It is not necessary to first enter the
keypad code. This will also arm your Ford anti-theft system.
%
*
[CF44800(ALL)01/96] Battery Saver
[CF44900(ALL)01/96]
When the ignition switch is turned to OFF, the vehicle will turn
off battery voltage to the interior lamps after 45 minutes. (The
exterior lamps are not affected.) The purpose is to minimize
extended battery drain if the lights have inadvertently been left
on or if a door or the glove box is not completely closed.
However, the timer will be immediately reset to another 45
minutes if any of the following occurs:
[CF45000(ALL)01/96]
■ any door is open or closed
[CF45100(ALL)01/96]
■ the front door handle is lifted (for Illuminated Entry only)
[CF45200(ALL)01/96]
■ taking the key IN or OUT of the ignition switch
[CF45300(ALL)01/96]
■ the Keyless Entry keypad is used
[CF45400(ALL)01/96]
■ the Remote Entry transmitter is activated
*
[CF45500(ALL)05/96] Remote Entry System (If equipped)
[CF45600(ALL)01/96]
If your vehicle has the remote entry system, you can lock and
unlock the vehicle doors without using a key. The remote entry
system also has a personal alarm feature. The buttons that
control the system are located on the hand held transmitter that
come with your vehicle.
File:05wncfs.ex
Update:Wed Jul 31 15:55:37 1996
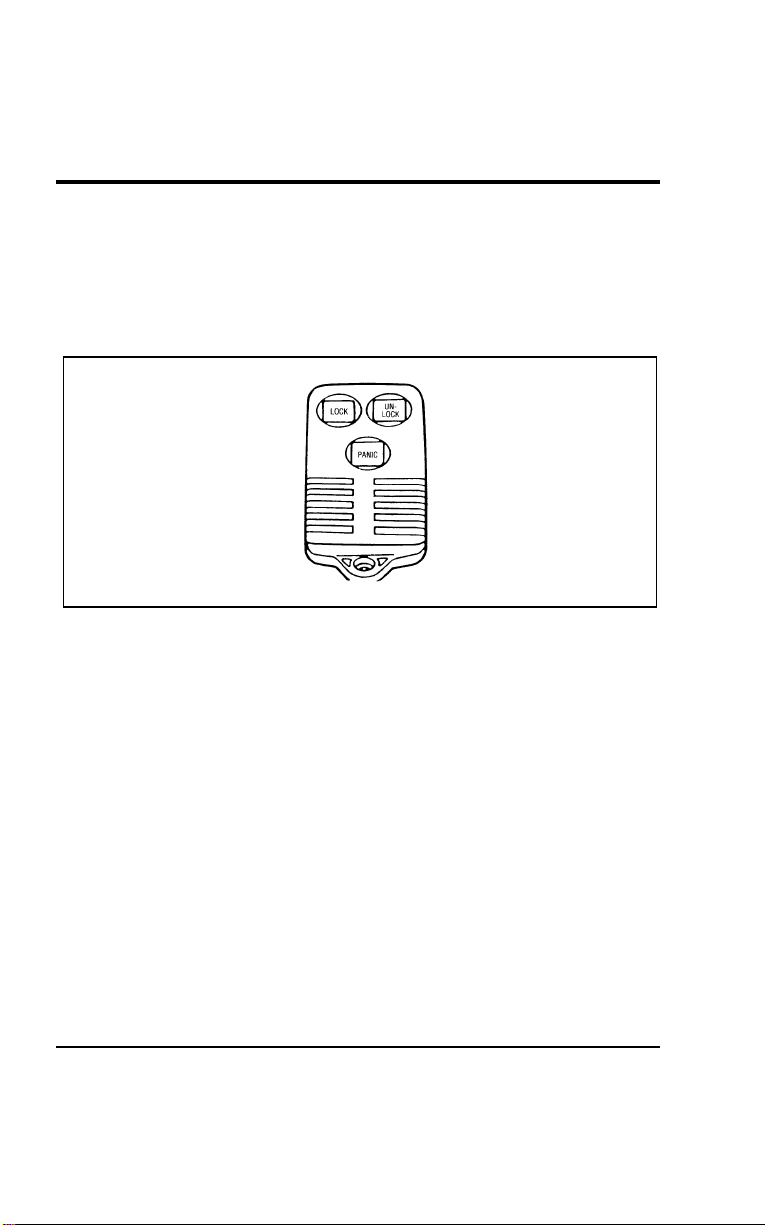
140
*
[CF45700(ALL)05/96]
The system will work with up to four remotes. Your vehicle
came with two remotes. Additional remotes can be ordered
from your dealer.
*
[CF45800(ALL)01/96]
The remote entry features only operate with the ignition in the
OFF position.
[CF45900(ALL)01/96]
10-1/2 pica
art:0050158-B
The remote entry transmitter
% [CF46000(ALL)07/96]
Unlocking the Doors
*
[CF46100(ALL)04/96]
To unlock the driver’s door, press the UNLOCK control.
*
[CF46200(ALL)04/96]
To unlock the other doors, press the UNLOCK control a second
time within five seconds of unlocking the driver’s door.
*
[CF46300(ALL)04/96]
Locking the doors
*
[CF46400(ALL)04/96]
To lock all the doors, press the LOCK control.
[CF46500(ALL)01/96]
If you would like a signal that the doors have been locked,
press the LOCK button again within five seconds. The doors
will lock again and the horn will beep.
File:05wncfs.ex
Update:Wed Jul 31 15:55:37 1996

Controls and Features
141
%
*
[CF46600(ALL)03/96]
Activating the remote personal alarm
[CF46700(ALL)01/96]
If you wish to activate the remote personal alarm, press the
PANIC button. This will honk the horn and flash the tail lamps
for approximately two minutes and forty-five seconds. You can
turn it OFF by pressing the PANIC button again on the same
transmitter or by turning the ignition key to the RUN position.
If the alarm does not turn off, move the transmitter closer to the
vehicle and press the button again.
[CF46800(ALL)01/96]
When you use the remote entry UNLOCK, or PANIC buttons,
the illuminated entry system turns on the interior lights for 25
seconds. You can turn these lights off with the LOCK button or
by turning the ignition to the RUN position.
[CF46900(ALL)07/96]
Replacing the batteries
*
[CF47000(ALL)05/96]
The remote is powered by two coin type three-volt lithium 2016
batteries (included) that should last for several years of normal
use. If you notice a significant decrease in operating range, the
batteries should be replaced. Replacement batteries can be
purchased at most pharmacies, watch stores or at your Ford or
Lincoln-Mercury dealer.
*
[CF47100(ALL)01/96]
NOTE: The operating range of the remote entry system can
also be affected by weather conditions (such as very
cold temperatures) or structures around the vehicle
(buildings, other vehicles, radio towers, etc.). Typical
operating range will allow you to be up to 33 feet (10
meters) away from your vehicle.
File:05wncfs.ex
Update:Wed Jul 31 15:55:37 1996
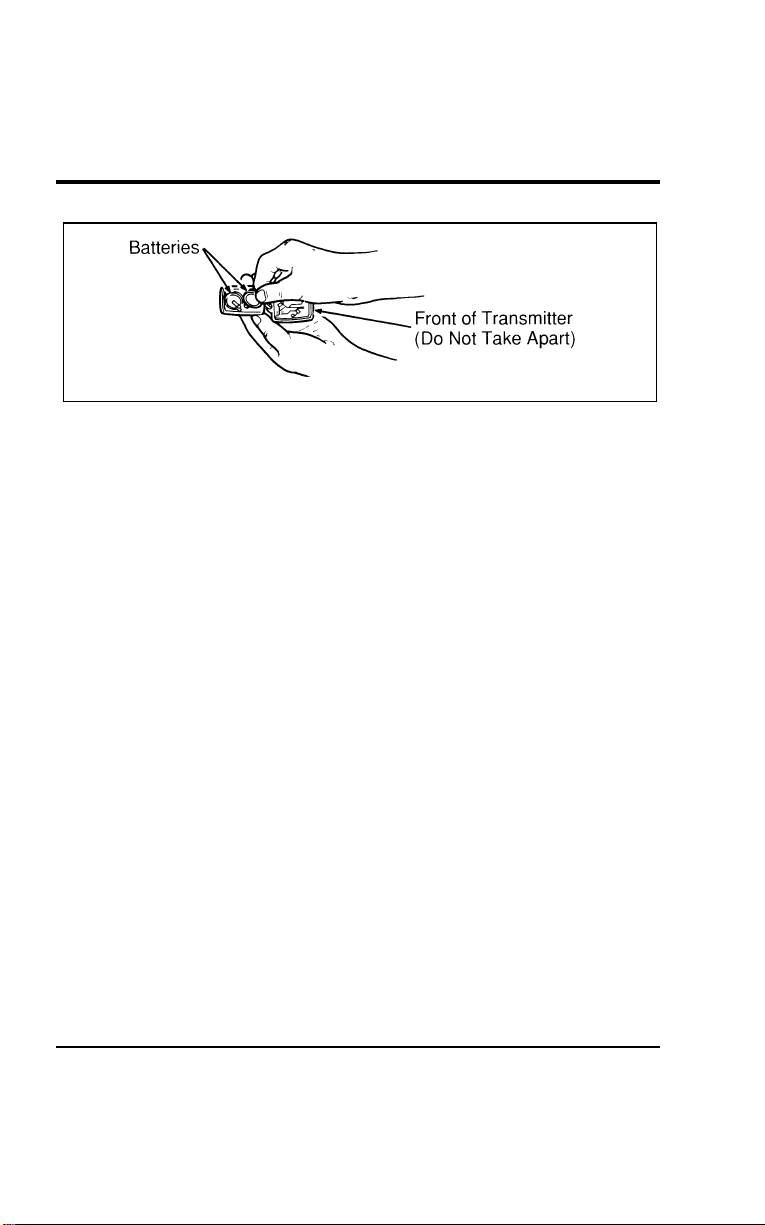
142
[CF47200(ALL)01/96]
7-1/2 pica art:0050159-A
Replacing the batteries
*
[CF47300(ALL)05/96]
The remote can be snapped apart to replace the batteries by
twisting a thin coin between the two halves of the remote. DO
NOT TAKE THE FRONT PART OF THE REMOTE APART.
When installing the new batteries, be sure to place the positive
(+) side down as marked. Snap the two halves back together.
%
*
[CF47400(ALL)05/96]
Replacement/additional remotes
*
[CF47500(ALL)05/96]
In the event a remote is lost, return the remaining remotes to
your dealer for reprogramming of your remote entry system.
This is necessary to prevent further unauthorized use of the lost
remote.
*
[CF47600(ALL)05/96]
Additional remotes may be purchased from your dealer (remote
entry system will work with up to four remotes). Return your
existing remotes to your dealer so the remote entry system can
be reprogrammed with your new and existing remotes.
*
[CF47700(ALL)01/96]
THIS DEVICE COMPLIES WITH PART 15 OF THE FCC
RULES. OPERATION IS SUBJECT TO THE FOLLOWING
TWO CONDITIONS: (1) THIS DEVICE MAY NOT CAUSE
HARMFUL INTERFERENCE, AND (2) THIS DEVICE MUST
ACCEPT ANY INTERFERENCE RECEIVED, INCLUDING
INTERFERENCE THAT MAY CAUSE UNDESIRED
OPERATION.
File:05wncfs.ex
Update:Wed Jul 31 15:55:37 1996

Controls and Features
143
%
*
[CF47800(ALL)01/96]
Illuminated Entry System (If equipped)
*
[CF47900(ALL)01/96]
This system will provide illumination of the vehicle’s interior
courtesy lamps when either outside front door handle is pulled
or when the remote entry system is used to unlock the door or
sound the personal alarm. The system will automatically turn
off after approximately 25 seconds or when the ignition is
turned to the RUN or ACC position.
[CF48000(ALL)01/96]
NOTE: The illuminated entry timer will not turn off the
courtesy lamps if they have been turned on by the
door and or dimmer switch.
% [CF48100(ALL)01/96]
Autolock
[CF48200(ALL)01/96]
The Autolock feature is part of your remote entry system and is
enabled at the factory. With the Autolock feature enabled, all of
the doors will automatically lock when:
[CF48300(ALL)01/96]
■ the vehicle doors and liftgate are closed
*
[CF48400(ALL)05/96]
■ the ignition key is turned to the ON position
[CF48500(ALL)04/96]
■ the brake pedal is pressed
[CF48600(ALL)05/96]
■ you shift through R (Reverse)
[CF48700(ALL)04/96]
■ one second has elapsed after the brake pedal is released
*
[CF48800(ALL)05/96]
The Autolock feature will repeat when:
[CF48900(ALL)01/96]
■ a door is opened and then all doors and the liftgate are
closed
[CF49000(ALL)04/96]
■ one second has elapsed after the brake pedal is released
[CF49100(ALL)01/96]
On vehicles with Keyless Entry, you can deactivate the system
by using the buttons for the keyless entry system if you do not
want to use the Autolock feature.
File:05wncfs.ex
Update:Wed Jul 31 15:55:37 1996

144
[CF49200(ALL)04/96]
The doors may not lock automatically at the correct time if the
driver:
[CF49300(ALL)04/96]
■ shifts through gears without pressing the brake
[CF49400(ALL)04/96]
■ shifts through gears quickly after starting the vehicle
[CF49500(ALL)04/96]
■ releases their foot from the brake while someone has stepped
out of the vehicle for a moment
*
[CF49600(ALL)05/96]
To deactivate the Autolock system:
*
[CF49700(ALL)05/96] 1. Enter your permanent five-digit entry code (not the user
code you may have set).
*
[CF49800(ALL)01/96] 2. Within five seconds, press and hold 7/8.
[CF49900(ALL)01/96] 3. Within five more seconds, press and release 3/4.
*
[CF50000(ALL)05/96] 4. Release 7/8.
[CF50100(ALL)04/96]
To reactivate the Autolock system, simply repeat the instructions
for deactivating the system. By re-entering the code that
deactivates the Autolock, the keyless entry system reinstates the
Autolock feature.
% [CF50200(ALL)01/96] Anti-Theft System (if equipped)
*
[CF50300(ALL)01/96]
When armed, this system helps protect your vehicle against
break-ins or theft.
%
*
[CF50400(ALL)01/96]
When an unauthorized entry occurs, the system triggers and
will:
*
[CF50500(ALL)03/96]
■ flash the parking lamps, and alarm indicator lamp
*
[CF50600(ALL)01/96]
■ honk the horn
*
[CF50700(ALL)01/96]
■ disable the starting circuit to prevent the vehicle from being
started
File:05wncfs.ex
Update:Wed Jul 31 15:55:37 1996

Controls and Features
145
%
*
[CF50800(ALL)07/96]
Arming the System
*
[CF50900(ALL)01/96] 1. Remove the key from the ignition. The hood must be closed
to arm the system.
*
[CF51000(ALL)05/96] 2. Open any door. The alarm indicator light will start flashing
to remind you to arm the system.
[CF51100(ALL)04/96] 3. Lock the doors by using the power door lock switch. The
alarm indicator light will now glow steadily.
[CF51200(ALL)01/96] 4. Close all doors. The alarm indicator light will then remain
on steadily for 30 seconds and then go out. When the light
goes out, the system is armed.
*
[CF51300(ALL)01/96]
NOTE: Be sure to close all doors completely. If not, the alarm
indicator light will remain on. Remember, your
anti-theft system is armed only after the alarm
indicator light remains on steadily for approximately
30 seconds after the last door is closed, and then goes
out.
*
[CF51400(ALL)01/96]
You can also arm the anti-theft system with the factory installed
remote entry system or the keyless entry system by following
this sequence:
*
[CF51500(ALL)01/96] 1. Remove the key from the ignition. The hood must be closed
to arm the system.
*
[CF51600(ALL)01/96] 2. Close all of the doors.
[CF51700(ALL)01/96] 3. Press the remote entry transmitter LOCK button or use the
keyless entry system by pressing 7/8 and 9/0 at the same
time. The alarm indicator will come on for 30 seconds to
show the alarm is arming and then turn off to show that it
has armed.
[CF51800(ALL)01/96]
The anti-theft system is designed to work with the factory
installed remote keyless entry system. It may not work with
other remote entry systems.
File:05wncfs.ex
Update:Wed Jul 31 15:55:37 1996

146
%
*
[CF51900(ALL)03/96]
Disarming an Untriggered Anti-Theft System
[CF52000(ALL)01/96]
You can disarm the system by unlocking either front door or
the liftgate with your door key. Turn the key all the way to the
end of travel or the system will not disarm.
[CF52100(ALL)01/96]
You can also disarm the system by unlocking the driver’s door
by using the UNLOCK button of the remote entry transmitter or
by using the five-digit unlock code on the keyless entry system
keypad.
[CF52200(ALL)04/96]
If the system is armed and you remain in your vehicle, simply
insert the key into the ignition and turn it to ON. This disarms
the system and allows you to open the door and exit without
triggering the system.
%
*
[CF52300(ALL)03/96]
Disarming a Triggered System
*
[CF52400(ALL)01/96]
The alarm can be disarmed by:
[CF52500(ALL)04/96]
■ unlocking any door with the key, or
*
[CF52600(ALL)04/96]
■ using the UNLOCK control on the remote entry transmitter
[CF52700(ALL)01/96]
■ using the five-digit unlock code on the keyless entry keypad
[CF52800(ALL)01/96]
NOTE: The flashing lights and honking horn will shut off
automatically approximately two minutes and 45
seconds after the system is triggered. It will trigger
again if another intrusion occurs. However, the starter
circuit remains disabled until the system is disarmed.
File:05wncfs.ex
Update:Wed Jul 31 15:55:37 1996

147
SeatingandSafetyRestraints
%
*
[SS00200(ALL)05/96] Seats
*
[SS00300(ALL)01/96]
AdjustingtheSeats
[SS00400(ALL)01/96]
Adjusting the front seats manually
[SS00500(ALL)01/96]
Tomovethefrontseatsforwardorbackward:
[SS00600(ALL)01/96] 1.Findtheadjustmentbaratthelowercushionofthefront
seat.
[SS00700(ALL)01/96] 2.Pullthebaruptounlatchtheseat.
*
[SS00800(ALL)01/96] 3.Movetheseattothedesiredposition.
*
[SS00900(ALL)01/96] 4.Releasethebartolatchtheseatinitsnewposition.Make
suretheseatlockssecurelyinplace.
*
[SS01000(ALL)05/96]
WARNING
Neveradjustthedriver’sseatorseatbackwhenthe
vehicleismoving.
*
[SS01100(ALL)07/96]
WARNING
Donotpilecargohigherthantheseatbackstoavoid
injuringpeopleinacollisionorsuddenstop.
*
[SS01200(ALL)02/96]
WARNING
Alwaysdriveandridewithyourseatbackuprightand
thelapbeltsnugandlowacrossthehips.
*
[SS01300(ALL)05/96]
WARNING
Childrenshouldalwaysridewiththeseatbackinthe
fullyuprightposition.
File:06wnsss.ex
Update:Thu Jul 18 11:00:49 1996
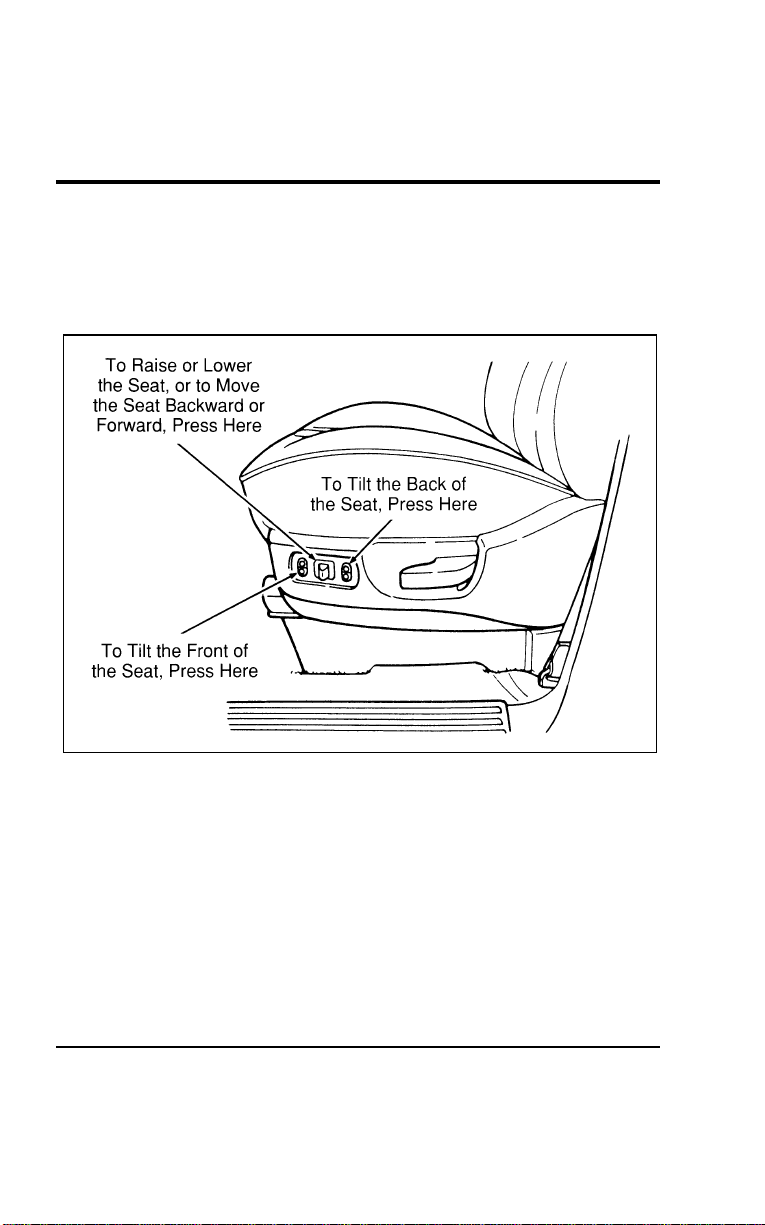
148
% [SS01400(ALL)01/96]
Using the power seats (if equipped)
[SS01500(ALL)01/96]
If your vehicle has the power seat option, you can adjust it in
several directions. The controls are on the outboard side of the
driver’s seat.
[SS01600(ALL)01/96]
17-1/2 pica
art:0050103-A
The power controls on the driver’s seat
File:06wnsss.ex
Update:Thu Jul 18 11:00:49 1996

Seating and Safety Restraints
149
% [SS01700(ALL)01/96]
Power lumbar support, driver/passenger seat
(If equipped)
[SS01800(ALL)01/96]
If your vehicle is equipped with this option, you can inflate a
lumbar support pad in the seat back. To inflate the lumbar pad,
push the raised side of the rocker switch. To deflate, push the
recessed side of the switch.
[SS01900(ALL)01/96]
17-1/2 pica
art:0050102-A
The power lumbar switch on the passenger seat
[SS02000(ALL)01/96]
Reclining Bucket Seats
[SS02100(ALL)01/96]
Your vehicle is equipped with reclining front bucket seats and
may have optional reclining second row buckets. To recline
your seat:
[SS02200(ALL)01/96] 1. On the left sides (front seats) or window seat sides (second
row buckets) of the seats, find the handle for the recliner.
*
[SS02300(ALL)01/96] 2. Lift the handle up and hold it in place.
File:06wnsss.ex
Update:Thu Jul 18 11:00:49 1996
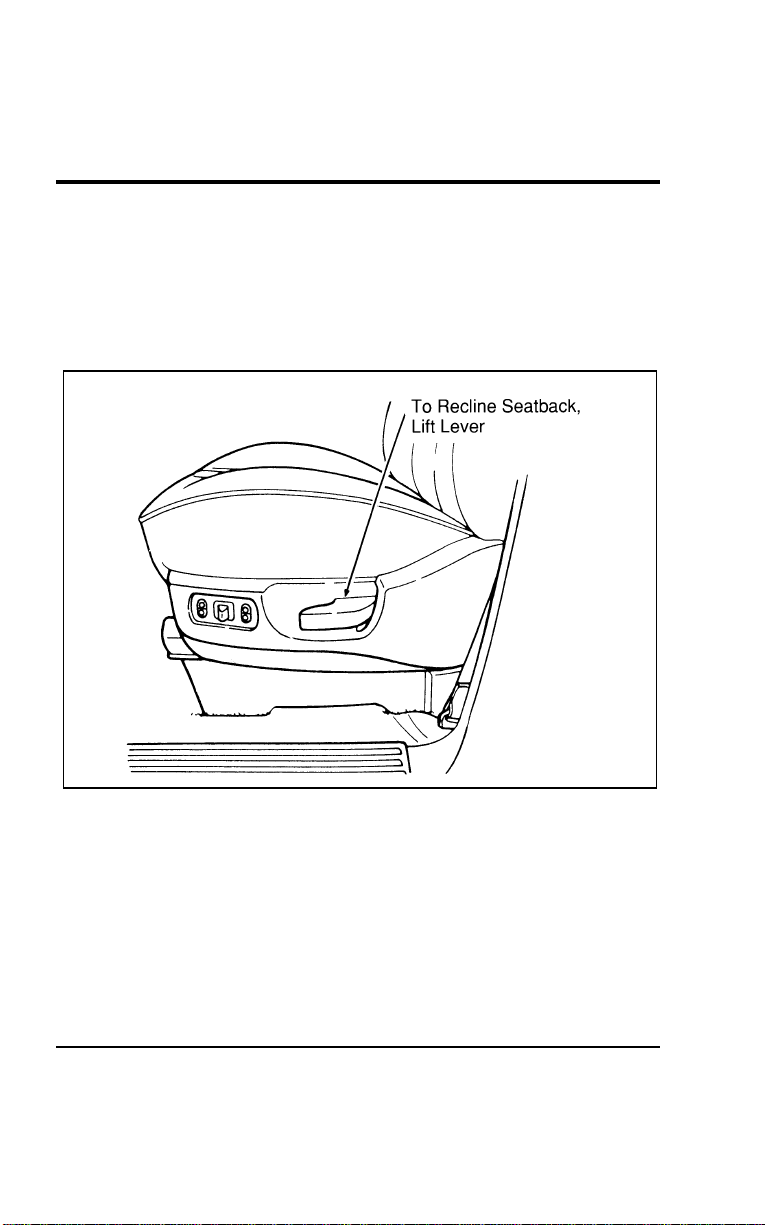
150
*
[SS02400(ALL)01/96] 3. Lean against the back of the seat and adjust it to the position
you want.
*
[SS02500(ALL)01/96] 4. Release the handle to lock the seatback in position.
*
[SS02600(ALL)01/96] 5. To return the seatback to upright position, lift the handle
and lean forward. Then release the handle.
[SS02700(ALL)01/96]
17-1/2 pica
art:0050165-B
Reclining bucket seat
File:06wnsss.ex
Update:Thu Jul 18 11:00:49 1996
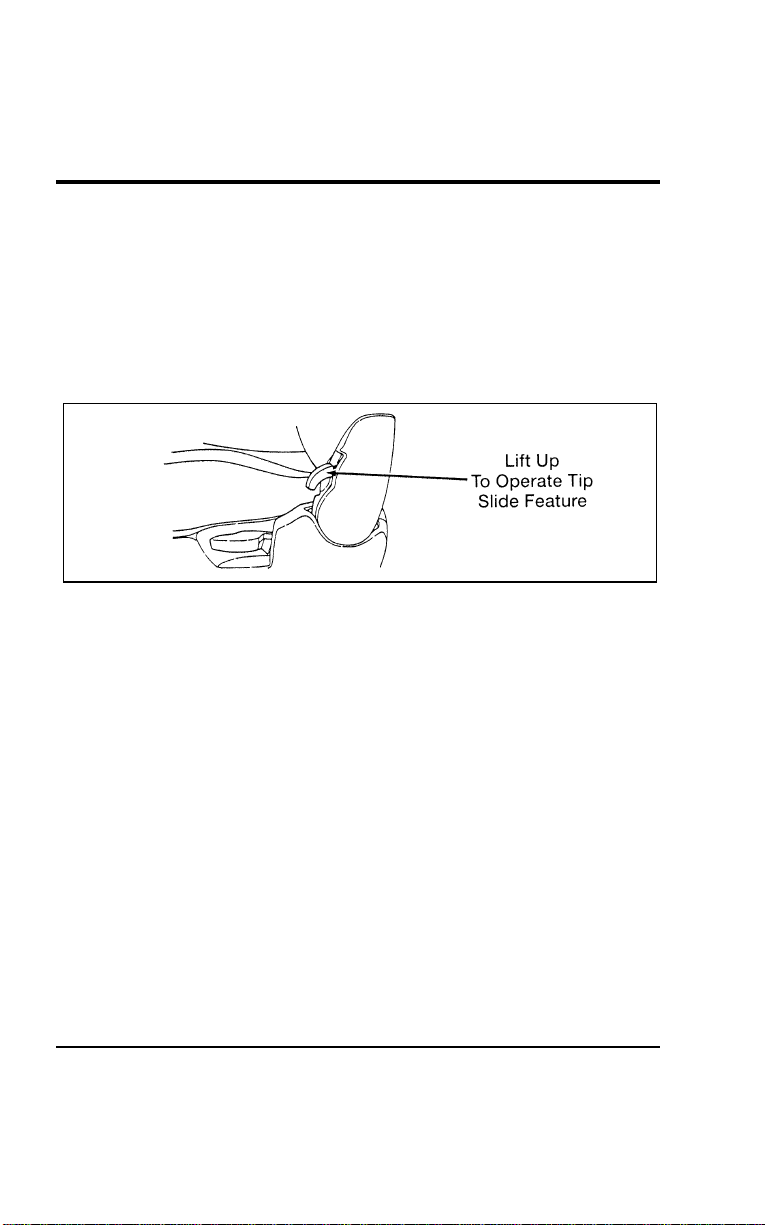
Seating and Safety Restraints
151
[SS02705(ALL)07/96]
Tip Slide Seat (If equipped)
[SS02710(ALL)07/96]
This feature allows convenient access into the second row seats
through the driver’s door.
[SS02715(ALL)07/96]
To operate the tip slide seat:
[SS02720(ALL)07/96] 1. Lift the tip slide release lever located at the base of the
driver’s seatback. The seatback will tilt forward.
[SS02725(ALL)07/96]
7-1/2 pica art:0050292-B
File:06wnsss.ex
Update:Thu Jul 18 11:00:49 1996

152
[SS02730(ALL)07/96]
17-1/2 pica
art:0050291-B
[SS02735(ALL)07/96] 2. Push on the seatback to move the seat assembly forward.
This provides access to the second row for loading and
unloading groceries, briefcases, passengers, etc. through the
driver’s door.
File:06wnsss.ex
Update:Thu Jul 18 11:00:49 1996
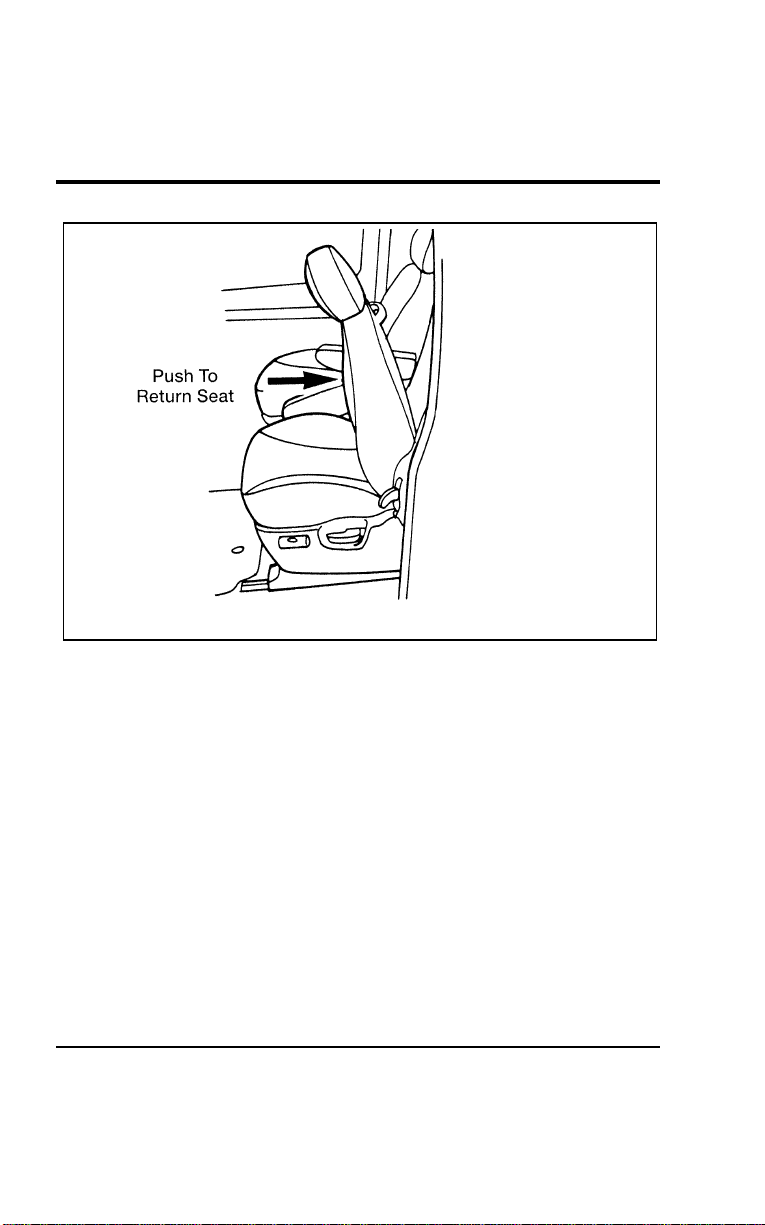
Seating and Safety Restraints
153
[SS02740(ALL)07/96]
17-1/2 pica
art:0050295-B
[SS02745(ALL)07/96]
To return the driver seat to its previous position and seatback
angle:
[SS02750(ALL)07/96] 1. Push the seatback to move the seat assembly rearward, until
it stops.
[SS02755(ALL)07/96] 2. Continue pushing to return the seatback to its previously
locked position.
[SS02760(ALL)07/96]
NOTE: When returning the seatback to its original position,
you may experience a slight hesitation. If so, stop
pushing the seatback momentarily, then resume. The
seatback will return to its original position after the
seat is safely latched.
File:06wnsss.ex
Update:Thu Jul 18 11:00:49 1996
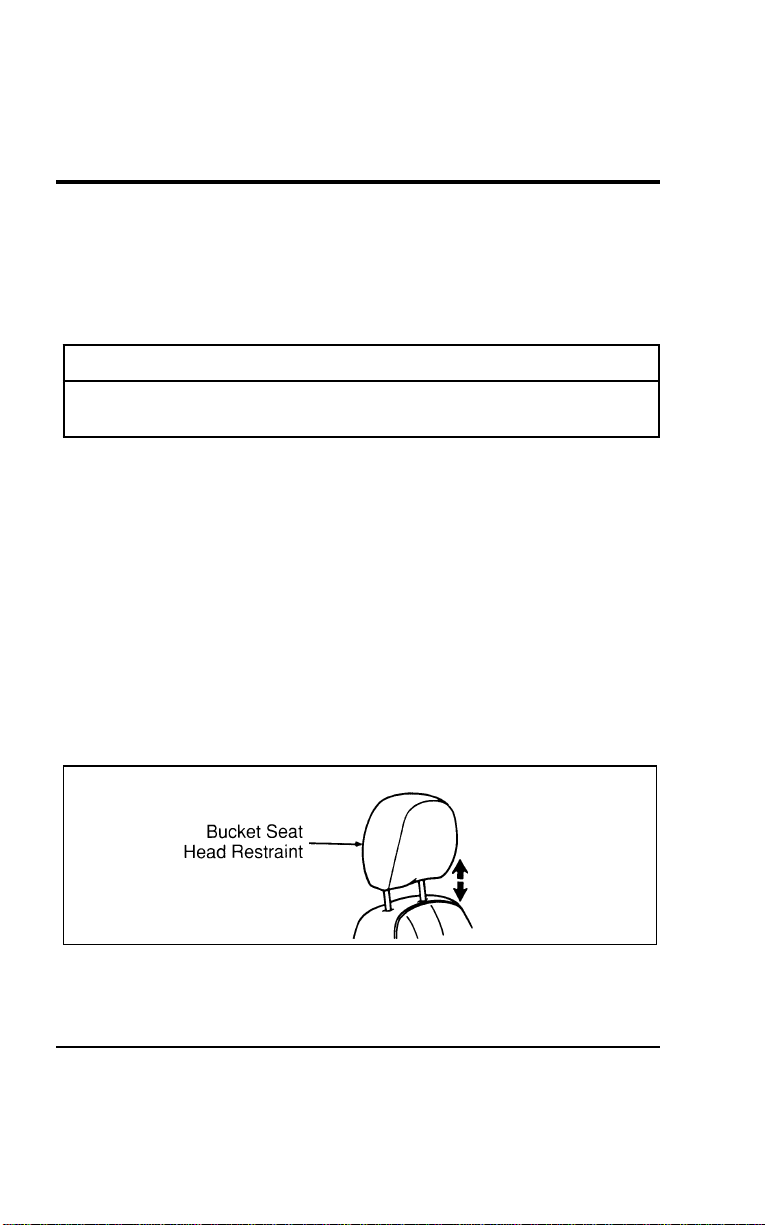
154
[SS02765(ALL)07/96]
YourWindstartipslideseathasbeenequippedwithalock-out
featurewhichpreventstheseatbackfromreturningtoits
originalpositionuntiltheseatlatchesinthetracks.Iftheseat
hasnotlatchedcheckundertheseatandinthetracksfor
possibleobstructions.
[SS02770(ALL)07/96]
WARNING
DONOTDRIVETHEVEHICLEWITHTHETIPSLIDE
SEATUNLATCHED.
[SS02775(ALL)07/96]
Tomovetheseatforwardorbackward:
[SS02780(ALL)07/96] 1.Findtheadjustmentbarunderneaththefrontpartofthe
seat.
[SS02785(ALL)07/96] 2.Liftthebartounlatchtheseat.
%[SS02800(ALL)01/96]
Adjusting the Head Restraints (LX Only)
[SS02900(ALL)01/96]
Yourvehicle’sbucketseatsareequippedwithheadrestraints
whichareverticallyadjustable.Thepurposeoftheserestraintsis
tolimitheadmotionintheeventofarearcollision.
[SS03000(ALL)01/96]
Toadjusttheheadrestraintsup,simplypulluponthem.To
adjustthembackdownward,pushdown.Theheadrestraints
willremainstationaryinwhateverpositiontheyareplaced.
[SS03100(ALL)01/96]
7-1/2picaart:0050172-A
Headrestraintadjustment
[SS03200(ALL)01/96]
NOTE:OnGLmodels,frontbucketseatsaredesignedwith
integralheadrests.
File:06wnsss.ex
Update:Thu Jul 18 11:00:49 1996

Seating and Safety Restraints
155
[SS03300(ALL)01/96]
E-Z access operation — passenger side optional
second row bucket seats
[SS03400(ALL)01/96]
To provide easy access to the rear of the vehicle, the passenger
side second row bucket seatback can be tilted forward.
*
[SS03500(ALL)01/96]
To tilt seat forward:
*
[SS03600(ALL)01/96] 1. Put the seatback in the upright position.
[SS03700(ALL)01/96] 2. Lift upward on the handle on the right (outboard) side of
the seat (also the recliner release handle).
*
[SS03800(ALL)01/96] 3. The seat can now be tilted forward.
*
[SS03900(ALL)01/96]
To latch the seat in its normal position, push seatback rearward
until it is latched in position.
[SS04000(ALL)01/96]
Adjustable Three Passenger Bench Seat (If equipped)
[SS04100(ALL)01/96]
Your vehicle’s third row passenger bench seat may be adjustable
forward and backward. This adjustment allows for additional
cargo space with the seat adjusted to the full forward position
and extra leg room when adjusted rearward.
[SS04200(ALL)01/96]
Rotate the release handle upward to unlatch. The release handle
is located on the right side of the seat near the floor. Adjust to
the desired seat position and release the handle. Make certain
the seat is latched and secure.
[SS04300(ALL)01/96]
Seat/Bed Conversion (If equipped)
[SS04400(ALL)01/96]
2nd Row Seat
[SS04500(ALL)01/96]
To convert the seat to a bed:
[SS04600(ALL)01/96] 1. Unlatch the seat/bed lever, located on the right-hand side of
the seat cushion by pushing down.
[SS04700(ALL)01/96] 2. Push the seatback down and rearward by applying pressure
at the top of the seatback until it latches.
File:06wnsss.ex
Update:Thu Jul 18 11:00:49 1996
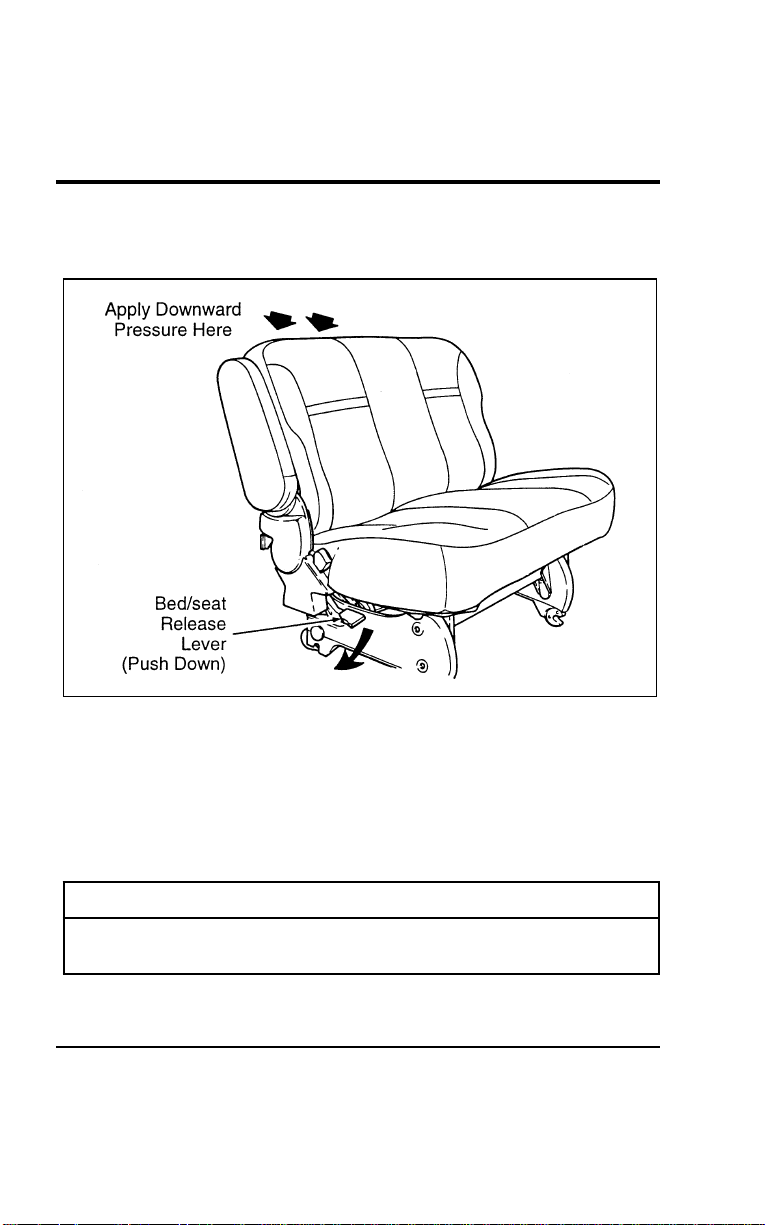
156
[SS04800(ALL)01/96]
The seat cushion will move forward when going from the seat
to the bed position.
[SS04900(ALL)01/96]
17-1/2 pica
art:0050260-A
2nd row seat (seat position)
[SS05000(ALL)01/96]
To convert the bed to a seat:
[SS05100(ALL)01/96] 1. While in front of the seat, pull the release lever up, slightly
raise the seatback, then push the seat bottom rearward until
the seatback is in the full upright and locked position.
*
[SS05200(ALL)01/96] 2. Make sure the safety belts are free and available for use.
[SS05300(ALL)04/96]
R WARNING
The seat/bed should not be occupied while the vehicle is
moving unless it is in the upright, fully-latched position.
File:06wnsss.ex
Update:Thu Jul 18 11:00:49 1996
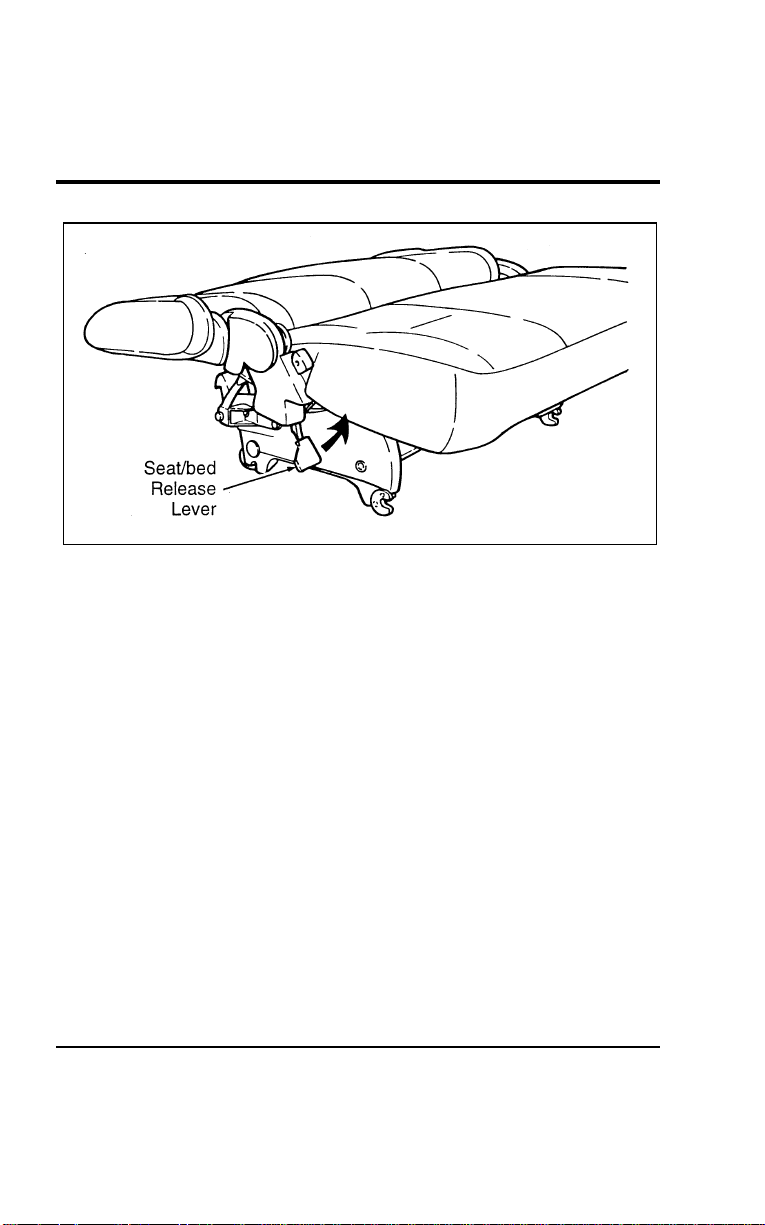
Seating and Safety Restraints
157
[SS05400(ALL)01/96]
13-1/2 pica
art:0050262-A
2nd row seat (bed position)
[SS05500(ALL)01/96]
3rd row seat
[SS05600(ALL)01/96]
To convert the seat to a bed:
[SS05700(ALL)01/96] 1. From the rear of the vehicle, pull down on the release lever
located on the right-hand side of the seat, and at the same
time pull the seatback rearward.
[SS05800(ALL)01/96] 2. Push down at the top of the seatback until it latches.
File:06wnsss.ex
Update:Thu Jul 18 11:00:49 1996
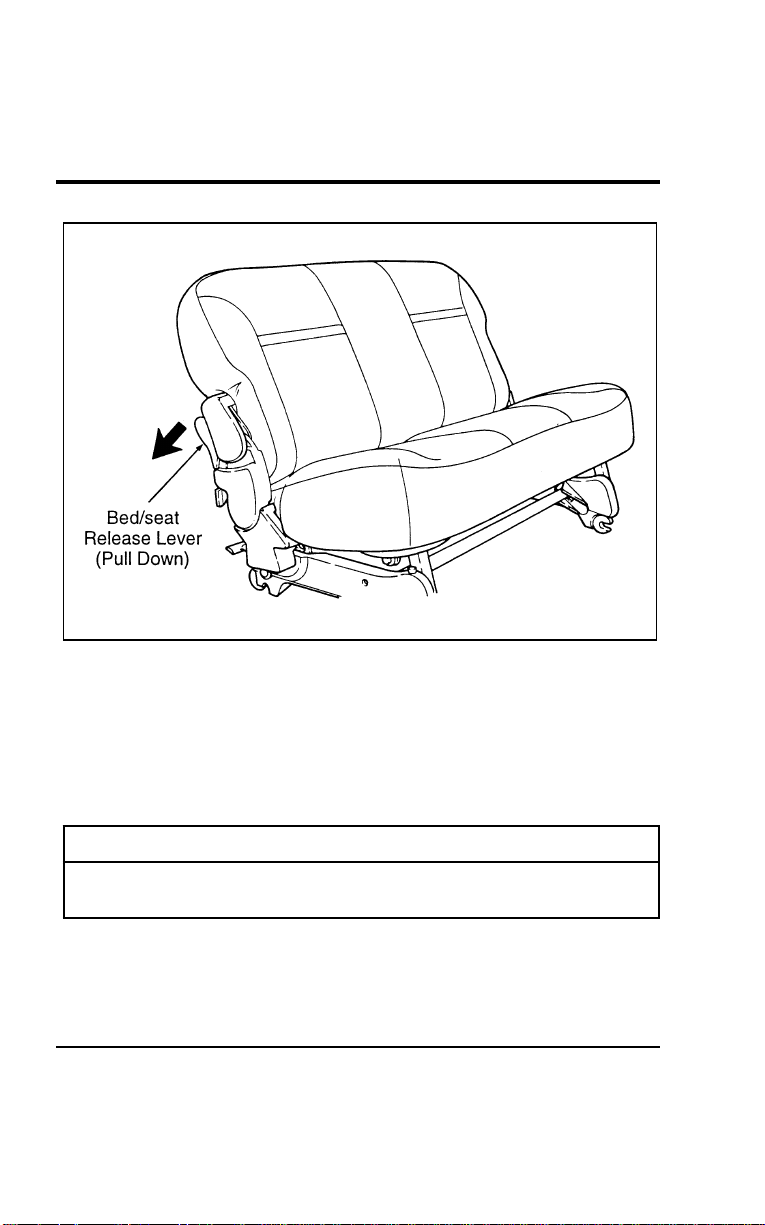
158
[SS05900(ALL)01/96]
17-1/2 pica
art:0050261-A
3rd row seat (seat position)
[SS06000(ALL)01/96]
To convert the bed to a seat:
[SS06100(ALL)01/96] 1. From the rear of the vehicle, pull the release lever down and
at the same time lift the seatback up. Raise the seatback to
the full upright and locked position.
*
[SS06200(ALL)01/96] 2. Make sure the safety belts are free and available for use.
[SS06300(ALL)04/96]
R WARNING
The seat/bed should not be occupied while the vehicle is
moving unless it is in the upright, fully-latched position.
File:06wnsss.ex
Update:Thu Jul 18 11:00:49 1996
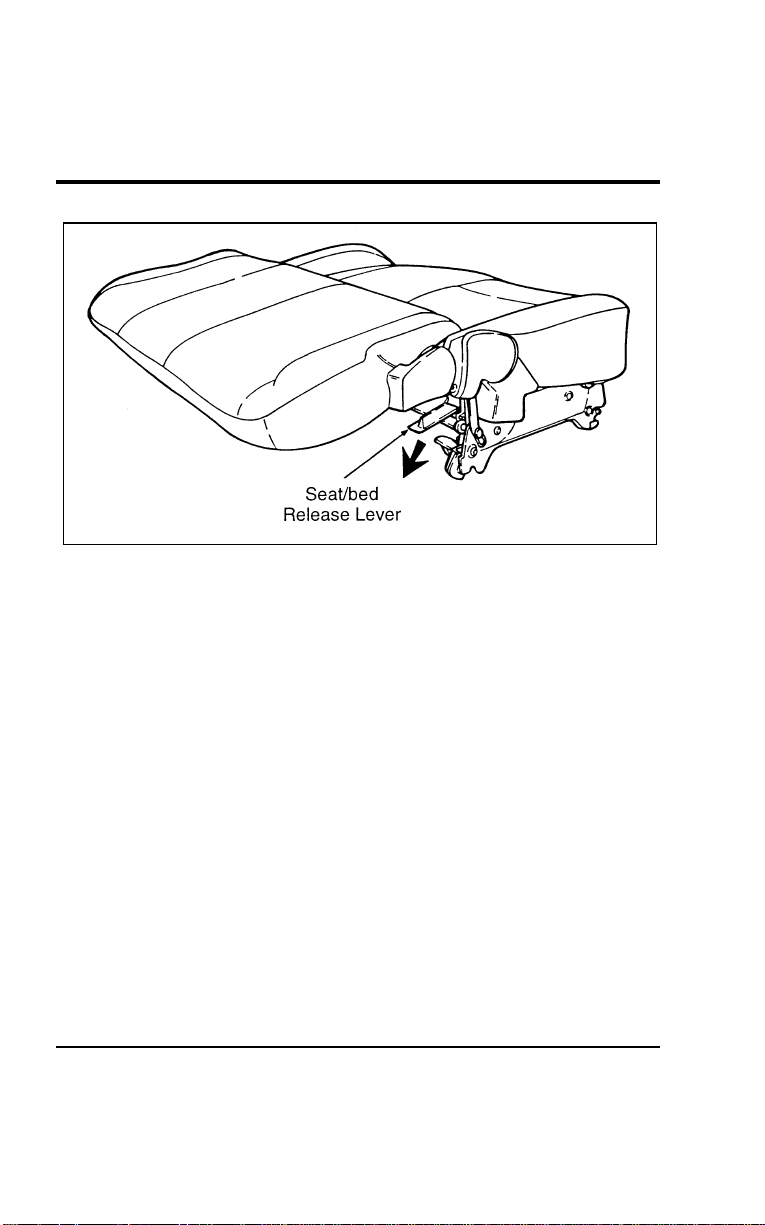
Seating and Safety Restraints
159
[SS06400(ALL)01/96]
13-1/2 pica
art:0050263-A
3rd row seat (bed position)
[SS06500(ALL)01/96]
Removing the Seats
[SS06600(ALL)01/96]
Quick release second row bucket seats (If equipped)
[SS06700(ALL)01/96]
To remove the second row bucket seats:
[SS06800(ALL)01/96] 1. Lift the seat latch handles (located at the rear of the seat
near the floor) up and rearward, causing the latch hooks to
disengage from the rear floor attachments.
[SS06900(ALL)01/96] 2. While lifting the handles, lift the seat at the rear and rotate
entire seat assembly forward, pivoting on the front floor
attachments. When seat latches are clear of floor attachments,
release the latch handles.
[SS07000(ALL)01/96] 3. Pull the seat rearward to disengage it from the front floor
pins.
File:06wnsss.ex
Update:Thu Jul 18 11:00:49 1996

160
[SS07100(ALL)01/96]
Toinstallthesecondrowbucketseats:
[SS07200(ALL)01/96] 1.Lifttheseatassembliesintothevehicle.
[SS07300(ALL)01/96] 2.Locatefronthooksonfrontpinsanddroprearhooksover
rearpinswithenoughforcetocausethehooksattherearto
engageandhookontothepinsinthefloorwells.
[SS07400(ALL)01/96] 3.Ensurethatthelatchhandlesarefullyseatedinthedown
position.
*
[SS07500(ALL)02/96]
WARNING
Checktoseethattheseatandseatbackarelatched
securelyinposition.Keepfloorareafreeofobjectsthat
wouldpreventproperseatengagement.Neverattemptto
adjusttheseatwhilethevehicleisinmotion.
[SS07600(ALL)01/96]
Two and Three Passenger Bench Seat Assemblies
[SS07700(ALL)01/96]
NOTE:Itiseasiesttoremove/reinstallboththesecondand
thirdrowbenchseatsthroughtheslidingdoor.Also,
removeanyfloormats(ifequipped)intherear
seatingcompartmentsbeforeseatremoval.
*
[SS07800(ALL)01/96]
Toremoveseatassembly:
[SS07900(ALL)01/96] 1.(Forsecondrowbenchseatonly)Disengagethetongue
portionofthelap/shoulderbeltfromthedetachableanchor
assemblybyinsertingakeyorsmallscrewdriverintothe
slotprovidedonthedetachableanchor(seeFigure1).When
thisshoulderbeltassemblyisfreeoftheseat,allowthe
retractortowinduptheslackinthebelt.
File:06wnsss.ex
Update:Thu Jul 18 11:00:49 1996
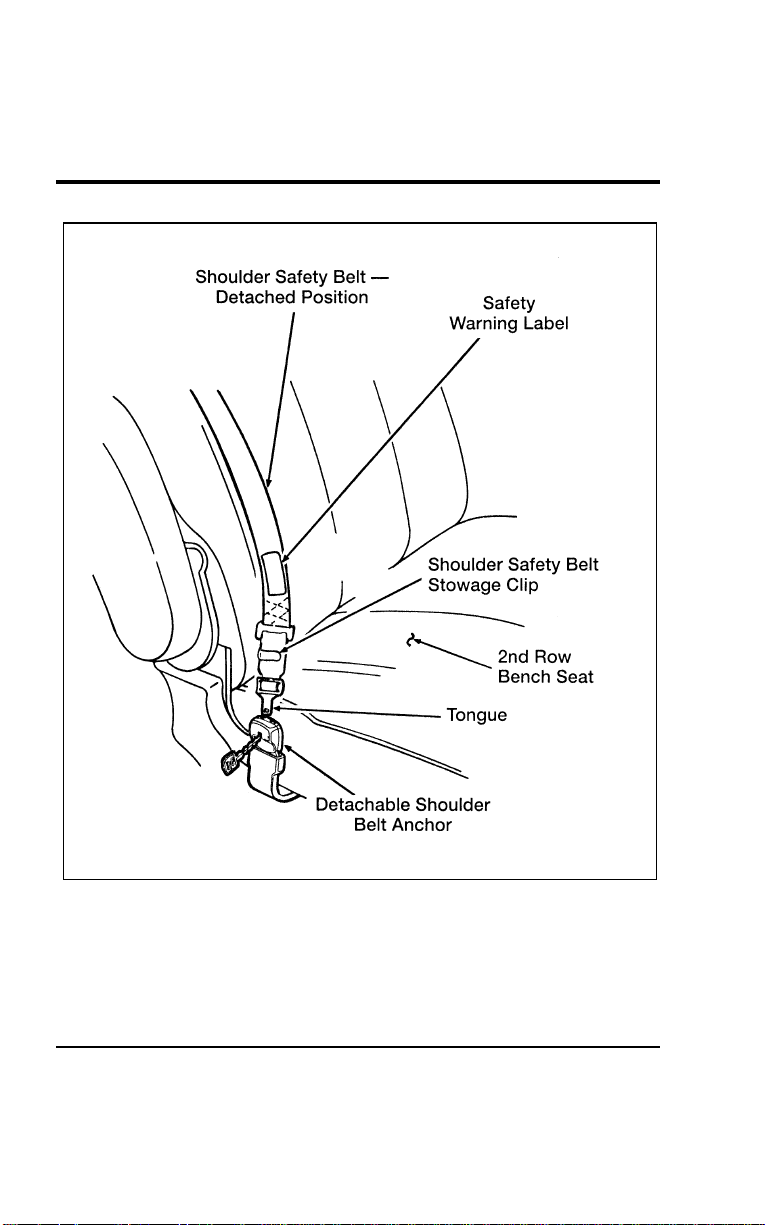
Seating and Safety Restraints
161
[SS08000(ALL)01/96]
27-1/2 pica art:0050169-F
Figure 1: Second row detachable anchor — detached position
File:06wnsss.ex
Update:Thu Jul 18 11:00:49 1996
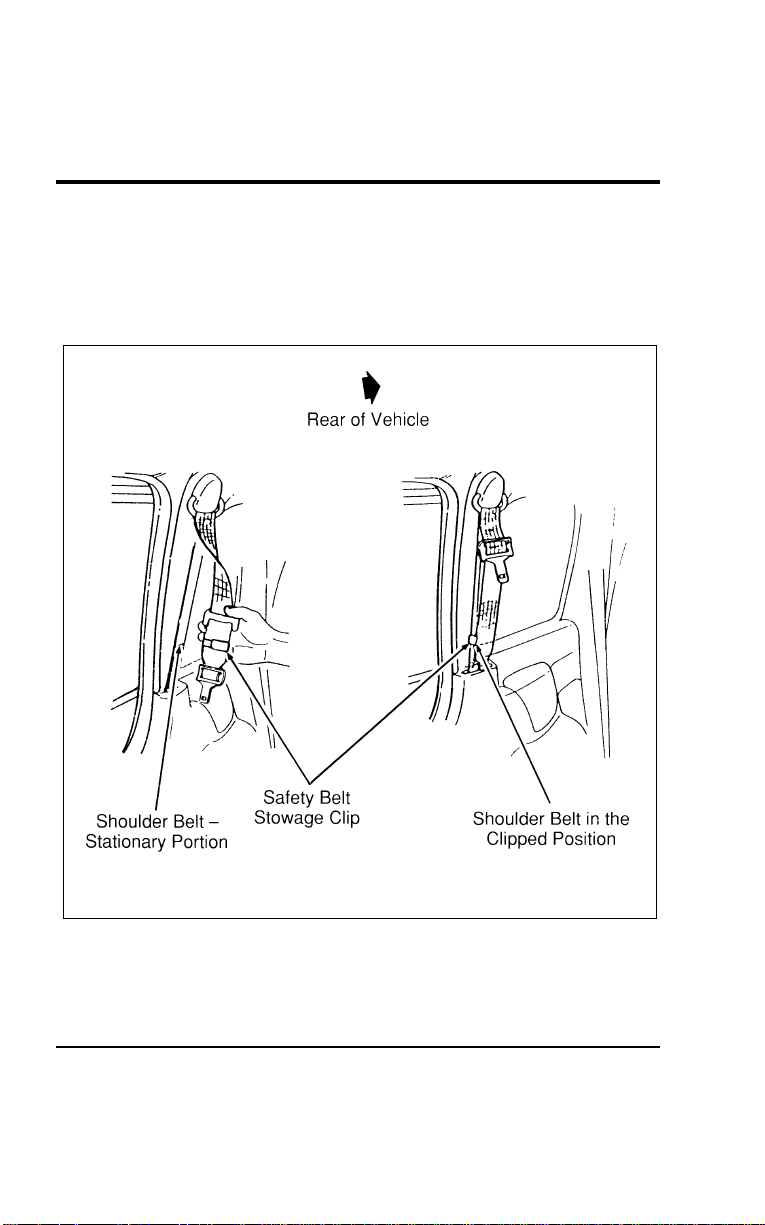
162
[SS08100(ALL)01/96] 2. Using the clip attached to the end of the shoulder belt, clip
the end of the belt to the stationary portion of the shoulder
belt (see Figure 2). The end of the shoulder belt must be
clipped in order to keep it from striking anything during
vehicle operation.
[SS08200(ALL)01/96]
24 pica art:0050170-D
Figure 2: Securing the detachable shoulder belt
File:06wnsss.ex
Update:Thu Jul 18 11:00:49 1996

Seating and Safety Restraints
163
[SS08300(ALL)01/96]
Refer to Figure 3 for steps 3-6.
[SS08400(ALL)01/96] 3. Release the seatback by pulling the lever located at the back
of the seat on the right hand side. Fold the seatback forward
and latch it in the down position (except for bench seat
equipped with built-in child safety seat).
[SS08500(ALL)01/96] 4. Locate the seat latch handles at the rear of the seat near the
floor. For the second row bench seat, lift the latch handles
up and rearward. For the third row bench seat, just lift the
latch handles. The latch hooks will disengage from the rear
floor attachments.
[SS08600(ALL)01/96] 5. While still lifting the handles, lift seat at rear and rotate
entire seat assembly forward, pivoting on the front floor
attachments. When the rear seat latches are clear of floor
attachments, release the latch handles.
[SS08700(ALL)01/96] 6. Pull the seat rearward to disengage it from the front floor
pins.
File:06wnsss.ex
Update:Thu Jul 18 11:00:49 1996
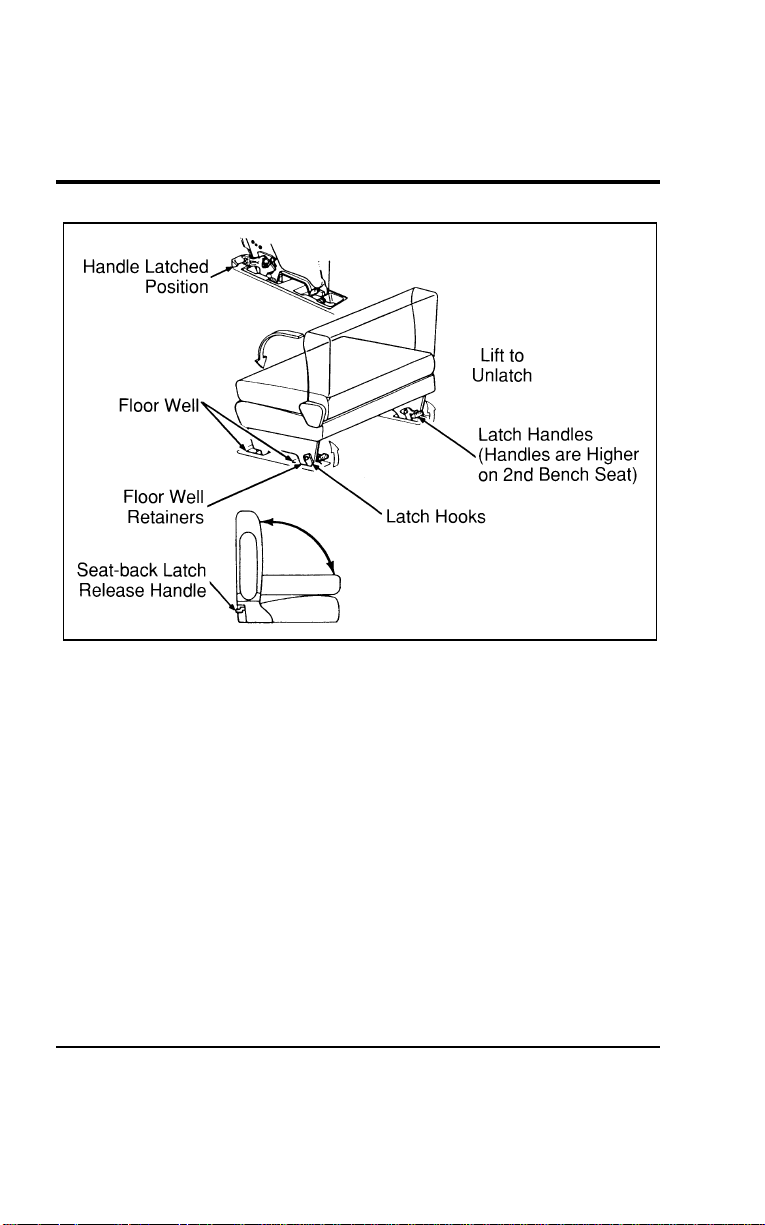
164
[SS08800(ALL)01/96]
17-1/2 pica
art:0050171-A
Figure 3: Removal and installation of the second and third bench seats
*
[SS08900(ALL)01/96]
Be careful that the latches are not damaged when the seats are
stored.
*
[SS09000(ALL)01/96]
To install the seat assembly:
*
[SS09100(ALL)01/96] 1. Clear the area of debris around the seat floor attachments.
[SS09200(ALL)01/96] 2. With the seatback in a folded and latched position (except
for bench seats equipped with built-in child safety seat),
place the seat assembly in your vehicle. Tip the seat
assembly forward and engage the front seat hooks onto the
forward attachment pins in the floor wells.
*
[SS09300(ALL)01/96] 3. Rotate the seat downward and engage the latch into the rear
floor attachment. Lifting of the latch handles is not required
for installation.
File:06wnsss.ex
Update:Thu Jul 18 11:00:49 1996

SeatingandSafetyRestraints
165
*
[SS09400(ALL)01/96] 4.Ensurethatthelatchhandlesarefullyseatedinthedown
position.
[SS09500(ALL)01/96] 5.(Secondrowbenchseatonly)Beforeyouengagethesafety
belt,besureitisnottwisted.Atwistedsafetybeltmay
causetheretractortonotworkproperly.Removeanytwist,
theninsertthetongueendofthesafetybeltintothe
detachableanchoruntilyouheara“snap”andfeelthelatch
engage.
[SS09600(ALL)01/96] 6.Toraisetheseatback,pullupontheseatbacklatchhandle.
Aslightdownwardpressureontheseatback(benchseat
only)willreduceeffortonthelatch.Rotatetheseatback
upwarduntilthelatchre-engages.
*
[SS09700(ALL)01/96]
WARNING
Whenreinstallingarearseatinyourvehicleitmustbe
placedinitsoriginalposition.Improperinstallationof
theseatwillpreventcorrectuseofthesafetybeltsand
couldincreasetheriskofinjury.Refertothewarning
labelontheseatbelt.
[SS09800(ALL)01/96]
Wheneverthesecondrowbenchseatisinstalledinthevehicle
andnooneisusingtheoutboardseatingposition(nearestthe
slidingdoor),thelap/shouldersafetybeltmustbeproperly
stowed.
*
[SS09900(ALL)05/96]
Thesecondrowpassengersideoutboardseatingpositionusesa
hookabovethesliding/cargodoortostowtheshouldersafety
beltwhenenteringorexitingthevehicleorwhenitisnotbeing
used.
[SS10000(ALL)05/96]
NOTE:Whenthebeltisstowedusingthehook,DONOTuse
thehangingbeltasanassistwhenenteringthe
vehicle.
File:06wnsss.ex
Update:Thu Jul 18 11:00:49 1996
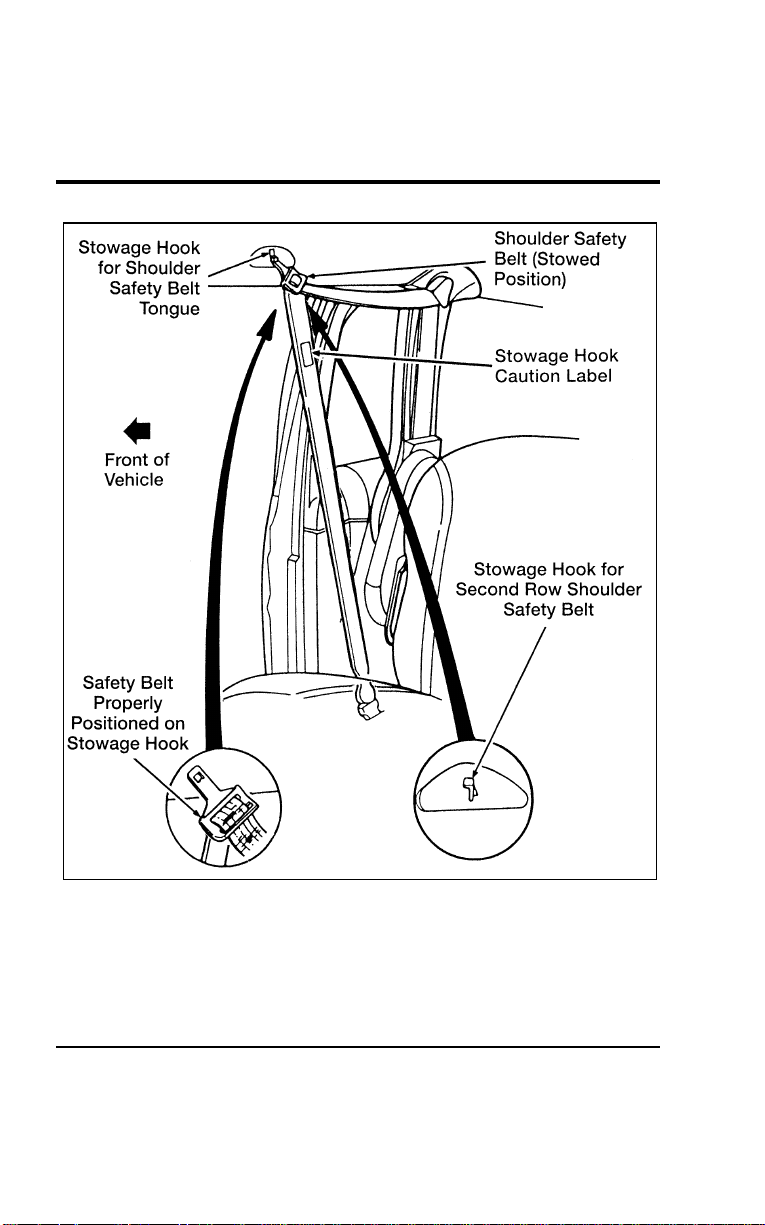
166
[SS10100(ALL)01/96]
27-1/2 pica
art:0050212-D
Proper stowage of shoulder safety belt
File:06wnsss.ex
Update:Thu Jul 18 11:00:49 1996
SeatingandSafetyRestraints
167
[SS10200(ALL)01/96]
Thetwopassengerbenchseatmustbeinstalledinthefirstrow
behindthefrontseats.
*
[SS10300(ALL)05/96]
WARNING
Neveradjustthedriver’sseatorseatbackwhenthe
vehicleismoving.
*
[SS10400(ALL)01/96]
WARNING
Alwayslatchthevehicleseattothefloor,whetherthe
seatisoccupiedorempty.Ifnotlatched,theseatmay
causeinjuryduringasuddenstop.
*
[SS10500(ALL)01/96]
WARNING
Beforeusingtheseat,makesurethatthelatchhooksare
securelylockedaroundthefloorpins.
%
*
[SS10600(ALL)05/96] StorageCompartments
*
[SS10700(ALL)01/96]
UnderseatStorageCompartment(Ifequipped)
[SS10800(ALL)01/96]
Theunderseatstoragecompartmentislocatedunderneaththe
frontpassengerseat.Itcanbeopenedbypullingupandtoward
theinstrumentpanel.
File:06wnsss.ex
Update:Thu Jul 18 11:00:49 1996
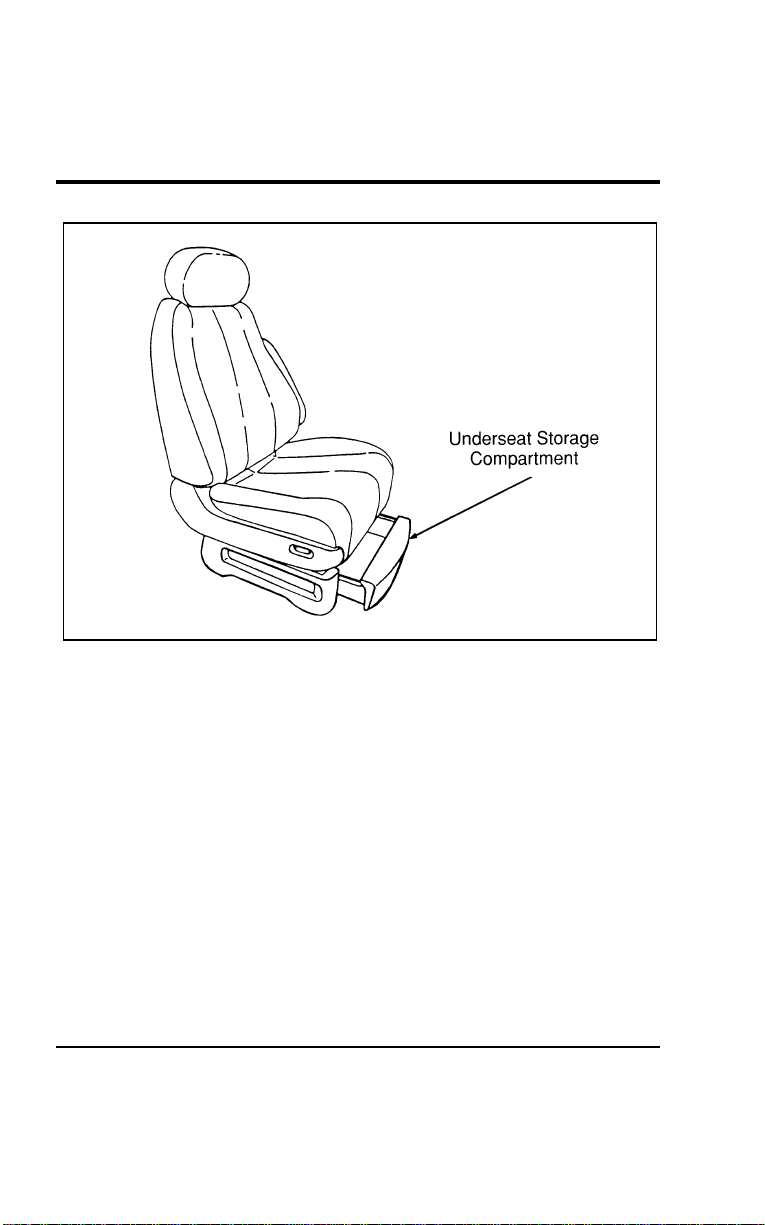
168
[SS10900(ALL)01/96]
17-1/2 pica
art:0050042-A
The underseat storage compartment
[SS11000(ALL)04/96] Safety Belts
[SS11100(ALL)04/96]
The use of safety belts helps to restrain you and your
passengers in case of a collision. In most states and in Canada,
the law requires their use. We strongly recommend that you use
them every time you travel in your vehicle.
*
[SS11200(ALL)02/96]
Safety belts provide best restraint when:
*
[SS11300(ALL)02/96]
■ the seatback is upright
*
[SS11400(ALL)02/96]
■ the occupant is sitting upright (not slouched)
*
[SS11500(ALL)02/96]
■ the lap belt is snug and low on the hips
*
[SS11600(ALL)02/96]
■ the shoulder belt is snug against the chest
*
[SS11700(ALL)02/96]
■ the knees are straight forward
File:06wnsss.ex
Update:Thu Jul 18 11:00:49 1996
SeatingandSafetyRestraints
169
*
[SS11800(ALL)02/96]
Seethefollowingsectionsinthischapterfordirectionsonhow
toproperlyusethesesafetybelts.AlsoseeSafetyRestraintsfor
Childreninthischapterforspecialinstructionsaboutusing
safetybeltsforchildren.
*
[SS11900(ALL)12/95]
WARNING
Makesurethatyouandyourpassengers,including
pregnantwomen,wearsafetybelts.Besurethatthelap
beltportionofyoursafetybeltfitssnuglyandaslowas
possiblearoundthehips.
*
[SS12000(ALL)05/96]
WARNING
Cargoshouldalwaysbesecuredtopreventitfrom
shiftingandcausingdamagetothevehicleorharmto
passengers.
*
[SS12100(ALL)07/96]
WARNING
Eachseatingpositioninyourvehiclehasaspecificsafety
beltassemblywhichismadeupofonebuckleandone
tonguethataredesignedtobeusedasapair.1)Usethe
shoulderbeltontheoutsideshoulderonly.Neverwear
theshoulderbeltunderthearm.2)Neverswingit
aroundyourneckovertheinsideshoulder.3)Neveruse
asinglebeltformorethanoneperson.
*
[SS12200(ALL)02/96]
WARNING
Alwaysdriveandridewithyourseatbackuprightand
thelapbeltsnugandlowacrossthehips.
*
[SS12300(ALL)05/96]
WARNING
Childrenshouldalwaysridewiththeseatbackinthe
fullyuprightposition.
File:06wnsss.ex
Update:Thu Jul 18 11:00:49 1996
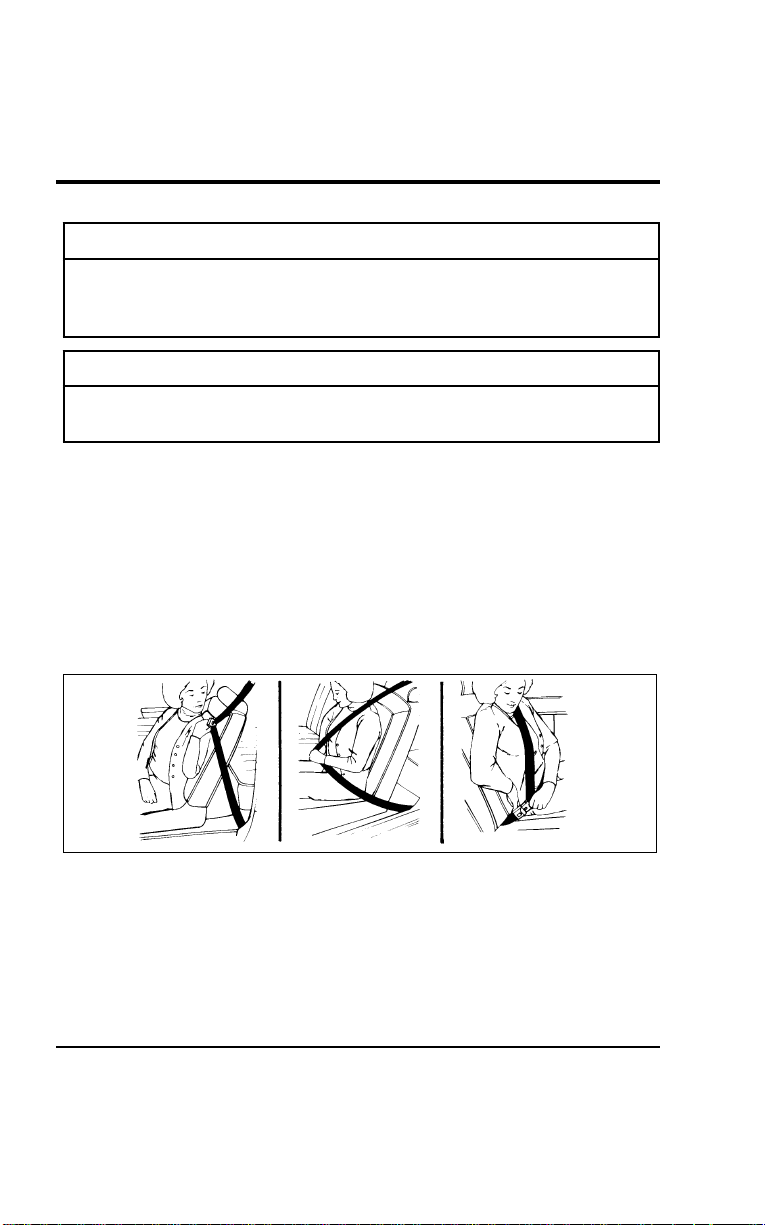
170
*
[SS12400(ALL)05/96]
WARNING
Neverletapassengerholdachildonhisorherlap
whilethevehicleismoving.Thepassengercannot
protectthechildfrominjuryinacollision.
*
[SS12600(ALL)02/96]
WARNING
Lockthedoorsofyourvehiclebeforedrivingtolessen
theriskofthedoorcomingopeninacollision.
%
*
[SS12700(ALL)02/96] CombinationLapandShoulderBelts
*
[SS12800(ALL)02/96]
Whileyourvehicleisinmotion,thecombinationlapand
shoulderbeltadjuststoyourmovement.However,ifyoubrake
hard,turnhard,orifyourvehiclereceivesanimpactof5mph
(8km/h)ormore,thelap/shoulderbeltlocksandhelpsreduce
yourforwardmovement.
*
[SS12900(ALL)01/96]
Afteryougetintoyourvehicle,closethedoorandlockit.Then
adjusttheseattothepositionthatsuitsyoubest.
[SS13000(ALL)12/95]
7-1/2picaart:0050084-A
Fasteningthefrontseatlapandshoulderbelt
[SS13100(ALL)12/95]
Pushthereleasebuttononthebuckle.Thisallowsthetongueto
unlatchfromthebuckle.
File:06wnsss.ex
Update:Thu Jul 18 11:00:49 1996

Seating and Safety Restraints
171
[SS13200(ALL)12/95]
10-1/2 pica
art:0050074-B
Unfastening the combination lap and shoulder belts
[SS13300(ALL)04/96]
While the belt retracts, guide the tongue to its original position
to prevent it from striking you or part of the vehicle.
[SS13400(ALL)12/95]
Shoulder Belt Adjustment (Driver and Right Front
Passenger)
[SS13500(ALL)12/95]
You can adjust the shoulder belt height to one of five (5)
positions. To adjust, pinch the release button and slide it up or
down until the belt rests on your shoulder near your neck.
Release the button and make sure the adjuster is firmly seated
in one of the five (5) positions.
File:06wnsss.ex
Update:Thu Jul 18 11:00:49 1996
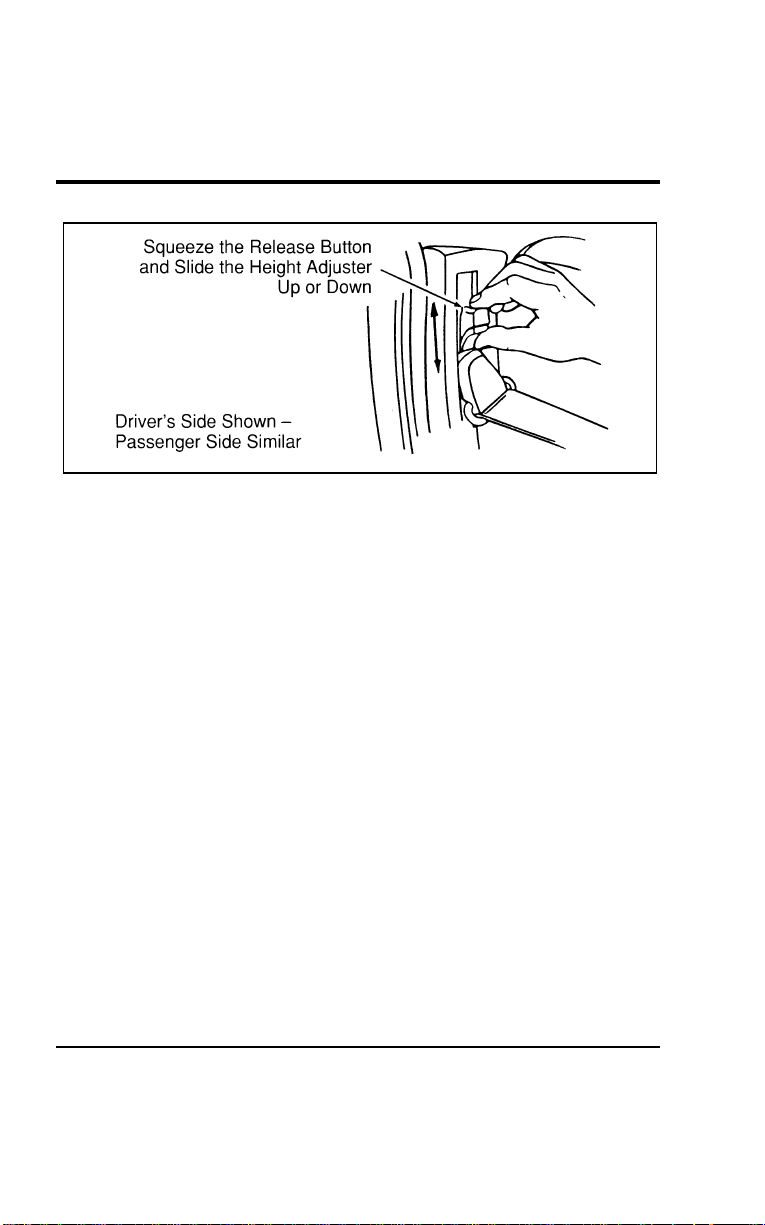
172
[SS13600(ALL)12/95]
10-1/2 pica
art:0050166-A
The shoulder belt height adjuster
[SS13700(ALL)12/95]
Combination Lap and Shoulder Belt — Second Row
Bench Seat
*
[SS13800(ALL)01/96]
There is a unique safety restraint system for the outside seating
position of the second row bench seat. It is very important that
you read and understand this section before anyone rides in the
outside seating position (near the sliding door) of the
two-passenger bench seat.
[SS13900(ALL)12/95]
In addition to safety belt anchorages in the floor and roof
structures, the second row bench seat has a detachable safety
belt anchor mounted to the right window side of the seat. The
safety belt should always remain attached to this anchor except
when removing this seat.
[SS14000(ALL)12/95]
The second row passenger side outboard seating position uses a
hook above the sliding door to stow the shoulder safety belt
when entering or exiting the vehicle or when it is not being
used.
[SS14100(ALL)05/96]
NOTE: When the belt is stowed using the hook, DO NOT use
the hanging belt as an assist when entering the
vehicle.
File:06wnsss.ex
Update:Thu Jul 18 11:00:49 1996

Seating and Safety Restraints
173
[SS14200(ALL)12/95]
27-1/2 pica
art:0050212-D
Proper stowage of second row shoulder safety belt
File:06wnsss.ex
Update:Thu Jul 18 11:00:49 1996

174
[SS14300(ALL)12/95]
When removing the second row bench seat:
[SS14400(ALL)12/95] 1. Disengage the safety belt from the seat by inserting a key or
small screwdriver into the slot provided on the detachable
anchor (see Figure 1). When this shoulder belt assembly is
free of the seat, allow the retractor to wind up the slack in
the belt.
[SS14500(ALL)01/96] 2. Using the clip attached to the end of the shoulder belt, clip
the end of the belt to the stationary portion of the shoulder
belt (see Figure 2). The end of the shoulder belt must be
clipped in order to keep it from striking anything during
vehicle operation.
File:06wnsss.ex
Update:Thu Jul 18 11:00:49 1996

Seating and Safety Restraints
175
[SS14600(ALL)12/95]
27-1/2 pica art:0050169-F
Figure 1: Second row bench seat detachable anchor
File:06wnsss.ex
Update:Thu Jul 18 11:00:49 1996
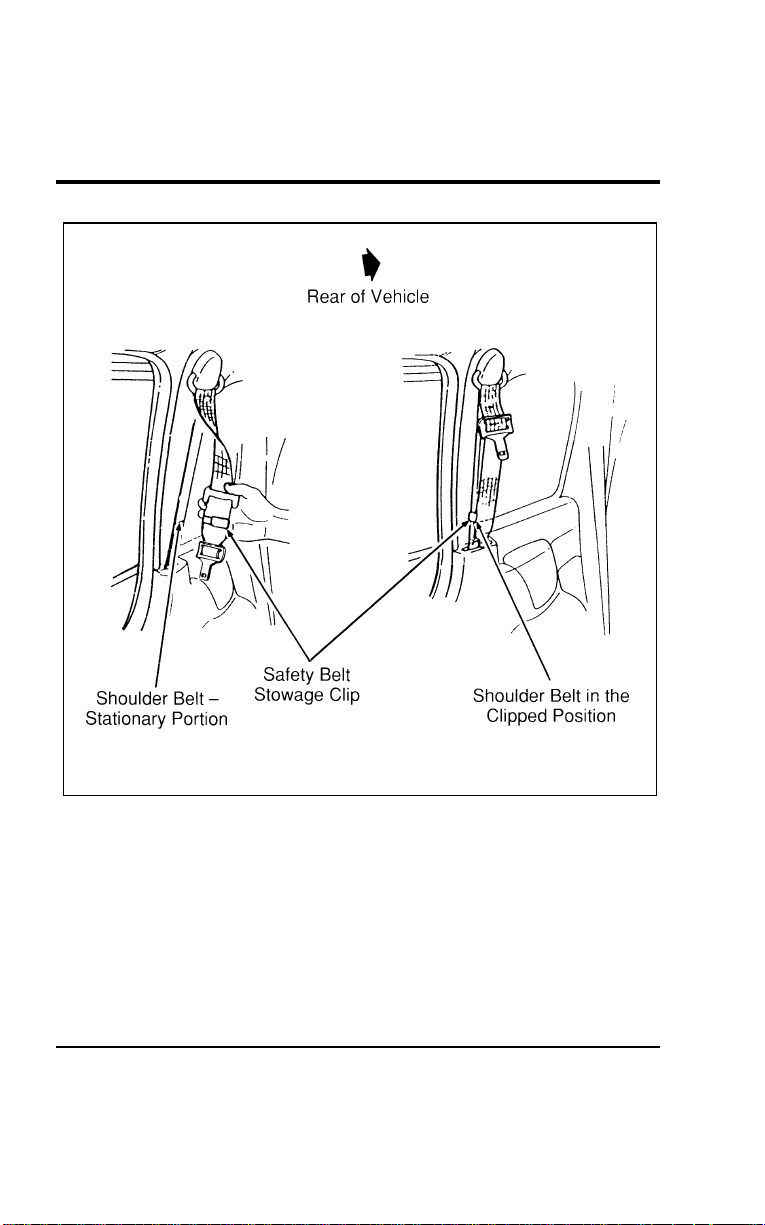
176
[SS14700(ALL)01/96]
24 pica art:0050170-D
Figure 2: Securing the detachable shoulder belt
[SS14800(ALL)12/95]
Refer to “Seats” in this section for information on removing and
installing seats.
[SS14900(ALL)12/95]
After re-installing the second row bench seat, make sure that the
safety belt is not twisted before you insert it into the detachable
anchor. A twisted safety belt may cause the retractor to work
improperly. Then insert the detachable anchor tongue into the
detachable anchor until you hear a “snap” and feel the latch
engage.
File:06wnsss.ex
Update:Thu Jul 18 11:00:49 1996

SeatingandSafetyRestraints
177
*
[SS15000(ALL)01/96]
WARNING
Whenreinstallingarearseatinyourvehicleitmustbe
placedinitsoriginalposition.Improperinstallationof
theseatwillpreventcorrectuseofthesafetybeltsand
couldincreasetheriskofinjury.Refertothewarning
labelontheseatbelt.
[SS15100(ALL)12/95]
Yourvehicleisequippedwithaduallockingmoderetractoron
theshoulderbeltportionofthecombinationlap/shouldersafety
beltforfrontpassengerandrearseatwindowpassengers.
[SS15200(ALL)12/95]
Duallockingmoderetractorsoperateintwoways:
[SS15300(ALL)12/95]
Vehicle Sensitive (Emergency) Locking Mode
[SS15400(ALL)12/95]
Inthisoperatingmode,theshoulderbeltretractorwillallowthe
occupantfreedomofmovement,lockingtightonlyonhard
braking,hardcorneringorimpactsofapproximatelyfivemph
(8km/h)ormore.
[SS15500(ALL)12/95]
Automatic Locking Mode
*
[SS15600(ALL)08/95]
Inthisoperatingmode,theshoulderbeltretractorwillbe
automaticallylockedandremainlockedwhenthecombination
lap/shouldersafetybeltisbuckled,anddoesnotallowthe
occupantfreedomofmovement.Thismodeprovidesthe
following:
*
[SS15700(ALL)01/96]
■Atightlap/shoulderbeltfitonoccupant
[SS15800(ALL)12/95]
■Childseatorinfantcarrierrestraint
[SS15900(ALL)12/95]
Rear-facinginfantseatsshouldneverbeplacedinthefrontseat.
[SS16000(ALL)12/95]
Thismodemustbeusedwheninstallingachildseatonthe
frontpassengerseatandrearwindowseatswhereduallocking
retractorsareprovided.
File:06wnsss.ex
Update:Thu Jul 18 11:00:49 1996

178
*
[SS16100(ALL)01/96]
To switch the retractor from the emergency locking mode to the
automatic locking mode, perform the following steps:
*
[SS16200(ALL)02/96] 1. Buckle the lap/shoulder combination belt.
*
[SS16300(ALL)12/95] 2. Grasp the shoulder portion of the belt and pull downward
until all of the belt is extracted, and when allowed to retract,
a clicking sound will be heard. At this time, the belt retractor
is in the automatic locking mode (child restraint mode).
[SS16400(ALL)12/95] 3. A clicking sound will be heard as the belt is allowed to
retract. This indicates that the retractor is in the automatic
locking mode.
[SS16500(ALL)12/95]
NOTE: When the combination lap/shoulder belt is unbuckled
and allowed to retract completely, the retractor will
switch back to the vehicle sensitive (emergency)
locking mode. See detailed instructions under Safety
Seats for Children later in this chapter.
%
*
[SS16600(ALL)12/95] Lap Belts
*
[SS16700(ALL)12/95]
The lap belt in the center of the rear seat does not adjust
automatically. You must adjust it to fit snugly and as low as
possible around your hips. Do not wear it around your waist.
%
*
[SS16800(ALL)01/96]
If you need to lengthen the belt, unfasten it and tip the belt
tongue at a right angle to the belt. Pull the belt tongue over
your lap until it reaches the buckle.
*
[SS16900(ALL)01/96]
If you need to shorten the belt, pull on the loose end of the
webbing until the belt fits snugly.
[SS17000(ALL)12/95]
To unfasten the belt, push the release button on the buckle.
File:06wnsss.ex
Update:Thu Jul 18 11:00:49 1996
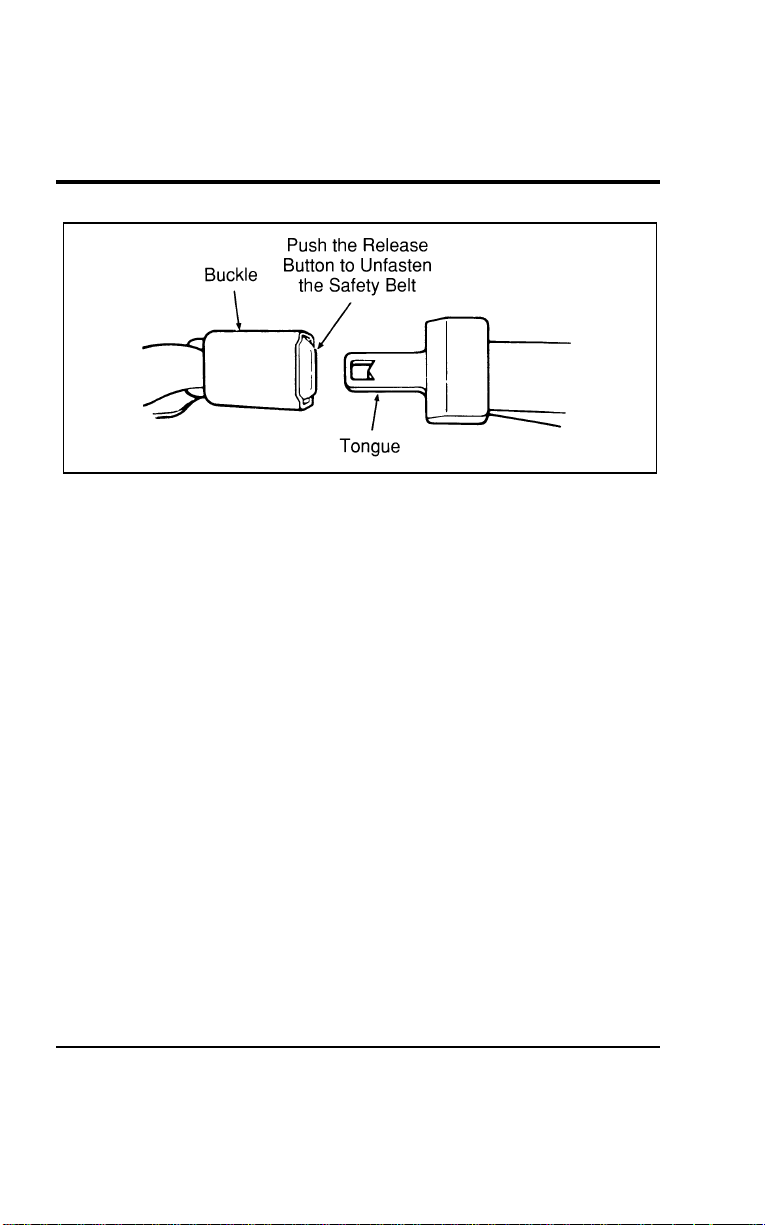
Seating and Safety Restraints
179
[SS17100(ALL)12/95]
10-1/2 pica
art:0050085-A
Unfastening the lap belt in the center rear seating position
%
*
[SS17200(ALL)03/96] Safety Belt Maintenance
*
[SS17300(ALL)02/96]
Check the safety belt systems periodically to make sure that
they work properly and are not damaged.
*
[SS17400(ALL)03/96]
All safety belt assemblies, including retractors, buckles, front
seat belt buckle support assemblies (slide bar) (if so equipped),
child safety seat tether bracket assemblies (if so equipped), and
attaching hardware, should be inspected after any collision. Ford
recommends that all safety belt assemblies used in vehicles
involved in a collision be replaced. However, if the collision was
minor and a qualified technician finds that the belts do not
show damage and continue to operate properly, they do not
need to be replaced. Safety belt assemblies not in use during a
collision should also be inspected and replaced if either damage
or improper operation is noted.
%
*
[SS17700(ALL)02/96]
Safety Belt Extension Assembly
*
[SS17800(ALL)01/96]
For some people, the safety belt may be too short even when it
is fully extended. You can add about eight inches (20 cm) to the
belt length with a safety belt extension assembly (part number
611C22). Safety belt extensions are available at no cost from
your dealer.
File:06wnsss.ex
Update:Thu Jul 18 11:00:49 1996

180
*
[SS17900(ALL)02/96]
WARNING
Failuretofollowtheseinstructionswillaffectthe
performanceofthesafetybeltsandincreasetheriskof
personalinjury.
%
*
[SS18000(ALL)05/96] AirBagSupplementalRestraintSystem
(SRS)
*
[SS18100(ALL)05/96]
ThedriverandrightfrontpassengerairbagsareSupplemental
RestraintSystems(SRS),providedattheseseatingpositionsin
additiontothelap/shoulderbelt,andaredesignedto
supplementtheprotectionprovidedtoproperlybelted
occupantsinmoderatetoseverefrontalcollisions.The
supplementalairbagsystemdoesnotproviderestrainttothe
lowerbody.
%
*
[SS18200(ALL)05/96]
TheImportanceofWearingSafetyBelts
*
[SS18400(ALL)05/96]
WARNING
Alloccupantsofthevehicle,includingthedriver,should
alwaysweartheirsafetybelts,evenwhenanairbag
SupplementalRestraintSystemisprovided.
*
[SS18500(ALL)05/96]
Therearefourveryimportantreasonstousesafetybeltseven
withanairbagsystem.Useyoursafetybeltsto:
*
[SS18600(ALL)05/96]
■helpkeepyouintheproperposition(awayfromtheairbag)
whenitinflates
*
[SS18700(ALL)05/96]
■reducetheriskofharminrollover,sideorrearimpact
collisions,becauseanairbagisnotdesignedtoinflatein
suchsituations
*
[SS18800(ALL)05/96]
■reducetheriskofharminfrontalcollisionsthatarenot
severeenoughtoactivatethesupplementalairbag
*
[SS18900(ALL)05/96]
■reducetheriskofbeingthrownfromyourvehicle
File:06wnsss.ex
Update:Thu Jul 18 11:00:49 1996

SeatingandSafetyRestraints
181
%
*
[SS19000(ALL)05/96]
TheImportanceofBeingProperlySeated
*
[SS19100(ALL)05/96]
Inacollision,theairbagmustinflateextremelyfasttohelp
provideadditionalprotectionforyou.Inordertodothis,the
airbagmustinflatewithconsiderableforce.Ifyouarenot
seatedinanormalridingpositionwithyourbackagainstthe
seatback,theairbagmaynotprotectyouproperlyandcould
possiblyhurtyouasitinflates.
*
[SS19200(ALL)05/96]
Yourvehicleisequippedwitharightfrontpassengerairbag.
Airbagsdeploywithgreatforce,fasterthantheblinkofaneye.
Frontpassengers,especiallychildrenandsmalladults,must
neversitonthefrontedgeoftheseat,standneartheglove
compartmentoftheinstrumentpanel,orleanoverneartheair
bagcoverwhenthevehicleismoving.Alloccupantsshouldsit
withtheirbacksagainsttheseatback,movetheseattothemost
rearwardpositionifpossibleandusethesafetybelts.Children
weighinglessthan40lbs.(18kg)alwaysshouldusechildor
infantseats.
%
*
[SS19300(ALL)05/96]
WARNING
Whenusingforward-facingchildseatsmovethe
passengerseatasfarbackfromtheinstrumentpanelas
possible.Neversecurerear-facingchildseatsorinfant
carriersinthefrontseat.
*
[SS19400(ALL)05/96]
Theforceoftherapidlyinflatingpassengerairbagcouldpush
thetopoftherear-facingseatagainstthevehicleseatback,
armrestsorconsole.Rear-facinginfantseatsmustalwaysbe
securedintherearseat.
*
[SS19500(ALL)05/96]
WARNING
Donotplaceobjectsormountequipmentonornearthe
airbagcoverthatmaycomeincontactwithaninflating
airbag.Failuretofollowthisinstructionmayincrease
theriskofpersonalinjuryintheeventofacollision.
File:06wnsss.ex
Update:Thu Jul 18 11:00:49 1996

182
*
[SS19600(ALL)05/96]
Forfurtherinformationaboutthepropermountingof
equipmentinthefrontseatofthisvehicle,pleaserefertoFord’s
brochureentitledSomeImportantInformationAboutAirBag
SupplementalRestraintSystemwhichcanbeobtainedbycalling
HelmInc.at1-800-782-4356.AskforbrochureFPS-8602.
*
[SS19700(ALL)05/96]
Foradditionalimportantsafetyinformationontheproperuseof
seatbelts,childseats,andinfantseats,pleasereadtheother
sectionsofthischapteroftheOwnerGuide,especiallysections
entitledSafetyBeltsforChildrenandSafetySeatsforChildren.
%
*
[SS19800(ALL)05/96]
HowDoestheAirBagSupplementalRestraintSystem
Work?
*
[SS19900(ALL)05/96]
TheAirBagSupplementalRestraintSystemconsistsofthe
driverandpassengerairbags,impactsensors,asystem
diagnosticmodule,areadinesslightandtone,andtheelectrical
wiringwhichconnectsthecomponents.
[SS20000(ALL)04/96]
Thedriverairbagisinthecenterofthesteeringwheelandis
indicatedbytheletters“SRS.”Therightfrontpassengerseatair
bagisintheupperright-handsectionoftheinstrumentpanel
ledgeabovetheglovecompartment.Theletters“SRS”appear
there.Bothairbagsaredesignedtostayoutofsightuntilthey
areactivated.
*
[SS20100(ALL)05/96]
WARNING
Donotattempttoservice,repair,ormodifytheAirBag
SupplementalRestraintSystemoritsfuses.Seeyour
FordorLincoln-Mercurydealer.
File:06wnsss.ex
Update:Thu Jul 18 11:00:49 1996

SeatingandSafetyRestraints
183
[SS20200(ALL)04/96]
Ifacollisionoccurs,thesensorssensetheseverityoftheimpact
andactivatestheairbagsifnecessary.Theairbagsystemis
designedtodeployinfrontalandfront-angledcollisionsmore
severethanhittingaparkedvehicle(ofsimilarsizeandweight)
head-onatabout28mph(45km/h).Becausethesystemsenses
thecrashseverityratherthanvehiclespeed,somefrontal
collisionsatspeedsabove28mph(45km/h)willnotinflatethe
airbag.
*
[SS20300(ALL)05/96]
Whenthesensorsactivatethesystem,theairbagsinflate
rapidly,fillingwithnon-toxicnitrogengasinafractionofa
second.Immediatelyafterinflation,theairbagsdeflateby
releasingthenitrogengasthroughventholes.Thewhole
processtakesplaceinamatterofseconds.
*
[SS20400(ALL)05/96]
WARNING
Severalairbagsystemcomponentsgethotafterinflation.
Donottrytotouchthemafterinflation.
File:06wnsss.ex
Update:Thu Jul 18 11:00:49 1996
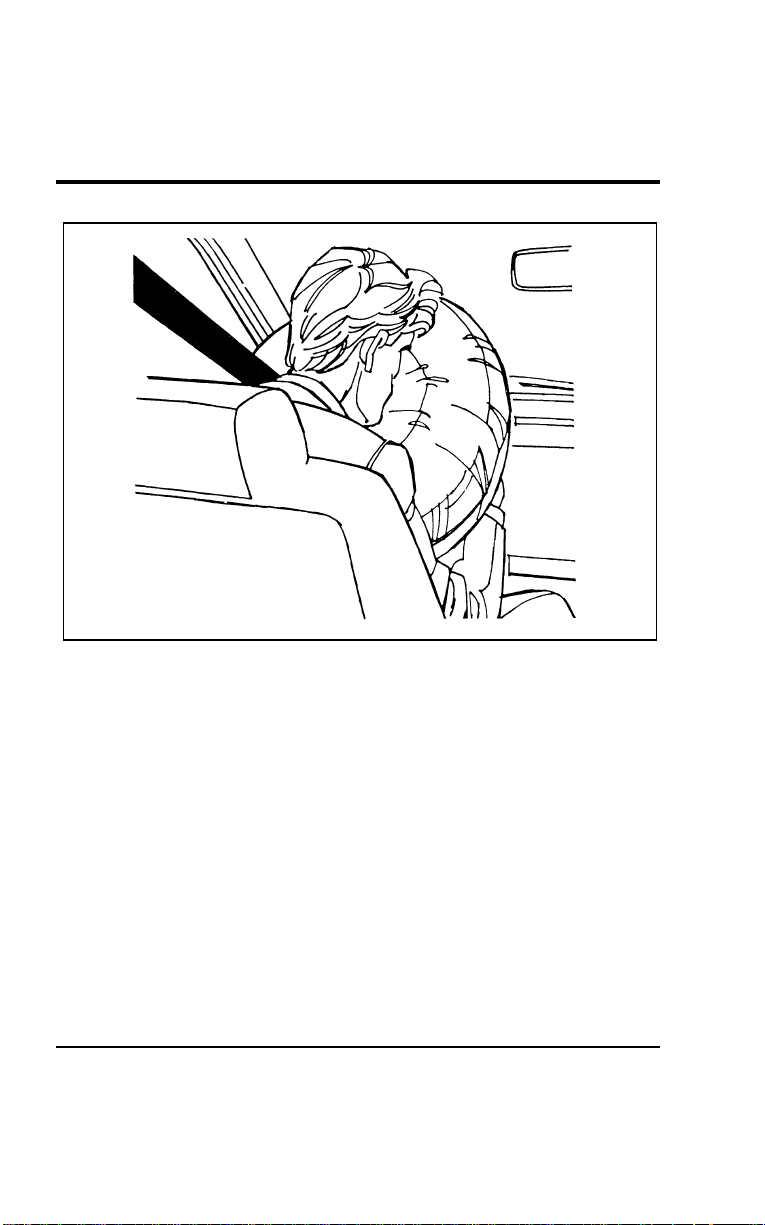
184
*
[SS20500(ALL)01/96]
17-1/2 pica
art:0050087-A
Inflated driver-side air bag
File:06wnsss.ex
Update:Thu Jul 18 11:00:49 1996

SeatingandSafetyRestraints
185
*
[SS20600(ALL)01/96]
17-1/2pica
art:0050088-A
Inflatedpassenger-sideairbag
*
[SS20700(ALL)05/96]
WARNING
Theairbagwillinflateonlyonce.Thesystemis
designedtofunctiononaone-time-onlybasis.Iftheair
bagisinflated,THEAIRBAGWILLNOTFUNCTION
AGAINANDMUSTBEREPLACEDIMMEDIATELY.If
theairbagisnotreplaced,thiswillincreasetheriskof
injuryinasubsequentcollision.
*
[SS20800(ALL)05/96]
Toensurethattheairbagsystemwilloperateasintendedina
crash,thesystemisequippedwithadiagnosticmodule,which
controlsareadinesslampandawarningtone.Thediagnostic
modulemonitorsitsowncircuits,theairbagelectricalsystem,
theairbagreadinesslight,theairbagpowerandtheairbag
inflators.
File:06wnsss.ex
Update:Thu Jul 18 11:00:49 1996

186
*
[SS20900(ALL)03/96]
The air bag supplemental restraint system uses a readiness light
and a tone to indicate the condition of the system. The
readiness light is in the instrument cluster. When you turn the
ignition key to ON, this light will illuminate for approximately
six (6) seconds and then turn off. This indicates that the system
is operating normally. NOTE: Maintenance of the air bag system
is not required.
%
*
[SS21000(ALL)05/96]
A problem with the system is indicated by one or more of the
following:
*
[SS21100(ALL)05/96]
■ the readiness light will either flash or stay illuminated,
*
[SS21200(ALL)05/96]
■ or it will not illuminate immediately after ignition is turned
on,
%
*
[SS21300(ALL)05/96]
■ a group of five beeps will be heard. The tone pattern will
repeat periodically until the problem and light are repaired.
[SS21400(ALL)12/95]
If any of these things happen, even intermittently, have the air
bag system serviced at your Ford or Lincoln-Mercury dealer
immediately.
%
*
[SS21500(ALL)05/96]
Disposal of air bags and air bag equipped vehicles
[SS21600(ALL)12/95]
For disposal of air bags or air bag equipped vehicles, see your
local Ford or Lincoln-Mercury dealer. Air bags MUST be
disposed of by qualified personnel.
%
*
[SS21700(ALL)01/96] Safety Restraints for Children
*
[SS21800(ALL)01/96]
In the U.S. and Canada, you are required by law to use safety
restraints for children. If small children ride in your vehicle —
this generally includes children who are four years old or
younger and who weigh 40 pounds (18 kg) or less — you must
put them in safety seats that are made specially for children.
Safety belts alone do not provide maximum protection for these
children. Check your local and state laws for specific
requirements.
File:06wnsss.ex
Update:Thu Jul 18 11:00:49 1996
SeatingandSafetyRestraints
187
*
[SS21900(ALL)05/96]
WARNING
Neverletapassengerholdachildonhisorherlap
whilethevehicleismoving.Thepassengercannot
protectthechildfrominjuryinacollision.
*
[SS22000(ALL)05/96]
WARNING
Cargoshouldalwaysbesecuredtopreventitfrom
shiftingandcausingdamagetothevehicleorharmto
passengers.
*
[SS22100(ALL)05/96]
WARNING
Carefullyfollowallofthemanufacturer’sinstructions
includedwiththesafetyseatyouputinyourvehicle.If
youdonotinstallandusethesafetyseatproperly,the
childmaybeinjuredinasuddenstoporcollision.
*
[SS22200(ALL)05/96]
WARNING
Donotleavechildren,unreliableadults,orpets
unattendedinyourvehicle.
*
[SS22300(ALL)05/96]
WARNING
Safetybeltsandseatscanbecomehotinavehiclethat
hasbeenclosedupinsunnyweather;theycouldburna
smallchild.Checkseatcoversandbucklesbeforeyou
placeachildanywherenearthem.
*
[SS22400(ALL)05/96]
Whenpossible,putchildrenintherearseatofyourvehicle.
Accidentstatisticssuggestthatchildrenaresaferwhenproperly
restrainedintherearseatingpositionsthaninthefrontseating
positions.
File:06wnsss.ex
Update:Thu Jul 18 11:00:49 1996

188
%
*
[SS22500(ALL)01/96]
Built-InChildSeat(Ifequipped)
[SS22600(ALL)12/95]
Thesecondrowbenchseatmayincludetwooptionalbuilt-in
childsafetyseats(oneonthedriversideandoneonthe
passengerside).Thischildrestraintistobeusedonlyby
childrenwhoareatleastoneyearold,weighbetween9and
27kilograms(20and60pounds)andwhoseshoulders(top)are
belowthebottomoftheheadrestinthefullupposition.
*
[SS22700(ALL)03/96]
Ifyourchildislessthanoneyearoldorweighslessthan
10kilograms(22pounds),alwaysusearearfacinginfantor
convertibleseatbecauseachildofthatsizeisnotsufficiently
developedtowithstandcrashforcesinafrontfacingposition.
Followthespecificmanufacturer’sinstructionsforweightand
heightrestrictions.
*
[SS22800(ALL)01/96]
WARNING
Alwayslatchthevehicleseattothefloor,whetherthe
seatisoccupiedorempty.Ifnotlatched,theseatmay
causeinjuryduringasuddenstop.
*
[SS22900(ALL)08/95]
Childrenmustbeproperlybuckledbeforeridinginthevehicle.
Itisthelawineverystateandprovince.Thischildseat
conformstoallFederal/Canadianmotorvehiclesafety
standards.
[SS23000(ALL)04/96]
Built-in child seat belt retractors
[SS23100(ALL)04/96]
Thebeltsonthebuilt-inchildseatareequippedwitharetractor
thatlockswhenbothbelttonguesarelatchedintothecrotch
safetybeltbuckle.
[SS23200(ALL)04/96]
Theretractorwillswitchfromtheemergencylockingmodeto
theautomaticlockingmodewhentheshoulderbeltsarepulled
allthewayout.Theretractorwillswitchbacktoemergency
lockingmodewhenthebeltsareunbuckledandtheshoulder
beltsretractcompletely.
File:06wnsss.ex
Update:Thu Jul 18 11:00:49 1996
SeatingandSafetyRestraints
189
[SS23300(ALL)04/96]
Theautomaticlockingmodemustbeusedtoholdsmall
childreninposition,particularlysleepingchildrenandthose
whomaytrytosquirmoutofthebelts.Theemergencylocking
modeisalsousedwhilebucklingthebelts.
[SS23400(ALL)12/95]
Frequentlycheckthechildseat’slapandshoulderharnessbelts
forcorrectplacementandtightness.Usethechildseatonlyif
theharnessbeltswillstaysnugwhenbeltsareplacedintothe
lockmodewithachildintheseat.Ifbeltsdonotremainsnug,
takethevehicletothedealerforchildseatrepair.
*
[SS23500(ALL)01/96]
Alwaysadjustthelapandshoulderharnessbeltsprovidedwith
thischildseatsnuglyaroundyourchild.
*
[SS23600(ALL)05/96]
WARNING
Donotleavechildren,unreliableadults,orpets
unattendedinyourvehicle.
*
[SS23700(ALL)05/96]
WARNING
Safetybeltsandseatscanbecomehotinavehiclethat
hasbeenclosedupinsunnyweather;theycouldburna
smallchild.Checkseatcoversandbucklesbeforeyou
placeachildanywherenearthem.
*
[SS23800(ALL)01/96]
WARNING
Failuretofollowalloftheinstructionsontheuseofthis
childrestraintsystemcanresultinyourchildstrikingthe
vehicle’sinteriorduringasuddenstoporcrash.
File:06wnsss.ex
Update:Thu Jul 18 11:00:49 1996
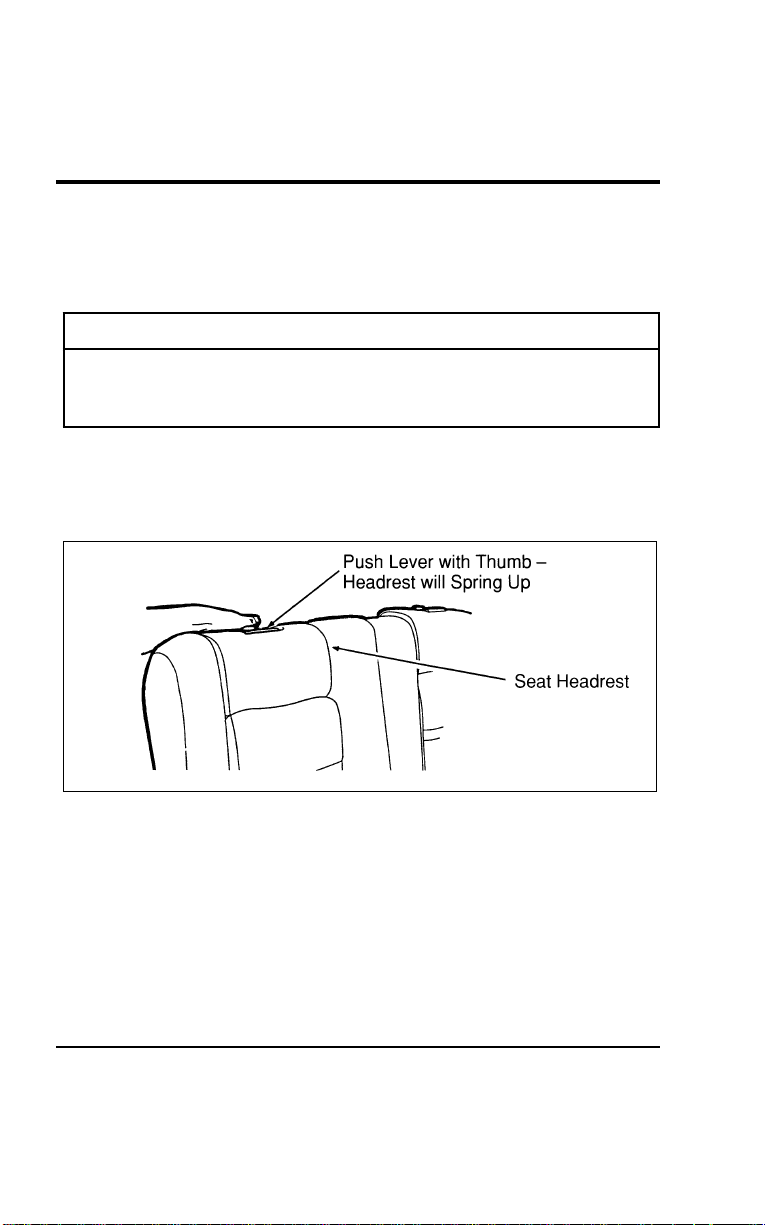
190
*
[SS23900(ALL)08/95]
How to use the Built-In Child Seat
*
[SS24000(ALL)01/96]
Readthefollowingproceduresandallofthelabelsonthe
Built-InChildSeatbeforeusingtheseat.
*
[SS24100(ALL)01/96]
WARNING
NeverusetheBuilt-InChildSeatasaboostercushion
withtheadultsafetybelts.Achildusingtheadultbelts
couldslideforwardandoutfromunderthesafetybelts.
[SS24200(ALL)12/95] 1.Pushtheheadrestreleaseleverandgrasptheheadrestas
showninFigure1.Thenreleasetheleverandrotatethe
headrestfullupuntilthelatch“clicks”inthefullup
position.RefertoFigure2.
[SS24300(ALL)12/95]
10-1/2pica
art:0050134-B
Figure1:Releasingtheheadrest
File:06wnsss.ex
Update:Thu Jul 18 11:00:49 1996
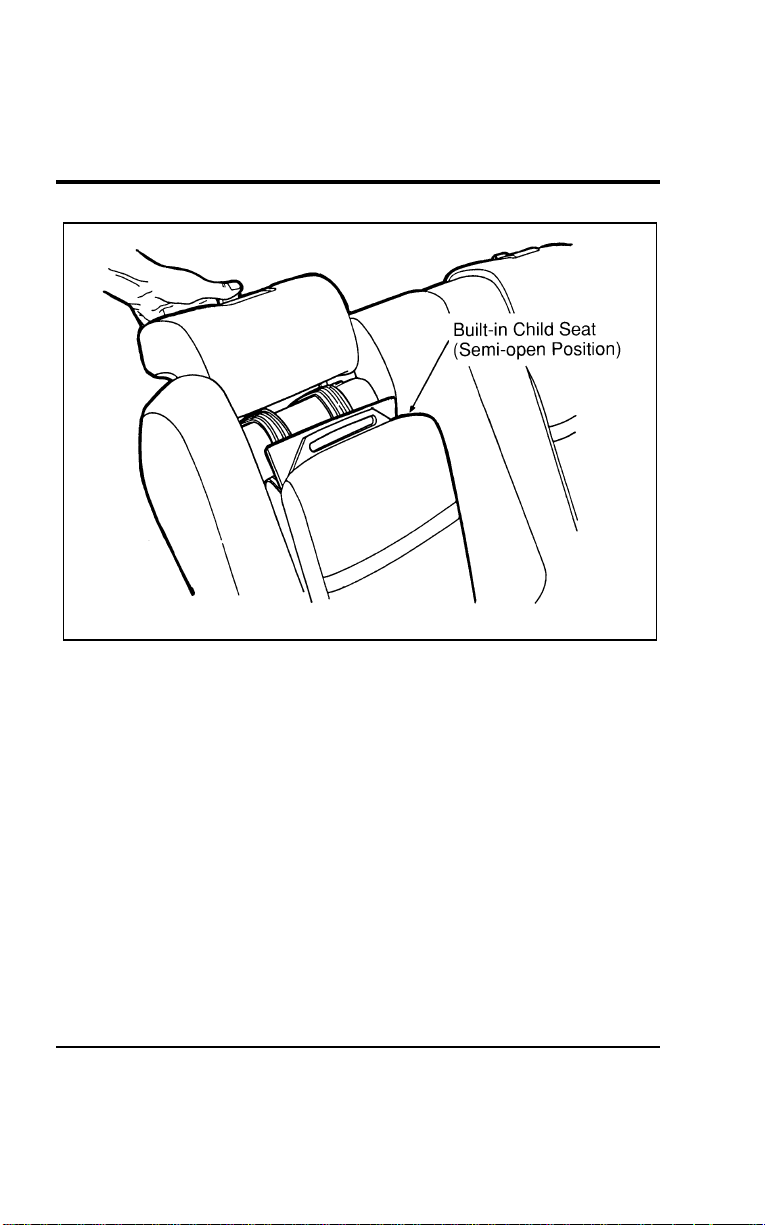
Seating and Safety Restraints
191
[SS24400(ALL)12/95]
17-1/2 pica
art:0050135-B
Figure 2: Release the lever and rotate the headrest to the full up position
File:06wnsss.ex
Update:Thu Jul 18 11:00:49 1996
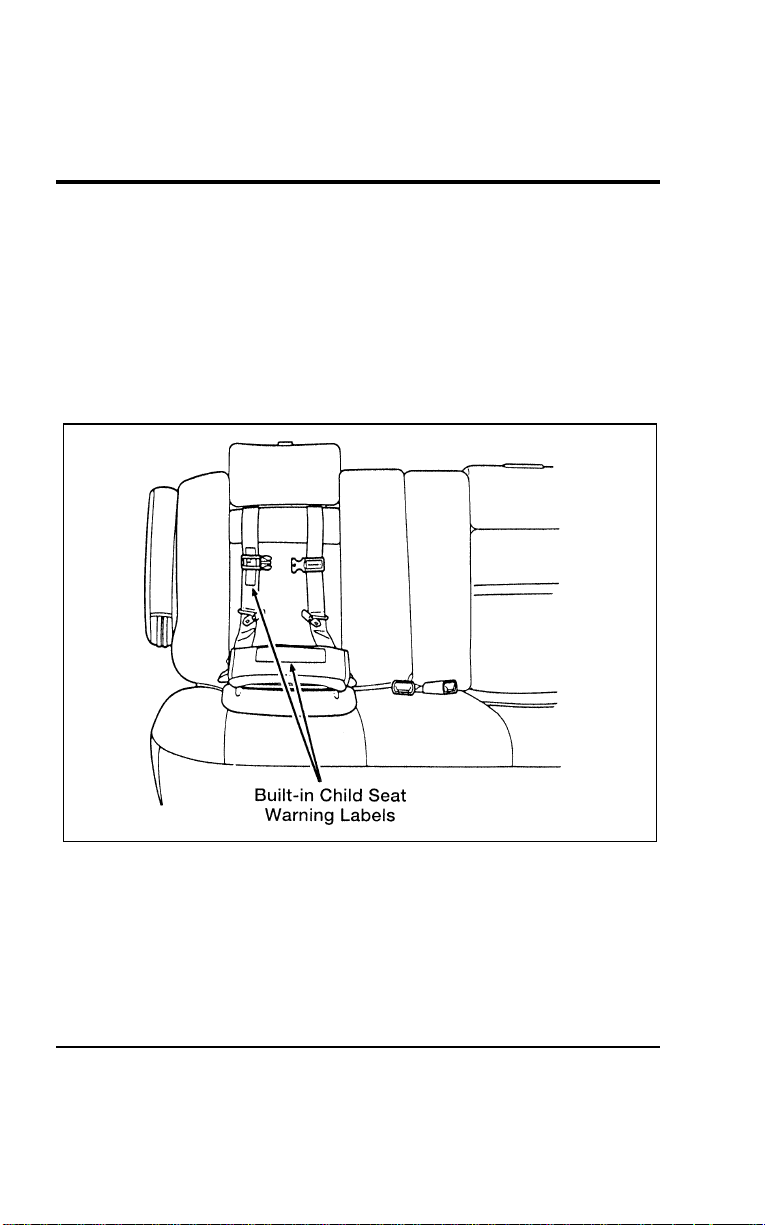
192
[SS24500(ALL)12/95] 2. Lower the seat cushion. Refer to Figure 3. The child safety
seat will move to a semi-reclined position as the seat cushion
is lowered.
[SS24600(ALL)12/95] 3. Read the information and warnings on the child seat cushion
protector flap and shoulder safety belt. Refer to Figure 3.
Check the child’s size, weight and age to be sure the child is
not too small or too large for the child seat. Then fold the
flap down onto the adult seat cushion.
[SS24700(ALL)12/95]
17-1/2 pica
art:0050136-D
Figure 3: Child seat information and warnings
[SS24800(ALL)12/95] 4. If connected, squeeze the top and the bottom of the right
half of the chest clip and pull to separate both halves.
File:06wnsss.ex
Update:Thu Jul 18 11:00:49 1996

Seating and Safety Restraints
193
[SS24900(ALL)12/95] 5. Place the child on the child seat and position the shoulder
belts over each shoulder. Refer to Figure 4.
[SS25000(ALL)12/95]
10-1/2 pica
art:0050139-B
Figure 4: Shoulder safety belt placement on the child
[SS25100(ALL)12/95]
NOTE: Read the following steps carefully to become familiar
with the indicator windows located on each safety belt
tongue and the chest clip. When either of the tongues
or the chest clip is unbuckled, the color red appears in
the window. When the tongues or chest clip are
securely buckled, the color green appears.
File:06wnsss.ex
Update:Thu Jul 18 11:00:49 1996
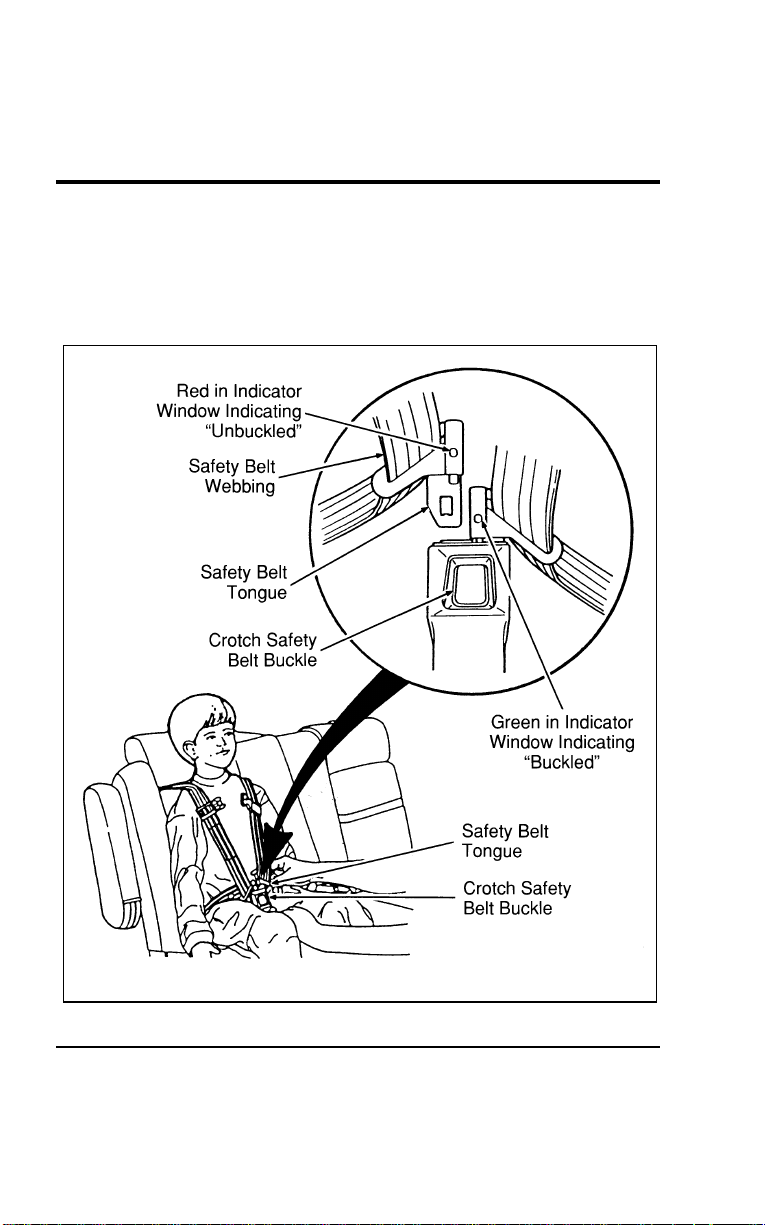
194
[SS25150(ALL)02/96] 6. Insert either the left or right safety belt tongue into the
single opening of the crotch safety belt buckle as shown in
Figure 5. (It does not matter which tongue is inserted first.)
Then insert the other tongue. The color green must appear in
the indicator window on each tongue when buckled.
[SS25200(ALL)12/95]
27-1/2 pica
art:0050140-B
Figure 5: Fastening the crotch safety belt buckle
File:06wnsss.ex
Update:Thu Jul 18 11:00:49 1996

SeatingandSafetyRestraints
195
[SS25300(ALL)12/95] 7.Fastenbothhalvesofthechestclipbelowthechild’s
shouldersandadjustittocomfortablyholdtheshoulder
beltsinplaceonthechild’schest.Thecolorgreenmust
appearintheindicatorwindowwhenfastened.(Thepurpose
ofthisclipistopositiontheshoulderbeltscorrectlyonthe
child’sshoulders.)RefertoFigure6.
*
[SS25400(ALL)01/96]
WARNING
Ifbothtonguesdonotlatchinthebuckle,donotusethe
childseat.Seeyourdealerforrepairs.
File:06wnsss.ex
Update:Thu Jul 18 11:00:49 1996
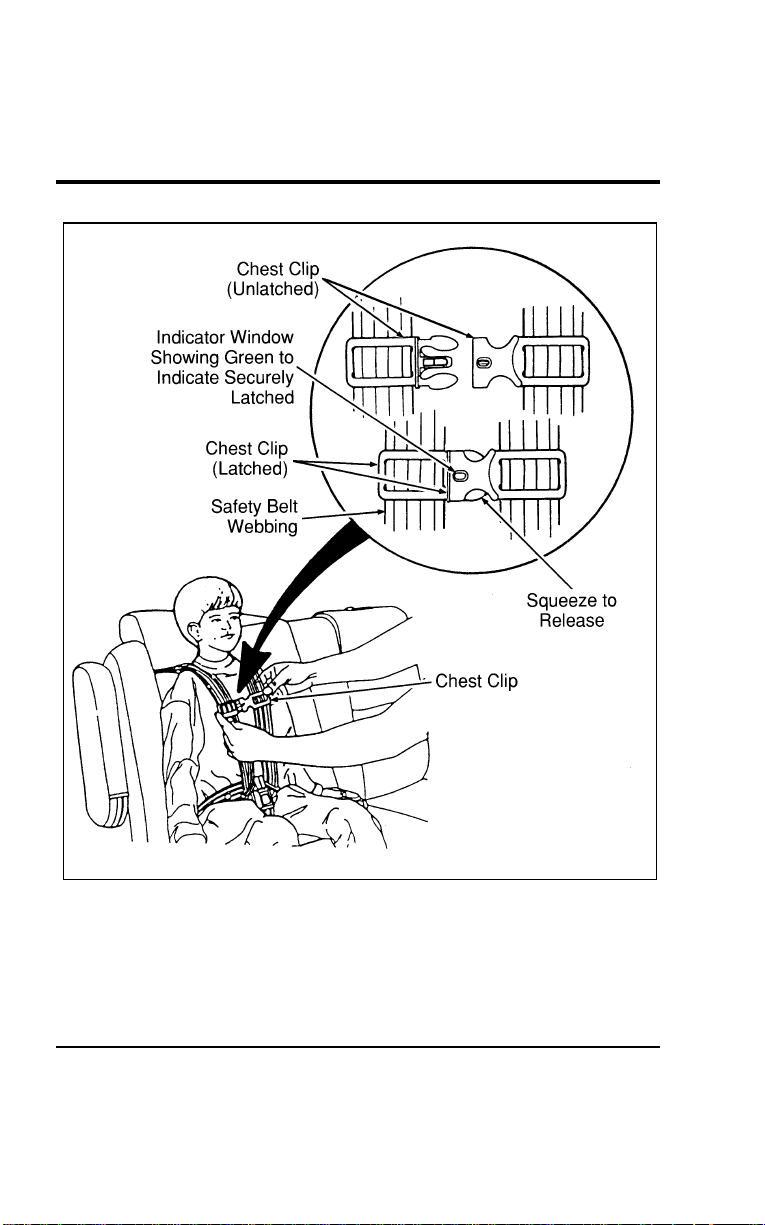
196
[SS25500(ALL)12/95]
27-1/2 pica
art:0050141-B
Figure 6: Securing the chest clip
File:06wnsss.ex
Update:Thu Jul 18 11:00:49 1996
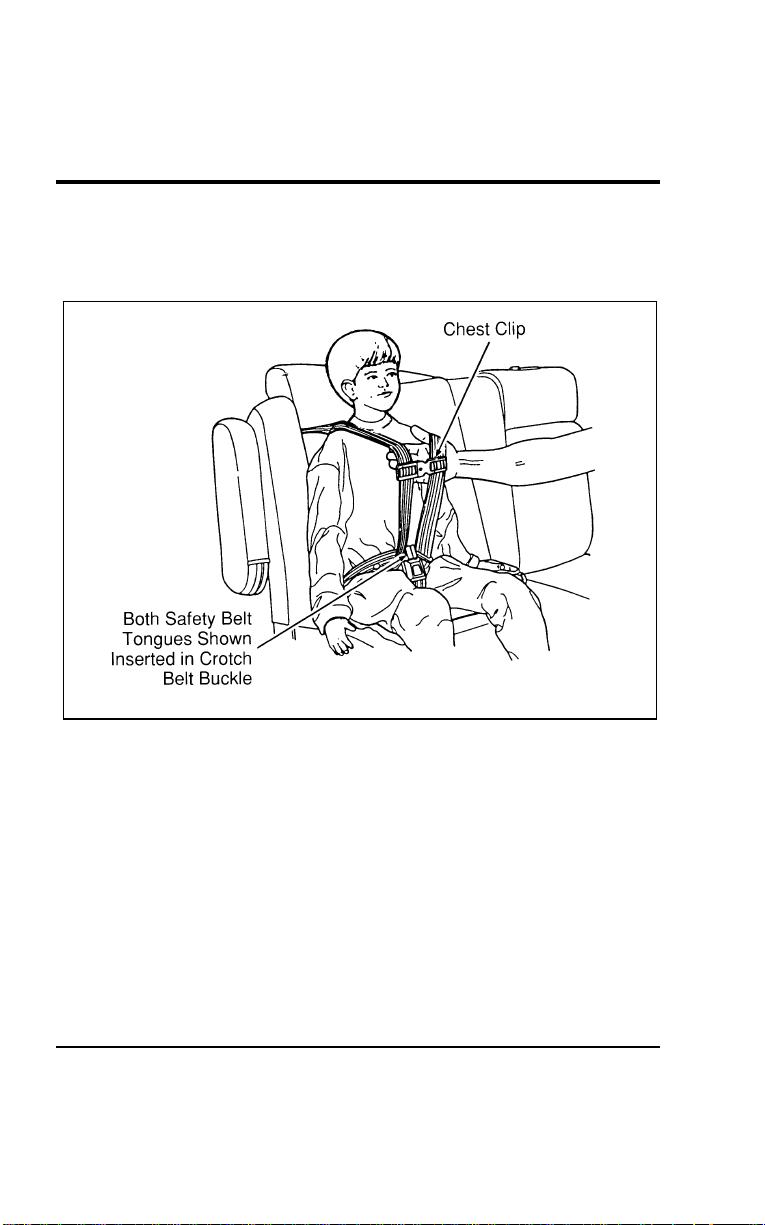
Seating and Safety Restraints
197
[SS25600(ALL)12/95] 8. Pull the shoulder belts out to ensure that the crotch safety
belt buckle and chest clip are securely fastened. Refer to
Figure 7.
[SS25700(ALL)12/95]
17-1/2 pica
art:0050142-B
Figure 7: Checking for securely latched buckle and chest clip
[SS25800(ALL)12/95] 9. Pull left shoulder belt fully out to put the retractor into the
lock mode. Allow belts to retract and fit snugly. The purpose
of the lock mode is to prevent the child from getting out of
the seat while the vehicle is in operation and to hold a
sleeping child in position. The belts will lock automatically
during a collision or hard braking.
File:06wnsss.ex
Update:Thu Jul 18 11:00:49 1996

198
*
[SS25900(ALL)08/95]
To remove the child from the built-in child seat:
[SS26000(ALL)12/95] 1.Openthechestclip.ReferbacktoFigure6.
*
[SS26100(ALL)08/95] 2.Pressthereleasebuttononthecrotchsafetybeltbuckle.
[SS26200(ALL)12/95] 3.Slidetheshoulderbeltsoffthechild’sshouldersandremove
thechild.ReferbacktoFigure4.
[SS26300(ALL)12/95]
To fold up the child seat:
[SS26400(ALL)12/95] 1.Foldtheprotectorflapoverthechildseatcushion.Refer
backtoFigure3.
[SS26500(ALL)12/95] 2.Rotatethechildseatcushionupward.
[SS26600(ALL)12/95] 3.Pushtheheadrestreleaseleverandslidetheheadrest
downwarduntilitlatchesagainstthechildseatcushion.
ReferbacktoFigures1and2.
[SS26700(ALL)12/95] 4.Whenthechildseatisnotinuse,itmaybefoldedupso
thatanadultmayusethevehicle’srearseat.
*
[SS26800(ALL)01/96]
Inspection after a collision
*
[SS26900(ALL)01/96]
WARNING
Allbuilt-inchildrestraints,includingseats,buckles,
retractors,seatlatches,interlocks,andattachinghardware
shouldbeinspectedbyaqualifieddealertechnicianafter
anycollision.
*
[SS27000(ALL)01/96]
Ifthechildseatwasinuseduringacollision,Fordrecommends
replacingit.However,ifthecollisionwasminorandaqualified
technicianfindsthatthechildrestraintsdonotshowdamage
andcontinuetooperateproperly,theydonotneedtobe
replaced.Ifthereisanybendingofthevehicleseatbackorseat
structure,itshouldalsobereplaced.Built-inchildseatsnotin
useduringacollisionshouldalsobeinspectedandreplacedif
eitherdamageorimproperoperationisnoted.
File:06wnsss.ex
Update:Thu Jul 18 11:00:49 1996

SeatingandSafetyRestraints
199
*
[SS27300(ALL)08/95]
Built-in child seat maintenance
[SS27400(ALL)04/96]
Regularlyinspectthelapandshoulderbeltssystemofyour
childseat.SeeyourFordDealeriftheshoulderbeltwebbingis
frayed,orifthebuckleandtonguearedamagedand/ordonot
functionproperly.
%
*
[SS27500(ALL)01/96]
SafetyBeltsforChildren
*
[SS27600(ALL)01/96]
Childrenwhoaretoolargeforchildsafetyseatsshouldalways
wearsafetybelts.(Seeinstructionswithyourchildseat,or
contactitsmanufacturer,todeterminemaximumsizeofchild
thatwillsafelyfitintheseat.)
*
[SS27700(ALL)01/96]
WARNING
Ifsafetybeltsarenotproperlywornandadjustedas
described,theriskofseriousinjurytothechildina
collisionwillbemuchgreater.
*
[SS27800(ALL)01/96]
Iftheshoulderbeltportionofoneofthelapandshoulderbelts
canbepositionedsothatitdoesnotcrossorrestinfrontofthe
child’sfaceorneck,thechildshouldwearthelapandshoulder
belt.Movingthechildclosertothecenterofthevehiclemay
helpprovideagoodshoulderbeltfit.
*
[SS27900(ALL)01/96]
Lapbeltsandthelapbeltportionoflapandshoulderbelts
shouldalwaysbewornsnuglyandbelowthehips,touchingthe
child’sthighs.
*
[SS28000(ALL)05/96]
WARNING
Childrenshouldalwaysridewiththeseatbackinthe
fullyuprightposition.
File:06wnsss.ex
Update:Thu Jul 18 11:00:49 1996

200
%
*
[SS28100(ALL)01/96]
Safety Seats for Children
*
[SS28200(ALL)01/96]
Use a safety seat that is recommended for the size and weight
of the child. Always follow the safety seat manufacturer’s
instructions when installing and using the safety seat.
*
[SS28300(ALL)01/96]
Ford recommends the use of a child safety seat having a top
tether strap. Install the child safety seat in a seating position
which is capable of providing a tether anchorage. For more
information on top tether straps see Attaching Safety Seats With
Tether Straps in this chapter.
*
[SS28400(ALL)05/96]
When installing a child safety seat, be sure to use the correct
safety belt buckle for that seating position, and make sure the
tongue is securely fastened in the buckle. For a shoulder/lap
belt combination with a sliding tongue, make sure the retractor
is in the automatic locking mode.
[SS28500(ALL)04/96]
In rear-facing infant seats, the infant’s head is closer to the
passenger air bag. The force of the rapidly inflating air bag
could push the top of the rear-facing seat against the vehicle
seatback. REAR-FACING INFANT SEATS MUST ALWAYS BE
SECURED IN THE REAR SEAT, and other child seats and
infant seats should be secured in the rear seat whenever
possible. Forward-facing child seats used in the front seat must
have the passenger seat moved as far back from the instrument
panel as possible.
*
[SS28600(ALL)05/96]
Your vehicle is equipped with a right front passenger air bag.
Air bags deploy with great force, faster than the blink of an eye.
Front passengers, especially children and small adults, must
never sit on the front edge of the seat, stand near the glove
compartment of the instrument panel, or lean over near the air
bag cover when the vehicle is moving. All occupants should sit
with their backs against the seatback, move the seat to the most
rearward position if possible and use the safety belts. Children
weighing less than 40 lbs. (18 kg) always should use child or
infant seats.
File:06wnsss.ex
Update:Thu Jul 18 11:00:49 1996

SeatingandSafetyRestraints
201
%
*
[SS28700(ALL)05/96]
WARNING
Whenusingforward-facingchildseatsmovethe
passengerseatasfarbackfromtheinstrumentpanelas
possible.Neversecurerear-facingchildseatsorinfant
carriersinthefrontseat.
*
[SS28800(ALL)05/96]
Theforceoftherapidlyinflatingpassengerairbagcouldpush
thetopoftherear-facingseatagainstthevehicleseatback,
armrestsorconsole.Rear-facinginfantseatsmustalwaysbe
securedintherearseat.
*
[SS28900(ALL)05/96]
Allchildrestraintsystemsaredesignedtobesecuredinvehicle
seatsbylapbeltsorbythelapportionofalap-shoulderbelt.
*
[SS29000(ALL)03/96]
WARNING
Ifyoudonotproperlysecurethesafetyseat,thechild
occupyingtheseatmaybeinjuredduringacollisionor
suddenstop.Anunsecuredsafetyseatcouldalsoinjure
otherpassengers.
*
[SS29100(ALL)05/96]
WARNING
Carefullyfollowallofthemanufacturer’sinstructions
includedwiththesafetyseatyouputinyourvehicle.If
youdonotinstallandusethesafetyseatproperly,the
childmaybeinjuredinasuddenstoporcollision.
*
[SS29200(ALL)05/96]
WARNING
Alwayskeepthebucklereleasebuttonpointingupward
andawayfromthechildseat,withthetonguebetween
thechildseatandthereleasebuttonasshowninthe
followingillustration.
File:06wnsss.ex
Update:Thu Jul 18 11:00:49 1996

202
*
[SS29300(ALL)05/96]
Installing Child Safety Seats in the Front Seat and Rear
Window Passenger Seating Positions
[SS29400(ALL)12/95]
Your vehicle is equipped with a dual locking mode retractor on
the shoulder belt portion of the combination lap/shoulder safety
belt for the front seat passenger and for the rear window
passengers.
[SS29500(ALL)12/95]
If you choose to install a forward-facing child seat or infant
carrier in the front seating positions, move the seat as far back
as possible.
*
[SS29600(ALL)01/96]
For seating positions equipped with a dual-locking mode
retractor, use the following procedure:
[SS29700(ALL)12/95] 1. Position the child seat in the center of passenger seat.
*
[SS29800(ALL)02/96] 2. Pull down on shoulder belt, then grasp shoulder belt and lap
belt together. See Figure 1.
File:06wnsss.ex
Update:Thu Jul 18 11:00:49 1996
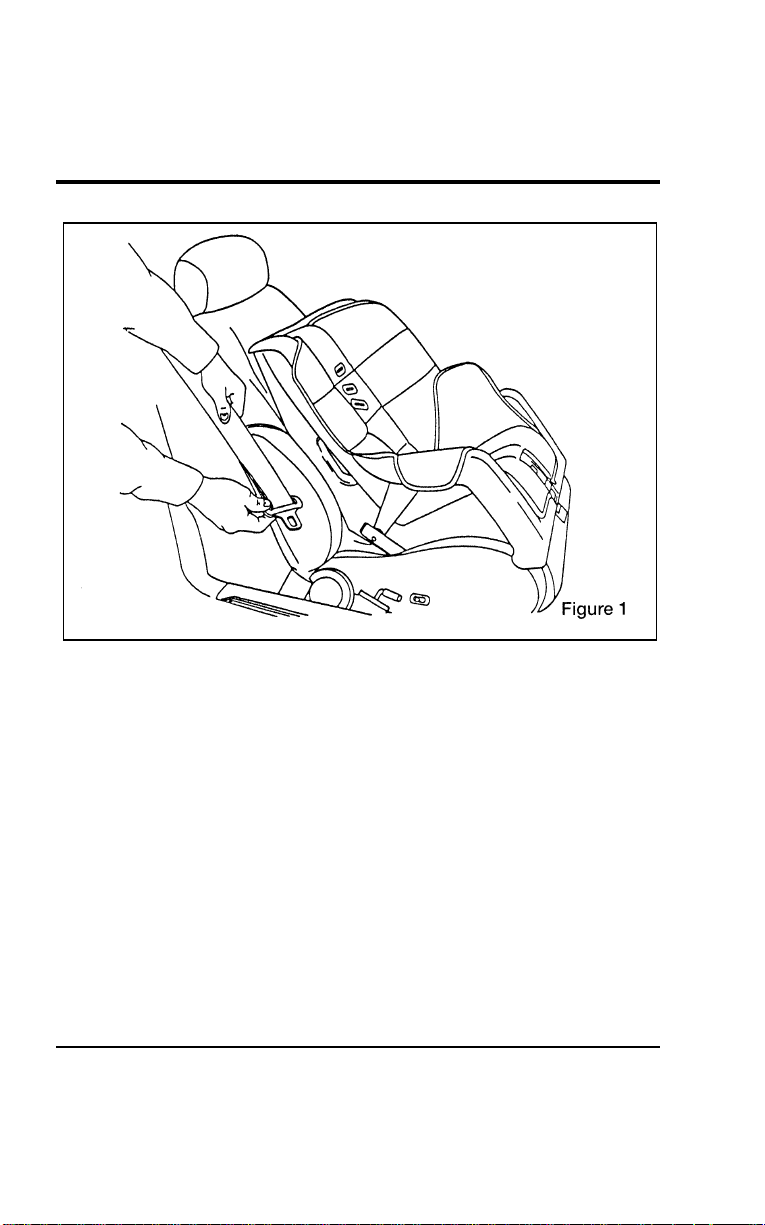
Seating and Safety Restraints
203
[SS29900(ALL)12/95]
17-1/2 pica
art:0050276-A
File:06wnsss.ex
Update:Thu Jul 18 11:00:49 1996
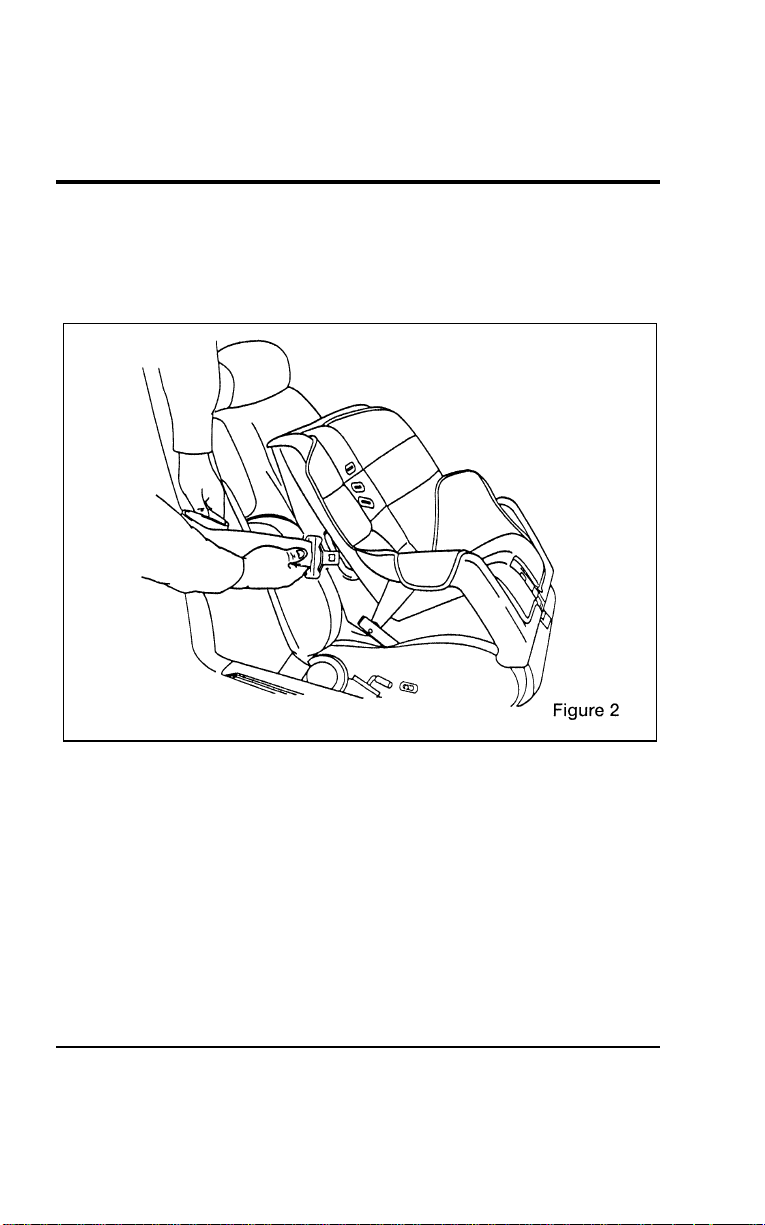
204
*
[SS30000(ALL)01/96] 3. While holding the shoulder and lap belt portions together,
route the tongue through the child seat according to the
child seat manufacturer’s instructions. See Figure 2. Be sure
that the belt webbing is not twisted.
[SS30100(ALL)12/95]
17-1/2 pica
art:0050277-A
Routing the lap/shoulder belt
File:06wnsss.ex
Update:Thu Jul 18 11:00:49 1996
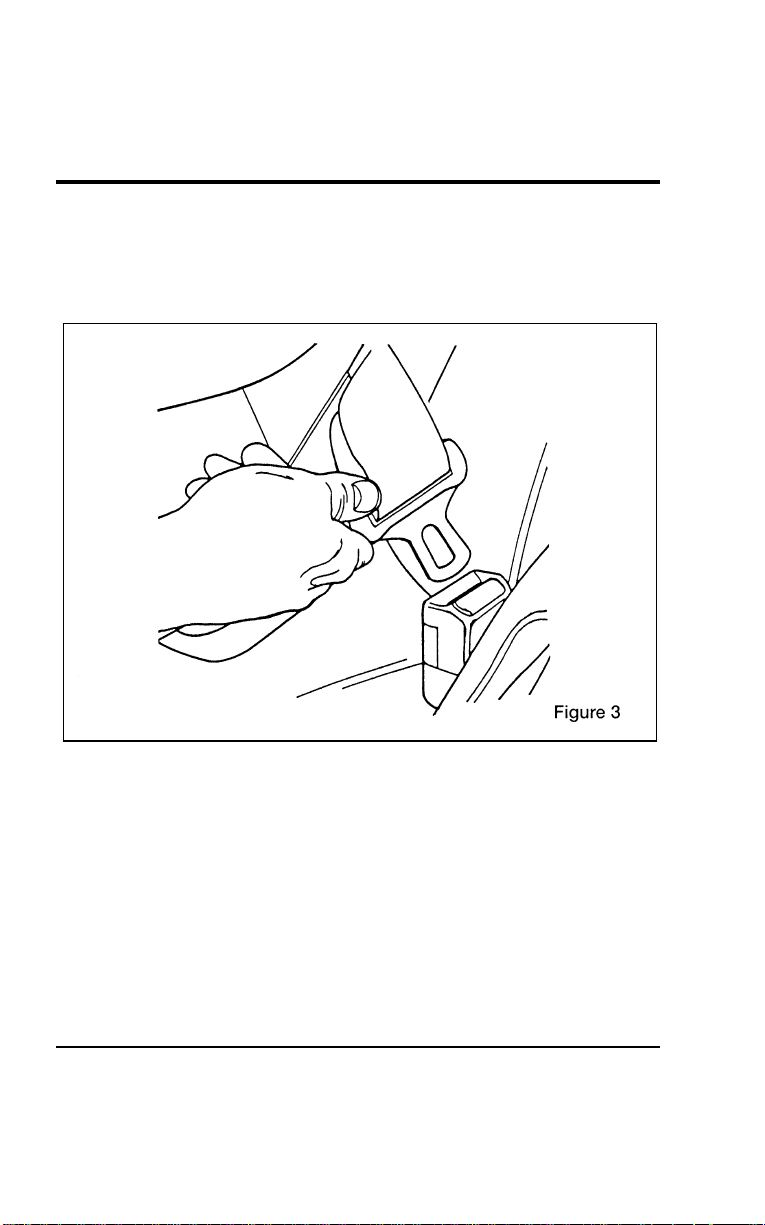
Seating and Safety Restraints
205
[SS30200(ALL)12/95] 4. Insert the belt into the proper buckle for that seating position
until you hear and feel the latch engage. See Figure 3. Make
sure the tongue is latched securely to buckle by pulling on
the tongue.
[SS30300(ALL)12/95]
17-1/2 pica
art:0050278-A
Buckling the belt
*
[SS30400(ALL)12/95] 5. Grasp the shoulder portion of the belt and pull downward
until all of the belt is extracted and a click is heard. At this
time, the retractor is in the automatic locking mode (child
restraint mode). See Figure 4.
[SS30500(ALL)12/95]
NOTE: The dual-locking mode retractor must be in the
automatic locking mode to properly restrain a child
seat.
File:06wnsss.ex
Update:Thu Jul 18 11:00:49 1996

206
[SS30600(ALL)12/95]
17-1/2 pica
art:0050279-A
Setting the retractor to automatic locking mode
[SS30700(ALL)12/95] 6. Allow the belt to retract. A clicking sound will be heard as
the belt retracts. This indicates the retractor is in the
automatic locking mode. Pull on the lap belt portion across
the child seat towards the buckle and continue to pull up on
the shoulder belt portion while pushing down on the child
seat allowing the shoulder belt to retract, to remove any
slack in seat belt. See Figures 5 and 6.
File:06wnsss.ex
Update:Thu Jul 18 11:00:49 1996
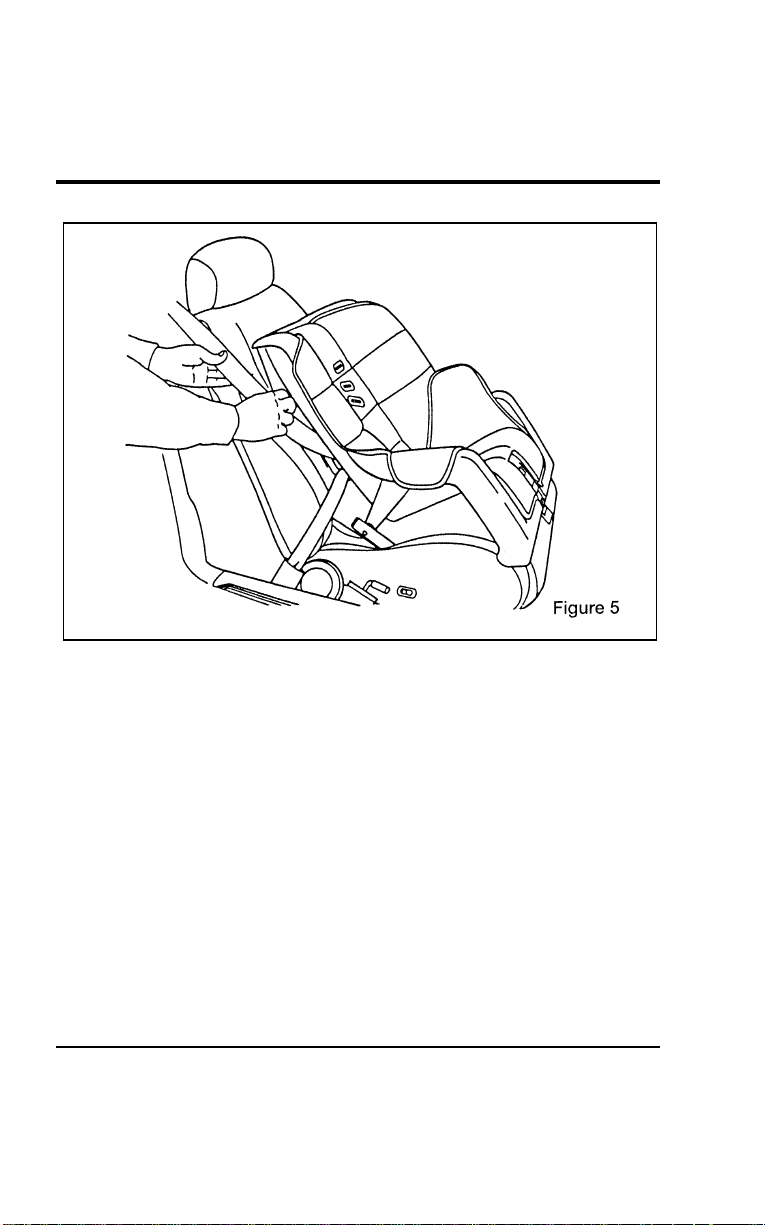
Seating and Safety Restraints
207
[SS30800(ALL)12/95]
17-1/2 pica
art:0050280-A
File:06wnsss.ex
Update:Thu Jul 18 11:00:49 1996
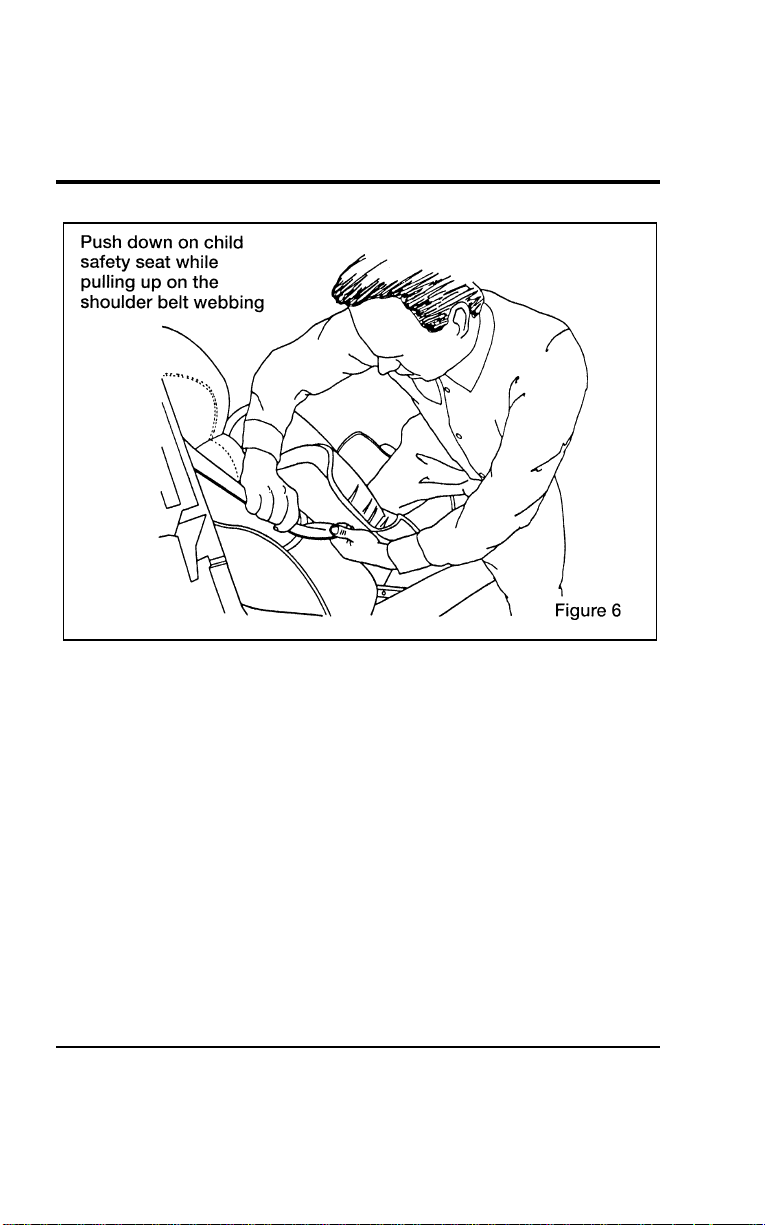
208
[SS30900(ALL)12/95]
17-1/2 pica
art:0050281-A
File:06wnsss.ex
Update:Thu Jul 18 11:00:49 1996

Seating and Safety Restraints
209
[SS31000(ALL)12/95] 7. Before placing the child into the child seat, forcibly tilt the
seat from side to side and in forward directions to make
sure that the seat is securely held in place. See Figure 7.
[SS31100(ALL)12/95]
17-1/2 pica
art:0050282-A
Checking that the seat is secure
File:06wnsss.ex
Update:Thu Jul 18 11:00:49 1996

210
[SS31200(ALL)12/95] 8. Double check the retractor is in the automatic locking mode.
Try to pull more belt out of the retractor. If you cannot, the
belt is in the automatic locking mode. See Figure 8.
[SS31300(ALL)12/95]
17-1/2 pica
art:0050283-A
Checking the retractor
[SS31400(ALL)12/95] 9. Check to make sure that the seat is properly secured prior to
each use. If the retractor is not locked, repeat steps 6
through 8.
[SS31500(ALL)12/95]
NOTE: To remove retractor from the automatic lock mode,
allow seat belt to retract fully to its stowed position
and the retractor will automatically switch back to the
vehicle sensitive locking mode for normal adult usage.
File:06wnsss.ex
Update:Thu Jul 18 11:00:49 1996

Seating and Safety Restraints
211
*
[SS31600(ALL)05/96]
Installing a Child Safety Seat at the Center Seating
Position with Locking Adjustable Lap Belt
*
[SS31700(ALL)01/96] 1. Lengthen the lap belt. To lengthen the belt, hold the tongue
so that its bottom is perpendicular to the direction of
webbing while sliding the tongue up the webbing.
*
[SS31800(ALL)01/96] 2. Place the child safety seat in the center seating position.
*
[SS31900(ALL)01/96] 3. Route the tongue and webbing through the child seat
according to the child seat manufacturer’s instructions.
*
[SS32000(ALL)01/96] 4. Insert the belt tongue into the proper buckle for the center
seating position until you hear a snap and feel it latch. Make
sure the tongue is securely fastened to the buckle by pulling
on tongue.
*
[SS32100(ALL)01/96] 5. Push down on the child seat while pulling on the loose end
of the lap belt webbing to tighten the belt.
[SS32200(ALL)12/95] 6. Before placing the child into the child seat, forcibly tilt the
child seat from side to side and in forward directions to
ensure that the seat is held securely in place. If the child seat
moves excessively, repeat steps 5 through 6 or properly
install the child seat in a different seating position.
%
*
[SS32300(ALL)04/96]
Attaching Safety Seats With Tether Straps
*
[SS32400(ALL)04/96]
Some manufacturers make safety seats that include a tether
strap that goes over the back of the vehicle seat and attaches to
an anchoring point. Other manufacturers offer the tether strap
as an accessory. Contact the manufacturer of your child safety
seat for information about ordering a tether strap.
[SS32500(ALL)12/95]
You can attach a tether strap to the front passenger or second
row seats by using the built-in tether anchors provided on the
back of the seats as described below.
[SS32600(ALL)12/95]
Follow the child seat manufacturer’s instructions to attach the
tether strap to the tether anchor.
File:06wnsss.ex
Update:Thu Jul 18 11:00:49 1996
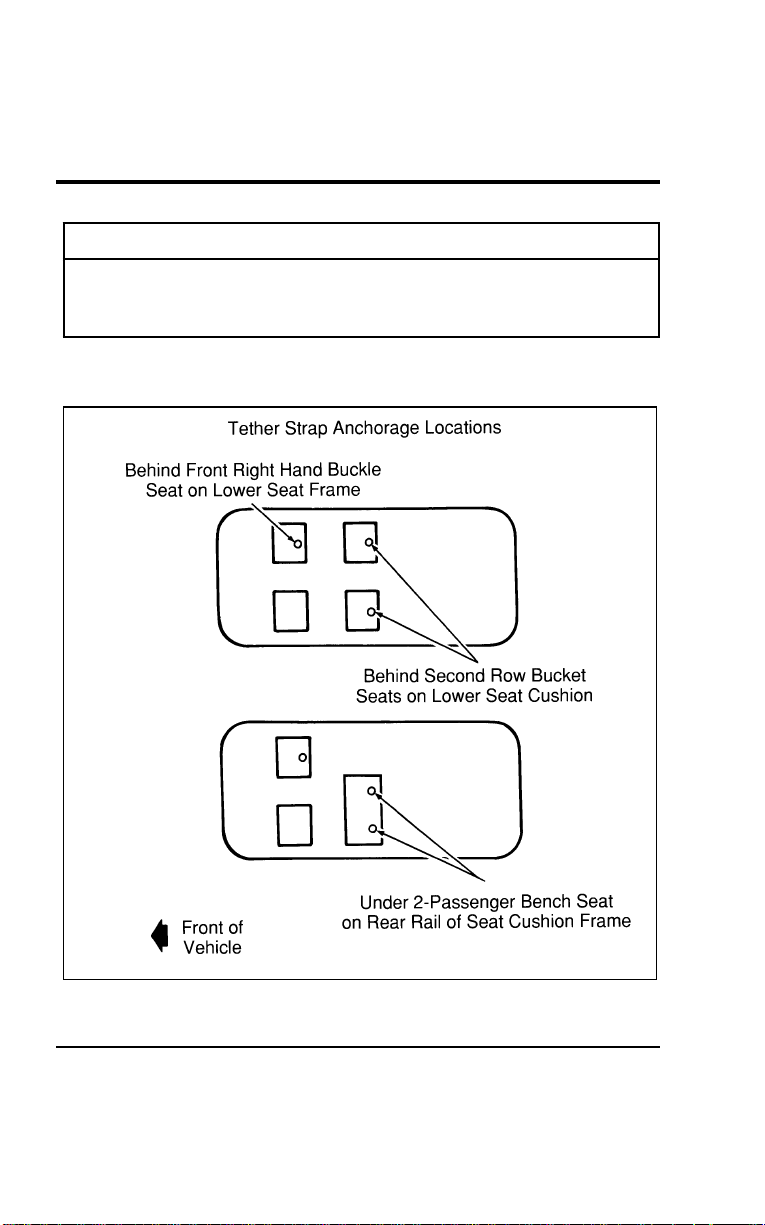
212
[SS32700(ALL)12/95]
WARNING
Useonlythetetherattachmentlocationsshownbelow.
Thetetheranchormaynotperformproperlyifthewrong
mountinglocationisused.
[SS32800(ALL)12/95]
Threetetherstrapanchorlocationshavebeenprovidedinyour
vehicle.Theyareasfollows:
[SS32900(ALL)12/95]
24picaart:0050183-A
Tetherstrapanchorlocations
File:06wnsss.ex
Update:Thu Jul 18 11:00:49 1996
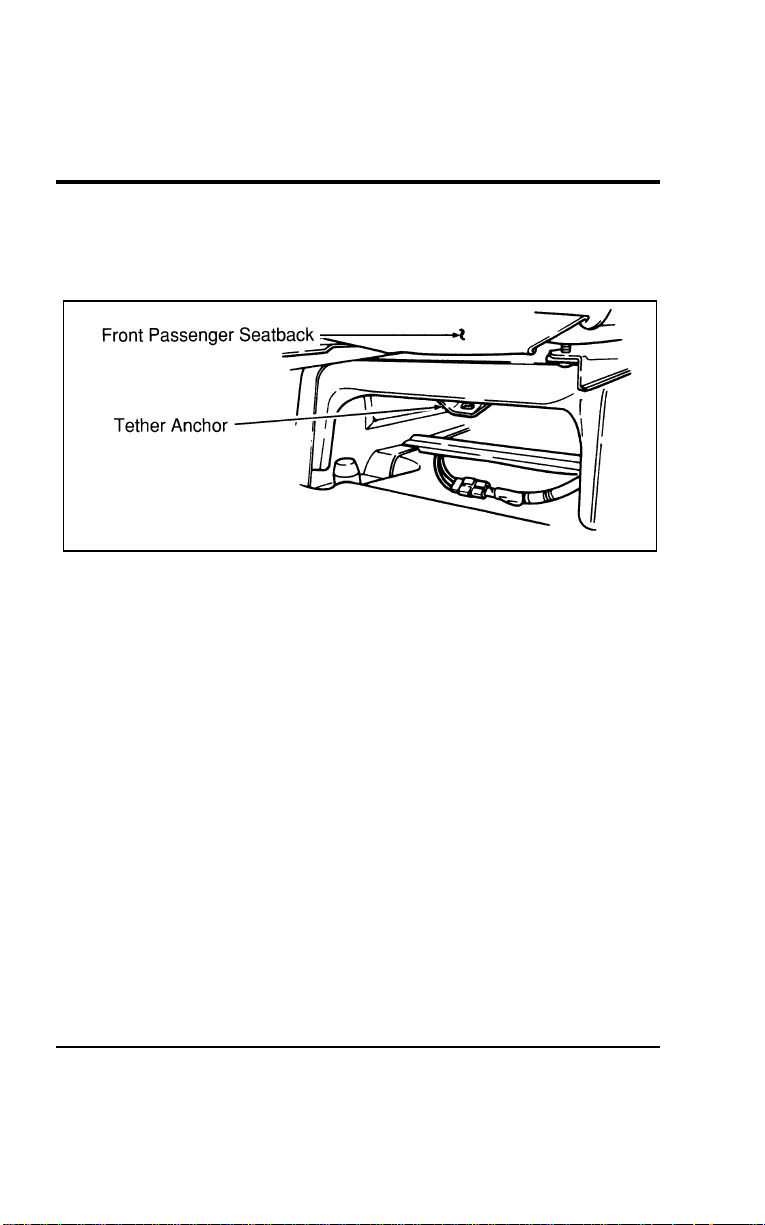
Seating and Safety Restraints
213
[SS33000(ALL)12/95]
■ FRONT PASSENGER SEATING POSITION — You must use
the tether strap anchor location provided on the back of the
seat cushion frame. (Refer to Figure 1.)
[SS33100(ALL)12/95]
10-1/2 pica
art:0050180-A
Figure 1: Tether anchor location — Front passenger seat
[SS33200(ALL)12/95]
■ SECOND ROW BENCH (if equipped) SEATING POSITION
— You must use one of the two tether strap anchor locations
(one each side) provided on the back of the seat cushion.
(Refer to Figures 2 and 3.)
File:06wnsss.ex
Update:Thu Jul 18 11:00:49 1996
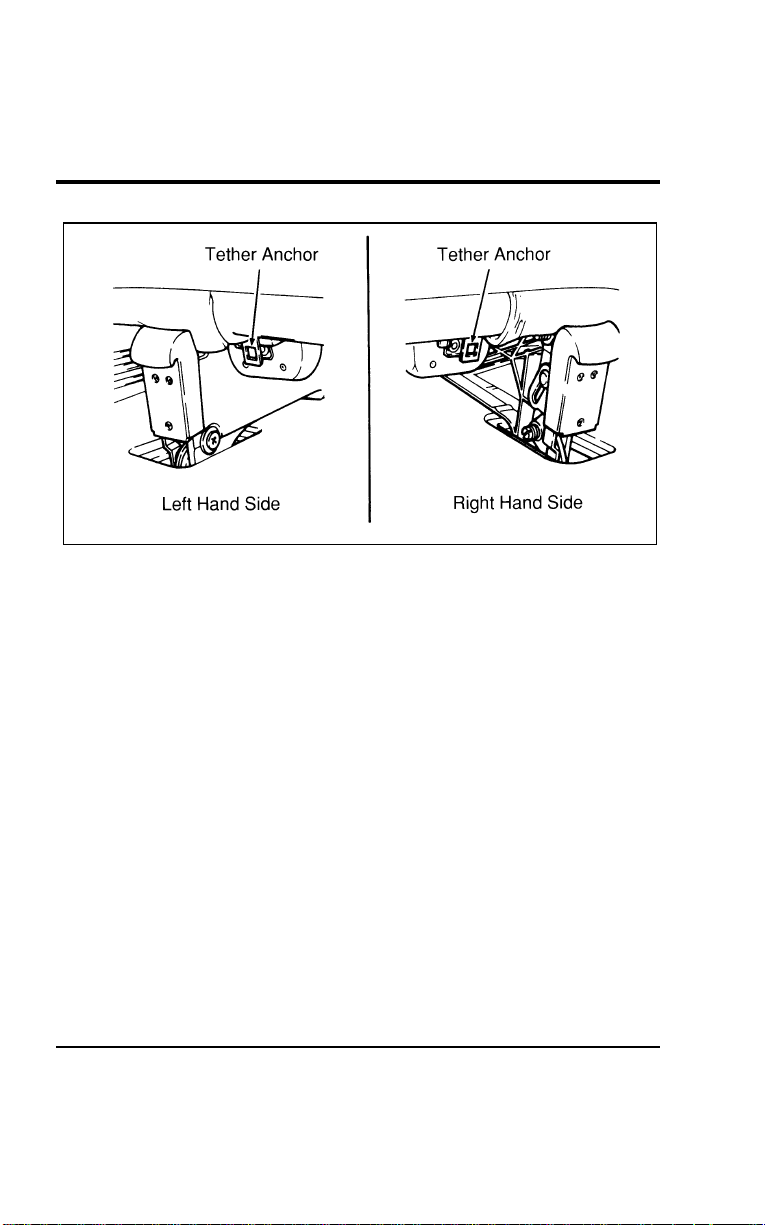
214
[SS33300(ALL)12/95]
13-1/2 pica
art:0050181-A
Figure 2: Tether anchor location — second row bench seat (with built-in child
safety seat)
File:06wnsss.ex
Update:Thu Jul 18 11:00:49 1996
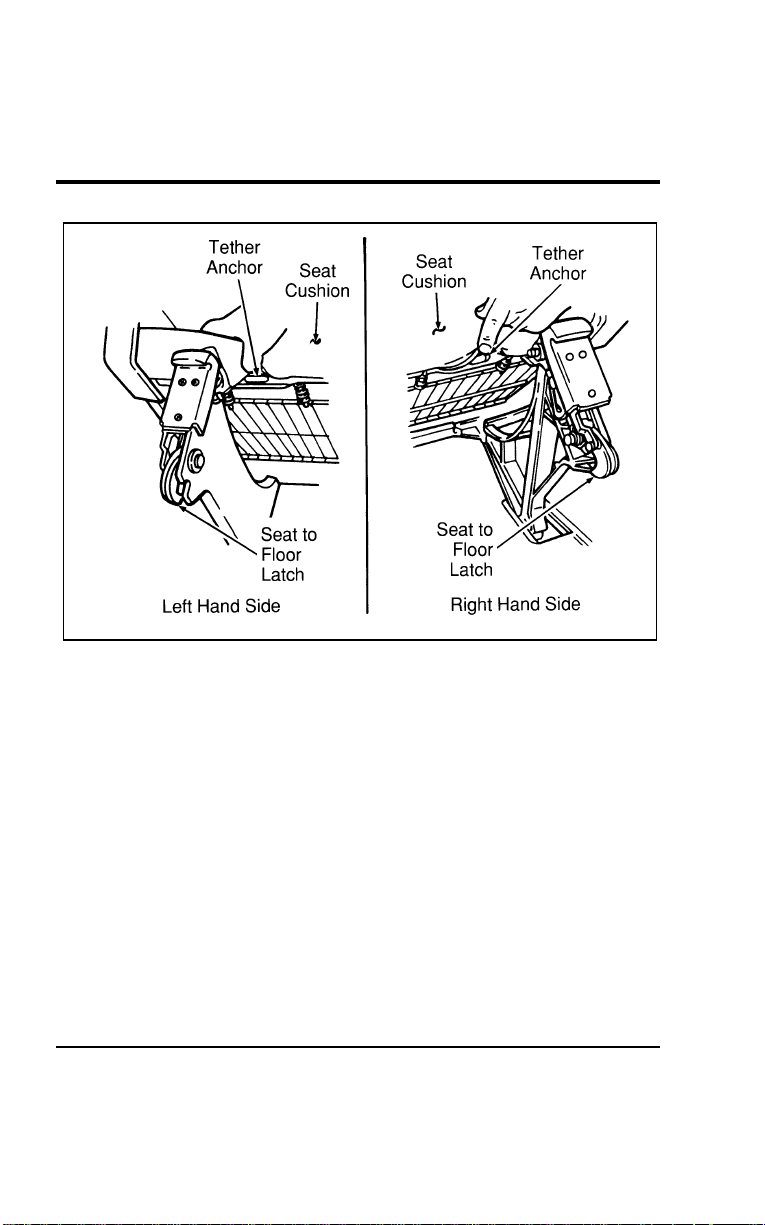
Seating and Safety Restraints
215
[SS33400(ALL)12/95]
17-1/2 pica
art:0050184-A
Figure 3: Tether anchor location — second row bench seat (without built-in
child safety seat)
File:06wnsss.ex
Update:Thu Jul 18 11:00:49 1996
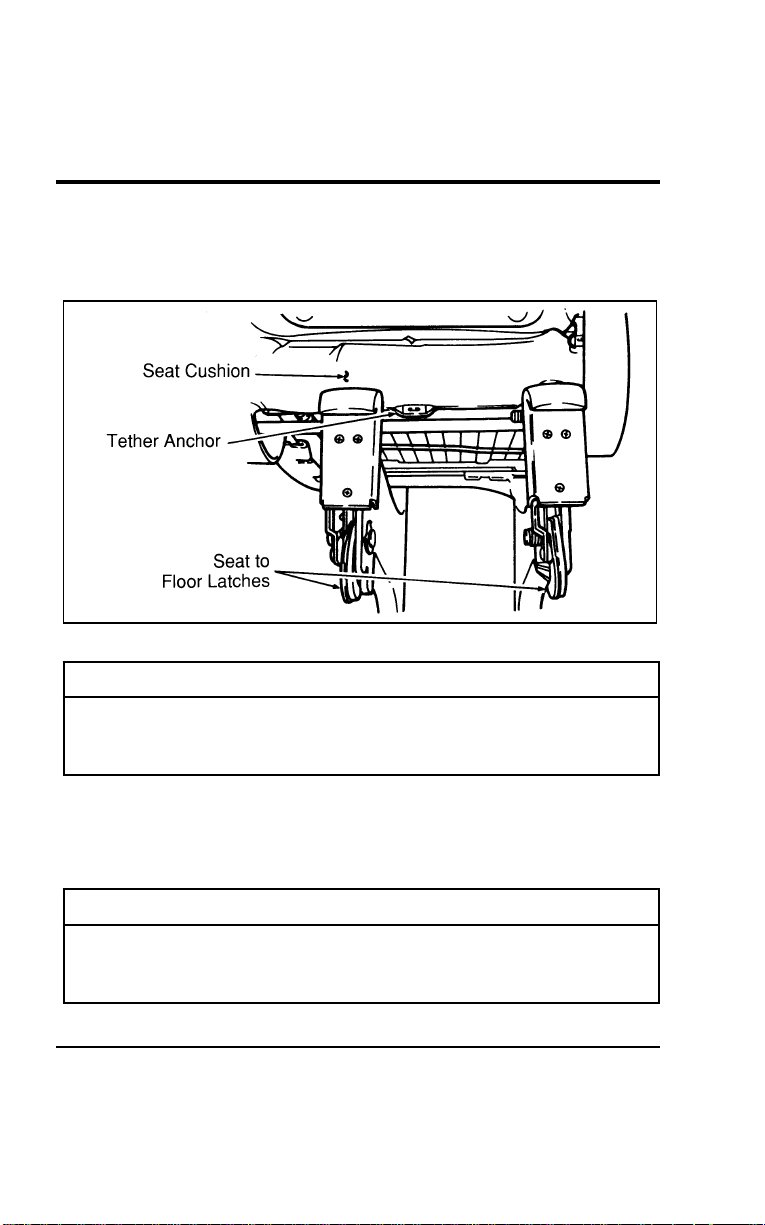
216
[SS33500(ALL)12/95]
■SECONDROWBUCKET(ifequipped)SEATINGPOSITION
—Youmustusethetetherstrapanchorlocationprovided
onthebackoftheseatcushion.(RefertoFigure4.)
[SS33600(ALL)12/95]
13-1/2pica
art:0050178-A
Figure4:Tetheranchorlocation—secondrowbucketseat
*
[SS33700(ALL)01/96]
WARNING
Onlyusethetetherattachmentholelocationsshownin
theillustrations.Thetetheranchormaynotperform
properlyifthewrongmountinglocationisused.
[SS33800(ALL)12/95]
Onceyouhaveattachedthesafetyseat,testtheseatbeforeyou
placethechildinit.Tilttheseatfromsidetoside.Alsotryto
tugtheseatforward.Checktoseeifthebeltholdstheseatin
place.
[SS33900(ALL)12/95]
WARNING
Ifthesafetyseatisnotanchoredproperly,theriskofa
childbeinginjuredinacollisionorsuddenstopgreatly
increases.
File:06wnsss.ex
Update:Thu Jul 18 11:00:49 1996

217
Starting
%
*
[TO00200(ALL)01/96] Fuel-InjectedEngines
[TO00300(ALL)12/95]
Sinceyourvehiclehasafuel-injectedengine,themost
importantthingtorememberistoavoidpressingdownonthe
acceleratorwhilecrankingtheenginetostart.Onlyusethe
acceleratorwhenyouhaveproblemsgettingyourvehicle
started.
%
*
[TO00400(ALL)01/96]
PreparingtoStartYourVehicle
*
[TO00500(ALL)02/96]
WARNING
Donotstartyourvehicleinaclosedgarageorinother
enclosedareas.Exhaustfumescanbetoxic.Alwaysopen
thegaragedoorbeforeyoustarttheengine.
*
[TO00600(ALL)01/96]
Beforeyoustartyourvehicle,always:
*
[TO00700(ALL)01/96] 1.Makesureyouandallyourpassengersbuckleyoursafety
belts.SeeSafetybeltsintheIndexformoredetails.
*
[TO00800(ALL)01/96] 2.Makesuretheheadlampsandotheraccessoriesareturned
offwhenstarting.
[TO00900(ALL)12/95] 3.MakesurethatthegearshiftleverisinPark(P)andthe
parkingbrakeissetbeforeyouturnthekey.
[TO01000(ALL)12/95]
Beforeyoustartyourvehicle,youshouldtestthewarninglights
ontheinstrumentclustertomakesurethattheywork.Referto
theInstrumentationchapter.
[TO01100(ALL)12/95]
StartingtheEngine
[TO01200(ALL)12/95]
Tostarttheengine:
[TO01300(ALL)12/95] 1.FollowthestepsunderPreparingtoStartYourVehicle.
*
[TO01400(ALL)01/96] 2.Keepyourfootonthebrakepedalandturntheignitionkey
toON.
File:08wntos.ex
Update:Thu Jul 18 11:01:04 1996

218
*
[TO01500(ALL)12/95] 3. DO NOT depress the accelerator pedal when starting your
engine. DO NOT use the accelerator until after the engine is
running and you are ready to drive away.
[TO01600(ALL)12/95] 4. Turn the key to the START position until the engine starts.
(Release the key after the engine has started and it will
return to the ON position.)
[TO01700(ALL)12/95]
If you have difficulty in turning the key, rotate the steering
wheel slightly to relieve any binding.
%
*
[TO01800(ALL)01/96]
For a cold engine:
*
[TO01900(ALL)01/96]
■ At temperatures 10˚F (-12˚C) and below: If the engine does
not start in fifteen (15) seconds on the first try, turn the key
to OFF, wait approximately ten (10) seconds so you do not
flood the engine, then try again.
*
[TO02000(ALL)01/96]
■ At temperatures above 10˚F (-12˚C): If the engine does not
start in five (5) seconds on the first try, turn the key to OFF,
wait approximately ten (10) seconds so you do not flood the
engine, then try again.
*
[TO02100(ALL)01/96]
For a warm engine:
*
[TO02200(ALL)01/96]
■ Do not hold the key in the START position for more than
five (5) seconds at a time. If the engine does not start within
five (5) seconds on the first try, turn the key to the OFF
position. Wait a few seconds after the starter stops, then try
again.
*
[TO02300(ALL)01/96]
Whenever you start your vehicle, release the key as soon as the
engine starts. Excessive cranking could damage the starter.
*
[TO02400(ALL)01/96]
After you start the engine, let it idle for a few seconds. Keep
your foot on the brake pedal and release the parking brake.
Put the gearshift lever in gear, slowly release the brake pedal
and drive away in the normal manner.
File:08wntos.ex
Update:Thu Jul 18 11:01:04 1996

Starting
219
*
[TO02500(ALL)12/95]
NOTE: Your vehicl ehasaninterloc ktha t prevent syoufrom
shiftin gout of P(Park ) unles syour foo t i sonthe
brak epedal.
*
[TO02600(ALL)01/96]
Iftheenginestilldoesnotstartaftertwoattempts:
[TO02700(ALL)04/96] 1.TurnthekeytotheOFFpositionandwaitabouttwo
minutes.
*
[TO02800(ALL)01/96] 2.Presstheacceleratorallthewaytothefloorandholdit.
[TO02900(ALL)12/95] 3.TurnthekeytotheSTARTposition.
[TO03000(ALL)12/95] 4.Releasethekeywhentheenginestarts.
*
[TO03100(ALL)03/96] 5.Releasetheacceleratorgraduallyastheenginespeedsup.
*
[TO03200(ALL)05/96]
Iftheenginestilldoesnotstart,thefuelpumpshut-offswitch
mayhavebeenactivated.Fordirectionsonhowtoresetthe
switchseeFuelPumpShut-OffSwitchintheindex.
[TO03300(ALL)12/95]
Acomputersystemcontrolstheengine’sidlerpm.Whenyou
startyourvehicle,theengine’sidlingrpmnormallyrunshigh.
Thesefasterenginespeedswillmakeyourvehiclemoveslightly
fasterthanwhentheengineisatitsnormalwarmengineidle
speed.Itshould,however,slowdownwhenthevehiclewarms
up.Ifitdoesnot,havetheidlerpmchecked.
*
[TO03400(ALL)01/96]
WARNING
Donot park , idle , or driv eyour vehicl ei ndr ygras sor
othe r dr ygroun dcover . Theemissio nsyste mheat sup
th eengin ecompartmen t andexhaus t system , whic hcan
star t afire.
File:08wntos.ex
Update:Thu Jul 18 11:01:04 1996
220
%
*
[TO03500(ALL)01/96]
UsingtheEngineBlockHeater(Ifequipped)
[TO03600(ALL)12/95]
Usingyourengineblockheaterisstronglyrecommendedifyou
liveinaregionwheretemperaturesconsistentlyreachs20˚F
(s29˚C)orbelowduringthewintermonths.Anengineblock
heaterwarmstheenginecoolantwhichimprovesstarting,
warmsuptheenginefaster,andallowstheheater-defrost
systemtorespondmorequickly.
*
[TO03700(ALL)01/96]
WARNING
Topreven t electrica l shock , donot useyour heate r with
ungrounde delectrica l system sor two-pronge d(cheater)
adapters.
*
[TO03800(ALL)01/96]
Forbestresults,plugtheheaterinatleastthreehoursbefore
youstartyourvehicle.Usingtheheaterforlongerthanthree
hourswillnotdamagetheengine,soyoucanleaveitplugged
inallnighttostartyourvehiclethefollowingmorning.
*
[TO03900(ALL)12/95] GuardingAgainstExhaustFumes
[TO04000(ALL)12/95]
Carbonmonoxide,althoughcolorlessandodorless,ispresentin
exhaustfumes.
*
[TO04100(ALL)02/96]
WARNING
Donot star t your vehicl ei naclose dgarag eor i nother
enclose dareas . Exhaus t fumesca nbetoxic . Alwaysopen
th egarag edoor befor eyoustar t th eengine.
*
[TO04200(ALL)01/96]
WARNING
I f youeve r smel l exhaus t fumesof anykin dinsid eyour
vehicle , haveyour deale r inspec t andfi xyour vehicle
immediately . Donot driv ei f yousmel l exhaus t fumes.
Thesefumesar eharmfu l andcoul dkil l you.
File:08wntos.ex
Update:Thu Jul 18 11:01:04 1996

Starting
221
*
[TO04300(ALL)01/96]
Have the exhaust and body ventilation systems checked by a
qualified technician whenever:
*
[TO04400(ALL)01/96]
■ your vehicle is raised for service
*
[TO04500(ALL)01/96]
■ the sound of the exhaust system changes
*
[TO04600(ALL)01/96]
■ your vehicle has been damaged in an accident
[TO04700(ALL)12/95]
If the exhaust system has any indications of leaks it should be
repaired immediately.
*
[TO04800(ALL)01/96]
Improve your ventilation by keeping all air intake vents clear of
snow, leaves, and other objects.
[TO04900(ALL)12/95]
If the engine idles while you are stopped in an open area for
long periods of time, open the windows at least one inch. Also,
adjust the heating or air conditioning to bring in outside air.
*
[TO05000(ALL)01/96]
Read the section Climate Control Systems for instructions on
bringing fresh outside air into your vehicle. Refer to the Index.
File:08wntos.ex
Update:Thu Jul 18 11:01:04 1996

223
Driving
%
*
[GF00200(ALL)05/96] Brakes
*
[GF00300(ALL)01/96]
When the foot (service) brake pedal is depressed, the
high-mount brake lamp should illuminate.
*
[GF00400(ALL)01/96]
Front Disc Brakes
[GF00500(ALL)01/96]
The front disc brakes are self-adjusting. They only require
periodic inspection for pad wear.
[GF00600(ALL)01/96]
Rear Disc Brakes (If equipped)
[GF00700(ALL)01/96]
The rear disc brakes are self-adjusting. They only require
periodic inspection for pad wear.
[GF00800(ALL)01/96]
The rear disc parking brakes need to be adjusted manually.
*
[GF00900(ALL)03/96]
Rear Drum Brakes
*
[GF01000(ALL)01/96]
The rear drum brakes are self-adjusting. Automatic adjustment
occurs through normal use of the brakes.
*
[GF01100(ALL)05/96]
Four-Wheel Anti-lock Brakes
*
[GF01200(ALL)01/96]
The Anti-lock Brake System (ABS) prevents wheels from
completely locking up by automatically releasing and
re-applying the brakes. During ABS braking, slight brake pedal
pulsations may be felt on the driver’s foot. These pulsations
represent the rapid cycling of the ABS valves. The pedal
pulsations are considered normal ABS operation, and will stop
when normal braking is resumed or when the vehicle comes to
a stop.
%
*
[GF01300(ALL)01/96]
During ABS activation, a mechanical noise may be heard as the
ABS system cycles. This is normal ABS operation.
*
[GF01400(ALL)01/96]
The ABS system has self-check capabilities. The system turns on
the ABS warning light each time you start the engine. After the
engine is started and the ABS warning light turns off, the
system performs another test the first time the vehicle reaches
File:09wngfs.ex
Update:Thu Jul 18 11:01:42 1996
224
4mph(6km/h).AmechanicalnoisemaybeheardastheABS
systemperformsaselftest.Thisisanormalpartoftheselftest
feature.Ifamalfunctionisfoundduringthischeck,theABS
warninglightwillcomeon.
[GF01500(ALL)01/96]
6picaart:0050147-B
Theanti-lockbrakesystemlight
*
[GF01600(ALL)01/96]
Youshouldalwaysbecarefulwhenbraking,evenifyour
vehiclehastheABSsystem.Heavybrakingonroadswithloose
surfacessuchassnoworgravel,orroadswithseverepavement
irregularitiescouldalsocauseyoutolosecontrolofyour
vehicle.
*
[GF01700(ALL)03/96]
WARNING
Iftheanti-lockbrakesystemwarninglightremainsonor
comesonwhiledriving,havethebrakingsystemchecked
byaqualifiedservicetechnicianassoonaspossible.
*
[GF01800(ALL)03/96]
NOTE:Ifafaultoccursintheanti-locksystem,andthebrake
warninglightisnotlit,theanti-locksystemis
disabledbutnormalbrakefunctionremains
operational.
*
[GF01900(ALL)01/96]
FordMotorCompanyhasnotfoundanynegativeeffectsof
mobileradiotransmittingequipmentinstalledonvehicleswith
theABSsystemprovidingthattheradioisinstalledaccording
totheradiomanufacturer’sinstructions.However,ifyouhave
hadamobileradiotransmitterinstalledandtheABSlight
comeson(atanytimeotherthanimmediatelyafterturningthe
File:09wngfs.ex
Update:Thu Jul 18 11:01:42 1996

Driving
225
keytotheONposition)haveyourmobileradiodealerinspect
theradioinstallation.Also,iftheABSsystemisactivatedother
thanduringmaximumbraking,haveyourmobileradio
installationchecked.
%
*
[GF02000(ALL)03/96]
IfBrakesDoNotGripWellorPedalis“Low”
*
[GF02100(ALL)01/96]
Ifthebrakepedalseems“low”itmayindicatetheneedfora
brakesysteminspectionand/orservice.Applyyourparking
brakeseveraltimes.Iftheconditionhasnotimproved,you
shouldhaveyourbrakescheckedassoonaspossible.
%
*
[GF02200(ALL)01/96]
Occasionalbrakesquealduringlighttomoderatestopsdoesnot
affectthefunctionofthebrakesystemandisnormal.However,
ifthesquealbecomesveryloudorifitbecomesmorefrequent,
returnthevehicletoyourdealerforinspection.
*
[GF02300(ALL)03/96]
WARNING
Modificationstothesuspensionspringratesand/or
vehiclerideheightmayadverselyaffectvehiclestopping
ability.
%
*
[GF02400(ALL)01/96]
StoppingDistances
*
[GF02500(ALL)01/96]
Stoppingdistancesvarywithdifferentloadsanddriving
conditions.Usecautionwhenyoudriveundernewconditions
andacquaintyourselfwithyourvehicle’sperformance.
%
*
[GF02600(ALL)01/96]
ApplyingtheBrakes
[GF02700(ALL)01/96]
Applythebrakepedalevenly.Usethe“squeeze”technique.
Pushonthebrakepedalwithasteadilyincreasingforce.This
allowsthewheelstocontinuetorollwhileyouareslowing
down,whichletsyousteerproperly.
*
[GF02800(ALL)01/96]
Donotdrivewithyourfootrestingonthebrakepedal.This
willincreaseyourvehicle’sstoppingdistanceandmayalso
causebrakedamage.
File:09wngfs.ex
Update:Thu Jul 18 11:01:42 1996
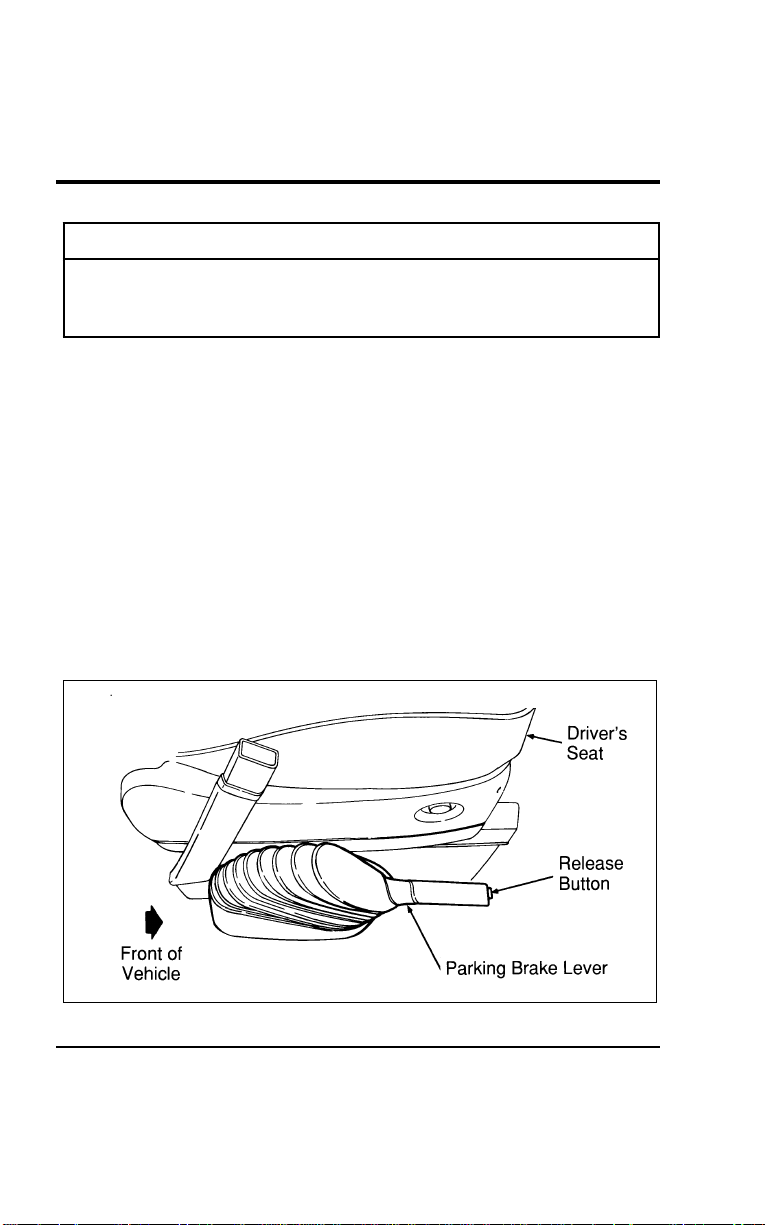
226
*
[GF02900(ALL)01/96]
WARNING
Ifyouaredrivingdownalongorsteephill,shifttoa
lowergear.Donotapplyyourbrakescontinuously,as
theymayoverheatandbecomelesseffective.
%
*
[GF03000(ALL)05/96] UsingtheParkingBrake
*
[GF03100(ALL)03/96]
Theparkingbrakeshouldbeusedwheneveryouparkyour
vehicle.
[GF03200(ALL)01/96]
Theparkingbrakeisahandoperatedleverlocatedonthefloor
ofyourvehiclejusttotherightofthedriver’sseat.
[GF03300(ALL)01/96]
Tosettheparkingbrakewhileparkingyourvehicle,pressthe
brakepedalwithyourrightfootandholditwhileyoufully
applytheparkingbrakelever.
[GF03400(ALL)01/96]
Toreleasetheparkingbrake,pressthebrakepedalwithyour
rightfoot,pulluptheleverwhiledepressingthereleasebutton
ontheparkingbrakeleverthenlowertheleverallthewayto
thefloor.
[GF03500(ALL)01/96]
13-1/2pica
art:0050057-B
Theparkingbrake
File:09wngfs.ex
Update:Thu Jul 18 11:01:42 1996

Driving
227
*
[GF03600(ALL)05/96]
WARNING
Alwayssettheparkingbrakefullyandmakesurethe
gearshiftislatchedinP(Park).Turnofftheignition
wheneveryouleaveyourvehicle.
*
[GF03700(ALL)02/96]
WARNING
Iftheparkingbrakeisfullyreleased,buttheBrake
Systemlightremainson,havethebrakeschecked
immediately.Theymaynotbeworkingproperly.
*
[GF03800(ALL)02/96]
Theparkingbrakeisnotdesignedtostopamovingvehicle,but
youcanusetheparkingbraketostopyourvehicleinan
emergencyiftheservicebrakesfail.However,sincetheparking
brakedoesnotstopyourvehicleasquicklyasthenormal
brakes,thestoppingdistancewillincreasegreatly.
%
*
[GF03850(ALL)02/96] TractionControl(Ifequipped)
[GF03875(ALL)02/96]
TractionControlcanhelpimproveyourtractiononslippery
surfaces,butalwaysoperateyourvehiclewithinreasonable
limits.Abruptchangesinacceleration,deceleration,turning,or
combinationsofthesemaneuverscancauseyourvehicleto
behavedifferentlythananticipated,especiallywhenroad
conditionsvary.
[GF03900(ALL)07/96]
ToturnTractionControloff,pressthebuttonlocatedinthe
centeroftheinstrumentpanel.
[GF04000(ALL)07/96]
TractionControlcanbeturnedbackonbypressingthebutton
againorbyrestartingtheengine.
File:09wngfs.ex
Update:Thu Jul 18 11:01:42 1996

228
%
*
[GF04100(ALL)01/96] Steering Your Vehicle
*
[GF04200(ALL)01/96]
Your vehicle has power steering. Power steering uses energy
from the engine to help steer your vehicle.
*
[GF04300(ALL)01/96]
Never hold the steering wheel in the extreme right or left
position for more than five seconds if the engine is running.
This can damage the power steering pump.
%
*
[GF04400(ALL)03/96]
If the amount of effort needed to steer your vehicle changes at a
constant vehicle speed, have the power steering system checked.
If the power steering system breaks down (or if the engine is
turned off), you can steer the vehicle manually but it takes more
effort.
*
[GF04500(ALL)01/96]
NOTE: After any severe impact such as striking large
potholes, sliding into curbs on icy roads, or a collision
involving the front end, have the front suspension
and steering checked for possible damage.
%
*
[GF04600(ALL)01/96] Automatic Transaxle Operation
%
*
[GF04700(ALL)05/96]
Putting Your Vehicle in Gear
[GF04800(ALL)01/96]
Your vehicle’s gearshift lever is on the steering column. The
OVERDRIVE ON/OFF button is located on the end of the
gearshift lever. You can put the gearshift lever in any one of
several positions.
File:09wngfs.ex
Update:Thu Jul 18 11:01:42 1996
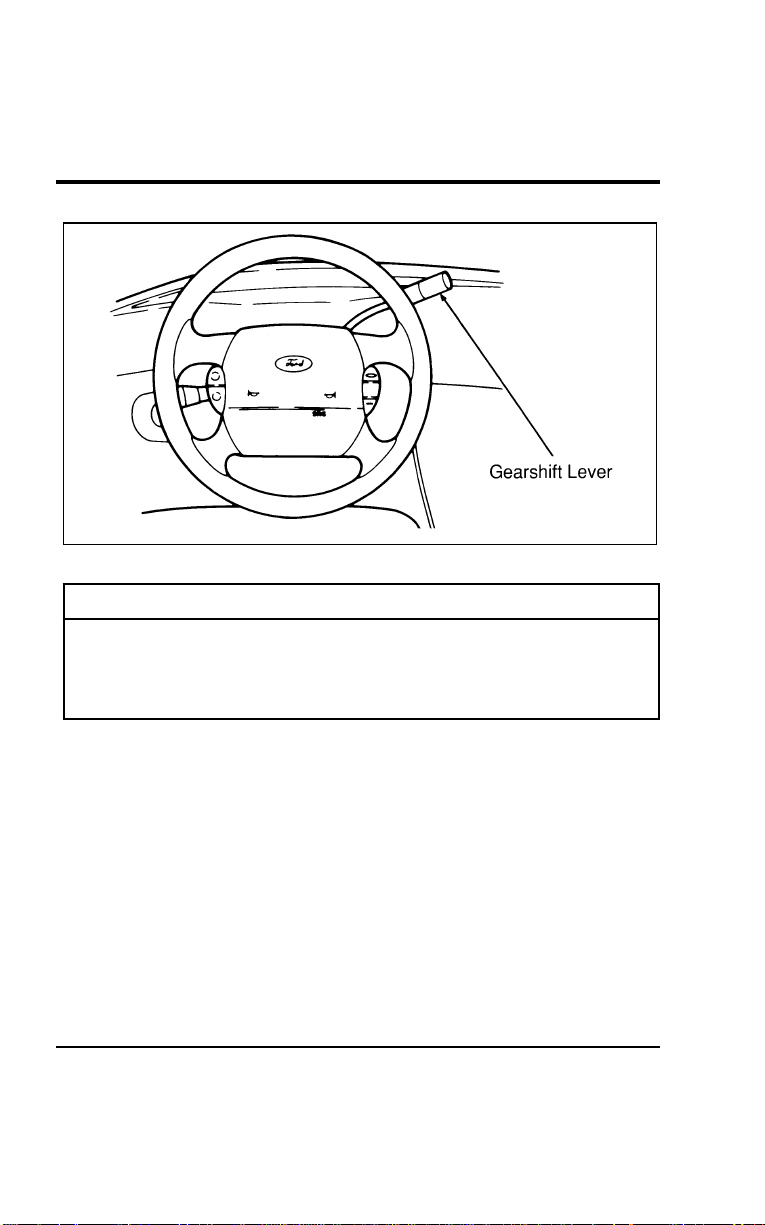
Driving
229
[GF04900(ALL)01/96]
13-1/2pica
art:0050016-A
Thesteeringcolumngearshift
*
[GF05000(ALL)05/96]
WARNING
Holdthebrakepedaldownwhileyoumovethegearshift
leverfrompositiontoposition.Ifyoudonotholdthe
brakepedaldown,yourvehiclemaymoveunexpectedly
andinjuresomeone.
*
[GF05100(ALL)01/96]
Onceyouplacethegearshiftleversecurelyintoposition,
graduallyreleasethebrakepedalandusetheacceleratoras
necessary.
%[GF05200(ALL)01/96]
Brake-ShiftInterlockSafetyFeature
[GF05300(ALL)01/96]
Yourvehiclehasaspecialbrake-shiftinterlocksafetyfeature
whichpreventsyoufromshiftingoutofP(Park)withoutthe
brakepedaldepressed.ToshiftthetransaxleoutoftheP(Park)
position,theignitionmustbeintheONpositionandyourfoot
mustbepressingonthebrakepedal.
File:09wngfs.ex
Update:Thu Jul 18 11:01:42 1996

230
*
[GF05400(ALL)01/96]
IftheshiftlevercannotbemovedfromtheP(Park)position
withthebrakepedaldepressed:
*
[GF05500(ALL)01/96] 1.Shuttheengineoffandremovetheignitionkey.
*
[GF05600(ALL)01/96] 2.Applytheparkingbrake.
*
[GF05700(ALL)05/96] 3.Reinserttheignitionkeyandturnittothefirstposition
(OFF).
*
[GF05800(ALL)01/96] 4.Depressthebrakepedal,movethegearshiftlevertoN
(Neutral)andstarttheengine.
*
[GF05900(ALL)05/96]
IfyouneedtoshiftoutofP(Park)byusingthealternate
proceduredescribedabove,itispossiblethatafusehasblown
andthatyourbrakelampsmayalsonotbefunctional.Please
refertothechaptertitledRoadsideEmergenciesinthisOwner
Guideforinstructionsoncheckingandreplacingfuses.
*
[GF06000(ALL)05/96]
WARNING
DONOTDRIVEYOURVEHICLEUNTILYOUVERIFY
THATTHEBRAKELAMPSAREWORKING.
%
*
[GF06100(ALL)05/96]
BackingUp
*
[GF06200(ALL)01/96]
BeforeshiftingintooroutofR(Reverse),youshouldalways
cometoacompletestop.
%
*
[GF06300(ALL)05/96]
Driving
[GF06400(ALL)01/96]
When to use N (Neutral)
*
[GF06500(ALL)09/95]
InN(Neutral),thewheelsofthetransaxlearenotlocked.Your
vehiclewillrollfreely,evenontheslightestincline,unlessthe
parkingbrakeorbrakesareon.
File:09wngfs.ex
Update:Thu Jul 18 11:01:42 1996
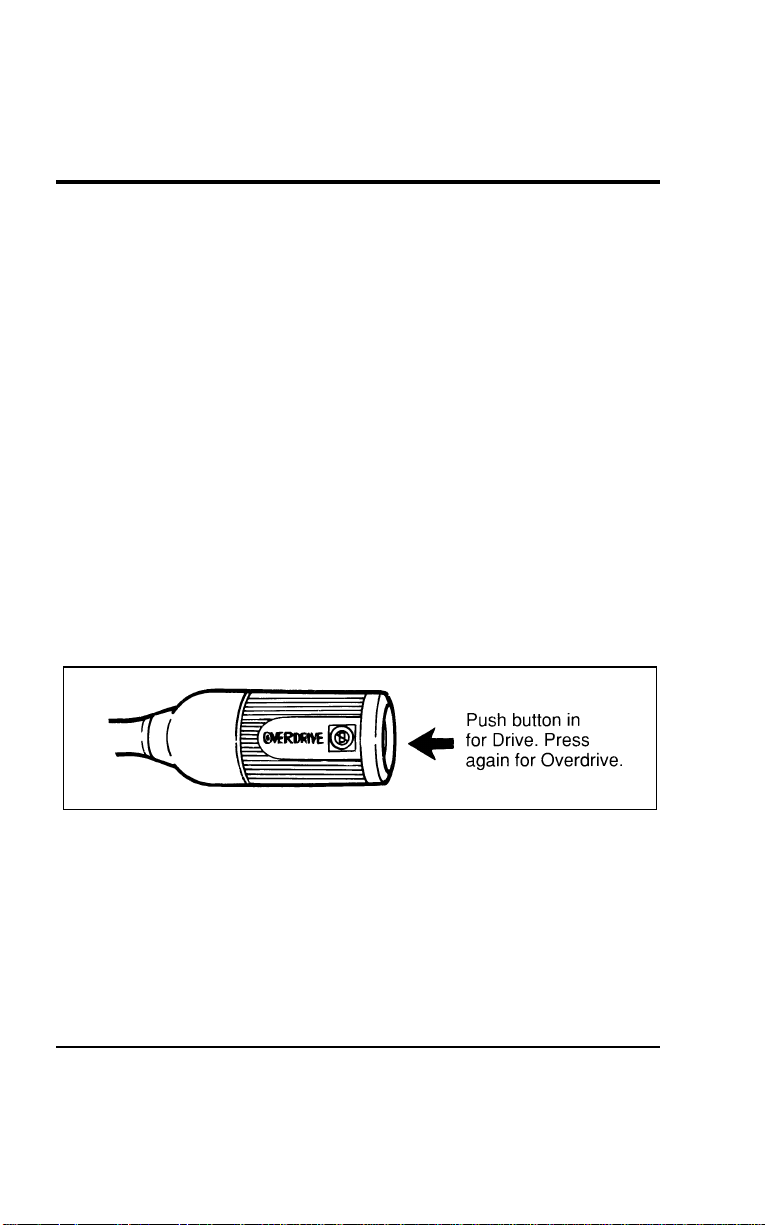
Driving
231
[GF06600(ALL)01/96]
When to use
j
Overdrive
[GF06700(ALL)01/96]
Overdrive is the normal driving position. When the gearshift
lever is placed in
j
Overdrive, and the Overdrive Off button
has not been pressed, the vehicle will automatically upshift to
second, third and fourth gears. The transaxle will shift into the
correct gear when the right speed is reached.
% [GF06800(ALL)01/96]
When to use D (Drive) — with the Overdrive Off button
activated
[GF06900(ALL)01/96]
You will notice that there is only one drive position on your
gearshift indicator (instead of Drive and Overdrive). However,
you will find a button and an indicator light located on the
gearshift lever. Push in the button on the end of the lever and
the OVERDRIVE OFF light on the end of the gearshift lever will
illuminate. With the OVERDRIVE OFF light illuminated, the
transaxle will operate in first, second and third gears and will
not shift into fourth gear. Operating in Drive (OVERDRIVE OFF
light illuminated) provides more engine braking than Overdrive
for descending hills or city driving.
[GF07000(ALL)01/96]
6 pica art:0050058-A
Overdrive button location
[GF07100(ALL)01/96]
To return the transaxle to the normal Overdrive operation, press
the OVERDRIVE ON/OFF button again. Use this button to
select Overdrive or Overdrive Off whenever you drive your
vehicle.
*
[GF07200(ALL)01/96]
The transaxle will be in the “overdrive on” mode when the
vehicle is started even if the O/D OFF mode was selected when
the vehicle was last shut off.
File:09wngfs.ex
Update:Thu Jul 18 11:01:42 1996

232
*
[GF07300(ALL)01/96]
NOTE:IftheO/DOFFindicatorlightisflashingonandoff
repeatedlywhenthevehicleisstarted,thereisa
transaxleelectronicsystemmalfunction.Contactyour
dealerassoonaspossible.
*
[GF07400(ALL)05/96]
When to use 2 (Second)
[GF07500(ALL)01/96]
Use2(Second)whendrivingonslipperyroadsortoprovide
additionalenginebrakingondowngrades.Thisposition
providesSecondandFirstgearoperationonly.
*
[GF07600(ALL)01/96]
When to use 1 (First)
[GF07700(ALL)05/96]
Use1(First)toprovidemaximumenginebrakingonsteep
downgrades.UpshiftsfromFirstcanbemadebymanually
shiftingto2(Second)or
j
(Overdrive).1(First)gearprovides
onlyfirstgearoperation.IfyouselectFirstwhiledrivingat
higherspeeds,thetransaxlewillshiftto2(Second),andthen
downshiftto1(First)afterthevehicledeceleratestotheproper
speed.
*
[GF07800(ALL)01/96]
Parking
*
[GF07900(ALL)01/96]
AlwayscometoacompletestopbeforeyoushiftintoP(Park).
Thispositionlocksthetransaxleandpreventsthefrontwheels
fromturning.TosecurelylatchthegearshiftintheP(Park)
position,pullittowardyou,pushitcompletely
counterclockwiseagainstthestop,andthenpushittowardthe
instrumentpanel.
[GF08000(ALL)01/96]
ThegearshiftissecurelylatchedinP(Park)ifyoucannot
rotateitinaclockwisedirectionwithoutpullingittowardyou.
*
[GF08100(ALL)05/96]
WARNING
Alwayssettheparkingbrakefullyandmakesurethe
gearshiftislatchedinP(Park).Turnofftheignition
wheneveryouleaveyourvehicle.
File:09wngfs.ex
Update:Thu Jul 18 11:01:42 1996

Driving
233
*
[GF08200(ALL)05/96]
WARNING
Neverleaveyourvehicleunattendedwhileitisrunning.
*
[GF08300(ALL)05/96]
Forced Downshifts
[GF08400(ALL)01/96]
Togainextraaccelerationin
j
(Overdrive)(whenpassing
anothervehicle)pushtheacceleratortothefloor.Thetransaxle
willautomaticallydownshifttotheappropriategear(third,
secondorfirst).
*
[GF08500(ALL)01/96] VehicleLoadingInformation
*
[GF08600(ALL)01/96]
Yourvehicle’sloadcapacityisdesignatedbyweight,not
volume,soyoucannotnecessarilyusealltheavailablespace.
Maximumsafevehicleweightsaswellastiresizes,rimsizes
andinflationpressuresarespecifiedforyourvehicleatthe
assemblyplantontheSafetyComplianceCertificationLabel.
Thecertificationlabelislocatedonthepillarinthedriver’s
dooropening.
*
[GF08700(ALL)01/96]
Eachadditionalitemofequipmentaffectshowmuchcargoa
vehiclecancarry.Ifavehicleisoverloaded,performancewill
sufferandserviceconcernsmayarise.
*
[GF08800(ALL)01/96]
NOTE:Thevehiclemustnotbeloadedtoboththefrontand
rearGAWRbecausetheGVWRwillbeexceeded.The
GAWRofthefrontandrearaxlesexceedtheGVWR
whenaddedtogether.
File:09wngfs.ex
Update:Thu Jul 18 11:01:42 1996

234
*
[GF08900(ALL)01/96]
Understanding Loading Information
*
[GF09000(ALL)01/96]
There are five terms that are used to describe a vehicle’s ability
to carry a load:
*
[GF09100(ALL)01/96]
■ Base Curb Weight
*
[GF09200(ALL)01/96]
■ Payload
*
[GF09300(ALL)01/96]
■ GVW (Gross Vehicle Weight)
*
[GF09400(ALL)01/96]
■ GVWR (Gross Vehicle Weight Rating)
*
[GF09500(ALL)01/96]
■ GAWR (Gross Axle Weight Rating)
*
[GF09600(ALL)01/96]
■ GCWR (Gross Combined Weight Rating)
*
[GF09700(ALL)01/96]
Base Curb Weight
*
[GF09800(ALL)01/96]
The base curb weight is the weight of the vehicle including fuel,
coolants, lubricants, emergency tools and spare wheel and tire.
It also includes any equipment that is standard. It does not
include passengers, cargo or optional equipment installed by
factory, dealer, aftermarket supplier or customer.
*
[GF09900(ALL)01/96]
Payload
*
[GF10000(ALL)01/96]
Maximum payload is the combined, maximum allowable weight
of cargo, occupants and optional equipment that the vehicle is
designed to carry. It is the Gross Vehicle Weight Rating minus
the base curb weight.
*
[GF10100(ALL)01/96]
Gross Vehicle Weight (GVW)
*
[GF10200(ALL)01/96]
The Gross Vehicle Weight (GVW) is the total weight of the
passengers, cargo and all equipment.
*
[GF10300(ALL)01/96]
It is important to remember that GVW is not a limit or a
specification, but actual weight. If an owner loads up the vehicle
and weighs it, that’s the GVW at that moment. If the owner
adds on more of a load and weighs it again, that becomes the
GVW.
File:09wngfs.ex
Update:Thu Jul 18 11:01:42 1996

Driving
235
%
*
[GF10400(ALL)01/96]
Gross Vehicle Weight Rating (GVWR)
[GF10500(ALL)01/96]
To avoid overloading your vehicle, never exceed the specified
Gross Vehicle Weight Rating for your vehicle. The GVWR is the
maximum allowable weight of the vehicle when fully loaded
including passengers, cargo and all equipment.
%
*
[GF10600(ALL)01/96]
Gross Axle Weight Rating (GAWR)
*
[GF10700(ALL)01/96]
We have all seen a car or a truck that is loaded down in the
rear and riding high in the front. This is a dangerous condition
that usually means that the rear suspension components are
under severe strain and that vehicle handling is impaired. There
is more to carrying a load than just payload or GVWR.
[GF10800(ALL)01/96]
Your Safety Compliance Certification Label not only gives the
GVWR, it also gives the Gross Axle Weight Rating (GAWR)
which is the maximum weight allowed on the axle system.
*
[GF10900(ALL)01/96]
The rating is based on the carrying capacity of the weakest axle
and suspension component as well as other factors. This is why
it is so important to observe vehicle loading ratings.
Overloading a vehicle punishes components and can lead to
shortened service life or outright failure.
*
[GF11000(ALL)01/96]
The weakest link in the suspension system defines the GAWR,
and may be the tires. Tires are rated to carry a specific
maximum load at a specific tire pressure.
*
[GF11100(ALL)01/96]
When passenger car tires are installed on light trucks and
multipurpose passenger vehicles, they are rated at a 10% lower
load carrying capacity due to the differences in vehicle usages.
*
[GF11200(ALL)01/96]
With the tires inflated to the specified pressure, the total weight
of your vehicle must not exceed the GVWR and GAWR
specified on the Safety Compliance Certification Label. This
includes full fuel tank(s), vehicle equipment, and occupants, as
well as the cargo load.
File:09wngfs.ex
Update:Thu Jul 18 11:01:42 1996
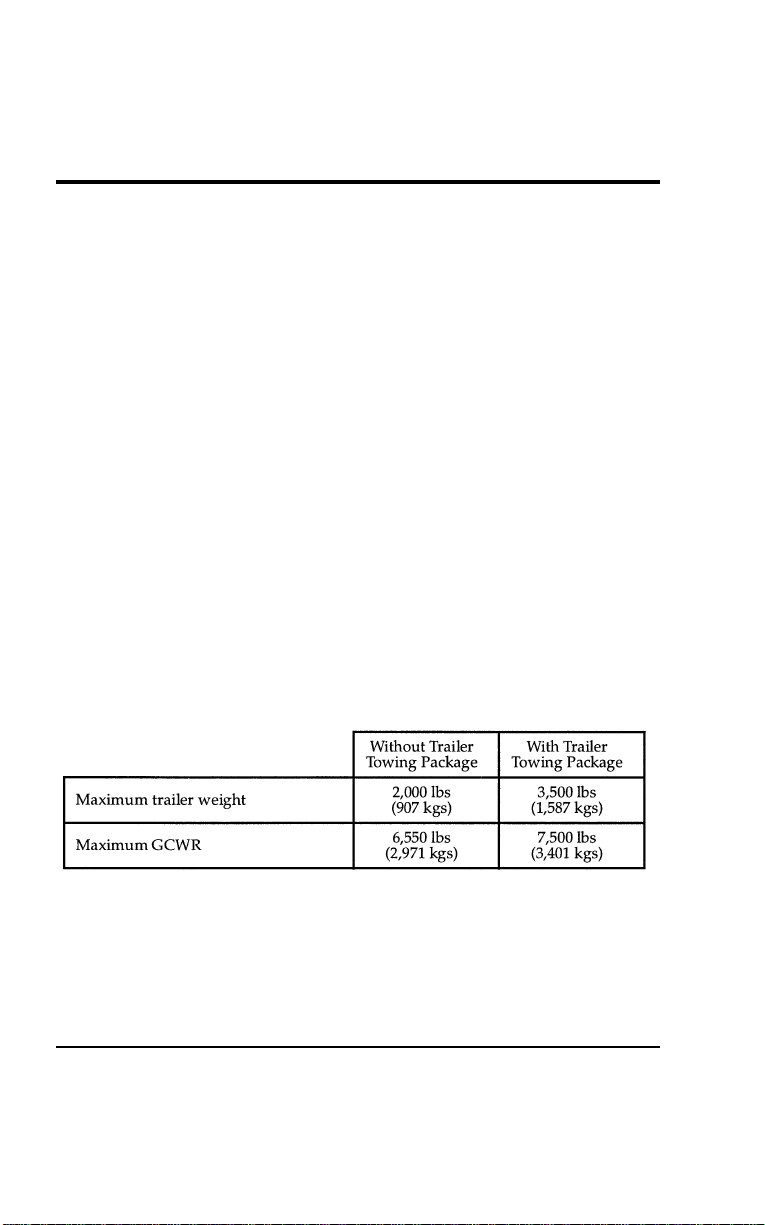
236
*
[GF11300(ALL)01/96]
Gross Combined Weight Rating (GCWR)
*
[GF11400(ALL)01/96]
The GCWR is the maximum allowable weight of the towing
vehicle and the loaded trailer (including all cargo and
passengers).
%
*
[GF11500(ALL)01/96]
Calculating the Payload for Your Vehicle
*
[GF11600(ALL)01/96]
To know how much weight your vehicle can carry:
*
[GF11700(ALL)01/96] 1. Obtain the GVWR and GAWR from your Safety Compliance
Certification Label.
[GF11800(ALL)01/96]
— If you do not plan to pull a trailer, do not include these
ratings into your calculations.
*
[GF11900(ALL)01/96] 2. Fill the fuel tank.
*
[GF12000(ALL)01/96] 3. Weigh your vehicle without cargo.
*
[GF12100(ALL)01/96] 4. Subtract vehicle actual weight from the GVWR to find out
how much more weight your vehicle can carry.
*
[GF12200(ALL)01/96] 5. Weigh the vehicle again once it is loaded to make sure that
the GVWR and front and rear GAWR’s are not exceeded.
%
*
[GF12300(ALL)01/96]
Trailer towing table
[GF12400(ALL)01/96]
eight pica
chart:0050061-C
File:09wngfs.ex
Update:Thu Jul 18 11:01:42 1996
Driving
237
[GF12500(ALL)01/96]
Ifyoususpectthatyourpayloadisexcessive,haveyourvehicle
weighedatahighwayweightstationoranotherappropriate
commercialfacility.Fillthefueltank.Weighthetotalvehicle
andtrailer(ifapplicable),thenseparatelyweighthevehicleat
thefrontandrearwheels.Finally,weighthetrailerseparatelyif
applicable.
*
[GF12600(ALL)01/96]
Trailers
*
[GF12700(ALL)01/96]
Towingatrailersafelymeanshavingtheproperweightonthe
tongue(usually10-15%ofthetrailerweight).
*
[GF12800(ALL)01/96]
IfyourvehicleexceedstheGVWR,removecargofromyour
vehicleaccordingly.IfyourvehicleexceedseitherGAWR,shift
theloadorremovecargoaccordingly.
*
[GF12900(ALL)01/96]
WARNING
DonotexceedtheGVWRortheGAWRspecifiedonthe
SafetyComplianceCertificationLabel.
*
[GF13000(ALL)01/96]
WARNING
Towingtrailersbeyondthemaximumrecommended
grosstrailerweightexceedsthelimitofthevehicleand
couldresultinenginedamage,transaxledamage,
structuraldamage,lossofcontrol,andpersonalinjury.
*
[GF13100(ALL)05/96]
PreparingtoTow
*
[GF13200(ALL)01/96]
Foryoursafetyandforthegoodofyourvehicle,usetheright
equipmentforthetypeoftraileryoutow.Also,makesurethat
alltowingequipmentisproperlyattachedtoyourvehicle.If
youarenotcertainthatyouareusingtherightequipmentin
thepropermanner,seeyourdealerorareliabletrailerdealer.
File:09wngfs.ex
Update:Thu Jul 18 11:01:42 1996
238
%
*
[GF13300(ALL)01/96]
Hitches
*
[GF13400(ALL)01/96]
Fortowingtrailersupto2,000lbs.(907kg),useagood
weight-carryinghitchandhitchballwhichuniformlydistributes
thetrailertongueloadthroughtheunderbodystructure.
*
[GF13500(ALL)01/96]
Donotusesingleclampbumperhitchesorhitchesthatattach
totheaxle.
*
[GF13600(ALL)01/96]
Wheneveratrailerhitchandhardwareareremoved,makesure
allmountingholesintheunderbodyareproperlysealedto
preventexhaustfumesfromenteringthevehicle.
*
[GF13700(ALL)01/96]
Safety chains
*
[GF13800(ALL)01/96]
Alwaysusesafetychainsbetweenyourvehicleandtrailer.
Crosschainsunderthetrailertongueandallowslackfor
turningcorners.Connectsafetychainstothevehicleframeor
hookretainers.Neverattachchainstothebumper.
[GF13900(ALL)04/96]
Trailer brakes
*
[GF14000(ALL)01/96]
Separatetrailerbrakesarerequiredonmosttrailersweighing
over1,500lbs.(680kg).
*
[GF14100(ALL)05/96]
WARNING
Donotconnectatrailer’shydraulicbrakesystemdirectly
toyourvehicle’sbrakesystem.Yourvehiclemaynot
haveenoughbrakingpowerandyourchancesofhaving
acollisiongreatlyincrease.
%
*
[GF14200(ALL)01/96]
TrailerLamps
*
[GF14300(ALL)01/96]
Makesureyourtrailerlampsconformtofederalandlocal
regulations.
*
[GF14400(ALL)01/96]
ClassITrailerTowelectricalwiringprovidestwocircuits(right
handandlefthand)tooperatetrailerstop/turntaillamps.Each
stop/turncircuitwilloperateonecombinationstop/turnlight
bulb(#1157,3157,2357,or3357)onthetrailer.Neveraddmore
thanonetrailerlightbulbtoonecircuit.
File:09wngfs.ex
Update:Thu Jul 18 11:01:42 1996

Driving
239
*
[GF14500(ALL)01/96]
WARNING
Alwaysreplaceafusewithonethathasthespecified
amperagerating.Usingafusewithahigheramperage
ratingcancauseseverewiredamageandcouldstarta
fire.
%
*
[GF14600(ALL)05/96]
DrivingWhileYouTow
*
[GF14700(ALL)05/96]
Beespeciallycarefulwhendrivingwhileyoutowatrailer.
Neverdrivefasterthan45mph(70km/h)whenyoutowin
hillycountryonhotdays.Also,anticipatestopssothatyoucan
brakegradually.
*
[GF14800(ALL)01/96]
Ifyouusethespeedcontrolwhileyouaretowingonverylong,
steepgrades,thespeedcontrolmayshutoffautomatically.
*
[GF14900(ALL)01/96]
Whendescendingasteepgradewithatrailer,operateinDrive
ratherthanOverdrive.Ifadditionalbrakingisneeded,shiftinto
2(Second)or1(First)gear.
[GF15000(ALL)05/96]
ServicingYourVehicleIfYouTow
*
[GF15100(ALL)07/96]
Ifyoutowatrailerforalongdistance,yourvehiclewillneed
tobeservicedmorefrequentlythanusual.Refertothe
MaintenanceSchedulebookletforadditionalinformation.
*
[GF15200(ALL)01/96]
TrailerTowingTips
*
[GF15300(ALL)01/96]
Beforestartingonatrip,practiceturning,stoppingandbacking
inanareaawayfromheavytraffic.Gettoknowthe“feel”of
thevehicle/trailercombination.
*
[GF15400(ALL)01/96]
Practicebackingup.Backupveryslowly,withsomeoneoutside
attherearofyourtrailertoguideyou.Placeyourhandatthe
bottomofthesteeringwheelandmoveitinthedirectionyou
wanttherearofthetrailertoswing.Slightmovementofthe
steeringwheelresultsinamuchlargermovementoftherearof
thetrailer.
File:09wngfs.ex
Update:Thu Jul 18 11:01:42 1996

240
*
[GF15500(ALL)01/96]
When turning, drive slightly beyond the normal turning point
so the trailer wheels will clear curbs or other obstructions.
*
[GF15600(ALL)01/96]
Allow more room for stopping with a trailer attached. Trailer
brakes should be applied first, whether manually or
automatically controlled, when approaching a stop.
*
[GF15700(ALL)01/96]
For an easy-to-operate vehicle/trailer combination, the trailer
tongue load should be approximately 10-15% of the loaded
trailer weight.
*
[GF15800(ALL)01/96]
Make a thorough check of your equipment before starting out
on the road. After you have traveled about 50 miles (80 km),
stop in a protected area and double-check your hitch and
electrical connections. Also check trailer wheel lug nuts for
tightness.
[GF15900(ALL)01/96]
When stopped in traffic for long periods of time in hot weather,
place the gearshift selector lever in P (Park) to increase the
engine idle speed. This aids in engine cooling and air
conditioner efficiency. If the engine overheats, turn the selector
knob to select the fresh air position to stop the air conditioner
compressor. Increase the engine speed for a short time.
*
[GF16000(ALL)01/96]
Vehicles with trailers should not be parked on a grade.
However, if you must park on a grade, place wheel chocks
under the trailer’s wheels as follows:
[GF16100(ALL)01/96] 1. Apply the foot service brake pedal and hold.
*
[GF16200(ALL)01/96] 2. Have another person place the wheel chocks under the
trailer wheels.
[GF16300(ALL)01/96] 3. With the chocks in place, release the foot service brake
pedal, making sure the chocks are holding.
[GF16400(ALL)01/96] 4. Apply the parking brake by pressing the service brake pedal
down firmly with your right foot while applying the parking
brake lever with your right hand.
*
[GF16500(ALL)01/96] 5. Shift the gearshift lever into P (Park).
File:09wngfs.ex
Update:Thu Jul 18 11:01:42 1996
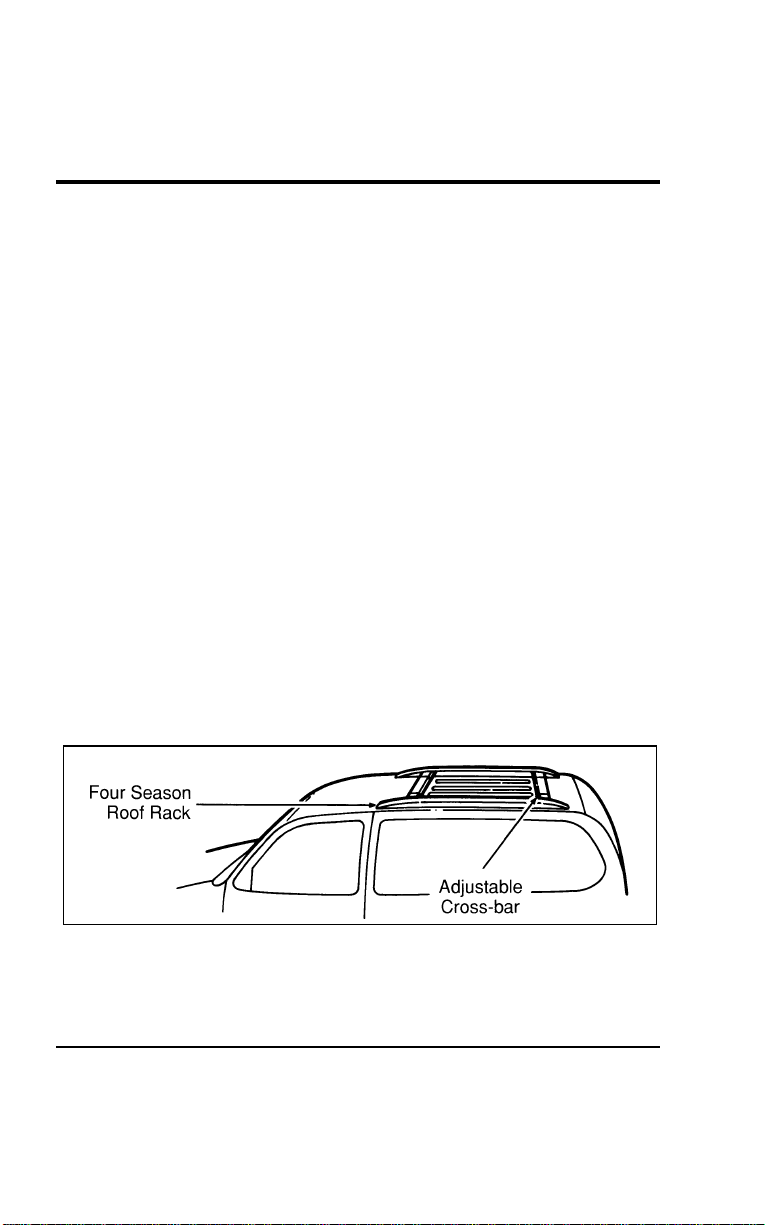
Driving
241
[GF16600(ALL)01/96]
Complete the following steps to start your vehicle after it has
been parked on a grade:
[GF16700(ALL)01/96] 1. Apply the foot service brake pedal and hold.
*
[GF16800(ALL)03/96] 2. Start the engine.
*
[GF16900(ALL)01/96] 3. Shift the gearshift lever into gear and release the parking
brake.
[GF17000(ALL)01/96] 4. Release the foot service brake pedal and move the vehicle
uphill to free the wheel chocks.
[GF17100(ALL)01/96] 5. Apply the foot service brake pedal and hold while another
person retrieves the chocks.
%
*
[GF17200(ALL)01/96] Four Season Roof Rack (If equipped)
[GF17300(ALL)12/95]
Always load your luggage as far back as it will safely go on the
four season roof rack. Do not load more than 165 pounds
(75 kg) on the roof rack structure or 100 pounds (45 kg) on the
roof panel slats. Be careful that your vehicle does not exceed the
Gross Vehicle Weight Rating (GVWR) or its Gross Axle Weight
Rating (GAWR front and rear). The GVWR and GAWR are
located on the Safety Compliance Certification Label (located on
the driver’s door pillar).
[GF17400(ALL)12/95]
7-1/2 pica art:0050109-A
The four season roof rack
File:09wngfs.ex
Update:Thu Jul 18 11:01:42 1996
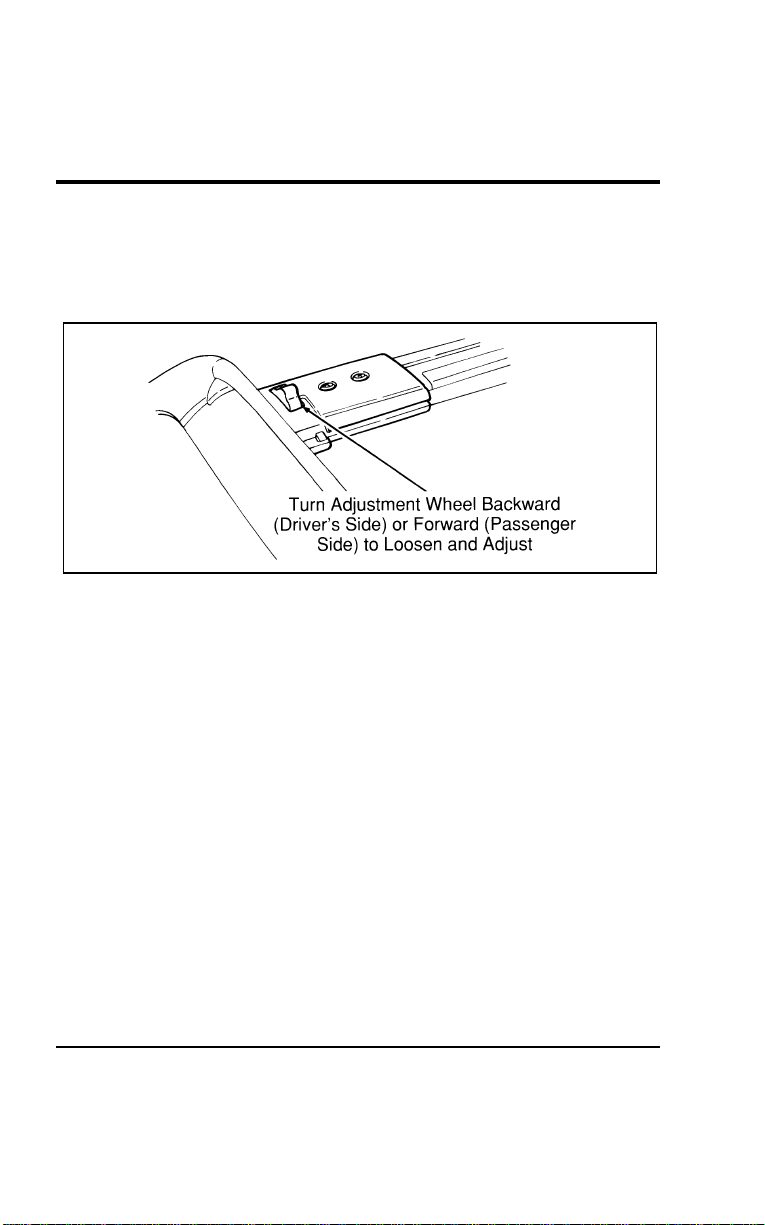
242
[GF17500(ALL)12/95]
The rear cross-bar can be adjusted forward and backward. Place
your luggage between the bars, adjust the rear bar, and secure
the luggage with rope to the bars. Items carried on the roof
rack must be properly secured before driving your vehicle.
[GF17600(ALL)12/95]
10-1/2 pica
art:0050032-B
The adjustable cross-bar
%
*
[GF17700(ALL)01/96] Driving Under Special Conditions
%
*
[GF17800(ALL)01/96]
Tips for Safe Driving
[GF17900(ALL)04/96]
As with any new vehicle, yours may drive and handle
differently from your previous vehicle. Use greater care until
you become accustomed to its features and driving
characteristics.
[GF18000(ALL)04/96]
Always operate your vehicle within reasonable limits. Abrupt
changes in acceleration, deceleration, turning, or combinations of
these maneuvers can cause a vehicle to behave differently than
anticipated, especially when road conditions vary.
[GF18100(ALL)04/96]
For example, even with anti-lock brakes, extreme braking can
make it difficult to control the direction of the vehicle. Use a
“squeeze” technique. Push on the brake pedal with steadily
increasing force. This allows the wheels to brake, yet continue to
roll so that you may steer in the direction you want to travel.
File:09wngfs.ex
Update:Thu Jul 18 11:01:42 1996
Driving
243
[GF18200(ALL)04/96]
Ifyoureleasetheacceleratorabruptlyorbrakehardwhile
goingtoofastaroundaseverecurve,yourvehiclemaychange
itsdirectionoftravel.Avoidapplyingthebrakes,ifpossible.If
youmustapplythebrakes,usethe“squeeze”technique
describedearlier.
*
[GF18300(ALL)01/96]
WheelSpin
[GF18400(ALL)01/96]
Extremeaccelerationcancausethefrontwheelstospin,
resultinginreducedsteeringcontrol.Ifthewheelsspinduring
vehiclestart-up,shiftto2(Second)gear.Moveforwardslowly
andevenly.Ifthisdoesnotwork,tryrockingthevehicle.
%[GF18500(ALL)04/96]
DrivingatHighSpeeds
*
[GF18600(ALL)03/96]
WARNING
Drivingtoofastforconditionscreatesthepossibilityof
lossofvehiclecontrol.Drivingatveryhighspeedsfor
extendedperiodsoftimemayresultindamagetovehicle
components.
*
[GF18700(ALL)03/96]
FordMotorCompanyrecommendsobeyingpostedspeedlimits.
*
[GF18800(ALL)05/96]
WARNING
Donotspinthewheelsatover35mph(55km/h).The
tiresmayfailandinjureapassengerorbystander.
%
*
[GF18900(ALL)01/96]
DrivinginBadWeather
%
*
[GF19000(ALL)01/96]
Slippery roads
[GF19100(ALL)01/96]
■Drivecautiouslyonwetorsnowyroads.
*
[GF19200(ALL)01/96]
■Donotquicklymovethesteeringwheelunlessnecessary.
[GF19300(ALL)04/96]
■Drivemoreslowlythanyouwouldnormally.
*
[GF19400(ALL)01/96]
■Donotusespeedcontrol.
*
[GF19500(ALL)01/96]
■Giveyourvehiclemoredistancetostop.
File:09wngfs.ex
Update:Thu Jul 18 11:01:42 1996
244
[GF19600(ALL)04/96]
■Usethe“squeeze”techniqueforbrakingasdescribedin
previousbrakingsections.
*
[GF19700(ALL)01/96]
■Considerusingoneofthelowergears.
*
[GF19800(ALL)01/96]
WARNING
Toavoidskiddingandlosingcontrolonslipperyroads,
donotdownshiftinto1(First)whenyouaremoving
fasterthan20mph(30km/h).
[GF19900(ALL)04/96]
WARNING
TheAnti-LockBrakeSystemmaynotpreventbrake
lock-uponextremelyslipperysurfaces.
%
*
[GF20000(ALL)01/96]
High water
*
[GF20100(ALL)01/96]
Donotdrivethroughfloodedareasunlessyouaresurethatthe
waterisbelowthebottomofthewheelhubs.
[GF20200(ALL)04/96]
Ifyoumustdrivethroughhighwater,driveslowly.Youmay
havelimitedtractionorwetbrakessoallowextrastopping
distancebecauseyourvehiclewillnotstopasquicklyasusual.
[GF20300(ALL)04/96]
Afteryoudrivethroughthestandingwater,applyyourbrakes
gentlyseveraltimesasyourvehiclemovesslowlytohelpdry
thebrakes.
*
[GF20400(ALL)05/96]
RockingtheVehicle
[GF20500(ALL)04/96]
Ifyourvehiclegetsstuck(forexample,inmudorsnow),you
mayrockitout.Shiftinasteadyrhythmbetweenforwardand
reversegears.Atthesametime,presslightlyontheaccelerator.
Ifyouarestillstuckafterafewminutesofrocking,callfora
towtruck.
[GF20600(ALL)01/96]
NOTE:IfyourvehicleisequippedwithTractionControl,
makesurethesystemhasbeenturnedoffbefore
attemptingtorockthevehicle.
File:09wngfs.ex
Update:Thu Jul 18 11:01:42 1996
Driving
245
[GF20700(ALL)01/96]
SeeTractionControlOffLightintheInstrumentationsectionof
thisguideformoreinformation.
[GF20800(ALL)04/96]
Donotrockthevehicleformorethanafewminutes.Thismay
overheattheengine,damagethetransaxle,ordamagethetires.
%
*
[GF20900(ALL)01/96]
DrivingWithaHeavyLoad
*
[GF21000(ALL)01/96]
TheSafetyComplianceCertificationLabel,locatedonthe
driver’sdoorpillar,providesimportantinformationregarding
theweightlimitsyourvehiclecansafelycarryortow.Thetotal
weightofyourvehicle,includingtheweightofthepassengers
andcargo,shouldneverbemorethantheGrossVehicleWeight
Rating(GVWR).Also,theweightthatyourvehiclecarrieson
thefrontaxleandrearaxleshouldneverbemorethanthe
GrossAxleWeightRating(GAWR)fortherespectiveaxle.
*
[GF21100(ALL)01/96]
Theloadcapacitiesofyourvehicle’stiresaffecttheGVWRor
GAWRlimitations.Usingreplacementtireswithahigherweight
limitthantheoriginalsdoesnotincreaseGVWRorGAWR.
UsinglowercapacityreplacementtiresmaylowerGVWRand
GAWRlimitations.
*
[GF21200(ALL)01/96]
WARNING
DonotexceedtheGVWRortheGAWRspecifiedonthe
SafetyComplianceCertificationLabel.
*
[GF21300(ALL)03/96]
Vehicle/TrailerLoads
[GF21400(ALL)01/96]
YourvehiclemaytowaClassItrailerupto2,000lbs.(907kgs)
or3,500lbs.(1,587kgs)withTrailerTowPackageprovidedthe
GrossVehicleWeight(GVW)islessthantheGVWRshownon
theSafetyComplianceCertificationLabel.
File:09wngfs.ex
Update:Thu Jul 18 11:01:42 1996

246
%
*
[GF21500(ALL)01/96]
Towing a Trailer
*
[GF21600(ALL)01/96]
Towing a trailer puts an additional load on your vehicle’s
engine, transaxle, axle, brakes, tires and suspension. For your
safety and for the good of your vehicle, use the right equipment
for the type of trailer you tow.
*
[GF21700(ALL)01/96]
■ Stay within the load limits when you tow.
*
[GF21800(ALL)01/96]
■ Carefully and thoroughly prepare your vehicle for towing,
making sure to use the right equipment and to attach it
properly. See Preparing to Tow in this section.
*
[GF21900(ALL)01/96]
■ Use extra caution when driving your vehicle while you tow.
See Driving While You Tow in this section.
*
[GF22000(ALL)01/96]
■ Service your vehicle more frequently if you tow a trailer. See
Servicing Your Vehicle if You Tow in this section.
*
[GF22100(ALL)01/96]
Do not tow a trailer until your vehicle has been driven at least
500 miles (800 km).
File:09wngfs.ex
Update:Thu Jul 18 11:01:42 1996

247
Roadside Emergencies
*
[ER00200(ALL)01/96]
The hazard flasher is used to alert other drivers to hazardous
situations.
*
[ER00300(ALL)01/96]
The hazard flasher switch operates the same lamps as the turn
signal lever. When the hazard flasher is activated, all of these
lamps will flash on and off. The turn signal indicators cannot be
used when the hazard lamps are flashing. Operation of the
hazard flashers does not affect operation of the brakelamps.
*
[ER00400(ALL)01/96]
The flashers work even with the key out of the ignition. The
flashers will work for up to two hours when the battery is fully
charged and in good condition. They will not drain the battery
excessively. If the flashers run for longer than two hours or if
your battery is not fully charged, your battery may be drained
to the point where the vehicle will not start.
%
*
[ER00500(ALL)01/96] What To Do If The Engine Does Not Start
%
*
[ER00600(ALL)01/96]
Fuel Pump Shut-Off Switch
*
[ER00700(ALL)03/96]
If the engine cranks but does not start or does not start even
after a small collision, the fuel pump shut-off switch may have
been activated. The shut-off switch is a device intended to stop
the fuel pump when your vehicle has been involved in a
substantial jolt.
*
[ER00800(ALL)03/96]
Once the shut-off switch is activated, you must reset the switch
by hand before you can start your vehicle.
[ER00900(ALL)12/95]
The fuel pump shut-off switch reset button is located behind the
jack access cover under the jack in the cargo compartment.
File:10wners.ex
Update:Tue Jul 9 12:14:55 1996
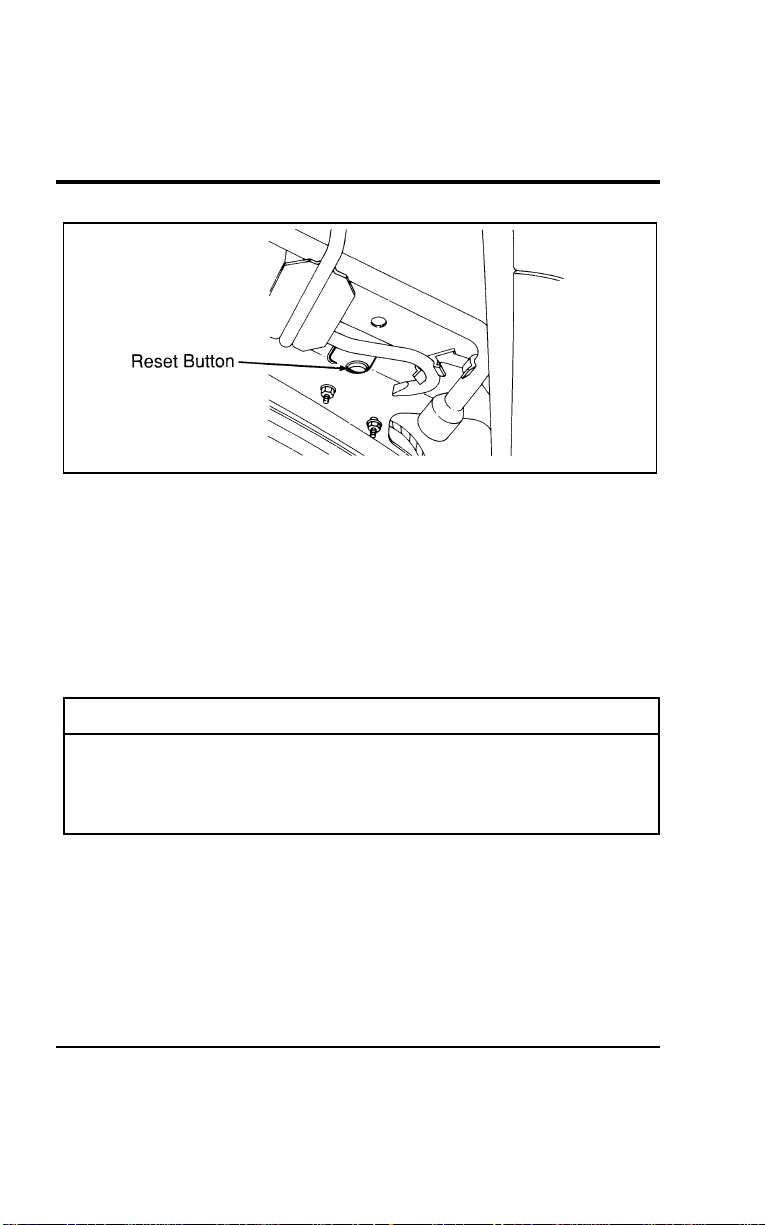
248
[ER01000(ALL)12/95]
10-1/2pica
art:0050046-A
Fuelpumpshut-offswitchresetbuttonlocation
[ER01010(ALL)01/96]
Iftheenginecranksbutdoesnotstartorifyouhavehada
collision,thefuelpumpshut-offswitchmayhavebeen
triggered.Theshut-offswitchisadevicethatautomatically
stopstheflowoffueltotheenginewhenyourvehiclehasbeen
involvedinacollision.Theimpactdoesnothavetobegreatfor
theswitchtobetriggered.Inmanyinstances,youmightnot
evenknowthattheswitchhasbeentriggered.
*
[ER01100(ALL)03/96]
WARNING
Ifyouseeorsmellfuel,donotresettheswitchortryto
startyourvehicle.Haveallthepassengersgetoutofthe
vehicleandcallthelocalfiredepartmentoratowing
service.
*
[ER01200(ALL)01/96]
Ifyourenginecranks,butdoesnotstartafteracollision:
*
[ER01300(ALL)01/96] 1.TurnthekeyintheignitiontotheOFFposition.
*
[ER01400(ALL)03/96] 2.Checkunderthevehicleforleakingfuel.
*
[ER01500(ALL)01/96] 3.Ifyoudonotseeorsmellfuel,pushthefuelpumpshut-off
resetbuttondown.Iftheredbuttonisalreadyset,youmay
haveadifferentmechanicalorelectricalproblem.
File:10wners.ex
Update:Tue Jul 9 12:14:55 1996
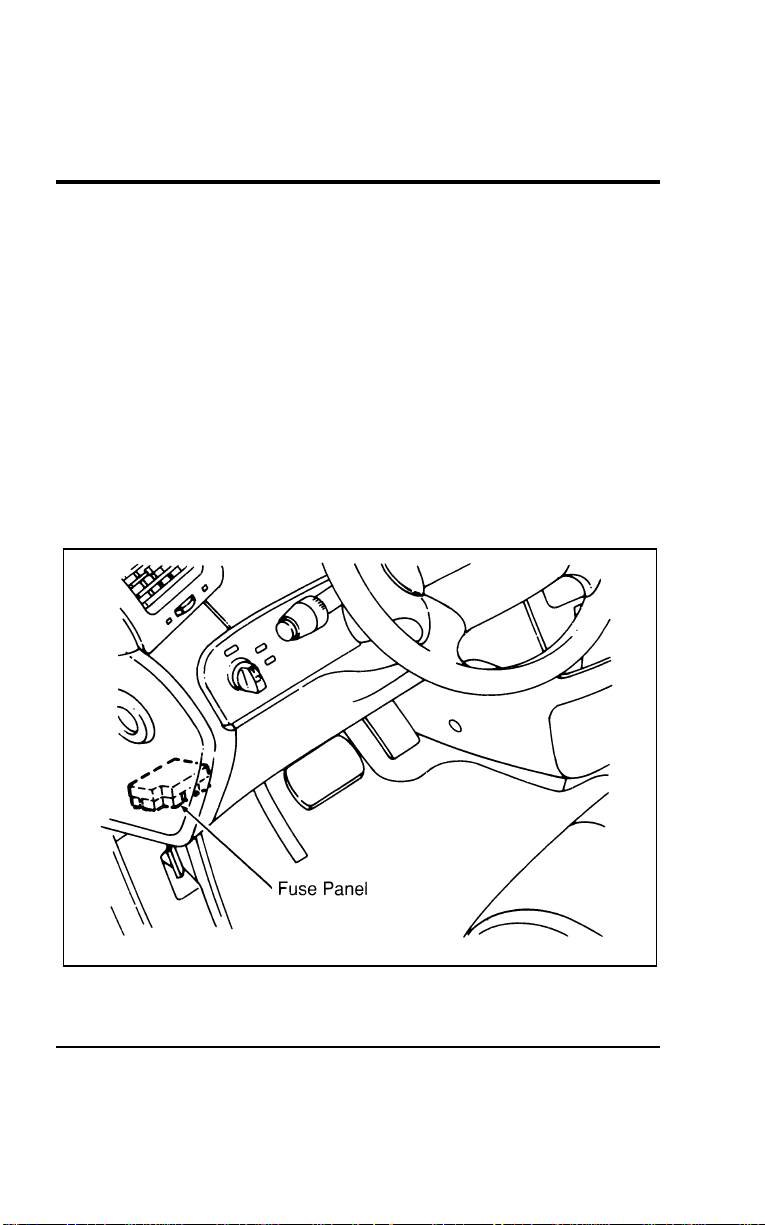
Roadside Emergencies
249
*
[ER01600(ALL)01/96] 4. Turn the ignition key to the ON position for a few seconds,
then turn it to the OFF position.
*
[ER01700(ALL)01/96] 5. Check under the vehicle again for leaking fuel. If you see or
smell fuel, do not start your vehicle again. If there is no fuel,
you can try to start your vehicle again.
*
[ER01800(ALL)03/96] 6. Check all vehicle warning lights before driving your vehicle.
[ER01900(ALL)01/96]
Fuses and Maxi-Fuses
[ER02000(ALL)01/96]
Fuses and maxi-fuses (high-current fuses) protect your vehicle’s
electrical system from overloading. If electrical parts in your
vehicle are not working, the system may have been overloaded
and caused a blown fuse. Before you replace or repair any
electrical parts, check the appropriate fuses.
[ER02100(ALL)01/96]
17-1/2 pica
art:0050026-A
Fuse panel location
File:10wners.ex
Update:Tue Jul 9 12:14:55 1996
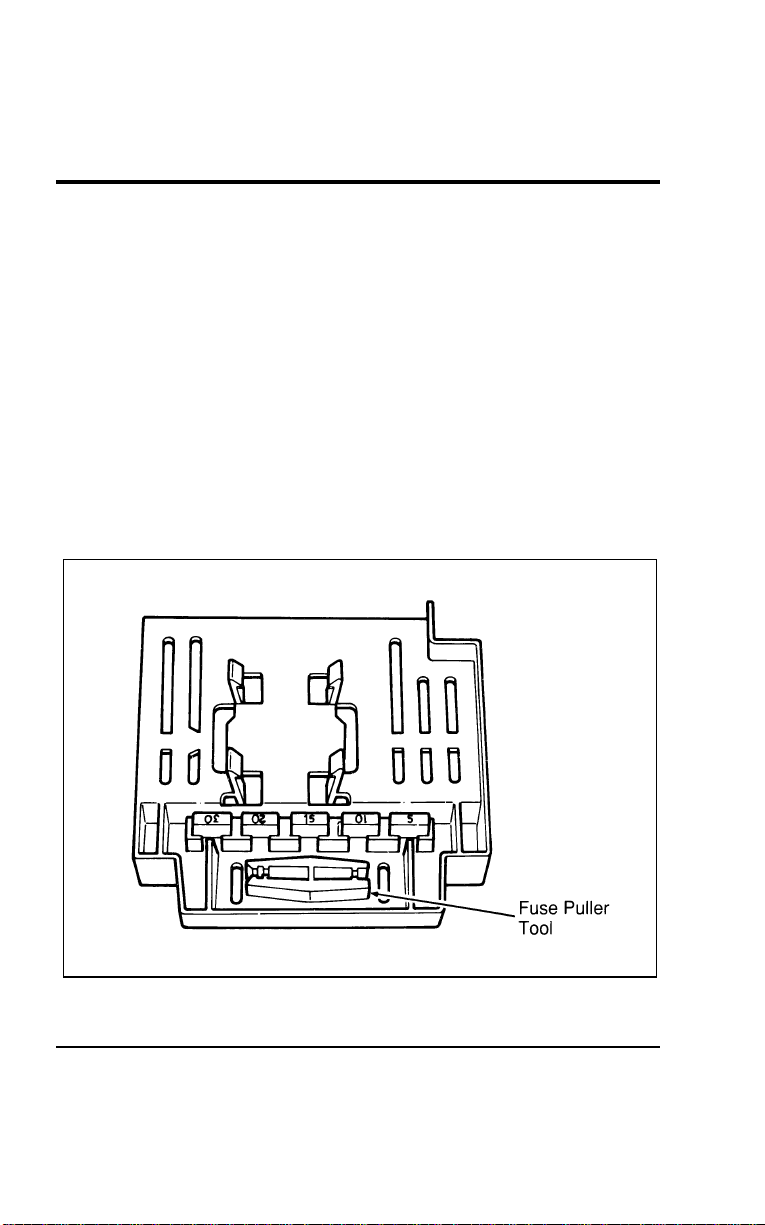
250
[ER02200(ALL)01/96]
The following charts tell you which fuses protect each electrical
part of your vehicle. If a fuse blows (opens) a circuit, all the
parts of your vehicle that use that circuit will not work.
[ER02300(ALL)01/96]
Once you have determined which fuses to check, follow the
procedures under Checking and replacing fuses.
[ER02400(ALL)04/96]
NOTE: Fuse links should only be repaired by your dealer.
%
*
[ER02500(ALL)01/96]
Checking and Replacing Fuses
*
[ER02600(ALL)01/96]
If you need to check a fuse, find the fuse panel for the electrical
system, which is located under the instrument panel, and follow
these steps:
*
[ER02700(ALL)01/96] 1. To remove the fuse panel cover, pull down on the fuse panel
cover handle.
[ER02800(ALL)01/96]
17-1/2 pica
art:0050027-A
Fuse puller tool location — fuse panel cover
File:10wners.ex
Update:Tue Jul 9 12:14:55 1996
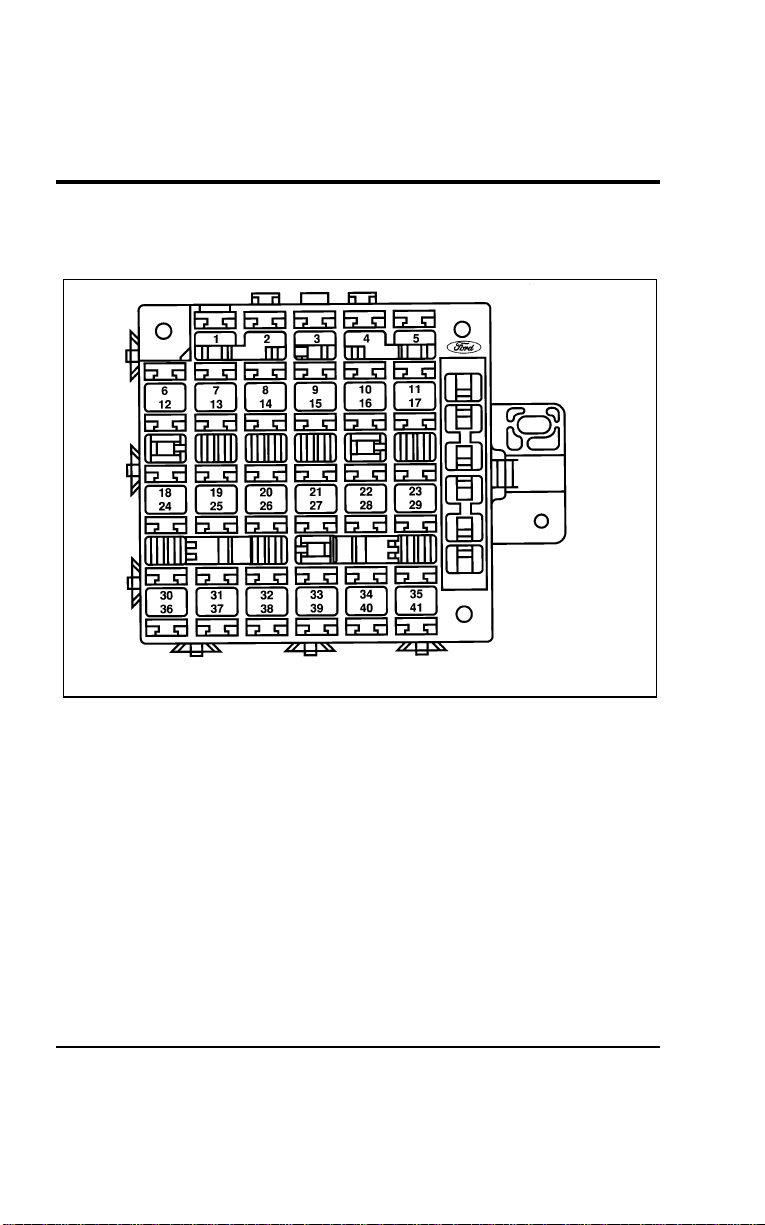
Roadside Emergencies
251
[ER02900(ALL)01/96] 2. On the fuse panel, find the number of the fuse you want to
check.
[ER03000(ALL)01/96]
17-1/2 pica
art:0050112-B
Main fuse panel under instrument panel
File:10wners.ex
Update:Tue Jul 9 12:14:55 1996
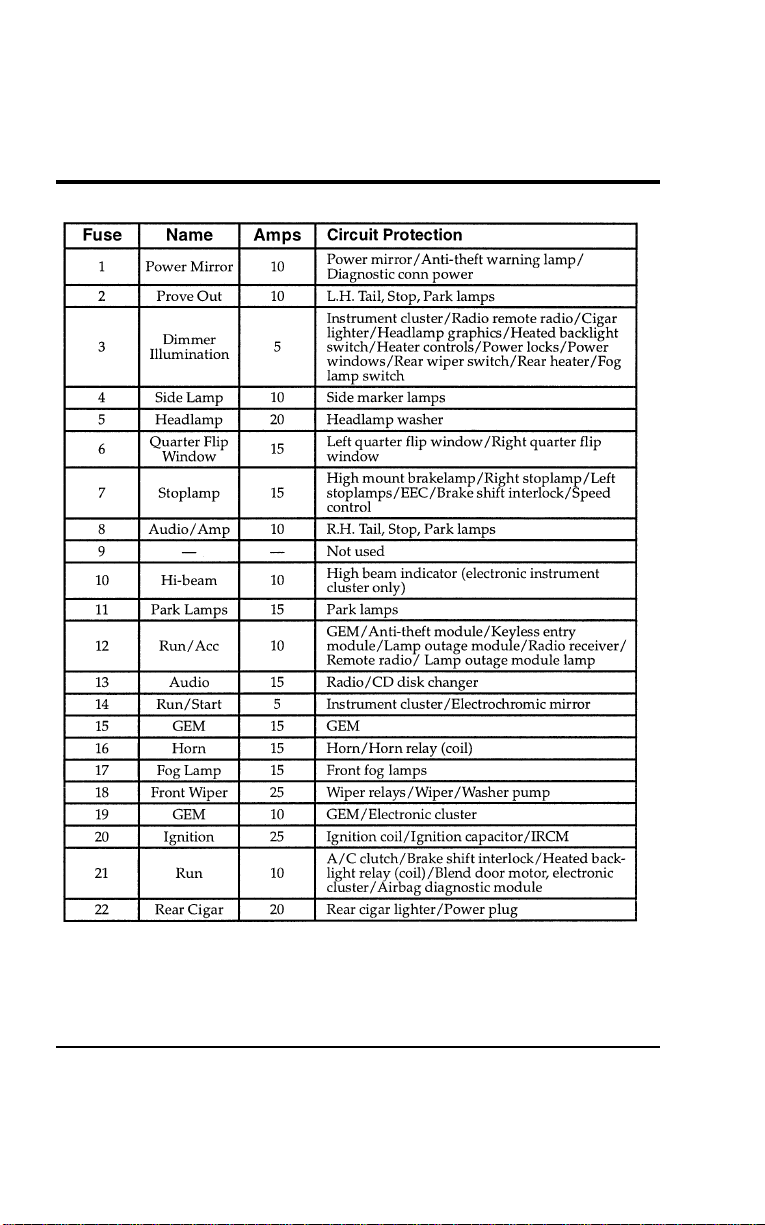
252
[ER03100(ALL)01/96]
thirty-two pica
chart:0050110-F
File:10wners.ex
Update:Tue Jul 9 12:14:55 1996
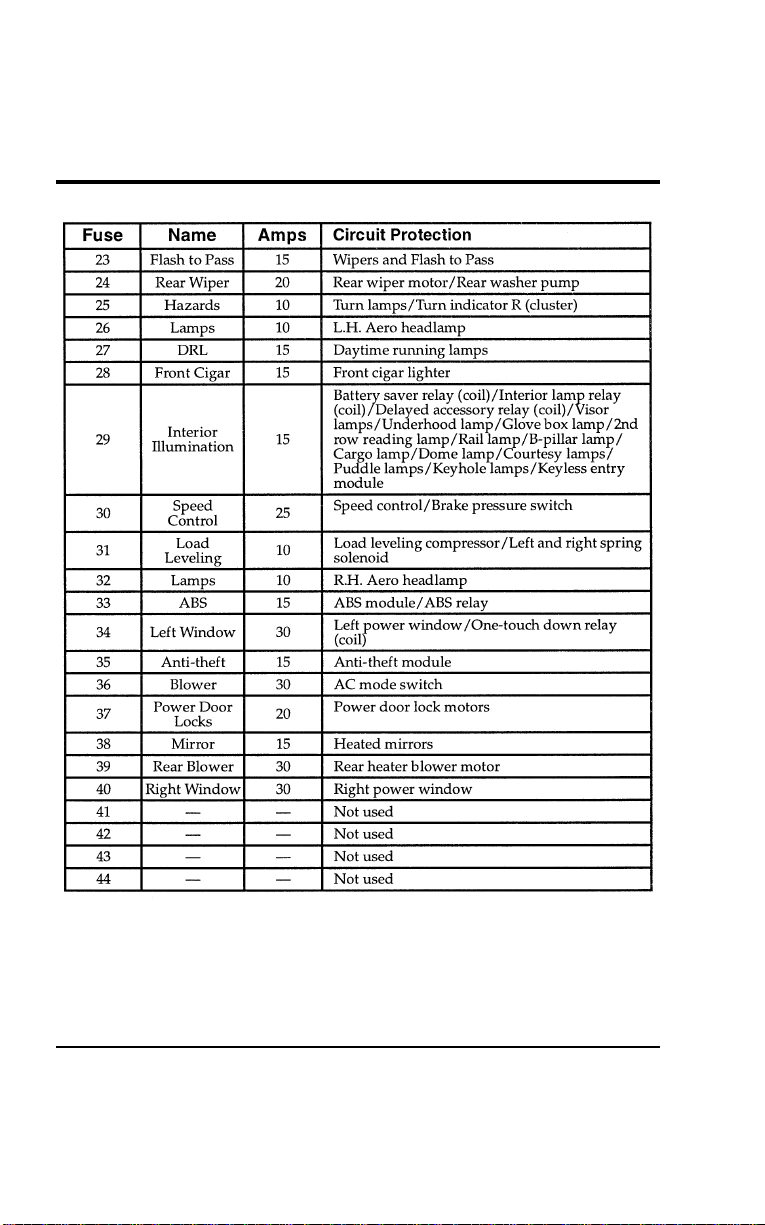
Roadside Emergencies
253
[ER03200(ALL)01/96]
thirty-two pica
chart:0050111-E
File:10wners.ex
Update:Tue Jul 9 12:14:55 1996
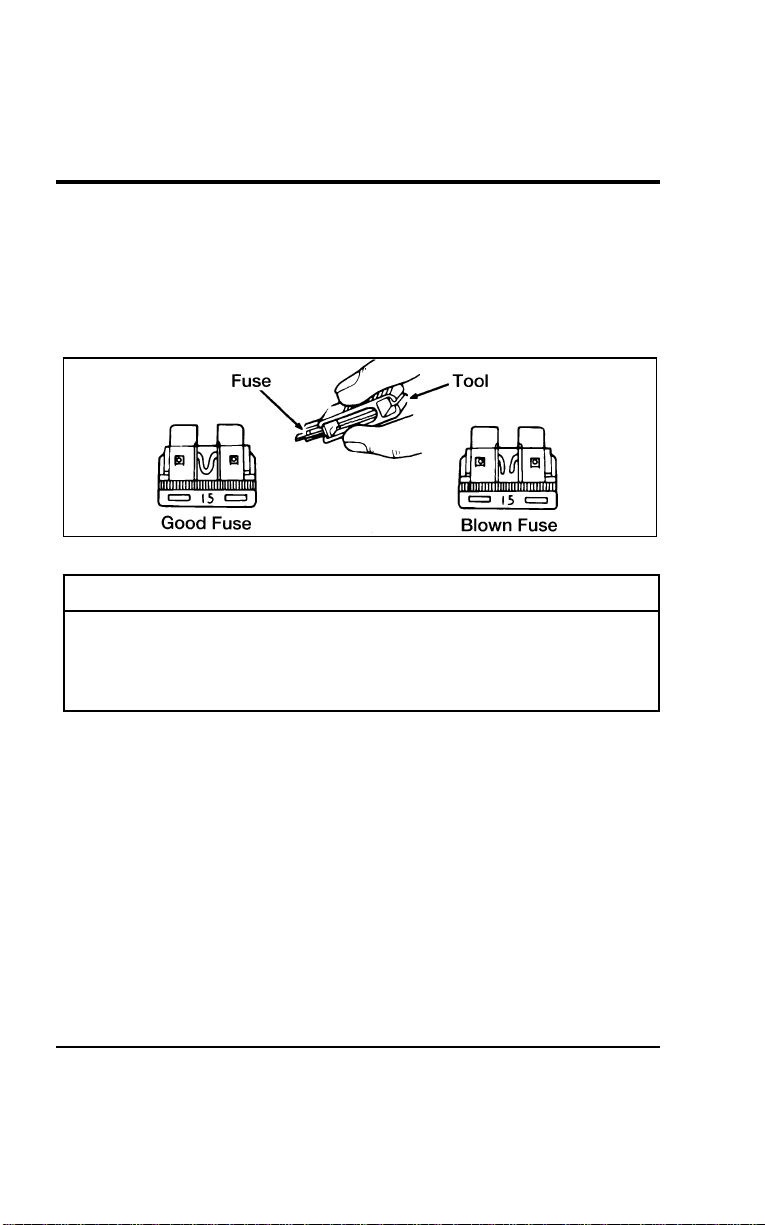
254
[ER03300(ALL)01/96] 3.Usethefusepullertooltoremovethefuse.
[ER03400(ALL)01/96] 4.Checkthefusetoseeifitisblown.Lookthroughtheclear
sideofthefusetoseeifthemetalwireinsideisseparated.If
itis,thefuseisblownandshouldbereplacedwithafuseof
thecorrectamperagerating.
*
[ER03500(ALL)01/96]
7-1/2picaart:0040210-B
Fusepullertoolandfuse
*
[ER03600(ALL)01/96]
WARNING
Alwaysreplaceafusewithonethathasthespecified
amperagerating.Usingafusewithahigheramperage
ratingcancauseseverewiredamageandcouldstarta
fire.
*
[ER03700(ALL)01/96] 5.Putthefusepanelcoverbackon.
*
[ER03800(ALL)04/96]
Evenafteryoureplaceafuse,itmaycontinuetoblowifyoudo
notfindwhatcausedtheoverload.Ifthefusecontinuesto
blow,haveyourelectricalsystemchecked.
File:10wners.ex
Update:Tue Jul 9 12:14:55 1996
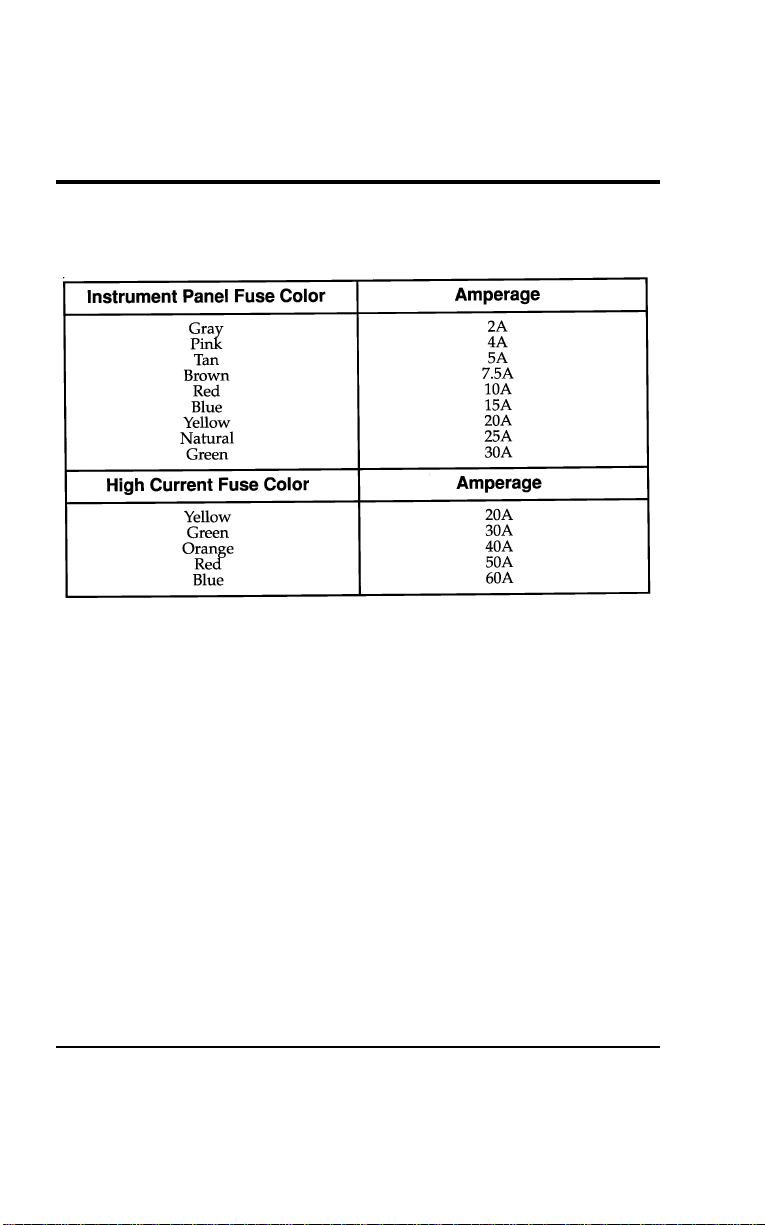
Roadside Emergencies
255
*
[ER03900(ALL)01/96]
The following chart indicates the colors and amperage ratings of
standard fuses.
[ER04000(ALL)01/96]
fourteen pica
chart:0050113-B
File:10wners.ex
Update:Tue Jul 9 12:14:55 1996
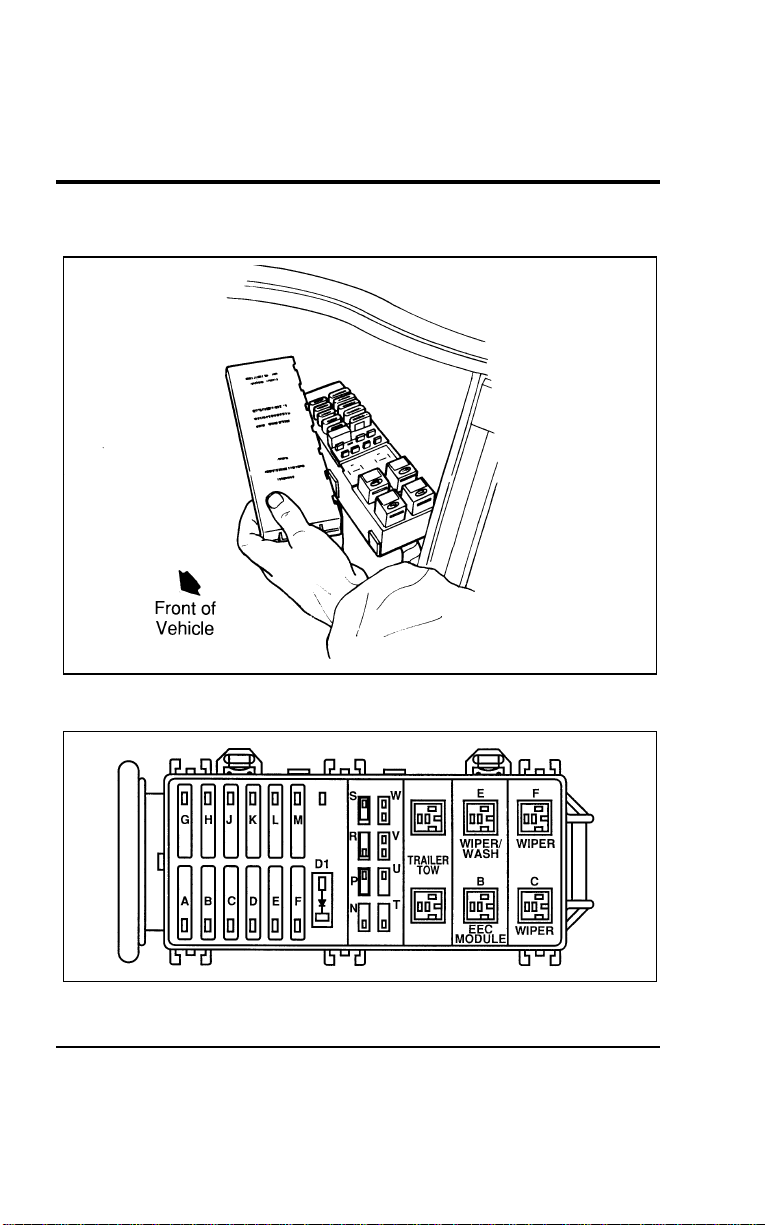
256
%
*
[ER04100(ALL)01/96]
Engine Compartment Main Fuse Panel
[ER04200(ALL)01/96]
17-1/2 pica
art:0050039-B
Engine compartment main fuse panel located on driver’s side of engine
compartment
[ER04300(ALL)01/96]
10-1/2 pica
art:0050114-C
Engine compartment main fuse and relay panel
File:10wners.ex
Update:Tue Jul 9 12:14:55 1996
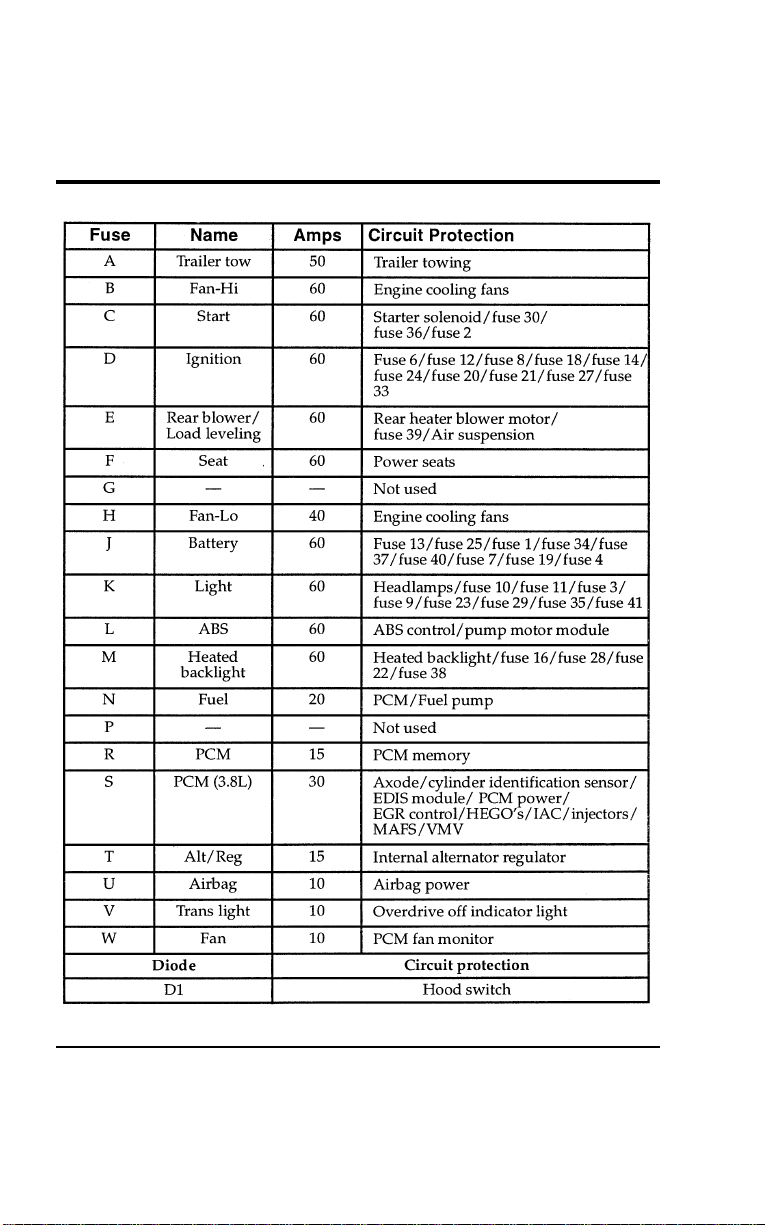
Roadside Emergencies
257
[ER04400(ALL)01/96]
thirty-three pica
chart:0050115-F
File:10wners.ex
Update:Tue Jul 9 12:14:55 1996
258
*
[ER04500(ALL)01/96]
WARNING
Alwaysdisconnectthebatterybeforeservicinghigh
currentfuses.
*
[ER04600(ALL)01/96]
Fordrecommendsthathighcurrentfusesbereplacedbya
qualifiedtechnician.
*
[ER04700(ALL)01/96]
WARNING
AlwaysreplacethecovertothePowerDistributionBox
beforereconnectingthebatteryorrefillingfluid
reservoirs.
[ER04800(ALL)01/96]
Ablownmaxi-fusemaybereplacedbutwillcontinuetoblow
untilthecauseoftheoverloadconditioniscorrected.
*
[ER04900(ALL)01/96]
WARNING
Alwaysreplaceafusewithonethathasthespecified
amperagerating.Usingafusewithahigheramperage
ratingcancauseseverewiredamageandcouldstarta
fire.
%
*
[ER05000(ALL)05/96]
Relays
%[ER05100(ALL)01/96]
Relaysaredeviceswhichreceivesignalsfromcomponentsor
systems.Afterreceivingsignals,relaystransferthesesignalsto
activateordeactivateothercomponentsorsystems.Onerelay
boxislocatedwiththemaxi-fusesnearthebatteryandoneis
locatedwiththefusepanelundertheinstrumentpanel.
File:10wners.ex
Update:Tue Jul 9 12:14:55 1996
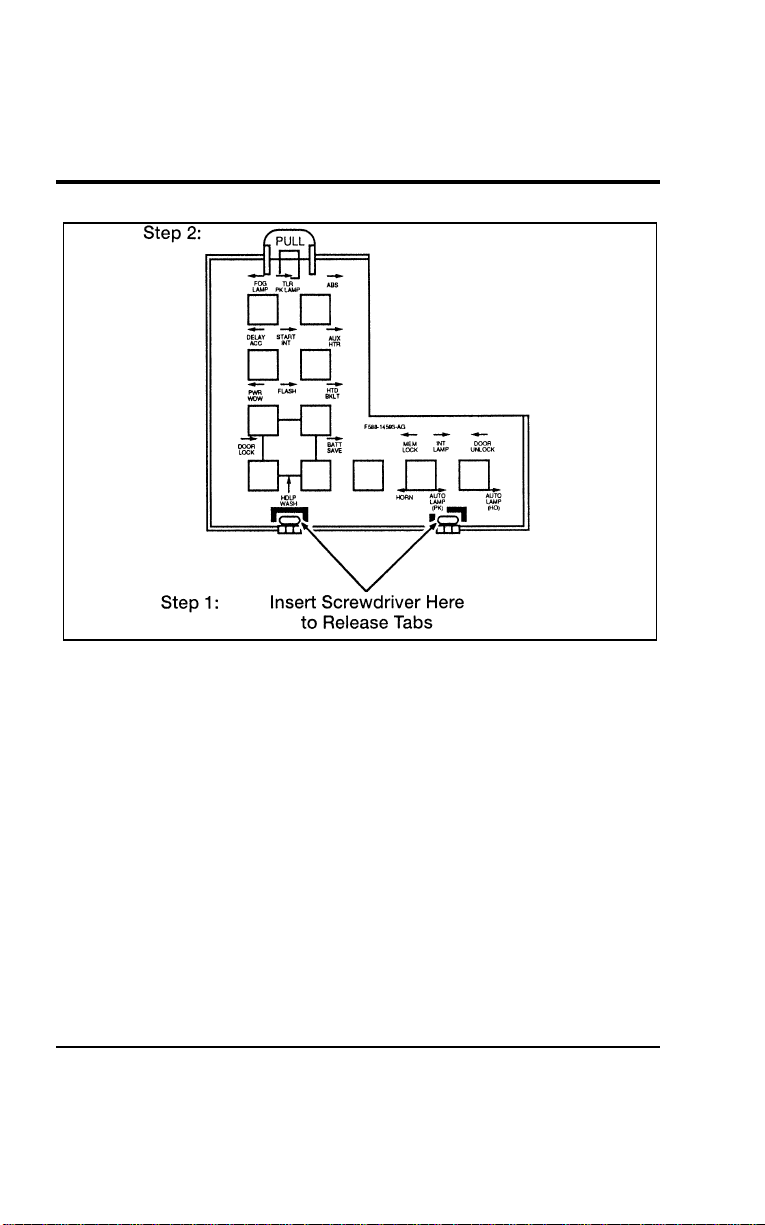
Roadside Emergencies
259
[ER05200(ALL)01/96]
17-1/2 pica
art:0050215-D
The relay box cover located under the instrument panel
%
*
[ER05300(ALL)01/96] Changing a Flat Tire
*
[ER05400(ALL)02/96]
If you get a flat tire while you are driving, do not apply the
brake heavily. Instead, gradually decrease the speed. Hold the
steering wheel firmly and slowly move to a safe place on the
side of the road. Park on a level spot, turn off the ignition, set
the parking brake, and turn on the hazard flashers.
% [ER05500(ALL)01/96]
Using the Spare Tire
*
[ER05600(ALL)01/96]
Your vehicle has a temporary spare tire (unless you ordered the
optional full-size spare tire). This spare tire is smaller than a
regular tire and is designed for emergency use only. Use it only
when you get a flat tire and replace it as soon as you can. This
spare tire is marked with the words TEMPORARY USE ONLY
so that you can easily identify it.
File:10wners.ex
Update:Tue Jul 9 12:14:55 1996

260
*
[ER05700(ALL)02/96]
WARNING
Ifyouusethetemporarysparetirecontinuouslyordo
notfollowtheseprecautions,thetirecouldfail,causing
youtolosecontrolofthevehicle,possiblyinjuring
yourselforothers.
*
[ER05800(ALL)01/96]
Whenyoudrivewiththetemporarysparetire,DONOT:
*
[ER05900(ALL)01/96]
■exceed50mph(80km/h)underanycircumstances
*
[ER06000(ALL)01/96]
■loadyourvehiclesothatitisheavierthanthemaximum
vehicleloadratinglistedonthetiredecal
*
[ER06100(ALL)01/96]
■towatrailer
*
[ER06200(ALL)01/96]
■usetirechains
*
[ER06300(ALL)01/96]
■trytorepairthetemporarysparetireorremoveitfromits
wheel
*
[ER06400(ALL)01/96]
■usethewheelforanyothertypeofvehicle
*
[ER06500(ALL)01/96]
■drivethroughanautomaticcarwash.Becausethetemporary
sparetireissmallerthanaconventionaltire,itreducesthe
groundclearance.Yourvehiclemaygetcaughtintherails
anditcouldbedamaged.
[ER06600(ALL)01/96]
Finding the spare tire
[ER06700(ALL)01/96]
Thesparetireisstoredunderneathyourvehicle,directlybelow
thecargoarea.
File:10wners.ex
Update:Tue Jul 9 12:14:55 1996
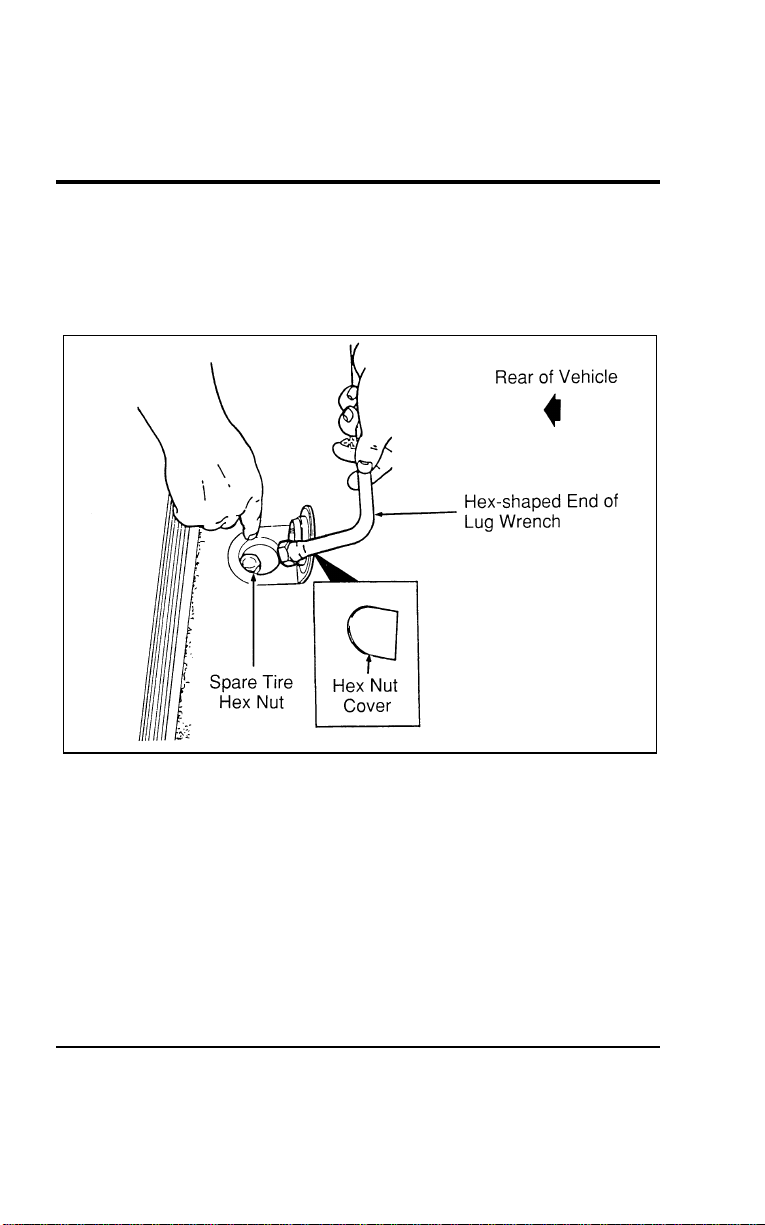
Roadside Emergencies
261
[ER06800(ALL)01/96]
Removing the spare tire
*
[ER06900(ALL)01/96] 1. Open the liftgate and find the plastic hex nut cover in the
carpeting of the cargo area. Lift the cover to expose the hex
nut.
[ER07000(ALL)01/96]
17-1/2 pica
art:0050024-B
The spare tire cover
*
[ER07100(ALL)05/96] 2. Find the lug wrench in the tool kit located behind the jack in
the right cargo area side panel.
*
[ER07200(ALL)01/96] 3. Fit the hex-shaped end of the lug wrench over the hex nut
in the floor of the cargo area. Turn counterclockwise until
the cable extends far enough to lower the spare tire to the
ground.
File:10wners.ex
Update:Tue Jul 9 12:14:55 1996
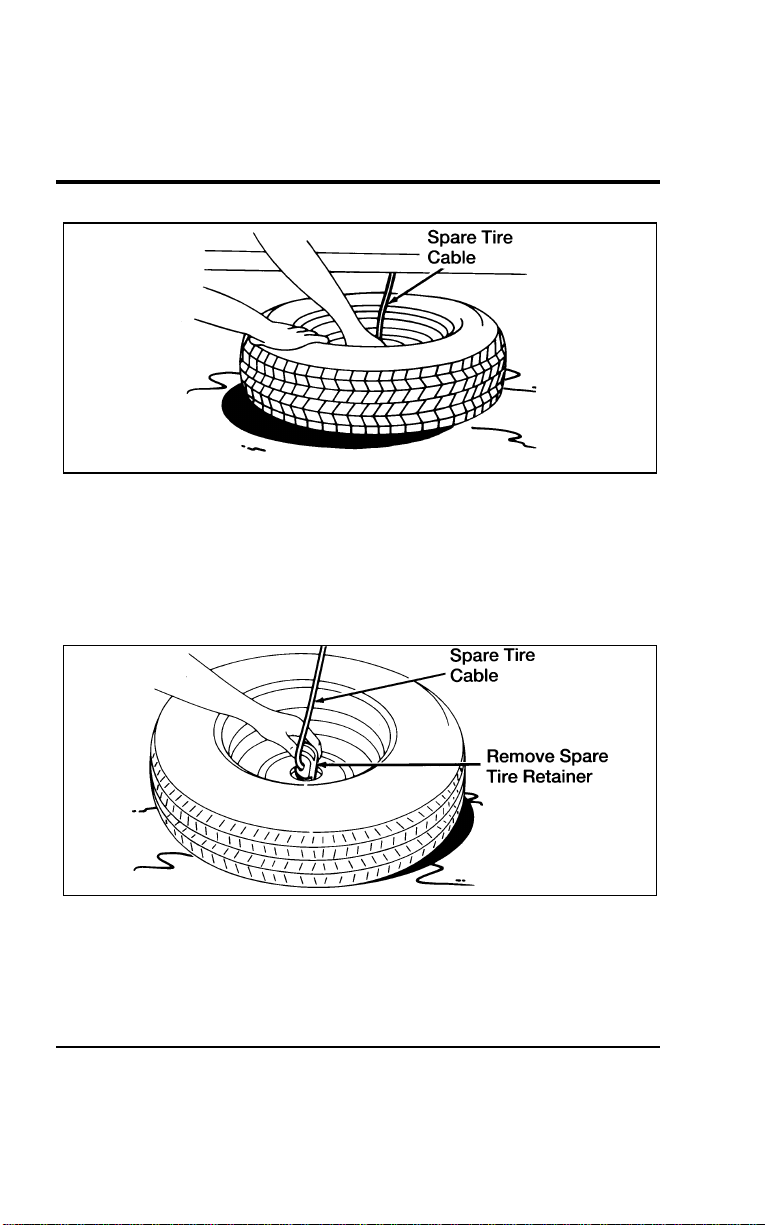
262
*
[ER07300(ALL)01/96]
10-1/2 pica
art:0040172-B
The spare tire in the lowered position
*
[ER07400(ALL)01/96] 4. Continue to turn the hex nut counterclockwise until the
spare tire retainer can be seen for removal.
*
[ER07500(ALL)01/96] 5. Remove the retainer from the center of the wheel. It may be
necessary to lift one end of the tire to disengage the retainer.
*
[ER07600(ALL)01/96]
10-1/2 pica
art:0040173-B
Removing the spare tire retainer
File:10wners.ex
Update:Tue Jul 9 12:14:55 1996
RoadsideEmergencies
263
%[ER07700(ALL)04/96]
ChangingtheTire
*
[ER07800(ALL)01/96]
Youshouldonlyraiseyourvehiclewithajackproperlyplaced
atthefrontorrearjackingpoints.
*
[ER07900(ALL)05/96] 1.Makesurethatyourvehiclewillnotmoveorrollandthat
thetiresandjackareonalevel,solidsurface.Putthe
gearshiftleverinP(Park).Settheparkingbrakeandblock
thewheel—inbothdirections—thatisdiagonallyopposite
thetirethatyouarechanging.
*
[ER08000(ALL)01/96]
WARNING
Whenoneofthefrontwheelsisofftheground,the
transaxlealonewillnotpreventthevehiclefrommoving
orslippingoffthejack,evenifthevehicleisinP(Park).
*
[ER08100(ALL)01/96]
WARNING
Topreventthevehiclefrommovingwhenyouchangea
tire,besuretheparkingbrakeisset,thenblock(inboth
directions)thewheelthatisdiagonallyopposite(other
sideandendofthevehicle)tothetirebeingchanged.
*
[ER08200(ALL)03/96]
WARNING
Ifthevehicleslipsoffthejack,youorsomeoneelse
couldbeseriouslyinjured.
*
[ER08300(ALL)01/96]
WARNING
OnvehiclesequippedwithAirSuspension,turnOFFthe
AirSuspensionswitchpriortojacking,hoistingor
towingyourvehicle.
File:10wners.ex
Update:Tue Jul 9 12:14:55 1996
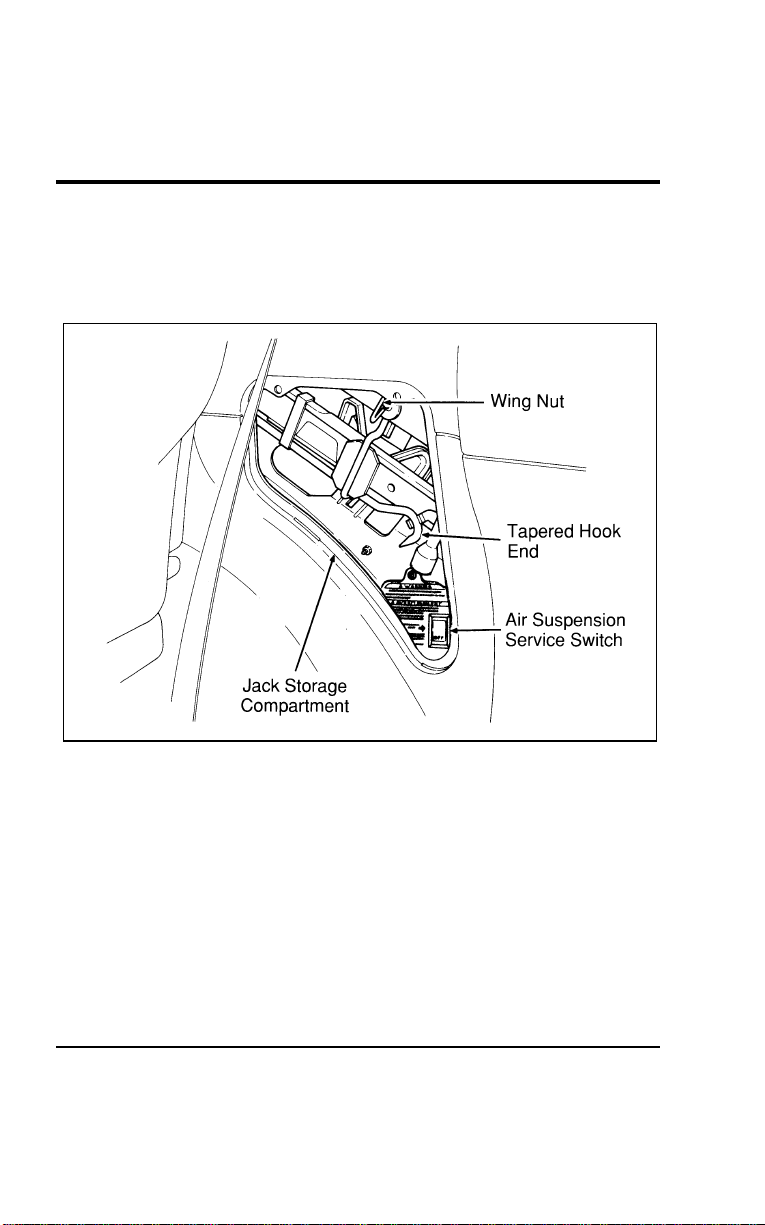
264
[ER08400(ALL)01/96] 2. Get out the spare tire and jack. See previous section for
instructions on spare tire removal. The jack is located in the
rear storage compartment in the right door panel of the
cargo area. Remove wing bolt to unfasten jack.
[ER08500(ALL)01/96]
17-1/2 pica
art:0050043-C
Jack storage
File:10wners.ex
Update:Tue Jul 9 12:14:55 1996
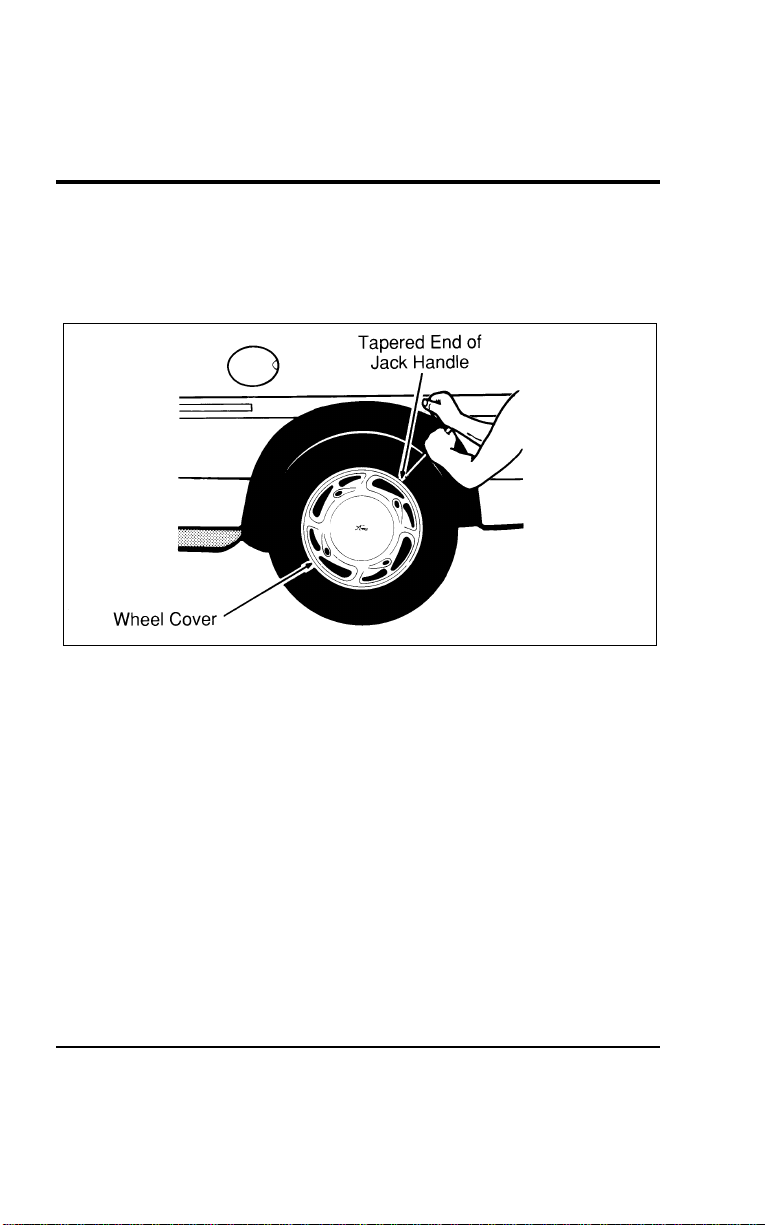
Roadside Emergencies
265
*
[ER08600(ALL)01/96] 3. Insert the tapered end of the jack handle behind the wheel
cover of the tire to be changed and gently pry it off. When
you want to replace the wheel cover, simply align the valve
stem to the slot in the cover and press it back on.
[ER08700(ALL)01/96]
13-1/2 pica
art:0050044-A
Wheel cover removal
% [ER08800(ALL)01/96]
If you have the optional cast-aluminum wheels, remove the
wheel cap to gain access to the lug nuts. To remove the cap,
insert the tapered end of the jack handle behind the notch in
the wheel and gently pry the cap off. To replace it, press it back
on.
File:10wners.ex
Update:Tue Jul 9 12:14:55 1996
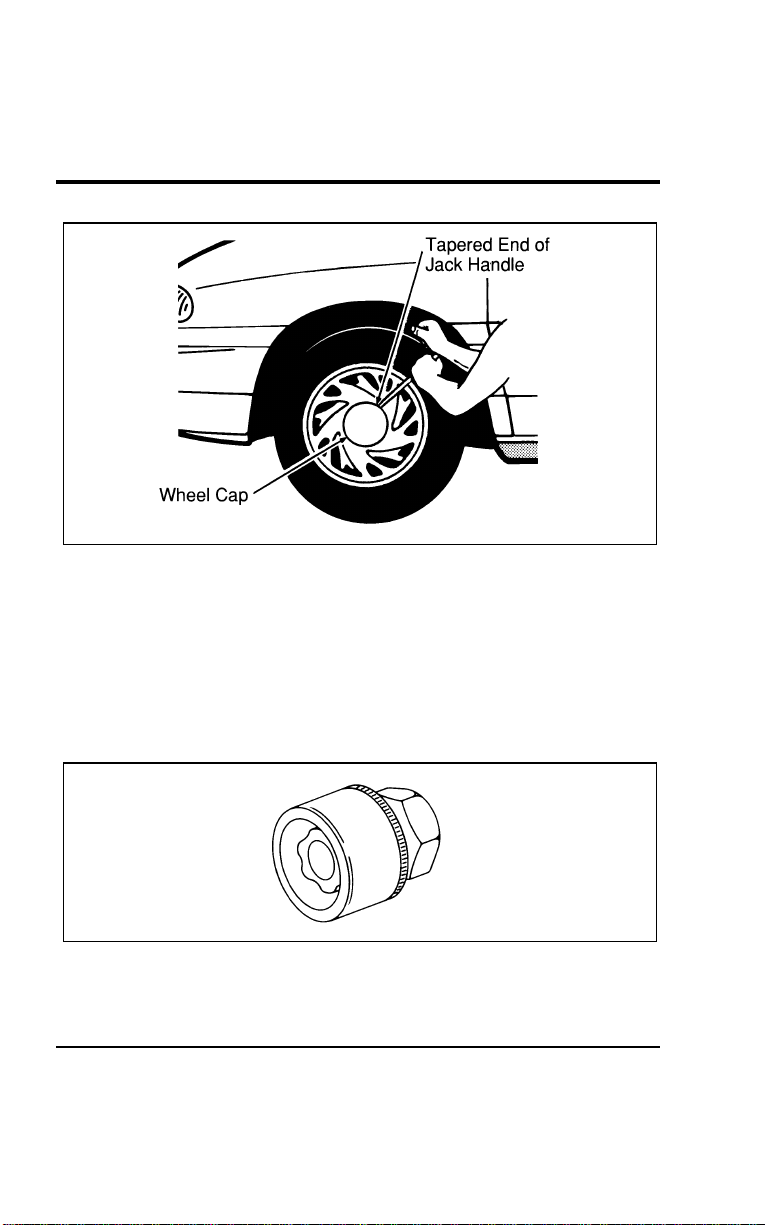
266
[ER08900(ALL)01/96]
13-1/2 pica
art:0050045-A
Wheel cover removal (optional cast aluminum wheels)
*
[ER09000(ALL)01/96] 4. Fit the hex-shaped end of the lug wrench over the wheel lug
nuts and loosen them one-half turn (counterclockwise). Do
not remove the wheel lug nuts until you raise the tire off the
ground.
%
*
[ER09100(ALL)01/96] If your vehicle has the optional locking lug nuts, you must
use the lug nut removal tool provided with your vehicle’s
tool kit.
*
[ER09200(ALL)01/96]
7-1/2 pica art:0040182-A
Anti-theft lug nut
*
[ER09300(ALL)01/96] 5. Fit the jack under the proper jacking point indicated by the
notch in the bottom of the door frame panel.
File:10wners.ex
Update:Tue Jul 9 12:14:55 1996
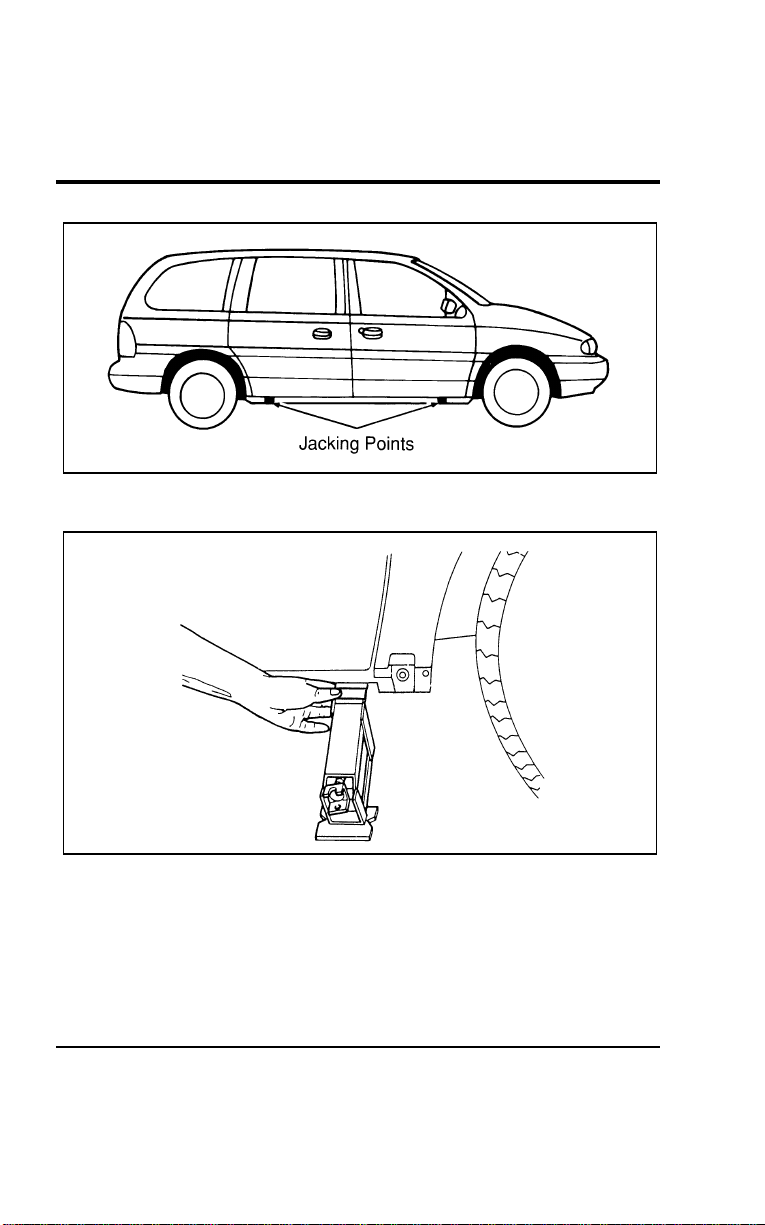
Roadside Emergencies
267
[ER09400(ALL)01/96]
10-1/2 pica
art:0050210-B
The notches for the jack
[ER09500(ALL)01/96]
13-1/2 pica
art:0050047-B
Jack placement
[ER09600(ALL)01/96]
NOTE: If your vehicle is equipped with running boards, refer
to the following illustration before jacking.
File:10wners.ex
Update:Tue Jul 9 12:14:55 1996
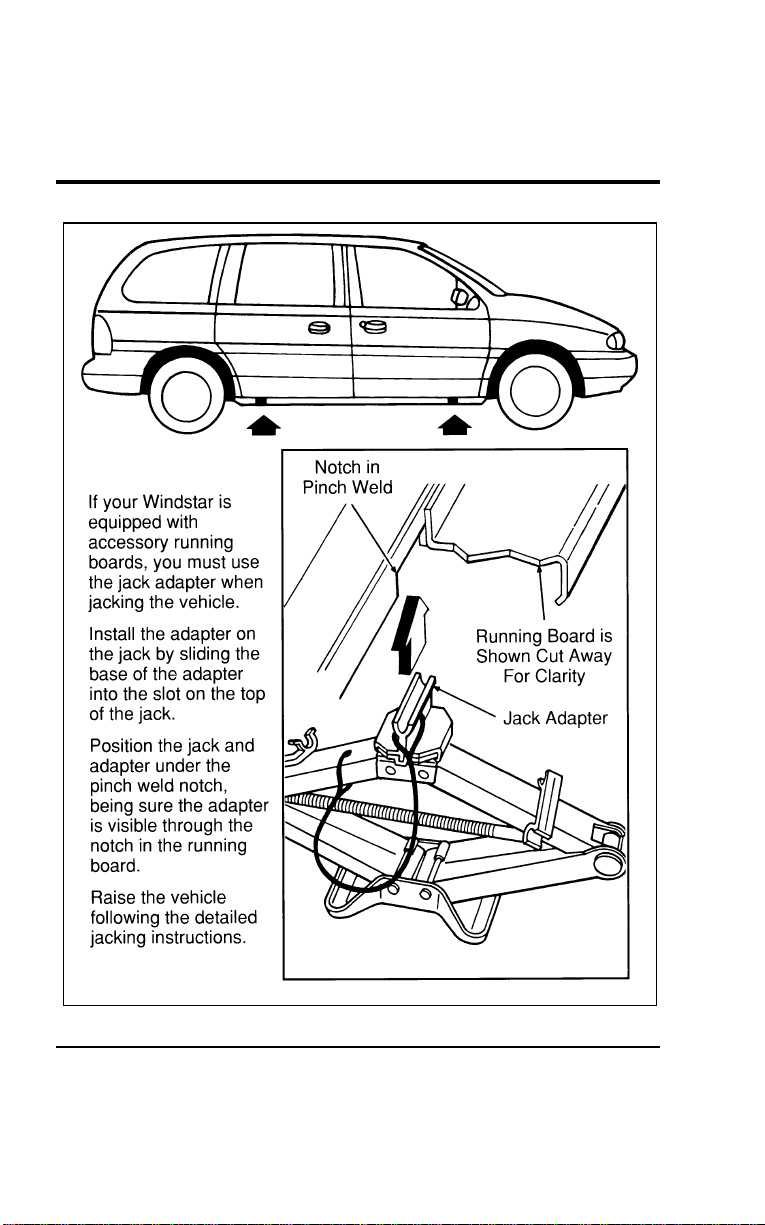
268
[ER09700(ALL)01/96]
33-1/2 pica
art:0050211-A
Jacking information for running boards
File:10wners.ex
Update:Tue Jul 9 12:14:55 1996
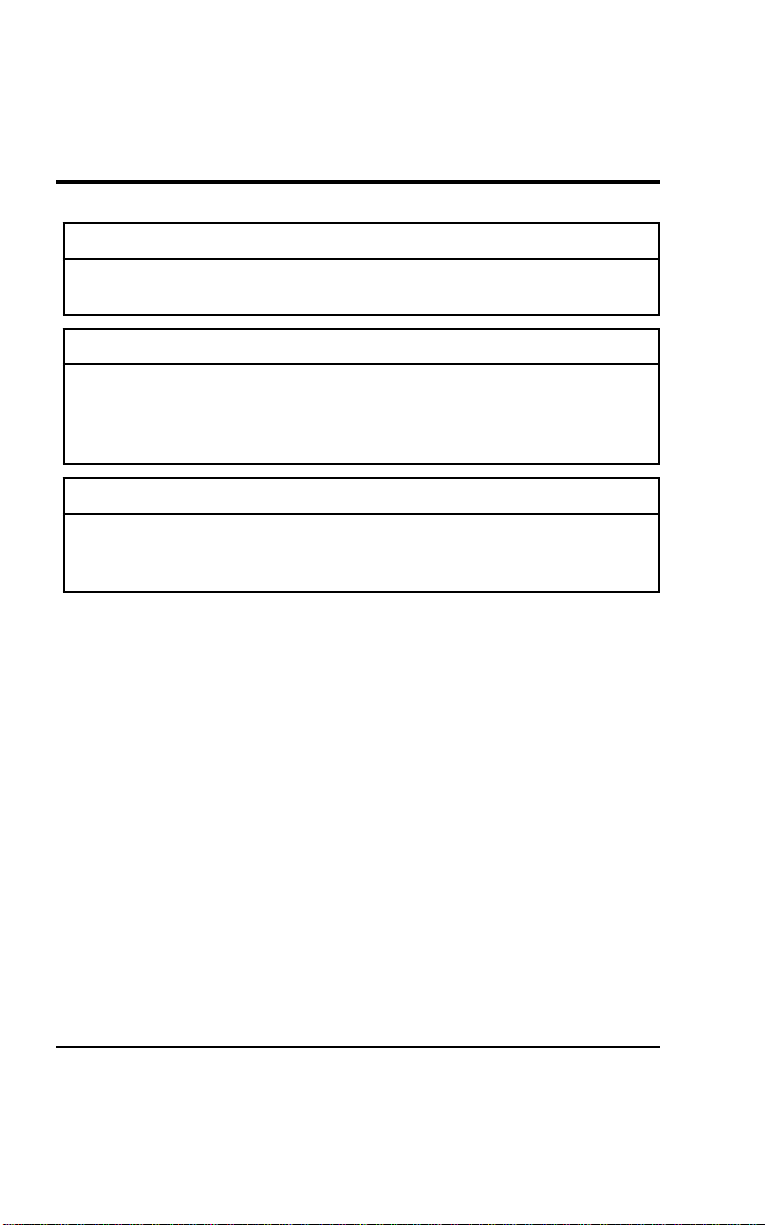
RoadsideEmergencies
269
*
[ER09800(ALL)05/96]
WARNING
Toavoidinjury,neverruntheenginewithonewheeloff
theground,suchaswhenchangingatire.
*
[ER09900(ALL)01/96]
WARNING
Tolessentheriskofpersonalinjury,donotputanypart
ofyourbodyunderthevehiclewhilechangingatire.Do
notstarttheenginewhenyourvehicleisonthejack.
Thejackisonlymeantforchangingthetire.
*
[ER10000(ALL)01/96]
WARNING
Neverraiseyourvehiclebyusingabumperjack.The
bumpercouldbedamagedorthejackcouldslipandyou
couldbeinjured.
[ER10100(ALL)01/96]
NOTE:Neverraiseyourvehiclebyplacingthejackonthe
torsionbar(withinaxle)orfrontorrearsuspension
components.Seriousdamagetothesecomponentsmay
occur.
[ER10200(ALL)01/96] 6.Insertthejackhandleintothejack,andslidethetaperedend
ofthejackhandlethroughtheslotinthelugnutwrench.
Allofthesetoolsareneededtojackupavehicle.
File:10wners.ex
Update:Tue Jul 9 12:14:55 1996
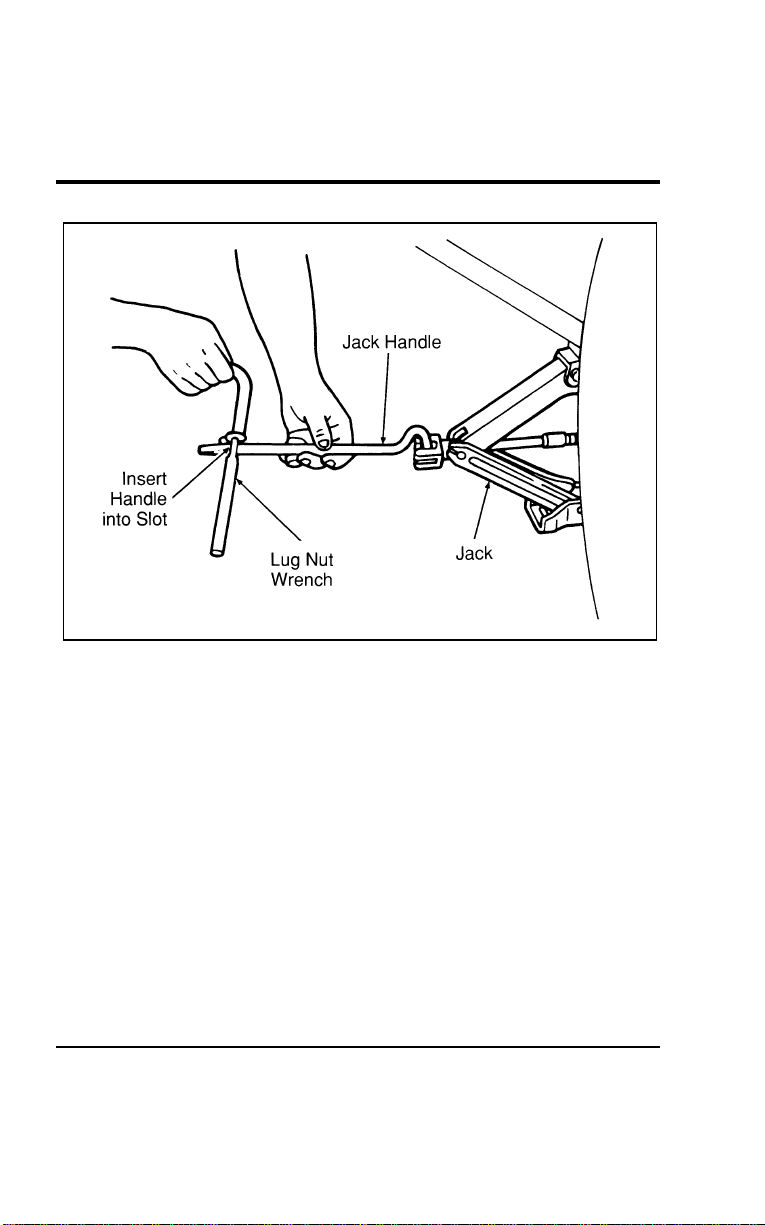
270
[ER10300(ALL)01/96]
17-1/2 pica
art:0050118-A
The jack and handle assembly
*
[ER10400(ALL)01/96] 7. Turn the lug nut wrench (attached to the jack handle)
clockwise to raise the vehicle off the ground.
*
[ER10500(ALL)01/96] 8. Remove the wheel lug nuts with the lug nut wrench.
*
[ER10600(ALL)01/96] 9. Remove the flat tire and replace it with the spare tire.
*
[ER10700(ALL)01/96] 10. Place the wheel lug nuts on the spare tire. Use the lug nut
wrench to screw the lug nuts snug against the wheel, but do
not tighten fully.
*
[ER10800(ALL)01/96] 11. Lower the vehicle by turning the jack handle
counterclockwise.
*
[ER10900(ALL)01/96] 12. Use the wheel lug wrench to tighten lug nuts in the
appropriate sequence. Re-check for complete tightness.
File:10wners.ex
Update:Tue Jul 9 12:14:55 1996
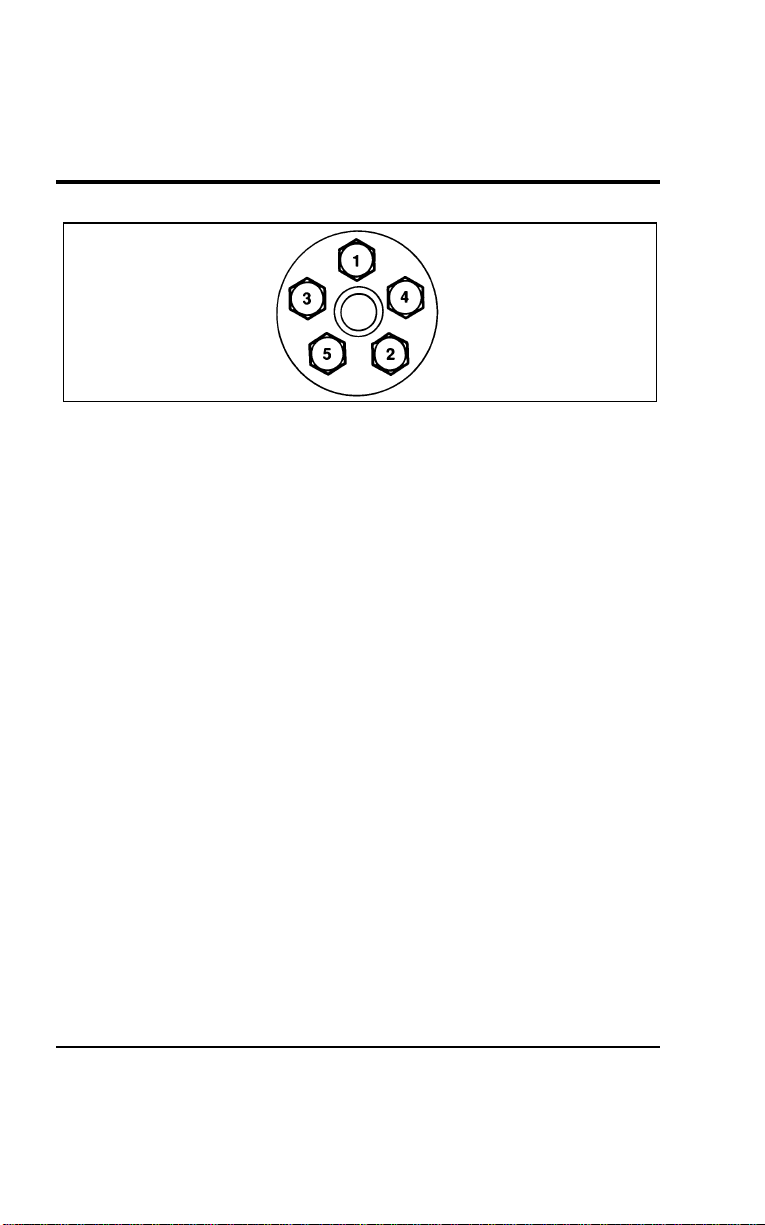
Roadside Emergencies
271
%
*
[ER11000(ALL)01/96]
7-1/2 pica art:0040176-A
Lug nut tightening sequence
[ER11100(ALL)01/96]
The lug nuts should be tightened to 83-113 ft-lb (113-153 Nm).
*
[ER11200(ALL)01/96] 13. Replace the wheel cover by pressing it into place. If you
have the standard wheel covers, you must align the notch in
the wheel cover with the tire’s valve stem and align the
recess in the back of the wheel cover with one of the lug
nuts. If you have the optional aluminum wheel, press the
center wheel cap into place after matching up the design of
the wheel cap to the wheel.
[ER11300(ALL)01/96] 14. Replace the jack in the storage compartment and make sure
the jack is securely fastened.
*
[ER11400(ALL)01/96] 15. Store the flat tire under the vehicle just as you would store
the spare tire. Refer to the section on Stowing the Spare Tire
in this chapter.
[ER11500(ALL)01/96] 16. Unblock the wheels.
*
[ER11600(ALL)01/96]
Retighten the lug nuts to the specified torque at 500 miles
(800 km) of operation, after any wheel change, or any time the
lug nuts are loosened.
File:10wners.ex
Update:Tue Jul 9 12:14:55 1996

272
*
[ER11700(ALL)01/96]
Stowing the spare tire
[ER11800(ALL)01/96] 1.Toraisethetiretothestowedposition,laythetireonthe
groundwiththeinteriorsidefacingup.Installtheretainer
throughthewheelcenterandslidethetireunderthevehicle.
Fitthehex-shapedendofthewheellugwrenchoverthehex
nutinthefloorofthecargoarea.Turnthewheellug
wrenchclockwiseuntilthetireisraisedtoitsoriginal
positionunderneaththevehicle.
[ER11900(ALL)01/96]
NOTE:Thehexnutratchetswhenthetireisraisedtothe
stowedposition.Itwillnotallowyoutoover-tighten.
*
[ER12000(ALL)01/96] 2.Checkforproperseatingagainsttheunderbodysupports
andretightenifnecessary.
[ER12100(ALL)01/96]
WARNING
Checkthetireseatingpositionforloosenessandmake
surethetireisnottoofarforwardtoavoidaxlecontact.
*
[ER12200(ALL)01/96]
WARNING
Makesurethesparetireandjackingequipmentare
stowedandsecuredintheproperstoragelocation.
%
*
[ER12300(ALL)02/96] Jump-StartingYourVehicle
*
[ER12400(ALL)01/96]
Yourvehicle’sbatterymaydischargeifyouleavethelightsor
anyelectricalequipmentonafteryouturntheengineoff.Ifthis
happens,youmaybeabletojump-startfromaboosterbattery
tostartyourvehicle.
*
[ER12500(ALL)02/96]
WARNING
Thegasesaroundthebatterycanexplodeifexposedto
flames,sparks,orlitcigarettes.Anexplosioncouldresult
ininjuryorvehicledamage.
File:10wners.ex
Update:Tue Jul 9 12:14:55 1996

RoadsideEmergencies
273
*
[ER12600(ALL)05/96]
WARNING
Toprotectyourselfwhenchargingabattery,always
shieldyourfaceandeyes.Makesurethatyoucan
breathefreshair.
%
*
[ER12700(ALL)02/96]
WARNING
Applyingtoomuchpressureontheendswhenliftinga
batterycouldcauseacidtospill.Liftthebatterywitha
carrierorwithyourhandsontheoppositecorners.
%
*
[ER12800(ALL)05/96]
WARNING
Batteriescontainsulfuricacidwhichburnsskin,eyes,
andclothing.
*
[ER12900(ALL)02/96]
Iftheacidtouchessomeone’sskin,eyes,orclothing,
immediatelyflushtheareawithwaterforatleast15minutes.If
someoneswallowstheacid,havehimorherdrinklotsofmilk
orwaterfirst,thenMilkofMagnesia,abeatenegg,orvegetable
oil.Calladoctorimmediately.
*
[ER13000(ALL)02/96]
Toavoiddamagingyourvehicleoryourbattery,andtoavoid
injurytoyourself,followthesedirectionsforpreparingyour
vehicletojump-startandconnectingthejumpercablesinthe
ordertheyaregiven.Ifindoubt,callforroadservice.
[ER13100(ALL)01/96]
Toprepareyourvehicleforjump-starting:
[ER13200(ALL)01/96] 1.Useonlya12-voltbatterytojump-startyourvehicle.Your
vehiclehasa12-voltstartingsystem,soyouneedtousea
12-voltjumpersystem.Youcandamageyourstartingmotor,
ignitionsystem,andotherelectricalpartsifyouconnect
themtoa24-voltpowersupply(eithertwo12-voltbatteries
inseriesora24-voltmotorgeneratorset).
[ER13300(ALL)04/96] 2.Donotdisconnectthebatteryofthevehiclethatneedsa
jump-start.Youcoulddamagethevehicle’selectricalsystem.
File:10wners.ex
Update:Tue Jul 9 12:14:55 1996

274
[ER13400(ALL)04/96] 3.Parkthesecondvehicleclosetothehoodofyourvehicle,
butmakesurethevehiclesdonottoucheachother.Setthe
parkingbrakeonbothvehiclesandstayclearoftheengine
coolingfan.
[ER13500(ALL)04/96] 4.Checkthebatteryterminalsandremoveanyexcessive
corrosionbeforeyouattachthejumpercables.
*
[ER13600(ALL)01/96] 5.Turnontheheaterblowerinbothvehicles.Turnoffallother
switchesandlightsinbothvehiclestopreventpossible
damagetoeithervehicle’selectricalsystems.
%[ER13700(ALL)01/96]
Toconnectthejumpercables:
[ER13800(ALL)04/96] 1.Connectoneendofthefirstjumpercabletothepositive(+)
terminalofthedeadbattery.(Youcanconnecteitherjumper
cabletothepositive(+)terminal,aslongasyouusethe
samecableforbothpositiveterminals.)Mostjumpercables
havearedcableandablackcable.Theredcableisgenerally
usedforthepositiveterminalsandtheblackforthenegative
ones.
*
[ER13900(ALL)02/96] 2.Connecttheotherendofthefirstcabletothepositive(+)
terminaloftheboosterbattery.
[ER14000(ALL)04/96] 3.Connectoneendofthesecondcabletothenegative(s)
terminaloftheboosterbattery—NOTtothedeadbattery.
[ER14100(ALL)01/96] 4.Connecttheotherendofthatcabletoagood,unpainted
metallicsurfaceintheenginecompartmentofthevehicle
thatneedsajump-start.Thefollowingillustrationshows
whereyoucanfindametallicsurface.
*
[ER14200(ALL)02/96]
WARNING
Donotconnecttheendofthesecondcabletothe
negative(s)terminalofthebatterytobejumped.A
sparkmaycauseanexplosionofthegasesthatsurround
thebattery.
File:10wners.ex
Update:Tue Jul 9 12:14:55 1996

Roadside Emergencies
275
[ER14300(ALL)01/96]
24 pica art:0050022-B
Jumper Cable Placement (3.8L)
File:10wners.ex
Update:Tue Jul 9 12:14:55 1996
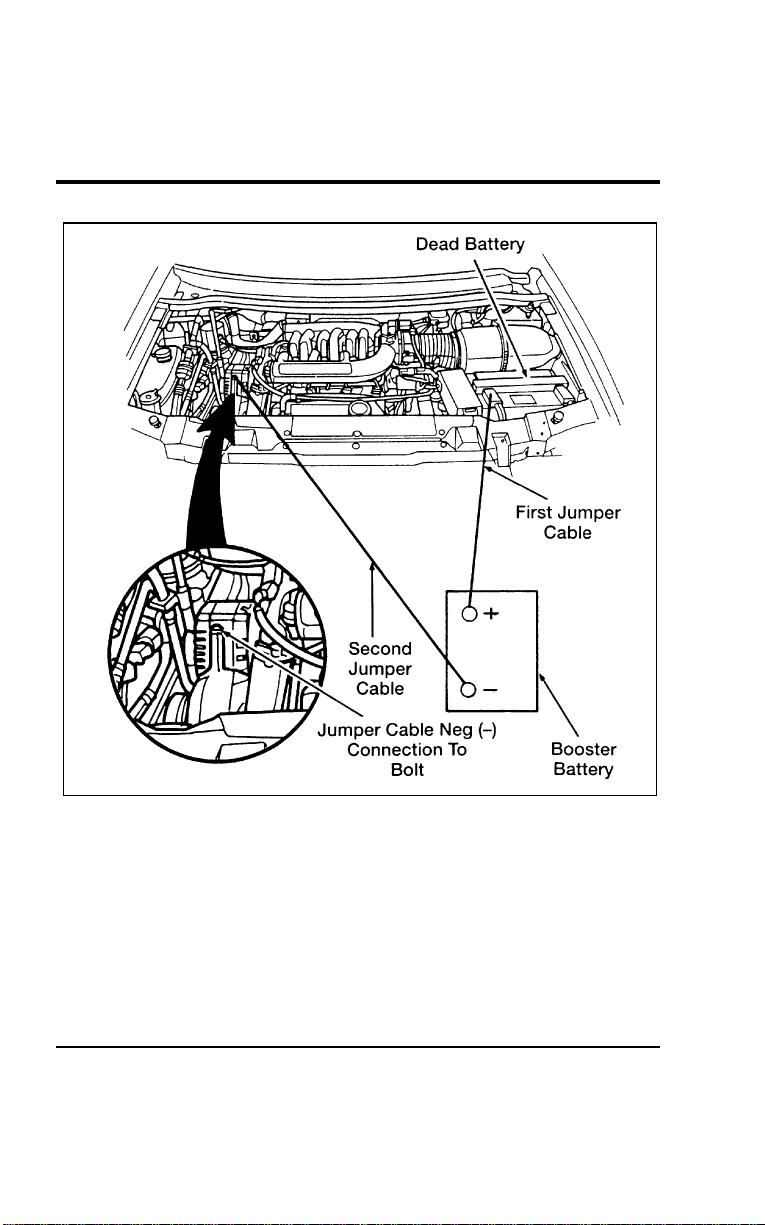
276
[ER14400(ALL)01/96]
24 pica art:0050259-B
Jumper Cable Placement (3.0L)
File:10wners.ex
Update:Tue Jul 9 12:14:55 1996

Roadside Emergencies
277
[ER14500(ALL)01/96]
After you connect the jumper cables to the batteries:
[ER14600(ALL)04/96] 1. Make sure that the jumper cables are not in the way of
moving engine parts, then start the vehicle that has the
booster battery. Run the engine at a moderate speed.
[ER14700(ALL)01/96] 2. Let the dead battery charge for a few minutes and then start
the vehicle that has the dead battery. If the starter does not
crank, check for good, solid jumper cable clamp attachments.
It may take a couple of tries before your vehicle starts. If
your vehicle does not start after several attempts, you may
have a different mechanical problem.
[ER14800(ALL)04/96] 3. When both vehicles are running, let them idle for a few
minutes to charge the dead battery.
% [ER14900(ALL)01/96]
Take the jumper cables off in the following order:
[ER15000(ALL)01/96] 1. Remove the negative (s) end of the jumper cable from the
metallic surface in the engine compartment of the vehicle
that needed a jump-start.
[ER15100(ALL)04/96] 2. Remove the other end of the negative (s) cable from the
booster battery.
*
[ER15200(ALL)02/96] 3. Remove the positive (+) cable from the booster battery.
[ER15300(ALL)04/96] 4. Remove the other end of the positive (+) cable from the
vehicle that needed a jump-start.
% [ER15400(ALL)01/96]
After your vehicle is started, let it idle for a while to let the
engine “relearn” its idle conditions and drive it around for a
little while with all electrical accessories turned off, to let the
battery recharge. You may need to use a battery charger to
fully recharge the battery.
File:10wners.ex
Update:Tue Jul 9 12:14:55 1996

278
%
*
[ER15500(ALL)04/96] Towing Your Vehicle
*
[ER15600(ALL)01/96]
If you need to have your vehicle towed, contact a professional
towing service or, if you are a member, your roadside assistance
center.
*
[ER15700(ALL)01/96]
When calling for a tow truck, tell the operator what kind of
vehicle you have. A towing manual is available from Ford
Motor Company for all authorized tow truck operators. Have
your tow truck driver refer to this manual for the proper
hook-up and towing procedures for your vehicle.
File:10wners.ex
Update:Tue Jul 9 12:14:55 1996

279
Maintenance and Care
*
[MC00200(ALL)01/96] How Ford Makes Servicing Your Vehicle
Easy
*
[MC00300(ALL)01/96]
Ford has two goals for servicing your vehicle.
*
[MC00400(ALL)01/96] 1. When we can, we design parts that do not need to be
serviced.
*
[MC00500(ALL)01/96] 2. We want to make servicing your vehicle as easy as possible.
To help you:
*
[MC00600(ALL)01/96]
■ We highlight do-it-yourself items in yellow in your engine
compartment so that you can find them easily.
*
[MC00700(ALL)03/96]
■ When possible, we design parts that can be replaced without
tools.
[MC00800(ALL)07/96]
■ We give you a Maintenance Schedule booklet that makes
tracking routine service for your vehicle easy.
*
[MC00900(ALL)01/96]
This chapter tells you about the basic parts that you need to
check and service regularly.
[MC01000(ALL)01/96]
If you need professional servicing, see the chapter on Customer
Assistance in this Owner Guide.
[MC01100(ALL)01/96]
Check your Warranty Information Booklet to find out which parts
are covered.
%
*
[MC01200(ALL)01/96] Precautions When Servicing Your Vehicle
*
[MC01300(ALL)01/96]
Be especially careful when inspecting or servicing your vehicle.
Here are some general precautions for your safety:
[MC01400(ALL)04/96]
■ If you must work with the engine running, avoid wearing
loose clothing or jewelry that could get caught in moving
parts.
*
[MC01500(ALL)01/96]
■ Do not work on a vehicle in an enclosed space with the
engine running, unless you are sure you have enough
ventilation.
File:11wnmcs.ex
Update:Mon Jul 8 14:29:32 1996

280
*
[MC01600(ALL)01/96]
■Nevergetunderavehiclewhileitissupportedbyajack
only.Ifyoumustworkunderavehicle,usesafetystands.
*
[MC01700(ALL)01/96]
■Keepalllitcigarettesandothersmokingmaterialsaway
fromthebatteryandallfuel-relatedparts.
[MC01800(ALL)04/96]
WorkingUndertheHood
[MC01900(ALL)01/96]
Beforeyouopenthehood,readthissectioncarefully.
*
[MC02000(ALL)01/96]
If you plan to work under the hood while the engine is
off:
*
[MC02100(ALL)05/96]
WARNING
Alwayssettheparkingbrakefullyandmakesurethe
gearshiftislatchedinP(Park).Turnofftheignition
wheneveryouleaveyourvehicle.
*
[MC02200(ALL)01/96]
WARNING
Alwaysremovethekeyfromtheignitionafteryouturn
offtheengine.
*
[MC02300(ALL)01/96]
If you must work under the hood while the engine is
on:
*
[MC02400(ALL)05/96]
WARNING
Alwayssettheparkingbrakefullyandmakesurethe
gearshiftislatchedinP(Park).Turnofftheignition
wheneveryouleaveyourvehicle.
[MC02500(ALL)04/96]
WARNING
Donotwearlooseclothingorjewelrythatcangetcaught
inthemovingparts.
File:11wnmcs.ex
Update:Mon Jul 8 14:29:32 1996
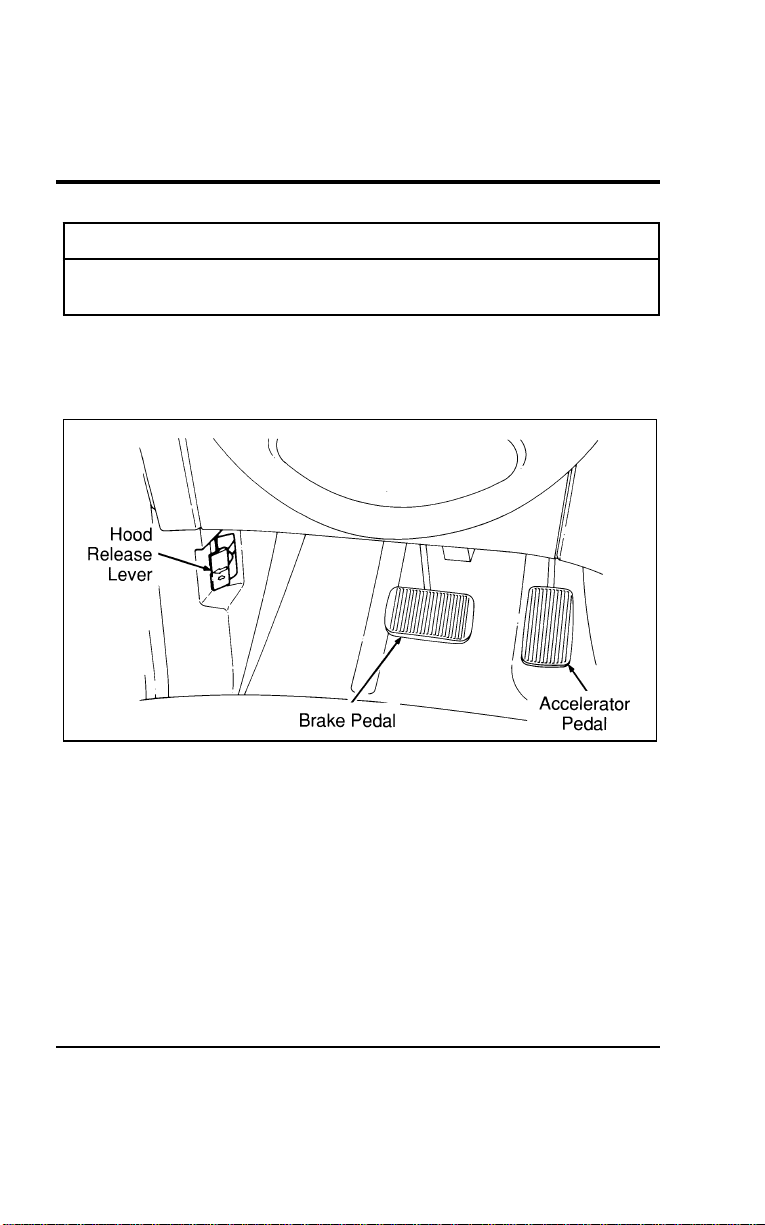
MaintenanceandCare
281
*
[MC02600(ALL)01/96]
WARNING
Donotstartyourenginewiththeaircleanerremoved
anddonotremoveitwhiletheengineisrunning.
%[MC02700(ALL)04/96]
Toopenthehood:
[MC02800(ALL)01/96] 1.Pullthehoodreleaseleverlocatedbelowtheinstrument
paneltotheleftofthesteeringwheel.
[MC02900(ALL)01/96]
13-1/2pica
art:0050053-B
Hoodreleaseleverlocation
[MC03000(ALL)01/96] 2.Gotothefrontofthevehicleandreleasethesecondary
hoodlatchunderthehoodinthefrontcenterofthevehicle.
*
[MC03100(ALL)01/96] 3.Liftthehoodandreleasetheproprodfromitsretaining
clip.Placetheendoftheproprodintheproprodhole
providedontheundersideofthehood.
File:11wnmcs.ex
Update:Mon Jul 8 14:29:32 1996
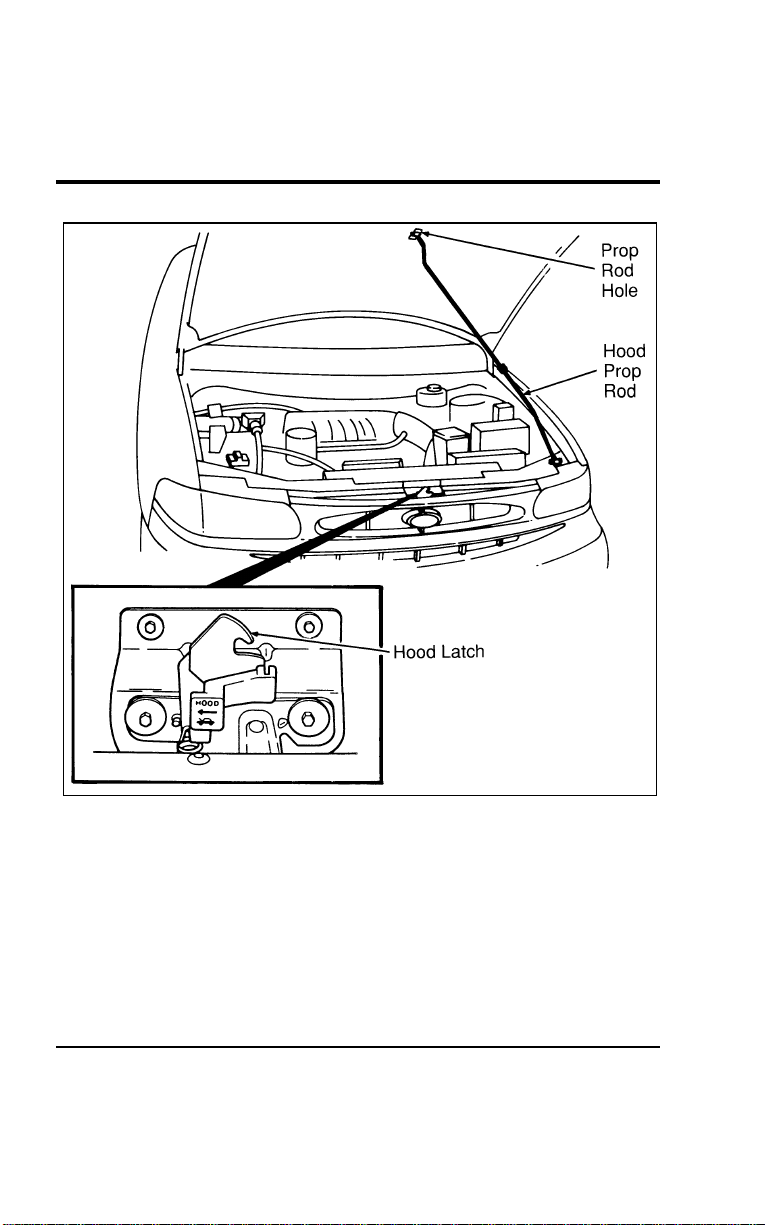
282
[MC03200(ALL)01/96]
24 pica art:0050028-B
Propping the hood
File:11wnmcs.ex
Update:Mon Jul 8 14:29:32 1996

Maintenance and Care
283
*
[MC03300(ALL)01/96]
To close the hood:
*
[MC03400(ALL)01/96] 1. Remove the prop rod from the slotted hole in the hood.
Place the rod in its retaining clip and close the hood with
enough force to make it latch. Be sure to oil the hood latch
every six months to maintain smooth operation.
*
[MC03500(ALL)01/96] 2. Try to lift the hood after closing it to be sure it is securely
latched.
%
*
[MC03600(ALL)03/96] Engine Compartment
[MC03700(ALL)01/96]
Your vehicle has a 3.0 liter SFI, V-6 engine or an optional 3.8
liter SFI, V-6 engine. The following illustrations show diagrams
of your engine and where you can find items you should
service regularly.
File:11wnmcs.ex
Update:Mon Jul 8 14:29:32 1996
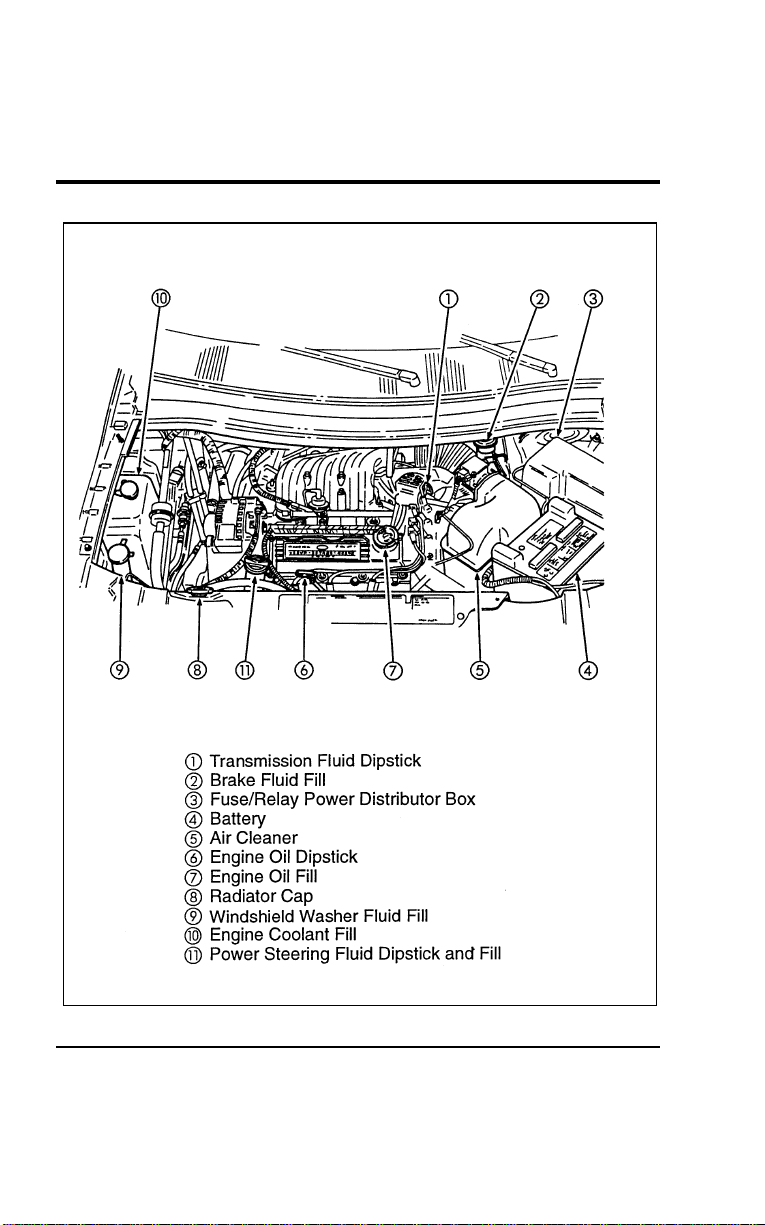
284
[MC03800(ALL)01/96]
33-1/2 pica
art:0050234-B
The engine compartment (3.0 liter only)
File:11wnmcs.ex
Update:Mon Jul 8 14:29:32 1996
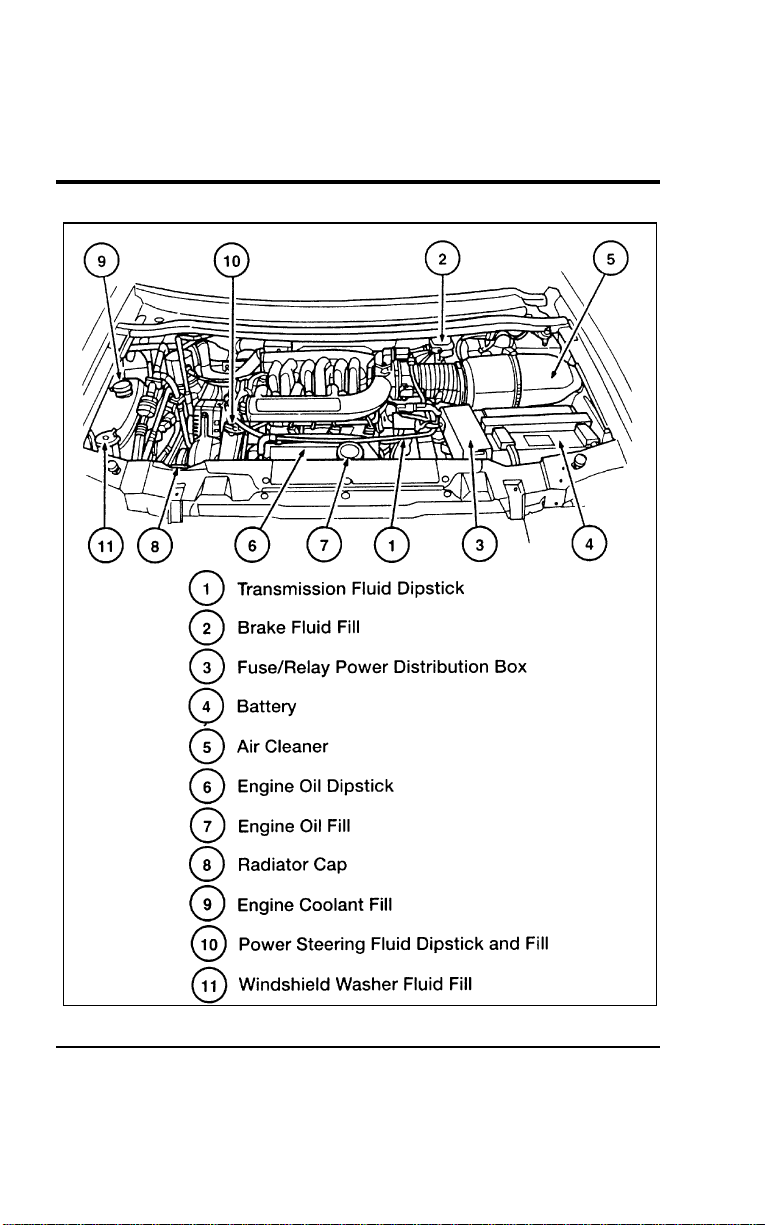
Maintenance and Care
285
[MC03900(ALL)01/96]
33-1/2 pica
art:0050038-C
The engine compartment (3.8 liter only)
File:11wnmcs.ex
Update:Mon Jul 8 14:29:32 1996
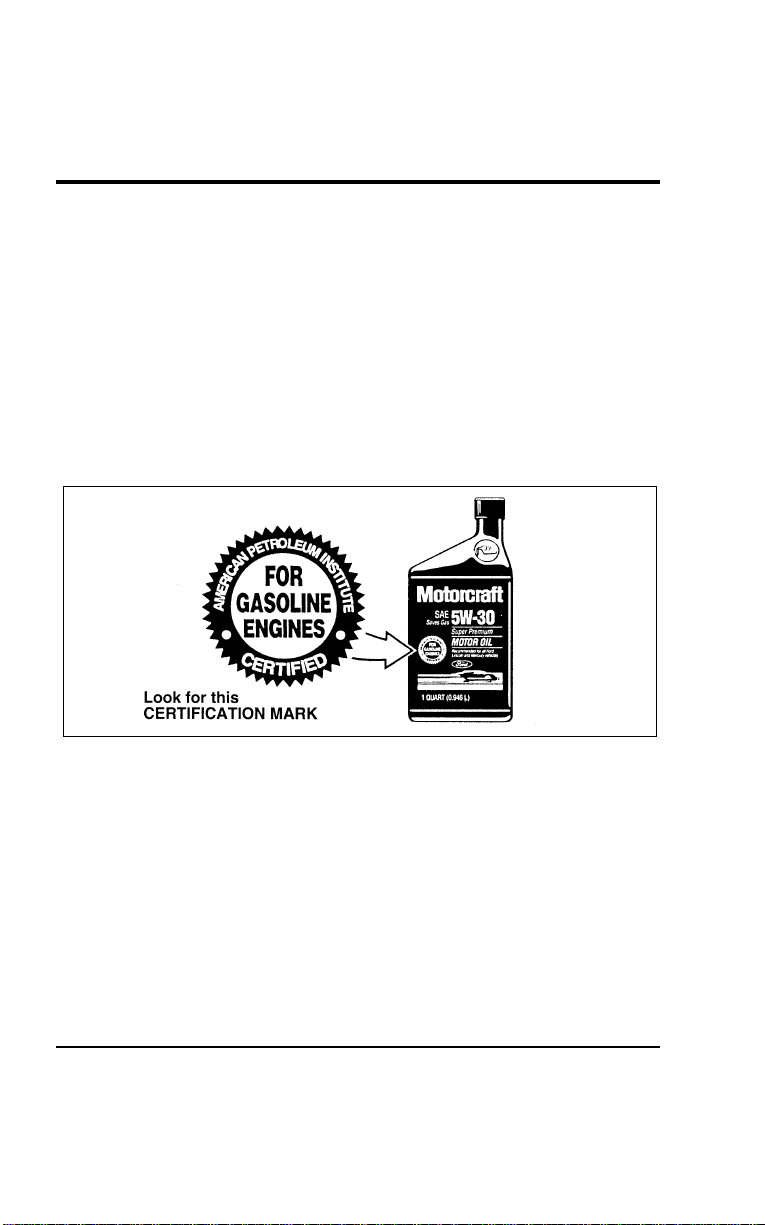
286
[MC04000(ALL)04/96] What to Check When You Stop at a Service
Station
%
*
[MC04100(ALL)01/96] Engine Oil Recommendations
*
[MC04200(ALL)01/96]
We recommend using Motorcraft oil or an equivalent oil
meeting Ford Specification WSS-M2C153-F and displaying the
American Petroleum Institute CERTIFICATION MARK on the
front of the container.
[MC04300(ALL)04/96]
Use only engine oils displaying the American Petroleum
Institute CERTIFICATION MARK on the front of the container:
*
[MC04400(ALL)01/96]
10-1/2 pica
art:0001314-A
The API Certification Mark
*
[MC04500(ALL)01/96]
Never use:
*
[MC04600(ALL)01/96]
■ “Non-Detergent” oils
*
[MC04700(ALL)02/96]
■ Oils labeled API SA, SB, SC, SD, SE, SF or SG
%
*
[MC04800(ALL)01/96
]
■ Additional engine oil additives, oil treatments or engine
treatments
File:11wnmcs.ex
Update:Mon Jul 8 14:29:32 1996

Maintenance and Care
287
%
*
[MC04900(ALL)03/96
]
Engine oils with an SAE 5W-30 viscosity are PREFERRED for
your vehicle. They provide the best engine performance, fuel
economy and engine protection for all climates down to -15˚F
(-25˚C).
%
*
[MC05000(ALL)03/96
]
Synthetic engine oils which are CERTIFIED and of the preferred
viscosity may be used in your engine. The engine oil and oil
filter must still be changed according to the maintenance
schedule.
%
*
[MC05100(ALL)01/96
]
Checking and Adding Engine Oil
*
[MC05200(ALL)01/96]
Since the proper amount of engine oil is important for safe
engine operation, check the oil using the dipstick each time you
put fuel in your vehicle. Remember the engine must be off, the
oil must be warm and the vehicle must be parked on level
ground.
%
*
[MC05300(ALL)01/96
]
Checking the engine oil level:
*
[MC05400(ALL)01/96] 1. Turn the engine off after it has warmed up and allow a few
minutes for the engine oil to drain back into the oil pan.
*
[MC05500(ALL)01/96] 2. Set the parking brake, making sure the gearshift is securely
latched in P (Park).
*
[MC05600(ALL)01/96] 3. Open the hood. Protect yourself from engine heat.
[MC05700(ALL)01/96] 4. Locate the dipstick labelled “Engine Oil” and carefully pull it
out of the engine.
*
[MC05800(ALL)01/96] 5. Wipe the dipstick clean and put it back into position, making
sure it is fully seated.
File:11wnmcs.ex
Update:Mon Jul 8 14:29:32 1996
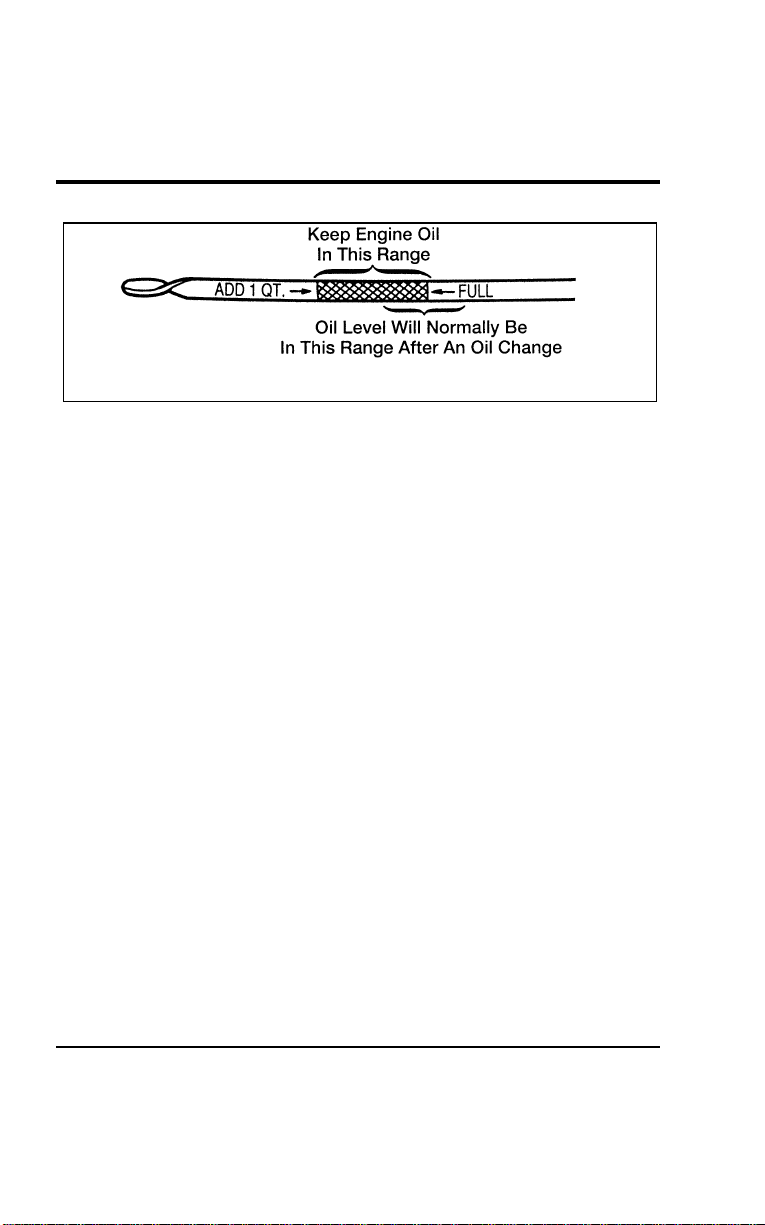
288
[MC05900(ALL)01/96]
7-1/2 pica art:0050073-D
Engine oil dipstick
*
[MC06000(ALL)01/96] 6. Carefully, pull the dipstick out again. If the oil level is below
the “ADD 1 QT.” line, add engine oil as necessary. If the oil
level is beyond the letter “F” in FULL, engine damage or
high oil consumption may occur and some oil must be
removed from the engine.
*
[MC06100(ALL)01/96] 7. Put the dipstick back in and make sure it is fully seated.
*
[MC06200(ALL)01/96]
It may be necessary to add some oil between oil changes. Make
sure you use a CERTIFIED engine oil of the preferred viscosity.
Your vehicle’s warranty coverage may not apply if engine
damage is caused by the use of improper engine oil.
*
[MC06300(ALL)01/96]
Add engine oil through the oil filler cap highlighted in yellow.
To add oil, remove the filler cap and use a funnel to pour oil
into the opening. Be careful not to overfill the engine. Recheck
the oil level after you finish adding oil.
%
*
[MC06400(ALL)01/96
]
Changing the Engine Oil and the Oil Filter
*
[MC06500(ALL)05/96]
Refer to the Maintenance Schedule booklet for additional
information.
%
*
[MC06600(ALL)05/96
]
NOTE: Always dispose of used automotive fluids in a
responsible manner. Follow your community’s
standards for disposing of these types of fluids. Call
your local recycling center to find out about recycling
automotive fluids.
File:11wnmcs.ex
Update:Mon Jul 8 14:29:32 1996

MaintenanceandCare
289
*
[MC06700(ALL)01/96]
WARNING
ContinuouscontactwithUSEDmotoroilhascaused
cancerinlaboratorymice.
*
[MC06800(ALL)01/96]
Protectyourskinbywashingwithsoapandwater.
%
*
[MC06900(ALL)05/96] BrakeFluid
*
[MC07000(ALL)01/96]
Yourvehicleisequippedwithabrakefluidlevelindicatorin
themastercylinderwhichlightstheBRAKEwarninglighton
theinstrumentpanelwhenthebrakefluidlevelislow.
*
[MC07100(ALL)01/96]
Undernormalcircumstances,yourvehicleshouldnotuseup
brakefluidrapidly.However,expectthelevelofthebrakefluid
toslowlyfallasyouputmoremileageonyourvehicleandthe
brakepadswear.
[MC07200(ALL)07/96]
Checkthebrakefluidatleastonceayear.Youcandothisby
lookingatthefluidlevelintheplasticreservoironthemaster
cylinder.ThefluidlevelshouldbeatorneartheMAXmark.
Addfluidiflevelis0.30"ormorebelowtheMAXline.
*
[MC07300(ALL)01/96]
WARNING
Brakefluidistoxic.
*
[MC07400(ALL)01/96]
Ifbrakefluidcontactseyes,flusheyeswithrunningwaterfor
15minutes.Getmedicalattentionifirritationpersists.Iftaken
internally,drinkwaterandinducevomiting.Getmedical
attentionimmediately.
%
*
[MC07500(ALL)03/96
]
Ifthefluidislow,carefullycleanandremovethefillercap
fromthereservoir.FillthereservoirtotheMAXlinewithFord
HighPerformanceDOT3BrakeFluidC6AZ-19542-ABorDOT3
equivalentfluidmeetingFordspecificationESA-M6C25-A.
File:11wnmcs.ex
Update:Mon Jul 8 14:29:32 1996
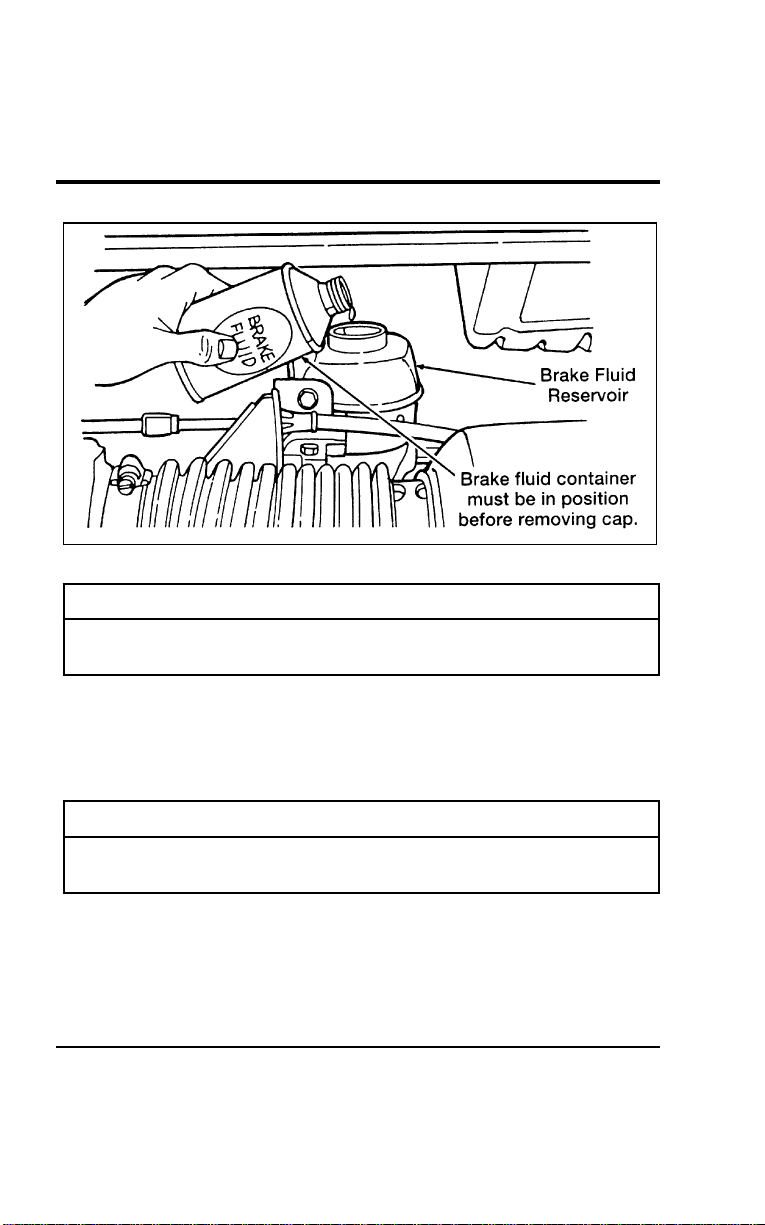
290
[MC07600(ALL)01/96]
13-1/2pica
art:0050216-B
Thebrakefluidreservoir
*
[MC07700(ALL)01/96]
WARNING
IfyouuseabrakefluidthatisnotDOT3,youwill
causepermanentdamagetoyourbrakes.
*
[MC07800(ALL)01/96]
DonotfillthereservoirabovetheMAXline.
*
[MC07900(ALL)01/96]
Ifyoufindthatthefluidlevelisexcessivelylow—belowthe
seamorridgeontheoutsideoftheplasticreservoir—havethe
brakesysteminspected.
*
[MC08000(ALL)01/96]
WARNING
Donotletthereservoirforthemastercylinderrundry.
Thismaycausethebrakestofail.
File:11wnmcs.ex
Update:Mon Jul 8 14:29:32 1996
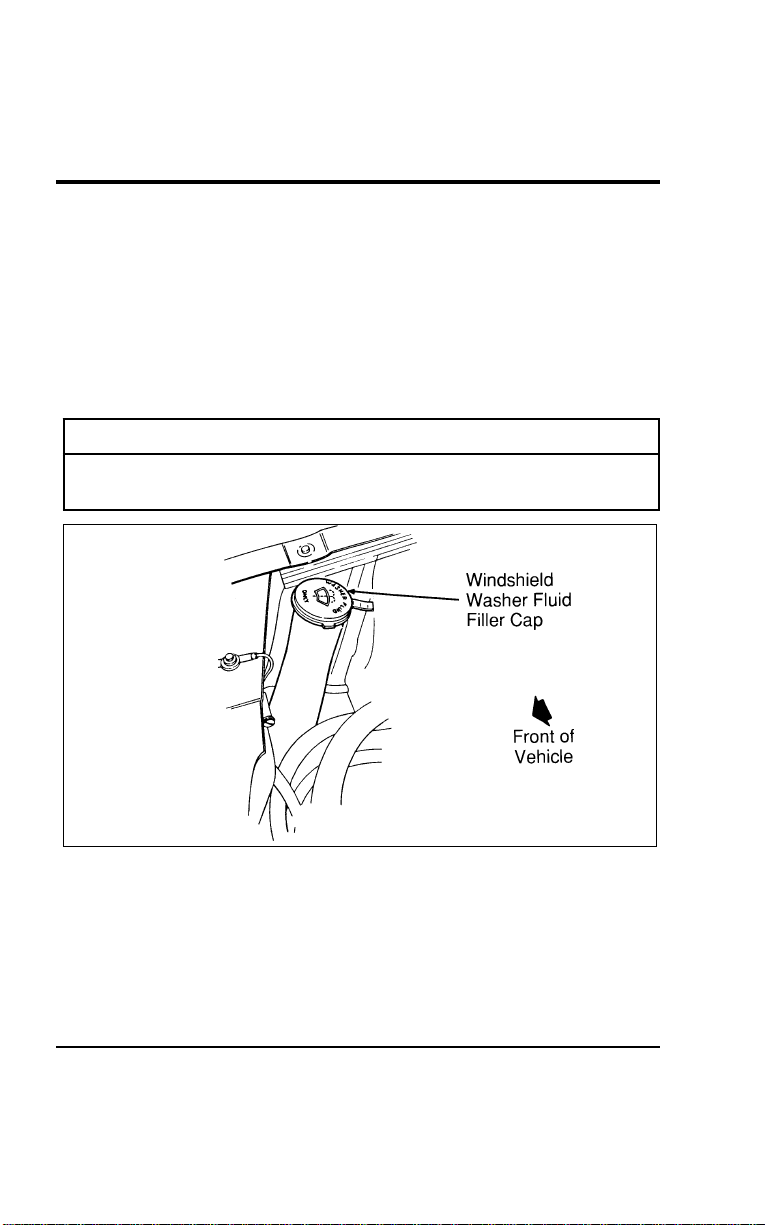
MaintenanceandCare
291
%
*
[MC08100(ALL)02/96] WindshieldWasherFluid
%
*
[MC08200(ALL)03/96
]
WasherFluid
[MC08300(ALL)01/96]
Checkthelevelofthewindshieldwasherfluideverytimeyou
stopforfuel.Thereservoirforwasherfluidislocatedonthe
front,passengersideoftheenginecompartment.Thisreservoir
containsthefluidforboththewindshieldandliftgatewashers.
*
[MC08400(ALL)01/96]
WARNING
Donotputwindshieldwasherfluidinthecontainerfor
theenginecoolant.
[MC08500(ALL)01/96]
13-1/2pica
art:0050050-B
Windshieldwasherfilllocation
%
*
[MC08600(ALL)02/96
]
Usespeciallyformulatedwindshieldwasherfluidratherthan
plainwater,becausespeciallyformulatedwasherfluidscontain
additivesthatdissolveroadgrime.Forsafetyreasons,washer
fluidscontaininganappropriateantifreezesuchasmethanol
shouldbeusedinfreezingweather(temperaturesbelow32˚F
[0˚C]).StateorlocalregulationsonVolatileOrganicCompounds
File:11wnmcs.ex
Update:Mon Jul 8 14:29:32 1996

292
(VOCs)mayrestrictuseofthemostcommonantifreeze,
methanol.Washerfluidscontainingnon-methanolantifreeze
agentsshouldbeusedonlyiftheyprovidecoldweather
protectionwithoutdamagingthevehicle’spaintfinish,wiper
blades,andwindshieldwashersystem.
*
[MC08700(ALL)03/96]
WARNING
Windshieldwasherfluidcontainsmethanolwhichis
poisonous.
[MC08800(ALL)01/96]
Whenaddingwindshieldwashersolution,besuretoobserveall
warningsindicatedonthewashersolutioncontainer.
%
*
[MC08900(ALL)01/96] EngineCoolant
%
*
[MC09000(ALL)01/96
]
CheckingtheEngineCoolant
[MC09100(ALL)01/96]
Yourvehicle’senginecoolantprotectstheenginefrom
overheatinginthesummerandfromfreezinginthewinter.
Checktheleveloftheenginecoolantatleastonceamonth,but
preferablyeachtimeyoustopforfuel.Simplycheckthecoolant
reservoir,locatedintheenginecompartment.Thecoolant
shouldstayslightlyabovethe“FULLCOLD”mark.
*
[MC09200(ALL)05/96]
AddingEngineCoolant
*
[MC09300(ALL)05/96]
WARNING
Donotputenginecoolantinthecontainerforthe
windshieldwasherfluid.
*
[MC09400(ALL)05/96]
Ifsprayedtocleantheglass,enginecoolantorantifreezecould
makeitdifficulttoseethroughthewindshield.
File:11wnmcs.ex
Update:Mon Jul 8 14:29:32 1996
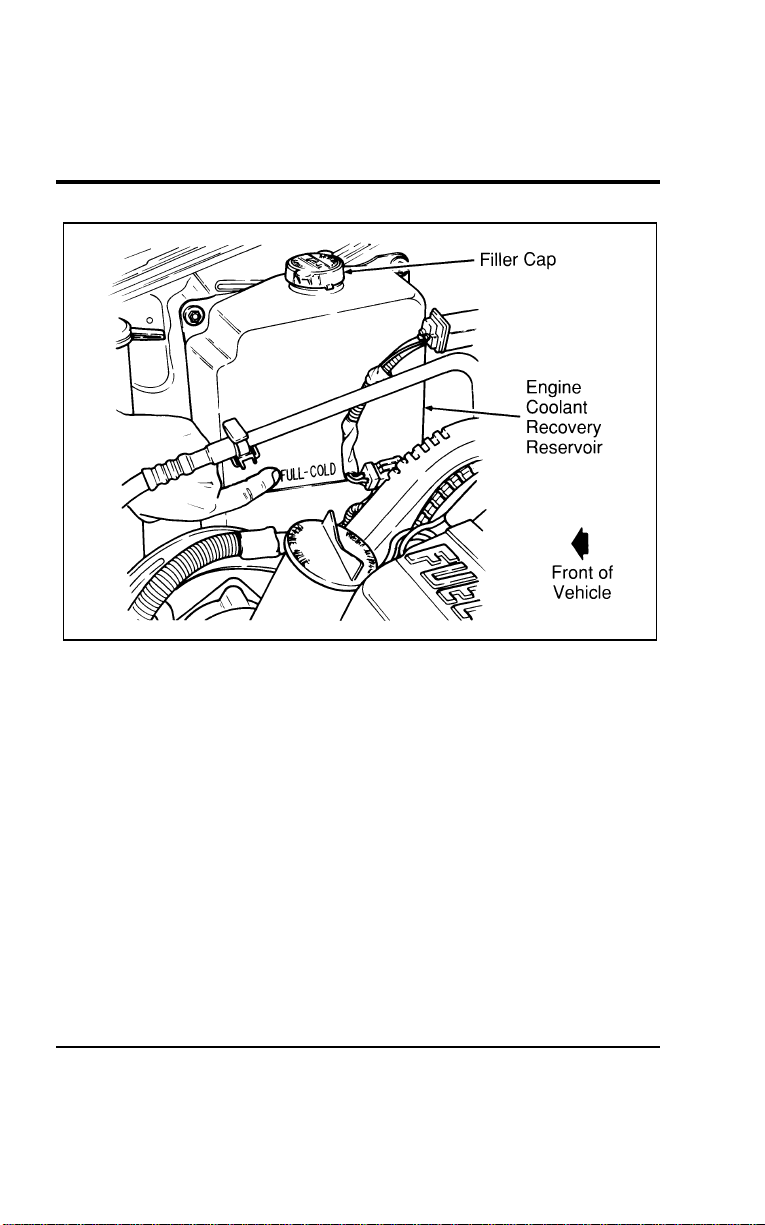
Maintenance and Care
293
[MC09500(ALL)01/96]
17-1/2 pica
art:0050025-B
Engine coolant recovery reservoir fill location
%
*
[MC09600(ALL)05/96
]
Use Ford Premium Cooling System Fluid or an equivalent
engine coolant that meets Ford Specification ESE-M97B44-A. Do
not use alcohol or methanol antifreeze and do not use engine
coolant mixed with alcohol or methanol antifreeze. If you do
not use the proper coolant, the aluminum radiator on your
vehicle will corrode.
*
[MC09700(ALL)05/96]
Whenever you remove the radiator cap, make sure that you also
check the condition of the radiator cap rubber seals. Make sure
they are clean and free of any dirt. Rinse off with water, if
necessary. When you replace the radiator cap, make sure the
radiator filler neck seats are clean. Also check that the overflow
hose is not kinked or turned in such a way that prevents an
easy flow.
File:11wnmcs.ex
Update:Mon Jul 8 14:29:32 1996

294
*
[MC09800(ALL)05/96]
Never remove the radiator cap while the engine is running or
hot. If you must remove the radiator cap, follow these steps to
avoid personal injury that can be caused by escaping steam or
engine coolant.
*
[MC09900(ALL)05/96] 1. Turn the engine off and let it cool before removing the
radiator cap. You should exercise care when removing the
cap, even from a cooled engine.
*
[MC10000(ALL)05/96] 2. When the engine is cool, wrap a thick cloth around the cap
and turn it slowly counterclockwise to the first stop.
*
[MC10100(ALL)05/96] 3. Step back while the pressure is released.
*
[MC10200(ALL)05/96] 4. When you are sure that all the pressure has been released,
use the cloth to press, turn, and remove cap.
[MC10300(ALL)01/96] 5. Stand away from the radiator opening while removing the
cap. Hot steam may blow out or hot engine coolant may
splash out.
%
*
[MC10400(ALL)05/96
]
Freezing Protection
*
[MC10500(ALL)05/96]
The factory-installed solution of Ford Premium Cooling System
Fluid and water will protect your vehicle to s35˚F (s37˚C).
Check the freeze protection rating of the engine coolant at least
once a year, just before winter.
% [MC10600(ALL)01/96]
Add engine coolant only to the engine coolant recovery
reservoir — not to the radiator. If the coolant level is low, add
to the engine coolant recovery reservoir a 50/50 mixture of
water and the type of engine coolant that Ford specifies. If the
coolant recovery reservoir is empty, you should also check the
radiator to see if it is low. Check the coolant level again the
next few times you drive your vehicle.
File:11wnmcs.ex
Update:Mon Jul 8 14:29:32 1996

Maintenance and Care
295
*
[MC10700(ALL)05/96]
Ford Premium Cooling System Fluid is an optimized formula
that will protect all metals and rubber elastomers used in Ford
engines for four years or 50,000 miles (80,000 km). It is not
necessary and not recommended to use supplemental coolant
additives in your gasoline powered vehicle. These additives may
harm your engine cooling system. Follow the recommended
service interval for changing your engine coolant.
*
[MC10800(ALL)05/96]
NOTE: When adding to or changing your engine coolant, it is
important to maintain a coolant concentration between
40% (s11˚F [s24˚C]) and 60% (s62˚F [s52˚C])
depending on your local climate conditions. When
coolant concentration falls below 40%, you will lose
freeze protection; above 60%, your engine may
overheat on a warm day. If coolant concentration is
outside this range, you may lose corrosion and rust
protection for the metals in your engine cooling
system.
[MC10900(ALL)01/96]
NOTE: Do not use an engine coolant that does not meet all
14 requirements of Ford specification ESE-M97B44-A.
The use of a coolant that does not meet the 14
requirements may void your warranty for the engine
cooling system. Use only a premium, nationally
recognized brand name engine coolant.
*
[MC11000(ALL)05/96]
Ford Motor Company expressly authorizes the Ford Rotunda
engine coolant recycling process and chemicals. Use only Ford
Rotunda recycled engine coolant or an equivalent non-Ford
Rotunda recycled engine coolant that is certified by the supplier
to meet Ford specification ESE-M97B44-A.
%
*
[MC11100(ALL)05/96
]
NOTE: Always dispose of used automotive fluids in a
responsible manner. Follow your community’s
standards for disposing of these types of fluids. Call
your local recycling center to find out about recycling
automotive fluids.
File:11wnmcs.ex
Update:Mon Jul 8 14:29:32 1996

296
*
[MC11200(ALL)05/96]
Leave the coolant in all year. Make sure that the coolant will
not freeze at the temperature level in which you usually drive
during winter months. Keep an engine coolant in your engine
that has a protection rating of at least s20˚F (s29˚C).
*
[MC11300(ALL)05/96]
To find out how much engine coolant mixture your vehicle’s
coolant system can hold, see Refill Capacities in Capacities and
Specifications chapter.
[MC11400(ALL)01/96]
You may add water by itself only in an emergency, but you
should replace it with a 50/50 mixture of water and coolant as
soon as possible.
*
[MC11500(ALL)05/96]
Have your dealer check the engine cooling system for leaks if
you have to add engine coolant more than once a month, or
you have to add more than a quart (liter) at a time.
%
*
[MC11600(ALL)01/96
]
Checking Hoses
*
[MC11700(ALL)01/96]
Inspect all engine and heater system hoses for deterioration,
leaks and loose clamps before adding or replacing engine
coolant. Make whatever repairs or replacements are necessary
using Motorcraft parts or their equivalents.
%
*
[MC11800(ALL)05/96
]
Engine Coolant Drain and Flush
[MC11900(ALL)01/96]
To drain and flush your engine coolant, you MUST see your
Ford dealer or refer to the procedure in the service manual.
Failing to do so could result in engine damage.
% [MC12000(ALL)04/96]
Power Steering Fluid
*
[MC12100(ALL)01/96]
Check the level of the power steering fluid at least twice a
year (i.e., every Spring and Fall).
*
[MC12200(ALL)01/96]
To check the level of your power steering fluid:
[MC12300(ALL)01/96] 1. Start the engine and let it run until the power steering fluid
reaches normal operating temperature. The power steering
fluid will reach the right temperature after at least five
minutes of idling or at least one mile (1 km) of driving.
File:11wnmcs.ex
Update:Mon Jul 8 14:29:32 1996

Maintenance and Care
297
*
[MC12400(ALL)01/96] 2. While the engine idles, turn the steering wheel back and
forth several times. Make sure that the cap assembly is
installed at this time.
*
[MC12500(ALL)01/96] 3. Then turn the engine off.
*
[MC12600(ALL)01/96] 4. Check the fluid level in the power steering fluid reservoir.
[MC12700(ALL)01/96]
13-1/2 pica
art:0050163-A
The power steering fluid cap
[MC12800(ALL)01/96] 5. If the power steering fluid is low, add fluid in small
amounts, continuously checking the level, until the fluid is
between the minimum (MIN) and maximum (MAX) lines on
the dipstick. Do not overfill.
[MC12900(ALL)01/96] 6. Make sure the cap is free of all dirt prior to re-installing to
prevent pump damage.
*
[MC13000(ALL)01/96]
Use only power steering fluid that meets Ford Specification
ESW-M2C33-F, such as Ford Premium Power Steering Fluid,
E6AZ-19582-AA or an equivalent Type F Automatic Transaxle
Fluid with a Ford registration number (an 8-digit number
beginning with “2P” printed on the fluid container).
File:11wnmcs.ex
Update:Mon Jul 8 14:29:32 1996

298
*
[MC13100(ALL)01/96]
NOTE: If the power steering fluid is low, do not drive your
vehicle for a long period of time before adding fluid.
This can damage the power steering pump.
*
[MC13200(ALL)01/96]
If you must check the power steering fluid when it is cold,
make sure that the fluid reaches at least the minimum (MIN)
mark. The reading will only be accurate if the fluid temperature
is approximately 70˚ to 100˚F (21˚ to 38˚C).
%
*
[MC13300(ALL)01/96] Automatic Transaxle Fluid
[MC13400(ALL)01/96]
Under normal circumstances, you need to change the fluid at
30,000 miles (48,000 km) for normal operating conditions or
21,000 miles (34,000 km) for severe duty. However, if the
transaxle is not working properly (for example, slipping or
shifting slowly), or you notice some sign of fluid leakage, the
fluid level should be checked.
*
[MC13500(ALL)01/96]
It is best to check the transaxle fluid level at normal operating
temperature, after approximately 20 miles (30 km) of driving.
However, if necessary, you can check the fluid level without
having to drive 20 miles (30 km) to obtain a normal operating
temperature if outside temperatures are above 50˚F (10˚C).
*
[MC13600(ALL)01/96]
NOTE: If the vehicle has been operated for an extended
period at high speeds or in city traffic during hot
weather, or if it has been pulling a trailer, the engine
should be turned off for about 30 minutes to allow
the fluid to cool before checking.
%
*
[MC13700(ALL)01/96
]
Checking the Automatic Transaxle Fluid
*
[MC13800(ALL)01/96]
With the vehicle on a level surface, start the engine and move
the gearshift lever through all of the gear ranges allowing
sufficient time for each position to engage. Securely latch the
gearshift lever in the P (Park) position, fully set the parking
brake and leave the engine running.
File:11wnmcs.ex
Update:Mon Jul 8 14:29:32 1996
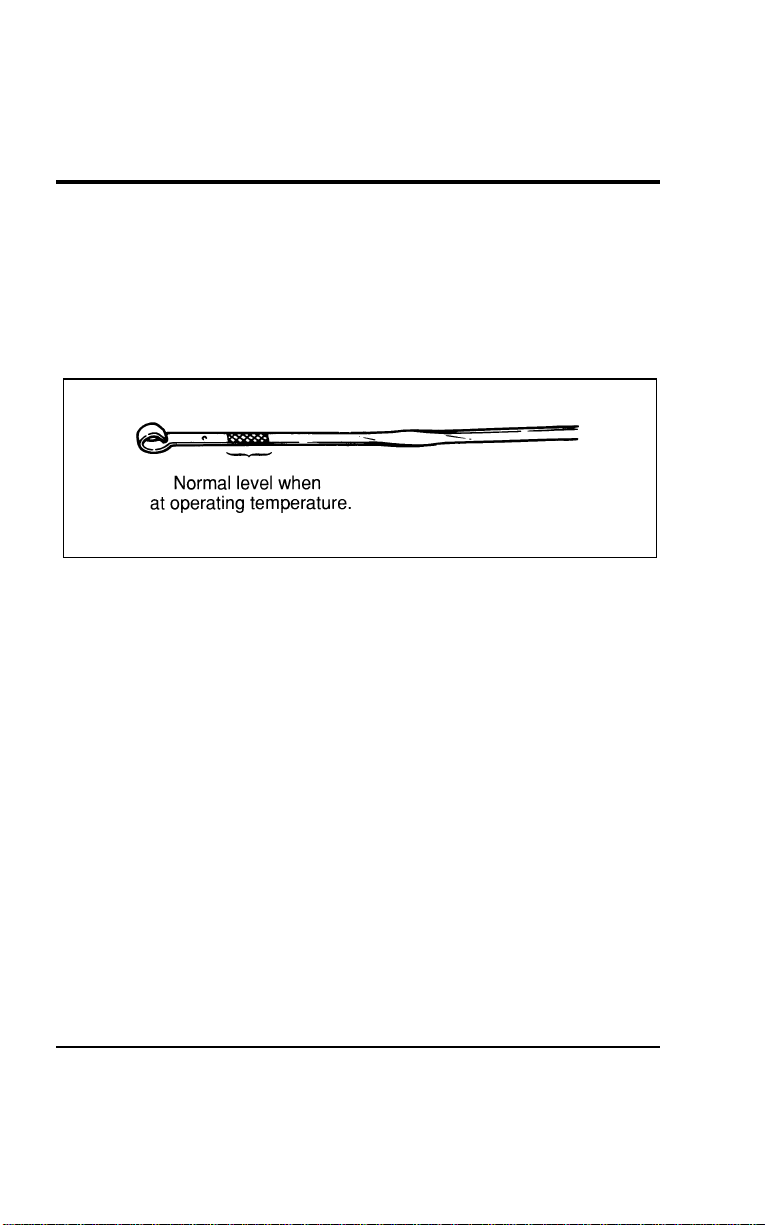
Maintenance and Care
299
*
[MC13900(ALL)01/96]
Wipe off the dipstick cap, pull the dipstick out and wipe the
indicator end clean. Put the dipstick back into the filler tube and
make sure it is fully seated. Pull the dipstick out and read the
fluid level.
[MC14000(ALL)01/96]
When checking fluid at normal operating temperature, the fluid
level should be within the crosshatched area on the dipstick.
[MC14100(ALL)01/96]
7-1/2 pica art:0050021-A
The automatic transmission dipstick
[MC14200(ALL)01/96]
NOTE: Your vehicle should not be driven until some fluid
has been added if the fluid level is below the bottom
hole on the dipstick and the outside temperature is
above 50˚F (10˚C). Add only enough fluid to bring the
level above the bottom hole. The fluid level should be
rechecked at normal operating temperature.
%
*
[MC14300(ALL)01/96
]
Adding Automatic Transaxle Fluid
*
[MC14400(ALL)01/96]
The fluid type is stamped on the dipstick. Before adding any
fluid, be sure that the correct type will be used.
*
[MC14500(ALL)01/96]
Add fluid in 1/2 pint (0.25 liter) increments through the filler
tube to bring the level to the correct area on the dipstick. If an
overfill occurs, excess fluid should be removed by a qualified
technician.
File:11wnmcs.ex
Update:Mon Jul 8 14:29:32 1996

300
%
*
[MC14600(ALL)05/96
]
NOTE: Always dispose of used automotive fluids in a
responsible manner. Follow your community’s
standards for disposing of these types of fluids. Call
your local recycling center to find out about recycling
automotive fluids.
*
[MC14700(ALL)01/96]
NOTE: Always use Motorcraft MERCONH or equivalent
MERCONH automatic transaxle fluid when you refill
your automatic transaxle fluid.
%
*
[MC14800(ALL)01/96] Battery
*
[MC14900(ALL)05/96]
The Motorcraft maintenance-free battery does not require
additional water during its life of service. The vents are part of
the cover and cannot be removed. For longer, trouble-free
operation, keep the top of the battery clean and dry. Also, make
certain the battery cables are tightly fastened to the battery
terminals.
*
[MC15000(ALL)05/96]
If you see any corrosion on the battery cables or terminals,
remove the cables from the terminal and clean them both with a
wire brush. You can neutralize the acid with a solution of
baking soda and water. Reinstall the cables when you are done
cleaning them, and apply a small quantity of grease to the top
of each battery terminal to help prevent corrosion.
*
[MC15100(ALL)01/96]
Battery replacement
*
[MC15200(ALL)05/96]
If your original equipment battery requires replacement while
under warranty, it may, in some cases, be replaced by a
Motorcraft low-maintenance battery. The low-maintenance
battery has removable vent caps for checking the electrolyte
level and for adding water, if needed.
*
[MC15300(ALL)05/96]
Check your battery’s electrolyte level, at least every 12 months
or 12,000 miles (20,000 km), in temperatures up to 90˚F (32˚C).
Keep the electrolyte in each cell up to the “level” indicator. Do
not overfill the battery cell.
File:11wnmcs.ex
Update:Mon Jul 8 14:29:32 1996
MaintenanceandCare
301
*
[MC15400(ALL)05/96]
Iftheelectrolytelevelinyourbatterygetslow,youcanadd
plaintapwatertothebattery,aslongasyoudonotusehard
water(waterwithahighmineraloralkalicontent).Ifpossible,
however,trytoonlyfillthebatterycellwithdistilledwater.If
thebatteryneedswateroften,havethechargingsystem
checked.
%
*
[MC15500(ALL)01/96
]
HelpUsProtectOurEnvironment
*
[MC15600(ALL)01/96]
FordMotorCompanystronglyrecommendsthatusedlead-acid
batteriesbereturnedtoanauthorizedrecyclingfacilityfor
disposal.
*
[MC15700(ALL)01/96]
7-1/2picaart:0040201-A
Batteryrecyclingsymbol
*
[MC15800(ALL)02/96]
WARNING
Thegasesaroundthebatterycanexplodeifexposedto
flames,sparks,orlitcigarettes.Anexplosioncouldresult
ininjuryorvehicledamage.
%
*
[MC15900(ALL)05/96
]
WARNING
Batteriescontainsulfuricacidwhichburnsskin,eyes,
andclothing.
File:11wnmcs.ex
Update:Mon Jul 8 14:29:32 1996

302
*
[MC16000(ALL)02/96]
Iftheacidtouchessomeone’sskin,eyes,orclothing,
immediatelyflushtheareawithwaterforatleast15minutes.If
someoneswallowstheacid,havehimorherdrinklotsofmilk
orwaterfirst,thenMilkofMagnesia,abeatenegg,orvegetable
oil.Calladoctorimmediately.
%
*
[MC16100(ALL)02/96
]
WARNING
Applyingtoomuchpressureontheendswhenliftinga
batterycouldcauseacidtospill.Liftthebatterywitha
carrierorwithyourhandsontheoppositecorners.
%
*
[MC16200(ALL)02/96] WiperBlades
[MC16300(ALL)01/96]
Checkthewindshieldwipersatleasttwiceayear.Alsocheck
themwhenevertheyseemlesseffectivethanusual.Such
substancesastreesapandsomehotwaxtreatmentsusedby
commercialcarwashesreducetheeffectivenessofwipers.
*
[MC16400(ALL)01/96]
Ifthebladesdonotwipeproperly,cleanboththewindshield
andthewiperblades.Useundilutedwindshieldwashersolution
oramilddetergent.Rinsethoroughlywithclearwater.Donot
usefuel,kerosene,paintthinner,orothersolventstocleanyour
wiperblades.Thesewilldamageyourblades.
[MC16500(ALL)01/96]
Yourwipershaveaservicefeaturethatallowsyoutopullthe
wiperarmsandbladesawayfromthewindshieldandintoan
uprightposition.Thisservicepositionallowsyoueasyaccessto
thebladesfromeithersideofyourvehicle.
*
[MC16600(ALL)01/96]
Toreachthewiperbladeseasily,turntheignitionswitchto
ACCESSORYandturnyourwiperson.Waitforthemtoreacha
verticalpositionandturntheignitiontoOFF.Movingthe
wipersmanuallymaydamagethem.
File:11wnmcs.ex
Update:Mon Jul 8 14:29:32 1996

Maintenance and Care
303
[MC16700(ALL)07/96]
Wiper Blade Replacement
*
[MC16800(ALL)01/96]
If the wipers still do not work properly after you clean them,
you may need to replace the wiper blade assembly. When
replacing the wiper blade assembly always use a Motorcraft part
or equivalent.
*
[MC16900(ALL)08/95]
To replace the wiper blades:
*
[MC17000(ALL)01/96] 1. Pull the wiper arm away from the windshield and into the
lock position.
[MC17100(ALL)01/96] 2. Turn the blade at an angle from the wiper arm. Squeeze the
lock tabs of the plastic clip together to release the blade and
pull the wiper blade down toward the windshield to remove
it from the arm.
*
[MC17200(ALL)08/95] 3. Attach a new wiper blade to the wiper arm and press it into
place until you hear it click.
%
*
[MC17300(ALL)01/96] Tires
[MC17400(ALL)04/96]
Look at your tires each time you fill your fuel tank. If one tire
looks lower than the others, check the pressure in all of them.
[MC17500(ALL)01/96]
■ Keep your tires inflated to the recommended pressures. See
Checking the pressure of the tires later in this chapter.
*
[MC17600(ALL)01/96]
■ Stay within the recommended load limits. See Driving with a
heavy load in the Index.
*
[MC17700(ALL)03/96]
■ Make sure the weight of your load is evenly distributed.
*
[MC17800(ALL)03/96]
■ Adjust tire pressure to recommended specifications found on
the Safety Compliance Certification Label.
*
[MC17900(ALL)03/96]
If you do not take these precautions, your tires may fail or go
flat.
File:11wnmcs.ex
Update:Mon Jul 8 14:29:32 1996

304
*
[MC18000(ALL)01/96]
WARNING
Alwaysobeypostedspeedlimits.Ifyoudrivetoofast
forroadconditions,youcouldlosecontrolofyour
vehicle.Undersomecircumstances,drivingatveryhigh
speedsforextendedperiodsoftimemaydamagevehicle
components,creatingariskofcomponentfailureanda
potentiallossofvehiclecontrol.Anytimeyoulose
controlofyourvehicle,itmayresultininjury.
[MC18100(ALL)01/96]
Atleastonceamonth,checkthepressureinallyourtires,
includingthespare.Useanaccuratetirepressuregauge.Check
thetirepressurewhentiresarecold,thatis,afterthevehicle
hasbeenparkedforatleastonehourorhasbeendrivenless
than3miles(5km).Youcanfindthepropercoldtirepressure
ontheSafetyComplianceCertificationLabellocatedonthe
driver’sdoorpillar.
*
[MC18200(ALL)01/96]
WARNING
Improperlyinflatedtirescanaffectvehiclehandlingand
canfailsuddenly,possiblyresultinginlossofvehicle
control.
%
*
[MC18300(ALL)01/96
]
TireRotation
*
[MC18400(ALL)01/96]
Becauseyourvehicle’sfrontandreartiresperformdifferent
jobs,theyoftenweardifferently.Tomakesureyourtireswear
evenlyandlastlonger,rotatethemasindicatedinthefollowing
diagram.
File:11wnmcs.ex
Update:Mon Jul 8 14:29:32 1996
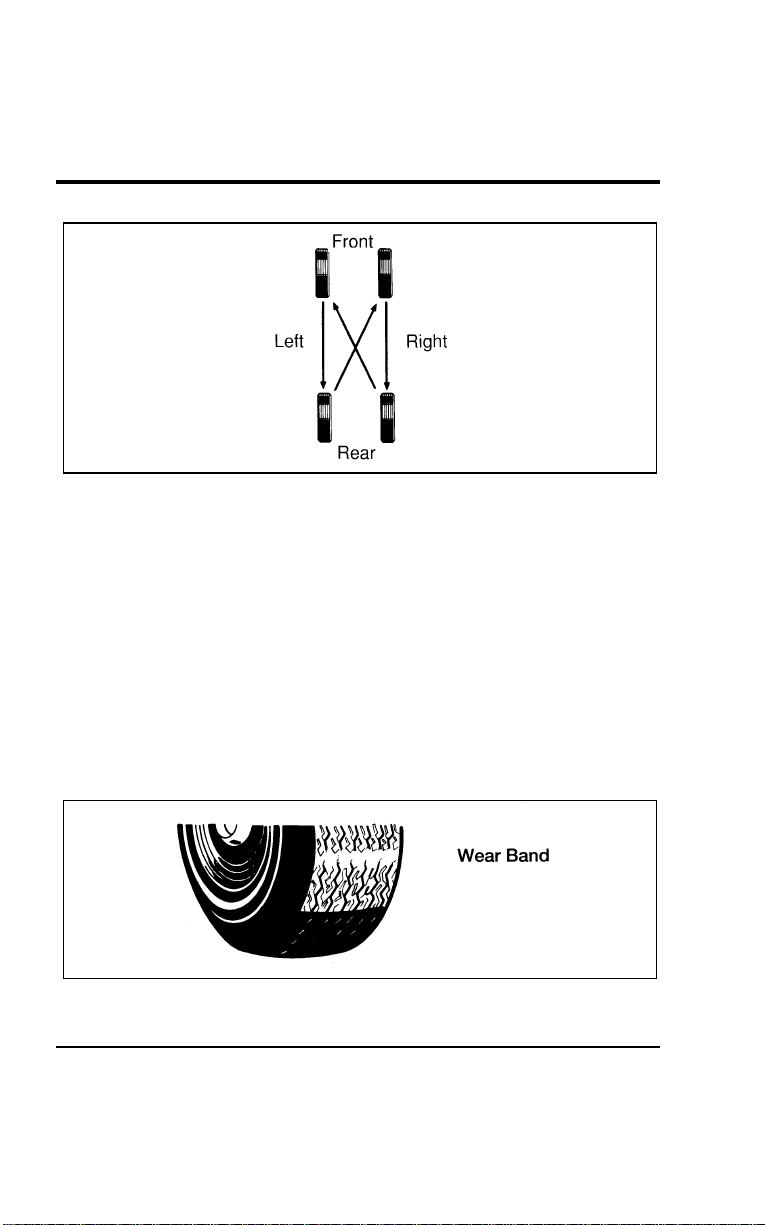
Maintenance and Care
305
[MC18500(ALL)01/96]
10-1/2 pica
art:0050224-A
Rotating the tires
*
[MC18600(ALL)01/96]
If your vehicle has the optional full-size spare tire, you may
rotate the spare tire into the rotation pattern.
[MC18700(ALL)01/96]
If your vehicle has aluminum wheels, you may remove the
full-size (if equipped) spare tire from the wheel and remount it
on an aluminum wheel to rotate the spare tire into your
vehicle’s rotation pattern.
%
*
[MC18800(ALL)01/96
]
Replacing the Tires
*
[MC18900(ALL)01/96]
Replace tires that show wear bands. When your tire shows a
wear band, it has only 1/16 of an inch (1.59 mm) of tread left.
*
[MC19000(ALL)01/96]
7-1/2 pica art:0040200-A
A worn-out tire
File:11wnmcs.ex
Update:Mon Jul 8 14:29:32 1996
306
*
[MC19100(ALL)02/96]
Becauseyourvehicle’stiresmaywearunevenly,youmayneed
toreplacethembeforeawearbandappearsacrosstheentire
tread.
*
[MC19200(ALL)01/96]
WARNING
Whenreplacingfullsizetires,nevermixradial,
bias-belted,orbias-typetires.Useonlythetiresizesthat
arelistedonthetirepressuredecal.Makesurethatall
tiresarethesamesize,speedrating,andload-carrying
capacity.Useonlythetirecombinationsrecommendedon
thedecal.Ifyoudonotfollowtheseprecautions,your
vehiclemaynotdriveproperlyandsafely.
*
[MC19300(ALL)03/96]
WARNING
Makesurethatallreplacementtiresareofthesamesize,
type,load-carryingcapacity,andtreaddesign(e.g.“All
Terrain”,etc.),asoriginallyofferedbyFord.
*
[MC19400(ALL)03/96]
WARNING
Donotreplaceyourtireswith“highperformance”tires
orlargersizetires.
*
[MC19500(ALL)03/96]
WARNING
Useofaftermarketwheelassembliesmaydamageyour
vehicleorcauseaccidentsresultinginseriousinjuries.
*
[MC19600(ALL)03/96]
WARNING
Failuretofollowtheseprecautionsmayadverselyaffect
thehandlingofthevehicleandmakeiteasiertolose
controlandrollover.
File:11wnmcs.ex
Update:Mon Jul 8 14:29:32 1996

Maintenance and Care
307
*
[MC19700(ALL)01/96]
Tires that are larger or smaller than your vehicle’s original tires
may affect the accuracy of your speedometer and odometer.
%
*
[MC19800(ALL)01/96
]
Information About Tire Quality Grades
*
[MC19900(ALL)01/96]
New vehicles are fitted with tires that have their Tire Quality
Grade (described below) molded into the tire’s sidewall. These
Tire Quality Grades are determined by standards that the
United States Department of Transportation has set.
*
[MC20000(ALL)01/96]
Tire Quality Grades apply to new pneumatic tires for use on
this vehicle. They do not apply to deep tread, winter-type snow
tires, space-saver or temporary use spare tires, tires with
nominal rim diameters of 10 to 12 inches (254-305 mm) or
limited production tires as defined in Title 49 Code of Federal
Regulations Part 575.104(c)(2).
*
[MC20100(ALL)01/96]
U.S. Department of Transportation — Tire quality grades: The
U.S. Department of Transportation requires Ford to give you the
following information about tire grades exactly as the
government has written it.
%
*
[MC20200(ALL)01/96
]
Treadwear
*
[MC20300(ALL)01/96]
The treadwear grade is a comparative rating based on the wear
rate of the tire when tested under controlled conditions on a
specified government test course. For example, a tire graded 150
would wear one and one-half (1 1/2) times as well on the
government course as a tire graded 100. The relative
performance of tires depends upon the actual conditions of their
use, however, and may depart significantly from the norm due
to variations in driving habits, service practices and differences
in road characteristics and climate.
File:11wnmcs.ex
Update:Mon Jul 8 14:29:32 1996

308
*
[MC20400(ALL)01/96]
Traction A B C
*
[MC20500(ALL)01/96]
The traction grades, from highest to lowest, are A, B, and C,
and they represent the tire’s ability to stop on wet pavement as
measured under controlled conditions on specified government
test surfaces of asphalt and concrete. A tire marked C may have
poor traction performance. Warning: The traction grade assigned
to this tire is based on braking (straight ahead) traction tests
and does not include cornering (turning) traction.
*
[MC20600(ALL)01/96]
Temperature A B C
[MC20700(ALL)01/96]
The temperature grades are A (the highest), B, and C,
representing the tire’s resistance to the generation of heat and
its ability to dissipate heat when tested under controlled
conditions on a specified indoor laboratory test wheel. Sustained
high temperature can cause the material of the tire to
degenerate and reduce tire life, and excessive temperature can
lead to sudden tire failure. The grade C corresponds to a level
of performance which all passenger car tires must meet under
the Federal Motor Vehicle Safety Stadard No. 109. Grades B and
A represent higher levels of performance on the laboratory test
wheel than the minimum required by law. Warning: The
temperature grade for this tire is established for a tire that is
properly inflated and not overloaded. Excessive speed,
underinflation, or excessive loading, either separately or in
combination, can cause heat buildup and possible tire failure.
%
*
[MC20800(ALL)01/96
]
Snow Tires and Chains
*
[MC20900(ALL)03/96]
The tires on your vehicle have all-weather treads that provide
traction in rain or snow. However, during the winter months in
some climates, you may need to use snow tires and occasionally
chains for your tires.
File:11wnmcs.ex
Update:Mon Jul 8 14:29:32 1996

MaintenanceandCare
309
*
[MC21000(ALL)01/96]
WARNING
Whenusingsnowtires,makesuretheyarethesamesize
andgradeasthetiresyounormallyuseonyourvehicle.
*
[MC21100(ALL)01/96]
Donotusechainswhenusingatemporaryspare.Forfullsize
tires,usechainsonthetiresonlyinanemergencyorifthelaw
requiresthemwhereyoulive.Whenyouusethetirechains:
*
[MC21200(ALL)01/96]
■Makesurethechainsaretherightsizeforyourtires.Use
onlySAEClass“S”chains.Othertypesmaydamageyour
vehicle.
*
[MC21300(ALL)01/96]
■Putchainsontightlywiththeendshelddownsecurely.
Followthechainmanufacturer’sinstructions.
*
[MC21400(ALL)01/96]
■Driveslowly.Ifyoucanhearthechainsruborbangagainst
yourvehicle,stopthevehicleandtightenthechains.Ifyou
continuetohearthechainsruborbangagainstyourvehicle,
removethechainstopreventdamagetoyourvehicle.
*
[MC21500(ALL)01/96]
■Avoidfullyloadingyourvehicleifpossible.
*
[MC21600(ALL)01/96]
■Removetirechainsatthefirstopportunityafterusingthem
onsnowandice.Donotusethechainsondryroads.
[MC21700(ALL)01/96]
LimitedchainclearanceexistswithP215/70R15tires.Ifyour
vehicleisequippedwiththesetires,extracaremustbeobserved
toavoiddamagewithchains.
[MC21800(ALL)01/96]
Besure:
[MC21900(ALL)01/96]
■Thechainsarefullytightened
[MC22000(ALL)01/96]
■Thevehicleisdrivenbelow30MPH(50km/h)
[MC22100(ALL)01/96]
■Thevehicleislightlyloaded
[MC22200(ALL)01/96]
■Toavoidsharpturns
*
[MC22300(ALL)01/96]
Makesureyoursuspensioninsulatorsandbumpersarenot
missingorworntoavoiddamagetoyourvehicle.
File:11wnmcs.ex
Update:Mon Jul 8 14:29:32 1996
310
%[MC22400(ALL)04/96]
FillingYourFuelTankWithFuel
[MC22500(ALL)01/96] 1.Openthefueldoor(locatedonthedriver’ssideofthe
vehicle).
[MC22600(ALL)01/96] 2.Unscrewthefuelcapbyexertingpressureontheplasticcap
androtatingthefuelcapcounterclockwise.
[MC22700(ALL)01/96] 3.Turnthefuelcap3/4ofaturnuntilahissingsoundis
heard.Waituntilthehissingsoundstopsandthencontinue
rotatingcounterclockwisetoremovethefuelcap.
[MC22800(ALL)01/96] 4.Followthefuelcapremovalinstructionsandusecautionto
minimizethepossibilityoffuelsprayingwhenyouunscrew
thecap.
*
[MC22900(ALL)01/96]
WARNING
Thefuelsystemmaybeunderpressure.Ifthefuelcapis
ventingvapororifyouhearahissingsound,waituntil
itstopsbeforecompletelyremovingthecap.
[MC23000(ALL)01/96]
WARNING
Turnthefuelcap3/4ofaturntorelieveanypressure
andvacuuminthefueltank.Thecapwillstart
unthreadingafter3/4ofaturn.
File:11wnmcs.ex
Update:Mon Jul 8 14:29:32 1996
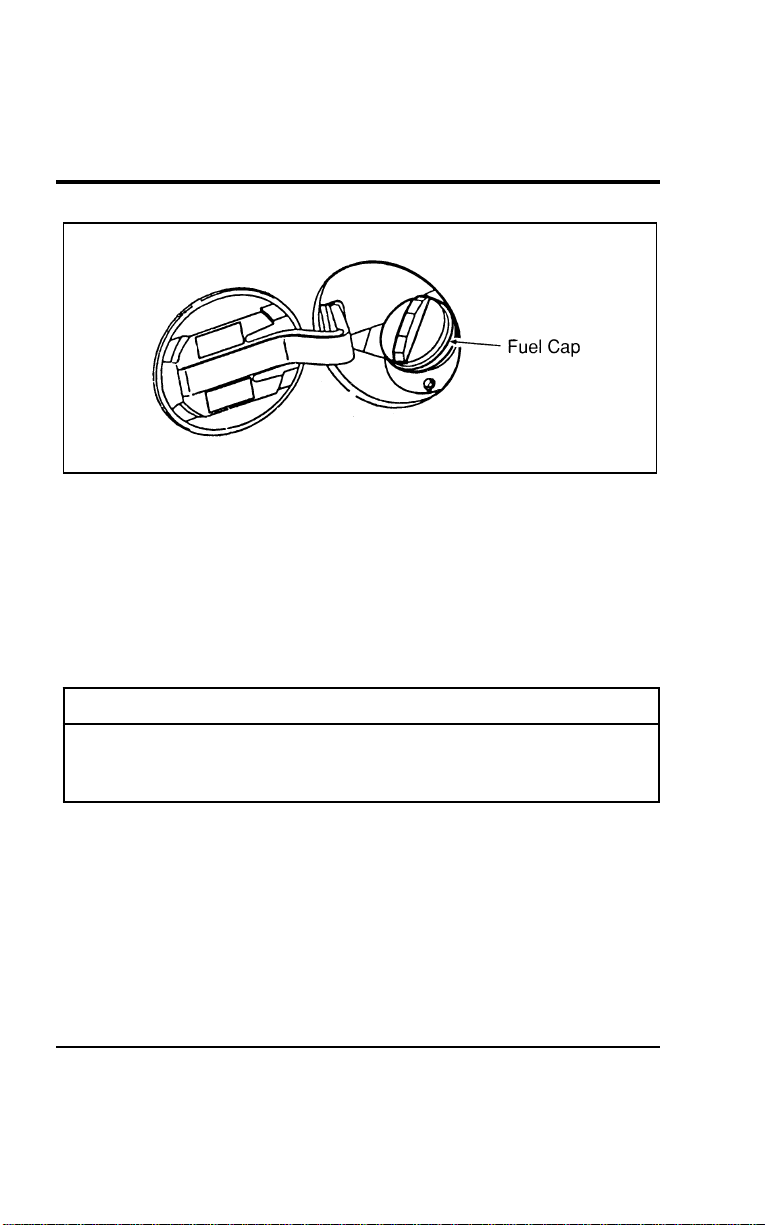
MaintenanceandCare
311
[MC23100(ALL)01/96]
10-1/2pica
art:0050054-A
Thefueldoor
[MC23200(ALL)01/96]
Toreplaceandsecurethefuelcap,placeitinpositionand
rotateitclockwiseuntilitclicks(ratchets).Theratcheting
mechanismallowsthefuelcaptobesealedwithout
overtightening.
*
[MC23300(ALL)01/96]
Ifyoulosethefuelcap,replaceitwithanauthorizedMotorcraft
orequivalentpart.
%
*
[MC23400(ALL)01/96
]
WARNING
Ifyoudonotusetheproperfuelcap,thepressureinthe
fueltankcandamagethefuelsystemorcauseittowork
improperlyinacollision.
*
[MC23500(ALL)01/96]
NOTE:Ifyoureplaceyourfuelcapwithanaftermarketfuel
fillercap,thecustomerwarrantymaybevoidforany
damagetothefueltankand/orfuelsystem.
File:11wnmcs.ex
Update:Mon Jul 8 14:29:32 1996

312
*
[MC23600(ALL)01/96]
A venting fuel tank is not an abnormal condition. It may be
caused by:
*
[MC23700(ALL)01/96]
■ too volatile a fuel for the weather conditions. Service stations
sometimes sell winter grade fuel in the summer.
*
[MC23800(ALL)01/96]
■ pulling a heavy load on hot days, or at high altitudes.
*
[MC23900(ALL)01/96]
■ extended periods of idling with the engine RPM increased
above the normal idle range.
*
[MC24000(ALL)01/96]
■ parking the vehicle in full sunlight for extended periods on
extremely hot days.
%
*
[MC24100(ALL)01/96
]
Choosing the Right Fuel
*
[MC24200(ALL)03/96]
Use only UNLEADED FUEL. Using leaded fuel is prohibited by
federal law and could damage your vehicle. The damage may
not be covered by your warranty.
*
[MC24300(ALL)05/96]
Vehicle inspection programs may detect misfueling. Under these
circumstances, you may be required by law to make costly
repairs at your own expense.
%
*
[MC24400(ALL)04/96
]
Octane recommendation
*
[MC24500(ALL)03/96]
Your vehicle is designed to use regular unleaded gasoline with
an (R+M)/2 octane rating of 87. We do not recommend
gasolines labeled “regular” in high altitude areas that are sold
with octane ratings of 86 or even less.
*
[MC24600(ALL)02/96]
6 pica art:0040193-A
Typical octane rating label
File:11wnmcs.ex
Update:Mon Jul 8 14:29:32 1996

Maintenance and Care
313
[MC24700(ALL)01/96]
In some parts of the country, “regular” grade fuels are sold
with octane ratings of 86 or even less especially in high altitude
areas. We recommend that you do not use these fuels. Always
use a fuel with an octane rating of at least 87, even if it is sold
as a “midgrade” or “premium.”
%
*
[MC24800(ALL)03/96
]
Do not be concerned if your vehicle sometimes knocks lightly.
However, if it knocks heavily under most driving conditions on
the recommended octane rated fuel, see your dealer or a
qualified service technician to prevent any engine damage.
%
*
[MC24900(ALL)05/96
]
Fuel quality
[MC25000(ALL)04/96]
If your vehicle has problems starting, rough idle, or hesitation
problems when the engine is cold, it may be caused by fuel
with low volatility. Try a different brand of fuel. If the
condition persists, see your dealer or qualified service
technician.
*
[MC25100(ALL)05/96]
It should not be necessary to add any aftermarket products to
your fuel tank if you continue to use a high-quality fuel.
*
[MC25200(ALL)05/96]
■ minimizing deposits in fuel injectors, combustion chambers
and on intake valves.
*
[MC25300(ALL)05/96]
■ assuring quick starting and smooth warm-up.
*
[MC25400(ALL)05/96]
■ protecting the fuel system from vapor lock in very hot
weather, which causes the engine to hesitate or stall and
makes restarts difficult.
*
[MC25500(ALL)05/96]
■ protecting your fuel system from rusting.
*
[MC25600(ALL)05/96]
■ preventing the fuel lines from freezing.
*
[MC25700(ALL)05/96]
■ preventing the fuel system from “gumming up” when your
vehicle is not used for long periods of time.
*
[MC25800(ALL)05/96]
It should not be necessary to add any aftermarket products to
your fuel tank if you continue to use a high-quality fuel.
File:11wnmcs.ex
Update:Mon Jul 8 14:29:32 1996

314
%
*
[MC25900(ALL)04/96
]
Gasolines for clean air
*
[MC26000(ALL)04/96]
Fordapprovestheuseofgasolinestoimproveairquality,
includingreformulatedgasolines,thatcontainoxygenatessuch
asamaximumof10%ethanolor15%MTBE.Thereshouldbe
nomorethan5%methanolwithco-solventsandadditivesto
protectthefuelsystem.
*
[MC26100(ALL)05/96]
Reformulatedgasolineisalsorequiredincertainareasofthe
U.S.Thesefuelsaredesignedtofurtherreduceemissionsfrom
yourvehicle.
*
[MC26200(ALL)05/96]
Generally,youshouldnotexperiencedifficultiesoperatingyour
vehicleonfuelscontainingoxygenates.Weencourageyouto
usethesefuels.
%
*
[MC26300(ALL)01/96
]
SafetyInformationRelatingtoAutomotiveFuels
*
[MC26400(ALL)01/96]
WARNING
Automotivefuelscancauseseriousinjuryordeathif
misusedormishandled.
*
[MC26500(ALL)01/96]
Gasolineandotherautomotivefuelsareextremelyflammable.
Turnyourvehicleoffanddonotsmokewhilerefuelingyour
vehicle.Keepsparksandothersourcesofignitionawayfrom
fuels.
[MC26600(ALL)01/96]
Automotivefuelscanbeharmfulorfatalifswallowed.Never
attempttosiphonanyfuelbymouth.
[MC26700(ALL)01/96]
Ifanyfuelisswallowed,callaphysicianorpoisoncontrol
centerimmediately.Donotdelaycallingaphysicianmerely
becausenoadverseeffectsarenoticedatfirst;thetoxiceffectsof
fuelsmaynotbecomeapparentformanyhours.
File:11wnmcs.ex
Update:Mon Jul 8 14:29:32 1996

Maintenance and Care
315
*
[MC26800(ALL)01/96]
If gasoline is swallowed, do not induce vomiting. If a
gasoline-methanol blend is swallowed, induce vomiting under
the direction of a physician or poison control center.
[MC26900(ALL)01/96]
Gasoline and gasoline-methanol blends may contain small
amounts of carcinogens, such as benzene. Long-term exposure to
unleaded gasoline vapors has caused cancer in laboratory
animals. Excessive inhalation of fuel vapors can cause headache,
dizziness, nausea, poor coordination, and other symptoms which
could interfere with your ability to safely operate your vehicle.
Avoid breathing vapors while refueling. If fuel vapors are
inhaled in excessive quantities, move the victim to fresh air and
seek medical attention.
[MC27000(ALL)04/96]
Fuels can also be harmful if absorbed through the skin. Be
careful not to splash fuel on yourself or your clothing. If fuel is
splashed on the skin, promptly remove contaminated clothing
and wash the skin thoroughly with soap and water.
*
[MC27100(ALL)01/96]
Fuels can cause severe eye irritation and possibly eye damage. If
fuel is splashed in the eyes, remove contact lenses (if worn),
flush with large amounts of water for 15 minutes, and seek
medical attention.
*
[MC27200(ALL)01/96]
If you are taking the medication “Antabuse” or other forms of
disulfiram for the treatment of alcoholism, vapor or skin contact
with a gasoline-methanol blend may cause the same kind of
adverse reaction as drinking an alcoholic beverage. In sensitive
individuals, serious personal injury or sickness could result.
Consult a physician promptly if you experience an adverse
reaction.
*
[MC27300(ALL)08/95]
NOTE: Avoid running out of fuel because this situation may
have an adverse effect on modern powertrain
components.
File:11wnmcs.ex
Update:Mon Jul 8 14:29:32 1996

316
%
*
[MC27400(ALL)01/96
]
Running Out of Fuel
*
[MC27500(ALL)01/96]
If your vehicle runs out of fuel, try to stop on level ground
away from traffic. Add at least two gallons (8 liters) of fuel to
start your vehicle again. If your vehicle is not on level ground,
you may need as much as five gallons (20 liters) of fuel to start
it.
[MC27600(ALL)01/96]
You may need to turn the ignition to START several times
before engaging the starter (leaving it in that position several
seconds each time) before the fuel system starts to pump fuel
from the tank to the engine.
%
*
[MC27700(ALL)03/96
]
Fuel Economy
*
[MC27800(ALL)01/96]
Fuel economy is an estimate of the efficiency of your vehicle
and can be calculated as Miles Per Gallon (MPG) or Liters Per
100 Kilometers (L/100K).
[MC27900(ALL)01/96]
To calculate the fuel economy:
*
[MC28000(ALL)01/96] 1. Fill the tank completely and record the initial odometer
reading.
*
[MC28100(ALL)01/96] 2. Every time you buy fuel record the amount (in gallons or
liters) purchased.
[MC28200(ALL)01/96] 3. Divide the total number of miles that you have driven by
the total number of gallons that your vehicle has used. This
will give you the average numbers of miles per gallon.
[MC28300(ALL)01/96] In metric, multiply the number of liters used by 100 and
divide the answer by the number of kilometers traveled. This
will give you the number of liters used per 100 km.
File:11wnmcs.ex
Update:Mon Jul 8 14:29:32 1996

Maintenance and Care
317
*
[MC28400(ALL)01/96]
Comparisons With Environmental Protection Agency
(EPA) Fuel Economy Estimates
[MC28500(ALL)01/96]
EPA fuel economy figures are obtained from laboratory tests
under simulated road conditions and therefore are estimates
which may not reflect the actual conditions you experience. The
tests also do not exactly duplicate your personal style of
driving, including all your stops, starts, and lane changes. Other
factors that may affect fuel economy include using the air
conditioning, driving speed, vehicle load and tire inflation
pressure. The EPA fuel economy estimate is not a guarantee
that you will achieve the fuel economy shown.
%
*
[MC28600(ALL)01/96
]
Improving Fuel Economy
[MC28700(ALL)01/96]
You can improve the fuel economy for your vehicle in three
ways:
[MC28800(ALL)07/96] 1. Maintain your vehicle effectively. A well-tuned, properly
maintained vehicle gives you better fuel economy. Follow the
schedules for maintaining your vehicle that are in the
Maintenance Schedule booklet.
[MC28900(ALL)04/96] 2. Drive your vehicle efficiently. Change your driving habits to
conserve fuel:
[MC29000(ALL)04/96]
■ Do not drive with your foot on the brake.
[MC29100(ALL)04/96]
■ Watch traffic so that you do not have to stop suddenly.
[MC29200(ALL)01/96]
■ Do not accelerate suddenly. Drive at a steady speed
whenever you can.
[MC29300(ALL)04/96]
■ Do not let the engine idle for a long time.
[MC29400(ALL)01/96]
■ Do not carry loads that are too heavy. To find out the limits
for the loads that your vehicle can carry, see Driving with a
heavy load in the Index.
File:11wnmcs.ex
Update:Mon Jul 8 14:29:32 1996

318
[MC29500(ALL)01/96]
■ Keep the tires properly inflated. To find out the
recommended tire pressure, see Checking the pressure of the
tires later in this chapter.
[MC29600(ALL)01/96]
■ Use your air conditioning system wisely. To find out about
fuel economy and air conditioning, see Climate control systems
in the Index.
[MC29700(ALL)01/96]
In addition to your individual driving habits, optional
equipment, such as air conditioning, can have a significant effect
on fuel economy. Various aftermarket add-on items that increase
aerodynamic drag can also reduce fuel economy.
%
*
[MC29800(ALL)01/96] Emission Control System
*
[MC29900(ALL)01/96]
Your vehicle is equipped with a catalytic converter which
enables your vehicle to comply with applicable exhaust emission
requirements.
*
[MC30000(ALL)01/96]
To make sure that the catalytic converter and the other emission
control parts continue to work properly:
*
[MC30100(ALL)01/96]
■ Use only unleaded fuel.
*
[MC30200(ALL)01/96]
■ Avoid running out of fuel.
*
[MC30300(ALL)01/96]
■ Never turn off the ignition while your vehicle is moving,
especially at high speeds.
[MC30400(ALL)07/96]
■ Have the services listed in your Maintenance Schedule booklet
performed according to the specified schedule. The scheduled
maintenance services are required because they are
considered essential to the life and performance of your
vehicle and to its emission system.
File:11wnmcs.ex
Update:Mon Jul 8 14:29:32 1996
MaintenanceandCare
319
*
[MC30500(ALL)01/96]
WARNING
Donotpark,idle,ordriveyourvehicleindrygrassor
otherdrygroundcover.Theemissionsystemheatsup
theenginecompartmentandexhaustsystem,whichcan
startafire.
*
[MC30600(ALL)01/96]
WARNING
Donotremovethefloorcarpetinyourvehicle.Emission
controlscausehighexhausttemperaturesunderthefloor.
*
[MC30700(ALL)05/96]
WARNING
Exhaustleaksmayresultintheentryofharmfuland
potentiallylethalfumesintothepassengercompartment.
Underextremeconditionsexcessiveexhausttemperatures
coulddamagethefuelsystem,theinteriorfloorcovering,
orothervehiclecomponents,possiblycausingafire.
*
[MC30900(ALL)01/96]
Watchforfluidleaks,strangeodors,smokeandlossofoil
pressure.Alsowatchforthechargewarninglight,thecheck
enginelight,orthetemperaturewarninglight.Thesesometimes
indicatethattheemissionsystemisnotworkingproperly.
*
[MC31000(ALL)01/96]
Donotmakeanyunauthorizedchangestoyourvehicleor
engine.Changesthatcausemoreunburnedfueltoreachthe
exhaustsystemcanincreasethetemperatureoftheengineor
exhaustsystem.
*
[MC31100(ALL)01/96]
Bylaw,anyonewhomanufactures,repairs,services,sells,leases
vehicles,tradesvehicles,orsupervisesafleetofvehiclesisnot
permittedtointentionallyremoveanemissioncontroldeviceor
preventitfromworking.InsomeoftheUnitedStatesandin
Canada,vehicleownersmaybeliableiftheiremissioncontrol
deviceisremovedorispreventedfromworking.
File:11wnmcs.ex
Update:Mon Jul 8 14:29:32 1996

320
%
*
[MC31200(ALL)01/96
]
In general, maintenance, replacement, or service of the emission
control devices or systems in your new Ford Motor Company
vehicle or engine may be performed at your expense by any
automotive repair establishment or individual using automotive
parts equivalent to those with which your vehicle or engine was
originally equipped.
*
[MC31300(ALL)01/96]
Ford strongly recommends the use of genuine Ford replacement
parts. If other than Ford or Motorcraft parts or Ford authorized
remanufactured parts are used for maintenance replacements or
for the service of components affecting emission control, such
non-Ford parts should be equivalent to genuine Ford Motor
Company parts in performance and durability. It is the owner’s
responsibility to determine the equivalency of such parts. Please
consult your warranty booklet for complete warranty
information.
*
[MC31400(ALL)08/95]
Never use a metal exhaust collector when you service your
vehicle. If the metal collector contacts any of your vehicle’s
plastic trim or bumper parts they could melt or deform.
*
[MC31500(ALL)01/96]
Do not drive your vehicle if it does not operate properly. See
your dealer if the engine runs on for more than five seconds
after you shut it off or if it misfires, surges, stalls, or backfires.
*
[MC31600(ALL)01/96]
Information about your vehicle’s emissions control system is on
the Vehicle Emission Control Information decal located on or
near the engine. This decal identifies engine displacement and
gives some tune-up specifications.
File:11wnmcs.ex
Update:Mon Jul 8 14:29:32 1996

Maintenance and Care
321
%
*
[MC31700(ALL)03/96
]
How to Prepare Your Vehicle for
Inspection/Maintenance (I/M) Testing
*
[MC31800(ALL)07/96]
In some localities it may become a legal requirement to pass an
Inspection/Maintenance (I/M) test of the On-Board Diagnostic
(OBD) II system. If the vehicle’s powertrain system or its battery
has just been serviced, the OBD II system is reset to a not ready
for I/M testing condition. To prepare for I/M testing, the law
specifies that additional mixed city and highway driving is
required to complete the check of the OBD II system.
*
[MC31825(ALL)07/96]
The driving modes required to reach the ready condition consist
of a minimum of 30 minutes of city and highway driving as
described below:
*
[MC32000(ALL)07/96]
■ At least twenty minutes driving in stop and go, city type
traffic with at least four idle periods.
*
[MC32100(ALL)07/96]
■ At least ten minutes of driving on an expressway or
highway.
*
[MC32200(ALL)07/96]
Before completing the above driving modes, the engine must be
warmed up and at operating temperature. Once started, the
vehicle must not be turned off during these driving modes.
[MC33200(ALL)01/96]
Lights
*
[MC33300(ALL)01/96]
It is a good idea to check the operation of the following lights
frequently:
*
[MC33400(ALL)01/96]
■ headlamps
*
[MC33500(ALL)01/96]
■ tail lamps
*
[MC33600(ALL)01/96]
■ brakelamps
*
[MC33700(ALL)01/96]
■ hazard flasher
*
[MC33800(ALL)01/96]
■ turn signals
*
[MC33900(ALL)05/96]
■ license plate lamps
*
[MC34000(ALL)01/96]
■ fog lamps
File:11wnmcs.ex
Update:Mon Jul 8 14:29:32 1996

322
%
*
[MC34100(ALL)01/96
]
Thealignmentofyourheadlampsshouldbecheckedif:
*
[MC34200(ALL)01/96]
■oncomingmotoristsfrequentlysignalyoutoturnoffyour
vehicle’shighbeamswhenyoudonothavethehighbeams
on
*
[MC34300(ALL)01/96]
■theheadlampsdonotseemtogiveyouenoughlighttosee
clearlyatnight
*
[MC34400(ALL)01/96]
■theheadlampbeamsarenotpointedslightlydownandto
theright
%[MC34500(ALL)04/96]
ReplacingtheHeadlampBulb
*
[MC34600(ALL)03/96]
Theheadlampsonyourvehicleusereplaceablebulbs.Whenthe
lampburnsout,simplyreplacethebulb,ratherthanthewhole
lamp.
*
[MC34700(ALL)01/96]
WARNING
Handleahalogenheadlampbulbcarefullyandkeepout
ofchildren’sreach.Graspthebulbonlybyitsplastic
baseanddonottouchtheglass.Theoilfromyourhand
couldcausethebulbtobreakthenexttimethe
headlampsareoperated.
*
[MC34800(ALL)01/96]
Donotremovetheburnedoutbulbunlessyoucanimmediately
replaceitwithanewone.Ifabulbisremovedforanextended
periodoftime,contaminantsmayentertheheadlampandaffect
itsperformance.
[MC34900(ALL)04/96]
Toremovetheheadlampbulb:
*
[MC35000(ALL)01/96] 1.Makesurethattheengineisoffandtheheadlampswitchon
theinstrumentpanelisintheOFFposition.
[MC35100(ALL)01/96] 2.Liftthehoodandlocatetheheadlampbulbinstalledinthe
rearoftheheadlamp.Removetheelectricalconnectorfrom
thebulbbypullingtheconnectorawayfromthebulb
assembly.
File:11wnmcs.ex
Update:Mon Jul 8 14:29:32 1996
Maintenance and Care
323
[MC35200(ALL)01/96]
17-1/2 pica
art:0050182-A
Headlamp bulb removal
[MC35300(ALL)01/96] 3. Squeeze the bulb retaining clip toward the bulb until it
releases. Keep the clip. You must use it again to hold the
new bulb in place.
*
[MC35400(ALL)01/96] 4. Carefully remove the bulb assembly from its socket by
gently pulling it rearward without turning.
*
[MC35500(ALL)01/96] 5. Do not touch the bulb with your skin or you could shatter
the bulb. Always grasp the bulb assembly from the plastic
base.
*
[MC35600(ALL)01/96] 6. Be sure that you have the proper replacement bulb ready
before you discard the burned out bulb.
File:11wnmcs.ex
Update:Mon Jul 8 14:29:32 1996

324
*
[MC35700(ALL)01/96]
To install a bulb:
*
[MC35800(ALL)01/96] 1. With the flat side of the bulb’s plastic base facing upward,
insert the glass end of the bulb into the socket. You may
need to turn the bulb left or right to line up the grooves in
the plastic base with the tabs in the socket. When the
grooves are aligned, push the bulb into the socket until the
plastic base contacts the rear of the socket. Do not touch the
glass with your fingers.
[MC35900(ALL)01/96] 2. Snap the retaining clip over the plastic base.
*
[MC36000(ALL)01/96] 3. Push the electrical connector into the rear of the plastic base
until it snaps, locking it into place.
*
[MC36100(ALL)01/96] 4. Turn the headlamps on and make sure that they work
properly. If the headlamp was correctly aligned before you
changed bulbs, you should not need to align it again.
% [MC36200(ALL)01/96]
Replacing the Taillamp Bulbs
[MC36300(ALL)01/96]
To remove a bulb:
[MC36400(ALL)01/96] 1. Open the liftgate.
[MC36500(ALL)01/96] 2. Remove two screws along top edge of taillamp lens.
[MC36600(ALL)01/96] 3. Grasp lens with fingers at point B and pull side of lens out
until snap attachment releases.
File:11wnmcs.ex
Update:Mon Jul 8 14:29:32 1996
Maintenance and Care
325
[MC36700(ALL)01/96]
13-1/2 pica
art:0050177-A
Taillamp lens removal
[MC36800(ALL)01/96] 4. Grasp lens along liftgate opening edge and pull straight
rearward until snap attachment releases.
[MC36900(ALL)01/96] 5. Remove bulb and socket by twisting to unlock and pulling
straight out.
[MC37000(ALL)01/96] 6. Remove bulb from socket by pulling straight out from
socket.
[MC37100(ALL)01/96]
To install a taillamp bulb:
[MC37200(ALL)01/96] 1. Insert new bulb into socket by pushing bulb until it is locked
in position.
[MC37300(ALL)01/96] 2. Install socket into lamp by aligning socket to lamp and
turning clockwise until locked in place.
[MC37400(ALL)01/96] 3. Align pins along liftgate edge with holes in body and snap
attachment into retainer.
[MC37500(ALL)01/96] 4. Rock lens around on outer edge and snap in second snap
attachment.
[MC37600(ALL)01/96] 5. Replace two screws along top edge of lens.
File:11wnmcs.ex
Update:Mon Jul 8 14:29:32 1996
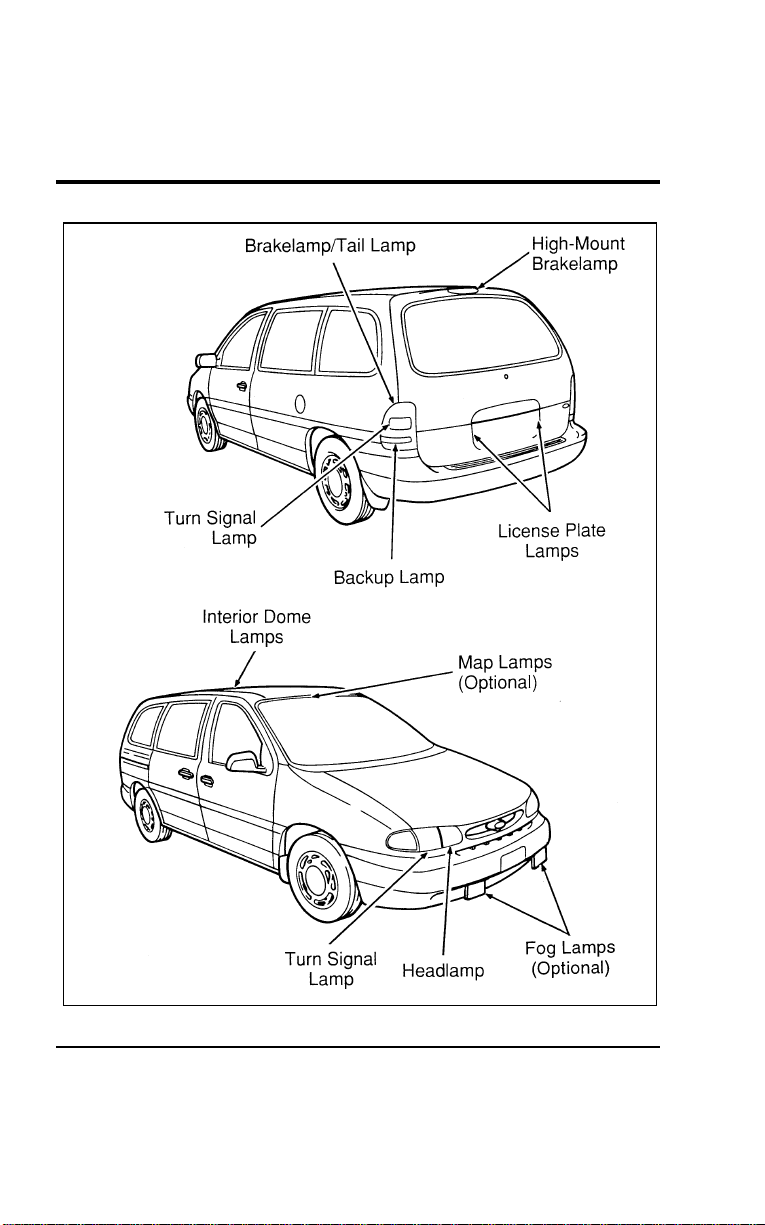
326
[MC37700(ALL)01/96]
33-1/2 pica
art:0050019-D
Light bulb locations
File:11wnmcs.ex
Update:Mon Jul 8 14:29:32 1996

Maintenance and Care
327
[MC37800(ALL)01/96]
Replacing The Fog Lamp Bulb
[MC37900(ALL)01/96]
To remove a bulb:
[MC38000(ALL)01/96] 1. Disconnect wiring connector from lamp.
[MC38100(ALL)01/96] 2. Rotate bulb and socket to remove from lamp.
*
[MC38200(ALL)01/96]
To install a bulb:
[MC38300(ALL)01/96] 1. Install bulb and socket into lamp and rotate.
[MC38400(ALL)01/96] 2. Connect wiring connector to lamp.
File:11wnmcs.ex
Update:Mon Jul 8 14:29:32 1996
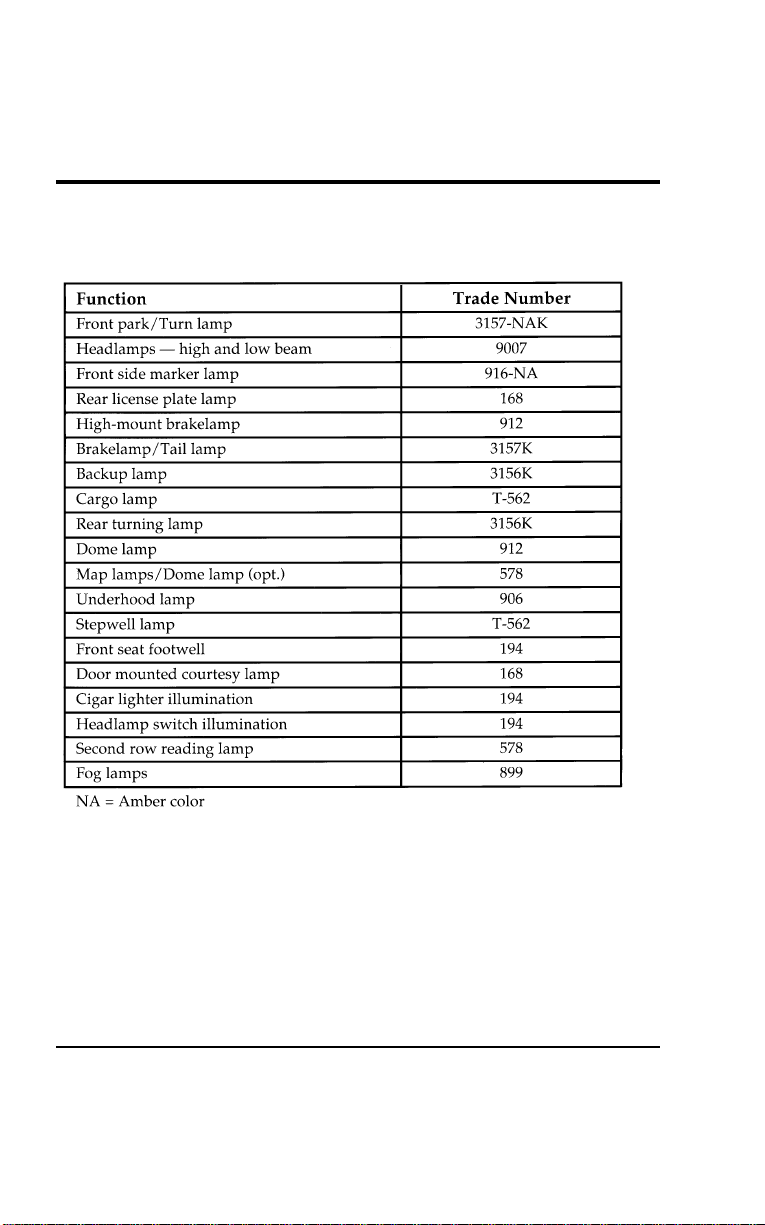
328
%
*
[MC38500(ALL)03/96
]
Bulb replacement chart
% [MC38600(ALL)01/96]
twenty-eight pica
chart:0050116-E
File:11wnmcs.ex
Update:Mon Jul 8 14:29:32 1996

Maintenance and Care
329
%
*
[MC38700(ALL)04/96] Cleaning Your Vehicle
%
*
[MC38800(ALL)01/96
]
Washing and Polishing Your Vehicle
*
[MC38900(ALL)01/96]
Wash the outside of your vehicle, including the underside, with
a mild detergent.
*
[MC39000(ALL)01/96]
DO NOT:
*
[MC39100(ALL)01/96]
■ Wash your vehicle with hot water
*
[MC39200(ALL)01/96]
■ Wash your vehicle while it sits in direct sunlight
*
[MC39300(ALL)01/96]
■ Wash your vehicle while the body is hot
*
[MC39400(ALL)01/96]
Pollen, bird droppings and tree sap can damage the paint,
especially in hot weather. Wash your vehicle as often as
necessary to keep it clean.
*
[MC39500(ALL)01/96]
Take similar precautions if your vehicle is exposed to chemical
industrial fallout.
*
[MC39600(ALL)01/96]
Paint damage resulting from fallout is not related to a defect in
paint materials or workmanship and therefore is not covered by
warranty. Ford, however, believes that continual improvement
in customer satisfaction is a high priority. For this reason, Ford
has authorized its dealers to repair, at no charge to the owner,
the surfaces of new vehicles damaged by environmental fallout
within 12 months or 12,000 miles (20,000 km) of purchase,
whichever comes first. Customers may be required to bring their
vehicle in for inspection by a Ford representative.
*
[MC39700(ALL)01/96]
Polish your vehicle to remove harmful deposits and protect the
finish.
File:11wnmcs.ex
Update:Mon Jul 8 14:29:32 1996

330
%
*
[MC39800(ALL)01/96
]
Cleaning Chrome and Aluminum Parts
*
[MC39900(ALL)12/95]
Wash chrome and aluminum parts with a mild detergent. Do
not use steel wool, abrasive cleaners, fuel, or strong detergents.
%
*
[MC40000(ALL)01/96
]
Cleaning Plastic Parts
*
[MC40100(ALL)01/96]
Some of your vehicle’s exterior trim parts are plastic. Clean with
a tar and road oil remover if necessary. Use a vinyl cleaner for
routine cleaning.
*
[MC40200(ALL)01/96]
Do not clean plastic parts with thinners, solvents or
petroleum-based cleaners.
%
*
[MC40300(ALL)01/96
]
If you have your vehicle rustproofed, remove oversprayed
rustproofing with a tar and road oil remover. If rustproofing is
not removed from plastic and rubber parts, it can cause
deterioration.
%
*
[MC40400(ALL)02/96
]
Cleaning the Safety Belts
*
[MC40500(ALL)02/96]
Clean the safety belts with any mild soap solution that is
recommended for cleaning upholstery or carpets. Do not bleach
or dye the belt webbing because this may weaken it.
*
[MC40600(ALL)01/96]
Your Built-In Child Seat may be cleaned with mild soap and
water. Do not use household cleaners as they may weaken the
webbing or damage the plastic parts. For your convenience, the
liner can be removed, machine-washed, and air-dried.
File:11wnmcs.ex
Update:Mon Jul 8 14:29:32 1996

Maintenance and Care
331
*
[MC40700(ALL)05/96]
Cleaning the Instrument Panel Lens
*
[MC40800(ALL)01/96]
Clean the instrument panel lens with a soft cloth and a glass
cleaner, such as Ford Ultra-Clear Spray Glass Cleaner, or
equivalent. Do not use paper towel or any abrasive cleaner to
clean the lens as these may cause scratches.
%
*
[MC40900(ALL)01/96
]
Cleaning the Exterior Lamps
*
[MC41000(ALL)01/96]
Do not use dry paper towel, chemical solvents or abrasive
cleaners to clean the lamps, as these may cause scratches or
crack the lamps.
%
*
[MC41100(ALL)02/96
]
Cleaning the Interior Lamps
*
[MC41200(ALL)02/96]
Your interior dome lamps and map lamps are plastic and
should be cleaned with a mild detergent diluted in water. Rinse
them with clear water.
File:11wnmcs.ex
Update:Mon Jul 8 14:29:32 1996

332
%
*
[MC41300(ALL)03/96
]
Cleaning the Seats
*
[MC41400(ALL)01/96]
Leather and vinyl
[MC41500(ALL)01/96]
For routine cleaning, wipe the surface with a soft, damp cloth.
For more thorough cleaning, wipe the surface with a leather
cleaner of a mild soap.
%
*
[MC41600(ALL)05/96
]
Fabric
*
[MC41700(ALL)05/96]
Remove dust and loose dirt with a whisk broom or a vacuum
cleaner. Remove fresh spots immediately. Follow the directions
that come with the cleaner.
*
[MC41800(ALL)05/96]
NOTE: Before using any cleaner, test it on a small, hidden
area of fabric. If the fabric’s color or texture is
adversely affected by a particular cleaner, do not use
it.
%
*
[MC41900(ALL)03/96
]
Cleaning the Wheels
*
[MC42000(ALL)03/96]
Wash the wheels with the same detergent you use to wash your
vehicle’s body. Do not use acid-based wheel cleaners, steel wool,
abrasives, fuel, or strong detergents. These substances will
damage protective coatings. Use tar and road oil remover to
remove grease and tar.
File:11wnmcs.ex
Update:Mon Jul 8 14:29:32 1996
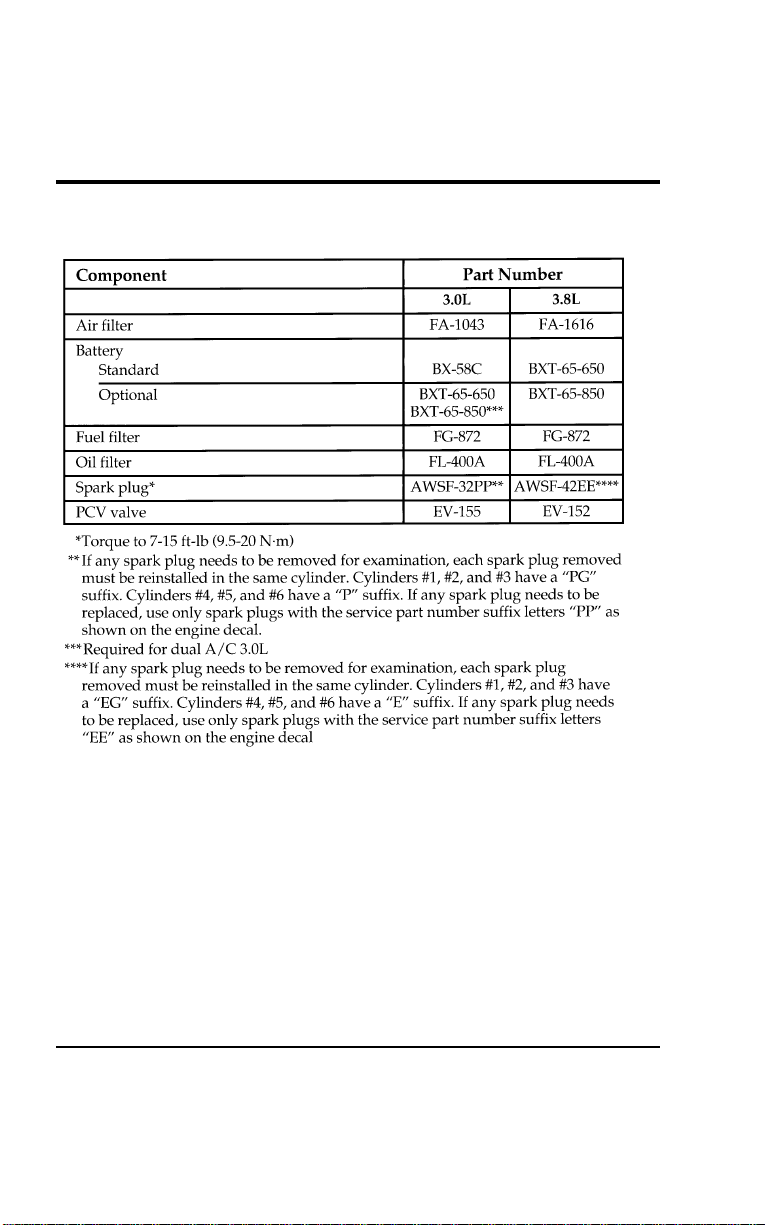
333
Capacities and Specifications
%
*
[CS00200(ALL)01/96] Motorcraft Parts
% [CS00300(ALL)01/96]
twenty pica
chart:0050067-H
File:12wncss.ex
Update:Thu Jul 18 11:01:58 1996
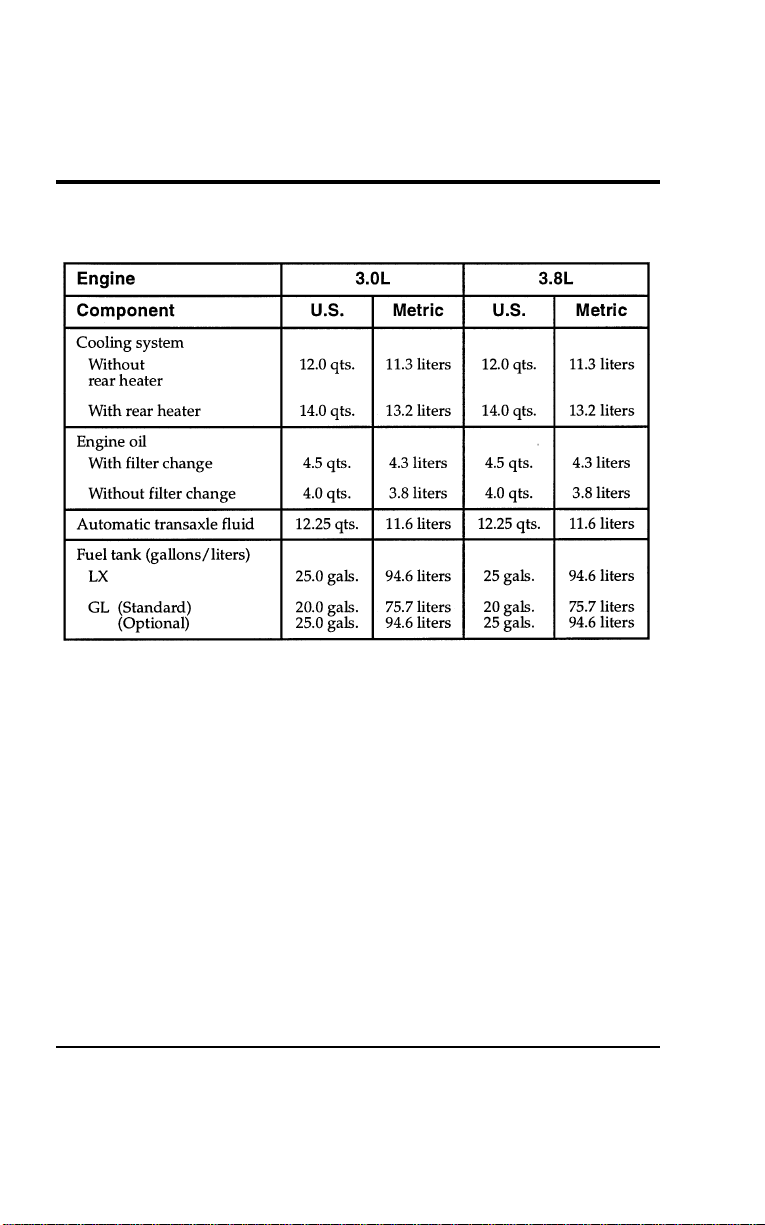
334
% [CS00400(ALL)07/96] Refill Capacities
[CS00500(ALL)01/96]
eighteen pica
chart:0050068-E
File:12wncss.ex
Update:Thu Jul 18 11:01:58 1996
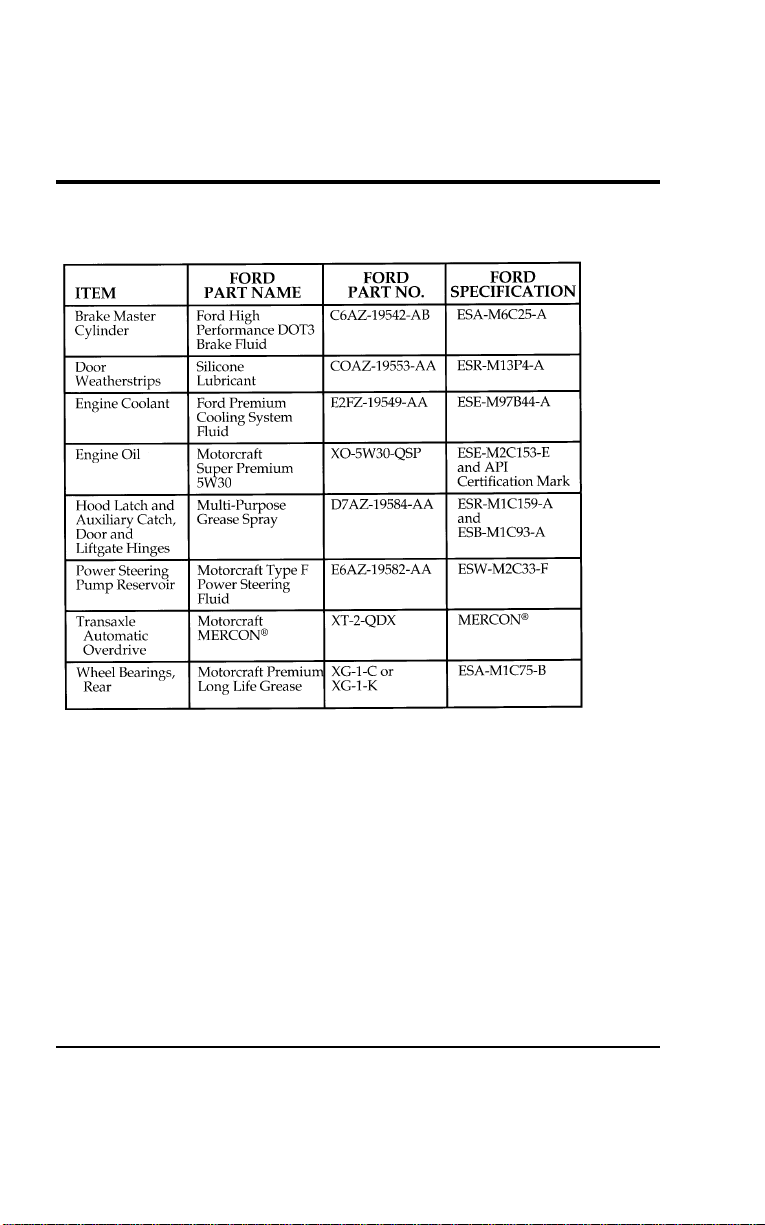
Capacities and Specifications
335
%
*
[CS00600(ALL)01/96] Lubricant Specifications
% [CS00700(ALL)07/96]
twenty-two pica
chart:0050066-F
File:12wncss.ex
Update:Thu Jul 18 11:01:58 1996

336
%
*
[CS00800(ALL)01/96] Vehicle Storage
*
[CS00900(ALL)01/96]
Maintenance Tips
*
[CS01000(ALL)01/96]
If you plan on storing your vehicle for an extended period of
time (60 days or more), refer to the following maintenance
recommendations to keep your vehicle in good operating
condition.
*
[CS01100(ALL)01/96]
General
*
[CS01200(ALL)01/96]
■ Store your vehicle in a dry, ventilated place.
*
[CS01300(ALL)01/96]
■ Protect from sunlight, if possible.
*
[CS01400(ALL)01/96]
■ When your vehicle is stored outside, it will require regular
maintenance to protect against rust and damage.
*
[CS01500(ALL)01/96]
Body
*
[CS01600(ALL)01/96]
■ Wash your vehicle thoroughly to remove dirt, grease, oil, tar
or mud from exterior surfaces, rear wheel housings and
underside of front fenders.
*
[CS01700(ALL)01/96]
■ Touch-up raw or primed metal to prevent rust.
*
[CS01800(ALL)01/96]
■ Cover chrome and stainless steel parts with a thick coat of
auto wax to prevent discoloration. Re-wax as necessary when
your vehicle is washed.
[CS01900(ALL)01/96]
■ Lubricate all hood, door and liftgate hinges and latches with
a light grade oil.
*
[CS02000(ALL)01/96]
■ Cover interior soft trim to prevent fading.
*
[CS02100(ALL)01/96]
■ Keep all rubber parts free from oil and solvents.
File:12wncss.ex
Update:Thu Jul 18 11:01:58 1996

CapacitiesandSpecifications
337
%
*
[CS02200(ALL)01/96]
Engi ne
*
[CS02300(ALL)01/96]
■Starttheengineeveryfifteendays.Runitatfastidleuntilit
reachesnormaloperatingtemperature.
*
[CS02400(ALL)01/96]
■Withyourfootonthebrake,shiftthetransaxleintoallgears
whiletheengineisrunning.
%
*
[CS02500(ALL)01/96]
Fuel system
%
*
[CS02600(ALL)01/96]
■Fillfueltankwithhigh-qualityunleadedfueluntilthefirst
automaticshutoffofthefuelpumpnozzle.
[CS02700(ALL)01/96]
WARNING
Thefuelfilter,fuelsupplylinesandengineare
maintainedunderpressure.Thispressuremustbe
relievedpriortoservicingthefuelfilterandengine
compartmentconnectionsinordertoavoidthedangerof
fuelspray.
*
[CS02800(ALL)01/96]
NOTE:Duringextendedperiodsofvehiclestorage(60daysor
more),fuelmaydeteriorateduetooxidation.Thiscan
damagerubberandotherpolymersinthefuelsystem
andmayalsoclogsmallorifices.
*
[CS02900(ALL)01/96]
FordGasStabilizershouldbeaddedwheneveractualor
expectedstorageperiodsexceed60days.Followtheinstructions
onthelabel.Thevehicleshouldthenbeoperatedatidlespeed
tocirculatetheadditivethroughoutthefuelsystem.
*
[CS03000(ALL)01/96]
Avolatilecorrosioninhibitoraddedtothefuelsystemwill
protectthefuelsystem’sinnersurfacesfromcorrosion.Follow
theinstructionspackagedwiththeproduct.
[CS03100(ALL)01/96]
WARNING
Fuelsystemcomponentsmaybedamagedbytorchesand
weldingequipment.
File:12wncss.ex
Update:Thu Jul 18 11:01:58 1996

338
%
*
[CS03200(ALL)01/96]
Cooling system
*
[CS03300(ALL)01/96]
■ Protect your vehicle against freezing temperatures.
%
*
[CS03400(ALL)01/96]
Battery
*
[CS03500(ALL)01/96]
■ Check and recharge the battery as necessary.
*
[CS03600(ALL)01/96]
■ Keep connections clean and covered with a light coat of
grease.
%
*
[CS03700(ALL)01/96]
Brakes
*
[CS03800(ALL)01/96]
■ Make sure the brakes and parking brake are fully released.
%
*
[CS03900(ALL)01/96]
Tires
*
[CS04000(ALL)01/96]
■ Maintain recommended air pressure.
*
[CS04100(ALL)01/96]
Miscellaneous
*
[CS04200(ALL)01/96]
■ Make sure all linkages, cables, levers and clevis pins under
the vehicle are covered with grease to prevent rust.
*
[CS04300(ALL)01/96]
■ Lubricate working parts to prevent corrosion.
File:12wncss.ex
Update:Thu Jul 18 11:01:58 1996

339
*
[RD00100(ALL)02/96] Reporting Safety Defects (U.S. only)
*
[RD00200(ALL)02/96]
If you believe that your vehicle has a defect which could cause
an accident or could cause injury or death, you should
immediately inform the National Highway Traffic Safety
Administration (NHTSA) in addition to notifying Ford Motor
Company.
*
[RD00300(ALL)05/96]
If NHTSA receives similar complaints, it may open an
investigation, and if it finds that a safety defect exists in a
group of vehicles, it may order a recall and remedy campaign.
However, NHTSA cannot become involved in individual
problems between you, your dealer, or Ford Motor Company.
*
[RD00400(ALL)02/96]
To contact NHTSA, you may either call the Auto Safety Hotline
toll-free at 1-800-424-9393 (or 366-0123 in Washington, D.C. area)
or write to: NHTSA, U.S. Department of Transportation,
Washington, D.C. 20590. You can also obtain other information
about motor vehicle safety from the Hotline.
File:13wnrds.ex
Update:Mon Jul 8 14:25:17 1996

341
Customer Assistance
%
*
[HS00205(ALL)05/96] Roadside Assistance
*
[HS00210(ALL)11/95]
Ford Motor Company has set up a 24-hour, seven-day-a-week
hotline with trained operators who put you in touch with the
help you need if you experience a problem with your vehicle.
This complimentary service is provided to you throughout your
warranty period of 3 years or 36,000 miles (60,000 km),
whichever comes first. To purchase Roadside Assistance
coverages beyond this period (available through Ford Auto Club
in the United States or Ford and Lincoln-Mercury dealers in
Canada), contact your Ford or Lincoln-Mercury dealer.
Additional Roadside Assistance coverage is unavailable in
Puerto Rico and the Virgin Islands.
*
[HS00215(ALL)06/94]
Roadside Assistance will cover the following:
*
[HS00220(ALL)06/94]
■ Mount your spare if you have a flat tire.
*
[HS00225(ALL)06/94]
■ Jump-start your battery if it is dead.
*
[HS00230(ALL)06/94]
■ Unlock your vehicle if you are locked out.
*
[HS00235(ALL)06/94]
■ Bring you fuel if you run out.
*
[HS00240(ALL)06/94]
■ Tow your vehicle if you are stranded. Even non-warranty
related tows, like accidents or getting stuck in mud or snow,
are covered (some exclusions apply, such as impound towing
and repossession).
*
[HS00245(ALL)06/94]
How to use Roadside Assistance
*
[HS00250(ALL)06/94]
Your Roadside Assistance identification card can be found in the
Owner Guide portfolio in your glove compartment. Complete
the card and place it in your wallet for quick reference.
*
[HS00255(ALL)04/95]
To receive roadside assistance in the United States call
1-800-241-FORD (in Canada call 1-800-665-2006).
*
[HS00260(ALL)04/95]
Should you need to arrange for roadside assistance yourself,
Ford Motor Company will reimburse the reasonable cost. To
obtain information about reimbursement call 1-800-241-FORD (in
Canada call 1-800-665-2006).
File:14wnhss.ex
Update:Mon Jul 8 14:25:33 1996
342
*
[HS00800(ALL)01/93] If You Have a Service Concern
*
[HS00900(ALL)01/93]
Ford Motor Company has authorized Ford and Lincoln-Mercury
dealerships to service your vehicle. This section tells you how to
get service or maintenance for your vehicle.
% [HS01510(ALL)04/95] Dealership Service and Maintenance
[HS01520(ALL)04/95]
Your satisfaction is our #1 goal. If you have questions or
concerns with your vehicle, we suggest you follow these steps:
[HS01530(ALL)04/96] 1. Contact your Sales Representative or Service Advisor at your
selling/servicing dealership.
[HS01540(ALL)04/95] 2. If the inquiry or concern remains unresolved, contact the
Sales Manager or Service Manager at the dealership.
[HS01550(ALL)04/95] 3. If the inquiry or concern cannot be resolved at the dealership
level, please contact the Ford Customer Assistance Center.
[HS01560(ALL)04/95]
In the United States:
[HS01570(ALL)04/95]
7-1/2 pica art:0050105-A
File:14wnhss.ex
Update:Mon Jul 8 14:25:33 1996
Customer Assistance
343
[HS01640(ALL)04/95]
In Canada:
[HS01650(ALL)05/95]
7-1/2 pica art:0050104-B
[HS01701(ALL)05/95]
Outside the U.S. or Canada:
[HS01720(ALL)06/95]
7-1/2 pica art:0040273-C
*
[HS02200(ALL)04/95]
To process your request, the Ford Customer Assistance Center
needs the following information:
*
[HS02300(ALL)02/95]
■ your telephone number(s) (both business and home)
*
[HS02400(ALL)05/96]
■ the name of the dealer and the city where the dealership is
located
*
[HS02500(ALL)05/96]
■ the year and make of your vehicle
*
[HS02600(ALL)05/96]
■ the date purchased
*
[HS02700(ALL)05/96]
■ the current mileage on your vehicle
% [HS02800(ALL)05/96]
■ your 17-digit Vehicle Identification Number (VIN) (shown on
your owner card)
File:14wnhss.ex
Update:Mon Jul 8 14:25:33 1996

344
*
[HS03300(ALL)05/96]
If you still have a complaint involving a warranty dispute, you
may wish to contact the Dispute Settlement Board (U.S. only) or
the Canadian Motor Vehicle Arbitration Plan (CAMVAP) in
Canada.
%
*
[HS03500(ALL)05/96] The Dispute Settlement Board (U.S. Only)
*
[HS03600(ALL)05/96]
The Dispute Settlement Board is:
*
[HS03700(ALL)05/96]
The Dispute Settlement Board may not be available in all states.
Ford Motor Company reserves the right to change eligibility
limitations, modify procedures and/or to discontinue this
service without notice and without incurring obligations.
*
[HS03800(ALL)05/96]
What Kinds of Cases Does the Board Review?
[HS03900(ALL)02/95]
The Board reviews all product performance and service
complaints on Ford, Mercury and Lincoln cars and Ford and
Mercury light trucks under warranty that have not been
resolved by a dealer or Ford Motor Company, except those
involving:
*
[HS04000(ALL)05/96]
■ a non-Ford product
*
[HS04100(ALL)05/96]
■ a non-Ford dealership
*
[HS04200(ALL)05/96]
■ a vehicle sales transaction
*
[HS04300(ALL)05/96]
■ request for reimbursement of consequential expenses.
Expenses incidental to the warranty complaint being
reviewed are eligible for consideration.
*
[HS04400(ALL)05/96]
■ items not covered by the new vehicle limited warranty
*
[HS04500(ALL)05/96]
■ alleged liability claims
*
[HS04600(ALL)05/96]
■ property damage where the damage is significant when
compared to the economic loss alleged under the warranty
dispute
*
[HS04700(ALL)05/96]
■ cases currently in litigation
File:14wnhss.ex
Update:Mon Jul 8 14:25:33 1996

Customer Assistance
345
*
[HS04800(ALL)05/96]
■ vehicles not used primarily for family, personal, or
household purposes (except in states where the Dispute
Settlement Board is required to review commercial vehicles)
[HS04900(ALL)05/96]
NOTE: Complaints involving vehicles on which applicable
express written new vehicle warranties have expired at
receipt of your application are not eligible. Eligibility
may differ according to state law. For example, see the
unique brochure for California purchasers/lessees.
*
[HS05000(ALL)05/96]
How Does the Board Work?
*
[HS05100(ALL)05/96]
The Board consists of:
*
[HS05200(ALL)05/96]
■ three consumer representatives
*
[HS05300(ALL)05/96]
■ a Ford or Lincoln/Mercury dealer
*
[HS05400(ALL)05/96]
Consumer candidates for Board membership are recruited and
trained by an independent consulting firm. Dealers are chosen
because of their business leadership qualities.
[HS05501(ALL)04/95]
If the involved vehicle is within 36 months and 36,000 miles of
the date of delivery (warranty start date), you have the right to
make an oral presentation before the Board by indicating your
choice on the application. Also, oral presentations may be
requested by the Board. A decision is made by the Board by
simple majority vote.
*
[HS05550(ALL)05/96]
Board members will review all available information related to
the complaint, including oral presentations, if necessary. They
then arrive at a fair and impartial decision, decided by a simple
majority.
*
[HS05600(ALL)05/96]
Because the Board usually meets only once a month, some cases
may take longer than 30 days to be reviewed. The Board makes
every effort to resolve each case within 40 days of receiving the
consumer application form.
File:14wnhss.ex
Update:Mon Jul 8 14:25:33 1996
346
[HS05700(ALL)04/95]
After your case has been reviewed, the Board will mail you its
decision in writing. It will also provide you with a form to
indicate your acceptance or rejection of an award decision. The
decisions of the board are binding on the dealer and Ford, but
customers may have other options available to them under state
or federal law.
*
[HS05900(ALL)05/96]
The decisions of the Board, however, may be introduced into
evidence by any party in subsequent legal proceedings that may
be initiated.
*
[HS06000(ALL)05/96]
How Do You Contact the Board?
*
[HS06101(ALL)05/96]
Write to the Board at the following address to request a
brochure that contains an application. You will be sent a
brochure which contains a one-page customer application form.
The form should be completed and mailed to the same address.
*
[HS06200(ALL)05/96]
6 pica art:0040272-A
[HS06300(ALL)04/96]
You will be sent a brochure and a one-page customer
application form. To begin the Board review process, the form
should be completed and mailed to the special Board P.O. Box
number shown above.
*
[HS06400(ALL)05/96]
What is the Review Process?
*
[HS06500(ALL)05/96]
Your application will be reviewed and if it is determined to be
eligible, you will receive an acknowledgment indicating the file
number assigned to your application and the local Board
address. At the same time, your dealer and Ford Motor
Company representative are asked to submit statements.
File:14wnhss.ex
Update:Mon Jul 8 14:25:33 1996

Customer Assistance
347
*
[HS06600(ALL)05/96]
To review your case properly, the Board needs the following
information:
*
[HS06700(ALL)05/96]
■ legible copies of all documents and maintenance or repair
orders relevant to the case
[HS06800(ALL)02/95]
■ the year, make, model, and Vehicle Identification Number
*
[HS06900(ALL)05/96]
■ the date you bought your vehicle
*
[HS07000(ALL)05/96]
■ the date of repair(s) and mileage at the time of occurrence(s)
*
[HS07100(ALL)05/96]
■ the current mileage
*
[HS07200(ALL)05/96]
■ the name of the dealer who sold or serviced the vehicle
*
[HS07300(ALL)05/96]
■ a brief description of your unresolved concern
*
[HS07400(ALL)05/96]
■ a brief summary of the action taken with the dealer and
Ford Motor Company
*
[HS07500(ALL)05/96]
■ the names (if known) of all the people you contacted at the
dealership
[HS07600(ALL)02/95]
■ a description of the action you want taken to resolve your
concern
*
[HS07651(ALL)05/96]
Should your case NOT qualify for review, a letter of explanation
will be mailed to you.
%
*
[HS08100(ALL)05/96] Getting Help Outside the U.S. and Canada
*
[HS08200(ALL)05/96]
Before you export your vehicle to a foreign country, contact the
appropriate foreign embassy or consulate to make sure local
regulations do not prevent you from registering your vehicle.
Officials at the embassy can also help you decide whether you
should import your vehicle to that country.
*
[HS08300(ALL)05/96]
Officials at the embassy or consulate can tell you where to get
unleaded fuel. If you cannot get unleaded fuel or can get only
fuel with an anti-knock index that is lower than your vehicle
needs, contact a district or customer assistance center before you
leave the U.S. or Canada.
File:14wnhss.ex
Update:Mon Jul 8 14:25:33 1996
348
*
[HS08400(ALL)05/96]
Use of leaded fuel in your vehicle without a proper conversion
may damage the effectiveness of your emissions control system
and may cause engine knocking or serious engine damage. Ford
Motor Company is not responsible for any damage that is
caused by use of improper fuel.
*
[HS08500(ALL)06/95]
You may also have difficulty importing your vehicle back into
the U.S. if you use leaded fuel.
*
[HS08600(ALL)01/93]
If your vehicle must be serviced while you are traveling or
living in Central or South America, the Caribbean, or the
Middle East, contact the nearest Ford dealership. If the
dealership cannot help you, contact:
*
[HS08700(ALL)10/95]
7-1/2 pica art:0040273-C
*
[HS08800(ALL)06/95]
If you are in other foreign countries, contact the nearest Ford
dealership. If the dealership cannot help you, they can direct
you to the appropriate Ford affiliate office.
*
[HS08900(ALL)06/95]
If you buy your vehicle in North America and then relocate
outside of the U.S. or Canada, register your Vehicle
Identification Number and new address with Ford Motor
Company Export Operations.
File:14wnhss.ex
Update:Mon Jul 8 14:25:33 1996
Customer Assistance
349
%
*
[HS09000(ALL)05/96] Ford of Canada Customer Assistance
*
[HS09100(ALL)08/95]
Ford Motor Company of Canada, Limited
[HS09200(ALL)08/93]
Owners who wish to telephone the Company may contact the
Customer Assistance Centre using the following telephone
number or may write to the following address:
[HS09300(ALL)08/93]
Please have your 17-digit vehicle identification number available.
*
[HS09400(ALL)06/95]
7-1/2 pica art:0050104-B
%
*
[HS09501(ALL)05/96]
Mediation/Arbitration Program (Canada Only)
*
[HS09600(ALL)05/96]
In those cases where you continue to feel that the efforts by
Ford and the dealer to resolve a factory-related vehicle service
concern have been unsatisfactory, Ford of Canada participates in
an impartial third party mediation/arbitration program
administered by the Canadian Motor Vehicle Arbitration Plan
(CAMVAP).
*
[HS09700(ALL)05/96]
The CAMVAP program is a straight-forward and relatively
speedy alternative to resolve a disagreement when all other
efforts to produce a settlement have failed. This procedure is
without cost to you and is designed to eliminate the need for
lengthy and expensive legal proceedings.
File:14wnhss.ex
Update:Mon Jul 8 14:25:33 1996

350
*
[HS09800(ALL)05/96]
In the CAMVAP program, impartial third-party Arbitrators
conduct hearings at mutually convenient times and places in an
informal environment. These impartial Arbitrators review the
positions of the parties, make decisions and, where appropriate,
render awards to resolve disputes. CAMVAP decisions are fast,
fair and final as the arbitrator’s award is binding on both you
and Ford of Canada.
*
[HS09900(ALL)05/96]
CAMVAP services are available in all territories and provinces,
except Quebec. For more information, without charge or
obligation, call your CAMVAP Provincial Administrator directly
at 1-800-207-0685.
File:14wnhss.ex
Update:Mon Jul 8 14:25:33 1996

351
Accessories
[AC00500(ALL)12/93] Ford Accessories for Your Windstar
[AC00600(ALL)11/93]
Many accessories for your Windstar are available through your
local authorized dealer. These accessories have been designed to
meet your needs and are custom designed to complement the
style and aerodynamics of your vehicle. Some of the available
accessories are listed below.
*
[AC00700(ALL)01/93] Safety, Comfort, and Convenience
*
[AC00800(ALL)06/93]
Comfort and Convenience
[AC00900(ALL)04/95]
Engine Block Heater (Standard in Canada)
Remote Keyless Entry
*
[AC01000(ALL)01/93]
Protection and Appearance Equipment
[AC01100(ALL)04/95]
Aero Running Boards
Molded Running Boards
Carpet Floor Mats
Cleaners, Waxes and Polishes
Front End Cover
Front End Mini Cover
Lubricants and Oils
Side Window Shields
Styled Wheel Protector Locks
Rear Air Deflector
Door Edge Guards
File:15wnacs.ex
Update:Thu Jul 18 11:02:08 1996

352
[AC01200(ALL)12/93]
Audio Equipment
[AC01300(ALL)12/93]
CD Changer
*
[AC01400(ALL)01/93]
Safety Equipment
*
[AC01500(ALL)11/93]
Vehicle Security Systems
*
[AC01600(ALL)01/93]
Travel Equipment
[AC01700(ALL)05/95]
Soft Luggage Carrier
Aero Hood Deflector
Factory Luggage Rack & Adaptors
Trailer Hitch (Class II)
Console
*
[AC01800(ALL)05/96]
NOTE: When adding accessories, equipment, passengers, and
luggage to your vehicle, do not exceed the total
weight capacity of the vehicle or of the front or rear
axle (GVWR, GAWR as shown on the Safety
Compliance Certification Label). Consult your dealer
for specific weight information.
*
[AC01900(ALL)09/95]
NOTE: Devices that emit radio frequency (RF) energy such as
AM/FM radios, mobile communication systems
(two-way radios, telephones) and radio controlled
security systems, are subject to the rules and
regulations of the Federal Communications
Commission (FCC) 47 CFR Parts 2 and 15. Any such
system installed in your vehicle should comply with
those rules and should be installed only by a
qualified technician. In addition, to insure continued
compliance with the FCC’s requirements, RF devices
must not be modified or changed in a manner not
expressly approved by Ford Motor Company.
File:15wnacs.ex
Update:Thu Jul 18 11:02:08 1996

Accessories
353
*
[AC02000(ALL)09/95]
NOTE: Mobile communication systems, particularly if not
properly installed, may adversely affect the operation
of the vehicle. For example, such systems, when
operated, may cause the engine to stumble or stall. In
addition, such systems may themselves be damaged,
or their operation affected, by the operation of the
vehicle. (Citizens band [CB] transceivers, garage door
openers, and other transmitters whose power output is
5 watts or less, ordinarily will not affect vehicle
operation.)
*
[AC02100(ALL)09/95]
NOTE: Because Ford has no control over the operation or
manufacture of such systems or their installation, Ford
cannot assume responsibility for any adverse effects or
damage if this equipment is used.
File:15wnacs.ex
Update:Thu Jul 18 11:02:08 1996
354
[AC03100(ALL)05/95]
thirty-two pica
chart:0040403-A
File:15wnacs.ex
Update:Thu Jul 18 11:02:08 1996
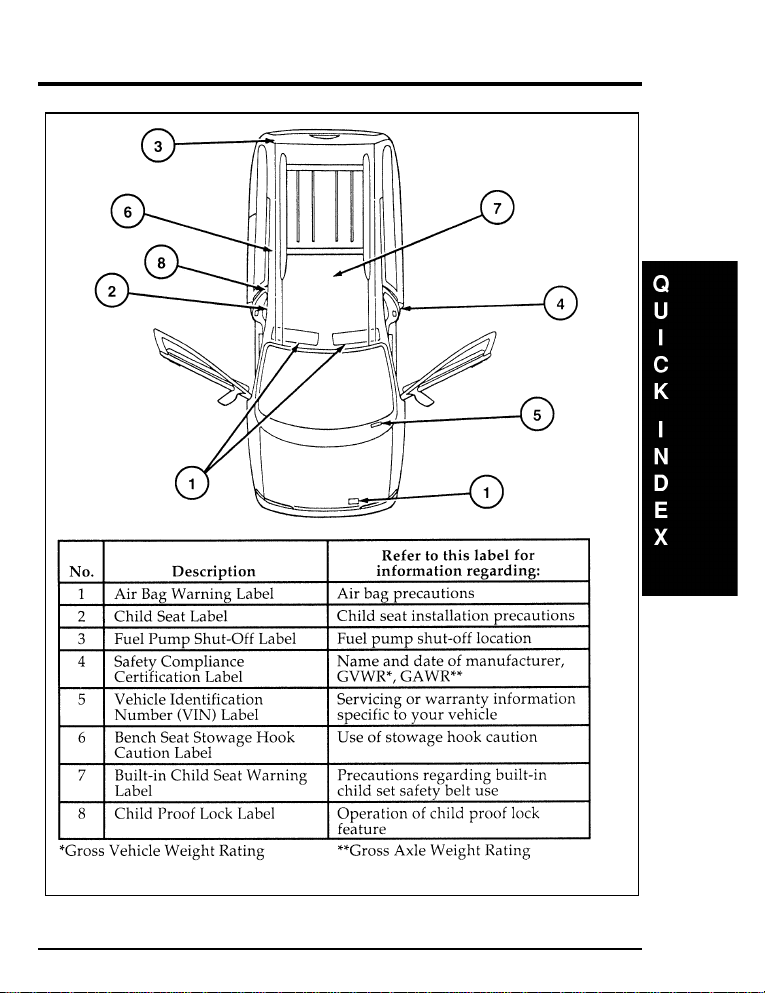
357
[QI01000(ALL)07/95]
full page art:0050273-A
Warning label locations
File:16wnqis.ex
Update:Fri Aug 2 10:11:19 1996
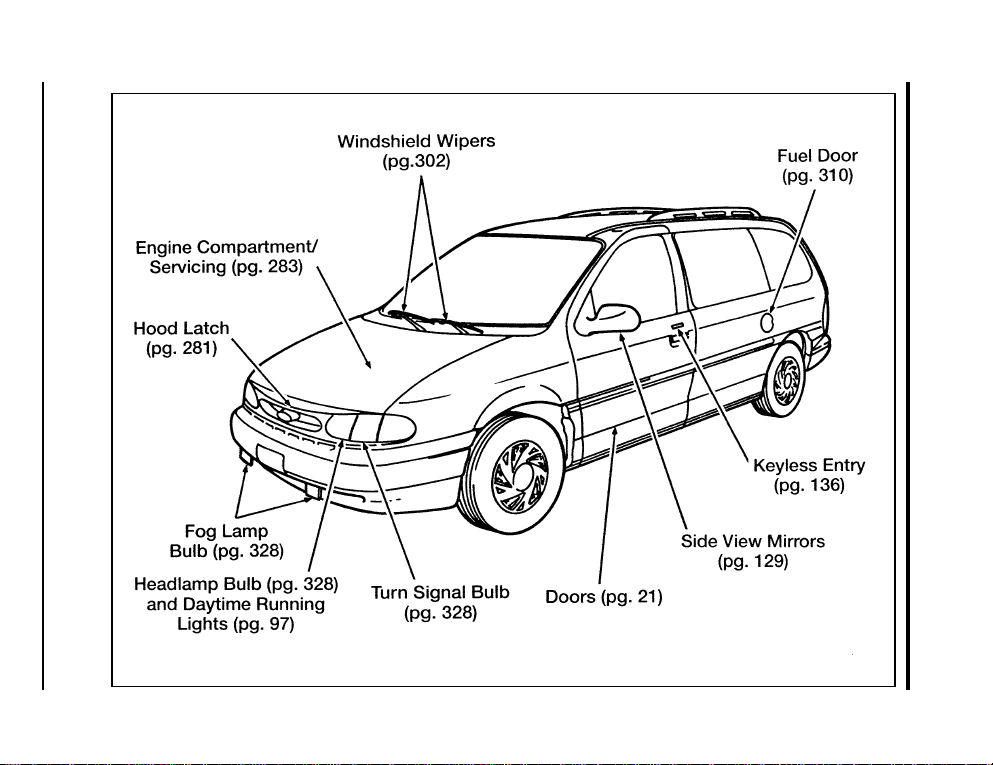
358
[QI02100(ALL)06/94]
full page art:0050001-D
Front exterior view
File:16wnqis.ex
Update:Fri Aug 2 10:11:19 1996
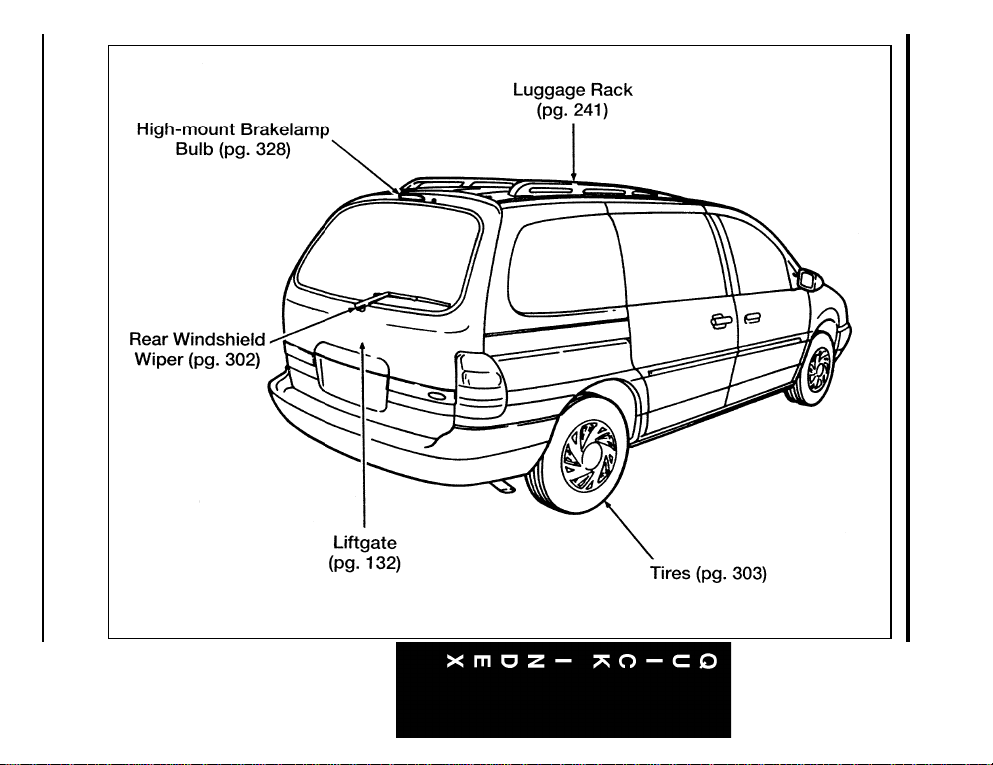
359
[QI02200(ALL)07/95]
full page art:0050002-C
Rear exterior view
File:16wnqis.ex
Update:Fri Aug 2 10:11:19 1996
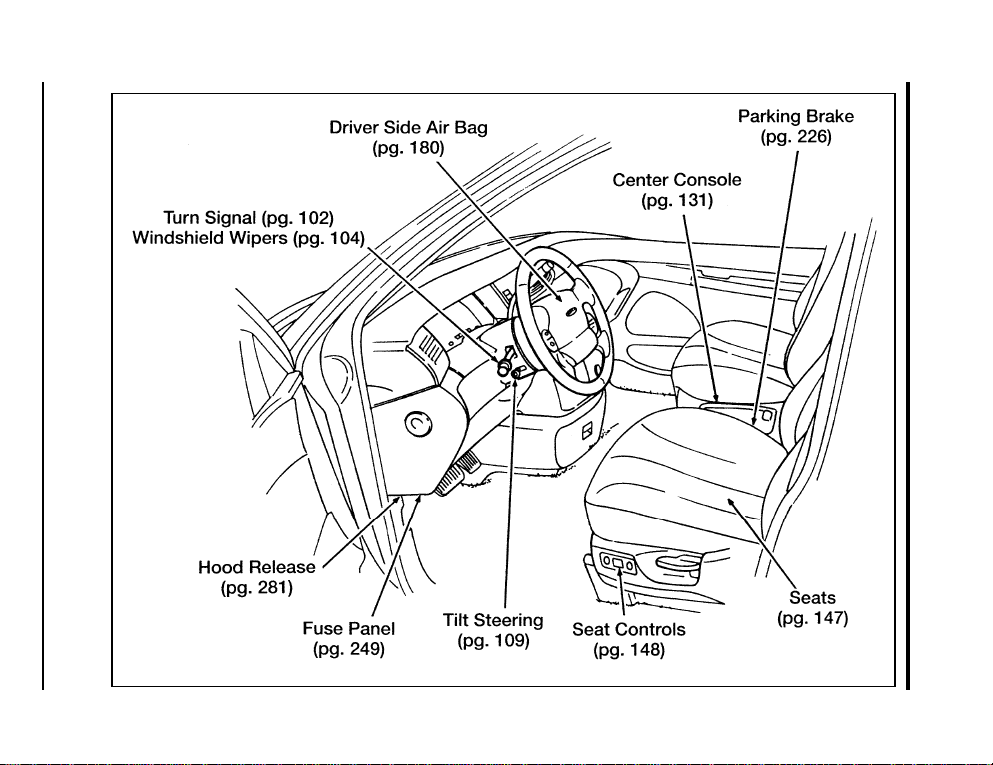
360
[QI02300(ALL)07/95]
full page art:0050003-D
Entrance view
File:16wnqis.ex
Update:Fri Aug 2 10:11:19 1996
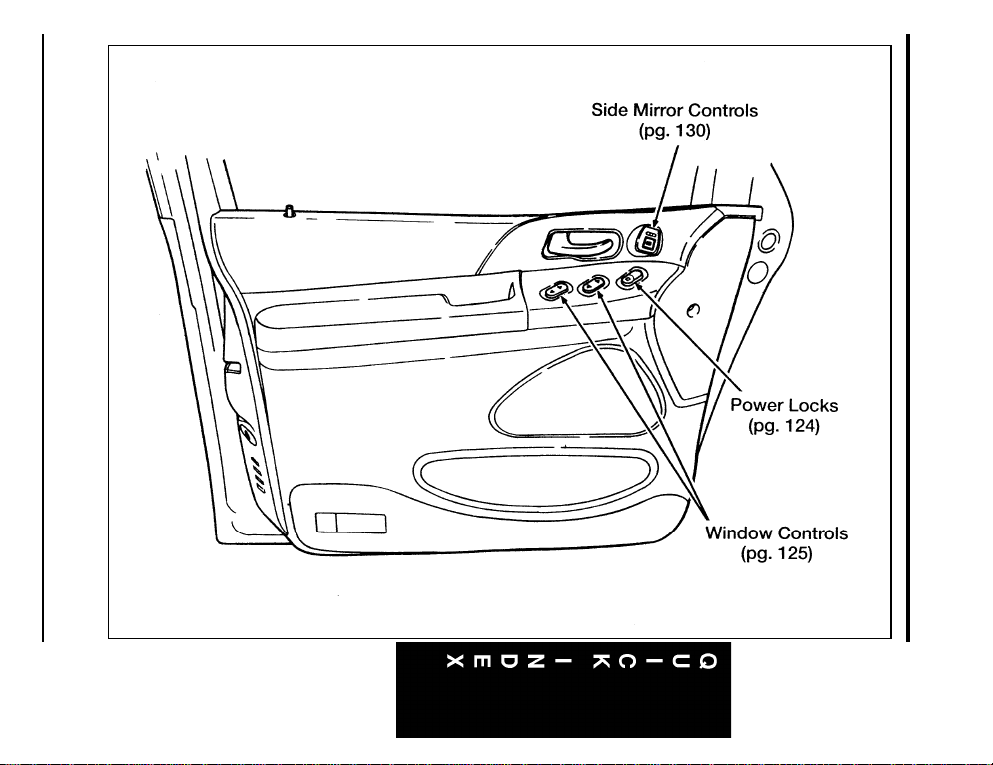
361
[QI02400(ALL)07/95]
full page art:0050004-C
Driver’s door
File:16wnqis.ex
Update:Fri Aug 2 10:11:19 1996
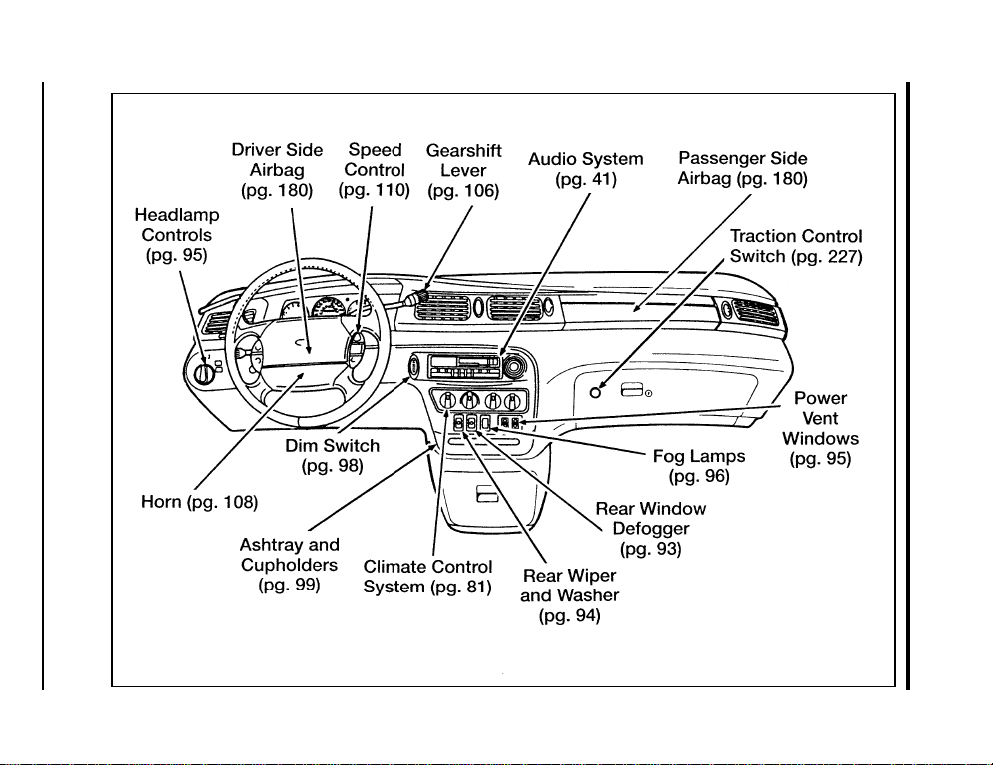
362
[QI02500(ALL)07/95]
full page art:0050005-G
Instrument panel
File:16wnqis.ex
Update:Fri Aug 2 10:11:19 1996
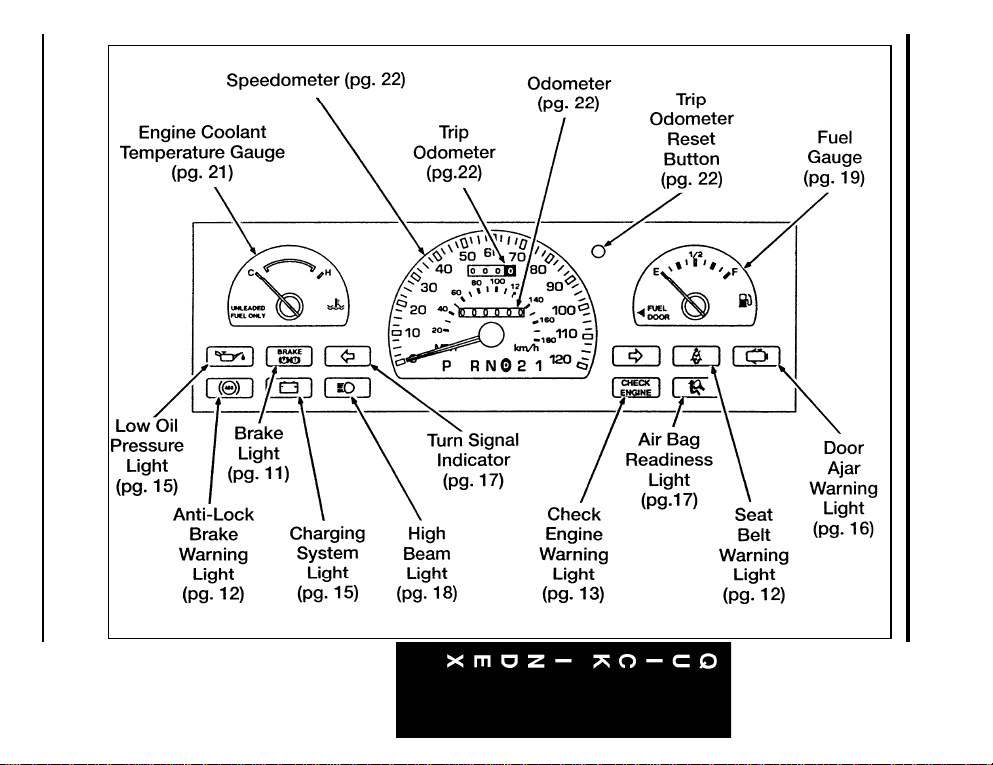
363
[QI02601(ALL)07/95]
33-1/2 pica art:0050231-E
Mechanical instrument cluster
File:16wnqis.ex
Update:Fri Aug 2 10:11:19 1996
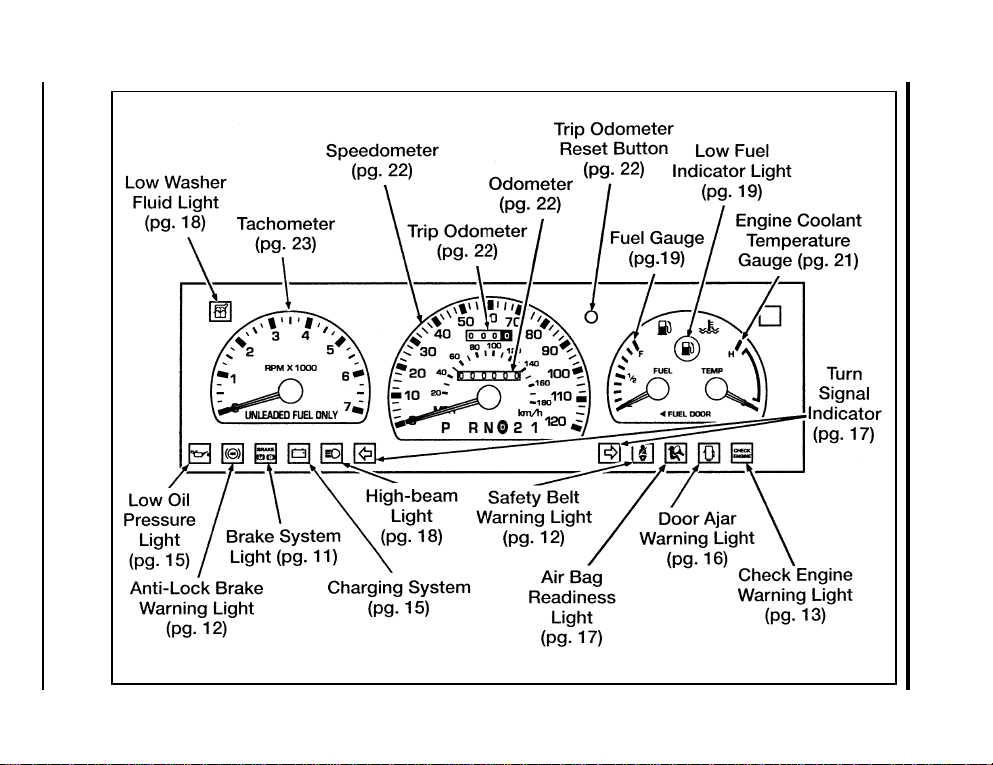
364
[QI02700(ALL)07/95]
full page art:0050007-H
Mechanical instrument cluster with tachometer
File:16wnqis.ex
Update:Fri Aug 2 10:11:19 1996
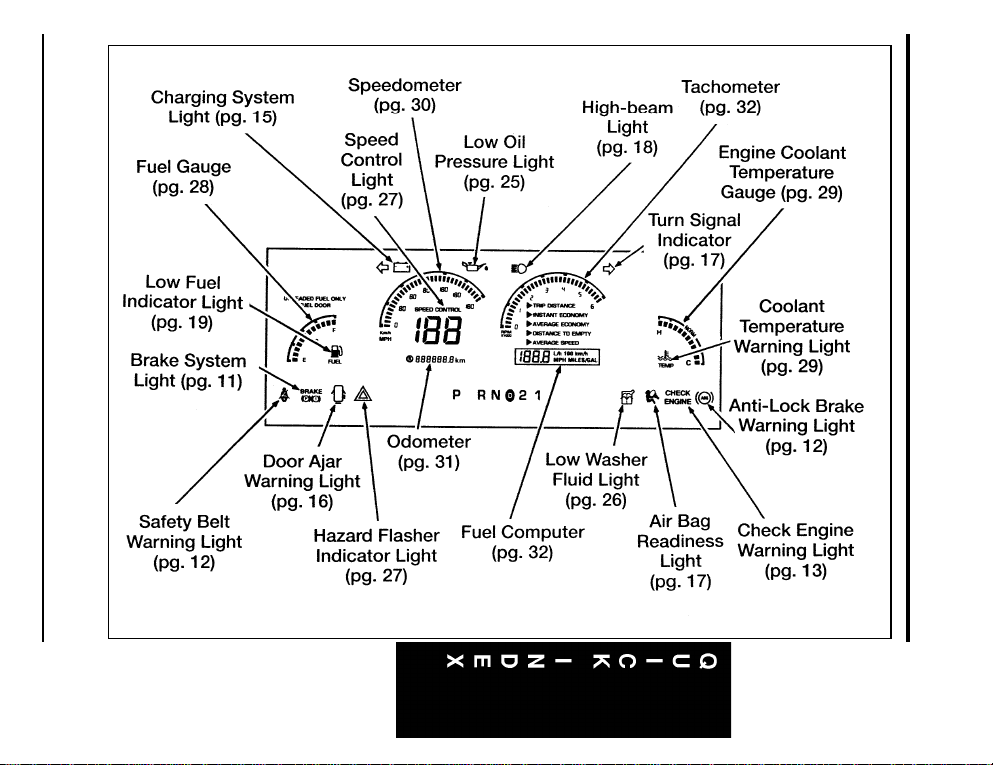
365
[QI02750(ALL)07/95]
full page art:0050006-H
Electronic instrument cluster
File:16wnqis.ex
Update:Fri Aug 2 10:11:19 1996
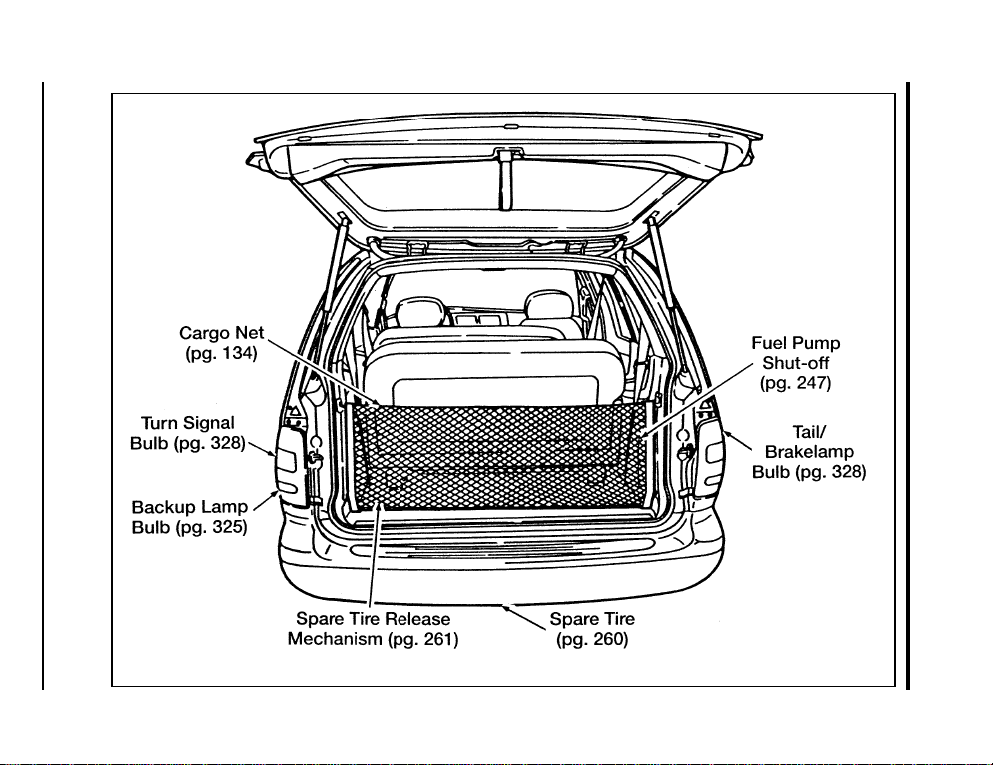
366
[QI02800(ALL)07/95]
full page art:0050008-E
Rear cargo area
File:16wnqis.ex
Update:Fri Aug 2 10:11:19 1996

Index
367
A
ABS warning light (see Anti-lock brake system) ......12
Accessory position on the ignition............ 100
Additives, engine oil.................. 286
Air bag supplemental restraint system
and child safety seats .............. 181, 200
description ................... 180, 182
disposal ...................... 186
driver air bag.................. 180, 182
indicator light.....................17
operation ...................... 182
passenger air bag .................. 182
proper seating ................... 181
service and information labels ............ 182
tone generator ................... 186
wearing safety belts ................. 180
Air cleaner filter, location ............... 283
Air conditioning, manual heating and
air conditioning system .............. 83
Alarm, activating remote personal............ 141
Alcohol, in fuel .................... 314
Aluminum wheels ................... 265
Antenna, radio (see Electronic sound system)...... 41,99
Antifreeze (see Engine coolant) ............. 292
Anti-lock brake system (ABS)
description ..................... 223
noise........................ 223
see also Brake.................... 223
warning light .....................12
Anti-theft lug nuts and key............... 266
Anti-theft system
arming the system.................. 145
description ..................... 144
disarming an untriggered system ........... 146
disarming a triggered system............. 146
File:wnixs.ex
Update:Thu Aug 1 08:57:39 1996

368
Anti-theft system (continued)
triggering ................... 144, 146
warning light ..................... 39
Appeals (see Dispute settlement board) ......... 344
Assistance (see Customer assistance) .......... 341
Audio system (see Electronic sound system) ........ 41
Autolamp system (see Headlamps) ........... 115
Autolock (see Keyless entry) .............. 143
Automatic transaxle
driving with .................... 228
fluid, adding .................. 298–299
fluid, checking ................... 298
fluid, refill capacities ................ 334
fluid, specification.................. 335
B
Backing up ...................... 230
Basic vehicle warranty .................. 3
Battery
acid, treating emergencies ............ 273, 301
battery saver .................... 139
charging system warning light ............. 15
how to service ................... 300
jumping a disabled battery.............. 272
maintenance-free .................. 300
proper disposal, recycling .............. 301
servicing ...................... 300
when storing your vehicle .............. 338
File:wnixs.ex
Update:Thu Aug 1 08:57:39 1996

369
Index
Brake fluid ...................... 289
brake warning light ..................11
checking and adding ................ 289
description ..................... 289
specifications .................. 289, 335
Brakelamp, bulb replacement .............. 324
Brakes
adjustment ..................... 223
anti-lock ...................... 223
anti-lock brake system (ABS) warning light ....... 12
applying the brakes ................. 225
brake warning light ..................11
fluid, checking and adding.............. 289
fluid, refill capacities ................ 289
fluid, specifications ............... 289, 335
front disc...................... 223
if brakes do not grip well .............. 225
lubricant specifications................ 335
master cylinder ................... 289
new brake linings ................... 4
noise...................... 223, 225
parking ...................... 226
power braking ................... 223
servicing .................... 225, 289
stopping distances................ 225, 242
when storing your vehicle .............. 338
Brake-shift interlock .................. 229
Break-in period ..................... 4
Brights (high beams) ...................18
Built-in child seat, operation .............. 188
Bulbs, replacing
headlamps ..................... 322
specifications .................... 328
File:wnixs.ex
Update:Thu Aug 1 08:57:39 1996

370
C
Canada, customer assistance .............. 349
Canada, warranty information .............. 3
Canadian Motor Vehicle Arbitration Plan (CAMVAP). . . 349
Capacities for refilling fluids .............. 334
Carbon monoxide in exhaust .............. 220
Cargo net....................... 134
Car seats for children (see Child safety seats) ...... 200
Cassette tape player (see Electronic
sound system) ............. 54,58,71,75
Catalytic converter .................. 318
CD player (see Electronic sound system).......... 47
Chains, tires ..................... 308
Changing a tire .................... 259
Charging system warning light .............. 15
Childproof locks.................... 122
Child safety restraints ................. 186
built-in child seat .................. 188
child safety belts .................. 199
child safety seats .................. 200
Child safety seats
and air bags .................. 181, 200
attaching with tether straps ............. 211
automatic locking mode (retractor) .......... 200
built-in child seat .................. 188
in front seat .................. 181, 200
in rear outboard seat ................ 200
in rear seat ..................... 200
tether anchorage hardware.............. 211
Chime
headlamps on .................... 97
safety belt ...................... 12
File:wnixs.ex
Update:Thu Aug 1 08:57:39 1996

371
Index
Cleaning your vehicle ................. 329
CD player and discs.................. 51
chrome and aluminum parts ............. 330
exterior....................... 329
exterior lamps ................... 331
fabric ....................... 332
headlamps ..................... 331
instrument panel .................81,330
instrument panel lens ................ 331
interior....................... 332
interior lamps.................... 331
plastic parts .................... 330
polishing ...................... 329
rustproofing .................... 330
safety belts ..................... 330
tail lamps ..................... 331
upholstery and interior trim ............. 332
washing ...................... 329
waxing ....................... 329
wheels ....................... 332
Climate control system
air conditioning .................... 81
heating........................81
Clock...................... 47,62,77
Cold engine starting .................. 218
Combination lap and shoulder belts ........... 170
Compact disc player (see Electronic sound system) . . . 42, 47
Compact disc radio (see Electronic sound system) ..... 42
Console, description .................. 131
Controls, mirrors ................... 129
Coolant (see Engine coolant)
checking and adding ................ 292
drain and flush ................... 296
preparing for storage ................ 338
proper solution ................... 294
File:wnixs.ex
Update:Thu Aug 1 08:57:39 1996

372
Coolant (see Engine coolant) (continued)
refill capacities ................... 334
specifications .................. 293, 335
temperature gauge ................ 21,29
warnings ...................... 292
Cooling fan ...................... 279
Cupholder(s) ...................... 99
Customer Assistance Center, Ford (U.S.)......... 342
Customer Assistance Centre, Ford of Canada ...... 349
D
Daytime running light system .............. 97
Defrost
rear window ..................... 93
windshield ...................... 85
Dipstick ....................... 287
automatic transaxle fluid............... 298
engine oil ..................... 287
Disabled vehicle (see Towing) ............. 278
Dispute Settlement Board ............... 344
Doors ........................ 121
door ajar warning light ................ 16
lubricant specifications................ 335
Driving under special conditions
bad weather .................... 243
heavy load ..................... 245
high speed ..................... 243
high water ..................... 244
slippery roads ................... 243
tips for safe driving ................. 242
towing a trailer ................... 246
File:wnixs.ex
Update:Thu Aug 1 08:57:39 1996

373
Index
E
Electrical system
fuses ........................ 250
operating when the engine is off ........... 100
relays ....................... 258
Electronic radio with cassette
(see Electronic sound system) ...........71
Electronic sound system
antenna ....................... 99
tuning the radio................ 43,54,72
warranty and service information............ 80
Electronic stereo cassette radio
(see Electronic sound system) ...........71
Electronic stereo radio (see Electronic sound system) ....71
Emergencies, roadside
assistance...................... 341
battery acid spills ................ 273, 302
fuel ........................ 314
jump-starting .................... 272
towing ....................... 278
Emergency brake (parking brake) ............ 226
Emission control system ................ 318
catalytic converter .................. 318
emissions warranty .............. 3,318, 320
Engine
check engine warning light............... 13
does not start .................... 247
fuel injected engine, starting ............. 217
fuel pump shut-off switch .............. 247
preparing to start .................. 217
service points .................... 283
storing your vehicle ................. 336
Engine block heater .................. 220
File:wnixs.ex
Update:Thu Aug 1 08:57:39 1996

374
Engine coolant
checking and adding ................ 292
checking hoses ................... 296
disposal .................. 288, 295, 300
drain and flush ................... 296
preparing for storage ................ 338
proper solution ............... 288, 294, 300
recovery reservoir................ 283, 292
specifications .................... 335
temperature gauge ................ 21,29
Engine coolant temperature gauge
description .................... 21,29
mechanical ...................... 21
Engine fan ...................... 279
Engine knocking ................... 313
Engine oil
changing oil and oil filter .............. 288
checking and adding ................ 287
dipstick ...................... 287
disposal .................. 288, 295, 300
engine oil pressure warning light.......... 15,25
filter, specifications ................. 333
refill capacities ................... 334
specifications .................... 286
synthetic oil .................... 286
“break-in” oils .................... 4
viscosity ...................... 287
Entry system
illuminated ..................... 143
keyless....................... 136
remote ....................... 139
Exhaust fumes .................... 220
Extended Service Plan, Ford ............... 4
File:wnixs.ex
Update:Thu Aug 1 08:57:39 1996

375
Index
F
Fan, engine fan, avoiding injury............. 279
Federal Communications Commission ........... 79
Flashers, hazard .................... 108
Flashing the lights ................... 103
Flat tire........................ 259
Fluid refill capacities .................. 334
Foglamps ........................ 96
Ford Dispute Settlement Board ............. 344
Ford Extended Service Plan................ 4
Ford Motor Company of Canada ............ 349
Ford of Canada Customer Assistance Centre ....... 349
Foreign registration .................. 347
French owner guides, how to obtain............ 3
Fuel
calculating fuel economy............... 316
capacity ...................... 334
choosing the right fuel................ 312
filling your vehicle with fuel ............. 310
filter, specifications ................. 333
fuel gauge .................... 19,28
improving fuel economy ............... 317
low fuel warning light.................19
octane rating .................... 312
quality ....................... 313
running out of fuel ................. 316
safety information relating to automotive fuels..... 314
storing your vehicle ................. 337
treating emergencies................. 314
Fuel and distance computer
average economy ................... 35
English/metric button ................. 33
instant economy.................... 34
reset button......................33
select button .....................33
File:wnixs.ex
Update:Thu Aug 1 08:57:39 1996

376
Fuel and distance computer (continued)
to empty indicator .................. 35
trip distance ..................... 34
Fuel cap, replacing .................. 311
Fuel filter, specifications ................ 333
Fuel gauge ..................... 19,28
Fuse panels
engine compartment................. 256
instrument panel .................. 250
Fuses
charts ....................... 252
checking and replacing ............... 250
G
Gas mileage (see Fuel economy) .......... 312, 316
Gasohol ....................... 314
Gauges, Electronic
engine coolant temperature gauge ........... 29
fuel gauge ...................... 28
odometer....................... 31
speedometer ..................... 30
tachometer ...................... 32
Gauges, Mechanical
engine coolant temperature gauge ........... 21
fuel gauge ...................... 19
odometer....................... 22
speedometer ..................... 22
tachometer ...................... 23
trip odometer..................... 22
GAWR (Gross Axle Weight Rating)
calculating ..................... 236
definition.................... 235, 245
driving with a heavy load .............. 245
location ...................... 235
Gearshift
automatic operation ................. 228
column-mounted .................. 228
locking the gearshift................. 100
File:wnixs.ex
Update:Thu Aug 1 08:57:39 1996

377
Index
Gearshift (continued)
positions ...................... 228
shifting the gears .................. 228
shift-lock ...................... 229
GVWR (Gross Vehicle Weight Rating)
calculating ..................... 236
definition.................... 235, 245
driving with a heavy load .............. 245
location ...................... 235
H
Hazard flashers .................... 108
Headlamps
aiming ....................... 322
autolamp system .................. 115
bulb specification .................. 328
checking alignment ................. 322
cleaning ...................... 331
daytime running lights................. 97
flashing ...................... 103
high beam ..................... 103
replacing bulbs ................... 322
turning on and off ..................95
warning chime ....................97
Head restraints .................... 154
Heated mirrors .................... 131
Heating
manual heating and air conditioning system ....... 81
rear seat controls ................... 91
High beams
indicator light.....................18
operation ...................... 103
Hitch ......................... 238
Hood
latch location .................... 281
lubrication specifications ............... 335
File:wnixs.ex
Update:Thu Aug 1 08:57:39 1996

378
Hood (continued)
release lever .................... 281
working under the hood............... 279
Horn ......................... 108
Hoses, checking .................... 296
I
Identification Number, Vehicle (VIN) .......... 343
Idle, relearning .................... 277
Ignition
positions of the ignition ............... 100
removing the key .................. 101
Indicator lamp module.................. 37
Indicator lights and chimes (see Lights) .......... 7
Infant seats (see Safety seats) ............ 186, 200
Instrument cluster
electronic....................... 25
Instrument panel
cleaning .....................81,331
lighting up panel and interior ............. 98
registers ....................... 82
Integrated child seat (see Built-in child seat) ....... 188
Interval wipers .................... 104
J
Jack
operation...................... 263
positioning ..................... 263
Jump-starting your vehicle
attaching cables................... 274
disconnecting cables................. 277
File:wnixs.ex
Update:Thu Aug 1 08:57:39 1996

379
Index
K
Keyless entry system
autolock ...................... 143
locking and unlocking doors ............. 138
programming entry code............... 137
Keys
positions of the ignition ............... 100
removing key from the ignition............ 101
stuck in lock position ................ 101
L
Lamps
autolamp delay system ............... 115
bulb replacement specifications chart ......... 328
daytime running light system .............97
dome lamps .................... 117
flashing the lamps.................. 103
fog lamps ...................... 96
hazard flashers ................... 108
headlamps ......................95
high beams ..................... 103
illuminated entry system............... 143
illuminated mirrors ................. 120
instrument panel, dimming............... 98
interior lamps.....................98
map lamps ..................... 117
trailer ....................... 238
Lane change indicator (see Turn signal) ......... 102
Lap belts ....................... 178
Liftgate ........................ 132
Lights, warning and indicator
airbag........................17
anti-lock brakes (ABS) ................. 12
anti-theft ....................... 39
brake ........................11
charging system....................15
File:wnixs.ex
Update:Thu Aug 1 08:57:39 1996

380
Lights, warning and indicator (continued)
check engine ..................... 13
door ajar ....................... 16
hazard warning light ............... 27,108
high beam ...................... 18
low fuel ....................... 19
low washer fluid ................. 18,26
oil pressure.................... 15,25
safety belt ...................... 12
service engine soon .................. 13
speed control .................... 114
theft system ..................... 39
traction control system ................ 37
turn signal indicator................17,102
Load limits
GAWR....................... 245
GVWR ....................... 245
trailer towing.................. 236, 246
Lubricant specifications ................ 335
Luggage rack ..................... 241
Lug nuts
anti-theft ...................... 266
tightening sequence ................. 271
Lumbar support pad.................. 149
M
Maintenance schedule and record (see separate Maintenance
Schedule and Record booklet) ........... 3
Maintenance (see servicing)............... 279
Master cylinder, brakes ................ 289
Methanol in fuel ................... 314
Mileage, calculating fuel economy............ 316
Mirrors
automatic dimming rearview mirror ....... 118, 122
dual electric remote control ............. 130
heated ....................... 131
rearview ...................... 129
File:wnixs.ex
Update:Thu Aug 1 08:57:39 1996

381
Index
Mirrors (continued)
side view mirrors (manual).............. 129
side view mirrors (power) .............. 130
vanity mirror, illuminated .............. 120
Motorcraft parts .................... 333
N
New vehicle break-in .................. 4
O
Octane rating ..................... 312
Odometer
description .................... 22,31
trip odometer ..................... 22
Oil filter ....................... 288
Oil (see Engine oil) .................. 286
Oil viscosity...................... 286
On-board diagnostic (OBD II) system .......... 321
Overdrive....................... 231
Overseas offices .................... 347
P
Panic alarm feature, remote entry system ........ 141
Parking brake
operation ...................... 226
warning light .....................11
Parts (see Motorcraft Parts) ............... 333
PCV valve, specifications ................ 333
Power door locks ................... 124
Power features
door locks ..................... 124
lumbar support ................... 149
mirrors....................... 129
seats ........................ 148
windows ...................... 125
File:wnixs.ex
Update:Thu Aug 1 08:57:39 1996

382
Power steering
dipstick ...................... 296
driving with power steering ............. 228
fluid, checking and adding.............. 296
fluid, specifications ................. 335
servicing ...................... 228
R
Radio (see Electronic sound systems) ........... 41
Rear climate control system ............... 91
Rearview mirror.................... 118
Rear window ..................... 125
defroster ....................... 93
washer........................ 94
washer reservoir .................. 291
Refill capacities for fluids ............... 334
Relays ........................ 258
Remote entry system ................. 139
illuminated entry .................. 143
locking/unlocking doors............... 140
panic alarm .................... 141
replacement/additional transmitters.......... 142
Restraints, safety (see Safety restraints)
adult........................ 147
child........................ 186
infant ..................... 186, 200
Roadside assistance .................. 341
Roadside emergencies ................. 247
Roof rack....................... 241
Rotating the tires ................... 304
File:wnixs.ex
Update:Thu Aug 1 08:57:39 1996

383
Index
S
Safe driving tips.................... 242
Safety Compliance Certification Label .......... 236
Safety information relating to automotive fuels ...... 314
Safety restraints
adjusting the safety belts............. 170, 178
center front lap belt ................. 178
center rear lap belt ................. 178
cleaning the safety belts ............... 330
extension assembly ................. 179
for children..................... 186
for infants ................... 186, 200
for pregnant women............... 147, 169
lap and shoulder belts ................ 170
lap belt....................... 178
maintenance .................... 179
replacement..................... 179
warning light and chime................12
Safety seats for children
and air bags .................. 181, 200
attaching with tether straps ............. 211
automatic locking mode (retractor) .......... 200
built-in child seat .................. 188
in front seat .................... 200
in rear outboard .................. 200
in rear seat ..................... 200
tether anchorage hardware .............. 211
Seats
adjusting the seats, power .............. 148
child safety seats .................. 200
cleaning upholstery ................. 332
head restraints ................... 154
lumbar support ................... 149
File:wnixs.ex
Update:Thu Aug 1 08:57:39 1996

384
Servicing your vehicle
precautions when servicing ............. 279
servicing when you tow ............... 278
Shift-lock system ................... 229
Shift positions (see Gearshift).............. 228
Shoulder and lap belts (see Safety restraints)....... 170
Shoulder belts (see Safety restraints) .......... 170
Side mirrors
adjusting ...................... 129
heated ....................... 131
Snow tires and chains ................. 308
Spare tire
changing the tire .................. 259
conventional spare ................. 259
Spark plugs, specifications ............... 333
Special driving conditions ............... 242
Specification chart, lubricants .............. 335
Speed control
resetting ...................... 113
tap up/tap down .................. 113
when towing a trailer ................ 239
Speedometer .................... 22,30
Starting your vehicle
preparing to start your vehicle ............ 217
starting a cold engine ................ 218
starting your vehicle if the battery is disabled ..... 272
Steering, power .................... 228
Steering wheel
horn ........................ 108
locking....................... 100
tilting ....................... 109
Storage compartments ................. 167
cargo net...................... 134
center console ................... 131
File:wnixs.ex
Update:Thu Aug 1 08:57:39 1996

385
Index
Storing your vehicle .................. 336
Supplemental air bag readiness light ...........17
Supplemental Restraint System (SRS) .......... 180
T
Tachometer ....................... 32
Tail lamps
bulb replacement ................ 324, 328
cleaning ...................... 331
Temperature control (see Climate control) ......... 81
Tether anchor installation (see Child restraints) ...... 211
Tilt steering wheel ................... 109
Tires
changing ...................... 259
checking the pressure ................ 303
cleaning ...................... 332
inspection and maintenance ............. 303
replacing ...................... 305
rotating ...................... 304
snow tires and chains ................ 308
storing your vehicle ................. 338
tire grades ................... 305, 307
treadwear ................... 305, 307
wear bands ..................... 305
Towing a trailer (see Trailer towing) .......... 246
Towing your vehicle
using wheel dollies ................. 278
with a tow truck .................. 278
Traction control .................... 227
Trailer towing
tips ........................ 239
trailer lamps .................... 238
File:wnixs.ex
Update:Thu Aug 1 08:57:39 1996

386
Transaxle
automatic operation ................. 228
fluid, checking and adding (automatic) ........ 298
lubricant specifications................ 335
Transaxle control switch ................ 231
Transmitter (see Remote entry) ............. 139
Trip odometer ..................... 22
Turn signal
indicator lights ..................17,102
lever........................ 102
U
Used engine oil, disposal............ 288, 295, 300
V
Vanity mirror ..................... 120
Variable interval wipers ................ 104
Vehicle Identification Number (VIN) .......... 343
Vehicle loading
calculating the load ................. 236
understanding loading information .......... 245
Vehicle storage .................... 336
Ventilating your vehicle (see Climate control) ....... 81
Viscosity (see Engine oil)................ 286
Visor (see Sunvisor) .................. 120
Voltmeter (see Battery voltage gauge) ........... 15
W
Warning chimes
headlamps on .................... 97
safety belt ...................... 12
Warning lights (see Lights) ................ 7
Warranties ....................... 3
basic......................... 3
Canada ....................... 3
radio......................... 80
File:wnixs.ex
Update:Thu Aug 1 08:57:39 1996

387
Index
Warranty Information Booklet .............. 3
Washer fluid ..................... 104
rear window reservoir ................ 291
reservoir ...................... 291
warning light ................... 18,26
windshield ..................... 291
Weight limits (GAWR, GVWR) ............. 245
Wheel bearings lubricant specifications ......... 335
Wheel dollies (see Towing) ............... 278
Wheels
anti-theft lugnuts .................. 266
cleaning ...................... 332
covers ....................... 265
inspection and maintenance ............. 303
Windows ....................... 125
manual windows, operating ............. 125
power windows, operating .............. 125
Windshield, washing.................. 104
Windshield washer fluid and wipers .......... 104
checking and adding fluid .............. 291
checking and replacing wiper blades ......... 302
liftgate reservoir................... 291
low washer fluid light ............... 18,26
operation ...................... 104
reservoir ...................... 291
specifications .................... 291
variable interval wipers ............... 104
Windshield wipers and washer ............. 104
Wrecker towing .................... 278
File:wnixs.ex
Update:Thu Aug 1 08:57:39 1996
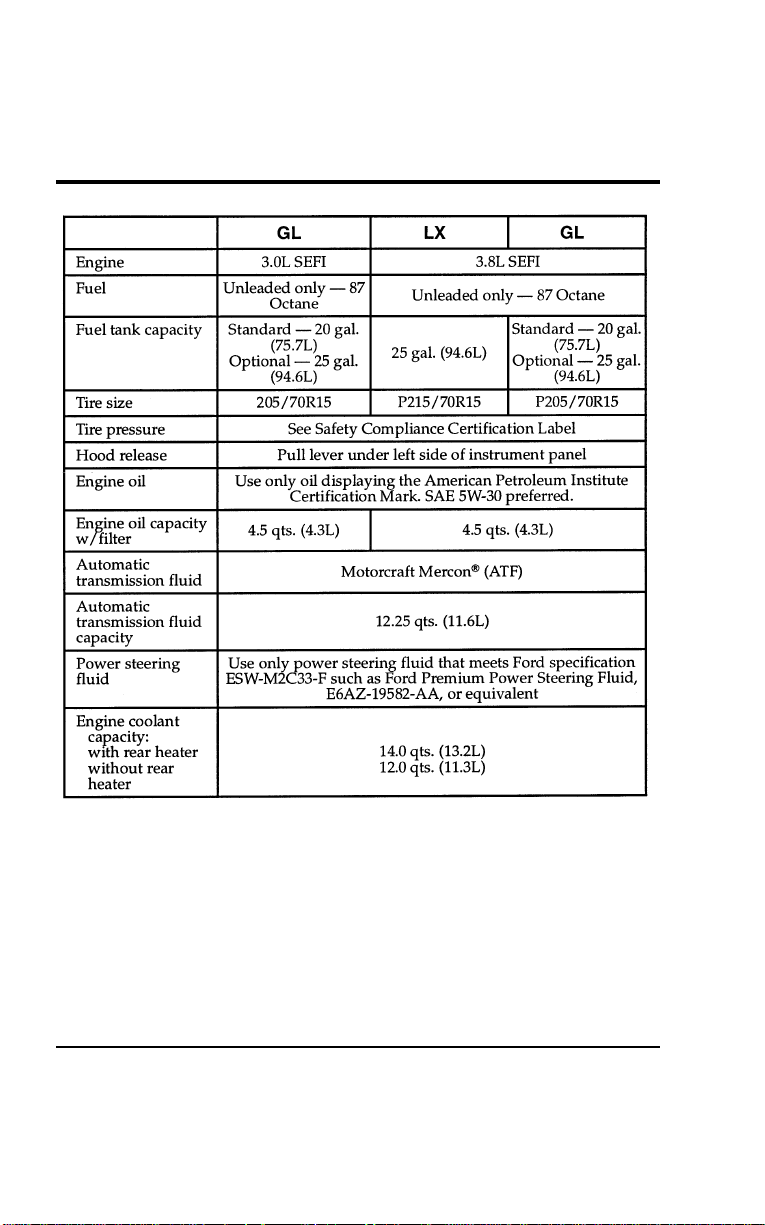
388
Service Station Information
[GS00200(ALL)02/95]
thirty-two pica
chart:0050223-E
File:17wngss.ex
Update:Mon Jul 8 14:26:51 1996