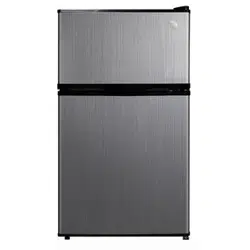
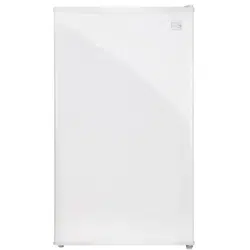
Use & Care Guide for Refrigerator
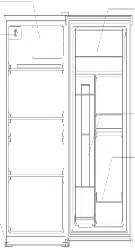
PARTS AND FEATURES
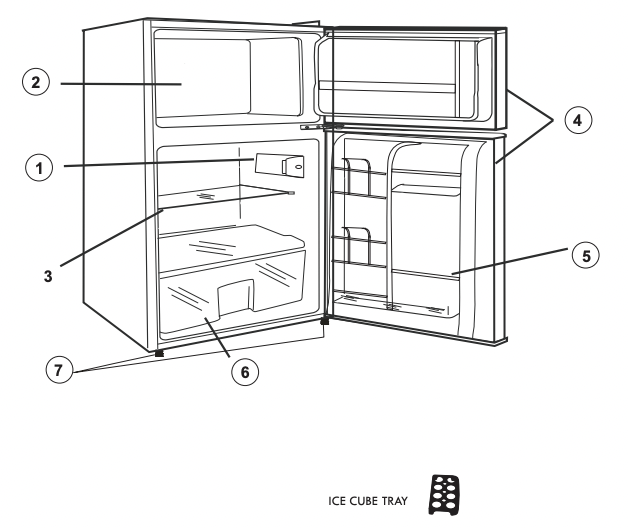
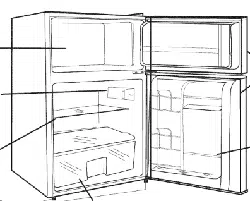
1. Temperature control
2. Freezer compartment
3. Slide-out glass shelves
4. Reversible door
5. 2 Liter bottle rack
6. Vegetable and fruit crisper drawer
7. Leveling Feet
PREPARING TO USE YOUR REFRIGERATOR
Unpacking Your Refrigerator
1. Remove all packaging material. This includes the foam base and all adhesive tape holding the refrigerator accessories inside and outside. Slide out and remove the plastic or foam guard used to protect the compressor from shipping damage due to vibration and shock.
2. Inspect and remove any remaining packaging, tape or printed materials before powering on the refrigerator.
3. Check to be sure you have all accessories and parts listed in the Parts and Features section.
Proper Air Circulation
To ensure that your refrigerator works at the maximum efficiency it was designed for, you should install it in a location where there is proper air circulation, plumbing and electrical connections.
The following are recommended clearances around the refrigerator:
3/4 inches (19mm)
2 inches (50mm)
2 inches (50mm)
Electrical Requirements
Make sure there is a suitable power outlet (115 volts, 15 amps) with proper grounding to power the refrigerator.
WARNING: Avoid the use of three prong adapters. NEVER cut off the thirdgrounding prong in order to accommodate a two prong outlet. Cutting off the grounding prong is a dangerous practice since it provides no effective grounding for the refrigerator and may result in serious injury from electrical shock.
OPERATING YOUR REFRIGERATOR
Installation
Your refrigerator is designed for freestanding installation only. It should not be recessed or built-in. Place the refrigerator on a floor strong enough to support it fully loaded. When moving the refrigerator, never tilt it by more than a 45 degrees angle. This could damage the compressor and the sealed system.
If the refrigerator has been tilted more than 45 degrees, let it stand in an upright position for at least 24 hours prior to plugging it into the power source. This will allow the refrigerant to settle and reduce the possibility of a malfunction in the cooling system.
Plug the refrigerator into an exclusive, properly installed grounded wall outlet.
Do not under any circumstances cut or remove the third (grounding) prong from the power cord. And do not plug another appliance into the same outlet as the refrigerator. See the WARNING in Electrical Requirements on the previous page. J
toward a certified electrician or a Sears or other qualified service dealer After plugging the appliance into a wall outlet, allow the unit to cool down for 24 hours(recommended) before placing food into the refrigerator.
Installation Limitations
Do not install your refrigerator in any location not properly insulated or
heated, such as a garagq etc. Your refrigerator was not designed to operate in temperature
settings below 55" Fahrenheit. Select a suitable location for the refrigerator on a hard
even surface away from direct sunlight or heat sources such as radiators, baseboard heaters,
cooking appliances, etc.
Leveling Feet
There are two leveling feet on the bottom of the unit near the unit front. Turn the leveling feet knobs to the left to raise the cabinet, and to the right to lower the cabinet.
DOOR REVERSAL
WARNING: Unplug the refrigerator before performing door reversal process. Failure to unplug may result in serious injury or death from electrical shock.
CAUTION: To avoid personal injury and property damage, obtain assistance from another person to perform the door reversal process.
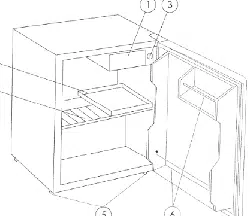
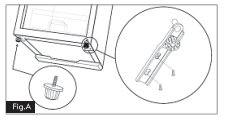
1, Remove leveling foot from front of cabinet base (Fig. A).
2, Remove screws securing lower hinge bracket to base of cabinet.
Remove bracket. (Fig. A)
3, Remove lower door from middle hinge post (open door and pull down).
4, Remove screws from middle hinge bracket and remove bracket.
Remove upper door from top hinge post (open door and pull down).
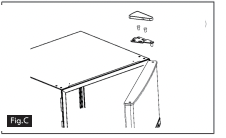
5, With flat blade tool, carefully remove cover from top hinge bracket. Remove screws securing bracket to top of cabinet and remove bracket (Fig. C).
NOTE: Be careful to retain all washers and gaskets in position when removing and replacing hinges.
6, Remove the hole plugs on each door. The upper door has plugs on the top and bottom.
7, Attach top hinge bracket to opposite side of cabinet. Replace bracket cover. Re-fit the hole plugs on the opposite sides of both doors.
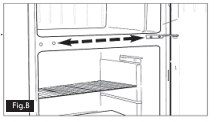
8, Remove the middle hinge hole plugs from the divider panel between the upper and lower compartment (Fig. B). Re-fit plugs on opposite side of panel. Install middle hinge bracket using holes exposed from removal of plugs.
9, Install upper door. To install, loosen and remove screw nearest to middle hinge post. Lower middle hinge slightly to insert top hinge post into door. Rotate middle hinge up to insert middle hinge post into door.
Replace and secure screw.
10, Install lower door. To install, insert middle hinge post into top hole in door.
Close door. Insert post of lower hinge into bottom of door. Secure lower hinge bracket to base of cabinet with previously removed screws.
11, Install leveling foot to opposite side of cabinet base.
CAUTION: If the refrigerator has been placed in a horizontal or tilted position for ease of door reversal, wait 24 hours before plugging it in. Plugging in sooner may result in permanent damage to cooling system.
FEATURES AND USE
Initial Use
To reach the set coldness level when operating the refrigerator for the first time, run it without food load until you hear the compressor stop. This usually takes 2 to 3 hours. Once the set temperature is reached, load food into the refrigerator.
Note: If the refrigerator has been placed in a horizontal or tilted position for any period of time, wait 24 hours before plugging it in.
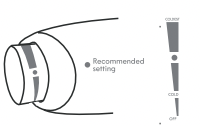
Temperature Control
The first time you turn the unit on, adjust the temperature control knob to Recommended setting and give your refrigerator time to cool down completely before adding food. After it is fully cooled, test it and adjust towards COLD to make less cool or towards COLDEST to cool more to best suit your needs.
Note: Turning the temperature control knob to the OFF position will stop the cooling cycle but does not shut off power to the unit.
Defrosting Your Refrigerator
For maximum energy efficiency , defrost freezer section whenever frost accumulates to a thickness of 1/ 8" or more on freezer walls. Note that frost tends to accumulate more during the summer months.
To defrost freezer, turn the temperature control dial to OFF. Open both freezer and refrigerator door and remove ice cube tray, crisper drawer and all food items from both compartments. Defrosting will take several hours,so store the food in another refrigerator in the meantime. Once defrosting is complete, replace ice cube tray and food in both compartments.
Defrosting may take a few hours. To speed up defrost time, keep the door open and place a bowl of warm water in the refrigerator.
You may now reset your refrigerator to the desired temperature and return food.
CAUTION: DO NOT use boiling water to melt frost accumulation on freezer walls, as it may damage plastic parts.
WARNING: DO NOT use a sharp or metallic instrument to remove frost from the refrigerator interior, as damage to refrigerant tubing may occur. Tubing damage may allow flammable refrigerant gas leakage, which can result in personal injury.
Normal Operating Sounds You May Hear
Boiling water, gurgling sounds or slight vibrations that are the result of the refrigerant circulating through the cooling coils
The thermostat control will click when it cycles on and off.
CARE AND CLEANING
Cleaning and Maintenance
WARNING: To avoid electric shock, always unplug your refrigerator before cleaning. Ignoring this warning may result in death or injury.
CAUTION: Before using cleaning products, always read and understand the cleaning processes explained in this manual. Follow cleaning product manufacturers's instructions and warnings to avoid personal injury or product damage.
General Cleaning
Prepare a cleaning solution of 1 to 2 tablespoons of baking soda mixed with warm water. Use a sponge or soft cloth, dampened with the cleaning solution, to wipe down your refrigerator.
Rinse with clean warm water and dry with a soft cloth.
Do not use harsh chemicals, abrasives, ammonia, chlorine bleach, concentrated detergents, solvents or metal scouring pads. Some of these chemicals may dissolve, damage and/or discolor your refrigerator.
Door Gaskets
Clean door gaskets every three months according to the instructions described above in General Cleaning.
Gaskets must be kept clean and pliable to ensure a proper seal.
Petroleum jelly applied lightly on the hinge side of gaskets will keep the gaskets pliable and ensure a good seal.
Power Interruptions
Occasionally there may be power interruptions due to thunderstorms or other causes. Remove the power cord plug from the AC outlet when a power outage occurs. When power has been restored after a prolonged outage, inspect all food for spoilage. Clean the inside of the refrigerator and freezer compartment before reuse.
Vacation and Moving Care
For long vacations or absences, unplug the unit, empty food from both compartments, move the temperature dial to the OFF position and clean the door gaskets according to the General Cleaning section. Prop door open, so air can circulate inside. When moving, always move the refrigerator vertically. Do not move unit when in a horizontal position, as possible damage to the sealed system could occur.
WARNING: When handling, moving, using or cleaning this refrigerator, be careful to avoid damaging refrigerant tubing. Tubing damage may allow flammable refrigerant gas leakage, which can result in personal injury.
TROUBLESHOOTING
|
Refrigerator does not operate
|
- Check if the temperature control is in the Off position.
- Check if refrigerator is plugged in.
- Check if there is power at the AC outlet by checking the circuitbreaker.
|
|
Food temperature appears too warm
|
- Allow time for recently added warm food to reach fresh food or freezer temperature.
- Check gaskets for proper seal.
- Adjust temperature control to colder setting.
- Reduce the frequency of door openings.
|
|
Food temperature is too cold
|
- If temperature control setting is too cold, adjust to a warmer setting and allow several hours for temperature to adjust.
|
|
Refrigerator runs too frequently
|
- This may be normal to maintain constant temperature during high temperature and humid days.
- Doors may have been opened frequently or for an extended period of time.
- Check gasket for proper seal.
- Check to see if doors are completely closed.
|
|
Moisture build-up on interior or exterior of the refrigerator
|
- This is normal during high humidity periods. Reduce prolonged or frequent door openings. Check door gaskets for proper seal.
|
|
Refrigerator has an odor
|
- Interior needs cleaning.
- Foods improperly wrapped or sealed are giving off odors.
|
|
Refrigerator door does not shut properly
|
- Level the refrigerator.
- See Door Reversal section for description of door attachment features. Check for blockages created by food containers, shelves, etc.
|