For repair - in your home - of all major brand appliances,
lawn and garden equipment, or heating and cooling systems,
no matter who made it, no matter who sold it !
For the replacement parts, accessories and
owner's manuals that you need to do-it-yourself.
For Sears professional installation of home appliances
and items like garage door openers and water heaters.
1-800-4-MY-HOME ® Call anytime, day or night
(1-800-469-4663) (U.S.A. and Canada)
www.sears.com www.sears.ca
Our Home
For repair of carry-in items like vacuums, lawn equipment,
and electronics, call anytime for the location of the nearest
Sears Parts & Repair Service Center
1-800-488-1222 (U.S.A.) 1-800-469-4663 (Canada)
www.sears.com www.sears.ca
To purchase a protection agreement on a product serviced by Sears:
1-800-827-6655 (U.S.A.)
Para pedir servicio de reparaci6n
a domicilio, y para ordenar piezas:
1-888-SU-HOGAR®
(1-888-784--6427)
iii: www_:iiill i°msea rs
1-800-361-6665 (Canada)
Au Canada pour service en frangais:
1-800-LE-FOYERuc
(1-800-53343937)
www.sears.ca
TM
® Registered Trademark / ' Trademark of KCD IP, LLC in the United States, or Sears Brands, LLC in other countries
T_d
® Marca Registrada / ' Marca de Fabrica de KCD IP, LLC en Estados Unidos, o Sears Brands, LLC in otros paises
MD
McMarque de commerce / ' Marque depos6e de Sears Brands, LLC
Use & Care Guide
Manual de Uso y Cuidado
English/ Espaiol
Kenmore
C pa
q ©
Modes iMode,:q : 255;,,9 '73)2
P/N 134779000B (0807)
Sears Brands Management Corporation
Hoffman Estates, IL 60179 U.S.A.
www.kenmore.com
www.sears.com
"F/ eFGto[
I
ke?Ftge#'°"" s,=
c us
6/8/10
KENMORE LIMITED WARRANTY
FORONE YEARfrom the date of sale thisappliance iswarranted against defects in
materialor workmanship when it is installed, operated and maintained according to all
supplied instructions.
WITH PROOFOF SALE,a defective product will receive free repair or replacement at option
of seller.To arrange for warranty service,call 1-800-4-MY-HOME®
Thiswarranty applies for only 90 days from the date of purchase if this product is ever used for
other than private household purposes_
This warranty covers only defects in material and workmanship. Sears willNOT pay for:
1.Expendable itemsthat can wear out from normal use,including but not limited to filters,
belts, light bulbs, and bags.
2. A service technician to instruct the user incorrect product installation, operation or
maintenance_
3. A service technician to clean or maintain this product.
4. Damage to or failure of this product if it isnot installed, operated or maintained
according to the all instructionssupplied with the product.
& Damage to or failure of this product resultingfrom accident, abuse,misuseor use for
other than itsintended purpose_
6. Damage to or failure of this product caused by the useof detergents, cleaners, chemicals
or utensilsother than those recommended in all instructionssupplied with the product_
7. Damage to or failure of parts or systemsresulting from unauthorized modifications made
to this product.
Disclaimer of implied warranties; Jimitatian of remedies
Customer'ssole and exclusive remedy under this limited warranty shall be product repair as
provided herein. Implied warranties, including warranties of merchantability or fitnessfor a
particular purpose,are limited to one year or the shortest period allowed by law. Searsshall
not be liable for incidental or consequential damages. Some states and provinces do not allow
the exclusion or limitation of incidental or consequential damages, or limitation on the duration
of implied warranties of merchantability or fitness,so these exclusions or limitations may not
appty to you.
Thiswarranty applies only while this appliance is used in the United States.
Thiswarranty gives you specific legal rights,and you may also have other rights which vary
from state to state.
Sears Brands Management Corporation, Hoffman Estates, IL 60179
Congratulations on making a smart purchase. Your new Kenmore®product isdesigned and
manufactured for years of dependable operation. Butlike all products, it may require
preventive maintenance orrepair from time to time. That's when having a Master
Protection Agreement can save you money and aggravation. The Master Protection
Agreement also helps extend the life of your new product.
Here's what the Agreement includes:
Parts and labor needed to help keep products operating properly under normal
use_ not just defects. Our coverage goes weJJbeyondthe product warranty. No
deductibles_ nofunctional failure excluded from coverage--real protection.
[] Expert service by a force of more than 10,000 authorized Sears service
technicians_ which means someone you cantrust will be working on your product_
[] Unlimited service calls and nationwide service, as often asyou want us,
whenever you want us.
[] _No=lemon_guarantee - replacement of your covered product if four or
more product failures occur within twelve months.
[] Product replacement if your covered product can't be fixed.
[] Annual Preventive Maintenance Check at your request - no extra charge.
[] Fast help by phone - we call it Rapid Resolution - phone support from a
Sears representative on all products. Think of usas a _qalking owner's manuak_
[] Power surge protection against electrical damage due to power fluctuations.
[] $250 Food Lass Protection annually for any food spoilage that is the result of
mechanical failure of any covered refrigerator or freezer.
[] Rental reimbursement if repair of your covered product takes longer than
promised.
[] 25°/0 discount off the regular price of any non-covered repair service and related
installed parts=
Once you purchase the Agreement, a simple phone call isall that ittakes for you to schedule
service. You can call anytime day or night,orschedule a service appointment online.
The Master Protection Agreement isa risk free purchase. If you cancel for any reason
during the product warranty period, we will providea full refund, or a prorated refund
anytime after the product warranty period expires. Purchaseyour Master Protection
Agreement today!
Some limitations and exclusions apply. For prices and additional
information in the U.SoAocall 1-800-827-6655.
Sears Installation Service
ForSears professional installation of home appliances, garage door openers, water
heaters, and other major home items,in the U.S.A.or Canada call I°800-4-MYoHOME®.
6/8/10
KENMORE LIMITED WARRANTY
FORONE YEARfrom the date of sale thisappliance iswarranted against defects in
materialor workmanship when it is installed, operated and maintained according to all
supplied instructions.
WITH PROOFOF SALE,a defective product will receive free repair or replacement at option
of seller.To arrange for warranty service, call 1-800-4-MY-HOME®
Thiswarranty applies for only 90 days from the date of purchase if this product is ever used for
other than private household purposes_
This warranty covers only defects in material and workmanship. Sears willNOT pay for:
1.Expendable itemsthat can wear out from normal use,including but not limited to filters,
belts, light bulbs, and bags.
2. A service technician to instruct the user incorrect product installation, operation or
maintenance_
3. A service technician to clean or maintain this product.
4. Damage to or failure of this product if it isnot installed, operated or maintained
according to the all instructionssupplied with the product.
& Damage to or failure of this product resultingfrom accident, abuse,misuseor use for
other than itsintended purpose_
6. Damage to or failure of this product caused by the useof detergents, cleaners, chemicals
or utensilsother than those recommended in all instructionssupplied with the product_
7. Damage to or failure of parts or systemsresulting from unauthorized modifications made
to this product.
Disclaimer of implied warranties; Jimitatian of remedies
Customer'ssole and exclusive remedy under this limited warranty shall be product repair as
provided herein. Implied warranties, including warranties of merchantability or fitnessfor a
particular purpose,are limited to one year or the shortest period allowed by law. Searsshall
not be liable for incidental or consequential damages. Some states and provinces do not allow
the exclusion or limitation of incidental or consequential damages, or limitation on the duration
of implied warranties of merchantability or fitness,so these exclusions or limitations may not
appty to you.
Thiswarranty applies only while this appliance is used in the United States.
Thiswarranty gives you specific legal rights, and you may also have other rights which vary
from state to state.
Sears Brands Management Corporation, Hoffman Estates, IL 60179
Congratulations on making a smart purchase. Your new Kenmore®product is designed and
manufactured for years of dependable operation. Butlike all products, it may require
preventive maintenance orrepair from time to time. That's when having a Master
Protection Agreement can save you money and aggravation. The Master Protection
Agreement also helps extend the life of your new product.
Here's what the Agreement includes:
Parts and labor needed to help keep products operating properly under normal
use_ not just defects. Our coverage goes weJJbeyondthe product warranty. No
deductibles_ nofunctional failure excluded from coverage--real protection.
[] Expert service by a force of more than 10,000 authorized Sears service
technicians_ which means someone you cantrust will be working on your product_
[] Unlimited service calls and nationwide service, as often asyou want us,
whenever you want us.
[] _No=lemon_guarantee - replacement of your covered product if four or
more product failures occur within twelve months.
[] Product replacement if your covered product can't be fixed.
[] Annual Preventive Maintenance Check at your request - no extra charge.
[] Fast help by phone - we call it Rapid Resolution - phone support from a
Sears representative on all products. Think of usas a _qalking owner's manuak_
[] Power surge protection against electrical damage due to power fluctuations.
[] $250 Food Lass Protection annually for any food spoilage that is the result of
mechanical failure of any covered refrigerator or freezer.
[] Rental reimbursement if repair of your covered product takes longer than
promised.
[] 25°/0 discount off the regular price of any non-covered repair service and related
installed parts=
Once you purchase the Agreement, a simple phone call isall that ittakes for you to schedule
service. You can call anytime day or night,orschedule a service appointment online.
The Master Protection Agreement isa risk free purchase. If you cancel for any reason
during the product warranty period, we will providea full refund, or a prorated refund
anytime after the product warranty period expires. Purchaseyour Master Protection
Agreement today!
Some limitations and exclusions apply. For prices and additional
information in the U.SoAocall 1-800-827-6655.
Sears Installation Service
ForSears professional installation of home appliances, garage door openers, water
heaters, and other major home items,in the U.S.A.or Canada call I°800-4-MYoHOME®.
6/8/10
3
2
4
,/_ -ZTe .... d-- /
i,: ,' Zi
....'.... 2 ,'H
' 1' ' i,_ ........ T-
i
i",,; ,
ji [i _ / '
........ +
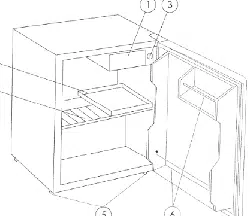
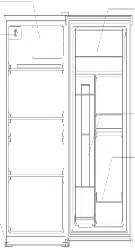
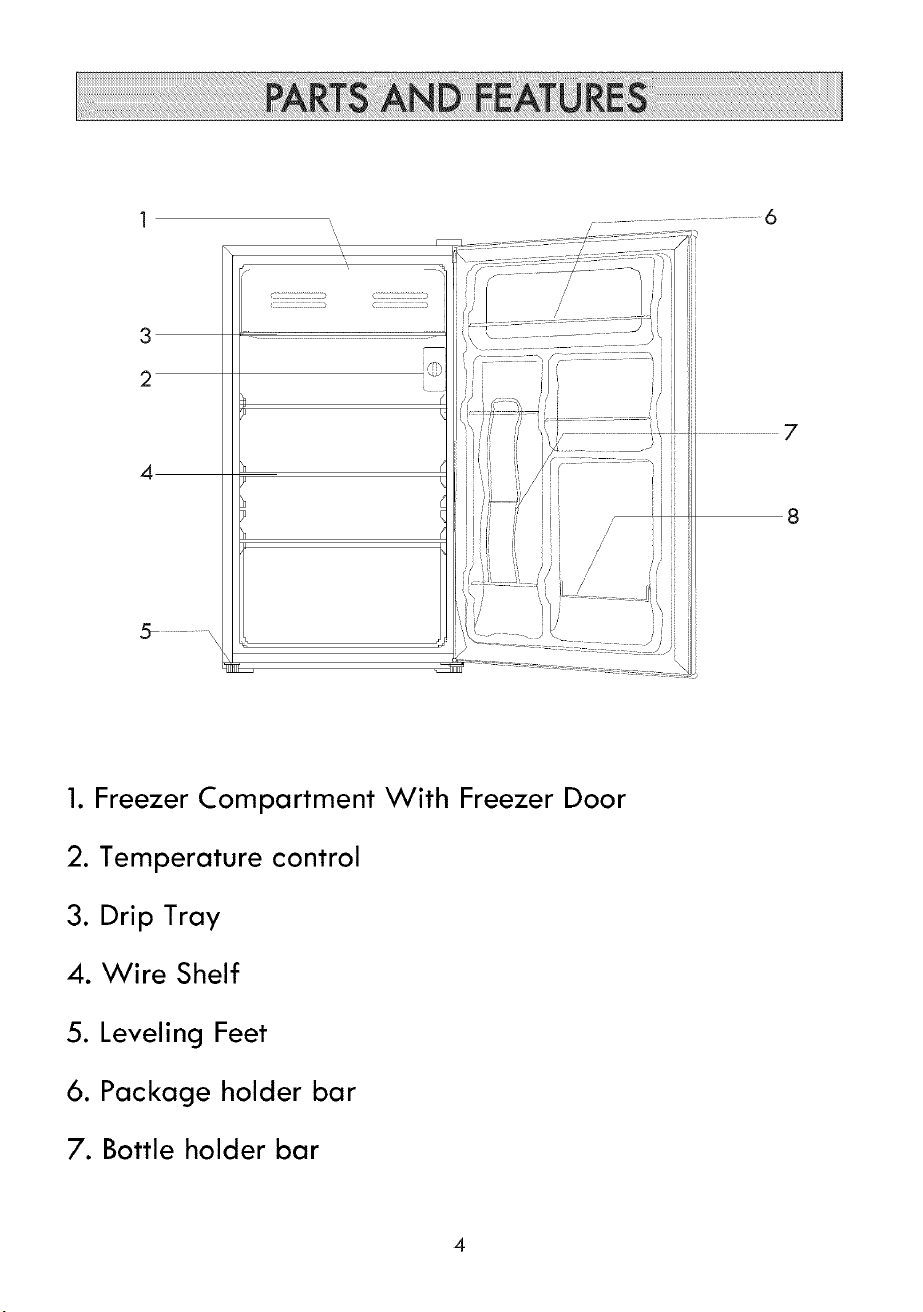
1. Freezer Compartment With Freezer Door
2. Temperature control
3. Drip Tray
4. Wire Shelf
5. Leveling Feet
6. Package holder bar
7. Bottle holder bar
7
8
DANG
Riskof child entrapment. Before you throw away your old refrigerator,
take off the doors. Leavethe shelvesin place so that children may
not easily climb inside.
CFC/HCFC DISPOSAL
Yourold refrigerator may havea cooling systemthat usedCFCsor HCFCs
(chlorof/uorocarbonsor hydrochlorofiuorocarbons).CFCsand HCFCsare believed to harm
stratosphericozone if releasedto theatmosphere.Other refrigerantsmay alsocauseharm
to theenvironmentif releasedto theatmosphere.
If youare throwingaway your old refrigerator,makesurethe refrigerant isremovedfor
proper disposalby a qualified technician.If you intentionallyreleaserefrigerant,you may
be subjectto finesand imprisonmentunder provisionsof environmentallegislation.
WARNING: When handling, moving,usingor cleaning this refrigerator, be careful
to avoid damaging refrigerant tubing. Tubingdamage may allow flammable refrigerant
gas leakage, which can result in personal injury.
Thank you for using our Kenmore product. This easy-to-use manual will guide
you in getting the best use of your refrigerator.
PRODUCT RECORD
Staple your receipt to your manual.
Record the model and serial number of
your unit in the spaces provided to the right.
Model number:
255.99792
Serial number:
6/8/10
3
2
4
,/_ -ZTe .... d-- /
i,: ,' Zi
....'.... 2 ,'H
' 1' ' i,_ ........ T-
i
i",,; ,
ji [i _ / '
........ +
1. Freezer Compartment With Freezer Door
2. Temperature control
3. Drip Tray
4. Wire Shelf
5. Leveling Feet
6. Package holder bar
7. Bottle holder bar
7
8
DANG
Riskof child entrapment. Before you throw away your old refrigerator,
take off the doors. Leavethe shelvesin place so that children may
not easily climb inside.
CFC/HCFC DISPOSAL
Yourold refrigerator may havea cooling systemthat usedCFCsor HCFCs
(chlorof/uorocarbonsor hydrochlorofiuorocarbons).CFCsand HCFCsare believed to harm
stratosphericozone if releasedto theatmosphere.Other refrigerantsmay alsocauseharm
to theenvironmentif releasedto theatmosphere.
If youare throwingaway your old refrigerator,makesurethe refrigerant isremovedfor
proper disposalby a qualified technician.If you intentionallyreleaserefrigerant,you may
be subjectto finesand imprisonmentunder provisionsof environmentallegislation.
WARNING: When handling, moving,usingor cleaning this refrigerator, be careful
to avoid damaging refrigerant tubing. Tubingdamage may allow flammable refrigerant
gas leakage, which can result in personal injury.
Thank you for using our Kenmore product. This easy-to-use manual will guide
you in getting the best use of your refrigerator.
PRODUCT RECORD
Staple your receipt to your manual.
Record the model and serial number of
your unit in the spaces provided to the right.
Model number:
255.99792
Serial number:
6/8/10
Unpacking Your Refrigerator
1. Removeall packaging material. Thisincludes the foam base and all adhesive
tape holding the refrigerator accessories insideand outside.Slide out and
remove the plastic or foam guard usedto protect the compressor from shipping
damage due to vibration and shock.
2. Inspect and remove any remaining packaging,tape or printed materials
before powering on the refrigerator.
3. Check to be sureyou have all accessories and parts listed inthe Partsand
Featuressection.
Proper Air Circulation
To ensurethat your refrigerator works at the maximum efficiency it was
designed for, you should install it ina location where there isproper air
circulation, plumbing and electrical connections.
The following are recommended clearances around the refrigerator :
Sides...................3/4 inches (19mm)
Top......................2 inches (50mm)
Back..................2 inches (50mm)
Electrical Requirements
Make sure there isa suitable power outlet (115volts, 15amps) with
proper grounding to power the refrigerator.
WARNING: Avoid the useof three prong adapters. NEVERcut oF the third
grounding prong inorder to accommodate a two prong outlet. Cutting oF the
grounding prong isa dangerous practice since it provides noeffective grounding
for the refrigerator and may result in seriousinjury from electrical shock.
Installation
Yourrefrigerator is designed for freestanding installationont4 It should not be
recessedor built-in. Placethe refrigerator on a floor strong enough to support it fully
loaded. When movingthe refrigerator, nevertilt it by more than a 45 degrees angle. This
could damage the compressorand the sealed system.
tf the refrigerator hasbeen tilted more than 45 degrees, let it stand inan upright
position for at least24 hoursprior to plugging it intothe power source. This
will allow the refrigerant to settle and reduce the possibility of a malfunctionin
the cooling system.
Plugthe refrigerator into an exclusive,properly installed grounded wall outlet.
Do not plug another appliance into the same outlet as the refrigeraton
Do not under any circumstancescut or removethe third (grounding) prong from
the power cord. See the WARNING in Electrical Requirementson the previous
page. Any questionsconcerning power and/or grounding should bedirected
toward a certified electrician or a Searsor other qualified service dealer.
After plugging the appliance intoa walt outlet,allow the unitto cool down for
2-3 hoursbefore placing food into the refrigeraton
Installation Limitations
Do not install your refrigerator in any location not properly insulatedor
heated, suchas a garage,etc. Your refrigerator was not designed to operate in temperature
settings below 55° Fahrenheit.Select a suitable location for the refrigerator on a hard
even surface away from direct sunlightor heat sources suchas radiators, baseboard heaters,
cooking appliances, etc.
Leveling Feet
There are two leveling feet on the bottom of the unit near the unitfront. Turn the leveling
foot knobs to the left to raise the cabinet, and to the right to lower the cabinet.
7
6/8/10
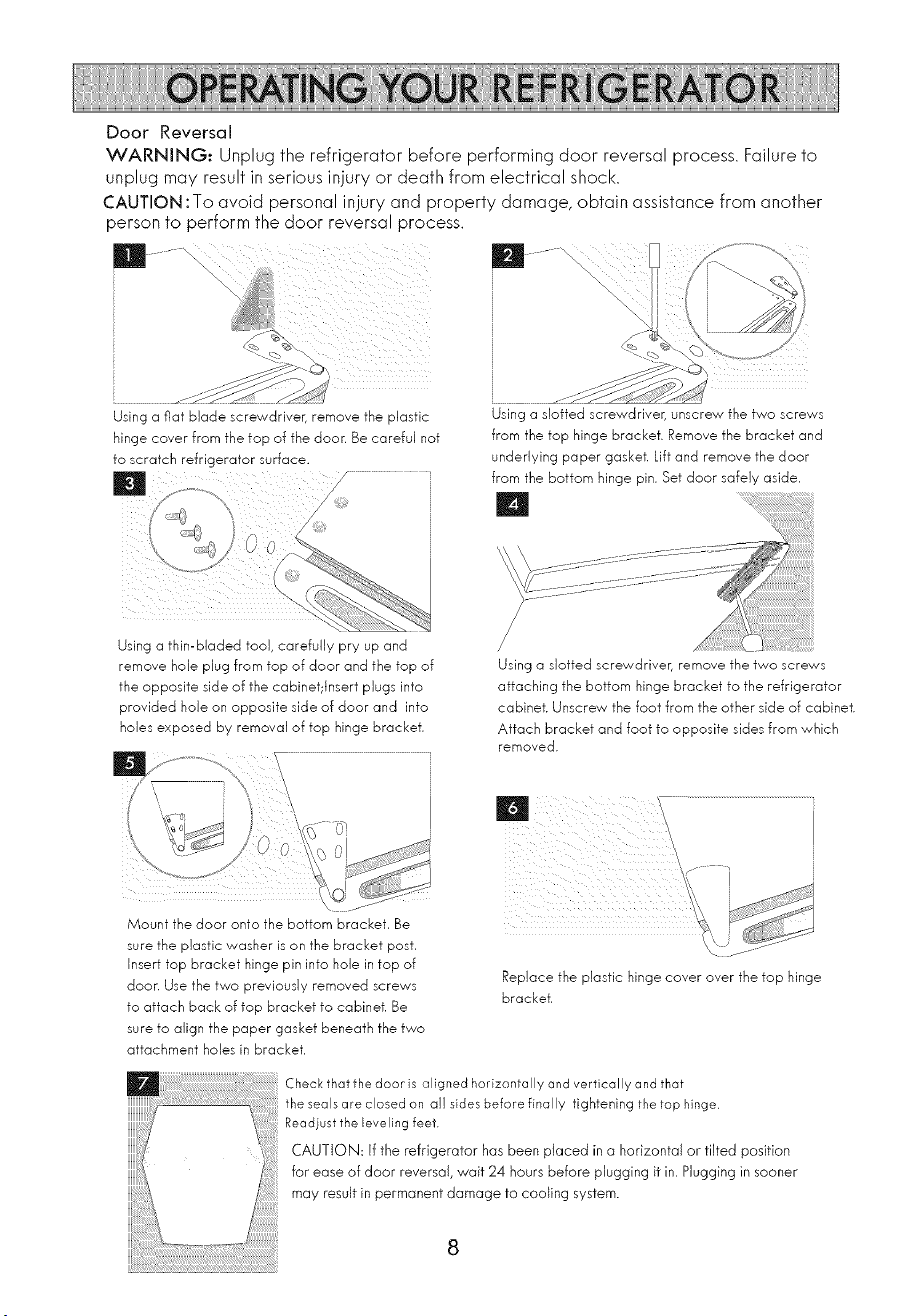
Door Reversal
WARNING: Unplug the refrigerator before performing door reversal process. Failure to
unplug may result in serious injury or death from electrical shock.
CAUTION:To avoid personal injury and property damage, obtain assistance from another
person to perform the door reversal process.
Using a fiat blade screwdriver, remove the plastic
hinge cover from the top of the door. Becareful not
to scratch refrigerator surface.
Using a slotted screwdriver, unscrew the two screws
from the top hinge bracket. Remove the bracket and
underlying paper gasket. Liftand remove the door
from the bottom hinge pin. Set door safely aside.
m
Using a thin-bladed tool, carefully pry up and
remove hole plug from top of door and the top of
the opposite side of the cabinet;insert plugs into
provided hole on opposite side of door and into
holes exposed by removal of top hinge bracket.
/
Using a slotted screwdriver, remove the two screws
attaching the bottom hinge bracket to the refrigerator
cabinet. Unscrew the foot from the other side of cabinet.
Attach bracket and foot to opposite sides from which
removed.
Mount the door onto the bottom bracket. Be
sure the plastic washer is on the bracket post.
Insert top bracket hinge pin into hole in top of
doon Use the two previously removed screws
to attach back of top bracket to cabinet. Be
sure to align the paper gasket beneath the two
attachment holes in bracket.
Replace the plastic hinge cover over the fop hinge
bracket.
Check that the door is aligned horizonta Ily and vertically and that
the seals are closed on all sides before finally tightening the top hinge.
Readjustthe Levelingfeet,
CAUTION: Ifthe refrigerator has been placed in a horizontal or tilted position
for ease of door reversal, wait 24 hours before plugging it in. Plugging in sooner
may result in permanent damage to cooling system.
Holder Bars
The inside of the refrigerator door is equipped with holder bars to keep food packages,
bottles and pop cans securely in place on the door shelves.
Initial Use
To reach the set coldness level when operating the refrigerator for the first time, run it without food
load until you hear the compressor stop. Thisusually takes 2 to 3 hours.Once the set temperature is
reached, load food into the refrigerator.
Note: If the refrigerator has been placed in a horizontal or
tilted position for any period of time, wait 24 hoursbefore plugging it in.
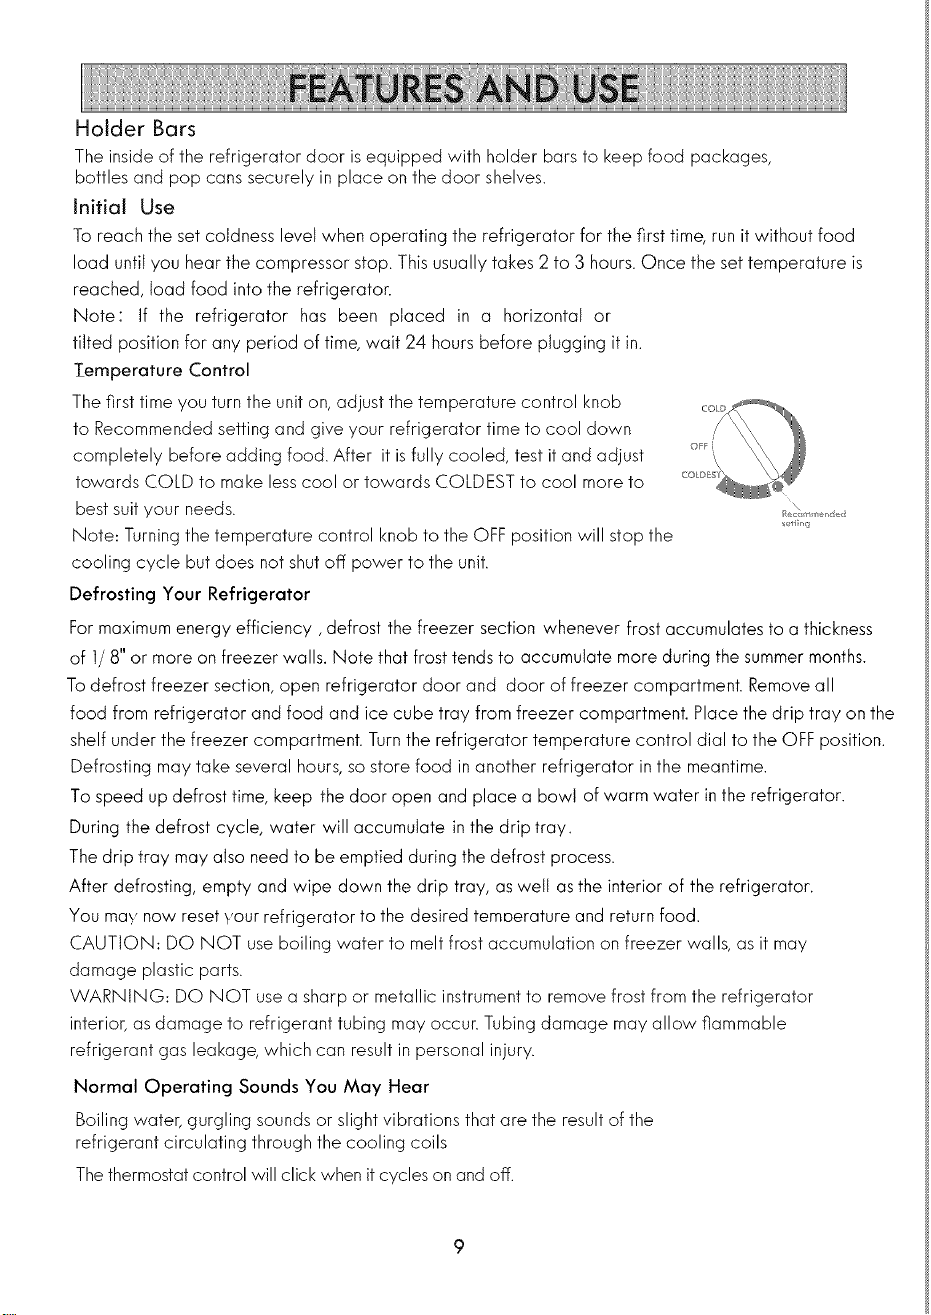
Temperature Control
The first time you turnthe uniton, adjust the temperature control knob
to Recommendedsetting and give your refrigerator time to cool down
completely before adding food. After it isfully cooled, test it and adjust
towards COLD to make lesscool or towards COLDESTto cool more to
best suit your needs. ........_
se_lg
Note: Turningthe temperature control knob to the OFFposition will stop the
cooling cycle but does not shutoff power to the unit.
Defrosting Your Refrigerator
Formaximumenergy efficiency, defrost the freezer section whenever frost accumulates to a thickness
of ]/8" or more on freezer walls. Note that frost tendsto accumulate more during the summermonths.
To defrost freezer section, open refrigerator door and door of freezer compartment. Removeall
food from refrigerator and food and ice cube tray from freezer compartment. Place the drip tray on the
shelfunder the freezer compartment. Turnthe refrigerator temperature control dial to the OFFposition.
Defrosting may take several hours,so store food in another refrigerator in the meantime.
To speed up defrost time, keep the door open and place a bowl of warm water inthe refrigerator.
During the defrost cycle, water will accumulate in the drip tray.
The drip tray may also need to be emptied during the defrost process.
After defrosting, empty and wipe down the drip tray, as welt asthe interior of the refrigerator.
You may now resetyour refrigerator to the desired temoerature and return food.
CAUTION: DO NOT use boiling water to melt frost accumulation on freezer walls, as it may
damage plastic parts.
WARNING: DO NOT use a sharp or metallic instrumentto remove frost from the refrigerator
interior, as damage to refrigerant tubing may occur. Tubing damage may allow flammable
refrigerant gas leakage, which can result in personal injury.
Normal Operating Sounds You May Hear
Boiling water, gurgling sounds or slight vibrations that are the resultof the
refrigerant circulating through the cooling coils
The thermostatcontrol will click whenit cycles on and off.
9
6/8/10
Door Reversal
WARNING: Unplug the refrigerator before performing door reversal process. Failure to
unplug may result in serious injury or death from electrical shock.
CAUTION:To avoid personal injury and property damage, obtain assistance from another
person to perform the door reversal process.
Using a fiat blade screwdriver, remove the plastic
hinge cover from the top of the door. Becareful not
to scratch refrigerator surface.
Using a slotted screwdriver, unscrew the two screws
from the top hinge bracket. Remove the bracket and
underlying paper gasket. Liftand remove the door
from the bottom hinge pin. Set door safely aside.
m
Using a thin-bladed tool, carefully pry up and
remove hole plug from top of door and the top of
the opposite side of the cabinet;insert plugs into
provided hole on opposite side of door and into
holes exposed by removal of top hinge bracket.
/
Using a slotted screwdriver, remove the two screws
attaching the bottom hinge bracket to the refrigerator
cabinet. Unscrew the foot from the other side of cabinet.
Attach bracket and foot to opposite sides from which
removed.
Mount the door onto the bottom bracket. Be
sure the plastic washer is on the bracket post.
Insert top bracket hinge pin into hole in top of
doon Use the two previously removed screws
to attach back of top bracket to cabinet. Be
sure to align the paper gasket beneath the two
attachment holes in bracket.
Replace the plastic hinge cover over the fop hinge
bracket.
Check that the door is aligned horizonta Ily and vertically and that
the seals are closed on all sides before finally tightening the top hinge.
Readjustthe Levelingfeet,
CAUTION: Ifthe refrigerator has been placed in a horizontal or tilted position
for ease of door reversal, wait 24 hours before plugging it in. Plugging in sooner
may result in permanent damage to cooling system.
Holder Bars
The inside of the refrigerator door is equipped with holder bars to keep food packages,
bottles and pop cans securely in place on the door shelves.
Initial Use
To reach the set coldness level when operating the refrigerator for the first time, run it without food
load until you hear the compressor stop. Thisusually takes 2 to 3 hours.Once the set temperature is
reached, load food into the refrigerator.
Note: If the refrigerator has been placed in a horizontal or
tilted position for any period of time, wait 24 hoursbefore plugging it in.
Temperature Control
The first time you turnthe uniton, adjust the temperature control knob
to Recommendedsetting and give your refrigerator time to cool down
completely before adding food. After it isfully cooled, test it and adjust
towards COLD to make lesscool or towards COLDESTto cool more to
best suit your needs. ........_
se_lg
Note: Turningthe temperature control knob to the OFFposition will stop the
cooling cycle but does not shutoff power to the unit.
Defrosting Your Refrigerator
Formaximumenergy efficiency, defrost the freezer section whenever frost accumulates to a thickness
of ]/8" or more on freezer walls. Note that frost tendsto accumulate more during the summermonths.
To defrost freezer section, open refrigerator door and door of freezer compartment. Removeall
food from refrigerator and food and ice cube tray from freezer compartment. Place the drip tray on the
shelfunder the freezer compartment. Turnthe refrigerator temperature control dial to the OFFposition.
Defrosting may take several hours,so store food in another refrigerator in the meantime.
To speed up defrost time, keep the door open and place a bowl of warm water inthe refrigerator.
During the defrost cycle, water will accumulate in the drip tray.
The drip tray may also need to be emptied during the defrost process.
After defrosting, empty and wipe down the drip tray, as welt asthe interior of the refrigerator.
You may now resetyour refrigerator to the desired temoerature and return food.
CAUTION: DO NOT use boiling water to melt frost accumulation on freezer walls, as it may
damage plastic parts.
WARNING: DO NOT use a sharp or metallic instrumentto remove frost from the refrigerator
interior, as damage to refrigerant tubing may occur. Tubing damage may allow flammable
refrigerant gas leakage, which can result in personal injury.
Normal Operating Sounds You May Hear
Boiling water, gurgling sounds or slight vibrations that are the resultof the
refrigerant circulating through the cooling coils
The thermostatcontrol will click whenit cycles on and off.
9
6/8/10
Cleaning and Maintenance
WARNING: To avoid electric shock, always unplug your refrigerator before
cleaning. Ignoringthiswarning may result in death or injury.
CAUTION.' Before using cleaning products, always read and understand the cleaning processes
explained in this manual. Follow cleaning product manufacturers_s instructions and warnings to avoid
personal injury or product damage.
General Cleaning
Prepare a cleaning solution of ] to 2 tablespoons of baking soda mixed with warm water. Usea
sponge or soft cloth, dampened with the cleaning solution, to wipe down your refrigerator.
Rinse with dean warm water and dry with a soft cloth.
Do not use harsh chemicals, abrasives, ammonia, chlorine bleach, concentrated detergents,
solvents or metal scouring pads. Some of these chemicals may dissolve, damage and/or discolor your
refrigerator.
Door Gaskets
Clean door gaskets every three months according to the instructions described above in General
Cleaning.
Gaskets must be kept dean and pliable to ensure a proper seal.
Petroleum jelly applied lightly on the hinge side of gaskets will keep the
gaskets pliable and ensure agood seal.
Power Interruptions
Occasionally there may be power interruptions due to thunderstorms or other causes. Remove the
power cord plug from the AC outlet when a power outage occurs. When power has been restored
after a prolonged outage, inspect all food for spoilage. Clean the inside of the refrigerator and
freezer compartment before reuse.
Vacation and Moving Care
For long vacations or absences, unplug the unit, empty food from both compartments, move
the temperature dial to the OFF position and clean the door gaskets according to the General
Cleaning section. Prop door open, so air can circulate inside. When moving, always move the
refrigerator verticall% Do not move unit when in a horizontal position, as possible damage to the
sealed system could occur.
WARNING: When handling, moving,usingor cleaning this refrigerator, be careful to
avoid damaging refrigerant tubing. Tubing damage may allow flammable refrigerant
gas leakage, which can result in personal injury.
10
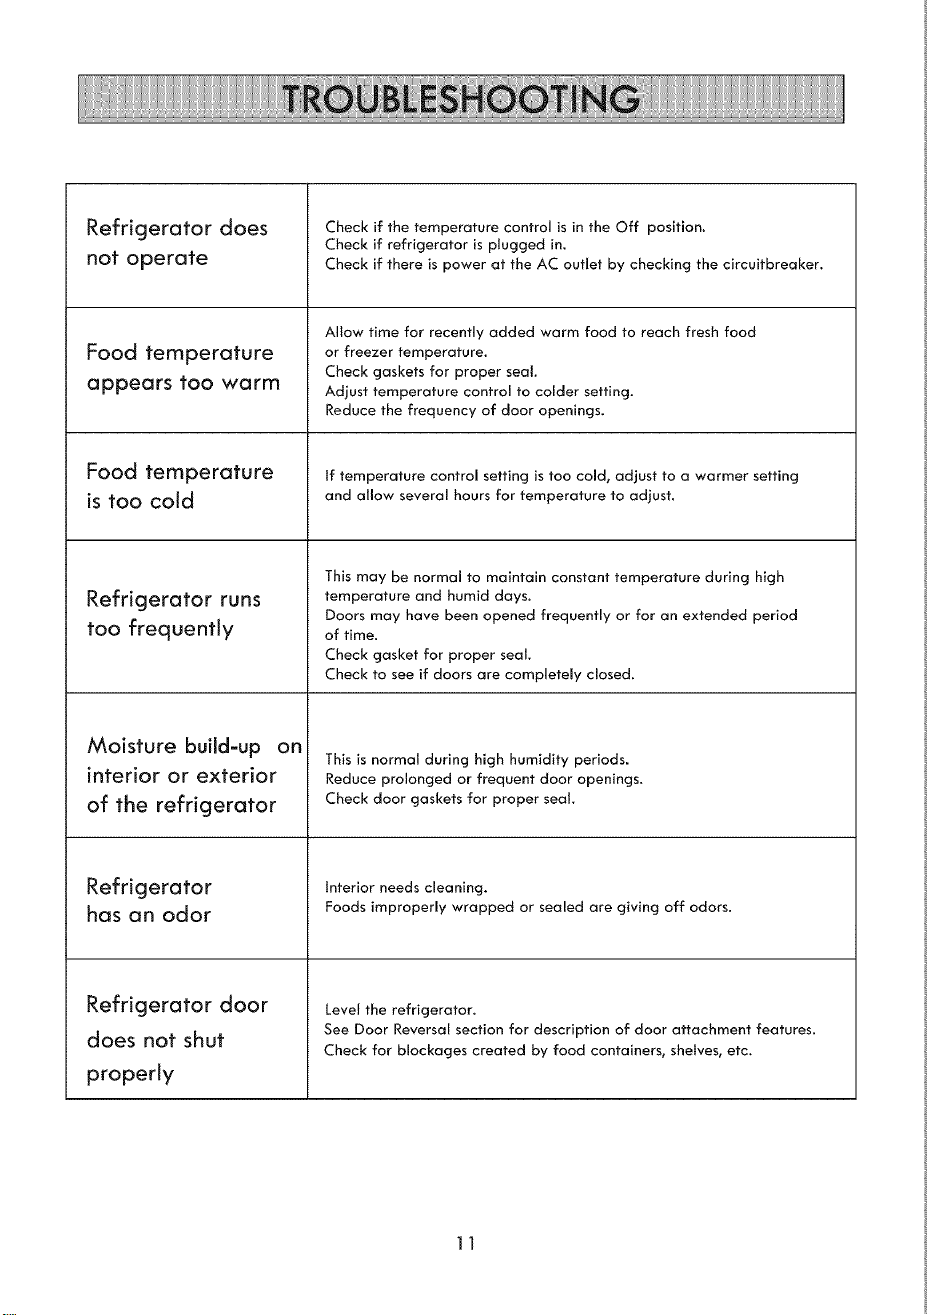
Refrigerator does
not operate
Food temperature
appears too warm
Food temperature
is too cold
Refrigerator runs
too frequently
Check if the temperature control is in the Off position.
Check if refrigerator is plugged in.
Check if there is power at the AC outlet by checking the circuitbreaker.
Allow time for recently added warm food to reach fresh food
or freezer temperature.
Check gaskets for proper seal.
Adjust temperature control to colder setting.
Reduce the frequency of door openings.
tf temperature control setting is too cold, adjust to a warmer setting
and allow several hours for temperature to adjust.
This may be normal to maintain constant temperature during high
temperature and humid days.
Doors may have been opened frequently or for an extended period
of time.
Check gasket for proper seal.
Check to see if doors are completely closed.
Moisture build-up on
interior or exterior
of the refrigerator
Refrigerator
has an odor
Refrigerator door
does not shut
properly
This is normal during high humidity periods.
Reduce prolonged or frequent door openings.
Check door gaskets for proper seal.
Interior needs cleaning.
Foods improperly wrapped or sealed are giving off odors.
Level the refrigerator.
See Door Reversal section for description of door attachment features.
Check for blockages created by food containers, shelves, etc.
11
6/8/10
Cleaning and Maintenance
WARNING: To avoid electric shock, always unplug your refrigerator before
cleaning. Ignoringthiswarning may result in death or injury.
CAUTION.' Before using cleaning products, always read and understand the cleaning processes
explained in this manual. Follow cleaning product manufacturers_s instructions and warnings to avoid
personal injury or product damage.
General Cleaning
Prepare a cleaning solution of ] to 2 tablespoons of baking soda mixed with warm water. Usea
sponge or soft cloth, dampened with the cleaning solution, to wipe down your refrigerator.
Rinse with dean warm water and dry with a soft cloth.
Do not use harsh chemicals, abrasives, ammonia, chlorine bleach, concentrated detergents,
solvents or metal scouring pads. Some of these chemicals may dissolve, damage and/or discolor your
refrigerator.
Door Gaskets
Clean door gaskets every three months according to the instructions described above in General
Cleaning.
Gaskets must be kept dean and pliable to ensure a proper seal.
Petroleum jelly applied lightly on the hinge side of gaskets will keep the
gaskets pliable and ensure agood seal.
Power Interruptions
Occasionally there may be power interruptions due to thunderstorms or other causes. Remove the
power cord plug from the AC outlet when a power outage occurs. When power has been restored
after a prolonged outage, inspect all food for spoilage. Clean the inside of the refrigerator and
freezer compartment before reuse.
Vacation and Moving Care
For long vacations or absences, unplug the unit, empty food from both compartments, move
the temperature dial to the OFF position and clean the door gaskets according to the General
Cleaning section. Prop door open, so air can circulate inside. When moving, always move the
refrigerator verticall% Do not move unit when in a horizontal position, as possible damage to the
sealed system could occur.
WARNING: When handling, moving,usingor cleaning this refrigerator, be careful to
avoid damaging refrigerant tubing. Tubing damage may allow flammable refrigerant
gas leakage, which can result in personal injury.
10
Refrigerator does
not operate
Food temperature
appears too warm
Food temperature
is too cold
Refrigerator runs
too frequently
Check if the temperature control is in the Off position.
Check if refrigerator is plugged in.
Check if there is power at the AC outlet by checking the circuitbreaker.
Allow time for recently added warm food to reach fresh food
or freezer temperature.
Check gaskets for proper seal.
Adjust temperature control to colder setting.
Reduce the frequency of door openings.
tf temperature control setting is too cold, adjust to a warmer setting
and allow several hours for temperature to adjust.
This may be normal to maintain constant temperature during high
temperature and humid days.
Doors may have been opened frequently or for an extended period
of time.
Check gasket for proper seal.
Check to see if doors are completely closed.
Moisture build-up on
interior or exterior
of the refrigerator
Refrigerator
has an odor
Refrigerator door
does not shut
properly
This is normal during high humidity periods.
Reduce prolonged or frequent door openings.
Check door gaskets for proper seal.
Interior needs cleaning.
Foods improperly wrapped or sealed are giving off odors.
Level the refrigerator.
See Door Reversal section for description of door attachment features.
Check for blockages created by food containers, shelves, etc.
11
6/8/10

12 13
6/8/10

12 13
6/8/10
Garantia Iirnitada de Kenrnare
DENTRO DE UN ANO a partir de la fecha de venta, el aparato est6 garantizado contra
defectos de material y mane de obra si la instalaci6n, la utilizaci6n y el mantenimiento se
realizan de acuerdo con todas las instruccionessuministradas.
CON LA PRUEBADEVENTA, puede recibir unarreglo gratuito del producto con defecto.
Llame al 1-800-4-MY-HOME® para organizar el servicio de garanfia..
Sieste producto se utiliza para arras finesque no sean el usafamiliar privado, esta
garanfia rige 0nicamente durante 90 divasa partir de la fecha de compra.
Esta garant/a cubre _nicarnente los defectes de material V mane de ebra.
Sears NO pagar6 le siguiente:
1.Componentesdesechables que pueden gastarse debido al usahabitual, incluyendo,
y sin limitarse a los filtros, lascorreas, las 16mparasy las boslsas.
2. Unt_cnico de servicio que instruyan al usuario en la manera adecuada de instalar,
utilizar o mantener el producto.
3. Unt_cnico de servicio para la limpieza y mantenimiento del producto.
4. DaBoso fallas de este producto si @1mismo no rue instalado, utilizado y mantenido de
acuerdo con todas las instrucciones proporcionadas junto con el producto.
5. DaBoso fallas en el producto que sean el resultado de accidentes, abuse, mal usau otra
clase de usa que no sea el apropiado.
6. Da_os o fallas en el producto causados par el usa de detergentes, limpiadores, productos
qui_micoso elementos que no sean los recomendados en las instruccionesprovistas con el
producto.
Z Da_os o fallas de las piezas o sistemascoma resultado de modificaciones no autorizadas
hechasal producto.
Renuncia de respensabilidades de garantia irnplicitas; lirnitacJ6n del arregle
La0nica y exclusiva opci6n del cliente en virtud de esta garanfia limitada ser6 la reparaci6n
del producto seg0n Io indicado enel presente documento. Lasgaranfias implicitas, incluyendo
las garanfias de aptitud para la venta o de idoneidad para unfin enparticular, est6n limitadas
a un abe o al periodo mrs carte permitido par la ley. Searsno se responsabiliza par daBos
incidentales o consecuentes.Algunos estados y provincias no permiten la exclusi6n o limitaci6n
de da_os incidentales o consecuentes olas limitaciones de duraci6n de las garanfias implicitas
de comercializaci6n o aptitud, par Io que estas exclusioneso limitaciones pueden no aplicarse
en sucase.
Estagaranfia se aplica 0nicamente mientras este producto se usedentro de los EstadosUnidos.
Estagaranfia le otorga derechos legales especificos. Usted puede tener adem6s arras derechos
que varfan de unestado a otro.
Cornpa_ia de Gesti6n de Marca Sears, Hoffrnan Estates, IL 60179
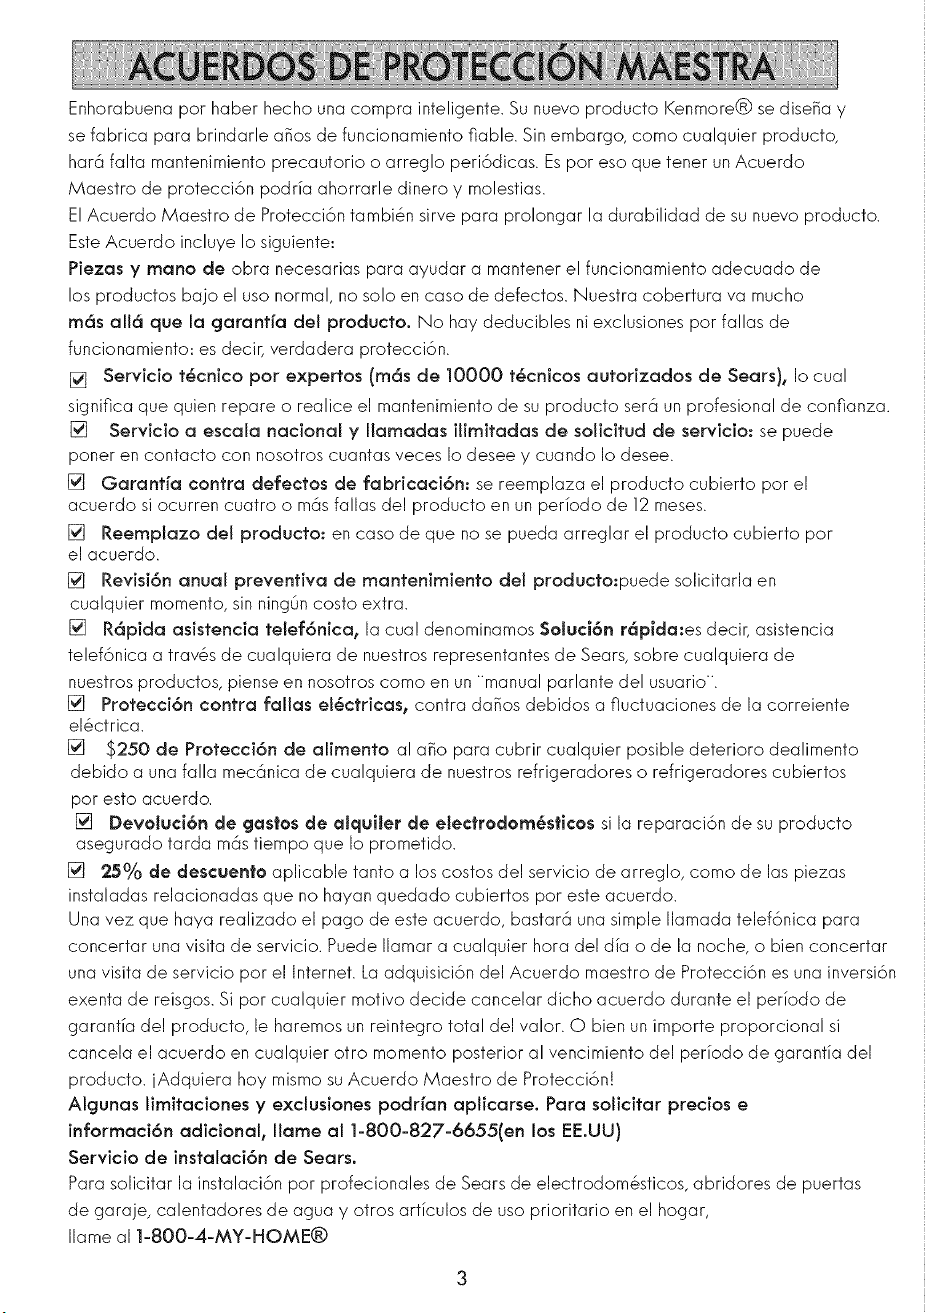
Enhorabuena par haber hecho una compra inteligente. Su nuevo producto Kenmore® se diseBay
se fabrica para brindarle a_os de funcionamiento fiable. Sin embargo, coma cualquier producto,
har6 falta mantenimiento precautorio o arreglo peri6dicas. Espar eso que tener un Acuerdo
Maestro de protecci6n podrfa ahorrarle dinero y molestias.
ElAcuerdo Maestro de Protecci6ntambi@nsirve para prolongar la durabilidad de su nuevo producto.
EsteAcuerdo incluye Io siguiente:
Piezas y mane de obra necesarias para ayudar a mantener el funcionamiento adecuado de
los productos bajo el usa normal, nosolo en case de defectos. Nuestra cobertura va mucho
rn6s all6 que la garantia del preducte. No hay deducibles ni exclusionespar fallas de
funcionamiento: es decir, verdadera protecci6n.
[] Servicio t6cnico par expertos (rn6s de 10000 t6cnicos autorizados de Sears), Iocual
significa que quien repare o realice el mantenimiento de suproducto serRun profesional de confianza.
[] Servicio a escala national y Ilarnadas ilimltadas de solicitud de servicio: se puede
poner en contacto con nosotros cuantas veces Io desee y cuando Io desee.
[] Garantia contra defectos de fabricaci6n: se reemplaza el producto cubierto par el
acuerdo si ocurren cuatro o mRsfallas del producto en unperiodo de 12meses.
[] Reernplazo del producto: en case de que no se pueda arreglar el producto cubierto par
el acuerdo.
[] Revisi6n anual preventiva de rnantenirnJento del producto:puede solicitarla en
cualquier momenta, sinning0ncosta extra.
[] R6pida asistencJa telef6nica, la cua! denominamos Seiuci6n r6pida:es decic asistencia
telef6nica a trav@sde cualquiera de nuestrosrepresentantes de Sears,sabre cualquiera de
nuestrosproductos, piense en nosotros coma en un 'manual parlante del usuario.
[] ProteccJ6n contra fallas el_ctricas, contra da_os debidos a fluctuaciones de la correiente
el6ctrica.
[] $250 de ProteccJ6n de alJmento al abe para cubrir cualquier posible deterioro dealimento
debido a una falla mecRnica de cualquiera de nuestrosrefrigeradores o refrigeradores cubiertos
par esto acuerdo.
[] DeveJuci6n de gastos de aJquiJer de eJectredern_stices si la reparaci6n de su producto
asegurado tarda mrs tiempo que Io prometido.
[] 25°/0 de clescuenteaplicable tanto a los castes del servicio de arreglo, coma de las piezas
instaladas relacionadas que no hayanquedado cubiertos par este acuerdo.
Una vez que haya realizado el page de este acuerdo, bastar6 una simple Ilamada telef6nica para
concertar unavisita de servicio. PuedeIlamar a cualquier hera del di_ao de la noche, o bien concertar
una visita de servicio par el lnternet. Laadquisici6n del Acuerdo maestro de Protecci6n es una inversi6n
exenta de reisgos.Si par cualquier motive decide cancelar dicho acuerdo durante el periodo de
garanfia del producto, le haremosun reintegro total del valor. O bien unimporte proporcional si
cancela el acuerdo en cualquier otro momenta posterior al vencimiento del periodo de garanfia del
producto, jAdquiera hay mismosuAcuerdo Maestro de Protecci6n!
Algunas lirnitacJones y exclusiones podrian aplicarse. Para solicJtar precios e
inforrnacJ6n adicional, Itarne al 1-800-827-6655(en los EE.UU)
ServicJo de instalacJ6n de Sears.
Parasolicitar la instalaci6n par profecionales de Searsde electrodom6sticos, abridores de puertas
de garaje, calentadores de agua y otros arficulos de usaprioritario en el hogar,
Ilame al 1-800-4-MY-HOME®
6/8/10
Garantia Iirnitada de Kenrnare
DENTRO DE UN ANO a partir de la fecha de venta, el aparato est6 garantizado contra
defectos de material y mane de obra si la instalaci6n, la utilizaci6n y el mantenimiento se
realizan de acuerdo con todas las instruccionessuministradas.
CON LA PRUEBADEVENTA, puede recibir unarreglo gratuito del producto con defecto.
Llame al 1-800-4-MY-HOME® para organizar el servicio de garanfia..
Sieste producto se utiliza para arras finesque no sean el usafamiliar privado, esta
garanfia rige 0nicamente durante 90 divasa partir de la fecha de compra.
Esta garant/a cubre _nicarnente los defectes de material V mane de ebra.
Sears NO pagar6 le siguiente:
1.Componentesdesechables que pueden gastarse debido al usahabitual, incluyendo,
y sin limitarse a los filtros, lascorreas, las 16mparasy las boslsas.
2. Unt_cnico de servicio que instruyan al usuario en la manera adecuada de instalar,
utilizar o mantener el producto.
3. Unt_cnico de servicio para la limpieza y mantenimiento del producto.
4. DaBoso fallas de este producto si @1mismo no rue instalado, utilizado y mantenido de
acuerdo con todas las instrucciones proporcionadas junto con el producto.
5. DaBoso fallas en el producto que sean el resultado de accidentes, abuse, mal usau otra
clase de usa que no sea el apropiado.
6. Da_os o fallas en el producto causados par el usa de detergentes, limpiadores, productos
qui_micoso elementos que no sean los recomendados en las instruccionesprovistas con el
producto.
Z Da_os o fallas de las piezas o sistemascoma resultado de modificaciones no autorizadas
hechasal producto.
Renuncia de respensabilidades de garantia irnplicitas; lirnitacJ6n del arregle
La0nica y exclusiva opci6n del cliente en virtud de esta garanfia limitada ser6 la reparaci6n
del producto seg0n Io indicado enel presente documento. Lasgaranfias implicitas, incluyendo
las garanfias de aptitud para la venta o de idoneidad para unfin enparticular, est6n limitadas
a un abe o al periodo mrs carte permitido par la ley. Searsno se responsabiliza par daBos
incidentales o consecuentes.Algunos estados y provincias no permiten la exclusi6n o limitaci6n
de da_os incidentales o consecuentes olas limitaciones de duraci6n de las garanfias implicitas
de comercializaci6n o aptitud, par Io que estas exclusioneso limitaciones pueden no aplicarse
en sucase.
Estagaranfia se aplica 0nicamente mientras este producto se usedentro de los EstadosUnidos.
Estagaranfia le otorga derechos legales especificos. Usted puede tener adem6s arras derechos
que varfan de unestado a otro.
Cornpa_ia de Gesti6n de Marca Sears, Hoffrnan Estates, IL 60179
Enhorabuena par haber hecho una compra inteligente. Su nuevo producto Kenmore® se diseBay
se fabrica para brindarle a_os de funcionamiento fiable. Sin embargo, coma cualquier producto,
har6 falta mantenimiento precautorio o arreglo peri6dicas. Espar eso que tener un Acuerdo
Maestro de protecci6n podrfa ahorrarle dinero y molestias.
ElAcuerdo Maestro de Protecci6ntambi@nsirve para prolongar la durabilidad de su nuevo producto.
EsteAcuerdo incluye Io siguiente:
Piezas y mane de obra necesarias para ayudar a mantener el funcionamiento adecuado de
los productos bajo el usa normal, nosolo en case de defectos. Nuestra cobertura va mucho
rn6s all6 que la garantia del preducte. No hay deducibles ni exclusionespar fallas de
funcionamiento: es decir, verdadera protecci6n.
[] Servicio t6cnico par expertos (rn6s de 10000 t6cnicos autorizados de Sears), Iocual
significa que quien repare o realice el mantenimiento de suproducto serRun profesional de confianza.
[] Servicio a escala national y Ilarnadas ilimltadas de solicitud de servicio: se puede
poner en contacto con nosotros cuantas veces Io desee y cuando Io desee.
[] Garantia contra defectos de fabricaci6n: se reemplaza el producto cubierto par el
acuerdo si ocurren cuatro o mRsfallas del producto en unperiodo de 12meses.
[] Reernplazo del producto: en case de que no se pueda arreglar el producto cubierto par
el acuerdo.
[] Revisi6n anual preventiva de rnantenirnJento del producto:puede solicitarla en
cualquier momenta, sinning0ncosta extra.
[] R6pida asistencJa telef6nica, la cua! denominamos Seiuci6n r6pida:es decic asistencia
telef6nica a trav@sde cualquiera de nuestrosrepresentantes de Sears,sabre cualquiera de
nuestrosproductos, piense en nosotros coma en un 'manual parlante del usuario.
[] ProteccJ6n contra fallas el_ctricas, contra da_os debidos a fluctuaciones de la correiente
el6ctrica.
[] $250 de ProteccJ6n de alJmento al abe para cubrir cualquier posible deterioro dealimento
debido a una falla mecRnica de cualquiera de nuestrosrefrigeradores o refrigeradores cubiertos
par esto acuerdo.
[] DeveJuci6n de gastos de aJquiJer de eJectredern_stices si la reparaci6n de su producto
asegurado tarda mrs tiempo que Io prometido.
[] 25°/0 de clescuenteaplicable tanto a los castes del servicio de arreglo, coma de las piezas
instaladas relacionadas que no hayanquedado cubiertos par este acuerdo.
Una vez que haya realizado el page de este acuerdo, bastar6 una simple Ilamada telef6nica para
concertar unavisita de servicio. PuedeIlamar a cualquier hera del di_ao de la noche, o bien concertar
una visita de servicio par el lnternet. Laadquisici6n del Acuerdo maestro de Protecci6n es una inversi6n
exenta de reisgos.Si par cualquier motive decide cancelar dicho acuerdo durante el periodo de
garanfia del producto, le haremosun reintegro total del valor. O bien unimporte proporcional si
cancela el acuerdo en cualquier otro momenta posterior al vencimiento del periodo de garanfia del
producto, jAdquiera hay mismosuAcuerdo Maestro de Protecci6n!
Algunas lirnitacJones y exclusiones podrian aplicarse. Para solicJtar precios e
inforrnacJ6n adicional, Itarne al 1-800-827-6655(en los EE.UU)
ServicJo de instalacJ6n de Sears.
Parasolicitar la instalaci6n par profecionales de Searsde electrodom6sticos, abridores de puertas
de garaje, calentadores de agua y otros arficulos de usaprioritario en el hogar,
Ilame al 1-800-4-MY-HOME®
6/8/10
3
2
4
.............
7
8
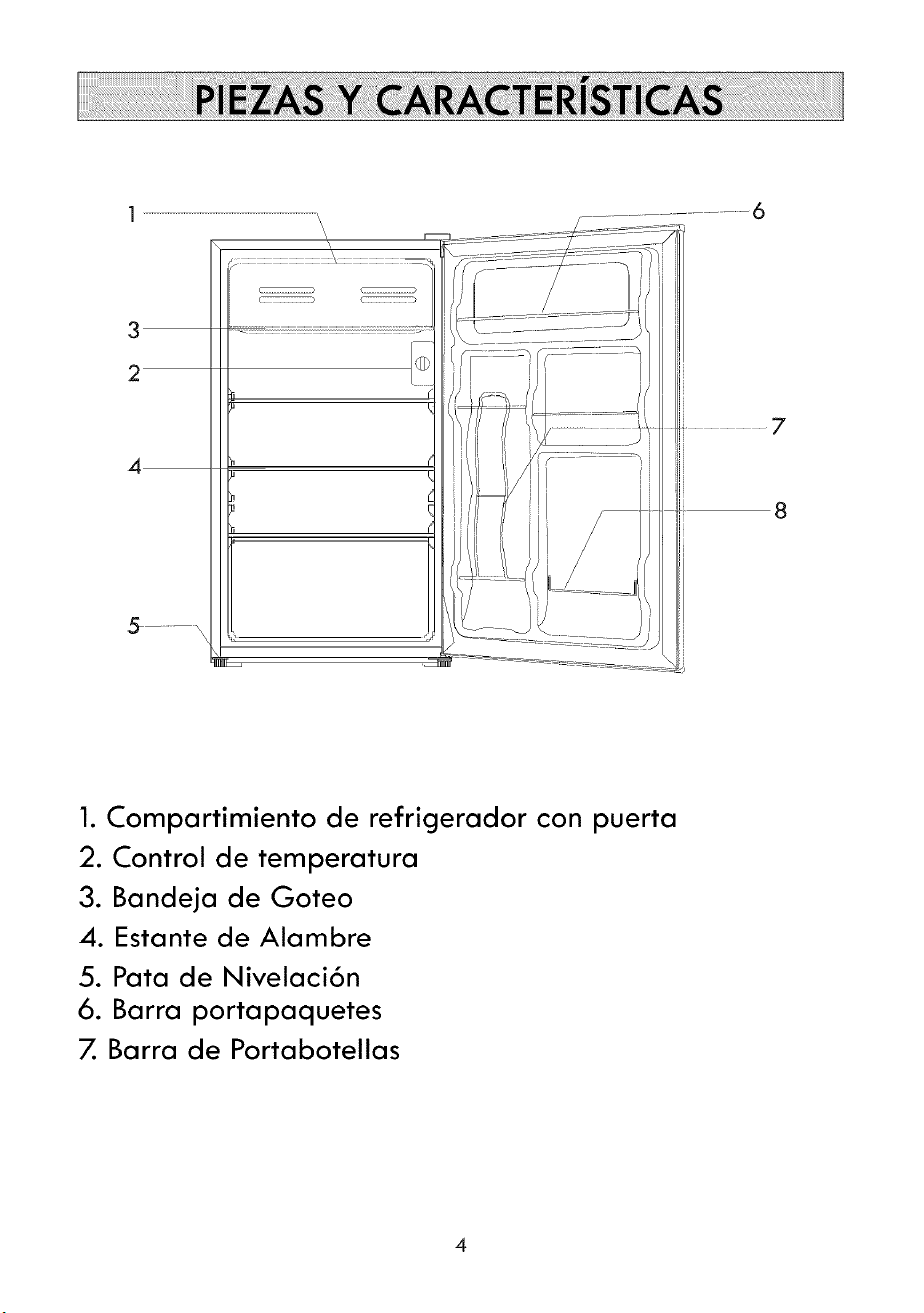
1. Compartimiento de refrigerador con puerta
2. Control de temperatura
3. Bande]a de Goteo
4. Estante de Alambre
5. Pata de Nivelaci6n
6. Barra portapaquetes
7. Barra de Portabotellas
4
PELIGRO
Riesgode que los niBosqueden atrapados. Quite las puertas antes de desechar
suvieja refrigerador. Deje losestantes en su lugar para que los ni_osno puedan
meterse adentro f@cilmente.
ELIMiNACI6N DE CFC/HCFC
Esposible que su antJguo refrigerador tenga un sJstemade refrigeraci6n que
utilizaba CFCsor HCFCs (colofluorocarbonos o hidroclorofluorocarbonos). Se
cree que los CFCsy HCFCshacen da_o al ozono estratosf@ico si se liberan en la
atm6sfera.
Siest6 pot desechar su viejo refrigerador, asegOresede que unt_cnico calificado
extraiga el refrigerante para una eliminaci6n adecuada. Si libera el refrigerante
de manera intencional, es posible que se atenga a sanciones de multasy
encarcelamiento segOnlas disposiciones de la legislaci6n medioambiental.
Advertencia: Tenga cuidado para avitar daBo de tubo de refrigerante. Esposible
que el daBo de tubo causa la fuga de gas de refrigerante inflamable, el cual puede
resultar en lesi6n personal.
Gracias pot utilizar el producto de I<enmore. Este manual f6cJl-de-usar
le instruye en utilizar apropiadamente su refrigerador.
REGISTRO DE PRODUCTO
Engrampe su recibo al manual.
Recuerde el nOmero de serie y el nOmero de model
de su unidad ofrecidos en el espacio de la derecha.
NOmero de ModeJo:
255.99792
NOmero de Serie:
6/8/10
3
2
4
.............
7
8
1. Compartimiento de refrigerador con puerta
2. Control de temperatura
3. Bande]a de Goteo
4. Estante de Alambre
5. Pata de Nivelaci6n
6. Barra portapaquetes
7. Barra de Portabotellas
4
PELIGRO
Riesgode que los niBosqueden atrapados. Quite las puertas antes de desechar
suvieja refrigerador. Deje losestantes en su lugar para que los ni_osno puedan
meterse adentro f@cilmente.
ELIMiNACI6N DE CFC/HCFC
Esposible que su antJguo refrigerador tenga un sJstemade refrigeraci6n que
utilizaba CFCsor HCFCs (colofluorocarbonos o hidroclorofluorocarbonos). Se
cree que los CFCsy HCFCshacen da_o al ozono estratosf@ico si se liberan en la
atm6sfera.
Siest6 pot desechar su viejo refrigerador, asegOresede que unt_cnico calificado
extraiga el refrigerante para una eliminaci6n adecuada. Si libera el refrigerante
de manera intencional, es posible que se atenga a sanciones de multasy
encarcelamiento segOnlas disposiciones de la legislaci6n medioambiental.
Advertencia: Tenga cuidado para avitar daBo de tubo de refrigerante. Esposible
que el daBo de tubo causa la fuga de gas de refrigerante inflamable, el cual puede
resultar en lesi6n personal.
Gracias pot utilizar el producto de I<enmore. Este manual f6cJl-de-usar
le instruye en utilizar apropiadamente su refrigerador.
REGISTRO DE PRODUCTO
Engrampe su recibo al manual.
Recuerde el nOmero de serie y el nOmero de model
de su unidad ofrecidos en el espacio de la derecha.
NOmero de ModeJo:
255.99792
NOmero de Serie:
6/8/10

Desembale el refrigerador
1.Quite todos los materiales de embalaje, incluyendo la base de espuma y la cinta adhesiva
que mantiene los accesorios del refrigerador dentro y fuera. Saca y quite el protector de
plRstico o de espuma que estR utiliza para proteger el compresor contra da_os durante el
transporte debido a vibraciones y golpes.
2. Examiney quite cualquier embalaje, cinta o materiales imperesos que queden antes de
enchufar el refrigerador.
3. Aseg0rese de que tenga todos los accesorios y piezas enumerados en la secci6n de
PiezasY Caracteristicas
Circulaci6n Adecuada de Aire
Paraasegurar que su refrigerador funcione con la mRximaeficiencia por la que fue
diseBado, se debe instalar enuna posici6n en la que tiegan una buena circulaci6n
de aire, tubefias y conexiones el&ctricas.
Se recomiendan espacios adicionales alrededor del congeladpor en Io siguiente:
laterales:.......................................3/4 pulgadas (l?mm)
Partesuperor:..............................2 pulgadas (50ram)
Partede atrRs:............................2 pulgadas (50ram)
Requisitos el6ctricos
Aseg0rese de que haya untomacorriente adecuado (115voltios, 15amperios) puesto
apropiadamente a la tierra para la alimentaci6n del refrigerador.
ADVERTENCIA: Eviteel usode adaptadores de tres puntas,y nuncacorte la
tercera puntade tierra para adaptarlo a una enchufe de dos puntas.Espeligroso
cortar la punta de la tierra porque el refrigerador no tiene conexi6n efectiva a tierra
para y puede tener como resultado peligroso de descarga electrica.
Instalaci6n
Su refrigerador debe de ser instalado independientemente. No puede ser empostrado ni
incrustado. Coloque el refrigerador en unsuelo suficientemente fuerte como para soportar
el refrigerador totalmente cargado. Nunca Io incline mrs de unRngulo de 45 grados al
mover el refrigerador. Estopodria daBar el compresor y el sistema herm@ico.
Siel refrigerador se ha inclinado mrs de 45 grados, d&jelo en una posici6n vertical mrs
que 24 horas antes de enchufarlo en la fuente de alimentaci6n. Asi que facilita al asiento
del refrigerante y reduce la posibilidad de fallo del sistema de refrigeraci6n.
Enchufeel refrigerador enun tomacorriente exclusivo que estR apropiadamente instalado
a tierra. No conecte otro aparato al mismoenchufe.
No corte de ninguna manera ni quite la tercera (tierra) puntadel cable de alimentaci6n.
Consultea la ADVERTENCIAen RequisitosEl&ctricos en la pRgina anterior. Debe dirigirse
a unelectricista certificado o hacia Searsu otro comerciante cualificado de servicio con
cualquier pregunta relacionada con la alimentaci6n y/o la conexi6n a tierra. Despu@sde
enchufar el aparato en untomacorriente de la pared, deje que la unidad se enfrie durante
2-3 horas antes de colocar alimentos en el refrigerador.
Limitaciones de la instalaci6n
No instale surefrigerador en ning0n lugar caliente o sinaislamiento adecuado, como un
garaje, etc. Surefrigerador debe de ser manejado a temperatura por debajo de 55°
Fahrenheit.Elige una posici6n adecuado para que el refrigerador se coloque en una
superficie s61iday nivelada lejos de la luz solar directa o fuentesde calor, como radiadores,
calentadores de z6calo, aparatos de cocina, etc.
Paras de Ni',,ela¢i6n
Hay dos parasde nivelaci6n en el fondo de la unidad, cerca de la unidad de frente. Gire el
pomo de nivelaci6n hacia la izquierda para levantar el cabinete, y hacia la derecha para
bajar el cabinete.
6/8/10
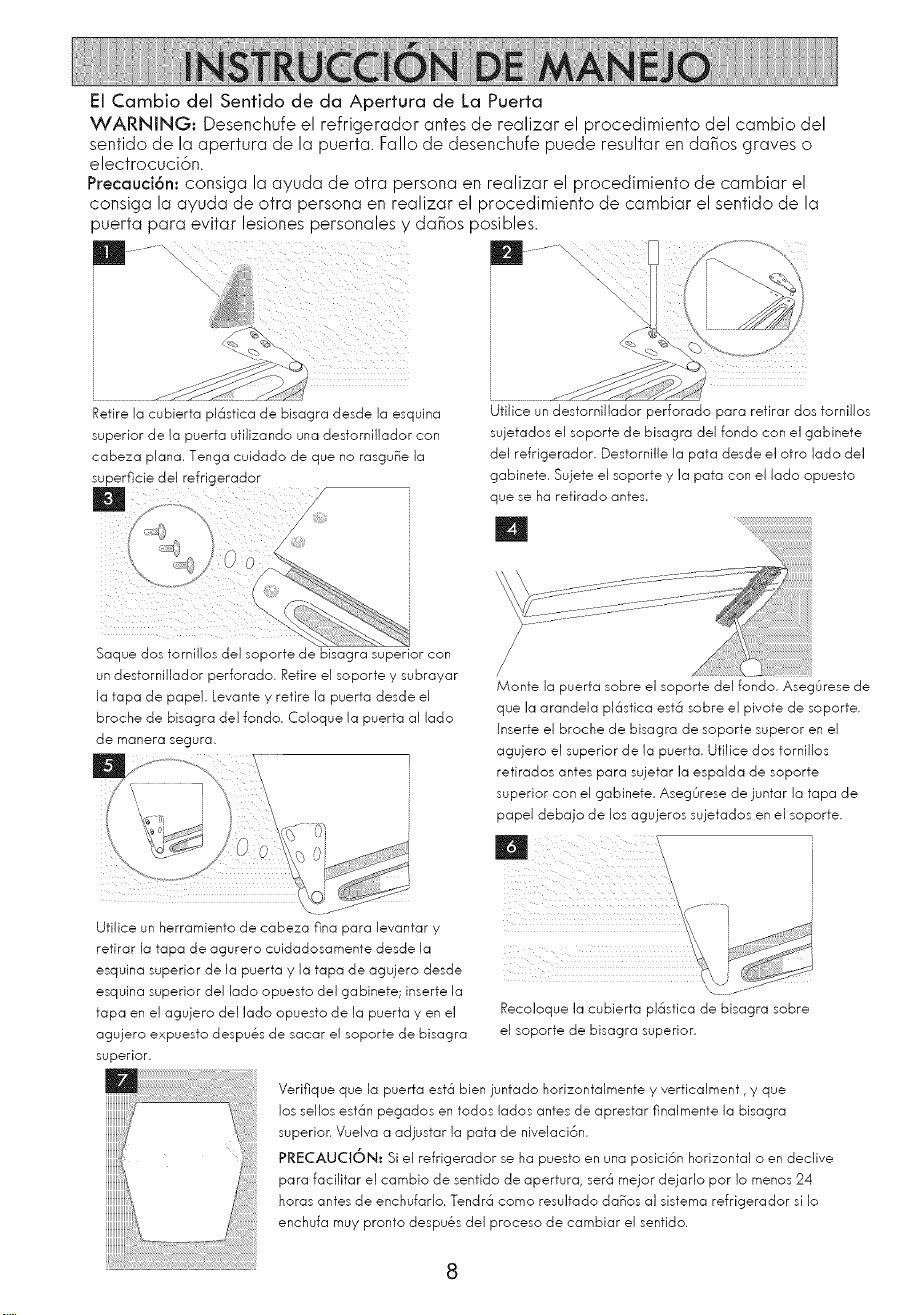
EJCambJo deJ Senfido de da Apertura de La Puerta
WARNING: Desenchufe el refricjerador antes de realizar el procedimiento del cambio del
sentido de la apertura de la puerta. Fallo de desenchufe puede resultar en da_os graves o
electrocuci6n.
Precaud6n: consicja la ayuda de otra persona en realizar el procedimiento de cambiar el
consicja la ayuda de otra persona en realizar el procedimiento de cambiar el sentido de la
puerta para evitar lesiones personales y da_os posibles.
Retire la cubierta pklstica de bisagra desde ]a esquina
superior de la puerta utflizando una destornfllador con
cabeza pJana. Tenga cuidado de que no rasguBe la
superficie de] refrigerador
Saque dos torniflos de] soporte de bisagra superior con
un destornfllador perforado. Retire el soporte y subrayar
la tapa de papek Levante y retire la puerta desde el
broche de bisagra de] fondo. Cdoque la puerta al 1ado
de manera segura.
Utflice un destorniHador perforado para retirar dos torniJJos
sujetados e]soporte de bisagra dd fondo con e] gabinete
de1 refrigerador. Destornflle la pata desde el otro ]ado de]
gabinete. Su]ete e] soporte y la pata con e] ]ado opuesto
que se ha retirado antes.
Monte la puerta sobre el soporte del rondo. Aseg6rese de
que ]a arandeJa pJ6stica est6 sobre e] pivote de soporte.
Inserte e] broche de bisagra de soporte superor en el
agu]ero e] superior de ]a puerta. UtiJice dos tornfllos
retirados antes para su]etar ]a espaJda de soporte
superior con e] gabinete. Aseg6rese de ]untar Ja tapa de
papal debajo de los agu]eros sujetados en el soporte.
Utflice un herramiento de cabeza fina para levantar y _\
retirar la tapa de agurero cuidadosamente desde la \
esquina superior de la puerta y ]a tapa de agujero desde
esquina superior de] ]ado opuesto de] gabinete; inserte ]a \ ...........
tapa en e] agujero de] ]ado opuesto de ]a puerta y en e] RecoJoque Ja cubierta pJ6stica de bisagra sobre
agujero expuesto despu_s de sacar eJ soporte de bisagra eJ soporte de bisagra superior.
superior.
Verifique que la puerta est6 bien ]untado horizontalmente y verticaJment, y que
los seiios est6n pegados en todos lados antes de aprestar finalmente la bisagra
superion Vueiva a adiustar la pata de nivelaci6n.
PRECAUCI6N: Sie] refrigerador se ha puesto en una posici6n horizontal o en dedive
para faciiitar e] cambio de sentido de apertura, ser6 meior deiar]o pot 1omenos 24
horas antes de enchufar]o. Tendr6 como resuitado daBos a] sistema refrigerador si 1o
enchufa muy pronto despu_s de] proceso de cambiar e] sentido.
Barra de porta
Elinterior de la puerta del refrigerador est6 equipado con barras de porta para guardar
paquetes de alimentos, botellas y latas sujetRndolosfirmemente en estantes de la puerta.
Uso Inicial
Hacja funcionar el refricjerador sincargo de alimentos hasta que para el compresor para
alcanzar el nivel de frio ajustado al manejar el refricjerador pot primer vez. Tardar6 24 horas.
Una vez que alcanza a la temperatura fijo ya puede almacenar losalimentos enel refricjerador.
Nora: Siel refricjerador se ha puesto en posici6n horizontal o endeclive durante uncierto periodo,
ser6 mejor esperar 24 horas antesde enchufarlo.
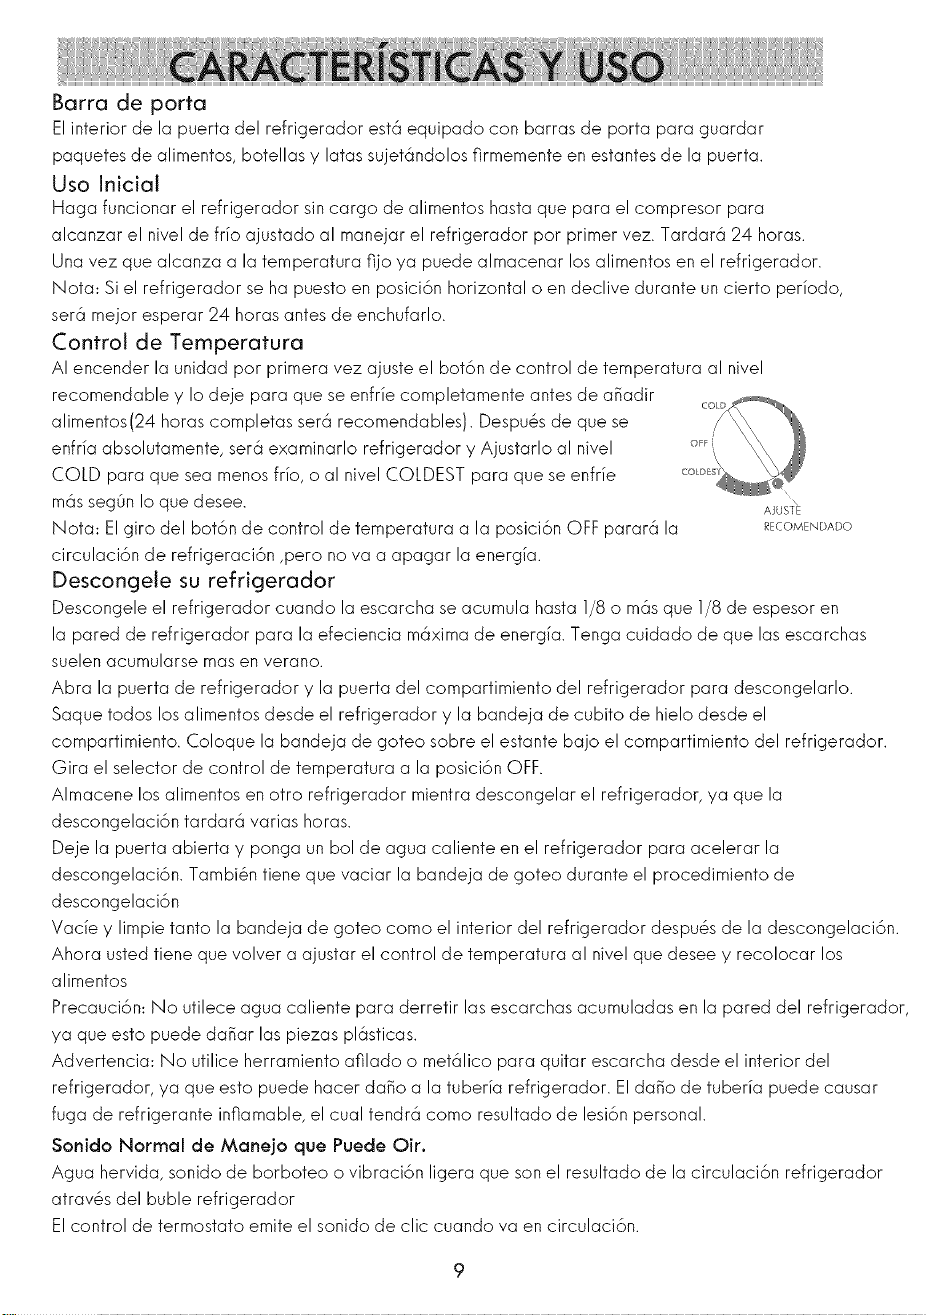
Control de Temperatura
AI encender la unidad por primera vez ajuste el bot6n de control de temperatura al nivel
recomendable y Io deje para que se enfrie completamente antes de aBadir
alimentos (24 horas completas ser6 recomendables). Despu@sde que se
enfria absolutamente, ser6 examinarlo refricjerador y Ajustarlo al nivel
COLD para que sea menosfrio, o al nivel COLDESTpara que se enfrie
mrs seg0n Io que desee. AJUSPE
Nora: Elgiro del bot6n de control de temperatura a la posici6n OFFparar6 la _ECOMENDADO
circulaci6n de refricjeraci6n ,pero nova a apacjar la enercjia.
Descongele su refrigerador
Desconcjele el refricjerador cuando la escarcha se acumula hasta 1/8o mrs que 1/8de espesor en
la pared de refrigerador para la efeciencia mRximade energia. Tenga cuidado de que las escarchas
suelen acumularse masen verano.
Abra la puerta de refricjerador y la puerta del compartimiento del refricjerador para desconcjelarlo.
Saque todos losalimentos desde el refricjerador y la bandeja de cubito de hielo desde el
compartimiento. Coloque la bandeja de goteo sobre el estante bajo el compartimiento del refrigerador.
Gira el selector de control de temperatura a la posici6n OFF.
Almacene losalimentos en otro refricjerador mientra desconcjelar el refricjerador, ya que la
descongelaci6n tardar6 varias horas.
Deje la puerta abierta y ponga un bol de agua caliente en el refrigerador para acelerar la
descongelaci6n. Tambi@ntiene que vaciar la bandeja de goteo durante el procedimiento de
descongelaci6n
Vaci_ey limpie tanto la bandeja de goteo como el interior del refrigerador despu@sde la descongelaci6n.
Ahora usted tiene que volver a ajustar el control de temperatura al nivel que desee y recolocar los
alimentos
Precauci6n: No utilece agua caliente para derretir las escarchas acumuladas en la pared del refrigerador,
ya que esto puede da_ar las piezas plRsticas.
Advertencia: No utilice herramiento afilado o met61icopara quitar escarcha desde el interior del
refricjerador, ya que esto puede hacer daBo a la tuberia refricjerador. EldaBo de tuberia puede causar
fuga de refrigerante inflamable, el cual tendr6 como resultado de lesi6n personal.
Sonido Normal de Manejo que Puede Oir.
Acjua hervida, sonido de borboteo o vibraci6n ligera que son el resultado de la circulaci6n refrigerador
atrav@sdel buble refricjerador
Elcontrol de termostato emite el sonido de clic cuando va en circulaci6n.
9
6/8/10
EJCambJo deJ Senfido de da Apertura de La Puerta
WARNING: Desenchufe el refricjerador antes de realizar el procedimiento del cambio del
sentido de la apertura de la puerta. Fallo de desenchufe puede resultar en da_os graves o
electrocuci6n.
Precaud6n: consicja la ayuda de otra persona en realizar el procedimiento de cambiar el
consicja la ayuda de otra persona en realizar el procedimiento de cambiar el sentido de la
puerta para evitar lesiones personales y da_os posibles.
Retire la cubierta pklstica de bisagra desde ]a esquina
superior de la puerta utflizando una destornfllador con
cabeza pJana. Tenga cuidado de que no rasguBe la
superficie de] refrigerador
Saque dos torniflos de] soporte de bisagra superior con
un destornfllador perforado. Retire el soporte y subrayar
la tapa de papek Levante y retire la puerta desde el
broche de bisagra de] fondo. Cdoque la puerta al 1ado
de manera segura.
Utflice un destorniHador perforado para retirar dos torniJJos
sujetados e] soporte de bisagra dd fondo con e] gabinete
de1 refrigerador. Destornflle la pata desde el otro ]ado de]
gabinete. Su]ete e] soporte y la pata con e] ]ado opuesto
que se ha retirado antes.
Monte la puerta sobre el soporte del rondo. Aseg6rese de
que ]a arandeJa pJ6stica est6 sobre e] pivote de soporte.
Inserte e] broche de bisagra de soporte superor en el
agu]ero e] superior de ]a puerta. UtiJice dos tornfllos
retirados antes para su]etar ]a espaJda de soporte
superior con e] gabinete. Aseg6rese de ]untar Ja tapa de
papal debajo de los agu]eros sujetados en el soporte.
Utflice un herramiento de cabeza fina para levantar y _\
retirar la tapa de agurero cuidadosamente desde la \
esquina superior de la puerta y ]a tapa de agujero desde
esquina superior de] ]ado opuesto de] gabinete; inserte ]a \ ...........
tapa en e] agujero de] ]ado opuesto de ]a puerta y en e] RecoJoque Ja cubierta pJ6stica de bisagra sobre
agujero expuesto despu_s de sacar eJ soporte de bisagra eJ soporte de bisagra superior.
superior.
Verifique que la puerta est6 bien ]untado horizontalmente y verticaJment, y que
los seiios est6n pegados en todos lados antes de aprestar finalmente la bisagra
superion Vueiva a adiustar la pata de nivelaci6n.
PRECAUCI6N: Sie] refrigerador se ha puesto en una posici6n horizontal o en dedive
para faciiitar e] cambio de sentido de apertura, ser6 meior deiar]o pot 1omenos 24
horas antes de enchufar]o. Tendr6 como resuitado daBos a] sistema refrigerador si 1o
enchufa muy pronto despu_s de] proceso de cambiar e] sentido.
Barra de porta
Elinterior de la puerta del refrigerador est6 equipado con barras de porta para guardar
paquetes de alimentos, botellas y latas sujetRndolosfirmemente en estantes de la puerta.
Uso Inicial
Hacja funcionar el refricjerador sincargo de alimentos hasta que para el compresor para
alcanzar el nivel de frio ajustado al manejar el refricjerador pot primer vez. Tardar6 24 horas.
Una vez que alcanza a la temperatura fijo ya puede almacenar losalimentos enel refricjerador.
Nora: Siel refricjerador se ha puesto en posici6n horizontal o endeclive durante uncierto periodo,
ser6 mejor esperar 24 horas antesde enchufarlo.
Control de Temperatura
AI encender la unidad por primera vez ajuste el bot6n de control de temperatura al nivel
recomendable y Io deje para que se enfrie completamente antes de aBadir
alimentos (24 horas completas ser6 recomendables). Despu@sde que se
enfria absolutamente, ser6 examinarlo refricjerador y Ajustarlo al nivel
COLD para que sea menosfrio, o al nivel COLDESTpara que se enfrie
mrs seg0n Io que desee. AJUSPE
Nora: Elgiro del bot6n de control de temperatura a la posici6n OFFparar6 la _ECOMENDADO
circulaci6n de refricjeraci6n ,pero nova a apacjar la enercjia.
Descongele su refrigerador
Desconcjele el refricjerador cuando la escarcha se acumula hasta 1/8o mrs que 1/8de espesor en
la pared de refrigerador para la efeciencia mRximade energia. Tenga cuidado de que las escarchas
suelen acumularse masen verano.
Abra la puerta de refricjerador y la puerta del compartimiento del refricjerador para desconcjelarlo.
Saque todos losalimentos desde el refricjerador y la bandeja de cubito de hielo desde el
compartimiento. Coloque la bandeja de goteo sobre el estante bajo el compartimiento del refrigerador.
Gira el selector de control de temperatura a la posici6n OFF.
Almacene losalimentos en otro refricjerador mientra desconcjelar el refricjerador, ya que la
descongelaci6n tardar6 varias horas.
Deje la puerta abierta y ponga un bol de agua caliente en el refrigerador para acelerar la
descongelaci6n. Tambi@ntiene que vaciar la bandeja de goteo durante el procedimiento de
descongelaci6n
Vaci_ey limpie tanto la bandeja de goteo como el interior del refrigerador despu@sde la descongelaci6n.
Ahora usted tiene que volver a ajustar el control de temperatura al nivel que desee y recolocar los
alimentos
Precauci6n: No utilece agua caliente para derretir las escarchas acumuladas en la pared del refrigerador,
ya que esto puede da_ar las piezas plRsticas.
Advertencia: No utilice herramiento afilado o met61icopara quitar escarcha desde el interior del
refricjerador, ya que esto puede hacer daBo a la tuberia refricjerador. EldaBo de tuberia puede causar
fuga de refrigerante inflamable, el cual tendr6 como resultado de lesi6n personal.
Sonido Normal de Manejo que Puede Oir.
Acjua hervida, sonido de borboteo o vibraci6n ligera que son el resultado de la circulaci6n refrigerador
atrav@sdel buble refricjerador
Elcontrol de termostato emite el sonido de clic cuando va en circulaci6n.
9
6/8/10
Limpieza y Mantenimiento
ADVERTENCIA: desenchufe siempre el refrigerador antes de limpiarlo para evitar la descarga
el_ctrica. Eldescuido de esta advertencia puede tener como resultado de muerto o lesi6n.
Precauci6n: Lea y entienda siempre el procedimiento de limpieza explicada en esta manual
antes de usar productos de limpieza. Siga la instrucci6n del fabricante de producto de limpieza
para evitar lesi6n personal y da_os de producto.
Limpieza general
Prepare una 1a 2 cucharadas de soluci6n limpiadora combinando la bicarbonata con agua
calentita. Utilice una esponja o un trapo suave,humedecido con la soluci6n limpiadora, para
limpiar su refrigerador.
Enjuagueel refrigerador con agua calentita y limpia, y s@quelocon un trapo suave.
No utilice elementos qui_micosafilados, elementos abrasivos, elementos amoniaco, lejia de
cloro, detergentes, concentrados, disolventes o estropajos met61icos,algunos de los cuales
pueden disolverse,da_ar y/o decolorar su refrigerador
Tapa de Ja puerta
Limpie la tapa de la puerto coda tres mesesde acuerdo con la instrucci6n descrito arriba en
la secci6nl 'Limpieza Genera.
Hay que mantener la tapa limpia y plegable para asegurar su funci6n de tapar el refrigerador.
Un poco de Jalea de petr61eo aplicada sobre la bisagra de la tapa puede mantener la flexibilidad
y unbuen funci6n de cierra de la tapa.
InterrupcJ6n de la energia
Tendr6 interrupci6n de energia a veces por la tempestad o otras causas. Retireel clavija de enchufe
de energia desde el toma de corriente de C.A cuando ocurre el corte de energia. Cuando la energia
recupera despu@sde uncorte prolongado examine losalimentos por si acaso del podredumbre.
Limpie el interior del refrigerador y el compartimiento del refrigerador antes de usarlo
Cuidado en VacacJ6n y despu_s de moverlo
Desenchufe la unidad y saque los alimentos desde ambos compartimentos, gire el selector de
temperatura a la posici6n OFFy limpie la tapa de la puerto de acuerdo con la secci6nLimpieza
General-en vacaci6n largo o unaasencia prolongada,. Deje la puerto abierta para que el aire
haga circulaci6n en el interior.
Siempre mueveel refrigerador verticalmente al trasladarlo. No mueveel refrigerador poni_ndolo
en posici6n horizontal, por si acaso que da_a al sistema de sello.
ADVERTENCIA: Tenga cuidado de evitar daBos a tuberia refrigerador cuando maneja, mueve,
usao limpia el refrigerador. EldaBo a la tuberia puede caular fuga de gas de refrigerante flamable,
la cual puede resultar en lesi6n personal
10
El refrigerador no
funciona
La temperatura de
alimento es
demasiado alto
La temperatura de
alimento es
demasiado baja
El refrigerador
funciona con
demasiada frecuncia
Humedad
acumulada en el
interior o exterior
del refrigerador.
El refrigerador
tiene mal olor.
La puerto del
refrigerador no se
puede cerrar
apropiadamente.
VeHfique sl el control de temperatura est6 en poslci6n OFF,
VerJfique sl el refrlgerador est6 conectado,
Verifique si tlene energfa a trav@s de verificar el interrruptor,
Aisle los aJimentos reci@n acjragados de los alimentos frescos por alcjun
tiempo o baja la temperatura.
Vedfique la tapa a ver si est6 sellada adecuadamente,
Adjuste el control de temperatura a nlvel m6s fifo,
Reduzca Ja frecuencla de abrk Ja puerta.
Si el ajuste del control de la temperatura est6 en nlvel demaslado fifo,
ajOstelo a nivel m6s calentlto y espere unas horas para que la
temperatura se establezca,
Es normal funcionar asJ durante d[a de temperatura alta y dla h_medo
para mantener una temperatura estable,
La puerta se abieron muy frecuentemente o qued6 abierto durante un
periodo de tlempo prolongado,
Vedfique la tapa aver si est6 sellada adecuadamente,
Verifique sl la puerta est6 completamente cerrada,
Eso es normal durante el perfodo con alta humedad.
Evite que la puerto se abra muy frecuentemente o quede ablerta
durante tiempo prologado,
Verifique si la tapa est6 sellada apropiadamente,
Hace falta Ja Jimpleza deJ interion
Los alJmentos inapropladamente envueltos o envasados est6n
desprendiendo real olor,
Nivele el refrigeradon
Vea Ja descrlpci6n de Ja caracter[stica de acoplamlento de puerta en
la secci6n de Cambio del Sentido de Apertura de la Puerto,
Verifique si est6 bloqueado por recipientes de allmento t estantes t etc.
11
6/8/10
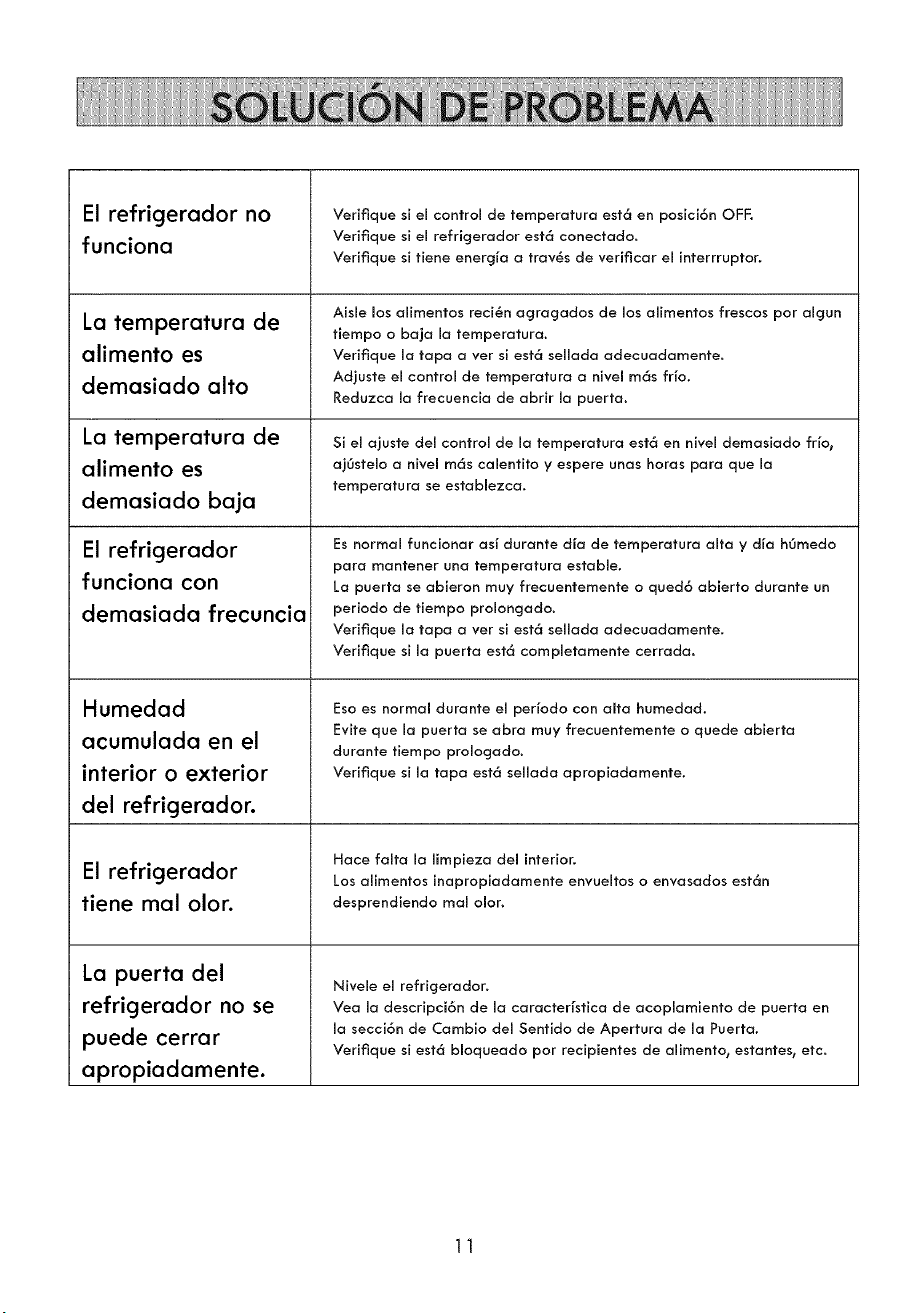

12 13
6/8/10

12 13
6/8/10

For repair - in your home - of all major brand appliances,
lawn and garden equipment, or heating and cooling systems,
no matter who made it, no matter who sold it !
For the replacement parts, accessories and
owner's manuals that you need to do-it-yourself.
For Sears professional installation of home appliances
and items like garage door openers and water heaters.
1-800-4-MY-HOME ® Call anytime, day or night
(1-800-469-4663) (U.S.A. and Canada)
www.sears.com www.sears.ca
Our Home
For repair of carry-in items like vacuums, lawn equipment,
and electronics, call anytime for the location of the nearest
Sears Parts & Repair Service Center
1-800-488-1222 (U.S.A.) 1-800-469-4663 (Canada)
www.sears.com www.sears.ca
To purchase a protection agreement on a product serviced by Sears:
1-800-827-6655 (U.S.A.)
Para pedir servicio de reparaci6n
a domicilio, y para ordenar piezas:
1-888-SU-HOGAR®
(1-888-784--6427)
iii: www_:iiill i°msea rs
1-800-361-6665 (Canada)
Au Canada pour service en frangais:
1-800-LE-FOYERuc
(1-800-53343937)
www.sears.ca
TM
® Registered Trademark / ' Trademark of KCD IP, LLC in the United States, or Sears Brands, LLC in other countries
T_d
® Marca Registrada / ' Marca de Fabrica de KCD IP, LLC en Estados Unidos, o Sears Brands, LLC in otros paises
MD
McMarque de commerce / ' Marque depos6e de Sears Brands, LLC
Use & Care Guide
Manual de Uso y Cuidado
English/ Espaiol
Kenmore
C pa
q ©
Modes iMode,:q : 255;,,9 '73)2
P/N 134779000B (0807)
Sears Brands Management Corporation
Hoffman Estates, IL 60179 U.S.A.
www.kenmore.com
www.sears.com
"F/ eFGto[
I
ke?Ftge#'°"" s,=
c us
6/8/10