KENMORE LIMITED WARRANTY
FOR ONE YEAR from the date of sale this applance is warranted
against defects in materlal or workmanship when it is installed,
operated and maintained according to al suppled instructions.
WITH PROOF OF SALE, return a defective product to the retaler
from which it was purchased for free repair or replacement at
option of seler.
This warranty is void if this product is ever used for other than
private household purposes.
This warranty gives you specific legal rights, and you may also
have other rights which vary from state to state.
Sears Brands Management Corporation, Hoffman Estates, IL 60179
KENMORE GARANTJA LIMITADA
DENTRO DE UN ANO a partlr de la fecha de venta, este aparato
est_ garantizado contra defectos de material y mano de obra si la
instalaci6n, la utlizaci6n y el mantenimiento se reaizan de acuerdo
con todas las instrucciones suministradas.
CON LA PRUEBA DE VENTA, puede devolver el producto con defecto
al detalista desde el cual se compr6 el producto para un serviclo de
arreglo gratuito o reemplazo seggn la opci6n del vendedor
Esta garantia ser_ nula si este producto se utiliza para arras fines que
no sean el usa familar prlvado.
Esta garantia le otorga derechos legales especificos. Usted puede tener
adem_s arras derechos clue varian de un estado a otto.
Sears Brands Management Corporation, Hoffman Estates, IL 60179
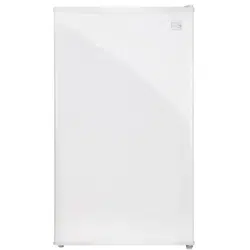
Use & Care Guide
Manual de Usa y Cuidado
English / Espafiol
Kenmore
Co pa
3o'I cu,'-° ft
&
P/N 134779000B (0807)
Sears Brands Management Corporation
Hoffrnan Estates, IL 60179 U.S.A.
www.kenmore.com
WWW.Sea rs,corrl
=
° °d
6/8/10
J
3
\
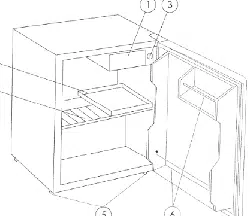
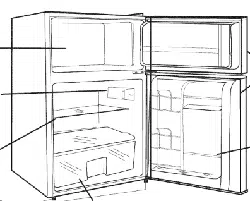
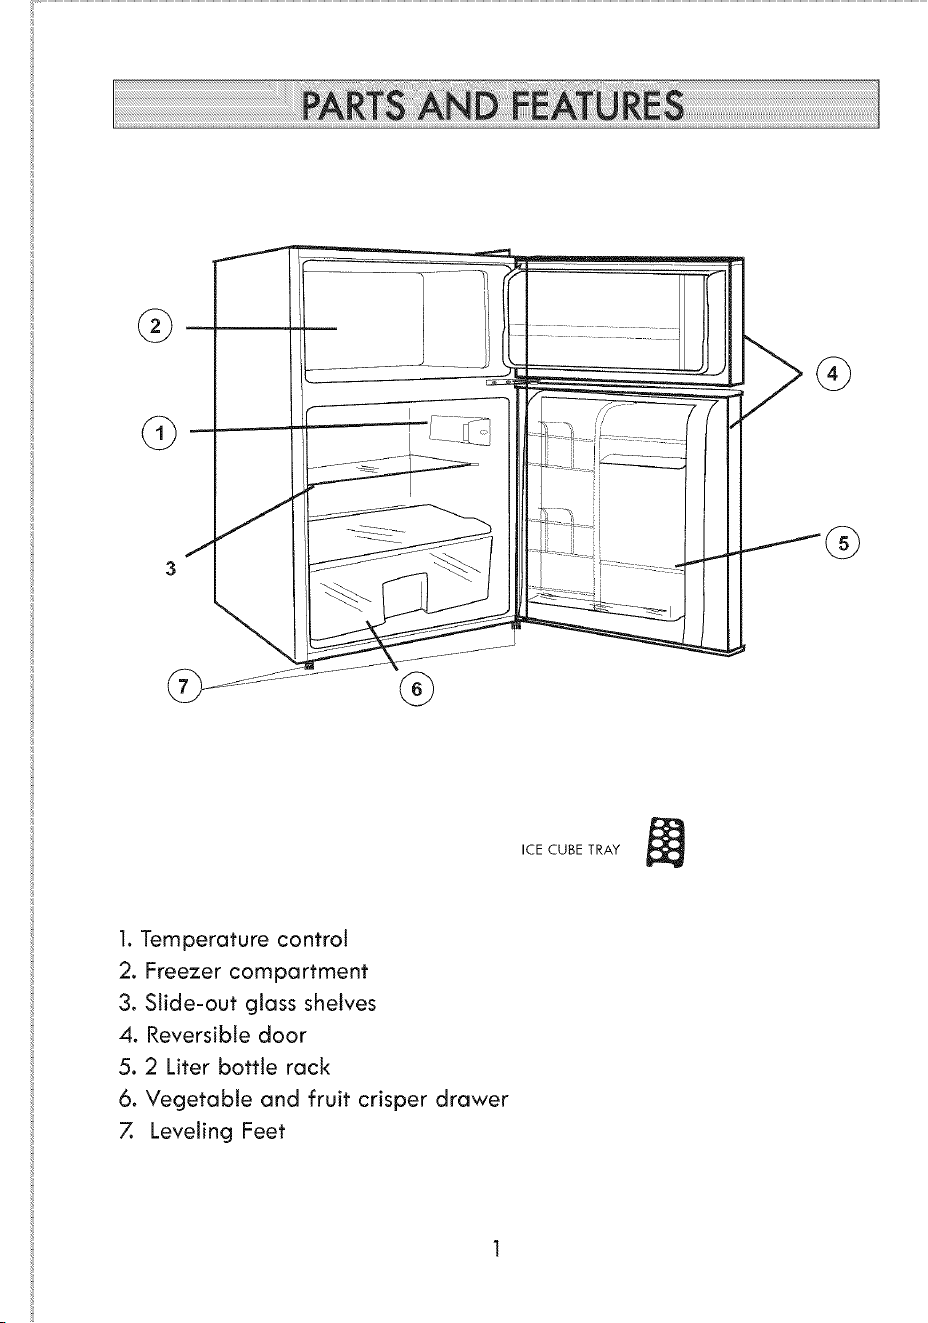
1. Temperature control
2. Freezer compartment
3. Slide-out glass shelves
4. Reversible door
5. 2 Liter bottle rack
6. Vegetable and fruit crisper drawer
Z Leveling Feet
ICE CUBE TRAY
DANGE
Riskof child entrapment. Before you throw away your old refrigerator,
take off the doors. Leave the shelvesin place so that children may
not easily climb inside.
CFC!HCFC DISPOSAL
Youro{d refrigerator may havea cooling systemthat usedCFCsor HCFCs
(chlorofluorocarbonsor hydroch{orofluorocarbons).CFCsand HCFCsare believedto harm
stratosphericozone if releasedto theatmosphere.Other refrigerantsmay alsocause harm
to the environmentif releasedto theatmosphere.
If youare throwingaway your old refrigerator,makesurethe refrigerant isremovedfor
proper disposalby a qualified technician.Ifyou intentionallyreleaserefrigerant,you may
be subjectto finesand imprisonmentunderprovisionsof environmentallegislation.
WARNING: When handling, moving,usingor cleaning this refrigerator, be careful to
avoid damaging refrigerant tubing. Tubingdamage may allow flammable refrigerant
gas leakage, which can result in personal injury.
PRQDUCT RECORD
Write the model and serial number of your product in the spaces provided
below. Both are found printed on an identification label attached to the unit
interior.
Mode[ number: 255.99763
Serial number:
2
6/8/10

J
3
\
1. Temperature control
2. Freezer compartment
3. Slide-out glass shelves
4. Reversible door
5. 2 Liter bottle rack
6. Vegetable and fruit crisper drawer
Z Leveling Feet
ICE CUBE TRAY
DANGE
Riskof child entrapment. Before you throw away your old refrigerator,
take off the doors. Leave the shelvesin place so that children may
not easily climb inside.
CFC!HCFC DISPOSAL
Youro{d refrigerator may havea cooling systemthat usedCFCsor HCFCs
(chlorofluorocarbonsor hydroch{orofluorocarbons).CFCsand HCFCsare believedto harm
stratosphericozone if releasedto theatmosphere.Other refrigerantsmay alsocause harm
to the environmentif releasedto theatmosphere.
If youare throwingaway your old refrigerator,makesurethe refrigerant isremovedfor
proper disposalby a qualified technician.Ifyou intentionallyreleaserefrigerant,you may
be subjectto finesand imprisonmentunderprovisionsof environmentallegislation.
WARNING: When handling, moving,usingor cleaning this refrigerator, be careful to
avoid damaging refrigerant tubing. Tubingdamage may allow flammable refrigerant
gas leakage, which can result in personal injury.
PRQDUCT RECORD
Write the model and serial number of your product in the spaces provided
below. Both are found printed on an identification label attached to the unit
interior.
Mode[ number: 255.99763
Serial number:
2
6/8/10

Unpacking Your Refrigerator
1. Remove all packaging material. This includes the foam base and all adhesive
tape holding the refrigerator accessories inside and outside. Slide out and
remove the plastic or foam guard used to protect the compressor from shipping
damage due to vibration and shock.
2. Inspect and remove any remaining packaging, tape or printed materials
before powering on the refrigerator.
3. Check to be sure you have all accessories and parts listed in the Parts and
Features section.
Proper Air Circulation
To ensure that your refrigerator works at the maximum efficiency it was
designed for, you should install it in a location where there is proper air
circulation, plumbing and electrical connections.
The following are recommended clearances around the refrigerator :
Sides ...................3/4 inches (18mm)
Top......................2 inches (50mm)
Back .................. 2 inches (50ram)
Electrical Requirements
Make sure there is a suitable power outlet (115 volts, 15 amps) with
proper grounding to power the refrigerator.
WARNING: Avoid the use of three prong adapters. NEVERcut of:[the
thirdgrounding prong in order to accommodate a two prong outlet. Cutting
off the grounding prong is a dangerous practice since it provides no effective
grounding for the refrigerator and may result in seriousinjury from electrical shock.
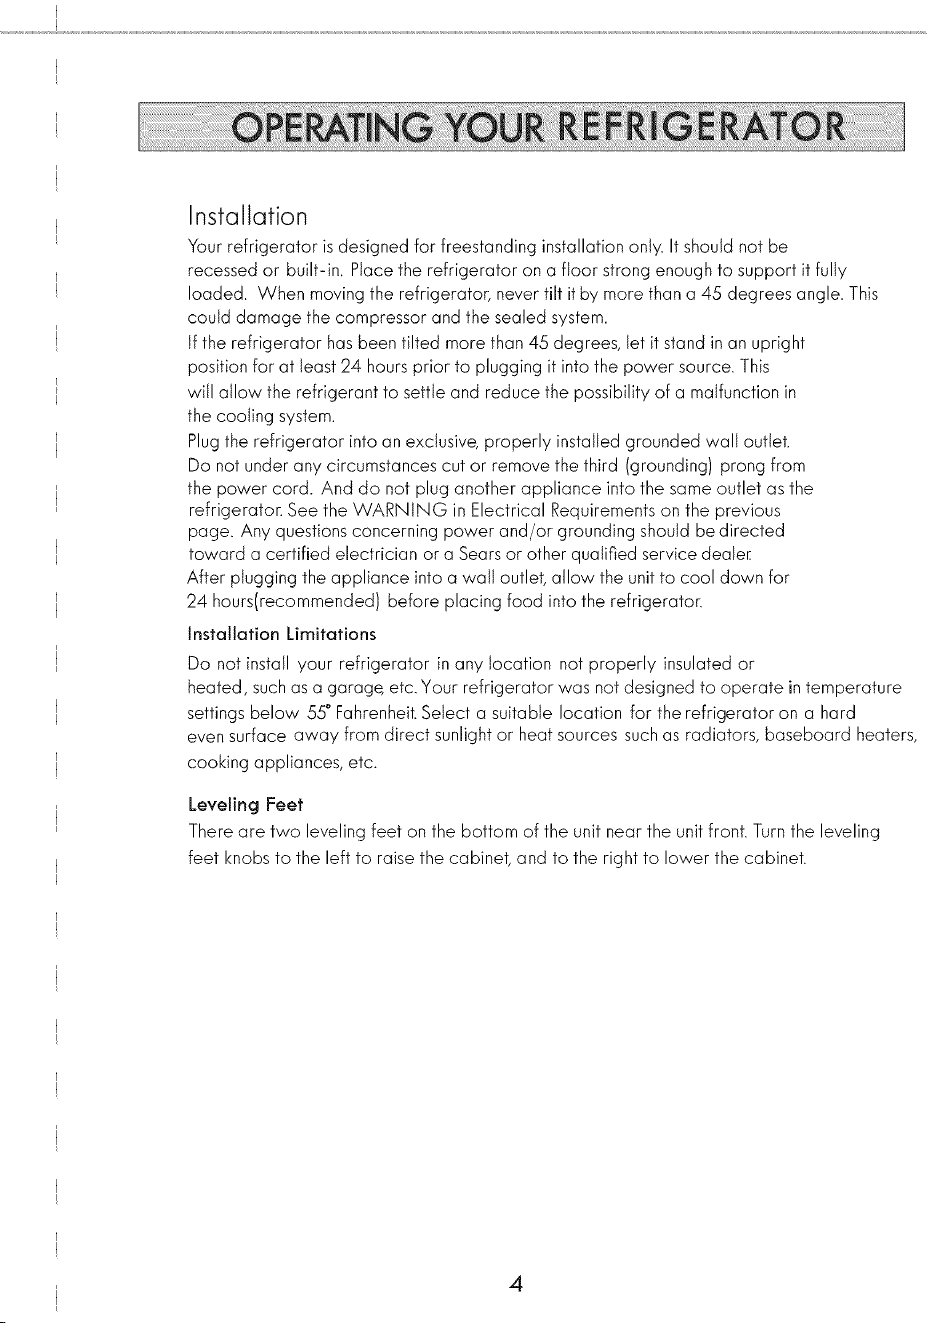
Installation
Your refrigerator is designed for freestanding installation ont4 It should not be
recessed or built-in. Place the refrigerator on a floor strong enough to support it fully
loaded. When moving the refrigerator, never tilt it by more than a 45 degrees angle. This
could damage the compressor and the sealed system.
tf the refrigerator has been tilted more than 45 degrees, let it stand in an upright
position for at least 24 hours prior to plugging it into the power source. This
will allow the refrigerant to settle and reduce the possibility of a malfunction in
the cooling system.
Plug the refrigerator into an exclusive, properly installed grounded wall outlet.
Do not under any circumstances cut or remove the third (grounding) prong from
the power cord. And do not plug another appliance into the same outlet as the
refrigeraton See the WARNING in Electrical Requirements on the previous
page. Any questions concerning power and/or grounding should be directed
toward a certified electrician or a Sears or other qualified service dealer
After plugging the appliance into a wall outlet, allow the unit to cool down for
24 hours(recommended) before placing food into the refrigeraton
Installation Limitations
Do not install your refrigerator in any location not properly insulated or
heated, such as a garage, etc. Your refrigerator was not designed to operate in temperature
settings below 55° Fahrenheit. Select a suitable location for the refrigerator on a hard
even surface away from direct sunlight or heat sources such as radiators, baseboard heaters,
cooking appliances, etc.
Leveling Feet
Thereare two leveling feet on the bottom of the unit near the unit front. Turnthe leveling
feet knobs to the left to raise the cabinet, and to the right to lower the cabinet.
4
6/8/10
Unpacking Your Refrigerator
1. Remove all packaging material. This includes the foam base and all adhesive
tape holding the refrigerator accessories inside and outside. Slide out and
remove the plastic or foam guard used to protect the compressor from shipping
damage due to vibration and shock.
2. Inspect and remove any remaining packaging, tape or printed materials
before powering on the refrigerator.
3. Check to be sure you have all accessories and parts listed in the Parts and
Features section.
Proper Air Circulation
To ensure that your refrigerator works at the maximum efficiency it was
designed for, you should install it in a location where there is proper air
circulation, plumbing and electrical connections.
The following are recommended clearances around the refrigerator :
Sides ...................3/4 inches (18mm)
Top......................2 inches (50mm)
Back .................. 2 inches (50ram)
Electrical Requirements
Make sure there is a suitable power outlet (115 volts, 15 amps) with
proper grounding to power the refrigerator.
WARNING: Avoid the use of three prong adapters. NEVERcut of:[the
thirdgrounding prong in order to accommodate a two prong outlet. Cutting
off the grounding prong is a dangerous practice since it provides no effective
grounding for the refrigerator and may result in seriousinjury from electrical shock.
Installation
Your refrigerator is designed for freestanding installation ont4 It should not be
recessed or built-in. Place the refrigerator on a floor strong enough to support it fully
loaded. When moving the refrigerator, never tilt it by more than a 45 degrees angle. This
could damage the compressor and the sealed system.
tf the refrigerator has been tilted more than 45 degrees, let it stand in an upright
position for at least 24 hours prior to plugging it into the power source. This
will allow the refrigerant to settle and reduce the possibility of a malfunction in
the cooling system.
Plug the refrigerator into an exclusive, properly installed grounded wall outlet.
Do not under any circumstances cut or remove the third (grounding) prong from
the power cord. And do not plug another appliance into the same outlet as the
refrigeraton See the WARNING in Electrical Requirements on the previous
page. Any questions concerning power and/or grounding should be directed
toward a certified electrician or a Sears or other qualified service dealer
After plugging the appliance into a wall outlet, allow the unit to cool down for
24 hours(recommended) before placing food into the refrigeraton
Installation Limitations
Do not install your refrigerator in any location not properly insulated or
heated, such as a garage, etc. Your refrigerator was not designed to operate in temperature
settings below 55° Fahrenheit. Select a suitable location for the refrigerator on a hard
even surface away from direct sunlight or heat sources such as radiators, baseboard heaters,
cooking appliances, etc.
Leveling Feet
Thereare two leveling feet on the bottom of the unit near the unit front. Turnthe leveling
feet knobs to the left to raise the cabinet, and to the right to lower the cabinet.
4
6/8/10
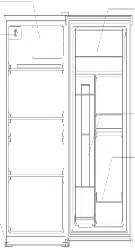
DOOR REVERSAL
WARNING: Unplug the refrigerator before performing door reversal _rocess. Failure to unplug
may result in serious injury or death from electrical shock.
CAUTION: To avoid personal injury and property damage, obtain assistance from another person
to perform the door reversal process.
1,Remove leveling foot from front of cabinet base (Fig. A).
2, Remove screws securing lower hinge bracket to base of cabinet.
Remove bracket. (Fig.A)
3, Remove lower door from middle hinge post (open door and
pull down).
4 Remove screws from m dd e h nge bracket and remove bracket i.................l] ............
Remove upper door from top hinge post opendoor and pulldown .I ........................:......:!,J:l
5 With fiat blade tool carefully remove cover from top hinge , /_:_-- ....... 7'[{i--_]--1 J
bracket. Remove screws securing bracket to top of cabinet and l _ Jij
remove bracket (F,g. C). I_ ; II I
NOTE: Be careful to retain all washers and gaskets in position I_ i JJ /
when removing and replacing hinges.
6, Remove the hole plugs on each door. The upper door has plugs
on the top and bottom.
7,,Attach top hinge bracket to opposite side of cabinet. Replace
bracket cover. Re-fit the hole plugs on the opposite sides of both
doors, i
8, Remove the middle hinge hole plugs from the divider panel _
between the upper and lower compartment (Fig. B). Re-fit plugs
on opposite side of panel. Install middle hinge bracket using holes
exposed from removal of plugs.
9, Install upper door. To install, loosen and remove screw nearest to
middle hinge post. Lower middle hinge slightly to insert top hinge post
into door. Rotate middle hinge up to insert middle hinge post into door.
Replace and secure screw.
10, Install lower door. To install, insert middle hinge post into top hole in door.
Close door. Insert post of lower hinge into bottom of door. Secure lower hinge
bracket to base of cabinet with previously removed screws.
11,Install leveling foot to opposite side of cabinet base.
CAUTION: If the refrigerator has been placed in a horizontal or tilted position for ease of door
reversal, wait 24 hours before plugging it in. Plugging in sooner may result in permanent damage
to cooling system.
initial Use
To reach the set coldness level when operating the refrigerator for the first time, run it without food
load until you hear the compressor stop. This usually takes 2 to 3 hours. Once the set temperature is
reached, load food into the refrigerator.
Note: tf the refrigerator has been placed in a horizontal or
titted position for any period of time, wait 24 hours before plugging it in.
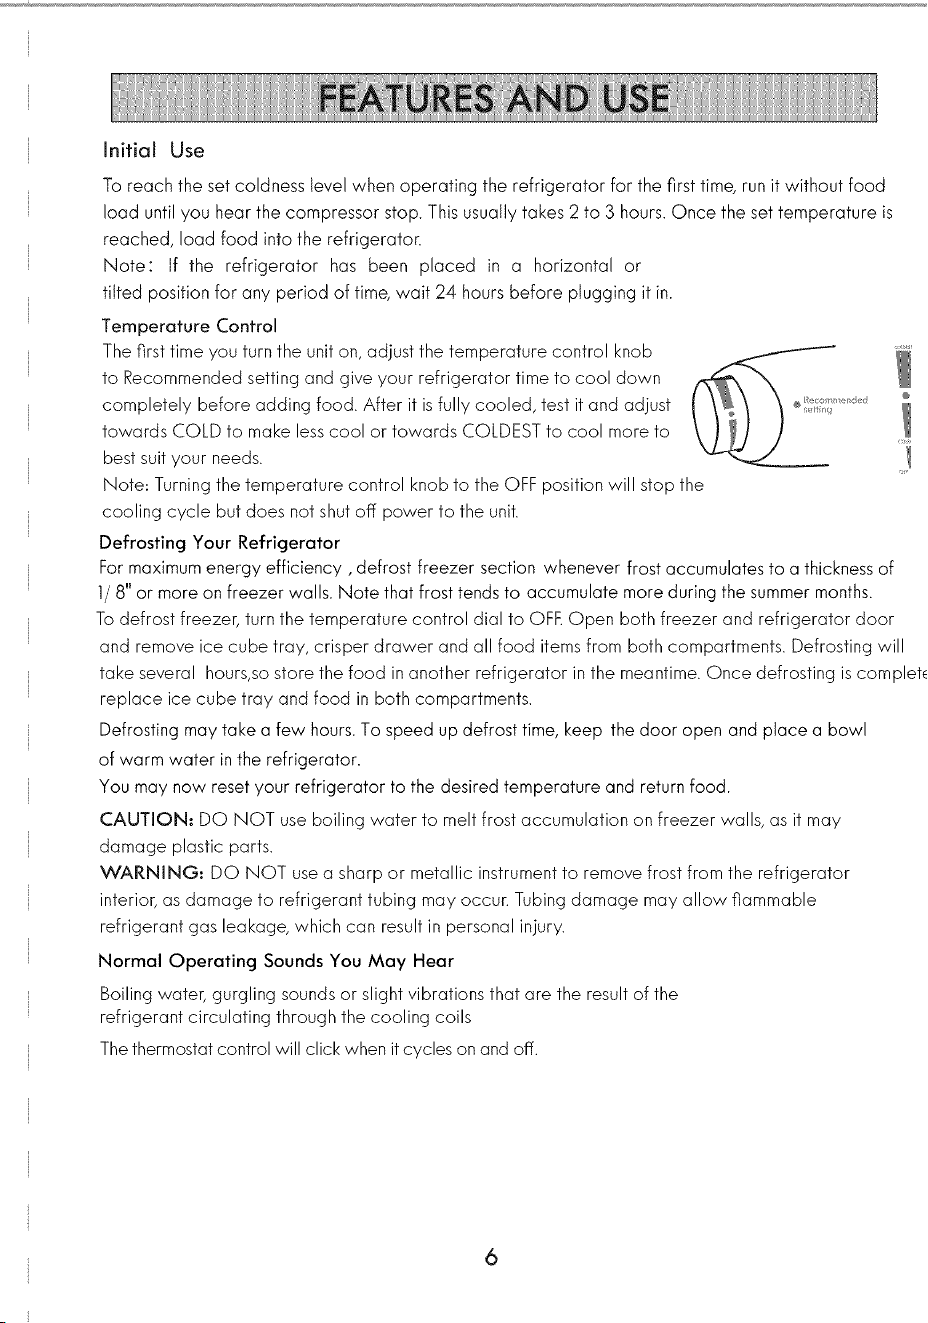
Temperature Control
The first time you turn the unit on, adjust the temperature control knob _
to Recommended setting and give your refrigerator time to cool down _
completely before adding food. After it is fully cooled, test it and adjust
towards COLD to make less cool or towards COLDEST to cool more to
best suit your needs.
Note: Turning the temperature control knob to the OFF position will stop the
cooling cycle but does not shut off power to the unit.
Defrosting Your Refrigerator
For maximum energy efficiency, defrost freezer section whenever frost accumulates to a thickness of
1/8" or more on freezer walls. Note that frost tends to accumulate more during the summer months.
To defrost freezer, turn the temperature control dial to OFF. Open both freezer and refrigerator door
and remove ice cube tray, crisper drawer and all food items from both compartments. Defrosting will
take several hours,so store the food in another refrigerator in the meantime. Once defrosting is complete,
replace ice cube tray and food in both compartments.
Defrosting may take a few hours. To speed up defrost time, keep the door open and place a bowl
of warm water in the refrigerator.
You may now reset your refrigerator to the desired temperature and return food.
CAUTION; DO NOT use boiling water to melt frost accumulation on freezer walls, as it may
damage plastic parts.
WARNING; DO NOT use a sharp or metallic instrument to remove frost from the refrigerator
interior, as damage to refrigerant tubing may occur. Tubing damage may allow flammable
refrigerant gas leakage, which can result in personal injury.
Normal Operating Sounds You May Hear
Boiling water, gurgling sounds or slight vibrations that are the result of the
refrigerant circulating through the cooling coils
The thermostat control will click when it cycles on and off.
5 6
6/8/10
DOOR REVERSAL
WARNING: Unplug the refrigerator before performing door reversal _rocess. Failure to unplug
may result in serious injury or death from electrical shock.
CAUTION: To avoid personal injury and property damage, obtain assistance from another person
to perform the door reversal process.
1,Remove leveling foot from front of cabinet base (Fig. A).
2, Remove screws securing lower hinge bracket to base of cabinet.
Remove bracket. (Fig.A)
3, Remove lower door from middle hinge post (open door and
pull down).
4 Remove screws from m dd e h nge bracket and remove bracket i.................l] ............
Remove upper door from top hinge post opendoor and pulldown .I ........................:......:!,J:l
5 With fiat blade tool carefully remove cover from top hinge , /_:_-- ....... 7'[{i--_]--1 J
bracket. Remove screws securing bracket to top of cabinet and l _ Jij
remove bracket (F,g. C). I_ ; II I
NOTE: Be careful to retain all washers and gaskets in position I_ i JJ /
when removing and replacing hinges.
6, Remove the hole plugs on each door. The upper door has plugs
on the top and bottom.
7,,Attach top hinge bracket to opposite side of cabinet. Replace
bracket cover. Re-fit the hole plugs on the opposite sides of both
doors, i
8, Remove the middle hinge hole plugs from the divider panel _
between the upper and lower compartment (Fig. B). Re-fit plugs
on opposite side of panel. Install middle hinge bracket using holes
exposed from removal of plugs.
9, Install upper door. To install, loosen and remove screw nearest to
middle hinge post. Lower middle hinge slightly to insert top hinge post
into door. Rotate middle hinge up to insert middle hinge post into door.
Replace and secure screw.
10, Install lower door. To install, insert middle hinge post into top hole in door.
Close door. Insert post of lower hinge into bottom of door. Secure lower hinge
bracket to base of cabinet with previously removed screws.
11,Install leveling foot to opposite side of cabinet base.
CAUTION: If the refrigerator has been placed in a horizontal or tilted position for ease of door
reversal, wait 24 hours before plugging it in. Plugging in sooner may result in permanent damage
to cooling system.
initial Use
To reach the set coldness level when operating the refrigerator for the first time, run it without food
load until you hear the compressor stop. This usually takes 2 to 3 hours. Once the set temperature is
reached, load food into the refrigerator.
Note: tf the refrigerator has been placed in a horizontal or
titted position for any period of time, wait 24 hours before plugging it in.
Temperature Control
The first time you turn the unit on, adjust the temperature control knob _
to Recommended setting and give your refrigerator time to cool down _
completely before adding food. After it is fully cooled, test it and adjust
towards COLD to make less cool or towards COLDEST to cool more to
best suit your needs.
Note: Turning the temperature control knob to the OFF position will stop the
cooling cycle but does not shut off power to the unit.
Defrosting Your Refrigerator
For maximum energy efficiency, defrost freezer section whenever frost accumulates to a thickness of
1/8" or more on freezer walls. Note that frost tends to accumulate more during the summer months.
To defrost freezer, turn the temperature control dial to OFF. Open both freezer and refrigerator door
and remove ice cube tray, crisper drawer and all food items from both compartments. Defrosting will
take several hours,so store the food in another refrigerator in the meantime. Once defrosting is complete,
replace ice cube tray and food in both compartments.
Defrosting may take a few hours. To speed up defrost time, keep the door open and place a bowl
of warm water in the refrigerator.
You may now reset your refrigerator to the desired temperature and return food.
CAUTION; DO NOT use boiling water to melt frost accumulation on freezer walls, as it may
damage plastic parts.
WARNING; DO NOT use a sharp or metallic instrument to remove frost from the refrigerator
interior, as damage to refrigerant tubing may occur. Tubing damage may allow flammable
refrigerant gas leakage, which can result in personal injury.
Normal Operating Sounds You May Hear
Boiling water, gurgling sounds or slight vibrations that are the result of the
refrigerant circulating through the cooling coils
The thermostat control will click when it cycles on and off.
5 6
6/8/10
Cleaning and Maintenance
WARNING: To avoid electric shock, always unplug your refrigerator before
cleaning. Ignoringthiswarning may result in death or injury.
CAUTION.' Before using cleaning products, always read and understand the cleaning processes
explained in this manual. Follow cleaning product manufacturers_s instructions and warnings to avoid
personal injury or product damage.
General Cleaning
Prepare a cleaning solution of ] to 2 tablespoons of baking soda mixed with warm water. Usea
sponge or soft cloth, dampened with the cleaning solution, to wipe down your refrigerator.
Rinse with dean warm water and dry with a soft cloth.
Do not use harsh chemicals, abrasives, ammonia, chlorine bleach, concentrated detergents,
solvents or metal scouring pads. Some of these chemicals may dissolve, damage and/or discolor your
refrigerator.
Door Gaskets
Clean door gaskets every three months according to the instructions described above in General
Cleaning.
Gaskets must be kept dean and pliable to ensure a proper seal.
Petroleum jelly applied lightly on the hinge side of gaskets will keep the
gaskets pliable and ensure agood seal.
Power Interruptions
Occasionally there may be power interruptions due to thunderstorms or other causes. Remove the
power cord plug from the AC outlet when a power outage occurs. When power has been restored
after a prolonged outage, inspect all food for spoilage. Clean the inside of the refrigerator and
freezer compartment before reuse.
Vacation and Moving Care
For long vacations or absences, unplug the unit, empty food from both compartments, move
the temperature dial to the OFF position and clean the door gaskets according to the General
Cleaning section. Prop door open, so air can circulate inside. When moving, always move the
refrigerator verticall% Do not move unit when in a horizontal position, as possible damage to the
sealed system could occur.
WARNING: When handling, moving,usingor cleaning this refrigerator, be careful to avoid
damaging refrigerant tubing. Tubingdamage may allow flammable refrigerant gas leakage,
which can result in personal injury.
7
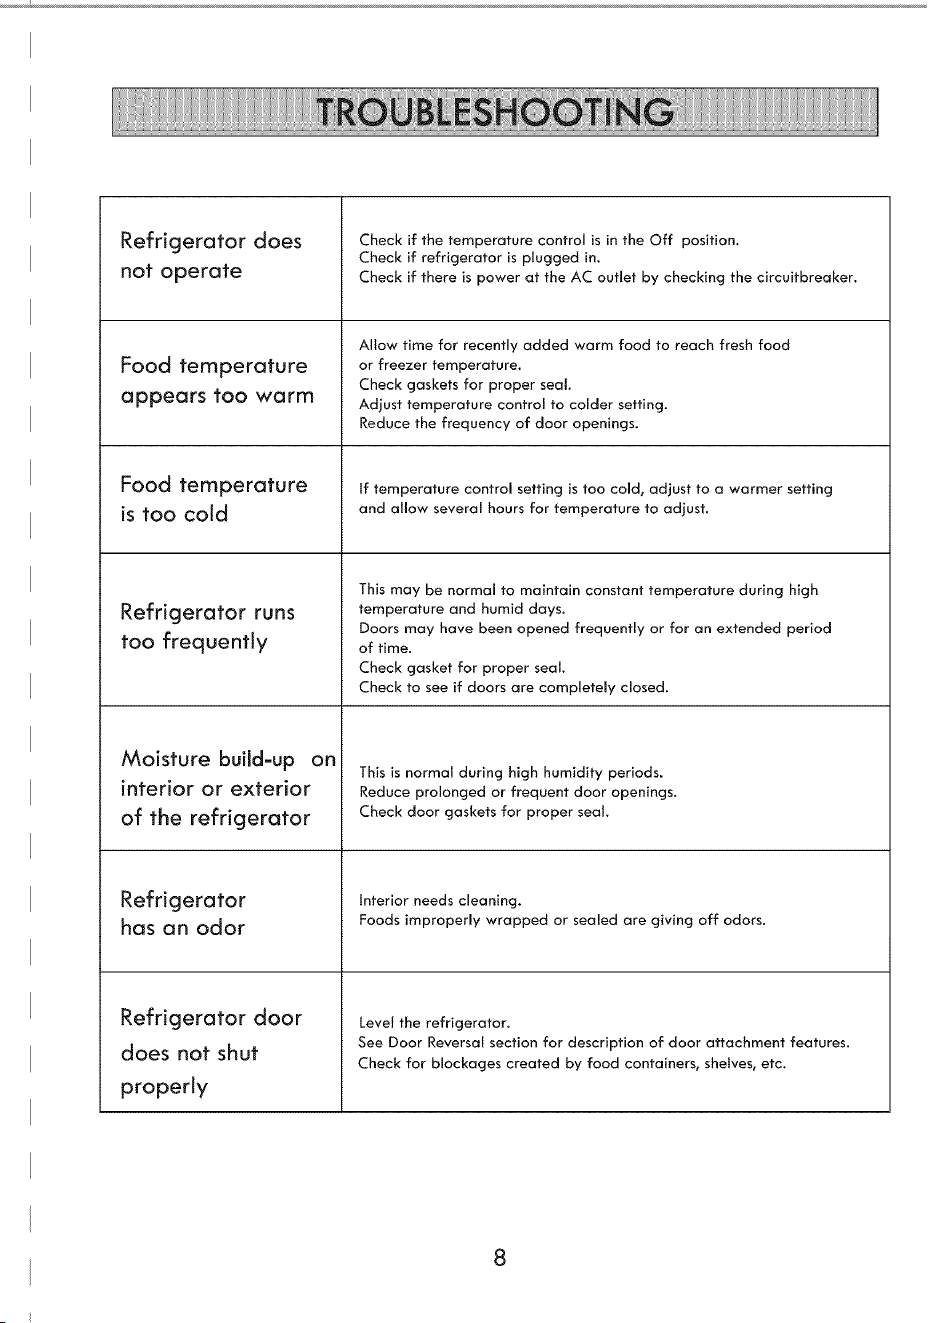
Refrigerator does
not operate
Food temperature
appears too warm
Food temperature
is too cold
Refrigerator runs
too frequently
Check if the temperature control is in the Off position.
Check if refrigerator is plugged in.
Check if there is power at the AC outlet by checking the circuitbreaker.
Allow time for recently added warm food to reach fresh food
or freezer temperature.
Check gaskets for proper seal.
Adjust temperature control to colder setting.
Reduce the frequency of door openings.
tf temperature control setting is too cold, adjust to a warmer setting
and allow several hours for temperature to adjust.
This may be normal to maintain constant temperature during high
temperature and humid days.
Doors may have been opened frequently or for an extended period
of time.
Check gasket for proper seal.
Check to see if doors are completely closed.
Moisture build-up on
interior or exterior
of the refrigerator
Refrigerator
has an odor
Refrigerator door
does not shut
properly
This is normal during high humidity periods.
Reduce prolonged or frequent door openings.
Check door gaskets for proper seal.
Interior needs cleaning.
Foods improperly wrapped or sealed are giving off odors.
Level the refrigerator.
See Door Reversal section for description of door attachment features.
Check for blockages created by food containers, shelves, etc.
6/8/10
Cleaning and Maintenance
WARNING: To avoid electric shock, always unplug your refrigerator before
cleaning. Ignoringthiswarning may result in death or injury.
CAUTION.' Before using cleaning products, always read and understand the cleaning processes
explained in this manual. Follow cleaning product manufacturers_s instructions and warnings to avoid
personal injury or product damage.
General Cleaning
Prepare a cleaning solution of ] to 2 tablespoons of baking soda mixed with warm water. Usea
sponge or soft cloth, dampened with the cleaning solution, to wipe down your refrigerator.
Rinse with dean warm water and dry with a soft cloth.
Do not use harsh chemicals, abrasives, ammonia, chlorine bleach, concentrated detergents,
solvents or metal scouring pads. Some of these chemicals may dissolve, damage and/or discolor your
refrigerator.
Door Gaskets
Clean door gaskets every three months according to the instructions described above in General
Cleaning.
Gaskets must be kept dean and pliable to ensure a proper seal.
Petroleum jelly applied lightly on the hinge side of gaskets will keep the
gaskets pliable and ensure agood seal.
Power Interruptions
Occasionally there may be power interruptions due to thunderstorms or other causes. Remove the
power cord plug from the AC outlet when a power outage occurs. When power has been restored
after a prolonged outage, inspect all food for spoilage. Clean the inside of the refrigerator and
freezer compartment before reuse.
Vacation and Moving Care
For long vacations or absences, unplug the unit, empty food from both compartments, move
the temperature dial to the OFF position and clean the door gaskets according to the General
Cleaning section. Prop door open, so air can circulate inside. When moving, always move the
refrigerator verticall% Do not move unit when in a horizontal position, as possible damage to the
sealed system could occur.
WARNING: When handling, moving,usingor cleaning this refrigerator, be careful to avoid
damaging refrigerant tubing. Tubingdamage may allow flammable refrigerant gas leakage,
which can result in personal injury.
7
Refrigerator does
not operate
Food temperature
appears too warm
Food temperature
is too cold
Refrigerator runs
too frequently
Check if the temperature control is in the Off position.
Check if refrigerator is plugged in.
Check if there is power at the AC outlet by checking the circuitbreaker.
Allow time for recently added warm food to reach fresh food
or freezer temperature.
Check gaskets for proper seal.
Adjust temperature control to colder setting.
Reduce the frequency of door openings.
tf temperature control setting is too cold, adjust to a warmer setting
and allow several hours for temperature to adjust.
This may be normal to maintain constant temperature during high
temperature and humid days.
Doors may have been opened frequently or for an extended period
of time.
Check gasket for proper seal.
Check to see if doors are completely closed.
Moisture build-up on
interior or exterior
of the refrigerator
Refrigerator
has an odor
Refrigerator door
does not shut
properly
This is normal during high humidity periods.
Reduce prolonged or frequent door openings.
Check door gaskets for proper seal.
Interior needs cleaning.
Foods improperly wrapped or sealed are giving off odors.
Level the refrigerator.
See Door Reversal section for description of door attachment features.
Check for blockages created by food containers, shelves, etc.
6/8/10
10

10
\
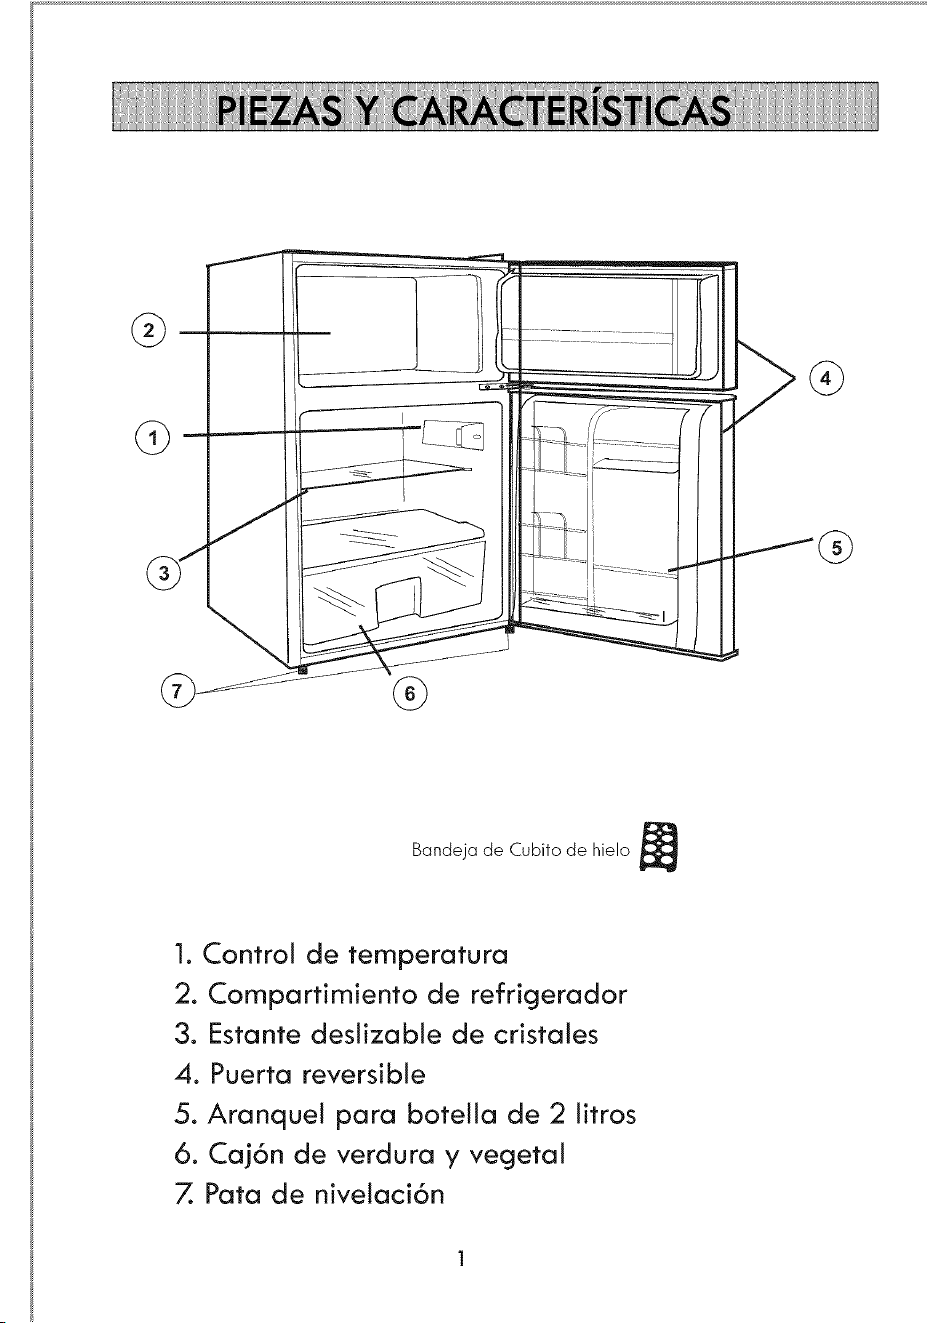
Bandeja de Cubito de hielo
1. Control de temperatura
2. Compartimiento de refrigerador
3. Estante deslizable de cristales
4. Puerta reversible
5. AranqueJ para botella de 2 litros
6. Ca]6n de verdura y vegetal
7. Pata de nivelaci6n
PELIGRO
Riesgode que los niBosqueden atrapados. Quite las puertas antes de desechar
suvieja refrigerador. Deje losestantes en su lugar para que los ni_osno puedan
meterse adentro f6cilmente.
ELIMiNACI6N DE CFC/HCFC
Esposible que suantiguo refrigerador tenga un sistemade refrigeraci6n que
utilizaba CFCsor HCFCs (colofluorocarbonos o hidroclorofluorocarbonos). Se
cree que los CFCsy HCFCshacen da_o al ozono estratosf@ico si se liberan en la
atm6sfera.
Siest6 pot desechar su viejo refrigerador, asegOresede que unt_cnico calificado
extraiga el refrigerante para una eliminaci6n adecuada. Si libera el refrigerante
de manera intencional, es posible que se atenga a sanciones de multasy
encarcelamiento segOnlas disposiciones de la legislaci6n medioambiental.
Advertencia: Tenga cuidado para avitar daBo de tubo de refrigerante. Esposible
que el daBo de tubo causa la fuga de gas de refrigerante inflamable, el cual puede
resultar en lesi6n personal.
REGISTRO DE PRODUCTO
Gracias pot utilizar el producto de Kenmore. Este manual f6cJl-de-usar
le Jnstruye en utilizar apropiadamente su refrigerador.
NOmero de ModeJo:
255.99763
NOmero de Serie:
6/8/10
\
Bandeja de Cubito de hielo
1. Control de temperatura
2. Compartimiento de refrigerador
3. Estante deslizable de cristales
4. Puerta reversible
5. AranqueJ para botella de 2 litros
6. Ca]6n de verdura y vegetal
7. Pata de nivelaci6n
PELIGRO
Riesgode que los niBosqueden atrapados. Quite las puertas antes de desechar
suvieja refrigerador. Deje losestantes en su lugar para que los ni_osno puedan
meterse adentro f6cilmente.
ELIMiNACI6N DE CFC/HCFC
Esposible que suantiguo refrigerador tenga un sistemade refrigeraci6n que
utilizaba CFCsor HCFCs (colofluorocarbonos o hidroclorofluorocarbonos). Se
cree que los CFCsy HCFCshacen da_o al ozono estratosf@ico si se liberan en la
atm6sfera.
Siest6 pot desechar su viejo refrigerador, asegOresede que unt_cnico calificado
extraiga el refrigerante para una eliminaci6n adecuada. Si libera el refrigerante
de manera intencional, es posible que se atenga a sanciones de multasy
encarcelamiento segOnlas disposiciones de la legislaci6n medioambiental.
Advertencia: Tenga cuidado para avitar daBo de tubo de refrigerante. Esposible
que el daBo de tubo causa la fuga de gas de refrigerante inflamable, el cual puede
resultar en lesi6n personal.
REGISTRO DE PRODUCTO
Gracias pot utilizar el producto de Kenmore. Este manual f6cJl-de-usar
le Jnstruye en utilizar apropiadamente su refrigerador.
NOmero de ModeJo:
255.99763
NOmero de Serie:
6/8/10
Desembale el refrigerador
1.Quite todos los materiales de embalaje, incluyendo la base de espuma y la cinta adhesiva
que mantiene los accesorios del refrigerador dentro y fuera. Saca y quite el protector de
plRstico o de espuma que estR utiliza para proteger el compresor contra da_os durante el
transporte debido a vibraciones y golpes.
2. Examiney quite cualquier embalaje, cinta o materiales imperesos que queden antes de
enchufar el refrigerador.
3. Aseg0rese de que tenga todos los accesorios y piezas enumerados en la secci6n de
PiezasY Caracteristicas
Circulaci6n Adecuada de Aire
Paraasegurar que su refrigerador funcione con la mRximaeficiencia por la que fue
diseBado, se debe instalar enuna posici6n en la que tiegan una buena circulaci6n
de aire, tubefias y conexiones el&ctricas.
Se recomiendan espacios adicionales alrededor del congeladpor en Io siguiente:
laterales:.......................................3/4 pulgadas (l?mm)
Partesuperor:..............................2 pulgadas (50ram)
Partede atrRs:............................2 pulgadas (50ram)
Requisitos el6ctricos
Aseg0rese de que haya un tomacorriente adecuado (115voltios, 15amperios) puesto
apropiadamente a la tierra para la alimentaci6n del refrigerador.
ADVERTENCIA: Evite el uso de adaptadores de tres puntas,y nunca corte la
tercera puntade tierra para adaptarlo a una enchufe de dos puntas.Espeligroso
cortar la punta de la tierra porque el refrigerador no tiene conexi6n efectiva a tierra
para y puede tener como resultado peligroso de descarga electrica.
Instalaci6n
Su refrigerador debe de ser instalado independientemente. No puede ser empostrado ni
incrustado. Coloque el refrigerador en unsuelo suficientemente fuerte como para soportar
el refrigerador totalmente cargado. Nunca Io incline mrs de un Rngulo de 45 grados al
mover el refrigerador. Estopodria daBar el compresor y el sistema herm@ico.
Siel refrigerador se ha inclinado mrs de 45 grados, d&jelo en una posici6n vertical mrs
que 24 horas antes de enchufarlo en la fuente de alimentaci6n. Asi que facilita al asiento
del refrigerante y reduce la posibilidad de fallo del sistema de refrigeraci6n.
Enchufeel refrigerador enun tomacorriente exclusivo que estR apropiadamente instalado
a tierra. No conecte otro aparato al mismoenchufe.
No corte de ninguna manera ni quite la tercera (tierra) puntadel cable de alimentaci6n.
Consultea la ADVERTENCIA en RequisitosEl&ctricos en la pRgina anterior. Debe dirigirse
a unelectricista certificado o hacia Searsu otro comerciante cualificado de servicio con
cualquier pregunta relacionada con la alimentaci6n y/o la conexi6n a tierra. Despu_sde
enchufar el aparato en untomacorriente de la pared, deje que la unidad se enfrie durante
24 horasantes de colocar alimentos en el refrigerador.
Limitaciones de la instalaci6n
No instale surefrigerador en ning0n lugar caliente o sinaislamiento adecuado, como un
garaje, etc. Surefrigerador debe de ser manejado a temperatura por debajo de 55°
Fahrenheit.Eligeuna posici6n adecuado para que el refrigerador se coloque en una
superficie s61iday nivelada lejos de la luz solar directa o fuentesde calor, como radiadores,
calentadores de z6calo, aparatos de cocina, etc.
Paras de Ni',,ela¢i6n
Hay dos parasde nivelaci6n en el fondo de la unidad, cerca de la unidad de frente. Gire el
pomo de nivelaci6n hacia la izquierda para levantar el cabinete, y hacia la derecha para
bajar el cabinete.
4
6/8/10
El Cambio del Senfido de da Apertura de La Puerta
ADVERTENCIA: Desenchufe el refrigerador antes de realizar el procedimiento del cambio del sentido
de la apertura de la puerta. Fallo de desenchufe puede resultar en da_os graves o electrocuci6n.
PRECAUCleN: Consiga la ayuda de otra persona en realizar el procedimiento de cambiar el sentido
de la puerta para evitar lesi6n personal y da_os de propiedad.
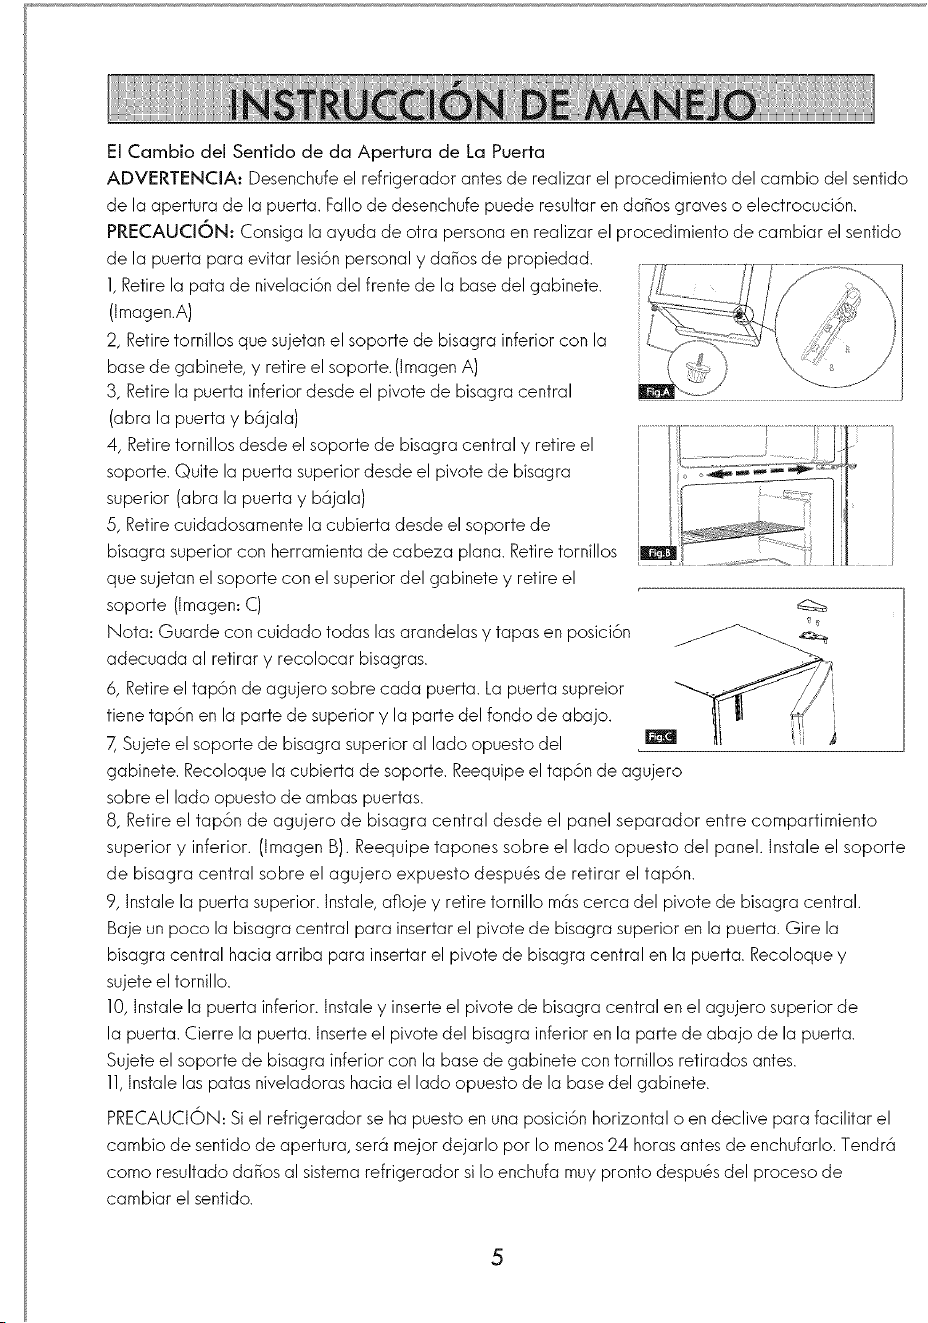
1,Retire la pata de nivelaci6n del frente de la base del gabinete.
(Imagen.A)
2, Retire tornillos que sujetan el soporte de bisagra inferior con la
base de gabinete, y retire el soporte. (Imagen A)
3, Retire la puerta inferior desde el pivote de bisagra central
(abra la puerta y bRjala)
4, Retire tornillos desde el soporte de bisagra central y retire el
soporte. Quite la puerta superior desde el pivote de bisagra
superior (abra la puerta y bRjala)
5, Retire cuidadosamente la cubierta desde el soporte de
bisagra superior con herramienta de cabeza plana. Retire tornillos
que sujetan el soporte con el superior del gabinete y retire el
soporte (Imagen: C)
Nota: Guarde con cuidado todas las arandelas y tapas en posici6n _r
adecuada al retirar y recolocar bisagras.
6, Retire el tap6n de agujero sobre cada puerta. La puerta supreior
tiene tap6n en la parte de superior y la parte del fondo de abajo, i
7,,Sujete el soporte de bisagra superior al lado opuesto del _
gabinete. Recoloque la cubierta de soporte. Reequipe el tap6n de agujero
sobre el lado opuesto de ambas puertas.
8, Retire el tap6n de agujero de bisagra central desde el panel separador entre compartimiento
superior y inferior. (Imagen B). Reequipe tapones sobre el lado opuesto del panel. Instale el soporte
de bisagra central sobre el agujero expuesto despu@s de retirar el tap6n.
9, lnstale la puerta superior, lnstale, afloje y retire tornillo mrs cerca del pivote de bisagra central.
Baje un poco la bisagra central para insertar el pivote de bisagra superior en la puerta. Gire la
bisagra central hacia arriba para insertar el pivote de bisagra central en la puerta. Recoloque y
sujete el tornillo.
10, lnstale la puerta inferior, lnstale y inserte el pivote de bisagra central en el agujero superior de
la puerta. Cierre la puerta, lnserte el pivote del bisagra inferior en la parte de abajo de la puerta.
Sujete el soporte de bisagra inferior con la base de gabinete con tornillos retirados antes.
11,Instale las patas niveladoras hacia el lado opuesto de la base del gabinete.
PRECAUCI(DN: Si el refrigerador se ha puesto en una posici6n horizontal o en declive para facilitar el
cambio de sentido de apertura, ser6 mejor dejarlo por Io menos 24 horas antes de enchufarlo. Tendr6
como resultado daBos al sistema refrigerador si Io enchufa muy pronto despu@s del proceso de
cambiar el sentido.
Uso initial
Haga funcionar el refrigerador sin cargo de alimentos hasta que para el compresor para
alcanzar el nivel de trio ajustado al manejar el refrigerador por primer vez. Normalmente tardar6
de 2 a 3 horas.Una vez que alcanza a la temperatura fijo ya puede almacenar los alimentos en el
refrigerador.
Nota: Si el refrigerador se ha puesto en posici6n horizontal o en declive durante un cierto periodo,
ser6 mejor esperar 24 horas antes de enchufarlo.
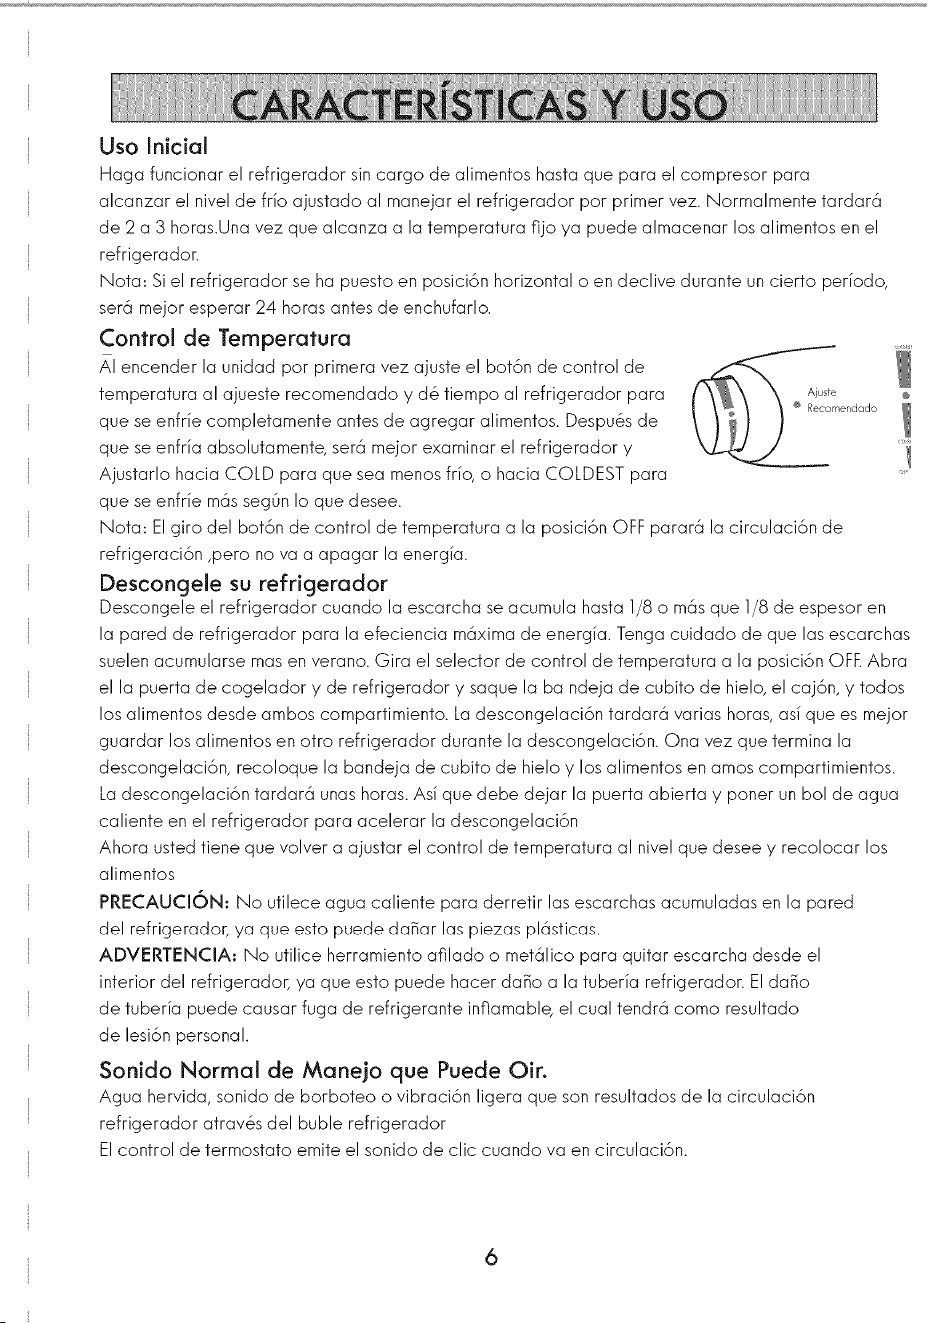
Control de Temperatura
AI encender la unidad por primera vez ajuste el botdn de control de
temperatura al ajueste recomendado y d& tiempo al refrigerador para
® Recomendado
que se enfrie completamente antes de agregar alimentos. Despu@s de
que se enfria absolutamente, serR mejor examinar el refrigerador y
Ajustarlo hacia COLD para que sea menos trio, o hacia COLDEST para
que se enfrie mrs seg0n Io que desee.
Nota: El giro del bot6n de control de temperatura a la posici6n OFF pararR la circulaci6n de
refrigeraci6n ,pero no va a apagar la energi_a.
Descongele su refrigerador
Descongele el refrigerador cuando la escarcha se acumula hasta 1/8 o mrs que 1/8 de espesor en
la pared de refrigerador para la efeciencia mRxima de energi_a. Tenga cuidado de que las escarchas
suelen acumularse mas en verano. Gira el selector de control de temperatura a la posici6n OFF.Abra
el la puerta de cogelador y de refrigerador y saque la ba ndeja de cubito de hielo, el caj6n, y todos
los alimentos desde ambos compartimiento. La descongelaci6n tardarR varias horas, asi que es mejor
guardar los alimentos en otro refrigerador durante la descongelaci6n. Ona vez que termina la
descongelaci6n, recoloque la bandeja de cubito de hielo y los alimentos en amos compartimientos.
La descongelaci6n tardarR unas horas. Asi que debe dejar la puerta abierta y porter un bol de agua
caliente en el refrigerador para acelerar la descongelaci6n
Ahora usted tiene que volver a ajustar el control de temperatura al nivel que desee y recolocar los
alimentos
PRECAUCI6N: No utilece agua caliente para derretir las escarchas acumuladas en la pared
del refrigerador, ya que esto puede daBar las piezas pl(_sticas.
ADVERTENCIA: No utilice herramiento afilado o met61ico para quitar escarcha desde el
interior del refrigerador, ya que esto puede hacer da_o a la tuberia refrigerador. El daBo
de tuberia puede causar fuga de refrigerante inflamable, el cual tendr6 como resultado
de lesi6n personal.
Sonido Normal de Mane]o que Puede Oin
Agua hervida, sonido de borboteo o vibraci6n ligera que son resultados de la circulaci6n
refrigerador atrav&s del buble refrigerador
El control de termostato emite el sonido de clic cuando va en circulaci6n.
5 6
6/8/10
El Cambio del Senfido de da Apertura de La Puerta
ADVERTENCIA: Desenchufe el refrigerador antes de realizar el procedimiento del cambio del sentido
de la apertura de la puerta. Fallo de desenchufe puede resultar en da_os graves o electrocuci6n.
PRECAUCleN: Consiga la ayuda de otra persona en realizar el procedimiento de cambiar el sentido
de la puerta para evitar lesi6n personal y da_os de propiedad.
1,Retire la pata de nivelaci6n del frente de la base del gabinete.
(Imagen.A)
2, Retire tornillos que sujetan el soporte de bisagra inferior con la
base de gabinete, y retire el soporte. (Imagen A)
3, Retire la puerta inferior desde el pivote de bisagra central
(abra la puerta y bRjala)
4, Retire tornillos desde el soporte de bisagra central y retire el
soporte. Quite la puerta superior desde el pivote de bisagra
superior (abra la puerta y bRjala)
5, Retire cuidadosamente la cubierta desde el soporte de
bisagra superior con herramienta de cabeza plana. Retire tornillos
que sujetan el soporte con el superior del gabinete y retire el
soporte (Imagen: C)
Nota: Guarde con cuidado todas las arandelas y tapas en posici6n _r
adecuada al retirar y recolocar bisagras.
6, Retire el tap6n de agujero sobre cada puerta. La puerta supreior
tiene tap6n en la parte de superior y la parte del fondo de abajo, i
7,,Sujete el soporte de bisagra superior al lado opuesto del _
gabinete. Recoloque la cubierta de soporte. Reequipe el tap6n de agujero
sobre el lado opuesto de ambas puertas.
8, Retire el tap6n de agujero de bisagra central desde el panel separador entre compartimiento
superior y inferior. (Imagen B). Reequipe tapones sobre el lado opuesto del panel. Instale el soporte
de bisagra central sobre el agujero expuesto despu@s de retirar el tap6n.
9, lnstale la puerta superior, lnstale, afloje y retire tornillo mrs cerca del pivote de bisagra central.
Baje un poco la bisagra central para insertar el pivote de bisagra superior en la puerta. Gire la
bisagra central hacia arriba para insertar el pivote de bisagra central en la puerta. Recoloque y
sujete el tornillo.
10, lnstale la puerta inferior, lnstale y inserte el pivote de bisagra central en el agujero superior de
la puerta. Cierre la puerta, lnserte el pivote del bisagra inferior en la parte de abajo de la puerta.
Sujete el soporte de bisagra inferior con la base de gabinete con tornillos retirados antes.
11,Instale las patas niveladoras hacia el lado opuesto de la base del gabinete.
PRECAUCI(DN: Si el refrigerador se ha puesto en una posici6n horizontal o en declive para facilitar el
cambio de sentido de apertura, ser6 mejor dejarlo por Io menos 24 horas antes de enchufarlo. Tendr6
como resultado daBos al sistema refrigerador si Io enchufa muy pronto despu@s del proceso de
cambiar el sentido.
Uso initial
Haga funcionar el refrigerador sin cargo de alimentos hasta que para el compresor para
alcanzar el nivel de trio ajustado al manejar el refrigerador por primer vez. Normalmente tardar6
de 2 a 3 horas.Una vez que alcanza a la temperatura fijo ya puede almacenar los alimentos en el
refrigerador.
Nota: Si el refrigerador se ha puesto en posici6n horizontal o en declive durante un cierto periodo,
ser6 mejor esperar 24 horas antes de enchufarlo.
Control de Temperatura
AI encender la unidad por primera vez ajuste el botdn de control de
temperatura al ajueste recomendado y d& tiempo al refrigerador para
® Recomendado
que se enfrie completamente antes de agregar alimentos. Despu@s de
que se enfria absolutamente, serR mejor examinar el refrigerador y
Ajustarlo hacia COLD para que sea menos trio, o hacia COLDEST para
que se enfrie mrs seg0n Io que desee.
Nota: El giro del bot6n de control de temperatura a la posici6n OFF pararR la circulaci6n de
refrigeraci6n ,pero no va a apagar la energi_a.
Descongele su refrigerador
Descongele el refrigerador cuando la escarcha se acumula hasta 1/8 o mrs que 1/8 de espesor en
la pared de refrigerador para la efeciencia mRxima de energi_a. Tenga cuidado de que las escarchas
suelen acumularse mas en verano. Gira el selector de control de temperatura a la posici6n OFF.Abra
el la puerta de cogelador y de refrigerador y saque la ba ndeja de cubito de hielo, el caj6n, y todos
los alimentos desde ambos compartimiento. La descongelaci6n tardarR varias horas, asi que es mejor
guardar los alimentos en otro refrigerador durante la descongelaci6n. Ona vez que termina la
descongelaci6n, recoloque la bandeja de cubito de hielo y los alimentos en amos compartimientos.
La descongelaci6n tardarR unas horas. Asi que debe dejar la puerta abierta y porter un bol de agua
caliente en el refrigerador para acelerar la descongelaci6n
Ahora usted tiene que volver a ajustar el control de temperatura al nivel que desee y recolocar los
alimentos
PRECAUCI6N: No utilece agua caliente para derretir las escarchas acumuladas en la pared
del refrigerador, ya que esto puede daBar las piezas pl(_sticas.
ADVERTENCIA: No utilice herramiento afilado o met61ico para quitar escarcha desde el
interior del refrigerador, ya que esto puede hacer da_o a la tuberia refrigerador. El daBo
de tuberia puede causar fuga de refrigerante inflamable, el cual tendr6 como resultado
de lesi6n personal.
Sonido Normal de Mane]o que Puede Oin
Agua hervida, sonido de borboteo o vibraci6n ligera que son resultados de la circulaci6n
refrigerador atrav&s del buble refrigerador
El control de termostato emite el sonido de clic cuando va en circulaci6n.
5 6
6/8/10
Limpieza y Mantenimiento
ADVERTENCIA: desenchufe siempre el refrigerador antes de limpiarlo para evitar la descarga
el_ctrica. Eldescuido de esta advertencia puede tener como resultado de muerto o lesi6n.
Precauci6n: Lea y entienda siempre el procedimiento de limpieza explicada en esta manual
antes de usar productos de limpieza. Siga la instrucci6n del fabricante de producto de limpieza
para evitar lesi6n personal y da_os de producto.
Limpieza general
Prepare una 1a 2 cucharadas de soluci6n limpiadora combinando la bicarbonata con agua
calentita. Utilice una esponja o untrapo suave,humedecido con la soluci6n limpiadora, para
limpiar su refrigerador.
Enjuagueel refrigerador con agua calentita y limpia, y s@quelocon untrapo suave.
No utilice elementos qui_micosafilados, elementos abrasivos, elementos amoniaco, lejia de
cloro, detergentes, concentrados, disolventes o estropajos met61icos,algunos de los cuales
pueden disolverse,da_ar y/o decolorar su refrigerador
Tapa de Ja puerta
Limpie la tapa de la puerta cada tres mesesde acuerdo con la instrucci6n descrito arriba en
la secci6nl 'Limpieza Genera.
Hay que mantener la tapa limpia y plegable para asegurar su funci6n de tapar el refrigerador.
Un poco de Jalea de petr61eo aplicada sobre la bisagra de la tapa puede mantener la flexibilidad
y unbuen funci6n de cierra de la tapa.
InterrupcJ6n de la energ[a
Tendr6 interrupci6n de energia a veces por la tempestad o otras causas. Retireel clavija de enchufe
de energia desde el toma de corriente de C.A cuando ocurre el corte de energia. Cuando la energia
recupera despu@sde uncorte prolongado examine losalimentos por si acaso del podredumbre.
Limpie el interior del refrigerador y el compartimiento del refrigerador antes de usarlo
Cuidado en VacacJ6n y despu_s de moverlo
Desenchufe la unidad y saque los alimentos desde ambos compartimentos, gire el selector de
temperatura a la posici6n OFFy limpie la tapa de la puerta de acuerdo con la secci6nLimpieza
General-en vacaci6n larga o unaasencia prolongada,. Deje la puerta abierta para que el aire
haga circulaci6n en el interior.
Siempre mueveel refrigerador verticalmente al trasladarlo. No mueveel refrigerador poni_ndolo
en posici6n horizontal, por siacaso que da_a al sistema de sello.
ADVERTENCIA: Tengacuidado de evitar daBos a tuberia refrigerador cuando maneja, mueve,
usao limpia el refrigerador. EldaBo a la tuberia puede caular fuga de gas de refrigerante flamable,
la cual puede resultar en lesi6npersonal
7
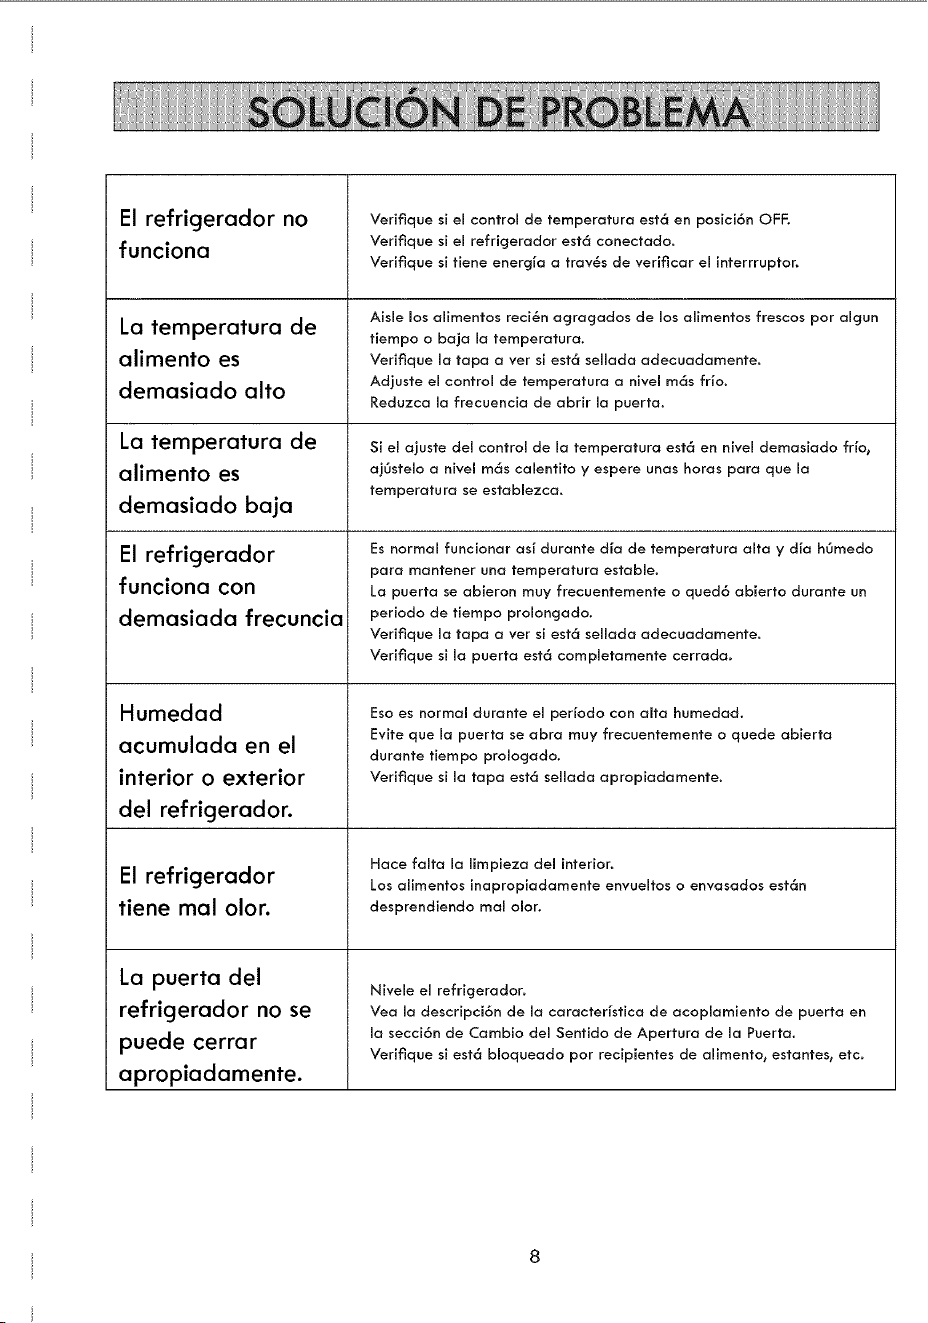
El refrigerador no
funciona
La temperatura de
alimento es
demasiado alto
La temperatura de
alimento es
demasiado baja
El refrigerador
funciona con
demasiada frecuncia
Humedad
acumulada en el
interior o exterior
del refrigerador.
El refrigerador
tiene mal olor.
La puerta del
refrigerador no se
puede cerrar
apropiadamente.
VeHfique sl el control de temperatura est6 en posici6n OFF,
VerJfique sl el refrlgerador est6 conectado,
Verifique si tlene energfa a trav@s de verificar el interrrupton
Aisle los aJimentos reci@n acjragados de los alimentos frescos por alcjun
tiempo o baja la temperatura.
Vedfique la tapa aver si est6 sellada adecuadamente,
Adjuste el control de temperatura a nlvel m6s fifo,
Reduzca Ja frecuencla de abrk Ja puerta.
SJ el ajuste del control de la temperatura est6 en nlvel demaslado fifo,
ajOstelo a nivel m6s calentlto y espere unas horas para que la
temperatura se establezca,
Es normal funcionar as[ durante d[a de temperatura aJta y d[a h_medo
para mantener una temperatura estabJe,
La puerta se abieron muy frecuentemente o qued6 abierto durante un
periodo de tlempo prolongado,
Vedfique la tapa a ver si est6 sellada adecuadamente,
Verifique sl la puerta est6 completamente cerrada,
Eso es normal durante el perfodo con alta humedad.
Evite que la puerta se abra muy frecuentemente o quede ablerta
durante tiempo prologado,
VerJfique sJ la tapa est6 sellada apropJadamente,
Hace falta Ja JJmpleza deJ interior,
Los alJmentos inapropladamente envueltos o envasados est6n
desprendiendo real olor,
Nivele el refrJgerador.
Yea Ja descrlpci6n de la caracter[stica de acoplamlento de puerta en
la secci6n de CambJo del Senfido de Apertura de la Puerta,
Verifique si est6 bloqueado por recipientes de alimento t estantes t etc.
6/8/10
Limpieza y Mantenimiento
ADVERTENCIA: desenchufe siempre el refrigerador antes de limpiarlo para evitar la descarga
el_ctrica. Eldescuido de esta advertencia puede tener como resultado de muerto o lesi6n.
Precauci6n: Lea y entienda siempre el procedimiento de limpieza explicada en esta manual
antes de usar productos de limpieza. Siga la instrucci6n del fabricante de producto de limpieza
para evitar lesi6n personal y da_os de producto.
Limpieza general
Prepare una 1a 2 cucharadas de soluci6n limpiadora combinando la bicarbonata con agua
calentita. Utilice una esponja o untrapo suave,humedecido con la soluci6n limpiadora, para
limpiar su refrigerador.
Enjuagueel refrigerador con agua calentita y limpia, y s@quelocon untrapo suave.
No utilice elementos qui_micosafilados, elementos abrasivos, elementos amoniaco, lejia de
cloro, detergentes, concentrados, disolventes o estropajos met61icos,algunos de los cuales
pueden disolverse,da_ar y/o decolorar su refrigerador
Tapa de Ja puerta
Limpie la tapa de la puerta cada tres mesesde acuerdo con la instrucci6n descrito arriba en
la secci6nl 'Limpieza Genera.
Hay que mantener la tapa limpia y plegable para asegurar su funci6n de tapar el refrigerador.
Un poco de Jalea de petr61eo aplicada sobre la bisagra de la tapa puede mantener la flexibilidad
y unbuen funci6n de cierra de la tapa.
InterrupcJ6n de la energ[a
Tendr6 interrupci6n de energia a veces por la tempestad o otras causas. Retireel clavija de enchufe
de energia desde el toma de corriente de C.A cuando ocurre el corte de energia. Cuando la energia
recupera despu@sde uncorte prolongado examine losalimentos por si acaso del podredumbre.
Limpie el interior del refrigerador y el compartimiento del refrigerador antes de usarlo
Cuidado en VacacJ6n y despu_s de moverlo
Desenchufe la unidad y saque los alimentos desde ambos compartimentos, gire el selector de
temperatura a la posici6n OFFy limpie la tapa de la puerta de acuerdo con la secci6nLimpieza
General-en vacaci6n larga o unaasencia prolongada,. Deje la puerta abierta para que el aire
haga circulaci6n en el interior.
Siempre mueveel refrigerador verticalmente al trasladarlo. No mueveel refrigerador poni_ndolo
en posici6n horizontal, por siacaso que da_a al sistema de sello.
ADVERTENCIA: Tengacuidado de evitar daBos a tuberia refrigerador cuando maneja, mueve,
usao limpia el refrigerador. EldaBo a la tuberia puede caular fuga de gas de refrigerante flamable,
la cual puede resultar en lesi6npersonal
7
El refrigerador no
funciona
La temperatura de
alimento es
demasiado alto
La temperatura de
alimento es
demasiado baja
El refrigerador
funciona con
demasiada frecuncia
Humedad
acumulada en el
interior o exterior
del refrigerador.
El refrigerador
tiene mal olor.
La puerta del
refrigerador no se
puede cerrar
apropiadamente.
VeHfique sl el control de temperatura est6 en posici6n OFF,
VerJfique sl el refrlgerador est6 conectado,
Verifique si tlene energfa a trav@s de verificar el interrrupton
Aisle los aJimentos reci@n acjragados de los alimentos frescos por alcjun
tiempo o baja la temperatura.
Vedfique la tapa aver si est6 sellada adecuadamente,
Adjuste el control de temperatura a nlvel m6s fifo,
Reduzca Ja frecuencla de abrk Ja puerta.
SJ el ajuste del control de la temperatura est6 en nlvel demaslado fifo,
ajOstelo a nivel m6s calentlto y espere unas horas para que la
temperatura se establezca,
Es normal funcionar as[ durante d[a de temperatura aJta y d[a h_medo
para mantener una temperatura estabJe,
La puerta se abieron muy frecuentemente o qued6 abierto durante un
periodo de tlempo prolongado,
Vedfique la tapa a ver si est6 sellada adecuadamente,
Verifique sl la puerta est6 completamente cerrada,
Eso es normal durante el perfodo con alta humedad.
Evite que la puerta se abra muy frecuentemente o quede ablerta
durante tiempo prologado,
VerJfique sJ la tapa est6 sellada apropJadamente,
Hace falta Ja JJmpleza deJ interior,
Los alJmentos inapropladamente envueltos o envasados est6n
desprendiendo real olor,
Nivele el refrJgerador.
Yea Ja descrlpci6n de la caracter[stica de acoplamlento de puerta en
la secci6n de CambJo del Senfido de Apertura de la Puerta,
Verifique si est6 bloqueado por recipientes de alimento t estantes t etc.
6/8/10

9 lO
6/8/10
9 lO
6/8/10
KENMORE LIMITED WARRANTY
FOR ONE YEAR from the date of sale this applance is warranted
against defects in materlal or workmanship when it is installed,
operated and maintained according to al suppled instructions.
WITH PROOF OF SALE, return a defective product to the retaler
from which it was purchased for free repair or replacement at
option of seler.
This warranty is void if this product is ever used for other than
private household purposes.
This warranty gives you specific legal rights, and you may also
have other rights which vary from state to state.
Sears Brands Management Corporation, Hoffman Estates, IL 60179
KENMORE GARANTJA LIMITADA
DENTRO DE UN ANO a partlr de la fecha de venta, este aparato
est_ garantizado contra defectos de material y mano de obra si la
instalaci6n, la utlizaci6n y el mantenimiento se reaizan de acuerdo
con todas las instrucciones suministradas.
CON LA PRUEBA DE VENTA, puede devolver el producto con defecto
al detalista desde el cual se compr6 el producto para un serviclo de
arreglo gratuito o reemplazo seggn la opci6n del vendedor
Esta garantia ser_ nula si este producto se utiliza para arras fines que
no sean el usa familar prlvado.
Esta garantia le otorga derechos legales especificos. Usted puede tener
adem_s arras derechos clue varian de un estado a otto.
Sears Brands Management Corporation, Hoffman Estates, IL 60179
Use & Care Guide
Manual de Usa y Cuidado
English / Espafiol
Kenmore
Co pa
3o'I cu,'-° ft
&
P/N 134779000B (0807)
Sears Brands Management Corporation
Hoffrnan Estates, IL 60179 U.S.A.
www.kenmore.com
WWW.Sea rs,corrl
=
° °d
6/8/10