Owners' Guide Washers and Dryers
Before you start
Initial settings
Run Calibration (recommended) Calibration ensures accurate weight detection by the washer. Make sure the drum is empty before running Calibration.
- Press POWER to turn on the washer.
- Press and hold Temp. and Delay End simultaneously for 3 seconds.
- Press START/PAUSE to start Calibration.
- The door is locked during the operation.
- The drum keeps rotating clockwise and anticlockwise for several minutes.
- When complete, the washer turns off automatically.
Laundry guidelines
STEP 1 Sort
Sort the laundry according to these criteria:
- Care Label: Sort the laundry into cottons, mixed fibres, synthetics, silks, wools, and rayon.
- Color: Separate whites from colors.
- Size: Mixing different sized items together in the drum improves the washing performance.
- Sensitivity: Wash delicate items separately. For pure, new woollen items, curtains, and silk items, check the labels for washing instructions.
NOTE Make sure to check the care label on all clothing, and sort clothing accordingly before starting the wash.
STEP 2 Empty pockets
Empty all the pockets of your laundry items
- Metal objects such as coins, pins, and buckles on clothing may damage other laundry items as well as the drum.
Turn clothing with buttons and embroideries inside out
- If pants or jacket zippers are open while washing, the drum may be damaged. Zippers should be closed and fixed with a string.
- Clothing with long strings may become entangled with other clothes. Make sure to tie the strings before starting the wash.
STEP 3 Use a laundry net
- Brassieres (water washable) must be placed in a laundry net. Metal parts of the brassieres may break through and tear other laundry items.
- Small, light clothing such as socks, gloves, stockings, and handkerchiefs may become caught around the door. Place them inside a fine laundry net.
- Do not wash the laundry net by itself without other laundry. This may cause abnormal vibrations that could move the washer and result in injury.
STEP 4 Prewash (if necessary)
Select the Prewash option for the selected cycle if the laundry is heavily soiled. Do not use the Prewash option if you will be adding detergent manually to the drum.
STEP 5 Determine the load capacity
Do not overload the washer. Overloading may cause the washer to wash improperly.
NOTE When washing bedding or bedding covers, the wash time may be lengthened or the spin efficiency may be reduced. For bedding or bedding covers, the recommended maximum spin level is “Low or Medium Spin”, and the load capacity is 3.0 kg or less.
CAUTION If the laundry is unbalanced and the “UB” information code is displayed, redistribute the load. Unbalanced laundry may reduce the spinning performance.
STEP 6 Add the correct detergent type
The type of detergent depends on the type of fabric (cotton, synthetic, delicate items, wool), color, wash temperature, and degree of soiling. Always use “low suds” HE laundry detergent which is designed for automatic washers.
NOTE
- Follow the detergent manufacturer’s recommendations based on the weight of the laundry, the degree of soiling, and the hardness of the water in your local area. If you are not sure about the water hardness, contact a local water authority.
- Do not use detergent that tends to be hardened or solidified. This detergent may remain after the rinse cycle, blocking the drain outlet.
CAUTION When washing wool using the WOOL cycle, use only a neutral liquid detergent. Powder detergent used with the WOOL cycle can remain on the laundry and discolor it.
Use HE detergent only

Your washer is designed to use high efficiency (HE) detergents.
- For the best cleaning results, use a high efficiency detergent such as Tide HE, Wisk HE, Cheer HE or Gain HE*. High efficiency detergents contain suds suppressors that reduce or eliminate suds. When fewer suds are produced, the load tumbles more efficiently and cleaning is maximized. (* Brand names are trademarks of their respective manufacturers.)
WARNING Regular detergent is not recommended. Use HE detergents only.
Detergent drawer guidelines
The washer provides a four-compartment dispenser: the front-left compartment for the main wash, the rear-left for pre-wash, the front-right for fabric softeners, and the rearright for the liquid chlorine bleach.
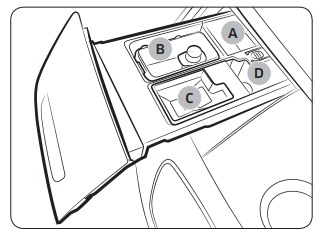
- Prewash compartment (A): Add prewash detergent or starch.
- Main-wash compartment (B): Add mainwash detergent, water softener, soaking detergent, color–safe, non–chlorine bleach, and/or stain removers.
- Softener compartment (C): Add fabric softener. Do not exceed the max line.
- Bleach compartment (D): Add liquid chlorine bleach. Do not exceed the max line.
CAUTION
- Do not open the detergent drawer while the washer is operating.
- Do not use the following types of detergent: - Tablet or capsule types - Ball or net types
- To prevent the compartment from clogging, concentrated or highly-enriched agents (fabric softener or detergent) must be diluted with water before being added.
To add washing agents to the detergent drawer
- Slide open the detergent drawer.
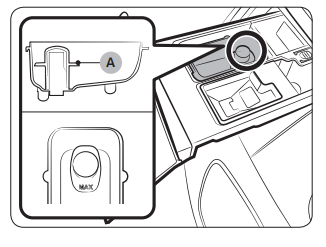
- Add the liquid laundry detergent to the liquid detergent container in the mainwash compartment. Make sure that the detergent does not exceed the marked max line (A).
NOTE
Do not add powdered laundry detergent or other powdered laundry agents to the liquid laundry con-tainer.
To use powdered detergent, see page 34.
- Add fabric softener to the softener compartment. Do not exceed the max line (A).
CAUTION
- Powdered fabric softener is not recommended. Use liquid fabric softener only.
- Concentrated fabric softener must be diluted with water before being added.
- Do not add main-wash detergent to the softener compartment.
- If you want to prewash, add prewash detergent to the prewash compartment as instructed or recommended by the manufacturer.
NOTE If you use a high efficiency (HE) detergent, apply 1/3 of the recommended amount to the prewash compartment and 2/3 of the recommended amount to the mainwash compartment.
- Close the detergent drawer.
To use powdered detergent
First, remove the provided liquid detergent container from the mainwash compartment. Then, add powdered detergent to the main-wash compartment according to the detergent manufacturer’s instructions.
CAUTION Do not add powdered detergent to the liquid detergent container.
To use the bleach compartment
Add only liquid chlorine bleach to the bleach compartment. Do not exceed the max line.
CAUTION Do not add undiluted liquid chlorine bleach directly to the load or to the drum. It is a powerful chemical and can cause fabric damage, such as weakening of the fibers or color loss if not used properly.
To use oxigen boosters or color-safe bleach
Oxygen boosters or color-safe bleach can increase washing performance. Make sure to add the oxygen booster or color-safe bleach after putting the laundry into the drum.
NOTE To use both powder detergent and powder oxygen booster or powder color-safe bleach, it is more effective to put them together into the drum before loading the laundry.
Operations
WARNING To reduce the risk of fire, electric shock, or injury to persons, read the IMPORTANT SAFETY INSTRUCTIONS before operating this appliance.
Feature panel

| 01 Cycle Selector |
Turn the dial to select a cycle. |
| 02 Display |
The display shows current cycle information and estimated time remaining, or an information code if the washer needs to be checked. |
| 03 Temp. |
Press to change the water temperature for the current cycle.
- Extra Hot: Heavily soiled, colorfast items. Only available with NORMAL, HEAVY DUTY, SANITIZE and Self Clean+.
- Hot: Whites and heavily soiled, colorfast items.
- Warm: Uses warm water only in the final rinse process. This is for energy saving purposes.
- Cold: Brightly colored, very lightly soiled items. The washer supplies additional hot water or uses the heater to warm up the water if it is below 60 °F (16 °C).
- Tap Cold: Uses only cold water without using the heater. No warm water is supplied.
|
| 04 Spin |
Press to change the spinning speed for the current cycle.
- Extra High: Extends the spinning process to effectively remove moisture from the load.
NOTE Extra High uses a stronger spinning process to remove moisture, so it is not suitable for wrinkle-free or no-iron fabrics, or overloads.
- High: Underwear, t-shirts, jeans and sturdy cottons.
- Medium: Jeans, wrinkle-free or wash-and-wear items and synthetics.
- Low: Delicate items that requires a lower spinning speed.
- No Spin: The drum does not spin after the final drain process.
- Rinse Hold (No lamp turns on): The final rinse process is suspended so that the laundry remains in the water. To unload the laundry, run a drain or spin process.
NOTE
Spin Only: This cycle runs a spin cycle only. Press and hold Spin for 3 seconds. With the cycle time on the display, press Spin repeatedly until a desired spinning speed is selected. Then, press START/PAUSE to start the cycle.
This cycle is available only when no specific cycle is selected.
|
| 05 Soil Level |
Press the button to select the soil level/washing time.
- Heavy: For heavily soiled loads.
 - Normal: For moderately soiled loads. This setting is best for most loads.
 - Light: For lightly soiled loads.
|
| 06 Options |
Press the buttons to select different cycle options. |
| 07 START/PAUSE |
Press to Start or Pause operation. |
| 08 POWER |
Press to turn on/off the washer. |
Simple steps to start
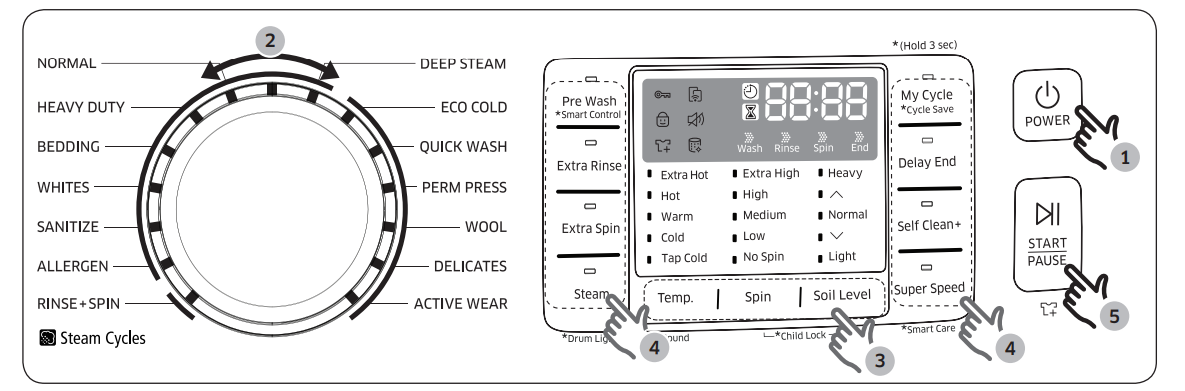
- Press POWER to turn on the washer.
- Turn the Cycle Selector to select a cycle.
- Change the cycle settings (Temp., Spin, and Soil Level) as necessary.
- Select desired options as necessary.
- Press START/PAUSE.
To change the cycle during operation
- Press START/PAUSE to stop operation.
- Select a different cycle.
- Press START/PAUSE again to start the new cycle.
WARNING Do not place anything on top of your washer while it is running.
Cycle overview
Standard cycles
| Cycle |
Description |
| RINSE+SPIN |
- Use for loads that need rinsing only or to add rinse-aided fabric softener to a load.
|
| ECO COLD |
- For normally and lightly soiled items. This cycle uses only cold water to save energy. Cold water also helps prevent fabric damage.
|
| QUICK WASH |
- For lightly soiled items that you want to finish washing quickly.
|
| PERM PRESS |
- For wash-and-wear, synthetic fabrics, and lightly to normally soiled items.
|
| WOOL |
- For machine-washable wool in loads less than 4.4 lbs (2.0 kg).
- The WOOL cycle rotates the drum horizontally to maintain the properties of the wool fibers and to prevent damage to the laundry. Then, the drum stops rotating for a period of time to allow the laundry to soak in the water after which it re-starts.
- A neutral detergent is recommended for this cycle.
|
| DELICATES |
- For sheer fabrics, bras, lingerie (silk), and other handwashonly fabrics.
- For best performance, use liquid detergent.
|
| ACTIVE WEAR |
- For exercise wear such as sports jerseys, training pants, shirts/tops and other performance clothing. This cycle provides effective soil removal with controlled drum rotation for special fabric care.
|
Steam cycles
| Cycle |
Description |
| NORMAL |
- For cottons, bed linens, table linens, underwear, towels, or shirts. The washing time and the rinse count are automatically adjusted according to the load.
|
| HEAVY DUTY |
- For sturdy, colorfast fabrics and heavily soiled items.
|
| BEDDING |
- For bulky items such as comforters, blankets, and sheets.
- For best results, wash only 1 type of bedding.
- For bulky items, use liquid detergent and do not roll the items when you place them in the drum because they might get stuck.
|
| WHITES |
- For white items with or without bleach.
|
| DEEP STEAM |
- For heavily soiled, colorfast items. This cycle uses steam and a high water temperature to effectively remove stains
|
| SANITIZE |
- For heavily soiled, colorfast items. This cycle heats the water to 150 °F to eliminate bacteria.
NOTE If you press START/PAUSE during the heating portion of Sanitize cycle, your washer door will remain locked for your safety.
|
| ALLERGEN |
- This cycle removes dust mites, pet dander, and other allergy causing substances from fabric.
|
Options
| Option |
Description |
| Pre Wash |
- This option adds a preliminary washing process before the main wash cycle.
a. Add detergent to the pre-wash section of the detergent compartment.
b. Turn the Pre Wash option on. The washer rotates the drum and drains, and then continues to the main wash cycle.
NOTE This option is not available with some cycles.
|
| Extra Rinse |
- Adds an additional rinse at the end of the cycle to remove laundry additives more thoroughly.
|
| Extra Spin |
- Adds additional spin time to remove more water from loads.
|
| Steam |
- Press this button to use the Steam function. Steam is available with the NORMAL, HEAVY DUTY, BEDDING, SANITIZE, DEEP STEAM, WHITES and ALLERGEN. For heavily soiled, colorfast items, the Steam function improves stain treatment and uses less water.
|
| My Cycle |
- Create your own washing cycle with preferred settings and use the cycle with a single button push.
|
| Delay End |
- Set the washer to finish your wash automatically at a later time. Choose a delay of between 1 to 24 hours (in 1 hour increments).
|
| Self Clean+ |
- Cleans the drum by removing dirt and mold from the drum.
- Perform once every 40 washes with no detergent or bleach added.
- Make sure the drum is empty.
- Do not add any drum cleaning agents.
|
| Super Speed |
- Press this button if you need to shorten the washing time, applicable for NORMAL, DEEP STEAM, HEAVY DUTY, BEDDING or ALLERGEN. The shortened time may differ depending on the selected cycle/load/options.
|
| Smart Control |
- After you have inserted the Smart Home Adapter and connected the washer to your home network using the Samsung Smart Home app, you can control the washer remotely. To begin, press and hold Smart Control for 3 seconds. The Smart Control indicator blinks and the door locks. The washer enters the waiting for remote commands mode For more information, visit the Samsung Smart Home website.
|
Delay End
You can set the washer to finish your wash automatically at a later time by choosing a delay of between 1 to 24 hours (in 1 hour increments). The hour displayed indicates the time the wash will finish.
- Select a cycle. Then, change the cycle settings if necessary.
- Press Delay End repeatedly until a desired end time is set.
- Press START/PAUSE. The
 indicator turns on with the clock running.
- To cancel Delay End, restart the washer by pressing POWER.
Real-life case
You want to finish a two-hour cycle 3 hours from now. To do this, you add the Delay End option to the current cycle with a 3-hour setting, and then press START/PAUSE at 2:00 p.m. The washer starts operating at 3:00 p.m. and ends at 5:00 p.m. Provided below is the time line for this example.

Steam
With the Steam cycle, the washer senses the weight of the load and controls the steam effect according to the load size. This improves washing performance. Available Steam cycles are: NORMAL, HEAVY DUTY, BEDDING, WHITES, SANITIZE, ALLERGEN, and DEEP STEAM.
- Turn the Cycle Selector to select a Steam cycle.
- Press Steam.
- Add detergent and fabric softener as instructed.
- Press START/PAUSE to start the cycle.
NOTE
- Steam may not be visible or present during the cycle. This is normal.
- Unlike other Steam cycles, you don’t need to press Steam for DEEP STEAM as the Steam function turns on automatically.
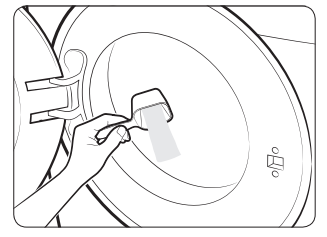
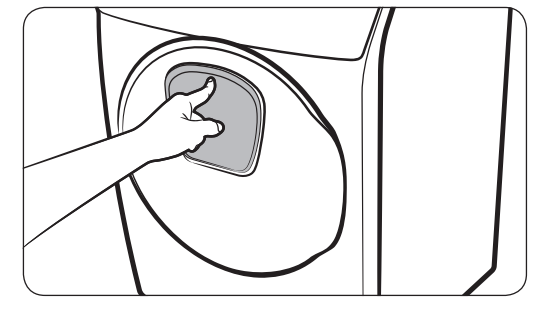
Special features
AddWash 
When the AddWash indicator  turns on, you can stop the washer and put additional laundry into the drum. The Add Door opens by more than 100° for easy access.
- Press START/PAUSE to stop operation.
- Press the upper area of the Add Door to unlock.
- Open the Add Door and insert additional laundry into the drum
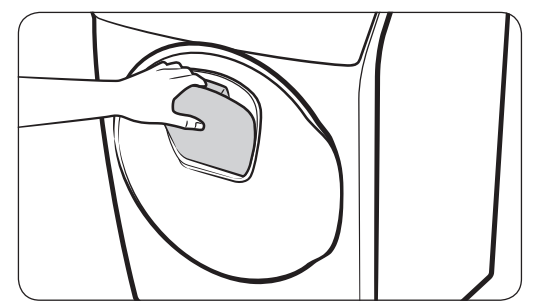
- Lift the Add Door back into place, and then push it gently until you hear a click. The Add Door is locked.
- Press START/PAUSE to resume operation.
NOTE
- The water inside the drum does not leak if the Add Door is closed properly. Water drops may form around the window, but they do not leak from inside the drum.
- After washing is complete, open the Add Door and leave open for some time to dry the drum.
CAUTION
- Do not open the Add Door if suds have formed inside the drum.
- Do not open or touch the Add Door while the machine is operating. The Add Door may be opened unintentionally.
- Do not add an excessive amount of laundry through the Add Door. Performance may be degraded.
- Do not use the lower area of the Add Door as a handle. Your fingers may be caught.
- Make sure that no laundry is caught in the Add Door.
- Keep your pets out of the washer, especially the Add Door.
- Do not open the Add Door while the Steam or Sanitize functions are running. Hot steam may leak out of the window.
- Do not press or push the Add Door when closing the washer door. The Add Door may open.
Child Lock
To prevent children or infants from accidently starting or mis-setting the washer, Child Lock locks all buttons except for the Power button.
To activate the Child Lock
- Press and hold both Soil Level and Spin for 3 seconds. Then, press START/PAUSE to activate. The door locks and the Child Lock indicator turns on.
To deactivate the Child Lock temporarily
- You can deactivate the Child Lock temporarily for 1 minute. To do this, press and hold both Soil Level and Spin for 3 seconds. The door is unlocked for 1 minute and the Child Lock indicator blinks.
NOTE
- If you open the door 1 minute or more after deactivating Child Lock, an alarm sounds for up to 2 minutes.
- If you close the door within 2 minutes, the door locks and Child Lock is reactivated. After 2 minutes, the door does not lock with no alarm sound.
- To add laundry after activating Child Lock, first deactivate Child Lock or restart the washer.
To cancel the Child Lock
- Press and hold both Soil Level and Spin for 6 seconds. The door unlocks and the Child Lock indicator turns off.
My Cycle
Create your own washing cycle with preferred settings and use the cycle with the push of a single button.
To create your own cycle
- Turn the Cycle Selector to select a cycle.
- Change the cycle settings (Temp., Spin, and Soil Level) as necessary.
- Add your preferred options. For more information, see the “Options” section.
- Press and hold My Cycle for 3 seconds to save your settings. Applicable indicators blink for 3 seconds. Once you save the cycle, you can use it by pressing My Cycle.
NOTE
If you press My Cycle and then release it within 3 seconds, the previously saved cycle and options appear.
Sound
Mute or unmute the sound (button beeps, indicator beeps and chimes, etc.)
- To mute or unmute the sound, press and hold Temp. for 3 seconds. When the sound is muted, the
 indicator turns on.
Drum Light
- The drum light turns on when the door is open, and turns off after 2 minutes. To manually turn the drum light on or off, press and hold Steam for 3 seconds.
ATC (Auto Temperature Control)
ATC enables the washer to control water temperatures in each washing cycle using the washer’s internal thermistor. It is designed to maintain certain washing temperatures for best results.
NOTE
- If you select NORMAL or HEAVY DUTY, you may notice the washer supplying cold water. This is normal because the machine is designed to reduce power consumption.
- In these cycles, the Hot temperature is similar to bath-water temperatures, and the Warm temperature to comfortable swimming pool temperatures.
- To wash clothes at a specific temperature, you must choose a different cycle first.
Maintenance
Keep the washer clean to prevent its performance from deteriorating and to preserve its life cycle.
WARNING
Certain internal parts are intentionally not grounded and may present a risk electric shock only during servicing. Service personnel – Do not contact the following parts while the appliance is energized: Control board, heat sink, motor, inlet valve and pump.
Self Clean+
Perform this cycle regularly to clean the drum and to remove mold from it.
- Make sure the drum is empty.
- Press POWER to turn on the washer.
- Press Self Clean+.
- Press START/PAUSE.
NOTE
The water temperature for Self Clean+ is set to EXTRA HOT, which cannot be changed.
CAUTION
Do not use any cleaning agents. Do not add detergent or bleach. Chemical residue in the drum degrades the cleaning performance.
Self Clean+ reminder 
- The Self Clean+ reminder appears on the main display once every 40 washes. It is advisable to perform the Self Clean+ regularly.
- If you do not run Self Clean + after every 40 washes, the Self Clean + reminder turns off after one hour
- When you first see this reminder, you can ignore the reminder for 6 consecutive washes. From the 7th wash, the reminder no longer appears. However, it appears again on the second 40th wash.
Emergency drain
In case of a power failure, drain the water inside the drum before taking out the laundry.
- Power off the washer, and then unplug it from the electrical outlet.
- Gently press the top area of the filter cover to open.
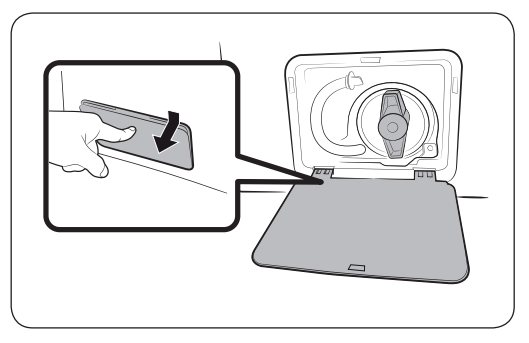
- Put an empty, spacious container around the cover, and stretch the emergency drain tube to the container while holding the tube cap (A).
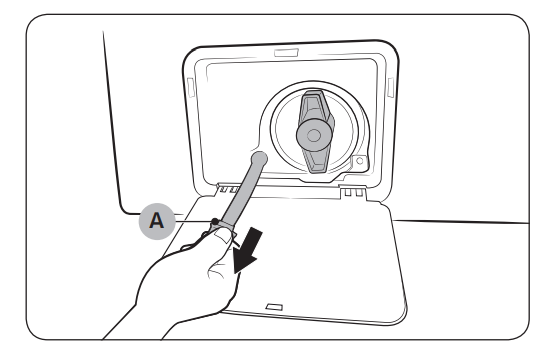
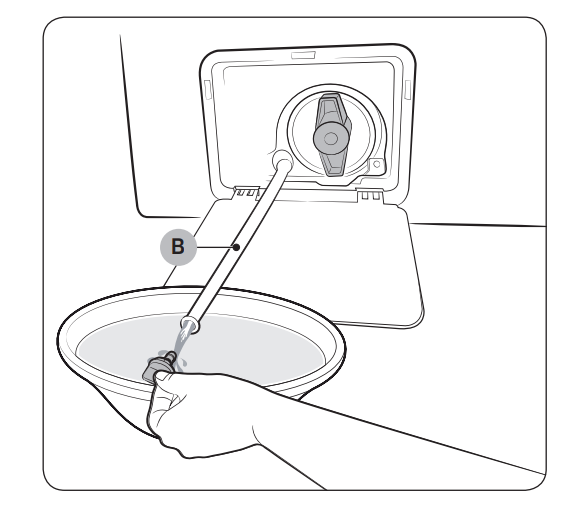
- Open the tube cap and let water in the Emergency drain tube (B) flow into the container.
- When done, close the tube cap, and reinsert the tube. Then, close the filter cover.
NOTE Use a spacious container because the water in the drum may be more than expected.
Cleaning
Surface of the washer
Use a soft cloth with a nonabrasive household detergent. Do not spray water onto the washer.
Mesh filter
Clean the mesh filter of the water hose once or twice a year.
- Turn off the washer, and then unplug the power cord.
- Close the faucet.
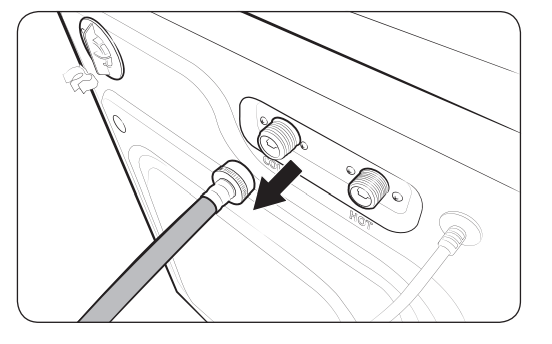
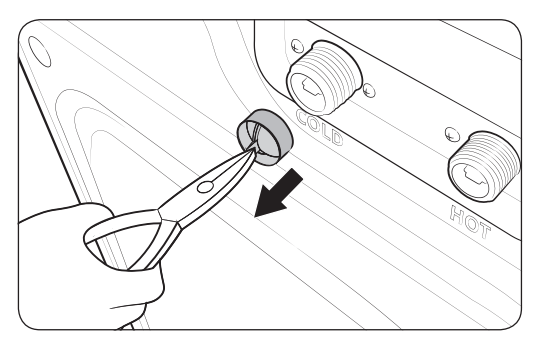
- Loosen and disconnect the water hose from the back of the washer. Cover the hose with a cloth to prevent water from gushing out.
- Use pliers to pull out the mesh filter from the inlet valve.
- Submerge the mesh filter deeply in water so that the threaded connector is also submerged.
- Dry the mesh filter completely in a shaded area.
- Reinsert the mesh filter into the inlet valve, and reconnect the water hose to the inlet valve.
- Open the faucet.
NOTE If the mesh filter is clogged, the “4C” information code appears on the the washer’s display screen.
Pump filter
It is advisable to clean the pump filter 5 or 6 times a year to prevent it from clogging. A clogged pump filter may reduce the bubble effect.
- Turn off the washer, and then unplug the power cord.
- Drain the remaining water inside the drum. See the “Emergency drain” section on page 51.
- Gently press the top area of the filter cover to open.
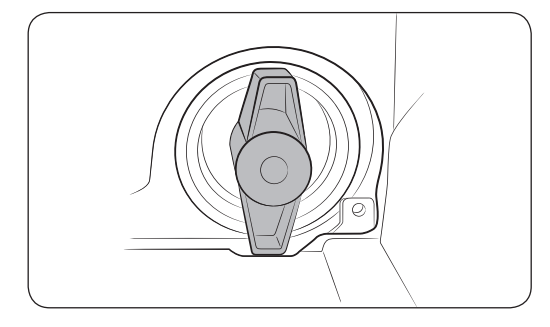
- Turn the pump filter knob (A) to the left, and drain off the remaining water.
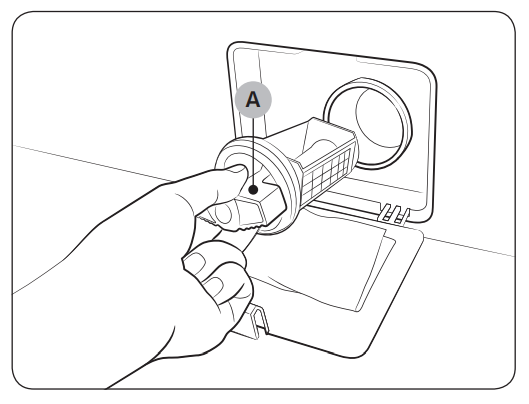
- Clean the pump filter using a soft brush. Make sure the drain pump propeller inside the filter is unclogged.
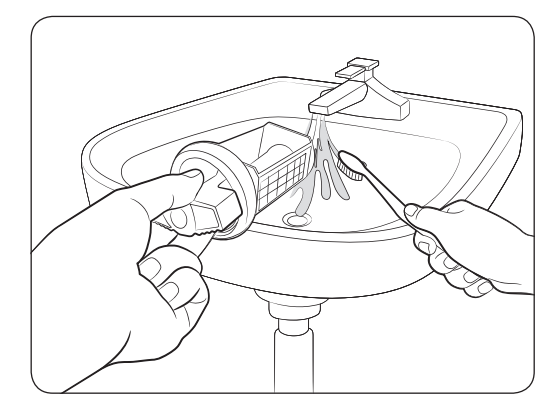
- Reinsert the pump filter, and then turn the filter knob to the right.
- Close the filter cover.
NOTE
- Some pump filters feature a safety knob that is designed to prevent accidents by children. To open the safety knob of the pump filter, push in and turn it counterclockwise. The spring mechanism of the safety knob helps open the filter.
- To close the safety knob of the pump filter, turn it clockwise. The spring makes a rattling sound, which is normal.
NOTE If the pump filter is clogged, the “5C” information code appears on the washer’s display screen.
CAUTION
- Make sure the filter knob is closed properly after cleaning the filter. Otherwise, this may cause a leak.
- Make sure the filter is inserted properly after cleaning it. Otherwise, this may cause an operational failure or a leak.
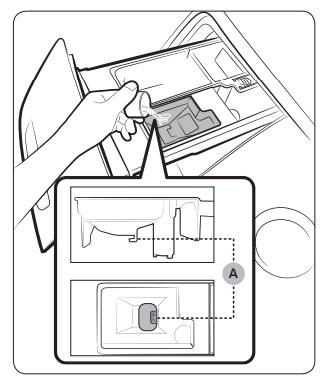
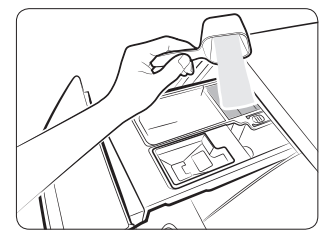
Detergent drawer
- While holding down the release lever (A) inside the drawer, slide open the drawer, and then remove the drawer from the washer.
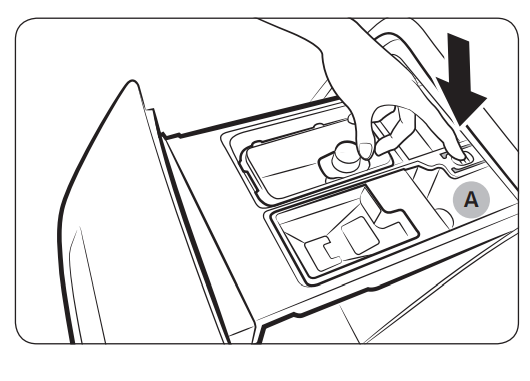
- Remove the Liquid detergent container from the drawer.
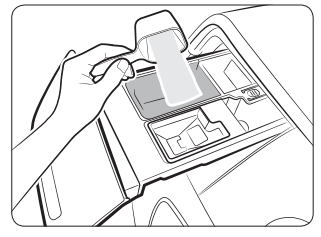
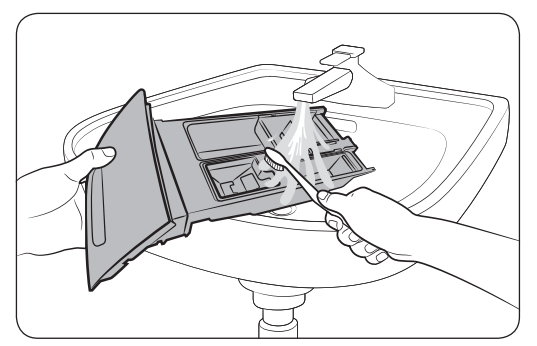
- Clean the drawer components in flowing water using a soft brush.
NOTE Other parts of the drawer can also be removed. They can fall out if you hold the drawer upside down.
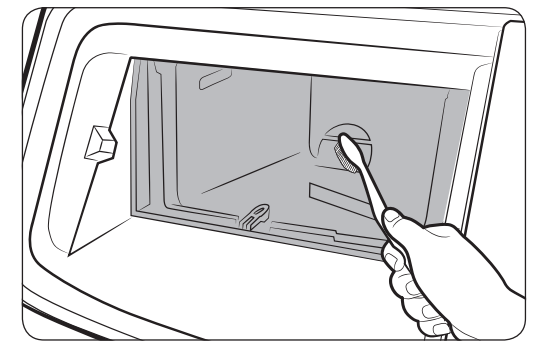
- Clean the drawer recess using a soft brush.
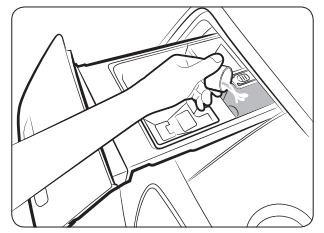
- Reinsert the liquid detergent container into the Detergent Drawer.
- Slide the drawer into the drawer recess, and then push it inward until it is fully closed.
NOTE To remove remaining detergent, perform a RINSE+SPIN cycle with the drum empty.
Add Door
- Open the Add Door.
- Use a wet cloth to clean the Add Door.
- Do not use cleaning agents. Discoloration may occur.
- Use caution when cleaning the rubber packing and the locking mechanism.
- Dust off the window area regularly.
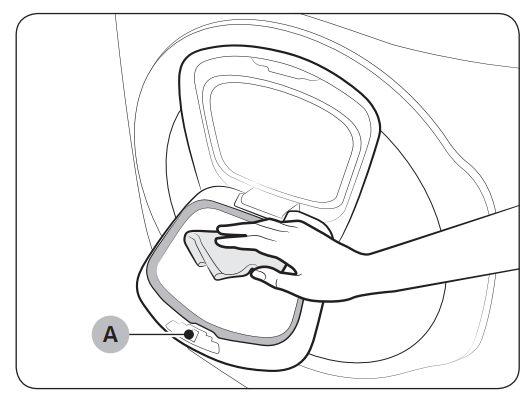
- Wipe up, and then close the Add Door. The Add Door is closed when you hear a click.
CAUTION
- Do not apply excessive force to the Add Door. It may break.
- Do not leave the Add Door open while the machine is operating.
- Do not put heavy objects on the Add Door at any time.
- To prevent physical injury, do not touch the Add Door while the drum is rotating.
- Do not open the Add Door while the machine is operating. This may cause physical injury.
- Do not use the feature panel while the Add Door is open. This may cause physical injury or system failure.
- Insert only laundry through the Add Door.
- Do not insert bulky items into the drum through the Add Door.
- Do not pull out the rubber packing of the Add Door when cleaning. You can damage the Add Door.
Door diaphragm
- Open the door and empty the drum.
- Turn out the diaphragm (sealing or gasket of the drum (A)), and check if it is stained. If so, follow the steps below.

- Combine 3/4 cups of liquid chlorine bleach and 1 gallon of warm tap water.
- Wearing rubber gloves, use a soft, clean cloth dipped in the water and chlorine solution to clean the diaphragm.
- Let stand for 5 minutes, and then wipe up and dry well.
CAUTION Use bleach carefully and be sure to follow the bleach manufacturer’s use and care instructions.
Recovery from freezing
The washer may freeze when the temperature in its location drops below 0 °C.
- Turn off the washer, and then unplug the power cord.
- Pour warm water over the faucet to loosen the water hose.
- Disconnect the water hose, and soak it in warm water.
- Pour warm water into the drum and leave it for about 10 minutes.
- Reconnect the water hose to the faucet.
NOTE If the washer still doesn’t operate normally, repeat the steps above until it operates normally.
Care against an extended time of disuse
Avoid leaving the washer unused for an extended time. If you intend to leave the washer unused for a long period of time, follow the directions below:
- Press the Power button, and then turn the Cycle Selector to RINSE+SPIN.
- Empty the drum, close the door, and then press START/PAUSE.
- When the cycle is complete, close the faucets and disconnect the water hoses.
- Turn off the washer, and then unplug the power cord.
- Open the door to let air circulate through the drum.
Cleaning the exterior
- Turn off the water faucets after finishing the day’s washing. This will shut off the water supply to your washer and prevent the unlikely possibility of damage from escaping water. Leave the door open to allow the inside of your washer to dry out.
- Use a soft cloth to wipe up all detergent, bleach, or other spills as they occur. Clean the following as recommended below:
- Control Panel – Clean with a soft, damp cloth. Do not use abrasive powders or cleaning pads. Do not spray cleaners directly on the panel.
- Cabinet – Clean with soap and water.
Cleaning the interior
Clean the interior of your washer periodically to remove any dirt, soil, odor, mold, mildew, or bacterial residue that may remain in your washer as a result of washing clothes.
CAUTION Failure to follow these instructions may result in unpleasant conditions, including odors and/or permanent stains on your washer or laundry.
NOTE Hard water deposits may be removed, if needed. Use a cleaner labeled “Washer safe”.
Troubleshooting
Checkpoints
If you encounter a problem with the washer, first check the table below and try the suggestions.
| Problem |
Action |
| Does not start. |
- Make sure the washer is plugged in.
- Make sure the door is properly closed.
- Make sure the faucets are open.
- Make sure to press or tap START/PAUSE to start the washer.
- Make sure Child Lock is not activated.
- Before the washer starts to fill, it will make a series of clicking noises to check the door lock and does a quick drain.
- Check the fuse or reset the circuit breaker
|
| Water supply is insufficient, or no water is supplied. |
- Fully open the faucet.
- Make sure the door is properly closed.
- Make sure the water supply hose is not frozen.
- Make sure the water supply hose is not kinked or clogged.
- Make sure there is sufficient water pressure.
|
| After a cycle, detergent remains in the detergent drawer. |
- Make sure the washer is running with sufficient water pressure.
- If you are using powdered detergent, do not use more than recommended.
- If you are using liquid detergent, do not over fill the liquid detergent compartment.
- Remove the liquid detergent and softener containers, and then clean the detergent drawer.
|
| Excessive vibrations or makes noise. |
- Make sure the washer is installed on a level, solid floor that is not slippery. If the floor is not level, use the levelling feet to adjust the height of the washer.
- Make sure the shipping bolts are removed.
- Make sure the washer is not contacting any other object.
- Make sure the laundry load is balanced.
- The motor can cause noise during normal operation.
- Overalls or metal-decorated clothes can cause noise while being washed. This is normal.
- Metal objects such as coins can cause noise. After washing, remove these objects from the drum or filter case.
|
| Does not drain and/ or spin. |
- Make sure the drain hose is neither kinked nor obsructed all the way to the drain system. If you there is a drain restriction, call for service.
- Make sure the debris filter is not clogged.
- Close the door and press or tap START/PAUSE. For your safety, the washer will not tumble or spin unless the door is closed.
- Make sure the drain hose is not frozen or clogged.
- Make sure the drain hose is connected to a drain system that is not clogged.
- If the washer is not supplied with sufficient power, the washer temporarily will not drain or spin. As soon as the washer regains sufficient power, it will operate normally.
|
| The door does not open. |
- Press or tap START/PAUSE to stop the washer.
- It may take a few moments for the door lock mechanism to disengage.
- The door will not open until 3 minutes after the washer has stopped or the power has been turned off.
- Make sure all the water in the drum is drained.
- The door may not open if water remains in the drum. Drain the drum and open the door manually.
- Make sure the door lock light is off. The door lock light turns off after the washer has drained.
|
| Excessive suds |
- Make sure you use the recommended types of detergent.
- Use high efficiency (HE) detergent to prevent oversudsing.
- Reduce the detergent amount for soft water, small loads, or lightly soiled loads.
- Non-HE detergent is not recommended.
|
| Cannot add additional detergent. |
- Do not fill the detergent or fabric softener compartments beyond the marked max fill limit.
|
| The washer stops. |
- Plug the power cord into a live electrical outlet.
- Check the fuse or reset the circuit breaker.
- Close the door and press START/PAUSE to start the washer. For your safety, the washer will not tumble or spin unless the door is closed.
- Before the washer starts to fill, it will make a series of clicking noises to check the door lock and does a quick drain.
- There may be a pause or soak period in the cycle. Wait and the washer may start.
- Make sure the mesh filter of the water supply hose at the faucets is not clogged. Periodically clean the mesh filter.
- If the washer is not supplied with sufficient power, the washer temporarily will not drain or spin. As soon as the washer regains sufficient power, it will operate normally.
|
| The washer fills with the wrong water temperature. |
- Fully open both taps.
- Make sure the temperature selection is correct.
- Make sure the hoses are connected to the correct taps. Flush the water lines.
- Make sure your water heater is set to supply hot water with a minimum temperature of 120 °F (49 °C) at the tap. Also, check the water heater capacity and recovery rate.
- Disconnect the hoses and clean the mesh filter. The mesh filter may be clogged.
- While the washer fills, the water temperature may change as the automatic temperature control feature checks the incoming water temperature. This is normal.
- While the washer fills, you may notice just hot and/or just cold water going through the dispenser when cold or warm temperatures are selected. This is a normal function of the automatic temperature control feature as the washer determines the water temperature.
|
| The load is wet at the end of a cycle. |
- Use the High or Extra High spin speed.
- Use high efficiency (HE) detergent to reduce oversudsing.
- The load is too small. Small loads (one or two items) may become unbalanced and not spin completely.
- Make sure the drain hose is not kinked or clogged.
|
| Leaks water. |
- Make sure the door is properly closed.
- Make sure all hose connections are tight.
- Make sure the end of the drain hose is correctly inserted and secured to the drain system.
- Avoid overloading.
- Use high efficiency (HE) detergent to prevent oversudsing.
|
| Has odors |
- Excessive suds collect in recesses and can cause foul odors.
- Run cleansing cycles to sanitize periodically.
- Clean the door seal (diaphragm).
- Dry the washer interior after a cycle has finished.
|
| No bubbles are seen (Bubbleshot models only). |
- Overloading may screen bubbles.
- Severely contaminated laundry may not generate bubbles
|
| Can I open the Add Door at any time? |
- The Add Door can be opened only when the
 indicator appears. Note that it does not open in the following cases: indicator appears. Note that it does not open in the following cases:
- When the steam or drying process is running and the internal temperature becomes high
- If you set the Child Lock on for safety reasons
- When a drum wash or drum drying cycle is running that does not permit additional laundry
|
Information codes
If the washer fails to operate, you may see an information code on the screen. Check the table below and try the suggestions.
| Code |
Action |
| 1C |
Check the water level sensor.
- Power off and then power the washer on after 2-3 minutes, and then try again.
- Depending on the model, the drain system drains water automatically. The POWER and START/PAUSE buttons may be disabled during this process.
|
| DC |
The door is open.
- Close the door, and then press START/PAUSE to resume operation.
|
| DC1 |
Check the door switch.
- Power off and then power the washer on after 2-3 minutes, and then try again.
|
| LC |
Check for water leaks.
- Power the washer off, and then check the drain system for any leaks. Once the leak issue is resolved, power the washer on after 2-3 minutes.
- Depending on the model, the drain system drains water automatically. The POWER and START/PAUSE buttons may be disabled during this process.
|
| 4C |
Check the water supply line.
- Check the connection to the water line (including water taps).
- Power off and then power the washer on after 2-3 minutes, and then try again.
- Depending on the model, the drain system drains water automatically. The POWER and START/PAUSE buttons may be disabled during this process.
|
| 4C2 |
Laundry needs protection because the water being supplied is too hot.
- Make sure the cold and hot water taps are properly connected.
- Power off and then power the washer on after 2-3 minutes, and then try again.
|
| 5C |
Check the drain system.
- Make sure the drain filter is not clogged.
- If the drain filter is clogged, clean the filter, and then restart the washer.
|
| HC |
Check the washing heater.
- Power off the washer, and then contact a Samsung customer service center.
|
| UB |
Check the spinning process.
- The load may not be balanced inside the drum. Check the drum and make sure the load is balanced.
- Press START/PAUSE to resume operation, or power off and then power the washer on after 2-3 minutes, and then try again.
|
| 8C, 8C1, 8C2 |
Check the MEMS sensor.
- Power off and then power the washer on after 2-3 minutes, and then try again.
|
| OC |
Water may overflow.
- Close the water tap, and then call for service
|
| 3C |
Check the motor.
- Power off and then power the washer on after 2-3 minutes, and then try again.
|
| AC6 |
Check the PBA communication status.
- Power off and then power the washer on after 2-3 minutes, and then try again.
|
| DDC |
The Add Door is open.
- Close the Add Door, and then press START/PAUSE to resume operation.
|
| DC3 |
Check the Add Door.
- Power off and then power the washer on after 2-3 minutes, and then try again.
|
| 9C1/9C2 |
The electronic control needs to be checked.
- Check if power is supplied properly.
- If the information code remains, contact a Samsung service center.
|
| SF |
System failed.
- Power off the washer, and then contact a Samsung service center.
|
If any information code keeps appearing on the screen, contact a local Samsung service center.