Loading ...
Loading ...
Loading ...
Replacing components Mobility
155
Changing wheels
The pouch with the wheel changing kit* is
stored under the flat load floor
*. It includes:
> Vehicle jack
> Reversible ratchet
> Wheel stud wrench
> Extractor hook for wheel center cover
> Chock
Preparing for a wheel change
Observe the safety precautions regarding
flat tires on page 152.<
Additional safety measures when chang-
ing tires:
Only change the tire when parked on a surface
that is level, firm and not slippery.
The vehicle or the jack could slip sideways on
soft or slippery support surfaces, such as snow,
ice, flagstones, etc.
Do not use a wooden block or similar object as a
support base for the jack, as this would prevent
it from extending to its full support height and
reduce its load-carrying capacity.
Do not lie under the vehicle or start the engine
when the vehicle is supported by the jack; other-
wise, there is a risk of fatal injury.<
1. Place the foldable chock
* behind the front
wheel on the other side of the vehicle or in
front of the wheel if the vehicle is on an
incline. If the wheel is changed on a surface
with a more severe slope, take additional
precautions to secure the vehicle from roll-
ing.
2. Uncover the lug bolts if necessary.
3. Loosen the lug bolts by a half turn.
Jacking up the vehicle
The vehicle jack is designed for changing
wheels only. Do not attempt to raise
another vehicle model with it or to raise any load
of any kind. To do so could cause accidents and
personal injury.<
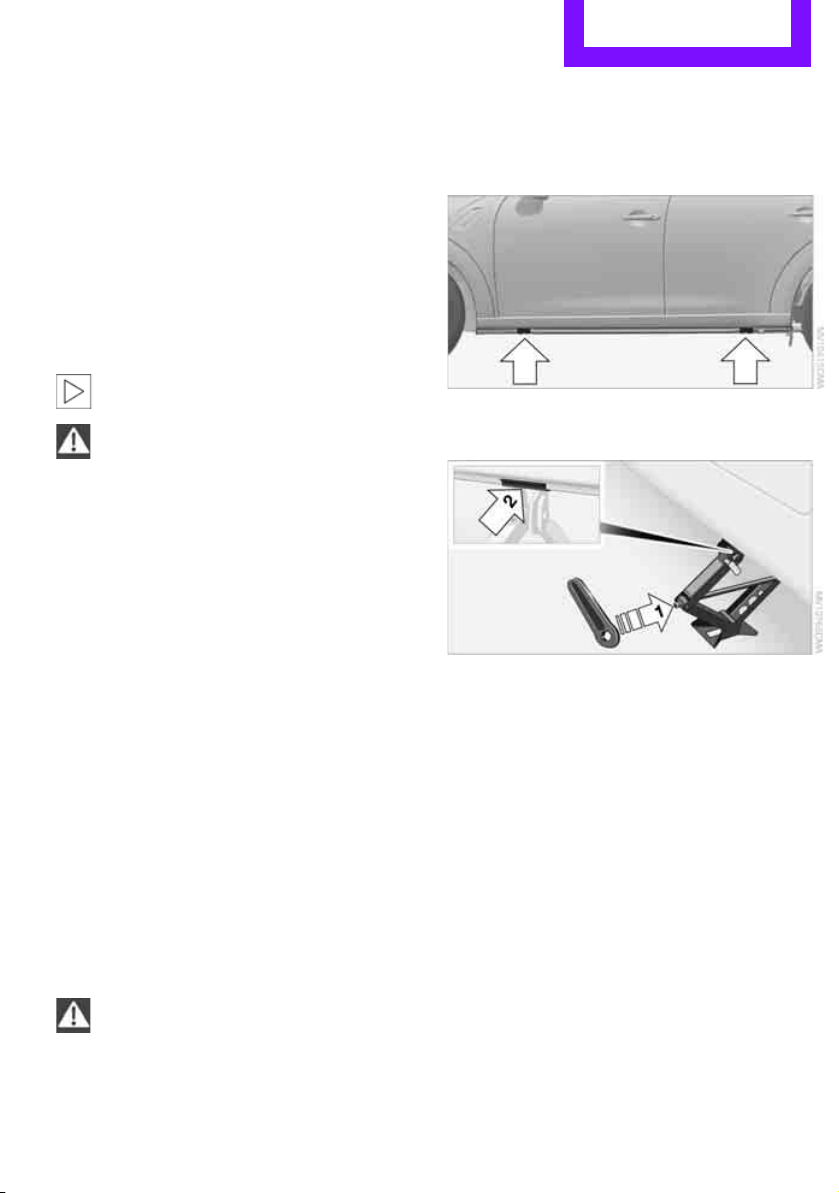
1. Place the jack at the jacking point closest to
the wheel.
The jack base must be perpendicular to the
surface beneath the jacking point.
2. Slide reversible ratchet onto the fixture on
the jack, arrow 1.
3. As you ratchet up the jack, place the jack
head onto the lifting point on the body,
arrow 2.
4. Jack the vehicle up until the wheel you are
changing is raised off the ground.
Mounting the wheel
1. Unscrew the lug bolts and remove the
wheel.
2. Remove accumulations of mud or dirt from
the mounting surfaces of the wheel and
hub. Clean the lug bolts.
3. Lift the new wheel into place.
4. Screw at least two lug bolts finger-tight into
opposite bolt holes.
5. Screw in the remaining bolts.
6. Tighten all the lug bolts firmly in a diagonal
pattern.
Online Edition for Part no. 01 40 2 607 530 - © 03/11 BMW AGOnline Edition for Part no. 01 40 2 607 530 - © 03/11 BMW AG
Loading ...
Loading ...
Loading ...