Documents: Go to download!
User Manual
- User Manual - (English)
- SRS673DMB - Samsung - Specifications Sheet - (English)
- Installation
- Operations
- Maintenance
- Troubleshooting
Table of contents
User manual Refrigerator
Installation
Follow these instructions carefully to ensure a proper installation of this refrigerator and to prevent accidents before using it.
WARNING
- Use the refrigerator only for its intended purpose as described in this manual.
- Any servicing must be performed by a qualified technician.
- Dispose of the product packaging material in compliance with the local regulations.
- To prevent electric shock, unplug the power cord before servicing or replacements.
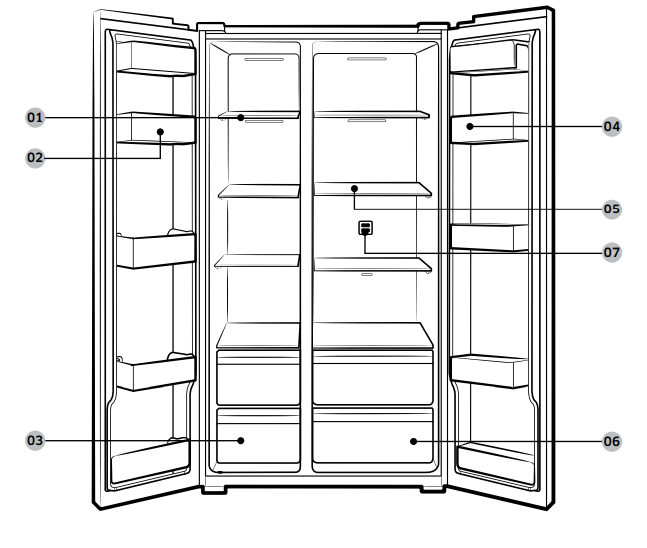
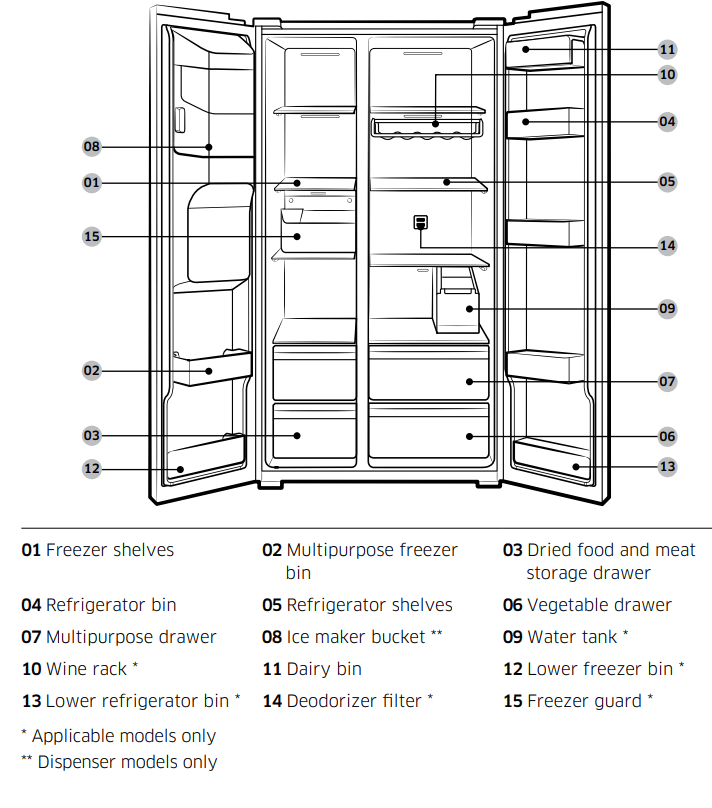
Refrigerator at a glance
The actual appearance of your refrigerator may differ, depending on the model and the country.
Normal models
Dispenser-featured models
Operations
Feature panel
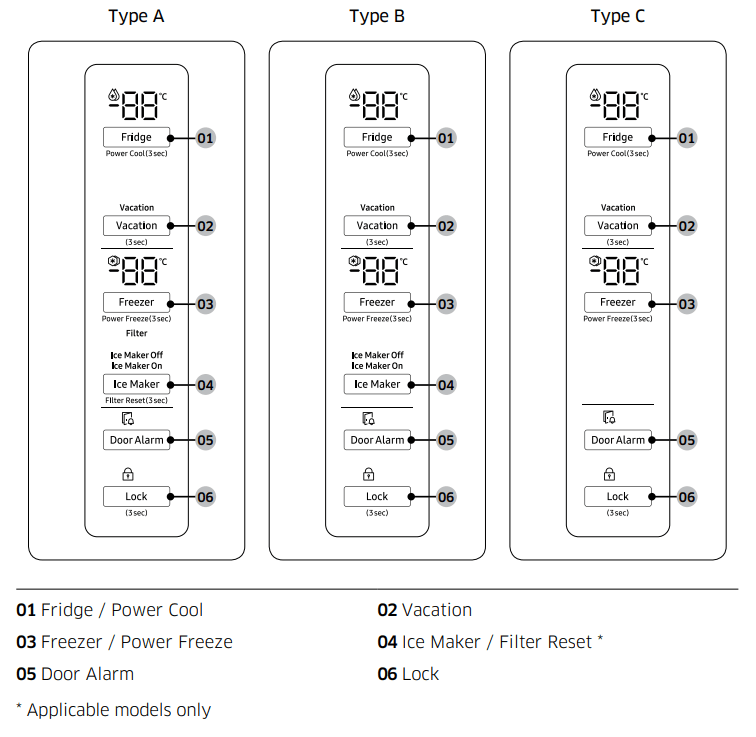
01 Fridge / Power Cool (3 sec)
- Fridge
- The Fridge button can be used to set the fridge temperature, or to activate/deactivate Power Cool.
- You can manually adjust the cooling temperature for the fridge. Keep pressing Fridge to select a desired temperature between 1 °C and 7 °C.
- Power Cool
- Power Cool speeds up the cooling process at maximum fan speed. This is useful to quickly cool food that spoils quickly, or after the door is left open for some time. The fridge keeps running at full speed for several hours and then returns to the previous temperature.
- Press and hold Fridge for 3 seconds.
- The corresponding indicator (
 ) lights up, and the refrigerator will speed up the cooling process for you
02 Vacation (3 sec)
| Vacation |
If you are going on vacation or a business trip, or if you do not intend to use the fridge for an extended time, use the Vacation mode.
NOTE
|
03 Freezer / Power Freeze (3 sec)
| Freezer | The Freezer button can be used to set the freezer temperature, or to activate Power Freeze. Available temperatures are between -15 °C and -23 °C. |
| Power Freeze |
Power Freeze speeds up the freezing process at maximum fan speed. The freezer keeps running at full speed for 50 hours and then returns to the previous temperature.
NOTE: Using Power Freeze increases power consumption. Make sure you turn it off and return to the previous temperature if you do not intend to use it. |
04 Ice Maker / Filter Reset (3 sec)
| Ice Maker |
Press Ice Maker to turn the ice maker on or off. The ice maker has 2 indicators ( Ice Maker On/Ice Maker Off ) to indicate the operating status.
CAUTION: If the ice bucket has been removed, you must turn the ice maker off. NOTE: If the ice maker is turned off, it will turn on if you press and hold the ice lever for more than 5 seconds. |
| Filter Reset |
After about 6 months (approximately 300 gallons) of using the original water filter, the Filter indicator turns red to remind you that the filter needs to be replaced. The Filter indicator blinks ref for several seconds when you open the door, reminding you that the filter needs to be replaced. If this happens, replace the filter, and press and hold Filter Reset for 3 seconds. The filter indicator will be reset, and the Filter indicator turns off. NOTE Some regional areas have relatively large amounts of lime contained in the water. This may reduce the lifecycle of the filter. In these areas, you will have to replace the water filter more often than specified above. |
05 Door Alarm
| Door Alarm |
You can set the alarm for a reminder. If the door is left open for more than 2 minutes, the alarm will sound with the alarm indicator blinking. The alarm is enabled by factory default. To disable the alarm, press Door Alarm. To enable, press Door Alarm again. If the door is left open for 5 minutes, internal lights (in the fridge and freezer) will blink for 10 seconds and then turn on. This will be repeated every minute for 5 minutes. This is to alert hearing-impaired users that a door is open and it is normal. |
06 Lock (3 sec)
| Lock (Main panel) |
To prevent accidental setting changes, press and hold Lock for 3 seconds. The main panel will be disabled and the Lock indicator ( If you press and hold the button again for more than 3 seconds, Lock will be deactivated. However, Lock will be reactivated if no button is pressed within 1 minute. NOTE Lock on the main panel does not affect the dispenser. The dispenser operates independently and so does the dispenser lever. To lock the dispenser and the dispenser lever, use the Lock function on the dispenser. |
Sabbath function
- Press and hold “Door Alarm” and ”Lock“key for 5 seconds simultaneously for the Sabbath function.
- In Sabbath function mode, Press and hold “Door Alarm” and ”Lock“key for 5 seconds simultaneously to exit this function.
Dispenser panel (applicable models only)
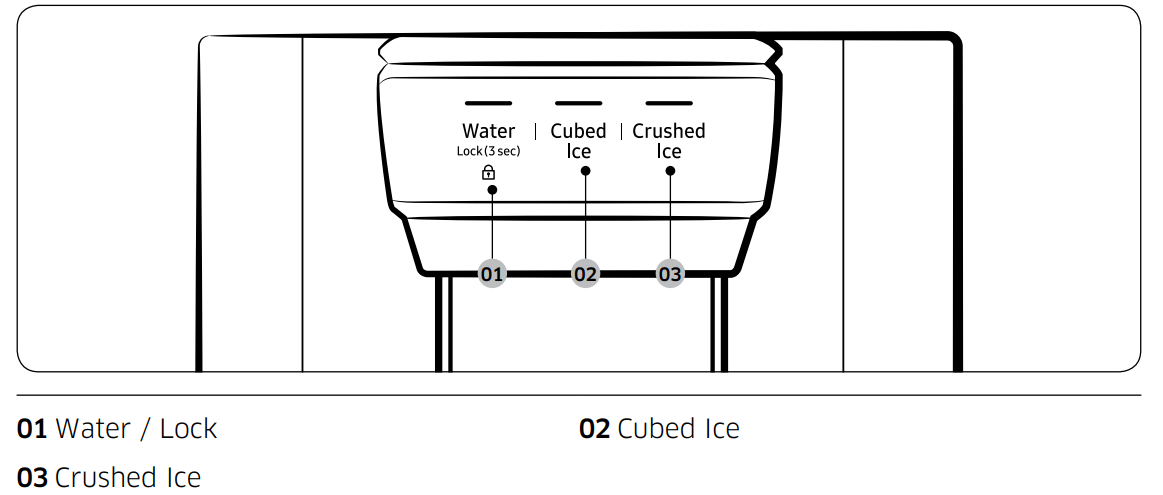
01 Water / Lock (3 sec)
| Water | To dispense chilled water, press Water. The corresponding indicator turns on. |
| Lock (Dispenser panel / Dispenser lever) |
To prevent use of the dispenser panel buttons and the dispenser lever, press and hold Water for more than 3 seconds. If you press and hold the button again for more than 3 seconds, the dispenser lock will be deactivated. When dispenser lock is on, the indicator blinks if any button on the dispenser panel is pressed or the dispenser lever is pressed. NOTE The Lock on the dispenser panel does not affect the controls on the main panel. To lock the main panel, use the Lock function on the main panel. |
02 Cubed Ice
| Cubed Ice | Press Cubed Ice to dispense cubed ice. The corresponding indicator turns on. |
03 Crushed Ice
| Crushed Ice | Press Crushed Ice to dispense crushed ice. The corresponding indicator turns on. |
Special features
The refrigerator features user-oriented devices that you can use to benefit from.
Water/Ice dispenser (applicable models only)
- Using the dispenser, you can dispense water with or without ice.
- The water dispenser offers 3 options: chilled water, cubed ice, and crushed ice. To dispense chilled water, press Water on the dispenser panel. Put a water glass under the dispenser, and then push the dispenser lever.
- To dispense water with ice
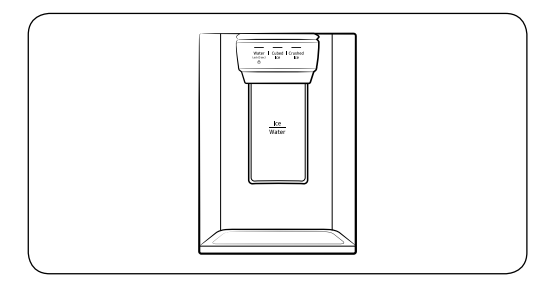
- With the Ice Maker enabled, press Cubed Ice or Crushed Ice to select the ice type.
- Put a water glass under the dispenser, and then push the dispenser lever with the glass. Ice will be dispensed from the dispenser.
- Press Water to select water.
- Push the dispenser lever with the glass. Water will be dispensed from the dispenser.
Ice maker (applicable models only): The refrigerator has a built-in ice maker that automatically dispenses ice so that you can enjoy filtered water with cubed or crushed ice. Ice making After you have installed your refrigerator and plugged it in, follow these instructions to ensure proper ice making and to keep the ice bucket full of ice:
- Let the refrigerator operate for at least 24 hours to ensure optimal performance.
- Dispense the first 4 to 6 ice cubes into a glass.
- Wait another 8 hours and dispense another 4 to 6 ice cubes.
- Then, wait another 16 hours and dispense the first glass-full of ice.
To fill the water tank (applicable models only)
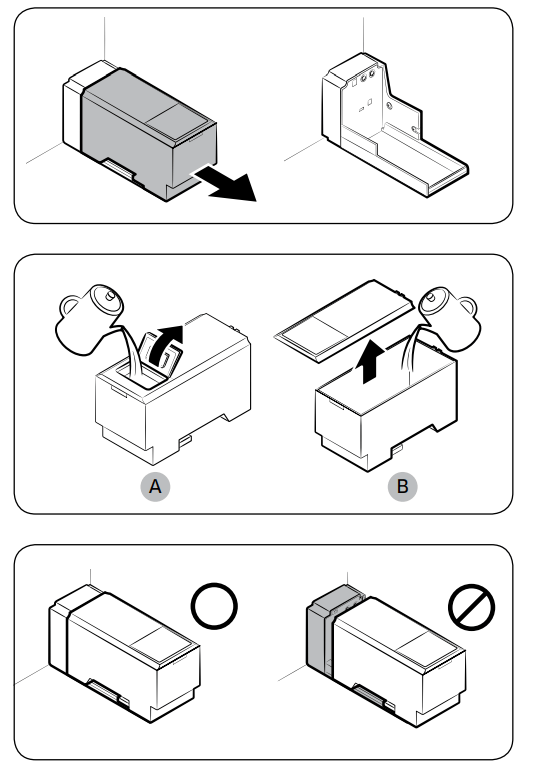
For first-time use, clean the inner side of the water tank and dry well.
- Hold both handgrips on the front of the tank, and slide out as shown.
- Open the front lid (A) of the cover or the entire cover (B) and fill the tank with a max of 5 litres water. CAUTION Do not exceed the max line. Water overflows.
- Reinsert the water tank and fit into the dispenser mechanism. Make sure the front side (with the front lid) of the tank faces to the front.
CAUTION
- Make sure the water tank fits into the shelf. Otherwise, the water tank may not operate properly.
- Do not use the refrigerator without inserting the water tank. This may decrease the cooling performance.
- Fill the tank only with potable water such as mineral or purified water. Do not use other liquid.
- Use caution when moving a filled tank. Physical injury may occur if the tank is dropped.
- Do not try to disassemble the internal pump yourself. If the internal pump is damaged or disconnected from the water tank, the dispenser does not operate.
For first-time use
- Push the dispenser lever for 10 seconds to emit air from the hoses of the water supply system.
- Discard the first six glasses of water to remove impurities in the water supply system.
Ice making (applicable models only): The refrigerator has a built-in ice maker that automatically dispenses ice so that you can enjoy filtered water with cubed or crushed ice to your preference.
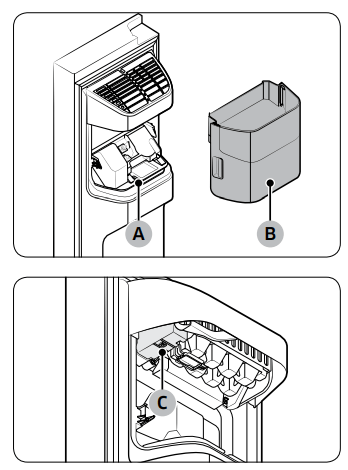
If ice does not dispense, first check the ice maker if it makes ice properly.
To check the ice maker
- Gently hold the icemaker bucket (B) with both hands and remove it from the ice chute (A).
- Check the icemaker bucket if it contains ice as appropriate.
- Press the button (C) on the bottom of the ice maker.
- You will hear a chime if the ice maker operates properly.
NOTE: If this symptom continues, contact the water line installer or a local Samsung service centre
To secure more storage space (applicable models only)
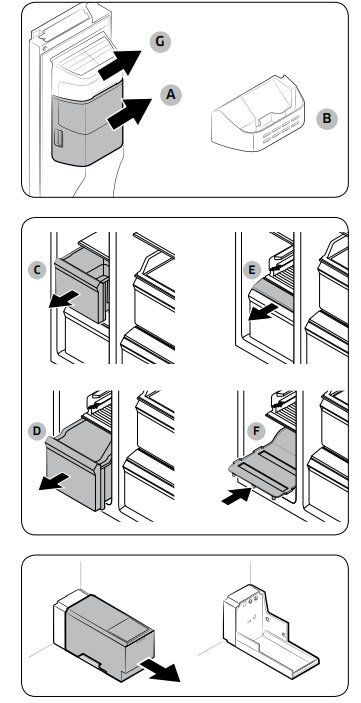
- If you do not use the ice maker and need more storage space, remove the icemaker bucket (A) and ice maker cover (G). Then, insert the Freezer guard (Optional) (B) into the icemaker bucket’s place.
- CAUTION: If the ice bucket has been removed, you must turn the ice maker off.
- To secure more space, remove the upper drawer (C), lower drawer (D), and lower drawer cover (E). Then, insert the provided bottom shelf (F).
- NOTE
- Removing the drawers does not affect the temperature or usage of the freezer.
- The declared freezer volume is measured with the bottom shelf, after removing the upper drawer, lower drawer, and lower drawer cover.
- For more space, remove the water tank and use the space to store more items
Icemaker bucket
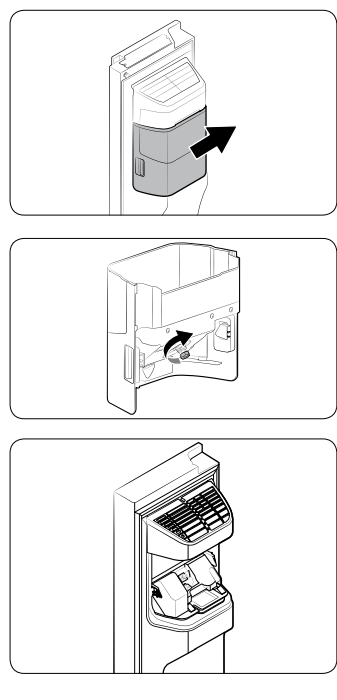
If you do not dispense ice for an extended period, ice may form clumps inside the bucket. If this happens, remove and empty the icemaker bucket.
- To remove the icemaker bucket, gently lift it up and pull out slowly while holding the handgrips with both hands.
- Remove and empty the icemaker bucket.
- When done, turn the gear handle on the rear of the bucket by 90°, and then put the bucket back into position. Make sure the bucket is inserted properly until you hear a clicking sound.
- Press and hold Ice Maker for 3 seconds to reset the ice maker.
CAUTION
- Do not apply excessive force to the bucket cover. The cover may break.
- Do not close the door hard. Water may spill over the ice maker.
- To prevent injury, make sure to clean up any ice or water that has fallen on the floor.
- To prevent accidents or injury, do not let children play with the water dispenser or the ice maker.
- Do not put your hand or an object into the ice chute. This may cause physical injury or product damage.
Maintenance
Handle and care
Shelves (fridge/freezer)
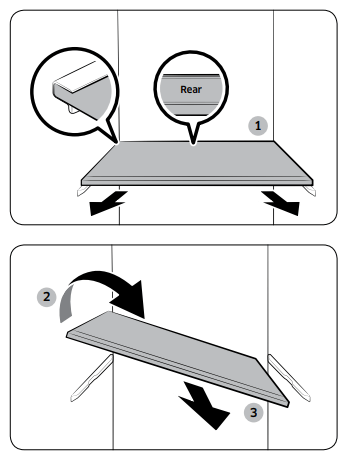
- To remove a shelf, fully open the corresponding door. Hold the front of the shelf and gently lift up and slide out.
- If the door cannot fully open, slide out the shelf half way to the front and turn it over to remove.
CAUTION
- The shelf must be inserted correctly. Do not insert upside down.
- Glass containers may scratch the surface of glass shelves.
- Do not insert a shelf in the wine rack position. This may damage the refrigerator. (applicable models only)
Door bins
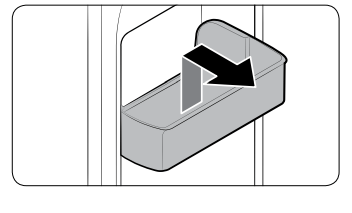
- To remove a door bin, hold the front sides of the bin and gently lift up to remove.
Drawers
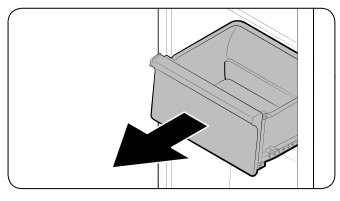
- Gently lift up the front of the drawer and slide out.
Vegetable / Dry drawers
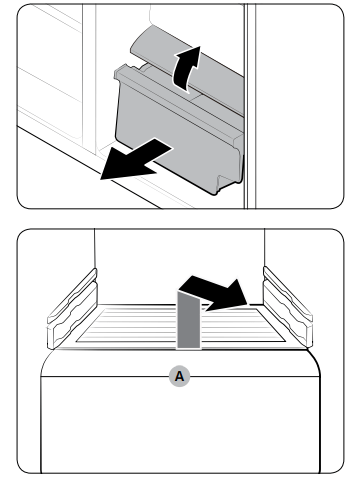
To remove the vegetable drawer from the fridge or the dry drawer from the freezer.
- First, remove surrounding multipurpose drawers if necessary.
- Gently pull out the vegetable/dry drawer.
- If your refrigerator is provided with a cover (A) for the vegetable/dry drawer, remove the cover. For this, hold the front of the shelf and gently lift up and slide out.
Icemaker bucket
- To remove the ice maker bucket, see the Icemaker bucket section on page 53.
Cleaning
Interior and exterior
WARNING
- Do not use benzene, thinner, or home/car detergent such as Clorox™ for cleaning purposes. They may damage the surface of the refrigerator and cause a fire.
- Do not spray water onto the refrigerator. This may cause electric shock.
- Do not put fingers or other objects into the dispenser hole.
Regularly use a dry cloth to remove all foreign substances such as dust or water from the power plug terminals and contact points.
- Unplug the power cord.
- Use a moistened, soft, lint-free cloth or paper towel to clean the refrigerator’s interior and exterior.
- When done, use a dry cloth or paper towel to dry well.
- Plug in the power cord.
Ice / Water dispenser (applicable models only)
- NOTE For hygienic purposes, frequently clean the dispenser area. CAUTION When crushed ice is selected, some residual ice chips may collect in the ice chute. To prevent this, remove the residual ice from the chute using a soft, clean cloth.
Rubber seals
- If the rubber seals of a door become dirty, the door may not close properly and reducing refrigerator performance and efficiency. Use a mild detergent and damp cloth to clean the rubber seals. Then, dry well with a cloth.
Rear panel
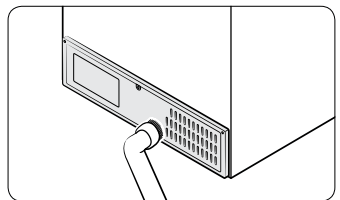
- To keep cords and exposed parts of the rear panel free of dirt, vacuum the panel once or twice a year.
- CAUTION: Do not remove the rear panel cover. Electric shock may occur.
Replacement
Water filter (applicable models only)
CAUTION
- Do not use third-party water filters. Use only Samsung-provided or -approved filters.
- Unapproved filters may leak and damage the refrigerator, causing electric shock. Samsung holds no responsibility for any damage that may occur from use of third party water filters.
- The filter indicator turns red as a reminder that lets you know it is time to replace the water filter.
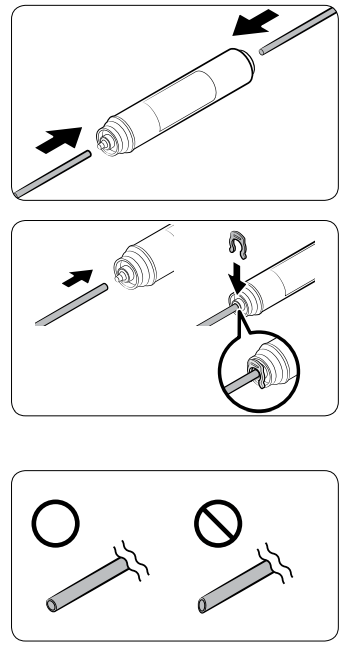
- Shut off the main water supply.
- Connect the water supply line to the inlet side of the filter to the end.
- Connect the dispenser line to the outlet side of the filter.
- Check if there is any leak. If not, fix the lines with the clips.
- Put the water filter into place and fix it with the clips.
- Press and hold Filter Reset for 3 seconds to reset the filter lifecycle.
- When replacing is complete, flush 1 litre of water to remove impurities from the water line.
CAUTION: When adjusting the length of the water line tubing, make sure to smooth out the cut surface at a right angle. This is to prevent a water leak.
NOTE
- A newly installed filter may cause the water dispenser to spurt water briefly. This is because air has entered the water line.
- This replacement process may involve the refrigerator to drip water onto the floor. If this happens, wipe up with dry cloths.
Reverse osmosis water filtration system: The water pressure of the water supply system to a reverse osmosis water filtration system must be between 206 kPa (30 psi) and 861 kPa (125 psi). The water pressure of the reverse osmosis water filtration system to the refrigerator’s cold water line must be at least 206 kPa (30 psi). If the water pressure is below the specified:
- Check if the sediment filter in the reverse osmosis system is blocked. Replace the filter if necessary.
- Refill the water tank in the reverse osmosis system with water.
- If your refrigerator has a water filter, it may further reduce the water pressure when used in conjunction with a reverse osmosis system. Remove the water filter. For more information or servicing, contact a licensed plumbing professional.
Ordering a new filter: To purchase a new water filter (part type: HAFEX/EXP), contact a local Samsung service centre.
Deodorizer filter
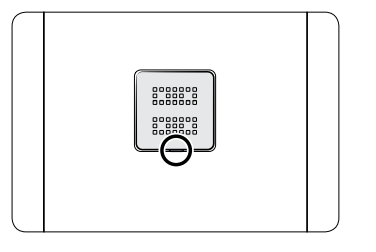
- Put the flat-head driver in the groove on the bottom of the deodorizer filter cover, and pry up. Replace the filter, and then put the filter cover back.
- The recommended usage period of the deodorizer filter is one year, and the period may vary depending on your usage. You can purchase the deodorizer filter separately from the service center.
Lamps: The lamps are not user-serviceable. To replace the lamps of the refrigerator, contact a local Samsung service centre.
Troubleshooting
Before calling for service, review the checkpoints below. Any service calls regarding normal situations (No Defect Cases) will be charged to users.
General
Temperature
1. Fridge/freezer does not operate. Fridge/freezer temperature is warm.
| Possible causes | Solution |
| Power cord is not plugged in properly | Properly plug in the power cord. |
| Temperature control is not set correctly | Set the temperature lower. |
| Refrigerator is located near a heat source or direct sunlight. | Keep the refrigerator away from direct sunlight or a heat source. |
| Not enough clearance between refrigerator and nearby walls or cabinets. | We recommend that the gap between the refrigerator and nearby walls (or cabinets) is more than 50 mm. |
| The refrigerator is overloaded. Food is blocking the refrigerator vents. | Do not overload the refrigerator. Do not allow food to block vents. |
2. Fridge/freezer is over-cooling.
| Possible causes | Solution |
| Temperature control is not set correctly. | Set the temperature higher. |
3. Interior wall is hot
| Possible causes | Solution |
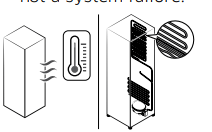
| Refrigerator has heat-proof piping in the interior wal |
To prevent condensation from forming, the refrigerator has heat-proof piping in the front corners. If the ambient temperature rises, this equipment may not work effectively. This is not a system failure.
|
Odour
1. Refrigerator has odours.
| Possible causes | Solution |
| Spoiled food | Clean the refrigerator and remove any spoiled food. |
| Food with strong odours. | Make sure strong smelling food is wrapped airtight. |
Frost
| Symptom | Possible causes | Solution |
| Frost around the vents. | Food is blocking the vents | Make sure no food blocks the refrigerator vents. |
| Frost on interior walls. | Door is not closed properly | Make sure food does not block the door. Clean the door gasket |
Condensation
1. Condensation forms on the interior walls
| Possible causes | Solution |
| If door is left open, moisture enters the refrigerator. | Remove the moisture and do not leave a door open for extended periods of time. |
| Food with high moisture content. | Make sure food is wrapped airtight. |
Water/ice (dispenser models only)
| Symptom | Possible causes | Solution |
| Water flow is weaker than normal. | Water pressure is too low | Make sure the water pressure is between 206 kPa (30 psi) to 861 kPa (125 psi). |
| Ice maker makes a buzzing sound. | The ice maker function is activated, but the water supply to the refrigerator has not been connected. | Turn off the Ice maker. |
2. Ice maker does not make ice
| Possible causes | Solution |
| Ice maker has just been installed. | You must wait for 12 hours for the refrigerator to make ice |
| Freezer temperature is too high. | Set the freezer temperature below -18 °C (0 °F) or -20 °C (-4 °F) in warm ambient air |
| Dispenser panel Lock is activated | Deactivate dispenser panel Lock |
| Ice maker is off | Turn on the ice maker. |
3. Ice does not dispense.
| Possible causes | Solution |
| Ice may jam if the ice dispenser is not used for a long time (approx. 3 weeks) | If you won't be using the refrigerator for a long time, empty the ice bucket and turn off the ice maker |
| Ice bucket is not properly inserted | Make sure the ice bucket is properly inserted. |
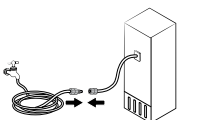
| Water line is not connected properly or water supply is not on. |
Check if the water line is installed correctly. Check if the water line stop cock is closed.
|
4. Water does not dispense
| Possible causes | Solution |
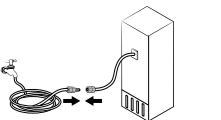
| Water line is not connected properly or water supply is not on |
Check if the water line is installed correctly. Check if the water line stop cock is closed.
|
| Dispenser panel Lock is activated. | Deactivate dispenser panel Lock. |
| A third-party water filter was installed. |
Use only Samsung-provided or approved filters. Unapproved filters may leak and damage the refrigerator. |
Do you hear abnormal sounds from the refrigerator?
Before calling for service, review the checkpoints below. Any service calls related to normal sounds will be charged to the user.
1. These sounds are normal.
- When starting or ending an operation, the refrigerator may make sounds similar to a car engine igniting. As the operation stabilizes, the sounds will decrease.

- While the fan is operating, these sounds may occur. When the refrigerator reaches the set temperature, no fan sound will occur.

- During a defrost cycle, water may drip on the defrost heater, causing sizzling sounds

- As the refrigerator cools or freezes, refrigerant gas moves through sealed pipes, causing bubbling sounds.

- As the refrigerator temperature increases or decreases, plastic parts contract and expand, creating knocking noises. These noises occur during the defrosting cycle or when electronic parts are working

- For ice maker models: When the water valve opens to fill the ice maker, buzzing sounds may occur.
- Due to pressure equalizing when opening and closing the refrigerator door, whooshing sounds may occur.
See other models: NE58R9311SS/AA SRF583DLS SRL454DSP NA36N6555TG/AA QN32Q50RAFXZA
 ) lights up, and the refrigerator will speed up the freezing process for you.
 ) will turn on. When Lock is on, the indicator blinks if any button on the main panel is pressed.