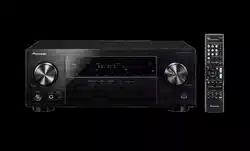
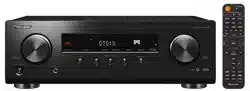
Pioneer VSX-834 7.2-Channel AV Receiver
Product's Documents
Below are documents related to this product, you can read online or download:
- Owner's manual - (English) Read Online | Download pdf
What’s in the box
Main unit (1)
Remote controller (RC-971R) (1), Batteries (AAA/R03) (2)
Speaker setup microphone (1)
Used during Initial Setup.
Indoor FM antenna (1)
AM loop antenna (1)
Quick Start Guide (1)
This document is an online instruction manual. It is not included as an accessory.
Connect speakers with an impedance of 4 Ω to 16 Ω.
The power cord must be connected only after all other connections are completed.
We will not accept any responsibility for damage arising from the connection with equipment manufactured by other companies.
Specifications and appearance are subject to change without prior notice.
Part Names
INPUT SELECTOR dial: Switch the input to be played.
K indicator: Lights up when doing 4K upscaling or 4K pass through.
FL OFF indicator: Lights up when the display is turned off by repeatedly pressing the DIMMER button on the remote controller.
ZONE A/B button: Selects an audio output destination from among "ZONE A", "ZONE B" and "ZONE A+B". ( p46)
PRESET +/- button: Selects preset radio stations registered when using
TUNER. ( p43)
Display ( p10)
STATUS button: Switches the information on the display and is used to operate RDS ( p45).
Listening mode button: Press "AUTO/DIRECT", "SURROUND" or "STEREO" to switch the listening mode. ( p53)
Remote control sensor: Receives signals from the remote controller.
The signal range of the remote controller is within about 16 ́/5 m, at an angle of 20° on the perpendicular axis and 30° to either side.
SOUND RETRIEVER button: Turns on/off the Sound Retriever function that provides better sound quality for compressed audio.
MASTER VOLUME
STANDBY/ON button
PHONES jack: Headphones with a standard plug (ø1/4"/6.3 mm) are connected.
TUNER button: Switches the input to be played to "TUNER". Also, pressing this button repeatedly switches the input between "AM" and "FM".
PERSONAL PRESET 1/2/3 buttons: Registers the current setting conditions such as input selector, listening mode, etc. or call the registered settings. ( p48)
BLUETOOTH button: Switches the input to be played to "BLUETOOTH".
SETUP MIC jack: The supplied speaker setup microphone is connected. ( p78, 89)
Display
Lights in the following conditions.
Connected by BLUETOOTH.
HDMI: HDMI signals are input and the HDMI input is selected.
DIGITAL: Digital signals are input and the digital input is selected.
Lights according to the type of input digital audio signal and the listening mode.
Lights in the following conditions.
RDS (European, Australian and Asian models): Receiving RDS broadcasting.
TUNED: Receiving AM/FM radio.
STEREO: Receiving FM stereo.
SLEEP: Sleep timer is set. ( p84)
AUTO STBY: Auto Standby is set. ( p84)
Displays the audio output destination.
A: Outputs audio only to the main room (ZONE A).
B: Outputs audio only to the separate room (ZONE B).
AB: Outputs audio to both the main room (ZONE A) and separate room (ZONE B).
Lights when headphones are connected.
Blinks when muting is on.
Displays various information of the input signals.
Lights when adjusting the volume.
Speaker/Channel display: Displays the output channel that corresponds to the selected listening mode.
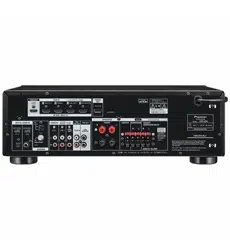
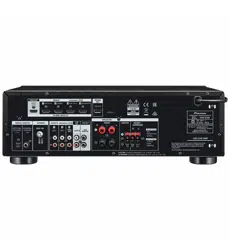
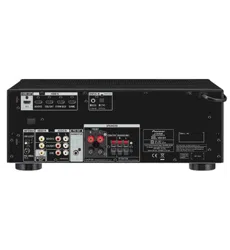
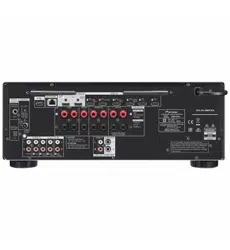
Rear Panel
HDMI OUT jacks: Transmit video signals and audio signals with a HDMI cable connected to a TV.
HDMI IN jacks: Transmit video signals and audio signals with a HDMI cable connected to an AV component.
POWER OUT port: The power (5 V/1 A) can be supplied to a streaming media player, etc. using a USB cable. ( p33) The playback function is not supported.
Power cord
DIGITAL AUDIO IN OPTICAL/COAXIAL jacks: Input TV or AV component digital audio signals with a digital optical cable or digital coaxial cable.
ANTENNA AM LOOP/FM UNBALANCE 75 Ω terminal: The supplied antennas are connected.
AUDIO IN jacks: Input TV or AV component audio signals with an analog audio cable.
ZONE B PRE/LINE OUT jacks: Output audio signals with an analog audio cable connected to a pre-main amplifier or a power amplifier in a separate room (ZONE B).
SUBWOOFER PRE OUT jack: Connect a powered subwoofer with a subwoofer cable. Up to two powered subwoofers can be connected. The same signal is output from each of the SUBWOOFER PRE OUT jacks.
SPEAKERS terminals: Connect speakers with speaker cables. (FRONT L/R terminals of North American models support banana plugs.)
Remote Controller
STANDBY/ON button
PERSONAL PRESET 1/2/3 buttons: Registers the current setting conditions such as input selector, listening mode, etc. or call the registered settings. ( p48)
Input selector buttons: Switches the input to be played.
Play buttons: Used for playback operation of a BLUETOOTH-enabled device. If the unit is switched to "CEC MODE" using the MODE button, an HDMI CEC function-enabled AV component can be operated. (Depending on the device, operation may not be possible.)
AV ADJUST) button: Settings such as "HDMI" and "Audio" can be made quickly during play on the TV screen. ( p86)
Cursor buttons and ENTER button: Select the item with the cursors and press
ENTER to confirm your selection. button: Display advanced setting items on the TV or the display to have a more enjoyable experience with this unit. ( p69)
TONE/DIALOG/SW buttons: Adjusts the sound quality of the speakers and volume level of the subwoofer. ( p50)
LISTENING MODE buttons: Allows you to select the listening mode. ( p53)
DIMMER button: You can switch the display off or adjust the brightness of the display in three steps.
CLEAR button: Deletes all characters you have entered when entering text on the TV screen.
Fav button: Used to register AM/FM radio stations. ( p43)
SLEEP button: Set the sleep timer. Select the time from "30 min", "60 min" and min". ( p52)
ZONE A/B button: Selects an audio output destination from among "ZONE A",
ZONE B" and "ZONE A+B".( p46)
STATUS) button: Switches the information on the display and is used to operate RDS p45). button: Returns the display to the previous state. button: Temporarily mutes audio. Press again to cancel muting.
Volume buttons
AUDIO SEL button: When a device is connected to two or more audio input terminals for one input selector, you can select which audio input signal to play.
SOUND RETRIEVER button: Turns on/off the Sound Retriever function that provides better sound quality for compressed audio.
MODE button: Switches between automatic tuning and manual tuning for AM/FM stations p41). Also, when an HDMI CEC function-enabled AV component is connected to this unit, you can switch "4. Play buttons" between "CEC MODE" and "RCV MODE" (normal mode).
Speaker Installation
Channel System
This is a basic 5.1 Channel System. Front speakers output the front stereo sound, and a center speaker outputs the sound of the center of the screen, such as dialogs and vocals. Surround speakers create the back sound field. Powered subwoofer reproduces the bass sound, and creates the rich sound field.
The front speakers should be positioned at ear height while the surround speakers should be positioned just above ear height. The center speaker should be set up facing the listening position at an angle. Placing the powered subwoofer between the center speaker and the front speaker gives you a natural sound even when playing music sources.
Front Speakers
Center Speaker
Surround Speakers
Powered Subwoofer
Channel System
This is a 7.1 Channel System that consists of the basic 5.1 Channel System ( p16) and added surround back speakers. Front speakers output the front stereo sound, and a center speaker outputs the sound of the center of the screen, such as dialogs and vocals. Surround speakers create the back sound field. Powered subwoofer reproduces the bass sound, and creates the rich sound field. Surround back speakers improves the sense of envelopment and connectivity of sound in the back sound field, and provides a more real sound
Speaker Connections and "Speaker Setup" Settings
Connections
Note) Speaker Impedance
Connect speakers with an impedance of 4 Ω to 16 Ω. If any of the speakers to be connected has an impedance of 4 Ω or more and less than 6 Ω, set "Speaker
Impedance" to "4 ohms" for "Speaker Setup" in the Initial Setup section ( p88). When setting "Speaker Impedance" from the Setup menu, press on the remote controller, and set "2. Speaker" - "Configuration" - "Speaker Impedance" ( p73) to "4 ohms".
Connect the Speaker Cables
Make correct connection between the unit's jacks and speaker's jacks (+ side to + side, and - side to - side) for each channel. If the connection is wrong, a bass sound will not be reproduced properly due to reverse phase. Twist the wires exposed from the tip of the speaker cable so that the wires do not stick out of the speaker terminal when connecting. If the exposed wires touch the rear panel, or the + side and - side wires touch each other, a malfunction may occur.
Connect the Subwoofer
To ARC TV
If the TV supports the ARC (Audio Return Channel) function (*), use only the
HDMI cable to connect with the TV. Use the ARC-compatible HDMI IN jack of the
TV for connection.
Setup
Settings are required to use the ARC function. Select "Yes" for "3. ARC Setup" in Initial Setup ( p88). If "No, Skip" is selected, settings are required in the
Setup menu after Initial Setup is completed. Pres on the remote controller, and set "6. Hardware" - "HDMI" - "Audio Return Channel" to "On". ( p83)
For detailed settings for TV connection, CEC function and audio output, refer to the instruction manual of the TV.
ARC function: This function transmits the audio signals of the TV via an
HDMI cable, and plays the audio of the TV on this unit. Connection to an ARC- compatible TV is complete with one HDMI cable. To check if the TV supports the
ARC function, refer to the instruction manual of the TV, etc. field.
The front speakers should be positioned at ear height while the surround speakers should be positioned just above ear height. The center speaker should be set up facing the listening position at an angle. Placing the powered subwoofer between the center speaker and the front speaker gives you a natural sound even when playing music sources. The surround back speakers should be positioned at ear height.
If surround back speakers are installed, be sure to install surround speakers as well.
Front Speakers
Center Speaker
Surround Speakers
Powered Subwoofer
Surround Back Speakers
To Non-ARC TV
If the TV does not support the ARC (Audio Return Channel) function (*), connect an HDMI cable and digital optical cable. If the TV does not have a DIGITAL
OPTICAL OUT jack, you can use an analog audio cable to connect with the
AUDIO IN TV jack.
If you use a cable set-top box, etc. connected to the input jack of this unit to watch TV (without using a TV’s built-in tuner), connection with a digital optical cable or analog audio cable is not required.
ARC function: This function transmits the audio signals of the TV via an
HDMI cable, and plays the audio of the TV on this unit. Connection to an ARC- compatible TV is complete with one HDMI cable. To check if the TV supports the
ARC function, refer to the instruction manual of the TV, etc.
Connecting an Audio Component
This is a connection example of an audio component. Connect a CD player using a digital coaxial cable or analog audio cable.
Playback
AV Component Playback
You can play the audio from AV components, such as Blu-ray disc players through this unit.
Basic Operations
Perform the following procedure when this unit is on.
Switch the input on the TV to the input connected to the unit.
Press the input selector whose name is the same as that of the jack to which the player is connected.
For example, press BD/DVD to play the player connected to the BD/DVD jack.
Press TV to listen the sound of the TV.
When the CEC link function works, the input switches automatically when a CEC compliant TV or player is connected to this unit using HDMI connection.
Start play on the AV component.
BLUETOOTH® Playback
You can wirelessly play the audio on a BLUETOOTH-enabled device, such as a smartphone.
Basic Operations
Perform the following procedure when this unit is on.
Pairing
When you press the BLUETOOTH button, "Now Pairing..." is displayed on this unit's display, and the pairing mode is enabled.
Enable (turn on) the BLUETOOTH function of the BLUETOOTH-enabled device, and then select this unit from among the devices displayed. If a password is requested, enter "0000".
This unit is displayed as "Pioneer VSX-834 XXXXXX".
To connect another BLUETOOTH-enabled device, press and hold the
BLUETOOTH button until "Now Pairing..." is displayed, and then perform step 2. This unit can store the pairing information of up to 8 paired devices.
The coverage area is approx. 48 ́/15 m. Note that connection is not always guaranteed with all BLUETOOTH-enabled devices.
Playing Back
Perform the connection procedure on the BLUETOOTH-enabled device.
Playing the music file.
The input on this unit automatically switches to "BLUETOOTH".
Turn up the volume of the BLUETOOTH-enabled device to an appropriate level.
Due to the characteristics of BLUETOOTH wireless technology, the sound produced on this unit may slightly be behind the sound played on the
BLUETOOTH-enabled device.
ZONE B Playback
While performing playback in the main room (ZONE A), you can enjoy the audio of the same source in the separate room (ZONE B) at the same time.
Playing Back
Press ZONE A/B to select an audio output destination.
ZONE A: Outputs audio only to the main room (ZONE A). "A" on the display of the main unit lights up.
ZONE B: Outputs audio only to the separate room (ZONE B). "B" on the display of the main unit lights up.
ZONE A+B: Outputs audio to both the main room (ZONE A) and separate room (ZONE B). "A" and "B" on the display of the main unit light up.
Start play on the AV component.
If the unit is connected to the pre-main amplifier in the separate room, adjust the volume on the pre-main amplifier. If the unit is connected to the power amplifier or ZONE speaker in the separate room, adjust the volume on the remote controller.
When connecting the power amplifier, set "Zone B Output Level" to
Variable" for "Speaker Setup" in the Initial Setup section ( p88). When setting "Zone B Output Level" from the Setup menu, press on the remote controller, and set "2. Speaker" - "Configuration" - "Zone B Output Level" ( p73) to "Variable". If it is not set, a large volume is output and the power amplifier, speakers, etc. may be damaged.
If "ZONE A+B" is selected as an audio output destination, you can select only the "Stereo" listening mode for the main room (ZONE A) when using the 2.1ch speaker layout. When using a speaker layout of 3.1ch or more, you can select only the "Ext.Stereo" listening mode.
Sleep Timer
You can allow the unit to enter standby automatically when the specified time has elapsed.
Press SLEEP button on the remote controller to select the time from "30 min", "60 min" and "90 min".
Off": The unit does not automatically enter standby mode.
You can also set this by pressing the button on the remote controller and selecting "6. Hardware" - "Power Management" - "Sleep Timer" ( p84) on the
Setup menu.
Listening Mode
You can change the listening mode during play by pressing repeatedly "AUTO/DIRECT", "SURR", or "STEREO".
Selecting a Listening mode
Each of AUTO/DIRECT, SURR, and STEREO buttons stores the listening mode that was selected last. If content incompatible of the listening mode selected last is played, the most standard listening mode for the content is automatically selected.
For details of the effects of each listening mode, refer to "Listening Mode
Effects" ( p58).
For listening modes selectable for each audio format of input signals, refer to
Input Formats and Selectable Listening Modes" ( p62).
Setup
Menu operations
Use the on-screen displays (OSD) that appear on the TV to make the settings.
Press on the remote controller to display the Setup menu.
Setup
Input/Output Assign
Source
Miscellaneous
Hardware
Speaker
MCACC
Audio Adjust
TV Out / OSD
Analog Audio Input
Input Skip
PERSONAL PRESET Information
HDMI Input
Digital Audio Input
Select the item with the cursor / buttons of the remote controller and press
ENTER to confirm your selection.
Use the cursors / to change the default values.
To return to the previous screen, press .
To exit the settings, press .
Input/Output Assign
TV Out / OSD
Make settings for TV output and On-Screen Displays (OSD) that appear on the TV.
HDMI Input
Change input assignment between the input selectors and HDMI IN jacks.
Speaker
Configuration
Change the settings of connection environment of the speakers.
AV Adjust
Menu operations
You can quickly adjust the settings you frequently use, such as tone adjustments, etc.
You can make the settings on the TV screen while playing something. Press on the remote controller to display the AV Adjust menu.
Select the item with the cursor / buttons of the remote controller and press
ENTER to confirm your selection.
Use the cursors to change the settings.
To return to the previous screen, press .
To exit the settings, press .
HDMI
Sound Delay: If the video is behind the audio, you can delay the audio to offset the gap. Different settings can be set for each input selector.
It cannot be set if the listening mode is Pure Direct and the input signal is analog.
Audio Return Channel: You can enjoy the sound of the HDMI-connected ARC- compatible TV through the speakers connected to the unit. Select "On" when listening to the audio of TV using the speakers of this unit. Select "Off" when the
ARC function is not used.
Audio
Sound Retriever: Improve the quality of the compressed audio. Playback sound of lossy compressed files such as MP3 will be improved. The setting can be separately set to each input selector. The setting is effective in the signals of kHz or less. The setting is not effective in the bitstream signals.
It cannot be set if the listening mode is Direct or Pure Direct.
Midnight: Make small sounds easily heard. It is useful when you need to reduce the volume while watching a movie late night. You can enjoy the effect only when playing Dolby series and DTS series input signals.
It cannot be set if the listening mode is Direct or Pure Direct.
The setting cannot be used in the following cases.
If "Loudness Management" is set to "Off" when playing Dolby Digital Plus or
Dolby TrueHD
When the input signal is DTS:X and "Dialog Control" is other than 0 dB
If you set the unit to the standby mode, the adjustments you made will be restored to the previous statuses.
MCACC
MCACC EQ: Enable or disable the equalizer function that corrects for distortion caused by the acoustic environment of the room.
It cannot be set if the listening mode is Pure Direct.
Phase Control: Correct phase disturbance in the low range to enhance the bass.
This enables you to achieve powerful bass reproduction that is faithful to the original sound.
It cannot be set if the listening mode is Pure Direct.
Theater Filter: Adjust the soundtrack that was processed to enhance its high pitch range, in order to make it suitable for home theater.
It cannot be set if the listening mode is Direct or Pure Direct.
Level
Front: Adjust the speaker level of the front speaker while listening to the sound.
Center: Adjust the speaker level of the center speaker while listening to the sound.
Subwoofer: Adjust the speaker level of the subwoofer while listening to the sound.
If you set the unit to the standby mode, the adjustments you made will be restored to the previous statuses.
Initial Setup with Auto Start-up Wizard
Operations
When you turn the unit on for the first time after purchase, the Initial Setup screen is automatically displayed on the TV to allow you to make settings required for startup using simple operations following on-screen guidance.
Switch the input of the TV to the input connected to the unit.
Put batteries into the remote controller of this unit.
Press on the remote controller to turn the unit on.
When the language selection screen is displayed on TV, select the language with the cursors / and press ENTER.
Select the item with the cursors of the remote controller, and press ENTER to confirm your selection. To return to the previous screen, press .
If you have terminated the Initial Setup halfway, turn this unit to standby mode.
Then turning the power on again can display the Initial Setup again.
The Initial Setup appears on the screen each time the power is turned on unless the Initial Set up is completed or "Never Show Again" is selected on the first screen.
To perform the Initial Setup again after the setting is completed, press , select "7. Miscellaneous" - "Initial Setup", and press ENTER.
Speaker Setup
Select the connected speaker configuration, and press ENTER.
Note that the image on the screen changes each time you select the number of channels in "Speaker Channels".
Speaker Setup
Select how many speakers you have. ENTER Next
Speaker Channels
Zone B Speaker
Speaker Impedance
Yes
Fixed ohms or above
Zone B Output Level
Subwoofer
Height Speaker - - -
The speaker combination selected in step 1 is displayed. "Yes" is displayed for the selected speakers. If the setting is correct, press ENTER.
Select "Next" and press ENTER. Then a test tone is output from each speaker to confirm the connection. Selecting each speaker with the cursors / will output the test tone. Press ENTER after confirmation.
If there is no problem with the speaker connection, select "Next" and press
ENTER. To return to "Speaker Setup", select "Back to Speaker Setup" and press ENTER.
Full Auto MCACC
Place the supplied speaker setup microphone at the listening position. The unit automatically measures the test tones output from each speaker, and sets the optimum volume level for each speaker, the crossover frequencies, and the distance from the listening position. This also automatically adjusts the equalizers for the speakers, and enables correction of sound distortion caused by the acoustic environment of the room.
It takes between 3 and 12 minutes for calibration to be completed. Each speaker outputs the test tone at high volume during measurement, so be careful of your surroundings. Also, keep the room as quiet as possible during measurement.
If you connect a subwoofer, check the power and volume of the subwoofer.
Set the subwoofer volume to more than half.
If the power of this unit suddenly turns off, the wires in the speaker cables have touched the rear panel or other wires, and the protection circuit is working. Twist the wires again securely, and make sure they do not stick out of the speaker terminals when connecting.
Place the supplied speaker setup microphone at the listening position, and connect it to the SETUP MIC jack on the main unit.
SETUP MIC
When placing the speaker setup microphone on a tripod, refer to the illustration.
Confirm a test tone is output from the subwoofer and press ENTER.
Press ENTER. Then, test tones are output from each speaker, and the connected speakers and the noise in the surrounding environment are automatically measured.
The measurement results in step 3 are displayed. Select "Next", and press
ENTER. The test tones are output again. Then, the unit automatically sets the optimum volume level, crossover frequency, etc.
When the measurement is completed, the measurement results are displayed.
You can check each setting using the cursors / . Select "Save" and press
ENTER to save the settings.
Disconnect the speaker setup microphone.
ARC Setup
To connect with an ARC-compatible TV, select "Yes". The ARC setting on this unit turns on, and you can listen to the TV's audio through this unit.
If you select "Yes", the HDMI CEC function is enabled and power consumption increases during standby.
Problems may be solved by simply turning the power on/off or disconnecting/ connecting the power cord, which is easier than working on the connection, setting and operating procedure. Try the simple measures on both the unit and the connected device. If the problem is that the video or audio is not output or theHDMI linked operation does not work, disconnecting/connecting the HDMI cable may solve it. When reconnecting, be careful not to wind the HDMI cable since if wound the HDMI cable may not fit well. After reconnecting, turn off and on the unit and the connected device.
Try restarting the unit
Restarting this unit may solve the problem. After turning the unit to standby mode, press and hold the STANDBY/ON button of the main unit for at least 5 seconds, and then restart the unit. (The settings on this unit are kept.) If the problem persists after restarting the unit, unplug and plug the power cords or HDMI cable of this unit and connected devices.

Resetting the unit (this resets the unit settings to the default)
If the restart of the unit does not solve the problem, reset the unit, and restore all the settings to the factory default at the time of purchase. This may solve the problem.
If the unit is reset, your settings are restored to the default values. Be sure to note down your setting contents before performing the following operations.

When the power is turned on, "AMP Diag Mode" appears on the display of the main unit.

The unit turns off unexpectedly
WARNING: If smoke, smell or abnormal noise is produced by the unit, unplug the power cord from the outlet immediately, and contact the dealer or our company's Support. p84)
 indicator on the display blinks, press on the remote controller to cancel muting.
Check the following if the problem persists after you have confirmed the above.
No sound from the TV
No sound from a connected player
A speaker produces no sound
The subwoofer produces no sound
If the setting of the front speakers is "Large", the low range elements will be output from the front speakers instead of from the subwoofer during 2 ch audio input of TV or music. To output the sound from the subwoofer, make one of the following settings.
Noise can be heard
The beginning of audio received by an HDMI IN cannot be heard
Sound suddenly reduces
 on the remote controller several times to switch the display of the main unit, and you can check the input format.
Check the following if the problem persists after you have confirmed the above.
Cannot select a desired listening mode
Cannot listen to the sound in Dolby TrueHD, Dolby Atmos or DTS-HD Master Audio format
About DTS signals
Check the following if the problem persists after you have confirmed the above.
No image appears
No image from a device connected to HDMI IN jack
Images flicker
Video and audio are out of synch
HDMI linked operation does not work with CEC-compliant devices, such as a TV
Poor reception or much noise
Check the following if the problem persists after you have confirmed the above.
Cannot connect with this unit
Music playback is unavailable on the unit even after successful BLUETOOTH connection
Sound is interrupted
The audio quality is poor after connection with a BLUETOOTH-enabled device
Cannot ZONE B-output the audio of externally connected AV components
The display does not light up
Strange noise can be heard from the unit
The message "Noise Error" appears during Full Auto MCACC
The measurement results of Full Auto MCACC show different distances to the speakers from the actual ones
Midnight function does not work