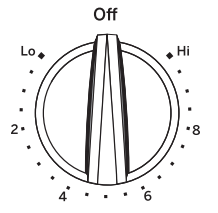
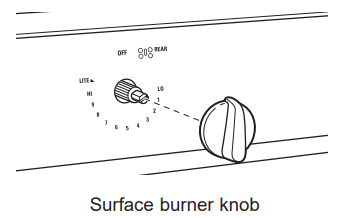
Push the knob in and turn in either direction to the setting you want.
A surface ON indicator light will glow when any surface unit is on
For glass cooktop surfaces:
A HOT COOKTOP indicator light will:
■ come on when the unit is hot to the touch.
■ stay on even after the unit is turned off.
■ stay on until the unit is cooled to approximately 150°F.
At both OFF and HI the control clicks into position. You may hear slight clicking sounds during cooking, indicating the control is maintaining your desired setting.
Be sure you turn the control knob to OFF when you finish cooking.
Coil Cooktops
Each coil surface unit uses "SENSI-TEMP TECHNOLOGY" to reduce the risk of cooktop oil and grease fires. This feature is located in the center of each surface unit. Power to the surface unit is temporarily interrupted when a pot or pan exceeds expected cooking temperatures. Even after the surface units are turned off, the surface unit retains enough heat to continue cooking. To avoid overcooking, remove pans from the surface units when the food is cooked. Avoid placing anything on the surface unit until it has cooled completely.
Oven Controls / Sabbath Mode
Oven Controls
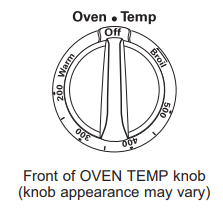
Oven Temperature Knob
Turn the OVEN TEMP knob to the setting you want.
The Oven/Cycle light comes on when the burner is on. It will cycle on and off during cooking.
To Adjust the Thermostat
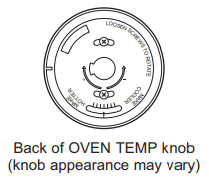
1. Pull the Oven Temp knob off the range and look at the back side. To make an adjustment, loosen (approximately one turn), but do not completely remove, the two screws on the back of the knob.
2. With the back of the knob facing you, hold the outer edge of the knob with one hand and turn the front of the knob with the other hand.
To increase the oven temperature, move the top screw toward the right. You’ll hear a click for each notch you move the knob.
To decrease the oven temperature, move the top screw toward the left.
Each click will change the oven temperature approximately 10°F. (Range is plus or minus 30°F from the arrow.) We suggest that you make the adjustment one click from the original setting and check oven performance before making any additional adjustments.
3. After the adjustment is made, retighten screws so they are snug, but be careful not to overtighten.
4. Replace the knob, matching the flat area of the knob to the shaft, and check performance.
Sabbath Mode
Certain models comply with the Star-K Jewish Sabbath requirements for use during the Sabbath and holidays.
Start Baking
To start baking, simply turn the thermostat knob to the desired temperature. Because a thermostat model will respond with a clicking sound when the thermostat knob is used to turn on the oven, this operation should take place before the Sabbath or Holidays begin.
Adjusting the Temperature
To adjust the oven temperature while in compliance with Sabbath requirements, the user must observe the oven ON indicator light:
To adjust the oven temperature to a higher value, the user must first confirm the "OVEN ON" light is on. Only then, can the user turn the knob to a higher temperature than was previously set.
To adjust the oven temperature to a lower value, the user must first confirm the "OVEN ON" light is off. Only then, can the user turn the knob to a lower temperature than was previously set.
Stop Baking
To stop baking, simply turn the thermostat knob to the off position. Because a thermostat model will respond with a clicking sound when the thermostat knob is used to turn off the oven, this operation should take place after the Sabbath or Holidays end.
Oven Light Operation (on some models)
The oven light can be set to either on or off prior to the start of the Sabbath or the holiday. Opening and closing of the door will not change the state of the oven light.
Sabbath Mode Power Outage Note
If a power outage occurs during a Sabbath bake, the unit will return to Sabbath bake mode when power is restored and the oven will return to the same temperature as before the outage, without any intervention from the user.
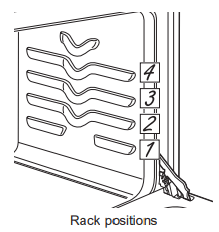
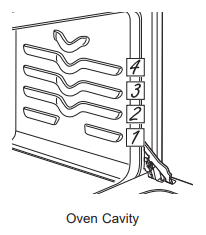
Oven Racks
Rack Positions
Your oven has four rack positions in the main oven. Recommended rack positions for various types of foods are provided in the Cooking Guide. Adjusting the rack position is one way to impact cooking results. For example, if you would prefer darker tops on cakes, muffins or cookies, try moving food one rack position higher. If you find foods are too brown on top, try moving them down next time.
When baking with multiple pans and on multiple racks, ensure there is sufficient space between pans to allow air to flow. This may improve cooking evenness.
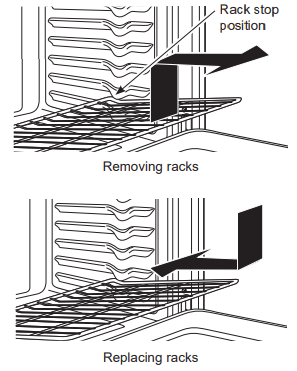
Removing and Replacing Flat Racks
When placing and removing cookware, pull the rack out
to the bump (stop position) on the rack support.
To remove a rack, pull it toward you until it reaches the stop position, tilt up the front of the rack and pull it out.
To replace a rack, place the curved end of the rack onto the rack supports. Tilt up the front of the rack and push the rack in until it stops. Then lay the rack flat and push it in until it is all the way into the oven.
Racks may become difficult to slide, especially after a self-clean cycle. To improve sliding conditions, use a soft cloth or paper towel to rub vegetable oil on the left and right edges of the racks and/or rack supports.
NOTE: Remove unused racks when using the oven for faster preheat, improved efficiency, and optimal cooking performance.
Cookware Guidelines
The material, finish, and size of cookware affect baking performance.
Dark, coated and dull pans absorb heat more readily than light, shiny pans. Pans that absorb heat more readily can result in a browner, crisper and thicker crust. If using dark and coated cookware check food earlier than the minimum cook time. If undesirable results are obtained with this type of cookware consider reducing oven temperature by 25° F next time.
Shiny pans can produce more evenly cooked baked goods such as cakes and cookies.
Glass and ceramic pans heat slowly but retain heat well. These types of pans work well for dishes such as pies and custards.
Air insulated pans heat slowly and can reduce bottom browning.
Keep cookware clean to promote even heating.
Cooking Modes
Your new oven has a variety of cooking modes to help you get the best results. These modes are described below. Refer to the Cooking Guide section for recommendations for specific foods. Remember, your new oven may perform differently than the oven it is replacing.
Bake
The bake mode is for baking and roasting. When preparing baked goods such as cakes, cookies and pastries, always preheat the oven first. To use this mode turn the thermostat knob to the desired temperature.
Warm (on some models)
Warm mode is designed to keep hot foods hot. Cover foods that need to remain moist and do not cover foods that should be crisp. Preheating is not required. Do not use Warm to heat cold food. It is recommended that food not be kept warm for more than 2 hours. To use this mode turn the thermostat knob to Warm.
Broil
Always broil with the oven door and drawer closed. Monitor food closely while broiling. Use caution when broiling on the upper rack positions as placing food closer to the broil burner increases smoking, splattering, and the possibility of fats igniting.
Try broiling foods that you would normally grill. Adjust rack positions to adjust the intensity of the heat to the food. Place foods closer to the broil burner when a seared surface and rare interior is desired. Thicker foods and foods that need to be cooked through should be broiled on a lower rack position. To use this mode turn the thermostat knob to the Broil setting.
CARE AND CLEANING
Cleaning the Range – Exterior
Control Knobs
The control knobs may be removed for easier cleaning. Make sure the knobs are in the OFF positions and pull them straight off the stems for cleaning.
The knobs can be cleaned in a dishwasher or they may also be washed with soap and water. Make sure the inside of the knobs are dry before replacing.
Replace the knobs, in the OFF position to ensure proper placement.
Control Panel
It’s a good idea to wipe the control panel after each use. Clean with mild soap and water or vinegar and water, rinse with clean water and polish dry with a soft cloth.
Do not use abrasive cleansers, strong liquid cleansers plastic scouring pads or oven cleaners on the control panel—they will damage the finish.
Oven Exterior
Do not use oven cleaners, abrasive cleansers, strong liquid cleansers, steel wool, plastic scouring pads, or cleaning powders on the interior or exterior of the oven. Clean with a mild soap and water or vinegar and water solution. Rinse with clean water and dry with a soft cloth. When cleaning surfaces, make sure that they are at room temperature and not in direct sunlight.
If stain on the door vent trim is persistent, use a mild abrasive cleaner and a sponge-scrubber for best results. Spillage of marinades, fruit juices, tomato sauces and basting liquids containing acids may cause discoloration and should be wiped up immediately. Let hot surfaces cool, then clean and rinse.
Painted Surfaces
Painted surfaces include the sides of the range and the Do not use commercial oven cleaners, cleaning powders, door, top of control panel and the drawer front. Clean steel wool or harsh abrasives on any painted surface. these with soap and water or a vinegar and water solution.
Stainless Steel Surfaces (on some models)
Do not use a steel wool pad; it will scratch the surface.
To clean the stainless steel surface, use warm sudsy water or a stainless steel cleaner or polish. Always wipe the surface in the direction of the grain. Follow the cleaner instructions for cleaning the stainless steel surface.
Cleaners with oxalic acid such as Bar Keepers Friend Soft Cleanser™ will remove surface rust, tarnish and small blemishes. Use only a liquid cleanser free of grit and rub in the direction of the brush lines with a damp, soft sponge.
To inquire about purchasing cleaning products including stainless steel appliance cleaner or polish, see the Accessories and Consumer Support sections at the end of this manual.
For easier cleaning, the control knobs may be removed by pulling them directly outwards once the knobs are in the OFF position. Do not pull knobs up or down or hang objects on them. This can damage the gas valve shaft. The knobs can be washed by hand with soap and water or in a dishwasher.
To replace knobs after cleaning, align the hole on the knob backside with the gas valve shaft and push inward until the knob is securely fastened. All knobs are interchangeable
Drip Pans
Remove the surface units. Then lift out the drip pans.
For best results, clean the drip pans by hand. Place them in a covered container (or a plastic bag) with V4 cup ammonia to loosen the soil. Rinse with clean water and polish with a clean soft cloth.
The drip pans may also be cleaned in a dishwasher. Clean the area under the drip pans often. Built-up soil, especially grease, may catch fire.
Do not cover the drip pans with foil. Using foil so close to the receptacle could cause shock, fire or damage to the range.
NOTE: If your cooktop is equipped with shiny, silver-colored drip pans, do not clean them in the self-cleaning oven. Permanent damage to the finish can occur.
If your cooktop is equipped with black or gray porcelain-coated drip pans, they can be cleaned in the oven during the self-cleaning cycle. Before you begin a self-cleaning cycle, remove any heavy soil from the drip pans and place them on the porcelain-coated oven racks. Do not place the drip pans directly on the oven bottom. After the self-cleaning cycle is completed and the drip pans are cool, wipe them with a damp cloth to remove any remaining ash or residue.
Oven
Be sure all controls are off and all surfaces are cool before cleaning any part of the oven.
Oven Interior
The interior of your new oven can be cleaned manually or by using steam clean process.
Spillage of marinades, fruit juices, tomato sauces and basting liquids containing acids may cause discoloration and should be wiped up as soon as hot surfaces cool, then clean and rinse.
Manual Cleaning
Do not use oven cleaners, strong liquid cleansers, steel wool, or scouring pads on the interior of the oven. For soils on the oven bottom and other enameled surfaces, use a gentle abrasive containing oxalic acid, such as Bar Keepers Friend®, with a non-scratch sponge. Take care not to apply any abrasive cleaners or sponges to the door glass, as it will scratch the reflective coating. The oven interior and door glass may be cleaned using a soft cloth with a mild soap and water, or vinegar and water solution. After cleaning, rinse with clean water and dry with a soft cloth.
Steam Cleaning
Steam Cleaning is for cleaning light soil from your oven. To use the Steam Clean feature:
Start with the oven at room temperature.
Wipe excess grease and soils from the oven.
Pour 1/2 cup of water onto the bottom of the oven.
Close the door.
Turn your oven temperature knob to 200°F.
Set a timer for 2 1/2 minutes. When time is finish, turn oven temperature knob to Off.
Set a timer for 27 minutes to allow oven to cool down.
Do not open the door during the Steam Cleaning. At the end of the cycle, soak up the remaining water, and wipe the moisture-softened soil from the oven walls and door.
Oven Exterior
Do not use oven cleaners, abrasive cleansers, strong liquid cleansers, steel wool, plastic scouring pads or cleaning powders on the interior or exterior of the oven. Clean with a mild soap and water or a 50/50 solution of vinegar and water. Rinse with clean water and dry with a soft cloth. When cleaning surfaces, make sure that they are at room temperature and not in direct sunlight.
Spillage of marinades, fruit juices, tomato sauces and basting liquids containing acids may cause discoloration and should be wiped up as soon as hot surfaces cool, then clean and rinse.
Oven Racks
All oven racks may be cleaned by hand with an abrasive After cleaning the racks, use a soft cloth or paper towel cleaner or steel wool. to rub a small amount of vegetable oil on the left and right edges of the rack. This will ensure the racks are easy to slide in and out of the oven
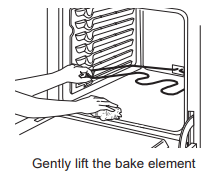
Oven Heating Elements
Do not clean the bake element or the broil element. Any soil will burn off when the elements are heated.
To clean the oven floor, gently lift the bake element. Clean the oven floor with warm, soapy water.
Cleaning the Glass Cooktop
Normal Daily Use Cleaning
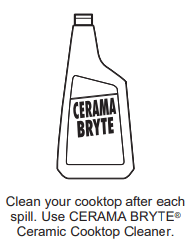
ONLY use CERAMA BRYTE® Ceramic Cooktop Cleaner on the glass cooktop. Other creams may not be as effective.
To maintain and protect the surface of your glass cooktop, follow these steps:
Before using the cooktop for the first time, clean it with CERAMA BRYTE® Ceramic Cooktop Cleaner. This helps protect the top and makes cleanup easier.
Daily use of CERAMA BRYTE® Ceramic Cooktop Cleaner will help keep the cooktop looking new.
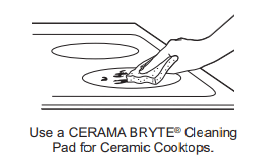
Shake the cleaning cream well. Apply a few drops of CERAMA BRYTE® Ceramic Cooktop Cleaner directly to the cooktop.
Use a paper towel or CERAMA BRYTE® Cleaning Pad for Ceramic Cooktops to clean the entire cooktop surface.
Use a dry cloth or paper towel to remove all cleaning residue. No need to rinse.
NOTE: It is very important that you DO NOT heat the cooktop until it has been cleaned thoroughly.
Burned-On Residue
NOTE: DAMAGE to your glass surface may occur if you use scrub pads other than those recommended.
Allow the cooktop to cool.
Spread a few drops of CERAMA BRYTE® Ceramic Cooktop Cleaner on the entire burned residue area.
Using a CERAMA BRYTE® Cleaning Pad for Ceramic Cooktops, rub the residue area, applying pressure as needed.
If any residue remains, repeat the steps listed above as needed.
For additional protection, after all residue has been removed, polish the entire surface with CERAMA BRYTE® Ceramic Cooktop Cleaner and a paper towel.
Heavy, Burned-On Residue
Allow the cooktop to cool.
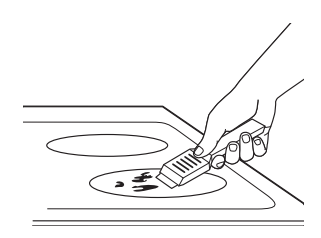
Use a single-edge razor blade scraper at approximately a 45° angle against the glass surface and scrape the soil. It will be necessary to apply pressure to the razor scraper in order to remove the residue.
After scraping with the razor scraper, spread a few drops of CERAMA BRYTE® Ceramic Cooktop Cleaner on the entire burned residue area. Use a CERAMA BRYTE® Cleaning Pad to remove any remaining residue.
For additional protection, after all residue has been removed, polish the entire surface with CERAMA BRYTE® Ceramic Cooktop Cleaner and a paper towel.
The CERAMA BRYTE® Ceramic Cooktop Scraper and all recommended supplies are available through our Parts Center. See the Accessories and Consumer Support sections at the end of this manual. NOTE: Do not use a dull or nicked blade.
Metal Marks and Scratches
1. Be careful not to slide pots and pans across your cooktop. It will leave metal markings on the cooktop surface.
These marks are removable using the CERAMA BRYTE® Ceramic Cooktop Cleaner with a CERAMA BRYTE® Cleaning Pad for Ceramic Cooktops.
2. If pots with a thin overlay of aluminum or copper are allowed to boil dry, the overlay may leave black discoloration on the cooktop.
This should be removed immediately before heating again or the discoloration may be permanent.
NOTE: Carefully check the bottom of pans for roughness that would scratch the cooktop.
Cooktop Seal
To clean the cooktop seal around the edges of the glass, lay a wet cloth on it for a few minutes, then wipe clean with nonabrasive cleaners.
Door and Drawer
Cleaning the Oven Door
Cleaning the Door Interior
Do not allow excess water to run into any holes or slots in the door.
Wipe dish soap over any baked-on spatters on the glass. Use a single sided safety razor blade to clean it off. Then wipe over the glass with a soapy cloth to remove any residue and dry off.
The area outside the gasket can be cleaned with a soap-filled plastic scouring pad. Do not rub or clean the door gasket - it has an extremely low resistance to abrasion.
If you notice the gasket becoming worn, frayed or damaged in any way or if it has become displaced on the door, you should have it replaced.
Cleaning the Door Exterior
If a stain on the door vent trim is persistent, use a mild abrasive cleaner and a sponge-scrubber for best results. Do not use this method on any other surface.
Stainless Steel Surfaces (on some models)
Do not use a steel wool pad; it will scratch the surface.
To clean the stainless steel surface, use warm sudsy water or a stainless steel cleaner or polish. Always wipe the surface in the direction of the grain. Follow the cleaner instructions for cleaning the stainless steel surface.
To inquire about purchasing cleaning products including stainless steel appliance cleaner or polish, see the Accessories and Consumer Support sections at the end of this manual.
Removable Storage Drawer (on some models)
The storage drawer is a good place to store cookware and bakeware. Do not store plastics or flammable material in the drawer.
The storage drawer may be removed for cleaning under the range. Clean the storage drawer with a damp cloth or sponge. Never use harsh abrasives or scouring pads.
Your storage drawer may have plastic slides (shown to the right) or metal rails. Follow the respective removal and replacement instructions for your model’s configuration.
Removing the Storage Drawer:
1. Pull drawer straight out until it stops.
2. Continue to pull the drawer until it is detached from the oven.
Replacing the Storage Drawer:
1. Rest the left drawer rail around the inner left rail guide and slide it in slightly.
2. Place the right drawer rail around the inner right rail guide and slide it in slightly.
3. Slide the drawer all the way in.
Oven Light
Oven Light Replacement
Be sure to let the light cover and bulb cool completely.
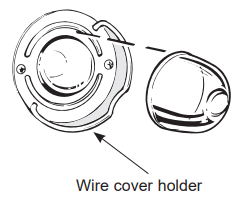
To remove the cover:
1. Hold a hand under the cover so it doesn’t fall when released. With fingers of the same hand. firmly push back the wire cover holder. Lift off the cover.
Do not remove any screws to remove the cover.
2. Replace bulb with a 40-watt appliance bulb.
To replace the cover:
Place it into groove of the light receptacle. Pull wire forward to the center of the cover unti it snaps into place.
Connect electrical power to the range.
Oven Door
The door is very heavy. Be careful when removing and lifting the door. Do not lift door by the handle.
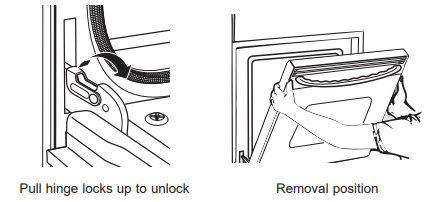
To Remove the Door:
Fully open the door.
Pull the hinge locks up and away from the range frame to the unlocked position.
Firmly grasp both sides of the door near the top.
Close door until the top of the door is approximately 6" from the range frame.
Lift door up and away from the range until both hinge arms are clear of the slots in the range frame.
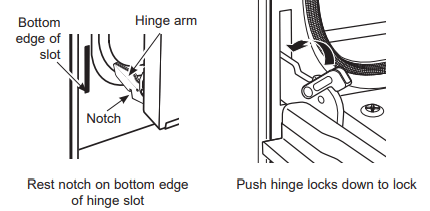
To Replace the Door:
Firmly grasp both sides of the door near the top.
With the door at the same angle as the removal position. rest the notch on the underside of the left hinge arm on the bottom edge of the left hinge slot. The notch in the hinge arm must be fully seated into the bottom of the slot. Repeat for the right side.
Fully open the door. If the door will not fully open. the notches in the bottoms of the hinge arms have not. seated correctly in the bottom edge of the slot. Lift the door off the range and repeat previous step.
Push the hinge locks toward the range cavity and down to the locked position.
Close the oven door.
TROUBLESHOOTING TIPS
Save time and money! Review the charts on the following pages first and you may not need to call for service.
Problem
Possible Cause
What To Do
Surface units will not maintain a rolling boil or cooking is not fast enough
Improper cookware being used.
Use pans which are flat and match the diameter of the surface unit selected.
In some areas, the power (voltage) may be low.
Cover pan with a lid until desired heat is obtained.
Coil surface units do not work properly
The surface units are not plugged in solidly.
With the controls off, check to make sure the surface unit is plugged completely into the receptacle.
The surface unit controls improperly set.
Check to see the correct control is set for the surface unit you are using.
The drip pans are not set securely in the cooktop.
With the controls off, check to make sure the drip pan is in the recess in the cooktop and that the opening in the pan lines up with the receptacle.
A fuse in your home may be blown or the circuit breaker tripped.
Replace the fuse or reset the circuit breaker.
Sensi-Temp Technology sensor cap is overly soiled.
Clean Sensi-temp Technology sensor cap per cleaning the range section.
Sensi-temp sensor cap stuck or will not flex up and down.
Call a qualified technician for replacement. Replace coil surface units with only the exact replacement part.
Surface units do not work properly
A fuse in your home may be blown or the circuit breaker tripped.
Replace the fuse or reset the circuit breaker.
Cooktop controls improperly set.
Check to see the correct control is set for the surface unit you are using.
Surface unit stops glowing when turned to a lower setting
The unit is still on and hot.
This is normal.
Scratches (may appear as cracks) on cooktop glass surface
Incorrect cleaning methods being used.
Scratches are not removable. Tiny scratches will become less visible in time as a result of cleaning.
Cookware with rough bottoms being used or coarse particles (salt or sand) were between the cookware and the surface of the cooktop. Cookware has been slid across the cooktop surface.
To avoid scratches, use the recommended cleaning procedures. Make sure bottoms of cookware are clean before use, and use cookware with smooth bottoms.
Areas of discoloration on the cooktop
Food spillovers not cleaned before next use.
See the Cleaning the glass cooktop section.
Hot surface on a model with a light-colored cooktop.
This is normal. The surface may appear discolored when it is hot. This is temporary and will disappear as the glass cools.
Plastic melted to the surface
Hot cooktop came into contact with plastic placed on the hot cooktop.
See the Glass surface—potential for permanent damage section in the Cleaning the glass cooktop section.
Pitting (or indentation) of the cooktop
Hot sugar mixture spilled on the cooktop.
Call a qualified technician for replacement.
Frequent cycling off and on of surface units
Improper cookware being used.
Use only flat cookware to minimize cycling.
My new oven doesn't cook like my old one. Is something wrong with the temperature settings?
Your new oven has a different cooking system from your old oven and therefore may cook differently than your old oven.
For the first few uses, follow your recipe times and temperatures carefully. If you still think your new oven is too hot or too cold, you can adjust the temperature yourself to meet your specific cooking preference.
NOTE: This adjustment affects Bake temperatures; it will not affect Broil.
Food does not bake properly
Oven controls improperly set.
See the Cooking Modes section.
Rack position is incorrect or rack is not level.
See the Cooking Modes section and Cooking Guide.
Incorrect cookware or cookware of improper size being used.
See the Cookware section.
Oven temperature needs adjustment.
See the Oven Controls section.
Ingredient substitution
Substituting ingredients can change the recipe outcome.
Food does not broil properly
Oven controls improperly set.
Make sure you select the appropriate broil mode.
Improper rack position being used.
See Cooking Guide for rack location suggestions.
Food being cooked in a hot pan.
Make sure cookware is cool.
Cookware not suited for broiling.
Use a pan specifically designed for broiling.
Aluminum foil used on the broiling pan and grid has not been fitted properly and slit as recommended.
If using aluminum foil conform to pan slits.
In some areas the power (voltage) may be low.
Preheat the broil element for 10 minutes.
Oven temperature too hot or too cold
Oven temperature needs adjustment.
See the Oven Controls section or adjust the thermostat.
Oven does not work or appears not to work
A fuse in your home may be blown or the circuit breaker tripped.
Replace the fuse or reset the circuit breaker.
Oven controls improperly set.
See the Using the Oven section.
Oven is in Sabbath Mode.
Verify, that the oven is not in Sabbath Mode. See the Oven Controls section.
“Crackling” or “popping” sound
This is the sound of the metal heating and cooling during both the cooking and cleaning functions.
This is normal.
Why is my range making a "clicking" noise when using my oven?
Your range cycles the heating elements by turning relays on and off to maintain the oven temperature.
This is normal.
Storage drawer won't close
Power cord may be obstructing drawer in the lower back of the range.
Reposition the drawer and power cord. See the Storage Drawer Removal instructions in the Care and cleaning of the range section.
Rear drawer support is on top of the guide rail.
Reposition the drawer. See Door and Drawer in the Care and Cleaning section.
Oven door is crooked
The door is out of position.
Because the oven door is removable, it sometimes gets out of position during installation. To straighten the door, push down on the high corner.
Oven light does not work
Light bulb is loose or defective.
Tighten or replace bulb.
Switch operating light is broken.
Call for service.
Excessive smoking during broiling
Food too close to burner element.
Lower the rack position of the food.
Strong odor
An odor from the insulation around the inside of the oven is normal for the first few times the oven is used.
This is temporary and will go away after several uses or a self-clean cycle.
My oven door glass appears to be "tinted" or have a "rainbow" color. Is this defective?
No. The inner oven glass is coated with a heat barrier to reflect the heat back into the oven to prevent heat loss and keep the outer door cool while baking.
This is normal. Under certain light or angles, you may see this tint or rainbow color.
Sometimes the oven takes longer to preheat to the same temperature
Cookware or food in oven.
The cookware or food in the oven will cause the oven to take longer to preheat. Remove items to reduce preheat time.
Number of racks in oven.
Adding more racks to the oven will cause the oven to take longer to preheat. Remove some racks.
Oven racks are difficult to slide
The shiny, silver-colored racks were cleaned in a self-clean cycle.
Apply a small amount of vegetable oil to a paper towel and wipe the edges of the oven racks with the paper towel. Do not spray with Pam® or other lubricant sprays.
Drawer does not slide smoothly or drags
The drawer is out of alignment.
Fully extend the drawer and push it all the way in See Door and Drawer in the Care and Cleaning section.
Drawer is over-loaded or load is unbalanced.
Reduce weight. Redistribute drawer contents.
Steam from the vent
When using the ovens, it is normal to see steam coming out of the oven vents. As the number of racks or amount of food being cooked increases, the amount of visible steam will increase.