Documents: Go to download!
User Manual
- User Manual - (English)
- ASTG24KMTC - Fujitsu - Product Catalogue - (English)
- Indoor Unit Overview and Operations
- Remote Controller Overview and Operations
- Care and Cleaning
- Troubleshooting
Table of contents
USER MANUAL AIR CONDITIONER
Indoor Unit Overview and Operations
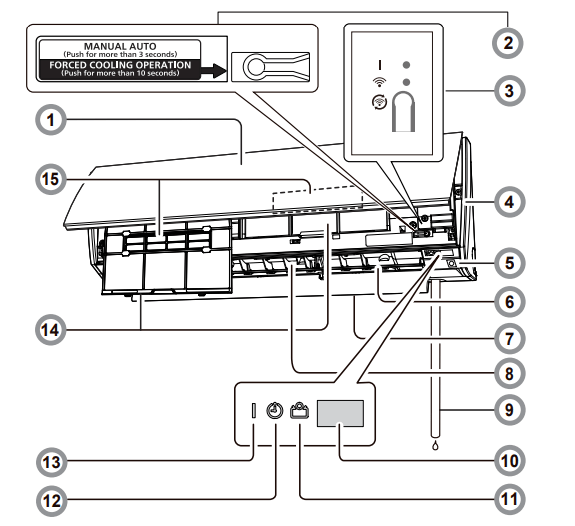
1.Intake grille
Before starting operation, make sure that the intake grille has been shut completely. Incomplete closing may have an effect on the proper function or performance of the product.
2. MANUAL AUTO button
Use when the remote controller is lost or there is a malfunction.

*:To stop forced cooling, press this button or Start/Stop button on the remote controller.
3. Wireless LAN control indicator and buttons
WLAN adapter is build-in for wireless LAN control. For details, refer to the setting manual of the Wireless LAN control.
NOTES:
• The indicators can be turned off by using the mobile app.
4. Front panel
5. Human Sensor
Used for Energy Saving Program. Controls temperature setting by detecting people in the room.
6. Vertical airflow direction louver
Each time you press Vertical SET button on the remote controller, the angle of the vertical airflow direction louver moves as follows:

• Do not adjust by hand.
• At the beginning of AUTO or HEAT mode, they may stay on position 1 for a while for adjustment.
• If the angle is set to position 5-8 for more than 30 minutes in COOL or DRY mode, the louver will automatically return to position 4.
• Keeping the position 5-8 during COOL or DRY mode may cause condensation to form, and the drops may damage your property.
7. Power diffuser
In conjunction with movement of the vertical airflow direction louver, the angle of the power diffuser moves as follows:

8 Horizontal airflow direction louver
Each time you press the Horizontal SET button on the remote controller, the airflow direction range of the horizontal airflow direction louver will change as follows:

9 Drain hose
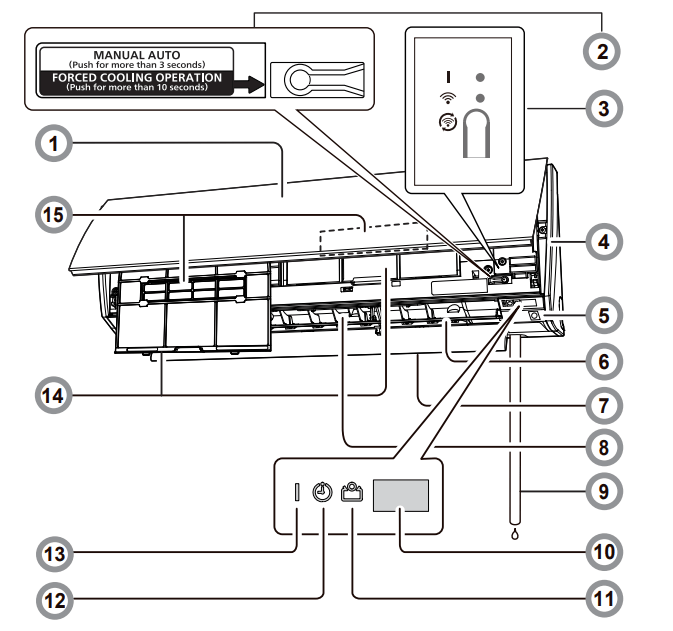
10 Remote controller signal receiver
11 ECONOMY indicator (green)
Lights in ECONOMY operation and in 10 °C HEAT operation. Blinks when it is time to clean the air filters (Installer setting). For details, refer to Filter Indicator (Installer setting).
12 TIMER indicator (orange)
Lights in TIMER operation, and blinks slowly when the timer setting error is detected.
For details, refer to “Auto-restart function” on page 9.
13 OPERATION indicator (green)
Lights in normal operation, and blinks slowly in Automatic Defrosting operation.
Blinks during Demand Response operation. For details, refer to page 8
14 Air filter
15 Air cleaning filters
Purify or deodorize the air, and provide fresh airflow.
Remote Controller Overview and Operations
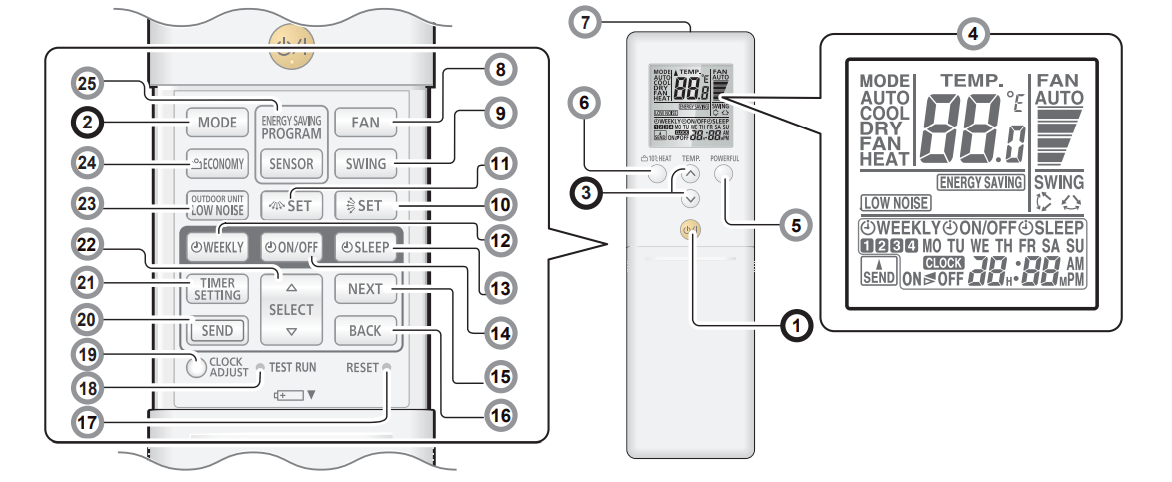
You can quickly start operation with the following 3 steps:
1 Start/Stop button
2 MODE button
Switches operation mode in following order.

NOTES in HEAT mode:
• At the beginning of the operation, the indoor unit operates at very low fan speed for about 3–5 minutes for preparation, then switches to the selected fan speed.
• Automatic Defrosting operation overrides the heating operation when necessary.
3 TEMP. (temperature) buttons
Sets the desired temperature.
In COOL or DRY mode, the temperature needs to be set lower than the current room temperature. In HEAT mode, the temperature needs to be set higher than the current room temperature.
Otherwise, corresponding operation mode may not start.

NOTES: Temperature control is not available in FAN mode.
4 Remote controller display
In this section, all the possible indicators are displayed for description. In actual operation, the display is linked with the button operation, and only shows the necessary indicators for each setting.
5 POWERFUL button
Activates the POWERFUL operation
The unit will operate at maximum power and strong airflow to quickly cool down or warm up the room.
When activated, the indoor unit will emit 3 short beeps.
To turn off, press the POWERFUL button again. The indoor unit will then emit 2 short beeps.
POWERFUL operation is automatically turned off in the following situations:
• Adjusted room temperature reaches the set temperature in COOL, DRY, or HEAT mode.
• 20 minutes have passed after the POWERFUL operation mode has been set.
Even in situations above, the POWERFUL operation will not automatically turn off unless it has run for a certain amount of time.
NOTES:
• The airflow direction and the fan speed are controlled automatically.
• This operation cannot be performed simultaneously with ECONOMY operation.
• POWERFUL operation will override the OUTDOOR UNIT LOW NOISE, ENERGY SAVING functions. Both functions, if set, will start after the POWERFUL operation is turned off.
6. 10 °C HEAT button
Starts 10 °C HEAT operation that maintains the room temperature at 10 °C so as to prevent the room temperature to drop too low. After pressing the button to start the 10 °C HEAT operation, the indoor unit emits 2 short beeps and the ECONOMY indicator (green) will turn on.
To turn off, press the Start/Stop button. The ECONOMY indicator will turn off.
NOTES:
• In 10 °C HEAT operation mode, only the vertical airflow direction can be adjusted by using the SET button.
• HEAT mode will not be performed if the room temperature is warm enough.
7 Signal transmitter
Aim at the signal receiver of the indoor unit properly.
• Signal transmit indicator  on the remote controller display shows that the signal from the remote controller is being transmitted.
• Operating range is approximately 7 m.
• You will hear a beep if the transmitted signal has been sent properly. If there is no beep, press the button on the remote controller again.
8 FAN button
Controls the fan speed.

• When AUTO is selected, the fan speed is automatically adjusted according to the operation mode.
9 SWING button
Sets the automatic swing operation. Each time the SWING button is pressed, the operation will change.

• The Left/right swing operation will follow the direction as shown on page 3 "Horizontal airfl ow direction louver"
• The Up/down Swing operation range will differ by mode as follows:

10 Vertical SET button
Adjusts the vertical airflow direction.
11 Horizontal SET button
Adjusts the horizontal airflow direction.
12 WEEKLY timer button
Activates the WEEKLY timer for a maximum of 4 on or off programs per day, each day of the week.
13 SLEEP timer button
Activates the SLEEP timer that helps you to fall asleep comfortably with gradual temperature control.
14 ON/OFF timer button
Activates the ON/OFF timer.
15 NEXT button
Used for adjusting the timer setting.
16 BACK button
Used for adjusting the timer setting.
17 RESET button
When you press the RESET button, press it gently by using the tip of a ballpoint pen or other small object in correct direction as shown in this figure.

18 TEST RUN button
Only used for the initial test in the unit installation. Do not press this button under normal use because it will cause incorrect operation.
• During the test run, the OPERATION indicator and the TIMER indicator blink simultaneously.
• To quit the test run that is started unintentionally, you need to turn off the air conditioner by pressing the START/STOP button.
19 CLOCK ADJUST button
Used for adjusting the clock.
20 SEND button
Used for sending the timer/clock setting.
21 TIMER SETTING button
Used to enter the timer setting mode.
22 SELECT button
Used for adjusting the clock or timer.
23 OUTDOOR UNIT LOW NOISE button
Starts or stops OUTDOOR UNIT LOW NOISE operation that lowers noise generated from the outdoor unit by cutting down the rotation number of the compressor, and suppressing the fan speed.
Once the operation is set, the setting is preserved until you press this button again to stop the operation, even if the indoor unit operation is stopped.
 on the remote controller display shows that the unit is in OUTDOOR UNIT LOW NOISE mode.
24 ECONOMY button
Starts or stops ECONOMY operation that saves more electricity than other operation modes by changing the set temperature to a moderate setting. By pressing the ECONOMY button, the ECONOMY indicator on the indoor unit turns on.
• In COOL or DRY mode, the room temperature will be adjusted a few degrees higher than the set temperature.
• In HEAT mode, the room temperature will be adjusted a few degrees lower than the set temperature.
25 SENSOR button (ENERGY SAVING PROGRAM)
Activates or deactivates the energy saving program.
* The Energy Saving program is ON at the time of purchase.

Care and Cleaning
Daily care
When cleaning the indoor unit body, mind the following:
• Do not use water hotter than 40 °C.
• Do not use scouring cleanser, volatile solvents such as benzene or thinner.
• Wipe the unit gently by using soft cloth.
Cleaning the intake grille
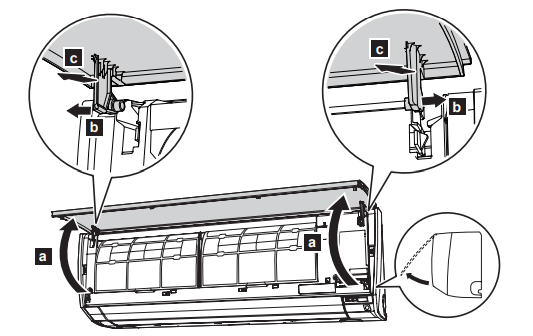
1.Open the intake grille in direction of the arrow a. While gently pressing the left and right mounting shafts of the intake grille outward b, remove the intake grille in direction of the arrow c
2. Wash the intake grille gently with water or wipe it gently with a soft cloth moisten with warm water. Then wipe it with a dry and soft cloth.
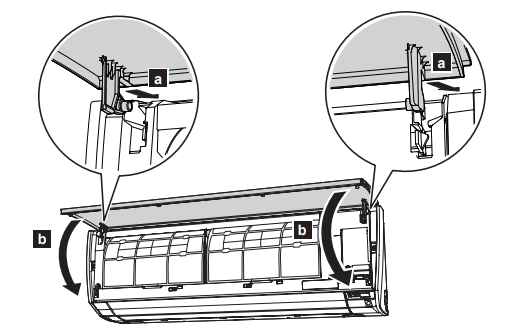
3. While holding the grille horizontal, set the left and right mounting shafts into the pillow blocks at the top of the panel a. To latch each shaft properly, insert the shaft until it snaps. Then close the intake grille b
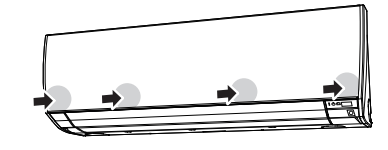
4. Press 4 places on the intake grille to close it completely.
Cleaning the air filters
Mind that you have a periodical cleaning of the air filters to prevent reducing the operation efficiency of the product.
Using of clogged air filter with dust will lower the product performance, and may cause airflow reduction or increase of operating noise.
Clean the air filters once every 2 weeks under normal use.
1.Open the intake grille. (Refer to a of step 1 in “Cleaning the intake grille”.)
2. While holding the intake grille with your hand, pull up the handle a of the filter in direction of the arrow and release the 2 claws b. Then pull the filter out with gently sliding it downward c.
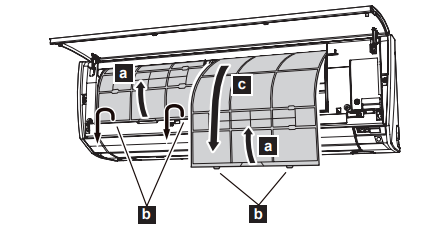
3. Filter holder and air cleaning filter are attached on the rear side of the air filter. Remove them from the air filter by unlatching each corner of the filter holder d
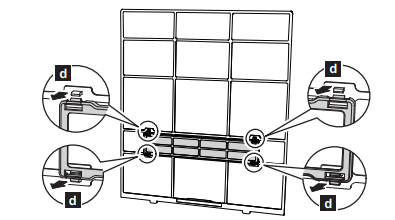
4. Remove dust by using a vacuum cleaner or by washing the filter. When you wash the filter, use neutral household detergent and warm water. After rinse the filter well, dry it thoroughly in a shaded place before you reinstall it.
5. Attach the air cleaning filter and the filter holder to each air filter.
6. Attach the air filter with aligning both side of the filter with the front panel, and push in the filter fully.
NOTES: Make sure that 2 claws are firmly snapped to the guide holes on the panel.
7. Close the intake grille firmly. (Refer to step 4 in “Cleaning the intake grille”.)
Replacing the air cleaning filters
1.Remove the air filter. (Refer to step 1 and 2 in “Cleaning the air filters”.)
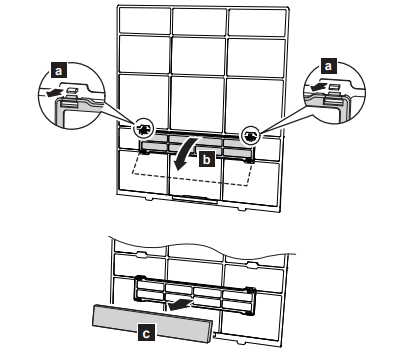
2. Release 2 latches a of the filter holder, and turn over the holder in direction of arrow b. Remove the soiled air cleaning filter c.
NOTES: Air cleaning filter is attached on each air filter.
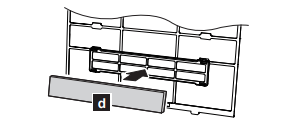
3. Attach new or maintained air cleaning filter d to the filter holder. New air cleaning filter can be attached to either of the right holder or the left holder.
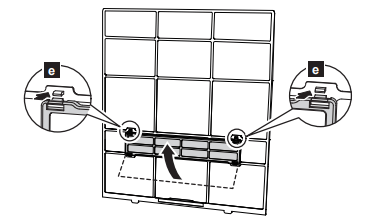
4. Latch 2 corners of the filter holder e to the air filter firmly.
5. Reinstall the air filter. (Refer to step 6 in “Cleaning the air filters”.)
6. Close the intake grille firmly. (Refer to step 4 in “Cleaning the intake grille”.)
Following 2 types of air cleaning filters are used in this product. When you replace them, purchase dedicated air cleaning filters for this product.
Apple-catechin filter: UTR-FA16

The Apple-catechin filter uses static electricity to clean fine particles and dust in the air such as tobacco smoke and plant pollen that are too small to see.
• This filter is disposable. Do not wash or reuse it.
• Once you open the package, use it as soon as possible. The cleaning effect is reduced if the filter is left with the package opened.
• Replace the filter once every 3 months under normal use.
• By setting the fan speed high, the air cleaning effect increases.
Ion deodorization filter: UTR-FA16-2

The filter deodorizes by powerfully decomposing absorbed odors using the oxidizing and reducing effects of ions generated by the ultra-fi ne-particle ceramic.
• To maintain the deodorizing effect, clean the filter once every 3 months as follows:
1. Remove the filter.
2. Flush the filter with high-pressure hot water until the surface of the filter is covered with water.
3. Wash the filter gently with diluent neutral detergent. Do not wash it by wringing or rubbing to prevent reducing the deodorizing effect by damage.
4. Rinse the filter well with water flow.
5. Dry the filter thoroughly in a shaded place.
6. Reinstall the filter to the indoor unit.
• Replace the filter once every 3 years under normal use.
After extended non-use of the unit
If you have shut down the indoor unit for 1 month or more, perform the FAN operation for half a day to dry the internal parts thoroughly before you perform normal operation.
Additional inspection
After long period of use, accumulated dust inside the indoor unit may reduce the product performance even if you have maintained the unit with instructed daily care or cleaning procedures written in this manual.
In such a case, a product inspection is recommended.
For more information, consult authorized service personnel.
Filter Indicator Reset (Special setting)
• This function can be used if set correctly during installation. Please consult authorized service personnel in order to use this function.
• Clean the air filter when the indicator lamp show the following;
| ECONOMY indicator lamp | Flashes 3 times, at intervals of 21 seconds |
After cleaning, reset the filter indicator by pushing the “MANUAL AUTO” button on the indoor unit for 3 seconds or less.
Troubleshooting
Following symptoms do not indicate product malfunction, but they are normal functions or characteristics of this product.
| Symptom | Cause | See page |
| Operation is delayed after restart | To prevent blowout of the fuse, the compressor will not operate while the protection circuit is working for about 3 minutes after sudden OFF→ON operation of the power supply. | – |
| Noise is heard. | • During operation or immediately after stopping the air conditioner, refrigerant flowing sound may be heard. Also it may be particularly noticeable for 2–3 minutes after starting operation. • During the operation, a slight squeaking sound produced by the minute expansion and contraction of the front panel caused by temperature change may be heard. | – |
| During heating operation, a sizzling sound produced by the automatic defrosting operation may be heard. | 9 | |
| Smell coming from the unit. | Various smells generated from interior textile, furniture, or cigarette smoke absorbed into the air conditioner may be emitted. | – |
| Mist or steam is emitted from the unit. | In COOL or DRY mode, a thin mist generated by condensation formed with sudden cooling process may be emitted. | – |
| During heating operation, the fan built-in the outdoor unit may stop and rising steam generated by the automatic defrosting operation may be seen. | 9 | |
| Airflow is weak or stops. | • Immediately after the heating operation is started, the fan speed stays very low temporarily to warm up the internal parts of the unit. • In HEAT mode, the outdoor unit stops and the indoor unit operates at very low fan speed if the room temperature rises above the set temperature. | – |
| In HEAT mode, the indoor unit temporarily stops for maximum of 15 minutes to perform the automatic defrosting operation while the OPERATION indicator is fl ashing. | 9 | |
| In DRY mode, the indoor unit operates at low fan speed to adjust the room humidity, and may stop from time to time. | – | |
| When the fan speed is set to “QUIET”, the fan rotates at very low speed and the airflow is reduced. | – | |
| In COOL mode, the indoor unit fan may stop from time to time when the outdoor unit is stopped. | 4 | |
| When monitoring operation is performed in AUTO mode, the fan rotates at very low speed. | – | |
| Outdoor unit emits water. | During heating operation, the outdoor unit may emit water generated by the automatic defrosting operation. | 9 |
When the filter sign is set, the LED lamp may flash. In this case, please refer to the "Filter Indicator Reset (Special setting)".
Before you call for or request servicing, troubleshoot a problem by performing following checks:
| Symptom | Diagnostic | See page |
| Does not operate at all. | Has the circuit breaker been turned off? Has there been a power outage? Has a fuse blown out or the circuit breaker been tripped? | – |
| Is the timer operating? | 6 | |
| Poor cooling or heating performance. | Is the air fi lter dirty? | 10 |
| Is the intake grille or outlet port of indoor unit blocked? | – | |
| Is the room temperature adjusted appropriately? | 4 | |
Is a window or door left opened? Is direct or strong sunlight shinning into the room in cooling operation? Are there other heating apparatus or computers operating, or too many people in the room in cooling operation? | – | |
Is the fan speed set to “QUIET”? When the fan speed setting is set to “QUIET”, noise reduction is prioritized and the air-conditioning performance may become lower. If the volume of provided airflow is not agreeable to your preference, set the fan speed to “LOW” or higher fan speed. | 5 | |
| Has the OUTDOOR UNIT LOW NOISE mode been set? | 5 | |
| Do you have an arrangement with your electric company for Demand Response? | 8 | |
| The unit operates differently from the remote controller setting. | Are the batteries used in the remote controller exhausted? Are the batteries used in the remote controller loaded properly? | 2 |
Immediately stop operation and turn off the electrical breaker in following cases. Then consult authorized service personnel.
• The problem persists even if you perform these checks or diagnostics.
• The OPERATION indicator and TIMER indicator blink while the ECONOMY indicator is blinking fast.
NOTES:
• For any troubleshooting related to the wireless LAN control, refer to the setting manual for wireless LAN control or the mobile app installed in your smartphone or tablet PC.
See other models: ASTG22KMTC ASTG34KMTC ASTG12KMTC ASTG24KMCB ASTG18KMCA
