Take out and wash the oven fittings with warm water and a little washing-up liquid.
Switch on the ventilation in the room or open a window.
Heat the oven (to a temperature of 250℃, for approx.30 min.), remove any stains and wash carefully.
Caution! When heating the oven for the first time, it is normal phenomenon tog ive off smoke and peculiar smell. This will disappear about 30 min later.
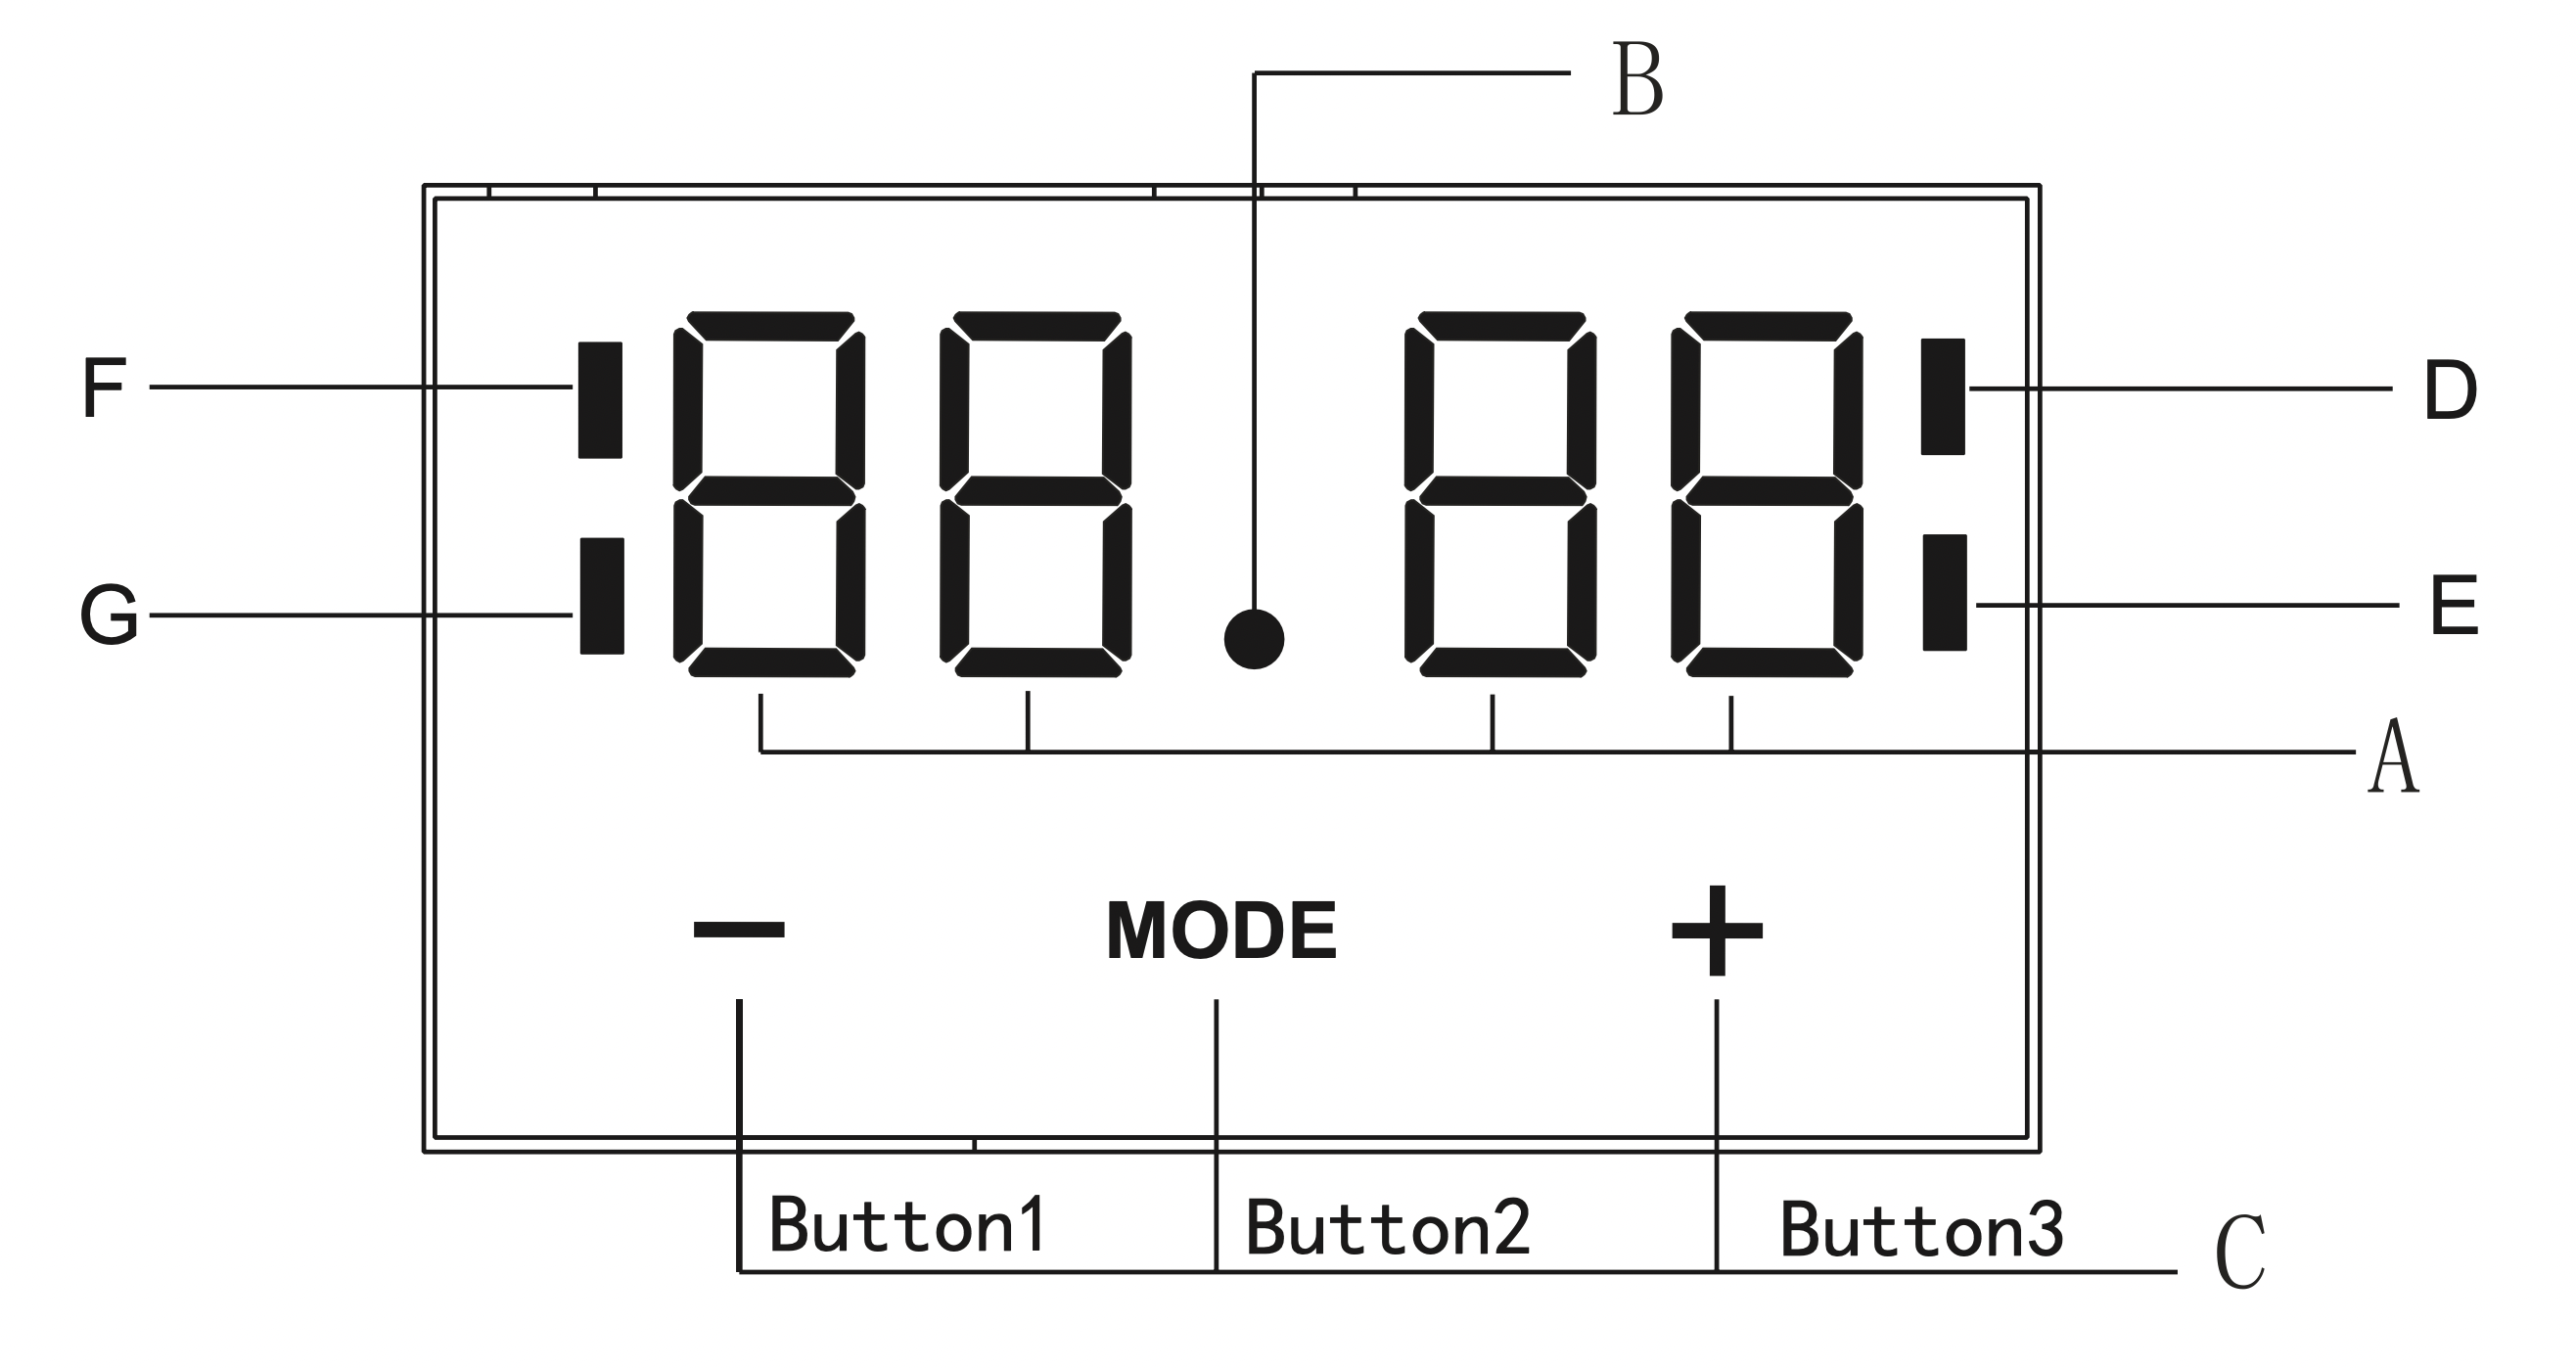
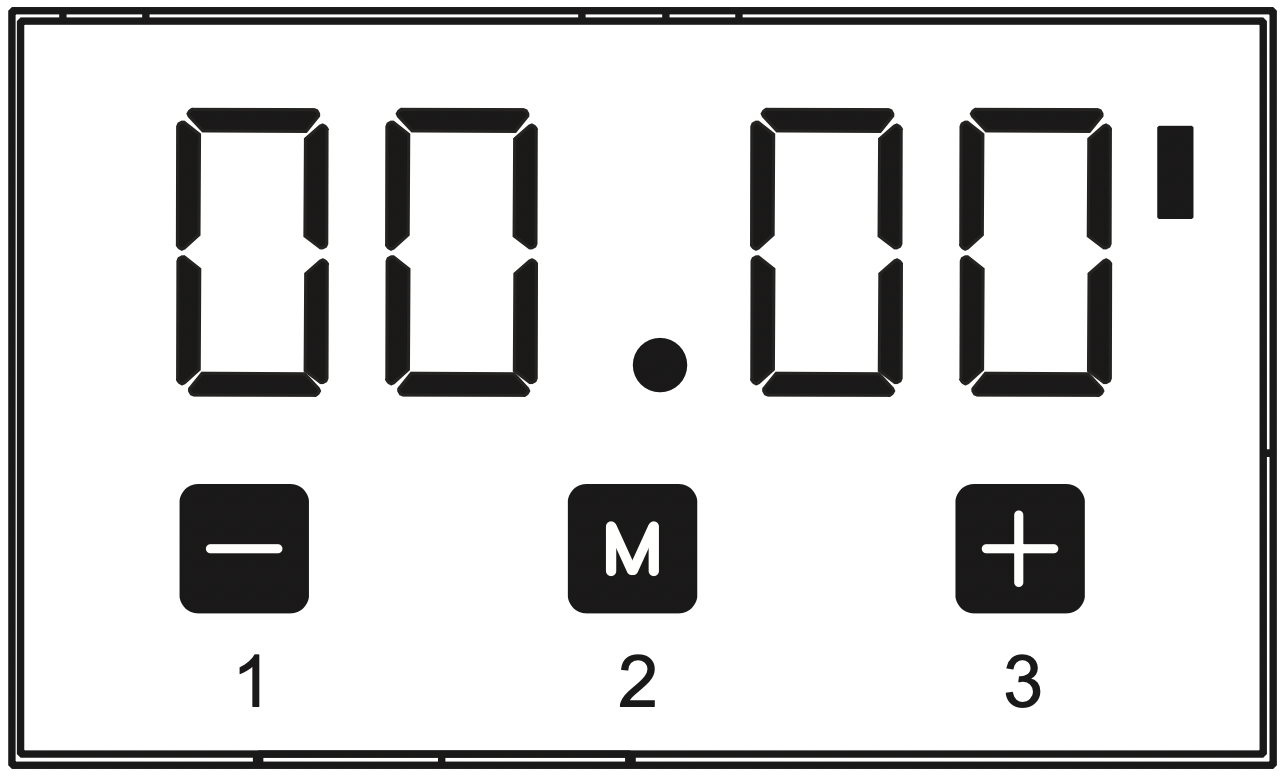
Electronic programmer
A - Display field
B - Seconds Icon
C - Buttons
D - Timer
E - Current time
F - Cooking time
G - End of cooking time
- Function
- To decrease the numbers on the digital display
- To increase the numbers on the digital display
Setting the time
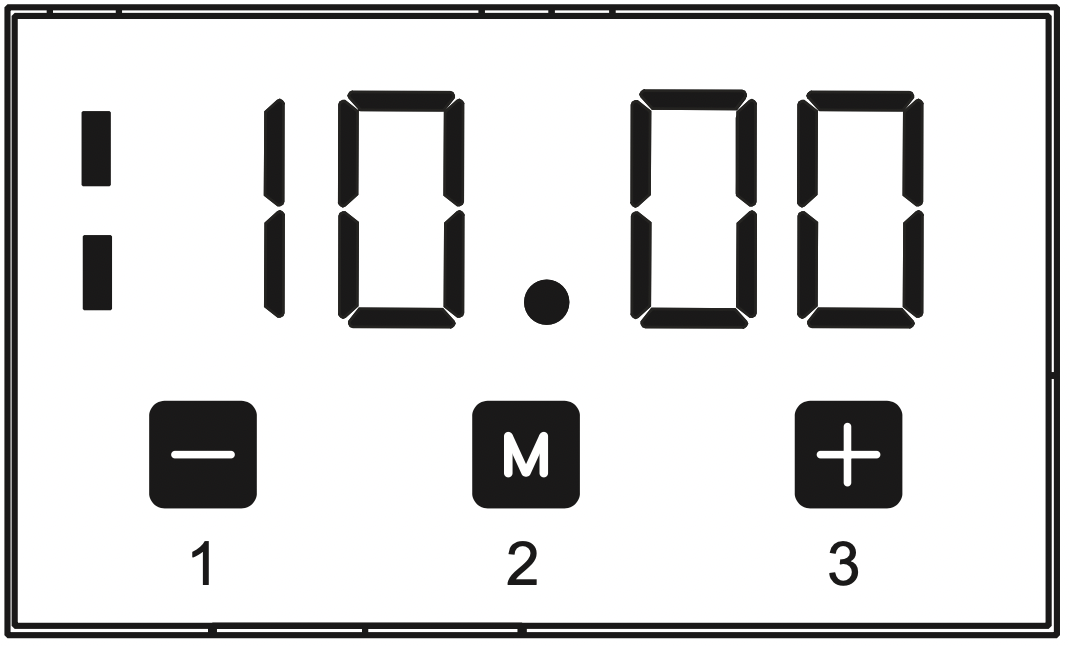
At power on, displayed “12.00", and flashes.
The current time can be set with button 1 and 3, 5 secondsafter the time has been set ,the new data will be saved.
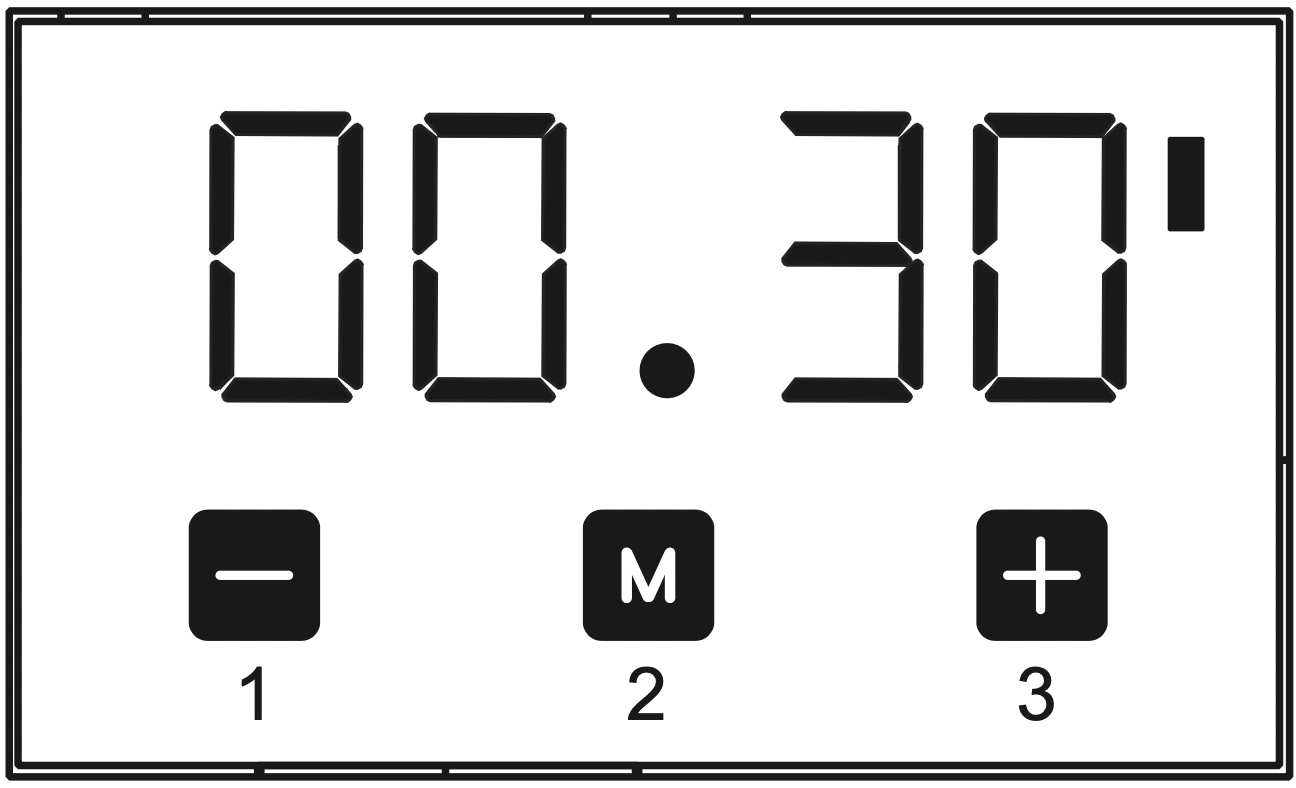
Timer
The timer can be activated at any time and any function. The timer can be set from1 minute to 23 hours and 59 minutes.
To set the timer you should:
Press button 2, flashing . Enter the timer setting.
Set the timer using buttons 1 and 3.
5 seconds after the time is set, or directly press the button 2, the signal function is on your setting is saved.
When the set time is up the alarm signal will be activated and the signal function starts flashing again.
Press any button, the signal function and alarm signal will go off. Or the alarm signal will be turned off automatically after 2 minutes.
Caution! Besides timer alarm, any other alarms can be turned off by pressing any button,If the alarm signal is not turned off manually, it will be turned off automatically after 2 minutes.
Semi-automatic operation
If the oven is to be switched off at a given time, or after defined period, you should:
Set the oven function knob and the temperature regulator knob to the setting at which you want the oven to operate.
Press the function button, the oven will begin to work and the function signal flashing.
Press button 1 or 3 to adjust the cooking time, within a range from1 minute to 10 hours.
Or press button "" twice. Then the display will show flashing . Set the end time by buttons 1 and 3.
The set time is introduced to the memory after 5 seconds.
When the set time passed, the oven is switched off automatically, the alarm is activated.
Press any button, the alarm signal and the icon will go off. Or the alarm signal will be turned off automatically after 2 minutes.
Caution!
The cooking time and end of cooking time range: Cooking time range: 0 < t < 10 hours End of cooking time range: current time < end of cooking time < current time + 10 hours End of cooking time = current time + cooking time
When using the semi-automatic operation, set either the cooking time or the end of cooking time.
If you set the cooking time to 0 or set the end of cooking time to the current time, the auto function will be off.
After the auto function be off, the cooking time to 0, end of cooking time and current time remains the same.
For example:
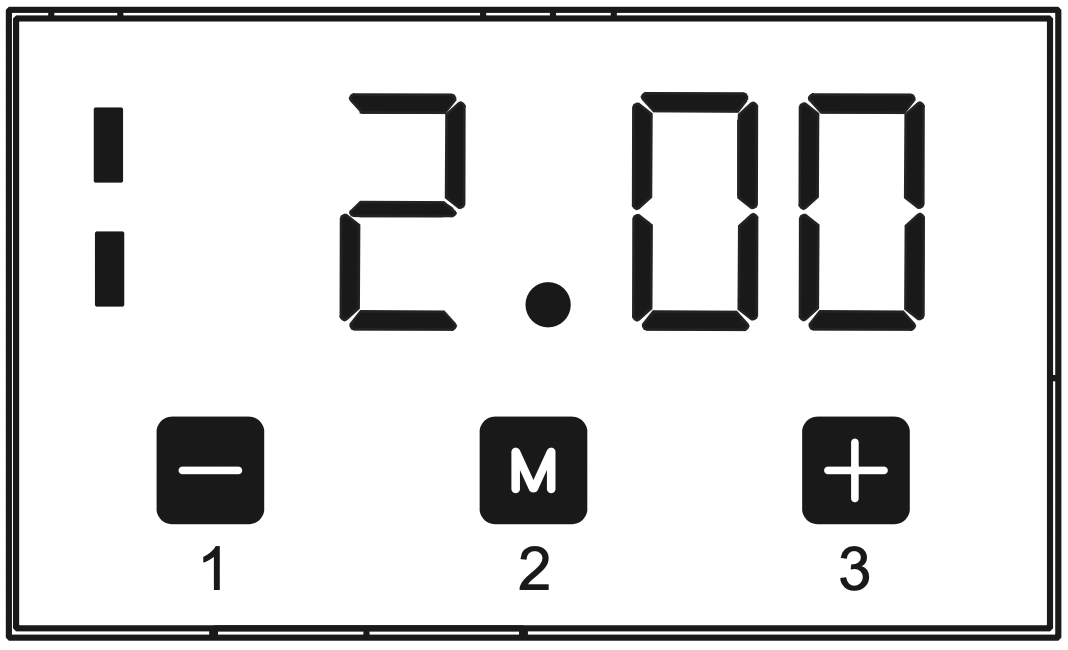
The current time is 2:00, want to oven work of 3 hours, end of cooking time is set to be 5:00 (2:00+3:00 = 5:00)
There are two methods to achieve this setting:
First method:
Set the cooking time using buttons 1 and 3.
End of cooking time automatically change to 5:00.
Second method:
Set the end of cooking time using buttons 1 and 3.
Cooking time automatically change to 3:00.5 seconds after the setting, the auto function is on. 3 hours later, the current time shows "5.00". The alarm signal is activated.
Automatic operation
If the oven is to be switched on for a specified period of time and switched off at a fixed hour then you should set the cooking time and the end of cooking time:
Set the oven function knob and the temperature regulator knob to the setting at which you want the oven to operate.
Press button 2, the oven will begin to work and the function signal flashing.
Press button 1 or 3 to adjust the cook time, within a range from 1 minute to 10 hours.
And press button 2.then the display will show flashing . Set the cooking time using buttons 1 and 3.
The set time is introduced to the memory after 5 seconds, the and always on.
When the set time passed, the oven is switched off automatically, the alarm is activated and the will go off.
Press any button, the alarm signal and the icon will go off, or the alarm signal will be turned off automatically after 2 minutes.
Caution! Work time = end of cooking time - cooking time
For example:
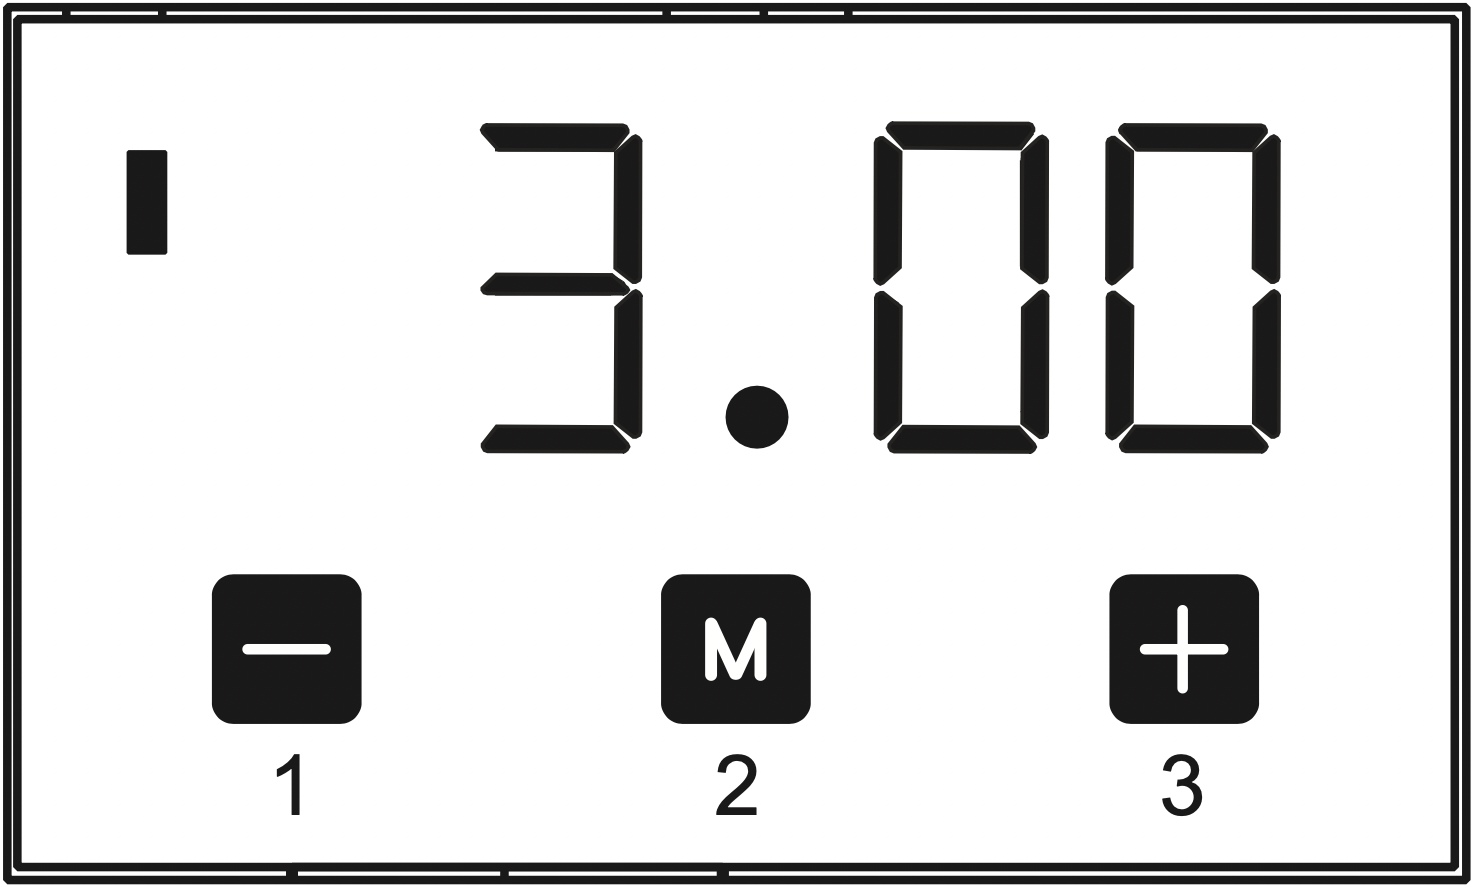
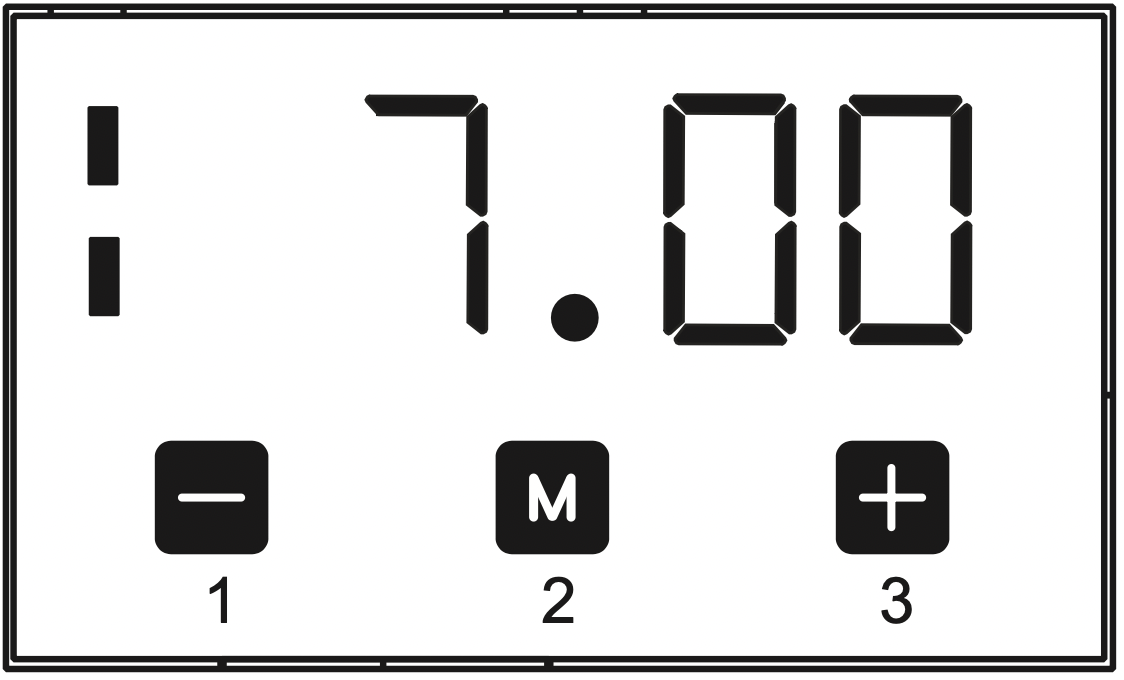
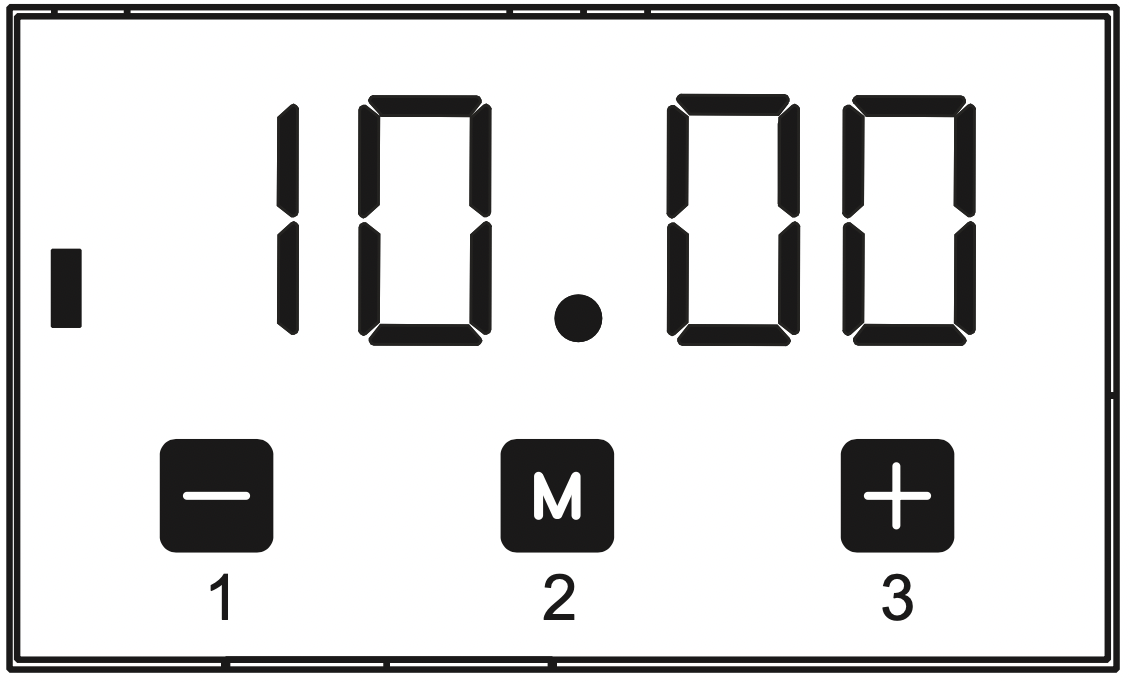
If the current time is 2:00; cooking time set to be 3 hours; end of cooking time set to be 10:00, the work time will be 7:00 (7:00=10:00-3:00).
Set the cooking time to be "3.00" with buttons 1 and 3.
Set the end of cooking time. Time to be "10.00" with buttons 1 and 3.
5 seconds after setting, the auto function is on.
When it up to 7:00, the oven will begin to work.
When it up to 10:00, the alarm signal is activated. The oven is switched off automatically.
Caution!
End of cooking time > current time +cooking time <= 10hours
At least more than one minute cooking time, cooking time and end of cooking time must be set.
If the cooking time set to be 0 or the end of cooking time set to be the current time, the auto function will be off.
After the auto function be off, the cooking time to 0, end of cooking time and current time remains the same.
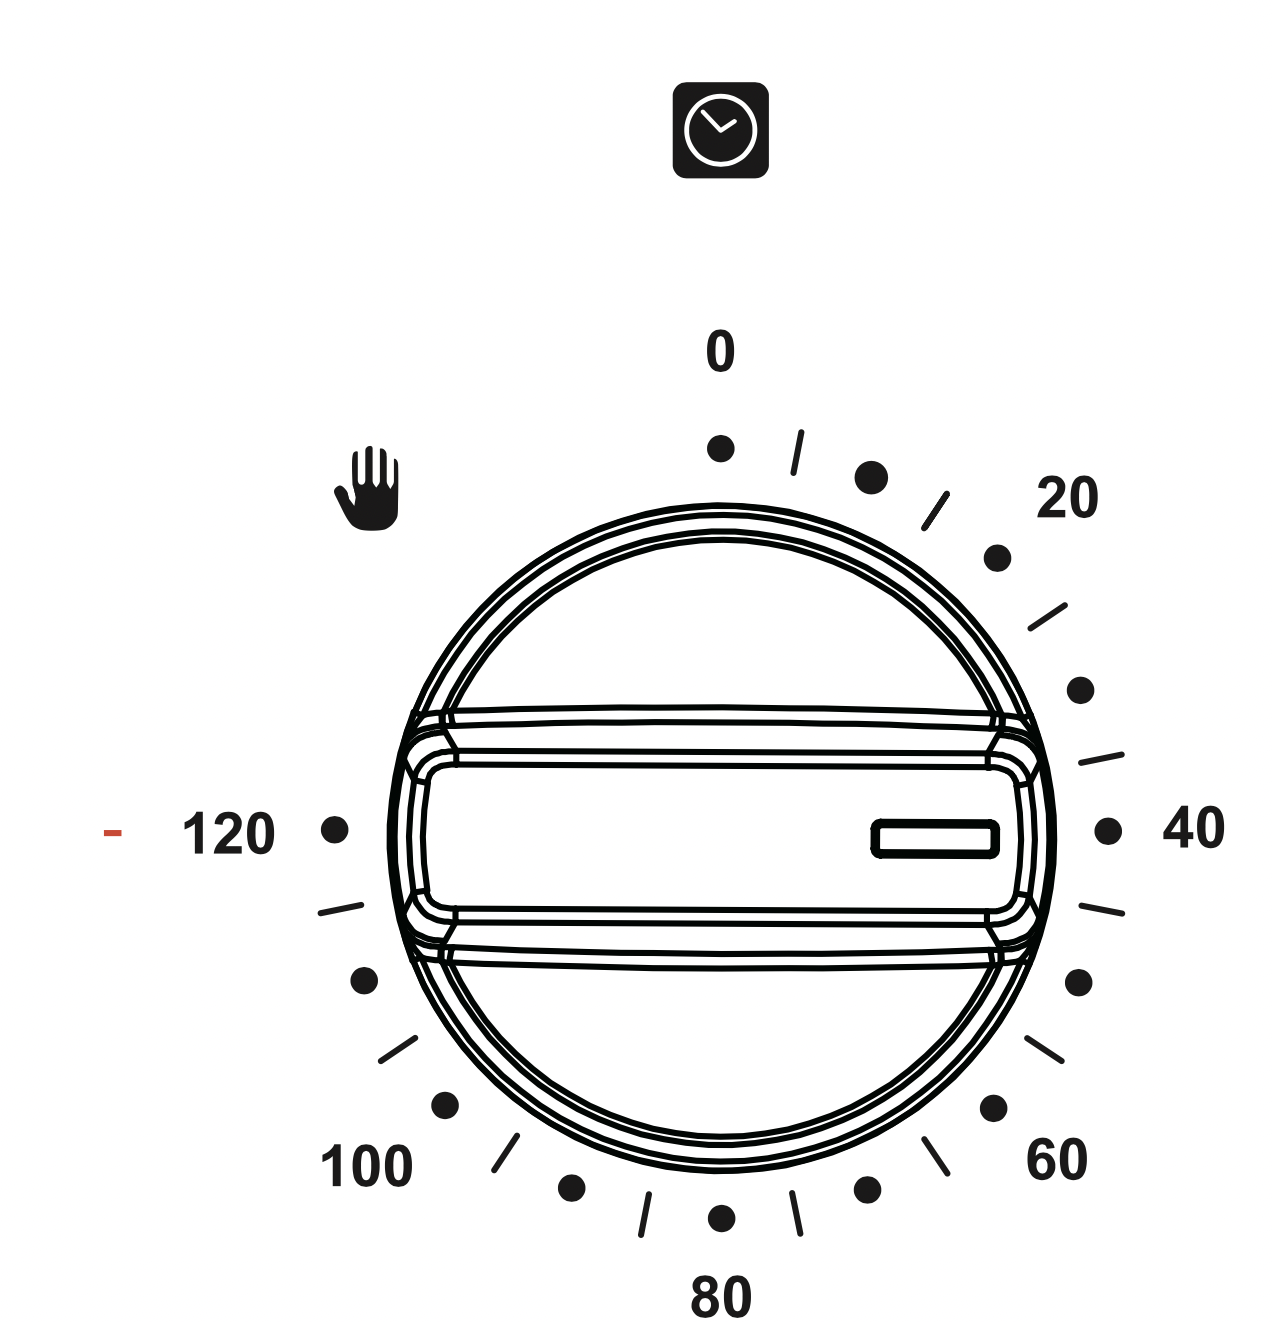
Mechanical timer
When use oven, user must set food cooking time.
Turn mechanical timer in a clockwise way to the time position (between 10 and 120 minutes) you want.
Turn function knob to the function position you want.
Turn temperature knob to the temperature position you want.
After above operation, oven knob runs normally.
When oven works till pre-set time, timer will have sound which means the cooking is finished. If you don't want the oven work controlled by the mechanical timer, a anti-clockwise way to the position.
Caution: Don't turn mechanical timer in a clockwise way from 120 to “”.
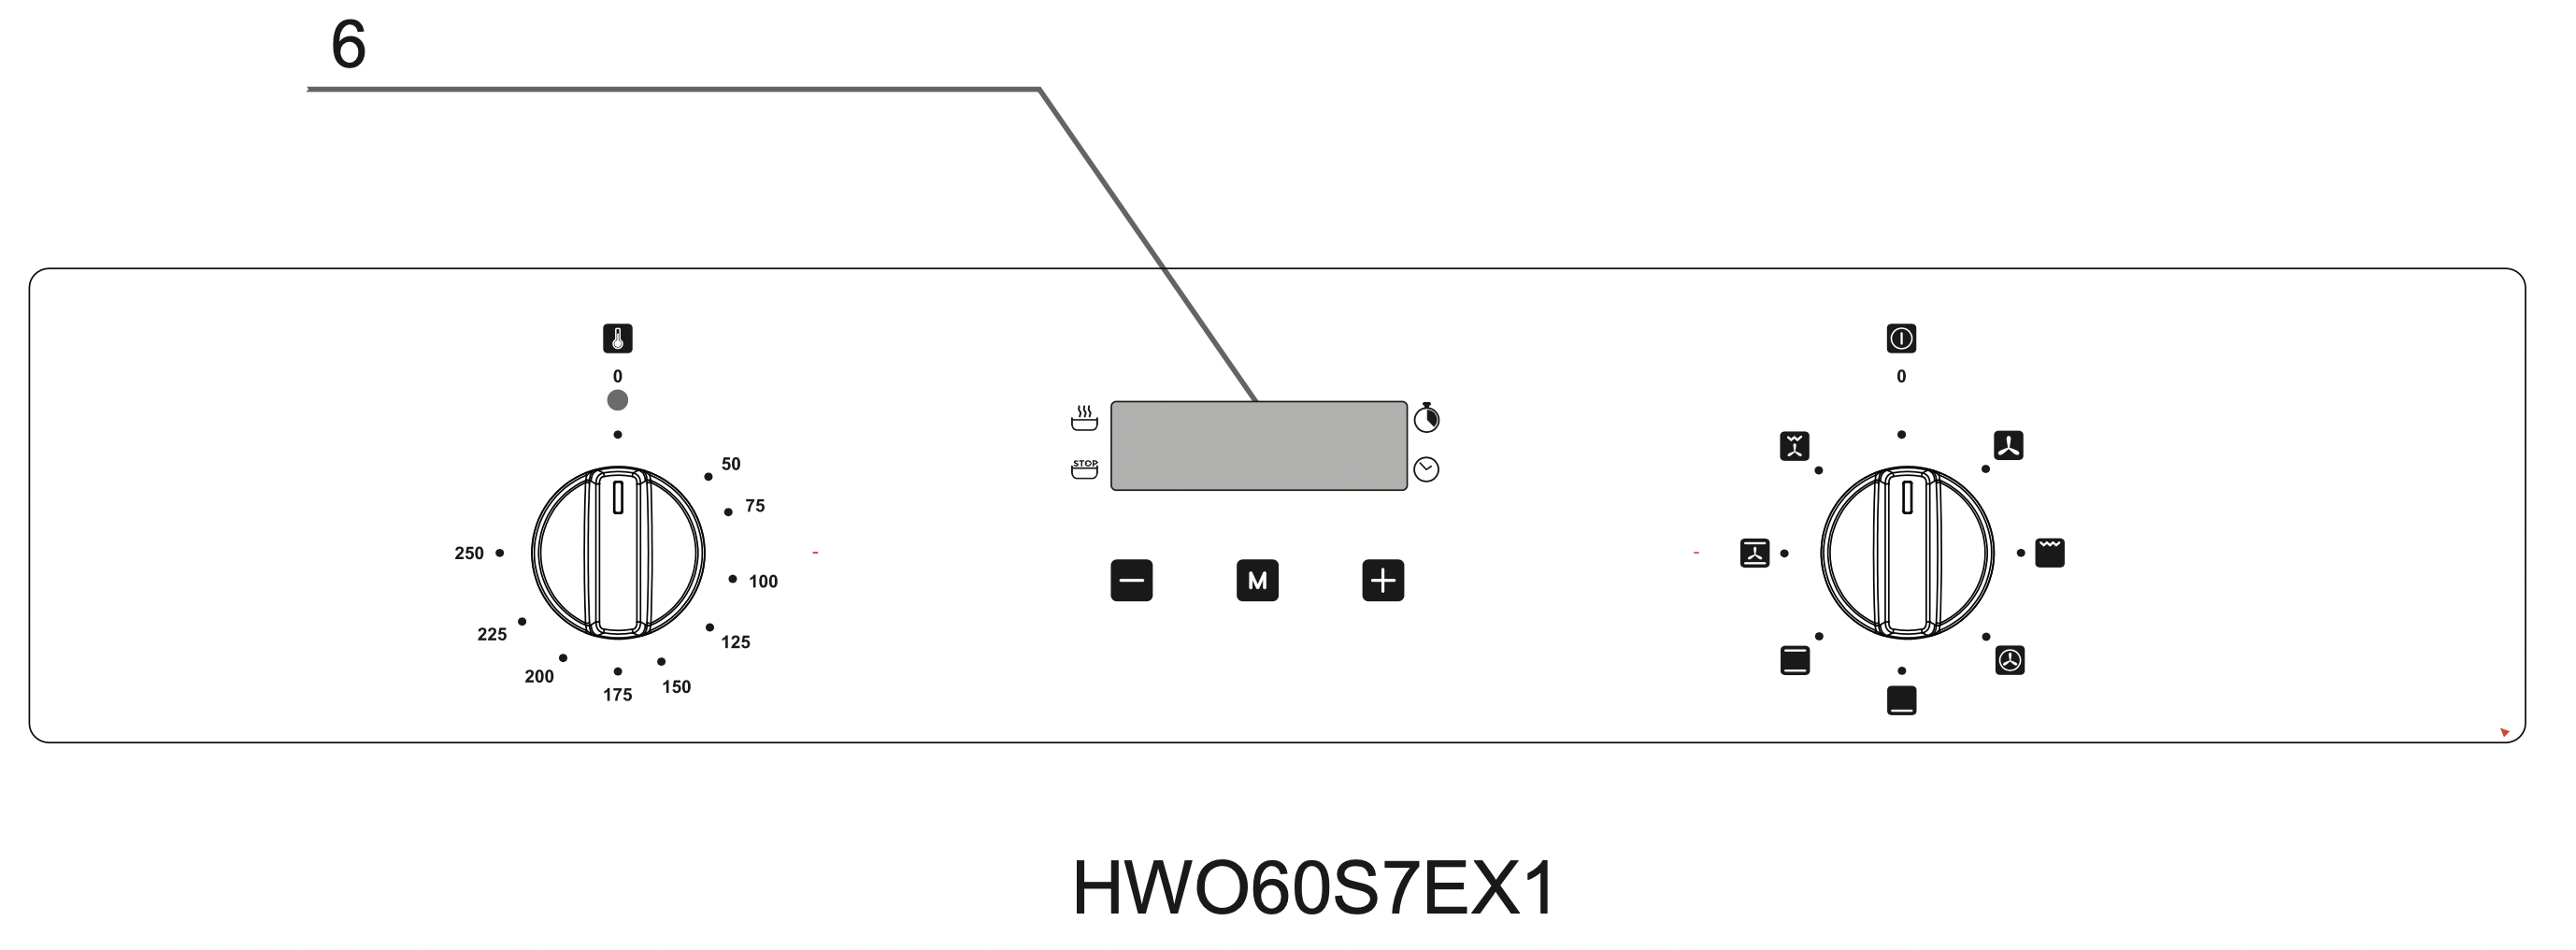
Oven
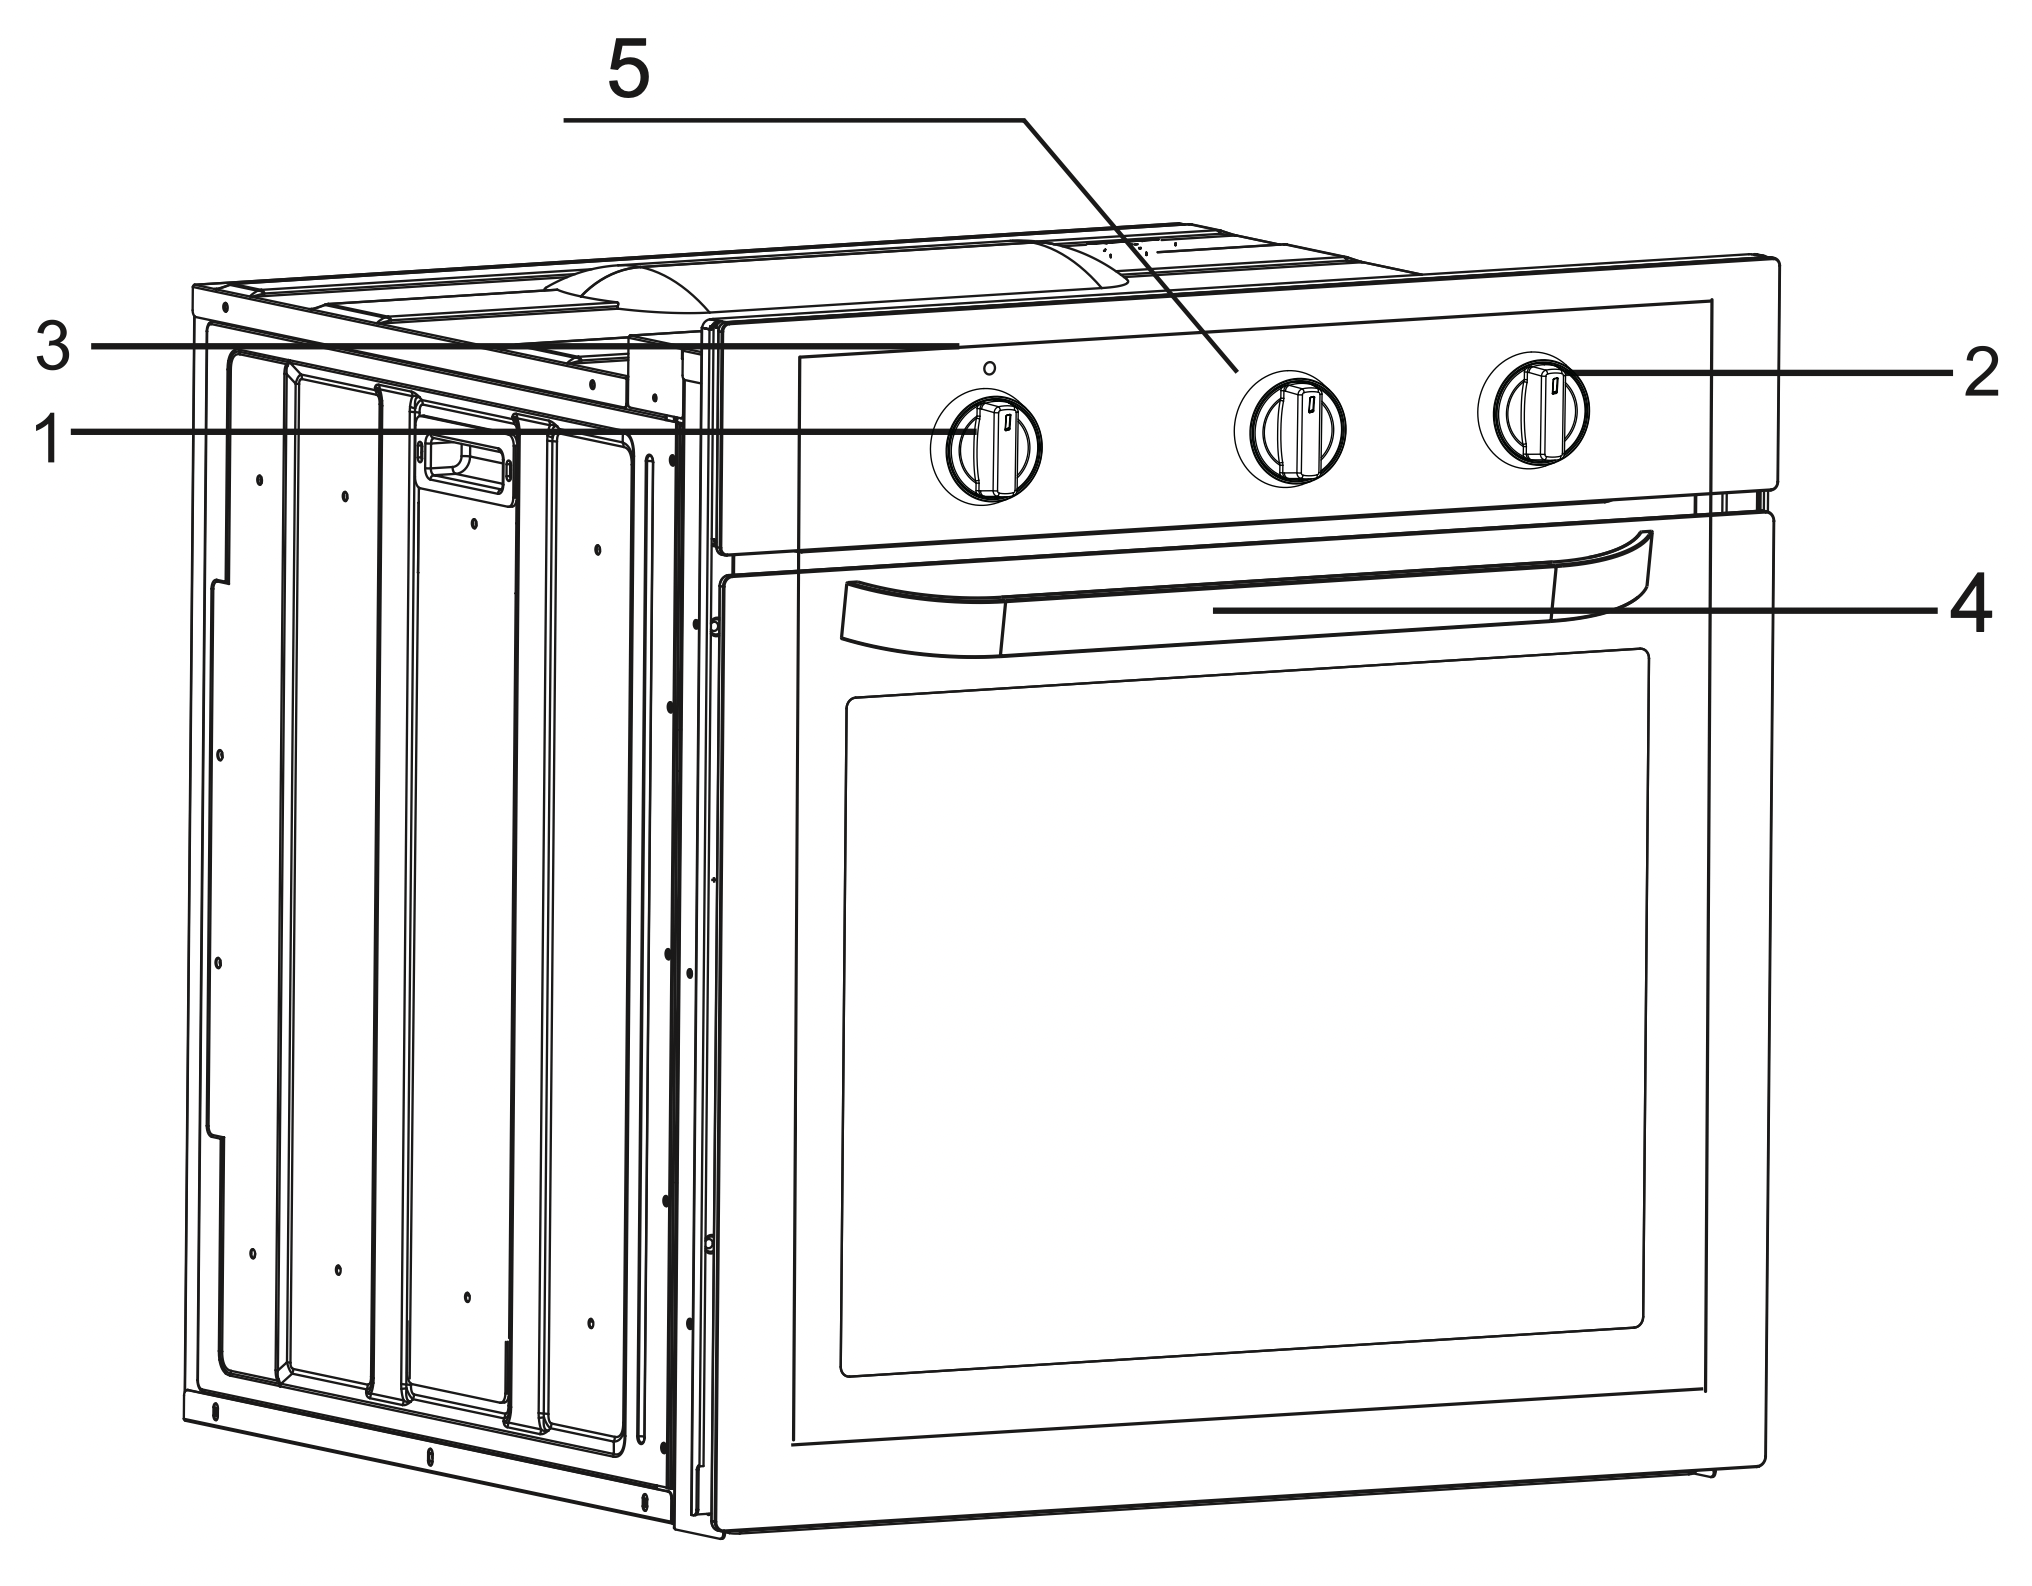
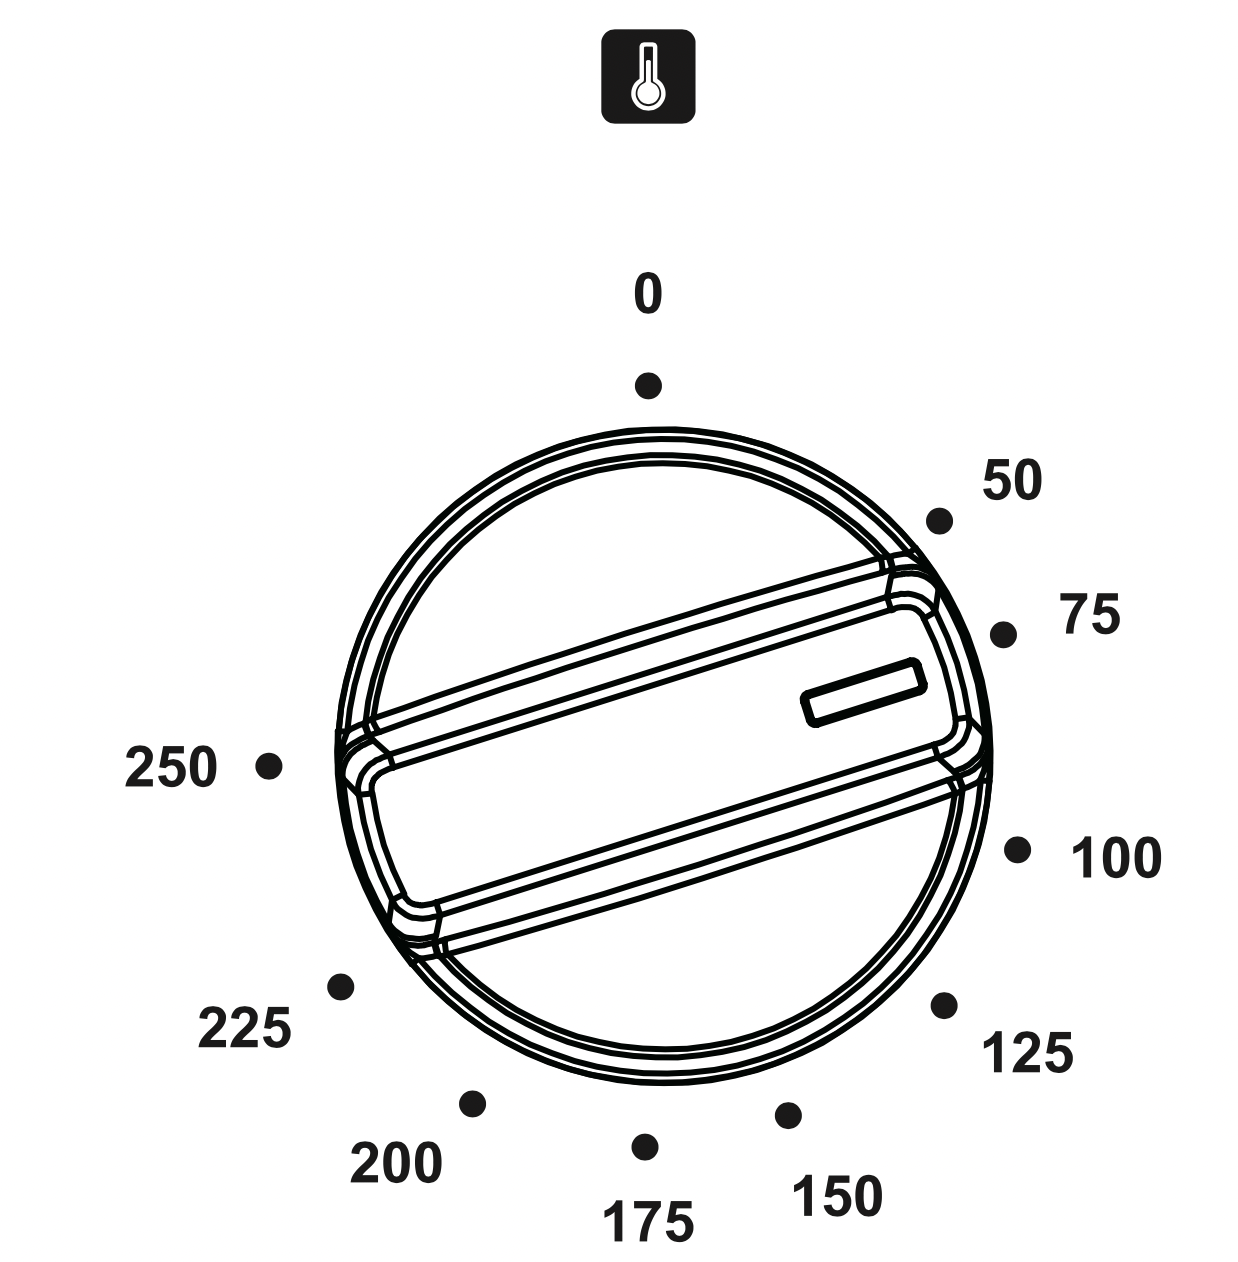
Oven is controlled by the function knob and the temperature control knob.
Caution! When selecting any heating function the oven will be switched on only after the temperature has been set by the temperature control knob.
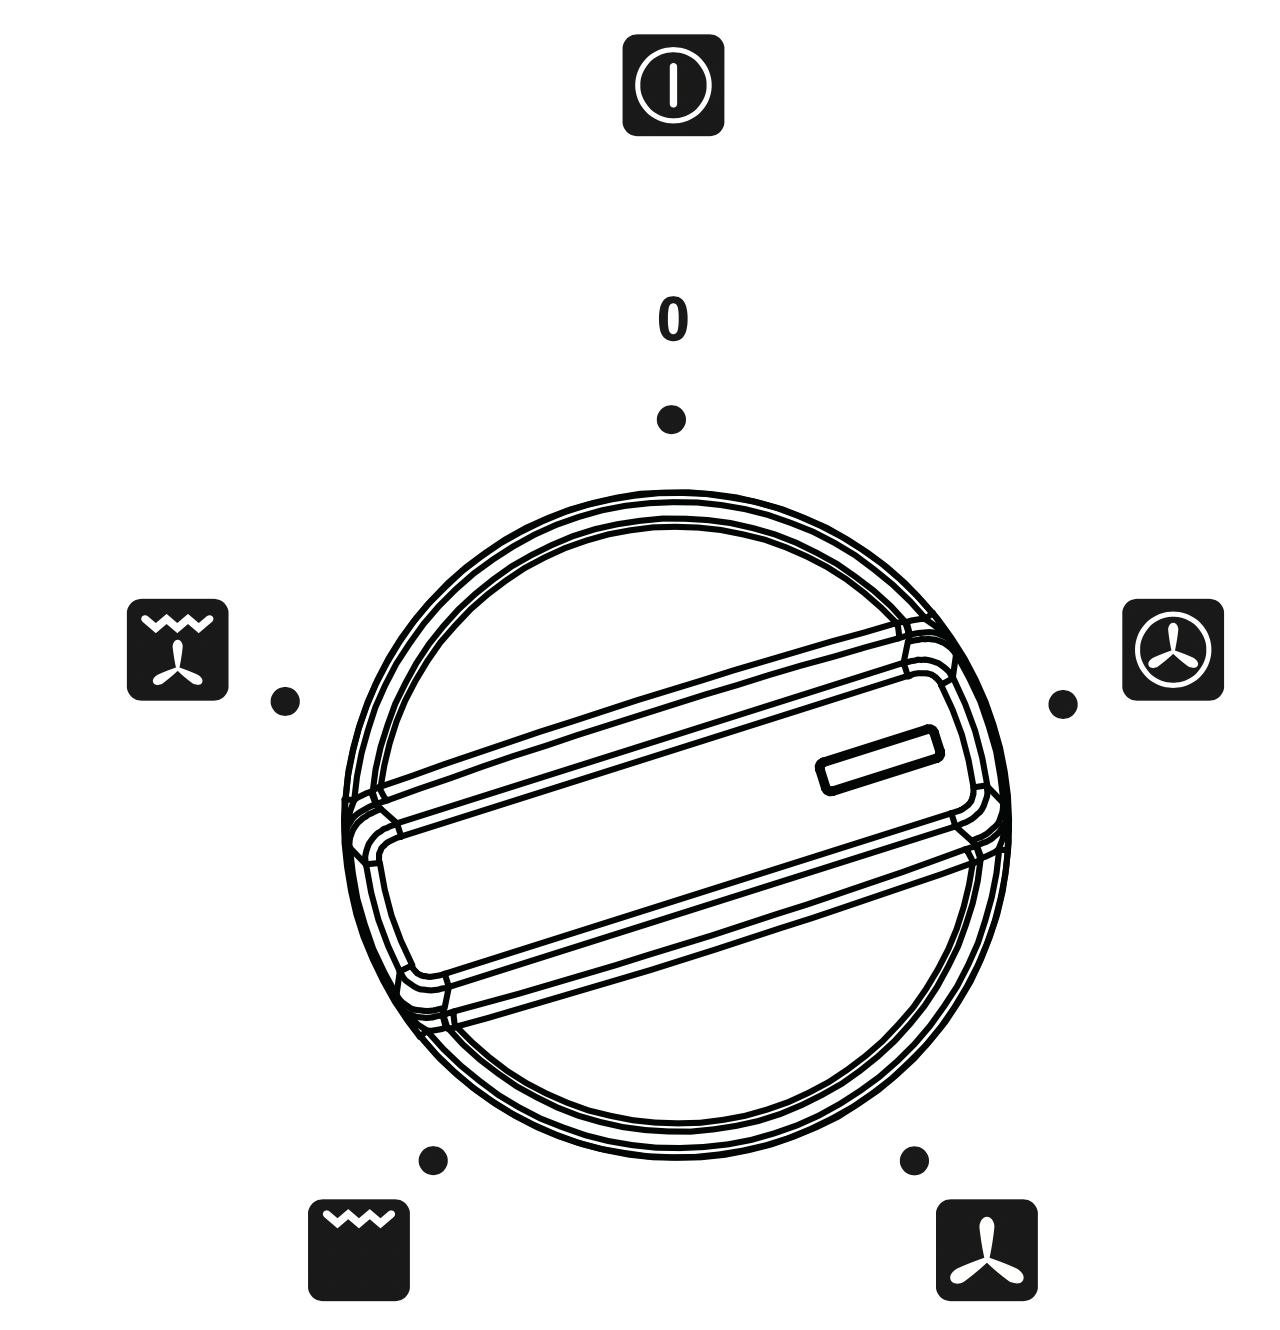
Possible settings of the oven function knob
Full Grill (Grill and the top element)
When the "combined grill" is active it enables grilling with the grill and with the top element switched on at the same time.
This function allows a higher temperature at the top of the cooking area, which causes more intense browning of the dish and permits larger portions to be grilled.
Warning! When using function Grill it is required that the oven door is closed.
Fan, grill element
This function uses the fan to circulate the heat from the grill element around the food.
The temperature can be set between 50℃ and 250℃.
Fan (Defrost)
At this function, the fan only works. You can cool the dish or the oven chamber or defrost food.
Circular heater Fan
At this funtion, allows the oven to be heated up in a forced way with the thermofan, which is in the central part of the oven chamber.
Heating the oven up in this way permit sever heat circulation around the dish that is in the oven.The advantage of this heating method is:
Reduction of oven heating-up time and of the initial heating stage.
Possibility to bake at two cooking levels simultaneously.
Reduction in the amount of fats and juices coming out of meat dishes, which results in an improvement in taste.
Bottom and top element on
Setting the knob to this position allows the oven to be heated conventionally.
Bottom element
At this oven function knob position, the oven activates the bottom element.
Fan, grill element
When the knob is turned to this position, the oven activates the grill and fan function. In practice, this function allows the grilling process to be speeded up and an improvement in the taste of the dish ,you should only use the gill with the oven door shut.
Fan, bottom and top element on
At this knob position the oven executes the cook function. Conventional oven with a fan.
Caution!
When the functions with fan have been selected but the temperature knob is set to zero only the fan will be on.
With this function you can cool the dish or the oven chamber.
Oven guide levels
Baking pans and accessories (oven grid, baking tray, etc) may be inserted into the oven in 6 guiding levels. Appropriate levels are indicated in the tables that follow. Always count levels from the bottom upwards!
Cleaning and Maintance
By ensuring proper cleaning and maintenance of your oven you can have a significant influence on the continuing fault-free operation of your appliance.
Before you start cleaning, the oven must be switched off and you should ensure that all knobs are set to the "0" position. Do not start cleaning until the oven has completely cooled.
Oven
The oven should be cleaned after each use.
Cool the oven completely before cleaning.
Never clean the appliance with pressurized hot steam cleaner.
The oven chamber should only be washed with warm water and a small amount of washing-up liquid.
Steam cleaning
Pour 250m I of water (1 cup) into a bowl placed in the oven on the first level from the bottom.
Close the oven door.
Set the temperature knob to 50℃, and the function knob to the bottom heater position.
Heat the oven chamber for approximately 30 minutes.
Open the oven door, wipe the chamber inside with a cloth or sponge and wash using warm water with washing-up liquid.
After cleaning the oven chamber wipe it dry.
Caution! Do not use cleaning products containing abrasive materials for the cleaning and maintenance of the glass front panel.
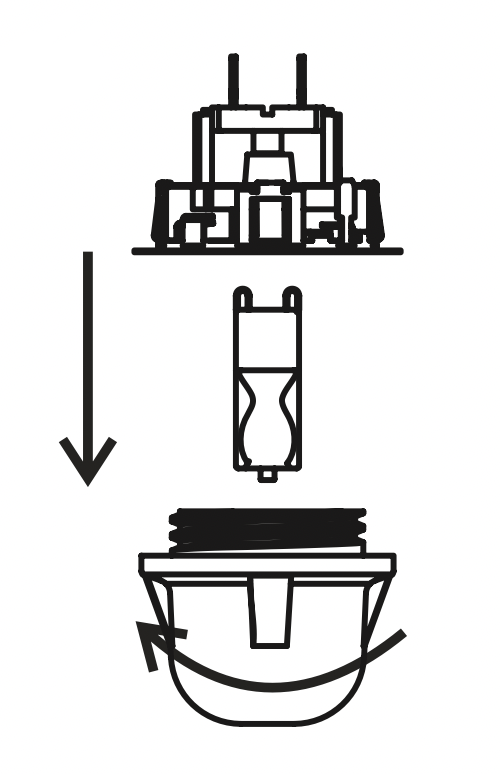
Changing the Oven Lamp
Before any maintenance is started involving electrical parts, the appliance must be disconnected from the power supply. If the oven has been in use, let the oven cavity and the heating elements cool down before attempting any maintenance.
Changing the bulb
Unscrew the protective cover. We recommend that you wash and dry the glass cover at this point.
Carefully remove the old bulb and insert the new bulb suitable for high temperatures (300°C) having the following specifications: 220-240V, 50Hz, 25W, G9 fitting.
Refit the protective cover.
IMPORTANT: Never use screwdrivers or other utensils to remove the light cover. This could damage the enamel of the oven or the lamp holder. Remove only by hand.
IMPORTANT: Never replace the bulb with bare hands as contamination from your fingers can cause premature failure. Always use a clean cloth or gloves.
Please note: The bulb replacement is not covered by your guarantee.
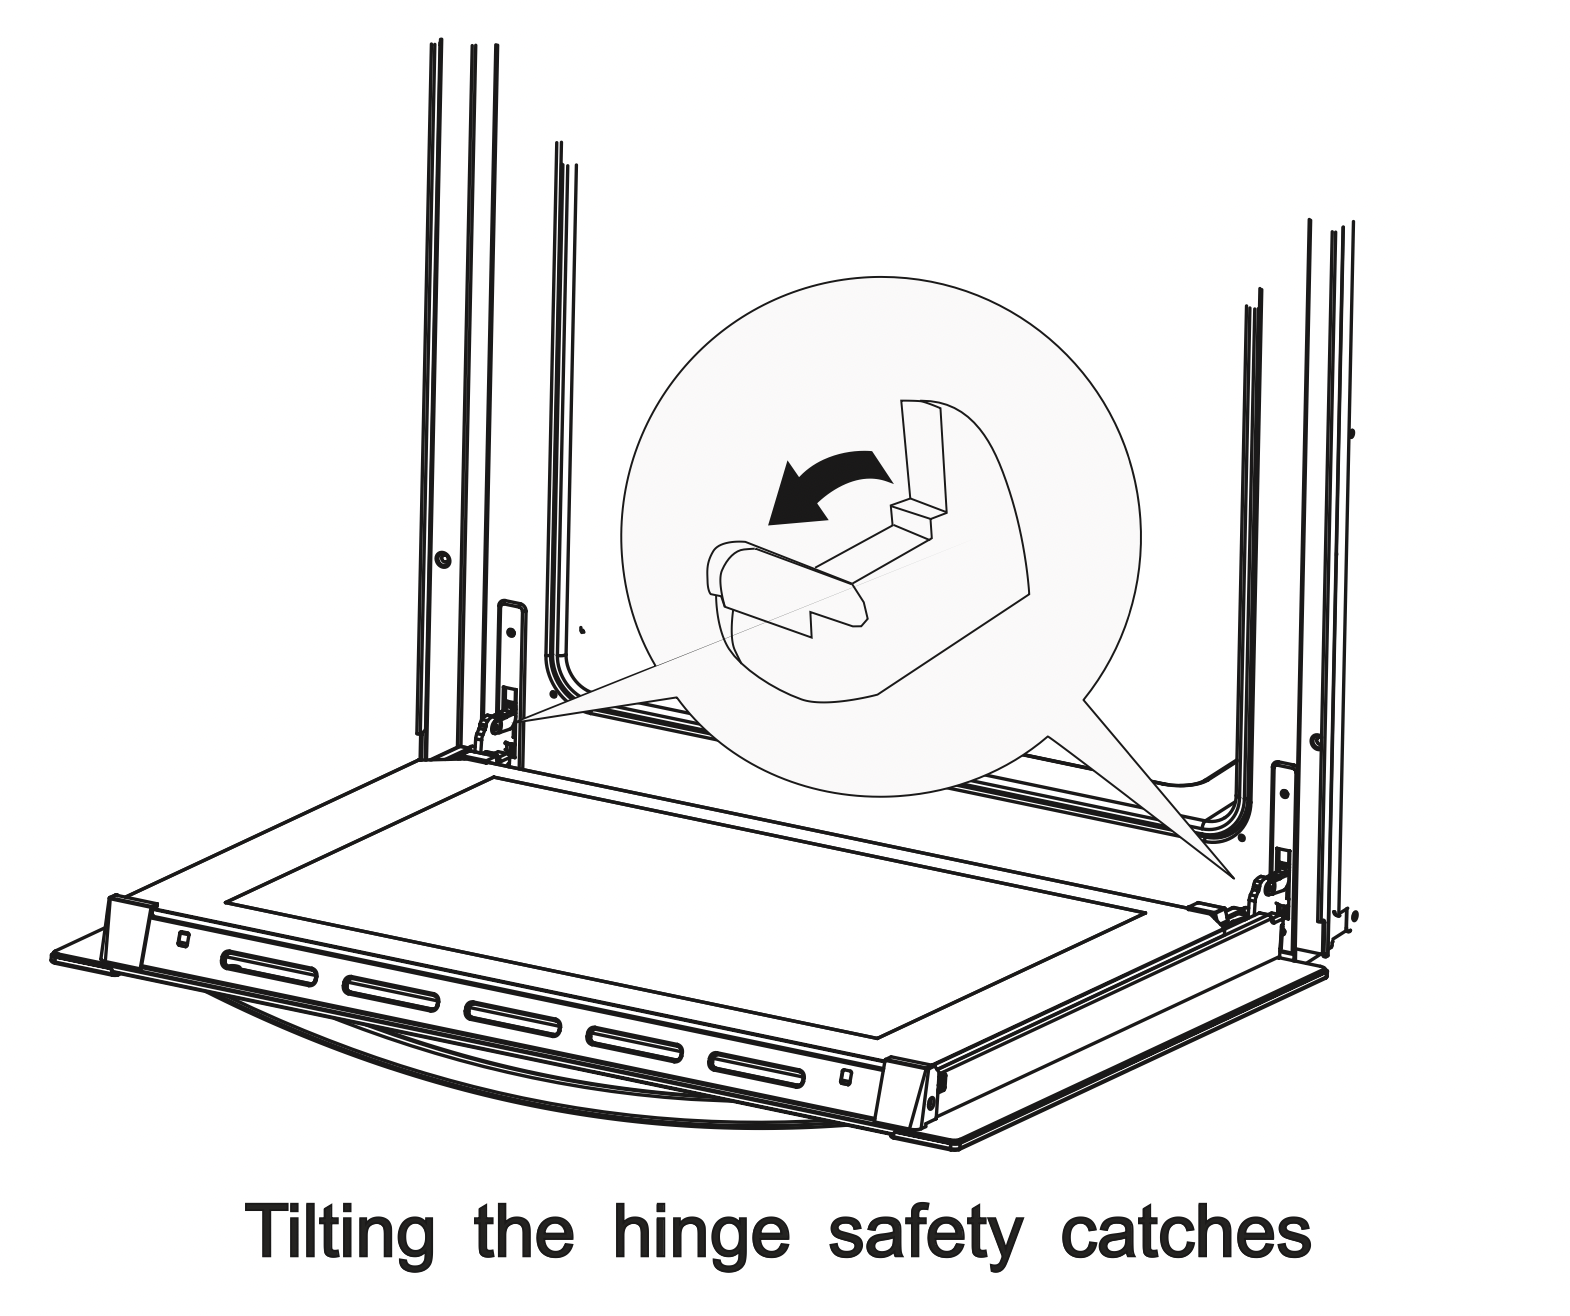
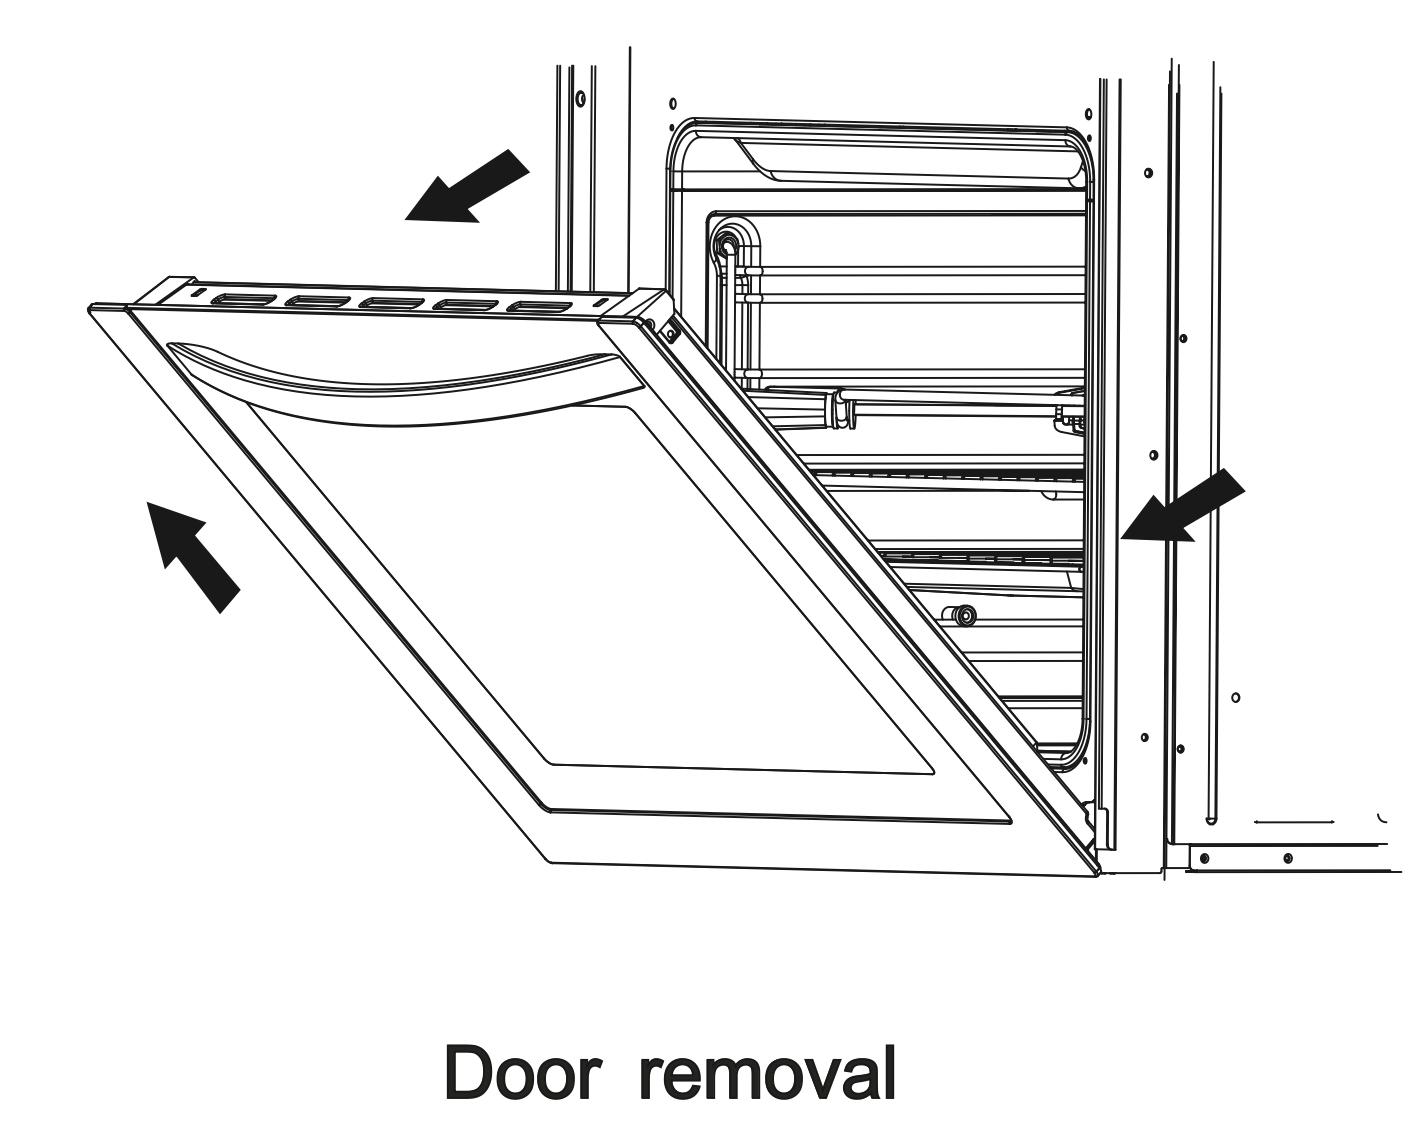
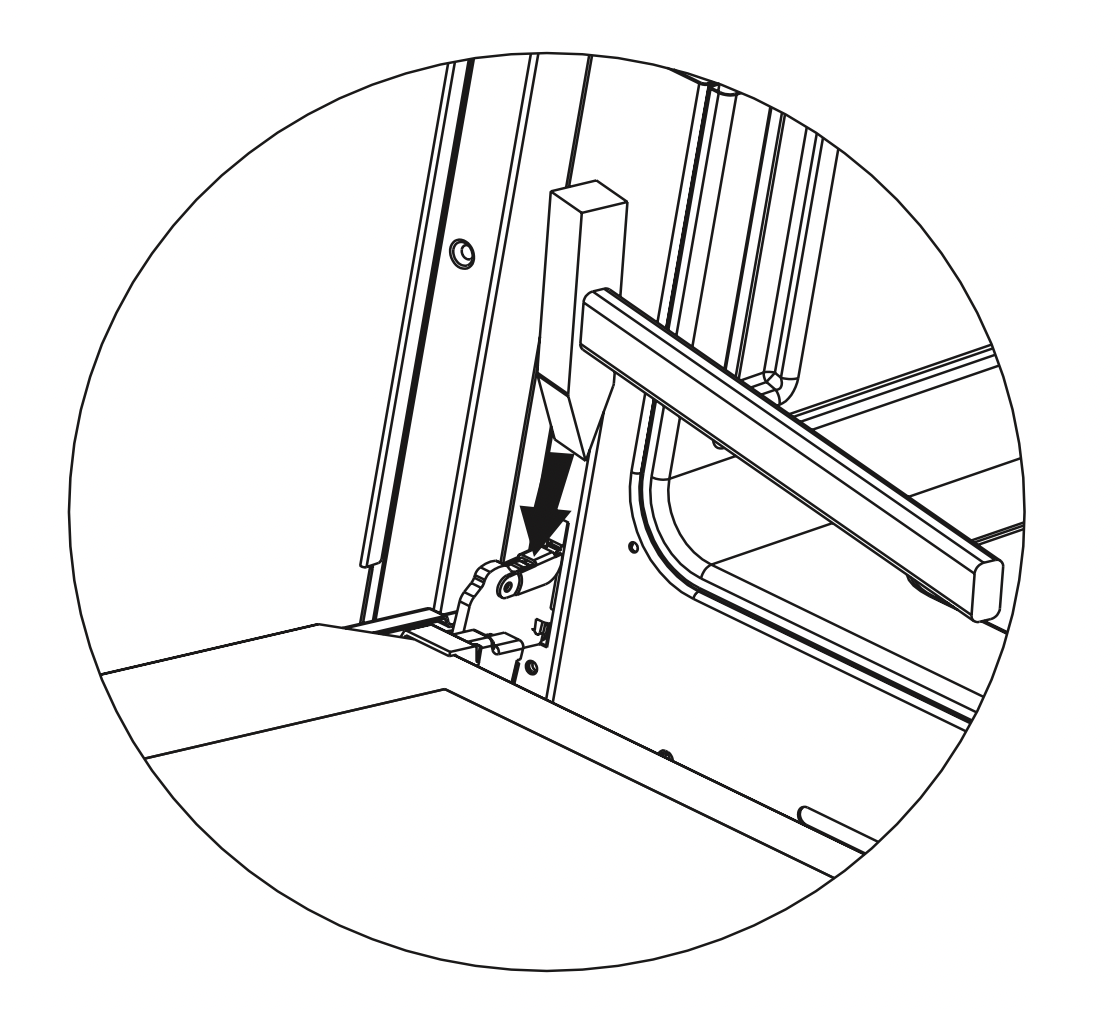
Door removal
In order to obtain easier access to the oven chamber for cleaning, it is possible to remove the door.
To do this, tilt the safety catch part of the hinge upwards. Close the door lightly, lift and pull it out towards you. In order to fit the door back on to the cooker, do the reverse. When fitting, ensure that the notch of the hinge is correctly placed on the protrusion of the hinge holder. After the door is fitted to the oven, the safety catch should be carefully lowered down again. If the safety catch is not set it may cause damage to the hinge when closing the door.
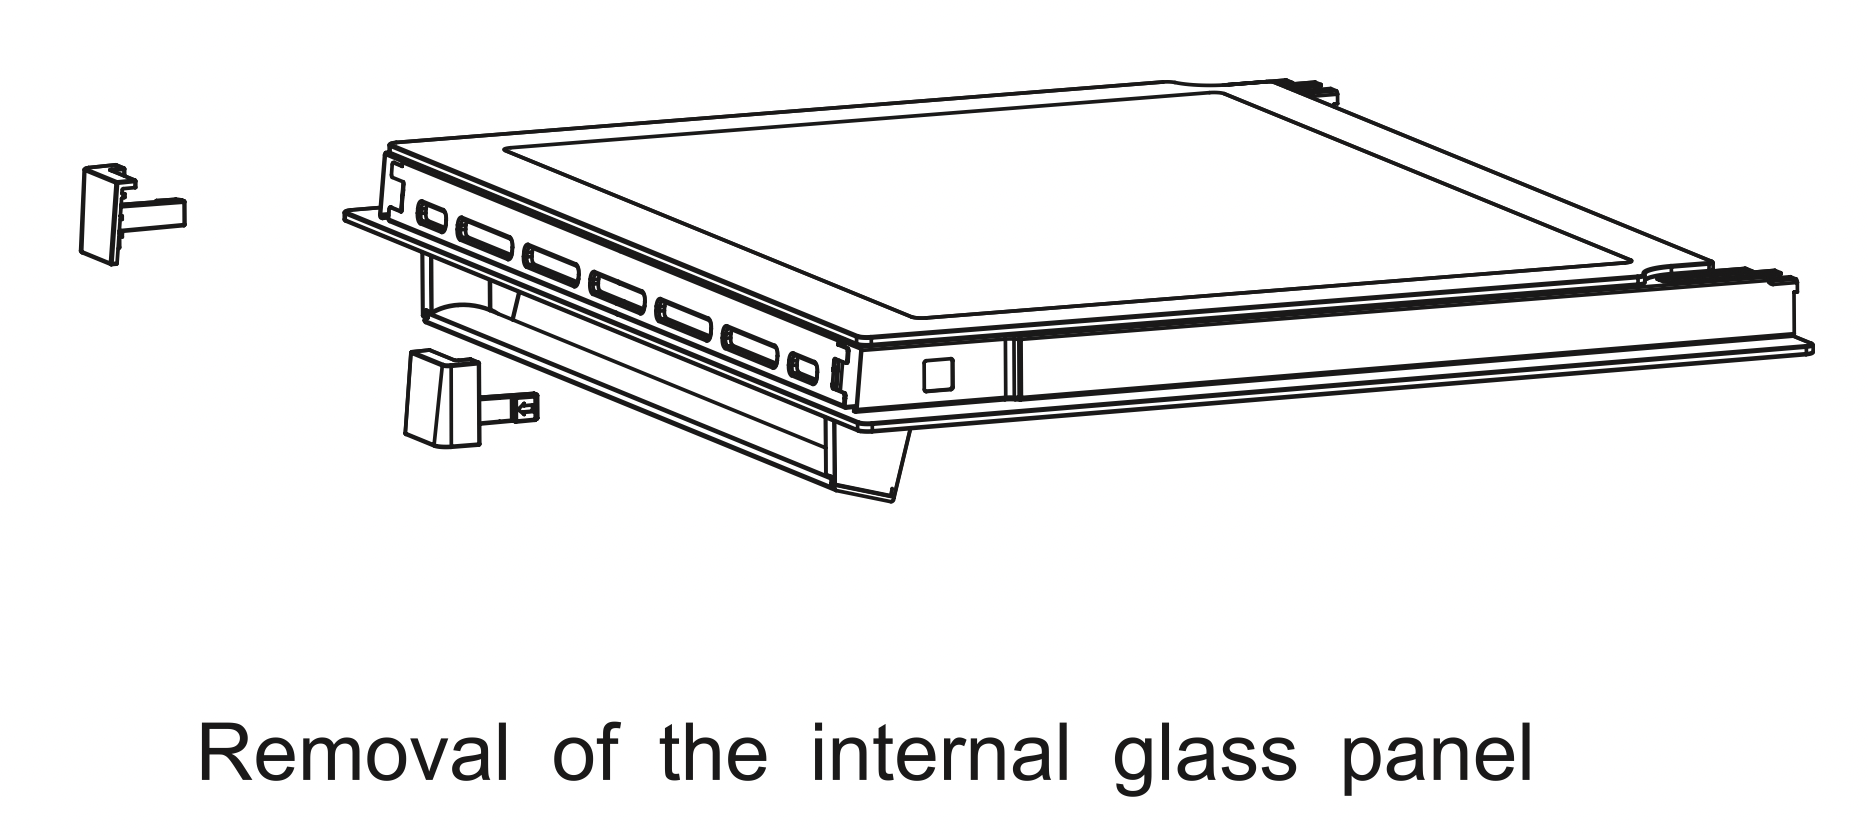
Removal of the internal glass panel
Press the symbol “↑” and outward the plastic latch that is in the cormer at the top of the door. Next take out the glass from the second blocking mechanism and remove. After cleaning, insert and block the glass panel, and insert in the blocking mechanism.
Install door
Operation in case of Emergency
In the event of an emergency, you should:
Switch off all working units of the oven
Call the service centre
Some minor faults can be fixed by referring to the instructions given in the table below. Before calling the customer support centre or the service centre check the following points that are presented in the table.
Problem
Reason
Action
The appiance does not work
Break in power supply.
Check the household fuse box; if threr is a blown fuse replace it with a new one.
Choose wrong function
Check if function knob, temperature knob is set to the correct position.
The programmer display is flashing "0:00"
The appliance was disconnected from the mains or there was a temporary.
Set the curent time (see Use of the programmer).
The oven lighting does not work.
The bulb is loose or damaged.
Tighten up or replace the blown bulb (see Cleaning and Maintence).
Q: I have a Haier HWO60S7EX1 oven which has worked for a few months. Today it started doing a single beep every 5 seconds. It is not the timer alarm (double beeps) and it continues to sound even during the timer alarm. I have switched off the oven - both temperature and function, and it is still beeping. Reply

 - Function
 - To decrease the numbers on the digital display
 - To increase the numbers on the digital display
 flashes.
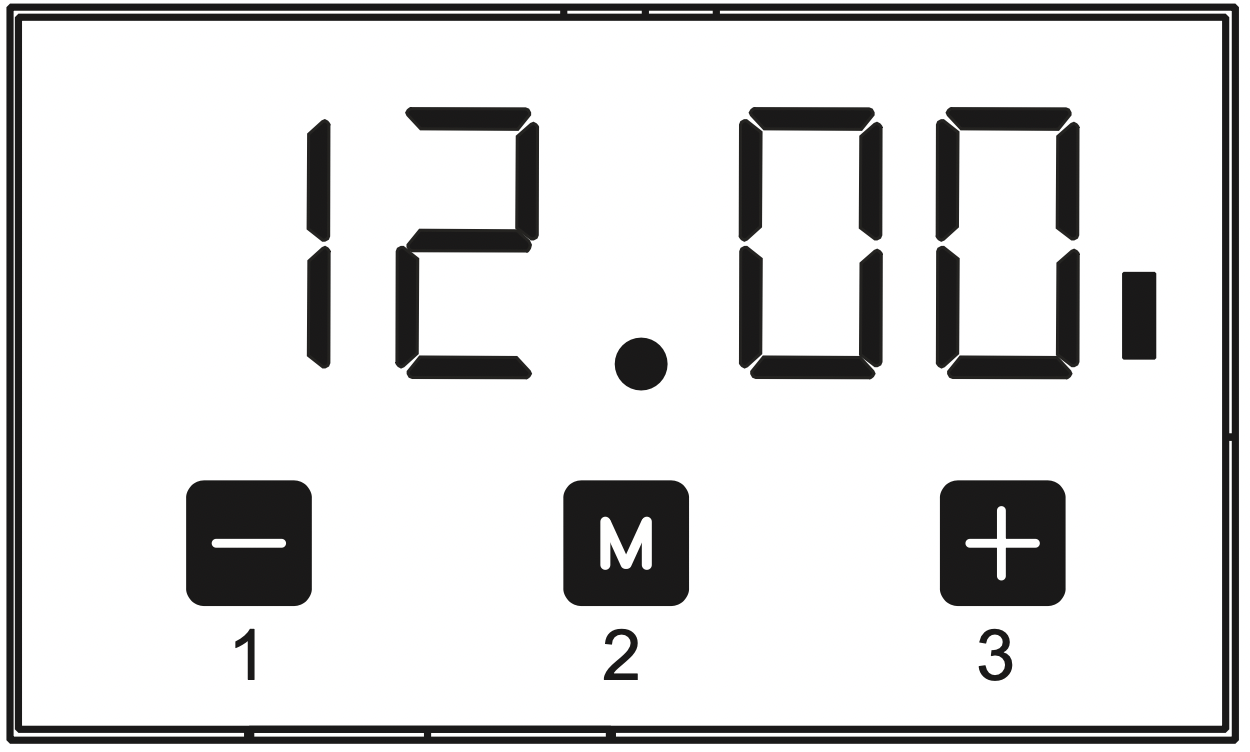
 . Enter the timer setting.

 flashing.
 " twice. Then the display will show flashing
  . Set the end time by buttons 1 and 3.
 icon will go off. Or the alarm signal will be turned off automatically after 2 minutes.
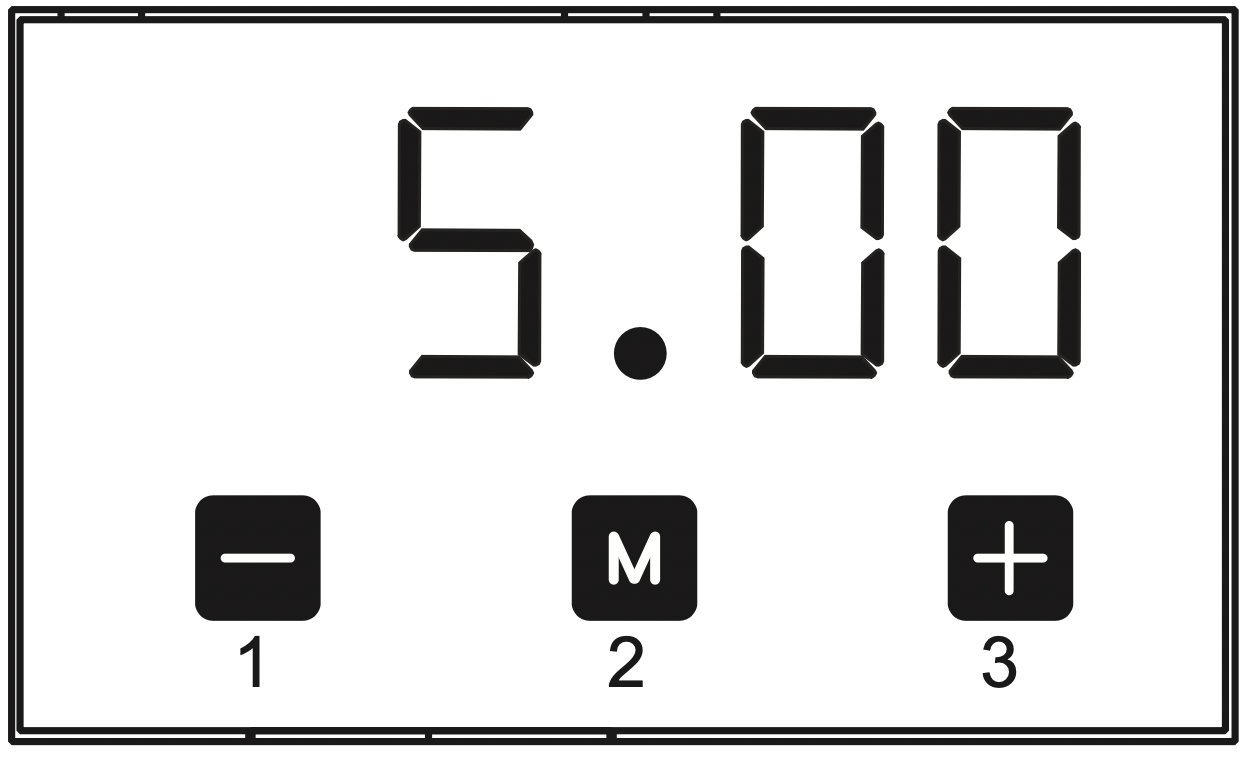

 flashing.
 . Set the cooking time using buttons 1 and 3.
 and
and  always on.
 will go off.
 icon will go off, or the alarm signal will be turned off automatically after 2 minutes.
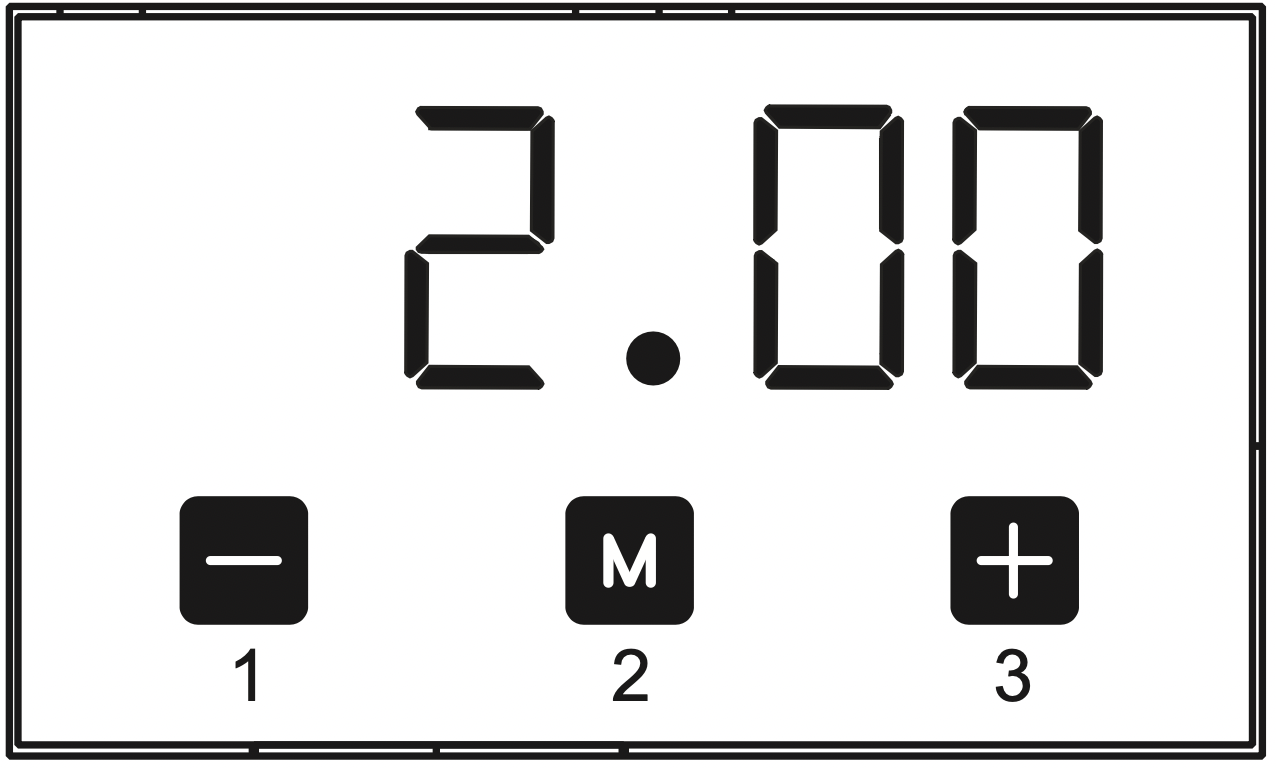

 ”.
”. Full Grill (Grill and the top element)
 Fan, grill element
 Fan (Defrost)
 Circular heater Fan
 Bottom and top element on
 Bottom element
 Fan, grill element
 Fan, bottom and top element on