OWNER'S MANUAL
VACUUM CLEANER
ENGLISH
A9-ACE
Before beginning installation, read these instructions
carefully. This will simplify installation and ensure that
the product is installed correctly and safely. Leave
these instructions near the product after installation
for future reference.
www.lg.com
2339AU-1

TABLE OF CONTENTS
This manual may contain images or
content that may be different from
the model you purchased.
This manual is subject to revision by
the manufacturer.
SAFETY INSTRUCTIONS
INSTALLATION
MAINTENANCE
TROUBLESHOOTING
READ ALL INSTRUCTIONS BEFORE USE .......................................................................
WARNING ......................................................................................................................
CAUTION .......................................................................................................................
03
03
09
Product Overview .........................................................................................................
Installing the Charging Station ....................................................................................
Storing the Accessories ................................................................................................
Charging the Battery ....................................................................................................
10
13
14
15
OPERATION
Getting Started .............................................................................................................
Operational Controls ....................................................................................................
Using the Nozzles and Tools ........................................................................................
16
17
18
Cleaning the Appliance .................................................................................................
Cleaning the Nozzles ....................................................................................................
19
22
Before Calling for Service .............................................................................................
23
SAFETY INSTRUCTIONS
READ ALL INSTRUCTIONS BEFORE USE
The following safety guidelines are intended to prevent unforeseen risks or
damage from unsafe or incorrect operation of the appliance. The guidelines
are separated into ‘WARNING’ and ‘CAUTION’ as described below.
Safety Messages
This symbol is displayed to indicate matters and opera-
tions that can cause risk. Read the part with this symbol
carefully and follow the instructions in order to avoid
risk.
WARNING
This indicates that the failure to follow the instructions can
cause serious injury or death.
CAUTION
This indicates that the failure to follow the instructions can
cause the minor injury or damage to the product.
WARNING
WARNING
Technical Safety
• This appliance is not intended for use by persons (including children) with
reduced physical, sensory or mental capabilities, or lack of experience and
knowledge, unless they have been given supervision or instruction concern-
ing use of the appliance by a person responsible for their safety. Children
should be supervised to ensure that they do not play with the appliance.
• Do not allow the appliance to be used as a toy. Close attention is necessary
when used by or near children.
• To reduce the risk of explosion, fire, death, electric shock, injury or scalding to
persons when using this product, follow basic precautions, including the
following:
3 SAFETY INSTRUCTIONS

Battery
• Never use the battery, adapter, and the charging station from other applianc-
es with this appliance. Use only the battery and the charging station provided
by LG Electronics.
• Never use the battery, adapter, and the charging station from this appliance
with other appliances.
• Unplug the power cord and remove the battery if the appliance will not be
used for an extended period of time.
• Do not use modified or damaged batteries.
• Do not disassemble, remove or short-circuit the battery.
• When disposing of the battery or the appliance, remove the battery from the
appliance and safely dispose of it.
• Have specifically designated battery packs replaced when it is no longer able
to hold a charge.
• Refer to the Charging the Battery section instructions for the method of
replacing the battery.
• When disposing of this appliance, follow regulations for disposal of recharge-
able lithium-ion batteries.
• Follow all local ordinances and regulations when handling or disposing of the
battery.
• Prevent unintentional starting. Ensure the switch is in the off position before
connecting to the battery pack, picking up or carrying the appliance.
• Disconnect the battery pack from the appliance before making any adjust-
ments, changing accessories, cleaning, serviing, or storing appliance.
• When battery pack is not in use, keep it away from other metal objects, like
paper clips, coins, keys, nails, screws or other small metal objects, that can
make a connection from one terminal to another.
• Under abusive conditions, liquid may be ejected from the battery. If this
• Do not allow children to play with or hang on the appliance
• Do not use the appliance with damaged power cord or plug. The cord must be
replaced. If the appliance is not working as it should, has been dropped,
damaged, left outdoors, or dropped into water, return it to an LG Electronics
service centre.
• Do not pull or carry by cord, use cord as a handle, close a door on cord, or pull
cord around sharp edges or corners. Do not run appliance over cord. Keep
cord away from heated surfaces.
• Do not unplug by pulling on cord. To unplug, grasp the plug, not the cord.
• Place the cords from other appliances out of the area to be cleaned.
4 SAFETY INSTRUCTIONS

Battery Specifications
- Model Name: VC-2339-5S1P
- Type: Rechargeable Lithium-ion Battery
- Rated Capacity: 2500 mAh
Installation
• To avoid an electrical shock or fire, do not install, charge or store the appli-
ance where it may be exposed to water, rainfall or high humidity.
• Install, charge and store the appliance in a well-ventilated place.
• Avoid operating the appliance in areas where there is a risk of leakage of flam-
mable gas, industrial oil or metallic dust.
• Do not store or install the appliance, power cord or plug near heating devices
or open flames.
• Install the charging station on a firm, level surface.
• Do not use or store the appliance at temperatures below 5 ℃ or above 38 ℃.
• Do not store or install the appliance where it is exposed to temperatures
below freezing or exposed to outdoor weather conditions.
• When installing or moving the appliance, be careful not to pinch, crush, or
damage the power cord or plug.
• Use the anchoring screws only when attaching to concrete or similar solid
surfaces.
• Never drill into a wall without first checking that the area behind it is free
from power conduits, plumbing, vents, or cables.
Operation
• Read all instructions before using the appliance, and save these instructions.
• Use only as described in this manual. Use only manufacturer’s recommended
attachment.
• This appliance is designed for normal indoor domestic use only. It is not to
happens, avoid contact. If contact accidentally occurs, flush with water. If
liquid contacts eyes, additionally seek medical help.
• If the appliance is to be stored unused for a long period, the batteries should
be removed.
• Before removing the battery, you must turn off this appliance.
• When fitting the battery into the product body, insert it completely until it
clicks.
5 SAFETY INSTRUCTIONS

be used for any non-residential, commercial, or industrial application.
• This product should only be used with a 100 - 240 V~ 50/60 Hz outlet. Make
sure to check the power specifications of the place where you intend to use
the appliance.
• Do not handle the power cord, plug, or appliance controls with wet hands.
• Wipe any moisture or dirt off the cord or plug with a dry cloth.
• Never attempt to operate this appliance if it is damaged, malfunctioning,
partially disassembled, or has missing or broken parts, including a damaged
cord or plug. Take it to an authorized LG Electronics service centre or dealer
for assistance.
• Do not apply excessive force to the power cord to bend it, or place it under a
heavy object as this will damage it.
• Do not use multiple-outlet adapters with this appliance. Make sure to use a
power socket with a capacity of 10 A.
• Do not plug the appliance into a damaged or loose outlet.
• Make sure to unplug the power cord when the appliance is not to be used for
an extended period of time.
• Do not damage, alter, excessively bend, twist, pull, pinch or heat the power
cord.
• Before using the appliance, remove any wire or string on the floor.
• Avoid touching the prongs of the power plug with your finger(s) when
unplugging the power cord.
• Do not cover the power cord with a rug or carpeting.
• Push the power plug firmly into the wall outlet so that it is not loose.
• If the product has been submerged, contact an LG Electronics service centre
or dealer for instructions before resuming use.
• If the product makes a strange noise or emits an odour or smoke, discontinue
use and contact an LG Electronics customer information centre.
• Only qualified technicians or service personnel from LG Electronics may
disassemble, repair or modify the appliance.
• Never insert a sharp metallic object such as a pin, nail or knife in a hole or gap
in the appliance or the charging station.
• Do not vacuum liquids with this appliance. Make sure that no water, beverage
or detergent gets inside the appliance or the charging station.
• Do not allow the appliance to sweep up blades, thumb tacks, sawdust, sharp
objects, or hot or cold ashes.
• Do not allow children to use the appliance.
• Do not let children or pets get close to the appliance when using, charging or
storing.
• Do not insert the nozzle or tools in your mouth.
6 SAFETY INSTRUCTIONS

• Keep clothing and hair, fingers, or other parts of the body away from open-
ings and moving parts.
• Do not operate the appliance with the suction inlet or outlet blocked.
• Do not use the appliance without the dust bin and filters in place.
• Do not use in an enclosed space where vapors are present from paint thinner,
mothproofing substances, flammable dust or other explosive or toxic materi-
als.
• Do not touch the charging terminals on the appliance or the charging station,
or insert an electrified object inside the appliance or the station.
• Always store the appliance on the floor standing or wall-mounted charging
station when it is not in use.
• Do not lean the appliance on walls, chairs or tables.
• If the earth leakage breaker is tripped when the product is put on the
charging station, immediately remove the appliance from the charging
station. Contact an LG Electronics customer service centre.
• Use extra care when cleaning on stairs.
• Do not use or store a heating device or flammable substance(ether, benzene,
alcohol, chemicals, combustible sprays, insecticide, air freshener or cosmet-
ics) in close proximity to the appliance.
• Do not attempt to clean up a liquid substance (water, beverage), odourous
substances (candy, chocolate, pet excrement), metallic objects (blades,
pins), flammable substances, burning / smoking(cigarettes, matches, or hot
ashes), surfactants, or glass shards with this appliance.
• In the event of a gas leak(natural gas, propane gas, etc.), do not operate this
or any other appliance. Open a window or door to ventilate the area immedi-
ately.
• Do not hold the charging station upside down with the battery in the charging
station.
• Do not expose the appliance, and the battery in particular, to heat, a heating
device or direct sunlight.
• Do not keep the appliance or its battery inside a vehicle which is exposed to
direct sunlight.
• Never allow any water, beverage or detergent to get inside the battery.
• Do not apply physical impacts to the battery.
7 SAFETY INSTRUCTIONS

Maintenance
• Make sure to unplug the power cord when cleaning or maintaining the
charging station.
• Do not wash the inlet port or the dust bin with water or detergent.
• Do not use detergents, polishes or air fresheners to clean the dust bin.
• Do not apply or spray a flammable substance (gasoline or thinner) or surfac-
tants (detergent or bath soap) on the appliance.
• Wash hands after handling nozzles. The nozzles contain carbon fiber, and
contact may cause minor skin irritation.
8 SAFETY INSTRUCTIONS
Disposal
• Keep packing materials out of the reach of children. Packaging materials can
pose a suffocation risk for children.
• Destroy the carton, plastic bag, and other packing materials after the appli-
ance is unpacked. Children might use them for play. Cartons covered with
rugs, bedspreads, or plastic sheets can become airtight chambers.
• Dispose of this appliance according to local, state, and regional laws and
regulations.
• Contact your local city council or the related government authority before
disposing of this appliance.

9 SAFETY INSTRUCTIONS
Operation
• This appliance has a built-in safety device to prevent damage from overheat-
ing. If the appliance becomes overheated after extended use, it may automat-
ically turn off. If this occurs, leave the appliance in a cool, well-ventilated area
for about an hour before turning on the power again.
• Do not subject the product to shocks or drop it.
• Do not install wet or damp filters.
• Always use a soft cloth to clean the appliance. Do not clean the product with
a volatile or organic solvent(thinner or acetone).
• Do not clean the same spot repeatedly for an extended period of time. Doing
so may damage the carpet or flooring surface.
• Keep fingers away from pinch points when assembling the appliance or the
charging station.
• Do not use the double-sided tape to anchor the charging station on wallpa-
per. Use the provided screws to anchor the charging station. The weight of
the charging station and the appliance could damage the paper.
• Do not apply force or any impact to the Cyclonic Mesh Filter.
• Do not remove the battery during operation.
CAUTION
• To reduce the risk of injury to persons, malfunction, or damage to the prod-
uct or property when using the appliance, follow basic safety precautions,
including the following:
10 INSTALLATION
INSTALLATION
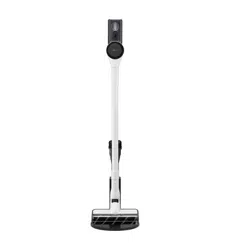
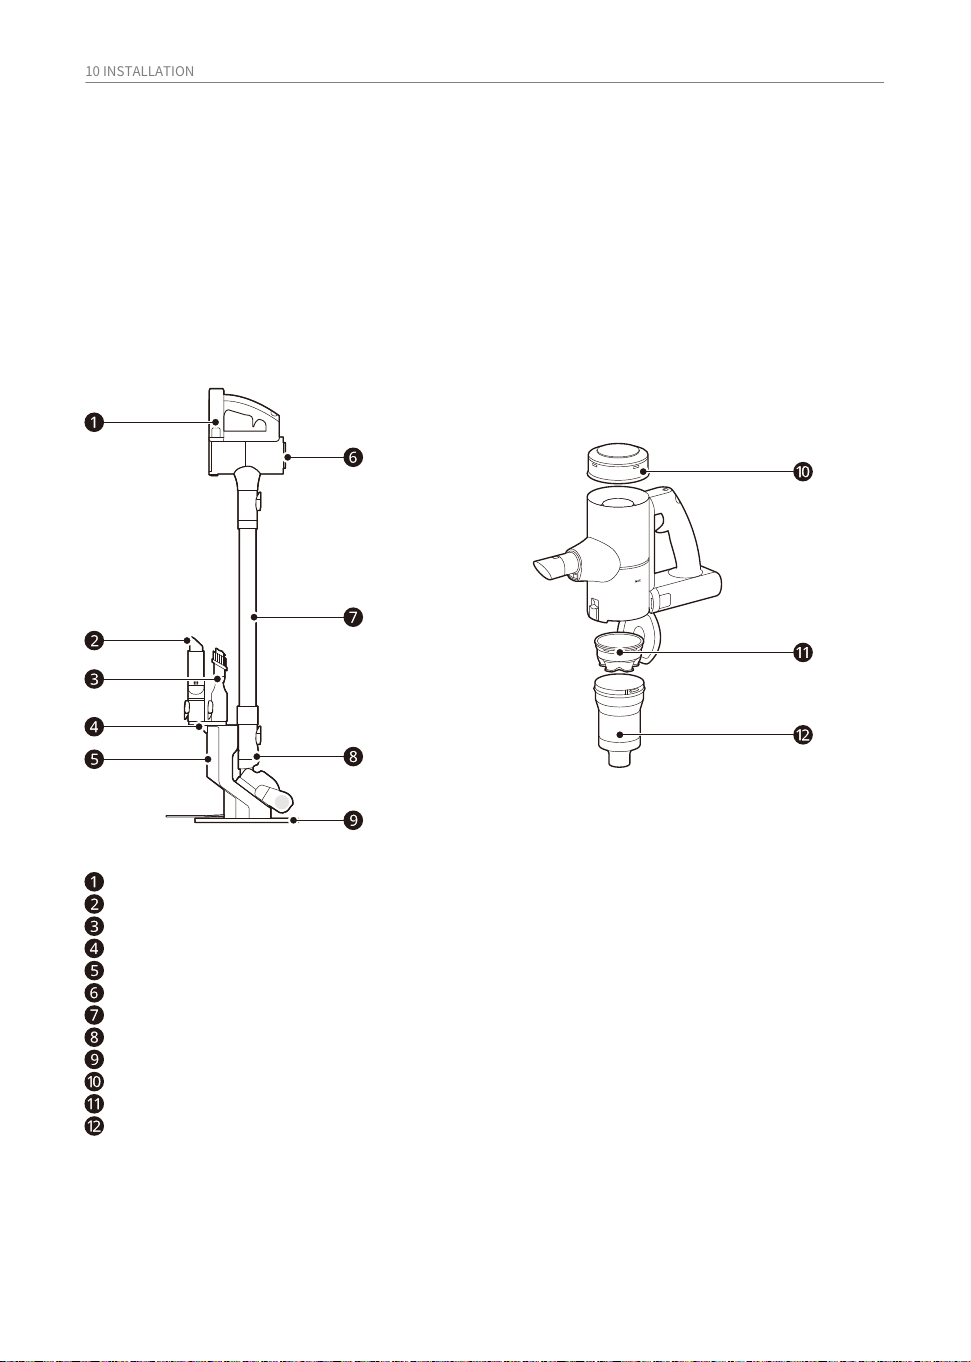
Product Overview
Front View
Battery
Crevice Tool
Combination Tool
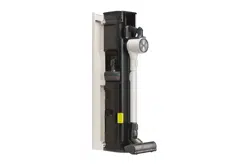
Tool Holder
Charging Station
Product Body
Fixed Pipe
Nozzle
Charging Station Support
Exhaust Filter
Pre-filter
Cyclonic Mesh Filter
The images in this guide may be different from the actual components and accessories, which are
subject to change by the manufacturer without prior notice for product improvement purposes.
*1 This feature is only available on some models.
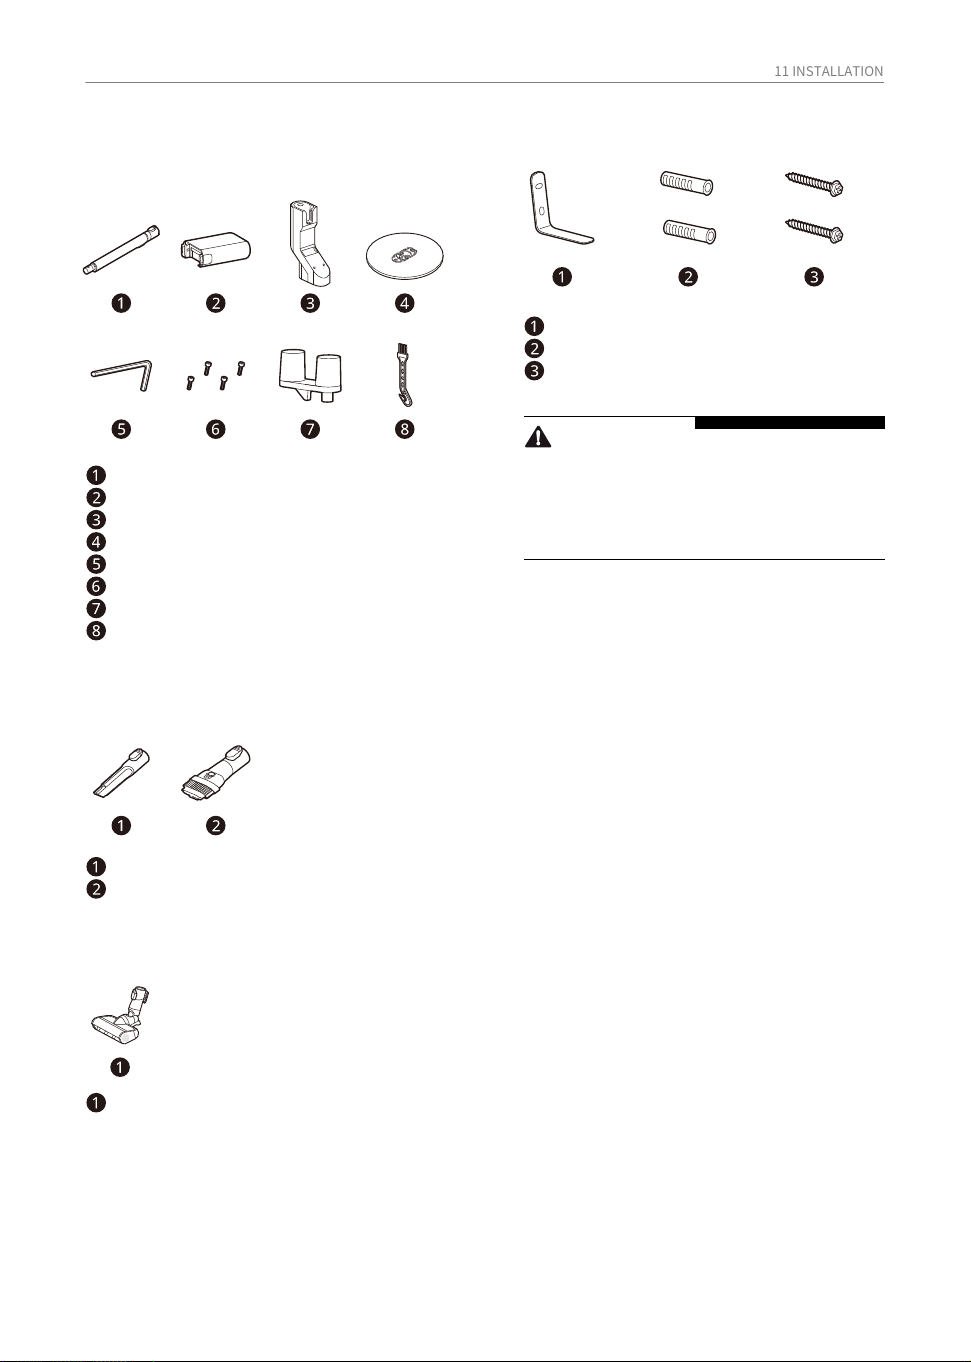
Included Accessories
Installation Kit
Accessories
11 INSTALLATION
Nozzles
CAUTION
• The battery, exhaust filter and the pre-filter
will eventually need to be replaced.
Contact an LG Electronics customer
service center.
Basic Accessories
Fixed Pipe
Battery
Charging Station
Charging Station Support
Allen Key
Charging Station Screws
Tool Holder
Cleaning Brush
‘L' Shaped Wall Mounting Bracket
Wall Anchor
Wall Set Screws
Crevice Tool
Combination Tool
Hard Floor Power Drive Nozzle
12 INSTALLATION
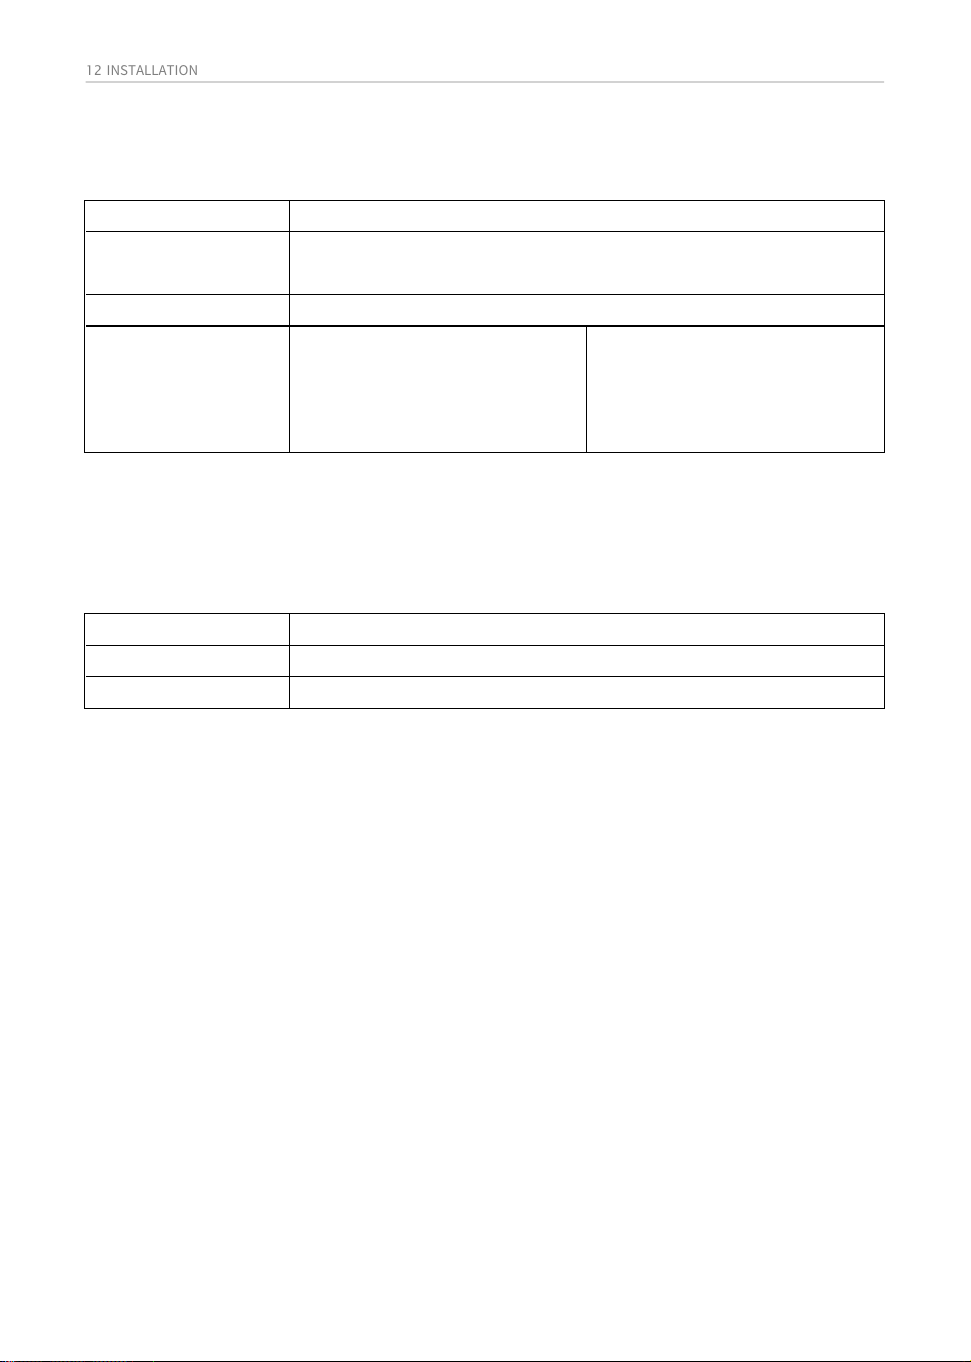
Specifications
Model
Dimensions (Width X
Depth X Height)
251 mm X 242 mm x 1026 mm
A9-ACE
Approximately 1.97 kg
• Dimensions are given for the assembled product body, pipe and nozzle.
• Battery run time is the result of using a fully charged battery according to the LG Electronics test
standard. Results may be different depending on actual use environment and period of use.
Appliance
Weight
Battery Run Time
(Using one battery)
Using with the Nozzle
Up to 6 minutes in Turbo Mode
Up to 15 minutes in Power Mode
Up to 30 minutes in Normal Mode
Using without the Nozzle
Up to 7 minutes in Turbo Mode
Up to 20 minutes in Power Mode
Up to 40 minutes in Normal Mode
Model ZD012M220075AU
Input
100 - 240 V~ 50/60 Hz 0.5 A
Output DC 22.0 V 0.75 A
Power Supply unit
13 INSTALLATION
Caution
• When assembling, be careful not to let the
charging adapter wire get caught between
the charging station and the charging station
support.
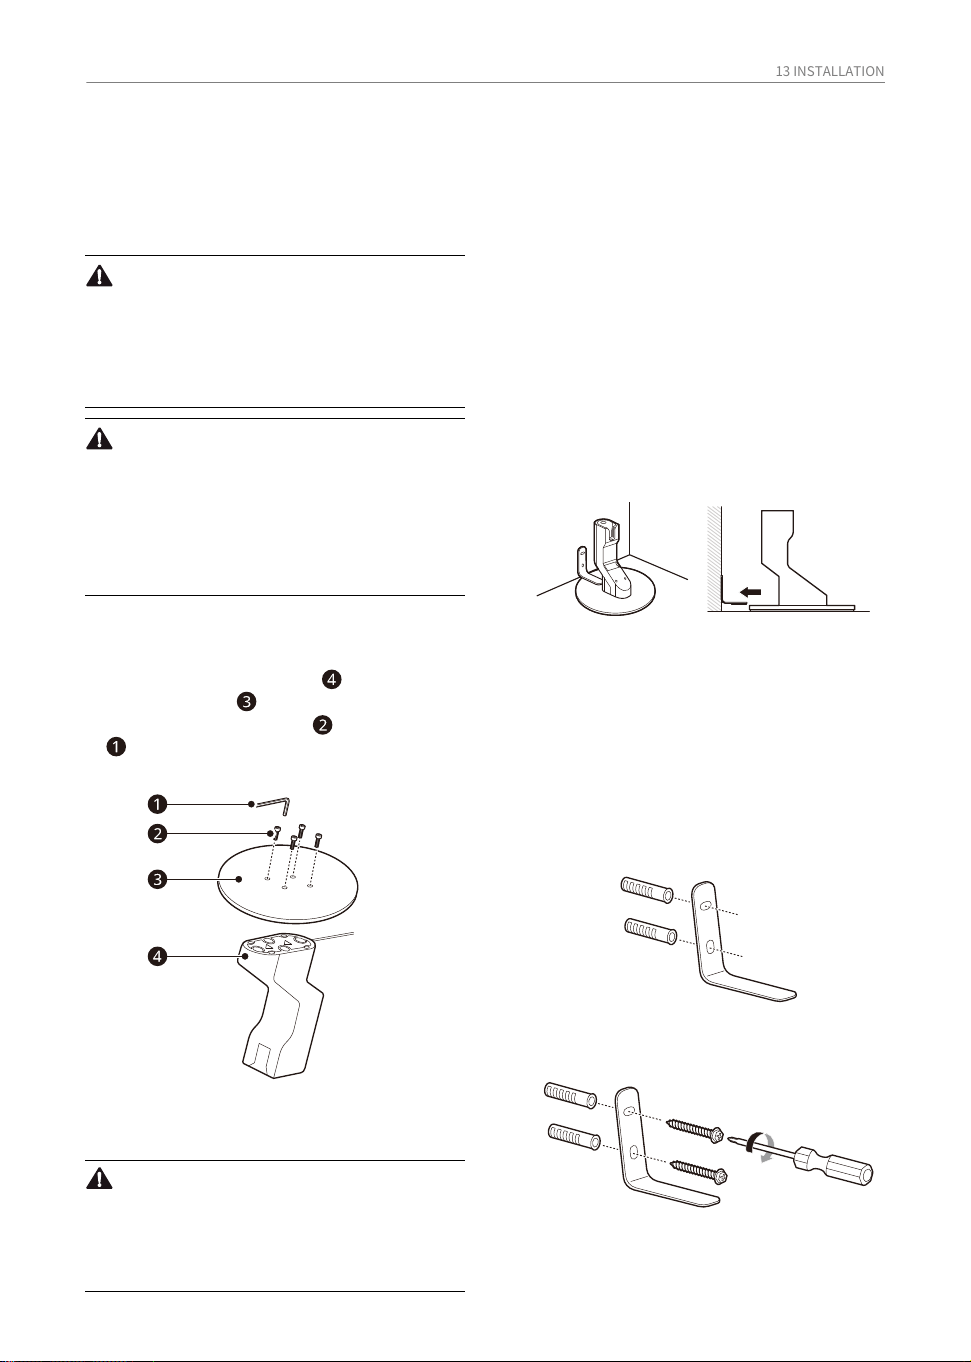
Installing the Charging
Station
• Assemble according to the triangular
assembly guide on the charging station
and the charging station support.
• The「L」shaped wall mounting bracket
should be located right behind the
product.
• Place the charging station stand against
the wall where it will be finally positioned
and then align the L bracket to the top of
the Charging base stand and the wall
before marking out the two holes.
The anti Tipping bracket helps prevent the
product and its charging station from tipping
over and causing damage or injury.
Warning
• Install the charging station on a level surface
so that it does not tip over.
• Supervise children or pets to avoid the
product and its charging station from tipping
over.
Caution
• When assembling the product or charging
station, be careful not to pinch your fingers.
• Be careful not to drop the accessories when
taking them out of the packaging box.
• Use wall screws only for solid walls, such as
concrete walls.
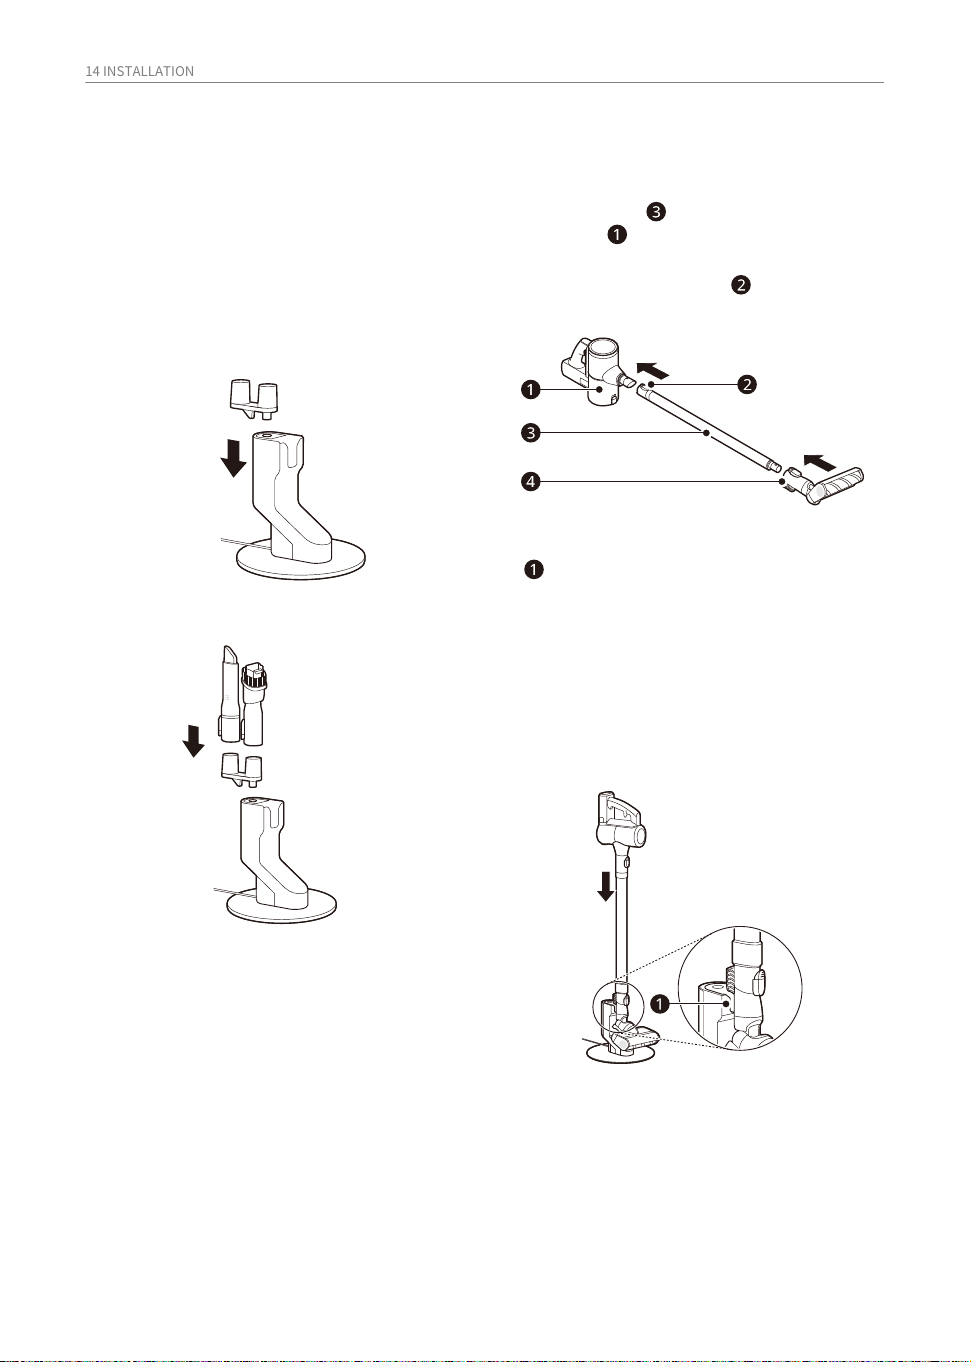
Be sure to follow the steps below
for the charging station
1. Mount the charging station to the charging
station support .
2. Use the included screws and Allen Key
to assemble the charging station and
charging station support.
Installing the Anti-Tip
Bracket
Installing the Stand-type
Charging Station
1. Before moving the product to its final
location, select a suitable place to install
the「L」shaped wall mounting bracket.
• We recommend a wall hole diameter of 8.5
mm and a depth of 55 mm.
• NOTE: Make sure there are no pipes or
wires inside the wall before drilling any
holes.
2. Drill 2 holes in the concrete wall at the
selected location to insert the wall anchors.
Its not recommended to secure the bracket
to a Gyprock or plaster board wall as any
impact or force to the bracket can damage
the wall or its fixings.
3. Use the wall set screws to fix the「L」
shaped wall mounting bracket to the
concrete wall.
4. Slide the charging station support under-
neath the retaining bracket and connect
the charging adaptor to the outlet.
14 INSTALLATION
Assembling the Appliance
• To remove the pipe, press and pull down
the pipe release button .
1. Assemble pipe and floor Nozzle onto the
main unit .
Storing the accessories
Storing the Tools
• The Tool holder can be assembled in 3
directions.
Store the frequently used tools such as the
combination tool and crevice tool attached to
the charging station.
Follow these steps to safely assemble the
appliance.
1. Insert Tool holder into the hole above the
charging station.
2. Insert the accessory tools into the holder.
• when the cleaner is successfully placed
into the charging station it will emit an
audible chime and the battery status bar
will flash briefly. if the chime is not heard,
then lift the cleaner from the charging
station then lift it from the charging
station and refit it again properly.
2. Align the product with the bottom groove
of the charging station.
15 INSTALLATION
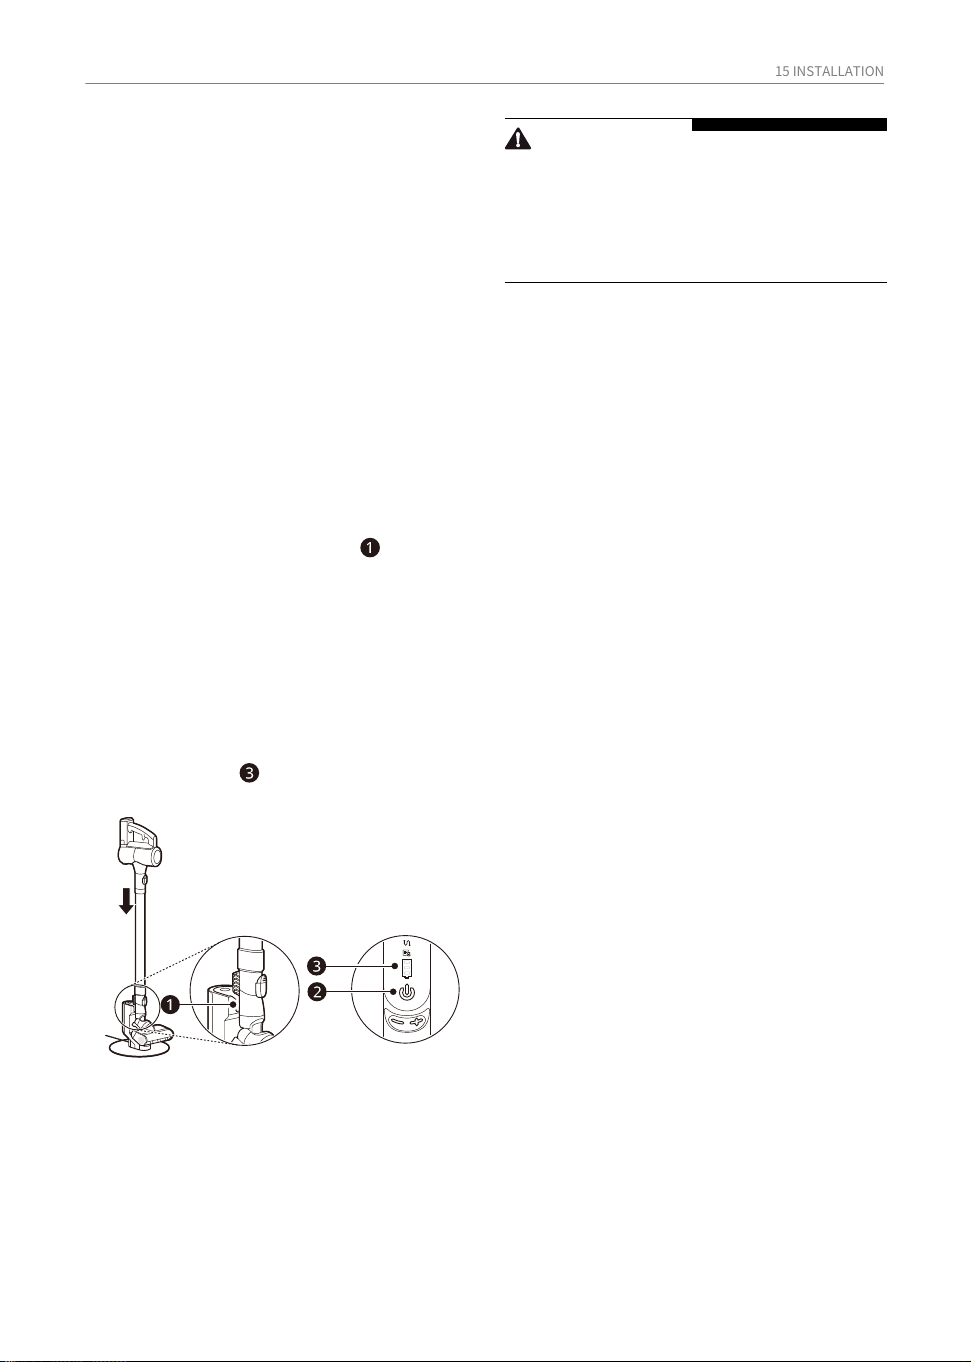
Charging the Battery
Before Charging the Battery
• Make sure that the adapter is connected to
the power outlet.
• Fully charging a single battery usually takes 4
hours.
• The battery will not be charged if the indoor
temperature is below 5 ℃. Only charge the
battery when indoor temperatures are
between 5 ℃ and 38 ℃.
• The battery will eventually need to be
replaced. Due to the battery characteristics,
runtime is shortened after using the
appliance repeatedly for an extended period.
• Lower the cleaner into the charging
station. When the cleaner is successfully
placed into the charging station it will emit
an audible chime and the battery status
bar will flash briefly. if the chime is not
heard, then lift the cleaner from the
charging station then lift it from the
charging station and refit it again properly.
• When charging is complete, the battery
level indicator will turn off.
1. Press the power button to power off the
product.
2. Align the product with the groove at the
bottom of the charging station .
CAUTION
• Make sure to securely fit the product body
onto the charging station. If the appliance
falls off the charging station, it could cause
injuries, property damage or product
damage.
16 OPERATION
• Support the bottom of the appliance when
cleaning an elevated surface.
• To avoid scratches on polished floors, keep
tools and the brushes and rollers of the
nozzles free from hair, grit, sand, or abrasive
objects.
• Make sure that the exhaust filter or pre-filter
is properly assembled before using the
appliance.
• Close the dust bin cover properly before
using the appliance. If the dust bin cover is
left open, the suction strength may deterio-
rate and affect the cleaning results.
• Store the appliance in the charging station or
place it flat on the floor when not in use.
Leaning the appliance against a wall or chair
can result in product damage or personal
injury if the appliance falls.
• Environmental conditions such as tempera-
ture and humidity may cause static electrici-
ty to accumulate on the appliance. Please
contact LG Electronics customer informa-
tion centre if the problem persists.
• Make sure to remove any foreign object such
as a sock or stocking before using the
appliance. Any foreign object on the inlet
port or extension pipe will prevent the
appliance from functioning properly.
• Please use the product at normal room
temperatures as the battery runtime may
deteriorate severely if used at temperatures
lower than 5 ℃ or higher than 38 ℃ for an
extended period of time.
• The battery runtime is dependent on the
surface type and the suction power.
• Follow manufacturer’s recommendations
when cleaning flooring, carpets, and rugs.
• Refer to the Specifications section for
battery runtime details.
• If it is not properly inserted, the battery
may fall out, causing product to malfunc-
tion or personal injury.
OPERATION
Getting Started
Before Using the Appliance
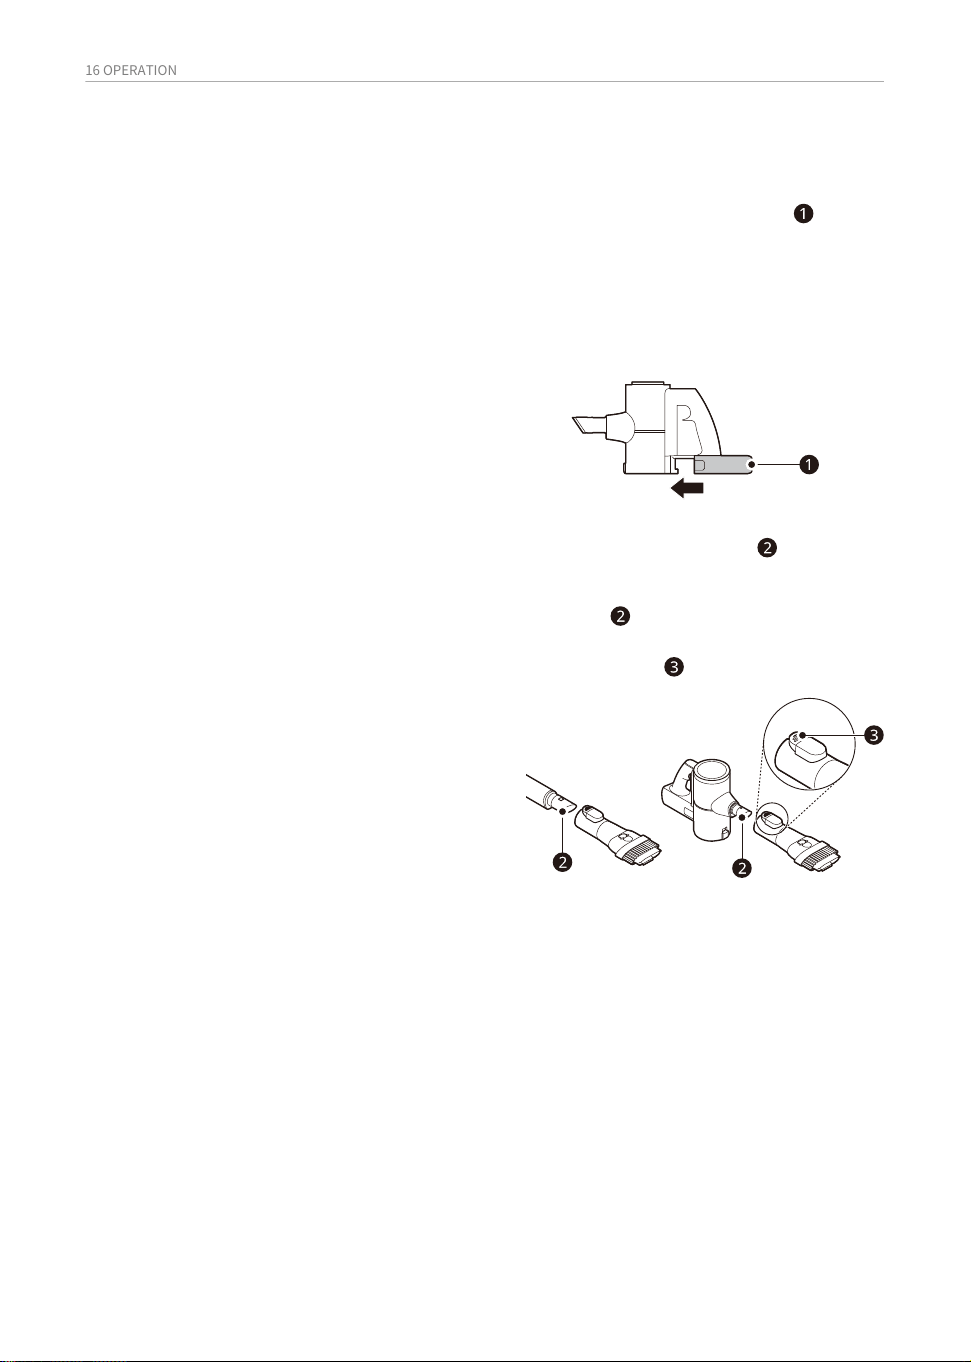
Assembling Attachments
1. Insert the fully charged battery into the
cavity at the bottom of the handle on the
product body and push the battery until it
clicks.
• Detach the accessories by pressing the
release button .
• To turn off the appliance, press the Power
button again.
2. Attach the nozzles, tools, or fixed pipe by
sliding them onto the inlet on the body
until they click into place. The nozzles and
tools can also be attached to the end of the
fixed pipe .
3. Press the Power button to activate the
Normal mode.
Nozzles and tools can be attached to either
the product body or the end of the fixed pipe.
17 OPERATION
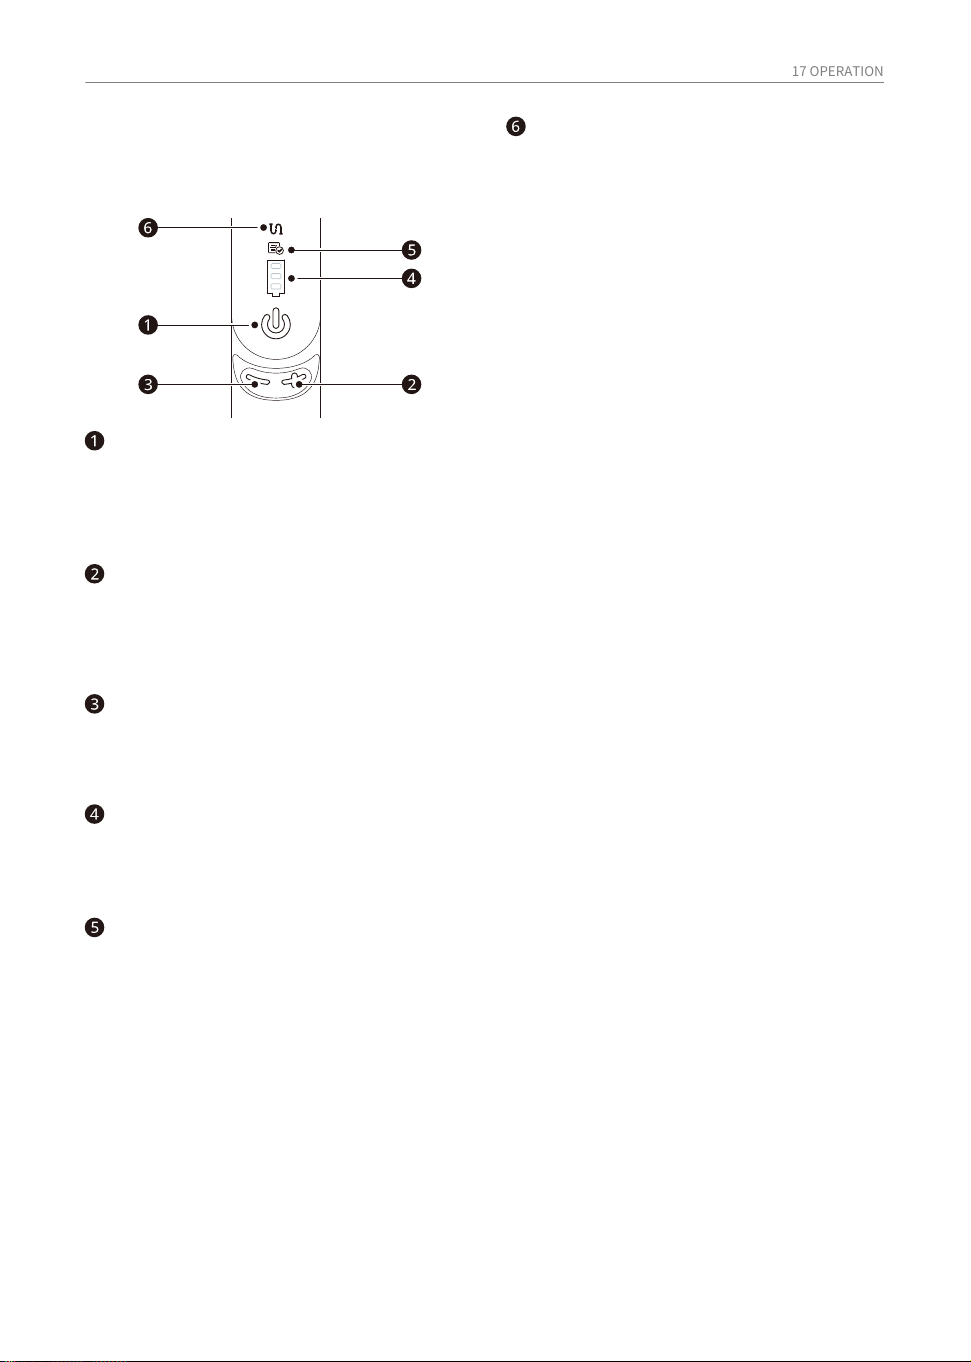
Operational Controls
Vacuum cleaner controls and status
lights
Reduce suction (-) button
• When you press the (-) button, the suction
power changes from Turbo → Power →
Normal mode.
Foreign matter clogging
indicator lamp
• If the inside of the product, pipes, suction
parts, inlets, pre-filters, exhaust filters,
etc., are blocked by foreign objects, the
icon will light up.
• If the foreign matter clogging persists, the
appliance will switch off and a Foreign
matter clogging notification will sound.
Remove any debris that may be lodged in
the pipe and clean the pre-filter, exhaust
filter, and cyclonic mesh filter.
Increase suction (+) button
• Press the (+) button to increase suction
power. The below 3 suction power modes
are available. Normal → Power → Turbo
mode.
Battery level indicator
• The corresponding icon indicates the
remaining battery capacity during use and
also turns off when charging is complete.
Filter cleaning interval reminder
light
• If you use the product for more than a
certain amount of time, the icon will light
up. Check the pre-filter, exhaust filter, and
cyclonic mesh filter and clean if necessary.
Power Button
• Press the power button to power the
cleaner on and off.
• When turned on, it operates in Normal
mode.
18 OPERATION
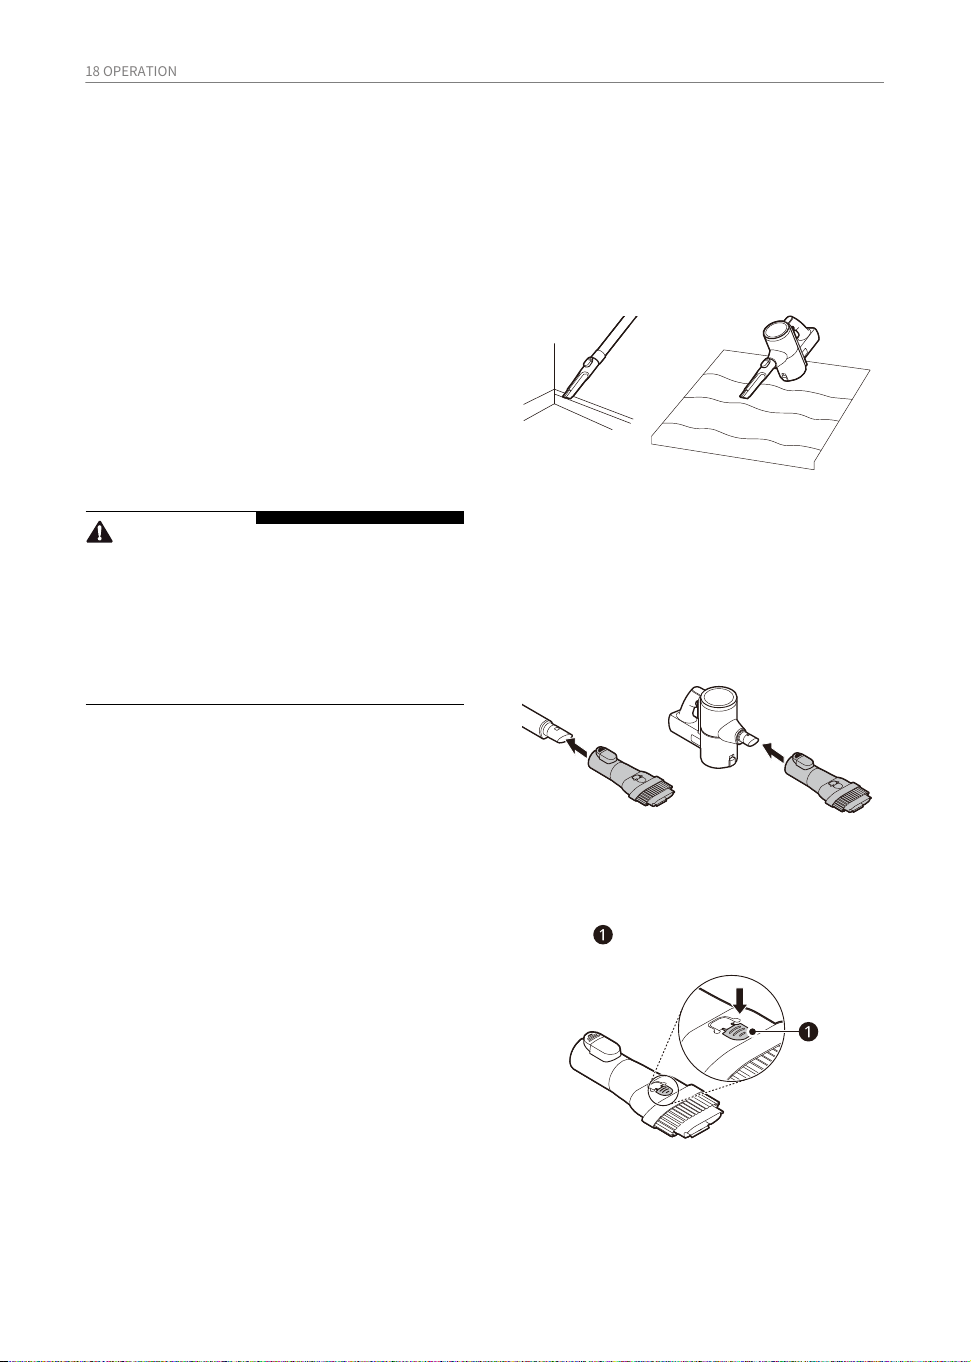
Use this tool to remove dust from corners or
narrow spaces.
Crevice Tool
Using the Nozzles and
Tools
Before Using the Nozzles
and Tools
• Adjust the suction power if the inlet gets
stuck on the floor, carpet, or bedding.
• Each Nozzle is equipped with a motor and
may make a sound when operating.
Some accessories are only available on some
models.
Specialized attachments can help you clean
more effectively. Tools and nozzles can be
attached to the product body or the fixed
pipe.
• Use it for areas with static electricity such as
mats.
• Use it with the Turbo mode to clean pet hair
out of furniture, mats, or tight areas like
corners.
Can be used in either crevice mode or brush
mode for cleaning corners or small gaps
where dust and dirt gather.
Combination Tool
• Crevice Mode
Use the tool in the crevice mode to clean flat
surfaces such as sofas or mattresses.
• Brush Mode
Use the tool in the brush mode to clean
delicate surfaces such as frames or furniture.
CAUTION
• Do not use the Floor Power Nozzle on PVC or
polyurethane mats for infants and children.
The mat may stick to the nozzle, making it
difficult to operate, causing damage to the
mat or static electricity on the appliance.
Clean mats using the crevice tool.
To convert modes, press the adjustment
button and push forward.
-
Floor Power Drive Nozzle
• Do not push the 'PUSH' button on the Floor
power nozzle during use as the rotating
brush will detachand may cause damage or
injury. It should only bepressed for cleaning
purposes and when the nozzleis detached
from the cleaner.
Use the Floor power nozzle for hard floors.
19 MAINTENANCE
• Empty the dust bin into a larger waster
bin.
• For less dust, the dust bin can first be
emptied into a plastic or paper bag before
disposing the bag into a waste bin.
1. Remove the battery from the body of the
product before cleaning.
2. Press the dust bin cover release button to
open the dust bin cover and empty the dust
bin.
MAINTENANCE
Cleaning the Appliance
Before Cleaning the
Appliance
• Turn off the power before cleaning the
appliance.
• The frequency of cleaning varies depend-
ing on the usage environment and usage
time. In a dusty environment, clean
frequently.
To maintain the optimum suction power, the
cyclonic mesh filter, the exhaust filter and the
pre-filter should be cleaned regularly and
washed under running water at least once a
month.
Cleaning the Dust Bin
• If the dust bin is completely full of dust or the
filter is clogged, the suction power may be
reduced.
Empty and clean the dust bin after every use.
Removing Foreign Objects
In order to maintain product performance, be
sure to remove any foreign objects and dust
from inside the product body, fixed pipe or air
inlets.
Separate the battery from the product body
and remove the foreign objects before resum-
ing use of the appliance.
• Foreign materials inside the product can
cause the product to be noisy, have poor
suction, or shut down during operation.
• If the inside of the product body, fixed pipe,
inlets, pre-filter, or exhaust filter is clogged
with foreign objects, the power will surge
(alternating from Hi to Lo power) a few times
to alert you to the blocked airflow. The
appliance will then automatically turn off to
prevent damage.
WARNING
• Never wash the nozzle, rotating brush or
product body with water. Water could reach
the motor and cause electric shock or fire.
• Do not allow foreign objects to enter the
motor. Doing so may cause electric shock,
fire or product damage.
• Do not insert fingers or sharp objects into the
motor. Doing so could cause product
damage, personal injury or electric shock.
CAUTION
• Do not apply force or allow impacts to the
cyclonic mesh filter. Doing so could deform
the filter, compromise product perfor-
mance, or cause the product to malfunction.
20 MAINTENANCE
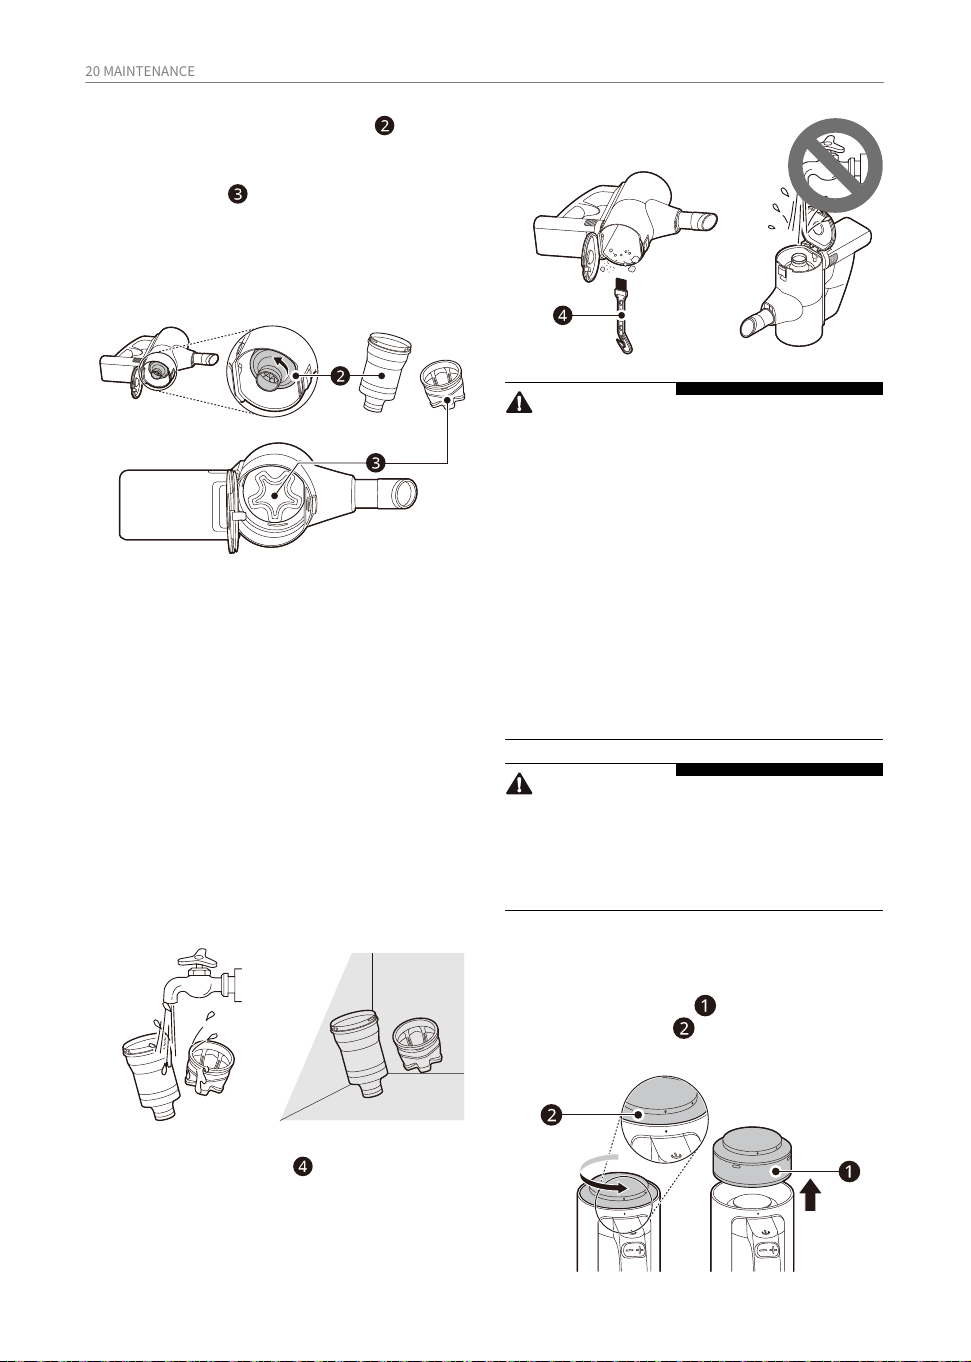
• If there is any stubborn dust left in the
cyclonic mesh filter, soak it in lukewarm
water (about 40°C) for 30 minutes and
then gently clean it with a brush before
rinsing it again.
• Never tap or hit the cyclonic mesh filter
against any surface as it will damage.
• Allow all the filters to dry in a well-ventilat-
ed area out of direct sunlight for at least 24
hours before reassembling.
• Any remaining moisture or undried filters
may cause odour or severe damage to the
suction motor.
4. Remove dust fromthe cyclonic mesh filter
and pre filter and wash with water at least
once a month.
5. Use the cleaning brush to remove the dust
inside the dust bin.
WARNING
• Never wash the product body with water.
Water could reach the motor and cause
electric shock or fire.
• Do not use the product body to suck up oils
or any liquids, including water.
• Do not use the appliance without the Cyclon-
ic Mesh Filter installed. Doing so could
damage the product.
• Do not insert fingers or sharp objects into the
motor to avoid product damage, personal
injury, or electric shock.
• Do not allow foreign objects to reach the
motor to avoid product damage, explosion
or fire.
CAUTION
• Do not apply force or allow impacts to the
Cyclonic Mesh Filter. Doing so could deform
the filter, compromise product perfor-
mance, or cause the product to malfunction.
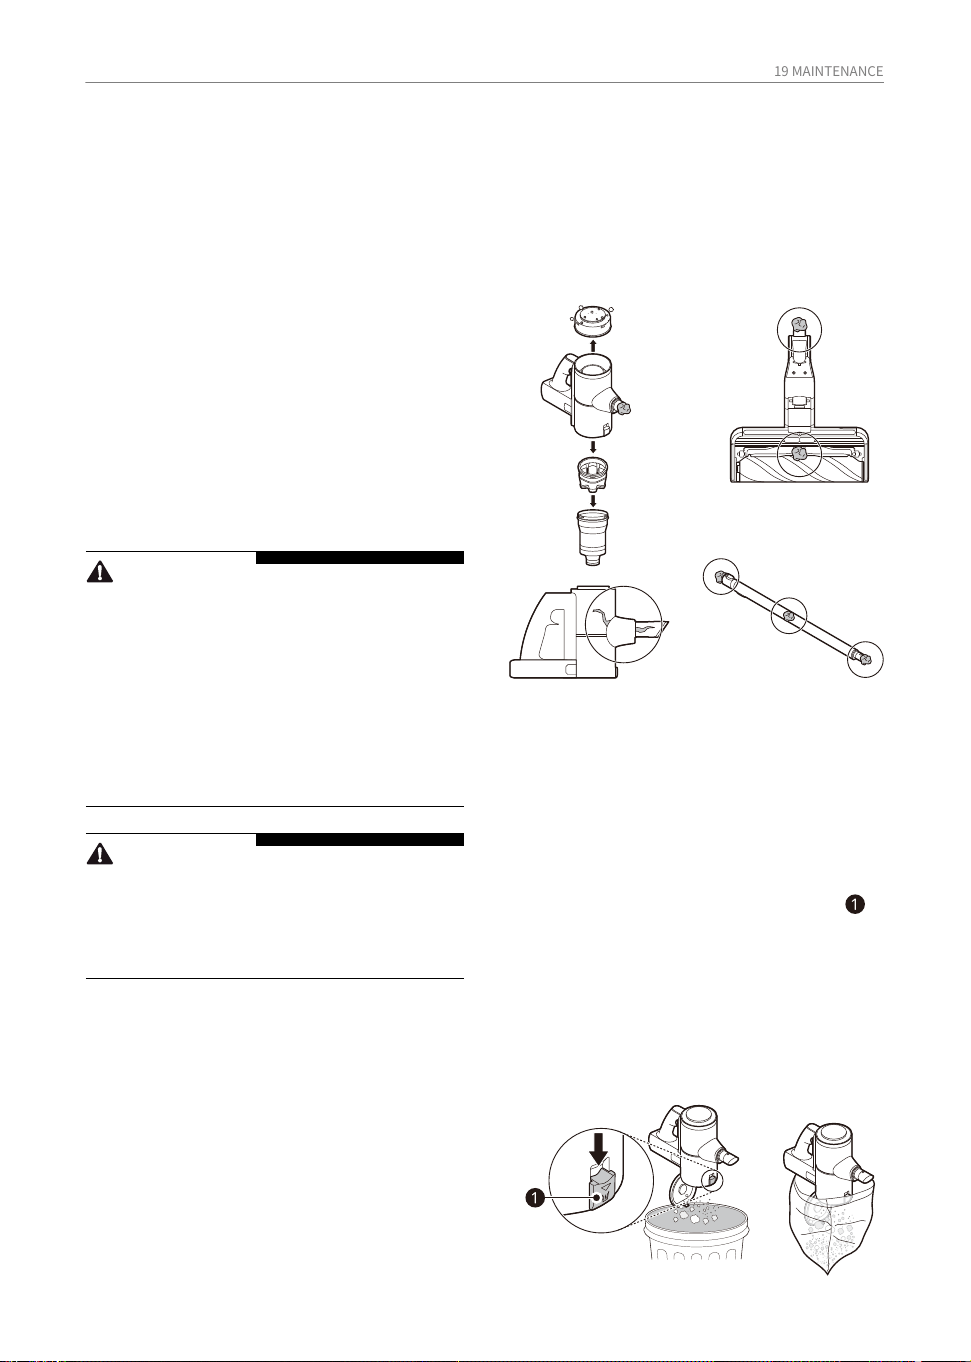
Cleaning the exhaust filter
1. Remove the battery from the product body.
2. Rotate exhaust filter counterclockwise to
the open position and remove it from the
product body.
3. Rotate the cyclonic mesh filter counter-
clockwise to detach it.
• When the cyclonic mesh filter is removed,
the pre-filter should be attached to the
cyclonic mesh filter. If it is not attached
with the cyclonic mesh filter then, check
the inside of the vacuum cleaner and take
it out by hand.

21 MAINTENANCE
• To prevent fire or permanent product
damage, do not wash the body of the
product with water as the suction motor is
directly under the filter.
• After washing the filter with water, allow it
to dry completely in a well-ventilated area
out of direct sunlight for at least 24 hours
before reassembling. Any remaining
moisture may cause odor or damage to
the motor.
4. Dust off the filter and wash with water at
least once a month.
3. Use the cleaning brush to clean the dust
from the motor exhaust area.
5. Align the exhaust filter to the open position
and rotate clockwise to the locked position
to assemble it onto the product body.
CAUTION
• Do not use the appliance without the
exhaust filter installed. Doing so could result
in product damage.
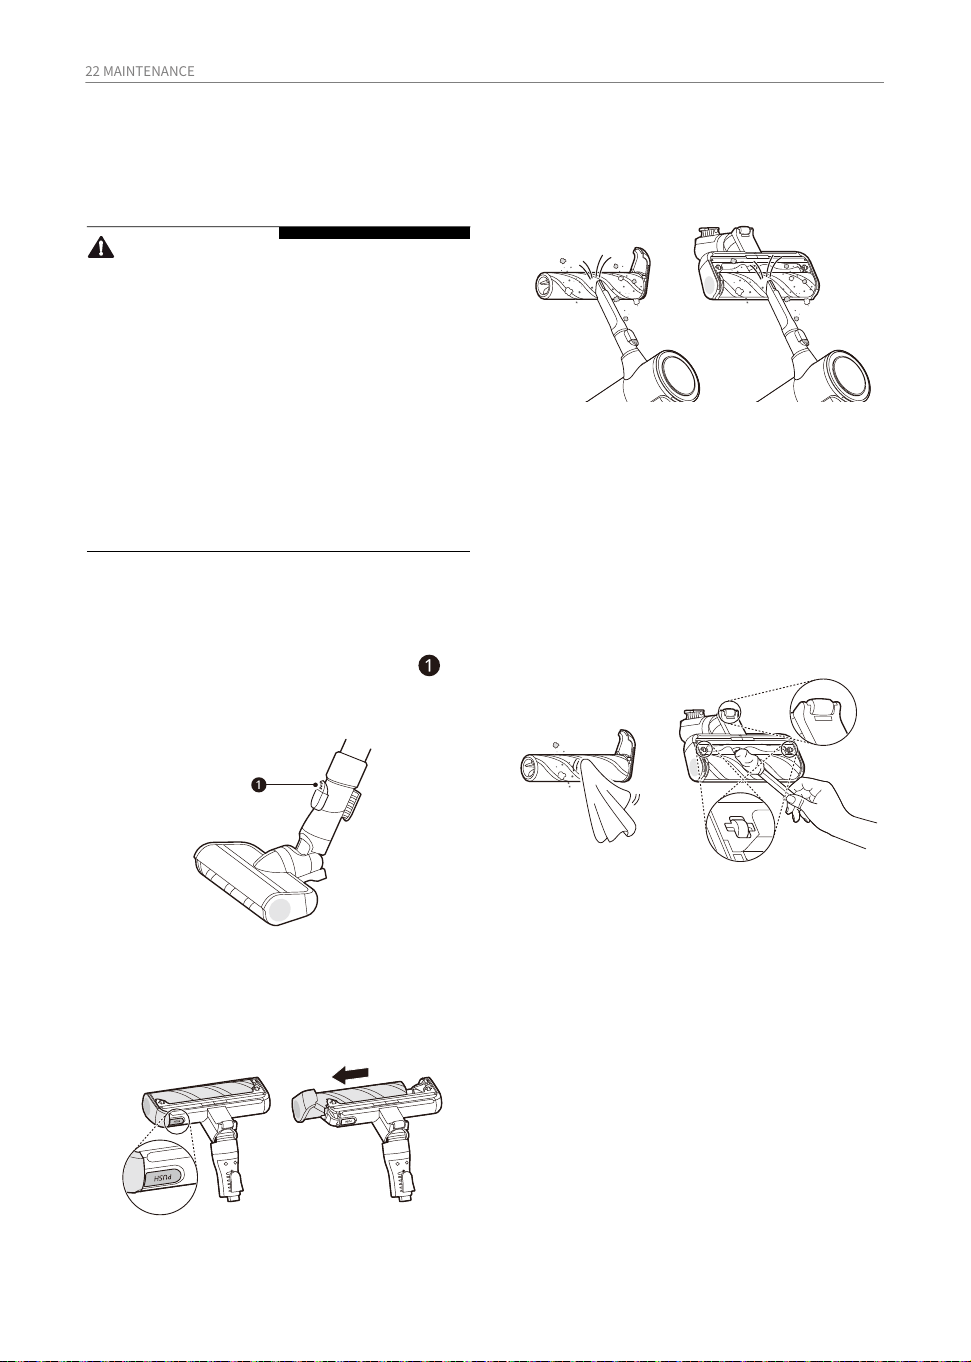
22 MAINTENANCE
• Wrap the handle of a long thin screwdriver
with a wet towel or cloth and use it to
clean the rotating brush and nozzle.thin
long screwdriver.
4. Use a damp towel or cloth to remove any
remaining foreign objects and dust from
the brush and the bottom of the nozzle.
Remove foreign objects, debris and hair
from all Rollers of the nozzles using
tweezers.
1. Press the nozzle's release button to
disconnect the nozzle from the pipe or
product body.
3. Attach the crevice tool to the product body
and use the vacuum to remove foreign
objects and dust from the brush and the
bottom of the nozzle.
5. Slide the brush back into the nozzle until it
clicks into place.
2. Turn the nozzle upside down and remove
the rotating brush while holding down the
PUSH button on the nozzle.
CAUTION
• Always separate the nozzle from the product
body or remove the battery before cleaning.
If the nozzle starts to operate during
cleaning, it could cause an injury.
• Keep fingers away from pinch points when
assembling the nozzle on the appliance or
the rotating brush on the nozzle.
• Do not use the rotating brush as a wet mop. It
may cause product damage.
• Do not rinse or submerge the rotating brush
or nozzle in water. It may cause product
damage.
Cleaning the Nozzles
Clean the nozzle and rotating
brush regularly.
Cleaning the Slim Hard
Floor Nozzle
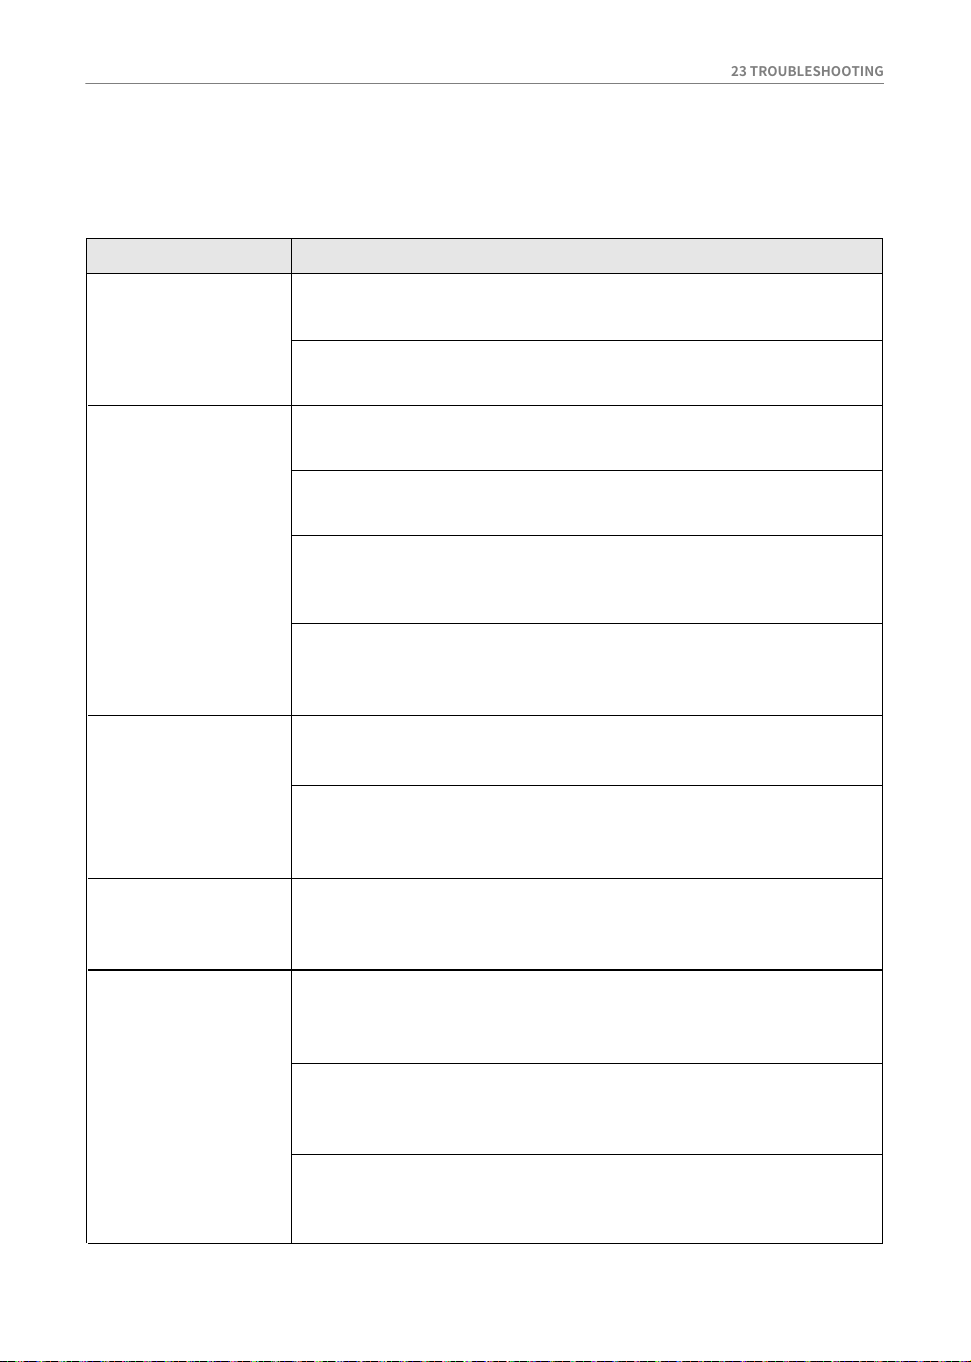
23 TROUBLESHOOTING
The appliance
does not operate.
Battery is fully discharged.
Suction power is
too weak.
Symptom Causes and Solutions
• Charge the battery.
Appliance is turned off.
• Press the Power button to turn on the appliance.
Dust bin is full of dust.
• Empty the dust bin.
Filters are clogged.
• Clean the pre-filter and the exhaust filter.
Inlet is clogged.
• Remove any foreign objects from inside the product body or the
fixed pipe.
Foreign object is on rotating brush, or in inlet port.
• Remove any foreign objects (thread, hair) from the rotating brush
or the inlet port.
A strange odour is
coming from the
appliance.
Appliance was purchased within the last 3 months.
• The cleaner may emit a smell of rubber for about 3 months after
purchase.
Dust bin is full of dust.
• The dust in the bin may cause some odour. Empty the bin and
clean it.
Foreign object is on the filter.
• The filter may emit an odour if it has not been cleaned for some
time. Clean the pre-filter and exhaust filter regularly.
The product body
does not appear
to be charging.
Power cord is unplugged.
• Plug the power cord securely into the outlet.
Hot air is coming
from the product
body.
Foreign object is on the charging terminals.
• Remove dirt or foreign objects from the charging terminals with a
dry cloth.
Motor is cooling.
• If the appliance is running normally, the hot air is a result of the
motor cooling and is not a sign of malfunction.
TROUBLESHOOTING
Before Calling for Service
Operation
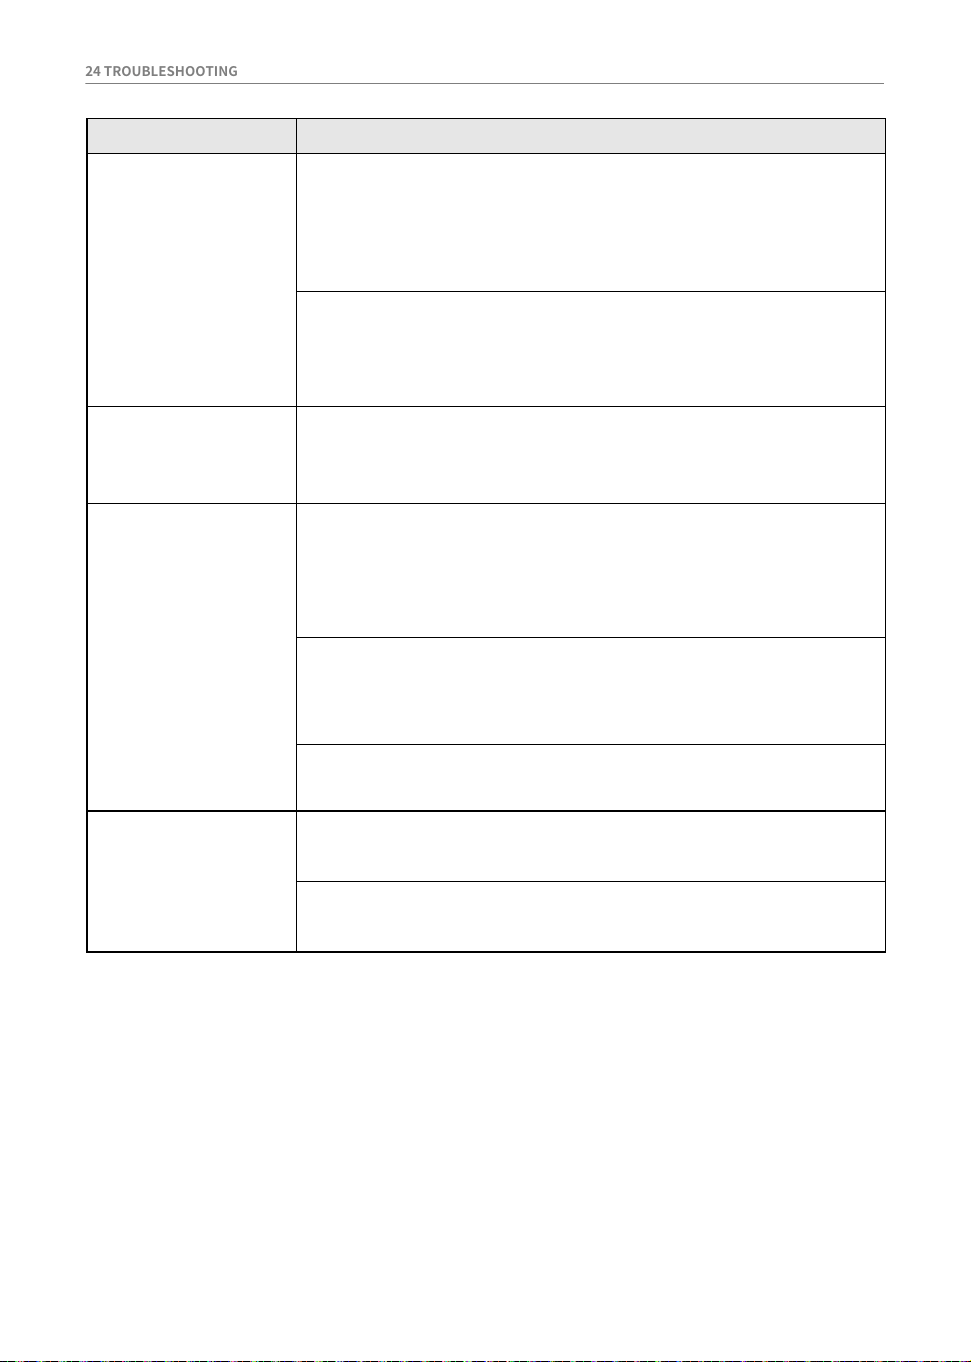
24 TROUBLESHOOTING
A strange odour is
coming from the
appliance.
Pre-filter, Fine dust filter orthe Cyclonic Mesh Filter were
installed while damp or wet.
The appliance
makes too much
noise.
The appliance turns
off unexpectedly or
by itself after the
motor speed
fluctuates
repeatedly.
Symptom Causes and Solutions
• Wash the filters with running water. To avoid odour, allow the
pre-filter to dry completely in a well-ventilated area out of direct
sunlight for at least 24 hours before reassembling.
Exhaust filter was installed while damp or wet.
• Wash the exhaust filter with running water. To avoid odour, allow
the exhaust filter to dry completely in a well-ventilated area out
of direct sunlight for at least 24 hours before reassembling.
• The battery must be fully charged before cleaning. If the problem
persists when the battery is fully charged and the fixed pipe and
attachments are clear from obstructions, contact an LG custom-
er information centre for service.
Foreign object is in the product body, fixed pipe, inlet port or
nozzle.
• Remove any foreign objects from the product body, fixed pipe,
inlet port or nozzle.
Filters are clogged.
• Clean the pre-filter and the exhaust filter.
Vacuum cleaner is running in Turbo mode.
• The motor may be louder at the higher suction power settings.
This is normal.
The rotating brush
does not rotate.
Brush is improperly installed.
• Remove the brush, clean it if necessary and attach it again.
Foreign object is on rotating brush.
• Remove any foreign objects from the rotating brush.
Battery is not fully charged.

Note

Note

Note