
Be sure to read this Operation Guide
before using the network camera.
Mobile Camera Viewer
Operation Guide
How to Read This Manual
This manual contains instructions on Mobile Camera
Viewer operations.
For details on camera settings, camera precautions
and limitations, refer to the camera Operation Guide.
Available functions will differ depending on the
camera. Some operations will not be available on
unsupported cameras even when functions are
mentioned in this manual.
The following icons are used to represent tap
gestures in this manual.
The screen images used in this manual are samples used for
explanation purposes. They may differ from the actual
screens that are displayed.
Screens from iOS are used as an example.
Tap Touch and hold
ENGLISH

2
Table of Contents
About Mobile Camera Viewer ......................3
Operating Environment .......................................3
Trademarks.........................................................3
Connecting to the Camera ...........................4
Main Screen...................................................7
Operating the Camera ..................................9
Operations in the Video Display Area .................9
Magnify and Display Part of Video
(Viewer PTZ)................................................ 12
Main Screen Control Panel ...............................13
(1) Preset button ............................................... 15
(2) Home Position button ..................................15
(3) Recording Started/Stopped button ..............16
(4) PTZ Control button ...................................... 17
(5) Control/Release button................................19
(6) Disconnect button........................................19
(7) Settings button............................................. 20
(8) Control for Admin button..............................24
(9) Snapshot button...........................................28
Troubleshooting..........................................30

3
About Mobile Camera
Viewer
Mobile Camera Viewer is a viewer for Canon
network cameras that runs on mobile devices
(iOS, Android).
Note that some functions may not be
available depending on your user privileges.
For details, consult the camera’s
administrator.
Operating Environment
Refer to the camera's Operation Guide.
Note
3D Touch on iOS devices is not supported.
Trademarks
O IOS is a trademark or registered
trademark of Cisco in the U.S. and other
countries and is used under license.
O 3D Touch is a trademark of Apple Inc.
O Android is a trademark of Google LLC.
4
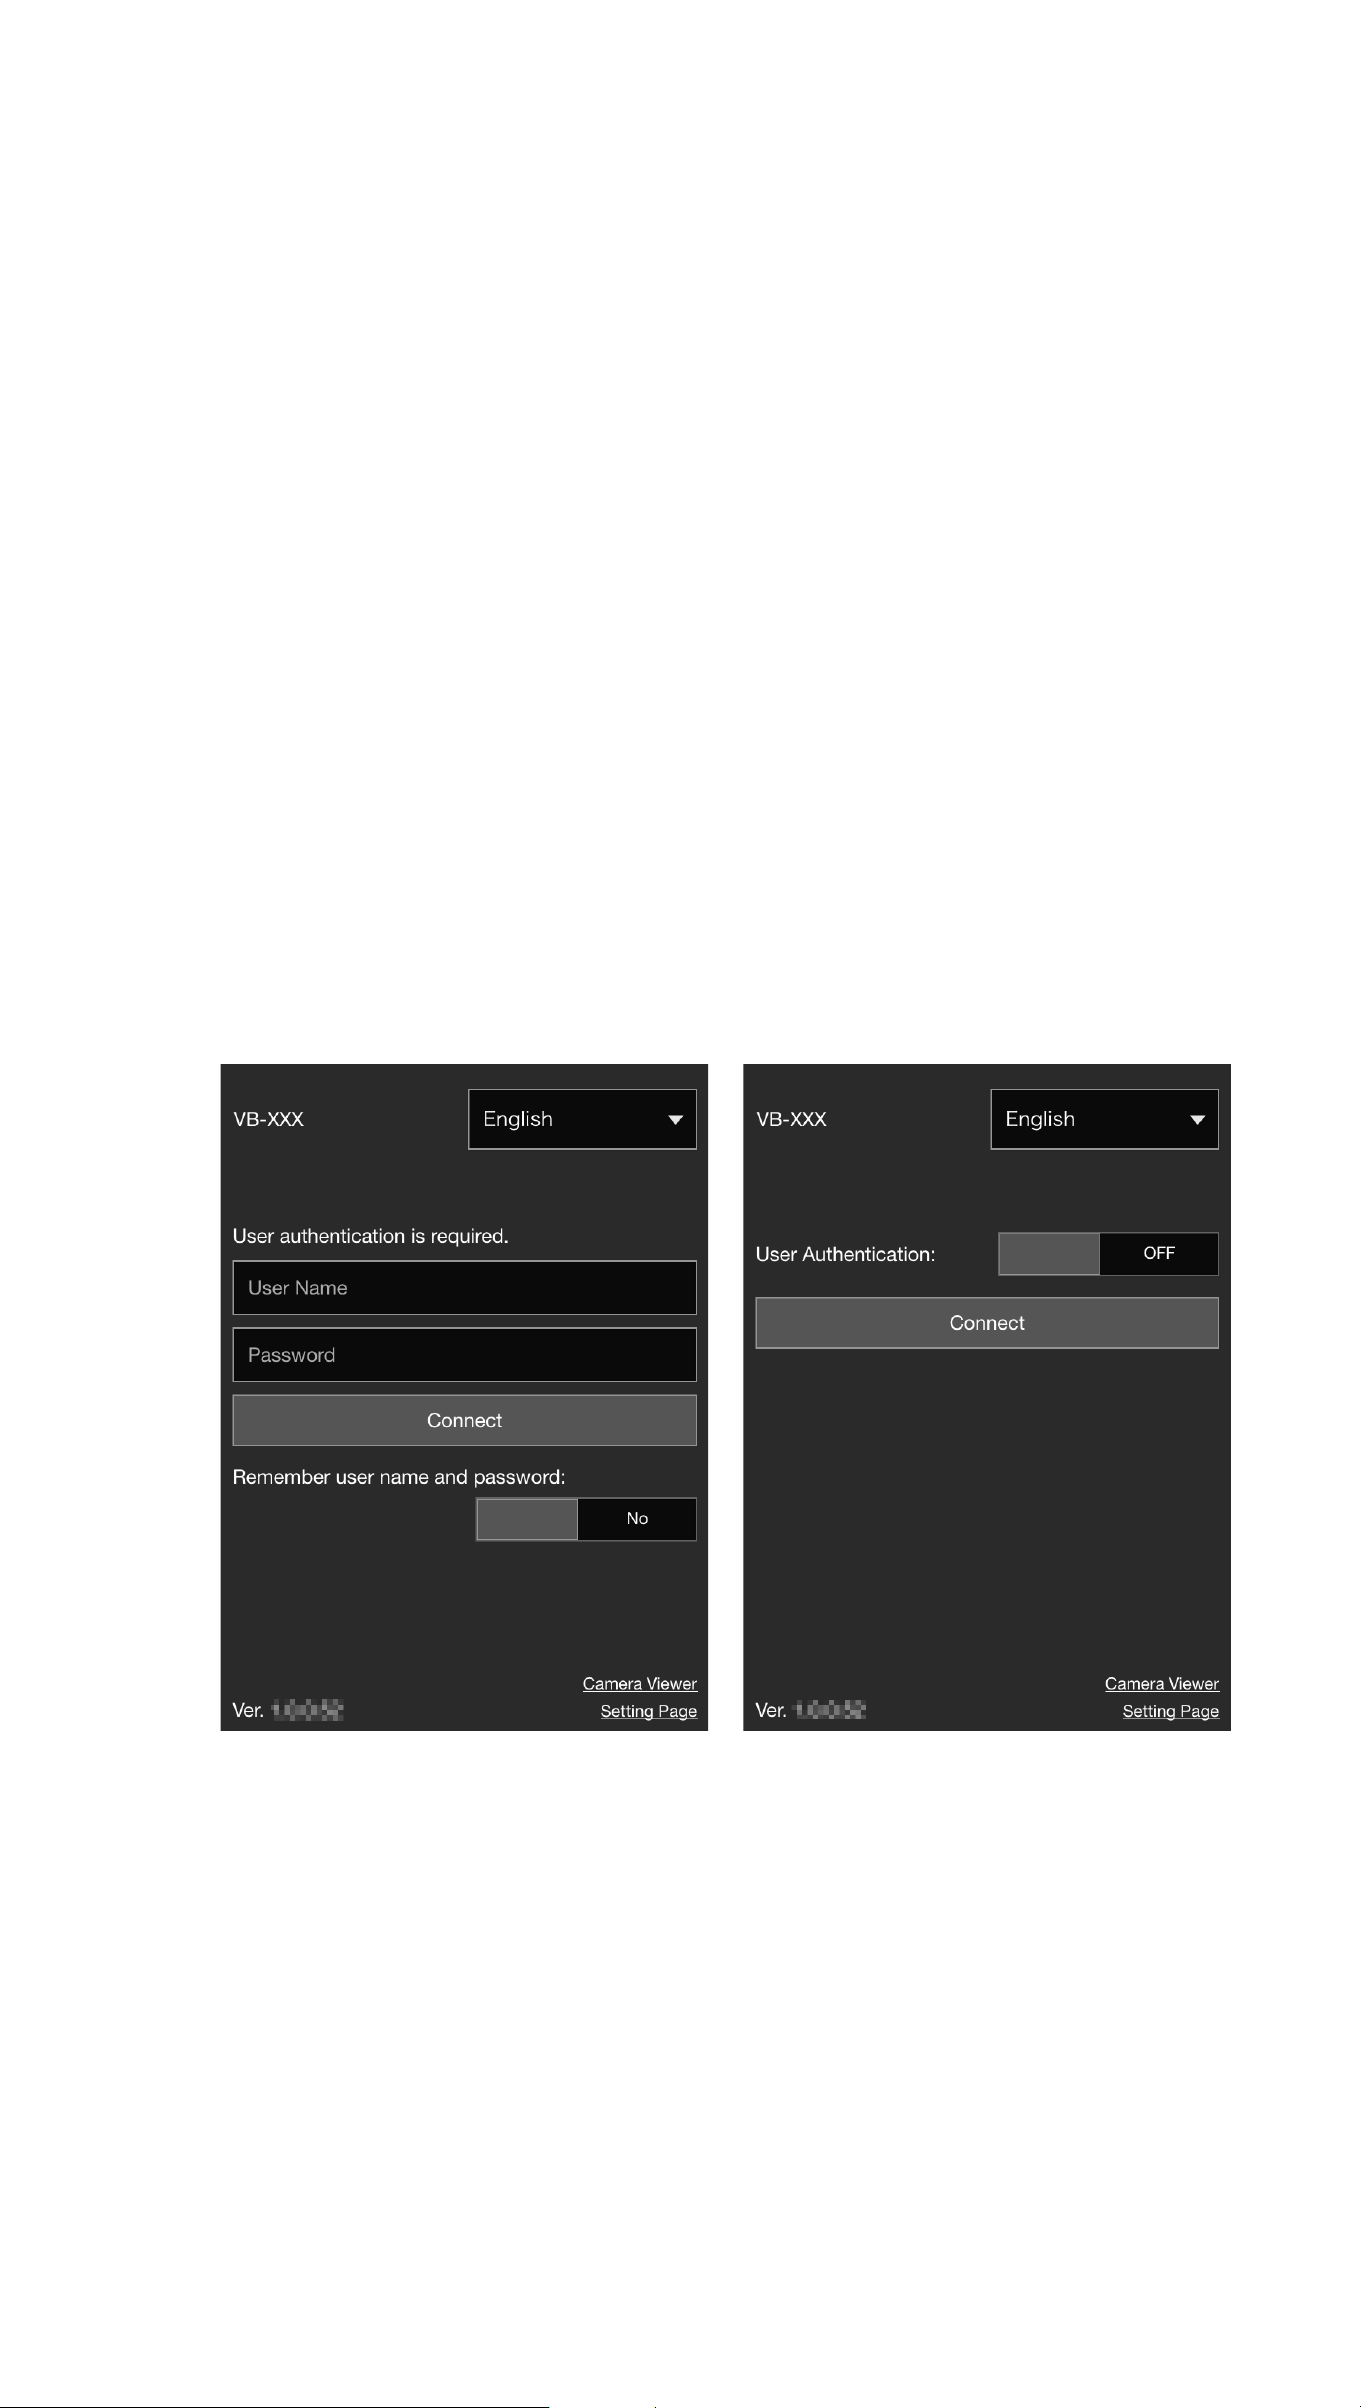
Connecting to the Camera
Use the device’s web browser to connect to
the camera and launch Mobile Camera
Viewer.
1 Launch browser and enter the
camera’s IP address.
One of the following screens appears.
To log into an account that requires user
authentication (left screen), enter the
user name and password.

5
Note
O The following authentication dialog box
appears when [Default Page] is set to [Display
Settings Page] in the viewer settings of the
camera's Settings page. Consult the camera’s
administrator and verify whether [Default
Page] is set to [Display Viewer].
O
Even if the screen on the right of the previous
page appears, you can connect as an account
that requires user authentication by setting
[User Authentication] to [ON] and entering the
user name and password.
O
Set [Remember user name and password] to
[Yes] to remember the user name and password.
O When you tap [Camera Viewer], the camera
viewer appears. When you tap [Settings
Page], the camera setting page appears.
2 Tap [Connect].
The main screen will appear.
Note
O To disconnect from the camera, tap the
Disconnect button (P.19).

6
O If you open another window or tab to access
the camera while an authenticated web page
is displayed, the authentication information
of the displayed web page may be discarded.
In this case, enter the authentication
information again.

8
Note
The Mobile Camera Viewer’s video cannot
rotate even when [Rotate Video Display] is set
to [Rotate clockwise 90 degrees] or [Rotate
counterclockwise 90 degrees] in the viewer
settings of the camera's Settings page. If you
want to display video in portrait orientation,
turn off your mobile device’s auto rotate
function, and then rotate your device.
9
Operating the Camera
Camera control privileges are required to
operate the camera.
You have camera control privileges when
[Release] is displayed.
When [Control] is displayed, tap it to
obtain camera control privileges.
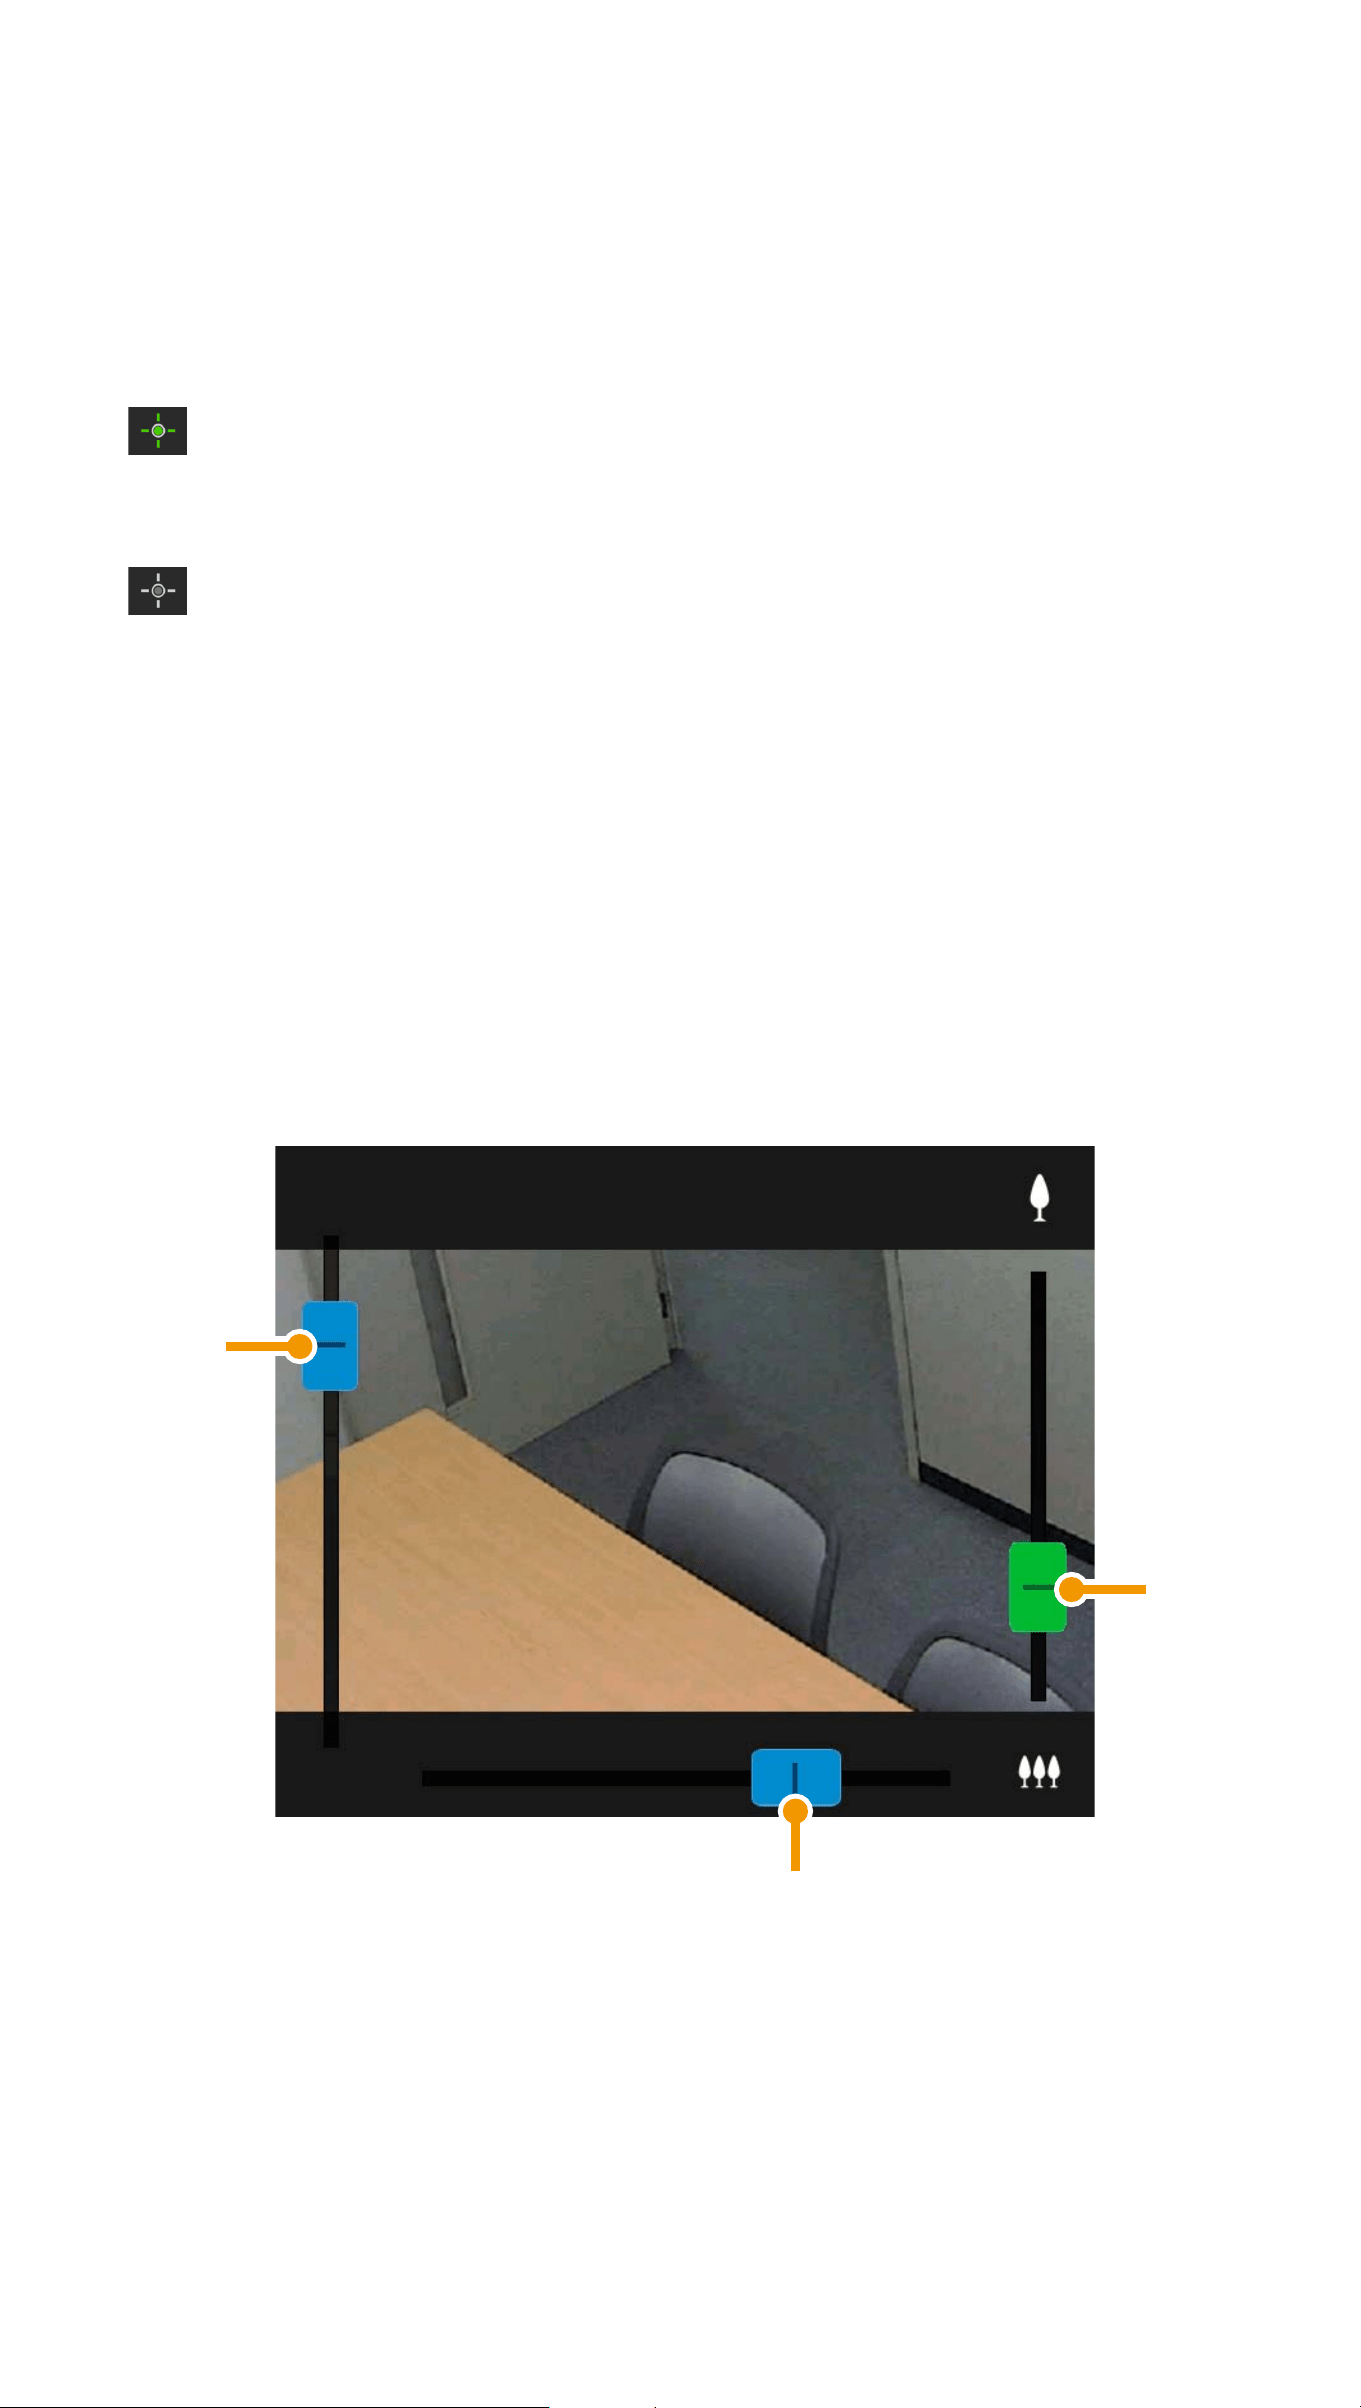
Operations in the Video Display
Area
OScroll Bar Controls
(1) Scroll bar for tilt
(2) Scroll bar for pan
(3) Scroll bar for zoom
(2)
(1)
(3)
10
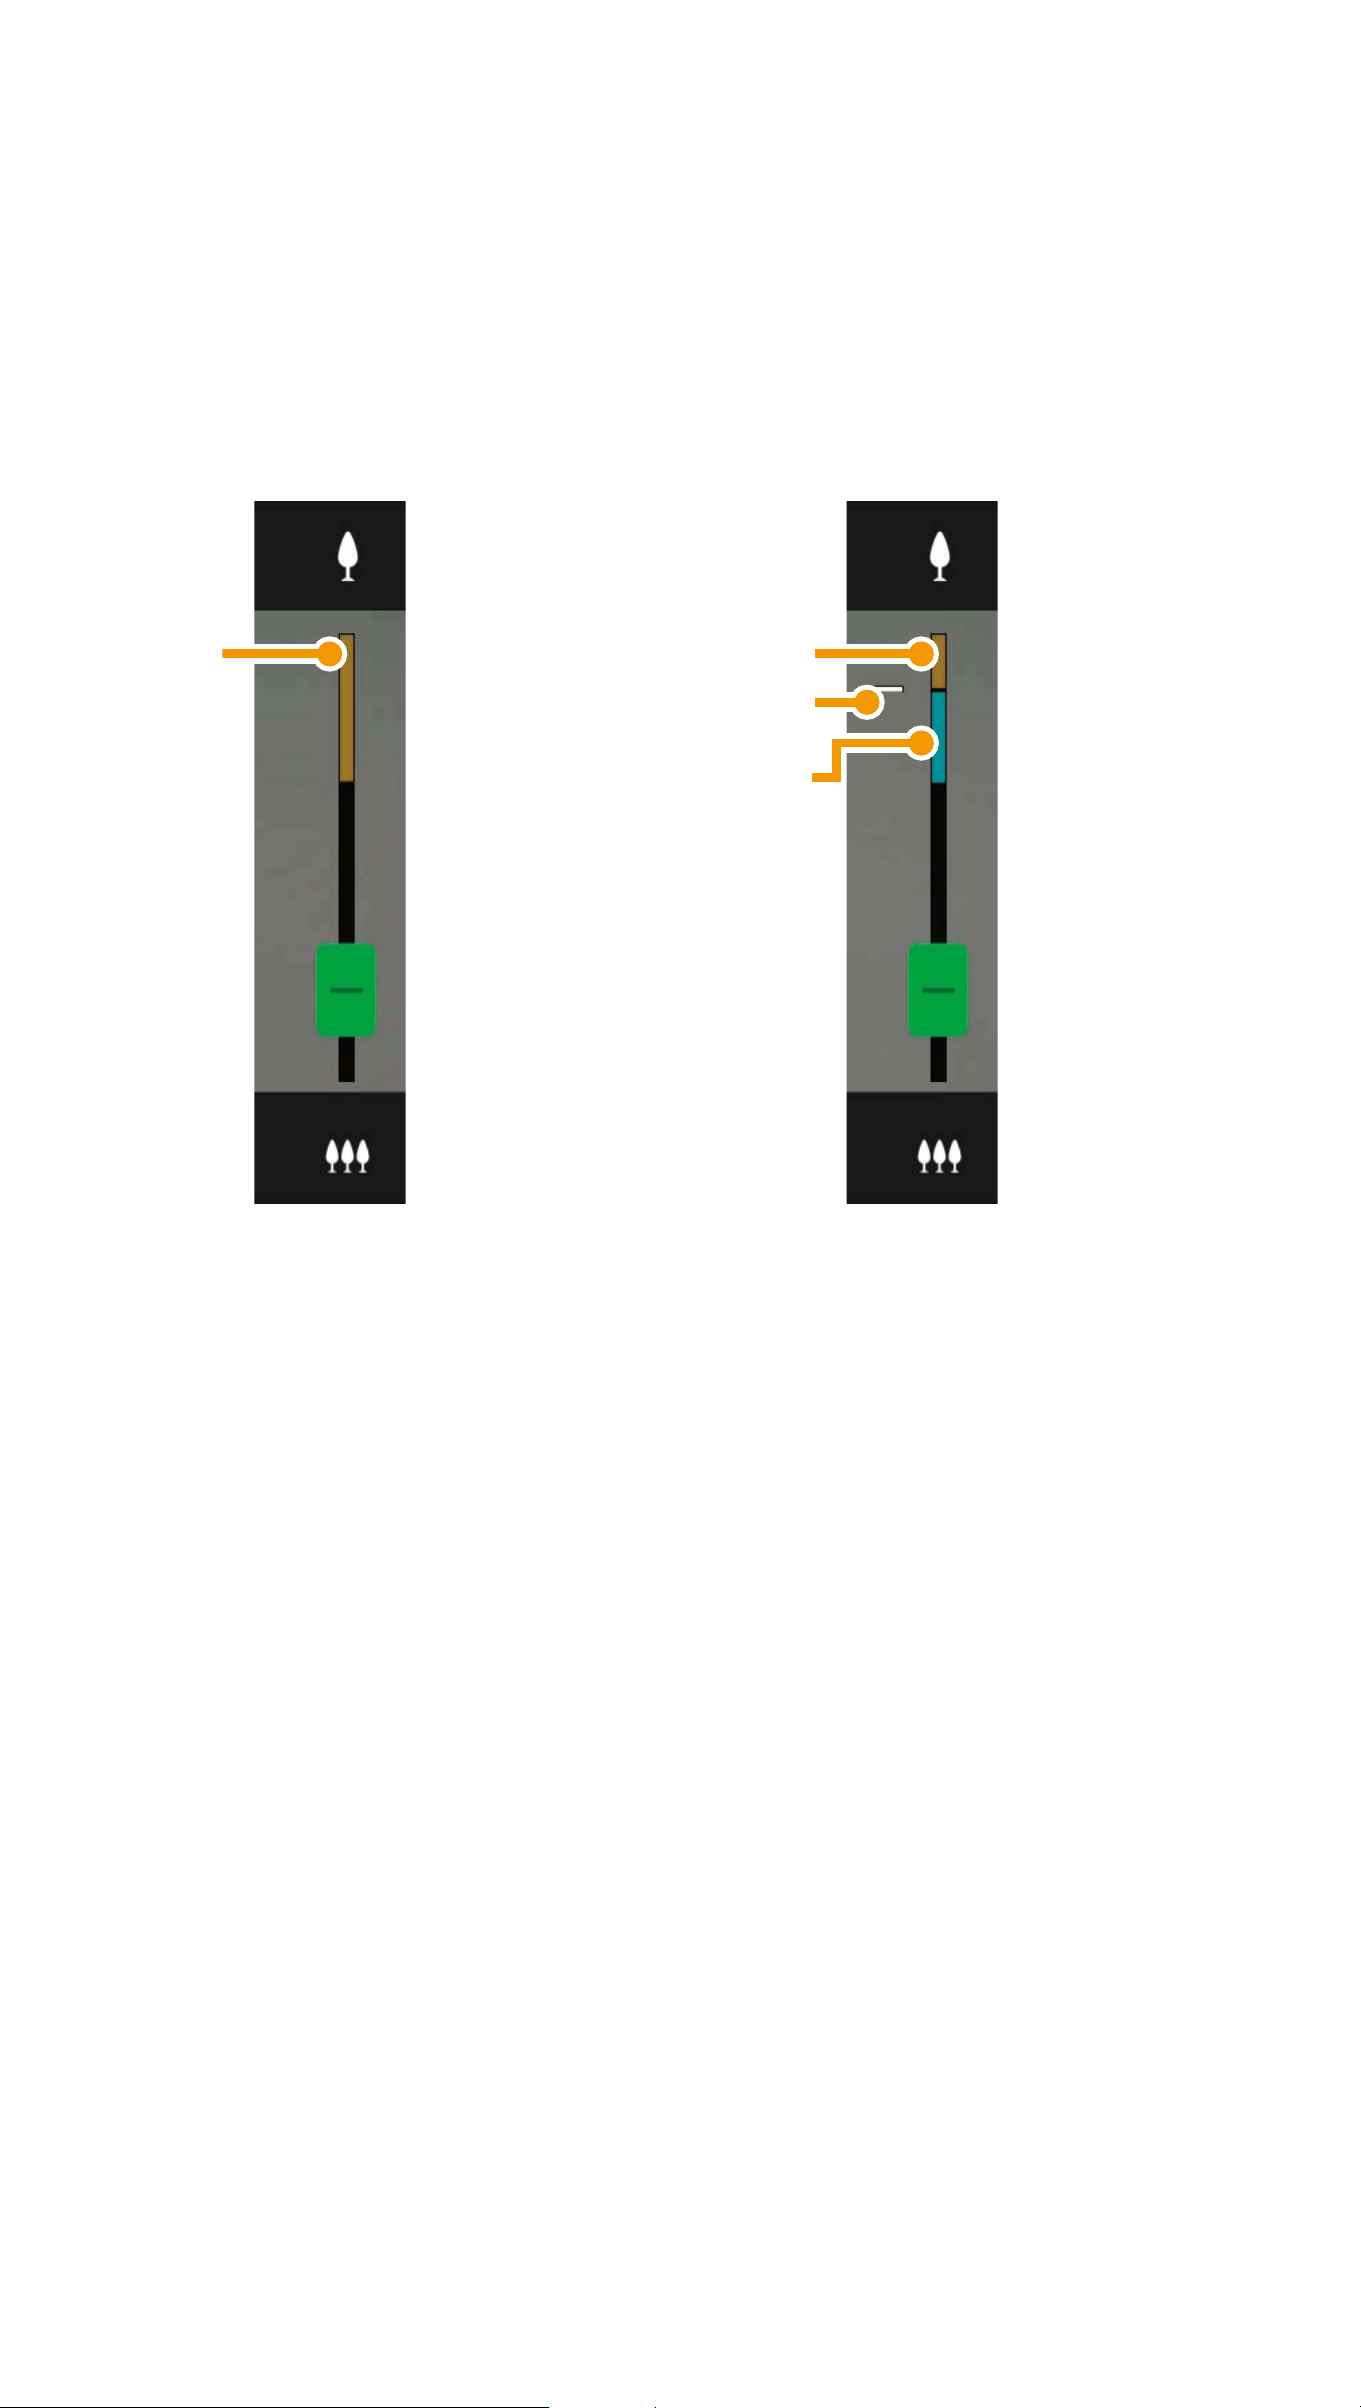
Digital Zoom
When a digital zoom range is available, the
scroll bar for zooming will appear as follows.
(i) Digital zoom range
The higher the zoom ratio, the lower the
video quality becomes.
(ii) Position where zooming pauses
(iii) Enhanced digital zoom range
OScreen Tap Operations
When you tap the video display area, the
camera will move so that the location that
was tapped is centered in the screen.
Without an enhanced
digital zoom range
With an enhanced
digital zoom range
(i)
(i)
(ii)
(iii)

12
ODrag to Move
In the video display area, swipe in the
direction you would like to change the
camera angle. An arrow will appear and the
camera angle will change in the direction of
the arrow.
Increasing the length of the arrow will
increase the movement speed.
Note
This function is not available while using
Viewer PTZ (P.12).
Magnify and Display Part of Video
(Viewer PTZ)
O Double-tapping the video display area will
magnify the video approximately 3x.
O In the video display area, pinch-out/pinch-
in to zoom in/zoom out video.
O Dragging on the screen when zoomed in,
moves the display position.
13
O Double-tapping while viewing magnified
video cancels magnified display.
O will appear in the upper part of the
video display area while viewing magnified
video.
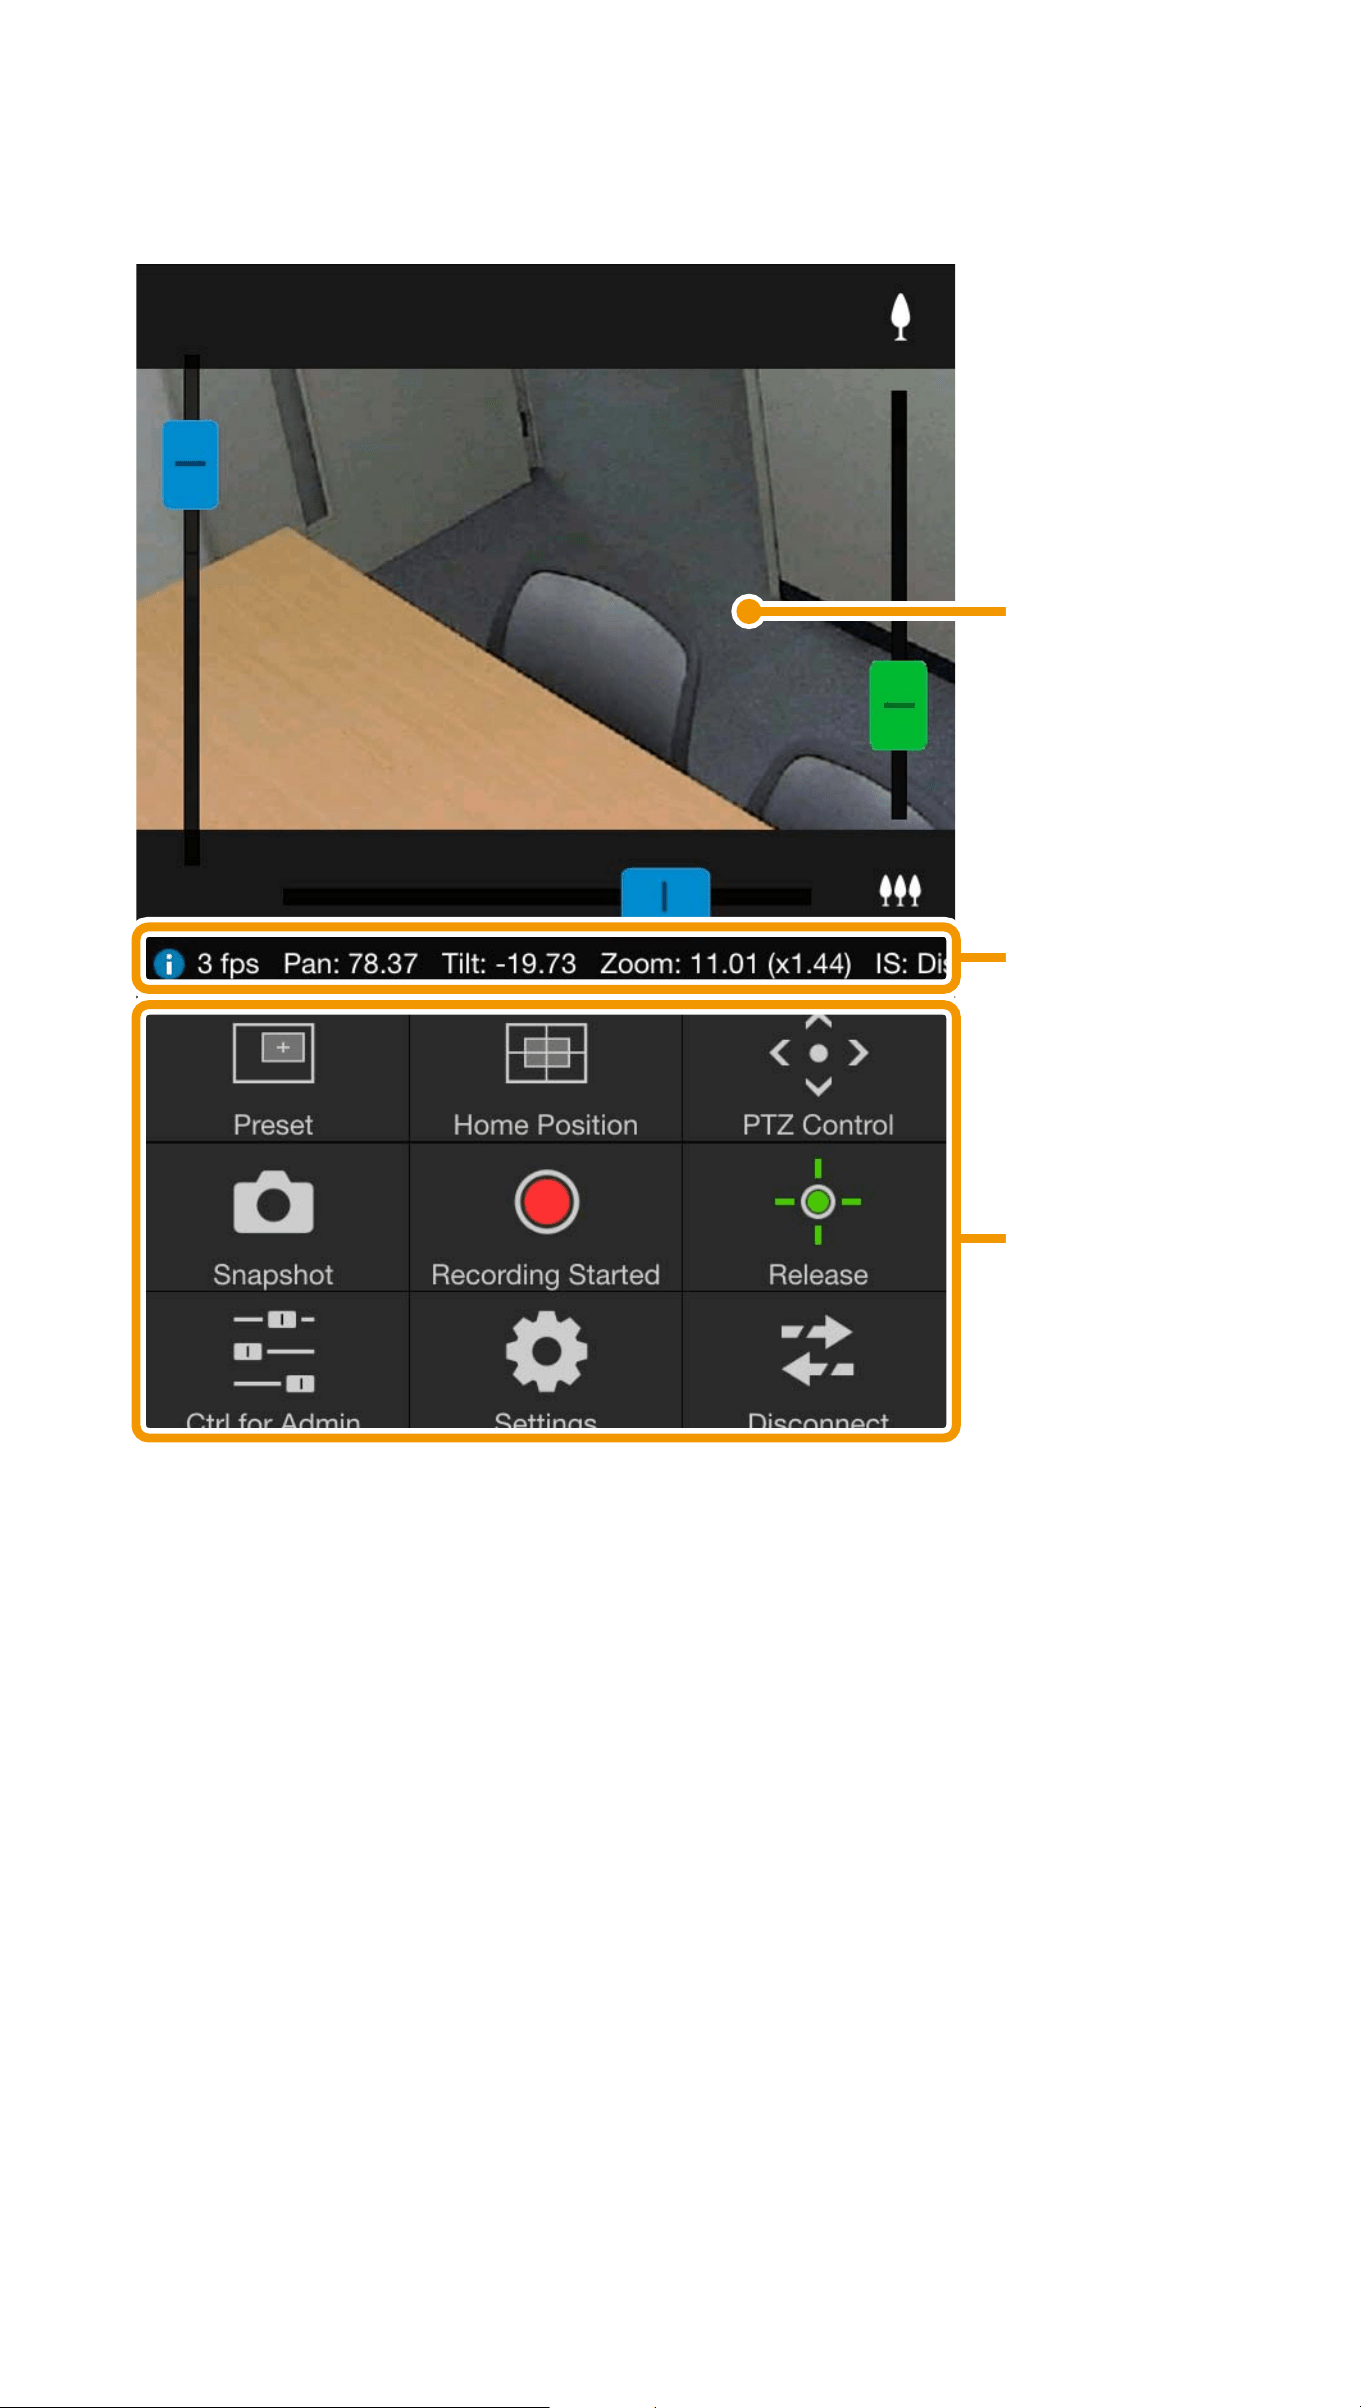
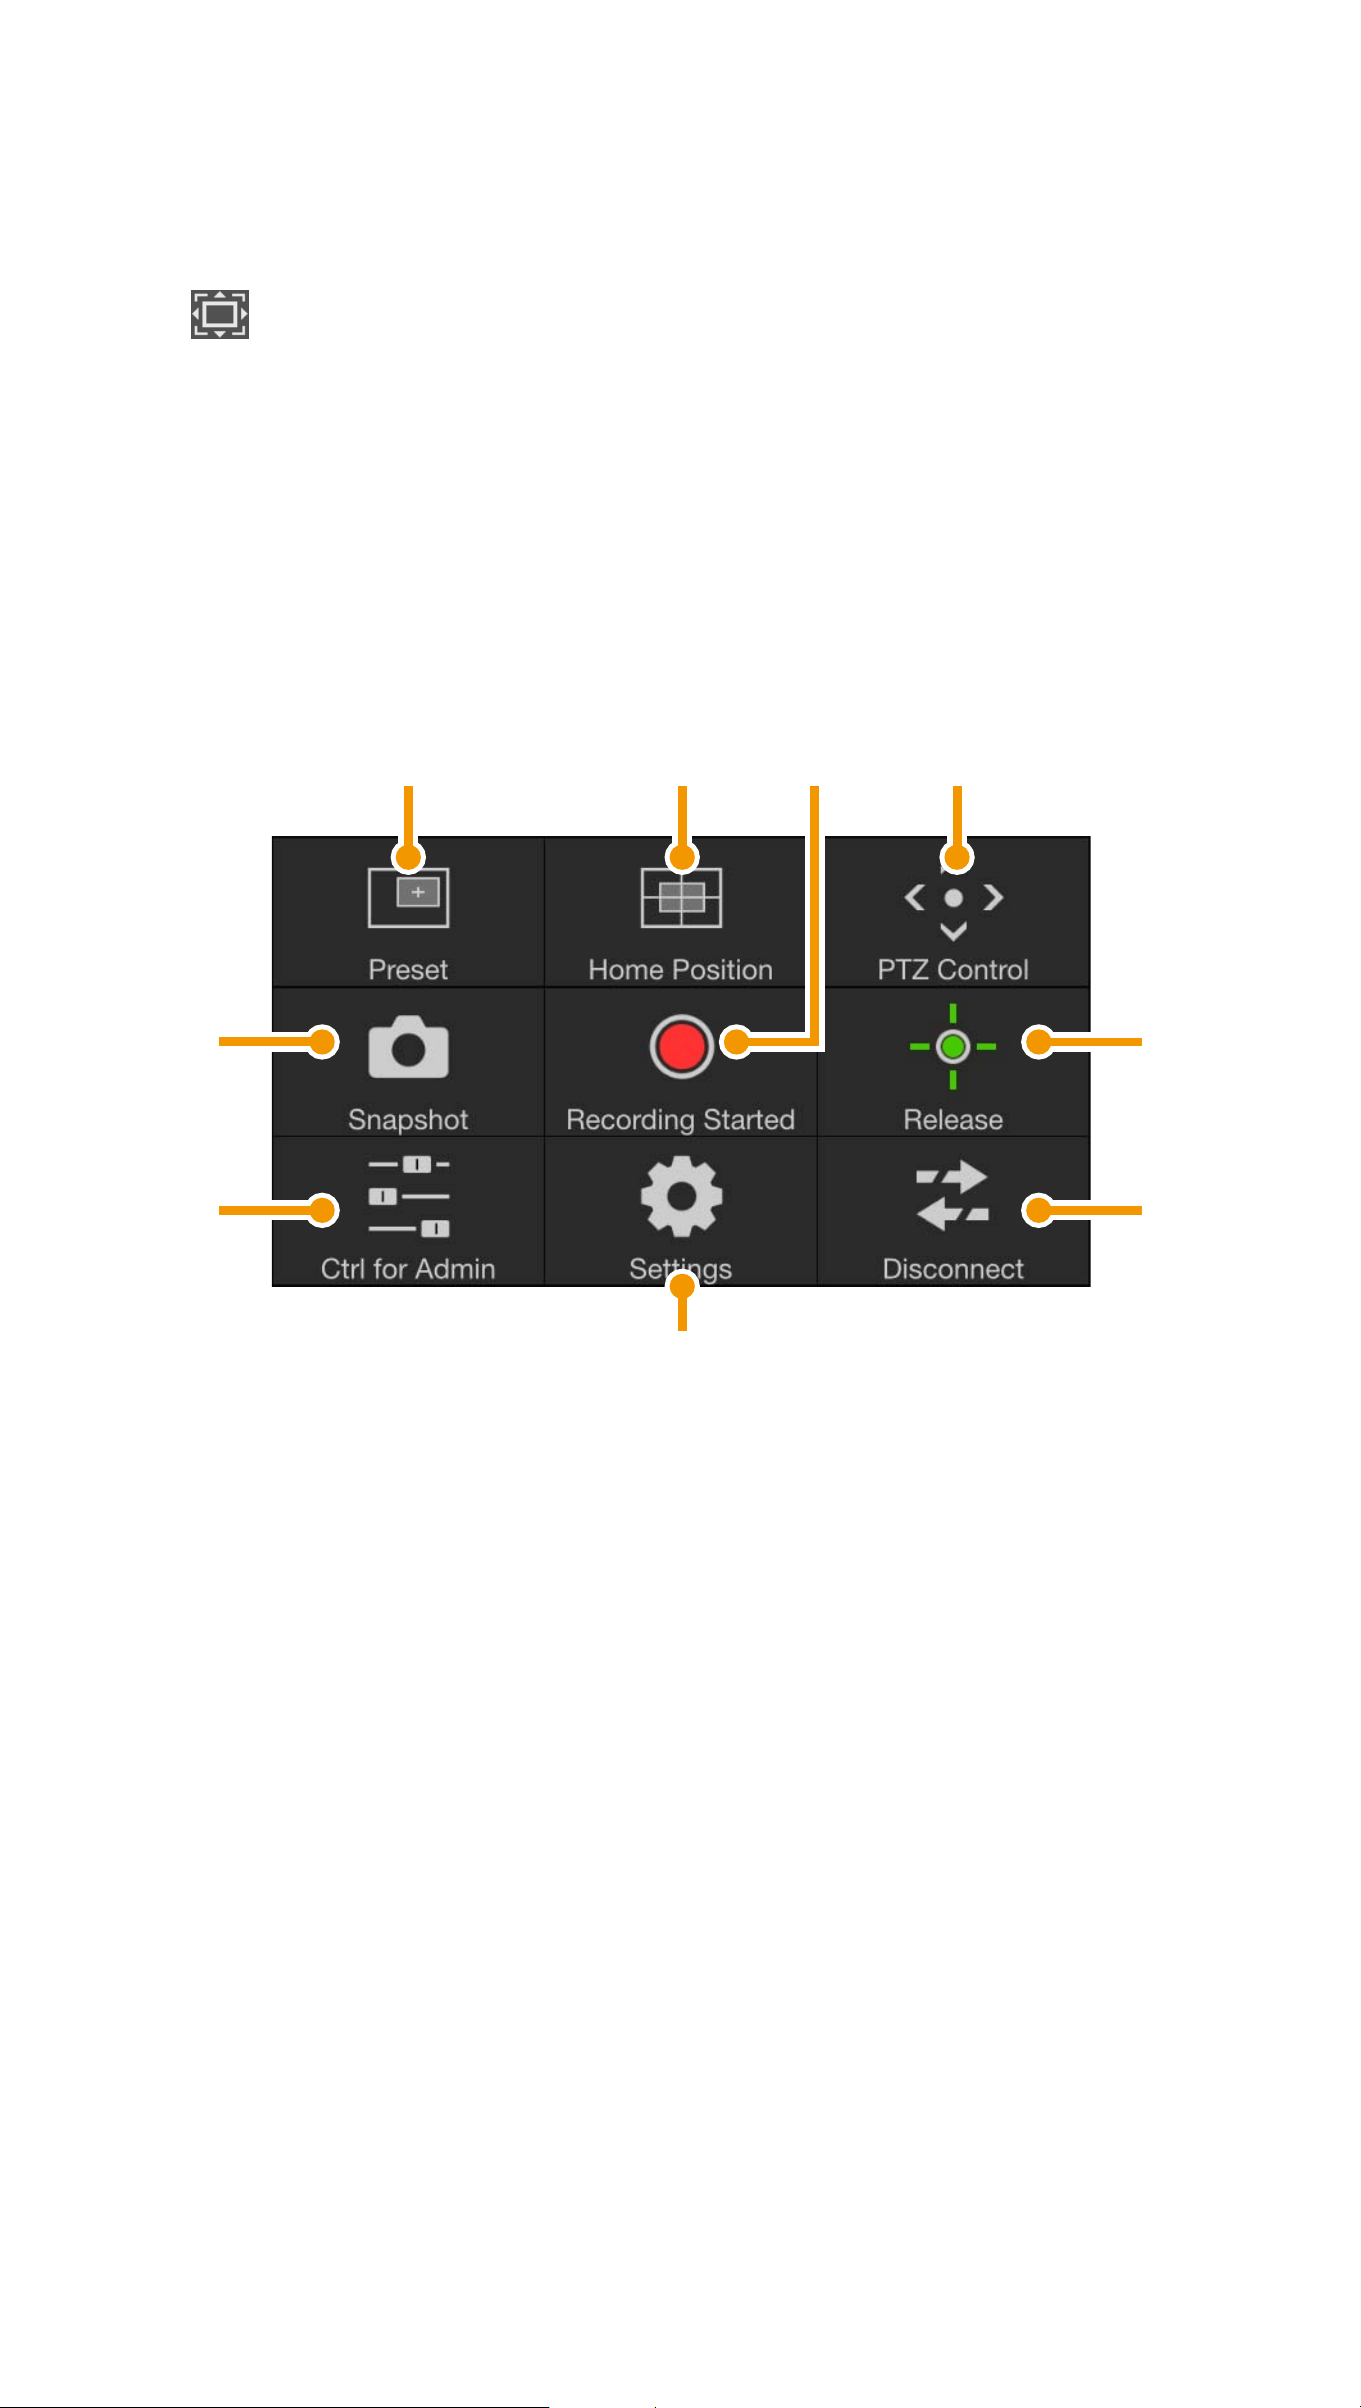
Main Screen Control Panel
(1) Preset button (P.15)
Camera settings, such as the camera
angle or exposure, are changed to
presets registered in advance.
(2) Home Position button (P.15)
Camera settings, such as the camera
angle or exposure, are returned to the
home position registered in advance.
(9)
(8)
(2) (3)
(7)
(5)
(6)
(1) (4)

14
(3) Recording Started/Stopped button
(P.16)
Starts or stops recording.
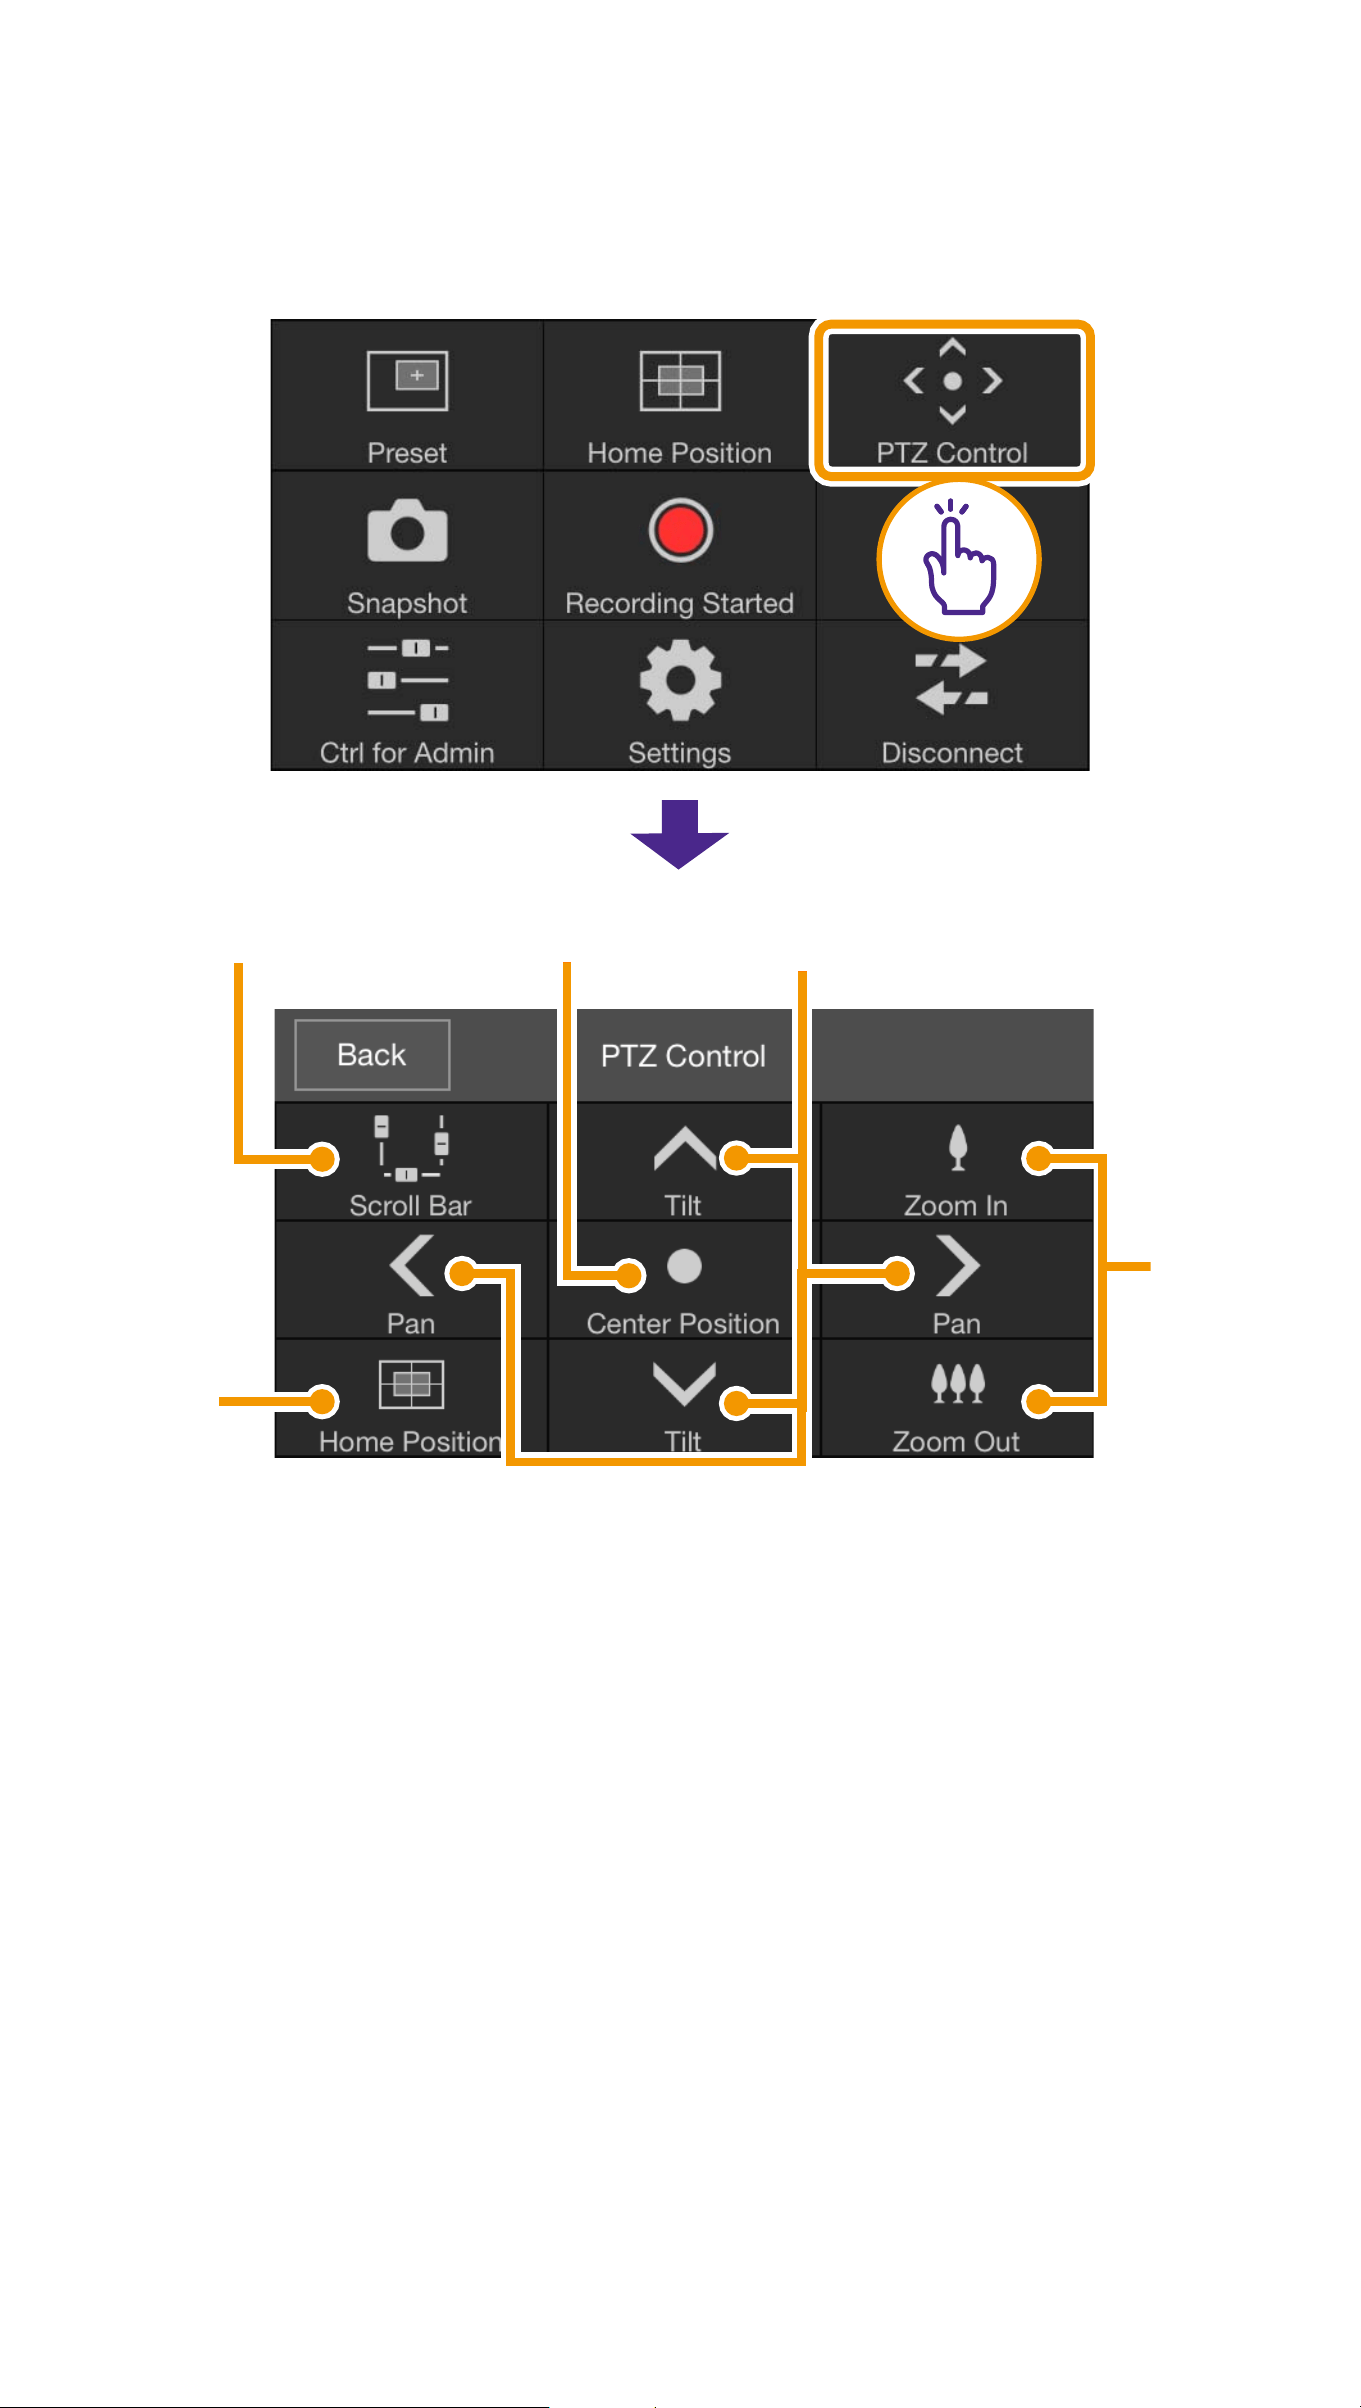
(4) PTZ Control button (P.17)
Displays the PTZ Control panel.
(5) Control/Release button (P.19)
Enables or disables camera control
privileges.
(6) Disconnect button (P.19)
Disconnects from the camera.
(7) Settings button (P.20)
Allows you to configure preset, video
capture size, and maximum frame rate
settings.
(8) Control for Admin button (P.24)
Allows you to configure focus, exposure,
Clear IR Mode, day/night, and external
device output settings.
(9) Snapshot button (P.28)
Captures a snapshot.
Note
Some functions may not be available depending
on your user privileges.
15
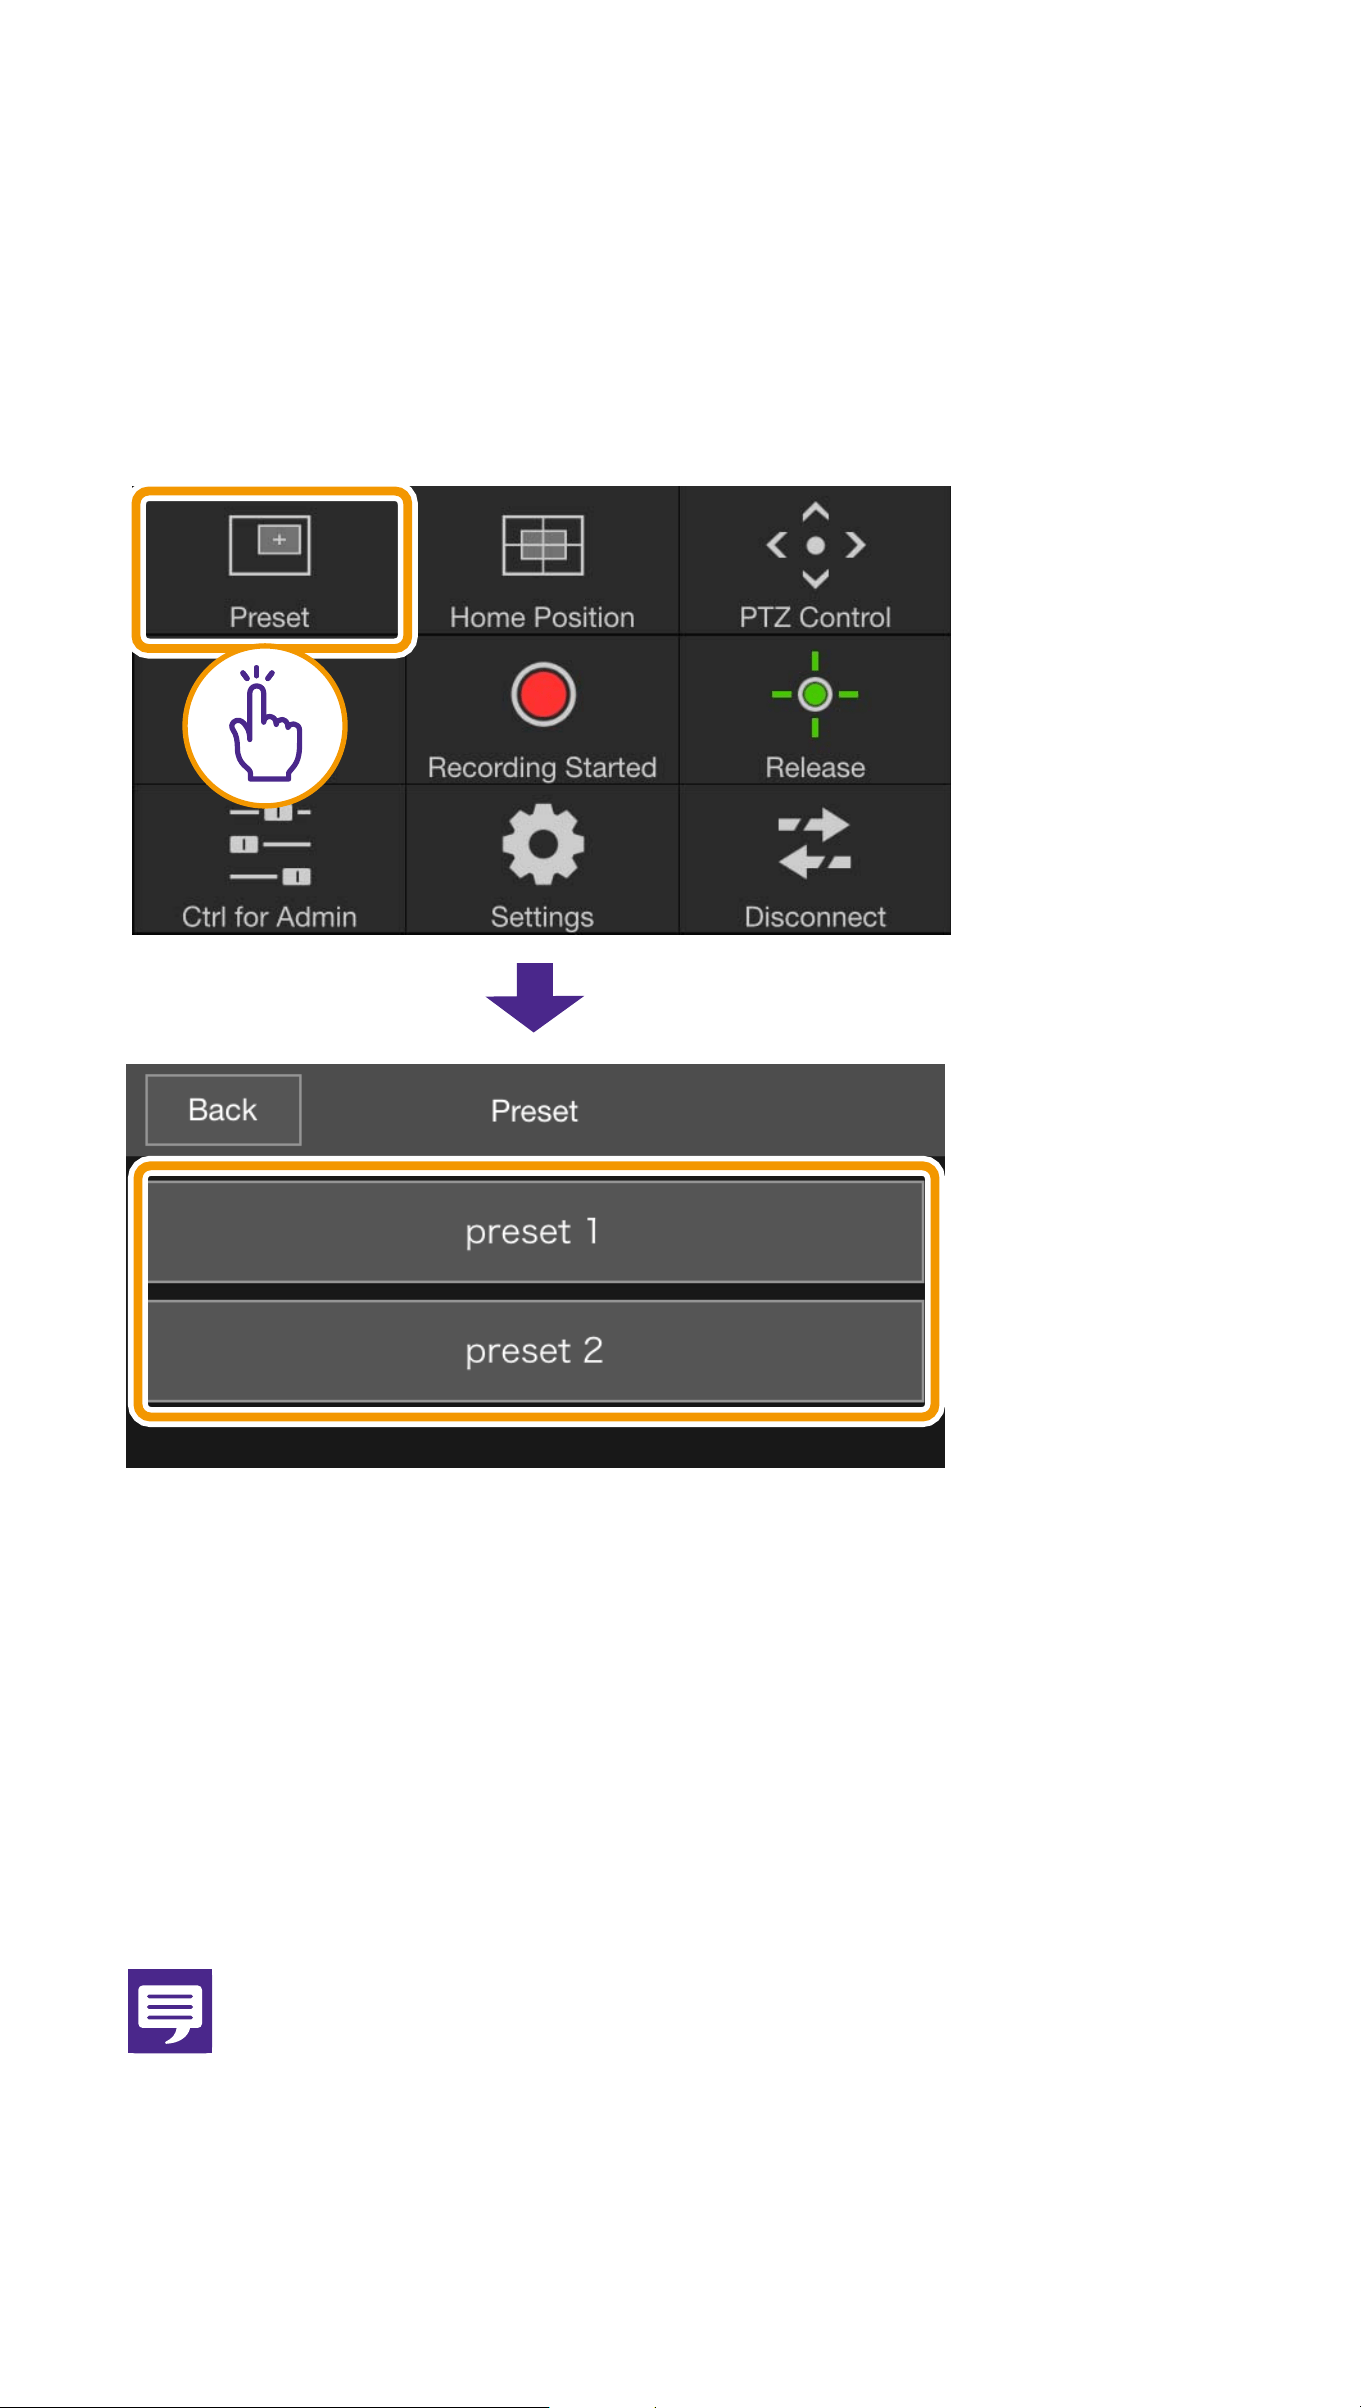
(1) Preset button
Camera settings, such as the camera angle
or exposure, are changed to presets
registered in advance.
(2) Home Position button
Camera settings, such as the camera angle
or exposure, are returned to the home
position registered in advance.
Note
Register the preset or home position
beforehand using [Register Preset] (P.21).
16
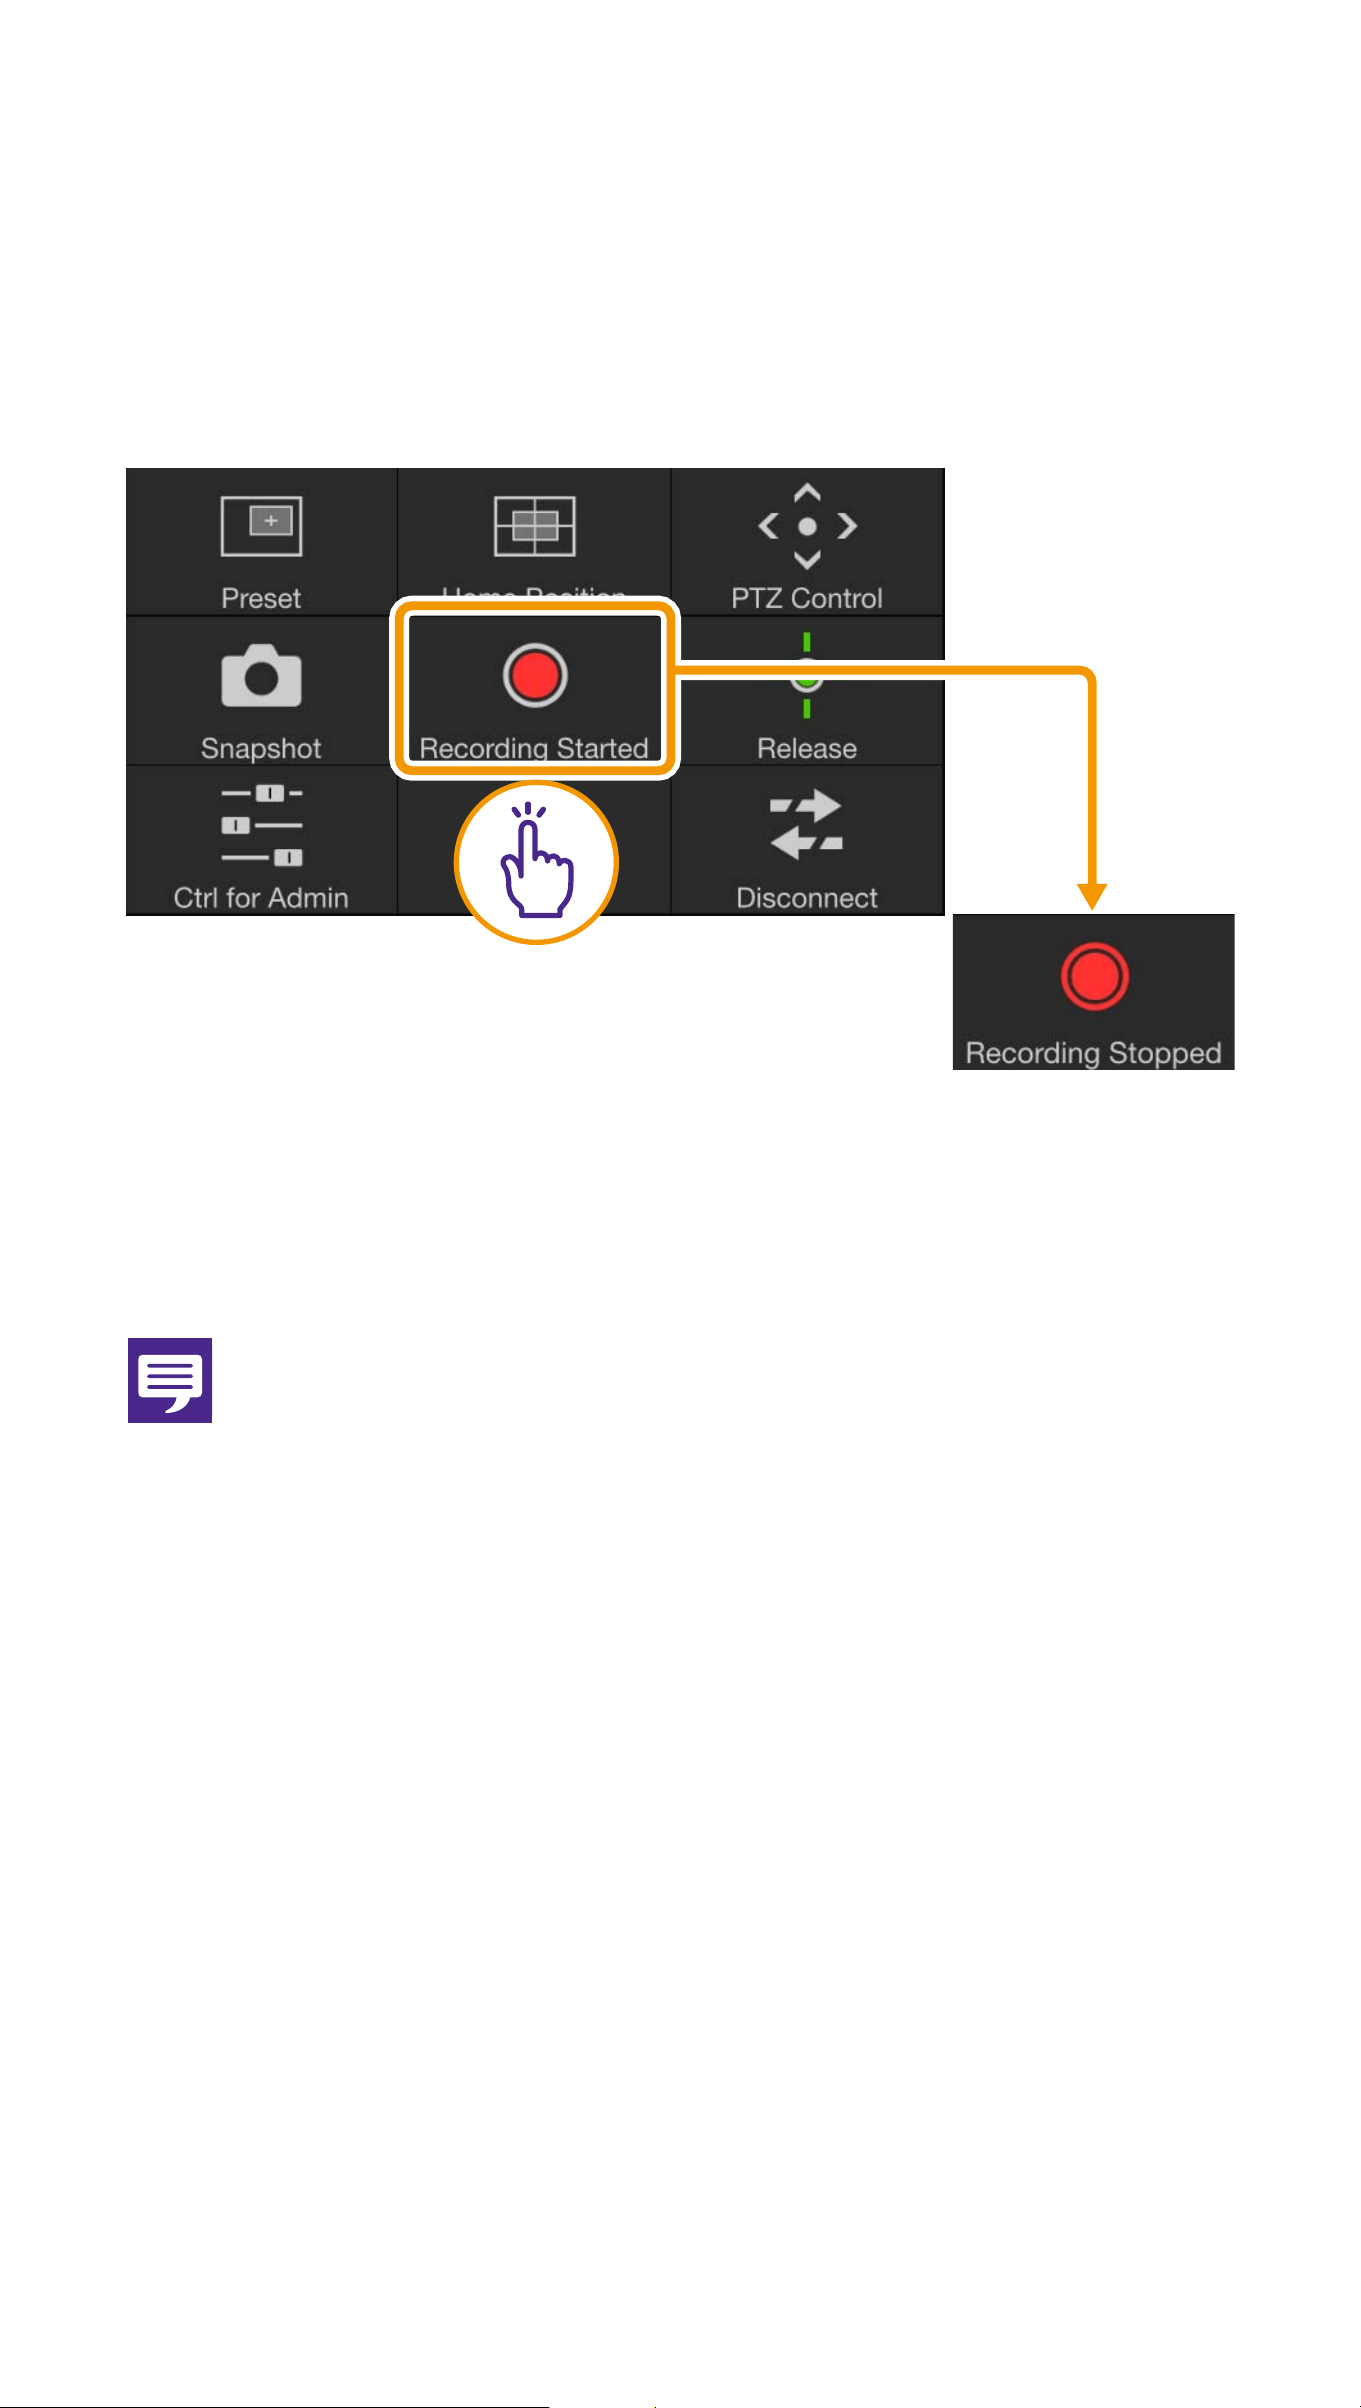
(3) Recording Started/Stopped
button
Tap the button to start recording to the
memory card. Tap again to stop recording.
Note
O When there is 20 MB or less available space
on a memory card, a message appears and
recording stops.
O The recorded video cannot be viewed in
Mobile Camera Viewer. To view the video, use
the Recorded Video Utility.
Displayed
when
recording

18
(iii) Pan/Tilt control button
Touch and hold to pan in that
direction. Release your finger to stop.
Touch and hold to tilt in that
direction. Release your finger to stop.
(iv) Zoom control button
Touch and hold to zoom in
(telephoto), and touch and hold to
zoom out (wide angle). Release your
finger to stop.
(v) Home Position button
Moves to the position set as the Home
Position (P.21).
Note
The Pan/Tilt and Zoom control buttons cannot
be used when [HTTPS Connection Policy] is set
to [HTTPS] or [HTTP and HTTPS] in the SSL/
TLS settings of the camera's Settings page, and
an HTTPS connection is established. Use the
pan/tilt/zoom scroll bars that appear in the
video display area.
19
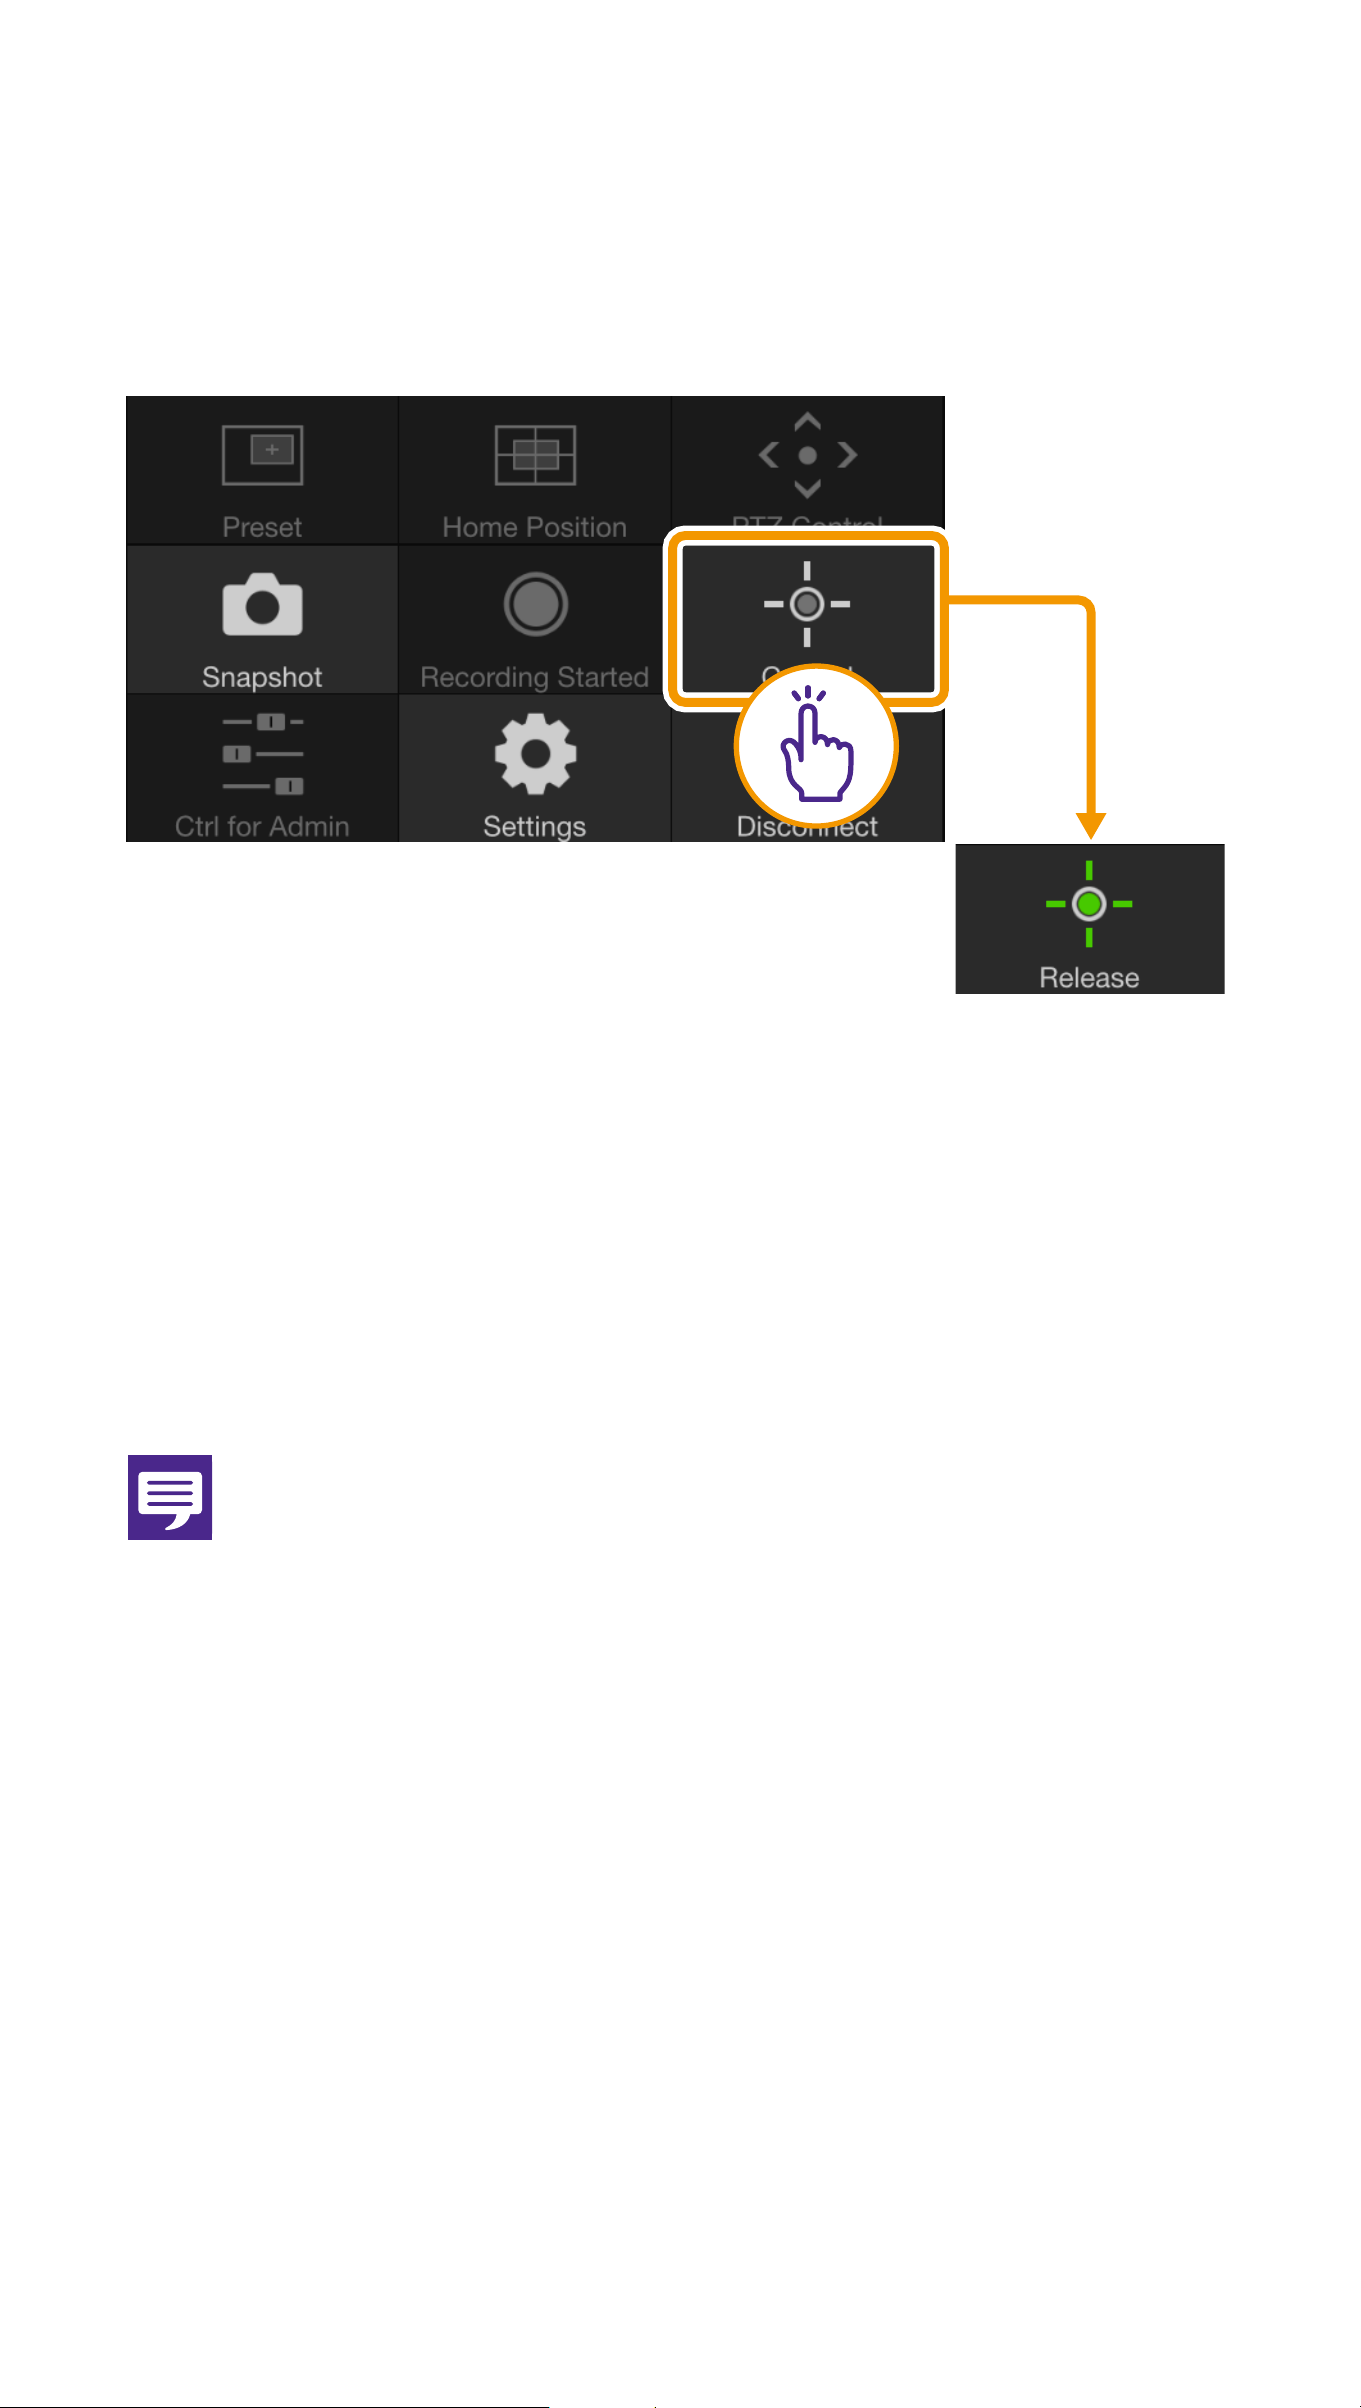
(5) Control/Release button
Tap to obtain control. Tap again to release
control.
Note
The camera cannot be controlled by multiple
users simultaneously. Only the user with
control privileges can control the camera.
(6) Disconnect button
Disconnects from the camera.
The login screen will appear when you
disconnect.
Displayed
when camera
control
privileges
have been
obtained
20
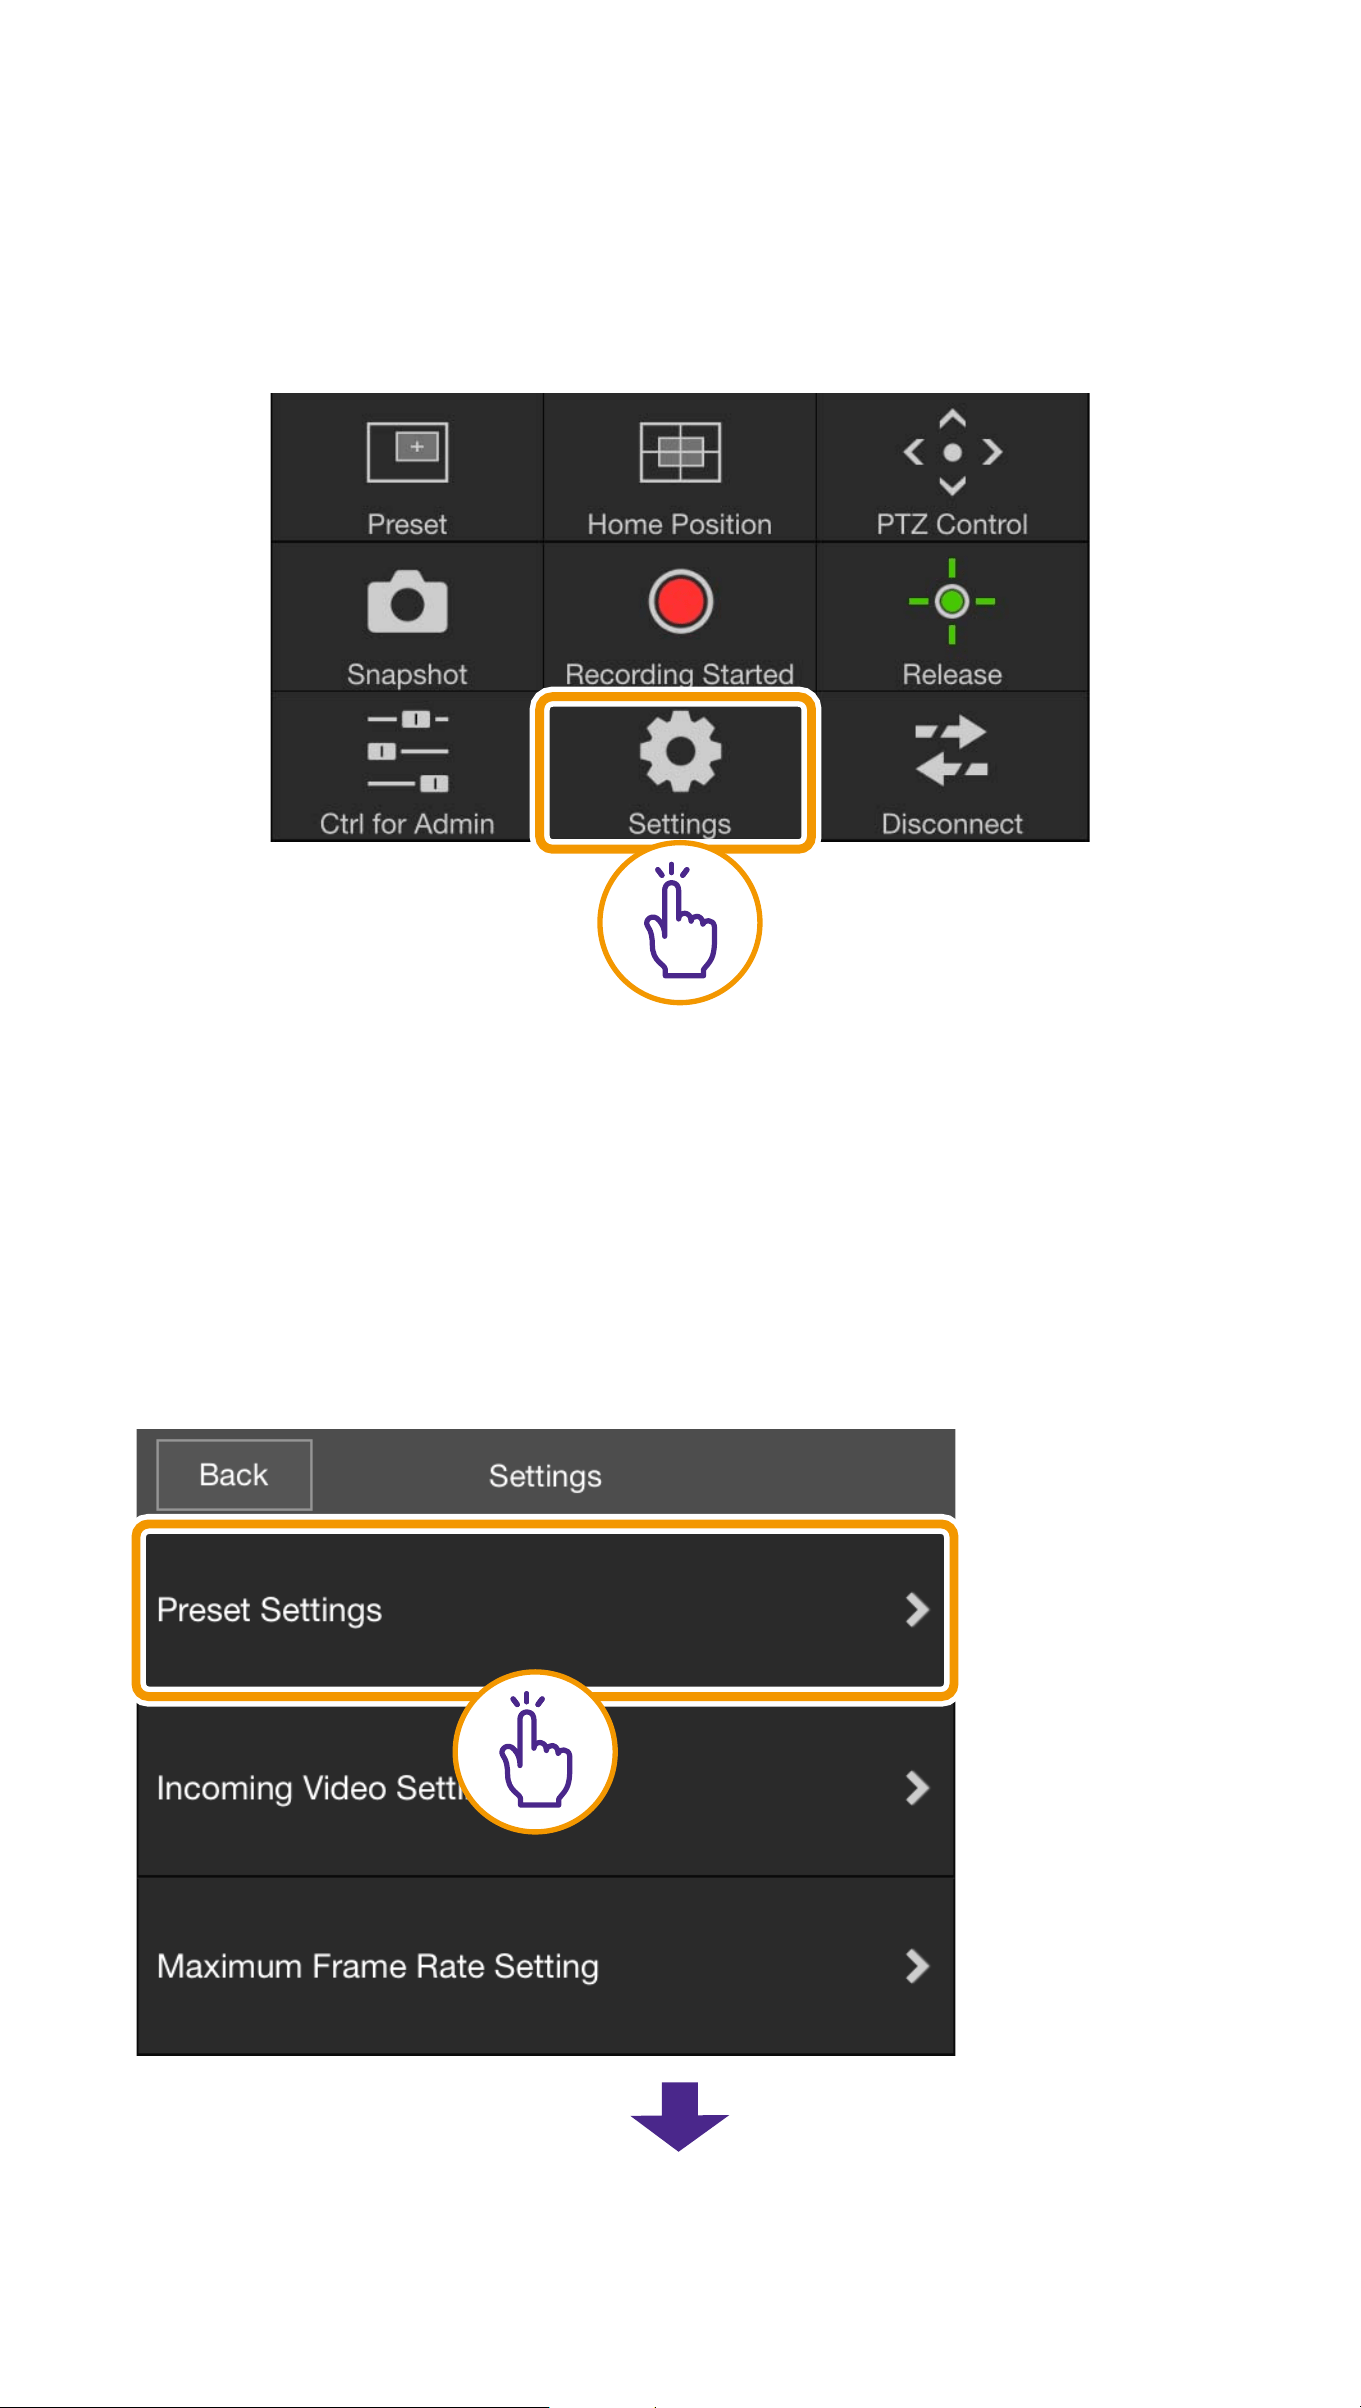
(7) Settings button
Allows you to configure preset, incoming
video size, and maximum frame rate settings.
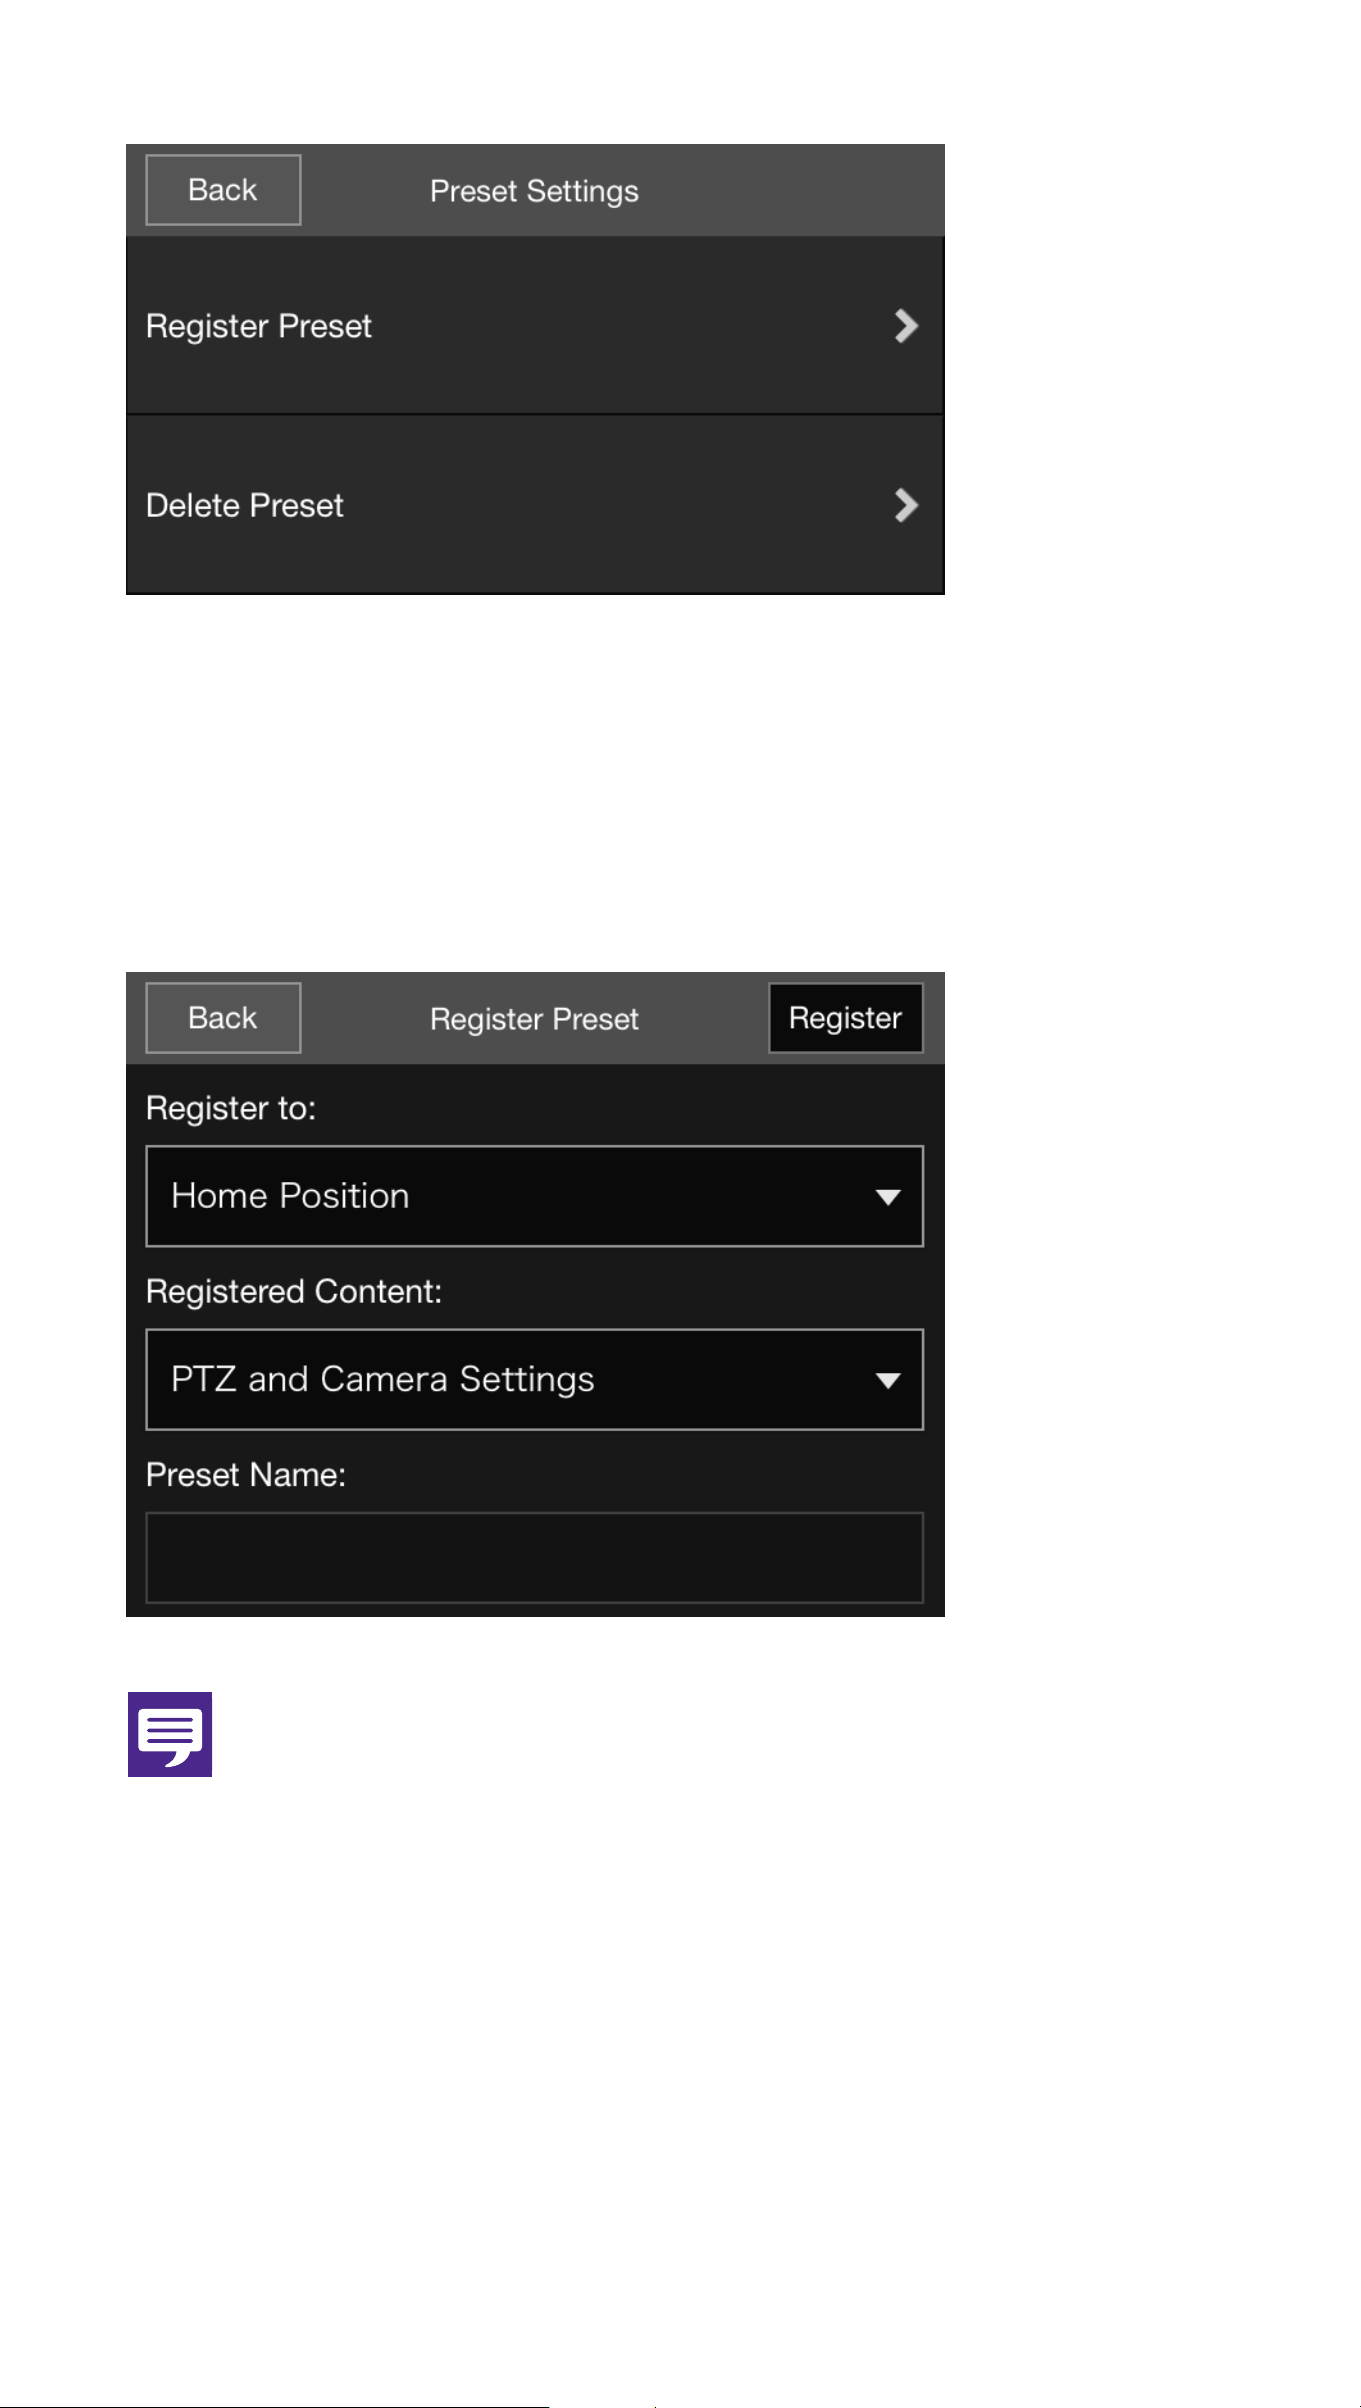
OPreset Settings
You can register current camera settings,
such as the camera angle or exposure, as
presets. Presets can also be deleted.
21
[Register Preset]
Select a preset number from [Register to],
select [Registered Content], enter a preset
name, and then tap [Register].
Note
If you select [Home Position] in [Register to],
you can set the home position.
22
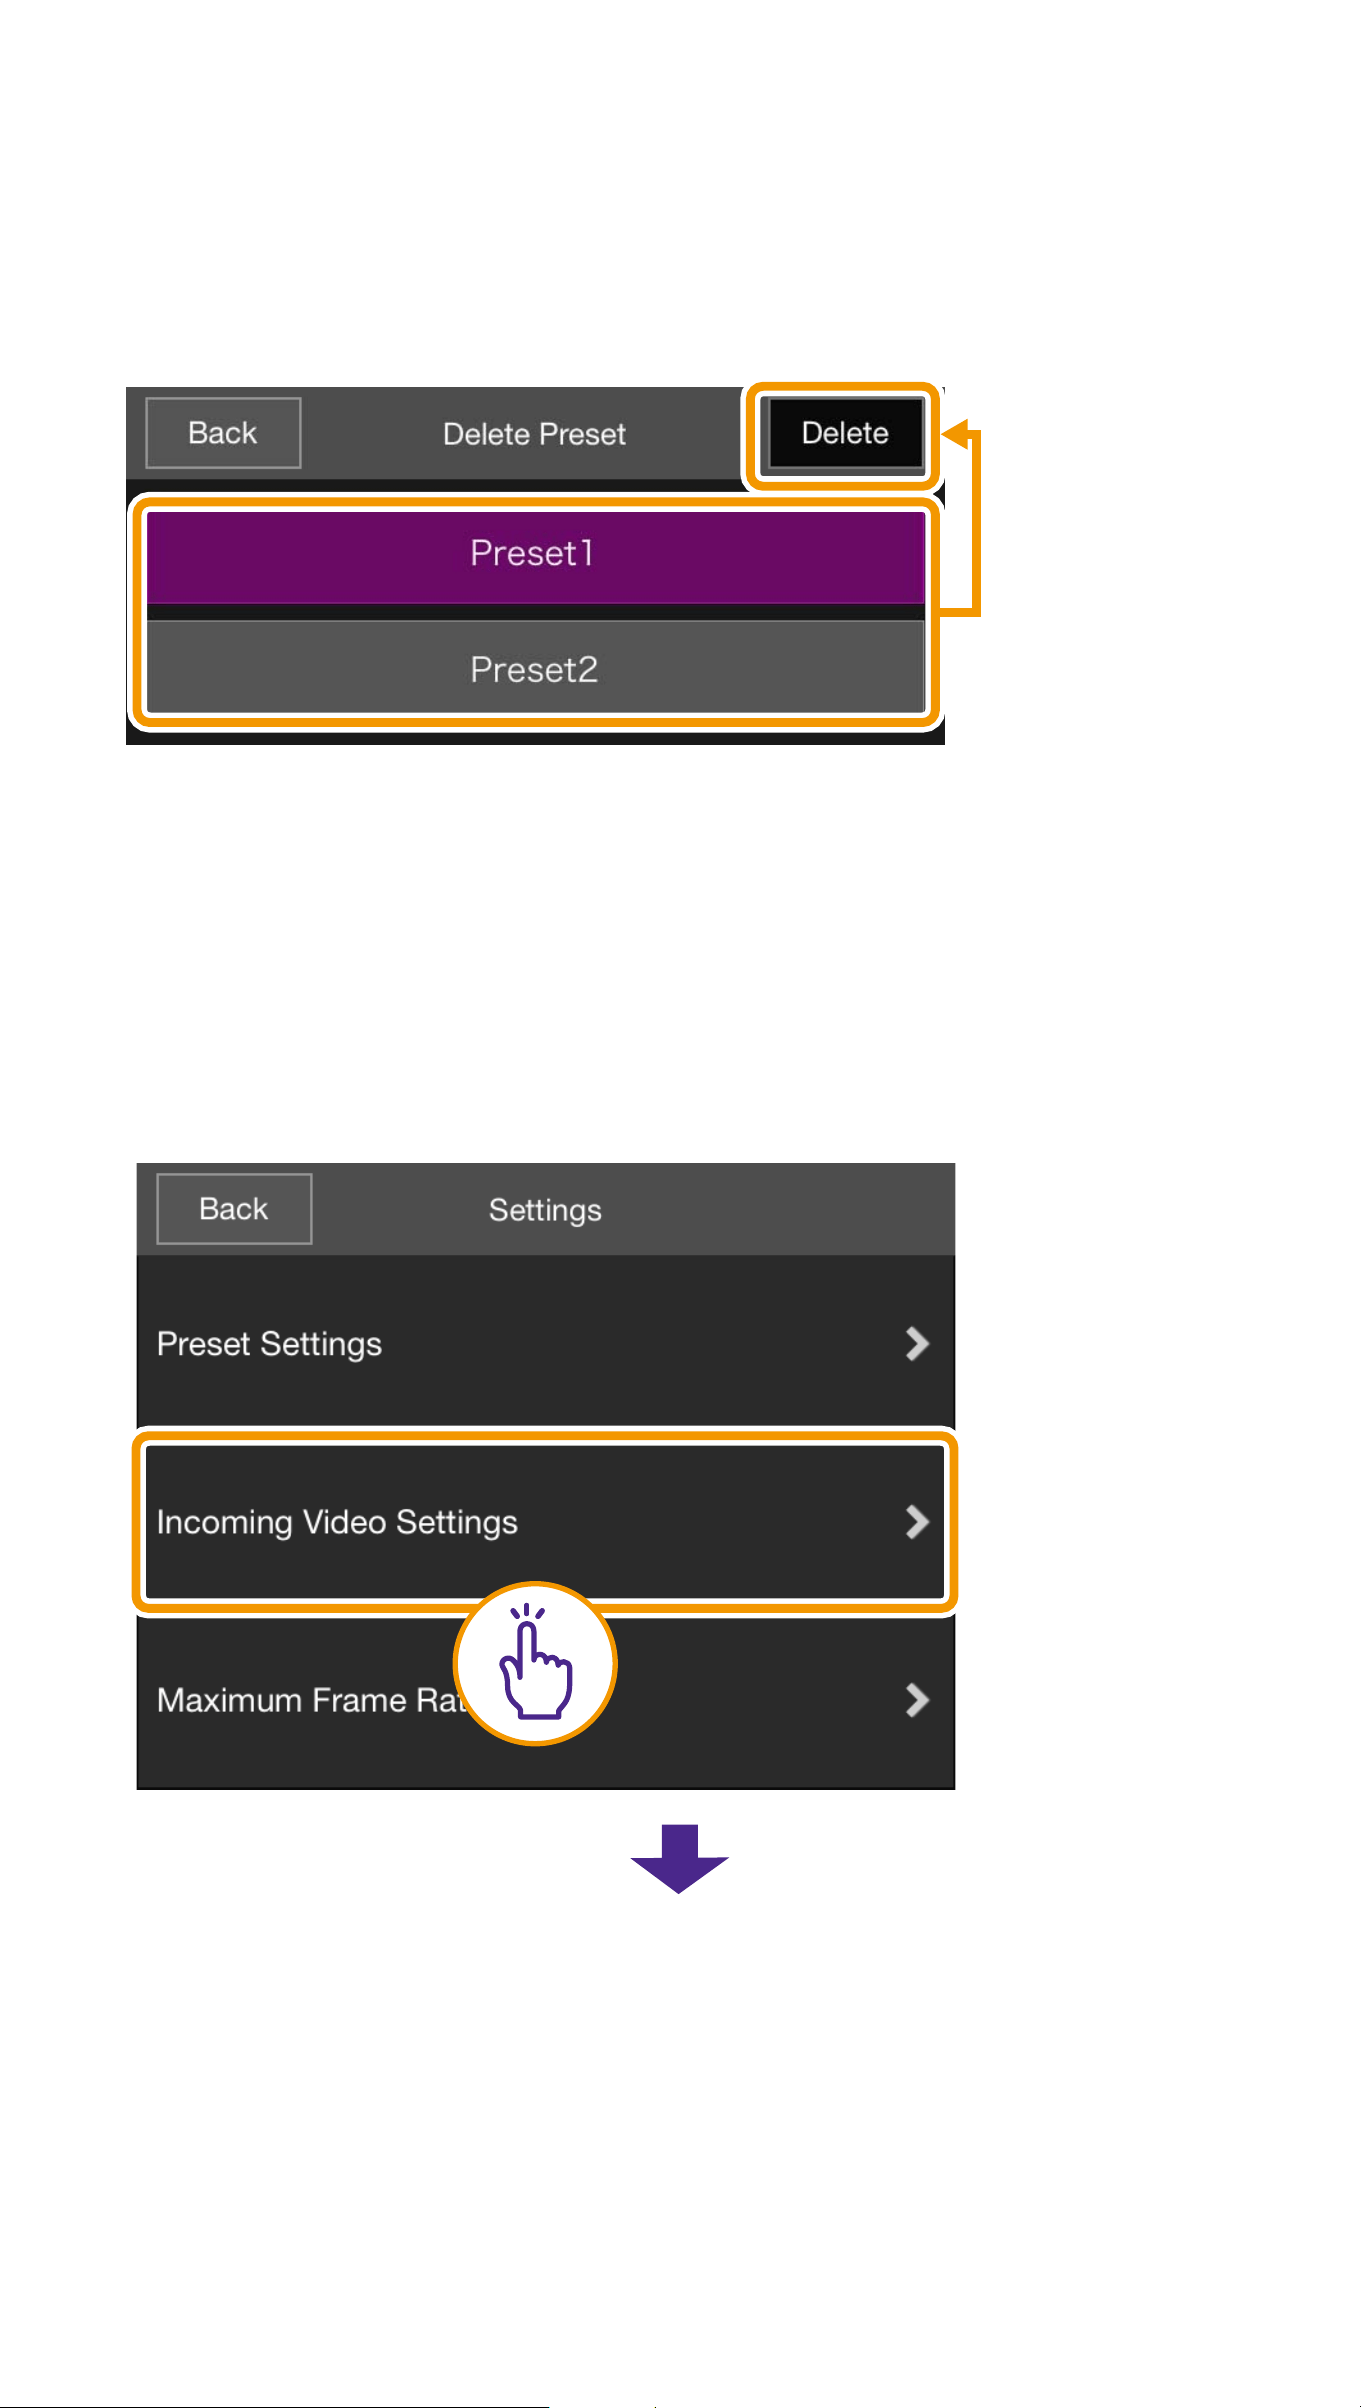
[Delete Preset]
Select a preset to delete and then tap
[Delete].
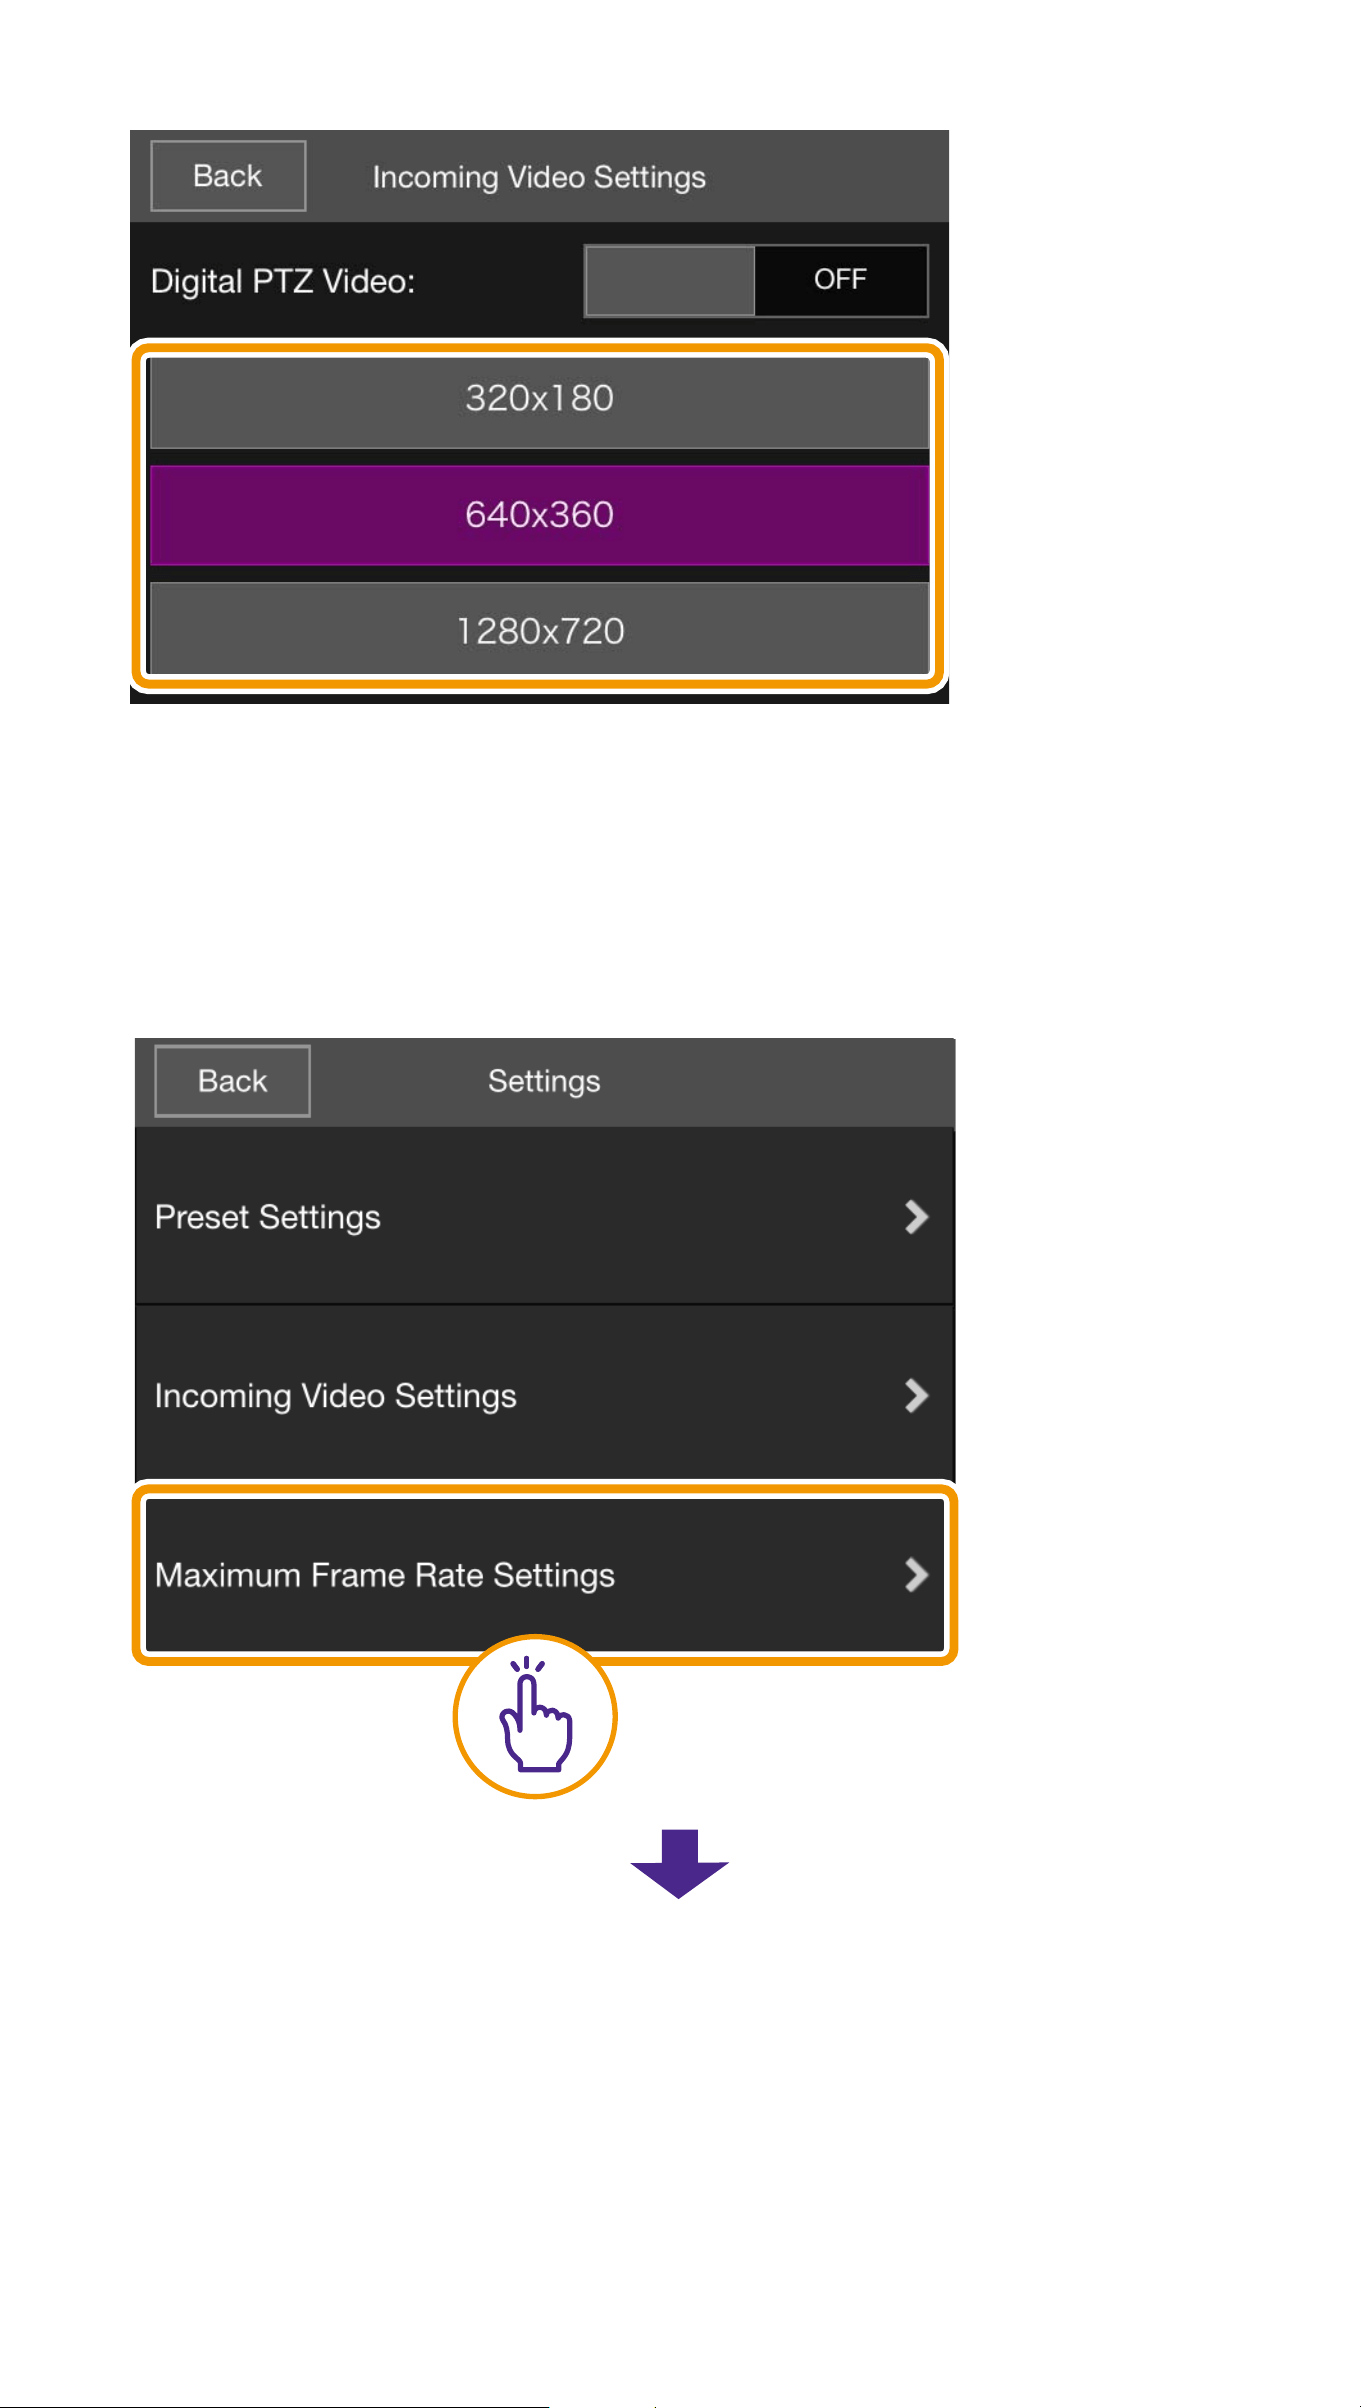
OIncoming Video Settings
Select whether to receive digital PTZ
cropped video and select the size of the
received video.
23
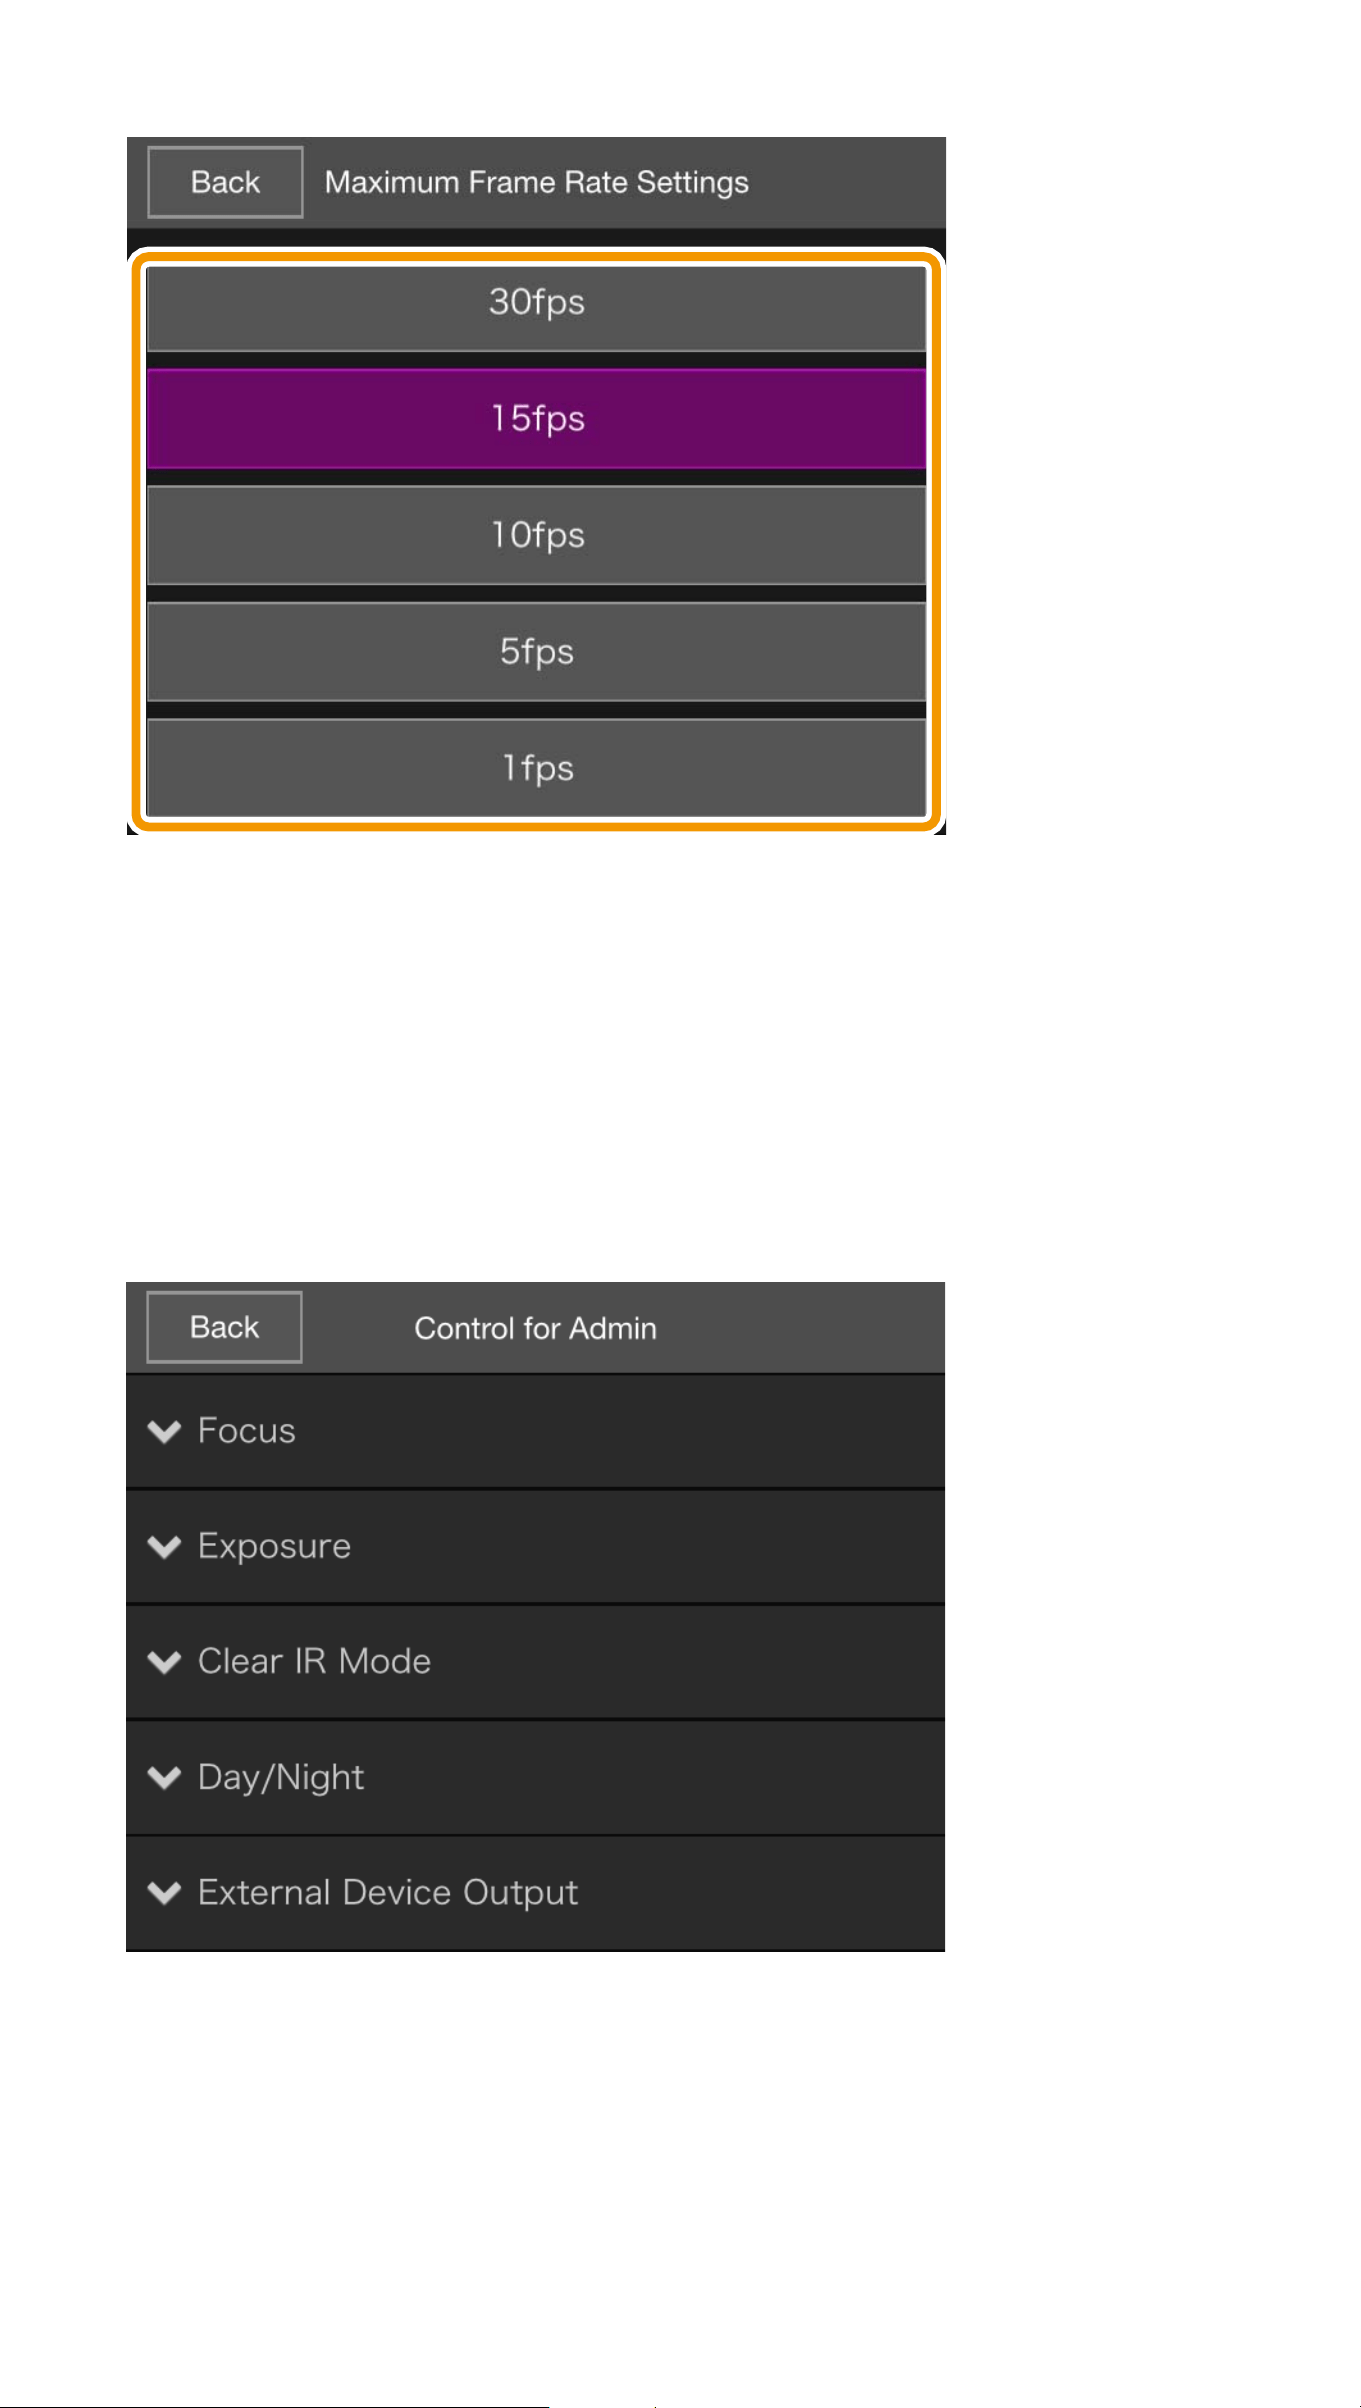
OMaximum Frame Rate Settings
You can set a maximum frame rate for video
received from the camera.
24
(8) Control for Admin button
Allows you to configure focus, exposure,
Clear IR Mode, day/night, and external
device output settings.
OFocus
[Auto]
Automatically focuses on the subject.
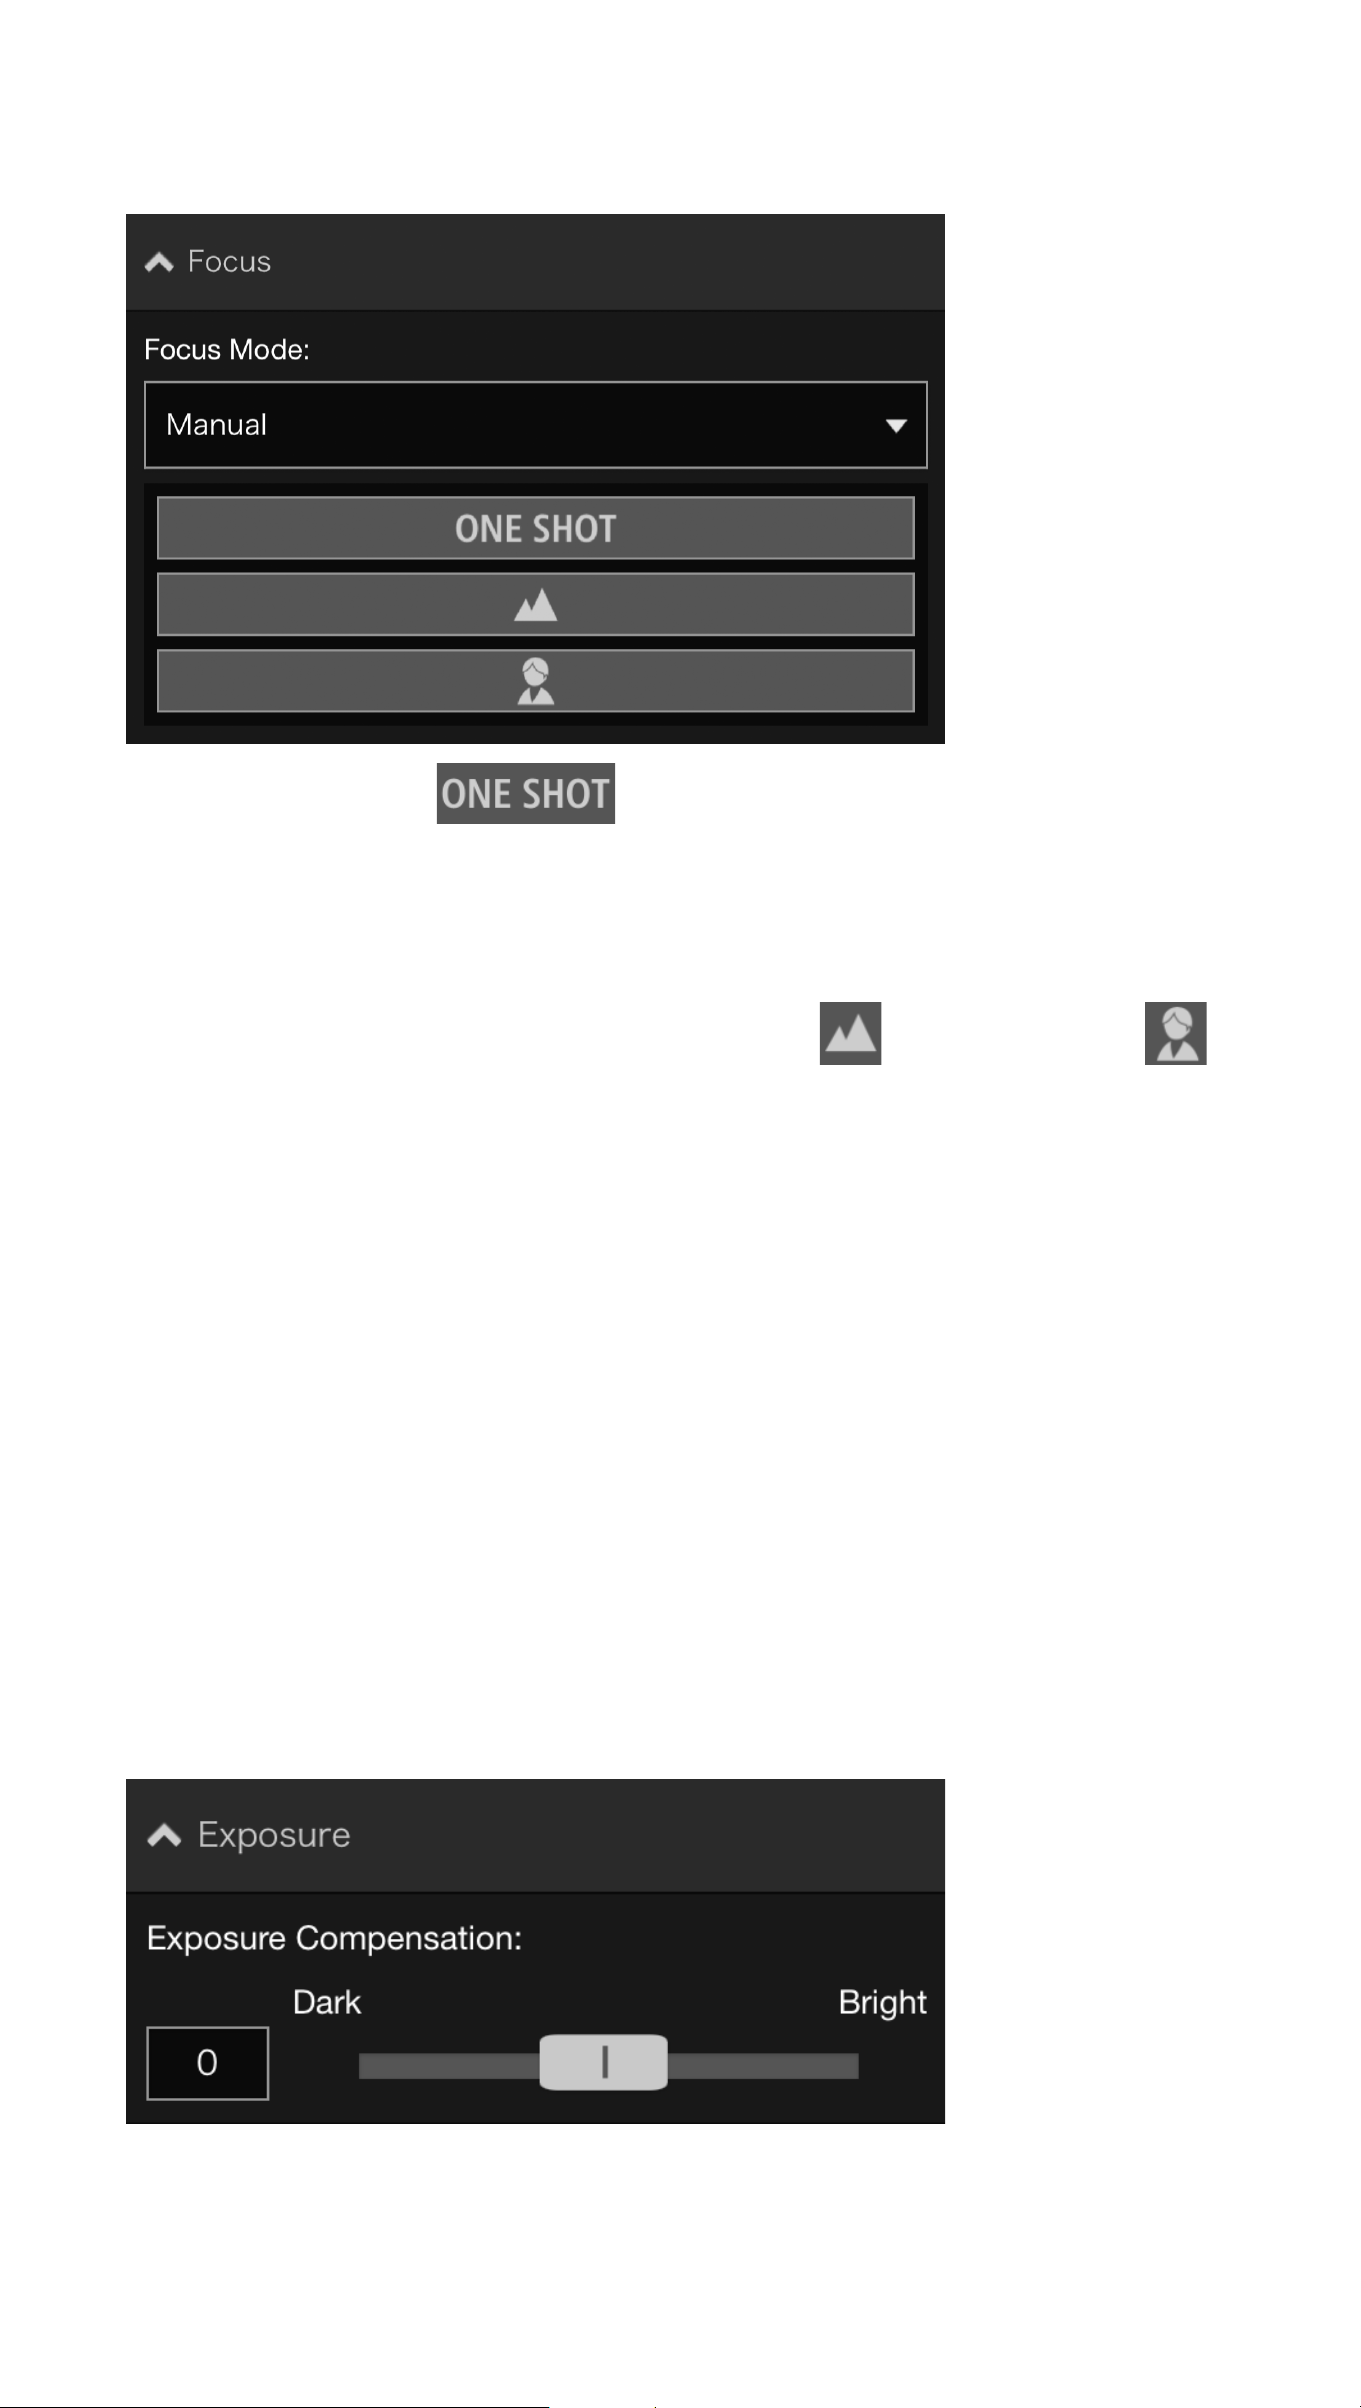
25
[Manual]
Tapping the button automatically
adjusts the focus once, and then switches to
the manual mode.
You can touch and hold the (Far) and
(Near) buttons to adjust the focus position in
the far and near directions, respectively.
[Fixed at infinity]
Move the focus position to near infinity.
When needing to focus more precisely,
select [Manual] setting and adjust the focus.
OExposure
26
To darken the video, set a negative value. To
brighten the video, set a positive value.
Note
This cannot be configured when [Exposure] is
set to [Manual] or [Smart Shade Control] is set
to [Auto] in the exposure settings of the
camera's Settings page.
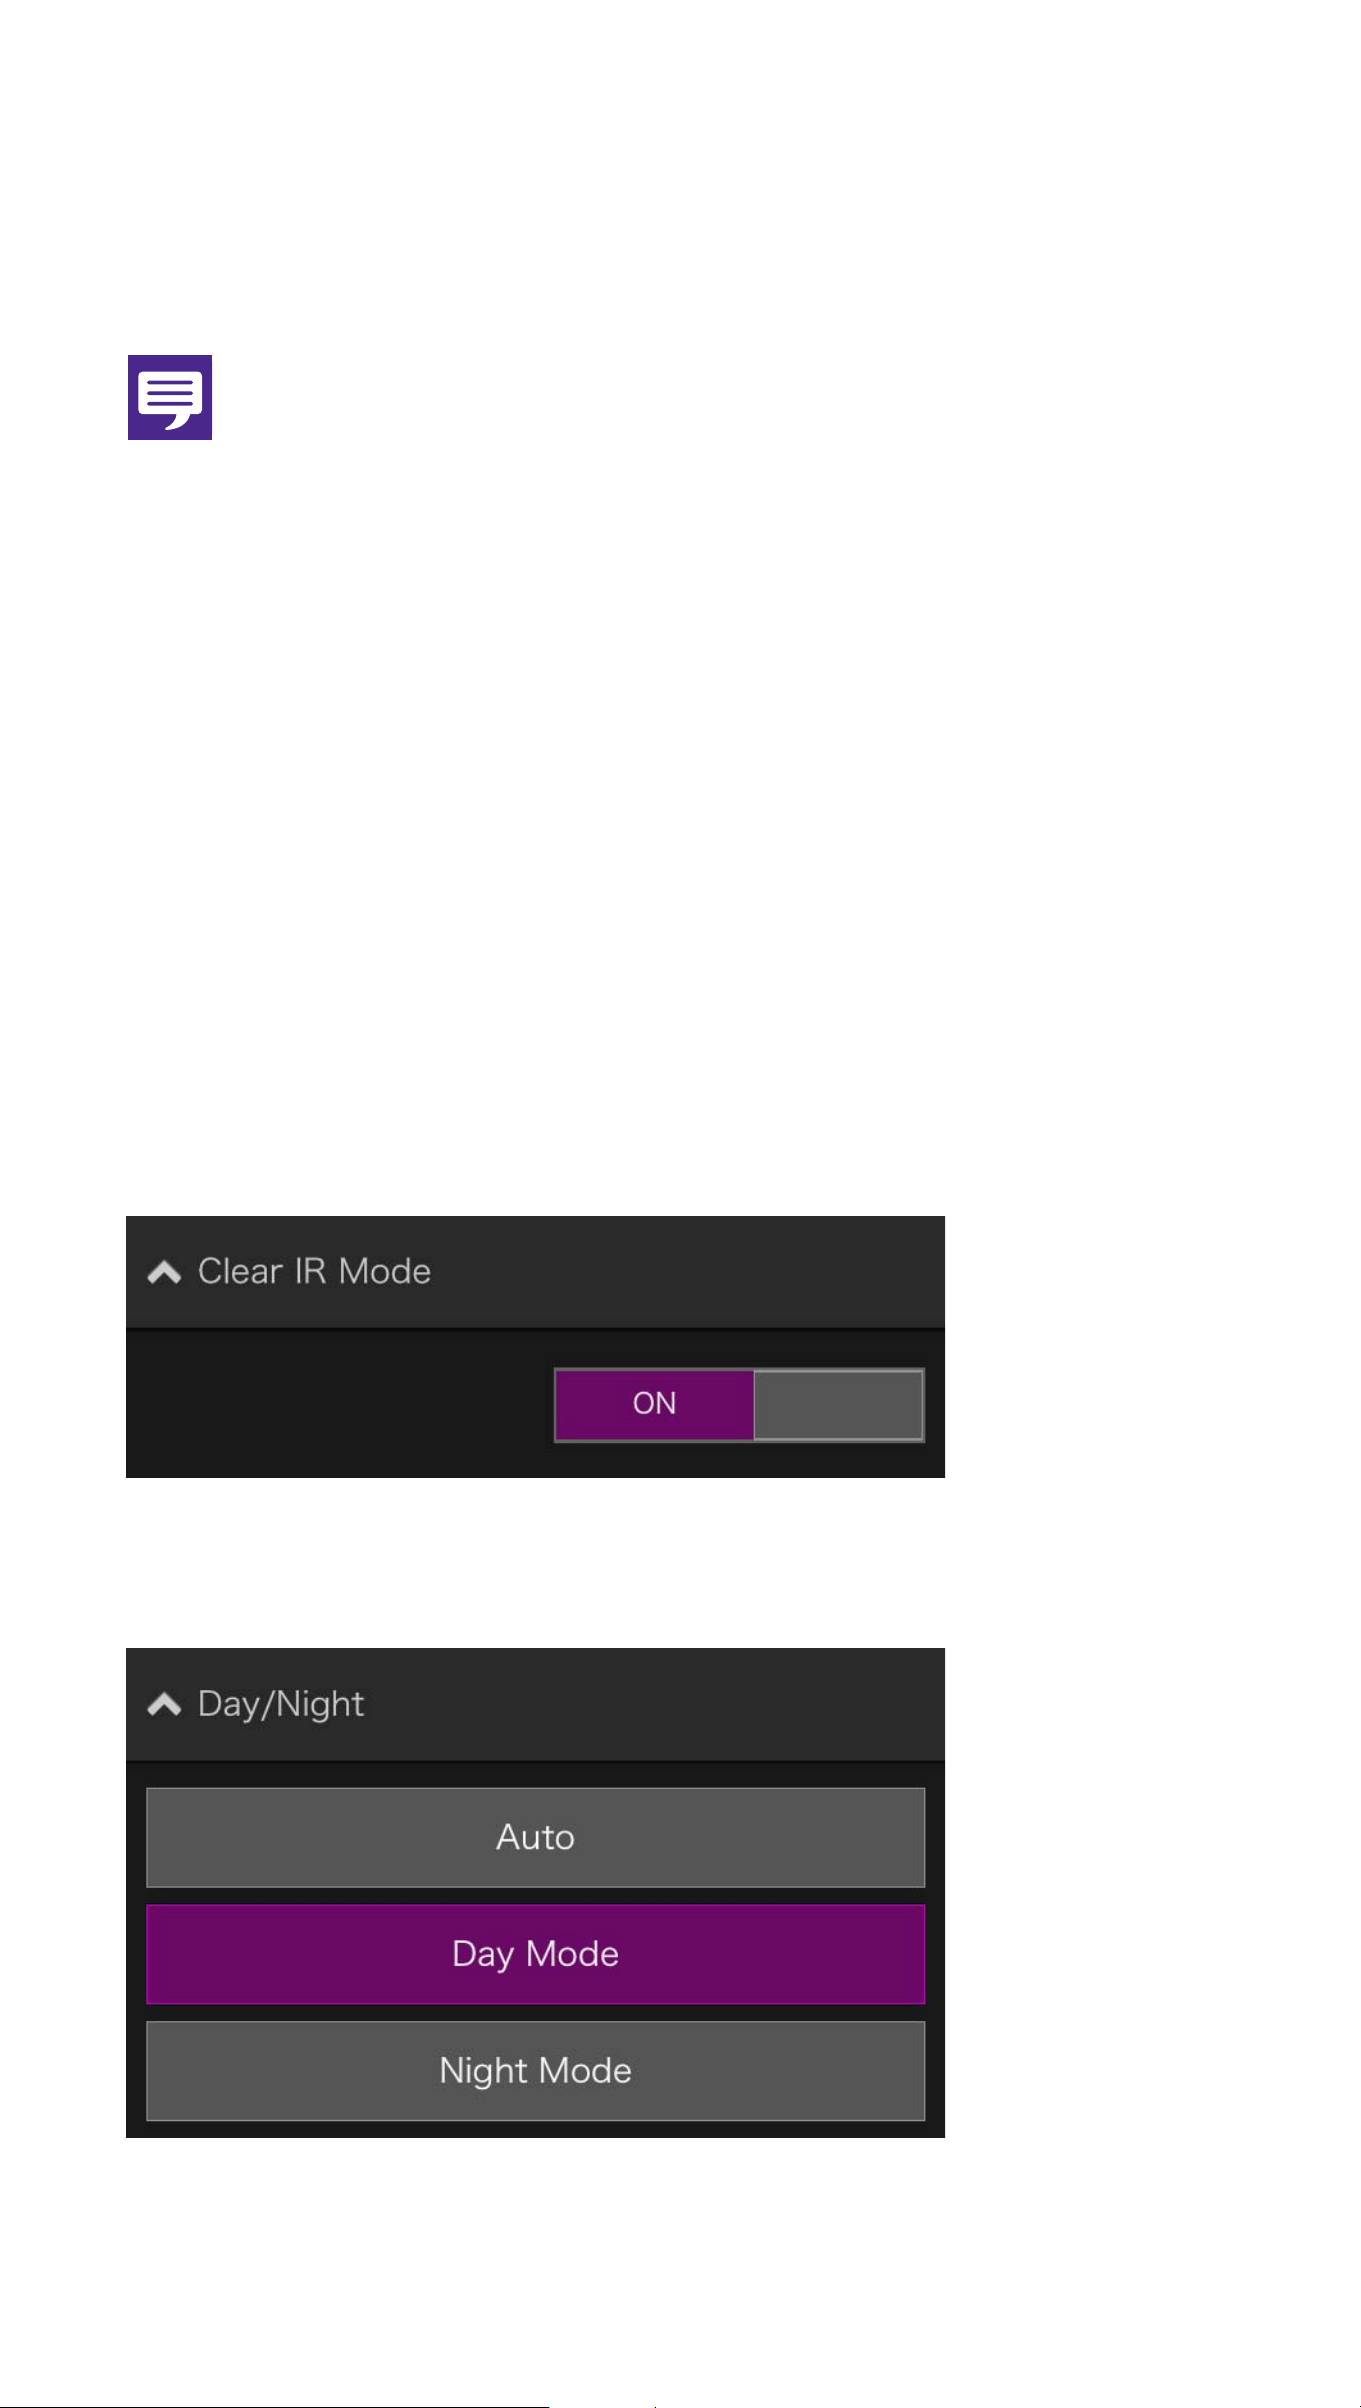
OClear IR Mode
Select whether to use Clear IR Mode.
Selecting [ON] changes the video to
monochrome and reduces distant haze or
shimmering of hot air.
ODay/Night
27
[Auto]
Automatically switches between [Day Mode]
or [Night Mode] to match the brightness.
[Day Mode]
Color video can be viewed in the normal
mode.
[Night Mode]
Video is shown in black and white, due to the
disabling of the infrared filter.
Note
This can only be configured when [Clear IR
Mode] is set to [OFF].
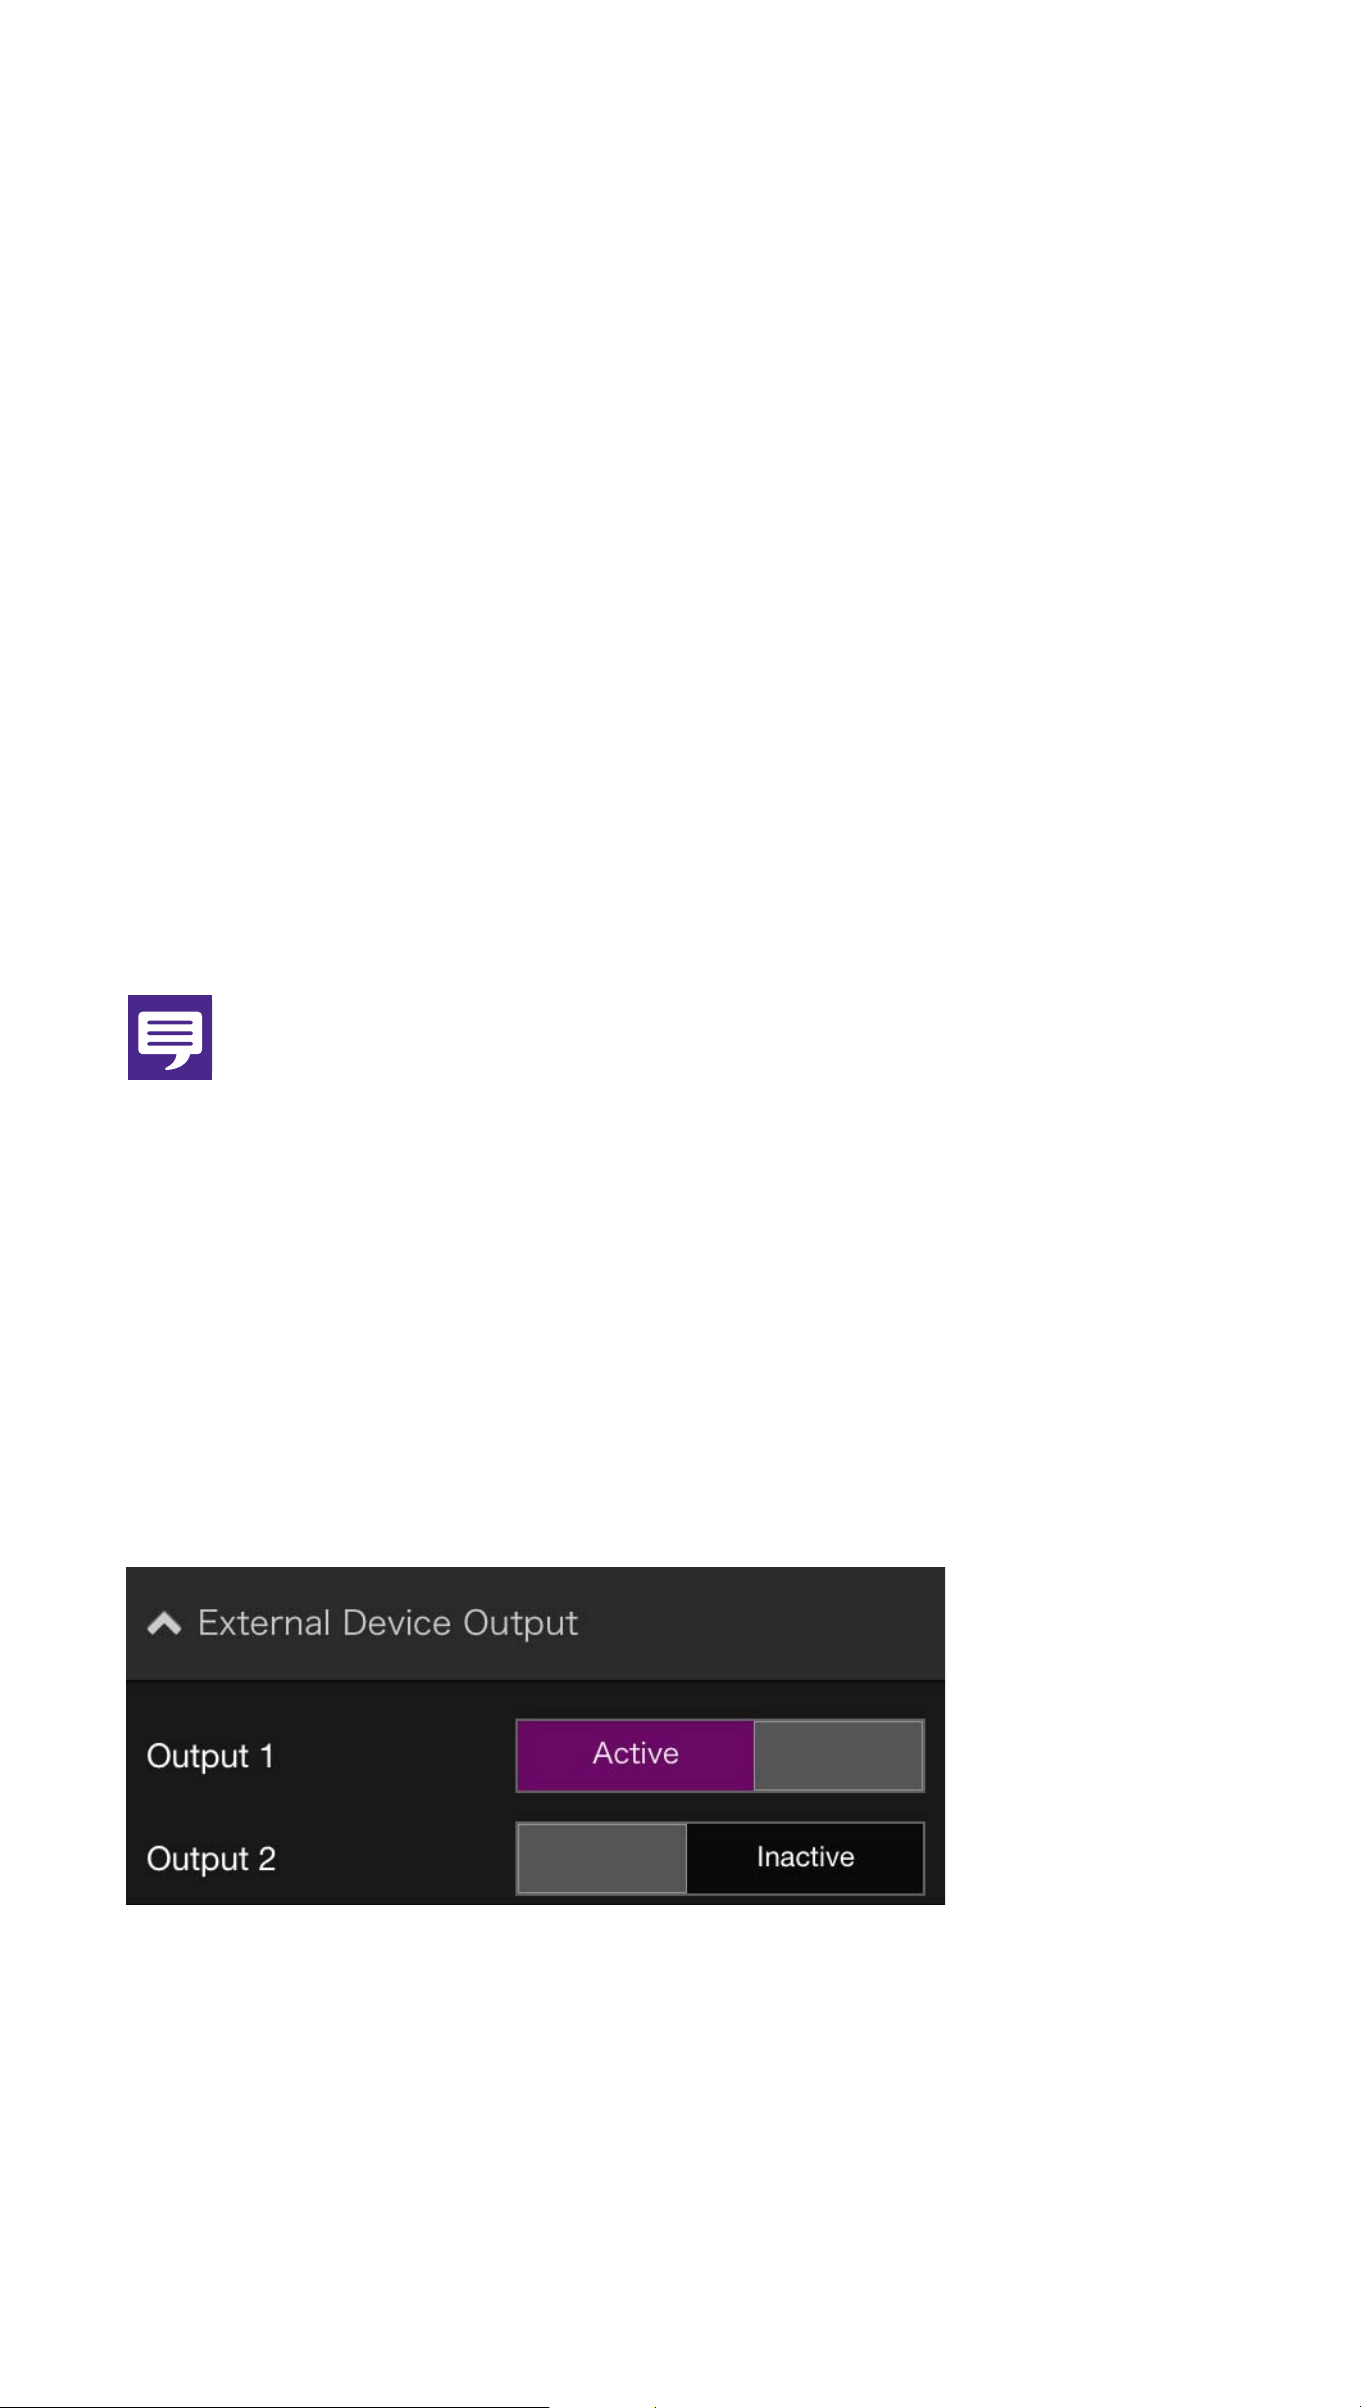
OExternal Device Output
You can control the output to an external
device connected to the camera.
28
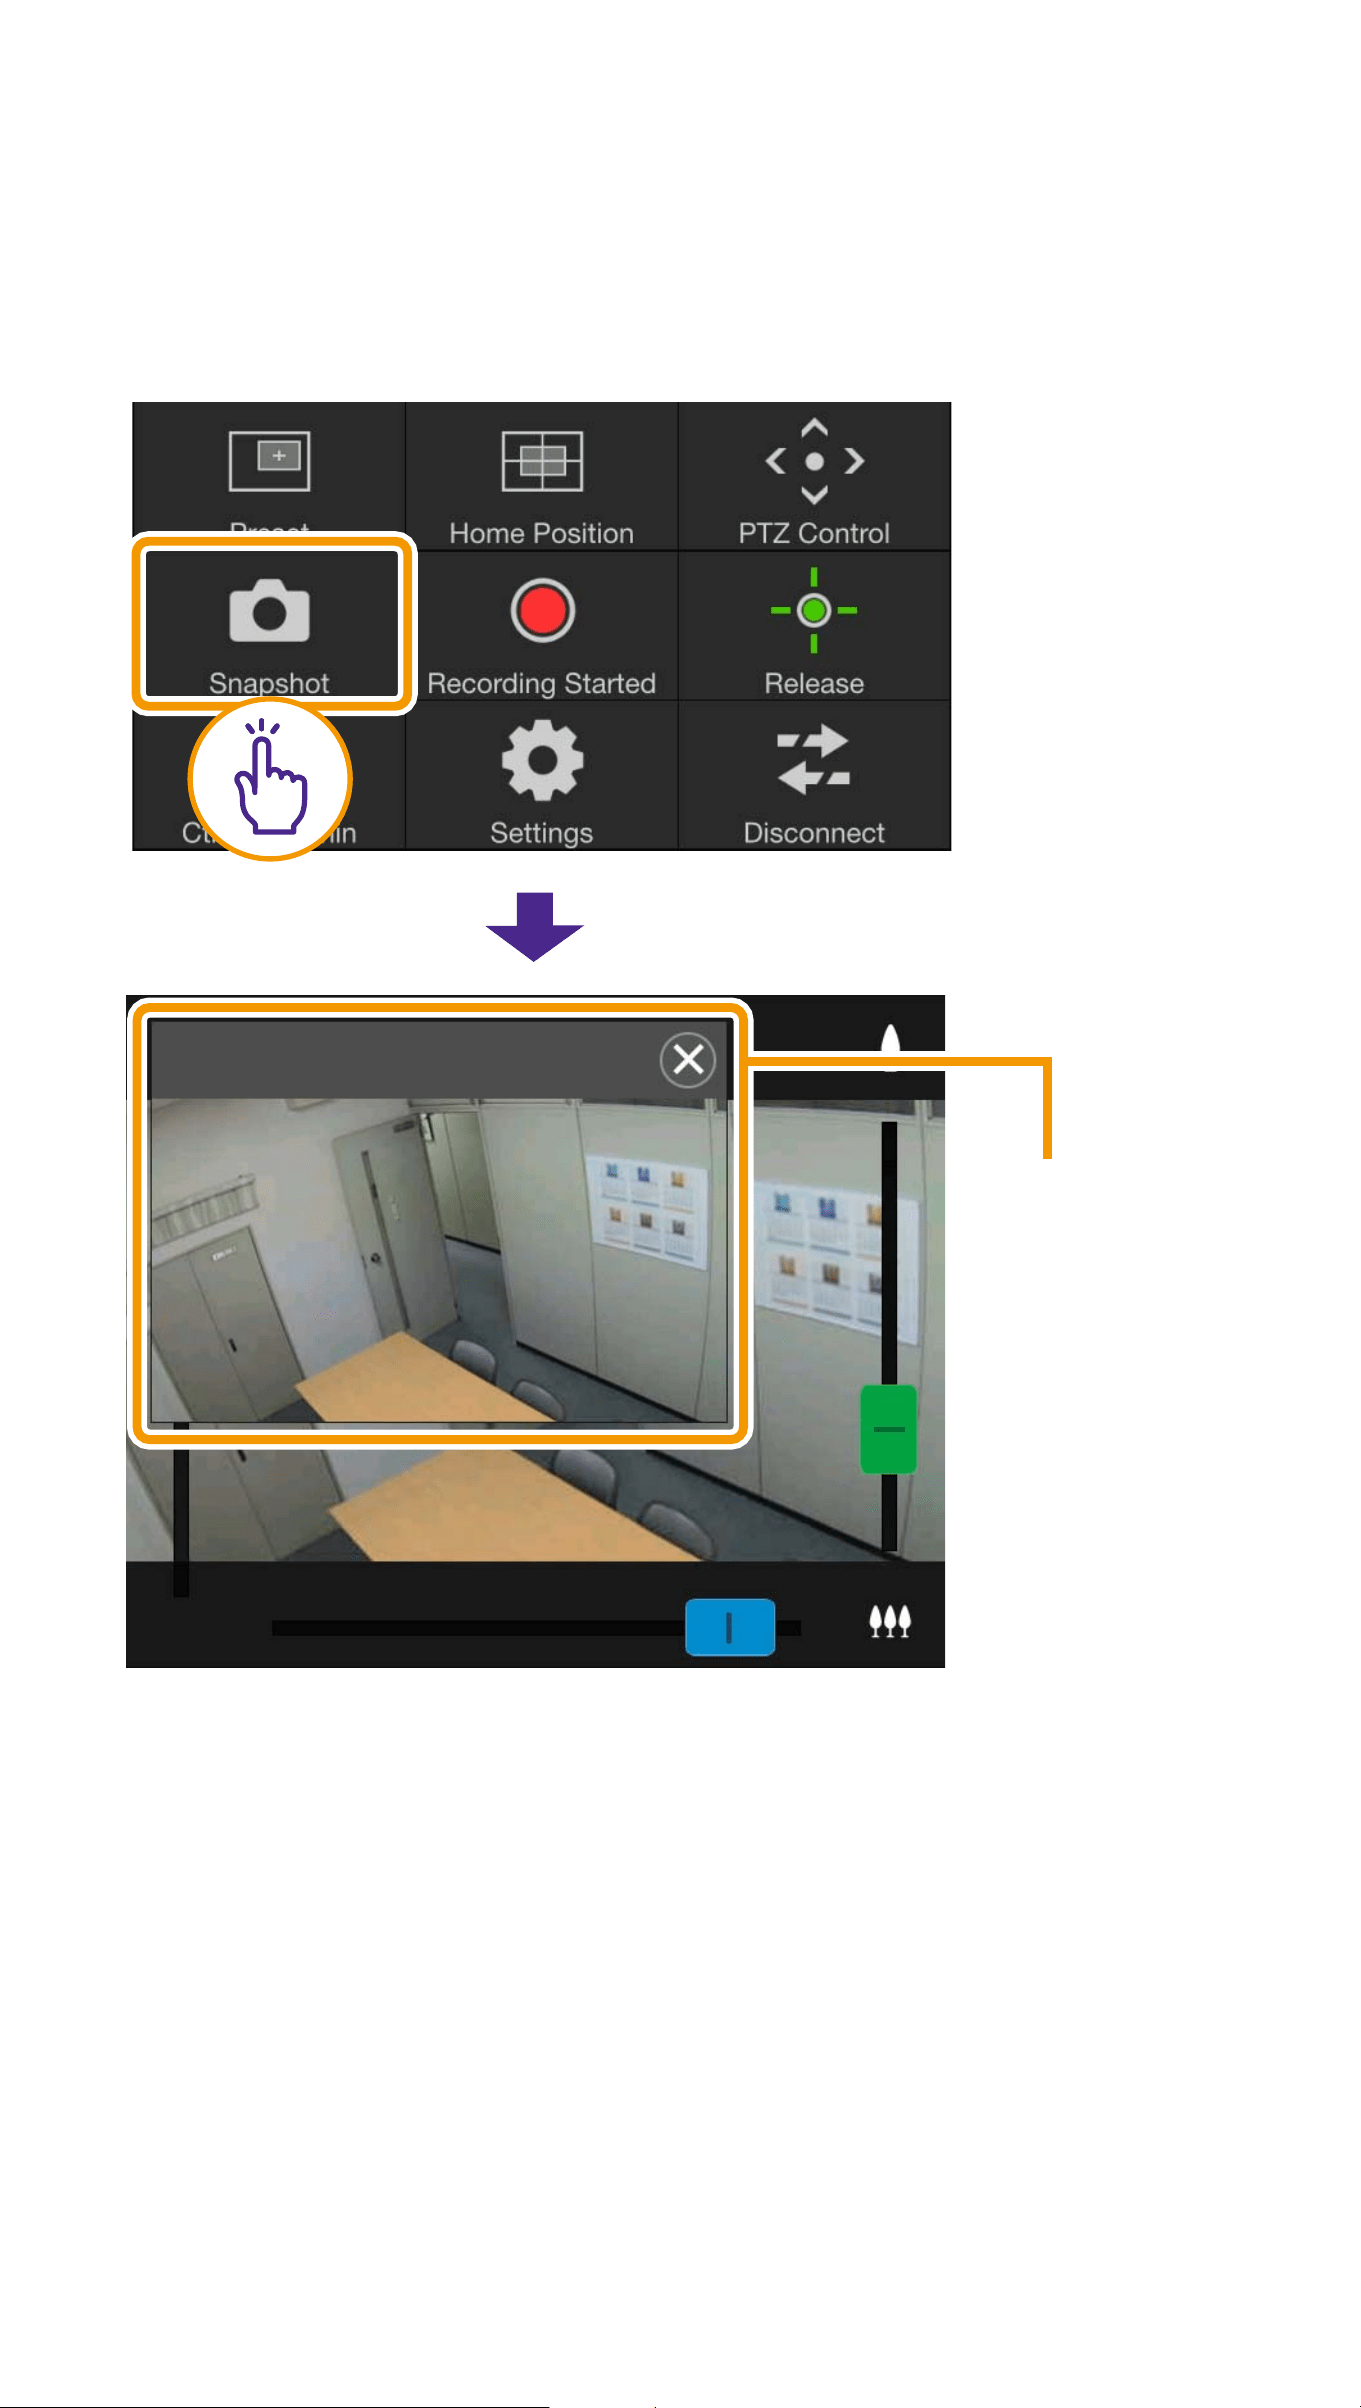
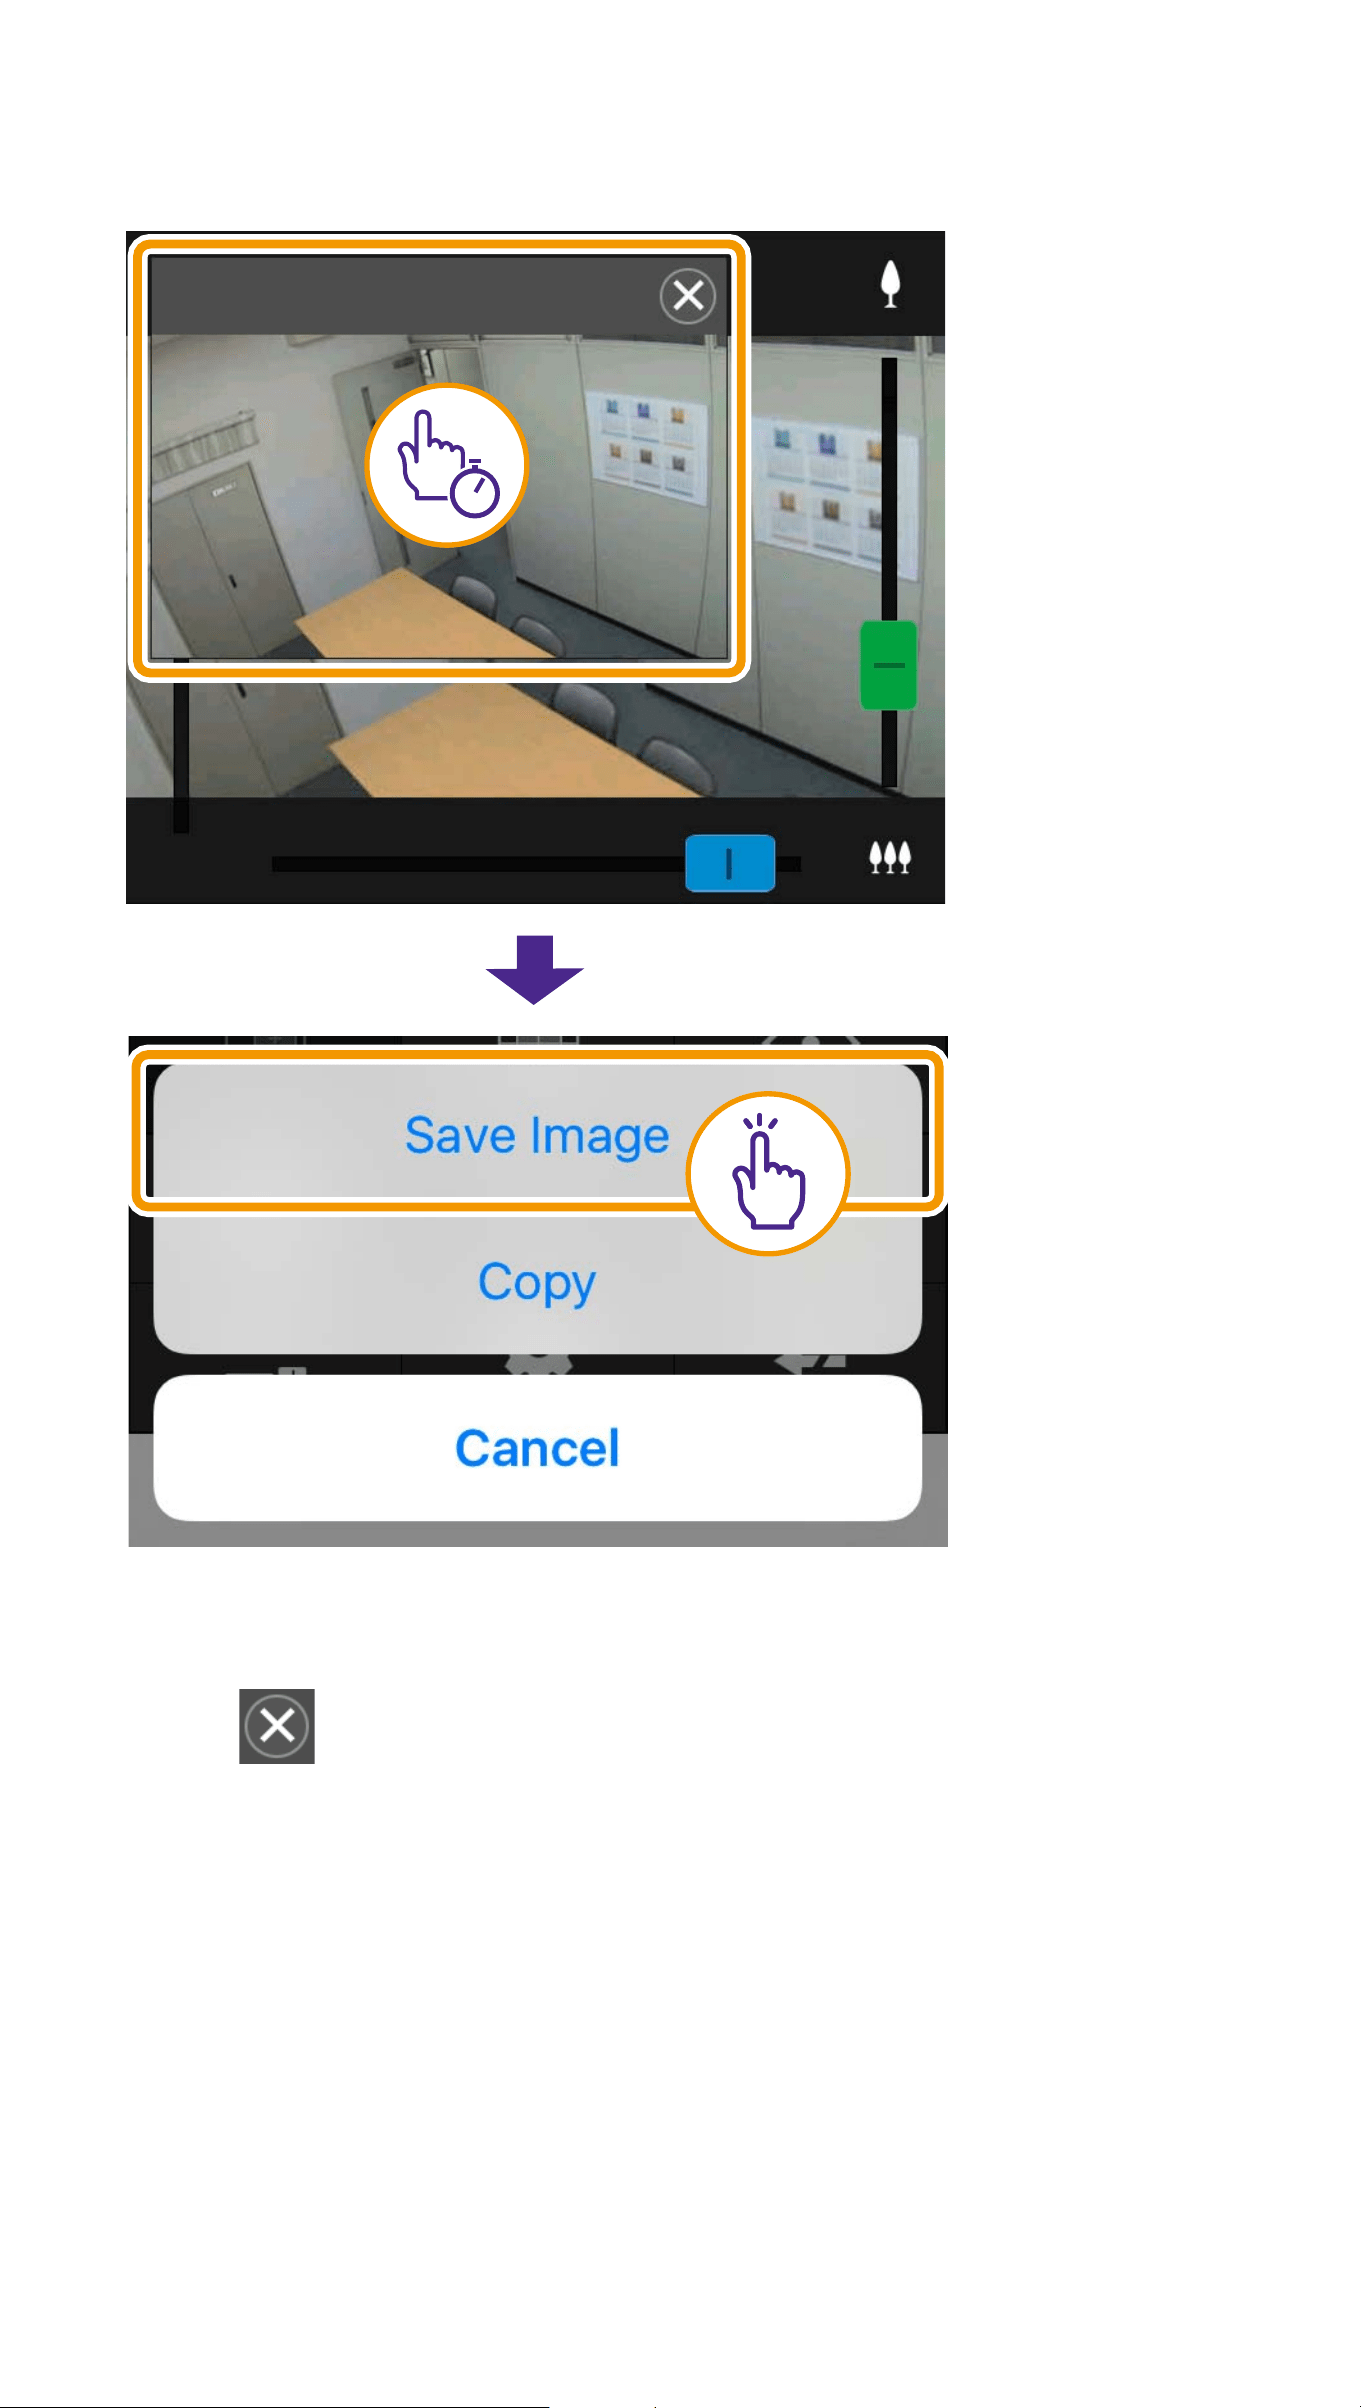
(9) Snapshot button
Captures the image in the video display area,
and saves the still image to the device.
Snapshot
panel
29
OSaving a Snapshot
OClosing the Snapshot Panel
Tap .

30
Troubleshooting
Cannot connect to camera
O Check to make sure the user name and
password are correct.
O Check to make sure upper-case letters
have not been used in place of lower-
case letters.
O Restart the web browser and connect
again.
O When the browser authentication
screen appears, select [Cancel], and
then connect to the camera again.
O Reboot the device and connect.
Cannot control the camera
O Multiple users cannot obtain control
privileges simultaneously.
O Control privileges may be revoked by
users connecting with elevated
privileges, such as administrators.
Check with the camera’s administrator
for details on privilege settings.

31
Viewer disconnects
O If the video is not displayed, tap the
video display area to try reconnecting
to the camera.
O Connections from authorized users and
guest users are disconnected while
creating a panorama image.
O Check the camera, network and device
for any abnormality.
O Reboot the device and connect.
Cannot register settings
O Only the admin user can register
settings.
O Relaunch the web browser, reconnect to
the camera, and register again.
Auto lock is activated or the screen has
turned off.
O Even when using the viewer, the mobile
device’s auto lock or auto screen
timeout settings are still active. To
deactivate these features, change the
device’s settings.

BIE-7099-005 © CANON INC. 2022
Display is slow
O The display may be slow for
approximately the first minute using an
SSL connection.
