INSTRUCTION
MANUAL
REFRIGERATOR

INSTRUCTION
MANUAL
REFRIGERATOR MODEL
FF36FBMS

4
Congratulations on your recent Forza purchase! Before you begin using your new Forza product, please take a moment
to review the Installation Manual. You will find the answers to all of your questions as well as some very important safety
information. Pay special attention to the Important Safety Instructions located at the beginning of the manual. Your Forza
product is ready and waiting to be used for your next gourmet creation!
Table of Contents
05 Warning
07 Safety and Warning Information
12 CFC/HCFC Disposal
12 Electrical & Grounding Requirements
14 Product Introduction
16 Installation
25 Operating the product
33 Maintenance and Cleaning
This Forza appliance is proudly made in Modena, Italy
by GlemGas S.p.A, a family owned company.
www.forzacucina.com
5
EN
Warning
CAUTION:
- This appliance can be used by children aged from 8 years and above and persons with reduced physical, sensory
or mental capabilities or lack of experience and knowledge if they have been given supervision or instruction
concerning use of the appliance in a safe way and understand the hazards involved. Children shall not play with the
appliance. Cleaning and user maintenance shall not be made by children without supervision.
- This appliance is not intended for use by persons (including children) with reduced physical, sensory or mental
capabilities, or lack of experience and knowledge, unless they have been given supervision or instruction concerning
use of the appliance by a person responsible for their safety.
- Children should be supervised to ensure that they do not play with the appliance.
The refrigerant isobutene(R600a) is contained within the refrigerant circuit of the appliance ,a natural gas with a high
level of environmental compatibility, with which is nevertheless flammable.
During transportation and installation of the appliance, ensure that none of the components of the refrigerant circuit
becomes damaged.
The refrigerant (R600a) is flammable.
Symbol ISO 7010 W021 Warning;
Risk of fire/flammable materials!
WARNING:
• The appliance must be positioned so that the plug is accessible.
• If the power cord is damaged, it must be replaced by the manufacturer, its service agent or similarly
qualified person to avoid any hazards.
• Keep ventilation openings, in the appliance enclosure or in the built-in structure, clear of obstruction.
• Do not use mechanical devices or other means to accelerate the defrosting process, other than those
recommended by the manufacturer.
• Do not damage the refrigerant circuit.
• Do not use electrical appliances inside the food storage compartments of the appliance, unless they are of
the type recommended by the manufacturer.
• This appliance is not intended for use by persons (including children) with reduced physical, sensory or
mental capabilities, or lack of experience and knowledge, unless they have been given supervision or
instruction concerning use of the appliance by a person responsible for their safety.
• Children should be supervised to ensure that they do not play with the appliance.
• When the refrigerator is discarded after use please follow all local laws and regulations.
• The refrigerant and insulation blowing gas are flammable. Disposing of the refrigerant can only be done at
authorized waste disposal centers. Do not expose the refrigerant or insulation to extreme heat or an open flame.

6
• Do not store explosive substances such as aerosol cans with a flammable propellant in this appliance.
• When positioning the appliance, ensure the supply cord is not trapped or damaged.
• Do not locate multiple portable socket-outlets or portable power supplies at the rear of the appliance.
• To avoid contamination of food, please respect the following instructions:
- Opening the door for long periods can cause a significant increase of the temperature in the compartments of the
appliance.
- Clean regularly surfaces that can come in contact with food and accessible drainage systems.
- Clean water tanks if they have not been used for 48h; flush the water system connected to a water supply if water
has not been drawn for 5 days.
- Store raw meat and fish in suitable containers in the refrigerator, so that it is not in contact with or drip onto other
food.
- lf the refrigerating appliance is left empty for long periods, switch o, defrost, clean, dry, and leave the door open to
prevent mould developing within the appliance.
• Risk of child entrapment. Before you throw away your old refrigerator or freezer:
- Take o the doors.
- Leave the shelves in place so that children may not easily climb inside.
• Before performing any type of installation or cleaning, disconnect the refrigerator from the power source
and reset the temperature controls to the desired setting(s). When you are finished, reconnect the refrigerator
to the electrical source and reset the temperature controls to the desired setting.
• This appliance is intended to be used in household and similar applications such as:
- Sta kitchen areas in shops, oces and other working environments;
- Farm houses and by clients in hotels, motels and other residential type environments;
- Bed and breakfast type environments;
- Catering and similar non-retail applications.
• The new hose-sets supplied with the appliance are to be used and that old hose-sets should not be reused.
• Fill with potable water only.
• Connect to potable water supply only. The water supply system must be installed and connected by a
professional technician. Connect the refrigerator with the cold water pipe :
Min. pressure: 1.4bar;
Max. pressure: 6.9bar;
7
EN
Safety and Warning Information
Pay attention to these symbols present in this manual:
This is the safety alert symbol.
This symbol alerts you to potential hazards that can kill or hurt you and others.
All safety messages will follow the safety alert symbol and either the word “DANGER” or “WARNING.”
You can be killed or seriously injured if you don’t immediately
follow instructions.
You can be killed or seriously injured if you don’t follow
instructions.
All safety messages will tell you what the potential hazard is, tell you how to reduce the chance of injury, and tell you
what can happen if the instructions are not followed.
IMPORTANT: Save these instructions for local electrical inspector use.
INSTALLER: Please leave this manual with owner for future reference. Leave these instructions with the appliance.
OWNER: Please keep this manual for future reference.
IMPORTANT: Special Warning – Please read all instructions before using this appliance as proper installation
is the owner’s responsibility. Have a qualified technician install this range.
IMPORTANT:
• Observe all governing codes and ordinances.
• Write down the model and serial numbers before installing the range. Both numbers are on the serial rating
plate, located under or behfind the product.
The appliance is applicable to 115V/60Hz only, and the
allowable voltage fluctuation range is 98~132V.
In order to ensure safety,the socket and its cable must be
able to withstand the current of above 15A.
Replaceable (LED only) light source by a professional.
To reduce the risk of fire ,electric shock, or injury to persons when using your product, basic safety
precautions should be followed, including the following.
Read all instructions before using this appliance.
Appliance connection
LED light
Safety and warning information
LED LED
8
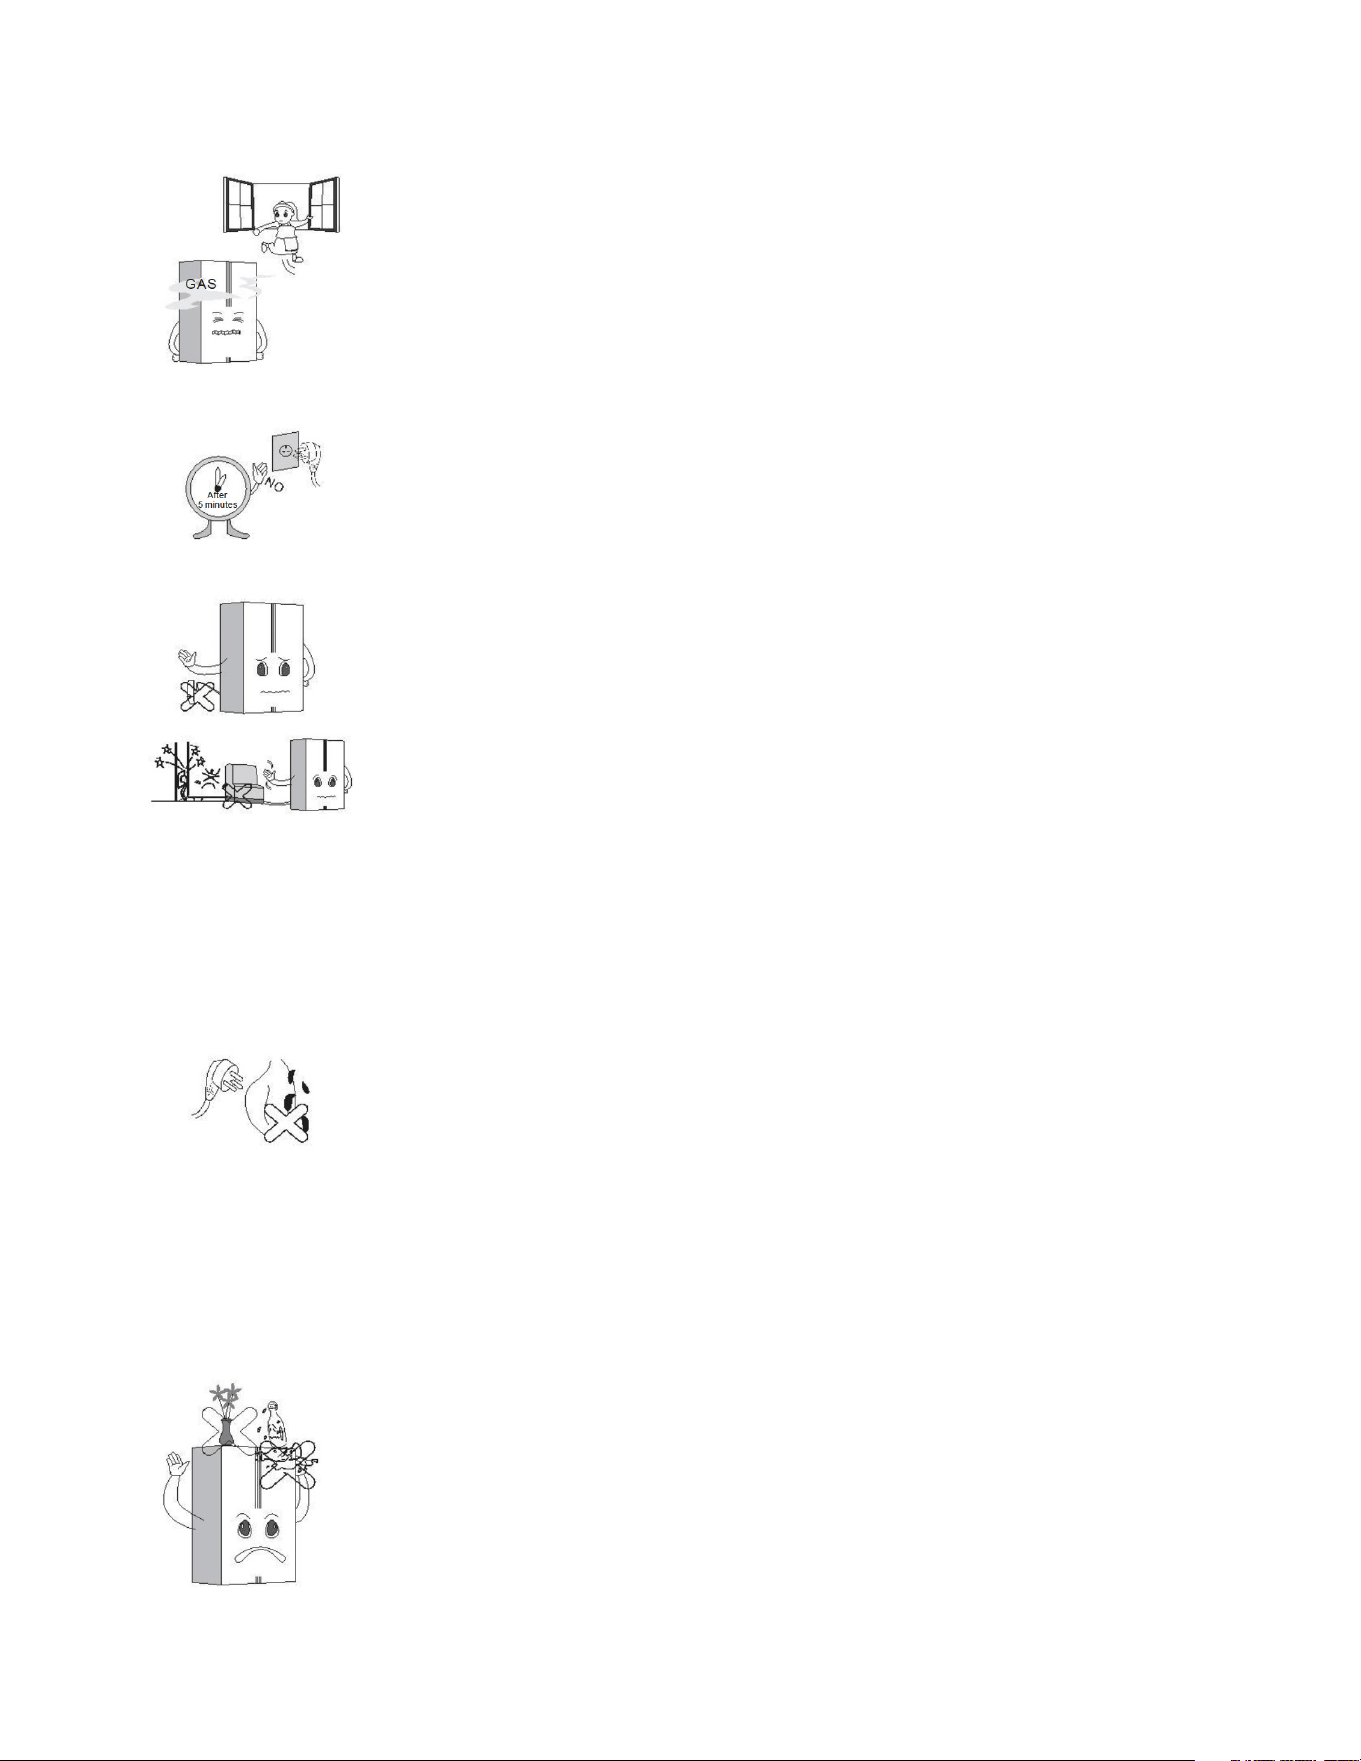
If you believe there is refrigerant leaking, do not touch the unit or the power outlet, ventilate
the room and if possible turn your unit o using the circuit breaker. Call the manufacturer
immediately.
Refrigerant will cause serious injury when coming into contact with the skin or eyes.
If this happens please immediately seek out medical treatment.
Make sure to use a grounded power outlet.Consult a qualified electrician or service person if
the ground-ing instructions are not completely understood,or if you have doubts on whether
the appliance is properly grounded.
Wait for 5 minutes or longer before reconnecting the power cord. Failure to do so may cause
the freezer to fail.
The incorrect grounding may cause breakdown and/or electric shock.
A dedicated outlet should be used.Using several devices at one outlet may cause fire.
Do not allow the power plug to face upward or to be squeezed at the back of the fridge.
Water may be flown into or the plug may be damaged, which can cause fire or injury.
Do not allow the power cord bent or pressed by the heavy object to be damaged.
Unplug the power cord when cleaning,handling the interior lamp of the fridge.
Failure to do so may result in a electric shock or other injury.
Remove water or dust from the power plug with a dry clean cloth,do not use wet hands touch it
and insert it with the ends of the pins securely connected.
Do not use the fridge for non-domestic perposes(storing medicine or testing materi-
al,blood,using on a ship,etc.)
It may cause an unexpected risk such as fire,electric shock,deterioration of stored material or
chemical reaction.
Do not use or store inflammable materials ether,benzene,alcohol,medicine,liquid propane
gas,spray or cosmetics near or in the fridge.It may cause explosion or cause a fire.
Do not put any glassware that is not design for use in a fridge or freezer inside.
The glass may crack or break which can lead to injury.
Do not place the heavy object or the dangerous objects such as:cup,flower vase,cosmetics,
medicine or any containers with water in the fridge.
It may be dropped and cause injury,fire or electric shock when opening or closing the door.
9
EN
Do not touch food or containers in the freezer with wet hands.It may cause frostbite.
Do not spray water at the outside or the inside of the fridger do not clean it with benzene or
thinner.
Do not clean the unit with any acidic cleaners, abrasive brushes, sharp tools, and/or any
cleaner that contains benzene.
Do not use a drier to dry the inside of the unit,nor light a candle to remove odour.It may cause
an explosion or fire.
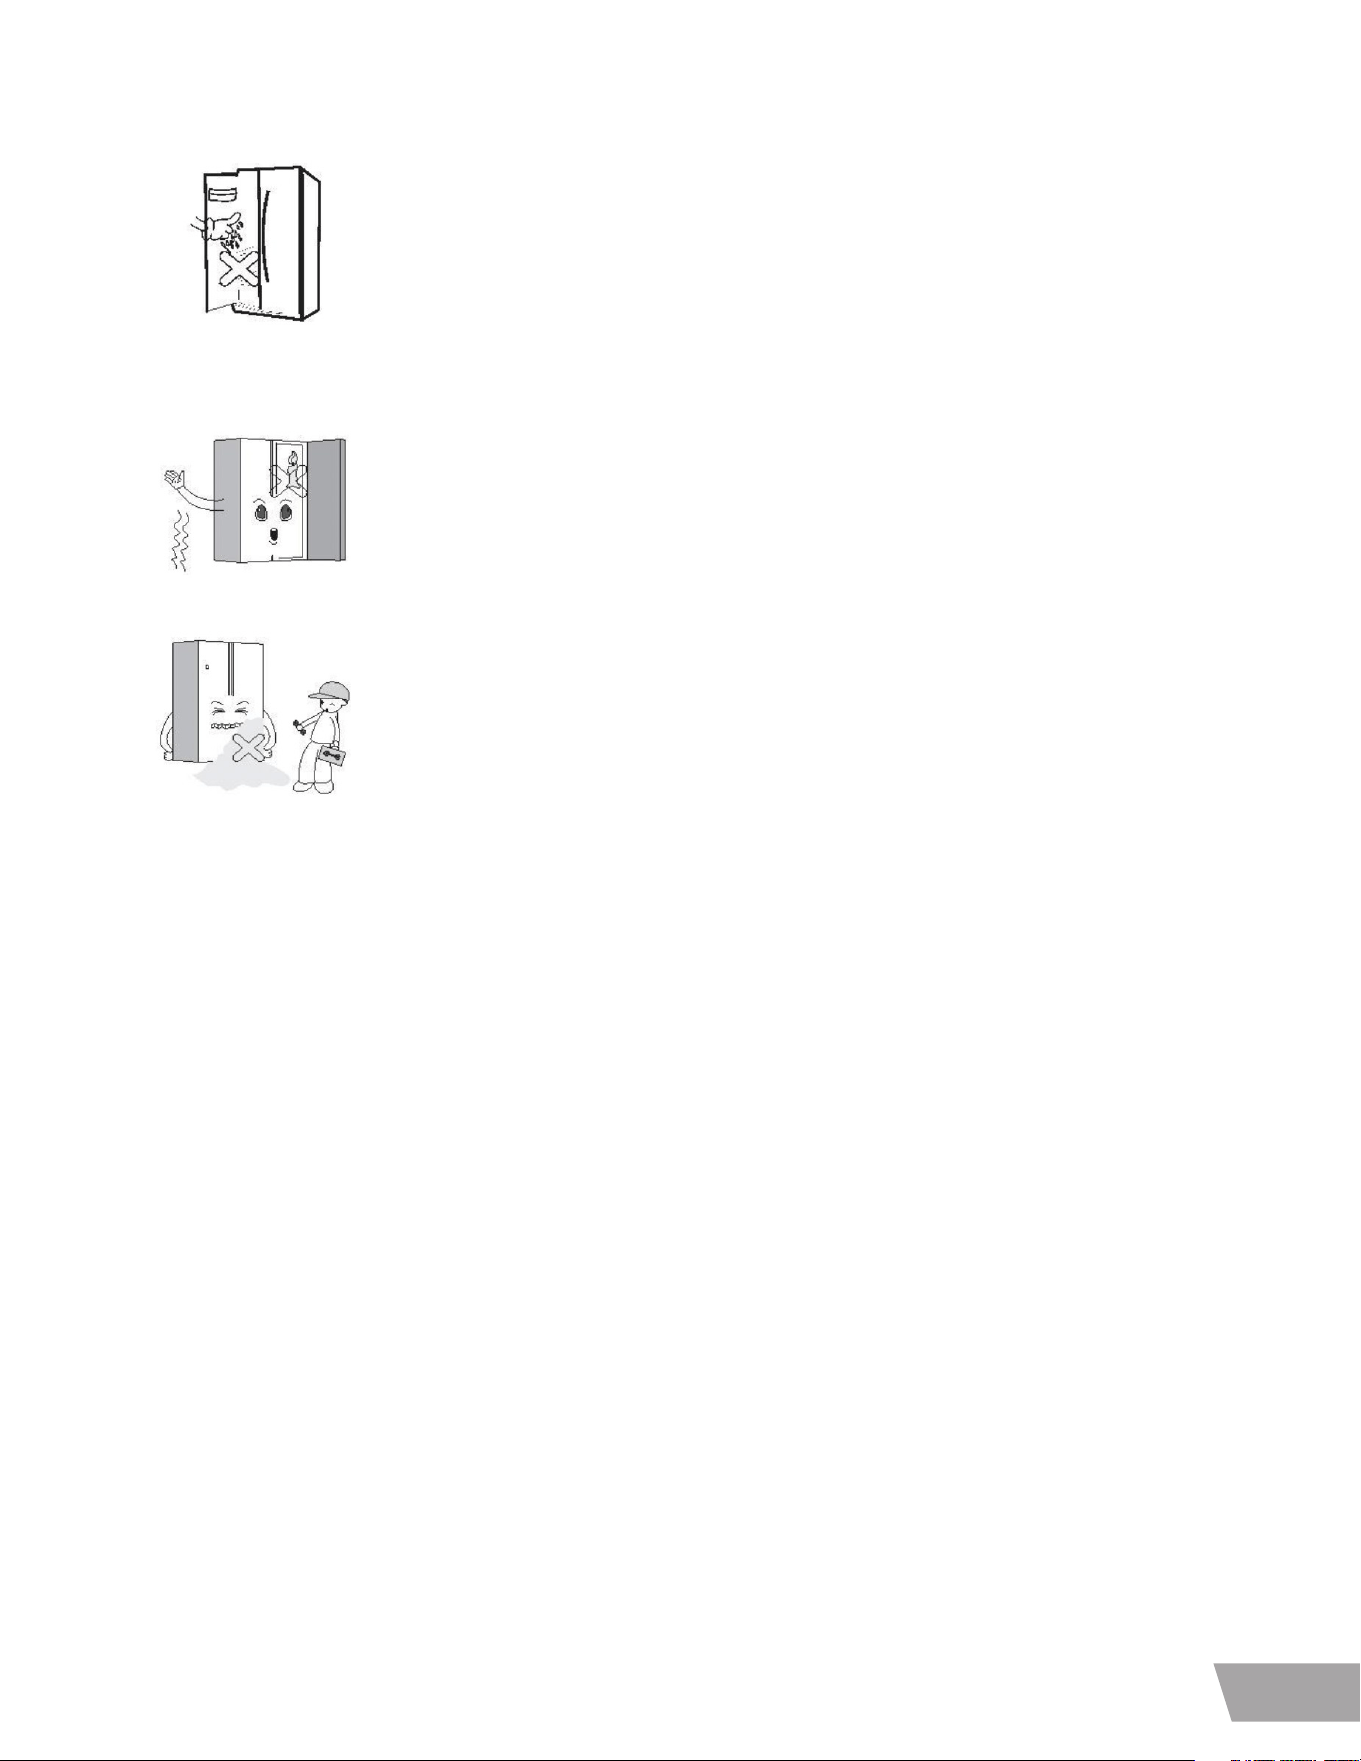
Do not cling to the door or the trays of the door.It may make the fridge fall down and cause
serious injuries or even death. Especially,do not allow the children to do the above.
Do not put ice in a thin crystal cup or ceramic ware.It may break cup or ceramic ware to cause
injury.
Do not allow anyone except a qualified service person to disassemble, repair, or alter the
fridge. Unless directed by the manufacturer.It may cause injury,electric shock or fire.
This appliance is intended to be used in household and similar applications such as:
– sta kitchen areas in shops, oces and other working environments;
– farm houses and by clients in hotels, motels and other residential type environments;
– bed and breakfast type environments;
– catering and similar non-retail applications.
Do not install the fridge in a wet or high humidity environment.Failure to do so will caus
premature deterioration, cause the unit to run more frequently and can cause an electrical
shock.
Install the appliance in a dry,well-ventilated room.
The appliance should be placed close to the wall outlet,it is easy to cut o the power supply at
the time of the accident.
Do not expose the unit to extreme heat or any open flame.
Keep your unit in a well ventilated area, make sure if the unit is built-in that there is adequate
air flow around the unit.
Do not cover or obstruct the exhaust area on the back of your unit, failure to do so may cause
eclectically shock or injury. It may cause electric shock or injury.

10
WARNING:
To reduce the risk of fire, electric shock, or personal injury when using your product, basic safety precautions
should be followed, including the following.
Read all instructions before using this appliance.
• NEVER unplug your refrigerator by pulling on the power cord. Always grip the plug firmly and pull it straight
out from the outlet.
• Immediately repair or replace all power cords that have become frayed or otherwise damaged. Do not use
a cord that shows cracks or abrasion damage along its length or at either the plug or connector end.
• Do not modify or extend the power cord length. It could cause electric shock or fire.
• When moving your refrigerator away from the wall, be careful not to roll over or damage the power cord.
• The insulation in this unit contains cyclopentane or a pentane-like gas which is fiammable and requires a
special elimination process. Before discontinuing use of this refrigerator, contact local authorities to arrange
for safe disposal of the unit.
• DO NOT store or use gasoline or other fiammable vapors and liquids in the vicinity of this or any other appliance.
• DO NOT store explosive substances such as aerosol cans containing fiammable propellants in this appliance.
• DO NOT allow children to climb, stand, or hang on the refrigerator doors or shelves in the refrigerator.
They could damage the refrigerator and seriously injure themselves.
• Keep fingers out of pinch point areas; clearances between the doors and cabinets are necessarily small.
Be careful closing doors when children are in the area.
• Unplug your refrigerator before cleaning or making any repairs.
NOTE:
It is strongly recommended that any service be performed by a qualified technician.
WARNING:
• Before service is performed on the interior LED lighting, unplug the refrigerator or turn o power at the
circuit breaker or fuse box.
NOTE:
The refrigerator and freezer compartment lights are LED interior lighting, and service should be performed by a qualified
technician.
WARNING: Setting either or both controls to the OFF position does not remove power to the light circuit.
11
EN
• When you are finished, reconnect the refrigerator to the electrical source and reset the controls
(Thermostat, Refrigerator Control, and or Freezer Control, depending on the model) to the desired setting.
• This refrigerator must be properly installed in accordance with the Attention Installer Instructions that
were taped to the front of the refrigerator.
• After your refrigerator is in operation, do not touch the cold surfaces in the freezer compartment when
hands are damp or wet. Skin may adhere to the extremely cold surfaces.
• DO NOT touch the automatic ice making mechanism while the refrigerator is plugged in.
• DO NOT refreeze frozen foods which have thawed completely. The United States Department of
Agriculture in Home and Garden Bulletin No. 69 says:
...You may safely refreeze frozen foods that have thawed if they still contain ice crystals or if they are still
cold—below 39.2°F.
...Thawed ground meats, poultry or fish that have any -color should not be refrozen and should not be eaten.
Thawed ice cream should be discarded. If the odor or color of any food is poor or questionable, dispose of it.
The food may be dangerous to eat.
Even partial thawing and refreezing reduces the eating quality of foods, particularly fruits, vegetables and
prepared foods. The eating quality of red meats if aected less than that of many other foods.
Use refrozen foods as soon as possible to save as much of their quality as you can.
CAUTION:
This appliance is not intended for use by persons (including children) with reduced physical, sensory or
mental capabilities, or lack of experience and knowledge, unless they have been given supervision or
instruction concerning use of the appliance by a person responsible for their safety.
Children should be supervised to ensure that they do not play with the appliance.
DANGER:
Risk of child entrapment
Junked or abandoned refrigerators are dangerous, even if they are sitting for only a few days. If you are getting
rid of your old refrigerator, please follow the instructions at right to help prevent accidents (child entrapment
and suocation.
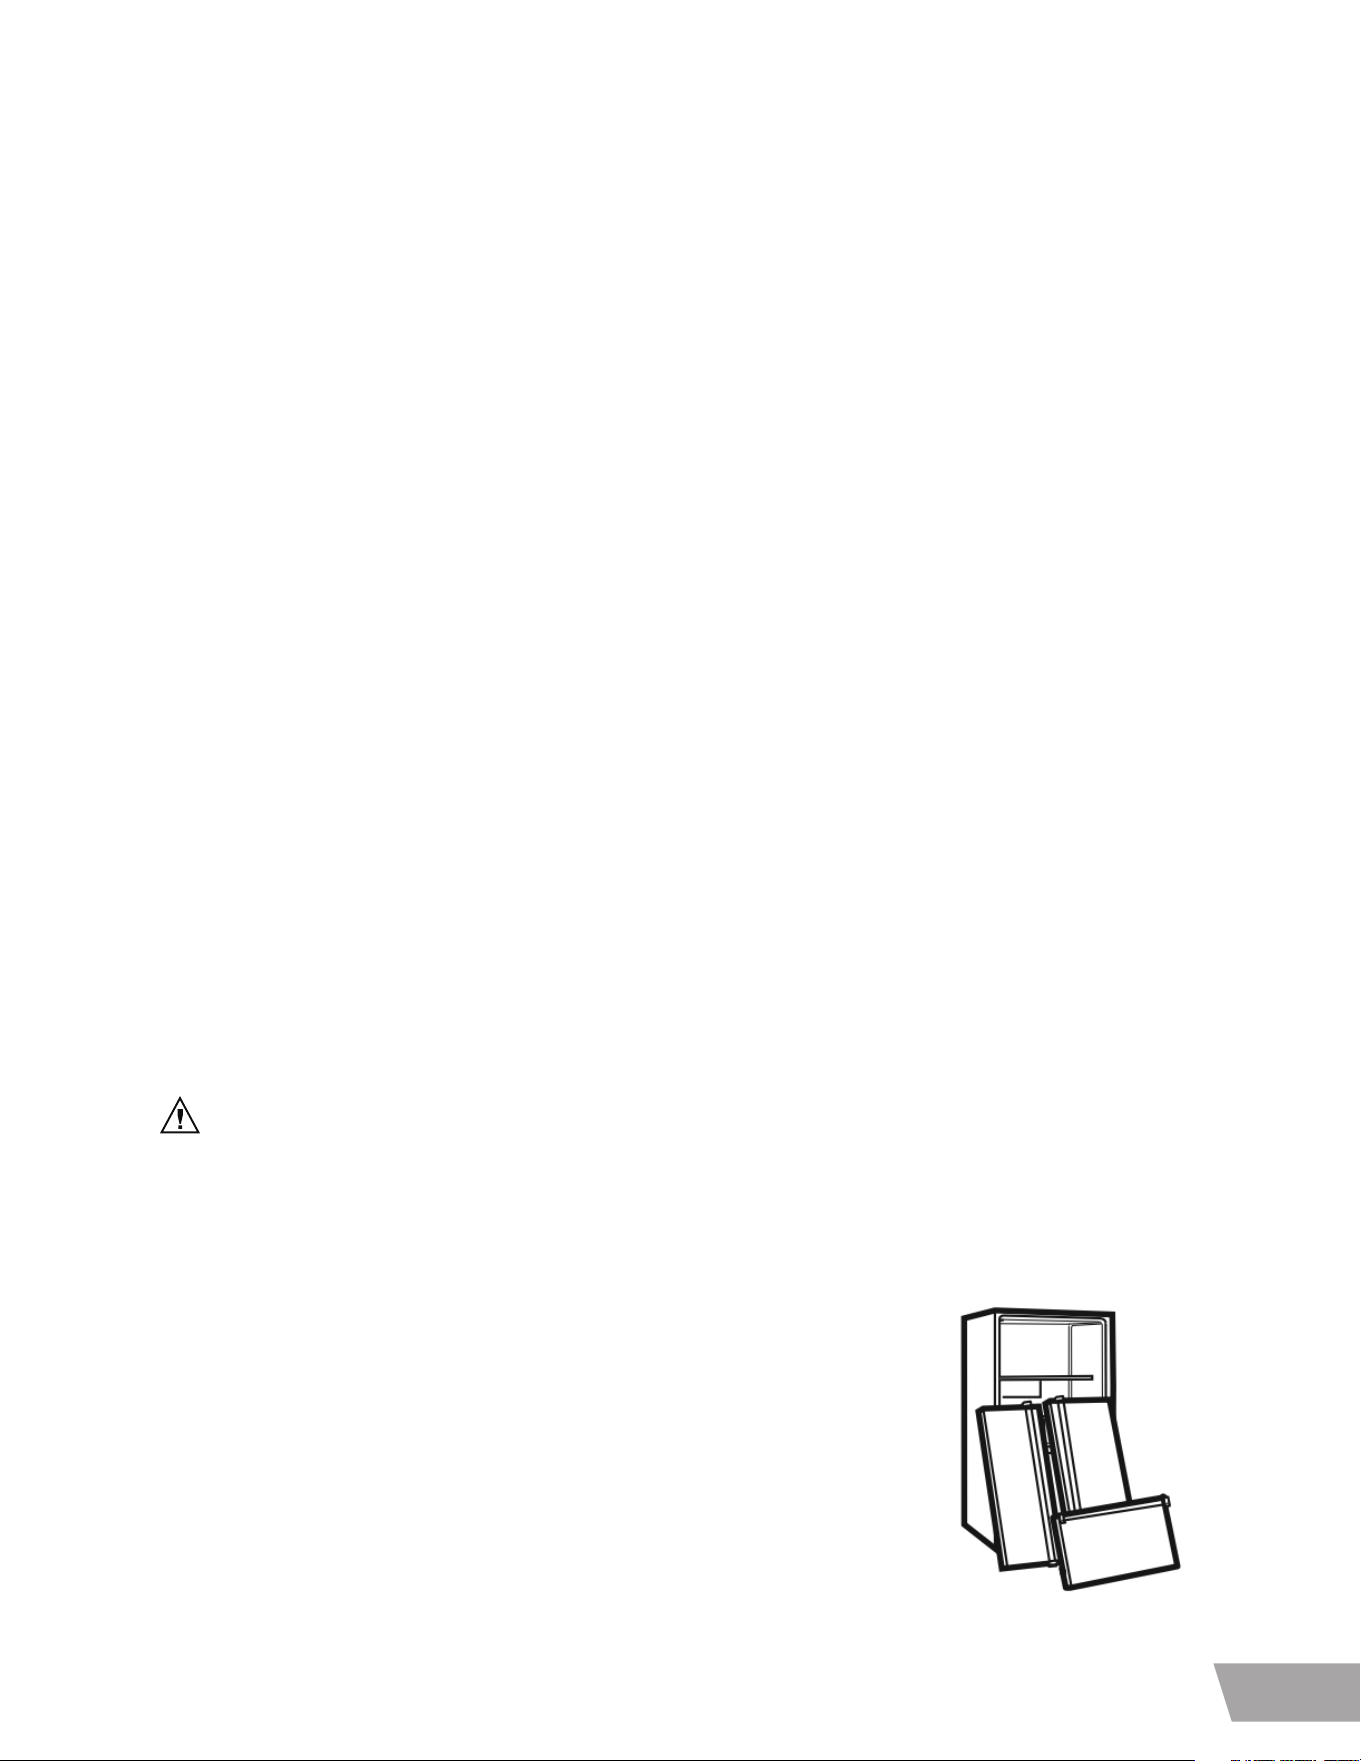
BEFORE YOU THROW AWAY YOUR OLD REFRIGERATOR OR FREEZER:
• Take o the doors.
• Leave the shelves in place so that children may not easily climb inside.
12
CFC/HCFC Disposal
Your old refrigerator may have a cooling system that used CFCs or HCFCs (chlorofluorocarbons or hydrochlorofluorocarbons).
CFCs and HCFCs are believed to harm stratospheric ozone if released to the atmosphere.
Other refrigerants may also cause harm to the environment if released to the atmosphere.
If you are throwing away your old refrigerator, make sure the refrigerant is removed for proper disposal by a qualified
technician. If you intentionally release refrigerant, you may be subject to fines and imprisonment under provisions of
environmental legislation.
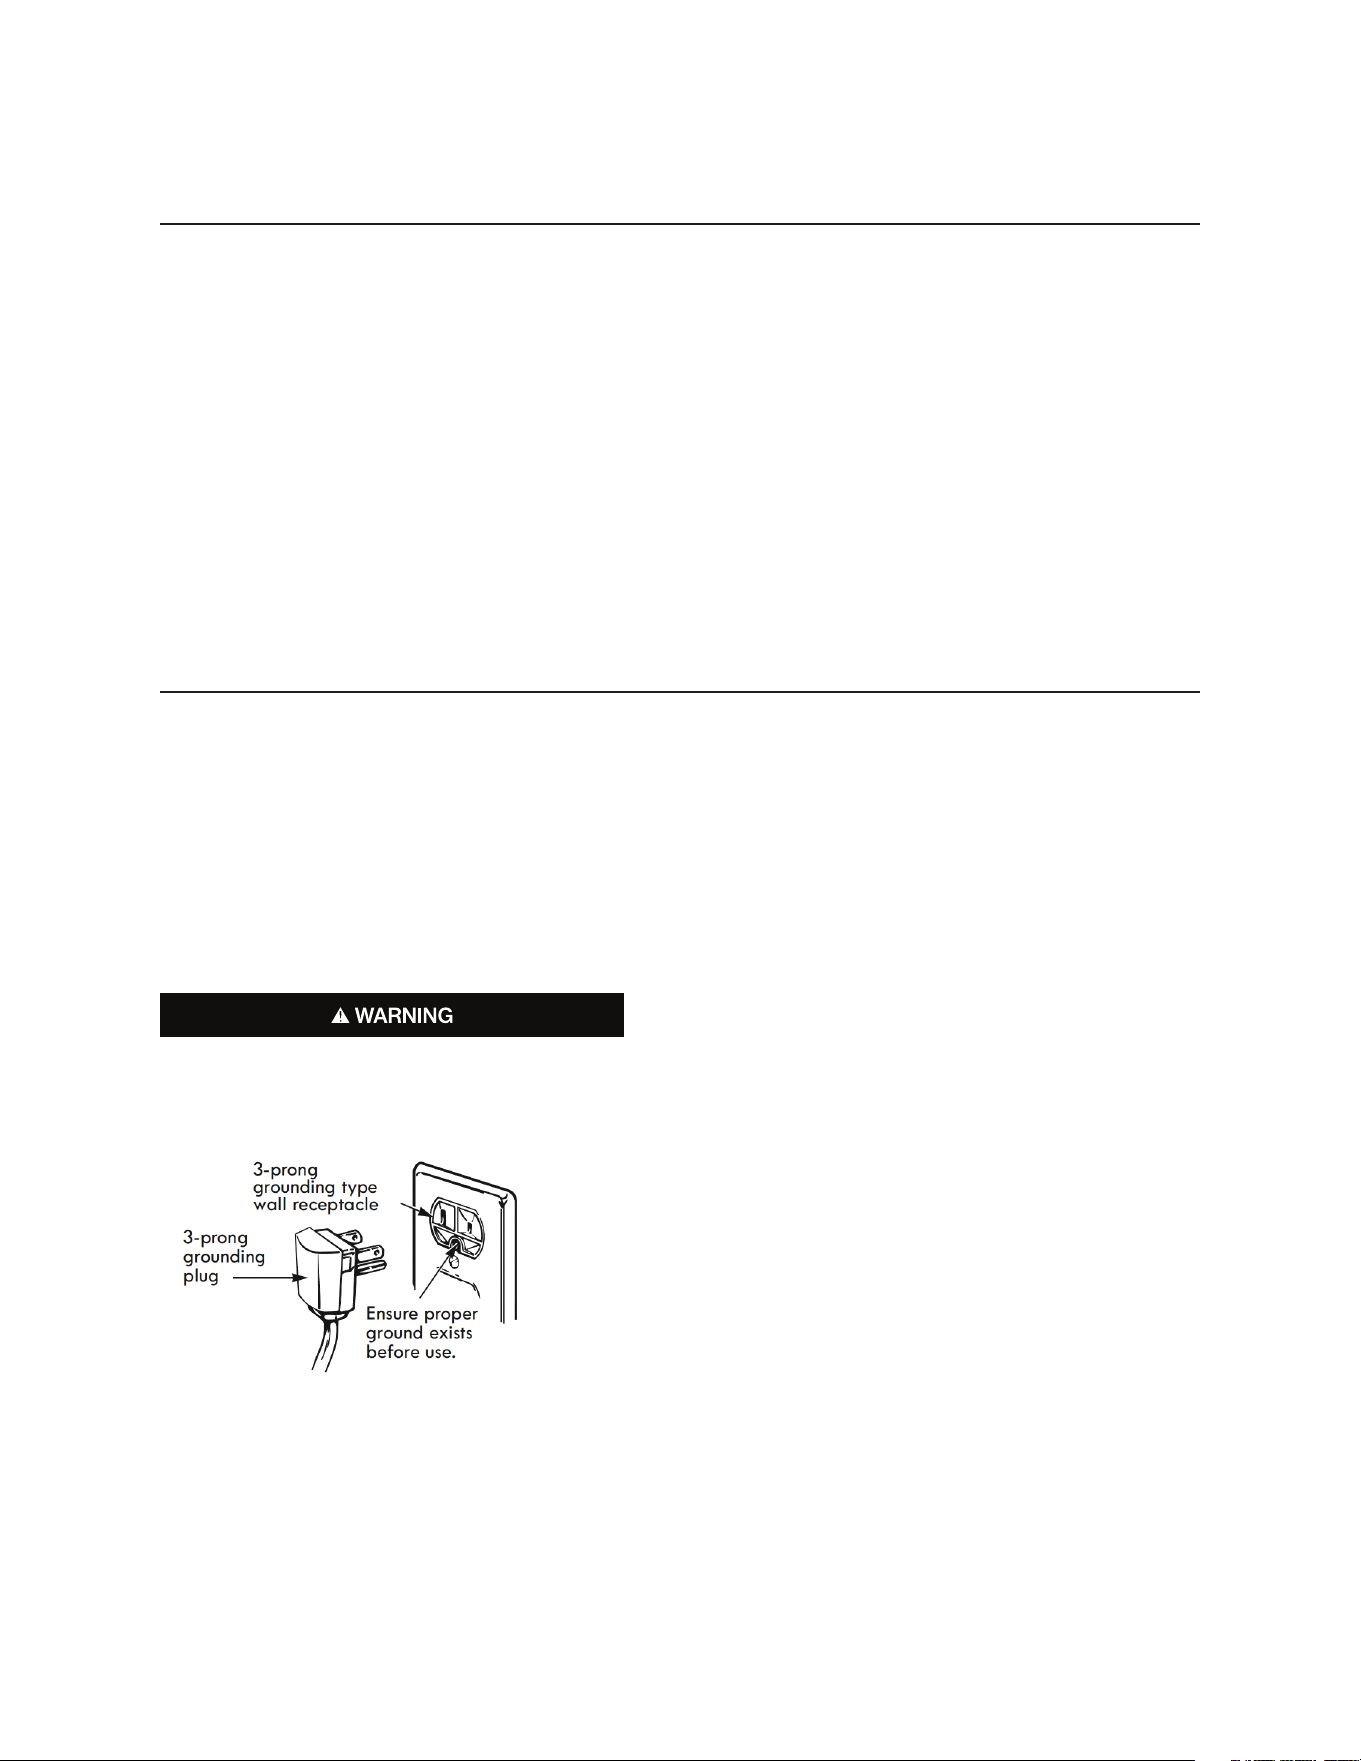
Electrical & Grounding Requirements
IMPORTANT: Please read carefully.
TO CONNECT ELECTRICITY
Electrical Shock Hazard:
FOR PERSONAL SAFETY, this appliance must be properly
grounded. Have the wall outlet and the circuit checked by
a qualified electrician to make sure the outlet is properly
grounded.
13
EN
RECOMMENDED GROUNDING METHOD
The refrigerator should always be plugged into its own individual properly grounded electrical outlet rated for 115 Volts, 60 Hz,
AC only, and fused at 15 amperes (minimum). This provides the best performance and also prevents overloading house wiring
circuits which could cause a fire hazard from overheated wires. It is recommended that a separate circuit serving only this
appliance be provided.
Use a receptacle that cannot be turned o with a switch or pull chain. Do not use an extension cord.
Where a standard two-prong wall outlet is encountered, it is your personal responsibility and obligation to have it replaced
with a properly grounded three-prong wall outlet.
USE OF EXTENSION CORDS
WARNING: Do not use extension cords or ungrounded (two-prong) adaptors. Because of potential safety
hazards under certain conditions, the use of an extension cord is not recommended.
However, if you still elect to use an extension cord, it is absolutely necessary that it be a UL-listed (USA), 3-wire
grounding type appliance extension cord having a grounding type plug and outlet, and that the electrical rating of the
cord be 15 ampere (minimum) and 120 volts.
Use of an extension cord will increase the clearance needed for the back of the refrigerator.
Do not bend the power cord excessively or place heavy
articles on it.
Connect the power plug in the proper position with the cord
hanging down.
When moving the refrigerator, be careful not to roll over or
damage the power cord.
If the power cord is damaged, have it replaced immediately by
the manufacturer or its service agent.
Do not insert the power plug with wet hands.
Do not insert your hands into the area under the bottom of the
appliance.
Make sure that the power plug is not squashed or damaged by
the back of the refrigerator.
Replacing Electrical Cord:
To avoid hazard, damaged power cords must be replaced by
the manufacturer or its service agent or a similarly qualified
technician. Do not operate the appliance with a damaged
power cord.
•
•
•
•
•
•
•
14
Product Introduction
Product features
This un
it container super freeze, energy-savings, noise reduction, optimal refrigeration are preset options for your unit.
Precise temperature control
Microcomputer control systems are able to separately control both the fridge and freezer more accurately.
Automatic defrosting
This unit is equipped with a program that controls the frequency and duration of defrosting your freezer. This will make sure
that you never need to manually defrost the freezer.
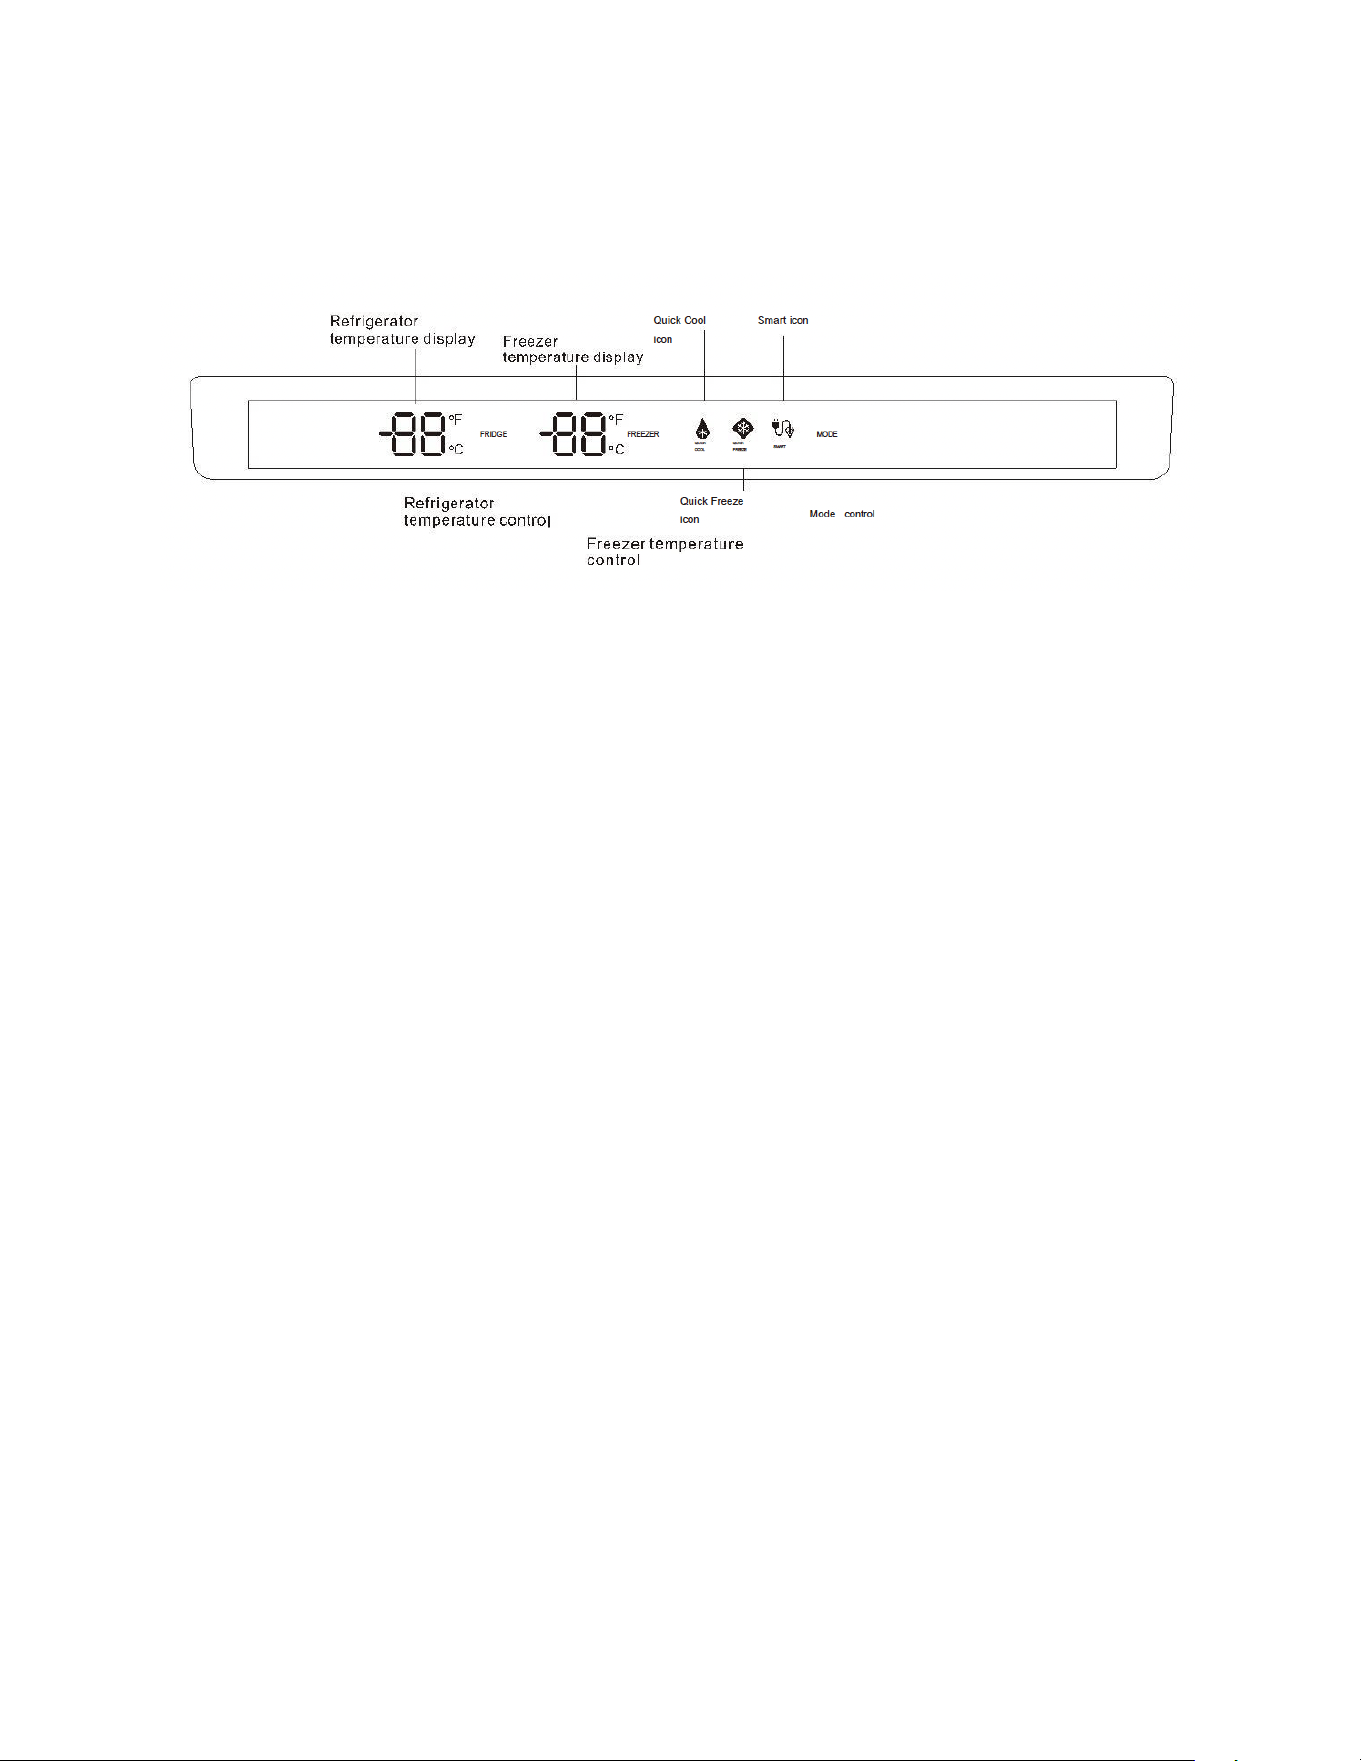
LED display and temperature controls
The control board respectively displays the fridge and freezer temperatures. To change the setting in either section simply
press the up or down arrow depending on the chance you would like made.
Tempered glass, safe and reliable
Tempered glass, is safe and reliable, easy to clean and durable.
Easy clean and removable door seal
The door seal(s) are easy to remove and clean, allowing the product to operate eciently for longer.
Automatic ice maker
The refrigerator has the function of automatic ice making.
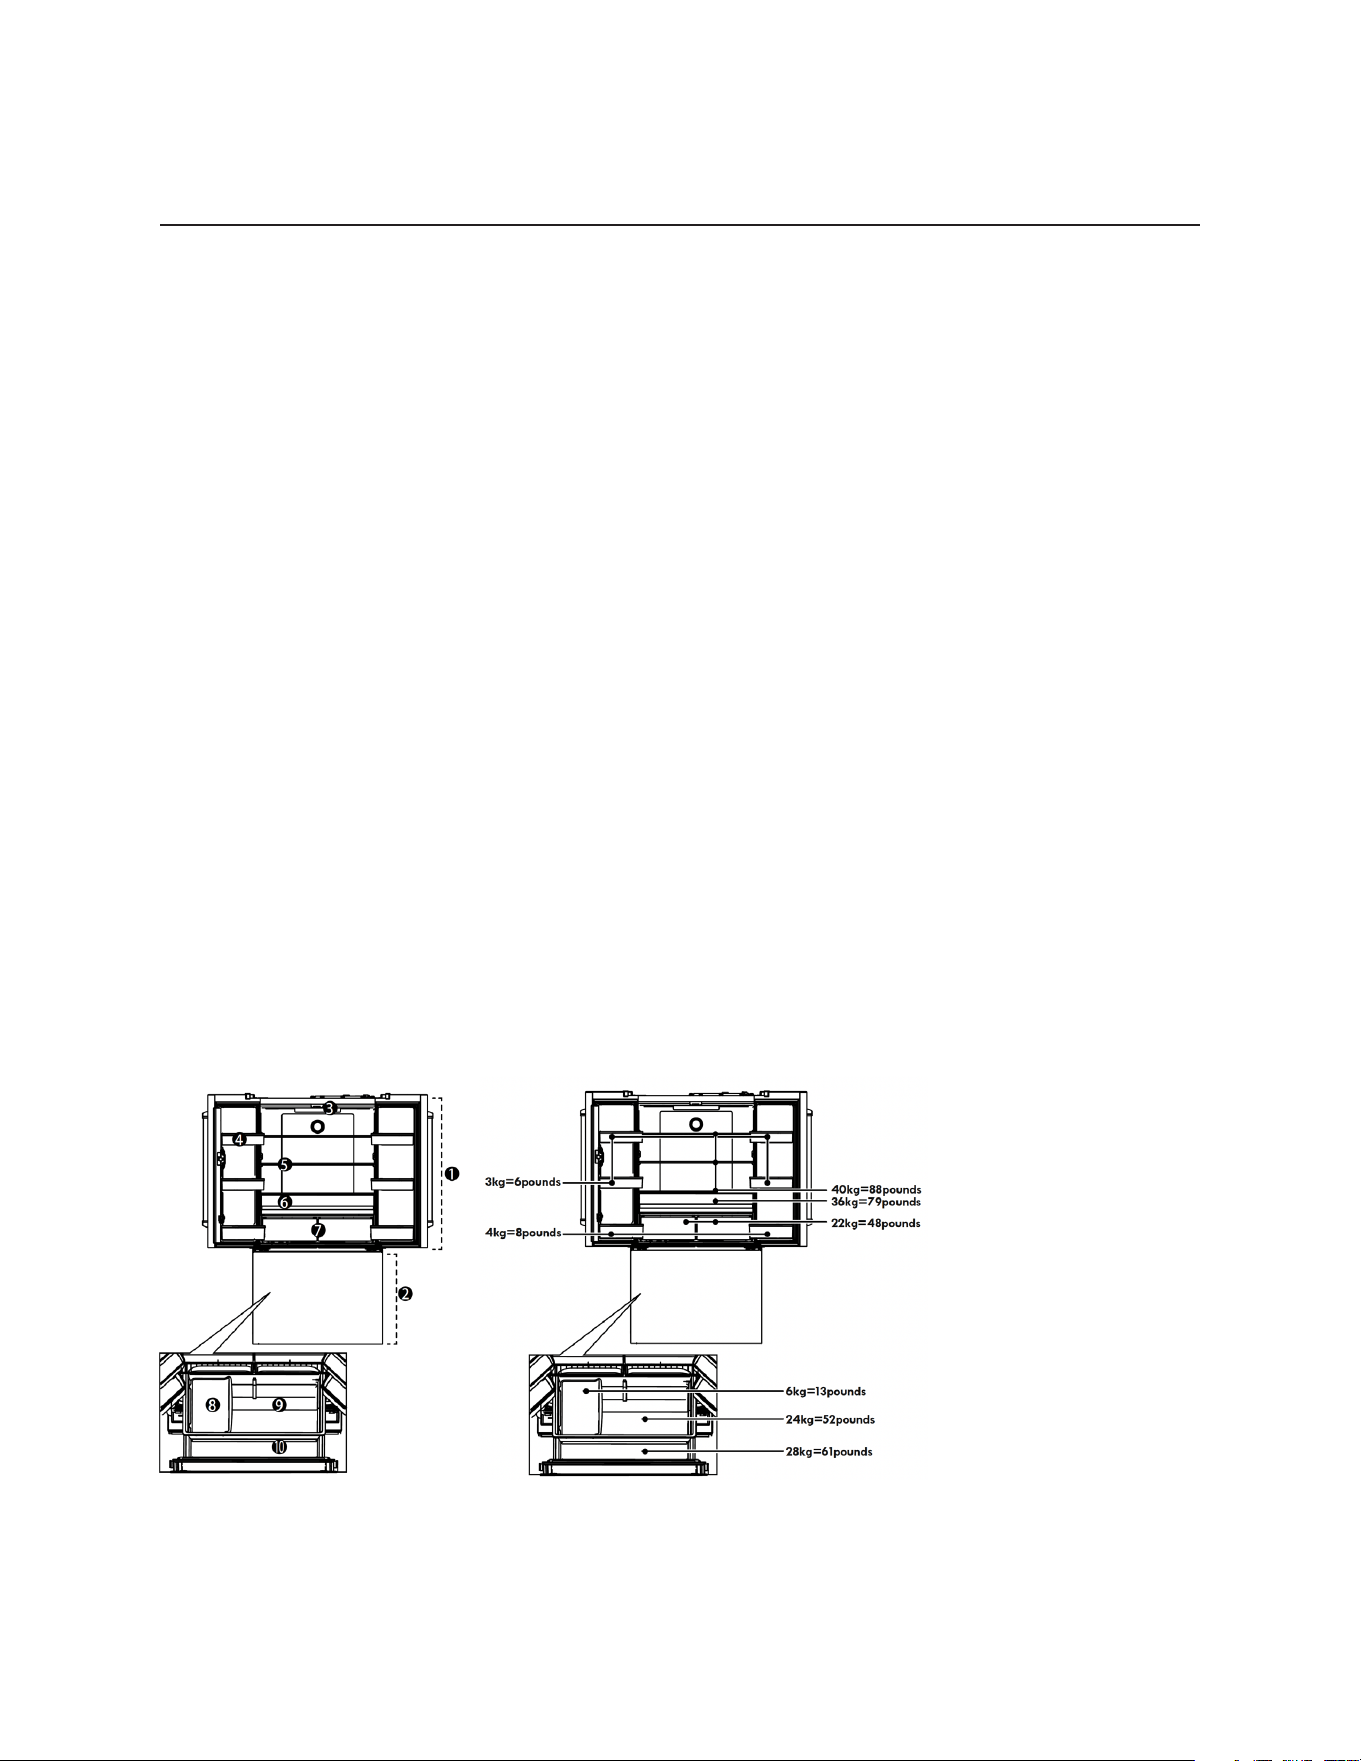
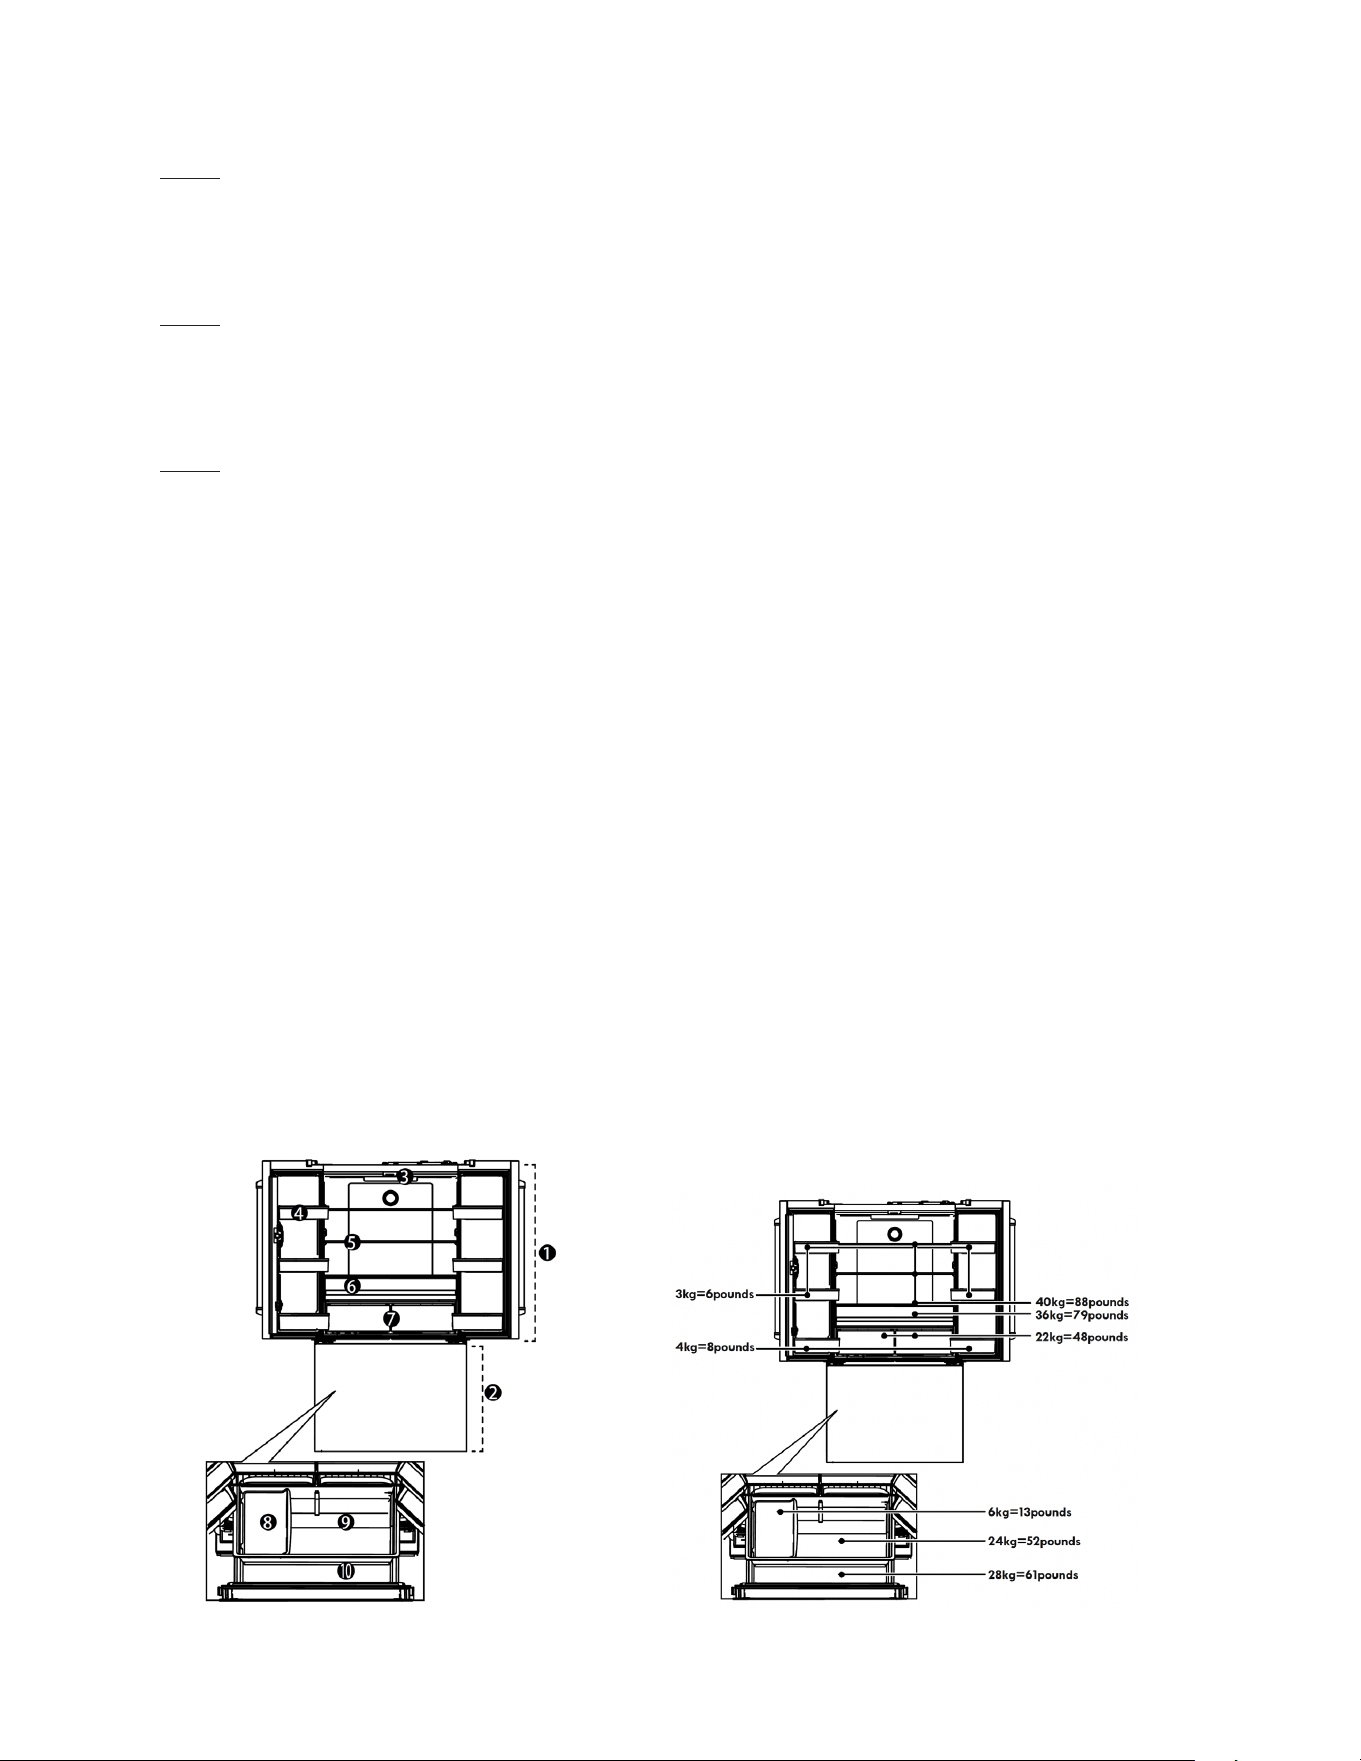
Product components
The layout of items below are subject to change without notice, and may not look or come setup as seen in the picture below.
The appearance and specifications of the actual product may dier depending on the model.
Figures in this user manual are schematic and may not match the product exactly. If the subject parts are not included in the
product you have purchased, then those parts are only valid for other models.
1 Fridge Compartment
2 Bottom Freezer
3 Display/Indicator Panel
4 Door Racks
5 Glass Shelves
6 Full Width Drawer
7 Vegetable Crisper Drawer
8 Ice Tank
9 Upper Drawer
10 Lower Drawer

15
EN
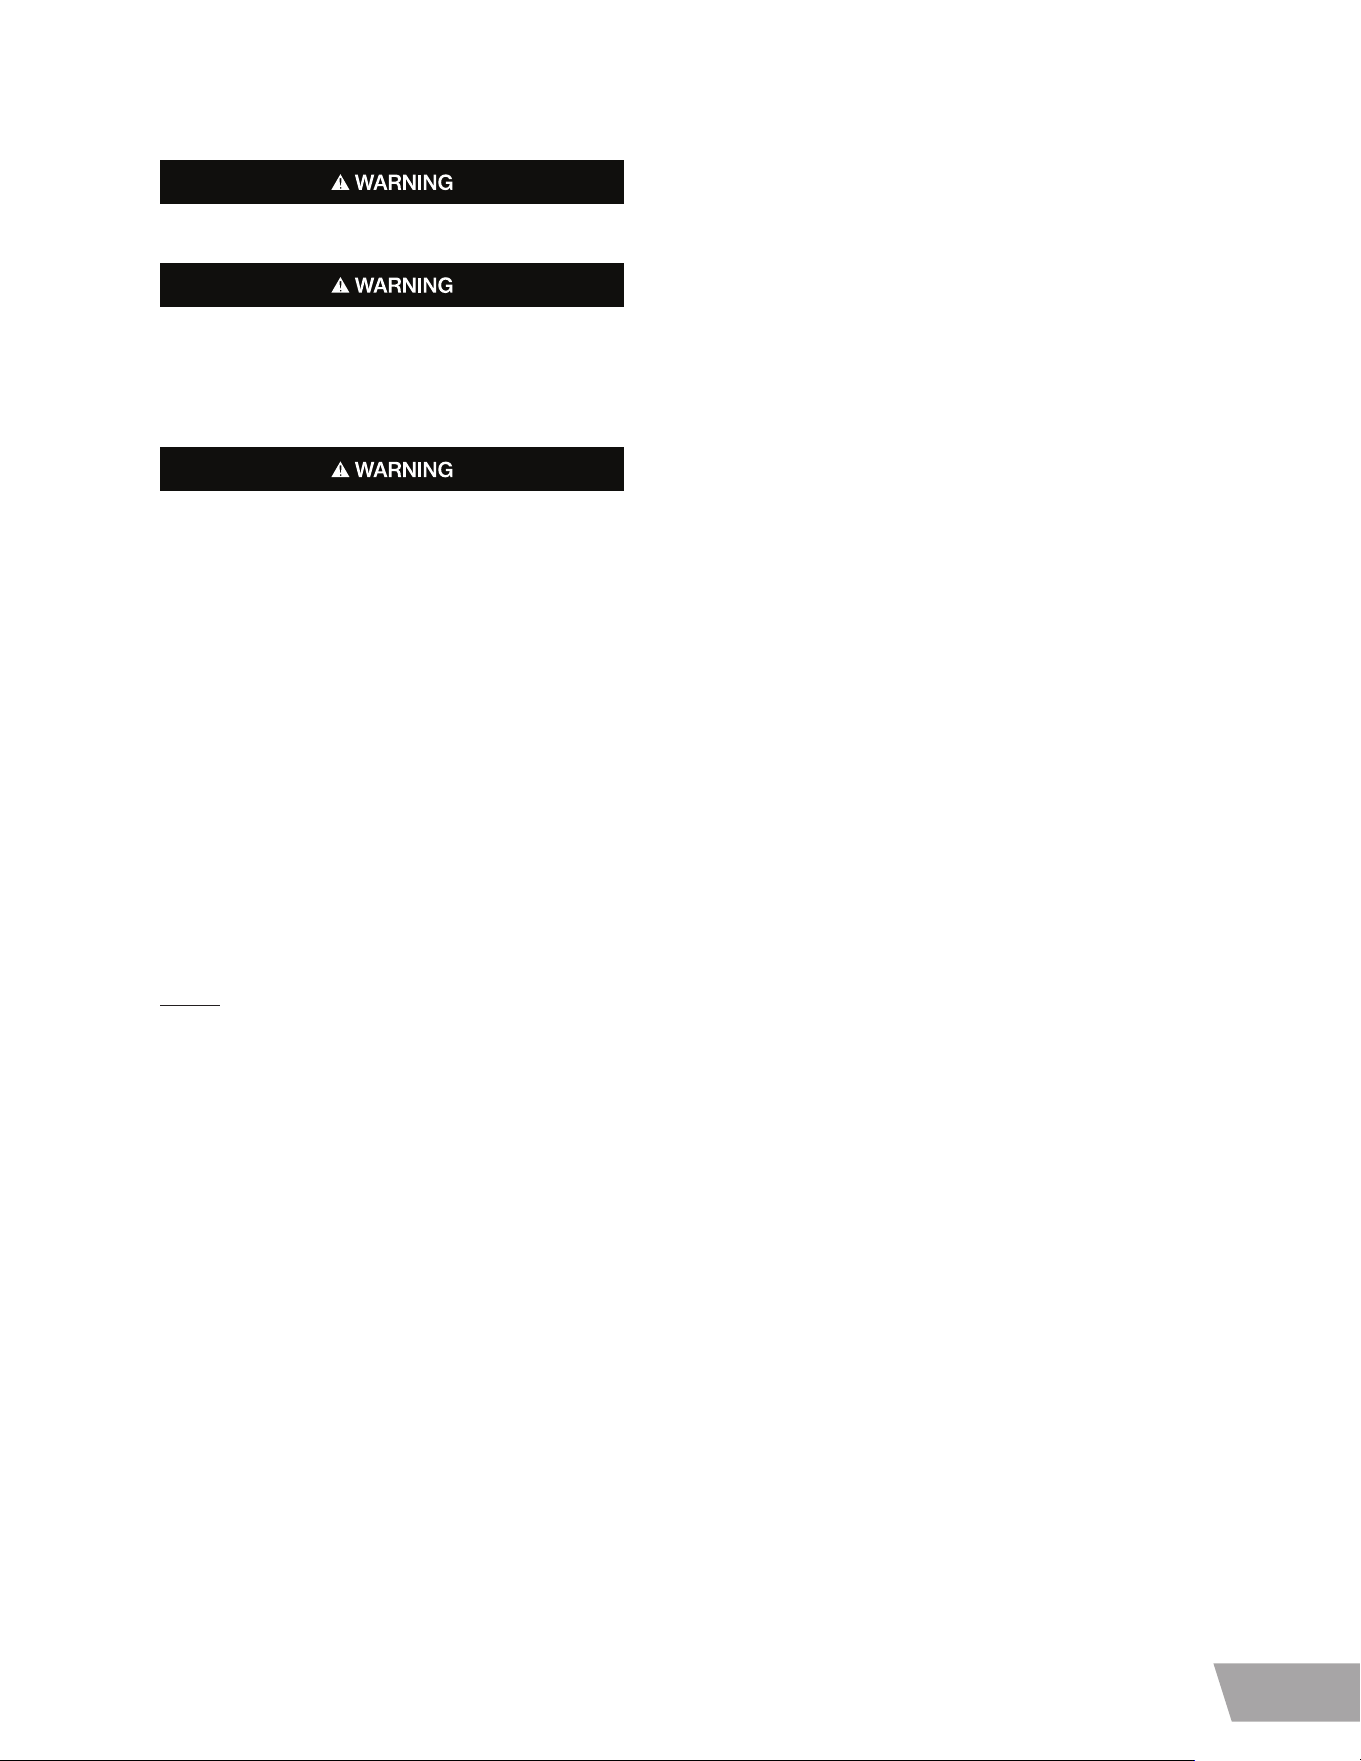
Installation dimension
Select a good location to place your appliance where it is flat and easy to use. Avoid placing the unit near heat sources,direct
sunlight or moisture.
The above figures are a guideline for installation purposes. The actual dimensions of the unit may vary slightly.
To ensure that your unit works at peak eciency please maintain sucient space around your unit.
FRONT SIDE TOP
70"
1
⁄
16
36"
(1780mm)
(911mm)
27"
3
⁄
16
70"
1
⁄
16
13
⁄
16
(1780mm)
(706mm)
(610mm)
24"
36"
24"
3
⁄
16
(911mm)
(610mm)
70"
1
⁄
16
(1780mm)
72"
5
⁄
8
(1844mm)
36"
1
⁄
3
(922mm)
25"
1
⁄
4
(641mm)
27"
1
3
⁄
1
6
(706mm)
30"
3
⁄
8
(771mm)
65"
1
⁄
8
43"
1
⁄
4
27"
13
⁄
16
38"
5
⁄
8
(706mm)
(1098mm
(1654mm)
(980mm)
)
16
Installation
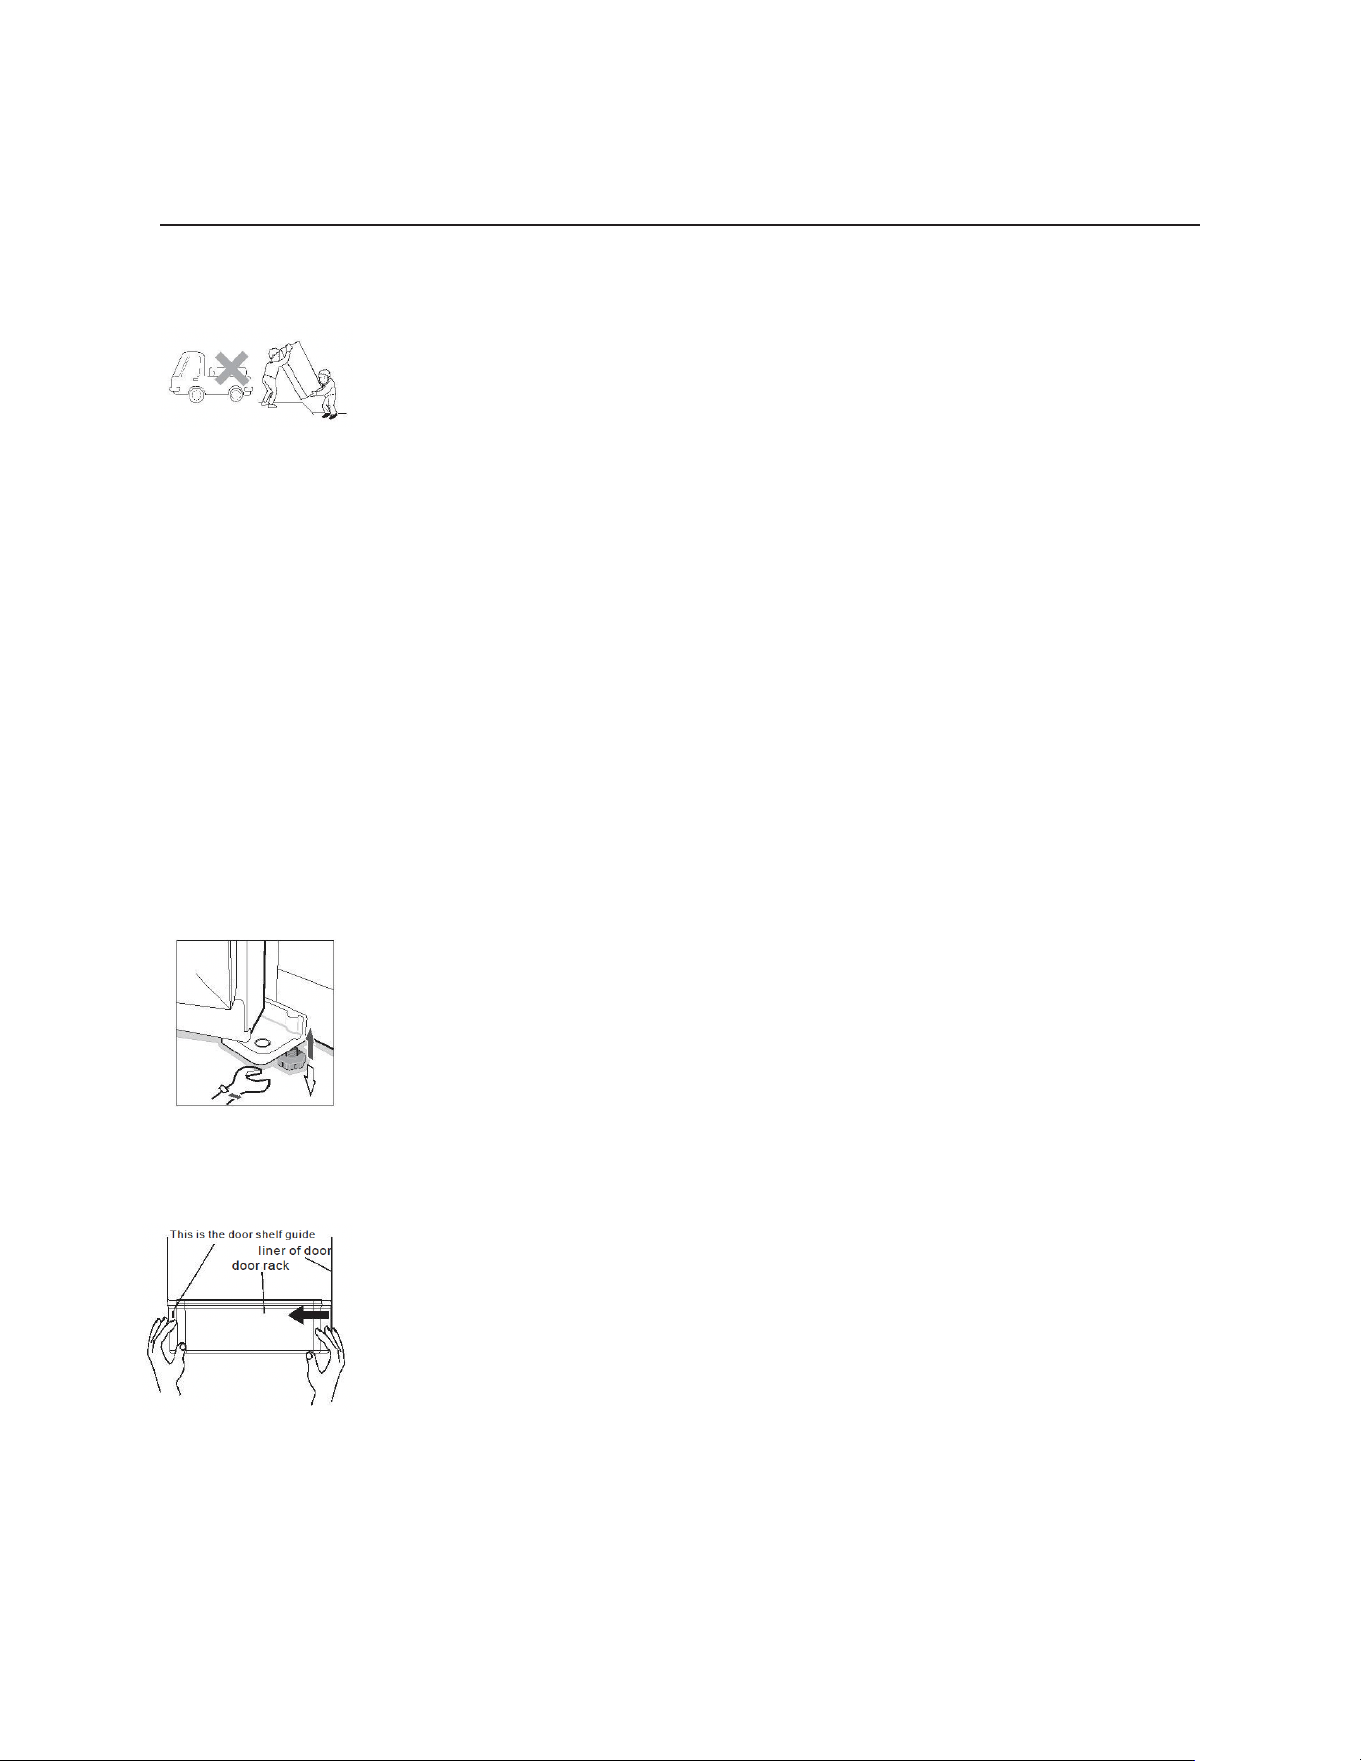
Transportation
Do not carry the refrigerator horizontally or by laying it down.
Do not carry the refrigerator by holding the door or handle; the refrigerator shall be carried by lifting
the bottom.
This unit should never be moved alone, two people are required to safely lift or move your unit.
Where to install your unit
The refrigerator must be placed on hard, flat ground; if cushioning is needed, stable, hard,
nonflammable cushion blocks shall be used.
DO NOT USE THE FOAM PACKAGING AS CUSHIONING BLOCKS!
The unit shall be kept away from damp locations where water is present.Water or dirt should be
removed from any surface of the unit as soon as possible using a soft cloth. This will help prevent rust
and will help your unit run at peak eciency.
Place the refrigerator in a well-ventilated place, reserve a certain space around and behind the
refrigerator, and do not cover or block the air grille on the rear cover plate of compressor at the back
of refrigerator; Keep the refrigerator away from heat source or direct sunlight.
Adjustable plastic feet
When the refrigerator stays in the packing box, plastic feet are in tightened state.
After carrying it out from the packing box for placement, please make sure to adjust two front plastic
feet until the height is suitable; just adjust two plastic feet with a wrench or directly by hand.
Plastic feet and rear rollers must touch the ground to prevent the refrigerator from movement,
vibration or noise.
When moving the refrigerator, adjust plastic feet counterclockwise to keep them o the ground,
and then push the refrigerator gently to move it.
Door rack
Disassembly: Hold both sides of the door rack with both hands. Push it from the side without the
guide and push it inward as seen in the diagram.Push until the edge of the door rack is separated from
the grove of the liner.
Installation: Hold both sides of the door rack with both hands. Install the buckle of the guide side at
first. Then push the other side inward slightly,the guide will then click into place and the door rack will
be installed. Please make sure it is installed properly before use.
17
EN
Excessive Weight Hazard:
Use two or more people to move and install the refrigerator.
Failure to do so can result in back or other injury.
Excessive Weight Hazard:
The refrigerator is heavy. When moving the refrigerator for
cleaning or service, be sure to protect the floor. Always pull
the refrigerator straight out when moving it. Do not wiggle or
walk the refrigerator when trying to move it,as floor damage
could occur.
Explosion Hazard:
Keep flammable materials and vapors, such as gasoline,
away from the refrigerator. Failure to do so can result in fire,
explosion,or death.
UNPACKING THE REFRIGERATOR
Remove tape and any temporary labels from the refrigerator before using. Do not remove any warning labels,the model and
serial number label, or the Tech Sheet that is located under the front of the refrigerator, behind the base grille.
To remove any remaining tape or glue, rub the area briskly with your thumb. Tape or glue residue can also be easily removed
by rubbing a small amount of liquid dish soap over the adhesive with your fingers. Wipe with warm water and dry.
Do not use sharp instruments, rubbing alcohol, flammable fluids, or abrasive cleaners to remove tape or glue.
These products can damage the surface of the refrigerator.
Refrigerator shelves are installed in the shipping position. Please reinstall shelves according to your individual storage needs.
NOTE:
This appliance is intended to be used in household and similar applications such as:
• sta kitchen areas in shops,oces and other working environments
• farm houses and by clients in hotels, motels and other residential environments
• bed and breakfast environments
• catering and similar non-retail applications.
This product is not to be used for special purposes such as the storage of medicine or test materials, or for use on ships, etc.
18
Be careful when you work with the hinge, stopper, etc.
You may be injured. To avoid risk of injury or electrical shock,
do not put hands or metal objects into the air vents or bottom
opening of the refrigerator.
Shock Hazard:
To reduce the risk of electric shock, do not install the
refrigerator in a wet or damp area.
INSTALLATION
The refrigerator should always be plugged into its own individual properly grounded electrical outlet rated for 115 Volts,60 Hz,
AC only, and fused at 15 amperes (minimum). This provides the best performance and also prevents overloading house wiring
circuits which could cause a fire hazard from overheated wires. It is recommended that a separate circuit serving only this
appliance be provided.
1. To avoid noise and vibration, the unit must be leveled and installed on a solidly constructed floor. If required, adjust the
leveling legs to compensate for unevenness of the floor. The front should be slightly higher than the rear to aid in door closing.
Leveling legs can be turned easily by tipping the cabinet slightly. Turn the leveling legs counterclockwise to raise the unit or
clockwise to lower it. (See LEVELING and DOOR ALIGNMENT.)
NOTE:
Installing on carpeting, soft tile surfaces, a platform or weakly supported structure is not recommended.
2. Install this appliance in an area where the temperature is between 50°F(10°C ) and 110°F(43°C). If the temperature around
the appliance is too low or high, cooling ability may be adversely aected.
3. Select a place where a water supply can be easily connected for the automatic icemaker.
NOTE:
The water pressure must be between 20 and 100 psi (138 - 689kPa) on models without a water filter and between 30 and
100 psi (207 - 689kPa) on models with a water filter.
4. Too small of a distance from adjacent items may result in lowered freezing capability and increased electricity
consumption charges. Allow at least 15.7 inches (40 cm) in front of the refrigerator to open the doors.
64
19
EN
NOTE:
Removing the doors is the recommended procedure when it is necessary to move the refrigerator through a narrow opening.
If it is necessary to remove the handles, follow the directions below.
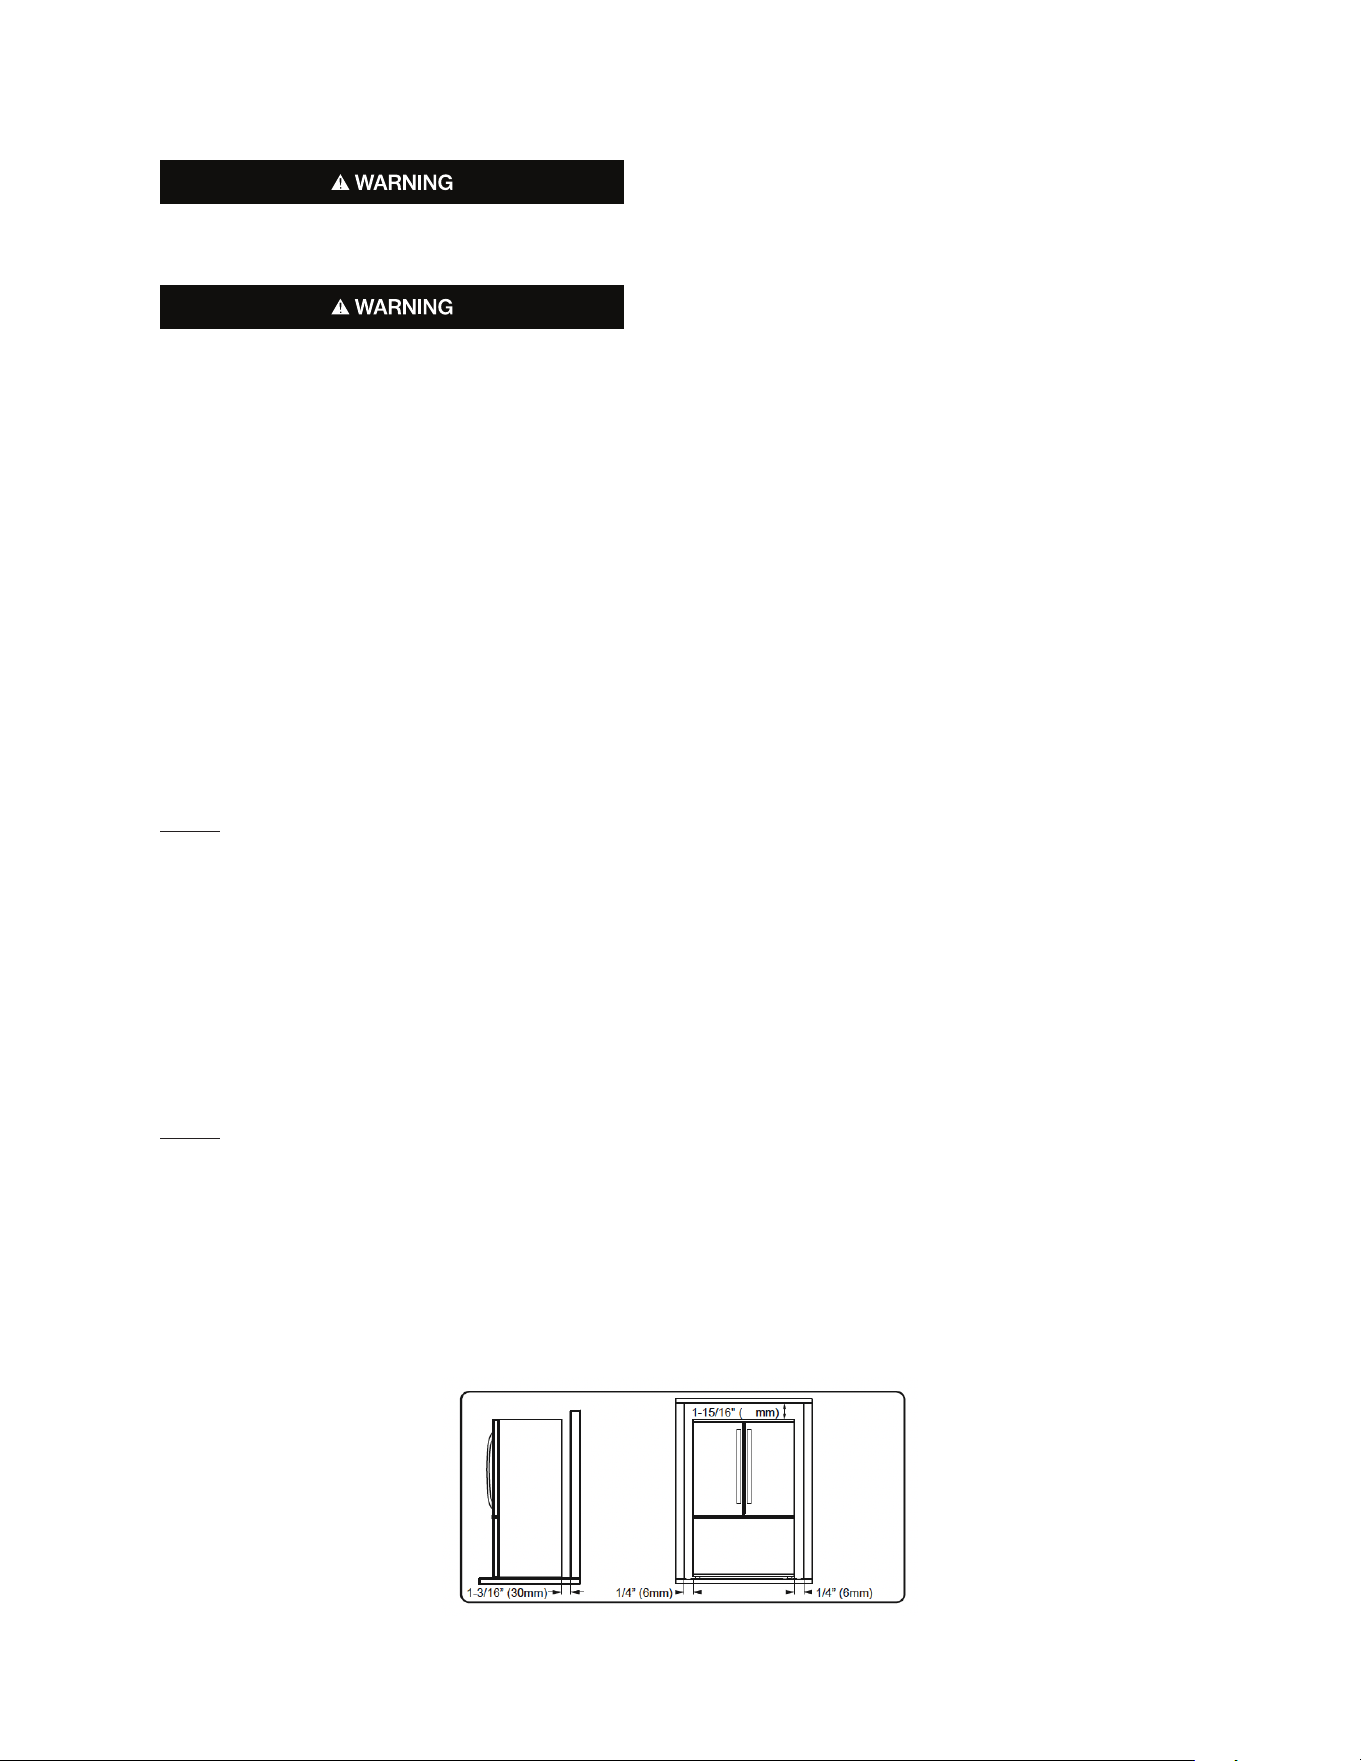
HOW TO REMOVE REFRIGERATOR DOOR HANDLE
NOTE:
Handle appearance may vary from the illustrations on this page.
Loosen the set screws with a 3/32 in. (2.5 mm)
Allen wrench and remove the handle.
HOW TO REPLACE FREEZER DRAWER HANDLE
NOTE:
Handle appearance may vary from the illustrations on this page.
Place the right end of the handle over the mounting
bolt on the right side of the freezer drawer and
carefully slide handle to the right until it stops.
Lower the left end of the handle over the left side
mounting bolt. Use a 2.5 mm hex key to tighten the
set screw to secure the handle in place.
When assembling or disassembling the handles:
Grasp the handle firmly to ensure it will not drop or cause
injury.
Prevent the handle from swinging toward nearby people or
animals.
Insert the handle footprints over the door mounting
fasteners and tighten the hex screws to fix the handle in place.
Check for any gap between the door and handle after the
handle is fixed in place.
•
•
•
•
20
•
•
REMOVING AND REPLACING REFRIGERATOR DOORS
Excessive Weight Hazard:
Use two or more people to remove and install the refrigerator
doors. Failure to do so can result in back or other injury.
Electrical Shock Hazard:
Disconnect the electrical supply to the refrigerator before
installing. Failure to do so could result in serious injury or death.
Do not put hands, feet or other objects into the air vents or
bottom of the refrigerator. You may be injured or receive an
electrical shock.
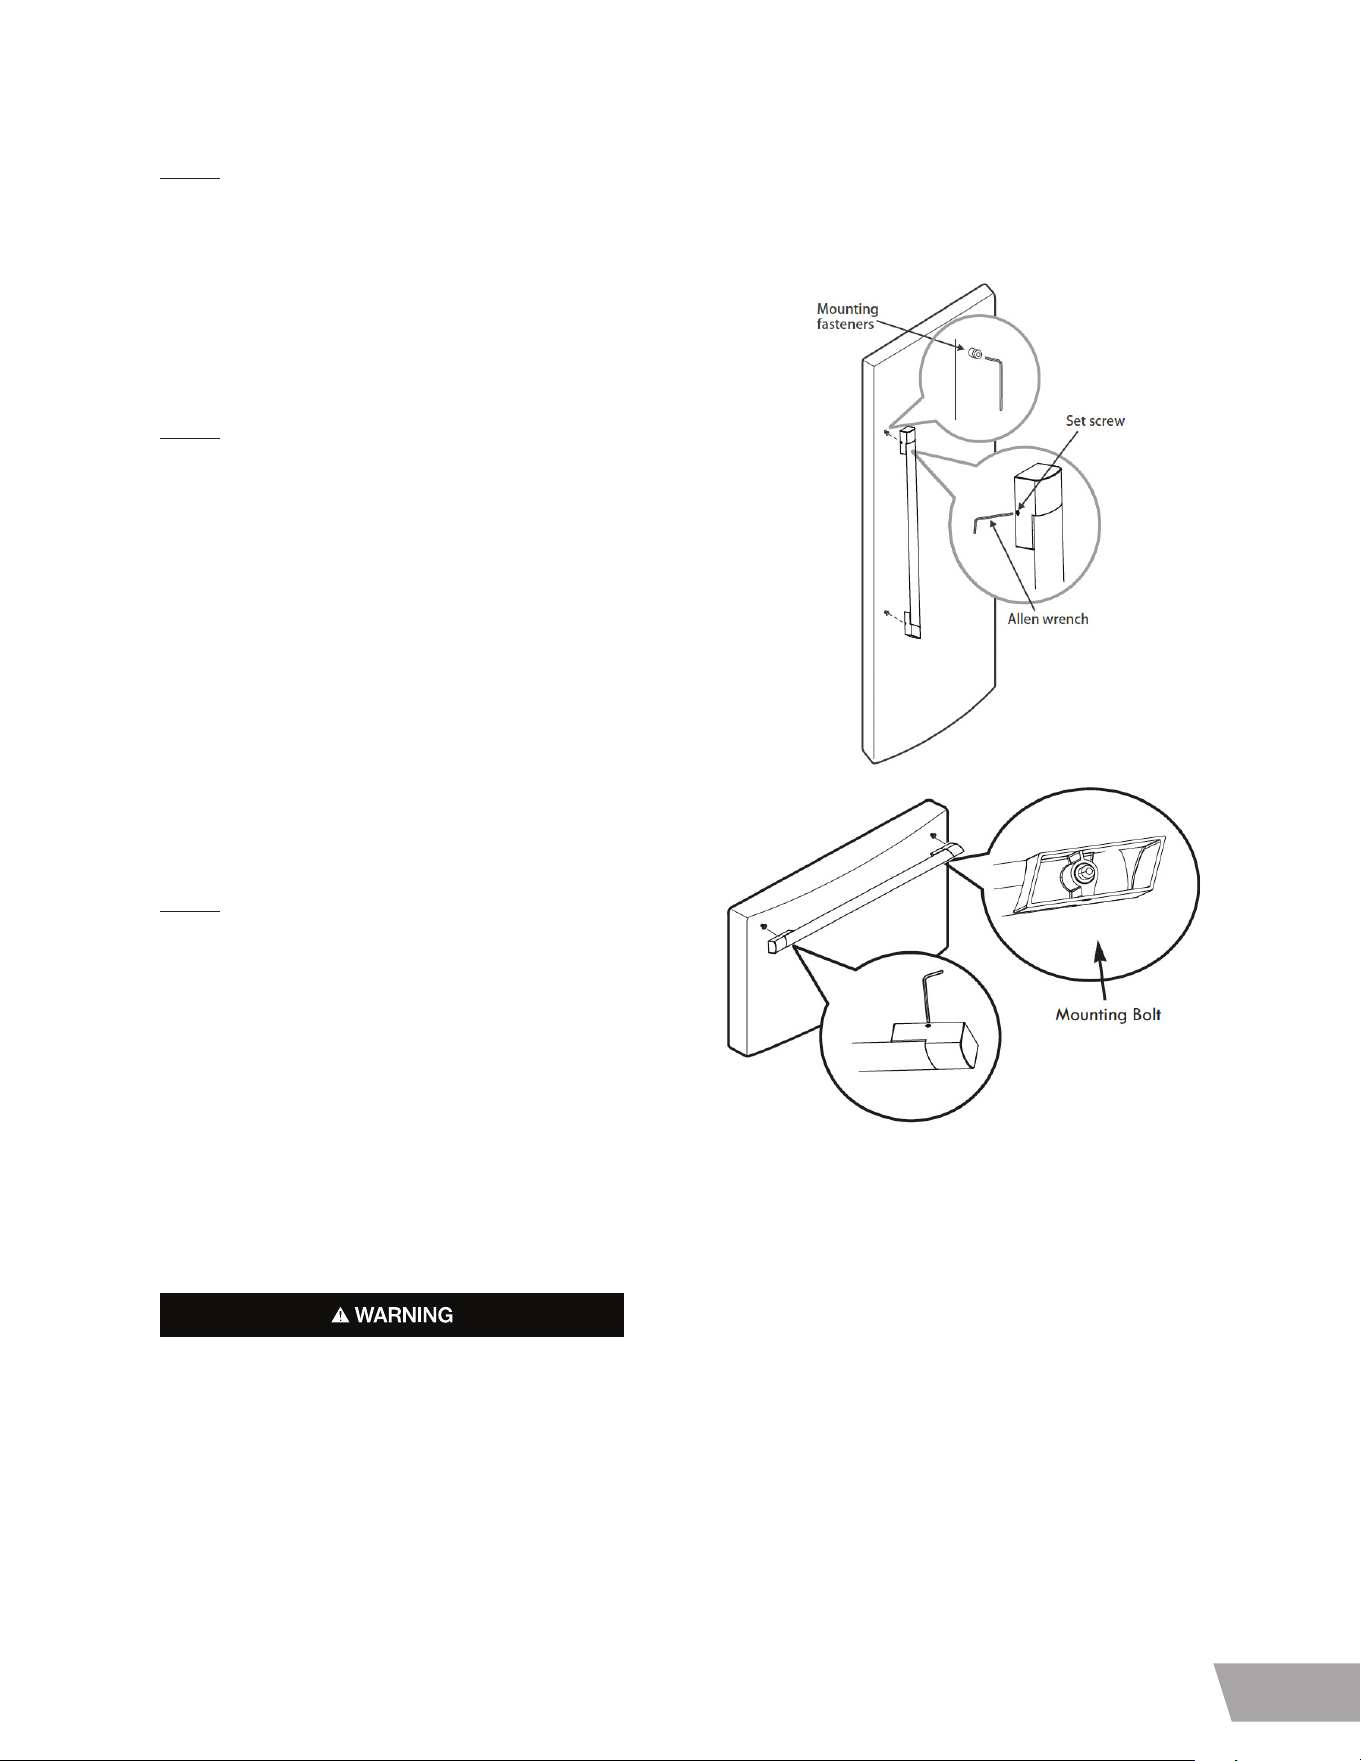
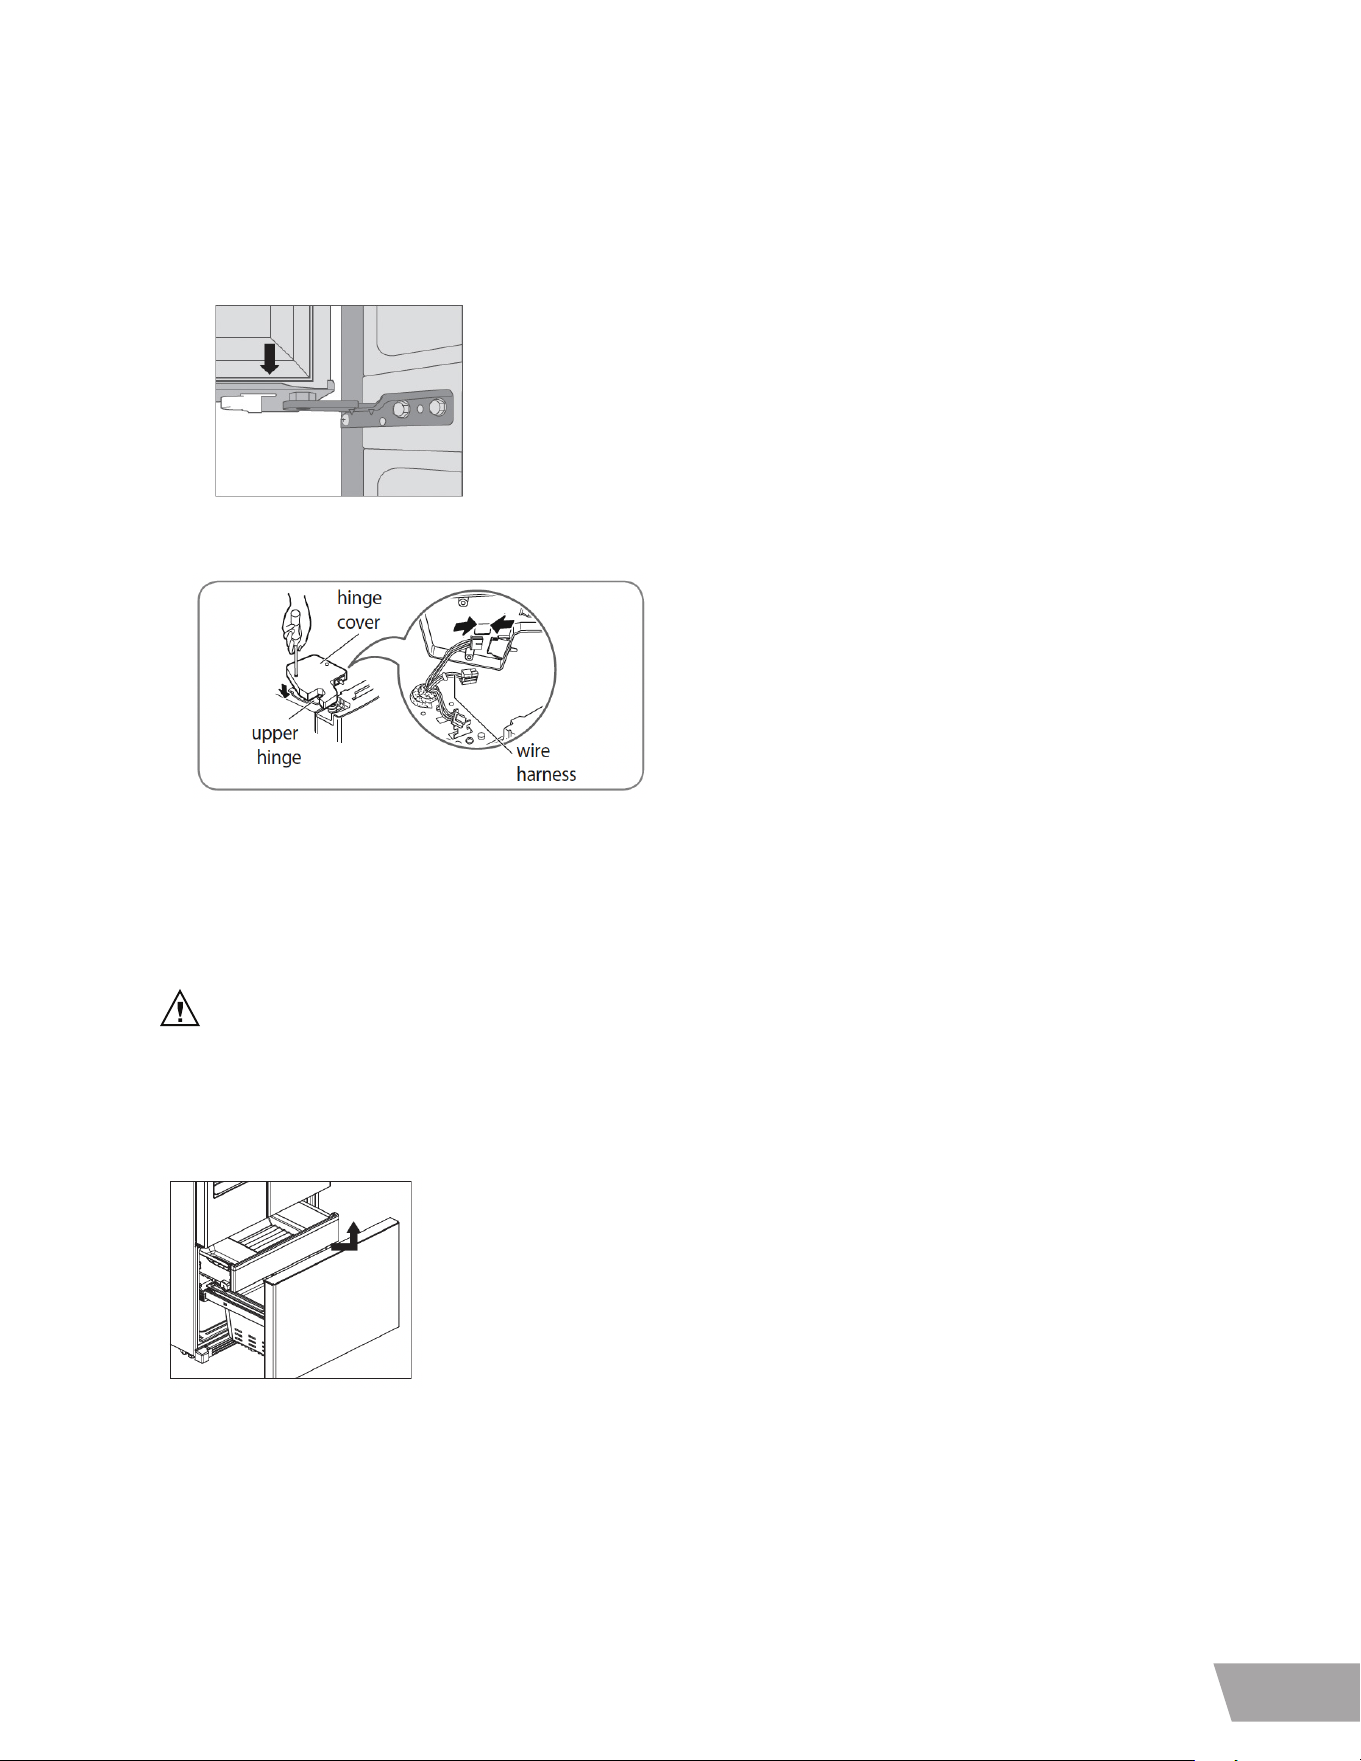
REMOVING THE LEFT /RIGHT (REFRIGERATOR) DOOR
1. Open the door. Remove the top hinge cover screw.
2. Use a flat blade screwdriver to pry back the hooks (not shown) of the hinge cover from the top of the refrigerator cabinet.
Lift up the cover.
3. Disconnect all the wire harnesses (left door).
CAUTION: When lifting the hinge free of the latch, be careful that the door does not fall forward.
4. Lift the door from the middle hinge pin and remove the door. Place the door, inside facing up, on a nonscratch surface.
5. Repeat steps 1 through 4 for the removal of the right door.
21
EN
REINSTALLING THE REFRIGERATOR DOORS
1. Place the door onto the middle hinge pin.
2. Reconnect all wire harnesses(right door). Position the cover into place. Insert and tighten the cover screw.
HOW TO REMOVE THE FREEZER DRAWER
WARNING: Use two or more people to remove and install the freezer drawer.
Failure to do so can result in personal injury, product or property damage.
1. Take out the ice bin first, and then take out the upper freezer drawer by lifting it up.
2. The lower freezer basket cannot be removed separately.
3. Using a screwdriver, unscrew the screws on both sides of the rail and remove the freezer door and lower drawer together.
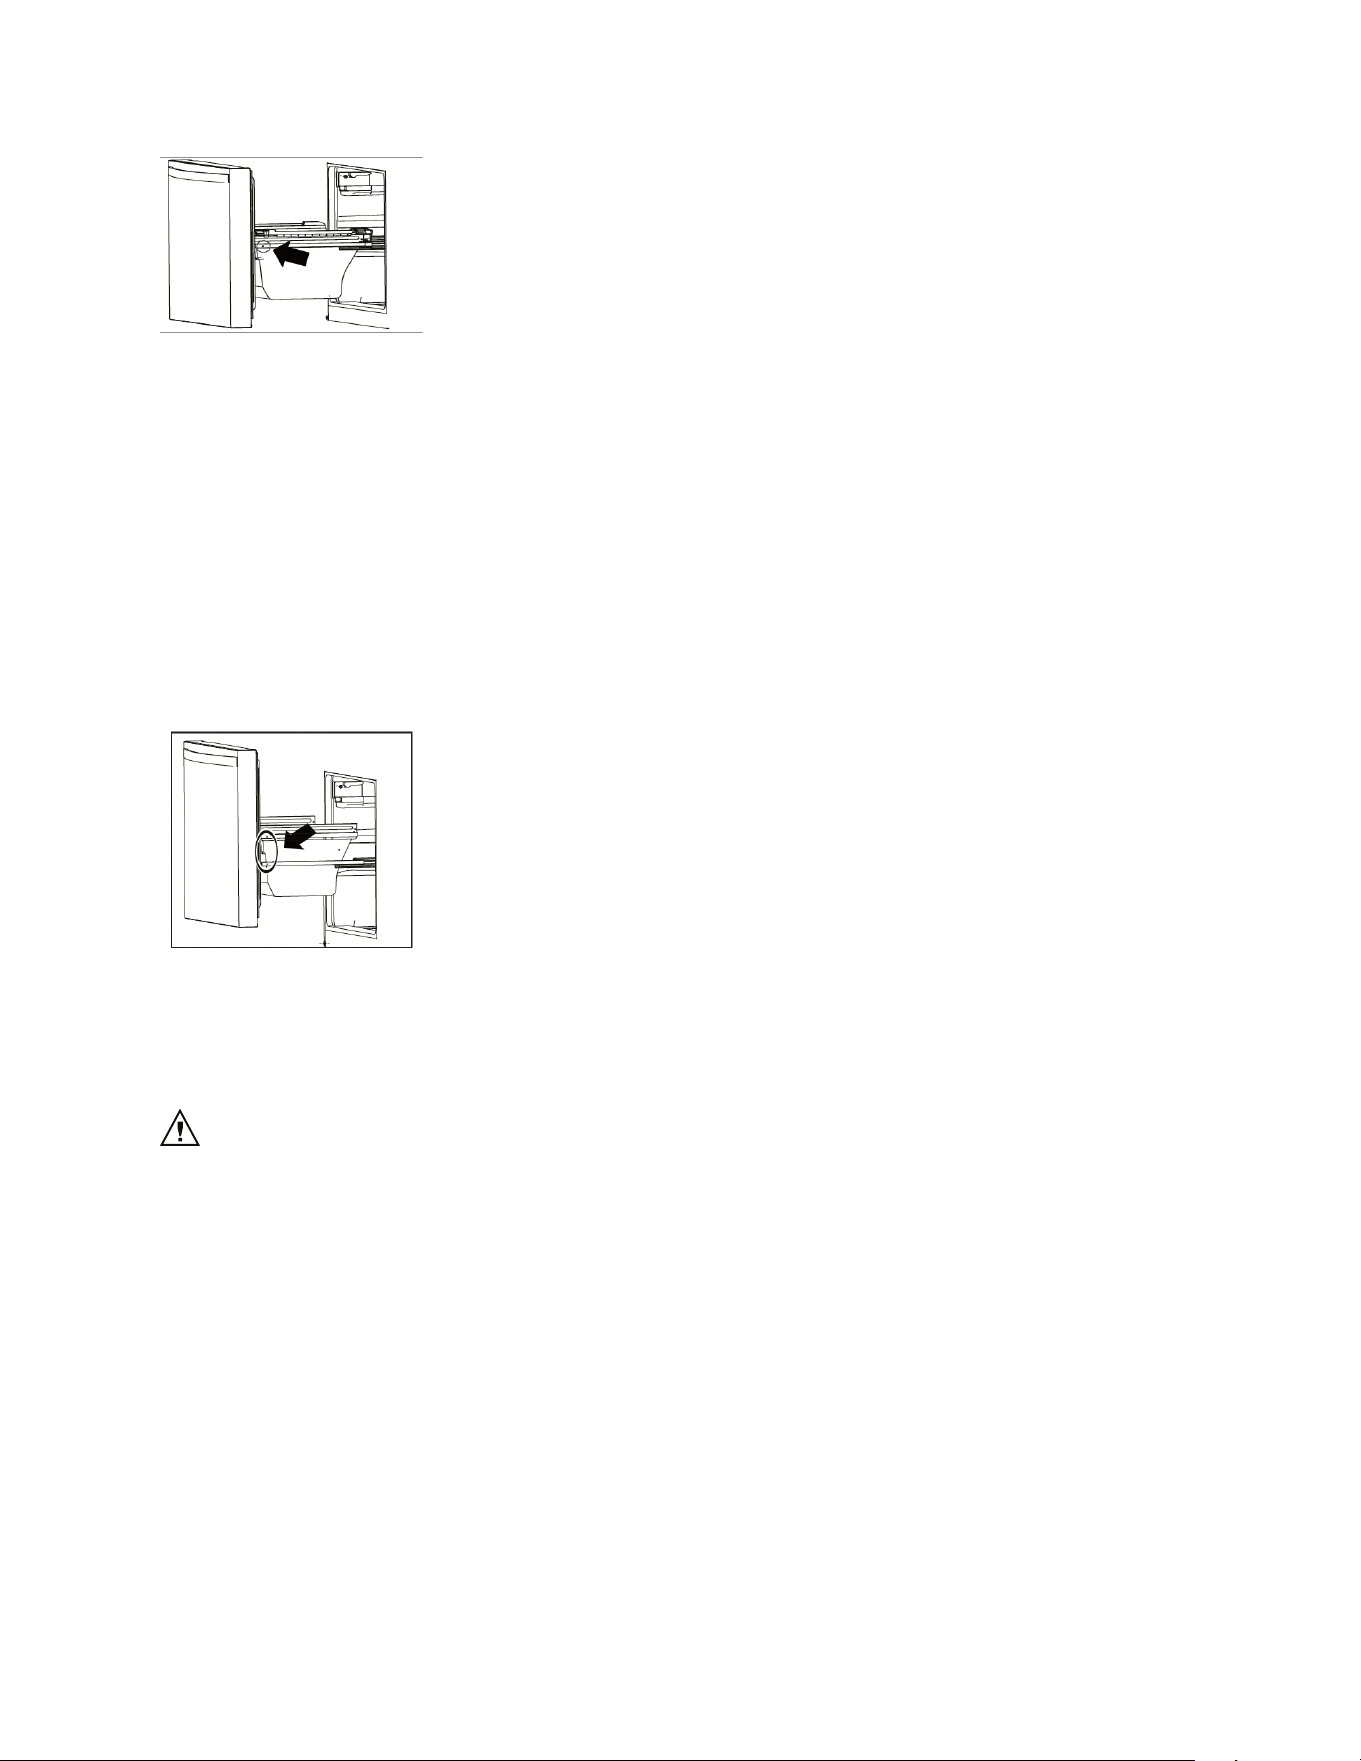
22
4. Pull exterior freezer drawer to fully disengage the rail assembly from the unit. Use 2 people for this task as the door is heavy
and awkward to handle.
HOW TO INSTALL THE FREEZER DRAWER
1. When installing, first place the lower drawer on the rail, then align and install the rail, and tighten the screws on both sides of
the rail.
2. Insert the upper freezer drawer above the lower basket, open and close the freezer drawer several times to make sure
operation is smooth and seal is consistent all the way around the freezer compartment.
CAUTION: Do not hold the handle when removing or replacing the drawer. The handle may come o and it
could cause personal injury.
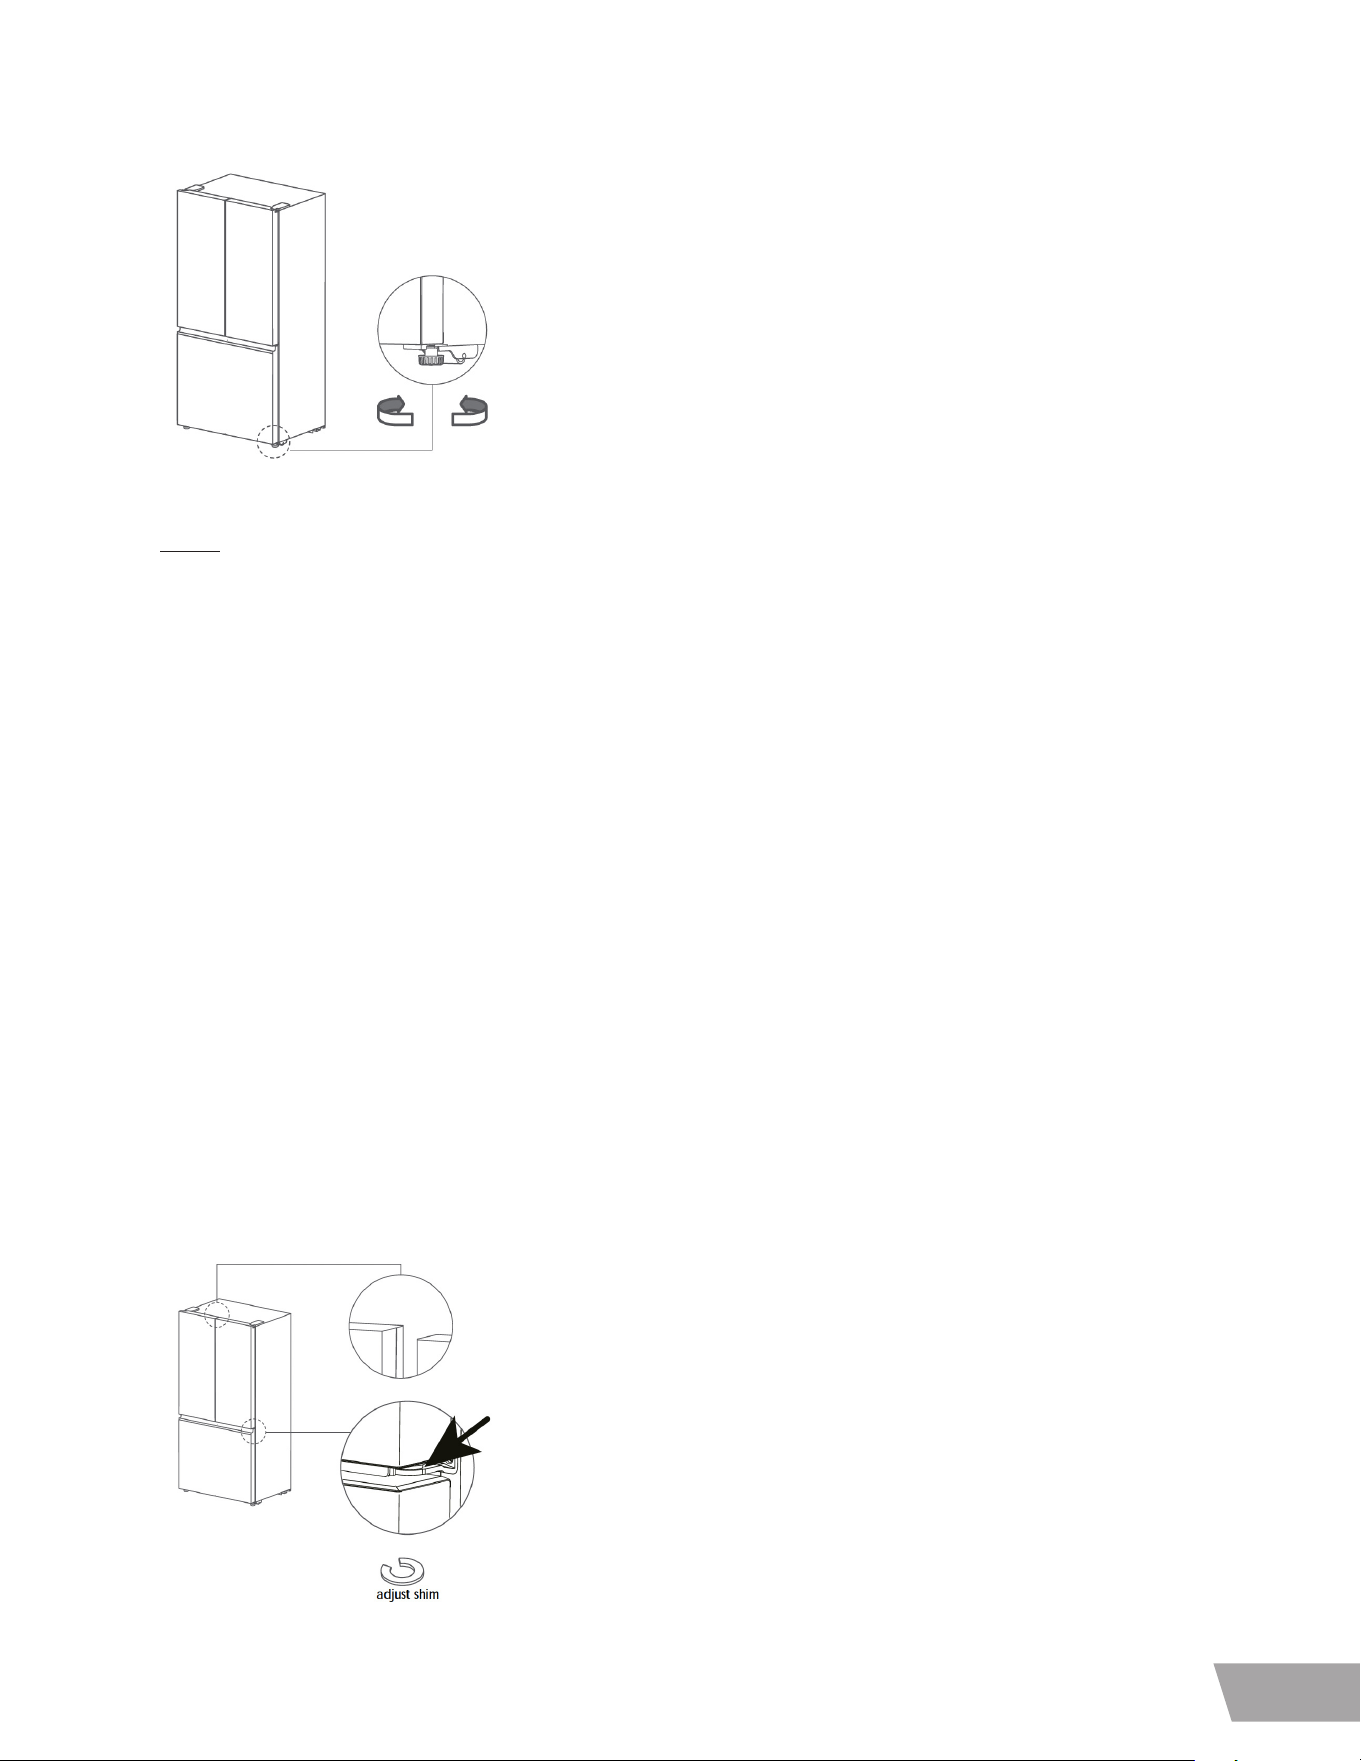
LEVELING
After installing, plug the refrigerator’s power cord into a 3-prong grounded outlet and push the refrigerator into the final position.
Your refrigerator has two front leveling legs—one on the right and one on the left. Adjust the legs to alter the tilt from
front-to-back or side-to-side. If your refrigerator seems unsteady, or you want the doors to close more easily, adjust the
refrigerator’s tilt using the instructions below:
1. Turn the leveling leg counterclockwise to raise that side of the refrigerator or clockwise to lower it. It may take several turns
of the leveling leg to adjust the tilt of the refrigerator.
23
EN
NOTE:
Having someone push backward against the top of the refrigerator takes some weight o of the leveling legs.
This makes it easier to adjust the legs.
2. Open both doors again and check to make sure that they close easily. If the doors do not close easily, tilt the refrigerator
slightly more to the rear by turning both leveling legs counterclockwise. It may take several more turns, and you should turn
both leveling legs the same amount.
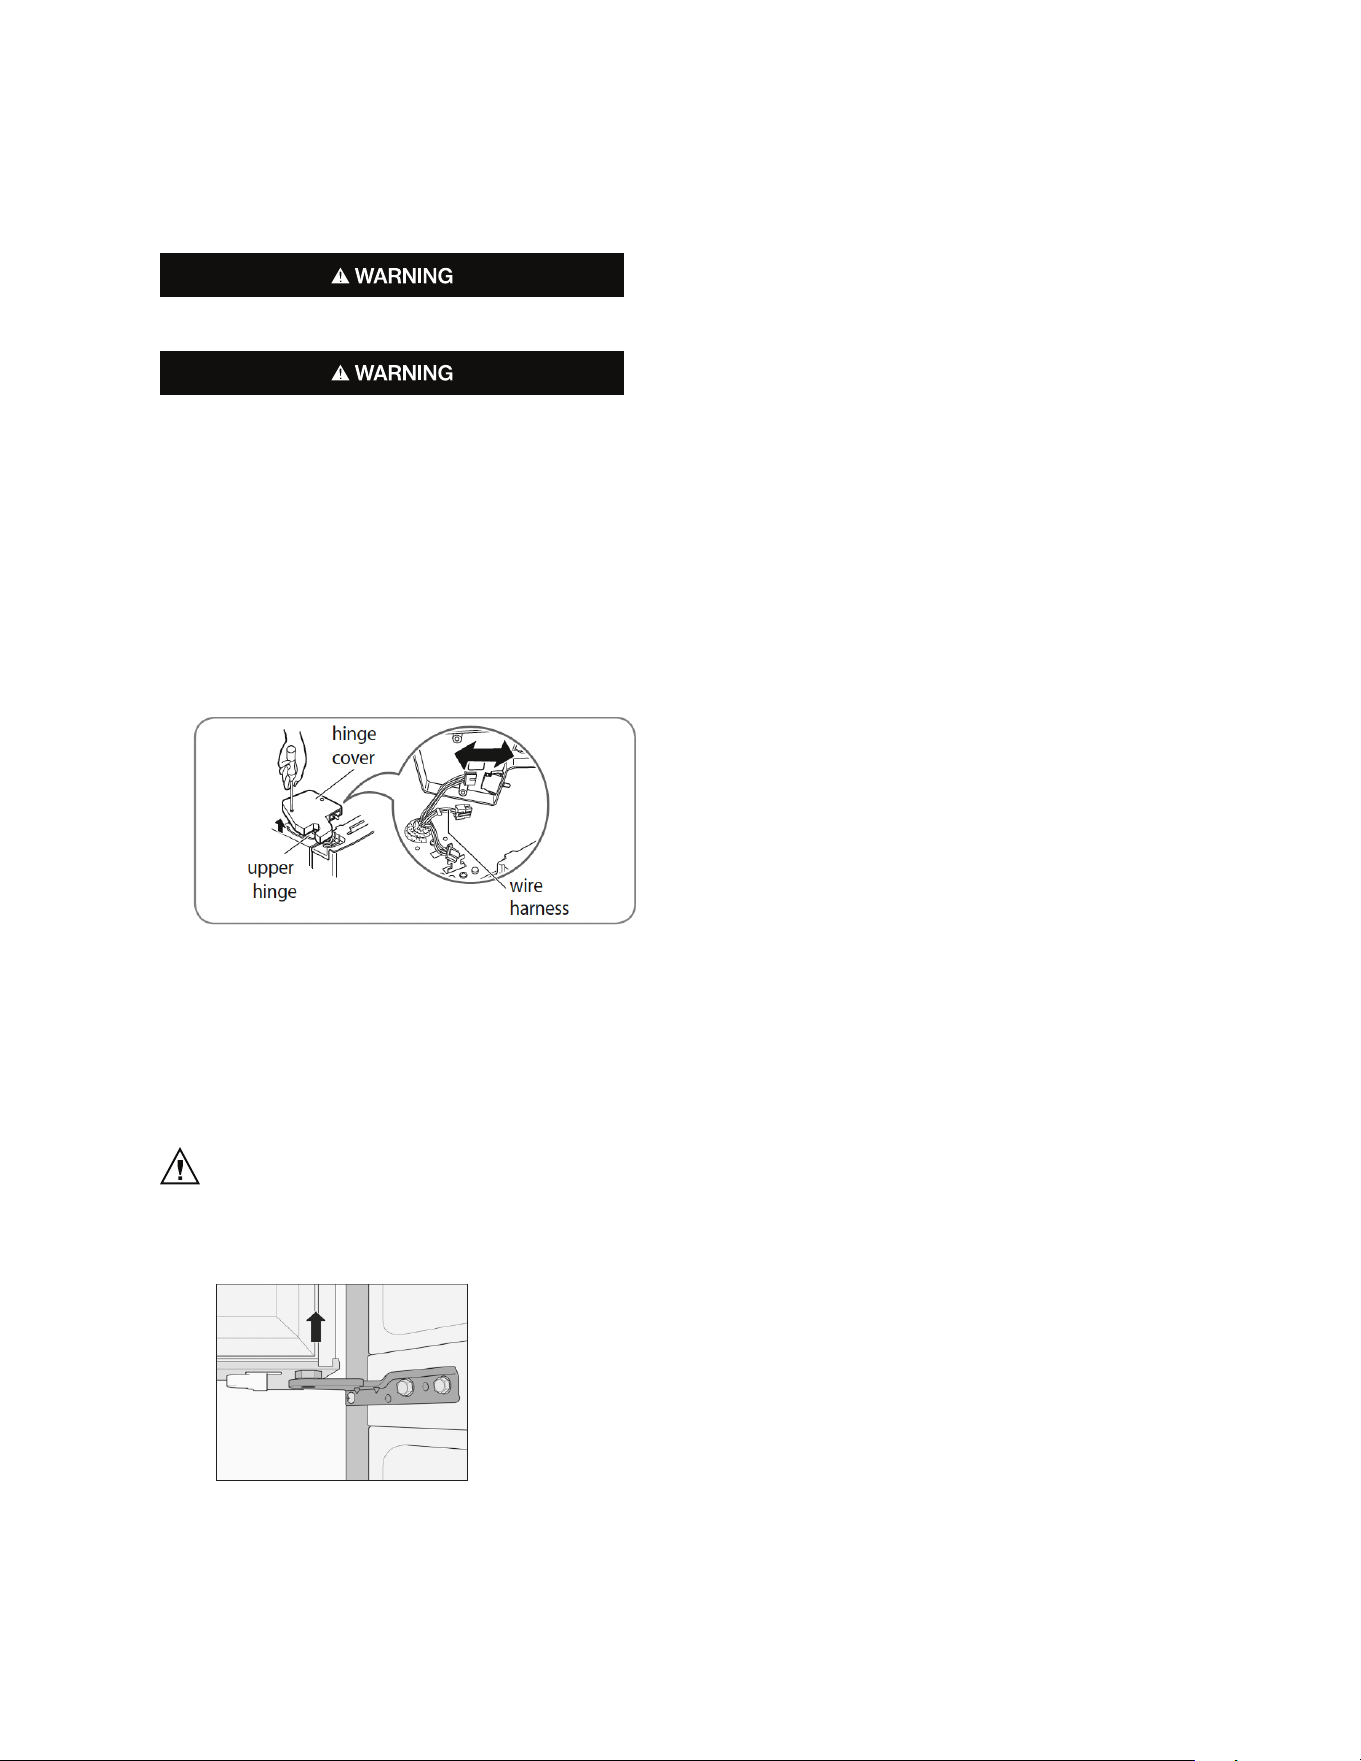
DOOR ALIGNMENT
If the doors are still uneven after the refrigerator has been leveled, finish adjusting the doors by following the instructions below.
1) Take out the adjustable shim from the instruction bag.
2) Lift the lower door up slightly with hand.
3) Place the adjust shim between door and hinge with hand or pliers.
24
•
•
WATER LINE CONNECTION
Excessive Weight Hazard:
Use two or more people to remove and install the refrigerator
doors. Failure to do so can result in back or other injury.
Electrical Shock Hazard:
Disconnect the electrical supply to the refrigerator before
installing. Failure to do so could result in serious injury or death.
Do not put hands, feet or other objects into the air vents or
bottom of the refrigerator. You may be injured or receive an
electrical shock.

25
EN
Operating the product
Before use
This refrigerating appliance is not intended to be used as a built-in appliance.
Remove all of the packaging, including the foam backing at the bottom of the unit and the tape that fixes the shelves and door
bins inside.
Place the refrigerator to a proper position, and adjust the feet to level. It is recommended to wipe out your unit with a warm
soapy cloth and dry it thoroughly before use.
Place the refrigerator and adjust to level, clean it, let the refrigerator stand for above 4-6 hours, and then power the unit on.
This helps make sure that the oil from the compressor has settled properly, and will help your unit run normally.
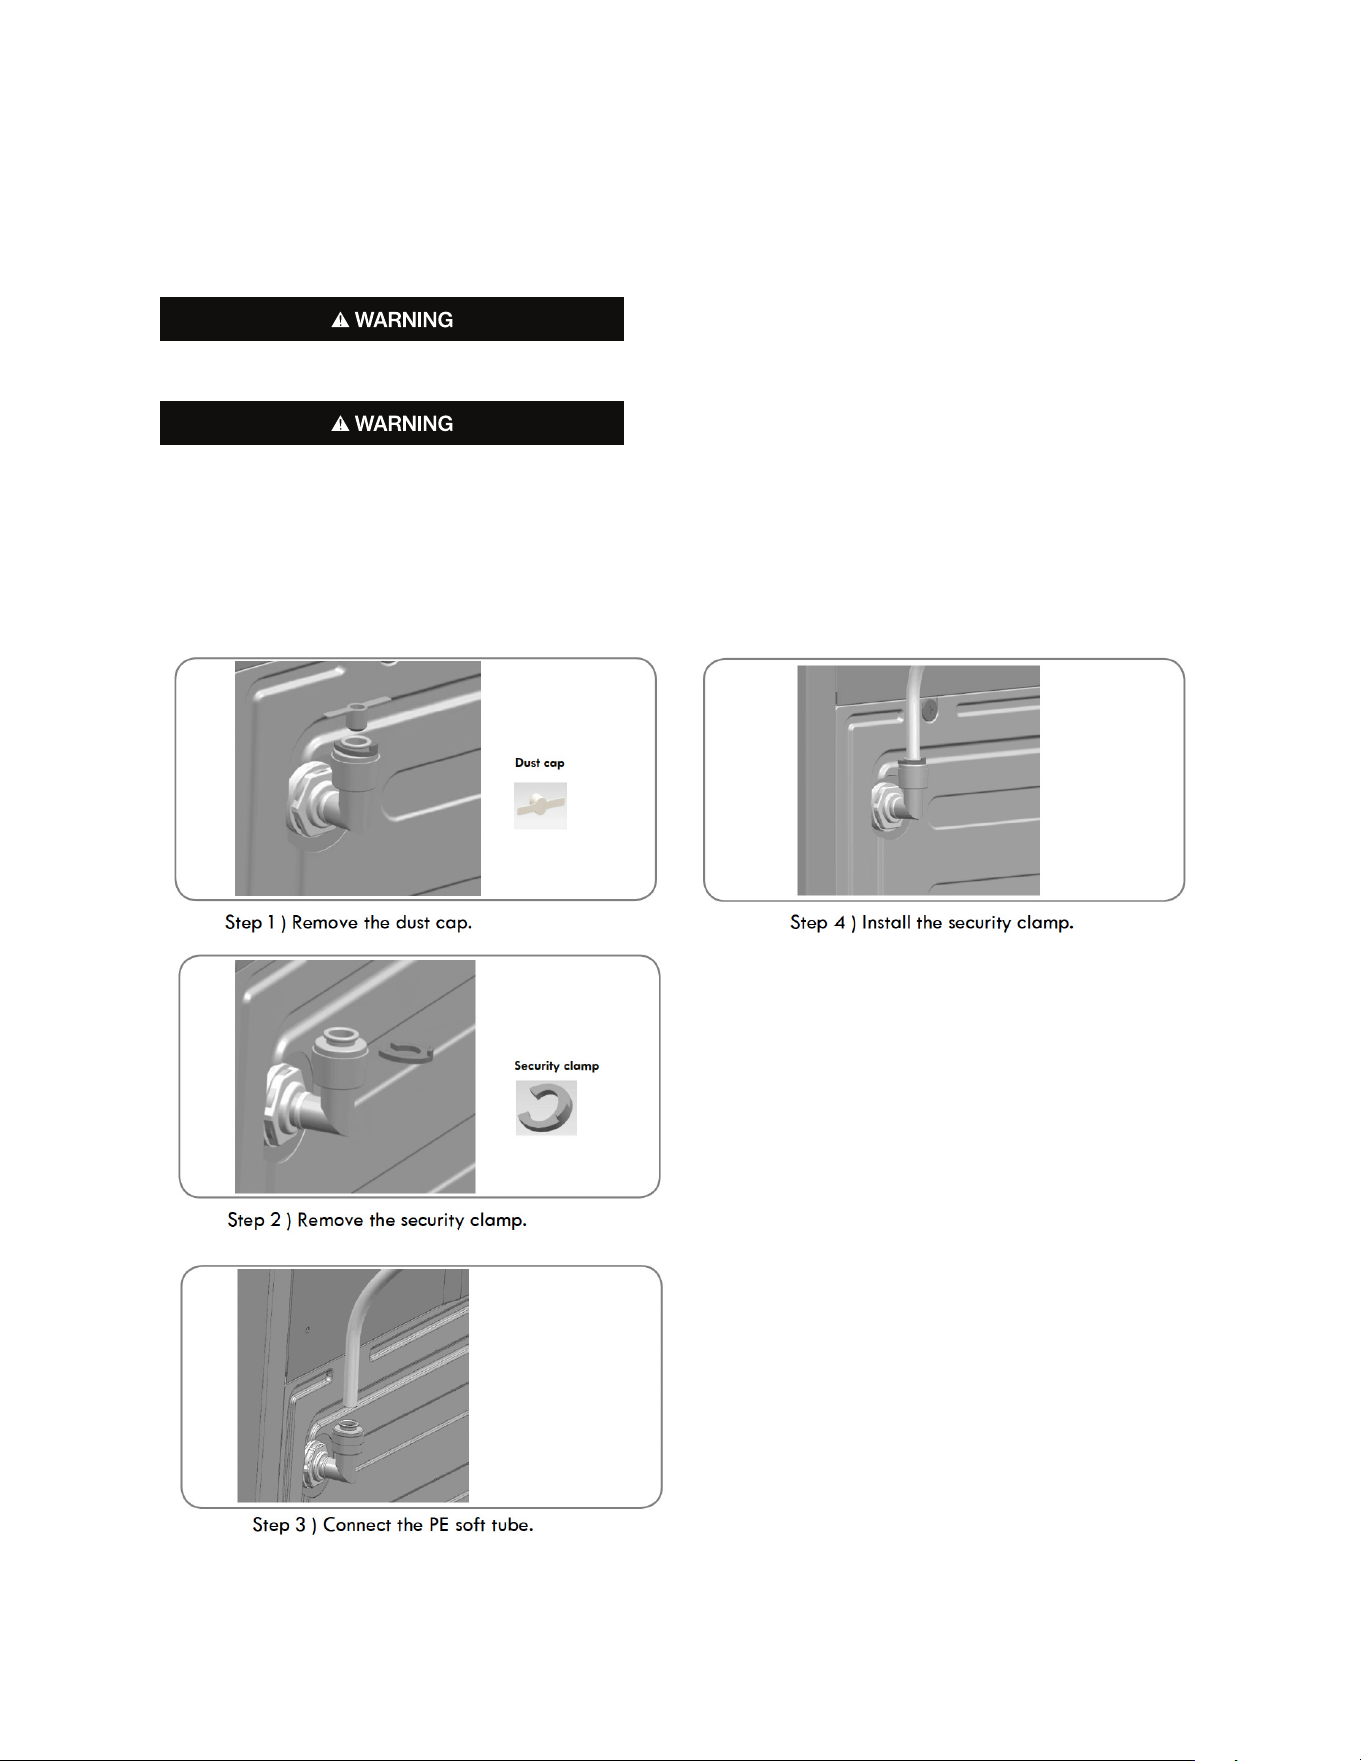
Water supply connection
WARNING: Connect to potable water supply only.
The water supply system must be installed and connected by a professional technician.
When using the function of ice maker, please make sure that the tap water pipe is connected normally and the water valve is
opened. Enough space shall be reserved for the faucet connecting water source.
After the refrigerator operates stably, the ice maker will make ice. Upon power-on for the first time, cold water is available after
5 hours since the refrigerator operates normally, and ice cubes or crushed ice is available after 12 hours.
Starting
Connect the power cord, and turn on the power switch.
Upon startup for the first time, the screen will display respective set temperature values (the temperature of the fridge section
is set to 41ºF(5°C), the temperature of the freezer is set to 0ºF(-18°C)).
The default mode is energy saving upon startup: The screen displays for 20s and then goes o. This mode to save energy
and prolong the service life of LED lights.
26
Control panel
Default is Fahrenheit when power is on.
Press “MODE” button 5 seconds, to switch between °C and °F.
Other buttons use the same method to switch between two modes.
Set temperature range: Celsius degree mode
1.Fridge temperature range: 2~8°C (Default value 5°C)
2.Freezer temperature range: -23~-15°C (Default value -18°C)
Set temperature range: Fahrenheit degree mode
1.Fridge temperature range: 35~46°F (Default value 41°F)
2.Freezer temperature range: -10~5°F(Default value 0°F)
Setting the Temperature Control
• The first time you turn the unit on, the unit will start at the factory-set default temperature, which is 41ºF(5°C) in the
refrigerator compartment and 0ºF(-18°C) in the freezer compartment.
• The first time you turn the unit on, adjust the temperature in the refrigerator compartment to 34ºF(1°C) and run for at least
4 hours before placing food inside. This will ensure that the freezer compartment is thoroughly chilled and the refrigerator
compartment is stabilized before food is placed inside. Then adjust the temperature setting to your desired setting.
• To adjust the temperature in each zone, press the appropriate zone button FRIDGE or FREEZER, and adjust it.
The temperature will change according to the pre-set temperatures as shown on the LED display.
27
EN
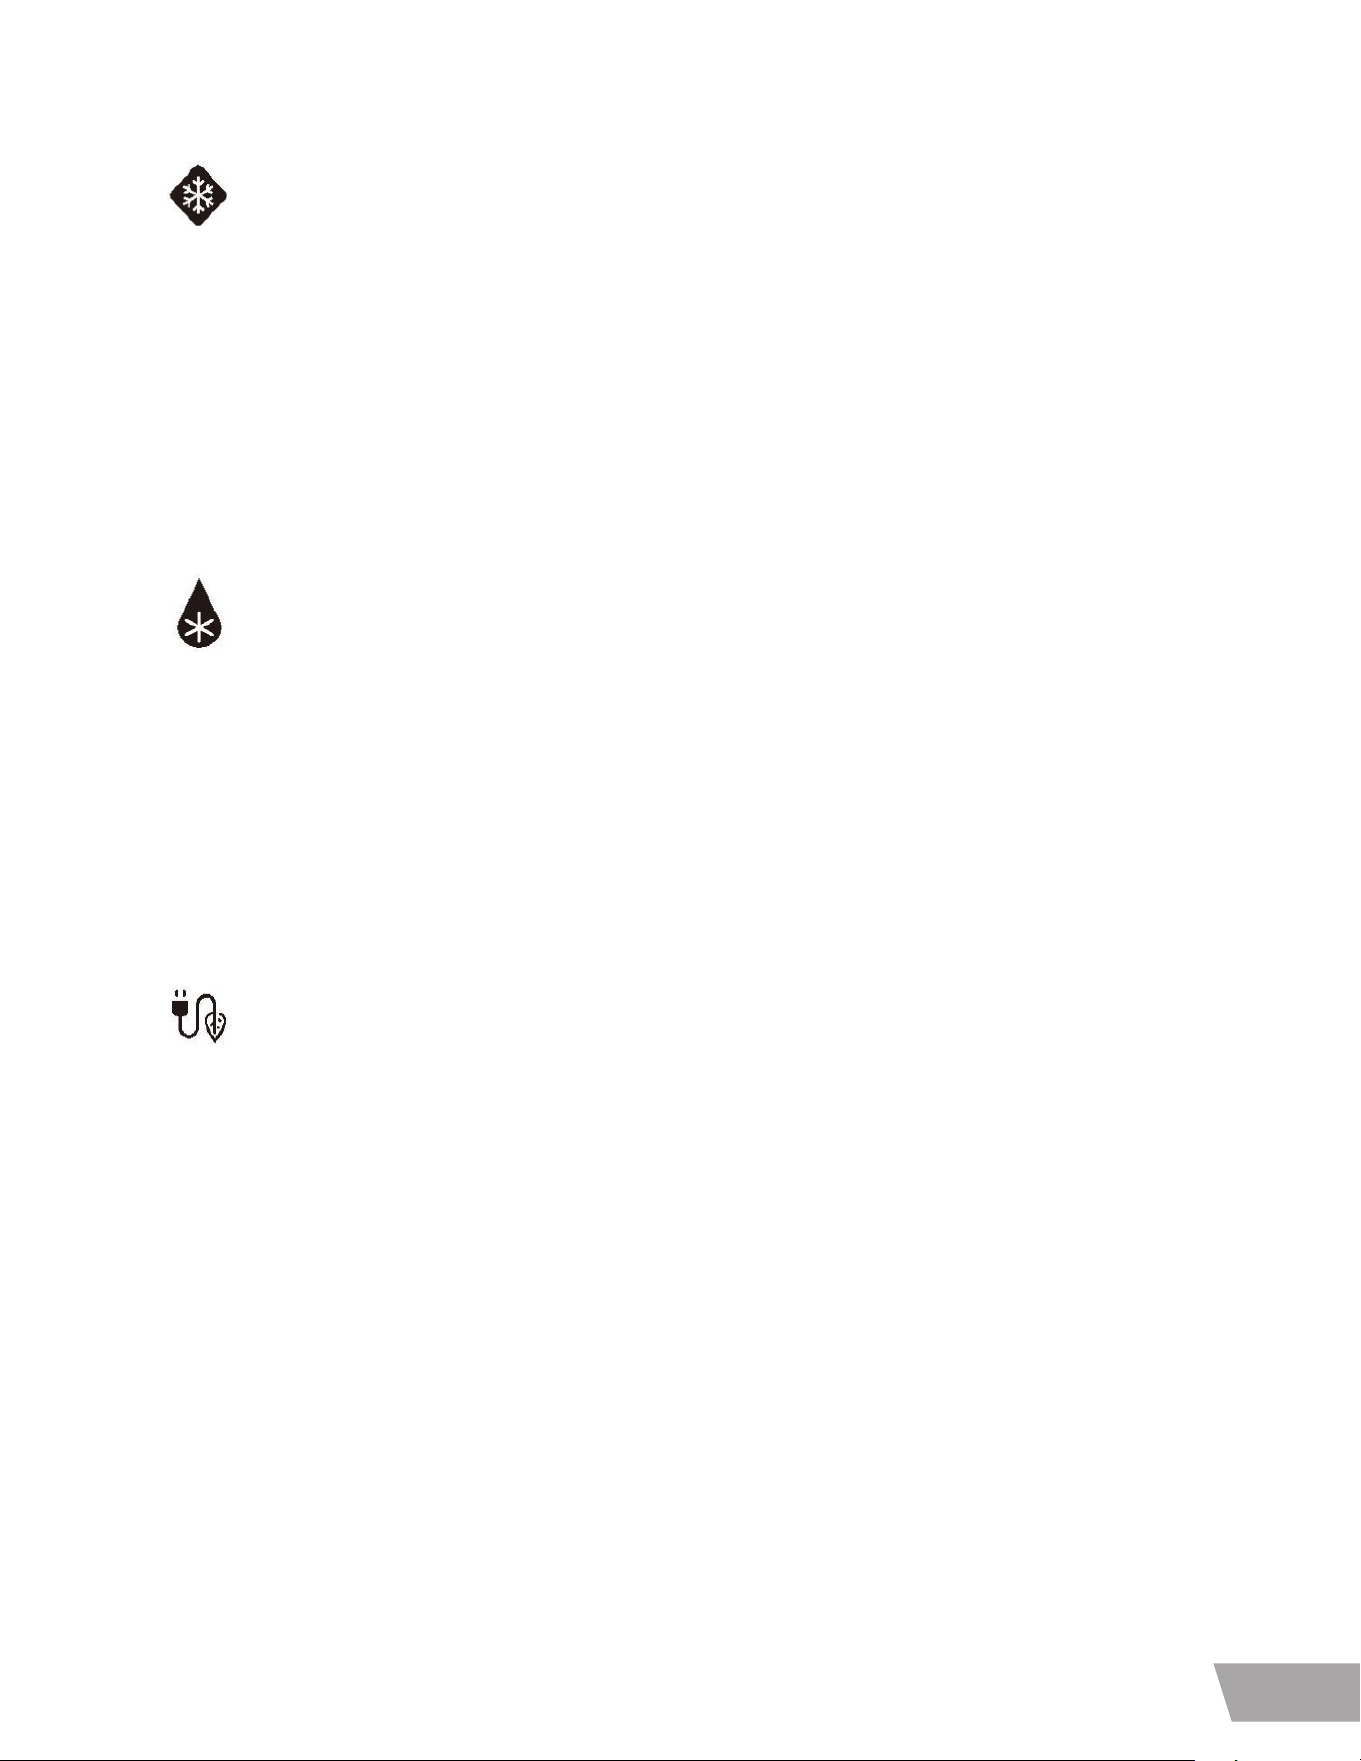
QUICK FREEZE MODE
This mode will quickly drop in temperature when storing large amounts of warm or room-temperature foods
in the freezer.
The unit will remain in QUICK FREEZE mode for 24 hours or until the temperature reaches -18ºF(-28°C) and will
then return to the original setting, or until the function is turned o at the control panel. QUICK COOL and QUICK
FREEZE can be run simultaneously.
To enable the QUICK FREEZE mode, press the feature button until the QUICK FREEZE icon is illuminated.
The icon will remain illuminated when activated. To disable the QUICK FREEZE mode, press the function button
until the QUICK FREEZE icon is turned o.
QUICK COOL MODE
This mode will set the refrigerator temperature to 35ºF(2°C) for quick drop in temperature when storing large
amounts of warm or room temperature foods in the refrigerator. The unit will remain in QUICK COOL mode for
2 hours and 30 minutes or until the temperature reaches 35ºF(2°C) and will then return to the original setting, or
until the function is turned o at the control panel. Both QUICK COOL and QUICK FREEZE can be run together at
the same time.
To enable the QUICK COOL mode, press the feature button until the QUICK COOL icon is illuminated. The icon
will remain illuminated when activated. To disable the QUICK COOL mode, press the function button until the
QUICK COOL icon is turned o.
SMART MODE (VACATION)
Use this mode when leaving for long periods of time, where you will remove the large majority of the refrigerator
contents but leave contents in the freezer. Smart mode will automatically set the refrigerator section to 41ºF(5°C)
and the freezer section to 0ºF(-18°C) . The unit will remain in SMART MODE until the feature is deactivated at the
control panel.
To enable SMART mode, press the feature button until the SMART icon is illuminated. The icon will remain
illuminated when activated. To disable SMART mode, press the function button until the SMART icon is turned o.
28
NOTE:
• IF THE UNIT IS UNPLUGGED, HAS LOST POWER, OR IT IS TURNED OFF. YOU MUST WAIT 3 TO 5 MINUTES BEFORE
RESTARTING THE UNIT. IF YOU ATTEMPT TO RESTART BEFORE THIS TIME DELAY, THE REFRIGERATOR-FREEZER
WILL NOT START.
NOTE:
• IF THE UNIT IS UNPLUGGED, HAS LOST POWER, OR IT IS TURNED OFF. YOU MUST WAIT 3 TO 5 MINUTES BEFORE
RESTARTING THE UNIT. IF YOU ATTEMPT TO RESTART BEFORE THIS TIME DELAY, THE REFRIGERATOR-FREEZER
WILL NOT START.
NOTE:
WE DO NOT RECOMMEND INSTALLING THE REFRIGERATOR WHERE THE TEMPERATURE WILL DROP BELOW
32ºF (0ºC) OR RISE ABOVE 110ºF (43ºC). THE COMPRESSOR WILL NOT BE ABLE TO MAINTAIN PROPER
TEMPERATURES INSIDE THE REFRIGERATOR.
FOR INSTALLATIONS WHERE THE TEMPERATURES WILL BE MORE THAN 32ºF (0ºC) , SET THE FREEZER
TEMPERATURE CONTROL TO THE “COLDEST” SETTING. THIS WILL IMPROVE THE FUNCTIONING THE
REFRIGERATOR UNDER THESE CONDITIONS.
Fridge compartment switch o/on
Long press”FRIDGE”button for 5 seconds to set fridge compartment on/o,when fridge compartment is switched o,the
fridge temperature digital display will go o;under the fridge compartment switched o state,long press”FRIDGE”button for 5
seconds to restart fridge function.
Refrigerator chamber
The fridge compartment should mainly be used to store food that will be consumed in a short time.
6 Full Width Drawer
7 Vegetable Crisper Drawer
8 Ice Tank
9 Upper Drawer
10 Lower Drawer
1 Fridge Compartment
2 Bottom Freezer
3 Display/Indicator Panel
4 Door Racks
5 Glass Shelves
29
EN
The ice maker can make about 4 lbs / 1.9 kg of ice every 24 hours.
When the freezing chamber reaches the set temperature, the ice maker can make the first batch of ice just for several hours.
CAUTION
When the ice maker is making ice cubes, you may hear the beep from water valve, flowing sound of water into ice maker, and
falling sound of ice cubes.
CAUTION
The food especially the oily food which stored in refrigerator ,please avoid the direct contact with the liner.When the interior
stained with oil or oily food soup stains, should be cleaned immediately to avoid the long contact with the liner which may lead
to the liner corrosion and cracking.
Instructions for storing foods
CAUTION
-When storing freezing foods, put them to the inside of freezing chamber, other than the bottle rack.
-Do not put bottled or canned foods into the freezing chamber to prevent frost cracking. Before putting hot foods into the
refrigerator, cool them to room temperature first; otherwise, they will increase power consumption.
-Mark the freezing date on the packaging bag according to dierent storage lives of foods, so as to prevent foods from
exceeding the time limit.
-Divide foods into proper pieces and package them separately, which are easy to freeze thoroughly and will not frozen
together.
-The packaging materials shall be odorless, airtight, watertight and pollution-free, so packaged foods are not easy to taint by
other odor, without quality reduction.
-Do not put too many fresh foods into the freezing chamber once, preferably not exceeding the freezing capacity value of
refrigerator.
-Melted foods can not be frozen again, unless they are made into dishes; otherwise, their service quality will be aected.
-Glass bottles or glass containers shall not be placed into the freezing chamber or at the air outlet of refrigerating chamber
duct; otherwise, they may explode.
-Foods can not block the air outlet; otherwise, abnormal air circulation will be caused.
Freezing chamber
The freezing chamber is used to freeze foods,store deeply frozen foods and make ice cubes.
lt can preserve foods for a long time.
The freezing chamber is suitable for retaining the freshness of foods for a long time.
time.
When storing meat, it is suggested to cut the meat into pieces which are easy to take out, and mark the freezing date to
prevent foods from exceeding the time limit.

30
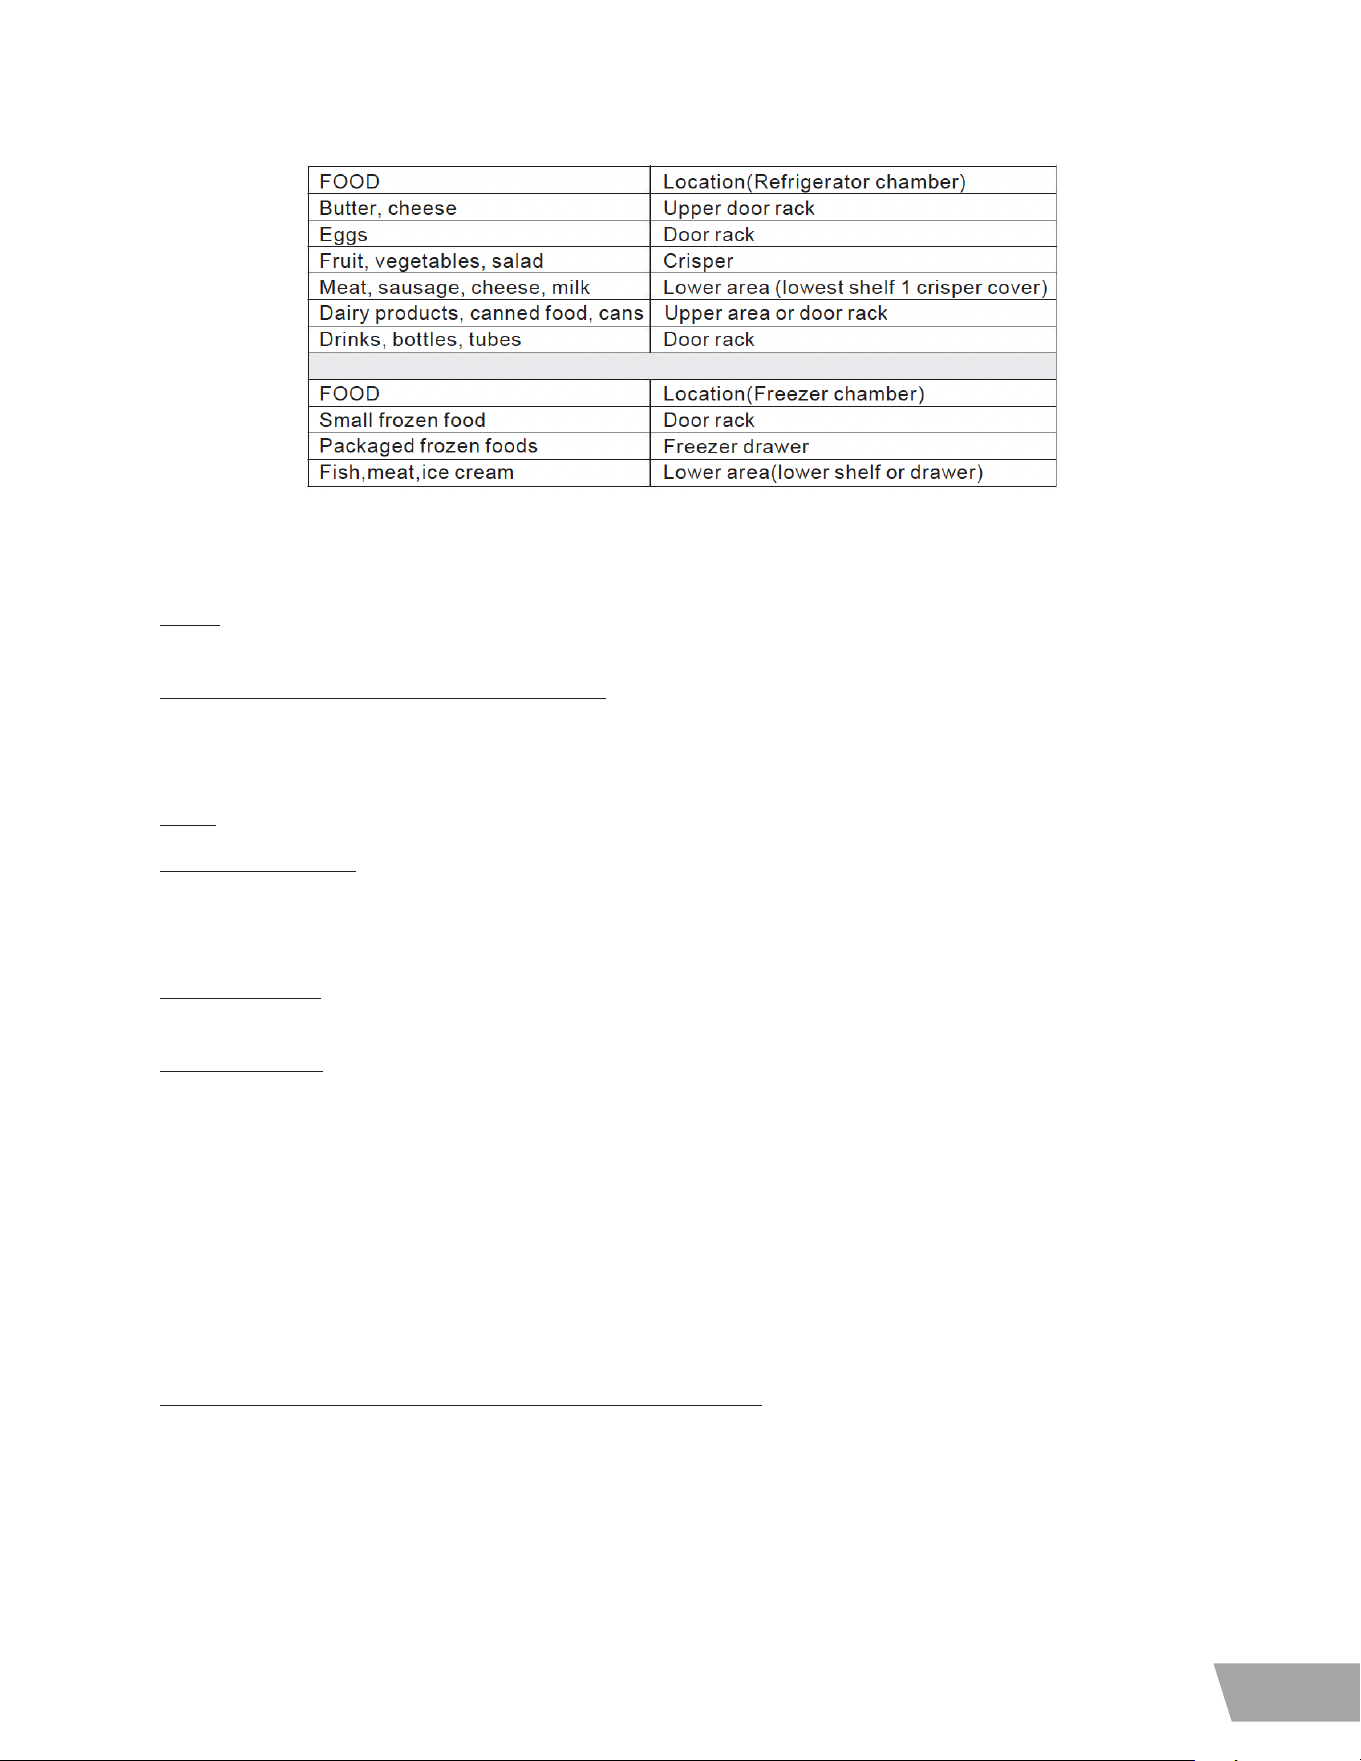
Storage of foods
Your appliance has the accessories as the “Structure illustration” showed in general, with this part instruction you can have
the right way to storage your food.The glass shelves and crisper can be removed to store food if needed.
NOTE: Food is not allowed to touch directly all surfaces inside the appliance. lt has to be wrapped separately in aluminum
sheet or in cellophane sheet or in airtight plastic boxes
Precautions for internal and external cleaning of refrigerator:
Before cleaning, always turn o the power switch, disconnect the power plug. During cleaning, make sure that no water will
enter the switch, control panel, door lamp and top control box.
Remove dirt from the outside of refrigerator with mild cleaner, then wipe with clean soft cloth, and let the refrigerator dry
naturally.
When cleaning door sealing strip, always use clean water, wipe with dry cloth and let it dry naturally. Wet soft cloth with warm
water or neutral cleaner to wipe the refrigerator body except the door sealing strip.
lt is forbidden to flush the refrigerator directly with water,which will aect electrical insulation properties, etc.
lt is forbidden to clean the refrigerator with metal wipers,ware brushes, coarse abrasive cleaners,strong alkaline
detergents,or flammable or toxic cleaning fluids.
Dairy foods and eggs
Most pre-packed dairy foods have a recommended ‘use by/best before/best by/ date stamped on them.
Store them in the fridge compartment and use within the recommended time.
Butter can become tainted by strong smelling foods so it is best stored in a sealed container.
Eggs should be stored in the fridge compartment.
Red meat
Place fresh red meat on a plate and loosely cover with waxed paper, plastic wrap or foil. Store cooked and raw meat on
separate plates. This will prevent any juice lost from the raw meat from contaminating the cooked product.
Poultry
Fresh whole birds should be rinsed inside and out with cold running water, dried and placed on a plate. Cover loosely with
plastic wrap or foil. Poultry pieces should also be stored this way. Whole poultry should never be stued until just before
cooking, otherwise food poisoning may result.
Fish and seafood
Whole fish and fillets should be used on the day of purchase. Until required refrigerate on a plate loosely covered with plastic
wrap, waxed paper or foil. lf storing overnight or longer, take particular care to select very fresh fish. Whole fish should be
rinsed in cold water to remove loose scales and dirt and then patted dry with paper towels. Place whole fish or fillets in a
sealed plastic bag. Keep shellfish chilled at all times. Use within 1-2 days.
Precooked foods and leftovers
These should be stored in suitable covered containers so that the food will not dry out. Keep for only 1-2 days.
Reheat leftovers only once and until steaming hot.
Vegetable container
The vegetable container is the optimum storage location for fresh fruit and vegetables.
Take care not to store the following at temperatures of less than 6°C for long periods: Citrus fruit, melons, aborigines,
pineapple, papaya, curette, passion fruit, cucumber, peppers, tomatoes.
Undesirable changes will occur at low temperatures such as softening of the flesh, browning and/or accelerated decaying
Do not refrigerate avocados (until they are ripe), bananas and mangoes.
31
EN
NOTE: Food is not allowed to touch directly all surfaces inside the appliance. It has to be wrapped separately in aluminum
sheet or in cellophane sheet or in airtight plastic boxes.
Freezing and storing food in the freezer compartment
• To store deep-frozen food.
• To make ice cubes.
• To freeze food.
NOTE: Ensure that the freezer compartment door has been closed properly.
Purchasing frozen food
• Packaging must not be damaged.
• Use by the ‘use by /best before/best by/’ date.
• If possible, transport deep-frozen food in an insulated bag and place quickly in the freezer compartment.
Storing frozen food
Store at -18°C or colder. Avoid opening the freezer compartment door unnecessarily.
Freezing fresh food
Freeze fresh and undamaged food only.
To retain the best possible nutritional value, flavour and colour, vegetables should be blanched before freezing.
Aubergines, peppers, zucchini and asparagus do not require blanching.
• The following foods are suitable for freezing:
Cakes and pastries, fish and seafood, meat, game, poultry, vegetables, fruit, herbs, eggs without shells,dairy products such
as cheese and butter, ready meals and leftovers such as soups, stews, cooked meat and fish, potato dishes, soues and
desserts.
• The following foods are not suitable for freezing:
Types of vegetables, which are usually consumed raw, such as lettuce or radishes, eggs in shells, grapes,whole apples, pears
and peaches, hard-boiled eggs, yogurt, soured milk, sour cream, and mayonnaise.
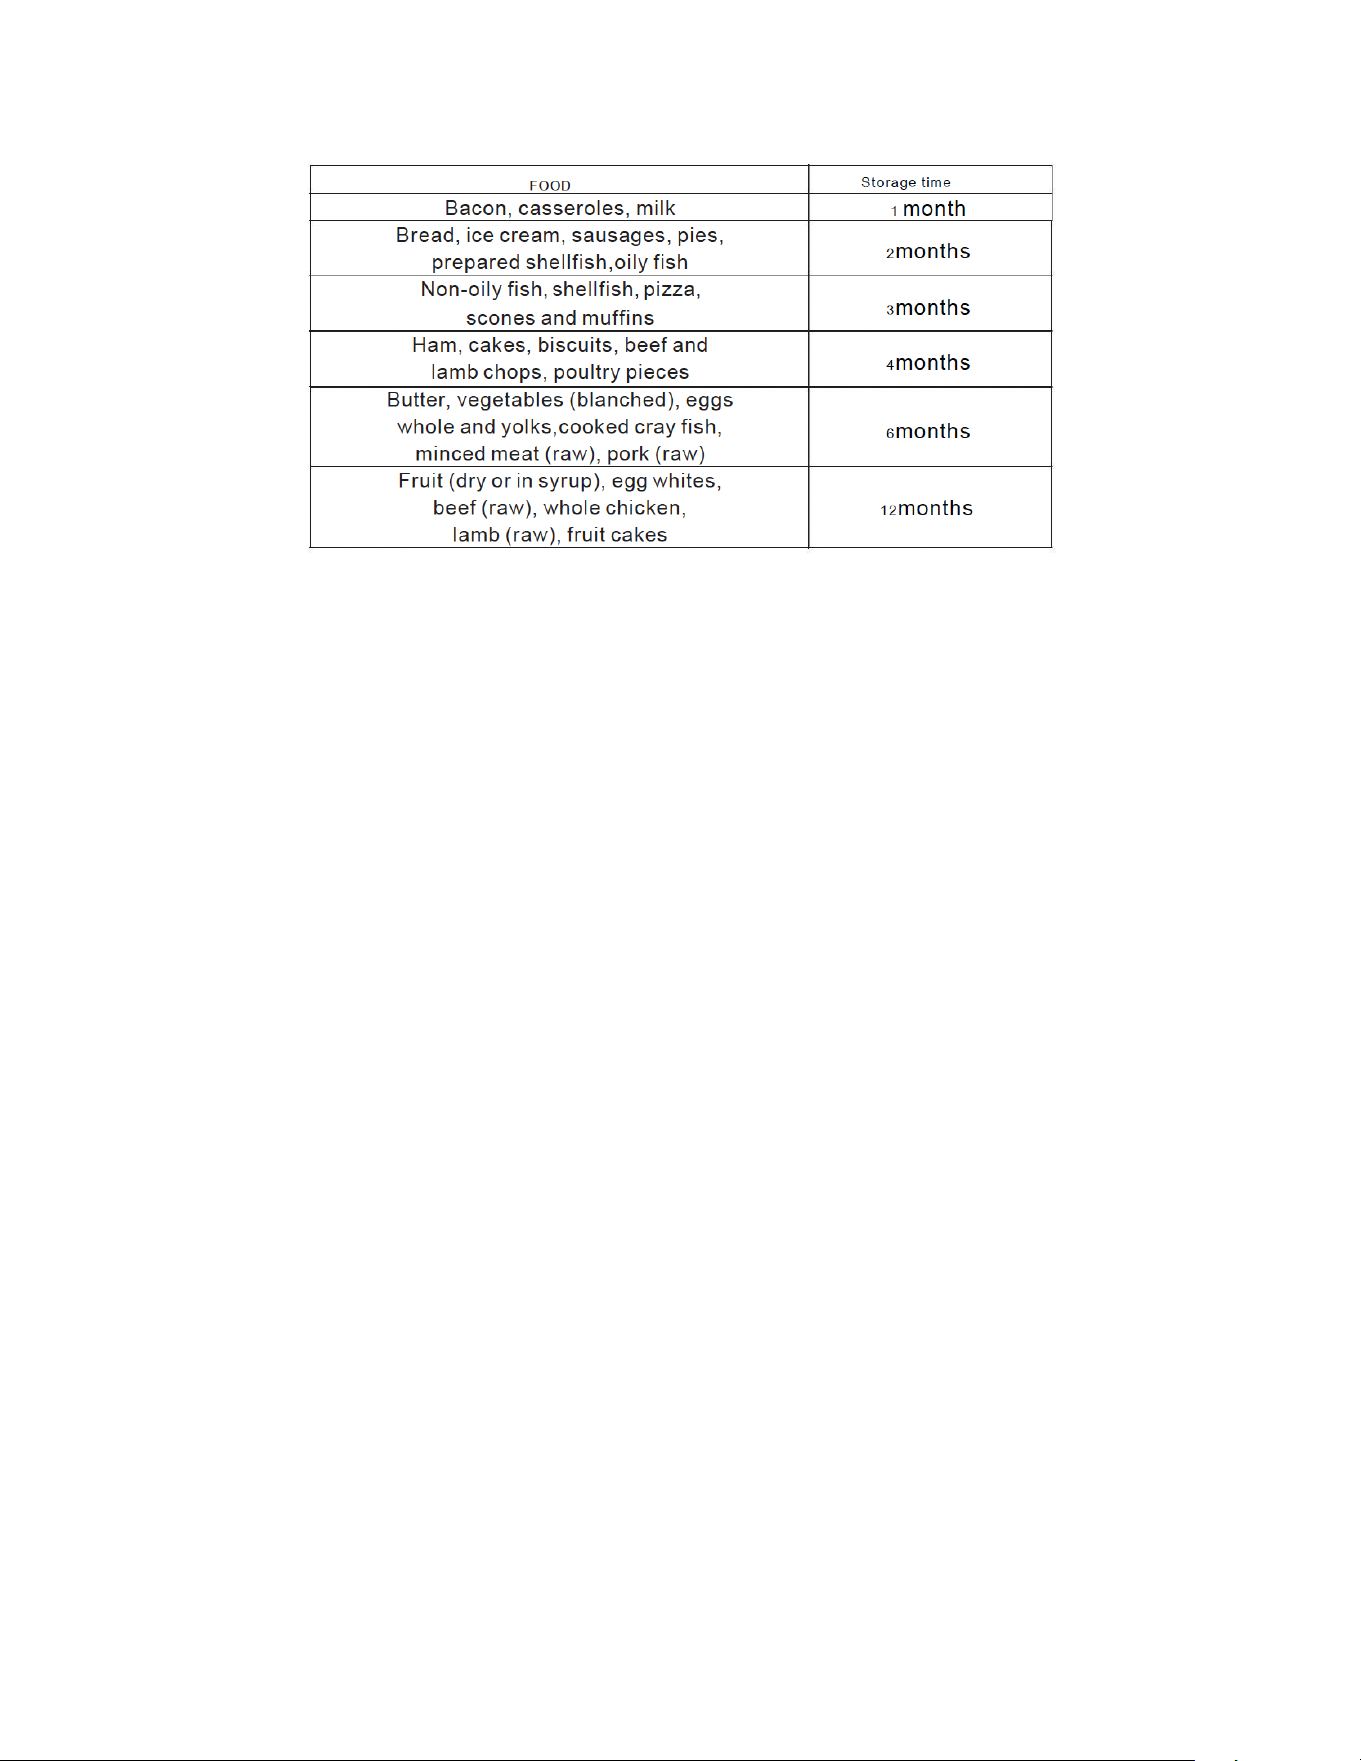
Recommended storage times of frozen food in the freezer compartment
These times vary depending on the type of food. The food that you freeze can be preserved from 1 to 12 months
(minimum at -18°C).
32

33
EN
Maintenance and Cleaning
Defrosting
This production has automatic defrosting function, without manual operation.
Cleaning
Precautions for internal and external cleaning of refrigerator:
- Before cleaning, always turn o the power switch, disconnect the power plug.
- During cleaning, make sure that no water will enter the switch, control panel, doorlamp and top control box.
- Remove dirt from the outside of refrigerator with mild cleaner, then wipe with clean soft cloth, and let the refrigerator dry
naturally.
- When cleaning door sealing strip, always use clean water, wipe with dry cloth and let it dry naturally. Wet soft cloth with warm
water or neutral cleaner to wipe the refrigerator body except the door sealing strip.
- lt is forbidden to flush the refrigerator directly with water,which will aect electrical insulation properties, etc.
- lt is forbidden to clean the refrigerator with metal wipers,ware brushes, coarse abrasive cleaners,strong alkaline
detergents,or flammable or toxic cleaning fluids.
After cleaning, connect the power plug of refrigerator,and connected with the refrigerator.
General information
On vacation
- When you want to leave for vacation, you had better to make the refrigerator operate continuously and leave foods that can
be stored for a short time. If you want to stop the refrigerator, remove all foods, disconnect the power plug, clean the inside of
refrigerator fully, and open the door to avoid producing abnormal odors.
At power failure
- Generally, short-term power failure will not aect the temperature of the refrigerator sharply. However, if power failure lasts
for a long time, you shall reduce the opening frequency of refrigerator, and shall not put fresh foods into the refrigerator
(prevent rise in the temperature of refrigerator from speeding up).
- If you know power failure is coming, you can turn on the “Super Freezer” function in advance to keep the temperature of
refrigerator to the lowest value.
Shutdown
- Generally, it is not suggested to stop refrigerator or turn o the power switch; otherwise, the life of refrigerator may be
aected.
If the ambient temperature is too low during shutdown, the remaining water in the water system may be iced; in this case,
please contact technicians to come for emptying the refrigerator.
Energy saving tips
- Make sure to keep the refrigerator away from heat source and direct sunlight.
- Before storing hot foods, cool them to room temperature and then put into refrigerator.
- Close the door timely, reduce the opening frequency, and shorten the opening time.
- When unfreezing frozen foods, you can put them into the refrigerating chamber, which will assist in refrigeration of the
refrigerating chamber.
- Make sure that the temperature sensor is not covered or blocked by foods,and keep proper distance with foods.

34
Troubleshooting
Check this list before contacting a servicer.
Doing so will save you time and money.
This list includes frequent complaints that are not related to faulty workmanship or materials.
Certain features mentioned here in may not apply to your product.
Button failure
Please check the control board whether the fridge under lock mode.When under lock mode, all buttons can’t work.
Low voltage,the compressor can’t start
You should purchase pressurizer of more than 1000W when the area of the appliance installation,that’s better to protect
your fridge.
Long time to start
When the ambient temperature too high, it will take long time to start the appliance.
Middle beams feel hot
Middle beams feel hot after a period of time of the appliance run,it belongs to the normal phenomenon.
Dew drops
When external air flows into the cool inner surface of the fridge,dew drops can be formed. If the humidity of the installed lo-
cation is high or during the rainy season,dew drops can form on the outer side of the fridge.This is a natural phenomenon that
occurs during the humid weather,Wipe the water drops with a dry cloth.
Noise
When you operate the fridge for the first time,the fridge will operate at high speed to cool fast and the sound can seem louder.
When the internal temperature falls below a certain level,the noise will subside.
When the operation of the compressor is starting or ending;various parts expanding/contracting or various control devices
operating or temperature change within the fridge,you will hear the sounds,these are normal sounds.
Compressor hot
When working,the temperature of the compressor outer is more than 80°C,please do not touch the compressor,it may cuase
serious injury.
Compressor long time running
When the ambient temperature too high or put too much fresh foods into the fridge,it will take long time to cool down until the
appliance run at the setting temperature.
Abnormal odors in refrigerator
Odorous foods shall be packaged tightly; check for bad foods; the inside of refrigerator shall be cleaned.
Ice maker failing to work normally
Whether the ice maker switch is turned on; whether the freezing chamber door is closed or ajar;
Whether the water valve is opened; whether water supply is obstructed, or water pressure is too low;
Whether the temperature of freezing chamber is high due to just power connection or frequent use;
Water leakage from ice outlet upon power-on for the first time
When the refrigerator is powered on for the first time, the system will execute self-check; at the moment, there may be a little
water flowing out from the ice outlet of ice maker; this is self-check action and is normal.

35
EN
No ice out from dispenser
If the temperature of freezing chamber is high or the door is opened and closed frequently, ice cubes in the ice storage box
may join together; take out ice cubes from the ice storage box, break them and then put back, and discard ice that is not
broken;
When the successive time of taking ice exceeds 1 minute, stop for 5 minutes and then take ice again;
Whether the valve is opened, the ice maker starts to make ice after the water system works normally;
The door of freezing chamber is not closed, make sure that all doors are closed.
No water out from dispenser
When the ambient temperature is lower than -2°C, no water will come out due to low-temperature icing of the water pipe, and
try to take water after the ambient temperature rises;
If you take water for above 3 minutes once, the refrigerator will execute automatic protection, release the ice discharge
button for a while, and then take water again.
Warm water out from dispenser
Because the water pipe has a section exposed outside the refrigerator, the temperature of the first cup of water taken may be
high, just continue to take water to get cold water.
Dispenser blocked
Ice melted is frozen on the screw rod, this is due to infrequent use or sharp temperature change, or overvoltage.
Empty the ice storage box, clean, wipe dry, and then put back.
Ice frozen together when ice maker operates stably
If ice is not used usually, ice cubes may frozen together; take out the frozen ice cubes from the ice storage box, break into
pieces and then put back, or discard directly.
36
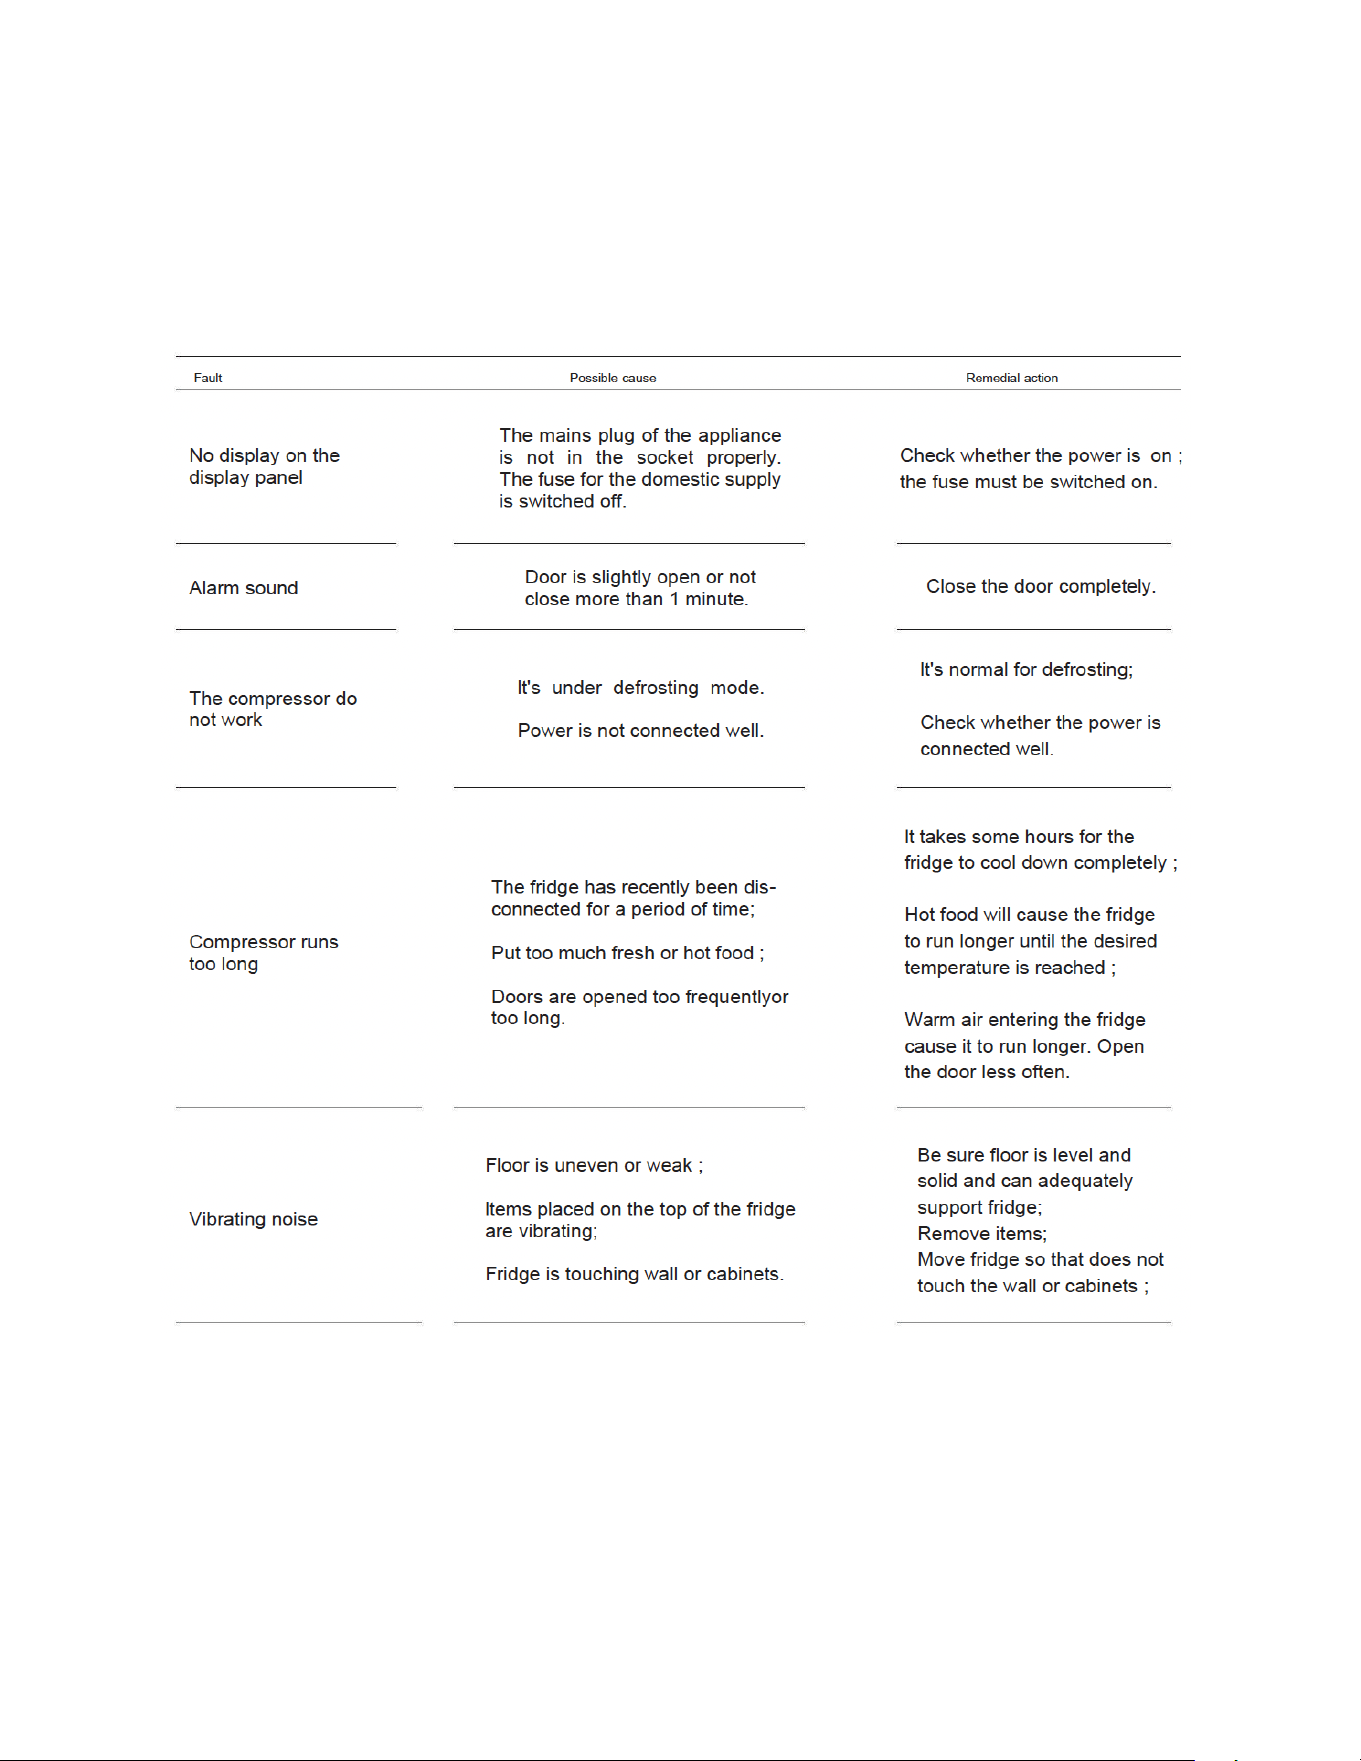
Troubleshooting table
Before calling for service, review this list. It may save you both time and expense.
This list includes common occurrences that are not the result of defective workmanship or materials in this appliance.

37
EN
FORZA WARRANTY
FREESTANDNG GAS RANGES – WALL OVENS – RANGE TOPS – DISHWASHERS –
RANGE HOODS – REFRIGERATOR
The warranties provided by Forza in this statement apply exclusively to Forza appliances and accessories sold as new
products to the original owner by a Forza authorized distributor, retailer, dealer or service center and installed in the United
States.
The warranties provided in this statement are not transferable and have validity from the date of original purchase.
Duration of warranty:
For twenty-four (24) months from the original date of purchase, the Forza warranty covers all parts and labor to repair or
replace, under normal residential use, any part of the product proving to be defective in material or workmanship as a result of
the original manufacturing process. Repair service must be performed by a Forza Authorized Service Center during normal
working hours.
Responsibilities of the buyer:
When writing or calling about a service problem, please include the following information:
• Your name, address and telephone number;
• Appliance model and serial number;
• Name of your dealer;
• A clear description of the problem you are having;
• Proof of purchase (sales receipt).
Cosmetic warranty:
Forza will cover parts showing cosmetic defects (doors, handles, glass, product frames, racking and interior, exterior surfaces)
in material and workmanship for a period of seven (7) days after the delivery of the unit. This coverage will include scratches,
stains, surface imperfections on stainless steel, paint and porcelain, with the exclusion of slight dierences in color due to
materials and painting/enameling technologies. However, slight color variation may be noticed because of the inherent
dierences in painted parts and porcelain parts as well as dierences in kitchen lighting, product locations, and other factors.
Therefore, this warranty does not apply to color variation attributable to such factors.
WHAT IS NOT COVERED:
1) The product used in any commercial application.
2) Service trips to your home, during which no fault is found.
3) Repair service provided by any service agency that is not Forza authorized.
4) Damage or repair service to correct any service provided by an unauthorized agency.
5) Damage or repair service to correct the use, addition or substitution of any orginal part with an unauthorized part.
6) Installation not in accordance with local electrical codes or plumbing codes.
7) Defects or damage due to improper storage of the product.
8) Damages due to failure in following the manufacturer’s recommended care, cleaning and maintenance instructions;
in particular, damages to the oven and/or the cooktop if they have not been cared and cleaned according to these
instructions.

38
9) Defects, damages or missing parts on products sold out of the original factory packaging or from displays.
10) Service calls or repairs to correct the installation of the product and/or related accessories, calibrations and normal
adjustments after installation and setup, including burner adjustments.
11) Service calls to connect, convert or otherwise repair the electrical wiring and/or gas line to properly use the product.
12) Service calls to provide instructions on the use of a Forza product.
13) Repair or failure of the product if it is abused, misused, used improperly, used for other than the intended purpose or if
used commercially/industrially.
14) Damage or repairs caused by the use of harsh chemicals or cleaning products improperly applied.
15) Replacement of wear and tear parts.
16) Replacement of house fuses or resetting of circuit breakers.
17) Damages to anything situated next to the product, including, but not limited to, ceiling, floor or cabinetry.
18) Defects and damages arising from accidents, alterations, misuse, abuse, improper installation, or installation that does
not conform to instructions given by Forza.
19) Damages occurred during transit, handling and/or installation of the product.
20) Defects and damage arising from external forces beyond the control of Forza such as fire, flood, earthquakes and other
acts of God.
21) Forza cannot guarantee the availability of service in areas more than 30 miles from an authorized retailer. In such cases
where travel charges are levied, those will be borne by the consumer.
22) This warranty only covers service performed at the location of product installation and will not cover costs associated
with repairing o-site unless expressly authorized by Forza nor does it cover the travel costs associated with providing
service to remote locations.
23) Replacement filters for ventilation hood recirculating kits are not covered by the product warranty.
24) Products with original serial numbers that have been removed.
25) Replacement light bulbs are not covered by the product warranty.
26) Damages to people or property caused by the product or through its usage.
In the case that the product is will be installed in a remote area, where certified trained technicians are not reasonably available,
the customer will be responsible for the transportation costs for the delivery of the product to the nearest authorized service
center or for the travel costs of a certified trained technician.
Remote locations/area: are defined as being outside of a 30 miles from any service provider.
Forza reserves the right to revise this warranty at any time.
Forza does not assume any responsibility for incidental or consequential damages. Some states do not allow the
exclusion or limitation of incidental or consequential damages, so the above limitation or exclusion may not apply
to you. This warranty gives you specific legal rights and you may also have other rights which may vary from state to
state.

39
EN
FORZA WARRANTY
B-STOCK/ DISPLAY MODEL
FREESTANDNG GAS RANGES – WALL OVENS – RANGE TOPS – DISHWASHERS–
RANGE HOODS – REFRIGERATOR
The warranties provided by Forza in this statement apply exclusively to Forza appliances and accessories sold to the original
owner by a Forza authorized distributor, retailer, dealer or service center and installed in the United States.
The warranties provided in this statement are not transferable and have validity from the date of original purchase.
B-Stock (refurbished product, product returns, ‘scratch and dent’ products, old stock (defined as more than one year’s dierence
between production date and date of sale to end user, discounted product etc.) and display models (trade shows, dealer,
project or distributor showroom display models, etc.) are not considered ‘new’, in-the- box product and are thus not covered by
FORZA standard warranty.
For any functional or cosmetic issue not disclosed by the seller realized at initial inspection / commission of the product:
please contact the seller.
Duration of warranty:
FULL NINETY DAY TOTAL PRODUCT WARRANTY
For ninety days from the original date of purchase, the FORZA product warranty covers all parts and labor to repair or replace,
under normal residential use, any part of the product proving to be defective in material or workmanship as a result of the original
manufacturing process. There is no service or cosmetic warranty of any kind of B-Stock model.
Responsibilities of the buyer: When writing or calling about a service problem, please include the following
information:
• Your name, address and telephone number;
• Appliance model and serial number;
• Name of your dealer;
• A clear description of the problem you are having;
• Proof of purchase (sales receipt).
WHAT IS NOT COVERED:
1) The product used in any commercial application.
2) Service trips to your home, during which no fault is found.
3) Repair service provided by any service agency that is not Forza authorized.
4) Damage or repair service to correct any service provided by an unauthorized agency.
5) Damage or repair service to correct the use, addition or substitution of any orginal part with an unauthorized part.
6) Installation not in accordance with local electrical codes or plumbing codes.
7) Defects or damage due to improper storage of the product.
8) Damages due to failure in following the manufacturer’s recommended care, cleaning and maintenance instructions;
in particular, damages to the oven and/or the cooktop if they have not been cared and cleaned according to these
instructions.
9) Defects, damages or missing parts on products sold out of the original factory packaging or from displays.
10) Service calls or repairs to correct the installation of the product and/or related accessories, calibrations and normal
adjustments after installation and setup, including burner adjustments.

40
11) Service calls to connect, convert or otherwise repair the electrical wiring and/or gas line to properly use the product.
12) Service calls to provide instructions on the use of a Forza product.
13) Repair or failure of the product if it is abused, misused, used improperly, used for other than the intended purpose or if
used commercially/industrially.
14) Damage or repairs caused by the use of harsh chemicals or cleaning products improperly applied.
15) Replacement of wear and tear parts.
16) Replacement of house fuses or resetting of circuit breakers.
17) Damages to anything situated next to the product, including, but not limited to, ceiling, floor or cabinetry.
18) Defects and damages arising from accidents, alterations, misuse, abuse, improper installation, or installation that does
not conform to instructions given by Forza.
19) Damages occurred during transit, handling and/or installation of the product.
20) Defects and damage arising from external forces beyond the control of Forza such as fire, flood, earthquakes and other
acts of God.
21) Forza cannot guarantee the availability of service in areas more than 30 miles from an authorized retailer. In such cases
where travel charges are levied, those will be borne by the consumer.
22) This warranty only covers service performed at the location of product installation and will not cover costs associated
with repairing o-site unless expressly authorized by Forza nor does it cover the travel costs associated with providing
service to remote locations.
23) Replacement filters for ventilation hood recirculating kits are not covered by the product warranty.
24) Products with original serial numbers that have been removed.
25) Replacement light bulbs are not covered by the product warranty.
26) Damages to people or property caused by the product or through its usage.
In the case that the product is will be installed in a remote area, where certified trained technicians are not reasonably available,
the customer will be responsible for the transportation costs for the delivery of the product to the nearest authorized service
center or for the travel costs of a certified trained technician.
Remote locations/area: are defined as being outside of a 30 miles from any service provider.
Forza reserves the right to revise this warranty at any time.
Forza does not assume any responsibility for incidental or consequential damages. Some states do not allow the
exclusion or limitation of incidental or consequential damages, so the above limitation or exclusion may not apply
to you. This warranty gives you specific legal rights and you may also have other rights which may vary from state to
state.
Forza is a brand of Glem Gas S.P.A
Via Modenese 4266, 41018 San Cesario S.P. (Modena), Italy
Web: www.forzacucina.com – Email: service@forzacucina.com
EN
Note

42
EN
This symbol on the product or in its packing indicates that this product may not be treated as household
waste. Instead, it should be taken to the appropriate waste collection point for the recycling of electrical
and electronic equipment.
By ensuring this product is disposed of correctly, you will help prevent potential negative consequences
for the environment and human health, which could otherwise be caused by the inappropriate waste
handling of this product. For more detailed information about the recycling of this product, please
contact your local council, your household waste disposal service, or the shop where you purchased
the product.
Forza is a brand of Glem Gas S.P.A — Via Modenese 4266, 41018 San Cesario S.P. (Modena), Italy
WEB www.forzacucina.com EMAIL service@forzacucina.com
