
SSC 3510WH
EN
STEAM CLEANER
Translation of the original manual

SSC 3510WH
A
1
2
3
4
5
6
7
9
8
10
B
1 2 3
4 5
6 7 8
9 10
C1 C2
C3
C4 C5
C6
D1 D2
D3

- 1 -
12/2024
2024, .
EN
Steam cleaner
User Manual
Important Safety Instructions
READ CAREFULLY AND STORE FOR FUTURE USE.
• This appliance is not to be used by children.
• This appliance may be only used by persons with
physical, sensory or mental impairments or by
inexperienced persons provided they are properly
supervised or have been informed about how to use of
the product in asafe manner and understand the potential
dangers.
• Children must not play with the appliance.
• Cleaning and maintenance must not be carried out by
children. Keep the power cable out of reach of children.
• If the power cord is damaged, have it replaced in
aprofessional service centre in order to prevent
adangerous situation. It is forbidden to use the appliance
with the power cord damaged.
• Only use clean water in the appliance. Do not use any
other liquids or add any detergents to the water.
• Pull the plug out of the socket before cleaning or
maintaining the appliance.
WARNING:
Danger of scalding.
STEAM CLEANER

- 2 -
12/2024
2024, .
• Liquid or steam must not flow towards equipment
containing electrical components, such as the interior of
the oven.
• The filling hole must not be opened during use. Follow the
instructions for safe water container refilling inthis manual.
• The appliance must not be left unattended while
connected to thepower supply.
• The appliance must not be used if it has fallen and/or if
there are visible signs of damage or leaks.
• Do not allow access to children if the appliance is live or
cooling.
. . . . . . . . . . . . . . . . . . . . . . . . . . . . . . . . . . . . . . . . . . . . . . . . . . . . . . . . . . . . . . . . . . . . . . . . . . . . . . . . . . . . . . . . . . . . . . . . . . . . . . . . . . . . . . . . . . . . . . . . . . . . . . . . . . . . . . . . . . . .
Additional Important Safety Instructions forUse of the Appliance
• This appliance is designed for use in households, offices and similar types of areas. Do not use in industrial surroundings.
• Do not expose the appliance to direct sunlight and do not place it near open fire or appliances that are asource of heat.
• Before connecting the plug of the power cord to apower socket, make sure that the nominal voltage listed on the steam cleaner'srating plate
matches the electrical voltage of the power outlet.
• Make sure that the power cable does not touch hot surfaces or sharp objects. Position the cable so that it is not tripped over.
• Do not immerse the appliance, power cord or plug in water or other liquids or rinse them under running water.
• Before switching on the appliance, make sure it is correctly assembled.
• Make sure that the air outlet or suction opening is not blocked when the appliance is in operation.
• Do not point the steam dispenser at people, animals, other appliances, etc.
• Do not expose the appliance to dripping or spraying water.
• Always store indoors.
• Do not touch the appliance with wet hands.
• Do not use the appliance inan enclosed area filled with fumes released by oil paints, paint thinners, certain anti-moth substances, flammable dust or
other explosive or toxic fumes.
• Do not use the appliance on leather, wax-polished furniture or floors, synthetic fabrics, velvet or other delicate steam-sensitive materials.
• Do not use the appliance to heat the room.
• Only use the accessories supplied with the appliance or recommended by the manufacturer. Use of other accessories may cause fire, electric shock
or injury.
• Never fill the water tank with descaling, aromatic, alcohol or detergent as this may damage it.
• Do not use the appliance to clean the following:
– smouldering cigarettes, burning objects, matches or hot ashes;
– flammable or volatile substances;
– sharp objects such as shards, needles, pins, etc;
– flour, plaster, cement and other building materials;
• The detergent container is filled with anon-foaming saponate that is suitable foruse in asteam cleaner, or you can use asolution of vinegar
andwater in aratio of 1:2.
• Do not fill the container with foaming detergents, chemicals, solvents, etc.
• Failure to follow the instructions regarding asuitable cleaning agent may cause serious health risks (e.g. skin burns, mucous membranes, etc.).
Always follow the detergent manufacturer'sinstructions and the instructions inthis user'smanual.
• Make sure the room is ventilated thoroughly. Always switch off the appliance andunplug the power cord from the mains socket after use, before
cleaning or maintenance.
• Disconnect the power cord from the socket by pulling the plug, not the cord. Otherwise, damage to the power cord or the socket may occur.
• Do not use the appliance if it is not working correctly, if it has been damaged or has been submerged in water. Do not repair or modify the appliance
yourself. All repairs should be carried out by an authorised service centre. Tampering with the appliance may result in the loss of your legal rights
regarding faulty performance or warranty for quality.
. . . . . . . . . . . . . . . . . . . . . . . . . . . . . . . . . . . . . . . . . . . . . . . . . . . . . . . . . . . . . . . . . . . . . . . . . . . . . . . . . . . . . . . . . . . . . . . . . . . . . . . . . . . . . . . . . . . . . . . . . . . . . . . . . . . . . . . . . . . .
- 3 -
12/2024
2024, .
EXPLANATION OF SYMBOLS PLACED ON THE PRODUCT OR INTHE ACCOMPANYING DOCUMENTATION
The product meets all the basic requirements of the applicable EU directives.
This symbol on products or original documents means that used electric or electronic products must not be added to ordinary municipal
waste.
Read the user'smanual.
. . . . . . . . . . . . . . . . . . . . . . . . . . . . . . . . . . . . . . . . . . . . . . . . . . . . . . . . . . . . . . . . . . . . . . . . . . . . . . . . . . . . . . . . . . . . . . . . . . . . . . . . . . . . . . . . . . . . . . . . . . . . . . . . . . . . . . . . . . . .

- 4 -
12/2024
2024, .
• Thank you for purchasing our SENCOR product; we hope it will serve
to your satisfaction.
• Prior to using this appliance, please read the user manual thoroughly,
even in cases when you are already familiar with the use of similar
types of appliances. Use the appliance only as described in this
user manual. Keep the manual for future reference. If you pass the
appliance on to another person, ensure that this user manual is
included.
• Carefully unpack the appliance and make sure not to discard any part
of the packaging material until you have found all its components. It
is recommended to keep the original packaging, packing material,
receipt and confirmation of the extent of the seller'sliability or warranty
certificate at least for the duration of the legal right of defective
performance or quality guarantee. When transporting the appliance,
we recommend packaging it again in the original box provided by the
manufacturer.
. . . . . . . . . . . . . . . . . . . . . . . . . . . . . . . . . . . . . . . . . . . . . . . . . . . . . . . . . . . . . . . . . . . .
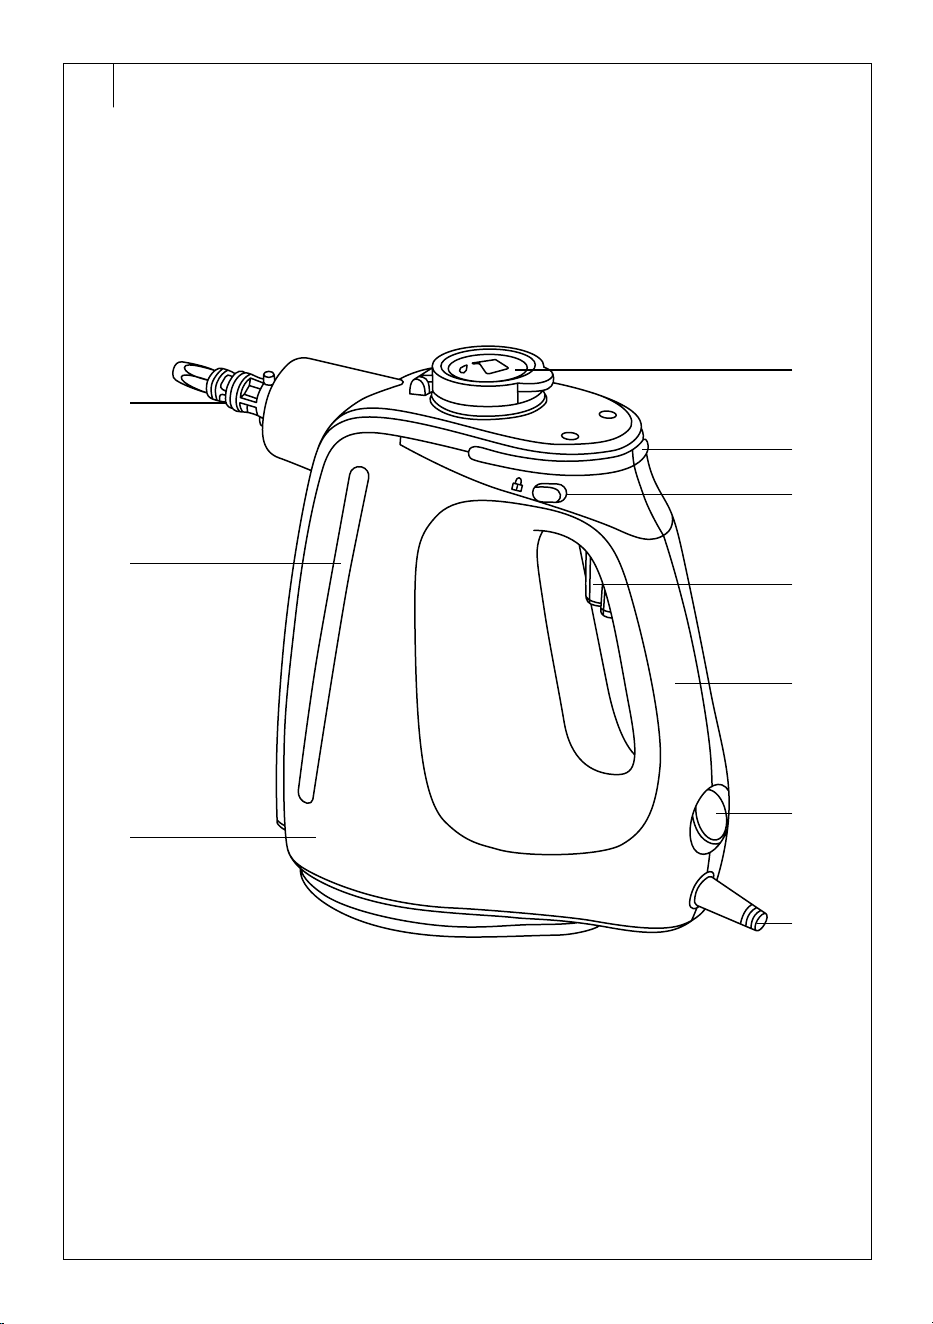
CLEANER DESCRIPTION
A1 Cleaner nozzle
A2 Water tank with MAX line
A3 Cleaner body
A4 Lid
A5 Heating indicator
A6 Power switch lock
A7 Power switch
A8 Handle
A9 Main power switch
A10 Power cord
. . . . . . . . . . . . . . . . . . . . . . . . . . . . . . . . . . . . . . . . . . . . . . . . . . . . . . . . . . . . . . . . . . . .
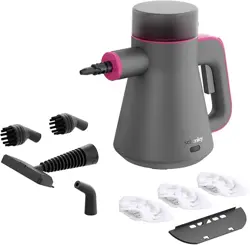
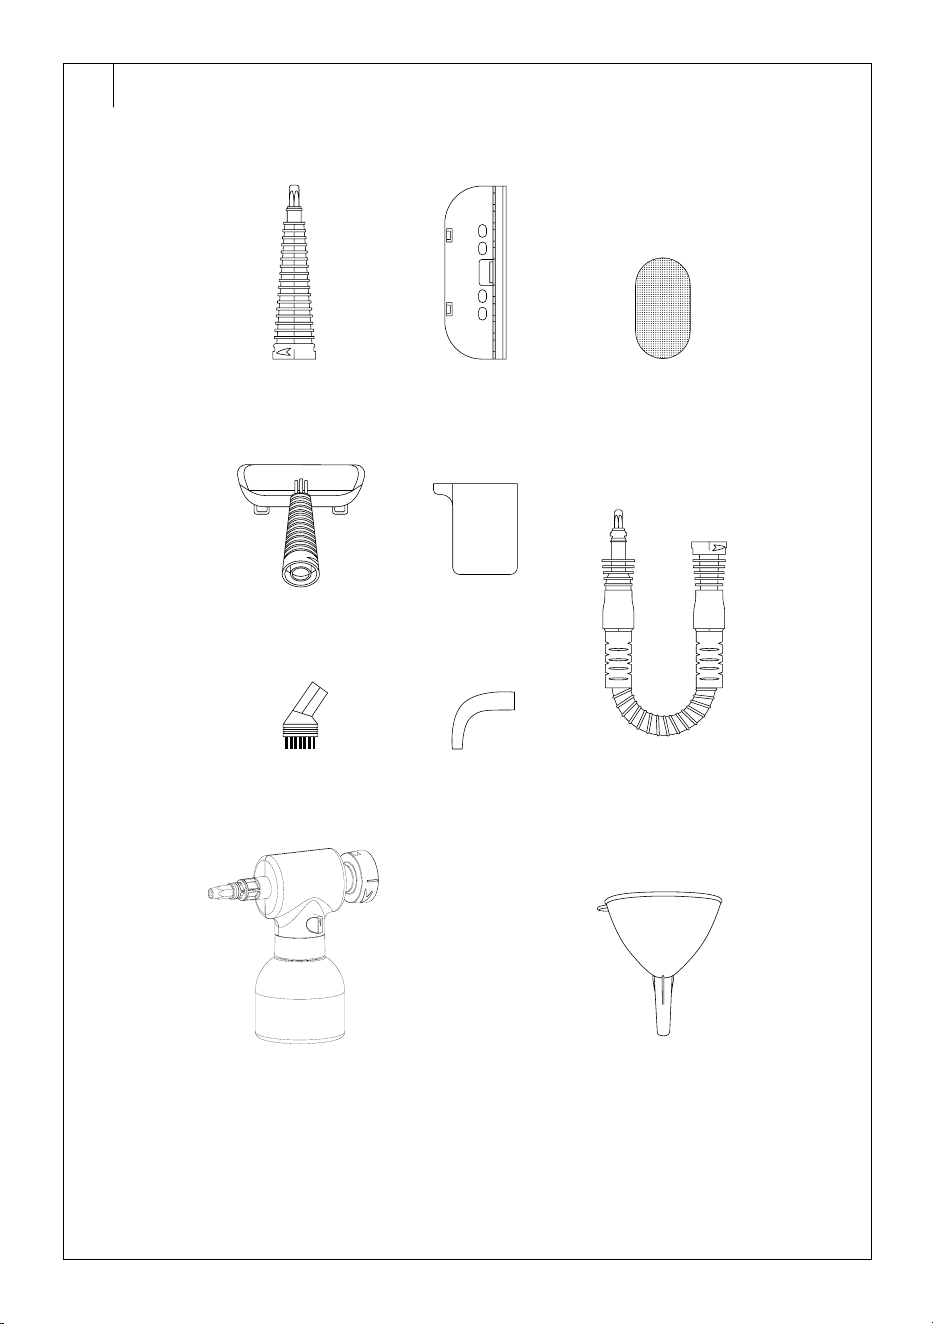
DESCRIPTION OF ACCESSORIES
B1 Straight nozzle
B2 Window squeegee
B3 Microfibre sleeve
B4 Minimop
B5 Measuring cup
B6 Round brush nozzle
B7 Curved nozzle
B8 Flexible hose
B9 Detergent container
B10 Funnel
. . . . . . . . . . . . . . . . . . . . . . . . . . . . . . . . . . . . . . . . . . . . . . . . . . . . . . . . . . . . . . . . . . . .
PURPOSE OF USE
• The Sencor SSC 3510WH steam cleaner is designed toclean
anddisinfect your home. You can use it toclean andremove dirt,
e.g. fromtiles, joints, washbasins, sinks, etc. Thanks to very high
temperature steam, it removes most of the greasy dirt, dried dirt or
bacteria, etc.
• The steam cleaner is supplied withadetergent container. This will
make cleaning more effective.
. . . . . . . . . . . . . . . . . . . . . . . . . . . . . . . . . . . . . . . . . . . . . . . . . . . . . . . . . . . . . . . . . . . .
STEAM CLEANER ACCESSORIES
Straight nozzle
This is used toclean tiles, paving andother hard floor surfaces withfixed
joints; taps andsanitary fixtures; toys, tables andother worktops; hard-
to-reach places.
Minimop with asleeve
This is used forsteaming clothes andforcleaning clothes, upholstered
furniture, curtains, bed linen, etc.
Minimop with squeegee
This is used toclean windows, mirrors andwalls of shower cabins.
Round brush nozzle
It is used toclean: stoves, grills andbarbecue utensils (if recommended
by the manufacturer); tiles andother hard floor surfaces withfixed joints;
taps andsanitary ware; toys, tables andother worktops.
Curved jet
It is used forcleaning: taps andsanitary fixtures; toys, tables andother
worktops; hard-to-reach places.
Flexible hose
This is designed to extend the range of the used accessories andeasier
handling.
Detergent container
Using asuitable cleaning agent, it is used toclean: stoves, grills
andbarbecue utensils (if recommended by the manufacturer); tiles
andother hard floor surfaces withfixed joints; taps andsanitary ware;
toys, tables andother worktops.
Note:
Asuitable cleaning agent is anon-foaming detergent
suitable foruse in asteam cleaner, or asolution of vinegar
andwater in aratio of 1:2. Do not use foaming detergents,
chemicals, bleach, solvents, etc. Follow the instructions of
the detergent manufacturer.
Important:
Before using the steam cleaner on any surface or
textiles, it is recommended to test in asmall place to
make sure that high temperature steam will not affect
or damage the material.
Do not use steam on the glued edge of the laminate
as this could get loose.
Do not use asteam cleaner toclean unsealed
wooden or parquet floors.
Do not use asteam cleaner toclean painted or
plastic-coated surfaces to avoid damage or danger.
When using amicrofibre sleeve, it is recommended to steam it before
applying it to the surface tobe cleaned.
Steam may damage the seal of the window frame and at low
temperatures may cause stress on the surface of the window glass, which
may cause the glass to break.
Around brush can scratch sensitive surfaces. Do not use the brush on
such surfaces.
Do not use asteam cleaner:
– forcleaning stubborn stains, blowing out dirt fromcorners or
crevices, etc.;
– towipe off damp dust;
– toremove slight wrinkles from hanging clothes. Steam anddry the
clothes at adistance of 10–20cm.
. . . . . . . . . . . . . . . . . . . . . . . . . . . . . . . . . . . . . . . . . . . . . . . . . . . . . . . . . . . . . . . . . . . .
SETUP BEFORE USE
• Remove the steam cleaner and all accessories from the packaging.
Make sure to remove all the parts. Check for any damage to the
cleaner and its accessories.
• Remove any protective films and advertising labels from the cleaner
and all accessories.
Cleaner assembly/disassembly
Warning:
Before inserting or removing the accessory, always
make sure that the steam cleaner is turned off
anddisconnected from the power socket.
Warning:
Allow the steam cleaner to cool completely before
removing the accessory to avoid scalding from the
hot steam.
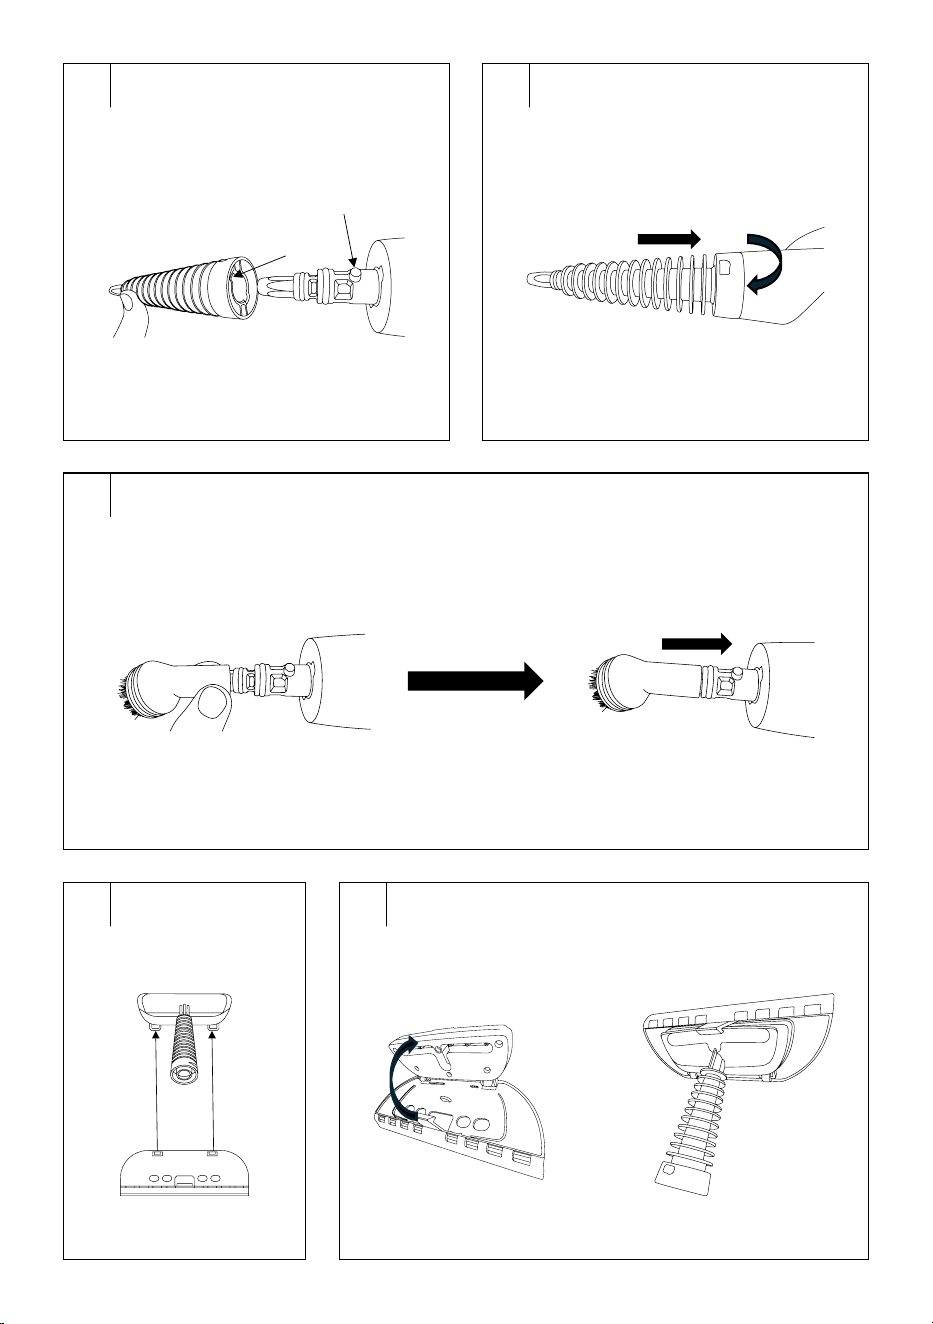
• Accessories (straight nozzle, minimop, round brush nozzle or curved
nozzle) can be mounted either on the steam cleaner nozzle or on the
flexible hose nozzle.
• Fit the attachment so that the tabs on the nozzle fit into the cut-outs
at the end of the attachment – see figure C1. Turn the attachment or
accessory anticlockwise until you feel resistance – see figure C2.
• The round brush nozzle and the curved nozzle are equipped with
ahexagonal inner frieze that fits directly onto the nozzle. Attach the
EN
Steam cleaner
User Manual
- 5 -
12/2024
2024, .
accessory onto the nozzle andpush until you feel resistance – see
figure C3.
• Put the window squeegee on the minimop so that the hooks at the
bottom of the squeegee fit into the holes at the bottom of the minimop
– see figure C4. Then fold the spatula onto the minimop until the lock
atthe top of the spatula clicks behind the top edge of the minimop –
see figure C5.
• To remove the accessory, turn it clockwise until you feel resistance,
andthen pull the accessory away from the nozzle.
• Remove the round brush nozzle or the curved nozzle by pulling it
away from the nozzle.
• To remove the window squeegee from theminimop, release the lock
in the top part of the squeegee and lift the squeegee away from the
minimop. Then release the hooks in the bottom part of the spatula
from theholes in the bottom part of the minimop.
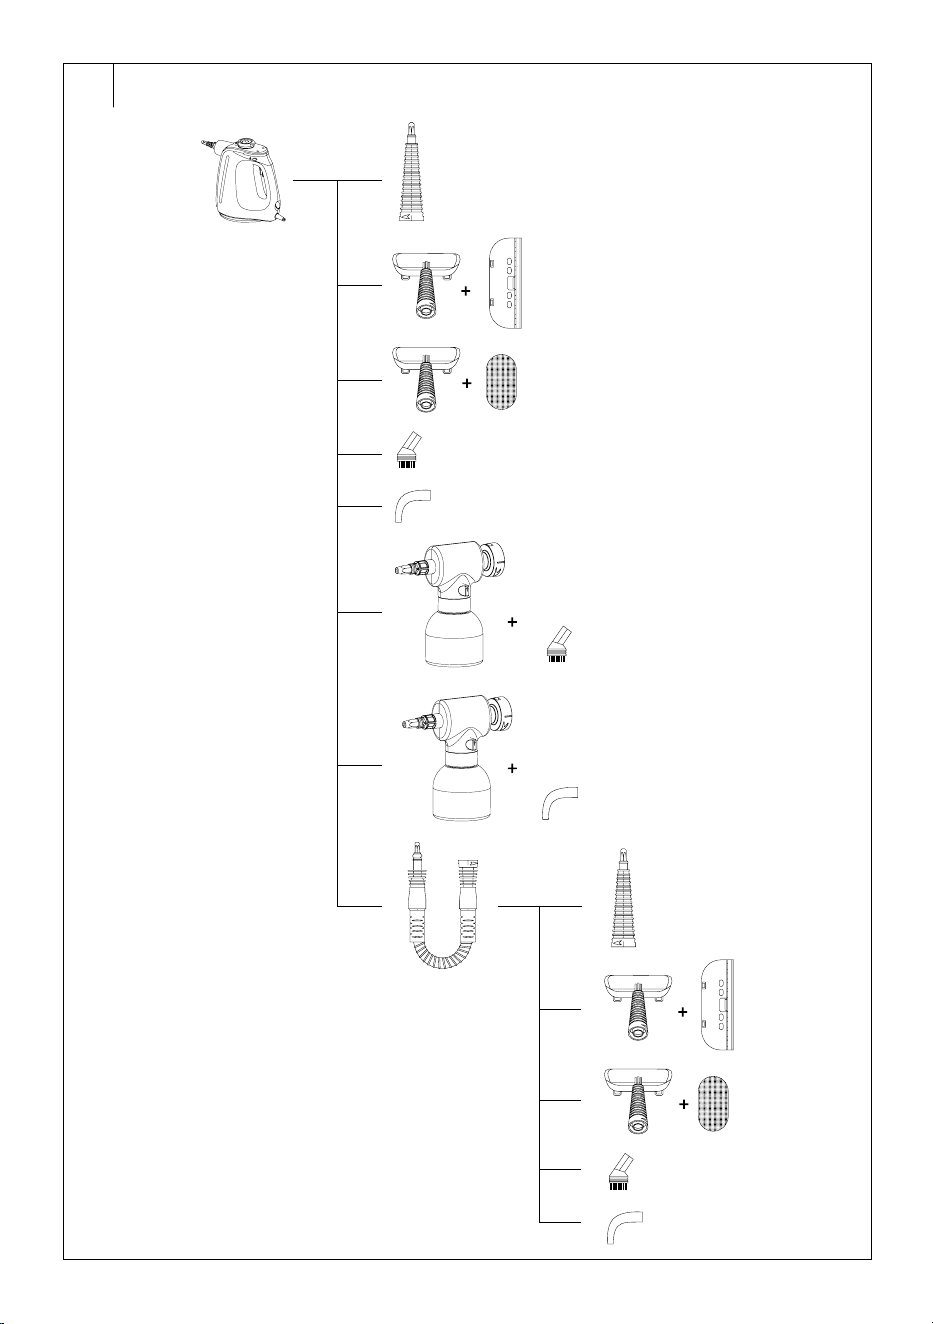
For more information on the using combinations of the individual
accessories, please refer to C6.
Filling the Water Tank
1. Place the steam cleaner on aflat and stable surface.
2. Open the lid and insert the funnel into the filling hole.
3. Using the measuring cup, pour clean water into the tank up to the
MAX mark.
4. Remove the funnel andclose the lid.
Warning:
Do not exceed the MAX line during filling.
Warning:
Always fill the tank with clean drinking or distilled
water if water in your distribution system is hard. Do
not use any detergents, chemical detergents, vinegar,
etc. There is arisk of serious damage to the steam
cleaner.
Filling water
If the water in the tank runs out during the use of the cleaner, turn it off
anddisconnect it from the power socket.
Then open the lid andpour clean water into the tank. Close the lid to
continueusing.
Warning:
Never fill the tank with water while the steam cleaner
is powered andinoperation.
. . . . . . . . . . . . . . . . . . . . . . . . . . . . . . . . . . . . . . . . . . . . . . . . . . . . . . . . . . . . . . . . . . . .
USING THE STEAM CLEANER
1. Assemble the steam cleaner withthe required accessories.
2. Fill the water tank. Check that the lid is closed properly.
3. Make sure that the switch lock is in the position.
4. Fully unwind the power cord and connect the power cord plug in the
mains socket.
5. Set the main power switch to the Iposition. The switch will light
up. At the same time, the heating indicator light will light up. This
indicates that the steam cleaner is heating up.
6. When the heating indicator goes out, the steam cleaner is ready for
use.
7. Turn the switch lock to the position.
8. Press the switch andafter awhile steam will start to escape from the
accessory outlet.
9. Keep the switch pressed. When you release the switch, the steam
discharge will stop. The switch can be locked in the pressed position.
Press the switch andgently slide it downwards. If you need to
interrupt or end the steam dispensing, move the switch upwards.
10. Slowly move the accessory over the area that you wish to clean.
11. When the cleaning is finished, release the switch and turn the switch
lock to the position.
12. Turn the main power switch to the Oposition and disconnect the
power plug from the mains socket.
Allow the steam cleaner to cool down completely before cleaning it or
changing accessories. When cleaning, please follow the instructions in
the “Cleaning and Maintenance” section.
Note:
While the steam cleaner is in use, the heating indicator
will turn on andoff. This means that the water in the tank
is being heated to steam temperature. The steam cleaner
can be used normally evenwhen the heating indicator
light is on.
Tip:
Wipe the cleaned area with adry cloth. The cleaned area
will be glossy, with no steam droplet marks.
If you notice adecrease in steam output, the water tank is almost empty
andwill need to be refilled.
If you completely drain the water from the tank, the heater will shut off to
prevent damage due to overheating.
Note:
Residual steam may be discharged from the steam cleaner
even if the switch is not held down. This is anormal
condition when the residual steam is being released by
inertia.
Note:
While the steam cleaner is being cooled, residual steam
may condense andform water droplets at the end of the
nozzle. This is anormal occurrence.
. . . . . . . . . . . . . . . . . . . . . . . . . . . . . . . . . . . . . . . . . . . . . . . . . . . . . . . . . . . . . . . . . . . .
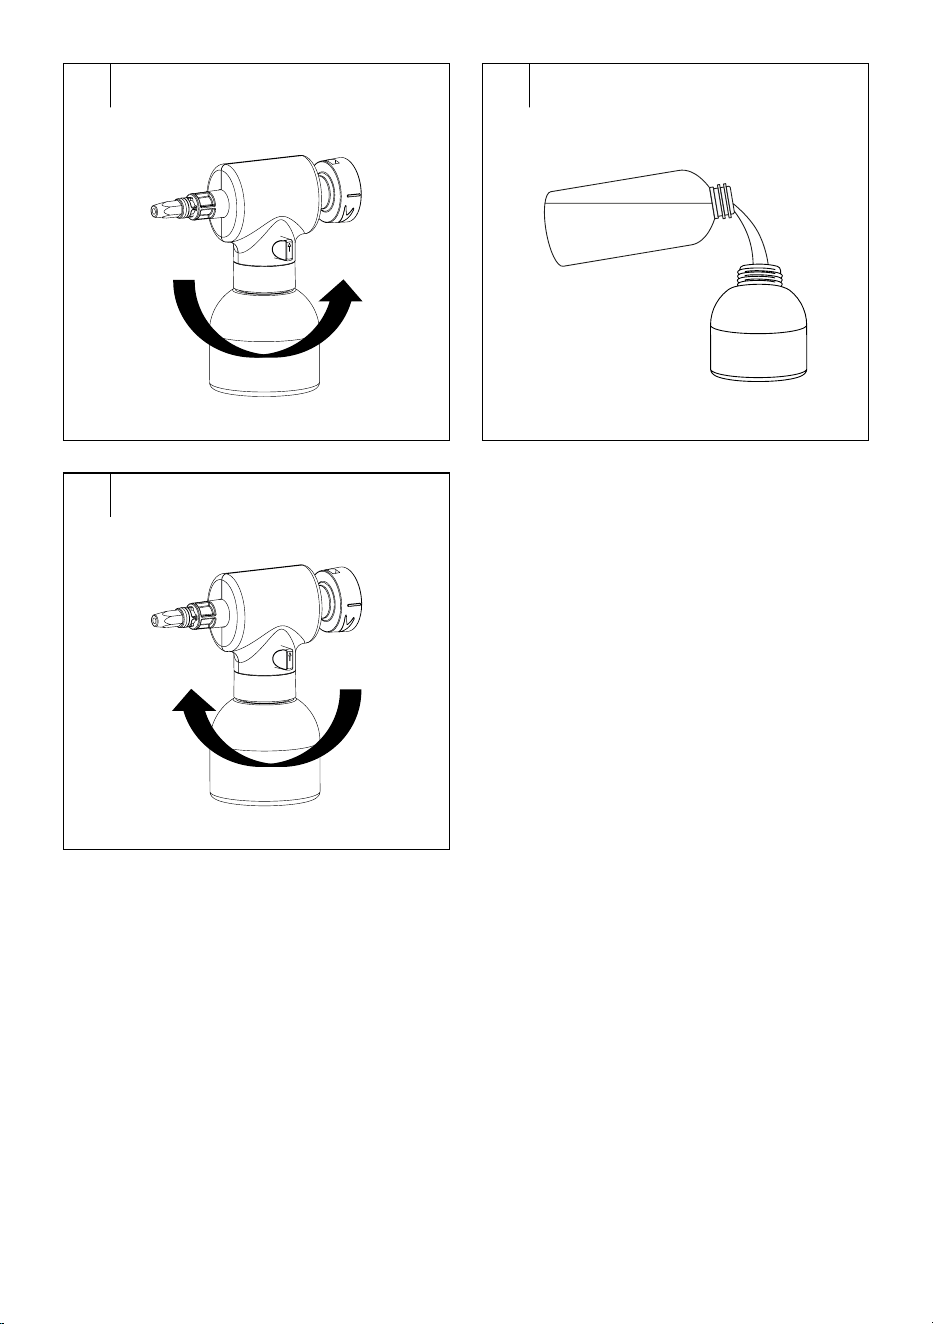
USE OF DETERGENT CONTAINER
Filling the container
1. Unscrew the tank – see figure D1; andpour in the cleaning agent –
see figure D2.
2. Screw the tank back – see figure D3. Make sure it is tightened
correctly.
Using the steam cleaner with detergent container
1. Make sure that the steam dial is in the position.
2. Attach the detergent container to the steam cleaner nozzle.
3. Fit the round brush nozzle or the curved nozzle.
4. Plug the power cord into the mains socket.
5. Set the main power switch to the Iposition. The switch will light
up. At the same time, the heating indicator light will light up. This
indicates that the steam cleaner is heating up.
6. When the heating indicator goes out, the steam cleaner is ready for
use.
7. Turn the switch lock to the position.
8. Turn the control on the detergent container to the position.
9. Press the switch andafter awhile steam will start to escape from the
accessory outlet.
10. Keep the switch pressed. When you release the switch, the steam
discharge will stop. The switch can be locked in the pressed position.
Press the switch andgently slide it downwards. If you need to
interrupt or end the steam dispensing, move the switch upwards.
11. Slowly move the accessory over the area that you wish to clean.
12. When the cleaning is finished, release the switch and set the switch
lock to the position.
13. Turn the control on the detergent container to the position.
14. Turn the main power switch to the Oposition and disconnect the
power plug from the mains socket.
Allow the steam cleaner to cool down completely before cleaning it or
changing accessories. When cleaning, please follow the instructions in
the “Cleaning and Maintenance” section.
Note:
Pour in non-foaming detergent suitable for use in asteam
cleaner, or asolution of vinegar andwater in aratio of 1:2
into the detergent container. Do not use foaming detergents,
chemical substances, bleach, solvents, etc.
- 6 -
12/2024
2024, .
Warning:
Failure to follow the instructions regarding asuitable
cleaning agent may cause serious health risks (e.g.
skin burns, mucous membranes, etc.). Always follow
the detergent manufacturer'sinstructions and the
instructions inthis user'smanual. Ensure that the
room is sufficiently ventilated.
. . . . . . . . . . . . . . . . . . . . . . . . . . . . . . . . . . . . . . . . . . . . . . . . . . . . . . . . . . . . . . . . . . . .
CLEANING AND MAINTENANCE
• Before cleaning or maintenance, make sure that the steam
cleaner is turned off by setting the main switch to the 0 position
anddisconnected from the power supply.
• Allow the steam cleaner andits accessories to cool down completely.
Keep in mind that when the steam cleaner cools down, the hot steam
turns into water vapor. Part of the water vapor accumulates on the
dispensing opening andturns into water droplets, so it is important to
allow the steam cleaner andaccessories to dry completely.
Warning:
If handled incorrectly, there is arisk of serious
scalding byhot steam.
Warning:
To prevent electric shock, do not immerse the steam
cleaner, its base or the power cord in water or other
liquids.
• Never use abrasive cleaning agents, solvents, etc. for cleaning.
• Neglecting cleaning and maintenance may affect the steam cleaner
operation and lead to reduced performance.
• Do not use steel wool, sharp objects or other appliances for cleaning.
Emptying the tank
Empty the water tank after each use. Otherwise, limescale may build up
on the container walls.
1. Move the steam cleaner over awash basin or sink.
2. Open the lid.
3. Pour out the tank contents.
4. Rinse the tank with clean water.
5. Leave the lid open to allow the tank to dry.
Warning:
Do not leave any water inthe tank. Otherwise,
limescale may build up on the container walls.
Cleaning the steam cleaner and accessories
• Wipe the steam cleaner and the accessories outer with asoft sponge
slightly dampened in warm water.
• Wipe with adry cloth.
• Allow all parts to dry thoroughly before storing.
• Wash the sleeve by hand inwarm water withasmall amount of fine
linen detergent. Rinse andwring. Allow to dry.
Warning:
No part of your steam cleaner and its accessories is
suitable for dishwasher use.
Warning:
The microfibre sleeve is not designed to be washed in
awashing machine or to bedried in atumble dryer.
Removing limescale deposits
If limescale builds up, follow the steps below to remove it.
1. Dissolve approximately 10g of descaling agent in 200ml water.
2. Pour the solution into the tank andallow it to act for 6 hours.
3. Turn the steam cleaner on and allow it to heat up. Press the switch
andleave the steam cleaner running until the tank is empty.
4. Rinse the tank and repeat the procedure as needed.
. . . . . . . . . . . . . . . . . . . . . . . . . . . . . . . . . . . . . . . . . . . . . . . . . . . . . . . . . . . . . . . . . . . .
STORAGE
Store the steam cleaner and its accessories in adry and dark place out of
reach of children and pets.
. . . . . . . . . . . . . . . . . . . . . . . . . . . . . . . . . . . . . . . . . . . . . . . . . . . . . . . . . . . . . . . . . . . .
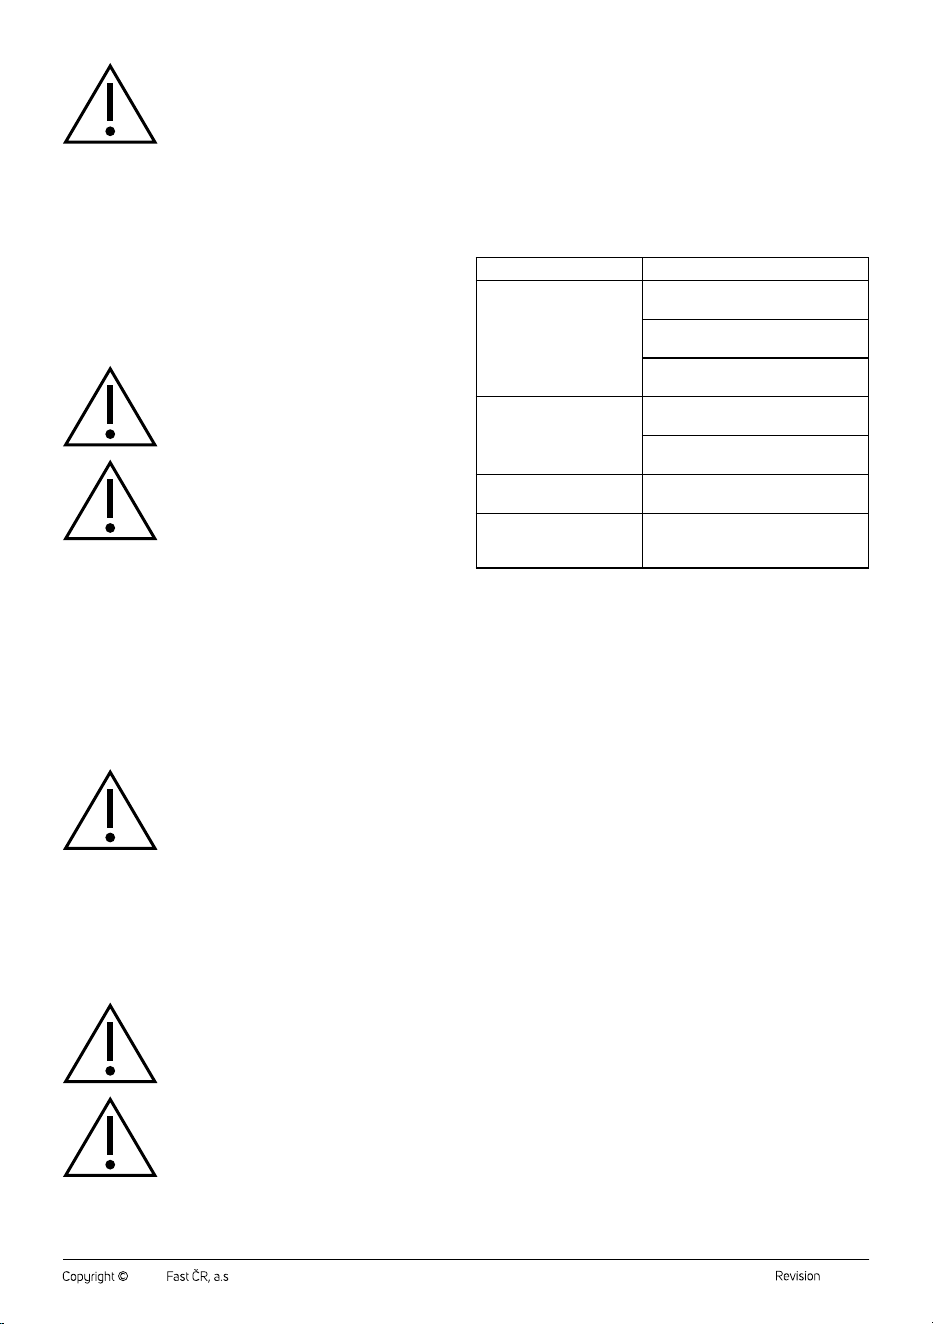
TROUBLESHOOTING
Problem Solution
The steam cleaner does not
dispense steam.
Check that power plug connected to the
mains socket.
Check that the main power switch is in
the Iposition.
Check that the water tank is filled with
water.
The steam cleaner does
not work.
Check that the main power switch is in
the Iposition.
Check that power plug connected to the
mains socket.
The steam cleaner is
clogged with limescale.
Carry out the descaling procedure
according to the instructions above.
The steam cleaner is
discharging steam even if
the button is not held down.
This is anormal phenomenon, it is
theresidual steam that comes from the
cleaner by inertia.
Original spare accessories
SSCX 0016 Replacement mopping textile sleeves
. . . . . . . . . . . . . . . . . . . . . . . . . . . . . . . . . . . . . . . . . . . . . . . . . . . . . . . . . . . . . . . . . . . .
TECHNICAL SPECIFICATIONS
Rated voltage..........................................................................................220–240 V~
Rated frequency ..........................................................................................50–60 Hz
Rated input .........................................................................................................1,350 W
Water tank capacity ......................................................................................... 550 ml
Dimensions ..............................................................................294 × 142 × 230mm
Weight ......................................................................................................................1.2 kg
Protection level ........................................................................................................IPX4
Changes to text and technical parameters are reserved.
. . . . . . . . . . . . . . . . . . . . . . . . . . . . . . . . . . . . . . . . . . . . . . . . . . . . . . . . . . . . . . . . . . . .
INSTRUCTIONS AND INFORMATION ON DISPOSAL OF USED
PACKAGING MATERIAL
Dispose of used packaging material at the location designated by the
municipality for waste disposal.
DISPOSAL OF USED ELECTRICAL AND ELECTRONIC EQUIPMENT
Used electrical andelectronic products must not be added to ordinary
municipal waste. For proper disposal and recycling of these products,
deliver them to designated collection points. Alternatively, in some
European Union states or other European countries the products can be
returned to the local retailer when buying an equivalent new product. By
properly disposing of this product, you help preserve valuable natural
resources and contribute to preventing potential negative impacts on the
environment and human health resulting from improper waste disposal.
For further details, contact your local authorities or the nearest collection
point. Fines may be imposed for improper disposal of this type of waste in
accordance with national regulations.
For Business Entities in European Union States
To dispose of electric or electronic equipment, request necessary
information from your retailer or supplier.
Disposal in Other Countries Outside the European Union
If you wish to dispose of this product, request the necessary information
about the correct disposal method from the local council or from your retailer.
. . . . . . . . . . . . . . . . . . . . . . . . . . . . . . . . . . . . . . . . . . . . . . . . . . . . . . . . . . . . . . . . . . . .

FAST ČR, a.s.
U Sanitasu 1621
CZ-251 01 Říčany
www.sencor.com
info@sencor.cz