Instructions
ENG
Safety Precautions ............................................................................2
General Precautions ..........................................................................3
Nomenclature ....................................................................................5
1. Attaching and Detaching the Lens ................................................6
2. Setting the Focus Mode ................................................................8
3. Zooming ........................................................................................9
4. Control Ring ................................................................................14
5. Lens Function Button (AF Stop Button) ......................................15
6. Hood ............................................................................................16
7. Lens Cap .....................................................................................18
8. Drop-In Filters..............................................................................19
9. Nodal Point ..................................................................................22
Specifications ..................................................................................23
ENG-1
Thank you for purchasing a Canon product.
The Canon RF7-14mm F2.8-3.5 L FISHEYE STM is a fisheye zoom
lens for use with EOS R series cameras.
●“STM” stands for Stepping Motor.
Conventions used in these instructions
Warning to prevent lens or camera malfunction or damage.
Supplementary notes on using the lens and taking pictures.
Camera Firmware and Camera Applications
Please use the latest versions of firmware and applications with the
camera in use. For details on whether the firmware and applications
in use are the latest version or not, and for details on updating
them, please check the Canon website.

ENG-2
Safety Precautions
Precautions to ensure that the camera is used safely. Read these
precautions thoroughly. Make sure all details are observed in order to
prevent risks and injury to the user and other people.
Warning
Details pertaining to risks that may result in death or
serious injury.
●
Do not look directly at the sun or other strong light sources
through a lens. This may result in loss of sight.
●
Do not leave a lens in the sun without the lens cap attached. The
lens may concentrate entering sunlight and cause a malfunction or fire.
Caution
Details pertaining to risks that may result in injury or
damage to other objects.
●
Do not leave the product in places exposed to extremely high
or low temperatures. The product may cause burns or injury when
touched.
●
Do not insert your hand or fingers into the product. This may result
in injury.

ENG-3
General Precautions
Handling Precautions
●
Do not leave the product in excessive heat such as in a car in direct
sunlight. High temperatures can cause the product to malfunction.
●
If the lens is taken from a cold environment into a warm one,
condensation may develop on the lens surface and internal parts. To
prevent condensation in this case, first put the lens into an airtight
plastic bag before taking it from a cold to warm environment. Then take
out the lens after it has warmed gradually. Do the same when taking
the lens from a warm environment into a cold one.
●
In order to optimize aperture control, there are occasions in which the
aperture blades will move during zooming and focusing, even when the
aperture value is set for aperture-priority AE or manual exposure, etc.
●
Please also read any lens related handling precautions listed in your
camera’s instruction manual.
Shooting Precautions
●
This lens has a short focus length, which means dirt or dust on
the surface of the front lens will show up easily on photos. Use a
commercially-available blower to remove dirt or dust from the front lens
surface.
●
This lens has an extremely wide shooting angle, meaning sunlight
or other strong light sources can enter the image easily. This can
lead to flares or ghosts under certain shooting conditions. To prevent
this, we recommend being aware of where the light source is, such
as photographing from shadows or other places where a strong light
source will not enter the lens.
●
When shooting hand-held shots, be careful that your body does not
appear in the image. And when using a tripod, be careful that the leg of
the tripod does not appear in the image. Check the camera viewfinder
or monitor carefully.
●
This lens is an interchangeable lens, so the center of the circular
fisheye image circle may not always be the center of the photographed
image. In the same way, the vignetting around the four corners may not
always be even.

ENG-4
This device complies with Part 15 of the FCC Rules. Operation is subject to the
following two conditions: (1) This device may not cause harmful interference, and
(2) this device must accept any interference received, including interference that
may cause undesired operation.
Do not make any changes or modifications to the equipment unless otherwise
specified in the instructions. If such changes or modifications should be made,
you could be required to stop operation of the equipment.
This equipment has been tested and found to comply with the limits for a class
B digital device, pursuant to part 15 of the FCC Rules. These limits are designed
to provide reasonable protection against harmful interference in a residential
installation. This equipment generates, uses and can radiate radio frequency
energy and, if not installed and used in accordance with the instructions, may
cause harmful interference to radio communications.
However, there is no guarantee that interference will not occur in a particular
installation. If this equipment does cause harmful interference to radio or
television reception, which can be determined by turning the equipment off and
on, the user is encouraged to try to correct the interference by one or more of the
following measures:
• Reorient or relocate the receiving antenna.
• Increase the separation between the equipment and receiver.
• Connect the equipment into an outlet on a circuit different from that to which the
receiver is connected.
• Consult the dealer or an experienced radio/TV technician for help.
CAN ICES-3 (B) / NMB-3 (B)

ENG-5
Nomenclature
Focusingring(→8)
Controlring(→14)
Lens function button
(→15)
Contacts
(→6)
Lensmount(→6)
Lens mount index
(→6)
Focusmodeswitch(→8)
Hood mount
(→16)
Drop-InFilter(→19)
Zoom limit/lock switch
(→11)
Cindex(→10)
Zoomring(→9)
Zoompositionindex(→9)
Rubber ring
(→7)
●For detailed information, reference page numbers are provided in
parentheses(→**).
ENG-6
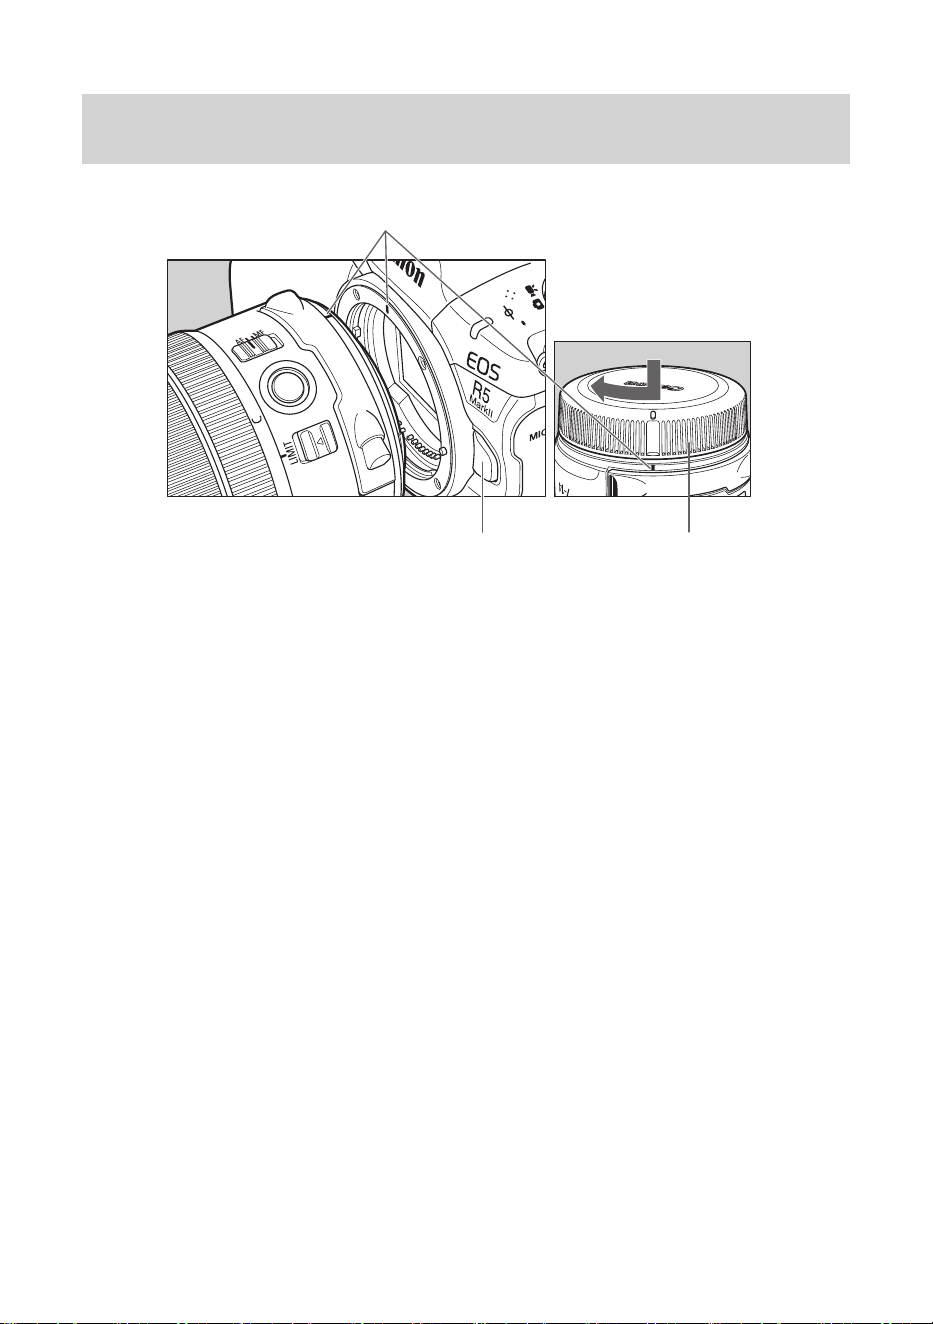
1. Attaching and Detaching the Lens
Lens mount index
Lens release button
Dust cap
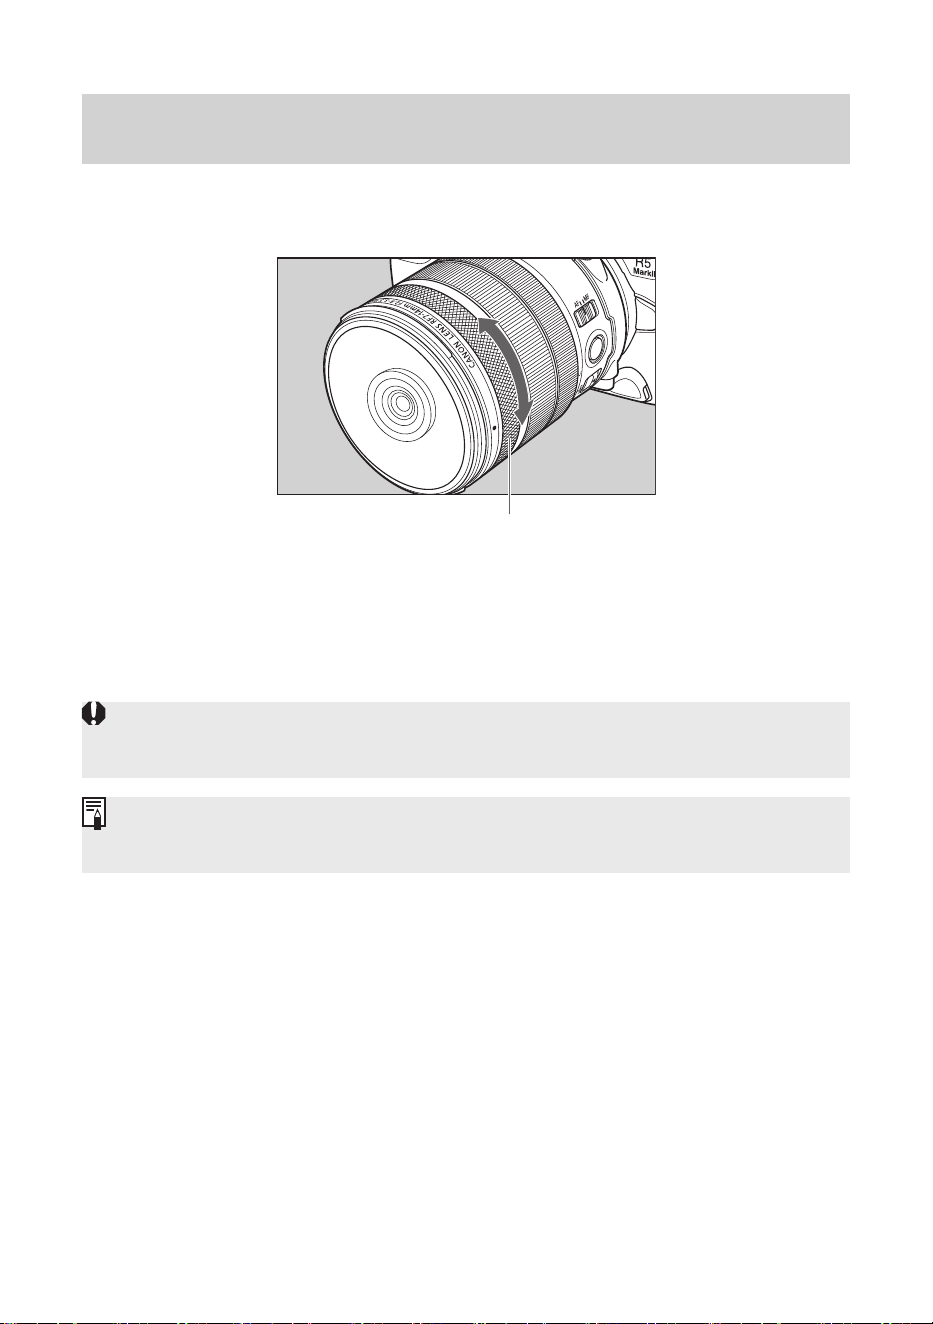
Attaching the Lens
Align the lens mount indexes of the lens and camera, and turn the
lens clockwise until you hear a click.
Detaching the Lens
Turn the lens counterclockwise while pressing the camera’s lens
release button. Detach the lens once it has stopped turning.
Please refer to the camera’s instructions for details.

ENG-7
Attaching and Detaching the Lens
●Set the camera’s power switch to OFF when attaching or detaching
the lens.
● Attach the hood and lens cap before detaching the lens from the
camera.
● After detaching the lens, place the lens with the rear end up and attach
the dust cap to prevent the lens surface and contacts from getting
scratched. Make sure the lens and dust cap mount indexes are aligned
when attaching the dust cap.
● Contacts that are scratched, soiled, or have fingerprints on them
may result in faulty connections or corrosion, which may lead to
malfunctions. If the contacts get soiled, clean them with a soft cloth.
● The lens mount has a rubber ring to improve dust-resistance and
water-resistance performance. This rubber ring may cause friction
marks to appear around the camera’s lens mount, although this will
have no effect on usage.
●The rubber ring can be replaced at a Canon Service Center.
(Chargeable)
ENG-8
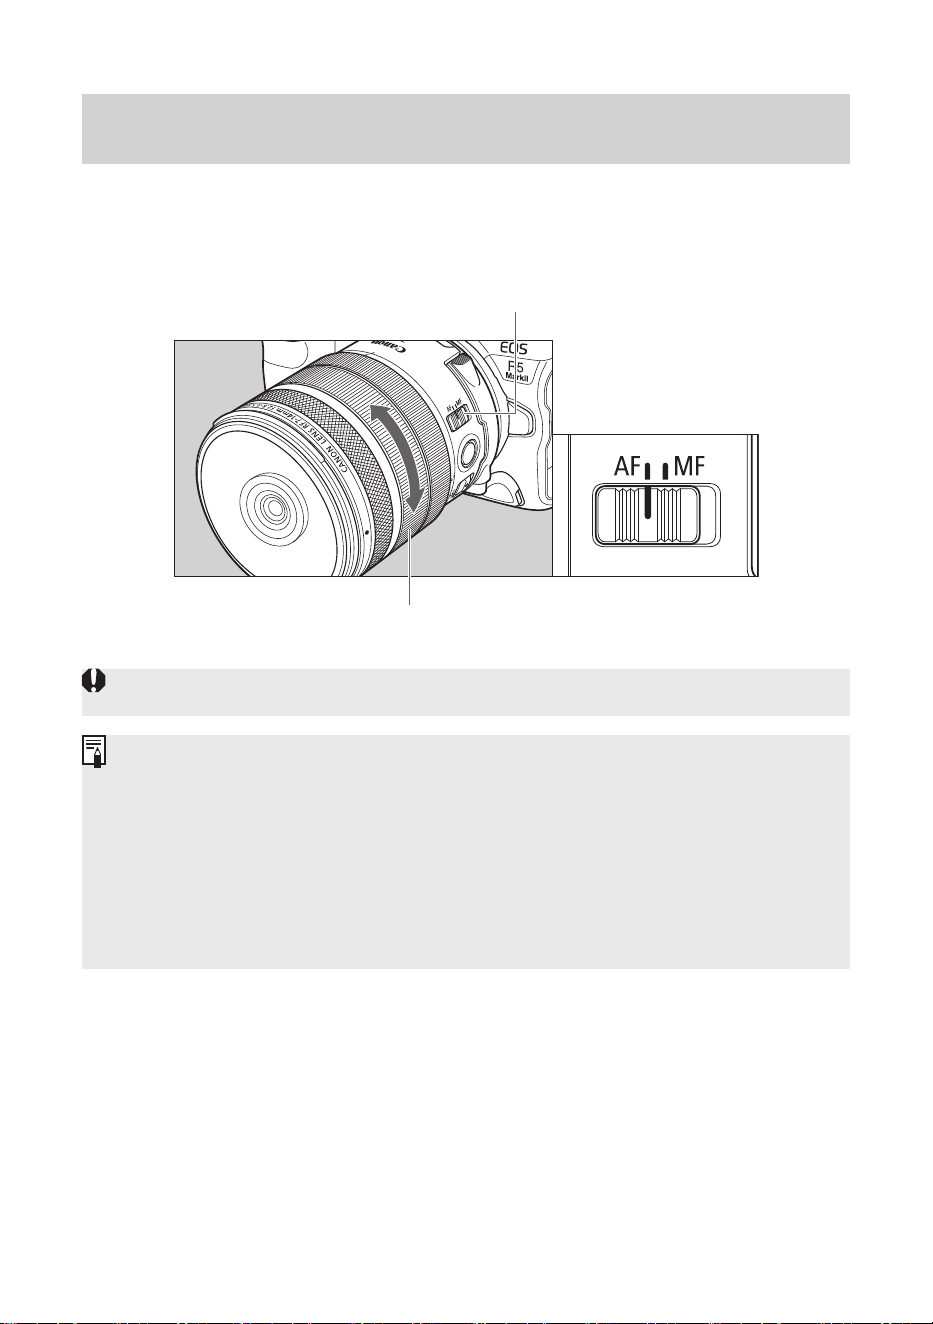
2. Setting the Focus Mode
To shoot in autofocus (AF) mode, set the focus mode switch to AF.
To use only manual focusing (MF), set the focus mode switch to MF,
and focus by turning the focusing ring.
Focus mode switch
Focusing ring
●Delayed focus may occur if the focusing ring is quickly turned.
●The lens’ focusing ring is electronic.
● This lens supports electronic manual focusing and electronic full-time
manual focusing.
● When movie recording, the AF speed will be slower than the still image
shooting mode. It is possible to adjust the AF speed on the camera by
setting the Movie Servo AF parameter to [Enable].
Please refer to the camera’s instructions for details.
ENG-9
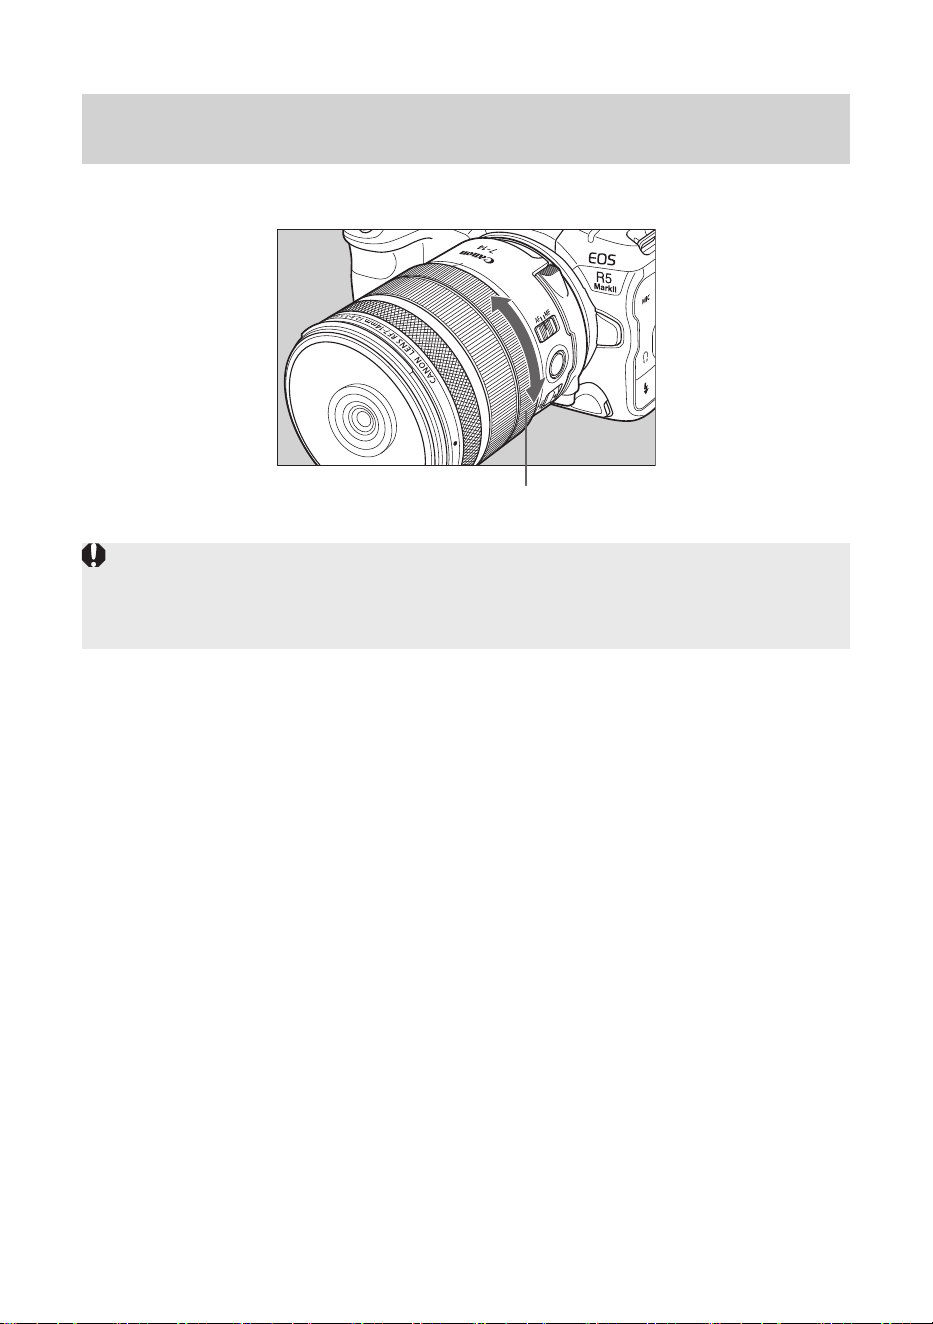
3. Zooming
To zoom, turn the lens’ zoom ring.
Zoom ring
●Be sure to finish zooming before focusing. Zooming after focusing can
affect the focus.
● Blurring may temporarily occur if the zoom ring is quickly turned.

ENG-10
Zooming
C index
“C” Mark
The “C” mark on the zoom ring is a guide to ensure diagonal fisheye
photography can be done without vignetting using APS-C EOS R
series cameras.
Match the C index with the “C” mark on the zoom ring.
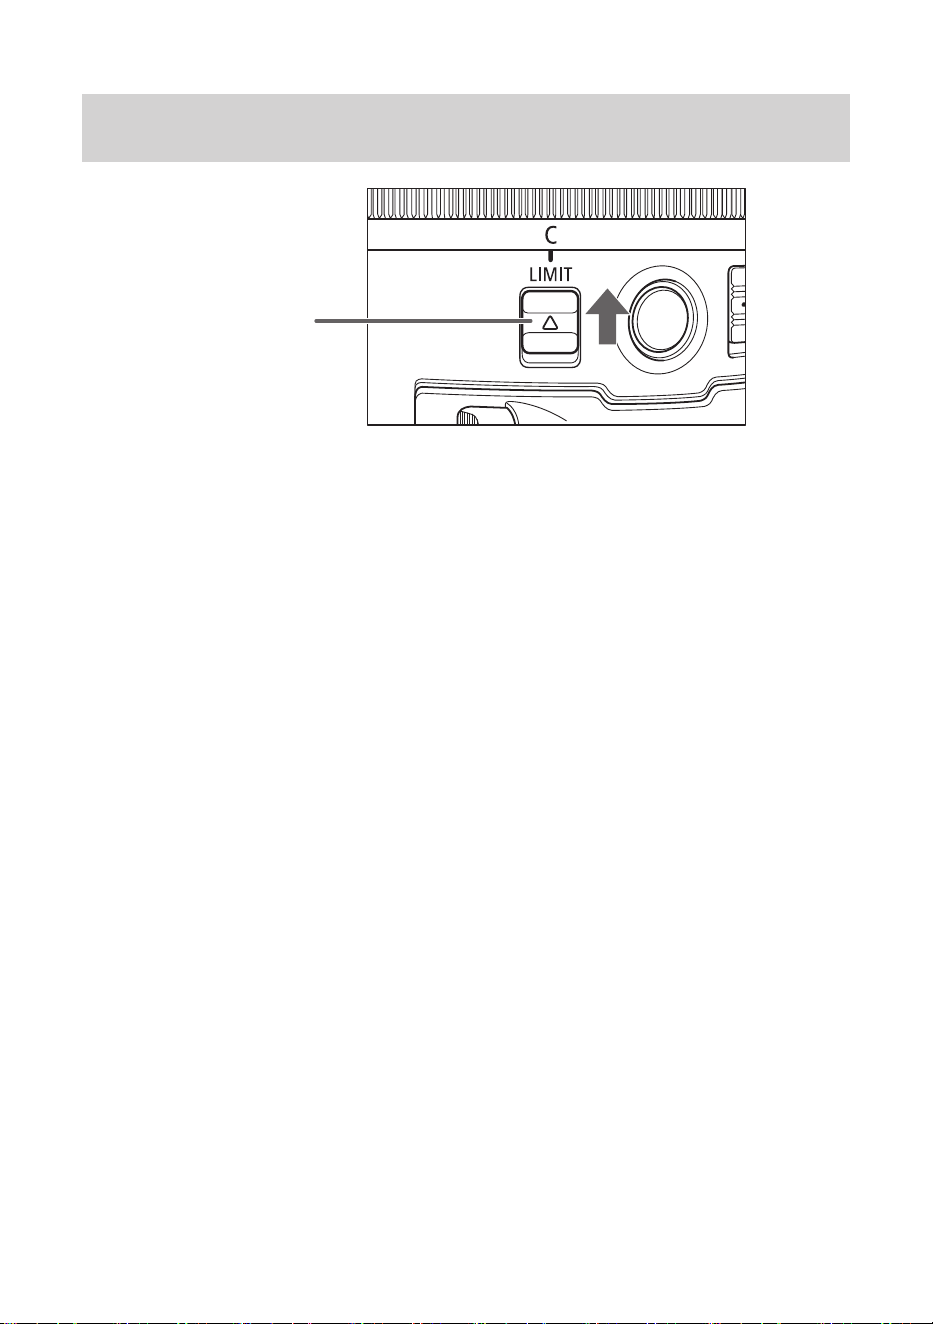
ENG-11
Zooming
Zoom limit/
lock switch
Zoom Limit/Lock Switch
The zoom limit/lock switch can be used to limit the zoom range.
● When using a fullframe camera, stable circular fisheye photography
is possible as the zoom range is fixed at the wide end.
After matching the zoom index with the “7”, slide the switch towards
“LIMIT” to engage the zoom lock.
●When using an APS-C camera, this limits the zoom range at the
wider side, and ensures that diagonal fisheye photography can be
done without vignetting.
After matching the C index with the “C” mark on the zoom ring, slide
the switch towards “LIMIT” to limit the zoom. When the C index is
at the “C” mark on the zoom ring, diagonal fisheye photography is
possible. At other positions, vignette-free photography is possible.

ENG-12
Zooming
Explanation of fisheye photography
This section explains circular fisheye and diagonal fisheye
photography using this lens.
• Circular Fisheye Photography
Thiscapturesa190°angleofviewwithintheimagesensorshortside.
This is when using a full-frame camera at the wide end (7 mm focal
length).
Focal length: 7 mm
190°angleofview
Full-size image sensor
*Thesizeofthecircleforeachfocallengthisthescopeoftheimagecircle
on the focal plane.
*Outsidethecircleisoutsidetheimagecircle,andwillbevignetted.
ENG-13
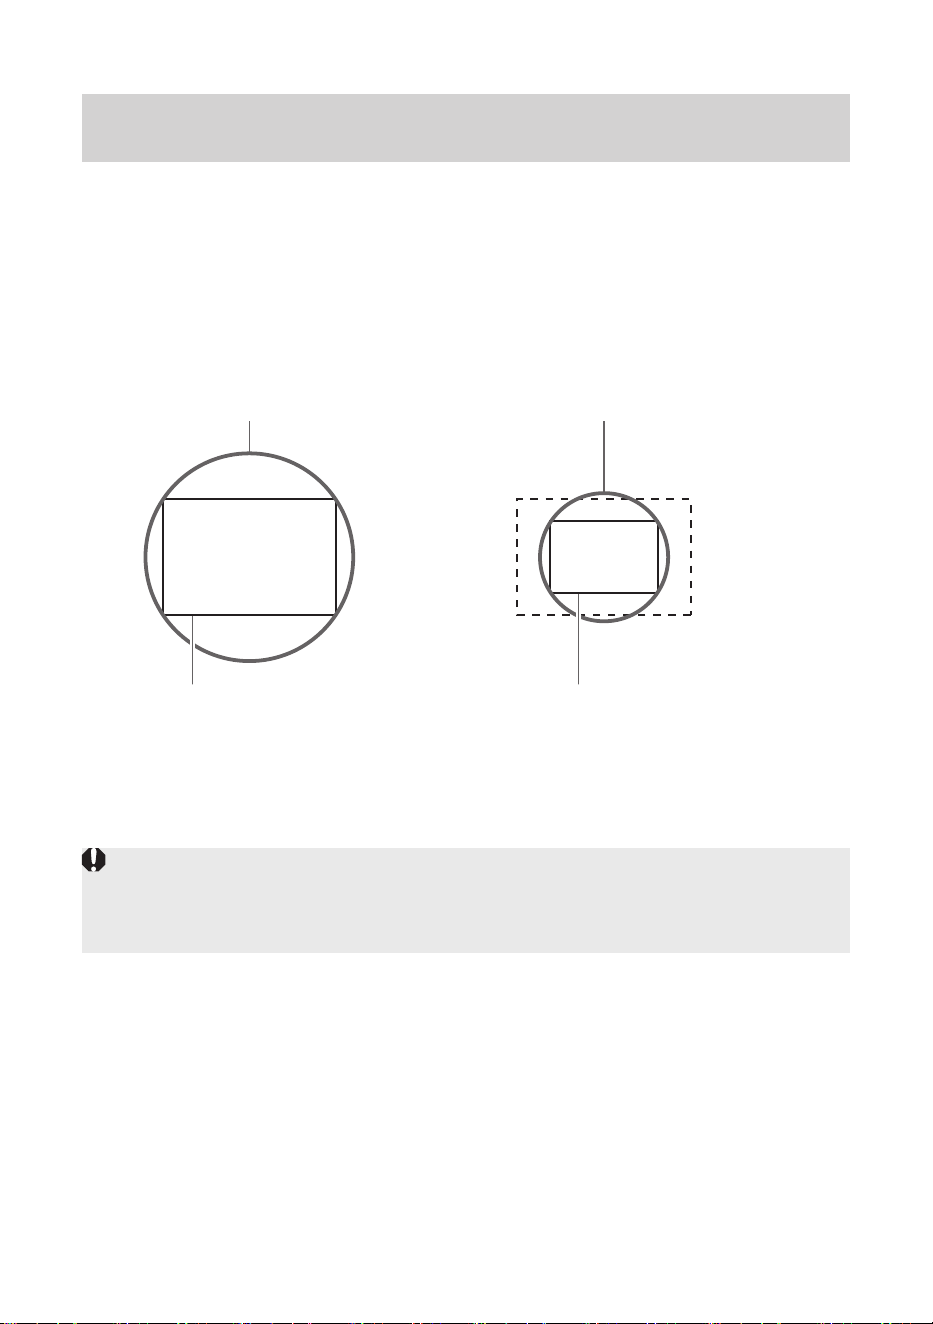
Zooming
• Diagonal Fisheye Photography
Thiscapturesa180°angleofviewwithintheimagesensordiagonal.
Images will not be vignetted if using a full-frame camera at the
telephoto end (14 mm focal length) or an APS-C camera with the C
index set to the “C” mark on the zoom ring (approx. 8.7 mm focal
length).
Full-size image sensor
APS-C image sensor
180°angleofview
180°angleofview
Focal length: 14 mm
Match C index to “C” mark on
the zoom ring
(Focal length: approx. 8.7 mm)
● If the AF frame is outside the image circle, autofocus or exposure may
not function correctly. Move the AF frame to inside the image circle.
Please refer to the camera’s instructions for details.
ENG-14
4. Control Ring
The control ring can be assigned the functions that are commonly
used with cameras, such as shutter speed and aperture settings.
Control ring
The click action of the control ring allows you to have a sense of how
much it is being turned.
Please refer to the camera’s instructions for details on how to use the
control ring.
●Control ring operation sounds may be recorded when recording
movies.
●The clicking sensation of the control ring can be removed by the
Canon Service Center. (Chargeable)

ENG-15
5.
Lens Function Button (AF Stop Button)
In the default settings, the lens function button serves as an AF stop
button. You can assign different functions to the button from the
[Customize buttons] section of the camera.
Please refer to the camera’s instructions for details.
Lens function button
(AF stop button)
Use as an AF Stop Button
During autofocus operation, you can press an AF stop button to
temporarily pause autofocus, and then release the button to resume.
Press an AF stop button to maintain a focusing distance or to avoid
focus search.
Press the shutter button while holding down an AF stop button to
shoot at that focusing distance.
● Useful when autofocus is operating mostly in Servo AF.
ENG-16
6. Hood
The custom lens hood reduces unwanted light that causes flare and
ghosting and protects the front of the lens from rain, snow, and dust.
When using the lens hood, the zoom ranges where vignette-free
photography is possible are as follows.
• Full frame :Telephoto end only
• APS-C : Range between telephoto end and “C” (range when
using the zoom limit/lock switch)
Detach the hood to photograph in other situations.
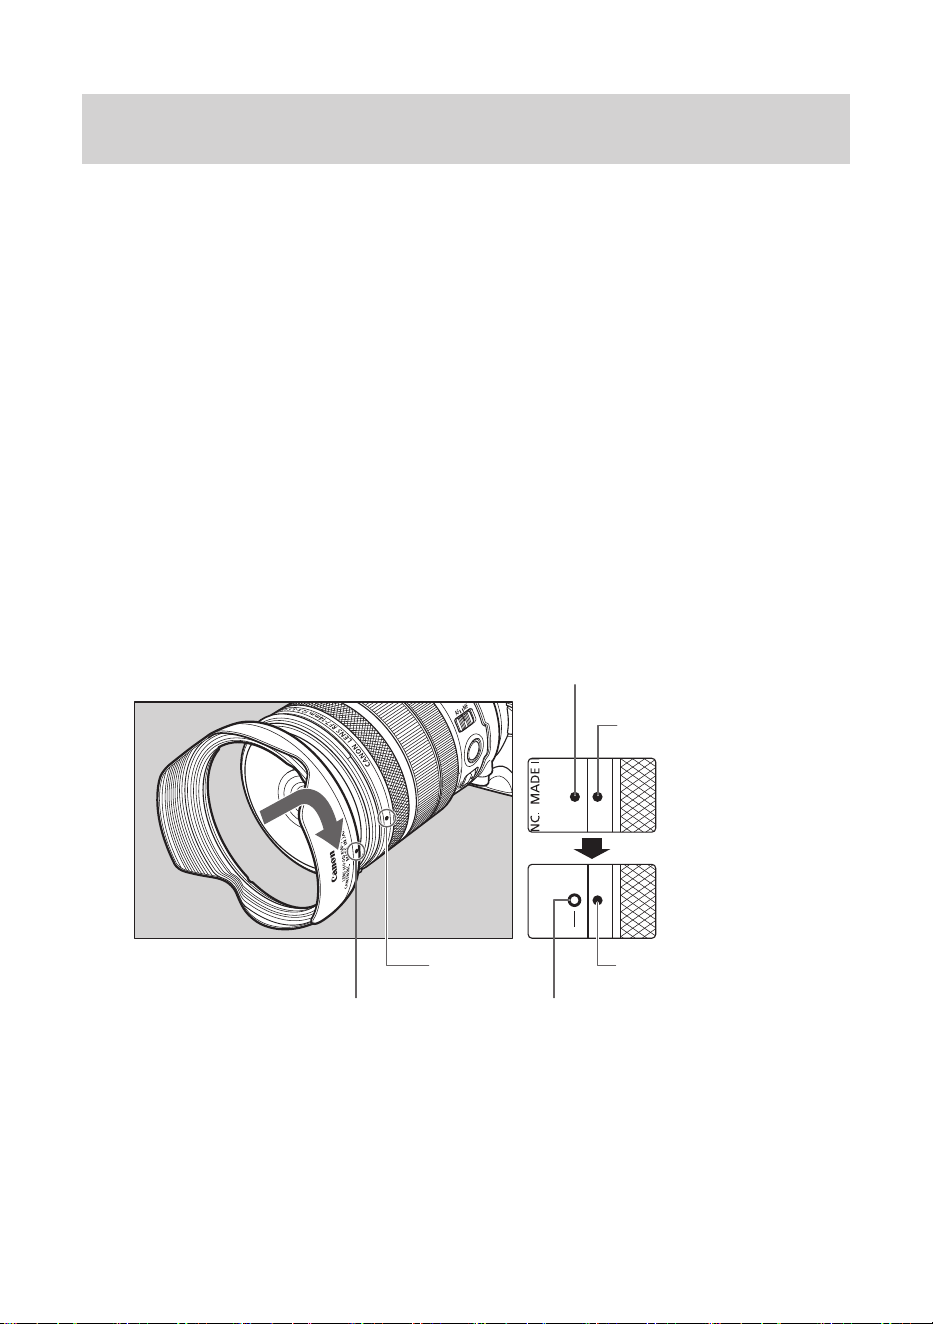
Attaching the Hood
Align the red attachment position mark on the hood with the red dot
on the front of the lens, and then turn the hood in the direction of the
arrow until you hear a click.
Attachment position mark
Stop position mark
Attachment position mark
Red dot
Red dotRed dot
ENG-17
Hood
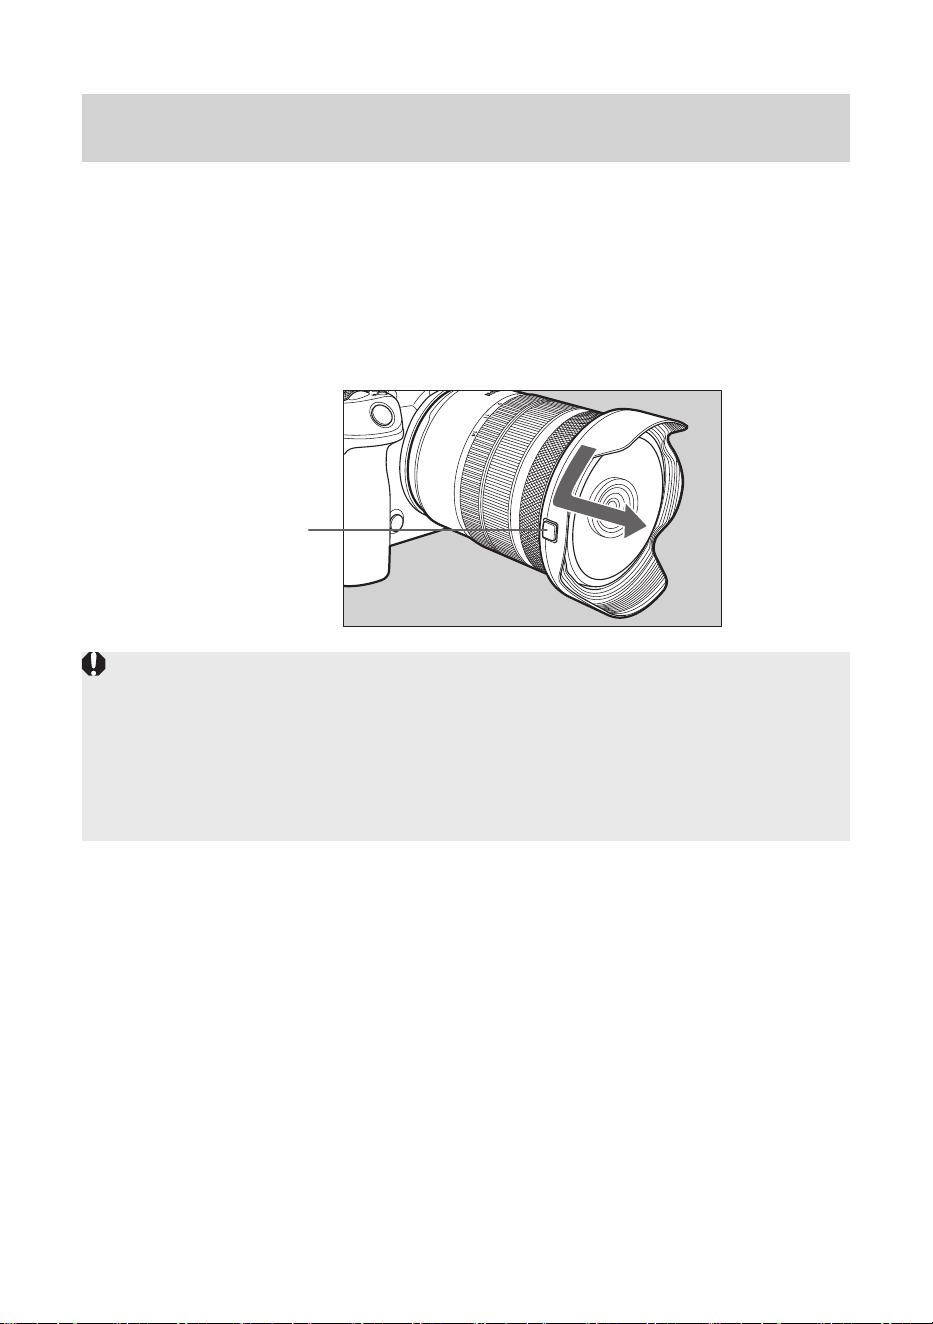
Detaching the Hood
Keep your finger pressed down on the button located on the side of
the hood, and then turn the hood in the direction of the arrow until the
attachment position mark on the hood is aligned with the red dot on
the front of the lens to detach it.
Note that the hood cannot be reverse-mounted on the lens for storage.
Button
● If the hood is not attached properly, vignetting (darkening of the
perimeter of the picture) may occur.
●The lens cap can be attached while the hood is mounted.
● Grasp and turn the base of the hood when attaching and detaching
it. There are cases in which it may become deformed if the hood is
turned with it grasped near to the rim.
ENG-18
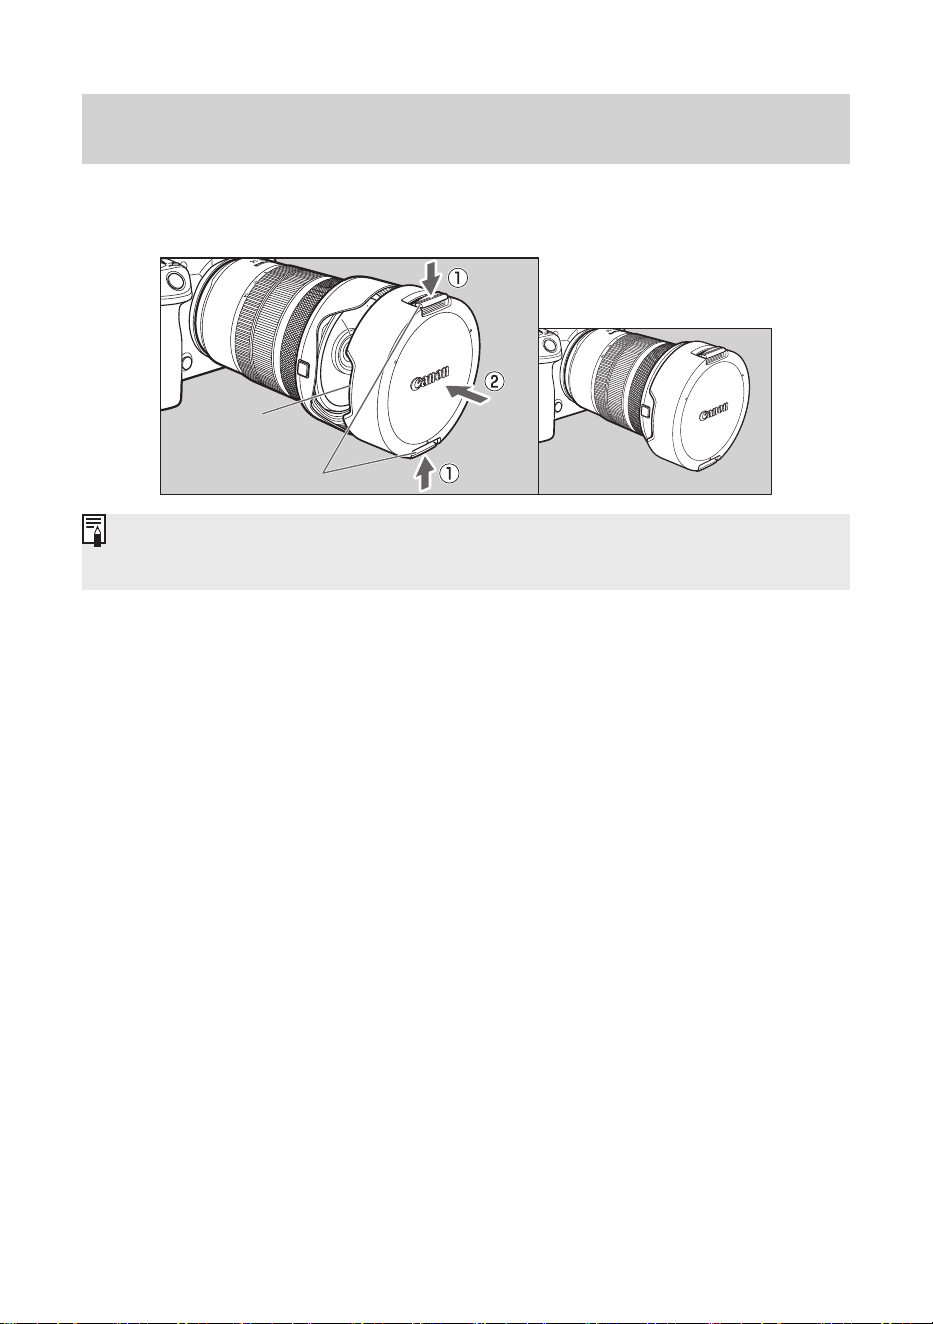
7. Lens Cap
With the attached lens hood on, the lens cap is attached by matching
the button on the side of the hood with the notch on the cap.
Lock knob
Notch
●The lens cap is attached by catching the hooks on the top and bottom
inside the front end of the hood.
ENG-19
8. Drop-In Filters
Drop-In Filters can be attached at the rear of the lens. Three types
of Drop-In Filters are available (sold separately). This lens comes
packaged with a Drop-In Clear Filter (same product as i. Drop-In Clear
Filter A).
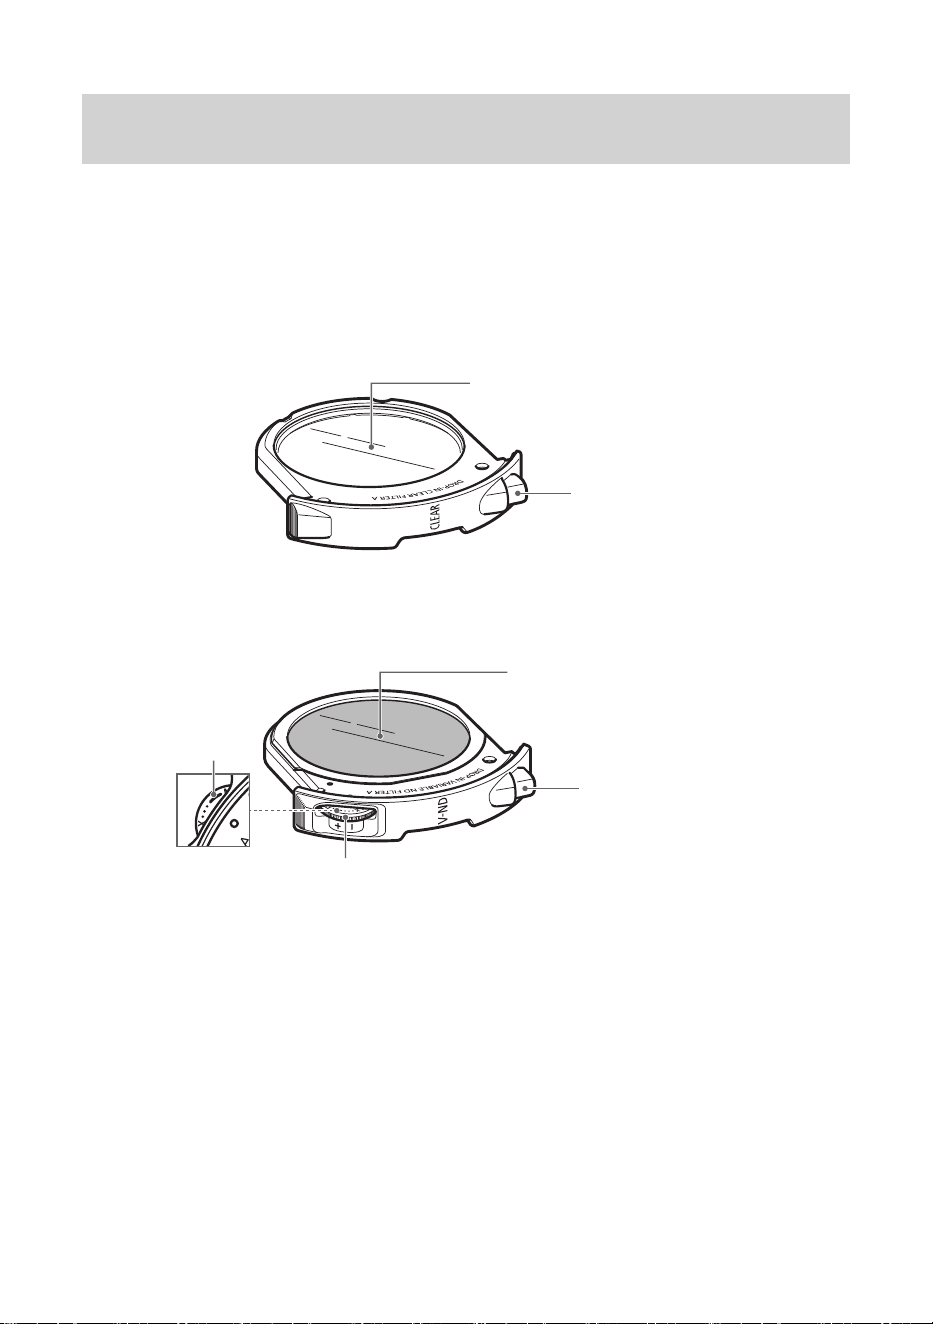
i. Drop-In Clear Filter A
Clear filter
Lock release button
Transparent glass filter
ii. Drop-In Variable ND Filter A
Variable ND filter
Lock release button
Adjustment dial
White line
Density can be adjusted by turning the adjustment dial.
Adjustmentrange:ND3-500(equivalentto1.5to9stopsofaperture)
ENG-20
Drop-In Filters
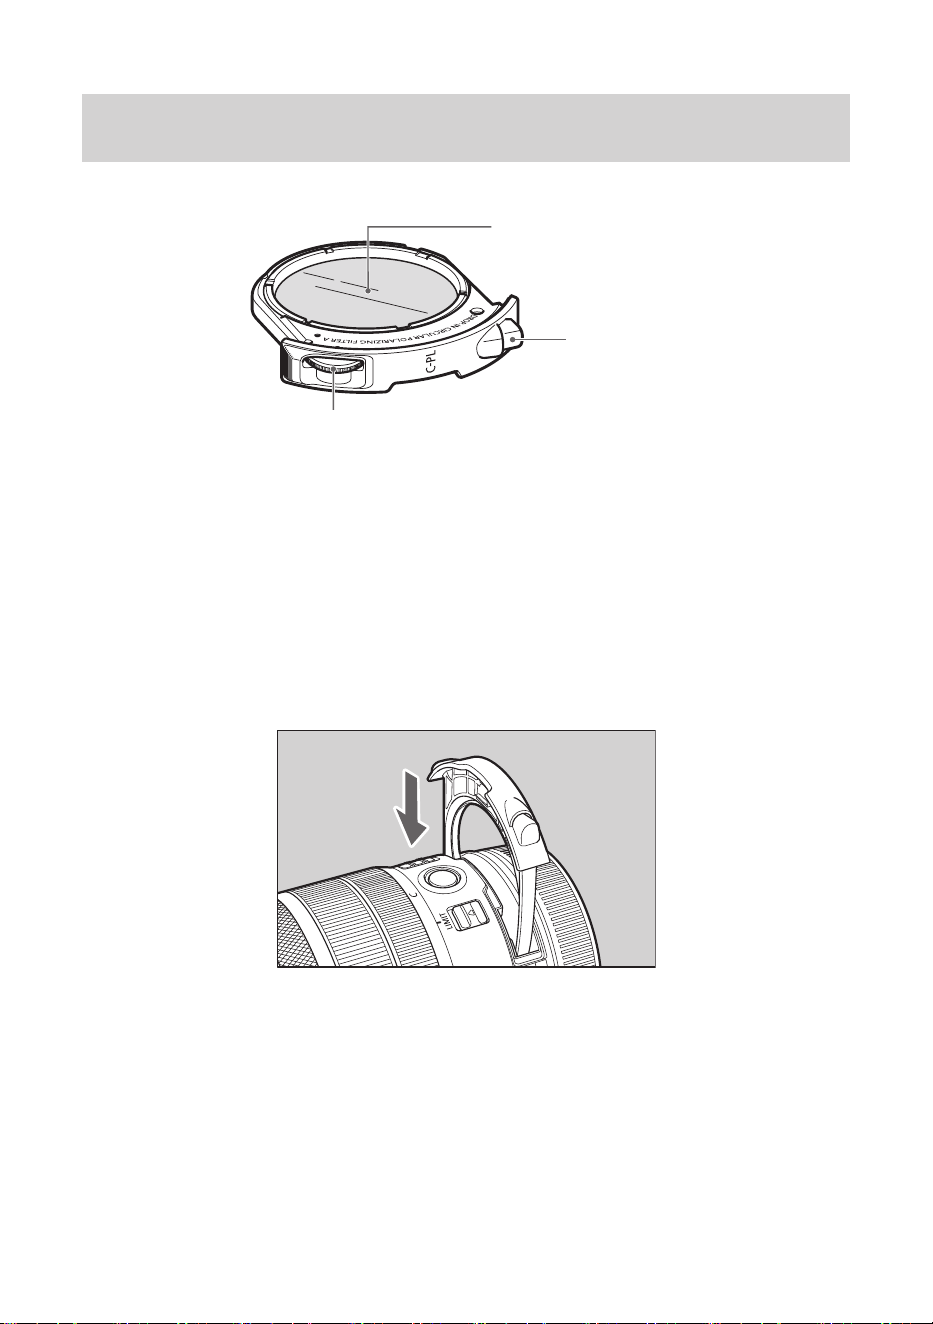
iii. Drop-In Circular Polarizing Filter A
Lock release button
Circular polarizing filter
Adjustment dial
Polarization angle can be adjusted by turning the adjustment dial.
Detaching Drop-In Filters
Pull out the Drop-In Filter while pressing the lock release button.
Attaching Drop-In Filters
Push down on the Drop-in Filter until you hear a click.

ENG-21
Drop-In Filters
●Attaching or detaching the Drop-In Filter should be done before
attaching the lens on the camera. If the Drop-In Filter is inserted or
removed with the lens on the camera, it could interfere with other
camera accessories attached to the camera.
● This lens must be used with one of the Drop-In Filters. If a filter is not
used, the image will be affected by unnecessary light, etc.
● When the Drop-in Variable ND Filter A is used, the range where the
whitelineontheadjustmentdialisnotvisible(generallyND250and
above) can lead to a blue tint or variations in density.
● When the Drop-In Variable ND Filter A is used, the tint or density of the
filter can change after years of use.
ENG-22
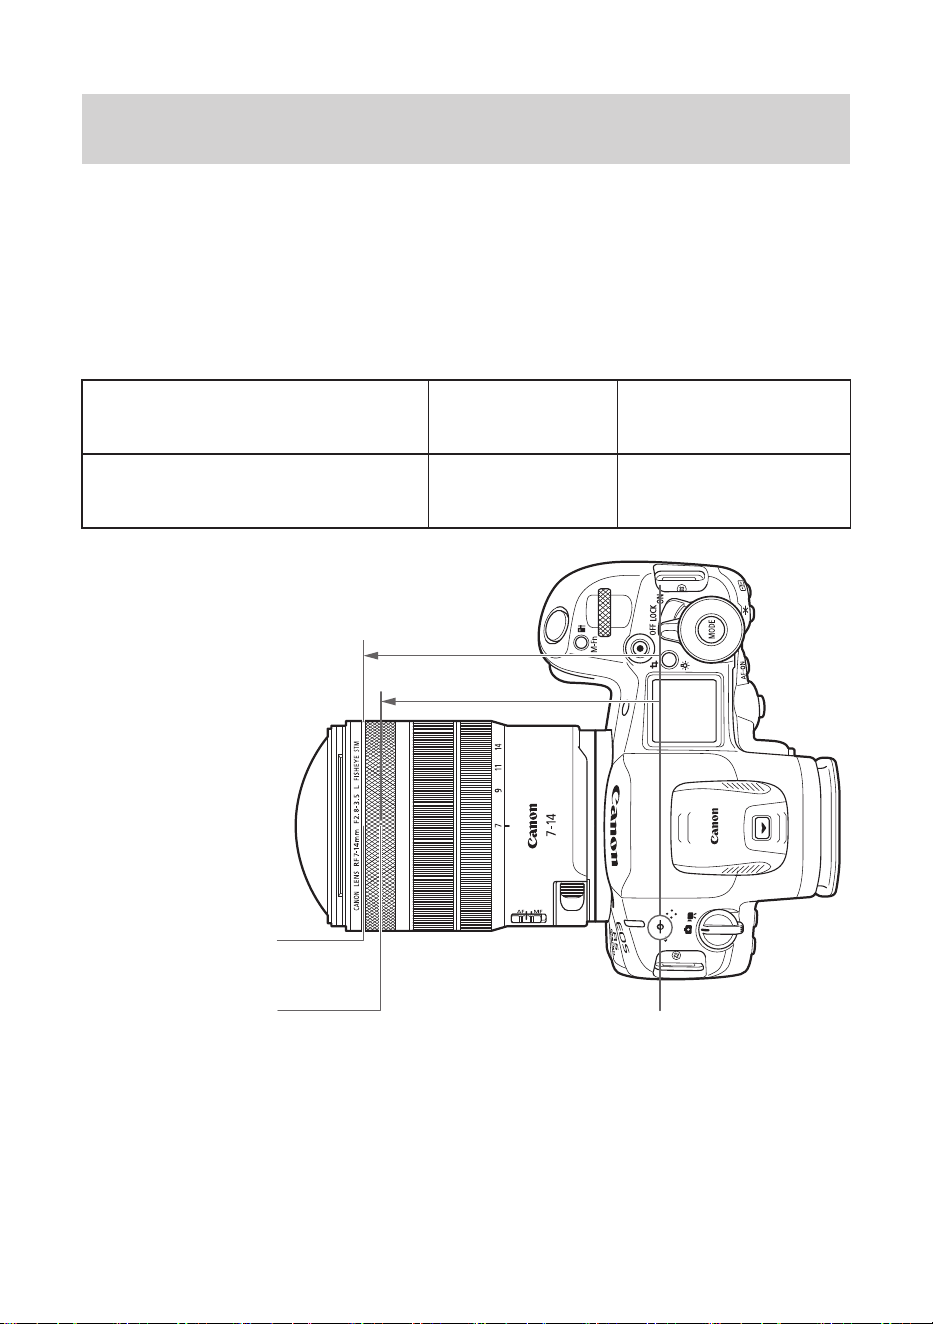
9. Nodal Point
The nodal point is the rotation center position where the lens parallax
is smallest.
Rotating the lens around the position shown here will reduce parallax,
making it suitable for stitching multiple images together.
The nodal point location is the distance from camera’s focal plane
mark for each focal length, and its values are as follows.
Focal Length 7 mm
(wide end)
14 mm
(telephoto end)
Distance from camera’s focal
plane mark
103mm 99 mm
Focal plane mark
Nodal point
(wide end)
Nodal point
(telephoto end)
103mm
99 mm

ENG-23
Specications
Focal Length/Aperture 7-14mm f/2.8-3.5
Lens Construction 11 groups, 16 elements
Maximum Aperture f/2.8-3.5
Minimum Aperture f/22-29 (1/3 stops), f/22-27 (1/2 stops)
Angle of View
Horizontal:190°-149°45’,
Vertical:190°-99°50’,
Diagonal:190°-180°
Min. Focusing Distance 0.15m/0.49ft.
Max. Magnification 0.35x(at14mm)
Filter Drop-In Filter
Max. Diameter and
Length
Approx.76.5x109.4mm/3.01x4.31in.
Weight Approx. 476 g/16.79 oz.
Hood EW-76*
Lens Cap LensCap7-14*
Lens Dust Cap LensDustCapRF*
Case LP1219*
*Comesincludedwiththelens,butcanalsobepurchasedseparately.

ENG-24
Specications
● The lens length is measured from the lens mount surface to the front
end of the lens.
Add27.6mm/1.09in.whentheincludedlenscap,hood,anddust
cap are attached.
● The maximum diameter, length, and weight listed are for the lens
itself only.
●TheClose-upLens250D/500Dcannotbeattachedbecausethereis
no size that fits the lens.
● Extenders cannot be used.
●Movie Digital IS is not possible when using this lens on certain
cameras.*
*EOSR,RP,Ra
● The image may degrade when zooming during continuous shooting.
● All data listed is measured according to Canon standards.
● Product specifications and appearance are subject to change without
notice.
●When the aperture is changed from the maximum aperture by an
amount equivalent to one click only, the display of the aperture value
may not change, or may change by an amount equivalent to two
clicks. This phenomenon is due to restrictions related to the display
of the aperture values, but the actual exposure control is being
performed properly.

CT1-D432-A © CANON INC. 2026 0925Ni
