DPR-76BT
Version 2
中文
GB

001
Important safety instructions
Read and understand all safety and operating instructions before the radio is
operated.
Retain instruction: The safety and operating instructions should be retained for
further reference.
Heed warnings. All warnings on the appliance and operating instructions should
be followed.
Follow all operations and use instructions.
Water and moisture: The appliance should not be used near water. Do not use
near a bathtub, washbowl, laundry tub,kitchen sink, wet basement, swimming
pool, etc.
Unplug the radio from the AC power outlet before cleaning. Use only a damp cloth
for cleaning the exterior of the radio.
Do not place the radio on an unstable cart, stand, bracket or table. The radio may
fall, causing serious personal injury and damage to the radio.
Ventilation: This radio should be situated so that its location or position does not
interfere with its proper ventilation. For example, the radio should not be used on
a bed, sofa, rug or other soft surfaces that may block the ventilation openings. It
should not be placed in a built-in situation like a cabinet that may reduce air ow
through the ventilation openings.
Power sources: The radio should be operated only from the type of power source
indicated on the marking label. If you are not sure of the type of power supply to
your home, consult your radio dealer or power company.
Mains adaptor: The mains adaptor should be positioned so it is not walked on,
pinched, or items placed on top of it. Pay particular attention to wires at plugs,
convenience receptacles, and the point where they exit from the unit. Unplug the
mains adaptor by gripping the adaptor, not the wire. Operate the radio using only
the current type of power source indicated. If you are not sure of the type of power
supply to your home, consult your dealer or local power company.
1.
2.
3.
4.
5.
6.
7.
8.
9.
10.
002
Do not overload wall outlets or extension cords. This can result in a risk of re or
electrical shock. Never insert objects of any kind into the radio through opening.
The objects may touch dangerous voltage points or short out parts. This could
cause a re or electrical shock.
If the radio is left unattended or unused for long periods of time, unplug it from the
wall outlet. This will prevent damage caused by unplug it from the wall outlet. This
will prevent damage caused by lightning or power line surges.
If the radio is left unattended and used for a long period of time, remove the
batteries. The batteries may leak and damage furniture or your radio.
Do not attempt to service the receiver yourself. Removing the cover may expose
you to dangerous voltage, and will void the warranty. Refer all servicing to
authorized service personnel.
Never push objects of any kind into this radio through opening as they may touch
dangerous voltage points or short-out parts that could result in a re or electric
shock. Never spill liquid of any kind into the product.
The appliance should be serviced by qualied service personnel when:
The power supply cord or the plug has been damaged.
Objects have fallen or liquid had been spilled into the radio.
The radio has been exposed to rain or water.
The radio does not appear to operate normally or exhibits a marked change in
performance.
The radio has been dropped, or the enclosure damaged.
A warning that batteries (battery pack or batteries installed) shall not be exposed
to excessive heat such as sunshine, re or the like.
11.
12.
13.
14.
15.
16.
17.
18.
19.
● minimum distances around the apparatus for sucient ventilation;
● the ventilation should not be impeded by covering the ventilation openings
with nitems, such as newspaper, table-cloths, curtains, etc.;
● no naked ame sources, such as lighted candles, should be placed on the
apparatus;
● attention should be drawn to the environmental aspects of battery disposal;
● the use of apparatus in tropical and / or moderate climates.
To prevent possible hearing damage, do not listen at high volume levels for
long periods.
CAUTION

003
Important information on charging
and using rechargeable batteries
Recharge the batteries in any case at least every 2 months.
Make sure the Battery Select switch inside the battery compartment is set to the
“NiMH” position.
Put the batteries in the compartment while paying attention to the correct polarity
of the batteries (+ and -).
First use: Charge new batteries in one continuous, uninterrupted, charge until they
are full. This rst charge may take longer than normal. For longer battery life it is
advised to always recharge in one continuous, uninterrupted charge until batteries
are full and to not recharge again while the batteries are still full.
New batteries will only reach their full capacity after some time of use (several
charge and discharge cycles).
Leave the complete group of batteries in place inside the radio and do not use
these batteries or a few of them for other purposes. This will result in a mix of (fully)
charged and (partly) empty batteries. This can seriously damage the batteries and
radio when recharged.
It is advised to only charge batteries at room temperatures between 5 degrees C
– 35 degrees C. In lower or higher temperatures full charge cannot be achieved.
Depending on the capacity of the batteries, charging from “empty” to “full” can
take several hours, even up to 6 hours or more.
Do not charge batteries when the radio is hot or exposed to heat or heat sources.
It is advised to clean the metal contacts of the batteries and of the charger inside
the radio e.g. with a contact-spray from time to time.
Do not use a mix of old and new rechargeable batteries.
Do not use a mix of rechargeable and non-rechargeable batteries.
Do not use a mix of full and empty rechargeable batteries.
1.
2.
3.
4.
5.
6.
7.
8.
9.
10.
11.
12.
13.

004
14.
15.
16.
17.
18.
19.
20.
21.
22.
Do not use batteries that have a dierent mAh capacity.
Do not use damaged, deformed or leaking batteries.
Battery level indication is an approximate indication only and can vary with battery
type that is used.
Batteries can become hot during charging.
In cold conditions the capacity of batteries will be much lower than when used at
normal room temperature.
Batteries (even when supplied with the radio), as being consumables, do not fall
under the warranty conditions of the radio.
Batteries should not be disposed of by incineration and with household waste.
Disposable batteries should be taken to a suitable recycling center if possible.
“Risk of explosion if the battery is replaced by an incorrect type.”
CAUTION
005
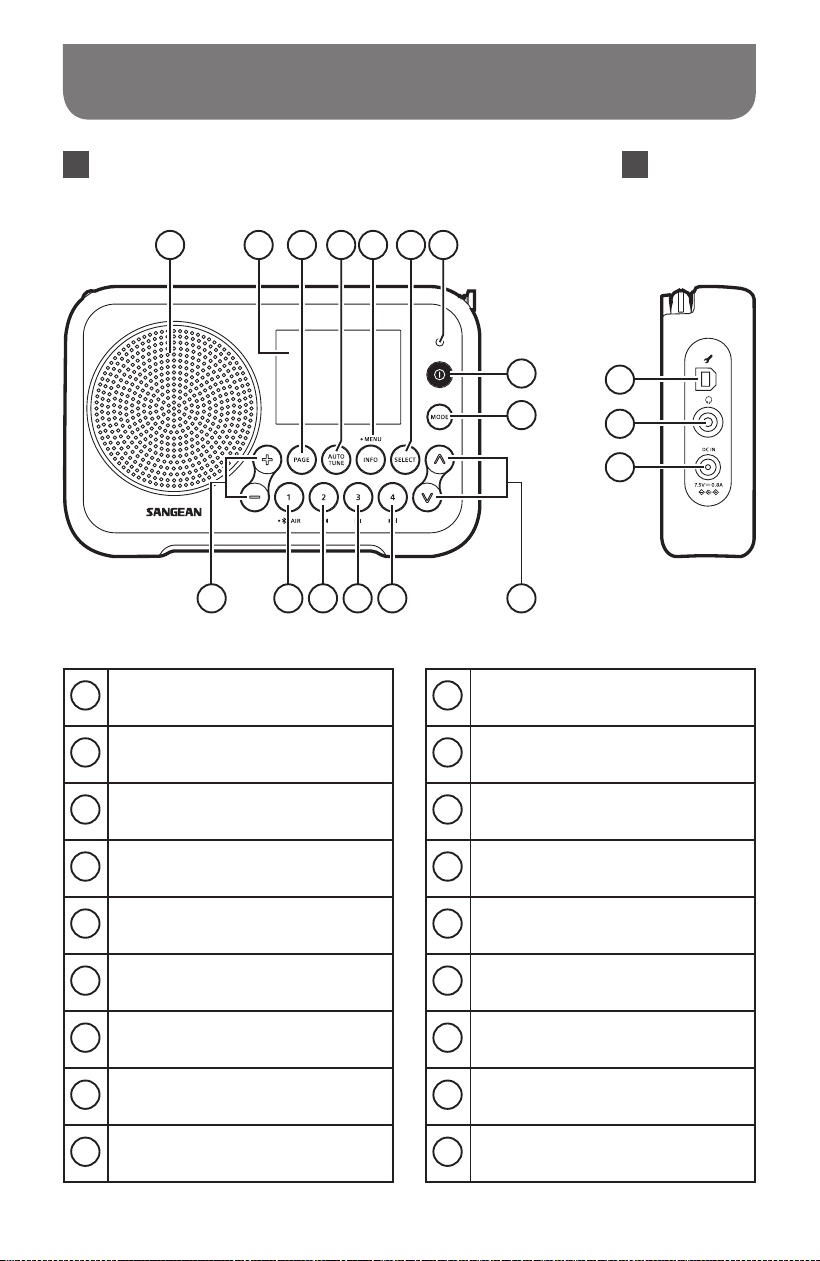
Controls
Front view Left view
16
17
18
1
15 11
10
121314
9
8
2
3
4
5
6
7
1
Speaker
2
LCD display
3
Page button
4
Auto Tune button
5
Info / Menu button
6
Select button
7
Charge / Battery Low indicator
8
On / O button
9
Mode button
10
Tuning Up / Down button
11
Preset 4 / Next track / Fast-forward
button
12
Preset 3 / Play / Pause button
13
Preset 2 / Previous track / Rewind
button
14
Preset 1 / Bluetooth pairing button
15
Volume Up / Down button
16
USB socket for software upgrade
17
Headphone socket
18
DC IN socket
006
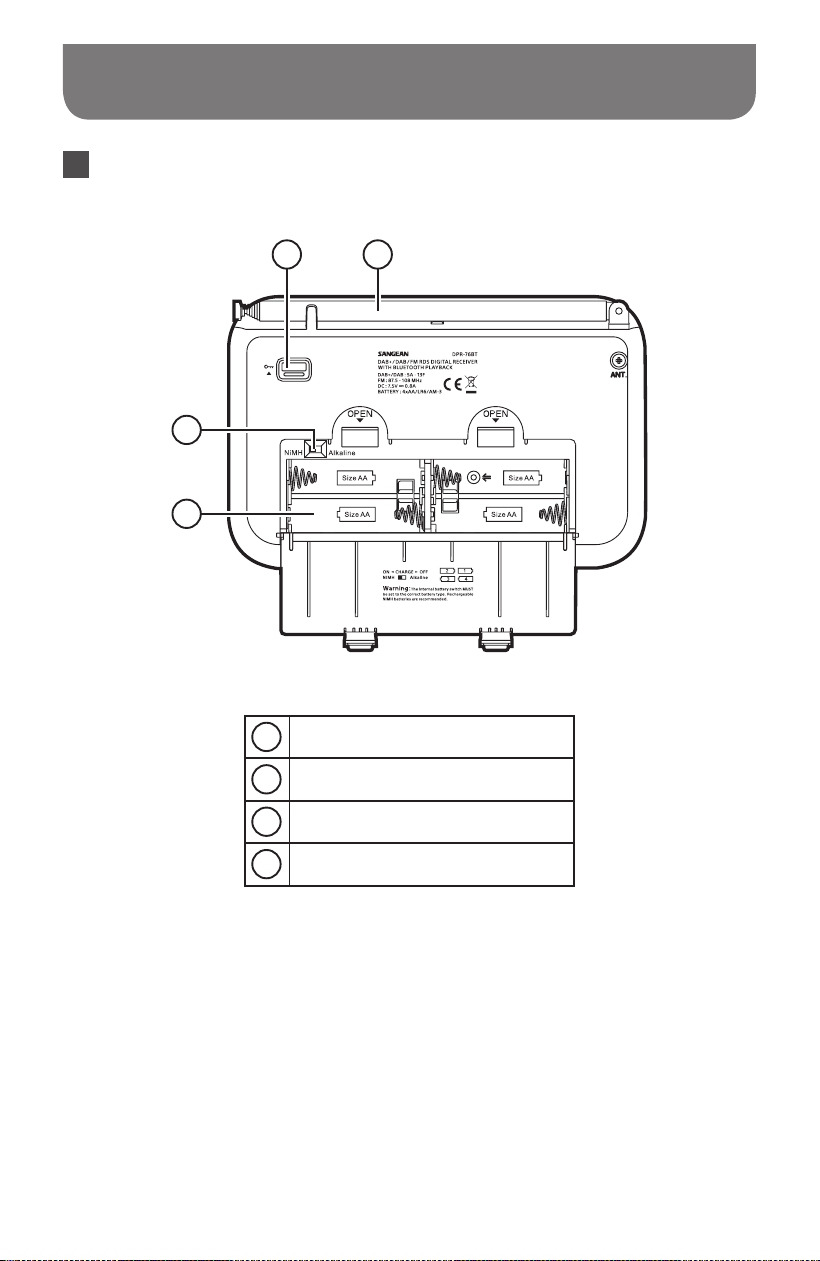
Controls
Back view
19 20
21
22
19
Lock switch
20
Telescopic aerial
21
NiMH / Alkaline batteries switch
22
Battery compartment
007
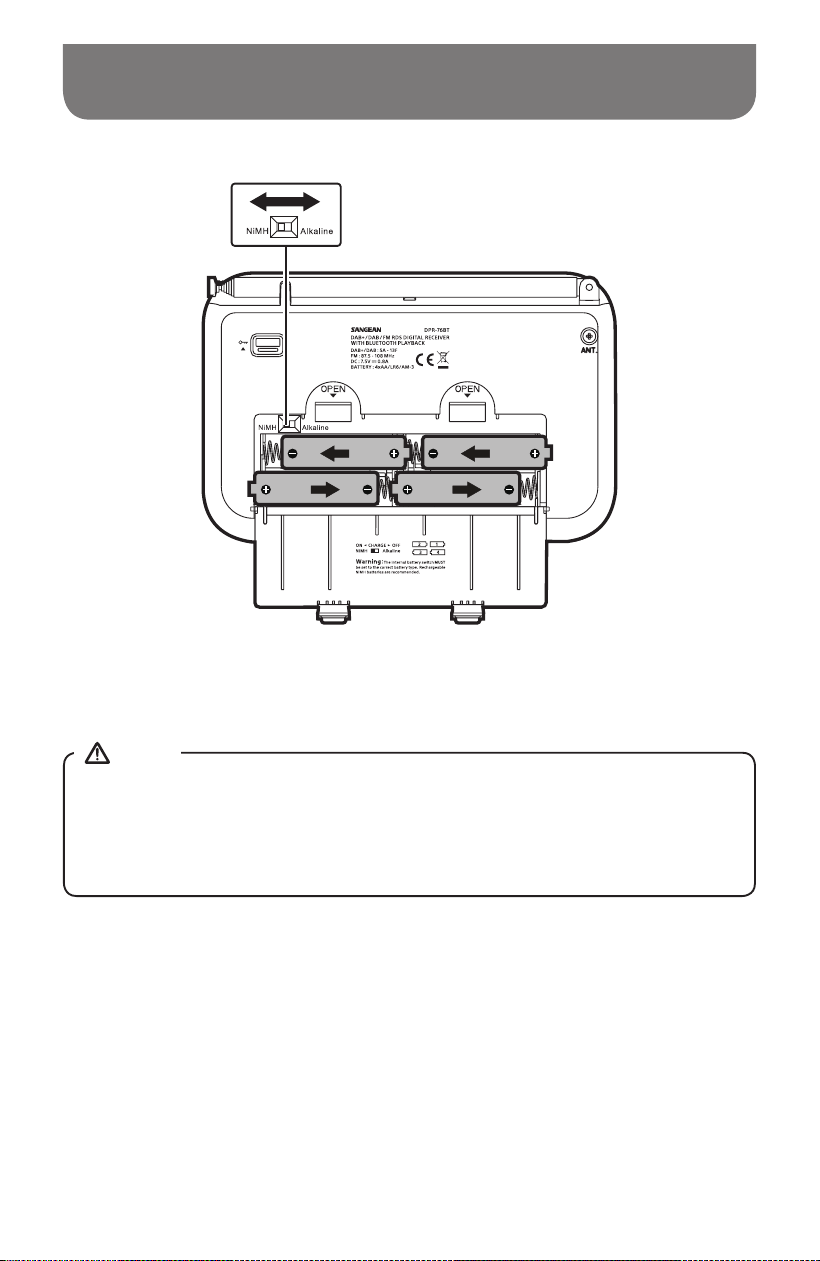
Battery operation
Open the battery cover on the rear of the unit by pushing the latch downward.
Insert 4xLR6 (AA size) batteries into the space in the compartment. Ensure the
batteries are inserted in accordance with the diagram shown. Close the battery
compartment door.
The low battery indicator showing red, reduced power, distortion and a ‘stuttering’
sound are all signs that the batteries may need replacing.
If the radio is not to be used for any extended period of time it is recommended that
the batteries are removed from the radio.
1.
2.
3.
4.
Before you insert the batteries, check the NiMH / Alkaline switch position. If you
use non-rechargeable batteries, make sure the NiMH / Alkaline switch which
located inside the battery compartment is switched to Alkaline position. If you use
rechargeable batteries, make sure to switch NiMH / Alkaline switch to NiMH position.
NOTE
008
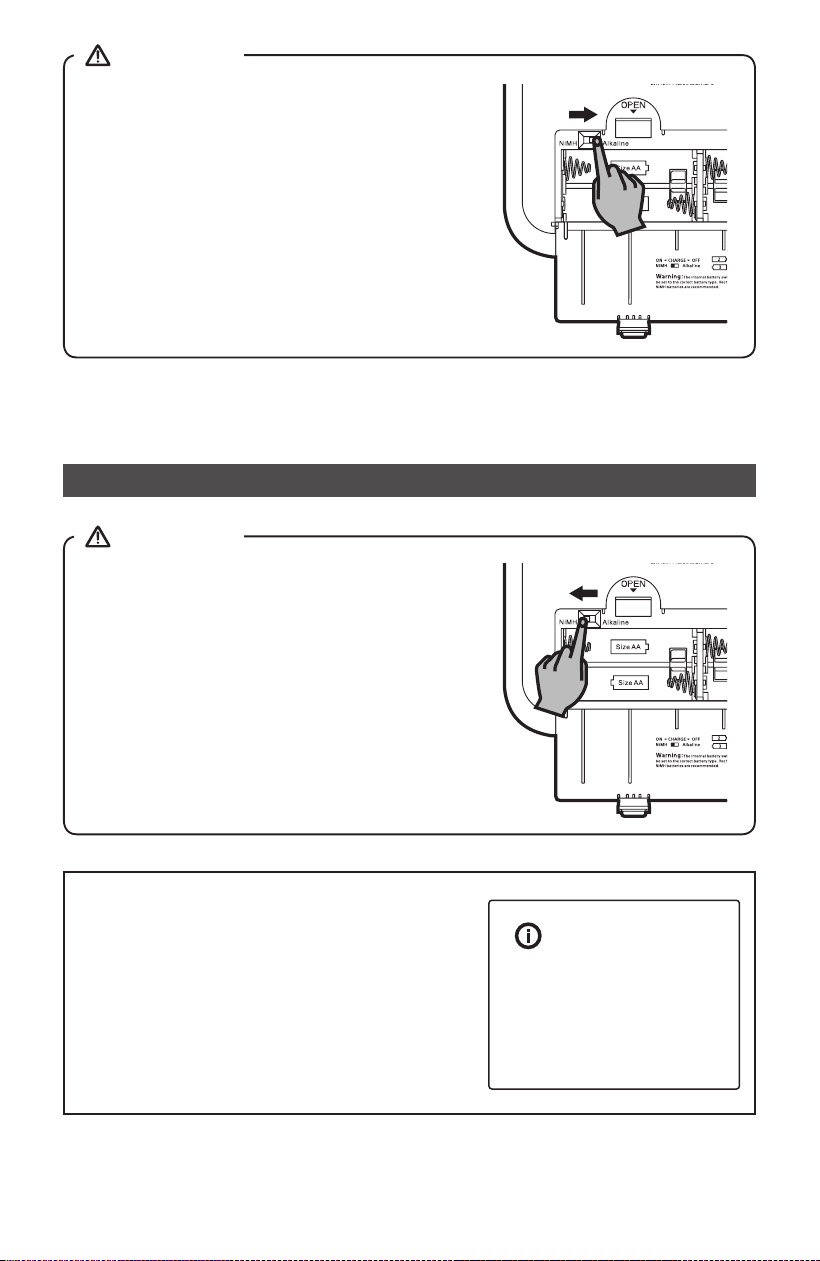
When using rechargeable batteries the battery
switch must be placed in the NiMH position.
Batteries will only be charged when the radio is
switched o and connected to the AC adaptor.
When using alkaline batteries the battery switch
must be placed in the alkaline position. Failure
to do so could result in serious damage to the
batteries or radio.
● If extended listening using batteries is anticipated, then the use of rechargeable
batteries is recommended.
Charging the batteries
The charge indicator will ash green indicating
that batteries are charging. Batteries will be fully
charged in around 4-6 hours depending on their
capacity. The charge indicator shows a steady
green light when battery charging is complete.
The display will show “Battery Full”.
IMPORTANT
IMPORTANT
Battery Full
009
● Duration for charging your batteries fully can vary according to the mAh capacity
of the batteries. Higher mAh batteries require a longer charging time.
● When the batteries are exhausted, the battery light will show red for a short while.
The radio will then switch itself o. It may not be possible to switch the radio back
on until the batteries are recharged, or until the radio is connected to the mains
adaptor.
● Under some conditions the charging LED indicator may switch o after ashing
briefly. This may happen if the batteries are already freshly charged, or if the
radio detects that you may be attempting to recharge alkaline batteries or mixed
dierent types or capacity of rechargeable battery. In these cases the charging
will be stopped.
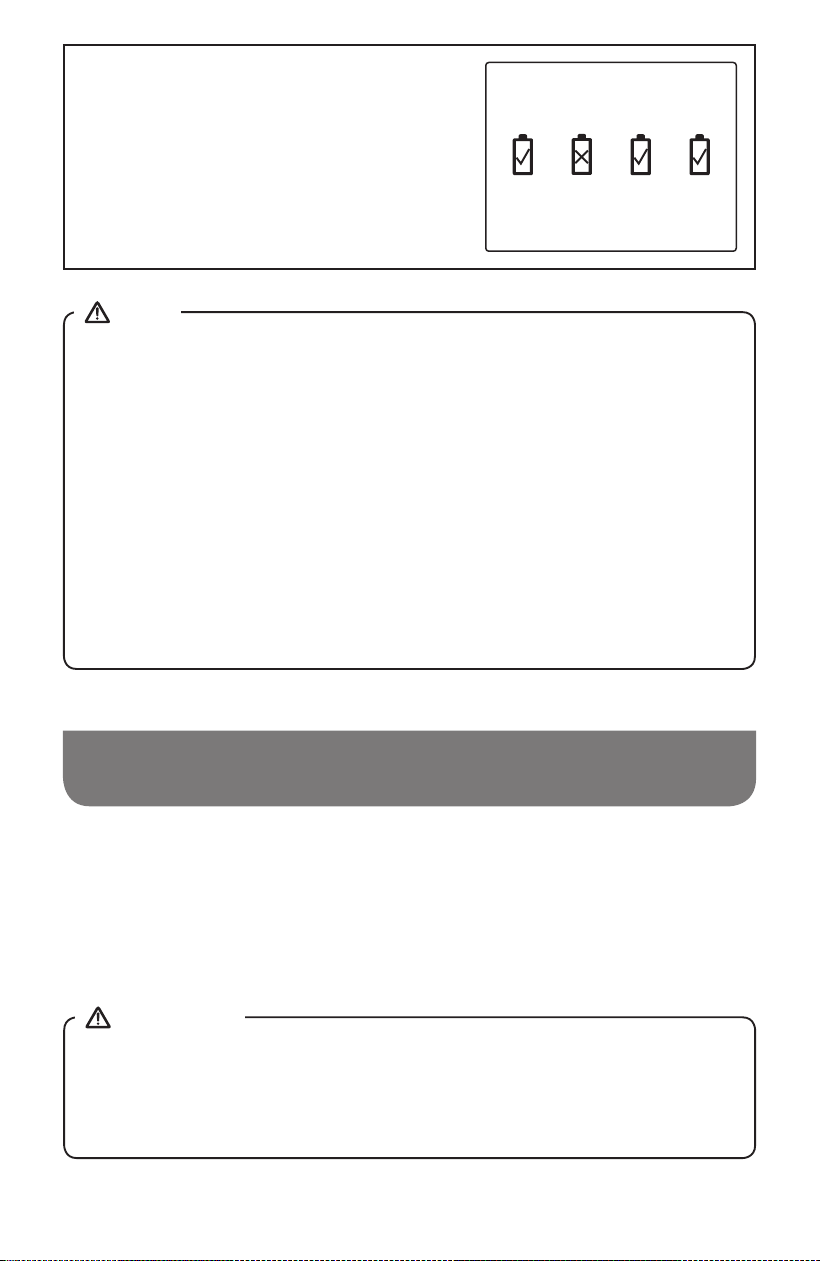
NOTE
During the charging process, if a battery is
detected as faulty / damaged, the battery
indicator will be shown with a cross under the
corresponding battery number.
1 2 3 4
The mains adaptor is used as the means of connecting the radio to the mains
supply. The mains socket used for the radio must remain accessible during normal
use. In order to disconnect the radio from the mains completely, the mains adaptor
should be removed from the mains socket outlet completely.
IMPORTANT
Using the AC power adaptor
The AC power adaptor required for this unit should be 7.5 volts DC at 0.8A center pin
positive. Insert the adaptor plug into the DC socket on the left side of the radio. Plug the
adaptor into a standard mains socket outlet.
Whenever the adaptor is used, the batteries are automatically disconnected. The AC
adaptor should be disconnected from the main supply when not in use.
010
Lock switch
The Lock switch is used to prevent unintentional operation of your radio.
Set the Lock switch located on the back of your radio to the ‘Lock’ position .
The power and all other buttons will be disabled, this will prevent accidental operation
when your radio is packed in a suitcase or travel bag.
To release the lock, slide the Lock switch down to the ‘Unlock’ position .
1.
2.
Operating your radio – DAB
Carefully extend the telescopic aerial.
Press the On / O button to switch on your radio. The display will show “Welcome to
Digital Radio” for a few seconds.
If this is the rst time the radio is used, a quick scan of the Band III DAB channels will
be carried out. If the radio has been used before the last used station will be selected.
During the scanning process, as new stations are detected the station counter will
increase and the stations will be added to the list which is stored in the radio. The
bar graph indicates the progress of the scan.
When the scanning is completed the rst station (in numeric-alpha order 0...9...A....Z)
will be selected.
If the station list is still empty after the scan, your radio will show “No station found”
for a moment.
If no signals are found it may be necessary to relocate your radio to a position giving
better reception.
1.
2.
3.
4.
5.
6.
7.
011
Selecting a station – DAB
When playing a DAB radio station, the display normally shows the name of the
current station with other related information.
Press the Tuning Up / Down button to scroll through the list of available stations.
Press and release the Select button to select the station. The display may show
“Connecting…” while your radio nds the station.
Adjust the Volume up or Down buttons to the required setting.
1.
2.
3.
4.
If after selecting a station the station does not tune, it may be necessary to relocate
your radio to a position giving better reception.
NOTE
Secondary services – DAB
Some DAB radio stations may have one or more secondary stations associated with
them. If a station has a secondary station available then the secondary will appear in the
list of station names beneath the main (or primary) station.
To listen to a secondary service, press the Tuning Up / Down button to scroll to the
chosen station, and press the Select button to tune to the station. If the secondary
service is not available (o-air) then the primary service will be selected.

012
Display modes – DAB
Your radio has a range of display options when in DAB mode:
Press the Info button to cycle through the dierent options.
a. Text Displays text messages such as the artist or track name,
phone in number, trac alerts, etc.
b. Program Type Displays the type of station being listened to such as Pop,
Classic, News etc.
c. Multiplex Name /
Frequency
Displays the name of the DAB multiplex to which the current
station belongs as well as its broadcast frequency.
d. Signal error /
strength
Displays the signal error and strength for the station being
listened to. A lower error number indicates a better quality
of radio signal. The signal strength graph can be used when
positioning the radio or its antenna. For good reception the
graph should occupy three or more blocks.
e. Bit rate and
audio type
Displays the digital bit rate and audio coding information for
the station being listened to.
f . Date Displays the current date.
g. DL Plus text Some stations may provide other programme related
information for the display in addition to the regular text. If
none is available, a message ‘No info’ is displayed.
A signal strength indicator is always shown in the lower area of the display on the right
hand side. If the broadcast being received is in stereo, then the stereo speaker symbol
will be shown. If the currently tuned station has been stored as a preset, then the preset
number will also be shown.
If a DAB broadcast provides a slideshow image, this may be viewed by pressing the
Select button. For full screen, press the Select button. Press the Select button again to
exit the slideshow.
1.

013
Finding new stations – DAB
As time passes new stations may become available. To nd new stations proceed as
follows:
Press the On / O button to switch on your radio.
Press the Mode button to select DAB radio mode.
Press the Auto Tune button to initiate the scan. You can also press and hold the Info /
Menu button to enter the DAB menu. Then press the Tuning Up / Down button to select
the “Scan”. Press the Select button to initiate the scan. The display will show 'Scanning'
and your radio will perform a scan of the DAB Band III frequencies. As new stations
are found the station counter will increase and stations will be added to the list. The bar
graph indicates the progress of the scan.
1.
2.
3.
Manual Tuning – DAB
Manual tuning allows you to tune directly to the various Band III DAB channels (5A to
13F).
When in DAB mode press and hold the Info / Menu button to enter the DAB menu.
Press the Tuning Up / Down button to select the “Manual tune”.
Press the Select button to enter manual tune option.
Press the Tuning Up / Down button to choose the required DAB channel.
Press the Select button to cause the radio to tune to the chosen channel.
1.
2.
3.
4.
5.
014
Dynamic Range Control
settings – DAB
Dynamic Range Control (also known as DRC) can make quieter sounds easier to hear
when your radio is used in a noisy environment by reducing the dynamic range of the
audio signal.
When in DAB mode press and hold the Info / Menu button to enter the DAB menu.
Press the Tuning Up / Down button to select the “DRC”.
Press the Select button to enter the DRC adjustment mode. The current DRC
setting will be indicated with an asterisk.
Press the Tuning Up / Down button to highlight the required DRC setting (the default
is O).
'High' - DRC is set as sent by broadcaster.
'Low' - DRC level is set to 1 / 2 that sent by broadcaster.
'O' - DRC is switched o, Broadcast DRC will be ignored.
Press the Select button to conrm the setting.
1.
2.
3.
4.
5.
Not all DAB broadcasts use the DRC function. If the broadcast does not provide
DRC information, then the DRC setting in the radio will have no eect.
NOTE
Station order setup – DAB
Your radio has 3 station order settings from which you can choose. The station order
settings are, alphanumeric, multiplex and active.
The default station order on your radio is alphanumeric.
NOTE
When in DAB mode press and hold the Info / Menu button to enter the DAB menu.
1.

015
Press the Tuning Up / Down button to select the “Station Order”.
Press the Select button to enter the station order adjustment mode.
Press the Tuning Up / Down button to choose 'Alphanumeric', 'Multiplex' and
'Active'.
'Alphanumeric' - sorts the station list alpha-numerically 0...9 A...Z.
'Multiplex' - organizes the station list by DAB multiplex.
'Active' - shows only those stations for which a signal can be found.
The current setting is indicated by an asterisk.
Press the Select button to conrm the required station order.
2.
3.
4.
5.
Prune stations – DAB
If you move to a different part of the country, some of the stations which were listed
may no longer be available. Also, from time to time, some DAB services may stop
broadcasting, or may change location or frequency. Stations which cannot be found,
or which have not been received for a very long time are shown in the station list with
a question mark. The Prune stations function will delete the marked DAB stations from
your station list.
When in DAB mode press and hold the Info / Menu button to enter the DAB menu.
Press the Tuning Up / Down button to select the “Prune Station”.
Press the Select button to enter adjustment mode.
Press the Tuning Up / Down button to select to “Yes” or “No”. To activate the Prune
function select “Yes”, then press the Select button to conrm the setting. If you do
not wish to prune stations, select “No” and then press the Select button to conrm
the setting.
1.
2.
3.
4.
If you have moved your radio to a dierent part of the country you should also carry
out a search for new stations (please see the section 'Finding new stations').
NOTE

016
Operating your radio – FM
Carefully extend the telescopic aerial.
Press the On / O button to switch on your radio.
Press the Mode button to select the FM band.
To scan up in frequency, press and hold the Tuning Up button. (Alternatively, rst
press the Tuning Up button and then press the Auto Tune button.) Your radio
will scan in an upwards direction (low frequency to high frequency) and stop
automatically when it nds a station of sucient strength.
To scan down in frequency, press and hold the Tuning Down button. (Alternatively,
rst press the Tuning Down button and then press the Auto Tune button.) Your radio
will scan in a downwards direction and stop automatically when it nds a station of
sucient strength.
After a few seconds the display will update. The display will show the frequency of
the signal found. If the signal is strong enough and there is RDS data present then
the radio will display the station name.
When the end of the waveband is reached your radio will recommence tuning from
the opposite end of the waveband.
Press the Volume Up / Down button to adjust the sound level as needed.
To switch o your radio, press the On / O button.
1.
2.
3.
4.
5.
6.
7.
8.

017
Manual tuning – FM
Press the On / O button to switch on your radio.
Press the Mode button to select the FM band.
Press either the Tuning Up or Down buttons to tune to a station. The frequency will
change in steps of 50kHz.
When the end of the waveband is reached the radio will recommence tuning from
the opposite end of the waveband.
Press the Volume Up / Down button to adjust the sound level as needed.
1.
2.
3.
4.
5.
Display modes – FM
Your radio has a range of display options when in FM mode:
Press the Info button to cycle through the dierent options.
a. Text Displays text messages such as the artist or track name,
phone in number, trac alerts, etc.
b. Program Type Displays the type of station being listened to such as Pop,
Classic, News etc.
c. Frequency Displays the frequency of the FM signal.
d. Date Displays the current date.
1.
These FM mode information displays are only available when the radio is able to
receive RDS information from the broadcaster.
The RDS indicator at the bottom of the display shows that there is some RDS data
present in the broadcast being received.
NOTE
018
Scan sensitivity setting – FM
Your radio will normally scan for FM broadcasts which are strong enough to give good
reception. However, you may wish the Auto-scan function to also be able to nd weaker
signals, possibly from more distant radio transmitters. Your radio includes a local /
distant option for the Auto-scan function.
When in FM mode, press and hold the Info / Menu button to enter the FM menu.
Press the Tuning Up / Down button to select “Scan zone”. Press the Select button to
enter the setting. The current scan setting is indicated with an asterisk.
Press Tuning Up / Down button to choose either the 'Local' or 'Distant' option. The
Distant option will allow the radio to nd weaker signals when scanning.
Press Select button to conrm the setting. The Local or Distant setting is stored in
the radio and remains in force until changed or until a system reset.
1.
2.
3.
4.
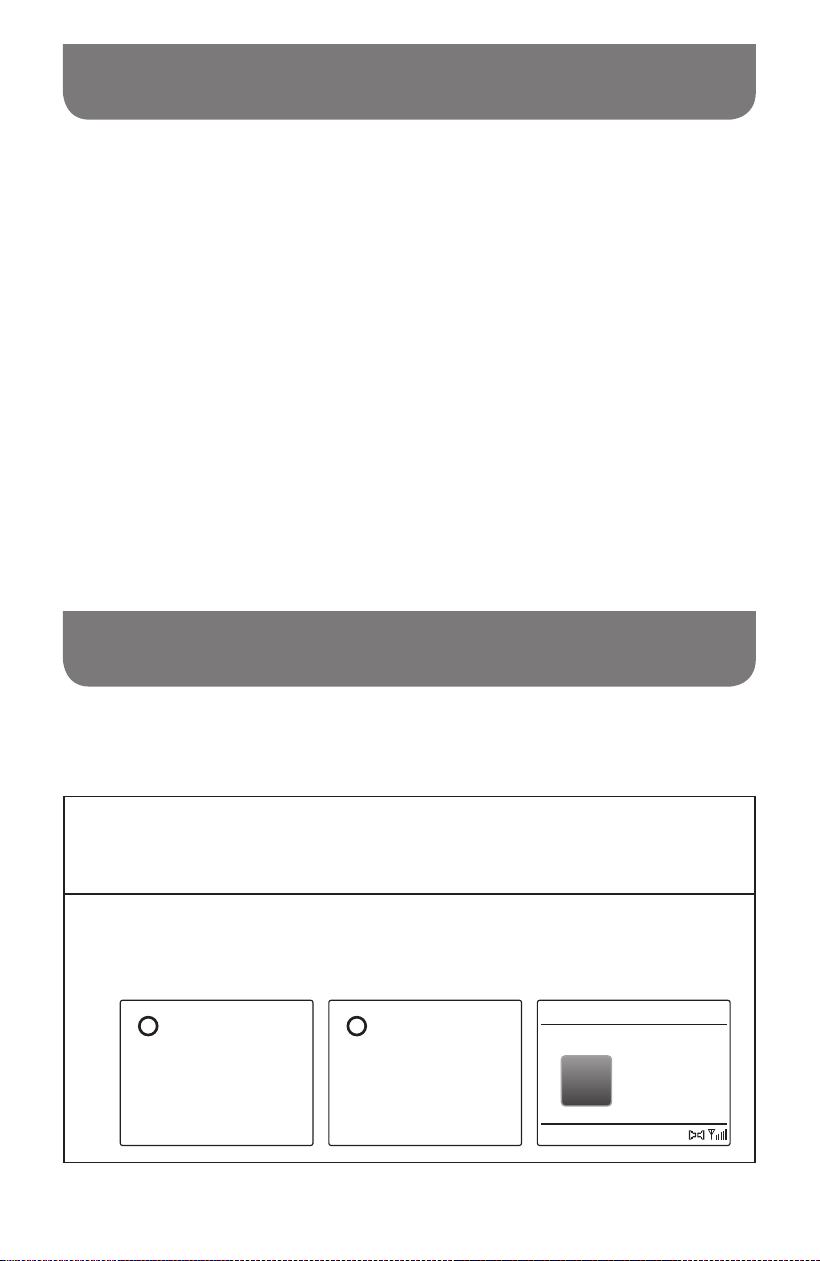
Stereo / Mono switching – FM
If the FM radio station being listened to has a weak signal, some hiss may be audible. It is
possible to reduce this hiss by forcing the radio to play the station in mono rather than stereo.
1
Ensure your radio is in FM mode and tune to the required FM station.
2
Press the Select button to switch to mono or stereo. The display will show
“Force mono” or “Auto Stereo”. If the broadcast being received is in stereo,
then the stereo speaker symbol will be shown in the lower area of the display.
Force mono
i
[No Radio Text]
88.50 MHz
FM
00:00
FM
Auto Stereo
i
019
Presetting stations in DAB and FM
modes
There are 20 presets (5 pages x 4 presets) each for DAB and FM radio. They are used
the same way for each operating mode.
Press the On / O button to switch on your radio.
Tune to the required radio station as previously described.
To store the station as a preset, press the Page button to select the required preset
page 1 to 5 and then press and hold the required preset button (1-4) until the display
shows e.g.“Page2 M1 Saved”.
Stations which are already stored in the presets may be overwritten by following the
above procedure.
1.
2.
3.
4.
1.
2.
3.
The radio station presets are retained in memory when the radio is switched o and
disconnected from the mains supply.
NOTE
Press the On / O button to switch on your radio.
Select the required operating mode using the Mode button.
Press the Page button to select the required preset page and momentarily press
the required Preset button, your radio will tune to the station stored in the selected
preset memory. The chosen preset number is also shown in the lower area of the
radio display, e.g. '
P2M1'.
Recalling a preset in DAB and FM
modes
020
Listening music via Bluetooth
streaming
You need to pair your Bluetooth device with your radio before you can auto-link to play
stream Bluetooth music through your radio. Pairing creates a “bond” so two devices can
recognize each other.
Pairing and playing your Bluetooth device for the rst time
With your radio switched on, press the Mode button to select Bluetooth function.
The display will appear “Disconnected” to show the radio is discoverable.
Activate Bluetooth on your device according to the device’s user manual to link to the
radio. Locate the Bluetooth device list and select the device named “DPR-76BT” (With
some Smartphone’s that are equipped with earlier versions than BT 2.1 Bluetooth
device, you may need to input the pass code “0000”).
Once connected, there will be a confirmation tone sound and the name of your
connected Bluetooth device will show on the display. You can simply select and play
any music from your source device. The volume control can be adjusted from your
source device, or directly from the radio.
Use the controls on your Bluetooth-enabled device or on the radio to play / pause
and navigate tracks.
1.
2.
3.
4.
If 2 Bluetooth devices are pairing for the rst time, both must search for your
radio, it will show its availability on both devices. However, if one device links
with this unit rst, then the other Bluetooth device won’t nd it on the list.
If you take your source device out of range, the connection will be temporarily
disconnected to your radio. Your radio will automatically reconnect if the
source device is brought back in range. Be aware that during the period of
disconnection, no other Bluetooth device can pair or link with your radio.
If “DPR-76BT” shows in your Bluetooth device list but your device cannot
connect with it, please delete the item from your list and pair the device with the
radio again following the steps described previously.
The effective operation range between the system and the paired device is
approximately 10 meters (30 feet). Any obstacle between the system and the
device can reduce the operational range.
Bluetooth connectivity performance may vary depending on the connected
Bluetooth devices. Please refer to the Bluetooth capabilities of your device
before connecting to your radio. All features may not be supported on some
paired Bluetooth devices.
With some mobile phones, making/receiving calls, text messages, e-mails or
any other activities unrelated to audio streaming may mute the Bluetooth audio
streaming or even temporarily disconnect from your device. Such behavior is a
function of the connected device and does not indicate a fault with your radio.
NOTE
1.
2.
3.
4.
5.
6.

021
Display modes - Bluetooth
Your radio has a range of display options when in Bluetooth mode. Note that the
availability of information depends on the specic media format.
Press and release the Info button to cycle through the different options. If your
connected device is able to provide information from the track being played, your radio
can display the following in Bluetooth mode: Track name, Artist, Album and Date.
Playing audio les in Bluetooth mode
When you have successfully connected your radio with the chosen Bluetooth source device
you can start to play your music using the controls on your connected Bluetooth device.
Once playing has started adjust the volume to the required setting using the Volume
control on your radio or on your enabled Bluetooth source device.
Use the controls on your Bluetooth source device to play / pause and navigate
tracks. Alternatively, control the playback using Play / Pause, Next track, Previous
track buttons on your radio.
Press and hold the Fast-forward / Rewind button to move through the current track.
Release the button when the desired point is reached.
Playing a previously-paired Bluetooth source device
The radio can memorize up to 6 sets of paired Bluetooth source devices, when the memory
exceed this amount, the earliest paring device will be over written from the device.
If your Bluetooth source device already paired with the radio previously, the unit will
memorize your Bluetooth source device and it attempts to reconnect with a Bluetooth
source device in memory which is last connected.
Disconnecting your Bluetooth device
Press and hold the Bluetooth pairing button for 2-3 seconds to disconnect with your Bluetooth
device. You can also press the Mode button to select any mode other than Bluetooth mode or
turn o Bluetooth on your Bluetooth source device to disable the connection.
If you disconnect the Bluetooth device when you are in Bluetooth mode, the “Disconnected”
will show on the display, indicating Bluetooth is available again for pairing.
1.
2.
3.
Not all player applications or devices may respond to all of these controls.
NOTE
When Bluetooth is not connected, the radio will automatically turn o after 15 minutes.
NOTE

022
Automatically updating the clock
You may specify that the radio sets its clock from DAB or FM radio broadcasts. After a
power failure the radio will then set its clock the next time that you turn on the radio in
DAB or FM mode.
Alternatively you may specify that the time is not automatically updated. In this case the
clock must always be set manually after a power interruption.
With your radio switched on, press and hold Info / Menu button to access the menu
for the current mode.
Press the Tuning Up / Down button to select “System settings”. Press the Select
button to enter the system settings menu. (Using the Tuning Up / Down and Select
buttons to select “Back” will go back to a higher level menu.)
Press the Tuning Up / Down button to select “Time setup”. Press the Select button
to enter the setting.
Press the Tuning Up / Down button to select “Auto update”. Press the Select button
to enter the auto-update menu.
Press the Tuning Up / Down button to choose an update option from “From DAB”,
“From FM”, or “No update” as required. Press the Select button to confirm your
choice. The radio will then exit to the previous menu display.
1.
2.
3.
4.
5.
Setting the clock format
With your radio switched on, press and hold Info / Menu button to access the menu
for the current mode.
Press the Tuning Up / Down button to select “System settings”. Press the Select
button to enter the system settings menu.
Press the Tuning Up / Down button to select “Time setup”. Press the Select button
to enter the setting.
Press the Tuning Up / Down button to select “Clock format”. Press the Select button to
enter the clock format setting. The current clock display format is marked with an asterisk.
Press the Tuning Up / Down button to select either 12 or 24 hour format. Press the
Select button to conrm your choice of clock format. If the 12 hour clock format is
chosen, the radio will display a 12 hour clock with an AM or PM indicator.
1.
2.
3.
4.
5.

023
Manually setting the clock
1.
2.
3.
4.
5.
6.
7.
8.
9.
● If the radio has been set to use a 12 hour format, there will be an option here for
setting AM or PM for the clock time. Press the Tuning Up / Down button to select AM
or PM. Press the Select button to conrm the setting.
With your radio switched on, press and hold Info / Menu button to access the menu
for the current mode.
Press the Tuning Up / Down button to select “System settings”. Press the Select
button to enter the system settings menu.
Press the Tuning Up / Down button to select “Time setup”. Press the Select button
to enter the setting.
Press the Tuning Up / Down button to select “Set time”. Press the Select button to
enter the clock setup. The day digits will ash.
Press the Tuning Up / Down button until the correct day is shown on the display.
Press the Select button to conrm the setting. The month digits will then ash.
Press the Tuning Up / Down button to select the correct month. Press the Select
button. The year digits will then ash.
Press the Tuning Up / Down button to select the correct year. Press the Select
button. The hour digits will then ash.
Press the Tuning Up / Down button to select the correct hour. Press the Select
button. The minute digits will then ash.
Press the Tuning Up / Down button to select the correct minutes. Then Press the
Select button to conrm the setting.

024
Brightness control
The brightness of the display can be adjusted when the radio is in use.
With your radio switched on, press and hold Info / Menu button to access the menu
for the current mode.
Press the Tuning Up / Down button to select “System settings”. Press the Select
button to enter the system settings menu.
Press the Tuning Up / Down button to select “Backlight”. Press the Select button to
enter the setting menu
In Backlight menu, there are 2 settings:
Timeout: to adjust the length of time before the backlight turns o.
On Level: to adjust the brightness when the radio is in use.
Press the Tuning Up / Down button to select your option and press the Select button
to conrm your setting.
1.
2.
3.
4.
Language selection
By default your radio will display all menus and messages in English. You can choose
your preferred language.
With your radio switched on, press and hold Info / Menu button to access the menu
for the current mode.
Press the Tuning Up / Down button to select “System settings”. Press the Select
button to enter the system settings menu.
Press the Tuning Up / Down button to select “Language”. Press the Select button to
enter the setting menu.
Press the Tuning Up / Down button until your preferred language is highlighted and
press the Select button to conrm the setting.
1.
2.
3.
4.
025
Headphone socket
A 3.5mm Headphone Socket located on the left hand side of your radio is provided for
use with headphones. Inserting a plug automatically mutes the internal loudspeaker.
Please be aware that the sensitivity of headphones can vary widely. We therefore
recommend setting volume to a low level before connecting headphones to the radio. It
is also recommended to reduce the volume before unplugging your headphones.
Excessive sound pressure from earphones and headphones can cause hearing
loss. To prevent possible hearing damage, do not listen at high volume levels for
long periods.
IMPORTANT
If you wish to completely reset your radio to its initial state this may be performed by following
this procedure. By performing a factory reset, all user entered settings will be erased.
With your radio switched on, press and hold Info / Menu button to access the menu
for the current mode.
Press the Tuning Up / Down button to select “System settings”. Press the Select
button to enter the system settings menu.
Press the Tuning Up / Down button to select “Factory reset”. Press the Select button
to enter the setting.
Press the Tuning Up / Down button to select “Yes” or “No”. If you do not wish to
carry out a system reset, select “No” and then press the Select button to conrm the
setting.
With “Yes” selected, press the Select button. A full reset will be performed. All
presets and station lists will be erased. All settings will be set to their default values.
After a system reset, the radio will be restarted. The display will show “Welcome
to Digital Radio” and a scan of the DAB band III will be performed. In case of
malfunction due to electrostatic discharge, reset the product (reconnection of power
source may be required) to resume normal operation.
Factory reset
1.
2.
3.
4.
5.

026
The software version display is provided for reference and customer support purposes
and cannot be changed.
With your radio switched on, press and hold Info / Menu button to access the menu
for the current mode.
Press the Tuning Up / Down button to select “System settings”. Press the Select
button to enter the system settings menu.
Press the Tuning Up / Down button to select “SW version”. Press the Select button
to display the software version.
Press the Info / Menu button to exit the software version display.
Software version display
1.
2.
3.
4.
From time to time, new software features for your radio may be developed. Your radio
has therefore been designed to allow its internal software to be updated using your USB
upgrade port.
You should not attempt to update your radio unless it is recommended to you by
Sangean Customer Services. Updating the software may remove all radio station
presets and settings from your radio.
Software updates for your radio may be available in the future. As software updates
become available software and information on how to update your radio can be found at:
http://www.sangean.com
For more information, please contact our Head Office by sending an email to
Using the micro USB cable (not supplied) to connect the USB socket on the left
hand side of the radio and your PC USB port.
Go to the website above to download the latest software. Follow the on-screen
instructions on your PC provided with the upgrade software to complete the software
upgrade.
USB socket for software upgrade
1.
2.
027
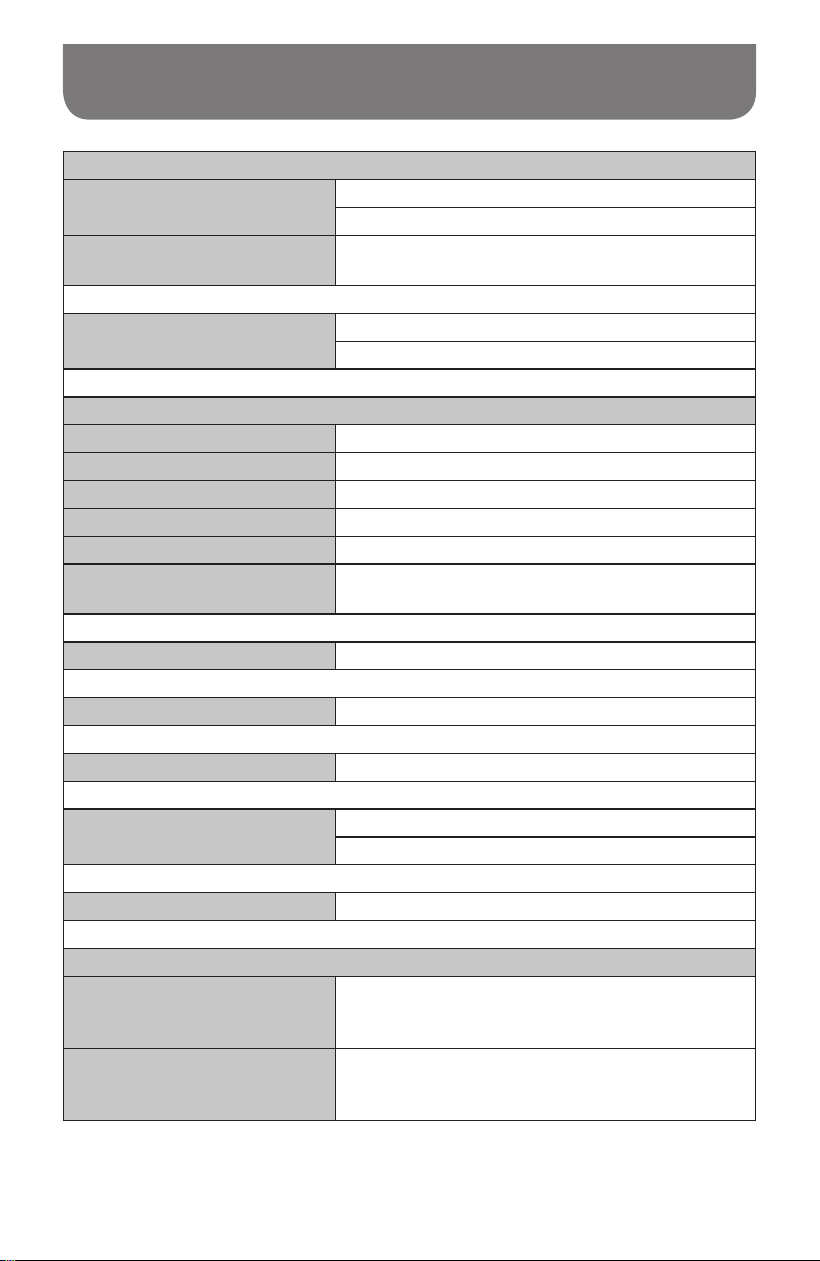
Specications
Power Requirements
Mains Power Supply
INPUT: AC 100-240 V ~ 50/60 Hz
OUTPUT: DC 7.5V 0.8A 6.0W
Batteries
4 x LR6 (AA size) Alkaline or NiMH rechargeable
(not included)
Frequency Coverage
FM 87.5-108 MHz
DAB 174.928-239.200 MHz
Bluetooth
Bluetooth specication Bluetooth
®
5.0+EDR
Prole Support A2DP, AVRCP
Bluetooth Audio CODEC SBC, AAC
Transmitting Power Power Class 2
Line of sight range 10 meters / 30 feet
The frequency and maximum
transmitted power
2402MHz ~ 2480MHz: 1.73dBm (Bluetooth EDR)
Speaker 8Ω 2W
Output power 0.5W
Headphone socket 3.5mm diameter, stereo
Aerial System
DAB Telescopic aerial
FM Telescopic aerial
Operating temperature range 0°C to + 35°C
Information on Power Consumption
O mode
This device does not have a standby mode, and
its power consumption in o mode is less than
0.3W.
Bluetooth mode
In Bluetooth mode, when there is no signal
output, the idle power consumption is 2W after 15
minutes.
028
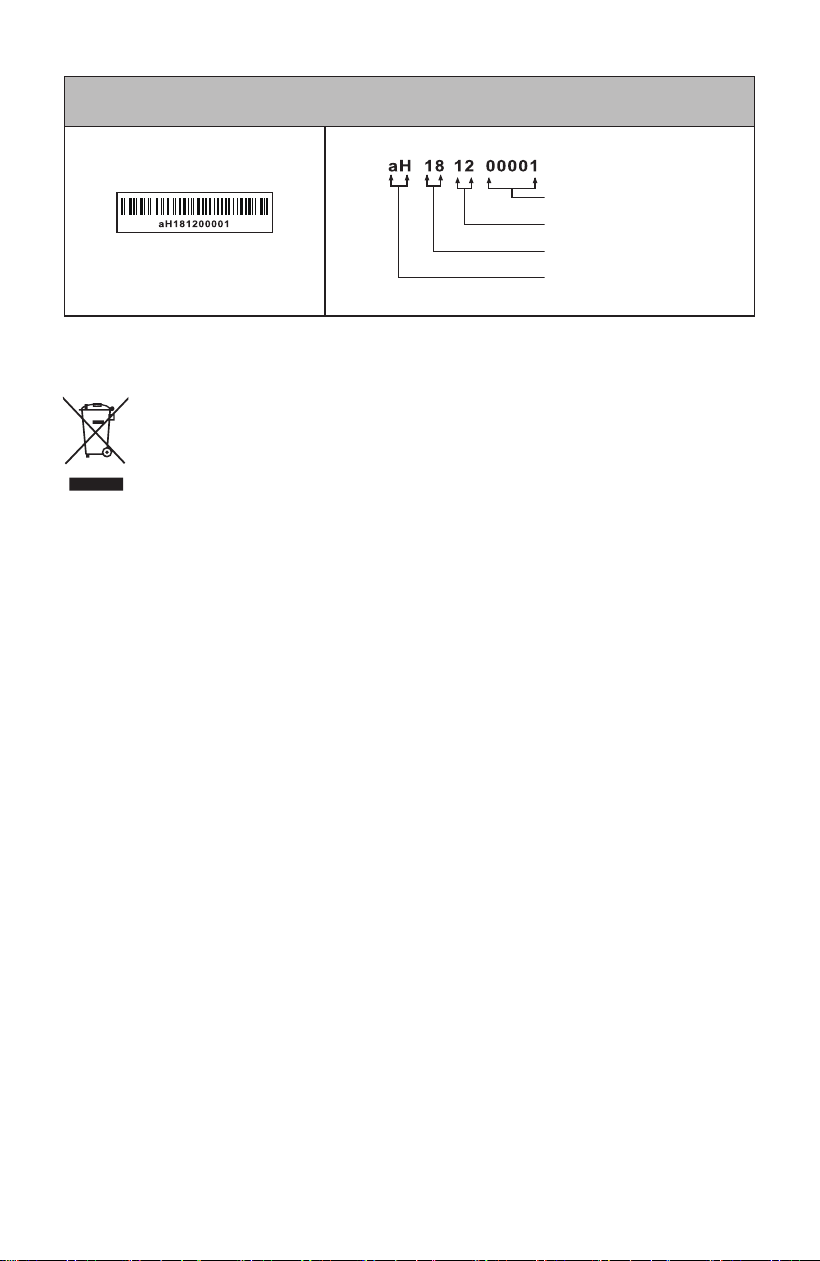
※
The barcode label on the product is dened as below:
Serial number
Production month
Production year
Product code
RECYCLING This product bears the selective sorting symbol for Waste electrical
and electronic equipment (WEEE). This means that this product must be handled
pursuant to European directive 2012/19/EU in order to be recycled or dismantled
to minimize its impact on the environment.
Sangean reserves the right to amend the specications without notice.
