

55 AMP PORTABLE MONSTER BATTERY CHARGER 12/24V
SAVE THIS MANUAL: KEEP THIS MANUAL FOR SAFETY WARNINGS, PRECAUTIONS, ASSEMBLY,
OPERATING, INSPECTION, MAINTENANCE AND CLEANING PROCEDURES. WRITE THE PRODUCT’S
SERIAL NUMBER ON THE BACK OF THE MANUAL NEAR THE ASSEMBLY DIAGRAM (OR MONTH
AND YEAR OF PURCHASE IF PRODUCT HAS NO NUMBER).
OWNER’S MANUAL AND SAFETY INSTRUCTIONS
ITEM: 21523
FOR QUESTIONS PLEASE CALL OUR CUSTOMER SUPPORT: (909) 628 4900 MON-FRI 9AM TO 3PM PST

GENERAL SAFETY WARNINGS
Read all safety warnings and instructions. Failure to follow the warnings and instructions
may result in electric shock, fire and/or serious injury. Save all warnings and instructions for
future reference.
SAFETY
1
The warnings, precautions, and instructions discussed in this instruction manual cannot cover all
possible conditions and situations that may occur. It must be understood by the operator that
common sense and caution are factors which cannot be built into this product, but must be supplied by
the operator. Read carefully and understand all ASSEMBLY AND OPERATION INSTRUCTIONS before
operating. Failure to follow the safety rules and other basic safety precautions may result in serious
personal injury.
Read and understand all instructions. Failure to follow all instructions may result in serious injury or
property damage.
DO NOT allow persons to operate or assemble the product until they have read this manual and have
developed a thorough understanding of how it works.
DO NOT modify this product in any way. Unauthorized modification may impair the function and/or
safety and could affect the life of the product. There are specific applications for which the product was
designed.
Use the right tool for the job. DO NOT attempt to force small equipment to do the work of larger
industrial equipment. There are certain applications for which this equipment was designed. This
product will be safer and do a better job at the capacity for which it was intended. DO NOT use this
equipment for a purpose for which it was not intended.
WORKING IN VICINITY OF A LEAD-ACID BATTERY IS DANGEROUS. BATTERIES GENERATE
EXPLOSIVE GASES DURING NORMAL BATTERY OPERATION. FOR THIS REASON, IT IS OF
UTMOST IMPORTANCE THAT EACH TIME BEFORE USING YOUR CHARGER.
To reduce risk of battery explosion, follow these instructions and those published by the battery
manufacturer and the manufacturer of any equipment you intend to use in vicinity of battery.
REVIEW CAUTIONARY MARKINGS ON THESE PRODUCTS AND ON ENGINE.
Keep children and bystanders away from the work area while operating the charger. DO NOT
allow children to handle the product.
Use charger for charging a LEAD-ACID battery only. It is not intended to supply power to a low voltage
electrical system other than in an automotive application. Do not use battery charger for charging dry-
cell batteries that are commonly used with home and portable appliances. These batteries may burst
and cause injury to persons and damage to property.
Stay alert, watch what you are doing, and use common sense when operating the tool. DO NOT use the
tool while you are tired or under the influence of drugs, alcohol, or medication.
Use of an attachment not recommended or sold by the battery charger manufacturer may result in a risk
of fire, electric shock, or injury to persons.
IMPORTANT SAFETY INFORMATION

2
To reduce risk of damage to electric plug and cord, pull by plug rather than cord when disconnecting
charger.
Check for damaged parts before each use. Carefully check that the product will operate properly and
perform its intended function. Replace damaged or worn parts immediately. Never operate the product
with a damaged part.
An extension cord should not be used unless absolutely necessary. Use of an improper extension cord
could result in a risk of fire and electric shock. If extension cord must be used, make sure the pins on
plug of extension cord are the same number, size and shape as those of plug on charger B. That
extension cord is properly wired and in good electrical condition; and C. That wire size is AWG #18 (18
gauge) to 100 feet and AWG #16 for distances over 100 feet.
DO NOT operate charger with damaged cord or plug - replace the cord or plug immediately.
DO NOT operate charger if it has received a sharp blow, been dropped, or otherwise damaged in any
way; take it to a qualified service technician.
DO NOT disassemble charger; take it to a qualified service technician when service or repair is required.
Incorrect reassembly may result in a risk of electric shock or fire.
To reduce risk of electric shock, unplug charger from outlet before attempting any maintenance or
cleaning. Turning off controls will not reduce this risk.
DO NOT expose charger to rain or snow.
NEVER charge a frozen battery.
ALWAYS turn off the power before taking off the collet of the battery.
When charging the battery pay generate in a flammable gas. Keep away from sparks.
The red collet goes to the positive terminal, while the black goes to the negative. NEVER reverse the
collets when charging.
DO NOT use if wires are damaged.
Make sure the charger is kept on a level surface. DO NOT allow it to shake or vibrate while in use.
Someone should be within range of your voice or close enough to come to your aid when you work near
a lead-acid battery.
Have plenty of fresh water and soap nearby in case battery acid contacts skin, clothing, or eyes.
Wear complete eye protection and clothing protection. Avoid touching eyes while working with a battery
acid. Acid particles or corrosion may get into eyes. Immediately flood eye with running cold water for at
least 10 minutes and get medical attention immediately.
If battery acid contacts skin or clothing, wash immediately with soap and water.
NEVER smoke or allow a spark or flame in vicinity of battery or engine.
Be extra cautious to reduce risk of dropping a metal tool onto battery. It might spark or short-circuit
battery or other electrical part that may cause explosion.
Remove personal metal items such as rings, bracelets, necklaces, and watches when working with a
lead-acid battery. A lead-acid battery can produce a short-circuit current high enough to weld a ring or
the like to metal, causing a severe burn.
IMPORTANT SAFETY INFORMATION

3
If necessary to remove battery from vehicle to charge, always remove grounded terminal from battery
first. Make sure all accessories in the vehicle are off, so as not to cause an arc.
Be sure area around battery is well ventilated while battery is being charged. Gas can be forcefully
blown away by using a piece of cardboard or other non-metallic material as a fan.
Clean battery terminals with a mixture of baking soda and hot water. Be careful to keep corrosion from
coming in contact with eyes.
Study all battery manufacturer’s specific precautions such as removing or not removing cell caps while
charging and recommended rates of charge.
Determine voltage of battery by referring to car owner’s manual and make sure that output voltage
selector switch is set at correct voltage.
Locate the charger as far away from the battery as DC cables permit.
NEVER place the charger directly above the battery being charged; gases from the battery will corrode
and damage the charger.
NEVER allow battery acid to drip on the charger when reading specic gravity or lling the battery.
DO NOT operate the charger in a closed area or restrict ventilation in any way.
DO NOT set a battery on top of the charger.
Locate the charger at least 18” above the floor.
DO NOT place the charger where rain, snow, or other moisture could drip on it.
Charger should be grounded to reduce risk of electric shock. Charger is equipped with an electric cord
having an equipment-grounding conductor and grounding plug. The plug must be plugged into an
outlet that is properly installed and grounded in accordance with all local codes and ordinances.
DANGER – Never alter AC cord or plug provided – if it will not fit outlet, have proper outlet installed by a
qualified electrician. Improper connection can result in a risk of an electric shock.
CAUTION: Connect and disconnect DC output clips only after setting any switches with an OFF position
to off and removing AC power cord from electric outlet. Never allow clips to touch each other.
To reduce explosion risk, never connect both clips directly to the battery. When making each connection,
twist or rock clip back and forth several times to make a good connection and to reduce the risk of a clip
slipping off and creating a spark. Do not twist or rock clip on the battery after the second clip connection
is made.
SAVE THESE WARNINGS
IMPORTANT SAFETY INFORMATION
4
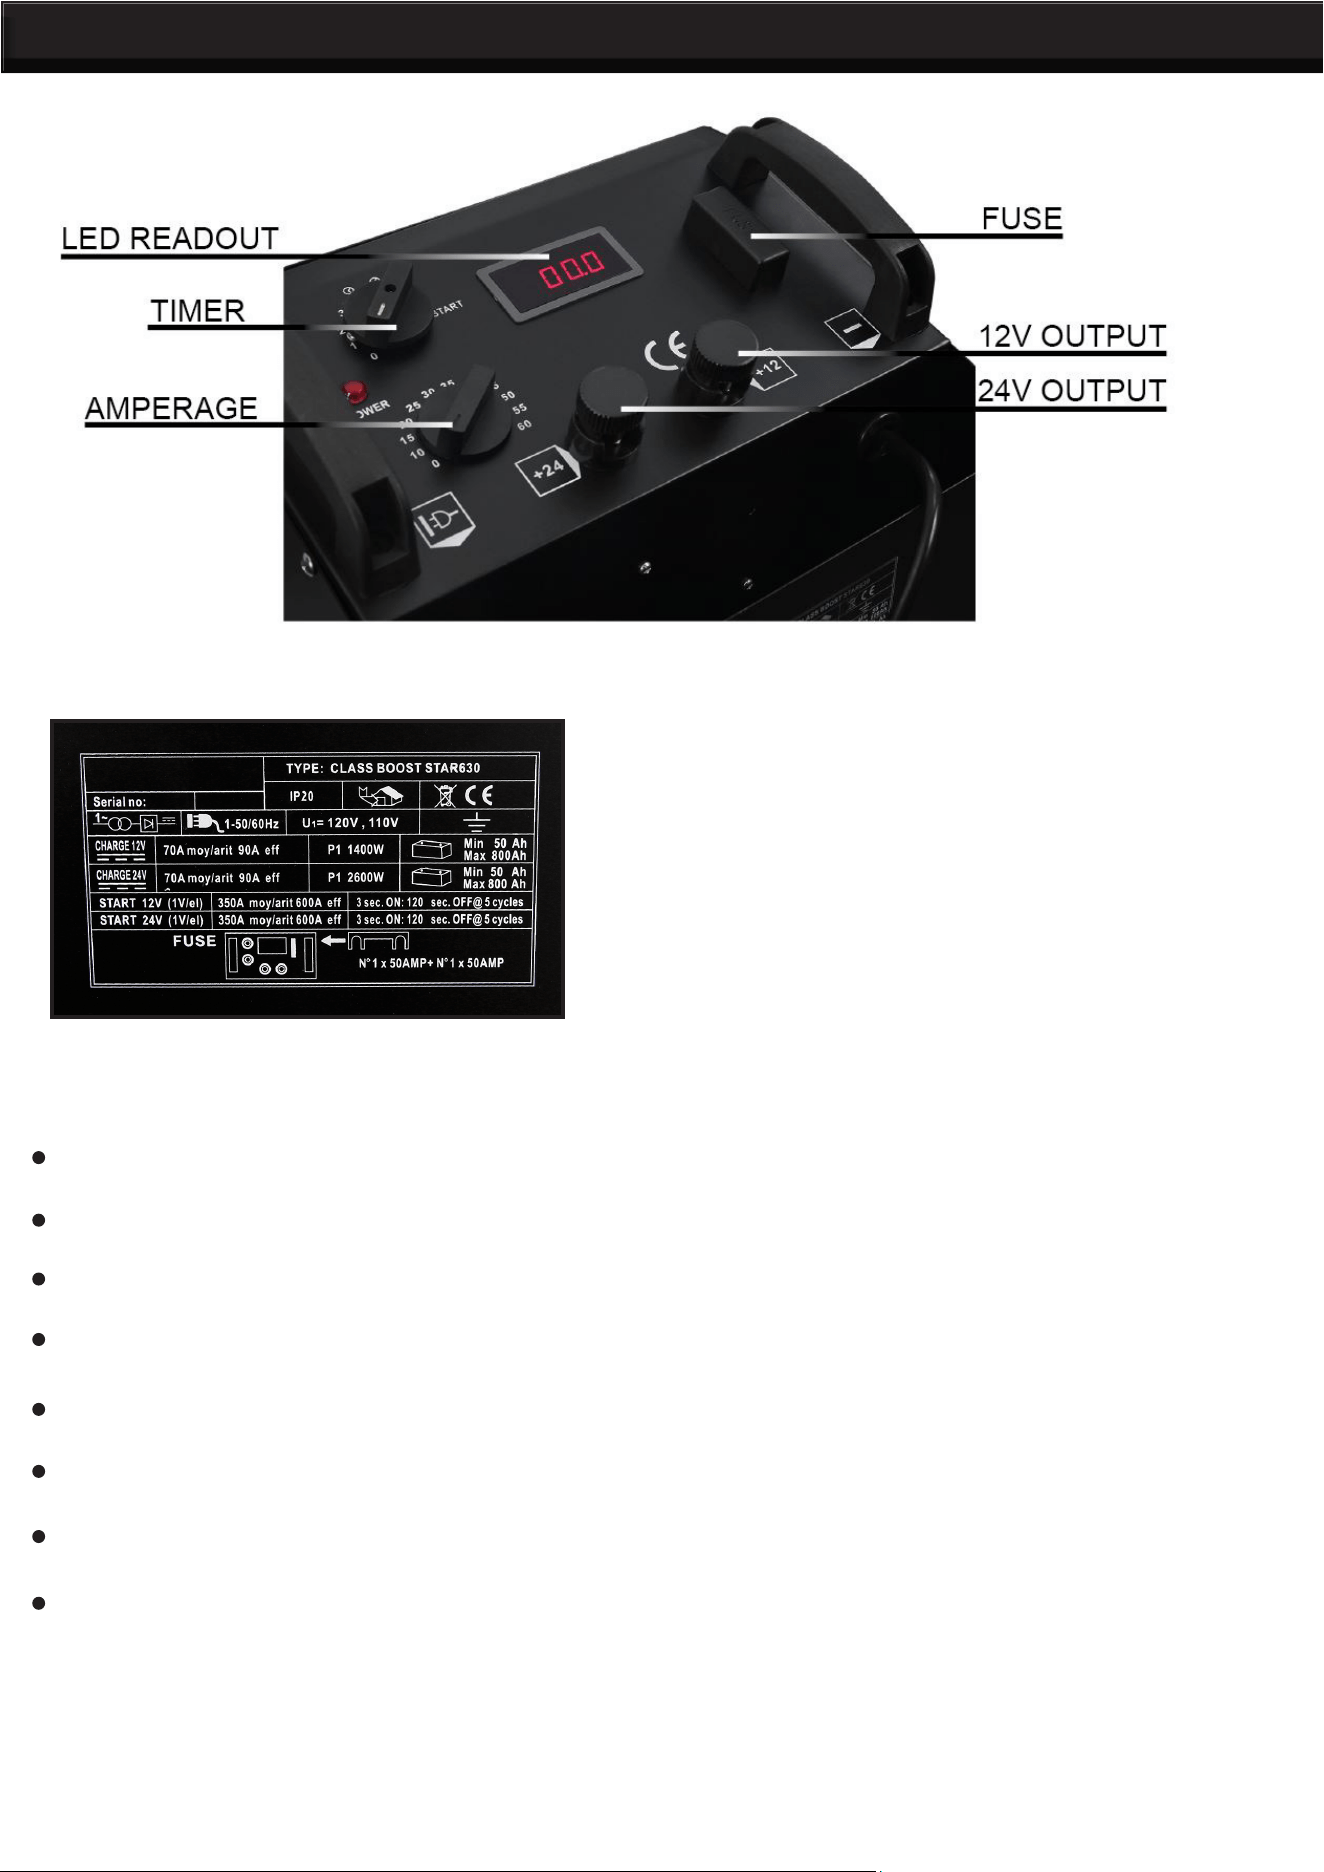
FEATURES:
110V 60Hz Battery Charger For Lead-Acid Batteries
AC Input: 12V = 1400W , 24V= 2600W
Charger Voltage: 12V = 56A , 24V = 55A
Max Charger Current: 90A , Battery Capacities 60-600Ah
Starter Current: 600A
Built In Fan for Cooling With Automatic Thermistor Protection
Adjustable Timer For Quick Charge, Set & Forget
CE, RoHS Certied, Perfect For Cars, Boats, Trailers, RV’s55 Amp Portable Monster Battery Charger
12/24 Volt Automatic Car Truck
PRODUCT INFORMATION
4
PRINCIPLE OPERATION
1. Before charging, clear the storage battery and carefully check its initial voltage.
2. When charging, the current lies on the type of storage battery which is generally about 10% of the max
current of the battery.
TIME: Upon the type of storage battery, the formula is: Charging Type = Battery Current / Charging
Current
Additionally, when the charging times go by, the charging current will drop so the actual charging time
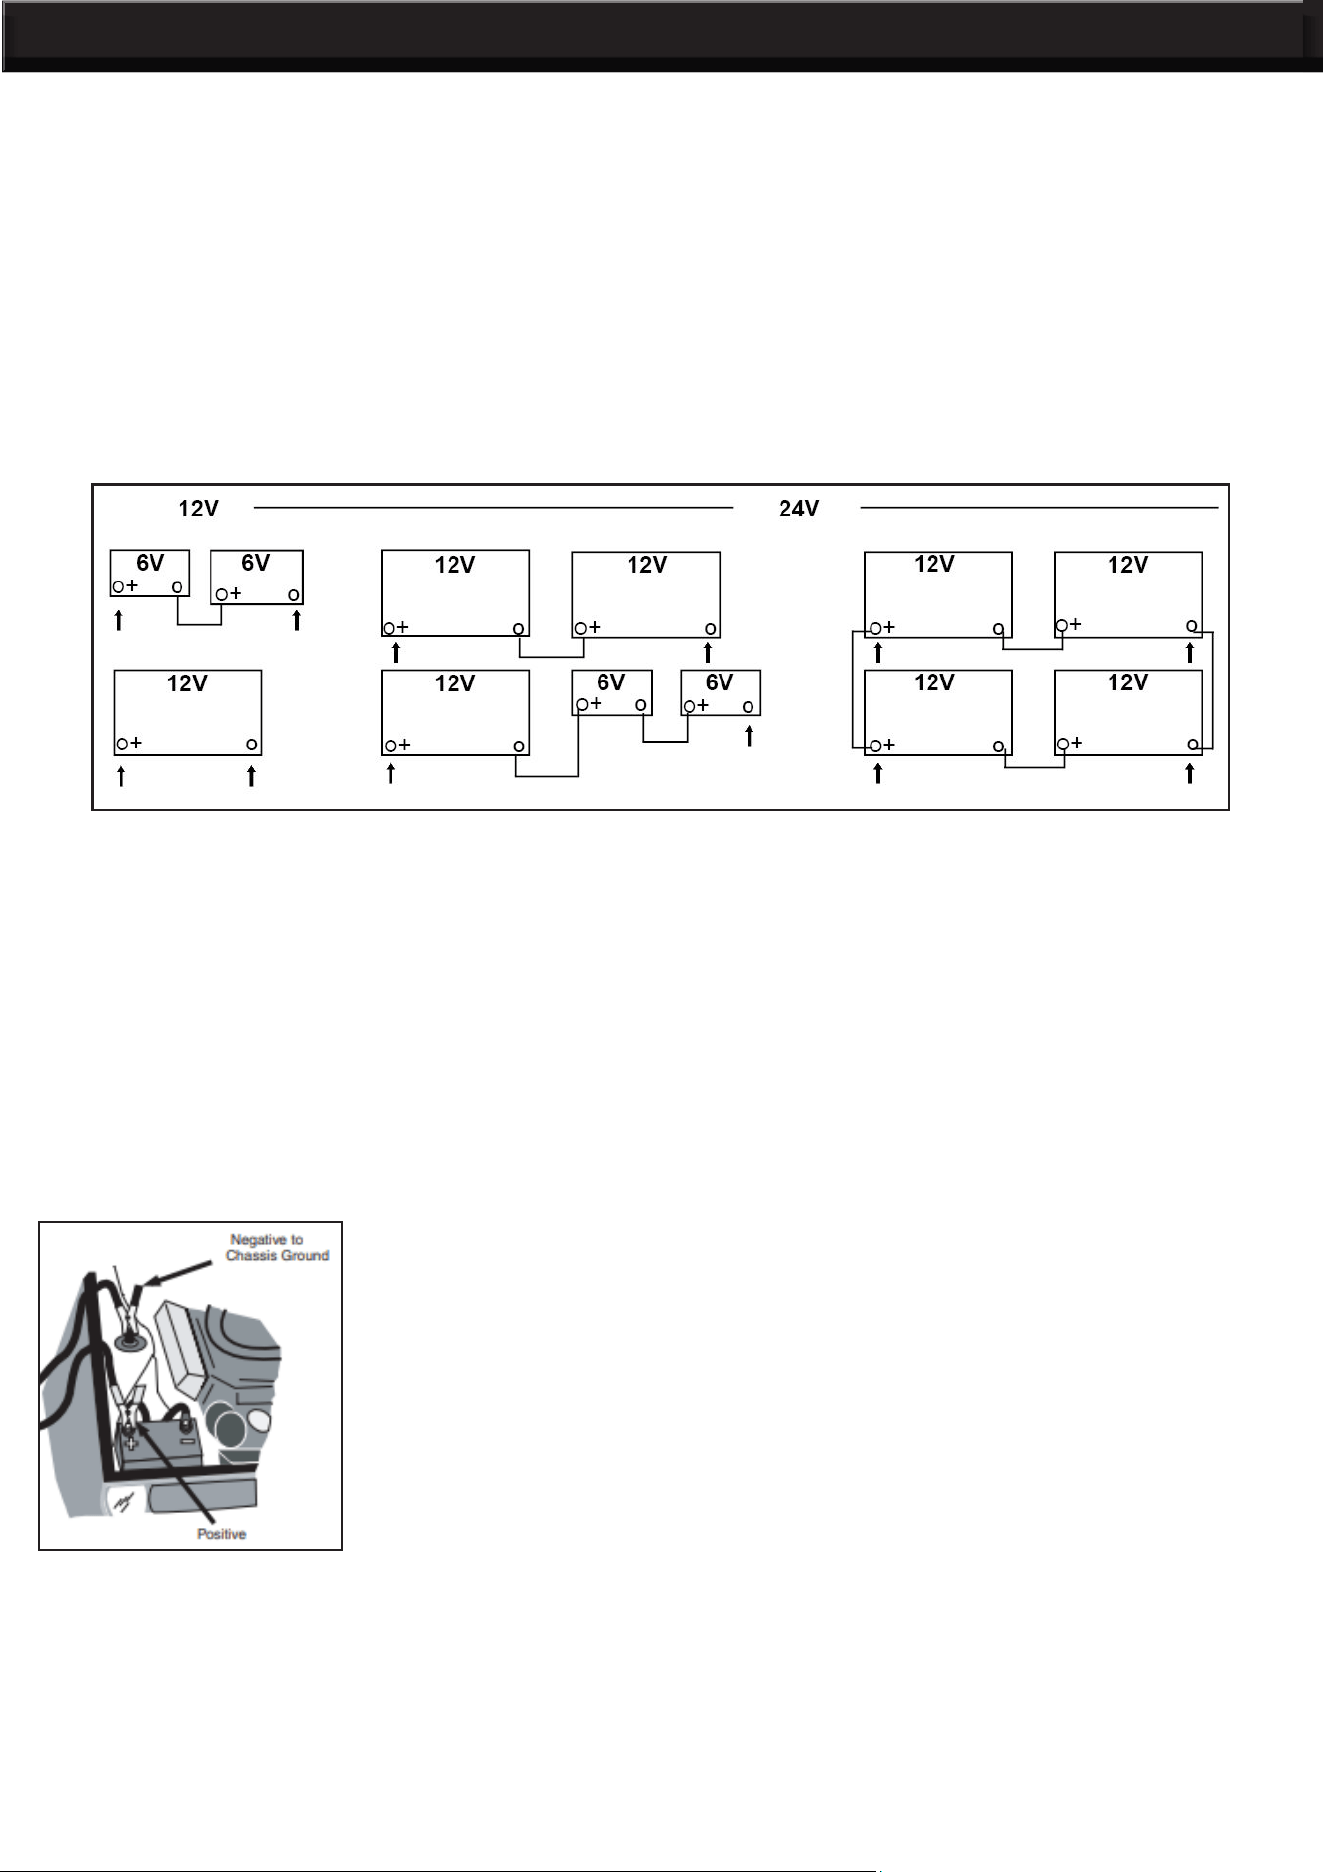
should be 1/4 times longer than theoretical. This machine can refresh one or more batteries simultaneously
as shown below. The charging time will then expand.
CHARGING A BATTERY THAT IS INSTALLED IN A VEHICLE
1. Position AC and DC cords to reduce risk of damage by hood, door, or moving engine part.
2. Stay clear of fan blades, belts, pulleys, and other parts that can cause injury to persons.
3. Check polarity of battery posts. POSITIVE (POS, P, +) battery post usually has larger diameter than
NEGATIVE (NEG, N, –) post.
4. Determine which post of battery is grounded (connected) to the chassis. If the negative post is grounded
to the chassis (as in most vehicles), see Figure 1 and instruction 5a. If the positive post is grounded to the
chassis.
5a. For NEGATIVE GROUNDED vehicle, connect POSITIVE (Red) clip
from the battery charger to the POSITIVE (POS, P,+) ungrounded post of
the battery.
5b. For POSITIVE GROUNDED vehicle, connect the NEGATIVE (Black)
clip from the battery charger to the NEGATIVE (NEG, N, –) ungrounded
post of the battery.
7. When disconnecting charger, turn all switches with an OFF position to off, disconnect AC cord, remove
clip from vehicle chassis, and then remove clip from battery terminal.
6. Connect the remaining battery charger clip to the vehicle chassis or engine
block, as far away from the battery as possible. Do not connect the clip to
carburetor, fuel lines, or sheet metal body parts. Connect to a heavy gauge
metal part of the frame or engine block.
8. Refer to the Operating Instructions for information on setting selector switches. Be sure to refer to the
instructions for your model of charger.
OPERATION
5
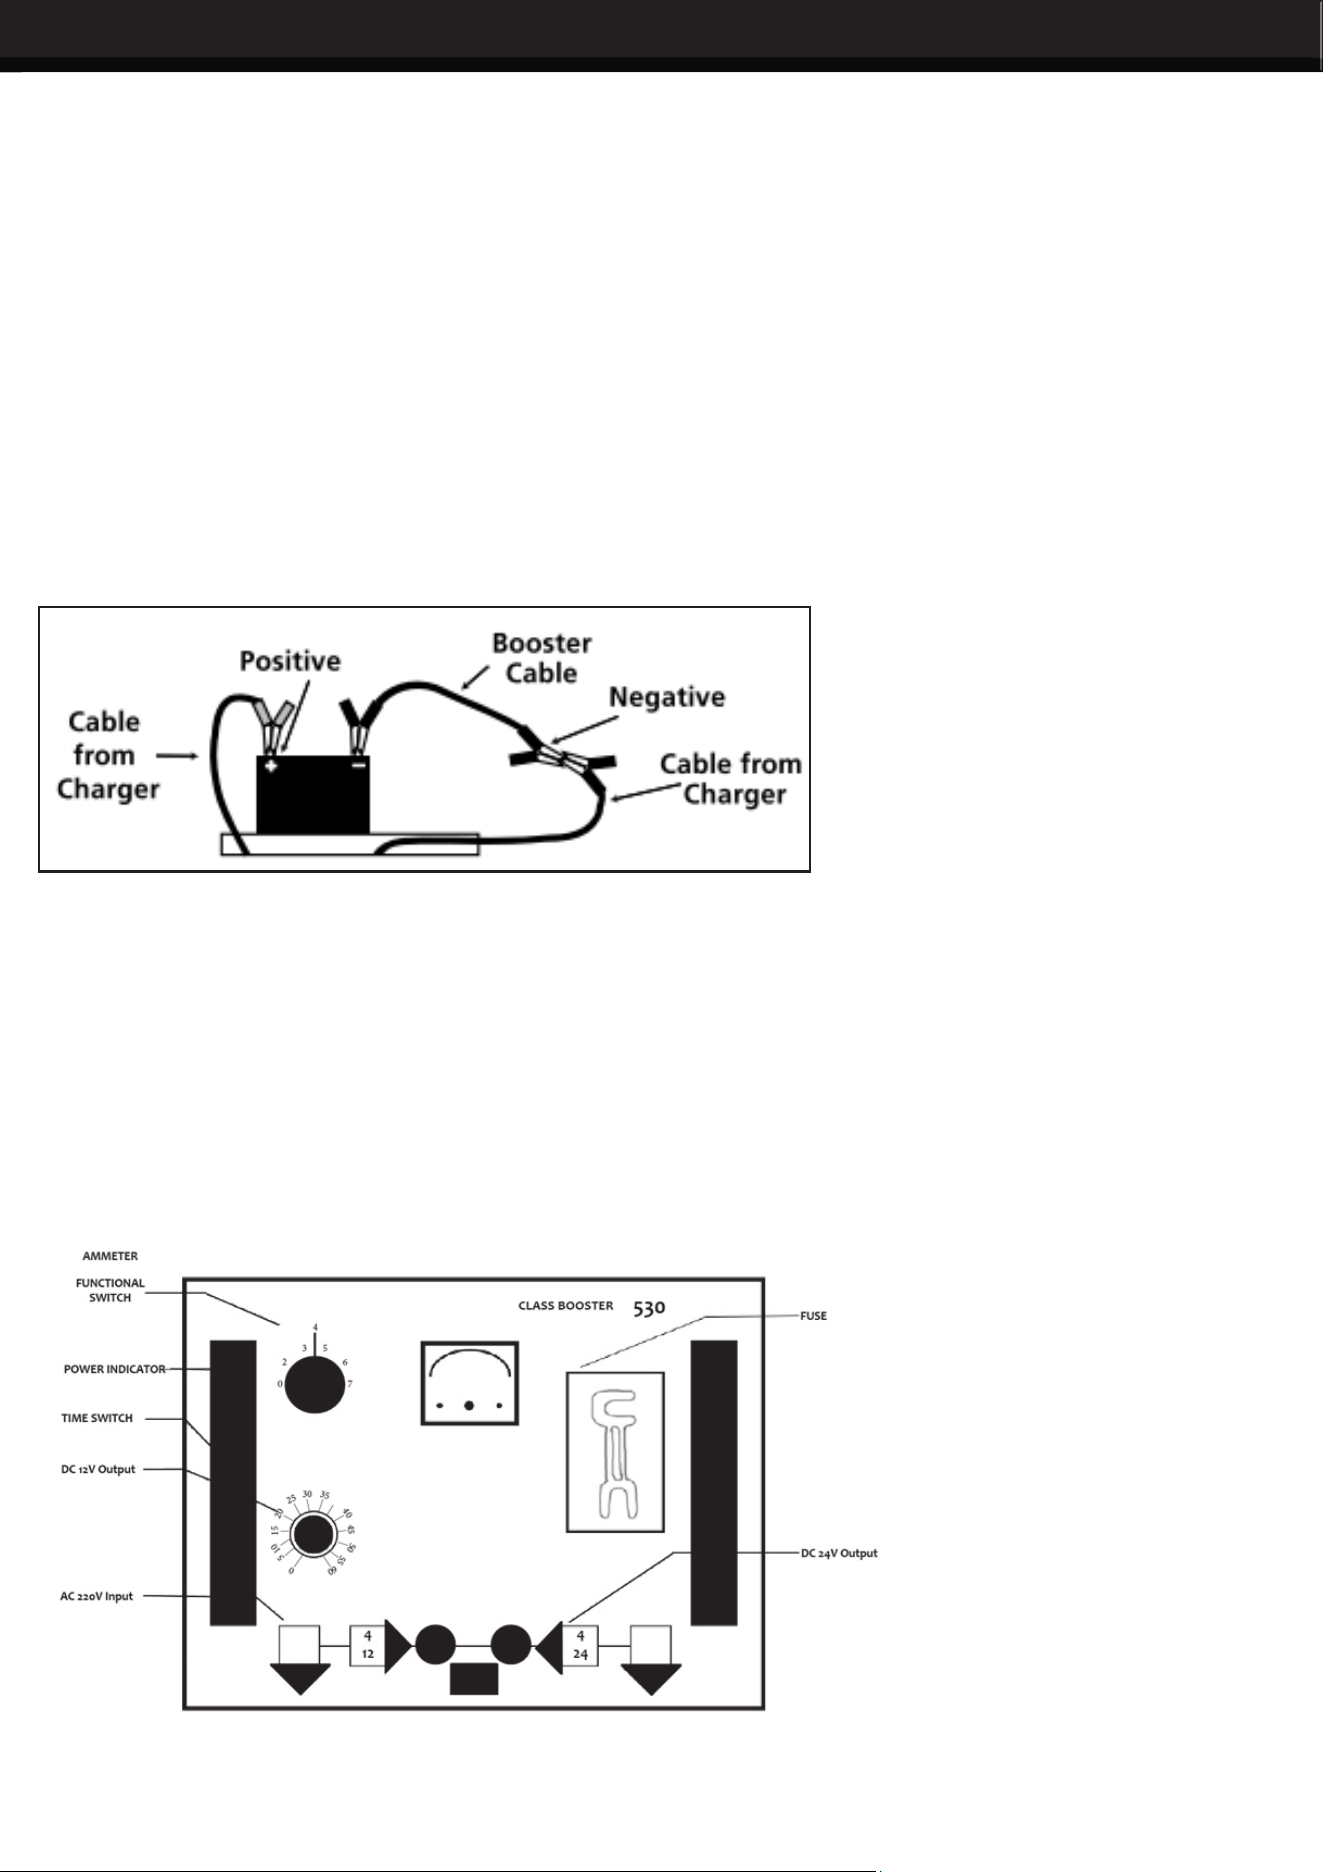
CHARGING A BATTERY OUTSIDE OF THE VEHICLE
1. Check polarity of battery posts. POSITIVE (POS, P,+) battery post usually has a larger diameter than
NEGATIVE (NEG, N,–) post.
2. Attach a cable (not provided) to the NEGATIVE (NEG, N, –) battery post. This cable must be a minimum
of 24” long, and of a wire gauge that is no lighter than the wire gauge of the charger’s output cables (battery
cables and booster cables work well).
3. Connect POSITIVE (RED) charger clip to POSITIVE(POS, P, +) post of battery.
4. Position yourself and the free end of the cable (installed in step #2) as FAR away from the battery as
possible. FACING AWAY FROM THE BATTERY, connect the NEGATIVE (Black) charger clip to the free
end of the cable.
5. When disconnecting charger, always do so in reverse sequence of connecting procedure and break rst
connection while as far away from battery as practical.
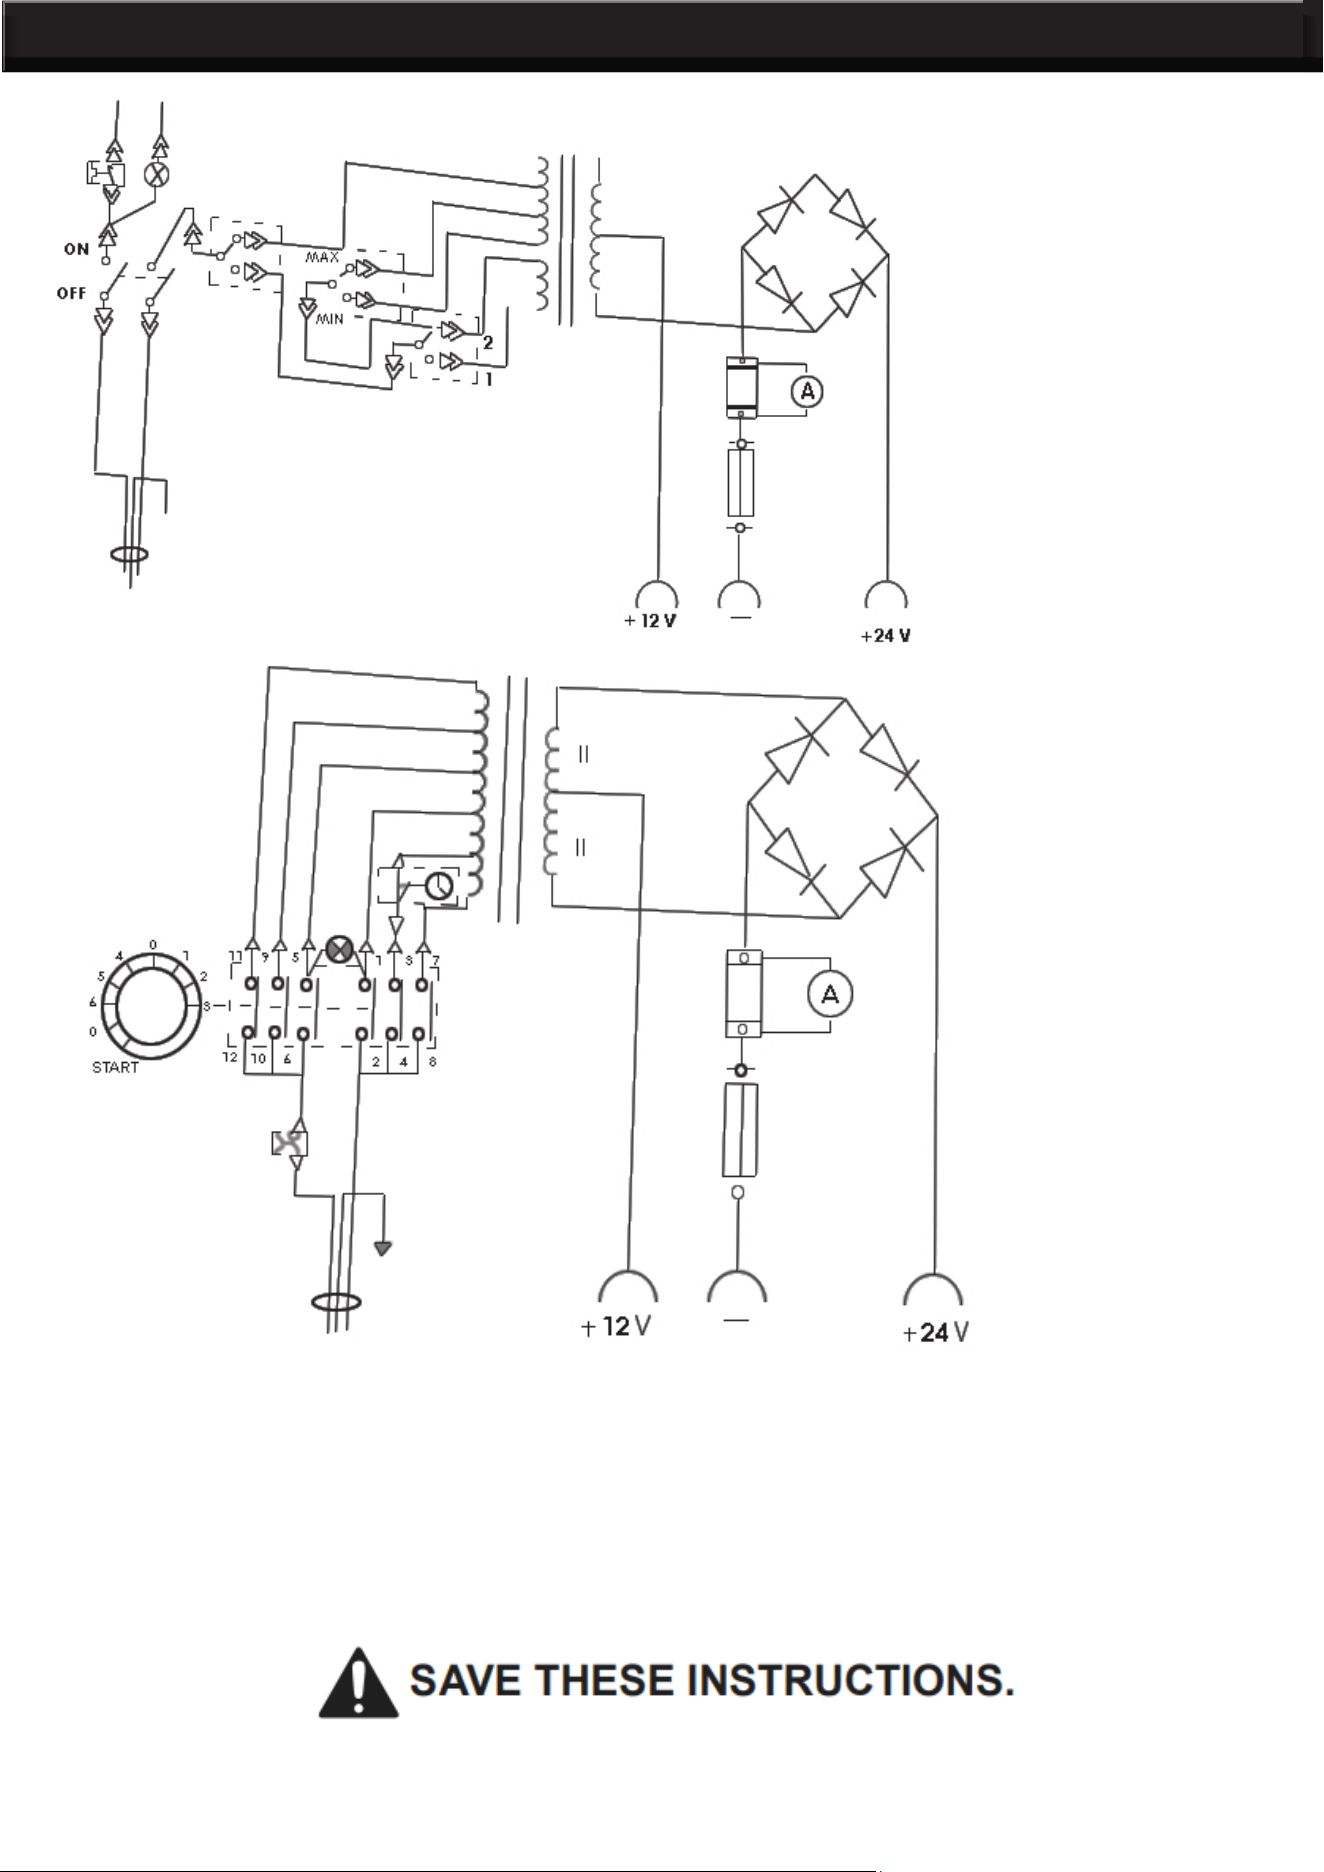
FOR CLASS BOOSTER
1. Choose appropriate voltage (12V or 24V) and connect the charging collets.
2. Turning on switch 1 to 1, 2 or 3 is slow charge, while to 4, 5 or 6 is quick charge. Quick charging time
usually is 1 hour, controlled by a timer.
3. When starting the engine of a vehicle, rst turn on the switch 1 to “start”, wait for 2 minutes and start the
engine for 4-5 seconds. If the engine will not start for 3-4 times, wait for 10 minutes and repeat the operation
mentioned above.
OPERATION
6
CHARGER CARE & MAINTENANCE
1. Clean the clamps after each use. Wipe off any battery uid that may have come in contact with the
clamps to prevent corrosion. Battery uid may be neutralized with a solution of water and baking soda.
2. Once a year, apply some grease to the exposed wires on the ends of the cables where the clamp is
connected to prevent corrosion.
3. If needed, the case may be wiped clean with a soft cloth.
OPERATION
7
THE MANUFACTURER AND/OR DISTRIBUTOR HAS PROVIDED THE PARTS LIST AND ASSEMBLY
DIAGRAM IN THIS MANUAL AS A REFERENCE TOOL ONLY. NEITHER THE MANUFACTURER OR
DISTRIBUTOR MAKES ANY REPRESENTATION OR WARRANTY OF ANY KIND TO THE BUYER THAT
HE OR SHE IS QUALIFIED TO MAKE ANY REPAIRS TO THE PRODUCT, OR THAT HE OR SHE IS
QUALIFIED TO REPLACE ANY PARTS OF THE PRODUCT. IN FACT, THE MANUFACTURER AND/OR
DISTRIBUTOR EXPRESSLY STATES THAT ALL REPAIRS AND PARTS REPLACEMENTS SHOULD BE
UNDERTAKEN BY CERTIFIED AND LICENSED TECHNICIANS, AND NOT BY THE BUYER. THE BUYER
ASSUMES ALL RISK AND LIABILITY ARISING OUT OF HIS OR HER REPAIRS TO THE ORIGINAL
PRODUCT OR REPLACEMENT PARTS THERETO, OR ARISING OUT OF HIS OR HER INSTALLATION
OF REPLACEMENT PARTS THERETO.
Record Product’s Serial Number Here:
Note: If product has no serial number, record month and year of purchase instead.
Note: Some parts are listed and shown for illustration purposes only and are not available individually
as replacement parts.
PLEASE READ THE FOLLOWING CAREFULLY
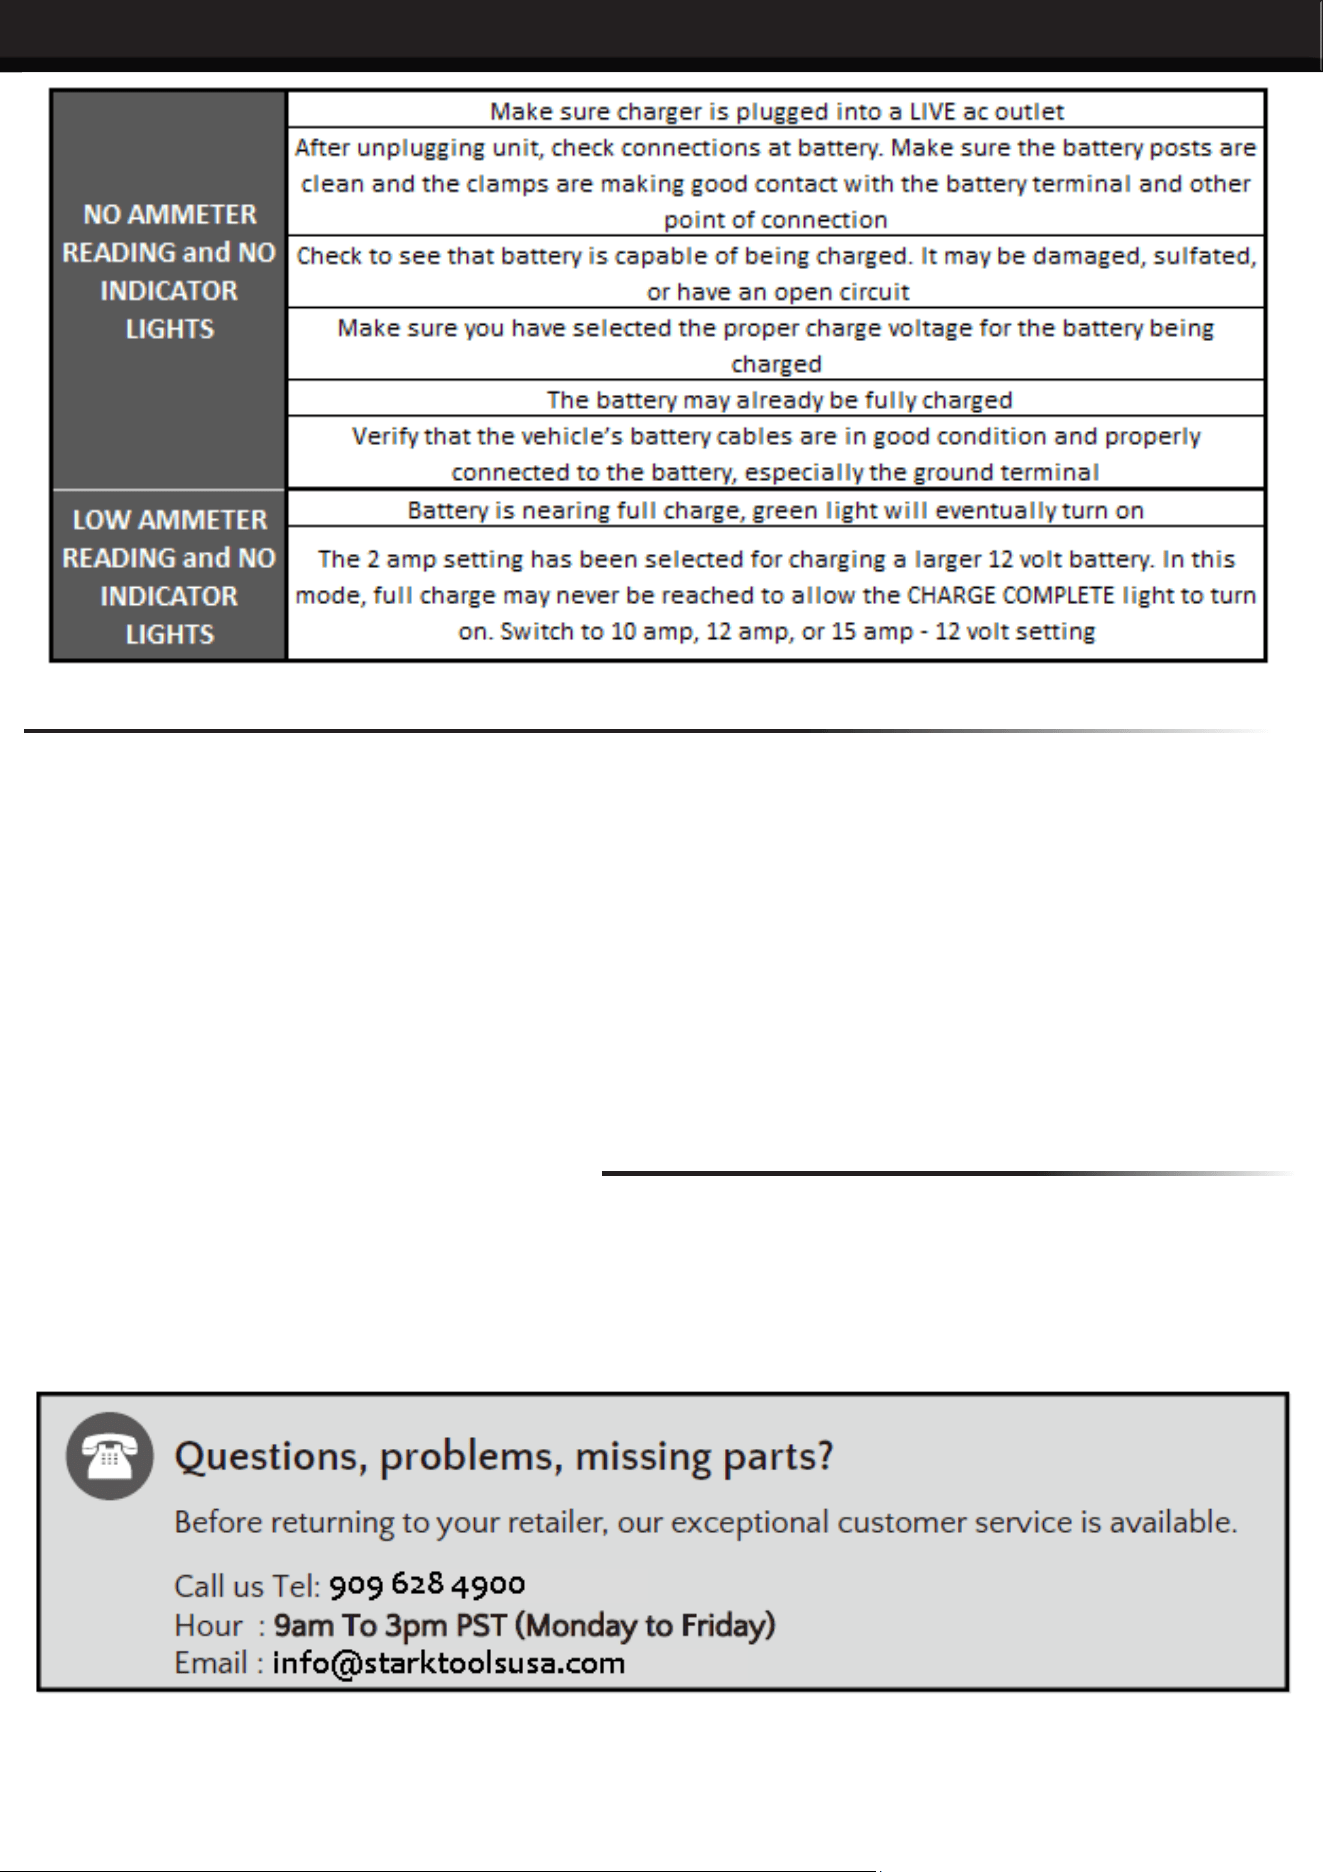
TROUBLESHOOTING
PRODUCT MADE IN CHINA
