APOLLO 520
5.1.2CH DOLBY ATMOS SOUNDBAR WITH
WIRELESS SUBWOOFER
User Manual
nakamichihomeaudionakamichihomeaudio.com nakamichi.global


Contents
1. Important Safety Instructions ................................................................................................3
1.1 Safety ....................................................................................................................................................3
1.2 Warning ................................................................................................................................................4
2. What’s in the Box ....................................................................................................................5
3. Identifying the Parts ...............................................................................................................6
3.1 Main Unit ..............................................................................................................................................6
3.2 Wireless Subwoofer ..............................................................................................................................7
3.3 Remote Control ...................................................................................................................................7
4. Preparations ...........................................................................................................................8
4.1 Prepare the Remote Control..............................................................................................................8
4.2 Replace the Remote Control Battery ...............................................................................................8
4.3 Placement and Mounting ..................................................................................................................8
4.4 Wall Mounting (if using option-B) .......................................................................................................8
5. Connections ...........................................................................................................................9
5.1 Dolby Atmos
® ..........................................................................................................................................................................................................................................9
5.2 HDMI Connection ..............................................................................................................................10
5.3 Use the OPTICAL Socket ...................................................................................................................10
5.4 Use the COAXIAL Socket ..................................................................................................................11
5.5 Use the AUX Socket ...........................................................................................................................11
5.6 Connect Power .................................................................................................................................11
6. Pair up with the Subwoofer .................................................................................................11
6.1 Automatic pairing .............................................................................................................................11
6.2 Manual pairing...................................................................................................................................12
7. Basic Operation ...................................................................................................................12
7.1 Standby/ON .......................................................................................................................................12
7.2 Select Modes .....................................................................................................................................12
7.3 Adjust the Bass/Treble Level .............................................................................................................12
7.4 Turn the Surround Sound ON/OFF ....................................................................................................12
7.5 Select Equalizer (EQ) Effect ..............................................................................................................13
7.6 Adjust the Volume .............................................................................................................................13
7.7 About the Display Brightness ............................................................................................................13
7.8 AV SYNC (Set the Audio Delay) .......................................................................................................13
8. AUX / OPTICAL / COAXIAL / HDMI Operation ..................................................................13
9. Bluetooth Operation ............................................................................................................14
9.1 Pair Bluetooth-enabled Devices ......................................................................................................14
9.2 Listen to Music from Bluetooth Device ............................................................................................14
10. USB Operation ......................................................................................................................15
11. Troubleshooting ....................................................................................................................15
.......................................................................................................................16
English
3 EN
plug has two blades and a third
grounding prong. The wide blade or
the third prong is provided for your
into your outlet, consult an electrician
for replacement of the obsolete outlet.
10 Protect the power cord from being
walked on or pinched particularly at
plugs, convenience receptacles, and the
point where they exit from the apparatus.
11 Only use attachments/accessories
12 Use only with the cart, stand,
tr ip od, bracket or t able
s p e c i f i e d b y t h e
manufacturer, or sold with
the apparatus. When a cart or rack is
used, use caution when moving the
cart/apparatus combination to avoid
injury from tip-over.
13 Unplug the apparatus during lightning
storms or when unused for long periods
of time.
14 Refer all servic i n g to q u alif i e d
personnel. Servicing is required when
the apparatus has been damaged in
any way, such as power supply cord
or plug is damaged, liquid has been
spilled or objects have fallen into the
apparatus, the unit
has been exposed
to rain or moisture, does not operate
normally, or has been dropped.
15
This equipment is a Class II or
double insulated electrical appliance.
It has been designed in such a way
that it does not require a safety
connection to electrical earth.
16 The apparatus shall not be exposed to
with liquids, such as vases, shall be
placed on the apparatus.
17 Minimum distance around the apparatus
18 The ventilation should not be impeded
by covering the ventilation openings
with items, such as newspapers,table-
cloths, curtains, etc…
19 No naked flame sources, such as
lighted candles, should be placed on
the apparatus.
20 Batteries should be recycled or disposed
of as per state and local guidelines.
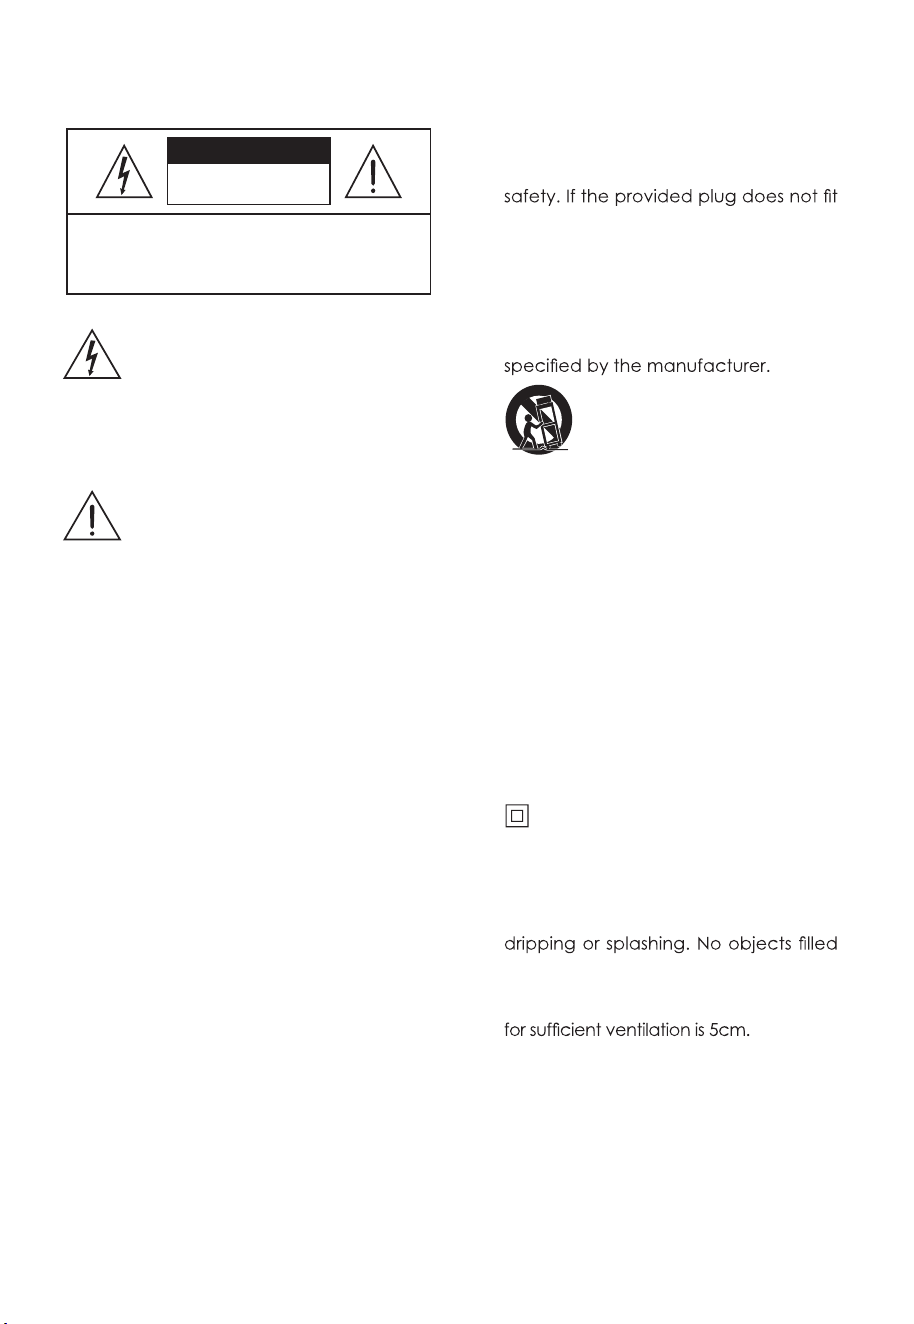
1. Important Safety Instructions
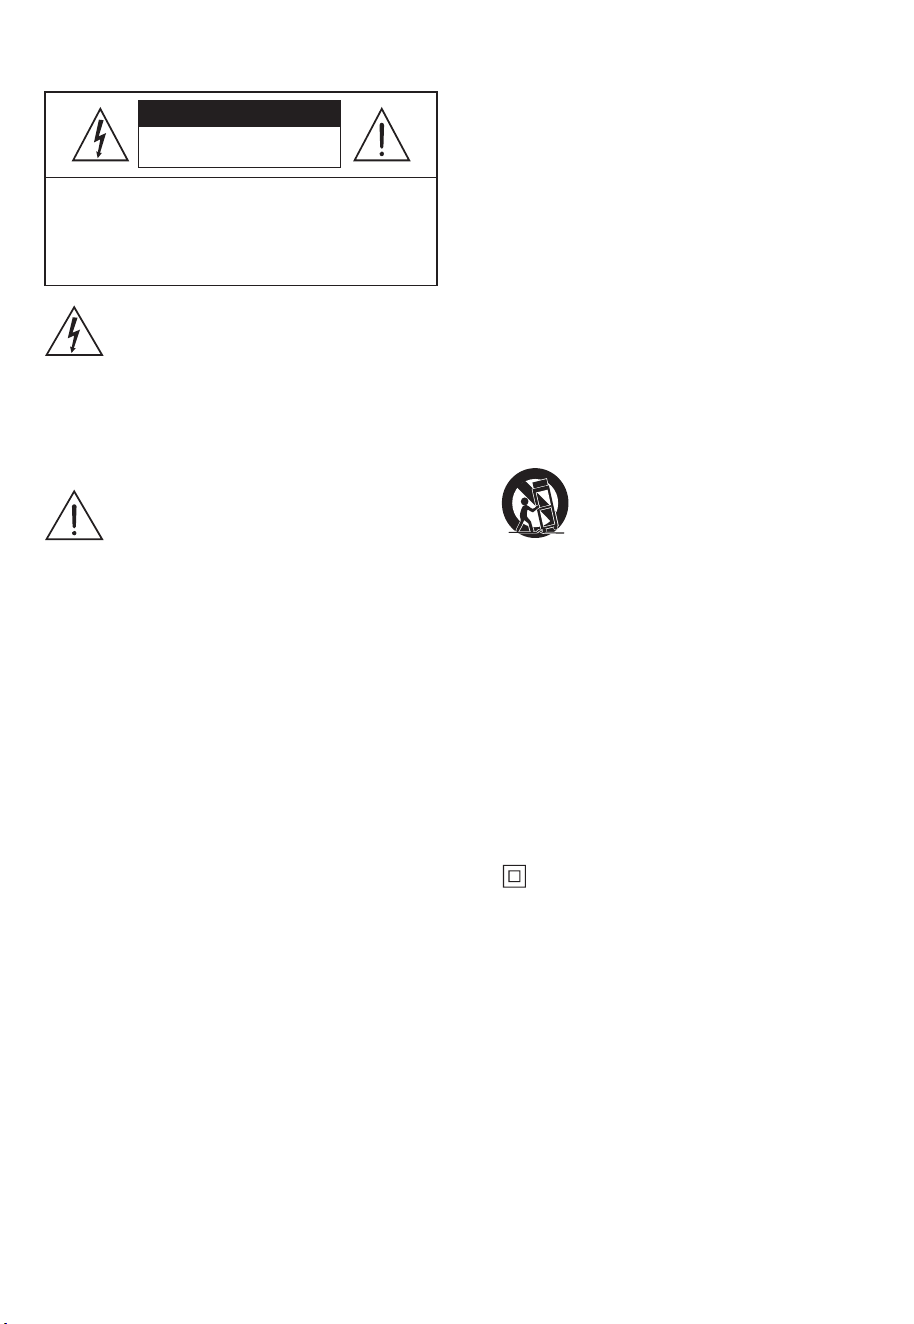
The lightning flash with arrowhead
symbol, within an equilateral triangle,
is intended to alert the user to the
presence of uninsulated “dangerous
voltage” within the product’s
enclosure that may be of sufficient
magnitude as to constitute a risk of
electric shock to persons.
The exclamation point within an
equilateral triangle is intended to alert
the user to the presence of important
oper a t ing an d mai nten a nce
(servicing) instructions in the literature
acco
mpanying the appliance.
1.1 Safety
1 Read these instructions – All the safety
and operating instructions should be
read before this product is operated.
2 Keep these instructions – The safety
and operating instructions should be
retained for future reference.
3 Heed all warnings – All warnings on
the appliance and in the operating
instructions should be adhered to.
4 Follow all instructions – All operating and
usage instructions should be followed.
5 Do not use this apparatus near water
– The appliance should not be used
near water or moisture – for example,
in a wet basement or near a swimming
pool or similar.
6 Clean only with a dry cloth.
7 Do not block any ventilation openings.
Install
i n accordance w i t h t h e
manufacturer’s instructions.
8 Do not install near any heat sources such
as radiators, heaters, stoves, or other
apparatus (including amplifiers) that
produce heat.
9 Do not defeat the safety purpose of
the polarized or grounding plug. A
polarized plug has two blades with
one wider than the other. A grounding
CAUTION
CAUTION: TO REDUCE THE RISK OF ELECTRIC
SHOCK, DO NOT REMOVE COVER (OR BACK).
NO USER-SERVICEABLE PARTS INSIDE. REFER
SERVICING TO QUALIFIED SERVICE PERSONNEL.
RISK OF ELECTRIC SHOCK
DO NOT OPEN

4 EN
21 The use of apparatus in moderate
climates.
Caution:
- Use of controls or adjustments or
performance of procedures other than
those described herein, may result in
hazardous radiation exposure or other
unsafe operation.
- To reduce the risk of fire or electric
shock, do not expose this apparatus to
rain or moisture. The apparatus must not
be exposed to dripping or splashing and
must not be placed on apparatus.
- The mains plug/appliance coupler is
used as the disconnect device, the
disconnect device must remain readily
operable.
- Danger of explosion if battery is
incorrectly replaced. Replace only
with the same or equivalent type.
1.2 Warning
• The battery (batteries or battery pack)
shall not be exposed to excessive heat
• Before operating this system, check
the voltage of this system to see if it is
identical to the voltage of your local
power supply.
• Do not place this unit close to strong
•
or receiver.
• If any solid object or liquid falls into the
system, unplug the system and have it
operating it any further.
• Do not attempt to clean the unit with
chemical solvents as this may damage
the finish. Use a clean, dry or slightly
damp cloth.
• When removing the power plug from
the wall outlet, always pull directly on
the plug, never yank on the cord.
• Changes or modifications to this unit
not expressly approved by the party
responsible for compliance will void
the user’s authority to operate the
equipment.
• The rating label is pasted on the
bottom or back of the equipment.
AC voltage: This symbol indicates that
the rated voltage marked with the symbol is
AC voltage.
Battery usage CAUTION
To prevent battery leakage which may
result in bodily injury, property damage, or
damage to the apparatus:
- Install all batteries correctly, + and - as
marked on the apparatus.
- Do not mix old and new batteries.
- Do not mix alkaline, standard (Carbon-
Zinc) or rechargeable (Ni-Cd, Ni- MH,
etc.) batteries.
- Remove batteries when the unit is not
used for a long time.
Correct Disposal of this product.
This marking indicates that this
product should not be disposed
with other household wastes
throughout the EU. To prevent
possible harm to the environment or
human health from uncontrolled waste
disposal, recycle it responsibly to promote
the sustainable reuse of material resources.
To return your used device, please use the
return and collection systems or contact
the retailer where the product was
purchased. They can take this product for
environmental safe recycling.
We hereby declares that this
product is in compliance with the
essential requirements and other
relevant pro
visions of Directive
2014/53/EU.
The Bluetooth word mark and logos are
registered trademarks owned by Bluetooth
SIG,. Inc.
The Adopted Trademarks HDMI, HDMI High-
Definition Multimedia Interface, and the
HDMI Logo are trademarks or registered
trademarks of HDMI Licensing Administrator,
Inc. in the United States and other countries.
Dolby, Dolby Audio, Dolby Atmos, and
the double-D symbol are registered
trademarks of Dolby Laboratories Licensing
Corporation. Manufactured under license
from Dolby Laboratories. Confidential
unpublished works. Copyright © 1992-2020
Dolby Laboratories. All rights reserved.
or similar.
5 EN
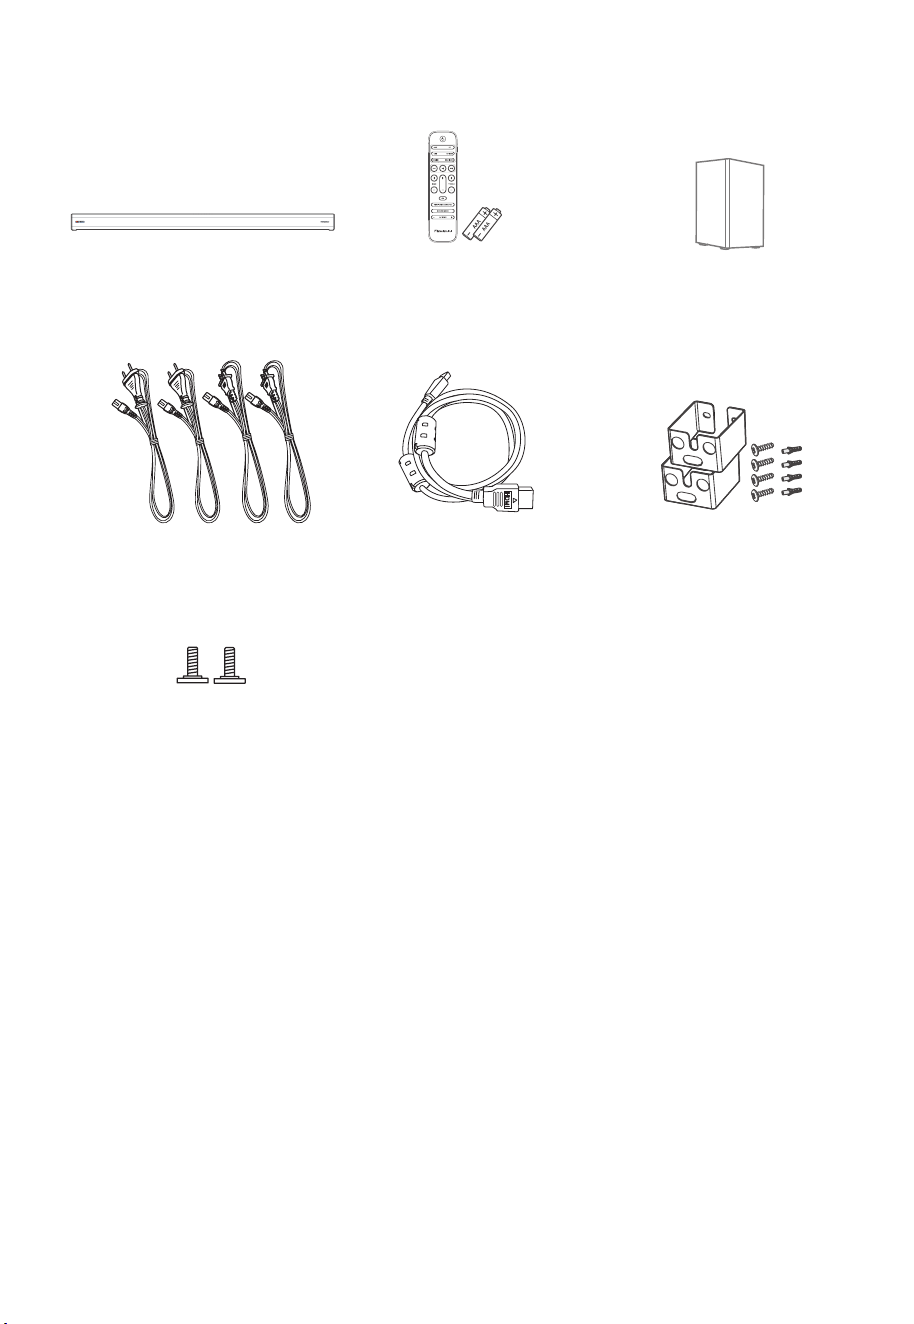
Wireless Subwoofer
2. What’s in the Box
• Power cord quantity and plug type vary by regions.
• Images, illustrations and drawings shown on this User Manual are for reference only.
Actual product may vary in appearance.
HDMI Cable
Main Unit
Wall mounting Screw
Remote Control /
AAA Batteries x 2
Wall Bracket
CCC AC Power Cord x 2
EU AC Power Cord x 2
6 EN
4 5 6
8 9 10 11 12 13
aux
2 1
3
7
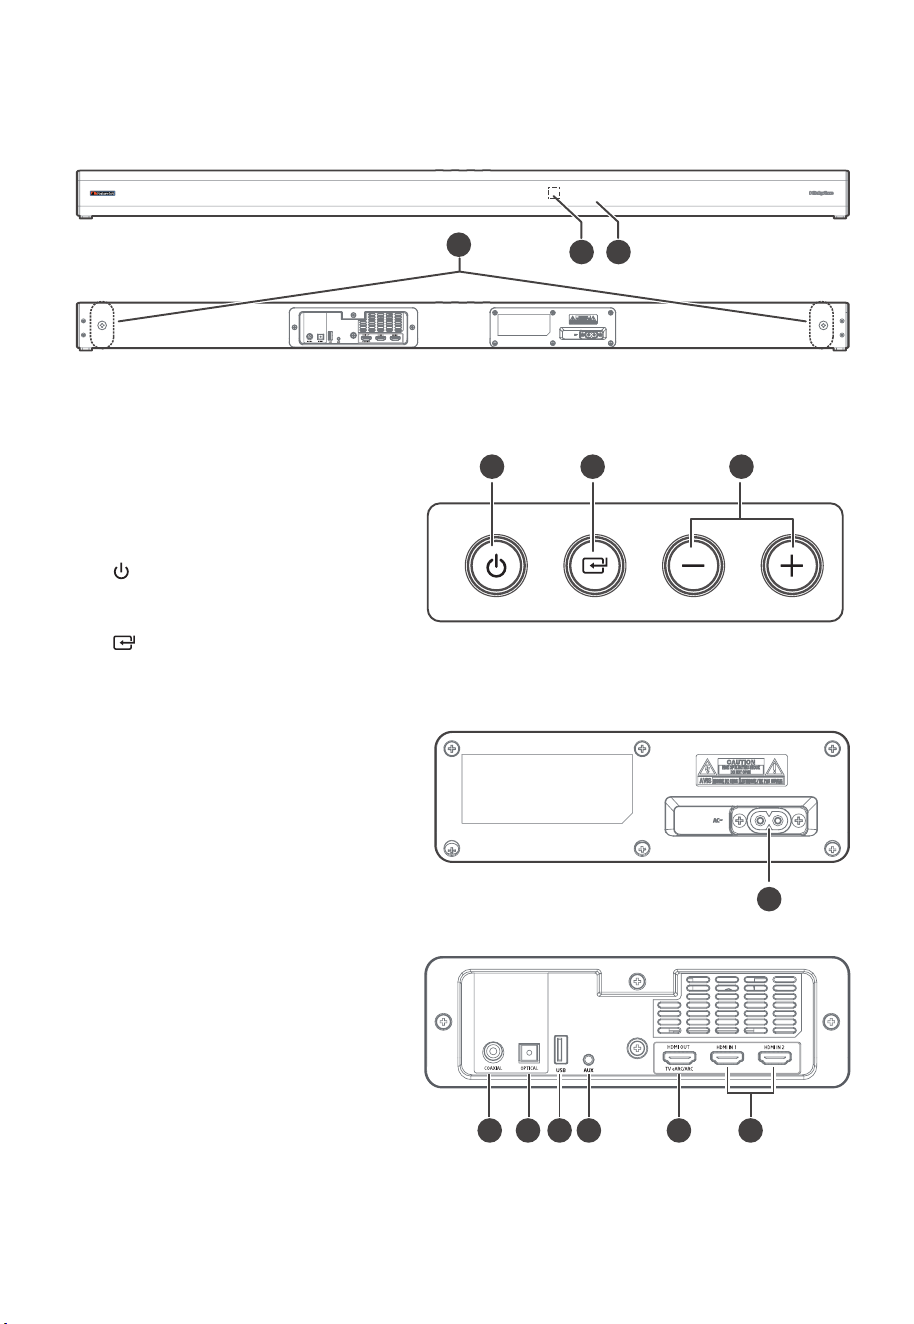
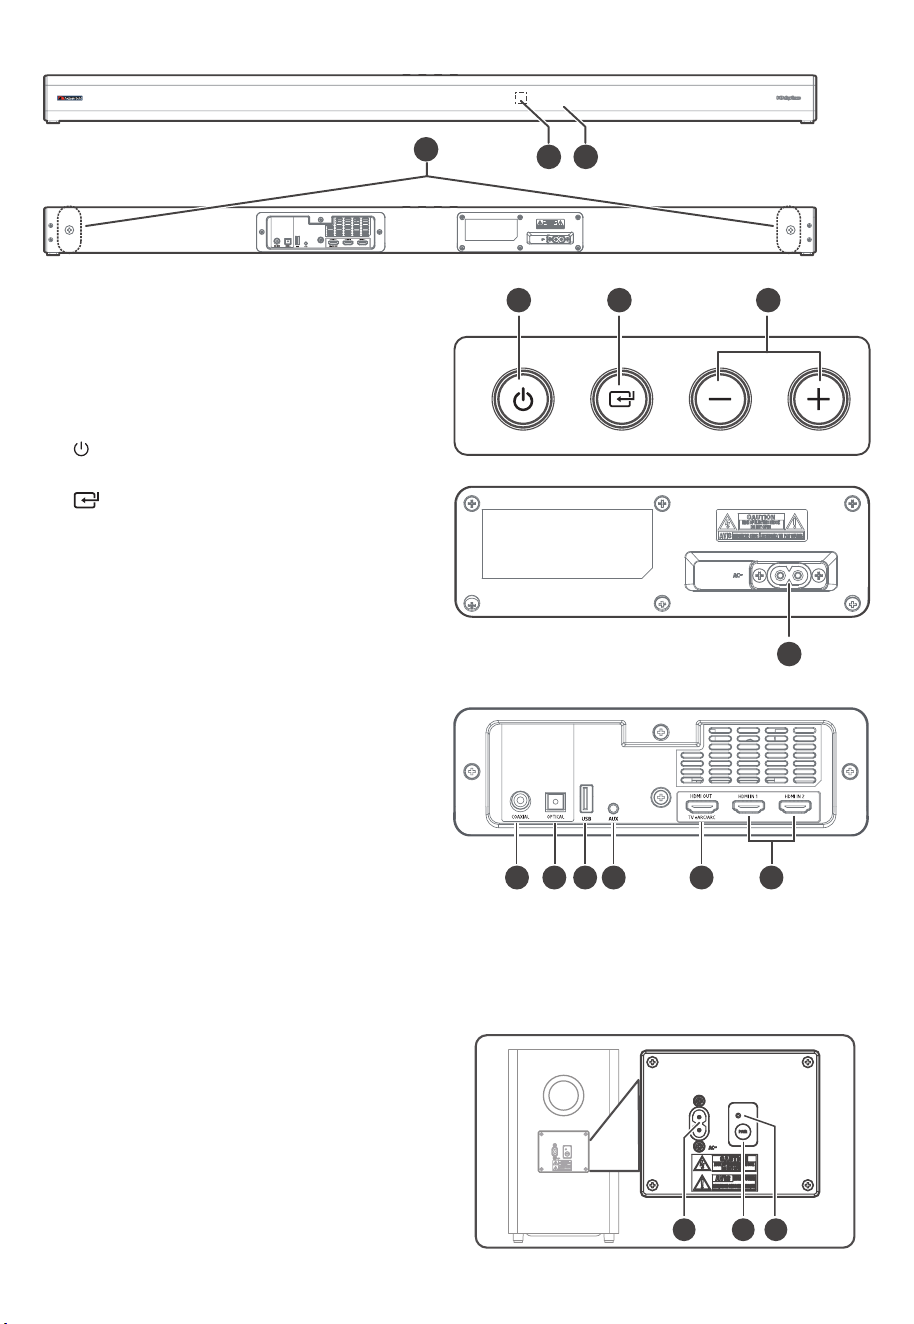
3. Identifying the Parts
3.1 Main Unit
1 Display Window
Show the current status.
2 Remote Control Sensor
Receive signal from the remote
control.
3 Screws
Install the wall mounting screws into
the back of the unit.
4
(ON/OFF) Button
Switch the unit between ON and
Standby mode.
5
(SOURCE) Button
Select the play function.
6 +/- (vol) Buttons
Increase/decrease the volume level.
7 AC~ Socket
Connect to power.
8 COAXIAL Socket
9 OPTICAL Socket
10 USB Socket
Insert the USB device to play music.
11 AUX Socket
Connect to an external audio device.
12 HDMI OUT (TV eARC/ARC) Sockets
The port for connecting a TV. The
port supports the eARC/ARC HDMI
feature, which allows the soundbar
to play audio that originates on the
connected TV.
13 HDMI IN 1 / HDMI IN 2 Sockets
Two HDMI ports for connecting HDMI
source devices, such as a DVD player,
Blu-ray Disc™ player, or gaming
console. Note that only one HDMI
input is usable at a time.
7 EN
1 2 3
1
2
3
5
8
10
6
7
9
11
4
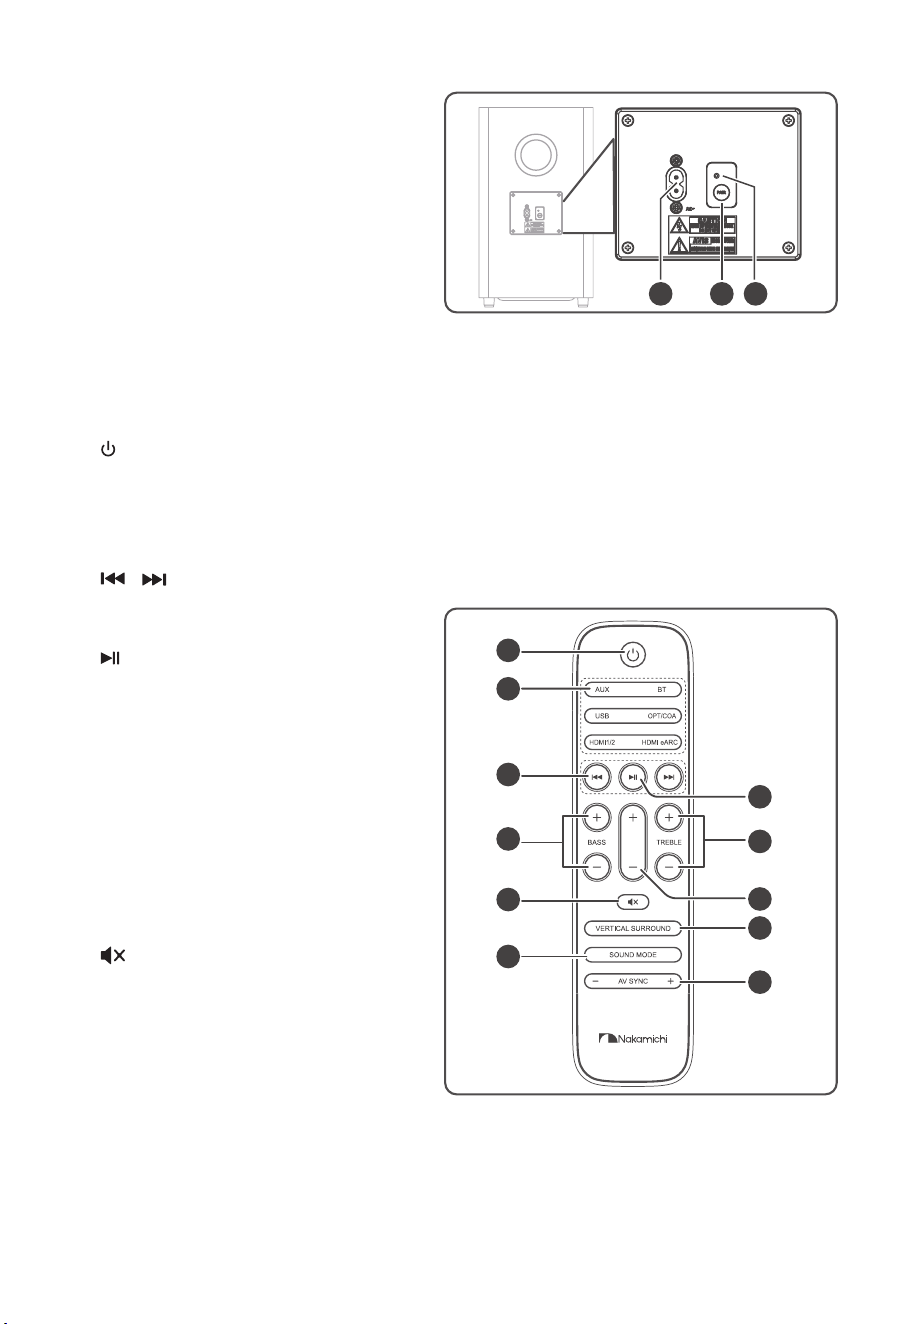
3.2 Wireless Subwoofer
1 AC~ Socket
Connect to power.
2 PAIR button
Press activate the pairing function
between the main unit and the
subwoofer.
3 Subwoofer's PAIR Indicator
Light stops blinking once the
Subwoofer is paired with the
Soundbar.
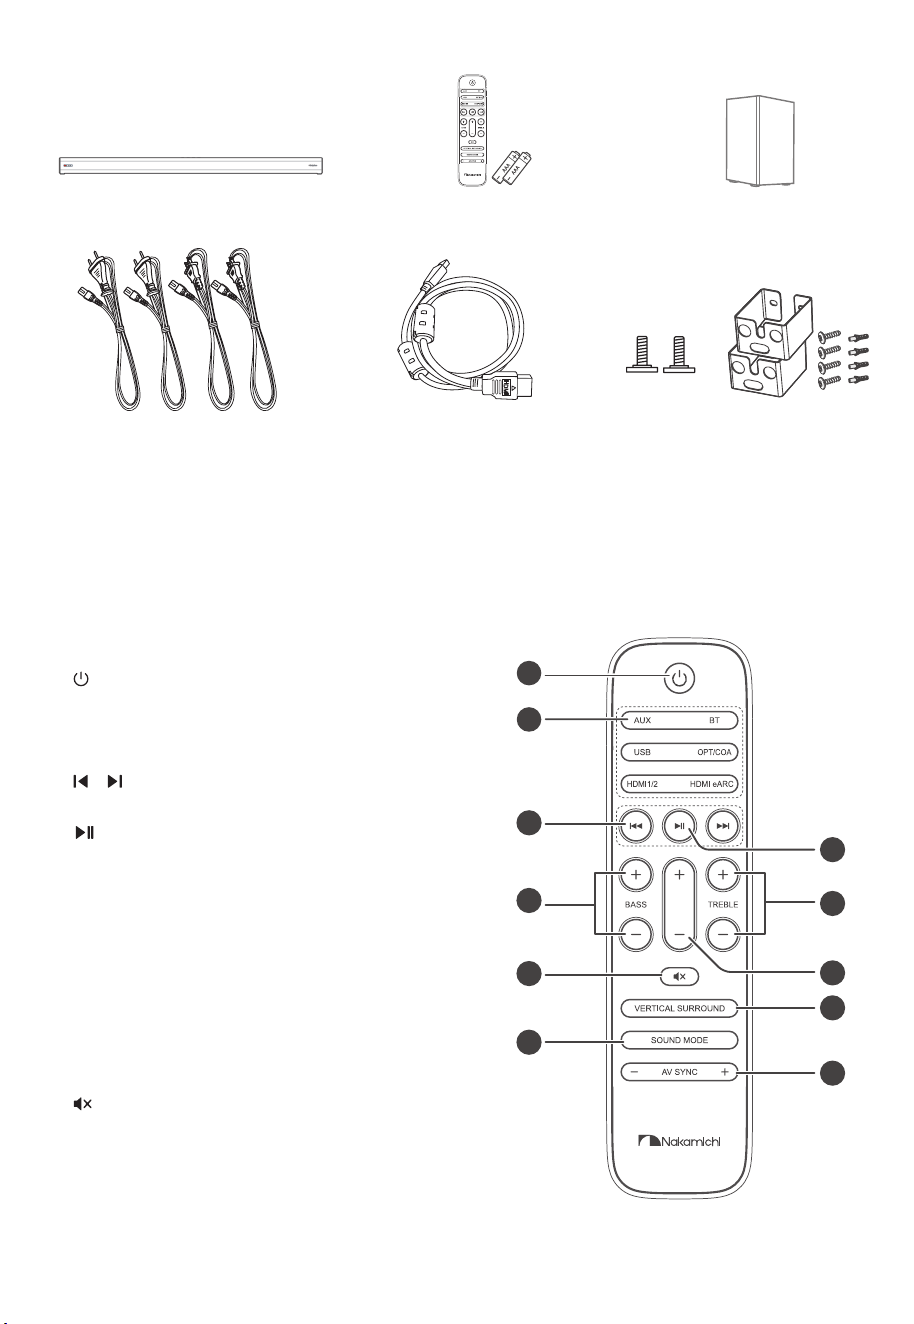
3.3 Remote Control
1
Switch the unit between ON and
STANDBY mode.
2 SOURCE buttons
Select the play function.
3
/
Skip to previous/next track in BT / USB
mode.
4
Play/pause/resume playback in
BT/USB mode. Press and hold to
activate the pairing function in
Bluetooth mode or disconnect the
existing paired Bluetooth device.
5 BASS +/-
Adjust bass level.
6 TREBLE +/-
Adjust treble level.
7 +/- (vol)
Increase/decrease the volume level.
8
(MUTE)
Mute or resume the sound.
9 VERTICAL/SURROUND
Adjust the surround ON/OFF.
10 SOUND MODE
Select Equalizer (EQ) Effect.
11 AV SYNC +/-
Set the Audio Delay
8 EN
4. Preparations
4.1 Prepare the Remote Control
The provided remote control allows the
unit to be operated from a distance.
•
Even if the remote control is operated
within the effective range 19.7 feet
(6 m) , remote control o pe ra tion
may be impossible if there are any
obstacles between the unit and the
remote control.
•
If the remote control is operated
near other products which generate
infrared rays, or if other remote
control devices using infra-red rays
are used near the unit, it may operate
incorrectly. Conversely, the other
products may operate incorrectly.
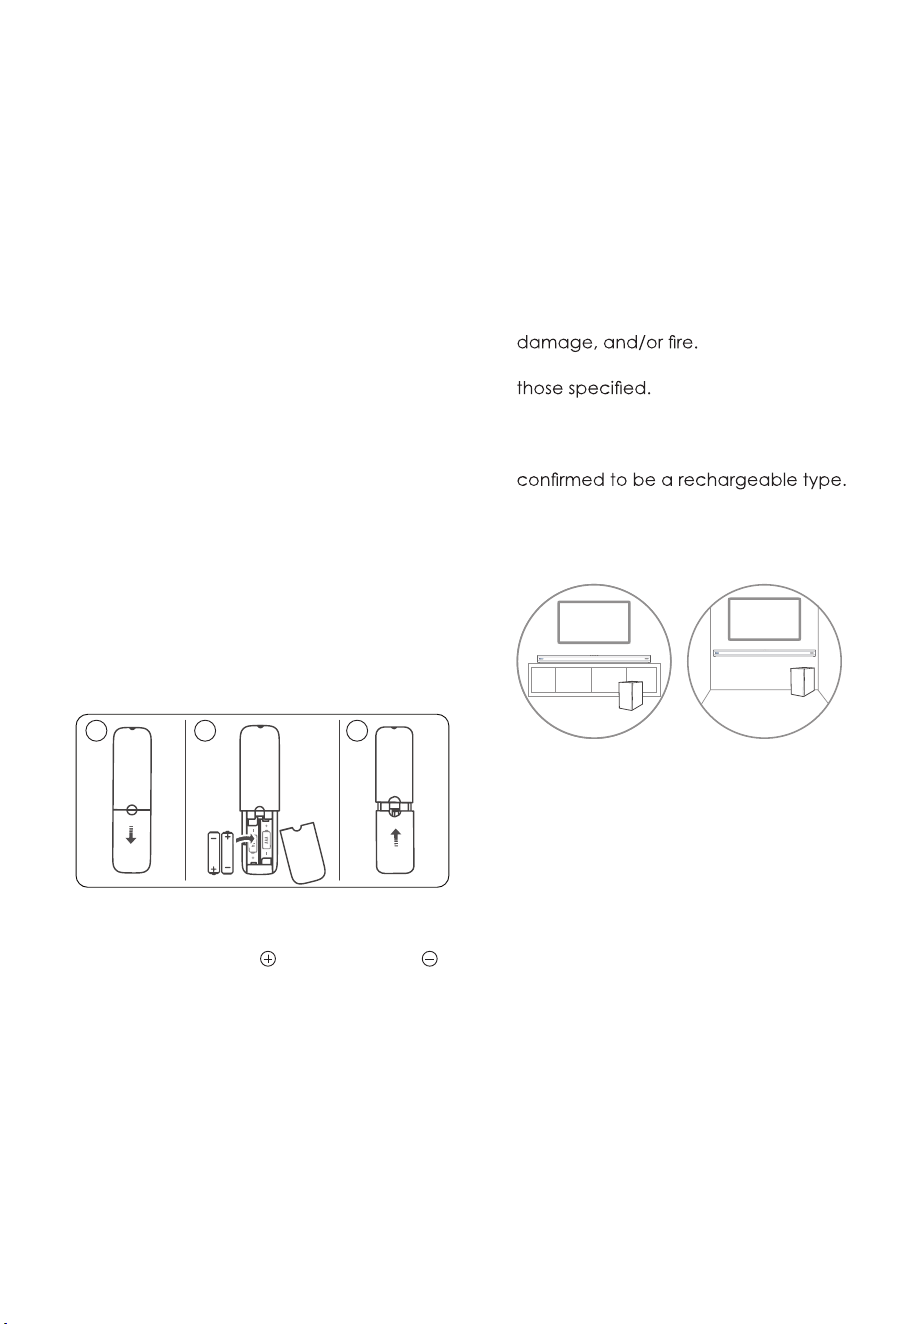
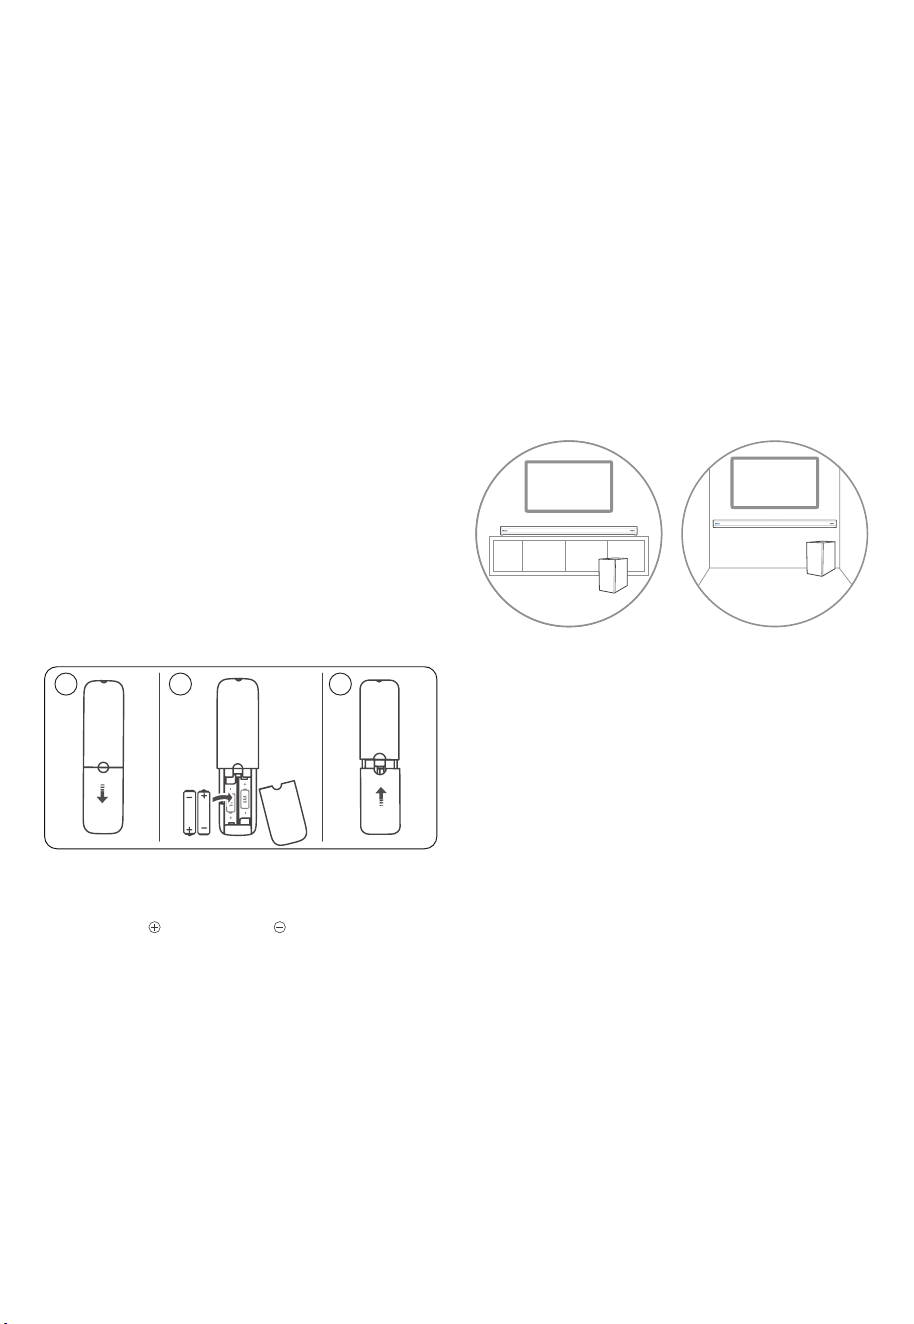
4.2 Replace the Remote Control
Battery
1 Press and slide the back cover to open
the battery compartment of the remote
control.
2 Insert
two AAA size batteries (included).
Make sure the (+) and (–) ends of the
batteries match the (+) and (–) ends
indicated in the battery compartment.
3 Close the battery compartment cover.
A
A A
AA A
1 2 3
Precautions Concerning Batteries
• Be sure to insert the batteries with
correct positive “ ” and negative “ ”
polarities.
• Use batteries of the same type.
Never use different types of batteries
together.
• E i ther rech a rge abl e o r non -
rechargeable batteries can be used.
Refer to the precautions on their
labels.
• Be aware of your fingernails when
removing the battery cover and the
battery.
• Do not drop the remote control.
• Do not allow anything to impact the
remote control.
• Do not spill water or any liquid on the
remote control.
• Do not place the remote control on a
wet object.
• Do not place the remote control
under direct sunlight or near sources of
excessive heat.
• Remove th
e battery from the remote
control when not in use for a long
period of time, as corrosion or battery
leakage may occur and result in
physical injury, and/or property
• Do not use any batteries other than
• Do not mix new batteries with old
ones.
• Never recharge a battery unless it is
4.3 Placement and Mounting
Placement
A B
A If your TV is placed on a table, you can
place the unit on the table directly in
front of the TV stand, centered with
the TV screen.
B If your TV is attached to a wall, you
can mount the unit on the wall directly
below the TV screen.
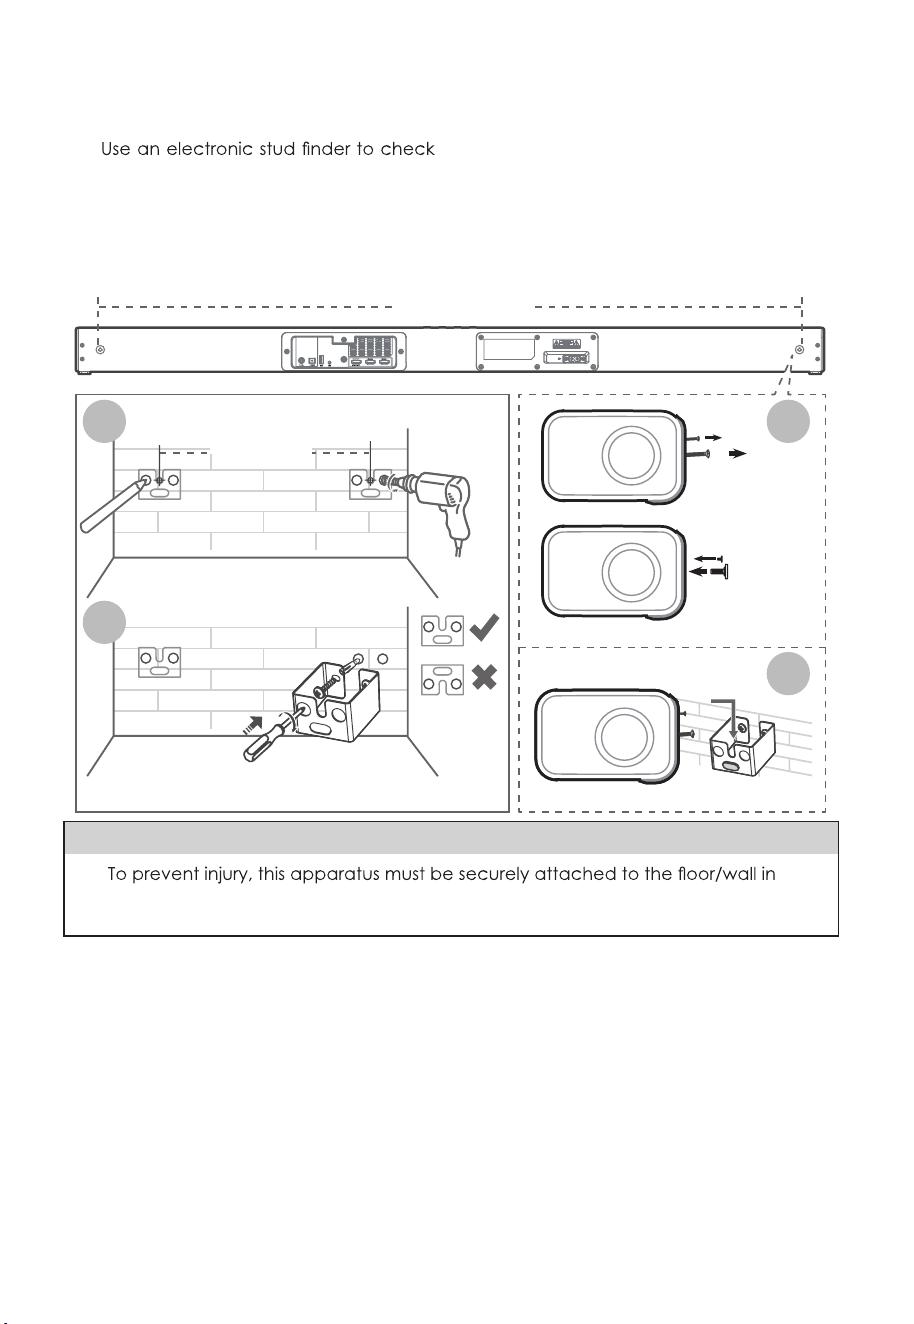
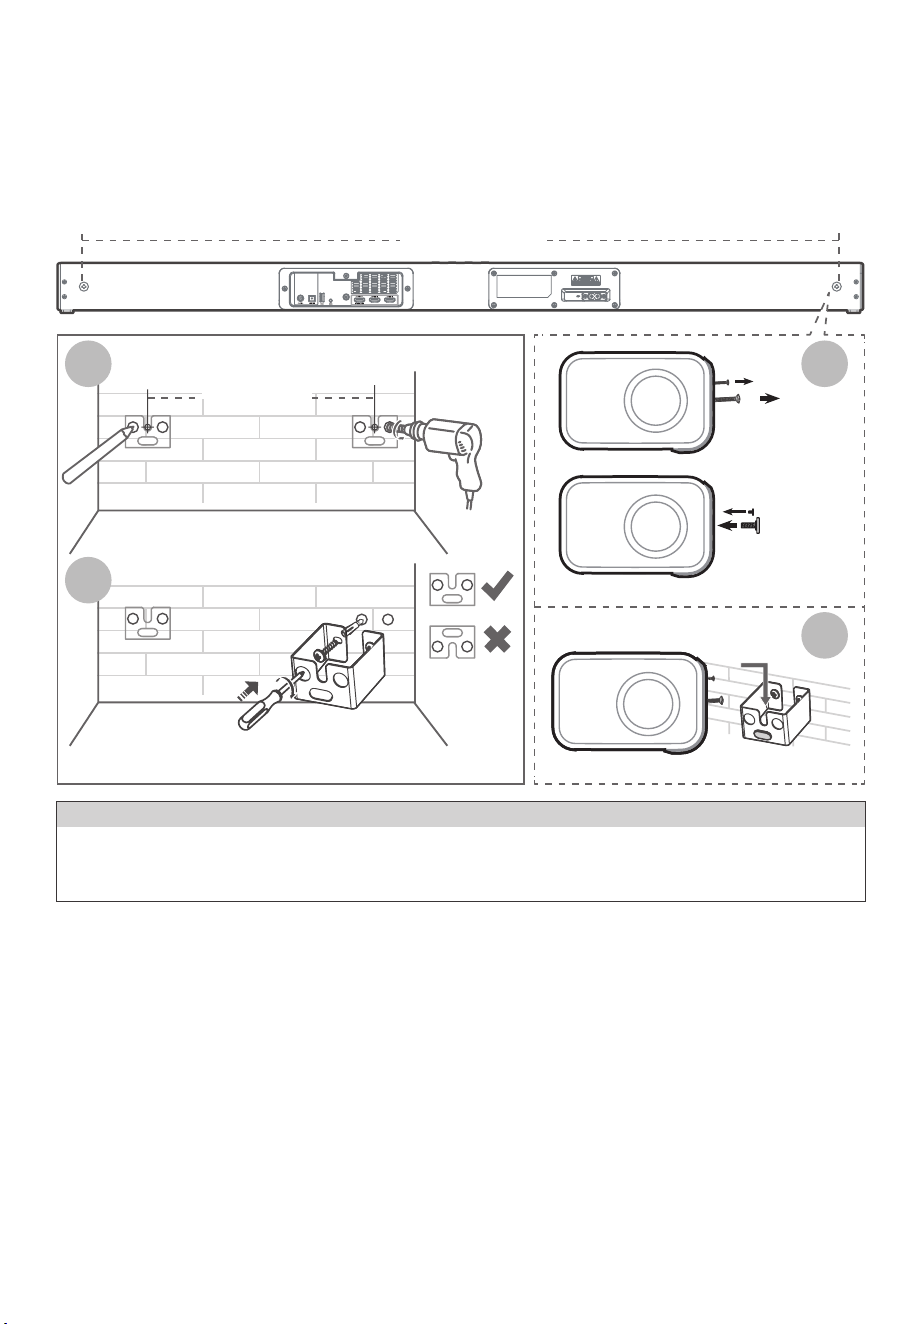
4.4 Wall Mounting (if using option-B)
Note:
- Installation must be carried out by
qualified personnel only. Incorrect
assembly can result in severe personal
injury and property damage (if you
intend to install this product yourself,
you must check for installations such
as electrical wiring and plumbing that
may be buried inside the wall). It is the
installer’s responsibility to verify that the
wall will safely support the total load of
the unit and wall brackets.
- Additional tools (not inclu
ded) are
required for the installation.
9 EN
- Do not overtighten screws.
- Keep this instruction manual for future
reference.
-
the wall type before drilling and
mounting.
1. Drill 4 parallel holes (Ø 5.5-6 mm each
according to wall type) in the wall. The
distance between the holes should be
1121 mm.
2. Firmly fix 1 dowel into each hole in the
wall if necessary. Tighten the wall mount
brackets on the wall with screws and
screwdriver (not included). Make sure that
they are securely installed.
3. Remove the screws at the back of the
unit. Install the wall mounting screws
into the back of the unit.
4. Lift the unit onto the wall mount
brackets and slot into place.
5. Connections
5.1 Dolby Atmos
®
Dolby Atmos gives you immersive listening
experience by delivering sound in three
dimensional space, and all the richness,
clarity, and power of Dolby sound. For
more information, please visit dolby.com/
technologies/dolby-atmos
For using Dolby Atmos
®
Dolby Atmos
®
is available only in HDMI
mode. For the details of the connection,
please refer to “HDMI Connection”.
1. To use Dolby Atmos
®
in HDMI1, HDMI2
and HDMI ARC/eARC mode, your TV
has to support Dolby Atmos
®
.
2. Make sure that “No Encoding“ is selected
for bitstream in the audio output of the
connected external device (e.g. Blu-ray
DVD player, TV etc.).
3. While entering Dolby Atmos / Dolby
Digital / PCM format, the soundbar will
shows
DOLBY ATMOS
/
DOLBY AUDIO
/
PCM AUDIO
.
1121 mm
Remove
the screws
Install the wall
mounting screws
3
4
1121 mm
1
2
WARNING
•
accordance with the installation instructions.
• Suggested wall mounting height: ≤ 1.5 meters.
10 EN
Tips:
• The full Dolby Atmos experience is
only available when the Soundbar is
connected to the source via a HDMI
2.0 cable.
• The Soundbar will still function when
connected via other methods (such
as a Dig ital Opt ica l cable ) but
these are unable to support all of
the Dolby features. Given this, our
recommendation is to connect via
HDMI, in order to ensure full Dolby
support.
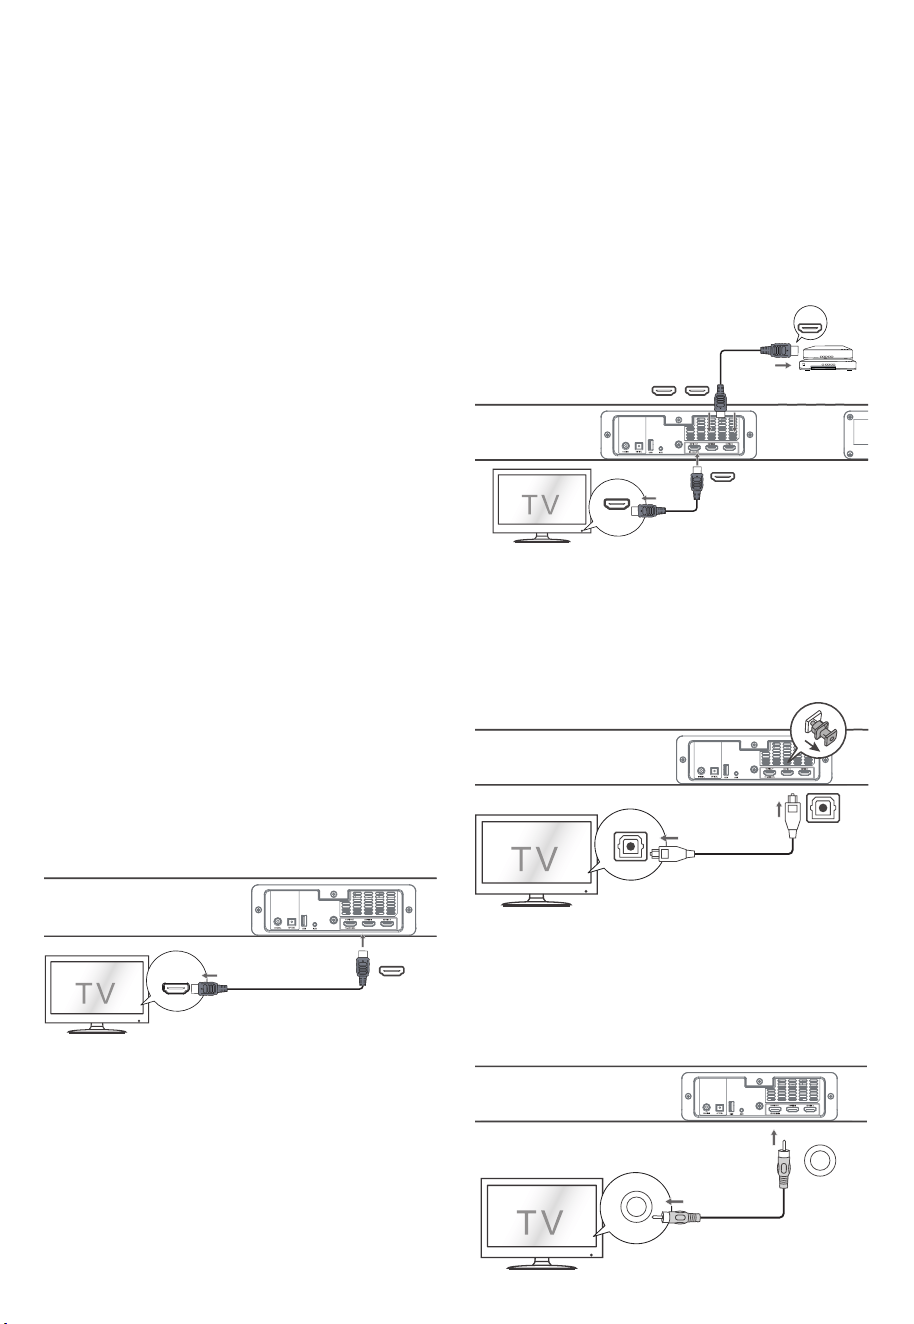
5.2 HDMI Connection
Some 4K HDR TVs require the HDMI input or
picture settings to be set for HDR content
reception. For further setup details on
HDR display, please refer to the instruction
manual of your TV.
Using HDMI to connect the soundbar, AV
equipment and TV:
Method 1:
eARC / ARC (Audio Return Channel)
The eARC / ARC (Audio Return Channel)
function allows you to send audio from
your ARC- compliant TV to your sound
bar through a single HDMI connection. To
enjoy the ARC function, please ensure
your
TV is both HDMI-CEC and ARC compliant
and set up accordingly. When correctly
set up, you can use your TV remote control
to adjust the volume output (VOL +/- and
MUTE) of the sound bar.
- Connect the HDMI cable (included)
from unit's HDMI OUT (TV eARC/ARC)
socket to the HDMI (ARC) socket on
your ARC compliant TV. Then press the
remote control to sel
ect HDMI eARC.
HDMI (eARC/ARC)
HDMI OUT
TV eARC/ARC
Tips:
• Your TV must support the HDMI-CEC
and ARC function. HDMI-CEC and
ARC must be set to On.
• The setting method of HDMI-CEC and
ARC may differ depending on the TV.
For details about ARC function, please
refer to the owner’s manual.
• Only HDMI 1.4 or higher version cable
can support the ARC function.
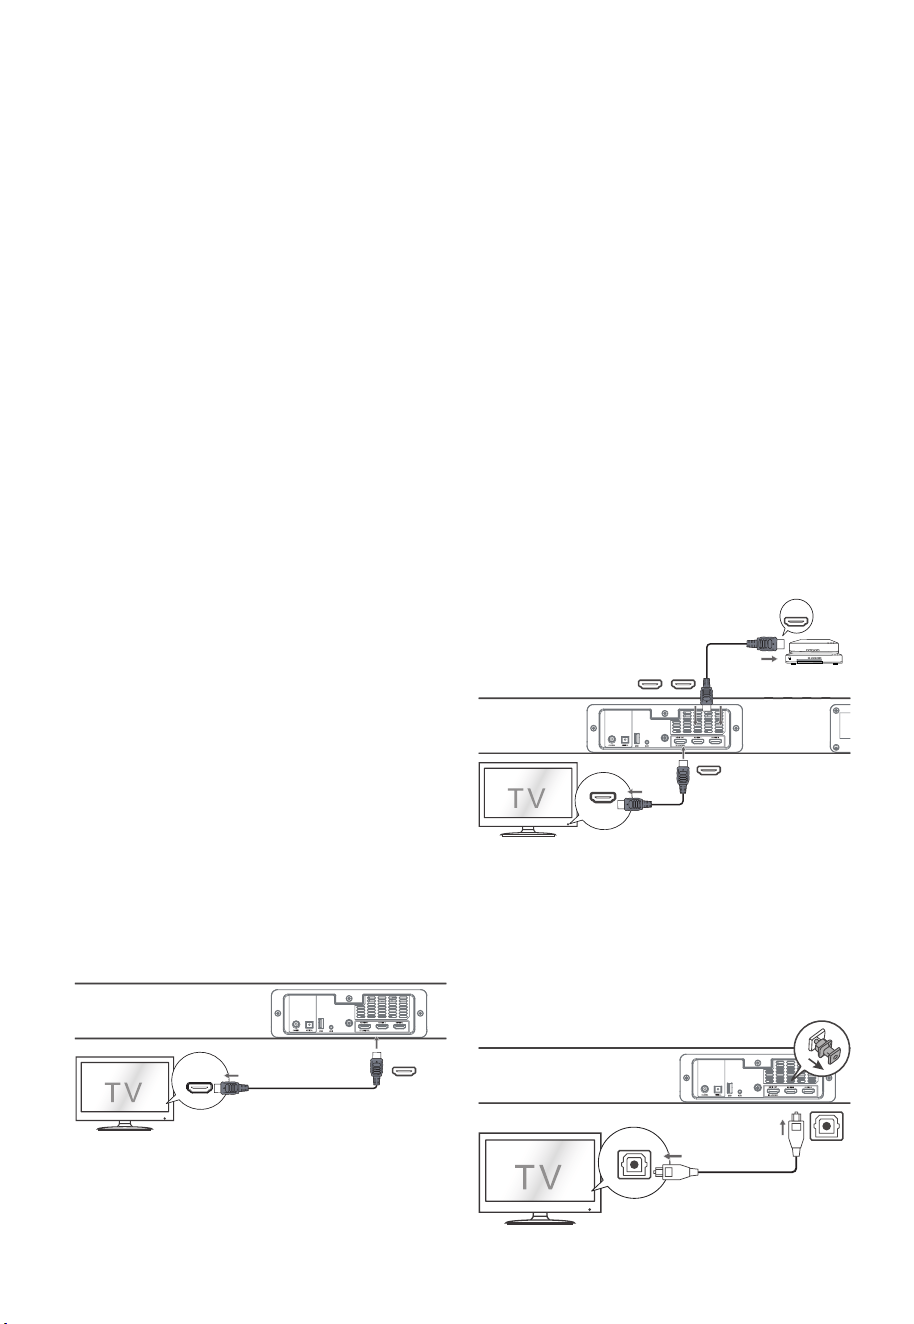
Method 2: Standard HDMI
- If your TV is not HDMI ARC-compliant,
connect your soundbar to the TV
through a standard HDMI connection.
1. Use an HDMI cable (included) to
connect the soundbar's HDMI OUT (TV
eARC/ARC) socket to the TV’s HDMI
IN socket.
2. Use an HDMI cable (not included) to
connect the soundbar's HDMI IN (1 or
2) socket to your external de
vices (e.g.
games consoles, DVD players and blu-ray).
HDMI IN
HDMI OUT
Blu-ray Player / DVD Player /
Recorder / Set-top Box...
HDMI OUT
TV eARC/ARC
HDMI IN 1 HDMI IN 2
5.3 Use the OPTICAL Socket
- Remove the protective cap of the
OPTICAL socket, then connect an
OPTICAL cable (not included) to the
TV’s OPTICAL OUT socket and the
OPTICAL socket on the unit.
OPTICAL
OPTICAL
11 EN
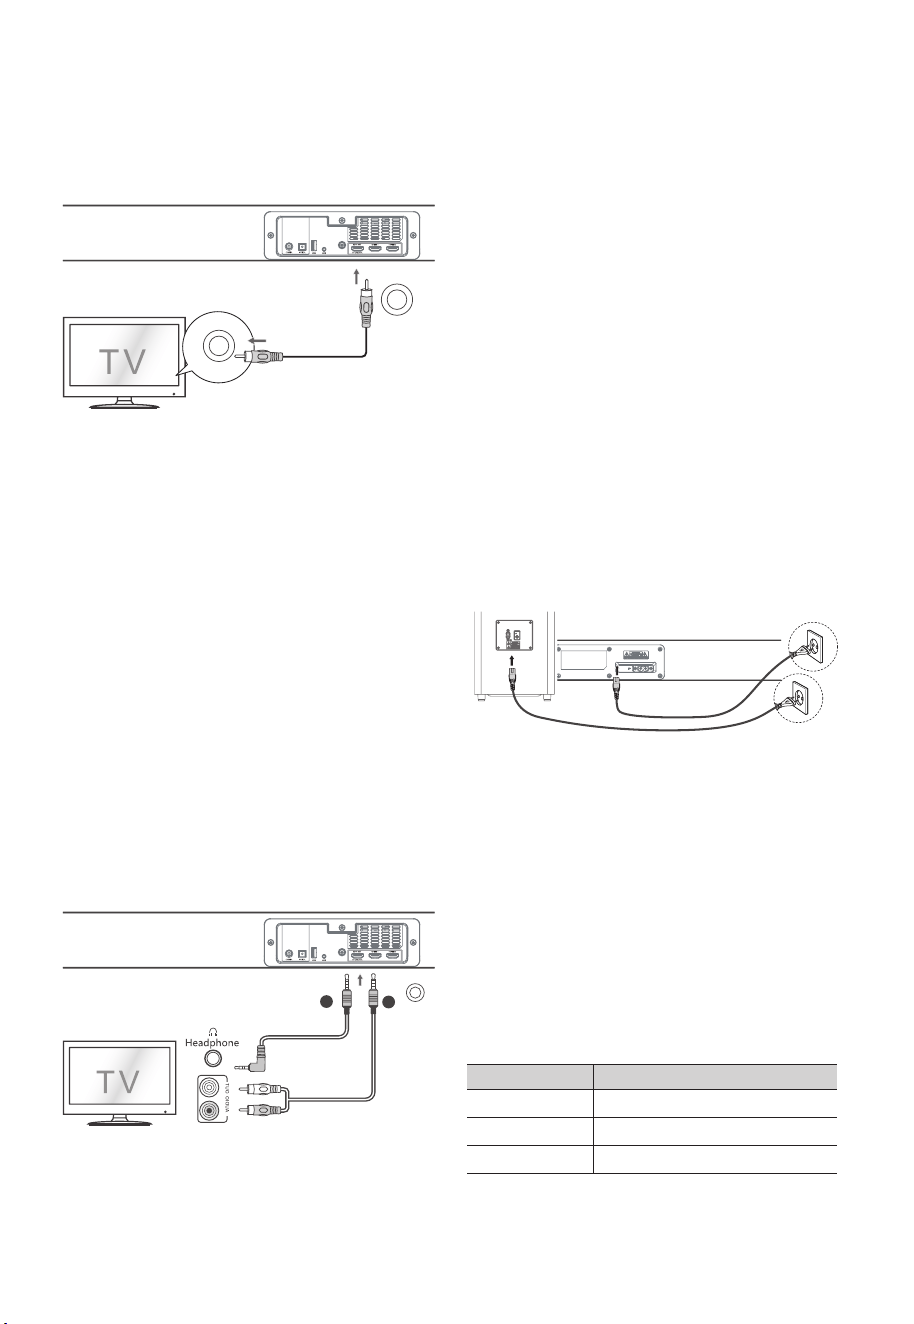
5.4 Use the COAXIAL Socket
• You also can use the COAXIAL cable
(not included) to connect the TV's
COAXIAL OUT socket and COAXIAL
socket on the unit.
OPTICAL
COAXIAL
COAXIAL
Tip: The unit may not be able to decode all
digital audio formats from the input source.
In this case, the unit will mute. This is NOT a
defect. Ensure that the audio setting of the
input source (e.g. TV, game console, DVD
player, etc.) is set to PCM or Dolby Digital
(Refer to the user manual of the input
source device for its audio setting details)
with HDMI / OPTICAL / COAXIAL input.
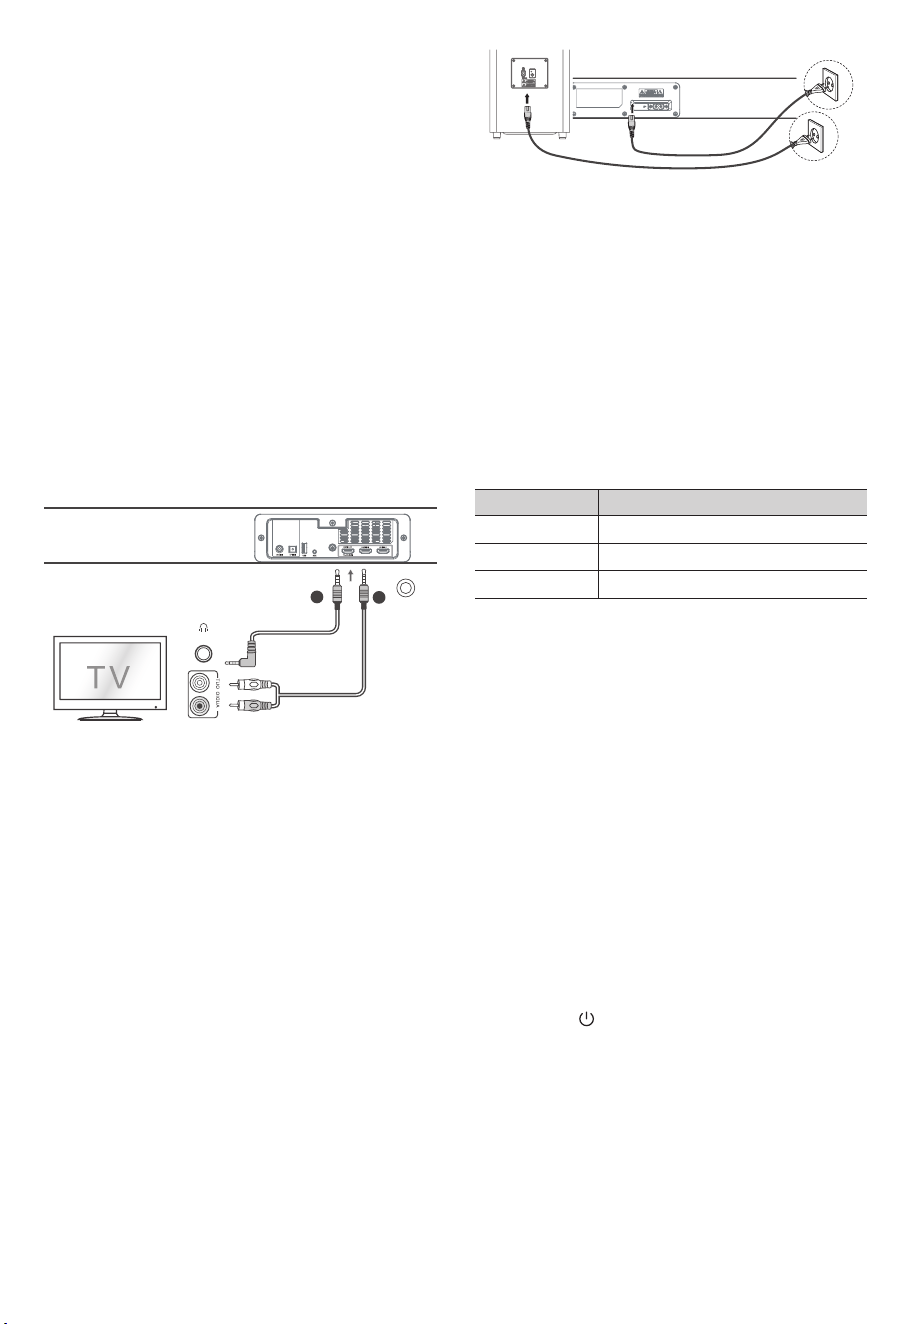
5.5 Use the AUX Socket
A. Use a 3.5mm to 3.5mm audio cable
(not included) to connect the TV’s or
external audio device headphone
socket to the AUX socket on the unit.
B. Use a RCA to 3.5mm audio cable (not
included) to connect the TV’s audio
output sockets to the AUX socket on
the unit.
AUX
A
B
5.6 Connect Power
Risk of product damage!
- Ensure that the power supply voltage
corresponds to the voltage printed on
the back or the underside of the unit.
- Before connecting the AC power
cord, ensure you have completed all
other connections.
• Soundbar
Connect the mains cable to the AC~
socket of the main unit and then into
a mains socket.
• Subwoofer
Connect the mains cable to the AC~
socket of the Subwoofer and then into
a mains socket.
Note:
- If there is no power, ensure the power
cord and plug are fully inserted and
the power is turned on.
- Power cord quantity and plug type
vary by regions.
6. Pair up with the Subwoofer
6.1 Automatic pairing
T h e s u b w o o f e r an d so u n dbar wil l
automatically pair when both units are
plugged into the mains sockets and turned
on. No cable is needed for connecting the
two units.
• Determine the status based on the
wireless Subwoofer indicator.
LED State Status
Fast blink
Subwoofer in pairing mode
Constant on
Connected / Pairing successful
Slow blink
Connection / Pairing Failed

12 EN
NOTE:
- Do not press the PAIR button on the
rear of the subwoofer, except for
manual pairing.
- If the automatic pairing fails, pair the
subwoofer with the main unit manually.
6.2 Manual pairing
1. Ensure that all the cables are well
connected and the main unit is in
Standby mode.
2. Press and hold the PAIR button on the
rear of the subwoofer for a few
seconds. The subwoofer will enter the
pairing mode and the Pair Indicator
will blink quickly.
3. Press
the button on the main unit
or on the remote control to switch the
main unit on.
4. A fter the w i r e l e s s connect i o n
succeeded, the Pair Indicator will light
up.
5. If the Pair indicator blinks, the wireless
connection has failed. Unplug the
cable of the subwoofer and then
reconnect the main cable after 4
minutes. Repeat step 1 ~ 4.
NOTE:
• If the wireless connection fails again,
check if there is conflict or strong
interference (for example, interference
from an electronic device) around
or strong interferences and repeat the
above procedures.
• The subwoofer should be within 6m (18
feet) of the soundbar in an open area.
• If a T V or an extern al dev ic e is
connected, the main unit only AUX
model and the subwoofer will switch
on automatically when the TV or the
external device is switched on.
• If the main unit is not connected with
the subwoofer and it is in On mode,
the POWER Indicator will flash. Follow
step 1 ~ 4 above to pair the subwoofer
to the main unit.
7. Basic Operation
7.1 Standby/ON
When you first connect the main unit to
the mains socket, the main unit will be in
Standby mode.
• Press the
button on the unit or on the
remote control to switch the unit ON.
• Press the
button again to switch the
unit back to STANDBY mode.
• Disconnect the mains plug from the
mains socket if you want to switch the
unit OFF completely.
• Auto Wake
- If a TV or an external devic e is
connected (AUX / HDMI ARC), the unit
will switch on automatically when the
TV or the external device is switched
on.
• Automatic Power Off Function
- The unit automatically turns to Standby
mode after about 15 minutes if the TV
or the external unit is disconnected,
switched off.
- To switch the unit off completely,
remove the mains plug from the mains
socket.
• Please turn the unit off completely to
save energy when not in use.
7.2 Select Modes
Press the (SOURCE) button on the unit
or the AUX, BT, OPT/COA, HDMI 1/2, HDMI
eARC and USB and buttons on the remote
control to select the desired mode. The
selected mode will shows on the display.
7.3 Adjust the Bass/Treble Level
• Press the BASS +/- buttons on the
remote control to adjust bass level.
• Press the TREBLE +/- buttons on the
remote control to adjust treble level.
7.4 Turn the Surround Sound ON/OFF
• Press the VERTICAL/SURROUND button
on the remote control to turn on the
surround sound. Press this button again
to turn off the surround sound.

13 EN
7.5 Select Equalizer (EQ) Effect
Press the SOUND MODE button on the
remote control to select your desired
preset equalizer effects.
• VOICE: Create sound effect which
makes human voice more clear and
outstanding for listening.
• SPORT: Create an atmosphere as if
watching a sports game in a stadium.
• MOVIE: Create a surround listening
experience. Ideal for watching movies.
• MUSIC: Create two-channel or multi-
channel stereo sound. Ideal for
listening to music.
7.6 Adjust the Volume
•
Press the + / - (VOL) buttons on the
unit or on the remote control to adjust
the volume.
•
If you wish to turn the sound off, press
the
(MUTE) button on the remote
control. Press the
(MUTE) button
again or press the + / - (VOL) buttons
on the unit or on the remote control to
resume normal listening.
7.7 About the Display Brightness
• When no operation for 10 seconds,
the brightness of the screen will
automatically dim the brightness.
When operated again, the brightest
level will be automatically restored.
7.8 AV SYNC (Set the Audio Delay)
• Video image processing, sometimes
longer than the time required to
process the audio signal. This is called
“delayed.” Audio Delay feature is
designed to remedy this delay.
• Set the audio delay, provided only
for the current playback mode. (As
provided in the HDMI eARC audio
delay mode, the delay mode is valid
only for the HDMI eARC).
• Press the AV SYNC+/- buttons on the
remote control to adjust the delay
time.
- AV00 ~ AV200 (By default, the audio
delay is set to 00).
Tips
- In AUX / BT / USB
mode, press the AV
SYNC+/- buttons has no effect. The
audio delay setting is only valid for
digital audio (e.g HDMI 1, HDMI 2, HDMI
eARC, OPTICAL, COAXIAL).
8. AUX / OPTICAL / COAXIAL
/ HDMI Operation
1 Ensure that the unit is connected to
the TV or audio device.
2 Pre ss the
(SOURCE) button
repeatedly on the unit or the AUX,
OPT/COA, HDMI 1/2, HDMI ARC
buttons on the remote control to
select the desired mode.
3 Operate your audio device directly for
playback features.
4 Press the VOL +/– button to adjust the
volume to your desired level.
Tip:
• The unit may not be able to decode
all digital audio formats from the input
source. In this case, the unit will mute.
This is NOT a defect. Ensure that the
audio setting of the input source (e.g.
TV, game console, DVD player, etc.)
is set to PCM or Dolby Digital (Refer to
the user manual of the input source
device for its audio setting details) with
HDMI 1 / HDMI 2 / HDMI ARC / OPTICAl /
COAXIAL input.
• In HDMI 1 / HDMI2 / HDMI ARC/eAR
C
mode, when entering DOLBY ATMOS
audio format, the Soundbar display
shows
DOLBY ATMOS
.
• When entering DOLBY DIGITAL audio
format, the Soundbar display shows
DOLBY AUDIO
.
• When entering PCM audio format, the
Soundbar display shows
PCM AUDIO
.
• When entering non-PCM or DOLBY
DIGITAL audio formats, if there’s no
sound output from the unit, the display
shows
NONSUPPORT FORMAT
.

14 EN
9. Bluetooth Operation
9.1 Pair Bluetooth-enabled Devices
The first time you connect your bluetooth
device to this player, you need to pair your
device to this player.
Note:
- The operational range between this
player and a Bluetooth device is
approximately 8 meters (without any
object between the Bluetooth device
and the unit).
- Before you connect a Bluetooth
device to this unit, ensure you know the
device’s capabilities.
- Compatibility with all Bluetooth
devices is not guaranteed.
- Any obstacle between this unit and
a Bluetooth device can reduce the
operational range.
- If the signal strength is weak, your
Bluetooth receiver may disconnect,
but it will re-enter pairing mode
automatically.
1 D u r i n g ON m o d e, pr e s s the
(SOURCE) button repeatedly on the
unit or press the BT button on the
remote control to select Bluetooth
mode. "NO BT" will show on the display
if the unit is not paired to any Bluetooth
device.
2 Activate your Bluetooth device and
select the search mode. "Apollo 520"
will appear on your Bluetooth device
list.
- If you can't find the unit, press and
hold the
or BT button on the remote
control to be searchable. You will hear
audio prompt from the unit and the
display will show “PAIR”.
3 Select "Apollo 520" in the pairing list. After
audio prompt, the system is successfully
connected and the display panel
shows "BT".
4 Play music from the connected
Bluetooth device.
To disconnect the Bluetooth function,
you can :
- Switch to another function on the unit.
- Disable the function from your Bluetooth
device. The Bluetooth device will be
disconnected from the soundbar after
audio prompt.
- Press and hold the
or BT button on
the remote control.
Tips:
• Enter "0000" for the password if
necessary.
• If no other Bluetooth device pairs
with this player within two minutes,
the player will recover its previous
connection.
• The player will also be disconnected
when your device is moved beyond
the operational range.
• If you want to reconnect your device
to this player, place it within the
operational range.
• If the device is moved beyond the
operational range, when it is brought
back, please check if the device is still
connected to the player.
• If the connection is lost, follow the
instructions above to pair your device
to the player again.
9.2 Listen to Music from Bluetooth
Device
- If the connected Bluetooth device
supports Advanced Audio Distribution
Profile (A2DP), you can listen to the
music stored on the device through
the player.
- If the device also supports Audio Video
Remote Control Profile (AVRCP), you
can use the player's remote control to
play music stored on the device.
1. Pair your device with the player.
2. Play music via your device (if it
supports A2DP).
3. Use supplied remote control to control
play (if it supports AVRCP).
- To pause/resume play, press the
button on the remote control.
- To skip to a track, press the
/
buttons on the remote control.
15 EN
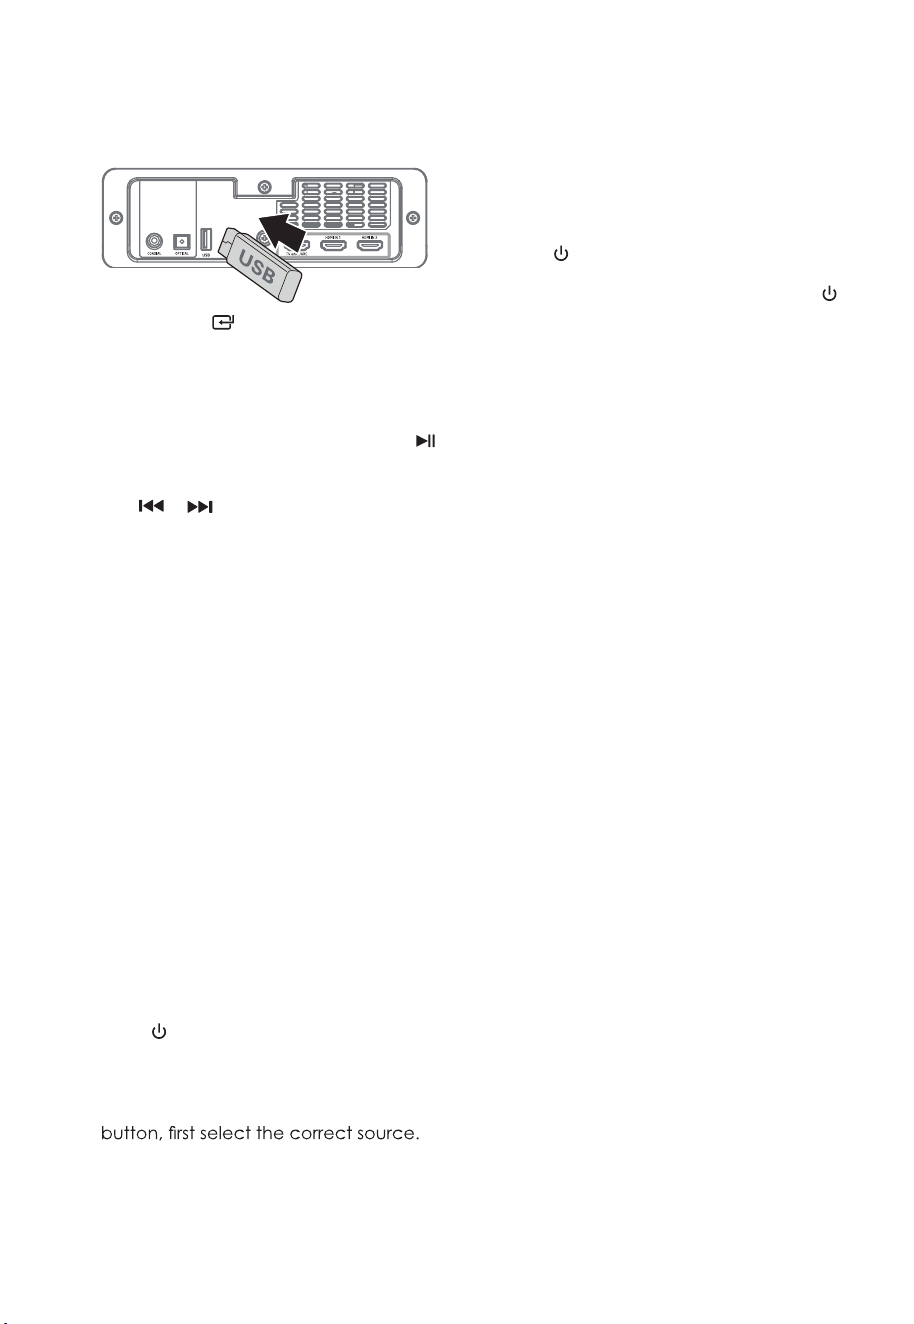
10. USB Operation
1 Insert the USB device.
2 Pre ss the (SOURCE ) button
repeatedly on the unit or press the USB
button on the remote control to select
USB mode.
3 During playback:
- To pause or resume play, press the
button on the remote control.
- To skip to the previous/next file, press
the
/ buttons on the remote
control.
Tips:
• The unit can support USB devices with
up to 32 GB of memory.
• This unit can play MP3.
• USB file system should be FAT32 or
FAT16.
11. Troubleshooting
To keep the warranty valid, never try to
repair the system yourself. If you encounter
problems when using this unit, check the
following points before requesting service.
No power
• En sure that th e AC c ord o f the
apparatus is properly connected .
• Ensure that there is power at the AC
outlet.
• Press
(standby) button to turn the
unit on.
Remote control does not work
• Before you press any playback control
• Reduce the distance between the
remote control and the unit.
• Insert the battery with its polarities (+/-)
aligned as indicated.
• Replace the battery.
• Aim the remote control directly at the
sensor on the front of the unit.
No sound
• Make sure that the unit is not muted.
Press MUTE or VOL+/- button to resume
normal listening.
• Press
on the unit or on the remote
control to switch the soundbar to
standby mode. Then press the
button again to switch the soundbar
on.
• Unplug both the soundbar and the
subwoofer from the mains socket,
then plug them again. Switch on the
soundbar.
• Ensure the audio setting of the input
source (e.g. TV, game console, DVD
player, etc.) is set to PCM or Dolby
Digital mode while using digital (e.g.
HDMI, OPTICAL, COAXIAL) connection.
• The subwoofer is out of range, please
move the subwoofer closer to the
soundbar. Make sure the subwoofer is
within 5 m of the soundbar (the closer
the better).
• The s oundbar m ay h ave l o s t
connection with the subwoofer. Re-
pair the units by following the steps
on the section “Pairing the Wireless
Subwoofer with the Soundbar”.
• The unit may not be able to decode
all digital audio formats from the input
source. In this case, the unit will mute.
This is NOT a defect.d
evice is not
muted.
TV has display problem while viewing
HDR content from HDMI source.
• Some 4K HDR TVs require the HDMI
input or picture settings to be set for
HDR content reception. For further
setup details on HDR display, please
refer to the instruction manual of your
TV.
I can’t find the Bluetooth name of
this unit on my Bluetooth device for
Bluetooth pairing
• Ensure the Bluetooth function is
activated on your Bluetooth device.
• Ensure you have paired the unit with
your Bluetooth device.
16 EN
This is a 15 mins power off function,
one of the ERPII standard requirement
for saving power
• When the unit's external input signal
level is too low, the unit will be turned
off automatically in 15 minutes. Please
increase the volume level of your
external device.
The subwoofer is idle or the indicator
of subwoofer do not light up.
• Please unplug power cord from the
mains socket, and plug it in again after
4 minutes to reset the subwoofer.
12.
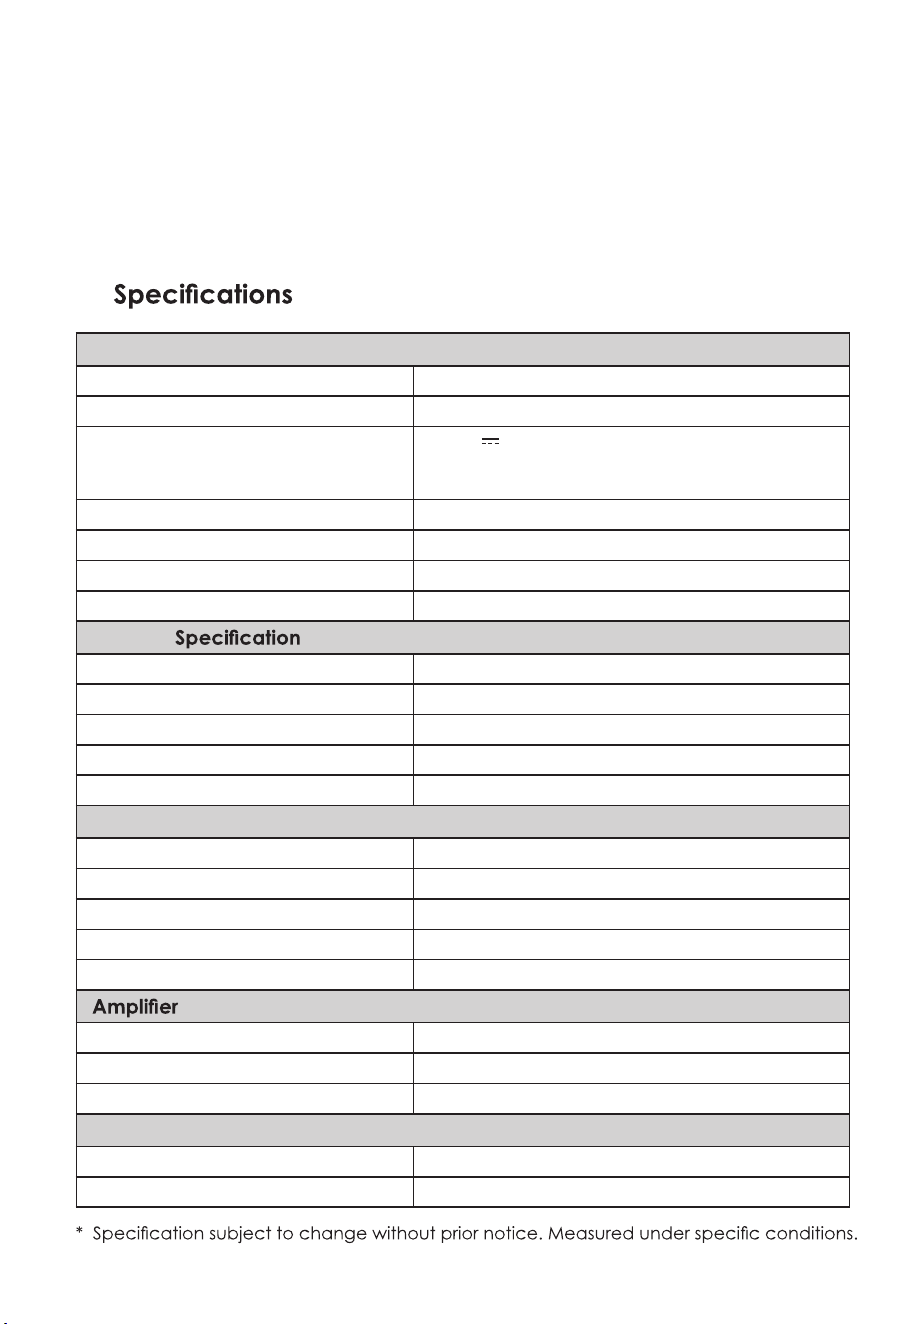
Soundbar
Power Supply AC100-240V~ 50/60Hz
Power Consumption 80 W / < 0.5 W (StandBy)
USB
5V
500mA
Hi-Speed USB (2.0) / FAT32 / FAT16
32G (max) , MP3
Dimension (WxHxD) 1200 x 70 x 108 mm
Net Weight 4.6 kg
Audio Input Sensitivity 700mV
Frequency Response 120Hz - 20KHz
Wireless
V 4.2 (A2DP, AVRCP)
Maximum Power Transmitted
Bluetooth Version /Profiles
≤ 5 dBm
Bluetooth Frequency Bands 2400 MHz ~ 2483.5 MHz
2.4G Wireless Frequency Range 2400 MHz ~ 2483 MHz
2.4G Wireless Maximum Power ≤ 6 dbm
Subwoofer
Power Supply AC100-240V~ 50/60Hz
Power Consumption 80 W / < 0.5 W (StandBy)
Dimension (WxHxD) 240 x 420 x 240 mm
Net Weight 5.5 kg
Frequency Response 40Hz - 120Hz
(RMS Outputpower)
Total 380 W
Main Unit 25W (8Ω) x 6 + 50W (4Ω)
Subwoofer 180W (3Ω)
Remote Control
Distance/Angle 6m / 30°
Battery Type AAA (1.5V X 2)

Contenido
Español
1. Instrucciones De Seguridad Importantes
Seguridad
Advertencia
1.1
1.2
Emparejar Dispositivos Habilitados Para Bluetooth
Escuchar Música Desde Un Dispositivo Bluetooth
9.1
9.2
2. Qué Hay En La Caja.
Mando A Distancia
Unidad Principal
Subwoofer Inalámbrico
3.1
3.2
3.3
3. Identificación De Las Piezas
Prepare El Control Remoto
Reemplace La Batería Del Control Remoto
Colocación Y Montaje
Montaje En Pared (Si Usa La Opción B)
4.1
4.2
4.3
4.4
4. Preparativos
Dolby Atmos
®
Conexión HDMI
Utilice El Enchufe OPTICAL
Utilice El Conector COAXIAL
Usar La Toma AUX
Conectar La Energía
5.1
5.2
5.3
5.4
5.5
5.6
5. Conexiones
Emparejamiento Automático
Emparejamiento Manual
6.1
6.2
6. Emparejamiento Con El Subwoofer
En Espera / Encendido
Seleccionar Modos
Ajustar El Nivel De Graves / Agudos
Activar / Desactivar El Sonido Envolvente
Seleccionar Efecto De Ecualizador (EQ)
Ajustar El Volumen
Acerca Del Brillo De La Pantalla
Av Sync (Establecer El Retardo De Audio)
7.1
7.2
7.3
7.4
7.5
7.6
7.7
7.8
7. Operación Básica
8. Funcionamiento AUX / OPTICAL / COAXIAL / HDMI
9. Operación Bluetooth
10. Operación USB
11. Solución De Problemas
12. Especificaciones
2
2
3
11
12
4
4
5
5
4
6
6
6
6
6
7
8
8
8
9
9
7
9
9
9
10
10
10
10
10
10
10
10
10
11
11
12
12
14
2 ES
1. Instrucciones De Seguridad Importantes
El símbolo del rayo con punta de
flecha,
dentro de un triángulo equiláte
ro, tiene la
intención de alertar al usuario de la
presencia de "voltaje peligroso" no aislado
dentro del gabinete del producto que
puede ser de magnitud suficiente como
para constituir un riesgo de descarga
eléctrica para las personas.
El signo de exclamación dentro de un
triángulo equilátero tiene la intención de
alertar al usuario de la presencia de
instrucciones importantes de operación y
mantenimiento (servicio) en la literatura
que acompaña al aparato.
1.1 Seguridad
1.
Lea estas instrucciones: Todas las instrucciones
de seguridad y funcionamiento deben leerse
antes de utilizar este producto.
7.
No bloquee las aberturas de ventilación. Haga
la instalación conforme a las instrucciones del
fabricante.
8.
No lo instale cerca de fuentes de calor como
radiadores, calentadores, estufas u otros
aparatos (incluidos amplificadores) que
produzcan calor.
19.
No se deben colocar sobre el aparato fuentes
de llamas desnudas, como velas encendidas.
20.
Las baterías deben reciclarse o desecharse de
acuerdo con las pautas estatales y locales.
9.
No anule el propósito de seguridad del enchufe
polarizado o con conexión a tierra. Un enchufe
polarizado tiene dos clavijas, una más ancha
que la otra. Un enchufe con conexión a tierra
tiene dos clavijas y una tercera clavija de
conexión a tierra. La hoja ancha o la tercera
clavija se proporcionan para su seguridad. Si el
enchufe provisto no encaja en su tomacorrien-
te, consulte a un electricista para reemplazar el
tomacorriente obsoleto.
10.
Proteja el cable de alimentación para que no
se pise ni se pellizque, especialmente en los
enchufes, los receptáculos de conveniencia y
el punto por donde salen del aparato.
13.
Desenchufe el aparato durante tormentas
eléctricas o cuando no lo utilice durante largos
períodos de tiempo.
14.
Refiera el desalojo a personal calificado. Se
requiere servicio cuando el aparato se ha
dañado de alguna manera, como el cable de
alimentación o el enchufe están dañados, se
ha derramado líquido o han caído objetos
dentro del aparato, la unidad ha estado
expuesta a la lluvia o la humedad, no funciona
normalmente, o se ha caído.
11.
Utilice únicamente los complementos /
accesorios especificados por el fabricante.
2.
Conserve estas instrucciones: las instrucciones
de seguridad y funcionamiento deben
conservarse para futuras consultas.
3.
Preste atención a todas las advertencias: se
deben respetar todas las advertencias en el
aparato y en las instrucciones de funciona-
miento.
5.
No utilice este aparato cerca del agua: el
aparato no debe utilizarse cerca del agua o la
humedad, por ejemplo, en un sótano húmedo
o cerca de una piscina y similares.
4.
Siga todas las instrucciones: se deben seguir
todas las instrucciones de funcionamiento y
uso.
6.
Límpielo solo con un paño seco.
Precaución: Para Reducir El Riesgo De Descarga
Eléctrica, No Retire La Cubierta (O La Parte
Posterior). En El Interior No Hay Piezas Que Puedan
Reparar El Usuario. Consulte El Servicio A Personal
De Servicio Cualificado.
PRECAUCIÓN
RIESGO DE SHOCK ELÉCTRICO
NO ABRIR
15.
Este equipo es un aparato eléctrico de
Clase II o de doble aislamiento. Ha sido
diseñado de tal manera que no requiere una
conexión de seguridad a tierra eléctrica.
16.
El aparato no debe exponerse a goteos o
salpicaduras. No se deben colocar sobre el
aparato objetos llenos de líquido, como jarrones.
17.
La distancia mínima alrededor del aparato para
una ventilación suficiente es de 5 cm.
18.
La ventilación no debe impedirse cubriendo las
aberturas de ventilación con elementos como
periódicos, manteles, cortinas, etc.
12.
Úselo únicamente con el carro, soporte,
trípode, soporte o mesa especificados
por el fabricante o vendidos con el
aparato. Cuando se utiliza un carrito o
una rejilla, tenga cuidado al mover la combinación
de carrito y aparato para evitar lesiones por vuelco.

1.2 Advertencia
Uso de la batería PRECAUCIÓN
21.
El uso de aparatos en climas moderados.
•
El uso de controles o ajustes o la realización de
procedimientos distintos a los descritos en este
documento pueden provocar una exposición
peligrosa a la radiación u otra operación
peligrosa.
•
Instale todas las baterías correctamente, + y -
como está marcado en el aparato.
•
No mezcle pilas alcalinas, estándar (carbo-
no-zinc) o recargables (Ni-Cd, Ni-MH, etc.).
•
Retire las pilas cuando la unidad no se utilice
durante un período prolongado.
Por la presente declaramos que este
producto cumple con las requisitos
esenciales y otras disposiciones pertinentes
de la Directiva 2014/53 / UE.
La marca denominativa y los logotipos de Bluetooth
son marcas comerciales registradas propiedad de
Bluetooth SIG,. Inc.
Las marcas comerciales adoptadas HDMI, HDMI
High-Definition Multimedia Interface y el logotipo de
HDMI son marcas comerciales o marcas comercia-
les registradas de HDMI Licensing Administrator, Inc.
en los Estados Unidos y otros países.
Dolby, Dolby Audio, Dolby Atmos y el símbolo de la
doble D son marcas comerciales registradas de
Dolby Laboratories Licensing Corporation. Fabricado
bajo licencia de Dolby Laboratories. Obras
confidenciales inéditas. Copyright C 1992-2020
Dolby Laboratories. Reservados todos los derechos.
Eliminación correcta de este producto. Esta
marca indica que este producto no debe
desecharse con otros desechos domésticos
en toda la UE. Para evitar posibles daños al
medio ambiente o la salud humana debido a la
eliminación incontrolada de desechos, recíclelos de
manera responsable para promover la reutilización
sostenible de los recursos materiales. Para devolver
su dispositivo usado, utilice los sistemas de devolu-
ción y recolección o comuníquese con el minorista
donde compró el producto. Pueden llevar este
producto para un reciclaje seguro para el medio
ambiente.
•
No mezcle pilas nuevas y viejas.
Para evitar fugas de la batería que pueden resultar
en lesiones corporales, daños a la propiedad o daños
al aparato:
•
Para reducir el riesgo de incendio o descarga
eléctrica, no exponga este aparato a la lluvia ni
a la humedad. El aparato no debe exponerse a
goteos o salpicaduras y no se deben colocar
objetos llenos de líquido, como jarrones, sobre
el aparato.
•
El enchufe de red / acoplador del aparato se
utiliza como dispositivo de desconexión, el
dispositivo de desconexión debe permanecer
fácilmente operativo.
•
La batería (baterías o paquete de baterías) no
debe exponerse a un calor excesivo como la
luz solar, el fuego o similares.
•
Antes de operar este sistema, verifique el voltaje
de este sistema para ver si es idéntico al voltaje
de su fuente de alimentación local.
•
No coloque esta unidad cerca de campos
magnéticos fuertes.
•
No coloque esta unidad sobre el amplificador o
receptor.
•
La etiqueta de clasificación está pegada en la
parte inferior o trasera del equipo.
~
Voltaje de CA: este símbolo indica que el voltaje
nominal marcado con el símbolo es voltaje de
CA.
•
Los cambios o modificaciones a esta unidad no
aprobados expresamente por la parte respons-
able del cumplimiento anularán la autoridad del
usuario para operar el equipo.
•
Si algún objeto sólido o líquido cae dentro del
sistema, desenchúfelo y haga que personal
calificado lo revise antes de seguir utilizándolo.
•
No intente limpiar la unidad con solventes
químicos ya que esto puede dañar el acaba-
do. Utilice un paño limpio, seco o ligeramente
humedecido.
•
Cuando retire el enchufe de la toma de corriente,
tire siempre directamente del enchufe, nunca tire
del cable.
•
Peligro de explosión si la batería es reemplaza-
da incorrectamente. Reemplace sólo con el
mismo tipo o equivalente.
Precaución:
3 ES
5
BASS +/-
Ajusta el nivel de graves.
9
VERTICAL/SURROUND
Ajuste el sonido envolvente ON / OFF.
10
SOUND MODE
Seleccione el efecto de ecualizador (EQ).
11
AV SYNC +/-
Configurar el retardo de audio.
6
TREBLE +/-
Ajuste el nivel de agudos.
7
+/- (Volumen)
Aumente / disminuya el nivel de volumen.
1
2
3
5
8
10
6
7
9
11
4
4
Reproducir / pausar / reanudar la reproducción en
modo BT / USB. Mantenga presionado para activar
la función de emparejamiento en el modo Bluetooth
o desconecte el dispositivo Bluetooth emparejado
existente.
3
/
Salta a la pista anterior/ siguiente en modo BT/ USB.
8
(SILENCIO)
Silenciar o reanudar el sonido.
3.1 Mando A Distancia
4 ES
2. Qué Hay En La Caja
3. Identificación De Las Piezas
•
La cantidad de cable de alimentación y el tipo de enchufe varían según la región.
1
Cambie la unidad entre ON y Modo de espera.
2
Botones SOURCE
Seleccione la función de reproducción.
•
Las imágenes, ilustraciones y dibujos que se muestran en este manual del usuario son solo para
referencia. El producto real puede variar en apariencia.
Unidad Principal Control Remoto /
Pilas AAA x 2
Subwoofer Inalámbrico
Cable de alimentación CCC CA x 2
Cable de alimentación de CA de la UE x 2
Cable HDMI Soporte de pared
aux
2 1
3
4 5 6
7
8 9 10 11 12 13
1 2 3
3.2 Unidad Principal
3.3 Subwoofer Inalámbrico
1
Ventana De Visualización
Muestra el estado actual.
2
Sensor De Control Remoto
Recibe la señal del mando a distancia.
3
Tornillos
Instale los tornillos de montaje en pared en la
parte posterior de la unidad.
5
Botón Fuente
Seleccione la función de reproducción.
6
+ / - botones de volumen
Aumente / disminuya el nivel de volumen.
10
Toma USB
Inserte el dispositivo USB para reproducir música.
11
Zócalo AUX
Conéctese a un dispositivo de audio externo.
1
CA ~ Enchufe
Conéctese a la energía.
2
Botón PAIR
Pulse para activar la función de emparejamien-
to entre la unidad principal y el subwoofer.
3
Indicador Pair Del Subwoofer
La luz deja de parpadear una vez que el
subwoofer está emparejado con la barra de
sonido.
12
Tomas HDMI OUT (TV eARC / ARC)
El puerto para conectar un televisor. El puerto
admite la función eARC / ARC HDMI, que
permite que la barra de sonido reproduzca
audio que se origina en el televisor conectado.
13
Tomas HDMI IN 1 / HDMI IN 2
Dos puertos HDMI para conectar dispositivos
fuente HDMI, como un reproductor de DVD,
reproductor de Blu-ray Disc
TM
o consola de
juegos. Tenga en cuenta que solo se puede
utilizar una entrada HDMI a la vez.
7
AC ~ Enchufe
Conéctese a la energía.
8
Toma COAXIAL
9
Enchufe ÓPTICO
5 ES
4
(Encendido / Apagado) Botón
Cambie la unidad entre el modo ON y Standby.
El control remoto provisto permite operar la unidad
a distancia.
AA A
AA A
1 2 3
A B
•
Incluso si el control remoto se opera dentro del
rango efectivo de 19,7 pies (6 m), el funciona-
miento del control remoto puede resultar
imposible si hay obstáculos entre la unidad y el
control remoto.
•
Si el control remoto se opera cerca de otros
productos que generan rayos infrarrojos, o si se
utilizan otros dispositivos de control remoto que
usan rayos infrarrojos cerca de la unidad, es
posible que funcione incorrectamente. Por el
contrario, los otros productos pueden funcionar
incorrectamente.
•
Utilice pilas del mismo tipo. Nunca use diferentes
tipos de baterías juntas.
•
Tenga cuidado con las uñas cuando retire la
tapa de la batería y la batería.
•
No deje caer el control remoto.
•
No permita que nada impacte el control remoto.
•
No derrame agua ni ningún líquido sobre el
mando a distancia.
•
No coloque el control remoto sobre un objeto
húmedo.
•
No coloque el control remoto bajo la luz solar
directa o cerca de fuentes de calor excesivo.
•
Retire la batería del control remoto cuando no
esté en uso durante un período de tiempo
prolongado, ya que puede producirse corrosión
por fugas de la batería y provocar lesiones
físicas y / o daños a la propiedad y / o incendio.
•
No utilice baterías que no sean las especificadas.
•
No mezcle pilas nuevas con viejas.
•
Nunca recargue una batería a menos que se
confirme que es de tipo recargable.
A
Si su televisor está colocado sobre una mesa,
puede colocar la unidad sobre la mesa
directamente en frente del soporte del televisor,
centrada con la pantalla del televisor.
•
La instalación debe ser realizada únicamente
por personal calificado. Un montaje incorrecto
puede resultar en lesiones personales graves y
daños a la propiedad (si tiene la intención de
instalar este producto usted mismo, debe
verificar si hay instalaciones tales como
cableado eléctrico y plomería que puedan estar
enterradas dentro de la pared). Es responsabili-
dad del instalador verificar que la pared
soportará de manera segura la carga total de
la unidad y los soportes de pared.
•
Se requieren herramientas adicionales (no
incluidas) para la instalación.
•
No apriete demasiado los tornillos.
•
Conserve este manual de instrucciones para
consultarlo en el futuro.
•
Utilice un buscador de vigas electrónico para
comprobar el tipo de pared antes de taladrar y
montar.
B
Si su televisor está conectado a una pared,
puede montar la unidad en la pared directa-
mente debajo de la pantalla del televisor.
Colocación
Nota:
•
Se pueden utilizar pilas recargables o no. Consulte
las precauciones en sus etiquetas.
1
Presione y deslice la tapa trasera para abrir el
compartimiento de la batería del control remoto.
Precauciones Relativas A Las Baterías
2
Inserte dos pilas de tamaño AAA (incluidas).
Asegúrese de que los extremos (+) y (-) de las pilas
coincidan con los extremos (+) y (-) indicados en
el compartimento de las pilas.
3
Cierre la tapa del compartimento de la batería.
4.1 Prepare El Control Remoto
4.2 Reemplace La Batería Del Control Remoto
4.3 Colocación Y Montaje
4.4 Montaje En Pared (Si Usa La Opción B)
6 ES
4. Preparativos
•
Asegúrese de insertar las pilas con las polaridades
positivas “ ” y negativas “ ” correctas.
1121 mm
Quite los tornillos
Instale los tornillos
de montaje en
pared
3
4
1121 mm
1
2
5.1 Dolby Atmos
®
Para usar Dolby Atmos
®
Dolby Atmos le brinda una experiencia auditiva
envolvente al brindar sonido en un espacio tridimen-
sional y toda la riqueza, claridad y potencia del
sonido Dolby. Para obtener más información, visite
dolby.com/ technologies / dolby-atmos
Dolby Atmos
®
está disponible solo en el modo HDMI.
Para obtener más información sobre la conexión,
consulte "Conexión HDMI".
ADVERTENCIA
•
Para evitar lesiones, este aparato debe fijarse firmemente al piso / pared de acuerdo con las instruc-
ciones de instalación.
•
Altura de montaje en pared sugerida: ≤ 1,5 metros.
5. Conexiones
1
Taladre 4 orificios paralelos (Ø 5,5-6 mm cada
uno según el tipo de pared) en la pared. La
distancia entre los orificios debe ser de 1121 mm.
3
Quite los tornillos en la parte posterior de la
unidad. Instale los tornillos de montaje en pared
en la parte posterior de la unidad.
4
Levante la unidad sobre los soportes de montaje
en pared y colóquela en su lugar.
2
Fije firmemente 1 taco en cada agujero de la
pared si es necesario. Apriete los soportes de
montaje en pared en la pared con tornillos y
destornillador (no incluidos). Asegúrese de que
estén instalados de forma segura.
1
Para usar Dolby Atmos
®
en los modos HDMI1,
HDMI2 y HDMI ARC / eARC, su televisor debe ser
compatible con Dolby Atmos
®
.
2
Asegúrese de que "Sin codificación" esté
seleccionado para el flujo de bits en la salida de
audio del dispositivo externo conectado (por
ejemplo, reproductor de DVD Blu-ray, TV, etc.).
3
Al ingresar al formato Dolby Atmos / Dolby Digital
/ PCM, la barra de sonido mostrará
DOLBY
ATMOS / DOLBY AUDIO / PCM AUDIO.
7 ES
HDMI (eARC/ARC)
HDMI OUT
TV eARC/ARC
HDMI IN
HDMI OUT
Blu-ray Player / DVD Player /
Recorder / Set-top Box...
HDMI OUT
TV eARC/ARC
HDMI IN 1 HDMI IN 2
OPTICAL (ÓPTICO)
OPTICAL (ÓPTICO)
COAXIAL
COAXIAL
OPTICAL
OPTICAL
COAXIAL
COAXIAL
•
Si su televisor no es compatible con HDMI ARC,
conecte su barra de sonido al televisor a través
de una conexión HDMI estándar.
•
Retire la tapa protectora de la toma OPTICAL,
luego conecte un cable OPTICAL (no incluido) a
la toma OPTICAL OUT del televisor y a la toma
OPTICAL de la unidad.
•
También puede utilizar el cable COAXIAL (no
incluido) para conectar la toma COAXIAL OUT y
la toma COAXIAL del televisor en la unidad.
1
Utilice un cable HDMI (incluido) para conectar la
toma HDMI OUT (TV eARC / ARC) de la barra
acústica a la toma HDMI IN del televisor.
2
Utilice un cable HDMI (no incluido) para conectar
la toma HDMI IN (1 o 2) de la barra de sonido a
sus dispositivos externos (por ejemplo, consolas de
juegos, reproductores de DVD y blu-ray).
•
La experiencia Dolby Atmos completa solo está
disponible cuando la barra de sonido está
conectada a la fuente a través de un cable
HDMI 2.0.
•
La barra de sonido seguirá funcionando cuando
se conecte a través de otros métodos (como un
cable óptico digital), pero estos no son compati-
bles con todas las funciones Dolby. Dado esto,
nuestra recomendación es conectarse a través
de HDMI, para garantizar la compatibilidad total
con Dolby.
•
Conecte el cable HDMI (incluido) de la toma
HDMI OUT (TV eARC / ARC) de la unidad a la
toma HDMI (ARC) de su televisor compatible con
ARC. Luego presione el control remoto para
seleccionar HDMI eARC.
Método 1:
eARC / ARC (Canal De Retorno De Audio)
Algunos televisores 4K HDR requieren que la entrada
HDMI o la configuración de imagen se establezcan
para la recepción de contenido HDR. Para obtener
más detalles sobre la configuración de la pantalla
HDR, consulte el manual de instrucciones de su
televisor.
La función eARC / ARC (Canal de retorno de audio)
le permite enviar audio desde su televisor compati-
ble con ARC a su barra de sonido a través de una
sola conexión HDMI. Para disfrutar de la función ARC,
asegúrese de que su televisor sea compatible con
HDMI-CEC y ARC y que esté configurado en
consecuencia. Cuando está configurado correcta-
mente, puede usar el control remoto de su televisor
para ajustar la salida de volumen (VOL +/- y MUTE)
de la barra de sonido.
Método 2: HDMI Estándar
Uso de HDMI para conectar la barra de sonido, el
equipo AV y el televisor:
Consejos:
•
Su televisor debe admitir la función HDMI-CEC y
ARC. HDMI-CEC y ARC deben estar activados.
•
Solo el cable HDMI 1.4 o una versión superior
puede admitir la función ARC.
•
El método de configuración de HDMI-CEC y ARC
puede diferir según el televisor. Para obtener
detalles sobre la función ARC, consulte el manual
del propietario.
Consejos:
5.2 Conexión HDMI
5.3 Utilice El Enchufe OPTICAL
5.4 Utilice El Enchufe COAXIAL
8 ES
Estado del LED Estado
AUX
Auricular
A
B
6. Emparejar Con El Subwoofer
5.5 Utilice La Toma AUX
6.1 Emparejamiento Automático
6.2 Emparejamiento Manual
5.6 Conecte La Electricidad
Consejo:
Es posible que la unidad no pueda decodificar todos
los formatos de audio digital de la fuente de
entrada. En este caso, la unidad se silenciará. Esto
no es un defecto. Asegúrese de que la configura-
ción de audio de la fuente de entrada (por ejemplo,
TV, consola de juegos, reproductor de DVD, etc.)
esté configurada en PCM o Dolby Digital (consulte el
manual del usuario del dispositivo de fuente de
entrada para obtener detalles sobre la configura-
ción de audio) con HDMI / ÓPTICA. / Entrada
COAXIAL.
Riesgo de daños en el producto!
Nota:
A
Utilice un cable de audio de 3,5 mm a 3,5 mm
(no incluido) para conectar el televisor o la toma
de auriculares del dispositivo de audio externo a
la toma AUX de la unidad.
-
Asegúrese de que el voltaje de la fuente de
alimentación corresponda al voltaje impreso en
la parte posterior o inferior de la unidad.
-
Si no hay energía, asegúrese de que el cable de
alimentación y el enchufe estén completamente
insertados y que la energía esté encendida.
Nota:
-
No presione el botón PAIR en la parte posterior
del subwoofer, excepto para el emparejamiento
manual.
-
Si el emparejamiento automático falla, empareje
el subwoofer con la unidad principal manual-
mente.
1
Asegúrese de que todos los cables estén bien
conectados y que la unidad principal esté en
modo de espera.
2
Mantenga presionado el botón PAIR en la parte
posterior del subwoofer durante unos segundos.
Luego, el subwoofer entrará en el modo de
emparejamiento y el indicador de empareja-
miento parpadeará rápidamente.
3
Presione el botón en la unidad principal o
en el control remoto para encender la unidad
principal.
4
Una vez que la conexión inalámbrica se haya
realizado correctamente, el indicador de
emparejamiento se iluminará.
5
Si el indicador de Emparejamiento parpadea, la
conexión inalámbrica ha fallado. Desenchufe el
cable del subwoofer y luego vuelva a conectar
el cable principal después de 4 minutos. Repita
los pasos 1 ~ 4.
-
La cantidad de cable de alimentación y el tipo
de enchufe varían según la región.
-
Antes de conectar el cable de alimentación de
CA, asegúrese de haber completado todas las
demás conexiones.
•
Barra de sonido
Conecte el cable de red a la toma AC ~ de la
unidad principal y luego a una toma de corriente.
•
Altavoz de subgraves
Conecte el cable de red a la toma AC ~ del
Subwoofer y luego a una toma de corriente.
B
Utilice un cable de audio RCA a 3,5 mm (no
incluido) para conectar las tomas de salida de
audio del televisor a la toma AUX de la unidad.
El subwoofer y la barra de sonido se emparejarán
automáticamente cuando ambas unidades se
conecten a las tomas de corriente y se enciendan.
No se necesita cable para conectar las dos
unidades.
Parpadeo rápido
Constante en
Parpadeo lento
Subwoofer en modo de emparejamiento
Conectado / Emparejamiento exitoso
Conexión / Emparejamiento fallido
•
Determine el estado basándose en el indicador
de subwoofer inalámbrico.
9 ES

7. Operación Básica
•
Si la conexión inalámbrica vuelve a fallar, verifique
si hay algún conflicto o interferencia fuerte (por
ejemplo, interferencia de un dispositivo electróni-
co) alrededor de su ubicación. Elimine estos
conflictos o interferencias fuertes y repita los
procedimientos anteriores.
•
Presione los botones
BASS +/-
en el control
remoto para ajustar el nivel de graves.
•
Presione el botón
VERTICAL / SURROUND
en el
control remoto para encender el sonido
envolvente. Presione este botón nuevamente
para apagar el sonido envolvente.
•
Presione los botones
TREBLE +/-
en el control
remoto para ajustar el nivel de agudos.
•
El subwoofer debe estar a 6 m de la barra de
sonido en un área abierta.
•
Si se conecta un televisor o un dispositivo externo,
la unidad principal solo el modelo AUX y el
subwoofer se encenderán automáticamente
cuando se encienda el televisor o el dispositivo
externo.
•
Si la unidad principal no está conectada con el
subwoofer y está en modo Encendido, el
indicador de ENCENDIDO parpadeará. Siga los
pasos 1 ~ 4 anteriores para emparejar el altavoz
de subgraves con la unidad principal.
•
Presione el botón en la unidad o en el control
remoto para encender la unidad.
•
Vuelva a pulsar el botón para volver a poner
la unidad en modo STANDBY.
•
Desconecte el enchufe de red de la toma de
corriente si desea apagar la unidad por
completo.
•
Apague la unidad por completo para ahorrar
energía cuando no esté en uso.
-
Si se conecta un televisor o un dispositivo externo
(AUX / HDMI ARC), la unidad se encenderá
automáticamente cuando se encienda el
televisor o el dispositivo externo.
•
Despertador Automático
-
La unidad pasa automáticamente al modo de
espera después de unos 15 minutos si el televisor
o la unidad externa se desconectan o apagan.
-
Para apagar la unidad por completo, retire el
enchufe de la toma de corriente.
•
Función De Apagado Automático
Cuando conecte por primera vez la unidad principal
a la toma de corriente, la unidad principal estará en
modo de espera.
Presione el botón SOUND MODE en el control remoto
para seleccionar los efectos de ecualizador
preestablecidos que desee.
Presione el botón (SOURCE) en la unidad o los
botones AUX, BT, OPT / COA, HDMI 1/2, HDMI eARC y
USB y en el control remoto para seleccionar el modo
deseado. El modo seleccionado se mostrará en la
pantalla.
Nota:
7.1 En Espera / Encendido
7.3 Ajustar El Nivel De Graves / Agudos
•
VOZ (VOICE) : Crea un efecto de sonido que
hace que la voz humana sea más clara y
sobresaliente para la escucha.
•
PELÍCULA (MOVIE) : Crea una escucha
envolvente experiencia. Ideal para ver
películas.
•
MÚSICA (MUSIC) : Crea sonido estéreo de dos
canales o multicanal. Ideal para escuchar música.
•
DEPORTE (SPORT) :
Crea una atmósfera como si
estuvieras
viendo un partido deportivo en un
estadio.
7.5 Seleccione El Efecto De Ecualizador (EQ)
7.4 Activar / Desactivar El Sonido Envolvente
•
Presione los botones
+ / - (VOLUME)
en la unidad
o en el control remoto para ajustar
El volumen.
7.6 Ajustar El Volumen
•
Cuando no se realiza ninguna operación durante
10 segundos, el brillo de la pantalla atenuará
automáticamente el brillo. Cuando se opera de
nuevo, el nivel más brillante se restaurará
automáticamente
7.7 Acerca Del Brillo De La Pantalla
•
Procesamiento de imágenes de video, a veces
más largo que el tiempo requerido para procesar
la señal de audio. Esto se llama "retrasado". La
función de retardo de audio está diseñada para
remediar este retardo.
•
Configure el retardo de audio, proporcionado
solo para el modo de reproducción actual.
7.8 AV SYNC (Establecer El Retardo De Audio)
7.2 Seleccionar Modos
10 ES
•
Si desea apagar el sonido, presione el botón
(MUTE)
en el control remoto. Presione el botón
(MUTE)
nuevamente o presione los botones
+ / -
(VOLUME)
en la unidad o en el control remoto
para reanudar la escucha normal.

9. Operación Bluetooth
8. Funcionamiento AUX /
OPTICAL / COAXIAL / HDMI
9.1 Emparejar Dispositivos Habilitados Para
Bluetooth
La primera vez que conecte su dispositivo bluetooth
a este reproductor, deberá emparejar su dispositivo
con este reproductor.
(Como se proporciona en el modo de retardo de
audio HDMI eARC, el modo de retardo es válido
solo para HDMI eARC).
Consejo:
•
Es posible que la unidad no pueda decodificar
todos los formatos de audio digital de la fuente
de entrada. En este caso, la unidad se silenciará.
Esto no es un defecto. Asegúrese de que la
configuración de audio de la fuente de entrada
(por ejemplo, TV, consola de juegos, reproductor
de DVD, etc.) esté configurada en PCM o Dolby
Digital (consulte el manual del usuario del
dispositivo de fuente de entrada para obtener
detalles sobre la configuración de audio) con
HDMI 1 / Entrada HDMI 2 / HDMI ARC / ÓPTICA /
COAXIAL.
Note:
Para desconectar la función Bluetooth, puede:
•
El rango operativo entre este reproductor y un
dispositivo Bluetooth es de aproximadamente 8
metros (sin ningún objeto entre el dispositivo
Bluetooth y la unidad).
•
Antes de conectar un dispositivo Bluetooth a esta
unidad, asegúrese de conocer las capacidades
del dispositivo.
•
No se garantiza la compatibilidad con todos los
dispositivos Bluetooth.
•
Cualquier obstáculo entre esta unidad y un
dispositivo Bluetooth puede reducir el alcance
operativo.
•
Si la intensidad de la señal es débil, su receptor
Bluetooth puede desconectarse, pero volverá a
ingresar al modo de emparejamiento automáti-
camente.
2
Active su dispositivo Bluetooth y seleccione el
modo de búsqueda. "Apollo 520" aparecerá en
su lista de dispositivos Bluetooth.
3
Seleccione "Apollo 520" en la lista de empareja-
miento. Después de la indicación de audio, el
sistema se conecta correctamente y el panel de
visualización muestra "BT".
4
Reproduzca música desde el dispositivo Bluetooth
conectado.
-
Si no puede encontrar la unidad, presione y
mantenga presionado el botón o BT en el
control remoto para poder realizar búsquedas.
Escuchará un mensaje de audio de la unidad y
la pantalla mostrará "PAIR".
-
Cambie a otra función en la unidad.
-
Desactive la función de su dispositivo Bluetooth.
El dispositivo Bluetooth se desconectará de la
barra de sonido después del mensaje de audio.
-
Mantenga presionado el botón o BT del
control remoto.
1
Durante el modo ON, presione el botón
(SOURCE) repetidamente en la unidad o presione
el botón BT en el control remoto para seleccionar
el modo Bluetooth. "NO BT" aparecerá en la
pantalla si la unidad no está emparejada con
ningún dispositivo Bluetooth.
•
En el modo HDMI 1 / HDMI2 / HDMI ARC / eARC,
al ingresar al formato de audio DOLBY ATMOS, la
pantalla de la barra de sonido muestra DOLBY
ATMOS.
•
Al ingresar al formato de audio DOLBY DIGITAL,
la pantalla de la barra de sonido muestra DOLBY
AUDIO.
•
Al ingresar al formato de audio PCM, la pantalla
de la barra de sonido muestra PCM AUDIO.
•
Al ingresar formatos de audio que no son PCM o
DOLBY DIGITAL, si no hay salida de sonido desde
la unidad, la pantalla muestra NO NSUPPORT
FORMAT.
•
Presione los botones AV SYNC +/- en el control
remoto para ajustar el tiempo de retardo.
1
Asegúrese de que la unidad esté conectada al
televisor o dispositivo de audio.
3
Opere su dispositivo de audio directamente para
las funciones de reproducción.
4
Presione el botón VOLUME +/– para ajustar el
volumen al nivel deseado.
2
Presione el botón (SOURCE) repetidamente
en la unidad o los botones AUX, OPT/ COA, HDMI
1/2, HDMI ARC en el control remoto para
seleccionar el modo deseado.
Consejos:
-
AV00 ~ AV200 (De forma predeterminada, el
retardo de audio se establece en 00).
-
En el modo AUX / BT / USB, presionar los botones
AV SYNC +/- no tiene ningún efecto. El ajuste de
retardo de audio solo es válido para audio digital
(por ejemplo, HDMI 1, HDMI 2, HDMI eARC,
OPTICAL, COAXIAL).
11 ES
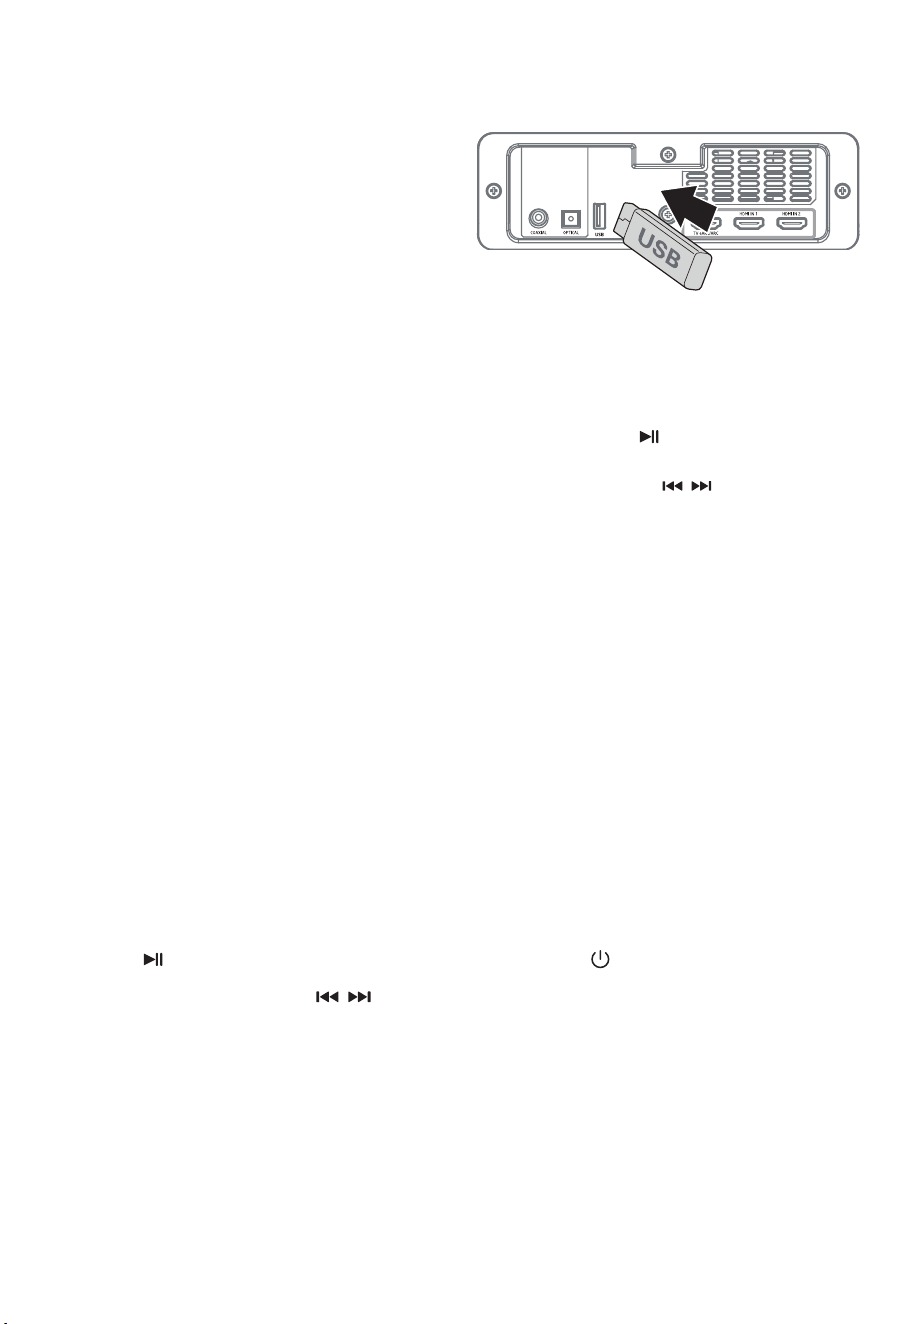
10. Operación USB
11. Solución De Problemas
-
Para pausar o reanudar la reproducción,
presione el botón en el control remoto.
-
Para saltar al archivo anterior / siguiente,
presione los botones / en el control remoto.
Para mantener la validez de la garantía, nunca
intente reparar el sistema usted mismo. Si encuentra
problemas al usar esta unidad, verifique los siguientes
puntos antes de solicitar servicio.
Consejos:
•
Introduzca "0000" como contraseña si es
necesario.
•
Si ningún otro dispositivo Bluetooth se empareja
con este reproductor en dos minutos, el
reproductor recuperará su conexión anterior.
•
El reproductor también se desconectará cuando
su dispositivo se mueva más allá del rango
operativo.
•
Si desea volver a conectar su dispositivo a este
reproductor, colóquelo dentro del rango
operativo.
•
Si el dispositivo se mueve más allá del rango
operativo, cuando lo devuelva, verifique si el
dispositivo todavía está conectado al reproduc-
tor.
•
Si se pierde la conexión, siga las instrucciones
anteriores para emparejar su dispositivo con el
reproductor nuevamente.
Consejos:
•
La unidad puede admitir dispositivos USB con
hasta 32 GB de memoria.
Ninguna Energía
•
Asegúrese de que el cable de CA del aparato
esté conectado correctamente.
•
Asegúrese de que haya energía en la toma de
AC.
•
Presione el botón (espera) para encender la
unidad.
El Control Remoto No Funciona
•
Antes de presionar cualquier botón de control de
reproducción, primero seleccione la fuente
correcta.
•
Antes de presionar cualquier botón de control de
reproducción, primero seleccione la fuente
correcta.
•
Inserte la batería con sus polaridades (+/-)
alineadas como se indica.
•
Reemplace la batería.
•
Apunte el control remoto directamente al sensor
en la parte frontal de la unidad.
•
Esta unidad puede reproducir MP3.
•
El sistema de archivos USB debe ser FAT32 o
FAT16.
1
Inserte el dispositivo USB.
2
Presione el botón (SOURCE) repetidamente en la
unidad o presione el botón USB en el control
remoto para seleccionar el modo USB.
3
Durante la reproducción:
9.2 Escuchar Música Desde Bluetooth
Dispositivo
•
Si el dispositivo Bluetooth conectado es
compatible con el perfil de distribución de
audio avanzado (A2DP), puede escuchar la
música almacenada en el dispositivo a través
del reproductor.
•
Si el dispositivo también admite el perfil de
control remoto de audio y video (AVRCP), puede
usar el control remoto del reproductor para
reproducir música almacenada en el dispositivo.
1
Vincula tu dispositivo con el reproductor.
2
Reproduzca música a través de su dispositivo (si
es compatible con A2DP).
3
Utilice el control remoto suministrado para
controlar la reproducción (si es compatible con
AVRCP).
12 ES
•
Para pausar / reanudar la reproducción, presione
el botón en el control remoto.
•
Para saltar a una pista, presione / botones
del mando a distancia.

El Televisor Tiene Problemas De Visualización Al Ver
Contenido HDR Desde Una Fuente HDMI.
•
Algunos televisores 4K HDR requieren que la
entrada HDMI o la configuración de imagen se
establezcan para la recepción de contenido
HDR. Para obtener más detalles sobre la
configuración de la pantalla HDR, consulte el
manual de instrucciones de su televisor.
No Puedo Encontrar El Nombre De Bluetooth De Esta
Unidad En Mi Dispositivo Bluetooth Para El
Emparejamiento Bluetooth
•
Asegúrese de que la función Bluetooth esté
activada en su dispositivo Bluetooth.
•
Asegúrese de haber emparejado la unidad con
su dispositivo Bluetooth.
Esta Es Una Función De Apagado De 15 Minutos, Uno
De Los Requisitos Estándar De ERPII Para Ahorrar
Energía.
•
Cuando el nivel de la señal de entrada externa
de la unidad es demasiado bajo, la unidad se
apagará automáticamente en 15 minutos.
Aumente el nivel de volumen de su dispositivo
externo.
Sin Sonido
•
Asegúrese de que la unidad no esté silenciada.
Presione el botón MUTE o VOL +/- para reanudar
el sonido normal.
•
Desenchufe la barra de sonido y el subwoofer de
la toma de corriente y vuelva a enchufarlos.
Encienda la barra de sonido.
•
Asegúrese de que la configuración de audio de
la fuente de entrada (por ejemplo, TV, consola
de juegos, reproductor de DVD, etc.) esté
configurada en el modo PCM o Dolby Digital
mientras usa la conexión digital (por ejemplo,
HDMI, OPTICAL, COAXIAL).
•
El subwoofer está fuera de rango, acerque el
subwoofer a la barra de sonido. Asegúrese de
que el altavoz de subgraves esté a menos de 5m
de la barra de sonido (cuanto más cerca, mejor).
•
Es posible que la barra de sonido haya perdido la
conexión con el altavoz de subgraves. Repare las
unidades siguiendo los pasos de la sección
"Emparejamiento del subwoofer inalámbrico con
la barra de sonido".
•
Es posible que la unidad no pueda decodificar
todos los formatos de audio digital de la fuente
de entrada. En este caso, la unidad se silenciará.
Esto NO es un defecto. El dispositivo no está
silenciado.
•
Presione en la unidad o en el control remoto
para cambiar la barra de sonido al modo de
espera. Luego presione el botón nuevamente
para encender la barra de sonido.
13 ES
El Subwoofer Está Inactivo O El Indicador Del
Subwoofer No Se Enciende.
•
Desenchufe el cable de alimentación de la
toma d
e corriente y vuelva a enchufarlo después
de 4 minutos para reiniciar el subwoofer.

12. Especificaciones
14 ES
Barra De Sonido
Fuente De Alimentación AC100-240V~ 50/60Hz
El Consumo De Energía 80 W / < 0.5 W (De Reserva)
USB
5V
500mA
USB de alta velocidad (2.0) / FAT32 / FAT16
32G (máx.), MP3
Dimensión (WxHxD) 1200 x 70 x 108 mm
Peso Neto 4.6 kg
Sensibilidad De Entrada De Audio 700mV
Respuesta Frecuente 120Hz - 20KHz
Especificación Inalámbrica
V 4.2 (A2DP, AVRCP)
Potencia Máxima Transmitida
Versión / Perfiles De Bluetooth
≤ 5 dBm
Bandas De Frecuencia De Bluetooth 2400 MHz ~ 2483.5 MHz
Rango De Frecuencia Inalámbrico 2.4G 2400 MHz ~ 2483 MHz
Potencia Máxima Inalámbrica 2.4G ≤ 6 dbm
Altavoz De Subgraves
Fuente De Alimentación AC100-240V~ 50/60Hz
El Consumo De Energía 80 W / < 0.5 W (De Reserva)
Dimensión (WxHxD) 240 x 420 x 240 mm
Peso Neto 5.5 kg
Respuesta Frecuente 40Hz - 120Hz
Amplificador (Potencia De Salida Rms)
Total 380 W
Unidad Principal 25W (8Ω) x 6 + 50W (4Ω)
Altavoz De Subgraves 180W (3Ω)
Control Remoto
Distancia / Ángulo 6m / 30°
Tipo De Batería
* Especificaciones sujetas a cambios sin previo aviso. Medido bajo condiciones específicas.
AAA (1.5V X 2)

目录
1. 重要安全说明
1.1 安全
1.2 警告
2
2
3
2. 包装内物品 4
3. 识别设备
3.1 遥控
3.2 主机
3.3 无线低音炮
4
4
5
5
4. 准备工作
4.1 准备遥控器
4.2 更换遥控器电池
4.3 放置和安装
4.4 壁挂式安装(如果使用选项 B)
6
6
6
6
6
5. 连接
5.1 杜比全景声
5.2 HDMI 连接
5.3 使用 OPTICAL(光纤)端口
5.4 使用 COAXIAL(同轴)端口
5.5 使用 AUX 端口
5.6 连接电源
7
7
8
8
8
9
9
6. 与低音炮配对
6.1 自动配对
6.2 手动配对
9
9
9
7. 基本操作
7.1 待机/开机
7.2 选择模式
7.3 调整低音/高音电平
7.4 打开/关闭环绕声
7.5 选择均衡器 (EQ) 效果
7.6 调节音量
7.7 关于显示亮度
7.8 AV SYNC(设置音频延迟)
9
9
10
10
10
10
10
10
10
8. AUX/ OPTICAL/ COAXIAL/ HDMI 操作 10
9. 蓝牙操作
9.1 配对蓝牙设备
9.2 从蓝牙设备听音乐
10
10
11
10. USB操作 11
11. 故障排除 11
12. 产品规格 12
简体中文
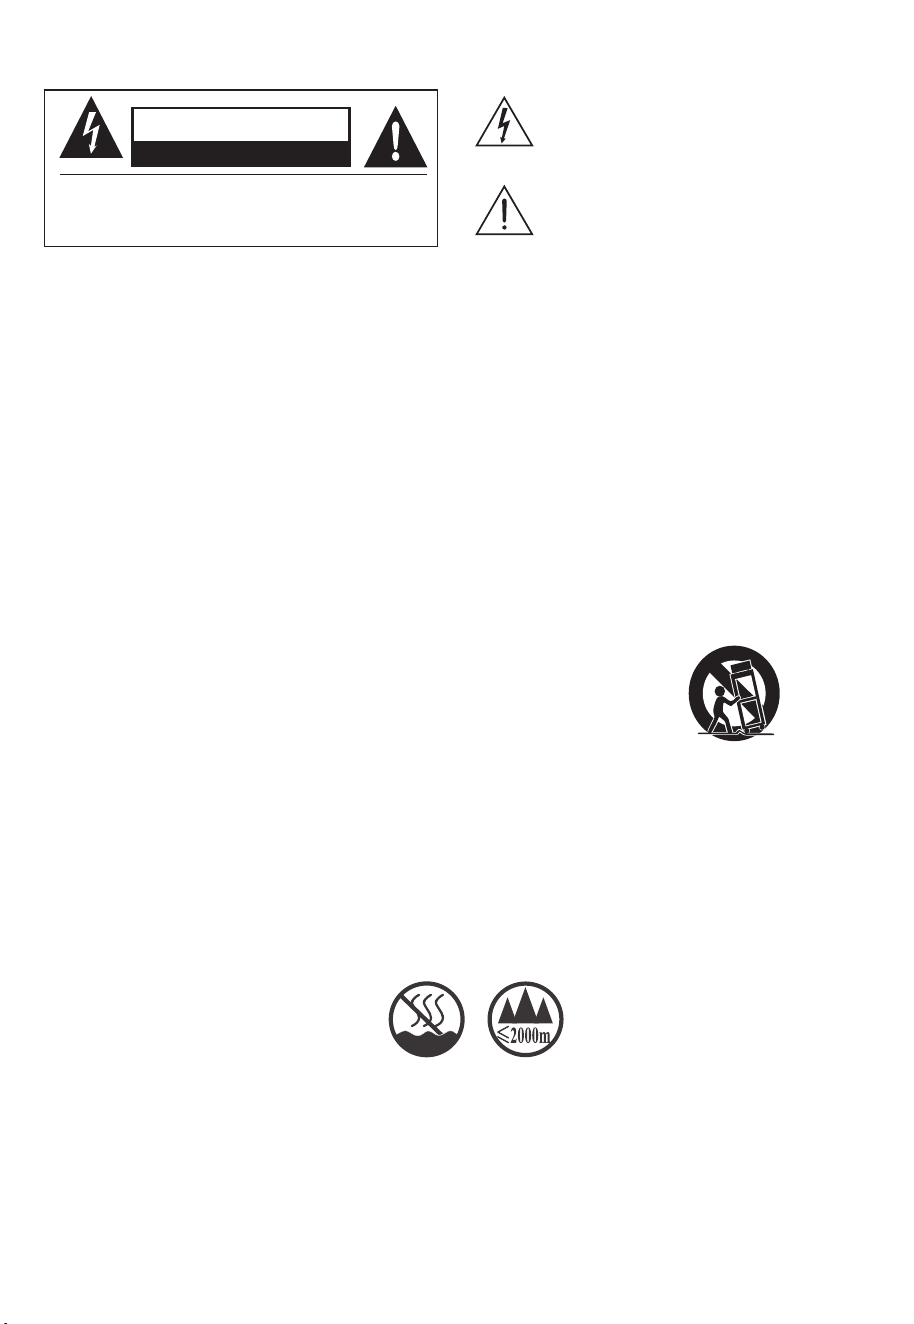
1. 重要安全说明
2 CN
注意: 请勿拆开机盖,以防触电!本机内部没有用户可以
维修的零件,需要时,请交给有资格的维修人员进行维修!
仅供海拔2000米及以下和非热带气候条件下安全使用!
等腰三角形内带有箭头的闪电图形旨在提醒用
户注意产品外壳内存在未绝缘的“危险电压”,该
电压可能足以对人造成触电危险
1.1 安全
1. 阅读这些说明 ‒ 在操作本产品之前,应阅读所有安全和操作说明。
2. 保留这些说明 ‒ 应保留安全和操作说明以备将来参考。
3. 注意所有警告 ‒ 应遵守设备上和操作说明中的所有警告。
4. 遵循所有说明 ‒ 应遵循所有操作和使用说明。
5. 请勿在靠近水的地方使用本设备 ‒ 本设备不应在靠近水或潮湿的地方使用⸺例如,在潮湿的地下室或游泳池附近等。
6. 只能用干布清洁。
7. 不要堵塞任何通风口 ‒ 按照制造商的说明进行安装。
8. 请勿安装在任何热源附近,例如散热器、加热器、火炉或其他产生热量的设备(包括放大器)。
9. 不要忽视极化或接地型插头的安全用途。极化插头有两个插脚,一个比另一个宽。接地型插头有两个插脚和第三个接地针
脚。宽插脚或第三个针脚是为了安全目的而设。如果配套的插头不适合您的插座,请咨询电工更换过时的插座。
10. 注意保护电源线免受踩踏或者挤压,特别是在插头、方便插座和从设备中伸出来处的电源线。
11. 只能使用制造商规定的附件/配件。
12. 只能使用制造商规定的或随设备一起出售的推车、支架、三脚架、支架或桌子一起使用。
使用手推车或架子时,移动手推车/设备组合时请小心,以免翻倒造成伤害。
13. 雷雨天气或长时间不使用时,请拔掉设备的插头。
14. 将所有维修交给合格维修人员。当设备遭到任何方式损坏时,就需要进行维修,例如:电源线或插头损坏、液体溅入或物体
掉入设备内、设备被雨淋或受潮、无法正常运行、或跌落。
15. 设备为 II 类或双重绝缘电器。它的设计方式不需要与电气接地的安全连接。
16. 设备不得滴水或溅水。不得在仪器上放置装满液体的物体,例如花瓶。
17. 设备周围保持足够通风的最小距离为 5 厘米。
18. 不得用报纸、桌布、窗帘等物品盖住通风口来妨碍通风��
19. 不得在设备上放置明火源,例如点燃的蜡烛。
20. 电池应根据州和地方指南进行回收或处理。
21. 在温和气候下使用仪器。
22. 仅适用于在非热带气候下使用。
23. 仅适用于海拔2000m以下地区使用。
警告:
- 使用此处所述以外的控制或调整或程序执行,可能会导致危险的辐射暴露或其他不安全操作。
- 为降低火灾或触电风险,请勿将本设备暴露在雨中或潮湿环境中。 不得将设备暴露在滴水或溅水环境中,不得将盛有液体
的物体(例如花瓶)放置在设备上。
- 电源插头/电器耦合器用作断开装置,断开装置必须保持易于操作。
- 如果电池更换不当,有爆炸危险。 仅替换为相同或等效的类型。
请勿打开机盖 以防触电
警 告
等腰三角形内的惊叹号旨在提醒用户注意附随
产品而提供的说明材料中存在相关操作和维修
的重要说明。

3 CN
1.2 警告
• 电池(电池或电池组)不得暴露在阳光、火等过热环境中。
• 在操作本设备之前,请检查本设备的电压,看它是否与您当地的电源电压相同。
• 请勿将本机靠近强磁场。
• 请勿将本机放在放大器或接收器上。
• 如果有任何固体物体或液体掉入设备中,请拔下设备电源并请合格人员进行检查,然后再继续操作。
• 请勿尝试使用化学溶剂清洁设备,因为这可能会损坏饰面。使用干净、干燥或微湿的布。
• 从墙上插座中拔出电源插头时,请轻柔直接拔插头,切勿猛拉电源线。
• 未经合规责任方明确批准而对本装置进行更改或修改将使用户操作该设备的授权无效。
• 额定标签粘贴在设备的底部或背面。
~ 交流电压:该符号表示标有该符号的额定电压为交流电压。
正确处理本产品。 该标志表明该产品不应与整个欧盟的其他生活垃圾一起处理。 为防止不受控制的废物处理可
能对环境或人类健康造成危害,请负责任地回收利用,以促进材料资源的可持续再利用。 要退回您用过的设备,
请使用退货和收集系统或联系购买产品的零售商。 他们可以将本产品用于环保安全回收。
电池使用注意
为防止可能导致人身伤害、财产损失或设备损坏的电池泄漏:
• 按照设备上的标记,正确安装所有电池,+ 和 -。
• 请勿混用新旧电池。
• 请勿混用碱性、标准(碳锌)或充电(镍镉、镍氢等)电池。
• 长时间不使用本机时请取出电池。
我们特此声明,本产品符合指令
2014/53/EU 的基本要求和其他相关规定。
由杜比实验室授权制造。
Dolby、Dolby Atmos、Dolby Vision Compatible
和double-D符号是杜比实验室的商标。
HDMI和HDMI High-Definition Mutimedia Interface
以及HDMI徽标是HDMI 授权管理公司在美国和其他
国家的商标或注册商标。
Bluetooth®字标和徽标是蓝牙信号公司拥有的注册商标,
Nakamichi有限责任公司对此类标记的任何使用均已获
得许可。
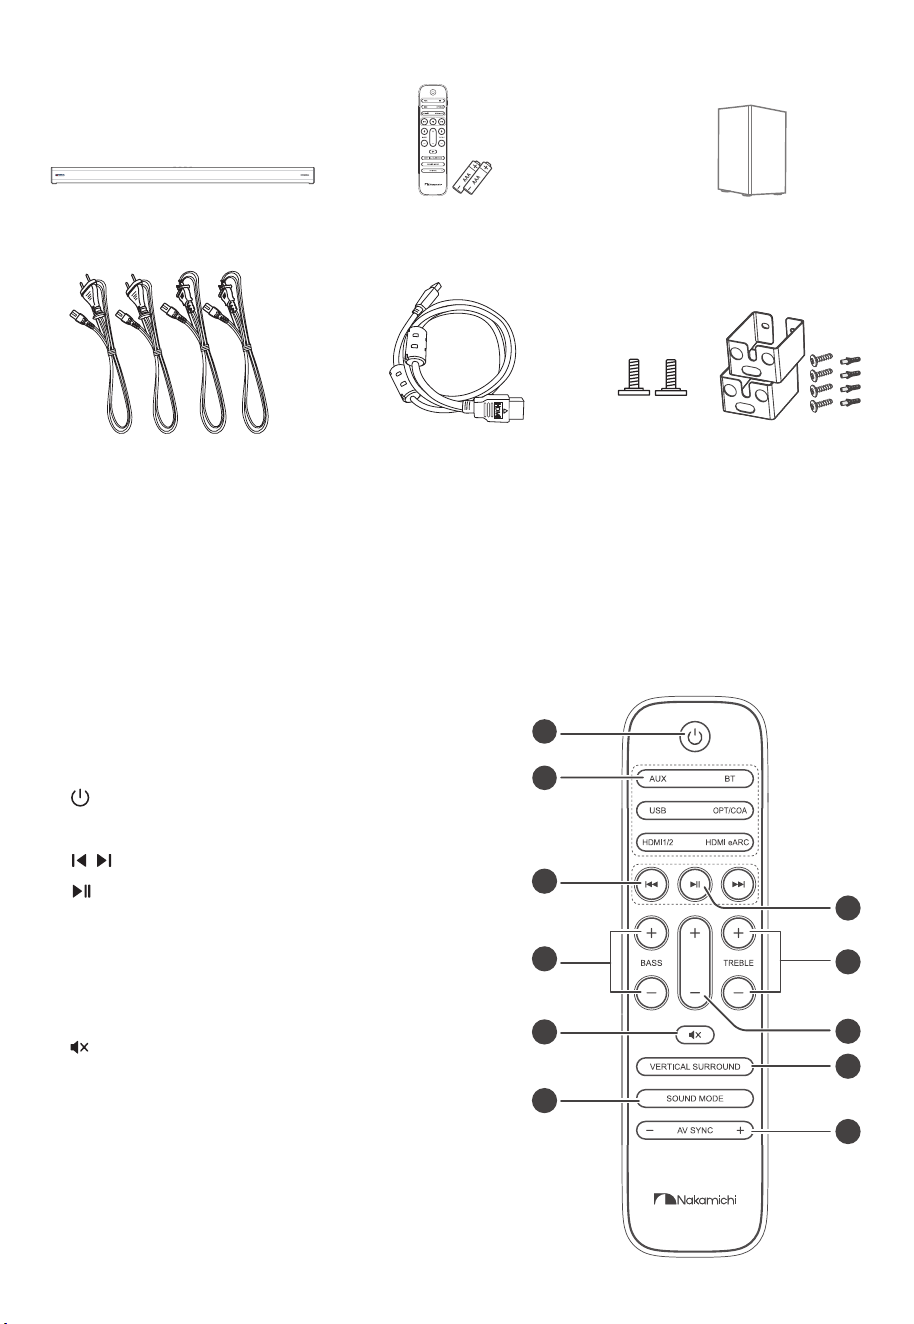
2. 包装内物品
4 CN
3. 识别设备
主机 x 1 遥控器 / AAA 电池 x 2
CCC交流电源线 x 2
EU交流电源线 x 2
HDMI线
• 电源线数量和插头类型因地区而异。
• 本用户手册中显示的图像、插图和图纸仅供参考。实际产品的外观可能有所不同。
墙壁安装螺丝 x2 / 支架 x2 /
支架螺丝 x4 / 墙锚 x4
无线低音炮 x 1
1. :开机或切换到待机模式。
2. SOURCE: 选择播放功能。
3. / 在蓝牙/USB模式下跳至上一首/下一首曲目。
4. 在蓝牙/USB 模式下播放/暂停/恢复播放。 在蓝牙模式下
按住可激活配对功能或断开现有配对的蓝牙设备。
-/+)音低( SSAB .5 : 调整低音电平。
6. TREBLE(高音) +/-: 调整高音电平。
7. +/-音量键: 增大/减小音量。
:)音静( .8 静音或恢复声音。
9. 垂直/环绕: 调整环绕声开/关。
10. 声音模式: 选择均衡器 (EQ) 效果。
11. AV SYNC +/-: 设置音频延迟
3.1 遥控
1
2
3
5
8
10
6
7
9
11
4
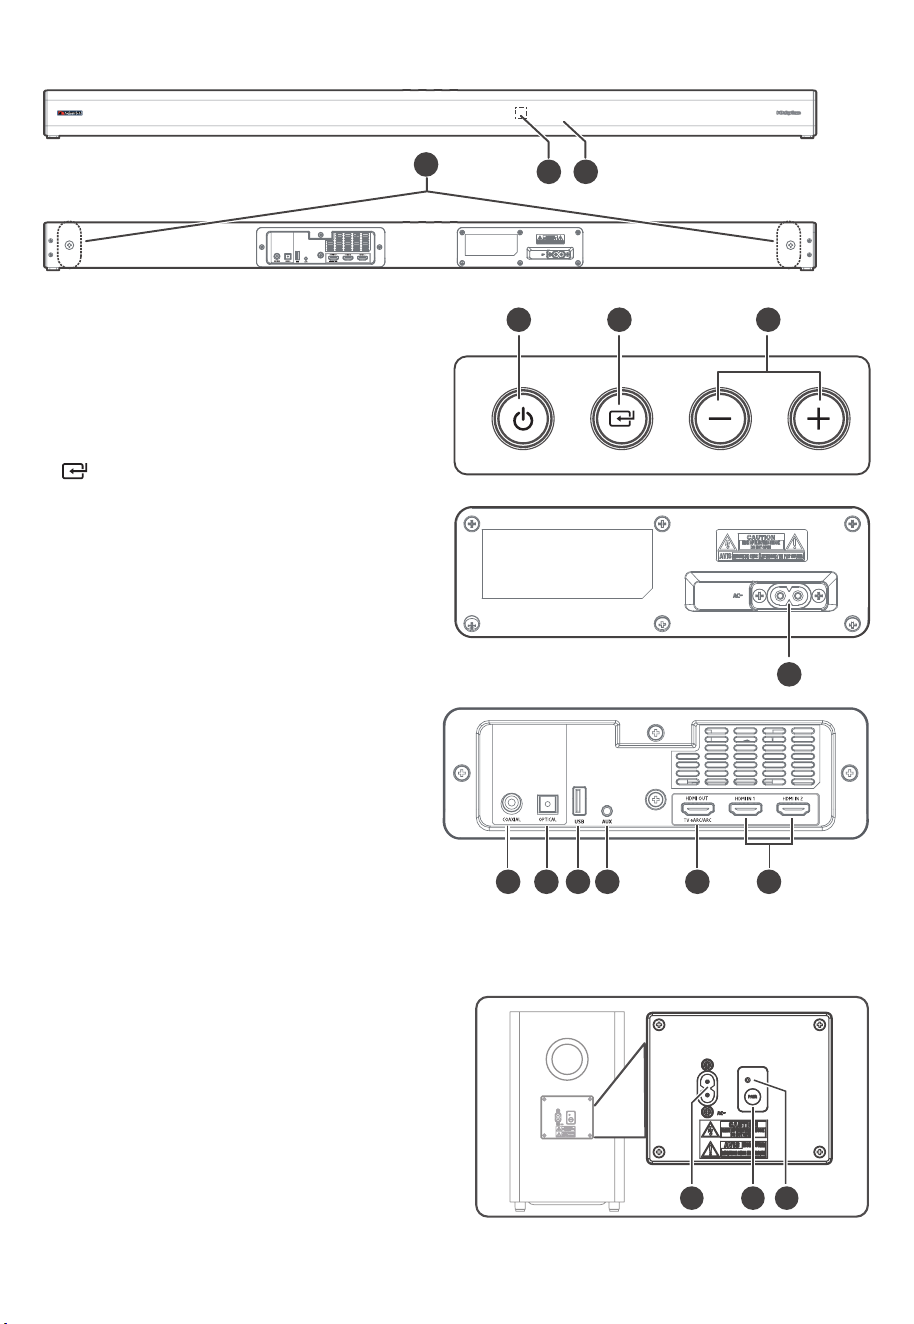
1. 显示窗口: 显示当前状态。
2. 遥控感应器: 接收遥控器信号。
3. 螺丝: 将壁挂安装螺钉安装到设备背面。
4. 开/关按钮: 开机或切换到待机模式。
5. 信号源按钮: 选择播放功能。
6. +/- 音量按钮: 增大/减小音量。
7. AC~ 端口: 连接电源。
8. 同轴端口
9. 光纤端口
10. USB端口: 插入USB设备以播放音乐。
11. AUX 端口: 连接到外部音频设备。
12. HDMI 输出 (TV eARC/ARC) 端口:
用于连接电视的端口。 该端口支持 eARC/ARC HDMI
功能,允许条形音箱播放来自连接电视的音频。
13. HDMI IN 1 / HDMI IN 2 端口
两个 HDMI 端口,用于连接 HDMI 源设备,例如 DVD
播放器、Blu-ray Disc™ 播放器或游戏机。 请注意,一
次只能使用一个 HDMI 输入。
1. AC~ 端口: 连接电源。
2. 配对按钮: 按激活主机和低音炮之间的配对功能。
3. 低音炮的 PAIR 指示灯:
一旦重低音扬声器与条形音箱配对,指示灯就会停止闪烁。
5 CN
3.2 主机
3.3 无线低音炮
aux
2 1
3
4 5 6
7
8 9 10 11 12 13
1 2 3
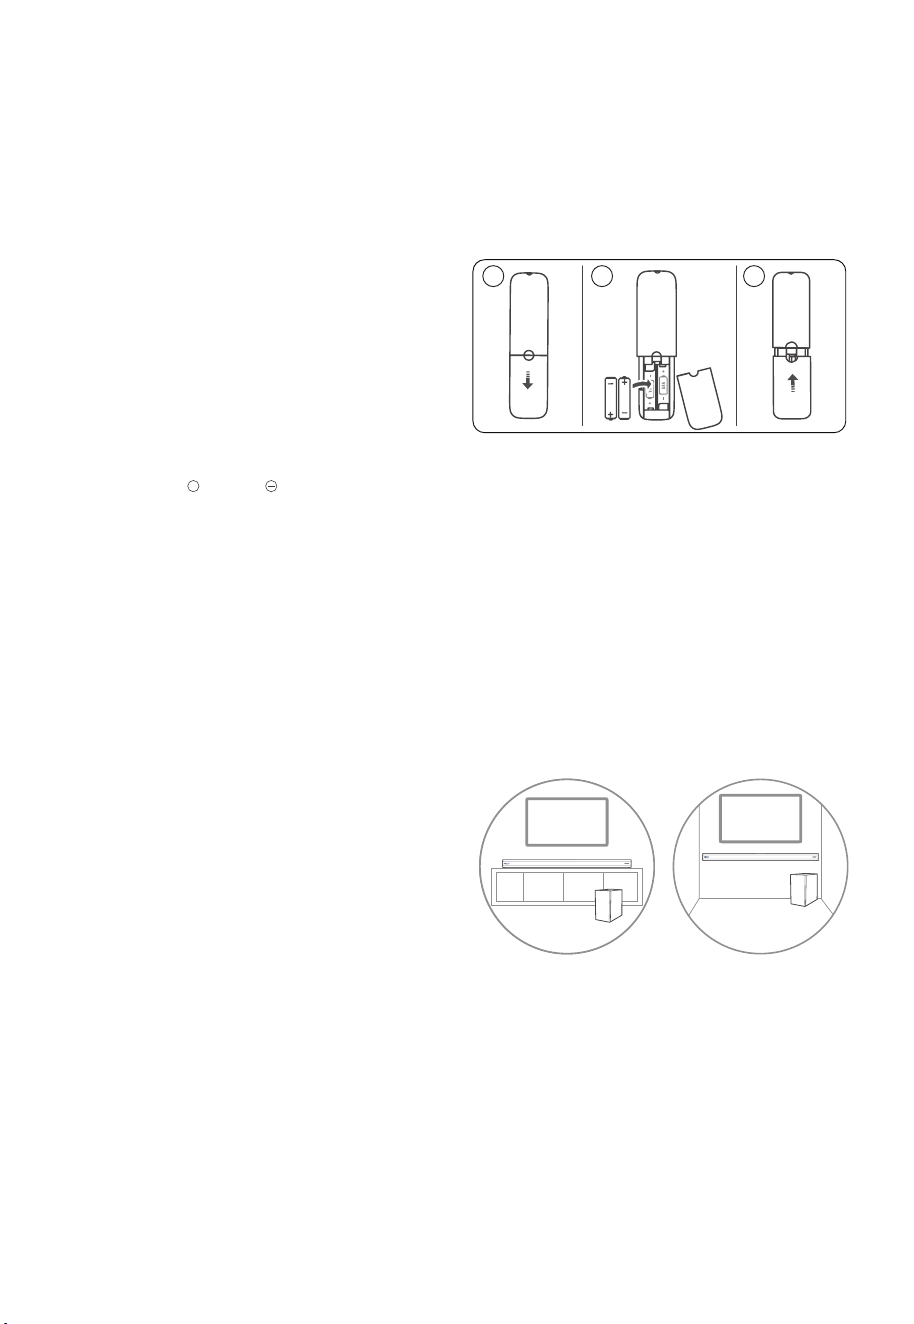
4.1 准备遥控器
提供的遥控器允许远距离操作设备。
• 即使在 6m(19.7 英尺) 的有效范围内操作遥控器,如果本机和遥控器之间有障碍物,可能无法进行遥控操作。
• 如果在产生红外线的其他产品附近操作遥控器,或者在本机附近使用其他使用红外线的遥控设备,则可能无法正确操作。
相反,其他产品可能无法正常运行。
4.2 更换遥控器电池
1. 按下并滑动后盖打开遥控器的电池仓。
2. 插入两节 AAA 电池(随附)。 确保电池的 (+) 和 (‒) 端与电
池盒中指示的 (+) 和 (‒) 端匹配。
3. 关闭电池仓盖。
4.3 放置和安装
放置
4.4 壁挂式安装(如果使用选项 B)
注意:
• 安装只能由合格人员进行。 不正确的组装可能会导致严重
的人身伤害和财产损失(如果您打算自己安装本产品,您
必须检查可能埋在墙内的电线和管道等安装)。 安装人员有
责任确认墙壁能够安全地支撑装置和墙壁支架的总负载。
• 安装需要的额外工具(不包括在内)。
• 不要将螺丝拧得过紧。
• 保留本使用说明书以备将来参考。
• 在钻孔和安装之前,使用电子螺柱探测器检查墙壁类型。
安装方法:
1. 在墙壁上钻4个平行孔(每个 Ø 5.5-6 mm,根据墙壁类
型)。 孔之间的距离应为 1121 毫米。
2. 如有必要,将1个销钉牢牢固定在墙上的每个孔中。 用
螺钉和螺丝刀(未随附)拧紧墙上的壁挂支架。 确保它
们安装牢固。
3. 拆下设备背面的螺丝,然后将壁挂安装螺丝安装到设备
背面。
4. 将设备抬到壁挂支架上并插入到位。
电池注意事项
• 务必以正确的正极“ + ”和负极“ ”插入电池。
• 使用相同类型的电池。 切勿同时使用不同类型的电池。
• 可以使用可充电电池或不可充电电池。 请参阅其标签上的
注意事项。
• 除非确认为可充电类型,否则切勿给电池充电。
• 取下电池盖和电池时,请注意您的指甲。
• 请勿掉落遥控器。
• 不要让任何东西撞击遥控器。
6 CN
4. 准备工作
• 请勿将水或任何液体洒在遥控器上。
• 请勿将遥控器放在潮湿的物体上。
• 请勿将遥控器置于阳光直射下或过热源附近。
• 长时间不使用遥控器时,请从遥控器中取出电池,否则可能
会发生腐蚀或电池泄漏,从而导致人身伤害和/或财产损失
和/或火灾。
• 请勿使用指定电池以外的任何电池。
• 不要将新电池与旧电池混用。
A. 如果您的电视放在桌子上,您可以将本机直接放在电视
架正前方的桌子上,以电视屏幕为中心。
B. 如果您的电视挂在墙上,您可以将本机安装在电视屏幕
正下方的墙上。
A
A A
AA A
1 2 3
A B
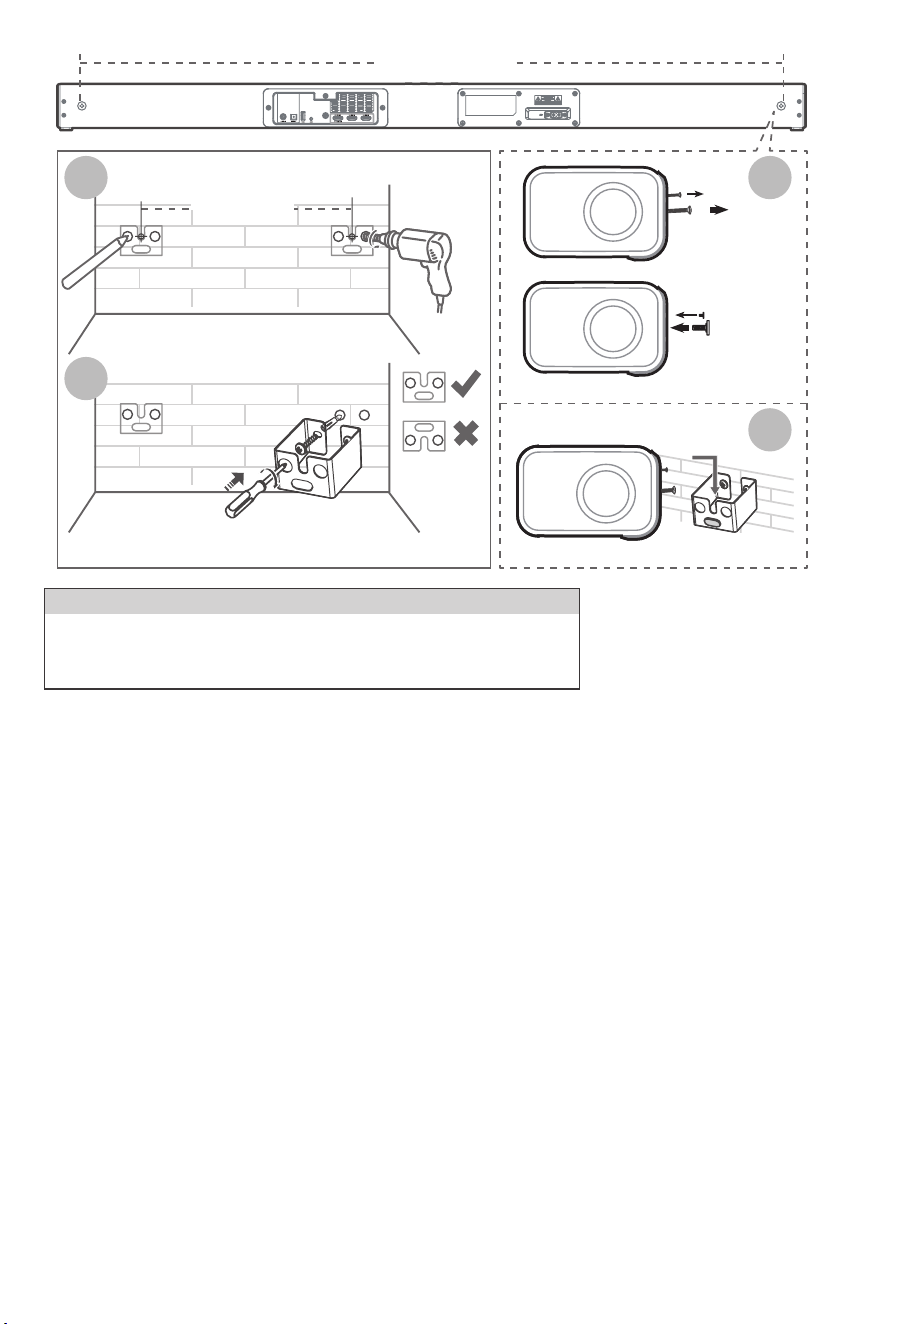
5.1 杜比全景声
杜比全景声(Dolby Atmos)通过在三维空间中传递声音以及杜比音效的所有丰富性、清晰度和力量,为您提供身临其境的聆
听体验。 有关更多信息,请访问 dolby.com/technologies/dolby-atmos
使用 Dolby Atmos®
Dolby Atmos® 仅在 HDMI 模式下可用。有关连接的详细信息,请参阅“HDMI 连接”。
温馨提示:
• 只有当条形音箱通过HDMI 2.0电缆连接到信号源时,才能获得完整的杜比全景声 (Dolby Atmos) 体验。
• 当通过其他方法(例如数字光缆)连接时,条形音箱仍能正常工作,但这些方法无法支持所有杜比功能。
鉴于此,我们建议通过HDMI连接,以确保完全支持杜比。
1. 要在HDMI1、HDMI2 和 HDMI ARC/eARC 模式下使用 Dolby Atmos®,您的电视必须支持 Dolby Atmos®。
2. 确保在连接的外部设备(例如: 蓝光DVD播放器、电视等)的音频输出中为比特流选择“无编码”。
3. 进入Dolby Atmos / Dolby Digital / PCM 格式时,条形音箱将显示 DOLBY ATMOS / DOLBY AUDIO / PCM AUDIO。
5. 连接
7 CN
• 为防止受伤,必须按照安装说明将此设备牢固地固定在地板/墙壁上。
• 建议的壁挂安装高度:≤ 1.5 米。
警 告
1121 mm
拆下螺丝
安装
墙壁安装螺丝
3
4
1121 mm
1
2
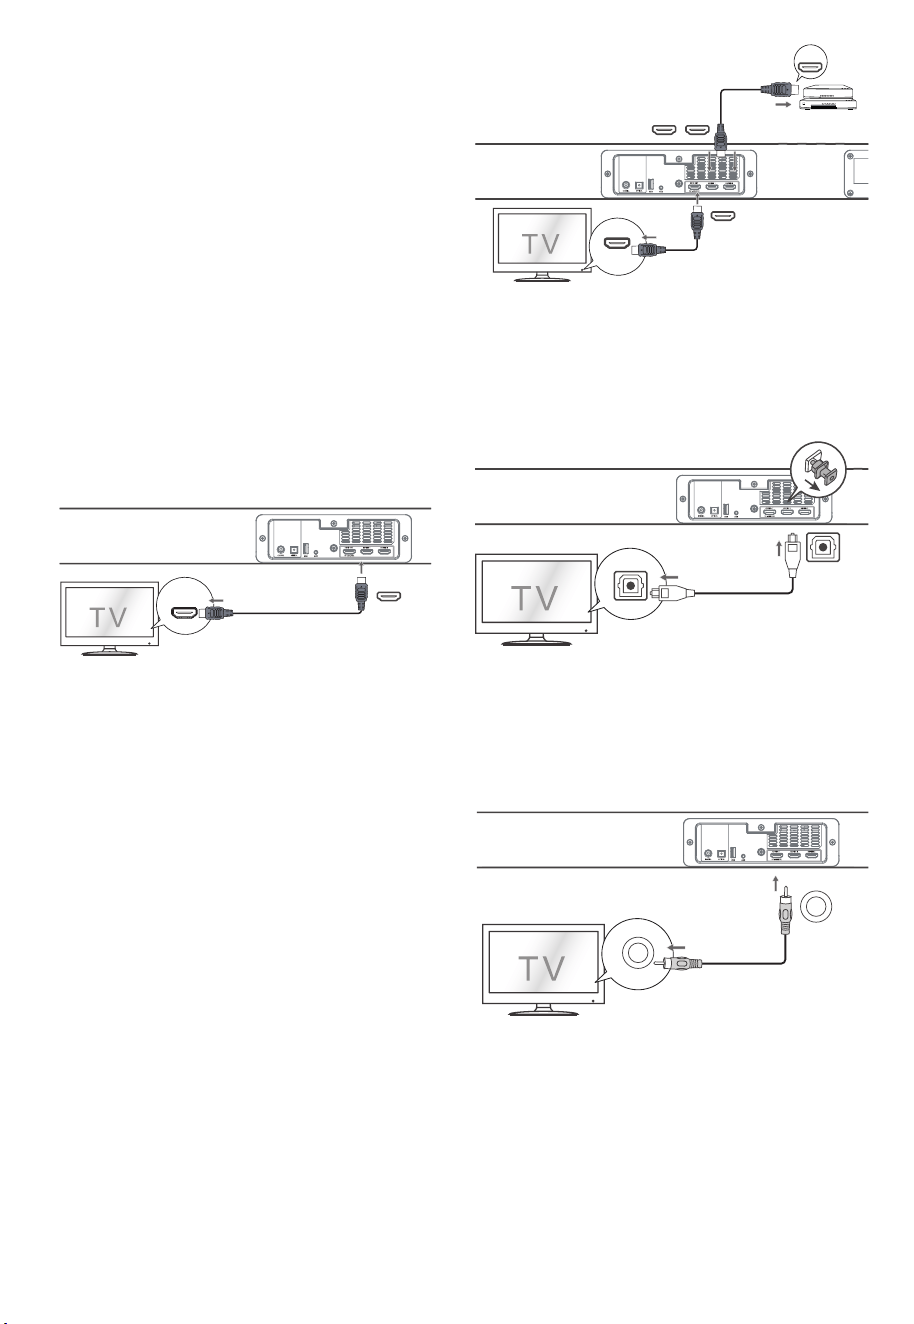
8 CN
5.2 HDMI 连接
某些4K HDR电视需要为HDR内容接收设置HDMI输入或图
像设置。 有关HDR显示的更多设置详细信息,请参阅电视的
使用说明书。
使用HDMI连接条形音箱、AV设备和电视:
5.3 使用OPTICAL(光纤)端口
取下光纤端口的保护盖,然后将光纤电缆(未随附)连接到电
视的光纤输出插孔和设备上的OPTICAL(光纤)端口。
5.4 使用COAXIAL (同轴)端口
• 您也可以使用同轴电缆(未随附)连接电视的同轴输出插孔
和本机上的 COAXIAL (同轴)端口。
方法一: eARC / ARC(音频回传通道)
eARC / ARC(音频回传通道)功能允许您通过单个 HDMI 连
接将音频从符合 ARC 的电视发送到条形音箱。 要享受 ARC
功能,请确保您的电视符合 HDMI-CEC 和 ARC 标准并进行
相应设置。 正确设置后,您可以使用电视遥控器调整条形音
箱的音量输出(VOL +/- 和 MUTE)。
• 将HDMI电缆(随附)从设备的HDMI OUT (TV eARC/ARC)
插孔连接到 ARC 兼容电视上的 HDMI (ARC)插孔。 然后按
遥控器选择 HDMI eARC。
方法二:标准HDMI
如果您的电视不符合HDMI ARC,请通过标准 HDMI 连接将
条形音箱连接到电视。
1. 使用 HDMI 电缆(随附)将条形音箱的 HDMI OUT
(TV eARC/ARC) 插孔连接到电视的 HDMI IN 插孔。
2. 使用 HDMI 电缆(未随附)将条形音箱的 HDMI IN(1 或 2)
插孔连接到外部设备(例如游戏机、DVD 播放器和蓝光)。
温馨提示:
• 您的电视必须支持HDMI-CEC 和 ARC 功能。 HDMI-CEC和
ARC必须设置为开。
• HDMI-CEC 和 ARC 的设置方法可能因电视而异。 有关ARC
功能的详细信息,请参阅用户手册。
• 只有HDMI 1.4 或更高版本的电缆才能支持ARC 功能。
温馨提示:
本机可能无法解码来自输入源的所有数字音频格式。 在这
种情况下,本机将静音。 确保输入源(例如电视、游戏机、DVD
播放器等)的音频设置为PCM 或 Dolby Digital(有关其音频
设置的详细信息,请参阅输入源设备的用户手册)带 HDMI /
光纤/同轴输入。
HDMI (eARC/ARC)
HDMI OUT
TV eARC/ARC
HDMI IN
HDMI OUT
Blu-ray Player / DVD Player /
Recorder / Set-top Box...
HDMI OUT
TV eARC/ARC
HDMI IN 1 HDMI IN 2
OPTICAL(光纤)
OPTICAL (光纤)
COAXIAL
COAXIAL
OPTICAL
OPTICAL
COAXIAL(同轴)
COAXIAL (同轴)
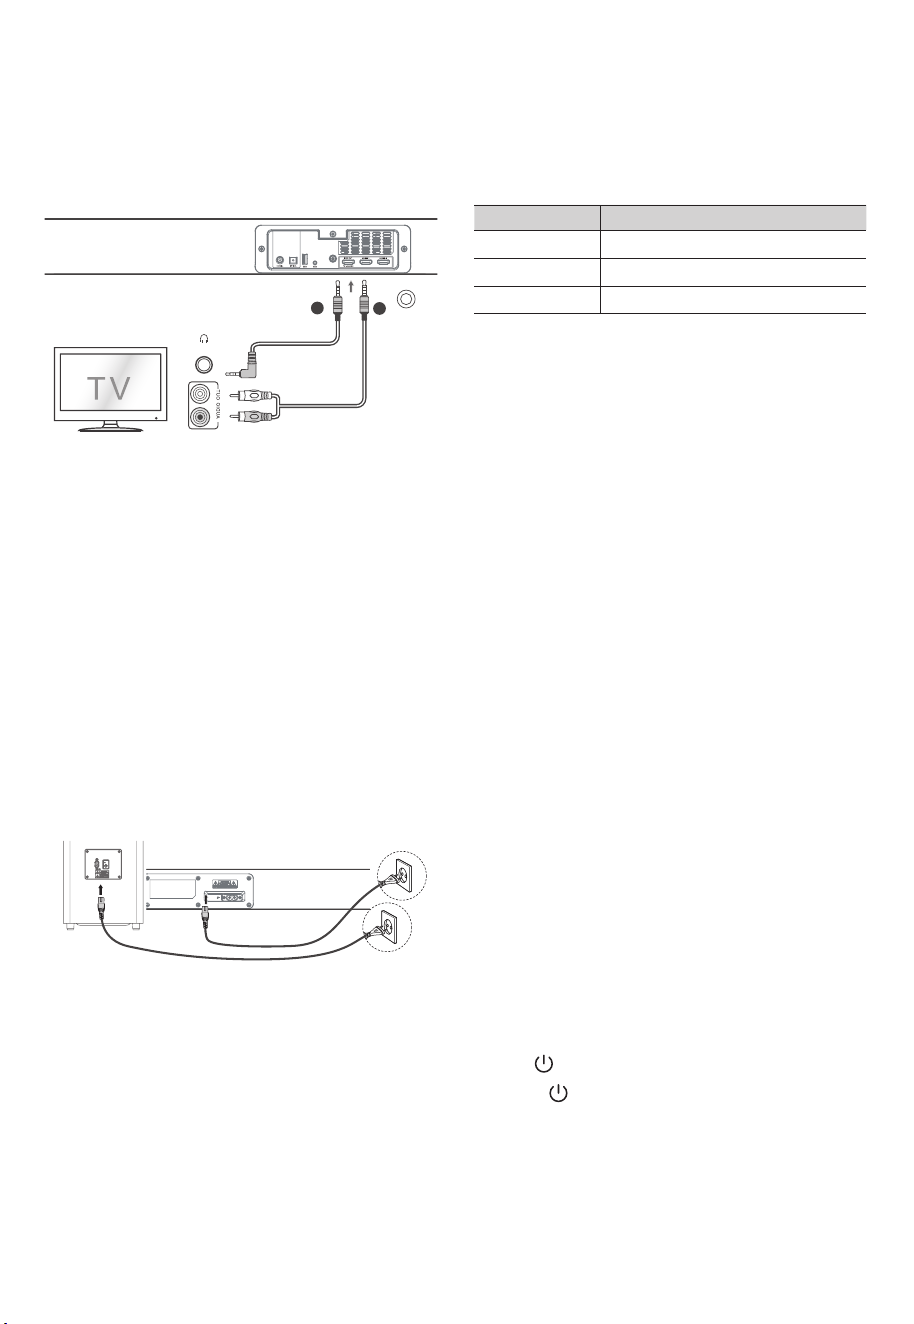
6. 与低音炮配对
6.2 手动配对
1. 确保所有线缆连接良好且主机处于待机模式。
2. 按住低音炮背面的 PAIR 按钮几秒钟。 低音炮将进入配对
模式,配对指示灯将快速闪烁。
3. 按主机或遥控器上的按钮打开主机。
4. 无线连接成功后,配对指示灯会亮起。
5. 如果配对指示灯慢闪,则无线连接失败。 拔下低音炮的电
缆,然后在 4 分钟后重新连接主电缆。 重复步骤 1 ~ 4。
6.1 自动配对
当两个装置都插入电源插座并打开时,低音炮和条形音箱将
自动配对。 无需电缆即可连接两个单元。
• 根据无线低音炮指示灯确定状态。
温馨提示:
• 除手动配对外,请勿按低音炮背面的 PAIR 按钮。
• 如果自动配对失败,请手动将低音炮与主机配对。
LED灯状态 配对状态
快闪
常亮
慢闪
处于配对模式的低音炮
已连接/配对成功
连接/配对失败
温馨提示:
• 如果无线连接再次失败,请检查您所在位置是否存在冲突
或强干扰(例如,来自电子设备的干扰)。 去除这些冲突或
强干扰,重复上述步骤。
• 低音炮应位于开放区域中条形音箱的6m范围内。
• 如果连接了电视或外部设备,当打开电视或外部设备时,主
机仅 AUX 型号和低音炮将自动打开。
• 如果主机未与低音炮连接且处于开启模式,则电源指示灯
将闪烁。 按照上面的步骤 1 ~ 4 将低音炮与主机配对。
7. 基本操作
自动唤醒
• 如果连接了电视或外部设备(LINE IN / HDMI ARC),当打
开电视或外部设备时,本机将自动打开。
7.1 待机/开启
当您第一次将主机连接到电源插座时,主机将处于待机模式。
• 按本机 或遥控器上的按钮打开本机。
• 再次按下 按钮将本机切换回待机模式。
• 如果您想完全关闭设备,请从电源插座上拔下电源插头。
5.5 使用 AUX 端口
A. 使用3.5毫米音频线(未随附)将电视或外部音频设备耳机
插孔连接到设备上的 AUX 插孔。
B. 使用RCA转3.5毫米音频线(未随附)将电视的音频输出插
孔连接到设备上的 AUX 插孔。
5.6 连接电源
产品损坏风险!
- 确保电源电压与印在设备背面或底部的电压相符。
- 在连接交流电源线之前,确保您已完成所有其他连接。
• 条形音箱
将电源线连接到主机的 AC~ 插座,然后插入电源插座。
• 低音炮
将电源线连接到低音炮的 AC~ 插座,然后插入电源插座。
9 CN
AU
耳机
X
A
B
注意:
- 如果没有电源,请确保电源线和插头完全插入并打开电源。
- 电源线数量和插头类型因地区而异。

7.3 调整低音/高音电平
• 按遥控器上的 BASS +/- 按钮调整低音电平。
• 按遥控器上的 TREBLE +/- 按钮调整高音电平。
7.6 调整音量
• 按本机或遥控器上的 +/- (VOL) 按钮调节音量。
• 如果您想关闭声音,请按遥控器上的静音按钮。 再次按
静音按钮或按本机或遥控器上的 +/- (VOL) 按钮恢复正常
收听。
7.7 关于显示亮度
• 10秒无操作时,屏幕亮度会自动调暗。 再次操作时,将自动
恢复到最亮级别。
7.8 AV SYNC(设置音频延迟)
• 视频图像处理,有时比处理音频信号所需的时间更长。 这
被称为“延迟”。 音频延迟功能旨在弥补这种延迟。
音CRAe IMDH如( 。式模放播前当于用适仅,迟延频音置设 •
频延迟模式中提供的,延迟模式仅对HDMI eARC有效)。
• 按遥控器上的 AV SYNC+/- 按钮调整延迟时间。
- AV00 ~ AV200(默认情况下,音频延迟设置为 00)。
7.4 打开/关闭环绕声
• 按遥控器上的 VERTICAL/SURROUND 按钮打开环绕声。
再次按下此按钮可关闭环绕声。
8. AUX/ OPTICAL/ COAXIAL/
HDMI 操作
1. 确保本机已连接到电视或音频设备。
2. 反复按本机上的 (SOURCE) 按钮或遥控器上的 AUX、
OPT/COA、HDMI 1/2、HDMI ARC 按钮选择所需模式。
3. 直接操作您的音频设备以获得播放功能。
4. 按 VOL +/- 按钮将音量调节到您想要的水平。
自动关机功能
• 如果电视或外部设备断开连接、关闭,设备会在大约 15 分
钟后自动进入待机模式。
• 要完全关闭设备,请从电源插座上拔下电源插头。
• 不使用时请完全关闭设备以节省能源。
9. 蓝牙操作
9.1 配对蓝牙设备
首次将蓝牙设备连接到此播放器时,您需要将设备与此播放
器配对。
注意:
• 本播放器和蓝牙设备之间的操作范围约为 8 米(蓝牙设备
和本机之间没有任何物体)。
• 将蓝牙设备连接到本机之前,请确保您了解设备的功能。
• 不保证与所有蓝牙设备的兼容性。
• 本机和蓝牙设备之间的任何障碍物都会降低操作范围。
• 如果信号强度较弱,您的蓝牙接收器可能会断开连接,但
会自动重新进入配对模式。
7.2 选择模式
按本机上的 (SOURCE)按钮或遥控器上的AUX、BT、OPT
/COA、HDMI 1/2、HDMI eARC 和 USB 按钮选择所需模式。
所选模式将显示在显示屏上。所选模式将显示在显示屏上。
7.5 选择均衡器 (EQ) 效果
播放时,按遥控器上的SOUND MODE按钮选择所需的预设
均衡器效果。
• 人声(VOICE): 创建使人声更清晰、更出众的音效。
• 运动(SPORT): 营造一种仿佛在体育场观看体育比赛的氛围。
• 电影(MOVIE): 营造环绕声聆听体验。 非常适合看电影。
• 音乐(MUSIC): 创建双声道或多声道立体声。 非常适合听音乐。
温馨提示:
在 AUX / BT / USB 模式下,按 AV SYNC+/- 按钮无效。 音频
延迟设置仅对数字音频有效(例如 HDMI 1、HDMI 2、HDMI
eARC、OPTICAL、COAXIAL)。
温馨提示:
• 本机可能无法解码来自输入源的所有数字音频格式。在这
种情况下,本机将静音。确保输入源(例如电视、游戏机、DVD
关有(latigiD ybloD 或 MCP 为置设置设频音的)等器放播
其音频设置的详细信息,请参阅输入源设备的用户手册)具
有HDMI 1/ HDMI 2/ HDMI ARC/ 光纤 / 同轴输入。
• 在HDMI 1/ HDMI2/ HDMI ARC/ eARC 模式下,当进入
DOLBY ATMOS 音频格式时,Soundbar 显示屏显示
DOLBY ATMOS。
• 当输入DOLBY DIGITAL 音频格式时,条形音箱显示屏会显
示DOLBY AUDIO。
• 输入PCM音频格式时,条形音箱显示屏会显示PCM AUDIO。
• 当输入非PCM或DOLBY DIGITAL音频格式时,如果本机没
有声音输出,显示屏将显示NONSUPPORT FORMAT。
10 CN
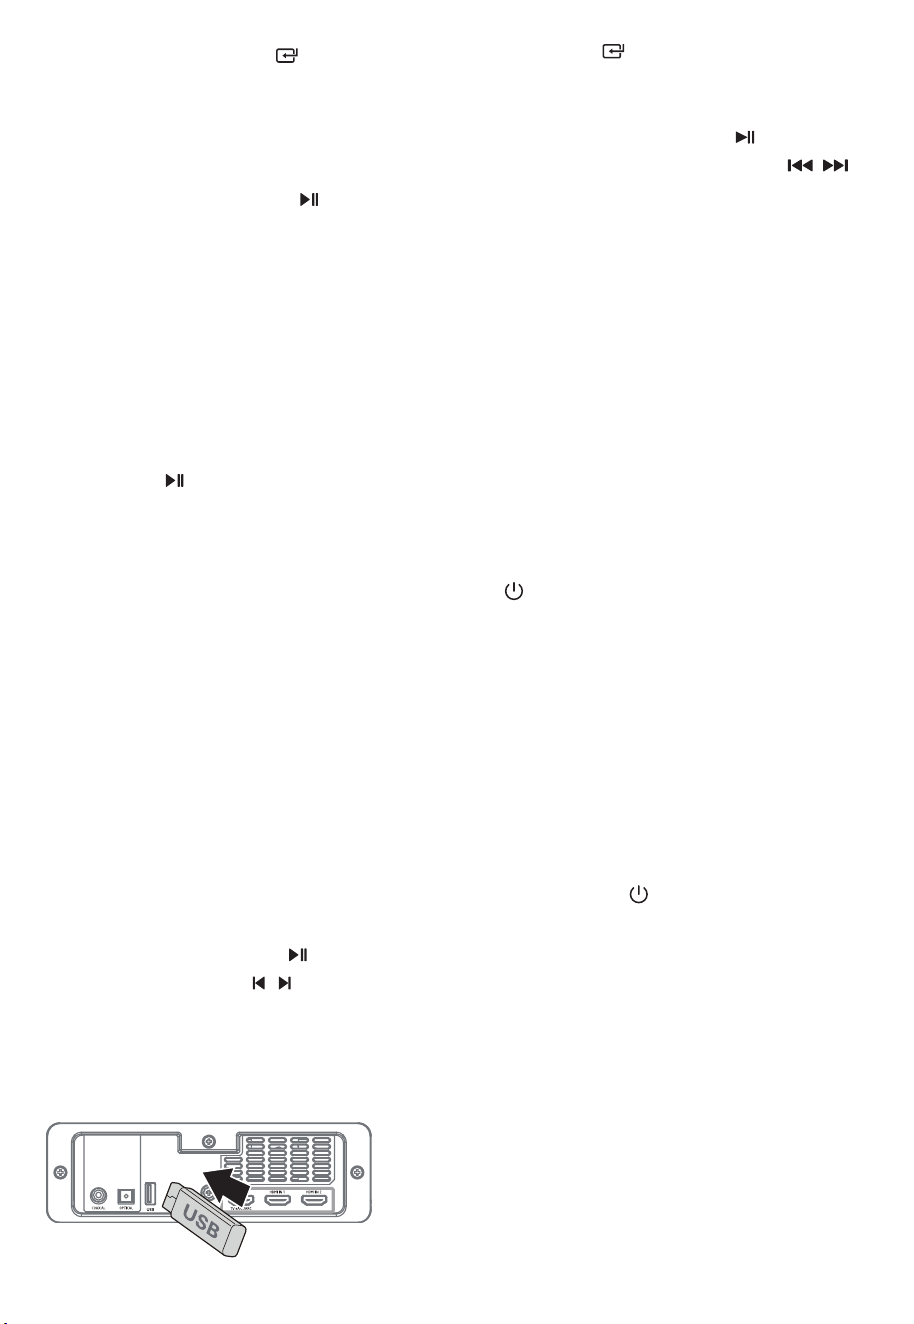
11. 故障排除
10. USB操作
为保持保修有效,切勿尝试自行修理设备。 如果您在使用本
设备时遇到问题,请在请求维修前检查以下几点。
1. 在开机模式下,反复按本机上的 (SOURCE) 按钮或遥
控器上的 BT 按钮选择蓝牙模式。 如果本机未与任何蓝牙
设备配对,显示屏上将显示“NO BT”。
2. 出将”025 ollopA“ 。式模索搜择选并备设牙蓝的您活激
现在您的蓝牙设备列表中。
• 如果找不到本机,请按住遥控器上的 或 BT 按钮进行搜
索。 您将听到本机的音频提示,显示屏将显示“PAIR”。
3. 在配对列表中选择“Apollo 520”。 有声音提示后,系统连
接成功,显示面板显示“BT”。
4 .从连接的蓝牙设备播放音乐。
要断开蓝牙功能,您可以:
• 切换到本机的其他功能。
• 从您的蓝牙设备禁用该功能。 蓝牙设备将在音频提示后与
条形音箱断开连接。
• 按住遥控器上的 或 BT 按钮。
温馨提示:
• 如有必要,输入“0000”作为密码。
• 如果两分钟内没有其他蓝牙设备与本播放器配对,播放器
将恢复之前的连接。
• 当您的设备超出操作范围时,播放器也会断开连接。
• 如果您想将您的设备重新连接到此播放器,请将其置于操
作范围内。
• 如果设备超出操作范围,带回时请检查设备是否仍与播放
器连接。
• 如果连接失败,请按照上述说明重新将设备与播放器配对。
9.2 从蓝牙设备听音乐 在设备上的音乐。
1. 将您的设备与播放器配对。
2. 通过您的设备播放音乐(如果它支持 A2DP)。
3. 使用提供的遥控器控制播放(如果它支持 AVRCP)。
• 要暂停/恢复播放,请按遥控器上的 按钮。
• 要跳至曲目,请按遥控器上的 / 按钮。
1. 插入 USB 设备。
2. 重复按本机上的 (SOURCE)按钮或按遥控器上的USB
按钮选择 USB 模式。
3. 播放过程中:
• 要暂停或继续播放,请按遥控器上的 按钮。
• 要跳到上一个/下一个文件,请按遥控器上的 /
按钮。
温馨提示
• 本设备可支持具有高达32GB内存的USB设备。
• 本设备可以播放MP3。
• USB文件系统应为FAT32 或FAT16。
设备不能正常启动
• 确保设备的交流电源线连接正确。
• 确保交流电源插座有电。
。备设开打钮按)机待( 按 •
遥控器不起作用
• 在按下任何播放控制按钮之前,首先确认电池是否有电。
• 减少遥控器和本机之间的距离。
• 按照指示插入电池,使其极性 (+/-) 对齐。
• 更换电池。
• 将遥控器直接对准设备正面的传感器。
没有声音
• 确保本机未静音。按 MUTE 或 VOL+/- 按钮恢复正常收听。
• 按本机或遥控器上的 将条形音箱切换到待机模式。然
后再次按下按钮打开条形音箱。
• 从电源插座中拔下条形音箱和低音炮,然后重新插入。打开
条形音箱。
• 确保在使用数字(例如 HDMI、OPTICAL)连接时将输入源
( 例如电视、游戏机、DVD 播放器等)的音频设置设为 PCM
或杜比数字模式。
• 低音炮超出范围,请将低音炮移近条形音箱。确保低音炮距
离条形音箱 5 m 以内(越近越好)。
• 条形音箱可能与低音炮失去连接。按照“将无线低音炮与
Soundbar 配对”部分中的步骤重新配对设备。
• 本机可能无法解码来自输入源的所有数字音频格式。在这种
情况下,机器将处于静音状态。
11 CN

12. 产品规格
在用于蓝牙配对的蓝牙设备上找不到本机的蓝牙名称
• 确保蓝牙设备上的蓝牙功能已激活。
• 检查是否已将本机与蓝牙设备配对。
15分钟断电功能,是ERPII标准对省电的要求之一
• 当本机的外部输入信号电平太低时,本机将在15分钟后自
动关闭。 请提高外部设备的音量。
低音炮空闲或低音炮指示灯不亮。
• 请从电源插座上拔下电源线,4 分钟后重新插入并重启低
音炮。
从HDMI源观看HDR内容时,电视出现显示问题。
• 某些4K HDR电视需要为HDR内容接收设置HDMI输入或图
像设置。有关 HDR 显示的更多设置详细信息,请参阅电视的
使用说明书。
条形音箱
电源供应 AC100-240V~ 50/60Hz
功耗 80 W / < 0.5 W (待机)
USB
蓝牙版本/配置文件
5V
高速 USB (2.0) / FAT32 / FAT16 32G(最大),MP3
500mA
产品尺寸(宽x高x深) 1200 × 70 × 108 mm
净重 4.6 kg
音频输入灵敏度 700mV
频率响应 120Hz - 20KHz
蓝牙规格
V 4.2 (A2DP, AVRCP)
最大传输功率 ≤ 5 dBm
蓝牙频段 2400 MHz ~ 2483.5 MHz
2.4G 无线频段 2400 MHz ~ 2483 MHz
2.4G 无线最大功率 ≤ 6 dbm
低音炮
电源供应 AC100-240V~ 50/60Hz
功耗 80 W / < 0.5 W (待机)
产品尺寸(宽x高x深) 240 × 420 × 240 mm
净重 5.5 kg
频率响应 40Hz - 120Hz
功率放大器(RMS 输出功率)
整套
380 W
主机 25W (8Ω) x 6 + 50W (4Ω)
低音炮 180W (3Ω)
遥控器
距离/角度 6m / 30°
电池类型 AAA (1.5V X 2)
规格如有更改,恕不另行通知。 在特定条件下测量。
12 CN

Made in China | 中国制造
nakamichi.global nakamichihomeaudio nakamichihomeaudio