
5.1.2CH ATMOS SOUNDBAR
WIRELESS SUBWOOFER / WIRELESS SURROUND
APOLLO 550
User Manual
nakamichihomeaudionakamichihomeaudio.com nakamichi.global

English
Contents
1. Important Safety Instructions ................................................................................................3
1.1 Safety ....................................................................................................................................................3
1.2 Warning ................................................................................................................................................4
2. What’s in the Box ....................................................................................................................5
3. Identifying the Parts ...............................................................................................................6
3.1 Main Unit ..............................................................................................................................................6
3.2 Wireless Subwoofer ..............................................................................................................................6
3.3 Wireless Surround .................................................................................................................................7
3.4 Remote Control ...................................................................................................................................7
4. Preparations ...........................................................................................................................8
4.1 Prepare the Remote Control..............................................................................................................8
4.2 Replace the Remote Control Battery ...............................................................................................8
8
4.3 Placement and Mounting Placement
..............................................................................................
4.4 Wall Mounting (For Unit) ......................................................................................................................8
4.5 Wall Mounting (For Surround) ...........................................................................................................10
5. Connections .........................................................................................................................10
5.1 Dolby Atmos
®
5.2 HDMI Connection ..............................................................................................................................
......................................................................................................................................
10
10
5.3 Use the OPTICAL Socket ...................................................................................................................11
5.4 Use the COAXIAL Socket ..................................................................................................................11
5.5 Use the AUX Socket ...........................................................................................................................11
5.6 Connect Surround Speakers ............................................................................................................11
5.7 Connect Power .................................................................................................................................12
5.8 Pair up with the Subwoofer & Surround ..........................................................................................12
6. Basic Operation ...................................................................................................................13
6.1 Standby/ON .......................................................................................................................................13
6.2 Select Modes .....................................................................................................................................13
6.3 Adjust the Bass/Treble Level .............................................................................................................13
6.4 Turn the Surround Sound ON/OFF ....................................................................................................13
6.5 Select Equalizer (EQ) Effect ..............................................................................................................13
6.6 Adjust the Volume .............................................................................................................................13
6.7 About the Display Brightness ............................................................................................................13
6.8 AV SYNC (Set the Audio Delay) .......................................................................................................13
7. AUX/OPTICAL/COAXIAL/HDMI Operation ........................................................................14
8. Bluetooth Operation ............................................................................................................14
8.1 Pair Bluetooth-enabled Devices ......................................................................................................14
8.2 Listen to Music from Bluetooth Device ............................................................................................15
9. USB Operation ......................................................................................................................15
10. Troubleshooting ....................................................................................................................15
.......................................................................................................................17
English
Contents
1. Important Safety Instructions ................................................................................................3
1.1 Safety ....................................................................................................................................................3
1.2 Warning ................................................................................................................................................4
2. What’s in the Box ....................................................................................................................5
3. Identifying the Parts ...............................................................................................................6
3.1 Main Unit ..............................................................................................................................................6
3.2 Wireless Subwoofer ..............................................................................................................................6
3.3 Wireless Surround .................................................................................................................................7
3.4 Remote Control ...................................................................................................................................7
4. Preparations ...........................................................................................................................8
4.1 Prepare the Remote Control..............................................................................................................8
4.2 Replace the Remote Control Battery ...............................................................................................8
4.3 Placement and Mounting Placement
...................................................................................
8
4.4 Wall Mounting (For Unit) ......................................................................................................................8
4.5 Wall Mounting (For Surround) ...........................................................................................................10
5. Connections .........................................................................................................................10
5.1 Dolby Atmos
® ........................................................................................................................................................................................................................................10
5.2 HDMI Connection ..............................................................................................................................10
5.3 Use the OPTICAL Socket ...................................................................................................................11
5.4 Use the COAXIAL Socket ..................................................................................................................11
5.5 Use the AUX Socket ...........................................................................................................................11
5.6 Connect Surround Speakers ............................................................................................................11
5.7 Connect Power .................................................................................................................................12
5.8 Pair up with the Subwoofer & Surround ..........................................................................................12
6. Basic Operation ...................................................................................................................13
6.1 Standby/ON .......................................................................................................................................13
6.2 Select Modes .....................................................................................................................................13
6.3 Adjust the Bass/Treble Level .............................................................................................................13
6.4 Turn the Surround Sound ON/OFF ....................................................................................................13
6.5 Select Equalizer (EQ) Effect ..............................................................................................................13
6.6 Adjust the Volume .............................................................................................................................13
6.7 About the Display Brightness ............................................................................................................13
6.8 AV SYNC (Set the Audio Delay) .......................................................................................................13
7. AUX/OPTICAL/COAXIAL/HDMI Operation ........................................................................14
8. Bluetooth Operation ............................................................................................................14
8.1 Pair Bluetooth-enabled Devices ......................................................................................................14
8.2 Listen to Music from Bluetooth Device ............................................................................................15
9. USB Operation ......................................................................................................................15
10. Troubleshooting ....................................................................................................................15
.......................................................................................................................17
3 EN
the other. A grounding plug has two
blades and a third grounding prong.
The wide blade or the third prong is
provided for your safety. If the provided
an electrician for replacement of the
obsolete outlet.
10 Protect the power cord from being
where they exit from the apparatus.
11 Only use attachments/accessories
12
or sold with the apparatus.
when moving the cart/apparatus
combination to avoid injury from tip-over.
13 Unplug the apparatus during lightning
storms or when unused for long periods
of time.
Servicing is required when the apparatus
liquid has been spilled or objects have
dropped.
15
This equipment is a Class II or double
insulated electrical appliance. It has
been designed in such a way that it
does not require a safety connection to
electrical earth.
16 The apparatus shall not be exposed to
placed on the apparatus.
17 Minimum distance around the apparatus
18 The ventilation should not be impeded
by covering the ventilation openings with
apparatus.
20 Batteries should be recycled or disposed of
as per state and local guidelines.
21 The use of apparatus in moderate
climates.
1. Important Safety Instructions
is intended to alert the user to the
presence of uninsulated “dangerous
voltage” within the product’s enclosure
to constitute a risk of electric shock to
persons.
The exclamation point within an
equilateral triangle is intended to
alert the user to the presence of
important operating and maintenance
(servicing) instructions in the literature
accompanying the appliance.
1.1 Safety
1 Read these instructions – All the safety
and operating instructions should be
read before this product is operated.
2 Keep these instructions – The safety and
operating instructions should be retained
for future reference.
3 Heed all warnings – All warnings on
the appliance and in the operating
instructions should be adhered to.
4 Follow all instructions – All operating and
usage instructions should be followed.
5 Do not use this apparatus near water –
The appliance should not be used near
basement or near a swimming pool and
the like.
6 Clean only with a dry cloth.
7 Do not block any ventilation openings.
Install in accordance with the
manufacturer’s instructions.
8 Do not install near any heat sources such
produce heat.
9 Do not defeat the safety purpose of the
polarized or grounding plug. A polarized
plug has two blades with one wider than
CAUTION
CAUTION: TO REDUCE THE RISK OF ELECTRIC
NO USER-SERVICEABLE PARTS INSIDE. REFER
SERVICING TO QUALIFIED SERVICE PERSONNEL.
RISK OF ELECTRIC SHOCK
DO NOT OPEN

4 EN
Caution:
-
Use of controls or adjustments or
performance of procedures other than
hazardous radiation exposure or other
unsafe operation.
do not expose this apparatus to rain or
moisture. The apparatus must not be
exposed to dripping or splashing and
must not be placed on apparatus.
- The mains plug/appliance coupler is
disconnect device must remain readily
operable.
- Danger of explosion if battery is
incorrectly replaced. Replace only with
the same or equivalent type.
1.2 Warning
•
The battery (batteries or battery pack)
shall not be exposed to excessive heat
the voltage of this system to see if it is
identical to the voltage of your local
power supply.
• Do not place this unit close to strong
receiver.
• If any solid object or liquid falls into the
operating it any further.
• Do not attempt to clean the unit with
chemical solvents as this may damage
damp cloth.
• When removing the power plug from the
not expressly approved by the party
responsible for compliance will void
the user’s authority to operate the
equipment.
• The rating label is pasted on the bottom
or back of the equipment.
AC voltage: This symbol indicates that the
rated voltage marked with the symbol is AC
voltage.
Battery usage CAUTION
To prevent battery leakage which may result
to the apparatus:
marked on the apparatus.
- Do not mix old and new batteries.
etc.) batteries.
- Remove batteries when the unit is not
used for a long time.
Correct Disposal of this product. This
marking indicates that this product
should not be disposed with other
household wastes throughout the
EU. To prevent possible harm to the
environment or human health from
responsibly to promote the sustainable reuse
of material resources. To return your used
systems or contact the retailer where the
product was purchased. They can take this
product for environmental safe recycling.
We hereby declares that this
product is in compliance with the
essential requirements and other
relevant provisions of Directive
2014/53/EU.
The Bluetooth
®
word mark and logos are
Inc. and any use of such marks by Nakamichi
is under license. Other trademarks and trade
names are those of their respective owners.
dress and the HDMI Logos are trademarks
or registered trademarks of HDMI Licensing
countries.
are registered trademarks of Dolby Laboratories
Licensing Corporation. Manufactured under
unpublished works. Copyright © 2012-2021
Dolby Laboratories. All rights reserved.
NE 4
Caution:
-
Use of controls or adjustments or
performance of procedures other than
hazardous radiation exposure or other
unsafe operation.
do not expose this apparatus to rain or
moisture. The apparatus must not be
exposed to dripping or splashing and
must not be placed on apparatus.
- The mains plug/appliance coupler is
disconnect device must remain readily
operable.
- Danger of explosion if battery is
incorrectly replaced. Replace only with
the same or equivalent type.
1.2 Warning
•
The battery (batteries or battery pack)
shall not be exposed to excessive heat
the voltage of this system to see if it is
identical to the voltage of your local
power supply.
• Do not place this unit close to strong
receiver.
• If any solid object or liquid falls into the
operating it any further.
• Do not attempt to clean the unit with
chemical solvents as this may damage
damp cloth.
• When removing the power plug from the
not expressly approved by the party
responsible for compliance will void
the user’s authority to operate the
equipment.
• The rating label is pasted on the bottom
or back of the equipment.
AC voltage: This symbol indicates that the
rated voltage marked with the symbol is AC
voltage.
Battery usage CAUTION
To prevent battery leakage which may result
to the apparatus:
marked on the apparatus.
- Do not mix old and new batteries.
etc.) batteries.
- Remove batteries when the unit is not
used for a long time.
Correct Disposal of this product. This
marking indicates that this product
should not be disposed with other
household wastes throughout the
EU. To prevent possible harm to the
environment or human health from
responsibly to promote the sustainable reuse
of material resources. To return your used
systems or contact the retailer where the
product was purchased. They can take this
product for environmental safe recycling.
We hereby declares that this
product is in compliance with the
essential requirements and other
relevant provisions of Directive
2014/53/EU.
The Bluetooth
®
word mark and logos are
Inc. and any use of such marks by Nakamichi
is under license. Other trademarks and trade
names are those of their respective owners.
dress and the HDMI Logos are trademarks
or registered trademarks of HDMI Licensing
countries.
are registered trademarks of Dolby Laboratories
Licensing Corporation. Manufactured under
unpublished works. Copyright © 2012-2021
Dolby Laboratories. All rights reserved.

5 EN
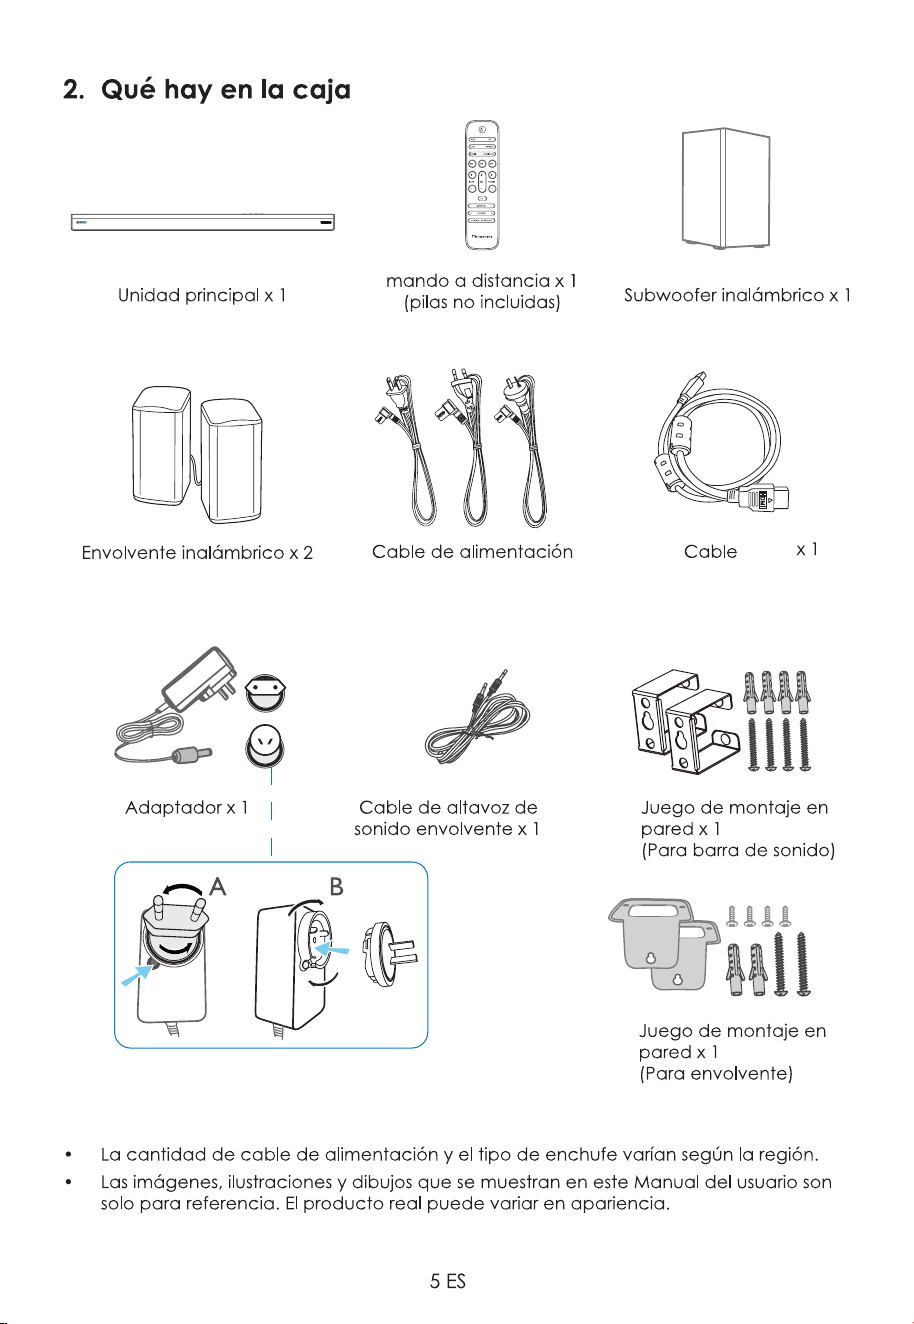
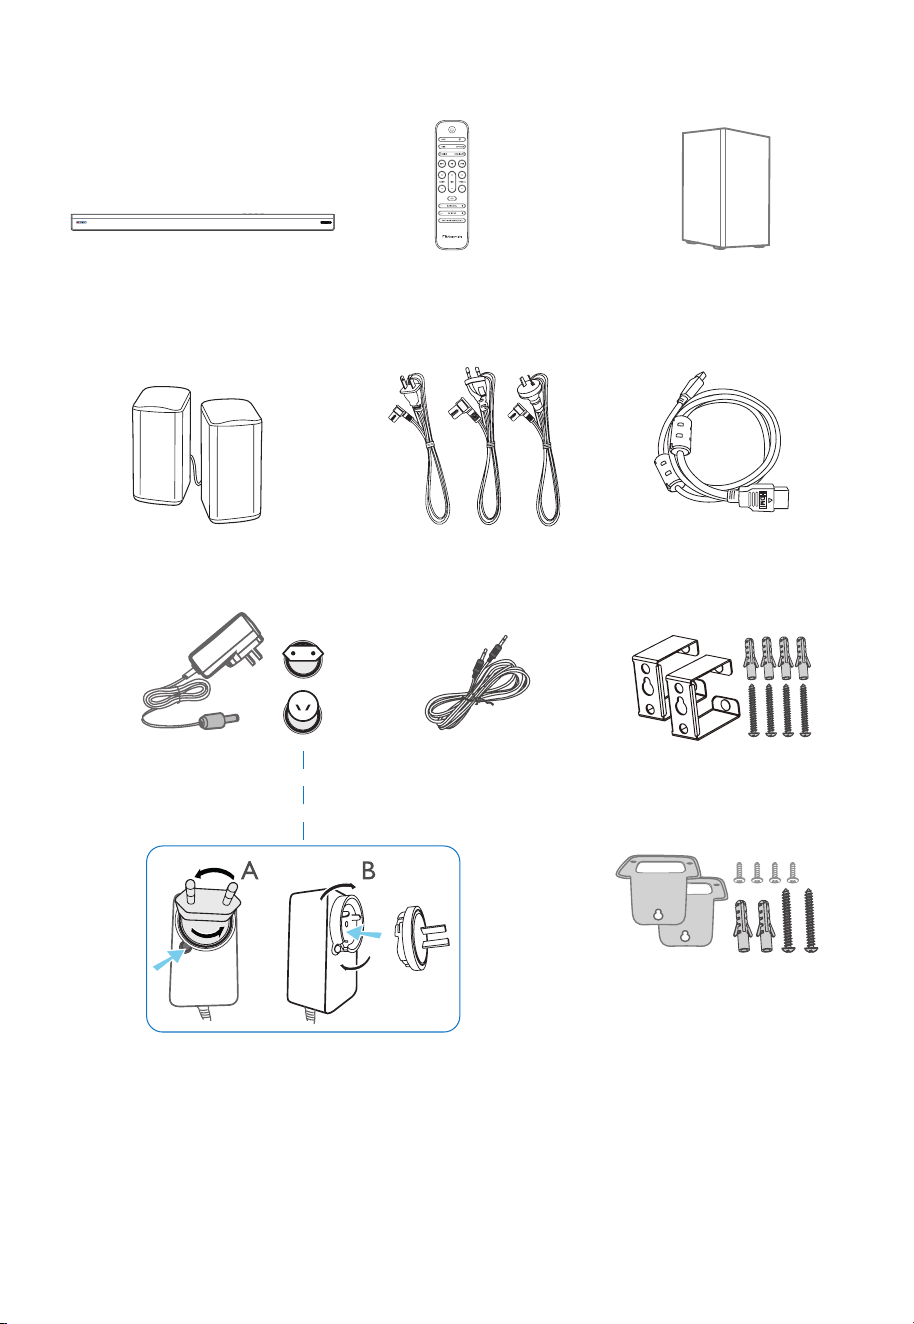
Wireless Subwoofer x 1
2. What’s in the Box
• Power cord quantity and plug type vary by regions.
Actual product may vary in appearance.
HDMI Cable x 1
Main Unit x 1
Wireless Surround x 2
Adapter x 1
Remote Control x 1
(not supplied batteries)
Wall Mount Kit x 1
(For Surround)
Wall Mount Kit x 1
(For Soundbar)
CCC AC Power Cord x 2
Surround Speaker Cable x 1
x2 x2 x2
x 6
6 EN
14 15 16
11 12 13
aux
2 1
3
6 7 8
10
4 95
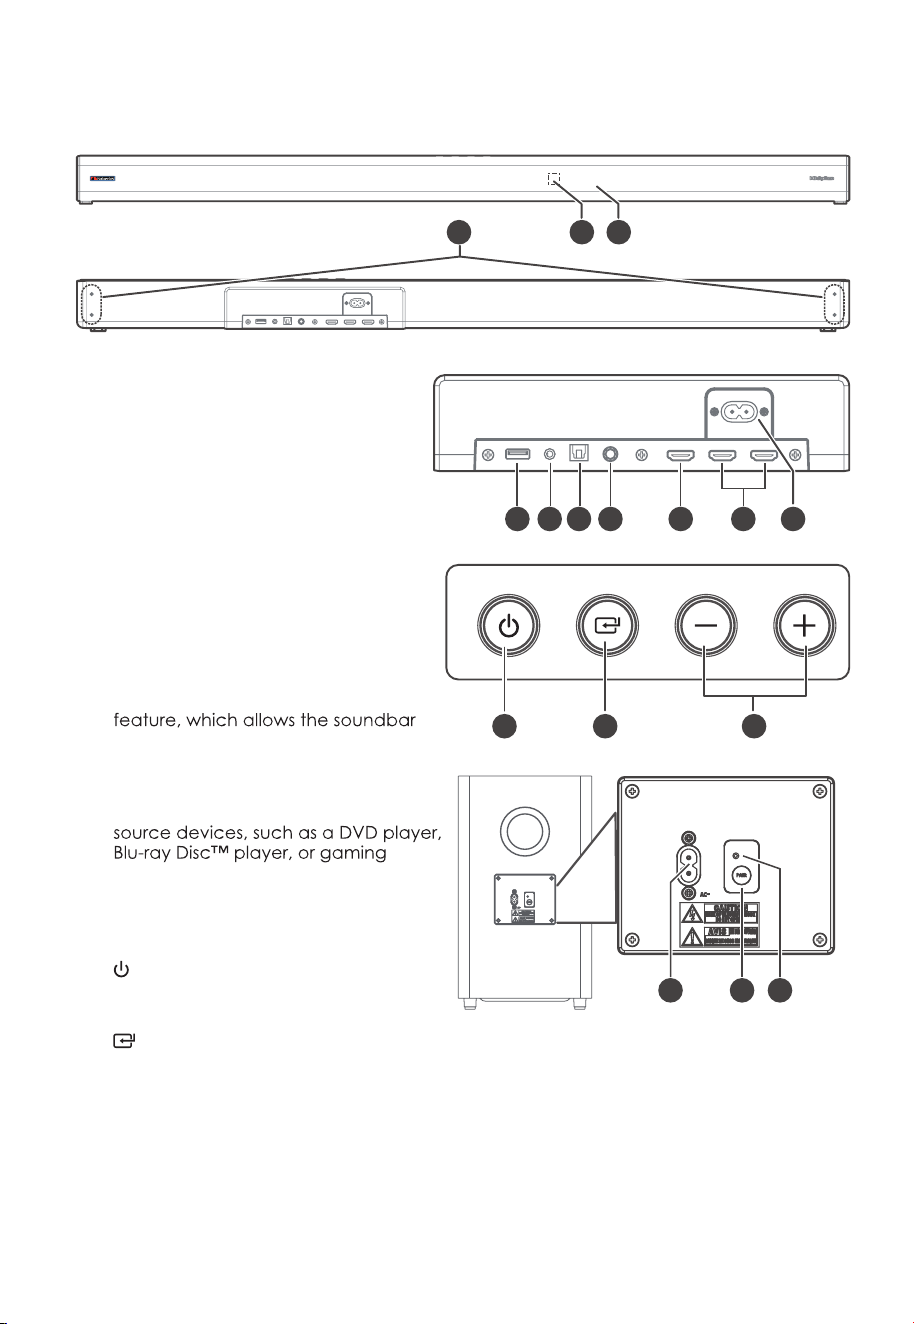
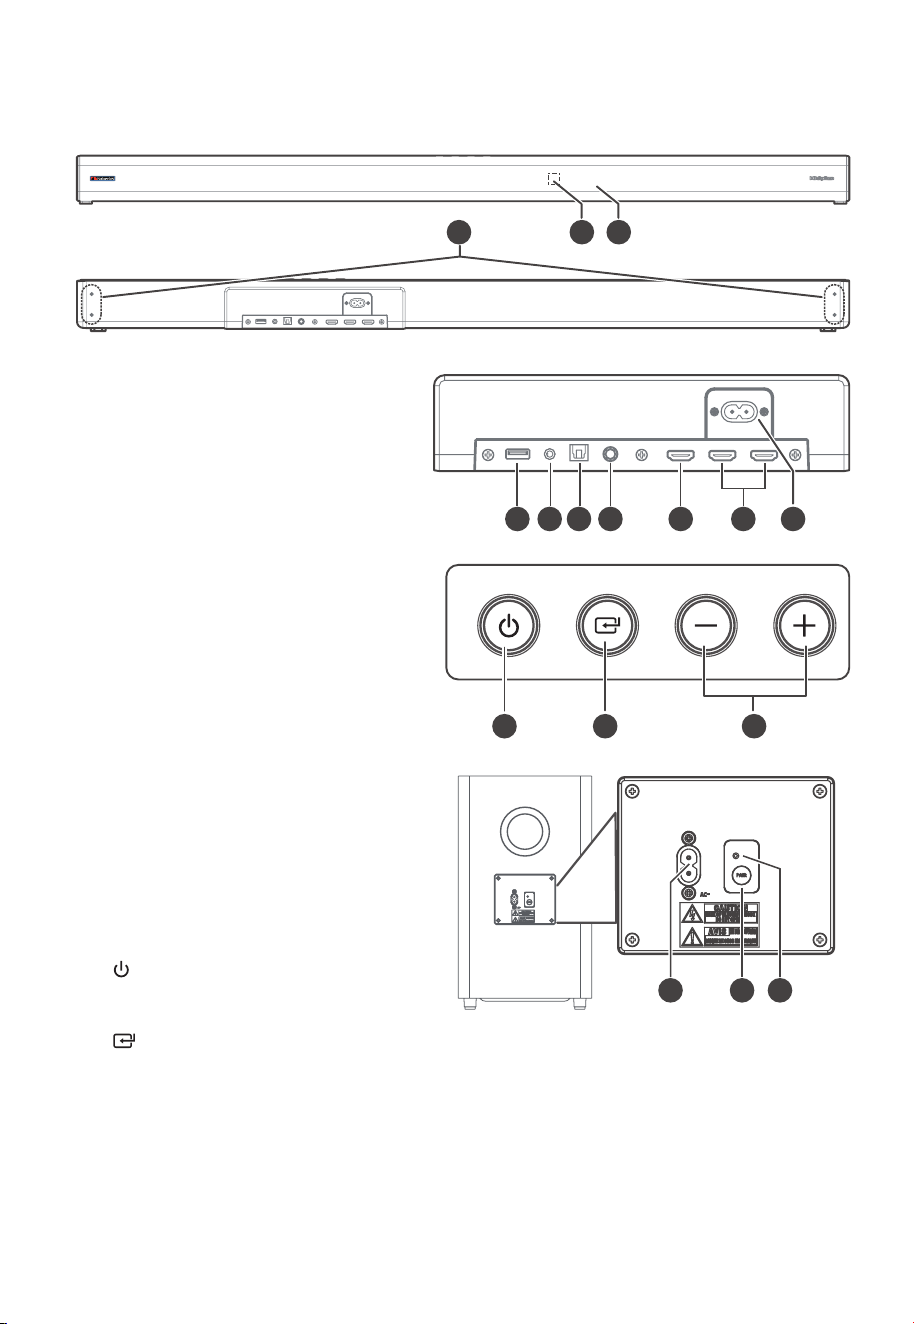
3. Identifying the Parts
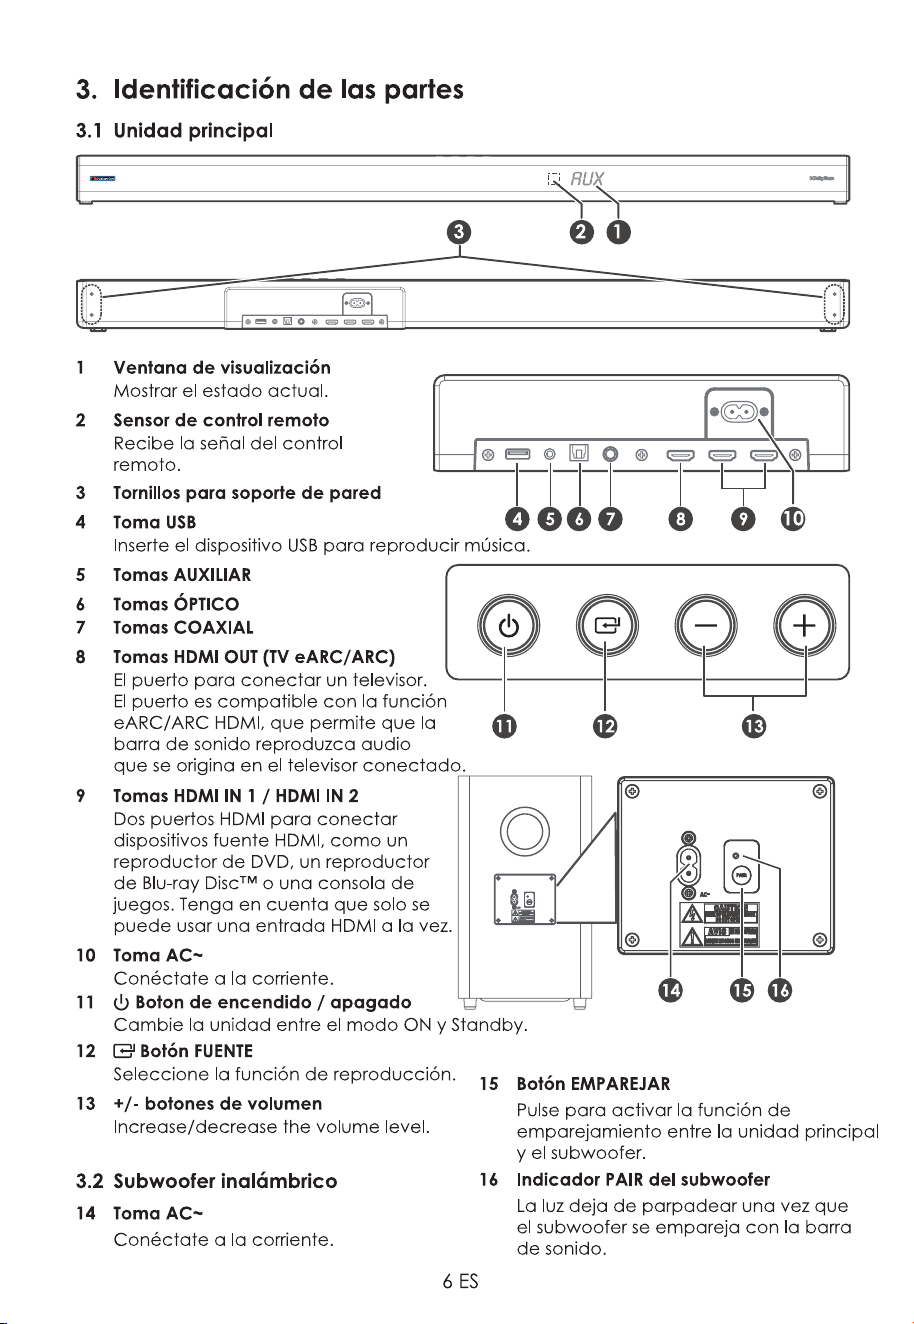
3.1 Main Unit
1 Display Window
Show the current status.
2 Remote Control Sensor
Receive signal from the remote
control.
3 Wall Bracket Screws
4 USB Socket
Insert the USB device to play music.
5 AUX Socket
6 OPTICAL Socket
7 COAXIAL Socket
8 HDMI OUT (TV eARC/ARC) Sockets
The port for connecting a TV. The
port supports the eARC/ARC HDMI
to play audio that originates on the
connected TV.
9 HDMI IN 1 / HDMI IN 2 Sockets
Two HDMI ports for connecting HDMI
console. Note that only one HDMI
input is usable at a time.
10 AC~ Socket
Connect to power.
11
(ON/OFF) Button
Switch the unit between ON and
Standby mode.
12
(SOURCE) Button
Select the play function.
13 +/- (vol) Buttons
Increase/decrease the volume level.
3.2 Wireless Subwoofer
14 AC~ Socket
Connect to power.
15 PAIR button
Press activate the pairing function
between the main unit and the
subwoofer.
16 Subwoofer's PAIR Indicator
Light stops blinking once the
Subwoofer is paired with the Soundbar.
6 EN
14 15 16
11 12 13
aux
2 1
3
6 7 8
10
4 95
3. Identifying the Parts
3.1 Main Unit
1 Display Window
Show the current status.
2 Remote Control Sensor
Receive signal from the remote
control.
3 Wall Bracket Screws
4 USB Socket
Insert the USB device to play music.
5 AUX Socket
6 OPTICAL Socket
7 COAXIAL Socket
8 HDMI OUT (TV eARC/ARC) Sockets
The port for connecting a TV. The
port supports the eARC/ARC HDMI
to play audio that originates on the
connected TV.
9 HDMI IN 1 / HDMI IN 2 Sockets
Two HDMI ports for connecting HDMI
console. Note that only one HDMI
input is usable at a time.
10 AC~ Socket
Connect to power.
11
(ON/OFF) Button
Switch the unit between ON and
Standby mode.
12 (SOURCE) Button
Select the play function.
13 +/- (vol) Buttons
Increase/decrease the volume level.
3.2 Wireless Subwoofer
14 AC~ Socket
Connect to power.
15 PAIR button
Press activate the pairing function
between the main unit and the
subwoofer.
16 Subwoofer's PAIR Indicator
Light stops blinking once the
Subwoofer is paired with the Soundbar.
7 EN
1
2
3
5
8
10
6
7
9
11
4
5
4
5
3
1
2
6
Speaker L
Speaker R
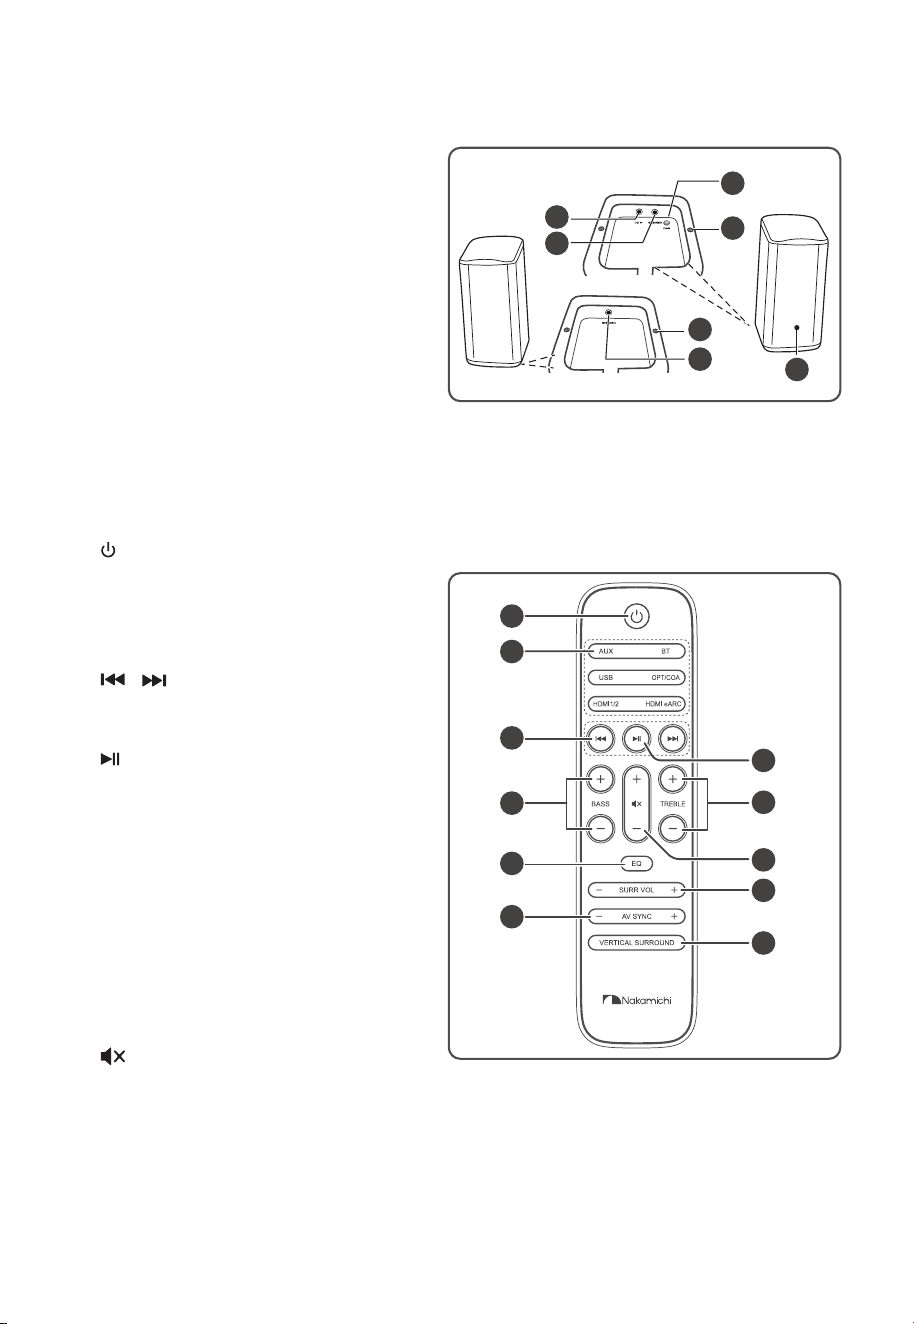
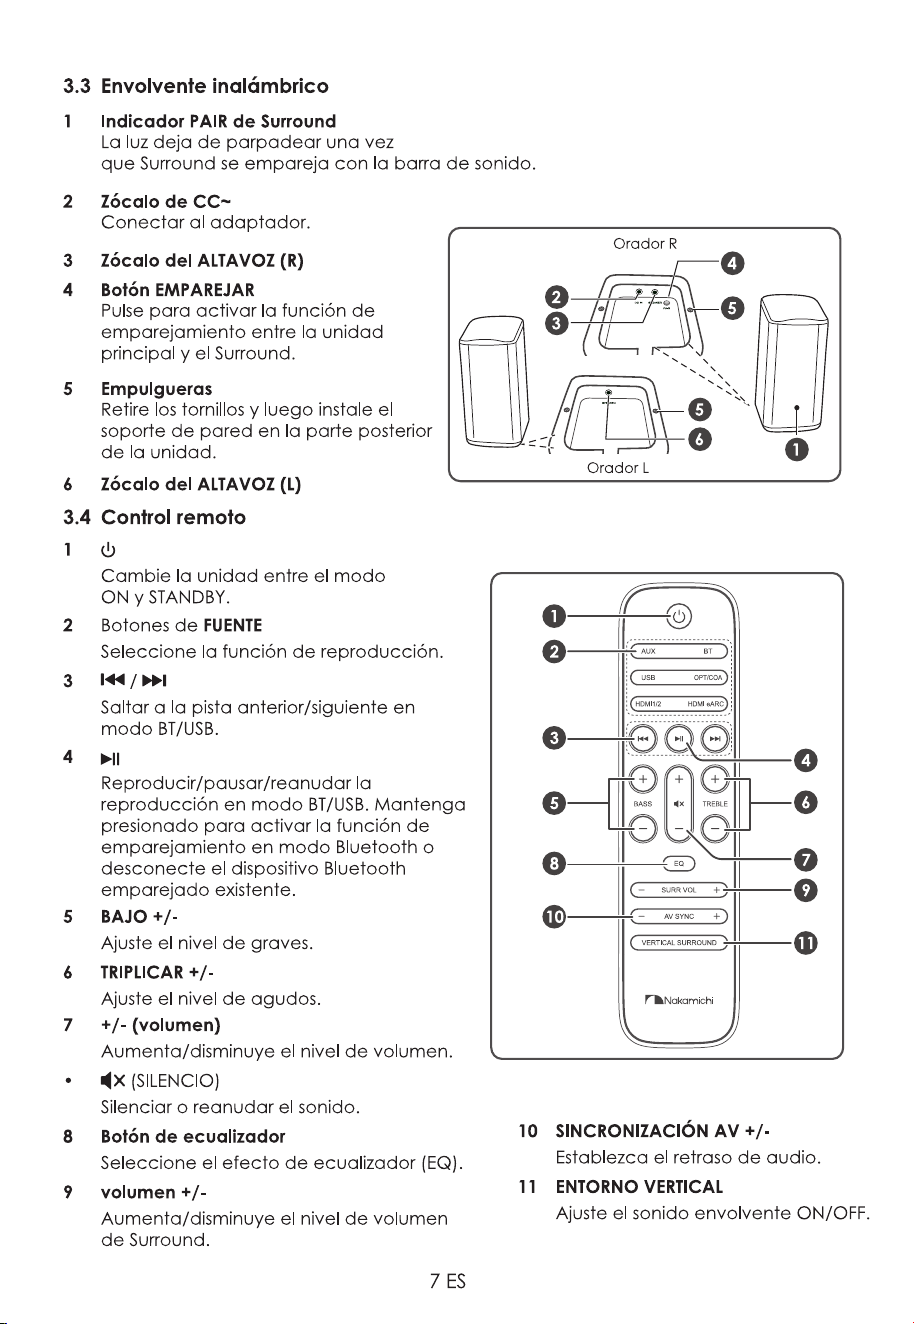
3.3 Wireless Surround
1 Surround's PAIR Indicator
Light stops blinking once the Surround
is paired with the Soundbar.
2 DC~ Socket
Connect to adapter.
3 SPEAKER (R) Socket
4 PAIR button
Press activate the pairing function
between the main unit and the
Surround.
5 Screws
Remove the screws then install the
wall Bracket into the back of the unit.
6 SPEAKER (L) Socket
3.4 Remote Control
1
Switch the unit between ON and
STANDBY mode.
2 SOURCE buttons
Select the play function.
3
/
Skip to previous/next track in BT/USB
mode.
4
Play/pause/resume playback in BT/
USB mode. Press and hold to activate
the pairing function in Bluetooth
mode or disconnect the existing
paired Bluetooth device.
5 BASS +/-
Adjust bass level.
6 TREBLE +/-
Adjust treble level.
7 +/- (vol)
Increase/decrease the volume level.
•
(MUTE)
Mute or resume the sound.
8 EQ Button
Select Equalizer (EQ) Effect.
9 SURR VOL +/-
Increase/decrease the Surround’s
volume level.
10 AV SYNC +/-
Set the Audio Delay.
11 VERTICAL SURROUND
Adjust the surround ON/OFF.
8 EN
4. Preparations
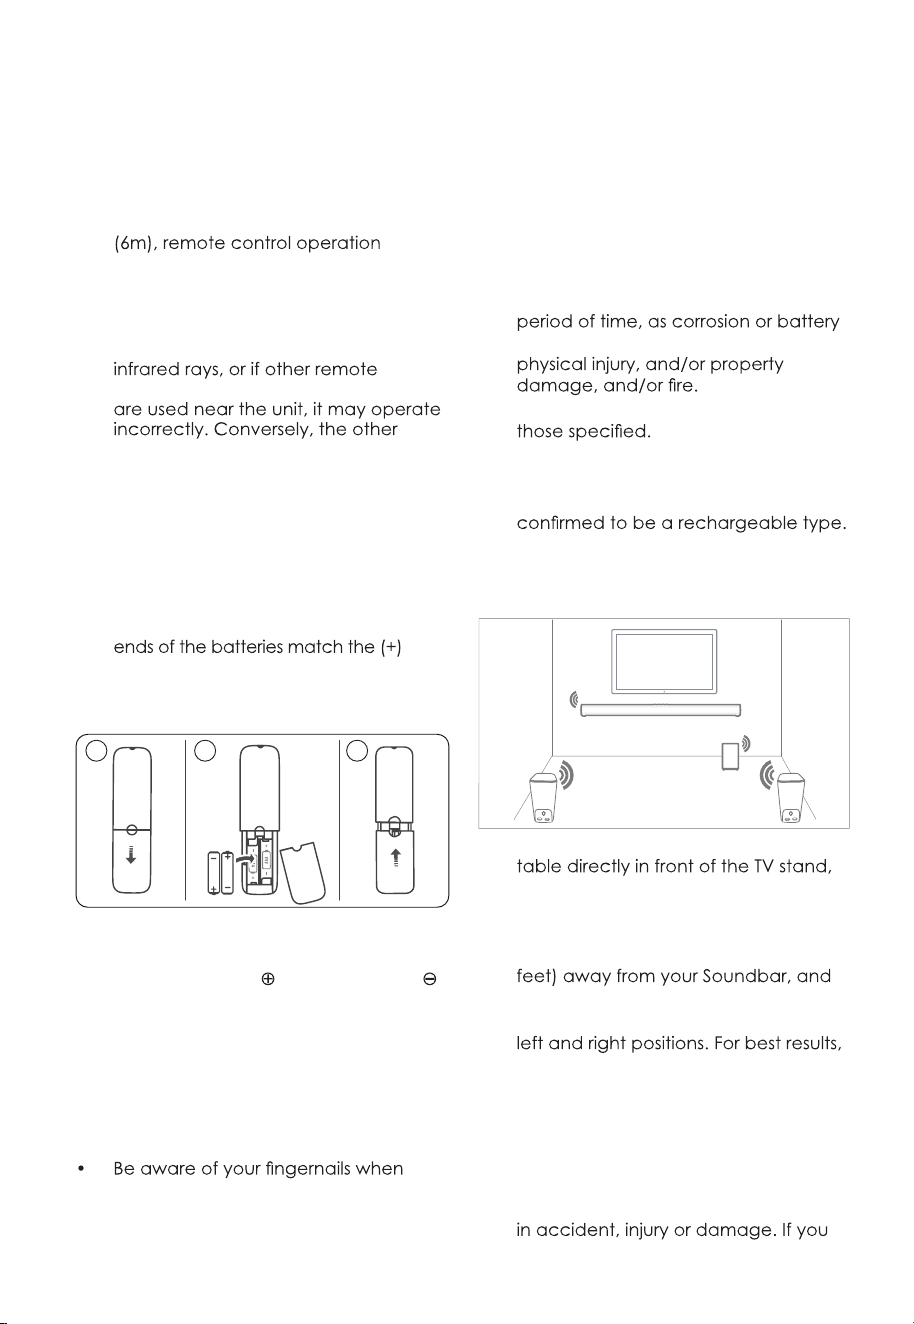
4.1 Prepare the Remote Control
The provided remote control allows the
unit to be operated from a distance.
•
Even if the remote control is operated
within the effective range 19.7 feet
may be impossible if there are any
obstacles between the unit and the
remote control.
•
If the remote control is operated
near other products which generate
control devices using infra-red rays
products may operate incorrectly.
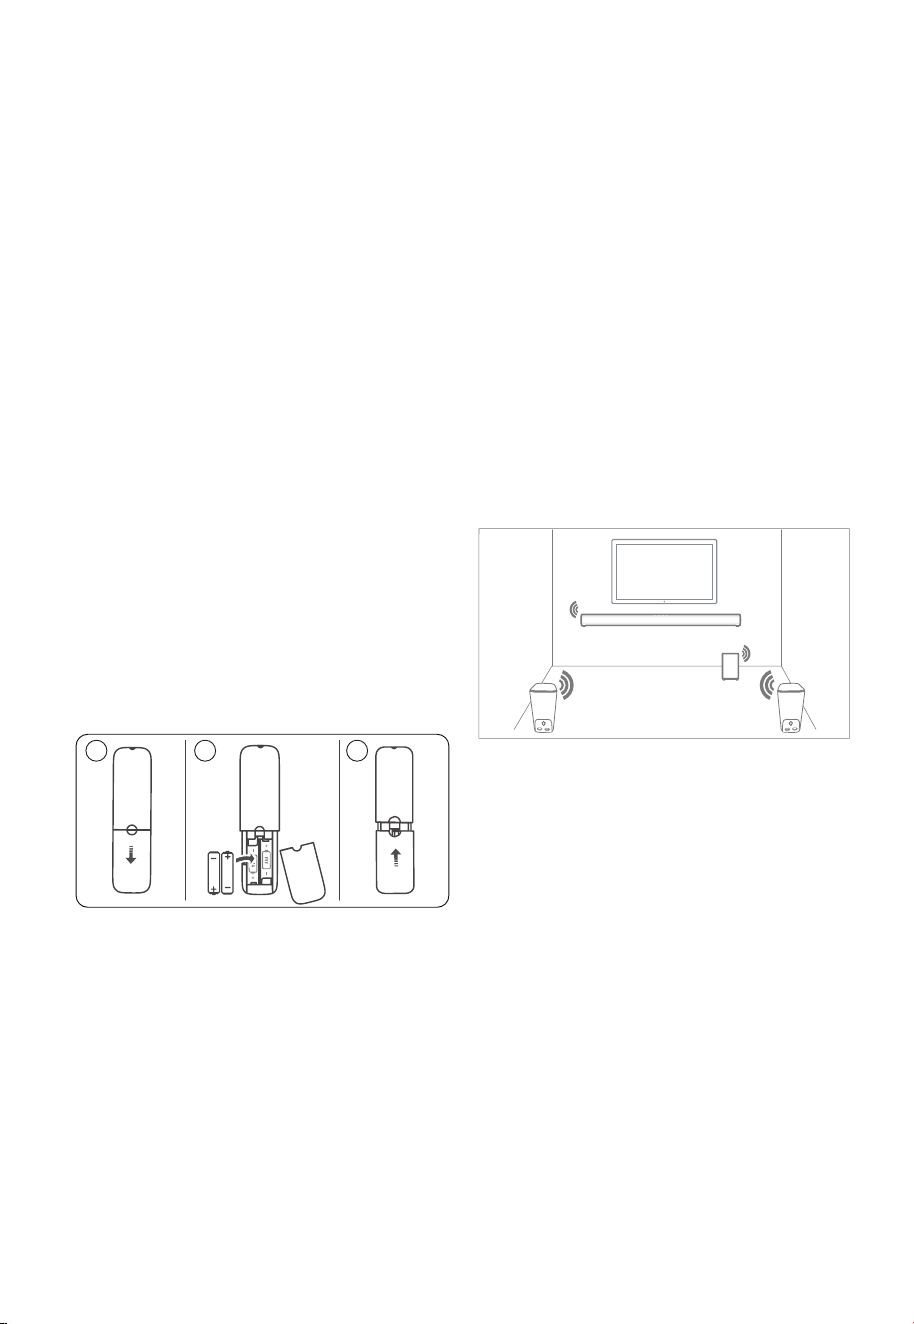
4.2 Replace the Remote Control
Battery
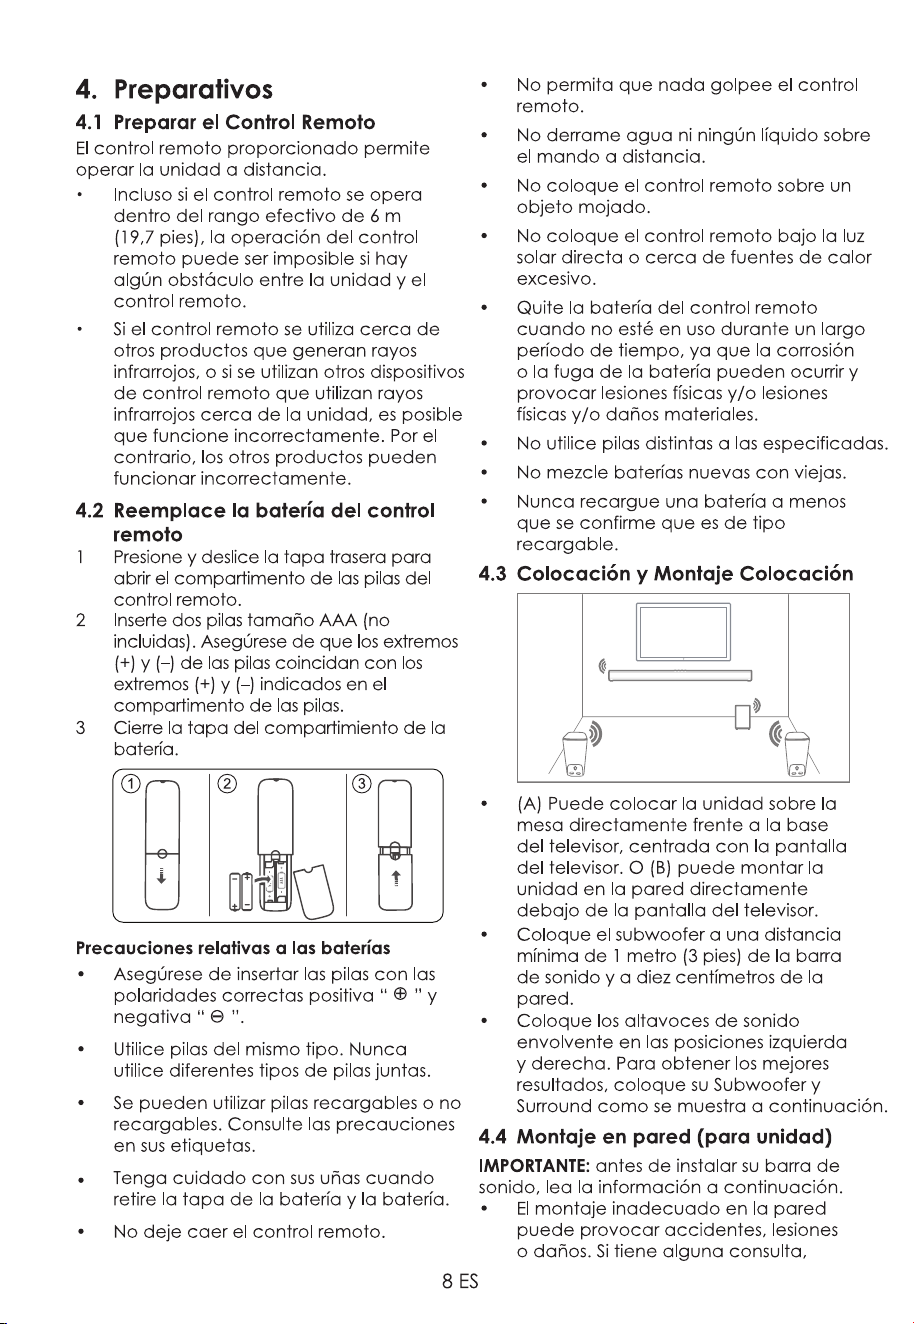
1 Press and slide the back cover to open
the battery compartment of the remote
control.
2 Insert two AAA size batteries (not
included). Make sure the (+) and (–)
and (–) ends indicated in the battery
compartment.
3 Close the battery compartment cover.
AA A
A
A
A
1 2 3
Precautions Concerning Batteries
• Be sure to insert the batteries with
correct positive “
” and negative “ ”
polarities.
• Use batteries of the same type.
Never use different types of batteries
together.
• Either rechargeable or non-
rechargeable batteries can be used.
Refer to the precautions on their
labels.
removing the battery cover and the
battery.
• Do not drop the remote control.
• Do not allow anything to impact the
remote control.
• Do not spill water or any liquid on the
remote control.
• Do not place the remote control on a
wet object.
• Do not place the remote control
under direct sunlight or near sources of
excessive heat.
• Remove the battery from the remote
control when not in use for a long
leakage may occur and result in
• Do not use any batteries other than
• Do not mix new batteries with old
ones.
• Never recharge a battery unless it is
4.3 Placement and Mounting
Placement
• (A) You can place the unit on the
centered with the TV screen. Or (B)
you can mount the unit on the wall
directly below the TV screen.
• Place the Subwoofer at least 1 meter (3
ten centimeters away from the wall.
• Place the surround speakers in the
place your Subwoofer & Surround as
shown below.
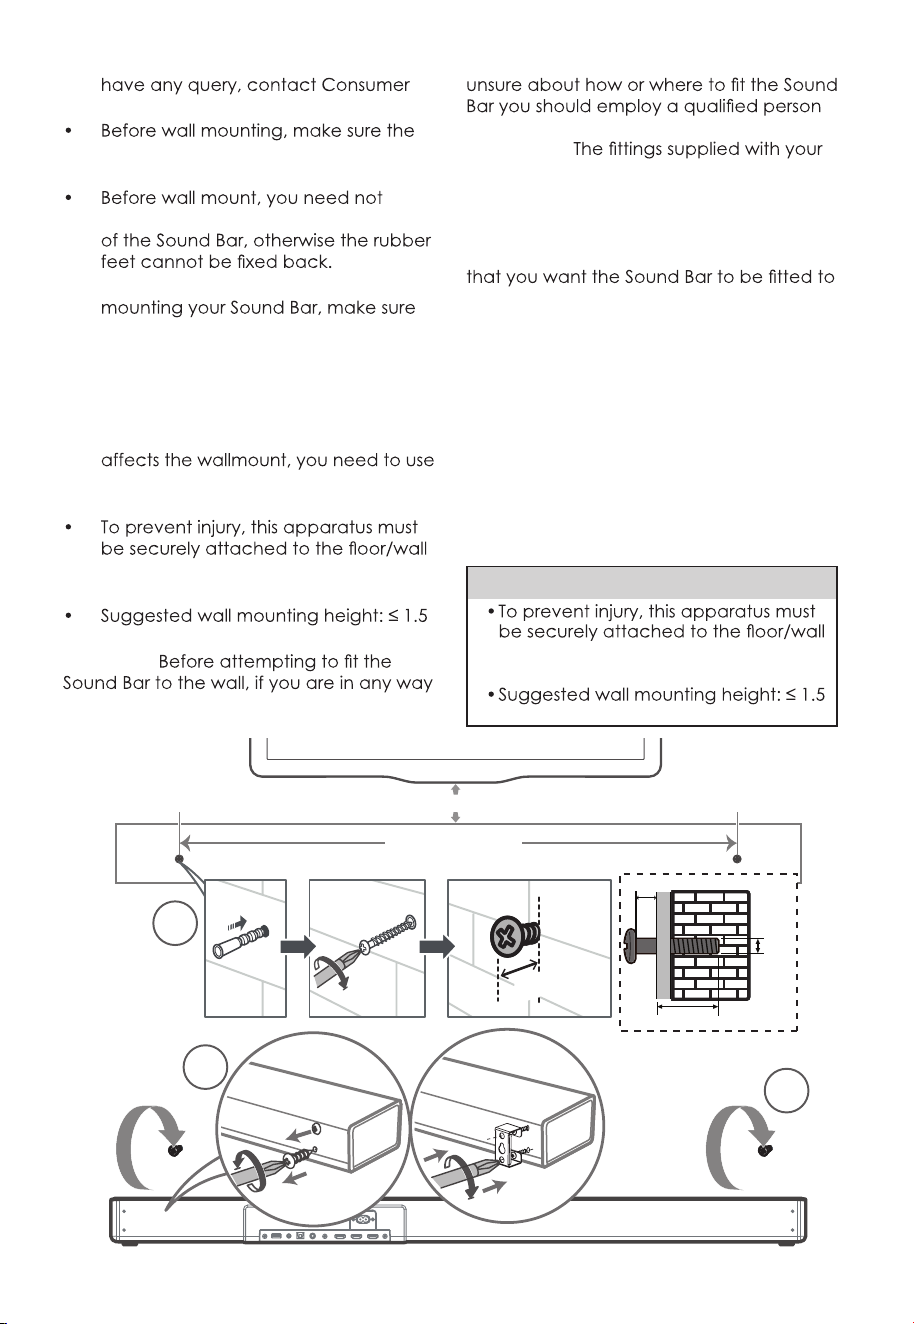
4.4 Wall Mounting (For Unit)
IMPORTANT: Before installing your Sound
Bar please read the information below.
• Improper wall mounting may result
8 EN
4. Preparations
4.1 Prepare the Remote Control
The provided remote control allows the
unit to be operated from a distance.
•
Even if the remote control is operated
within the effective range 19.7 feet
may be impossible if there are any
obstacles between the unit and the
remote control.
•
If the remote control is operated
near other products which generate
control devices using infra-red rays
products may operate incorrectly.
4.2 Replace the Remote Control
Battery
1 Press and slide the back cover to open
the battery compartment of the remote
control.
2 Insert two AAA size batteries (not
included). Make sure the (+) and (–)
and (–) ends indicated in the battery
compartment.
3 Close the battery compartment cover.
A
A
A
AA
A
1 2 3
Precautions Concerning Batteries
• Be sure to insert the batteries with
correct positive “
” and negative “ ”
polarities.
• Use batteries of the same type.
Never use different types of batteries
together.
• Either rechargeable or non-
rechargeable batteries can be used.
Refer to the precautions on their
labels.
removing the battery cover and the
battery.
• Do not drop the remote control.
• Do not allow anything to impact the
remote control.
• Do not spill water or any liquid on the
remote control.
• Do not place the remote control on a
wet object.
• Do not place the remote control
under direct sunlight or near sources of
excessive heat.
• Remove the battery from the remote
control when not in use for a long
leakage may occur and result in
• Do not use any batteries other than
• Do not mix new batteries with old
ones.
• Never recharge a battery unless it is
4.3 Placement and Mounting
Placement
• (A) You can place the unit on the
centered with the TV screen. Or (B)
you can mount the unit on the wall
directly below the TV screen.
• Place the Subwoofer at least 1 meter (3
ten centimeters away from the wall.
• Place the surround speakers in the
place your Subwoofer & Surround as
shown below.
4.4 Wall Mounting (For Unit)
IMPORTANT: Before installing your Sound
Bar please read the information below.
• Improper wall mounting may result
9 EN
Care in your country.
wall can support the weight of your
Sound Bar.
remove the rubber feet at the bottom
• Depending on the type of wall
that you use screws of a suitable
length and diameter.
• Please check whether the USB port
on the back of the Sound Bar is
connected to a USB device. If it is
found that the connected USB device
another USB device of the appropriate
size.
in accordance with the installation
instructions.
meters.
WARNING:
to install your Sound Bar.
IMPORTANT:
Sound Bar may not be suitable for all types
of wall. Please consult a professional for
advice before drilling any holes if you are
in any doubt.
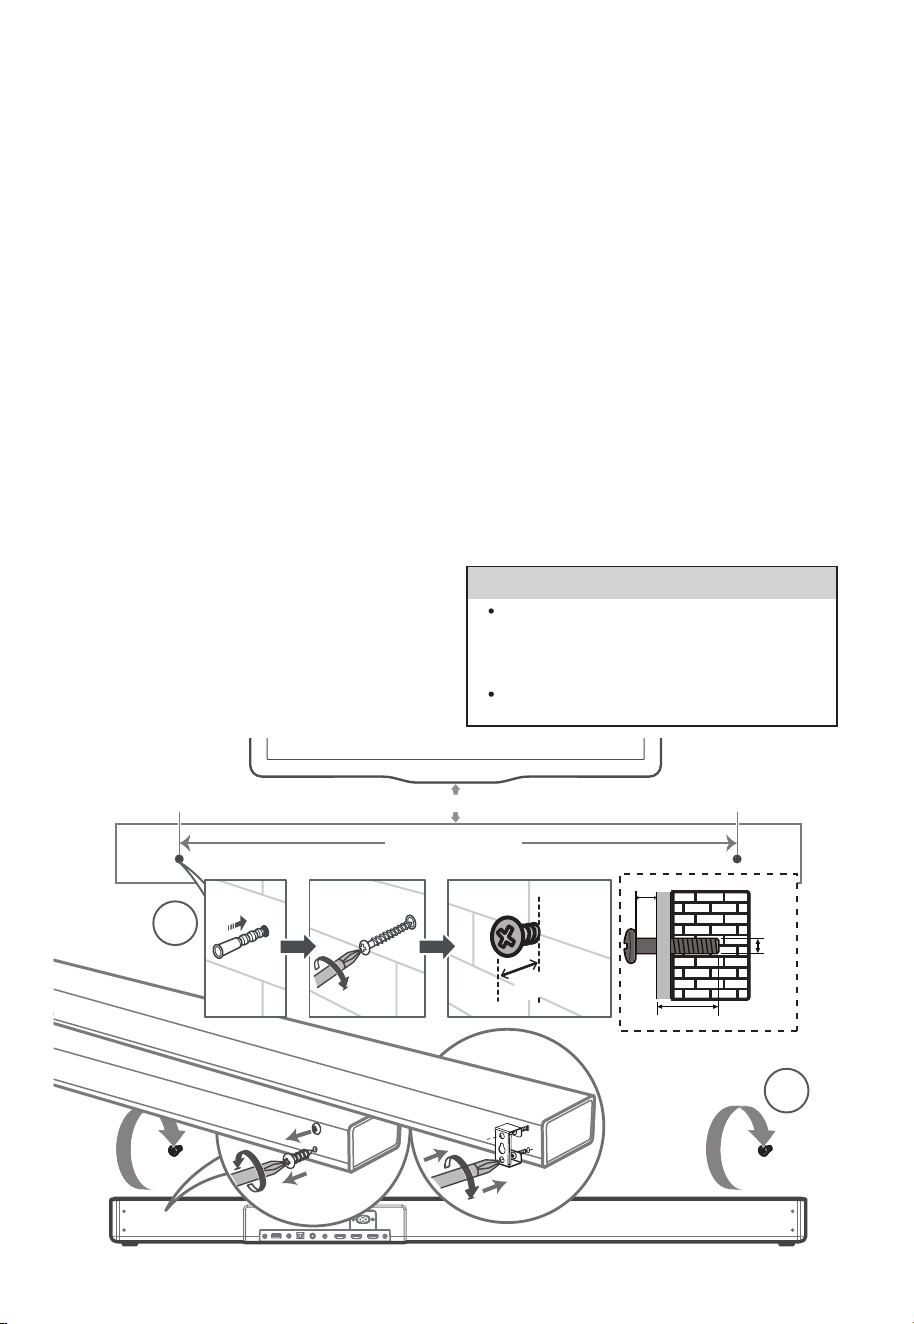
IMPORTANT: Mark the position on the wall
and check that they align with the holes in
the brackets before drilling any holes.
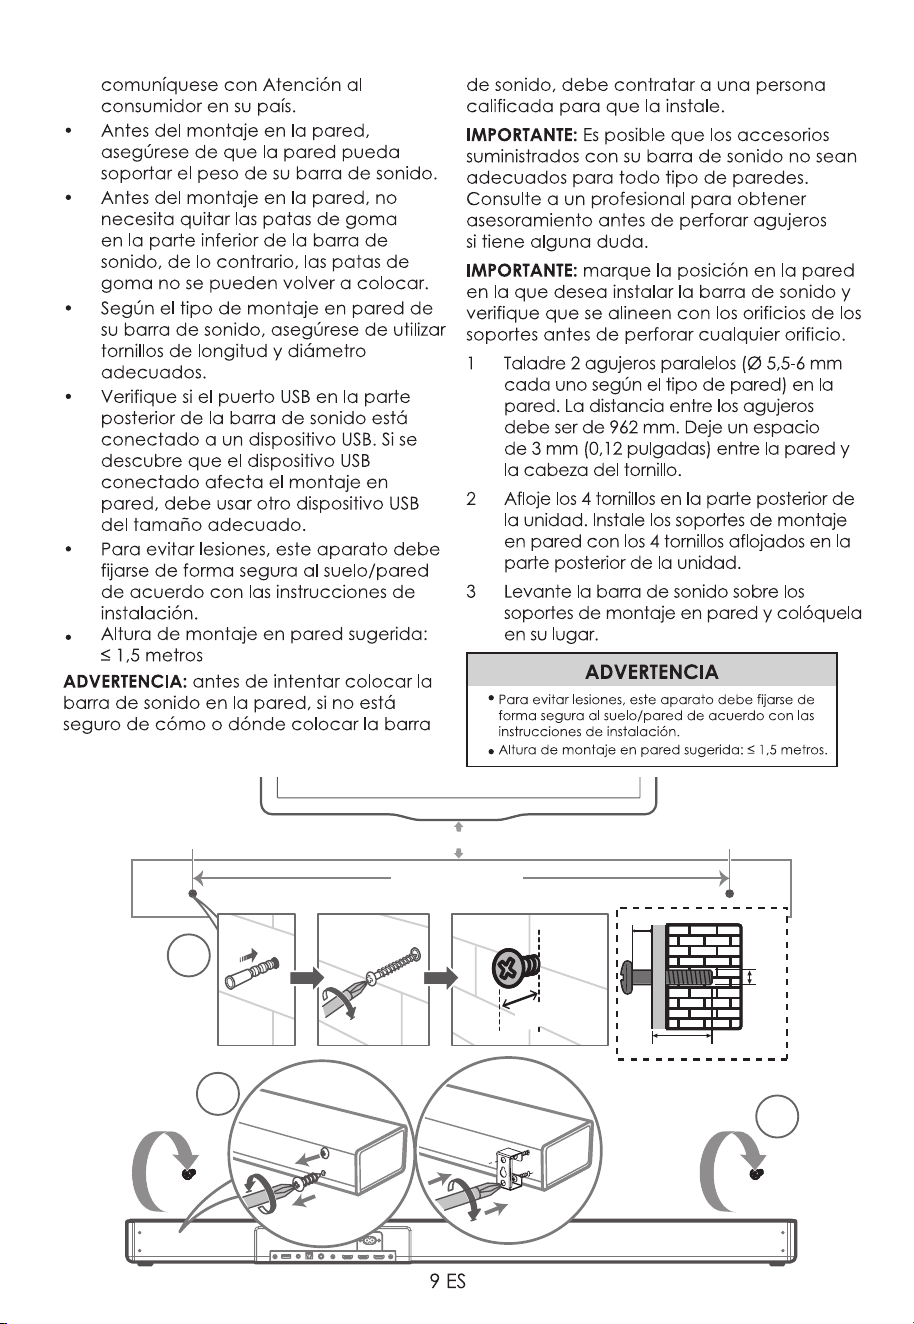
1 Drill 2 parallel holes (Ø 5.5-6 mm each
according to wall type) in the wall. The
distance between the holes should be
962 mm. Leave a 0.12 inch (3mm) gap
between the wall and the screw’s head.
2 Loosen the 4 screws at the back of the
unit. Install the wall mounting brackets
with the 4 loosened screws into the
back of the unit.
3 Lift the Sound Bar onto the wall mount
brackets and slot into place.
1
2
3
962 MM
~50 MM/2.0”
~3MM/0.12’’
~3MM/0.12”
4mm/
0.16”
>25MM/0.98”
WARNING
in accordance with the installation
instructions.
meters.
10 EN
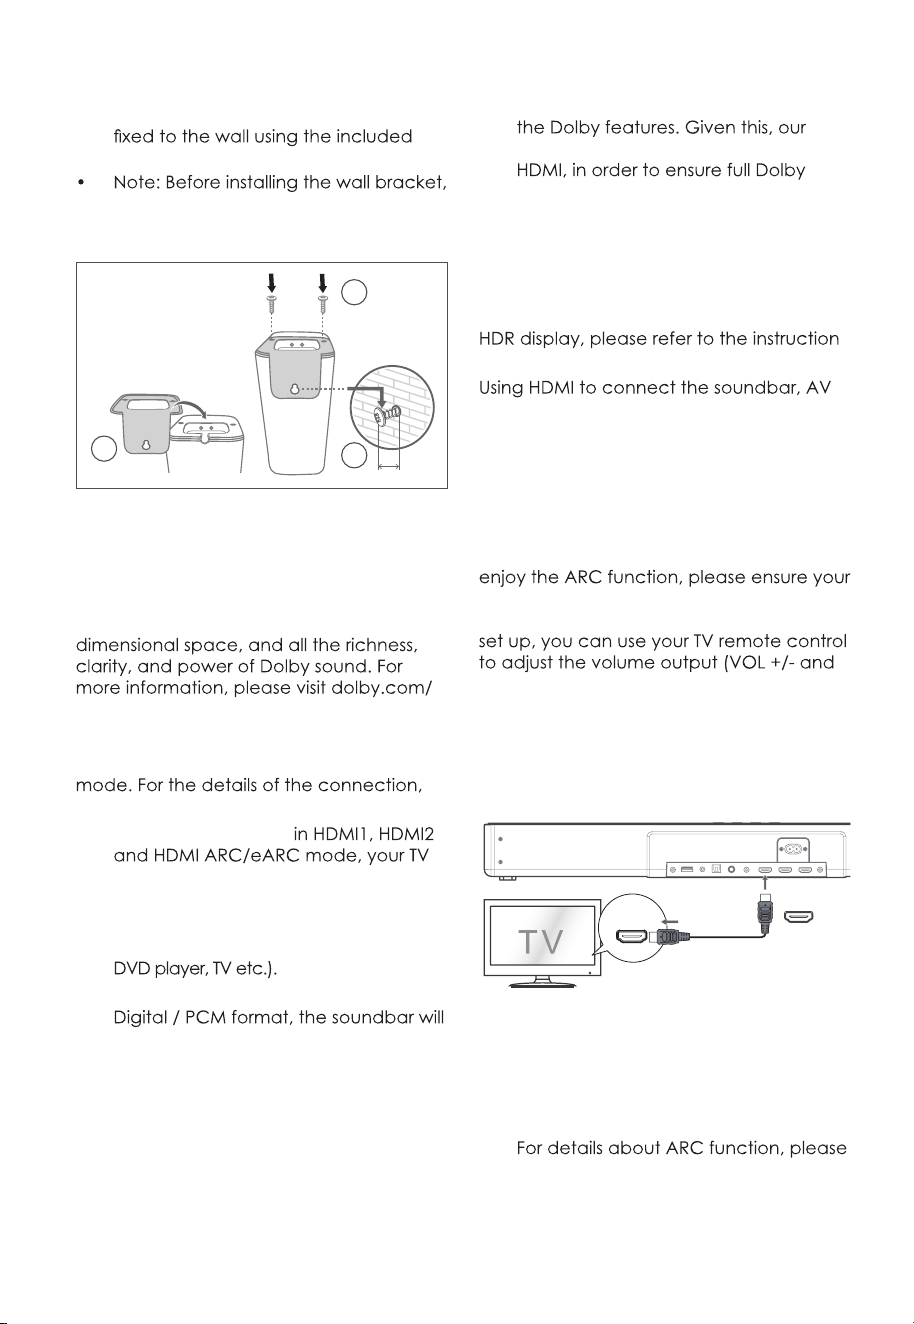
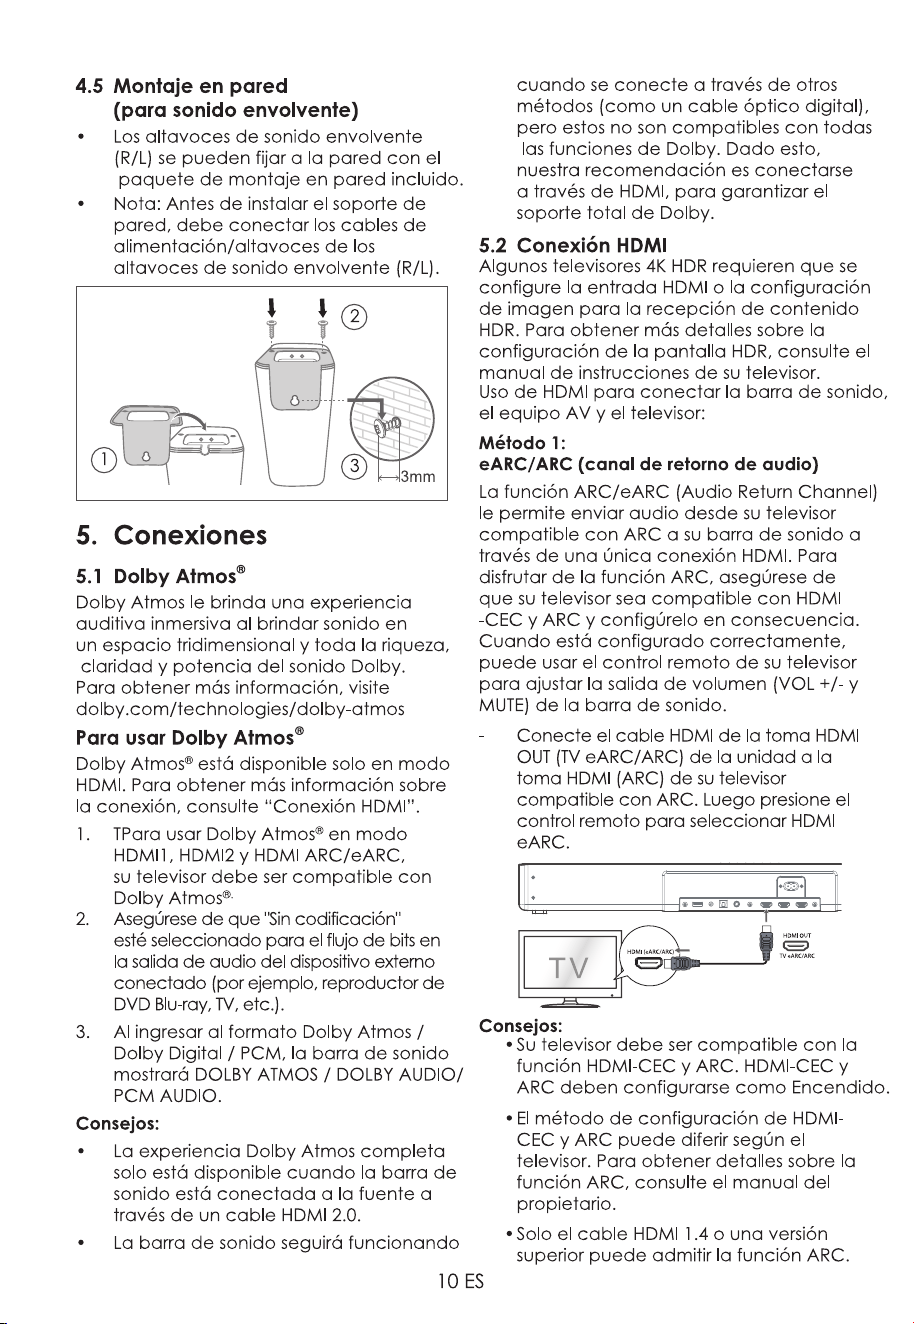
4.5 Wall Mounting (For Surround)
• The (R /L) surround speakers can be
wall mount package.
you need to connect the power /
speaker cables of the (R /L) surround
speakers.
3
2
3mm
1
5. Connections
5.1 Dolby Atmos
®
Dolby Atmos gives you immersive listening
experience by delivering sound in three
technologies/dolby-atmos
For using Dolby Atmos
®
Dolby Atmos
®
is available only in HDMI
please refer to “HDMI Connection”.
1. To use Dolby Atmos
®
has to support Dolby Atmos
®
.
2. Make sure that “No Encoding“ is selected
for bitstream in the audio output of the
connected external device (e.g. Blu-ray
3. While entering Dolby Atmos / Dolby
shows DOLBY ATMOS / DOLBY AUDIO /
PCM AUDIO.
Tips:
• The full Dolby Atmos experience is
only available when the Soundbar is
connected to the source via a HDMI
2.0 cable.
• The Soundbar will still function when
connected via other methods (such
as a Digital Optical cable) but
these are unable to support all of
recommendation is to connect via
support.
5.2 HDMI Connection
Some 4K HDR TVs require the HDMI input or
picture settings to be set for HDR content
reception. For further setup details on
manual of your TV.
equipment and TV:
Method 1:
eARC/ARC (Audio Return Channel)
The ARC / eARC (Audio Return Channel)
function allows you to send audio from
your ARC- compliant TV to your sound
bar through a single HDMI connection. To
TV is both HDMI-CEC and ARC compliant
and set up accordingly. When correctly
MUTE) of the sound bar.
- Connect the HDMI cable from unit's
HDMI OUT (TV eARC/ARC) socket to
the HDMI (ARC) socket on your ARC
compliant TV. Then press the remote
control to select HDMI eARC.
HDMI (eARC/ARC)
HDMI OUT
TV eARC/ARC
Tips:
• Your TV must support the HDMI-CEC
and ARC function. HDMI-CEC and
ARC must be set to On.
• The setting method of HDMI-CEC and
ARC may differ depending on the TV.
refer to the owner’s manual.
• Only HDMI 1.4 or higher version cable
can support the ARC function.
10 EN
4.5 Wall Mounting (For Surround)
• The (R /L) surround speakers can be
wall mount package.
you need to connect the power /
speaker cables of the (R /L) surround
speakers.
3
2
3mm
1
5. Connections
5.1 Dolby Atmos
®
Dolby Atmos gives you immersive listening
experience by delivering sound in three
technologies/dolby-atmos
For using Dolby Atmos
®
Dolby Atmos
®
is available only in HDMI
please refer to “HDMI Connection”.
1. To use Dolby Atmos
®
has to support Dolby Atmos
®
.
2. Make sure that “No Encoding“ is selected
for bitstream in the audio output of the
connected external device (e.g. Blu-ray
3. While entering Dolby Atmos / Dolby
shows DOLBY ATMOS / DOLBY AUDIO /
PCM AUDIO.
Tips:
• The full Dolby Atmos experience is
only available when the Soundbar is
connected to the source via a HDMI
2.0 cable.
• The Soundbar will still function when
connected via other methods (such
as a Digital Optical cable) but
these are unable to support all of
recommendation is to connect via
support.
5.2 HDMI Connection
Some 4K HDR TVs require the HDMI input or
picture settings to be set for HDR content
reception. For further setup details on
manual of your TV.
equipment and TV:
Method 1:
eARC/ARC (Audio Return Channel)
The ARC / eARC (Audio Return Channel)
function allows you to send audio from
your ARC- compliant TV to your sound
bar through a single HDMI connection. To
TV is both HDMI-CEC and ARC compliant
and set up accordingly. When correctly
MUTE) of the sound bar.
- Connect the HDMI cable from unit's
HDMI OUT (TV eARC/ARC) socket to
the HDMI (ARC) socket on your ARC
compliant TV. Then press the remote
control to select HDMI eARC.
HDMI (eARC/ARC)
HDMI OUT
TV eARC/ARC
Tips:
• Your TV must support the HDMI-CEC
and ARC function. HDMI-CEC and
ARC must be set to On.
• The setting method of HDMI-CEC and
ARC may differ depending on the TV.
refer to the owner’s manual.
• Only HDMI 1.4 or higher version cable
can support the ARC function.
11 EN
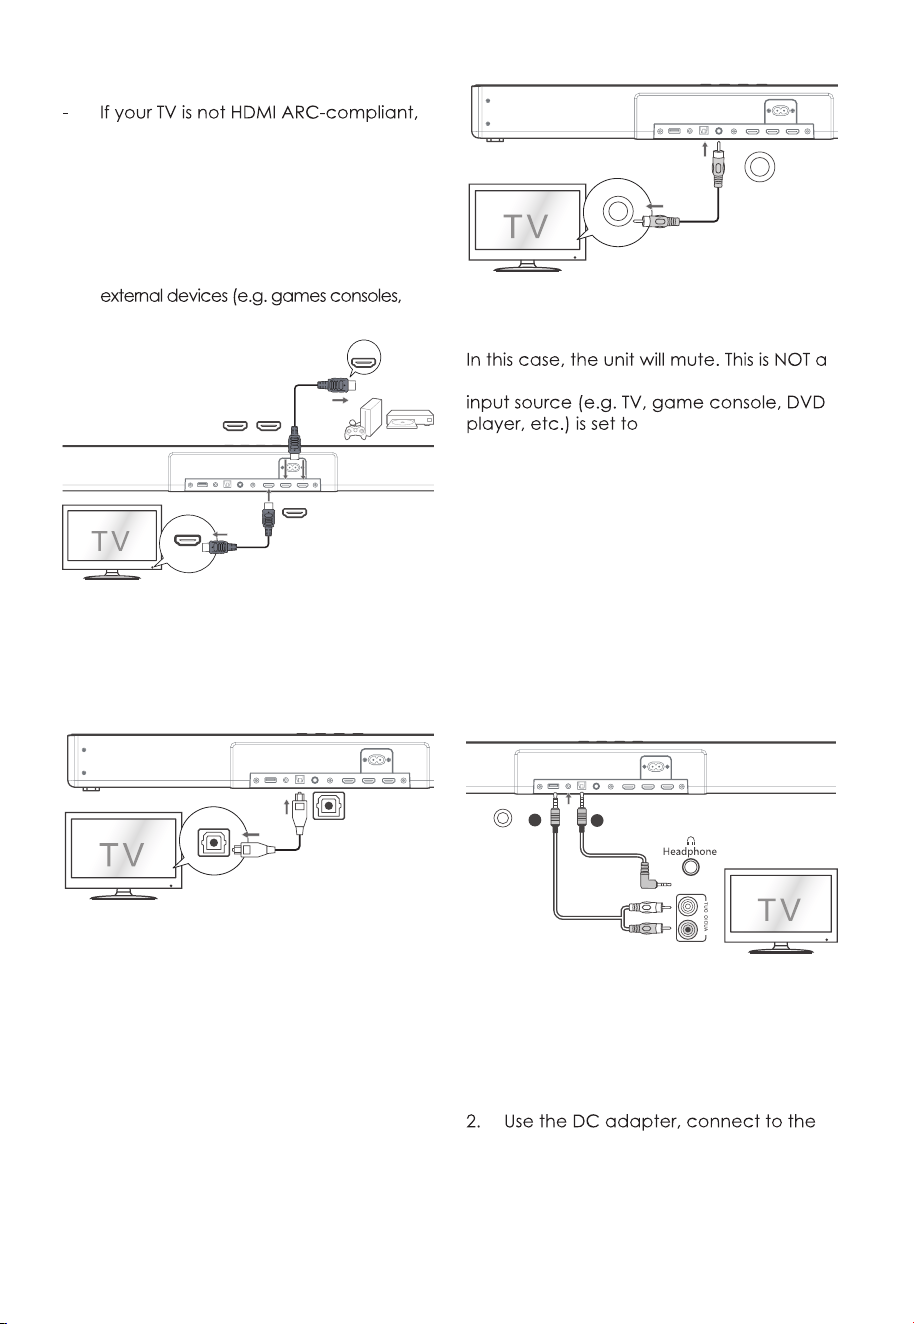
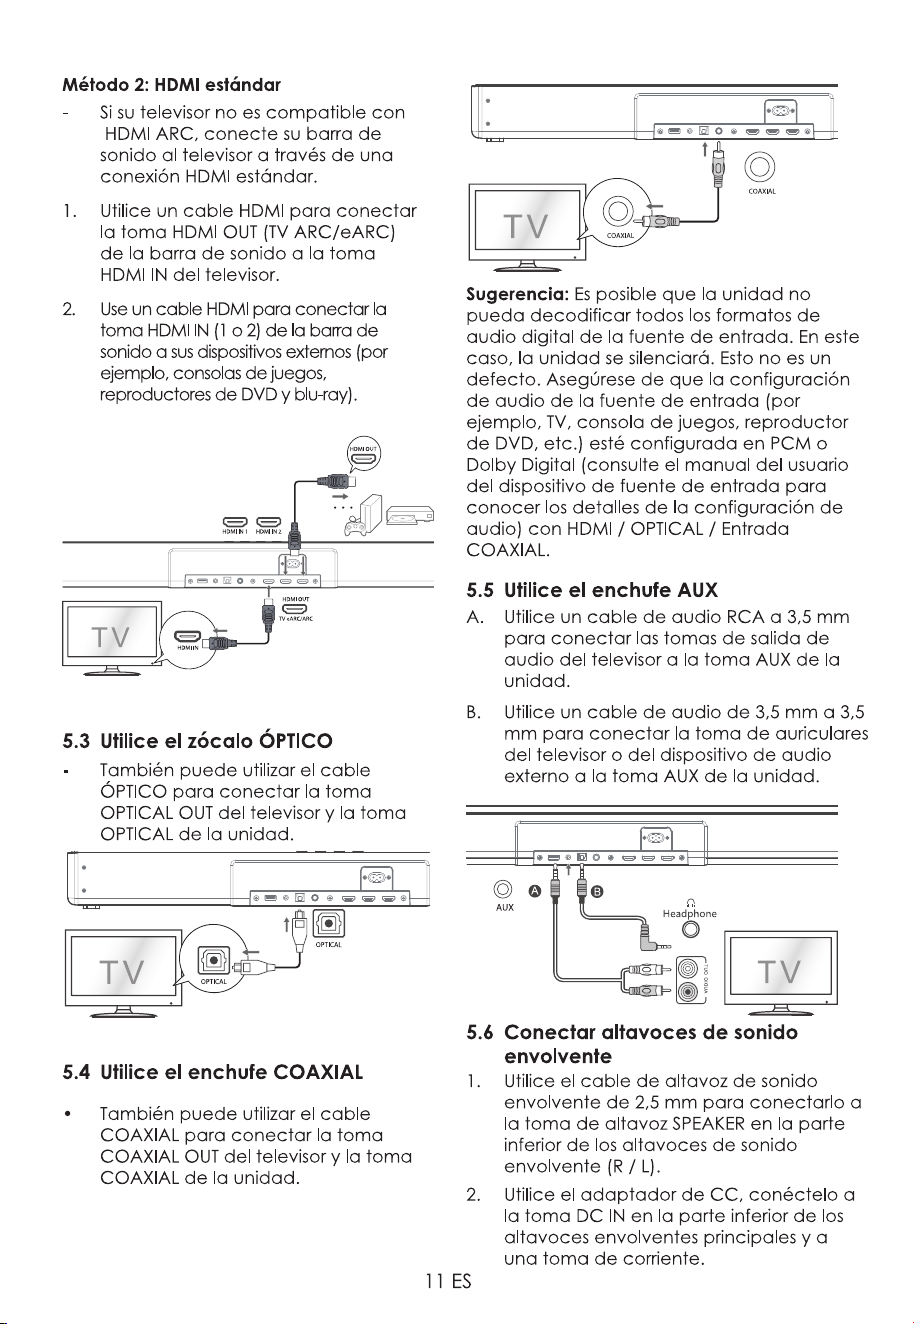
Method 2: Standard HDMI
connect your soundbar to the TV
through a standard HDMI connection.
1. Use an HDMI cable to connect the
soundbar's HDMI OUT (TV ARC/eARC)
socket to the TV’s HDMI IN socket.
2. Use an HDMI cable to connect the
soundbar's HDMI IN (1 or 2) socket to your
DVD players and blu-ray).
HDMI IN
HDMI OUT
HDMI OUT
TV eARC/ARC
HDMI IN 1 HDMI IN 2
.
.
.
5.3 Use the OPTICAL Socket
- You also can use the OPTICAL cable to
connect the TV’s OPTICAL OUT socket
and the OPTICAL socket on the unit.
OPTICAL
OPTICAL
COAXIAL
COAXIAL
5.4 Use the COAXIAL Socket
• You also can use the COAXIAL cable
to connect the TV's COAXIAL OUT
socket and COAXIAL socket on the
unit.
COAXIAL
COAXIAL
Tip: The unit may not be able to decode all
digital audio formats from the input source.
defect. Ensure that the audio setting of the
PCM or Dolby Digital
(Refer to the user manual of the input
source device for its audio setting details)
with HDMI / OPTICAL / COAXIAL input.
5.5 Use the AUX Socket
A. Use a RCA to 3.5mm audio cable to
connect the TV’s audio output sockets
to the AUX socket on the unit.
B. Use a 3.5mm to 3.5mm audio cable
to connect the TV’s or external audio
device headphone socket to the AUX
socket on the unit.
AUX
A
B
5.6 Connect Surround Speakers
1. elbac rekaeps dnuorrus mm5.2 eht esU
to connect to the SPEAKER speaker
socket on the bottom of the (R / L)
surround speakers.
DC IN socket on the bottom of the
main surround speakers and to a
power outlet.
12 EN
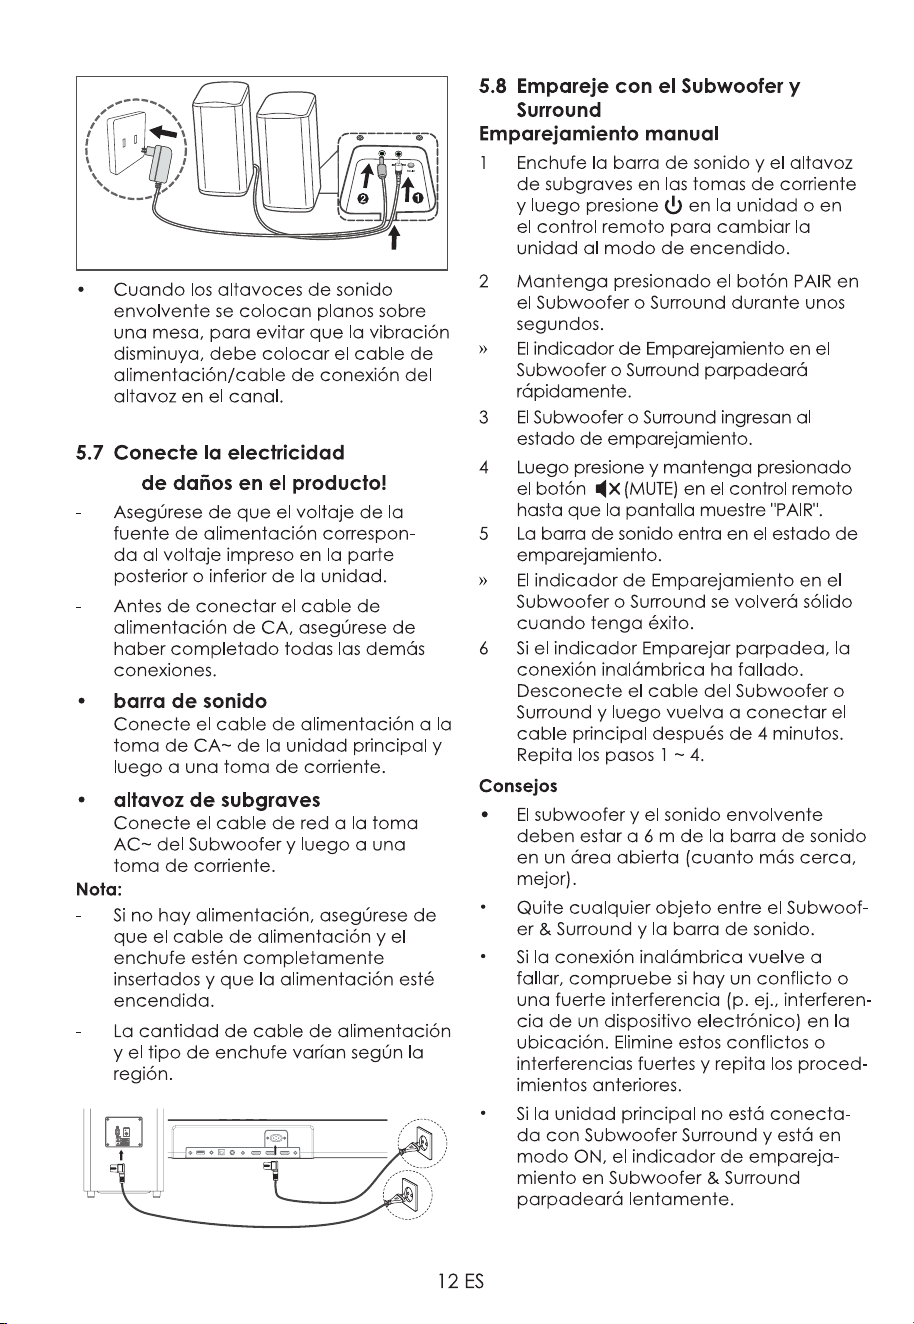
• When surround speakers are placed
the power cord / speaker connection
cable in the trough.
5.7 Connect Power
Risk of product damage!
- Ensure that the power supply voltage
corresponds to the voltage printed on
the back or the underside of the unit.
- Before connecting the AC power
other connections.
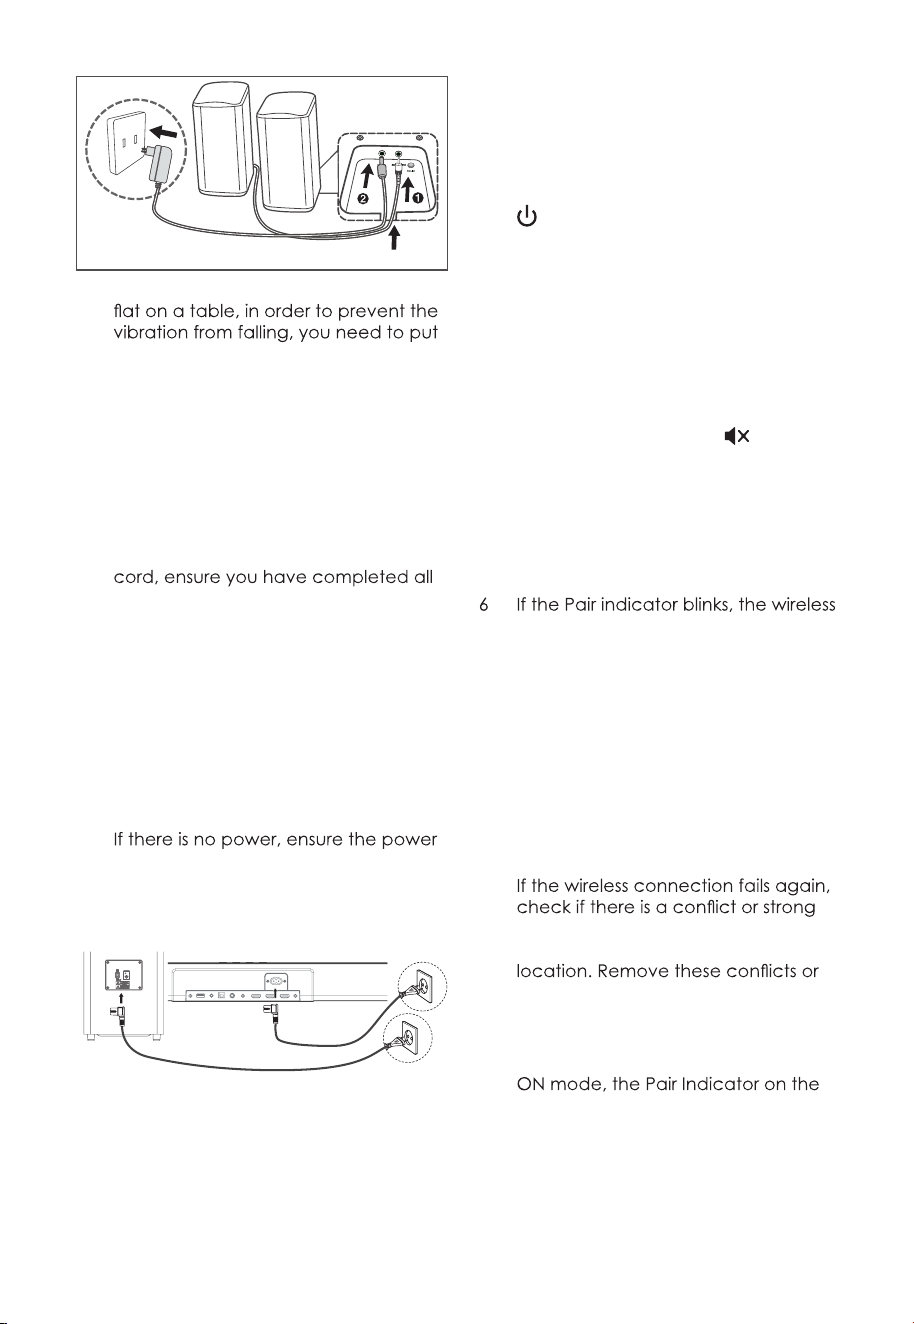
• Soundbar
Connect the mains cable to the AC~
socket of the main unit and then into
a mains socket.
• Subwoofer
Connect the mains cable to the AC~
socket of the Subwoofer and then into
a mains socket.
Note:
-
cord and plug are fully inserted and
the power is turned on.
- Power cord quantity and plug type
vary by regions.
5.8 Pair up with the Subwoofer &
Surround
Manual Pairing
1 Plug the Soundbar and the subwoofer
into the mains sockets and then press
on the unit or remote control to
switch the unit to On mode.
2 Press and hold the PAIR button on
the Subwoofer or Surround for a few
seconds.
» The Pair indicator on the Subwoofer or
Surround will rapidly blink.
3 The Subwoofer or Surround enter the
pairing state.
4 Then press and hold the
(MUTE)
button on the remote control until the
display show " PAIR ".
5 The soundbar enter the pairing state.
» The Pair indicator on the Subwoofer
or Surround will become solid when
successful.
connection has failed. Unplug the
cable of the Subwoofer or Surround
and then reconnect the main cable
after 4 minutes. Repeat step 1 ~ 4.
Tips:
•
The Subwoofer&Surround should be
within 6 m of the Soundbar in an open
area (the closer the better).
• Remove any objects between
the Subwoofer&Surround and the
Soundbar.
•
interference (e. g. interference from
an electronic device) around the
strong interferences and repeat the
above procedures.
• If the main unit is not connected with
the Subwoofer&Surround and it is in
Subwoofer&Surround will blink slowly.
12 EN
• When surround speakers are placed
the power cord / speaker connection
cable in the trough.
5.7 Connect Power
Risk of product damage!
- Ensure that the power supply voltage
corresponds to the voltage printed on
the back or the underside of the unit.
- Before connecting the AC power
other connections.
• Soundbar
Connect the mains cable to the AC~
socket of the main unit and then into
a mains socket.
• Subwoofer
Connect the mains cable to the AC~
socket of the Subwoofer and then into
a mains socket.
Note:
-
cord and plug are fully inserted and
the power is turned on.
- Power cord quantity and plug type
vary by regions.
5.8 Pair up with the Subwoofer &
Surround
Manual Pairing
1 Plug the Soundbar and the subwoofer
into the mains sockets and then press
on the unit or remote control to
switch the unit to On mode.
2 Press and hold the PAIR button on
the Subwoofer or Surround for a few
seconds.
» The Pair indicator on the Subwoofer or
Surround will rapidly blink.
3 The Subwoofer or Surround enter the
pairing state.
4 Then press and hold the
(MUTE)
button on the remote control until the
display show " PAIR ".
5 The soundbar enter the pairing state.
» The Pair indicator on the Subwoofer
or Surround will become solid when
successful.
connection has failed. Unplug the
cable of the Subwoofer or Surround
and then reconnect the main cable
after 4 minutes. Repeat step 1 ~ 4.
Tips
•
The Subwoofer&Surround should be
within 6 m of the Soundbar in an open
area (the closer the better).
• Remove any objects between
the Subwoofer&Surround and the
Soundbar.
•
interference (e. g. interference from
an electronic device) around the
strong interferences and repeat the
above procedures.
• If the main unit is not connected with
the Subwoofer&Surround and it is in
Subwoofer&Surround will blink slowly.
13 EN
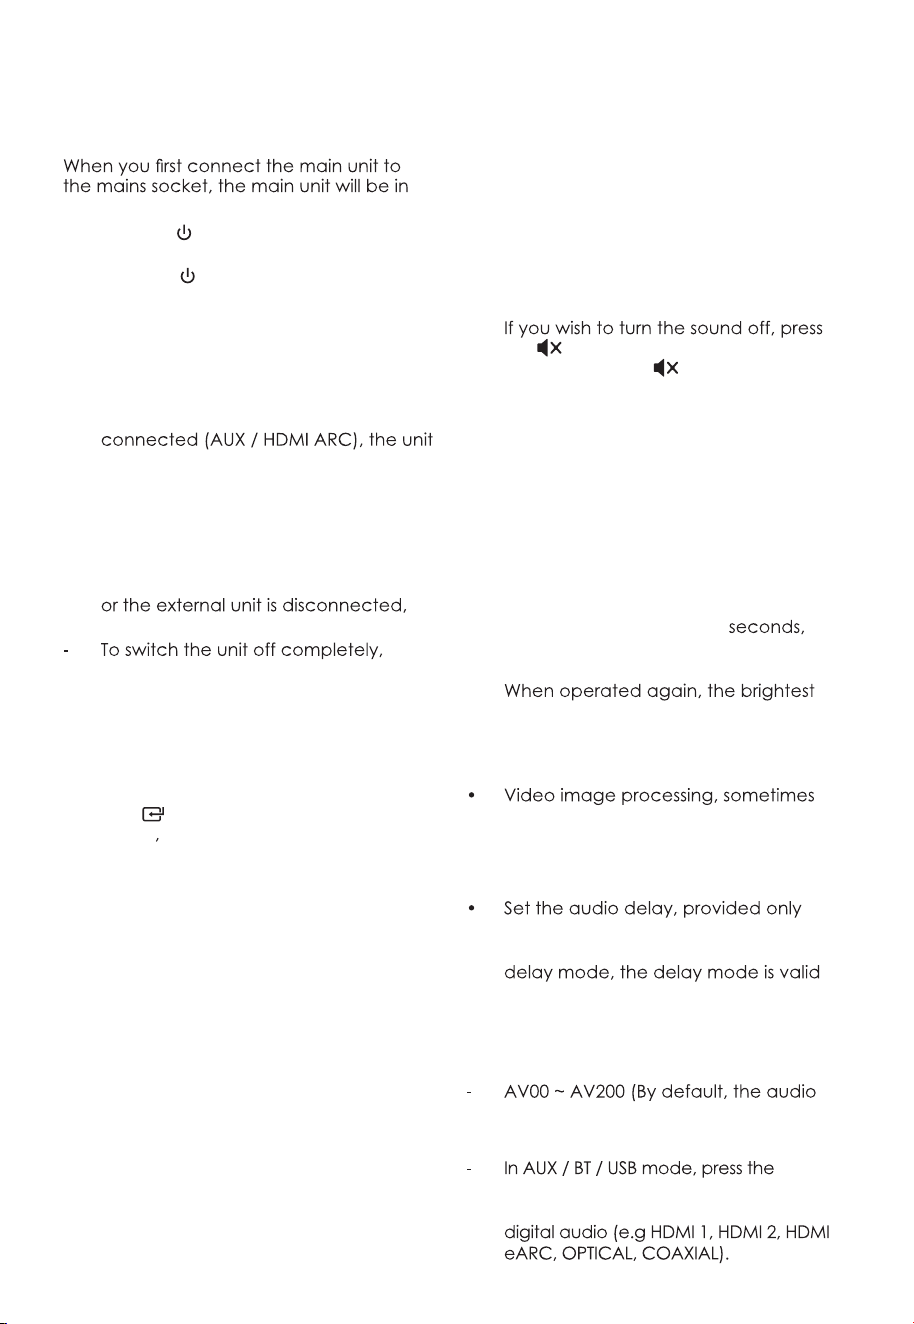
6. Basic Operation
6.1 Standby/ON
Standby mode.
• Press the
button on the unit or on the
remote control to switch the unit ON.
• Press the
button again to switch the
unit back to STANDBY mode.
• Disconnect the mains plug from the
mains socket if you want to switch the
unit OFF completely.
• Auto Wake
- If a TV or an external device is
will switch on automatically when the
TV or the external device is switched
on.
• Automatic Power Off Function
- The unit automatically turns to Standby
mode after about 15 minutes if the TV
switched off.
remove the mains plug from the mains
socket.
• Please turn the unit off completely to
save energy when not in use.
6.2 Select Modes
Press the (SOURCE) button on the unit
or the AUX
BT, OPT/COA, HDMI 1/2, HDMI
eARC and USB buttons on the remote
control to select the desired mode. The
selected mode will shows on the display.
6.3 Adjust the Bass/Treble Level
• Press the BASS +/- buttons on the
remote control to adjust bass level.
• Press the TREBLE +/- buttons on the
remote control to adjust treble level.
6.4 Turn the Surround Sound ON/OFF
• Press the VERTICAL SURROUND button
on the remote control to turn on the
surround sound. Press this button again
to turn off the surround sound.
6.5 Select Equalizer (EQ) Effect
Press the EQ button on the remote control
to select your desired preset equalizer
:
NEWS / MOVIE / MUSIC.
6.6 Adjust the Volume
•
Adjust the Soundbar’s Volume
Press the +/- (VOL) buttons on the unit
or on the remote control to adjust the
volume.
the (MUTE) button on the remote
control. Press the (MUTE) button
again or press the +/- (VOL) buttons
on the unit or on the remote control to
resume normal listening.
•
Adjust the Surround’s Volume
Press the SURR VOL +/- button on
the remote control to increase or
decrease the Surround’s volume level.
6.7 About the Display Brightness
• When no operation for 30
the brightness of the screen will
automatically dim the brightness.
level will be automatically restored.
6.8 AV SYNC (Set the Audio Delay)
longer than the time required to
process the audio signal. This is called
“delayed.” Audio Delay feature is
designed to remedy this delay.
for the current playback mode. (As
provided in the HDMI eARC audio
only for the HDMI eARC).
• Press the AV SYNC+/- buttons on the
remote control to adjust the delay
time.
delay is set to 00).
Tips:
AV
SYNC+/- buttons has no effect. The
audio delay setting is only valid for
14 EN
7. AUX/OPTICAL/COAXIAL/
HDMI Operation
1 Ensure that the unit is connected to
the TV or audio device.
2 Press the
(SOURCE) button
repeatedly on the unit or the AUX,
OPT/COA, HDMI 1/2, HDMI ARC
buttons on the remote control to
select the desired mode.
3 Operate your audio device directly for
playback features.
4 Press the VOL +/– button to adjust the
volume to your desired level.
Tips:
• The unit may not be able to decode
all digital audio formats from the input
This is NOT a defect. Ensure that the
audio setting of the input source (e.g.
set to PCM or Dolby Digital (Refer to the
user manual of the input source device
for its audio setting details) with HDMI
1 / HDMI 2 / HDMI ARC / OPTICAL /
COAXIAL input.
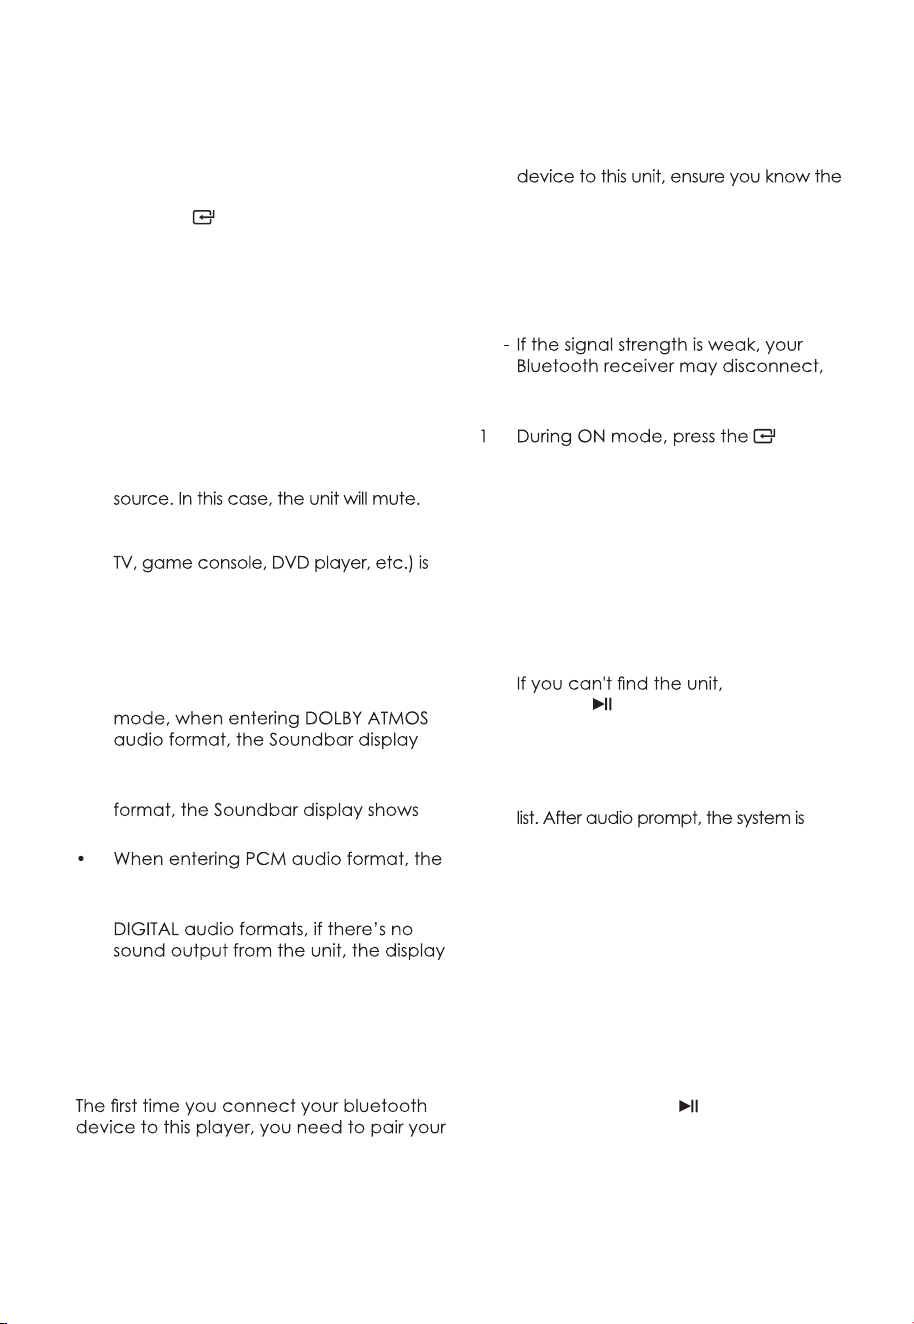
• In HDMI 1 / HDMI2 / HDMI ARC/eARC
shows DOLBY ATMOS.
• When entering DOLBY DIGITAL audio
DOLBY AUDIO.
Soundbar display shows PCM AUDIO.
• When entering non-PCM or DOLBY
shows NOT SUPPORT.
8. Bluetooth Operation
8.1 Pair Bluetooth-enabled Devices
device to this player.
Note:
- The operational range between this
player and a Bluetooth device is
approximately 8 meters (without any
object between the Bluetooth device
and the unit).
- Before you connect a Bluetooth
device’s capabilities.
- Compatibility with all Bluetooth
devices is not guaranteed.
- Any obstacle between this unit and
a Bluetooth device can reduce the
operational range.
but it will re-enter pairing mode
automatically.
(SOURCE) button repeatedly on the
unit or press the BT button on the
remote control to select Bluetooth
mode. "NO BT" will show on the display
if the unit is not paired to any Bluetooth
device.
2 Activate your Bluetooth device and
select the search mode. "APOLLO 550"
will appear on your Bluetooth device
list.
-
press and
hold the
or BT button on the remote
control to be searchable. You will hear
audio prompt from the unit and the
display will show " PAIR ".
3 Select "APOLLO 550" in the pairing
successfully connected and and the
display panel shows " BT " .
4 Play music from the connected
Bluetooth device.
To disconnect the Bluetooth function,
you can :
- Switch to another function on the unit.
- Disable the function from your Bluetooth
device. The Bluetooth device will be
disconnected from the soundbar after
audio prompt.
- Press and hold the
or BT button on
the remote control.
Tips:
• Enter "0000" for the password if
necessary.
14 EN
7. AUX/OPTICAL/COAXIAL/
HDMI Operation
1 Ensure that the unit is connected to
the TV or audio device.
2 Press the (SOURCE) button
repeatedly on the unit or the AUX,
OPT/COA, HDMI 1/2, HDMI ARC
buttons on the remote control to
select the desired mode.
3 Operate your audio device directly for
playback features.
4 Press the VOL +/– button to adjust the
volume to your desired level.
Tip:
• The unit may not be able to decode
all digital audio formats from the input
This is NOT a defect. Ensure that the
audio setting of the input source (e.g.
set to PCM or Dolby Digital (Refer to the
user manual of the input source device
for its audio setting details) with HDMI
1 / HDMI 2 / HDMI ARC / OPTICAL /
COAXIAL input.
• In HDMI 1 / HDMI2 / HDMI ARC/eARC
shows DOLBY ATMOS.
• When entering DOLBY DIGITAL audio
DOLBY AUDIO.
Soundbar display shows PCM AUDIO.
• When entering non-PCM or DOLBY
shows NOT SUPPORT.
8. Bluetooth Operation
8.1 Pair Bluetooth-enabled Devices
device to this player.
Note:
- The operational range between this
player and a Bluetooth device is
approximately 8 meters (without any
object between the Bluetooth device
and the unit).
- Before you connect a Bluetooth
device’s capabilities.
- Compatibility with all Bluetooth
devices is not guaranteed.
- Any obstacle between this unit and
a Bluetooth device can reduce the
operational range.
but it will re-enter pairing mode
automatically.
(SOURCE) button repeatedly on the
unit or press the BT button on the
remote control to select Bluetooth
mode. "NO BT" will show on the display
if the unit is not paired to any Bluetooth
device.
2 Activate your Bluetooth device and
select the search mode. "APOLLO 550"
will appear on your Bluetooth device
list.
-
press and
hold the
or BT button on the remote
control to be searchable. You will hear
audio prompt from the unit and the
display will show " PAIR ".
3 Select "APOLLO 550" in the pairing
successfully connected and and the
display panel shows " BT " .
4 Play music from the connected
Bluetooth device.
To disconnect the Bluetooth function,
you can :
- Switch to another function on the unit.
- Disable the function from your Bluetooth
device. The Bluetooth device will be
disconnected from the soundbar after
audio prompt.
- Press and hold the
or BT button on
the remote control.
Tips:
• Enter "0000" for the password if
necessary.
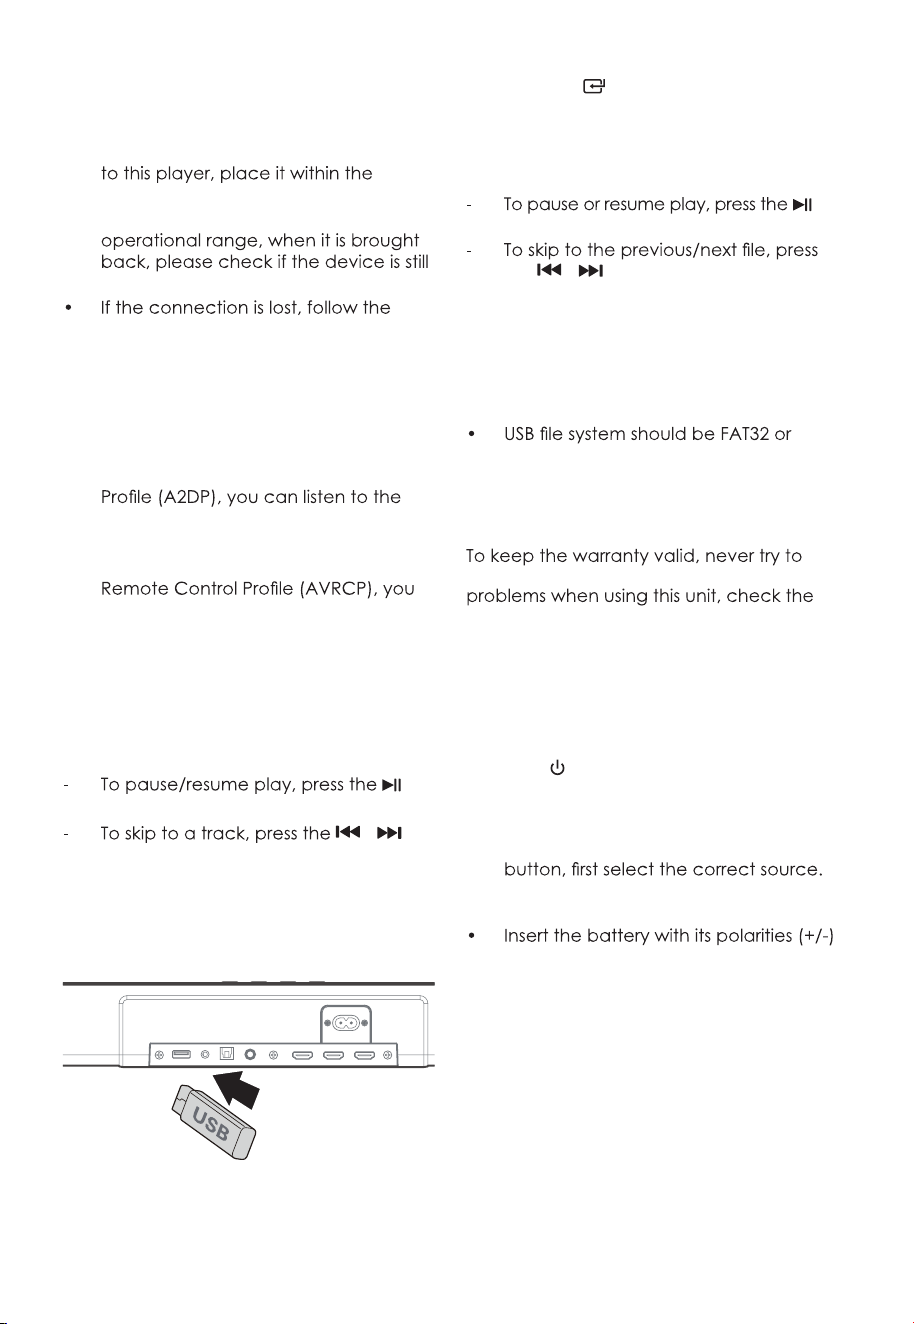
15 EN
• The player will also be disconnected
when your device is moved beyond
the operational range.
• If you want to reconnect your device
operational range.
• If the device is moved beyond the
connected to the player.
instructions above to pair your device
to the player again.
8.2 Listen to Music from Bluetooth
Device
- If the connected Bluetooth device
supports Advanced Audio Distribution
music stored on the device through
the player.
- If the device also supports Audio Video
can use the player's remote control to
play music stored on the device.
1. Pair your device with the player.
2. Play music via your device (if it
supports A2DP).
3. Use supplied remote control to control
play (if it supports AVRCP).
button on the remote control.
/
buttons on the remote control.
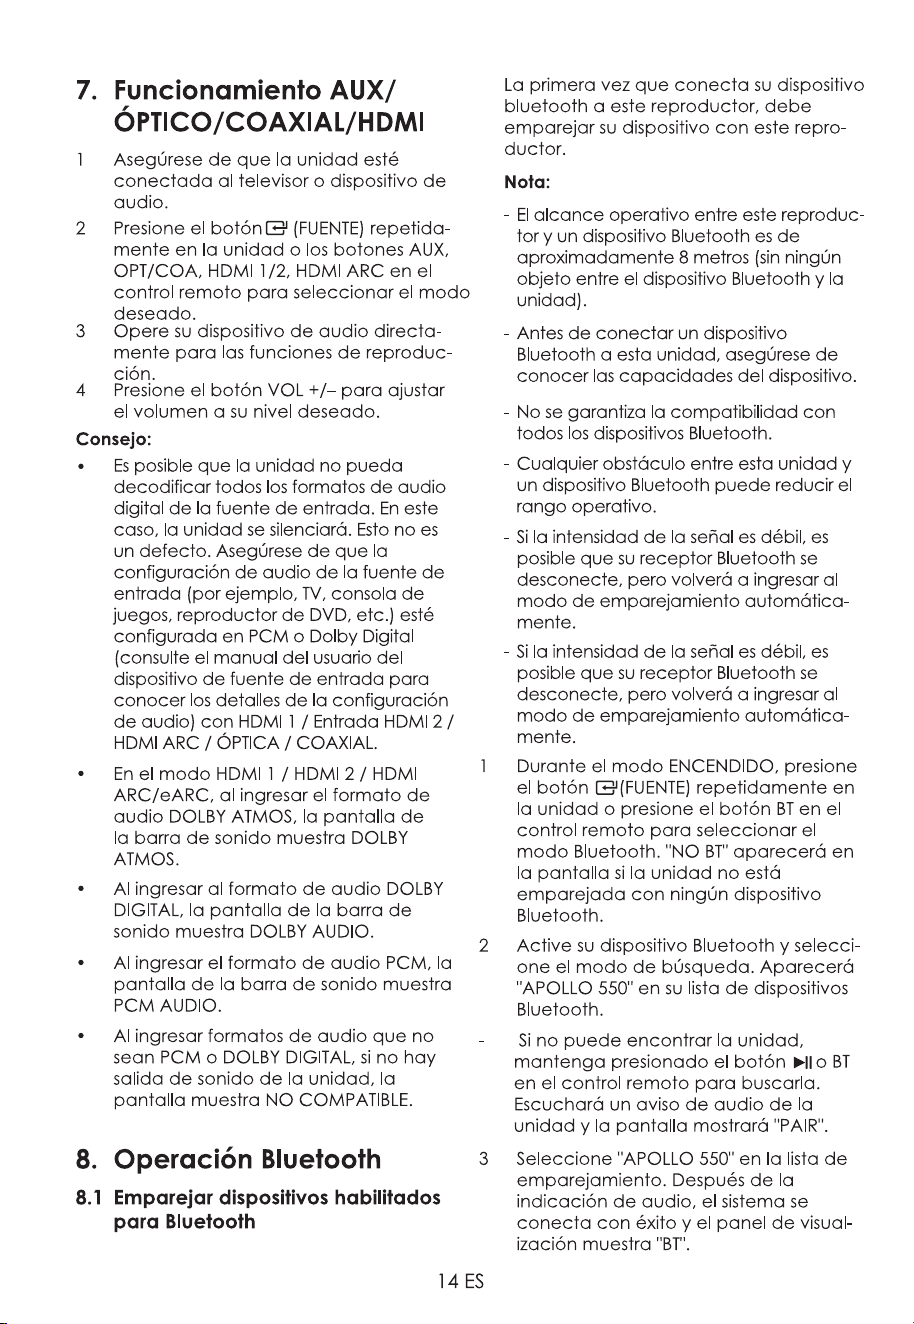
9. USB Operation
1 Insert the USB device.
2 Press the
(SOURCE) button
repeatedly on the unit or press the USB
button on the remote control to select
USB mode.
3 During playback:
button on the remote control.
the
/ buttons on the remote
control.
Tips:
• The unit can support USB devices with
up to 32 GB of memory.
• This unit can play MP3.
FAT16.
10. Troubleshooting
repair the system yourself. If you encounter
following points before requesting service.
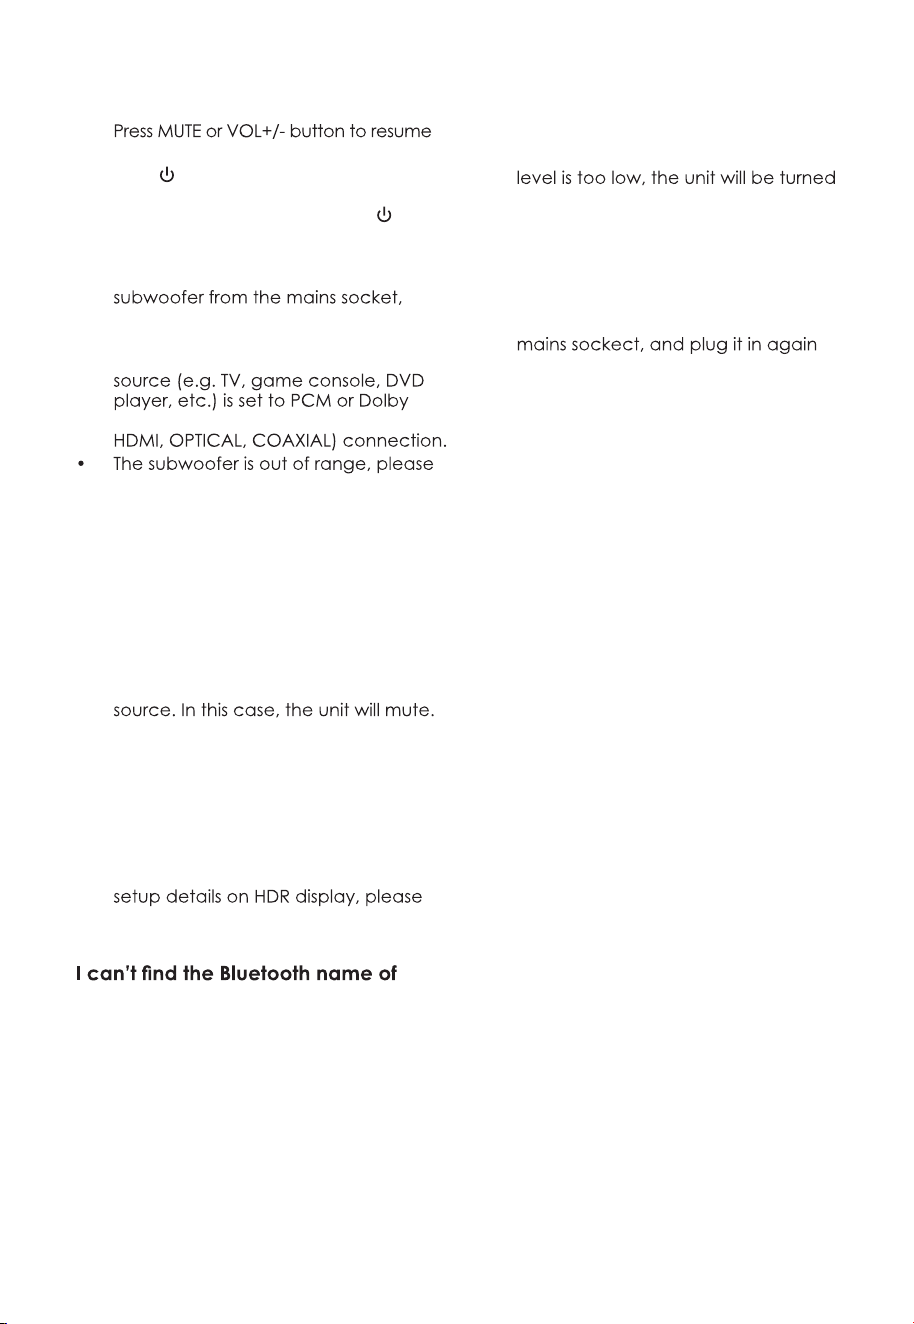
No power
• Ensure that the AC cord of the
apparatus is properly connected .
• Ensure that there is power at the AC
outlet.
• Press
(standby) button to turn the
unit on.
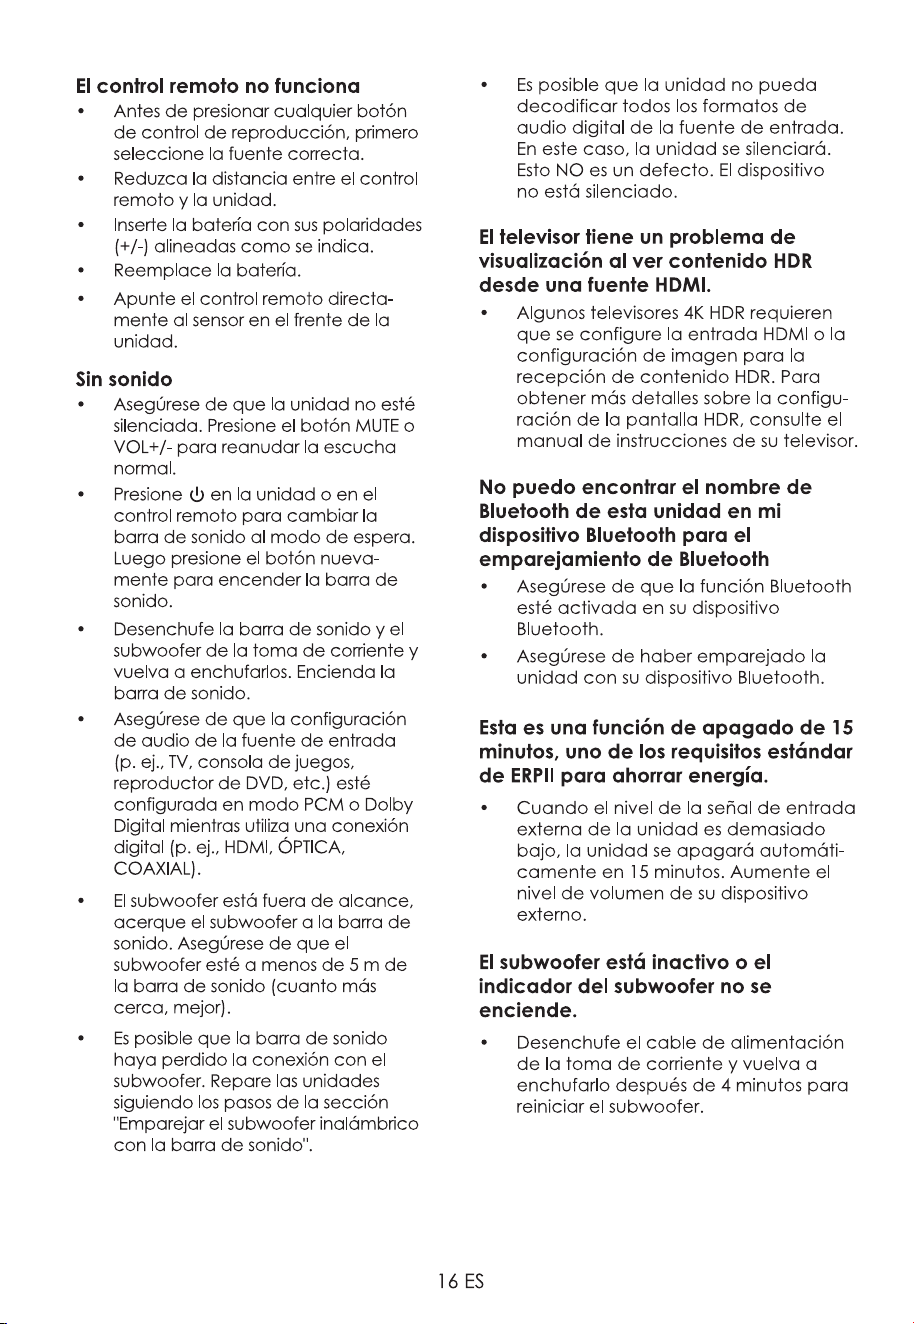
Remote control does not work
• Before you press any playback control
• Reduce the distance between the
remote control and the unit.
aligned as indicated.
• Replace the battery.
• Aim the remote control directly at the
sensor on the front of the unit.
16 EN
No sound
• Make sure that the unit is not muted.
normal listening.
• Press
on the unit or on the remote
control to switch the soundbar to
standby mode. Then press the
button again to switch the soundbar
on.
• Unplug both the soundbar and the
then plug them again. Switch on the
soundbar.
• Ensure the audio setting of the input
Digital mode while using digital (e.g.
move the subwoofer closer to the
soundbar. Make sure the subwoofer is
within 5 m of the soundbar (the closer
the better).
• The soundbar may have lost
connection with the subwoofer. Re-
pair the units by following the steps
on the section “Pairing the Wireless
Subwoofer with the Soundbar”.
• The unit may not be able to decode
all digital audio formats from the input
This is NOT a defect.device is not
muted.
TV has display problem while viewing
HDR content from HDMI source.
• Some 4K HDR TVs require the HDMI
input or picture settings to be set for
HDR content reception. For further
refer to the instruction manual of your
TV.
this unit on my Bluetooth device for
Bluetooth pairing
• Ensure the Bluetooth function is
activated on your Bluetooth device.
• Ensure you have paired the unit with
your Bluetooth device.
This is a 15 mins power off function,
one of the ERPII standard requirement
for saving power
• When the unit's external input signal
off automatically in 15 minutes. Please
increase the volume level of your
external device.
The subwoofer is idle or the indicator
of subwoofer do not light up.
• Please unplug power cord from the
after 4 minutes to reset the subwoofer.
17 EN
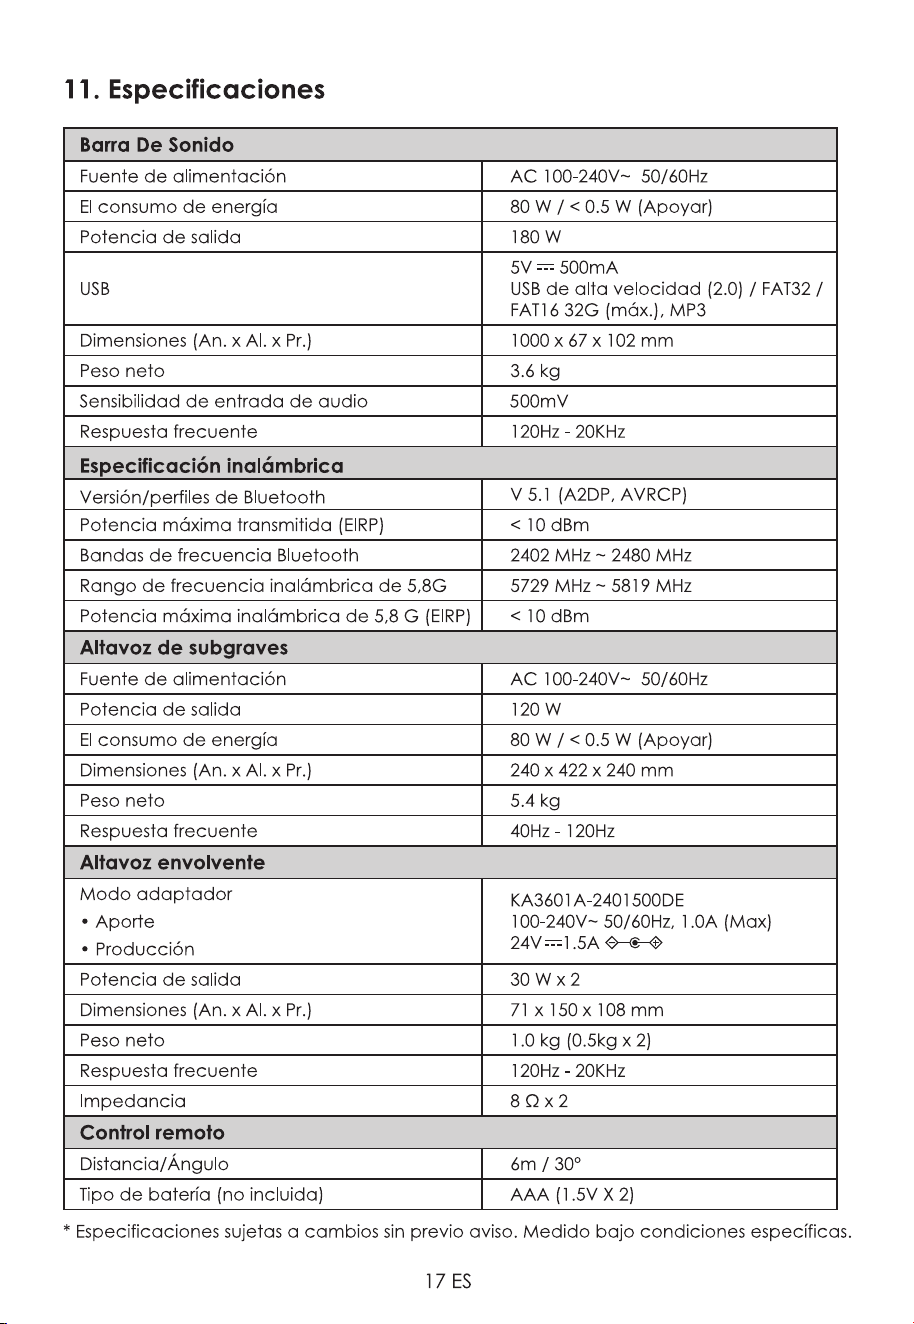
11.
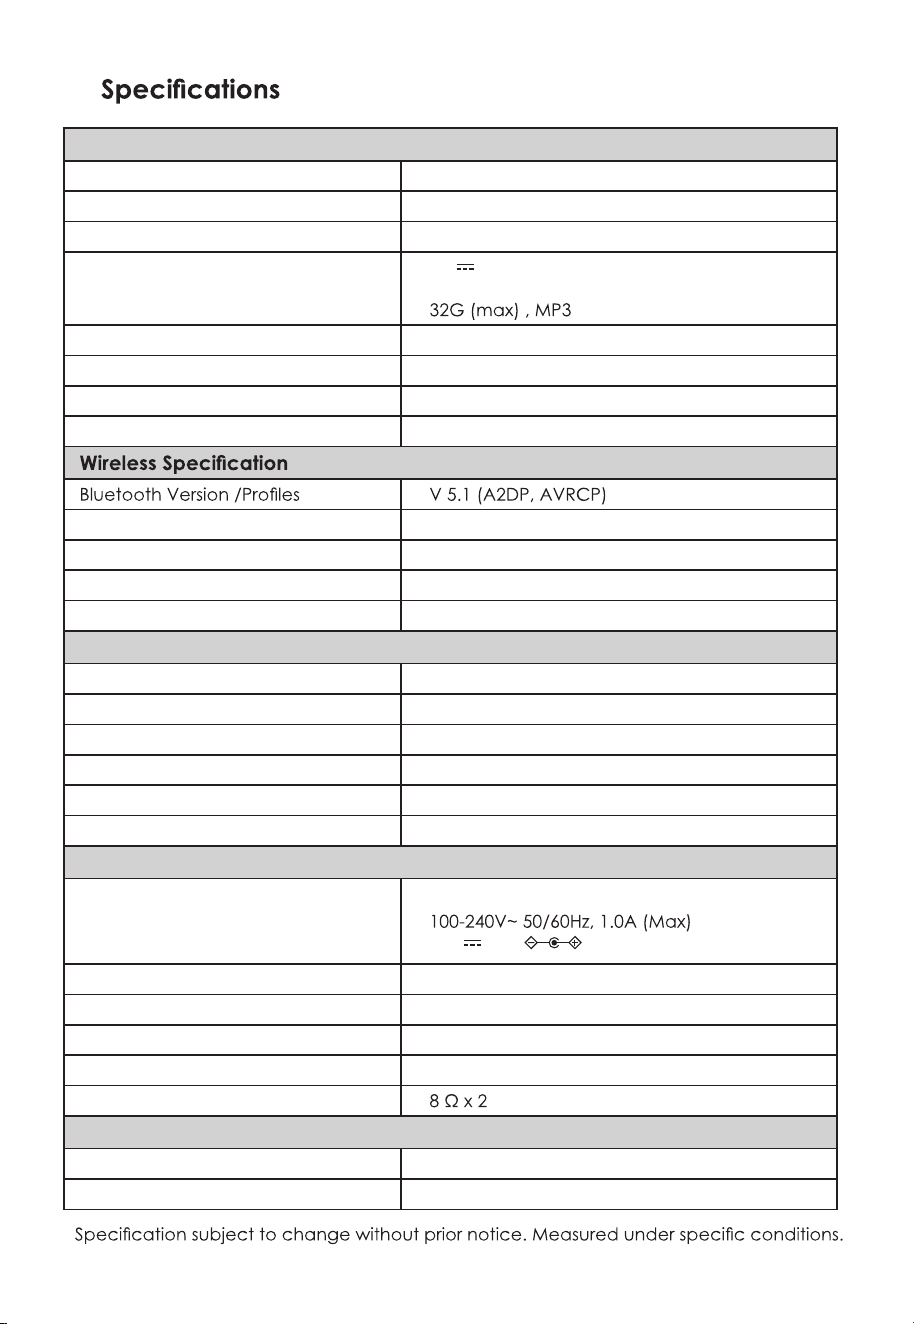
Soundbar
Power Supply AC 100-240V~ 50/60Hz
Power Consumption 80 W / < 0.5 W (StandBy)
Output Power 180 W
USB
5V
500mA
Hi-Speed USB (2.0) / FAT32 / FAT16
Dimension (WxHxD) 1000 x 67 x 102 mm
Net Weight 3.6 kg
Audio Input Sensitivity 500mV
Frequency Response 120Hz - 20KHz
Maximum Power Transmitted (EIRP) < 10 dBm
Bluetooth Frequency Bands 2402 MHz ~ 2480 MHz
5.8G Wireless Frequency Range 5729 MHz ~ 5819 MHz
5.8G Wireless Maximum Power (EIRP) < 10 dBm
Subwoofer
Power Supply AC 100-240V~ 50/60Hz
Output Power 120 W
Power Consumption 80 W / < 0.5 W (StandBy)
Dimension (WxHxD) 240 x 422 x 240 mm
Net Weight 5.4 kg
Frequency Response 40Hz - 120Hz
Surround Speaker
Adapter Mode
• Input
• Output
KA3601A-2401500DE
24V 1.5A
Output Power 30 W x 2
Dimension (WxHxD) 71 x 150 x 108 mm
Net Weight 1.0 kg (0.5kg x 2)
Frequency Response 120Hz - 20KHz
Impedance
Remote Control
Distance/Angle 6m / 30°
Battery Type (not included) AAA (1.5V X 2)
*
11
HDMI
x2 x2 x2
x 6
1
2
3
962 MM
~50 MM/2.0”
~3MM/0.12’’
~3MM/0.12”
4mm/
0.16”
>25MM/0.98”
Riesgo

ǿȜȒȓȞȔȎțȖȓ
1. ǰȎȔțȩȓȖțȟȠȞȡȘȤȖȖȝȜȠȓȣțȖȘȓȏȓȕȜȝȎȟțȜȟȠȖ 3
Ɍɟɯɧɢɤɚɛɟɡɨɩɚɫɧɨɫɬɢ 3
1.2 ɉɪɟɞɭɩɪɟɠɞɟɧɢɟ 4
2. Ʉɨɦɩɥɟɤɬ ɩɨɫɬɚɜɤɢ 5
3.
ɂɞɟɧɬɢɮɢɤɚɰɢɹ ɱɚɫɬɟɣ 6
Ɉɫɧɨɜɧɨɣɛɥɨɤ 6
Ȼɟɫɩɪɨɜɨɞɧɵɣ ɫɚɛɜɭɮɟɪ 6
3.4 ɉɭɥɶɬɞɢɫɬɚɧɰɢɨɧɧɨɝɨɭɩɪɚɜɥɟɧɢɹ 7
4. ǽȜȒȑȜȠȜȐȖȠȓșȪțȩȓȜȝȓȞȎȤȖȖ 8
ɉɨɞɝɨɬɨɜɤɚɩɭɥɶɬɚɞɢɫɬɚɧɰɢɨɧɧɨɝɨɭɩɪɚɜɥɟɧɢɹ 8
Ɂɚɦɟɧɚɛɚɬɚɪɟɟɤɩɭɥɶɬɚɞɢɫɬɚɧɰɢɨɧɧɨɝɨɭɩɪɚɜɥɟɧɢɹ 8
8
5. ǽȜȒȘșȬȥȓțȖȓ10
5.1 Dolby Atmos
®
......................................................................................................................................
ɉɨɞɤɥɸɱɟɧɢɟ+'0,
10
10
ɂɫɩɨɥɶɡɨɜɚɧɢɟɝɧɟɡɞɚ237,&$/ 11
ɂɫɩɨɥɶɡɨɜɚɧɢɟɝɧɟɡɞɚ&2$;,$/ 11
ɂɫɩɨɥɶɡɨɜɚɧɢɟɝɧɟɡɞɚ$8; 11
ɉɨɞɤɥɸɱɟɧɢɟɩɢɬɚɧɢɹ 12
ȼɵɛɟɪɢɬɟɷɮɮɟɤɬɷɤɜɚɥɚɣɡɟɪɚ(4 13
13
13
$96<1&ɭɫɬɚɧɨɜɤɚɡɚɞɟɪɠɤɢɡɜɭɤɚ 13
7. ǾǮǯǼȀǮǰǾdzǴǶǺǮȃ$8;237,&$/&2$;,$/+'0, 14
8. ǾȎȏȜȠȎ%OXHWRRWK 14
ɋɨɩɪɹɠɟɧɢɟɭɫɬɪɨɣɫɬɜɫɩɨɞɞɟɪɠɤɨɣ%OXHWRRWK 14
ɋɥɭɲɚɣɬɟɦɭɡɵɤɭɫɭɫɬɪɨɣɫɬɜɚ%OXHWRRWK 15
9. ǾȎȏȜȠȎȟ86%ȡȟȠȞȜȗȟȠȐȎȚȖ 15
10. ȁȟȠȞȎțȓțȖȓțȓȖȟȝȞȎȐțȜȟȠȓȗ
11. 7ȓȣțȖȥȓȟȘȖȓȣȎȞȎȘȠȓȞȖȟȠȖȘȖ
15
17
ȞȡȟȟȘȖȗ
Ȼɟɫɩɪɨɜɨɞɧые колонкиɨɛɴɟɦɧогоɡɜɭчания ..7
ɋɨɩɪɹɠɟɧɢɟɫɫɚɛɜɭɮɟɪɨɦɢколонками ɨɛɴɟɦɧогоɡɜɭчания.. 12
ɉɨɞɤɥɸɱɟниеɞɢɧɚɦɢɤовɨɛɴɟɦɧɨɝɨɡɜɭɱɚɧɢɹ 11
6. ǼȟțȜȐțȎȭȜȝȓȞȎȤȖȭ 13
Ɋɟɠɢɦɨɠɢɞɚɧɢɹɜɤɥ 13
ȼɵɛорɪɟɠɢɦов.... 13
Регулировкаɭɪɨɜɧяɧɢɡɤɢɯɜɵɫɨɤɢɯɱɚɫɬɨɬ 13
ȼɤɥɸɱениеɜɵɤɥɸɱɟниеɨɛɴɟɦɧогоɡɜɭɤа 13
Регулировка ɝɪɨɦɤɨɫɬи....
Ɉɹɪɤɨɫɬɢɞɢɫɩɥɟɹ
ɇɚɫɬɟɧɧɵɣɦɨɧɬɚɠȾɥɹколонок ɨɛɴɟɦɧɨɝɨɡɜɭɱɚɧɢɹ 10
Ɋɚɡɦɟɳɟɧɢɟɢɦɨɧɬɚɠ
ɇɚɫɬɟɧɧɵɣɦɨɧɬɚɠДɥɹсаундбара
8
1ȼɚɠɧɵɟ ɢɧɫɬɪɭɤɰɢɢɩɨ ɬɟɯɧɢɤɟ
ɛɟɡɨɩɚɫɧɨɫɬɢ
ȼɇɂɆȺɇɂȿ:ȾɅə ɋɇɂɀȿɇɂə ɊɂɋɄȺ ɉɈɊȺɀȿɇɂə ɗɅȿɄɌɊɂɑȿ
ɋɄɂɆ ɌɈɄɈɆ ɇȿ ɋɇɂɆȺɃɌȿ ɄɊɕɒɄɍ ɂɅɂ ɁȺȾɇɘɘ
ɄɊɕɒɄɍ. ȼɇɍɌɊɂ ɇȿɌ ɑȺɋɌȿɃ, ɈȻɋɅɍɀɂȼȺȿɆɕɏ ɉɈɅɖɁɈ
ȼȺɌȿɅȿɆ. ɌȿɏɇɂɑȿɋɄɈȿ ɈȻɋɅɍɀɂȼȺɇɂȿ ɉɊɈȼɈȾɂɌɋə
ɌɈɅɖɄɈ ɄȼȺɅɂɎɂɐɂɊɈȼȺɇɇɕɆ ɋȿɊȼɂɋɇɕɆ ɉȿɊɋɈɇȺɅɈɆ.
Ɍɟɯɧɢɤɚɛɟɡɨɩɚɫɧɨɫɬɢ
5. ɇɟɢɫɩɨɥɶɡɭɣɬɟɷɬɨɭɫɬɪɨɣɫɬɜɨɪɹɞɨɦɫɜɨ
ɞɨɣ Ɂɚɩɪɟɳɚɟɬɫɹɢɫɩɨɥɶɡɨɜɚɬɶ ɩɪɢɛɨɪɜɛɥɢɡɢ
ɜɨɞɵɢɥɢ ɜɥɚɝɢ ɧɚɩɪɢɦɟɪɜɫɵɪɨɦɩɨɞɜɚɥɟ
ɜɨɡɥɟɛɚɫɫɟɣɧɚɢɬɩ.
6. ɑɢɫɬɢɬɟɬɨɥɶɤɨɫɭɯɨɣɬɤɚɧɶɸ
7. ɇɟɡɚɤɪɵɜɚɣɬɟɜɟɧɬɢɥɹɰɢɨɧɧɵɟɨɬɜɟɪɫɬɢɹ.
ɍɫɬɚɧɚɜɥɢɜɚɣɬɟɜɫɨ
ɨɬɜɟɬɫɬɜɢɢɫɢɧɫɬɪɭɤɰɢ
ɹɦɢɩɪɨɢɡɜɨɞɢɬɟɥɹ.
8. ɇɟɭɫɬɚɧɚɜɥɢɜɚɣɬɟ ɪɹɞɨɦ ɫɢɫɬɨɱɧɢɤɚɦɢ ɬɟɩɥɚ
ɬɚɤɢɦɢɤɚɤɪɚɞɢɚɬɨɪɵɨɛɨɝɪɟɜɚɬɟɥɢɩɟɱɢɢɥɢ
ɞɪɭɝɢɟ ɭɫɬɪɨɣɫɬɜɚ ɜɤɥɸɱɚɹɭɫɢɥɢɬɟɥɢ, ɜɵɞɟ
ɥɹɸɳɢɟɬɟɩɥɨ
ɧɟɩɨɞɯɨɞɢɬ ɞɥɹɜɚɲɟɣ ɪɨɡɟɬɤɢɨɛɪɚɬɢɬɟɫɶ ɤ
ɷɥɟɤɬɪɢɤɭ ɞɥɹɡɚɦɟɧɵɭɫɬɚɪɟɜɲɟɣɪɨɡɟɬɤɢ
10. ɇɟɧɚɫɬɭɩɚɣɬɟɧɚɲɧɭɪɩɢɬɚɧɢɹɢɧɟɡɚɳɟɦ
ɥɹɣɬɟɟɝɨ ɨɫɨɛɟɧɧɨɜɨɛɥɚɫɬɢ ɜɢɥɨɤɪɨɡɟɬɨɤɢ
ɜɦɟɫɬɚɯɜɵɯɨɞɚɢɡɭɫɬɪɨɣɫɬɜɚ
11. ɂɫɩɨɥɶɡɭɣɬɟɬɨɥɶɤɨɩɪɢɧɚɞɥɟɠɧɨɫɬɢ ɢ ɚɤɫɟɫ
ɫɭɚɪɵ,ɭɤɚɡɚɧ
ɧɵɟ ɮɢɪɦɨɣɩɪɨɢɡɜɨɞɢɬɟɥɟɦ
12. ɂɫɩɨɥɶɡɭɣɬɟɬɨɥɶɤɨɫɬɟɥɟɠɤɨɣɫɬɨɣɤɨɣɲɬɚ
ɬɢɜɨɦɤɪɨɧɲɬɟɣɧɨɦ ɢɥɢ ɫɬɨɥɨɦ, ɭɤɚɡɚɧ
ɧɵɦ ɩɪɨɢɡɜɨɞɢɬɟɥɟɦɢɥɢ ɩɪɨɞɚɜɚɟɦɵɦ
ɜɦɟɫɬɟɫɭɫɬɪɨɣɫɬɜɨɦɉɪɢɢɫɩɨɥɶɡɨɜɚɧɢɢ
ɬɟɥɟɠɤɢɢɥɢɫɬɨɣɤɢɫɨɛɥɸɞɚɣɬɟ ɨɫɬɨɪɨɠɧɨɫɬɶ
ɩɪɢɩɟɪɟɦɟɳɟɧɢɢɭɫɬɪɨɣɫɬɜɚɧɚɬɟɥɟɠɤɟ,
ɱɬɨɛɵɢɡɛɟɠɚɬɶɬɪɚɜɦ ɜ ɪɟɡɭɥɶɬɚɬɟɨɩɪɨɤɢɞɵ
ɜɚɧɢɹ.
13. Ɉɬɤɥɸɱɚɣɬɟ ɭɫɬɪɨɣɫɬɜɨɨɬɫɟɬɢ ɜɨɜɪɟɦɹ ɝɪɨɡɵ
ɢɥɢ ɤɨɝɞɚɧɟɢɫɩɨɥɶɡɭɟɬɟ ɟɝɨɜɬɟɱɟɧɢɟ ɞɥɢ
ɬɟɥɶɧɨɝɨɜɪɟɦɟɧɢ.
15. ɗɬɨɨɛɨɪɭɞɨɜɚɧɢɟ ɹɜɥɹɟɬɫɹɷɥɟɤɬɪɢɱɟɫ
ɤɢɦ
ɩɪɢɛɨɪɨɦɄɥɚɫɫɚ,, ɢɥɢɫ ɞɜɨɣɧɨɣɢɡɨɥɹɰɢɟɣ.
Ɉɧɛɵɥɪɚɡɪɚɛɨɬɚɧɬɚɤɢɦɨɛɪɚɡɨɦɱɬɨɧɟɬɪɟ
ɛɭɟɬɡɚɳɢɬɧɨɝɨ ɩɨɞɤɥɸɱɟɧɢɹ ɤ ɡɚɡɟɦɥɟɧɢɸ.
16. Ɂɚɩɪɟɳɚɟɬɫɹɩɨɞɜɟɪɝɚɬɶ ɭɫɬɪɨɣɫɬɜɨɜɨɡɞɟɣ
ɫɬɜɢɸ ɤɚɩɟɥɶɢɥɢ ɛɪɵɡɝ. ɇɢɤɚɤɢɟɩɪɟɞɦɟɬɵ
ɧɚɩɨɥɧɟɧɧɵɟ ɠɢɞɤɨɫɬɶɸ,ɬɚɤɢɟ ɤɚɤ ɧɚɩɪɢɦɟɪ
ɜɚɡɵ ɧɟɥɶɡɹ ɫɬɚɜɢɬɶ ɧɚ ɭɫɬɪɨɣɫɬɜɨ.
19. Ɂɚɩɪɟɳɚɟɬɫɹɫɬɚɜɢɬɶɧɚɭɫɬɪɨɣɫɬɜɨɢɫɬɨɱɧɢɤɢ
ɨɬɤɪɵɬɨɝɨɨɝɧɹ, ɧɚɩɪɢɦɟɪɡɚɠɠɟɧɧɵɟɫɜɟɱɢ.
58
20. Ȼɚɬɚɪɟɢ ɫɥɟɞɭɟɬ ɭɬɢɥɢɡɢɪɨɜɚɬɶɜɫɨɨɬɜɟɬɫɬɜɢɢ
ɫɝɨɫɭɞɚɪɫɬɜɟɧɧɵɦɢɢɦɟɫɬɧɵɦɢɧɨɪɦɚɦɢ ɢ
ɩɪɚɜɢɥɚɦɢ.
21. ɂɫɩɨɥɶɡɭɣɬɟ ɭɫɬɪɨɣɫɬɜɨ ɜ ɭɦɟɪɟɧɧ
ɨɦɤɥɢɦɚɬɟ.
4. ɋɥɟɞɭɣɬɟɜɫɟɦɢɧɫɬɪɭɤɰɢɹɦ ɋɨɛɥɸɞɚɣɬɟ
ɜɫɟɢɧɫɬɪɭɤɰɢɢɩɨ ɷɤɫɩɥɭɚɬɚɰɢɢɢɢɫɩɨɥɶɡɨɜɚ
ɧɢɸ.
3. Ɉɛɪɚɳɚɣɬɟɜɧɢɦɚɧɢɟɧɚɜɫɟ ɩɪɟɞɭɩɪɟɠɞɟ
ɧɢɹ ɋɥɟɞɭɟɬɫɨɛɥɸɞɚɬɶ ɜɫɟɩɪɟɞɭɩɪɟɠɞɟɧɢɹ
ɧɚɩɪɢɛɨɪɟɢɜɢɧɫɬɪɭɤɰɢɹɯɩɨɷɤɫɩɥɭɚɬɚɰɢɢ
2. ɋɨɯɪɚɧɢɬɟɷɬɢɢɧɫɬɪɭɤɰɢɢ ɋɨɯɪɚɧɢɬɟ ɢɧ
ɫɬɪɭɤɰɢɢɩɨɬɟɯɧɢɤɟ ɛɟɡɨɩɚɫɧɨɫɬɢɢ ɷɤɫɩɥɭɚɬɚ
ɰɢɢɞɥɹɢɫɩɨɥɶɡɨɜɚɧɢɹ ɜ ɛɭɞɭɳɟɦ
1. ɉɪɨɱɬɢɬɟɷɬɢɢɧɫɬɪɭɤɰɢɢ ɜɫɟɢɧɫɬɪɭɤɰɢɢ
ɩɨɬɟɯɧɢɤɟ ɛɟɡɨɩɚɫɧɨɫɬɢ ɢɷɤɫɩɥɭɚɬɚɰɢɢ
ɞɨɥɠɧɵɛɵɬɶɩɪɨɱɢɬɚɧɵ ɩɟɪɟɞɢɫɩɨɥɶɡɨɜɚɧɢɟɦ
ɷɬɨɝɨɢɡɞɟɥɢɹ.
17. Ɇɢɧɢɦɚɥɶɧɨɟɪɚɫɫɬɨɹɧɢɟ ɜɨɤɪɭɝ ɭɫɬɪɨɣɫɬɜɚ
ɞɥɹɨɛɟɫɩɟɱɟɧɢɹɞɨɫɬɚɬɨɱɧɨɣ ɜɟɧɬɢɥɹɰɢɢɫɨ
ɫɬɚɜɥɹɟɬɫɦ
18. ɇɟɥɶɡɹ ɡɚɤɪɵɜɚɬɶ ɜɟɧɬɢɥɹɰɢɨɧɧɵɟɨɬɜɟɪɫɬɢɹ
ɬɚɤɢɦɢɩɪɟɞɦɟɬɚɦɢ, ɤɚɤ ɝɚɡɟɬɵɫɤɚɬɟɪɬɢ,
ɲɬɨɪɵɢɬ. ɩ.
Ɂɧɚɱɨɤ ɦɨɥɧɢɢ ɫɨ ɫɬɪɟɥɤɨɣ ɜɧɭɬɪɢ ɬɪɟɭɝɨɥɶɧɢɤɚ
ɩɪɟɞɧɚɡɧɚɱɟɧ ɞɥɹ ɩɪɟɞɭɩɪɟɠɞɟɧɢɹɩɨɥɶɡɨɜɚɬɟɥɹɨ
ɧɚɥɢɱɢɢ ɧɟɢɡɨɥɢɪɨɜɚɧɧɨɝɨ "ɨɩɚɫɧɨɝɨ ɧɚɩɪɹɠɟ
ɧɢɹ ɜɧɭɬɪɢ ɤɨɪɩɭɫɚ ɢɡɞɟɥɢɹ ɤɨɬɨɪɨɟ ɦɨɠɟɬ
ɢɦɟɬɶ ɞɨɫɬɚɬɨɱɧɭɸ ɜɟɥɢɱɢɧɭ, ɱɬɨɛɵɫɨɡɞɚɬɶɪɢɫɤ
ɩɨɪɚɠɟɧɢɹɷɥɟɤɬɪɢɱɟɫɤɢɦ ɬɨɤɨɦ ɞɥɹɥɸɞɟɣ.
ȼɨɫɤɥɢɰɚɬɟɥɶɧɵɣ ɡɧɚɤ ɜɬɪɟɭɝɨɥɶɧɢɤɟ ɩɪɟɞɭɩɪɟ
ɠɞɚɟɬ ɩɨɥɶɡɨɜɚɬɟɥɹɨ ɧɚɥɢɱɢɢ ɜɚɠɧɵɯ ɢɧɫɬɪɭɤ
ɰɢɣ ɩɨ ɷɤɫɩɥɭɚɬɚɰɢɢ ɢ ɬɟɯɧɢɱɟɫɤɨɦɭ ɨɛɫɥɭɠɢɜɚ
ɧɢɸ ɪɟɦɨɧɬɭ ɜɞɨɤɭɦɟɧɬɚɰɢɢ, ɩɪɢɥɚɝɚɟɦɨɣ ɤ
ɩɪɢɛɨɪɭ.
14. ɉɨɪɭɱɢɬɟ ɜɫɟ ɨɛɫɥɭɠɢɜɚɧɢɟ ɤɜɚɥɢɮɢɰɢɪɨɜɚɧ
ɧɨɦɭɩɟɪɫɨɧɚɥɭɈɛɫɥɭɠɢɜɚɧɢɟɬɪɟɛɭɟɬɫɹɟɫɥɢ
ɭɫɬɪɨɣɫɬɜɨɛɵɥɨɩɨɜɪɟɠɞɟɧɨɤɚɤɢɦɥɢɛɨɨɛɪɚ
ɡɨɦ ɧɚɩɪɢɦɟɪ ɩɨɜɪɟɠɞɟɧ ɲɧɭɪ ɩɢɬɚɧɢɹ ɢɥɢ
ɜɢɥɤɚ ɩɪɨɥɢɬɚ ɠɢɞɤɨɫɬɶ ɢɥɢ ɜɧɭɬɪɶ ɭɫɬɪɨɣ
ɫɬɜɚ ɭɩɚɥɢ ɩɪɟɞɦɟɬɵ ɭɫɬɪɨɣɫɬɜɨ ɩɨɞɜɟɪɝɥɨɫɶ
ɜɨɡɞɟɣɫɬɜɢɸɞɨɠɞɹɢɥɢɜɥɚɝɢɧɟ ɪɚɛɨɬɚɟɬɧɨɪ
ɦɚɥɶɧɨɢɥɢ ɛɵɥɨ ɭɪɨɧɟɧɨ.
9. ɇɟɩɪɟɧɟɛɪɟɝɚɣɬɟɡɚɳɢɬɧɨɣɮɭɧɤɰɢɟɣɩɨɥɹɪ
ɧɨɣ ɜɢɥɤɢɢɥɢɜɢɥɤɢɫ ɡɚɡɟɦɥɟɧɢɟɦɉɨɥɹɪɧɚɹ
ɜɢɥɤɚɢɦɟɟɬ ɞɜɚɤɨɧɬɚɤɬɚ,ɨɞɢɧɢɡ ɤɨɬɨɪɵɯ
ɲɢɪɟɞɪɭɝɨɝɨȼɢɥɤɚɡɚɡɟɦɥɟɧɢɹɢɦɟɟɬɞɜɚ ɤɨɧ
ɬɚɤɬɚɢɬɪɟɬɢɣ ɤɨɧɬɚɤɬɡɚɡɟɦɥɟɧɢɹɒɢɪɨɤɢɣ
ɤɨɧɬɚɤɬɢɥɢɬɪɟɬɢɣɤɨɧɬɚɤɬɩɪɟɞɭɫɦɨɬɪɟɧ ɞɥɹ
ɜɚɲɟɣ ɛɟɡɨɩɚɫɧɨɫɬɢ. ȿɫɥɢɩɨɫɬɚɜɥɹɟɦɚɹɜɢɥɤɚ
58
ȼɧɢɦɚɧɢɟ:
– ɂɫɩɨɥɶɡɨɜɚɧɢɟ ɷɥɟɦɟɧɬɨɜɭɩɪɚɜɥɟɧɢɹɪɟɝɭɥɢ
ɪɨɜɨɤɢɥɢ ɜɵɩɨɥɧɟɧɢɟɩɪɨɰɟɞɭɪɨɬɥɢɱɧɵɯɨɬ
ɨɩɢɫɚɧɧɵɯɜɞɚɧɧɨɦɞɨɤɭɦɟɧɬɟɦɨɠɟɬɩɪɢɜɟ
ɫɬɢɤɨɩɚɫɧɨɦɭɨɛɥɭɱɟɧɢɸɢɥɢɞɪɭɝɨɣɧɟɛɟɡ
ɨɩɚɫɧɨɣɪɚɛɨɬɟ
– ɑɬɨɛɵ ɫɧɢɡɢɬɶɪɢɫɤɜɨɡɝɨɪɚɧɢɹɢɥɢɩɨɪɚɠɟɧɢɹ
ɷɥɟɤɬɪɢɱɟɫɤɢɦɬɨɤɨɦ,ɧɟ ɩɨɞɜɟɪɝɚɣɬɟɭɫɬɪɨɣ
ɫɬɜɨɜɨɡɞɟɣɫɬɜɢɸɞɨɠɞɹɢɥɢɜɥɚɝɢɇɢɤɚɤɢɟ
ɩɪɟɞɦɟɬɵ,ɧɚɩɨɥɧɟɧɧɵɟ ɠɢɞɤɨɫɬɶɸɬɚɤɢɟɤɚɤ
ɧɚɩɪɢɦɟɪɜɚɡɵɧɟɥɶɡɹɫɬɚɜɢɬɶ ɧɚɭɫɬɪɨɣɫɬɜɨ.
– ɋɟɬɟɜɨɣɲɬɟɩɫɟɥɶ ɫɨɟɞɢɧɢɬɟɥɶɩɪɢɛɨɪɚɢɫ
ɩɨɥɶɡɭɟɬɫɹɜ ɤɚɱɟɫɬɜɟɭɫɬɪɨɣɫɬɜɚɨɬɤɥɸɱɟɧɢɹ.
ɍɫɬɪɨɣɫɬɜɨɨɬɤɥɸɱɟɧɢɹ ɞɨɥɠɧɨɧɚɯɨɞɢɬɶɫɹɜ
ɦɟɫɬɟɥɟɝɤɨɞɨɫɬɭɩɧɨɦɜɨɜɪɟɦɹɪɚɛɨɬɵ
– ɋɭɳɟɫɬɜɭɟɬɨɩɚɫɧɨɫɬɶ ɜɡɪɵɜɚɩɪɢɧɟɩɪɚɜɢɥɶ
ɧɨɣ ɡɚɦɟɧɟɛɚɬɚɪɟɢɁɚɦɟɧɹɣɬɟɬɨɥɶɤɨɧɚɬɨɬ
ɠɟɢɥɢ ɷɤɜɢɜɚɥɟɧɬɧɵɣɬɢɩ
ɉɪɟɞɭɩɪɟɠɞɟɧɢɟ
• Ȼɚɬɚɪɟɹ ɛɚɬɚɪɟɢɢɥɢ ɛɚɬɚɪɟɣɧɵɣɛɥ
ɨɤɧɟ
ɞɨɥɠɧɵ ɩɨɞɜɟɪɝɚɬɶɫɹɱɪɟɡɦɟɪɧɨɦɭɧɚɝɪɟɜɭɬɚ
ɤɨɦɭɤɚɤ ɜ ɫɥɭɱɚɟ ɩɪɹɦɵɯ ɫɨɥɧɟɱɧɵɯ ɥɭɱɟɣ
ɨɝɧɹɢɬɩ
• ɉɟɪɟɞ ɷɤɫɩɥɭɚɬɚɰɢɟɣɷɬɨɣɫɢɫɬɟɦɵɩɪɨɜɟɪɶɬɟ
ɧɚɩɪɹɠɟɧɢɟ ɫɢɫɬɟɦɵɱɬɨɛɵɭɛɟɞɢɬɶɫɹɱɬɨ ɨɧɨ
ɢɞɟɧɬɢɱɧɨɧɚɩɪɹɠɟɧɢɸ ɜɚɲɟɣ ɦɟɫɬɧɨɣɫɟɬɢ
ɷɧɟɪɝɨɩɢɬɚɧɢɹ.
• ɇɟɪɚɡɦɟɳɚɣɬɟɞɚɧɧɨɟɭɫɬɪɨɣɫɬɜɨɛɥɢɡɤɨ ɤ
ɫɢɥɶɧɵɦɦɚɝɧɢɬɧɵɦɩɨɥɹɦ
• ɇɟɤɥɚɞɢɬɟ ɞɚɧɧɨɟɭɫɬɪɨɣɫɬɜɨ ɧɚɭɫɢɥɢɬɟɥɶ
ɢɥɢ ɪɟɫɢɜɟɪ
• ɇɟɩɵɬɚɣɬɟɫɶ ɱɢɫɬɢɬɶɭɫɬɪɨɣɫɬɜɨɯɢɦɢɱɟɫɤɢɦɢ
ɪɚɫɬɜɨɪɢɬɟɥɹɦɢɬɚɤ ɤɚɤ ɷɬɨɦɨɠɟɬɩɨɜɪɟɞɢɬɶ
ɩɨɤɪɵɬɢɟɂɫɩɨɥɶɡɭɣɬɟɱɢɫɬɭɸɫɭɯɭɸ ɢɥɢ
ɫɥɟɝɤɚɜɥɚɠɧɭɸɬɪɹɩɤɭ
• ȼɵɧɢɦɚɹɜɢɥɤɭɢɡɪɨɡɟɬɤɢɜɫɟɝɞɚɬɹɧɢɬɟ
ɡɚ
ɜɢɥɤɭɧɢɤɨɝɞɚ ɧɟɞɟɪɝɚɣɬɟɡɚɲɧɭɪ
• ɂɡɦɟɧɟɧɢɹɢɥɢɦɨɞɢɮɢɤɚɰɢɢɞɚɧɧɨɝɨɭɫɬɪɨɣ
ɫɬɜɚɧɟɨɞɨɛɪɟɧɧɵɟ ɜ ɹɜɧɨɣ ɮɨɪɦɟ ɫɬɨɪɨɧɨɣ,
ɨɬɜɟɬɫɬɜɟɧɧɨɣɡɚɫɨɛɥɸɞɟɧɢɟɬɪɟɛɨɜɚɧɢɣɚɧ
ɧɭɥɢɪɭɸɬɩɪɚɜɨɩɨɥɶɡɨɜɚɬɟɥɹɧɚɷɤɫɩɥɭɚɬɚɰɢɸ
ɨɛɨɪɭɞɨɜɚɧɢɹ.
• ɉɚɫɩɨɪɬɧɚɹɬɚɛɥɢɱɤɚɧɚɤɥɟɢɜɚɟɬɫɹ ɧɚɧɢɠɧɟɣ
ɢɥɢ ɡɚɞɧɟɣ ɱɚɫɬɢ ɨɛɨɪɭɞɨɜɚɧɢɹ.
~ ɇɚɩɪɹɠɟɧɢɟɩɟɪɟɦɟɧɧɨɝɨɬɨɤɚ: ɷɬɨɬɫɢɦɜɨɥ
ɭɤɚɡɵɜɚɟɬɧɚɬɨɱɬɨɧɨɦɢɧɚɥɶɧɨɟɧɚɩɪɹɠɟɧɢɟɨɬ
ɦɟɱɟɧɧɨɟ ɷɬɢɦ ɫɢɦɜɨɥɨɦ, ɹɜɥɹɟɬɫɹɧɚɩɪɹɠɟɧɢɟɦ
ɩɟɪɟɦɟɧɧɨɝɨɬɨɤɚ
ɂɫɩɨɥɶɡɨɜɚɧɢɟɛɚɬɚɪɟɢȼɇɂɆȺɇɂȿ!
ȼɨɢɡɛɟɠɚɧɢɟɩɪɨɬɟɱɤɢɛɚɬɚɪɟɣ, ɤɨɬɨɪɚɹɦɨɠɟɬ
ɩɪɢɜɟɫɬɢ ɤɬɟɥɟɫɧɵɦ ɩɨɜɪɟɠɞɟɧɢɹɦɦɚɬɟɪɢɚɥɶ
ɧɨɦɭɭɳɟɪɛɭɢɥɢɩɨɜɪɟɠɞɟɧɢɸ ɭɫɬɪɨɣɫɬɜɚ:
– ɉɪɚɜɢɥɶɧɨɭɫɬɚɧɨɜɢɬɟɜɫɟɛɚɬɚɪɟɢ ɫɭɱɟɬɨɦ ɩɨ
ɥɹɪɧɨɫɬɢɢ, ɤɚɤ ɭɤɚɡɚɧɨ ɧɚɩɪɢɛɨ
ɪɟ.
– ɇɟɫɦɟɲɢɜɚɣɬɟ ɫɬɚɪɵɟɢ ɧɨɜɵɟɛɚɬɚɪɟɢ
– ɇɟɢɫɩɨɥɶɡɭɣɬɟɜɦɟɫɬɟɳɟɥɨɱɧɵɟ ɫɬɚɧɞɚɪɬɧɵɟ
ɭɝɨɥɶɧɨɰɢɧɤɨɜɵɟɢɥɢ ɚɤɤɭɦɭɥɹɬɨɪɧɵɟ Ni
&d, Ni0+ɢɬɞ. ɛɚɬɚɪɟɢ
– ɍɞɚɥɢɬɟ ɛɚɬɚɪɟɢɟɫɥɢɭɫɬɪɨɣɫɬɜɨɧɟɢɫɩɨɥɶɡɭ
ɟɬɫɹɜɬɟɱɟɧɢɟɞɥɢɬɟɥɶɧɨɝɨɜɪɟɦɟɧɢ.
ɋɥɨɜɟɫɧɵɣɡɧɚɤ %lXHtootK ɢɥɨɝɨɬɢɩɵɹɜɥɹɸɬɫɹ ɡɚ
ɪɟɝɢɫɬɪɢɪɨɜɚɧɧɵɦɢɬɨɜɚɪɧɵɦɢɡɧɚɤɚɦɢ, ɩɪɢɧɚɞɥɟ
ɠɚɳɢɦɢ ɤɨɦɩɚɧɢɢ %lXHtootK6,G ,. ,nc.
ɉɪɢɧɹɬɵɟɬɨɜɚɪɧɵɟɡɧɚɤɢ+D0,, +'0, +iJK
DHfinition 0XltimHGia ,ntHrfacHɢɥɨɝɨɬɢɩ+D0, ɹɜ
ɥɹɸɬɫɹɬɨɜɚɪɧɵɦɢ ɡɧɚɤɚɦɢɢɥɢ ɡɚɪɟɝɢɫɬɪɢɪɨɜɚɧ
ɧɵɦɢɬɨɜɚɪɧɵɦɢ ɡɧɚɤɚɦɢ ɤɨɦɩɚɧɢɢ +'0, /LcHQs
ing Administrator, ,nc. ɜ ɋɒȺɢɞɪɭɝɢɯɫɬɪɚɧɚɯ
Dolby, Dolby AXdio, Dolby Atmos ɢɫɢɦɜɨɥ
ɞɜɨɣɧɨɣ
ɛɭɤɜɵ'ɹɜɥɹɸɬɫɹ ɡɚɪɟɝɢɫɬɪɢɪɨɜɚɧɧɵɦɢ ɬɨɜɚɪ
ɧɵɦɢɡɧɚɤɚɦɢ ɤɨɦɩɚɧɢɢ DolE\/DboratoriHs
/LcHnsing &orporation. ɂɡɝɨɬɨɜɥɟɧɨɩɨɥɢɰɟɧɡɢɢ
ɤɨɦɩɚɧɢɢDolb\/DEoratoriHs. Ʉɨɧɮɢɞɟɧɰɢɚɥɶɧɵɟ
ɧɟɨɩɭɛɥɢɤɨɜɚɧɧɵɟ ɪɚɛɨɬɵ. &opyrigKt © 1992 –
2020 Dolb\/DEoratoriHs. ȼɫɟɩɪɚɜɚɡɚɳɢɳɟɧɵ
ɉɪɚɜɢɥɶɧɚɹ ɭɬɢɥɢɡɚɰɢɹ ɷɬɨɝɨ ɢɡɞɟɥɢɹ.
Ⱦɚɧɧɵɣɡɧɚɤ ɭɤɚɡɵɜɚɟɬɧɚɬɨɱɬɨɷɬɨ ɢɡɞɟ
ɥɢɟ ɧɟɥɶɡɹɭɬɢɥɢɡɢɪɨɜɚɬɶ ɜɦɟɫɬɟɫɞɪɭɝɢɦɢ
ɛɵɬɨɜɵɦɢɨɬɯɨɞɚɦɢ ɩɨɜɫɟɦɭȿɋ. Ⱦɥɹ
ɩɪɟɞɨɬɜɪɚɳɟɧɢɹ ɜɨɡɦɨɠɧɨɝɨ ɜɪɟɞɚ ɨɤɪɭɠɚɸɳɟɣ
ɫɪɟɞɟ ɢɥɢ ɡɞɨɪɨɜɶɸ ɱɟɥɨɜɟɤɚ ɨɬ ɧɟɤɨɧɬɪɨɥɢɪɭɟ
ɦɨɝɨɭɧɢɱɬɨɠɟɧɢɹ ɨɬɯɨɞɨɜɭɬɢɥɢɡɢɪɭɣɬɟɢɯ ɨɬɜɟɬ
ɫɬɜɟɧɧɨɫɩɨɫɨɛɫɬɜɭɹ ɭɫɬɨɣɱɢɜɨɦɭɩɨɜɬɨɪɧɨɦɭɢɫ
ɩɨɥɶɡɨɜɚɧɢɸɦɚɬɟɪɢɚɥɶɧɵɯɪɟɫɭɪɫɨɜȾɥɹ ɜɨɡɜɪɚɬɚ
ɢɫɩɨɥɶɡɨɜɚɧɧɨɝɨ ɭɫɬɪɨɣɫɬɜɚ, ɜɨɫɩɨɥɶɡɭɣɬɟɫɶ ɫɢ
ɫɬɟɦɚɦɢ ɜɨɡɜɪɚɬɚ ɢ ɫɛɨɪɚ ɢɥɢ ɨɛɪɚɬɢɬɟɫɶ ɤ ɩɪɨ
ɞɚɜɰɭɭɤ
ɨɬɨɪɨɝɨɛɵɥɨ ɩɪɢɨɛɪɟɬɟɧɨ ɢɡɞɟɥɢɟ. Ɉɧɢ
ɦɨɝɭɬɫɞɚɬɶ ɷɬɨɢɡɞɟɥɢɟ ɧɚɷɤɨɥɨɝɢɱɟɫɤɢ ɛɟɡɨɩɚɫ
ɧɭɸɭɬɢɥɢɡɚɰɢɸ.
ɇɚɫɬɨɹɳɢɦɦɵɡɚɹɜɥɹɟɦ, ɱɬɨɷɬɨɬɩɪɨ
ɞɭɤɬɫɨɨɬɜɟɬɫɬɜɭɟɬɨɫɧɨɜɧɵɦɬɪɟɛɨɜɚ
ɧɢɹɦɢɞɪɭɝɢɦɫɨɨɬɜɟɬɫɬɜɭɸɳɢɦɩɨɥɨ
ɠɟɧɢɹɦȾɢɪɟɤɬɢɜɵ201453 (8.
• ȿɫɥɢ ɜ ɫɢɫɬɟɦɭ ɩɨɩɚɞɟɬ ɤɚɤɨɣɥɢɛɨ ɬɜɟɪɞɵɣ
ɩɪɟɞɦɟɬ ɢɥɢ ɠɢɞɤɨɫɬɶ ɨɬɤɥɸɱɢɬɟ ɫɢɫɬɟɦɭ ɢ
ɩɪɟɠɞɟ ɱɟɦ ɩɨɜɬɨɪɧɨ ɜɤɥɸɱɚɬɶ ɫɢɫɬɟɦɭ ɩɪɨ
ɜɟɪɶɬɟɟɺ ɫɩɨɦɨɳɶɸ ɤɜɚɥɢɮɢɰɢɪɨɜɚɧɧɨɝɨɩɟɪ
ɫɨɧɚɥɚ
.
58
Ȼɟɫɩɪɨɜɨɞɧɨɣɫɚɛɜɭɮɟɪ
2. ǸȜȚȝșȓȘȠȝȜȟȠȎȐȘȖ
Ɉɫɧɨɜɧɨɣɛɥɨɤ
ɉɭɥɶɬɞɢɫɬɚɧɰɢɨɧɧɨɝɨ
ɭɩɪɚɜɥɟɧɢɹɛɚɬɚɪɟɣɤɢɜ
ɤɨɦɩɥɟɤɬɧɟɜɯɨɞɹɬ
Ʉɨɦɩɥɟɤɬɞɥɹɧɚɫɬɟɧɧɨɝɨ
ɦɨɧɬɚɠɚɞɥɹɨɛɴɟɦɧɨɝɨ
ɡɜɭɱɚɧɢɹ
Ʉɚɛɟɥɶɞɢɧɚɦɢɤɚ
ɨɛɴɟɦɧɨɝɨɡɜɭɱɚɧɢɹ
x2 x2 x2
Аɞɚɩɬɟɪ
Ʉɨɦɩɥɟɤɬɞɥɹɧɚɫɬɟɧɧɨɝɨ
ɦɨɧɬɚɠɚ Ⱦɥɹɡɜɭɤɨɜɨɣ
ɩɚɧɟɥɢ
$&ɒɧɭɪɩɢɬɚɧɢɹ
(Зависит от региона)
Колонкиɨɛɴɟɦɧого
Ʉɨɥɢɱɟɫɬɜɨɲɧɭɪɨɜɩɢɬɚɧɢɹɢɬɢɩɜɢɥɤɢɡɚɜɢɫɹɬɨɬɪɟɝɢɨɧɚ
ɂɡɨɛɪɚɠɟɧɢɹɪɢɫɭɧɤɢɢɱɟɪɬɟɠɢɩɪɟɞɫɬɚɜɥɟɧɧɵɟɜɞɚɧɧɨɦɪɭɤɨɜɨɞɫɬɜɟɩɨɥɶɡɨɜɚɬɟɥɹ
ɩɪɟɞɧɚɡɧɚɱɟɧɵɬɨɥɶɤɨɞɥɹɫɩɪɚɜɤɢɎɚɤɬɢɱɟɫɤɨɟɢɡɞɟɥɢɟɦɨɠɟɬɨɬɥɢɱɚɬɶɫɹɩɨɜɧɟɲɧɟɦɭɜɢɞɭ
Кабель HDMI
ɡɜɭчания( шт)
58
14 15 16
11 12 13
aux
2 1
3
6 7 8
10
4 95
3. ǶȒȓțȠȖȢȖȘȎȤȖȭȥȎȟȠȓȗ
4 86%ɪɚɡɴɟɦ
ȼɫɬɚɜɶɬɟ86%ɭɫɬɪɨɣɫɬɜɨɞɥɹɜɨɫɩɪɨɢɡɜɟɞɟɧɢɹɦɭɡɵɤɢ
5 Ⱦɨɩɨɥɧɢɬɟɥɶɧɵɣɪɚɡɴɟɦ
8 Ɋɚɡɴɟɦɵ+'0,28779H$5&$5&
ɉɨɪɬɞɥɹɩɨɞɤɥɸɱɟɧɢɹɬɟɥɟɜɢɡɨɪɚɉɨɪɬ
ɩɨɞɞɟɪɠɢɜɚɟɬɮɭɧɤɰɢɸH$5&$5&+'0,
ɤɨɬɨɪɚɹɩɨɡɜɨɥɹɟɬɡɜɭɤɨɜɨɣɩɚɧɟɥɢ
ɜɨɫɩɪɨɢɡɜɨɞɢɬɶɡɜɭɤɫɩɨɞɤɥɸɱɟɧɧɨɝɨɬɟɥɟɜɢɡɨɪɚ
10 $&aɊɨɡɟɬɤɚ
ɉɨɞɤɥɸɱɢɬɶɫɹɤɢɫɬɨɱɧɢɤɭɩɢɬɚɧɢɹ
11
ɄɧɨɩɤɚȼɄɅȼɕɄɅ
ɉɟɪɟɤɥɸɱɢɬɟɭɫɬɪɨɣɫɬɜɨɦɟɠɞɭɪɟɠɢɦɚɦɢ
21ɢ6WDQGE\
12
ɄɧɨɩɤɚɂɋɌɈɑɇɂɄ
ȼɵɛɟɪɢɬɟɮɭɧɤɰɢɸɜɨɫɩɪɨɢɡɜɟɞɟɧɢɹ
13 Ʉɧɨɩɤɢɝɪɨɦɤɨɫɬɶ
ɍɜɟɥɢɱɟɧɢɟɭɦɟɧɶɲɟɧɢɟɭɪɨɜɧɹɝɪɨɦɤɨɫɬɢ
ɇɚɠɦɢɬɟɱɬɨɛɵɚɤɬɢɜɢɪɨɜɚɬɶɮɭɧɤɰɢɸ
ɫɨɩɪɹɠɟɧɢɹɦɟɠɞɭɨɫɧɨɜɧɵɦɭɫɬɪɨɣɫɬɜɨɦ
ɢɫɚɛɜɭɮɟɪɨɦ
16 ɂɧɞɢɤɚɬɨɪ3$,5ɫɚɛɜɭɮɟɪɚ
ɂɧɞɢɤɚɬɨɪɩɟɪɟɫɬɚɧɟɬɦɢɝɚɬɶɤɚɤɬɨɥɶɤɨ
ɫɚɛɜɭɮɟɪɛɭɞɟɬɫɨɩɪɹɠɟɧɫɨɡɜɭɤɨɜɨɣɩɚɧɟɥɶɸ
15 КɧɨɩɤɚɋɈɉɊəɀȿɇɂȿ
3 Местоɧɚɫɬɟɧɧɨɝɨɤɪɨɧɲɬɟɣɧɚ
2 Ⱦɚɬɱɢɤɞɢɫɬɚɧɰɢɨɧɧɨɝɨɭɩɪɚɜɥɟɧɢɹ
Сɢɝɧɚɥɨɬɩɭɥɶɬɚɞɢɫɬɚɧɰɢɨɧɧɨɝɨ
ɭɩɪɚɜɥɟɧɢɹ Не закрывать.
6 Ɉптический разъём
7 Ʉоаксиальный разъём
1 ɈɤɧɨLCD ɞɢɫɩɥɟɹ
Отображениеɬɟɤɭɳегоɫɬɚɬɭɫа
Ⱦɜɚɩɨɪɬɚ+'0,ɞɥɹɩɨɞɤɥɸɱɟɧɢɹ
ɭɫɬɪɨɣɫɬɜɢɫɬɨɱɧɢɤɨɜ+'0,ɬɚɤɢɯɤɚɤ
ɩɪɨɢɝɪɵɜɚɬɟɥɶ'9'ɩɪɨɢɝɪɵɜɚɬɟɥɶɞɢɫɤɨɜ
%OXUD\ɢɥɢɢɝɪɨɜɚɹɤɨɧɫɨɥɶɈɛɪɚɬɢɬɟ
ɜɧɢɦɚɧɢɟɱɬɨɨɞɧɨɜɪɟɦɟɧɧɨɦɨɠɧɨ
ɢɫɩɨɥɶɡɨɜɚɬɶɬɨɥɶɤɨɨɞɢɧɜɯɨɞ+'0,
9 Ɋɚɡɴɟɦɵ+'0,,1+'0,,1
ɉɨɞɤɥɸɱɢɬеɤɢɫɬɨɱɧɢɤɭɩɢɬɚɧɢɹ
3.1 ǼȟțȜȐțȜȗȏșȜȘ
3.2 Беспроводной сабвуфер
14 $&aɊɨɡɟɬɤɚ

58
1
2
3
5
8
10
6
7
9
11
4
5
4
5
3
1
2
6
6SHDNHUL
6SHDNHUR
1 ɂɧɞɢɤɚɬɨɪ3$,5ɨɛɴɟɦɧɨɝɨɡɜɭɱɚɧɢɹ
ɂɧɞɢɤɚɬɨɪɩɟɪɟɫɬɚɧɟɬɦɢɝɚɬɶɤɚɤɬɨɥɶɤɨ
ɨɛɴɟɦɧɵɣɡɜɭɤɛɭɞɟɬɫɨɩɪɹɠɟɧɫɡɜɭɤɨɜɨɣ
ɩɚɧɟɥɶɸ
ɇɚɠɦɢɬɟɱɬɨɛɵɚɤɬɢɜɢɪɨɜɚɬɶɮɭɧɤɰɢɸ
ɫɨɩɪɹɠɟɧɢɹɦɟɠɞɭɨɫɧɨɜɧɵɦɭɫɬɪɨɣɫɬɜɨɦ
ɢɨɛɴɟɦɧɵɦɡɜɭɤɨɦ
3.4 Ⱦɢɫɬɚɧɰɢɨɧɧɨɟɭɩɪɚɜɥɟɧɢɟ
1
ɉɟɪɟɤɥɸɱɢɬɟɭɫɬɪɨɣɫɬɜɨɦɟɠɞɭɪɟɠɢɦɚɦɢ
21ɢ67$1'%<
3
ɉɟɪɟɯɨɞɤɩɪɟɞɵɞɭɳɟɣɫɥɟɞɭɸɳɟɣ
ɞɨɪɨɠɤɟɜɪɟɠɢɦɟ%786%
4
ȼɨɫɩɪɨɢɡɜɟɞɟɧɢɟɩɚɭɡɚɜɨɡɨɛɧɨɜɥɟɧɢɟ
ɜɨɫɩɪɨɢɡɜɟɞɟɧɢɹɜɪɟɠɢɦɟ%786%
ɇɚɠɦɢɬɟɢɭɞɟɪɠɢɜɚɣɬɟɱɬɨɛɵ
ɚɤɬɢɜɢɪɨɜɚɬɶɮɭɧɤɰɢɸɫɨɩɪɹɠɟɧɢɹɜ
ɪɟɠɢɦɟ%OXHWRRWKɢɥɢɨɬɤɥɸɱɢɬɶ
ɫɭɳɟɫɬɜɭɸɳɟɟɫɨɩɪɹɠɟɧɧɨɟɭɫɬɪɨɣɫɬɜɨ
%OXHWRRWK
5 %$66
Ɉɬɪɟɝɭɥɢɪɭɣɬɟɭɪɨɜɟɧɶɛɚɫɨɜ
6 75(%/(
Ɉɬɪɟɝɭɥɢɪɭɣɬɟɭɪɨɜɟɧɶɜɵɫɨɤɢɯɱɚɫɬɨɬ
9 685592/
ɍɜɟɥɢɱɟɧɢɟɭɦɟɧɶɲɟɧɢɟɭɪɨɜɧɹɝɪɨɦɤɨɫɬɢ
ɨɛɴɟɦɧɨɝɨɡɜɭɱɚɧɢɹ
11 9(57,&$/6855281'
Ɉɬɪɟɝɭɥɢɪɭɣɬɟɜɤɥɸɱɟɧɢɟɜɵɤɥɸɱɟɧɢɟ
ɨɤɪɭɠɚɸɳɟɝɨɡɜɭɱɚɧɢɹ
4 КɧɨɩɤɚɋɈɉɊəɀȿɇɂȿ
5 ȼɢɧɬɵ
ɍɞɚɥɢɬɟɜɢɧɬɵɡɚɬɟɦɭɫɬɚɧɨɜɢɬɟɧɚɫɬɟɧɧɵɣ
ɤɪɨɧɲɬɟɣɧɧɚɡɚɞɧɸɸɱɚɫɬɶɭɫɬɪɨɣɫɬɜɚ
8 (4Ʉɧɨɩɤɚ
ȼɵɛɟɪɢɬɟɗɮɮɟɤɬɷɤɜɚɥɚɣɡɟɪɚ(4
7 Громкость
ɍɜɟɥɢɱɟɧɢɟɭɦɟɧɶɲɟɧɢɟɭɪɨɜɧɹɝɪɨɦɤɨɫɬɢ
•
Приглушение
Ɉɬɤɥɸɱɢɬɶɢɥɢɜɨɡɨɛɧɨɜɢɬɶɡɜɭɤ
3.3 Ȼɟɫɩɪɨɜɨɞɧыеколонки ɨɛɴɟɦɧогоɡɜɭɤа
2 ɂɋɌɈɑɇɂɄ
ȼɵɛɟɪɢɬɟисточникɜɨɫɩɪɨɢɡɜɟɞɟɧɢɹ
10 $96<1&
ɍɫɬɚɧɨɜɢɬɟɡɚɞɟɪɠɤɭɡɜɭɤɚ
2 Разъемɩɨɫɬɨɹɧɧɨɝɨɬɨɤɚ a
ɉɨɞɤɥɸɱɢɬɶɤɚɞɚɩɬɟɪɭ
6 ȾɂɇȺɆɂɄɅевыйразъем
3 ȾɂɇȺɆɂɄɉравыйразъем
8 RU
AA
A
A
A
A
1 2 3
• (A) Вы можете разместить устройство на столе
прямо перед подставкой для телевизора по
центру экрана телевизора. Или (B) вы можете
закрепить устройство на стене прямо под
экраном телевизора.
Разместите сабвуфер на расстоянии не менее
1 метра (3 футов) от саундбара и десяти
сантиметров от стены.
•
Разместите динамики объемного звучания в
левом и правом положениях. Для достижения
наилучших результатов разместите сабвуфер
и объемный звук, как показано ниже.
•
4. Подготовительные операции
4.1 Подготовка пульта дистанционного
управления
Поставляемый пульт дистанционного управления
позволяет управлять устройством на расстоянии.
• Даже если пульт дистанционного управления
работает в пределах эффективного диапазона
6 м, управление пультом дистанционного управ-
ления может быть невозможно, если между
устройством и пультом дистанционного управ-
ления есть какие-либо препятствия.
• Если пульт дистанционного управления рабо-
тает рядом с другими изделиями, которые гене-
рируют инфракрасные лучи, или если другие
устройства дистанционного управления, исполь-
зующие инфракрасные лучи, используются ря-
дом с устройством, он может работать некор-
ректно. И наоборот, другие изделия могут ра
бо-
тать некорректно.
4.2 Замена ба
тареек пульта дистанционного
управления
1. Нажмите и сдвиньте заднюю крышку, чтобы от-
крыть батарейный отсек пульта дистанционного
управления.
3 Закройте крышку батарейного отсека.
Меры предосторожности при обращении с бата-
рейками
• Обязательно вставляйте батарейки, соблюдая
правильную полярность: плюс (+) и минус (-).
• Используйте батарейки одного типа. Никогда не
используйте вместе батарейки разных типов.
• Можно использовать либо перезаряжаемые,
либо неперезаряжаемые батареи. См. меры
предосторожности на их
этикетках.
• При снятии крышки батарейного отсека и выни-
мании батареек будьте аккуратны и не повре-
дите свои ногти.
• Не роняйте пульт дистанционного управления.
• Не позволяйте ничему воздействовать на пульт
дистанционного управ
ления.
• Не проливайте воду или другие жидкости на
пульт дистанционного управления.
• Не кладите пульт дистанционного управления
на влажные предметы.
• Не размещайте пульт дистанционного управле-
ния под прямыми солнечными лучами или ря-
дом с источниками чрезмерного тепла.
• Выньте батарейки из пульта дистанционного
управления, если не используете его в течение
длительного периода времени, так как может
произойти коррозия или протекание батарейки,
что может привести к травмам и/или поврежде-
нию имущества, и/или к пожару.
• Не используйте ника
кие другие батарейки,
кроме рекомендованных.
• Не смешивайте новые батарейки со старыми.
• Никогда не подзаряжайте батарейки, пока не
убедитесь, что они перезаряжаемого типа.
2. Вставьте две батарейки типа AAA (не входят в
комплект). Убедитесь, что полюса (+) и (-) бата-
реек совпадают с полюсами (+) и (-), указан-
ными в батарейном отсеке.
4.3 Размещение и установка
Перед установкой звуковой панели
прочтите приведенную ниже информацию.
• Неправильный настенный монтаж может
привести к несчастному случаю, травме или
повреждению. Если у вас есть какие-либо
вопросы, обратитесь в службу поддержки
потребителей в вашей стране.
4.4 Настенный монтаж (для блока)
Важно:
9 RU
• Перед настенным монтажом убедитесь,
что стена выдержит вес саундбара.
• Перед настенным креплением не нужно
снимать резиновые ножки в нижней части
саундбара, иначе резиновые ножки нельзя
будет зафиксировать обратно.
• Во избежание травм данное устройство
должно быть надежно прикреплено к
полу/стене в соответствии с инструкциями
по установке.
• Рекомендуемая высота настенного монтажа:
≤ 1,5 метра.
• Пожалуйста, проверьте, подключен ли
USB-порт на задней панели звуковой панели
к USB-устройству. Если обнаружено, что
подключенное USB-устройство влияет на
настенное крепление, необходимо
использовать другое USB-устройство
соответствующего размера.
1 Просверлите 2 параллельных отверстия (Ø5,
5-6 мм каждое в зависимости от типа стены)
в стене. Расстояние между отверстиями
должно быть 962 мм. Оставьте зазор 0,12
дюйма (3 мм) между стеной и головкой винта.
2 Ослабьте 4 винта на задней панели устройства.
Установите кронштейны для настенного
монтажа с 4 ослабленными винтами на задней
панели устройства.
3 Поднимите SoundBar за кронштейны для
настенного крепления и вставьте на место.
ПРЕДУПРЕЖДЕНИЕ
1
2
3
962 MM
~50 MM/2.0”
~3MM/0.12’’
~3MM/0.12”
4mm/
0.16”
>25MM/0.98”
Во избежание травм данное устройство
должно быть надежно прикреплено к полу/
стене в соответствии с инструкциями по
установке.
Рекомендуемая высота настенного монтажа:
≤ 1,2 метра.
Важно: Отметьте на стене положение, на
котором вы хотите установить звуковую панель, и
проверьте, чтобы они совпадали с отверстиями в
кронштейнах, прежде чем сверлить какие-либо
отверстия.
Важно: Крепления, поставляемые с вашей
звуковой панелью, могут не подходить для всех
типов стен. Пожалуйста, проконсультируйтесь с
профессионалом, прежде чем сверлить какие-либо
отверстия, если у вас есть какие-либо сомнения.
• В зависимости от типа настенного крепления
саундбара убедитесь, что вы используете
винты подходящей длины и диаметра.
ПРЕДУПРЕЖДЕНИЕ.
Прежде чем пытаться закрепить звуковую панель
на стене, если вы каким-либо образом не знаете,
как и где установить звуковую панель, вам следует
нанять квалифицированного специалиста для
установки.
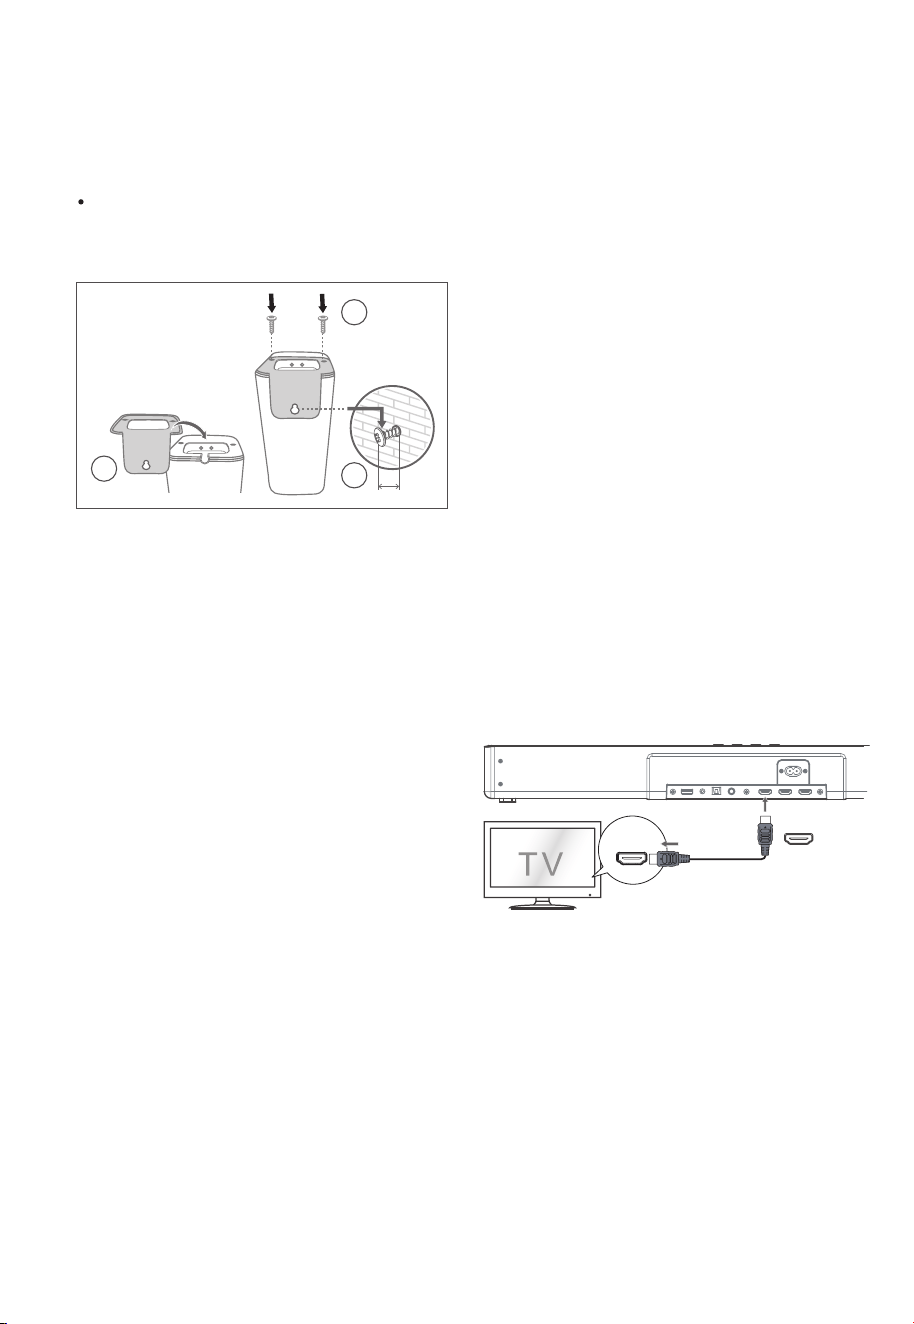
58
• Ⱦɢɧɚɦɢɤɢɨɛɴɟɦɧɨɝɨɡɜɭɱɚɧɢɹ5/ɦɨɠɧɨ
ɡɚɤɪɟɩɢɬɶɧɚɫɬɟɧɟɫɩɨɦɨɳɶɸɩɪɢɥɚɝɚɟɦɨɝɨ
ɤɨɦɩɥɟɤɬɚɧɚɫɬɟɧɧɨɝɨɤɪɟɩɥɟɧɢɹ
ɉɪɢɦɟɱɚɧɢɟɉɟɪɟɞɭɫɬɚɧɨɜɤɨɣɧɚɫɬɟɧɧɨɝɨ
ɤɪɨɧɲɬɟɣɧɚɧɟɨɛɯɨɞɢɦɨɩɨɞɤɥɸɱɢɬɶ
ɤɚɛɟɥɢɩɢɬɚɧɢɹɞɢɧɚɦɢɤɨɜɞɢɧɚɦɢɤɨɜ
ɨɛɴɟɦɧɨɝɨɡɜɭɱɚɧɢɹɩɪɚɜɨɝɨɥɟɜɨɝɨ
3
2
3mm
1
-
HDMI (eARC/ARC)
HDMI OUT
TV eARC/ARC
ɋɨɜɟɬɵ:
• ȼɚɲ ɬɟɥɟɜɢɡɨɪ ɞɨɥɠɟɧɩɨɞɞɟɪɠɢɜɚɬɶ+'0,
&(& ɢɮɭɧɤɰɢɸ AR&. +D0,&(& ɢ AR&
ɞɨɥɠɧɵɛɵɬɶɜɤɥɸɱɟɧɵ.
• Ɇɟɬɨɞɧɚɫɬɪɨɣɤɢ+'0,&(& ɢ AR& ɦɨɠɟɬɨɬ
ɥɢɱɚɬɶɫɹɜ ɡɚɜɢɫɢɦɨɫɬɢɨɬɬɟɥɟɜɢɡɨɪɚ Ⱦɥɹɩɨɥɭ
ɱɟɧɢɹɩɨɞɪɨɛɧɨɣɢɧɮɨɪɦɚɰɢɢɨɮɭɧɤɰɢɢAR&,
ɩɨɠɚɥɭɣɫɬɚ ɨɛɪɚɬɢɬɟɫɶɤɪɭɤɨɜɨɞɫɬɜɭɩɨɥɶɡɨɜɚ
ɬɟɥɹ ɜɥɚɞɟɥɶɰɚ.
• Ɍɨɥɶɤɨ ɤɚɛɟɥɶ +'0, 1.4 ɢɥɢɛɨɥɟɟɩɨɡɞɧɟɣɜɟɪ
ɫɢɢ ɩɨɞɞɟɪɠɢɜɚɟɬ ɮɭɧɤɰɢɸAR&.
5 ɉɨɞɤɥɸɱɟɧɢɟ
Dolby Atmos
®
Dolby Atmos ɞɚɟɬɜɚɦɩɨɥɧɨɟɩɨɝɪɭɠɟɧɢɟ ɜɩɪɨɫɥɭ
ɲɢɜɚɧɢɟɩɪɟɞɨɫɬɚɜɥɹɹ ɡɜɭɤ ɜɬɪɟɯɦɟɪɧɨɦ ɩɪɨɫɬɪɚɧ
ɫɬɜɟ, ɢɜɫɟɛɨɝɚɬɫɬɜɨ ɱɢɫɬɨɬɭ ɢɦɨɳɧɨɫɬɶɡɜɭɱɚɧɢɹ
Dolby. Ⱦɥɹɩɨɥɭɱɟɧɢɹ ɛɨɥɟɟɩɨɞɪɨɛɧɨɣɢɧɮɨɪɦɚ
ɰɢɢɩɨɠɚɥɭɣɫɬɚɩɨɫɟɬɢɬɟdolby.com tHFKQologiHV
dolbyatmos.
Ⱦɥɹɢɫɩɨɥɶɡɨɜɚɧɢɹ'olby
$tmos®
Dolby Atmosɞɨɫɬɭɩɟɧ ɬɨɥɶɤɨɜ ɪɟɠɢɦɟ +'0,.
Ⱦɥɹɩɨɥɭɱɟɧɢɹɩɨɞɪɨɛɧɨɣɢɧɮɨɪɦɚɰɢɢɨɩɨɞɤɥɸɱɟ
ɧɢɢ, ɫɦ ɪɚɡɞɟɥ "ɉɨɞɤɥɸɱɟɧɢɟ+'0,".
1. ɑɬɨɛɵ ɢɫɩɨɥɶɡɨɜɚɬɶDolby Atmos® ɜ +'0,1,
+'0,2 ɢ +'0, AR&H$R&, ɜɚɲɬɟɥɟɜɢɡɨɪ ɞɨɥ
ɠɟɧɩɨɞɞɟɪɠɢɜɚɬɶDolby Atmos®.
2. ɍɛɟɞɢɬɟɫɶɱɬɨ ɜɵɛɪɚɧɨ"No (QFRGing Ȼɟɡ ɤɨɞɢ
ɪɨɜɚɧɢɹ" ɞɥɹɛɢɬɨɜɨɝɨɩɨɬɨɤɚɧɚ ɚɭɞɢɨɜɵɯɨɞɟ
ɩɨɞɤɥɸɱɟɧɧɨɝɨ ɜɧɟɲɧɟɝɨɭɫɬɪɨɣɫɬɜɚ ɧɚɩɪɢɦɟɪ,
ɩɪɨɢɝɪɵɜɚɬɟɥɹ%lXray DVDɬɟɥɟɜɢɡɨɪɚɢɬɞ..
3. ɉɪɢɜɯɨɞɟ ɜ ɮɨɪɦɚɬDolby Atmos Dolby Digital
3&0 ɧɚɫɚɭɧɞɛɚɪɟ ɛɭɞɟɬɨɬɨɛɪɚɠɚɬɶɫɹ'2/%Y
A702S '2/%Y $8',2 3&0 $8',2.
ɩɨɞɤɥɸɱɚɬɶɫɹɱɟɪɟɡ+D0,, ɱɬɨɛɵɨɛɟɫɩɟɱɢɬɶɩɨɥ
ɧɭɸɩɨɞɞɟɪɠɤɭDolby.
ɋɨɜɟɬɵ:
• ȼɫɟ ɜɨɡɦɨɠɧɨɫɬɢ Dolby Atmos ɞɨɫɬɭɩɧɵɬɨɥɶɤɨ
ɜɬɨɦɫɥɭɱɚɟ ɟɫɥɢ ɫɚɭɧɞɛɚɪɩɨɞɤɥɸɱɟɧ ɤɢɫɬɨɱ
ɧɢɤɭɫɩɨɦɨɳɶɸ ɤɚɛɟɥɹ +'0, 2.0.
•
ɋɚɭɧɞɛɚɪɛɭɞɟɬɪɚɛɨɬɚɬɶ ɩɪɢɩɨɞɤɥɸɱɟɧɢɢɞɪɭɝɢɦɢ
ɫɩɨɫɨɛɚɦɢ ɧɚɩɪɢɦɟɪɫ ɩɨɦɨɳɶɸɰɢɮɪɨɜɨɝɨɨɩɬɢ
ɱɟɫɤɨɝɨɤɚɛɟɥɹɧɨɨɧɢɧɟɦɨɝɭɬɩɨɞɞɟɪɠɢɜɚɬɶɜɫɟ
ɮɭɧɤɰɢɢDolE\ɍɱɢɬɵɜɚɹ ɷɬɨɦɵɪɟɤɨɦɟɧɞɭɟɦ
ɉɨɞɤɥɸɱɟɧɢɟ+DMI
ɇɟɤɨɬɨɪɵɟɬɟɥɟɜɢɡɨɪɵ4K +'Rɬɪɟɛɭɸɬɱɬɨɛɵ
ɜɯɨɞ+D0,ɢɥɢɧɚɫɬɪɨɣɤɢɢɡɨɛɪɚɠɟɧɢɹɛɵɥɢ
ɧɚɫɬɪɨɟɧɵɞɥɹɩɪɢɟɦɚɤɨɧɬɟɧɬɚ+DRȾɨɩɨɥɧɢɬɟɥɶ
ɧɵɟɫɜɟɞɟɧɢɹɨɧɚɫɬɪɨɣɤɟ +'Rɞɢɫɩɥɟɹɫɦɢɧ
ɫɬɪɭɤɰɢɢɩɨ ɷɤɫɩɥɭɚɬɚɰɢɢɜɚɲɟɝɨɬɟɥɟɜɢɡɨɪɚ
ɂɫɩɨɥɶɡɨɜɚɧɢɟ+D0,ɞɥɹɩɨɞɤɥɸɱɟɧɢɹɫɚɭɧɞɛɚɪɚ,
ɚɭɞɢɨɜɢɞɟɨɨɛɨɪɭɞɨɜɚɧɢɹɢɬɟɥɟɜɢɡɨɪɚ
Ɇɟɬɨɞ 1:
H$5&$5&$udiR5HtuUQ&hanQHO Ɉɛɪɚɬɧɵɣ
ɚɭɞɢɨɤɚɧɚɥ
Ɏɭɧɤɰɢɹ H$R&A5&ɨɛɪɚɬɧɵɣɚɭɞɢɨɤɚɧɚɥɩɨɡɜɨ
ɥɹɟɬ
ɩɟɪɟɞɚɜɚɬɶ ɡɜɭɤ ɫɜɚɲɟɝɨAR&ɫɨɜɦɟɫɬɢɦɨɝɨ
ɬɟɥɟɜɢɡɨɪɚɧɚ ɫɚɭɧɞɛɚɪɱɟɪɟɡɨɞɧɨ ɫɨɟɞɢɧɟɧɢɟ
+'0,ɑɬɨɛɵɩɨɥɶɡɨɜɚɬɶɫɹɮɭɧɤɰɢɟɣA5&ɭɛɟɞɢ
ɬɟɫɶɱɬɨɜɚɲɬɟɥɟɜɢɡɨɪɩɨɞɞɟɪɠɢɜɚɟɬ+D0,&(&ɢ
A5&ɢɧɚɫɬɪɨɣɬɟɟɝɨɫɨɨɬɜɟɬɫɬɜɭɸɳɢɦɨɛɪɚɡɨɦ.
ɉɪɢɩɪɚɜɢɥɶɧɨɣɧɚɫɬɪɨɣɤɟɜɵɦɨɠɟɬɟɢɫɩɨɥɶɡɨɜɚɬɶ
ɩɭɥɶɬɞɢɫɬɚɧɰɢɨɧɧɨɝɨɭɩɪɚɜɥɟɧɢɹɬɟɥɟɜɢɡɨɪɚɞɥɹ
ɪɟɝɭɥɢɪɨɜɤɢɜɵɯɨɞɧɨɣɝɪɨɦɤɨɫɬɢ 92/
ɉɨɞɤɥɸɱɢɬɟɤɚɛɟɥɶ+'0,ɨɬɪɚɡɴɟɦɚ+'0,287
79H$5&$5&ɭɫɬɪɨɣɫɬɜɚɤɪɚɡɴɟɦɭ+'0,
$5&ɧɚɬɟɥɟɜɢɡɨɪɟɫɨɜɦɟɫɬɢɦɨɦɫ$5&
Ɂɚɬɟɦɧɚɠɦɢɬɟɧɚɩɭɥɶɬɟɞɢɫɬɚɧɰɢɨɧɧɨɝɨ
ɭɩɪɚɜɥɟɧɢɹɱɬɨɛɵɜɵɛɪɚɬɶ+'0,H$5&
ɢ
087(ɫɚɭɧɞɛɚɪɚ.
4.5 ǻȎȟȠȓțțȩȗȚȜțȠȎȔ
КолонкиȜȏȨȓȚțȜȑȜȕȐȡȥȎțȖȭ
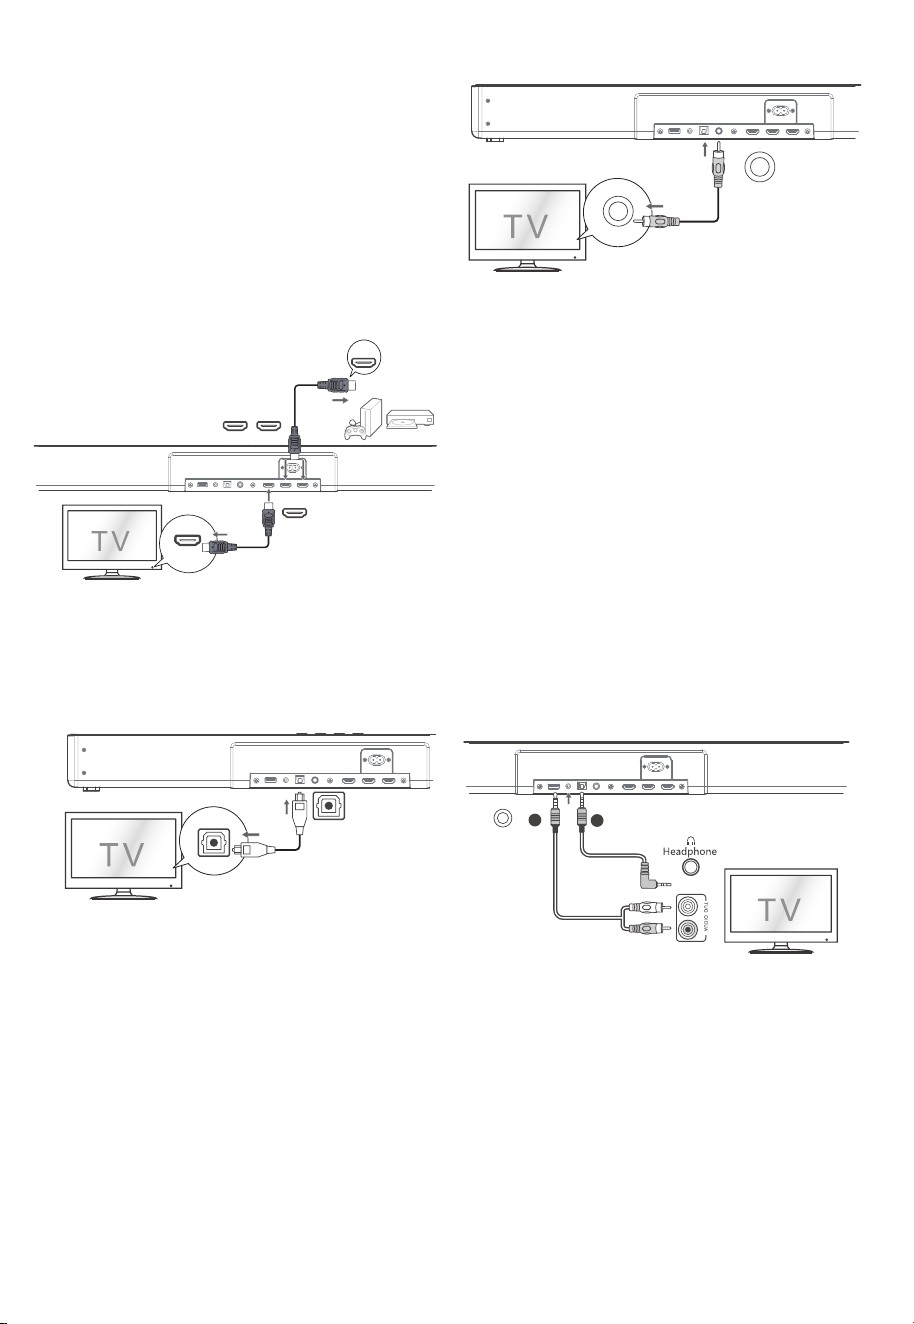
HDMI IN
HDMI OUT
HDMI OUT
TV eARC/ARC
HDMI IN 1 HDMI IN 2
.
.
.
COAXIAL
COAXIAL
OPTICAL
OPTICAL
AUX
A
B
58
Ɇɟɬɨɞ 2:ɋɬɚɧɞɚɪɬɧɵɣ+'0,
ȿɫɥɢɜɚɲɌȼɧɟɩɨɞɞɟɪɠɢɜɚɟɬ+'0, AR&,
1. ɂɫɩɨɥɶɡɭɣɬɟɤɚɛɟɥɶ+'0,ɞɥɹɩɨɞɤɥɸɱɟɧɢɹ
ɪɚɡɴɟɦɚ+'0,28779$5&H$5&ɡɜɭɤɨɜɨɣ
ɩɚɧɟɥɢɤɪɚɡɴɟɦɭ+'0,,1ɬɟɥɟɜɢɡɨɪɚ
ɂɫɩɨɥɶɡɭɣɬɟɤɚɛɟɥɶ+'0,ɞɥɹɩɨɞɤɥɸɱɟɧɢɹ
ɪɚɡɴɟɦɚ+'0,,1ɢɥɢɡɜɭɤɨɜɨɣɩɚɧɟɥɢ
ɤɜɧɟɲɧɢɦɭɫɬɪɨɣɫɬɜɚɦɧɚɩɪɢɦɟɪɢɝɪɨɜɵɦ
ɤɨɧɫɨɥɹɦ'9'ɩɪɨɢɝɪɵɜɚɬɟɥɹɦ%OX5D\
ȼɵɬɚɤɠɟɦɨɠɟɬɟɢɫɩɨɥɶɡɨɜɚɬɶɈɉɌɂɑȿɋɄɂɃ
ɤɚɛɟɥɶɞɥɹɫɨɟɞɢɧɟɧɢɹɪɚɡɴɟɦɚ237,&$/287
ɬɟɥɟɜɢɡɨɪɚɢɪɚɡɴɟɦɚ237,&$/ɧɚɭɫɬɪɨɣɫɬɜɟ
ɂɫɩɨɥɶɡɭɣɬɟɚɭɞɢɨɤɚɛɟɥɶ5&$ɧɚɦɦɞɥɹ
ɩɨɞɤɥɸɱɟɧɢɹɜɵɯɨɞɧɵɯɚɭɞɢɨɪɚɡɴɟɦɨɜ
ɬɟɥɟɜɢɡɨɪɚɤɪɚɡɴɟɦɭ$8;ɧɚɭɫɬɪɨɣɫɬɜɟ
ɂɫɩɨɥɶɡɭɣɬɟɚɭɞɢɨɤɚɛɟɥɶ±ɦɦɞɥɹ
ɩɨɞɤɥɸɱɟɧɢɹɪɚɡɴɟɦɚɧɚɭɲɧɢɤɨɜɬɟɥɟɜɢɡɨɪɚ
ɢɥɢɜɧɟɲɧɟɝɨɚɭɞɢɨɭɫɬɪɨɣɫɬɜɚɤɪɚɡɴɟɦɭ
$8;ɧɚɭɫɬɪɨɣɫɬɜɟ
ȼɵɬɚɤɠɟɦɨɠɟɬɟɢɫɩɨɥɶɡɨɜɚɬɶ
ɄɈȺɄɋɂȺɅɖɇɕɃɤɚɛɟɥɶɞɥɹɫɨɟɞɢɧɟɧɢɹ
ɪɚɡɴɟɦɚ&2$;,$/287ɬɟɥɟɜɢɡɨɪɚɢɪɚɡɴɟɦɚ
&2$;,$/ɧɚɭɫɬɪɨɣɫɬɜɟ
2
5.3 ɂɫɩɨɥɶɡɨɜɚɧɢɟɝɧɟɡɞɚ237,&$/
-
5.4 ɂɫɩɨɥɶɡɨɜɚɧɢɟɝɧɟɡɞɚ&2$;,$/
•
ɋɨɜɟɬ ȼɨɡɦɨɠɧɨɱɬɨɭɫɬɪɨɣɫɬɜɨɧɟɫɦɨɠɟɬ ɞɟɤɨ
ɞɢɪɨɜɚɬɶɜɫɟɰɢɮɪɨɜɵɟɚɭɞɢɨɮɨɪɦɚɬɵɨɬ ɢɫɬɨɱɧɢɤɚ
ɜɯɨɞɧɨɝɨɫɢɝɧɚɥɚ ȼ ɷɬɨɦ ɫɥɭɱɚɟɭɫɬɪɨɣɫɬɜɨ ɛɭɞɟɬ
ɛɟɡ ɡɜɭɤɚ. ɗɬɨɇȿ ɹɜɥɹɟɬɫɹ ɞɟɮɟɤɬɨɦ. ɍɛɟɞɢɬɟɫɶ,
ɱɬɨɚɭɞɢɨɧɚɫɬɪɨɣɤɚ ɢɫɬɨɱɧɢɤɚɜɯɨɞɧɨɝɨɫɢɝɧɚɥɚ
ɧɚɩɪɢɦɟɪɬɟɥɟɜɢɡɨɪɚɢɝɪɨɜɨɣɩɪɢɫɬɚɜɤɢDVD
ɩɥɟɟɪɚɢɬ. ɞ. ɭɫɬɚɧɨɜɥɟɧɚ ɜ ɡɧɚɱɟɧɢɟ3&0 ɢɥɢ
'olby 'igital Ɉɛɪɚɬɢɬɟɫɶɤɪɭɤɨɜɨɞɫɬɜɭɩɨɥɶɡɨɜɚ
ɬɟɥɹ ɭɫɬɪɨɣɫɬɜɚɢɫɬɨɱɧɢɤɚɜɯɨɞɧɨɝɨɫɢɝɧɚɥɚ ɡɚɩɨ
ɞɪɨɛɧɵɦɢ ɫɜɟɞɟɧɢɹɦɢ ɨɛ ɟɝɨ ɚɭɞɢɨɧɚɫɬɪɨɣɤɚɯɫɨ
ɜɯɨɞɨɦ +'0, 237
,&A/ &2$;,A/.
5.5 ɂɫɩɨɥɶɡɨɜɚɧɢɟɝɧɟɡɞɚ$8;
A.
%
5.6 ɉɨɞɤɥɸɱɢɬɟɞɢɧɚɦɢɤɢɨɛɴɟɦɧɨɝɨɡɜɭɱɚɧɢɹ
1.
2.
ɂɫɩɨɥɶɡɭɣɬɟɤɚɛɟɥɶɞɢɧɚɦɢɤɚɨɛɴɟɦɧɨɝɨ
ɡɜɭɱɚɧɢɹɦɦɞɥɹɩɨɞɤɥɸɱɟɧɢɹɤɪɚɡɴɟɦɭ
ɞɢɧɚɦɢɤɚ63($.(5ɜɧɢɠɧɟɣɱɚɫɬɢɩɪɚɜɨɝɨ
ɥɟɜɨɝɨɞɢɧɚɦɢɤɚɨɛɴɟɦɧɨɝɨɡɜɭɱɚɧɢɹ
ɂɫɩɨɥɶɡɭɣɬɟɚɞɚɩɬɟɪɩɨɫɬɨɹɧɧɨɝɨɬɨɤɚ
ɩɨɞɤɥɸɱɢɬɟɟɝɨɤɪɚɡɴɟɦɭ'&,1ɜɧɢɠɧɟɣ
ɱɚɫɬɢɨɫɧɨɜɧɵɯɞɢɧɚɦɢɤɨɜɨɛɴɟɦɧɨɝɨ
ɡɜɭɱɚɧɢɹɢɤɫɟɬɟɜɨɣɪɨɡɟɬɤɟ
ɩɨɞɤɥɸɱɢɬɟɜɚɲɫɚɭɧɞɛɚɪɤ Ɍȼɢɫɩɨɥɶɡɭɹ
ɫɬɚɧɞɚɪɬɧɨɟ+'0, ɫɨɟɞɢɧɟɧɢɟ
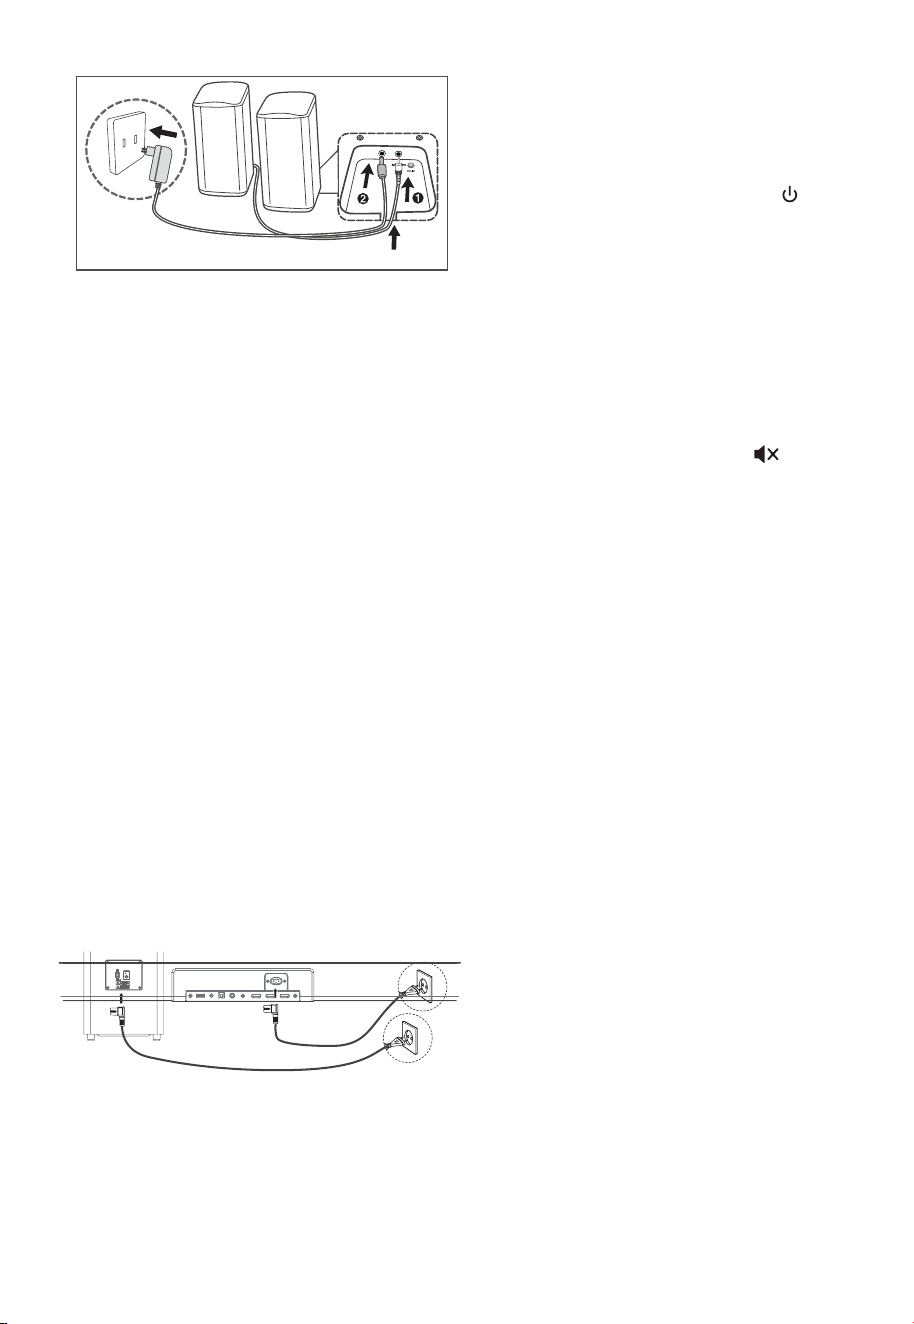
58
• ȿɫɥɢɝɪɨɦɤɨɝɨɜɨɪɢɬɟɥɢɨɛɴɟɦɧɨɝɨɡɜɭɱɚɧɢɹ
ɪɚɫɩɨɥɨɠɟɧɵɝɨɪɢɡɨɧɬɚɥɶɧɨɧɚɫɬɨɥɟɜɨ
ɢɡɛɟɠɚɧɢɟɩɚɞɟɧɢɹɜɢɛɪɚɰɢɢɧɟɨɛɯɨɞɢɦɨ
ɩɨɦɟɫɬɢɬɶɲɧɭɪɩɢɬɚɧɢɹɫɨɟɞɢɧɢɬɟɥɶɧɵɣ
ɤɚɛɟɥɶɝɪɨɦɤɨɝɨɜɨɪɢɬɟɥɹɜɠɟɥɨɛ
ɉɨɞɤɥɸɱɢɬɟɡɜɭɤɨɜɭɸɩɚɧɟɥɶɢɫɚɛɜɭɮɟɪɤ
ɫɟɬɟɜɵɦɪɨɡɟɬɤɚɦɚɡɚɬɟɦɧɚɠɦɢɬɟɧɚ
ɭɫɬɪɨɣɫɬɜɟɢɥɢɧɚɩɭɥɶɬɟɞɢɫɬɚɧɰɢɨɧɧɨɝɨ
ɭɩɪɚɜɥɟɧɢɹɱɬɨɛɵɩɟɪɟɤɥɸɱɢɬɶɭɫɬɪɨɣɫɬɜɨ
ɜɪɟɠɢɦ©ȼɤɥª
ɂɧɞɢɤɚɬɨɪɩɚɪɵɧɚɫɚɛɜɭɮɟɪɟɢɥɢɨɛɴɟɦɧɨɦ
ɡɜɭɱɚɧɢɢɛɭɞɟɬɛɵɫɬɪɨɦɢɝɚɬɶ
ɋɚɛɜɭɮɟɪɢɥɢɨɛɴɟɦɧɵɣɞɢɧɚɦɢɤɩɟɪɟɯɨɞɹɬ
ɜɫɨɫɬɨɹɧɢɟɫɨɩɪɹɠɟɧɢɹ
ɇɚɠɦɢɬɟɢɭɞɟɪɠɢɜɚɣɬɟɤɧɨɩɤɭ087(
ɧɚɩɭɥɶɬɟɞɢɫɬɚɧɰɢɨɧɧɨɝɨɭɩɪɚɜɥɟɧɢɹɩɨɤɚ
ɧɚɞɢɫɩɥɟɟɧɟɩɨɹɜɢɬɫɹ©3$,5ª
ɋɚɭɧɞɛɚɪɜɨɣɞɟɬɜɫɨɫɬɨɹɧɢɟɫɨɩɪɹɠɟɧɢɹ
ɂɧɞɢɤɚɬɨɪ3DLUɧɚɫɚɛɜɭɮɟɪɟɢɥɢɨɛɴɟɦɧɨɦ
ɡɜɭɱɚɧɢɢɡɚɝɨɪɢɬɫɹɜɫɥɭɱɚɟɭɫɩɟɯɚ
57 ɉɨɞɤɥɸɱɟɧɢɟ ɩɢɬɚɧɢɹ
Ɉɩɚɫɧɨɫɬɶɩɨɜɪɟɠɞɟɧɢɹɢɡɞɟɥɢɹ
ɍɛɟɞɢɬɟɫɶɱɬɨɧɚɩɪɹɠɟɧɢɟɩɢɬɚɧɢɹɫɨɨɬɜɟɬ
ɫɬɜɭɟɬɧɚɩɪɹɠɟɧɢɸ, ɭɤɚɡɚɧɧɨɦɭɧɚɡɚɞɧɟɣɢɥɢ
ɧɢɠɧɟɣɫɬɨɪɨɧɟɭɫɬɪɨɣɫɬɜɚ
ɉɟɪɟɞɩɨɞɤɥɸɱɟɧɢɟɦ ɲɧɭɪɚɩɢɬɚɧɢɹɫɟɬɢɩɟɪɟ
ɦɟɧɧɨɝɨɬɨɤɚɭɛɟɞɢɬɟɫɶ ɱɬɨɜɵɭɫɬɚɧɨɜɢɥɢ ɜɫɟ
ɞɪɭɝɢɟ ɫɨɟɞɢɧɟɧɢɹ.
• ɋɚɭɧɞɛɚɪ
ɉɨɞɤɥɸɱɢɬɟɫɟɬɟɜɨɣ ɤɚɛɟɥɶɩɢɬɚɧɢɹ ɤɪɨɡɟɬɤɟ
ɩɟɪɟɦɟɧɧɨɝɨɬɨɤɚ$&~ ɨɫɧɨɜɧɨɝɨɛɥɨɤɚɚɡɚ
ɬɟɦ ɤ ɫɟɬɟɜɨɣ ɪɨɡɟɬɤɟ.
• ɋɚɛɜɭɮɟɪ
ɉɨɞɤɥɸɱɢɬɟɫɟɬɟɜɨɣ ɤɚɛɟɥɶɤɪɨɡɟɬɤɟ $&~
ɫɚɛɜɭɮɟɪɚ, ɚɡɚɬɟɦ ɤ ɪɨɡɟɬɤɟ ɫɟɬɟɜɨɝɨɩɢɬɚɧɢɹ.
ɉɪɢɦɟɱɚɧɢɟ
ȿɫɥɢɧɟɬɩɢɬɚɧɢɹɭɛɟɞɢɬɟɫɶɱɬɨɲɧɭɪ ɩɢɬɚɧɢɹ
ɢɜɢɥɤɚɩɨɥɧɨɫɬɶɸɜɫɬɚɜɥɟɧɵɢ ɩɢɬɚɧɢɟɜɤɥɸ
ɱɟɧɨ
Ɋɚɡɦɟɪ ɲɧɭɪɚɩɢɬɚɧɢɹɢ ɬ
ɢɩɜɢɥɤɢɜɚɪɶɢɪɭɸɬɫɹ
ɜ ɡɚɜɢɫɢɦɨɫɬɢɨɬɪɟɝɢɨɧɚ
Ɋɭɱɧɨɟɫɨɩɪɹɠɟɧɢɟ
1
2
»
3
4
5
ȿɫɥɢɢɧɞɢɤɚɬɨɪɫɨɩɪɹɠɟɧɢɹɦɢɝɚɟɬ
ɛɟɫɩɪɨɜɨɞɧɨɟɫɨɟɞɢɧɟɧɢɟɧɟɭɫɬɚɧɨɜɥɟɧɨ
Ɉɬɤɥɸɱɢɬɟɤɚɛɟɥɶɫɚɛɜɭɮɟɪɚɢɥɢɨɛɴɟɦɧɨɝɨ
ɡɜɭɱɚɧɢɹɚɡɚɬɟɦɫɧɨɜɚɩɨɞɤɥɸɱɢɬɟɨɫɧɨɜɧɨɣ
ɤɚɛɟɥɶɱɟɪɟɡɦɢɧɭɬɵɉɨɜɬɨɪɢɬɟɲɚɝɢa
ɋɚɛɜɭɮɟɪɢɫɢɫɬɟɦɚɨɛɴɟɦɧɨɝɨɡɜɭɱɚɧɢɹ
ɞɨɥɠɧɵɧɚɯɨɞɢɬɶɫɹɜɩɪɟɞɟɥɚɯɦɨɬ
ɡɜɭɤɨɜɨɣɩɚɧɟɥɢɧɚɨɬɤɪɵɬɨɦɩɪɨɫɬɪɚɧɫɬɜɟ
ɱɟɦɛɥɢɠɟɬɟɦɥɭɱɲɟ
ɍɞɚɥɢɬɟɜɫɟɩɪɟɞɦɟɬɵɦɟɠɞɭɫɚɛɜɭɮɟɪɨɦɢ
ɨɛɴɟɦɧɵɦɡɜɭɤɨɦɢɡɜɭɤɨɜɨɣɩɚɧɟɥɶɸ
ȿɫɥɢɛɟɫɩɪɨɜɨɞɧɨɟɫɨɟɞɢɧɟɧɢɟɫɧɨɜɚɧɟ
ɪɚɛɨɬɚɟɬɩɪɨɜɟɪɶɬɟɧɟɬɥɢɩɨɛɥɢɡɨɫɬɢ
ɤɨɧɮɥɢɤɬɚɢɥɢɫɢɥɶɧɵɯɩɨɦɟɯɧɚɩɪɢɦɟɪ
ɩɨɦɟɯɨɬɷɥɟɤɬɪɨɧɧɨɝɨɭɫɬɪɨɣɫɬɜɚɍɞɚɥɢɬɟ
ɷɬɢɤɨɧɮɥɢɤɬɵɢɥɢɫɢɥɶɧɵɟɩɨɦɟɯɢɢ
ɩɨɜɬɨɪɢɬɟɜɵɲɟɭɤɚɡɚɧɧɵɟɩɪɨɰɟɞɭɪɵ
ȿɫɥɢɨɫɧɨɜɧɨɣɛɥɨɤɧɟɩɨɞɤɥɸɱɟɧɤ
ɫɚɛɜɭɮɟɪɭɢɨɛɴɟɦɧɨɦɭɡɜɭɱɚɧɢɸɢɧɚɯɨɞɢɬɫɹ
ɜɪɟɠɢɦɟ21ɢɧɞɢɤɚɬɨɪɫɨɩɪɹɠɟɧɢɹɧɚ
ɫɚɛɜɭɮɟɪɟɢɨɛɴɟɦɧɨɦɡɜɭɱɚɧɢɢɛɭɞɟɬ
ɦɟɞɥɟɧɧɨɦɢɝɚɬɶ
6
»
ɋɨɜɟɬɵ:
•
•
•
•
ɋɨɩɪɹɠɟɧɢɟ панели ɫ ɫɚɛɜɭɮɟɪɨɦ ɢ
динамиками ɨɛɴɟɦɧогоɡɜɭɤа
ɇɚɠɦɢɬɟɢɭɞɟɪɠɢɜɚɣɬɟɤɧɨɩɤɭ3$,5ɧɚ
ɫɚɛɜɭɮɟɪɟɢɥɢдинамиках объемного
ɡɜɭɱɚɧɢɢɜɬɟɱɟɧɢɟɧɟɫɤɨɥɶɤɢɯɫɟɤɭɧɞ

58
6 Ɉɫɧɨɜɵ ɪɚɛɨɬɵ
Ɋɟɠɢɦɨɠɢɞɚɧɢɹ /ȼɄɅ
Ʉɨɝɞɚ ɜɵɜɩɟɪɜɵɟɩɨɞɤɥɸɱɚɟɬɟɨɫɧɨɜɧɨɣɛɥɨɤ ɤ ɫɟ
ɬɟɜɨɣɪɨɡɟɬɤɟ, ɨɧɩɟɪɟɯɨɞɢɬ ɜɪɟɠɢɦ ɨɠɢɞɚɧɢɹ
Standby.
• ɇɚɠɦɢɬɟɤɧɨɩɤɭ ɧɚɛɥɨɤɟ ɢɥɢɧɚɩɭɥɶɬɟɞɢ
ɫɬɚɧɰɢɨɧɧɨɝɨɭɩɪɚɜɥɟɧɢɹ, ɱɬɨɛɵɜɤɥɸɱɢɬɶɨɫ
ɧɨɜɧɨɣɛɥɨɤ.
• ɇɚɠɦɢɬɟɤɧɨɩɤɭ ɟɳɟ ɪɚɡ, ɱɬɨɛɵɩɟɪɟɤɥɸɱɢɬɶ
ɛɥɨɤ ɨɛɪɚɬɧɨɜ ɪɟɠɢɦ ɨɠɢɞɚɧɢɹ.
• ȼɵɧɶɬɟɜɢɥɤɭ ɫɟɬɟɜɨɝɨɲɧɭɪɚɢɡɪɨɡɟɬɤɢ ɟɫɥɢ
ɯɨɬɢɬɟɩɨɥɧɨɫɬɶɸ ɜɵɤɥɸɱɢɬɶɛɥɨɤ.
• Ⱥɜɬɨɩɪɨɛɭɠɞɟɧɢɟ
ȿɫɥɢɩɨɞɤɥɸɱɟɧɬɟɥɟɜɢɡɨɪɢɥɢ ɜɧɟɲɧɟɟ ɭɫɬɪɨɣ
ɫɬɜɨ/,N( ,N +'0, AR&, ɛɥɨɤ ɚɜɬɨɦɚɬɢɱɟ
ɫɤɢɜɤɥɸɱɢɬɫɹɩɪɢɜɤɥɸɱɟɧɢɢɬɟɥɟɜɢɡɨɪɚɢɥɢ
ɜɧɟɲɧɟɝɨɭɫɬɪɨɣɫɬɜɚ
• Ɏɭɧɤɰɢɹɚɜɬɨɦɚɬɢɱɟɫɤɨɝɨɨɬɤɥɸɱɟɧɢɹɩɢɬɚ
ɧɢɹ
Ȼɥɨɤ ɚɜɬɨɦɚɬɢɱɟɫɤɢɩɟɪɟɯɨɞɢɬɜɪɟɠɢɦ Standby
ɨɠɢɞɚɧɢɹ ɩɪɢɦ
ɟɪɧɨɱɟɪɟɡɦɢɧɭɬɟɫɥɢɬɟɥɟ
ɜɢɡɨɪɢɥɢ ɜɧɟɲɧɟɟɭɫɬɪɨɣɫɬɜɨɨɬɫɨɟɞɢɧɹɸɬɫɹ
ɢɥɢ ɜɵɤɥɸɱɚɸɬɫɹ
ɑɬɨɛɵɩɨɥɧɨɫɬɶɸ ɜɵɤɥɸɱɢɬɶɛɥɨɤ, ɜɵɧɶɬɟ
ɜɢɥɤɭɫɟɬɟɜɨɝɨɲɧɭɪɚɢɡ ɪɨɡɟɬɤɢ
Ⱦɥɹɷɤɨɧɨɦɢɢ ɷɧɟɪɝɢɢ, ɩɨɠɚɥɭɣɫɬɚɩɨɥɧɨɫɬɶɸ
ɜɵɤɥɸɱɚɣɬɟɛɥɨɤ, ɤɨɝɞɚ ɨɧ ɧɟɢɫɩɨɥɶɡɭɟɬɫɹ
ȼɵɛɨɪ ɪɟɠɢɦɨɜ ɪɚɛɨɬɵ
ɇɟɫɤɨɥɶɤɨɪɚɡɧɚɠɦɢɬɟɤɧɨɩɤɭ S285&(ɂɋ
ɌɈɑɇɂɄɧɚɨɫɧɨɜɧɨɦ ɛɥɨɤɟ ɢɥɢ $8;B7237
&2$+'0, 1+'0, H$5& ɢ USB ɢ ɤɧɨɩɤɢɧɚ
ɩɭɥɶɬɟɞɢɫɬɚɧɰɢɨɧɧɨɝɨ ɭɩɪɚɜɥɟɧɢɹ, ɱɬɨɛɵɜɵɛɪɚɬɶ
ɬɪɟɛɭɟɦɵɣɪɟɠɢɦ. ȼɵɛɪɚɧɧɵɣɪɟɠɢɦ ɨɬɨɛɪɚɠɚɟɬɫɹ
ɧɚɞɢɫɩɥɟɟ
Ɋɟɝɭɥɢɪɨɜɤɚ ɬɟɦɛɪɚ ɧɢɡɤɢɯ / ɜɵɫɨɤɢɯɱɚ
ɫɬɨɬ
• ɇɚɠɦɢɬɟ ɤɧɨɩɤɢ B$SS ɧɚɩɭɥɶɬɟ Ⱦɍɞɥɹ
ɪɟɝɭɥɢɪɨɜɤɢ ɬɟɦɛɪɚ ɧɢɡɤɢɯ ɱɚɫɬɨɬ.
• ɇɚɠɦɢɬɟ ɤɧɨɩɤɢ 75(%/( ɧɚɩɭɥɶɬɟ
Ⱦɍ
ɞɥɹɪɟɝɭɥɢɪɨɜɤɢ ɬɟɦɛɪɚ ɜɵɫɨɤɢɯ ɱɚɫɬɨɬ.
ȼɤɥɸɱɟɧɢɟ /ɜɵɤɥɸɱɟɧɢɟɨɛɴɟɦɧɨɝɨɡɜɭ
ɱɚɧɢɹ
• ɇɚɠɦɢɬɟɤɧɨɩɤɭ 9(578&$/ SU55281' ɧɚ
ɩɭɥɶɬɟȾɍ ɞɥɹɜɤɥɸɱɟɧɢɹ ɨɛɴɟɦɧɨɝɨɡɜɭɱɚɧɢɹ.
ɇɚɠɦɢɬɟ ɷɬɭɤɧɨɩɤɭɟɳɟ ɪɚɡɱɬɨɛɵɜɵɤɥɸɱɢɬɶ
ɨɛɴɟɦɧɨɟ ɡɜɭɱɚɧɢɟ.
6.5 ǰȩȏȓȞȖȠȓȫȢȢȓȘȠȫȘȐȎșȎȗȕȓȞȎ
(4
ɇɚɠɦɢɬɟɤɧɨɩɤɭ(4ɧɚɩɭɥɶɬɟɞɢɫɬɚɧɰɢɨɧɧɨɝɨ
ɭɩɪɚɜɥɟɧɢɹɱɬɨɛɵɜɵɛɪɚɬɶɧɭɠɧɵɣ
ɩɪɟɞɭɫɬɚɧɨɜɥɟɧɧɵɣɷɤɜɚɥɚɣɡɟɪ1(:6029,(
086,&
Ɋɟɝɭɥɢɪɨɜɤɚ ɝɪɨɦɤɨɫɬɢ
•
Ɉɬɪɟɝɭɥɢɪɭɣɬɟɝɪɨɦɤɨɫɬɶɡɜɭɤɨɜɨɣɩɚɧɟɥɢ
•
ǼȠȞȓȑȡșȖȞȡȗȠȓȑȞȜȚȘȜȟȠȪȜȏȨȓȚțȜȑȜ
ȕȐȡȥȎțȖȭ
ɇɚɠɦɢɬɟɤɧɨɩɤɭ685592/ɧɚɩɭɥɶɬɟ
ɞɢɫɬɚɧɰɢɨɧɧɨɝɨɭɩɪɚɜɥɟɧɢɹɱɬɨɛɵɭɜɟɥɢɱɢɬɶ
ɢɥɢɭɦɟɧɶɲɢɬɶɭɪɨɜɟɧɶɝɪɨɦɤɨɫɬɢɨɛɴɟɦɧɨɝɨ
ɡɜɭɱɚɧɢɹ
ɇɚɠɢɦɚɣɬɟ ɤɧɨɩɤɢ 92/ ɧɚɛɥɨɤɟ ɢɥɢ ɧɚ
ɩɭɥɶɬɟɞɢɫɬɚɧɰɢɨɧɧɨɝɨ ɭɩɪɚɜɥɟɧɢɹ, ɱɬɨɛɵ ɨɬɪɟ
ɝɭɥɢɪɨɜɚɬɶ ɭɪɨɜɟɧɶ ɝɪɨɦɤɨɫɬɢ.
ȿɫɥɢɜɵɯɨɬɢɬɟɜɵɤɥɸɱɢɬɶɡɜɭɤɧɚɠɦɢɬɟ
ɤɧɨɩɤɭ 087( ɧɚɩɭɥɶɬɟɞɢɫɬɚɧɰɢɨɧɧɨɝɨ
ɭɩɪɚɜɥɟɧɢɹ. ɇɚɠɦɢɬɟɤɧɨɩɤɭ 087( ɟɳɟ
ɪɚɡɢɥɢɧɚɠɦɢɬɟɤɧɨɩɤɢ 92/ ɧɚ ɛɥɨɤɟ ɢɥɢ
ɧɚɩɭɥɶɬɟ ɞɢɫɬɚɧɰɢɨɧɧɨɝɨɭɩɪɚɜɥɟɧɢɹ ɞɥɹɜɨɡ
ɨɛɧɨɜɥɟɧɢɹ ɪɟɠɢɦɚ ɧɨɪɦɚɥɶɧɨɝɨ ɩɪɨɫɥɭɲɢɜɚ
ɧɢɹ.
67 Ɉ ɹɪɤɨɫɬɢ ɞɢɫɩɥɟɹ
ȿɫɥɢɜɬɟɱɟɧɢɟɫɟɤɭɧɞ ɧɟɜɵɩɨɥɧɹɟɬɫɹɧɢɤɚ
ɤɢɯɞɟɣɫɬɜɢɣ, ɹɪɤɨɫɬɶ ɷɤɪɚɧɚ ɚɜɬɨɦɚɬɢɱɟɫɤɢ
ɭɦɟɧɶɲɢɬɫɹ. ɉɪɢ ɜɨɡɨɛɧɨɜɥɟɧɢɢɞɟɣɫɬɜɢɣɭɪɨ
ɜɟɧɶɹɪɤɨɫɬɢ ɛɭɞɟɬ ɚɜɬɨɦɚɬɢɱɟɫɤɢɜɨɫɫɬɚɧɨɜɥɟɧ
AV SYNC ɭɫɬɚɧɨɜɤɚɡɚɞɟɪɠɤɢ ɡɜɭɤɚ
• Ɉɛɪɚɛɨɬɤɚɜɢɞɟɨɢɡɨɛɪɚɠɟɧɢɹɢɧɨɝɞɚ ɡɚɧɢɦɚɟɬ
ɛɨɥɶɲɟ ɜɪɟɦɟɧɢ, ɧɟɨɛɯɨɞɢɦɨɝɨɞɥɹ ɨɛɪɚɛɨɬɤɢ
ɚɭɞɢɨɫɢɝɧɚɥɚ. ɗɬɨɧɚɡɵɜɚɟɬɫɹ"ɡɚɞɟɪɠɤɨɣ".
Ɏɭɧɤɰɢɹ ɚɭɞɢɨɡɚɞɟɪɠɤɢ AXGio DHlay ɩɪɟɞɧɚ
ɡɧɚɱɟɧɚɞɥɹ ɭɫɬɪɚɧɟɧɢɹ ɷɬɨɣ ɡɚɞɟɪɠɤɢ
• ɍɫɬɚɧɨɜɢɬɟɡɚɞɟɪɠɤɭɡɜɭɤɚɩɪɟɞɭɫɦɨɬɪɟɧɧɭɸ
ɬɨɥɶɤɨ ɞɥɹɬɟɤɭɳɟɝɨɪɟɠɢɦɚɜɨɫɩɪɨɢɡɜɟɞɟɧɢɹ.
ȼ ɜɢɞɟ ɪɟɠɢɦɚ ɡɚɞɟɪɠɤɢ ɡɜɭɤɚ+D0,H$R&ɪɟ
ɠɢɦ ɡɚɞɟɪɠɤɢ ɡɜɭɤɚ ɞɟɣɫɬɜɢɬɟɥɟɧ ɬɨɥɶɤɨɞɥɹ
+'0,H$R
&.
• ɇɚɠɦɢɬɟɤɧɨɩɤɢ$96<1& ɧɚɩɭɥɶɬɟɞɢ
ɫɬɚɧɰɢɨɧɧɨɝɨɭɩɪɚɜɥɟɧɢɹ, ɱɬɨɛɵɧɚɫɬɪɨɢɬɶ
ɜɪɟɦɹ ɡɚɞɟɪɠɤɢ
• AVa$V200 ɩɨɭɦɨɥɱɚɧɢɸ ɡɚɞɟɪɠɤɚ ɡɜɭɤɚ
ɭɫɬɚɧɚɜɥɢɜɚɟɬɫɹɜ ɡɧɚɱɟɧɢɟ.
ɋɨɜɟɬɵ:
ȼɪɟɠɢɦɟ$8; %7 8S%, ɧɚɠɚɬɢɟ ɤɧɨɩɨɤ $9
S<1& ɧɟ ɨɤɚɡɵɜɚɟɬɧɢɤɚɤɨɝɨɜɥɢɹɧɢɹ.
ɇɚɫɬɪɨɣɤɚɡɚɞɟɪɠɤɢɡɜɭɤɚɞɟɣɫɬɜɭɟɬɬɨɥɶɤɨɞɥɹ
ɰɢɮɪɨɜɨɝɨ ɚɭɞɢɨ ɧɚɩɪɢɦɟɪ+'0, 1, +'0, 2,
+'0, H$R&, 237,&A/, &2$;,A/.
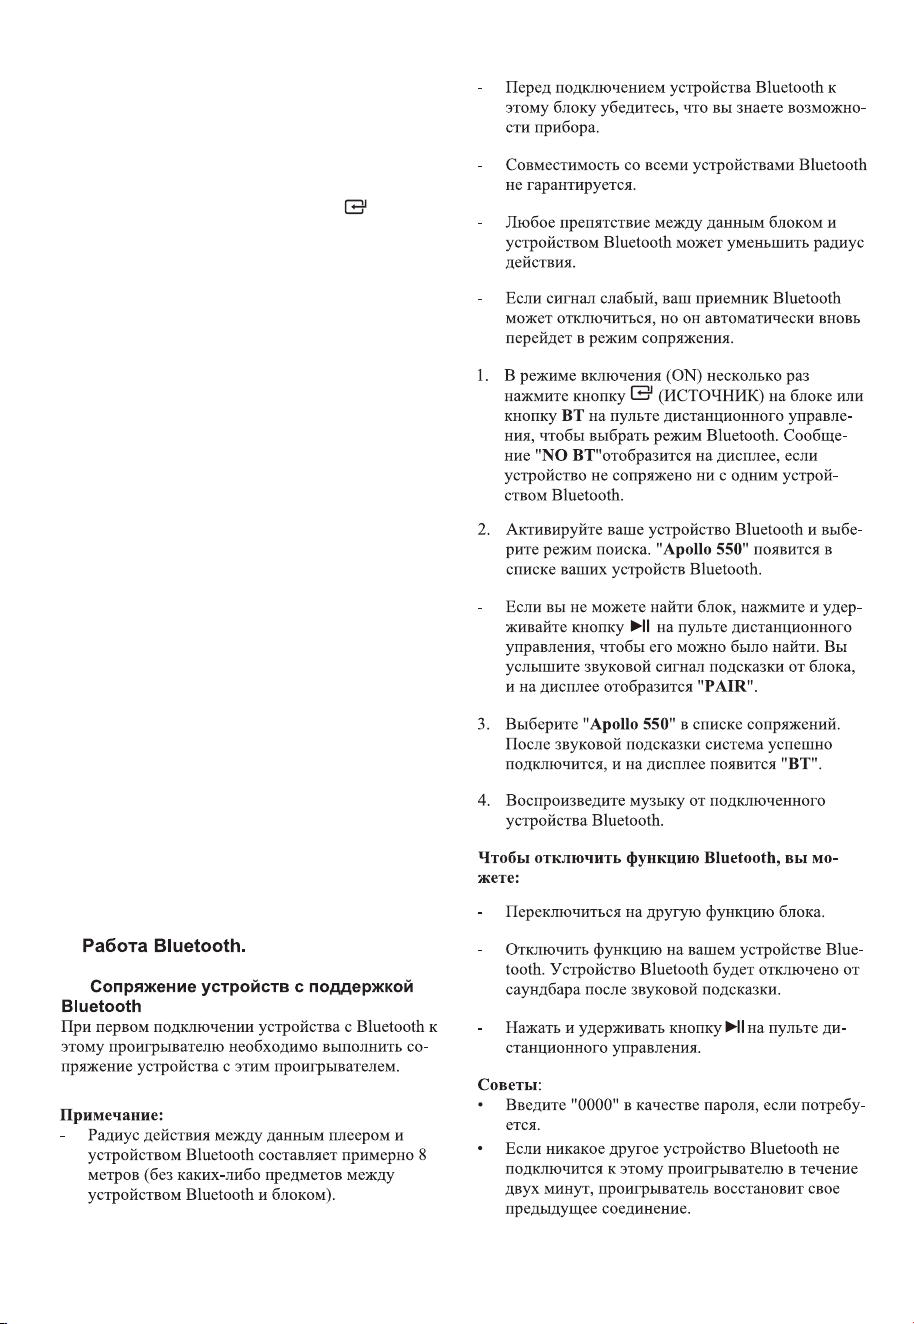
7ɊȺȻɈɌȺ ȼ ɊȿɀɂɆȺɏ AUX / OPTICAL /
COAXIAL / +DMI
1. ɍɛɟɞɢɬɟɫɶɱɬɨɛɥɨɤ ɩɨɞɤɥɸɱɟɧɤɬɟɥɟɜɢɡɨɪɭ
ɢɥɢɚɭɞɢɨɭɫɬɪɨɣɫɬɜɭ
2. ɇɟɫɤɨɥɶɤɨɪɚɡ ɧɚɠɢɦɚɣɬɟ ɤɧɨɩɤɭ ɂɋɌɈɑ
ɇɂɄɧɚɛɥɨɤɟ ɢɥɢ ɤɧɨɩɤɢ $8;237 &2$
+'0, 1+'0, $5& ɧɚɩɭɥɶɬɟ ɞɢɫɬɚɧɰɢɨɧ
ɧɨɝɨɭɩɪɚɜɥɟɧɢɹ, ɱɬɨɛɵɜɵɛɪɚɬɶɬɪɟɛɭɟɦɵɣɪɟ
ɠɢɦ.
3. ɍɩɪɚɜɥɹɣɬɟɜɚɲɢɦ ɚɭɞɢɨɭɫɬɪɨɣɫɬɜɨɦɧɚɩɪɹɦɭɸ
ɞɥɹɮɭɧɤɰɢɣɜɨɫɩɪɨɢɡɜɟɞɟɧɢɹ.
4. ɇɚɠɦɢɬɟɤɧɨɩɤɭ92/ – ɞɥɹɪɟɝɭɥɢɪɨɜɤɢ
ɝɪɨɦɤɨɫɬɶɞɨ ɠɟɥɚɟɦɨɝɨ ɭɪɨɜɧɹ.
ɋɨɜɟɬ
• ȼɨɡɦɨɠɧɨɱɬɨɛɥɨɤ ɧɟɫɦɨɠɟɬ ɞɟɤɨɞɢɪɨɜɚɬɶɜɫɟ
ɰɢɮɪɨɜɵɟ ɚɭɞɢɨɮɨɪɦɚɬɵɨɬ ɢɫɬɨɱɧɢɤɚɜɯɨɞɧɨɝɨ
ɫɢɝɧɚɥɚ. ȼ ɷɬɨɦ ɫɥɭɱɚɟɛɥɨɤ ɛɭɞɟɬɛɟɡɡɜɭɤɚ. ɗɬɨ
ɇȿ ɹɜɥɹɟɬɫɹ ɞɟɮɟɤɬɨɦ. ɍɛɟɞɢɬɟɫɶ, ɱɬɨɚɭɞɢɨ
ɧɚɫɬɪɨɣɤɚ ɢɫɬɨɱɧɢɤɚɜɯɨɞɧɨɝɨɫɢɝɧɚɥɚɧɚɩɪɢ
ɦɟɪɬɟɥɟɜɢɡɨɪɚɢɝɪɨɜɨɣ
ɩɪɢɫɬɚɜɤɢDVD
ɩɥɟɟɪɚɢɬ. ɞ. ɭɫɬɚɧɨɜɥɟɧɚ ɜ ɡɧɚɱɟɧɢɟ3&0 ɢɥɢ
'olby 'igital Ɉɛɪɚɬɢɬɟɫɶɤɪɭɤɨɜɨɞɫɬɜɭɩɨɥɶɡɨ
ɜɚɬɟɥɹɭɫɬɪɨɣɫɬɜɚɢɫɬɨɱɧɢɤɚɜɯɨɞɧɨɝɨɫɢɝɧɚɥɚ
ɡɚɩɨɞɪɨɛɧɵɦɢ ɫɜɟɞɟɧɢɹɦɢ ɨɛɟɝɨɚɭɞɢɨɧɚ
ɫɬɪɨɣɤɚɯɫɨ ɜɯɨɞɨɦ +D0, 1 +'0, 2 +'0,
AR& 237,&A/ &2$;,A/.
• ȼɪɟɠɢɦɟ+'0, 1 +'0, 2 +'0, AR&
H$R&, ɩɪɢ ɜɯɨɞɟ ɜɚɭɞɢɨɮɨɪɦɚɬ '2/%YA7
026, ɧɚɞɢɫɩɥɟɟ ɫɚɭɧɞɛɚɪɚɨɬɨɛɪɚɠɚɟɬɫɹ
'2/%YA702S.
• ɉɪɢɜɯɨɞɟ ɜɚɭɞɢɨɮɨɪɦɚɬ '2/%YD,G,7A/, ɧɚ
ɞɢɫɩɥɟɟɫɚɭɧɞɛɚɪɚɨɬɨɛɪɚɠɚɟɬɫɹ'2/%Y $8
D,2.
58
8.
8.1
• ɉɪɢɜɯɨɞɟ ɜɚɭɞɢɨɮɨɪɦɚɬɵɧɟɹɜɥɹɸɳɢɟɫɹ
3&0 ɢɥɢ '2/%YD,G,7A/, ɟɫɥɢɧɚɜɵɯɨɞɟɢɡ
ɛɥɨɤɚɨɬɫɭɬɫɬɜɭɟɬɡɜɭɤɨɜɨɣɫɢɝɧɚɥ,ɧɚɞɢɫɩɥɟɟ
ɨɬɨɛɪɚɠɚɟɬɫɹ121 S8332R7 F2R0$7 ɎɈɊ
ɆȺɌ ɇȿɉɈȾ
ȾȿɊɀɂȼȺȿɌɋə.
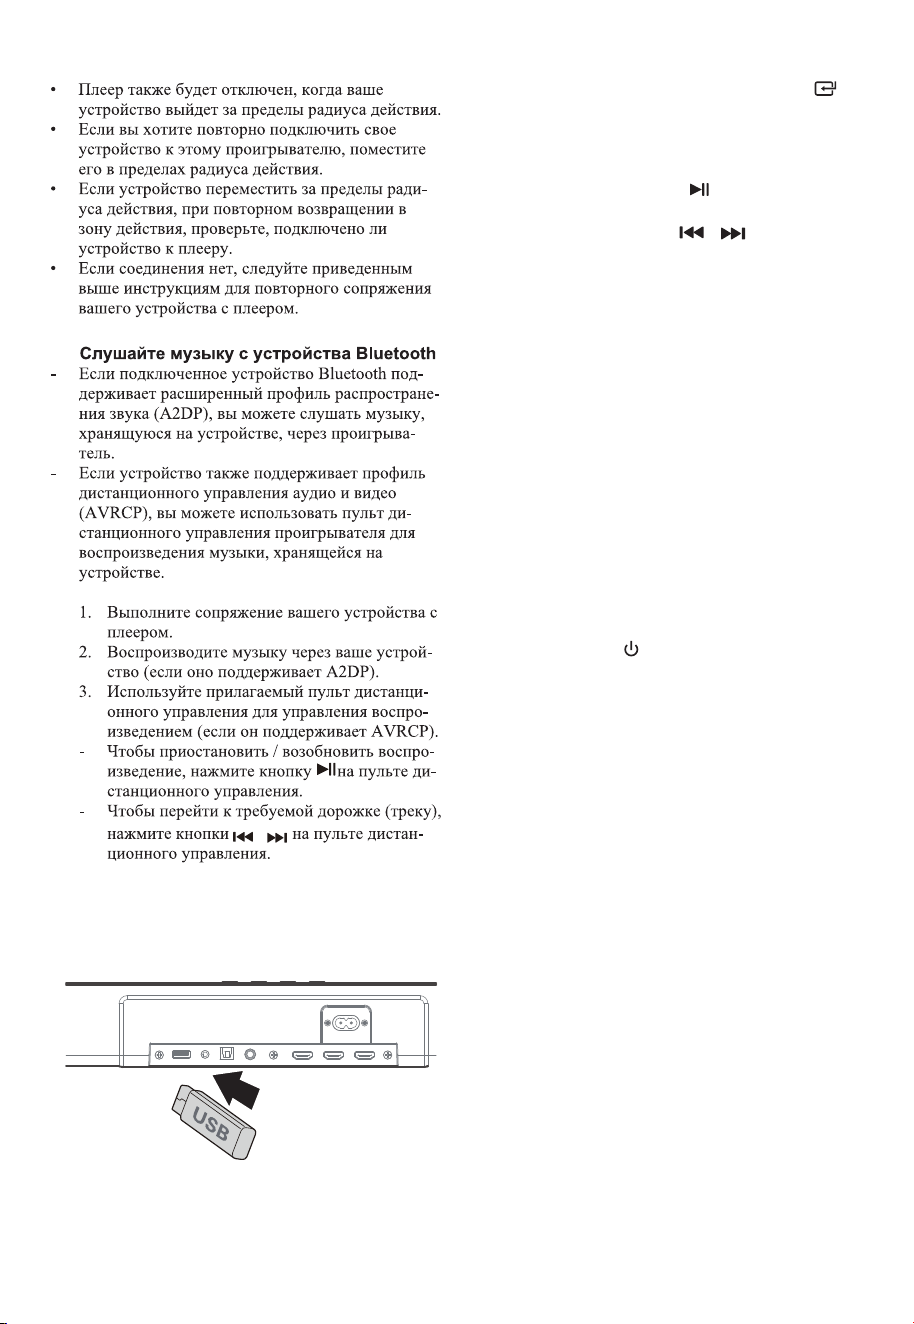
8.2
9 Ɋɚɛɨɬɚ ɫ USBɭɫɬɪɨɣɫɬɜɚɦɢ
1. ȼɫɬɚɜɶɬɟ86%ɭɫɬɪɨɣɫɬɜɨ
2. Ⱦɥɹ ɜɵɛɨɪɚɪɟɠɢɦɚ86% ɧɚɠɦɢɬɟɤɧɨɩɤɭ
S285&( ɧɟɫɤɨɥɶɤɨɪɚɡ ɧɚɛɥɨɤɟ ɢɥɢɧɚɠɦɢɬɟ
ɤɧɨɩɤɭUSB ɧɚ ɩɭɥɶɬɟ Ⱦɍ.
3. ȼɨɜɪɟɦɹ ɜɨɫɩɪɨɢɡɜɟɞɟɧɢɹ:
Ⱦɥɹɩɪɢɨɫɬɚɧɨɜɤɢɢɥɢɜɨɡɨɛɧɨɜɥɟɧɢɹ ɜɨɫɩɪɨɢɡ
ɜɟɞɟɧɢɹɧɚɠɦɢɬɟɤɧɨɩɤɭ ɧɚɩɭɥɶɬɟ Ⱦɍ
ɑɬɨɛɵ ɩɟɪɟɣɬɢɤɩɪɟɞɵɞɭɳɟɦɭɫɥɟɞɭɸɳɟɦɭ
ɮɚɣɥɭɧɚɠɦɢɬɟɤɧɨɩɤɢ ɧɚɩɭɥɶɬɟ Ⱦɍ
ɋɨɜɟɬɵ:
• Ȼɥɨɤ ɦɨɠɟɬɩɨɞɞɟɪɠɢɜɚɬɶ86%ɭɫɬɪɨɣɫɬɜɚɫɩɚ
ɦɹɬɶɸɞɨ2ȽȻ
• Ⱦɚɧɧɵɣɛɥɨɤ ɦɨɠɟɬɜɨɫɩɪɨɢɡɜɨɞɢɬɶɮɨɪɦɚɬ
033.
• Ɏɚɣɥɨɜɚɹɫɢɫɬɟɦɚ86% ɞɨɥɠɧɚ ɛɵɬɶFA732 ɢɥɢ
FA716.
10 ɍɫɬɪɚɧɟɧɢɟɧɟɢɫɩɪɚɜɧɨɫɬɟɣ
ɑɬɨɛɵ ɝɚɪɚɧɬɢɹɨɫɬɚɜɚɥɚɫɶɜɫɢɥɟɧɢɤɨɝɞɚɧɟɩɵ
ɬɚɣɬɟɫɶɪɟɦɨɧɬɢɪɨɜɚɬɶɫɢɫɬɟɦɭɫɚɦɨɫɬɨɹɬɟɥɶɧɨ
ȿɫɥɢɭɜɚɫ ɜɨɡɧɢɤɧɭɬɩɪɨɛɥɟɦɵɩɪɢ ɢɫɩɨɥɶɡɨɜɚɧɢɢ
ɷɬɨɝɨ ɭɫɬɪɨɣɫɬɜɚ,ɩɪɨɜɟɪɶɬɟɫɥɟɞɭɸɳɢɟɩɭɧɤɬɵ
ɩɪɟɠɞɟɱɟɦɨɛɪɚɳɚɬɶɫɹ ɜ ɫɟɪɜɢɫɧɵɣɰɟɧɬɪ
ɇɟɬɩɢɬɚɧɢɹ
• ɍɛɟɞɢɬɟɫɶɱɬɨɲɧɭɪɩɢɬɚɧɢɹɩɨɩɟɪɟɦɟɧɧɨɦɭ
ɬɨɤɭ ɭɫɬɪɨɣɫɬɜɚɩɨɞɤɥɸɱɟɧɩɪɚɜɢɥɶɧɨ
• ɍɛɟɞɢɬɟɫɶɱɬɨɜɪɨɡɟɬɤɟ ɟɫɬɶɧɚɩɪɹɠɟɧɢɟ
• ɇɚɠɦɢɬɟɤɧɨɩɤɭ , ɱɬɨɛɵ ɜɤɥɸɱɢɬɶɛɥɨɤ.
ɉɭɥɶɬɞɢɫɬɚɧɰɢɨɧɧɨɝɨɭɩɪɚɜɥɟɧɢɹɧɟɪɚɛɨɬɚɟɬ
• ɉɟɪɟɞɧɚɠɚɬɢɟɦ ɥɸɛɨɝɨ ɷɥɟɦɟɧɬɚɭɩɪɚɜɥɟɧɢɹ
ɜɨɫɩɪɨɢɡɜɟɞɟɧɢɟɦ ɜɵɛɟɪɢɬɟɩɪɚɜɢɥɶɧɵɣɢɫɬɨɱ
ɧɢɤ.
• ɍɦɟɧɶɲɢɬɟɪɚɫɫɬɨɹɧɢɟɦɟɠɞɭɩɭɥɶɬɨɦ ɞɢɫɬɚɧ
ɰɢɨɧɧɨɝɨɭɩɪɚɜɥɟɧɢɹɢɭɫɬɪɨɣɫɬɜɨɦ
• ȼɫɬɚɜɶɬɟɛɚɬɚɪɟɣɤɢ,ɫɨɛɥɸɞɚɹ ɭɤɚɡɚɧɧɭɸɩɨɥɹɪ
ɧɨɫɬɶ+.
• Ɂɚɦɟɧɢɬɟɛɚɬɚɪɟɣɤɢ
.
• ɇɚɩɪɚɜɶɬɟɩɭɥɶɬ ɞɢɫɬɚɧɰɢɨɧɧɨɝɨɭɩɪɚɜɥɟɧɢɹ
ɩɪɹɦɨɧɚɞɚɬɱɢɤɧɚɩɟɪɟɞɧɟɣɩɚɧɟɥɢɛɥɨɤɚ.
ɇɟɬɡɜɭɤɚ
• ɍɛɟɞɢɬɟɫɶɱɬɨɡɜɭɤ ɧɚɛɥɨɤɟ ɧɟ ɨɬɤɥɸɱɟɧ
ɇɚɠɦɢɬɟɤɧɨɩɤɭ087( ɢɥɢ92/ +, ɱɬɨɛɵɜɨɡ
ɨɛɧɨɜɢɬɶɧɨɪɦɚɥɶɧɨɟɩɪɨɫɥɭɲɢɜɚɧɢɟ
58

58
• ɍɛɟɞɢɬɟɫɶɱɬɨɧɚɫɬɪɨɣɤɚ ɡɜɭɤɚɢɫɬɨɱɧɢɤɚ ɜɯɨɞ
ɧɨɝɨɫɢɝɧɚɥɚ ɧɚɩɪɢɦɟɪɬɟɥɟɜɢɡɨɪɚɢɝɪɨɜɨɣ
ɩɪɢɫɬɚɜɤɢDVDɩɥɟɟɪɚ ɢɬɞ. ɭɫɬɚɧɨɜɥɟɧɚɜ
ɪɟɠɢɦ 3&0 ɢɥɢ Dolby Digital ɩɪɢ ɢɫɩɨɥɶɡɨɜɚ
ɧɢɢɰɢɮɪɨɜɨɝɨ ɧɚɩɪɢɦɟɪ+'0,, 237,&A/
ɩɨɞɤɥɸɱɟɧɢɹ.
• ɋɚɛɜɭɮɟɪ ɧɚɯɨɞɢɬɫɹɜɧɟɡɨɧɵɞɟɣɫɬɜɢɹɩɟɪɟɦɟ
ɫɬɢɬɟɫɚɛɜɭɮɟɪɛɥɢɠɟ ɤ ɫɚɭɧɞɛɚɪɭ. ɍɛɟɞɢɬɟɫɶ
ɱɬɨɫɚɛɜɭɮɟɪɧɚɯɨɞɢɬɫɹ ɜɩɪɟɞɟɥɚɯɦɨɬ
ɫɚɭɧɞɛɚɪɚ ɱɟɦɛɥɢɠɟɬɟɦɥɭɱɲɟ.
• ȼɨɡɦɨɠɧɨɱɬɨɛɥɨɤ ɧɟɦɨɠɟɬ ɞɟɤɨɞɢɪɨɜɚɬɶɜɫɟ
ɰɢɮɪɨɜɵɟ ɚɭɞɢɨɮɨɪɦɚɬɵɨɬ ɢɫɬɨɱɧɢɤɚɜɯɨɞɧɨɝɨ
ɫɢɝɧɚɥɚ. ȼ ɷɬɨɦ ɫɥɭɱɚɟɡɜɭɤɛɭɞɟɬɨɬɤɥɸɱɟɧ.
ɗɬɨ
ɇȿɞɟɮɟɤɬɁɜɭɤɭɫɬɪɨɣɫɬɜɚ ɧɟɨɬɤɥɸɱɟɧ
• ɇɚɠɦɢɬɟ ɤɧɨɩɤɭ ɧɚɛɥɨɤɟ ɢɥɢɧɚɩɭɥɶɬɟɞɢ
ɫɬɚɧɰɢɨɧɧɨɝɨɭɩɪɚɜɥɟɧɢɹ, ɱɬɨɛɵɩɟɪɟɤɥɸɱɢɬɶ
ɫɚɭɧɞɛɚɪɜɪɟɠɢɦ ɨɠɢɞɚɧɢɹɁɚɬɟɦɧɚɠɦɢɬɟ
ɤɧɨɩɤɭ ɟɳɟ ɪɚɡɱɬɨɛɵɜɤɥɸɱɢɬɶɫɚɭɧɞɛɚɪ.
• ȼɵɧɶɬɟɜɢɥɤɢ ɫɚɭɧɞɛɚɪɚ ɢɫɚɛɜɭɮɟɪɚɢɡ ɪɨɡɟɬɤɢ
ɫɟɬɟɜɨɝɨɩɢɬɚɧɢɹɚɡɚɬɟɦɫɧɨɜɚɜɫɬɚɜɶɬɟ ɢɯ
ȼɤɥɸɱɢɬɟɫɚɭɧɞɛɚɪ.
ɇɚɬɟɥɟɜɢɡɨɪɟɜɨɡɧɢɤɚɟɬɩɪɨɛɥɟɦɚɫɨɬɨɛɪɚɠɟ
ɧɢɟɦɩɪɢɩɪɨɫɦɨɬɪɟ+'5ɤɨɧɬɟɧɬɚɨɬɢɫɬɨɱɧɢɤɚ
+'0,.
• ɇɟɤɨɬɨɪɵɟɬɟɥɟɜɢɡɨɪɵ4K +'Rɬɪɟɛɭɸɬ
ɧɚɫɬɪɨɣɤɢɜɯɨɞɚ +'0, ɢɥɢɧɚɫɬɪɨɟɤɢɡɨɛɪɚɠɟ
ɧɢɹɞɥɹɩɪɢɟɦɚ ɤɨɧɬɟɧɬɚ +'RȾɨɩɨɥɧɢɬɟɥɶɧɵɟ
ɫɜɟɞɟɧɢɹɨɧɚɫɬɪɨɣɤɟ+DRɞɢɫɩɥɟɹɫɦɜɢɧ
ɫɬɪɭɤɰɢɢɩɨ ɷɤɫɩɥɭɚɬɚɰɢɢɜɚɲɟɝɨɬɟɥɟɜɢɡɨɪɚ
əɧɟɦɨɝɭ ɧɚɣɬɢɢɦɹ%luHtootKɷɬɨɝɨɛɥɨɤɚ ɧɚ
ɫɜɨɟɦɭɫɬɪɨɣɫɬɜɟ%OuHtootKɞɥɹɫɨɩɪɹɠɟɧɢɹɩɨ
BlXHtooth.
• ɍɛɟɞɢɬɟɫɶɱɬɨɧɚɜɚɲɟɦ ɭɫɬɪɨɣɫɬɜɟ%lXHtootK
ɚɤɬɢɜɢɪɨɜɚɧɚ ɮɭɧɤɰɢɹ %lXHtootK
• ɍɛɟɞɢɬɟɫɶɱɬɨɜɵɜɵɩɨɥɧɢɥɢɫɨɩɪɹɠɟɧɢɟɛɥɨɤɚ
ɫɭɫɬɪɨɣɫɬɜɨɦ%lXHtootK
ɋɚɛɜɭɮɟɪɧɚɯɨɞɢɬɫɹɜɪɟɠɢɦɟɨɠɢɞɚɧɢɹ ɢɥɢɢɧ
ɞɢɤɚɬɨɪɫɚɛɜɭɮɟɪɚɧɟɡɚɝɨɪɚɟɬɫɹ.
• ȼɵɧɶɬɟɲɧɭɪɩɢɬɚɧɢɹɢɡɪɨɡɟɬɤɢ ɫɟɬɟɜɨɝɨɩɢɬɚ
ɧɢɹ ɢɫɧɨɜɚɩɨɞɤɥɸɱɢɬɟ
ɟɝɨɱɟɪɟɡɦɢɧɭɬɵ
ɱɬɨɛɵɩɟɪɟɡɚɝɪɭɡɢɬɶ ɫɚɛɜɭɮɟɪ
ɗɬɨɮɭɧɤɰɢɹɨɬɤɥɸɱɟɧɢɹɩɢɬɚɧɢɹɧɚɦɢɧɭɬ,
ɨɞɧɨɢɡɬɪɟɛɨɜɚɧɢɣɫɬɚɧɞɚɪɬɚ(53,,ɞɥɹɷɤɨɧɨ
ɦɢɢɷɧɟɪɝɢɢ
• ȿɫɥɢɭɪɨɜɟɧɶɜɧɟɲɧɟɝɨɜɯɨɞɧɨɝɨ ɫɢɝɧɚɥɚɛɥɨɤɚ
ɫɥɢɲɤɨɦɧɢɡɤɢɣɨɧɚɜɬɨɦɚɬɢɱɟɫɤɢɜɵɤɥɸɱɢɬɫɹ
ɱɟɪɟɡɦɢɧɭɬ. ɉɨɠɚɥɭɣɫɬɚɭɜɟɥɢɱɶɬɟɭɪɨɜɟɧɶ
ɝɪɨɦɤɨɫɬɢɜɚɲɟɝɨɜɧɟɲɧɟɝɨɭɫɬɪɨɣɫɬɜɚ
• ȼɨɡɦɨɠɧɨɱɬɨɫɚɭɧɞɛɚɪ ɩɨɬɟɪɹɥɫɜɹɡɶ ɫɫɚɛɜɭ
ɮɟɪɨɦНастройтеɛɥɨɤɢ, ɜɵɩɨɥɧɢɜ ɞɟɣɫɬɜɢɹ
ɨɩɢɫɚɧɧɵɟ ɜ ɪɚɡɞɟɥɟ"ɋɨɩɪɹɠɟɧɢɟ ɛɟɫ
ɩɪɨɜɨɞɧɨɝɨ ɫɚɛɜɭɮɟɪɚɫ ɫɚɭɧɞɛɚɪɨɦ".

58
ɂɫɬɨɱɧɢɤɩɢɬɚɧɢɹ $&9a+]
ɉɨɬɪɟɛɥɹɟɦɚɹɦɨɳɧɨɫɬɶ ::
ȼɵɯɨɞɧɚɹɦɨɳɧɨɫɬɶ :
86%
5V
500mA
+L6SHHG86%)$7)$7
32G (ɦɚɤɫ), 03
Ƚɚɛɚɪɢɬɧɵɟɪɚɡɦɟɪɵɒ ɯȼɯȽ [[PP
ȼɟɫɧɟɬɬɨ 3.6 kg
ɑɭɜɫɬɜɢɬɟɥɶɧɨɫɬɶɚɭɞɢɨɜɯɨɞɚ 500mV
ɑɚɫɬɨɬɧɚɹɯɚɪɚɤɬɟɪɢɫɬɢɤɚ
ȼɟɪɫɢɹ ɩɪɨɮɢɥɢ %lXHtootK
+].+]
9$'3$95&3
G%P
ɑɚɫɬɨɬɧɵɟɞɢɚɩɚɡɨɧɵ%OXHWRRWK 0+]a0+]
0+]a0+]
G%P
ȼɯɨɞ
ȼɵɯɨɞ
.$$'(
9a+]$ɦɚɤɫ
24V 1.5A
ȼɵɯɨɞɧɚɹɦɨɳɧɨɫɬɶ :[
Ƚɚɛɚɪɢɬɧɵɟɪɚɡɦɟɪɵɒ ɯȼɯȽ [[PP
ȼɟɫɧɟɬɬɨ NJNJ[
ɑɚɫɬɨɬɧɚɹɯɚɪɚɤɬɟɪɢɫɬɢɤɚ +].+]
ȍ[ɂɦɩɟɞɚɧɫ
ɉɭɥɶɬɞɢɫɬɚɧɰɢɨɧɧɨɝɨɭɩɪɚɜɥɟɧɢɹ
Ɋɚɫɫɬɨɹɧɢɟ ɭɝɨɥ P
Ɍɢɩɛɚɬɚɪɟɢɧɟɜɤɥɸɱɟɧɨ $$$9;
1 Ɍɟɯɧɢɱɟɫɤɢɟ ɯɚɪɚɤɬɟɪɢɫɬɢɤɢ
ɋɚɭɧɞɛɚɪ
* Ɍɟɯɧɢɱɟɫɤɢɟ ɯɚɪɚɤɬɟɪɢɫɬɢɤɢ ɦɨɝɭɬ ɛɵɬɶ ɢɡɦɟɧɟɧɵ ɛɟɡ ɩɪɟɞɜɚɪɢɬɟɥɶɧɨɝɨ ɭɜɟɞɨɦɥɟɧɢɹ ɂɡɦɟɪɹɸɬɫɹɩɪɢ
ɨɩɪɟɞɟɥɟɧɧɵɯ ɭɫɥɨɜɢɹɯ.
ɆɚɤɫɢɦɚɥɶɧɚɹɩɟɪɟɞɚɜɚɟɦɚɹɦɨɳɧɨɫɬɶɗɂɂɆ
Ⱦɢɚɩɚɡɨɧ ɱɚɫɬɨɬɛɟɫɩɪɨɜɨɞɧɨɣɫɜɹɡɢȽȽɰ
Ɇɚɤɫɢɦɚɥɶɧɚɹɦɨɳɧɨɫɬɶ ɛɟɫɩɪɨɜɨɞɧɨɣɫɟɬɢ 5,8 ȽȽɰ
ɜ ɪɟɠɢɦ
ɟ ɨɠɢɞɚɧɢɹ
ɜ ɪɟɠɢɦ
ɟ ɨɠɢɞɚɧɢɹ
Ɍɟɯɧɢɱɟɫɤɢɟɯɚɪɚɤɬɟɪɢɫɬɢɤɢколонок объемного звучания
ɋɚɛɜɭɮɟɪ
ɂɫɬɨɱɧɢɤɩɢɬɚɧɢɹ $&9a+]
ȼɵɯɨɞɧɚɹɦɨɳɧɨɫɬɶ :
ɉɨɬɪɟɛɥɹɟɦɚɹɦɨɳɧɨɫɬɶ ::
Ƚɚɛɚɪɢɬɧɵɟɪɚɡɦɟɪɵɒ ɯȼɯȽ [[PP
ȼɟɫɧɟɬɬɨ 5.4 kg
ɑɚɫɬɨɬɧɚɹɯɚɪɚɤɬɟɪɢɫɬɢɤɚ +]+]
Колонки объёмного звучания
Ɋɟɠɢɦɚɞɚɩɬɟɪɚ
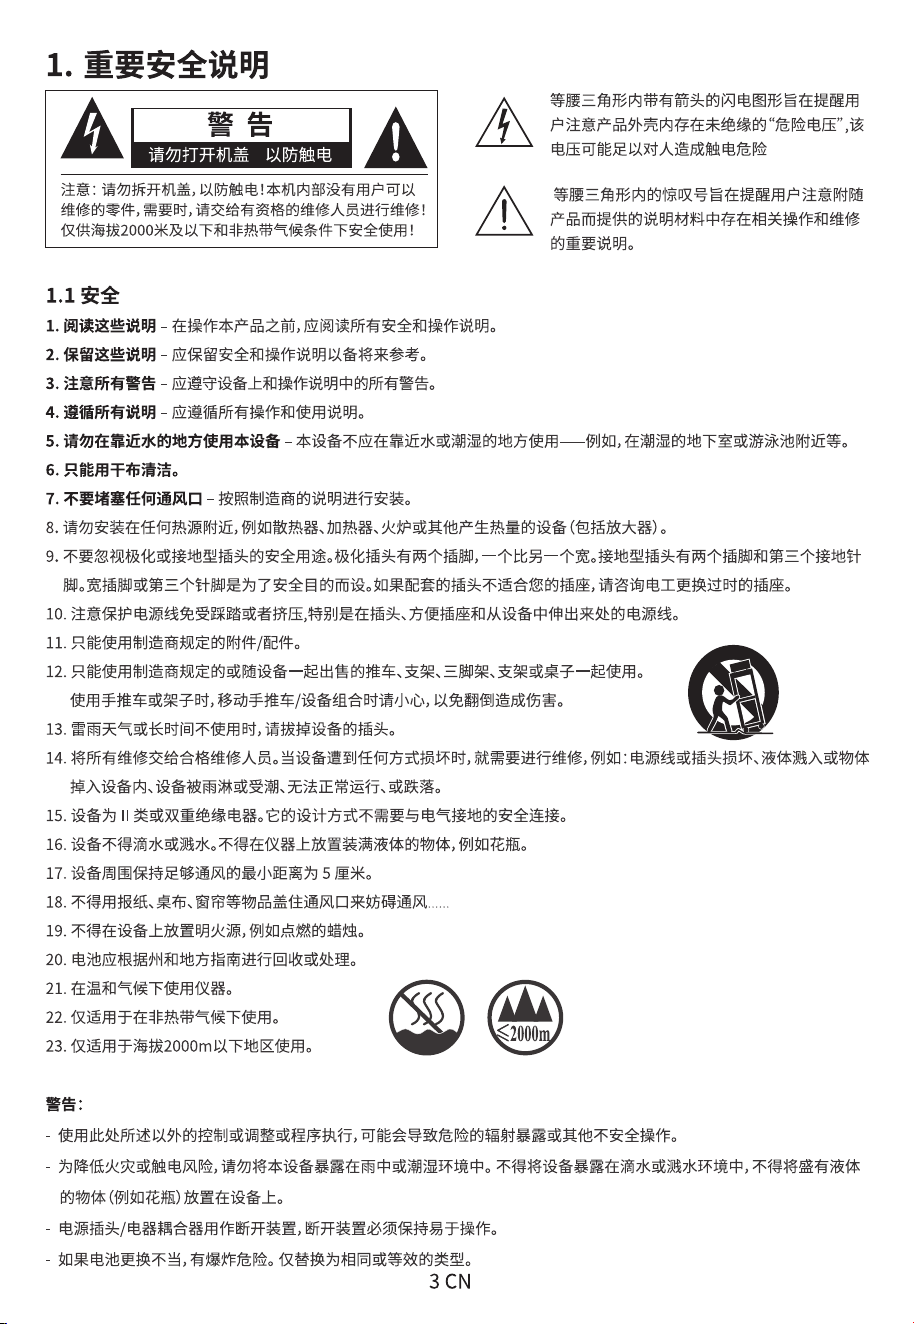

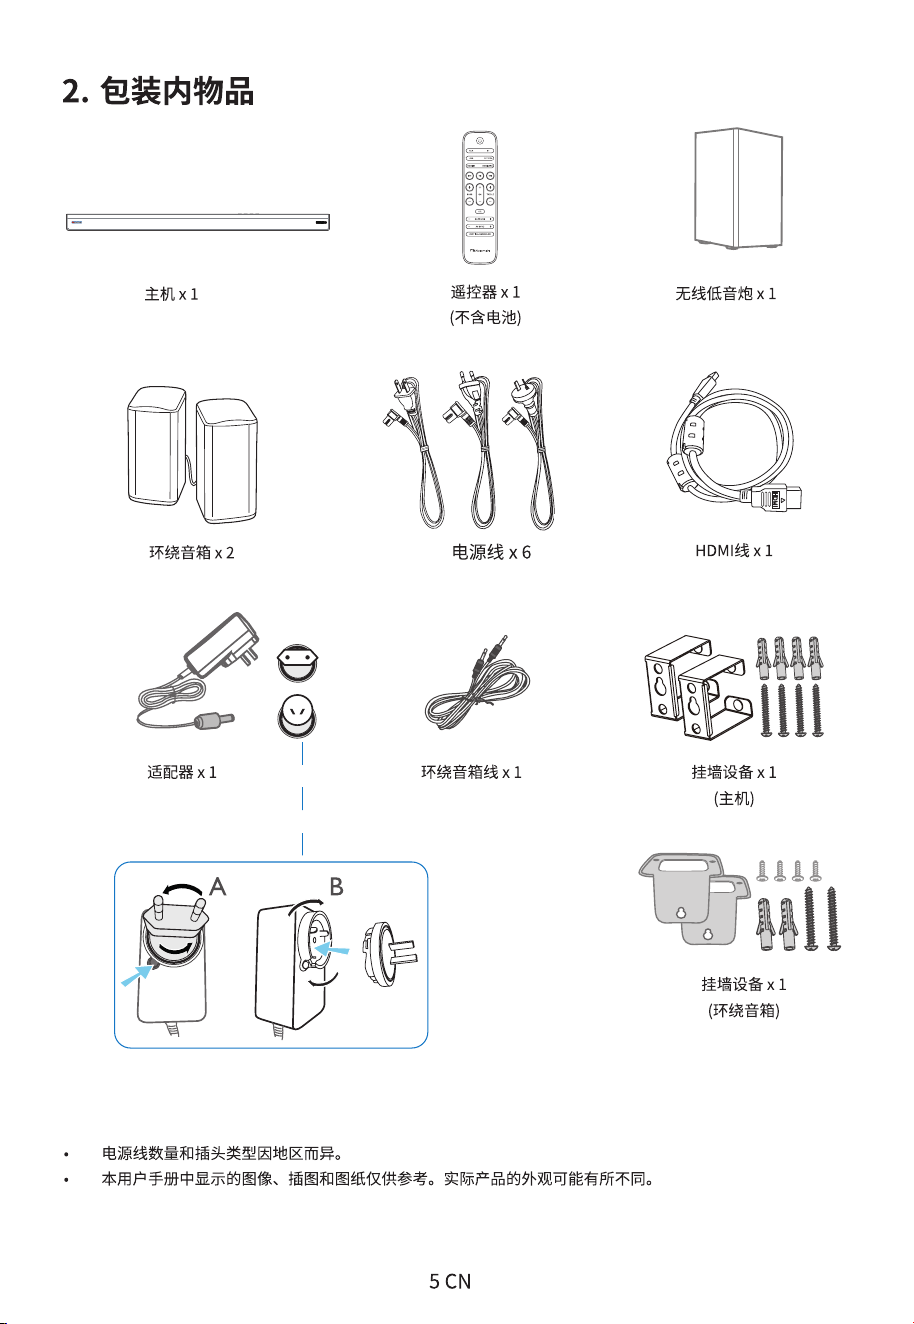
x2 x2 x2
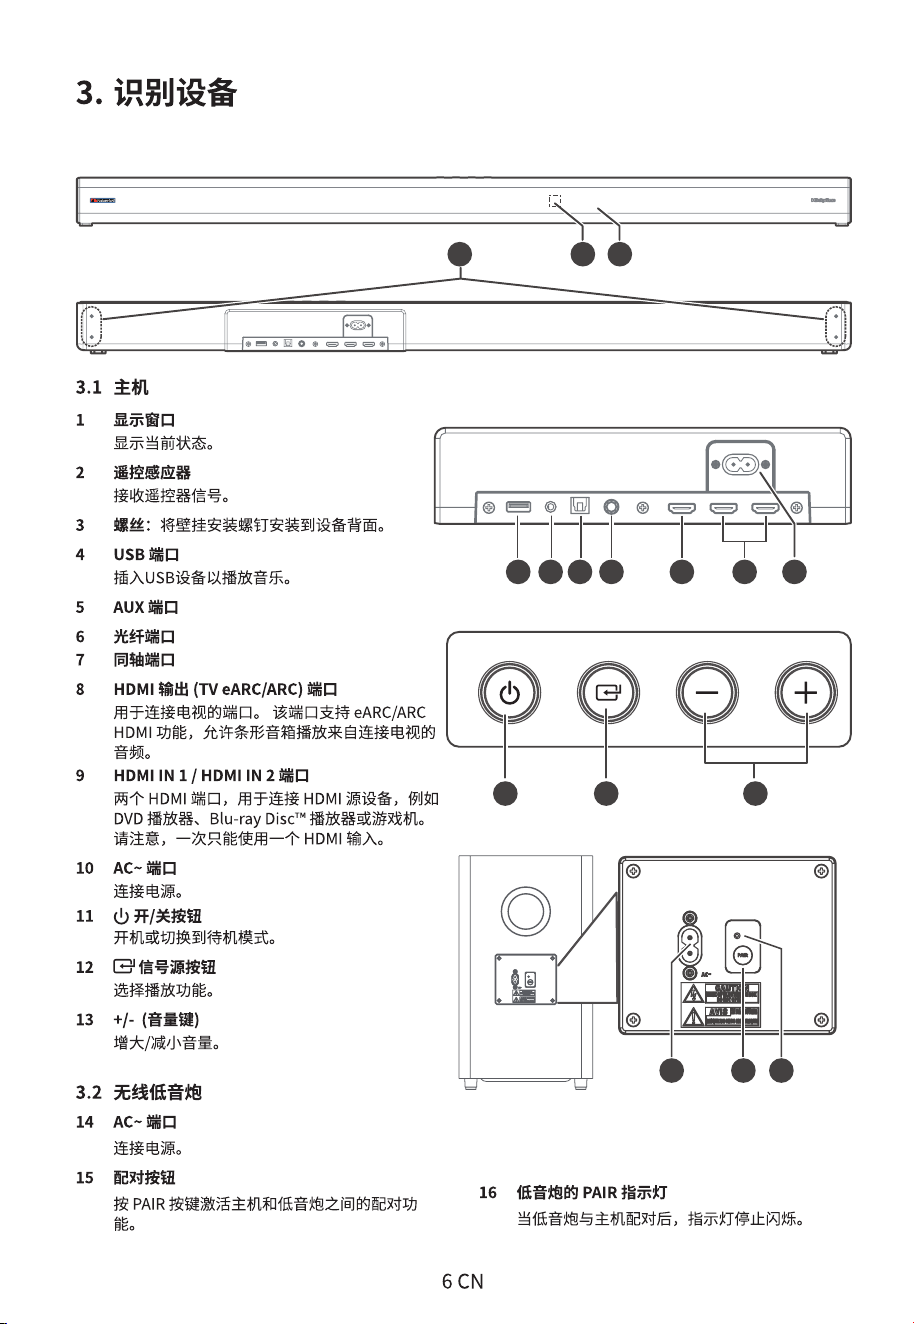
14 15 16
11 12 13
aux
2 1
3
6 7 8
10
4 95
14 15 16
11 12 13
aux
2 1
3
6 7 8
10
4 95
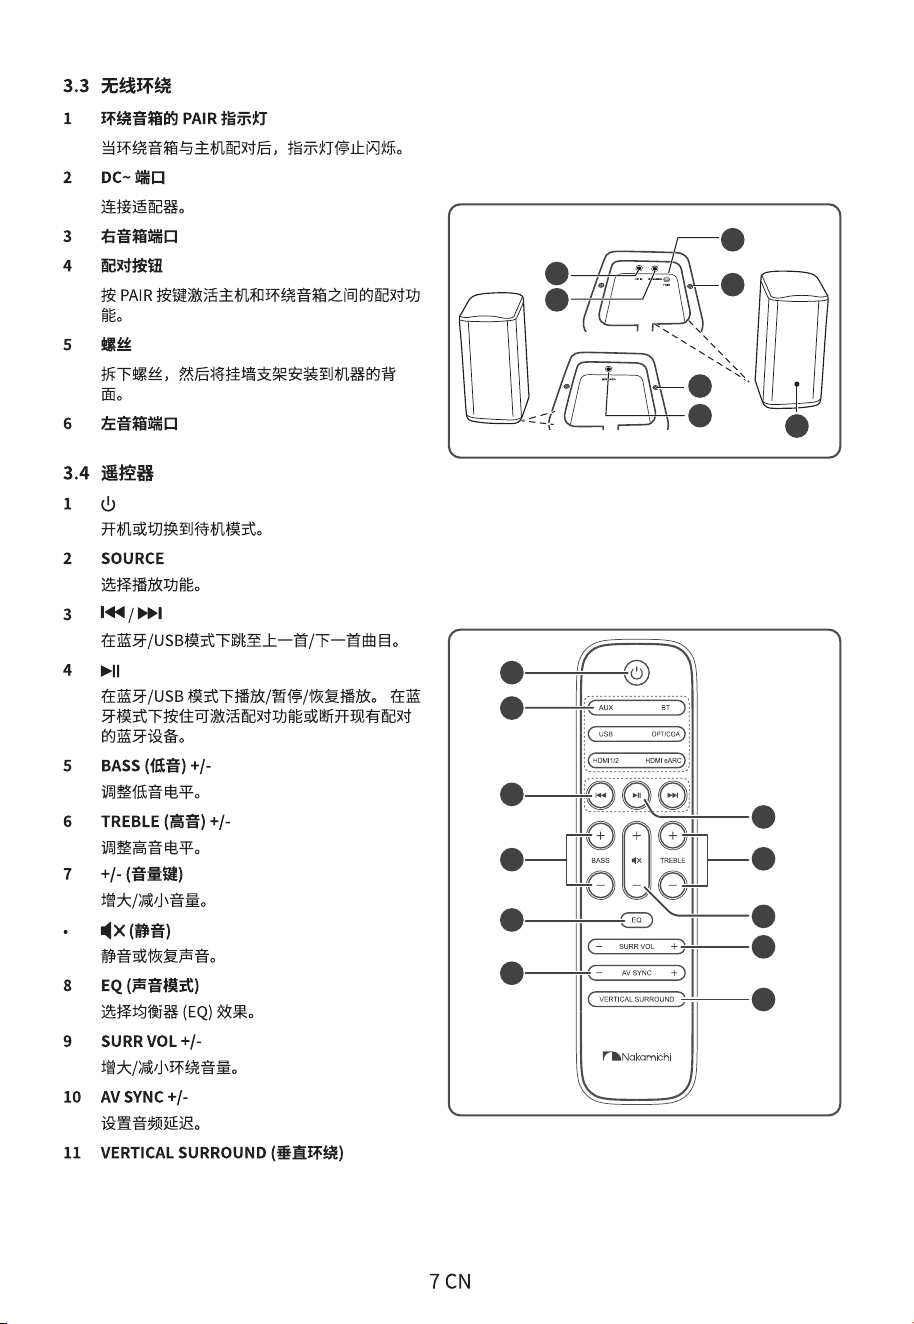
1
2
3
5
8
10
6
7
9
11
4
5
4
5
3
1
2
6
Speaker L
Speaker R
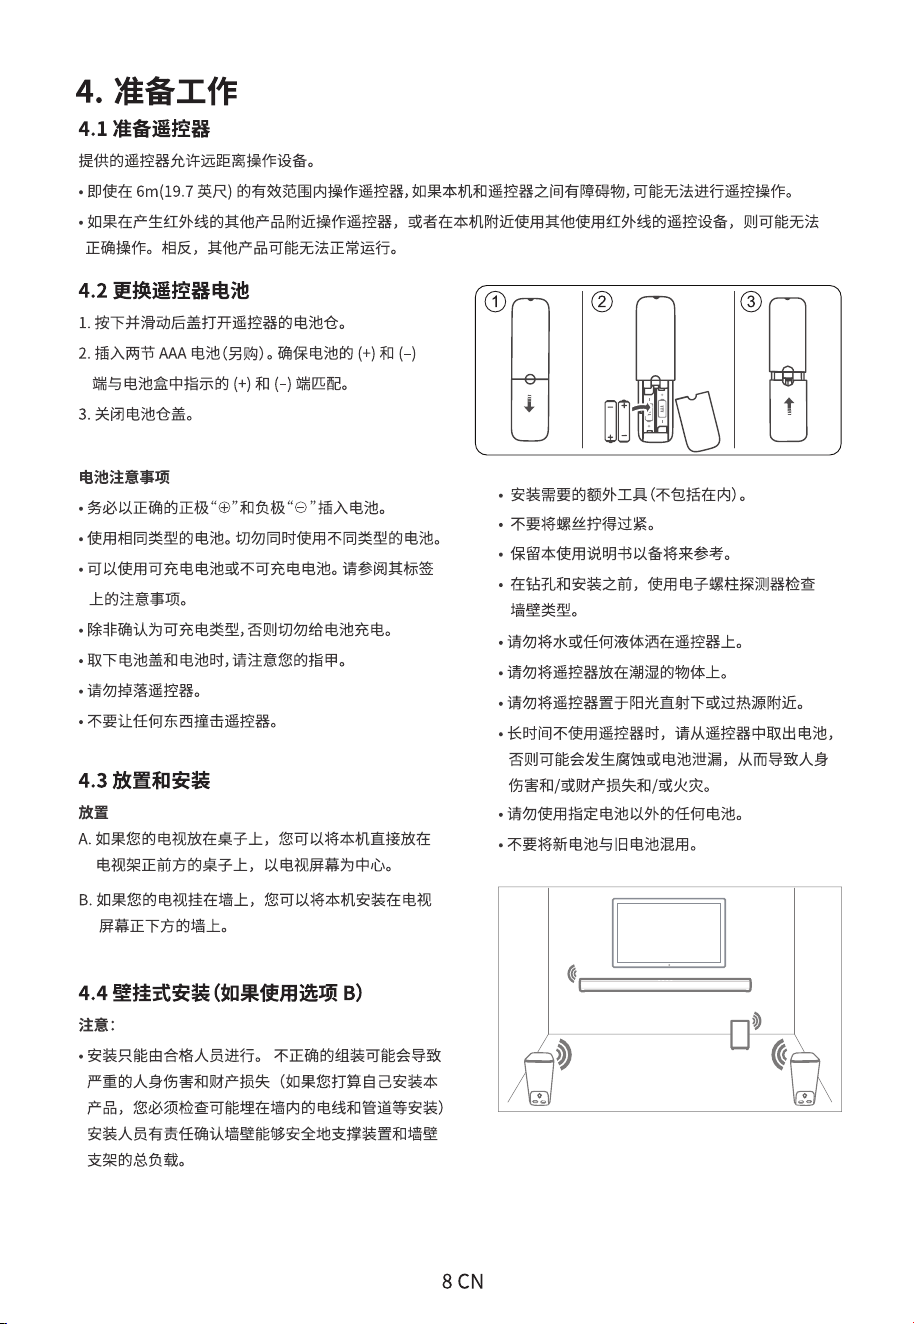
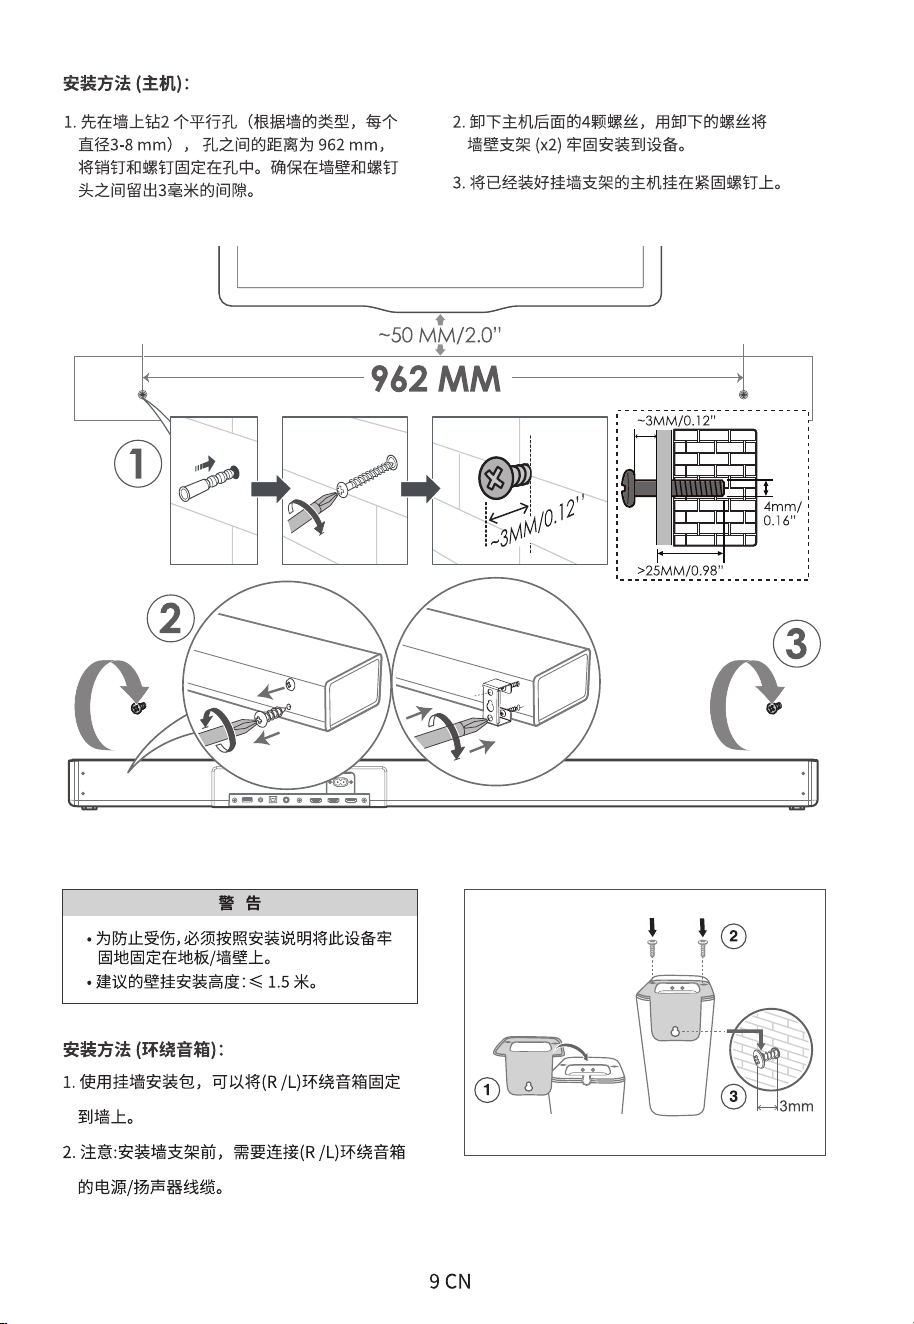
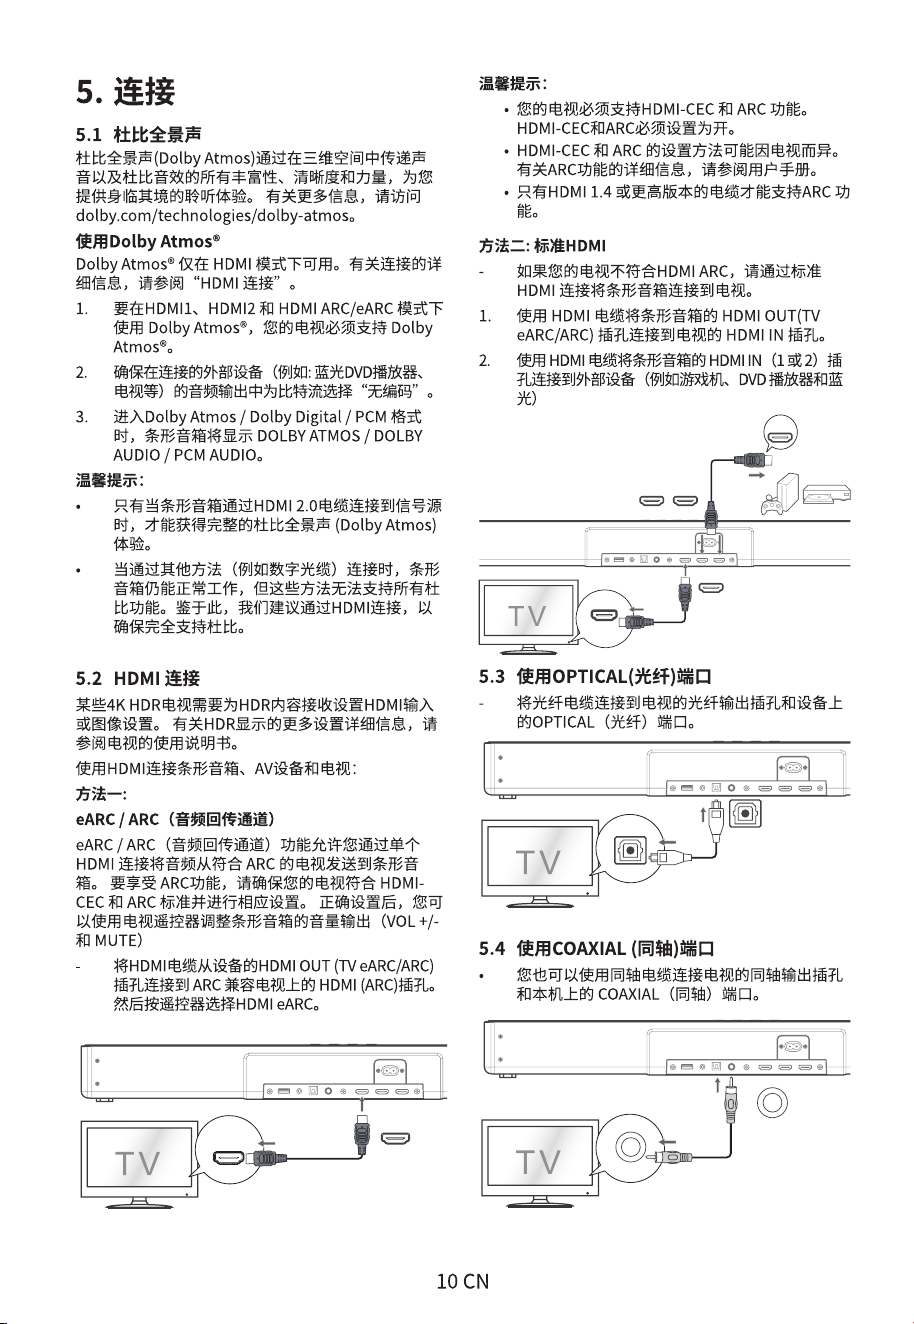
HDMI (eARC/ARC)
HDMI OUT
TV eARC/ARC
HDMI IN
HDMI OUT
HDMI OUT
TV eARC/ARC
HDMI IN 1 HDMI IN 2
.
.
.
OPTICAL
OPTICAL
COAXIAL
COAXIAL
OPTICAL
OPTICAL
COAXIAL
COAXIAL
HDMI (eARC/ARC)
HDMI OUT
TV eARC/ARC
HDMI IN
HDMI OUT
HDMI OUT
TV eARC/ARC
HDMI IN 1 HDMI IN 2
.
.
.
OPTICAL
OPTICAL
COAXIAL
COAXIAL
OPTICAL
OPTICAL
COAXIAL
COAXIAL
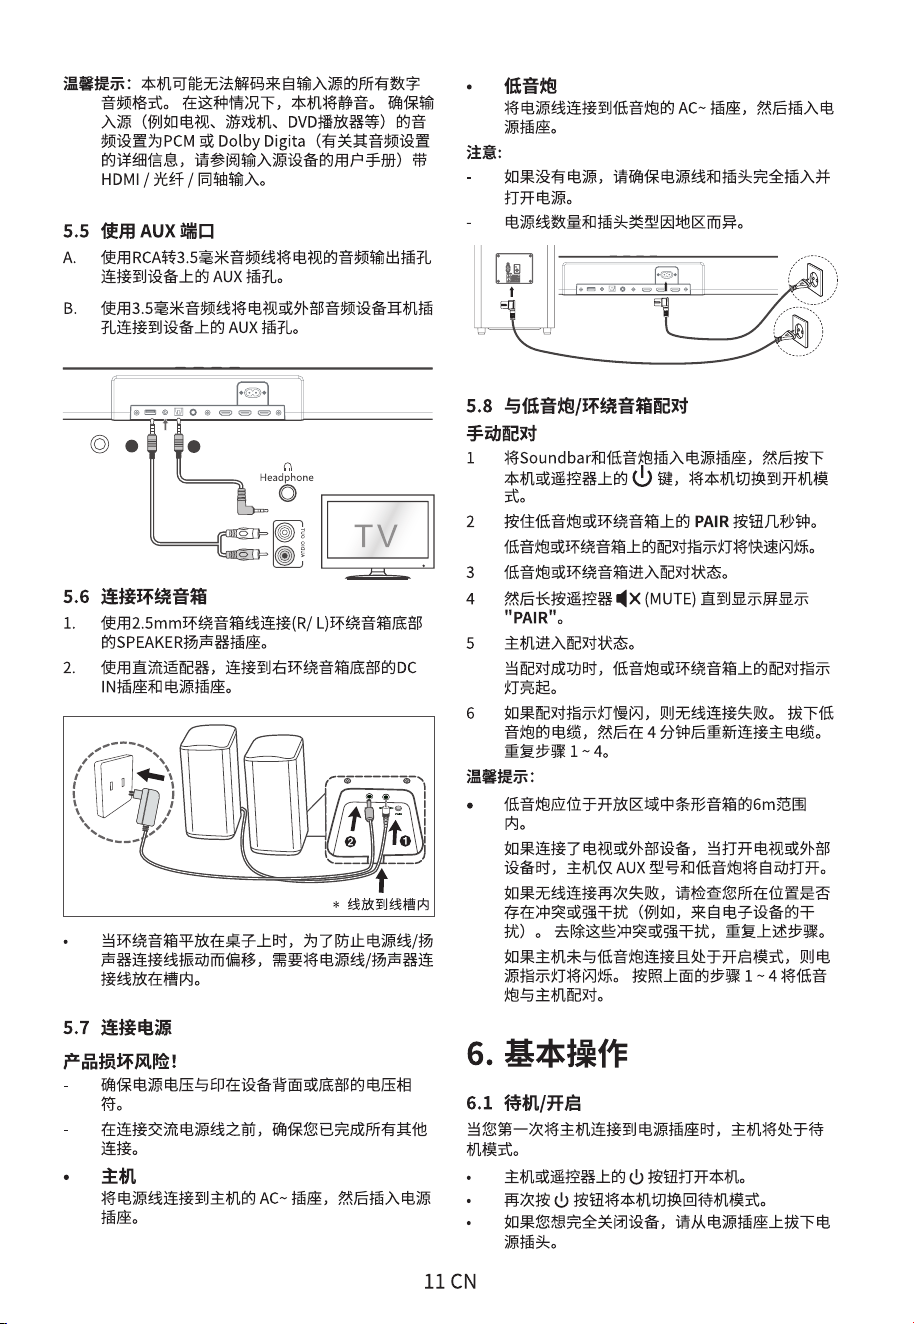
AUX
A
B
»
»
•
•
•
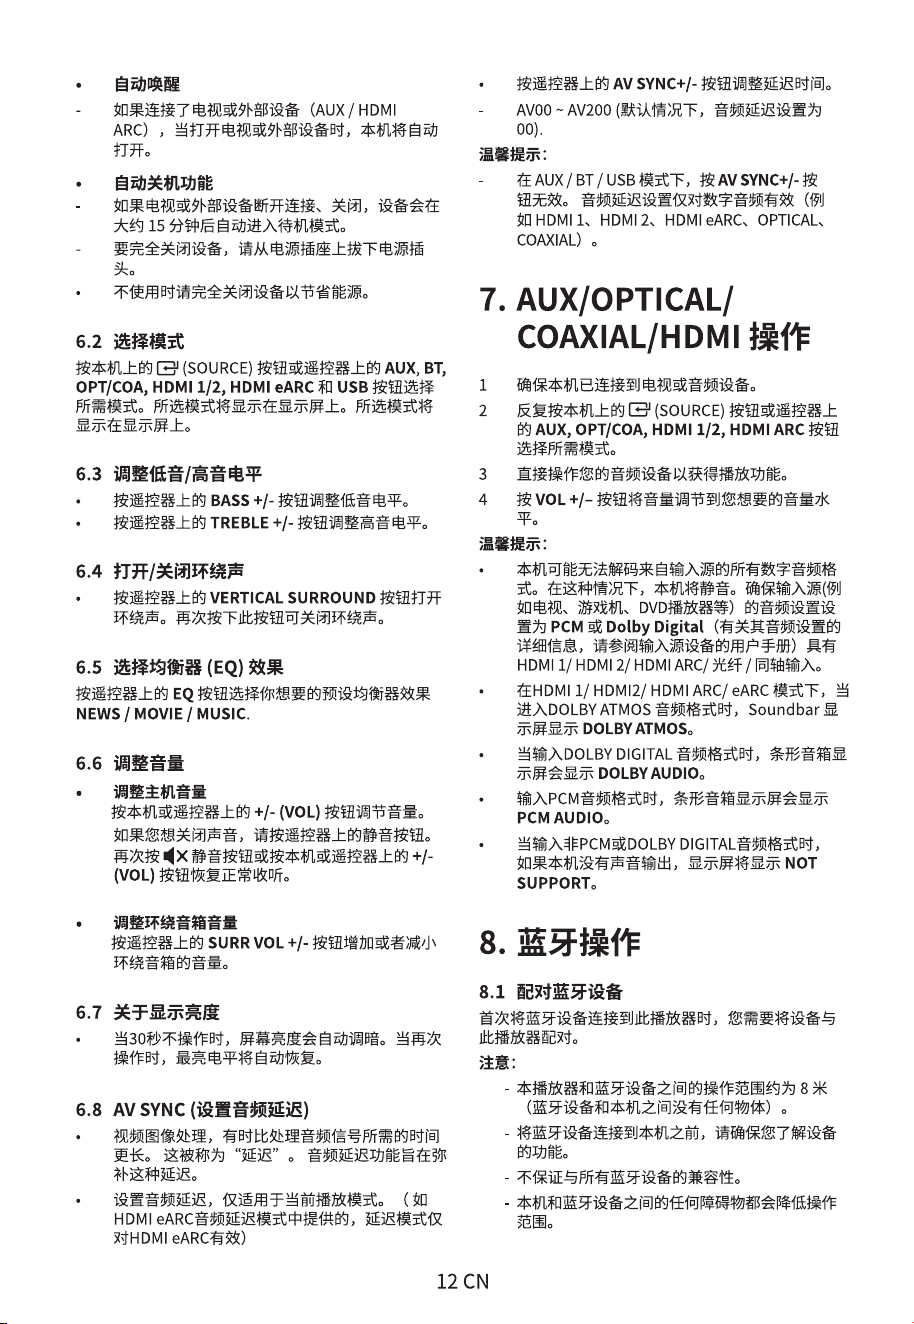
:
:
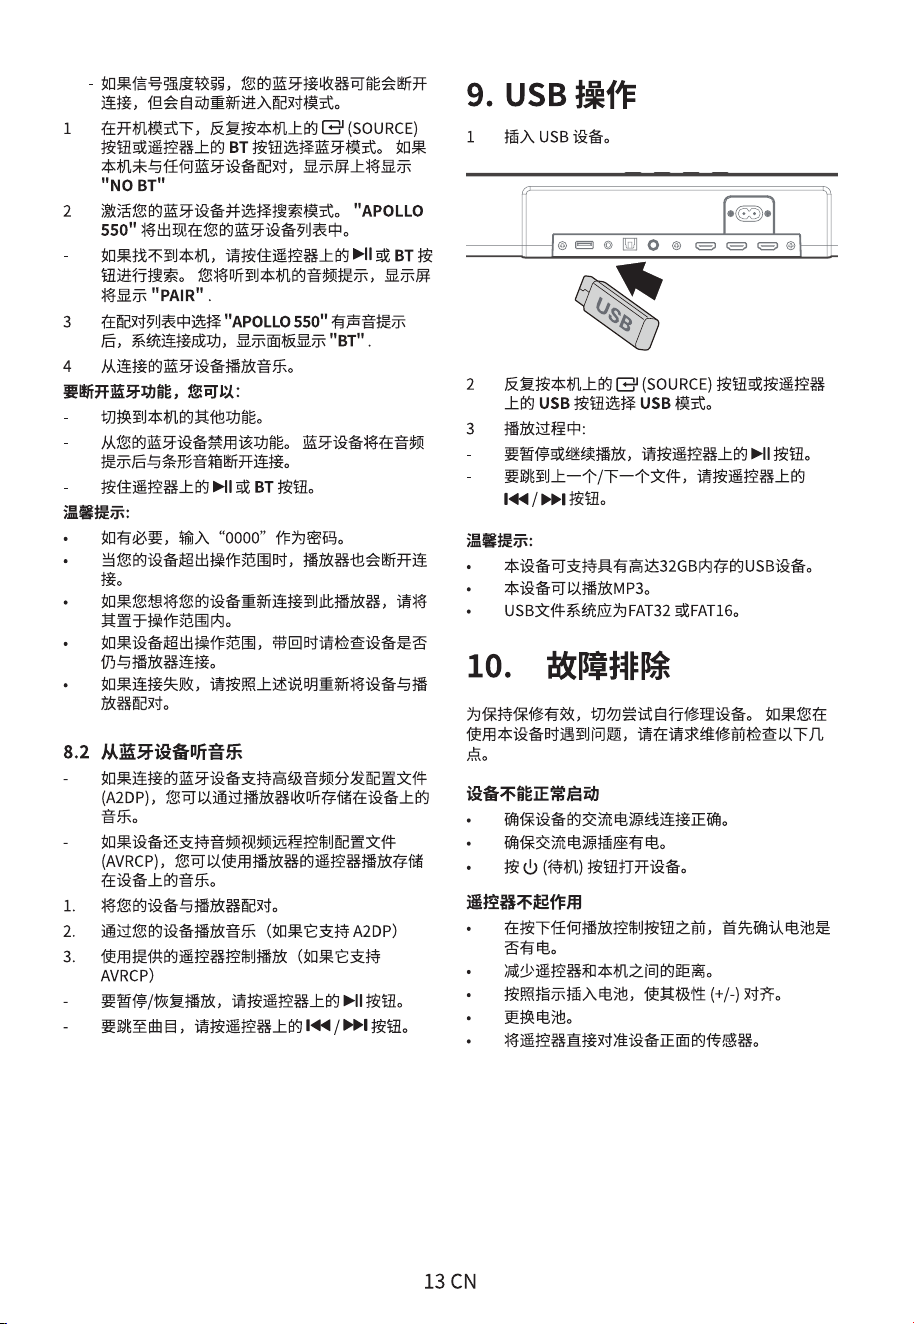
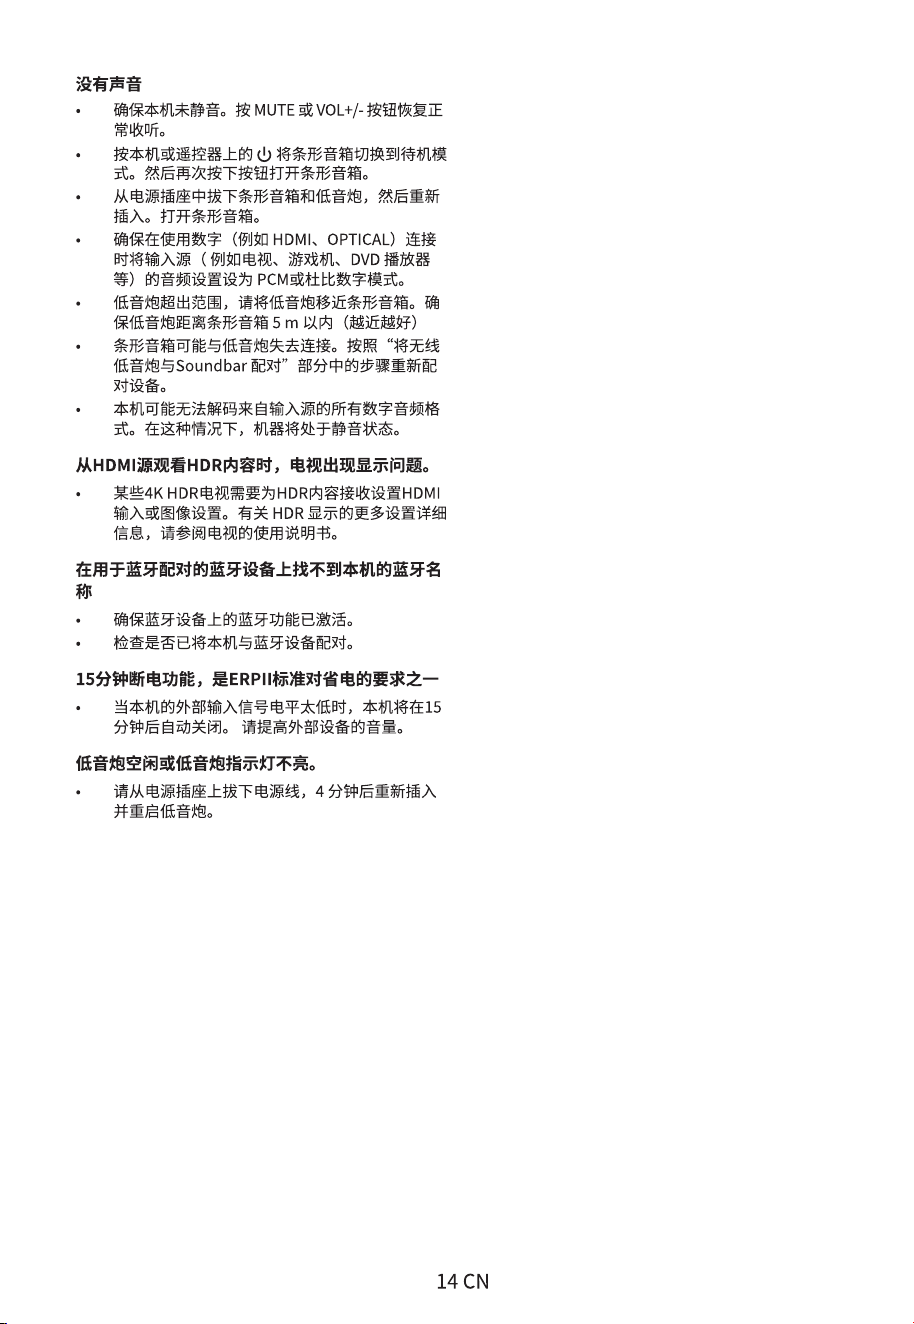
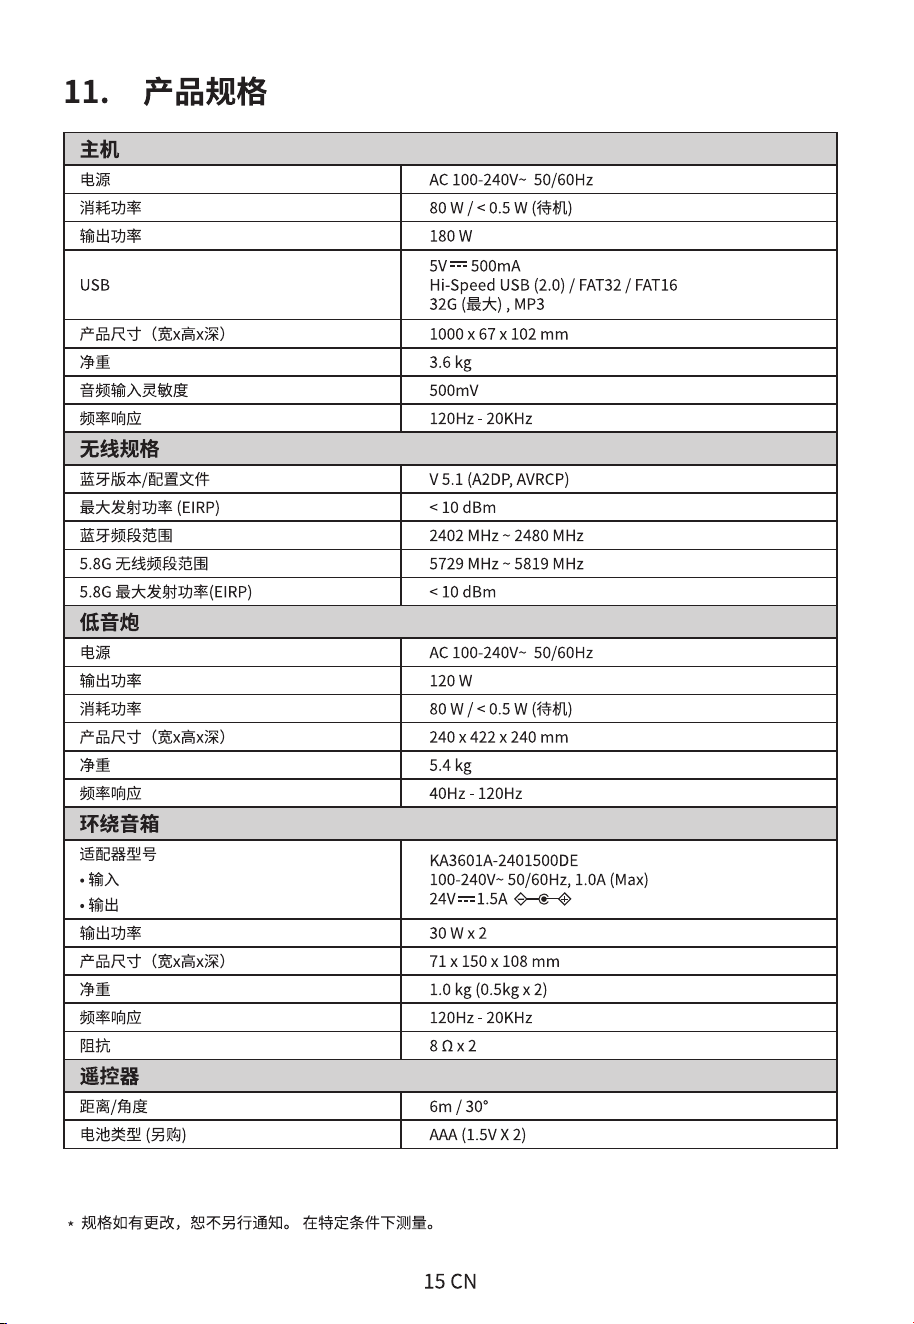

nakamichihomeaudio
Made in China |
WWW.NAKAMICHIHOMEAUDIO.COM
nakamichi.global
nakamichihomeaudio
CONNECT WITH US ONLINE TO EXPLORE NAKAMICHI’S COMPLETE RANGE,
INSTRUCTIONS & SOFTWARE DOWNLOADS AND WARRANTY REGISTRATION.
Nakamichi Corp, Japan
