If you want to reset the channel connection, press and
hold the [ ] button until the temperature and humidity
of the outdoor device on the indoor device display "----",
and then repeat the above setting operations to reset
the connection.
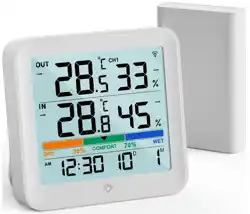
Wireless indoor/outdoor
Temperature and Humidity Monitor
VOCOO
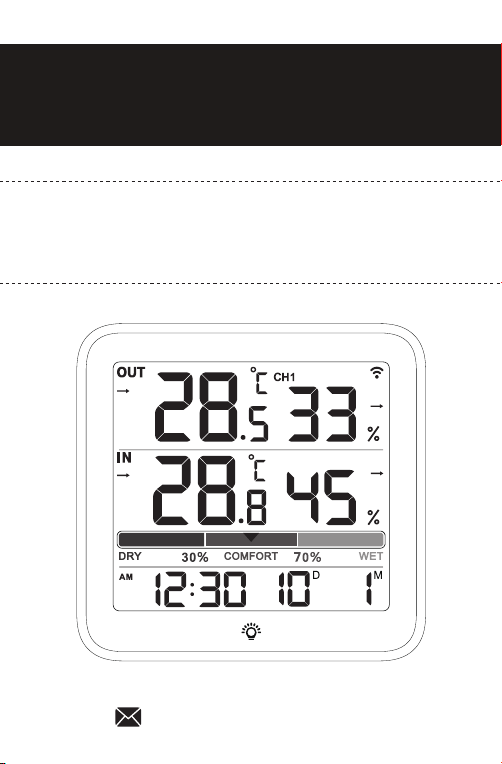
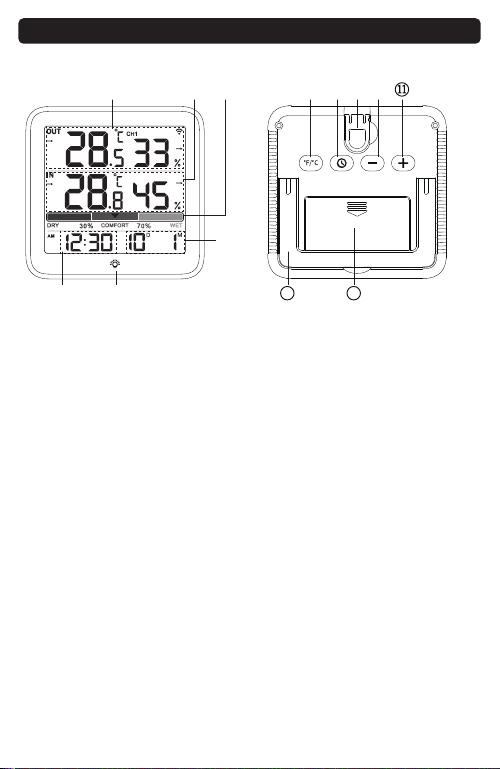
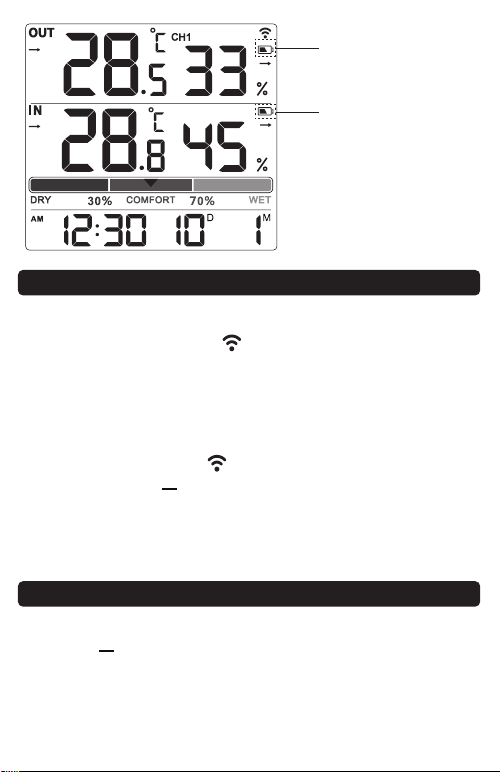
1. Outdoor temperature
humidity
2. Indoor temperature
humidity
3. Comfort level:
DRY/COMFORT/WET
4. Date
5. Time
6. Backlight touch button
7. ℉/℃ conversion/
Clear the MAX/MIN
temperature humidity data
8. Time,
12/24H format conversion
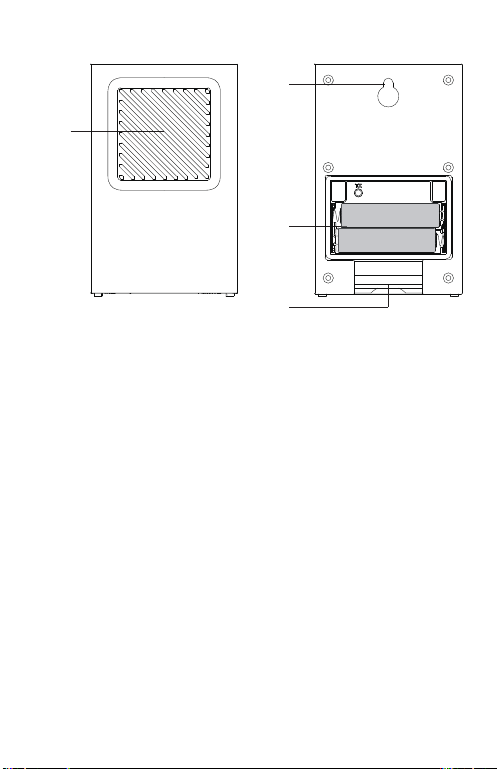
9. Wall hanging hole
10. Down/Reconnect
MAX/MIN
11. Up
12. Tabletop Stand
13. Battery compartment
-1- -2- -4-
-5- -6- -8- -9-
①
⑦ ⑧ ⑨ ⑩② ③
④
⑤
12 13
⑥
Diagram
8. Humidity accuracy range: ±5% RH
9. Refresh rate: 10S
10. Low battery warning for indoor / outdoor device
11. Backlight touch button(15s)
12. Automatically clearing the maximum and minimum
values of temperature and humidity within 24 hours
1. Power supply: 2*AAA battery
2. Two mounting methods: stand and wall hanging
3. Indoor temperature measurement range:
-10℃~60℃(14℉~140℉)
4. Indoor temperature lower than -10℃, LL is displayed
Indoor temperature higher than 60℃, HH is displayed
5. Humidity measurement range: 10%~99%
6. Temperature °C/℉ Switch
7. Temperature accuracy range: ± 1℃
Modle:6202
Indoor Device
In case the temperature or humidity readings need
becalibrated same to your other devices or product
placement or environmental factors impact your data
accuracy. Calibration can improve accuracy.
1. To access calibration mode,press the [ ]and[ ]
buttons and hold together until the temperature
number begins to flash, release the both button and
just press the [ ]or[ ] button to adjust the
temperature. (Max士5°C, Max土41°F)
2. Press the [ ] button until the humidity number
begins to flash, release the button and press the [ ]
or[ ] button to adjust the humidity. (Max土10%)
3. Press the [ ] button to save your adjustments.
Or after 15 seconds of inactivity, the display will save
the adjustments and exit calibration mode.
Note:
(1) Calibrations will be erased if the batteries are
removed.
(2) The display will automatically return to normal
mode without saving data after flashing 10 times
Without pressing any button.
(3) Calibrations only available for the indoor temperature
and humidity because outdoor air flow is uncontrolled.
Calibration
1. Power supply: 2*AAA battery
2. Waterproof and wall hanging design
(Vents facing down)
3. Outdoor temperature measurement range:
-40℃~60℃(-40℉~140℉)
4. Outdoor temperature lower than -40℃, LL is displayed
Outdoor temperature higher than 60℃, HH is displayed
5. Humidity measurement range: 10%~99%
6. Temperature accuracy range: ± 1℃
7. Humidity accuracy range: ±5% RH
1. Red indicator light
2. Wall hanging hole
3. Air flow Vent
4. Battery compartment
①
②
③
④
Outdoor Device
-7-
Low battery display
icon of outdoor device
Low battery display
icon of indoor device
1. Open the battery cover of the outdoor device, as
shown in the figure below.
2. Put 2* AAA batteries according to the polarity marks,
and close the battery cover.
Note:
1. Please do not mix old and new batteries to use.
2. If the battery is running low(voltage<2.7V), there will
be a low battery icon on the indoor device display.
3. After the receiver is low in power, it will restart
repeatedly/full display, please replace the battery
Battery Installation
12/24H Time Setting
2. Indoor thermometer: long press [ ] button or
re-install the battery(WiFi symbol flashing means
connecting )
3. Re-install the battery of outdoor sensor( the red signal
indicator flashes means automatically connecting)
1. The distance between the outdoor device and the
Indoor device: a straight line distance of 330ft/100m
in an open area, and the range would shorter based
on interference present.
2. The indoor device should always be placed in a
well-ventilated place, away from vents, heating or
cooling elements, direct sunlight, windows, doors or
any other openings.
3. The outdoor device can be placed on an indoor or
outdoor plane and ensure that the outdoor device is
within the transmission distance of the indoor device
and has the least obstacles.
4. Both indoor and outdoor device can be installed on
the wall.
5. External sensor vents are not waterproof, please keep
the vents down to prevent the rain from damaging
the sensor inside.
Note: Every time when you replace the battery (indoor/
outdoor device) or the indoor/outdoor device loses
connection, please be sure to Replace the indoor and
outdoor device battery for pair and reconnect the
device according to the above synchronization process.
Note
If the outdoor data display ---- or replace the dead
battery,please try the following steps:
1. Remove the battery of the outdoor and indoor
thermometer.
Tips
1. After the indoor device is installed with the battery,
the indoor device RF " " icon flashes for 3 minutes,
indicating that the indoor device has entered the
connection mode and is waiting for the outdoor
device to connect.
2. After installing the battery on the outdoor device,
wait a while the RF " " icon no longer flashes, or
long press the [ ] button for connection,and the
temperature and humidity of the outdoor device are
displayed on the indoor unit, which means that the
connection is successful.
Connection between Indoor & Outdoor Device
Clear the outdoor Device Value and Reconnect
1. Press the [ ] button once to display the highest indoor
and outdoor temperature/humidity record with in
24Hrs since the last reset, and the display shows MAX.
2. Press the [ ] button again to display the lowest indoor
and outdoor temperature / humidity record within
24Hrs since the last reset. The display shows MIN.
MAX & MIN Record of Temperature & Humidity
Launch mode: ASK433MHZ
Firing period: CH1=57S
Specification
60-Day Money-Back for Any Reason
You may return your undamaged product and
packaging within 60 days of purchase to receive a full
refund for any reason.
18-Month Warranty for Quality-Related Issue
Please kindly contact our customer service if you have
quality-related issues, we will take care of quality-related
issues with a replacement or full refund.
WARRANTY
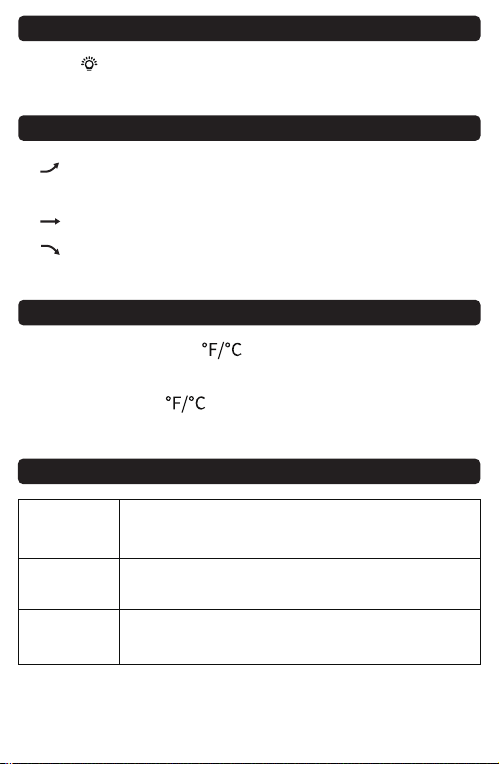
Touch [ ] button once to turn on backlight and 15s
automatically turned off.
Backlight
1.[ ] Indicates that the temperature and humidity are
on an upward trend
2.[ ] Indicates no change in temperature and humidity
3.[ ] Indicates that the temperature and humidity are
on an downward trend
Temperature and Humidity Trend
1. Short pressing the [ ] button to switch between
Celsius/Fahrenheit.
2. Long pressing [ ] button to clear the maximum
and minimum temperature and humidity values.
℃/℉ Conversion
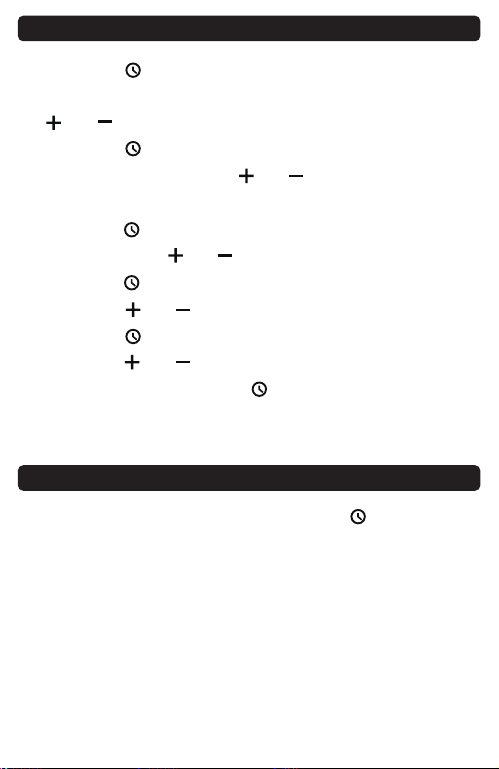
1. Press the [ ] button and hold until the Year number
begin to flash, then release the button and press the
[ ]or[ ] button to adjust the Year.
2. Press the [ ] button once, the Month number begin
to flash, then press the [ ]or[ ] button to adjust
the Month.
3. Press the [ ] button again, the day begin to flash,
then press the [ ]or[ ] button to adjust the day.
4. Press the [ ] button, the hour begin to flash, then
press the [ ]or[ ] button to adjust the hour.
5. Press the [ ] button, the minute begin to flash, then
press the [ ]or[ ] button to adjust the minute.
6. After finish setting, press [ ] button to confirm or
automatically save if no operation within 15s and
return to time/day display.
Date/Time Setting
-3-
Comfort Level
DRY
Humidity is below 29%
( 10%, 11-20%, 21-29%)
Humidity is between 30%-69%
( 30-39%, 40-60%, 61-69% )
Humidity is above 70%
( 70-79%, 80-89%, 90-99% )
COMFORT
WET
1. Under normal using mode, press the [ ] button to
switch 12/24H time format.
2. When the 12H time format is selected, the AM or PM
will display on the screen.
support@vocoovip.com
CLEAR MAX/MIN
If you want to reset the channel connection, press and
hold the [ ] button until the temperature and humidity
of the outdoor device on the indoor device display "----",
and then repeat the above setting operations to reset
the connection.
Wireless indoor/outdoor
Temperature and Humidity Monitor
VOCOO
1. Outdoor temperature
humidity
2. Indoor temperature
humidity
3. Comfort level:
DRY/COMFORT/WET
4. Date
5. Time
6. Backlight touch button
7. ℉/℃ conversion/
Clear the MAX/MIN
temperature humidity data
8. Time,
12/24H format conversion
9. Wall hanging hole
10. Down/Reconnect
MAX/MIN
11. Up
12. Tabletop Stand
13. Battery compartment
-1- -2- -4-
-5- -6- -8- -9-
①
⑦ ⑧ ⑨ ⑩② ③
④
⑤
12 13
⑥
Diagram
8. Humidity accuracy range: ±5% RH
9. Refresh rate: 10S
10. Low battery warning for indoor / outdoor device
11. Backlight touch button(15s)
12. Automatically clearing the maximum and minimum
values of temperature and humidity within 24 hours
1. Power supply: 2*AAA battery
2. Two mounting methods: stand and wall hanging
3. Indoor temperature measurement range:
-10℃~60℃(14℉~140℉)
4. Indoor temperature lower than -10℃, LL is displayed
Indoor temperature higher than 60℃, HH is displayed
5. Humidity measurement range: 10%~99%
6. Temperature °C/℉ Switch
7. Temperature accuracy range: ± 1℃
Modle:6202
Indoor Device
In case the temperature or humidity readings need
becalibrated same to your other devices or product
placement or environmental factors impact your data
accuracy. Calibration can improve accuracy.
1. To access calibration mode,press the [ ]and[ ]
buttons and hold together until the temperature
number begins to flash, release the both button and
just press the [ ]or[ ] button to adjust the
temperature. (Max士5°C, Max土41°F)
2. Press the [ ] button until the humidity number
begins to flash, release the button and press the [ ]
or[ ] button to adjust the humidity. (Max土10%)
3. Press the [ ] button to save your adjustments.
Or after 15 seconds of inactivity, the display will save
the adjustments and exit calibration mode.
Note:
(1) Calibrations will be erased if the batteries are
removed.
(2) The display will automatically return to normal
mode without saving data after flashing 10 times
Without pressing any button.
(3) Calibrations only available for the indoor temperature
and humidity because outdoor air flow is uncontrolled.
Calibration
1. Power supply: 2*AAA battery
2. Waterproof and wall hanging design
(Vents facing down)
3. Outdoor temperature measurement range:
-40℃~60℃(-40℉~140℉)
4. Outdoor temperature lower than -40℃, LL is displayed
Outdoor temperature higher than 60℃, HH is displayed
5. Humidity measurement range: 10%~99%
6. Temperature accuracy range: ± 1℃
7. Humidity accuracy range: ±5% RH
1. Red indicator light
2. Wall hanging hole
3. Air flow Vent
4. Battery compartment
①
②
③
④
Outdoor Device
-7-
Low battery display
icon of outdoor device
Low battery display
icon of indoor device
1. Open the battery cover of the outdoor device, as
shown in the figure below.
2. Put 2* AAA batteries according to the polarity marks,
and close the battery cover.
Note:
1. Please do not mix old and new batteries to use.
2. If the battery is running low(voltage<2.7V), there will
be a low battery icon on the indoor device display.
3. After the receiver is low in power, it will restart
repeatedly/full display, please replace the battery
Battery Installation
12/24H Time Setting
2. Indoor thermometer: long press [ ] button or
re-install the battery(WiFi symbol flashing means
connecting )
3. Re-install the battery of outdoor sensor( the red signal
indicator flashes means automatically connecting)
1. The distance between the outdoor device and the
Indoor device: a straight line distance of 330ft/100m
in an open area, and the range would shorter based
on interference present.
2. The indoor device should always be placed in a
well-ventilated place, away from vents, heating or
cooling elements, direct sunlight, windows, doors or
any other openings.
3. The outdoor device can be placed on an indoor or
outdoor plane and ensure that the outdoor device is
within the transmission distance of the indoor device
and has the least obstacles.
4. Both indoor and outdoor device can be installed on
the wall.
5. External sensor vents are not waterproof, please keep
the vents down to prevent the rain from damaging
the sensor inside.
Note: Every time when you replace the battery (indoor/
outdoor device) or the indoor/outdoor device loses
connection, please be sure to Replace the indoor and
outdoor device battery for pair and reconnect the
device according to the above synchronization process.
Note
If the outdoor data display ---- or replace the dead
battery,please try the following steps:
1. Remove the battery of the outdoor and indoor
thermometer.
Tips
1. After the indoor device is installed with the battery,
the indoor device RF " " icon flashes for 3 minutes,
indicating that the indoor device has entered the
connection mode and is waiting for the outdoor
device to connect.
2. After installing the battery on the outdoor device,
wait a while the RF " " icon no longer flashes, or
long press the [ ] button for connection,and the
temperature and humidity of the outdoor device are
displayed on the indoor unit, which means that the
connection is successful.
Connection between Indoor & Outdoor Device
Clear the outdoor Device Value and Reconnect
1. Press the [ ] button once to display the highest indoor
and outdoor temperature/humidity record with in
24Hrs since the last reset, and the display shows MAX.
2. Press the [ ] button again to display the lowest indoor
and outdoor temperature / humidity record within
24Hrs since the last reset. The display shows MIN.
MAX & MIN Record of Temperature & Humidity
Launch mode: ASK433MHZ
Firing period: CH1=57S
Specification
60-Day Money-Back for Any Reason
You may return your undamaged product and
packaging within 60 days of purchase to receive a full
refund for any reason.
18-Month Warranty for Quality-Related Issue
Please kindly contact our customer service if you have
quality-related issues, we will take care of quality-related
issues with a replacement or full refund.
WARRANTY
Touch [ ] button once to turn on backlight and 15s
automatically turned off.
Backlight
1.[ ] Indicates that the temperature and humidity are
on an upward trend
2.[ ] Indicates no change in temperature and humidity
3.[ ] Indicates that the temperature and humidity are
on an downward trend
Temperature and Humidity Trend
1. Short pressing the [ ] button to switch between
Celsius/Fahrenheit.
2. Long pressing [ ] button to clear the maximum
and minimum temperature and humidity values.
℃/℉ Conversion
1. Press the [ ] button and hold until the Year number
begin to flash, then release the button and press the
[ ]or[ ] button to adjust the Year.
2. Press the [ ] button once, the Month number begin
to flash, then press the [ ]or[ ] button to adjust
the Month.
3. Press the [ ] button again, the day begin to flash,
then press the [ ]or[ ] button to adjust the day.
4. Press the [ ] button, the hour begin to flash, then
press the [ ]or[ ] button to adjust the hour.
5. Press the [ ] button, the minute begin to flash, then
press the [ ]or[ ] button to adjust the minute.
6. After finish setting, press [ ] button to confirm or
automatically save if no operation within 15s and
return to time/day display.
Date/Time Setting
-3-
Comfort Level
DRY
Humidity is below 29%
( 10%, 11-20%, 21-29%)
Humidity is between 30%-69%
( 30-39%, 40-60%, 61-69% )
Humidity is above 70%
( 70-79%, 80-89%, 90-99% )
COMFORT
WET
1. Under normal using mode, press the [ ] button to
switch 12/24H time format.
2. When the 12H time format is selected, the AM or PM
will display on the screen.
support@vocoovip.com
support@vocoovip.com
CLEAR MAX/MIN
If you want to reset the channel connection, press and
hold the [ ] button until the temperature and humidity
of the outdoor device on the indoor device display "----",
and then repeat the above setting operations to reset
the connection.
Wireless indoor/outdoor
Temperature and Humidity Monitor
VOCOO
1. Outdoor temperature
humidity
2. Indoor temperature
humidity
3. Comfort level:
DRY/COMFORT/WET
4. Date
5. Time
6. Backlight touch button
7. ℉/℃ conversion/
Clear the MAX/MIN
temperature humidity data
8. Time,
12/24H format conversion
9. Wall hanging hole
10. Down/Reconnect
MAX/MIN
11. Up
12. Tabletop Stand
13. Battery compartment
-1- -2- -4-
-5- -6- -8- -9-
①
⑦ ⑧ ⑨ ⑩② ③
④
⑤
12 13
⑥
Diagram
8. Humidity accuracy range: ±5% RH
9. Refresh rate: 10S
10. Low battery warning for indoor / outdoor device
11. Backlight touch button(15s)
12. Automatically clearing the maximum and minimum
values of temperature and humidity within 24 hours
1. Power supply: 2*AAA battery
2. Two mounting methods: stand and wall hanging
3. Indoor temperature measurement range:
-10℃~60℃(14℉~140℉)
4. Indoor temperature lower than -10℃, LL is displayed
Indoor temperature higher than 60℃, HH is displayed
5. Humidity measurement range: 10%~99%
6. Temperature °C/℉ Switch
7. Temperature accuracy range: ± 1℃
Modle:6202
Indoor Device
In case the temperature or humidity readings need
becalibrated same to your other devices or product
placement or environmental factors impact your data
accuracy. Calibration can improve accuracy.
1. To access calibration mode,press the [ ]and[ ]
buttons and hold together until the temperature
number begins to flash, release the both button and
just press the [ ]or[ ] button to adjust the
temperature. (Max士5°C, Max土41°F)
2. Press the [ ] button until the humidity number
begins to flash, release the button and press the [ ]
or[ ] button to adjust the humidity. (Max土10%)
3. Press the [ ] button to save your adjustments.
Or after 15 seconds of inactivity, the display will save
the adjustments and exit calibration mode.
Note:
(1) Calibrations will be erased if the batteries are
removed.
(2) The display will automatically return to normal
mode without saving data after flashing 10 times
Without pressing any button.
(3) Calibrations only available for the indoor temperature
and humidity because outdoor air flow is uncontrolled.
Calibration
1. Power supply: 2*AAA battery
2. Waterproof and wall hanging design
(Vents facing down)
3. Outdoor temperature measurement range:
-40℃~60℃(-40℉~140℉)
4. Outdoor temperature lower than -40℃, LL is displayed
Outdoor temperature higher than 60℃, HH is displayed
5. Humidity measurement range: 10%~99%
6. Temperature accuracy range: ± 1℃
7. Humidity accuracy range: ±5% RH
1. Red indicator light
2. Wall hanging hole
3. Air flow Vent
4. Battery compartment
①
②
③
④
Outdoor Device
-7-
Low battery display
icon of outdoor device
Low battery display
icon of indoor device
1. Open the battery cover of the outdoor device, as
shown in the figure below.
2. Put 2* AAA batteries according to the polarity marks,
and close the battery cover.
Note:
1. Please do not mix old and new batteries to use.
2. If the battery is running low(voltage<2.7V), there will
be a low battery icon on the indoor device display.
3. After the receiver is low in power, it will restart
repeatedly/full display, please replace the battery
Battery Installation
12/24H Time Setting
2. Indoor thermometer: long press [ ] button or
re-install the battery(WiFi symbol flashing means
connecting )
3. Re-install the battery of outdoor sensor( the red signal
indicator flashes means automatically connecting)
1. The distance between the outdoor device and the
Indoor device: a straight line distance of 330ft/100m
in an open area, and the range would shorter based
on interference present.
2. The indoor device should always be placed in a
well-ventilated place, away from vents, heating or
cooling elements, direct sunlight, windows, doors or
any other openings.
3. The outdoor device can be placed on an indoor or
outdoor plane and ensure that the outdoor device is
within the transmission distance of the indoor device
and has the least obstacles.
4. Both indoor and outdoor device can be installed on
the wall.
5. External sensor vents are not waterproof, please keep
the vents down to prevent the rain from damaging
the sensor inside.
Note: Every time when you replace the battery (indoor/
outdoor device) or the indoor/outdoor device loses
connection, please be sure to Replace the indoor and
outdoor device battery for pair and reconnect the
device according to the above synchronization process.
Note
If the outdoor data display ---- or replace the dead
battery,please try the following steps:
1. Remove the battery of the outdoor and indoor
thermometer.
Tips
1. After the indoor device is installed with the battery,
the indoor device RF " " icon flashes for 3 minutes,
indicating that the indoor device has entered the
connection mode and is waiting for the outdoor
device to connect.
2. After installing the battery on the outdoor device,
wait a while the RF " " icon no longer flashes, or
long press the [ ] button for connection,and the
temperature and humidity of the outdoor device are
displayed on the indoor unit, which means that the
connection is successful.
Connection between Indoor & Outdoor Device
Clear the outdoor Device Value and Reconnect
1. Press the [ ] button once to display the highest indoor
and outdoor temperature/humidity record with in
24Hrs since the last reset, and the display shows MAX.
2. Press the [ ] button again to display the lowest indoor
and outdoor temperature / humidity record within
24Hrs since the last reset. The display shows MIN.
MAX & MIN Record of Temperature & Humidity
Launch mode: ASK433MHZ
Firing period: CH1=57S
Specification
60-Day Money-Back for Any Reason
You may return your undamaged product and
packaging within 60 days of purchase to receive a full
refund for any reason.
18-Month Warranty for Quality-Related Issue
Please kindly contact our customer service if you have
quality-related issues, we will take care of quality-related
issues with a replacement or full refund.
WARRANTY
Touch [ ] button once to turn on backlight and 15s
automatically turned off.
Backlight
1.[ ] Indicates that the temperature and humidity are
on an upward trend
2.[ ] Indicates no change in temperature and humidity
3.[ ] Indicates that the temperature and humidity are
on an downward trend
Temperature and Humidity Trend
1. Short pressing the [ ] button to switch between
Celsius/Fahrenheit.
2. Long pressing [ ] button to clear the maximum
and minimum temperature and humidity values.
℃/℉ Conversion
1. Press the [ ] button and hold until the Year number
begin to flash, then release the button and press the
[ ]or[ ] button to adjust the Year.
2. Press the [ ] button once, the Month number begin
to flash, then press the [ ]or[ ] button to adjust
the Month.
3. Press the [ ] button again, the day begin to flash,
then press the [ ]or[ ] button to adjust the day.
4. Press the [ ] button, the hour begin to flash, then
press the [ ]or[ ] button to adjust the hour.
5. Press the [ ] button, the minute begin to flash, then
press the [ ]or[ ] button to adjust the minute.
6. After finish setting, press [ ] button to confirm or
automatically save if no operation within 15s and
return to time/day display.
Date/Time Setting
-3-
Comfort Level
DRY
Humidity is below 29%
( 10%, 11-20%, 21-29%)
Humidity is between 30%-69%
( 30-39%, 40-60%, 61-69% )
Humidity is above 70%
( 70-79%, 80-89%, 90-99% )
COMFORT
WET
1. Under normal using mode, press the [ ] button to
switch 12/24H time format.
2. When the 12H time format is selected, the AM or PM
will display on the screen.
support@vocoovip.com
CLEAR MAX/MIN
