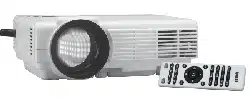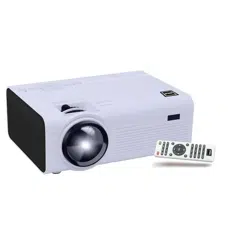
MODEL NO. RPJ181_DISP12
720P PROJECTOR
PRODUCT GUIDE
PLEASE READ BEFORE OPERATING THIS EQUIPMENT
Ideal for dark viewing environments for optimal performance.
Please note:Projector brightness is measure in ANSI lumens. Your viewing
environment is the deciding factor on how many lumens your projector needs.
MODEL NO.
PLEASE READ BEFORE OPERATING THIS EQUIPMENT
Ideal for dark viewing environments for optimal performance.
Please note:Projector brightness is measure in ANSI lumens. Your viewing
environment is the deciding factor on how many lumens your projector needs.
This product has been manufactured and sold under the responsibility of
CURTIS INTERNATIONAL LTD.
RCA, the RCA logo and the two dogs (Nipper and Chipper) logo are trademarks
used under license by CURTIS INTERNATIONAL LTD.
– further information at www.rca-brand.com.
All other products, services, companies, trademarks, trade or product names
and logos referenced herein are the property of their respective owners.

1.Read this instructions.
2.Keep this instructions.
3.Heed all Warnings.
4.Follow all instructions.
5.Do not use this apparatus near water.
6.Clean only with a dry cloth.
7.Do not block any ventilation openings. Install in accordance with the
manufacturer’s instructions.
8.Do not install near any heat sources such as radiators, heat registers,
stoves, or other apparatus (including amplifier) that product heat.
9.Protect the power cord from being walked on or pinched particularly at
plugs, convenience receptacles, and the point where they exit from the
apparatus.
10.Only use attachments/accessories specified by the manufacturer.
11.Unplug this apparatus during lightning storms or when unused for long
periods of time.
12.Refer all servicing to qualified service personnel. Servicing is required when
the apparatus has been damaged in any way, such as power-supply cord
or plug is damaged, liquid has been spilled or objects have fallen into the
apparatus, the apparatus has been exposed to rain or moisture, does not
operate normally, or has been dropped.
13.Use only with a cart, stand, tripod, bracket, or table specified by the
manufacturer or sold with the apparatus. When a cart is used, use caution
when moving the cart/apparatus combination to avoid injury from tip-over.
1
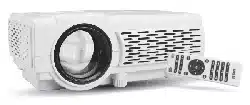
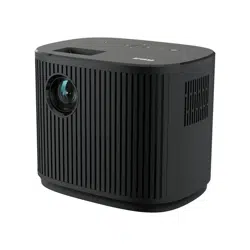
RCA HD 720P projector
Important Safety Instructions

2
RCA HD 720P projector
Additional Warnings and Precautions
1.Do not look directly into the projector light.
2.Don’t touch the projector lens.
3.Do not use this device near water.
4.Clean only with a slightly damp cloth.
5.Do not cover or block any ventilation openings. When placing the device on
a shelf, leave 5 cm (2”) free space around the whole device.
6.Install in accordance with the supplied user manual.
7.Don’t step on or pinch the power adaptor. Be very careful, particularly near
the plugs and the cable’s exit point. Do not place heavy items on the power
adaptor, which may damage it. Keep the entire device out of children’s reach!
When playing with the power cable, they can seriously injure themselves.
8.Unplug this device during lightning storms or when unused for a long period.
9.Keep the device away from heat sources such as radiators, heaters, stoves,
candles and other heat-generating products or naked flame.
10.Avoid using the device near strong magnetic fields.
11.Electrostatic discharge can disturb normal usage of this device. If so, simply
reset and restart the device following the instruction manual. During file
transmission, please handle with care and operate in a static-free environment.
12. Warning! Never insert an object into the product through the vents or openings.
High voltage flows through the product and in
serting an object can cause electric
shock and/or short circuit internal parts. For the same reason, do not spill water or
liquid on the product.
13.Do not use in wet or moist areas such as bathrooms, steamy kitchens or near
swimming pools.
14. Do not use this device when condensation may occur.
15. Although this device is manufactured with the utmost care and checked
several times before leaving the factory, it is still possible that problems may occur,
as with all electrical appliances. If you notice smoke, an excessive build-up of heat
or any other unexpected phenomena, you should disconnect the plug from the
main power socket immediately.
16.This device must operate on a power source as specified on the specification
label. If you are not sure of the type of power supply used in your home, consult
your dealer or local power company.
17.The socket outlet must be installed near the equipment and must be easily
accessible.
18.Do not overload ac outlets or extension cords. Overloading can cause fire or
electric shock.
19.Devices with class 1 construction should be connected to a main socket outlet
with a protective earthed connection.
20.Devices with class 2 construction do not require a earthed connection.
21.Keep away fr
om rodents. Rodents enjoy biting on power cords. Always hold the
plug when pulling it out of the main supply socket. Do not pull the power cord. This
can cause a short circuit.

3
Remote Main Unit
User
ManualAC Power Adapter
FCC Warning
This device complies with Part 15 of the FCC rules. Operation is subject to the following
two conditions: (1) this device may not cause harmful interference, and (2) this device
must accept any interference received, including interference that may cause
undesired operation.
NOTE: This equipment has been tested and found to comply with the limits for a Class
B digital device, pursuant to Part 15 of the FCC Rules. These limits are designed to
provide reasonable protection against harmful interference in a residential installation.
This equipment generates, uses, and can radiate radio frequency energy and, if not
installed and used in accordance with the instructions, may cause harmful interference
to radio communications.However, there is no guarantee that interference will not
occur in a particular installation. If this equipment does cause harmful interference to
and on, the user is encouraged to try to correct the interference by one or more of the
following measures:
• Reorient or relocate the receiving antenna.
• Increase the separation between the equipment and receiver.
receiver is connected.
• Consult the dealer or an experienced radio/TV technician for help.
• Please see the Important Product Information insert in the Roku Streaming Stick box
for streaming player safety precautions, legal notices, and other important information.
FCC RF Radiation Exposure Statement Caution: To maintain compliance with the FCC's
RF exposure guidelines,place the product at least 20cm from nearby persons.
What's Included
TOP5 tips
MODEL NO. RPJ181_DISP12
720P PROJECTOR
PRODUCT GUIDE
PLEASE READ BEFORE OPERATING THIS EQUIPMENT
Ideal for dark viewing environments for optimal performance.
Please note:Projector brightness is measure in ANSI lumens. Your viewing
environment is the deciding factor on how many lumens your projector needs.
MODEL NO.
PLEASE READ BEFORE OPERATING THIS EQUIPMENT
Ideal for dark viewing environments for optimal performance.
Please note:Projector brightness is measure in ANSI lumens. Your viewing
environment is the deciding factor on how many lumens your projector needs.
This product has been manufactured and sold under the responsibility of
CURTIS INTERNATIONAL LTD.
RCA, the RCA logo and the two dogs (Nipper and Chipper) logo are trademarks
used under license by CURTIS INTERNATIONAL LTD.
– further information at www.rca-brand.com.
All other products, services, companies, trademarks, trade or product names
and logos referenced herein are the property of their respective owners.
OK
M
4
Table of Contents
Important Safety Instructions - - - - - - - - - - - - - - - - - - - - - - - - - - - -P1
Additional Warnings and Precautions - - - - - - - - - - - - - - - - - - - - - - - P2
FCC Warning - - - - - - - - - - - - - - - - - - - - - - - - - - - - - - - - - - - - - P3
What’s Included - - - - - - - - - - - - - - - - - - - - - - - - - - - - - - - - -- - - P3
Table of Contents - - - - - - - - - - - - - - - - - - - - - - - - - - - - - -- - - - - P4
Placing Your Projector - - - - - - - - - - - - - - - - - - - - - - - - - - -- - - - - - P5
To Reduce Image Distortion - - - - - - - - - - - - - - - - - - - - - - - - - - - - - P6
Placing Your Projector On Ceiling - - - - - - - - - - - - - - - - - - - - - - - - - - P6
Adjust the Vertical Location - - - - - - - - - - - - - - - - - - - - - - - - - - - - - P7
Adjust the Focus and Keystone - - - - - - - - - - - - - - - - - - - - - - - - - - - P7
Projector Remote - - - - - - - - - - - - - - - - - - - - - - - - - - - - - - - - - - - P8
Install / Remove Battery Of Remote - - - - - - - - - - - - - - - - - - - - - - - - - P8
Controls of Projector - - - - - - - - - - - - - - - - - - - - - - - - - - - - - - - - - -P9
Distance Between The Projector And Screen - - - - - - - - - - - - - - - - - - - - P10
Select an Input Source - - - - - - - - - - - - - - - - - - - - - - - - - - - - - - - - P11
HDMI Device Connection - - - - - - - - - - - - - - - - - - - - - - - - - - - - - - - P11
Multimedia Connection - - - - - - - - - - - - - - - - - - - - - - - - - - - - - - - - P12
AV Video Device Connection - - - - - - - - - - - - - - - - - - - - - - - - - - - - - P13
Audio Device Connection - - - - - -- - - - - - - - - - - - - - - - - - - - - - - - - P13
Projector Setting Menu 1.0 - - - - - - - - - - - - - - - - - - - - - - - - - - - - - - -P14
Projector Setting Menu 2.0 - - - - - - - - - - - - - - - - - - - - - - - - - - - - - - -P15
Projector Setting Menu 3.0 - - - - - - - - - - - - - - - - - - - - - - - - - - - - - - P16
Projector Setting Menu 4.0 - - - - - - - - - - - - - - - - - - - - - - - - - - - - - - P18
Specifications - - - - - - - - - - - - - - - - - - - - - - - - - - - - - - - - - - - - - P19
Troubleshooting - - - - - - - - - - - - - - - - - - - - - - - - - - - - - - - - - - - - P19
Warranty Card - - - - - - - - - - - - - - - - - - - - - - - - - - - - - - - - - - - - - P21
5
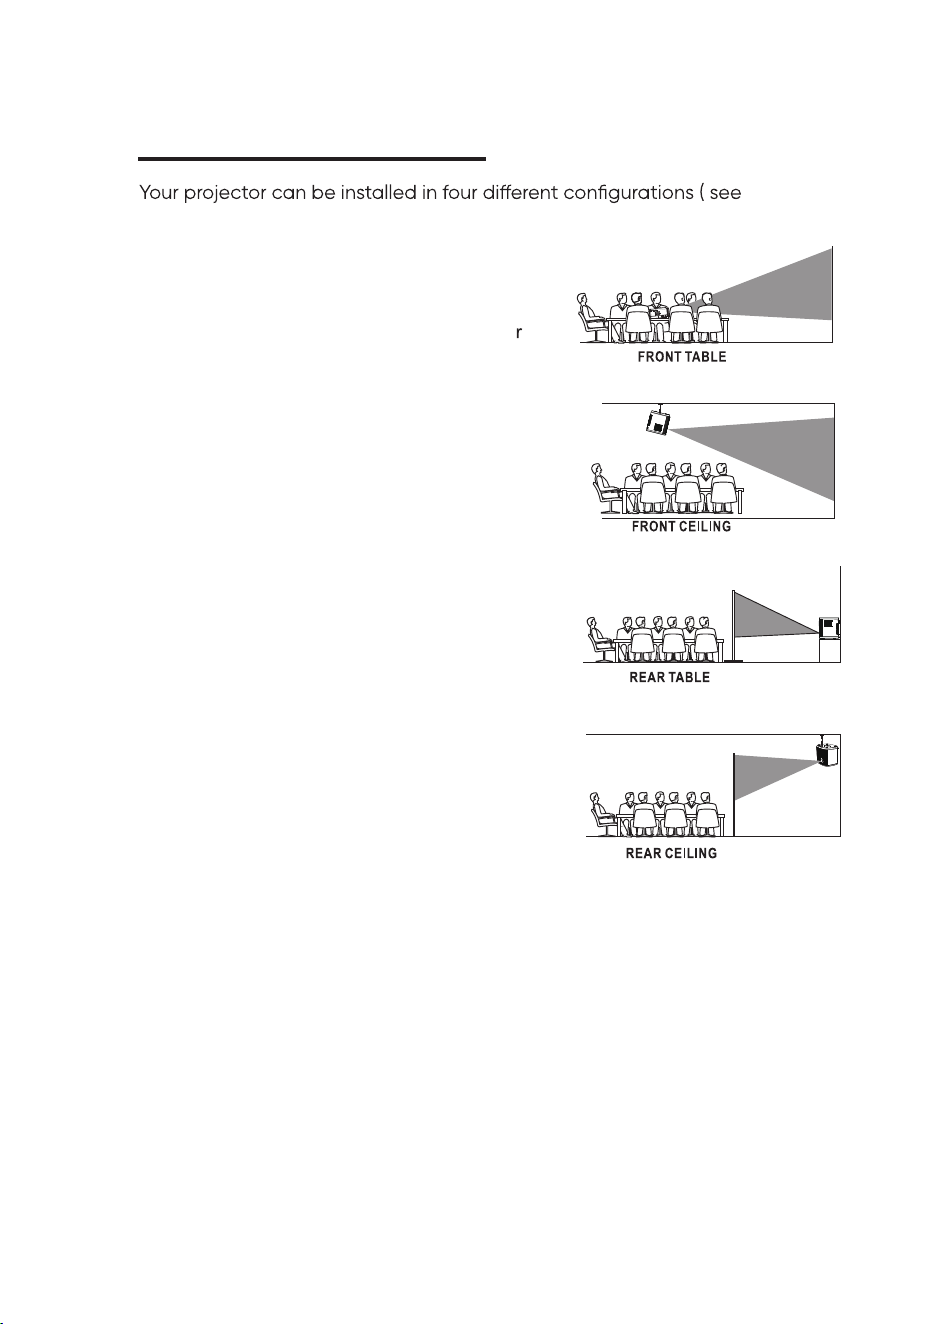
Placing Your Projector
picture below):
Front Table:
Select this location with the projector placed
near the floor in front of the screen. This is the
most common way to position the projector
for quick setup and portability.
Front Ceiling:
Select this location with the projector
suspended upside-down from the ceiling in
front of the screen.
NOTE: A projector mount is required to install
the projector in a ceiling.
Rear Table:
Select this location with the projector placed
near the floor behind the screen.
NOTE: That a special rear projection screen
is required.
Rear Ceiling:
Select this location with the projector
suspended upside-down from the ceiling
behind the screen.
NOTE:
A projector mount is required to install the
projector in a ceiling.
A special rear projection screen is required.
6
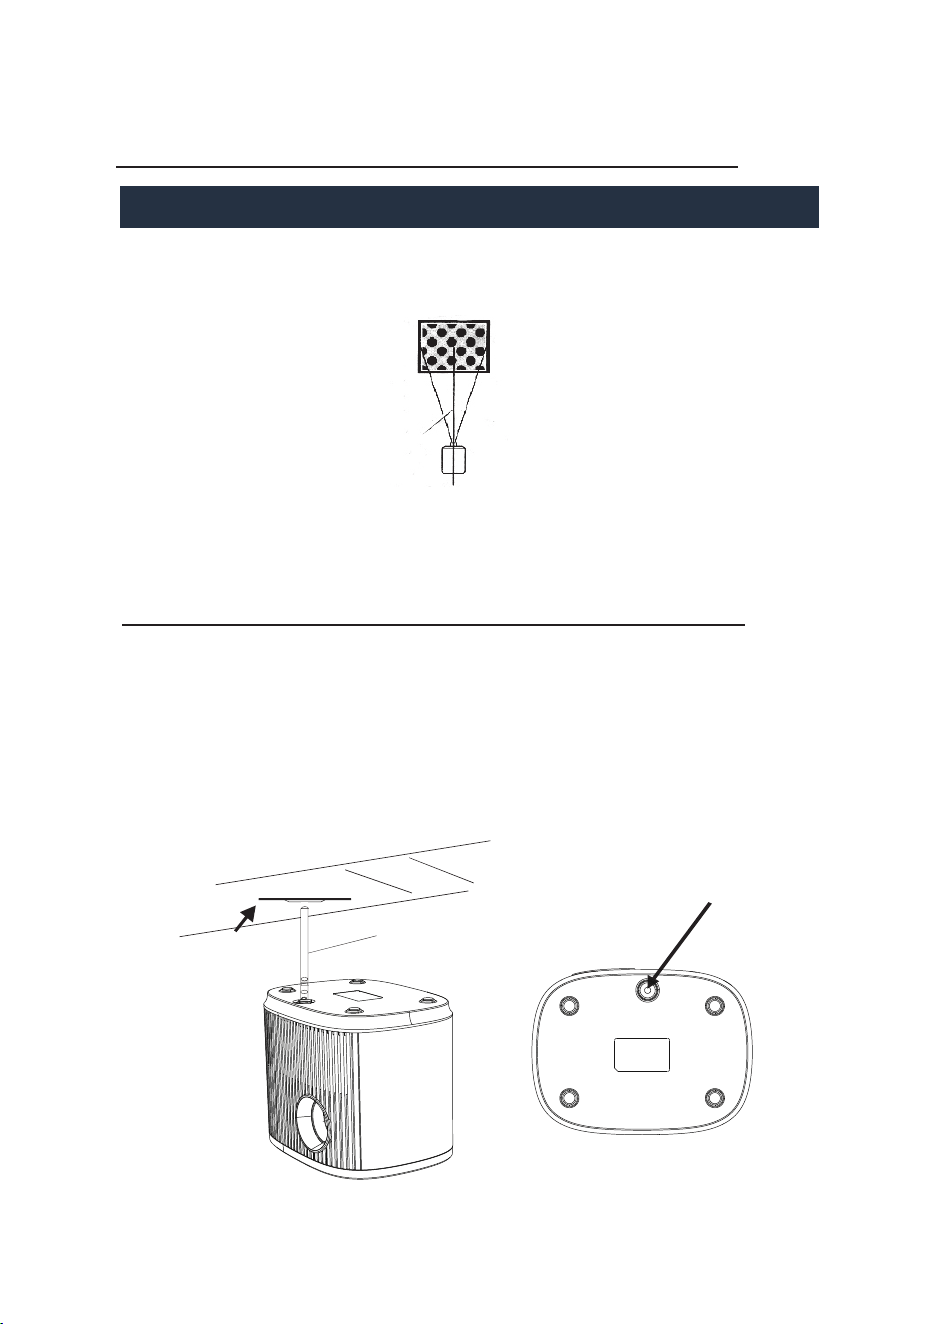
TO REDUCE IMAGE DISTORTION
It is recommended to move the projector as close to center of screen.
Square /Rectangle
Screen
Projector
PLACING YOUR PROJECTOR ON CEILING
When installing the projector in the ceiling, please purchase a projector mount
recommended by an installation professional and follow the instructions that
come with the mount.
Before installing the projector in the ceiling, please check to make sure the
ceiling structure can support the weight of the projector and the mount. If in
doubt, please ask the advice from an installation professorial.
NOTE: Projector mount and screw(s) not included
HANGER
CEILING
FIXED HANGER HOLE
7
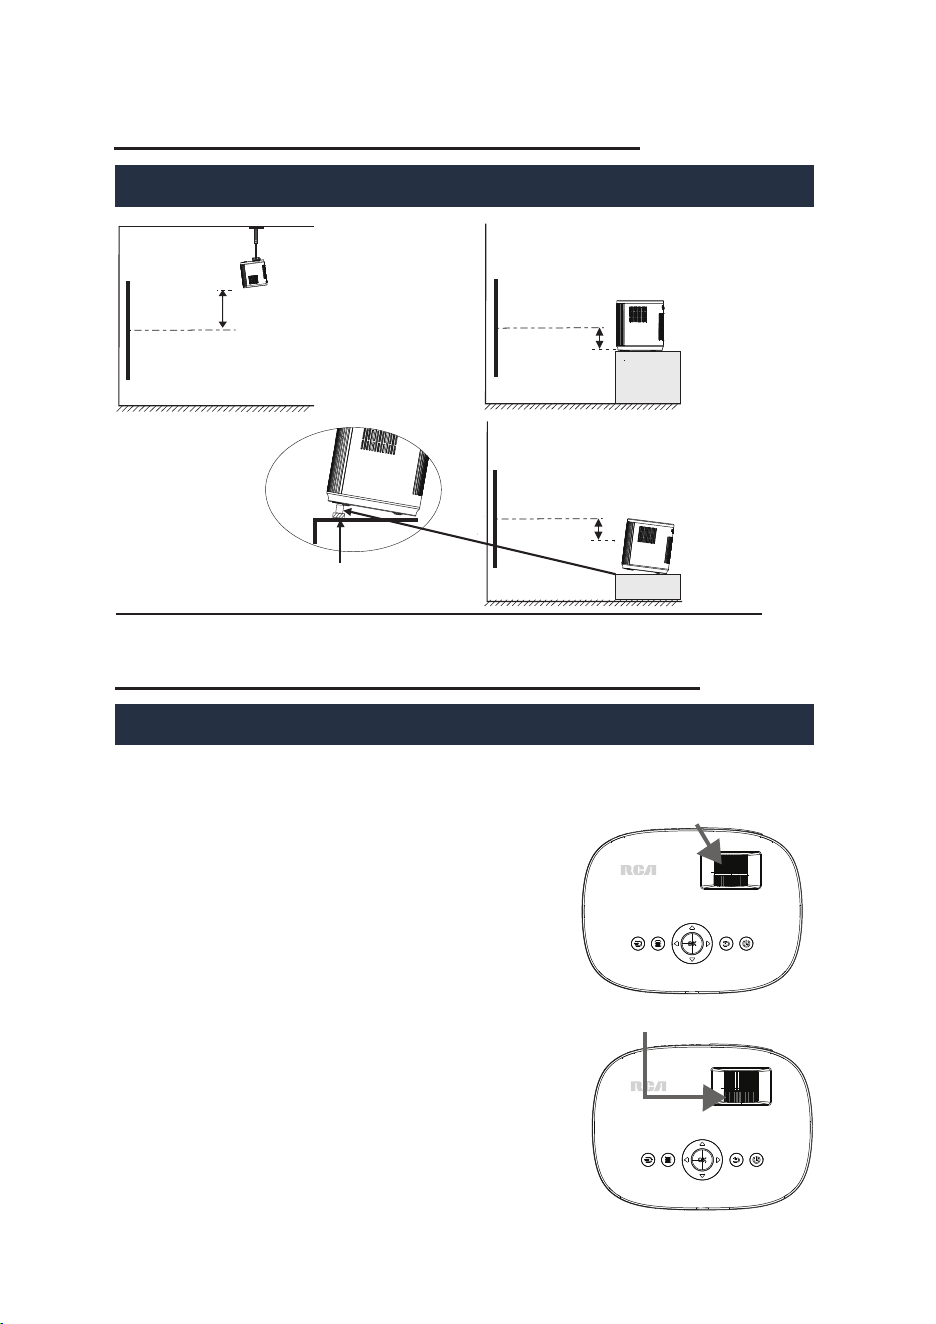
ADJUST THE VERTICAL LOCATION
ADJUST THE FOCUS AND KEYSTONE
Follow below picture to adjust the vertical location.
It is recommended to move the projectior as close to center of screen.
VERTICAL
DIMENSION
SCREEN
SCREEN
Adjust this knob(Adjusting Knob)
PROJECTOR
PROJECTOR
VERTICAL
DIMENSION
SCREEN
VERTICAL
DIMENSION
PROJECTOR
Adjust the focus by turning the knob while
observing the image pixels near the center of the
screen. Optimal focus is obtained when the
pixels are clearly visible. Depending on the
projected screen size, the focus near the screen
edges may be less sharp than the screen center.
Keystone image is created when the projector
beam is projected to the screen in an angle.
Keystone correction will restore the distorted
image to a rectangular or square shape.
FOCUSING RING
Then sharpen the image
by rotating focus knob
KEYSTONE CORRECTION
OK
M
NOTES :
8
AAA / UM4
AAA / UM4
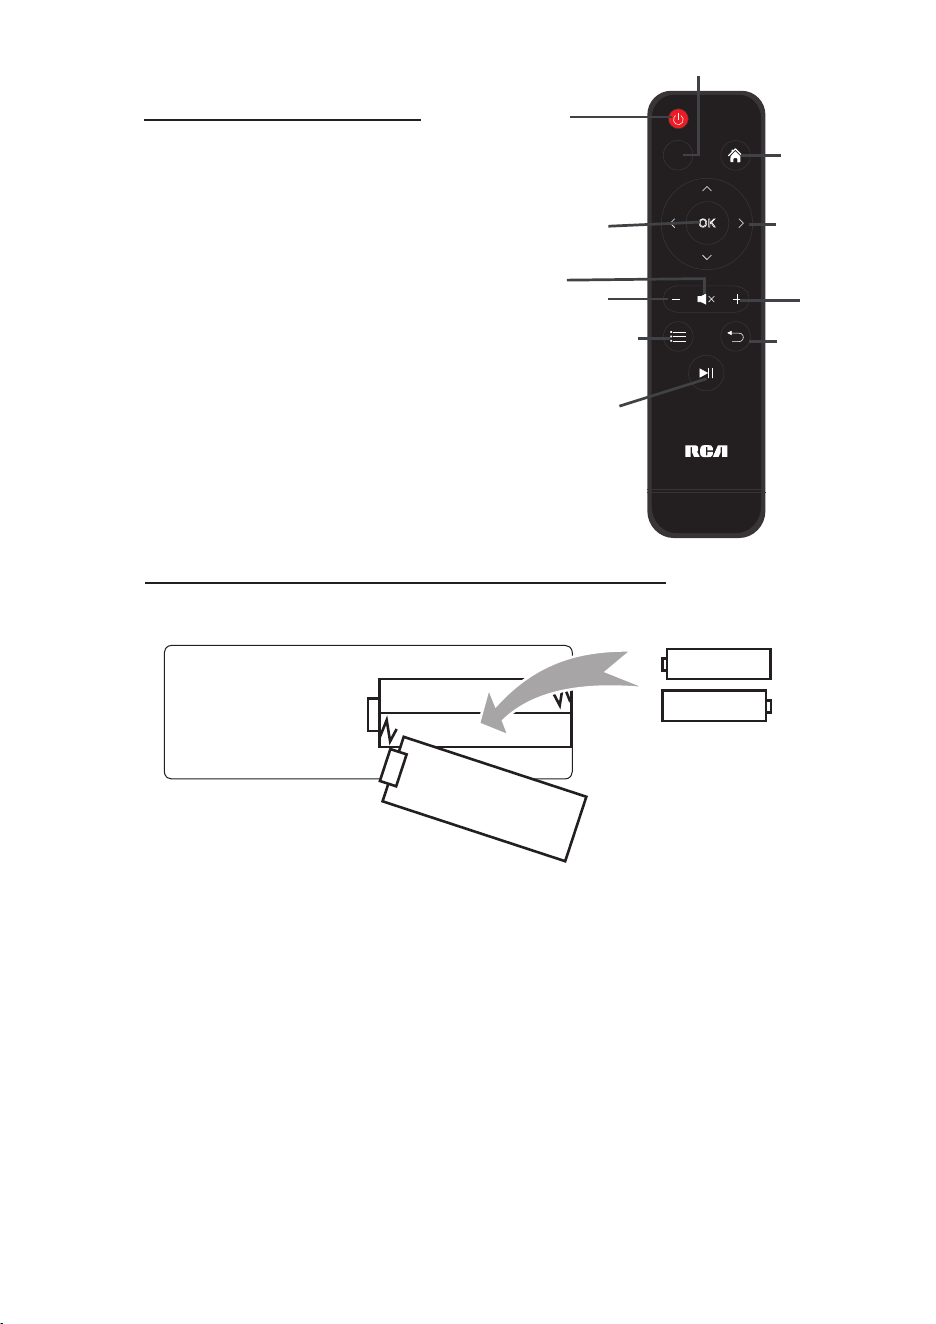
Projector Remote
Power: Press to power ON.
Press twice to power OFF.
Mute: Press to mute volume.
VOL+ /VOL-: Press to adjust audio level.
Arrows / OK : Press to navigate and confirm
selections in Settings and other menus.
Return/ Exit: Press to exit the projector menu.
Aspect ratio: Press to adjust the aspect ratio 16:9 / 4:3.
Home : Press to enter the home menu.
Menu:Press to access projector Settings.
Play/ Pause: Press to play or pause an individual
chapter or track.
POWER ON
MENU
OK
MUTE
VOLUME-
VOLUME+
Aspect
ratio
PLAY/PAUSE
RETURN
HOME MENU
NAVIGATOR
BUTTONS
Install/Remove Battery Of Remote
Remove the battery compartment cover on the back of your remote by carefully sliding to open.
The battery cover can then be lifted away. Fit the correct batteries (Excluded 2*AAA batteries),
referring to the polarity markings.Finally, replace the cover.
• Batteries shall not be exposed to excessive heat such as sunshine, fire.
• Be sure that the batteries are installed polarity correctly.
• Do not mix old and new batteries.
• Only same or equivalent type batteries as recommend are to be used.
• Do not dispose of batteries in fire, battery may explode or leak. Do not try to recharge
a battery.
BATTERY DOOR
9
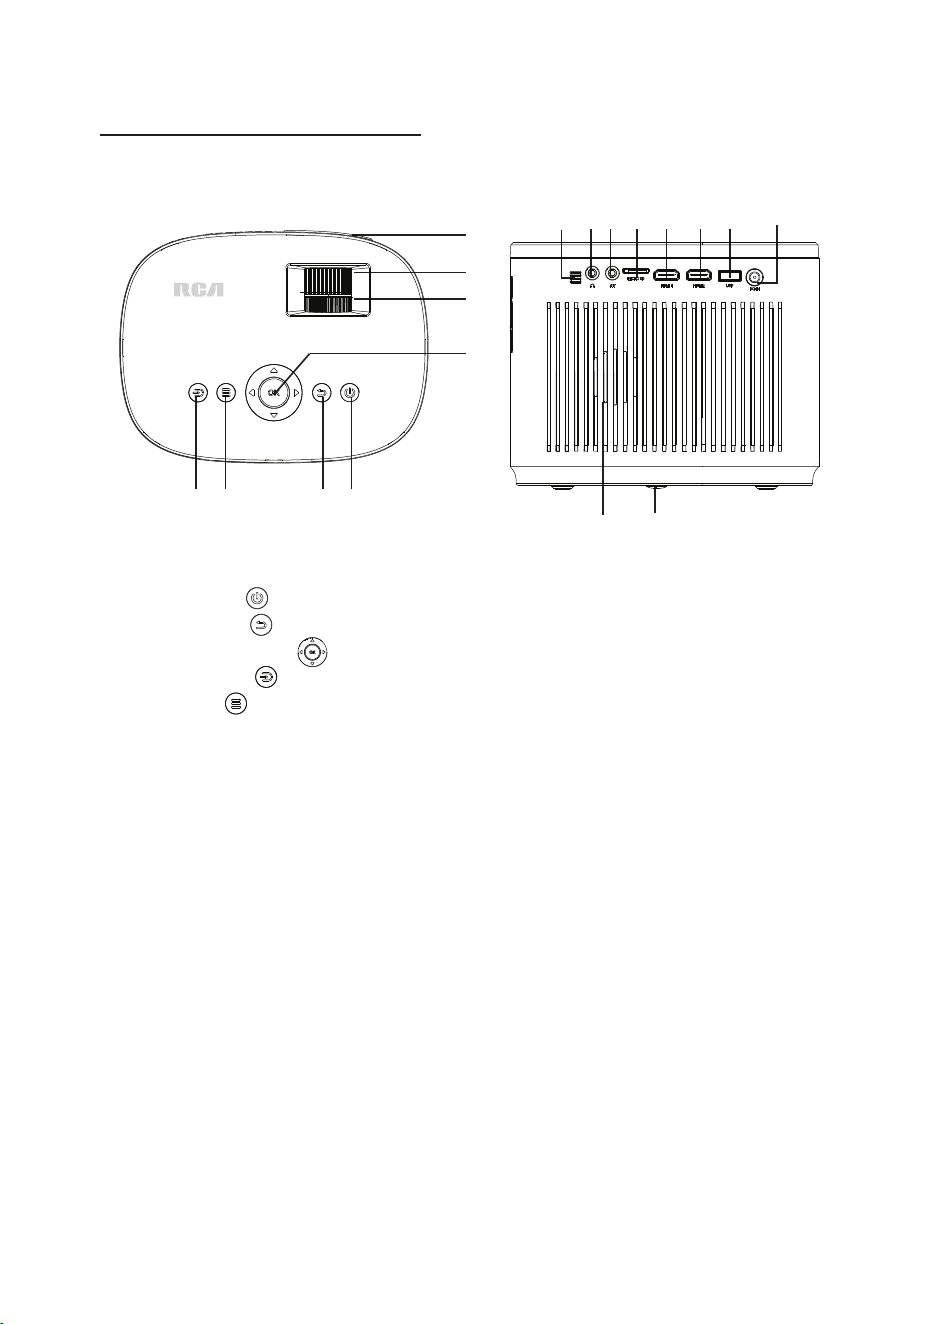
Controls Of Projector
124 5
3
7
8
9 1011 12 13 14 15 16
1.POWER Button
2.RETURN Button
3.NAVIGATION
4.SOURCE Button
5.MENU Button
6.Keystone Correction
7. Focusing Ring
8. LENS
9. IR Window
6
10. Headphone Jack
11. AV
12. MICRO SD
13.HDMI Port 1
14.HDMI Port 2
15.USB Port
16.POWER INPUT
17.Adjusting Knob
18.Speaker Driver
1718
10
40 inch
60inch
80 inch
100 inch
1.11 m 1.66 m 2.21 m 2.77 m 3.32 m 3.8m
Projector Control Functions
TURN ON
TURN OFF
1)Plug the projector into a power source.
Indicator light: Red.
2)Press the power button .Indicator
light: White
3)The projector turned on after 5 seconds.
2:Unplug the power adapter.
Note
Distance Between The Projector And Screen
Distance Between The Projector And Screen
Screen
Square /Rectangle
Projector
Projection
distance
Projection size
Projection Position
reference only.
It is recommended to place the projector in front of the center of
the screen.
Power
Press to
power on the
projector.
Press twice to power
Source
Press to
change media
source mode.
Arrows/OK
Press to
navigate on-
screen menus
and make
selections.
Back
Press to return
to a previous
page or setting
in the on-
screenmenus.
Menu
Press to access
on-screen
menus and
options.
120 inch
1: Press twice this power button
to turn o this unit.
140 inch
11
1) If you connect your devices to the projector via “HDMI 1” port, please click
“HDMI 1” input source.
2) If you connect via “HDMI 2” port, please click “HDMI 2” input source.
Note: In rare cases, if the projector’s speaker
has no sound when playing a DVD
movie in a player connecting to the HDMI input,
please check the player’s digital audio settings
and make sure it is set to “Auto” mode or “PCM”
mode
Connection Instructions
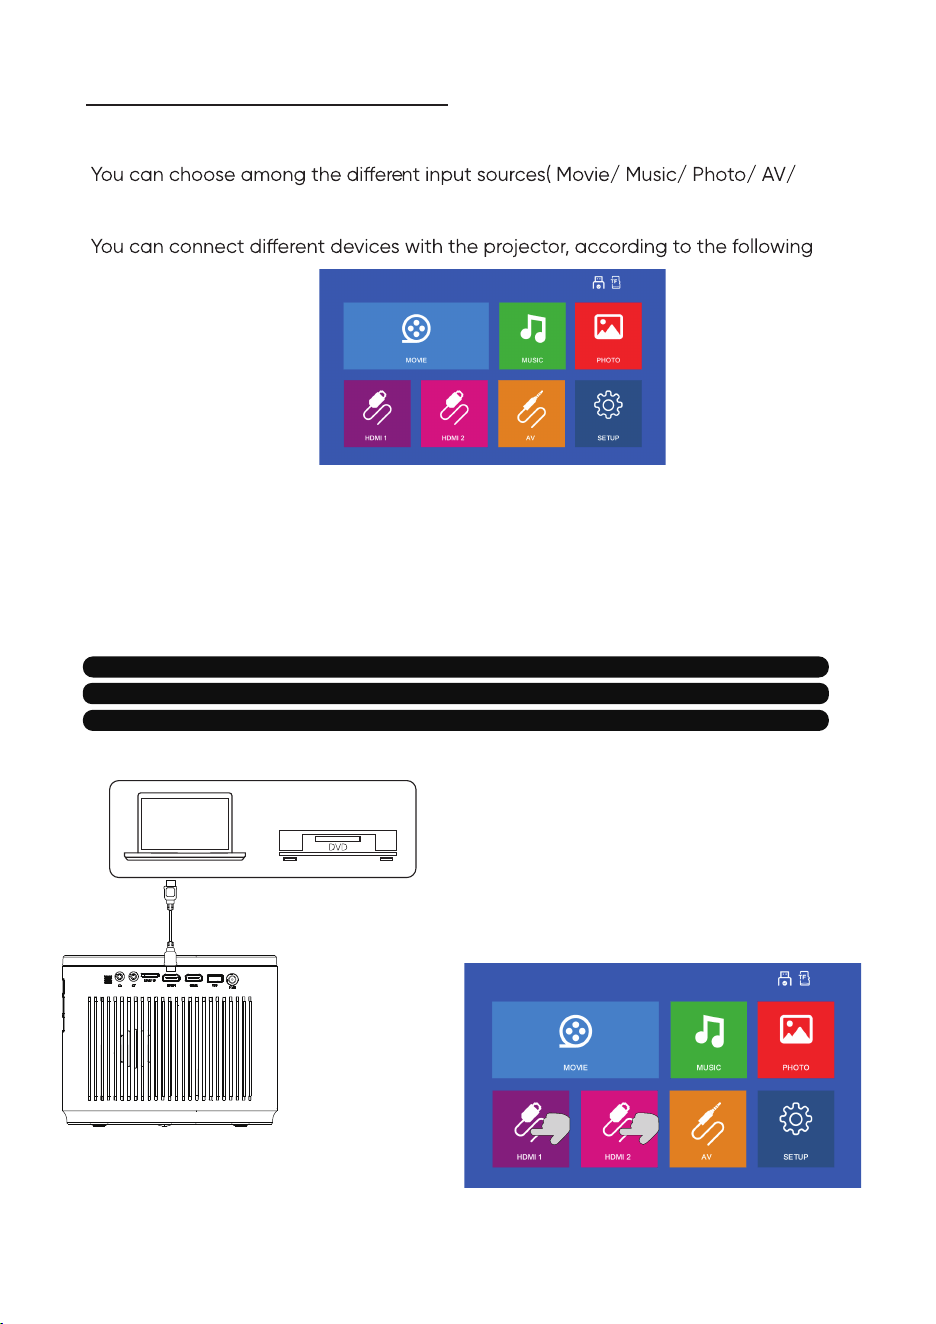
Select an input source
You will see the picture below when the projector is turned on.
HDMI1/HDMI2) by pressing the arrows buttons(UP/DOWN/LEFT/RIGHT)
on the projector touch panel or remote control.
connection instructions.
HDMI device connection
The projector can connect to devices with HDMI input function. It is compatible
with laptops, DVD players, Blu-ray players, Chromecast, TV Stick, etc. An HDMI
cable is excluded.
The projector is equipped with 2 HDMI input ports, including 2 HDMI female socket
inputs (HDMI 1 and HDMI 2).
Interface
12
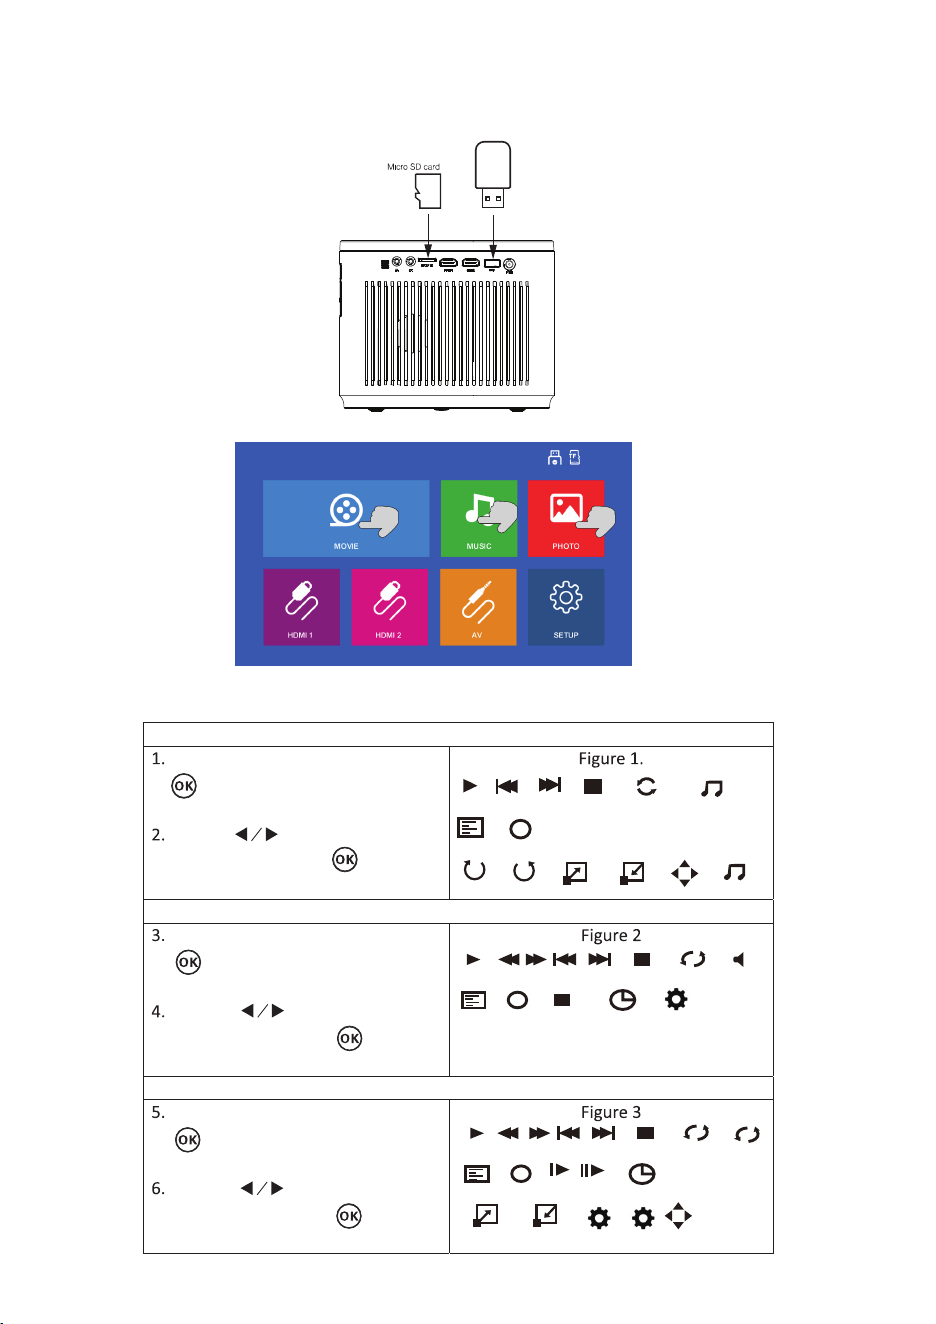
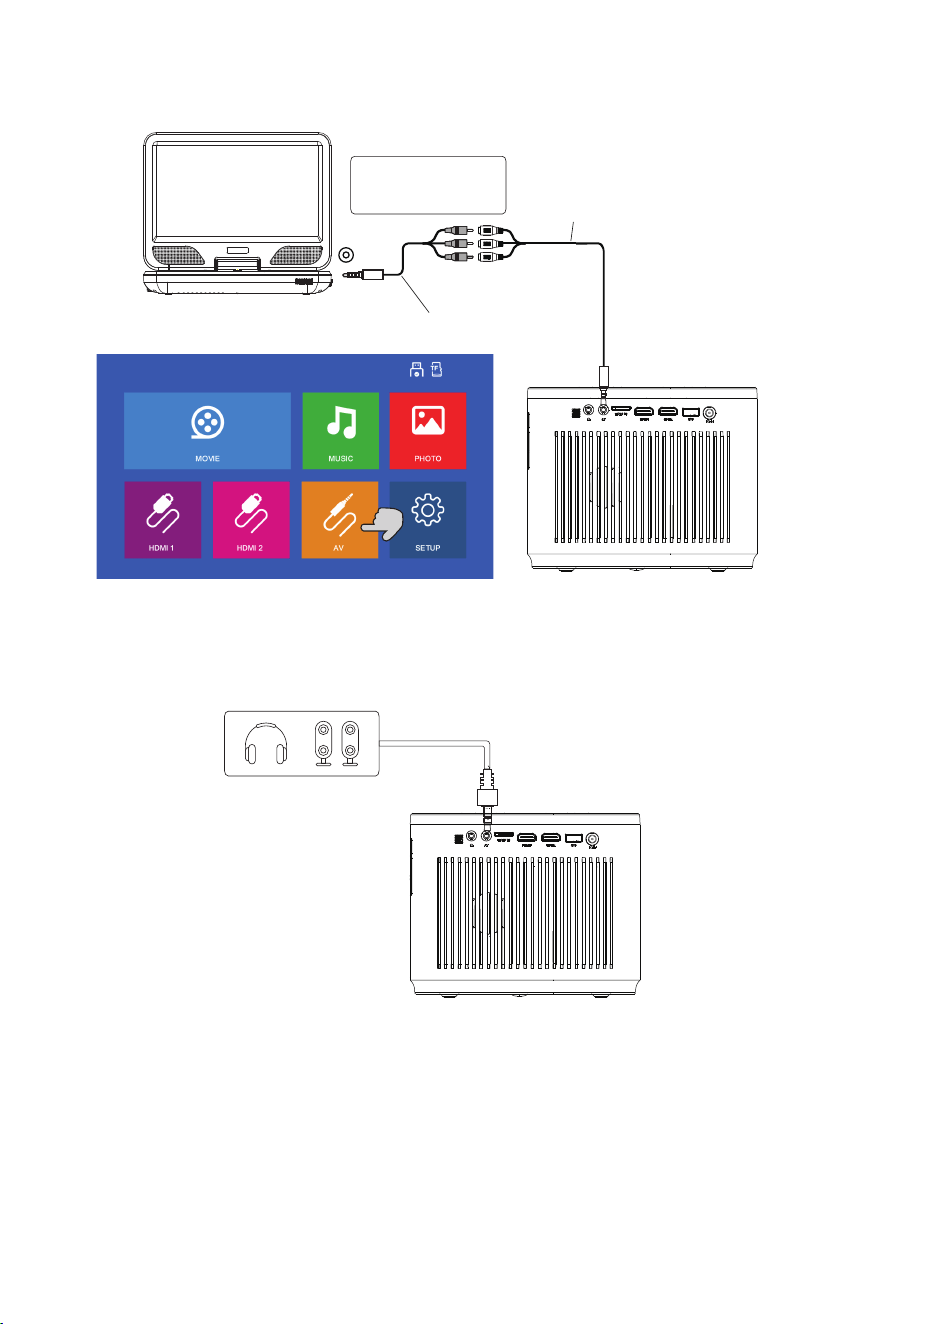
Select “ MOVIE”, “MUSIC”, “ PHOTO” to enter the content you want to play.
Insert USB/Micro SD card (maximum up to 1 TB) into the corresponding slots
(as shown in the picture).
Multimedia connection
Sub-Menu on Photo screen
When photo playback, press the
screen show on lower (figure 1).
button and more function
Use the button to select
icon and press the button
to play special function.
Sub-Menu on Music screen
Sub-Menu on Movie screen
When music playback, press the
button and more function
screen show on lower (figure 2).
Use the button to select
icon and press the button
to play special function.
When movie playback, press the
button and more function
screen show on lower (figure 3).
Use the button to select
icon and press the button
to play special function.
Play FB FF Prev Next Stop Repeat All Mute
Playlist Info Close P.... GotoTime Auto
i
X
X
Playlist info
i
Play Prev Next Stop Repeat All Music On
Rotate Rotate Zoom ln Zoom Out Move Music S......
+ -
Play FB FF Prev Next Stop Repeat All Set A
Playlist Info Slow Step GotoTime
i
AB
+ -
Zoom In Zoom Out Aspect Auto Move
13
AV video device connection
Connect the projector AV interface with the AV cable, as is shown in the pictures.
Video Cable: YELLOW
Audio Left Channel: WHITE
Audio Right Channel: RED
Portable DVD Player/Video Player
AV OUT
Male AV Cable(not include)
Female AV Cable(not include)
Projector
Audio devices connection
The projector can connect to a headphone and to a wired audio system using a
3.5mm jack(not include)
Projector
14
Select MENU Enter
Picture Mode Standard
Contrast 50
Brightness 50
Color 50
Sharpness 50
Color Temperature Medium
AUDIO
OPTION
TIME
PICTURE
Noise Reduction Middle
PROJECTOR SETTING
Options Related to “PICTURE” are set on this screen
OK
Press button to enter projector menu. Press again to previous status.
1. Picture Mode
Select Standard, Dynamic, Mild ,or User(custom).
2. Contrast ,Brightness, etc
Set Picture Mode to “User “ to adjust these settings.
3. Color Temperature
Select Warm ,Cool, or Medium.
4. Noise Reduction
Use buttons to select
manual page.
This manual showed on
right upper of view
screen.
Tint 50
15
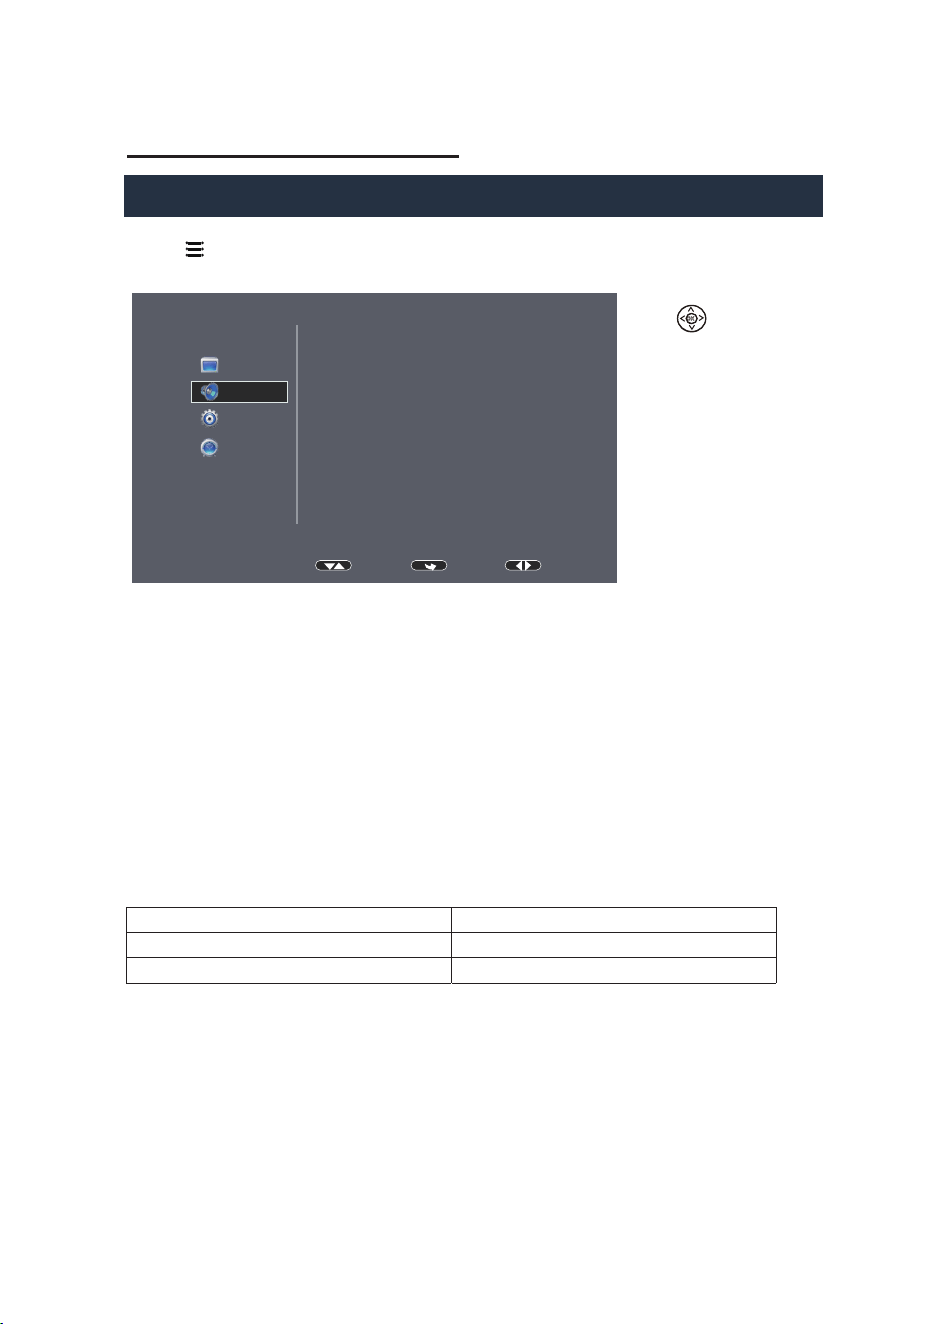
Select MENU Enter
Sound Mode Standard
Treble 50
Bass 25
Auto Volume Off
TIME
OPTION
AUDIO
PICTURE
PROJECTOR SETTING
Sound Mode - User Parameter
Treble 0-100
0-100Bass
OK
Press button to enter projector menu. Press again to previous status.
Use buttons to select
manual page.
This manual showed on
right upper of view
screen.
1. Sound Mode
Select Standard, Movie, Music, Sports ,or User (custom).
2. Treble, Bass
Set Sound Mode to “User “ to adjust these settings.
Options Related to “AUDIO” are set on this screen.
3. Auto Volume
Turn Auto Volume ON or OFF.
16
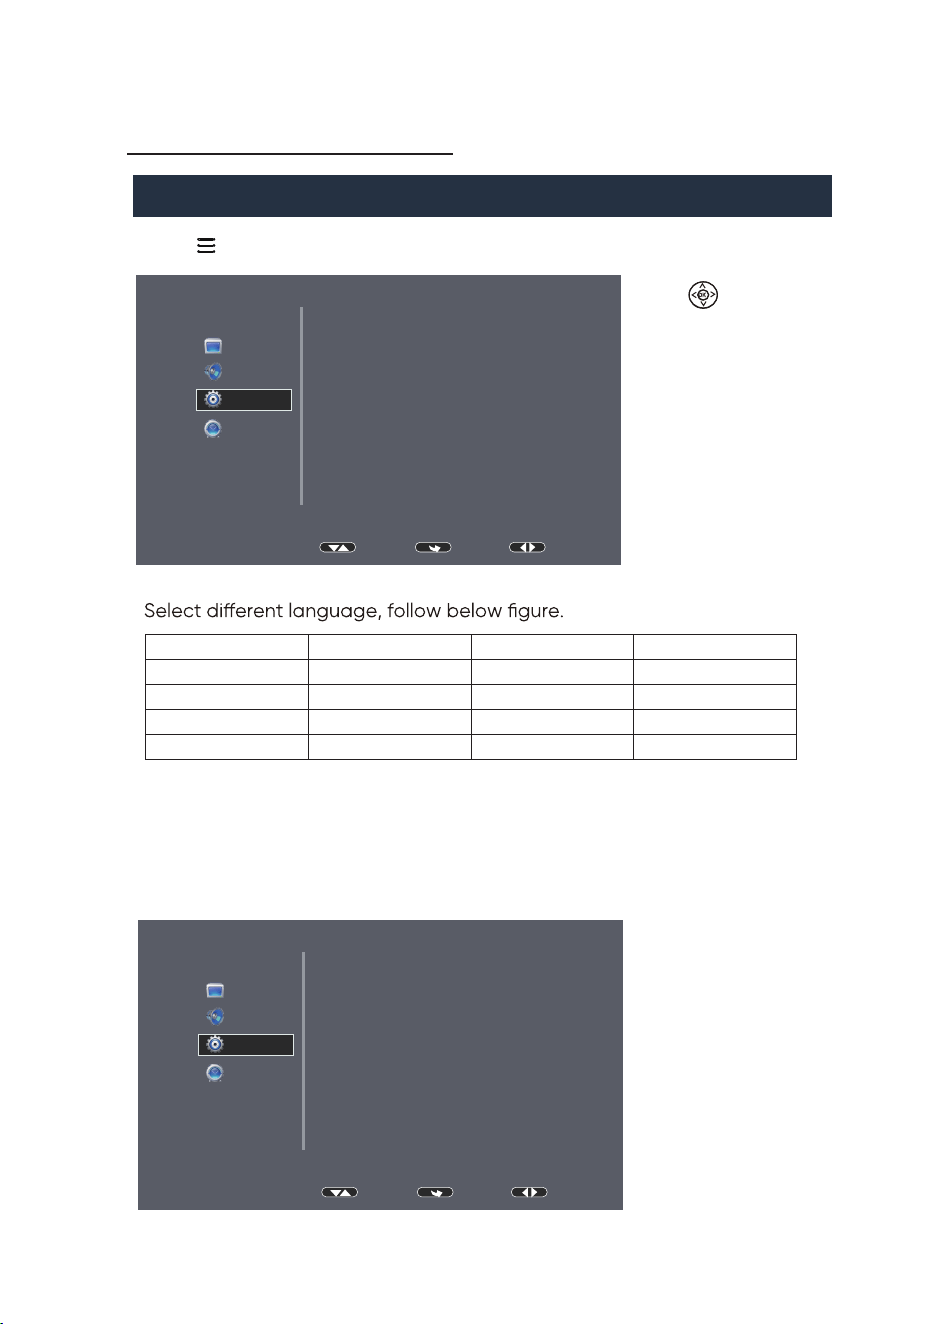
Select MENU Enter
OSD Language English
Aspect Ratio 16:9
Projection zoom
Front
Reset
Info
TIME
OPTION
PICTURE
AUDIO
PROJECTOR SETTING
English Slovak Portuguese Danish
German Czech Dutch
Japanese Hungarian Italian
Chinese Norwegian Polsky
Serbian Finnish French
Croatian
Swedish
Spanish
OK
Press button to enter projector menu. Press again to previous status.
Use buttons to select
manual page.
This manual showed on
right upper of view
screen.
1. OSD Language
2. Aspect Ratio
Select 16:9, 4:3, full, ZOOM1, ZOOM2, PANORAMA, JUST SCAN, AUTO
Options Related to “OPTION” are set on this screen.
Projection mode
100%
HDMI Link
3. HDMI Link
For access CEC function with TV box.
Select MENU Enter
Enable HDMI Link On
TV Auto Power On Off
TIME
OPTION
PICTURE
AUDIO
Device Auto Standby Off

4. Projection mode
Select Front, Rear, F/Ceiling, Rear Ceiling.
5.Projection zoom
Select to adjust the screen size from 80% to 100%.
17
PROJECTOR SETTING
6. Reset
Select Y or N.
7. Info
Display the unit information.
1) Select Enable HDMI link to be On, plug in HDMI will automatically enter the
HDMI interface. Select O to disable this function.
2) Select TV auto Power On to be On, use the remote control of the TV box to
control the box to turn on it, the projector will turn on with it. Select O to
disable this function.
3) Select Device Auto Standby to be On, use the remote control of the projector
to turn o it, the TV box will turn o with it. Select O to disable this function.
18
PROJECTOR SETTING
OK
Press button to enter projector menu. Press again to previous status.
Use buttons to select
manual page.
This manual showed on
right upper of view
screen.
Options Related to “TIME” are set on this screen.
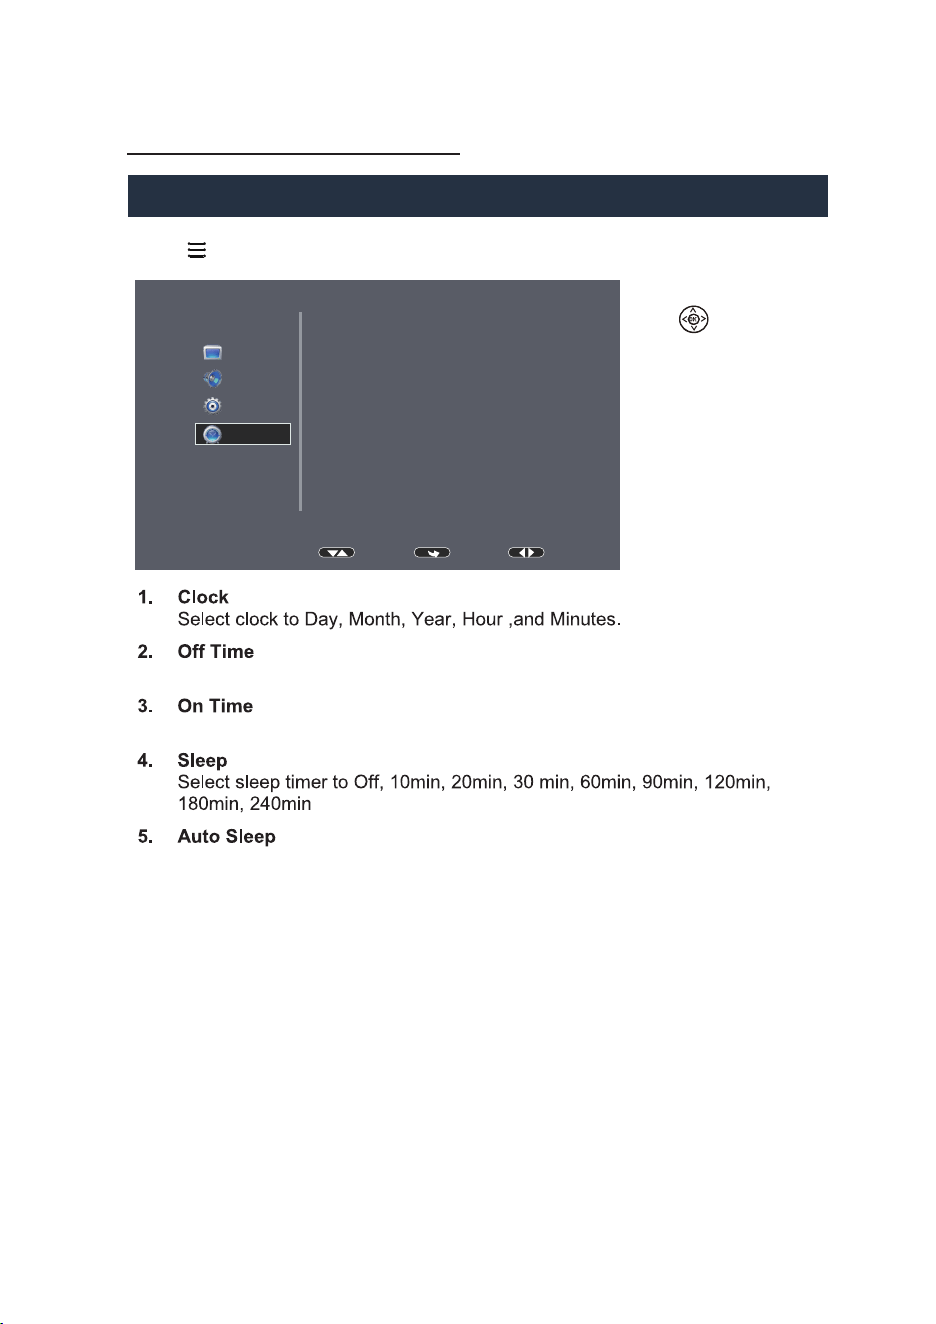
Select MENU Enter
Clock 2024/1/1 0:00
Off Time Off
On Time Off
Sleep Timer Off
Auto Sleep Off
TIME
PICTURE
SOUND
OPTION
Timer
Select auto sleep function to off, 1Hour, 2Hours, 4Hours, 8Hours.
Select to off, once and everyday. Hour and Minutes.
Select to off, once and everyday. Hour, Minutes , input source and Volume.
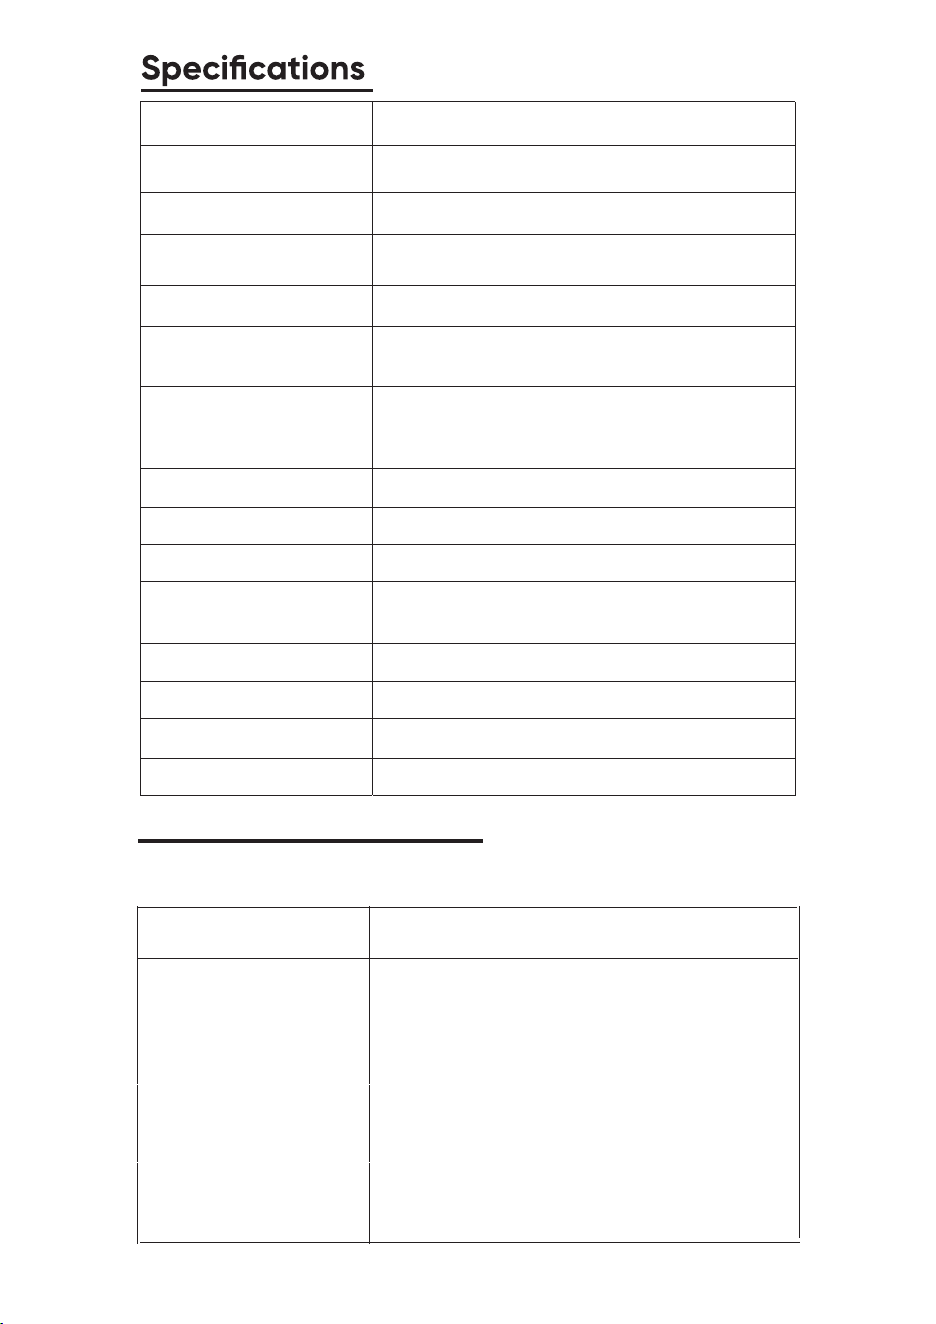
HDMI/AV
Dimension
Speaker
Projection distance
1*5W
1.11m-3.8m (Optimal 1.11m-3.32m)
No Image is Projected or
a "No Signal" message is
displayed
1.Power light is on. If it is not on, check the
projector is plugged into the power source supply,
that the socket is switched on, and then press the
power button on the projector.
2.Check the lens cover has been removed.
3.Check the cables are securely attached and
installed as per the User Manual.
4.The image source may not be set correctly.
Press the Home button on the Control Panel or
the Remote, to select the correct setting.
5.Check in the Menu section under Video input
signal to make sure that has been set correctly.
Before resorting the maintenance service, please kindly check by yourself with
the following chart.
Symptom
Cause (and Remedy)
LED
White light output ANSI: 120lm
1280 x 720
Light Source Type
Brightness Output
Display Native Resolution
HDMI Input Supported
Video Resolution
1080p , 1080i , 720p, 576i , 480p,480i
Power Consumption
Operating 42W;
Standby 0.8W
Power Input
Connect Included Adapter
DC 24V , 1.75A
Included Adapter
Connect DC input of unit
Input AC100-240V,50/60Hz
Output DC24V , 1.75A
Color Temperature
6500-8000K
Projection Size Optimal 37"-140"
Signal Port
USB Port
Weight
Support USB device up to 32GB
Support format mpeg1, Mpeg2 ,mpeg4, mp3 , Jpeg
0.81KG
7.87’’L X 5.91’’W X 6.3’’H
TROUBLE SHOOTING
19
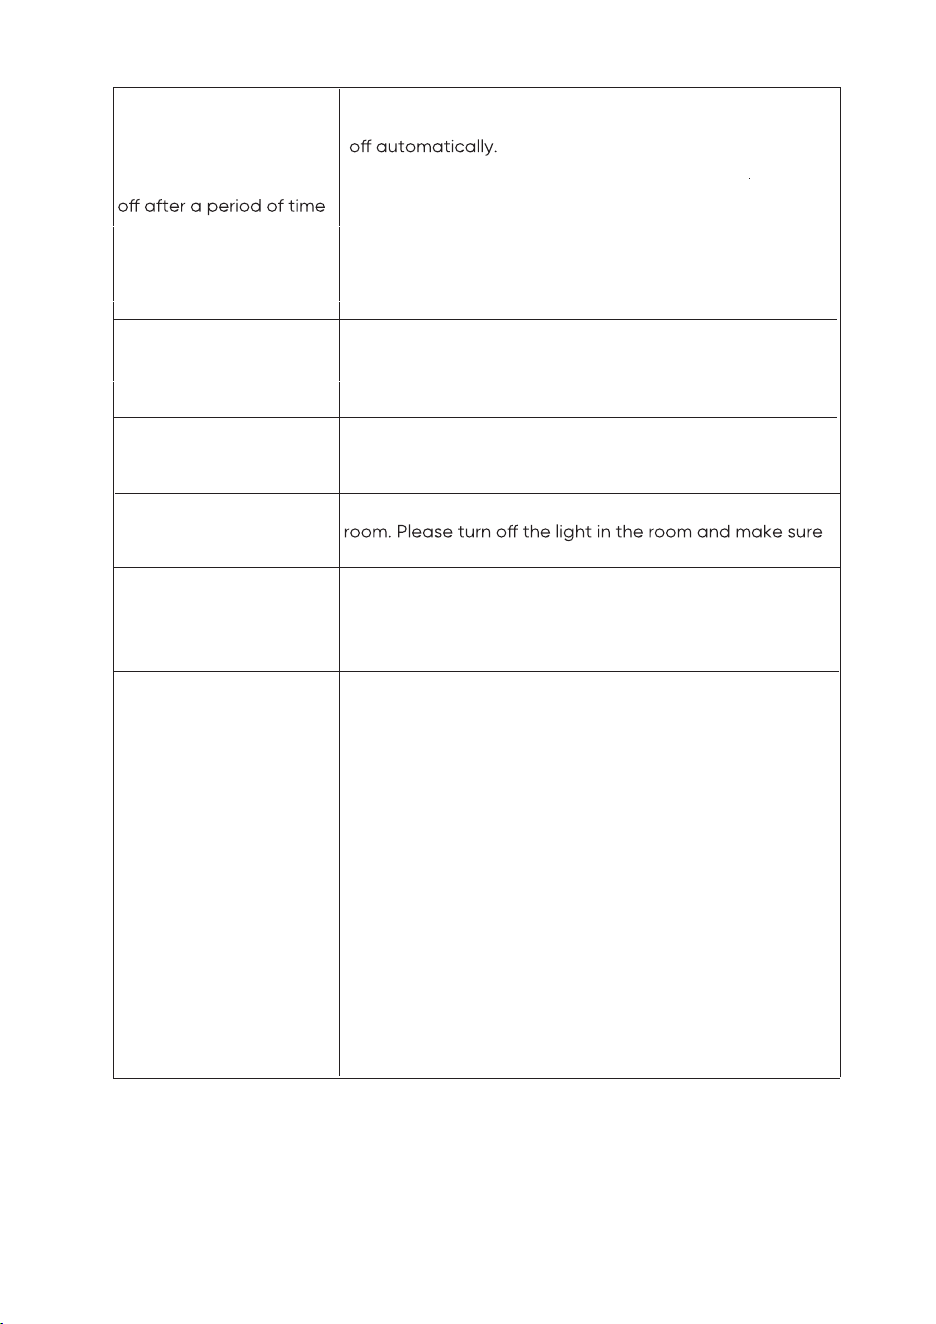
Is the warning light indicator red? If so, the
projector is overheating which turns the light
1.Leave the projector to cool for a few moments.
2.Once cooled, check nothing is blocking the
ventilation vents.
3.Check the air filter is clean and clean if necessary.
4.Turn on the projector.
If the issue persists please contact the service
assistance support for further assistance.
The Image is wider at
the top/bottom of the
screen
This is called keystone and is due to the projection
angle not being perpendicular to the screen. To
correct use the projectors inbuilt keystone function
to adjust the image.
Spots on the screen
Using a vacuum cleaner to clean the lens. If cleaning
doesn’t resolve things, please contact the service
assistance support for further assistance.
The image brightness
has faded
This could possible be caused by the ambient light in the
to operate the projector in the dark environment.
For service assistance and product information, please call:
Pour obtenir assistance et information appelez:
Curtis International Ltd.
7045 BECKETT DRIVE, UNIT 15,
MISSISSAUGA, ON, L5S 2A3 www.curtisint.com
Streaming stick
will not power on
You cannot see the video
from your streaming
stick on your projector
The streaming stick needs to be properly connected to
power in order to function. For optimal performance,
use the included USB cable to connect to the USB port
on the projector.
First, make sure the projector is turned on and set to the
HDMI 1 and HDMI 2 input. Then press a button on the
Roku remotecontrol to ensure that the Roku device is not
in standbyor screensaver mode. Listed below are the
most common reasons you may not see video on your
projector:
1. You have the wrong input (source) selected on your
projector. Look to see which input you have the
streaming stick connected to. Press this button, it may
display a menu with a choice of inputs, Use the arrow
buttons on the projector remote to select the correct
input and then press OK.
2. The streaming stick is not connected properly.
Ensure it is firmly connected to the HDMI 1 and HDMI 2
connector on your projector.
3. If all else fails, disconnect and reconnect all cables
including the power cable. For more help
visit: go.roku.com/usingroku.
The Lamp (Bulb) switches
1-800-968-9853.
1-800-968-9853.
20

This product is warranted to be free from defects in material and workmanship for a period of
ninety (90) days from the date of original delivery to the consumer. During this period, your
exclusive remedy is repair or replacement of this product or component found to be defective,
at our option; however, you are responsible for all costs associated with returning the product
to us. If the product or component is no longer available, we will replace with a similar one of
equal or greater value. Prior to a replacement being sent, the product must be rendered
inoperable or returned to us.
This warranty does not cover glass, filters, wear from normal use, use not in conformity with the
printed directions., or damage to the product resulting from accident, alteration, abuse, or
misuse. This warranty extends only to the original consumer purchaser or gift recipient. Keep
the original sales receipt, as proof of purchase is required to make a warranty claim. This
warranty is void if the product is used for other than single-family household use or subjected to
any voltage and waveform other than as on the specified rating on the label (e.g., 120V~60Hz).
We exclude all claims for special, incidental, and consequential damages caused by breach of
express or implied warranty. All liability is limited to the amount of the purchase price. Every
implied warranty, including any statutory warranty or condition of merchantability or fitness for
a particular purpose, is disclaimed except to the extent prohibited by law, in which case such
warranty or condition is limited to the duration of this written warranty. This warranty gives you
specific legal rights. You may have other legal rights that vary depending on where you live.
Some states or provinces do not allow limitations on implied warranties or special, incidental,
or consequential damages, so the foregoing limitations may not apply to you.
For faster service, locate the model, type, and serial numbers on your appliance.
To make a warranty claim, please email support2@curtiscs.com or call 1-800-968-9853.
90 day Warranty
ATTACH YOUR PROOF OF PURCHASE HERE, PROOF OF PURCHASE IS REQUIRED TO
OBTAIN WARRANTY SERVICE.
Please have the following information available when you contact the Support Team.
Name, address and telephone number.
Model number and serial number.
A clear, detailed description of the problem.
Proof of purchase including dealer or retailer name, address and date of purchase.
21