
Canon FAXPHONE L80
Canon FAXPHONE L80
Printer Driver
for Windows
Software User’s Guide

ii Preface
Copyright
© 2003 by Canon, Inc. All rights reserved.
This manual may not be reproduced in any form, in whole or part,
without the prior written consent of Canon, Inc.
Trademark Acknowledgments
Canon is a registered trademark of Canon, Inc.
Microsoft and Windows are registered trademarks of Microsoft
Corporation.
Pentium is a registered trademark of Intel Corporation.
All other trademarks identified herein are the property of their respective
owners.

Contents iii
Contents
Chapter 1 Introduction.....................................................................................................1-1
Printer Driver: an Overview..........................................................................1-2
System Requirements .....................................................................................1-2
About This Guide............................................................................................1-4
Conventions Used in This Guide...........................................................1-4
Other User Assistance.....................................................................................1-5
Chapter 2 Installing the Printer Driver.........................................................................2-1
Before You Begin the Installation: a Checklist.............................................2-2
Installing the Software....................................................................................2-3
Setting the Default Printer .............................................................................2-6
Sharing the Printer Installation .....................................................................2-6
Setting Up Your Printer for Sharing......................................................2-7
Installing the Printer Driver on a Client System .................................2-8
Removing the Printer Driver.........................................................................2-9
Changing the Port Connection......................................................................2-9
Chapter 3 Printing.............................................................................................................3-1
Printing a Document.......................................................................................3-2
Defining Print Settings: an Overview...........................................................3-2
Viewing a Summary of Print Settings...................................................3-5
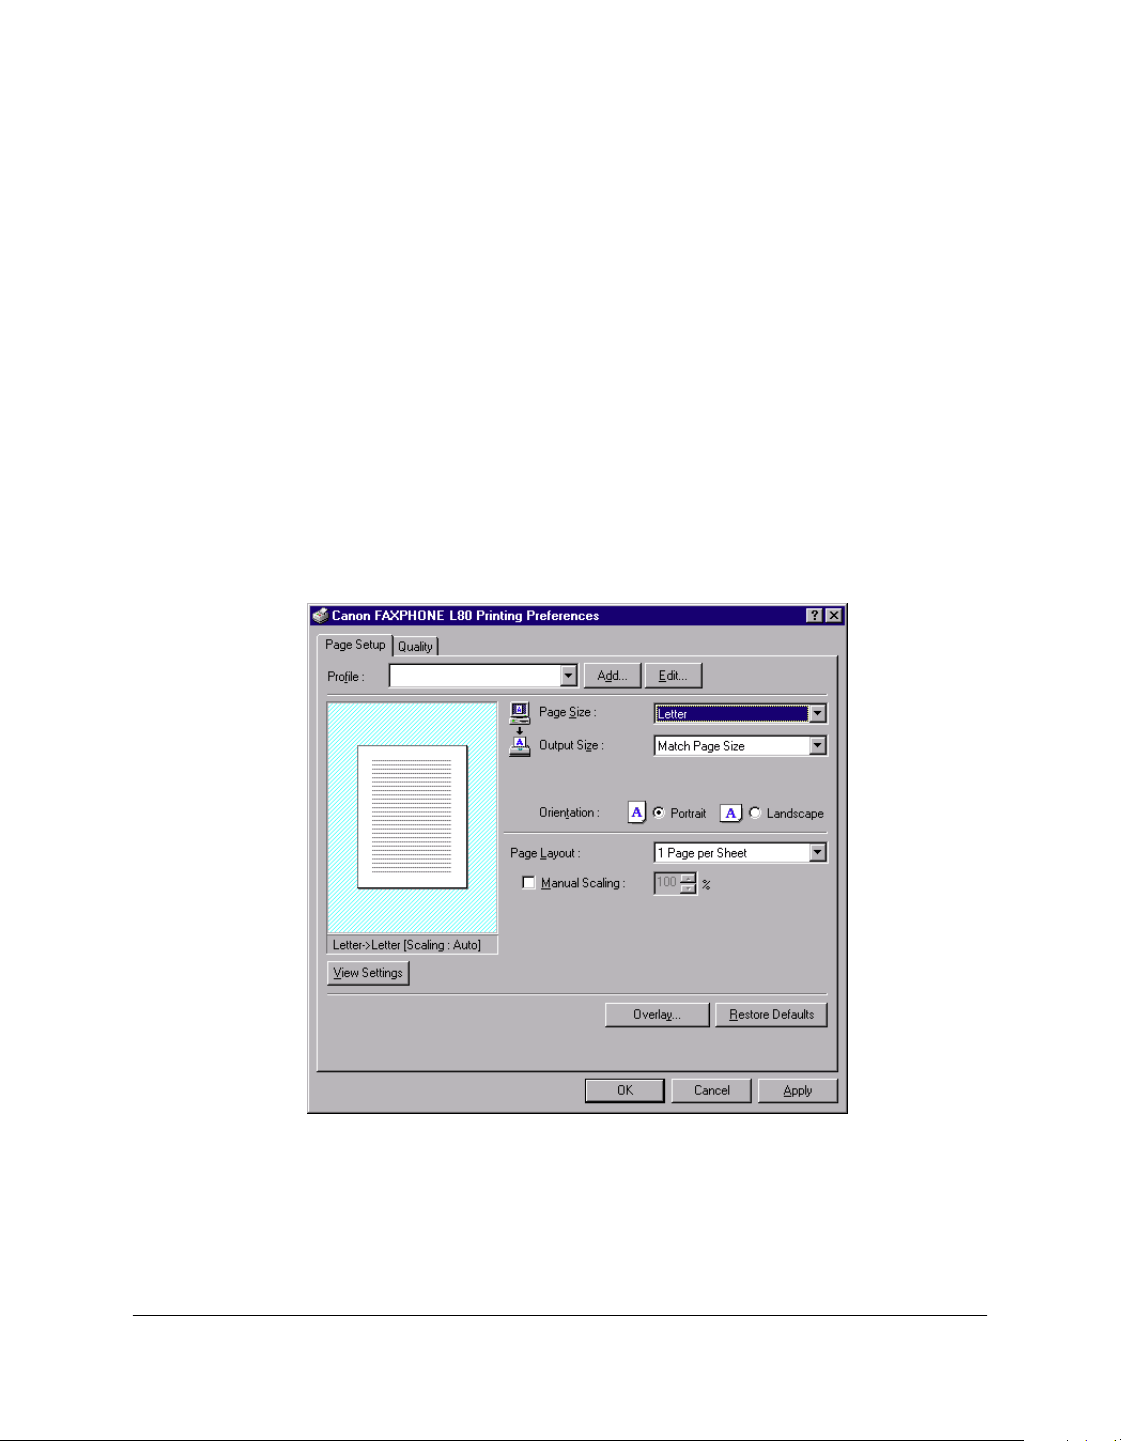
Defining Page Settings....................................................................................3-6
Defining a Custom Paper Size................................................................3-7
Defining a Print Overlay.......................................................................3-13
Defining Quality Print Settings...................................................................3-15
Conserving Toner When Printing........................................................3-16
Adding a Print Profile...................................................................................3-17
Using a Print Profile...............................................................................3-18
Editing a Print Profile ...................................................................................3-19
Changing Information About a Print Profile .....................................3-20
Adjusting the Display Order................................................................3-20
Exporting a Print Profile .......................................................................3-21
Importing a Print Profile.......................................................................3-22
Deleting a Print Profile..........................................................................3-23
Displaying Printer Driver Information......................................................3-23
Defining Default Print Settings ...................................................................3-23

iv Contents
Chapter 4 Frequently Asked Questions........................................................................4-1
Printer Cannot Be Initialized.........................................................................4-2
Installation Is Displaying Unexpected Behavior. .......................................4-2
Documents Are Not Printing Correctly........................................................4-4
Paper Is Not Loading Correctly.....................................................................4-6
The Print Quality Is Not Satisfactory............................................................4-6
Appendix A Sharing Your Printer Cross-Platform in Windows 2000/XP ..................A-1
Appendix B Installing from a Local or Network Drive................................................ B-1
Installing the Software................................................................................... B-1
Glossary ..................................................................................................................................G-1
Index ......................................................................................................................................... I-1

Chapter 1 Introduction 1-1
Introduction
Chapter 1
1Introduction
Welcome and congratulations on your purchase of the Canon
FAXPHONE L80 (also referred to in this guide as the printer) and its
accompanying printer driver software.
Contents of this chapter:
❏
Printer Driver: an Overview ..................................................................1-2
❏
System Requirements .............................................................................1-2
❏
About This Guide....................................................................................1-4
• Conventions Used in This Guide...................................................1-4
❏
Other User Assistance.............................................................................1-5

1-2 Introduction Chapter 1
Printer Driver: an Overview 1
The printer driver is software that enables the printer to communicate
with your computer. You can use the printer as the default printer in any
Windows application that supports printing.
The printer driver includes features that enable you to define the results
of your printed output (documents or images), such as:
❏
Custom paper sizes
❏
Graphic image as an overlay on documents
(for example, to print your company logo on each page)
❏
Multiple pages (up to nine) printed on one sheet of paper
❏
User-defined print profiles for storing and using print preferences.
System Requirements 1
To successfully install and operate your printer and printer driver, your
system must meet the following minimum requirements:
❏
Windows Operating System
Microsoft Windows 98, Windows Me, Windows 2000, or Windows
XP.
❏
USB Port
❏
Computer Processor
•Windows 98: A 90-megahertz (MHz) Pentium processor or higher
•Windows Me: A 150-MHz Pentium processor or higher
•Windows 2000: A 133-MHz Pentium processor or higher
•Windows XP: A 233-MHz Pentium processor or higher

Chapter 1 Introduction 1-3
Introduction
❏
Memory
•Windows 98/Me: 32 megabytes (MB) of RAM. 64 MB of RAM or
more is recommended.
•Windows 2000/XP: 64 MB of RAM. 128 MB of RAM or more is
recommended.
❏
Hard Disk Space
15 MB of available hard disk space
❏
Disk Drive
CD-ROM drive, or access to one over a network connection
❏
Monitor
256-color SVGA monitor or greater
❏
Printer Cable
A USB cable 16.4 feet (5 meters) in length or shorter.
If you upgraded your system to Windows 98/Me or Windows 2000/XP
from Windows 95 or Windows NT, the USB port on your computer
may
not
operate successfully. Successful operation of the port is ensured when
using a system installed with Windows 98/Me or Windows 2000/XP by
the computer manufacturer. For assistance in resolving the support of a
USB port on your system, contact the technical support department with
your PC manufacturer, for a possible change of setting or an upgrade to
the BIOS residing on your system.

1-4 Introduction Chapter 1
About This Guide 1
This guide assumes you have a basic understanding of Windows. This
includes how to start your system and navigate within the Windows
environment. You should be familiar with common Windows terms such
as window, dialog box, button, icon, menu, application, select, open,
close, click, double-click, drag, and list box.
For assistance in familiarizing yourself with Windows, refer to your
Microsoft Windows user documentation.
Screen illustrations were prepared using a Windows 98 system, or a
Windows 2000 system (for instructions specified for Windows 2000).
Conventions Used in This Guide 1
The following types of formatting identify specific types of information
provided in this guide.
Italicized text Used to stress the importance of a word
or phrase, or to refer to the title of
another guide. For example:
You
cannot
access the dialog box....
-or-
...the
Microsoft Windows User’s Guide
....
Text in quotation marks Used to refer to the title of a section
within the guide. For example:
...the “Installing the Software” section....
Click, double-click Use of the word click or double-click
provides instructions for selecting or
choosing a command or option,
generally with a mouse. For example:
Click OK to continue.

Chapter 1 Introduction 1-5
Introduction
Monospaced text Used for commands you might type
when installing the software, or system
messages that may display on your
screen. For example:
A:\SETUP
Capitalization Used for all the key words in the name
or title of an option on the screen. For
example:
In the dialog box, click Image Type to
set....
Other User Assistance 1
In addition to this guide, the following online information and
instructions are available.
❏
Printer Driver Online Help
The online help includes context-sensitive help about a window or
dialog box and step-by-step instructions for performing tasks.
❏
Canon FAXPHONE L80 User’s Guide
This guide offers detailed information on how to set up and operate
your printer. It includes initial setup procedures, daily maintenance,
and troubleshooting.

1-6 Introduction Chapter 1

Chapter 2 Installing the Printer Driver 2-1
Installing the Printer
Driver
Chapter 2
2Installing the Printer Driver
Contents of this chapter:
❏
Before You Begin the Installation: a Checklist ....................................2-2
❏
Installing the Software............................................................................2-3
❏
Setting the Default Printer......................................................................2-6
❏
Sharing the Printer Installation .............................................................2-6
• Setting Up Your Printer for Sharing..............................................2-7
• Installing the Printer Driver on a Client System..........................2-8
❏
Removing the Printer Driver .................................................................2-9
❏
Changing the Port Connection..............................................................2-9

2-2 Installing the Printer Driver Chapter 2
Before You Begin the Installation: a
Checklist 2
To ensure a smooth and successful installation, review the following
precautions:
❏
Do not connect.
Do not connect
the USB cable to the port on your computer at this
time. When you begin the installation of the software, the installation
program will prompt you when it is appropriate to connect the
printer to your computer.
Use the procedures in the “Installing the Software” section to install
the software with the installation disk.
❏
Cancel new hardware detection.
As a reminder: If your system displays a found new hardware dialog
box, click Cancel, and then disconnect the USB cable from the port on
your computer.
❏
Turn on computer. Start Windows.
If you have not already done so, turn on your computer and start
Windows.
❏
Close applications.
If any Windows applications (including any virus checkers) are open,
close the applications. With the applications closed, you ensure that
the software installs properly.
To install the printer driver if you are using Windows 2000/XP, you must
log on as Administrator or have Administrator privileges. If you do not
have Administrator privileges, ask your system administrator to install
the printer driver software on your PC.
Chapter 2 Installing the Printer Driver 2-3
Installing the Printer
Driver
If your current printer purchase is replacing a MultiPASS printer, you
must remove
the MultiPASS software installed on your system
before
installing
the new printer. For instructions on removing the MultiPASS
software, see the software user’s guide that came with your MultiPASS
software.
Installing the Software 2
You are ready to install the software once you have prepared your
system, as described in the “Before You Begin the Installation: a
Checklist” section.
If the software has been placed on a local or network drive, you can install
the software on your system from that drive, rather than using the
installation disk. For instructions, see Appendix B.
Reminder: Do not connect the USB cable before installing the software.
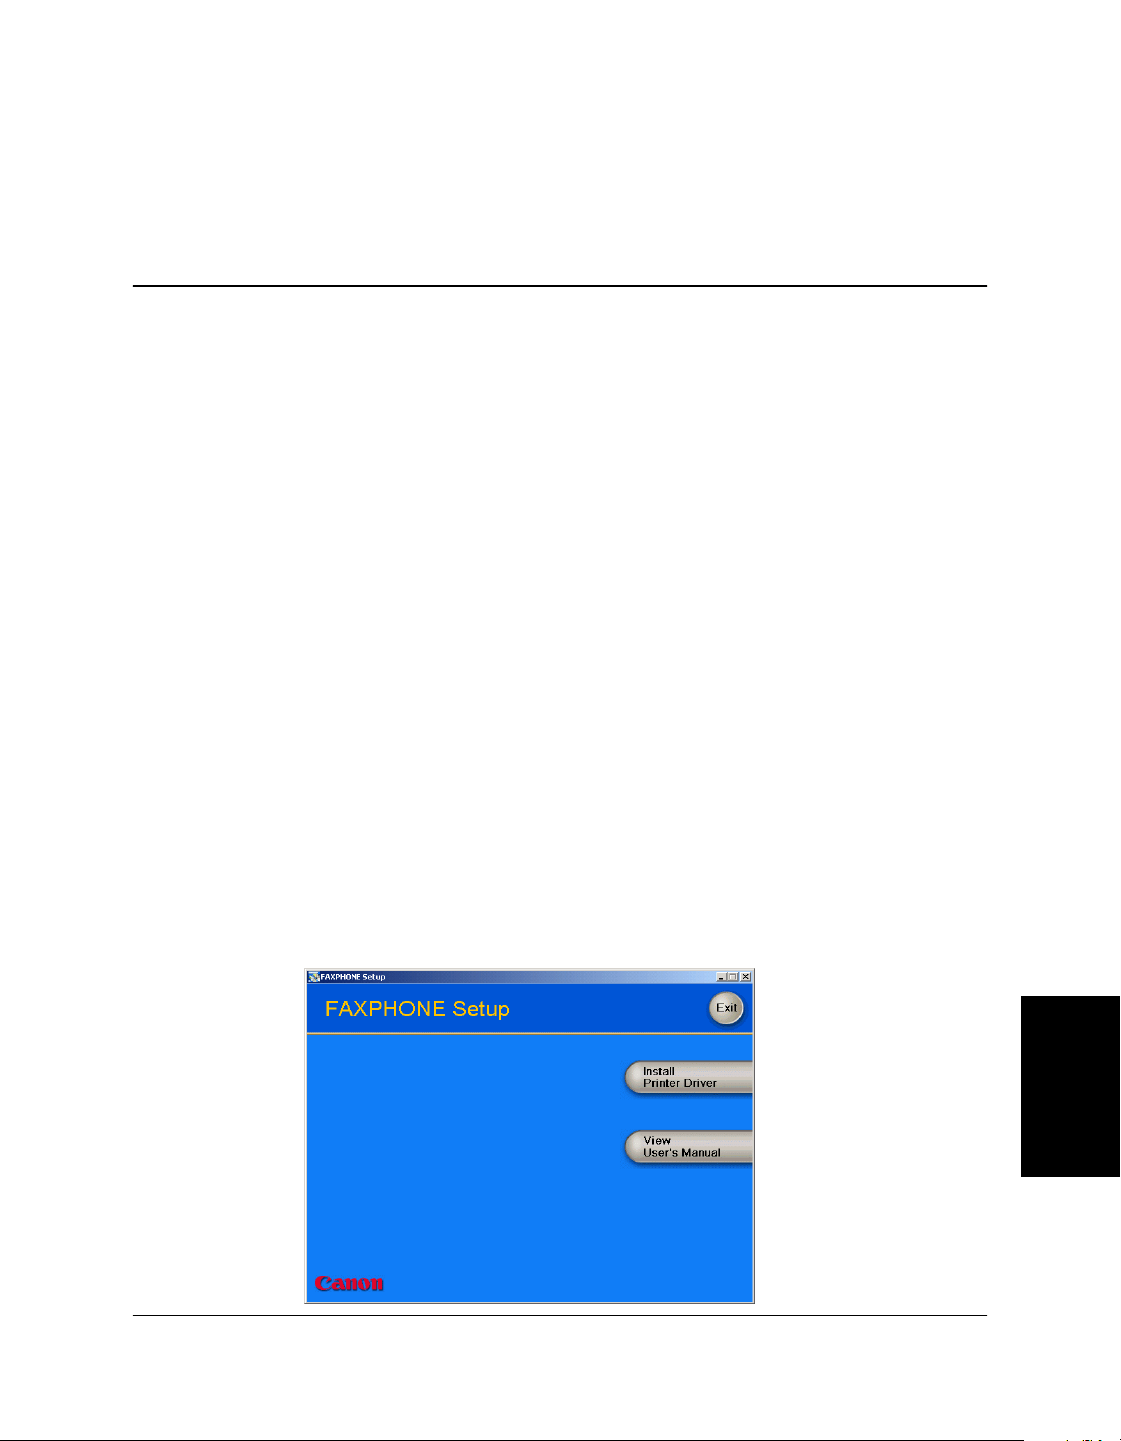
To install the software:
1. Insert the installation disk into your disk drive.
2. If AutoRun is enabled, the installation starts automatically.

2-4 Installing the Printer Driver Chapter 2
If installation does not start automatically, choose Run from the Start
menu. Type D:\SETUP.EXE (if your CD-ROM drive is D:) in the
command line and click OK.
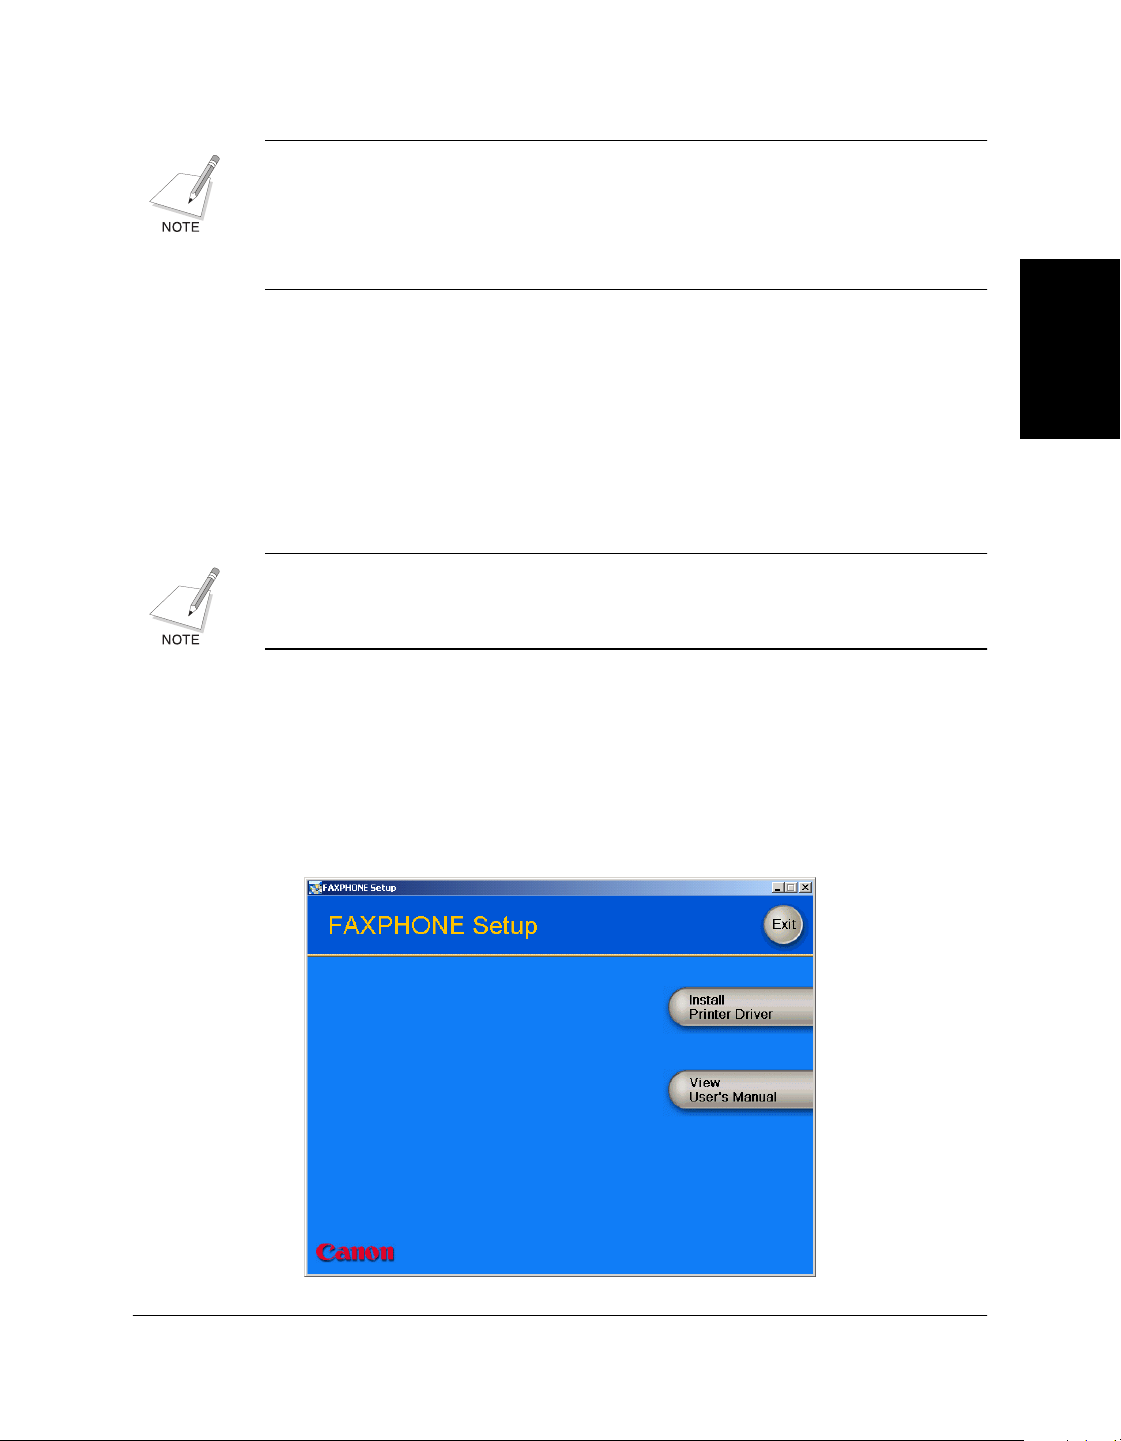
3. Click
Install Printer Driver
to start installation.
4. Follow the on-screen instructions to complete the installation process.
During installation, follow these guidelines:
• Click
Next
or
Yes
to move from one dialog box to the next.
• Be sure to wait for Windows to complete each setup step. If you
hear the computer working, wait until it is done.
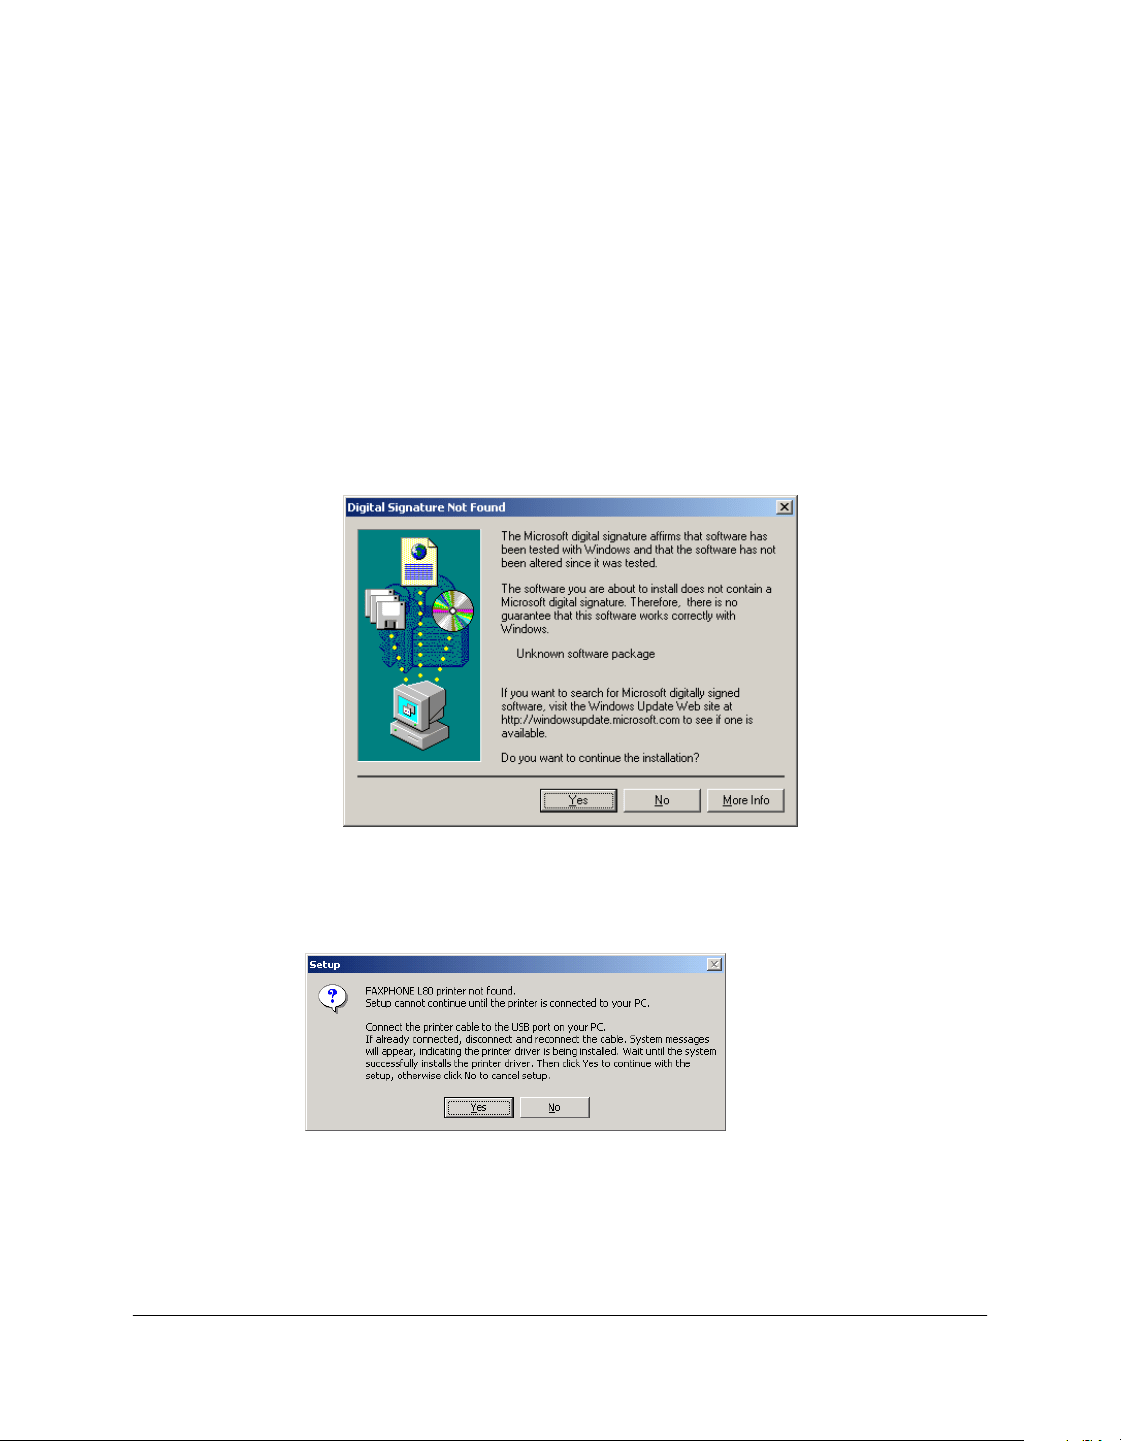
• If the Digital Signature Not Found screen appears, click
Yes
to
continue.
5. When prompted, remove the label from the USB port on the back of
the machine. Then connect the USB cable to the port on your
computer.
Chapter 2 Installing the Printer Driver 2-5
Installing the Printer
Driver
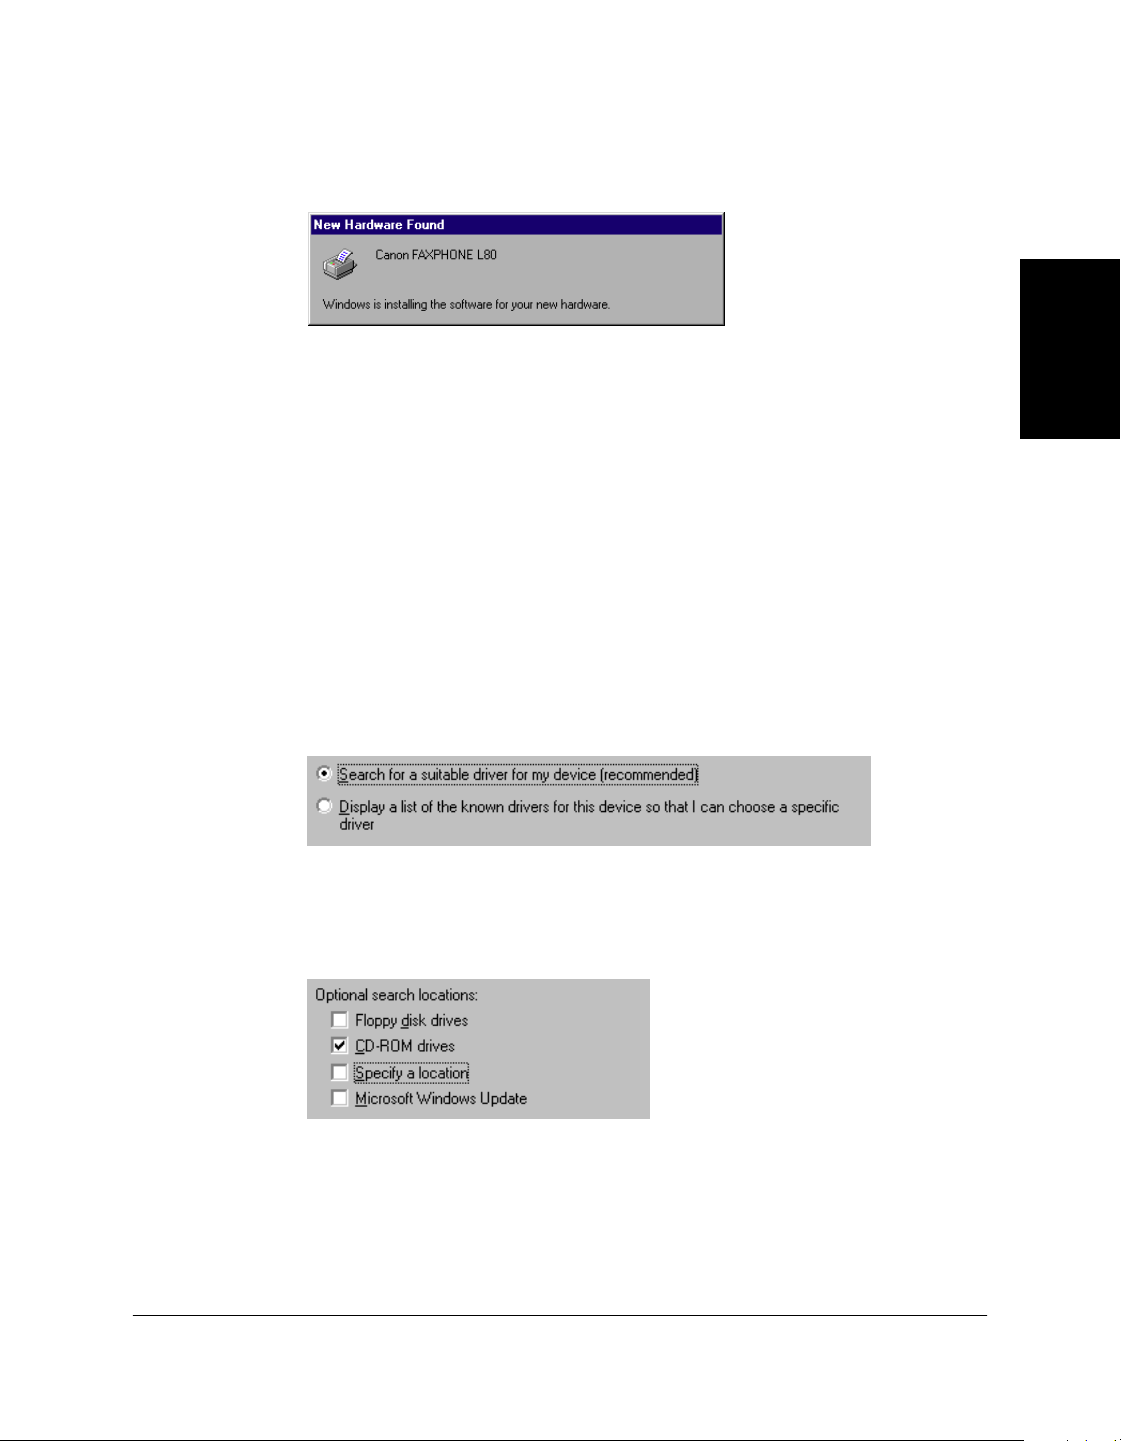
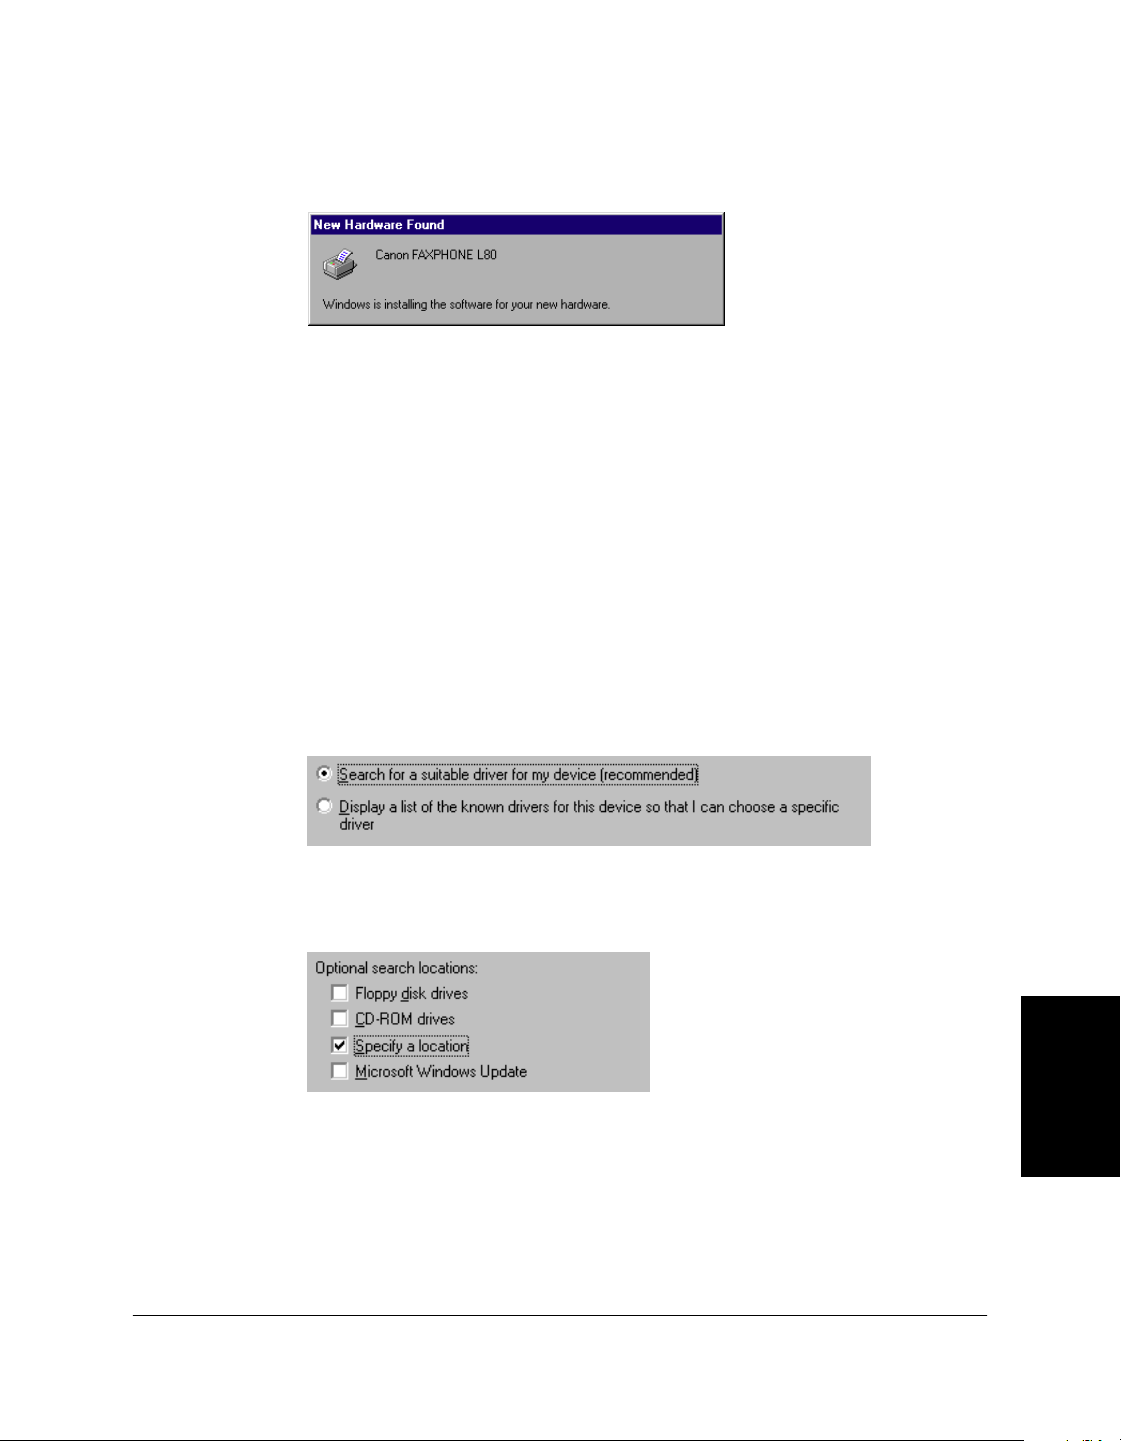
6. The system displays messages indicating that the driver for your
printer is being installed.
For Windows 98/Me: Wait for the system to complete the installation
of the printer driver.
For Windows 2000/XP: See Step 7.
7. For Windows 2000/XP:
When the Found New Hardware Wizard appears during the setup,
and prompts you for additional information, conduct the following:
For Windows 2000
• Search for a suitable driver for the printer.
(Do not display a list of drivers.)
• Search only on the installation disk.
(Click CD-ROM drives only, and clear the other options.)

2-6 Installing the Printer Driver Chapter 2
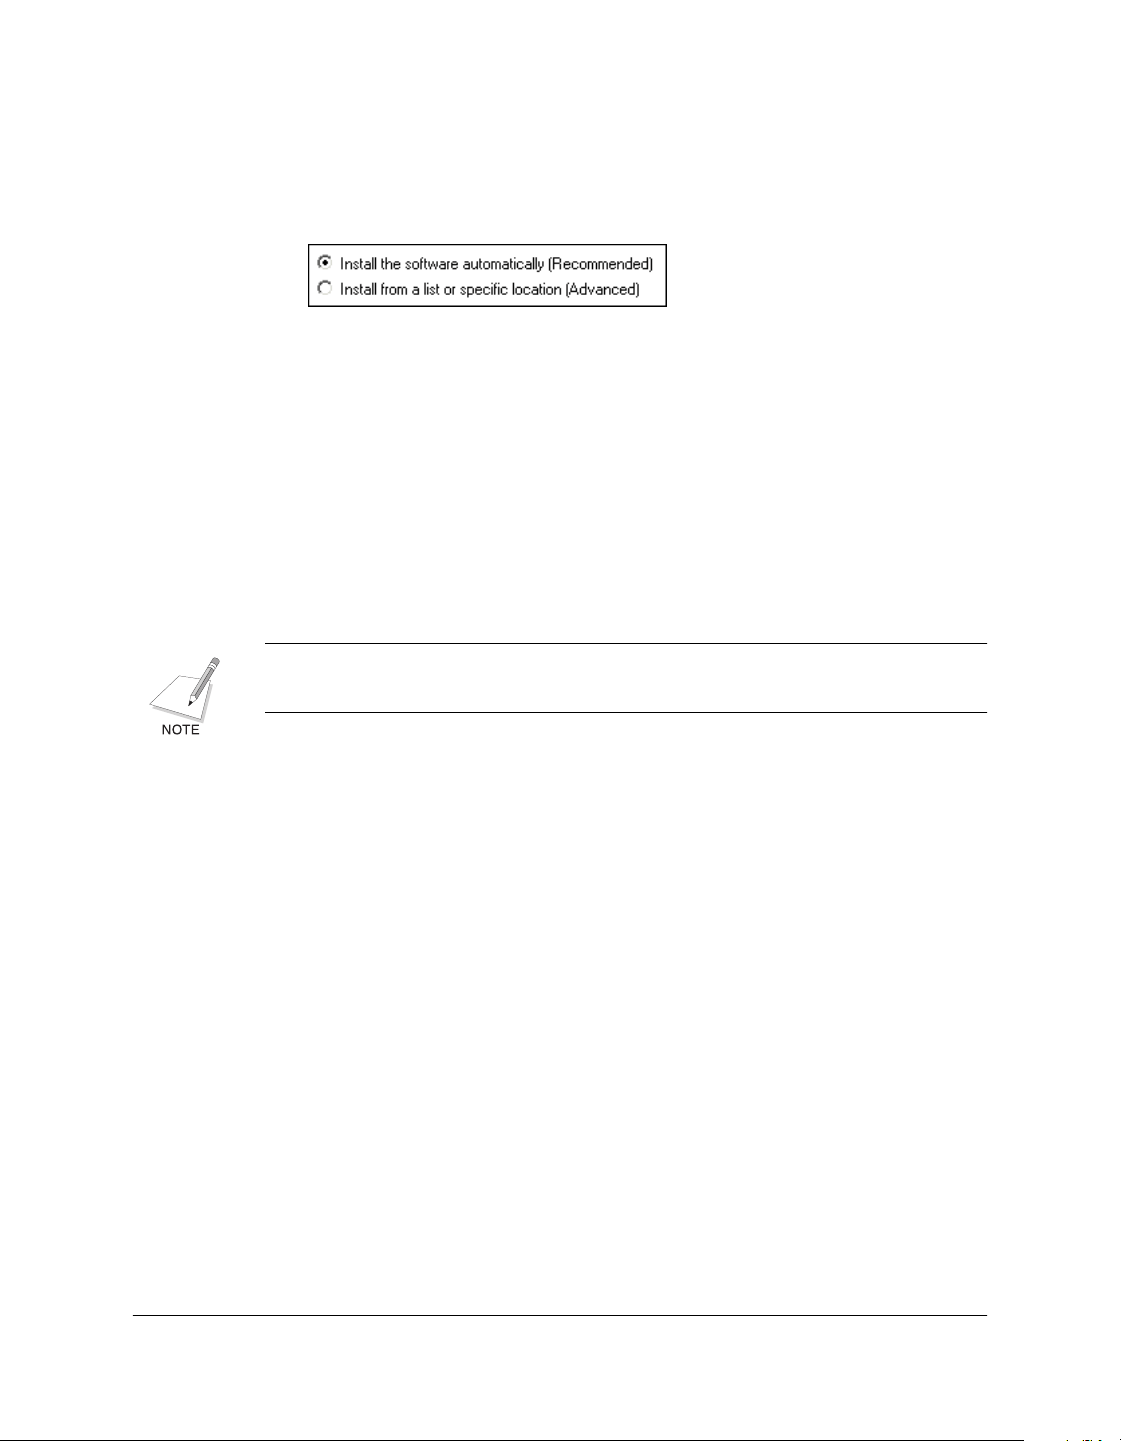
For Windows XP
• Select Install the software automatically (Recommended).
8. When the setup is finished, if prompted, restart Windows.
The installation program determines whether Windows needs to be
restarted on your system.
Setting the Default Printer 2
When you install the printer driver software, the system automatically
sets the printer as the default printer. If necessary, however, follow these
instructions to set the default printer.
To set the default printer:
1. On the Windows desktop, click Start, point to Settings, and then click
Printers (in Windows XP, click Start, and then click Printers and
Faxes).
2. In the Printers window (in Windows XP, the Printers and Faxes
window), click the printer icon.
3. On the File menu, click Set As Default (Windows 98/Me) or Set as
Default Printer (Windows 2000/XP).
Sharing the Printer Installation 2
You may be using your computer and the printer connected to your
computer in an environment where multiple computers are connected by
a network. In this case, you can share the use of your printer with the
other computers on the network.

Chapter 2 Installing the Printer Driver 2-7
Installing the Printer
Driver
If you choose to share the use of your printer, your computer acts as the
host system or server to the other computers (also referred to as remote or
client systems).
To use your printer, the client systems must have the printer driver
software installed on them. The software can be installed on the client
systems directly from your system. Based on which Windows operating
system you are using, the following client systems can share your printer:
If your system (server) is: Install on client system:
Windows 98/Me Windows 98/Me
Windows 2000/XP Windows 98/Me or Windows 2000/XP
When a document is printed by the client system on a shared printer, any
printing messages (status or error messages) display on the server
system.
Setting Up Your Printer for Sharing 2
Before the client systems can be installed with the printer driver software,
you must set up the printer for sharing on the server system.
To set up the printer for sharing:
1. On the server system, on the Windows desktop, click Start, point to
Settings, and then click Printers (in Windows XP, click Start, and then
click Printers and Faxes).
2. In the Printers window (in Windows XP, the Printers and Faxes
window), click the printer icon.
3. On the File menu, click Sharing.
If the Sharing command is not available, you need to set up printer
sharing in Windows. For details, see your Windows user
documentation.
4. In the Properties dialog box, on the Sharing tab, click Shared As (in
Windows XP, Share this Printer).

2-8 Installing the Printer Driver Chapter 2
5. In the Share Name box (Windows 98/Me/XP) or Shared As box
(Windows 2000), type a name you want to assign to the shared
printer.
If available, you may also want to assign a password, which would
then be required by the client system when using the printer.
6. If your situation matches the following, set up an additional driver to
match the button in OS:
•Windows 2000/XP server system sharing with Windows 98/Me
client systems.
For detailed instructions, see Appendix A in this guide.
7. In the Properties dialog box, click OK.
Installing the Printer Driver on a Client System 2
Once the printer has been set up for sharing, the printer driver can be
installed from the server system to the appropriate client systems.
To install the printer driver on a client system:
1. On the client system, on the Windows desktop, click Start, point to
Settings, and then click Printers (in Windows XP, click Start, and then
click Printers and Faxes).
2. In the Printers window, double-click Add Printer (in Windows XP, in
the Printers and Faxes window, click Add a printer).
3. Follow the on-screen instructions.
Install the printer driver as a network printer, based on the name
assigned to the shared printer.
You cannot install the printer driver on a client system that has
MultiPASS software installed on it.

Chapter 2 Installing the Printer Driver 2-9
Installing the Printer
Driver
Removing the Printer Driver 2
As needed, you can remove the printer driver from your system.
To remove the printer driver:
1. On the Windows desktop, click Start, point to Settings, and then click
Control Panel (in Windows XP, click Start, and then click Control
Panel).
2. In Control Panel, double-click Add/Remove Programs (in Windows
XP, double-click Add or Remove Programs).
3. In the Add/Remove Programs Properties dialog box (in Windows
XP, the Add or Remove Programs dialog box), click Canon
FAXPHONE L80, and then click the Add/Remove button (Windows
98/Me) or the Change/Remove button (Windows 2000/XP).
4. Follow the on-screen instructions.
5. After the printer driver has been removed, restart your computer.
Changing the Port Connection 2
To change the port, disconnect the USB cable from the port on your
computer, and reconnect the cable to another USB port or hub.
When changing the port connection, it is not necessary to uninstall and
reinstall the printer driver software.

2-10 Installing the Printer Driver Chapter 2

Chapter 3 Printing 3-1
Printing
Chapter 3
3Printing
Contents of this chapter:
❏ Printing a Document...............................................................................3-2
❏ Defining Print Settings: an Overview...................................................3-2
• Viewing a Summary of Print Settings...........................................3-5
❏ Defining Page Settings............................................................................3-6
• Defining a Custom Paper Size........................................................3-7
• Defining a Print Overlay...............................................................3-13
❏ Defining Quality Print Settings ...........................................................3-15
• Conserving Toner When Printing................................................3-16
❏ Adding a Print Profile...........................................................................3-17
• Using a Print Profile.......................................................................3-18
❏ Editing a Print Profile ...........................................................................3-19
• Changing Information About a Print Profile .............................3-20
• Adjusting the Display Order ........................................................3-20
• Exporting a Print Profile ...............................................................3-21
•Importing a Print Profile...............................................................3-22
• Deleting a Print Profile..................................................................3-23
❏ Displaying Printer Driver Information ..............................................3-23
❏ Defining Default Print Settings ...........................................................3-23

3-2 Printing Chapter 3
Printing a Document 3
Once you have installed the software, you are ready to print a document,
from any Windows application that supports printing, such as Word for
Windows.
Predefined printer settings are initially installed, enabling you to print
immediately. These settings determine what your documents look like
when printed. For example, they define such settings as the paper size
and page orientation.
Instructions for printing a document can vary somewhat for different
Windows applications. Therefore, for detailed instructions, see the user
documentation for the specific application from which you are printing.
The following instructions summarize the general procedures for printing
a document.
To print a document:
1. With your document open, click the command to print your
document. (In most Windows applications, the Print command is on
the File menu or toolbar.)
2. In the Print dialog box, make sure the printer is selected under Printer
(Windows 98/Me) or Select Printer (Windows 2000/XP).
3. Click the command to print your document (usually OK or Print).
Defining Print Settings: an Overview 3
Print settings determine how your document looks when it is printed.
Although predefined print settings are initially installed with the
software, you may want to change these settings for certain documents.
Print settings can be changed to suit the type of document you are
printing. For example, if you regularly print draft copies of reports, you
can define print settings to suit your printing requirements.
Chapter 3 Printing 3-3
Printing
You can change a number of print settings, such as the paper size, page
layout, resolution, and halftoning method. If you use certain print
settings often, you can save the settings as a print profile and reuse the
profile as needed.
The following instructions summarize the general procedures for
changing printer settings, based on your version of Windows. For
detailed information on specific print settings, see the sections that
immediately follow these instructions.
To define print settings (Windows 98/Me):
1. On the Windows desktop, click Start, point to Settings, and then click
Printers.
2. In the Printers window, right-click the printer icon. On the displayed
menu, click Properties.
3. In the Properties dialog box, on the Page Setup or Quality tab, specify
the desired printer settings.
3-4 Printing Chapter 3
4. To accept the changes and close the dialog box, click OK.
To accept the changes and leave the dialog box open, click Apply.
To cancel the changes and return to the default settings, click Restore
Defaults.
To close the dialog box without accepting any changes, click Cancel.
To define print settings (Windows 2000/XP):
1. On the Windows desktop, click Start, point to Settings, and then click
Printers (in Windows XP, click Start, and then click Printers and
Faxes).
2. In the Printers window (in Windows XP, the Printers and Faxes
window), right-click the printer icon. On the displayed menu, click
Printing Preferences.
3. On the Page Setup or Quality tab, specify the desired printer settings.
Chapter 3 Printing 3-5
Printing
4. To accept the changes, close the dialog box, and print the document,
click OK.
If available, to accept the changes and leave the dialog box open, click
Apply.
To cancel the changes and return to the default settings, click Restore
Defaults.
To close the dialog box without accepting any changes or printing the
document, click Cancel.
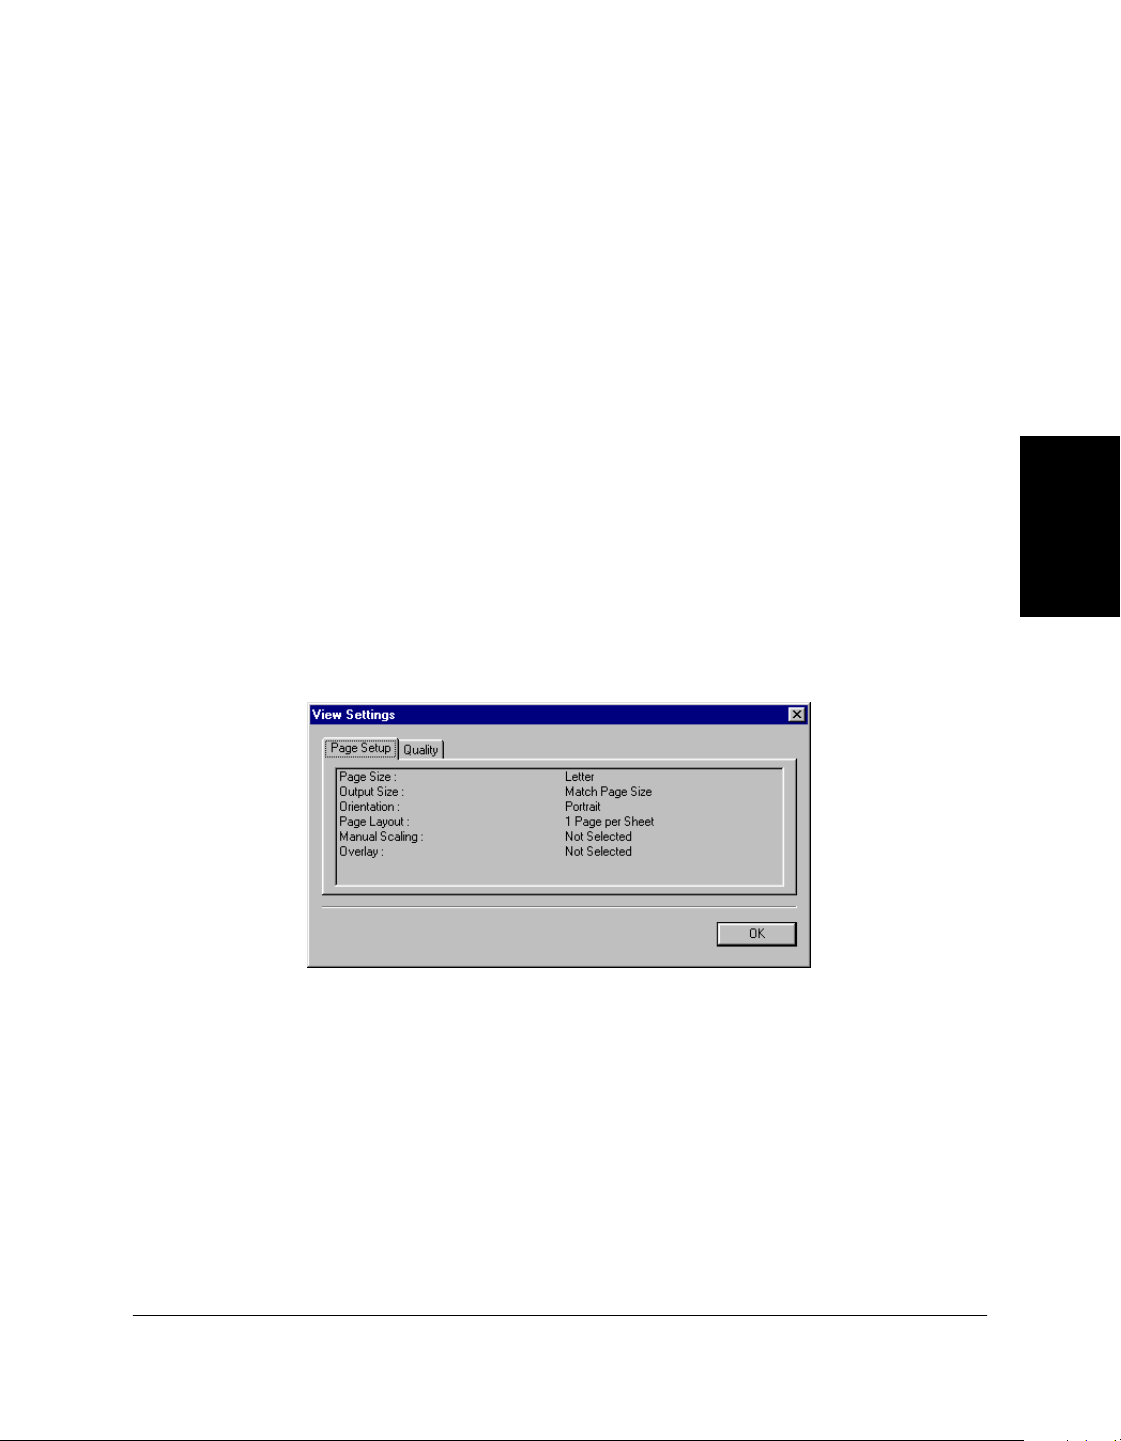
Viewing a Summary of Print Settings 3
As you work with the individual print settings on the different tabs, you
can view a summary of the current settings at any time.
To view a summary of print settings:
On Page Setup or Quality tab, click View Settings.
3-6 Printing Chapter 3
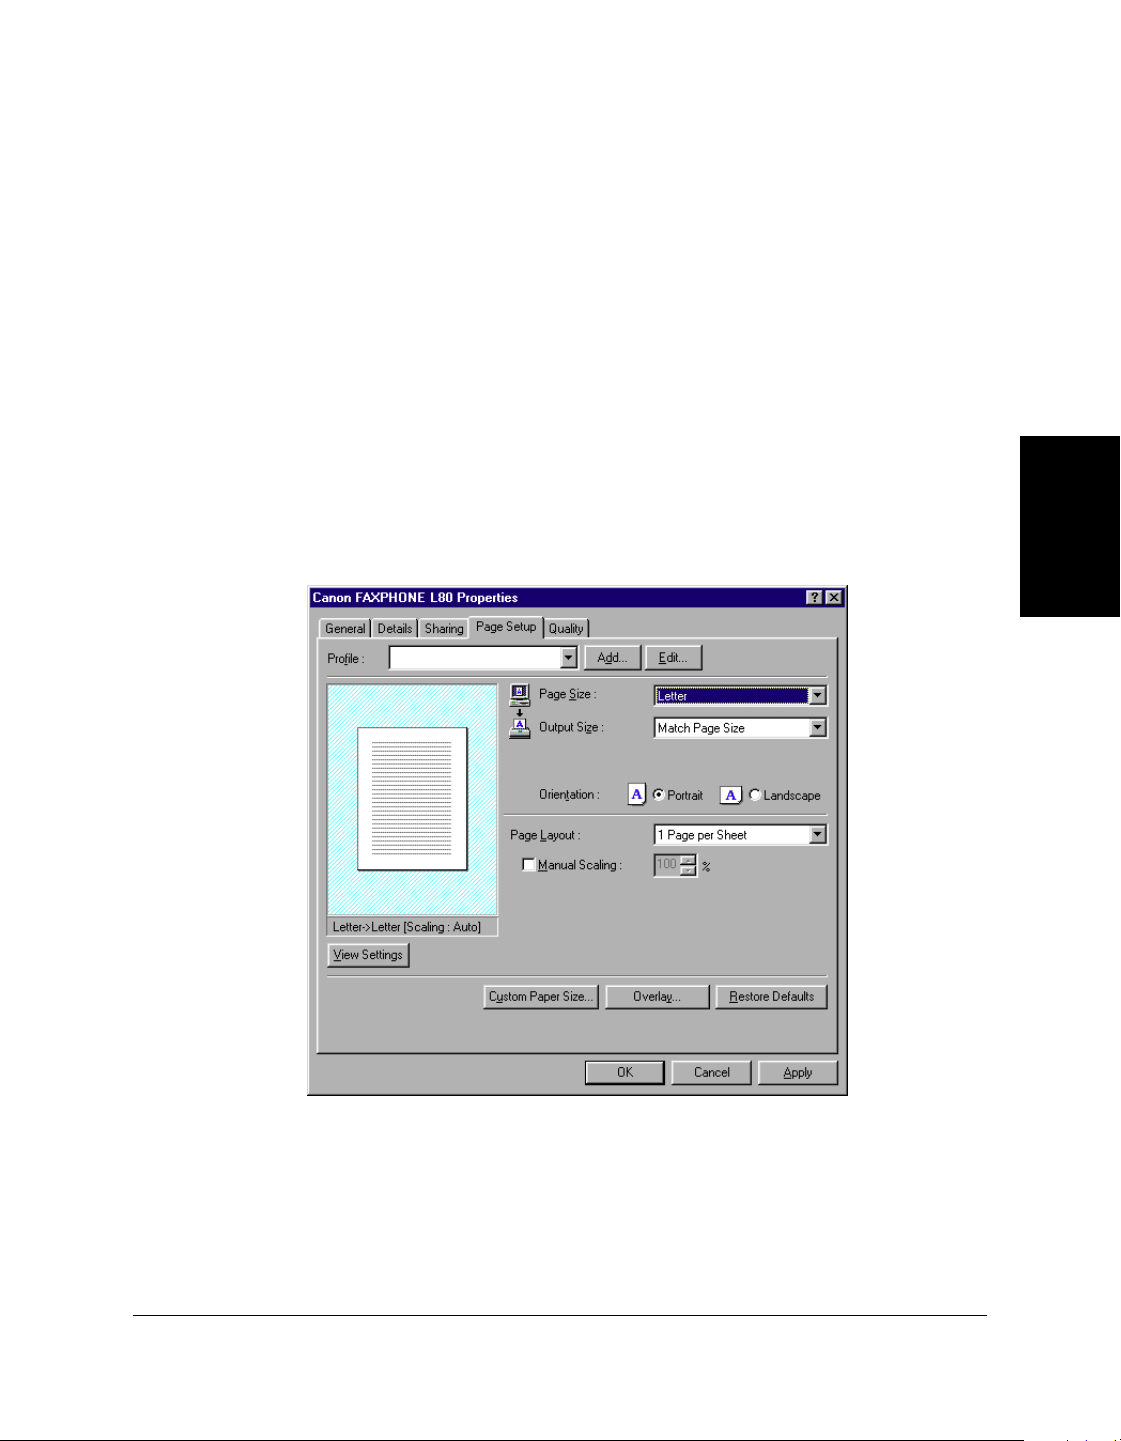
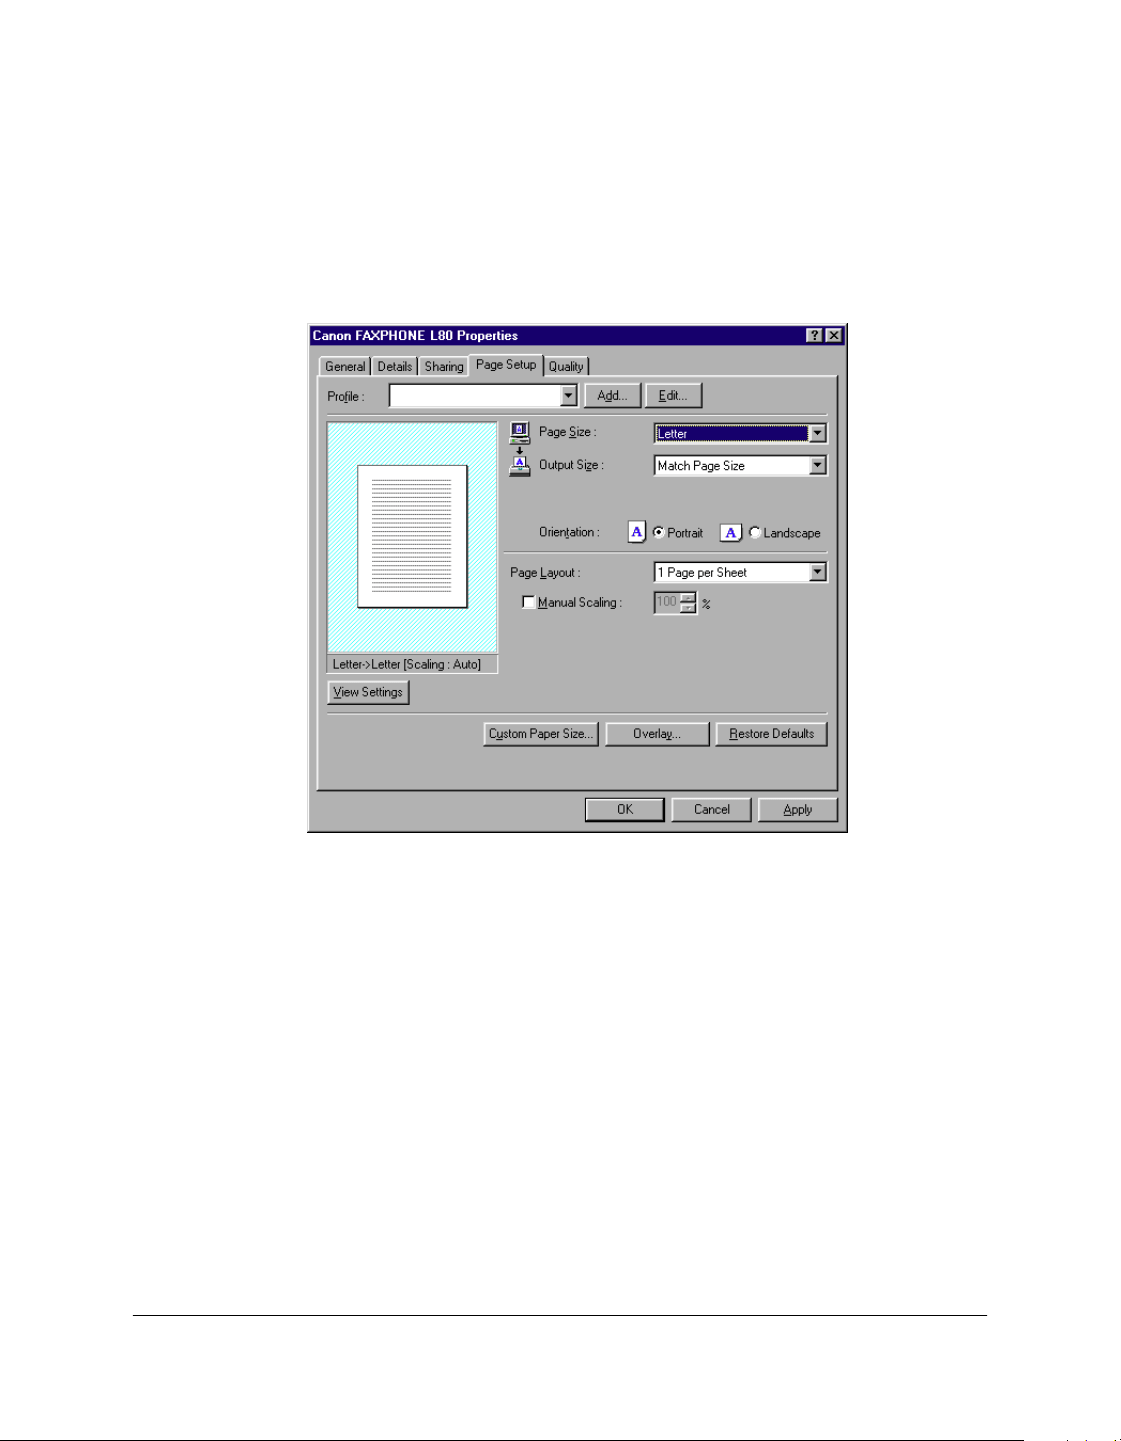
Defining Page Settings 3
Page settings determine the following print results, as defined on the
Page Setup tab in the Properties dialog box (Windows 98/Me) or Printing
Preferences dialog box (Windows 2000/XP).
❏ Page Size
Click the size of the page you want to use for your printed document.
Usually, the page size specified here is the page size you specified
when you created your document in the Windows application.
If you want to define a custom size, see the “Defining a Custom Paper
Size” section in this chapter for details.
❏ Output Size
Click Match Page Size to specify that the print size should be
maintained based on the specified page size. If you click another
output size, the content of the document is automatically reduced or
enlarged to match the output size.

Chapter 3 Printing 3-7
Printing
❏ Orientation
Click Portrait or Landscape to determine how your document is
oriented on the page when printed. Portrait prints the content of your
document across the narrower dimension of a rectangular sheet of
paper. Landscape prints the content of your document across the
wider dimension of a rectangular sheet of paper.
❏ Page Layout
Click how many document pages you want to print on a single sheet
of paper.
If you specify to print more than one page on a sheet, in the Page
Order box, click the order in which you want the document pages to
appear on the printed page.
❏ Manual Scaling
If you select to print only one document page per sheet of paper, click
to reduce or enlarge the contents of the document when printed, and
then type or click the percentage of reduction or enlargement.
Defining a Custom Paper Size 3
When selecting the page or output size, you can choose a custom form
size. The software is initially installed with the following custom-sized
form names: Form 1, Form 2, Form 3. You redefine these custom forms as
needed, based on your preferred height and width dimensions.
The procedures for defining a custom paper size are different based on
whether you are using Windows 98/Me or Windows 2000/XP.
Defining a Custom Paper Size (Windows 98/Me)
Follow these instructions to define a custom paper size if you are using
Windows 98/Me.
To define a custom paper size:
1. On the Page Setup tab, click Custom Paper Size.
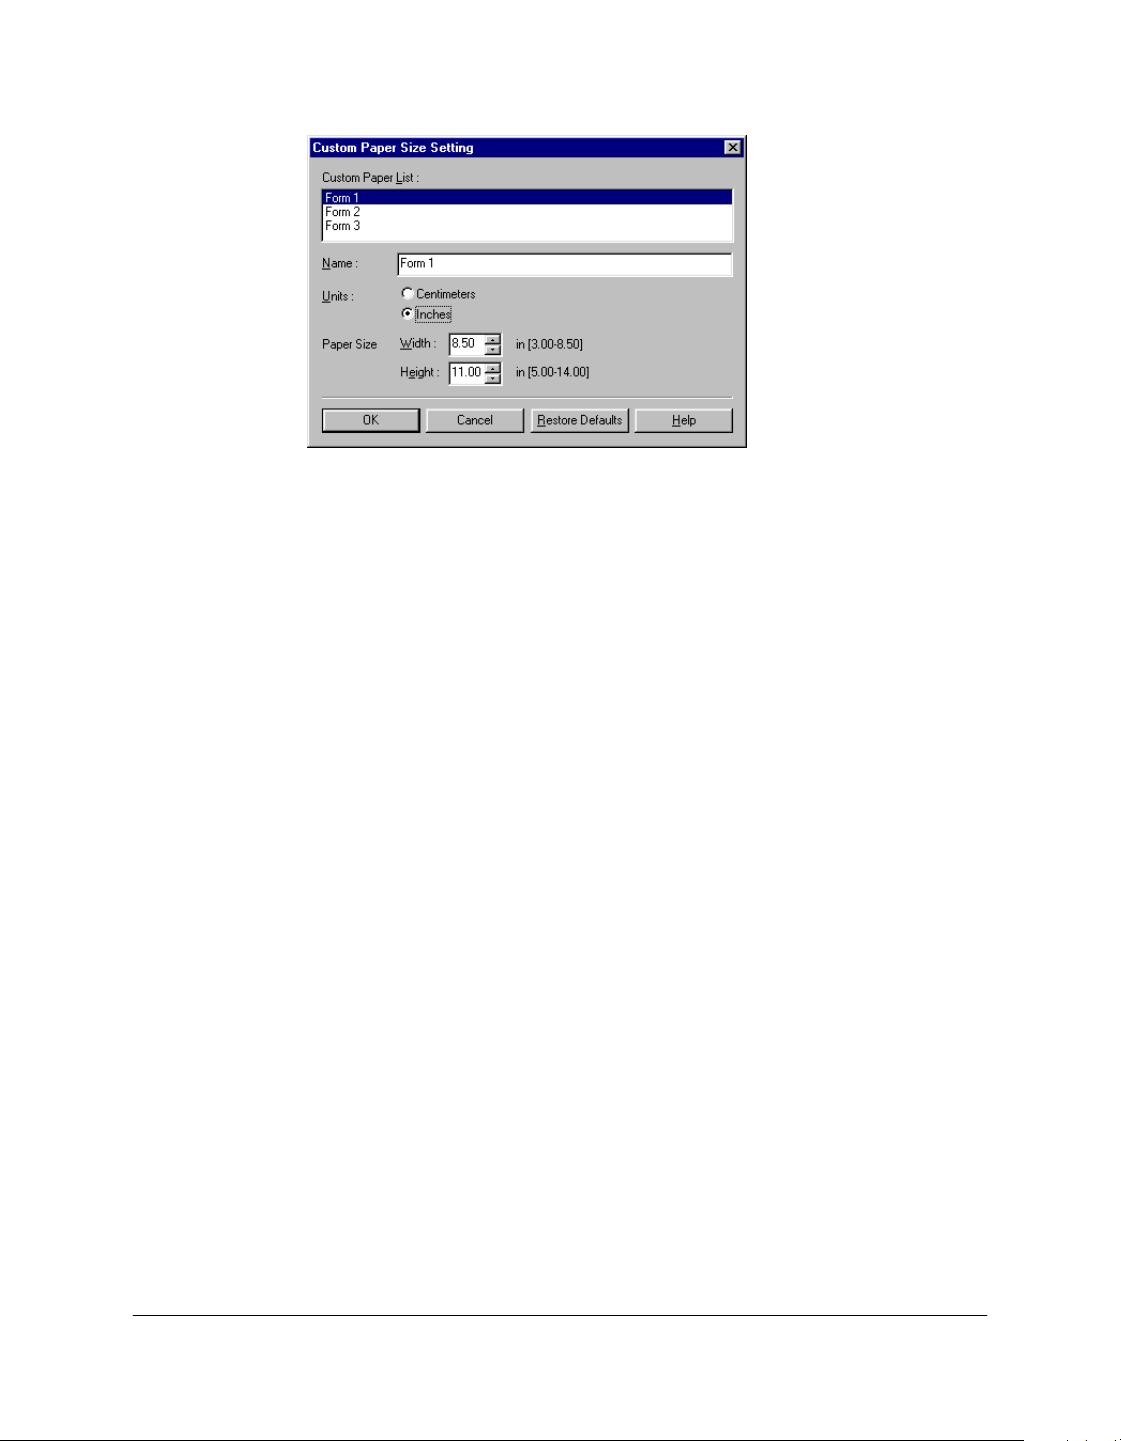
3-8 Printing Chapter 3
2. In the Custom Paper Size Setting dialog box, under Custom Paper
List, click an existing form name.
3. If you want to assign a new name to the custom-sized form you are
defining, type a name in the Name box.
4. Click the unit of measure by which you want to define the size of
your paper.
5. In the Paper Size boxes, type or click the width and height of the
custom size.
You must set the height greater than the width.
6. To save the custom size, click OK.
To return the settings to their default values, click Restore Defaults.
To cancel the changed settings, click Cancel.
Your custom-sized paper is now available in the Page Size and Output
Size boxes on the Page Setup tab.
Defining a Custom Paper Size (Windows 2000/XP)
Follow these instructions to define a custom paper size if you are using
Windows 2000/XP.

Chapter 3 Printing 3-9
Printing
Meeting Size Requirements
When defining the custom form, the size and printer area margins you set
must meet certain requirements.
When setting the custom size:
The width and height must meet the following minimum and maximum
measurements:
❏ Width: 3.00 inches (7.62 cm) to 8.50 inches (21.59 cm)
❏ Height: 5.00 inches (12.70 cm) to 14.00 inches (35.56 cm).
The height must be greater than the width.
When setting the printer area margins:
The margins must be set as follows (if you set the custom-sized width less
than 8.35 inches (21.20 cm)):
❏ Top margin: 0.08 inch (0.20 cm)
❏ Bottom margin: 0.24 inch (0.60 cm)
❏ Left margin: 0.08 inch (0.20 cm)
❏ Right margin: 0.08 inch (0.20 cm).
If you set the custom-sized width greater than 8.35 inches (21.20 cm), you
must calculate the left and right printer area margins as follows:
[width] minus 8.19 inches (20.80 cm) divided by 2 equals [left/right
margin]
For example, if you set the width to 8.50 inches (21.59 cm), calculate the
left and right margins as follows:
8.50 inches (21.59 cm) minus 8.19 inches (20.80 cm) divided by 2
equals 0.155 inch (0.395 cm)
3-10 Printing Chapter 3
Defining and Assigning the Custom Form
First, you need to define the custom-sized form to make it available on
your system. Next, you assign the newly defined form as an available
setting in your printer driver.
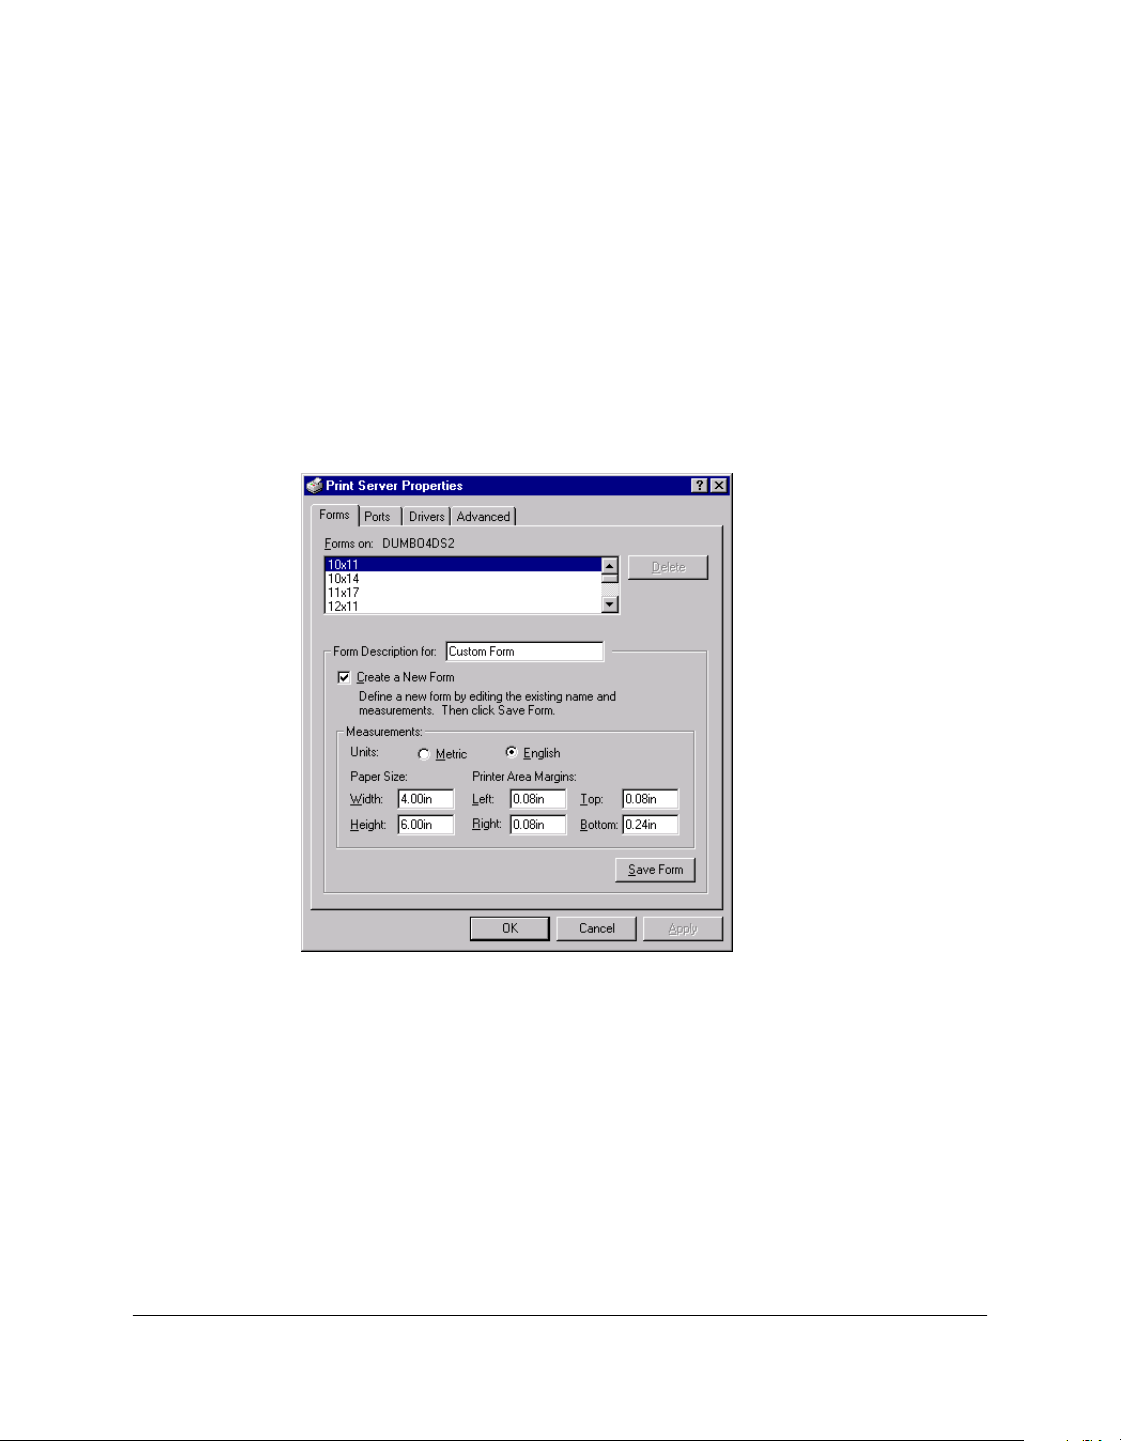
To define a custom form on your system:
1. On the Windows desktop, click Start, point to Settings, and then click
Printers (in Windows XP, click Start, and then click Printers and
Faxes).
2. In the Printers window (in Windows XP, the Printers and Faxes
window), on the File menu, click Server Properties.
3. In the Print Server Properties dialog box, on the Forms tab, click
Create A New Form.
4. In the Form Description For box (in Windows XP, Form name box),
type a name or description for your custom-sized form.
5. Click the unit of measure by which you want to define the
dimensions of your form.
In Windows XP,
the dialog box
screen is
different.
Chapter 3 Printing 3-11
Printing
6. In the Paper Size boxes, type the width and height of your form.
7. In the Printer Area Margins boxes, type the appropriate margins for
your form.
8. Click Save Form, and then click Close to close the dialog box.
To assign the custom form in your printer driver:
1. In the Printers window (in Windows XP, Printers and Faxes
window), right-click the printer icon.
2. On the displayed menu, click Properties.
3. In the Printer Properties dialog box, click the Select Forms tab.
4. In the Selected Forms list, click the form name that you want to
replace with your custom-sized form.
5. Click Change Forms.
3-12 Printing Chapter 3
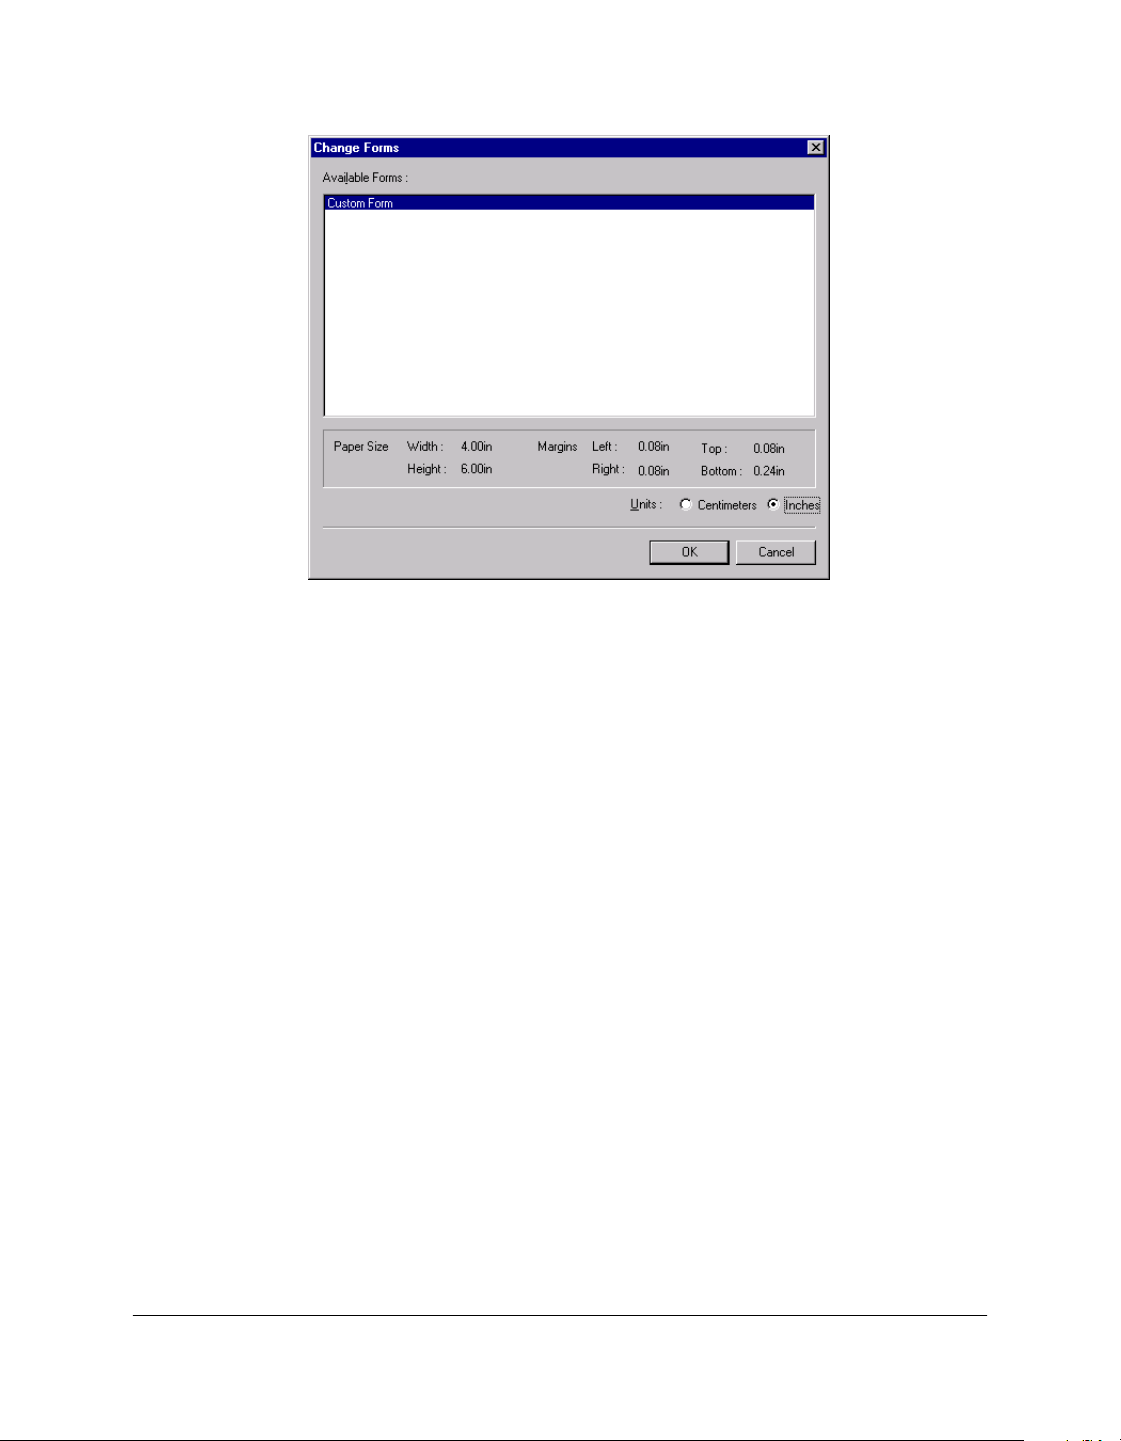
6. In the Change Forms dialog box, in the Available Forms list, click the
custom-sized form to want to assign.
You can click the preferred unit of measure for reviewing the size of
the selected form.
7. Click OK.
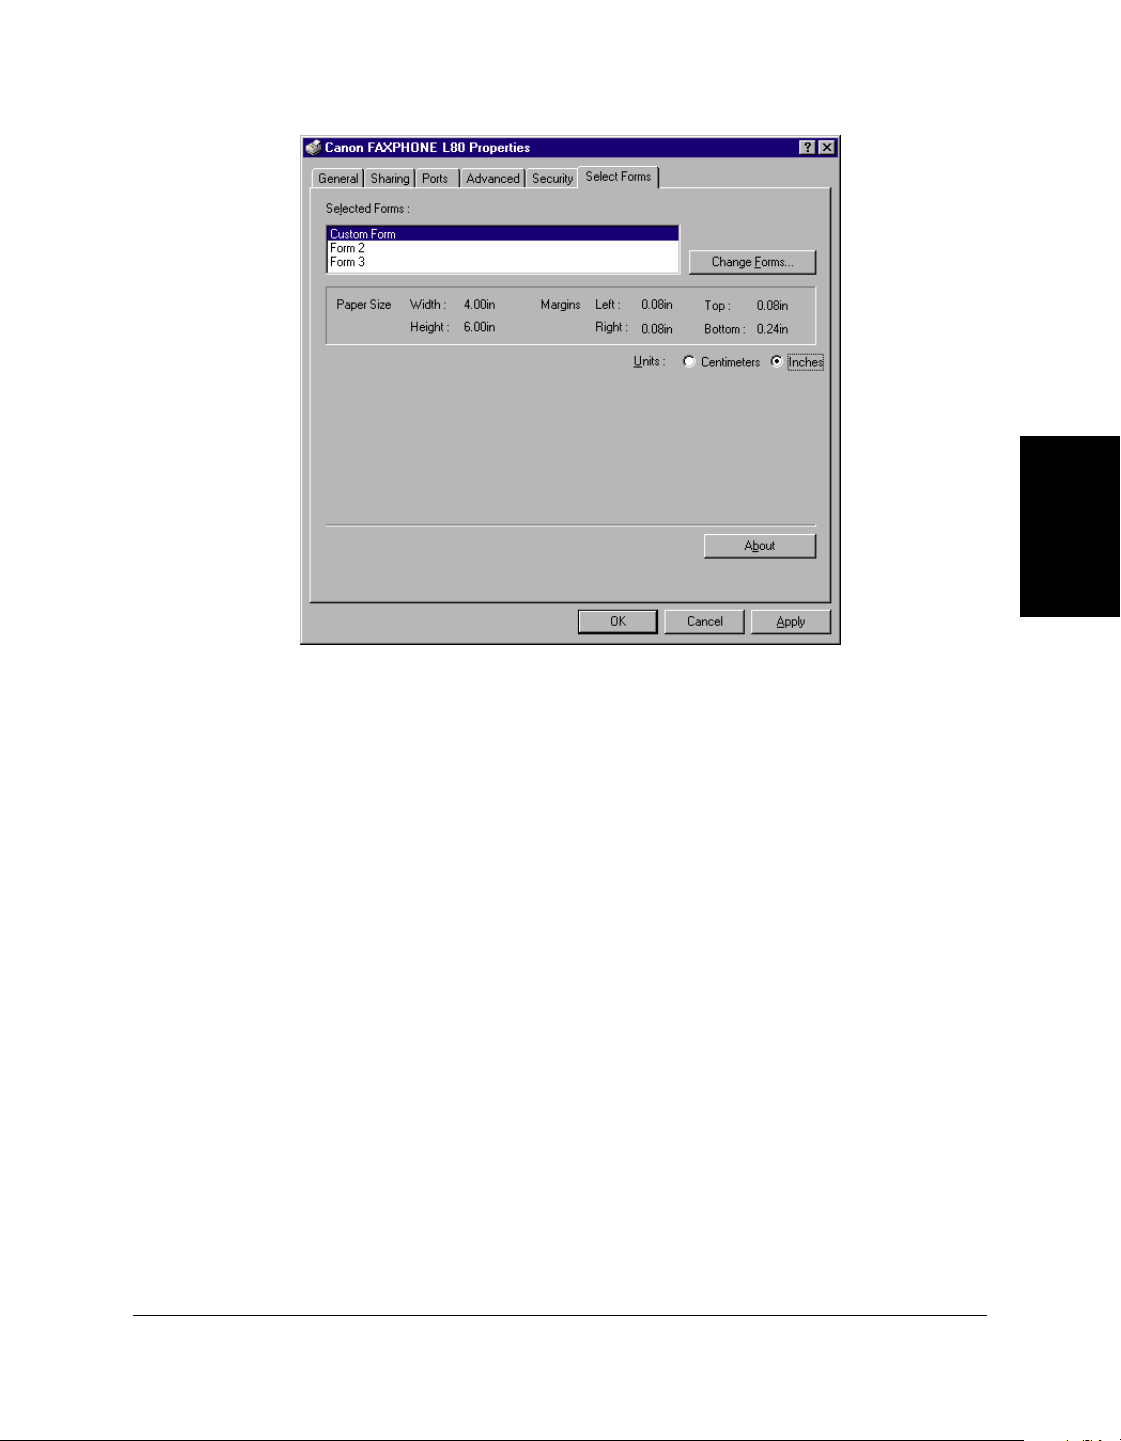
Chapter 3 Printing 3-13
Printing
The custom-sized form becomes available in your printer driver and can
be selected in the Page Size and Output Size boxes on the Page Setup tab.
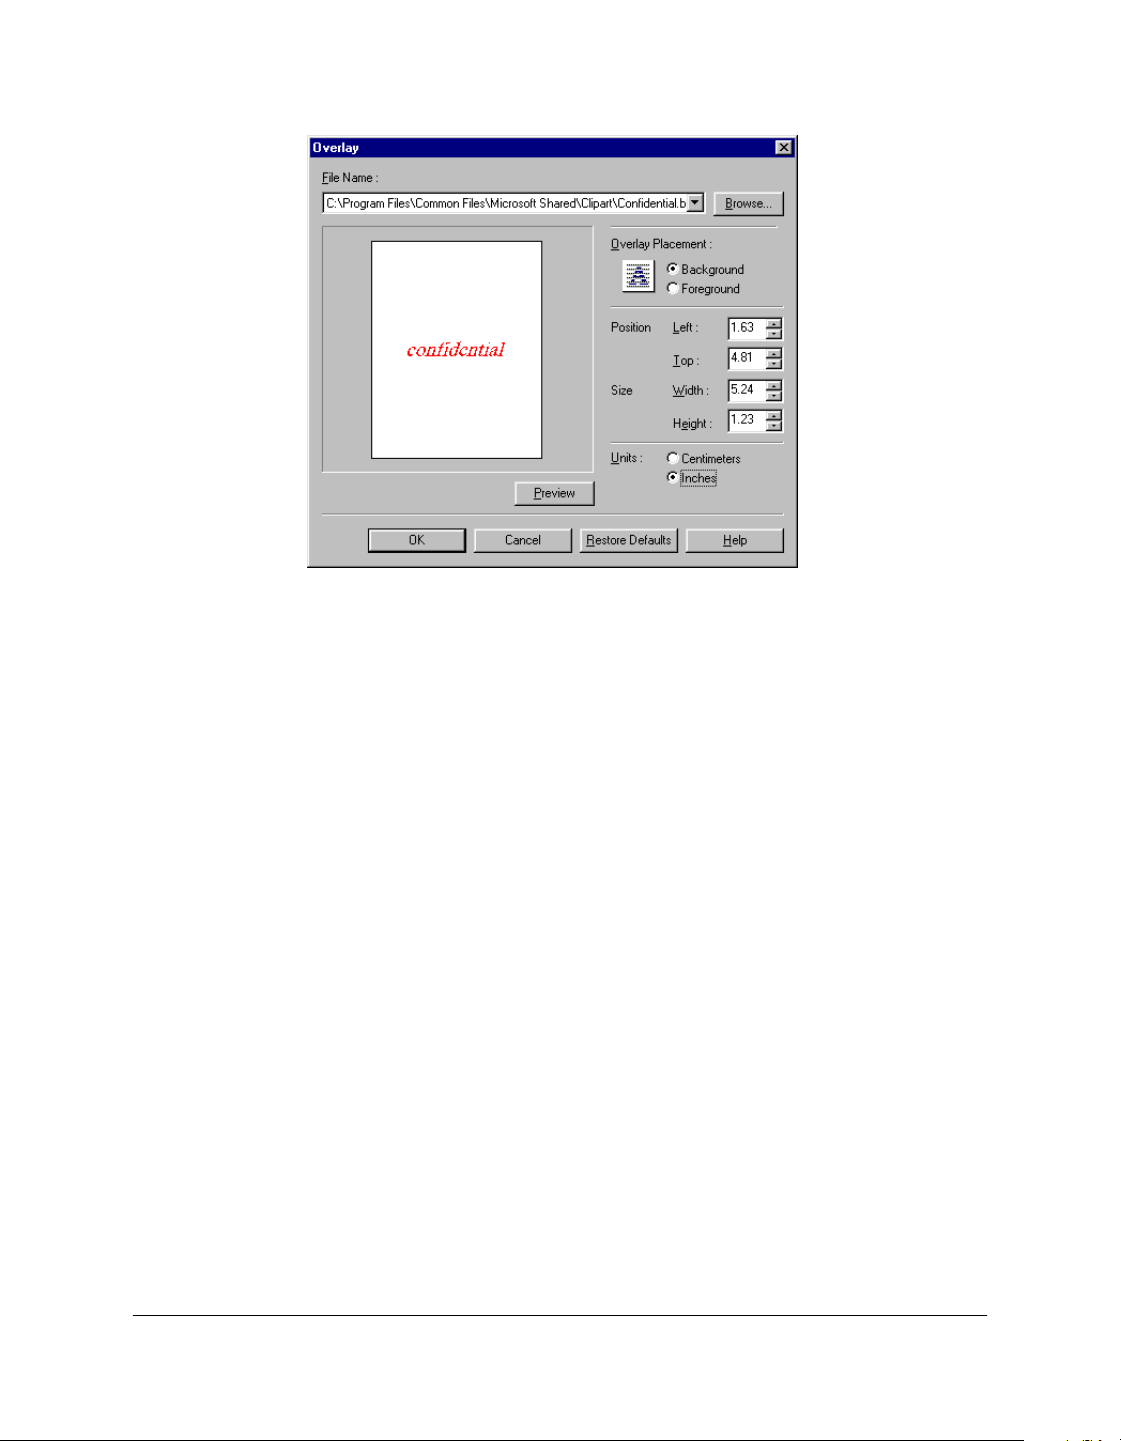
Defining a Print Overlay 3
You can print your document with an image in the foreground or
background. For example, you may want to print your company’s logo
on letters. Once you select the image you want to use, you can set the
placement, position, and size of the overlay. As you define the settings, a
graphic illustration provides a preview of the overlay image.
The overlay image file must be available in Windows bitmap (.bmp) or
metafile (.wmf) format.
To define a print overlay:
1. On the Page Setup tab, click Overlay.
3-14 Printing Chapter 3
2. In the Overlay dialog box, do one of the following:
• In the File Name list, click an existing overlay image.
• To select a new overlay image file, click Browse. In the Select File
dialog box, type or click the path and file name for the image that
you want to use, and then click OK (in Windows XP, click Open).
3. Under Overlay Placement, click whether you want the image in the
foreground or background of your printed document.
4. Click the unit of measure by which you want to define the position
and size of the overlay image.
5. In the Position boxes, type or click the desired position of your
background image, from the left and top edges of the paper.
6. In the Size boxes, type or click the height and width of the overlay
image.
7. To update the preview overlay image if you type, rather than click,
the position and size, click Preview.
Chapter 3 Printing 3-15
Printing
When you type, rather than click, the actual values, the preview
illustration of the overlay image does not automatically reflect the
changes.
8. To save your overlay settings, click OK.
To return the position and size settings to their original values, click
Restore Defaults.
To cancel your changed settings, click Cancel.
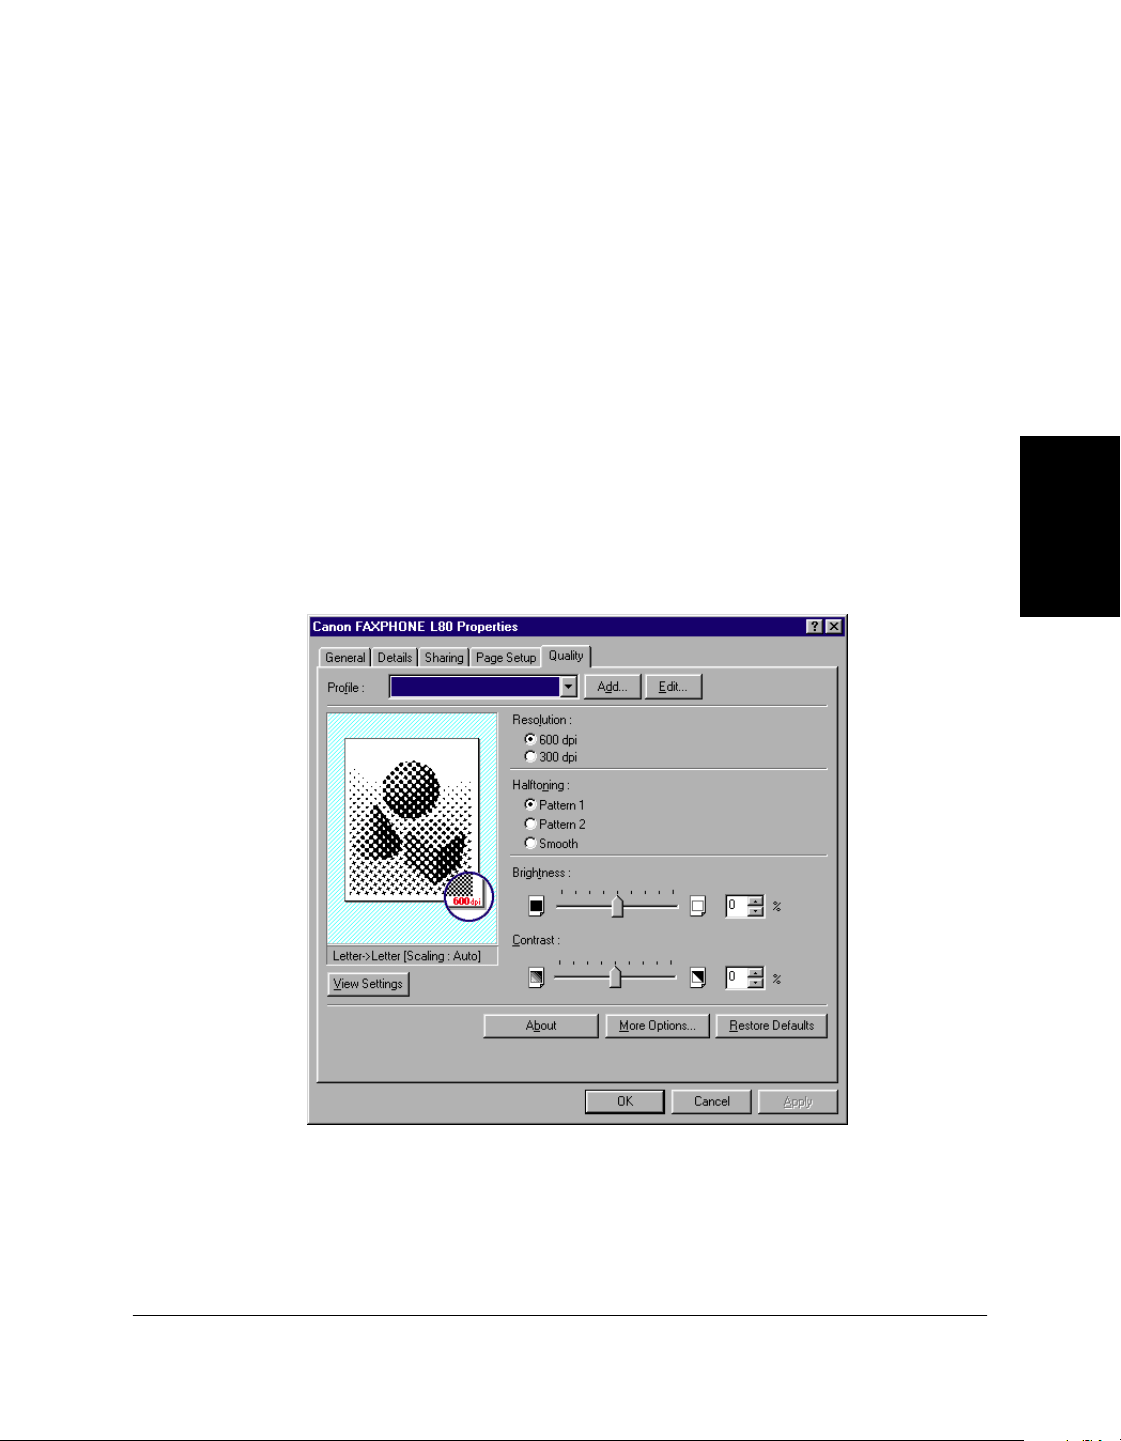
Defining Quality Print Settings 3
Quality print settings determine the following print results, as defined on
the Quality tab.

3-16 Printing Chapter 3
❏ Resolution
Click the resolution, in dots per inch (dpi) for your printed document.
Usually, the higher the resolution, the sharper the appearance of the
document. However, print speed may be slower.
❏ Halftoning
Click the desired halftoning method, that determines the dark and
light shadings in your grayscale images:
• Pattern 1
Click for standard halftoning.
• Pattern 2
Click for halftoning that uses a different pattern than Pattern 1.
•Smooth
Click for near-photographic quality printing.
❏ Brightness
Move the slider, or type or click the percentage, to increase or
decrease the level of brightness of your image. The lower the
brightness, the darker the image.
❏ Contrast
Move the slider, or type or click the percentage, to increase or
decrease the level of difference between the darker and lighter parts
of your image. The lower the contrast, the smaller the difference
between the darker and lighter parts of the image.
Conserving Toner When Printing 3
You can conserve the amount of toner that is used when printing a
document. For example, if you are printing a draft copy of a report, you
may prefer to print with a reduced amount of toner, until you are ready to
print the final version.
To conserve toner when printing:
1. On the Quality tab, click More Options.
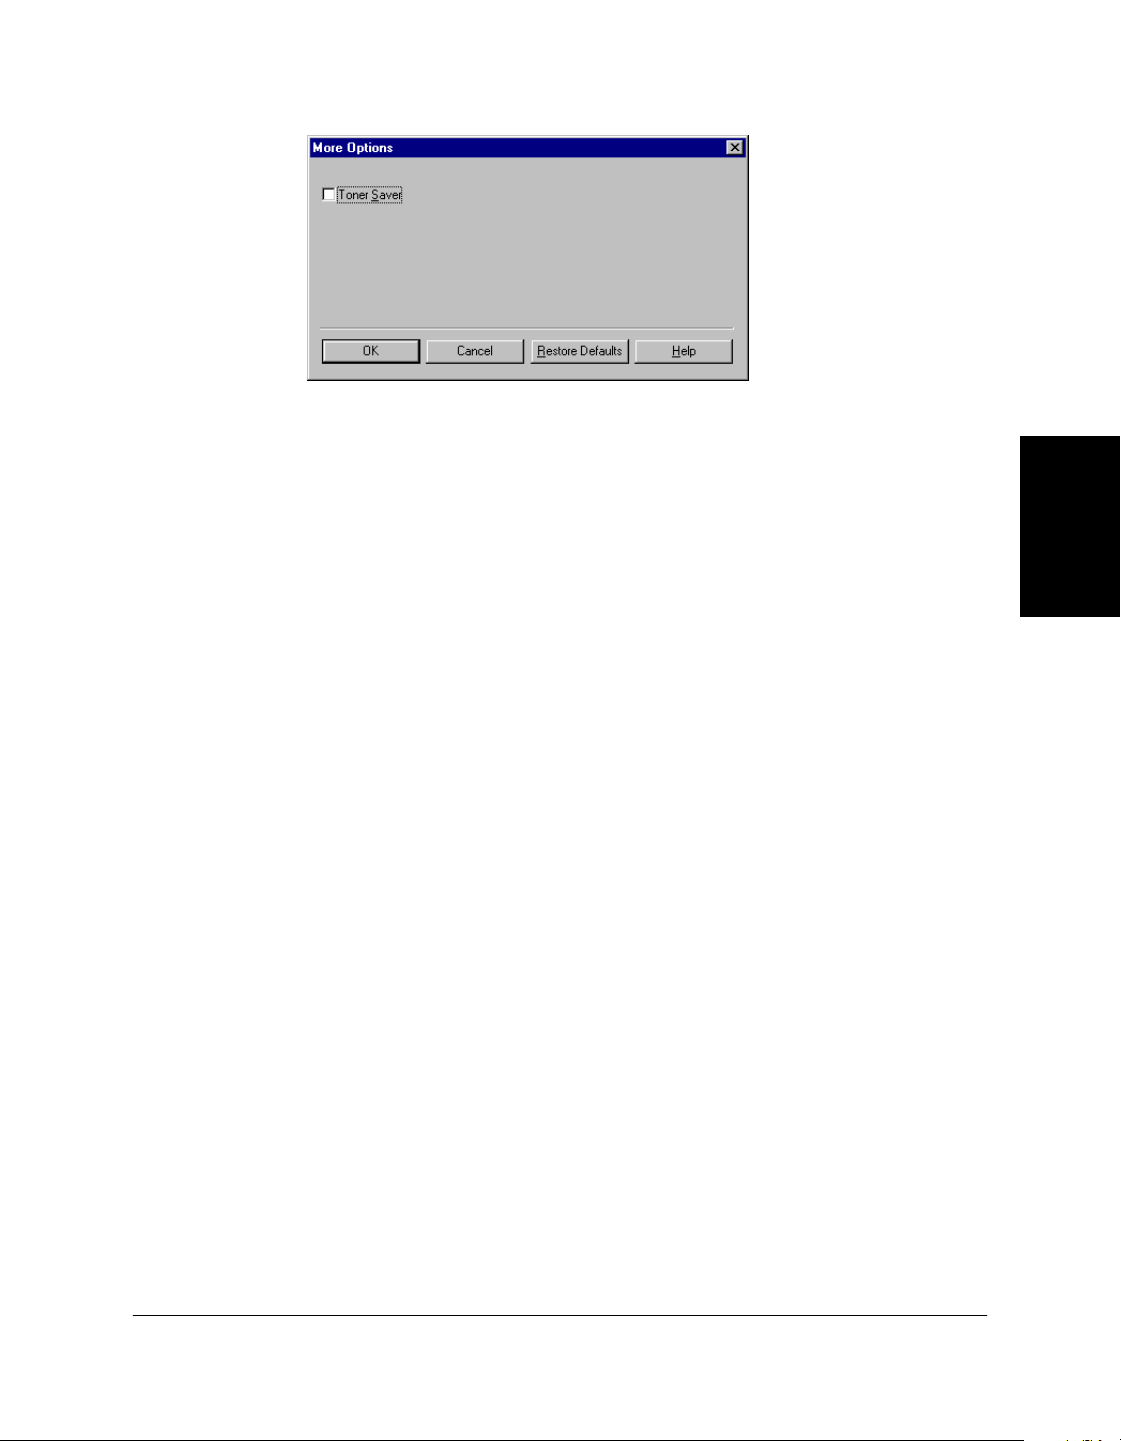
Chapter 3 Printing 3-17
Printing
2. In the More Options dialog box, click Toner Saver.
3. To save your setting, click OK.
To return the setting to its default value, click Restore Defaults.
To cancel your changed setting, click Cancel.
Adding a Print Profile 3
After you define the settings on the Page Setup and Quality tabs, you can
save the settings as a print profile for future use. For example, one print
profile may be appropriate when printing a Word document, and another
when printing a Photoshop graphic. To quickly set options for printing
your next document, you can select your saved print profile.
To add a print profile:
1. On the Page Setup and Quality tabs, define your print settings, and
then click Add.
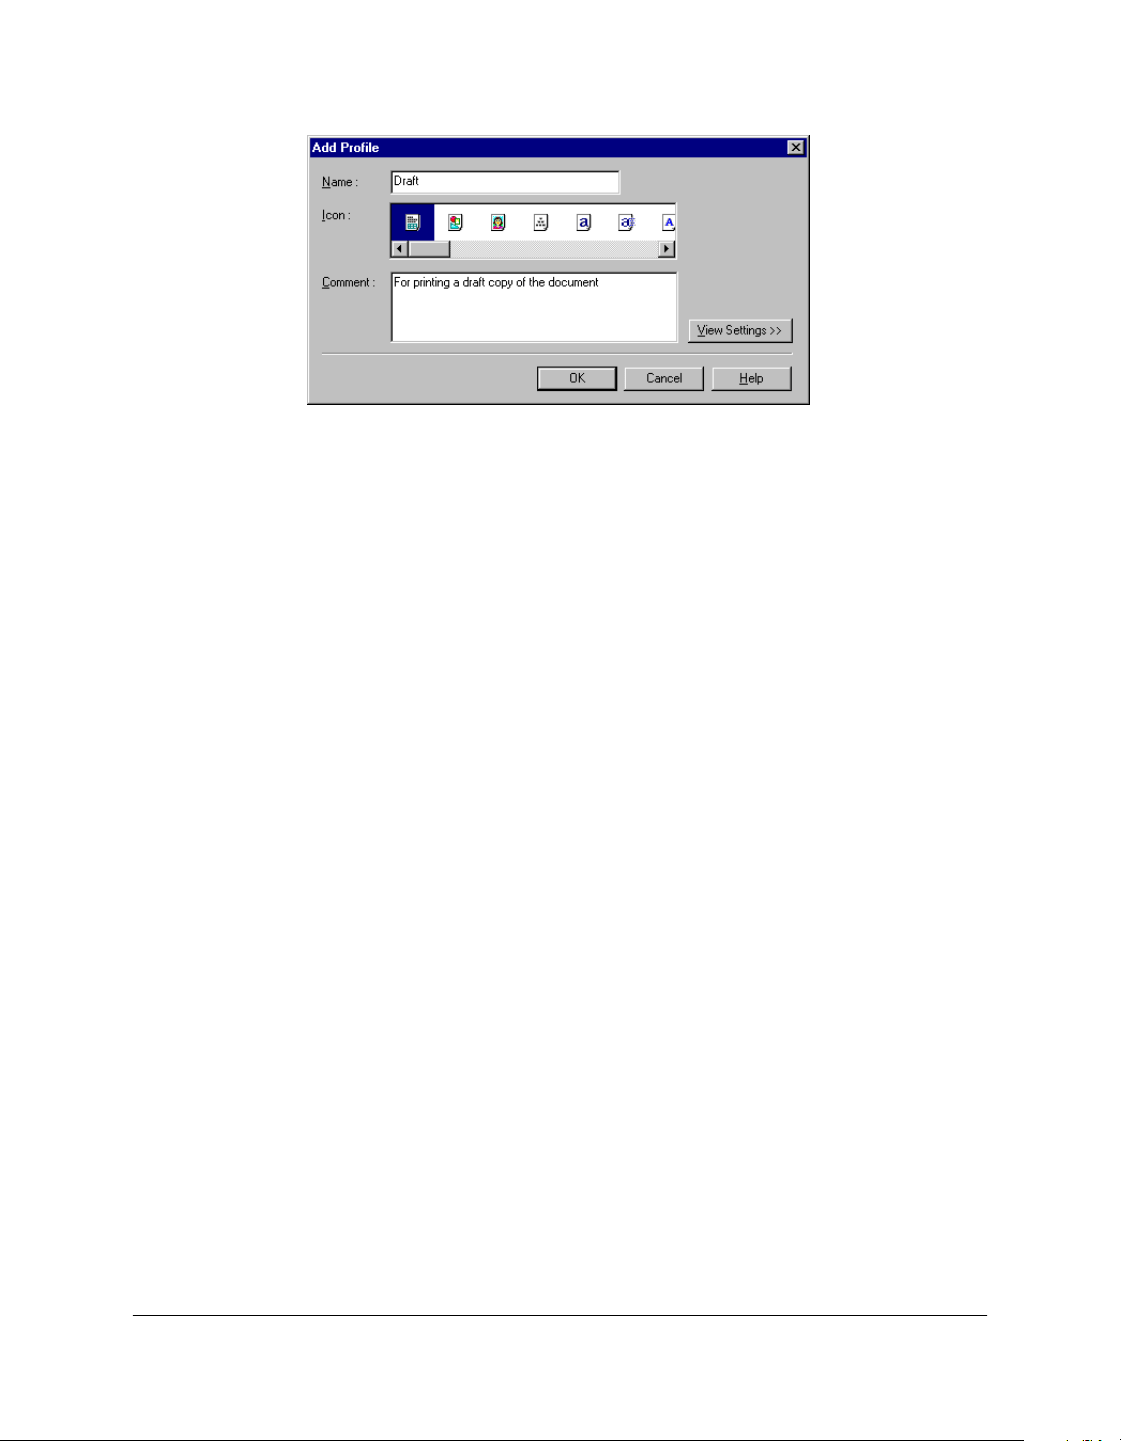
3-18 Printing Chapter 3
2. In the Add Profile dialog box, enter a name for the new print profile
in the Name box.
3. In the Icon box, click an icon to associate your new print profile.
4. In the Comment box, type an internal description of the print profile.
5. To review the print settings that will be saved as a print profile, click
View Settings.
6. To save the profile, click OK.
To cancel your settings, click Cancel.
Using a Print Profile 3
Once you have added print profiles, you can use any particular profile
when printing a document.
To use a print profile:
On the Page Setup or Quality tab, click the desired print profile in the
Profile box.
The settings saved for the selected profile appear on the tabs.

Chapter 3 Printing 3-19
Printing
Editing a Print Profile 3
After adding print profiles, you can edit a print profile to accomplish one
of the following:
❏ Change information about a print profile (name, icon, or comments)
❏ Adjust the display order of the existing profiles
❏ Export a print profile to a file
❏ Import a print profile from a file
❏ Delete a print profile.
To edit a print profile:
On the Page Setup or Quality tab, click Edit.
For further instructions, see the corresponding sections that follow.
3-20 Printing Chapter 3
Changing Information About a Print Profile 3
For easier reference, you may want to assign a different name or icon to a
print profile, or record additional comments about the intended use of the
print profile.
To change information about a print profile:
1. In the Edit Profile dialog box, in the Profile List box, click the print
profile that you want to edit.
2. Enter your changes for the name, icon, and comments.
3. To save the profile, click OK.
To cancel your settings, click Cancel.
Adjusting the Display Order 3
The print profiles display on the Page Setup and Quality tabs in a
particular order. If the current order is not convenient for you, you can
adjust the display order.
To adjust the display order of the print profiles:
1. In the Edit Profile dialog box, in the Profile List box, click the print
profile that you want to move.
2. Click Move Up or Move Down to move the profile as desired.
3. To save the change, click OK.
To cancel your change, click Cancel.
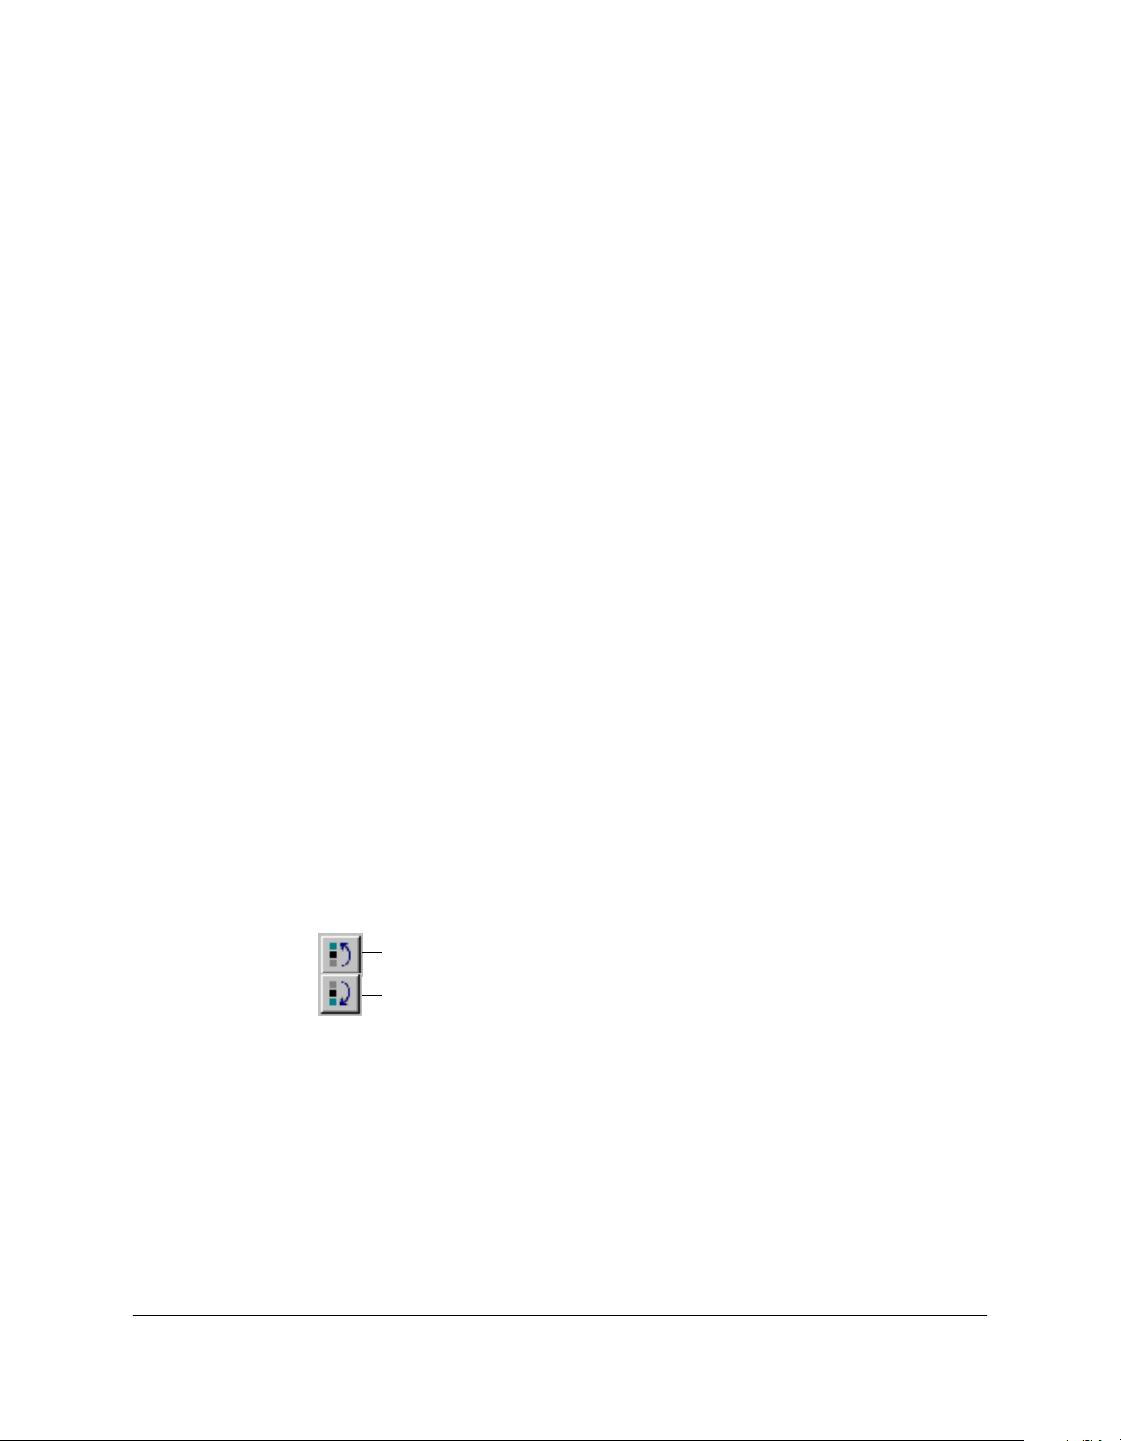
Move Up
Move Down
Chapter 3 Printing 3-21
Printing
Exporting a Print Profile 3
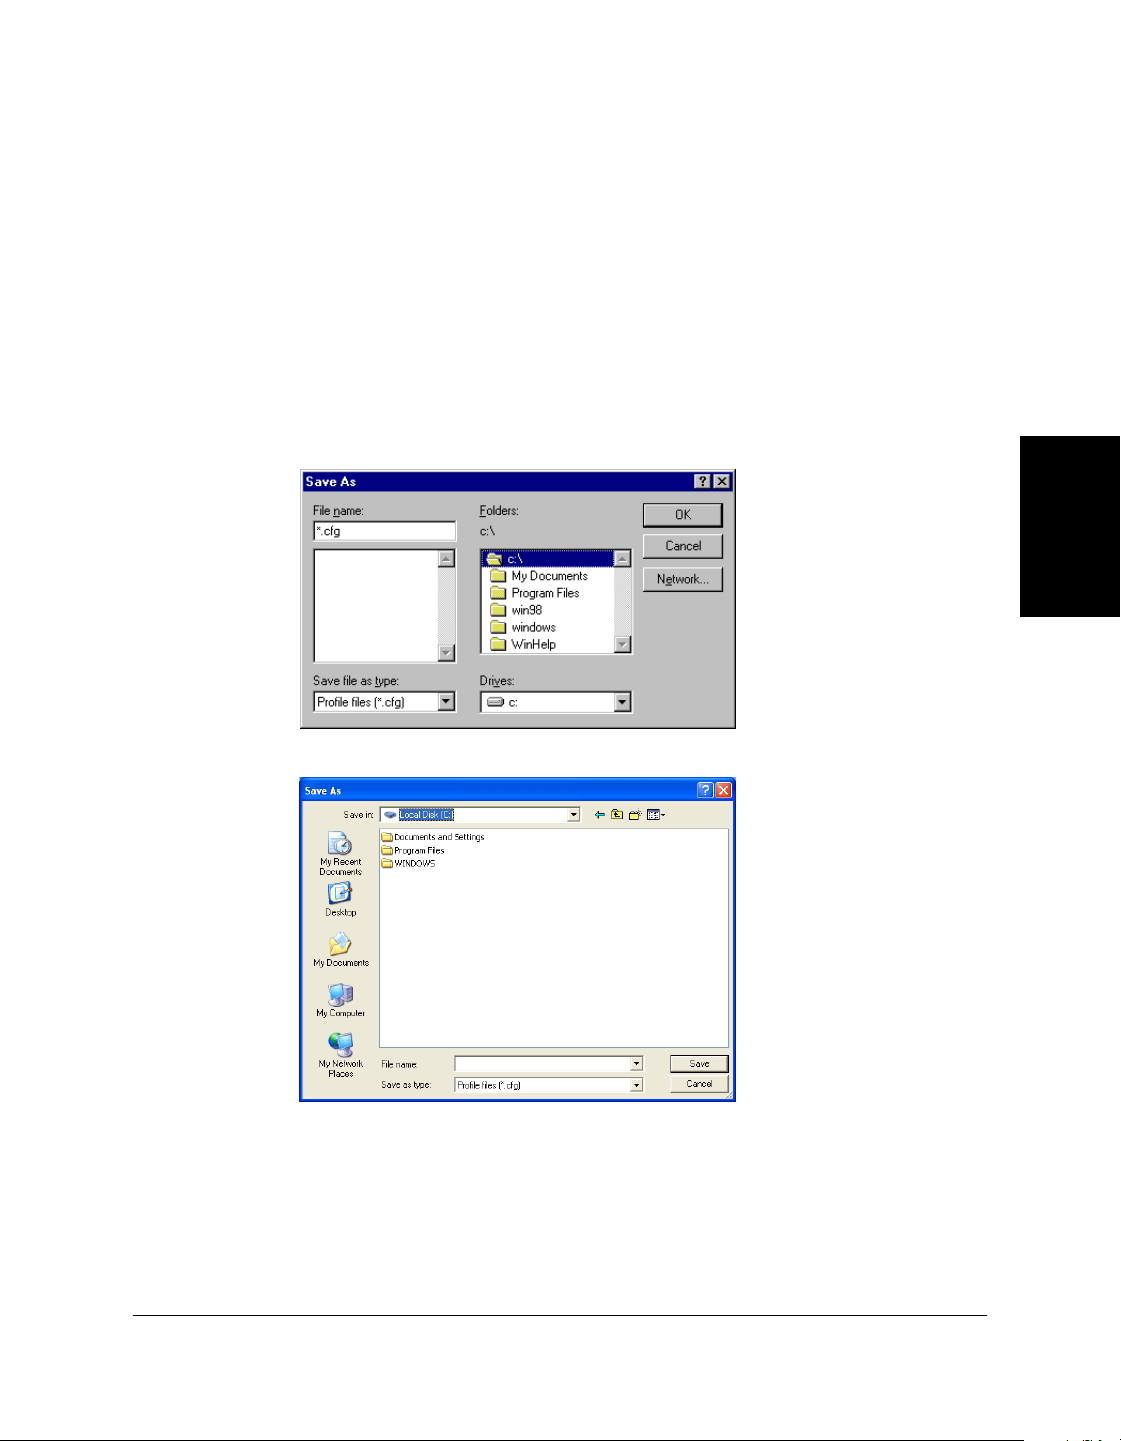
To keep the number of print profiles to a minimum, you can export a
print profile as a file (with the file name extension .cfg). Once a print
profile is exported, you can delete the print profile from the list. Anytime
you need the print profile, you can import the file, to use the print profile
again.
To export a print profile as a file:
1. In the Edit Profile dialog box, in the Profile List box, click the custom
print profile that you want to export, and then click Export.
2. In the Save As dialog box, type or click the path and file name.
3. Click OK (in Windows 2000/XP, click Save).
This is the
Windows 98/Me
dialog box
screen.
This is the
Windows
2000/XP dialog
box screen.
3-22 Printing Chapter 3
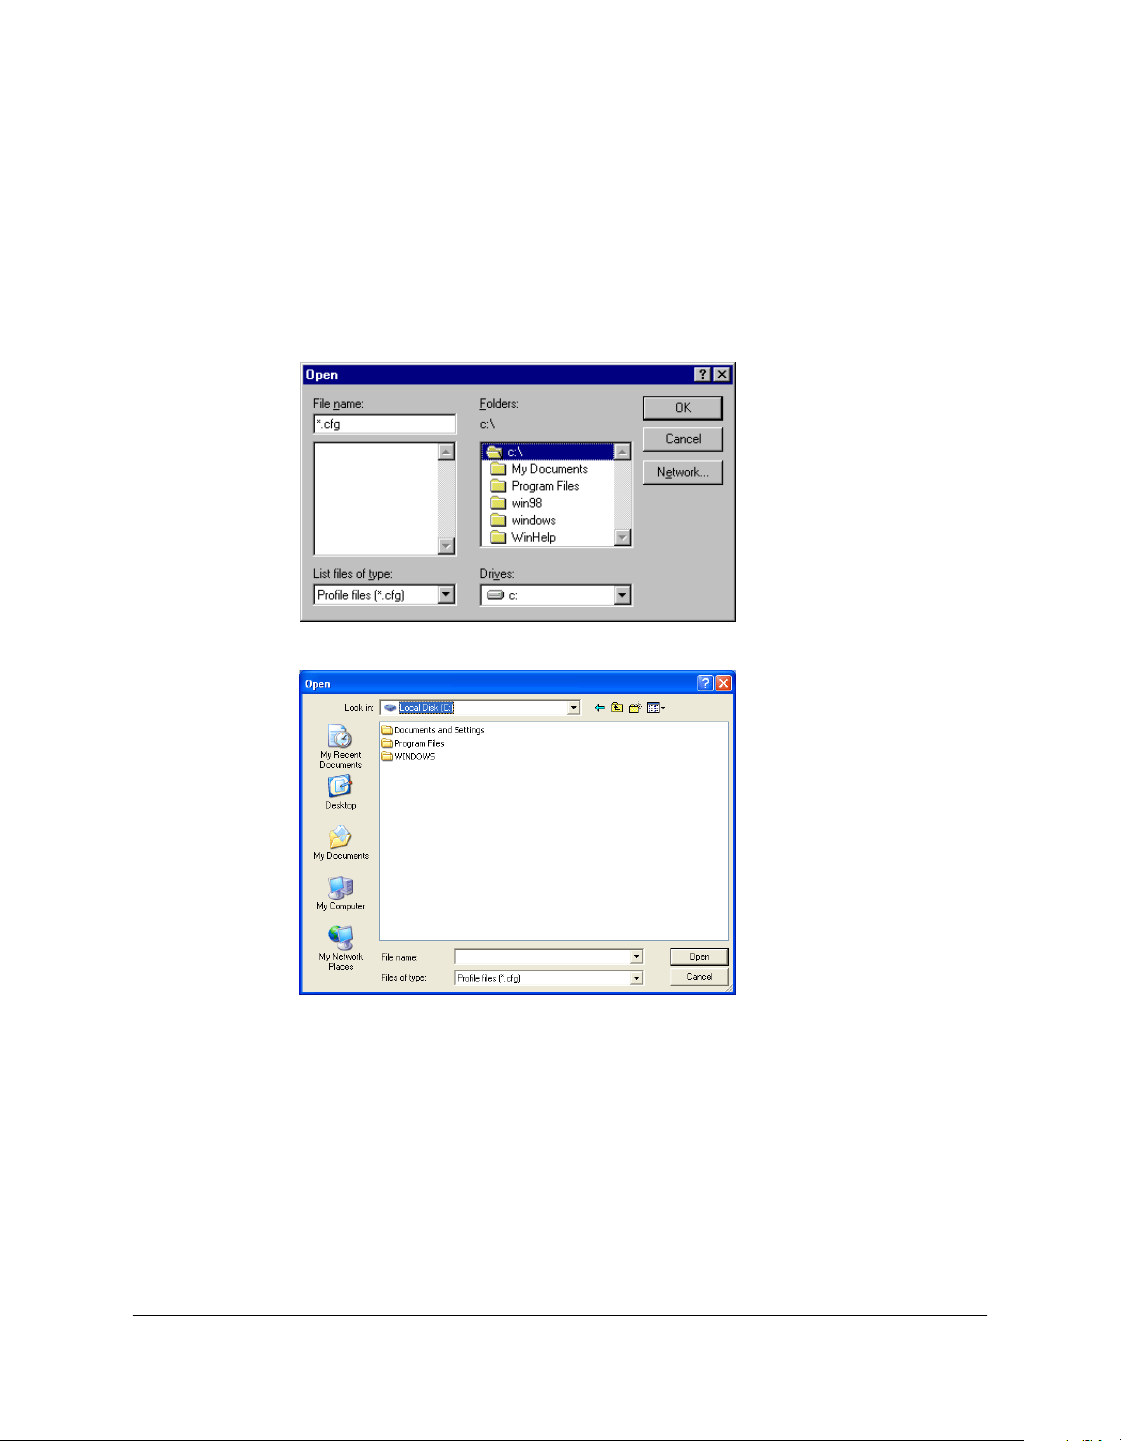
Importing a Print Profile 3
If you have a print profile that you exported to a file and then deleted,
you can import the file to use the print profile again.
To retrieve a print profile from a file:
1. In the Edit Profile dialog box, click Import.
2. In the Open dialog box, type or click the path and file name for the
print profile.
3. Click OK (in Windows 2000/XP, click Open).
This is the
Windows 98/Me
dialog box
screen.
This is the
Windows
2000/XP dialog
box screen.

Chapter 3 Printing 3-23
Printing
Deleting a Print Profile 3
When you decide that you no longer need a print profile, you can delete it
(for example, after exporting the print profile).
To delete a print profile:
1. In the Edit Profile dialog box, in the Profile List box, click the print
profile that you want to delete.
2. Click Delete.
Displaying Printer Driver Information 3
You can display information about your printer driver, such as the
version and copyright.
To display printer driver information:
On the Quality tab, click About.
Defining Default Print Settings 3
You can access printer driver settings directly from the Windows
desktop, before actually printing a document, to change the default print
settings.
To set the default printer settings:
1. On the Windows desktop, click Start, point to Settings, and then click
Printers (in Windows XP, click Start, and then click Printers and
Faxes).
2. In the Printers window (in Windows XP, the Printers and Faxes
window), click the printer icon.
3. On the File menu, click Properties (Windows 98/Me) or Printing
Preferences (Windows 2000/XP).

3-24 Printing Chapter 3
4. In the Properties dialog box (Windows 98/Me), Printing Preferences
dialog box (Windows 2000), Properties dialog box or Printing
Preferences dialog box (Windows XP), on the Page Setup and Quality
tabs, specify your changes and click OK.

Chapter 4 Frequently Asked Questions 4-1
Frequently Asked
Questions
Chapter 4
4Frequently Asked Questions
Contents of this chapter:
❏ Printer Cannot Be Initialized. ................................................................4-2
❏ Installation Is Displaying Unexpected Behavior. ...............................4-2
❏ Documents Are Not Printing Correctly. ..............................................4-4
❏ Paper Is Not Loading Correctly. ...........................................................4-6
❏ The Print Quality Is Not Satisfactory. ..................................................4-6

4-2 Frequently Asked Questions Chapter 4
Printer Cannot Be Initialized. 4
❏ Is the LCD blank?
You might have a power problem. Check that the power cord is plugged
securely into the printer, and that your power source is OK. You should
have the printer connected directly to its own AC outlet and not
connected to a power strip to which your computer is connected.
❏ Is the printer set to the correct port?
Make sure that the printer is configured for the correct port in the Printer
Properties dialog box. Check both ends of the USB cable to be sure that it
is securely fastened.
Installation Is Displaying Unexpected
Behavior. 4
❏ For Windows 2000/XP: Are you not able to complete the installation
of the printer driver?
During the installation, you may be unable to continue beyond the dialog
box prompting you to connect the USB cable to your port. (If you cannot
continue, the system is unable to display the found new hardware
wizard, described in Step 7 in the “Installing the Software” section in
Chapter 2.)
In this situation, you need to exit the setup, remove the device from the
Windows Device Manager, and restart the installation process.
To resolve this situation:
1. Click No in the dialog box prompting you to connect your cable, and
exit the setup.
2. Remove the device from the Windows Device Manager. The device
may appear listed as Canon FAXPHONE L80 or Unknown Device.

Chapter 4 Frequently Asked Questions 4-3
Frequently Asked
Questions
To remove the device: Click Start, point to Settings and then click
Control Panel (in Windows XP, click Start, and then click Control
Panel). In the Control Panel window, double-click System, click
Hardware tab, and then click Device Manager (in Windows XP, click
Performance and Maintenance, click System, and then on the
Hardware tab, click Device Manager). Under Universal Serial Bus
Controllers or Other Devices, click the device and press the Delete
key.
If you are unable to remove the device, disconnect the power cord
from the printer to turn it off, and then reconnect the power cord.
3. Disconnect the USB cable from the port.
4. Start the installation process again. For instructions, see Chapter 2,
“Installing the Printer Driver.”
❏ For Windows 98/Me: Are you not able to complete the installation of
the printer driver?
During the installation, you may be unable to continue beyond the dialog
box prompting you to connect the USB cable to your port.
In this situation, you need to exit the setup, remove the device from the
Windows Device Manager, and restart the installation process.
To resolve this situation:
1. Click No in the dialog box prompting you to connect your cable, and
exit the setup.
2. Remove the device from the Windows Device Manager. The device
may appear listed as Canon FAXPHONE L80 or Unknown Device.
To remove the device: Click Start, point to Settings and then click
Control Panel. In the Control Panel window, double-click System. On
Device Manager tab, under Universal Serial Bus Controllers or Other
Devices, click the device and press the Delete key.
If you are unable to remove the device, disconnect the power cord
from the printer to turn it off, and then reconnect the power cord.
3. Disconnect the USB cable from the port.

4-4 Frequently Asked Questions Chapter 4
4. Start the installation process again. For instructions, see Chapter 2,
“Installing the Printer Driver.”
Documents Are Not Printing Correctly. 4
❏ Is the LCD blank?
You might have a power problem. Check that the power cord is plugged
securely into the printer, and that your power source is OK.
❏ Is the printer warm to the touch?
The printer might have overheated and shut down. Turn the printer off
and let it cool down for several minutes. Try using it again. Be aware that
when you turn the printer off, any unprinted documents are cleared from
printer memory. Unprinted documents can include received faxes
waiting to be printed or scheduled faxes waiting to be sent.
❏ Does paper not come out of the printer?
Make sure the Print Setup option of your printing application shows your
printer as the printer selected.
❏ Does the job not print when using DOS?
The printer driver can be used to print documents only in Windows; it
cannot print a document in DOS.
❏ Is the document printing with undesirable results?
You may experience undesirable results when printing a document if you
have the Windows Printing System (or other bi-directional device, such
as a later model laser printer) installed on your computer and you are
attempting to use the same port on which you also have the printer
connected. Be sure that the printer is the only device configured to a
particular port.

Chapter 4 Frequently Asked Questions 4-5
Frequently Asked
Questions
❏ Is the document not printing?
If your document is not printing, consider the following.
❏ The printer driver may not have installed fully.
To verify if the installation was incomplete, display Programs (in
Windows XP, display All Programs) in the Start menu on the
Windows desktop. If the Canon FAXPHONE L80 item does not
appear, you need to complete the printer driver installation.
To do so, insert the installation disk into your disk drive.
Follow the on-screen instructions to complete the installation.
(If installation does not start automatically, click Start, and then click
Run. In the Run dialog box, type D:\SETUP.EXE (where D: is your
disk drive containing the installation disk), and then click OK.)
❏ You need to check your Windows application settings.
To determine if your Windows application settings may be the
problem, print a test page with your printer driver. To do so, open the
printer properties dialog box. On the General tab, click Print Test
Page.
If the test page prints successfully, the printer and printer driver are
set up appropriately. Therefore, check the settings for your Windows
application.
❏ You may need to remove and reinstall the printer driver.
To determine if you need to remove and reinstall the printer driver,
print a test page (as described in the previous item). If the test page
does not print successfully, remove the printer driver, and then
reinstall (as described in Chapter 2).
❏ Are you unable to print to a shared printer?
If you are using a client system that is set up to use a shared printer, yet
you are unable to print to the shared printer, check the following:
❏ That the server system, to which the printer is connected, is turned on
❏ That the server system has set the printer to be shared

4-6 Frequently Asked Questions Chapter 4
❏ That the server system is set to allow your system access to the shared
printer.
Paper Is Not Loading Correctly. 4
❏ Does paper not load into the printer?
The multi-purpose tray might contain too many sheets or paper might not
be inserted all the way into the multi-purpose tray.
❏ Does paper not feed through one sheet at a time?
Be sure to fan the stack of paper before placing it in the multi-purpose
tray.
❏ Is an envelope not loading correctly?
Make sure you do not stack more than 7 envelopes in the multi-purpose
tray.
The Print Quality Is Not Satisfactory. 4
❏ Is some of the document content not printing?
If some of the document content is not printing, check that the USB cable
is securely plugged in at both ends. Make sure your cable does not exceed
16.4 feet (5 meters). Check your application’s print setup to make sure
your printer is selected.
❏ Does some of the document content not fit on the page?
Make sure paper is aligned correctly in the multi-purpose tray. Check
that margins and paper size are set correctly in your printing application.
Also, check that the scaling is set appropriately in the printer driver
settings. The scaling may be set to enlarge the document page to a size
that is too large for the paper.
❏ Is printing not clear?
Check the print resolution. A higher resolution prints more clearly.

Chapter 4 Frequently Asked Questions 4-7
Frequently Asked
Questions
❏ Do fonts not print smoothly?
Bitmapped fonts designed for dot matrix printers will not look smooth
when printed by your high-resolution printer. Choose another font. Make
sure you install an outline font manager such as Adobe Type Manager or
Bitstream Facelift, or that you choose a TrueType font.
❏ Is the printing not dark enough?
Check the print settings, such as the print resolution, brightness, contrast,
and toner saver. Try replacing the toner cartridge.
❏ Did a toner low warning appear while printing?
If you want to continue printing your document, even though you are
low on toner, change the TONER SUPPLY LOW setting on the printer
from RX TO MEMORY to KEEP PRINTING. (Even if the toner cartridge
is out of toner, the document will not be stored in memory.)
❏ Do vertical white streaks appear?
Vertical white streaks may appear when the error message CHANGE
CARTRIDGE is displayed. This situation indicates that the toner level is
low or that the toner is unevenly distributed in the cartridge.
To resolve the situation, open the front cover of the printer and remove
the toner cartridge. Gently rock the cartridge from side to side five or six
times to evenly distribute the toner inside. Replace the cartridge in the
printer, and close the front cover.
If redistributing the toner does not resolve the situation, replace your
cartridge. For instructions, see Chapter 8 of the Basic Guide.

4-8 Frequently Asked Questions Chapter 4

Appendix A Sharing Your Printer Cross-Platform in Windows 2000/XP A-1
Sharing Your Printer
Cross-Platform in
Windows 2000/XP
Appendix A
ASharing Your Printer Cross-Platform
in Windows 2000/XP
If your system (server) is Windows 2000/XP sharing with Windows 98/
Me client systems, you may need to set up an alternate driver.
During the setup, have the printer driver installation disk available.
To set up the printer for sharing:
1. On the server system, on the Windows desktop, click Start, point to
Settings, and then click Printers (in Windows XP, click Start, and then
click Printers and Faxes).
2. In the Printers window (in Windows XP, the Printers and Faxes
window), click the printer icon.
3. On the File menu, click Sharing.
4. In the Properties dialog box, on the Sharing tab, click Shared As (in
Windows XP, Share this Printer).
5. In the Shared As box (in Windows XP, the Share name box), type a
name you want to assign to the shared printer.
6. Click Additional Drivers.
7. Follow the on-screen instructions:
•When prompted in the Additional Drivers dialog box, click the
environment you want to support on your Intel Pentium system:
Windows 98.
•When prompted to insert your Windows 2000/XP disk in your
disk drive, insert the printer driver installation disk instead.

A- 2 Sharing Your Printer Cross-Platform in Windows 2000/XP Appendix A
•When prompted for an .inf file, browse your printer driver
installation disk for the following folder:
\WinBJ\A\Disk1
Appendix B Installing from a Local or Network Drive B-1
Installing from a
Local or Network
Drive
Appendix B
BInstalling from a Local or Network
Drive
If the printer driver software has been placed on a local or network drive,
you can install the software on your system from that drive, rather than
using the printer driver installation disk.
Installing the Software 4
You are ready to install the software once you have prepared your
system, as described in the “Before You Begin the Installation: a
Checklist” section in Chapter 2.
Reminder: Do not connect the USB cable before installing the software.
To install the software:
1. On the Windows desktop, click Start, and then click Run.
2. In the Run dialog box, browse to the drive and folder where the
printer driver software is located. In the folder containing the printer
driver software, locate the following folder and file, and click OK:
\Setup.exe
B-2 Installing from a Local or Network Drive Appendix B
3. Click Install Printer Driver to start installation.
4. Follow the on-screen instructions to complete the installation process.
During installation, follow these guidelines:
• Click Next or Yes to move from one dialog box to the next.
• Be sure to wait for Windows to complete each setup step. If you
hear the computer working, wait until it is done.
• If the Digital Signature Not Found screen appears, click Yes to
continue.
5. When prompted, remove the label from the USB port on the back of
the machine. Then connect the USB cable to the port on your
computer.
Appendix B Installing from a Local or Network Drive B-3
Installing from a
Local or Network
Drive
6. The system displays messages indicating that the driver for your
printer is being installed.
For Windows 98/Me: Wait for the system to complete the installation
of the printer driver.
For Windows 2000/XP: See Step 7.
7. For Windows 2000/XP:
When the Found New Hardware Wizard appears during the setup,
and prompts you for additional information, conduct the following:
For Windows 2000
• Search for a suitable driver for the printer.
(Do not display a list of drivers.)
• Specify a location.
B-4 Installing from a Local or Network Drive Appendix B
For Windows XP
• Select Install the software automatically (Recommended).
When prompted, browse to the drive and folder where the
printer driver software is located. In the folder containing the
printer driver software, locate the following folder, and click OK:
\Setup\W2KDrv\A\Disk1
8. When the setup is finished, if prompted, restart Windows.
The installation program determines whether Windows needs to be
restarted on your system.
If you want to remove the printer driver software from your system, see
the “Removing the Printer Driver” section in Chapter 2.

Glossary G-1
Glossary
GGlossary
A
application
Software prepared for a specific function or set of functions. Examples of
an application program include word processing programs. Developers
who make application programs include drivers that support different
types of printers.
automatic feed
Method by which paper can be fed into the printer when the built-in
multi-purpose tray is used.
B
brightness
The relative proportion of light and dark areas. Decreasing brightness
darkens the overall image. Increasing brightness lightens the overall
image.
C
contrast
The degree of difference between the lightest and darkest areas of an
image. Decreasing contrast lightens the dark areas and darkens the light
areas. Increasing contrast darkens the dark areas and lightens the light
areas.
D
default setting
A system setting incorporated at the factory and permanently registered
in the application. Also, a value or a setting that the software assumes
until or unless you specify another value.
dpi
Dots per inch. A unit of measurement for indicating a printer resolution.

G- 2 Glossary
F
form
A custom paper size, with width and height dimensions defined by the
user.
G
graphic
A written, printed, or electronically displayed symbol or drawing. Also,
characters or text that have been generated by a computer graphics
application program.
grayscale
A color in black and white as a result of different intensities of black.
H
halftone
The process of converting a grayscale image to black dots and white
(unprinted) dots that simulate the gray shades in the original image.
K
kilobyte (KB)
A unit of measure, representing the binary number 1024, in thousand-
byte units.
L
landscape orientation
The horizontal print orientation in which a document is printed across the
wider dimension of a rectangular sheet of paper. This is the print mode
often used for wide tables of data or graphic images. Compare with
portrait orientation.
local printer
A printer that is connected directly to your computer.
M
megabyte (MB)
A unit of measure, representing one million bytes.

Glossary G-3
Glossary
N
network
A group of computers connected by cables or other means and using
software that enables them to share equipment (such as printers) and
exchange information.
O
orientation
The print orientation in which a document is printed either across the
narrower or wider dimension of a sheet of paper (portrait orientation or
landscape orientation, respectively).
overlay
Print data or an image (such as a logo or title) that is printed in the
foreground or background of all the pages of a document.
P
paper feed
Movement of a sheet of paper into the printer paper path.
portrait orientation
The vertical print orientation in which a document is printed across the
narrower dimension of a rectangular sheet of paper. This is the print
mode typical of most letters, reports, and other such documents.
Compare with landscape orientation.
printer driver
Software that sends printing instructions to a printer. The printer driver
keeps track of the attributes of a printer and the codes a program must
send to access those attributes.
R
resolution
The density of dots for any given output device, expressed in dots per
inch (dpi). Low resolution causes font characters and graphics to have a
jagged appearance, but prints faster than higher resolutions. Higher
resolution provides smoother curves and angles, as well as a better match
to traditional typeface designs, but prints more slowly.

G- 4 Glossary
S
scaling
Enlarging or reducing the printed image.
U
USB
Universal Serial Bus. A connectivity specification for attaching
peripherals to computers. It eliminates the need to install cards into
dedicated computer slots and reconfigure the system.

Index I-1
Index
IndexI
A
about
displaying printer driver information 3-23
B
brightness
setting 3-16
C
cable
system requirement
1-3
change port
overview
2-9
computer processor
system requirement
1-2
conserve toner
setting
3-16
contrast
setting
3-16
conventions
used in this guide 1-4
cross-platform
sharing the printer with Windows 2000/XP,
overview
A-1
custom paper size
defining (Win2000/XP) 3-8
defining (Win98/Me)
3-7
setting
3-7
D
default print settings
defining 3-23
default printer driver
setting
2-6
disk drive
system requirement 1-3
E
enlarging the print size
setting manually 3-7
H
halftoning
setting
3-16
hard disk space
system requirement
1-3
hub for USB
changing from USB port to hub 2-9
I
installation
from a local or network driver B-1
preparing for 2-2
procedure 2-3, B-1
shared printer 2-6
L
landscape
setting the print orientation 3-7
local drive
installing from B-1

I- 2 Index
M
manual scaling
setting
3-7
memory
system requirement 1-3
monitor
system requirement 1-3
N
network drive
installing from
B-1
O
operating system
system requirement 1-2
orientation
setting
3-7
output size
setting
3-6
overlay
defining
3-13
P
page layout
setting 3-7
page settings
defining 3-6
page size
setting
3-6
paper size
defining a custom size (Win2000/XP)
3-8
defining a custom size (Win98/Me) 3-7
setting a custom size for printing 3-7
Point and Print
installing a shared printer
2-6
port
changing from one USB to another
2-9
changing, overview
2-9
portrait
setting the print orientation 3-7
print
a document in a Windows application 3-2
print overlay
defining 3-13
print profile
adding 3-17
adjusting display order 3-20
changing name, icon, comments 3-20
deleting 3-23
editing overview 3-19
exporting to a file 3-21
importing from a file
3-22
using 3-18
print quality setting
defining
3-15
print settings
default settings
3-23
defining (Win2000/XP) 3-4
defining (Win98/Me)
3-3
defining, an overview
3-2
viewing a summary
3-5
printer driver
displaying information about
3-23
overview 1-2
removing 2-9
setting as the default 2-6
printer installation
procedure 2-3, B-1
sharing 2-6

Index I-3
Index
Q
quality settings
defining
3-15
R
reducing the print size
setting manually
3-7
remove printer driver
procedure
2-9
resolution
setting
3-16
S
save toner
setting 3-16
share the printer
cross-platform in Windows 2000/XP,
overview
A-1
setting up to share
2-7
setup overview
2-6
system requirements
described 1-2
T
toner
saving
3-16
U
USB port
changing from one to another 2-9
connecting when installing the software 2-3
V
view printer settings
procedure 3-5

I- 4 Index
