By connecting your Android OS smart device such as a smartphone or tablet to a compatible Yamaha digital
instrument and using special apps, you can take advantage of various functions such as controlling the
instrument from the smart device, or displaying the score on the smart device — expanding the potential of
the instrument and making it an even more integral part of your total music life. This manual explains how to
connect an Android OS smart device to a compatible Yamaha digital instrument.
NOTE
This manual supplements the instructions of the Owner’s Manual provided with the digital instrument. Please read the Owner’s Manual of
your particular instrument first before reading this manual.
NOTE
If you are using an iPhone or iPad, refer to the separate manual “Smart Device Connection Manual for iPhone/iPad (iPhone/iPad
Connection Manual).”
Yamaha apps for keyboard instruments
Refer to the following web page for information on Yamaha apps for keyboard instruments.
OS and device compatibility varies from app to app. Be sure, therefore, to refer to the compatibility-related
information provided on each app’s page.
You can download the apps from the “Play Store,” accessible by clicking or tapping the “Google Play” icon
in each app’s page of the website above.
Certain apps do not need to be connected to an instrument. In such a case, there is no need to follow the
instructions provided in this manual.
NOTICE
To prevent the smart device from falling, note the following points:
• Never place the smart device in an unstable position.
• Before moving the instrument, make sure to remove the smart device from the instrument.
• Never put anything else on the music rest together with the smart device, such as a song booklet or
another smart device. Doing so may make the music rest unstable and result in dropping the smart device.
• Never slide the smart device along the music rest or submit it to strong shock, such as pushing or hitting it
when on the music rest.
• After use, or when you separate from the instrument, make sure to remove the smart device from the music
rest.
To avoid noise caused by communication, note the following points:
When using your instrument along with a smart device, we recommend that you turn on Airplane Mode on
your device in order to avoid noise caused by communication. If you connect to the instrument by a Wi-Fi
network or Bluetooth at this time, we recommend that after turning on Airplane Mode, you also turn on Wi-Fi/
Bluetooth.
https://www.yamaha.com/2/apps/
EN
Smart Device Connection Manual
for Android™

Smart Device Connection Manual for Android
2
Information
• The contents of this manual are exclusive copyrights of Yamaha Corporation.
• Copying of the reproduction of this manual in whole or in part by any means is expressly forbidden without the
written consent of the manufacturer.
• Yamaha makes no representations or warranties with regard to the use of the documentation and cannot be held
responsible for the results of the use of this manual.
• The illustrations as shown in this manual are for instructional purposes, and may appear somewhat different from
those on your instrument or device.
• Copying of the commercially available musical data including but not limited to MIDI data and/or audio data is
strictly prohibited except for your personal use.
• Android and Google Play are trademarks of Google LLC.
• iPhone, iPad, iPod touch, Lightning and iTunes are trademarks of Apple Inc., registered in the U.S. and other
countries.
• IOS is a trademark or registered trademark of Cisco in the U.S. and other countries and is used under license.
• The Bluetooth
®
word mark and logos are registered trademarks owned by Bluetooth SIG, Inc. and any use of
such marks by Yamaha Corporation is under license.
• The company names and product names in this manual are the trademarks or registered trademarks of their
respective companies.

Smart Device Connection Manual for Android
3
Contents
Yamaha apps for keyboard instruments .................................................... 1
NOTICE .......................................................................................................... 1
Information .................................................................................................... 2
Determining the connection type ................................................................ 4
Connection .................................................................................................... 5
Troubleshooting Problems with Wireless LAN Connections ................. 11
Glossary of Terms ...................................................................................... 12
Smart Device Connection Manual for Android
4
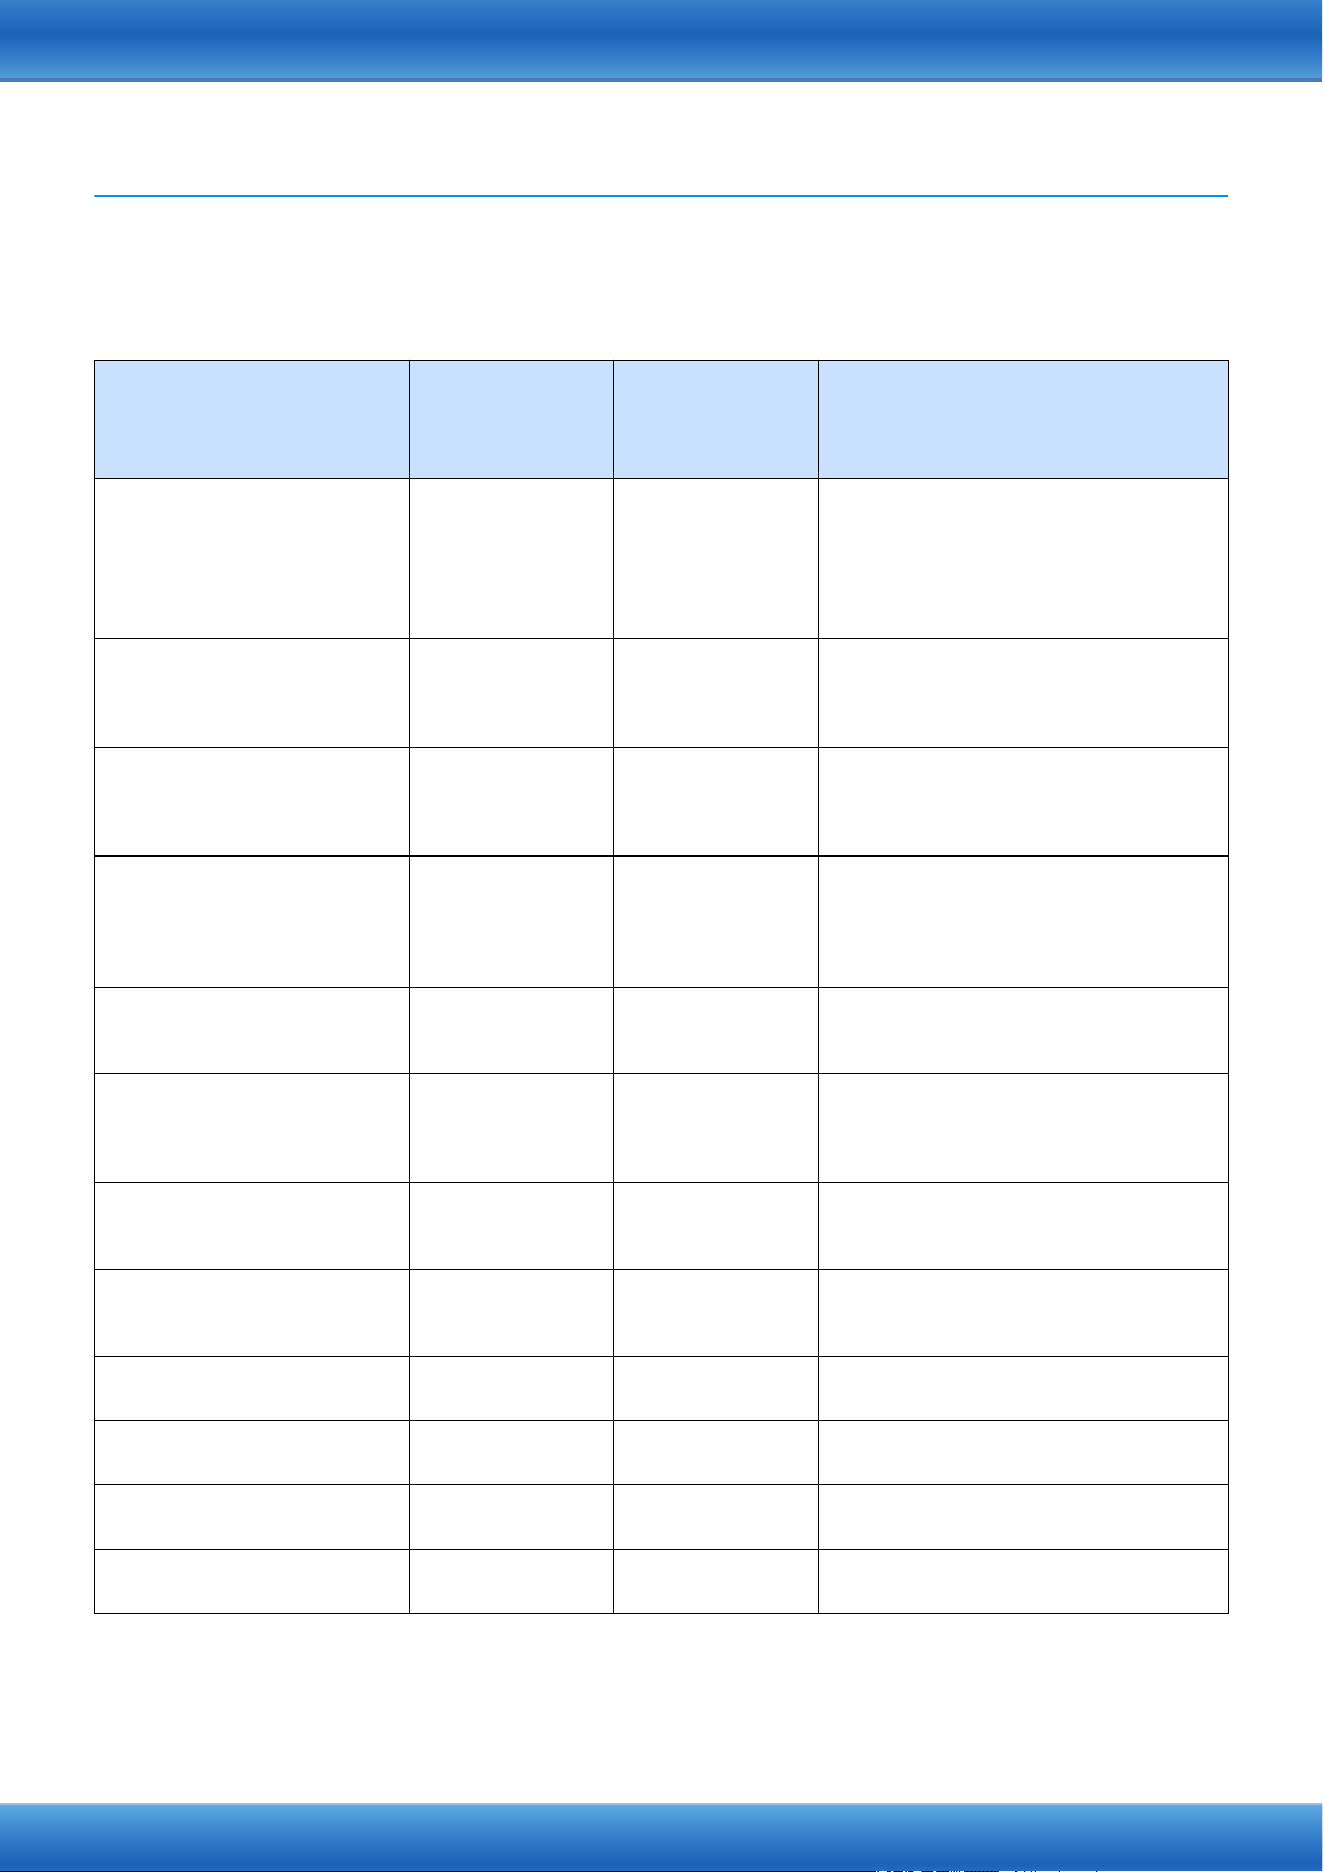
Determining the connection type
Since the procedures to connect with a smart device differ depending on the instrument, confirm which connection
type applies to your instrument, using the following chart.
NOTE
If you use the “Smart Pianist” app, you can connect the instrument to the smart device by using its connection wizard. To start the connection
wizard, tap [ ] located at the upper left on the “Smart Pianist” screen to open the menu, and then tap “Instrument” “Start Connection
Wizard.”
NOTE
If your instrument is compatible with Bluetooth, it can also be connected to a smart device via Bluetooth. For details, refer to the Owner’s Manual
of your instrument.
NOTE
Connection types may be limited depending on the app being used. Please check the description of each app on the website (https://
www.yamaha.com/2/apps/) in advance.
Specifications of your instrument
Equipped with
USB TO HOST
(Type B) terminal
It can be connected by using a USB cable
and conversion adaptor.
It can be connected by using a USB
cable. Depending on the smart device,
a conversion adaptor may be required.
Equipped with
USB TO HOST
(Type C) terminal
Connection A
(page 5)
Connection B
(page 6)
It can be connected by using the USB
wireless LAN adaptor (UD-WL01).
If a wireless LAN function is included on
the instrument, the adaptor is
unnecessary.
Compatible with wireless
LAN connection
Connection C
or D (pages 7
or 8)
Smart Device Connection Manual for Android
5
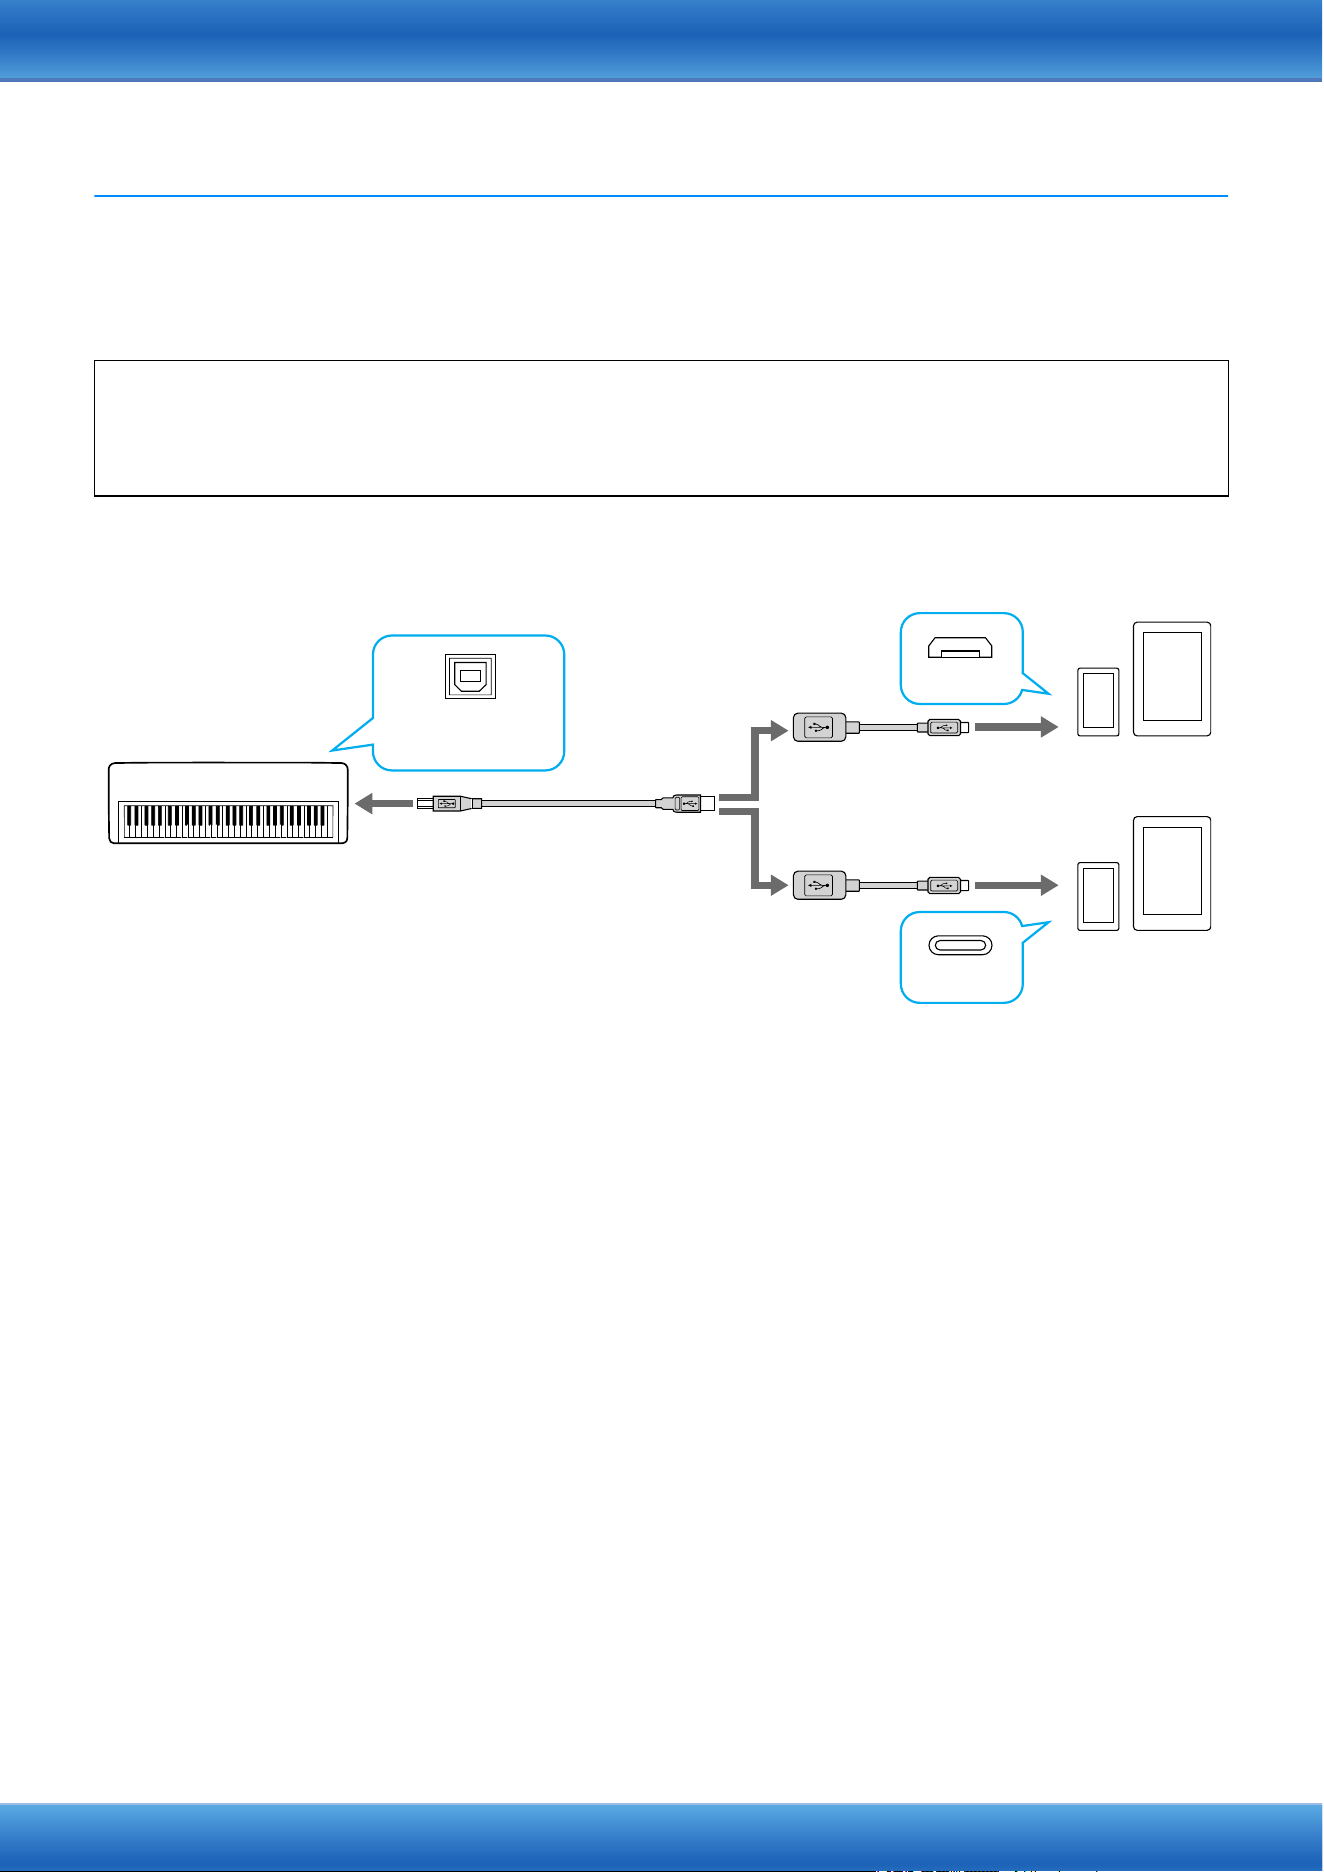
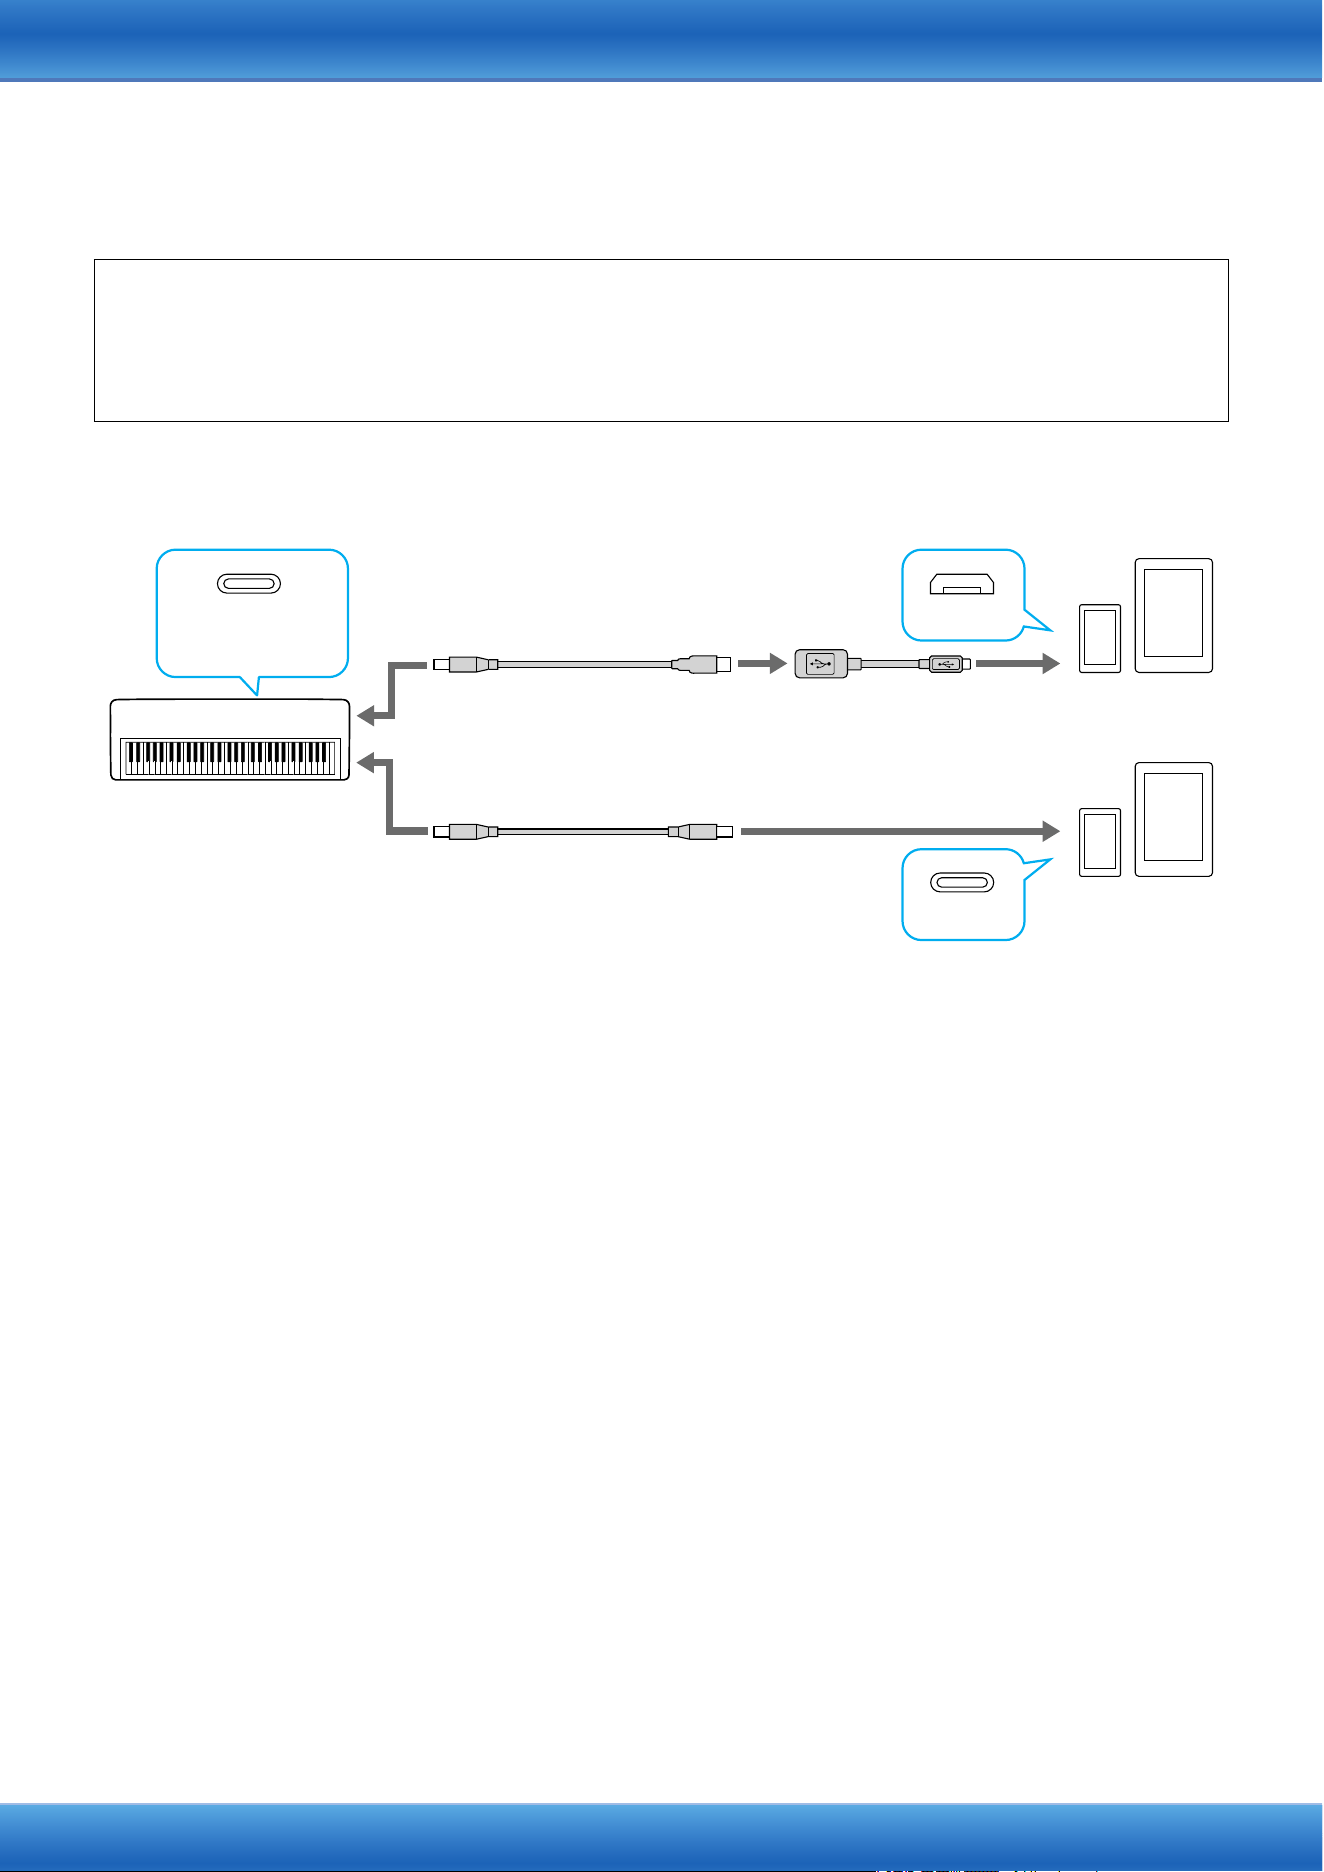
Connection
Connection A: Connection by using a USB cable for instruments equipped
with USB TO HOST (Type B) terminal
NOTICE
Use a USB cable of less than 3 meters. USB 3.0 cables cannot be used.
1 Turn off the power of the instrument.
Quit any open app on your smart device.
2 Connect your smart device to the instrument.
Follow the order as indicated in the illustration above.
3 Turn on the power to the instrument.
4 Use the app on your smart device to communicate with the instrument.
NOTE
Some apps need the appropriate setting to communicate with the instrument. For details, refer to the relevant app manuals.
Required devices
• USB cable (Type A plug – Type B plug)
• USB conversion adaptor (Type A socket – Micro B plug or Type A socket – Type C plug)
Make sure to prepare an adaptor which is compatible with the USB terminal of your smart device.
1
2
2
3
3
USB
(Type B
plug)
USB
(Type A
plug)
USB cable
USB conversion adaptor
(Type A socket – Micro B plug)
USB TO HOST
(Type B)
USB conversion adaptor
(Type A socket – Type C plug)
Micro B
Type C
Smart device
Smart device
Instrument
Smart Device Connection Manual for Android
6
Connection B: Connection by using a USB cable for instruments equipped
with USB TO HOST (Type C) terminal
NOTICE
Use a USB cable of less than 3 meters. The cable must be a communication cable compliant with USB standards, and not a charging-
only cable.
1 Turn off the power of the instrument.
Quit any open app on your smart device.
2 Connect your smart device to the instrument.
Follow the order as indicated in the illustration above.
3 Turn on the power to the instrument.
4 Use the app on your smart device to communicate with the instrument.
NOTE
Some apps need the appropriate setting to communicate with the instrument. For details, refer to the relevant app manuals.
Required devices
• When connecting to a smart device equipped with a USB Micro B connector
USB cable (Type A plug – Type C plug) and USB conversion adaptor (Type A socket – Micro B plug)
• When connecting to a smart device equipped with a USB Type C connector
USB cable (Type C plug – Type C plug)
1
1
2
23
USB
(Type C
plug)
USB
(Type C
plug)
USB cable
USB conversion adaptor
(Type A socket – Micro B plug)
USB TO HOST
(Type C)
Micro B
Type C
Smart device
Smart device
Instrument
USB
(Type C
plug)
USB
(Type A
plug)
USB cable
Smart Device Connection Manual for Android
7
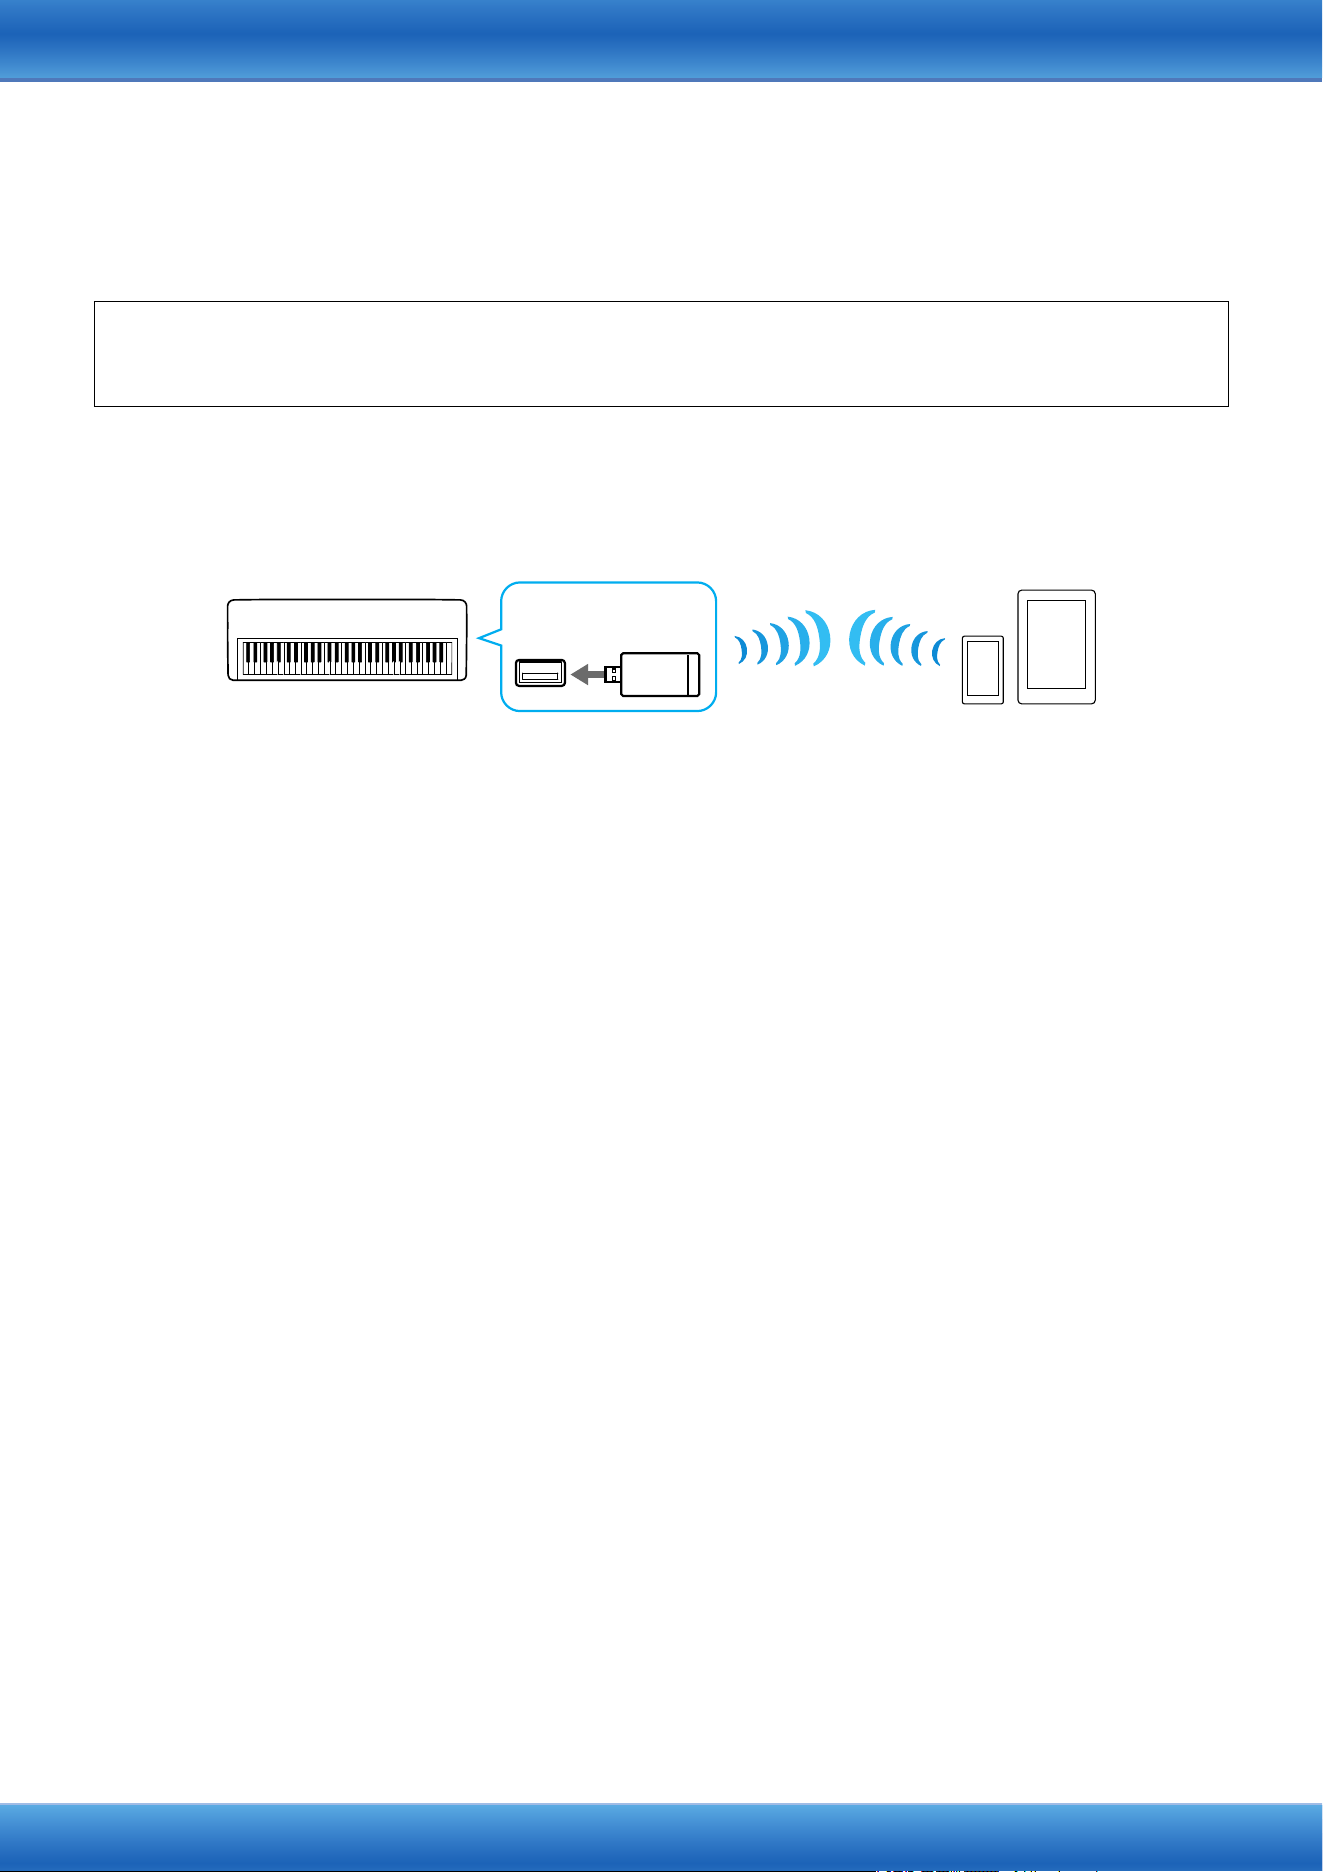
Connection C: Direct connection by using a USB wireless LAN adaptor
This connection is only for instruments which have the Access Point mode function or Ad Hoc mode function. If you
are using an instrument which does not have one of these functions, follow the instructions of Connection D
(page 8).
NOTE
Please note that when the instrument is connected, no Internet access is available on your smart device, limiting part of their functions, such as
mailing and searching.
NOTE
Since the operations differ depending on the instrument, refer to the Owner’s Manual or the Reference Manual of your instrument as well.
If the wireless LAN function is included to the instrument, skip the steps 1 and 2 below.
1 Turn off the power of the instrument.
Quit any open app on your smart device.
2 Connect the USB wireless LAN adaptor to the USB TO DEVICE terminal of the instrument.
3 Turn on the power to the instrument.
4 Switch the instrument’s wireless LAN setting to the Access Point mode or Ad Hoc mode.
5 As necessary, set the SSID and so on.
You can make various settings (such as SSID, security, password, channel, key), although the specific settings
differ depending on the mode used by the instrument. If you have two or more instruments to connect, set the
SSID and channel to different values on each instrument.
6 Save the settings on the instrument.
7 Connect the smart device to the instrument.
7-1 Call up the Wi-Fi display on your smart device by tapping “Settings” “Wi-Fi.”
7-2 Turn on the Wi-Fi.
7-3 From the network list shown on the display, tap the instrument that you set to Access Point mode or Ad Hoc mode.
If the key is required, input the key, then connect.
8 Use the app on your smart device to communicate with the instrument.
NOTE
Some apps need the appropriate setting to communicate with the instrument. For details, refer to the relevant app manuals.
Required devices
• USB wireless LAN adaptor UD-WL01 (This is unnecessary if the wireless LAN function is included on the
instrument.)
1
Smart device
USB wireless LAN
adaptor (UD-WL01)
Wireless LAN
Instrument
Smart Device Connection Manual for Android
8
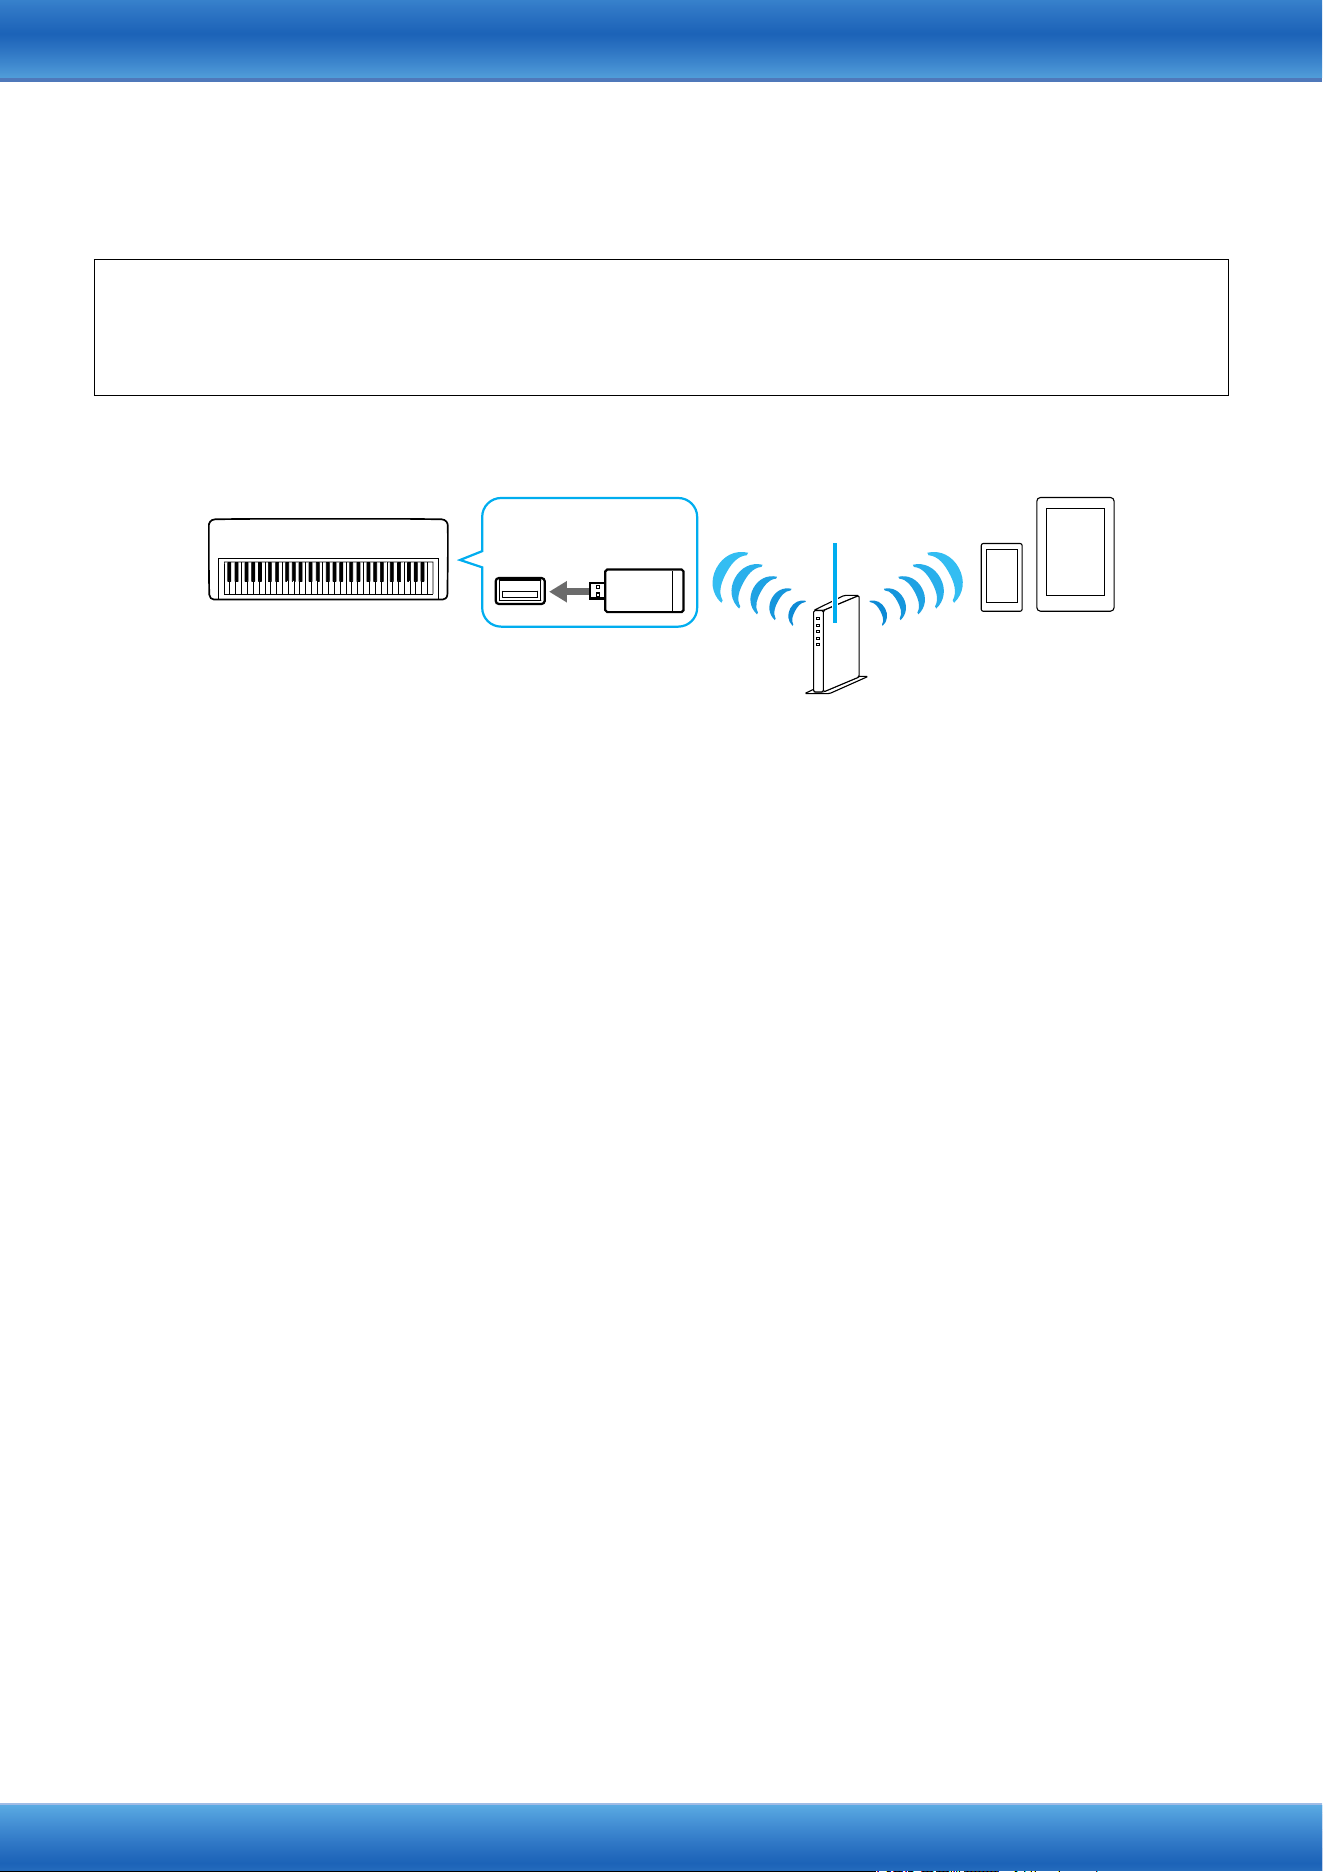
Connection D: Connection via an access point by using a wireless LAN
adaptor
NOTE
Since the operations differ depending on the instrument, refer to the Owner’s Manual or the Reference Manual of your instrument as well.
If the wireless LAN function is included on the instrument, skip steps 1 and 2 below.
1 Turn off the power to the instrument.
Quit any open app on your smart device.
2 Connect the USB wireless LAN adaptor to the USB TO DEVICE terminal of the instrument.
3 Turn on the power to the instrument.
4 If your instrument has a wireless LAN mode setting, set it to Infrastructure mode.
5 Connect the instrument to the network.
There are three methods of connection:
• Automatic setup by WPS (page 9)
• Displaying the networks in the wireless LAN and connecting to the network (page 10)
• Manual setup (page 10)
Select the appropriate setup method from the above depending on your network environment.
NOTE
Since some instruments can only be connected by “Automatic setup by WPS,” refer to the Owner’s Manual or the Reference Manual of
your instrument.
6 Connect the smart device to the access point.
6-1 Call up the Wi-Fi display on your smart device by tapping “Settings” “Wi-Fi.”
6-2 Turn on the Wi-Fi.
6-3 From the network list shown on the display, tap on the network to which you connected your instrument in step 5.
If the key is required, input the key, then connect.
7 Use the app on your smart device to communicate with the instrument.
NOTE
Some apps need the appropriate setting to communicate with the instrument. For details, refer to the relevant app manuals.
Required devices
• USB wireless LAN adaptor UD-WL01 (This is unnecessary if the wireless LAN function is included on the
instrument.)
• Access point with router (This is unnecessary if your modem has router capability.)
1
Access point
Wireless
LAN
Wireless
LAN
USB wireless LAN
adaptor (UD-WL01)
Smart device
Instrument
Smart Device Connection Manual for Android
9
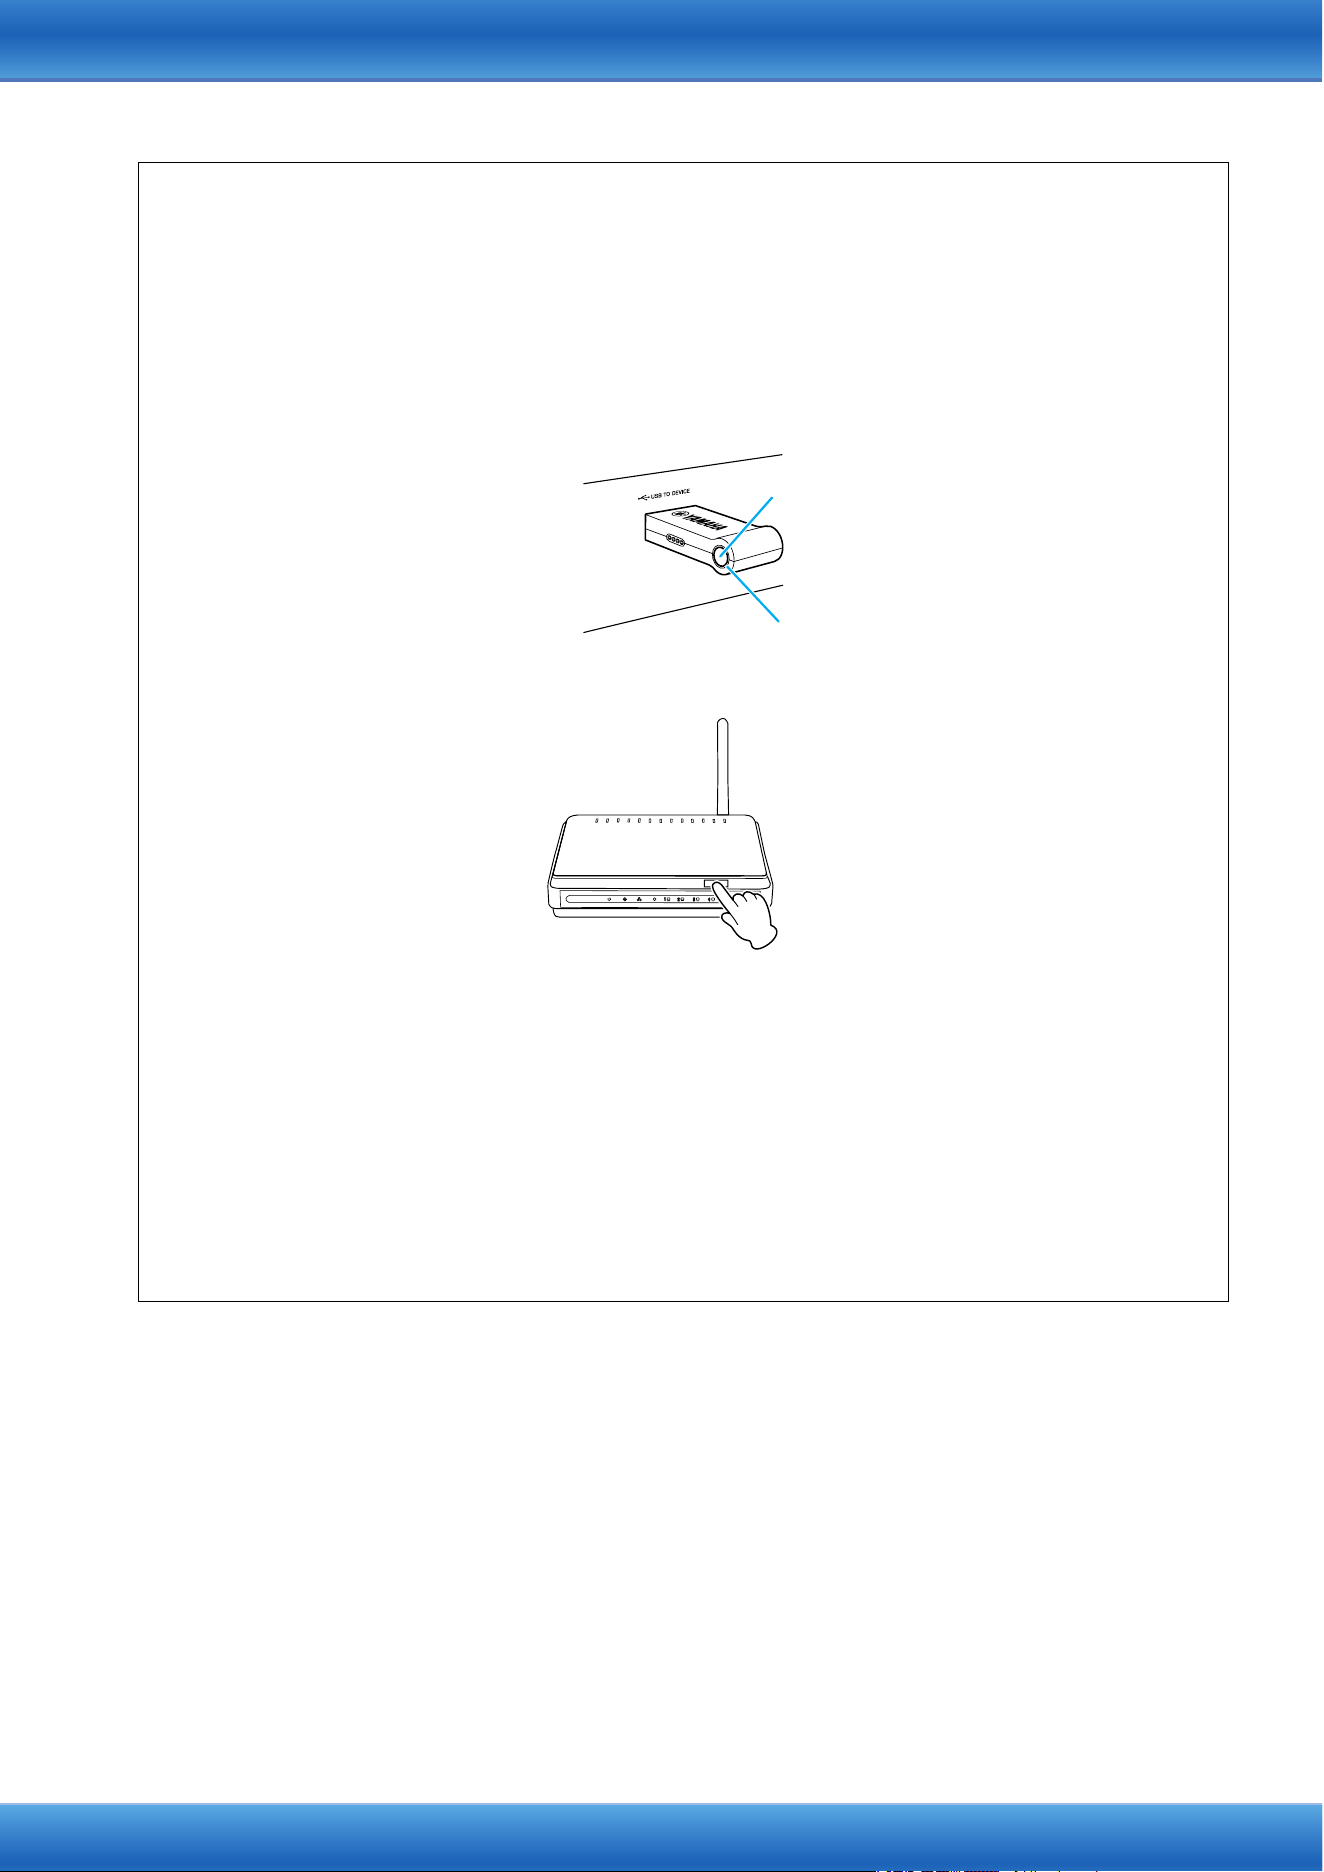
Automatic Setup by WPS
If your access point supports WPS, you can easily connect the instrument to access point by WPS,
without making settings, such as key input, etc.
NOTE
Check whether your access point supports WPS by referring to the owner’s manual for the access point you are using.
1 Press and hold the [WPS] button on the USB wireless LAN adaptor (UD-WL01) for
longer than three seconds to start WPS.
The LED lamp of the adaptor flashes.
2 Press the WPS button on your access point within two minutes after step 1 above.
When the connection to the wireless network is completed, the LED lamp of the UD-WL01 lights,
and then flashes during communication over the network. The necessary information is
automatically set, and the connection between access point and the instrument has been
completed.
NOTE
For details about the operations in the setting of the access point, read the owner’s manual for the access point you are
using.
If you cannot set by WPS, follow the instructions in “Displaying the networks in the wireless LAN and
connecting to the network” (page 10).
3 Proceed to step 6 on page 8 to connect the access point and smart device.
LED lamp
[WPS] button
Press the WPS button on your access point.
Smart Device Connection Manual for Android
10
Displaying the networks in the wireless LAN and connecting to the network
You can connect the instrument to the network by selecting it in the wireless LAN setting display on the
instrument.
1 Display the networks in the wireless LAN setting display of the instrument.
NOTE
If no signal from the access point is received, the access point cannot be listed. Also, closed access points cannot be listed.
2 Connect the instrument to the access point.
From the networks listed on the display, select the desired one.
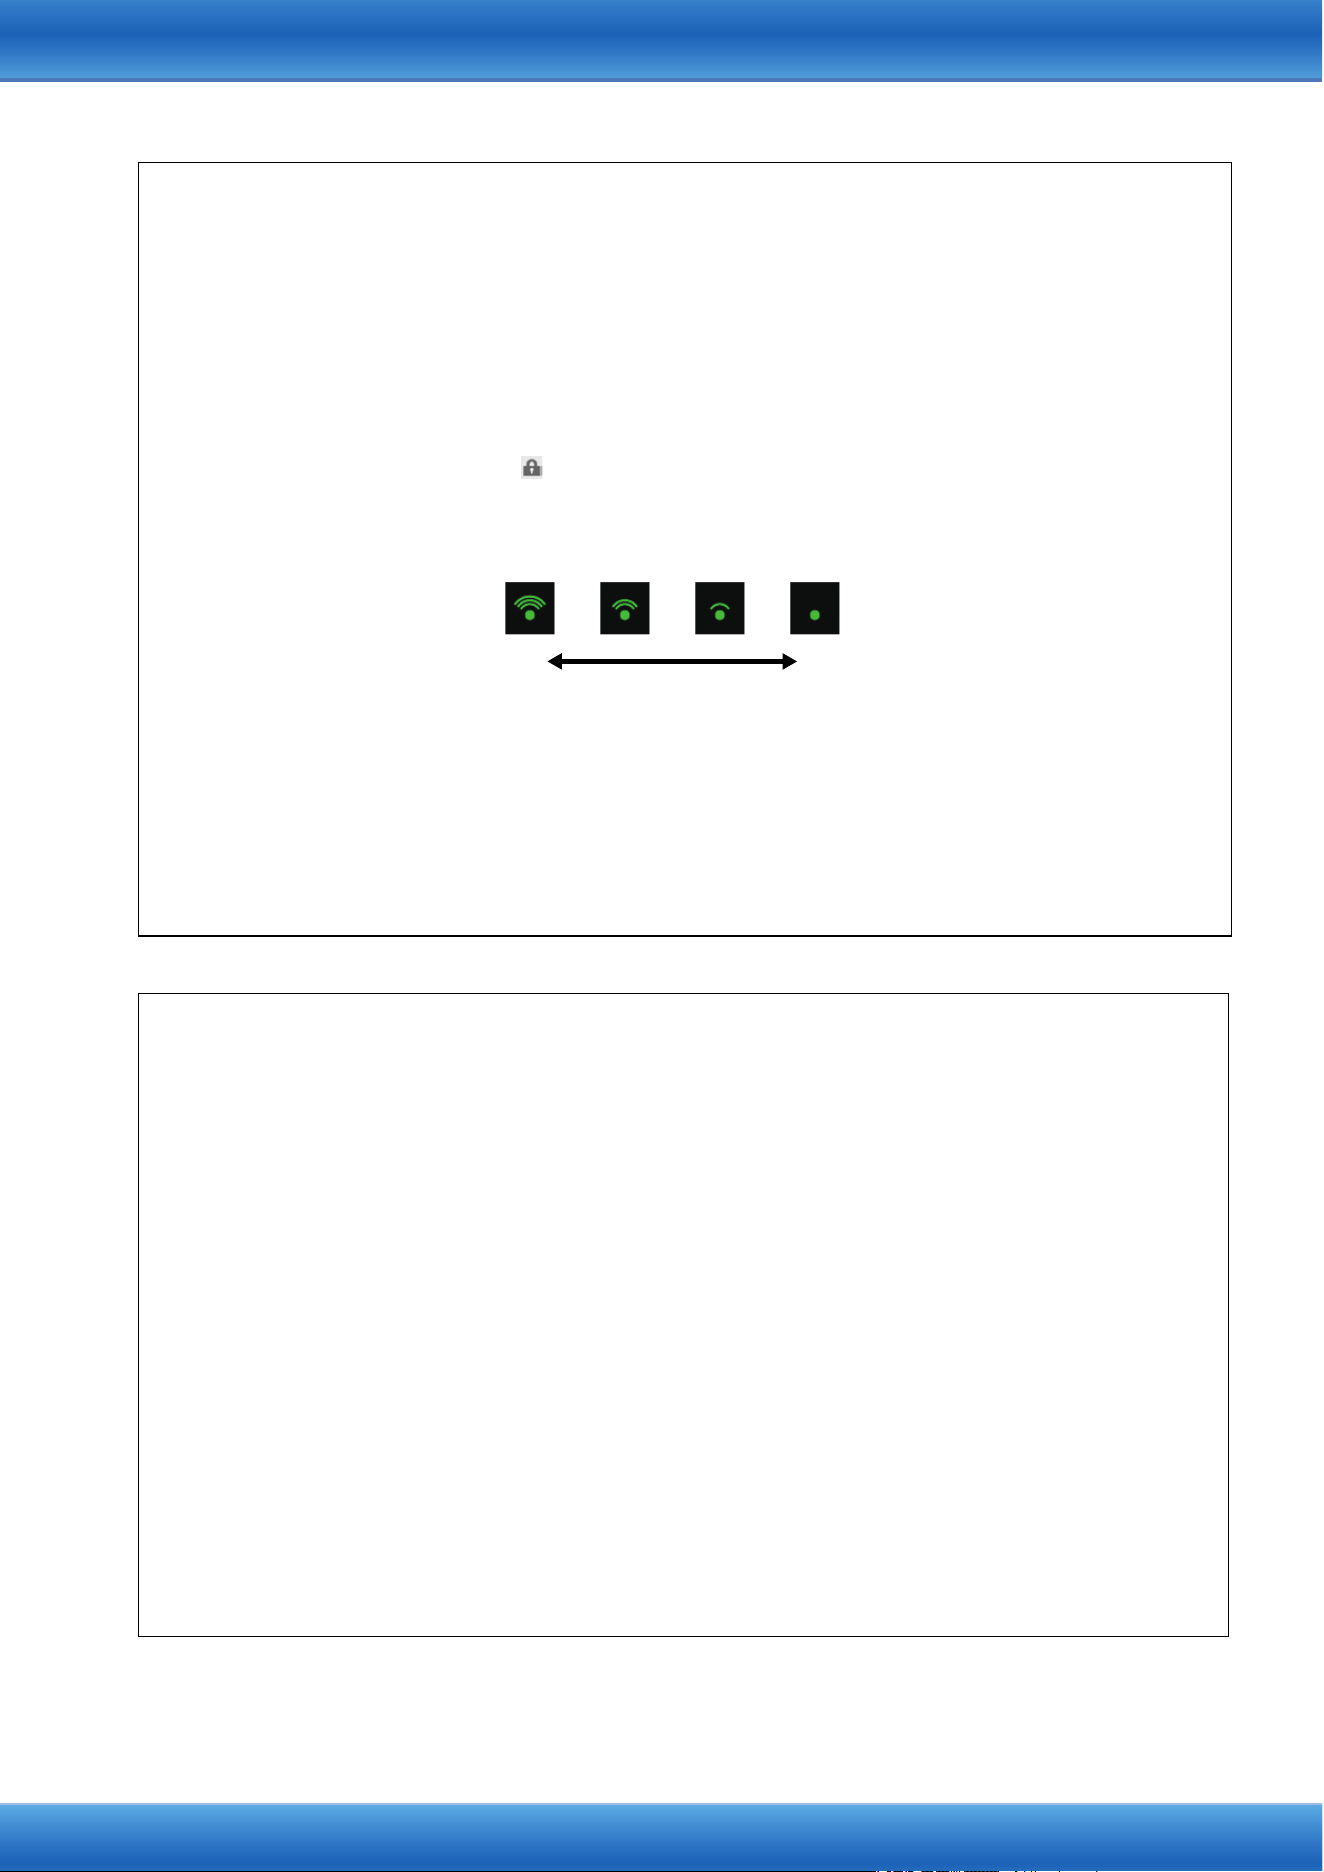
For a network with a lock icon ( ), you need to enter the password, and for the network without the
lock icon, you can connect the network only by selecting it.
When connection is done successfully, the connection status is shown on the display, and the icon
shown below appears according to the signal strength.
The connection between the instrument and the access point is complete.
If you cannot find the desired network on the display or you want to set by a method other than
described above, follow the instructions in “Manual setup” (page 10).
NOTE
The name of the function described above may differ or the function may not be supported depending on the instrument.
3 Proceed to step 6 on page 8 to connect the access point and smart device.
Manual setup
If you cannot find the desired network on the display, it may be a network with closed or non-disclosure.
In this case, you will need to manually input SSID, security and key settings for connection.
NOTE
About the confirmation and changes in the access point settings, refer to the manual of the access point.
NOTE
For more information on successively inputting the SSID, Security and Password on the display of the instrument, refer to the
Owner's Manual or the Reference Manual of your instrument.
1 On the wireless LAN setting display on the instrument, select “Other” network (or
Manual Setup), then input in succession these settings: SSID, Security and
Password.
2 Execute the connection operation on the instrument such as pressing the [Connect]
button.
The necessary information is automatically set, and the connection between access point and the
instrument has been completed.
3 Proceed to step 6 on page 8 to connect the access point and smart device.
If you cannot find the desired network on the display or you want to set by a method other than
described above, follow the instructions in “Direct connection by using a USB wireless LAN
adaptor” (page 7).
Strong Weak
Smart Device Connection Manual for Android
11
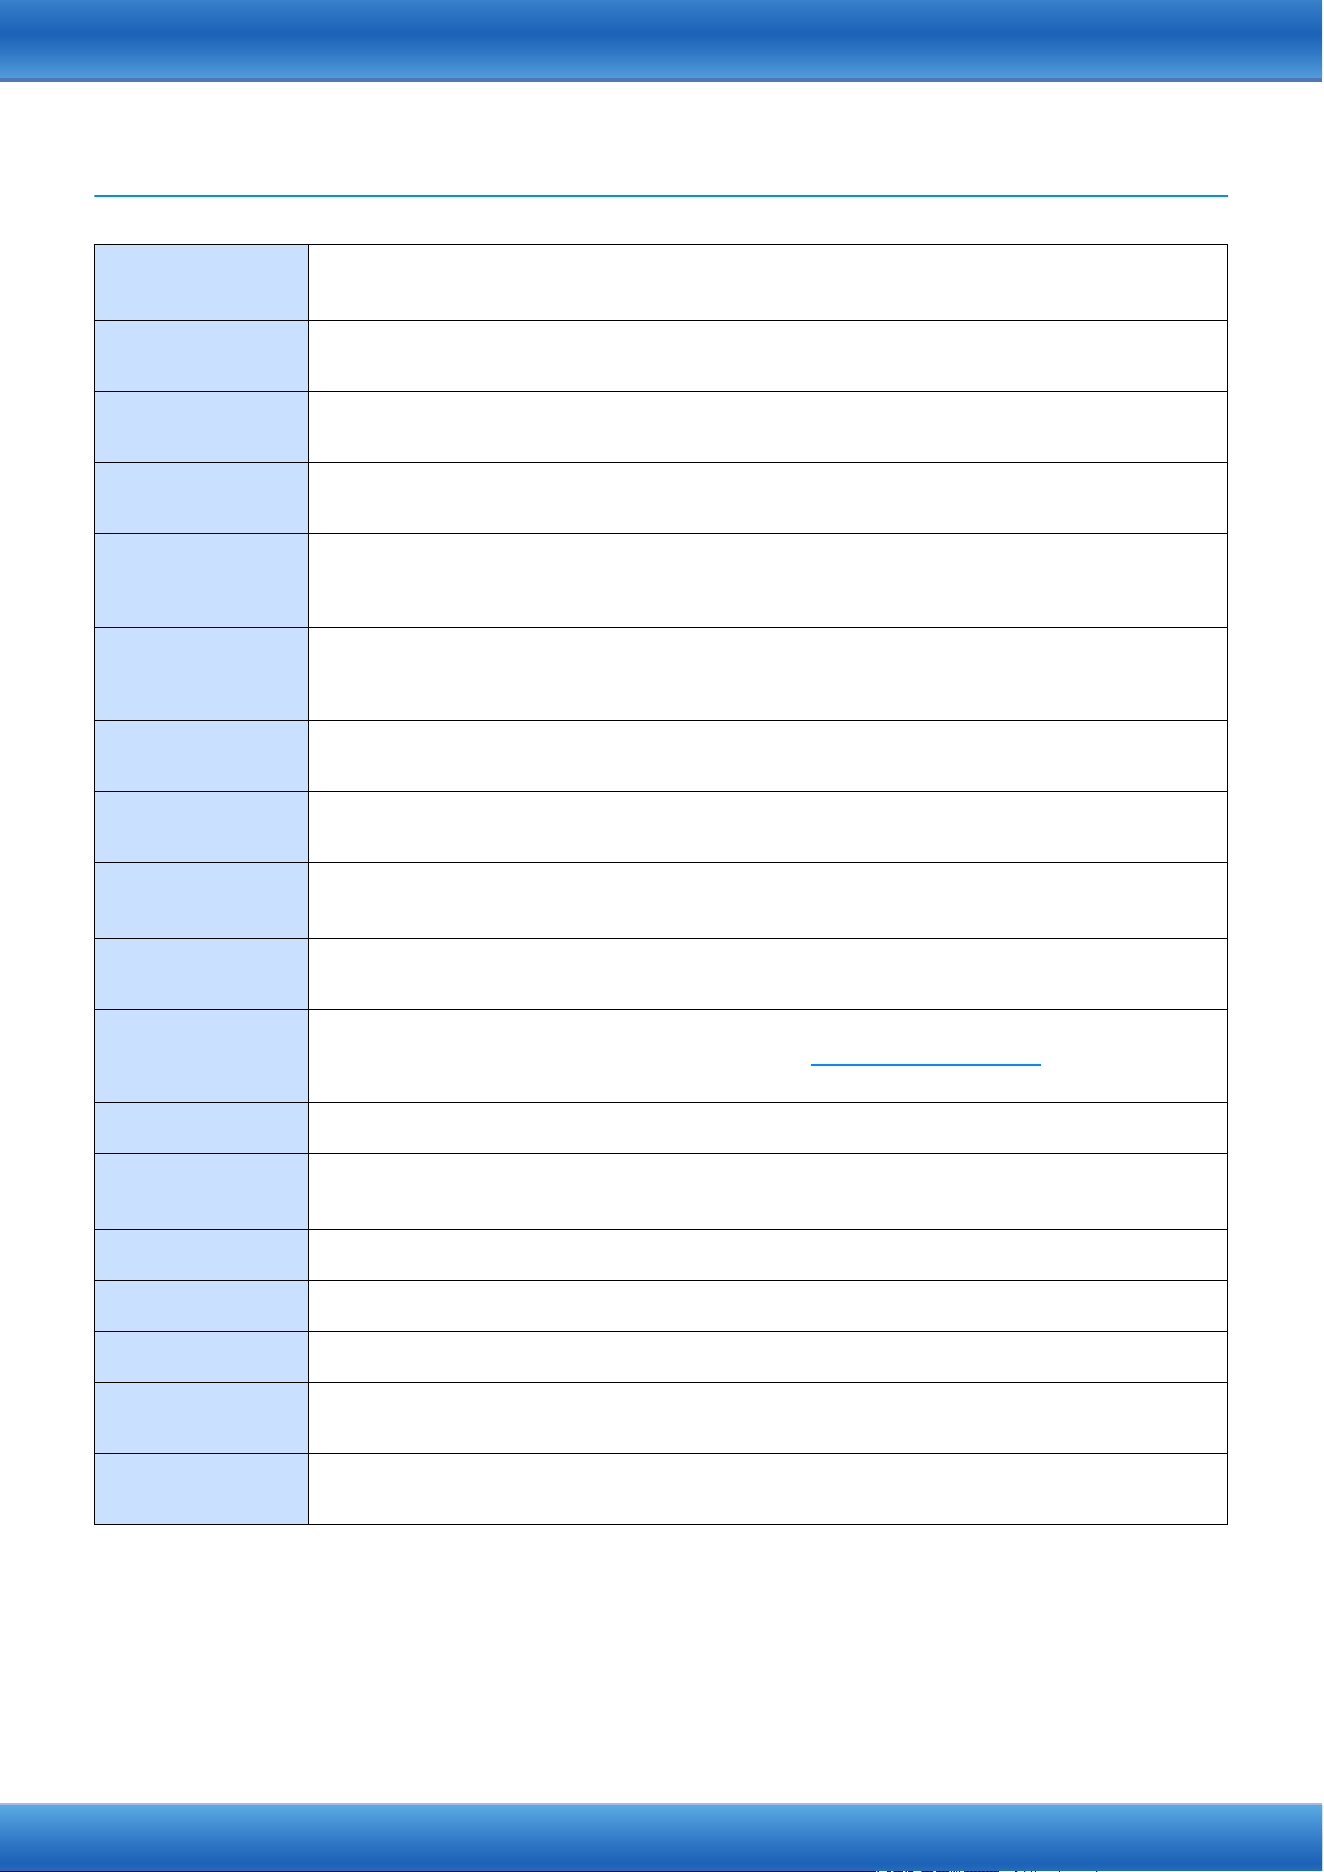
Troubleshooting Problems with Wireless LAN Connections
Factors such as electromagnetic interference can result in disconnection, recording or playback stopping, and
other similar problems. In such a case, please try to resolve the problem using the following countermeasures.
NOTE
The term “access point” below refers to any device that can function as a router.
Countermeasure
Connection via
an access point
(Connection D)
Connection not
via an access
point
(Connection C)
Applicable situations
Change the Wi-Fi channel being
used.
(Refer to the manual
that came with your
access point for
details regarding Wi-Fi
channels.)
(Refer to the Owner’s
Manual or Reference
Manual that came with
your instrument for
details regarding Wi-Fi
channels.)
When, in addition to the access point to
which the instrument and the smart device
are connected, other access points are
available (multiple networks are displayed
on the smart device Wi-Fi settings screen).
Stop using Wi-Fi on other
devices connected to the same
access point.
– When watching video or downloading data
on other devices connected to the same
network overloads the access point and
causes the wireless speed to drop.
Change to Connection C
(connection not via an access
point).
– When multiple devices are connected to
the same network. The access point is
overloaded and the wireless speed has
dropped.
Turn off any electrical products
generating electromagnetic
interference.
When electromagnetic waves used by
wireless devices such as portable
telephones, microwave ovens, and
Bluetooth devices are causing
interference.
Move closer to the access point.
– When the network signal strength shown
on the instrument’s Wi-Fi settings page or
on the smart device is low.
Move the instrument slightly
away from the access point.
– When the instrument is right beside the
access point, and the strength of the
electromagnetic waves is actually making
it difficult to receive data.
Turn off Bluetooth on the smart
device.
Bluetooth can generate electromagnetic
interference even when not being used to
connect to other devices.
Update the OS of the smart
device to the latest version.
In certain cases, communication
performance may be improved by
updating the OS.
Restart the smart device.
In certain cases, devices may connect
after being reset.
Restart the access point.
– In certain cases, devices may connect to
an access point when it is restarted.
Update the access point’s
firmware to the newest version.
– In certain cases, updating the firmware
may improve communication performance.
Replace the access point.
– When using an access point employing old
specifications such as IEEE802.11b.
Smart Device Connection Manual for Android
12
Glossary of Terms
© 2018 Yamaha Corporation
Published 03/2024 MW-D0
Access point
A device which acts as a base station when transmitting data by wireless LAN.
Some access points are combined with modem functions.
Broadband
An Internet connection technology/service (such as ADSL and optical fiber) that allows for high-
speed, high-volume data communication.
Internet
A huge network made up of networks, the Internet allows high-speed data transfer among
computers, mobile phones and other devices.
LAN
Short for Local Area Network, this is a data-transfer network that connects a group of computers at a
single location (such as an office or home) by means of a special cable.
Link
Location information in other sentences and images, etc. that are under buttons and character
strings on a web page. When the place with the link is clicked, the page selection jumps to the
relevant link.
Modem
A device which connects and allows data transfer between a conventional telephone line and a
computer. It converts the digital signals from the computer to analog audio for sending over the
phone line, and vice versa.
Provider
A communications business that offers Internet connection services. In order to connect to the
Internet, it is necessary to contract to a provider.
Router
A device that allows multiple devices (e.g., computers, your Yamaha instrument) to share the same
Internet connection.
Security setting
of access point
Protects data passed from various access points from being intercepted from an unauthorized
person/device.
Server
A hardware system or computer used as a central point for a network, providing access to files and
services.
Site
Short for “website,” this refers to the group of web pages that are opened together. For example, the
collection of web pages whose addresses begin with “http
s://www.yamaha.com/” is referred to as
the Yamaha site.
SSID
A name used to identify a particular access point, or the wireless networks set as the access point.
USB Wireless
LAN Adaptor
A device which allows wireless LAN connection.
WEP
A standard of security format of wireless LAN.
Wireless LAN
A LAN connection that allows data transfer through a wireless, cable-free connection.
Wireless network
Wireless network where signal is sent and received by using electric waves.
WPA/WPA2
A standard of security format of wireless LAN. It is more secure than the WEP format adopted in the
past.
WPS
A structure to easily make a setting of wireless LAN by pushing only the WPS buttons of an access
point and the wireless LAN device.